3244 - english · pièces du patron a) devant x2 c) manche x2 e) arrière du pied x2 g) bande de...
TRANSCRIPT
INC
.IN
C.
#3244 – ENGLISH Footed pajamas
How to choose the appropriate size: Use the size corresponding to bust for the width, and to girth measurement for the length.
Seam and hem allowances are included in the pattern
Unless otherwise instructed:
Stitch this garment 6 mm (1/4’’) from edge. Pieces are assembled right sides together. If the right and wrong sides of your fabric are very similar, mark wrong side with tape or stickers
Pattern Pieces A) Front X2 C) Sleeve X2 E) Back of foot X2 G) Collar band X1 I) Ankle cuff X2 B) Back X2 D) Top of foot X2 F) Sole X4 (or 2 main fabric + 2 gripper fabric) H) Sleeve cuff X2 J) Pocket X2 Jalie sewing technique for stretch fabrics (if you do not have a serger, use this technique on seams that will need to stretch)
1. First stitch: Wide zigzag stitch along the edge of the fabric, without stretching the fabric (fig. 1). *This stitch will not be shown in the illustrations* 2. Second stitch: Straight stitch 6 mm (1/4’’) from edge, stretching the fabric gently (fig. 2) to preserve the seams’ elasticity.
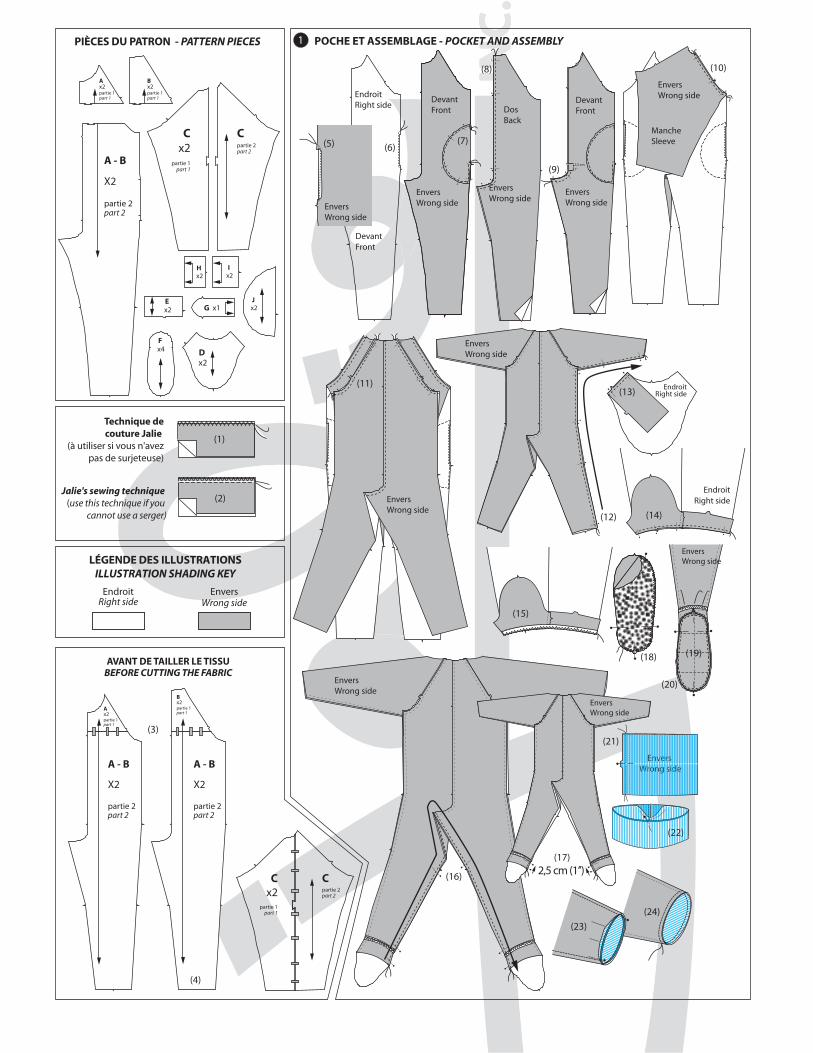
BEFORE CUTTING THE FABRIC Tape parts 1 and 2 of pieces A, B and C to make front, back and sleeve (fig. 3). Remove notch at back ankle (fig. 4). Use these new pieces to cut the fabric.
1. Pocket and Assembly Clip front side seam at pocket opening marks and fold to wrong side. Topstitch as shown (fig. 5-6), starting at the raw edge of side seam. Pin right side of pocket to wrong side of front, matching notches (fig. 7) and stitch as shown. Pin back pieces at center back and crotch seam (fig. 8) and stitch. Pin front pieces at center front and sew front crotch (fig. 9), from 2,5 cm (1”) below the notch to inseam. Pin sleeve to front, matching single notches (fig. 10) and stitch. Pin sleeve to back, matching double notches (fig. 11) and stitch. Pin front to back and sew side and underarm seams, from ankle to wrist, matching notches and constructions seams (fig. 12). FOOT (VIEW A) Pin top of foot to back of foot at side seam, matching notches (fig. 13) and stitch. Pin top of foot to front, matching ankle notches (fig. 14) and stitch. If you are using a foot of a different size than the pajamas body, simply pin
at notch, side seam and ends and stretch the smaller piece between the pins to fit the bigger piece. Pin and zigzag stitch ankle elastic to seam allowance (fig. 15) (« zig » on the elastic, « zag » in the air), stretching the elastic as you sew. Pin front to back at inseam (fig. 16) and stitch from one heel to the other.
FOR PAJAMAS WITH ZIPPER AT INSEAM: Stitch only for 2,5 cm (1’’) on each foot (fig. 17). Pin wrong side of gripper sole (or second layer of sole) to the wrong side of the inner layer and baste raw edges with a zigzag stitch (fig. 18).
Topstitch across the sole to keep the layers well attached (fig. 19). Pin top of foot to sole, matching notches and side seams (fig. 20) and stitch. ANKLE CUFF (VIEW B) Pin front to back at inseam (fig. 16) and stitch from one heel to the other.
FOR PAJAMAS WITH ZIPPER AT INSEAM: Stitch only for 2,5 cm (1’’) on each foot (fig. 17). Pin ends of the ankle cuff piece together, matching notches (fig. 21), and stitch to form a loop. Fold cuff wrong sides together and mark half with pin (fig. 22). Turn pajamas wrong side out and pin cuff to right side of ankle, matching cuff seam with inseam and half mark with side seam (fig. 23). Stitch, stretching the band as you sew to fit the opening (fig. 24).
2. Zipper Cut top of zipper tape approximately 1 cm (3/8”) above top stops (fig. 25). Pin right side of zipper to right side of right front. Baste with a zigzag stitch from neckline to lower notch (fig. 26). Stitch 6 mm (1/4”) from edge from neckline to lower notch (fig. 27). Mark notch placements on wrong side of zipper tape (fig. 28). Turn pajamas wrong side out, pin right side of open zipper to left front, matching marks with notches. Baste and stitch from lower notch to neckline. Prolong crotch seam to overlap zipper seam by approximately 1 cm (3/8”) (fig. 29). Cut excess zipper at the bottom, 2,5 (1”) from end of zipper seam. Wrap the end of the zipper with a small piece a fabric and stitch across (fig. 30). Tack wrapped zipper end to the crotch seam allowance (fig. 31). PAJAMAS WITH INSEAM ZIPPER: Sew zipper to inseam from one ankle to the other, using the same technique as the front zip.
3. Collar Mark half (center back) and center of point (center front) (fig. 32-33). Pin open collar band to right side of neckline, with the point mark at neckline corner (front 6 mm (1/4”) from edge of point). (fig. 34) and sew
from point to notch WITHOUT STRETCHING the band. Pin half mark to right side of center back and stitch, stretching the band to fit neckline (fig. 35). Bring curved edge of band to right side of sewn curved edge (the neckline corner is sandwiched between the band layers) and stitch over
visible seam (fig. 36). Turn right side out. Sew raw edge of band to neckline seam allowance with a serger or fold raw edge of band to wrong side and hand stitch (fig. 37). Sew sleeve cuffs using the technique illustrated in figures 21 to 24 under “ankle cuff – View B”.
Thank you for sewing with Jalie
INC
.IN
C.
#3244 – FRANÇAIS Pyjama à pattes
Comment choisir la bonne taille : Utiliser la mesure du buste et des hanches pour la largeur et celle du tronc pour la longueur.
Les ressources de couture et d’ourlet sont comprises.
Sauf lors d’avis contraire : Ce vêtement est cousu à 6 mm (1/4") du bord. Lors de l’assemblage, les pièces du vêtement sont superposées endroit contre endroit. Si l’envers et l’endroit du tissu sont très similaires, prenez le temps d’appliquer des autocollants ou du ruban adhésif pour indiquer l’envers.
Pièces du patron A) Devant X2 C) Manche X2 E) Arrière du pied X2 G) Bande de col X1 I) Bande à la cheville X2 B) Dos X2 D) Dessus du pied X2 F) Semelle X4 (X2 tissu principal + X2 tissu antidérapant) H) Bande au poignet X2 J) Poche X2
Technique de couture Jalie (utiliser cette technique si vous n’avez pas de surjeteuse)
1. Première couture : point zigzag large directement sur le bord vif du tissu (fig. 1), « zig » sur le tissu, « zag » dans le vide. *Ce zigzag ne sera pas montré afin d’alléger les illustrations*
2. Deuxième couture : point droit à 6 mm (1/4") du bord du tissu (fig. 2).
AVANT DE TAILLER LE TISSU Joindre les deux parties des pièces A, B et C pour former le devant, le dos et la manche du pyjama et fixer avec du ruban adhésif (fig. 3). Enlever le cran de la cheville sur la pièce du dos (fig. 4). Utiliser ces nouvelles pièces pour tailler le tissu.
1. Poche et assemblage Cranter aux marques de l’ouverture de la poche au côté devant et replier sur l’envers. Surpiquer en débutant au bord vif du tissu (fig. 5-6). Épingler l’endroit de la poche sur l’envers du devant en faisant correspondre les crans (fig. 7) et coudre tel qu’illustré. Épingler les pièces du dos en faisant correspondre les crans (fig. 8) et coudre le milieu dos et la fourche dos. Épingler les pièces du devant et coudre la fourche devant (fig. 9), en débutant à 2,5 cm (1’’) sous le cran et cousant jusqu’à l’entrejambe. Épingler la manche au devant en faisant correspondre les crans simples (fig. 10) et coudre. Épingler la manche au dos en faisant correspondre les crans doubles (fig. 11) et coudre. Épingler le dos au devant et coudre de la cheville au poignet en faisant correspondre les crans et les coutures de manches (fig. 12). PIED (MODÈLE A) Épingler le dessus du pied à l’arrière du pied en faisant correspondre les crans et coudre la couture côté (fig. 13). Épingler le dessus du pied au devant en faisant correspondre les crans de la cheville devant (fig. 14) et coudre. Si vous utilisez un pied de taille
différente du reste du pyjama, épingler au cran et à la couture côté et tendre légèrement la pièce la plus petite pour qu’elle s’ajuste à l’autre. Épingler et coudre l’élastique sur la ressource de couture (fig. 15) à l’aide d’un point zigzag (« zig » sur l’élastique, « zag » dans le vide) en
tendant l’élastique pour qu’il s’ajuste à la pièce. Épingler le devant au dos à l’entrejambe (fig. 16) et coudre d’un talon à l’autre. SI VOUS DÉSIREZ INSÉRER UNE FERMETURE À GLISSIÈRE À L’ENTREJAMBE : Coudre seulement 2,5 cm (1’’) aux deux pieds (fig. 17).
Épingler l’envers de la semelle antidérapante (ou de la deuxième pièce de semelle) sur l’envers de la semelle et joindre les bords vifs au point zigzag (fig. 18). Surpiquer selon votre inspiration pour maintenir les épaisseurs ensemble (fig. 19).
Épingler le dessus de pied sur la semelle en faisant correspondre les crans (fig. 20) et coudre. BANDE À LA CHEVILLE (MODÈLE B) Épingler le devant au dos à l’entrejambe (fig. 16) et coudre d’un talon à l’autre.
SI VOUS DÉSIREZ INSÉRER UNE FERMETURE À GLISSIÈRE À L’ENTREJAMBE : Coudre seulement 2,5 cm (1’’) aux deux pieds (fig. 17). Épingler les extrémités de la bande en faisant correspondre les crans (fig. 21) et coudre. Plier la bande envers contre envers et marquer la demie à l’aide d’une épingle (fig. 22). Épingler la bande sur l’endroit de la cheville en alignant la couture avec l’entrejambe et la demie avec la couture côté (fig. 23). Coudre en étirant la bande entre les épingles pour qu’elle s’ajuste à l’ouverture (fig. 24).
2. Fermeture à glissière Couper le haut du ruban d’environ à environ 1 cm (3/8’’) des arrêts du haut (fig. 25). Épingler l’endroit de la fermeture à glissière sur l’endroit du côté droit du devant. Coudre au zigzag de haut en bas en arrêtant au cran du bas (fig. 26). Coudre au point droit à environ 6 mm (1/4’’) du bord de haut en bas (fig. 27). Marquer l’emplacement des deux crans sur l’envers du ruban (fig. 28). Tourner le pyjama sur l’envers, épingler l’endroit de la fermeture à glissière ouverte sur l’endroit du côté gauche du devant en faisant
correspondre les marques avec les crans et coudre au zigzag, puis au point droit de bas en haut en débutant au cran inférieur. Prolonger la couture de la fourche devant pour qu’elle chevauche la couture de la fermeture d’environ 1 cm (3/8’’) (fig. 29). Couper l’excédent de fermeture à glissière à environ 2,5 cm (1’’) de la fin de la couture. Coudre une petite pièce de tissu de la largeur du ruban pour envelopper le bout coupé (fig. 30) et coudre. Taquer le ruban enveloppé à la ressource de couture de la fourche (fig. 31). PYJAMA AVEC FERMETURE À L’ENTREJAMBE : Coudre la fermeture éclair d’une cheville à l’autre en utilisant la technique utilisée au devant.
3. Col Assurez-vous que la demie (milieu dos) et le centre de la pointe (milieu devant) soient bien marquées (fig. 32-33). Épingler le col ouvert sur l’endroit de l’encolure, la pointe excédant le milieu devant de 6 mm (1/4’’) (fig. 34). Coudre de la pointe jusqu’au cran SANS TENDRE la bande. Épingler la marque de demie du col sur l’envers du milieu dos et poursuivre la couture d’un cran à l’autre, en tendant la bande pour qu’elle
s’ajuste à l’encolure (fig. 35). Ramener la bande endroit contre endroit de la pointe au cran (en prenant le coin du devant en sandwich), épingler et coudre sur la couture
apparente (fig. 36). Retourner sur l’endroit. Retourner le bord vif de la bande sur son envers et finir à la main ou simplement joindre les bords vifs à la surjeteuse (fig. 37).
Coudre les bandes aux poignets en utilisant la technique des bandes aux chevilles (fig. 21-24, section « bande à la cheville – modèle B).
Merci de coudre avec Jalie
INC
.IN
C.
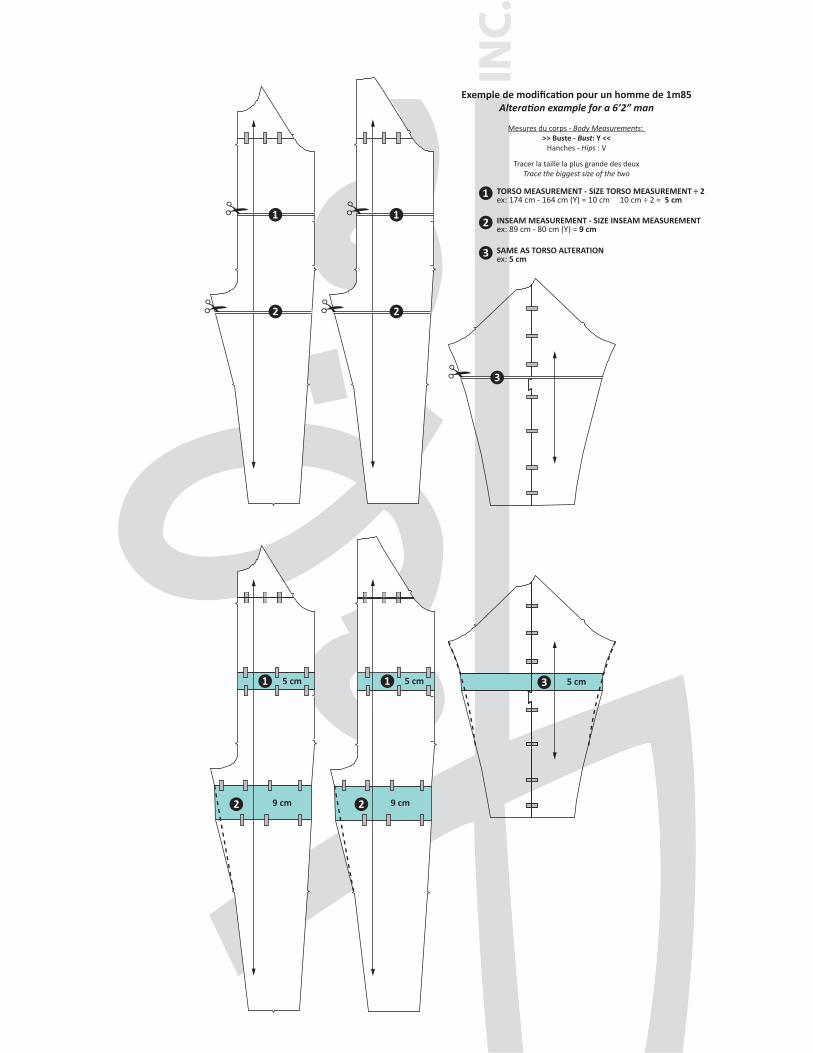
TORSO MEASUREMENT - SIZE TORSO MEASUREMENT ÷ 2ex: 174 cm - 164 cm (Y) = 10 cm 10 cm ÷ 2 = 5 cm
INSEAM MEASUREMENT - SIZE INSEAM MEASUREMENTex: 89 cm - 80 cm (Y) = 9 cm
SAME AS TORSO ALTERATIONex: 5 cm
Exemple de modification pour un homme de 1m85Alteration example for a 6’2” man
Mesures du corps - Body Measurements: >> Buste - Bust: Y <<
Hanches - Hips : V
Tracer la taille la plus grande des deuxTrace the biggest size of the two
5 cm5 cm 5 cm
9 cm9 cm
✁ ✁
✁ ✁
✁
INC
.IN
C.
(24)
Technique decouture Jalie
(à utiliser si vous n'avezpas de surjeteuse)
Jalie's sewing technique (use this technique if you
cannot use a serger)
(2)
1 POCHE ET ASSEMBLAGE - POCKET AND ASSEMBLYPIÈCES DU PATRON - PATTERN PIECES
(1)
LÉGENDE DES ILLUSTRATIONSILLUSTRATION SHADING KEY
EnversWrong side
EndroitRight side
AVANT DE TAILLER LE TISSUBEFORE CUTTING THE FABRIC
(3)
Bx2partie 1part 1
A - B
X2
partie 2part 2
A - B
X2
partie 2part 2
Cpartie 2part 2
Cx2
partie 1part 1
2,5 cm (1’’)
Envers Wrong side
Cpartie 2part 2
Cx2
partie 1part 1
G x1
H x2
I x2
J x2
D x2
F x4
E x2
A - B
X2
partie 2part 2
Bx2partie 1part 1
Ax2partie 1part 1
2,5 cm1’’
Envers Wrong side
EndroitRight side
DevantFront
Envers Wrong side
Envers Wrong side
Envers Wrong side
Envers Wrong side
Envers Wrong side
(4)
(5) (6)
(8)
(9)
(10)
Envers Wrong side
(11)
EndroitRight side
(14)
(15)
(18)
Envers Wrong side
(19)
(20)
(16)
(17)
(21)
(22)
(23)
Envers Wrong side
(7)
Envers Wrong side
(12)
EndroitRight side(13)
DevantFront
DevantFrontDos
BackMancheSleeve

INC
.IN
C.
Envers Wrong side
Envers Wrong side
(25)
(26)
(28)
(27)
(29)
(30)
(31)
2 FERMETURE À GLISSIÈRE - ZIPPER
(32)(33)
(35)
(36)
(37)
3 COL ET FINITION - COLLAR AND FINISHING
(34)
DevantFront
DevantFront