3026 north commerce parkwaymiramar, fl 33025t:(954)-447-5000f:(954)-447-9200w w w. c d l. n e t
TRANSCRIPT

3026 North Commerce Parkway Miramar, FL 33025 t: (954)-447-5000 f: (954)-447-9200 w w w. c d l. n e t

8/24/05 VERSION 12
TTable of able of CContents ontents
ChaptersChapters Page (s)Page (s)
1.1. Welcome to the Horizon Supplier Network ConsoleWelcome to the Horizon Supplier Network Console 33
2.2. Section 1:Section 1: 4-64-6 Log on to The Horizon Network ConsoleLog on to The Horizon Network Console
3.3. Section 2: Section 2: 7-137-13About the Supplier Network ConsoleAbout the Supplier Network Console
A). FramesA). FramesB). Results WindowB). Results Window
4.4. Section 3:Section 3: 14-2414-24 Using the Supplier Network Console Using the Supplier Network Console
A). Accepting JobsA). Accepting JobsB). In Progress JobsB). In Progress JobsC). eBilling VerificationC). eBilling VerificationD). ReportsD). Reports

8/24/05 VERSION 13
WWelcome to the elcome to the HHorizon orizon NNetworketwork
Welcome to Velocity Systems' Horizon Supplier Network Console, powered by E-Courier software.
As a supplier to Velocity Systems you will benefit from the many features of the Horizon Supplier Network Console, which are outlined in this Supplier Users Guide. We have provided simple instructions on how to use our password-protected, Internet-based system for fast, easy management of all pickup and delivery jobs performed for Velocity Systems.
The system requirements are very easy as well. All that is needed is a computer, a Microsoft Internet Explorer 6.0 or greater browser and a dedicated Internet connection, such as an internal network, Broadband or DSL connection. For easy access to the system please save the following link under “Favorites” on your Internet Explorer:www.horizonconsole.com/supplier
If you have any questions or need assistance using the system contact Velocity Systems Customer Support at:
Email: [email protected]
Hours: Monday – Sunday: 7:00 am – 11:00 EST
WELCOME TO HORIZON!

8/24/05 VERSION 14
LLog on to the og on to the SSupplierupplier N Networketwork C Consoleonsole
SECTION 1SECTION 1
In Section 1 you will lean how to log on to the Horizon Supplier Network Console. Topics that will be reviewed are:
• Logging in & Support, Section 1: A • System Updating and Launch, Section 1: B

8/24/05 VERSION 15
LLog on to the og on to the SSupplier upplier NNetwork etwork CConsoleonsole
1). On your web browser go to: www.horizonconsole.com/agents
2). Enter the User Name you received from Velocity Systems.
3). Enter the Password you received from Velocity Systems.
4). Once entered, the Login button will become activated and you can access the Supplier Console by clicking the Login button.
You have now successfully entered the Horizon Supplier Network Console.
If you need assistance logging on to the system, or have forgotten or not received your username or password, email Velocity Systems Customer Support at: [email protected]
1
2
3
4
Section 1: A) LOG ON

8/24/05 VERSION 16
LLog on to the og on to the SSupplier upplier NNetwork etwork CConsoleonsole
1). When a user initially logs in, it will take a few seconds for all of the work orders to be retrieved. During this time you will see a red “Updating…” signal at the top of the screen.
2). Once completed, “Totals” will appear. The user is now logged in in to the Dispatch mode and is ready begin using the system.
If you need assistance logging on to the system, or have forgotten or not received your username or password, email Velocity Systems Customer Support at: [email protected]
1
2
Section 1: B) UPDATING

8/24/05 VERSION 17
AAbout the bout the SSupplier upplier NNetwork etwork CConsoleonsole
SECTION 2SECTION 2
In Section 2 you will lean about the components of the Supplier Console Network. Topics that will be reviewed are:
• Frames, Section 2: A • Results Window, Section 2: B

8/24/05 VERSION 18
Now that the user has logged on and the system has been updated, the user will view a screen similar to the one shown in Example 1.
The Supplier Console consists of two components:A. FramesB. Results Window
“Frames” are categories that drive the dispatching function throughout the entire system. Frame categories are:
B
Example 1
• Agent Console• Totals• Job Details
• To Be Accepted• Message• e-Billing Verification
The “Results Window” are categories that show the results of the dispatching function preformed by the Frame categories.
• Check All• Order No.• Pickup• Delivery
• Notes• Description• P/W• Pay
Not all of the Frames will be visible at the same time. Frames change based on actions required to process each orders through the dispatching function.
• Pay Batch• Pay Date• DB
Results Window categories are;
A
Section 2: A) FRAMES
AAbout the bout the SSupplier upplier NNetwork etwork CConsole onsole
8/24/05 VERSION 19
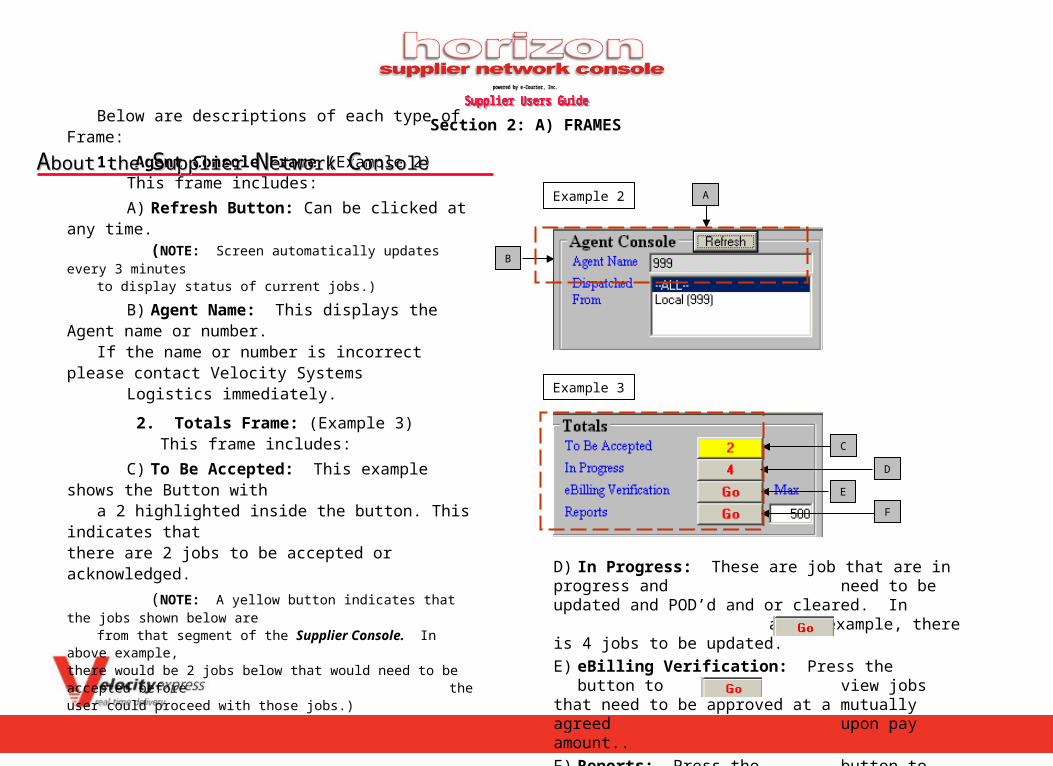
D) In Progress: These are job that are in progress and need to be updated and POD’d
and or cleared. In above example, there is 4 jobs to be updated.E) eBilling Verification: Press the button to
view jobs that need to be approved at a mutually agreed upon pay amount.. F) Reports: Press the button to view some
reporting tools to help the user report and or reconcile.
Below are descriptions of each type of Frame:
1. Agent Console Frame (Example 2)This frame includes:
A) Refresh Button: Can be clicked at any time. (NOTE: Screen automatically updates every 3 minutes to display status of current jobs.)
B) Agent Name: This displays the Agent name or number. If the name or number is incorrect please contact
Velocity Systems Logistics immediately.
2. Totals Frame: (Example 3) This frame includes:
C) To Be Accepted: This example shows the Button with a 2 highlighted inside the button. This indicates that there are 2 jobs to be accepted or acknowledged.
(NOTE: A yellow button indicates that the jobs shown below are from that segment of the Supplier Console. In above example, there would be 2 jobs below that would need to be accepted before the user could proceed with those jobs.)
A
B
Example 2
Example 3
C
D
E
F
Section 2: A) FRAMES
AAbout the bout the SSupplier upplier NNetwork etwork CConsoleonsole

8/24/05 VERSION 110
The To Be Accepted Button (example 4) changes depending on which section of the module the user is working in.
A. Default View or when the ‘To Be Accepted’ button or the ‘In Progress’ button is clicked. You can limit view to a number
of days if desired.
A
Example 4
Example 5
Example 6
When the ‘eBilling Verification’ Button (example 5) is clicked, the frame allows the user to input search criteria to display desired results
The Message Frame (example 6) allows you to send free form messages as well as the ability to select a job and send an email message concerning that job. This frame can be seen in all sections..
Section 2: A) FRAMES
AAbout the bout the SSupplier upplier NNetwork etwork CConsoleonsole

8/24/05 VERSION 111
The Job Detail Frame (example 7) is only visible in the ‘In Progress’ and ‘eBilling Verification’ section of the Supplier Console.This frame will display Job Detail when a job is selected from the Results Window. (Section 2, B) Users are also able to update job information such as pieces and/or weight as well as entering POD information.
Example 7
Section 2: A) FRAMES
AAbout the bout the SSupplier upplier NNetwork etwork CConsoleonsole

8/24/05 VERSION 112
The Results Window (Example 1) displays the number of stops associated with a particular section.
A. The column headers may vary depending on the sectionof Supplier Console the user is working within.
B. The first column will always displays a Check All button as well as a check box in each row. This allows the user to select all jobs, a few jobs or a single job to update, complete or approve payment.
Example 1 A
B
In the diagram shown in Example 2 the second row is highlighted because the mouse is hovering over the row. If a row is selected (this is done by clicking on the job number in blue text, as you mouse over the blue text it will turn to red) the background color will be blue (As shown in Example 2).
Example 2
Section 2: B) RESULTS WINDOW
AAbout the bout the SSupplier upplier NNetwork etwork CConsoleonsole

8/24/05 VERSION 113
The Supplier Console will update, by default, every couple minutes. The user can also manually refresh the module at any time by pressing the refresh button (shown circled in Red in Example 3) When the system is updating the phrase ‘UPDATING… will display in Red text (as shown circled in Blue in Example 3) The system will lock during the update process. If any row from the Results Window is selected, updating will be disabled.
Example 3
AAbout the bout the SSupplier upplier NNetwork etwork CConsoleonsole
Section 2: B) RESULTS WINDOW

8/24/05 VERSION 114
UUsing the sing the SSupplierupplier N Network etwork CConsole onsole
SECTION 3SECTION 3
In Section 3 you will lean about Using the Supplier Console Network. Topics that will be reviewed are:
• Accepting Jobs, Section 3: A, • In Progress Jobs, Section 3: B, • eBilling Verification, Section 3: C • Reports, Section 4: D.

8/24/05 VERSION 115
UUsing the sing the SSupplierupplier N Network etwork CConsole onsole
Now that you have an understanding of the two components that make up the Supplier Console Network, Frames and the Results Window, we will now move to “Using the Supplier Console Network”.
There are four steps that will discussed in this section that will teach you how to use the Supplier Console Network. They are:
Step 1: Accepting Jobs:
Step 2 In Progress
Step 3: eBilling Verification
Step 4: Reports
After you have logged into the system and all updates have occurred the user will be taken to the “To Be Accepted section” (example 1) to begin using the Supplier Network Console.
Example 1
Section 3: A) ACCEPTING JOBS

8/24/05 VERSION 116
UUsing the sing the SSupplierupplier N Network etwork CConsole onsole
Step 1: Accepting Jobs
In Example 2, the two ‘2’ inside the yellow button (circled Red) indicates the number of jobs to accept.
The user can see complete detail of each job in the “Results Window” shown by following the Red arrow.
Example 2
Section 3: A) ACCEPTING JOBS

8/24/05 VERSION 117
UUsing the sing the SSupplierupplier N Network etwork CConsole onsole Example 3
Section 3: A) ACCEPTING JOBS
Step 1: Accepting Jobs
A) To Accept all Jobs click on the “Check All” button, (example 3) this will place a check in each check box. When a user clicks on “Check All” the button will then display “Clear All” by clicking again the user can un-check all jobs if desired.
B) To Accept one (1) or more, but not all jobs, simply check the “Check Box” in the desired row or rows.
C) Then click the “Accept Button” to accept the jobs.
D) If the user does not want to Accept a Job or Jobs, example 4) then they should click on the desired job number in the results window. When hovering over a Job Number, with the mouse, the job number text will turn red. Then single “left click.”
A
B
C
D
Example 4

8/24/05 VERSION 118
UUsing the sing the SSupplierupplier N Network etwork CConsole onsole
Section 3: A) ACCEPTING JOBS
Step 1: Accepting Jobs
E) Once the Job Number has been clicked, (D), it will turn from red to gray. (example 5, red circle) and will place the Job Number in the Massage Frame
F) The user then selects an Email Address and can create a message in the Note Field
G) The user then clicks on the Send Button to send the message containing the intended recipient.
(NOTE: A message can be sent for any reason with or without the Job number, but it is advised that if the message is pertaining to a specific job number, the user click on the job first so as to reference it in the message.)
After all or some jobs are accepted and messages are sent for jobs not being accepted (if any) please proceed to step 2.
E
Example 5
F
G

8/24/05 VERSION 119
UUsing the sing the SSupplierupplier N Network etwork CConsole onsole
Section 3: B) IN PROGRESS
Step 2: In Progress:
To move on to the ‘In Progress’ section, click on the “In Progress Button” as shown in Example 6, A.
Once the “In Progress Button” is clicked, it will display in yellow to indicate that the user is in the “In Progress” section of the Supplier Console. (NOTE: Jobs can be updated (piece count changed or weight updated etc), completed and even eBilling verified from this section. Users can even print 1
or all orders in manifest form, as well as sending messages.)
Example 6
A

8/24/05 VERSION 120
UUsing the sing the SSupplierupplier N Network etwork CConsole onsole
Section 3: B) IN PROGRESS
Step 2: In Progress:
A. Select a job to update by clicking on the “Job Number” as shown in Red Circle.
B. Update (If Needed) to change existing criteria and then select the Update Button.
C. To complete the job enter as follows:
1. Pick Up Date and Time (if shown) and POD Date andTime
2. Event Info – Click each event (if any) and select the Yes or No button.
3. Route Info (if any) (See Black circle).
4. When all information is entered, press Complete Button.
5, Repeat for each job as they are completed. (Real Time is preferred)
(NOTE: As long as POD, Date and Time are entered users can save a step by updating Pay Status to either Agent Approved or Agent Suspended (if Agent Suspended is set, user must enter Pay Notes to explain suspension.)
Example 7
A
B
C
1
2
3
4
NOTES

8/24/05 VERSION 121
UUsing the sing the SSupplierupplier N Network etwork CConsole onsole
Section 3: C) eBilling Verification
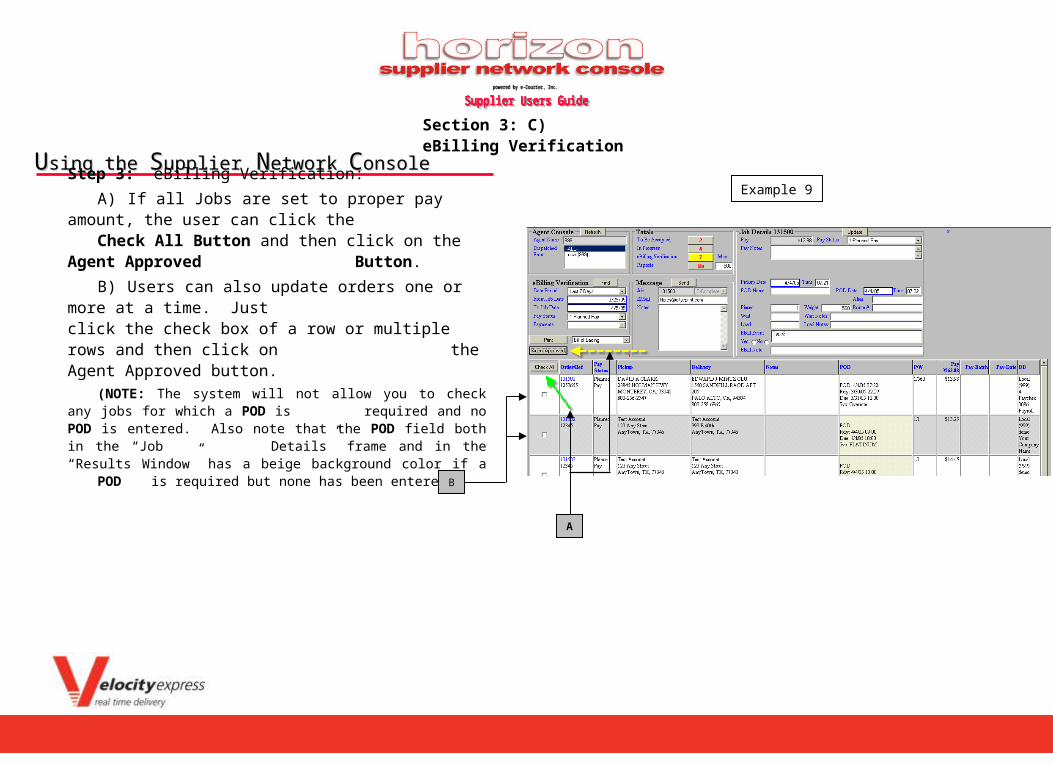
Step 3: eBilling Verification:
Users can verify pay amounts as well as research status of completed jobs from this section.
Click on the eBilling Verification Button to proceed to this section. the button will turn yellow to indicate that a user is in the eBilling Verification Section of the Supplier Console as shown in Example, 8A.
Example 8
A
8/24/05 VERSION 122
UUsing the sing the SSupplierupplier N Network etwork CConsole onsole
Section 3: C) eBilling Verification
Step 3: eBilling Verification:
A) If all Jobs are set to proper pay amount, the user can click the Check All Button and then click on the Agent Approved
Button.
B) Users can also update orders one or more at a time. Just click the check box of a row or multiple rows and then click on the Agent Approved button.
(NOTE: The system will not allow you to check any jobs for which a POD is required and no POD is entered. Also note that the POD field both in the “Job Details” frame and in the “Results Window” has a beige background color if a POD is required but none has been entered.
Example 9
A
B

8/24/05 VERSION 123
UUsing the sing the SSupplierupplier N Network etwork CConsole onsole
Section 3: C) eBilling Verification
Step 3: eBilling Verification:
C) To Suspend the job enter as follows:
1. Click on Job Number to be suspended.
2. Set Pay Status to 3-Suspended.
3. Enter detailed Reason for suspension including correct pay amount in the Pay Notes.
4. Click on Update Button.
5. Repeat as needed for jobs that should be suspended. (NOTES: Messages can be sent form this section also. Users should note the eBilling Verification frame in this section. This allows users to research any or all jobs in a date range based on one (1) or all pay statuses. Users should also note the different column headers in the “Results Window” of this section. The Report feature can be accessed by pressing the Reports Button labeled ‘Go” and shown in above screen shot with Blue circle. Each screen has print button can print 1 or some or all jobs. Will print in Manifest format Including POD line.
Example 10
1
23
4
NOTES
NOTES

8/24/05 VERSION 124
UUsing the sing the SSupplierupplier N Network etwork CConsole onsole
Section 3: C) eBilling Verification
The e-billing verification screen allows you to view jobs from prior days.
The system defaults to the last 7 days.
If you are looking for a job older than 7 days ago you need to change the dates to match the job date you want.
Set the criteria

8/24/05 VERSION 125
UUsing the sing the SSupplierupplier N Network etwork CConsole onsole
Section 3: D) Reports
Step 4: Reports:
The reports section allows agents/drivers to review past orders based on pay status and date range. Once criteria is set the system will show those jobs. As with the other sections, the user can select certain jobs by checking the check box and print the selected items.
From the Dropdown menu, pick the period you want