merlin.wsmerlin.ws/aclc/photo_organizers/picasa/picasa 3 user... · web viewthis is the main...
TRANSCRIPT

™ User Manual 1
1 This manual is meant only as an introduction to Picasa 3.9,139, Build 161
™

User Guide Manual 2
With Picasa, you can organize photos, add keyword tags, identify people, simply edit, create various outputs, and upload photos to Picasa Web Albums where additional functions and options are available. There are two main elements of Picasa.
1. The latest version of Picasa software installed for use on your PC2. The Picasa Web Albums cloud application which is used on-line3
Item 1 – The latest version may be downloaded at:https://picasa.google.com/
Item 2 - May be setup at: https://support.google.com/picasa/answer/158794?hl=en&ref_topic=24015
Item 1If this is the first installation of Picasa, it will present several boxes to configure Picasa.
Check all the boxes you want. Set Picasa with your Defaults. Where to scan for Photos.
If you are upgrading from a previous version of Picasa you do not have to do anything special other than install the new version of Picasa. The new version will automatically convert any previous Picasa database to the new format and preserve your configurations and settings for Picasa.
2 This manual is meant only as an introduction to Picasa. There are many more features and functions available and only by using Picasa over time can one become more knowledgeable of these. All features and functions are fully explained at: http://picasa.google.com/support / 3 The use of on-line Web Albums will not be covered in this manual. Use the link above to Learn More.
Rod Holley Page 2 of 24

Picasa helps you find and organize all your photos and videos and view them in various ways. IMPORTANT NOTE: Picasa does not store the photos in Picasa. That is, Picasa only links to the photos in your PC folders. It does not copy the photos to Picasa so there are no duplicate photos when using Picasa, other than duplicates you might have on your computer. See Note and Caution on Page 6.
When you open Picasa, it scans the folders you designated in Picasa folder manager and displays the images it finds in these folders. The photos can be displayed in various sorts.
Picasa displays the file types that you selected during the installation setup. The default file types available during installation are JPG, BMP, GIF, PNG, TGA, TIF & TIFF, WEBP, RAW (from many manufacturers).
Files types that are available in TOOLS>OPTIONS>FILES TYPES to change are JPG, BMP, GIF, PNG, TGA, TIF & TIFF, WEBP, PSD, RAW, Movies (AVI, MPG, ASF, WMV) and Quicktime Movies (MOV). See Appendix A for file types and when to use them.
Movie file types are AVI, MPG, ASF, WMV, and MOV. Picasa automatically updates changes made in your folders and photos outside of
Picasa.
Limited photo editing function are available within Picasa. When you edit a photo in Picasa, your original photo is always preserved. Your original files are never touched. The photo edits made are only viewable in Picasa until you save your changes. Even then, Picasa creates a new version of the photo with your edits applied; leaving the original file totally preserved in a hidden folder named .picasaoriginals in the same folder where the original photo was located.
Rod Holley Page 3 of 24
Library View
Picasa automatically organizes all your photos/images, graphics,4 and movie files and displays them by folders or Picasa groupings; i.e. Albums, People, Projects, etc. inside its main Library view.
Panel Layouts of the Picasa Library View are: 1-FOLDER LIST & PICASA GROUPINGS The left-hand list in Picasa’s library view shows all the folders that were set for Picasa to scan (watch)5 or groupings that Picasa creates when various functions are used. The photos contained in any item selected in this panel are displayed in the Lightbox. There are various icons available to change Lightbox views. See Lightbox below.2-PICTURE TRAY & OUTPUT OPTIONS The Picture Tray by default will show any photo that is selected in the Lightbox. To place multiple items in the Picture Tray, press & hold the CTRL key while clicking on other photos in the same folder or other folders. Release the CTRL key when finished. To remove a photo in the tray, right click the photo in the tray and select Remove Selection. Once you are satisfied with the contents of the Picture Tray you can press any of the output options buttons to perform the corresponding action on all the items in the tray at once. The output option icons are: Upload, Email, Print, Export, Shop, Blog This!, Collage, Movie and Geo-Tag. 3-LIGHTBOX This is the main section of the Picasa library view and displays thumbnails of the photos and movies corresponding to the selected folders or grouping in the left panel Folder List. To change the thumbnail size, use the slider at the bottom right of the lightbox or use View in the menu bar to select a common thumbnail size. Double-click on any folder to edit its title, date, place taken or description. Music can also be added here for shows. Double click any photo to open it in the editor. (Covered later)4-VIEW PANELS The different view panels can be selected by clicking View in the menu bar and selecting one of four views: Properties, Tags, People, and Places. View Panels can be closed with the black “x” at the top right of the panel when not in use.
4 In this manual, the term photos, images and graphics are interchangeable for all formats viewable in Picasa5 See File>Add Folders - Page 7
Rod Holley Page 4 of 24

MENU BAR and TOOL BAR: Note: If the mouse pointer rests over most icons in Picasa, a text clue box will generally appear giving you an idea of what the icon does.
The left side:
STANDARD MENU BAR:Under the various menu items (FILE, EDIT, etc.) you can find all the functions that are available in Picasa. Many of these functions are also available as shortcut icons in other areas as well. The best way to learn all of these functions is with use over time. Do not be afraid to experiment. If you select something that might delete an item, you will always get a “Are you sure…” window. If you are unsure, just cancel the operation and nothing is lost. See section STANDARD MENU BAR on Page 8 and Appendix B for some of the other function descriptions.
TOOL BAR:IMPORT: Click this to get photos from various devices (like a camera or camera storage card) and copy them to a folder on your computer. If the folder is a “watched” folder, it will automatically be linked to the Picasa library and displayed. If it is not a “watched” folder, it will not be displayed in the Picasa library. See IMPORT PHOTOS on Page 9 on how to import.
CREATE NEW ALBUM: Albums, which is a Picasa grouping, are different from folders because albums only exist in Picasa and are not real folders on your PC. Albums may contain photos from across multiple folders. For example, you might create an album called 'My Grandchild,' and include photos of your grandchild that are saved in several different folders on your PC. It is important to note that when you delete or remove photos from an album, the original photo files remain in their original locations on your PC.
FOLDER VIEWS: Using these views, nothing is being changed on your computer. This only shows the folders in different views.
The first two icons will show folders as a flat or tree structure. The recommended selection is tree structure.
The pull down arrow icon shows various ways to sort the folders.
CAPTURE PHOTO OR VIDEO: This lets you capture photos or vides from various devices, like a web cam.
Rod Holley Page 5 of 24

MENU BAR and TOOLBAR cont.:
The toolbar right side:
VARIOUS FILTER ICONS:1. The Star displays only photos where star ratings were added. 2. The Arrow shows photos that were uploaded to Picasa Web Albums. 3. The Head show photos with faces. 4. The Film Strip show only movies or videos5. The Push Pin show only photos where geo tags were added6. The Slider lets you view photos by their age from 20 years to 2 days old. Positioning
the slider to the far left displays all photos.
SEARCH PHOTOS TEXT BOX:This area is used to find photos by searching on a key word or words. This includes all information associated with the photo; i.e., filename, file extension, tags and any information in the properties of the photo.
After any filter selection or search, you can return to the full library by clicking on the “Back to View All” Button that appears after a filter or search function is done.
Note and Caution about the Folder List and Lightbox in Picasa:You can remove a folder from Picasa and leave it unchanged on your PC. You cannot remove an individual photo from Picasa. But you can delete an individual photo from Picasa, which will also delete it from your PC.
Both of these functions are accomplished by right clicking. In the case of a folder, right click the folder and select “Remove Folder from Picasa”.
This will remove the folder and its images from Picasa but not from your PC. In the case of a single photo, right click the photo and select “Delete from Disk”. This will
delete it from Picasa and your PC.
Rod Holley Page 6 of 24

STANDARD MENU BARAppendix B - Other Useful Functions in the Menu Bar
FILE: Add Folders to Picasa: Lets you add,
remove or change which and how Picasa will treat folders. The options are Scan Once, Scan Always, or Remove from Picasa. This is where you can also turn on or off Face Detection. Note there is a Help button here that will give detail information about this specific function. These Help button are available in many of the various functions throughout Picasa. Use them! Also accessible under TOOLS>FOLDER MANAGER
Export Picture to Folder: You can choose a new exported location to save the photo (Browse), Name the exported folder, Choose a new image size (optional), Select image quality and Add a watermark to the photo.
Appendix C - Export Function –Page 17.Appendix D – DPI, Resolution, Pixel Size, and File Size Explained – Pages 18 & 19.
VIEW: Change thumbnails view to small or
normal. Variable thumbnail views can also be changed with the slider bar on the right side of the Picture Tray and Option Output Panel.
Select View - Properties, Tags People, or Places to open the respective panel on the right side of the Picasa library. This can also be done with icons on the right side of the Picture Tray and Option Output Panel
Select Slideshow to view photos in a specific folder or multiple folders. Select Thumbnail Caption to select what will show under each photo. Options are
Rod Holley Page 7 of 24

none, Filename, Caption, Tags, or Resolution.
Rod Holley Page 8 of 24

IMPORT PHOTOS:
You can start the import function either by clicking the Import button on the tool bar or by clicking FILE>IMPORT FROM…Photos can be imported from many various devices, but for the purpose of this manual, only importing from a camera will be covered. For other import operations, go to: http://picasa.google.com/support /
When the Import function is selected, the Import Tab Window will open.At this point, connect the camera to the computer and turn it on or remove the camera storage card from the camera and insert it into the appropriate slot on your computer.
If the AutoPlay Window opens, note the Removable Disk Letter (in this example (H:) and click the red “X” to close the AutoPlay Window.
Back to Picasa’s Import tab, click on the pull down arrow by the Import From: area. Look for the Removable Disk Letter that showed in the AutoPlay Window. If the AutoPlay Window did not open, there would generally be only one Removable Disk listed; select this from the list.
Picasa will now read all the photos and copy them to a temporary folder on your PC. This may be very quick or could take a few minutes depending on number and size of photos.
Rod Holley Page 9 of 24

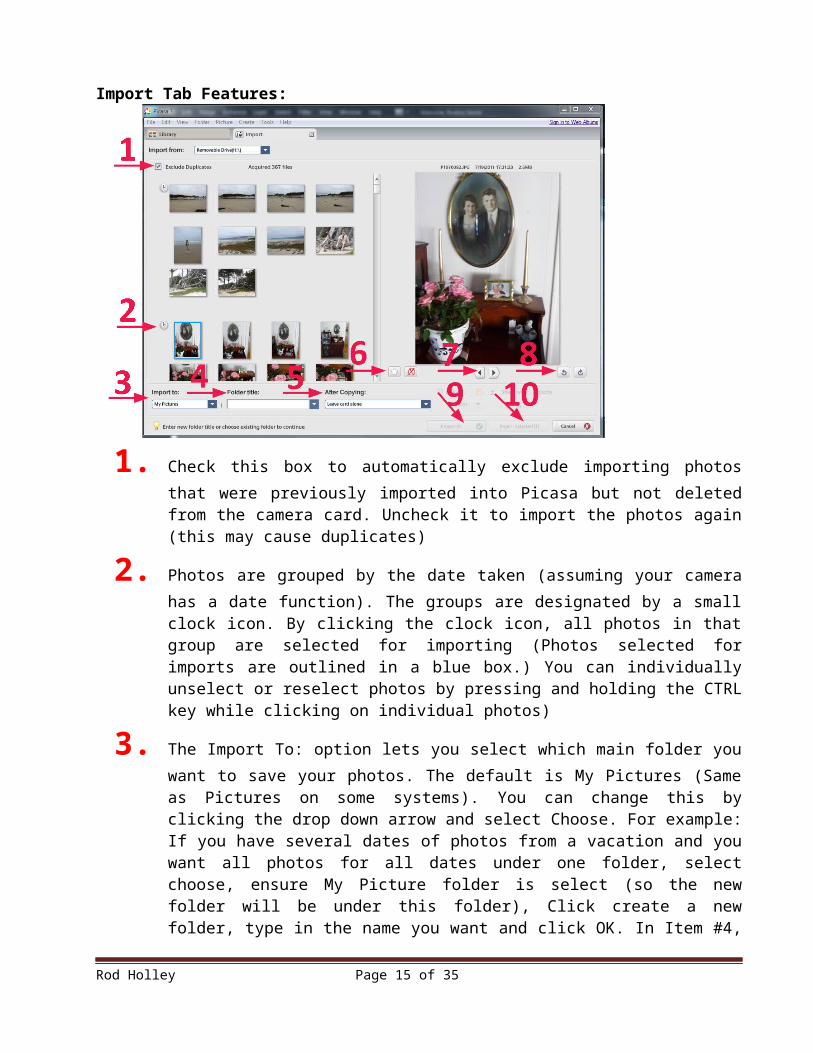
Import Tab Features:
1. Check this box to automatically exclude importing photos that were previously imported into Picasa but not deleted from the camera card. Uncheck it to import the photos again (this may cause duplicates)
2. Photos are grouped by the date taken (assuming your camera has a date function). The groups are designated by a small clock icon. By clicking the clock icon, all photos in that group are selected for importing (Photos selected for imports are outlined in a blue box.) You can individually unselect or reselect photos by pressing and holding the CTRL key while clicking on individual photos)
3. The Import To: option lets you select which main folder you want to save your photos. The default is My Pictures (Same as Pictures on some systems). You can change this by clicking the drop down arrow and select Choose. For example: If you have several dates of photos from a vacation and you want all photos for all dates under one folder, select choose, ensure My Picture folder is select (so the new folder will be under this folder), Click create a new folder, type in the name you want and click OK. In Item #4, select Date the Photo Was Taken.
4. The Folder Title: option lets you choose how you want to name the actual folder where the photos will be imported. The options are to name the folder anything you want, the date the photo was taken, or today’s date. Remember this folder will be a sub-folder under the selection that was made in item #3.
5. This is where you select what you want to occur after the photos are imported. The options are: Leave card alone; Delete only copied photos; Delete everything on card.
Rod Holley Page 10 of 24

6. By clicking the Star Icon, you can star mark (your best photos) all the selected photos or the Red X Icon to not imported the selected photos.
7. Navigation arrows for viewing the previous or next photos.
8. Rotate photos clockwise or counter-clockwise
9. Import All Button is a quick way simply to import all photos based on the options in the Import To:, Folder Title:, and After Copying: settings.
10. Import Selected (#) Button import only the photos that are selected (blue box around the photo). The number (#) indicates how many photos are currently selected.
When finished with the import process, click the “x” on the Import Tab or you can leave it open and just click the Library Tab to return to the main Picasa window.
Note: If you do not import all photos and delete all photos from the card, at some point you should clear your card for the next round of photos you plan to take. It is like putting a new role of film into your camera.
Rod Holley Page 11 of 24

Editing Photos
By double clicking on any photo, it will open into the Picasa editing function.
The top of the editing window options. You can always return to the Picasa Library from here by clicking the Back to Library
Button on the top-left. The Play Button lets you begin a slide show of the photos in the selected folder. The Navigation Arrows (Previous and Next) lets you scroll through the photos in the
selected folder. The last icon on top lets you upload the photos to Picasa Web Album.
The Adjustment Panel lets you perform various changes. There are five (5) categories of changes that are available. Each change within each category has its own parameters to work with. The best way to learn the various changes are to experiment with them. Multiple changes can be applied to a single photo. You can Undo or Redo any individual change applied in the order they were applied. Simply click on the Undo or Redo Buttons for each change applied.
The Histogram & Cameral Information is for reference only. A perfect-lighted photo will have a perfect bell curve.
Click on “Make a caption!” to add a photo caption.
The Blue Bar at the bottom gives property information about the current photo.
Rod Holley Page 12 of 24
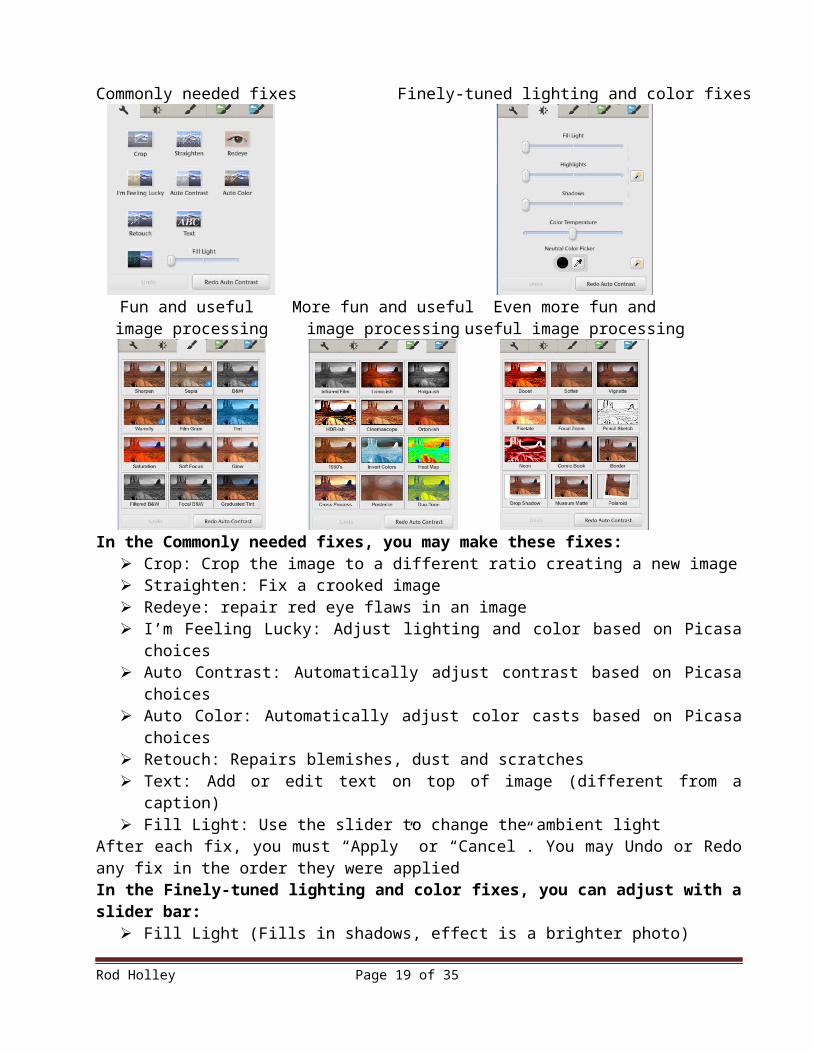
Commonly needed fixes Finely-tuned lighting and color fixes
Fun and useful More fun and useful Even more fun andimage processing image processing useful image processing
In the Commonly needed fixes, you may make these fixes: Crop: Crop the image to a different ratio creating a new image Straighten: Fix a crooked image Redeye: repair red eye flaws in an image I’m Feeling Lucky: Adjust lighting and color based on Picasa choices Auto Contrast: Automatically adjust contrast based on Picasa choices Auto Color: Automatically adjust color casts based on Picasa choices Retouch: Repairs blemishes, dust and scratches Text: Add or edit text on top of image (different from a caption) Fill Light: Use the slider to change the ambient light
After each fix, you must “Apply” or “Cancel”. You may Undo or Redo any fix in the order they were appliedIn the Finely-tuned lighting and color fixes, you can adjust with a slider bar:
Fill Light (Fills in shadows, effect is a brighter photo) Highlights (Makes the bright areas of the photo, brighter) Shadows (Makes the shadow areas of the photo darker) Color Temperature (Changes from warmer to cooler colors) Color Picker (Click the Eye Dropper Icon, then click on what you feel is the most
neutral color in the photo. If done correctly, it will adjust white balance)The adjustment is applied as you move the slider but you may Undo or Redo any adjustment in the order they were changed. In the Fun and useful panels:
Rod Holley Page 13 of 24

These panels give you effects that are applied to the image. The best thing to do is experiment with various effects to get the results you like. Multiple effects can be applied to the any image. You may Undo or Redo any adjustment in the order they were made.
Rod Holley Page 14 of 24
Appendix A
When should the different photo formats be used?
TIFFThis is usually the best quality output from a digital camera. Digital cameras often offer around three JPG quality settings plus TIFF or sometimes RAW. Since JPG always means at least some loss of quality, TIFF means better quality. However, the file size is huge compared to even the best JPG setting, and the advantages may not be noticeable.A more important use of TIFF is as the working storage format as you edit and manipulate digital images. You do not want to go through several loads, edit, save cycles with JPG storage, as the degradation accumulates with each new save. One or two JPG saves at high quality may not be noticeable, but the tenth certainly will be. TIFF is lossless, so there is no degradation associated with saving a TIFF file.Do NOT use TIFF for web images. They produce big files, and more importantly, most web browsers will not display TIFFs.
JPGThis is the format of choice for nearly all photographs on the web. You can achieve excellent quality even at rather high compression settings. I suggest using JPG as the primary format for all digital photographs. If I edit a photo, I will use my software's proprietary format until finished, and then save the result as a JPG.Digital cameras save in a JPG format by default. Switching to TIFF or RAW improves quality in principle, but the difference is difficult to see. Shooting in TIFF has two disadvantages compared to JPG: fewer photos per memory card, and a longer wait between photographs as the image transfers to the card. I rarely shoot in TIFF mode.Never use JPG for line art. On images such as these with areas of uniform color with sharp edges, JPG does a poor job. GIF and PNG are well suited for these tasks. Google JPG vs. GIF for web images. A word of caution: Continually re-saving an individual jpg photo many times will deteriorate the quality (like a copy of a copy of a copy, etc.)
JPG 2000 (File extension .jp2 or .jpx)While there is a modest increase in compression performance of JPEG 2000 compared to JPEG, the main advantage offered by JPEG 2000 is the significant flexibility of the code stream. The code stream obtained after compression of an image with JPEG 2000 is scalable in nature, meaning that it can be decoded in a number of ways; for instance, by truncating the code stream at any point, one may obtain a representation of the image at a lower resolution, or signal-to-noise ratio – see scalable compression. By ordering the code stream in various ways, applications can achieve significant performance increases. However, because of this flexibility, JPEG 2000 requires encoders/decoders that are complex and computationally demanding. Another difference, in comparison with JPEG, is in terms of visual artifacts: JPEG 2000 produces ringing artifacts, manifested as blur and rings near edges in the image, while JPEG produces ringing artifacts and 'blocking' artifacts, due to its 8×8 blocks. JPG 2000 is not yet widely used.
Rod Holley Page 15 of 24

Appendix A (cont.)
When should the different photo formats be used?
GIFIf your image has fewer than 256 colors and contains large areas of uniform color, GIF is your choice. The files will be small yet perfect. Do NOT use GIF for photographic images, since it can contain only 256 colors per image. GIF also maintains transparency.
PNGPNG is of principal value in two applications:1. If you have an image with large areas of exactly uniform color, but contains more than
256 colors, PNG is your choice. Its strategy is similar to that of GIF, but it supports 16 million colors, not just 256.
2. If you want to display a photograph exactly without loss on the web, PNG is your choice. Later generation web browsers support PNG, and PNG is the only lossless format that web browsers support.PNG is superior to GIF. It produces smaller files and allows more colors. PNG also supports partial transparency. Partial transparency can be used for many useful purposes, such as fades and anti-aliasing of text. Unfortunately, Microsoft's Internet Explorer does not currently support PNG transparency, so for now web authors must avoid using transparency in PNG images. This should change shortly.
Other FormatsWhen using graphics software such as Photoshop or Paint Shop Pro, working files should be in the proprietary format of the software. After editing, save results in TIFF, PNG, or JPG.Use RAW only for in-camera storage, and copy or convert to TIFF, PNG, or JPG as soon as you transfer to your PC. You do not want your image archives to be in a proprietary format. Although several graphics programs can now read the RAW format for many digital cameras, it is unwise to rely on any proprietary format for long-term storage. Will you be able to read a RAW file in five years? In twenty? JPG is the format most likely to be readable in 50 years. Thus, it is appropriate to use RAW to store images in the camera and perhaps for temporary lossless storage on your PC, but be sure to create a TIFF, or better still a PNG or JPG, for archival storage.
For additional information and/or clarification, Google a specific format.
Rod Holley Page 16 of 24

Appendix B
Other Useful Functions
Not all features and functions can be covered in any one session. Use the online tutorial to learn about other features and functions (http://picasa.google.com/support / ).
Some that might be of interest are:
On Menu Bar: Create>o Make a Poster
Print a single photo onto multiple sheets that can be taped together to make a large poster.
o Picture Collage Arrange multiple photos on a single sheet of paper in various layouts.
o Gift CD Burn a selection of photos to a CD with or without a slideshow of the
photos.o Movie from Selection
Create a movie from selected photos with titles, captions and transitions that can be uploaded to YouTube or Exported as a Clip that can be burned to a CD or DVD.
On Menu Bar: Tools>o Geotag
Tag any photo or group of photos with a world location of where the photo(s) were taken using Google Earth. It can also be tagged on a world map using the icon on the Picture Tray and Output Options Bar.
o Options Name Tags: Check Enable face detection
Using face detection will help you to find all photos of any specific person.
On Picture Tray and Output Options Bar: o Using Tags is like writing on the back of a photo. These tag keywords will
help you quick find groups of photos with the same tags. Multiple tags can be applied to a single photo.
Rod Holley Page 17 of 24

Appendix C
Export Function
The Export function can be used to create a photo for use on a web site. Generally, today’s cameras take very large file photos, which if used directly on a web site will take a long time to both upload and every time someone views the web page, to download it. There is not any one size perfect for all web sites. Using Picasa, generally the best settings for web site photos is to Resize to: 800 pixels with Image quality set to Automatic. Using a Watermark is optional.
A table showing the various results using different Resize Option. Original Sample Photo: 35.8 MB 3754 x 3324Pixel Setting File Size KB Pixel Size HxW320 41 320 x 283480 87 480 x 424640 132 640 x 566800 183 800 x 7071024 183 1024 x 9051200 264 1200 x 10601600 333 1600 x 1413
While the Pixel Setting above are pre-defined, you can type in any number you want for a pixel setting.
A table to show the Image Quality Options at an 800 Pixel Setting:Image Quality Setting File Size in KBAuto 184Normal 184Max 279Min 121Custom (85) 189
Rod Holley Page 18 of 24
While the above table reflects an Image Quality Setting of Custom (85), the slider bar can be used to set the custom number anywhere from Zero (0) to 100. Nothing less than 50 should be used.
Rod Holley Page 19 of 24

Appendix D
Pixel, Resolution, DPI, PPI, Photo Pixel Size and File Size Explained
Pixels (short for Picture Elements) are the building blocks of every photo. They are pre-defined squares (but displayed on screens as not quite squared) of light and color data aligned next to one another both horizontally and vertically. Each pixel has a dark to light number ranging from zero (0), which is pure black to 255, which is pure white. Therefore, there are 256 defined values in the range. This range of values are used in each of the colors Red, Green and Blue to make up 16 million possible colors (256 x 256 x 256) of an image.
Resolution is a term to express the quality of an image. When taking a digital photo (capturing pixels) or viewing an image on a screen, the resolution is the number of Pixels Per Inch (PPI). When the image is printed, it is the number of Dots Per Inch (DPI) the printer prints.6 While it is sometimes expressed only as a single number, it implies both a width and height. Unfortunately, the term DPI is used interchangeable with PPI in various applications, which causes some confusion.
Photo Pixel Size is simply the width and height 7 of the photo expressed in pixels (see tables in Appendix C).On a monitor’s or TV’s display, resolution is expressed as either a number combination or single number. An example on a computer monitor is 800 x 600, which indicates that there are 800 pixels horizontally across (wide) by 600 lines of pixels vertically (high). This equals 480,000 pixels (800 times 600). In a high-def 1080 TV, the single number 1080 implies a pixel resolution of 1920 wide by 1080 high.The bottom line is that a higher PPI means there is a larger amount of image information; the file size is larger and the photo quality is better. The higher PPI will also result in a higher DPI (within the limits of the printer)6 and a better quality printed photo. Too low of a PPI or DPI and the image will appeared jagged along the edges, usually called Pixelated. An image to be viewed on a screen should never be below 72 PPI and a printed image should not be below 300 PPI for a standard photo size (4” x 6”). See next page for additional sizeing information.
However conversely, if the PPI resolution is set too high, the file size becomes very large making it slow down computer processing; slow down sending photos in eMails (if even possible to send) and slow down viewing web images.
6 An inkjet printer sprays ink through tiny nozzles, and is typically capable of 300-600 DPI. A laser printer applies toner through a controlled electrostatic charge, and may be in the range of 600 to 1,800 DPI. This varies by manufactures and is continually changing.
7 With photos, monitors, and TVs, the size is usually expressed as Width x Height, whether the photo is portrait or landscape. With artwork; i.e., paintings, it is expressed as Height x Width. However, these are not applied consistently, so it is always best to take a quick look at the numbers and the image to determine which is Width and which is Height.
Rod Holley Page 20 of 24

Appendix D (cont.)
Pixel, Resolution, DPI, PPI, Photo Pixel Size and File Size Explained
So what is the best resolution to have? That depends on how the image will be used. To view on a screen (Monitor or TV), around 100 PPI (72 PPI is minimum) is all that is required. To print a quality 4x6 photo, around 300 PPI is necessary. If you want to print larger images, i.e. 8x10, then around 600 PPI is necessary. The larger the print image that is wanted, the higher the PPI resolution required. The PPI resolution determines the quality of a printed image with the DPI range of the printer.
File Size is determined by the combination of the PPI Resolution and Photo Pixel Size. Changing either the PPI Resolution and/or the Photo Pixel Size will change the file size. The bigger or smaller either item, the bigger or smaller will be the file size.
Assuming pixel resampling 8 is enabled, changing the document size; i.e. 8x10 to 5x7, will correspondingly change the Photo Pixel Size, but not the PPI Resolution. With pixel resampling not enabled, changes to the document size will not change the pixel size, but will change the PPI Resolution.
8 Pixel Resampling is a function that will either generate new pixels based on surrounding pixels or discard pixels. The most common setting is to have pixel resampling enabled. In Picasa, pixel resampling is not enabled and this cannot be changed. Rod Holley Page 21 of 24

Index
A
Album.............................................................................................................................................................................. 6Appendix A.................................................................................................................................................................... 14Appendix B.................................................................................................................................................................... 16Appendix C.................................................................................................................................................................... 17Appendix D.................................................................................................................................................................... 18
B
Burn a CD...................................................................................................................................................................... 16
C
Captions.................................................................................................................................................................... 8, 12Capture Photo or Video................................................................................................................................................... 6Collage.......................................................................................................................................................................... 16Create
CD, Gift..................................................................................................................................................................... 16Collage...................................................................................................................................................................... 16Movie......................................................................................................................................................................... 16Poster........................................................................................................................................................................ 16
Create New Album..........................................................................................................................................................6Create on Menu Bar...................................................................................................................................................... 16
D
Download........................................................................................................................................................................ 4DPI................................................................................................................................................................................. 18
E
Editing Photos............................................................................................................................................................... 12Effects Tab Panel..........................................................................................................................................................13Export Function.............................................................................................................................................................17Export Photos.................................................................................................................................................................. 8
F
Face Detection.............................................................................................................................................................. 16File................................................................................................................................................................................... 8File Size......................................................................................................................................................................... 19Filter................................................................................................................................................................................. 7Find Photos..................................................................................................................................................................... 7Folder List........................................................................................................................................................................ 5Folder Views.................................................................................................................................................................... 6Folders Picasa Scans......................................................................................................................................................8Formats, Other.............................................................................................................................................................. 15Formats, Photos............................................................................................................................................................14Functions-Other Useful.................................................................................................................................................16
Rod Holley Page 22 of 24

G
Geotag in Menu Bar...................................................................................................................................................... 16GIF................................................................................................................................................................................. 15Gift CD........................................................................................................................................................................... 16Groupings, Picasa.....................................................................................................................................See Folder List
H
Histogram...................................................................................................................................................................... 12
I
Icons, Filter...................................................................................................................................................................... 7Image Size........................................................................................................................................See Export FunctionImport.................................................................................................................................................................... 6, 9, 10Import Photos.................................................................................................................................................................. 9Import Tab Features......................................................................................................................................................10
J
JPG................................................................................................................................................................................ 14JPG 2000...................................................................................................................................................................... 14
L
Library............................................................................................................................................................................. 5Lightbox........................................................................................................................................................................... 5
M
Menu Bar......................................................................................................................................................................... 8Menu Bar......................................................................................................................................................................... 6Menu Bar and Tool Bar................................................................................................................................................... 6Movie............................................................................................................................................................................. 16
O
Options in Menu BarSetting Picasa Preferences.......................................................................................................................................16
Output Options................................................................................................................................................................ 5
P
People............................................................................................................................................................................. 8Picnik..................................................................................................................................................See Editing PhotosPicture Tray & Output Options........................................................................................................................................5Pixel Size....................................................................................................................................................................... 18Pixels............................................................................................................................................................................. 18Places.............................................................................................................................................................................. 8PNG............................................................................................................................................................................... 15Poster............................................................................................................................................................................ 16
Rod Holley Page 23 of 24

PPI................................................................................................................................................................................. 18Properties........................................................................................................................................................................ 8
R
Resample, Pixels...........................................................................................................................................................19Resize Options..............................................................................................................................................................17Resolution..................................................................................................................................................................... 18
S
Search............................................................................................................................................................................. 7Search Photos Text Box..................................................................................................................................................7Size, File........................................................................................................................................................................ 19Size, Pixel...................................................................................................................................................................... 18Slideshow........................................................................................................................................................................ 8Support - Online.............................................................................................................................................................. 4
T
Tags.......................................................................................................................................................................... 8, 16Tags, Name................................................................................................................................................................... 16Thumbnail........................................................................................................................................................................ 8TIFF............................................................................................................................................................................... 14Tool Bar........................................................................................................................................................................... 6Tools on Menu Bar........................................................................................................................................................16Tuning Tab Panel.......................................................................................................................................................... 13
U
User Guide Introduction.................................................................................................................................................. 4
V
View................................................................................................................................................................................. 8View Panels..................................................................................................................................................................... 5
W
Web Albums.................................................................................................................................................................... 4
Rod Holley Page 24 of 24