2m149818 khindceilingfan cf563w2 im · bekalan kuasa suis dinding (hidup/ padam) bumi kipas siling....
TRANSCRIPT

www.khind.com.my P/N: 40-50536-00
This manual is also available online
model / 型号 CF563W2
22
Safety Precautions
Warning
1
>1m
More than 2.5m
Ceiling
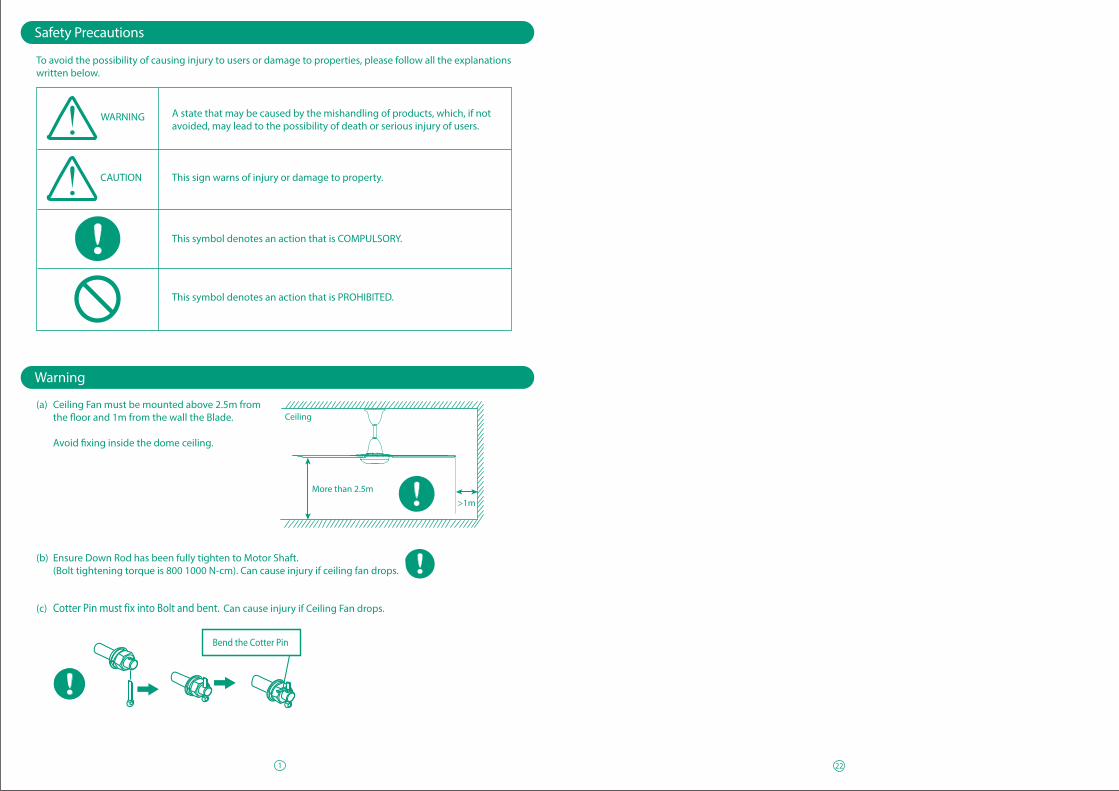
To avoid the possibility of causing injury to users or damage to properties, please follow all the explanations written below.
(a) Ceiling Fan must be mounted above 2.5m from the �oor and 1m from the wall the Blade.
Avoid �xing inside the dome ceiling.
(b) Ensure Down Rod has been fully tighten to Motor Shaft. (Bolt tightening torque is 800 1000 N-cm). Can cause injury if ceiling fan drops.
(c) Cotter Pin must fix into Bolt and bent. Can cause injury if Ceiling Fan drops.
A state that may be caused by the mishandling of products, which, if not avoided, may lead to the possibility of death or serious injury of users.
This sign warns of injury or damage to property.
This symbol denotes an action that is COMPULSORY.
This symbol denotes an action that is PROHIBITED.
Bend the Cotter Pin

Safety Wire
Rubber Wheel
Bracket
Bolt M8
Screw
Down Rod
Screw
Bottom Canopy
Bolt M6
Top Canopy
Flat Washer
SpringWasher
Fan Blade
Spring Washer
Hex NutCotter Pin
Ceiling Hook
Ceiling
Underlay
2
Parts Identi�cation
Speed Regulator
34
5
01
2
A
C
B
Diagram 1
Speci�cation subject to change without pror notice.
Model
CF563W1
Voltage
220-240V~ 50Hz
Power
90W
BladeQuantity
3
Blade Size
56 Inches
Revolutionsper Minute
Max: 290rpm
NetWeight
5.8 kg A : 146.5 mm B : 445 mm C : 1400 mm
(Refer to Diagram 1)
ProductDimension
Speci�cations
21
Pemasangan pada Sumber Kuasa
Pemeriksaan Selepas Pemasangan
Untuk keselamatan, sila periksa dan pastikan yang berikut.
(a) Kipas telah dipasang dengan betul dan selamat pada penyangkuk siling.
(b) Tali keselamatan telah dipasang dengan betul dan diketatkan dengan skru.
(c) Pendawaian antara bekalan kuasa dan kipas siling disambung dengan kemas dan betul.
(d) Skru pada semua penutup plastik dipasang dengan ketat.
(e) Skru pada bilah kipas dipasang dengan ketat.
(f ) Pin penyepit dan nat yang dibekalkan telah dipasang dan diketatkan.
Pengawal Kelajuan
Suis lontaran tunggal dwikutub (Suis Pemutus)
Bekalan Kuasa
Suis Dinding (Hidup/ Padam)Kipas SilingBumi

3
Caution
Care and Maintenance
(a) This appliance must be earthed.
(b) Do not use any other down rod except provided by KHIND . This is to ensure good performance and extra protection
(c) To reduce the risk of injury to person, install fan at least 2.5m (8.3ft) above the ground and 1 meter from the nearest wall.
(d) The replacement of parts of the safety suspension system shall be performed by the manufacturer, its service agent or suitably quali�ed persons.
(e) The double pole single throw switch must have a contact separation of at least 3mm. lt must be incorporated in the �xed wiring.
(f ) Safety wire must be able to withstand 10 times the weight of fan body.
(g) Disconnect power supply before dismantling any part for cleaning.
(h) Do not attempt to repair fan. Always return fan to our authorised service agent for repair.
(i) Do not use in hot or wet environment or near to �ammable materials.
(j) The wires in this main leads are coloured in accordance with the following code: Green/Yellow-Earth, Brown-Live, Blue-Neutral.
(k) If the supply cord is damaged, it must be replaced by the manufacturer, its service agent or similarly quali�ed persons in order to avoid a hazard.
(l) This appliance is not intended for use by persons (including children) with reduced physical, sensory or mental capabilities, or lack of experience and knowledge, unless they have been given supervision or instruction concerning use of the appliance by a person responsible for their safety. Children should be supervised to ensure that they do not play with appliance.
(m) Primary suspension system length more than 300mm of non-standard down rod shall be supplied by the same manufacturer, with similar material, complete with safety wire rope, marking and installation instruction.
(n) If unusual oscillating movement is observed, immediately stop using the ceiling fan and contact the manufacturer, its service agent or suitably qualified persons.
Do not use these appliance in high temperature and high humidity.
(a) Keep the fan clean
(b) Use it in dry place
(c) Do not bend the blades when installing & maintaining
(d) Wipe away dirt with clean soft cloth, soap & water to clean the fan. Wipe until dry. Do not use solvents such as gasoline or petroleum
(e) It is recommended to examine the fan suspension system for wear & tear of the bolt & rod at least once every year.
20
Pengesahan Akhir
Ukur jarak kedudukan semua Bilah dengan menggunakan pita pengukur.Sila laraskan kedudukan Bilah Kipas untuk mendapatkan kedudukan yang sama dari siling kepadahujung Bilah, L (dalam ukuran +1 mm).
AMARAN
Selepas pemasangan pastikan Kipas Siling tidak bergoyang berlebihan.Boleh menyebabkan kecederaan jika Kipas Siling jatuh.
Regulator Kelajuan
(1) Pasangkan tapak regulator pada dinding dengan menggunakan skru.(2) Sambungkan wayar bekalan dengan merujuk kepada gambarajah litar. Pasang penutup regulator dengan skru.
A F
Kapasitor
Blok TerminalTapak Regulator PenutupRegulator
Rotary
~220-240V
KAPASITOR
L
LNE
F A
HITAM
HITAM
ROTARY
KUNINGMERAH PUTIH
PUTIH
MERAH
KUNINGMERAH
MERAH
MERAH
PUTIH
PUTIH
BLOK TERMINAL
MOTOR BIRU
REGULATOR
KAPASITOR
MERAH

4
Assembly Instruction
Safety Wire Installation
(a) Connect brown and blue wires from downrod to the terminal block marked 'L' and 'N' respectively. Assemble fan blade (3 pcs) to motor with the provided screws.
Install fan unit with rubber wheel to ceiling hook and tighten with bolt & nut and cotter pin.
Connect fan wires to the power supply point.
Note: The connection of the fan to �xed wiring must have a means for disconnection from the supply mains having a contact separation in all poles that provide full disconnection under overvoltage category III conditions, and disconnection must be incorporated in the �xed wiring in accordance with the wiring rules.
(b) Take out the Bolt & Hex Nut assembly from the part set and attach assembled ceiling fan to the Ceiling Hook and adjust the bolt parallel to the Bracket hole and lock tightly.
(c) Ensure that the safety wire is properly and correctly inserted through the hole on the motor shaft and down rod as shown in Fig. Note: The mounting of the suspension system shall be performed by the manufacturer, its service agent or suitably quali�ed persons.
(d) Loop the safety wire across the ceiling hook, then tighten the screw on the terminal of the safety wire at the down rod and make sure the screw is securely �xed.
WARNING
Hook must be able to withstand 10 times the ceiling fan weight.
Fix Cotter Pin into bolt and bent it.
WARNING
The safety wire must be installed securely.
Can cause injury if ceiling fan drops.
19
(e) Tarik sengkuap atas ke atas untuk menutup penggantung siling, kemudian kuncikan skru seperti yang ditunjukkan dibawah.
(f ) Pastikan jarak sengkuap bawah mesti dipasang diantara 5mm dari motor seperti yang ditunjukkan dibawah.
Sengkuap AtasSengkuap AtasSkru
Siling
Sengkuap Bawah
Langkah 1 : Keluarkan bolt bilah (6 biji) darI motor unit.
Langkah 2 : Jajarkan lubang bilah kipas pada unit motor bersama skru dan sesendal yang diberikan.
PENTING : MEMASANG BILAH KIPAS HANYA SETELAH KIPAS SILING DIPASANG PADA PENYANGKUK.
Memasang Bilah Kipas pada Unit Motor
WARNING
Do not �x at this position.
Lock screw tightly.
Jangan pasang bilah kipas pada posisi, seperti yang ditunjukkan dalam gambarajah.Boleh menyebabkan tiada arus angin. Boleh menyebabkan kecederaan jika bilah kipas terjatuh.
5
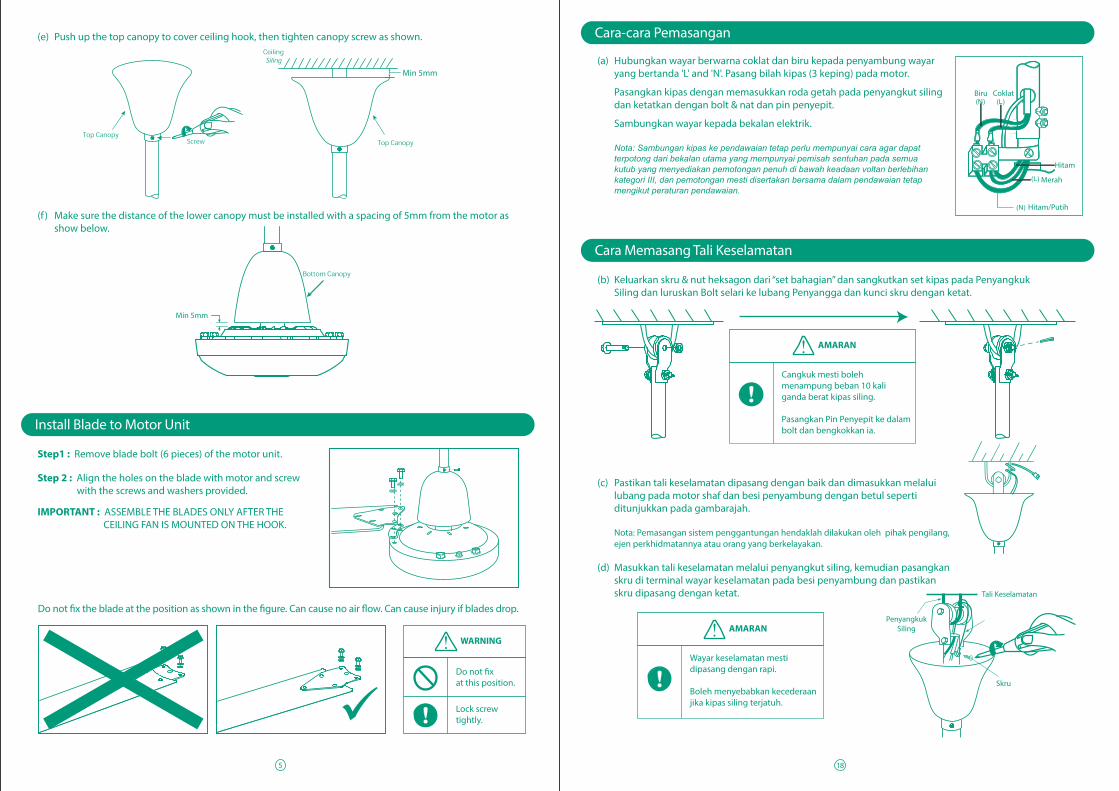
(e) Push up the top canopy to cover ceiling hook, then tighten canopy screw as shown.
(f ) Make sure the distance of the lower canopy must be installed with a spacing of 5mm from the motor as show below.
Step1 : Remove blade bolt (6 pieces) of the motor unit.
Step 2 : Align the holes on the blade with motor and screw with the screws and washers provided.
IMPORTANT : ASSEMBLE THE BLADES ONLY AFTER THE CEILING FAN IS MOUNTED ON THE HOOK.
WARNING
Do not �x at this position.
Lock screw tightly.
Do not �x the blade at the position as shown in the �gure. Can cause no air �ow. Can cause injury if blades drop.
Install Blade to Motor Unit
18
Cara-cara Pemasangan
Cara Memasang Tali Keselamatan
(a) Hubungkan wayar berwarna coklat dan biru kepada penyambung wayar yang bertanda 'L' and 'N'. Pasang bilah kipas (3 keping) pada motor.
Pasangkan kipas dengan memasukkan roda getah pada penyangkut siling dan ketatkan dengan bolt & nat dan pin penyepit.
Sambungkan wayar kepada bekalan elektrik.
Nota: Sambungan kipas ke pendawaian tetap perlu mempunyai cara agar dapat terpotong dari bekalan utama yang mempunyai pemisah sentuhan pada semua kutub yang menyediakan pemotongan penuh di bawah keadaan voltan berlebihan kategori III, dan pemotongan mesti disertakan bersama dalam pendawaian tetap mengikut peraturan pendawaian.
(b) Keluarkan skru & nut heksagon dari “set bahagian” dan sangkutkan set kipas pada Penyangkuk Siling dan luruskan Bolt selari ke lubang Penyangga dan kunci skru dengan ketat.
(c) Pastikan tali keselamatan dipasang dengan baik dan dimasukkan melalui lubang pada motor shaf dan besi penyambung dengan betul seperti ditunjukkan pada gambarajah. Nota: Pemasangan sistem penggantungan hendaklah dilakukan oleh pihak pengilang, ejen perkhidmatannya atau orang yang berkelayakan.
(d) Masukkan tali keselamatan melalui penyangkut siling, kemudian pasangkan skru di terminal wayar keselamatan pada besi penyambung dan pastikan skru dipasang dengan ketat.
Biru Coklat
Hitam
Merah
Hitam/Putih
AMARAN
Cangkuk mesti boleh menampung beban 10 kali ganda berat kipas siling.
Pasangkan Pin Penyepit ke dalambolt dan bengkokkan ia.
PenyangkukSiling
Tali Keselamatan
Skru
AMARAN
Wayar keselamatan mesti dipasang dengan rapi.
Boleh menyebabkan kecederaanjika kipas siling terjatuh.

6
Speed Regulator
(1) Mount the regulator base to the wall with screws
(2) Connect the supply wire according to circuit diagram shown. Secure the regulator front cover to the base with screw.
A F
Capacitor
Terminal BlockRegulator Base Regulator Front Cover
Rotary
~220-240V
CAPACITOR
L
LNE
F A
BLACK
BLACK
ROTARY
YELLOWRED WHITE
WHITE
RED
YELLOWRED
RED
RED
WHITE
WHITE
TERMINAL BLOCK
MOTOR BLUE
REGULATOR
CAPACITOR
RED
Final Con�rmation
Measure the distance using a measuring tape.Please adjust all the Blades to get the equal distance from ceiling to the Blade Tip, L (within 1 mm tolerance).
WARNING
After installation, make sure the Ceiling Fan does not wobble extremely. Can cause injury if Ceiling Fan drops.
17
Perhatian
Penjagaan dan Penyelenggaraan
(a) Peralatan ini mesti dibumikan.
(b) Jangan gunakan besi penyambung lain selain daripada yang dibekalkan oleh KHIND. Ini untuk memastikan prestasi yang baik dan perlindungan tambahan.
(c) Untuk mengurangkan risiko kecederaan, pasangkan kipas ini sekurang-kurangnya setinggi 2.5m(8.3kaki) dari lantai dan 1 meter jarak dari dinding terdekat.
(d) Penggantian bahagian-bahagian sistem penggantungan keselamatan hendaklah dilakukan oleh pihak pengilang, ejen perkhidmatannya atau orang yang berkelayakan.
(e) Suis double pole dalam pendawaian tetap hendaklah mempunyai jarak sentuhan sekurang-kurangnya 3mm.
(f ) Tali keselamatan hendaklah berupaya menampung 10 kali ganda berat kipas.
(g) Putuskan bekalan kuasa sebelum membuka sebarang bahagian kipas untuk kerja pembersihan.
(h) Jangan cuba untuk memperbaiki kipas. Sila hantar kepada pusat servis kami yang sah untuk pembaikan.
(i) Jangan gunakan kipas ini di kawasan yang terlalu panas atau lembap atau berdekatan bahan mudah terbakar.
(j) Warna wayar pada 'main lead'seperti berikut: Hijau/Kuning-Earth, Biru-Neutral, Coklat-Hidup.
(k) Sekiranya talikod rosak, ianya hendaklah dibaiki oleh pusat servis agen atau juruteknik yang berkelayakan untuk mengelakkan daripada sebarang bahaya.
(l) Perkakas ini bukan untuk digunakan oleh orang (termasuk kanak-kanak) yang kurang upaya �zikal, deria atau kecacatan mental, atau kurang pengalaman dan pengetahuan, melainkan mereka diberi perhatian atau tunjuk ajar berkaitan penggunaan perkakas oleh orang yang bertanggungjawab untuk keselamatan mereka. Kanak-kanak haruslah diperhatikan untuk memastikan mereka tidak bermain dengan perkakas ini.
(m) Panjang sistem suspensi utama lebih dari 300mm besi penyambung yang bukan standard hendaklah diberi oleh pengilang yang sama, dengan bahan yang sama, lengkap dengan tali dawai keselamatan, ditandakan dan arahan pemasangan.
(n) Jika terlihat pergerakan berayun yang luar biasa, segera hentikan kipas siling dan hubungi pihak pengilang, ejen perkhidmatan atau orang yang berkelayakan.
Do not use these appliance in high temperature and high humidity.
(a) Jaga kipas supaya sentiasa bersih.
(b) Gunakan di tempat yang kering.
(c) Jangan bengkokkan bilah kipas semasa pemasangan atau penyelenggaraan dijalankan.
(d) Lap kotoran dengan kain lembut, sabun & air untuk membersihkan kipas. Lap sehingga kering. Jangan gunakan larutan seperti gasolin atau petrol.
(e) Adalah disyorkan supaya memeriksa sistem penggantungan kipas sekurang-kurangnya sekali setiap 1 tahun.

7
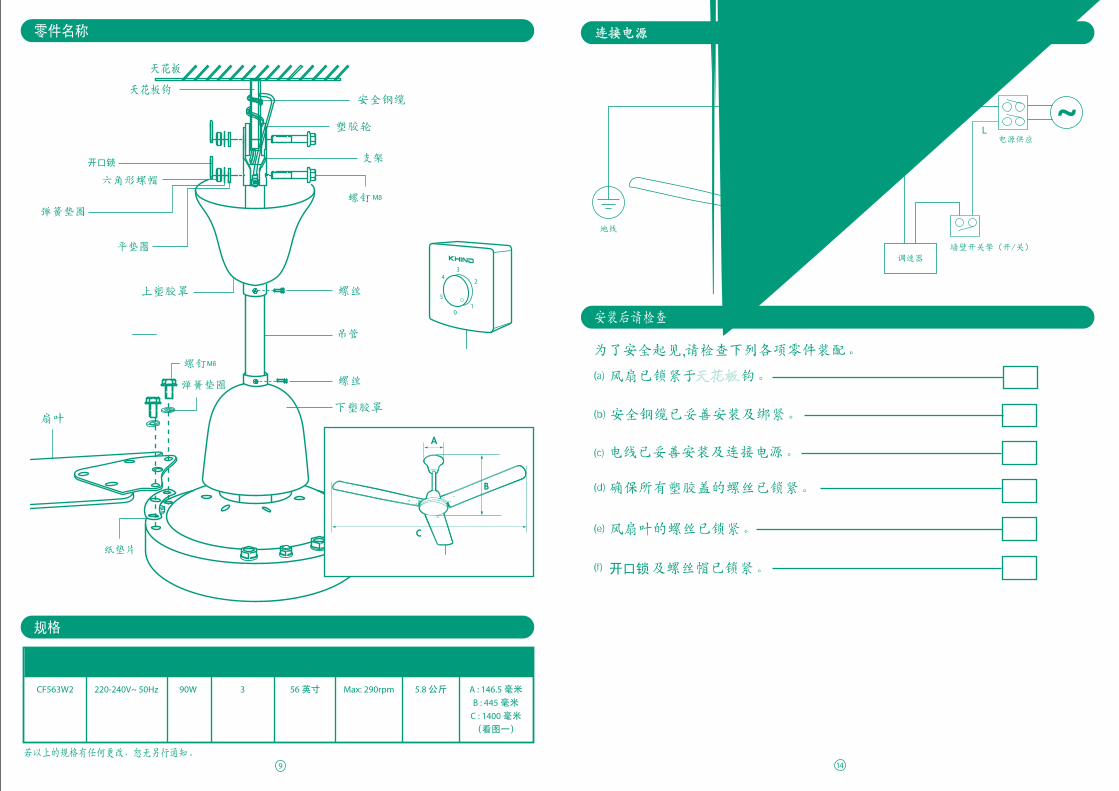
Connecting the Power Supply
Checkpoint After Installation
To ensure safety, kindly check the following
(a) The ceiling fan is securely �xed to the main hook.
(b) The safety wire is securely �xed and tightened by a screw.
(c) The wiring between the power supply and ceiling fan is connected properly and correctly.
(d) Make sure all the screws to secure the plastic covers are tightened properly.
(e) The screws for securing the fan blades are tightened properly.
(f ) The cotter pins and nuts provided are inserted and tightened properly.
Regulator
Double pole single throw switch (Switch Breaker)
Power Supply
Wall Switch (On/ O�)Ceiling FanEarth
Tali Keselamatan
Roda Getah
Penyangga
Bolt M8
Skru
Down Rod
Skru
Sengkuap Bawah
Bolt M6
Sengkuap Atas
Sesendal Rata
SesendalSpring
Bilah Kipas
Sesendal Spring
Nat HeksagonPin Penyepit
Penyangkuk Siling
Siling
Pelapik
2
Pengenalan Bahagian
Regulator Kelajuan
34
5
01
2
A
C
B
Gambar 1
Spesi�kasi mungkin berubah tanpa pemberitahuan.
Model
CF563W1
Voltan
220-240V~ 50Hz
Kuasa
90W
KuantitiBilah
3
Saiz Bilah
56 Inci
Putaranper Minit
Max: 290rpm
BeratBersih
5.8 kg A : 146.5 mm B : 445 mm C : 1400 mm
(Rujuk Gambar 1)
DimensiProduk
Spesi�kasi

8
(a)
(b) 钉
(c)
钉
Langkah-langkah keselamatan dan pencegahan
Amaran
15
>1m
Lebih daripada 2.5m
Siling
Untuk mengelakkan kemungkinan berlaku kecederaan kepada pengguna atau kerosakan harta benda, silapatuhi semua penerangan yang dinyatakan di bawah.
(a) Kipas Siling mesti dipasang lebih daripada 2.5m dari lantai dan 1m dari dinding kepada Bilah Kipas.
Elakkan daripada memasang pada siling berbentuk kubah.
(b) Pastikan Besi Penyambung dipasang dengan ketat pada Shaf Motor. (Daya Kilas mengetat bolt adalah 800 1000 N-cm). Boleh menyebabkan kecederaan jika terjatuh.
(c) Pin penyepit mesti dipasangkan pada Bolt dan dibengkokkan. Boleh menyebabkan kecederaan jika Kipas Siling terjatuh.
Keadaan yang mungkin disebabkan oleh kecuaian dalam mengendalikan produk, yang mana, jika tidak dielakkan, boleh mengakibatkan kematian atau kecederaan parah kepada pengguna.
Petunjuk ini memberi amaran tentang kecederaan atau kerosakan harta benda.
Simbol ini menunjukkan perbuatan yang WAJIB DILAKUKAN.
Simbol ini menunjukkan perbuatan yang DILARANG.
AMARAN
AWAS
Bengkokkan Pin Penyepit
14
天花板
开口锁
34
5
01
2
调速器
9
型号
CF563W2 220-240V~ 50Hz 90W
扇叶数量
3
扇叶尺寸
56 英寸 Max: 290rpm
净重量
5.8 公斤 A : 146.5 毫米
B : 445 毫米
C : 1400 毫米
(看图一)
产品尺寸每分钟转速
A
C
B
图一

10
KHIND
为了安全起见,风扇安装必须远离地面超过2.5公尺(8.3尺)及距离墙壁1公尺。
替换悬挂组合的部件应由维修中心,所授权的维修中心或拥有同等技术的人士进行。
l
(m) 吊管长度大于300mm应使用由制造商提供的吊管 (拥有相同规格的材料) 并附备标记,安装指南及安装好的安全钢缆。
(n) 如此吊扇有异常摆动,请立即停止使用吊扇并联系维修中心,所授权的维修中 心或拥有同等技术的人士。
此风扇必须进行至少一年一次悬挂组合的螺栓与吊管的磨损检查。
13
调速器使用方法
(1)
(2)
底
A F
电容
接线端子座调速器后板 调速器前板
旋转开关
~220-240V
电容
L
LNE
F A
黑色
黑色
旋转开关
黄色
红色 白色
白色
红色
黄色红色
红色
红色
白色
白色
接线端子座
马达 蓝色
调速器
电容
红色
最后确认

11
(a)
(b)
(c)
(d)
开口销必须插入螺栓钉,然后折弯。
注意:在超额供应电压第III等级条件下,与符合电源接线规则,风扇与电线的连接点设计必须具备可完全断开所有电源接触点。
注意:悬挂系统的安装应由维修中心,所授权的维修中心或拥有同等技术的人士进行。
12
(e)
(f )
步骤一 : 将马达上的6颗螺丝取下。
步骤二 : 将扇叶支架的孔对准马达,用从马达上 取下的螺丝及垫圈将支架锁紧。
重点:当马达已安装好在天花板钩上,才可以安 装扇叶。