2910 float & tape transmitter - varec
TRANSCRIPT

IOM104GVAE1612
Automation Solutions for oil & gas, defense and aviation applications
Installation and Operations M
anualD
ispatch and Fuels Accounting
2910 Float & Tape TransmitterPrecision instrument for remote monitoring of tank level and temperature information


Varec, Inc. iii
Copyright
All rights reserved. Printed in the United States of America.
Except as permitted under the United States Copyright Act of 1976, no part of this publication may be reproduced, stored in a retrieval system or transmitted in any form or by any means - electronic, mechanical, photocopying, recording, or otherwise - without the prior written permission of the Publisher:
Varec, Inc.5834 Peachtree Corners EastNorcross (Atlanta), Georgia 30092Phone: (770) 447-9202Fax: (770) 662-8939
Trademarks Acknowledged
Varec, Inc. recognizes all other trademarks. Trademarks of other products mentioned in this manual are held by the companies producing them.
FuelsManager®, TankView®, TacFuels®, Varec®, and FuelsManager IntoPlane® are registered trademarks of Varec, Inc.
All other product and service names mentioned are the trademarks of their respective companies.
Product Approvals
This document and the information provided within are controlled by the approvals agency(s) listed below. All changes to this document must be submitted to and approved by the agency(s) before public release.
• FM Approvals (FM)

Disclaimer of Warranties
The contract between the Seller and the Buyer states the entire obligation of the Seller. The contents of this instruction manual shall not become part of or modify any prior or existing agreement, commitment, or relationship between the Seller and Buyer. There are no express or implied warranties set out in this instruction manual. The only warranties that apply are those in the existing contract between the Seller and Buyer.
The 2910 Float & Tape Transmitter (FTT) has not been tested by Varec under all possible operational conditions, and Varec may not have all the data relative to your application. The information in this instruction manual is not all inclusive and does not and cannot take into account all unique situations. Consequently, the user should review this product literature in view of his or her application. If you have any further questions, please contact Varec for assistance.
Limitations of Seller's Liability
In the event that a court holds that this instruction manual created some new warranties, Seller's liability shall be limited to repair or replacement under the standard warranty clause. In no case shall the Seller's liability exceed that stated as Limitations of Remedy in the contract between the Seller and Buyer.
Use of parts that are not manufactured or supplied by Varec voids any warranty and relieves Varec of any obligation to service the product under warranty. Varec recommends the use of only Varec manufactured or supplied parts to maintain or service Varec 2910 Float & Tape Transmitters.
Terms of Use
The information provided in this document is provided "as is" without warranty of any kind. Varec, Inc. disclaim all warranties, either express or implied, including the warranties of merchantability and fitness for a particular purpose. In no event shall Varec, Inc. or its suppliers be liable for any damages whatsoever including direct, indirect, incidental, consequential, loss of business profits or special damages, even if Varec, Inc. or its suppliers have been advised of the possibility of such damages.
This manual is solely intended to describe product installation and functions and should not be used for any other purpose. It is subject to change without prior notice. This manual was prepared with the highest degree of care. However, should you find any errors or have any questions, contact one of our service offices or your local sales agent.
iv Installation and Operations Manual

Safety Precaution Definitions
Caution! Damage to equipment may result if this precaution is disregarded.
Warning! Direct injury to personnel or damage to equipment which can cause injury to personnel may result if this precaution is not followed.
Safety Precautions
Read this manual carefully and make sure you understand its contents before using this product. Follow all instructions and safety guidelines presented in this manual when using this product. If the user does not follow these instructions properly, Varec cannot guarantee the safety of the system.
Note Comply with all applicable regulations, codes, and standards. For safety precautions, the user should refer to the appropriate industry or military standards.
Caution! Electrical Hazard! Read and understand static and lightning electrical protection and grounding described in API 2003. Make certain that the tank installation, operation, and maintenance conforms with the practice set forth therein.
Warning! Striking the gaugehead of the transmitter with a metal object could cause a spark to occur. When removing or replacing the gaugehead in flammable or hazardous liquid storage areas, take necessary measures to protect the gaugehead from impact.
Warning! Volatile fumes may be present! Ensure that the tank has been leak and pressure tested as appropriate for the liquid to be stored. Observe appropriate safety precautions in flammable or hazardous liquid storage areas. Do not enter a tank that has contained hydrocarbons, vapors, or toxic materials, until a gas-free environment is certified. Carry breathing equipment when entering a tank where oxygen may be displaced by carbon dioxide, nitrogen, or other gases. Wear safety glasses as appropriate. Use a hard hat.
Warning! Sparks or static charge could cause fire or explosion! The mechanical connections between the guide cables, the float, the tape, and the gaugehead provide a resistance to ground that is adequate for the safe electrical drain of electrostatic charges that may accumulate in the tank and the product. Worker activity and worker clothing may accumulate electrostatic charges on the body of a worker. Care should be used in flammable environments to avoid the hazard.
Warning! Broken negator motor spring pieces can cause injury when the back cover of the gaugehead is removed! Whenever the back cover is removed, stand to one side as the last bolt is removed.
Varec, Inc. v

vi Installation and Operations Manual

vii Installation and Operations Manual
Contents
1 Introduction . . . . . . . . . . . . . . . . . . . . . . . . . . . . . . . . . . . . . . . . . . . . . . . . . . . . . 1
1.1 Overview . . . . . . . . . . . . . . . . . . . . . . . . . . . . . . . . . . . . . . . . . . . . . . . . . . . . . . . 1
1.2 Function & System Design . . . . . . . . . . . . . . . . . . . . . . . . . . . . . . . . . . . . . . . . . 2
1.2.1 System functionality . . . . . . . . . . . . . . . . . . . . . . . . . . . . . . . . . . . . . . . . . . 2
1.2.2 Internal system design . . . . . . . . . . . . . . . . . . . . . . . . . . . . . . . . . . . . . . . . 3
2 Preparing for Installation . . . . . . . . . . . . . . . . . . . . . . . . . . . . . . . . . . . . . . . . 5
2.1 Site Preparation Checklist. . . . . . . . . . . . . . . . . . . . . . . . . . . . . . . . . . . . . . . . . . 5
2.2 General Safety Guidelines . . . . . . . . . . . . . . . . . . . . . . . . . . . . . . . . . . . . . . . . . 6
2.3 Unpacking . . . . . . . . . . . . . . . . . . . . . . . . . . . . . . . . . . . . . . . . . . . . . . . . . . . . . . 6
2.4 Becoming Familiar with the 2910 FTT . . . . . . . . . . . . . . . . . . . . . . . . . . . . . . . . 6
2.5 Grounding the Equipment . . . . . . . . . . . . . . . . . . . . . . . . . . . . . . . . . . . . . . . . . . 7
2.6 Installation Overview. . . . . . . . . . . . . . . . . . . . . . . . . . . . . . . . . . . . . . . . . . . . . . 7
3 Mounting. . . . . . . . . . . . . . . . . . . . . . . . . . . . . . . . . . . . . . . . . . . . . . . . . . . . . . . . 9
3.1 Installation Safety Guidelines . . . . . . . . . . . . . . . . . . . . . . . . . . . . . . . . . . . . . . . 9
3.2 Mounting on a Varec Gaugehead . . . . . . . . . . . . . . . . . . . . . . . . . . . . . . . . . . . 10
3.3 Mounting on Alternate Gaugeheads . . . . . . . . . . . . . . . . . . . . . . . . . . . . . . . . . 12
4 Wiring. . . . . . . . . . . . . . . . . . . . . . . . . . . . . . . . . . . . . . . . . . . . . . . . . . . . . . . . . . 13
4.1 Overview . . . . . . . . . . . . . . . . . . . . . . . . . . . . . . . . . . . . . . . . . . . . . . . . . . . . . . 13
4.2 Safety Guidelines . . . . . . . . . . . . . . . . . . . . . . . . . . . . . . . . . . . . . . . . . . . . . . . 15
4.3 Checking Line Resistance . . . . . . . . . . . . . . . . . . . . . . . . . . . . . . . . . . . . . . . . 15
4.4 2910 FTT Wiring Diagram — AC Option . . . . . . . . . . . . . . . . . . . . . . . . . . . . . 16
4.5 2910 FTT Wiring Diagram — Discrete I/O, AC, and 2 Limit Switches Option . 17
4.6 2910 FTT Wiring Diagram — Discrete Input and 2 Limit Switches Option . . . . 18
4.7 2910 FTT Wiring Diagram — Discrete I/O, AC, and 4 Limit Switches Option . 19
4.8 Terminating System Wiring at the Transmitter . . . . . . . . . . . . . . . . . . . . . . . . . 20
4.8.1 Junction box terminals . . . . . . . . . . . . . . . . . . . . . . . . . . . . . . . . . . . . . . . 20
4.8.2 Terminal assignments: terminal circuit board . . . . . . . . . . . . . . . . . . . . . . . 21
4.8.3 Communications wiring . . . . . . . . . . . . . . . . . . . . . . . . . . . . . . . . . . . . . . 22
4.8.4 RTD wiring . . . . . . . . . . . . . . . . . . . . . . . . . . . . . . . . . . . . . . . . . . . . . . . 22
4.8.5 Discrete inputs . . . . . . . . . . . . . . . . . . . . . . . . . . . . . . . . . . . . . . . . . . . . 22
4.8.6 Contact outputs . . . . . . . . . . . . . . . . . . . . . . . . . . . . . . . . . . . . . . . . . . . . 23
4.8.7 Input power. . . . . . . . . . . . . . . . . . . . . . . . . . . . . . . . . . . . . . . . . . . . . . . 23
4.9 Connecting Wiring in the Transmitter . . . . . . . . . . . . . . . . . . . . . . . . . . . . . . . . 24
4.9.1 Overview . . . . . . . . . . . . . . . . . . . . . . . . . . . . . . . . . . . . . . . . . . . . . . . . 24
4.9.2 Earth ground locations . . . . . . . . . . . . . . . . . . . . . . . . . . . . . . . . . . . . . . . 24
4.9.3 Connector locations: communications circuit board . . . . . . . . . . . . . . . . . . . 25

viii Installation and Operations Manual
4.9.4 Connector assignments: communications circuit board . . . . . . . . . . . . . . . . 26
4.9.5 Connector and switch locations: AC power supply circuit board . . . . . . . . . . 28
4.9.6 Connector assignments: AC power supply circuit board . . . . . . . . . . . . . . . . 28
4.9.7 Selecting the AC voltage setting . . . . . . . . . . . . . . . . . . . . . . . . . . . . . . . . 29
4.9.8 Setting optional outputs as NC or NO. . . . . . . . . . . . . . . . . . . . . . . . . . . . . 30
4.9.9 Wiring limit switches. . . . . . . . . . . . . . . . . . . . . . . . . . . . . . . . . . . . . . . . . 31
5 Initial Configuration (MODBUS or GSI MODBUS) . . . . . . . . . . . . . . . 33
5.1 Setting the Unit Address . . . . . . . . . . . . . . . . . . . . . . . . . . . . . . . . . . . . . . . . . . 35
5.2 Choosing Communications Settings . . . . . . . . . . . . . . . . . . . . . . . . . . . . . . . . . 36
5.3 Setting the Data Format . . . . . . . . . . . . . . . . . . . . . . . . . . . . . . . . . . . . . . . . . . 37
5.4 Setting the RTD Type . . . . . . . . . . . . . . . . . . . . . . . . . . . . . . . . . . . . . . . . . . . . 38
5.5 Terminating the MODBUS Network . . . . . . . . . . . . . . . . . . . . . . . . . . . . . . . . . 38
5.6 Setting the Bias Current . . . . . . . . . . . . . . . . . . . . . . . . . . . . . . . . . . . . . . . . . . 39
6 Initial Configuration (Mark/Space) . . . . . . . . . . . . . . . . . . . . . . . . . . . . . . 41
6.1 Setting the Unit Address . . . . . . . . . . . . . . . . . . . . . . . . . . . . . . . . . . . . . . . . . . 42
6.2 Choosing Communications Settings . . . . . . . . . . . . . . . . . . . . . . . . . . . . . . . . . 42
6.3 Setting the Data Format . . . . . . . . . . . . . . . . . . . . . . . . . . . . . . . . . . . . . . . . . . 43
6.4 Setting the RTD Type . . . . . . . . . . . . . . . . . . . . . . . . . . . . . . . . . . . . . . . . . . . . 44
7 Initial Configuration (Tankway) . . . . . . . . . . . . . . . . . . . . . . . . . . . . . . . . . 45
7.1 Setting the Unit Address . . . . . . . . . . . . . . . . . . . . . . . . . . . . . . . . . . . . . . . . . . 46
7.2 Choosing Communications Settings . . . . . . . . . . . . . . . . . . . . . . . . . . . . . . . . . 46
7.3 Setting the Data Format . . . . . . . . . . . . . . . . . . . . . . . . . . . . . . . . . . . . . . . . . . 47
7.4 Setting the RTD Type . . . . . . . . . . . . . . . . . . . . . . . . . . . . . . . . . . . . . . . . . . . . 48
8 Configuration & Calibration — Level, Limits, and Outputs . . . . . . 49
8.1 Calibrating the Transmitter Tank Level . . . . . . . . . . . . . . . . . . . . . . . . . . . . . . . 50
8.1.1 Before beginning the calibration process . . . . . . . . . . . . . . . . . . . . . . . . . . 50
8.1.2 Setting the transmitter level. . . . . . . . . . . . . . . . . . . . . . . . . . . . . . . . . . . . 50
8.2 Calibrating Limit Switches. . . . . . . . . . . . . . . . . . . . . . . . . . . . . . . . . . . . . . . . . 51
8.3 Configuring Outputs . . . . . . . . . . . . . . . . . . . . . . . . . . . . . . . . . . . . . . . . . . . . . 53
9 Maintenance and Troubleshooting . . . . . . . . . . . . . . . . . . . . . . . . . . . . . 57
9.1 Maintenance . . . . . . . . . . . . . . . . . . . . . . . . . . . . . . . . . . . . . . . . . . . . . . . . . . . 57
9.1.1 Checking the CPU status . . . . . . . . . . . . . . . . . . . . . . . . . . . . . . . . . . . . . 57
9.1.2 Checking communications status . . . . . . . . . . . . . . . . . . . . . . . . . . . . . . . 59
9.1.3 2910 FTT exploded view . . . . . . . . . . . . . . . . . . . . . . . . . . . . . . . . . . . . . 60
9.1.4 2910 FTT spare parts list . . . . . . . . . . . . . . . . . . . . . . . . . . . . . . . . . . . . . 61
9.1.5 2910 FTT exploded view — with limit switches only. . . . . . . . . . . . . . . . . . . 62
9.1.6 2910 FTT spare parts list — with limit switches only . . . . . . . . . . . . . . . . . . 62
9.1.7 Upgrading software . . . . . . . . . . . . . . . . . . . . . . . . . . . . . . . . . . . . . . . . . 63

Float & Tape Transmitter
Varec, Inc. ix
9.2 Troubleshooting . . . . . . . . . . . . . . . . . . . . . . . . . . . . . . . . . . . . . . . . . . . . . . . . 64
9.2.1 Replacing the AC power supply fuse . . . . . . . . . . . . . . . . . . . . . . . . . . . . . 64
9.2.2 Using ViewRTU to troubleshoot the 2910 FTT . . . . . . . . . . . . . . . . . . . . . . 65
9.2.3 Returning the 2910 FTT to factory default settings. . . . . . . . . . . . . . . . . . . . 67
9.2.4 Resetting the 2910 FTT . . . . . . . . . . . . . . . . . . . . . . . . . . . . . . . . . . . . . . 67
9.2.5 Using the LEDs to check the transmitter level . . . . . . . . . . . . . . . . . . . . . . . 68
9.2.6 Verifying temperature data - checking RTD resistance. . . . . . . . . . . . . . . . . 68
10 Specifications. . . . . . . . . . . . . . . . . . . . . . . . . . . . . . . . . . . . . . . . . . . . . . . . . . 69
10.1 Environmental . . . . . . . . . . . . . . . . . . . . . . . . . . . . . . . . . . . . . . . . . . . . . . . . . 69
10.2 Encoder. . . . . . . . . . . . . . . . . . . . . . . . . . . . . . . . . . . . . . . . . . . . . . . . . . . . . . 69
10.3 Functional . . . . . . . . . . . . . . . . . . . . . . . . . . . . . . . . . . . . . . . . . . . . . . . . . . . . 69
10.4 Primary Components . . . . . . . . . . . . . . . . . . . . . . . . . . . . . . . . . . . . . . . . . . . 70
10.5 Switches and Indicators . . . . . . . . . . . . . . . . . . . . . . . . . . . . . . . . . . . . . . . . . 70
10.6 Input/Output Options. . . . . . . . . . . . . . . . . . . . . . . . . . . . . . . . . . . . . . . . . . . . 70
10.7 Physical. . . . . . . . . . . . . . . . . . . . . . . . . . . . . . . . . . . . . . . . . . . . . . . . . . . . . . 70
11 Ordering Information . . . . . . . . . . . . . . . . . . . . . . . . . . . . . . . . . . . . . . . . . . . 71
11.1 Order Codes . . . . . . . . . . . . . . . . . . . . . . . . . . . . . . . . . . . . . . . . . . . . . . . . . . 71
11.2 Transmitter Adapter Kits . . . . . . . . . . . . . . . . . . . . . . . . . . . . . . . . . . . . . . . . . 72
A Appendix A — MODBUS Implementation . . . . . . . . . . . . . . . . . . . . . . . 73
A.1 Introduction. . . . . . . . . . . . . . . . . . . . . . . . . . . . . . . . . . . . . . . . . . . . . . . . . . . . 73
A.2 Implementation . . . . . . . . . . . . . . . . . . . . . . . . . . . . . . . . . . . . . . . . . . . . . . . . . 73
A.3 Configuration . . . . . . . . . . . . . . . . . . . . . . . . . . . . . . . . . . . . . . . . . . . . . . . . . . 73
A.4 Functions and Data Formats . . . . . . . . . . . . . . . . . . . . . . . . . . . . . . . . . . . . . . 74
A.5 Integer Registers . . . . . . . . . . . . . . . . . . . . . . . . . . . . . . . . . . . . . . . . . . . . . . . 75
A.5.1 Integer data . . . . . . . . . . . . . . . . . . . . . . . . . . . . . . . . . . . . . . . . . . . . . . 75
A.5.2 Integer data . . . . . . . . . . . . . . . . . . . . . . . . . . . . . . . . . . . . . . . . . . . . . . 76
A.5.3 Coded data. . . . . . . . . . . . . . . . . . . . . . . . . . . . . . . . . . . . . . . . . . . . . . . 77
A.5.4 Packed bit data . . . . . . . . . . . . . . . . . . . . . . . . . . . . . . . . . . . . . . . . . . . . 77
A.6 Floating-Point Registers . . . . . . . . . . . . . . . . . . . . . . . . . . . . . . . . . . . . . . . . . . 78
A.6.1 Floating-point data. . . . . . . . . . . . . . . . . . . . . . . . . . . . . . . . . . . . . . . . . . 78
A.6.2 The Two 16-bit registers format . . . . . . . . . . . . . . . . . . . . . . . . . . . . . . . . 78
A.6.3 Floating point data. . . . . . . . . . . . . . . . . . . . . . . . . . . . . . . . . . . . . . . . . . 78
A.6.4 The one 32-bit register format. . . . . . . . . . . . . . . . . . . . . . . . . . . . . . . . . . 79
A.6.5 Floating point data. . . . . . . . . . . . . . . . . . . . . . . . . . . . . . . . . . . . . . . . . . 79
A.6.6 Floating point data. . . . . . . . . . . . . . . . . . . . . . . . . . . . . . . . . . . . . . . . . . 79
A.7 Status Bits . . . . . . . . . . . . . . . . . . . . . . . . . . . . . . . . . . . . . . . . . . . . . . . . . . . . 80
A.7.1 Status bit data. . . . . . . . . . . . . . . . . . . . . . . . . . . . . . . . . . . . . . . . . . . . . 80
A.8 Exception Responses. . . . . . . . . . . . . . . . . . . . . . . . . . . . . . . . . . . . . . . . . . . . 80
A.9 Data Out of Range . . . . . . . . . . . . . . . . . . . . . . . . . . . . . . . . . . . . . . . . . . . . . . 81

Contents
Varec, Inc. x
A.10 Loopback Test . . . . . . . . . . . . . . . . . . . . . . . . . . . . . . . . . . . . . . . . . . . . . . . . 81
A.11 Hardware Implementation . . . . . . . . . . . . . . . . . . . . . . . . . . . . . . . . . . . . . . . 81
A.12 Integer Register Map . . . . . . . . . . . . . . . . . . . . . . . . . . . . . . . . . . . . . . . . . . . 82
A.13 32-Bit Floating Point Register Map. . . . . . . . . . . . . . . . . . . . . . . . . . . . . . . . . 86
A.14 Status Bit Register Map . . . . . . . . . . . . . . . . . . . . . . . . . . . . . . . . . . . . . . . . . 87
B Appendix B — Setting the Transmitter Level Using BCD . . . . . . . 89
B.1 Before Beginning to Set the Transmitter Level . . . . . . . . . . . . . . . . . . . . . . . . . 89
B.1.1 LEDs and switch functions and locations . . . . . . . . . . . . . . . . . . . . . . . . . . 89
B.1.2 Forward or reverse encoding . . . . . . . . . . . . . . . . . . . . . . . . . . . . . . . . . . 89
B.2 Setting the Transmitter Level Using BCD (Forward and Reverse Encoding) . . 90
B.2.1 Decimal to Binary Conversion (Forward and Reverse Encoding) . . . . . . . . . 92
B.2.2 Meters to Binary Conversion (Forward and Reverse Encoding) . . . . . . . . . . 93
B.2.3 Decimal Feet/Inches and Fractional Inches to Binary Conversion (Forward and Reverse Encoding) . . . . . . . . . . . . . . . . . . . . . . . . . . . . . . . 94
C Appendix C — Database Points . . . . . . . . . . . . . . . . . . . . . . . . . . . . . . . . 95
C.1 System Information (SYS) . . . . . . . . . . . . . . . . . . . . . . . . . . . . . . . . . . . . . . . . 95
C.1.1 Description . . . . . . . . . . . . . . . . . . . . . . . . . . . . . . . . . . . . . . . . . . . . . . . 95
C.1.2 ViewRTU dialog box: EDIT POINT . . . . . . . . . . . . . . . . . . . . . . . . . . . . . . 95
C.1.3 Parameters . . . . . . . . . . . . . . . . . . . . . . . . . . . . . . . . . . . . . . . . . . . . . . 96
C.2 Encoder Information (ENC) . . . . . . . . . . . . . . . . . . . . . . . . . . . . . . . . . . . . . . . 97
C.2.1 Description . . . . . . . . . . . . . . . . . . . . . . . . . . . . . . . . . . . . . . . . . . . . . . . 97
C.2.2 Application . . . . . . . . . . . . . . . . . . . . . . . . . . . . . . . . . . . . . . . . . . . . . . . 97
C.2.3 Parameters . . . . . . . . . . . . . . . . . . . . . . . . . . . . . . . . . . . . . . . . . . . . . . 98
C.3 Resistive Temperature Detector (RTD) . . . . . . . . . . . . . . . . . . . . . . . . . . . . . . 99
C.3.1 Description . . . . . . . . . . . . . . . . . . . . . . . . . . . . . . . . . . . . . . . . . . . . . . . 99
C.3.2 Parameters . . . . . . . . . . . . . . . . . . . . . . . . . . . . . . . . . . . . . . . . . . . . . 100
C.4 MODBUS Register Block (MBLK) . . . . . . . . . . . . . . . . . . . . . . . . . . . . . . . . . 101
C.4.1 Description . . . . . . . . . . . . . . . . . . . . . . . . . . . . . . . . . . . . . . . . . . . . . . 101
C.4.2 Application . . . . . . . . . . . . . . . . . . . . . . . . . . . . . . . . . . . . . . . . . . . . . . 101
C.4.3 Parameters . . . . . . . . . . . . . . . . . . . . . . . . . . . . . . . . . . . . . . . . . . . . . 101
C.5 Digital Outputs (DO) . . . . . . . . . . . . . . . . . . . . . . . . . . . . . . . . . . . . . . . . . . . . 105
C.5.1 Description . . . . . . . . . . . . . . . . . . . . . . . . . . . . . . . . . . . . . . . . . . . . . . 105
C.5.2 Parameters . . . . . . . . . . . . . . . . . . . . . . . . . . . . . . . . . . . . . . . . . . . . . 105
D Appendix D — RTD Resistance - Temperature Charts . . . . . . . . . 107
D.1 Pt100 RTD Resistance vs. Temperature . . . . . . . . . . . . . . . . . . . . . . . . . . . . 107
D.2 Cu100 RTD Resistance vs. Temperature . . . . . . . . . . . . . . . . . . . . . . . . . . . 111
D.3 Cu90 RTD Resistance vs. Temperature . . . . . . . . . . . . . . . . . . . . . . . . . . . . 114
Index . . . . . . . . . . . . . . . . . . . . . . . . . . . . . . . . . . . . . . . . . . . . . . . . . . . . . . . . . . . . . . .117

Float & Tape Transmitter
Varec, Inc. 1
1 Introduction
This manual provides the information needed to install, maintain, and troubleshoot the Varec 2910 Float & Tape Transmitter (FTT).
1.1 Overview
The 2910 Float & Tape Transmitter (FTT) is a precision digital instrument designed to mount directly to most mechanical float and tape tank gauges and transmit level and other data to an inventory management system.
The 2910 FTT is available for Mark/Space, MODBUS, GSI MODBUS, or Tankway (L&J) field communications. It can be mounted directly to most manufacturers’ tank gauges, including GSI, L&J, and others (see Figure 1-1: with the 2910 FTT mounted to the Varec 2500 Automatic Tank Gauge (ATG)).
Figure 1-1:2910 FTT - Installed on Varec 2500 ATG
The 2910 FTT is explosion proof and approved for use in hazardous-classified locations, making it particularly suitable for bulk storage applications found in the oil and gas industry.

Introduction
2 Installation and Operations Manual
1.2 Function & System Design
1.2.1 System functionality
Figure 1-2: 2910 FTT System Diagram
1. In response to changes in liquid level, the mechanical level gauge rotates the 2910 FTT encoder drive shaft.
2. The 2910 FTT’s precision direct drive gearing turns two encoder sensors.3. The two sensors in the encoder detect the angular position of the drive shaft and the
high-resolution encoder produces a level value.
4. If a spot temperature RTD (Resistance Temperature Detector) is used, the communications board translates the RTD input to a digital temperature value.
5. The communications circuit board converts the encoded level and temperature to a specific field communications protocol.
6. The communications circuit board transmits the data to an interface device for display in a control room by an inventory management system, such as FuelsManager.
FuelsManagerSoftware
8130 RTUor
8300 TGI
Loop Communcations e.g. Modbus
Star Communcations e.g. Mark/Space
FieldJunction Box
+24V
+5V
+15V
-15V
CPU
COMM
I/O
ERROR
Communicationsbetween DCS/PLCs for control capabilities
Tank Gaugeand
Transmitter
Power
LoopCommuncations
3-wireRTD

Float & Tape Transmitter
Varec, Inc. 3
1.2.2 Internal system design
The 2910 FTT is constructed with the following assemblies, as shown in Figure 1-3:
A. Enclosure CoverB. Communications Circuit BoardC. AC Power Circuit Board (Optional)D. Connector Circuit BoardE. Encoder Assembly F. Enclosure BaseG. Junction Box H. Limit Switch Assembly (Optional)
Figure 1-3: System Components - Exploded View
All standard electronics for the 2910 FTT are contained on the communications circuit board (B). This includes DC power, field communications, a 3-wire temperature input, and two discrete inputs.
An optional circuit board (C) contains an AC power supply, two additional discrete inputs, and four contact outputs. The limit switch assembly (H) can support up to four optional limit switches. These limit switches and inputs/outputs can be used in safety applications such as overfill protection, level switch inputs, local alarm control, permissives, and interlocks. The limit switches and inputs/outputs can also provide basic automation control.
A
B
C
D
E
F
G
H

Introduction
4 Installation and Operations Manual

Float & Tape Transmitter
Varec, Inc. 5
2 Preparing for Installation
This chapter provides a pre-installation checklist, safety information, unpacking instructions, grounding instructions, and an overview of the installation steps.
2.1 Site Preparation Checklist
Before installing the 2910 FTT transmitter on a mechanical float and tape gauge, ensure that:
1. The mechanical float gauge is operating correctly.2. There is sufficient space around the mechanical gauge to install the transmitter and acces-
sories (such as conduit and cabling). Refer to Figure 2-1.3. The correct transmitter/mechanical gauge adaptor is available, if required.4. The gaugehead shall be adequately grounded for the safe electrical drain of electrostatic
charges that may accumulate in the tank and the product (see Section 2.5 on page 7).5. The correct field connections at the gaugehead are ready to connect to the 2910 FTT (i.e.
power, communications, and temperature sensor wiring).6. The installlation complies with all safety guidelines as described in Section 2.2 on page 6.
The tank can remain in-service and the mechanical float gauge can remain in place while installing and configuring the 2910 FTT.
Figure 2-1: 2910 FTT Dimensions
9.10231
9.75248
2.3860
8.00203
12.25311
4.00101
1.9349 3/4" NPT
Optional Junction Box

Preparing for Installation
6 Installation and Operations Manual
2.2 General Safety Guidelines
The 2910 FTT is certified to be used in Class I, Division 1, Groups C and D, and Class I, Zone 1, Group IIB hazardous locations.
The user should follow other local safety guidelines for additional protection. Information may also be obtained from the following sources:
• National Electric Code (NEC)• National Fire Protection Association (NFPA)• Instrument Society of America (ISA)• FM Approvals LLC (FM)• Underwriters Laboratories Incorporated (UL)
When in doubt about the safety of an area, the user should check with the local safety authorities. Always observe equipment labels and warning signs posted in the area.
2.3 Unpacking
Varec 2910 Float & Tape Transmitters are shipped fully assembled and ready for installation.
To unpack the 2910 FTT:
1. Place the shipping container on a secure bench.2. Open the shipping container, taking care not to damage the contents.3. Carefully remove transmitter from the shipping container and place it on the bench. 4. Inspect the transmitter for shipping damage. Report any damage to the carrier.
Note If the transmitter must be stored prior to installation, it should be repacked in its shipping container and stored in a temperature- and humidity- controlled environment.
2.4 Becoming Familiar with the 2910 FTT
The 2910 FTT is housed within an explosion-proof enclosure (see Figure 9-3 on page 60). The cover is provided to permit access to the 2910 FTT’s electronics (i.e. circuit boards). "O" Ring seals are provided to prevent moisture from entering the termination or electronics compartments.
The 2910 FTT housing provides an external grounding lug and 3/4-inch NPT plugs. The plugs permit access to the 2910 FTT wiring connections.

Float & Tape Transmitter
Varec, Inc. 7
2.5 Grounding the Equipment
Warning! The 2910 FTT must be grounded before communication and power connections are made.
An external grounding lug is provided on the 2910 FTT. A connection from the ground lug to earth ground must be made before any other wiring connections are made.
Note For proper operation of the 2910 FTT, a ground strap must be attached to the FTT. Grounding through mounting kits or pipe coupling is not adequate.
Properly seal all ports to prevent moisture or other contamination from entering the wiring compartment.
2.6 Installation Overview
To install the transmitter, follow the steps shown in the following flowchart:
Figure 2-2: 2910 FTT Installation Sequence
Preparation(Chapter 2)
Mounting(Chapter 3)
Wiring(Chapter 4)
Initial Configuration(MODBUS)
(Chapter 5)
Communications protocol?
Initial Configuration(Tankway)(Chapter 7)
Initial Configuration(Mark/Space)(Chapter 6)
General Configuration & Calibration(Chapter 8)
Mark/Space Tankway
MODBUS

Preparing for Installation
8 Installation and Operations Manual

Float & Tape Transmitter
Varec, Inc. 9
3 Mounting
The 2910 FTT can be mounted in the following ways:
• Mount the complete transmitter on a 2500 ATG gaugehead (see Section 3.2, "Mounting on a Varec Gaugehead" on page 10).
• Mount the complete transmitter on a non-Varec gauge (see Section 3.3, "Mounting on Alternate Gaugeheads" on page 12).
This chapter describes each of the above procedures.
The tank can remain in-service and the mechanical float gauge can remain in place while installing and configuring the 2910 FTT.
Note Please read the safety guidelines section before beginning the mounting process.
3.1 Installation Safety Guidelines
• This equipment should be installed only by qualified personnel familiar with the installation of tank gauging equipment.
• Caution should be exercised when entering any area that is posted or otherwise assumed to contain hazardous gases. Always follow other local guidelines.
• Obtain a hot permit before removing the transmitter cover with power applied. • To prevent shock hazards, the housing of all units should be properly grounded in
accordance with the National Electric Code. A grounding conductor should be wired to the grounding terminal provided on the 2910 FTT.
Warning! Before attempting installation of the 2910 FTT, review the General Safety Guidelines described in Chapter 2 "Preparing for Installation" on page 5. Installation and maintenance personnel should become familiar with any hazards present as well as any agency requirements before working with any equipment.
Mounting
10 Installation and Operations Manual
3.2 Mounting on a Varec Gaugehead
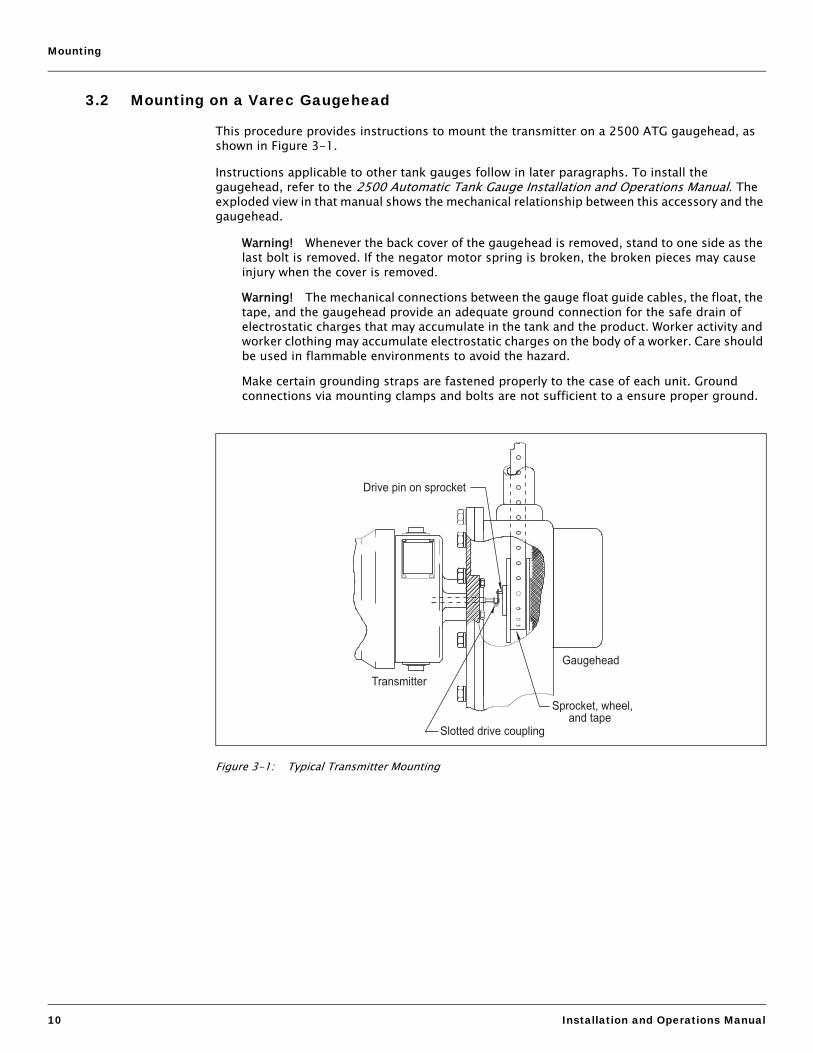
This procedure provides instructions to mount the transmitter on a 2500 ATG gaugehead, as shown in Figure 3-1.
Instructions applicable to other tank gauges follow in later paragraphs. To install the gaugehead, refer to the 2500 Automatic Tank Gauge Installation and Operations Manual. The exploded view in that manual shows the mechanical relationship between this accessory and the gaugehead.
Warning! Whenever the back cover of the gaugehead is removed, stand to one side as the last bolt is removed. If the negator motor spring is broken, the broken pieces may cause injury when the cover is removed.
Warning! The mechanical connections between the gauge float guide cables, the float, the tape, and the gaugehead provide an adequate ground connection for the safe drain of electrostatic charges that may accumulate in the tank and the product. Worker activity and worker clothing may accumulate electrostatic charges on the body of a worker. Care should be used in flammable environments to avoid the hazard.
Make certain grounding straps are fastened properly to the case of each unit. Ground connections via mounting clamps and bolts are not sufficient to a ensure proper ground.
Figure 3-1: Typical Transmitter Mounting
Sprocket, wheel,and tape
Drive pin on sprocket
Gaugehead
Slotted drive coupling
Transmitter

Float & Tape Transmitter
Varec, Inc. 11
1. Remove the back cover of the gaugehead (see the 2500 Automatic Tank Gauge Installation and Operations Manual).
2. Remove the access cap from the back cover of the gaugehead (see the 2500 Automatic Tank Gauge Installation and Operations Manual). Remove and discard the four fiber washers.
3. Mount the transmitter in place of the cap onto the back cover of the gaugehead, using the four hex head cap screws that are attached to the access cap. Make sure that the top of the 2910 FTT housing (marked with “TOP”) lines up with the top of the back cover. Position the circular gasket with the four bolt holes between the transmitter and back cover.
4. Position the back cover and transmitter so that the drive pin on the gaugehead sprocket passes through the slotted drive coupling on the transmitter drive shaft.
5. Fasten the back cover to the gaugehead.6. Proceed with field wiring, as described in Chapter 4 "Wiring" on page 13.

Mounting
12 Installation and Operations Manual
3.3 Mounting on Alternate Gaugeheads
The following steps describe the typical tasks required for mounting the transmitter on other manufacturers’ gaugeheads. An adapter is required. Refer to Chapter 9 "Maintenance and Troubleshooting" on page 57.
The gaugehead is assumed to be installed on the tank. See Figure 3-1 on page 10 and perform the following steps.
1. Remove the mounting plate (back cover) from the gaugehead.2. Remove the access cap from the mounting plate of the gaugehead. Keep the original gasket
and bolts.3. Mount the transmitter to the adapter, using the included gasket.4. Install the transmitter with adapter on the gaugehead mounting plate, using the four hex
head cap screws that are included with the adapter kit. Use the manufacturer’s original gaugehead gasket between the mounting plate and the adapter. Make sure that the top of the 2910 FTT housing (marked with “TOP”) lines up with the top of the mounting plate.
5. Position the mounting plate and transmitter so that the drive pin on the gaugehead sprocket passes through the slotted drive coupling on the transmitter drive shaft.
6. Fasten the mounting plate to the gaugehead.7. Proceed with field wiring, as described in Chapter 4 on page 13.

Float & Tape Transmitter
Varec, Inc. 13
4 Wiring
This chapter describes how to connect wiring terminations for the 2910 FTT. Wiring should be done after the unit is mounted as described in Chapter 3 "Mounting" on page 9.
4.1 Overview
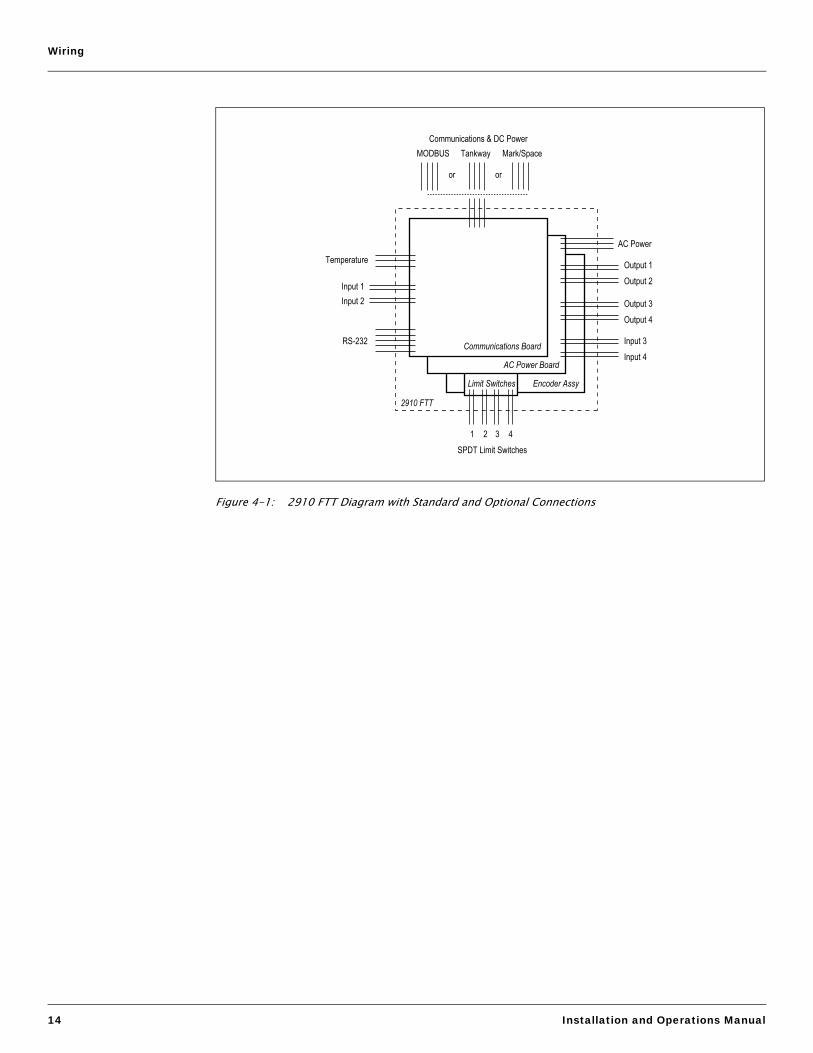
The wiring of the junction boxes to the 2910 FTT varies based on the order options. Figure 4-1 shows the wiring options available for the 2910 FTT. Some typical order options are illustrated in this section.
The following table presents typical ordering codes with a description of the options and the associated figure:
Field wiring the 2910 FTT Transmitter consists of the following steps:
1. Calculating line resistance (see Section 4.3, "Checking Line Resistance" on page 15). 2. Connecting field wiring to the junction box terminals (see Section 4.8, "Terminating System
Wiring at the Transmitter" on page 20).
To connect the internal wiring for the 2910 FTT, see Section 4.9, "Connecting Wiring in the Transmitter" on page 24.
Order Code
OptionDescription
AssociatedFigure
N2910-xx-2-yy-0-N-0-A AC Only Figure 4-2 on page 16
N2910-xx-2-yy-3-A-0-B Discrete I/O, 2 Limit Switches, and AC Figure 4-3 on page 17
N2910-xx-1-yy-3-A-0-A 2 Limit Switches Figure 4-4 on page 18
N2910-xx-2-yy-3-B-0-B Discrete I/O, 4 Limit Switches, and AC Figure 4-5 on page 19
Table 4-1: Typical Order Options
Wiring
14 Installation and Operations Manual
Figure 4-1: 2910 FTT Diagram with Standard and Optional Connections
Limit Switches
Temperature
2910 FTT
RS-232
Encoder Assy
AC Power Board
Output 1
Output 2
AC Power
SPDT Limit Switches
Input 2
1 2 3 4
Input 1
Communications Board
Mark/SpaceTankwayCommunications & DC Power
MODBUS
or or
Output 3
Output 4
Input 3
Input 4

Float & Tape Transmitter
Varec, Inc. 15
4.2 Safety Guidelines
• Maintenance should be performed only by authorized personnel.• Caution should be exercised when entering any area that is posted or otherwise assumed to
contain hazardous gases. Always follow local guidelines.• Obtain a hot permit before removing the transmitter cover with power applied. • Before installing/repairing any wiring to the 2910 FTT, make sure that the power is turned
off at the main circuit breaker or switch. The power switch should be locked in the OFF position and labeled to prevent other personnel from turning the power on during installation.
• To prevent shock hazards, the housing of all units should be properly grounded in accordance with the National Electric Code. A grounding conductor should be wired to the grounding terminal provided on the 2910 FTT.
• Do not apply power to the transmitter until all wiring connections have been made and the cover of the transmitter has been replaced.
• Do not apply power until the instrumentation’s communications network has been checked (see Section 4.3, "Checking Line Resistance" on page 15).
• Do not apply power in a hazardous environment until the explosion proof enclosure is closed.
• Incorrect field wiring connections can damage the transmitter electronics and cause system malfunctions.
4.3 Checking Line Resistance
The specification, quality, and condition of the cable between the 2910 FTT and the control room is critical to the reliability of the entire system. Before wiring the 2910 FTT(s) to your system, ensure that the field wiring meets the following criteria:
• The number of transmitters wired in each area does not exceed 31 (MODBUS) or 50 (Mark/Space). See Section 4.8.3, "Communications wiring" on page 22 for more information.
• Wiring distance of the entire communications network does not exceed 10,000 feet (Mark/Space) or 4,000 feet (MODBUS).
When existing or proposed wiring does not meet these limits, the Varec Engineering department should be consulted for a specific evaluation.

Wiring
16 Installation and Operations Manual
4.4 2910 FTT Wiring Diagram — AC Option
Figure 4-2: 2910 FTT Internal Wiring Diagram — AC Option (Order Code: N2910-xx-2-yy-0-N-0-A)
Sealed Nipple
2910 FTTJunction Box #1
2910 FTTCommunications PCB
B+ / +Pwr
Spare Wire: Coil & Stow
(in lg J-Box only)J-Box Gnd
Input 2 *Note 3
Input 1
B- / -Pwr
RTD
*Note 2*Note 1
J1
J12
J14
321
4321
3214
CBA
CBA
C1C2B-
B+
Wht/BrnWht/Grn
Grn/Yellow
RedWhtGrnBlk
Pink
BrownOrange
VioletGray
*Note 1: Space Line (Mark/Space)B or-TX/-RX (EIA-485 MODBUS)Computer [RXD] (Tankway)
A or+TX/+RX (EIA-485 MODBUS)Encoder [TXD] (Tankway)
*Note 2: Mark Line (Mark/Space)
7531
2345
9
6
AC Power Supply PCB(Optional)
J1
J8J3
321
234
1
LNG2345678
1
TB1
TB3
Surge Protector
Optional
DI2COM
1DI1Wht/Blue
Wht/YelWht/Blk
TB2
321
4101214
8
*Note 3: Common line for Input 1 and Input 2
TB4

Float & Tape Transmitter
Varec, Inc. 17
4.5 2910 FTT Wiring Diagram — Discrete I/O, AC, and 2 Limit Switches Option
Figure 4-3: 2910 FTT Wiring Diagram — Discrete I/O, AC, and 2 Limit Switches Option (Order Code: N2910-xx-2-yy-3-A-0-B)
Sealed Nipple2910 FTT
Junction Box #2
AC Power Supply PCB(Optional)
Terminal Block
Spare
Spare Wire: Coil & Stow
(in lg J-Box only)J-Box Gnd
J1
J8J3
321
234
1
LNG2345678
1
23456789
1011
1
12
234567891011
1
12
Wht/BrnWht/BlueWht/Orange
Wht/Gry
Wht/RedWht/Violet
Wht/BlkWht/Yel
Wht/Grn
Yellow
Red
Pink
Black
VioletGray
Blue
GreenWhite
Blue
Digital Output
AC NeutralAC Ground
22B
1B1
44B
3B3
Spare
AC Hot “L”
Sealed Nipple
2910 FTTJunction Box #1
2910 FTTCommunications PCB
B+ / +Pwr
Spare Wire: Coil & Stow
(in lg J-Box only)J-Box Gnd
Input 2*Note 3
Input 1
B- / -Pwr
RTD
*Note 2*Note 1
J1
J12
J14
321
4321
3214
CBA
CBA
C1C2B-
B+
Wht/BrnWht/Grn
Grn/Yellow
RedWhtGrnBlk
Pink
BrownOrange
VioletGray
*Note 1: Space Line (Mark/Space)B or-TX/-RX (EIA-485 MODBUS)Computer [RXD] (Tankway)
A or+TX/+RX (EIA-485 MODBUS)Encoder [TXD] (Tankway)
*Note 2: Mark Line (Mark/Space)
7531
2345
9
6
TB1
TB3
Surge Protector
Optional
DI2COM
1DI1Wht/Blue
Wht/YelWht/Blk
TB2
321
4101214
8
*Note 3: Common line for Input 1 and Input 2
TB4
Switch 1Switch 2Limit Switches (Optional)
Orange
COMMCOMM N.O.N.O. N.C.N.C.

Wiring
18 Installation and Operations Manual
4.6 2910 FTT Wiring Diagram — Discrete Input and 2 Limit Switches Option
Figure 4-4: 2910 FTT Internal Wiring Diagram — Discrete Input and 2 Limit Switches Option (Order Code: N2910-xx-1-yy-3-A-0-A)
Sealed Nipple
2910 FTTJunction Box #1
2910 FTTCommunications PCB
B+ / +Pwr
Spare Wire: Coil & Stow
(in lg J-Box only)J-Box Gnd
Input 2Input 1
B- / -Pwr
RTD
*Note 2*Note 1
J1
J12
J14
321
4321
3214
CBA
CBA
C1C2B-
B+
Wht/BrnWht/Grn
Grn/Yellow
RedWhtGrnBlk
Pink
BrownOrange
VioletGray
*Note 1: Space Line (Mark/Space)B or-TX/-RX (EIA-485 MODBUS)Computer [RXD] (Tankway)
A or+TX/+RX (EIA-485 MODBUS)Encoder [TXD] (Tankway)
*Note 2: Mark Line (Mark/Space)
7531
2345
9
6
TB1
TB3
Surge Protector
*Note 3
Optional
DI2COM
1DI1Wht/Blue
Wht/YelWht/Blk
TB2
321
4101214
8
*Note 3: Common line for Input 1 and Input 2
TB4
Switch 1Switch 2Limit Switches (Optional)
COMM N.C. COMM N.O.N.O. N.C.
Float & Tape Transmitter
Varec, Inc. 19
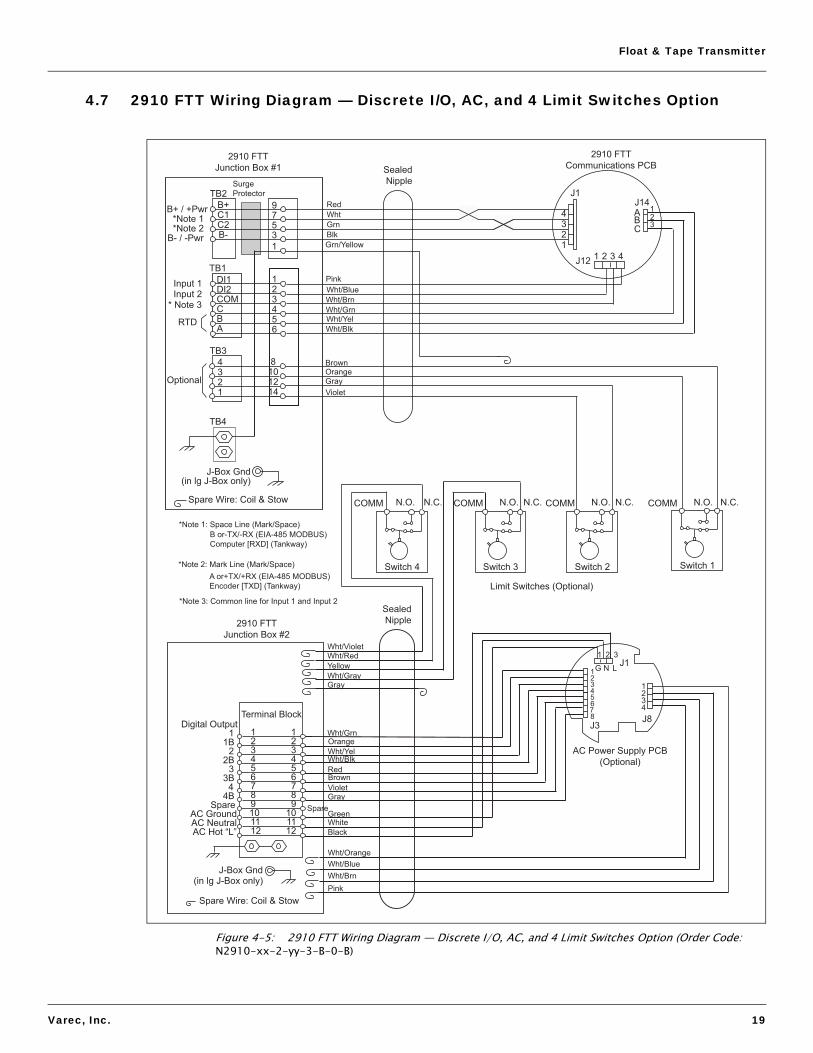
4.7 2910 FTT Wiring Diagram — Discrete I/O, AC, and 4 Limit Switches Option
Figure 4-5: 2910 FTT Wiring Diagram — Discrete I/O, AC, and 4 Limit Switches Option (Order Code: N2910-xx-2-yy-3-B-0-B)
Limit Switches (Optional)
Switch 1
Sealed Nipple2910 FTT
Junction Box #2
AC Power Supply PCB(Optional)
Terminal Block
Spare
Spare Wire: Coil & Stow
(in lg J-Box only)J-Box Gnd
J1
J8J3
321
234
1
LNG2345678
1
23456789
1011
1
12
234567891011
1
12
Wht/BlueWht/Orange
Wht/BlkWht/Yel
Red
Pink
Black
VioletGray
GreenWhite
Digital Output
AC NeutralAC Ground
22B
1B1
44B
3B3
Spare
AC Hot “L”
GrayWht/GrayYellowWht/RedWht/Violet
Orange
Brown
Sealed Nipple
2910 FTTJunction Box #1
2910 FTTCommunications PCB
B+ / +Pwr
Spare Wire: Coil & Stow
(in lg J-Box only)J-Box Gnd
Input 2Input 1
B- / -Pwr
RTD
*Note 2*Note 1
J1
J12
J14
321
4321
3214
CBA
CBA
C1C2B-
B+
Wht/BrnWht/Grn
Grn/Yellow
RedWhtGrnBlk
Pink
BrownOrange
VioletGray
*Note 1: Space Line (Mark/Space) B or-TX/-RX (EIA-485 MODBUS) Computer [RXD] (Tankway)
A or+TX/+RX (EIA-485 MODBUS)Encoder [TXD] (Tankway)
*Note 2: Mark Line (Mark/Space)
7531
2345
9
6
TB1
TB3
Surge Protector
* Note 3
Optional
DI2COM
1DI1Wht/Blue
Wht/YelWht/Blk
TB2
321
4101214
8
*Note 3: Common line for Input 1 and Input 2
TB4
Wht/Grn
Wht/Brn
Switch 3
COMM
Switch 4 Switch 2
N.O.N.O. N.C. N.C. COMM N.O. N.C. COMMN.O. N.C. COMM

Wiring
20 Installation and Operations Manual
4.8 Terminating System Wiring at the Transmitter
This section provides field wiring termination information for the 2910 FTT, including junction box terminal connections for communications, RTD input, discrete inputs, contact outputs, and input power
Note Varec recommends using 18 AWG shielded twisted pair wiring.
4.8.1 Junction box terminals
All wiring from the 2910 FTT is terminated at one or more junction boxes connected to the transmitter housing. The standard junction box provides 14 terminals using pluggable terminal connectors, and includes two earth ground terminals. The standard junction box is shown in Figure 4-6. The second junction box, if required, contains 12 terminals. One junction box is included in the standard configuration, and fittings are provided for additional junction boxes if they are required.
Figure 4-6: Earth Ground Connector, Terminal Circuit Board (Junction Box)
Table 4-2 on page 21 describes the terminal connections for the terminal circuit board. For transmitter wiring diagrams, see Figures 4-2 to Figure 4-5 on pages 16 –19.
Note Earth Ground is located on the terminal circuit board in the junction box as shown in Figure 4-6. For the second junction box, see Figure 4-9 on page 25.
1
2
3
4
DI1 TB2
TB4
G
B+
C1
B-
C2
Varec
COM
TB3
TB1
Serial No
R3
R4
R1
R2
GT2
GT1
A
BC
DI2
Rev 150905Assembly 012857
TB2DC Power or Mark/Space
TB4Earth Ground
TB1Digital Input,COM, RTD
TB3GeneralPurpose

Float & Tape Transmitter
Varec, Inc. 21
4.8.2 Terminal assignments: terminal circuit board
Terminal/Function Terminal Assignment Description
TB1 - Digital Input /Temperature Input
DI1 Digital Input 1 Digital Input
DI2 Digital Input 2 Digital Input
COM Digital Input Common For DI1 & DI2
C C RTD Return 2
B B RTD Return 1
A A RTD Signal
TB2 - Communications
B+ B+ / +Power (All Boards)
C1 Space Line (Mark/Space)
B or -TX/-RX (EIA-485 MODBUS)
Computer (RXD) (Tankway)
C2 Mark LIne (Mark/Space)
A or +TX/+RX (EIA-485 MODBUS)
Encoder (TXD) (Tankway)
B- B- / -Power (Gnd) (All Boards)
TB3 - Optional
1 None
Optional2 None
3 None
4 None
TB4 - Earth GroundG Earth Ground Earth Ground to Junction Box
G Earth Ground
Table 4-2: Terminal Assignments - Terminal Circuit Board
Wiring
22 Installation and Operations Manual
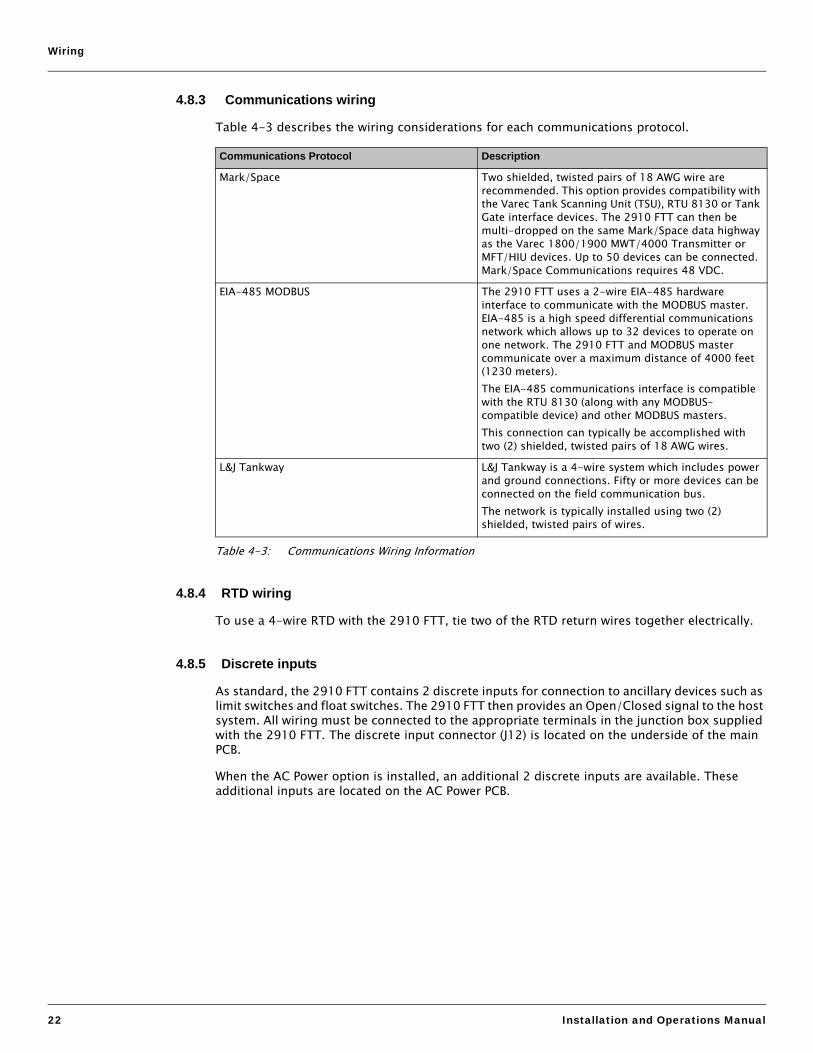
4.8.3 Communications wiring
Table 4-3 describes the wiring considerations for each communications protocol.
4.8.4 RTD wiring
To use a 4-wire RTD with the 2910 FTT, tie two of the RTD return wires together electrically.
4.8.5 Discrete inputs
As standard, the 2910 FTT contains 2 discrete inputs for connection to ancillary devices such as limit switches and float switches. The 2910 FTT then provides an Open/Closed signal to the host system. All wiring must be connected to the appropriate terminals in the junction box supplied with the 2910 FTT. The discrete input connector (J12) is located on the underside of the main PCB.
When the AC Power option is installed, an additional 2 discrete inputs are available. These additional inputs are located on the AC Power PCB.
Communications Protocol Description
Mark/Space Two shielded, twisted pairs of 18 AWG wire are recommended. This option provides compatibility with the Varec Tank Scanning Unit (TSU), RTU 8130 or Tank Gate interface devices. The 2910 FTT can then be multi-dropped on the same Mark/Space data highway as the Varec 1800/1900 MWT/4000 Transmitter or MFT/HIU devices. Up to 50 devices can be connected. Mark/Space Communications requires 48 VDC.
EIA-485 MODBUS The 2910 FTT uses a 2-wire EIA-485 hardware interface to communicate with the MODBUS master. EIA-485 is a high speed differential communications network which allows up to 32 devices to operate on one network. The 2910 FTT and MODBUS master communicate over a maximum distance of 4000 feet (1230 meters).The EIA-485 communications interface is compatible with the RTU 8130 (along with any MODBUS–compatible device) and other MODBUS masters.This connection can typically be accomplished with two (2) shielded, twisted pairs of 18 AWG wires.
L&J Tankway L&J Tankway is a 4-wire system which includes power and ground connections. Fifty or more devices can be connected on the field communication bus.The network is typically installed using two (2) shielded, twisted pairs of wires.
Table 4-3: Communications Wiring Information

Float & Tape Transmitter
Varec, Inc. 23
4.8.6 Contact outputs
When the AC Power option is installed, 4 contact outputs are provided. These are software driven “Normally Open/Closed” outputs. The outputs can be configured using a MODBUS host interface or a computer running ViewRTU. They can be set to trigger alarm lights, horns etc. for temperature or level alarms.
4.8.7 Input power
The standard 2910 FTT uses 20-65 V DC power, supplied through the main communications board. With an optional AC power PCB, the 2910 FTT can also be supplied with 40-65 VAC, 110 VAC, or 220 - 240 VAC at 50/60 Hz. Both options are galvanically-isolated from the micro controller.
To connect DC or AC power to the transmitter, connect the power wires to the appropriate terminals in the junction box(es) supplied with the 2910 FTT.
Note Before connecting power wires to the 2910 FTT, ensure that power is switched off and the instrument is correctly grounded.
Figure 4-7: Transmitter Housing with Two Junction Boxes

Wiring
24 Installation and Operations Manual
4.9 Connecting Wiring in the Transmitter
4.9.1 Overview
All standard electronics for the 2910 FTT are contained on the main communications circuit board. This includes 20-65 VDC power, field communications, 3-wire temperature input, and two discrete inputs. An optional secondary circuit board contains an AC power supply with three voltage ranges, two additional discrete inputs, and four discrete outputs. See Section 4.8.7, "Input power" on page 23 and Section 4.9.7, "Selecting the AC voltage setting" on page 29 for more information.
All wiring is terminated in junction box(es) . A standard application requires one junction box for communications, temperature, two discrete inputs, and two SPDT contacts. Depending on the complexity of the application, multiple junction boxes can be attached to the transmitter housing.
To connect wires to the electronics assembly, refer to Sections 4.9.3 – 4.9.9 for connector locations, terminal assignments, and special instructions. The system wiring diagrams are shown in Figure 4-2 to Figure 4-5 on pages 16 to 19.
Warning! Obtain a hot permit before removing the transmitter cover with power applied.
Note Earth Ground is located on the terminal circuit board in the junction box, as shown in Figure 4-8 (standard) and Figure 4-9 (second junction box version).
4.9.2 Earth ground locations
4.9.2.1 Standard terminal board
Figure 4-8: Earth Ground Connector: Standard Terminal Board Junction Box
1
2
3
4
DI1 TB2
TB4
G
B+
C1
B-
C2
Varec
COM
TB3
TB1
Serial No
R3
R4
R1
R2
GT2
GT1
A
BC
DI2
Rev 150905Assembly 012857
TB2DC Power or Mark/Space
TB4Earth Ground
TB1Digital Input,COM, RTD
TB3GeneralPurpose

Float & Tape Transmitter
Varec, Inc. 25
4.9.2.2 Earth ground location: second junction box terminal board
Figure 4-9: Earth Ground Connector: Second Junction Box Terminal Board
4.9.3 Connector locations: communications circuit board
Figure 4-10: Communications Board Connectors: Top View (Mark/Space shown)
EarthGround
J11
2
3
4
5
6
TB1
12
7
8
9
10
11
Note: J1 goes to the instrument TB1 goes to the field
C24
162X1
C30
R25
C27
1
R20
R41
C10
C12
R17
C21
R51
C15
K1
R27
R39
R38
C16
U2
SW8
C23
C20
C28L2
C25
U4
SW726
1
U3 76
51
J2
SW4
U5
Build Option:Serial No
SW3 SW5
U16
C9
D15
R33
D19
D21
R45
D22Q6
R23
R32
R30
R24
C13
D20
R35
J7
R21
C19
SW6
R43
R40
U11
R19
Q8
R34
R26
R37
R29
R18
SW2
R54
D14
R93
C34
D13D9
J5
5
9 6
1
J13
D12
D55
D11
D10
Module
D16
C29
B
J9
A
D5
C18
D8D1
C11
J4
D4
C33
C26
D7
R22
U7
R53
D6
U8
C17
90
70 60
40
302010
80
100
5081
51
SW1
D3
U6
J11
D2
R44
C14
U15U10
9
10 2
1J10
R14
1
J3Rev 281004
Varec, Inc.
Assembly 012842
R16
+1.8V
31
1
B-
+3.3V
B+
GND
R28
MARK SPACE
B
RESET
A
R9 R12
R15
R13
R8 R11
R10
R6
C1
R1C3
C4 R7
R5R4
C5
C6
C2
C8
U1
R3
R2
J1
J12
S
D Q1
T1
L1
C7
U17
R52
R48
C31
R46 C32
R31
R42
D27D26
D25D24
U14
Q5
D17
R49 R50
Q3
Q2
D18
Q7
U9
R47
Q4
U13
15
R94
U12
C22
R36
J8
J13Serial Connection
J10Varec Use OnlyJ5
Varec Use Only
Varec Mark Space©

Wiring
26 Installation and Operations Manual
Figure 4-11: Communications Board Components: Bottom View (Mark/Space shown)
4.9.4 Connector assignments: communications circuit board
R55
R68
Z1
R71
D47
C61
R82
D46
C37
19
20
C35
C46
R56
R72
R57
R81
C59
R58
C63
C38
C45
D53
D41D40
R62
R84
R79
C48
R75
C56Z2
J1
R83
B
A
R92
C55
C42
Q14
L4
R63
D33
Q13
R77
R61
C58
C57
D39D32
16 1
J15
R78
2
1
J6
C43
C47
D38D35 D37D30 D34D29 D31D28 D36
D44
R66
Q11
Q9
R59
R60
R65
C52
D50
D51
L3
D45
R64
C54
D49
C44
D48
D43Q10
Q12
C39
D42
U20
U18C41
C49
C51
C36
C53
C50
C40
R70R69
R67
J14
J12
R90 R91
Z3
R95
J23
J22
R85
R74
R80
J19
Q16
U19
D54
Z4
D52
R88
R73
Z5
Q15
J21
C60
R89
J20
R86
C64
R76
J18
C62
R87
J12Input
J6AC Power SupplyCircuit Board
J15Encoder
J1Communications& DC Power
J14 3-Wire Temperature Input
Connector/Function Terminal Assignment Description
J1 - Communications
1 B- / -Power (Gnd) (All Boards)
2 B+ / +Power (All Boards)
3
Mark Line (Mark/Space)
A or +TX/+RX (EIA-485 MODBUS)
Encoder (TXD) (Tankway)
4
Space Line (Mark/Space)
B or -TX/-RX (EIA-485 MODBUS)
Computer (RXD) (Tankway)
J5 - Programming (Varec Use Only)
J6 - AC Power Circuit Board Connection to optional AC Power Circuit Board
J9 - ROM Selection
Position A: selects microcontroller & internal Flash Jumper Pins for selection of ROM
sourcePosition B: selects PROM located in U2 (plug-in EPROM)
J10 - Programming Flash Programming (Varec Use Only)
Table 4-4: Connector Assignments: Communications Circuit Board

Float & Tape Transmitter
Varec, Inc. 27
J12 - Alarms(Discrete Inputs)
1 Common Common return
2 Alarm 1
3 Common Common return
4 Alarm 2
J13 - Serial Connection(RS-232)
2 RXD
3 TXD
5 RS-232 Gnd
J14 - 3-WireTemperature Input
1 A RTD Signal
2 B Return 1
3 C Return 2
Connector/Function Terminal Assignment Description
Table 4-4: Connector Assignments: Communications Circuit Board

Wiring
28 Installation and Operations Manual
4.9.5 Connector and switch locations: AC power supply circuit board
Figure 4-12: AC Power Supply Circuit Board: Top View
4.9.6 Connector assignments: AC power supply circuit board
R8
+
D9
D5
C6
C5
-
Q3
U1
R5
D10
NO
R6
J2
NC
D6
Q4
Q2
K1
L1
D4
R7
C1
C2
Q1
L
C3
Q5 Varec, Inc.
K2
G
K3
40-65
SW2
VAC
D7
R10
D8
K4
R2
0VC4
5V
R1
R3
S3
Rev 071204
+48V
S
GT2
J1
D2
D3
J8
S2
J3
B-
Assembly 012836
S1
R11
NO
S
J6
NC
N
Q7
NO
J5
NC
Q8
R9
R4
Q6
NO
J4
NC
D1
GT1
T1
110/220
R12
Serial No
110VAC
VAC
R14
220
Q9
R13
SW1
VAC
Z2
Z1
F1
8
1
1
4
SW1110 or 220 VAC
SW2High or Low AC Voltage
J1AC Power In
F1AC Power Fuse
J6NO/NC Jumper for Output 4
J5NO/NC Jumper for Output 3
J4NO/NC Jumper for Output 2
J3Discrete Outputs1 - 4
J2NO/NC Jumper for Output 1
J8Discrete Inputs1 & 2
Connector/Function Terminal Assignment Illustration
J1AC Power
L Line
N Neutral
G Ground
J3 Discrete Outputs (4)
1 Output 1 +
2 Output 1 -
3 Output 2 +
4 Output 2 -
5 Output 3 +
6 Output 3 -
7 Output 4 +
8 Output 4 -
Table 4-5: Terminal Assignments: AC Power Circuit Board
LG
J1
N
NO
J2
NCK1
K2
K3
K4
NO
J6
NC
NO
J5
NC
NO
J4
NC
J3
8
1

Float & Tape Transmitter
Varec, Inc. 29
Note Switches SW1 and SW2 on the AC Power circuit board determine the AC voltage set-ting for the 2910 FTT. See the “Selecting the AC voltage setting” section for instructions on setting the AC Power level.
Note Each optional discrete output is set to NO or NC using a jumper setting. See the “Set-ting optional outputs as NC or NO” section for instructions on setting optional outputs as NC or NO using the appropriate jumper.
4.9.7 Selecting the AC voltage setting
The optional AC Power Supply circuit board can operate at one of three voltage ranges: low (40 – 65 VAC), medium (110 VAC), or high (220 – 240 VAC).
To set the voltage:
1. Set SW2 to low voltage (40 - 65 VAC) or medium/high volt-age (110/220 VAC).
2. If SW2 is set to 110/220 VAC, set SW1 to 110 VAC or 220 VAC as appropriate.Caution! If SW2 is set to 40 - 65 VAC, set SW1 to 110 VAC to avoid blowing fuse F1.
Figure 4-13 shows AC voltage switches SW1 and SW2.Figure 4-13: AC Voltage Selection Switches
J8Discrete Inputs (2)
1 Common
2 Alarm3
3 Common
4 Alarm4
Connector/Function Terminal Assignment Illustration
Table 4-5: Terminal Assignments: AC Power Circuit Board
U1
C4
J8
1
4
+
D9
C6
-
D10
40-65
SW2
VAC
+48V
S
S
110/220
110VAC
VAC
220
SW1
VAC
SW1110 or 220 VAC
SW2High or Low AC Voltage

Wiring
30 Installation and Operations Manual
4.9.8 Setting optional outputs as NC or NO
Each of the four discrete outputs on the AC Power Supply circuit board can be set to operate as Normally Closed (NC) or Normally Open (NO). A jumper connector determines the setting for each output, as shown in Figure 4-12 and in Table 4-5 on page 28.
To set each output, push the jumper onto the NC and center pins for NC operation, or onto the NO and center pins for NO operation.
Figure 4-14: Optional Outputs and Jumpers
Table 4-6: Output - Jumper Assignments - AC Power Circuit Board
Note Outputs are set to NC at the factory.
Output Jumper1 J22 J43 J54 J6
D5
U1
NO
J2
NC
D6
K1
D4
K2
K3
D7 D8
K4
C4
S3GT2
D2
D3
J8
S2
J3
S1
NO
J6
NC
NO
J5
NC
NO
J4
NC
D1
8
1
1
4
AC Power Fuse
J6NO/NC Jumper for Output 4
J5NO/NC Jumper for Output 3
J4NO/NC Jumper for Output 2
J3Discrete Outputs1 - 4
J2NO/NC Jumper for Output 1

Float & Tape Transmitter
Varec, Inc. 31
4.9.9 Wiring limit switches
Each of the optional SPDT limit switches can be wired for Normally Open (NO) or Normally Closed (NC) operation by using the appropriate terminals:
• Under normal operating conditions, the Normally Closed (NC2) and Common (COM1) terminals of the limit switch are connected. The Normally Open (NO3) and Common (COM1) terminals of the limit switch become connectedas the switch arm rides upthe cam, as shown in Figure 4-15.
Figure 4-15: Limit Switch Connections
• When the limit switch arm rides up on the cam, it makes contact between the Normally Open (NO3) and Common (COM1), but it also breaks the connection between the Normally Closed (NC2) and Common (COM1).
Figure 4-6 on page 20 shows the limit switch terminal connections.
AdjustableAlarm Dwell Time
Alarm OFF
Alarm ON
Field Adjustment KnobNormally Closed (NC2)Connector
CommonConnector
Normally Open (NO3)Connector
(UNUSED)
Limit Switch

Wiring
32 Installation and Operations Manual

Float & Tape Transmitter
Varec, Inc. 33
5 Initial Configuration (MODBUS or GSI MODBUS)
After the 2910 FTT has been mounted and wired, it must be calibrated/configured as described below. To transmit GSI MODBUS data, see step 3.
1. Set the unit address (see Section 5.1, "Setting the Unit Address" on page 35).2. Choose the communications setting (see Section 5.2, "Choosing Communications Settings"
on page 36).3. Set the data format (English or Metric units, MODBUS or GSI MODBUS) and rotation direction
(see Section 5.3, "Setting the Data Format" on page 37). 4. Choose the RTD type (see Section 5.4, "Setting the RTD Type" on page 38).5. Terminate the MODBUS network (if required) (see Section 5.5, "Terminating the MODBUS
Network" on page 38).6. Set the bias current (see Section 5.6, "Setting the Bias Current" on page 39).7. Calibrate the transmitter level and limit switches, and configure outputs (see Chapter 8 on
page 49).
Note This chapter contains instructions relevant to a MODBUS or GSI MODBUS application. If using Mark/Space, see Chapter 6 on page 41; for Tankway, see Chapter 7 on page 45.
Alarm and output setpoints can be configured via MODBUS registers. see Section A, "Appendix A — MODBUS Implementation" on page 73 for an explanation of the MODBUS protocol and MODBUS register mapping tables.

Initial Configuration (MODBUS or GSI MODBUS)
34 Installation and Operations Manual
Figure 5-1 shows the MODBUS communications circuit board switch and LED locations.
Figure 5-1: MODBUS Communication Board Switches and LEDs
Note Firmware version indicates MODBUS.
Note To check the status of the communications circuit board CPU, see Section 9.1.1, "Checking the CPU status" on page 57. To check the communications status, see Section 9.1.2, "Checking communications status" on page 59.
Note To activate the LEDs on the communications circuit board, press switch SW8 shown in Figure 5-1. The LEDs will be enabled for about three minutes.
©
SW7Reset
SW8LED Enable
D1 - D8Level LEDs (Feet)
SW10Bias Current
SW9NetworkTermination
D21CPU LED
D22COMM LED
SW1 - SW6Rotary Switches
SW4SW3 SW5 SW6SW2SW1
Varec Modbus
D9 - D16Level LEDs (Fractional Feet)

Float & Tape Transmitter
Varec, Inc. 35
5.1 Setting the Unit Address
The unique address that identifies the 2910 FTT is set using rotary switches SW1-SW3. An address from 000 – 255 can be selected.
Warning! Obtain a hot permit before removing the transmitter cover with power applied.
To set the unit address:
1. Remove the transmitter cover.2. Set SW1 to SW3 to the desired unit address.
For example: to assign an address of 001, set SW1 = 0, SW2 = 0, and SW3 = 1.3. Press switch SW7 to reset the CPU.4. Replace the transmitter cover.

Initial Configuration (MODBUS or GSI MODBUS)
36 Installation and Operations Manual
5.2 Choosing Communications Settings
For the 2910 FTT in the MODBUS configuration, switch SW4 is used to select the communication baud rate and parity setting.
Warning! Obtain a hot permit before removing the transmitter cover with power applied.
To select communications settings:
1. Remove the transmitter cover.2. Rotate switch SW4 to the appropriate position, as identified in the following table.3. Press switch SW7 to reset the CPU.4. Replace the transmitter cover.
Position Setting Description
0 19200 N 19200 Baud, no parity
1 19200 O 19200 baud, odd parity
2 19200 E 19200 baud, even parity
3 9600 N 9600 Baud, no parity
4 9600 O 9600 baud, odd parity
5 9600 E 9600 baud, even parity
6 4800 N 4800 Baud, no parity
7 4800 O 4800 baud, odd parity
8 4800 E 4800 baud, even parity
9 2400 N 2400 Baud, no parity
A 2400 O 2400 baud, odd parity
B 2400 E 2400 baud, even parity
C 1200 N 1200 Baud, no parity
D 1200 O 1200 baud, odd parity
E 1200 E 1200 baud, even parity
F 9600 N 9600 Baud,no parity
Table 5-1: Rotary Switch SW4 Positions

Float & Tape Transmitter
Varec, Inc. 37
5.3 Setting the Data Format
The 2910 FTT can transmit data as standard MODBUS data in feet or meters, with forward or reverse rotation. The 2910 FTT can also transmit GSI MODBUS data in forward or reverse rotation. The position of switch SW5 determines which of those settings is used.
Warning! Obtain a hot permit before removing the transmitter cover with power applied.
To set the data format:
1. Remove the transmitter cover.2. Rotate switch SW5 to the appropriate position, as identified in Table 5-2.
Note Setting the 2910 FTT data format to Meters assumes that the transmitter is/will be installed on a metric mechanical gauge. Setting the data format to Feet assumes that the transmitter is/will be installed on an Imperial mechanical gauge.
3. Press switch SW7 to reset the CPU.4. Replace the transmitter cover.
Position Setting
0 Decimal Feet & Forward Rotation
1 Meters & Forward Rotation
2 Decimal Feet & Reverse Rotation
3 Meters & Reverse Rotation
4 GSI MODBUS MAP & Forward Rotation (Decimal Feet)
5 GSI MODBUS MAP & Reverse Rotation (Decimal Feet)
6 Feet & Forward Rotation (Feet/Inches/16ths of an Inch)
7-F Decimal Feet & Forward Rotation
8-F Feet and Reverse Rotation (Feet/Inches/16ths of an inch)
Table 5-2: Rotary Switch SW5 Positions
Initial Configuration (MODBUS or GSI MODBUS)
38 Installation and Operations Manual
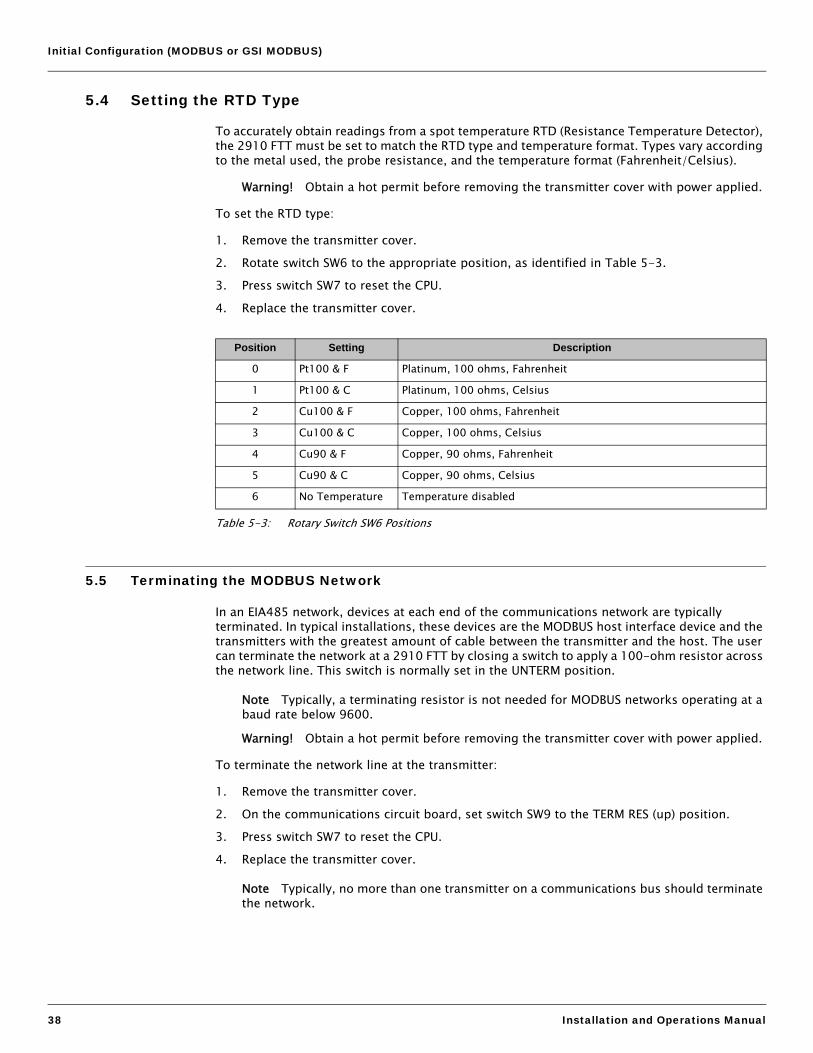
5.4 Setting the RTD Type
To accurately obtain readings from a spot temperature RTD (Resistance Temperature Detector), the 2910 FTT must be set to match the RTD type and temperature format. Types vary according to the metal used, the probe resistance, and the temperature format (Fahrenheit/Celsius).
Warning! Obtain a hot permit before removing the transmitter cover with power applied.
To set the RTD type:
1. Remove the transmitter cover.2. Rotate switch SW6 to the appropriate position, as identified in Table 5-3.3. Press switch SW7 to reset the CPU.4. Replace the transmitter cover.
5.5 Terminating the MODBUS Network
In an EIA485 network, devices at each end of the communications network are typically terminated. In typical installations, these devices are the MODBUS host interface device and the transmitters with the greatest amount of cable between the transmitter and the host. The user can terminate the network at a 2910 FTT by closing a switch to apply a 100-ohm resistor across the network line. This switch is normally set in the UNTERM position.
Note Typically, a terminating resistor is not needed for MODBUS networks operating at a baud rate below 9600.
Warning! Obtain a hot permit before removing the transmitter cover with power applied.
To terminate the network line at the transmitter:
1. Remove the transmitter cover.2. On the communications circuit board, set switch SW9 to the TERM RES (up) position.3. Press switch SW7 to reset the CPU.4. Replace the transmitter cover.
Note Typically, no more than one transmitter on a communications bus should terminate the network.
Position Setting Description
0 Pt100 & F Platinum, 100 ohms, Fahrenheit
1 Pt100 & C Platinum, 100 ohms, Celsius
2 Cu100 & F Copper, 100 ohms, Fahrenheit
3 Cu100 & C Copper, 100 ohms, Celsius
4 Cu90 & F Copper, 90 ohms, Fahrenheit
5 Cu90 & C Copper, 90 ohms, Celsius
6 No Temperature Temperature disabled
Table 5-3: Rotary Switch SW6 Positions

Float & Tape Transmitter
Varec, Inc. 39
5.6 Setting the Bias Current
In a MODBUS network, during periods of no communications, all devices on the network are in high-impedance states. This causes the data+ and data- lines to “float” meaning that they may not have a fixed voltage.
To remedy this situation, pull-up and pull-down resistors are typically used to provide a small bias current on the network. This current holds the data+ and data- lines at predetermined high and low voltage settings. Bias current is normally provided at the host, but can be provided at the 2910 FTT using switch SW10.
Warning! Obtain a hot permit before removing the transmitter cover with power applied.
To apply the bias resistors to the MODBUS network:
1. Remove the transmitter cover.2. On the communications circuit board, set switch SW10 to the BIASED (up) position.3. Press switch SW7 to reset the CPU.4. Replace the transmitter cover.
Note Applying the Bias Current on multiple 2910 FTT transmitters could cause poor per-formance in the EIA485 communications network.

Initial Configuration (MODBUS or GSI MODBUS)
40 Installation and Operations Manual

Float & Tape Transmitter
Varec, Inc. 41
6 Initial Configuration (Mark/Space)
After the 2910 FTT has been mounted and wired, it must be calibrated/configured as described below.
1. Set the unit address (see Section 6.1, "Setting the Unit Address" on page 42).2. Choose the communications setting (see Section 6.2, "Choosing Communications Settings"
on page 42).3. Set the data format (see Section 6.3, "Setting the Data Format" on page 43).4. Choose the RTD type (see Section 6.4, "Setting the RTD Type" on page 44).5. Calibrate transmitter level, calibrate limit switches, and configure outputs (see Chapter 8
"Configuration & Calibration — Level, Limits, and Outputs" on page 49).
Note This chapter contains instructions relevant to a Mark/Space application. If using MODBUS or GSI MODBUS, see Chapter 5 "Initial Configuration (MODBUS or GSI MODBUS)" on page 33; for Tankway, see Chapter 7 "Initial Configuration (Tankway)" on page 45.
See Figure 6-1 for the location of the switches and LEDs on the 2910 FTT Mark/Space communications circuit board.
Figure 6-1: Mark/Space Communications Board — Switches and LEDs
Note Firmware version indicates Mark/Space.
Note To check the status of the communications circuit board CPU, see Section 9.1.1, "Checking the CPU status" on page 57. To check the communications status, see Section 9.1.2, "Checking communications status" on page 59.
Note To activate the LEDs on the communications circuit board, press switch SW8, shown in Figure 6-1. The LEDs will be enabled for about three minutes.
C24
162X1
C30
R25
C27
1
R20
R41
C10
C12
R17
C21
R51
C15
K1
R27
R39
R38
C16
U2
SW8
C23
C20
C28L2
C25
U4
SW726
1
U3 76
51
J2
SW4
U5
Build Option:Serial No
SW3 SW5
U16
C9
D15
R33
D19
D21
R45
D22Q6
R23
R32
R30
R24
C13
D20
R35
J7
R21
C19
SW6
R43
R40
U11
R19
Q8
R34
R26
R37
R29
R18
SW2
R54
D14
R93
C34
D13D9
J5
5
9 6
1
J13
D12
D55
D11
D10
Module
D16
C29
B
J9
A
D5
C18
D8D1
C11
J4
D4
C33
C26
D7
R22
U7
R53
D6
U8
C17
90
70 60
40
302010
80
100
5081
51
SW1
D3
U6
J11
D2
R44
C14
U15U10
9
10 2
1J10
R14
1
J3Rev 281004
Varec, Inc.
Assembly 012842
R16
+1.8V
31
1
B-
+3.3V
B+
GND
R28
MARK SPACE
B
RESET
A
R9 R12
R15
R13
R8 R11
R10
R6
C1
R1C3
C4 R7
R5R4
C5
C6
C2
C8
U1
R3
R2
J1
J12
S
D Q1
T1
L1
C7
U17
R52
R48
C31
R46 C32
R31
R42
D27D26
D25D24
U14
Q5
D17
R49 R50
Q3
Q2
D18
Q7
U9
R47
Q4
U13
15
R94
U12
C22
R36
J8
SW7Reset
SW8LED Enable
D9 - D16Level LEDs (Inches)
D1 - D8Level LEDs (Feet)
D21CPU LED
D22COMM LEDVarec Mark Space©

Initial Configuration (Mark/Space)
42 Installation and Operations Manual
6.1 Setting the Unit Address
The unique address that identifies the 2910 FTT is set using rotary switches SW1-SW3. An address from 000 – 999 can be selected.
Warning! Obtain a hot permit before removing the transmitter cover with power applied.
To set the unit address:
1. Remove the transmitter cover.2. Set SW1 to SW3 to the desired unit address.
For example: to assign an address of 001, set SW1 = 0, SW2 = 0, and SW3 = 1.3. Press switch SW7 to reset the CPU.4. Replace the transmitter cover.
6.2 Choosing Communications Settings
The 2910 FTT can operate as a Varec 1800 or 1900 MWT transmitter, or as a GSI 2000 transmitter for level and temperature format. The data speed can be set to high or low, and the transmitter can be set for forward or reverse rotation.
Warning! Obtain a hot permit before removing the transmitter cover with power applied.
To select communications settings:
1. Remove the transmitter cover.2. Rotate switch SW4 to the appropriate position, as identified in Table 6-1.3. Press switch SW7 to reset the CPU.4. Replace the transmitter cover.
Position Setting
0 1900 MWT & High Speed & Forward Rotation
1 1900 MWT & High Speed & Reverse Rotation
2 1900 MWT & Low Speed & Forward Rotation
3 1900 MWT & Low Speed & Reverse Rotation
4 1800 & High Speed & Forward Rotation
5 1800 & High Speed & Reverse Rotation
6 1800 & Low Speed & Forward Rotation
7 1800 & Low Speed & Reverse Rotation
8 GSI 2000 & High Speed & Forward Rotation
9 GSI 2000 & High Speed & Reverse Rotation
10 GSI 2000 & Low Speed & Forward Rotation
11 GSI 2000 & Low Speed & Reverse Rotation
C-F 1900 MWT & High Speed & Forward Rotation
Table 6-1: Rotary Switch SW4 Positions

Float & Tape Transmitter
Varec, Inc. 43
6.3 Setting the Data Format
The 2910 FTT can transmit data in English or Metric format.
Warning! Obtain a hot permit before removing the transmitter cover with power applied.
To set the data format:
1. Remove the transmitter cover.2. Rotate switch SW5 to the appropriate position, as identified in Table 6-2.3. Refer to Section B.2.3, "Decimal Feet/Inches and Fractional Inches to Binary Conversion
(Forward and Reverse Encoding)" on page 94 and
Note Setting the 2910 FTT data format to meters assumes that the transmitter is/will be installed on a metric mechanical gauge. Setting the data format to feet assumes that the transmitter is/will be installed on an Imperial mechanical gauge.
4. Press switch SW7 to reset the CPU.5. Replace the transmitter cover.
Position Setting
0 Fractional Feet (10s of Feet/1s of Feet/Inches/16ths of an Inch)
1 Decimal Feet (10s of Feet/1s of Feet/10ths of Feet/100ths of Feet)
2 0-20 Meters
3 0-30 Meters
4-F Fractional Feet (10s of Feet/1s of Feet/Inches/16ths of an Inch)
Table 6-2: Rotary Switch SW5 Positions

Initial Configuration (Mark/Space)
44 Installation and Operations Manual
6.4 Setting the RTD Type
To accurately obtain readings from a spot temperature RTD (Resistance Temperature Detector), the 2910 FTT must be set to match the RTD type and temperature format. Types vary according to the metal used, the probe resistance, and the temperature format (Fahrenheit/Celsius).
Warning! Obtain a hot permit before removing the transmitter cover with power applied.
To set the RTD type:
1. Remove the transmitter cover.2. Rotate switch SW6 to the appropriate position, as identified in Table 6-3.3. Press switch SW7 to reset the CPU.4. Replace the transmitter cover.
Position Setting Description
0 Pt100 & F Platinum, 100 ohms, Fahrenheit
1 Pt100 & C Platinum, 100 ohms, Celsius
2 Cu100 & F Copper, 100 ohms, Fahrenheit
3 Cu100 & C Copper, 100 ohms, Celsius
4 Cu90 & F Copper, 90 ohms, Fahrenheit
5 Cu90 & C Copper, 90 ohms, Celsius
6 No MS Temperature no temperature input 40-bit Mark/Space Response message
7 Pt100 & F & 100 Offset Platinum, 100 ohms, Fahrenheit, 100 deg. offset
8 Pt100 & C & 100 Offset Platinum, 100 ohms, Celsius, 100 deg. offset
9 Cu100 & F & 100 Offset Copper, 100 ohms, Fahrenheit, 100 deg. offset
A Cu100 & C & 100 Offset Copper, 100 ohms, Celsius, 100 deg. offset
B Cu90 & F & 100 Offset Copper, 90 ohms, Fahrenheit, 100 deg. offset
C Cu90 & C & 100 Offset Copper, 90 ohms, Celsius, 100 deg. offset
D-F Pt100 & F & 100 Offset Platinum, 100 ohms, Fahrenheit, 100 deg. offset
Table 6-3: Rotary Switch SW6 Positions

Float & Tape Transmitter
Varec, Inc. 45
7 Initial Configuration (Tankway)
After the 2910 FTT has been mounted and wired, it must be calibrated/configured as described below.
1. Set the unit address (see Section 7.1, "Setting the Unit Address" on page 46).2. Choose the communications setting (see Section 7.2, "Choosing Communications Settings"
on page 46).3. Choose the RTD type (see Section 7.4, "Setting the RTD Type" on page 48).4. Calibrate transmitter level, calibrate limit switches, and configure outputs (see Chapter 8
on page 49).Note This chapter contains instructions relevant to a Tankway application. If using Mark/Space, see Chapter 6 on page 41; for MODBUS or GSI MODBUS, see Chapter 5 on page 33.
See Figure 7-1 for the location of the switches and LEDs on the 2910 FTT Tankway communications circuit board.
Figure 7-1: Tankway Communications Board — Switches and LEDs
Note Firmware version indicates Tankway.Note To check the status of the communications circuit board CPU, see Section 9.1.1, "Checking the CPU status" on page 57. To check the communications status, see Section 9.1.2, "Checking communications status" on page 59.Note To activate the LEDs on the communications circuit board, press switch SW8, shown in Figure 7-1. The LEDs will be enabled for about three minutes.
C24
162X1
C30
R25
C27
1
R20
R41
C10
C12
R17
C21
R51
C15
K1
R27
R39
R38
C16
U2
SW8
C23
C20
C28L2
C25
U4
SW726
1
U3 76
51
J2
SW4
U5
Build Option:Serial No
SW3 SW5
U16
C9
D15
R33
D19
D21
R45
D22Q6
R23
R32
R30
R24
C13
D20
R35
J7
R21
C19
SW6
R43
R40
U11
R19
Q8
R34
R26
R37
R29
R18
SW2
R54
D14
R93
C34
D13D9
J5
5
9 6
1
J13
D12
D55
D11
D10
Module
D16
C29
B
J9
A
D5
C18
D8D1
C11
J4
D4
C33
C26
D7
R22
U7
R53
D6
U8
C17
90
70 60
40
302010
80
100
5081
51
SW1
D3
U6
J11
D2
R44
C14
U15U10
9
10 2
1J10
R14
1
J3Rev 281004
Varec, Inc.
Assembly 012842
R16
+1.8V
31
1
B-
+3.3V
B+
GND
R28
B
RESET
A
R9 R12
R15
R13
R8 R11
R10
R6
C1
R1C3
C4 R7
R5R4
C5
C6
C2
C8
U1
R3
R2
J1
J12
S
D Q1
T1
L1
C7
U17
R52
R48
C31
R46 C32
R31
R42
D27D26
D25D24
U14
Q5
D17
R49 R50
Q3
Q2
D18
Q7
U9
R47
Q4
U13
15
R94
U12
C22
R36
J8
SW7Reset
SW8LED Enable
D9 - D16Level LEDs (Fractional Feet)
D1 - D8Level LEDs (Feet)
D21CPU LED
D22COMM LED
SW1
Display Calibrationand
Diagnostic DataEPROMSocket (U2)
TANKWAY
Varec© Tankway

Initial Configuration (Tankway)
46 Installation and Operations Manual
7.1 Setting the Unit Address
The unique address that identifies the 2910 FTT is set using rotary switches SW1-SW3. An address from 000 – 127 can be selected.
Warning! Obtain a hot permit before removing the transmitter cover with power applied.
To set the unit address:
1. Remove the transmitter cover.2. Set SW1 to SW3 to the desired unit address.
For example: to assign an address of 001, set SW1 = 0, SW2 = 0, and SW3 = 1.3. Press switch SW7 to reset the CPU.4. Replace the transmitter cover.
7.2 Choosing Communications Settings
The 2910 FTT can operate as an L&J 1000 MWT, 1500 MWT, or 2000 MWT. The Tank Data can be set for 1 or 4 data modes.
Warning! Obtain a hot permit before removing the transmitter cover with power applied.
To select communications settings:
1. Remove the transmitter cover.2. Rotate switch SW4 to the appropriate position, as identified inTable 7-1.3. Press switch SW7 to reset the CPU.4. Replace the transmitter cover.
Position Setting Description
0 Device Type 1 L&J 2000 MWT, for Varec gauges (forward encoding)
1 Device Type 2 L&J 2000 MWT, for Shand & Jurs gauges (reverse encoding)
2 Device Type 3 L&J 1000 MWT / 1500 MWT
3 Device Type 4 L&J 1000 MWT / 1500 MWT
4-F Device Type 1 L&J 2000 MWT, for Varec gauges (forward encoding)
Table 7-1: Rotary Switch SW4 Positions

Float & Tape Transmitter
Varec, Inc. 47
7.3 Setting the Data Format
The 2910 FTT transmits data in English format.
Warning! Obtain a hot permit before removing the transmitter cover with power applied.
To set the data format:
1. Remove the transmitter cover.2. Rotate switch SW5 to the appropriate position, as identified in Table 7-2.3. Refer to section B.2.3, "Decimal Feet/Inches and Fractional Inches to Binary Conversion
(Forward and Reverse Encoding)" on page 94 and
Note Setting the 2910 FTT data format to feet assumes that the transmitter is/will be installed on an Imperial mechanical gauge.
4. Press switch SW7 to reset the CPU.5. Replace the transmitter cover.
Position Setting
0 Fractional Feet (10s of Feet/1s of Feet/Inches/16ths of an Inch)
1 Decimal Feet (10s of Feet/1s of Feet/10ths of Feet/100ths of Feet)
2-F Fractional Feet (10s of Feet/1s of Feet/Inches/16ths of an Inch)
Table 7-2: Rotary Switch SW5 Positions

Initial Configuration (Tankway)
48 Installation and Operations Manual
7.4 Setting the RTD Type
To accurately obtain readings from a spot temperature RTD (Resistance Temperature Detector), the 2910 FTT must be set to match the RTD type and temperature format. Types vary according to the metal used and the probe resistance.
Warning! Obtain a hot permit before removing the transmitter cover with power applied.
To set the RTD type:
1. Remove the transmitter cover.2. Rotate switch SW6 to the appropriate position, as identified in Table 7-3.3. Press switch SW7 to reset the CPU.4. Replace the transmitter cover.l
Position Setting Description
0 Pt100 Platinum, 100 ohms
1 Cu100 Copper, 100 ohms
2 Cu90 Copper, 90 ohms
3 none RTD not used
4 - F Pt100 Platinum, 100 ohms
Table 7-3: Rotary Switch SW6 Positions

Float & Tape Transmitter
Varec, Inc. 49
8 Configuration & Calibration — Level, Limits, and Outputs
After the user has performed the protocol-specific configuration procedures for the 2910 FTT, the following configuration & calibration tasks remain:
1. Perform a manual measurement of the tank level (hand dip).2. Set the transmitter level to match the tank gauge level reading (see Section 8.1.2, "Setting
the transmitter level" on page 50).3. Calibrate limit switches (if used) to the desired tank level (see Section 8.2, "Calibrating Limit
Switches" on page 51).4. Configure outputs (if used) (Section 8.3, "Configuring Outputs" on page 53).
Note Configuration is not required for input devices. Each input must be wired to the 2910 FTT as described in Chapter 4 "Wiring" on page 13. The input (alarm) status can then be monitored from the system master as described in Section C.4.2.2, "Monitoring input devices" on page 101.
See Figure 8-1 for the location of the switches and LEDs on the 2910 FTT Mark/Space communications circuit board.
Figure 8-1: Mark/Space Communication Board Switches and LEDs
C24
162X1
C30
R25
C27
1
R20
R41
C10
C12
R17
C21
R51
C15
K1
R27
R39
R38
C16
U2
SW8
C23
C20
C28L2
C25
U4
SW726
1
U3 76
51
J2
SW4
U5
Build Option:Serial No
SW3 SW5
U16
C9
D15
R33
D19
D21
R45
D22Q6
R23
R32
R30
R24
C13
D20
R35
J7
R21
C19
SW6
R43
R40
U11
R19
Q8
R34
R26
R37
R29
R18
SW2
R54
D14
R93
C34
D13D9
J5
5
9 6
1
J13
D12
D55
D11
D10
Module
D16
C29
B
J9
A
D5
C18
D8D1
C11
J4
D4
C33
C26
D7
R22
U7
R53
D6
U8
C17
90
70 60
40
302010
80
100
5081
51
SW1
D3
U6
J11
D2
R44
C14
U15U10
9
10 2
1J10
R14
1
J3Rev 281004
Varec, Inc.
Assembly 012842
R16
+1.8V
31
1
B-
+3.3V
B+
GND
R28
MARK SPACE
B
RESET
A
R9 R12
R15
R13
R8 R11
R10
R6
C1
R1C3
C4 R7
R5R4
C5
C6
C2
C8
U1
R3
R2
J1
J12
S
D Q1
T1
L1
C7
U17
R52
R48
C31
R46 C32
R31
R42
D27D26
D25D24
U14
Q5
D17
R49 R50
Q3
Q2
D18
Q7
U9
R47
Q4
U13
15
R94
U12
C22
R36
J8
D9 - D16Level LEDs (Decimal Feet)
D1 - D8Level LEDs (Feet)
SW1 - SW6Rotary Switches
Varec Mark Space©

Configuration & Calibration — Level, Limits, and Outputs
50 Installation and Operations Manual
8.1 Calibrating the Transmitter Tank Level
8.1.1 Before beginning the calibration process
Before setting the transmitter level, perform a manual tank level measurement (hand dip) and verify that the level gauge is calibrated properly. If it is not, calibrate the gauge as directed in the gauge installation and operation manual.
This procedure assumes that the transmitter has been mounted to the gaugehead back cover and wired.
Note The 2910 FTT utilizes a capacitive encoder that maintains the correct level reading during and after a power outage, without a battery backup. No additional configuration is required after a power outage.
8.1.2 Setting the transmitter level
To set the transmitter level:
1. Remove the transmitter cover.Warning! Obtain a hot permit before removing the transmitter cover with power applied.
2. Loosen the set screw on the encoder drive shaft slottedcoupling, as shown in Figure 8-2. This allows the encoder to rotate freely without rotating the coupling.Caution! Excessively loosening the set screw will cause the coupling to fall. Loosen the set screw only to the extent required to free the encoder.
Figure 8-2: 2910 FTT Drive Shaft Coupling
3. Rotate the encoder shaft until the correct level reading is displayed by the host system, a laptop running ViewRTU, a TXA, or diagnostic LEDs D1 - D16.Note To use the LEDs for calibration, see “Appendix B — Setting the Transmitter Level Using BCD” on page 89.Note When using ViewRTU to display the level for calibration, feet, inches, and sixteenths level information is desired (view the ENC point for feet, inches, and sixteenths values). For more information, see “Appendix C — Database Points” on page 95, and Section 9.2.2, "Using ViewRTU to troubleshoot the 2910 FTT" on page 65.
4. Tighten the set screw on the encoder coupling.5. Replace the transmitter cover.
Coupling Set Screw
Slotted Coupling
Transmitter DriveShaft Sprocket

Float & Tape Transmitter
Varec, Inc. 51
8.2 Calibrating Limit Switches
Limit switches are cam-operated SPDT (Single-Pole, Double-Throw) switches that are used to turn on alarms or other devices when the tank contents reach a predetermined level. The adjustable cams on the 2910 FTT provide a limited amount of dwell adjustment. The adjustable dwell can be used to extend the duration of an alarm. Assemblies containing two or four limit switches are available as an option with the 2910 FTT.
Limit switches are mounted on the 2910 FTT encoder assembly and are mechanically driven directly from the transmitter drive shaft. Each switch can be set to close or open at any tank level.
Note All limit switches are wired to operate as a Normally Closed (NC) circuit at the factory. If a Normally Open (NO) operation is required, the user must change the wiring at the switch. See Section 4.9.9, "Wiring limit switches" on page 31.
Warning! Obtain a hot permit before removing the transmitter cover with power applied.
To calibrate limit switches:
1. Remove the transmitter cover.2. Loosen the slotted coupling on the transmitter drive shaft (see "Caution" on page 50). 3. Rotate the 2910 FTT
encoder shaft until the level reading to activate the switch is displayed by the host, TXA, or diagnostic LEDs D1 - D16 (see Figure 8-3).
Figure 8-3:Drive Shaft Coupling
Field AdjustmentKnob
Drive ShaftCoupling

Configuration & Calibration — Level, Limits, and Outputs
52 Installation and Operations Manual
4. Turn the cam until the switch activates with an audible click(see Figure 8-4).
5. Gently turn the encoder shaft back and forth to verify that the switch is operating properly.
Figure 8-4:Dwell on Cams
6. Twist the adjustable cams relative to eachother to adjust thelength of the dwell (the duration of the alarm).
Note Care should be taken to avoid having too much dwell that will cause the low alarm to sound at the high levels and vice versa.
Figure 8-5:Limit Switch Cams
7. After adjusting the dwell, verify that the level that the limit switch activates did not change (see Figure 8-6).
8. Repeat steps 3 through 7 for each of the remaining limit switches.
Figure 8-6: Dial and Notch Indicators9. Rotate the 2910 FTT encoder shaft until the correct level reading (matching the gauge) is
displayed by the host system, TXA, or diagnostic LEDs D1 - D16.10. Tighten the coupling on the transmitter drive shaft.11. Replace the transmitter cover.
AdjustableAlarm Dwell Time
Alarm OFF
Alarm ON
Field Adjustment KnobNormally ClosedConnector
CommonConnector
Normally OpenConnector
(UNUSED)
Limit Switch
(NC2)
(NO3)
Limit Switch
Limit Switch Cam
Dial Indicator
Field Adjustment Knob
Notch Indicator
Dial Indicator

Float & Tape Transmitter
Varec, Inc. 53
8.3 Configuring Outputs
To configure outputs for the 2910 FTT, the user must connect a laptop computer running the ViewRTU software to the RS-232 port. Then use ViewRTU to define alarm conditions and to assign a condition to each output. For the MODBUS 2910 FTT, the outputs can also be configured through the MODBUS interface by writing data to the appropriate registers.
Warning! Obtain a hot permit before removing the transmitter cover with power applied.
Note For more detailed information regarding the ViewRTU program, refer to any Varec RTU Installation and Operation manual.
To configure outputs:
1. Remove the 2910 FTT cover.2. Connect a laptop computer running ViewRTU software to the RS-232 connector (J13) on the
communications circuit board. Figure 8-7 shows the connector.
Figure 8-7: Communication Board Connectors, Top View (Mark/Space shown)
Note Input and output contacts are identified in Table 4-4 on page 26 and Table 4-5 on page 28.
C24
162X1
C30
R25
C27
1
R20
R41
C10
C12
R17
C21
R51
C15
K1
R27
R39
R38
C16
U2
SW8
C23
C20
C28L2
C25
U4
SW726
1
U3 76
51
J2
SW4
U5
Build Option:Serial No
SW3 SW5
U16
C9
D15
R33
D19
D21
R45
D22Q6
R23
R32
R30
R24
C13
D20
R35
J7
R21
C19
SW6
R43
R40
U11
R19
Q8
R34
R26
R37
R29
R18
SW2
R54
D14
R93
C34
D13D9
J5
5
9 6
1
J13
D12
D55
D11
D10
Module
D16
C29
B
J9
A
D5
C18
D8D1
C11
J4
D4
C33
C26
D7
R22
U7
R53
D6
U8
C17
90
70 60
40
302010
80
100
5081
51
SW1
D3
U6
J11
D2
R44
C14
U15U10
9
10 2
1J10
R14
1
J3Rev 281004
Varec, Inc.
Assembly 012842
R16
+1.8V
31
1
B-
+3.3V
B+
GND
R28
MARK SPACE
B
RESET
A
R9 R12
R15
R13
R8 R11
R10
R6
C1
R1C3
C4 R7
R5R4
C5
C6
C2
C8
U1
R3
R2
J1
J12
S
D Q1
T1
L1
C7
U17
R52
R48
C31
R46 C32
R31
R42
D27D26
D25D24
U14
Q5
D17
R49 R50
Q3
Q2
D18
Q7
U9
R47
Q4
U13
15
R94
U12
C22
R36
J8
J13Serial Connection
Varec Mark Space©

Configuration & Calibration — Level, Limits, and Outputs
54 Installation and Operations Manual
Start the ViewRTU application. The user will be prompted to select a firmware version file.
In the file names, LJ = L&J Tankway, MD = MODBUS, and MS = Mark/Space.
3. Select the file that matches the communications protocol used by the 2910 FTT, and then click OK. The main screen appears, as shown in Figure 8-8.
Figure 8-8: ViewRTU Main Window
4. Using the icons or the Point menu, select the MBLK point. The MBLK dialog box appears, showing data items that can be modified.

Float & Tape Transmitter
Varec, Inc. 55
Figure 8-9: ViewRTU Edit Point - MBLK Window

Configuration & Calibration — Level, Limits, and Outputs
56 Installation and Operations Manual
5. Define the alarm conditions that can be used for outputs. At minimum, set values for the following parameters:
CritLowLevel, AdvLowLevel, AdvHighLevel, CritHighLevel, LDeadband, CritLowTemp, AdvLowTemp, AdvHighTemp, CritHighTemp, TDeadband, MinLevel, MaxLevel, MinTemp, MaxTemp
Refer to Section C.4, "MODBUS Register Block (MBLK)" on page 101 for information about each point (parameter).
6. Set any other MBLK parameters as appropriate.7. Click the Exit button to return to the main screen.8. Using the icons or the Point menu, select the DO point. The DO dialog box appears, showing
data items that can be modified.
Figure 8-10: ViewRTU Edit Point - DO Window
9. Assign a control & activation event to each direct output by defining parameters DO1Assign – D04Assign. Refer to Section C.5, "Digital Outputs (DO)" on page 105 for more informa-tion.
10. To make a relay active at system startup, set the appropriate register in the DOPwrUpState parameter.
11. Click the Exit button.12. Close ViewRTU.13. Disconnect the laptop computer cable from the RS-232 connector.14. Replace the 2910 FTT cover.

Float & Tape Transmitter
Varec, Inc. 57
9 Maintenance and Troubleshooting
9.1 Maintenance
The 2910 FTT is designed and manufactured to provide accurate and reliable operation with no scheduled maintenance. The microprocessor is galvanically isolated from the power supply and optically isolated from the communications circuits. The 2910 FTT can also perform self-diagnostics. If a problem is encountered, the transmitter will isolate itself from the field communication bus.
Firmware upgrades and additional features can be installed in the field using a plug-in EPROM. For instructions, see Section 9.1.7, "Upgrading software" on page 63.
Varec can provide spare parts, maintenance kits, preventive maintenance advice, training, and warranties upon request.
Note To activate the LEDs on the communications circuit board, press switch SW8, shown in Figure 9-1 on page 58. The LEDs will be enabled for about three minutes.
Note The communications board must be reset to register configuration changes, includ-ing changes to rotary switches. To restart the CPU, see Section 9.2.4, "Resetting the 2910 FTT" on page 67.
9.1.1 Checking the CPU status
The 2910 FTT provides a CPU status LED (D21) on the communications circuit board. The user can visually check this LED to ensure that processor is operating properly.
Warning! Obtain a hot permit before removing the transmitter cover with power applied.
To check the processor status:
1. Remove the 2910 FTT cover.2. Press switch SW8 on the communications circuit board. The LEDs illuminate.
See Figure 9-1 for switch and LED locations.3. Verify that LED D21 (CPU) flashes on and off about once every three seconds. This indicates
normal CPU operation.
Note If LED D21 does not flash on and off about once every three seconds, return the unit for service.

Maintenance and Troubleshooting
58 Installation and Operations Manual
Figure 9-1: Communications Board: Diagnostic Switches and LEDs (Mark/Space shown)
C24
162X1
C30
R25
C27
1
R20
R41
C10
C12
R17
C21
R51
C15
K1
R27
R39
R38
C16
U2
SW8
C23
C20
C28L2
C25
U4
SW726
1
U3 76
51
J2
SW4
U5
Build Option:Serial No
SW3 SW5
U16
C9
D15
R33
D19
D21
R45
D22Q6
R23
R32
R30
R24
C13
D20
R35
J7
R21
C19
SW6
R43
R40
U11
R19
Q8
R34
R26
R37
R29
R18
SW2
R54
D14
R93
C34
D13D9
J5
5
9 6
1
J13
D12
D55
D11
D10
Module
D16
C29
B
J9
A
D5
C18
D8D1
C11
J4
D4
C33
C26
D7
R22
U7
R53
D6
U8
C17
90
70 60
40
302010
80
100
5081
51
SW1
D3
U6
J11
D2
R44
C14
U15U10
9
10 2
1J10
R14
1
J3Rev 281004
Varec, Inc.
Assembly 012842
R16
+1.8V
31
1
B-
+3.3V
B+
GND
R28
MARK SPACE
B
RESET
A
R9 R12
R15
R13
R8 R11
R10
R6
C1
R1C3
C4 R7
R5R4
C5
C6
C2
C8
U1
R3
R2
J1
J12
S
D Q1
T1
L1
C7
U17
R52
R48
C31
R46 C32
R31
R42
D27D26
D25D24
U14
Q5
D17
R49 R50
Q3
Q2
D18
Q7
U9
R47
Q4
U13
15
R94
U12
C22
R36
J8
SW7Reset
SW8LED Enable
D9 - D16Level LEDs (Fractional Feet)
D1 - D8Level LEDs (Feet)
D21CPU LED
D22COMM LED
EPROMSocket (U2)
Varec Mark Space©

Float & Tape Transmitter
Varec, Inc. 59
9.1.2 Checking communications status
The 2910 FTT provides a COMM status LED (D22) on the communications circuit board. The user can use this LED to visually verify that the circuit board is being polled by a host system and/or is transmitting information.
Warning! Obtain a hot permit before removing the transmitter cover with power applied.
To check the communications status:
1. Remove the 2910 FTT cover.2. Press switch SW8 on the communications circuit board. The LEDs illuminate. See Figure 9-2
for switch and LED locations.3. Check LED D22 (COMM):
• If the LED flashes on and off periodically, the 2910 FTT is communicating with an external system (being polled and/or transmitting). The rate is dependent on the rate the transmitter is being polled by the host system.
• If the LED stays on (illuminated) or off, the 2910 FTT is not communicating with an external system.
Figure 9-2: Communications Board: Diagnostic Switches and LEDs (Mark/Space shown)
C24
162X1
C30
R25
C27
1
R20
R41
C10
C12
R17
C21
R51
C15
K1
R27
R39
R38
C16
U2
SW8
C23
C20
C28L2
C25
U4
SW726
1
U3 76
51
J2
SW4
U5
Build Option:Serial No
SW3 SW5
U16
C9
D15
R33
D19
D21
R45
D22Q6
R23
R32
R30
R24
C13
D20
R35
J7
R21
C19
SW6
R43
R40
U11
R19
Q8
R34
R26
R37
R29
R18
SW2
R54
D14
R93
C34
D13D9
J5
5
9 6
1
J13
D12
D55
D11
D10
Module
D16
C29
B
J9
A
D5
C18
D8D1
C11
J4
D4
C33
C26
D7
R22
U7
R53
D6
U8
C17
90
70 60
40
302010
80
100
5081
51
SW1
D3
U6
J11
D2
R44
C14
U15U10
9
10 2
1J10
R14
1
J3Rev 281004
Varec, Inc.
Assembly 012842
R16
+1.8V
31
1
B-
+3.3V
B+
GND
R28
MARK SPACE
B
RESET
A
R9 R12
R15
R13
R8 R11
R10
R6
C1
R1C3
C4 R7
R5R4
C5
C6
C2
C8
U1
R3
R2
J1
J12
S
D Q1
T1
L1
C7
U17
R52
R48
C31
R46 C32
R31
R42
D27D26
D25D24
U14
Q5
D17
R49 R50
Q3
Q2
D18
Q7
U9
R47
Q4
U13
15
R94
U12
C22
R36
J8
SW7Reset
SW8LED Enable
D9 - D16Level LEDs (Fractional Feet)
D1 - D8Level LEDs (Feet)
D21CPU LED
D22COMM LED
EPROMSocket (U2)
Varec Mark Space©

Maintenance and Troubleshooting
60 Installation and Operations Manual
9.1.3 2910 FTT exploded view
Figure 9-3: 2910 FTT Exploded View
3
2
6
1
7
5
4

Float & Tape Transmitter
Varec, Inc. 61
9.1.4 2910 FTT spare parts list
ItemNo.
Spare Part # Quantity Description
1 N2910EAxxxxxxx 1 2910 FTT Electronics Assembly
2 08-12856 1 Terminal Board, 16 Terminals w/Surge Protection
3 08-08744-2 1 Terminal Board Assembly, 12 Terminals w/o Surge Protection
4A 08-12829 1 MODBUS Communications Board
4B 08-12842-1 1 Mark/Space
4C 08-12842-2 1 L&J Tankway Communications Board
5 08-12836 1 AC / DIDO Board
6 P14-170 1 O-Ring, Main Cover
7 P14-08230 1 O-Ring, Junction Box
Table 9-1: 2910 FTT Spare Parts List

Maintenance and Troubleshooting
62 Installation and Operations Manual
9.1.5 2910 FTT exploded view — with limit switches only
Figure 9-4: 2910 FTT Exploded View — With Limit Switches Only
9.1.6 2910 FTT spare parts list — with limit switches only
1
ItemNo.
Part No. QTY Description
1 P14-170 1 O-Ring, Main Cover
Table 9-2: 2910 FTT Spare Parts List — With Limit Switches Only
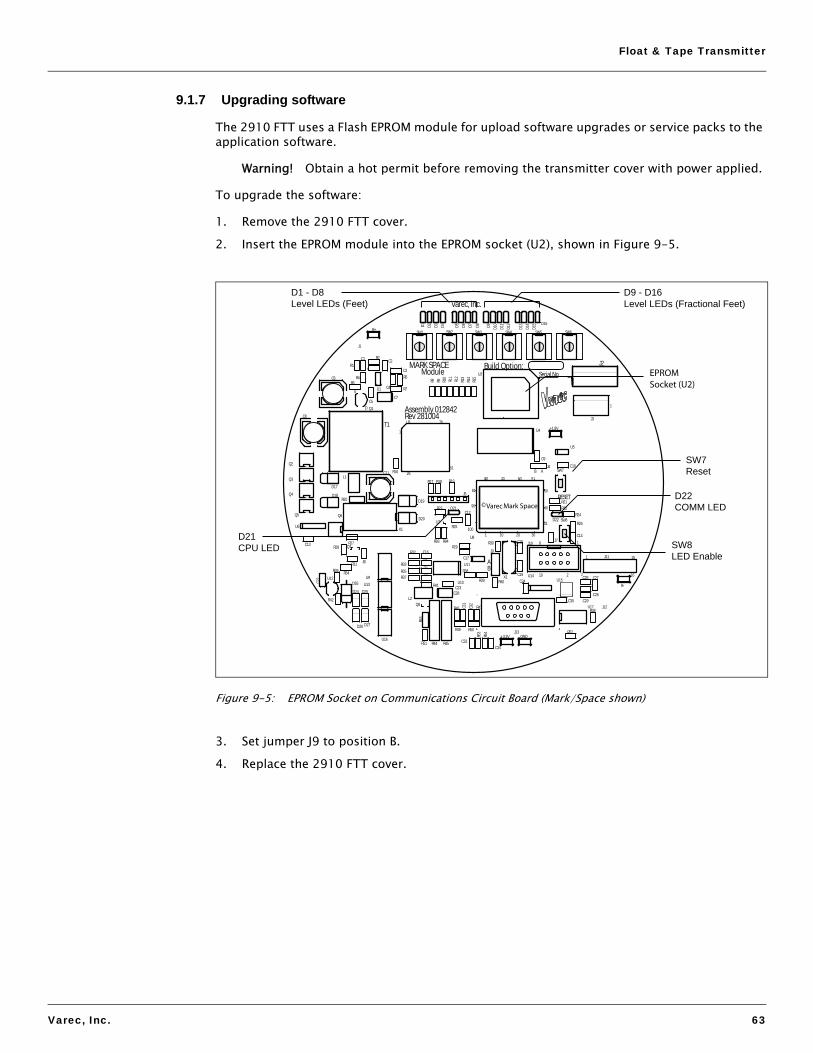
Float & Tape Transmitter
Varec, Inc. 63
9.1.7 Upgrading software
The 2910 FTT uses a Flash EPROM module for upload software upgrades or service packs to the application software.
Warning! Obtain a hot permit before removing the transmitter cover with power applied.
To upgrade the software:
1. Remove the 2910 FTT cover.2. Insert the EPROM module into the EPROM socket (U2), shown in Figure 9-5.
Figure 9-5: EPROM Socket on Communications Circuit Board (Mark/Space shown)
3. Set jumper J9 to position B.4. Replace the 2910 FTT cover.
C24
162X1
C30
R25
C27
1
R20
R41
C10
C12
R17
C21
R51
C15
K1
R27
R39
R38
C16
U2
SW8
C23
C20
C28L2
C25
U4
SW726
1
U3 76
51
J2
SW4
U5
Build Option:Serial No
SW3 SW5
U16
C9
D15
R33
D19
D21
R45
D22Q6
R23
R32
R30
R24
C13
D20
R35
J7
R21
C19
SW6
R43
R40
U11
R19
Q8
R34
R26
R37
R29
R18
SW2
R54
D14
R93
C34
D13D9
J5
5
9 6
1
J13
D12
D55
D11
D10
Module
D16
C29
B
J9
A
D5
C18
D8D1
C11
J4
D4
C33
C26
D7
R22
U7
R53
D6
U8
C17
90
70 60
40
302010
80
100
5081
51
SW1
D3
U6
J11
D2
R44
C14
U15U10
9
10 2
1J10
R14
1
J3Rev 281004
Varec, Inc.
Assembly 012842
R16
+1.8V
31
1
B-
+3.3V
B+
GND
R28
MARK SPACE
B
RESET
A
R9 R12
R15
R13
R8 R11
R10
R6
C1
R1C3
C4 R7
R5R4
C5
C6
C2
C8
U1
R3
R2
J1
J12
S
D Q1
T1
L1
C7
U17
R52
R48
C31
R46 C32
R31
R42
D27D26
D25D24
U14
Q5
D17
R49 R50
Q3
Q2
D18
Q7
U9
R47
Q4
U13
15
R94
U12
C22
R36
J8
SW7Reset
SW8LED Enable
D9 - D16Level LEDs (Fractional Feet)
D1 - D8Level LEDs (Feet)
D21CPU LED
D22COMM LED
EPROMSocket (U2)
Varec Mark Space©

Maintenance and Troubleshooting
64 Installation and Operations Manual
9.2 Troubleshooting
This section provides instructions for:
• 9.2.1, "Replacing the AC power supply fuse" on page 64• 9.2.2, "Using ViewRTU to troubleshoot the 2910 FTT" on page 65• 9.2.3, "Returning the 2910 FTT to factory default settings" on page 67• 9.2.4, "Resetting the 2910 FTT" on page 67• 9.2.5, "Using the LEDs to check the transmitter level" on page 68• 9.2.6, "Verifying temperature data - checking RTD resistance" on page 68
9.2.1 Replacing the AC power supply fuse
To replace the AC Power Supply fuse:
1. Remove power from the 2910 FTT.2. Remove the 2910 FTT cover.3. With a common screwdriver, unscrew the cylindrical fuse and remove it from the fuse holder
on the AC Power Supply circuit board.
Figure 9-6: AC Power Supply Circuit Board, Top View
4. Insert the new fuse and tighten it.5. Replace the 2910 FTT cover.
R8
+
D9
D5
C6
C5
-
Q3
U1
R5
D10
NO
R6
J2
NC
D6
Q4
Q2
K1
L1
D4
R7
C1
C2
Q1
L
C3
Q5 Varec, Inc.
K2
G
K3
40-65
SW2
VAC
D7 D8
K4
R2
C4
R1
R3
S3
Rev 071204
+48V
S
GT2
J1
D2
D3
J8
S2
B-
Assembly 012836
S1
NO
S
J6
NC
N
Q7
NO
J5
NC
Q8
R9
R4
Q6
NO
J4
NC
D1
GT1
T1
110/220
R12
0V
5V
110VAC
VAC
R14
220
Q9
R13
SW1
VAC
Z2
Z1
F1
J3
8
1
1
4
Serial No
F1AC Power Fuse

Float & Tape Transmitter
Varec, Inc. 65
9.2.2 Using ViewRTU to troubleshoot the 2910 FTT
For diagnostics and troubleshooting of the 2910 FTT, a laptop computer running the ViewRTU software can be connected to the RS-232 port. The user can then use ViewRTU to run diagnostics or perform other troubleshooting procedures on the transmitter.
Warning! Obtain a hot permit before removing the transmitter cover with power applied.
Note For more detailed information regarding the ViewRTU program, refer to any Varec RTU Installation and Operation manual.
1. Remove the 2910 FTT cover.2. Connect the communications port of a laptop computer running ViewRTU software to the
RS-232 connector (J13) on the communications circuit board using a crossover (Null MODEM) cable. Figure 9-9 shows the connector.
Figure 9-7: RS-232 Connector on Communications Circuit Board (Mark/Space shown)
3. Start the ViewRTU application. The user will be prompted to select a firmware version file. Select the file that matches the communications protocol used by the 2910 FTT, and then click OK.
In the file names, LJ = L&J Tankway, MD = MODBUS, and MS = Mark/Space.
C24
162X1
C30
R25
C27
1
R20
R41
C10
C12
R17
C21
R51
C15
K1
R27
R39
R38
C16
U2
SW8
C23
C20
C28L2
C25
U4
SW726
1
U3 76
51
J2
SW4
U5
Build Option:Serial No
SW3 SW5
U16
C9
D15
R33
D19
D21
R45
D22Q6
R23
R32
R30
R24
C13
D20
R35
J7
R21
C19
SW6
R43
R40
U11
R19
Q8
R34
R26
R37
R29
R18
SW2
R54
D14
R93
C34
D13D9
J5
5
9 6
1
J13
D12
D55
D11
D10
Module
D16
C29
B
J9
A
D5
C18
D8D1
C11
J4
D4
C33
C26
D7
R22
U7
R53
D6
U8
C17
90
70 60
40
302010
80
100
5081
51
SW1
D3
U6
J11
D2
R44
C14
U15U10
9
10 2
1J10
R14
1
J3Rev 281004
Varec, Inc.
Assembly 012842
R16
+1.8V
31
1
B-
+3.3V
B+
GND
R28
MARK SPACE
B
RESET
A
R9 R12
R15
R13
R8 R11
R10
R6
C1
R1C3
C4 R7
R5R4
C5
C6
C2
C8
U1
R3
R2
J1
J12
S
D Q1
T1
L1
C7
U17
R52
R48
C31
R46 C32
R31
R42
D27D26
D25D24
U14
Q5
D17
R49 R50
Q3
Q2
D18
Q7
U9
R47
Q4
U13
15
R94
U12
C22
R36
J8
J13Serial Connection
Varec Mark Space©

Maintenance and Troubleshooting
66 Installation and Operations Manual
4. The main screen appears, as shown in Figure 9-10.
Figure 9-8: ViewRTU Main Window
5. Using the icons or the Point menu, select a point. The dialog box for that point appears.6. View or edit the information as needed. Refer to “Appendix C — Database Points” on page
95 for information about each database point.7. Repeat steps 5 and 6 as needed for other points.8. Close ViewRTU.9. Disconnect the laptop computer cable from the RS-232 connector.10. Replace the 2910 FTT cover.

Float & Tape Transmitter
Varec, Inc. 67
9.2.3 Returning the 2910 FTT to factory default settings
Note This procedure will reset all level and temperature alarm setpoints.
Warning! Obtain a hot permit before removing the transmitter cover with power applied.
To initialize all 2910 FTT configuration parameters to factory default settings:
1. Remove the 2910 FTT cover.2. Press switches SW7 and SW8 simultaneously. See Figure 9-9 for switch locations.
Figure 9-9: Communications Board: Diagnostic Switches and LEDs (Mark/Space shown)
3. Release SW7. Continue pressing SW8 until LEDs D21 and D22 illuminate. Release SW8.4. Replace the 2910 FTT cover.
9.2.4 Resetting the 2910 FTT
Warning! Obtain a hot permit before removing the transmitter cover with power applied.
1. Remove the 2910 FTT cover.2. Press RESET switch SW7 (see Figure 9-9) to restart the application program.3. Replace the 2910 FTT cover.
C24
162X1
C30
R25
C27
1
R20
R41
C10
C12
R17
C21
R51
C15
K1
R27
R39
R38
C16
U2
SW8
C23
C20
C28L2
C25
U4
SW726
1
U3 76
51
J2
SW4
U5
Build Option:Serial No
SW3 SW5
U16
C9
D15
R33
D19
D21
R45
D22Q6
R23
R32
R30
R24
C13
D20
R35
J7
R21
C19
SW6
R43
R40
U11
R19
Q8
R34
R26
R37
R29
R18
SW2
R54
D14
R93
C34
D13D9
J5
5
9 6
1
J13
D12
D55
D11
D10
Module
D16
C29
B
J9
A
D5
C18
D8D1
C11
J4
D4
C33
C26
D7
R22
U7
R53
D6
U8
C17
90
70 60
40
302010
80
100
5081
51
SW1
D3
U6
J11
D2
R44
C14
U15U10
9
10 2
1J10
R14
1
J3Rev 281004
Varec, Inc.
Assembly 012842
R16
+1.8V
31
1
B-
+3.3V
B+
GND
R28
MARK SPACE
B
RESET
A
R9 R12
R15
R13
R8 R11
R10
R6
C1
R1C3
C4 R7
R5R4
C5
C6
C2
C8
U1
R3
R2
J1
J12
S
D Q1
T1
L1
C7
U17
R52
R48
C31
R46 C32
R31
R42
D27D26
D25D24
U14
Q5
D17
R49 R50
Q3
Q2
D18
Q7
U9
R47
Q4
U13
15
R94
U12
C22
R36
J8
SW7Reset
SW8LED Enable
D9 - D16Level LEDs (Fractional Feet)
D1 - D8Level LEDs (Feet)
D21CPU LED
D22COMM LED
EPROMSocket (U2)
Varec Mark Space©

Maintenance and Troubleshooting
68 Installation and Operations Manual
9.2.5 Using the LEDs to check the transmitter level
LEDs D1 - D16 on the communications circuit board (see Figure 9-9) indicate the transmitter level setting from 0 to119 ft. 15/16ths , in 1/16th of an inch increments.
Refer to “Appendix B — Setting the Transmitter Level Using BCD” on page 89 for detailed information about the level LEDs and LED pattern tables.
9.2.6 Verifying temperature data - checking RTD resistance
To verify the accuracy of the 2910 FTT temperature data, the user can determine if the RTD probe resistance is correct for the tank temperature.
Warning! Obtain a hot permit before removing the junction box or transmitter cover with power applied.
To check 2910 FTT temperature measurement:
1. Remove the 2910 FTT junction box cover.2. Disconnect the RTD wires from the terminal block. 3. Measure the actual tank temperature, using an analog tank thermometer or other method.4. Check the RTD resistance. Compare this to the actual tank temperature using the appro-
priate table for the RTD element type in “Appendix D — RTD Resistance - Temperature Charts” on page 107.
5. Reconnect the RTD wires to the terminal block.6. Replace the cover on the junction box.

Float & Tape Transmitter
Varec, Inc. 69
10 Specifications
10.1 Environmental
10.2 Encoder
10.3 Functional
Item Description
Operating Temperature -4 °F to +185 °F (-20 °C to +85 °C)
Operating Humidity 0 to 95% relative humidity, non-condensing
Safety Approvals Factory Mutual (cFMus) - (USA and Canada) Explosionproof, Class I, Division 1, Groups C&D T5 -25 °C ≤ Ta ≤ +85 °C Flameproof, Class I, Zone 1, AEx/Ex d IIB T5 -20°C ≤ Ta ≤ +85 °C
ATEX/IECEx (International) Flameproof, Class I, Zone 1, Ex II 2G, Ex d IIB T5 Gb -20 °C ≤ Ta ≤ +85 °C
Environmental Approvals IP66, NEMA 4
Item Description
Type Absolute Capacitance Encoder
Accuracy +/- 1/16” (1.58 mm)
Item Description
Power Requirements 20 to 65 VDC 0.05A40 to 65 / 110 / 220 – 240 VAC 750 mW nominal, 50/60 Hz
Available Ranges Feet: 0 - 120 ftMeters: 0 - 36 mNote: Limit switch ranges up to 100 feet.

Specifications
70 Installation and Operations Manual
10.4 Primary Components
10.5 Switches and Indicators
10.6 Input/Output Options
10.7 Physical
Component Description
Main Processor Board MODBUS, Mark/Space, or Tankway options
Item Description
Reset Switch Sends reset signal to processor
Rotary Switches 6 16-position rotary switches
Status Indicators 18 LEDs
Limit Switches 2 or 4 SPDT limit switches (optional):• 11 amp - 125, 250, 277 VAC• 4 amp - 125 VAC Tungsten filament Lamp Load• 1/3 HP - 125 VAC, 250 VDC• 1/2 amp - 125 VDC, 1/4 amp - 250 VDC
Item Description
Digital Inputs Dry Contact (100 ohm maximum)
Item Description
Net Weight 13 lbs (5.9 kg)
Shipping Weight 18 lbs (8.2 kg)
Enclosure Explosion proof die-cast aluminium
Conduit Entries 2910 FTT Die cast housing 2 x 3/4” NPTConduit junction box supplied with 3 x 3/4” NPT (utilizes one entry on 2910 FTT housing above)

Float & Tape Transmitter
Varec, Inc. 71
11 Ordering Information
11.1 Order Codes
ApprovalsEA Electronics Assembly (No Housing) - Not available with Communications Code NAFM cFMus (USA & Canada))
--Explosionproof, Class I, Division 1, Groups C&D T5 -25 °C ≤ Ta ≤ +85 °C--Flameproof, Class I, Zone 1, AEx/Ex d IIB T5 -20 °C ≤ Ta ≤ +85 °C
AT ATEX/IECEx (International))--Flameproof, Class I, Zone 1, Ex II 2G, Ex d IIB T5 Gb -20 °C ≤ Ta ≤ +85 °C
Power Input1 DC2 AC
CommunicationNA N/A (Limit switches only)MS Mark/SpaceMB EIA-485 MODBUS/GSI Type MODBUSLJ Tankway (L&J)
Range (Applies only to models with limit switches)0 N/A (Select this option if no limit switches are supplied)1 25 ft2 50 ft3 100 ft4 7.5 m5 15 m6 30 m
Limit SwitchesN None A Two (2) SPDT Limit Switches (adjustable dwell, positive activation)B Four (4) SPDT Limit Switches (adjustable dwell, positive activation)
Additional Junction Box0 No additional JB
Note: Communications code NA comes with 0 junction boxes. Note: Communications codes MS, MB, and LJ come with 1 or 2 junction boxes depending on the options chosen.
1 Additional JB Note: Applies only to Communications code NA.
Digital Inputs/OutputsA No Additional DIDO (Select this option if Communications code= NA)
Note: Communications codes MS, MB, and LJ come with 2 discrete inputs. Note: Power Input code 2 (AC models) come with a total of 4 discrete inputs and 4 dry contact outputs.
B Additional DIDO (Select this option for Power Input code 1 (DC models))Note: Comes with a total of 2 discrete inputs and 4 dry contact outputs.
N2910- Complete product designation

Ordering Information
72 Installation and Operations Manual
11.2 Transmitter Adapter Kits
Part Description13-05956-102 Adapter kit for mounting to L&J 92514, 92020 and 92030 gauges13-05956-202 Adapter kit for mounting to L&J 92006 and Whessoe Varec 2006, 2026, and 2036
gauges

Float & Tape Transmitter
Varec, Inc. 73
A Appendix A — MODBUS Implementation
A.1 Introduction
This protocol guide explains the operation of the MODBUS as it pertains to the 2910 Float & Tape Transmitter.
A.2 Implementation
The implementation of the MODBUS protocol for the 2910 FTT provides a standard form of digital communications. An effort has been made to parallel current implementations to the greatest extent possible, so that the 2910 FTT communicates with existing MODBUS masters.
Check compatibility carefully to ensure that the 2910 FTT is properly configured for the data format expected by the host computer. Exceptions made because of the unique requirements of the 2910 FTT application have been noted. This is no guarantee, however, that the interpretation made here will be the same as that followed by the MODBUS master.
The 2910 FTT implementation of the MODBUS protocol provides for the passing of measured and calculated variables, configuration information, and diagnostics in data registers. Data is sent in these registers as floating-point values, integer values, numeric codes related to configuration lists, status summary words (packed bits), or individual status flags (single bits).
One master and up to 31 2910 FTTs may be multi-dropped on a single EIA485 communication bus.
The MODBUS functions implemented in the 2910 FTT are listed in Table A-1.
A.3 Configuration
The MODBUS port on the 2910 FTT must be configured to establish communications, as described in Section 5.2, "Choosing Communications Settings" on page 36.
The 2910 FTT address provides a unique identification for the host. The 2910 FTT address is set via rotary switches, as described in Section 5.1, "Setting the Unit Address" on page 35. This address may range from 1 to 254 and must be unique. Each 2910 FTT only responds when a query has been sent to its unique address by the host.
The MODBUS protocol supports two modes of transmission, Remote Terminal Unit (RTU) or ASCII (American Standard Code for Information Interchange). The choice between these two modes is dependent on the preference of the host. RTU is often the preferred protocol because of its improved error detection capabilities and higher throughput. ASCII mode uses ASCII printable characters to represent hexadecimal values. This mode of transmission requires almost twice as many characters to pass information as does the RTU transmission mode. The 2910 FTT only supports the RTU mode of communications.
Function Code Function Information Type MODBUS Nomenclature
01 Read Bits Read output status
02 Read Bits Read input status
03 Read Integer, Code, Status word, Floating point Read output registers
Table A-1: MODBUS Functions

Appendix A — MODBUS Implementation
74 Installation and Operations Manual
Note Exception: Because the 2910 FTT does not distinguish between inputs and outputs, function codes 01 and 02 as they apply to bits, and function codes 03 and 04 as they apply to numeric values refer to the same data registers. For example, either function code 03 or function 04 can be used to read the integer form of the true mass variable at data address 0053.
Note Default communications settings are shown in bold type in Table A-2.
A.4 Functions and Data Formats
The MODBUS data in the 2910 FTT is arranged in integer registers, floating point registers, and status bits. The assignments for these registers are found at the end of this appendix.
Function codes 03, 04, 06, and 16 are used with integer registers.
Because of the multiple MODBUS hosts available today, the 2910 FTT supports two floating-point data formats: a two 16-bit register format and a one 32-bit register format. These two formats provide maximum system flexibility. In the two 16-bit registers format, function codes 03 and 04 are used to read floating-point registers while function code 16 is used to write floating-point registers. In the one 32-bit register format, function code 65 is used to read floating-point registers, while function code 66 is used to write floating-point registers.
Function codes 01, 02, 05, and 15 are used with status bits.
A complete description of all the preceding commands, except floating point, can be found in the Modicon MODBUS Protocol Reference Guide, document number PI-MBUS-300 Rev B.
04 Read Integer, Code, Status word, Floating point Read input registers
05 Write Bits Force single output status
06 Write Integer, Code, Status word Preset single register
15 Write Bits Force multiple outputs
16 Write Integer, Code, Status word, Floating point Preset multiple registers
65 Read Floating point Read floating point registers
66 Write Floating point Write floating point registers
Configuration Item Valid Entries(default in bold type)
MODBUSConfigurable
ViewRTU Configurable
MODBUS Address 1 to 254 No No
Maximum Integer Size Whole number (0 to 65,534)(default: 9999)
Yes Yes
Integer Scaling Factors Floating point number Yes Yes
Unit Selection Coding list No No
Baud Rate 300, 600, 1200, 2400, 4800, 9600, 19200
No No
Number of Stop Bits 1 No No
Parity Odd, Even, None No No
Table A-2: MODBUS Configuration Information
Function Code Function Information Type MODBUS Nomenclature
Table A-1: MODBUS Functions

Float & Tape Transmitter
Varec, Inc. 75
A.5 Integer Registers
Integer registers are the most commonly used type of MODBUS data and are supported by most MODBUS hosts. In the 2910 FTT implementation, the MODBUS registers are arranged in one of the following four formats:
Integer Data - a scaled number from 0 to the maximum MODBUS integer
Coded Data - Multiple choice configuration data chosen from a coded list
Packed Bit Data - Register form of 16 packed single bits
The integer, and coded data registers contain all of the information needed to configure and read process data. Any integer register may be read with function code 03 or function code 04. These same registers may be written one at a time with function code 06 or multiple registers can be written with function code 16.
For future compatibility, the 2910 FTT accepts reads and writes to reserved registers. Writes to reserved registers have no effect. Reads from reserved registers return a zero (0).
Note In all of the following communication examples, the error check value is dependent upon the mode of transmission.
A.5.1 Integer data
The integer data is a whole number between 0 and the maximum MODBUS integer (inclusive). The maximum MODBUS integer is a user-configurable variable that is a whole number between 0 and 65,535 (inclusive). The integer data must also be scaled for each data type by entering the desired units, a minimum, and a maximum value. In order for the integer value to be correctly interpreted, these scaling factors must match the format expected by the host system.
The following communication example shows the request for one register starting at register 0 (0000 Hex).
For the following example, assume:
• minimum = 1 meter• maximum = 15 meters
Term Definition
Address User-assigned address of the slave device
Function Code Function the slave is to perform
Start Register (H) High-order data address byte of the number of registers to read or write
Start Register (L) Low-order data address byte of the first register to read or write
Number of Registers (H) High-order byte of the number of registers to read or write
Number of Registers (L) Low-order byte of the number of registers to read or write
Byte Count Number of data bytes
Data MSB Data register's most significant byte
Data LSB Data register's least significant byte
Status Bit (H) High-order data address byte of the first bit to read or write
Status Bit (L) Low-order data address byte of the first bit to read or write
Error Check Message checksum CRC (Cyclical Redundancy Check)
Table A-3: Terms and Definitions

Appendix A — MODBUS Implementation
76 Installation and Operations Manual
• maximum MODBUS integer = 65,534
Note A formula for converting numbers to scaled integer format is provided in Section A.5.2, "Integer data" on page 76.
A.5.2 Integer data
• Hexadecimal representation • 4124 Decimal equivalent: 16,676
The data returned for data address 0 is 16,676 (4124 Hex). This value must be scaled using the following formula to give it meaning.
If a variable goes out-of-bounds (outside the minimum or maximum scale points), a value equal to the maximum MODBUS integer + 1 is returned. Writing to dynamically calculated parameters has no effect on those parameters.
Host Request
Address Function Code
Start RegH
Start RegL
# of RegH
# of RegL
ErrorCheck
01 03 00 00 00 01 XX
2910 FTT Response
Address Function Code
Byte Count DataMSB
DataLSB
ErrorCheck
01 03 02 41 24 XX
Table A-4: Communication Examples
4.56 meters

Float & Tape Transmitter
Varec, Inc. 77
A.5.3 Coded data
Coded data represents a table look-up value. Data written to these registers must be a valid table entry. Invalid data may cause a Configuration Error to occur. The following example shows coded data at data address 20 (0014 Hex) representing level units. The value 2 (0002 Hex) returned from the 2910 FTT corresponds to level units = FT-IN-16TH.
• Hexadecimal representation 0001• Level unit table representation: FT
A.5.4 Packed bit data
Packed bits represent 16 individual status bits packed into one register. The status bits have been packed this way for systems that prefer handling only register information. These bits may also be read or written individually using a bit command. The bits within the packed registers are grouped by data or function type. The following communication example of packed bits shows alarm status information at data address 5 (0005 Hex) returned by the 2910 FTT.
Note Bit #0 is ON indicating a critical low level Alarm
Host Request
Address Function Code
Start RegH
Start RegL
# of RegH
# of Reg ErrorCheck
01 03 00 14 00 01 XX
2910 FTT Response
Address Function Code
Byte Count DataMSB
DataLSB
ErrorCheck
01 03 02 00 01 XX
Table A-5: Coded Data Look-Up Value Registers
Host Request
Address Function Code
Start RegH
Start RegL
# of RegH
# of RegL
ErrorCheck
01 03 00 05 00 01 XX
2910 FTT Response
Address Function code
Byte Count DataMSB
DataLSB
ErrorCheck
01 03 02 00 01 XX
Table A-6: Status Bits Packed Registers

Appendix A — MODBUS Implementation
78 Installation and Operations Manual
A.6 Floating-Point Registers
Although not part of the MODBUS protocol specification, floating point numbers have been implemented using the IEEE 754 standard. Floating point numbers reduce the complexity required in scaling integer values and provide a means to transmit numbers used by the 2910 FTT that are not easily scaled (such as the scaling factors themselves).
A.6.1 Floating-point data
The 2910 FTT is capable of using a two 16-bit registers format and a one 32-bit register format. Examples and descriptions of both formats follow.
Note Although this type of data does not require scaling, it is important that the measure-ment unit selected in the 2910 FTT be the same as that expected by the host. In addition, where possible, data is available in both integer and floating-point formats.
A.6.2 The Two 16-bit registers format
Function code 03 or 04 is used to read floating-point registers in this format. Function code 16 is used to write floating-point registers in this format. An example of reading the temperature, register 102 (0066 Hex), in floating-point format from the 2910 FTT is shown as follows:
A.6.3 Floating point data
• Hexadecimal representation: 42 C8 00 00• Decimal equivalent: 100.00
Floating-point registers that are defined as reserved have zero (0) as their only legal value. A write command to a reserved floating-point register is ignored.
Host Request
Address Function Code
Start RegH
Start RegL
# of RegH
# of RegL
ErrorCheck
01 03 00 66 00 02 XX
2910 FTT Response
Address Function Code
Byte Count DataMSB
DataLSB
DataMSB
DataLSB
ErrorCheck
01 03 04 42 C8 00 00 XX
Table A-7: 16-Bit Floating-Point Registers

Float & Tape Transmitter
Varec, Inc. 79
A.6.4 The one 32-bit register format
Function code 65 (41 Hex) is used to read floating-point registers in this format. An example of a floating-point register read is shown below with the a temperature of 100.0 degrees is being read from register 1 (0001 Hex).
A.6.5 Floating point data
• Hexadecimal representation: 42 C8 00 00• Decimal equivalent: 100.00
Function code 66 (42 Hex) is used to write floating-point registers. An example of a floating-point register write is shown below with the value 100.0 being written into the Advisory High Temperature Alarm Setpoint, register 12 (000C Hex).
A.6.6 Floating point data
• Hexadecimal representation: 42 C8 00 00• Decimal equivalent: 100.00
Floating-point registers that are defined as reserved have zero (0) as their value. A write command to a reserved floating-point register will be ignored.
Host Request
Address Function Code
Start Reg H
Start RegL
# of Reg H
# of Reg L
ErrorCheck
01 41 00 01 00 01 XX
2910 FTT Response
Address Function Code
# of Reg H
# of RegL
DataMSB
Data Data Data LSB Error Check
01 41 00 01 42 C8 00 00 XX
Table A-8: 32-Bit Floating-Point Registers
Host Request
Address Function Code
Start RegH
Start RegL
# of RegH
# of RegL
DataMSB
01 42 00 0C 00 01 42
Data Data Data LSB
ErrorCheck
C8 00 00 XX
2910 FTT Response
Address Function Code
# of Reg H
# of RegL
ErrorCheck
01 03 02 41 XX
Table A-9: Floating Point Data

Appendix A — MODBUS Implementation
80 Installation and Operations Manual
A.7 Status Bits
In the 2910 FTT implementation, status bits contain alarms, commands, and status information. The state of a MODBUS status bit is defined as either ON (true) or OFF (false). The ON state is represented by a “1”. The status bits may be read with function code 1 or 2. They may be written one at a time with function code 5 or multiple bits may be written with function code 15. An example of a read message for bits 2 through 6 as returned by the 2910 FTT is shows as follows.
A.7.1 Status bit data
Binary representation 1 0010 (bits 6-2)Bit #2: High Advisory Alarm OFFBit #3: High Critical Alarm ONBit #4: Unauthorized Mass Movement OFFBit #5: Standard Density Alarm OFFBit #6: Critical Zone Alarm ON
A.8 Exception Responses
The exception responses returned by the 2910 FTT are listed below:
In addition, messages that are received with a parity error, checksum error, or message format error will be ignored.
Host Request
Address Function Code
Start RegH
Start RegL
# of RegH
# of RegL
ErrorCheck
01 02 00 02 00 04 XX
2910 FTT Response
Address Function Code
Byte Count Data ErrorCheck
01 02 01 12 XX
Table A-10:
Exception Response Reason
01 Illegal Function Message is not allowed
02 Illegal Data Address Data address (bit or register) requested is not defined
03 Illegal Data Value Data value being written is out of range
04 Busy During power-up
Table A-11: Exception Responses Returned by the 2910 FTT

Float & Tape Transmitter
Varec, Inc. 81
A.9 Data Out of Range
When integer data calculated by the 2910 FTT is outside the minimum or maximum scale points or is otherwise out of range, the value returned is that of the maximum MODBUS integer + 1. For example, if the maximum MODBUS integer is 65,534 (as used in our previous examples) the “data out of range” value is 65,535. The “data out of range” convention does not apply to the status bits, packed status bits, character data, and coded data.
The following error conditions will also cause the 2910 FTT to return scaled integer values of maximum MODBUS integer + 1.
• Off-line Mode• Strap Error• No CALC• API Correction Error• CALC Error
This permits a host to detect a serious failure without monitoring other 2910 FTT status bits.
A.10 Loopback Test
In accordance with the MODBUS specification, function code 8 initiates a loopback test. The purpose of this test is to check the communication system. It does not affect the operation of the 2910 FTT. The 2910 FTT supports only diagnostic code 00. This is a request to return query data. Upon receiving a loopback message containing this code, the 2910 FTT will echo the message sent by the host. The entire message returned will be identical to the message transmitted by the host field-per-field. An example of a loopback message is as follows:
A.11 Hardware Implementation
The 2910 FTT uses a 2-Wire EIA485 hardware interface to communicate with the MODBUS master. EIA485 is a high speed differential communications network which allows up to 32 devices to operate on one network. The 2910 FTT and MODBUS master share a twisted pair of wires to communicate.
The communication distance EIA485 can reliably travel is dependent on baud rate (communication speed), wire quality, environmental noise, wiring configuration, and the number of multi-dropped 2910 FTTs. The recommended wire for EIA485 systems is 18-gauge or larger, shielded, twisted pairs. The shield should be earth grounded at the MODBUS master (control system or computer end). The shield at the 2910 FTT should be open. The 2910 FTT- power line acts as a common reference tie to the MODBUS master.
Host Request
Address Function Code
Code HO Code LO Data Data ErrorCheck
01 08 00 02 F3 26 XX
2910 FTT Response
Address Function Code
Code HO Code LO Data Data Error Check
01 08 00 00 F3 26 XX
Table A-12: Function Code — Loopback Test

Appendix A — MODBUS Implementation
82 Installation and Operations Manual
Termination resistors of 100 Ohms are shown at each end of the communication bus to minimize reflections on the line. Termination resistors may not be necessary at baud rates of 9600 bits per second or slower.
Pull-up and pull-down resistors are also shown at the MODBUS master end of the cable. These resistors minimize the affects of noise when the lines are idle. Only one set of pull-up or pull-down resistors are required per twisted pair cable. These resistors are included in the 2910 FTT and can be included in the circuit using the procedure described in Chapter 5 on page 33.
A.12 Integer Register Map
Register Number Type Description
0 Scaled Level
1 Scaled Temperature
2 – 4 Reserved
5 Bit Field AimStat Bit Usage0 CRIT LO LEVEL1 ADV LO LEVEL2 ADV HI LEVEL3 CRIT HI LEVEL4 CRIT LO TEMP5 ADV LO TEMP6 ADV HI TEMP7 CRIT HI TEMP8 HW IN 19 HW IN 210 HW IN 3 *11 NW IN 4 *12 – 15 RESERVED* when optional AC Power module is installed
6 Bit Field DiagStatBit Usage0 BAD LEVEL1 BAD TEMP2 – 15 RESERVED
7 Bit Field CmdsBit Usage0 – 4 RESERVED5 CALIB LEVEL6 – 15 RESERVED
8 Reserved Reserved
9 Reserved Reserved
10 Scaled Crit Low Level Setpoint
11 Scaled Adv Low Level Setpoint
12 Scaled Adv High Level Setpoint
13 Scaled Crit High Level Setpoint
Table A-13: Integer Register Map

Float & Tape Transmitter
Varec, Inc. 83
14 Scaled Level Deadband
15 Scaled Crit Low Temp Setpoint
16 Scaled Adv Low Temp Setpoint
17 Scaled Adv High Temp Setpoint
18 Scaled Crit High Temp Setpoint
19 Scaled Temp Deadband
20 CodeRead-only
Level Units 0 - METERS1 - FEET
21 Code(Read-only)
Temp Units0 - C1 - F
22 Code(Read-only)
Level Type1 - FORWARD2 - REVERSE
23 Code(Read-only)
Temp Type0 - Pt1001 - Cu1002 - Cu90
24 Scaled Manual Temperature
25 Code Max Integer Value
26 Reserved
27 Scaled Calibration Level
28 – 99 Reserved
100 Float Level
102 Float Temp
104 Float RTD Resistance
106 Reserved Float
108 Reserved Float
110 Float Crit Low Level
112 Float Adv Low Level
114 Float Adv High Level
116 Float Crit High Level
118 Float Level Deadband
120 Float Crit Low Temp
122 Float Adv Low Temp
124 Float Adv High Temp
126 Float Crit High Level
128 Float Temp Deadband
130 Float Min Level
132 Float Max Level
Register Number Type Description
Table A-13: Integer Register Map

Appendix A — MODBUS Implementation
84 Installation and Operations Manual
134 Float Min Temp
136 Float Max Temp
138 Reserved Float
140 Float Man Temp
142 Float Calib Level
144 – 199 Reserved Float
200 Float Level
202 Float Temp
204 Float RTD Resist
206 Reserved Float
208 Reserved Float
210 Bit Field AlmStart
211 Bit Field DiagStat
212 - 214 Reserved Reserved
215 Code(Read-only)
Level Units
216 Code(Read-only)
Temp Units
217- 219 Reserved Reserved
220 Code(Read-only)
Level Type
221 Code(Read-only)
Temp Type
222 - 229 Reserved Reserved
230 Float Crit Low Level
232 Float Adv Low Level
234 Float Adv High Level
236 Float Crit High Level
238 Float Level Deadband
240 Float Crit Low Temp
242 Float Adv Low Temp
244 Float Adv High Temp
246 Float Crit High Level
248 Float Temp Deadband
250 Float Min Level
252 Float Max Level
254 Float Min Temp
256 Float Max Temp
258 Reserved Float
260 Float Man Temp
262 - 267 Reserved Reserved
Register Number Type Description
Table A-13: Integer Register Map

Float & Tape Transmitter
Varec, Inc. 85
268 Reserved Long Reserved
270 Bit Field DO StateBit Usage0 - Output #11 - Output #22 - Output #33 - Output #44 – 15 - Reserved
271 Bit Field DO Output in power-up state; when set the DO will close at power-up.Bit Usage:0 - Output #11 - Output #22 - Output #33 - Output #4
272 - 284 Reserved Reserved
285 Code DO #1 Output Assignment:0 - Not Assigned1 - Host Control2 - Critical High Level3 - Advisory High Level4 - Advisory Low Level5 - Critical Low Level6 - Critical High Temp7 - Advisory High Temp8 - Advisory Low Temp9 - Critical Low Temp
286 Code DO #2 Output Assignment:0 - Not Assigned1 - Host Control2 - Critical High Level3 - Advisory High Level4 - Advisory Low Level5 - Critical Low Level6 - Critical High Temp7 - Advisory High Temp8 - Advisory Low Temp9 - Critical Low Temp
Register Number Type Description
Table A-13: Integer Register Map

Appendix A — MODBUS Implementation
86 Installation and Operations Manual
A.13 32-Bit Floating Point Register Map
287 Code DO #3 Output Assignment:0 - Not Assigned1 - Host Control2 - Critical High Level3 - Advisory High Level4 - Advisory Low Level5 - Critical Low Level6 - Critical High Temp7 - Advisory High Temp8 - Advisory Low Temp9 - Critical Low Temp
288 Code DO #4 Output Assignment:0 - Not Assigned1 - Host Control2 - Critical High Level3 - Advisory High Level4 - Advisory Low Level5 - Critical Low Level6 - Critical High Temp7 - Advisory High Temp8 - Advisory Low Temp9 - Critical Low Temp
289 - 300 Reserved Reserved
Register Number Type Description
Table A-13: Integer Register Map
Register Number Description
0 Level
1 Temp
2 RTD Resist
3 Reserved
4 Reserved
5 Crit Low Level
6 Adv Low Level
7 Adv High Level
8 Level Deadband
9 Adv Low Temp
10 Crit High Level
11 Min Level
12 Min Temp
13 Reserved
Table A-14: 32-Bit Floating Point Register Map

Float & Tape Transmitter
Varec, Inc. 87
A.14 Status Bit Register Map
14 Reserved
15 Reserved
16 Reserved
17 Reserved
18 Reserved
19 Reserved
20 Reserved
21 Reserved
Register Number Description
Table A-14: 32-Bit Floating Point Register Map
Register Number Description
0 – 15 AlmStat
16 – 31 Diag Stat
32 – 47 Cmds
Table A-15: Status Bit Register Map

Appendix A — MODBUS Implementation
88 Installation and Operations Manual

Float & Tape Transmitter
Varec, Inc. 89
B Appendix B — Setting the Transmitter Level Using BCD
The 2910 FTT communications circuit board contains LEDs that indicate the transmitter level setting to the 1/16th of a fractional foot (inches), as well as to the 100ths of a foot. This section provides instructions for using binary coded decimal (BCD) to set the transmitter level and a decimal to binary conversion table used when converting the level in the tank from decimal to binary and fractional feet.
Metric modes are from 0 - 30 meters and are also discussed in this section.
B.1 Before Beginning to Set the Transmitter Level
B.1.1 LEDs and switch functions and locations
Figure B-1 shows the LED locations on the communications circuit board. LEDs D1 - D8 indicate the level in feet, in 1 foot increments. LEDs D9 - D16 indicate the level in fractional and decimal feet, in 16ths of an inch, and 100ths feet increments respectively.
Figure B-1: LED and Switch Locations (Mark/Space Communications circuit board — Top View)
Note To activate the LEDs on the communications circuit board, press switch SW8, shown in Figure B-1. The LEDs will be enabled for about three minutes.
B.1.2 Forward or reverse encoding
The level indicated by the LEDs is independent of the transmitter’s encoder direction setting. The LEDs present the level in a decimal format with D1– D4 representing the foot 10’s digit in binary, D5 – D8 representing the foot 1’s digit in binary. D9 – D12 represent the decimal feet 10’s value, and D13 – D16 representing the decimal feet 100’s value. Refer to Table B-3, "Decimal Feet/Inches and Fractional Inches to Binary Conversion", on page 94.
The encoder direction is set with a rotary switch. For more information, refer to the relevant Initial Configuration chapter.
162X1
R25
C27
1
R20
C10
C12
R17
C21
C15
K1
R27
R39
R38
C16
U2
SW8
C20
C25
U4
SW726
1
U3 76
51
J2
SW4
U5
Build Option:Serial No
SW3 SW5
C9
D15
R33
D19
D21
D22Q6
R23
R32
R30
R24
C13
D20
R35
J7
R21
C19
SW6
U11
R19
R34
R26
R37
R29
R18
SW2
D14
R93
D13D9
J5
D12
D11
D10
Module
D16
B
J9
A
D5
C18
D8D1
C11
J4
D4 D7
R22
U7
D6
U8
C17
90
70 60
40
302010
80
100
5081
51
SW1
D3
U6
J11
D2
C14
U15
9
10 2
1J10
R14
1
J3Rev 281004
Varec, Inc.
Assembly 012842
R16
+1.8V
31
1
B+
R28
MARK SPACE
B
RESET
A
R9 R12
R15
R13
R8 R11
R10
R6
C1
R1C3
C4 R7
R5R4
C5
C6
C2
C8
U1
R3
R2
J1
S
D Q1
T1
L1
C7
R31
U14
Q5
D17
Q3
Q2
D18
Q7
U9
Q4
15
R94
U1222
R36
J8
SW8LED Enable
D9 - D16Level LEDs (Fractional Feet)
D1 - D8Level LEDs (Feet)
Varec Mark Space©

Appendix B — Setting the Transmitter Level Using BCD
90 Installation and Operations Manual
B.2 Setting the Transmitter Level Using BCD (Forward and Reverse Encoding)
Note 1 = LED On 0 = LED Off
Warning! Obtain a hot permit before removing the transmitter cover with power applied.
To set the encoder level:
1. Remove the 2910 FTT cover.2. Press switch SW8 to enable the LEDs.3. Refer to Table B-3 on page 94. Find the whole number entry that matches your target level
in feet, decimal 10ths of feet, and 100ths of feet.
For example, if the target level is 41 feet, 8 8/16 inches, locate the entry for 41 feet.
4. Convert the inches into decimal feet. a. 8 8/16 inches = 8.5 inches. b. Now convert 8.5 inches to decimal by dividing 8.5 by 12, which equals .7083 feet.c. Now round .7083 to the nearest 100ths of feet, which equals .71.
5. Rotate the encoder shaft clockwise or counter-clockwise until LEDs D1 - D4 (10s of Feet) display the desired foot pattern.
Figure B-2: Decimal to Binary Example - 10s of Feet
6. Continue rotating the encoder shaft clockwise or counter-clockwise until LEDs D5 - D8 (1s of Feet) display the desired foot pattern.
Figure B-3: Decimal to Binary Example - 1s of Feet
3 0011 4 0100 5 0101
0 0000 1 0001 2 0010

Float & Tape Transmitter
Varec, Inc. 91
7. Rotate the encoder shaft clockwise or counter-clockwise to adjust the level until LEDs D9 - D12 (10ths of decimal feet) display the decimal feet pattern shown in Figure B-4:.
Figure B-4: Decimal to Binary Example - 10ths of Feet
8. Rotate the encoder shaft clockwise or counter-clockwise to adjust the level until LEDs D13 - D16 (100ths of decimal feet) display the decimal feet pattern shown in Figure B-5:.
Figure B-5: Decimal to Binary Example - 100ths of Feet
9. D1 - D16 should show the following pattern:• 0100 0001 0111 0001
10. Replace the 2910 FTT cover.
6 0110 7 0111 8 1000
0 0000 1 0001 2 0010

Appendix B — Setting the Transmitter Level Using BCD
92 Installation and Operations Manual
B.2.1 Decimal to Binary Conversion (Forward and Reverse Encoding)
Table B-1 should be used when converting the level in the tank from decimal to binary (see Example 1 below).
Example 1: Decimal
41 feet, 8 inches, and 8/16ths of an inch (41.71 Decimal) = 0100 0001 0111 0001 Binary
Table B-1: Decimal to Binary ConversionNote 1 = LED On
0 = LED Off
Decimal/Binary10s of Feet
Decimal/Binary 1s of Feet
Decimal/Binary 10ths of Feet
Decimal/Binary100ths of Feet
0 0000 0 0000 0 0000 0 0000
1 0001 1 0001 1 0001 1 0001
2 0010 2 0010 2 0010 2 0010
3 0011 3 0011 3 0011 3 0011
4 0100 4 0100 4 0100 4 0100
5 0101 5 0101 5 0101 5 0101
6 0110 6 0110 6 0110 6 0110
7 0111 7 0111 7 0111 7 0111
8 1000 8 1000 8 1000 8 1000
9 1001 9 1001 9 1001 9 1001
10 1010
11 1011

Float & Tape Transmitter
Varec, Inc. 93
B.2.2 Meters to Binary Conversion (Forward and Reverse Encoding)
Table B-2 should be used when converting the level in the tank from meters or feet to binary (see Example 2 below).
Example 2: Metric
12.7127 meters = 0001 0010 0111 0001 Binary
Note The binary equivalent has been rounded to the nearest one hundredths of a meter; therefore, total meters equal 12.71, as shown in Table B-2.
Table B-2: Meters to Binary ConversionNote 1 = LED On
0 = LED Off
Meters/Binary10s
Meters/Binary 1s
Meters/Binary 10ths
Meters/Binary100ths
0 0000 0 0000 0 0000 0 0000
1 0001 1 0001 1 0001 1 0001
2 0010 2 0010 2 0010 2 0010
3 0011 3 0011 3 0011 3 0011
4 0100 4 0100 4 0100
5 0101 5 0101 5 0101
6 0110 6 0110 6 0110
7 0111 7 0111 7 0111
8 1000 8 1000 8 1000
9 1001 9 1001 9 1001

Appendix B — Setting the Transmitter Level Using BCD
94 Installation and Operations Manual
B.2.3 Decimal Feet/Inches and Fractional Inches to Binary Conversion (Forward and Re-verse Encoding)
Table B-3 should be used when converting the level in the tank from decimal feet/inches and fractional inches to binary (see Example 1 below).
Example 1: Decimal
41 feet, 8 inches, and 8/16ths of an inch = 0100 0001 1000 1000 Binary
Table B-3: Decimal Feet/Inches and Fractional Inches to Binary ConversionNote 1 = LED On
0 = LED Off
Decimal/Binary10s of Feet
Decimal/Binary 1s of Feet
Decimal/Binary Inches
Fractional Inches/Binary1/16ths of an Inch
0 0000 0 0000 0 0000 0/16 0000
1 0001 1 0001 1 0001 1/16 0001
2 0010 2 0010 2 0010 2/16 0010
3 0011 3 0011 3 0011 3/16 0011
4 0100 4 0100 4 0100 4/16 0100
5 0101 5 0101 5 0101 5/16 0101
6 0110 6 0110 6 0110 6/16 0110
7 0111 7 0111 7 0111 7/16 0111
8 1000 8 1000 8 1000 8/16 1000
9 1001 9 1001 9 1001 9/16 1001
10 1010 10/16 1010
11 1011 11/16 1011
12/16 1010
13/16 1011
14/16 1010
15/16 1011

Float & Tape Transmitter
Varec, Inc. 95
C Appendix C — Database Points
This appendix describes the 2910 FTT database points. These points contain configuration parameters for the transmitter, as well as dynamic (real-time) data that show status during transmitter operation.
To access the points, the user must connect a laptop computer running the ViewRTU software to the RS-232 (EIA232) connector. See Section 8.3, "Configuring Outputs" on page 53, or “Section 9.2.2, "Using ViewRTU to troubleshoot the 2910 FTT" on page 65.
C.1 System Information (SYS)
C.1.1 Description
The System Information Point lists the hardware and software specifications of the system. Other information includes the hardware version.
C.1.2 ViewRTU dialog box: EDIT POINT

Appendix C — Database Points
96 Installation and Operations Manual
C.1.3 Parameters
The database parameters used by the SYS point are listed and described below:
Configuration Parameters Function
Tag The Tag contains 7 bytes of data to identify the transmitter. The format of the TAG is “LT xxx” where xxx is the transmitter address.
DBFile The database file name. DBFile is the name of the RCF database configuration file.
DBVer The database version.
Table C-1: View RTU Dialog Box: EDIT POINT — Parameters
Dynamic Parameters Function
UnitAddr The transmitter Unit Address (SW1-SW3)
DBPnts The number of database points defined
DBSize The size of the database in bytes
SysVer The Firmware version
HardVer The PCB hardware version
CPLDVer The CPLD program version
NumResets Records the number of system resets that have occurred since the last “Hard Reset” of the system
BuildTime The Date and Time the database structure was generated
SysCheckSum CRC-16 Checksum of the Firmware
PntCheckSum CRC-16 Checksum of point's static Configuration Parameters
PntStatus Byte value indicating status of point Values are:0: No error
Table C-2: View RTU Dialog Box: EDIT POINT — Dynamic Parameters

Float & Tape Transmitter
Varec, Inc. 97
C.2 Encoder Information (ENC)
C.2.1 Description
The ENC Information Point lists the parameters associated with the internal operation of the transmitter hardware. This includes parameters associated with the operation of the encoder.
C.2.2 Application
The ENC point is used to diagnose the current operation of the transmitter. The parameters can be used to evaluate the proper operation of the rotary switches as well as the proper operation of the encoders. The raw absolute and incremental encoder values can be evaluated. The current sensor states can be evaluated. The calculated reference values can be evaluated.

Appendix C — Database Points
98 Installation and Operations Manual
C.2.3 Parameters
The database parameters used by the ENC point are listed and described below:
Configuration Parameters Function
Command This parameter is reserved for future use.
EncValue This parameter is a 16-bit value indicating the incremental value.
FDisk This parameter is a 12-bit value indicating the level read from the foot encoder sensor.
IDisk This parameter is a 16-bit value indicating the level read from the fractional foot (inches) encoder sensor.
EncState This is a diagnostic code that describes the encoder state.
Level This parameter represents the level in feet derived from the absolute encoding process. This parameter is always encoded in the forward rotation direction.
IncLevel This parameter represents the level in feet derived from the incremental encoding process. This parameter is always encoded in the forward rotation direction.
Feet This parameter indicates the feet portion of the level derived from the absolute encoding process. This parameter is shown in foot units from zero to ninety-nine in binary.
Inches This parameter indicates the inches portion of the level derived from the absolute encoding process. This parameter is shown in inch units from zero to eleven in binary.
Sixteenths This parameter indicates the 1/16-inch portion of the level derived from the absolute encoding process. This parameter is shown in 1/16-inch units.
PntStatus Byte value indicating status of point Values are:0: No error
Elapse Time of last Point update.
PntCheckSum CRC-16 Checksum of point's static Configuration Parameters
Table C-3: Encoder Information (ENC) — Configuration Parameters

Float & Tape Transmitter
Varec, Inc. 99
C.3 Resistive Temperature Detector (RTD)
C.3.1 Description
The Resistive Temperature Detector point displays the data associated with the temperature measurement circuit on the 2910. The RTD point processes temperature using SI units, so the temperature is always displayed in degrees Celsius within the RTD point.

Appendix C — Database Points
100 Installation and Operations Manual
C.3.2 Parameters
The database parameters used by the RTD point are listed and described below:
Configuration Parameters Function
TempMode This parameter is set using SW6. The value of this parameter indicates the type of RTD to be interfaced with the 2910.0: PT1001: Cu1002: Cu90
Cal1-Cal5 These parameters are used to provide additional calibration to the RTD circuit. The factory default values are 20, 60, 100, 140, and 180. These values are sufficient for most applications. Set these parameters to adjust the interpolation points used in temperature calculation.
Filter Value between 1-10 indicating the number of temperature samples used in temperature filtering. The default value is 4.
Table C-4: Resistive Temperature Detector (RTD) — Configuration Parameters
Dynamic Parameters Function
Command Parameter used to activate calibration parameters.
Temp Measured temperature in degrees Celsius.
RawValue Un-calibrated resistance measurement value.
Resistance Calibrated Resistance measure value. The Value used to calculate the actual temperature parameter.
Value1-Value3 Parameters used in ratio metric resistance measurement.
Ref100 24-bit value representing the ratio metric value of a 100-ohm precision reference resistor.
Ref200 24-bit value representing the ratio metric value of a 200-ohm precision reference resistor.
PntStatus Byte value indicating status of point Values are:0x0001: Hardware Failure0x0002: Measurement is over range0x0004: Measurement in under range0x0008: Measurement is using modified calibration values
Elapse Time of last Point update.
PntCheckSum CRC-16 Checksum of point's static Configuration Parameters
Table C-5: Resistive Temperature Detector (RTD) — Dynamic Parameters
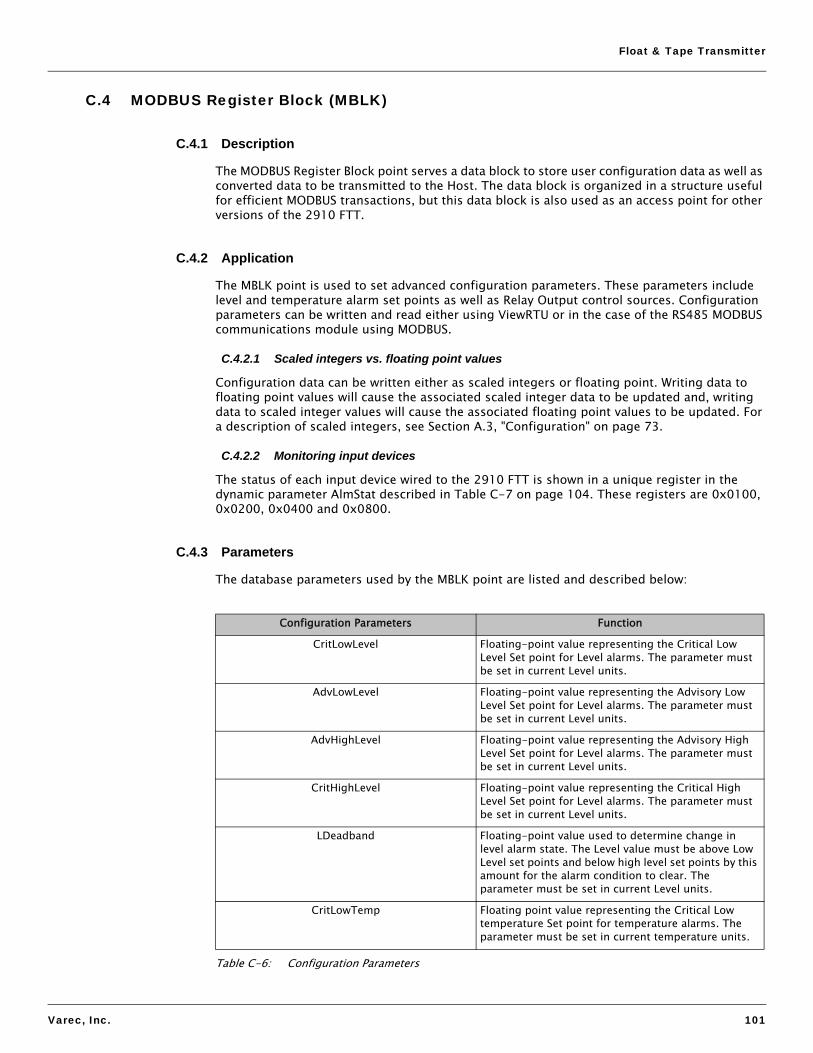
Float & Tape Transmitter
Varec, Inc. 101
C.4 MODBUS Register Block (MBLK)
C.4.1 Description
The MODBUS Register Block point serves a data block to store user configuration data as well as converted data to be transmitted to the Host. The data block is organized in a structure useful for efficient MODBUS transactions, but this data block is also used as an access point for other versions of the 2910 FTT.
C.4.2 Application
The MBLK point is used to set advanced configuration parameters. These parameters include level and temperature alarm set points as well as Relay Output control sources. Configuration parameters can be written and read either using ViewRTU or in the case of the RS485 MODBUS communications module using MODBUS.
C.4.2.1 Scaled integers vs. floating point values
Configuration data can be written either as scaled integers or floating point. Writing data to floating point values will cause the associated scaled integer data to be updated and, writing data to scaled integer values will cause the associated floating point values to be updated. For a description of scaled integers, see Section A.3, "Configuration" on page 73.
C.4.2.2 Monitoring input devices
The status of each input device wired to the 2910 FTT is shown in a unique register in the dynamic parameter AlmStat described in Table C-7 on page 104. These registers are 0x0100, 0x0200, 0x0400 and 0x0800.
C.4.3 Parameters
The database parameters used by the MBLK point are listed and described below:
Configuration Parameters Function
CritLowLevel Floating-point value representing the Critical Low Level Set point for Level alarms. The parameter must be set in current Level units.
AdvLowLevel Floating-point value representing the Advisory Low Level Set point for Level alarms. The parameter must be set in current Level units.
AdvHighLevel Floating-point value representing the Advisory High Level Set point for Level alarms. The parameter must be set in current Level units.
CritHighLevel Floating-point value representing the Critical High Level Set point for Level alarms. The parameter must be set in current Level units.
LDeadband Floating-point value used to determine change in level alarm state. The Level value must be above Low Level set points and below high level set points by this amount for the alarm condition to clear. The parameter must be set in current Level units.
CritLowTemp Floating point value representing the Critical Low temperature Set point for temperature alarms. The parameter must be set in current temperature units.
Table C-6: Configuration Parameters

Appendix C — Database Points
102 Installation and Operations Manual
AdvLowTemp Floating point value representing the Advisory Low temperature Set point for temperature alarms. The parameter must be set in current temperature units.
AdvHighTemp Floating point value representing the Advisory High temperature Set point for temperature alarms. The parameter must be set in current temperature units.
CritHighTemp Floating point value representing the Critical High temperature Set point for temperature alarms. The parameter must be set in current temperature units.
TDeadband Floating-point value used to determine change in temperature alarm state. The temperature value must be above Low Temp set points and below high Temp set points by this amount for the alarm condition to clear. The parameter must be set in current Temp units.
MinLevel Floating point value representing the minimal level value used in calculating scaled integer level parameters. The parameter must be set in current Level units.
MaxLevel Floating point value representing the maximum level value used in calculating scaled integer level parameters. The parameter must be set in current Level units. Note: The default maximum integer value is 120 feet.
MinTemp Floating point value representing the minimal temperature value used in calculating scaled integer temperature parameters. The parameter must be set in current temperature units.
MaxTemp Floating point value representing the maximum temperature value used in calculating scaled integer temperature parameters. The parameter must be set in current temperature units.
Reserved3 This value is used to maintain compatibility with the 4000 ATT register map.
ManTemp Floating-point value representing a manual temperature value.
Cleave Floating-point value used to calibrate to the current level. This parameter is used in conjunction with Cmds parameter to set the transmitter level. The parameter must be set in current level units.
NoiseRej This value is used to maintain compatibility with the 4000 ATT register map. Setting this parameter has no effect, as by default the A/D circuit rejects both 50 and 60 Hz noise.
LoLoLevSet Scaled Integer value representing the Critical Low Level Set point for Level alarms.
LowLevSet Scaled Integer value representing the Advisory Low Level Set point for Level alarms.
HighLevelSet Scaled Integer value representing the Advisory High Level Set point for Level alarms.
HiHiLevSet Scaled Integer value representing the Critical High Level Set point for Level alarms.
Configuration Parameters Function
Table C-6: Configuration Parameters

Float & Tape Transmitter
Varec, Inc. 103
LevDead Scaled Integer value used to determine change in level alarm state. The Scaled Integer Level iLevel value must be above Low Level set points and below high level set points by this amount for the alarm condition to clear.
LoLoTempSet Scaled Integer value representing the Critical Low temperature Set point for temperature alarms.
LowTempSet Scaled Integer value representing the Advisory Low temperature Set point for temperature alarms.
HighTempSet Scaled Integer value representing the Advisory High temperature Set point for temperature alarms
HiHiTempSet Scaled Integer value representing the Critical High temperature Set point for temperature alarms.
TempDead Scaled Integer value used to determine change in temperature alarm state. The Scaled Integer temperature iTemp value must be above Low temperature set points and below high temperature set points by this amount for the alarm condition to clear.
LevUnits Read only parameter - Units for Level to be transmitted to the Host interface. This value is derived from the rotary switches at startup.0: M (Meters)1: F (Feet)
TempUnits Read only parameter - Units for temperature data to be transmitted to the Host interface. This value is derived from the rotary switches at startup0: C (Celsius)1: F (Fahrenheit)
LevType This Read only parameter sets the rotation direction for the Level Gauge. This value is derived from the rotary switches at startup.1: Forward2: Reverse
TempType This Read only parameter sets the RTD type. This value is derived from the rotary switches at startup.0: PT1001: Cu1002: Cu90
iManTemp Scaled Integer value representing a manual temperature value.
MaxInt This parameter sets the maximum integer value used in Scaled Integer calculations.Note: The default maximum integer value is 9999.
DampVal This value is used to maintain compatibility with the 4000 ATT register map.
iCalLevel Scaled Integer value used to calibrate to the current level. This parameter is used in conjunction with Cmds parameter to set the transmitter level.
Configuration Parameters Function
Table C-6: Configuration Parameters
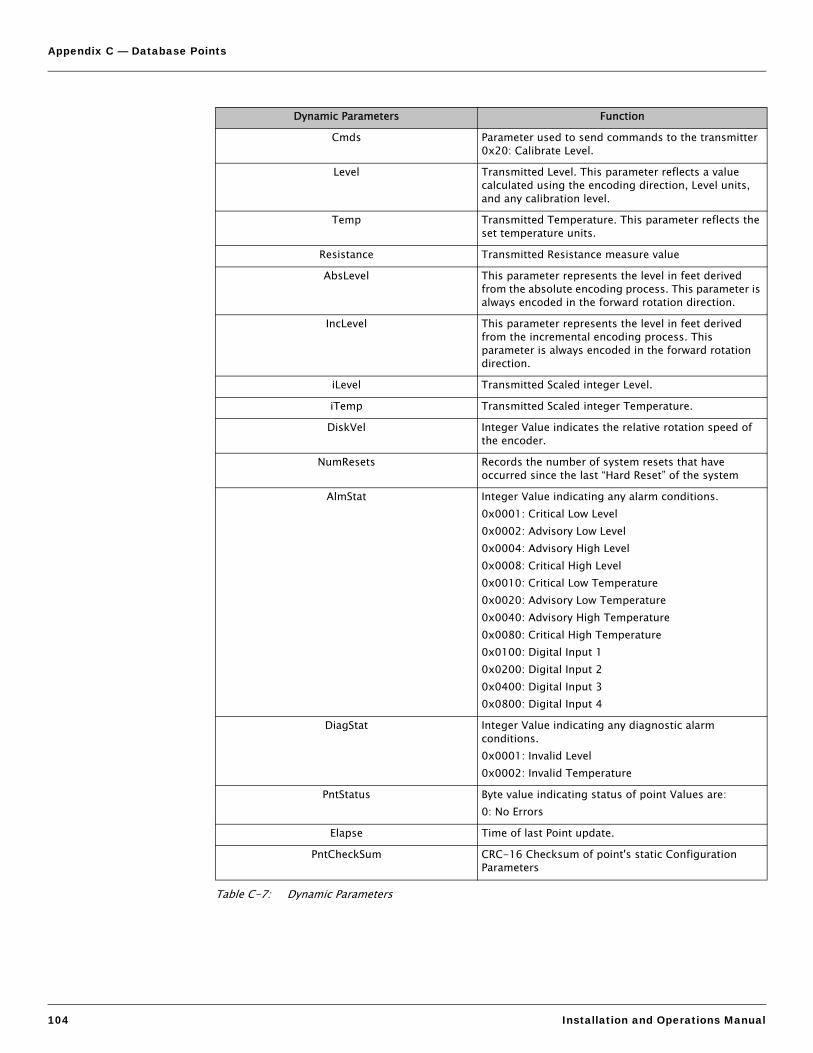
Appendix C — Database Points
104 Installation and Operations Manual
Dynamic Parameters Function
Cmds Parameter used to send commands to the transmitter 0x20: Calibrate Level.
Level Transmitted Level. This parameter reflects a value calculated using the encoding direction, Level units, and any calibration level.
Temp Transmitted Temperature. This parameter reflects the set temperature units.
Resistance Transmitted Resistance measure value
AbsLevel This parameter represents the level in feet derived from the absolute encoding process. This parameter is always encoded in the forward rotation direction.
IncLevel This parameter represents the level in feet derived from the incremental encoding process. This parameter is always encoded in the forward rotation direction.
iLevel Transmitted Scaled integer Level.
iTemp Transmitted Scaled integer Temperature.
DiskVel Integer Value indicates the relative rotation speed of the encoder.
NumResets Records the number of system resets that have occurred since the last “Hard Reset” of the system
AlmStat Integer Value indicating any alarm conditions.0x0001: Critical Low Level0x0002: Advisory Low Level0x0004: Advisory High Level0x0008: Critical High Level0x0010: Critical Low Temperature0x0020: Advisory Low Temperature0x0040: Advisory High Temperature0x0080: Critical High Temperature0x0100: Digital Input 10x0200: Digital Input 20x0400: Digital Input 30x0800: Digital Input 4
DiagStat Integer Value indicating any diagnostic alarm conditions.0x0001: Invalid Level0x0002: Invalid Temperature
PntStatus Byte value indicating status of point Values are:0: No Errors
Elapse Time of last Point update.
PntCheckSum CRC-16 Checksum of point's static Configuration Parameters
Table C-7: Dynamic Parameters

Float & Tape Transmitter
Varec, Inc. 105
C.5 Digital Outputs (DO)
C.5.1 Description
The Digital Output point contains the configuration and control parameters for activating the 4 optional output relays.
C.5.2 Parameters
Configuration Parameters Function
DOPwrUpState This parameter is used to force a Relay to be active at startup.0x0001: Relay 1 Activated at Startup0x0002: Relay 2 Activated at Startup0x0004: Relay 3 Activated at Startup0x0008: Relay 4 Activated at Startup
DO1Assign – D04Assign These parameters are used to assign the control and activation source for the output relays.0: Not Assigned1: Host Interface (MODBUS2: Critical High Level3: Advisory High Level4: Advisory Low Level5: Critical Low Level6: Critical High Temperature7: Advisory High Temperature8: Advisory Low Temperature9: Critical Low Temperature
Reserved3 This value is used to maintain compatibility with the 4000 ATT register map.
Table C-8: Configuration Parameters
Dynamic Parameters Function
DOOutputState This is a command parameter used to activate the output relays.0x0001: Activate Relay 1 (When set for HOST Control)0x0002: Activate Relay 2 (When set for HOST Control)0x0004: Activate Relay 3 (When set for HOST Control)0x0008: Activate Relay 4 (When set for HOST Control)
Reserved1 This value is used to maintain compatibility with the 4000 ATT register map.
DOType This value is used to maintain compatibility with the 4000 ATT register map.
Reserved2 This value is used to maintain compatibility with the 4000 ATT register map.
Table C-9: Dynamic Parameters
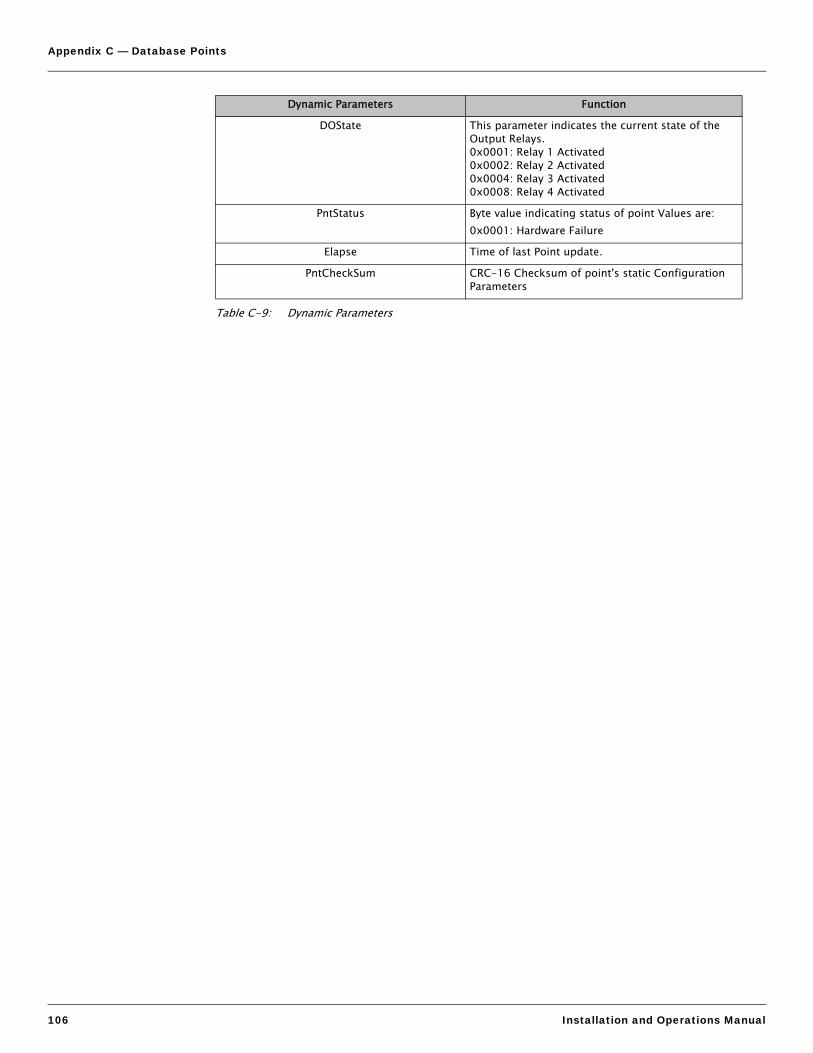
Appendix C — Database Points
106 Installation and Operations Manual
DOState This parameter indicates the current state of the Output Relays.0x0001: Relay 1 Activated0x0002: Relay 2 Activated0x0004: Relay 3 Activated0x0008: Relay 4 Activated
PntStatus Byte value indicating status of point Values are:0x0001: Hardware Failure
Elapse Time of last Point update.
PntCheckSum CRC-16 Checksum of point's static Configuration Parameters
Dynamic Parameters Function
Table C-9: Dynamic Parameters

Float & Tape Transmitter
Varec, Inc. 107
D Appendix D — RTD Resistance - Temperature Charts
This appendix describes the relationship between temperature and resistance for the three RTD types that can be used with the 2910 FTT. This information can be used to verify the accuracy of the RTD probe used with the 2910 FTT.
The following tables are provided:
• Section D.1, "Pt100 RTD Resistance vs. Temperature" on page 107• Section D.2, "Cu100 RTD Resistance vs. Temperature" on page 111• Section D.3, "Cu90 RTD Resistance vs. Temperature" on page 114
For troubleshooting instructions, see Section 9.2.6, "Verifying temperature data - checking RTD resistance" on page 68.
D.1 Pt100 RTD Resistance vs. Temperature
Pt100
RTD Resistance Temp °C Temp °F
16.76 -204.0 -335.2
18.49 -200.0 -328.0
20.22 -196.0 -320.8
21.94 -192.0 -313.6
23.66 -188.0 -306.4
25.37 -184.0 -299.2
27.08 -180.0 -292.0
28.78 -176.0 -284.8
30.47 -172.0 -277.6
32.16 -168.0 -270.4
33.85 -164.0 -263.2
35.53 -160.0 -256.0
37.21 -156.0 -248.8
38.88 -152.0 -241.6
40.55 -148.0 -234.4
42.21 -144.0 -227.2
43.87 -140.0 -220.0
45.52 -136.0 -212.8
47.18 -132.0 -205.6
48.82 -128.0 -198.4
50.47 -124.0 -191.2
52.11 -120.0 -184.0
53.74 -116.0 -176.8
Table D-1: Pt100 RTD Resistance vs. Temperature

Appendix D — RTD Resistance - Temperature Charts
108 Installation and Operations Manual
55.38 -112.0 -169.6
57 -108.0 -162.4
58.63 -104.0 -155.2
60.25 -100.0 -148.0
61.87 -96.0 -140.8
63.49 -92.0 -133.6
65.11 -88.0 -126.4
66.72 -84.0 -119.2
68.33 -80.0 -112.0
69.93 -76.0 -104.8
71.53 -72.0 -97.6
73.13 -68.0 -90.4
74.73 -64.0 -83.2
76.33 -60.0 -76.0
77.92 -56.0 -68.8
79.51 -52.0 -61.6
81.1 -48.0 -54.4
82.69 -44.0 -47.2
84.27 -40.0 -40.0
85.85 -36.0 -32.8
87.43 -32.0 -25.6
89.01 -28.0 -18.4
90.59 -24.0 -11.2
92.16 -20.0 -4.0
93.73 -16.0 3.2
95.3 -12.0 10.4
96.87 -8.0 17.6
98.44 -4.0 24.8
100 0.0 32.0
101.56 4.0 39.2
103.12 8.0 46.4
104.68 12.0 53.6
106.24 16.0 60.8
107.79 20.0 68.0
109.35 24.0 75.2
110.9 28.0 82.4
112.45 32.0 89.6
113.99 36.0 96.8
115.54 40.0 104.0
Pt100
RTD Resistance Temp °C Temp °F
Table D-1: Pt100 RTD Resistance vs. Temperature

Float & Tape Transmitter
Varec, Inc. 109
117.08 44.0 111.2
118.62 48.0 118.4
120.16 52.0 125.6
121.7 56.0 132.8
123.24 60.0 140.0
124.77 64.0 147.2
126.31 68.0 154.4
127.84 72.0 161.6
129.37 76.0 168.8
130.89 80.0 176.0
132.42 84.0 183.2
133.94 88.0 190.4
135.46 92.0 197.6
136.98 96.0 204.8
138.5 100.0 212.0
140.02 104.0 219.2
141.53 108.0 226.4
143.04 112.0 233.6
144.55 116.0 240.8
146.06 120.0 248.0
147.57 124.0 255.2
149.07 128.0 262.4
150.57 132.0 269.6
152.08 136.0 276.8
153.58 140.0 284.0
155.07 144.0 291.2
156.57 148.0 298.4
158.06 152.0 305.6
159.55 156.0 312.8
161.04 160.0 320.0
162.53 164.0 327.2
164.02 168.0 334.4
165.5 172.0 341.6
166.98 176.0 348.8
168.46 180.0 356.0
169.94 184.0 363.2
171.42 188.0 370.4
172.9 192.0 377.6
174.37 196.0 384.8
Pt100
RTD Resistance Temp °C Temp °F
Table D-1: Pt100 RTD Resistance vs. Temperature

Appendix D — RTD Resistance - Temperature Charts
110 Installation and Operations Manual
175.84 200.0 392.0
177.31 204.0 399.2
Pt100
RTD Resistance Temp °C Temp °F
Table D-1: Pt100 RTD Resistance vs. Temperature

Float & Tape Transmitter
Varec, Inc. 111
D.2 Cu100 RTD Resistance vs. Temperature
Cu100
RTD Resistance Temp °C Temp °F
12.78 -204.0 -335.2
14.3 -200.0 -328.0
15.82 -196.0 -320.8
17.35 -192.0 -313.6
18.87 -188.0 -306.4
20.39 -184.0 -299.2
21.92 -180.0 -292.0
23.44 -176.0 -284.8
24.97 -172.0 -277.6
26.49 -168.0 -270.4
28.01 -164.0 -263.2
29.54 -160.0 -256.0
31.06 -156.0 -248.8
32.58 -152.0 -241.6
34.11 -148.0 -234.4
35.63 -144.0 -227.2
37.15 -140.0 -220.0
38.68 -136.0 -212.8
40.2 -132.0 -205.6
41.72 -128.0 -198.4
43.25 -124.0 -191.2
44.77 -120.0 -184.0
46.3 -116.0 -176.8
47.82 -112.0 -169.6
49.34 -108.0 -162.4
50.87 -104.0 -155.2
52.39 -100.0 -148.0
53.91 -96.0 -140.8
55.44 -92.0 -133.6
56.96 -88.0 -126.4
58.48 -84.0 -119.2
60.01 -80.0 -112.0
61.53 -76.0 -104.8
63.06 -72.0 -97.6
64.58 -68.0 -90.4
66.1 -64.0 -83.2
Table D-2: Cu100 RTD Resistance vs. Temperature

Appendix D — RTD Resistance - Temperature Charts
112 Installation and Operations Manual
67.63 -60.0 -76.0
69.15 -56.0 -68.8
70.67 -52.0 -61.6
72.2 -48.0 -54.4
73.72 -44.0 -47.2
75.24 -40.0 -40.0
76.77 -36.0 -32.8
78.29 -32.0 -25.6
79.81 -28.0 -18.4
81.34 -24.0 -11.2
82.86 -20.0 -4.0
84.39 -16.0 3.2
85.91 -12.0 10.4
87.43 -8.0 17.6
88.96 -4.0 24.8
90.48 0.0 32.0
92 4.0 39.2
93.53 8.0 46.4
95.05 12.0 53.6
96.57 16.0 60.8
98.1 20.0 68.0
99.62 24.0 75.2
101.15 28.0 82.4
102.67 32.0 89.6
104.19 36.0 96.8
105.72 40.0 104.0
107.24 44.0 111.2
108.76 48.0 118.4
110.29 52.0 125.6
111.81 56.0 132.8
113.33 60.0 140.0
114.86 64.0 147.2
116.38 68.0 154.4
117.9 72.0 161.6
119.43 76.0 168.8
120.95 80.0 176.0
122.48 84.0 183.2
124 88.0 190.4
125.52 92.0 197.6
Cu100
RTD Resistance Temp °C Temp °F
Table D-2: Cu100 RTD Resistance vs. Temperature

Float & Tape Transmitter
Varec, Inc. 113
127.05 96.0 204.8
128.57 100.0 212.0
130.09 104.0 219.2
131.62 108.0 226.4
133.14 112.0 233.6
134.66 116.0 240.8
136.19 120.0 248.0
137.71 124.0 255.2
139.24 128.0 262.4
140.76 132.0 269.6
142.28 136.0 276.8
143.81 140.0 284.0
145.33 144.0 291.2
146.85 148.0 298.4
148.38 152.0 305.6
149.9 156.0 312.8
151.42 160.0 320.0
152.95 164.0 327.2
154.47 168.0 334.4
155.99 172.0 341.6
157.52 176.0 348.8
159.04 180.0 356.0
160.57 184.0 363.2
162.09 188.0 370.4
163.61 192.0 377.6
165.14 196.0 384.8
166.66 200.0 392.0
168.18 204.0 399.2
Cu100
RTD Resistance Temp °C Temp °F
Table D-2: Cu100 RTD Resistance vs. Temperature

Appendix D — RTD Resistance - Temperature Charts
114 Installation and Operations Manual
D.3 Cu90 RTD Resistance vs. Temperature
Cu90
RTD Resistance Temp °C Temp °F
51.77 -100.00 -148.00
53.32 -96.0 -140.8
54.87 -92.0 -133.6
56.42 -88.0 -126.4
57.97 -84.0 -119.2
59.52 -80.0 -112.0
61.07 -76.0 -104.8
62.61 -72.0 -97.6
64.16 -68.0 -90.4
65.71 -64.0 -83.2
67.26 -60.0 -76.0
68.81L -56.0 -68.8
70.36 -52.0 -61.6
71.91 -48.0 -54.4
73.46 -44.0 -47.2
75.01 -40.0 -40.0
76.56 -36.0 -32.8
78.11 -32.0 -25.6
79.66 -28.0 -18.4
81.20 -24.0 -11.2
82.75 -20.0 -4.0
84.30 -16.0 3.2
85.85 -12.0 10.4
87.40 -8.0 17.6
88.95 -4.0 24.8
90.50 0.0 32.0
92.05 4.0 39.2
93.60 8.0 46.4
95.15 12.0 53.6
96.70 16.0 60.8
98.25 20.0 68.0
99.80 24.0 75.2
101.34 28.0 82.4
102.89 32.0 89.6
104.44 36.0 96.8
105.99 40.0 104.0
107.54 44.0 111.2
Table D-3: Cu90 RTD Resistance vs. Temperature
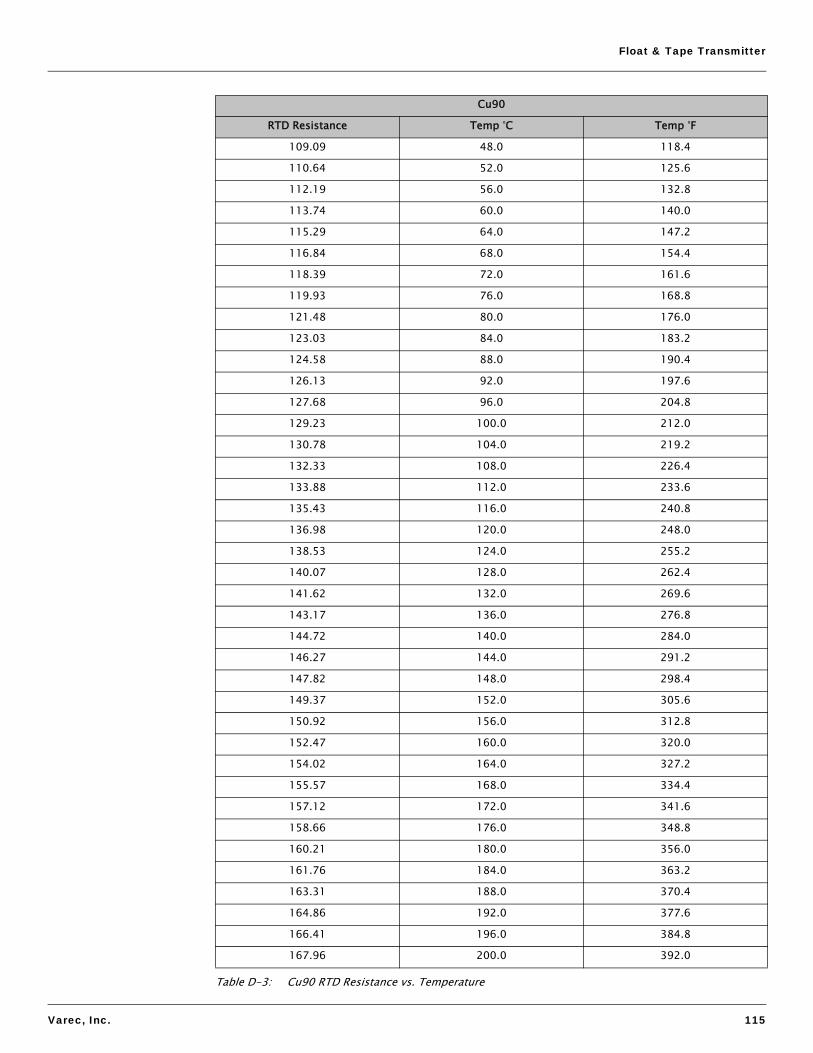
Float & Tape Transmitter
Varec, Inc. 115
109.09 48.0 118.4
110.64 52.0 125.6
112.19 56.0 132.8
113.74 60.0 140.0
115.29 64.0 147.2
116.84 68.0 154.4
118.39 72.0 161.6
119.93 76.0 168.8
121.48 80.0 176.0
123.03 84.0 183.2
124.58 88.0 190.4
126.13 92.0 197.6
127.68 96.0 204.8
129.23 100.0 212.0
130.78 104.0 219.2
132.33 108.0 226.4
133.88 112.0 233.6
135.43 116.0 240.8
136.98 120.0 248.0
138.53 124.0 255.2
140.07 128.0 262.4
141.62 132.0 269.6
143.17 136.0 276.8
144.72 140.0 284.0
146.27 144.0 291.2
147.82 148.0 298.4
149.37 152.0 305.6
150.92 156.0 312.8
152.47 160.0 320.0
154.02 164.0 327.2
155.57 168.0 334.4
157.12 172.0 341.6
158.66 176.0 348.8
160.21 180.0 356.0
161.76 184.0 363.2
163.31 188.0 370.4
164.86 192.0 377.6
166.41 196.0 384.8
167.96 200.0 392.0
Cu90
RTD Resistance Temp °C Temp °F
Table D-3: Cu90 RTD Resistance vs. Temperature

Appendix D — RTD Resistance - Temperature Charts
116 Installation and Operations Manual
169.51 204.0 399.2
198.94 280.00 536.00
Cu90
RTD Resistance Temp °C Temp °F
Table D-3: Cu90 RTD Resistance vs. Temperature

Varec, Inc. 117
Index
AAC power board
connector assignments . . . . . . . . . . . . . . . . . . . 28connector locations . . . . . . . . . . . . . . . . . . . . . . 28outputs. . . . . . . . . . . . . . . . . . . . . . . . . . . . . . . . 30switch locations . . . . . . . . . . . . . . . . . . . . . . . . . 28
AC power fuse, replacing . . . . . . . . . . . . . . . . . . . . 64AC voltage, setting . . . . . . . . . . . . . . . . . . . . . . . . . 29adapter kits . . . . . . . . . . . . . . . . . . . . . . . . . . . . . . . 72address, unit
Mark/Space . . . . . . . . . . . . . . . . . . . . . . . . . . . . 41Modbus . . . . . . . . . . . . . . . . . . . . . . . . . . . . . . . 33Tankway . . . . . . . . . . . . . . . . . . . . . . . . . . . . . . 46
assignments, connectorAC power board . . . . . . . . . . . . . . . . . . . . . . . . 28communications board . . . . . . . . . . . . . . . . . . . 26
assignments, terminalterminal board . . . . . . . . . . . . . . . . . . . . . . . . . . 21
Ccalibration
level . . . . . . . . . . . . . . . . . . . . . . . . . . . . . . . . . . 50limit switches . . . . . . . . . . . . . . . . . . . . . . . . . . . 51overview . . . . . . . . . . . . . . . . . . . . . . . . . . . . . . 49
charts, RTD resistance-temperature. . . . . . . . . . . 107checking communications status . . . . . . . . . . . . . . 59checking CPU status . . . . . . . . . . . . . . . . . . . . . . . 57checking line resistance . . . . . . . . . . . . . . . . . . . . . 15codes, order . . . . . . . . . . . . . . . . . . . . . . . . . . . . . . 71COMM status LED . . . . . . . . . . . . . . . . . . . . . . . . . 59communication status. . . . . . . . . . . . . . . . . . . . . . . 59communications board connector assignments . . . 26communications protocols . . . . . . . . . . . . . . . . . . . 22communications settings
Mark/Space . . . . . . . . . . . . . . . . . . . . . . . . . . . . 41MODBUS. . . . . . . . . . . . . . . . . . . . . . . . . . . . . . 36Tankway . . . . . . . . . . . . . . . . . . . . . . . . . . . . . . 46
component specifications . . . . . . . . . . . . . . . . . . . . 70components, primary . . . . . . . . . . . . . . . . . . . . . . . 70configuration
Mark/Space . . . . . . . . . . . . . . . . . . . . . . . . . . . . 41Modbus . . . . . . . . . . . . . . . . . . . . . . . . . . . . . . . 33overview . . . . . . . . . . . . . . . . . . . . . . . . . . . . . . 49Tankway . . . . . . . . . . . . . . . . . . . . . . . . . . . . . . 45
configuring outputs . . . . . . . . . . . . . . . . . . . . . . . . . 53connections
limit switches . . . . . . . . . . . . . . . . . . . . . . . . . . . 31connector assignments
AC power board . . . . . . . . . . . . . . . . . . . . . . . . 28communications board . . . . . . . . . . . . . . . . . . . 26
connector locationsAC power board . . . . . . . . . . . . . . . . . . . . . . . . 28communications board . . . . . . . . . . . . . . . . . . . 25
contact outputs . . . . . . . . . . . . . . . . . . . . . . . . . . . . 23CPU status . . . . . . . . . . . . . . . . . . . . . . . . . . . . . . . 57Cu100 RTD resistance-temperature chart . . . . . . 111Cu90 RTD resistance-temperature chart . . . . . . . 114
Ddata, format
GSI MODBUS . . . . . . . . . . . . . . . . . . . . . . . . . . 37Mark/Space . . . . . . . . . . . . . . . . . . . . . . . . . . . . 41MODBUS . . . . . . . . . . . . . . . . . . . . . . . . . . . . . . 37
data, temperature, verifying . . . . . . . . . . . . . . . . . . 68database points. . . . . . . . . . . . . . . . . . . . . . . . . . . . 95default settings, returning to . . . . . . . . . . . . . . . . . . 67discrete inputs . . . . . . . . . . . . . . . . . . . . . . . . . . . . . 22
EEIA-485 protocol, and wiring . . . . . . . . . . . . . . . . . . 22encoder specifications. . . . . . . . . . . . . . . . . . . . . . . 69environmental specifications . . . . . . . . . . . . . . . . . . 69EPROM, using to upgrade . . . . . . . . . . . . . . . . . . . 63
Ffield wiring, termination . . . . . . . . . . . . . . . . . . . . . . 20forward rotation
Mark/Space . . . . . . . . . . . . . . . . . . . . . . . . . . . . 41MODBUS . . . . . . . . . . . . . . . . . . . . . . . . . . . . . . 36
functional specifications . . . . . . . . . . . . . . . . . . . . . 69fuse, AC power, replacing . . . . . . . . . . . . . . . . . . . . 64
Ggaugehead mounting on . . . . . . . . . . . . . . . . . . 10, 12GSI MODBUS, transmitting. . . . . . . . . . . . . . . . . . . 37
Iindicator specifications . . . . . . . . . . . . . . . . . . . . . . 70input power . . . . . . . . . . . . . . . . . . . . . . . . . . . . . . . 23input/output specifications. . . . . . . . . . . . . . . . . . . . 70inputs, discrete . . . . . . . . . . . . . . . . . . . . . . . . . . . . 22installation
safety guidelines . . . . . . . . . . . . . . . . . . . . . . . . . 6
Jjumpers, setting for outputs. . . . . . . . . . . . . . . . . . . 30
Kkits, adapter. . . . . . . . . . . . . . . . . . . . . . . . . . . . . . . 72
LL&J 1000, 1500, or 2000 MWT . . . . . . . . . . . . . . . . 46L&J Tankway protocol, and wiring. . . . . . . . . . . . . . 22LED, CPU status . . . . . . . . . . . . . . . . . . . . . . . . . . . 57LEDs, using to set level. . . . . . . . . . . . . . . . . . . . . . 89level calibration . . . . . . . . . . . . . . . . . . . . . . . . . . . . 50
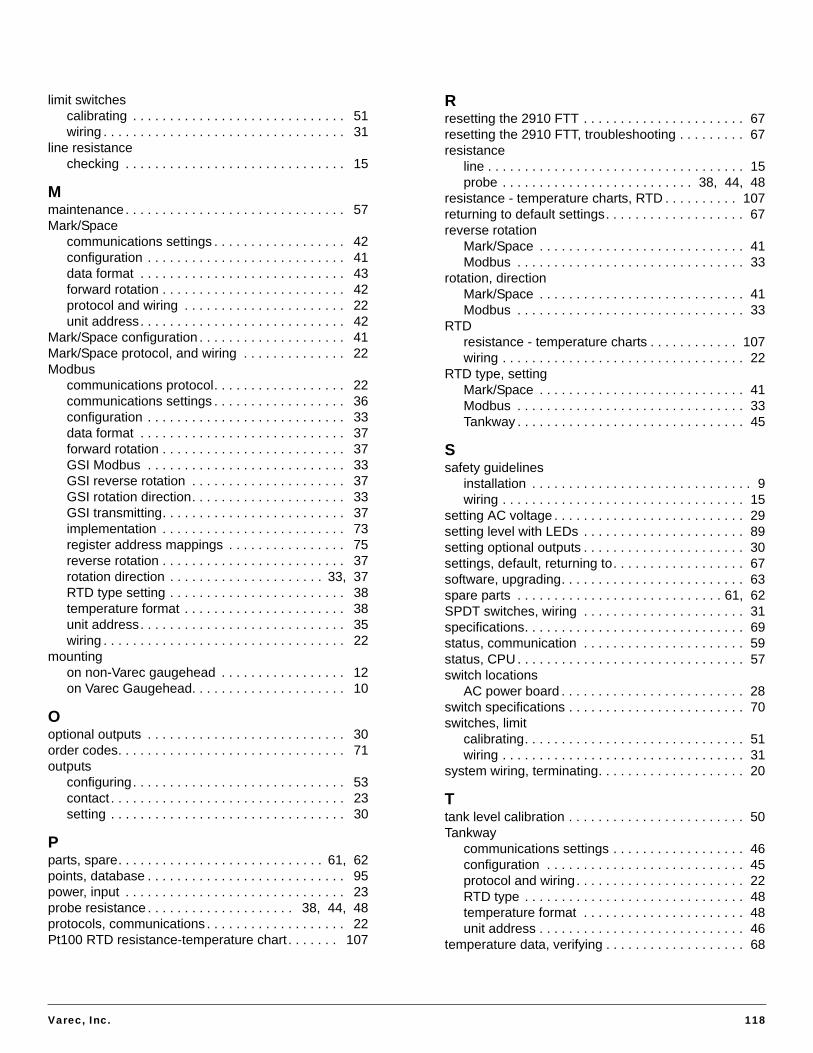
Varec, Inc. 118
limit switchescalibrating . . . . . . . . . . . . . . . . . . . . . . . . . . . . . 51wiring . . . . . . . . . . . . . . . . . . . . . . . . . . . . . . . . . 31
line resistancechecking . . . . . . . . . . . . . . . . . . . . . . . . . . . . . . 15
Mmaintenance . . . . . . . . . . . . . . . . . . . . . . . . . . . . . . 57Mark/Space
communications settings . . . . . . . . . . . . . . . . . . 42configuration . . . . . . . . . . . . . . . . . . . . . . . . . . . 41data format . . . . . . . . . . . . . . . . . . . . . . . . . . . . 43forward rotation . . . . . . . . . . . . . . . . . . . . . . . . . 42protocol and wiring . . . . . . . . . . . . . . . . . . . . . . 22unit address. . . . . . . . . . . . . . . . . . . . . . . . . . . . 42
Mark/Space configuration . . . . . . . . . . . . . . . . . . . . 41Mark/Space protocol, and wiring . . . . . . . . . . . . . . 22Modbus
communications protocol. . . . . . . . . . . . . . . . . . 22communications settings . . . . . . . . . . . . . . . . . . 36configuration . . . . . . . . . . . . . . . . . . . . . . . . . . . 33data format . . . . . . . . . . . . . . . . . . . . . . . . . . . . 37forward rotation . . . . . . . . . . . . . . . . . . . . . . . . . 37GSI Modbus . . . . . . . . . . . . . . . . . . . . . . . . . . . 33GSI reverse rotation . . . . . . . . . . . . . . . . . . . . . 37GSI rotation direction. . . . . . . . . . . . . . . . . . . . . 33GSI transmitting. . . . . . . . . . . . . . . . . . . . . . . . . 37implementation . . . . . . . . . . . . . . . . . . . . . . . . . 73register address mappings . . . . . . . . . . . . . . . . 75reverse rotation . . . . . . . . . . . . . . . . . . . . . . . . . 37rotation direction . . . . . . . . . . . . . . . . . . . . . 33, 37RTD type setting . . . . . . . . . . . . . . . . . . . . . . . . 38temperature format . . . . . . . . . . . . . . . . . . . . . . 38unit address. . . . . . . . . . . . . . . . . . . . . . . . . . . . 35wiring . . . . . . . . . . . . . . . . . . . . . . . . . . . . . . . . . 22
mountingon non-Varec gaugehead . . . . . . . . . . . . . . . . . 12on Varec Gaugehead. . . . . . . . . . . . . . . . . . . . . 10
Ooptional outputs . . . . . . . . . . . . . . . . . . . . . . . . . . . 30order codes. . . . . . . . . . . . . . . . . . . . . . . . . . . . . . . 71outputs
configuring. . . . . . . . . . . . . . . . . . . . . . . . . . . . . 53contact . . . . . . . . . . . . . . . . . . . . . . . . . . . . . . . . 23setting . . . . . . . . . . . . . . . . . . . . . . . . . . . . . . . . 30
Pparts, spare. . . . . . . . . . . . . . . . . . . . . . . . . . . . 61, 62points, database . . . . . . . . . . . . . . . . . . . . . . . . . . . 95power, input . . . . . . . . . . . . . . . . . . . . . . . . . . . . . . 23probe resistance . . . . . . . . . . . . . . . . . . . . 38, 44, 48protocols, communications . . . . . . . . . . . . . . . . . . . 22Pt100 RTD resistance-temperature chart . . . . . . . 107
Rresetting the 2910 FTT . . . . . . . . . . . . . . . . . . . . . . 67resetting the 2910 FTT, troubleshooting . . . . . . . . . 67resistance
line . . . . . . . . . . . . . . . . . . . . . . . . . . . . . . . . . . . 15probe . . . . . . . . . . . . . . . . . . . . . . . . . . 38, 44, 48
resistance - temperature charts, RTD . . . . . . . . . . 107returning to default settings. . . . . . . . . . . . . . . . . . . 67reverse rotation
Mark/Space . . . . . . . . . . . . . . . . . . . . . . . . . . . . 41Modbus . . . . . . . . . . . . . . . . . . . . . . . . . . . . . . . 33
rotation, directionMark/Space . . . . . . . . . . . . . . . . . . . . . . . . . . . . 41Modbus . . . . . . . . . . . . . . . . . . . . . . . . . . . . . . . 33
RTDresistance - temperature charts . . . . . . . . . . . . 107wiring . . . . . . . . . . . . . . . . . . . . . . . . . . . . . . . . . 22
RTD type, settingMark/Space . . . . . . . . . . . . . . . . . . . . . . . . . . . . 41Modbus . . . . . . . . . . . . . . . . . . . . . . . . . . . . . . . 33Tankway . . . . . . . . . . . . . . . . . . . . . . . . . . . . . . . 45
Ssafety guidelines
installation . . . . . . . . . . . . . . . . . . . . . . . . . . . . . . 9wiring . . . . . . . . . . . . . . . . . . . . . . . . . . . . . . . . . 15
setting AC voltage . . . . . . . . . . . . . . . . . . . . . . . . . . 29setting level with LEDs . . . . . . . . . . . . . . . . . . . . . . 89setting optional outputs . . . . . . . . . . . . . . . . . . . . . . 30settings, default, returning to. . . . . . . . . . . . . . . . . . 67software, upgrading. . . . . . . . . . . . . . . . . . . . . . . . . 63spare parts . . . . . . . . . . . . . . . . . . . . . . . . . . . . 61, 62SPDT switches, wiring . . . . . . . . . . . . . . . . . . . . . . 31specifications. . . . . . . . . . . . . . . . . . . . . . . . . . . . . . 69status, communication . . . . . . . . . . . . . . . . . . . . . . 59status, CPU . . . . . . . . . . . . . . . . . . . . . . . . . . . . . . . 57switch locations
AC power board . . . . . . . . . . . . . . . . . . . . . . . . . 28switch specifications . . . . . . . . . . . . . . . . . . . . . . . . 70switches, limit
calibrating. . . . . . . . . . . . . . . . . . . . . . . . . . . . . . 51wiring . . . . . . . . . . . . . . . . . . . . . . . . . . . . . . . . . 31
system wiring, terminating. . . . . . . . . . . . . . . . . . . . 20
Ttank level calibration . . . . . . . . . . . . . . . . . . . . . . . . 50Tankway
communications settings . . . . . . . . . . . . . . . . . . 46configuration . . . . . . . . . . . . . . . . . . . . . . . . . . . 45protocol and wiring. . . . . . . . . . . . . . . . . . . . . . . 22RTD type . . . . . . . . . . . . . . . . . . . . . . . . . . . . . . 48temperature format . . . . . . . . . . . . . . . . . . . . . . 48unit address . . . . . . . . . . . . . . . . . . . . . . . . . . . . 46
temperature data, verifying . . . . . . . . . . . . . . . . . . . 68

Float & Tape Transmitter
Varec, Inc. 119
temperature formatMark/Space . . . . . . . . . . . . . . . . . . . . . . . . . . . . 44MODBUS. . . . . . . . . . . . . . . . . . . . . . . . . . . . . . 38Tankway . . . . . . . . . . . . . . . . . . . . . . . . . . . . . . 48
temperature-resistance, charts. . . . . . . . . . . . . . . 107terminal assignments
terminal board . . . . . . . . . . . . . . . . . . . . . . . . . . 21terminal board terminal assignments . . . . . . . . . . . 21terminating system wiring . . . . . . . . . . . . . . . . . . . . 20troubleshooting
blown fuse . . . . . . . . . . . . . . . . . . . . . . . . . . . . . 64overview . . . . . . . . . . . . . . . . . . . . . . . . . . . . . . 64resetting the 2910 FTT . . . . . . . . . . . . . . . . . . . 67returning to defaults. . . . . . . . . . . . . . . . . . . . . . 67using ViewRTU . . . . . . . . . . . . . . . . . . . . . . . . . 65verifying temperature data. . . . . . . . . . . . . . . . . 68
Uunit address
Mark/Space . . . . . . . . . . . . . . . . . . . . . . . . . . . . 42MODBUS. . . . . . . . . . . . . . . . . . . . . . . . . . . . . . 35Tankway . . . . . . . . . . . . . . . . . . . . . . . . . . . . . . 46
upgradingsoftware. . . . . . . . . . . . . . . . . . . . . . . . . . . . . . . 63
VVarec gaugehead, mounting on . . . . . . . . . . . . . . . 10verifying temperature data . . . . . . . . . . . . . . . . . . . 68ViewRTU
configuring outputs with. . . . . . . . . . . . . . . . . . . 53using to troubleshoot . . . . . . . . . . . . . . . . . . . . . 65
voltage, setting AC . . . . . . . . . . . . . . . . . . . . . . . . . 29
Wwiring
communications protocols. . . . . . . . . . . . . . . . . 22limit switches . . . . . . . . . . . . . . . . . . . . . . . . . . . 31RTD . . . . . . . . . . . . . . . . . . . . . . . . . . . . . . . . . . 22safety guidelines . . . . . . . . . . . . . . . . . . . . . . . . 15terminating at transmitter. . . . . . . . . . . . . . . . . . 20
wiring diagrams . . . . . . . . . . . . . 13, 16, 17, 18, 19

Index
120 Installation and Operations Manual


Varec, Inc. • 5834 Peachtree Corners East, Norcross (Atlanta), GA 30092 USATel: +1 (770) 447-9202 • Fax: +1 (770) 662-8939
www.varec.com
© 2011 Varec, Inc. All Rights Reserved. This document is for information purposes only. Varec, Inc. makes no warranties, express or implied, in this summary. The names of actual companies and products mentioned herein may be the trademarks of their respective owners.
Document CodeIOM104GVAE1612