2021-08-09 commercial-credit-card-administration-user
TRANSCRIPT

Administrator
User Guide
Copyright © 2021 UMB Financial Corporation
UMB Commercial Card
Administrator – User Guide
Version 082021 Final
Reg. U.S. Pat. & Tm. Off.

Contents Introduction ............................................................................................................................................................................... 1
Logging into UMB ..................................................................................................................................................................... 1
Home Screen ............................................................................................................................................................................ 2
File Management ...................................................................................................................................................................... 3
Interface Files ........................................................................................................................................................................... 3
Uploading Files to the Vault ...................................................................................................................................................... 3
Processing Interface Files ......................................................................................................................................................... 4
Employee Management ............................................................................................................................................................ 7
Viewing employees ................................................................................................................................................................... 7
Creating New Employees ......................................................................................................................................................... 9
Setting Employees as Users .................................................................................................................................................. 11
Password Administration ........................................................................................................................................................ 12
Assigning Employees to Groups............................................................................................................................................. 13
Account Management ............................................................................................................................................................. 14
Managing Account Mapping and Delegation .......................................................................................................................... 14
Charge Code Management .................................................................................................................................................... 16
Updating Charge Codes ......................................................................................................................................................... 16
Updating Default Coding Rules .............................................................................................................................................. 18
Managing Company Suppliers ............................................................................................................................................... 20
Setting Preferred Suppliers .................................................................................................................................................... 20
Notification Management ........................................................................................................................................................ 21
Creating Automatic Notifications ............................................................................................................................................. 21
Editing Notifications ................................................................................................................................................................ 22
Attaching Components to Notifications ................................................................................................................................... 23
Sending Notifications Manually .............................................................................................................................................. 24
Notification Management – Email Whitelisting ....................................................................................................................... 26
Date Extract Management ...................................................................................................................................................... 27
Standard Extract Layout ......................................................................................................................................................... 27
Running Extracts .................................................................................................................................................................... 28
General Questions/Assistance ............................................................................................................................................... 29

UMB Commercial Card Administrator – User Guide
1
Introduction
The Administration Guide will work through the key areas of the UMB Commercial Card platform you must know as an administrator. This guide also includes some optional, more advanced information that you can use as a basic introduction to additional features in the platform.
Logging into UMB
Go to https://identity.commercialcard.umb.com/login Enter your administrator ‘Username’ and ‘Password’. Press the Enter key on your keyboard or click Log in.
UMB Commercial Card Administrator – User Guide
2
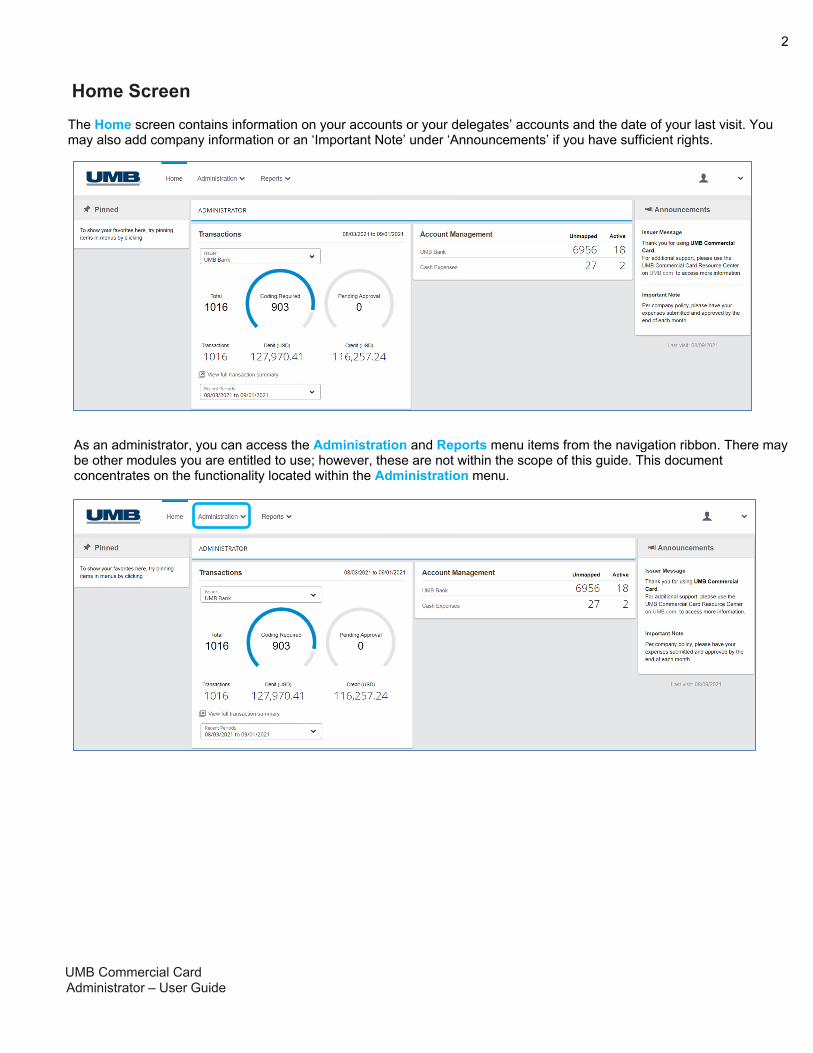
Home Screen The Home screen contains information on your accounts or your delegates’ accounts and the date of your last visit. You may also add company information or an ‘Important Note’ under ‘Announcements’ if you have sufficient rights.
As an administrator, you can access the Administration and Reports menu items from the navigation ribbon. There may be other modules you are entitled to use; however, these are not within the scope of this guide. This document concentrates on the functionality located within the Administration menu.

UMB Commercial Card Administrator – User Guide
3
File Management
Interface Files
To keep your records up to date with relevant company information, you can upload the Interface Files. For more information on these files, please refer to the respective interface format guides included in the interface pack, which can be found on the Vault. Uploading core data into the UMB Commercial Card platform involves the following processes:
Uploading the interface file into the Vault: The Vault is a secure, encrypted location within the platform that is used for uploading and downloading files.
Processing the files using the Process functions in the Vault: After uploading the interface file to the Vault, use functions to process the files and move data from these files onto the platform.
Note: Procedures in this section use the HR File as an example, but the process is the same for all interface files.
Uploading Files to the Vault
1. Navigate to Administration File Management The Vault.
2. In The Vault window be on the Inbox and click Upload files.
3. Locate the file you want to upload to The Vault. Select the appropriate document and click Open to begin the upload process.
4. Appropriate notifications for the progress and status of the uploads are displayed. Upon successful upload, the file appears in the Inbox.

UMB Commercial Card Administrator – User Guide
4
Note: Users can only upload one file at a time to their Inbox folder using the floating Upload files button.
Processing Interface Files
1. Navigate to Administration File Management The Vault
2. Click the checkbox to the left of the file you wish to process.
3. Click the Process File button at the top to open the Processing File function. A new function pane will open to the right-hand side of the screen for Processing File.

UMB Commercial Card Administrator – User Guide
5
4. In the ‘Interface Type’ drown down, select the interface file type that is to be processed. Once you have selected the correct type, click Validate at the bottom to begin processing.
5. The validation process will check the contents of the file and provide to you a summary of the changes that the file will introduce. This will also alert you to any possible errors in the file that should be fixed before fully processing.
Note: If errors are present and you wish to fix, click the Cancel button to stop the processing and then delete the file from The Vault. Go back to the original file you prepared, make the necessary updates and re-upload.
Click on the Preview button to get a chance to view the file’s contents in the browser. Note: only the first 100 records within the file will be available in the Preview function

UMB Commercial Card Administrator – User Guide
6
6. Click the Complete button to initiate the last step of processing. Once the ‘Processing complete’ message is received, the contents of the interface file are now in effect for your program.
7. The file name and description in The Vault will now be updated to include the Processed status.
Note: Status indicators for files are as follows:
Status Displayed when
Validating File validation is initiated (via Validate button).
Validated Validation completes. A failed validation will still show as validated.
Processing File is processing on the final step (via Complete button).
Processed File successfully processed.
Processing failed File processing failed.

UMB Commercial Card Administrator – User Guide
7
Employee Management An employee is any member of your organization that plays a role in your card program. This will include:
All cardholders, even if they are not users of UMB Commercial Card All users of UMB Commercial Card, even if they are not cardholders All program administrators identified in your contract with UMB as having administrative rights over the program
Viewing employees 1. Navigate to Administration Overview Administration Overview.
2. On the Administration Overview screen, select Employees.
3. In the Employee Search window, enter the criteria as required to search for specific employees and then click
the Search to display a list of employees that match the criteria.
To run another search, click Search at the top-right corner of the screen.

UMB Commercial Card Administrator – User Guide
8
The following table describes the icons available for each employee.
Icon Function Description
View employee details Opens the Personal Details Report window, which contains information,
such as reports and charge codes that the employee has access to.
View employee account details
Opens the Account Details Report window, which provides a summary of the employee’s credit card details. This icon only appears if the employee has a card account.
Set Charge Code Defaults
Opens the Default Charge Code - Personal window that enables you to set the default codes for the employee. Use the drop-down lists to select the charge codes.
If you have the right to view the codes, you can search for the codes that have been loaded into the system for your program.
Click ‘Save’ to save any default code updates made.
Change Username Opens the Change Username window which will prompt you for the
administrator password and the new username for the employee.
Change Password Opens the Change Password window which will prompt you for the administrator password and the new user password for the employee.
This function is useful when an employee cannot remember their password as a way of providing a Temporary Password to them.
Change Account Lock Status
Toggles the employees account between unlocked (grey icon) and locked (red icon) statuses. If an employee has been locked out of the system due to incorrect password attempts, then the locked status will be displayed.
Create New Username Opens the Create New Username window which will allow you to set a username and initial password for the employee to become an actual user.
Use this feature when adding a few new users. If you need to create users for many employees, consider using the User Interface (UI) file and refer to the Processing Interface Files instructions in this guide.
Add / Remove Employees from Groups
Adds or removes one or more employees to/from a Charge Group, Report Group, Approval Role, Rate Group, Rights Group, or to Change Managers.
To perform these changes, click the empty checkbox to select the employee and then click the link to Manage selected employees at the bottom.
This opens the Employee Management window, which allows you to Add
( + ) or Remove ( - ) group permissions on the selected employees. Click ‘Done’ to review the permission changes, and then click ‘Confirm’ to complete the changes using this function.

UMB Commercial Card Administrator – User Guide
9
Creating New Employees
There are two methods you can use to create new employees into the system:
1. Uploading employees using the HR Interface File
2. Creating employees in Employee Administration
The HR Interface File is a spreadsheet with specific columns, some of which are mandatory for completion. The file enables you to manage information of multiple employees at one time and is useful for uploading:
Basic details such as, email address or telephone number.
Approval details such as, the manager approving an employee’s expenses.
Reporting group information such as, the employee’s reporting rights.
UMB recommends using the HR Interface File as the best method to create employees and keep employee data in sync with your company’s HR data platform. Refer to the HR Interface Format Guide in the Interface Pack for more information. Details on how to process the file are found in the Processing Interface Files instructions in this guide.
Creating employees in Employee Administration
1. Navigate to Administration Overview Administration Overview.
2. On the Administration Overview screen, select Employees.
3. In the Employee Search window, click Search to perform a search for the employee to ensure that they do not already exist with an employee record in the UMB Commercial Card platform.
4. On the Employee Administration screen, click the Add New Employee link at the bottom of the listing on the screen.

UMB Commercial Card Administrator – User Guide
10
5. In the Insert Personal Details window, enter the details of the new employee in the appropriate fields (fields marked with an asterisk are mandatory), and then click Save.

UMB Commercial Card Administrator – User Guide
11
Setting Employees as Users
1. Perform an employee search with System Login Rights set to ‘No’.
2. In the search results, click for the employee.
3. The Create New Username window will open. Perform the following:
1. Enter your administrator password
2. Enter the employee’s ‘New Username’
3. Enter an initial password in both the ‘New User Password’ and ‘Confirm Password’ fields **
4. Then click ‘Save’
Note: If your program is set to auto-generate initial passwords (a setting in Notification Management) then the ‘Password’ fields will not be present. The UMB Commercial Card platform will automatically generate an email an initial password to the new user.

UMB Commercial Card Administrator – User Guide
12
Password Administration
All users should be able to self-service their passwords by clicking the Forgotten your password? link at the bottom of the login page (shown below). However, there could be circumstances under which you may need to assist users with getting passwords.
New user needing initial password to login first time:
If an employee did not receive their login details, you can have the system re-send the initial access emails,
including the initial password.
1. In the Employee Search window, click Search to perform a search for the employee.
2. Click the icon to open the View Employee Details window. 3. At the bottom of the window, look for the link titled Resend Login Details Email and click to have the system re-send
the initial access emails.
Existing user needing a new password
Once a username has been designated, if the user needs support to where you want to create a new password then perform the following: 1. In the Employee Search window, click Search to perform a search for the employee.
2. Click the icon to open the Change Password window. 3. Enter ‘Your Admin Password’ and set a new password for the user, and confirm the new password 4. Click Save. The new password will be in effect and need to be communicated to the user.

UMB Commercial Card Administrator – User Guide
13
Assigning Employees to Groups
1. In the Employee Search window, click ‘Search’ to perform a search for the employee.
2. Select at the end of the row next to the employee(s)’ name. A checkmark will appear in the square.
3. Click ‘Manage selected employees’ at the bottom of the list.
4. The Employee Management window will open. Select to ‘Add’ or ‘Remove’ options as appropriate.
Note: Although you may use this functionality to remove employees from Charge Groups and Approval Roles, it is unlikely that you would use this if there is only one Charge Group and one Approval Role. Report groups may change, however, if employees change responsibilities within the organization and require access to more advanced reports. You may only change group memberships this way. If you need to edit other employee details in the system, you must use the HR Interface File.

UMB Commercial Card Administrator – User Guide
14
Account Management For opening, closing, or account details on the cards in your program, please refer to the Card
Management – User Guide.
The Account Management module is where you can oversee a list of cards in your program, pull audit
reports (in Excel or PDF), or manage the mapping of card accounts to employees.
Managing Account Mapping and Delegation 1. Navigate to Administration Overview Account Management.
2. In the Account Search window enter the criteria to locate account(s) and then click ‘Search’.
Note: For example, if you want to map new accounts to employees, select ‘Unmapped accounts only’ in the Account Details section (pictured below)

UMB Commercial Card Administrator – User Guide
15
3. The results screen displays the number of accounts per status for each account issuer. To display the list of accounts associated with the status, click the corresponding number link.
4. From the list of accounts, click the appropriate icon or link to perform the functions described in the following table.
Function Description
View Account Details Opens the View & Maintain Account Details window, which displays details such as card address and credit limit. You can also set the transaction monitoring limit and account delegation here.
Map Account to an Employee
Opens the Employee Search window, where you can perform a search and then map a specific employee to the
account using the corresponding icon .
Clear Employee Mapping
Clears the account mapping from an employee. A warning message will be displayed. Click ‘OK’ to complete the process.
Delegate Account Opens the Employee Search window, where you can perform a search and then map a specific employee to the
account using the corresponding icon .
Export to Excel Exports the search results to an Excel file.
Export to PDF Exports the search results to a PDF document.

UMB Commercial Card Administrator – User Guide
16
Charge Code Management
Updating Charge Codes Charge codes are normally loaded into the platform using the CC Interface File. Refer to the CC Interface Format Guide in the Interface Pack for more information. Details on how to process the file are found in the Processing Interface Files instructions in this guide.
To insert new and make updates to individual charge codes, use the following instructions.
Navigate to Administration Overview Administration Overview.
1. In the Administration Overview screen, click Charge Codes.
2. In the Charge Code Search window, enter the criteria to filter the results and then click Search to display the results.

UMB Commercial Card Administrator – User Guide
17
3. In the Charge Codes screen, edit the charge codes. You can edit them individually or as a group. To edit the codes individually:
Hover the mouse over the charge code and then click the pencil icon .
In the Edit Charge Code window, change the details as required and then click Save.
To edit multiple charge codes:
Select the check boxes for the charge codes that you want to change, and then select the action from the Group Action list to display the corresponding dialogue box.
A new window will open for you to perform the update. Enter the required information and Save to effect the change across the selected codes.

UMB Commercial Card Administrator – User Guide
18
Updating Default Coding Rules
Default coding rules enables the automatic completion of transaction coding to reduce the amount of time needed by an employee to code transactions. The coding rules are based on a hierarchy that determines the default code to use, such as the company unit an employee belongs to, or the merchant category of the supplier used in the transaction.
1. Navigate to Administration Overview Administration Overview.
2. In the Administration Overview screen, under the Organization heading click the Default Codes box.
3. On the Default Coding Rule Management screen, click the category to display the items under it.
Then, click the checkbox associated with the item you want to build a rule for and then click Add (+) at the top
of the screen. .
Note: For categories that have too many options to fit on the screen, the Default Code Search window appears to filter the list. Enter the required criteria and then click ‘Search’.

UMB Commercial Card Administrator – User Guide
19
4. In the Add New Default Coding Rule window, enter the Applicability Settings and Default Coding that will apply to the item and then click Save.
5. The Default Coding Rule Management screen displays the rule that will apply to the item. If you ever
need to change the rule, click the Edit button to the right of the rule.

UMB Commercial Card Administrator – User Guide
20
Managing Company Suppliers When the card transaction data feed is loaded into the platform, any new supplier is automatically added to the system as a non-approved supplier. As an administrator, you will manage and assign preferred status suppliers. This will be useful in any supplier-based reporting you pull from the system.
Setting Preferred Suppliers 1. Navigate to Administration Overview Administration Overview.
2. In the Administration Overview screen, under the Organization heading click the Suppliers box.
3. When the Supplier Management window, enter the criteria to locate the supplier(s) you want to manage and then click Search.
Note: If the Merchant Category option is selected, the Supplier Management screen displays summarized results by merchant category. Click the category to display the suppliers under that category.
On the Supplier Management screen, click the respective icon to mark the supplier as preferred or non-preferred or click on the supplier name to view the supplier details.

UMB Commercial Card Administrator – User Guide
21
Notification Management The Notification Management module enables you to notify employees of actions or instructions necessary to process transactions, approvals and statements in the platform.
Creating Automatic Notifications
1. Navigate to Administration Overview Notification Management.
2. In the Administration - Notification Management screen, click Notifications.
3. Click New Notification.
4. In the Notifications – Create New window, enter the settings for the email and then click Save.
5. Optionally add more information to the automatic notification by attaching components to notifications.

UMB Commercial Card Administrator – User Guide
22
Editing Notifications
1. Navigate to Administration Overview Notification Management.
2. In the Administration – Notification Management screen, click Notifications.
3. From the list of All Account Issuers, click the hyperlink under the type of notifications you would like to edit.
4. In the Notifications – Edit window, complete the edits. The fields most likely to be edited are:
Setting Description
Frequency Type How often the notification is sent out.
Sender Address By default, this is set to [email protected] .
Enter an active email address if you want to allow employees to reply to automatic email notifications.
5. Click Save when complete.
UMB Commercial Card Administrator – User Guide
23
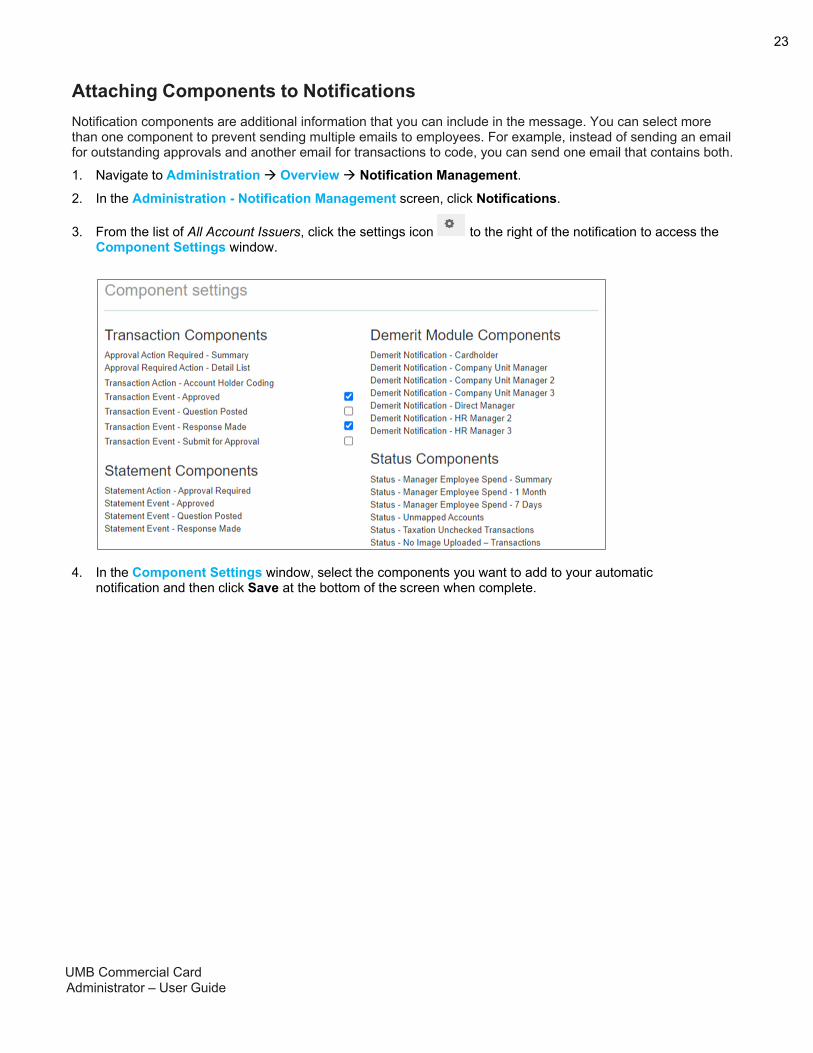
Attaching Components to Notifications
Notification components are additional information that you can include in the message. You can select more than one component to prevent sending multiple emails to employees. For example, instead of sending an email for outstanding approvals and another email for transactions to code, you can send one email that contains both.
1. Navigate to Administration Overview Notification Management.
2. In the Administration - Notification Management screen, click Notifications.
3. From the list of All Account Issuers, click the settings icon to the right of the notification to access the Component Settings window.
4. In the Component Settings window, select the components you want to add to your automatic notification and then click Save at the bottom of the screen when complete.

UMB Commercial Card Administrator – User Guide
24
Sending Notifications Manually
This function enables you to manually create and send a notification, such as an email.
1. Navigate to Administration Overview Notification Management.
2. In the Administration – Notification Management tab, enter the email settings.
3. Click the From button to enter the sender details such as your email address for ‘Sender Address’ and a separate
emails address for ‘Reply Address’.
4. Click the Destination button to select the recipients from the Email Destination List.

UMB Commercial Card Administrator – User Guide
25
5. Click the Report button to select the any attachments from the Email Report Options.
6. Type the ‘Subject’ line and body of the email. Then click Send Message at the bottom of the screen
7. To view a list of recently sent manual emails, click the Manual Log tab.

UMB Commercial Card Administrator – User Guide
26
Notification Management – Email Whitelisting
Some organizations may be using email server configurations that restrict the receipt of emails from outside platforms. These organizations may have issues with incorrectly flagging notification emails from UMB Commercial Card as ‘spam’ or malicious.
Organizations using Sender Policy Framework (SPF) DNS settings will want to ensure that UMB Commercial Card is authorized to send emails on behalf of their domain. The following IP addresses will need to be configured in SPF records to ensure users receive email notifications:
ip4: 118.127.87.207 ip4: 128.242.118.200
These records must be replaced with a single instance of:
include:spf1.fraedom.com

UMB Commercial Card Administrator – User Guide
27
Date Extract Management This functionality extracts transactions from the platform and generates an extract file that can be uploaded into your organization’s finance system.
The standard drip feed extract is used for extracting completed and approved transactions many times during a period, preferably until there is nothing left to extract. In cases where incomplete transactions exist, a flush extract (if enabled) can be run to clear the period. This allows prompt posting to the general ledger and supports a process that spreads processing time across the period.
Extract output files are tab-delimited text files in Unicode format and with the file names based on the CompanyName_Dripfeed_MMM_YYYYMMDD_hhmmss.TXT convention. Transactions are grouped by employees and the file contains no header or footer.
Standard Extract Layout
Field Number
Field Definition Type Example Description
1 Employee Name String Glenn May Employee name
2 Employee ID String 1234 Employee ID
3 Posting Date Date 30-May-11 Date DD-MMM-YY
4 All Finance Codes
(can be multiple fields)
String 14104500 All Finance Codes (Can
be multiple fields)
5 Source Currency String USD Source currency of Transaction
6 Tax Exclusive Amount in Source Currency
Decimal 91.55 Tax Exclusive Amount in Source Currency
7 Billing Currency String USD Billing currency of Transaction
8 Tax Exclusive Amount in Billing Currency
Decimal 83.23 Tax Exclusive Amount in Billing Currency
9 Tax Decimal 8.32 Tax amount
10 Tax Code String AUS GST Tax code selected for Transaction
11 Tax Inclusive Amount in Billing Currency
Decimal 83.23 Tax Inclusive Amount in Billing Currency
12 Description String Purchase Stag Hotel. Lunch meeting
Description 1
13 Description 2 String Description 2
14 Supplier Name String Stag Hotel Supplier name of transaction

UMB Commercial Card Administrator – User Guide
28
Running Extracts
1. Navigate to Administration Period Management Statement Periods to display summary information for each period.
2. Click Extract for the statement period to display the Period Access screen with summary information on the transactions to be extracted.
3. Click ‘Extract’ and then click ‘Ok’ to confirm the extraction.
When the extract is complete, you will receive a confirmation that the file has been placed in the Outbox of The Vault, ready for downloading.
Note: You should only download the extract when it is ready for downloading.

UMB Commercial Card Administrator – User Guide
29
General Questions/Assistance
If you need assistance navigating, please access Help for online assistance with any function or module of the platform. Simply select the menu by clicking on your name at the top right-hand side of the screen.
UMB has also posted additional resources located on our Commercial Card Resources page on UMB.com. Click on or enter the following address to access the resources: https://www.umb.com/business-banking/business-credit-cards/resource-center