20140123 sd-p104 malaysia(en+sc) - panasonic usa...of the appliance by a person responsible for...
TRANSCRIPT

Operating InstructionsAutomatic Bread Maker (Household Use)
SD-P104Model No.
The Warranty Card is attached.
Panasonic
P.56~57
Thank you for purchasing Panasonic product.Please read these instructions carefully to use the prouduct correctly and safely.
This product is intended for household use only.
Please carefully read the “Safety Precautions” (P.6~7) of this Manual before use.
Please keep the Warranty Card and this Operating Instructions for future use.

Various taste dedicated
dough, pizza dough making
2
Make various delicious breads manually
in a simple and convenient way!
Soft and delicious
(Dry yeast)
Bread
Dough
Others
With crispy crust and delicious taste Bread (P.18)
Slightly hard crust that are fragrant, healthy and nutritious Whole wheat bread (P.25)
Two-layered
bread with a
crispy cookie
crust Stuffed
bread (P.28)
Dumpling skin (P.38)
Cake (P.39) Chocolate (P.41)
Rolls (P.35) Croissant (P.36) Bagel (P.37) Pizza (P.37)
Fasten the whole baking progress! Rapid bread (P.23)
Add in rice to
make a high
water content
and soft Rice
bread (P.26)
With soft and fine crust Soft bread (P.23)
With crispy crust and original flour aroma French Bread (P.24)
High water content, soft and chewy Riceflour bread (P.27)

Page Page
Co
mfirm
atio
nB
asic
ing
red
ien
ts
an
d p
rep
ara
tion
sB
read
Do
ug
hD
essert
Tip
s
3
Table of Contents
Comfirmation
Safety precautions................................ 6
Operating requirements........................ 7
Parts names and accessories.............. 8
Current time (clock displays) adjustment...... 9
Replace lithium battery ................................ 9
Basic ingredients and preparations
Procedures and key points ................ 10
of bread-making
List of bread types and....................... 12
baking options
Bread-making ingredients.................. 14
Ingredients preparations .................... 17
Operating methods
Bread
Baking basic bread............................. 18
Convenient functions.......................... 20
Raisin ........................................................ 20
Crust colour .............................................. 22
Timer ........................................................ 22
Rapid bread / Soft bread.................... 23
French bread....................................... 24
Whole wheat bread............................. 25
Rice bread........................................... 26
Rice flour bread .................................. 27
Stuffed bread ...................................... 28
Various flavored bread........................ 29
Operating methods
Dough
Making bread dough / pizza dough... 34
Various flavored bread ....................... 35
Making dumpling skin ........................ 38
Dessert
Baking cake ........................................ 39
Making chocolate ............................... 41
Tips
Cleaning .............................................. 43
FAQ...................................................... 45
Abnormal shape of bread................... 48
Remedies for misoperations .............. 52
Troubleshooting.................................. 53
In case of the following displays........ 54
Specifications ..................................... 55

4
P.73P.73
P.76
P.68 P.74
P.77
P.85
P.75 P.78
P.86 P.87 P.87
P.89P.88 P.91

5

6
Safety precautions Please make sure to follow these instructions.
In order to prevent accidents or injuries to the user, other people, and damage to property, please follow the instructions below.
The following charts indicate the degree of damage caused by wrong operation.
WarningIndicates serious
injury or death. Caution
Indicates risk of injury
or property damage.
The symbols are explained and classified as follows.
This symbol indicates prohibition. This symbol indicates requirement
that must be followed.
Do not touch, block or cover the steam vent during use.
Properly use the power plug and the power cord.
Please use the lithium battery carefully.
WarningIn order to avoid
fire, burns and
electric shocks
Especially pay attention to children.
Do not use the sockets and wiring devices beyond their capacity. Do not use any power supply other than 220 V AC.Because overheating may happen if the
rated power of multiple circuits is exceeded.
Charging, short circuit, heatingand throwing it into fire are forbidden.
Do not mix with other metals and batteries.
Please keep it away from children.
Please consult your doctor if it is swallowed
accidentally.
Please wind it with adhesive tapes and keep it properly insulated
before rejection or storage.
Do not use when the power cord is damaged and the socket is loosened.Otherwise it may cause fire due to electric shock or
short circuit.
Please clean away dusts on the power plug regularly.
Take special care to see if the pins have too many
dusts on them. Poor insulations and fire will take
place due to moistures if so.
Insert the power plug firmly.Otherwise it may cause electric shock, heating and fire.
Do not plug or unplug the power cord with wet hands.(It may cause an electric shock.)
If the supply cord is damaged, it must be replaced by the manufacturer, its service agent or similarly qualified person in order to avoid a hazard.
Do not damage the power cord and the power plug.
(In order to avoid heating, fire and blowout the battery.)
Do not damage, modify and approach hot devices. Do not bend, twist, stretch, load or bundle the cord in force.
Otherwise it may cause fire due to electric shock or
short circuit.
Unplug the power plug, and wipe with the dry cloth.
When abnormal incident or malfunction take place, stop using the appliance immediately and pull the plug out from the electrical outlet.
The power plug and the power cord become
abnormally hot.
The power cord is damaged or power failure.
The main body is deformed or is abnormally hot.
The appliance makes abnormal turning noise during use.
Otherwise it may cause smoke, fire, electric
shock or burns.
Unplug the appliance immediately and contact
the service centre for the check or the repair.
Abnormalor breaking
down
It may cause
burns.
Co
mfirm
atio
n

10 cm
10 cm
Co
mfirm
atio
n
7
Co
mfirm
atio
n
5 cm
10 cm
Operating requirements
Do not use the appliance on the following places!
Properly use the power plug.
Install the lithium battery correctly.
The temperature of accessible surfaces may be high when the appliance is operating.
They are highly conductive and may
cause burns.
Caution
●
●
●
●
●
●
●
●
●
●
●
●
Please observe the following
instructions to avoid any accident
Please keep it away from infants and children.This appliance is not intended for use by persons (including children) with reduced physical, sensory or mental capabilities, or lack of experience and knowledge, unless they have been given supervision or instruction concerning use of the appliance by a person responsible for their safety.Children should be supervised to ensure that they do not play with the appliance.
Do not touch the bread pan, the main unit, the air vent, inner part of the appliance, the heater, the inner side of the lid and other high-temperature parts. Because of the heat while woring, do not clean and maintain until bread pan cools down.(Otherwise it may cause burns.)
On carpets and other objects that are non-resistant to heat. (It may cause fire.)
Make sure to hold the power plug when unplugging the power plug. (Otherwise it may cause electric shock or fire due to short circuit.)
Unplug the power plug when the appliance is not in use.(Otherwise it may cause electric shock, or fire due to electric leakage.)
Do not reverse the anode and cathode of the battery.
(It may cause heating, fire and blowout the battery. See P.9)
Near walls and furniture.Must keep away from it by over 5 cm.
(It may cause deformation and discoloration.)
Remove flour and keep away from the table edge by over 10 cm.
Places that are contaminated with flour, greases, dusts and other easily-falling articles.It may cause the appliance to slip and fall from the worktop.
Unstable surfaces and desktops covered with a tablecloth. (It may cause falling or fire.)*Be careful to find an appropriate place to
accommodate the hot bread pan.
Use gloves to take out the bread pan.*Do not use wet gloves.
Do not immerse the main unit in water or splash it with water.
Do not disassemble, repair or modify this appliance by yourself.
Otherwise it may cause electric shock or fire due to short circuit.
May cause burns, electric shock and injury.
It may cause fire, electric shock and injury.
Please consult service centre
on repairs.
In order to avoid fire, burns and injury
Bread pan
Glove
● Do not put any towel on the lid.
● The appliance is not intended to be
operated by means of an external timer
or separate remote control system.
● Please consult your doctor before
use if you are allergic to any food.
● Do not put it near place that
is wet or near fire source.
● Do not use excessive force on the parts
illustrated below.
(It may cause a malfuction or deformation.)
Heater
Temperaturesensor
Inner side of the lid
It may cause a malfuction
or deformation.
It may cause a malfuction
or deformation.
Sa
fety
pre
ca
utio
ns/O
pe
ratio
n re
qu
irem
en
ts

8
Parts names and accessories
■ Please clean the bread pan, blade and accessories before initial use (P.43)
Dispenser lid (removable P.44)
Open the upper lid with magnet held. While close
the lid, pls be careful not to press the magnet.
* Becareful that your hands are not clamped
Yeast dispenser
Insulating film
Do not use it to measure
wheat flour and others!
(Tablespoon) (Teaspoon)
Around ¾ marking
Around ½ marking
Bread pan
Dispenser flap(Raisin and nut dispenser)
Flap valve(Yeast dispenser)
Lid handle
(Left and right)
Air vent
(Left and right)
Lid
Air vent
Air vent
plug
Battery base(Embedded lithium battery)
Steam vent
Handle
Raisin and
nut dispenser(Removable P.44)
● Please pull out the insulating
film before use.
● Measuring cup
(Intended for liquid only P.11)
● Measuring spoon
“1 tbsp” indicates “1 tablespoon” for ingredients in the direction
● Blade(P.18)
Accessories(1 piece each)
“Tablespoon” and “Teaspoon” indicate measuring spoons available in the market.

Push BatteryPush Battery
Push Battery
Co
mfirm
atio
n
9
Control panel
(E.g. adjust the time to 3:30 p.m.)
Lithium battery
( Anode facing
downwards)
Install the lithium battery with
anode facing upwards
Turn over the
battery base
(Start)
(Stop)
Menu
(Menu)(Crust) (Timer)
(Raisin) (Hour / Minute)
● Start baking or timer
● Reset
● Stop after operation is started (Hold)
● Select menu● Change crust colour (P.22) ● Setting timer for the completion time or baking
time for menu “14 & 15” (P.22)
● Put in raisins and other ingredients
(P.20 ~ 21)
● Set timer (P.22)
● Adjust current time (P.9)Control panel
Current time (clock displays) adjustment Replace lithium battery
* Use the lithium battery to enable the bread maker to
memorize current time and previous settings.
①Take out the battery base
②Secure the battery with left hand and
remove the battery base.
③Turn the battery base upside down and
install the battery. Install the battery base
back in the main unit.
*Please confirm that the battery does not drop down.
*Baking can be started even if the lithium battery is
not installed.
● Pull out the insulating film in advance (P.8)● The time is displayed in the 24 hour system.
①Plug in* You cannot adjust time if it is not plugged in.
②Press “Hour” or “Minute” (flashing time)
Hold for fast
forward
③Adjust time
④Pull out the plug
●Release fingers when a beep sound is heard.
● Flashing stops after 5 seconds
(Time adjustment completed)
● “12:00” for noon and
“0:00” for midnight
Battery base
Lithium battery
Pa
rts n
am
es
an
d a
cc
es
so
ries

Dry yeast
10
Procedures and key points of bread-making
P.18, 34
For bread making
For making
various
flavored
bread
Ad
d flo
ur, w
ate
r and
oth
er in
gre
die
nts
Ad
d d
ry yeast
Ma
kin
g B
rea
d
Me
nu
se
tting
Soft taste
s
Automatic
dispensing of
dry yeast
Preparations Making dough
Key points of
making good
bread!
Home made bread change swelling condition and shape every timeBread-making process is highly vulnerable to temperature, humidity, ingredients and setting time. Conditions of shapes and swelling extents would change slightly even if the same baking method is applied.
Instant dry yeast that contribute to the fermentation and swelling of breads (P.14) are fresh stuff like fish and meats. lnstant dry yeast must be kept in a refrigerator! Remember to seal the instant dry yeast for storage after it is opened!
The freshness of ingredients is critical! Is it properly kept?
Size standards of bread
Small-size Large-size
15 cm20 cm
Keep in a refrigerator and use
it before the expiration date
Basic
ing
red
ien
ts
an
d p
rep
ara
tion
s

11
Basic
ing
red
ien
ts
an
d p
rep
ara
tion
sP
roced
ure
s a
nd
key p
oin
ts o
f bre
ad
-makin
g
P.35
Ta
ke
ou
t the
do
ug
h
Baking
Bake w
ith a
n o
ven
Ferm
enta
tion
Form
ing
Take
out th
e b
read
Ta
ke
ou
t the
bre
ad
Water substantially affects swelling conditions.The temperature of ingredients will rise when it is summer or the room temperature is over 25 °C. For that reason, please add ice cubes in water and bring temperature down to 5 °C. (Use it after the ice cubes are taken out.)
Measure flour in weight.
High room temperature.A high room temperature will adversely affect bread baking.
Flour must be measured in weight (The accessorized measuring cup is dedicated to liquid measurement. Do not use it!).Please correctly weigh the flour with a scale in an accuracy of 1 g.
refrigerate
when it is hot Take out the
ice cubesOnly intended for
weighing water
and other liquid!
Weigh with a
electronic scale!
Wheat
flour
When adding ingredients(P.20)

Menunumber(Reference
page)
Menu Availablefunctions
Time required (approx.) Bread-making process of breadmaker
(Required time and time for adding yeast will be changed depending on room temperature, crust colour, time and other conditions.)
1
2
3
4
5
6
7
8
9
10
*D1 12 3
1 13 3
*B1 12 2
12 3 4
*B 12 2 3 4
1 1 12
333
45
11 1
2 3 43*C
*B1 12 2 3 4*A
*B1 12 2 3 4*A
*B1 12 2 3 4*A
1 12 2 3 4*A *B
Time for adding yeast powder to the dough. (beep sounds)
Time for adding fruit and other ingredients. (beep sounds)
12
List of bread types and ba-king options
Tim
er
Cru
st colo
ur
Rais
ins
● Fulling in stuffing 55 min
later
4 h
4 h
2 h
5 h
5 h
1 h
4 h and 20 min
2 h and 15 min
2 h and 30 min
45 min
Bread
Rapid bread
Soft bread
French bread
*A Upon setting timer, “kneading” is preformed and the unit will stay in
standby mode after kneading.
*B Upon setting timer, standby mode is always maintained before the
next process is started. Standby period of 11 hours at the maximum.
*C This process may be skipped sometimes.
*D May be omitted; continuous “kneading” may take
place.
Whole wheat
bread
Rice bread
Rice flour
bread
Bread dough
Stuffed
bread
Pizza dough

11
12
13
1
7 7
1 1
24 46 *
Menunumber(Reference
page)
Menu Availablefunctions
Time required (approx.) Bread-making process of breadmaker
Tim
er
Cru
st colo
ur
Rais
ins
(Required time and time for adding yeast will be changed depending on room temperature, crust colour, time and other conditions.)
15 min
Basic
ing
red
ien
ts
an
d p
rep
ara
tion
s
13
Lis
t of b
rea
d ty
pe
s a
nd
ba
kin
g o
ptio
ns
1 h and 30 min
17 min
● Manually eliminate remaining flour 12
min after start up.
Dumpling skin
dough
Cake
Chocolate
5.
Baking dough
Blade rotation and dough mixing (audible)
Blend water into flour (Basically in stand )
Temperature adjustment and dough fermentation
(Almost in stand by mode)
Kneading
Rest
Baking
Addingcookie dough
Eliminate rema-ining flour
Additional mixing
Adding butters
Form the shape
Open the lid
Fermentation
* It may occurs that the mixing up function does not work for maximum 12 minutes.
1. 6.
2.7.
3.8.
9.
10.
4.

Sugar is used as the source of nutrition
to create carbon dioxide that makes the
dough rises.
Bread textures The dough rise with the carbon dioxides trapped inside.
Effects
Key
points
Dry yeastIn order to make a soft and delicious bread, it is better to use dry yeast that don't require advance fermentation.
*Do not use fresh yeast and baking powder.
Dry yeast
● The yeast is alive.
Different degrees of freshness of the
yeast will vary the expanding condition
while the dough is swelling or fermenting.
Therefore, please use yeast within the
expiration date and be sure to seal it well
and keep it in a refrigerator.
● If yeast powder get wet, its ability of
fast fermentation will be reduced.
14
Bread-making ingredientsIn additions to the basic ingredients, you may add your favorite ingredients to make breads of various tastes.
(Ingredients and dosages may vary depending on the kinds of breads)
Flour
Fats and oils
Dairy products
Salt
Egg
Mixed with water, the protein will be
combined to form glutens.
(High-gluten flour, Low-gluten flour)
(Butter, unsalted butter, margarine
and shortening)
(Milk powder, milk)
It makes the bread texture fine, soft and
moist.
Improve bread taste, smell and crust conditions.Prevent hardening of bread.
It can make the bread chewier while
adjusting the tastes.
It can also avoid bacterial propagation.
Improve bread taste, smell and crust
conditions.
It can also improve the elasticity of the bread.For making bread
Effects
Effects
Effects
Effects
Effects
Key
points
Key
points
Butter
● Flour screening is not necessary.
● The swelling extentsion may vary due
to the different protein contents.
● Use the ingredient which is produced
recently.
● Keep in a cool and dry place.
● Be sure to use a scale to
measure it in “weight”.
● Applicable to solid form, unnecessary to be softened.
* Unsalted butter is recommended.
● Please reduce the same quantity of water if milk is used.
● Please use skim milk powder or whole milk powder with natural nutritional content.
High-gluten
flour
Milk
powders
salt
MILK
Generally, use high-gluten flour which has high
protein content (12%~15%). Non bread flour has an
unobvious swelling effect. It will result in harder bread.
Furthermore, self-raising flour has no swelling effect.
*Please check the list of ingredients on the flour package in advance.
Bread yeast

Basic
ing
red
ien
ts
an
d p
rep
ara
tion
s
15
Bre
ad
-ma
kin
g in
gre
die
nts
Water
SugarGranulated sugar, brown sugar
and honey
Sugar is the nutrition for bread yeast which can speed up the fermentation. It can also improve taste, smell and crust of breads.
● Cold water is used for the following recipes (about 5 °C: almost the temperature of icy water)
● Alkaline water is not applicable.
For making bread
Effects
Effects
Key
points
Key
points
● Increase the amount of sugar to darken the crust; decrease the amount to lighten the crust.
● Do not use the low-calorie sugar substitute.
● Big sugar particles shall be pulverized.
● Do not use rock sugar and other crystal sugar.
Granulated
sugar
Baking powder
* Even adding it into bread and soft bread would not make it swell.
For making scones and cakes.
* About gluten
The substances resulted from combinations of the proteinsin flour and water.Bread-making yeast generates carbon dioxides to inspire the extention of the dough, hence finally generates the textures of the bread.
* As rice flour bread contains wheat (gluten), it is not recommended for
people who are allergic to wheat.
* Be sure to pay attention to the ingredients, cleaning methods, and
maintenance. Use after consulting
your doctor.
Gluten is produced by adding water in flour.
French bread
Other menus while roome temperature is above 25 °C
Rapid bread
Whole weat bread
Stuffed bread
Rice flour
Tips
Key
pointsRice flour does not contain the proteins necessary for dough swelling. Therefore, it is impossible to make bread if only rice flour are added.It is important to use different flour according to the various menu.
Please note the following to avoid damaging the
fluorine coating of the bread pan and blade:
●Adding hard ingredients may cause the fluorine coating
to peel off.
● For large crystalline particles such as coarse sugars
and sea salts, melt them down in the room temperature
water before use.
● Insufficient water may lead to dough hardening, thus
damaging the coating during dough kneading.
●Be sure to put ingredients into the bread pan in the
following order: flour —> other ingredients —> water.
●Do not use hard items such as knives, forks and
chopsticks to take out the bread.
●Always check whether the blade is attached in the
bread (at the bottom) before cutting the bread to avoid
damaging the blade.
* Eating the peeled-off fluorine coating does not affect
health.
● The water of which the hardness is within 50~200 should
be the most appropriate in this case.
* The hardness of the water is calculated from its calcium and magnesium content. Water of moderate hardness can improve the dough elasticity and the bread swelling effect. If the water is too hard, the bread will be harder.
● Distilled water is not applicable for bread swelling.

16
Basic weight of each spoon (Supplied measuring spoon)
Tablespoon Teaspoon
Granulated sugar Approx.12 g Approx.4 g
Milk powder Approx.6 g Approx.2 g
Salt Approx.5 g
Dry yeast Approx.2.8 g
In case of adding eggs or milk
Reduce the water in the same quantity of eggs or milk.
Egg (1 at the most)
Milk (half of water quantity at the most)
● Put egg and others into the measuring cup
and add water for measurement.
● Do not use timer.
(May deteriorate in summer)
In case of changes of recipe and type of ingredients
Adjust according to personal preferences based on the following quantities.
● Increasing the amount of sugars will darken the crusts. Decreasing the amount will lighten the crusts and reduce the height.
● The bread will have less texture without salt.Without salt, ferment acts less frequently, glutens will not form and quality of the bread will not be satisfactory.
● Margarine may be used to substitute butter, honey to substitute sugar and milk to substitute milk powder (P.14) Honey shall not exceed 25 g One tablespoon of milk powders is equivalent to 70 mL
milk
Ingredients To increase To decrease
ButterMay be increased
by 150%May be decreased
by 50%
Granulated sugarMay be increased
by 100%May be decreased
by 50%
Milk powderMay be increased
by 100%May be exempted
Salt
May be exempted
May be reduced by 50% for rice flour bread
Bread-making ingredients(Continued)

Ingredients preparations
High-gluten
flours
You may use your
favorite ingredients
to make various
flavored bread.
The ingredients (P.18) and the amount are
introduced based on the basic bread.
You may also add your favorite ingredients in addition to the
basic ingredients in order to make various flavored bread.
Put the ingredients
in the bread pan at
the beginning!
Among the basic ingredients
High-gluten
flours
Add your favorite ingredients
Your
favorite
ingredients
Butter Milkpowder
Granulated sugar
Vegetable Rice flour and other cereals
Fruit juice
: about 15 ~ 20% of flour weights
(Standard: 50 g)
grated
boil until
softened, pound into pieces
and cool down
boil, cut into
pieces and cool down
: about 10 ~ 20% of flour weights
(Standard: 30 g)
: not to exceed the quantity of
water
fruit juice
Fully cool in a refrigerator in
advance
Flour
quantity
(Remain the same) (Remain the same)
Decrease the weight of
cereals
E.g. Rye 30 g (12% of 250 g)
Flour 220 g
Deduct 80% of vegetable
weights
Decrease fruit juice
amount
(Remain the same)
Water
quantity
E.g. Cooked pumpkins 50 g
Water 140 mL
(180 mL - 80% of 50 g)
E.g. Orange juice 100 mL
Water 80 mL
(180 mL - 100 mL)
● Do not use timer function. ● Do not use timer function.
Basic
ing
red
ien
ts
an
d p
rep
ara
tion
s
17
Bre
ak
-ma
kin
g in
gre
die
nts
/ Ing
red
ien
t pre
pa
ratio
ns

③
④
②
①
Remove the bread pan and
Set the kneading blade
Bread pan
Shaft
Blade
① Rotate the bread
pan in the arrow
direction.
② Remove from the main body.
③Install the blade.
After installation there is 3 cm clearance.
It shall be free from any dough around.
You may reduce about 5 ℃ cold water by 10 mL
when the room temperature is above 25 ℃.
●Basic recipes of soft bread and rapid bread
P.23 ~
Add the ingredients other than the instant dry yeasts in the bread pan
high-gluten flours, water and other ingredients
Add instant dry yeast
Bread panLid
Dispenser lid
Yeast dispenser
Please dry the
water if any.
If the yeast dispenser
becomes wet, please use
tissues to dry the water.
The handle of bread pan will stop after push. (To make it convenient for extraction of the bread pan)There is no need to press it down to the bottom.
Static electricity will be generated by wiping and the instant dry yeast will adhere onto the dispenser walls.
① Stack up high-gluten flours
and other ingredients (except
dry yeasts) in the pan.
② Add water along the periphery.
③ Insert the bread pan
back.
④ Rotate in the arrow
direction and secure it.
⑤Close the lid.
into the yeast dispenser
Add the ingredients
Blade
Yeast dispenser
The shaft is fully
visible from the
axle hole
Baking basic bread
Bread 186 kcal (1 of the 6 pieces cut)
High-gluten flour 250 g
Butter 10 g
Granulated sugar 2 tbsp (24 g)
Milk powder 1 tbsp (6 g)
Salt 1 tsp (5 g)
Water* 190 mL
Instant dry yeast 1 tsp (2.8 g)
Operating methods Bread
18

Setting Take out
Time required: about 4 h
Select menu “1”
Press “Start”
Flash illuminated
▓ To select other types of breaddough / dessert
▓ To add raisin and other ingredients
▓ To select crust colour
▓ Setting timer for completion time
(P.22)
(P.22)
(P.20)
( P.23~
P.42)
●Approximate time of completion
●Do not open the lid after it is started. The instant dry yeast will spill out.However, the instant dry yeast have been added during manual addition of ingredients (P.21). Therefore, you may open the lid.
●Sounds will be heard while the dry yeast is putting in through the dispenser.
Please see P.12 for the baking
procedure.
Take out the bread pan and place it on a towel.
Remember to wear gloves to take out the
bread pan.
Pay attention to the rest place of the bread pan. (The bread pan gives out heats)The bread will cave in and shrink after a while.
Turn off the power
Cool down (about 2 min)
Take out the bread for heat radiation
●Make sure blade is in the bread pan after bread
is taken out.
The kneading blade may stay inside of the bread
(at the bottom). Please take it out.
① Press “Stop”
② Pull out the plug.
Gloves(Do not get wet)
Bread pan
Hold the handle and shake it forcefully several times Do not use a knife, a fork or chopsticks to take it out. (It will scratch the fluorine coating.)
Baking grille or others
Make sure that the
blade is not stuck
on it.
The blade will be damaged if you cut the bread before the blade is taken out of it.
19
Bre
ad
Ba
kin
g b
as
ic b
rea
d

“Raisin” for making bread that contains your favorite ingredients
Adding Automatically (completed
by the automatic bread maker)
Ingredients that can be automatically addedDry ingredients and ingredients that
hardly melt
You may set it to automatically add your favorite ingredients, E.g. raisins and nuts.Please add bananas, chocolates and other ingredients (P.21) that cannot be automatically added by manually when you hear the beep sound.
Please follow the ratio and amount of ingredients of various recipes. Otherwise, the ingredients may fly out from the bread pan, become cooked by the heater and consequently give out odors or smokes.
Put your favorite
ingredients into the raisin
and nut dispenser
The total weight in the dispenser shall not exceed 100 g
Raisin and nut dispenser
(Automatic adding of ingredients)
*“Kneading” temporarily stopped.
Preparations
① Press “Raisin”
Select “Yes”
② Press “Start”
● A small quantity of ingredients will cling to the walls
of the raisin and nut dispenser sometimes.
● The fruits with sugar on the surface may not be
add because the sugar melt down and stick to the
dispenser in case of summer or timed baking.
* Do not add ingredients if the timer function is on.
(In particular, deterioration may occur in summer)
Dried fruits
(Not over 100 g) Cut into small
pieces less
than 5 mmRaisin, plum,
orange peel, etc
Cashew, walnut and
others
Cut into small
pieces less
than 5 mm
Cut it into pieces of
10 mm wide
Wipe away water
Stoneless, cut it into
¼ and wipe away
the water.
Nuts
(Not over 100 g)
Green bean *
(Not over 30 g)
Olive*
(Not over 20 g)
Ham, bacon and
sausage*
(Not over 50 g)
● Addition of hard ingredients may damage the fluorine
coatings inside the bread pan.
Please use it carefully.
* Accidentally eating the fluorine coating will not harm
your health.
Cereal
Fruit oatmeal
Sugar-coated nut
Maple sugar cube
Pearl sugar
Sugar cubes and others
Please pay attention to the following ingredients during adding!
RaisinConvenient functions
(make it flash)
20

Ingredients that can’t be automatically added(stuck onto walls of dispenser, hard to be add)
Ingredients that are sticky, easily melt or have a high content of water
Set the convenient
features before
startup!
After selecting function
and menu...
● To add raisin and other ingredients
▓ Please manually add ingredients that cannot be added automatically
Manually add when you hear beep
sounds ( )
① Press “Raisin” and
select “Yes ” (make it flash)
② Start
⑤ Restart
③
④
After hearing beep sounds
Add ingredients into
Open the lid
the bread pan,
then close the lid
Within
3min
Bread pan● Even without pressing “start” the
beeper will sound after 3 min and the
unit will restart.
● Raisin and nut dispenser flap will
always remain open.
● Completion time
of bread baking
is displayed after
ingredients input.
Melon
Kiwi fruit
Fig
Mango
Pineapple
Papaya Others
● The dough won't rise if any
fresh fruit that have a rich
content of protein-degradation
is added.
Macerated fruits, onions and other chopped vegetables
Cheese, chocolate, etc
● The more ingredient added, the poorer swelling
of bread.
● Some ingredients may not keep their original shapes.
Sesames and other small
ingredients ought to be
added in the bread pan
before beginning (Not over
about 20% of flour weights)
▓ Proper time for adding ingredients when making stuffed breads ...
The time when beep sounds are heard varies with
recipe and room temperature.
·Bread: after about 1 h and 5 min ~ 1 h and 35 min
·Soft: after about 1 h and 55 min ~ 2 h and 15 min
·Rapid: after about 30 min ~ 35 min
·Rice: after about 1 h and 5 min ~ 1 h and 35 min
·French: after about 40 min ~ 1 h and 25 min
· Whole wheat: after about 1 h and 35 min ~ 2 h and
50 min
·Stuffed: 35 min ~ 40 min
·Rice flour: after about 45 min ~ 1 h
·Bread dough: after about 20 min ~ 35 min
21
Bre
ad
Co
nv
en
ien
t fun
ctio
ns

Convenient functions
Use this feature if you want to enjoy freshly-baked bread in the morning.
● Available function for crust colour setting
(P.12 ~ P.13)
● For “Raisin” and “Crust colour”
①Set “Raisin” and “Crust colour”
②Set “Timer”
● Standards on timer
Functions of “Bread”
·Bread : after 4 h and 10 min ~ 13 h
·Soft : after 4 h and 30 min ~ 13 h
·Rice bread : after 4 h and 10 min ~ 13 h
·French : after 5 h and 10 min ~ 13 h
·Whole wheat : after 5 h and 10 min ~ 13 h
·Rice flour : after 2 h and 40 min ~ 13 h
* Timer is not available for some menu.
* You cannot set a time that is beyond the timer limit.
[Timer setting examples]
Menu: bread
Current time: 8:30 p.m.
(LCD screen displays 20:30)
Scope of time settings: 0:40 a.m. to 9:30 a.m.
(“0:40” ~ “9:30”)
*It is impossible to set the time beyond the
range above.
Set the convenient
function before
startup!
After selecting function
and menu ...
● To change the crust colour ● For timer
Bake your favorite “Crust colour”
Use “Timer” to complete baking on specified time
You can set the crust colour as “Light” or “Standard”.
① Press “Crust” to select your favorite crust colour
① Confirm if the current time is correct
② Press “Timer”
④ Start (timer setting completed)
③Set the time for completion of baking
(Hold it for fast forward)
Crust colour Timer
22

1
23
Select Rapid bread: “2”
Soft bread: “3”
Start
Rapid bread / Soft breadTime required:
Rapid bread: about 2 hSoft bread: about 4 h and 20 min
● For reset
● To stop after started (Hold)
You may reduce about 5 ℃ cold water by
10 mL when the room temperature is above
25℃.
Soft bread 192 kcal (1 of the 6 pieces cut)
High-gluten flour 250 g
Butter 15 g
Granulated sugar 2 tbsp (24 g)
Milk powder 1 tbsp (6 g)
Salt 1 tsp (5 g)
Water* 190 mL
Instant dry yeast 1 tsp (2.8 g)
▓ To add raisins and other ingredients
▓ To select crust colour
▓ Setting timer for
completion time (Only
for soft bread)
(P.20)
(P.22)
(P.22)
Press “Stop” when you hear the beep sound. Take out the bread pan and cool it down for about 2 min. Then
take out the bread
Preparations
( P.18 )
① Install blade in the bread pan.
② Add in flour, water and other ingredients (except instant dry yeast).
③ Put the bread pan into the main body and place instant dry yeast in the yeast dispenser.
Ingredients
Please see P.12 for the baking
procedure.
Reduce by 10 mL when the room temperature
is above 25 ℃.
Rapid bread 205 kcal (1 of the 6 pieces cut)
High-gluten flour 280 g
Butter 10 g
Granulated sugar 2 tbsp (24 g)
Milk powder 1 tbsp (6 g)
Salt 1 tsp (5 g)
Cold water (5 ℃ )* 210 mL
Instant dry yeast 1½ tsp (4.2 g)
Bre
ad
23
Ra
pid
bre
ad
/ So
ft bre
ad
Co
nv
en
ien
t fun
ctio
ns

1
23烤色
French bread Time required: about 5 h
● For reset
● To stop after started (Hold)
Preparations
( P.18 )
① Install blade in the bread pan.
② Add in flour, water and other ingredients (except instant dry yeast).
③ Put the bread pan into the main body and place instant dry yeast in the yeast dispenser.
Reduce by 10 mL when the room temperature
is above 25 ℃.
French bread 153 kcal (1 of the 6 pieces cut)
High-gluten flour 225 g
Low-gluten flour 25 g
Salt 1 tsp (5 g)
Cold water (5 ℃ )* 190 mL
Instant dry yeast ½ tsp (1.4 g)
Ingredients
▓ Take out the French bread. Tap the bread pan on a towel. (See the figure on the right)
● Bread has a relatively poor quality when the
room temperature is above 30℃.
Select menu “4”
Start
▓ To add raisins and other ingredients
▓ Setting timer for
completion time
(P.20)
(P.22)
Please see P.12 for the baking
procedure.
Press “Stop” when you hear the beep sound. Take out the bread pan and cool it down for about 2 min. Then
take out the bread
Compared with other bread, French bread may be hard to be taken out from the bread pan. Please take out the bread according to the following Step 3.
24

23烤色
无
1
23
Please see P.12 for the baking
procedure.
Whole wheat bread Time required: about 5 h
● For reset
● To stop after started (Hold)
Preparations
( P.18 )
① Install blade in the bread pan.
② Add in flour, water and other ingredients (except instant dry yeast).
③ Put the bread pan into the main body and place instant dry yeast in the yeast dispenser.
Ingredients
1 Do not use the whole wheat flour which is
exclusive for making dim sum bread (low-gluten
flour).
2 Reduce by 10 mL when the room temperature
is above 25 ℃.
Whole wheat bread
(whole wheat flour 30%)181 kcal (1 of the 6 pieces cut)
Whole wheat flour(for breads) *1 75 g
High-gluten flour 175 g
Butter 10 g
Granulated sugar 2 tbsp (24 g)
Milk powder 1 tbsp (6 g)
Salt 1 tsp (5 g)
Cold Water (5 ℃ )*2 190 mL
Instant dry yeast 1 tsp (2.8 g)
● Bread has a relatively poor quality when the
room temperature is above 30℃.
Please use the menu “1” (Bread) feature if it is less than 30%.
▓ Ratio of whole wheat flour is 30% ~ 100% of total flour quantity.(Bran accounts for about 30% ~ 40%)
* The higher the ratio of whole wheat flour, the
lower the bread will rise.
* Bread shape and swelling degree vary according to the types of whole wheat flour.
Select menu “5”
Start
Press “Stop” when you hear the beep sound. Take out the bread pan and cool it down for about 2 min. Then
take out the bread
▓ To add raisins and other ingredients
▓ Setting timer for
completion time
(P.20)
(P.22)
25
Bre
ad
Wh
ole
wh
ea
t bre
ad
Fre
nc
h b
rea
d

1
23
Rice bread Time required: about 4 h
● For reset
● To stop after started (Hold)
Preparations
( P.18 )
① Install blade in the bread pan.
② Add in flour, water and other ingredients (except instant dry yeast).
③ Put the bread pan into the main body and place instant dry yeast in the yeast dispenser.
Reduce about 5 ℃ cold water by 10 mL
when the room temperature is above 25 ℃.
Rice bread 207 kcal (1 of the 6 pieces cut)
(When rice is 120 g in weight)
High-gluten flour 230 g
Cooled rice 100 ~ 120 g
Butter 10 g
Granulated sugar 2 tbsp (24 g)
Milk powder 1 tbsp (6 g)
Salt 1 tsp (5 g)
Water* 160 mL
Instant dry yeast ¾ tsp (2.1 g)
Ingredients
● You may also use brown rice or saffron rice to
substitute rice.
● The height and taste of bread may vary
depending on rice quantity.
● The more the rice is, the softer the baked bread
will be.
● The rice shall be cooled down in the refrigerator
when the room temperature is over 30 ℃.
● Keep flours in a refrigerator for cooling when
room temperature is above 30 ℃.
● You may use timer function. But do not use
cooked rice that has been stored (or defrosted)
for more than one day.
● Rice would keep its original state at time.
● Rice bread has a high content of water and may deteriorate easily.
Please eat it as soon as possible.
(Summer: on the same day Winter: within two days)
Select menu “6”
Start
▓ To add raisins and other ingredients
▓ To select crust colour
▓ Setting timer for
completion time
(P.20)
(P.22)
(P.22)
Please see P.12 for the baking
Press “Stop” when you hear the beep sound. Take out the bread pan and cool it for about 2 min. Then
take out the bread
26

For reset
To stop after started (Hold)
Time required: about 2 h and 30 minRice flour bread
(P.18)
Preparations Install blade in the bread pan.
Add in flour, water and other ingredients (except instant dry yeast).
Put the bread pan into the main body and place instant dry yeast in the yeast dispenser.
Select menu “7”
To add raisins and other ingredients
Setting timer for
completion time
To select crust colour
Start
Please see P.12
for the baking
procedure.
Press “Stop” when you hear beep sound.Take out the bread pan and cool it for about 2 min. Then
take out the bread
Using timer would deteriorate the bread quality when the room temperature is over 25 °C. (P.51)
Be sure to store flour and other ingredients in the refrigerator when the room temperature is over 30 °C.
High-gluten flour
Rice flour
Butter
Instant dry yeast
Use cold water at a temperature of about 5 °C.
When the room temperature is over 25 °C.
Granulated sugar
Milk powder
Salt
1½ tsp (4.2 g)
2 tbsp (24 g)
1 tbsp (6 g)
1 tsp (5 g)
190 mL
200 g50 g
20 g
water
Rice flour bread199 kcal (1 of the 6 pieces cut)
Ingredients
(P.22)
(P.22)
(P.20)
Bre
ad
Ric
e flo
ur b
rea
dR
ice
bre
ad
27

A
┌│││││││││││└
High-gluten flour
Butter
Instant dry yeast
Stuffing ingredients
Granulated sugar
Milk powder
Salt
Egg (evenly mixed)
Cold water (5 °C)
2 tbsp (24 g)
1 tbsp (6 g)
Half of M size (25 g)
¾ tsp (3.8 g)
1¼ tsp (3.5 g)
12 pieces (15 g/piece)
100 mL
200 g35 g
For reset
To stop after started (Hold)
Stuffed bread
(P.18)
Preparations Install blade in the bread pan.Add in flour, water and other ingredients (except instant dry yeast).Put the bread pan into the main body and place instant dry yeast in the yeast dispenser.
To add raisins and
other ingredients.
Ingredients
Stuffed bread 1162 kcal (Without stuffing)
Be sure to observe the foregoing amount.Excessive amount may cause the bread to spill out of the bread pan, overcooked, smelly or cause smoking.
Select your favorite ingredients. (Liquid is not allowed!)Curry (cook till the sauce becomes thick), meat ball, potato salad, sausage, tuna (with water fully trickled) and cheese (cut into small pieces) and many more.
If “Stop” is accidentally pressed in Step 3, press “Start” within 10 min to recover it.(Only for once; Invalid if any other button is pressed)
Beep sound will be heard and it will restarted 15 min later in Step 3 even if the operation is not yet completed.
Add different ingredients to make bread of different flavors at Step 3 (15 min).
P.30
Select menu “8”
(P.20)
Close the lid
When you hear any beep sound, press “Stop” and take out the bread.After the bread pan is cooled down for about 2 min,
The bread will be deformed upon over exertion.
Restart
take out the bread
Time required: about 2 h and 15 min.
Please see P.12
for the baking
procedure.
Start
When you hear beep sounds, open the
lid, take out the dough from the bread
pan and remove the blade.
Within 15 min
Do not press “Stop” when is flashing.
① Cut the dough into 12 equal portions.
② Fill each portion of dough with stuffing.
(Note: Expand the dough gently to avoid affecting the taste due to damage of gluten organization.)
③ Put all portions of dough into the bread pan.
(Either of the following ways is acceptable.)a. 3 layers, 4 portions of dough per layerb. 2 layers, 6 portions of dough per layer
28

Bre
ad
Va
riou
s fla
vo
red
bre
ad
1230 kcal
Containing red pepper and olive
Various flavored bread
Italian bread
Reduce by 10 mL when the room temperature is above 25 °C.
High-gluten flour
Low-gluten flour
Instant dry yeast
Salt
Olive oil
Cold water (5 °C)
½ tsp (1.4 g)
2 tablespoon (24 g)
1 tsp (5 g)
225 g25 g
170 mL
1170 kcal
You may add 20 g red peppers (or dried tomatoes) chopped
into small pieces of 5 mm and 20 g olives (or 1 teaspoon of
dried basil leaves) if you prefer.
Use “Raisin” function (P.20)
French countryside bread
Instant dry yeast
Reduce by 10 mL when the room temperature is above 25 °C.
Salt
½ tsp (1.4 g)
1 tsp (5 g)
High-gluten flour 200 gWhole wheat flour 50 g
Cold water (5 °C) 190 mL
900 kcal
Small dried fish and kelp rice bread
High-gluten flour
Rice flour
Butter
Instant dry yeast
Dried kelp (dried through wringing after water soaking)
Granulated sugar
Skim milk powder
Small dried fish (stir-fried without oil)
Salt
1½ tsp (4.2 g)
4 g (dry weight)
1 tsp (5 g)
2 tbsp (24 g)
1 tbsp (6 g)
200 g
20 g50 g
20 g
200 mL
Orange flavor rice flour bread
High-gluten flour
Rice flour
Orange sauces
Butter
Granulated sugar
Skim milk powder
Instant dry yeast
Use cold water at a temperature of about 5 °C. When the room temperature is over 25 °C.
Salt
1½ tsp (4.2 g)
1 tsp (5 g)
2 tbsp (24 g)
1 tbsp (6 g)
200 g
20 g50 g
20 g
170 mL
Calory standard for 1 loaf
Menu “4”
Menu “7” Menu “7”
Menu “4”
1236 kcal
Use cold water at a temperature of about 5 °C. When the room temperature is over 25 °C.
Use “Raisin” feature Manual feeding (P.21)
Put it in the bread pan at the very beginning.
Water Water
Stu
ffed
bre
ad
29

1420 kcal
130 mL
High-gluten flour
Butter
Instant dry yeast
Your favorite dried fruits
Cold water (5 °C)
Granulated sugar
Milk powder
Eggs (evenly mixed)
Salt
1¾ tsp (4.9 g)
2 tbsp (12 g)
1 tsp (5 g)
1 tbsp (12 g)
250 g25 g
60 g
One of M size (50 g)
Panettone
Menu “2”
Calorie standard for 1 loaf
110 mL
High-gluten flour
Cooled rice
Butter
Instant dry yeast
Water
Reduce by 10 mL when the room temperature is above 25 °C.
Reduce by 10 mL when the room temperature is above 25 °C. (Cold water at a temperature of 5 °C)
Granulated sugar
Milk powder
Curry powder
Black pepper powder
Refined cheese (cut into small pieces)
Common salt
¾ tsp (2.1 g)
½ teaspoon (3 g)
1 tbsp (6 g)
1 tsp (5 g)
2 tbsp (24 g)
210 g100 g20 g
30 g
20 g
20 g20 g
5 g
Use “Raisin” feature (P.20)
Curry rice bread
(cut into small pieces; boiled to a moderate degree)
(cut into small pieces; boiled to a moderate degree)
Olive bread 1143 kcal 1370 kcal
1336 kcal
1332 kcal
1246 kcal
High-gluten flour
Butter
Instant dry yeast
Reduce by 10 mL when the room temperature is above 25 °C.(Cold water at a temperature of 5 °C)
Granulated sugar
Milk powder
Salt
Dried vanilla
Water
1 tsp (2.8 g)
2 tbsp (24 g)
1 tbsp (6 g)
10 g (15 g for soft bread)
1 tsp (5 g)
Small quantity
250 g
20 g
180 mL
Sunflower seed honey bread
High-gluten flour
Butter
Instant dry yeast
Reduce by 10 mL when the room temperature is above 25 °C.(Cold water at a temperature of 5 °C)
Granulated sugar
Milk powder
Salt
Honey
Water
Sunflower seed
1 tsp (2.8 g)
2 tbsp (24 g)
1 tbsp (6 g)
15 g
1 tsp (5 g)
1 tablespoon (21 g)
250 g
20 g
180 mL
Salt
Fruit juice bread
High-gluten flour
Butter
Instant dry yeast
Reduce by 10 mL when the room temperature is above 25 °C.
Granulated sugar
Milk powder
Egg (evenly mixed)
100% tomato fruit juice
1½ tsp (4.2 g)
1 tbsp (12 g)
2 tbsp (12 g)
25 g
¾ tsp (3.8 g)
50 g
250 g
70 g
120 mL(stored in a refrigerator)
Dry it through trickling and cool downto room temperature
Red bean rice bread
High-gluten flour
Red bean rice (cooled)
Ghee
Instant dry yeast
Reduce by 10 mL when the room temperature is above 25 °C.
Granulated sugar
Salt
Black sesame
Water
¾ tsp (2.1 g)
1 tsp (5 g)
5 g160 mL
2 tbsp (24 g)
100 g10 g
230 g
Menu “1” or Menu “3” Menu “6”
Menu “1” or Menu “3”
Menu “2”
Menu “6”
High-gluten flour
Cooled rice
Ghee
Instant dry yeast
Water
Granulated sugar
White sesame
Salt
¾ tsp(2.1 g)
1 tsp (5 g)
2 tbsp (24 g)
230 g100 g10 g
10 g
5 g
160 mL
Use “Raisin” feature (P.20)
Use “Raisin” feature (P.20)
Salted seaweed bread
crust colour (Light) 1241 kcalMenu “6”
Salted seaweed
Reduce by 10 mL when the room temperature is above 25 °C.
Use “Raisin” feature (P.20)
Green olive
Use “Raisin” feature (P.20)
Use “Raisin” feature (P.20)
Assorted vegetables
Potato
Carrot
Bacon
Various flavored bread
30

Bre
ad
Va
riou
s fla
vo
red
bre
ad
A
B ┌│└
┌│││││││││││└
Cinnamon briocheSelect menu “8” to make bread dough
Put A into the blade-installed bread pan and install the bread pan
into the main body.
Feed instant dry yeast into the yeast dispenser, select menu “8”
and press (start).The operation shall be
completed within 15 min!
Take out the dough.
Rolling flat
Forming
When you hear beep sounds, open the lid and take out the
dough from the bread pan.
Roll the dough into a size of 15 cm x 25 cm (W x L).
Coat milk on 3/4 of dough near to you
and sprinkle cinnamon sugar and dried
fruits on it.
Cut it into four even pieces and place
them in the bread pan.
Start rolling from the side close to you.
Do not press “Stop”
Start baking
Making icing
Final processing
To make various flavored bread on menu “8”.
If the dough is sticky and
it is hard to roll it flat,
(press (Start) again).
Place B in a bowl and mix them on another bowl with 60 °C
hot water inside.
Upon completion of baking, take the bread out from the
bread pan and coat the bread with the icing.
The total weight of the bread dough and the ingredients shall not
exceed 600 g!
The dough may not rise or the baking may not be sufficient if
there are too many ingredients.
Sprinkle some high-gluten flours
on hands and the rolling pole to
make it easier for dough rolling.
Dry the boiled ingredients through trickling and cool them down to
room temperature.
Otherwise, the dough fermentation may be affected.
Prepare the ingredients in advance!
The operation time is 15 min.
Avoid using ingredients with a high content of water!
High-gluten flour
Butter
Instant dry yeast
For icing
Ingredients
Granulated sugar
Granulated sugar
Milk powder
Milk
Salt
Egg (evenly mixed)
Cold water (5 °C)
Cinnamon sugar An appropriate quantity
1 teaspoon (5 mL)
Dried fruits (pickled with rums)
Water
3 tbsp (36 g)
1 tbsp (6 g)
¾ tsp (3.8 g)
1¼ tsp (3.5 g)
110 mL
200 g
100 g
25 g
15 g
Ingredients 1493 kcal
Half of M size (25 g)
½ tsp (3 g)
31

A
┌││││││││││││└
Pineapple breadPut cookie dough in the refrigerator after
it is made.
Add instant dry yeast into the yeast dispenser, select menu
“8” Press (start).
Roll the cookie dough flat when only 10
min of process work are left.
Baking
Matcha black bean rollSelect menu “8” to make bread dough
Put A into the blade-installed bread pan and install it into the main body.
Add instant dry yeast into the yeast dispenser, select menu
“8” Press (start).
(Press )
Take out the dough.
Dough rolling
Add the contents and form the bread.
Baking
When you hear beep sounds, open the lid, take out the
dough from the bread pan and remove the blade.
Roll the dough into a slender shape that is slightly narrower than the bread pan.
Sprinkle evenly the black beans with water fully trickled.
Start rolling from the side close to you.
Put it in the bread pan.
Substitute green tea with coco powder. Add chocolate cubes and almond slices to make the chocolate almond bread rolls
that are kids’ favorites.
Do not press “Stop”High-gluten flour
Butter
Instant dry yeast
Black beans boiled with sugar
Contents
Powder sugar
Milk powder
Salt
Green tea
Egg (evenly mixed)
Cold water (5 °C)
2 tbsp (24 g)
1 tbsp (6 g)
1 teaspoon (2 g)
Half of M size (25 g)
¾ tsp (3.8 g)
1¼ tsp (3.5 g)
120 g
110 mL
200 g15 g
Ingredients 1268 kcal
(Press (start) again)
Ingredients 293 kcal (1 of the 6 pieces cut)
High-gluten flour
Butter
Instant dry yeast
Granulated sugar
Milk powder
Salt
Cold water (5 °C)
¾ tsp (2.1 g)
2 tbsp (24 g)
1 tbsp (6 g)
½ tsp (2.5 g)
100 mL
150 g15 g
Cookie dough (crust of pineapple bread)
Butter
Granulated sugar
Egg (evenly mixed)
Low-gluten flour
Baking powder
Vanilla essence
Granulated sugar (for
final processing)
50 g40 g
100 g1 tsp (3 g)
Small quantity
2~3 teaspoons
Half of M size (25 g)
Install blade in the bread pan.Add in flour, water and other ingredients (except instant dry yeast).
(P.32 ①~⑥)
(P.32 ⑦~⑧)
Open the lid when you hear the beep sound.
Add the cookie dough.Within 15 min
① Place the bread dough in the middle of the bread pan
again.
② Place the cookie dough on the bread dough with the
egg-coated side facing downward.
③ Slightly press the sides of the dough (do not press
hard)
④ Sprinkle granulated sugar from above.
Various flavored bread
32

Bre
ad
Va
riou
s fla
vo
red
bre
ad
Mix low-gluten flour and baking powder and shift them together. Use a wooden spatula to mix the butter at room temperature till they become creamy. Add granulated sugar by small quantity in 2 ~ 3 times. Mix the butter after each addition till the butter become whitish and smooth.
Add eggs by small quantities in 3 ~ 4 times. Fully mix after each addition. Finally, add the vanilla essences. Reserve 1/2 teaspoon of egg liquids.
Add the powder mix in Step and evenly mix them
till the granules of powder disappear.
Making Dough
Rolling flat
Tips for making stuffed bread!
Method of cookie dough making
Make the dough a round shape, cover with plastic wrap and put it in the refrigerator for over 20 min.
Use a rolling pole to roll the dough into a flat circle with a diameter of 14 ~ 15 cm. Cover the dough with
a plastic wrap for the convenience of rolling.
Coat one side of the dough with the reserved egg liquids (1/2 teaspoon).
You may also cut patterns on the surface of the cookie dough.
Use a bamboo stick to cut patterns in a depth of not over 1 mm.
Do not put in the cookie dough before it is flexible and bendable enough.That helps to make good-looking stuffed breads.
The cookie dough may crack and break down if the patterns are cut too deep.
33

Time required: Bread dough about 1h
Pizza dough about 45 min
Through the making of bread and pizza dough, you can also make croissant (P.36), bagels (P.37) and other various flavored bread.
For reset
To stop after started (Hold)
Making bread dough / pizza dough
(P.18)
Preparations Install blade in the bread pan.
Add in flour, water and other ingredients (except dry yeast).
Put the bread pan into the main body and place dry yeast in the yeast dispenser.
Select bread dough: “9”
Select pizza dough: “10”
To add raisins and other ingredients (Only for bread dough)
( P.20 )
Start
Take out the dough right away.
Press “Stop” when you hear the beep sounds.
If you keep it left in the bread pan, fermentation will
proceed further.
Changing the ratio of dough ingredients may slow down
the fermentation process. (P.47)
Pizza dough
High-gluten flour
Butter
Instant dry yeast
Use cold water at a temperature of about 5 °C.
When the room temperature is over 25 °C.
Granulated sugar
Milk powder
Salt
Water
1 tsp (12 g)
1 tbsp (6 g)
1 tsp (5 g)
1 tsp (2.8 g)
190 mL
280 g15 g
Ingredients
Bread dough
High-gluten flour
Butter
Instant dry yeast
Use cold water at a temperature of about 5 °C.
When the room temperature is over 25 °C.
Granulated sugar
Milk powder
Salt
Egg
3 tbsp (36 g)
2 tbsp (12 g)
1 tsp (5 g)
1 tsp (2.8 g)
160 mL
280 g50 g
Water
Please see P.12
for the baking
procedure.
Half of M size (25 g)
Operating methods
34

s
Various flavored bread Use bread dough
Tools used for bread-making with dough
●Dough rolling board
●Cooking paper
●Scale (Unit: 1 g)
●Atomizer
●Scraper
●Brush
●Rolling pole ●Small towel(Soaked and wrung dry)
Tools that may be used for making bread
●Kitchen scissors
●Bread mold
●Plastic wrap
● Thermometer and
others
FormingUse the scraper to divide the dough into 12 even pieces with 45 g each, shape them into balls, cover them with the small towel and place them still for about 15 min.
Shape them into ovals, cover them with the
small towel and place them still for about 10
~15 min.
Press slightly with hands and use the rolling pole to roll the dough thin.
Catch one end of the dough, stretch it to-wards your body and roll it up tightly.
FermentationPlace them on the table with the closure facing downwards. Spray water on it.
Allow the dough to ferment for 40 ~ 60 min (till it rises to double its original size) at a temperature of 30 ~ 35 °C and then apply egg liquids.
BakingBake them in an oven that is preheated to a temperature of 170 ~ 200 °C for about 15 min.
Stuffed bread with sweetened bean paste (Following Step of making rolls) roll the dough into a round plate with a diameter of 10 cm.
Wrap sweetened bean pastes with the dough made from Step , shape it into balls and press the
middle so that it caves in.
Properly arrange the , sprinkle water on it and allow it to ferment for 20 ~ 30 min (till it rises to dou-
ble its original size) at a temperature of 30 ~ 35 °C.
Apply egg liquids, sprinkle poppy seeds and bake them in an oven that is preheated to a temperature
of 170 ~ 190 °C for about 15 min.
●Oven
Ingredients 135 kcal (for 1 piece)
Bread dough (P.34)
Egg (evenly mixed)
Quantity at a time
25 g
Rolls
The dough may rise horizontally upon fermentation if it is not rolled up tightly
(12 pieces)
Ma
kin
g b
rea
d d
ou
gh
/ piz
za
do
ug
hD
ou
gh
Va
riou
s fla
vo
red
bre
ad
35

*
Ingredients (for 12 pieces)
Bread dough
High-gluten flour
Low-gluten flour
Butter
Granulated sugar
Milk powder
Salt
Egg liquid
(evenly-mixed)
Water
Instant dry yeast
225 g
55 g
15 g
3 tbsp (36 g)
1 tbsp (6 g)
1 tsp (5 g)
25 g
140 mL
1 tsp (2.8 g)
140 g
25 g
Butter (Cut into pieces
that are 1cm thick)
Egg(evenly-mixed)
204 kcal (for 1 piece)
1
*1 Make according to the steps in P.34.
Add in butterPut the dough in a bowl, cover it with a
plastic wrap and place it in a refrigerator for
30 ~ 60 min.
Apply flour on butter, place them on the
plastic wrap, roll them into a 20 x 20 cm
square shape and keep them in a refrigerator
for 15 ~ 30 min.
Use a rolling pole to strike and press the
dough and roll it into a 30 x 30 cm square
shape.
Wrap the butter of Step with the dough
cake, cover it with the plastic wrap and keep
it in a refrigerator for 10 ~ 20 min.
Strike and press it with the rolling pole till the
dough is thinner and roll it flat.
Fold up the dough three times, cover it with a
plastic wrap and keep it in a refrigerator for 10
~ 20 min.
Repeat steps and twice and keep it in a
refrigerator for 30 ~ 60 min.
FormingDivide the dough into two even pieces and
roll them into a 18 x 40 cm rectangular shape.
Divide them into 6 isoscele triangles.
Hold one end of the dough and roll it up.
Face the closure downwards.
FermentationSprinkle water on it and cover it with a
plastic wrap. Allow it to ferment for 40 ~
60 min (till it rises to double its original size)
at the room temperature and apply egg
liquids.
Baking Bake it in an oven that is preheated to a
temperature of 200 ~ 220 °C for about
10 min. Keep the remaining dough
in a refrigerator to avoid excessive
fermentation.
Doughnut Divide the dough into small pieces that are 35 g each. Cover them with a small towel and place them still
for 10 ~ 20 min.
Roll them into thin round and press the dough with the doughnut mold.
Allow the dough to ferment for 20 ~ 30 min (till it rises to double its original size) at a temperature of 30 ~ 35 °C.
Deep-fry them at an oil temperature of 170°C and spill cinnamon and refined white sugar on them finally.
Croissant
Prolong the refrigeration time when the room temperature is high
Various flavored bread Use bread dough
36

FormingUser the scraper to divide the dough into 2
pieces and shape them into balls.
(Divide it into 3 pieces for thin pizza dough)
Cover them with towel and place it still for 10 ~
20 min.
Put it on the cooking paper and roll it into a
round plate with a diameter of 25 cm.
Make holes on the dough with a fork.
Put ingredientsApply pizza sauces, add ingredients and cheeses for pizza.
BakingBake it in an oven that is preheated to a temperature of 180 ~ 200 °C
for about 15 min.
Keep the remaining dough in a refrigerator to avoid excessive fermentation.
Making bread doughPlace A Vegetable oil water into the bread pan that is installed with a
blade in sequence and add dry yeast into the yeast dispenser.
Make the dough according to the steps specified in “Making bread
dough” (P.34).
Forming Divide the dough into 8 small pieces that are 60 g each. Knead them into
balls, cover them with a small towel and place them still for 10 min.
Press the middle of the dough with one finger and rotate the dough till
the hole becomes bigger and form the shape of a bagel.
FermentationPlace them onto a cooking paper sprinkled
with flour and allow the dough to ferment for
about 40 min (till it rises to double its original
size) at a temperature of 30 ~ 35 °C.
Water boilingBoil them in boiling water on both sides for
30 seconds each and fully trickle the water.
BakingPut it on a baking pan covered with a cooking
paper and bake it in an oven preheated to a
temperature of 170 ~ 190 °C for 15 ~ 20 min.
Making pizza
Ingredients
Ingredients
(for 8 pieces) 156 kcal
(for 1 piece)
1127 kcal (for 1 pizza)(for 2 pizzas in a diameter of 25 cm each)
Bread dough
High-gluten flour
Granulated sugar
Salt
Vegetable oil
Water
Instant dry yeast
Bagels are directly edible. But it would be more
delicious to cut the bagel into half and add in fresh
vegetables, hams, cheeses and jam.
280 g
3 tbsp (36 g)
1 tsp (5 g)
2 teaspoon
180 mL
1 tsp (2.8 g)
A
Bagel
Pizza
Pizza dough (P.34)
Pizza seasoning
Pizza cheeses
Ingredients (E.g.)
Onion (thin slices)
Sausage (thin slices)
Bacon
Mushroom (thin slices)
Quantity at one time
4 tbsp (72 g)
200 g
1 small
10 pieces
2 pieces
6 pieces
2 piecesGreen pepper (thin slices)
Do
ug
hV
ario
us
flav
ore
d b
rea
d
37

Making dumpling skinTime required: about 15 min
●For reset
●To stop after started (Hold)1
23
Preparations
Ingredients
① Install the blade into the bread pan.
② Add ingredients into the bread pan.
③ Put the bread pan into the main unit.
or
12
3
Select menu “11”
Start
Take out the dough right away
Press “Stop” when you hear beep sounds.
DumplingMaking dumpling stuffing① Fry star aniseeds with peanut oil. Allow the peanut oil to cool down and
mix them with leeks (to prevent water from coming out from leeks). Then
evenly mix them with streaky pork and seasonings.
Rolling dough② Take out the dough, shape it into long strips with a diameter of 3 cm and
cut into 2 cm-wide small pieces. Use the rolling pole to roll the dough into
a round plate with a diameter of about 8 cm.
*Each dumpling skin weighs about 9 g and 30 ~ 40 dumplings can be
made in total.
Making dumpling③ Fill stuffing into the skin to make a dumpling.
* You may make dumpling into a crescent or a triangle shape as you prefer.
Boiling dumpling④ Boil half pot of water, pour the dumplings into the hot water. Wait till
the water boils again before adding half bowl of cold water into the
pot. Repeat this procedure 3 times. (This can improve the tenacity and
elasticity of dumpling skins)
Ingredients 54kcal (for 1 dumpling)
(for 30 ~ 40 pieces)
Powder for dumpling 280 g
Warm water (about 35 °C) 150 mL
High-gluten flour 140 g
Low-gluten flour 140 g
Warm water (about 35 °C) 170 mL
You can adjust the recipe based on your
preference
Peanut oil 1 tbsp (15 g)
Star aniseed 5 g
Leeks 125 g
Streaky pork 250 g
Salt 2 g
Gourner powder 2 g
Spice powder 6 g
Soy sauce 1 tbsp (18 g)
38

Baking cake
●For reset
●For stop after started (Hold)1
2, 45
Preparations
Ingredients
Cake
① Install blade in the bread pan.
② Add butter, granulated sugar, milk and eggs into the bread
pan in sequence.
③ Add in the sieved A.
2288 kcal (for 1 time)
Unsalted butter*
Granulated sugar
Milk
Egg (evenly mixed)
A Low-gluten flour
Baking powder
* Cool down to room temperature and cut it into small pieces of 1 cm.
140 g
100 g
1 tbsp (15 mL)
2 M size (100 g)
180 g
7 g
■You may add your favorite ingredients and stuffing!
■If “Stop” is erroneously pressed at Step 3
■15 min after Step 3 is started.
●The finished cake is similar to butter cake.
Press “Start” to recover within 10 min.
(Only for once; Invalid if any other key is pressed)
Beep sounds are heard and kneading is started
automatically.
Solid ingredients must be added during
cleaning of the residual flour( )
Coco
powder
(15 g)
Chocolate
cube
(50 g)
Black tea
(Earl Grey tea)
(4 g)
Walnut
(40 g)
The baked cake will become polluted on the
surface if the remaining flour are not cleared.( )
But not totally the same as the sponge
cake available in the market.( )
1
2
3
4
5
Select menu “12”
Start
eliminate the remaining powder.
Take out the cake
To select crust colour (P.22)
Beep sounds are heard.
Open the lid and
(About 12 min later)
Within
15 min
●Use a rubber spatula to clean the residual flour around.
Using metal spatula and tools will damage the fluorine
coatings.
●Do not press “Stop”( )
Close the lid and Restart.
Press “Stop” when you hear beep sounds.
● If baking is not complete, perform “Additional baking”.
(P.40)
●The cake may become deformed upon overexertion.
Please see P.13
for the baking
procedure.
Dessert
Ba
kin
g c
ak
eM
ak
ing
du
mp
ling
sk
inD
ou
gh
39

Time required: 1h and 30 min
“Additional baking” in case of insufficient baking
Additional baking is allowed for twice after baking is finished.
* Start (additional baking) within 15 min after baking is finished
Baking can’t be continued if the temperature of inner part of
the bread maker has dropped.
①Select menu “12”
②Set baking time
③Start
(Hold for fast forward)
■ To discontinue Hold “Stop” baking
●Can be set from 1 ~ 20 min
● Calory standard for 1 time
Lemon cake
Chocolate cake
Green tea red beans cake
2095 kcal
2384 kcal
2056 kcal
Unsalted butter(cut into small pieces of 1cm)
Granulated sugar
Milk
Egg (evenly mixed)
Rum (or Brandy)
A Low-gluten flour
Baking powder
*Lemon peel (grated)
Unsalted butter(cut into small pieces of 1 cm)
Granulated sugar
Egg (evenly mixed)
Coco powder
A Low-gluten flour
Baking powder
*Chocolate cube
*Citrus peel(cut into small pieces 5 mm ~ 1 cm)
*To add in during the residual flour is cleared.
*To add in during the residual four is cleared.
*To add in during the residual four is cleared.
110 g
100 g
1 tablespoon (15 mL)
100 g
1 tablespoon
180 g
7 g
For 1 piece
100 g
100 g
100 g
2½ tablespoon (15 g)
180 g
7 g
50 g
40 g
80 g
100 g
150 g
1½ teaspoon (3 g)
180 g
7 g
50 g
Saltless butter(cut into small pieces of 1 cm)
Granulated sugar
Egg (evenly mixed)
Green tea
A Low-gluten flour
Baking powder
*Red beans(cut into pieces of about 5 mm)
■ You can perform “additional baking” as following
*Without pressing “Stop” at step 5 (P.39)
Press to set baking time
Press to start
Pumpkin cake 1960 kcalUnsalted butter(cut into small pieces of 1 cm)
Granulated sugar
Milk
Egg (evenly mixed)
Pumpkin
A Low-gluten flour
Baking powder
100 g
80 g
2 tablespoon (30 mL)
100 g
50 g
180 g
7 g
(cut into small pieces of
2 cm and make it softer)
Baking cake
esse
40

●For reset
●To stop after started (Hold)1
23
Preparations
Ingredients
Chocolate (milk chocolate)
Chocolate (white chocolate)
Chocolate (black chocolate)
① Install blade in the bread pan.
② Break the chocolate and put them into the bread pan.
③ Add in cream and honey.
(for about
13 cm x 13 cm x 1 cm (L x W x H))
1303 kcal
1186 kcal
1416 kcal
Milk chocolate(Chocolate plate available in the market)
Whipping cream(a butterfat content of about 35%)
Honey
White chocolate(Chocolate plate available in the market)
Whipping cream(a butterfat content of about 35%)
Honey
Black chocolate(Chocolate plate available in the market)
Whipping cream(a butterfat content of about 35%)
Honey
3 pieces(165 ~ 174 g)
50 mL
10 g
4 pieces(160 ~ 180 g)
50 mL
10 g
3 pieces(165 ~ 174 g)
70 mL
10 g
* When cream with a butterfat content of over 41% is used, please substitute 10 mL of cream with milk.
(E.g.) Black chocolateWhipping cream: 60 mL Milk: 10 mL
● Be sure to use the amount described in the above.
Otherwise, the grease may become separated
or the chocolate will become too soft.
1
2
3
456
Select menu “13”
Start
Manually remove the blade.
Pour it with a rubber spatula
cooling until it sets
Cut into appropriate sizes
Please see P.13for the baking procedure.
When you hear beep sounds, press “Stop”, take out the bread pan and use a rubber spatula to eliminate the chocolates stuck on the blade.
● Perform Additional Mixing if the chocolate is not fully melted (P.42).● Using a metal spatula or tong etc may damage
the surface of blade.
● Splinkle coco powder or sugar powder on the cut chocolates.
into a pan placed with a plastic wrap or a cooking paper.
Keep them in a refrigerator for more than 2 hours for
Making chocolate
Dessert
Dessert
Ba
kin
g c
ak
eM
ak
ing
ch
oc
ola
te
41

Time required: about 17 min
Perform additional mixing when the mixing is not sufficient
Additional mixing is allowed for twice after mixing is finished.
*Start additioned mixing within 5 min after mixing is finished.
Additional mixing cannot be continued if the temperature of inner
part of automatic bread maker has dropped.
* Use a rubber spatula to eliminate the chocolates stuck in the bread
pan before additional mixing for successful mixing.
Select menu “13”
Set mixing time
③ Start
(Hold for fast forward)
■To discontinue mixing Hold “Stop”.
● It can be set from 1 ~ 5 min
● Calory standard for 1 time
Strawberry chocolate
Corn chips chocolate
White chocolate (plate)
Butter
Honey
Strawberry(pounded into jams)
4 pieces (160 g)
20 g
10 g
40 g
1136 kcal
1279 kcal(1 piece at each bite, about 20 pieces in total)
Black chocolate (plate)
A Whipping cream
Honey
Corn chips
2 pieces 116 g
40 mL
10 g
100 g
2 pieces 116 g
60 mL
10 g
180 mL
An appropriate quantity
① Use A for making chocolate. (P.41)
② Mix① and corn chips.
③ Use a spoon to discharge the chocolate onto a cooking paper for cooling in the refrigera-
tor. You may freely decide the size.
Mousse chocolate
1733 kcal(For about 5 glasses)
Black chocolate (plate)
A Whipping cream(a butterfat content of about 35%)
Honey
Whipping cream
Your favorite fruits (for decoration)
① Use A for making chocolate. (P.41)
② Wrip the cream.
③ Mix hot ① with②.
④ Pour it into a glass or other container for cooling and decorate it with your favorite fruits.
● You may also add grated chocolates and nuts if you prefer (10 ~ 20 g).
■ You can perform “additional baking” as following
*Without pressing “Stop” at step 3 (P.41)
Press to set baking time
Press to start
Making chocolate
42

43
Cleaning
In order to avoid
damaging the
fluorine coating of
the bread pan …
Cleaning● Please clean and dry as quickly as possible!
Do not put an unclean or wet bread pan
back into the body.
● Clean with a soft sponge!
Do not use cleansers or metal brushes to clean the bread pan.And do not use the nylon face of a sponge, sponges wrapped in nylon net or dish dryer as well((
))
Wash with water after the residual dough is cleared.
① Add a small amount of hot water into the bread pan and keep it still for a while.
● If it is hard to remove, rotate the blade slightly to remove it.
② Clean the bread pan and the blade with water.
● Do not leave any residual dough around the shaft or it may damage the fluorine coating.
③ Use a bamboo stick to remove the dough stuck on the blade and the shaft.
● Any residual dough on the shaft would cause the blade to be
easily detached and left in the
bread.
● Use kitchen detergents (neutral) for cleaning if it is very dirty.
● Contact between inner lid and the bread due to excessive swelling may damage the inner lid’s coating. Please rest as-sured that there is no harm to health & product performance. Wipe inner lid with well-wrung cloth shortly after bread making.
Tips
Bread pan, blade Lid
a well-wrung cloth.
Wipe with
●Use a well-wrung cloth to clean away the dry yeast on the flap
valve and make sure that the
vent of yeast dispenser is closed.
Cle
an
ing
Tip
s

44
Main body
Raisin and nut dispenser
Dispenser lid Yeast dispenser
Remove and wash with water
[Removal method]
Do not remove
Do not wipe the yeast
dispenser with dry cloth!
Otherwise, it would be difficult to
remove the instant dry yeastes due
to the influences caused by the
static electricity.
70 degrees
● Raise the dispenser lid to an angle of approximately 70 degrees and pull it upwards on the right.
a well-wrung cloth
and air dry.
Wipe with
And wash with water
After removal, use kitchen detergents (neutral)
●Pull it upwards
a well-wrung clothWipe with
● Clean away the flour, instant dry yeast and ingredients left
in the main body.
● Press and open the dispenser
flap.
● No residual grease is allowed.
Cleaning

45
FAQ
Ingre
die
nts
Can I use dedicated bread flours?
Is it possible to use other ingredients to substitute butter and milk powder?
Can I use the amount specified in the recipe books available in the market?
May I make half size of loaf?
Can I use self-made natural yeast?
How to store instant dry yeast?
Can I use all-purpose rice flour to make rice flour bread?
Can I use dedicated bread rice flour that is not specified in this manual?
What rice can be used to make rice bread?
Bread
French bread
You can make bread but need to adjust the quantity of water. If cave-in appears on
the top of bread because of excessive swelling, reduce water quantity by 5 ~ 10%.
You can make French bread, but the quality and swelling extent of bread may vary.
The amount specified herein is applicable to this bread maker.
The cooking effects may be affected if any other amount is used.
No. When half ingredients are used, the making procedures of the
bread maker can’t be matched because it is very hard to control
the conditions of “kneading” and “air discharges”.
The fermentation conditions are instable and the bread may not be baked
successfully.
Plain rice flour can be mixed with 20% flour to make rice flour mixed bread. (Use menu “1” (bread) for baking)
It is impossible to knead the dough. The bread may have different hardness because of different kinds of rice flour, even though the rice bread have the same ingredients.
Cooled rice at a temperature below 30 °C.The rice kept in a refrigerator shall also be applicable. Where the rice becomes hard which is not easily softened, use a certain amount of water to soften it before adding for the ease of mixing. (P.50)Frozen rice shall be thawed and recovered to room temperature before use.The rice kept warm for less than 12 hours shall be cooled down before use.
Yes. Please use the same quantity of margarine, shortening and
other solid grease to substitute butter.
Milk powder (1 tablespoon) is equivalent to 70 mL milk.
Please reduce the same quantity of water if milk is used.
Store them in a refrigerator. (Be sure to properly seal it and use it up as soon as
possible after unpacking.)Please use them before expiry date (the expiry date of unpacked products which are
stored according to instructions).
Do not store them in a refrigerator.
(Dry yeast may condensate and won’t fall down from the yeast dispenser)
Cle
an
ing
/ FA
QT
ips

46
FAQ
Up
on c
om
ple
tion o
f bakin
gIn
gre
die
nts
Is the cookie dough of stuffed bread usable after refrigerated?
Can I use the sticky rice soaked in water overnight?
Can a bread be baked in a square shape?
How to cut bread properly?
Is it hard to take out the bread smoothly?
Can bread and dough be kept in a freezing condition?
Is instant dry yeast not mixed during execution of bread dough menu?
The bread dough is too soft.
Which kind of flour is better for kneading flour?
Yes. Please allow the cookie dough to thaw naturally in advance so that it is not so
hard when it is placed on the bread dough.
High-gluten flour is recommended for bread forming.
It is applicable too, but the mochi made from it will be too soft, so it is not
recommended. You’d better deduct the water quantity that the sticky rice has
absorbed.
(12 pieces: 80 mL; 18 pieces: 140 mL)
In the automatic bread maker, the dough rises to become
hill-shaped (shape of the bottom of the bread pan) bread
during baking.
It is not easy to cut the bread when it is freshly baked. lt is recommended to wait for at least 30 min for easier cutting and better taste.
Lay the bread horizontally, move the bread knife forward and backward.
If the bread can hardly be taken out when the bread pan has been cooled
down for about 2 min, please place the bread pan into the main unit, keep it
there for 5 ~ 10 min and then take it out again.The bread will shrink and cave in if it is kept there for too long.Do not use a knife, a fork or chopstick etc. to take out the bread. (Otherwise, the fluorine coating may be damaged.)
Bread
Brioche
Pizza
Cut it into thin pieces, wrap them with a plastic wrap one by one and keep them in a freezing condition.
Wrap the rolled dough with a plastic wrap and freeze it.Add ingredients when the dough is still frozen before baking.
The instant dry yeast will work during separation, forming and secondary fermentation as long as it is mixed into the dough. No problem.
Please reduce water amount by 5 ~ 10 mL.
Spill flour for the convenience of operations.
Place formed and fermented dough in a tray, cover it with a plastic wrap and keep it in a freezing condition. After freezing, place it into a plastic bag for storage.
Thaw at a temperature of 30 ~ 35 °C and apply egg liquids before baking.
If time is limited, apply egg liquid when it is still frozen and prolong the baking time by about 5 min.

47
Up
on c
om
ple
tion o
f bakin
g
The dough does not ferment thoroughly during execution of bread dough menu.
Can failed dough be used again?
The dough is not
baked. …etc.
E.g
Fermentation process may slow down due to different ratio of ingredients.
Do not open the lid after process of bread dough is over. Keep it there for further
fermentation. (Standard: 20 ~ 30 min)
It can be used to make doughnut, pizza and other foods.
Please confirm at which status baking is stopped and resume the
subsequent operations.
When there is still instant dry yeast in the yeast dispenser
Start making dough again in the procedure of pizza
dough to make doughnut (P.36) and pizza (P.37).When there is no instant dry yeast in the yeast dispenser
Take out the dough and make doughnut (P.37) and pizza (P.37)!
FA
QT
ips

48
When the following conditions happen Please confirm the following
Abnormal shape of bread
Bre
ad
(sw
ellin
g)
Excessive swelling
Height standards
20Above
cm
Height standards
(Rice flour bread)
Insufficient swelling
(Bread, soft and rice bread)
(Rapid, whole wheat )*1
French bread, stuffed bread
cm15Insufficient
cm14Insufficient
cm13Insufficient
cm11Insufficient
cm10Insufficient
(Whole wheat bread*2)
* 2 Contain 100%whole wheat flour
* 1 Contain 50%whole wheat flour
Have you used the instant dry yeast that do not require advanced
fermentation?
Is it placed in the yeast dispenser?
Not enough?
Is it kept in the refrigerator? (P.10)
Have you used expired instant dry yeast?
Flour
Water
Granulated sugar
Instant dry yeast
Do you measure the weight with a scale?
(Do not use the measuring cup supplied)
Have you used flour with a protein content of over 12 ~ 15%?
Have you used high-gluten flour?
Have you used expired flour?
Is the ratio of high-gluten flour and low-gluten flour wrong?
Have you used cold water at a temperature of 5 °C?
Have you used cold water at a temperature of 5 °C?
Not enough?
Not enough?
<French bread...>
<Rapid, French bread, Whole wheat, Stuffed bread ...>
<When room temperature exceeds 25 °C>
Shape and swelling conditions vary according to temperature, humidity, ingredient and timer conditions.Are too many raisins and other ingredients added?
Is the room temperature too high? (The shape will change if the room temperature is too high)
Please store flour and other ingredients in the refrigerator.
Flour
Water
Instant dry yeast Excessive swelling may happen sometimes at the places of
which the altitude is over 1,000 metres high.
Contact between inner part of the lid and the bread due
to excessive swelling may damage the lid’s coating.
Accidentally eating the coating will not harm your health.
Too much?
Do you use the dedicated bread flour? (P.46)
Too much?
Too much?
If excessive swelling happens upon stated amount, please
try reducing the quantities of instant dry yeast or granulated sugars by 1/4 ~ 1/2.
It is hard to control the
bread has the same shape ...bread-making process. No

49
When the following conditions happen Please confirm the following
Bre
ad
(shap
e)
The bread always has a different shape and swelling condition.
Bottom caves in so that the bread cannot stand upright.
Are there remaining flour around?
Expected crust color
is not achieved.
Sticky bottom
and distinct
collapses
on the
sides
Cave-in on the top surface(Coked crusts)
Cave-in
Flat and square top surface
No swelling at allWhole bread is whitish and look like a ball.( )
Instant dry yeastHave you forgotten to add the instant dry yeast?
Have you used any improperly stored yeast or expired yeast?
Have you forgotten to install the blade?
Has any power failure occurred during operation?
Home made bread always has a different shape and swelling condition due to the following conditions!
The room temperature is high in summer.The room temperature has changed during operations.(The air-conditioner is shut down during operation etc.)
Flour with low protein content are used for baking.Improperly kept or overdue instant dry yeast are used.
Roomtemperature
Types and properties of ingredients
Have you rapidly taken the well-baked bread from the bread pan and put it on the griller for heat radiation?
Reduce water quantity by 10 mL for better baking effects if the room temperature is high.
Not enough flour?
Too much water?
<Whole wheat …>
A high ratio of whole wheat flour or different types of flours will easily lead to
such situations.
Blade shape is visible.
Have you touched the bottom of bread pan when you take out the bread?
(Bread is damaged sometimes due to blade rotations) Do not rotate
Too many flour?
Not enough water?
Please change crust color (P.22) or adjust the amount of granulated sugar. Crust color becomes lighter if amount of granulated sugar is reduced and darkened if the amount is increased.If the stove is too hard to hold the bread because the bread is too big, please reduce the quantity of dry yeast and water.If the bread ferments too much that the teppen of if touches the inner side of the lid, it is possible that part of the bread will stick on the lid while the lid is opened.
Ab
no
rma
l sh
ap
e o
f bre
ad
Tip
s

50
When the following conditions happen Please confirm the following
Bre
ad
(shap
e)
Ric
e b
read
Stu
ffed
bre
ad
Bread crust is too hard
Dough becomes sticky after forming and fermentation
It is hard to make croissants
The rice grains are
notably visible in the
rice bread.
The cookie dough
of stuffed bread
becomes soft.
The cookie dough
of stuffed bread
deflects on one side
The cookie dough of
stuffed bread
cracks
The bread would become soft if it is cooled down to human skin temperature and put in a plastic bag.
Excessively long fermentation will make the dough loose and sticky.
The fermentation time depends on the type of bread. Normally, the fermentation is
finished if you touch the rising dough with a finger slightly and it can recover slowly.
Melted butter cannot be well wrapped in a dough.Please keep the dough in a refrigerator for complete cooling before butter are wrapped in it.
* Please prolong the cooling time when the room temperature is high because the butter may easily melt down.
Please put rice and water in another container. Fully soften the rice before putting it into the bread pan.
Have you fully mixed the cookie dough?
Have you kneaded the surface of cookie dough till it becomes smooth?
Have you forced the cookie dough into the bread dough?
Have you pressed in the mold too much?
You only need to place the cookie dough on the bread dough. (Slightly press it so that the two doughs stick together and make a good-looking shape)*
The reason is that the butter melts so that the dough has too much
liquid in it.If the butter melts, the dough will become soft and fragile even if the dough is cooled down.*
Have you repositioned the bread dough in the middle?
Abnormal shape of bread

51
Abnormal shape of breadWhen the following conditions happen Please confirm the following
Stu
ffed
bre
ad
Ric
e flo
ur b
read
Cake
The cookie dough of
the stuffed bread is
too hard.
The cookie dough
of the stuffed bread
overflows the bread
pan.
The rice flour bread made through timer baking has a rather bad shape.
Insufficient swelling.
Remaining butter are left on the cake.
Is the amount of ingredients correct?
Have you added any baking powder?
Did you sieve the low-gluten flour and baking powder before feeding?
Have you cut butter into small pieces of 1 cm?
Have you recovered butter to the room temperature?
Is the adding sequence of ingredients correct?
Has the cookie dough been over cooled and become hardened?
Take out the cookie dough from the refrigerator according to the instruction of “10 min of process work are left” and roll the dough flat with a rolling pole.Till the cookie dough becomes flexible and soft.
*
Did you slightly press the cookie dough on all sides when you put it in?
Excessive pressing may cause the baked cookie dough to crack.*
Have you used the timer at a room temperature of over 25 °C?
Ingredient temperature rises too much when the room temperature is high so that it becomes deformed.Excessively long timing is not recommended.
*
Chocola
te
There are remaining
flour around cake.
The finished cake
is different from
expected.
Too soft.
Chocolates stick on
the inner sides of
the bread pan.
Whipping cream and
chocolates can not
be merged together.
Have you cleared the remaining flour?
Is the adding sequence of ingredients correct?
The finished cake looks like butter cake but is still different from the sponge cake
available in the market in terms of baking conditions.
Reduce low-gluten flour to 160 g to make softer cake.
The cream with a high content of butterfat (over 41%) may not merge with chocolates
with a high content of coco.
Adding extra 10 mL of milk may help the two ingredients to merge better.
Chocolates with a high content of milk will soften.
Please reduce the dosage of whipping cream by 10 ~ 20 mL.
Please use a rubber spatula to clean away the chocolates in the bread pan within
5 min and mix for another 2 ~ 3 min.
Ab
no
rma
l sh
ap
e o
f bre
ad
Tip
s

52
Remedies for misoperations
Pressed “Start” before adding any ingredients.
Ingredients can be added at the following time.However, the bread making process may fail if the ingredients are not fully mixed in the initial “kneading” procedure.
Forgotten ingredients Adding time
Butter
Granulated sugar
milk powder
Salt
Feed into the bread pan before adding the instant dry yeast.
“Dough” functionsPizza dough ................................................................within 1 min
Bread dough ............................................................within 10 min
“Bread” functionsRice flour ....................................................................within 35 min
Other menu ..............................................................within 20 min
Instant dry yeast
Add into the yeast dispenser before the instant dry yeast is dispensed.
“Dough” functionsPizza dough ................................................................within 1 min
Bread dough ............................................................within 10 min
“Bread” functionsRice flour ....................................................................within 35 min
Other menu ..............................................................within 20 min
*Open the lid to the minimum angle to avoid spill of instant dry yeasts.
Pressed “Start” when the wrong menu, raisin and crust color are selected!
Pressed “Stop”erroneously during operations!
Install the wrong blade and start the unit!
Pull out the power plug!
Reselect if it is just started. Hold “Stop” down to stop operation, select
the correct functions, menu *, raisin and crust color and restart.
*Do not change it into Rice flour bread. (The initial working procedure is different)
Press and hold “Stop” button to stop the unit. Reinstall the correct blade and
restart the unit.
(The blade may stop rotating if it is not the correct one.)
Plug in again within 10 min after unplugging and the operation will be resumed.Do not press “Start”.*
Press “Start” to recover within 10 min.Only valid for once. Do not press other buttons.*
■ Failed dough can be used again to make doughnut and pizza. (P.36, 37, 47)

53
TroubleshootingPlease confirm the following issues first.
If any anomaly is still identified, please contact Panasonic customer service centre immediately.
When the following conditions happen Causes Solutions
Key operation is disabled
Press Start but no operation
Operation stops(Display current time)
Stop halfway
(Blade does not work)
Instant dry yeast is not dispensed.
Timer cannot be set.
Start kneading immediately after timer setting.
Sounds are heard during operation and timing
Is the power plug removed?
“Rice flour” functions starts only from “Soak”. They don’t operate in the very beginning.
The instant dry yeast should be automatically added in depends on the room tempera-
ture and funcfion you have selected.
Yeast dispenser is damp or has static
electricity.
Operation will be stopped if power fails
for more than 10 min.
Are you attempting to make an impossible
timer setting?
The timer needed to complete baking varies
from different menu.
Plug in the power plug.
Wipe with a wrung cloth and air dry.
Use new instant dry yeast.
The dough can be used again if the
operation stops in a dough state.
(P.47)
Please make the setting within the
following range:BreadAfter 4 hours and 10 min 13 h
Soft breadAfter 4 hours and 30 min 13 h
Rice breadAfter 4 hours and 10 min 13 h
French breadAfter 5 hours and 10 min 13 h
Whole wheat breadAfter 5 hours and 10 min 13 h
Rice flour breadAfter 2 hours and 40 min 13 h
[Timer setting examples]
Menu: bread
Current time: 8:30 p.m.
(LCD screen displays 20:30)
Scope of time settings: 0:40 a.m. to 9:30 a.m.
(“0:40” “9:30”)
Are the instant dry yeasts dampened?
It is impossible to set the time beyond
the range above.
*
For the bread, Rice bread, French bread and the whole wheat bread functions that
use instant dry yeasts, only the initial “kneading” procedure will be started immediately
after timer setting. (P.12)
(Please consult Panasonic customer service centre.)*
Since too many ingredients are added and the blade is stucked by the hard ingredients, the motor is overloaded and the protective device is hence activated, which may cause the operation to stop immediately.(Powder still remains upon completion and baking does not happen)
The following sounds are normal.
When dough kneading and air discharge are going on,
the sounds of kneading are heard.
the sounds of motor running are heard.
When instant dry yeast and the ingredients of the raisin and nut dispenser are added into
the bread pan.The sounds of opening the flap valve and the dispenser flap are heard.
(No kneading)
Rem
ed
ies fo
r mis
op
era
tion
s / T
rou
ble
sh
oo
ting
Tip
s

54
Abnormal sounds on the blade
The current time is displayed in a fade colour and even disappears.
Powders still remain and baking does not occur
Dough is leaking out at the bottom of the bread pan
The bottom of the bread pan turns black
Please replace the main shaft bearing if the blade shaft does not rotate.
IHave you forgotten to install the blade?
Is the blade shaft excessively fastened in the
bread pan so that it can’t move.
A small amount of dough leaks out from the discharge port of the bread pan during operations.
There is a clearance between the blade and the
shaft. (The front end moves by 3 cm or so)
The lithium battery is at the end of its working life (about 2 years).
Remove and replace the battery.
(P.9)
Install the blade. (P.18)
Set the current time whenever you use the timer functions.
*
Before replacement of battery, inserting the plug can continue the operations. However, it is necessary to install the battery base in advance.(Otherwise, foreign matters may enter)
*
This is normal.Please confirm if the blade is rotating.
Discharge port (4 positions)
At the bottom of
the bread pan
please consult your Panasonic
customer service centre
Shaft
The bottom of the bread pan may turn black due to frictions upon kneading. In that
case, please wipe and clean with a damp kitchen towel.
Smokes or odors may occur upon initial use. However, they will disappear some time after use. Operations are
not affected.
In case of the following
displays
Display
Display
Display
Electricshock
To notify you of any power shut-off during operations.If power fails for less than 10 min, the operations will resume when power supply is resumed.(Unsuccessful bread-making may occur sometimes)
It will still display when the power plug is plugged in after it is removed.
The oven temperature rises high due
to continuous use. (above 40 °C)
Failure
Please contact with your local customer service center for repairs.*
Open the lid for full heat radiation of the oven.Cool down for about 1 hour after baking is finished.
To avoid affecting the rotations, the dough that enters the rotational part will be discharged.
Damage on inner lid’s coating
Contact between inner lid and the bread due to excessive swelling may damage
the inner lid’s coating. Please rest assured that there is no harm to health & product
performance.
Wipe inner lid with well-wrung cloth shortly after bread making.
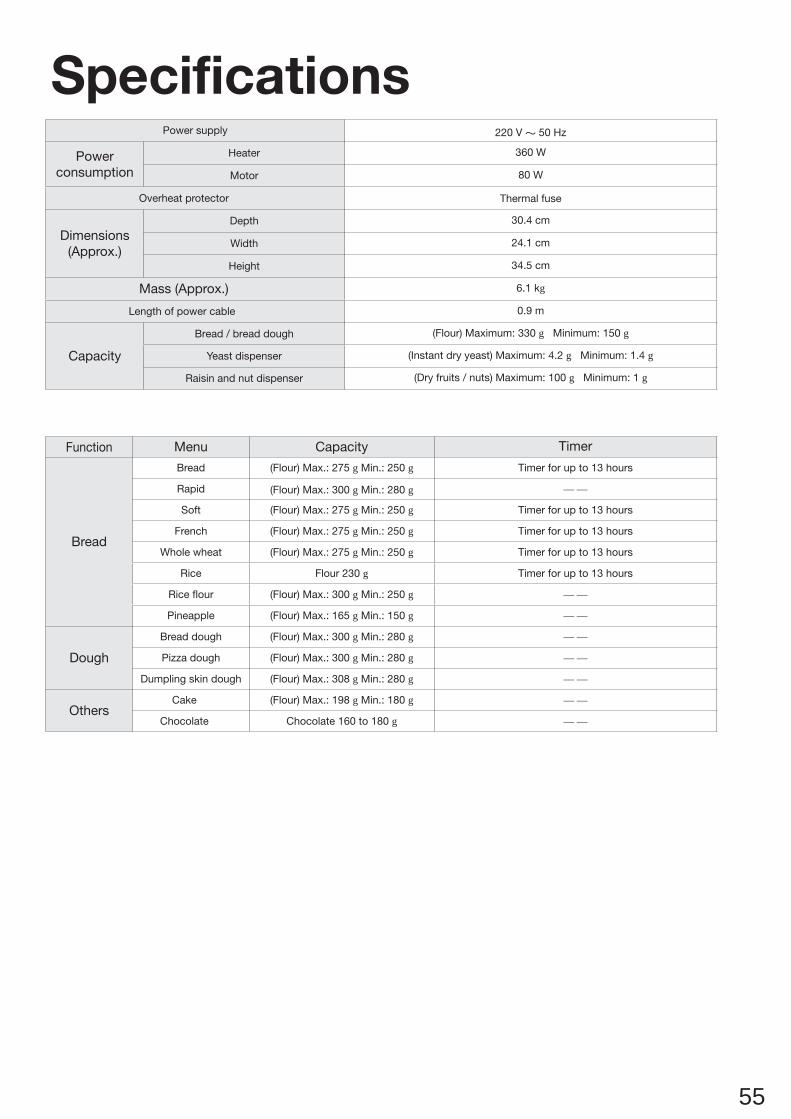
55
SpecificationsPower supply 220 V 50 Hz
Power
consumption
Heater 360 W
Motor 80 W
Overheat protector Thermal fuse
Dimensions
(Approx.)
Depth 30.4 cm
Width 24.1 cm
Height 34.5 cm
Mass (Approx.) 6.1 kg
Length of power cable 0.9 m
Capacity
Bread / bread dough (Flour) Maximum: 330 g Minimum: 150 g
Yeast dispenser (Instant dry yeast) Maximum: 4.2 g Minimum: 1.4 g
Raisin and nut dispenser (Dry fruits / nuts) Maximum: 100 g Minimum: 1 g
Function Menu Capacity Timer
Bread
Bread (Flour) Max.: 275 g Min.: 250 g Timer for up to 13 hours
Rapid (Flour) Max.: 300 g Min.: 280 g — —
Soft (Flour) Max.: 275 g Min.: 250 g Timer for up to 13 hours
French (Flour) Max.: 275 g Min.: 250 g Timer for up to 13 hours
Whole wheat (Flour) Max.: 275 g Min.: 250 g Timer for up to 13 hours
Rice Flour 230 g Timer for up to 13 hours
Rice flour (Flour) Max.: 300 g Min.: 250 g — —
Pineapple (Flour) Max.: 165 g Min.: 150 g — —
Dough
Bread dough (Flour) Max.: 300 g Min.: 280 g — —
Pizza dough (Flour) Max.: 300 g Min.: 280 g — —
Dumpling skin dough (Flour) Max.: 308 g Min.: 280 g — —
OthersCake (Flour) Max.: 198 g Min.: 180 g — —
Chocolate Chocolate 160 to 180 g — —

56
220 V

10 cm
10 cm
57
5 cm
10 cm
10 cm
5 cm
( P. 59)
/

58
■ (P.93)
( P.94)
¾
½
( P.94)
(P.68)
( P.61)
1 1

Push BatteryPush Battery
Push Battery
59
3 30
Hour Minute
12:000:00
5
( )
P.70 71
Raisin
Start
Stop
TimerCrustMenu
Hour /Minute
P.72 14 & 15
14 & 15 P.72
P.58
24
P.72
P.59

60
68,84
P.64
15 cm20 cm

61
85
25
5 1 g
(P.70

4
2
4 20
5
5
4
2 30
2 15
1
45
1 2
2
3
1 2
1 2
2
4
P.68
P.73
P.73
P.74
P.75
P.76
P.77
P.78
P.84
P.84
62
55
1
2
11
3
4
1
2
3
4
5
6
7
8
9
10

12
15
1 30
17
12
P.88
P.89
P.91
63
11
12
13
5.
1. 6.
2. 7.
3. 8.
9.
10.
4.

64
12 15%

50 200
(distilled water)
5
25
—> —>
65

66
1
12 g 4 g
6 g 2 g
5 g
2.8 g
1
●
●
●P.64
25 g1 70 mL
2.5 ½
2 ½
2
½

67
P.68
15 20%
50 g
···
10 20%
30 g
· ·· · ·· ·
· ·· 100%
30 g 250 g 12%
220 g
80%
50 g
140 mL
180 mL 50 g 80%
100 mL
80 mL
180 mL 100 mL
● ●
/

③
④
②
①
3 cm
25 5 10 mL
● P.73
①
186 kcal 6 1
250 g
10 g
2 24 g
1 6 g
1 5 g
190 mL
1 2.8 g
68

4
1
▓ /
▓
▓
▓ (P.72)
(P.72)
(P.70)
(P.73P.92)
●
P.71
P.62
2
Stop
69

P.71
.
100 g
.
※
① Raisin
Yes Yes
②
● .
●
100 g 5 mm
5 mm
10 mm
¼
100 g
30 g
20 g
50 g
70

●
▓
① Raisin
Yes Yes
②
⑤
③
④3
● Start
3
20%
▓
· 1 5 1 35
· 1 55 2 15
· 30 35
· 1 5 1 35
· 40 1 25
· 1 35 2 50
· 35 40
· 45 1
· 20 35● .
71

● Crust P.62 P.63
● Raisin Crust
① Raisin Crust
② Timer
●
· 4 10 13
· 4 30 13
· 4 10 13
· 5 10 13
· 5 10 13
· 2 40 13
8 30
20 30
0 40 9 30
0 40 9 30
● ●
① Crust
① ② Timer
④
③
P.62 63
72

1
23
2
3
/ 24 20
●●
▓
▓
▓
(P.70)
(P.72)
(P.72)
Stop2
P.68
① ②③
P.62
192 kcal 6 1
250 g
15 g
2 24 g
1 6 g
1 5 g
190 mL
1 2.8 g
25 5 10 mL
205 kcal 6 1
280 g
10 g
2 24 g
1 6 g
1 5 g
5 210 mL
1½ 4.2 g
25 10 mL
73
/

1
23烤色
P.62
5
●
●
P.68
① ② ③
153 kcal 6 1
225 g
25 g
1 5 g
5 190 mL
½ 1.4 g
▓
● 30
4
▓
▓
(P.70)
(P.72)
Stop2
3
25 10 mL
74

23烤色
无
1
23
5
P.68
① ② ③
1
2 25 10 mL
30%
181 kcal 6 1
1 75 g
175 g
10 g
2 24 g
1 6 g
1 5 g
5 2 190 mL
1 2.8 g
● 30
30 1
▓ 30 10030 40
5
Stop2
▓
▓
(P.70)
(P.72)
●
●
P.62
75

1
23
4
●
●
P.68
① ② ③
207 kcal 6 1
120 g
230 g
100 ~ 120 g
10 g
2 24 g
1 6 g
1 5 g
160 mL
¾ 2.1 g
● ● ●
● 30
● 30
● 1
●
●
6
▓
▓
▓
(P.70)
(P.72)
(P.72)
P.62
Stop2
25 5 10 mL
76

77
2 30
P.68
7
P.70
P.72
P.72
Stop
2
25
P.101
30
25 5
1½ 4.2 g
2 24 g
1 6 g
1 5 g190 mL
200 g50 g
20 g
199 kcal 6 1
P.62

12
a. 3 4
b. 2 6
Stop
2
15
Stop
2 15
P.68
P.62
P.70
3 Stop
10 Start
1
3 15
3 15
P.80
8
A
5
2 24 g
1 6 g
25 g¾ 3.8 g
1¼ 3.5 g12 15 g/
100 mL
200 g35 g
1162 kcal
78

79
25 10 mL
5
½ 1.4 g
2 24 g1 5 g
225 g25 g
170 mL
1170 kcal
5 mm
20 g 20 g 1
Raisin P.70
5
½ 1.4 g
1 5 g
200 g50 g
190 mL
900 kcal
25 5
1½ 4.2 g4 g
1 5 g1 6 g
200 g
20 g50 g
20 g2 24 g
200 mL
Raisin P.71
25 5
1½ 4.2 g
1 5 g1 6 g
200 g
20 g50 g
20 g2 24 g
170 mL
1
4
7 7
4
1236 kcal 1230 kcal
25 10 mL

80
1
110 mL
25 10 mL
¾ 2.1 g
½ 3 g
1 6 g1 5 g
2 24 g
210 g100 g20 g
30 g
20 g20 g
20 g
5 g
Raisin P.70
1370 kcal1143 kcal
25 10 mL 5
1 2.8 g
2 (24 g1 6 g
10 g 15 g
1 5 g
250 g
20 g
180 mL
Raisin P.70
1 3 6
25 10 mL
¾ 2.1 g
1 5 g2 24 g
230 g100 g10 g
10 g
5 g
160 mL
Raisin P.70
1241 kcal6
1336 kcal
25 10 mL 5
1 2.8 g
2 24 g
1 6 g
15 g
1 5 g1 21 g
250 g
20 g
180 mL
Raisin P.70
1 3
1332 kcal
25 10 mL
100%
1½ 4.2 g
1 12 g2 12 g
25 g
¾ 3.8 g50 g
250 g
70 g
120 mL
Raisin P.70
2
1246 kcal
25 10 mL
¾ 2.1 g
1 5 g5 g160 mL
2 24 g
100 g10 g
230 g
6
1420 kcal
130 mL
Raisin P.70
5
1¾ 4.9 g
2 12 g1 5 g
1 12 g
250 g25 g
60 g
50 g
2
25 10 mL 5

81
A
B ┌│└
┌│││││││││││└
8
A
8
15
15 cm 25 cm
¾
4
Stop
8
600 g !
B 60
15
!
5
1 5 mL
3 36 g1 6 g
¾ 3.8 g
1¼ 3.5 g110 mL
200 g
100 g
25 g
15 g
1493 kcal
25 g
½ 3 g

82
A
┌││││││││││││└
P.82 ~
P.82 ~10
8
8A
8
Stop
5
2 24 g
1 6 g
1 2 g
25 g
¾ 3.8 g
1¼ 3.5 g
120 g
110 mL
200 g15 g
1268 kcal
15
293 kcal 6 1
5
¾ 2.1 g
2 24 g1 6 g
½ 2.5 g100 mL
150 g15 g
50 g40 g
100 g1 3 g
25 g
2 3

2 3
3 4
½
20
14 15 cm
½
1 mm
83

84
1
45
P.86P.87
/
P.68
9
10
( )( P.70 )
Stop
P.97)
25 5
1 12 g1 6 g
1 5 g
1 2.8 g190 mL
280 g15 g
25 5
P.62
3 36 g2 12 g1 5 g
1 2.8 g160 mL
280 g
25 g
50 g

85
1 g
45 g 12
15
10 15
30 35
40 60 2
170 20015
10 cm
30 35 20 30 2
170 190 15
12 135 kcal 1
P.84 1
25 g
( )
/

86
12
225 g
55 g
15 g
3 36 g1 6 g1 5 g
25 g
140 mL
1 2.8 g
140 g
25 g
1 cm
204 kcal 1
1
1 P.84
30 60
20 20 cm
15 30
30 30 cm
10 20
10 20
30 60
2 18 40 cm
6
40 60 2
200 220
10
35 g 10 20
30 35 20 30 2
170

87
2
3
10 20
25 cm
180 200 15
60 g 8
10
30 35
40
2
30
170 190 15 20
8 156 kcal 1
2 25 cm1127 kcal 1
280 g
3 36 g1 5 g
2
180 mL
1 2.8 g
A
P.84 1
4 72 g
200 g
1
10
2
6
2

88
15
1
23
1
2
3
11
Stop
①
3 cm 2 cm
8 cm
9 g 30 40
3
30~40 54 kcal 1
1 15 g
5 g
125 g
250 g
2 g
2 g
6 g
1 18 g
280 g
35 150 mL
140 g
140 g
35 170 mL

89
1
2,45
A
3 Stop
3 15
10 Start
1
( )
15 g 50 g4 g
40 g
( )
( )
2288 kcal 1
A
1 cm
140
100
1 (15 mL
(100 )
180
7
1
2
34
5
12
15
Stop
P.90
Stop
2
P.72
P.63
12

90
2
15
12
1 20
1
2095 kcal
1 cm
A
110
100
1 15 mL
100
1
180
7
1
2384 kcal
1 cm
A
5 mm 1 cm
100
100
100
2½ 15 g
180
7
50
40
1960 kcal
1 cm
2 cm
A
100
80
2 30 mL
100
50
180
7
1 30
Stop
5 P.89 Stop
2056 kcal
80
100
150
1½ 3 g
180
7
50
1 cm
A
5 mm

91
1
23
13 cm 13 cm 1 cm
41%
10 mL
60 mL 10 mL
1
2
3
456
13
2
Stop
P.92
1303 kcal
35%
3165 174 g
50 mL
10 g
1186 kcal
35%
4160 180 g
50 mL
10 g
1416 kcal
35%
3165 174 g
70 mL
10 g
P.63

92
2
5
A P.91
A P.91
10 20 g
/
4 160 g
20 g
10 g
40 g
1136 kcal
1279 kcal20
A
2 116 g
40 mL
10 g
100 g
1
17
13
1 5
Stop
3 P.91 Stop
2 116 g
60 mL
10 g
180 mL
1733 kcal
A35%

93
·

94
·
70
70

95
5 10%
20%
30
P.100
12
1
/
1 70 mL

96
?
糬12 80 mL 18 140 mL
30
2
5 10
30 35
5 10 mL
5

97
20 30
10
P.86 P.87
P.87 P.87

98
1
1
2
12 15%
5
5
P.60
P.96
1,000 m
25
¼ ½
14 cm
13 cm
11 cm
10 cm
20 cm
15 cm
50%
100%
2

99
·
·
·
·
10 mL
P.72
!

100

101
160 g
41%
10 mL
10 20 mL
5 2 3
1 cm
25
10
!

102
Start
Stop
Start
Stop
Stop
10
Start
10 Start
1
P.86 87 97
· .....................................................1
· ...................................................10
· ...................................................35
· ...................................................20
· .....................................................1
· ...................................................10
· ...................................................35
· ...................................................20

103
Start
Panasionic
10
P.62
Panasonic
糬·
·
·
8 30
20:30
0 40 9 30
0:40 9:30
4 10 13
4 30 13
4 10 13
5 10 13
5 10 13
2 40 13
P.97
/

104
3 cm
2
10
40
Panasonic
1
P.59
P.68
Panasonic4
Electricshock

105
220 V 50 Hz
360 W
80 W
30.4 cm
24.1 cm
34.5 cm
6.1 kg
0.9 m
/ 330 g 150 g
4.2 g 1.4 g
/ 100 g 1 g
275 g 250 g 13
300 g 280 g
275 g 250 g 13
275 g 250 g 13
275 g 250 g 13
230 g 13
300 g 250 g
165 g 150 g
300 g 280 g
300 g 280 g
308 g 280 g
198 g 180 g
160 180 g

●
1
2
3
4
5
6
7
8
9
10
11
12
13
●Menu number table
NO. Menu
1 Bread
2 Rapid bread
3 Soft bread
4 French bread
5 Whole wheat bread
6 Rice bread
7 Rice flour bread
NO. Menu
8 Stuffed bread
9 Bread dough
10 Pizza dough
11 Dumpling skin dough
12 Cake
13 Chocolate
DZ50M172Y0314W0
Date of issue: March 2014Printed in China
2014 3
17
©
Manufacturer: Panasonic Manufacturing (Xiamen) Co.,Ltd.
Panasonic Manufacturing ( Xiamen ) Co.,Ltd. 2013
Made in ChinaNo.17,Chuang Xin Road, Xiamen Torch Hi-Tech Industrial Development Zone, Xiamen