2014 mercedes cla45 amg performance air … mercedes cla45 amg performance air intake ... • do not...
TRANSCRIPT

MISHIMOTO | 18 BOULDEN CIRCLE, NEW CASTLE, DE 19720 | P 877.466.4744 | WWW.MISHIMOTO.COM
®
01
2014+ MERCEDES CLA45 AMG PERFORMANCE AIR INTAKE PARTS LIST AND INSTALLATION GUIDE
PARTS INCLUDED
INSTALL TIME 1 HOURINSTALL DIFFICULTY
DISCLAIMER• Raise vehicle only on jack stands or on a vehicle lift.
• Allow vehicle to cool completely prior to attempting installation.
• Do not run the engine or drive the vehicle while overheating; serious damage can occur.
• Please dispose of any liquids properly.
• Mishimoto is not responsible for any vehicle damage or personal injury due to installation errors, misuse, or removal of Mishimoto products.
• Mishimoto suggests that a trained professional install all Mishimoto products.
CAUTION Never work on the cooling system when it is hot. The coolant temperature in the radiator can be considerably higher than boiling, and the system may be under pressure. Opening a cooling system that is hot or under pressure can result in serious injury. Always wait until the system has cooled completely before servicing it in any way.
INSTALL PROCEDURE01. Remove the top battery cover by pulling it forward.
02. Loosen and disconnect the negative terminal on the
battery. Position the terminal end so it will not contact
the battery post.
03. Remove the airbox lid. (4x T20 Torx bolts)
04. Release the air fi lter by turning it counterclockwise and
then remove it from the vehicle.
05. Loosen the worm-gear clamp connecting the intake boot
to the airbox.
06. Disconnect the MAP sensor from the wiring harness.
Push the gray tab out of the connector to unlock it, and
then remove the connector from the sensor.
CONTINUED ON FOLLOWING PAGE
1PC | SILICONE TURBO INLET HOSE W/ MOLDED CNC-MACHINED PORT BLOCK
1PC | HIGH-FLOW, OILED FILTER
1PC | AIRBOX W/ PROTECTIVE EDGING
1PC | 60–80MM WORM-GEAR CLAMP
1PC | 100–120MM WORM-GEAR CLAMP
MOUNTING HARDWARE
LARGE FLATHEAD SCREWDRIVER
SMALL FLATHEAD SCREWDRIVER
3/8" DRIVE RATCHET
3/8" DRIVE EXTENSION
1/4" DRIVE RATCHET
1/4" DRIVE EXTENSION
7MM DEEP SOCKET
10MM DEEP SOCKET
E12 TORX
T20 TORX
T45 TORX
4MM ALLEN KEY
7MM WRENCH
10MM WRENCH
TOOLS NEEDED
MISHIMOTO | 18 BOULDEN CIRCLE, NEW CASTLE, DE 19720 | P 1.877.GOMISHI | WWW.MISHIMOTO.COM
®
02
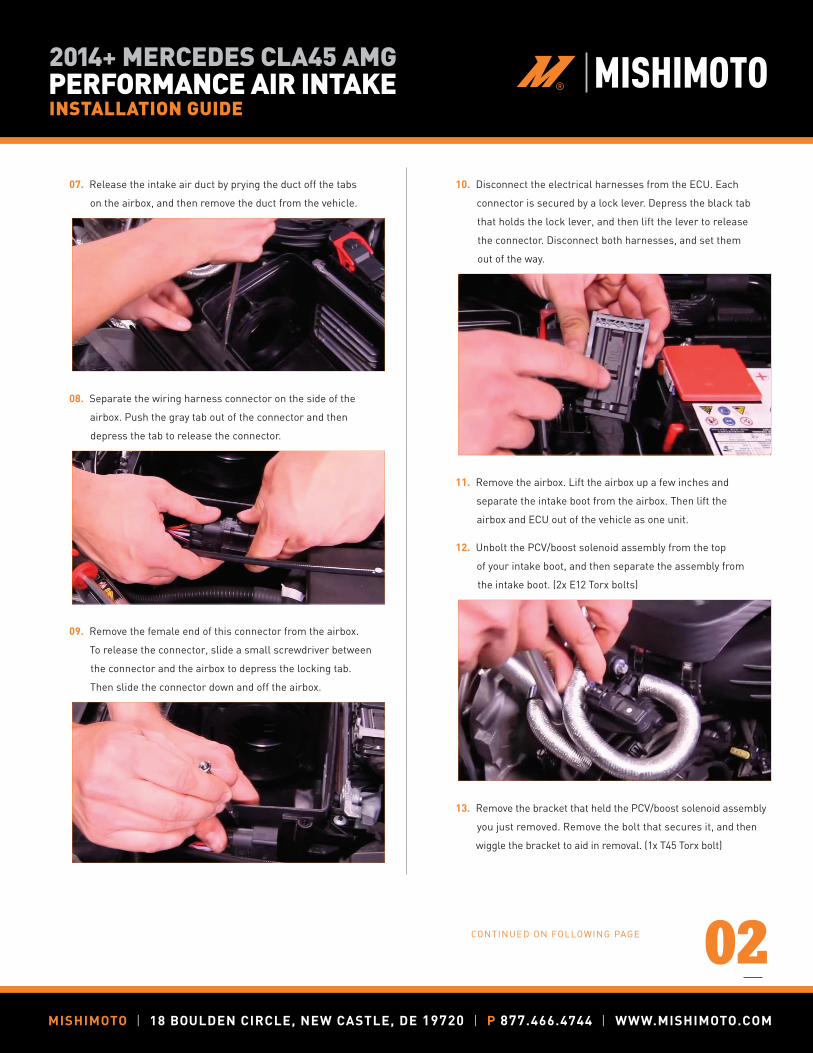
07. Release the intake air duct by prying the duct off the tabs
on the airbox, and then remove the duct from the vehicle.
08. Separate the wiring harness connector on the side of the
airbox. Push the gray tab out of the connector and then
depress the tab to release the connector.
09. Remove the female end of this connector from the airbox.
To release the connector, slide a small screwdriver between
the connector and the airbox to depress the locking tab.
Then slide the connector down and off the airbox.
10. Disconnect the electrical harnesses from the ECU. Each
connector is secured by a lock lever. Depress the black tab
that holds the lock lever, and then lift the lever to release
the connector. Disconnect both harnesses, and set them
out of the way.
11. Remove the airbox. Lift the airbox up a few inches and
separate the intake boot from the airbox. Then lift the
airbox and ECU out of the vehicle as one unit.
12. Unbolt the PCV/boost solenoid assembly from the top
of your intake boot, and then separate the assembly from
the intake boot. (2x E12 Torx bolts)
13. Remove the bracket that held the PCV/boost solenoid assembly
you just removed. Remove the bolt that secures it, and then
wiggle the bracket to aid in removal. (1x T45 Torx bolt)
MISHIMOTO | 18 BOULDEN CIRCLE, NEW CASTLE, DE 19720 | P 877.466.4744 | WWW.MISHIMOTO.COM
CONTINUED ON FOLLOWING PAGE
2014+ MERCEDES CLA45 AMG PERFORMANCE AIR INTAKE INSTALLATION GUIDE

MISHIMOTO | 18 BOULDEN CIRCLE, NEW CASTLE, DE 19720 | P 1.877.GOMISHI | WWW.MISHIMOTO.COM
®
03
14. Loosen the worm-gear clamp that connects the intake boot
to the turbo, and then remove the intake boot.
15. Remove the mounting bracket from your stock airbox.
(4x T20 Torx bolts)
16. Release the two clips that secure the ECU to the airbox, and
then remove the ECU. Set the ECU aside in a safe place.
17. Remove the MAP sensor adaptor from the airbox outlet.
(3x T20 Torx bolts)
18. Release the MAP sensor from the adapter by turning it
counterclockwise, and then remove the sensor.
19. Install the stock airbox mounting bracket onto the Mishimoto
airbox. Orient the bracket so the dowels point downward, in
the same direction as the dowel on the airbox. The 7mm bolts
install from inside the box, through the smaller holes. The
10mm bolts install from outside the box, through the larger
holes. Orient the bracket so it is fl ush with the side of the
box before fully tightening the bolts. (2x 7mm nuts and bolts,
2x 10mm nuts and bolts)
20. Install the ECU onto the airbox. Position the ECU so the
cooling fi ns are inside the airbox and the posts on the ECU
fi t inside the holes of the airbox. Then install the provided
bracket and secure it with two 10mm bolts. (2x 10mm bolts)
MISHIMOTO | 18 BOULDEN CIRCLE, NEW CASTLE, DE 19720 | P 877.466.4744 | WWW.MISHIMOTO.COM
CONTINUED ON FOLLOWING PAGE
2014+ MERCEDES CLA45 AMG PERFORMANCE AIR INTAKE INSTALLATION GUIDE

MISHIMOTO | 18 BOULDEN CIRCLE, NEW CASTLE, DE 19720 | P 1.877.GOMISHI | WWW.MISHIMOTO.COM
®
04
21. Slip two worm-gear clamps over the Mishimoto intake boot
and install it over the turbocharger inlet. (2x worm-gear clamps)
22. Install the PCV/boost solenoid assembly into the CNC-machined
adapter on the Mishimoto intake boot and secure it with the
original E12 Torx bolts. Then tighten the intake boot to the
turbocharger inlet. (2x E12 Torx bolts)
23. Install the MAP/pressure sensor to the Mishimoto intake pipe.
Insert the sensor so the connector faces the short end of the
pipe, then give it a quarter turn clockwise to seat it in the pipe.
24. Insert the long end of the intake pipe into the airbox. Install
the airbox in the vehicle, making sure that the three posts
engage the mounting grommets. Slip the intake pipe into
the intake boot and tighten the clamp to secure them.
25. Apply the provided foam tape to the intake air duct where it
will meet the front bumper. Then install the intake air duct
between the front bumper and the airbox.
26. Install the air fi lter to the intake pipe and secure it with the
worm-gear clamp.
27. Connect the MAP sensor electrical harness and push the
gray tab in to lock the connector.
28. Install the airbox lid and secure it with the provided bolts
and washers. (3x 4mm Allen bolts and washers)
29. Reconnect the wiring harness connector next to the airbox.
If desired, secure this connector to the main harness with
a zip tie.
30. Plug in the two ECU harnesses and lock down the levers.
31. Install the negative terminal on the battery and tighten the
adjustment nut.
32. Install your battery cover and slide it back toward the cabin
to lock it in.
33. If the hood latch cable became disconnected from the battery
cover, push it back into the clips.
MISHIMOTO | 18 BOULDEN CIRCLE, NEW CASTLE, DE 19720 | P 877.466.4744 | WWW.MISHIMOTO.COM
ENJOY!
Congrats! You just fi nished installing the 2014+ Mercedes CLA45 AMGPerformance Air Intake.
2014+ MERCEDES CLA45 AMG PERFORMANCE AIR INTAKE INSTALLATION GUIDE