©2013 jessica hamilton, …static1.squarespace.com/.../1463371663728/closuresfordolls.pdfbegin by...
TRANSCRIPT

1
Closures for Dolls: A Doll Project Tutorial ©2013 Jessica Hamilton, www.dollproject.com
Closures for Doll Clothing
Ready to hand sew some fully functional closures for your doll’s clothes? This
tutorial will walk you through how to create buttonholes, sew on metal snaps
and install zippers—all without a machine. Look for lots of extra tips
throughout this guide to ensure that your closure installation experience is
frustration free!
Let’s start with the basic supplies. Note: the following supply list includes all
of the materials used throughout this tutorial, so your supply needs will
depend on which type of closure you are creating. See the ends of the item
lines for an indication of which supply is needed for each type of closure. If the
supply is not marked for zippers, buttonholes or snaps, the supply is needed
or recommended for all three closure methods. For any unusual or difficult to
find supplies, see the resources section at the end of this tutorial.
2
Closures for Dolls: A Doll Project Tutorial ©2013 Jessica Hamilton, www.dollproject.com
Supplies and Materials
Doll scale buttons, Size 4/0 sew-on snaps and/or doll zippers
Waxed thread, such as prewaxed Silamide beading thread
Scissors
Sharp sewing needle small enough to pass through buttons & snaps
Disappearing ink Marker or fabric chalk
Ruler or straight edge
Thin Permanent ink pen or fabric pen—optional (buttonholes)
Awl or large needle (buttonholes)
Steam Iron--Recommended
White Tacky Glue: I like Crafter’s Pick “The Ultimate”-Optional (snaps)
Fabric chalk—optional (snaps)
Sewing Pins (snaps & zippers)
Fray Check (zippers)
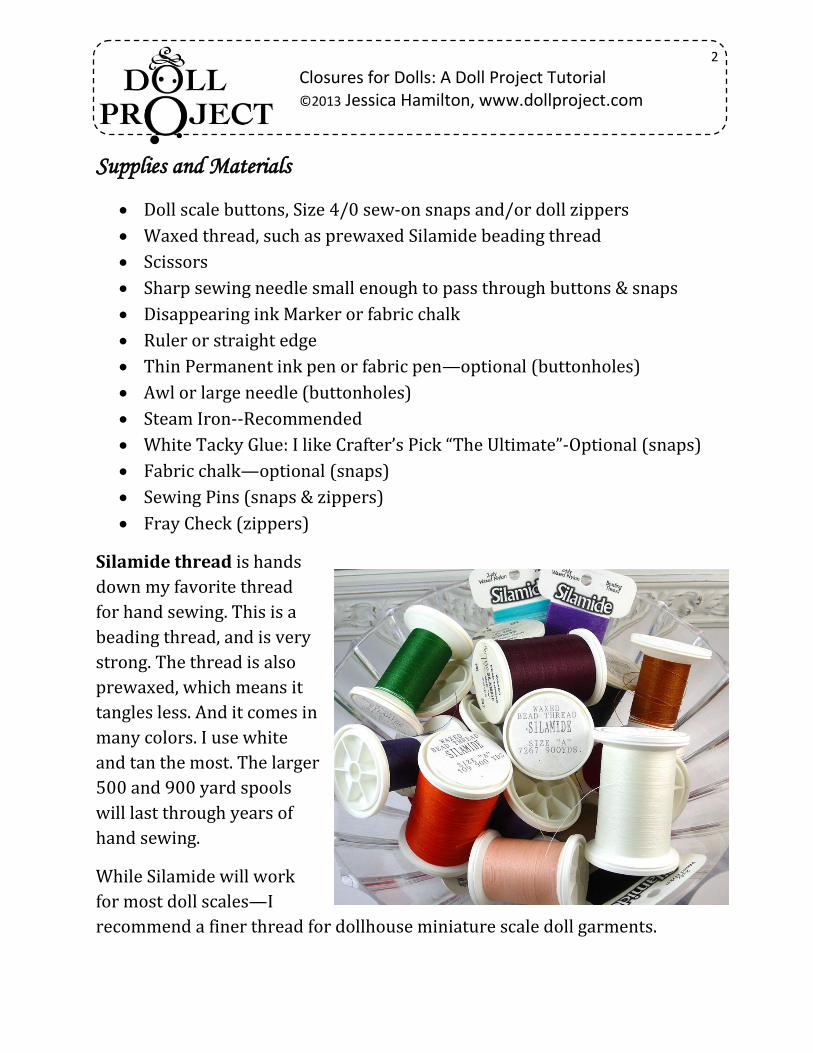
Silamide thread is hands
down my favorite thread
for hand sewing. This is a
beading thread, and is very
strong. The thread is also
prewaxed, which means it
tangles less. And it comes in
many colors. I use white
and tan the most. The larger
500 and 900 yard spools
will last through years of
hand sewing.
While Silamide will work
for most doll scales—I
recommend a finer thread for dollhouse miniature scale doll garments.

3
Closures for Dolls: A Doll Project Tutorial ©2013 Jessica Hamilton, www.dollproject.com
Ready to begin? Let’s
make some buttonholes!
Buttonhole Closures
Doll buttons are tiny,
shiny and awesome! I
admit, I am a hoarder of
tiny buttons. It turns out,
hand-sewn buttonholes
are actually pretty easy to
make. The buttonhole
stitch is commonly
confused with the blanket stitch, but they are not the same. With the
buttonhole stitch, you wind the thread around the needle so that each and
every stitch forms a knot along the edge of your buttonhole. These tiny knots
provide extra strength and durability so that even if part of the buttonhole
breaks or unravels with use, it is still functional. I’ll show you the buttonhole
stitch in a bit—first let’s talk about button types.
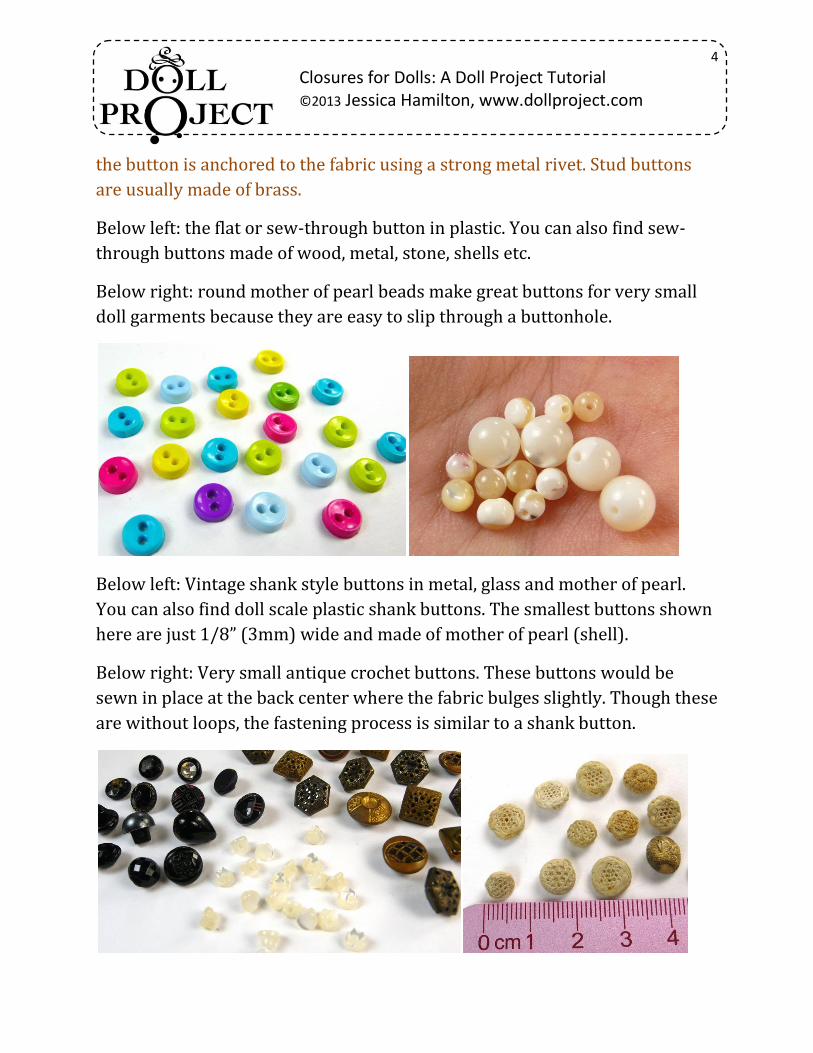
Button Types: There are three types of buttons commonly used in doll
costuming: the flat or sew-through button (the most common type usually
with 2 or 4 holes), the shank button (features a loop at the bottom which you
stitch through to anchor the button to fabric) and the third button type isn’t
really a button at all, but rather a bead. Round beads are often used in place
of buttons for very small or cumbersome doll clothing where traditional
buttons would be difficult to fasten. All three of these buttons use the same
type of buttonhole.
Note: There is another type of button called a “stud button” rarely seen in doll
clothing. The stud button, also called a “pressure button,” is the super strong
button used for denim jeans. Rather than being stitched in place, the back of
4
Closures for Dolls: A Doll Project Tutorial ©2013 Jessica Hamilton, www.dollproject.com
the button is anchored to the fabric using a strong metal rivet. Stud buttons
are usually made of brass.
Below left: the flat or sew-through button in plastic. You can also find sew-
through buttons made of wood, metal, stone, shells etc.
Below right: round mother of pearl beads make great buttons for very small
doll garments because they are easy to slip through a buttonhole.
Below left: Vintage shank style buttons in metal, glass and mother of pearl.
You can also find doll scale plastic shank buttons. The smallest buttons shown
here are just 1/8” (3mm) wide and made of mother of pearl (shell).
Below right: Very small antique crochet buttons. These buttons would be
sewn in place at the back center where the fabric bulges slightly. Though these
are without loops, the fastening process is similar to a shank button.

5
Closures for Dolls: A Doll Project Tutorial ©2013 Jessica Hamilton, www.dollproject.com
Cutting the buttonhole: First we need to determine the hole-size needed.
Measure the diameter of your button OR lay the button right on the fabric and
use a fabric marker to mark the placement of either edge. Some sewers
recommend cutting the buttonhole slot smaller than the diameter of the
button; others recommend making the hole length larger than the button. I
recommend making it the same length as the button, or slightly larger.
Once you have marked the location and the length of the buttonhole, it’s time
to create the slotted hole in the fabric. The sturdiest way to create a
buttonhole cut is to begin with an awl or large needle to create the initial
holes on either end of the fabric marks. Just run the awl through the marks
you’ve made for the slot ends. The awl separates the fabric fibers rather than
breaking them; the separation results in stronger ends that are less likely to
fray. The punctures also provide a starter hole for the tip of your scissors!
Use small, sharp fabric scissors to cut the buttonhole slot. If the fabric is likely
to fray, use fray check along any cuts you make. For most doll scale buttons, a
simple straight cut will be fine.
You can also vary the slot shape
a bit, making it wider, or giving
it fancy ends. If your awl tip is
large enough, you will
automatically have rounded
edge shapes which will be nice
for stitching around.

6
Closures for Dolls: A Doll Project Tutorial ©2013 Jessica Hamilton, www.dollproject.com
Tip: When first learning to sew a buttonhole, I recommend you work with a
fabric that doesn’t fray, such as ultrasuede. Easy to work with fabric will allow
you to concentrate more on your stitches and less on the integrity of the
fabric. Sturdy felt can be used as well.
For my buttonhole demonstration, I have cut the slot a bit larger than I
normally would so you can better see it.
Begin by knotting the thread and bringing the needle up through the
back of the fabric so the knot is concealed. Always start at either end of the
buttonhole slot. I like to use doubled thread so my needle won’t slip off, I
recommend single thread for buttonholes smaller than ¼” (5mm) for scale
purposes.
Tip: For doll clothing, the button area should be reinforced with 1-3 extra
layers of fabric folded over along the edge. Conceal the thread knot in between
these layers so it is invisible from the front and the back of the buttonhole. For
a very old or fragile fabric, I recommend adding a layer of interfacing or
similar fabric between the front and back folded fabric layers.

7
Closures for Dolls: A Doll Project Tutorial ©2013 Jessica Hamilton, www.dollproject.com
The buttonhole stitch is done
entirely from the front side of
the fabric—no need to guess
where the needle needs to
come out! When buttonhole
stitching, always push the tip
of the needle through the slot
and come out along the top
edges. We’ll talk more about
stitch width in a bit, first let’s
get this stitch down!
Push the tip of the needle
through the slot and back
up through the area where your knotted thread end is so that the thread
appears as a continuous loop. This placement will hide your original starting
point so that the buttonhole appears the same on both sides.
Now grab the end of the thread loop where it comes out of the fabric (not
the needle eye end).

8
Closures for Dolls: A Doll Project Tutorial ©2013 Jessica Hamilton, www.dollproject.com
Wrap this thread end behind your needle clockwise.
Continue wrapping around the needle clockwise so that the thread loops
around and behind the needle on both the eye and pointed ends to form
a circle of thread.

9
Closures for Dolls: A Doll Project Tutorial ©2013 Jessica Hamilton, www.dollproject.com
Pull the needle away from the buttonhole slot so that the loop becomes
smaller. When the thread loop shrinks to about an inch (2.5cm), change the
direction that you pull the needle so that it pulls from across (toward) the
buttonhole slot. This change of direction is what places the knot along the
inside edge of the buttonhole.
Repeat the same knotted stitch over and over and you’ll have yourself a
buttonhole! It may seem a bit complicated reading these steps, but once you
get rolling, you’ll be churning out buttonholes in no time!

10
Closures for Dolls: A Doll Project Tutorial ©2013 Jessica Hamilton, www.dollproject.com
When sewing the
buttonhole stitch, keep
your stitches very close
to each other and keep
the edge where your
needle comes out
straight so that your
buttonhole looks neat
and tidy. Here I have
blown up a few pictures
for you so you can see
the individual knots and
stitches.
Additional Buttonhole Tips: Technically, the buttonhole below left is
complete. The stitches and knots along the center slot are close together,
resulting in a durable buttonhole, ready to use. But if you are using a
contrasting thread, like this green here, you will probably want a more solid
looking buttonhole.

11
Closures for Dolls: A Doll Project Tutorial ©2013 Jessica Hamilton, www.dollproject.com
There few a couple ways to make your buttonhole appear more solid in
color. First, you can go back over the original stitches with more buttonhole
stitches, making sure to hit all the areas with gaps. The problem you may run
into here is that the tiny stitch knots do create bulk along the button slot and
when you are working in doll scale, bulk is not good. So, you can also try
simply a whip-stitch around the outer edge to fill in any color gaps. These
stitches will not be nearly as strong as your buttonhole stitches, but the
buttonhole is already sturdy and these stitches are merely for appearance.
A fun alternative to solidifying the appearance of the buttonhole is to use a
different color thread (previous image, right).
If your thread knots are just too bulky along the center and you can’t get the
stitches close enough, try a single thread (rather than doubling it), or use a
thinner thread. Make sure you still wax the thread if it is not prewaxed as the
wax adds strength.
Another tip is to use thread that matches your fabric (below right)—the
buttonhole will blend in to the surrounding fabric and gaps or any uneven
stitching will be less visible as a result.
12
Closures for Dolls: A Doll Project Tutorial ©2013 Jessica Hamilton, www.dollproject.com
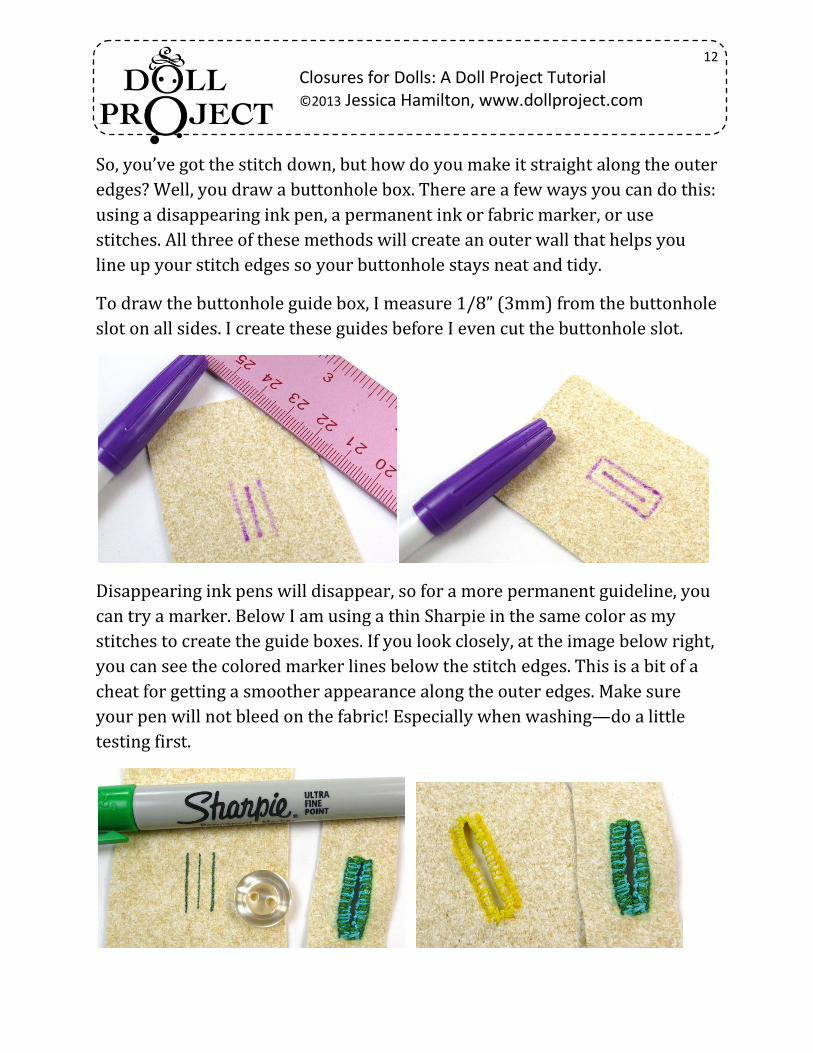
So, you’ve got the stitch down, but how do you make it straight along the outer
edges? Well, you draw a buttonhole box. There are a few ways you can do this:
using a disappearing ink pen, a permanent ink or fabric marker, or use
stitches. All three of these methods will create an outer wall that helps you
line up your stitch edges so your buttonhole stays neat and tidy.
To draw the buttonhole guide box, I measure 1/8” (3mm) from the buttonhole
slot on all sides. I create these guides before I even cut the buttonhole slot.
Disappearing ink pens will disappear, so for a more permanent guideline, you
can try a marker. Below I am using a thin Sharpie in the same color as my
stitches to create the guide boxes. If you look closely, at the image below right,
you can see the colored marker lines below the stitch edges. This is a bit of a
cheat for getting a smoother appearance along the outer edges. Make sure
your pen will not bleed on the fabric! Especially when washing—do a little
testing first.
13
Closures for Dolls: A Doll Project Tutorial ©2013 Jessica Hamilton, www.dollproject.com
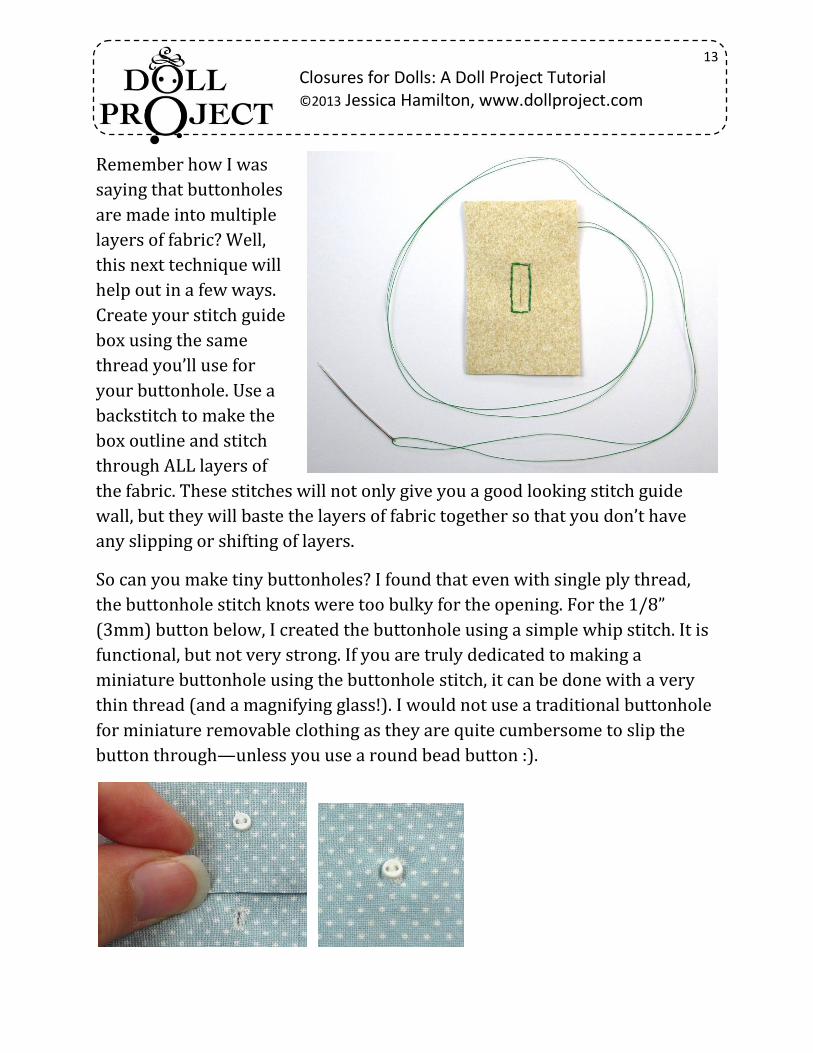
Remember how I was
saying that buttonholes
are made into multiple
layers of fabric? Well,
this next technique will
help out in a few ways.
Create your stitch guide
box using the same
thread you’ll use for
your buttonhole. Use a
backstitch to make the
box outline and stitch
through ALL layers of
the fabric. These stitches will not only give you a good looking stitch guide
wall, but they will baste the layers of fabric together so that you don’t have
any slipping or shifting of layers.
So can you make tiny buttonholes? I found that even with single ply thread,
the buttonhole stitch knots were too bulky for the opening. For the 1/8”
(3mm) button below, I created the buttonhole using a simple whip stitch. It is
functional, but not very strong. If you are truly dedicated to making a
miniature buttonhole using the buttonhole stitch, it can be done with a very
thin thread (and a magnifying glass!). I would not use a traditional buttonhole
for miniature removable clothing as they are quite cumbersome to slip the
button through—unless you use a round bead button :).

14
Closures for Dolls: A Doll Project Tutorial ©2013 Jessica Hamilton, www.dollproject.com
Spend a bit of time practicing your buttonholes. Challenge yourself to create
neat little rows of knotted stitches. It is quite therapeutic! :)
Buttonhole Variations: If you find that making the buttonhole stitch is less
than therapeutic for you, or if you want to try some other buttonhole methods,
I have a few additional techniques you can try.
1. Stitch a small loop of elastic in place of the buttonhole along the edge of the
garment, and slip the button through the elastic. This button closure is very
common with small-scale doll clothing.
2. Use a strip of leather or ultrasuede and stitch it along the fabric edge in
place of the buttonhole. You can cut small slits right into these durable fabrics
and there is no need for buttonhole stitching. Also try looking for bits of lace
or fabrics that already have little reinforced holes or slots you can attach.
3. And finally, you can use your sewing machine. Here is a bit about machine
sewn buttonholes--Many sewing machine models will make buttonholes for
you—even small buttonholes. Also, many sewing machines can sew the
buttons right on for you as well—even tiny ¼” (6mm) buttons! Ask your
sewing machine company which presser feet you will need for your machine.
Extra tip: for very small, rounded buttonholes, use the eyelet stitch on your
machine.
Now that you know all there is to know about buttonholes, let’s look at
another popular closure method, sew-on metal snaps!

15
Closures for Dolls: A Doll Project Tutorial ©2013 Jessica Hamilton, www.dollproject.com
Sew-on Snap Closures
Sew-on metal snaps consist of two parts, the smaller male part (below left)
and the larger female part (below right). The most common snap-size
recommended for dolls is size 4/0. (Not to be confused with size 4, which is
much larger—the 0 is important!)
Orignally, metal snaps were made in an even smaller size, called 5/0, but these
are much harder to find and I found the size difference to be quite minimal.
5/0 are just slightly thinner than the 4/0.
Now the actual process of sewing the snap on is quite simple. You just use
sturdy thread and a whip stitch through all four (sometimes three) outer
holes on each side. The challenge with snaps can be lining the little rascals up

16
Closures for Dolls: A Doll Project Tutorial ©2013 Jessica Hamilton, www.dollproject.com
and sewing them in the exact locations you want them. So we’ll spend more
time on that :).
First, let’s talk about stability. Tiny metal snaps are slippery on fabric. So, even
if you perfectly mark where they will line up on the fabric, they might slip
around when you begin to stitch them. Here are a two ways to make your
snaps stable on the fabric:
1. Most snaps have small holes
in the center. Use a thin sewing
pin and poke it up through the
center hole where you have
marked your snap placement
(we’ll get to placement marks in
a bit). Leave the pin in place
while you make your first two
stitches through the holes of the
snap. The pin will keep the snap
centered for you so your
stitches will be precise with no
slipping!
2. So, yes these little
guys are slippery. If
you have limited
dexterity (or patience)
another trick you can
try is place a small dot
of white tacky glue
under each snap part
and let it set a bit. The
glue is not a
permanent solution—it is merely to hold your snaps in place until you can
17
Closures for Dolls: A Doll Project Tutorial ©2013 Jessica Hamilton, www.dollproject.com
stitch them down securely. No one will ever know the glue was there—do
make sure the glue is waterproof though!
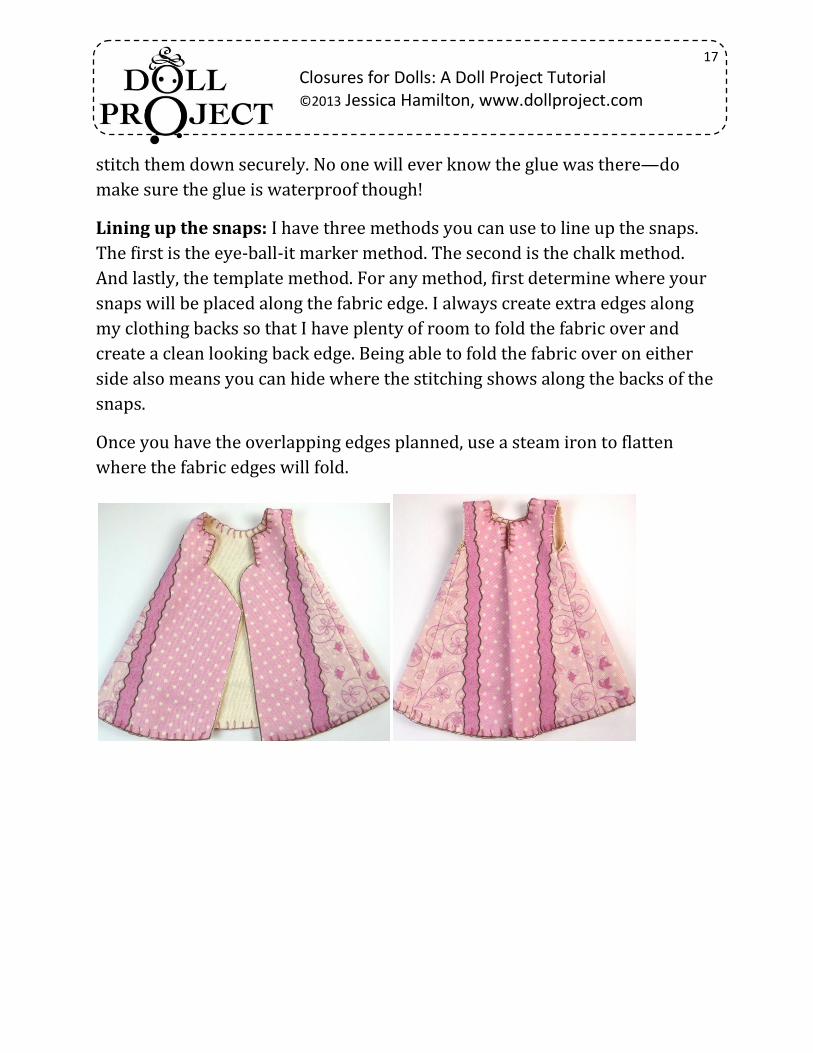
Lining up the snaps: I have three methods you can use to line up the snaps.
The first is the eye-ball-it marker method. The second is the chalk method.
And lastly, the template method. For any method, first determine where your
snaps will be placed along the fabric edge. I always create extra edges along
my clothing backs so that I have plenty of room to fold the fabric over and
create a clean looking back edge. Being able to fold the fabric over on either
side also means you can hide where the stitching shows along the backs of the
snaps.
Once you have the overlapping edges planned, use a steam iron to flatten
where the fabric edges will fold.

18
Closures for Dolls: A Doll Project Tutorial ©2013 Jessica Hamilton, www.dollproject.com
Eye-ball It Marker Method: Line up the edges of the garment so that both
sides where the snaps will be sewn are facing up and parallel to each other.
Place one set of snaps—male or female, along the edge of your fabric to
determine how far apart you want them and how many you will use. Use a
disappearing ink marker or fabric chalk to mark the centers where you want
the snaps to be. (Below left). Now mark the other side of the garment so that
the dots are lined up parallel with the first column (below right).
I suppose you can measure or use a ruler to line up your marks if you aren’t
feeling adventurous. :)
The Chalk Method: This snap
sewing method begins much the
same as the Eye-ball it Method.
As before, begin by determining
the placement and spacing for
your first column of snaps.
But here is the twist—now sew
the first column in place using
the ‘male’ end snaps.

19
Closures for Dolls: A Doll Project Tutorial ©2013 Jessica Hamilton, www.dollproject.com
Use fabric chalk to
mark on the centers
of each snap.
Note: I am using a
pastel chalk so you can
better see it in the
photo—I do not
normally use pastel
chalk for this technique
as it can stain the
fabric.
Now, very carefully fold the sewn snap side onto the empty side. Make sure to
line up the edges where you want them to be when the garment is closed. Feel
through the fabric with your fingertips and push/rub a bit over each snap.

20
Closures for Dolls: A Doll Project Tutorial ©2013 Jessica Hamilton, www.dollproject.com
When you separate the two sides, you will have little chalk marks that
precisely mark the centers of your snaps.
Go ahead and darken the marks with a disappearing ink pen or additional
chalk. Blow off any excess chalk to remove it from the fabric surface. Sew the
second column (female) snaps in place using your fancy new center guides.
21
Closures for Dolls: A Doll Project Tutorial ©2013 Jessica Hamilton, www.dollproject.com
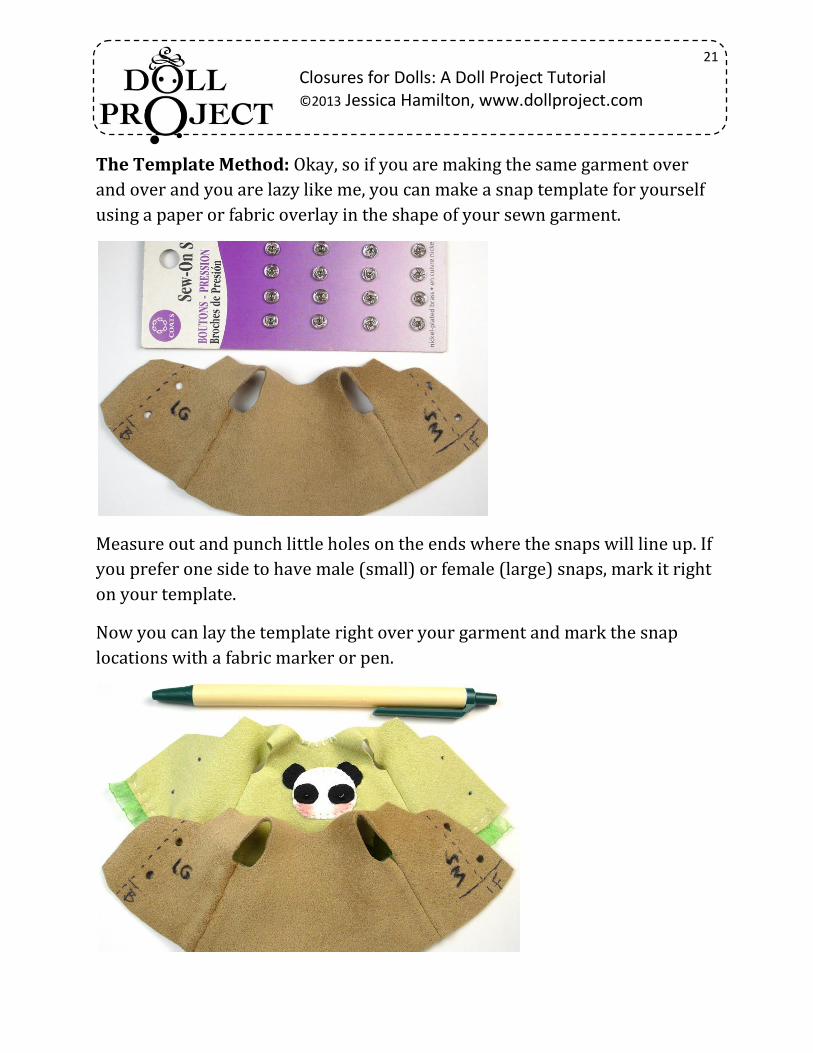
The Template Method: Okay, so if you are making the same garment over
and over and you are lazy like me, you can make a snap template for yourself
using a paper or fabric overlay in the shape of your sewn garment.
Measure out and punch little holes on the ends where the snaps will line up. If
you prefer one side to have male (small) or female (large) snaps, mark it right
on your template.
Now you can lay the template right over your garment and mark the snap
locations with a fabric marker or pen.

22
Closures for Dolls: A Doll Project Tutorial ©2013 Jessica Hamilton, www.dollproject.com
Ta-dah! Insert “It’s a snap” pun here. ;)
Extra Snap Sewing Tips: I use Silamide thread (surprise!) to sew metal snaps
in place. I make sure to whip-stitch through each hole twice to make each snap
side extra secure. Often I wait to knot the thread ends until the snap is sewn
into place and I tie the beginning and end threads together (less knot tying).
Use a thread that matches your fabric. Your front stitches might look like
below left, but the back ones will look similar to below right, so a matching
thread won’t be as noticeable as glaring tan on olive green.
Sometimes the metal of one snap side is distorted and won’t fit well with the
other side—this is especially common with the tiny 4/0 size snaps due to the
micro precision required at such a small scale. You can try using other male or
female parts and see if another fits. Buying snaps already on a card will
23
Closures for Dolls: A Doll Project Tutorial ©2013 Jessica Hamilton, www.dollproject.com
guarantee that the snap halves fit together. You can also try testing the male
and female halves before you sew them onto the garment. Punch a small hole
in a piece of cardboard and push the snap halves together through the hole—
the cardboard will make it much easier to separate the sides and your
fingernails will thank you.
Zipper Closures
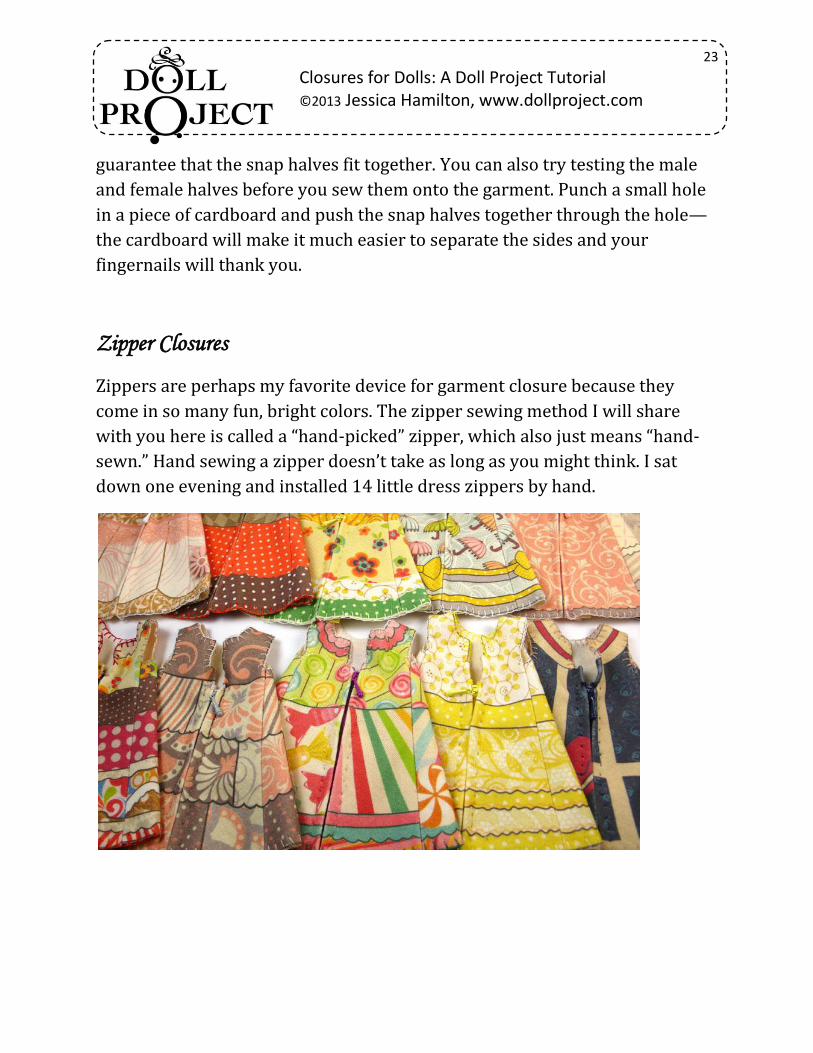
Zippers are perhaps my favorite device for garment closure because they
come in so many fun, bright colors. The zipper sewing method I will share
with you here is called a “hand-picked” zipper, which also just means “hand-
sewn.” Hand sewing a zipper doesn’t take as long as you might think. I sat
down one evening and installed 14 little dress zippers by hand.

24
Closures for Dolls: A Doll Project Tutorial ©2013 Jessica Hamilton, www.dollproject.com
First let’s look at the
anatomy of the zipper so
we can use official
zipper terms in this
tutorial. The type of
zipper I am using is
called a “closed end” or
“non-separating zipper.”
This is a special scale of
zipper made just for
dolls (see resources
section). The full zipper
is just 4” in length.
Here are two zipper diagrams for you from “zippersource.“
Be sure you can locate the top stop, bottom stop, slider, chain, teeth, tape
and pull tab parts. Our zippers do not have boxes, pins or heat seal patches
as those are parts used in a separating zipper (such as for a hooded
sweatshirt). You can also purchase separating zippers for doll scales, but they
are a bit more bulky due to the separation device.

25
Closures for Dolls: A Doll Project Tutorial ©2013 Jessica Hamilton, www.dollproject.com
Match the zippers to the garment fabrics or use a contrasting color to add
some pop.
Note: The doll scale zippers I am using do not have top-stops installed—
instead you add the top-stops when installing the zipper. This means two
things. 1. The slider will pull right off the teeth if you zip the zipper up too far
(you can thread it back on, but it is a pain to do, so be careful with the zipping
before the zipper is sewn in!). 2. You can cut the zipper to any length, so if you
need just 2” of zipper, you can cut the 4” zipper to fit.

26
Closures for Dolls: A Doll Project Tutorial ©2013 Jessica Hamilton, www.dollproject.com
Begin by folding and ironing the back flaps of the garment so that the exposed
edges are neat and line up over top of the zipper. Below left: the zipper height
is lined up with the sides of the dress. Below right: the back flaps are pulled
together over the zipper concealing most of it from view for a neat and tidy
hidden-zipper look.
Use a disappearing ink pen to mark
the location of stitches—make them
as close or far apart as you wish.
Stitches placed further apart will be
less noticeable on the outside of the
garment, but closer stitches will give
the zipper a sturdier bond, so choose
a width in between these. I like 1/8”
(3mm).
Always be sure your stitch guides are
far enough from the teeth of the
zipper so they won’t interfere with

27
Closures for Dolls: A Doll Project Tutorial ©2013 Jessica Hamilton, www.dollproject.com
the movement of the zipper. Placing the guide marks at least 1/8” (3mm) from
the zipper chain edges on either side will ensure your zipper functions.
Once your guide marks are in place, line up the zipper again so the length and
width are where you desire them. Pin into place along the tape edge of the
zipper with small sewing pins. Below: front and back views of the pinned
zipper edges. Pin with the right side of the garment facing out so that the
fabric edge is straight along the center of the zipper.
Use a back stitch to sew the zipper on. The dashed stitches will be visible
along the outside of the garment, so keep them very small. The back straight
stitch line will be along the back of the zipper.

28
Closures for Dolls: A Doll Project Tutorial ©2013 Jessica Hamilton, www.dollproject.com
Below: the back stitching is complete on one side of the zipper. The thread is
white and mostly blends in with the surrounding fabric—the purple dots you
see on the dress edge are just the fabric marker.
Here is a back view of the same stitching. Because the front stitches are so
small and wide apart, the back stitches are much longer in proportion.
Notice the bundle of white stitches along the top of the zipper above the pull.
This whip-stitching acts as a top stop for the zipper. You can make these
stitches on either side of the zipper chain to contain the slider. You can also
purchase small metal top-stops that can be pinched onto the zipper, but I find
the stitched top stops are less noticeable.

29
Closures for Dolls: A Doll Project Tutorial ©2013 Jessica Hamilton, www.dollproject.com
While the zipper is still mostly zipped, pin the other side of the garment edge
in place. Sew the second side, opening the zipper as needed for easier access
inside the garment.
Once the zipper is installed, cut any excess length away and use a little Fray
Check on the edges of the zipper fabric to discourage fraying. If you know the
exact length of zipper you will need ahead of time, you can cut it before you
install it. Just be sure the bottom and top of the zippers are cut in the angles
you want to fit behind the garment edges.
30
Closures for Dolls: A Doll Project Tutorial ©2013 Jessica Hamilton, www.dollproject.com
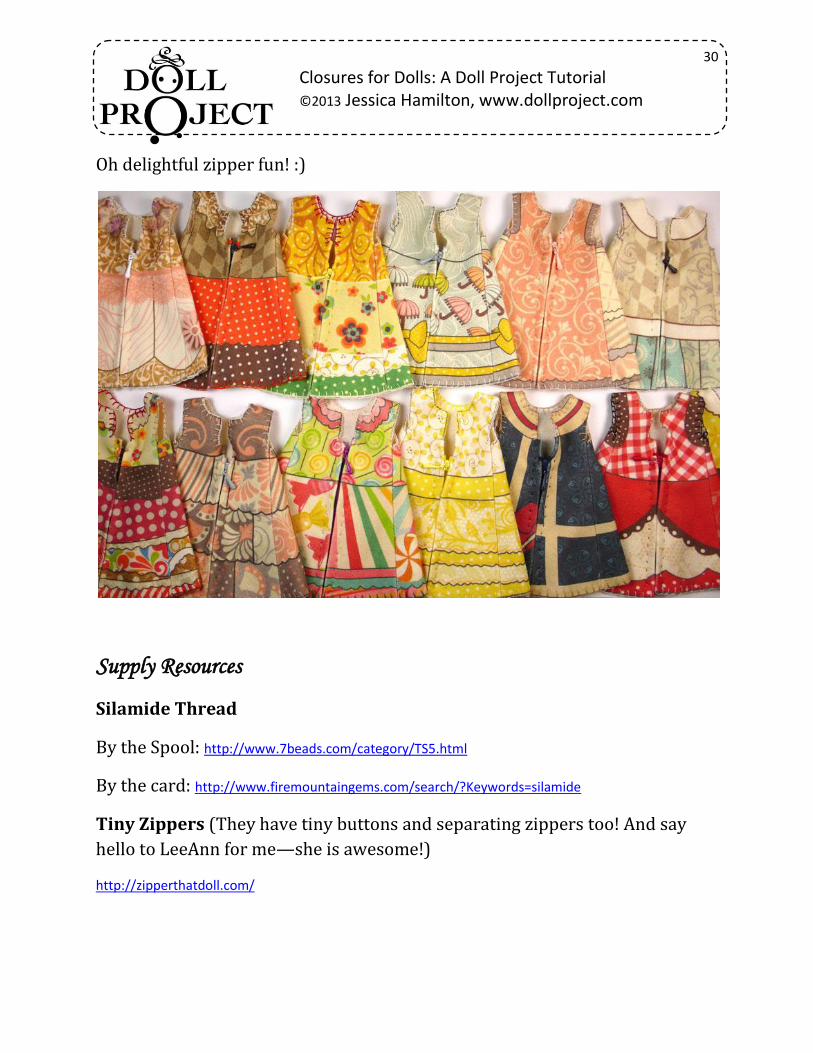
Oh delightful zipper fun! :)
Supply Resources
Silamide Thread
By the Spool: http://www.7beads.com/category/TS5.html
By the card: http://www.firemountaingems.com/search/?Keywords=silamide
Tiny Zippers (They have tiny buttons and separating zippers too! And say
hello to LeeAnn for me—she is awesome!)
http://zipperthatdoll.com/

31
Closures for Dolls: A Doll Project Tutorial ©2013 Jessica Hamilton, www.dollproject.com
Little Dress Kits (The garments featured here are available as kits)
https://www.etsy.com/shop/DollProject?section_id=11933016
Additional Web Resources
A blog post with some neat vintage buttonhole charts. http://www.coletterie.com/tutorials-tips-tricks/handmade-buttonholes
Back-stitch tutorial: http://www.sublimestitching.com/pages/how-to-back-stitch
This is a Doll Project Tutorial from Jessica Hamilton
I send out free projects (mostly doll-related) on the first Friday of every
month. If you are not a subscriber and would like to join my free email
newsletter list, you can sign up at http://dollproject.com :].
Copyright and Usage
© 2013 Jessica Hamilton, dba Doll Project
All rights reserved. No part of this tutorial may be reproduced or transmitted in
any form or by any means, electronic, mechanical, photocopying or otherwise
without prior written permission of Jessica Hamilton. All patterns are original
designs created by Jessica Hamilton.
Purchaser may sell the projects created using this tutorial without restriction as
long as it is the purchaser making the product (not a factory).