2012 chevrolet volt owner manual m - gmc · 2020-03-28 · chevrolet volt owner manual - 2012 black...
TRANSCRIPT

Black plate (1,1)Chevrolet Volt Owner Manual - 2012
2012 Chevrolet Volt Owner Manual M
In Brief . . . . . . . . . . . . . . . . . . . . . . . . 1-1Instrument Panel . . . . . . . . . . . . . . 1-2Initial Drive Information . . . . . . . . 1-4Vehicle Features . . . . . . . . . . . . . 1-17Battery and Efficiency. . . . . . . . 1-20Performance andMaintenance . . . . . . . . . . . . . . . . 1-25
Keys, Doors, andWindows . . . . . . . . . . . . . . . . . . . . 2-1Keys and Locks . . . . . . . . . . . . . . . 2-1Doors . . . . . . . . . . . . . . . . . . . . . . . . 2-13Vehicle Security. . . . . . . . . . . . . . 2-14Exterior Mirrors . . . . . . . . . . . . . . . 2-16Interior Mirrors . . . . . . . . . . . . . . . . 2-17Windows . . . . . . . . . . . . . . . . . . . . . 2-17
Seats and Restraints . . . . . . . . . 3-1Head Restraints . . . . . . . . . . . . . . . 3-2Front Seats . . . . . . . . . . . . . . . . . . . . 3-4Rear Seats . . . . . . . . . . . . . . . . . . . . 3-8
Safety Belts . . . . . . . . . . . . . . . . . . 3-11Airbag System . . . . . . . . . . . . . . . . 3-19Child Restraints . . . . . . . . . . . . . . 3-32
Storage . . . . . . . . . . . . . . . . . . . . . . . 4-1Storage Compartments . . . . . . . . 4-1Additional Storage Features . . . 4-2
Instruments and Controls . . . . 5-1Instrument Panel Overview. . . . 5-4Controls . . . . . . . . . . . . . . . . . . . . . . . 5-6Warning Lights, Gauges, andIndicators . . . . . . . . . . . . . . . . . . . . 5-9
Information Displays . . . . . . . . . . 5-29Vehicle Messages . . . . . . . . . . . . 5-45Vehicle Personalization . . . . . . . 5-53Universal Remote System . . . . 5-62
Lighting . . . . . . . . . . . . . . . . . . . . . . . 6-1Exterior Lighting . . . . . . . . . . . . . . . 6-1Interior Lighting . . . . . . . . . . . . . . . . 6-4Lighting Features . . . . . . . . . . . . . . 6-5
Infotainment System . . . . . . . . . 7-1Introduction . . . . . . . . . . . . . . . . . . . . 7-1Radio . . . . . . . . . . . . . . . . . . . . . . . . . . 7-7Audio Players . . . . . . . . . . . . . . . . 7-12Phone . . . . . . . . . . . . . . . . . . . . . . . . 7-20Trademarks and LicenseAgreements . . . . . . . . . . . . . . . . . 7-31
Climate Controls . . . . . . . . . . . . . 8-1Climate Control Systems . . . . . . 8-1Air Vents . . . . . . . . . . . . . . . . . . . . . . . 8-8
Driving and Operating . . . . . . . . 9-1Driving Information . . . . . . . . . . . . . 9-2Starting and Operating . . . . . . . 9-16Electric Vehicle OperatingModes . . . . . . . . . . . . . . . . . . . . . . 9-21
Engine Exhaust . . . . . . . . . . . . . . 9-26Electric Drive Unit . . . . . . . . . . . . 9-28Brakes . . . . . . . . . . . . . . . . . . . . . . . 9-29Ride Control Systems . . . . . . . . 9-33

Black plate (2,1)Chevrolet Volt Owner Manual - 2012
2012 Chevrolet Volt Owner Manual M
Cruise Control . . . . . . . . . . . . . . . . 9-36Object Detection Systems . . . . 9-38Charging . . . . . . . . . . . . . . . . . . . . . 9-44Fuel . . . . . . . . . . . . . . . . . . . . . . . . . . 9-53Towing . . . . . . . . . . . . . . . . . . . . . . . 9-58Conversions and Add-Ons . . . 9-58
Vehicle Care . . . . . . . . . . . . . . . . . 10-1General Information . . . . . . . . . . 10-2Vehicle Checks . . . . . . . . . . . . . . . 10-6Headlamp Aiming . . . . . . . . . . . 10-26Bulb Replacement . . . . . . . . . . 10-26Electrical System . . . . . . . . . . . . 10-30Wheels and Tires . . . . . . . . . . . 10-40Jump Starting . . . . . . . . . . . . . . . 10-68Towing . . . . . . . . . . . . . . . . . . . . . . 10-73Appearance Care . . . . . . . . . . . 10-78
Service and Maintenance . . . 11-1General Information . . . . . . . . . . 11-1Maintenance Schedule . . . . . . . 11-3Special ApplicationServices . . . . . . . . . . . . . . . . . . . . 11-8
Additional Maintenanceand Care . . . . . . . . . . . . . . . . . . . . 11-8
Recommended Fluids,Lubricants, and Parts . . . . . . 11-12
Maintenance Records . . . . . . . 11-14
Technical Data . . . . . . . . . . . . . . . 12-1Vehicle Identification . . . . . . . . . 12-1Vehicle Data . . . . . . . . . . . . . . . . . . 12-2
Customer Information . . . . . . . 13-1Customer Information . . . . . . . . 13-1Reporting Safety Defects . . . . 13-13Vehicle Data Recording andPrivacy. . . . . . . . . . . . . . . . . . . . 13-15
OnStar . . . . . . . . . . . . . . . . . . . . . . . 14-1OnStar Overview. . . . . . . . . . . . . 14-1OnStar Services . . . . . . . . . . . . . . 14-2OnStar AdditionalInformation . . . . . . . . . . . . . . . . . . 14-5
Index . . . . . . . . . . . . . . . . . . . . . i-1

Black plate (3,1)Chevrolet Volt Owner Manual - 2012
Introduction iii
The names, logos, emblems,slogans, vehicle model names, andvehicle body designs appearing inthis manual including, but not limitedto, GM, the GM logo, CHEVROLET,the CHEVROLET Emblem, VOLT,and the VOLT logo are trademarksand/or service marks of GeneralMotors LLC, its subsidiaries,affiliates, or licensors.
This manual describes features thatmay or may not be on your specificvehicle either because they areoptions that you did not purchase ordue to changes subsequent to theprinting of this owner manual.Please refer to the purchasedocumentation relating to yourspecific vehicle to confirm each ofthe features found on your vehicle.For vehicles first sold in Canada,substitute the name “GeneralMotors of Canada Limited” forChevrolet Motor Division whereverit appears in this manual.
Keep this manual in the vehicle forquick reference.
Canadian Vehicle Owners
Propriétaires Canadiens
A French language copy of thismanual can be obtained from yourdealer or from:
On peut obtenir un exemplaire dece guide en français auprès duconcessionnaire ou à l'adressesuivante:
Helm, IncorporatedP.O. Box 07130Detroit, MI 48207
1-800-551-4123Numéro de poste 6438 delangue françaisewww.helminc.com
Litho in U.S.A.Part No. 20819515 A First Printing ©2011 General Motors LLC. All Rights Reserved.

Black plate (4,1)Chevrolet Volt Owner Manual - 2012
iv Introduction
Using this ManualTo quickly locate information aboutthe vehicle, use the Index in theback of the manual. It is analphabetical list of what is in themanual and the page number whereit can be found.
Danger, Warnings, andCautionsWarning messages found on vehiclelabels and in this manual describehazards and what to do to avoid orreduce them.
Danger indicates a hazard with ahigh level of risk which will result inserious injury or death.
Warning or Caution indicates ahazard that could result in injury ordeath.
{ WARNING
These mean there is somethingthat could hurt you or otherpeople.
Notice: This means there issomething that could result inproperty or vehicle damage. Thiswould not be covered by thevehicle's warranty.
A circle with a slash through it is asafety symbol which means “DoNot,” “Do not do this,” or “Do not letthis happen.”
SymbolsThe vehicle has components andlabels that use symbols instead oftext. Symbols are shown along withthe text describing the operation orinformation relating to a specificcomponent, control, message,gauge, or indicator.
M : This symbol is shown whenyou need to see your owner manualfor additional instructions orinformation.
* : This symbol is shown whenyou need to see a service manualfor additional instructions orinformation.

Black plate (5,1)Chevrolet Volt Owner Manual - 2012
Introduction v
Vehicle Symbol Chart
Here are some additional symbolsthat may be found on the vehicleand what they mean. For moreinformation on the symbol, refer tothe Index.
9 : Airbag Readiness Light
# : Air Conditioning
! : Antilock Brake System (ABS)
b / g : Audio Steering WheelControls or OnStar®
I : Brake System WarningLight
A : Charge Port Door
" : Charging System (12‐VoltBattery)
I : Cruise Control
f : Electric Parking Brake
d : Electronic StabilityControl (ESC)
B : Engine Coolant Temperature
O : Exterior Lamps
y : Fault
g : First Responder
. : Fuel Gauge
+ : Fuses
3 : Headlamp High/Low-BeamChanger
_ : High Voltage
j : LATCH System ChildRestraints
[ : Leaf
* : Malfunction Indicator Lamp
: : Oil Pressure
O : Power
B : Remote Vehicle Start
> : Safety Belt Reminders
g : StabiliTrak® Disable
7 : Tire Pressure Monitor
i : Traction Control System (TCS)Disable
Q : Vehicle Ready
M : Windshield Washer Fluid

Black plate (6,1)Chevrolet Volt Owner Manual - 2012
vi Introduction
2 NOTES

Black plate (1,1)Chevrolet Volt Owner Manual - 2012
In Brief 1-1
In Brief
Instrument PanelInstrument Panel . . . . . . . . . . . . . . 1-2
Initial Drive InformationInitial Drive Information . . . . . . . . 1-4Remote Keyless Entry (RKE)System . . . . . . . . . . . . . . . . . . . . . . 1-4
Remote Start . . . . . . . . . . . . . . . . . . 1-5Door Locks . . . . . . . . . . . . . . . . . . . 1-5Windows . . . . . . . . . . . . . . . . . . . . . . 1-7Seat Adjustment . . . . . . . . . . . . . . 1-8Heated Seats . . . . . . . . . . . . . . . . . 1-9Head RestraintAdjustment . . . . . . . . . . . . . . . . . 1-10
Safety Belts . . . . . . . . . . . . . . . . . . 1-11Passenger SensingSystem . . . . . . . . . . . . . . . . . . . . . 1-11
Mirror Adjustment . . . . . . . . . . . . 1-11Steering WheelAdjustment . . . . . . . . . . . . . . . . . 1-12
Interior Lighting . . . . . . . . . . . . . . 1-13Exterior Lighting . . . . . . . . . . . . . 1-14Windshield Wiper/Washer . . . . 1-14Climate Controls . . . . . . . . . . . . . 1-15
Vehicle FeaturesRadio(s) . . . . . . . . . . . . . . . . . . . . . 1-17Satellite Radio . . . . . . . . . . . . . . . 1-18Portable Audio Devices . . . . . . 1-18Bluetooth® . . . . . . . . . . . . . . . . . . . 1-18Steering Wheel Controls . . . . . 1-18Cruise Control . . . . . . . . . . . . . . . 1-19Navigation System . . . . . . . . . . . 1-19Power Outlets . . . . . . . . . . . . . . . 1-20
Battery and EfficiencyHigh Voltage SafetyInformation . . . . . . . . . . . . . . . . . 1-20
Charging . . . . . . . . . . . . . . . . . . . . . 1-21Fueling . . . . . . . . . . . . . . . . . . . . . . 1-23Total Vehicle Range . . . . . . . . . 1-24Regenerative Braking . . . . . . . . 1-24Service . . . . . . . . . . . . . . . . . . . . . . 1-25
Performance and MaintenanceTraction ControlSystem (TCS) . . . . . . . . . . . . . . 1-25
Electronic StabilityControl (ESC) . . . . . . . . . . . . . . 1-25
Tire Pressure Monitor . . . . . . . . 1-26Tire Sealant andCompressor Kit . . . . . . . . . . . . . 1-26
Engine Oil Life System . . . . . . 1-26Driving for Better EnergyEfficiency . . . . . . . . . . . . . . . . . . . 1-27
Roadside AssistanceProgram . . . . . . . . . . . . . . . . . . . . 1-29
OnStar® . . . . . . . . . . . . . . . . . . . . . 1-29

Black plate (2,1)Chevrolet Volt Owner Manual - 2012
1-2 In Brief
Instrument Panel
Black plate (3,1)Chevrolet Volt Owner Manual - 2012
In Brief 1-3
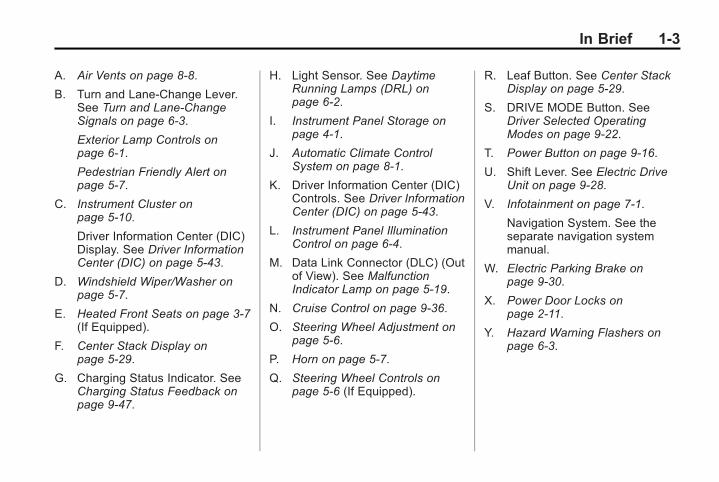
A. Air Vents on page 8‑8.
B. Turn and Lane‐Change Lever.See Turn and Lane-ChangeSignals on page 6‑3.
Exterior Lamp Controls onpage 6‑1.
Pedestrian Friendly Alert onpage 5‑7.
C. Instrument Cluster onpage 5‑10.
Driver Information Center (DIC)Display. See Driver InformationCenter (DIC) on page 5‑43.
D. Windshield Wiper/Washer onpage 5‑7.
E. Heated Front Seats on page 3‑7(If Equipped).
F. Center Stack Display onpage 5‑29.
G. Charging Status Indicator. SeeCharging Status Feedback onpage 9‑47.
H. Light Sensor. See DaytimeRunning Lamps (DRL) onpage 6‑2.
I. Instrument Panel Storage onpage 4‑1.
J. Automatic Climate ControlSystem on page 8‑1.
K. Driver Information Center (DIC)Controls. See Driver InformationCenter (DIC) on page 5‑43.
L. Instrument Panel IlluminationControl on page 6‑4.
M. Data Link Connector (DLC) (Outof View). See MalfunctionIndicator Lamp on page 5‑19.
N. Cruise Control on page 9‑36.
O. Steering Wheel Adjustment onpage 5‑6.
P. Horn on page 5‑7.
Q. Steering Wheel Controls onpage 5‑6 (If Equipped).
R. Leaf Button. See Center StackDisplay on page 5‑29.
S. DRIVE MODE Button. SeeDriver Selected OperatingModes on page 9‑22.
T. Power Button on page 9‑16.
U. Shift Lever. See Electric DriveUnit on page 9‑28.
V. Infotainment on page 7‑1.
Navigation System. See theseparate navigation systemmanual.
W. Electric Parking Brake onpage 9‑30.
X. Power Door Locks onpage 2‑11.
Y. Hazard Warning Flashers onpage 6‑3.

Black plate (4,1)Chevrolet Volt Owner Manual - 2012
1-4 In Brief
Initial DriveInformationThis section provides a briefoverview about some of theimportant features that may or maynot be on your specific vehicle.
For more detailed information, referto each of the features which can befound later in this owner manual.
Remote Keyless Entry(RKE) SystemThe Remote Keyless Entry (RKE)transmitter will work up to 60 m(195 ft) away from the vehicle.
Press the key release button toextend the key. The key can beused for all locks.
K : Press once to unlock the driverdoor. Press a second time withinfive seconds to unlock all doors.
Q : Press to lock all doors.
Lock and unlock feedback can bepersonalized. See VehiclePersonalization on page 5‑53.
7 : Press and release to locatethe vehicle. Press and hold forthree seconds to sound the panicalarm. Press again to cancel thepanic alarm.
B : Press Q and then press andhold B within five seconds tostart the vehicle's heating or airconditioning systems and rearwindow defogger from outside thevehicle using the RKE transmitter.See Remote Start on page 2‑7 formore information.
A : Press to open the charge portdoor. See Plug-In Charging onpage 9‑44 for more information.
See Keys on page 2‑1 and RemoteKeyless Entry (RKE) SystemOperation on page 2‑2.

Black plate (5,1)Chevrolet Volt Owner Manual - 2012
In Brief 1-5
Remote StartUse remote start to heat or cool theinterior when the vehicle is pluggedin to maximize electric range byutilizing electricity from the walloutlet. The engine may start tosupport the climate controloperation. Normal operation of thesystem will return after the vehiclehas been turned on.
Activating the Remote Start
1. Aim the RKE transmitter at thevehicle.
2. Press Q on the RKE transmitter;the doors will lock.
3. Within five seconds, press andhold B until the turn signallamps flash, or for approximatelyfour seconds. Pressing B againduring a remote start will turn thefeature off.
After entering the vehicle during aremote start, press the POWER Obutton on the center stack with thebrake pedal applied to operate asnormal.
Canceling Remote Start
To cancel a remote start, do any ofthe following:. Aim the RKE transmitter at the
vehicle and press and hold Buntil the parking lamps turn off.
. Turn on the hazard warningflashers.
. Press the POWER O button onthe center stack, with the brakepedal applied, then press thePOWER O button again to turnthe vehicle off.
See Remote Start on page 2‑7.
Door Locks
Keyless Access
The RKE transmitter must be within1 m (3 ft) of the door being opened.
To unlock the door from the driverdoor, press the lock/unlock buttonon the door handle. Press againwithin five seconds to unlock allpassenger doors.
Black plate (6,1)Chevrolet Volt Owner Manual - 2012
1-6 In Brief
To lock the doors, press the lock/unlock button if:. More than five seconds have
passed.. The lock/unlock button was used
to unlock all doors.. All doors are closed.
To unlock all doors from thepassenger door, press the lock/unlock button on the door handle.
To lock the doors, press the lock/unlock button if:. The lock/unlock button was used
to unlock all doors.. All doors are closed.
The Keyless Access can beprogrammed to unlock all doorson the first lock/unlock press fromthe driver door. See VehiclePersonalization on page 5‑53.
Remote Keyless Entry (RKE):The RKE transmitter must be within60 m (195 ft) of the vehicle.
K : Press to unlock.
Q : Press to lock.
See Remote Keyless Entry (RKE)System Operation on page 2‑2.
Key: To unlock or lock the door,turn the key left or right.
Inside the vehicle: Use the doorlock knob, the door handle, or thepower door switch. See Door Lockson page 2‑10.
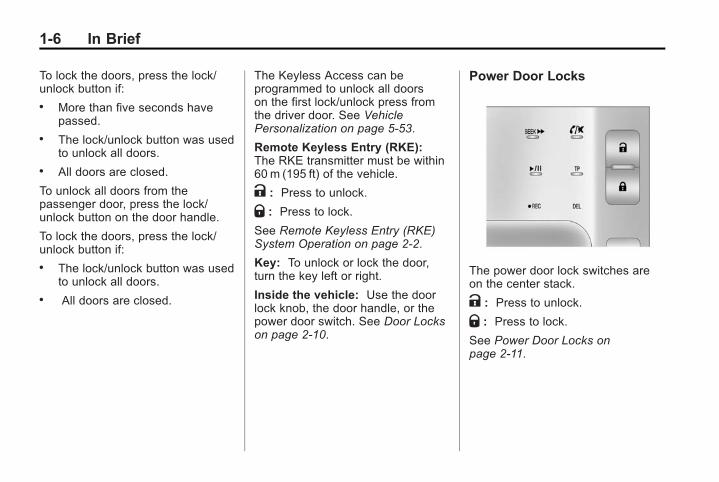
Power Door Locks
The power door lock switches areon the center stack.
K : Press to unlock.
Q : Press to lock.
See Power Door Locks onpage 2‑11.
Black plate (7,1)Chevrolet Volt Owner Manual - 2012
In Brief 1-7
Hatch
Keyless Access with RemoteKeyless Entry (RKE): To open thehatch with the doors locked, theRKE transmitter must be within1 m (3 ft) of the trunk. Press thebutton on the underside of the hatchand lift up.
Remote Keyless Entry (RKE):To open the hatch with the doorslocked, the RKE transmitter must bewithin 60 m (195 ft) of the vehicle.Unlock the doors with the RKEtransmitter, then press the button onthe underside of the hatch and liftup. Always close the hatch beforedriving. Do not press the buttonwhile closing the hatch; it willunlatch again. See Hatch onpage 2‑13.
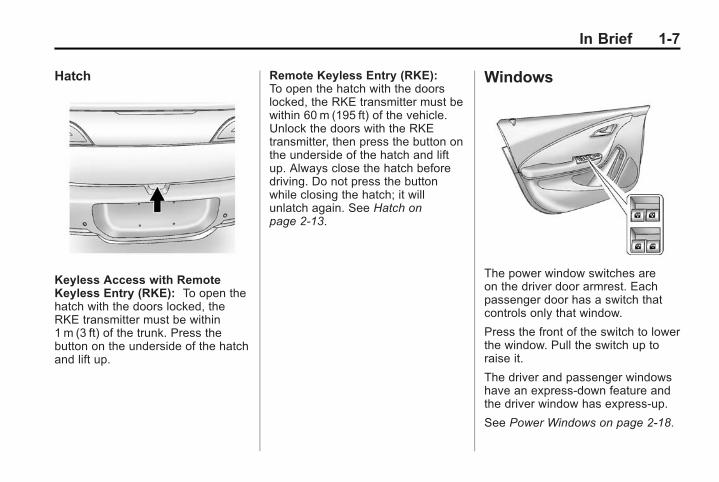
Windows
The power window switches areon the driver door armrest. Eachpassenger door has a switch thatcontrols only that window.
Press the front of the switch to lowerthe window. Pull the switch up toraise it.
The driver and passenger windowshave an express-down feature andthe driver window has express-up.
See Power Windows on page 2‑18.

Black plate (8,1)Chevrolet Volt Owner Manual - 2012
1-8 In Brief
Remote Window Operation
The vehicle may have remoteoperating windows that will openall the windows from outside thevehicle by pressing and holding Kon the Remote Keyless Entry (RKE)transmitter.
This feature can be disabled by adealer technician.
See Power Windows on page 2‑18.
Seat Adjustment
Seat Position
To adjust the seat position:
1. Pull the handle at the front of theseat cushion to unlock it.
2. Move the seat forward orrearward and release thehandle.
3. Try to move the seat back andforth to be sure it is locked inplace.
See Seat Adjustment on page 3‑4.
Height Adjustment
Move the lever up or down to raiseor lower the seat.
See “Seat Height Adjuster” underSeat Adjustment on page 3‑4.

Black plate (9,1)Chevrolet Volt Owner Manual - 2012
In Brief 1-9
Reclining Seatbacks
To recline the seatback:
1. Lift the lever.
2. Move the seatback to thedesired position, and thenrelease the lever to lock theseatback in place.
3. Push and pull on the seatback tomake sure it is locked.
To return the seatback to the uprightposition:
1. Lift the lever fully withoutapplying pressure to theseatback, and the seatback willreturn to the upright position.
2. Push and pull on the seatback tomake sure it is locked.
See Reclining Seatbacks onpage 3‑5.
Heated Seats
If available, the controls are on thecenter stack. To operate, the vehiclemust be on.
Press M or L to heat the driveror passenger seat cushion andseatback.

Black plate (10,1)Chevrolet Volt Owner Manual - 2012
1-10 In Brief
Press the button once for thehighest setting. With each press ofthe button, the heated seat willchange to the next lower setting,and then the off setting. Three lightsindicate the highest setting and onelight the lowest.
See Heated Front Seats onpage 3‑7 for more information.
Auto Heated Seats
If available, the controls can beaccessed while the vehicle is on bypressing the CLIMATE button on thecenter stack.
Press the touch screen M AUTO
or L AUTO button. The button colorwill change to green when thisfeature is on.
When the vehicle is on, this featurewill automatically activate theheated seats at the level required bythe vehicle's interior temperature.The active high, medium, low, or offheated seat level will be indicatedby the manual heated seat buttonlights on the center stack. Use thetouch screen buttons or the manualheated seat buttons on the centerstack to turn auto heated seats off.
See Heated Front Seats onpage 3‑7 for more information.
The heated seats can also beprogrammed to come on duringa remote start. See VehiclePersonalization on page 5‑53 formore information.
Head RestraintAdjustmentDo not drive until the head restraintsfor all occupants are installed andadjusted properly.
To achieve a comfortable seatingposition, change the seatbackrecline angle as little as necessarywhile keeping the seat and thehead restraint height in the properposition.
For more information see HeadRestraints on page 3‑2 and SeatAdjustment on page 3‑4.

Black plate (11,1)Chevrolet Volt Owner Manual - 2012
In Brief 1-11
Safety Belts
Refer to the following sections forimportant information on how to usesafety belts properly:. Safety Belts on page 3‑11.. How to Wear Safety Belts
Properly on page 3‑12.. Lap-Shoulder Belt on page 3‑13.. Lower Anchors and Tethers for
Children (LATCH System) onpage 3‑41.
Passenger SensingSystem
United States
Canada
The passenger sensing systemwill turn off the front outboardpassenger frontal airbag and kneeairbag under certain conditions.
No other airbag is affected by thepassenger sensing system. SeePassenger Sensing System onpage 3‑26 for more information.
The passenger airbag statusindicator lights on the overheadconsole when the vehicle is started.See Passenger Airbag StatusIndicator on page 5‑18.
Mirror Adjustment
Exterior
Mirrors can be folded inward towardthe vehicle to prevent damage whengoing through an automatic carwash. Push the mirror outward toreturn it to the original position.
See Folding Mirrors on page 2‑16.
Black plate (12,1)Chevrolet Volt Owner Manual - 2012
1-12 In Brief
Controls for the outside powermirrors are on the driver door.
To adjust a mirror:
1. Move the selector switch toL (left) or R (right) to choose thedriver or passenger mirror.
2. Press the arrows on the controlpad to move each mirror in thedesired direction.
3. Return the selector switch to thecenter position.
See Power Mirrors on page 2‑16.
When the rear window defogger isactivated, the heated mirriors,if equipped, will also come on. SeeHeated Mirrors on page 2‑16.
Interior
The vehicle has an automaticdimming inside rearview mirror.Automatic dimming reduces theglare from the headlamps of thevehicle behind you. The dimmingfeature and the indicator light comeon each time the vehicle is started.Hold the mirror in the center toadjust it. See Automatic DimmingRearview Mirror on page 2‑17.
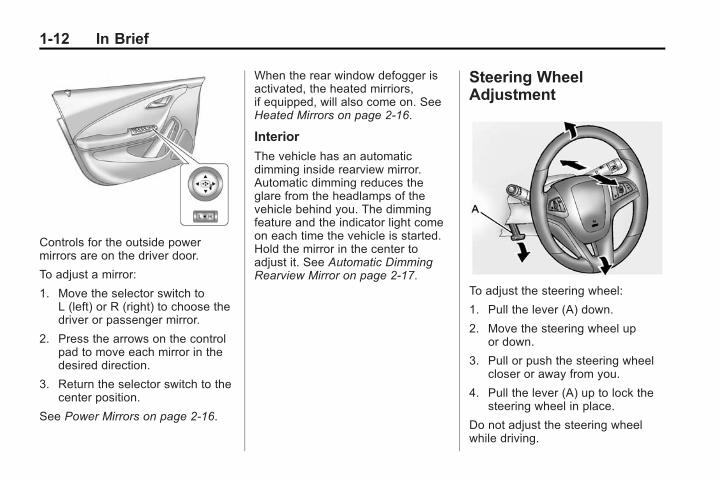
Steering WheelAdjustment
To adjust the steering wheel:
1. Pull the lever (A) down.
2. Move the steering wheel upor down.
3. Pull or push the steering wheelcloser or away from you.
4. Pull the lever (A) up to lock thesteering wheel in place.
Do not adjust the steering wheelwhile driving.

Black plate (13,1)Chevrolet Volt Owner Manual - 2012
In Brief 1-13
Interior LightingDome Lamps
The dome lamp controls are in theoverhead console.
To operate, press the followingbuttons:
' : Press to turn on the domelamps.
H : Press to turn the lamps onautomatically when a door isopened.
( : Press to turn the lamps off,even when a door is open.
Reading Lamps
There are front and rear readinglamps.
The front reading lamps are in theoverhead console.
#$ : Press to turn each lamp onor off.
The rear reading lamps are in theheadliner.
For more information on interiorlighting, see Instrument PanelIllumination Control on page 6‑4.

Black plate (14,1)Chevrolet Volt Owner Manual - 2012
1-14 In Brief
Exterior Lighting
The exterior lamp control is on theturn signal/lane change lever.
O : Turn to operate the exteriorlamps.
O : Turns the exterior lamps off.
AUTO: Turns the exterior lamps onand off automatically depending onthe exterior light.
; : Turns on the parking lamps,together with the sidemarker lamps,taillamps, license plate lamps, andinstrument panel lights.
5 : Turns on the headlamps,together with the parking lamps,sidemarker lamps, taillamps, licenseplate lamps, and instrument panellights.
For more information, see:. Exterior Lamp Controls on
page 6‑1.. Turn and Lane-Change Signals
on page 6‑3.. Headlamp High/Low-Beam
Changer on page 6‑2.
Windshield Wiper/Washer
The windshield wiper lever is on theside of the steering column. Withthe vehicle on, move the windshieldwiper lever to select the wiperspeed.
2: Move the lever up to 2 for fastwipes.
1: Move the lever up to 1 for slowwipes.
G : Move the lever up toG foradjustable interval wipes, then turnthe band up for more frequent wipesor down for less frequent wipes.
9 : Use to turn the windshieldwipers off.
3 : For a single wipe, briefly movethe wiper lever down. For severalwipes, hold the wiper lever down.
Windshield Washer
Pull the windshield wiper levertoward you to spray windshieldwasher fluid and activate the wipers.
See Windshield Wiper/Washer onpage 5‑7.

Black plate (15,1)Chevrolet Volt Owner Manual - 2012
In Brief 1-15
Climate ControlsHeating, cooling, and ventilation can be controlled by using the climatecontrol buttons and the climate touch screen.
Climate Control Buttons
A. Temperature Control
B. Driver and Passenger HeatedSeats
C. Defrost
D. Climate
E. Auto (Automatic Operation)
F. Rear Window Defogger
G. Manual Fan Control

Black plate (16,1)Chevrolet Volt Owner Manual - 2012
1-16 In Brief
Climate Touch Screen Controls
A. Driver and Passenger AutoHeated Seats
B. Air Delivery Mode Controls
C. Auto Recirculation
D. Manual Recirculation
E. Outside Air TemperatureDisplay
F. Climate Modes: Fan Only, ECO,Comfort
G. Climate Power Gauge
H. Manual Fan Control
I. Temperature Setting Display
J. Air Conditioning Indicator
K. Heat Status Indicator
See Automatic Climate ControlSystem on page 8‑1.
Auto Heated Seats are selectedusing the climate control touchscreen. See Heated Front Seats onpage 3‑7.

Black plate (17,1)Chevrolet Volt Owner Manual - 2012
In Brief 1-17
Vehicle Features
Radio(s)
VOL/ O : Press to turn the systemon and off. Turn to increase ordecrease the volume.
SOURCE: Press to choosebetween FM, AM, or XM™,if equipped.
TUNE/MENU: Turn to select radiostations. Press to select a menu.
r SEEK: Press to seek theprevious station or track.
SEEK[ : Press to seek the nextstation or track.
INFO: Press to show availableinformation about the current stationor track.
See Overview on page 7‑2 for moreinformation about these and otherradio features.
Storing a Favorite Station
Stations from all bands can bestored in the favorite lists in anyorder. Up to six stations can bestored in each favorite page and thenumber of available favorite pagescan be set.
To store the station to a position inthe list, press the correspondingnumeric button 1 to 6 until a beep isheard.
See “Storing a Station as aFavorite” in AM-FM Radio onpage 7‑7 for more information.
Setting the Clock
Adjusting the Time
The clock is in the center stackdisplay.
To set the time:
1. Press the CONFIG button toenter the menu options. Turn theTUNE/MENU knob to scrollthrough the available setupfeatures. Press the TUNE/MENU
knob or press the Time screenbutton to display other optionswithin that feature.
2. Press + or − to increase ordecrease the Hours and Minutesdisplayed on the clock.
12/24 HR Format: Press the 12 HRscreen button for standard time;press the 24 HR screen button formilitary time.
Day + or Day −: Press the Day +or Day − display buttons to increaseor decrease the day.
Display: Press Display to turn thedisplay of the time on the screen onor off.
See Clock on page 5‑42 for moreinformation.

Black plate (18,1)Chevrolet Volt Owner Manual - 2012
1-18 In Brief
Satellite RadioVehicles with an XM™ satellite radiotuner and a valid XM satellite radiosubscription can receive XMprogramming.
XM Satellite Radio Service
XM is a satellite radio service basedin the 48 contiguous United Statesand 10 Canadian provinces. XMsatellite radio has a wide variety ofprogramming and commercial-freemusic, coast to coast, and indigital-quality sound. A fee isrequired to receive the XM service.
For more information refer to:. www.xmradio.com or call
1-800-929-2100 (U.S.).. www.xmradio.ca or call
1-877-438-9677 (Canada).
For more information, see SatelliteRadio on page 7‑9.
Portable Audio DevicesThis vehicle has a 3.5 mm (1/8 in)auxiliary input and a USB portlocated in the center stack. Externaldevices such as iPods®, laptopcomputers, MP3 players, CDchangers, and USB storage devicesmay be connected, depending onthe audio system.
For more information, see AuxiliaryDevices on page 7‑15.
Bluetooth®
The Bluetooth system allows userswith a Bluetooth-enabled cell phoneto make and receive hands-freecalls using the vehicle audio systemand controls.
The Bluetooth-enabled cell phonemust be paired with the in-vehicleBluetooth system before it can beused in the vehicle. Not all phoneswill support all functions.
See Bluetooth (Overview) onpage 7‑20 or Bluetooth(Infotainment Controls) onpage 7‑21 or Bluetooth (VoiceRecognition) on page 7‑25.
Steering Wheel Controls
For vehicles with audio steeringwheel controls, some audio controlscan be adjusted at the steeringwheel.
b / g : Press to interact with anOnstar, Bluetooth, or navigationsystem (if equipped).

Black plate (19,1)Chevrolet Volt Owner Manual - 2012
In Brief 1-19
$ /i : Press to silence thevehicle speakers only. Press againto turn the sound on. For vehicleswith OnStar or Bluetooth systems,press to reject an incoming call,or to end a current call.
_ SRC ^ : Turn _ or ^ to select aradio band or audio source.
Turn _ or ^ to select the next orprevious favorite radio station, CDtrack, DVD track/chapter (withnavigation), or MP3 track.
Press SRC to change betweenradio and CD or DVD.
Press and hold SRC to interact withthe navigation system.
+ x −: Press + to increase or − todecrease the volume.
For more information, see SteeringWheel Controls on page 5‑6.
Cruise Control
The cruise control buttons are onthe steering wheel.
1 : Press to turn the cruise controlsystem on and off. An indicator lightwill turn on or off in the instrumentcluster.
* : Press to disengage cruisecontrol without erasing the setspeed from memory.
RES/+ : Move the thumbwheel upto resume to a previously set speedor to accelerate.
SET/− : Move the thumbwheeldown to set a speed and activatecruise control or to make the vehicledecelerate.
See Cruise Control on page 9‑36.
Navigation SystemIf the vehicle has a navigationsystem, there is a separatenavigation system manual thatincludes information on the radio,audio players, and navigationsystem.
The navigation system providesdetailed maps of most majorfreeways and roads. After adestination has been set, thesystem provides turn-by-turninstructions for reaching thedestination. In addition, the systemcan help locate a variety of pointsof interest (POIs), such as banks,airports, restaurants, and more.
See the navigation system manualfor more information.

Black plate (20,1)Chevrolet Volt Owner Manual - 2012
1-20 In Brief
Power OutletsThe accessory power outlets can beused to plug in electrical equipment,such as a cell phone or MP3 player.
There are three accessory poweroutlets:. Inside the front of the center
floor console.. On the rear of the center floor
console.. Inside the instrument panel
storage area.
The power outlets supply powerwhile the vehicle is on, or if thevehicle is in Retained AccessoryPower (RAP). See RetainedAccessory Power (RAP) onpage 9‑19.
Remove the cover to access andreplace when not in use.
See Power Outlets on page 5‑9.
Battery and Efficiency
High Voltage SafetyInformation
{ WARNING
Exposure to high voltage cancause shock, burns, and evendeath. The high voltagecomponents in the vehicle canonly be serviced by technicianswith special training.
High voltage components areidentified by labels. Do notremove, open, take apart,or modify these components.High voltage cable or wiring hasorange covering. Do not probe,tamper with, cut, or modify highvoltage cable or wiring.
This vehicle has a high voltagebattery and a standard 12‐voltbattery.
If the vehicle is in a crash, thesensing system may shut down thehigh voltage system. When thisoccurs, the high voltage battery isdisconnected and the vehicle willnot start. The SERVICE VEHICLESOON message in the DriverInformation Center (DIC) will bedisplayed. Before the vehicle can beoperated again, it must be servicedat your dealer.
See Battery on page 10‑23 forimportant safety information. If anairbag has inflated, see What WillYou See after an Airbag Inflates? onpage 3‑24.
Only a trained service technicianwith the proper knowledge and toolsshould inspect, test, or replace thehigh voltage battery. See yourdealer if the high voltage batteryneeds service.
See Battery on page 10‑23.
Black plate (21,1)Chevrolet Volt Owner Manual - 2012
In Brief 1-21
ChargingThe high voltage battery can becharged using a householdelectrical outlet. There are threeways to program how the vehicleis charged. See Charging onpage 5‑31 for more information.
This section explains the processfor charging the high voltage battery.Do not allow the vehicle to remain intemperature extremes for longperiods without being driven orplugged in. It is recommended thatthe vehicle be plugged in whentemperatures are below 0°C (32°F)and above 32°C (90°F) to maximizehigh voltage battery life.
The charging system may run fansand pumps that result in soundsfrom the vehicle while it is turnedoff. Additional unexpected clickingsounds may be caused by theelectrical devices used whilecharging.
While the charge cord is pluggedinto the vehicle, the vehicle cannotbe driven.
Charging
Start Charge
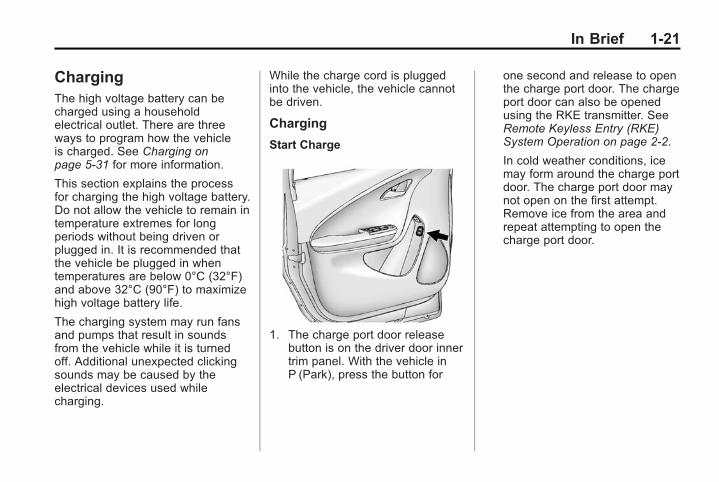
1. The charge port door releasebutton is on the driver door innertrim panel. With the vehicle inP (Park), press the button for
one second and release to openthe charge port door. The chargeport door can also be openedusing the RKE transmitter. SeeRemote Keyless Entry (RKE)System Operation on page 2‑2.
In cold weather conditions, icemay form around the charge portdoor. The charge port door maynot open on the first attempt.Remove ice from the area andrepeat attempting to open thecharge port door.

Black plate (22,1)Chevrolet Volt Owner Manual - 2012
1-22 In Brief
2. Open the rear hatch, lift the loadsupport floor covering (A), andremove the charge cord (D). It islocated near the tire sealant andcompressor kit (C). Pull up onthe charge cord handle (D) torelease it from the handleclip (E). Lift the charge cord upand rearward to remove it fromthe vehicle. The vehicle plug (B)is stored as shown.
3. Plug the charge cord into theelectrical outlet. See ElectricalRequirements for BatteryCharging on page 9‑52. Verifythat the charge cord status
indicators are both green. SeeCharge Cord on page 9‑50 formore information.
4. Then plug in the vehicle plug ofthe charge cord into the chargeport on the vehicle. Verify thatthe charging status indicatorilluminates on top of theinstrument panel and a hornchirp occurs. See ChargingStatus Feedback on page 9‑47for more information.
5. To arm the charge cord theftalert, lock the vehicle with theRKE transmitter. To disable this
feature, see “Charge Cord TheftAlert” in Vehicle Personalizationon page 5‑53.
End Charge
1. Unlock the vehicle with the RKEtransmitter to disarm the chargecord theft alert.
2. Unplug the vehicle plug of thecharge cord from the vehicle bysqueezing the vehicle plug leverand pull to remove.
3. Close the charge port door bypressing firmly in the center tolatch properly.
4. Unplug the charge cord from theelectrical outlet.

Black plate (23,1)Chevrolet Volt Owner Manual - 2012
In Brief 1-23
5. Before storing the charge cord,have the charge cord face upand wrap the charge cableneatly counterclockwise aroundthe body of the charge cord.
6. Place the charge cord, facedown, into the storagecompartment with the frontedge (F) of the charge cordbody under the clips (G) locatedin the front of the storagecompartment. The vehicleplug (B) should be on the rightside of the charge cord.
7. Push the charge cord handledown until it locks into thehandle clip at the rear of thestorage compartment.
FuelingThe fuel system on this vehiclerequires a refueling process tocontrol evaporative emissions. Torefuel the vehicle:
1. Press the fuel door button onthe driver door for one second.A WAIT TO REFUEL messagedisplays on the DriverInformation Center.

Black plate (24,1)Chevrolet Volt Owner Manual - 2012
1-24 In Brief
2. When the READY TO REFUELmessage displays, the fuel dooron the passenger side willunlock. Push the rearward edgeof the fuel door in and release toopen the door.
3. Turn the fuel capcounterclockwise to remove.While refueling, hang the fuelcap tether from the hook on theinside of the fuel door. Completerefueling within 30 minutes ofpushing the fuel door button onthe driver door. If refueling morethan 30 minutes, push the fueldoor button again.
4. After refueling, reinstall the fuelcap by turning it clockwise until itclicks. Close the fuel door.
See Filling the Tank on page 9‑56.
Total Vehicle Range
Total vehicle range is the remainingdistance the vehicle can be drivencombining the electric range andfuel range.
See Driving for Better EnergyEfficiency on page 9‑2.
Regenerative BrakingRegenerative braking takes some ofthe energy from the moving vehicleand turns it back into electricalenergy. This energy is then storedback into the high voltage batterysystem, contributing to increasedenergy efficiency.
See Regenerative Braking onpage 9‑32.

Black plate (25,1)Chevrolet Volt Owner Manual - 2012
In Brief 1-25
Service
{ WARNING
Never try to do your own serviceon high voltage components. Youcan be injured and the vehiclecan be damaged if you try to doyour own service work. Serviceand repair of these high voltagecomponents should only beperformed by a trained servicetechnician with the properknowledge and tools. See DoingYour Own Service Work onpage 10‑6.
Performance andMaintenance
Traction ControlSystem (TCS)The TCS limits wheel spin. Thesystem turns on automatically everytime the vehicle is on.. To turn off traction control, press
and release the TCS/ESCbutton, located on the overheadconsole. i illuminates and theappropriate DIC message isdisplayed. See Ride ControlSystem Messages on page 5‑50.
. Press and release the TCS/ESCbutton again to turn on tractioncontrol.
For more information, see TractionControl System (TCS) onpage 9‑33.
Electronic StabilityControl (ESC)The Electronic Stability Controlsystem called StabiliTrak assistswith directional control of the vehiclein difficult driving conditions. Thesystem turns on automatically everytime the vehicle is on.. To turn off both traction control
and StabiliTrak, press and holdthe TCS/ESC button located onthe overhead console, until iand g illuminate in theinstrument cluster and theappropriate DIC message isdisplayed. See Ride ControlSystem Messages on page 5‑50.
. Press and release the TCS/ESCbutton to turn on both systems.
For more information, see ElectronicStability Control (ESC) onpage 9‑34.

Black plate (26,1)Chevrolet Volt Owner Manual - 2012
1-26 In Brief
Tire Pressure MonitorThis vehicle may have a TirePressure Monitor System (TPMS).
The TPMS warning light alerts youto a significant loss in pressure ofone of the vehicle's tires. If thewarning light comes on, stop assoon as possible and inflate thetires to the recommended pressureshown on the Tire and LoadingInformation label. See Vehicle LoadLimits on page 9‑11. The warninglight will remain on until the tirepressure is corrected.
During cooler conditions, the low tirepressure warning light may appearwhen the vehicle is first started andthen turn off. This may be an early
indicator that the tire pressures aregetting low and the tires need to beinflated to the proper pressure.
The TPMS does not replace normalmonthly tire maintenance. It is thedriver’s responsibility to maintaincorrect tire pressures.
See Tire Pressure Monitor Systemon page 10‑47.
Tire Sealant andCompressor KitThis vehicle may have a tire sealantand compressor kit that can be usedto seal small punctures in the treadarea of the tire. Significant sidewalldamage will require the tire to bereplaced.
See Tire Sealant and CompressorKit on page 10‑60 for completeoperating information.
Engine Oil Life SystemThe engine oil life system calculatesengine oil life based on vehicle useand displays the CHANGE ENGINEOIL SOON message when it is timeto change the engine oil and filter.The oil life system should be resetto 100% only following an oilchange.
Resetting the Oil Life System
1. Use the SELECT knob to selectOIL LIFE on the DIC menu.
2. Press SELECT to start the OILLIFE reset procedure.
3. The DIC menu will display “Areyou sure that you want to reset?”Use SELECT to choose YES toreset oil life or NO to exit andreturn to the previous menu.

Black plate (27,1)Chevrolet Volt Owner Manual - 2012
In Brief 1-27
4. If YES is selected, the DIC menuwill display RESET OIL LIFE fora short time and then 100% OILLIFE will be displayed when OILLIFE is successfully reset.
See Engine Oil Life System onpage 10‑12.
Driving for Better EnergyEfficiencyUse the following tips to helpmaximize energy efficiency andrange.
Driving Style
Efficiency Gauge (InstrumentCluster)
The ball indicator should be keptgreen and in the center of thegauge.
Inefficient acceleration is indicatedwhen the ball turns yellow andtravels above the center of thegauge.
Aggressive braking is indicatedwhen the ball turns yellow andtravels below the center of thegauge.
Acceleration/Braking/Coasting
Avoid unnecessary rapidaccelerations and decelerations.
Electric range is maximized at80 km/h (50 mph) and below. Higherspeeds use more energy and cansignificantly reduce electric range.
Use cruise control whenappropriate.
Plan ahead for decelerations andcoast whenever possible. Forexample, do not rush to trafficsignals.
Do not shift to N (Neutral) to coast.The vehicle recovers energy whilecoasting and braking in D (Drive)or L (Low).
Drive Mode and PRNDL Selection
Use Normal Mode when possible.
Sport Mode provides moreresponsive acceleration thanNormal Mode but can reduceefficiency.
Use Mountain Mode prior toclimbing long, steep grades inmountainous areas. Be sure toengage Mountain Mode beforestarting to climb. Mountain Modereduces electric range and powerbut may be needed to maintainspeeds above 96 km/h (60 mph)when climbing grades of 5% orgreater.
Use L (Low) in heavy stop‐and‐gotraffic or when traveling downhill.L (Low) requires less brake pedalapplication and provides acontrolled, efficient way to slow thevehicle down.

Black plate (28,1)Chevrolet Volt Owner Manual - 2012
1-28 In Brief
Climate Setting
Using the heat and air conditioningsystems decreases the energyavailable for electric driving.
Optimal energy efficiency isachieved with the heat, airconditioning, and fan turned off.
Less energy is used at low fanspeeds. When using the fan:. Fan Only is the most energy
efficient climate setting as longas0 is not selected.
. ECO is for moderate airconditioning and heateroperation and is the next mostenergy efficient setting as longas0 is not selected
. Comfort provides the mostcomfort but is the least energyefficient.
Use the auto heated seat featureinstead of climate settings. Heatingthe seat uses less energy thanheating the vehicle interior.
Use remote start to heat or cool theinterior when the vehicle is pluggedin to maximize the electric range byutilizing electricity from the electricaloutlet.
In hot weather, avoid parking indirect sunlight or use sunshadesinside the vehicle.
Turn off the front and rear windowdefog/defrost when they are nolonger needed.
Avoid driving with the windows openat highway speeds.
Vehicle Charging/Maintenance
Charging
Keep the vehicle plugged in, evenwhen fully charged, to keep thebattery temperature ready for thenext drive. This is important whenoutside temperatures are extremelyhot or cold.
Maintenance
Always keep the tires properlyinflated and the vehicle properlyaligned.
The weight of excess cargo in thevehicle affects efficiency and range.Avoid carrying more than is needed.
If fuel is not regularly used, considerkeeping the fuel tank only one‐thirdfull. Excess fuel weight impactsefficiency and range.
Use premium fuel.
Avoid unnecessary use of electricalaccessories. Power used forfunctions other than propelling thevehicle will reduce EV range.
Using a rooftop carrier will reduceefficiency due to additional weightand drag.
Black plate (29,1)Chevrolet Volt Owner Manual - 2012
In Brief 1-29
Roadside AssistanceProgramU.S.: 1-888-811-1926
TTY Users: 1-888-889-2438
Canada: 1-800-268-6800
As the owner of a new Chevrolet,you are automatically enrolled inthe Roadside Assistance program.This program provides security andconvenience in the event of anon-road failure or emergencysituation. Service is provided24 hours a day, 365 days a year forthe 5 year/160 000 km (100,000 mi)coverage period.
See Roadside Assistance Programon page 13‑6 for more information.
Roadside Assistance and OnStar
If you have an active OnStarsubscription, press theQ buttonand the current GPS location willbe sent to an OnStar advisor whowill assess your problem, contactRoadside Assistance, and relayyour exact location to get the helpyou need.
Online Owner Center
The Online Owner Center is acomplimentary service that includesonline service reminders, vehiclemaintenance tips, online ownermanual, special privileges,and more.
Sign up today at:www.chevyownercenter.com(U.S.) or www.gm.ca (Canada).
OnStar®
If equipped, this vehicle has acomprehensive, in-vehicle systemthat can connect to a live Advisorfor Emergency, Security, Navigation,Connection, and DiagnosticServices. See OnStar Overview onpage 14‑1 for more information.

Black plate (30,1)Chevrolet Volt Owner Manual - 2012
1-30 In Brief
2 NOTES

Black plate (1,1)Chevrolet Volt Owner Manual - 2012
Keys, Doors, and Windows 2-1
Keys, Doors, andWindows
Keys and LocksKeys . . . . . . . . . . . . . . . . . . . . . . . . . . 2-1Remote Keyless Entry (RKE)System . . . . . . . . . . . . . . . . . . . . . . 2-2
Remote Keyless Entry (RKE)System Operation . . . . . . . . . . . 2-2
Remote Start . . . . . . . . . . . . . . . . . . 2-7Door Locks . . . . . . . . . . . . . . . . . . 2-10Power Door Locks . . . . . . . . . . . 2-11Delayed Locking . . . . . . . . . . . . . 2-11Automatic Door Locks . . . . . . . 2-12Lockout Protection . . . . . . . . . . . 2-12Safety Locks . . . . . . . . . . . . . . . . . 2-12
DoorsHatch . . . . . . . . . . . . . . . . . . . . . . . . 2-13
Vehicle SecurityVehicle Security . . . . . . . . . . . . . . 2-14Anti-theft Alarm System . . . . . . 2-14Immobilizer . . . . . . . . . . . . . . . . . . 2-15Immobilizer Operation . . . . . . . 2-15
Exterior MirrorsConvex Mirrors . . . . . . . . . . . . . . 2-16Power Mirrors . . . . . . . . . . . . . . . . 2-16Folding Mirrors . . . . . . . . . . . . . . . 2-16Heated Mirrors . . . . . . . . . . . . . . . 2-16
Interior MirrorsAutomatic Dimming RearviewMirror . . . . . . . . . . . . . . . . . . . . . . . 2-17
WindowsWindows . . . . . . . . . . . . . . . . . . . . . 2-17Power Windows . . . . . . . . . . . . . 2-18Sun Visors . . . . . . . . . . . . . . . . . . . 2-20
Keys and Locks
Keys
{ WARNING
Leaving children in a vehicle withthe Remote Keyless Entry (RKE)transmitter is dangerous for manyreasons; children or others couldbe badly injured or even killed.They could operate the powerwindows or other controls or evenmake the vehicle move. Thewindows will function with theRKE transmitter in the vehicleand they could be seriouslyinjured or killed if caught in thepath of a closing window. Do notleave the RKE transmitter in avehicle with children.
The key that is part of the RKEtransmitter can be used for all locks.

Black plate (2,1)Chevrolet Volt Owner Manual - 2012
2-2 Keys, Doors, and Windows
Press the key release button on theRKE transmitter to extend the key.Press the key release button andfold the key blade to retract the key.
The key has a bar-coded key tagthat the dealer or qualified locksmithcan use to make new keys. Storethis information in a safe place, notin the vehicle.
See your dealer if a replacementkey or an additional key is needed.
Notice: If the keys get locked inthe vehicle, it may have to bedamaged to get them out. Alwayscarry a spare key.
If locked out of the vehicle, call theRoadside Assistance Center. SeeRoadside Assistance Program onpage 13‑6. With an active OnStarsubscription, an OnStar Advisormay remotely unlock the vehicle.See OnStar Overview on page 14‑1.
Remote Keyless Entry(RKE) SystemSee Radio Frequency Statement onpage 13‑16 for informationregarding Part 15 of the FederalCommunications Commission (FCC)rules and Industry CanadaStandards RSS-GEN/210/220/310.
If there is a decrease in the RKEoperating range:. Check the distance. The
transmitter may be too far fromthe vehicle.
. Check the location. Othervehicles or objects may beblocking the signal.
. Check the transmitter's battery.See “Battery Replacement” laterin this section.
. If the transmitter is still notworking correctly, see yourdealer or a qualified technicianfor service.
Remote Keyless Entry(RKE) System OperationThe RKE transmitter functions willwork up to 60 m (195 ft) away fromthe vehicle.
Keep in mind that other conditions,such as those previously stated, canimpact the performance of thetransmitter.

Black plate (3,1)Chevrolet Volt Owner Manual - 2012
Keys, Doors, and Windows 2-3
K (Unlock): Press once to unlockthe driver door. Press a second timewithin five seconds to unlock alldoors.
The hazard warning lamps willflash twice each time the button ispressed and the anti-theft alarmsystem will be disarmed. SeeAnti-theft Alarm System onpage 2‑14.
On some models, pressing andholding K will open all of thevehicle's windows. See Power
Windows on page 2‑18. This featurecan be disabled by a servicetechnician.
Q (Lock): Press to lock all doors.The hazard warning lamps will flashonce and the anti-theft alarm systemwill be armed. See Anti-theft AlarmSystem on page 2‑14.
If the driver door is open when Q ispressed, all doors lock and thenthe driver door will unlock if theUnlocked Door Anti Lock Outfeature is enabled through thevehicle personalization. See“Unlocked Door Anti Lock Out”under Vehicle Personalization onpage 5‑53 for more information.This may vary based on vehiclepersonalization.
7 (Panic Alarm): Press andrelease one time to locate thevehicle. The exterior lamps flashand the horn chirps three times.Press and hold for three seconds tosound the panic alarm. The horn
sounds and the turn signals flash for30 seconds. Press again to cancelthe panic alarm.
B (Remote Start): Press Q andthen press and hold B withinfive seconds to start the vehicle'sheating or air conditioning systemsand rear window defogger fromoutside the vehicle using the RKEtransmitter. See Remote Start onpage 2‑7 for more information.
The auto heated seats, if equipped,can be programmed to come onwhen the vehicle is remotelystarted. See Vehicle Personalizationon page 5‑53 for more information.Also see “Auto Heated Seats” underHeated Front Seats on page 3‑7.
A (Charge Port Door): Press toopen the charge port door. SeePlug-In Charging on page 9‑44 formore information.

Black plate (4,1)Chevrolet Volt Owner Manual - 2012
2-4 Keys, Doors, and Windows
Keyless Access Operation
With the keyless access system,you can lock and unlock the doorsand access the hatch withoutremoving the RKE transmitter fromyour pocket, purse, briefcase, etc.The RKE transmitter should bewithin 1 m (3 ft) of the door or hatchbeing opened.
Keyless Unlocking/Locking fromthe Driver Door
When the doors are locked and theRKE transmitter is within 1 m (3 ft) ofthe driver door handle, pressing thelock/unlock button on the driver doorhandle will unlock the driver door.If the lock/unlock button is pressedagain within five seconds, allpassenger doors will unlock.Pressing the lock/unlock button willcause all doors to lock if any of thefollowing occur:. It has been more than
five seconds since the first lock/unlock button press.
. Two lock/unlock button presseswere used to unlock all doors.
. Any vehicle door has openedand all doors are now closed.
The vehicle can be customized toalways unlock all doors on the firstlock/unlock button press.
Keyless Unlocking/Locking fromPassenger Doors
When the doors are locked and theRKE transmitter is within 1 m (3 ft) ofthe door handle, pressing the lock/unlock button on that door handlewill unlock all doors. Pressing thelock/unlock button will cause alldoors to lock if any of the followingoccur:. After the lock/unlock button was
used to unlock all doors.. After any vehicle door has
opened and all doors are nowclosed.
Keyless Hatch Opening
Press the button on the underside ofthe hatch and lift up to open if theRKE transmitter is within range andthe doors are locked. If the doorsare unlocked, the transmitter is notrequired to open the hatch.
Programming Transmitters tothe Vehicle
Only RKE transmitters programmedto this vehicle will work. If atransmitter is lost or stolen, areplacement can be purchased andprogrammed through your dealer.When the replacement transmitteris programmed to this vehicle, allremaining transmitters must also bereprogrammed. Any lost or stolentransmitters will no longer workonce the new transmitter isprogrammed. Each vehicle canhave up to five transmitters matchedto it.

Black plate (5,1)Chevrolet Volt Owner Manual - 2012
Keys, Doors, and Windows 2-5
Programming with a RecognizedTransmitter
A new transmitter can beprogrammed to the vehicle whenthere is one recognized transmitter.For vehicles sold in Canada, tworecognized transmitters are requiredto program a new transmitter. Toprogram, the vehicle must be offand all of the transmitters, bothcurrently recognized and new, mustbe in the vehicle.
1. Place the recognizedtransmitter(s) in the cupholder.
2. Insert the vehicle key of the newtransmitter into the key lockcylinder on the outside of thedriver door and turn the key tothe unlock position five timeswithin 10 seconds.
The Driver Information Center(DIC) displays READY FORREMOTE #2, 3, 4 OR 5.
3. Remove the rubber mat in theinstrument panel storage.Extend the key blade on the newtransmitter and insert the keyblade into the transmitter slot.
4. Press and hold the POWER Obutton on the center stackfor two seconds. When thetransmitter is programmed, theDIC will show that it is ready toprogram the next transmitter.
5. Remove the transmitter from thetransmitter slot and press K onthe transmitter.
To program additionaltransmitters, repeat Steps 3through 5.
When all additional transmittersare programmed, press andhold the POWER O buttonfor 10 seconds to exitprogramming mode.
Programming without aRecognized Transmitter
Non-Canadian (U.S.) ownersare permitted to program a newtransmitter to their vehicle when arecognized transmitter is notavailable. The Canadian regulationsrequire that Canadian owners seetheir dealer for programming newtransmitters when two recognizedtransmitters are not available.

Black plate (6,1)Chevrolet Volt Owner Manual - 2012
2-6 Keys, Doors, and Windows
If there are no currently recognizedtransmitters available, follow thisprocedure to program up to fivetransmitters. This procedure willtake approximately 30 minutes tocomplete. The vehicle must be offand all of the transmitters must be inthe vehicle.
1. Insert the vehicle key of thetransmitter into the key lockcylinder on the outside of thedriver door and turn the key tothe unlock position five timeswithin 10 seconds.
The Driver Information Center(DIC) displays REMOTE LEARNPENDING, PLEASE WAIT.
2. Wait for 10 minutes until theDIC displays PRESS STARTBUTTON TO LEARN and thenpress the POWER O button onthe center stack.
The DIC display will again showREMOTE LEARN PENDING,PLEASE WAIT.
3. Repeat Step 2 two more times.After the third time, all previouslyknown transmitters will no longerwork with the vehicle. Remainingtransmitters can be programmedduring the next steps.
The DIC display should nowshow READY FORREMOTE #1.
4. Remove the rubber mat inthe instrument panel storage.Extend the key blade on the newtransmitter and insert the keyblade into the transmitter slot.
5. Press and hold the POWER Obutton for two seconds. Whenthe transmitter is programmed,the DIC will show that it is readyto program the next transmitter.
6. Remove the transmitter from thetransmitter slot and press K onthe transmitter.
To program additionaltransmitters, repeat Steps 4through 6.
When all additional transmittersare programmed, press andhold the POWER O buttonfor 10 seconds to exitprogramming mode.
Starting the Vehicle with a LowTransmitter Battery
If the transmitter battery is weak,the DIC may display NO REMOTEDETECTED when you try to startthe vehicle. The REPLACEBATTERY IN REMOTE KEYmessage may also be displayed atthis time.

Black plate (7,1)Chevrolet Volt Owner Manual - 2012
Keys, Doors, and Windows 2-7
To start the vehicle:
1. Open the instrument panelstorage and remove therubber mat.
2. Extend the key blade and placethe blade into the slot.
3. With the vehicle in P (Park) orN (Neutral), press the brakepedal and the POWER O buttonon the center stack. See PowerButton on page 9‑16 foradditional information.
Replace the transmitter battery assoon as possible.
Battery Replacement
Notice: When replacing thebattery, do not touch any of thecircuitry on the transmitter. Staticfrom your body could damage thetransmitter.
To replace the battery:
1. Extend the key blade and openthe battery cover on the back ofthe unit.
2. Remove the used battery. Avoidtouching the circuit board toother components.
3. Insert the new battery, positiveside facing down towardthe base.
4. Reassemble the battery cover.
5. Check the operation of thetransmitter with the vehicle.
Remote StartThis feature starts the heating orair conditioning systems and rearwindow defogger from outside thevehicle. Use remote start to heat orcool the interior when the vehicle isplugged in to maximize the electricrange by utilizing electricity from theelectrical outlet. Normal operation ofthe system will return after thevehicle has been turned on.
B (Remote Start): This button ison the RKE transmitter.
During remote start:. The climate control system will
typically default to the lastclimate settings. If Fan Off orFan Only were selected, the airconditioning or heat will turnon as needed. See AutomaticClimate Control System onpage 8‑1 for more information.

Black plate (8,1)Chevrolet Volt Owner Manual - 2012
2-8 Keys, Doors, and Windows
. If the vehicle has heated seats,and this feature has beenenabled through vehiclepersonalization, the heatedseats will turn on during colderoutside temperatures. See“Remote Start Heated Seats”under Heated Front Seats onpage 3‑7 and “Remote StartAuto Heated Seats” underVehicle Personalization onpage 5‑53 for additionalinformation.
. The rear defogger will turn onduring colder outsidetemperatures.
. Selecting1 during colderoutside temperatures beforeshutting the vehicle off will helpwindshield clearing.
. Shutting the vehicle off in ECOMode without1 selected willminimize the impact to electricrange. Shutting the vehicle offin other modes will maximizeheating or air conditioning.
. The engine may start to provideenergy for heating and cooling,independent of the vehiclebeing plugged in or completelycharged. Engine assistedheating operation, if available,can be personalized. See“Engine Assisted Heating” underVehicle Personalization onpage 5‑53.
. Vehicle range may decrease ifthe vehicle is not plugged intoan electrical outlet. If the vehicleis plugged in, much of theenergy needed to support thisfeature will be provided from theutility, not from the high voltagebattery.
Laws in some communities mayrestrict the use of features thatremotely start the engine. Forexample, some laws may requirea person using the remote startfeature to have the vehicle inview when doing so. Check localregulations for any requirements onremote starting of vehicles.
With the remote start feature, theRKE transmitter functions will havean increased range of operation.However, the range may be lesswhile the vehicle is running.
Other conditions can affect theperformance of the transmitter.See Remote Keyless Entry (RKE)System on page 2‑2 for additionalinformation.
Activating the Remote Start
To heat or cool the passengercompartment using remote start:
1. Aim the RKE transmitter at thevehicle.
2. Press Q on the RKE transmitter;the doors will lock.
3. Within five seconds, press andhold B until the turn signallamps flash, or for approximatelyfour seconds. Pressing B againduring a remote start will turn thefeature off.

Black plate (9,1)Chevrolet Volt Owner Manual - 2012
Keys, Doors, and Windows 2-9
Remote start will automatically shutoff after 10 minutes unless a timeextension is done.
While the remote start is active, theparking lamps will turn on andremain on.
After entering the vehicle during aremote start, press the POWER Obutton on the center stack with thebrake pedal applied to operate asnormal.
The remote start can be initiatedtwo separate times betweendriving. For each remote start, thepassenger compartment will beheated or cooled for 10 minutes.
Extending the Time
To extend the time of the firstremote start, repeat the steps foractivating remote start. Remote startcan only be extended one timebetween driving.
Canceling Remote Start
To cancel a remote start, do any ofthe following:. Aim the RKE transmitter at the
vehicle and press and hold Buntil the parking lamps turn off.
. Turn on the hazard warningflashers.
. Press the POWER O button onthe center stack, with the brakepedal applied, then press thePOWER O button again to turnthe vehicle off.
Conditions in Which RemoteStart May Not Work
Conditions in which a remote startmay not occur include:. An open hood.. Vehicle propulsion system
fault conditions, including anemission control systemmalfunction.
. High voltage battery faultconditions.
A second remote start or extensionwill not occur if the fuel level is low.
During a remote start, conditions inwhich a remote start may becanceled include:. Vehicle propulsion system or
high voltage battery faultconditions.
. Low engine oil pressure.
. Engine coolant temperature thatis too high.

Black plate (10,1)Chevrolet Volt Owner Manual - 2012
2-10 Keys, Doors, and Windows
Door Locks
{ WARNING
Unlocked doors can bedangerous.
. Passengers, especiallychildren, can easily open thedoors and fall out of a movingvehicle. The chance of beingthrown out of the vehicle in acrash is increased if thedoors are not locked. So, allpassengers should wearsafety belts properly andthe doors should be lockedwhenever the vehicle isdriven.
(Continued)
WARNING (Continued)
. Young children who get intounlocked vehicles may beunable to get out. A child canbe overcome by extreme heatand can suffer permanentinjuries or even death fromheat stroke. Always lock thevehicle whenever leaving it.
. Outsiders can easily enterthrough an unlocked doorwhen slowing or stopping thevehicle. Lock the doors tohelp prevent this fromhappening.
Keyless Access: The RKEtransmitter must be within 1 m (3 ft)of the door being opened.
To unlock the door from the driverdoor, press the lock/unlock buttonon the door handle. Press againwithin five seconds to unlock allpassenger doors.
To lock the doors, press the lock/unlock button if:. More than five seconds have
passed.. The lock/unlock button was used
to unlock all doors.. All doors are closed.

Black plate (11,1)Chevrolet Volt Owner Manual - 2012
Keys, Doors, and Windows 2-11
To unlock all doors from thepassenger door, press the lock/unlock button on the door handle.
To lock the doors, press the lock/unlock button if:. The lock/unlock button was used
to unlock all doors.. All doors are closed.
The Keyless Access can beprogrammed to unlock all doors onthe first lock/unlock press from thedriver door. See VehiclePersonalization on page 5‑53.
Remote Keyless Entry (RKE):The RKE transmitter must be within60 m (195 ft) of the vehicle.
K : Press to unlock.
Q : Press to lock.
See Remote Keyless Entry (RKE)System Operation on page 2‑2.
Key: To unlock or lock the door,turn the key left or right.
Inside the vehicle: Pull up or pushdown on the door lock knob. Pullonce on the door handle to unlockthe door and a second time to openthe door. Push the power door lockswitch. See Power Door Locks onpage 2‑11.
Power Door Locks
The power door lock switches areon the center stack.
K (Unlock): Press to unlock thedoors.
Q (Lock): Press to lock the doors.
Delayed LockingThis vehicle may have a delayedlocking feature. If delayed locking isenabled, a chime will sound toindicate a door or hatch is openwhen the doors are locked with thepower door lock switch. The doorswill automatically lock and thetheft-deterrent system will armafter all doors are closed andfive seconds have passed. Pressthe lock button again to make thedoors lock immediately. Press theunlock switch to cancel the delayedlock operation. To enable thisfeature, see “Power Door Locks”in Vehicle Personalization onpage 5‑53. To arm and disarm thetheft-deterrent system, see Anti-theftAlarm System on page 2‑14.
Black plate (12,1)Chevrolet Volt Owner Manual - 2012
2-12 Keys, Doors, and Windows
Automatic Door Locks
Automatic Door Lock
The doors are programmed toautomatically lock when the shiftlever is moved out of P (Park).
The automatic door lock featurecannot be disabled.
Automatic Door Unlock
The doors can be programmed toautomatically unlock when the shiftlever is moved into P (Park). See“Power Door Locks” in VehiclePersonalization on page 5‑53.
Lockout ProtectionIf the power door lock switch ispressed when the driver door isopen and the vehicle is on, all thedoors will lock and then the driverdoor will unlock.
This feature can also be enabled tofunction when the vehicle is off. Toenable this feature, see “UnlockedDoor Anti Lock Out” in VehiclePersonalization on page 5‑53.
Safety Locks
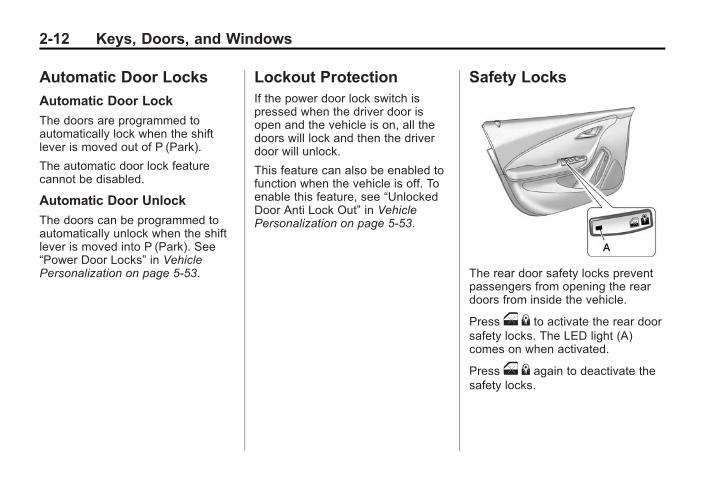
The rear door safety locks preventpassengers from opening the reardoors from inside the vehicle.
Presso { to activate the rear doorsafety locks. The LED light (A)comes on when activated.
Presso { again to deactivate thesafety locks.

Black plate (13,1)Chevrolet Volt Owner Manual - 2012
Keys, Doors, and Windows 2-13
Doors
Hatch
{ WARNING
Exhaust gases can enter thevehicle if it is driven in ExtendedRange Mode with the hatch open,or with any objects that passthrough the seal between thebody and the hatch. Engineexhaust contains carbonmonoxide (CO) which cannot beseen or smelled. It can causeunconsciousness and even death.
If the vehicle must be driven inExtended Range Mode with thehatch open:
. Do not operate in MountainMode if driving with thehatch open.
. Close all of the windows.
(Continued)
WARNING (Continued)
. Fully open the air outlets onthe instrument panel.
. Adjust the climate controlsystem to a setting thatbrings in only outside air andset the fan speed to thehighest setting. SeeAutomatic Climate ControlSystem on page 8‑1.
For more information aboutcarbon monoxide, see EngineExhaust on page 9‑26.
Keyless Access with RemoteKeyless Entry (RKE): To open thehatch with the doors locked, theRKE transmitter must be within1 m (3 ft) of the trunk. Press thebutton on the underside of the hatchand lift up.

Black plate (14,1)Chevrolet Volt Owner Manual - 2012
2-14 Keys, Doors, and Windows
Remote Keyless Entry (RKE):The RKE transmitter must be within60 m (195 ft) of the vehicle. Unlockthe doors with the RKE transmitter,then press the button on theunderside of the hatch and lift up.
Use the inside pull handle to lowerand close the hatch.
Always close the hatch beforedriving. Do not press the buttonwhile closing the hatch; it willunlatch again.
Vehicle SecurityThis vehicle has theft-deterrentfeatures; however, they do not makeit impossible to steal.
Anti-theft Alarm SystemThis vehicle has an anti-theft alarmsystem.
Arming the System
To arm the system, close all of thewindows and doors and then:
. Press Q on the RKE transmitter.
. Or, lock the vehicle using thepower door lock switch in thecenter stack if Unlocked DoorAnti Lock Out is turned off. See“Unlocked Door Anti Lock Out”under Vehicle Personalization onpage 5‑53 for more information.
The alarm automatically arms afterabout 30 seconds.
Pressing Q on the RKE transmittera second time will bypass the30-second delay and immediatelyarm the system.
Disarming the System
To disarm the system, press K onthe RKE transmitter, or if the vehiclehas the keyless access system,approach the vehicle with the RKEtransmitter.
Turning off the System Alarm
If there is an attempt to open thedoors, hatch, or hood without firstpressing K on the RKE transmitter,the system alarm will be activated.The exterior lamps will flash andthe horn will sound for about30 seconds.

Black plate (15,1)Chevrolet Volt Owner Manual - 2012
Keys, Doors, and Windows 2-15
To turn off the system alarm:
. Press K on the RKE transmitter.
. Or, start the vehicle by pressingPOWER O on the center stackwith the brake pedal appliedand the RKE transmitter in thevehicle.
Charge Cord Theft Alert
To arm or disarm the charge cordtheft alert, lock or unlock the vehiclewith the RKE transmitter.
If there is an attempt to remove thecharge cord while the vehicle islocked, the system alarm will beactivated. To turn off the systemalarm, press K on the RKEtransmitter.
This feature may be disabledthrough the vehicle personalization.See “Charge Cord Theft Alert”under Vehicle Personalization onpage 5‑53.
ImmobilizerSee Radio Frequency Statement onpage 13‑16 for informationregarding Part 15 of the FederalCommunications Commission (FCC)rules and Industry CanadaStandards RSS-GEN/210/220/310.
Immobilizer OperationThis vehicle has a passivetheft-deterrent system. The systemdoes not have to be manuallyarmed or disarmed.
The vehicle is automaticallyimmobilized when the vehicle isturned off.
The system is automaticallydisarmed when the vehicle isstarted with a valid RKE transmitterin the vehicle. The RKE transmitteruses electronic coding that matchesan immobilizer control unit in thevehicle and automatically disarms
the system. Only a correcttransmitter can be used to turnthe vehicle on.
The security light in the instrumentcluster comes on if there is aproblem with arming or disarmingthe theft-deterrent system.
When trying to start the vehicle, thesecurity light comes on briefly whenthe vehicle is turned on.
If the vehicle does not start and thesecurity light stays on, there is aproblem with the system. Attempt toturn the vehicle off and try it again.
Do not leave the RKE transmitter inthe vehicle.

Black plate (16,1)Chevrolet Volt Owner Manual - 2012
2-16 Keys, Doors, and Windows
Exterior Mirrors
Convex Mirrors
{ WARNING
A convex mirror can make things,like other vehicles, look fartheraway than they really are. If youcut too sharply into the right lane,you could hit a vehicle on theright. Check the inside mirror orglance over your shoulder beforechanging lanes.
The passenger side mirror is convexshaped. A convex mirror's surface iscurved so more can be seen fromthe driver seat.
Power Mirrors
Controls for the outside powermirrors are on the driver door.
To adjust a mirror:
1. Move the selector switch toL (left) or R (right) to choose thedriver or passenger mirror.
2. Press the arrows on the controlpad to move each mirror in thedesired direction.
3. Return the selector switch to thecenter position.
Folding Mirrors
Manual Foldaway Mirrors
The mirrors can be folded inwardtoward the vehicle to preventdamage when going through anautomatic car wash. Push the mirroroutward to return it to the originalposition.
Heated MirrorsThe vehicle may have heatedmirrors.
= (Rear Window Defogger):Press to heat the outside rearviewmirrors. See “Rear WindowDefogger” under Automatic ClimateControl System on page 8‑1 formore information.
Black plate (17,1)Chevrolet Volt Owner Manual - 2012
Keys, Doors, and Windows 2-17
Interior Mirrors
Automatic DimmingRearview MirrorThe vehicle has an automaticdimming inside rearview mirror.Automatic dimming reduces theglare from the headlamps of thevehicle behind you. The dimmingfeature and the indicator light comeon each time the vehicle is started.Hold the mirror in the center toadjust it.
Cleaning the Mirror
Do not spray glass cleaner directlyon the mirror. Use a soft toweldampened with water.
Windows
{ WARNING
Leaving children, helpless adults,or pets in a vehicle with thewindows closed is dangerous.They can be overcome bythe extreme heat and sufferpermanent injuries or even deathfrom heat stroke. Never leave achild, a helpless adult, or a petalone in a vehicle, especially withthe windows closed in warm orhot weather.
The vehicle aerodynamics aredesigned to improve fuel economyperformance. This may result in apulsing sound when either rearwindow is down and the frontwindows are up. To reduce thesound, open either a front windowor the sunroof (if equipped).

Black plate (18,1)Chevrolet Volt Owner Manual - 2012
2-18 Keys, Doors, and Windows
Power Windows
{ WARNING
Leaving children in a vehicle withthe RKE transmitter is dangerousfor many reasons; children orothers could be badly injured oreven killed. They could operatethe power windows or othercontrols or even make the vehiclemove. The windows will functionwith the RKE transmitter inthe vehicle and they could beseriously injured or killed if caughtin the path of a closing window.Do not leave the RKE transmitterin a vehicle with children.
When there are children in therear seat, use the window lockoutswitch to prevent unintentionaloperation of the windows.
The window switches on the driverdoor control all windows in thevehicle. Each passenger door hasa switch that controls only thatwindow.
Press the front of the switch to openthe window. Pull the switch up toclose it.
The power windows work when thevehicle is on, or when RetainedAccessory Power (RAP) is active.See Retained Accessory Power(RAP) on page 9‑19.
Express‐Down/Up Windows
Windows with an express-down orup feature allow the window to belowered or raised without holdingthe switch. The driver windowhas express-down and up; thepassenger and rear windows haveonly express-down.
Pull a window switch up or pushit down all the way, release it,and the window goes up or downautomatically. Stop the window bypushing or pulling the switch.
Express Window Anti-PinchFeature
If any object is in the path of thewindow when the express-up isactive, the window will stop at theobstruction and auto-reverse to apreset factory position. Weatherconditions such as severe icingmay also cause the window toauto-reverse. The window willreturn to normal operation once theobstruction or condition is removed.

Black plate (19,1)Chevrolet Volt Owner Manual - 2012
Keys, Doors, and Windows 2-19
Express Window Anti-PinchOverride
In an emergency, the anti-pinchfeature can be overridden in asupervised mode. Hold the windowswitch all the way up to the secondposition. The window will rise for aslong as the switch is held. Oncethe switch is released, the expressmode is re-activated.
In this mode, the window can stillclose on an object in its path. Usecare when using the override mode.
Programming the PowerWindows
Programming the power windowsmay be necessary if the 12-voltbattery has been disconnected ordischarged.
To program the window:
1. Close all doors with the vehicleon, or when Retained AccessoryPower (RAP) is active. SeeRetained Accessory Power(RAP) on page 9‑19.
2. Pull the window switch tocompletely close the window.Continue to hold the windowswitch two seconds after thewindow is closed.
3. Repeat for each window.
Remote Window Operation
The vehicle may have remoteoperating windows that will openall the windows from outside thevehicle by pressing and holding Kon the Remote Keyless Entry (RKE)transmitter.
This feature can be disabled by adealer technician.

Black plate (20,1)Chevrolet Volt Owner Manual - 2012
2-20 Keys, Doors, and Windows
Window Lockout
The rear window lockout switch ison the driver door. This featureprevents the rear passengerwindows from operating, exceptfrom the driver position.
Presso { to activate the rearwindow lockout switch. The LEDlight (A) comes on when activated.
Presso { again to deactivate thelockout switch.
Sun Visors
Pull the sun visor down to blockglare. Detach the sun visor from thecenter mount to pivot to the sidewindow, or to extend along the rod,if available.

Black plate (1,1)Chevrolet Volt Owner Manual - 2012
Seats and Restraints 3-1
Seats andRestraints
Head RestraintsHead Restraints . . . . . . . . . . . . . . . 3-2
Front SeatsSeat Adjustment . . . . . . . . . . . . . . 3-4Reclining Seatbacks . . . . . . . . . . 3-5Heated Front Seats . . . . . . . . . . . 3-7
Rear SeatsRear Seats . . . . . . . . . . . . . . . . . . . . 3-8
Safety BeltsSafety Belts . . . . . . . . . . . . . . . . . . 3-11How to Wear Safety BeltsProperly . . . . . . . . . . . . . . . . . . . . 3-12
Lap-Shoulder Belt . . . . . . . . . . . 3-13Safety Belt Use DuringPregnancy . . . . . . . . . . . . . . . . . . 3-17
Safety Belt Extender . . . . . . . . . 3-17
Safety System Check . . . . . . . . 3-17Safety Belt Care . . . . . . . . . . . . . 3-18Replacing Safety Belt SystemParts after a Crash . . . . . . . . . 3-18
Airbag SystemAirbag System . . . . . . . . . . . . . . . 3-19Where Are the Airbags? . . . . . 3-21When Should an AirbagInflate? . . . . . . . . . . . . . . . . . . . . . 3-22
What Makes an AirbagInflate? . . . . . . . . . . . . . . . . . . . . . 3-23
How Does an AirbagRestrain? . . . . . . . . . . . . . . . . . . . 3-24
What Will You See after anAirbag Inflates? . . . . . . . . . . . . 3-24
Passenger SensingSystem . . . . . . . . . . . . . . . . . . . . . 3-26
Servicing the Airbag-EquippedVehicle . . . . . . . . . . . . . . . . . . . . . 3-30
Adding Equipment to theAirbag-Equipped Vehicle . . . 3-31
Airbag System Check . . . . . . . . 3-31Replacing Airbag SystemParts after a Crash . . . . . . . . . 3-32
Child RestraintsOlder Children . . . . . . . . . . . . . . . 3-32Infants and YoungChildren . . . . . . . . . . . . . . . . . . . . 3-35
Child Restraint Systems . . . . . 3-37Where to Put the Restraint . . . 3-39Lower Anchors and Tethersfor Children (LATCHSystem) . . . . . . . . . . . . . . . . . . . . 3-41
Replacing LATCH SystemParts After a Crash . . . . . . . . . 3-47
Securing Child Restraints(Rear Seat) . . . . . . . . . . . . . . . . . 3-48
Securing Child Restraints(Front Passenger Seat) . . . . 3-50

Black plate (2,1)Chevrolet Volt Owner Manual - 2012
3-2 Seats and Restraints
Head Restraints
{ WARNING
With head restraints that are notinstalled and adjusted properly,there is a greater chance thatoccupants will suffer a neck/spinal injury in a crash. Do notdrive until the head restraints forall occupants are installed andadjusted properly.
Front Seats
The vehicle's front seats haveadjustable head restraints in theoutboard seating positions.
Adjust the head restraint so that thetop of the restraint is at the sameheight as the top of the occupant'shead. This position reduces thechance of a neck injury in a crash.
To raise or lower the head restraint,press the button located on the sideof the head restraint and pull up orpush the head restraint down andrelease the button.

Black plate (3,1)Chevrolet Volt Owner Manual - 2012
Seats and Restraints 3-3
Pull and push on the head restraintafter the button is released to makesure that it is locked in place.
The front seat outboard headrestraints are not designed to beremoved.
Rear Seats
The vehicle's rear seats haveadjustable head restraints in theoutboard seating positions.
The height of the head restraint canbe adjusted. Pull the head restraintup to raise it. Try to move the headrestraint to make sure that it islocked in place.
To lower the head restraint, pressthe button, located on the top ofthe seatback, and push the headrestraint down. Try to move thehead restraint after the button isreleased to make sure that it islocked in place.
If you are installing a child restraintin the rear seat, see “Securing aChild Restraint Designed for theLATCH System” under LowerAnchors and Tethers for Children(LATCH System) on page 3‑41.
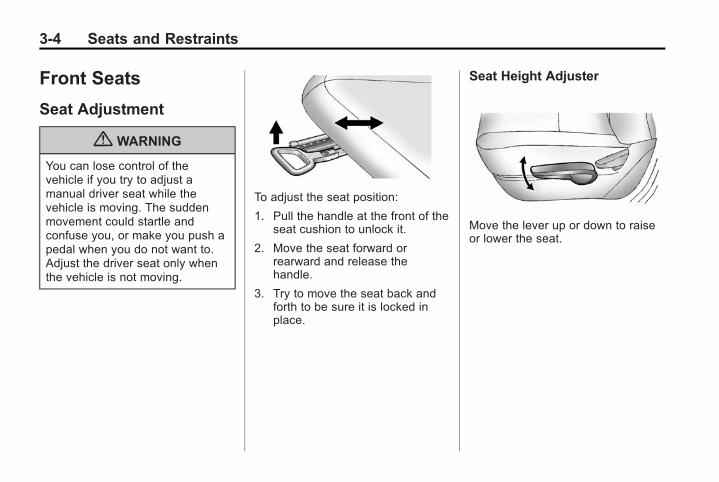
Black plate (4,1)Chevrolet Volt Owner Manual - 2012
3-4 Seats and Restraints
Front Seats
Seat Adjustment
{ WARNING
You can lose control of thevehicle if you try to adjust amanual driver seat while thevehicle is moving. The suddenmovement could startle andconfuse you, or make you push apedal when you do not want to.Adjust the driver seat only whenthe vehicle is not moving.
To adjust the seat position:
1. Pull the handle at the front of theseat cushion to unlock it.
2. Move the seat forward orrearward and release thehandle.
3. Try to move the seat back andforth to be sure it is locked inplace.
Seat Height Adjuster
Move the lever up or down to raiseor lower the seat.

Black plate (5,1)Chevrolet Volt Owner Manual - 2012
Seats and Restraints 3-5
Reclining Seatbacks
{ WARNING
You can lose control of thevehicle if you try to adjust amanual driver seat while thevehicle is moving. The suddenmovement could startle andconfuse you, or make you push apedal when you do not want to.Adjust the driver seat only whenthe vehicle is not moving.
{ WARNING
If either seatback is not locked, itcould move forward in a suddenstop or crash. That could causeinjury to the person sitting there.Always push and pull on theseatbacks to be sure they arelocked.
To recline the seatback:
1. Lift the lever.
2. Move the seatback to thedesired position, and thenrelease the lever to lock theseatback in place.
3. Push and pull on the seatback tomake sure it is locked.

Black plate (6,1)Chevrolet Volt Owner Manual - 2012
3-6 Seats and Restraints
To return the seatback to the uprightposition:
1. Lift the lever fully withoutapplying pressure to theseatback, and the seatbackreturns to the upright position.
2. Push and pull on the seatback tomake sure it is locked.
{ WARNING
Sitting in a reclined position whenthe vehicle is in motion can bedangerous. Even when buckledup, the safety belts cannot dotheir job when reclined like this.
The shoulder belt cannot do itsjob because it will not be againstyour body. Instead, it will be infront of you. In a crash, you couldgo into it, receiving neck or otherinjuries.
(Continued)
WARNING (Continued)
The lap belt cannot do its jobeither. In a crash, the belt couldgo up over your abdomen. Thebelt forces would be there, not atyour pelvic bones. This couldcause serious internal injuries.
For proper protection when thevehicle is in motion, have theseatback upright. Then sit wellback in the seat and wear thesafety belt properly.
Do not have a seatback reclined ifthe vehicle is moving.

Black plate (7,1)Chevrolet Volt Owner Manual - 2012
Seats and Restraints 3-7
Heated Front Seats
{ WARNING
If you cannot feel temperaturechange or pain to the skin, theseat heater may cause burnseven at low temperatures. Toreduce the risk of burns, peoplewith such a condition should usecare when using the seat heater,especially for long periods oftime. Do not place anything onthe seat that insulates againstheat, such as a blanket, cushion,cover, or similar item. Thismay cause the seat heater tooverheat. An overheated seatheater may cause a burn or maydamage the seat.
Navigation System Shown, BaseSystem Similar
If available, the controls are on thecenter stack. To operate, the vehiclemust be on.
Press M or L to heat the driveror passenger seat cushion andseatback.
Press the button once for thehighest setting. With each pressof the button, the heated seat willchange to the next lower setting,and then the off setting. Three lightsindicate the highest setting and onelight the lowest.
Auto Heated Seats
If available, the controls can beaccessed while the vehicle is on bypressing the CLIMATE button on thecenter stack.
Press the touch screen M AUTO
or L AUTO button. The button colorwill change to green when thisfeature is on.
When the vehicle is on, this featurewill automatically activate theheated seats at the level required bythe vehicle's interior temperature.

Black plate (8,1)Chevrolet Volt Owner Manual - 2012
3-8 Seats and Restraints
The active high, medium, low, or offheated seat level will be indicatedby the manual heated seat buttonlights on the center stack. Use thetouch screen buttons or the manualheated seat buttons on the centerstack to turn auto heated seats off.
If the passenger seat is unoccupied,the auto heated seats feature willnot activate that seat.
The auto heated seats featurecan be programmed to always beenabled when the vehicle is on.See Vehicle Personalization onpage 5‑53 for more information.
Remote Start Heated Seats
When it is cold outside, the heatedseats can be programmed to turnon automatically during a remotevehicle start. Unless the autoheated seats feature is available
and enabled, the heated seats willbe canceled when the vehicle isturned on. If the vehicle has autoheated seats and the feature isenabled, the seat heating level willautomatically change to the levelrequired by the vehicle's interiortemperature when the vehicle isturned on.
The indicator lights on the heatedseat buttons do not turn on during aremote start.
The temperature performance of anunoccupied seat may be reduced.This is normal.
The heated seats will not turn onduring a remote start unless theheated seats feature is enabled inthe vehicle personalization menu.See Vehicle Personalization onpage 5‑53 for more information.
Rear SeatsFolding the Seatback
{ WARNING
If either seatback is not locked, itcould move forward in a suddenstop or crash. That could causeinjury to the person sitting there.Always push and pull on theseatbacks to be sure they arelocked.

Black plate (9,1)Chevrolet Volt Owner Manual - 2012
Seats and Restraints 3-9
{ WARNING
A safety belt that is improperlyrouted, not properly attached,or twisted will not provide theprotection needed in a crash. Theperson wearing the belt could beseriously injured. After raising therear seatback, always check tobe sure that the safety belts areproperly routed and attached, andare not twisted.
To fold the seatback down:
Notice: Folding a rear seat withthe safety belts still fastened maycause damage to the seat or thesafety belts. Always unbuckle thesafety belts and return them totheir normal stowed positionbefore folding a rear seat.
A. Safety Belt Guide
B. Safety Belt Storage Clip
1. Remove the safety belt from thesafety belt guide (A) and place itin the storage clip (B).
The safety belt should remainin the storage clip while theseatback is in the foldedposition.
2. Pull the seatback release leverto unlock the seatback.
A tab near the lever raises whenthe seatback is unlocked.
3. Fold the seatback forward.

Black plate (10,1)Chevrolet Volt Owner Manual - 2012
3-10 Seats and Restraints
Raising the Seatback
Notice: Damage to the safety beltor seatback locking mechanismcan occur if the safety belt iscaught between the rear seatbackand the seatback lockingmechanism. The safety belt mustbe out of the way when the rearseat is raised to the upright,locked position. If the safety beltis damaged, see your dealer andhave it replaced.
To raise the seatback:
A. Seatback Locking Mechanism
B. Safety Belt Storage Clip
1. Make sure the safety belt is inthe storage clip (B) beforeraising the seatback.
The safety belt should notcross the seatback lockingmechanism (A) when raising theseatback.
2. Raise the seatback and push itrearward to lock it into place.
A tab near the seatback releaselever retracts when the seatbackis locked.
3. Push and pull the top of theseatback to be sure it is lockedinto position.
4. Return the safety belt to thesafety belt guide after raising theseatback.
Keep the seat in the upright, lockedposition when not in use.

Black plate (11,1)Chevrolet Volt Owner Manual - 2012
Seats and Restraints 3-11
Safety BeltsThis section of the manualdescribes how to use safety beltsproperly. It also describes somethings not to do with safety belts.
{ WARNING
Do not let anyone ride wherea safety belt cannot be wornproperly. In a crash, if you or yourpassenger(s) are not wearingsafety belts, injuries can be muchworse than if you are wearingsafety belts. You can be seriouslyinjured or killed by hitting thingsinside the vehicle harder or bybeing ejected from the vehicle.In addition, anyone who is notbuckled up can strike otherpassengers in the vehicle.
(Continued)
WARNING (Continued)
It is extremely dangerous to ridein a cargo area, inside or outsideof a vehicle. In a collision,passengers riding in these areasare more likely to be seriouslyinjured or killed. Do not allowpassengers to ride in any area ofthe vehicle that is not equippedwith seats and safety belts.
Always wear a safety belt, andcheck that all passenger(s) arerestrained properly too.
This vehicle has indicators as areminder to buckle the safety belts.See Safety Belt Reminders onpage 5‑16 for additional information.
Why Safety Belts Work
When riding in a vehicle, you travelas fast as the vehicle does. If thevehicle stops suddenly, you keepgoing until something stops you.It could be the windshield, theinstrument panel, or the safety belts!

Black plate (12,1)Chevrolet Volt Owner Manual - 2012
3-12 Seats and Restraints
When you wear a safety belt, youand the vehicle slow down together.There is more time to stop becauseyou stop over a longer distance and,when worn properly, your strongestbones take the forces from thesafety belts. That is why wearingsafety belts makes such goodsense.
Questions and Answers AboutSafety Belts
Q: Will I be trapped in the vehicleafter a crash if I am wearing asafety belt?
A: You could be — whether youare wearing a safety belt or not.Your chance of being consciousduring and after a crash, so youcan unbuckle and get out, ismuch greater if you are belted.
Q: If my vehicle has airbags, whyshould I have to wear safetybelts?
A: Airbags are supplementalsystems only; so they work withsafety belts — not instead ofthem. Whether or not an airbagis provided, all occupants stillhave to buckle up to get themost protection.
Also, in nearly all states and inall Canadian provinces, the lawrequires wearing safety belts.
How to Wear Safety BeltsProperlyThis section is only for people ofadult size.
There are special things to knowabout safety belts and children. Andthere are different rules for smallerchildren and infants. If a child willbe riding in the vehicle, see OlderChildren on page 3‑32 or Infantsand Young Children on page 3‑35.Follow those rules for everyone'sprotection.
It is very important for all occupantsto buckle up. Statistics show thatunbelted people are hurt more oftenin crashes than those who arewearing safety belts.
There are important things to knowabout wearing a safety belt properly.
. Sit up straight and always keepyour feet on the floor in frontof you.
. Always use the correct bucklefor your seating position.

Black plate (13,1)Chevrolet Volt Owner Manual - 2012
Seats and Restraints 3-13
. Wear the lap part of the beltlow and snug on the hips, justtouching the thighs. In a crash,this applies force to the strongpelvic bones and you would beless likely to slide under the lapbelt. If you slid under it, the beltwould apply force on yourabdomen. This could causeserious or even fatal injuries.
. Wear the shoulder belt over theshoulder and across the chest.These parts of the body are bestable to take belt restrainingforces. The shoulder belt locks ifthere is a sudden stop or crash.
{ WARNING
You can be seriously injured,or even killed, by not wearingyour safety belt properly.
. Never allow the lap orshoulder belt to becomeloose or twisted.
(Continued)
WARNING (Continued)
. Never wear the shoulder beltunder both arms or behindyour back.
. Never route the lap orshoulder belt over anarmrest.
Lap-Shoulder BeltAll seating positions in the vehiclehave a lap-shoulder belt.
The following instructions explainhow to wear a lap-shoulder beltproperly.
1. If the seat has a safety beltguide, and the safety belt is notrouted through the guide, slidethe edge of the belt webbingthrough the opening on theguide. Be sure the belt is nottwisted.
2. Adjust the seat, if the seat isadjustable, so you can sit upstraight. To see how, see “Seats”in the Index.
3. Pick up the latch plate and pullthe belt across you. Do not let itget twisted.
The lap-shoulder belt may lock ifyou pull the belt across you veryquickly. If this happens, let thebelt go back slightly to unlock it.Then pull the belt across youmore slowly.
If the shoulder portion of apassenger belt is pulled out allthe way, the child restraintlocking feature may be engaged.If this happens, let the belt goback all the way and start again.

Black plate (14,1)Chevrolet Volt Owner Manual - 2012
3-14 Seats and Restraints
4. Push the latch plate into thebuckle until it clicks.
Pull up on the latch plate tomake sure it is secure. If the beltis not long enough, see SafetyBelt Extender on page 3‑17.
Position the release button onthe buckle so that the safety beltcould be quickly unbuckled ifnecessary.
5. To make the lap part tight, pullup on the shoulder belt.
It may be necessary to pullstitching on the safety beltthrough the latch plate to fullytighten the lap belt on smalleroccupants.
To unlatch the belt, push the buttonon the buckle. The belt shouldreturn to its stowed position.
Before a door is closed, be sure thesafety belt is out of the way. If adoor is slammed against a safetybelt, damage can occur to both thesafety belt and the vehicle.
Safety Belt Pretensioners
This vehicle has safety beltpretensioners for front outboardoccupants. Although the safety beltpretensioners cannot be seen, theyare part of the safety belt assembly.

Black plate (15,1)Chevrolet Volt Owner Manual - 2012
Seats and Restraints 3-15
They can help tighten the safetybelts during the early stages of amoderate to severe frontal, nearfrontal, or rear crash if the thresholdconditions for pretensioneractivation are met.
And, if the vehicle has side impactairbags, safety belt pretensionerscan help tighten the safety belts in aside crash or a rollover event.
Pretensioners work only once. If thepretensioners activate in a crash,they need to be replaced, and othernew parts for the vehicle's safetybelt system may be required. SeeReplacing Safety Belt System Partsafter a Crash on page 3‑18.
Rear Safety Belt ComfortGuides
This vehicle may have rear safetybelt comfort guides. If not, they areavailable through your dealer. Theguides may provide added safetybelt comfort for older children whohave outgrown booster seats andfor some adults. When installed and
properly adjusted, the comfort guidepositions the belt away from theneck and head.
There is one guide, if equipped, foreach outside passenger position inthe rear seat. When using a comfortguide, remove the safety belt fromthe seat‐mounted guide beforeusing the comfort guide. To install acomfort guide to the safety belt:
1. Remove the guide from itsstorage clip on the interior bodytrim next to the rear seat.
2. Place the guide over the belt,and insert the two edges of thebelt into the slots of the guide.

Black plate (16,1)Chevrolet Volt Owner Manual - 2012
3-16 Seats and Restraints
3. The belt should not be twistedand it should lie flat. The elasticcord must be under the belt andthe guide on top.
{ WARNING
A safety belt that is not properlyworn may not provide theprotection needed in a crash. Theperson wearing the belt could beseriously injured. The shoulderbelt should go over the shoulderand across the chest. These partsof the body are best able to takebelt restraining forces.
4. Buckle and position the safetybelt as described previously inthis section. Make sure thatthe shoulder belt crosses theshoulder.
To remove and store the comfortguide, squeeze the belt edgestogether so that the safety belt canbe removed from the guide. Slidethe guide back into its storage cliplocated on the interior body trimnext to the side of the seatback.

Black plate (17,1)Chevrolet Volt Owner Manual - 2012
Seats and Restraints 3-17
Safety Belt Use DuringPregnancySafety belts work for everyone,including pregnant women. Like alloccupants, they are more likely tobe seriously injured if they do notwear safety belts.
A pregnant woman should wear alap-shoulder belt, and the lapportion should be worn as low aspossible, below the rounding,throughout the pregnancy.
The best way to protect the fetus isto protect the mother. When a safetybelt is worn properly, it is more likelythat the fetus will not be hurt in acrash. For pregnant women, as foranyone, the key to making safetybelts effective is wearing themproperly.
Safety Belt ExtenderIf the vehicle's safety belt will fastenaround you, you should use it.
But if a safety belt is not longenough, your dealer will order youan extender. When you go in toorder it, take the heaviest coat youwill wear, so the extender will belong enough for you. To help avoidpersonal injury, do not let someoneelse use it, and use it only for theseat it is made to fit. The extenderhas been designed for adults. Neveruse it for securing child seats. Towear it, attach it to the regular safetybelt. For more information, see theinstruction sheet that comes withthe extender.
Safety System CheckNow and then, check that the safetybelt reminder light, safety belts,buckles, latch plates, retractors,and anchorages are all workingproperly. Look for any other loose ordamaged safety belt system partsthat might keep a safety belt systemfrom doing its job. See your dealerto have it repaired. Torn or frayedsafety belts may not protect you in acrash. They can rip apart underimpact forces. If a belt is torn orfrayed, get a new one right away.
Make sure the safety belt reminderlight is working. See Safety BeltReminders on page 5‑16 for moreinformation.
Keep safety belts clean and dry.See Safety Belt Care on page 3‑18.

Black plate (18,1)Chevrolet Volt Owner Manual - 2012
3-18 Seats and Restraints
Safety Belt CareKeep belts clean and dry.
{ WARNING
Do not bleach or dye safety belts.It may severely weaken them. Ina crash, they might not be ableto provide adequate protection.Clean safety belts only with mildsoap and lukewarm water.
Replacing Safety BeltSystem Parts after aCrash
{ WARNING
A crash can damage the safetybelt system in the vehicle.A damaged safety belt systemmay not properly protect theperson using it, resulting inserious injury or even death in acrash. To help make sure thesafety belt systems are workingproperly after a crash, have theminspected and any necessaryreplacements made as soon aspossible.
After a minor crash, replacement ofsafety belts may not be necessary.But the safety belt assemblies thatwere used during any crash mayhave been stressed or damaged.See your dealer to have the safetybelt assemblies inspected orreplaced.
New parts and repairs may benecessary even if the safety beltsystem was not being used at thetime of the crash.
Have the safety belt pretensionerschecked if the vehicle has been in acrash, or if the airbag readiness lightstays on after you start the vehicleor while you are driving. See AirbagReadiness Light on page 5‑17.
Black plate (19,1)Chevrolet Volt Owner Manual - 2012
Seats and Restraints 3-19
Airbag SystemThe vehicle has the followingairbags:. A frontal airbag for the driver.. A frontal airbag for the front
outboard passenger.. A knee airbag for the driver.. A knee airbag for the front
outboard passenger.. A seat-mounted side impact
airbag for the driver.. A seat-mounted side impact
airbag for the front outboardpassenger.
. A roof-rail airbag for the driverand the passenger seateddirectly behind the driver.
. A roof-rail airbag for the frontoutboard passenger and thepassenger seated directlybehind the front outboardpassenger.
All of the airbags in the vehicle willhave the word AIRBAG embossedin the trim or on an attached labelnear the deployment opening.
For frontal airbags, the wordAIRBAG is on the center of thesteering wheel for the driver and onthe instrument panel for the frontoutboard passenger.
For knee airbags, the word AIRBAGis on the lower part of theinstrument panel.
For seat-mounted side impactairbags, the word AIRBAG is onthe side of the seatback closest tothe door.
For roof-rail airbags, the wordAIRBAG is on the ceiling or trim.
Airbags are designed to supplementthe protection provided by safetybelts. Even though today's airbagsare also designed to help reducethe risk of injury from the force of aninflating bag, all airbags must inflatevery quickly to do their job.
Here are the most important thingsto know about the airbag system:
{ WARNING
You can be severely injured orkilled in a crash if you are notwearing your safety belt, evenwith airbags. Airbags aredesigned to work with safetybelts, not replace them. Also,airbags are not designed to inflatein every crash. In some crashessafety belts are the only restraint.See When Should an AirbagInflate? on page 3‑22.
Wearing your safety belt during acrash helps reduce the chance ofhitting things inside the vehicle orbeing ejected from it. Airbags are“supplemental restraints” to thesafety belts. Everyone in thevehicle should wear a safety beltproperly, whether or not there isan airbag for that person.

Black plate (20,1)Chevrolet Volt Owner Manual - 2012
3-20 Seats and Restraints
{ WARNING
Because airbags inflate with greatforce and faster than the blinkof an eye, anyone who is upagainst, or very close to anyairbag when it inflates can beseriously injured or killed. Do notsit unnecessarily close to anyairbag, as you would be if sittingon the edge of the seat or leaningforward. Safety belts help keepyou in position before and duringa crash. Always wear a safetybelt, even with airbags. The drivershould sit as far back as possiblewhile still maintaining control ofthe vehicle.
Occupants should not lean on orsleep against the door or sidewindows in seating positions withseat-mounted side impact airbagsand/or roof-rail airbags.
{ WARNING
Children who are up against,or very close to, any airbagwhen it inflates can be seriouslyinjured or killed. Airbags pluslap-shoulder belts offer protectionfor adults and older children, butnot for young children and infants.Neither the vehicle's safety beltsystem nor its airbag systemis designed for them. Youngchildren and infants need theprotection that a child restraintsystem can provide. Alwayssecure children properly in thevehicle. To read how, see OlderChildren on page 3‑32 or Infantsand Young Children onpage 3‑35.
There is an airbag readiness lighton the instrument cluster, whichshows the airbag symbol. Thesystem checks the airbag electricalsystem for malfunctions. The lighttells you if there is an electricalproblem. See Airbag ReadinessLight on page 5‑17 for moreinformation.

Black plate (21,1)Chevrolet Volt Owner Manual - 2012
Seats and Restraints 3-21
Where Are the Airbags?
The driver frontal airbag is in thecenter of the steering wheel.
The front outboard passengerfrontal airbag is in the passengerside instrument panel.
The driver knee airbag is below thesteering column. The front outboardpassenger knee airbag is below theglove box.
Driver Side Shown, PassengerSide Similar
The driver and front outboardpassenger seat-mounted sideimpact airbags are in the side of theseatbacks closest to the door.

Black plate (22,1)Chevrolet Volt Owner Manual - 2012
3-22 Seats and Restraints
Driver Side Shown, PassengerSide Similar
The roof-rail airbags for the driver,front outboard passenger, andsecond row outboard passengersare in the ceiling above the sidewindows.
{ WARNING
If something is between anoccupant and an airbag, theairbag might not inflate properlyor it might force the object intothat person causing severe injuryor even death. The path of aninflating airbag must be keptclear. Do not put anythingbetween an occupant and anairbag, and do not attach or putanything on the steering wheelhub or on or near any otherairbag covering.
Do not use seat accessories thatblock the inflation path of aseat-mounted side impact airbag.
Never secure anything to the roofof a vehicle with roof-rail airbagsby routing a rope or tie‐downthrough any door or windowopening. If you do, the path of aninflating roof-rail airbag will beblocked.
When Should an AirbagInflate?Frontal airbags are designed toinflate in moderate to severe frontalor near frontal crashes to helpreduce the potential for severeinjuries, mainly to the driver's orfront outboard passenger's headand chest. However, they are onlydesigned to inflate if the impactexceeds a predetermineddeployment threshold. Deploymentthresholds are used to predict howsevere a crash is likely to be in timefor the airbags to inflate and helprestrain the occupants.
Whether the frontal airbags will orshould inflate is not based primarilyon how fast the vehicle is traveling.It depends on what you hit, thedirection of the impact, and howquickly the vehicle slows down.
Frontal airbags may inflate atdifferent crash speeds depending onwhether the vehicle hits an objectstraight on or at an angle, and

Black plate (23,1)Chevrolet Volt Owner Manual - 2012
Seats and Restraints 3-23
whether the object is fixed ormoving, rigid or deformable, narrowor wide.
Thresholds can also vary withspecific vehicle design.
Frontal airbags are not intended toinflate during vehicle rollovers, rearimpacts, or in many side impacts.
In addition the vehicle hasdual‐stage frontal airbags.Dual‐stage airbags adjust therestraint according to crash severity.
The vehicle has electronic frontalsensors, which help the sensingsystem distinguish between amoderate frontal impact and a moresevere frontal impact. For moderatefrontal impacts, dual-stage airbagsinflate at a level less than fulldeployment. For more severe frontalimpacts, full deployment occurs.
Frontal knee airbags aresingle‐stage airbags and designedto inflate in moderate to severe
frontal or near frontal impactsthat exceed a predetermineddeployment threshold.
The vehicle has seat-mounted sideimpact airbags and roof-rail airbags.See Airbag System on page 3‑19.Seat-mounted side impact androof-rail airbags are intended toinflate in moderate to severe sidecrashes. In addition, these roof‐railairbags are intended to inflateduring a rollover or in a severefrontal impact. Seat-mounted sideimpact and roof-rail airbags willinflate if the crash severity is abovethe system's designed thresholdlevel. The threshold level can varywith specific vehicle design.
Roof-rail airbags are not intendedto inflate in rear impacts. Aseat‐mounted side impact airbag isintended to inflate on the side of thevehicle that is struck. Both roof‐railairbags will inflate when either side
of the vehicle is struck or thesensing system predicts that thevehicle is about to roll over on itsside, or in a severe frontal impact.
In any particular crash, no one cansay whether an airbag should haveinflated simply because of thevehicle damage or repair costs.
What Makes an AirbagInflate?In a deployment event, the sensingsystem sends an electrical signaltriggering a release of gas from theinflator. Gas from the inflator fills theairbag causing the bag to break outof the cover. The inflator, the airbag,and related hardware are all part ofthe airbag module.
For airbag location, see Where Arethe Airbags? on page 3‑21.

Black plate (24,1)Chevrolet Volt Owner Manual - 2012
3-24 Seats and Restraints
How Does an AirbagRestrain?In moderate to severe frontal ornear frontal collisions, even beltedoccupants can contact the steeringwheel or the instrument panel. Inmoderate to severe side collisions,even belted occupants can contactthe inside of the vehicle.
Airbags supplement the protectionprovided by safety belts bydistributing the force of theimpact more evenly over theoccupant's body.
Rollover capable roof‐rail airbagsare designed to help contain thehead and chest of occupants in theoutboard seating positions in thefirst and second rows. The rollovercapable roof‐rail airbags aredesigned to help reduce the risk offull or partial ejection in rolloverevents, although no system canprevent all such ejections.
But airbags would not help inmany types of collisions, primarilybecause the occupant's motion isnot toward those airbags. See WhenShould an Airbag Inflate? onpage 3‑22 for more information.
Airbags should never be regardedas anything more than a supplementto safety belts.
What Will You See afteran Airbag Inflates?After the frontal airbags andseat-mounted side impact airbagsinflate, they quickly deflate, soquickly that some people may noteven realize an airbag inflated.Roof-rail airbags may still be at leastpartially inflated for some time afterthey inflate. Some components ofthe airbag module may be hot forseveral minutes. For location of theairbags, see Where Are theAirbags? on page 3‑21.
The parts of the airbag that comeinto contact with you may be warm,but not too hot to touch. There maybe some smoke and dust comingfrom the vents in the deflatedairbags. Airbag inflation does notprevent the driver from seeing out ofthe windshield or being able to steerthe vehicle, nor does it preventpeople from leaving the vehicle.
{ WARNING
When an airbag inflates, theremay be dust in the air. This dustcould cause breathing problemsfor people with a history ofasthma or other breathing trouble.To avoid this, everyone in thevehicle should get out as soon asit is safe to do so. If you havebreathing problems but cannotget out of the vehicle after anairbag inflates, then get fresh airby opening a window or a door.If you experience breathing
(Continued)

Black plate (25,1)Chevrolet Volt Owner Manual - 2012
Seats and Restraints 3-25
WARNING (Continued)
problems following an airbagdeployment, you should seekmedical attention.
The vehicle has a feature that mayautomatically unlock the doors, turnon the interior lamps and hazardwarning flashers, and shut off thefuel system after the airbags inflate.You can lock the doors, and turnoff the interior lamps and hazardwarning flashers by using thecontrols for those features.
{ WARNING
A crash severe enough to inflatethe airbags may have alsodamaged important functions inthe vehicle, such as the fuelsystem, brake and steeringsystems, etc. Even if the vehicleappears to be drivable after a
(Continued)
WARNING (Continued)
moderate crash, there may beconcealed damage that couldmake it difficult to safely operatethe vehicle.
Use caution if attempting torestart the vehicle after a crashhas occurred.
In many crashes severe enough toinflate the airbag, windshields arebroken by vehicle deformation.Additional windshield breakage mayalso occur from the front outboardpassenger airbag.. Airbags are designed to inflate
only once. After an airbaginflates, you will need some newparts for the airbag system.
If you do not get them, theairbag system will not be thereto help protect you in anothercrash. A new system will includeairbag modules and possiblyother parts. The service manualfor the vehicle covers the needto replace other parts.
. The vehicle has a crash sensingand diagnostic module whichrecords information after acrash. See Vehicle DataRecording and Privacy onpage 13‑15 and Event DataRecorders on page 13‑15.
. Let only qualified technicianswork on the airbag systems.Improper service can mean thatan airbag system will not workproperly. See your dealer forservice.

Black plate (26,1)Chevrolet Volt Owner Manual - 2012
3-26 Seats and Restraints
Passenger SensingSystemThe vehicle has a passengersensing system for the frontoutboard passenger position. Thepassenger airbag status indicatorwill light on the overhead consolewhen the vehicle is started.
United States
Canada
The words ON and OFF or thesymbol for on and off will be visibleduring the system check. When thesystem check is complete, either the
word ON or OFF, or the symbol foron and off will be visible. SeePassenger Airbag Status Indicatoron page 5‑18.
The passenger sensing systemturns off the front outboardpassenger frontal airbag and kneeairbag, under certain conditions.No other airbag is affected by thepassenger sensing system.
The passenger sensing systemworks with sensors that are part ofthe front outboard passenger seat.The sensors are designed to detectthe presence of a properly seatedoccupant and determine if the frontoutboard passenger frontal airbagand knee airbag should be allowedto inflate or not.
According to accident statistics,children are safer when properlysecured in a rear seat in a correctchild restraint for their weightand size.
We recommend that children besecured in a rear seat, including:an infant or a child riding in arear-facing child restraint; a childriding in a forward-facing child seat;an older child riding in a boosterseat; and children, who are largeenough, using safety belts.
Never put a rear-facing child seat inthe front. This is because the riskto the rear-facing child is so great,if the airbag inflates.
{ WARNING
A child in a rear-facing childrestraint can be seriously injuredor killed if the passenger frontalairbag inflates. This is becausethe back of the rear-facing childrestraint would be very close tothe inflating airbag. A child in aforward-facing child restraint canbe seriously injured or killed if the
(Continued)

Black plate (27,1)Chevrolet Volt Owner Manual - 2012
Seats and Restraints 3-27
WARNING (Continued)
passenger frontal airbag inflatesand the passenger seat is in aforward position.
Even if the passenger sensingsystem has turned off the frontoutboard passenger airbag(s), nosystem is fail-safe. No one canguarantee that an airbag will notinflate under some unusualcircumstance, even though theairbag(s) are off.
Secure rear-facing child restraintsin a rear seat, even if theairbag(s) are off. If you secure aforward-facing child restraint inthe front outboard passengerseat, always move the seat as farback as it will go. It is better tosecure the child restraint in arear seat.
The passenger sensing systemis designed to turn off the frontoutboard passenger airbag andknee airbag if:. The front outboard passenger
seat is unoccupied.. The system determines that
an infant is present in a childrestraint.
. A front outboard passengertakes his/her weight off of theseat for a period of time.
. Or, if there is a critical problemwith the airbag system or thepassenger sensing system.
When the passenger sensingsystem has turned off the frontoutboard passenger frontal airbagand knee airbag, the off indicatorwill light and stay lit to remind youthat the airbags are off. SeePassenger Airbag Status Indicatoron page 5‑18.
The passenger sensing systemis designed to turn on the frontoutboard passenger frontal airbagand knee airbag anytime the systemsenses that a person of adult size issitting properly in the front outboardpassenger seat.
When the passenger sensingsystem has allowed the airbags tobe enabled, the on indicator will lightand stay lit as a reminder that theairbags are active.
For some children, includingchildren in child restraints, and forvery small adults, the passengersensing system may or may not turnoff the front outboard passengerfrontal airbag and knee airbag,depending upon the person’sseating posture and body build.
Black plate (28,1)Chevrolet Volt Owner Manual - 2012
3-28 Seats and Restraints
Everyone in the vehicle whohas outgrown child restraintsshould wear a safety beltproperly — whether or not there isan airbag for that person.
{ WARNING
If the airbag readiness light evercomes on and stays on, it meansthat something may be wrongwith the airbag system. To helpavoid injury to yourself or others,have the vehicle serviced rightaway. See Airbag ReadinessLight on page 5‑17 for moreinformation, including importantsafety information.
If the On Indicator Is Lit for aChild Restraint
If a child restraint has been installedand the on indicator is lit:
1. Turn the vehicle off.
2. Remove the child restraint fromthe vehicle.
3. Remove any additional itemsfrom the seat such as blankets,cushions, seat covers, seatheaters, or seat massagers.
4. Reinstall the child restraintfollowing the directionsprovided by the child restraintmanufacturer and refer toSecuring Child Restraints (RearSeat) on page 3‑48 or SecuringChild Restraints (FrontPassenger Seat) on page 3‑50.
5. If, after reinstalling the childrestraint and restarting thevehicle, the on indicator is still lit,turn the vehicle off. Then slightlyrecline the vehicle seatbackand adjust the seat cushion,if adjustable, to make sure thatthe vehicle seatback is notpushing the child restraint intothe seat cushion.
Also make sure the childrestraint is not trapped underthe vehicle head restraint. If thishappens, adjust the headrestraint. See Head Restraintson page 3‑2.
6. Restart the vehicle.
The passenger sensing systemmay or may not turn off theairbags for a child in a childrestraint depending upon thechild's seating posture and bodybuild. It is better to secure achild restraint in a rear seat.

Black plate (29,1)Chevrolet Volt Owner Manual - 2012
Seats and Restraints 3-29
If the Off Indicator Is Lit for anAdult-Size Occupant
If a person of adult size is sittingin the front outboard passengerseat, but the off indicator is lit, itcould be because that personis not sitting properly in the seat.
Use the following steps to allow thesystem to detect that person andenable the front outboard passengerfrontal airbag and knee airbag:
1. Turn the vehicle off.
2. Remove any additional materialfrom the seat, such as blankets,cushions, seat covers, seatheaters, or seat massagers.
3. Place the seatback in the fullyupright position.
4. Have the person sit upright inthe seat, centered on the seatcushion, with legs comfortablyextended.
5. Restart the vehicle and have theperson remain in this position fortwo to three minutes after the onindicator is lit.
Additional Factors AffectingSystem Operation
Safety belts help keep thepassenger in position on the seatduring vehicle maneuvers andbraking, which helps the passengersensing system maintain thepassenger airbag status. See“Safety Belts” and “Child Restraints”in the Index for additionalinformation about the importance ofproper restraint use.
A thick layer of additional material,such as a blanket or cushion,or aftermarket equipment suchas seat covers, seat heaters, andseat massagers can affect how wellthe passenger sensing systemoperates. We recommend thatyou not use seat covers or otheraftermarket equipment except whenapproved by GM for your specificvehicle. See Adding Equipment tothe Airbag-Equipped Vehicle onpage 3‑31 for more informationabout modifications that can affecthow the system operates.
Black plate (30,1)Chevrolet Volt Owner Manual - 2012
3-30 Seats and Restraints
A wet seat can affect theperformance of the passengersensing system. Here is how:. The passenger sensing system
may turn off the passengerfrontal airbag and passengerknee airbag when liquid issoaked into the seat. If thishappens, the off indicator will belit, and the airbag readiness lighton the instrument panel will alsobe lit.
. Liquid pooled on the seat thathas not soaked in may make itmore likely that the passengersensing system will turn on thepassenger frontal airbag andpassenger knee airbag while achild restraint or child occupantis on the seat. If the passengerfrontal airbag and passengerknee airbag are turned on, theon indicator will be lit.
If the passenger seat gets wet, drythe seat immediately. If the airbagreadiness light is lit, do not install achild restraint or allow anyone to
occupy the seat. See AirbagReadiness Light on page 5‑17 forimportant safety information.
The on indicator may be lit if anobject, such as a briefcase,handbag, grocery bag, laptop,or other electronic device, is put onan unoccupied seat. If this is notdesired, remove the object fromthe seat.
{ WARNING
Stowing of articles under thepassenger seat or between thepassenger seat cushion andseatback may interfere with theproper operation of the passengersensing system.
Servicing theAirbag-Equipped VehicleAirbags affect how the vehicleshould be serviced. There are partsof the airbag system in severalplaces around the vehicle. Your
dealer and the service manual haveinformation about servicing thevehicle and the airbag system. Topurchase a service manual, seeService Publications OrderingInformation on page 13‑12.
{ WARNING
For up to 10 seconds after thevehicle is turned off and the12‐volt battery is disconnected,an airbag can still inflate duringimproper service. You can beinjured if you are close to anairbag when it inflates. Avoidyellow connectors. They areprobably part of the airbagsystem. Be sure to follow properservice procedures, and makesure the person performing workfor you is qualified to do so.

Black plate (31,1)Chevrolet Volt Owner Manual - 2012
Seats and Restraints 3-31
Adding Equipment to theAirbag-Equipped VehicleAdding accessories that change thevehicle's frame, bumper system,height, front end, or side sheetmetal may keep the airbag systemfrom working properly.
The operation of the airbag systemcan also be affected by changing ormoving any parts of the front seats,safety belts, airbag sensing anddiagnostic module, steering wheel,instrument panel, roof-rail airbagmodules, ceiling or pillar garnishtrim, overhead console, frontsensors, side impact sensors,rollover sensor module, or airbagwiring.
Your dealer and the service manualhave information about the locationof the airbag sensors, sensing anddiagnostic module, and airbagwiring.
In addition, the vehicle has apassenger sensing system thatincludes sensors as part of the front
outboard passenger seat. Thepassenger sensing system maynot operate properly if the originalseat trim is replaced with non-GMcovers, upholstery, or trim; or withGM covers, upholstery, or trimdesigned for a different vehicle.Any object, such as an aftermarketseat heater or a comfort-enhancingpad or device, installed under or ontop of the seat fabric, could alsointerfere with the operation of thepassenger sensing system. Thiscould either prevent properdeployment of the passengerairbag(s) or prevent the passengersensing system from properlyturning off the passenger airbag(s).See Passenger Sensing System onpage 3‑26.
If the vehicle has rollover roof‐railairbags, see Different Size Tiresand Wheels on page 10‑55 foradditional important information.
If your vehicle needs to be modifiedbecause you have a disability andyou have questions about whetherthe modifications will affect the
vehicle's airbag system, or if youhave questions about whether theairbag system will be affected if thevehicle is modified for any otherreason, call Customer Assistance.See Customer Assistance Officeson page 13‑3.
Airbag System CheckThe airbag system does not needregularly scheduled maintenance orreplacement. Make sure the airbagreadiness light is working. SeeAirbag Readiness Light onpage 5‑17 for more information.
Notice: If an airbag covering isdamaged, opened, or broken, theairbag may not work properly.Do not open or break the airbagcoverings. If there are anyopened or broken airbag covers,have the airbag covering and/orairbag module replaced. For thelocation of the airbags, seeWhere Are the Airbags? onpage 3‑21. See your dealer forservice.

Black plate (32,1)Chevrolet Volt Owner Manual - 2012
3-32 Seats and Restraints
Replacing Airbag SystemParts after a Crash
{ WARNING
A crash can damage theairbag systems in the vehicle.A damaged airbag systemmay not work properly andmay not protect you and yourpassenger(s) in a crash, resultingin serious injury or even death.To help make sure the airbagsystems are working properlyafter a crash, have theminspected and any necessaryreplacements made as soon aspossible.
If an airbag inflates or the vehiclehas been in a crash, the sensingsystem may shut down thehigh voltage system. When thisoccurs, the high voltage battery isdisconnected and the vehicle willnot start. The SERVICE VEHICLESOON message in the DriverInformation Center (DIC) will bedisplayed. Before the vehicle can beoperated again, it must be servicedat your dealer.
If an airbag inflates, you will need toreplace airbag system parts. Seeyour dealer for service.
If the airbag readiness light stays onafter the vehicle is started or comeson when you are driving, the airbagsystem may not work properly. Havethe vehicle serviced right away.See Airbag Readiness Light onpage 5‑17 for more information.
Child Restraints
Older Children
Older children who have outgrownbooster seats should wear thevehicle safety belts.

Black plate (33,1)Chevrolet Volt Owner Manual - 2012
Seats and Restraints 3-33
The manufacturer's instructions thatcome with the booster seat state theweight and height limitations for thatbooster. Use a booster seat with alap-shoulder belt until the childpasses the fit test below:. Sit all the way back on the seat.
Do the knees bend at the seatedge? If yes, continue. If no,return to the booster seat.
. Buckle the lap-shoulder belt.Does the shoulder belt rest onthe shoulder? If yes, continue.If no, try using the rear safetybelt comfort guide. See “RearSafety Belt Comfort Guides”under Lap-Shoulder Belt onpage 3‑13 for more information.If the shoulder belt still does notrest on the shoulder, then returnto the booster seat.
. Does the lap belt fit low andsnug on the hips, touching thethighs? If yes, continue. If no,return to the booster seat.
. Can proper safety belt fit bemaintained for the length of thetrip? If yes, continue. If no,return to the booster seat.
Q: What is the proper way towear safety belts?
A: An older child should wear alap-shoulder belt and get theadditional restraint a shoulderbelt can provide. The shoulderbelt should not cross the faceor neck. The lap belt should fitsnugly below the hips, justtouching the top of the thighs.
This applies belt force to thechild's pelvic bones in a crash.It should never be worn over theabdomen, which could causesevere or even fatal internalinjuries in a crash.
Also see “Rear Safety Belt ComfortGuides” under Lap-Shoulder Belt onpage 3‑13.
According to accident statistics,children and infants are safer whenproperly restrained in a childrestraint system or infant restraintsystem secured in a rear seatingposition.

Black plate (34,1)Chevrolet Volt Owner Manual - 2012
3-34 Seats and Restraints
In a crash, children who are notbuckled up can strike other peoplewho are buckled up, or can bethrown out of the vehicle. Olderchildren need to use safety beltsproperly.
{ WARNING
Never do this.
Never allow two children to wearthe same safety belt. The safetybelt cannot properly spread theimpact forces. In a crash, the twochildren can be crushed togetherand seriously injured. A safetybelt must be used by only oneperson at a time.
{ WARNING
Never do this.
Never allow a child to wear thesafety belt with the shoulder beltbehind their back. A child can beseriously injured by not wearingthe lap-shoulder belt properly. In acrash, the child would not berestrained by the shoulder belt.The child could move too farforward increasing the chance ofhead and neck injury. The child
(Continued)
WARNING (Continued)
might also slide under the lapbelt. The belt force would then beapplied right on the abdomen.That could cause serious or fatalinjuries. The shoulder belt shouldgo over the shoulder and acrossthe chest.

Black plate (35,1)Chevrolet Volt Owner Manual - 2012
Seats and Restraints 3-35
Infants and YoungChildrenEveryone in a vehicle needsprotection! This includes infantsand all other children. Neither thedistance traveled nor the age andsize of the traveler changes theneed, for everyone, to use safetyrestraints. In fact, the law in everystate in the United States and inevery Canadian province sayschildren up to some age must berestrained while in a vehicle.
{ WARNING
Children can be seriously injuredor strangled if a shoulder belt iswrapped around their neck andthe safety belt continues totighten. Never leave childrenunattended in a vehicle and neverallow children to play with thesafety belts.
Airbags plus lap‐shoulder belts offerprotection for adults and olderchildren, but not for young childrenand infants. Neither the vehicle'ssafety belt system nor its airbagsystem is designed for them. Everytime infants and young children ridein vehicles, they should have theprotection provided by appropriatechild restraints.
Children who are not restrainedproperly can strike other people,or can be thrown out of the vehicle.
{ WARNING
Never do this.
Never hold an infant or a childwhile riding in a vehicle. Due tocrash forces, an infant or a childwill become so heavy it is notpossible to hold it during a crash.For example, in a crash at only40 km/h (25 mph), a 5.5 kg (12 lb)infant will suddenly become a
(Continued)
WARNING (Continued)
110 kg (240 lb) force on a person'sarms. An infant should besecured in an appropriaterestraint.

Black plate (36,1)Chevrolet Volt Owner Manual - 2012
3-36 Seats and Restraints
{ WARNING
Never do this.
Children who are up against,or very close to, any airbag whenit inflates can be seriously injuredor killed. Never put a rear-facingchild restraint in the right frontseat. Secure a rear-facing childrestraint in a rear seat. It is alsobetter to secure a forward-facingchild restraint in a rear seat. If youmust secure a forward-facingchild restraint in the right frontseat, always move the frontpassenger seat as far back as itwill go.
Q: What are the different types ofadd-on child restraints?
A: Add-on child restraints, whichare purchased by the vehicleowner, are available in four basictypes. Selection of a particularrestraint should take intoconsideration not only the child'sweight, height, and age but alsowhether or not the restraint willbe compatible with the motorvehicle in which it will be used.
For most basic types of childrestraints, there are manydifferent models available. Whenpurchasing a child restraint, be
sure it is designed to be usedin a motor vehicle. If it is, therestraint will have a label sayingthat it meets federal motorvehicle safety standards.
The restraint manufacturer'sinstructions that come with therestraint state the weight andheight limitations for a particularchild restraint. In addition, thereare many kinds of restraintsavailable for children withspecial needs.
{ WARNING
To reduce the risk of neck andhead injury during a crash, infantsneed complete support. This isbecause an infant's neck is notfully developed and its headweighs so much compared withthe rest of its body. In a crash,an infant in a rear-facing childrestraint settles into the restraint,so the crash forces can be
(Continued)

Black plate (37,1)Chevrolet Volt Owner Manual - 2012
Seats and Restraints 3-37
WARNING (Continued)
distributed across the strongestpart of an infant's body, the backand shoulders. Infants shouldalways be secured in rear-facingchild restraints.
{ WARNING
A young child's hip bones are stillso small that the vehicle's regularsafety belt may not remain lowon the hip bones, as it should.Instead, it may settle up aroundthe child's abdomen. In a crash,the belt would apply force on abody area that is unprotected byany bony structure. This alonecould cause serious or fatalinjuries. To reduce the risk ofserious or fatal injuries during acrash, young children shouldalways be secured in appropriatechild restraints.
Child Restraint Systems
(A) Rear‐Facing Infant Seat
A rear-facing infant seat (A)provides restraint with the seatingsurface against the back of theinfant.
The harness system holds the infantin place and, in a crash, acts tokeep the infant positioned in therestraint.
(B) Forward-Facing Child Seat
A forward-facing child seat (B)provides restraint for the child'sbody with the harness.

Black plate (38,1)Chevrolet Volt Owner Manual - 2012
3-38 Seats and Restraints
(C) Booster Seats
A booster seat (C) is a child restraintdesigned to improve the fit of thevehicle's safety belt system.A booster seat can also help a childto see out the window.
Securing an Add-On ChildRestraint in the Vehicle
{ WARNING
A child can be seriously injuredor killed in a crash if the childrestraint is not properly secured inthe vehicle. Secure the childrestraint properly in the vehicleusing the vehicle safety belt orLATCH system, following theinstructions that came with thatchild restraint and the instructionsin this manual.
To help reduce the chance of injury,the child restraint must be securedin the vehicle. Child restraintsystems must be secured in vehicleseats by lap belts or the lap beltportion of a lap-shoulder belt, or
by the LATCH system. See LowerAnchors and Tethers for Children(LATCH System) on page 3‑41 formore information. Children can beendangered in a crash if the childrestraint is not properly secured inthe vehicle.
When securing an add-on childrestraint, refer to the instructionsthat come with the restraint whichmay be on the restraint itself or in abooklet, or both, and to this manual.The child restraint instructionsare important, so if they are notavailable, obtain a replacementcopy from the manufacturer.
Keep in mind that an unsecuredchild restraint can move around in acollision or sudden stop and injurepeople in the vehicle. Be sure toproperly secure any child restraint inthe vehicle — even when no child isin it.

Black plate (39,1)Chevrolet Volt Owner Manual - 2012
Seats and Restraints 3-39
In some areas, Certified ChildPassenger Safety Technicians(CPSTs) are available to inspectand demonstrate how to correctlyuse and install child restraints.In the U.S., refer to theNational Highway Traffic SafetyAdministration (NHTSA) website tolocate the nearest child safetyseat inspection station. For CPSTavailability in Canada, check withTransport Canada or the ProvincialMinistry of Transportation office.
Securing the Child within theChild Restraint
{ WARNING
A child can be seriously injured orkilled in a crash if the child is notproperly secured in the childrestraint. Secure the childproperly following the instructionsthat came with that child restraint.
Where to Put theRestraintAccording to accident statistics,children and infants are safer whenproperly restrained in a childrestraint system or infant restraintsystem secured in a rear seatingposition.
We recommend that children andchild restraints be secured in a rearseat, including: an infant or a childriding in a rear-facing child restraint;a child riding in a forward-facingchild seat; an older child riding in abooster seat; and children, who arelarge enough, using safety belts.

Black plate (40,1)Chevrolet Volt Owner Manual - 2012
3-40 Seats and Restraints
A label on the sun visor says,“Never put a rear-facing childrestraint in the front.” This isbecause the risk to the rear-facingchild is so great, if the airbagdeploys.
{ WARNING
A child in a rear-facing childrestraint can be seriouslyinjured or killed if the right frontpassenger airbag inflates.This is because the back of therear-facing child restraint wouldbe very close to the inflatingairbag. A child in a forward-facingchild restraint can be seriouslyinjured or killed if the right frontpassenger airbag inflates and thepassenger seat is in a forwardposition.
Even if the passenger sensingsystem has turned off the rightfront passenger airbag(s), nosystem is fail-safe. No one can
(Continued)
WARNING (Continued)
guarantee that an airbag will notdeploy under some unusualcircumstance, even though theairbag(s) are turned off.
Secure rear-facing child restraintsin a rear seat, even if theairbag(s) are off. If you secure aforward-facing child restraint inthe right front seat, always movethe front passenger seat as farback as it will go. It is better tosecure the child restraint in arear seat.
See Passenger Sensing Systemon page 3‑26 for additionalinformation.
When securing a child restraint in arear seating position, study theinstructions that came with thechild restraint to make sure it iscompatible with this vehicle.
Child restraints and booster seatsvary considerably in size, and somemay fit in certain seating positionsbetter than others. Always makesure the child restraint is properlysecured.
Depending on where you place thechild restraint and the size of thechild restraint, you may not be ableto access adjacent safety beltassemblies or LATCH anchors foradditional passengers or childrestraints. Adjacent seatingpositions should not be used if thechild restraint prevents access to orinterferes with the routing of thesafety belt.
Wherever a child restraint isinstalled, be sure to secure thechild restraint properly.
Keep in mind that an unsecuredchild restraint can move around in acollision or sudden stop and injurepeople in the vehicle. Be sure toproperly secure any child restraint inthe vehicle — even when no child isin it.

Black plate (41,1)Chevrolet Volt Owner Manual - 2012
Seats and Restraints 3-41
Lower Anchors andTethers for Children(LATCH System)The LATCH system holds a childrestraint during driving or in a crash.This system is designed to makeinstallation of a child restraint easier.The LATCH system uses anchors inthe vehicle and attachments on thechild restraint that are made for usewith the LATCH system.
Make sure that a LATCH-compatiblechild restraint is properly installedusing the anchors, or use thevehicle's safety belts to secure therestraint, following the instructionsthat came with that restraint, andalso the instructions in this manual.
When installing a child restraint witha top tether, you must also useeither the lower anchors or thesafety belts to properly secure thechild restraint. A child restraint mustnever be attached using only the toptether and anchor.
In order to use the LATCH systemin your vehicle, you need achild restraint that has LATCHattachments. The child restraintmanufacturer will provide you withinstructions on how to use the childrestraint and its attachments. Thefollowing explains how to attacha child restraint with theseattachments in the vehicle.
Not all vehicle seating positions orchild restraints have lower anchorsand attachments or top tetheranchors and attachments.
Lower Anchors
Lower anchors (A) are metal barsbuilt into the vehicle. There aretwo lower anchors for eachLATCH seating position that willaccommodate a child restraint withlower attachments (B).

Black plate (42,1)Chevrolet Volt Owner Manual - 2012
3-42 Seats and Restraints
Top Tether Anchor
A top tether (A, C) anchors thetop of the child restraint to thevehicle. A top tether anchor is builtinto the vehicle. The top tetherattachment (B) on the child restraintconnects to the top tether anchor inthe vehicle in order to reduce theforward movement and rotation ofthe child restraint during driving or ina crash.
The child restraint may havea single tether (A) or a dualtether (C). Either will have asingle attachment (B) to securethe top tether to the anchor.
Some child restraints that have atop tether are designed for usewith or without the top tether beingattached. Others require the toptether always to be attached.Be sure to read and follow theinstructions for the child restraint.In Canada, the law requires thatforward-facing child restraints havea top tether, and that the tether beattached. Be sure to read and followthe instructions for your childrestraint.
Lower Anchor and Top TetherAnchor Locations
Rear Seat
I (Top Tether Anchor): Seatingpositions with top tether anchors.
H (Lower Anchor): Seatingpositions with two lower anchors.

Black plate (43,1)Chevrolet Volt Owner Manual - 2012
Seats and Restraints 3-43
To assist in locating the loweranchors, each seating position withlower anchors has two labels, nearthe crease between the seatbackand the seat cushion.
To assist in locating the top tetheranchors, the top tether anchorsymbol is near the top tetheranchor.
Top Tether Anchors
The top tether anchors for outboardrear seating positions are on theback of the rear seatback. Be sureto use an anchor on the sameside of the vehicle as the seatingposition where the child restraint willbe placed.
Do not secure a child restraint in aposition without a top tether anchorif a national or local law requiresthat the top tether be attached, or ifthe instructions that come with thechild restraint say that the top tethermust be attached.
According to accident statistics,children and infants are saferwhen properly restrained in a child
restraint system or infant restraintsystem secured in a rear seatingposition. See Where to Put theRestraint on page 3‑39 foradditional information.
Securing a Child RestraintDesigned for the LATCHSystem
{ WARNING
If a LATCH-type child restraint isnot attached to anchors, the childrestraint will not be able to protectthe child correctly. In a crash, thechild could be seriously injured orkilled. Install a LATCH-type childrestraint properly using theanchors, or use the vehicle safetybelts to secure the restraint,following the instructions thatcame with the child restraint andthe instructions in this manual.

Black plate (44,1)Chevrolet Volt Owner Manual - 2012
3-44 Seats and Restraints
{ WARNING
Do not attach more than one childrestraint to a single anchor.Attaching more than one childrestraint to a single anchor couldcause the anchor or attachmentto come loose or even breakduring a crash. A child or otherscould be injured. To reduce therisk of serious or fatal injuriesduring a crash, attach only onechild restraint per anchor.
{ WARNING
Children can be seriously injuredor strangled if a shoulder belt iswrapped around their neck andthe safety belt continues totighten. Buckle any unused safetybelts behind the child restraint sochildren cannot reach them. Pullthe shoulder belt all the way out
(Continued)
WARNING (Continued)
of the retractor to set the lock,if the vehicle has one, after thechild restraint has been installed.
Notice: Do not let the LATCHattachments rub against thevehicle’s safety belts. This maydamage these parts. If necessary,move buckled safety belts toavoid rubbing the LATCHattachments.
Do not fold the empty rear seatwith a safety belt buckled. Thiscould damage the safety belt orthe seat. Unbuckle and return thesafety belt to its stowed position,before folding the seat.
Make sure to attach the childrestraint at the proper anchorlocation.
This system is designed to makeinstallation of child restraints easier.When using lower anchors, do notuse the vehicle's safety belts.
Instead use the vehicle's anchorsand child restraint attachmentsto secure the restraints. Somerestraints also use another vehicleanchor to secure a top tether.
1. Attach and tighten the lowerattachments to the loweranchors. If the child restraintdoes not have lowerattachments or the desiredseating position does not havelower anchors, secure the childrestraint with the top tether andthe safety belts. Refer to yourchild restraint manufacturerinstructions and the instructionsin this manual.
1.1. Find the lower anchorsfor the desired seatingposition.
1.2. Put the child restraint onthe seat.
If the head restraintinterferes with the properinstallation of the childrestraint, the headrestraint may be removed.

Black plate (45,1)Chevrolet Volt Owner Manual - 2012
Seats and Restraints 3-45
See “Head RestraintRemoval andReinstallation” atthe end of this section.
1.3. Attach and tighten the lowerattachments on the childrestraint to the loweranchors.
2. If the child restraint manufacturerrecommends that the top tetherbe attached, attach and tightenthe top tether to the top tetheranchor, if equipped. Refer to thechild restraint instructions andthe following steps:
2.1. Find the top tether anchoron the back of the rearseatback.
2.2. Route, attach, and tightenthe top tether accordingto your child restraintinstructions and thefollowing instructions:
If the position you are usingdoes not have a headrestor head restraint, or theheadrest or head restrainthas been removed, and youare using a single tether,route the tether over theseatback.
If the position you are usingdoes not have a headrestor head restraint, or theheadrest or head restrainthas been removed, and youare using a dual tether,route the tether over theseatback.

Black plate (46,1)Chevrolet Volt Owner Manual - 2012
3-46 Seats and Restraints
If the rear outboard seatingposition you are using hasan adjustable head restraintand you are using a dualtether, route the tetheraround the head restraint.
If the rear outboard seatingposition you are using hasan adjustable head restraint
and you are using a singletether, raise the headrestraint and route thetether under the headrestraint and in between thehead restraint posts.
3. Before placing a child in thechild restraint, make sure it issecurely held in place. To check,grasp the child restraint at theLATCH path and attempt tomove it side to side and backand forth. There should be nomore than 2.5 cm (1 in) ofmovement for proper installation.
Head Restraint Removal andReinstallation
The rear outboard head restraintscan be removed if they interfere withthe proper installation of the childrestraint.
To remove the head restraint:
1. Partially fold the seatbackforward. See Rear Seats onpage 3‑8 for additionalinformation.
2. Press both buttons on the headrestraint posts at the sametime, and pull up on the headrestraint.
3. Store the head restraint in thecargo area of the vehicle.
4. When the child restraint isremoved, reinstall the headrestraint before the seatingposition is used.

Black plate (47,1)Chevrolet Volt Owner Manual - 2012
Seats and Restraints 3-47
{ WARNING
With head restraints that are notinstalled and adjusted properly,there is a greater chance thatoccupants will suffer a neck/spinal injury in a crash. Do notdrive until the head restraints forall occupants are installed andadjusted properly.
To reinstall the head restraint:
1. Insert the head restraint postsinto the holes in the top of theseatback. The notches (A) onthe posts must face the driverside of the vehicle.
2. Push the head restraint down.
If necessary, press the heightadjustment release button tofurther lower the head restraint.See Head Restraints onpage 3‑2.
3. Try to move the head restraint tomake sure that it is locked inplace.
Replacing LATCH SystemParts After a Crash
{ WARNING
A crash can damage the LATCHsystem in the vehicle. A damagedLATCH system may not properlysecure the child restraint,resulting in serious injury or evendeath in a crash. To help makesure the LATCH system isworking properly after a crash,see your dealer to have thesystem inspected and anynecessary replacements made assoon as possible.
If the vehicle has the LATCH systemand it was being used during acrash, new LATCH system partsmay be needed.

Black plate (48,1)Chevrolet Volt Owner Manual - 2012
3-48 Seats and Restraints
New parts and repairs may benecessary even if the LATCHsystem was not being used at thetime of the crash.
Securing Child Restraints(Rear Seat)When securing a child restraint in arear seating position, study theinstructions that came with thechild restraint to make sure it iscompatible with this vehicle.
If the child restraint has the LATCHsystem, see Lower Anchors andTethers for Children (LATCHSystem) on page 3‑41 for how andwhere to install the child restraintusing LATCH. If a child restraint issecured in the vehicle using asafety belt and it uses a top tether,see Lower Anchors and Tethers forChildren (LATCH System) onpage 3‑41 for top tether anchorlocations.
Do not secure a child seat in aposition without a top tether anchorif a national or local law requiresthat the top tether be anchored, or ifthe instructions that come with thechild restraint say that the top strapmust be anchored.
If the child restraint does not havethe LATCH system, you will beusing the safety belt to secure thechild restraint in this position. Besure to follow the instructions thatcame with the child restraint. Securethe child in the child restraint whenand as the instructions say.
If more than one child restraintneeds to be installed in the rearseat, be sure to read Where to Putthe Restraint on page 3‑39.
1. Put the child restraint onthe seat.
If the head restraint interfereswith the proper installation of thechild restraint, the head restraint
may be removed. See “HeadRestraint Removal andReinstallation” under LowerAnchors and Tethers forChildren (LATCH System) onpage 3‑41.
2. Remove the safety belt from theguide on the seatback by slidingthe webbing through the openingon the guide. Do not secure thechild restraint with the safety beltrouted through the guide.
3. Pick up the latch plate, and runthe lap and shoulder portions ofthe vehicle's safety belt throughor around the restraint. The childrestraint instructions will showyou how.

Black plate (49,1)Chevrolet Volt Owner Manual - 2012
Seats and Restraints 3-49
4. Push the latch plate into thebuckle until it clicks.
Position the release button onthe buckle so that the safety beltcould be quickly unbuckled ifnecessary.
5. Pull the shoulder belt all the wayout of the retractor to set thelock. When the retractor lock isset, the belt can be tightened butnot pulled out of the retractor.
6. To tighten the belt, push downon the child restraint, pull theshoulder portion of the belt totighten the lap portion of the belt,and feed the shoulder belt backinto the retractor. When installinga forward-facing child restraint,it may be helpful to use yourknee to push down on the childrestraint as you tighten the belt.
Try to pull the belt out of theretractor to make sure theretractor is locked. If theretractor is not locked, repeatSteps 5 and 6.

Black plate (50,1)Chevrolet Volt Owner Manual - 2012
3-50 Seats and Restraints
7. If the child restraint has a toptether, follow the child restraintmanufacturer's instructionsregarding the use of the toptether. See Lower Anchors andTethers for Children (LATCHSystem) on page 3‑41 for moreinformation.
8. Before placing a child in thechild restraint, make sure it issecurely held in place. To check,grasp the child restraint at thesafety belt path and attempt tomove it side to side and backand forth. When the childrestraint is properly installed,there should be no more than2.5 cm (1 in) of movement.
To remove the child restraint,unbuckle the vehicle safety beltand let it return to the stowedposition. If the top tether isattached to a top tether anchor,disconnect it. If the head restraintwas removed, reinstall it beforethe seating position is used. See“Head Restraint Removal andReinstallation” under Lower Anchors
and Tethers for Children (LATCHSystem) on page 3‑41 for additionalinformation on installing the headrestraint properly.
If the seat has a safety belt guide,return the safety belt into the guideon the seatback by sliding thewebbing through the opening on theguide.
Securing Child Restraints(Front Passenger Seat)This vehicle has airbags. A rearseat is a safer place to secure aforward-facing child restraint. SeeWhere to Put the Restraint onpage 3‑39.
In addition, the vehicle has apassenger sensing system which isdesigned to turn off the right frontpassenger frontal airbag andpassenger knee airbag undercertain conditions. See PassengerSensing System on page 3‑26 andPassenger Airbag Status Indicator
on page 5‑18 for more information,including important safetyinformation.
A label on the sun visor says,“Never put a rear-facing child seatin the front.” This is because the riskto the rear-facing child is so great,if the airbag deploys.
{ WARNING
A child in a rear-facing childrestraint can be seriouslyinjured or killed if the rightfront passenger airbag inflates.This is because the back of therear-facing child restraint wouldbe very close to the inflatingairbag. A child in a forward-facingchild restraint can be seriouslyinjured or killed if the right frontpassenger airbag inflates and thepassenger seat is in a forwardposition.
(Continued)

Black plate (51,1)Chevrolet Volt Owner Manual - 2012
Seats and Restraints 3-51
WARNING (Continued)
Even if the passenger sensingsystem has turned off the rightfront passenger airbag(s), nosystem is fail-safe. No one canguarantee that an airbag will notdeploy under some unusualcircumstance, even though theairbag(s) are turned off.
Secure rear-facing child restraintsin a rear seat, even if theairbag(s) are off. If you secure aforward-facing child restraint inthe right front seat, always movethe front passenger seat as farback as it will go. It is better tosecure the child restraint in arear seat.
See Passenger Sensing Systemon page 3‑26 for additionalinformation.
If the child restraint has the LATCHsystem, see Lower Anchors andTethers for Children (LATCHSystem) on page 3‑41 for how andwhere to install the child restraintusing LATCH. If a child restraint issecured using a safety belt and ituses a top tether, see LowerAnchors and Tethers for Children(LATCH System) on page 3‑41 fortop tether anchor locations.
Do not secure a child seat in aposition without a top tether anchorif a national or local law requiresthat the top tether be anchored, or ifthe instructions that come with thechild restraint say that the top strapmust be anchored.
In Canada, the law requires thatforward-facing child restraints havea top tether, and that the tether beattached.
You will be using the lap-shoulderbelt to secure the child restraint inthis position. Follow the instructionsthat came with the child restraint.
1. Move the seat as far back as itwill go before securing theforward-facing child restraint.
When the passenger sensingsystem has turned off the rightfront passenger frontal airbagand passenger knee airbag, theoff indicator on the passengerairbag status indicator shouldlight and stay lit when you startthe vehicle. See PassengerAirbag Status Indicator onpage 5‑18.
2. Put the child restraint onthe seat.
3. Pick up the latch plate, and runthe lap and shoulder portions ofthe vehicle's safety belt throughor around the restraint. The childrestraint instructions will showyou how.

Black plate (52,1)Chevrolet Volt Owner Manual - 2012
3-52 Seats and Restraints
4. Push the latch plate into thebuckle until it clicks.
Position the release button onthe buckle so that the safety beltcould be quickly unbuckled ifnecessary.
5. Pull the shoulder belt all the wayout of the retractor to set thelock. When the retractor lock isset, the belt can be tightened butnot pulled out of the retractor.
6. To tighten the belt, push downon the child restraint, pull theshoulder portion of the belt totighten the lap portion of the belt,and feed the shoulder belt backinto the retractor. When installinga forward-facing child restraint, itmay be helpful to use your kneeto push down on the childrestraint as you tighten the belt.

Black plate (53,1)Chevrolet Volt Owner Manual - 2012
Seats and Restraints 3-53
Try to pull the belt out of theretractor to make sure theretractor is locked. If theretractor is not locked, repeatSteps 5 and 6.
7. Before placing a child in thechild restraint, make sure it issecurely held in place. To check,grasp the child restraint at thesafety belt path and attempt tomove it side to side and backand forth. When the childrestraint is properly installed,there should be no more than2.5 cm (1 in) of movement.
If the airbags are off, the offindicator in the passenger airbagstatus indicator will come on andstay on when the vehicle is started.
If a child restraint has been installedand the on indicator is lit, see “Ifthe On Indicator Is Lit for a ChildRestraint” under Passenger SensingSystem on page 3‑26 for moreinformation.
To remove the child restraint,unbuckle the vehicle safety belt andlet it return to the stowed position.

Black plate (54,1)Chevrolet Volt Owner Manual - 2012
3-54 Seats and Restraints
2 NOTES

Black plate (1,1)Chevrolet Volt Owner Manual - 2012
Storage 4-1
Storage
Storage CompartmentsInstrument Panel Storage . . . . . 4-1Glove Box . . . . . . . . . . . . . . . . . . . . 4-1Floor Console Storage . . . . . . . . 4-1Umbrella Storage . . . . . . . . . . . . . 4-2
Additional Storage FeaturesCargo Cover . . . . . . . . . . . . . . . . . . 4-2
StorageCompartments
Instrument Panel Storage
There is a storage compartment ontop of the instrument panel thatincludes an auxiliary power outlet.
Inside is a transmitter slot for theRemote Keyless Entry (RKE)transmitter. See Remote KeylessEntry (RKE) System Operation onpage 2‑2.
Glove BoxOpen the glove box by lifting up onthe lever.
Floor Console Storage
Inside the front of the floor consoleis an auxiliary power outlet (C)and a jack for auxiliary inputdevices (B). Cords can be routed inthe pass‐thru (A). See AuxiliaryDevices on page 7‑15.
The console has cupholders and astorage area.
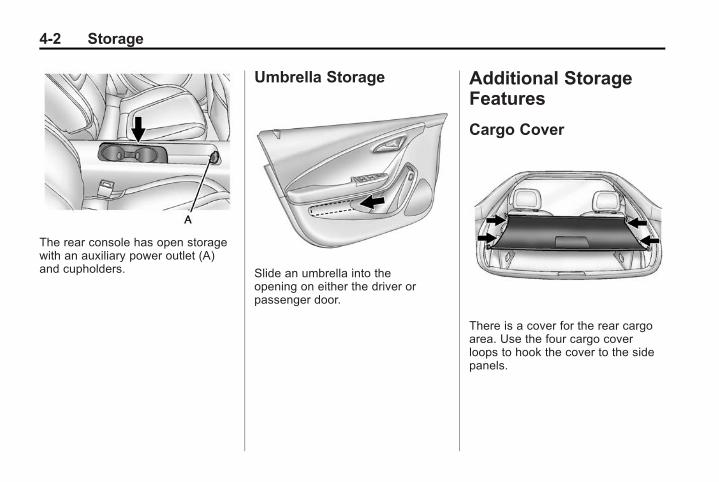
Black plate (2,1)Chevrolet Volt Owner Manual - 2012
4-2 Storage
The rear console has open storagewith an auxiliary power outlet (A)and cupholders.
Umbrella Storage
Slide an umbrella into theopening on either the driver orpassenger door.
Additional StorageFeatures
Cargo Cover
There is a cover for the rear cargoarea. Use the four cargo coverloops to hook the cover to the sidepanels.

Black plate (1,1)Chevrolet Volt Owner Manual - 2012
Instruments and Controls 5-1
Instruments andControls
Instrument Panel OverviewInstrument Panel Overview . . . . 5-4
ControlsSteering Wheel Adjustment . . . 5-6Steering Wheel Controls . . . . . . 5-6Horn . . . . . . . . . . . . . . . . . . . . . . . . . . 5-7Pedestrian Friendly Alert . . . . . . 5-7Windshield Wiper/Washer . . . . . 5-7Power Outlets . . . . . . . . . . . . . . . . . 5-9
Warning Lights, Gauges, andIndicatorsWarning Lights, Gauges, andIndicators . . . . . . . . . . . . . . . . . . . . 5-9
Instrument Cluster . . . . . . . . . . . 5-10Speedometer . . . . . . . . . . . . . . . . 5-14Odometer . . . . . . . . . . . . . . . . . . . . 5-14Trip Odometer . . . . . . . . . . . . . . . 5-15Compass . . . . . . . . . . . . . . . . . . . . 5-15
Battery Gauge (HighVoltage) . . . . . . . . . . . . . . . . . . . . 5-15
Fuel Gauge . . . . . . . . . . . . . . . . . . 5-15Driver Efficiency Gauge . . . . . . 5-16Total Vehicle Range . . . . . . . . . 5-16Safety Belt Reminders . . . . . . . 5-16Airbag Readiness Light . . . . . . 5-17Passenger Airbag StatusIndicator . . . . . . . . . . . . . . . . . . . . 5-18
Charging System Light(12-Volt Battery) . . . . . . . . . . . . 5-19
MalfunctionIndicator Lamp . . . . . . . . . . . . . 5-19
Brake System WarningLight . . . . . . . . . . . . . . . . . . . . . . . 5-22
Electric Parking BrakeLight . . . . . . . . . . . . . . . . . . . . . . . 5-22
Service Electric Parking BrakeLight . . . . . . . . . . . . . . . . . . . . . . . 5-22
Antilock Brake System (ABS)Warning Light . . . . . . . . . . . . . . 5-23
Sport Mode Light . . . . . . . . . . . . 5-23Mountain Mode Light . . . . . . . . 5-23Traction Off Light . . . . . . . . . . . . 5-24
StabiliTrak® OFF Light . . . . . . . 5-24Traction Control System(TCS)/StabiliTrak® Light . . . . 5-24
Engine Coolant TemperatureWarning Light . . . . . . . . . . . . . . 5-25
Tire Pressure Light . . . . . . . . . . 5-25Engine Oil Pressure Light . . . . 5-26Low Fuel Warning Light . . . . . . 5-26Security Light . . . . . . . . . . . . . . . . 5-27Vehicle Ready Light . . . . . . . . . 5-27High-Beam On Light . . . . . . . . . 5-27Lamps On Reminder . . . . . . . . . 5-27Cruise Control Light . . . . . . . . . 5-27Door, Hood, or Hatch OpenLight . . . . . . . . . . . . . . . . . . . . . . . 5-28
Information DisplaysCenter Stack Display . . . . . . . . 5-29Power Flows . . . . . . . . . . . . . . . . . 5-29Charging . . . . . . . . . . . . . . . . . . . . . 5-31Energy Information . . . . . . . . . . 5-41Clock . . . . . . . . . . . . . . . . . . . . . . . . 5-42Driver InformationCenter (DIC) . . . . . . . . . . . . . . . 5-43

Black plate (2,1)Chevrolet Volt Owner Manual - 2012
5-2 Instruments and Controls
Vehicle MessagesVehicle Messages . . . . . . . . . . . 5-45Battery and ChargingMessages . . . . . . . . . . . . . . . . . . 5-45
Brake System Messages . . . . 5-46Cruise Control Messages . . . . 5-46Door Ajar Messages . . . . . . . . . 5-46Drive Mode Messages . . . . . . . 5-46Electric Drive UnitMessages . . . . . . . . . . . . . . . . . . 5-47
Engine Cooling SystemMessages . . . . . . . . . . . . . . . . . . 5-47
Engine Oil Messages . . . . . . . . 5-47Fuel System Messages . . . . . . 5-48Key and Lock Messages . . . . . 5-48Lamp Messages . . . . . . . . . . . . . 5-49Object Detection SystemMessages . . . . . . . . . . . . . . . . . . 5-49
Propulsion PowerMessages . . . . . . . . . . . . . . . . . . 5-50
Ride Control SystemMessages . . . . . . . . . . . . . . . . . . 5-50
Airbag System Messages . . . . 5-51Anti-theft Alarm SystemMessages . . . . . . . . . . . . . . . . . . 5-51
Service Vehicle Messages . . . 5-51Starting the VehicleMessages . . . . . . . . . . . . . . . . . . 5-52
Tire Messages . . . . . . . . . . . . . . . 5-52Vehicle ReminderMessages . . . . . . . . . . . . . . . . . . 5-53
Vehicle Speed Messages . . . . 5-53Washer Fluid Messages . . . . . 5-53
Vehicle PersonalizationVehicle Personalization . . . . . . 5-53
Universal Remote SystemUniversal Remote System . . . 5-62Universal Remote SystemProgramming . . . . . . . . . . . . . . . 5-62
Universal Remote SystemOperation . . . . . . . . . . . . . . . . . . 5-65

Black plate (3,1)Chevrolet Volt Owner Manual - 2012
Instruments and Controls 5-3
2 NOTES

Black plate (4,1)Chevrolet Volt Owner Manual - 2012
5-4 Instruments and Controls
Instrument Panel Overview

Black plate (5,1)Chevrolet Volt Owner Manual - 2012
Instruments and Controls 5-5
A. Air Vents on page 8‑8.
B. Turn and Lane‐Change Lever.See Turn and Lane-ChangeSignals on page 6‑3.
Exterior Lamp Controls onpage 6‑1.
Pedestrian Friendly Alert onpage 5‑7.
C. Instrument Cluster onpage 5‑10.
Driver Information Center (DIC)Display. See Driver InformationCenter (DIC) on page 5‑43.
D. Windshield Wiper/Washer onpage 5‑7.
E. Heated Front Seats on page 3‑7(If Equipped).
F. Center Stack Display onpage 5‑29.
G. Charging Status Indicator. SeeCharging Status Feedback onpage 9‑47.
H. Light Sensor. See DaytimeRunning Lamps (DRL) onpage 6‑2.
I. Instrument Panel Storage onpage 4‑1.
J. Automatic Climate ControlSystem on page 8‑1.
K. Driver Information Center (DIC)Controls. See Driver InformationCenter (DIC) on page 5‑43.
L. Instrument Panel IlluminationControl on page 6‑4.
M. Data Link Connector (DLC) (Outof View). See MalfunctionIndicator Lamp on page 5‑19.
N. Cruise Control on page 9‑36.
O. Steering Wheel Adjustment onpage 5‑6.
P. Horn on page 5‑7.
Q. Steering Wheel Controls onpage 5‑6 (If Equipped).
R. Leaf Button. See Center StackDisplay on page 5‑29.
S. DRIVE MODE Button. SeeDriver Selected OperatingModes on page 9‑22.
T. Power Button on page 9‑16.
U. Shift Lever. See Electric DriveUnit on page 9‑28.
V. Infotainment on page 7‑1.
Navigation System. See theseparate navigation systemmanual.
W. Electric Parking Brake onpage 9‑30.
X. Power Door Locks onpage 2‑11.
Y. Hazard Warning Flashers onpage 6‑3.
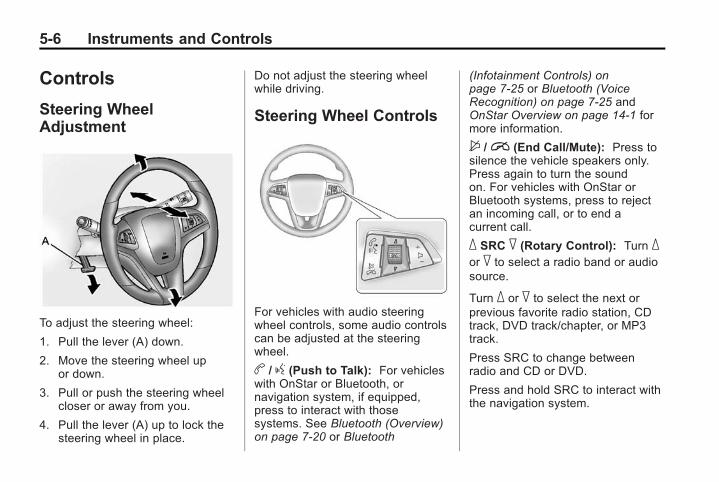
Black plate (6,1)Chevrolet Volt Owner Manual - 2012
5-6 Instruments and Controls
Controls
Steering WheelAdjustment
To adjust the steering wheel:
1. Pull the lever (A) down.
2. Move the steering wheel upor down.
3. Pull or push the steering wheelcloser or away from you.
4. Pull the lever (A) up to lock thesteering wheel in place.
Do not adjust the steering wheelwhile driving.
Steering Wheel Controls
For vehicles with audio steeringwheel controls, some audio controlscan be adjusted at the steeringwheel.
b / g (Push to Talk): For vehicleswith OnStar or Bluetooth, ornavigation system, if equipped,press to interact with thosesystems. See Bluetooth (Overview)on page 7‑20 or Bluetooth
(Infotainment Controls) onpage 7‑25 or Bluetooth (VoiceRecognition) on page 7‑25 andOnStar Overview on page 14‑1 formore information.
$ /i (End Call/Mute): Press tosilence the vehicle speakers only.Press again to turn the soundon. For vehicles with OnStar orBluetooth systems, press to rejectan incoming call, or to end acurrent call.
_ SRC ^ (Rotary Control): Turn _or ^ to select a radio band or audiosource.
Turn _ or ^ to select the next orprevious favorite radio station, CDtrack, DVD track/chapter, or MP3track.
Press SRC to change betweenradio and CD or DVD.
Press and hold SRC to interact withthe navigation system.

Black plate (7,1)Chevrolet Volt Owner Manual - 2012
Instruments and Controls 5-7
+ x − (Volume): Press + toincrease the volume; press − todecrease the volume.
HornPress near the horn symbols tosound the horn.
The pedestrian friendly alertprovides momentary soft‐note hornsound. See Pedestrian FriendlyAlert on page 5‑7 for moreinformation.
Pedestrian Friendly AlertUse this feature to alert people whomay not hear your vehicleapproaching.
The pedestrian friendly alert is onlyavailable when the vehicle ismoving or is stopped and is not inP (Park).
To use the pedestrian friendly alert:
Momentarily push theP button onthe end of the turn signal/lanechange lever, and a soft‐note alertwill momentarily sound.
Repeat for additional activations ofthe pedestrian friendly alert.
Windshield Wiper/Washer
The windshield wiper lever is on theside of the steering column. Withthe vehicle on, move the windshieldwiper lever to select the wiperspeed.
2: Move the lever up to 2 for fastwipes.
1: Move the lever up to 1 for slowwipes.

Black plate (8,1)Chevrolet Volt Owner Manual - 2012
5-8 Instruments and Controls
G (Adjustable Interval Wipes):Move the lever up toG foradjustable interval wipes, then turnthe band up for more frequent wipesor down for less frequent wipes.
9 (Off): Use to turn the windshieldwipers off.
3 (Mist): For a single wipe, brieflymove the wiper lever down. Forseveral wipes, hold the wiperlever down.
Clear ice and snow from the wiperblades before using them. If frozento the windshield, carefully loosen orthaw them. Damaged wiper bladesshould be replaced. See WiperBlade Replacement on page 10‑25.
Heavy snow or ice can overload thewipers. If the wiper motor overheats,the windshield wipers will stop untilthe motor cools and the wipercontrol is turned off. See ElectricalSystem Overload on page 10‑30.
Wipe Parking
If the vehicle is turned off while thewipers are on 1, 2, orG, they willstop immediately.
If the windshield wiper lever is thenmoved to off before the driver dooris opened or within 10 minutes, thewipers will restart and move to thebase of the windshield.
If the vehicle is turned off during awindshield wash, the wipers willstop when they reach the base ofthe windshield.
Windshield Washer
Pull the windshield wiper levertoward you to spray windshieldwasher fluid and activate the wipers.
The washer and wipers will continueuntil the lever is released or themaximum wash time is reached.
When the windshield wiper lever isreleased, additional wipes mayoccur depending on how long thewindshield washer had beenactivated. See Washer Fluid onpage 10‑19 for information on fillingthe windshield washer fluidreservoir.
{ WARNING
In freezing weather, do not usethe washer until the windshield iswarmed. Otherwise the washerfluid can form ice on thewindshield, blocking your vision.
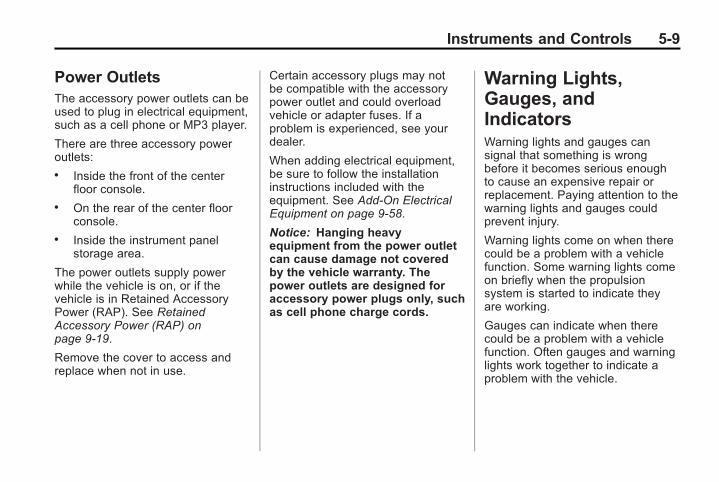
Black plate (9,1)Chevrolet Volt Owner Manual - 2012
Instruments and Controls 5-9
Power OutletsThe accessory power outlets can beused to plug in electrical equipment,such as a cell phone or MP3 player.
There are three accessory poweroutlets:. Inside the front of the center
floor console.. On the rear of the center floor
console.. Inside the instrument panel
storage area.
The power outlets supply powerwhile the vehicle is on, or if thevehicle is in Retained AccessoryPower (RAP). See RetainedAccessory Power (RAP) onpage 9‑19.
Remove the cover to access andreplace when not in use.
Certain accessory plugs may notbe compatible with the accessorypower outlet and could overloadvehicle or adapter fuses. If aproblem is experienced, see yourdealer.
When adding electrical equipment,be sure to follow the installationinstructions included with theequipment. See Add-On ElectricalEquipment on page 9‑58.
Notice: Hanging heavyequipment from the power outletcan cause damage not coveredby the vehicle warranty. Thepower outlets are designed foraccessory power plugs only, suchas cell phone charge cords.
Warning Lights,Gauges, andIndicatorsWarning lights and gauges cansignal that something is wrongbefore it becomes serious enoughto cause an expensive repair orreplacement. Paying attention to thewarning lights and gauges couldprevent injury.
Warning lights come on when therecould be a problem with a vehiclefunction. Some warning lights comeon briefly when the propulsionsystem is started to indicate theyare working.
Gauges can indicate when therecould be a problem with a vehiclefunction. Often gauges and warninglights work together to indicate aproblem with the vehicle.

Black plate (10,1)Chevrolet Volt Owner Manual - 2012
5-10 Instruments and Controls
When one of the warning lightscomes on and stays on whiledriving, or when one of the gaugesshows there may be a problem,check the section that explains whatto do. Waiting to do repairs can becostly and even dangerous.
Instrument ClusterThe instrument cluster displays apreview of information that includeselectric range, charging, odometer,and battery status. This happensupon entry when the driver door isopened, and following the welcomeanimation, before starting thevehicle.
A CHARGING OVERRIDE/INTERRUPTION OCCURREDmessage may display on the lowerleft of the screen to indicate that acharging override or interruption hasoccurred due to one or more of thefollowing events:. Override of the charge settings
by the owner using OnStar.. Unintended interruption of AC
power at the vehicle'scharge port.
. Interruption of charging by theutility company using OnStar asauthorized by vehicle owner.
The following screens may appear,depending on the status.
This screen indicates that thecharge cord is not connected. Plugthe charge cord in to charge thevehicle.
This screen indicates that thecharge cord is connected andcharging is complete.

Black plate (11,1)Chevrolet Volt Owner Manual - 2012
Instruments and Controls 5-11
This screen indicates that chargingis active and the estimated chargecompletion time is 10:00 a.m.
This screen indicates that chargingis programmed to be delayed withan estimated completion time of7:00 a.m.
This screen indicates that thevehicle is fully charged and thecharge cord is not connected.
This screen indicates that thecharge cord is connected, but thevehicle cannot be charged.

Black plate (12,1)Chevrolet Volt Owner Manual - 2012
5-12 Instruments and Controls
Complete Cluster with Enhanced Configuration in Electric Mode, Canada Similar

Black plate (13,1)Chevrolet Volt Owner Manual - 2012
Instruments and Controls 5-13
A. Battery Gauge (High Voltage)on page 5‑15.
B. Fuel Gauge on page 5‑15.
C. Service Electric Parking BrakeLight on page 5‑22.
D. Security Light on page 5‑27.
E. Engine Coolant TemperatureWarning Light on page 5‑25.
F. Charging System Light (12-VoltBattery) on page 5‑19.
G. Engine Oil Pressure Light onpage 5‑26.
H. High-Beam On Light onpage 5‑27.
I. Second Row Passenger SafetyBelt Reminder Light. See SafetyBelt Reminders on page 5‑16.
J. Turn and Lane-Change Signalson page 6‑3.
K. Compass on page 5‑15.
L. Speedometer on page 5‑14.
M. Cruise Control Light onpage 5‑27.
N. Electric Parking Brake Light onpage 5‑22.
O. Door, Hood, or Hatch OpenLight on page 5‑28.
P. Low Fuel Warning Light onpage 5‑26.
Q. Antilock Brake System (ABS)Warning Light on page 5‑23.
R. Electric Drive Unit Positions.See Electric Drive Unit onpage 9‑28.
S. Driver Efficiency Gauge onpage 5‑16.
T. Brake System Warning Light onpage 5‑22.
U. Driver Safety Belt ReminderLight. See Safety BeltReminders on page 5‑16.
V. Airbag Readiness Light onpage 5‑17.
W. Total Vehicle Range onpage 5‑16.
X. Vehicle Ready Light onpage 5‑27.
Y. StabiliTrak® OFF Light onpage 5‑24.
Z. Driver Information Center (DIC)on page 5‑43.
AA. Traction Off Light on page 5‑24.
AB. Sport Mode Light on page 5‑23and Mountain Mode Light onpage 5‑23.
AC. Lamps On Reminder onpage 5‑27.
AD.Odometer on page 5‑14.
AE. Malfunction Indicator Lamp onpage 5‑19.
AF. Traction Control System (TCS)/StabiliTrak® Light on page 5‑24.
AG.Tire Pressure Light onpage 5‑25.

Black plate (14,1)Chevrolet Volt Owner Manual - 2012
5-14 Instruments and Controls
Instrument Cluster DisplayConfigurations
There are two instrument clusterdisplay configurations to choosefrom. Press CONFIG to the leftof the steering wheel to changethe configuration. See DriverInformation Center (DIC) onpage 5‑43 for more information.
Choose either the Simple orEnhanced Configuration display.
Simple Configurationin Electric Mode
Simple Configuration in ExtendedRange Mode
The Enhanced Configurationdisplays the Driver EfficiencyGauge.
Enhanced Configurationin Electric Mode
Enhanced Configurationin Extended Range Mode
SpeedometerThe speedometer shows the vehiclespeed in both kilometers per hour(km/h) and miles per hour (mph).The DIC menu can be used tochange the units.
See Driver Information Center (DIC)on page 5‑43.
OdometerThe odometer shows how far thevehicle has been driven, in eitherkilometers or miles.

Black plate (15,1)Chevrolet Volt Owner Manual - 2012
Instruments and Controls 5-15
Trip OdometerThe trip odometer is within theDriver Information Center. SeeDriver Information Center (DIC) onpage 5‑43 for more information.
CompassThe vehicle has a compass displayin the instrument cluster abovethe speedometer. The compassreceives its heading and otherinformation from the GlobalPositioning System (GPS) antennaand vehicle speed information.
The compass system has automaticcalibration and zone adjustmentfeatures.
Avoid covering the GPS antenna forlong periods of time with objectsthat may interfere with the antenna'sability to receive a satellite signal.See Multi-Band Antenna onpage 7‑12 for the location of thevehicle's antenna. The compasssystem is designed to operate for acertain number of miles or degrees
of turn before needing a signal fromthe GPS satellites. The compasssystem will automatically determinewhen a GPS signal is restored andprovide a heading.
Battery Gauge (HighVoltage)
This indicator displays the highvoltage battery charge level.
When this indicator is displayedin the foreground, the vehicle isoperating in Electric Mode. Thenumber next to the indicator
displays an estimate of how farthe vehicle can be driven while inthis mode.
See Electric Mode on page 9‑21.
Fuel Gauge
This indicator displays the fuellevel. When this indicator is in theforeground, the vehicle is operatingin Extended Range Mode.
The number next to the indicatordisplays an estimate of how far thevehicle can be driven while inthis mode.
See Extended Range Mode onpage 9‑22.

Black plate (16,1)Chevrolet Volt Owner Manual - 2012
5-16 Instruments and Controls
Driver Efficiency Gauge
This gauge is a guide to driving inan efficient manner by keeping theball green and in the center of thegauge. The leaves stop spinningwhen the vehicle stops or when theball travels away from the center ofthe gauge.
See Driving for Better EnergyEfficiency on page 9‑2.
accel: If the ball turns yellow andtravels above the center of thegauge, acceleration is tooaggressive to optimize efficiency.
brake: If the ball turns yellow andtravels below the center of thegauge, braking is too aggressive tooptimize efficiency.
Total Vehicle Range
Total vehicle range is the remainingdistance the vehicle can be drivencombining the electric range andfuel range.
See Driving for Better EnergyEfficiency on page 9‑2.
Safety Belt Reminders
Driver Safety Belt ReminderLight
When the vehicle is started, thislight flashes and a chime may comeon to remind the driver to fastentheir safety belt. The light stays onsolid until the belt is buckled.
This cycle may continue severaltimes if the driver remains orbecomes unbuckled during drivingwhile the vehicle is moving.
If the driver safety belt is alreadybuckled, neither the light nor thechime comes on.

Black plate (17,1)Chevrolet Volt Owner Manual - 2012
Instruments and Controls 5-17
Passenger Safety BeltReminder Light
When the vehicle is started, thislight flashes and a chime may comeon to remind the front passenger tofasten their safety belt. The lightstays on solid until the belt isbuckled.
This cycle may continue severaltimes if the front passenger remainsor becomes unbuckled while thevehicle is moving.
If the front passenger safety belt isbuckled, neither the chime nor thelight comes on.
The front passenger safety beltreminder light and chime may turnon if an object is put on the seatsuch as a briefcase, handbag,
grocery bag, laptop, or otherelectronic device. To turn off thereminder light and/or chime, removethe object from the seat or bucklethe safety belt.
Second Row Passenger SafetyBelt Reminder Light
Second row seating positionsmonitored for safety belt use arerepresented by a colored symbolindicating safety belt status. Whenthe vehicle is started, two safety beltsymbols come on and stay on forseveral seconds in the instrumentcluster to alert the driver thatpassengers may need to fastentheir safety belts. After thepassenger safety belt is buckled,
the corresponding safety beltsymbol in the instrument clusterturns green. If a safety belt is notinitially buckled, the instrumentcluster displays a gray safety beltsymbol. While the vehicle is moving,if a second row passenger whowas previously buckled becomesunbuckled, the corresponding safetybelt symbol will change to flashingred for several seconds and a chimemay sound.
Airbag Readiness LightThis light shows if there is anelectrical problem. The systemcheck includes the airbag sensor,passenger sensing system, thepretensioners, the airbag modules,the wiring, and the crash sensingand diagnostic module. For moreinformation on the airbag system,see Airbag System on page 3‑19.

Black plate (18,1)Chevrolet Volt Owner Manual - 2012
5-18 Instruments and Controls
The airbag readiness light comes onand stays on for several secondswhen the vehicle is started. Thenthe light goes out.
A message may also display in theDriver Information Center (DIC).
See Airbag System Messages onpage 5‑51 for more information.
{ WARNING
If the airbag readiness light stayson after the vehicle is started orcomes on while driving, it meansthe airbag system might not beworking properly. The airbags inthe vehicle might not inflate in acrash, or they could even inflate
(Continued)
WARNING (Continued)
without a crash. To help avoidinjury, have the vehicle servicedright away.
Passenger Airbag StatusIndicatorThe vehicle has a passengersensing system. See PassengerSensing System on page 3‑26 forimportant safety information. Thepassenger airbag status indicator isin the overhead console.
United States
Canada
When the vehicle is started, thepassenger airbag status indicatorwill light ON and OFF, or the symbolfor on and off for several secondsas a system check. Then, afterseveral more seconds, the statusindicator will light either ON orOFF, or the on or off symbol to letyou know the status of the frontoutboard passenger frontal airbagand knee airbag.

Black plate (19,1)Chevrolet Volt Owner Manual - 2012
Instruments and Controls 5-19
If the word ON or the on symbol islit on the passenger airbag statusindicator, it means that the frontoutboard passenger frontal airbagand knee airbag are allowed toinflate.
If the word OFF or the off symbol islit on the airbag status indicator, itmeans that the passenger sensingsystem has turned off the frontoutboard passenger frontal airbagand knee airbag.
If, after several seconds, both statusindicator lights remain on, or if thereare no lights at all, there may be aproblem with the lights or thepassenger sensing system. Seeyour dealer for service.
{ WARNING
If the airbag readiness light evercomes on and stays on, it meansthat something may be wrongwith the airbag system. To helpavoid injury to yourself or others,
(Continued)
WARNING (Continued)
have the vehicle serviced rightaway. See Airbag ReadinessLight on page 5‑17 for moreinformation, including importantsafety information.
Charging System Light(12-Volt Battery)
The charging system light comes onbriefly when the vehicle is in ON/RUN, as a check to show the light isworking.
If the light stays on, or comes onwhile driving, there could be aproblem with the electrical charging
system. Have it checked by yourdealer. Driving while this light is oncould drain the 12‐volt battery.
If a short distance must be drivenwith the light on, be sure to turn offall accessories, such as the radio.
MalfunctionIndicator LampA computer system called OBD II(On-Board Diagnostics-SecondGeneration) monitors operation ofthe fuel, ignition, and emissioncontrol systems. It ensures thatemissions are at acceptable levelsfor the life of the vehicle, helping toproduce a cleaner environment.This light comes on when thevehicle is placed in Service OnlyMode, as a check to show it isworking. If it does not, have thevehicle serviced by your dealer. SeePower Button on page 9‑16 for moreinformation.

Black plate (20,1)Chevrolet Volt Owner Manual - 2012
5-20 Instruments and Controls
If the malfunction indicator lampcomes on and stays on, while thevehicle is in ON/RUN, this indicatesthat there is an OBD II problem andservice is required.
Malfunctions often are indicated bythe system before any problem isapparent. Being aware of the lightcan prevent more serious damageto the vehicle. This system assiststhe dealer technician in correctlydiagnosing any malfunction.
Notice: If the vehicle iscontinually driven with this lighton, the emission controls mightnot work as well, the vehicle fueleconomy might not be as good,and the engine might not run assmoothly. This could lead tocostly repairs that might not becovered by the vehicle warranty.
Notice: Modifications made tothe engine, electric drive unit,exhaust, intake, or fuel system ofthe vehicle or the replacementof the original tires with otherthan those of the same TirePerformance Criteria (TPC)can affect the vehicle emissioncontrols and can cause this lightto come on. Modifications tothese systems could lead tocostly repairs not covered bythe vehicle warranty. Thiscould also result in a failureto pass a required EmissionInspection/Maintenance test. SeeAccessories and Modifications onpage 10‑3.
This light comes on during amalfunction in one of two ways:
Light Flashing: A misfire conditionhas been detected. A misfireincreases vehicle emissions andcould damage the emission controlsystem on the vehicle. Diagnosisand service might be required.
The following can prevent moreserious damage to the vehicle:. Reduce vehicle speed.. Avoid hard accelerations.. Avoid steep uphill grades.
If the light continues to flash, whenit is safe to do so, stop the vehicle.Find a safe place to park thevehicle. Turn the vehicle off, wait atleast 10 seconds, and restart thevehicle. If the light is still flashing,follow the previous steps and seeyour dealer for service as soon aspossible.
Light On Steady: An emissioncontrol system malfunction hasbeen detected on the vehicle.Diagnosis and service might berequired.
The following may correct anemission system malfunction:. Check that the fuel cap is fully
installed. The diagnostic systemcan determine if the fuel caphas been left off or improperlyinstalled. A loose or missing fuel

Black plate (21,1)Chevrolet Volt Owner Manual - 2012
Instruments and Controls 5-21
cap allows fuel to evaporate intothe atmosphere. A few drivingtrips with the cap properlyinstalled should turn the light off.
. Check that good quality fuel isused. Poor fuel quality causesthe engine not to run asefficiently as designed and maycause stalling after start-up ormisfiring. These conditions mightgo away once the engine iswarmed up.
If one or more of theseconditions occurs, change thefuel brand used. It will require atleast one full tank of the properfuel to turn the light off.
If none of the above have madethe light turn off, your dealer cancheck the vehicle. The dealerhas the proper test equipmentand diagnostic tools to fix anymechanical or electrical problemsthat might have developed.
Emissions Inspection andMaintenance Programs
Some state and local governmentshave or might begin programsto inspect the emission controlequipment on the vehicle. Failure topass this inspection could preventgetting a vehicle registration.
The DLC is under the instrumentpanel to the left of the steeringwheel. See your dealer if assistanceis needed.
The vehicle may not passinspection if:. The vehicle may not pass this
inspection if the malfunctionindicator lamp is on while thevehicle is in ON/RUN, or if thevehicle is placed in Service Only
Mode and the malfunctionindicator lamp does notcome on. See your dealer forassistance in verifying properoperation of the malfunctionindicator lamp.
. The vehicle may not passthis inspection if the OBD II(On-Board Diagnostics) systemdetermines that critical emissioncontrol systems have not beencompletely diagnosed by thesystem. The vehicle wouldbe considered not ready forinspection. This can happen ifthe 12‐volt battery has recentlybeen replaced or if the 12‐voltbattery has run down. Thediagnostic system is designed toevaluate critical emission controlsystems during normal driving.This can take several days ofroutine driving. If this has beendone and the vehicle still doesnot pass the inspection for lackof OBD II system readiness, yourdealer can prepare the vehiclefor inspection.

Black plate (22,1)Chevrolet Volt Owner Manual - 2012
5-22 Instruments and Controls
Brake System WarningLightThe vehicle brake system consistsof two hydraulic circuits. If onecircuit is not working, the remainingcircuit can still work to stop thevehicle. For normal brakingperformance, both circuits need tobe working.
If the warning light comes on, thereis a brake problem. Have the brakesystem inspected right away.
Metric English
This light comes on briefly when thevehicle is turned on. If it does notcome on then, have it fixed so itwill be ready to warn if there is aproblem.
If the light comes on and stays on,there is a base brake problem.
{ WARNING
The brake system might not beworking properly if the brakesystem warning light is on.Driving with the brake systemwarning light on can lead to acrash. If the light is still on afterthe vehicle has been pulled offthe road and carefully stopped,have the vehicle towed forservice.
Electric Parking BrakeLight
This status light comes on when theparking brake is applied. If the lightflashes and stays on after the
parking brake is released, or whiledriving, there is a problem with theelectric parking brake system.
If the light does not come on,or remains flashing, see your dealer.
See Electric Parking Brake onpage 9‑30 for more information.
Service Electric ParkingBrake Light
The Service Electric Parking Brakelight should come on briefly whenthe vehicle is in ON/RUN. If it doesnot come on, have it fixed so itwill be ready to warn if there is aproblem.
If this light stays on, there is aproblem with a system on thevehicle that is causing the parking

Black plate (23,1)Chevrolet Volt Owner Manual - 2012
Instruments and Controls 5-23
brake system to work at a reducedlevel. The vehicle can still be driven,but should be taken to a dealer assoon as possible. See ElectricParking Brake on page 9‑30 formore information. If a messagedisplays in the Driver InformationCenter (DIC), see Brake SystemMessages on page 5‑46 for moreinformation.
Antilock Brake System(ABS) Warning Light
This light should come on brieflywhen the vehicle is in ON/RUN. If itdoes not come on, have the vehicleserviced by your dealer.
If the ABS warning light stays onlonger than a few seconds after thevehicle is in ON/RUN, or comes on
and stays on while driving, tryresetting the system. To reset thesystem:
1. While driving, pull over when it issafe to do so.
2. Place the vehicle in P (Park).
3. Turn the vehicle off.
4. Restart the vehicle.
If the ABS warning light remains onafter resetting the system or comeson again while driving, the vehicleneeds service. If the ABS warninglight is on, but the regular brakesystem warning light is not on, theantilock brakes are not workingproperly, but the regular brakes arestill functioning. Have the vehicleserviced right away. If both brakelights are on, the vehicle does nothave antilock brakes, and there is aproblem with the regular brakes aswell. Have the vehicle towed forservice. See Towing the Vehicle onpage 10‑73.
Sport Mode Light
This light comes on when SportMode is selected. See “Sport Mode”in Driver Selected Operating Modeson page 9‑22 for more information.
Mountain Mode Light
This light comes on when MountainMode is selected. See “MountainMode” in Driver Selected OperatingModes on page 9‑22 for moreinformation.

Black plate (24,1)Chevrolet Volt Owner Manual - 2012
5-24 Instruments and Controls
Traction Off Light
This light comes on briefly whilestarting the engine. If it does not,have the vehicle serviced by yourdealer. If the system is workingnormally, the indicator light thenturns off.
The traction off light comes on whenthe Traction Control System (TCS)has been turned off by pressing andreleasing the TCS/ESC button.
This light and the StabiliTrak Offlight come on when StabiliTrak isturned off.
If the TCS is off, wheelspin is notlimited. Adjust driving accordingly.
StabiliTrak® OFF Light
This light comes on briefly whilestarting the engine. If it does not,have the vehicle serviced by yourdealer.
This light comes on when theStabiliTrak system is turned off.If StabiliTrak is off, TCS is also off.
If the Traction Control System (TCS)is off, the system does not assist incontrolling the vehicle. Turn on theTCS and the StabiliTrak systemsand the warning light turns off.
Traction Control System(TCS)/StabiliTrak® Light
This light comes on briefly whilestarting the vehicle.
If it does not, have the vehicleserviced by your dealer. If thesystem is working normally theindicator light then goes off.
If the light comes on and stays onwhile driving, there could be aproblem with the TCS/StabiliTraksystem and the vehicle might needservice. When this warning light ison, the TCS/StabiliTrak system is offand does not limit wheel spin.
The light flashes if the system isactive and is working to assist thedriver with directional control of thevehicle in difficult driving conditions.
Black plate (25,1)Chevrolet Volt Owner Manual - 2012
Instruments and Controls 5-25
Engine CoolantTemperature WarningLight
The engine coolant temperaturewarning light comes on briefly whenthe vehicle is started.
If it does not, have the vehicleserviced by your dealer. If thesystem is working normally, theindicator light then goes off.
If the light comes on and stays onwhile driving, the vehicle may havea problem with the cooling system.Stop and turn off the vehicle toavoid damage to the engine.A warning chime sounds when thislight is on.
See Engine Overheating onpage 10‑19 for more information.
Tire Pressure Light
For vehicles with the Tire PressureMonitor System (TPMS), this lightcomes on briefly when the vehicle isin ON/RUN. It provides informationabout tire pressures and the TPMS.
When the Light is On Steady
This indicates that one or more ofthe tires are significantlyunderinflated.
A message in the Driver InformationCenter (DIC) may also display. SeeTire Messages on page 5‑52 formore information. Stop as soon aspossible, and inflate the tires to thepressure value shown on the Tireand Loading Information Label. SeeTires on page 10‑40 for moreinformation.
When the Light Flashes First andThen is On Steady
This indicates that there may be aproblem with the Tire PressureMonitor System. The light flashesfor about one minute and stays onsteady until the vehicle is in OFF.This sequence repeats each timethe vehicle is in ON/RUN. See TirePressure Monitor System onpage 10‑47 for more information.

Black plate (26,1)Chevrolet Volt Owner Manual - 2012
5-26 Instruments and Controls
Engine Oil Pressure Light
{ WARNING
Do not keep driving if the oilpressure is low. The engine canbecome so hot that it catches fire.Someone could be burned. Checkthe oil as soon as possible andhave the vehicle serviced.
Notice: Lack of proper engine oilmaintenance can damage theengine. The repairs would not becovered by the vehicle warranty.Always follow the maintenanceschedule for changing engine oil.
The oil pressure light should comeon briefly as the vehicle is started.If it does not come on have thevehicle serviced by your dealer.
If the light comes on and stays on, itmeans that oil is not flowing throughthe engine properly. The vehiclecould be low on oil and might havesome other system problem. Seeyour dealer.
Low Fuel Warning Light
The low fuel warning light comes onbriefly when the vehicle is started.
This light also comes on when thefuel level is low. When fuel is added,the light should go off. If it does not,have the vehicle serviced.
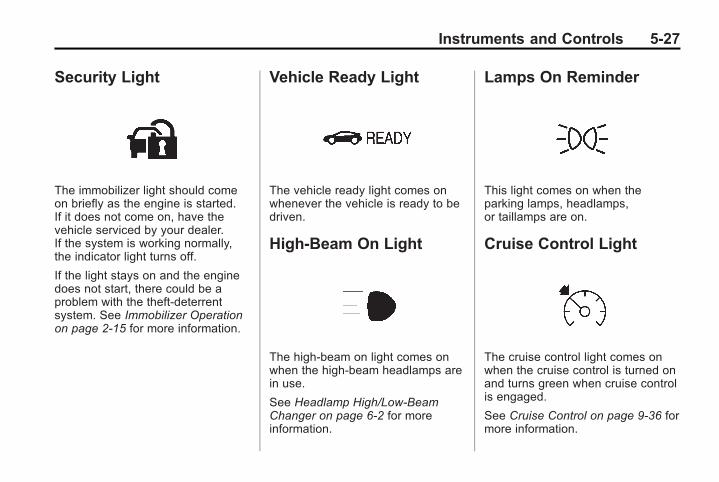
Black plate (27,1)Chevrolet Volt Owner Manual - 2012
Instruments and Controls 5-27
Security Light
The immobilizer light should comeon briefly as the engine is started.If it does not come on, have thevehicle serviced by your dealer.If the system is working normally,the indicator light turns off.
If the light stays on and the enginedoes not start, there could be aproblem with the theft-deterrentsystem. See Immobilizer Operationon page 2‑15 for more information.
Vehicle Ready Light
The vehicle ready light comes onwhenever the vehicle is ready to bedriven.
High-Beam On Light
The high-beam on light comes onwhen the high-beam headlamps arein use.
See Headlamp High/Low-BeamChanger on page 6‑2 for moreinformation.
Lamps On Reminder
This light comes on when theparking lamps, headlamps,or taillamps are on.
Cruise Control Light
The cruise control light comes onwhen the cruise control is turned onand turns green when cruise controlis engaged.
See Cruise Control on page 9‑36 formore information.

Black plate (28,1)Chevrolet Volt Owner Manual - 2012
5-28 Instruments and Controls
Door, Hood, or HatchOpen LightIf a door, hood, or hatch is notcompletely closed, a light comes ontogether with a graphic in the DriverInformation Center (DIC).
Door(s) Open
Hood Open Hatch Open
The DIC indicates when a door, thehood, or the hatch is open. The lightdisplays the open area as shaded.
The DIC and the light both displaywhen the vehicle is moving. Onlythe light displays if the vehicle isstopped.

Black plate (29,1)Chevrolet Volt Owner Manual - 2012
Instruments and Controls 5-29
Information Displays
Center Stack DisplayThe center stack screen displaysCharging, Power Flow, and EnergyInformation. See the information thatfollows.
Climate Control, Infotainment, andVehicle Personalization informationalso displays in this screen. Formore information on thesesystems, see:. Automatic Climate Control
System on page 8‑1.. The navigation system manual
and Infotainment on page 7‑1.. Vehicle Personalization on
page 5‑53.
The center stack controls only needa light touch to operate and workbest with bare hands. The controlswill work with most gloves althoughthey may take longer to respond.Use the finger pad rather than the
finger tip to minimize response time.If the controls are not responding,remove the gloves.
To view the Power Flow, Charging,and Energy Information, pressthe[ button on the center stack.
Power FlowsTo view the Power Flow screens,press the[ button on the centerstack and then press the PowerFlow button at the top of the touch
screen. The Power Flow screensindicate the current systemoperating condition. The screensshow the energy flow between theengine, electric drive unit, and highvoltage battery. These componentswill be highlighted when they areactive.
Battery Power ‐ Battery is activewith energy flowing to the wheels.

Black plate (30,1)Chevrolet Volt Owner Manual - 2012
5-30 Instruments and Controls
Battery Power ‐ Vehicle is stationaryin electric mode and no power isflowing to the wheels.
Engine Power ‐ Engine is activewith energy flowing to the wheels.
Engine Power ‐ Vehicle is stationaryin extended range mode and nopower is flowing to the wheels.
Engine and Battery Power ‐ Boththe engine and battery are activewith energy flowing to the wheels.
Regen Power Recovery ‐ Powerfrom the wheels returns to thebattery during regenerative brakingor coasting.

Black plate (31,1)Chevrolet Volt Owner Manual - 2012
Instruments and Controls 5-31
Power Off ‐ No power is flowing tothe wheels.
Charging
Programmable Charging
This vehicle has threeprogrammable charge modes.To view the current charge modestatus in the center stack display,press the[ button on the centerstack and then press the Chargingbutton at the top of the touchscreen.
The current charge mode statuscan also be viewed in a temporarypop-up in the center stack displayby pressing the charge port doorrelease button on the driver door.
The Charge Start and ChargeComplete time estimations are alsodisplayed on the screen. Theseestimations are most accurate whenthe vehicle is plugged in and inmoderate temperature conditions.Also, to get an accurate timeestimate, the vehicle uses aninternal clock for programmablecharging, not the clock in the centerstack.
Charge Mode Status
Immediately: The vehicle startscharging as soon as it is connectedto an electrical outlet. See Plug-InCharging on page 9‑44.
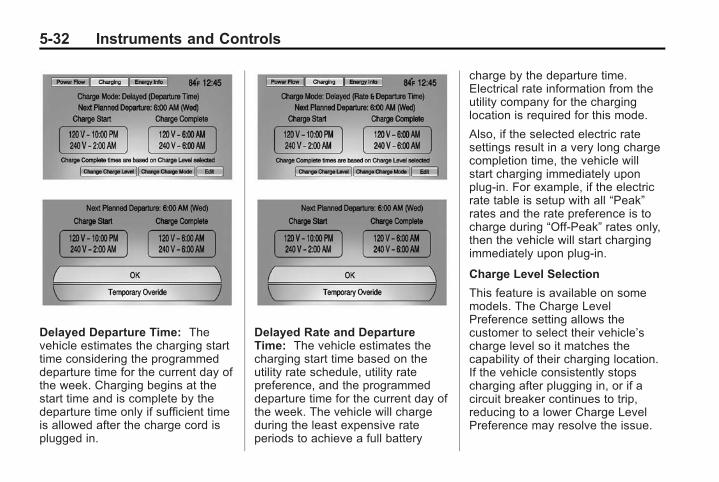
Black plate (32,1)Chevrolet Volt Owner Manual - 2012
5-32 Instruments and Controls
Delayed Departure Time: Thevehicle estimates the charging starttime considering the programmeddeparture time for the current day ofthe week. Charging begins at thestart time and is complete by thedeparture time only if sufficient timeis allowed after the charge cord isplugged in.
Delayed Rate and DepartureTime: The vehicle estimates thecharging start time based on theutility rate schedule, utility ratepreference, and the programmeddeparture time for the current day ofthe week. The vehicle will chargeduring the least expensive rateperiods to achieve a full battery
charge by the departure time.Electrical rate information from theutility company for the charginglocation is required for this mode.
Also, if the selected electric ratesettings result in a very long chargecompletion time, the vehicle willstart charging immediately uponplug-in. For example, if the electricrate table is setup with all “Peak”rates and the rate preference is tocharge during “Off-Peak” rates only,then the vehicle will start chargingimmediately upon plug-in.
Charge Level Selection
This feature is available on somemodels. The Charge LevelPreference setting allows thecustomer to select their vehicle’scharge level so it matches thecapability of their charging location.If the vehicle consistently stopscharging after plugging in, or if acircuit breaker continues to trip,reducing to a lower Charge LevelPreference may resolve the issue.

Black plate (33,1)Chevrolet Volt Owner Manual - 2012
Instruments and Controls 5-33
The Charge Level Preferenceshould be configured to match theelectrical current rating for the ACoutlet that the charge cord isconnected to. The Charge LevelPreference settings are:. Maximum: Limits AC current to
12 Amps. Reduced: Limits AC current to
8 Amps
The Charge Level Preferencesettings are not directly related tothe Charge Level Button on thecharge cord. The vehicle will adhereto the setting that minimizes the ACcurrent used to charge the vehicle.
The Charge Level Preferencesetting will return to Maximumeach time the cord has beendisconnected from the vehiclefor an extended period of time.
The Charge Level Preferencesetting can be changed at any timewhile the center stack display isoperable.
Charge Mode Selection
From the Charge Mode Statusscreen, press ChangeCharge Mode.
Select one option:. Immediately upon plug in.. Delayed based on
departure time.. Delayed based on electric rates
& departure time.

Black plate (34,1)Chevrolet Volt Owner Manual - 2012
5-34 Instruments and Controls
Departure Time Entry
From the Delayed Charge ModeStatus screen, press Edit to changethe departure time for each day ofthe week to match your personalschedule.
1. Press the day to change.
2. Press + or − to change the hoursand minutes.
3. Press + or − to change AMor PM.
4. Press Back to store changesand return to the previousscreen.
Charge Rate Selection
From the Delayed Rate andDeparture Time Charge ModeStatus screen, press Edit.
Select one of the following:. Edit Electric Rate Schedule.. Edit Departure Time Schedule.
See “Departure Time Entry.”. Select Charge Rate Preference.
Charge Rate Preference Selection
From the Departure Time & RateInformation screen, press SelectCharge Rate Preference.
Press one of the following options toselect the Charge Rate Preference:. Charge during Peak, Mid‐Peak,
and Off‐Peak Rates: The vehiclecan charge during any rateperiod to satisfy the nextplanned departure time.However, it will select when tocharge to minimize the total costof the charge.
. Charge during Mid‐Peak andOff‐Peak Rates: The vehicle willcharge during Off-Peak and/orMid-Peak rate periods only andwill select when to charge tominimize the total cost of thecharge.

Black plate (35,1)Chevrolet Volt Owner Manual - 2012
Instruments and Controls 5-35
. Charge during Off‐Peak Rates:The vehicle will only chargeduring Off-Peak rate periods.
Charging begins at the start timeand is complete by the departuretime only if sufficient time is allowedafter the charge cord is pluggedin. For example, if the vehicle isplugged in for only one hour prior tothe departure time, and the batteryis completely discharged, thevehicle will not be fully charged bythe departure time regardless of therate selection.
Also, if the selected electric ratesettings result in a very long chargecompletion time, the vehicle willstart charging immediately uponplug-in. For example, if the electricrate table is setup with all “Peak”rates and the rate preference is tocharge during “Off-Peak” rates only,then the vehicle will start chargingimmediately upon plug-in.
Electric Rate Plan Selection
Electric rates, or cost per unit, mayvary based on time, weekday/weekend, and season. During theday when the demand for electricityis high, the rates are usually higherand called Peak rates. At nightwhen the demand for electricity islow, the rates are usually lower andcalled Off-Peak rates. In someareas, a Mid-Peak rate is offered.
Contact the utility company to obtainthe rate schedule for your area. Thesummer and winter start dates mustbe established to use a summer/winter schedule.
From the Departure Time & RateInformation screen, press EditElectric Rate Schedule.
To edit the Summer/WinterSchedule:
1. Press Summer/Winter Schedule.
2. Press Edit.
To edit the Yearly Schedule:
1. Press Yearly Schedule.
2. Press Edit.

Black plate (36,1)Chevrolet Volt Owner Manual - 2012
5-36 Instruments and Controls
Summer/Winter Schedule StartDate Entering
From the Select Electric Rate Planscreen, press Summer/WinterSchedule then press Edit.
1. Press Summer Start.
2. Press + or − to set the monthand day for the start of summer.
3. Press Winter Start.
4. Press + or − to set the monthand day for the start of winter.
5. Press Edit Summer Schedule orEdit Winter Schedule to edit thedaily electric rate schedule.
Electric Rate Schedule Editing
From the Enter Summer/WinterStart Dates screen, press EditSummer Schedule or Edit WinterSchedule.
From the Select Electric Rate Planscreen, press Yearly Schedule andthen press Edit.
1. Press Weekday or Weekend.
2. Press Edit next to the row to bechanged.. Weekdays are Monday
through Friday and use thesame rate schedule.
. Weekends are Saturdayand Sunday and use thesame rate schedule.
Both weekday and weekendschedules must be set. The rateschedule only applies for a 24-hourperiod, starting at 12:00 AM andending at 12:00 AM. There can befive rate changes for each day; notall must be used.

Black plate (37,1)Chevrolet Volt Owner Manual - 2012
Instruments and Controls 5-37
The finish times must beconsecutive. If a finish time doesnot follow a start time, the errormessage displays “An invalid entrywas found in the data entered.Please re‐enter data.”
Electric Rate Finish Time Editing
From the Edit (Summer, Winter,or Yearly) Electric Rate Schedulescreen, press Edit next to the row tochange.
1. Press + or − to adjust the time.
2. Press Peak, Mid-Peak,or Off-Peak to select theelectric rate.
3. Press the Back button to storechanges.
Only the finish time can be edited.The start time is automaticallypopulated in the rate table.
Electric Rate Schedule Viewing
From the Select Electric Rate Planscreen, press View (Summer,Winter, or Yearly) Schedule.

Black plate (38,1)Chevrolet Volt Owner Manual - 2012
5-38 Instruments and Controls
Temporary Charge ModeOverride and Cancel
Programmed Delayed ChargeModes can be temporarilyoverridden to an Immediate ChargeMode for one charge cycle. Also,the next planned departure time canbe temporarily overridden for onecharge cycle. In addition to thein-vehicle overrides via the centerstack, there are also other ways totemporarily override a DelayedCharge Mode. See Plug-In Chargingon page 9‑44.
Temporary Override of a DelayedCharge Mode
To temporarily override a DelayedCharge Mode to Immediate ChargeMode from inside the vehicle:
1. Press the charge port doorrelease button on the driver doorto view the Charge Mode Statuspop-up in the center stackdisplay.
2. Press Temporary Override.
3. Press Charge Immediately UponPlug-In to temporarily overridean Immediate Charge Mode.
The Temporary Charge Mode Statusscreen will automatically display therevised charge complete time.

Black plate (39,1)Chevrolet Volt Owner Manual - 2012
Instruments and Controls 5-39
To cancel the temporary override toImmediate, from the TemporaryCharge Mode Status screen orpop-up, press Cancel TemporaryCharge Mode on the bottom of thetouch screen.
Temporary Override of the NextPlanned Departure Time
To temporarily override the NextPlanned Departure Time from insidethe vehicle:
1. Press the charge port doorrelease button on the driver doorto view the Charge Mode Statuspop-up in the center stackdisplay.
2. Press Temporary Override.
3. Press the + or – button tochange the NextDeparture Time.
4. Press Confirm Departure Time totemporarily override the NextPlanned Departure Time.
The Temporary Charge Mode Statusscreen will automatically display therevised charge complete time.
The Temporary Departure time canonly be updated for the same dayas the original Next PlannedDeparture Time. Also, the vehiclewill not accept a TemporaryDeparture Time that is before thepresent time of day.
To cancel the temporary override ofthe Next Planned Departure Time,from the Temporary Charge ModeStatus screen or pop-up, pressCancel Temporary Departure Timeon the bottom of the touch screen.

Black plate (40,1)Chevrolet Volt Owner Manual - 2012
5-40 Instruments and Controls
Charging Override/InterruptionPop-Up
The Charging Override/Interruptionpop-up will appear if any of thefollowing conditions occur:. The charging settings have been
modified via OnStar through thewebsite or the Mobile App. Forexample, the Departure TimeTables, the Rate Tables, or theCharge Mode were updatedusing the customer website(available in select regions).
. There was an unintended lossof AC power during the plug-incharge event. For example,there was a power outage or thecharge cord was unplugged fromthe wall.
. The charge process wasinterrupted by the utilitycompany via OnStar asauthorized by the vehicle owner(available in select regions).
For more information see UtilityInterruption of Charging onpage 9‑52.
Programmable ChargingDisabled
When the Programmable Chargingsystem is disabled, the DefaultCharge Mode Status screen and thepop-up will display “- -:- -” for theCharge Complete Time. TheProgrammable Charging system willbe disabled if the Charge CompleteTime cannot be confidentlyestimated. If the ProgrammableCharging system is consistentlydisabled, see your dealer for details.
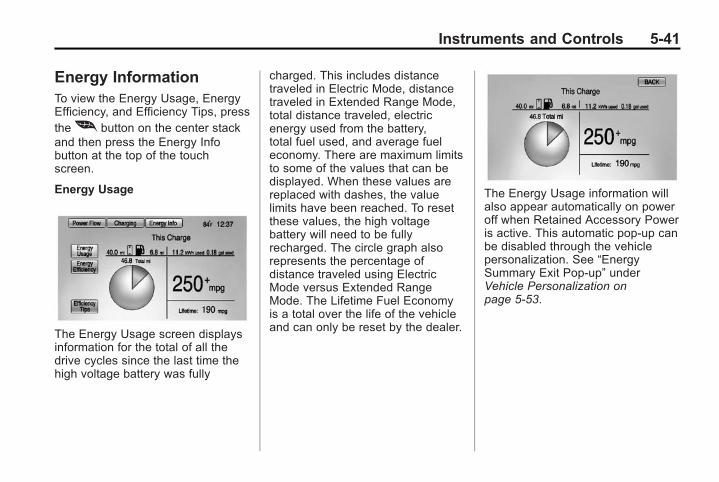
Black plate (41,1)Chevrolet Volt Owner Manual - 2012
Instruments and Controls 5-41
Energy InformationTo view the Energy Usage, EnergyEfficiency, and Efficiency Tips, pressthe[ button on the center stackand then press the Energy Infobutton at the top of the touchscreen.
Energy Usage
The Energy Usage screen displaysinformation for the total of all thedrive cycles since the last time thehigh voltage battery was fully
charged. This includes distancetraveled in Electric Mode, distancetraveled in Extended Range Mode,total distance traveled, electricenergy used from the battery,total fuel used, and average fueleconomy. There are maximum limitsto some of the values that can bedisplayed. When these values arereplaced with dashes, the valuelimits have been reached. To resetthese values, the high voltagebattery will need to be fullyrecharged. The circle graph alsorepresents the percentage ofdistance traveled using ElectricMode versus Extended RangeMode. The Lifetime Fuel Economyis a total over the life of the vehicleand can only be reset by the dealer.
The Energy Usage information willalso appear automatically on poweroff when Retained Accessory Poweris active. This automatic pop-up canbe disabled through the vehiclepersonalization. See “EnergySummary Exit Pop-up” underVehicle Personalization onpage 5‑53.

Black plate (42,1)Chevrolet Volt Owner Manual - 2012
5-42 Instruments and Controls
Energy Efficiency
The Energy Efficiency screen isaccessed by pressing EnergyEfficiency on the Energy Usagescreen. This screen displays theenergy efficiency over the drivecycle based on driving style andclimate settings. Driving in a moreefficient manner will result in ahigher percentage displayed fordriving style. Minimizing the use ofthe climate control system will resultin a higher percentage displayed forclimate setting.
Efficiency Tips
The Efficiency Tips screen isaccessed by pressing EfficiencyTips from the Energy Usage orEnergy Efficiency screen. Thisscreen provides a guide on how toimprove energy usage to increasefuel economy and range.
ClockThe clock is in the center stackdisplay.
To set the time:
Press the TP (Time Program) buttonto go directly to the time settingpage, or press the CONFIG buttonand select Time from the list.
1. Press the CONFIG button toenter the menu options. Turnthe TUNE/MENU knob to scrollthrough the available setupfeatures. Press the TUNE/MENUknob or press the Time screenbutton to display other optionswithin that feature.
2. Press + or − to increase ordecrease the Hours and Minutesdisplayed on the clock.
12/24 HR Format: Press the 12 HRscreen button for standard time;press the 24 HR screen button formilitary time.
Day + or Day −: Press the Day +or Day − display buttons to increaseor decrease the day.

Black plate (43,1)Chevrolet Volt Owner Manual - 2012
Instruments and Controls 5-43
Display: Press Display to turn thedisplay of the time on the screen onor off.
Driver InformationCenter (DIC)
The Driver Information Center (DIC)display is in the instrument cluster.The DIC displays information aboutthe vehicle. It also displays warningmessages if a system problem isdetected. See Vehicle Messages onpage 5‑45 for more information.
DIC Operation and Displays
View the DIC displays by pressingthe DIC buttons located to the leftof the steering wheel. The DIC
displays trip, fuel, and warningmessages if a system problem isdetected.
DIC Controls
CONFIG: Press to select either theSimple or Enhanced instrumentcluster configuration display.
} BACK: Press to return to theprevious screen, exit a screen,or return to the main menu.Press } BACK to minimize theDIC menu display.
SELECT: Press the center of theknob to select the highlighted item.Turn the knob to scroll through themenu items.
DIC Menu Items
At the main DIC menu:
1. Turn the SELECT knob to scrollthrough the possible DIC menus.
2. Press the center of the SELECTknob when a menu item ishighlighted to enter that menu.
3. Continue to turn and press theSELECT knob to scroll throughand select the available menuitems:
} : Trip A
x : Trip B
: : Oil Life
v : Tire Pressure
{ : Vehicle Messages
z : Units
y : Tutorial Mode
u : Turn-by-Turn

Black plate (44,1)Chevrolet Volt Owner Manual - 2012
5-44 Instruments and Controls
Trip A and Trip B
The trip displays show fuel used,average fuel economy, and distancetraveled since the last trip reset.
Reset the trip data by pressing andholding the SELECT button wheneither Trip A or Trip B is displayed.
Oil Life
This displays the percentage ofremaining oil life. The lowerthe percentage, the closer thevehicle is to needing an oil change.
When the oil life is depleted, theCHANGE ENGINE OIL SOONmessage displays. Change the oilas soon as possible. Additionalmaintenance is also recommendedin the Maintenance Schedule.See Maintenance Schedule onpage 11‑3 and Engine Oil onpage 10‑9.
The oil life must be reset aftereach oil change. Avoid accidentalresetting of the Engine Oil LifeSystem. It cannot be resetaccurately until the next oil change.
To reset the Engine Oil Life System,see Engine Oil Life System onpage 10‑12. The system is resetwhen 100% displays.
Tire Pressure
The display will show a vehicle withthe approximate pressures of allfour tires. Tire pressure is displayedin either kilopascals (kPa) or inpounds per square inch (psi).
If a low or high tire pressure isdetected, a message is displayedadvising to check the tire pressurein the specified tire. See TirePressure on page 10‑46 and TireMessages on page 5‑52 for moreinformation.
If the tire pressure display showsdashes instead of a value, theremay be a problem with the vehicle.See your dealer for service.
Vehicle Messages
Turn the SELECT knob to scrollthrough any active warningmessages. Press SELECT toreview the messages.
Units
Turn the SELECT knob to changethe unit display to METRIC or USwhen the display is active. PressSELECT to confirm the setting. Thiswill change the displays on thecluster and DIC to either metric orEnglish (US) measurements.
Tutorial Mode
Select this menu item to view ascreen that explains some of theunique features of the cluster.
Tutorial mode is only available whenthe vehicle is in P (Park).
Turn-by-Turn
Select this menu item to view theOnStar or Navigation SystemTurn-by-Turn guidance. See OnStarOverview on page 14‑1 or thenavigation manual, if the vehicle hasnavigation, for more information.

Black plate (45,1)Chevrolet Volt Owner Manual - 2012
Instruments and Controls 5-45
Vehicle MessagesMessages displayed in the DICindicate the status of the vehicle orsome action that may be neededto correct a condition. Multiplemessages may display one after theother.
Messages that do not requireimmediate action can beacknowledged and cleared bypressing the SELECT knob. Themessages requiring immediateaction cannot be cleared until thataction is performed. All messagesshould be taken seriously. Clearingthe messages does not correct theproblem.
Battery and ChargingMessages
BATTERY SAVER ACTIVE
This message displays when thevehicle has detected that the 12-voltbattery voltage has dropped andvehicle features are being disabled.
The 12-volt battery saver systemstarts reducing certain featurestrying to save the charge of the12-volt battery. Turn off unnecessaryfeatures to allow the battery torecharge.
BATTERY TOO COLD, PLUG INTO WARM
This message displays duringextremely cold temperatures, whenthe vehicle will not start until thehigh voltage battery is warmenough.
Plug the vehicle in to allow thecharging system to warm the highvoltage battery, then the vehicle canbe started.
CHARGE CORD CONNECTED
This message displays when thecharge cord is connected to thevehicle. The vehicle cannot beshifted out of P (Park) with thecharge cord connected.
CHARGE DOOR OPEN
This message displays when thecharge door is open and the vehicleis shifted out of P (Park).
LOW BATTERY
This message displays when the12-volt battery voltage is low. SeeBattery on page 10‑23 for moreinformation.
SERVICE BATTERYCHARGING SYSTEM
This message displays when thereis a fault in the 12-volt batterycharging system. Take the vehicleto your dealer for service.
SERVICE HIGH VOLTAGECHARGING SYSTEM
This message displays when thereis a problem with the high voltagecharging system. See your dealerfor service.

Black plate (46,1)Chevrolet Volt Owner Manual - 2012
5-46 Instruments and Controls
Brake System Messages
BRAKE FLUID LOW
This message displays when thebrake fluid level is low. See BrakeFluid on page 10‑21.
RELEASE PARKING BRAKE
This message displays if the electricparking brake is on while the vehicleis in motion. Release it beforeattempting to drive. See ElectricParking Brake on page 9‑30 formore information.
SERVICE BRAKE ASSIST
This message displays when thereis a problem with the brake boostassist system. When this messagedisplays, the brake boost assistmotor might be heard operating anda pulsation may be felt in the brakepedal. Take the vehicle to yourdealer for service.
SERVICE PARKING BRAKE
This message displays when thereis a problem with the parking brake.Take the vehicle to your dealer forservice.
STEP ON BRAKE TORELEASE PARK BRAKE
This message displays whenattempting to release the electricparking brake without the brakepedal applied. See Electric ParkingBrake on page 9‑30 for moreinformation.
Cruise Control Messages
APPLY BRAKE BEFORECRUISE
If this message displays whenattempting to activate cruise control,apply the brake pedal and try again.
CRUISE SET TO XXX
This message displays when thecruise control is set and shows thespeed it was set to. See CruiseControl on page 9‑36 for moreinformation.
Door Ajar Messages
DOOR(S) OPEN, HOOD OPEN,HATCH OPEN
A symbol will appear on the displayshowing the area that is open. SeeDoor, Hood, or Hatch Open Light onpage 5‑28.
Drive Mode Messages
MOUNTAIN MODE NOTAVAILABLE
This message displays when inMountain Mode and the modebecomes unavailable. See“Mountain Mode” under DriverSelected Operating Modes onpage 9‑22.

Black plate (47,1)Chevrolet Volt Owner Manual - 2012
Instruments and Controls 5-47
SPORT MODE NOTAVAILABLE
This message displays when inSport Mode and the mode becomesunavailable. See “Sport Mode”under Driver Selected OperatingModes on page 9‑22.
Electric Drive UnitMessages
SHIFT TO PARK
This message displays when thevehicle should be shifted toP (Park). This may appear whenattempting to turn off the vehiclewhen it is not in P (Park).
Engine Cooling SystemMessages
ENGINEOVERHEATED — REDUCESPEED
This message displays when theengine coolant temperature orengine oil is too hot. Reduce speedand allow the vehicle to cool down.
ENGINEOVERHEATED — TURNVEHICLE OFF
This message displays and acontinuous chime sounds if theengine cooling system reachesunsafe temperatures for operation.Stop and turn off the vehicle assoon as it is safe to do so to avoidsevere damage. This messageclears when the engine has cooledto a safe operating temperature.
ENGINE RUNNING DUE TOTEMPERATURE
This message displays when thehigh voltage battery is charged butthe engine has to come on becauseof the outside temperature or highvoltage battery temperature.
Engine Oil Messages
CHANGE ENGINE OIL SOON
This message displays when theengine oil needs to be changed.After changing the engine oil, theEngine Oil Life System must bereset. See Engine Oil Life Systemon page 10‑12 and DriverInformation Center (DIC) onpage 5‑43 for information on howto reset the system. See Engine Oilon page 10‑9 and MaintenanceSchedule on page 11‑3 for moreinformation.

Black plate (48,1)Chevrolet Volt Owner Manual - 2012
5-48 Instruments and Controls
OIL PRESSURE LOW — TURNVEHICLE OFF
This message displays if low oilpressure levels occur. Stop thevehicle as soon as safely possibleand do not operate it until the causeof the low oil pressure has beencorrected. Check the oil as soon aspossible and have the vehicleserviced by your dealer.
Fuel System Messages
CLOSE FUEL DOOR
This message displays when thefuel door is open and the vehicle ismoving.
ENGINE NOT AVAILABLEADD FUEL
This message displays when theengine is not available due torunning out of fuel. The vehicle cancontinue to be driven in ElectricMode until the battery is depleted,but will have reduced acceleration.
When this message is displayed,refuel the vehicle. See Out of Fuel/Engine Unavailable on page 9‑24.
FUEL LEVEL LOW
This message displays when thevehicle is low on fuel. Refuel assoon as possible.
READY TO REFUEL
This message displays when thefuel system is depressurized andthe vehicle can be refueled.
TIGHTEN GAS CAP
This message displays when thefuel cap is not on tight. Tighten thefuel cap.
WAIT TO REFUEL
This message displays when thefuel system is pressurized and youmust to wait to refuel the vehicle.
Key and Lock MessagesWhen programming new RemoteKeyless Entry (RKE) transmitters,DIC messages display. See RemoteKeyless Entry (RKE) SystemOperation on page 2‑2 for moreinformation.
NO REMOTE DETECTED
This message displays when theRKE transmitter is not detectedwhile attempting to start the vehicle.The transmitter battery may beweak. See “Starting the Vehicle witha Low Transmitter Battery” underRemote Keyless Entry (RKE)System Operation on page 2‑2 formore information.

Black plate (49,1)Chevrolet Volt Owner Manual - 2012
Instruments and Controls 5-49
NO REMOTE DETECTED,PRESS BRAKE TO RESTART
This message displays if the RKEtransmitter is no longer detected inthe vehicle. Press the brake pedaland the POWER O button torestart the vehicle, or press thePOWER O button without pressingthe brake pedal to turn the vehicleoff. If the vehicle is turned off and avalid transmitter is not available, thevehicle will not restart.
REMINDER: KEY LEFT INVEHICLE
This message displays whenleaving the vehicle with the RKEtransmitter still inside.
REPLACE BATTERY INREMOTE KEY
This message displays when thebattery in the RKE transmitter needsto be replaced.
SERVICE KEYLESS STARTSYSTEM
This message displays when thekeyless start system needs service.Take the vehicle to your dealer.
Lamp Messages
AUTOMATIC LIGHT CONTROLON OR OFF
A message will display when theautomatic light control has beenturned on or off.
CHECK LAMP or LAMPFAILURE
Depending on the lamp, one ofthese messages may display. SeeBulb Replacement on page 10‑26.
TURN SIGNAL ON
This message displays if the turnsignal has been left on. Turn off theturn signal.
Object Detection SystemMessages
PARK ASSIST OFF
This message displays when thepark assist system has been turnedoff or when there is a temporarycondition causing the system to bedisabled. See Ultrasonic ParkingAssist on page 9‑38.
SERVICE PARKING ASSIST
This message displays if there is aproblem with the Ultrasonic Frontand Rear Parking Assist (UFRPA)system. Do not use this system tohelp you park. See UltrasonicParking Assist on page 9‑38 formore information. See your dealerfor service.

Black plate (50,1)Chevrolet Volt Owner Manual - 2012
5-50 Instruments and Controls
Propulsion PowerMessages
PROPULSION POWER ISREDUCED
This message displays when thepropulsion power is reduced andcan affect the ability to accelerate.If this message is on, but thereis no reduction in performance,proceed to your destination. Theperformance may be reduced thenext time the vehicle is driven. Thevehicle may be driven at a reducedspeed while this message is on, butmaximum acceleration and speedmay be reduced. If this messagestays on when the malfunctionindicator lamp is on, the vehicleshould be taken to your dealer forservice as soon as possible.
This message can display whendriving in mountainous terrainwithout using Mountain Mode or bynot entering Mountain Mode soonenough to build a sufficient batterycharge reserve before climbing
steep grades. This is normaloperation to protect the highvoltage battery. Only if both thePROPULSION POWER ISREDUCED message and themalfunction indicator lamp are onshould the vehicle be taken to thedealer for service.
While climbing the grade with thismessage displayed, the vehiclespeed may be reduced until theengine can recover the battery stateof charge to a normal level. See“Mountain Mode” under DriverSelected Operating Modes onpage 9‑22.
Ride Control SystemMessages
LOW TRACTION
This message displays when theAntilock Brake System (ABS) isactive and is working to assist thedriver with control of the vehicle indifficult driving conditions.
SERVICE STABILITRAK
This message displays when thereis a problem detected with theStabiliTrak system. The vehicle issafe to drive, but the StabiliTraksystem is not operational. SeeElectronic Stability Control (ESC) onpage 9‑34 for information onresetting the system.
SERVICE TRACTIONCONTROL
This message displays when thereis a problem detected with theTraction Control System (TCS). Thevehicle is safe to drive, but the TCSis not operational. See TractionControl System (TCS) on page 9‑33for information on resetting thesystem.
STABILITRAK OFF
This message displays whenStabiliTrak is turned off. Adjust yourdriving accordingly.

Black plate (51,1)Chevrolet Volt Owner Manual - 2012
Instruments and Controls 5-51
TRACTION CONTROL OFF
This message displays when theTraction Control System (TCS) isturned off. Adjust your drivingaccordingly.
TRACTION CONTROL ON
This message displays when theTraction Control System (TCS) isturned on.
Airbag System Messages
SERVICE AIRBAG
This message displays if there is aproblem with the airbag system.Take the vehicle to your dealer forservice.
Anti-theft Alarm SystemMessages
SERVICE THEFT ALARM
This message displays if there is aproblem with the alarm. See yourdealer for service.
SERVICE THEFT DETERRENTSYSTEM
This message displays if there is aproblem with the theft-deterrentsystem. See your dealer for service.
Service Vehicle Messages
ENGINE MAINTENANCEXXX% COMPLETE
This message displays when theEngine Maintenance Mode isrunning. See “Engine MaintenanceMode” under Maintenance Modeson page 9‑24.
ENGINE NOT AVAILABLESERVICE SOON
This message displays when theengine is not available due to amalfunction that will not allow theengine to start. The vehicle cancontinue to be driven in ElectricMode until the battery is depleted,but will have reduced acceleration.
When this message is displayed,the vehicle should be taken to yourdealer for service as soon aspossible. See Out of Fuel/EngineUnavailable on page 9‑24.
SERVICE AC SYSTEM
This message displays if there is aproblem with the air conditioningsystem. Take the vehicle to yourdealer for service.
SERVICE HEATER SOON
This message displays if there is aproblem with the heater system.Take the vehicle to your dealer forservice.
SERVICE POWER STEERING
This message displays if there is aproblem with the power steeringsystem. Take the vehicle to yourdealer for service.

Black plate (52,1)Chevrolet Volt Owner Manual - 2012
5-52 Instruments and Controls
SERVICE VEHICLE SOON
This message displays if there is aproblem with the vehicle. Take thevehicle to your dealer for service.Depending on the severity of acrash, this message may come onalong with the airbag readinesslight.
Starting the VehicleMessages
PRESS BRAKE TO STARTVEHICLE
This message displays whenattempting to start the vehiclewithout first pressing the brakepedal.
PRESS BUTTON AGAIN TOTURN OFF
This message displays asa reminder to press thePOWER O button to turn thevehicle off when an attempt ismade to turn off the vehicle whileit is in motion.
Tire Messages
SERVICE TIRE MONITORSYSTEM
This message displays if there is aproblem with the Tire PressureMonitor System (TPMS). See TirePressure Monitor Operation onpage 10‑48 for more information.
TIRE LEARNING ACTIVE
This message displays when thesystem is learning new tires. SeeTire Pressure Monitor Operation onpage 10‑48 for more information.
TIRE LOW ADD AIR TO TIRE
This message displays when thepressure in one or more of the tiresis low.
This message also displays LEFTFRONT, RIGHT FRONT, LEFTREAR, or RIGHT REAR to indicatethe location of the low tire.
The low tire pressure warninglight will also come on. See TirePressure Light on page 5‑25.
If a tire pressure message appearson the DIC, stop as soon as youcan. Inflate the tires by adding airuntil the tire pressure is equal tothe values shown on the Tire andLoading Information label. See Tireson page 10‑40, Vehicle Load Limitson page 9‑11, and Tire Pressure onpage 10‑46.
You can receive more than one tirepressure message at a time. TheDIC also shows the tire pressurevalues. See Driver InformationCenter (DIC) on page 5‑43.

Black plate (53,1)Chevrolet Volt Owner Manual - 2012
Instruments and Controls 5-53
Vehicle ReminderMessages
ICE POSSIBLE DRIVEWITH CARE
This message is displayed when iceconditions are possible.
Vehicle Speed Messages
SPEED LIMITED TO XXX
This message displays when thevehicle speed is limited.
Washer Fluid Messages
WASHER FLUID LOW ADDFLUID
This message displays when thewasher fluid level is low. Forinformation on filling the washerfluid, see Washer Fluid onpage 10‑19.
VehiclePersonalizationThe Vehicle Personalizationfeatures can be accessed by usingeither the infotainment controls orthe touch screen in the center stackdisplay. See Overview on page 7‑2under “Infotainment System” formore information.
Using the InfotainmentControls
Use the CONFIG, TUNE/MENUknob, and } BACK buttonson the center stack to selectpersonalization features.
CONFIG (Configure): Press toscroll through the available menusacross the top of the touch screendisplay.
TUNE/MENU Knob. Press to enter, select, or activate
a highlighted menu option.. Turn to highlight a menu option.. Press to turn a system setting on
or off.
} BACK
. Press to exit a menu.
. Press to return to a previousscreen.
Submenus
An arrow on the right‐hand edge ofthe menu indicates that it has asubmenu with other options.
Selecting a Menu Option
1. Turn the TUNE/MENU knob tohighlight the function.
2. Press the TUNE/MENU knob toselect the highlighted option.A checkmark next to the optionindicates the selected option.

Black plate (54,1)Chevrolet Volt Owner Manual - 2012
5-54 Instruments and Controls
Turning a Function On or Off
1. Turn the TUNE/MENU knob tohighlight the function.
2. Press the TUNE/MENU knobto turn the function on or off.A checkmark next to the functionindicates that the function is on.
Using the Touch Screen
Use the touch screen icons andmenus on the center stack displayto select personalization features.
w : Touch to scroll up.
x : Touch to scroll down.
Back: Touch Back in the upperright corner of the display to returnto the previous menu.
Submenus
An arrow on the right‐hand edge ofthe menu indicates that it has asubmenu with other options.
Selecting a Menu Option
Touch any one of the availablemenu options on the touch screento select the option. A checkmarknext to the option indicates theselected option.
Turning a Function On or Off
Touch the screen where theavailable function is listed to turn iton or off. A checkmark next to thefunction indicates that the functionis on.
Entering thePersonalization Menu
Press the Vehicle Settings menu onthe touch screen.
The Vehicle Settings menu featuresmay include:. Climate and Air Quality. Comfort and Convenience. Languages. Lighting. Power Door Locks. Remote Locking, Unlocking,
Starting. Return to Factory Settings

Black plate (55,1)Chevrolet Volt Owner Manual - 2012
Instruments and Controls 5-55
Climate and Air Quality
Select the Climate and Air Qualitymenu to display:. Auto Fan Speed. Auto Heated Seats. Remote Start Auto Heated Seats. Auto Defog. Engine Assisted Heating. Engine Assisted Heating
(Plugged‐In)
Auto Fan Speed
This feature sets the automatic fanspeed to maintain the desiredinterior temperature. This selectionis available on vehicles with theautomatic climate control system.Choose a blower setting:
High: Increased speed.
Medium: Moderate speed.
Low: Reduced speed.
To select the auto fan speed:
1. Press the VehicleSettings menu.
2. Select Climate and Air Quality.
3. Select Auto Fan Speed.
4. Select the fan speed.
5. Press Back to return to theprevious menu.
Auto Heated Seats
When enabled, the auto heated seatbuttons on the touch screen willbe highlighted. This feature willautomatically activate heated seatsat the level required by the interiortemperature. The auto heated seatscan be turned off by using theheated seat buttons on the centerstack.
To turn the auto heated seats onor off:
1. Press the VehicleSettings menu.
2. Select Climate and Air Quality.
3. Turn the auto heated seatsfeature on or off.
4. Press Back to return to theprevious menu.
Remote Start Auto Heated Seats
When on, this feature will turn theheated seats on when using remotestart.
To turn the remote start auto heatedseats on or off:
1. Press the VehicleSettings menu.
2. Select Climate and Air Quality.
3. Turn the remote start autoheated seats feature on or off.
4. Press Back to return to theprevious menu.

Black plate (56,1)Chevrolet Volt Owner Manual - 2012
5-56 Instruments and Controls
Auto Defog
When on and high humidity isdetected, the climate control systemwill adjust the outside air, airconditioner, or heat to decreasefogging. The fan speed mayincrease. When high humidity is nolonger detected, the system willreturn to previous operation.
To turn the auto defog on or off:
1. Press the VehicleSettings menu.
2. Select Climate and Air Quality.
3. Turn the auto defog feature onor off.
4. Press Back to return to theprevious menu.
Engine Assisted Heating
If equipped, this feature selectsthe outside temperature level atwhich the engine may run to assistheating in Electric Mode. A changein selection will not take affectuntil after the vehicle is firstpowered down.
The Engine Assisted Heatingoptions are:. At Cold Outside Temperatures. At Very Cold Outside
Temperatures
To select the outside temperaturelevel:
1. Press the Vehicle menu.
2. Select Climate and Air Quality.
3. Select the temperature level.
4. Press Back to return to theprevious menu.
Engine Assisted Heating(Plugged‐In)
If equipped, this feature will enableor disable Engine Assisted Heatingwhenever the vehicle is plugged in.A change in setting will not takeaffect until after the vehicle is firstpowered down.
The Engine Assisted Heatingoptions are:. At Cold Outside Temperatures. At Very Cold Outside
Temperatures
To turn the Engine Assisted Heating(Plugged‐In) on or off:
1. Press the Vehicle menu.
2. Select Climate and Air Quality.
3. Turn the Engine AssistedHeating (Plugged‐In) feature onor off.
4. Press Back to return to theprevious menu.
Comfort and Convenience
Select the Comfort andConvenience menu and thefollowing will be displayed:. Chime Volume. Button Chime. Energy Summary Exit Pop‐up

Black plate (57,1)Chevrolet Volt Owner Manual - 2012
Instruments and Controls 5-57
. Charge Cord Theft Alert
. Charge Power Loss Alert
Chime Volume
This allows the selection of thechime volume level to be eithernormal or high.
To select the chime volume level:
1. Press the VehicleSettings menu.
2. Select Comfort andConvenience.
3. Select Chime Volume.
4. Select the volume level.
5. Press Back to return to theprevious menu.
Button Chime
This allows a tone to be heard whena selection is made using theinfotainment system.
To turn the button chime on or off:
1. Press the VehicleSettings menu.
2. Select Comfort andConvenience.
3. Turn the button chime feature onor off.
4. Press Back to return to theprevious menu.
Energy Summary Exit Pop‐up
This allows the energy summaryexit pop‐up to be turned on or off:
1. Press the VehicleSettings menu.
2. Select Comfort andConvenience.
3. Turn the energy summary exitpop‐up feature on or off.
4. Press Back to return to theprevious menu.
Charge Cord Theft Alert
This allows the charge cord theftalert to be turned on or off:
1. Press the VehicleSettings menu.
2. Select Comfort andConvenience.
3. Turn the Charge Cord Theft Alertfeature on or off.
4. Press Back to return to theprevious menu.
Charge Power Loss Alert
This allows the charge power lossalert to be turned on or off:
1. Press the VehicleSettings menu.
2. Select Comfort andConvenience.
3. Turn the Charge Power LossAlert feature on or off.
4. Press Back to return to theprevious menu.

Black plate (58,1)Chevrolet Volt Owner Manual - 2012
5-58 Instruments and Controls
Languages
This allows the selection of alanguage:
1. Press the VehicleSettings menu.
2. Select Languages.
3. Select English, French,or Spanish.
4. Press Back to return to theprevious menu.
Lighting
Select the Lighting menu and thefollowing will be displayed:. Exit Lighting. Vehicle Locator Lights
Exit Lighting
This allows the selection of howlong the exterior lamps stay onwhen leaving the vehicle and it isdark outside.
The available options are:. OFF. 30 seconds. 1 minute. 2 minutes
To select the length of time theexterior lamps will remain on:
1. Press the VehicleSettings menu.
2. Select Lighting.
3. Select Exit Lighting.
4. Select the length of time theexterior lamps will remain on.
5. Press Back to return to theprevious menu.
Vehicle Locator Lights
This allows the vehicle locatorlights to be turned on or off. Whenon, the headlamps, parking lamps,taillamps, license plate lamps,and back-up lamps will illuminatewhen K is pressed on the RKEtransmitter.
To turn the vehicle locator lights onor off:
1. Press the VehicleSettings menu.
2. Select Lighting.
3. Select Vehicle Locator Lights.
4. Turn the vehicle locator lights onor off.
5. Press Back to return to theprevious menu.
Power Door Locks
Select Power Door Locks and thefollowing will be displayed:. Auto Door Unlock. Unlocked Door Anti Lock Out. Delayed Door Lock
Auto Door Unlock
This allows selection of which doorswill automatically unlock when thevehicle is shifted into P (Park).

Black plate (59,1)Chevrolet Volt Owner Manual - 2012
Instruments and Controls 5-59
The available options are:. All Doors. Driver Door. OFF
To select how the doors willautomatically unlock:
1. Press the VehicleSettings menu.
2. Select Power Door Locks.
3. Select Auto Door Unlock.
4. Select how the doors willautomatically unlock.
5. Press Back to return to theprevious menu.
Unlocked Door Anti Lock Out
When on, this feature will keep thedriver door from locking until thedoor is closed. If this feature isturned on, the Delayed Door Lockmenu will not be available.
To turn the unlocked door anti lockout feature on or off:
1. Press the VehicleSettings menu.
2. Select Power Door Locks.
3. Select Unlocked Door AntiLock Out.
4. Turn the unlocked door anti lockout feature on or off.
5. Press Back to return to theprevious menu.
Delayed Door Lock
When on, this feature will delay thelocking of the doors. To override thedelay, press the power door lockswitch on the center stack.
To turn the delayed door lockfeature on or off:
1. Press the VehicleSettings menu.
2. Select Power Door Locks.
3. Select Delayed Door Lock.
4. Turn the delayed door lockfeature on or off.
5. Press Back to return to theprevious menu.
Remote Locking, Unlocking,Starting
Select Remote Locking, Unlocking,Starting and the following will bedisplayed:. Remote Lock Feedback. Remote Unlock Light Feedback. Door Unlock or Remote Door
Unlock. Remote Left in Vehicle Reminder. Passive Unlocking Door Options. Passive Locking Options

Black plate (60,1)Chevrolet Volt Owner Manual - 2012
5-60 Instruments and Controls
Remote Lock Feedback
This allows selection of whatfeedback is provided whenunlocking the vehicle with theRKE transmitter.
The available options are:. Lights and Horn. Lights Only. Horn Only. OFF
To select the remote lock feedback:
1. Press the VehicleSettings menu.
2. Select Remote Locking,Unlocking, Starting.
3. Select Remote Lock Feedback.
4. Select the remote feedback.
5. Press Back to return to theprevious menu.
Remote Unlock Light Feedback
When on, the exterior lamps willflash when unlocking the vehiclewith the RKE transmitter.
To turn the remote unlock lightfeedback feature on or off:
1. Press the VehicleSettings menu.
2. Select Remote Locking,Unlocking, Starting.
3. Select Remote Unlock LightFeedback.
4. Turn the remote unlock lightfeedback feature on or off.
5. Press Back to return to theprevious menu.
Door Unlock or Remote DoorUnlock
This allows selection of which doorswill unlock when pressing K on theRKE transmitter.
The available options are:. All Doors. Driver Door
If All Doors is selected, all doors willbe unlocked.
If Driver Door is selected, onlythe driver door will be unlockedon the first press of K. All doorswill be unlocked on the secondpress of K within five seconds ofthe prior press.
To select how the doors will unlockwith the RKE transmitter:
1. Press the VehicleSettings menu.
2. Select Remote Locking,Unlocking, Starting.
3. Select Door Unlock or RemoteDoor Unlock.
4. Select how the doors will unlock.
5. Press Back to return to theprevious menu.

Black plate (61,1)Chevrolet Volt Owner Manual - 2012
Instruments and Controls 5-61
Remote Left in Vehicle Reminder
When on, the horn will chirp rapidlythree times if an RKE transmitter isleft in the vehicle.
To turn the remote left in vehiclereminder feature on or off:
1. Press the VehicleSettings menu.
2. Select Remote Locking,Unlocking, Starting.
3. Select Remote Left in VehicleReminder.
4. Turn the remote left in vehiclereminder feature on or off.
5. Press Back to return to theprevious menu.
Passive Door Unlock
This allows selection of which doorsare unlocked by pressing the buttonon the outside door handle.
The available options are:. All Doors. Driver Door
To select how the doors will unlock:
1. Press the VehicleSettings menu.
2. Select Remote Locking,Unlocking, Starting.
3. Select Passive Door Unlock.
4. Select which doors to unlock.
5. Press Back to return to theprevious menu.
Passive Door Lock
This allows passive locking to beturned on or off and select whattype of feedback.
The available options are:. Off. On. On with Active Horn Chirp
To select doors locking feedback:
1. Press the VehicleSettings menu.
2. Select Remote Locking,Unlocking, Starting.
3. Select Passive Door Lock.
4. Select On, Off, or On with ActiveHorn Chirp.
5. Press Back to return to theprevious menu.
Return to Factory Settings
This returns all of the vehiclepersonalization settings to thefactory settings.
1. Press the VehicleSettings menu.
2. Select Return to FactorySettings.
3. Select Yes or No.
4. Press Back to return to theprevious menu.

Black plate (62,1)Chevrolet Volt Owner Manual - 2012
5-62 Instruments and Controls
Universal RemoteSystemSee Radio Frequency Statement onpage 13‑16 for informationregarding Part 15 of the FederalCommunications Commission (FCC)rules and Industry CanadaStandards RSS-GEN/210/220/310.
Universal Remote SystemProgramming
If the vehicle has this feature, youwill see these buttons with oneLED indicator next to them in theoverhead console.
This system provides a way toreplace up to three remote controltransmitters used to activate
devices such as garage dooropeners, security systems, andhome automation devices.
Do not use the Universal Remotesystem with any garage door openerthat does not have the stop andreverse feature. This includes anygarage door opener modelmanufactured before April 1,1982.
Read the instructions completelybefore attempting to program theUniversal Remote system. Becauseof the steps involved, it may behelpful to have another personavailable to assist with programmingthe Universal Remote system.
Keep the original hand-heldtransmitter for use in other vehiclesas well as for future UniversalRemote system programming. It isalso recommended that upon thesale of the vehicle, the programmedUniversal Remote system buttonsbe erased for security purposes.See “Erasing Universal RemoteSystem Buttons” later in thissection.
When programming a garage door,park outside of the garage. Parkdirectly in line with and facing thegarage door opener motor-head orgate motor-head. Be sure thatpeople and objects are clear ofthe garage door or gate beingprogrammed.
It is recommended that a newbattery be installed in the hand-heldtransmitter for quicker and moreaccurate transmission of theradio-frequency signal.
Programming the UniversalRemote System
For questions or help programmingthe Universal Remote system,call 1‐800‐355‐3515 or go towww.homelink.com.
Programming a garage door openerinvolves time-sensitive actions, soread the entire procedure beforestarting. Otherwise, the device willtime out and the procedure will haveto be repeated.

Black plate (63,1)Chevrolet Volt Owner Manual - 2012
Instruments and Controls 5-63
To program up to three devices:
1. Hold the end of the hand-heldtransmitter about 3 to 8 cm(1 to 3 in) away from theUniversal Remote systembuttons while keeping theindicator light in view. Thehand-held transmitter wassupplied by the manufacturerof the garage door openerreceiver (motor-head unit).
2. At the same time, press andhold both the hand-heldtransmitter button and one of thethree Universal Remote systembuttons to be used to operatethe garage door. Do not releasethe Universal Remote systembutton or the hand-heldtransmitter button until theindicator light changes from aslowly to a rapidly flashing light.You now may release bothbuttons.
Some entry gates and garagedoor openers may requiresubstitution of Step 2 with the
procedure noted in “GateOperator and CanadianProgramming” later in thissection.
3. Press and hold for five secondsthe newly trained UniversalRemote system button (thebutton selected in Step 2) whileobserving the indicator light andgarage door activation.. If the indicator light stays on
continuously or the garagedoor starts to move whenthe Universal Remotesystem button is pressedand released, then theprogramming is complete.There is no need tocontinue programmingSteps 4 through 6.
. If the Universal Remotesystem indicator light blinksrapidly for two seconds,then turns to a constantlight and the garage door
does not move, continuewith programming Steps 4through 6.
It may be helpful to haveanother person assist withthe remaining Steps 4through 6.
“Learn” or “Smart” Button
4. After Steps 1 through 3 havebeen completed, locate the“Learn” or “Smart” button insidethe garage on the garage dooropener receiver (motor-headunit). The name and colorof the button may vary bymanufacturer.

Black plate (64,1)Chevrolet Volt Owner Manual - 2012
5-64 Instruments and Controls
5. Firmly press and release the“Learn” or “Smart” button. Afterpressing this button, you willhave 30 seconds to completeStep 6.
6. Immediately return to thevehicle. Firmly press and holdfor two seconds the UniversalRemote system button, selectedin Step 2 to control the garagedoor, and then release it. If thegarage door does not move orthe lamp on the garage dooropener receiver (motor-headunit) does not flash, press andhold the same button a secondtime for two seconds, and thenrelease it. Again, if the doordoes not move or the garagedoor lamp does not flash, pressand hold the same button a thirdtime for two seconds, and thenrelease.
The Universal Remote systemshould now activate thegarage door.
To program the remaining twoUniversal Remote system buttons,begin with Step 1 of “Programmingthe Universal Remote System.”
Gate Operator and CanadianProgramming
If you have questions or need helpprogramming the Universal Remotesystem, call 1‐800‐355‐3515 or goto www.homelink.com.
Canadian radio-frequency lawsrequire transmitter signals to timeout or quit after several seconds oftransmission. This may not be longenough for the Universal Remotesystem to pick up the signal duringprogramming. Similarly, some U.S.gate operators are manufactured totime out in the same manner.
If you live in Canada, or you arehaving difficulty programming a gateoperator or garage door openerby using the “Programming theUniversal Remote System”procedures, regardless of whereyou live, replace Step 2 under“Programming the Universal RemoteSystem” with the following:
Continue to press and hold theUniversal Remote system buttonwhile you press and release everytwo seconds (cycle) the hand-heldtransmitter button until thefrequency signal has beensuccessfully accepted by theUniversal Remote system. TheUniversal Remote system indicatorlight will flash slowly at first and thenrapidly. Proceed with Step 3 under“Programming the Universal RemoteSystem” to complete.

Black plate (65,1)Chevrolet Volt Owner Manual - 2012
Instruments and Controls 5-65
Universal Remote SystemOperation
Using the Universal RemoteSystem
Press and hold the appropriateUniversal Remote system buttonfor at least half of a second. Theindicator light will come on while thesignal is being transmitted.
Erasing Universal RemoteSystem Buttons
All programmed buttons should beerased when the vehicle is sold orthe lease ends.
To erase all programmed buttonson the Universal Remote systemdevice:
1. Press and hold down thetwo outside buttons until theindicator light begins to flash.This should take about10 seconds.
2. Release both buttons.
Reprogramming a SingleUniversal Remote SystemButton
To reprogram any of the threeUniversal Remote system buttons:
1. Press and hold the desiredUniversal Remote systembutton. Do not release thebutton.
2. The indicator light will begin toflash after 20 seconds. Withoutreleasing the button, proceedwith Step 1 of the section“Programming the UniversalRemote System.”
If you have questions or need helpprogramming the Universal Remotesystem, call 1‐800‐355‐3515 or goto www.homelink.com. You mayalso call the customer assistancephone number under CustomerAssistance Offices on page 13‑3.

Black plate (66,1)Chevrolet Volt Owner Manual - 2012
5-66 Instruments and Controls
2 NOTES

Black plate (1,1)Chevrolet Volt Owner Manual - 2012
Lighting 6-1
Lighting
Exterior LightingExterior Lamp Controls . . . . . . . . 6-1Headlamp High/Low-BeamChanger . . . . . . . . . . . . . . . . . . . . . 6-2
Flash-to-Pass . . . . . . . . . . . . . . . . . 6-2Daytime RunningLamps (DRL) . . . . . . . . . . . . . . . . 6-2
Hazard Warning Flashers . . . . . 6-3Turn and Lane-ChangeSignals . . . . . . . . . . . . . . . . . . . . . . 6-3
Interior LightingInstrument Panel IlluminationControl . . . . . . . . . . . . . . . . . . . . . . 6-4
Dome Lamps . . . . . . . . . . . . . . . . . 6-4Reading Lamps . . . . . . . . . . . . . . . 6-5
Lighting FeaturesEntry Lighting . . . . . . . . . . . . . . . . . 6-5Exit Lighting . . . . . . . . . . . . . . . . . . . 6-6Battery Power Protection . . . . . . 6-6
Exterior Lighting
Exterior Lamp Controls
The exterior lamp control is on theturn signal/lane change lever.
O (Exterior Lamp Control):Operates the exterior lamps. Turn toone of the following positions:
O (Off): Turns the exteriorlamps off.
AUTO (Automatic Headlamps):Turns the exterior lamps on and offautomatically depending on theexterior light.
; (Parking Lamps): Turns onthe parking lamps together with thefollowing:. Sidemarker Lamps. Taillamps. License Plate Lamps. Instrument Panel Lights
5 (Headlamps): Turns on theheadlamps, together with thepreviously listed lamps and lights.

Black plate (2,1)Chevrolet Volt Owner Manual - 2012
6-2 Lighting
Headlamp High/Low-Beam Changer23 Headlamp High/Low‐BeamChanger: Push the turn signal/lanechange lever away from you andrelease, to turn the high beams on.To return to low beams, push thelever again or pull it toward you andrelease.
This indicator light turns on inthe instrument cluster when thehigh‐beam headlamps are on.
Flash-to-PassThe flash‐to‐pass feature works withthe low beams or Daytime RunningLamps (DRL) on or off.
To flash the high beams, pull theturn signal/lane change lever towardyou momentarily and then release it.
Daytime RunningLamps (DRL)The Daytime Running Lamps (DRL)system comes on in daylight whenthe following conditions are met:. The vehicle is on.. The exterior lamp control is in
the automatic position.. The electric drive unit is not in
P (Park).. The light sensor determines it is
daytime.
A light sensor on top of theinstrument panel makes the DRLwork, so be sure it is not covered.
Fully functional DRL are required onall vehicles first sold in Canada.
When the DRL are on, the taillamps,sidemarker lamps, instrument panellights, and other lamps will not beon. The instrument cluster will be lit.

Black plate (3,1)Chevrolet Volt Owner Manual - 2012
Lighting 6-3
When the exterior lamp control bandis turned to the headlamp position,the low-beam headlamps come on.The other lamps that come on withthe headlamps will also come on.
When the vehicle is on and you arestopped, the DRL can be turned offby moving the shift lever to P (Park).The DRL will stay off until the shiftlever is moved out of the P (Park)position.
The regular headlamp systemshould be turned on when needed.
Hazard Warning Flashers
| (Hazard Warning Flasher):Press this button, on the centerstack, to make the front and rearturn signal lamps flash on and off.This warns others that you arehaving trouble.
Press| again to turn theflashers off.
Turn and Lane-ChangeSignals
An arrow on the instrument clusterwill flash in the direction of the turnor lane change.
Move the lever all the way up ordown to signal a turn.

Black plate (4,1)Chevrolet Volt Owner Manual - 2012
6-4 Lighting
Raise or lower the lever until thearrow starts to flash to signal a lanechange. Hold it there until the lanechange is complete. If the lever ismoved momentarily to the lanechange position, the arrow will flashthree times.
The lever returns to its startingposition when it is released.
If a turn signal arrow flashes rapidlyor does not come on, a signal bulbmay need to be replaced. See BulbReplacement on page 10‑26.
Interior Lighting
Instrument PanelIllumination Control
The brightness of the instrumentpanel cluster display, infotainmentdisplay and controls, steering wheelcontrols, and all other illuminatedcontrols, as well as feature statusindicators can be adjusted.
The thumbwheel is on theinstrument panel beside the steeringcolumn.
Move the thumbwheel up or down tobrighten or dim the lights.
Dome Lamps
The dome lamp controls are in theoverhead console.
To operate, press the followingbuttons:
' (On): Press to turn on thedome lamps.
H (Door): Press to turn the lampson automatically when a door isopened.
( (Off): Press to turn the lampsoff, even when a door is open.

Black plate (5,1)Chevrolet Volt Owner Manual - 2012
Lighting 6-5
Reading LampsThere are front and rear readinglamps.
The front reading lamps are in theoverhead console.
#$ : Press to turn each lamp onor off.
The rear reading lamps are in theheadliner.
Lighting Features
Entry LightingThe headlamps, parking lamps,taillamps, back‐up lamps, and theinterior lights turn on briefly whenthe Remote Keyless Entry (RKE)transmitter K is pressed. The lightsturn off immediately when thePOWER O button is pressed orautomatically after a brief period.

Black plate (6,1)Chevrolet Volt Owner Manual - 2012
6-6 Lighting
Exit LightingThe headlamps, parking lamps,taillamps, back‐up lamps, andlicense plate lamps come on whenthe vehicle is turned off. Someinterior lights also come on whenthe vehicle is turned off. Theexterior lamps and interior lightsremain on after the door is closedfor a brief period and then turn off.
The exit lighting feature canbe changed. See VehiclePersonalization on page 5‑53.
Battery Power ProtectionThe battery saver feature isdesigned to protect the vehicle's12‐volt battery.
If the exterior lamps or any interiorlamp is left on and the vehicle isturned off, the battery rundownprotection system automaticallyturns the lamps off after about10 minutes.

Black plate (1,1)Chevrolet Volt Owner Manual - 2012
Infotainment System 7-1
InfotainmentSystem
IntroductionInfotainment . . . . . . . . . . . . . . . . . . . 7-1Theft-Deterrent Feature . . . . . . . 7-2Overview . . . . . . . . . . . . . . . . . . . . . . 7-2
RadioAM-FM Radio . . . . . . . . . . . . . . . . . 7-7Satellite Radio . . . . . . . . . . . . . . . . 7-9Radio Reception . . . . . . . . . . . . . 7-11Multi-Band Antenna . . . . . . . . . . 7-12
Audio PlayersCD Player . . . . . . . . . . . . . . . . . . . 7-12MP3 . . . . . . . . . . . . . . . . . . . . . . . . . 7-14Auxiliary Devices . . . . . . . . . . . . 7-15
PhoneBluetooth (Overview) . . . . . . . . 7-20Bluetooth (InfotainmentControls) . . . . . . . . . . . . . . . . . . . 7-21
Bluetooth (VoiceRecognition) . . . . . . . . . . . . . . . 7-25
Trademarks and LicenseAgreementsTrademarks and LicenseAgreements . . . . . . . . . . . . . . . . 7-31
Introduction
InfotainmentRead the following pages tobecome familiar with the audiosystem's features.
{ WARNING
Taking your eyes off the roadfor extended periods couldcause a crash resulting in injuryor death to you or others. Donot give extended attention toentertainment tasks while driving.
This system provides accessto many audio and non‐audiolistings.
To minimize taking your eyes off theroad while driving, do the followingwhile the vehicle is parked:. Become familiar with the
operation and controls of theaudio system.

Black plate (2,1)Chevrolet Volt Owner Manual - 2012
7-2 Infotainment System
. Set up the tone, speakeradjustments, and preset radiostations.
For more information, see DefensiveDriving on page 9‑5.
The vehicle has RetainedAccessory Power (RAP). With RAP,the audio system can be playedeven after the ignition is turned off.See Retained Accessory Power(RAP) on page 9‑19 for moreinformation.
Navigation/Radio System
For vehicles with a navigation radiosystem, see the separate navigationmanual.
Theft-Deterrent FeatureThe theft-deterrent feature works bylearning a portion of the VehicleIdentification Number (VIN) tothe infotainment system. Theinfotainment system does notoperate if it is stolen or moved to adifferent vehicle.
OverviewKeeping your eyes on the road andyour mind on the drive is importantfor safe driving. The infotainmentsystem has built-in featuresintended to help with this bydisabling some features whendriving. A grayed-out function isnot available when the vehicle ismoving.
All functions are available when thevehicle is parked. Do the followingbefore driving:. Become familiar with the
infotainment system operation,buttons on the faceplate, andtouch-sensitive screen buttons.
. Set up the audio by presettingfavorite stations, setting thetone, and adjusting thespeakers.
. Set up phone numbers inadvance so they can be calledeasily by pressing a singlebutton or a single voicecommand for vehicles equippedwith phone capability.
{ WARNING
Taking your eyes off the road toolong or too often while using thenavigation system could cause acrash and you or others could beinjured or killed. Focus yourattention on driving and limitglances at the moving map on thenavigation screen. Use voiceguidance whenever possible.
Infotainment System Overview
The infotainment system iscontrolled by using the buttons onthe faceplate and the touch screen.
See “Infotainment Control Buttons”in this section for more information.

Black plate (3,1)Chevrolet Volt Owner Manual - 2012
Infotainment System 7-3
A. F (Home Page)
B. SOURCE
C. V
D. TUNE/MENU
E. } BACK
F. TONE
G. CONFIG
H. X (Eject)
I. FAV (Favories)
J. AS 1–2
K. INFO (Information)
L. VOL/ O (Volume/Power)
M. k (Play/Pause)
N. TP (Time Program)
O. ? (Mute)
P. r SEEK and SEEK[

Black plate (4,1)Chevrolet Volt Owner Manual - 2012
7-4 Infotainment System
Infotainment Control Buttons
The buttons on the faceplate areused to start primary functions whileusing the infotainment system.
VOL/O (Volume/Power):
1. Press to turn the system onand off.
2. Turn to adjust the volume.
k (Play/Pause): Pressk to start,pause, and resume playback. SeeCD Player on page 7‑12 and MP3on page 7‑14 for more information.
SOURCE: Press to change theaudio sources such as AM-FMRadio, XM™ (if equipped), CD,and AUX.
TONE: Press to access thesound menu screen to adjust bass,midrange, and treble. See AM-FMRadio on page 7‑7 for moreinformation.
INFO (Information): Press totoggle through an audio informationscreen.
CONFIG (Configure): Press toadjust features for radio, display,phone, vehicle, and time.
F (Home Page): See “HomePage” following in this section.
TUNE/MENU: Turn to highlighta feature. Press to activate thehighlighted feature. Turn tomanually select a radio station.
5 (Phone Menu): See Bluetooth(Overview) on page 7‑20 orBluetooth (Infotainment Controls) onpage 7‑21 or Bluetooth (VoiceRecognition) on page 7‑25 for moreinformation.
} BACK: Press to return to theprevious screen in a menu.
If on a page accessed directly by afaceplate button or Home Pagescreen button, pressing } BACK willgo to previous menu.
FAV (Favorite Pages 1-6): Pressto display the current page numberabove the preset buttons. Thestored stations for each listdisplay on the touch-sensitive
preset buttons at the bottom ofthe screen. The number of presetFAV lists can be changed in theConfiguration Menu.
r SEEK (Seek Down):
1. Press to seek to the beginningof the current or previous track.If the track has been playing forless than five seconds, it seeksthe previous track. If longer thanfive seconds, the current trackstarts from the beginning.
2. Press and hold to quicklyreverse through a track. Releasethe button to return to playingspeed. See CD Player onpage 7‑12 and MP3 onpage 7‑14 for more information.
3. For AM, FM, or XM (if equipped),press to seek to the previousstrong station.
SEEK[ (Seek Up):
1. Press to seek the next track.
2. Press and hold to fast forwardthrough a track.

Black plate (5,1)Chevrolet Volt Owner Manual - 2012
Infotainment System 7-5
3. Release the button to return toplaying speed. See CD Playeron page 7‑12 and MP3 onpage 7‑14 for more information.
4. For AM, FM, or XM (if equipped),press to seek to the next strongstation.
Preset Buttons (1-6): The presetbuttons numbered one through sixcan be used to select stored AM,FM, and XM (if equipped) stations.
TP (Time Program): Press to setthe time.
X (Eject): Press to eject a discfrom the CD player. See CD Playeron page 7‑12.
Touch Screen Buttons
Touch screen buttons are on thescreen and highlighted when afeature is available. Some togglescreen buttons highlight when activeand gray out when inactive.
Home Page
The infotainment system displays ahome page that makes accessingmany of the features an easyprocess.
Back: If on page two of the HomePage, touch Back to return to pageone of the Home Page. If on pageone, Back serves no function.
Home: While navigating throughother menus, press to go back tothe Home Page to start a differentfeature.
FAV: Press to display a page ofstored (favorite) AM, FM, or XM (ifequipped) stations. Keep pressingFAV to scroll through the favoritepages.
Info: Press to toggle through anaudio information screen.
The Home Page Menu lists theoptions Customize Home Page andRestore Home Page Defaults.
Out of all available Home Pageicons, up to eight icons can beselected and sorted for the firstHome Page screen.
Home Page Features
Various functions are disabled whenthe vehicle is moving.
Press the Now Playing screenbutton to display the active sourcepage. The sources available areAM, FM, XM (if equipped), CD,USB/iPod, and AUX.
See AM-FM Radio on page 7‑7,Satellite Radio on page 7‑9, and CDPlayer on page 7‑12
Press the Phone screen button todisplay the Phone main page. SeeBluetooth (Overview) on page 7‑20or Bluetooth (Infotainment Controls)on page 7‑21 or Bluetooth (VoiceRecognition) on page 7‑25.

Black plate (6,1)Chevrolet Volt Owner Manual - 2012
7-6 Infotainment System
Press the Config screen button todisplay the Config main page. Fromthis display, you can adjust featuressuch as time and date, radio,phone, vehicle, and display.
Press the Tone screen button todisplay the Tone main page. Adjustthe tone and speakers by pressingthe screen buttons to change thelevels of sound for treble, midrange,bass, fade, and balance. SeeAM-FM Radio on page 7‑7.
Press the FM screen button todisplay the FM main page and playthe current or last tuned FM station.See AM-FM Radio on page 7‑7.
Press the AM screen button todisplay the AM main page and playthe current or last tuned AM station.See AM-FM Radio on page 7‑7.
Press the XM screen button (ifequipped) to display the XM mainpage and play the current or lasttuned XM channel. See AM-FMRadio on page 7‑7 and SatelliteRadio on page 7‑9.
Press the CD screen button todisplay the CD main page andplay the current or last CD trackselected. See CD Player onpage 7‑12.
Press the USB screen button todisplay the USB main page and playthe current or last track selected.See Auxiliary Devices on page 7‑15.
Press the AUX screen button toaccess any connected auxiliarydevice. See Auxiliary Devices onpage 7‑15.
Languages
The vehicle supports English,French (Canadian), and Spanish.The default language is English.
To change the display language,see Vehicle Personalization onpage 5‑53 for more information.
English and Metric UnitConversion
To change the display units betweenEnglish and metric units, see DriverInformation Center (DIC) onpage 5‑43 for more information.

Black plate (7,1)Chevrolet Volt Owner Manual - 2012
Infotainment System 7-7
Radio
AM-FM Radio
Playing the Radio
Audio Source
VOL/ O (Volume/Power):
1. Press to turn the radio on or off.
2. Turn to increase or decreasethe volume of the active source(i.e., current audio source, activenavigation voice guidance,or traffic prompts).
The steering wheel controls canalso be used to adjust the volume.See “Steering Wheel Controls” inthe vehicle owner manual for moreinformation.
To access the radio main page,press the SOURCE button on thefaceplate, the Now Playing screenbutton, or one of the audio screenbuttons on the Home Page.
While on the audio main page,press the Source button repeatedlyto display and cycle through theavailable sources (AM, FM, and XM(if equipped), CD, USB/iPod,and AUX).
Infotainment System Settings
Tone Settings
To access the tone settings, pressthe Home Page Tone button or theTONE button on the faceplate.
Use the tone settings to adjust thefollowing features:. Setting the tone. Adjusting the speakers
Setting the Tone
To adjust the tone:. Treble: Press + or − to change
the level.. Middle (Midrange): Press +
or − to change the level.. Bass: Press + or − to change
the level.
Adjusting the Speakers
To adjust the speaker balance:. Press the left arrow on the
bottom for more sound from theleft speakers or the right arrowon the bottom for more soundfrom the right speakers. Themiddle position balances thesound between the left and rightspeakers.
To adjust the speaker fade:. Press the upper arrow for more
sound from the front speakersand the lower arrow for moresound from the rear speakers.The middle position balancesthe sound between the front andrear speakers.
EQ Settings
The EQ settings are selectedthrough the tone menu. Press theleft or right arrows to cycle throughthe EQ options. The availablechoices are Pop, Rock, Jazz,Classical, and Talk.
Black plate (8,1)Chevrolet Volt Owner Manual - 2012
7-8 Infotainment System
Finding a Station
To select the band, see “AudioSource” earlier in this section.
Turn the TUNE/MENU knob to finda radio station. To select a presetstation, touch the FAV button andchoose a preset button.
Seeking a Station
Pressg orl to search for astation.
AM
1. Press the AM screen button onthe Home Page or select AMfrom the source pop-up todisplay the AM main page.
2. From the AM screen, press theMenu screen button to displaythe AM stations.
3. Press to select the desiredoption. To update the station list,touch Refresh.
FM
1. Press the FM screen button onthe Home Page or select FMfrom the source pop-up todisplay the FM main page.
2. From the FM screen, press theMenu screen button to displaythe FM stations.
3. Press to select the desiredoption. To update the station list,touch Refresh.
XM (If Equipped)
1. Press the XM screen button onthe Home Page or select XMfrom the source pop-up todisplay the XM main page.
2. From the XM screen, press theMenu screen button to displaythe XM categories.
3. Touch a desired category andthen turn the TUNE/MENU knobto scroll the station list.
Changing the Sources
To change audio sources from anyof the audio main pages (AM, FM,XM, CD, USB/iPod, or AUX),press the SOURCE button on thefaceplate or the Source screenbutton to display a pop-up ofavailable audio sources. Touch-tapor press the SOURCE button on thefaceplate repeatedly to change thedesired source.
Storing Radio Station Presets
There are a few ways to storepresets.
Up to 36 preset stations can bestored. AM, FM, and XM,if equipped, can be mixed.
1. From the AM, FM, or XM mainpage, press and hold one of thepreset screen buttons located atthe bottom of the screen. Aftera few seconds, a beep will beheard and the new presetinformation will display on thatscreen button.

Black plate (9,1)Chevrolet Volt Owner Manual - 2012
Infotainment System 7-9
2. Touch and hold a preset buttonto store the currently activestation. After a few seconds, abeep will be heard and the newpreset information will display ona small pop-up display at thebottom of the screen.
3. Repeat the steps for eachpreset.
To change the number of presetpages, see “Mixed-Band Presets”following for more information.
Recalling a Preset Station
To recall a preset station from a FAVpage, do the following:. Press the FAV button on the
faceplate to display the FAVpop-up. Select the desiredpreset from the pop-up.
. Press the FAV screen button atthe top bar to display the presetpop-up that appears at thebottom of the page. Press one ofthe preset screen buttons to goto the selected preset station.
. In the AM, FM, or XM (ifequipped) main page, press oneof the preset screen buttons togo to the selected preset station.
Mixed-Band Presets
Each page can store six presetstations. The presets within a pagecan be from different radio bands.
To scroll through the pages, pressthe FAV button located on thefaceplate or the FAV screen buttonon the top bar. The current pagenumber displays above the presetbuttons. The stored stations foreach FAV page display on thepreset buttons at the bottomof the screen. The number ofFAV pages displayed can bechanged in the Radio Settingsin the Configuration Menu.
Satellite Radio
XM™ Satellite Radio Service
Vehicles with an XM satellite radiotuner and a valid XM satellite radiosubscription can receive XMprogramming.
XM is a satellite radio service basedin the 48 contiguous United Statesand 10 Canadian provinces. XMsatellite radio has a wide variety ofprogramming and commercial-freemusic, coast to coast, and indigital-quality sound. A servicefee is required to receive the XMservice. For more information,see www.xmradio.com or1-800-929-2100 in the U.S. InCanada, see www.xmradio.ca or1-877-438-9677.
When XM is active, the channelname and number, category name,song title, and artist display on thescreen.

Black plate (10,1)Chevrolet Volt Owner Manual - 2012
7-10 Infotainment System
XM Categories
XM stations are organized incategories.
To customize which XM categoriesare used and displayed in thesystem, see “Adding or RemovingXM Categories” following.
Adding or RemovingCategories
1. From the Home Page press theConfig screen button or theCONFIG button on the faceplate.
2. Select Radio Settings from theConfig Menu list.
3. Select Add/Remove XMCategories.
4. From the Add/Remove XMCategories screen, select ordeselect any category to beused in XM mode. A checkmarkwill indicate that the category isselected.
Turning XM Album Art Onor Off
1. From the Home Page press theConfig screen button or theCONFIG button on the faceplate.
2. Select Radio Settings from theConfig Menu list.
3. Select XM Album Art to turn onor off.
XM Messages
XL (Explicit LanguageChannels): These channels, or anyothers, can be blocked by request,by calling 1-800-929-2100 in theU.S., and 1-877-438-9677 inCanada.
XM Updating: The encryption codein the receiver is being updated. Noaction is required. This processshould take no longer than30 seconds.
Loading XM: The audio system isacquiring and processing audio andtext data. No action is needed. Thismessage should disappear shortly.
Channel Off Air: This channel isnot currently in service. Tune in toanother channel.
Channel Unauth: This channel isblocked or cannot be received withyour XM subscription package.
Channel Unavailable: Thispreviously assigned channel is nolonger assigned. Tune to anotherstation.
No Artist Info: The system isworking properly. No artistinformation is available at this timeon this channel.
No Title Info: The system isworking properly. No song titleinformation is available at this timeon this channel.
No CAT Info: The system isworking properly. No categoryinformation is available at this timeon this channel.

Black plate (11,1)Chevrolet Volt Owner Manual - 2012
Infotainment System 7-11
No Information: The system isworking properly. No text orinformational messages areavailable at this time on thischannel.
No XM Signal: The system isworking properly. The vehicle maybe in a location where the XM signalis being blocked. When the vehicleis moved into an open area, thesignal should return.
CAT Not Found: The system isworking properly. There are nochannels available for the selectedcategory.
XM Radio ID: If tuned to channel 0,this message alternates with the XMradio eight‐digit radio ID label. Thislabel is needed to activate theservice.
Unknown: If this message isreceived when tuned to channel 0,there could be a receiver fault.Consult with your dealer.
Check Antenna: If this messagedoes not clear within a short periodof time, the receiver could have afault. Consult with your dealer.
XM Not Available: If this messagedoes not clear within a short periodof time, the receiver could have afault. Consult with your dealer.
Radio ReceptionFrequency interference and staticcan occur during normal radioreception if items such as cell phonechargers, vehicle convenienceaccessories, and external electronicdevices are plugged into theaccessory power outlet. If there isinterference or static, unplug theitem from the accessory poweroutlet.
FM
FM signals only reach about 16 to65 km (10 to 40 mi). Although theradio has a built-in electronic circuitthat automatically works to reduceinterference, some static can occur,
especially around tall buildings orhills, causing the sound to fade inand out.
AM
The range for most AM stations isgreater than for FM, especially atnight. The longer range can causestation frequencies to interfere witheach other. Static can occur whenthings like storms and power linesinterfere with radio reception. Whenthis happens, try reducing the trebleon the radio.
XM™ Satellite Radio Service
XM Satellite Radio Service givesdigital radio reception from coast tocoast in the 48 contiguous UnitedStates, and in Canada. Just aswith FM, tall buildings or hills caninterfere with satellite radio signals,causing the sound to fade in andout. In addition, traveling or standingunder heavy foliage, bridges,garages, or tunnels may cause lossof the XM signal for a period of time.

Black plate (12,1)Chevrolet Volt Owner Manual - 2012
7-12 Infotainment System
Cellular Phone Usage
Cellular phone usage can causeinterference with the vehicle's radio.
Multi-Band AntennaThe multi-band antenna is on theroof of the vehicle. The antenna isused for the AM‐FM radio, OnStar,the XM Satellite Radio ServiceSystem, and GPS (GlobalPositioning System), if the vehiclehas these features. Keep theantenna clear of obstructions forclear reception.
Audio Players
CD PlayerThe player can be used for CD andMP3 audio.
With the vehicle on, insert a discinto the slot, label side up. Theplayer pulls it in and begins playing.While playing, the navigationsystem is available.
The system is capable of playing:. Most audio CDs. CD-R. CD-RW. MP3 or unprotected WMA
formats
When playing any compatiblerecordable disc, the sound qualitycan be reduced due to disc quality,the method of recording, thequality of the music that has beenrecorded, or the way the disc hasbeen handled.
There can be increased skipping,difficulty in recording tracks,difficulty in finding tracks, and/ordifficulty in loading and ejecting.If these problems occur, check thedisc for damage or try a knowngood disc.
To avoid damage to the CD player:. Do not use scratched or
damaged discs.. Do not apply labels to discs. The
labels could get caught in theplayer.
. Insert only one disc at a time.
. Keep the loading slot free offoreign materials, liquids, anddebris.
. Use a marking pen to label thetop of the disc.

Black plate (13,1)Chevrolet Volt Owner Manual - 2012
Infotainment System 7-13
Loading and Ejecting Discs
To load a disc:
1. Turn the vehicle on.
2. Insert a disc into the slot, labelside up. The player pulls it in therest of the way. If the disc isdamaged or improperly loaded,there is an error and the discejects.
The disc automatically plays onceloaded.
PressX to eject a disc from theCD player. If the disc is not removedwithin a short period of time, it isautomatically pulled back into theplayer.
Playing an Audio CD
1. Press the CD screen button onthe Home Page or select CDfrom the source pop-up todisplay the CD main page.
2. From the CD screen, press theMenu screen button to displaythe menu options.
3. Press to select the desiredoption.
On the CD main page a tracknumber displays at the beginning ofeach track. Song, Artist, and Albuminformation displays when available.
Use the following controls to playthe disc:
k (Play/Pause): Use to start,pause, or resume play.
r SEEK (Seek Down):. Press to seek to the beginning
of the current or previous track.If the track has been playing forless than five seconds, it seeksto the previous track. If longerthan five seconds, the currenttrack starts from the beginning.
. Press and hold to fast reversethrough a track. Release thebutton to return to playingspeed. Elapsed time displays.
SEEK[ (Seek Up):
. Press to seek to the next track.
. Press and hold to fast forwardthrough a track. Release thebutton to return to playingspeed. Elapsed time displays.
TUNE/MENU: Turn to the right orleft to select the next or previoustrack. Press this knob to select theist. If a track is selected from themenu, the system plays the trackand returns to the CD screen.
Error Messages
If Disc Error displays and/or the disccomes out, it could be for one of thefollowing reasons:. The disc has an invalid or
unknown format.. The disc is very hot. Try the disc
again when the temperaturereturns to normal.
. The road is very rough. Try thedisc again when the road issmoother.

Black plate (14,1)Chevrolet Volt Owner Manual - 2012
7-14 Infotainment System
. The disc is dirty, scratched, wet,or upside down.
. The air is very humid. Try thedisc again later.
. There was a problem whileburning the disc.
. The label is caught in the CDplayer.
If the CD is not playing correctly, forany other reason, try a knowngood CD.
If any error continues, contact yourdealer.
MP3
Playing an MP3 CD
MP3 Format
There are guidelines that must bemet when creating an MP3 disc;otherwise the CD might not play.
The guidelines are:. Sampling rate: 8 kHz, 16 kHz,
22.05 kHz, 24 kHz, 32 kHz,44.1 kHz, and 48 kHz.
. Bit rates supported: 8, 16, 24,32, 40, 48, 56, 64, 80, 96, 112,128, 144, 160, 192, 224, 256,and 320 kbps.
. Maximum number of folders:255 with a maximum hierarchyof eight folders.
. Maximum of 1,024 files ona disc.
. Recorded on a CD-R or CD-RWwith a maximum capacity of700 MB.
. The Artist/Album/Song Titles/Genre information requires a CDto be fully scanned before themusic navigator works withthese menus. Disc scanningdoes not occur when the disc isbeing played.
MP3 Music Menu
Press the Menu screen button whilethat source is active to accessthe menu.
Press any of the following buttonson the MP3 Menu:
Shuffle Songs: Press to play thetracks randomly. Press again to stopshuffle.
Playlists: Press to view theplaylists stored on the disc. Select aplaylist to view the list of all songs inthat playlist. There might be a delaybefore the list displays. Select asong from the list to begin playback.
Artists: Press to view the list ofartists stored on the disc. Select anartist name to view a list of all songsby the artist. There might be a delaybefore the list displays. Select asong from the list to begin playback.
Albums: Press to view the albumson the disc. Select the album toview a list of all songs on the album.

Black plate (15,1)Chevrolet Volt Owner Manual - 2012
Infotainment System 7-15
There might be a delay before thelist displays. Select a song from thelist to begin playback.
Song Titles: Press to display a listof all songs on the disc. Songs aredisplayed as stored on the disc.There might be a delay before thelist displays. To begin playback,select a song from the list.
Genres: Press to view the genres.Select a genre to view a list of allsongs of that genre. Select a songfrom the list to begin playback.
Folders: Press to open a folder listto access the files within the folderstructure.
Root Directory
The root directory is treated as afolder. All files contained directlyunder the root directory areaccessed prior to any root directoryfolders.
Empty Folders
If a root directory or folder is emptyor contains only folders, the playeradvances to the next folder in thefile structure that contains acompressed audio file. The emptyfolder(s) are not displayed ornumbered.
No Folder
When the CD only containscompressed audio files without anyfolders or playlists, all files areunder the root folder.
File System and Naming
The song titles, artists, albums, andgenres are taken from the file's ID3tag and are only displayed if presentin the tag. If a song title is notpresent in the ID3 tag, the radiodisplays the file name as thetrack name.
Preprogrammed Playlists
The radio recognizespreprogrammed playlists; however,there is no editing capability. Theseplaylists are treated as specialfolders containing compressedaudio song files.
Auxiliary DevicesThis vehicle has an auxiliary inputjack in the center console. Possibleauxiliary audio sources include:. Laptop computer. MP3 player. Tape player
This jack is not an audio output.Do not plug headphones into theauxiliary input jack. Drivers areencouraged to set up any auxiliarydevice while the vehicle is inP (Park).

Black plate (16,1)Chevrolet Volt Owner Manual - 2012
7-16 Infotainment System
Connect a 3.5 mm (1/8 in) cablefrom the auxiliary device to theauxiliary input jack. When adevice is connected, the systemautomatically begins playing audiofrom the device over the vehiclespeakers.
If an auxiliary device has alreadybeen connected, but a differentsource is currently active, press theNow Playing screen button on theHome Page, then press Sourcerepeatedly to cycle through all of theavailable audio source screens, untilthe AUX source screen is selected.
Playing from a USB
A USB mass storage device orMicrosoft Transfer Protocal (MTP)device can be connected to theUSB port.
The USB port is in the centerconsole.
The USB icon displays when theUSB device is connected.
USB MP3 Player and USB Drives. The USB MP3 players and USB
drives connected must complywith the USB Mass StorageClass specification (USB MSC).
. Only USB MP3 players and USBdrives with a sector size or512 bytes and a cluster sizesmaller or equal to 32 kbytes inthe FAT32 file system aresupported.
. Hard disk drives are notsupported.
. The following restrictions applyfor the data stored on a USBMP3 player or USB device:
‐ Maximum folder structuredepth: 11 levels.
‐ Maximum number of MP3/WMA files that can bedisplayed: 1,000
. WMA with Digital RightsManagement (DRM) from onlinemusic shops cannot be played.WMA files can only be playedback safely if they were createdwith Windows Media Playerversion 8 or later.
‐ Applicable playlist extensionsare: .m3u, .pls.
‐ Playlist entries must be in theform of relative paths.
‐ The system attribute forfolders/files that contain audiodata must not be set.
To play a USB device, do one of thefollowing:. Connect the USB and it begins
to play.. Press the Now Playing screen
button on the Home Page, thenpress the SOURCE button onthe faceplate repeatedly to cyclethrough all of the available audiosource screens, until the USBsource screen is selected.
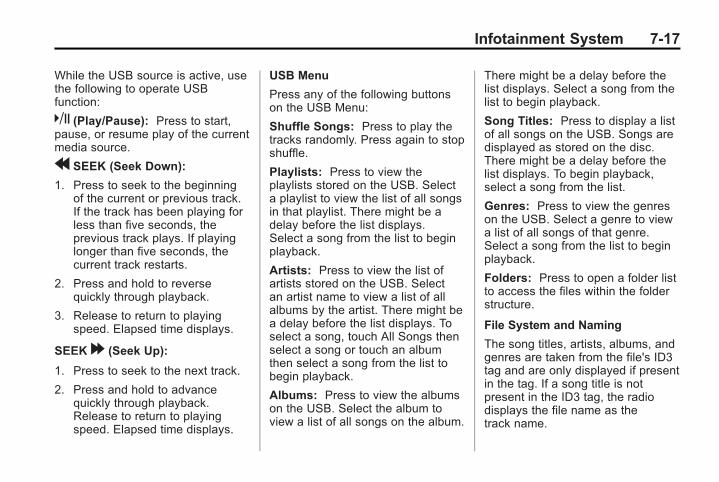
Black plate (17,1)Chevrolet Volt Owner Manual - 2012
Infotainment System 7-17
While the USB source is active, usethe following to operate USBfunction:
k (Play/Pause): Press to start,pause, or resume play of the currentmedia source.
r SEEK (Seek Down):
1. Press to seek to the beginningof the current or previous track.If the track has been playing forless than five seconds, theprevious track plays. If playinglonger than five seconds, thecurrent track restarts.
2. Press and hold to reversequickly through playback.
3. Release to return to playingspeed. Elapsed time displays.
SEEK[ (Seek Up):
1. Press to seek to the next track.
2. Press and hold to advancequickly through playback.Release to return to playingspeed. Elapsed time displays.
USB Menu
Press any of the following buttonson the USB Menu:
Shuffle Songs: Press to play thetracks randomly. Press again to stopshuffle.
Playlists: Press to view theplaylists stored on the USB. Selecta playlist to view the list of all songsin that playlist. There might be adelay before the list displays.Select a song from the list to beginplayback.
Artists: Press to view the list ofartists stored on the USB. Selectan artist name to view a list of allalbums by the artist. There might bea delay before the list displays. Toselect a song, touch All Songs thenselect a song or touch an albumthen select a song from the list tobegin playback.
Albums: Press to view the albumson the USB. Select the album toview a list of all songs on the album.
There might be a delay before thelist displays. Select a song from thelist to begin playback.
Song Titles: Press to display a listof all songs on the USB. Songs aredisplayed as stored on the disc.There might be a delay before thelist displays. To begin playback,select a song from the list.
Genres: Press to view the genreson the USB. Select a genre to viewa list of all songs of that genre.Select a song from the list to beginplayback.
Folders: Press to open a folder listto access the files within the folderstructure.
File System and Naming
The song titles, artists, albums, andgenres are taken from the file's ID3tag and are only displayed if presentin the tag. If a song title is notpresent in the ID3 tag, the radiodisplays the file name as thetrack name.

Black plate (18,1)Chevrolet Volt Owner Manual - 2012
7-18 Infotainment System
Playing from an iPod®
This feature supports the followingiPod models:. iPod nano (1st, 2nd, 3rd, and
4th generation). iPod with video (5.0 and
5.5 generation). Video is notshown; only audio is supported.
. iPod classic (6th generation)
. iPod touch (1st and 2ndgeneration)
There may be problems withoperation and function in thefollowing situations:. When connecting an iPod on
which a more recent version ofthe firmware is installed than issupported by the infotainmentsystem.
. When connecting an iPod onwhich firmware from otherproviders is installed.
To connect and control an iPod,connect one end of the standardiPod USB cable to the iPod's dockconnector. Connect the other end tothe USB port in the center console.
iPod music information displayson the radio’s display and beginsplaying through the vehicle’s audiosystem.
The iPod battery rechargesautomatically while the vehicle is on.When the vehicle is off while aniPod is connected using the iPodUSB cable, the iPod battery stopscharging and the iPod automaticallyturns off.
If the iPod is an unsupportedmodel, it can still be listened to inthe vehicle by connecting to theauxiliary input jack using a standard3.5 mm (1/8 in) stereo cable.
iPod Menu
Shuffle Songs: Press to play thetracks randomly. Press again to stopshuffle.
Press any of the following buttonson the iPod Menu:
Playlists:
1. Press to view the playlists storedon the iPod.
2. Select a playlist name to view alist of all songs in the playlist.
3. Select the desired song from thelist to begin playback.
Artists:
1. Press to view the artists storedon the iPod.
2. Select an artist name to view alist of all songs by the artist.
3. Select the desired song from thelist to begin playback.

Black plate (19,1)Chevrolet Volt Owner Manual - 2012
Infotainment System 7-19
Albums:
1. Press to view the albums storedon the iPod.
2. Select an album name to view alist of all songs on the album orselect All Songs to view allsongsby the artist.
3. Select the desired song from thelist to begin playback.
Song Titles:
1. Press to view a list of all songsstored on the iPod.
2. Select the desired song from thelist to begin playback.
Genres:
1. Press to view the genres storedon the iPod.
2. Select a genre name to view alist of artists of that genre.
3. Select an artist to view albumsor All Songs to view all songs ofthat genre.
4. Select album to view songs.
5. Select the desired song from thelist to begin playback.
Podcasts:
1. Press to view the podcastsstored on the iPod.
2. Select a podcast name to playthe desired podcast.
Composers:
1. Press to view the composersstored on the iPod.
2. Select a composer name toview a list of all songs by thatcomposer.
3. Select the desired song from thelist to begin playback.
Audio Books:
1. Press to view the audio booksstored on the iPod.
2. Select an audio book name toview a list of all audio books.
3. Select the desired audio bookfrom the list to begin playback.
Playing from an iPhone®
This feature supports the followingiPhone model:. iPhone (3g – 3gs)
To use the iPhone, follow the sameinstructions as stated earlier forusing an iPod.

Black plate (20,1)Chevrolet Volt Owner Manual - 2012
7-20 Infotainment System
Phone
Bluetooth (Overview)For vehicles equipped withBluetooth capability, the system caninteract with many cell phones,allowing:. Placement and receipt of calls in
a hands-free mode.. Sharing of the cell phone’s
address book or contact list withthe vehicle.
To minimize driver distraction,before driving, and with the vehicleparked:. Become familiar with the
features of the cell phone.Organize the phone book andcontact lists clearly and deleteduplicate or rarely used entries.If possible, program speed dialor other shortcuts.
. Review the controls andoperation of the infotainmentsystem.
. Pair cell phone(s) to the vehicle.The system may not work withall cell phones. See “Pairing” inthis section for more information.
. If the cell phone has voicedialing capability, learn to usethat feature to access theaddress book or contact list. See“Voice Pass-Thru” in this sectionfor more information.
. See “Storing and Deleting PhoneNumbers” in this section formore information.
{ WARNING
When using a cell phone, it canbe distracting to look too long ortoo often at the screen of thephone or the infotainment(navigation) system. Taking youreyes off the road too long ortoo often could cause a crashresulting in injury or death. Focusyour attention on driving.
Vehicles with a Bluetooth systemcan use a Bluetooth‐capable cellphone with a Hands‐Free Profile tomake and receive phone calls. Theinfotainment system and voicerecognition are used to controlthe system. The system can beused while in ON/RUN or ACC/ACCESSORY. The range of theBluetooth system can be up to 9.1 m(30 ft). Not all phones support allfunctions and not all phones workwith the Bluetooth system. Seewww.gm.com/bluetooth for moreinformation about compatiblephones.
Bluetooth Controls
Use the buttons located on theinfotainment system and thesteering wheel to operate theBluetooth system.
Steering Wheel Controls
b / g (Push To Talk): Press toanswer incoming calls, confirmsystem information, and start voicerecognition.

Black plate (21,1)Chevrolet Volt Owner Manual - 2012
Infotainment System 7-21
$ /i (End Call/Mute): Press toend a call, reject a call, or cancel anoperation.
Infotainment System Controls
For information about how tonavigate the menu system using theinfotainment controls, see Overviewon page 7‑2.
V (Phone): Press to enter thePhone main menu.
Voice Recognition
The voice recognition system usescommands to control the systemand dial phone numbers.
Noise: The system may notrecognize voice commands if thereis too much background noise.
When to Speak: A tone sounds toindicate that the system is ready fora voice command. Wait for the toneand then speak.
How to Speak: Speak clearly in acalm and natural voice.
Audio System
When using the Bluetooth system,sound comes through the vehicle'sfront audio system speakers andoverrides the audio system. Usethe VOL/ O knob during a call tochange the volume level. Theadjusted volume level remains inmemory for later calls. The systemmaintains a minimum volume level.
Other Information
The Bluetooth® word mark andlogos are owned by the Bluetooth®
SIG, Inc. and any use of such marksby General Motors is under license.Other trademarks and trade namesare those of their respective owners.
See Radio Frequency Statement onpage 13‑16 for informationregarding Part 15 of the FederalCommunications Commission (FCC)rules and Industry CanadaStandards RSS-GEN/210/220/310.
Bluetooth (InfotainmentControls)For information about how tonavigate the menu system using theinfotainment controls, see Overviewon page 7‑2.
Pairing
A Bluetooth‐enabled cell phonemust be paired to the Bluetoothsystem and then connected to thevehicle before it can be used. Seeyour cell phone manufacturer's userguide for Bluetooth functions beforepairing the cell phone. If a Bluetoothphone is not connected, calls will bemade using OnStar Hands‐FreeCalling, if available. See OnStarOverview on page 14‑1 for moreinformation.

Black plate (22,1)Chevrolet Volt Owner Manual - 2012
7-22 Infotainment System
Pairing Information. A Bluetooth phone with MP3
capability cannot be paired tothe vehicle as a phone and anMP3 player at the same time.
. Up to five cell phones can bepaired to the Bluetooth system.
. The pairing process is disabledwhen the vehicle is moving.
. Pairing only needs to becompleted once, unless thepairing information on the cellphone changes or the cell phoneis deleted from the system.
. Only one paired cell phone canbe connected to the Bluetoothsystem at a time.
. If multiple paired cell phones arewithin range of the system, thesystem connects to the firstavailable paired cell phone in theorder that they were first pairedto the system. To link to adifferent paired phone, see“Linking to a Different Phone”later in this section.
Pairing a Phone
1. Press the CONFIG button.
2. Select Phone Settings orBluetooth Settings.
3. Select Bluetooth.
4. Select Pair Device (Phone).A four‐digit PersonalIdentification Number (PIN)appears on the display. The PINis used in Step 6.
5. Start the pairing process on thecell phone to be paired to thevehicle. See the cell phonemanufacturer's user guide forinformation on this process.
6. Locate the device named “YourVehicle” in the list on the cellphone. Follow the instructionson the cell phone to enter thePIN provided in Step 4. After thePIN is successfully entered, thesystem prompts you to provide aname for the paired cell phone.This name will be used toindicate which phones arepaired and connected to the
vehicle. The system respondswith “<Phone name> has beensuccessfully paired” after thepairing process is complete.
7. Repeat Steps 1 through 6 to pairadditional phones.
Listing All Paired and ConnectedPhones
1. Press the CONFIG button.
2. Select Phone Settings orBluetooth Settings.
3. Select Bluetooth.
4. Select Device List.
Deleting a Paired Phone
1. Press the CONFIG button.
2. Select Phone Settings orBluetooth Settings.
3. Select Bluetooth.
4. Select Device List.
5. Select the phone to delete andfollow the on screen prompts.

Black plate (23,1)Chevrolet Volt Owner Manual - 2012
Infotainment System 7-23
Linking to a Different Phone
To link to a different phone, the newphone must be in the vehicle andavailable to be connected to theBluetooth system before theprocess is started.
1. Press the CONFIG button.
2. Select Phone Settings orBluetooth Settings.
3. Select Bluetooth.
4. Select Device List.
5. Select the new phone to link toand follow the on screenprompts.
If delete is selected, thehighlighted phone will bedeleted.
Making a Call UsingPhone Book
For cell phones that support thephone book feature, the Bluetoothsystem can use the contacts storedon your cell phone to make calls.See your cell phone's owner's guide
or contact your wireless provider tofind out if this feature is supportedby your phone.
When a cell phone supports thephone book feature, the PhoneBook and Call Lists menus areautomatically available.
The Phone Book menu allows youto access the phone book stored inthe cell phone to make a call.
The Call Lists menu allows you toaccess the phone numbers from theIncoming Calls, Outgoing Calls, andMissed Calls menus on your cellphone to make a call.
To make a call using the PhoneBook menu:
1. Press the PHONE button onceor twice (depending on theradio).
2. Select Phone Book.
3. Search through the list byselecting the letter group thephone book entry begins with,or press the TUNE/MENU
button to scroll through theentire list of names/numbers inthe phone book.
4. Select the name or number youwant to call.
To make a call using the CallLists menu:
1. Press the PHONE button onceor twice (depending on theradio).
2. Select Call Lists.
3. Select the Incoming Calls,Outgoing Calls, or MissedCalls list.
4. Select the name or number youwant to call.
Making a Call
To make a call:
1. Press the PHONE button onceor twice (depending on theradio).
2. Enter the phone number.
3. Select Call to start dialing thenumber.

Black plate (24,1)Chevrolet Volt Owner Manual - 2012
7-24 Infotainment System
Accepting or Declining a Call
When an incoming call is received,the infotainment system mutes anda ring tone is heard in the vehicle.
Accepting a Call
Turn the TUNE/MENU knob to“Answer” and press the TUNE/MENU knob to accept the call.
Declining a Call
Turn the TUNE/MENU knob to“Decline” and press the TUNE/MENU knob to decline the call.
Call Waiting
Call waiting must be supported onthe Bluetooth phone and enabled bythe wireless service carrier to work.
Accepting a Call
Turn the TUNE/MENU knob to“Answer” and press the TUNE/MENU knob to accept the call.
Declining a Call
Turn the TUNE/MENU knob to“Decline” and press the TUNE/MENU knob to decline the call.
Switching Between Calls (CallWaiting Calls Only)
To switch between calls:
1. Turn or press the TUNE/MENU knob.
2. Select Switch Call fromthe menu.
Conference Calling
Conference calling and three‐waycalling must be supported on theBluetooth phone and enabled by thewireless service carrier to work.
To start a conference while in acurrent call:
1. Turn or press the TUNE/MENU knob.
2. Select Enter Number.
3. Enter the phone number andthen select Call.
4. After the call has been placed,turn or press the TUNE/MENUknob and choose Merge Calls.
5. To add more callers to theconference call, repeat Steps 1through 4. The number of callersthat can be added is limited byyour wireless service carrier.
Ending a Call
Turn or press the TUNE/MENUknob and select Hang Up.
Muting a Call
To Mute a Call
Turn or press the TUNE/MENUknob and select Mute Call.
To Cancel Mute
Turn or press the TUNE/MENUknob and select Mute Call.

Black plate (25,1)Chevrolet Volt Owner Manual - 2012
Infotainment System 7-25
Dual Tone Multi-Frequency(DTMF) Tones
The in‐vehicle Bluetooth system cansend numbers during a call. This isused when calling a menu‐drivenphone system.
1. Turn or press the TUNE/MENUknob and select Enter Number.
2. Enter the phone number.
Bluetooth (VoiceRecognition)
Using Voice Recognition
To use voice recognition, pressthe b / g button located on thesteering wheel. Use the commandsbelow for the various voice features.For additional information, say“Help” while you are in a voicerecognition menu.
Pairing
A Bluetooth‐enabled cell phonemust be paired to the Bluetoothsystem and then connected to the
vehicle before it can be used. Seeyour cell phone manufacturer's userguide for Bluetooth functions beforepairing the cell phone. If a Bluetoothphone is not connected, calls will bemade using OnStar Hands‐FreeCalling, if available. See OnStarOverview on page 14‑1 for moreinformation.
Pairing Information. A Bluetooth phone with MP3
capability cannot be paired tothe vehicle as a phone and anMP3 player at the same time.
. Up to five cell phones can bepaired to the Bluetooth system.
. The pairing process is disabledwhen the vehicle is moving.
. Pairing only needs to becompleted once, unless thepairing information on the cellphone changes or the cell phoneis deleted from the system.
. Only one paired cell phone canbe connected to the Bluetoothsystem at a time.
. If multiple paired cell phones arewithin range of the system, thesystem connects to the firstavailable paired cell phone in theorder that they were first pairedto the system. To link to adifferent paired phone, see“Linking to a Different Phone”later in this section.
Pairing a Phone
1. Press b / g. The systemresponds “Ready,” followed bya tone.
2. Say “Bluetooth.”
3. Say “Pair.” The system respondswith instructions and a four‐digitPersonal Identification Number(PIN). The PIN is used in Step 5.
4. Start the pairing process on thecell phone that you want to pair.For help with this process, seeyour cell phone manufacturer'suser guide.

Black plate (26,1)Chevrolet Volt Owner Manual - 2012
7-26 Infotainment System
5. Locate the device named “YourVehicle” in the list on the cellphone. Follow the instructionson the cell phone to enter thePIN provided in Step 3. After thePIN is successfully entered, thesystem prompts you to provide aname for the paired cell phone.This name will be used toindicate which phones arepaired and connected to thevehicle. The system respondswith “<Phone name> has beensuccessfully paired” after thepairing process is complete.
6. Repeat Steps 1 through 5 to pairadditional phones.
Listing All Paired and ConnectedPhones
The system can list all cell phonespaired to it. If a paired cell phone isalso connected to the vehicle, thesystem responds with “is connected”after that phone name.
1. Press b / g. The systemresponds “Ready,” followed bya tone.
2. Say “Bluetooth.”
3. Say “List.”
Deleting a Paired Phone
If the phone name you want todelete is unknown, see “Listing AllPaired and Connected Phones.”
1. Press b / g. The systemresponds “Ready,” followed bya tone.
2. Say “Bluetooth.”
3. Say “Delete.” The system asksfor which phone to delete.
4. Say the name of the phone youwant to delete.
Connecting to a Different Phone
To connect to a different cell phone,the Bluetooth system looks for thenext available cell phone in theorder in which all the available cellphones were paired. Depending onwhich cell phone you want toconnect to, you may have to usethis command several times.
1. Press b / g. The systemresponds “Ready,” followed bya tone.
2. Say “Bluetooth.”
3. Say “Change phone.”. If another cell phone is
found, the response will be“<Phone name> is nowconnected.”
. If another cell phone is notfound, the original phoneremains connected.

Black plate (27,1)Chevrolet Volt Owner Manual - 2012
Infotainment System 7-27
Storing and Deleting PhoneNumbers
The system can store up to30 phone numbers as name tags inthe Hands‐Free Directory that isshared between the Bluetooth andOnStar systems.
The following commands are usedto delete and store phone numbers.
Store: This command will store aphone number, or a group ofnumbers as a name tag.
Digit Store: This command allowsa phone number to be stored as aname tag by entering the digits oneat a time.
Delete: This command is used todelete individual name tags.
Delete All Name Tags: Thiscommand deletes all stored nametags in the Hands‐Free CallingDirectory and the DestinationsDirectory.
Using the “Store” Command
1. Press b / g. The systemresponds “Ready,” followed bya tone.
2. Say “Store.”
3. Say the phone number or groupof numbers you want to store allat once with no pauses, thenfollow the directions given by thesystem to save a name tag forthis number.
Using the “Digit Store” Command
If an unwanted number isrecognized by the system, say“Clear” at any time to clear the lastnumber.
To hear all of the numbersrecognized by the system, say“Verify” at any time.
1. Press b / g. The systemresponds “Ready,” followed bya tone.
2. Say “Digit Store.”
3. Say each digit, one at a time,that you want to store. Aftereach digit is entered, the systemrepeats back the digit it heardfollowed by a tone. After the lastdigit has been entered, say“Store,” and then follow thedirections given by the system tosave a name tag for this number.
Using the “Delete” Command
1. Press b / g. The systemresponds “Ready,” followed bya tone.
2. Say “Delete.”
3. Say the name tag you want todelete.
Using the “Delete All Name Tags”Command
This command deletes all storedname tags in the Hands FreeCalling Directory and theDestinations Directory.

Black plate (28,1)Chevrolet Volt Owner Manual - 2012
7-28 Infotainment System
To delete all name tags:
1. Press b / g. The systemresponds “Ready,” followed bya tone.
2. Say “Delete all name tags.”
Listing Stored Numbers
The list command will list all thestored numbers and name tags.
Using the “List” Command
1. Press b / g. The systemresponds “Ready,” followed bya tone.
2. Say “Directory.”
3. Say “Hands Free Calling.”
4. Say “List.”
Making a Call
Calls can be made using thefollowing commands.
Dial or Call: The dial or callcommand can be usedinterchangeably to dial a phonenumber or a stored name tag.
Digit Dial: This command allows aphone number to be dialed byentering the digits one at a time.
Re‐dial: This command is used todial the last number used on the cellphone.
Using the “Dial” or “Call”Command
1. Press b / g. The systemresponds “Ready,” followed bya tone.
2. Say “Dial” or “Call.”
3. Say the entire number withoutpausing or say the name tag.
Once connected, the person calledwill be heard through the audiospeakers.
Using the “Digit Dial” Command
The digit dial command allows aphone number to be dialed byentering the digits one at a time.After each digit is entered, thesystem repeats back the digit itheard followed by a tone.
If an unwanted number isrecognized by the system, say“Clear” at any time to clear the lastnumber.
To hear all of the numbersrecognized by the system, say“Verify” at any time.
1. Press b / g. The systemresponds “Ready,” followed bya tone.
2. Say “Digit Dial.”
3. Say each digit, one at a time,that you want to dial. After eachdigit is entered, the systemrepeats back the digit it heardfollowed by a tone. After thelast digit has been entered,say “Dial.”
Once connected, the person calledwill be heard through the audiospeakers.

Black plate (29,1)Chevrolet Volt Owner Manual - 2012
Infotainment System 7-29
Using the “Re‐dial” Command
1. Press b / g. The systemresponds “Ready,” followed bya tone.
2. After the tone, say “Re‐dial.” Thesystem dials the last numbercalled from the connected cellphone.
Once connected, the person calledwill be heard through the audiospeakers.
Receiving a Call
When an incoming call is received,the audio system mutes and a ringtone is heard in the vehicle.
. Press b / g to answer the call.
. Press $ /i to ignore a call.
Call Waiting
Call waiting must be supported onthe cell phone and enabled by thewireless service carrier.
. Press b / g to answer anincoming call when another callis active. The original call isplaced on hold.
. Press b / g again to return tothe original call.
. To ignore the incoming call, noaction is required.
. Press $ /i to disconnect thecurrent call and switch to the callon hold.
Three‐Way Calling
Three‐way calling must besupported on the cell phone andenabled by the wireless servicecarrier.
1. While on a call, press b / g.2. Say “Three‐way call.”
3. Use the dial or call command todial the number of the third partyto be called.
4. Once the call is connected,press b / g to link all callerstogether.
Ending a Call
Press $ /i to end a call.
Muting a Call
During a call, all sounds from insidethe vehicle can be muted so that theperson on the other end of the callcannot hear them.
To mute a call, press b / g, andthen say “Mute Call.”
To cancel mute, press b / g, andthen say “Un‐mute Call.”

Black plate (30,1)Chevrolet Volt Owner Manual - 2012
7-30 Infotainment System
Transferring a Call
Audio can be transferred betweenthe Bluetooth system and the cellphone.
The cell phone must be paired andconnected with the Bluetoothsystem before a call can betransferred. The connection processcan take up to two minutes after theignition is turned to ON/RUN.
To Transfer Audio from theBluetooth System to a Cell Phone
During a call with the audio in thevehicle:
1. Press b / g.2. Say “Transfer Call.”
To Transfer Audio to the BluetoothSystem from a Cell Phone
During a call with the audio on thecell phone, press b / g. The audiotransfers to the vehicle. If the audiodoes not transfer to the vehicle,use the audio transfer feature on thecell phone. See your cell phonemanufacturer's user guide for moreinformation.
Voice Pass-Thru
Voice pass‐thru allows access to thevoice recognition commands on thecell phone. See your cell phonemanufacturer's user guide to see ifthe cell phone supports this feature.
To access contacts stored in the cellphone:
1. Press b / g. The systemresponds “Ready,” followed bya tone.
2. Say “Bluetooth.”
3. Say “Voice.” The systemresponds “OK, accessing<phone name>.”
The cell phone's normal promptmessages will go through their cycleaccording to the phone's operatinginstructions.
Dual Tone Multi-Frequency(DTMF) Tones
The Bluetooth system can sendnumbers and the numbers stored asname tags during a call. You canuse this feature when calling amenu‐driven phone system.Account numbers can also bestored for use.

Black plate (31,1)Chevrolet Volt Owner Manual - 2012
Infotainment System 7-31
Sending a Number or Name TagDuring a Call
1. Press b / g. The systemresponds “Ready,” followed bya tone.
2. Say “Dial.”
3. Say the number or name tagto send.
Clearing the System
Unless information is deleted out ofthe in‐vehicle Bluetooth system, itwill be retained indefinitely. Thisincludes all saved name tags inthe phone book and phone pairinginformation. For information on howto delete this information, see theprevious sections on “Deleting aPaired Phone” and “DeletingName Tags.”
Trademarks andLicense Agreements
Manufactured under licenseunder U.S. Patent #'s: 5,451,942;5,956,674; 5,974,380; 5,978,762;6,487,535 & other U.S. andworldwide patents issued &pending. DTS and the Symbol areregistered trademarks and DTSDigital Surround and the DTS logosare trademarks of DTS Inc. AllRights Reserved.
Manufactured under license fromDolby Laboratories. Dolby and thedouble-D symbol are trademarks ofDolby Laboratories.
MP3PRO audio decodingtechnology licensed from CodingTechnologies, Fraunhofer IIS andThompson.

Black plate (32,1)Chevrolet Volt Owner Manual - 2012
7-32 Infotainment System
“Made for iPod” means that anelectronic accessory has beendesigned to connect specificallyto iPod and has been certified bythe developer to meet Appleperformance standards.
iPod is a trademark of AppleComputer, Inc., registered in theU.S. and other countries.
Music and video recognitiontechnology and related dataare provided by Gracenote®.Gracenote is the industry standardin music recognition technology
and related content delivery.For more information, visitwww.gracenote.com.
CD and music data from Gracenote,Inc., copyright © 2000 to presentGracenote. One or more patentsowned by Gracenote apply tothis product and service. Seethe Gracenote website for anon-exhaustive list of applicableGracenote patents. Gracenote andCDDB, MusicID, Media VOCS, theGracenote logo and logotype, andthe “Powered by Gracenote” logoare either registered trademarks ortrademarks of Gracenote in theUnited States and/or othercountries.
If you require more informationregarding the use of theGracenote Service, visit:www.gracenote.com/corporate.
For the data provided byGracenote® Music RecognitionService, the content is notnecessarily guaranteed 100%.
Regarding the use of GracenoteMusic Recognition Service, whenthis product is used, it is necessaryto agree to the following articles.
Gracenote® End User License
This application or device containssoftware from Gracenote, Inc. ofEmeryville, California (“Gracenote”).The software from Gracenote (the“Gracenote Software”) enablesthis application to perform discand/or file identification and obtainmusic-related information, includingname, artist, track, and titleinformation (“Gracenote Data”)from online servers or embeddeddatabases (collectively, “GracenoteServers”) and to perform otherfunctions. You may use GracenoteData only by means of the intendedEnd-User functions of thisapplication or device. You agree thatyou will use Gracenote Data, theGracenote Software, and GracenoteServers for your own personalnon-commercial use only. You agreenot to assign, copy, transfer or

Black plate (33,1)Chevrolet Volt Owner Manual - 2012
Infotainment System 7-33
transmit the Gracenote Software orany Gracenote Data to any thirdparty.
YOU AGREE NOT TO USE OREXPLOIT GRACENOTE DATA, THEGRACENOTE SOFTWARE, ORGRACENOTE SERVERS, EXCEPTAS EXPRESSLY PERMITTEDHEREIN. You agree that yournon-exclusive license to use theGracenote Data, the GracenoteSoftware, and Gracenote Serverswill terminate if you violate theserestrictions. If your licenseterminates, you agree to cease anyand all use of the Gracenote Data,the Gracenote Software, andGracenote Servers.
Gracenote reserves all rights inGracenote Data, the GracenoteSoftware, and the GracenoteServers, including all ownershiprights.
Under no circumstances willGracenote become liable for anypayment to you for any informationthat you provide. You agree thatGracenote, Inc. may enforce itsrights under this Agreement againstyou directly in its own name.
The Gracenote service uses aunique identifier to track queries forstatistical purposes.
The purpose of a randomlyassigned numeric identifier is toallow the Gracenote service tocount queries without knowinganything about who you are. Formore information, see the web pagefor the Gracenote Privacy Policy forthe Gracenote service.
The Gracenote Software and eachitem of Gracenote Data are licensedto you “AS IS.” Gracenote makesno representations or warranties,express or implied, regarding theaccuracy of any Gracenote Datafrom in the Gracenote Servers.
Gracenote reserves the right todelete data from the GracenoteServers or to change datacategories for any cause thatGracenote deems sufficient.
No warranty is made that theGracenote Software or GracenoteServers are error-free or thatfunctioning of Gracenote Softwareor Gracenote Servers will beuninterrupted.
Gracenote is not obligated toprovide you with new enhanced oradditional data types or categoriesthat Gracenote may provide in thefuture and is free to discontinue itsservices at any time.
Gracenote disclaims all warrantiesexpress or implied, including,but not limited to, impliedwarranties of merchantability,fitness for a particular purpose,title, and non-infringement.

Black plate (34,1)Chevrolet Volt Owner Manual - 2012
7-34 Infotainment System
Gracenote does not warrant theresults that will be obtained by youruse of the Gracenote software orany Gracenote server. In no casewill Gracenote be liable for anyconsequential or incidentaldamages or for any lost profits orlost revenues.
Portions of this software arecopyright © 2008 The FreeTypeProject (www.freetype.org). All rightsreserved.

Black plate (1,1)Chevrolet Volt Owner Manual - 2012
Climate Controls 8-1
Climate Controls
Climate Control SystemsAutomatic Climate ControlSystem . . . . . . . . . . . . . . . . . . . . . . 8-1
Air VentsAir Vents . . . . . . . . . . . . . . . . . . . . . . 8-8
Climate ControlSystems
Automatic ClimateControl SystemThe climate control buttons and thetouch screen are used to adjust theheating, cooling, and ventilation.
The vehicle may require the useof an auxiliary heat source undercertain cold conditions. Thisprovides additional heating anddefrost capability obtained by
running the engine, even if thehigh voltage battery is adequatelycharged. Under these conditions,the engine will start and use fuel.Make sure there is fuel in the tank.
Do not allow the vehicle to remainin extreme temperatures for longperiods without being driven orbeing plugged in.

Black plate (2,1)Chevrolet Volt Owner Manual - 2012
8-2 Climate Controls
Climate Control Buttons
A. Temperature Control
B. Driver and Passenger HeatedSeats
C. Defrost
D. Climate
E. Auto (Automatic Operation)
F. Rear Window Defogger
G. Manual Fan Control

Black plate (3,1)Chevrolet Volt Owner Manual - 2012
Climate Controls 8-3
Climate Touch Screen Controls
A. Driver and Passenger AutoHeated Seats
B. Air Delivery Mode Controls
C. Auto Recirculation
D. Manual Recirculation
E. Outside Air TemperatureDisplay
F. Climate Modes: Fan Only, ECO,Comfort
G. Climate Power Gauge
H. Manual Fan Control
I. Temperature Setting Display
J. Air Conditioning Indicator
K. Heat Status Indicator
Climate Control Touch Screen
The climate mode, fan, air delivery,recirculation, and auto heated seatsare controlled by pressing theCLIMATE button on the center stackand viewing information in thecenter stack display.
Climate Mode Operation
There are three climate modesettings: Fan Only, ECO, andComfort. These settings adjust theimpact the climate control systemhas on the vehicle's electric rangeor fuel economy.
To select a climate mode:
1. Press CLIMATE on the centerstack.
2. Press the climate mode buttonon the touch screen. The climatemode will be lit.

Black plate (4,1)Chevrolet Volt Owner Manual - 2012
8-4 Climate Controls
Fan Only Mode: The airconditioning and electric heat areturned off. As long as0 is notselected, the climate control settingsmay not have a noticeable effect onthe vehicle electric range and fueleconomy.
When in Fan Only mode, the AUTOindicator light will be off. WhenAUTO is selected in Fan Onlymode, the mode will change toeither ECO or Comfort.
When in Fan Only mode, the airconditioning system may turn onautomatically if the high voltagebattery is being cooled. The climatecontrol system could blow cold air.This is normal. To prevent cold airfrom blowing into the interior, turn offthe fan control and select the ventmode and manual recirculationmode, and close the air vents.
When in Fan Only mode, ifAuto Defog is enabled, the airconditioning and electric heatmay turn on when high humidityconditions exist. See “Climate and
Air Quality” under VehiclePersonalization on page 5‑53 formore information on the Auto Defogselection. The air conditioning mayalso run if0 is selected.
ECO Mode: The air conditioningand electric heat are controlled tobalance comfort with fuel economy.As long as0 is not selected,the vehicle electric range or fueleconomy will decrease less than inComfort mode, but will result inmoderate comfort.
Comfort Mode: The airconditioning and electric heat arecontrolled to reach the best comfortlevel based on the temperaturesetting selected. In this mode,vehicle electric range or fueleconomy will decrease dependingon the amount of energy required toreach the best comfort levels.
Climate Power Gauge
When the climate mode is changed,the Climate Power gauge displaysthe impact that user setting changeshave on energy consumption. Thehigher the reading, the more energyis being used.
Air Conditioning/Heat StatusIndicators
The air conditioning/heat statusdisplays when the air conditioning orelectric heat is being used.

Black plate (5,1)Chevrolet Volt Owner Manual - 2012
Climate Controls 8-5
The air conditioning and electricheat could be on at the same timewhen dehumidification is required inECO or Comfort modes.
In Fan Only mode, occasionally theair conditioning and/or heatingstatus will be on if the Auto Defogfunction is enabled and highhumidity is detected. See “Climateand Air Quality” under VehiclePersonalization on page 5‑53, fordetails on enabling or disabling theAuto Defog function.
The air conditioning may also runif0 is selected, regardless of theclimate mode.
Automatic Operation
The system automatically controlsthe fan speed, air delivery mode,and recirculation to heat or cool thevehicle to the selected temperature.
When the AUTO indicator light ison, the system is in full automaticoperation. If the air delivery mode,
fan speed, or recirculation setting isadjusted, the AUTO indicator turnsoff and the selected settings display.
For automatic operation:
1. Press AUTO.
2. Set the temperature. An initialsetting of 23°C (74°F) isrecommended. Allow the systemtime to stabilize. Adjust thetemperature as needed.
Q / R (Temperature Control):Press to increase or decrease thetemperature.
Auto Defog: The system willmonitor high humidity inside thevehicle. When high humidity isdetected, the climate control systemmay adjust to outside air supply andturn on the air conditioner or theheater. The fan speed may slightlyincrease to help prevent fogging.When high humidity is no longerdetected, the system will return toits prior operation. To turn Auto
Defog off or on, see “Climateand Air Quality” under VehiclePersonalization on page 5‑53.
Manual Operation
A (Fan Control): Press the fancontrol buttons or the touch screenfan control, to increase or decreasethe fan speed. The fan speedsetting displays. Pressing eitherbutton cancels automatic fan controland the fan can be controlledmanually. Press AUTO to return toautomatic operation. Press the fandown button repeatedly to turn offthe fan and the climate controlsystem.
If the fan is manually turned offwhile in ECO or Comfort mode, thedisplay will automatically change toFan Only mode. When the fan isturned back on either by manuallyincreasing fan speed or pressingthe AUTO button, the climatemode will revert back to ECO orComfort mode.

Black plate (6,1)Chevrolet Volt Owner Manual - 2012
8-6 Climate Controls
Air Delivery Mode Control: PressCLIMATE to select the Climatetouch screen. Press the air deliverymode touch screen button tochange the direction of the airflow.The selected air delivery modebutton is lit. Pressing any of the airdelivery buttons cancels automaticair delivery control and the directionof the airflow can be controlledmanually. Press AUTO to return toautomatic operation.
To change the current mode, selectone of the following:
Y (Vent): Air is directed to theinstrument panel outlets.
\ (Bi-Level): Air is dividedbetween the instrument paneloutlets and the floor outlets.
[ (Floor): Air is directed to thefloor outlets.
- (Defog): Air is directed to thewindshield and floor outlets. Clearsthe windows of fog or moisture.
0 (Defrost): Air is directed tothe windshield. The windshield iscleared of fog or frost more quickly.Selecting0 will disable automaticcontrol and the AUTO buttonindicator will not be lit.
Selecting0 again will return to theprevious climate settings.
For best results, clear all snow andice from the windshield beforedefrosting.
If0 is selected in Fan Only orECO mode, air conditioning orelectric heat may turn on and havea noticeable effect on vehicleelectric range and fuel economy.
AUTOh (Auto Recirculation):Press to allow the system toautomatically choose the air supplymode for best performance interms of comfort, efficiency, anddefogging. Air is recirculated oroutside air is pulled into the vehicle.The touch screen button is lit.
h (Manual Recirculation):Press to alternate betweenrecirculating air inside the vehicleor pulling in outside air. Whenselected, the touch screen buttonlights up to indicate that air is beingrecirculated. This helps to quicklycool the air inside the vehicle orprevent outside air and odors fromentering.
Pressing this button cancelsautomatic recirculation. Press AUTOor AUTOh to return to automaticoperation; recirculation runsautomatically as needed.
Manual recirculation mode is notavailable when in Defrost or Defogmodes.
M / L (Manual Heated Seats): Ifavailable, the controls are on thecenter stack. To operate, the vehiclemust be on.
Press M or L to heat the driveror passenger seat cushion andseatback. For more information, seeHeated Front Seats on page 3‑7.

Black plate (7,1)Chevrolet Volt Owner Manual - 2012
Climate Controls 8-7
M AUTO/ L AUTO (Auto HeatedSeats): If available, the controlsare on the touch screen on thecenter stack.
Press the touch screen L AUTO
or M AUTO button. The button colorwill change to green when thisfeature is on. When the vehicle ison, this feature will automaticallyactivate the heated seats at thelevel required by the vehicle'sinterior temperature. The activehigh, medium, low, or off heatedseat level will be indicated by themanual heated seat button lights onthe center stack. Use the touchscreen buttons or the manualheated seat buttons on the centerstack to turn auto heated seats off.For more information, see HeatedFront Seats on page 3‑7.
Rear Window Defogger
= (Rear Window Defogger):Press to turn the rear windowdefogger on or off.
The rear window defogger turnsoff automatically after aboutfive minutes. If turned on again, itruns for about five minutes beforeturning off. The defogger can alsobe turned off by turning thevehicle off.
For vehicles with heated outsiderearview mirrors, they turn on whenthe rear window defogger button ison and help to clear fog or frost fromthe surface of the mirror. SeeHeated Mirrors on page 2‑16.
Notice: Do not try to clear frostor other material from the insideof the front windshield and rearwindow with a razor blade oranything else that is sharp. Thismay damage the rear windowdefogger grid and affect theradio's ability to pick up stationsclearly. The repairs would not becovered by the vehicle warranty.
Remote Start: For vehicles withthis feature, the climate controlsystem may be started by using theRemote Keyless Entry (RKE)transmitter. The climate controlsystem will default to an appropriateheating or cooling mode. SeeRemote Start on page 2‑7.
The rear window defogger turns onif it is cold outside.
Compressor
The vehicle has an electric poweredair conditioning compressor.This allows for continuous airconditioning and/or high voltagebattery cooling operation, withoutrunning the engine.
The compressor operating speedis not tied to the engine speed, sosome noise may be heard from thecompressor, especially when airconditioning use is high and theengine has turned off. This isnormal.

Black plate (8,1)Chevrolet Volt Owner Manual - 2012
8-8 Climate Controls
Sensors
Solar Sensor
The solar sensor is located on topof the instrument panel, near thewindshield, where it monitors solarintensity.
The climate control system usesthe sensor information to adjustthe temperature, fan speed,recirculation, and air delivery modefor best comfort.
Do not cover the sensor; otherwisethe automatic climate control systemmay not work properly.
Humidity Sensor
The humidity sensor is near thebase of the inside rearview mirror.The climate control system uses thesensor information to adjust thetemperature and recirculation forbest comfort.
Outside Air Temperature Sensor
The outside air temperature sensoris located behind the front grille ofthe vehicle. The vehicle uses thesensor information to displayoutside air temperature. The climatecontrol system uses the informationto adjust the climate systemoperation.
Air VentsUse the louvers on the air vents tochange the direction of the airflow.
Use the thumbwheels near eachvent to open and close off theairflow.
Operation Tips. Keep all outlets open whenever
possible for best systemperformance.
. Keep the path under all seatsclear of objects to help circulatethe air inside the vehicle moreeffectively.
. Use of non-GM approved hooddeflectors can adversely affectthe performance of the system.

Black plate (1,1)Chevrolet Volt Owner Manual - 2012
Driving and Operating 9-1
Driving andOperating
Driving InformationDriving for Better EnergyEfficiency . . . . . . . . . . . . . . . . . . . . 9-2
Distracted Driving . . . . . . . . . . . . . 9-4Defensive Driving . . . . . . . . . . . . . 9-5Drunk Driving . . . . . . . . . . . . . . . . . 9-5Control of a Vehicle . . . . . . . . . . . 9-5Braking . . . . . . . . . . . . . . . . . . . . . . . 9-5Steering . . . . . . . . . . . . . . . . . . . . . . . 9-6Off-Road Recovery . . . . . . . . . . . . 9-6Loss of Control . . . . . . . . . . . . . . . . 9-7Driving on Wet Roads . . . . . . . . . 9-8Highway Hypnosis . . . . . . . . . . . . 9-8Hill and Mountain Roads . . . . . . 9-9Winter Driving . . . . . . . . . . . . . . . . . 9-9If the Vehicle Is Stuck . . . . . . . . 9-11Vehicle Load Limits . . . . . . . . . . 9-11
Starting and OperatingNew Vehicle Break-In . . . . . . . . 9-16Power Button . . . . . . . . . . . . . . . . 9-16Starting and Stopping theVehicle . . . . . . . . . . . . . . . . . . . . . 9-17
Retained AccessoryPower (RAP) . . . . . . . . . . . . . . . 9-19
Shifting Into Park . . . . . . . . . . . . 9-19Shifting out of Park . . . . . . . . . . 9-20Parking over ThingsThat Burn . . . . . . . . . . . . . . . . . . 9-21
Electric Vehicle OperatingModesSystem Operation . . . . . . . . . . . 9-21Electric Mode . . . . . . . . . . . . . . . . 9-21Extended Range Mode . . . . . . 9-22Driver Selected OperatingModes . . . . . . . . . . . . . . . . . . . . . . 9-22
Out of Fuel/EngineUnavailable . . . . . . . . . . . . . . . . 9-24
Maintenance Modes . . . . . . . . . 9-24
Engine ExhaustEngine Exhaust . . . . . . . . . . . . . . 9-26Running the Vehicle WhileParked . . . . . . . . . . . . . . . . . . . . . 9-27
Electric Drive UnitElectric Drive Unit . . . . . . . . . . . 9-28
BrakesAntilock BrakeSystem (ABS) . . . . . . . . . . . . . . 9-29
Electric Parking Brake . . . . . . . 9-30Regenerative Braking . . . . . . . . 9-32
Ride Control SystemsTraction ControlSystem (TCS) . . . . . . . . . . . . . . 9-33
Electronic StabilityControl (ESC) . . . . . . . . . . . . . . 9-34
Cruise ControlCruise Control . . . . . . . . . . . . . . . 9-36
Object Detection SystemsUltrasonic Parking Assist . . . . 9-38Rear VisionCamera (RVC) . . . . . . . . . . . . . 9-41
ChargingPlug-In Charging . . . . . . . . . . . . . 9-44Delayed ChargingOverride . . . . . . . . . . . . . . . . . . . . 9-46
Charging StatusFeedback . . . . . . . . . . . . . . . . . . 9-47

Black plate (2,1)Chevrolet Volt Owner Manual - 2012
9-2 Driving and Operating
Charge Cord . . . . . . . . . . . . . . . . . 9-50Utility Interruption ofCharging . . . . . . . . . . . . . . . . . . . 9-52
Electrical Requirements forBattery Charging . . . . . . . . . . . 9-52
FuelFuel . . . . . . . . . . . . . . . . . . . . . . . . . 9-53Gasoline Specifications (U.S.and Canada Only) . . . . . . . . . . 9-54
California FuelRequirements . . . . . . . . . . . . . . 9-54
Fuels in Foreign Countries . . . 9-54Fuel Additives . . . . . . . . . . . . . . . 9-54Filling the Tank . . . . . . . . . . . . . . 9-56Filling a Portable FuelContainer . . . . . . . . . . . . . . . . . . . 9-57
TowingGeneral TowingInformation . . . . . . . . . . . . . . . . . 9-58
Conversions and Add-OnsAdd-On ElectricalEquipment . . . . . . . . . . . . . . . . . 9-58
Driving Information
Driving for Better EnergyEfficiencyUse the following tips to helpmaximize energy efficiency andrange.
Driving Style
Efficiency Gauge (InstrumentCluster)
The ball indicator should be keptgreen and in the center of thegauge.
Inefficient acceleration is indicatedwhen the ball turns yellow andtravels above the center of thegauge.
Aggressive braking is indicatedwhen the ball turns yellow andtravels below the center of thegauge.
Acceleration/Braking/Coasting
Avoid unnecessary rapidaccelerations and decelerations.
Electric range is maximized at80 km/h (50 mph) and below. Higherspeeds use more energy and cansignificantly reduce electric range.
Use cruise control whenappropriate.
Plan ahead for decelerations andcoast whenever possible. Forexample, do not rush to trafficsignals.
Do not shift to N (Neutral) to coast.The vehicle recovers energy whilecoasting and braking in D (Drive)or L (Low).
Drive Mode and PRNDL Selection
Use Normal Mode when possible.
Sport Mode provides moreresponsive acceleration thanNormal Mode but can reduceefficiency.

Black plate (3,1)Chevrolet Volt Owner Manual - 2012
Driving and Operating 9-3
Use Mountain Mode prior toclimbing long, steep grades inmountainous areas. Be sure toengage Mountain Mode beforestarting to climb. Mountain Modereduces electric range and powerbut may be needed to maintainspeeds above 96 km/h (60 mph)when climbing grades of 5% orgreater.
Use L (Low) in heavy stop‐and‐gotraffic or when traveling downhill.L (Low) requires less brake pedalapplication and provides acontrolled, efficient way to slow thevehicle down.
Climate Setting
Using the heat and air conditioningsystems decreases the energyavailable for electric driving.
Optimal energy efficiency isachieved with the heat, airconditioning, and fan turned off.
Less energy is used at low fanspeeds. When using the fan:. Fan Only is the most energy
efficient climate setting as longas0 is not selected.
. ECO is for moderate airconditioning and heateroperation and is the nextmost energy efficient setting aslong as0 is not selected
. Comfort provides the mostcomfort but is the least energyefficient.
Use the auto heated seat featureinstead of climate settings. Heatingthe seat uses less energy thanheating the vehicle interior.
Use remote start to heat or cool theinterior when the vehicle is pluggedin to maximize the electric range byutilizing electricity from the electricaloutlet.
In hot weather, avoid parking indirect sunlight or use sunshadesinside the vehicle.
Turn off the front and rear windowdefog/defrost when they are nolonger needed.
Avoid driving with the windows openat highway speeds.
Vehicle Charging/Maintenance
Charging
Keep the vehicle plugged in, evenwhen fully charged, to keep thebattery temperature ready for thenext drive. This is important whenoutside temperatures are extremelyhot or cold.
Maintenance
Always keep the tires properlyinflated and the vehicle properlyaligned.
The weight of excess cargo in thevehicle affects efficiency and range.Avoid carrying more than is needed.
If fuel is not regularly used, considerkeeping the fuel tank only one‐thirdfull. Excess fuel weight impactsefficiency and range.

Black plate (4,1)Chevrolet Volt Owner Manual - 2012
9-4 Driving and Operating
Use premium fuel.
Avoid unnecessary use of electricalaccessories. Power used forfunctions other than propelling thevehicle will reduce EV range.
Using a rooftop carrier will reduceefficiency due to additional weightand drag.
Distracted DrivingDistraction comes in many formsand can take your focus from thetask of driving. Exercise goodjudgment and do not let otheractivities divert your attentionaway from the road. Many localgovernments have enacted lawsregarding driver distraction. Becomefamiliar with the local laws inyour area.
To avoid distracted driving, alwayskeep your eyes on the road, handson the wheel, and mind on the drive.. Do not use a phone in
demanding driving situations.Use a hands-free method toplace or receive necessaryphone calls.
. Watch the road. Do notread, take notes, or look upinformation on phones orother electronic devices.
. Designate a front seatpassenger to handle potentialdistractions.
. Become familiar with vehiclefeatures before driving, suchas programming favorite radiostations and adjusting climatecontrol and seat settings.Program all trip information intoany navigation device prior todriving.
. Wait until the vehicle is parkedto retrieve items that have fallento the floor.
. Stop or park the vehicle to tendto children.
. Keep pets in an appropriatecarrier or restraint.
. Avoid stressful conversationswhile driving, whether with apassenger or on a cell phone.
{ WARNING
Taking your eyes off the road toolong or too often could cause acrash resulting in injury or death.Focus your attention on driving.
Refer to the Infotainment sectionfor more information on using thatsystem, including pairing and usinga cell phone.
If equipped, refer to the navigationmanual for information on thatsystem, including pairing and usinga cell phone.

Black plate (5,1)Chevrolet Volt Owner Manual - 2012
Driving and Operating 9-5
Defensive DrivingDefensive driving means “alwaysexpect the unexpected.” The firststep in driving defensively is to wearthe safety belt. See Safety Belts onpage 3‑11.. Assume that other road users
(pedestrians, bicyclists, andother drivers) are going to becareless and make mistakes.Anticipate what they might doand be ready.
. Allow enough following distancebetween you and the driver infront of you.
. Focus on the task of driving.
Drunk DrivingDeath and injury associated withdrinking and driving is a globaltragedy.
{ WARNING
Drinking and then driving isvery dangerous. Your reflexes,perceptions, attentiveness, andjudgment can be affected by evena small amount of alcohol. Youcan have a serious — or evenfatal — collision if you drive afterdrinking.
Do not drink and drive or ride witha driver who has been drinking.Ride home in a cab; or if you arewith a group, designate a driverwho will not drink.
Control of a VehicleBraking, steering, and acceleratingare important factors in helping tocontrol a vehicle while driving.
BrakingBraking action involves perceptiontime and reaction time. Deciding topush the brake pedal is perceptiontime. Actually doing it isreaction time.
Average driver reaction time isabout three‐fourths of a second.In that time, a vehicle moving at100 km/h (60 mph) travels 20 m(66 ft), which could be a lot ofdistance in an emergency.
Helpful braking tips to keep in mindinclude:. Keep enough distance between
you and the vehicle in frontof you.
. Avoid needless heavy braking.
. Keep pace with traffic.
If the engine ever stops while thevehicle is being driven, brakenormally but do not pump thebrakes. Doing so could makethe pedal harder to push down.

Black plate (6,1)Chevrolet Volt Owner Manual - 2012
9-6 Driving and Operating
If the engine stops, there will besome power brake assist but it willbe used when the brake is applied.Once the power assist is used up, itcan take longer to stop and thebrake pedal will be harder to push.
Steering
Electric Power Steering
Your vehicle has electric powersteering. It does not have powersteering fluid. Regular maintenanceis not required.
If power steering assist is lost dueto a system malfunction, the vehiclecan be steered, but may requireincreased effort.
See specific vehicle steeringmessages under Vehicle Messageson page 5‑45.
Curve Tips. Take curves at a reasonable
speed.. Reduce speed before entering a
curve.. Maintain a reasonable steady
speed through the curve.. Wait until the vehicle is out of
the curve before acceleratinggently into the straightaway.
Steering in Emergencies. There are some situations when
steering around a problem maybe more effective than braking.
. Holding both sides of thesteering wheel allows you to turn180 degrees without removinga hand.
. The Antilock Brake System(ABS) allows steering whilebraking.
Off-Road Recovery
The vehicle's right wheels can dropoff the edge of a road onto theshoulder while driving. Followthese tips:
1. Ease off the accelerator andthen, if there is nothing in theway, steer the vehicle so thatit straddles the edge of thepavement.

Black plate (7,1)Chevrolet Volt Owner Manual - 2012
Driving and Operating 9-7
2. Turn the steering wheel aboutone-eighth of a turn, until theright front tire contacts thepavement edge.
3. Then turn the steering wheel togo straight down the roadway.
Loss of Control
Skidding
There are three types of skids thatcorrespond to the vehicle's threecontrol systems:. Braking Skid — wheels are not
rolling.. Steering or Cornering
Skid — too much speed orsteering in a curve causes tiresto slip and lose cornering force.
. Acceleration Skid — too muchthrottle causes the drivingwheels to spin.
Defensive drivers avoid most skidsby taking reasonable care suitedto existing conditions, and by notoverdriving those conditions. Butskids are always possible.
If the vehicle starts to slide, followthese suggestions:. Ease your foot off the
accelerator pedal and quicklysteer the way you want thevehicle to go. The vehicle maystraighten out. Be ready for asecond skid if it occurs.
. Slow down and adjust yourdriving according to weatherconditions. Stopping distancecan be longer and vehicle
control can be affected whentraction is reduced by water,snow, ice, gravel, or othermaterial on the road. Learn torecognize warning clues — suchas enough water, ice, or packedsnow on the road to make amirrored surface — and slowdown when you have any doubt.
. Try to avoid sudden steering,acceleration, or braking,including reducing vehiclespeed by shifting to a lowergear. Any sudden changescould cause the tires to slide.
Remember: Antilock brakes helpavoid only the braking skid.

Black plate (8,1)Chevrolet Volt Owner Manual - 2012
9-8 Driving and Operating
Driving on Wet RoadsRain and wet roads can reducevehicle traction and affect yourability to stop and accelerate.Always drive slower in these typesof driving conditions and avoiddriving through large puddles anddeep‐standing or flowing water.
{ WARNING
Wet brakes can cause crashes.They might not work as well in aquick stop and could causepulling to one side. You couldlose control of the vehicle.
After driving through a largepuddle of water or a car/vehiclewash, lightly apply the brakepedal until the brakes worknormally.
Flowing or rushing water createsstrong forces. Driving throughflowing water could cause thevehicle to be carried away. If this
(Continued)
WARNING (Continued)
happens, you and other vehicleoccupants could drown. Do notignore police warnings and bevery cautious about trying to drivethrough flowing water.
Hydroplaning
Hydroplaning is dangerous. Watercan build up under the vehicle'stires so they actually ride on thewater. This can happen if the road iswet enough and you are going fastenough. When the vehicle ishydroplaning, it has little or nocontact with the road.
There is no hard and fast rule abouthydroplaning. The best advice is toslow down when the road is wet.
Other Rainy Weather Tips
Besides slowing down, other wetweather driving tips include:. Allow extra following distance.. Pass with caution.. Keep windshield wiping
equipment in good shape.. Keep the windshield washer fluid
reservoir filled.. Have good tires with proper
tread depth. See Tires onpage 10‑40.
. Turn off cruise control.
Highway HypnosisAlways be alert and pay attentionto your surroundings while driving.If you become tired or sleepy, find asafe place to park the vehicleand rest.

Black plate (9,1)Chevrolet Volt Owner Manual - 2012
Driving and Operating 9-9
Other driving tips include:. Keep the vehicle well ventilated.. Keep the interior
temperature cool.. Keep your eyes moving — scan
the road ahead and to the sides.. Check the rearview mirror and
vehicle instruments often.
Hill and Mountain RoadsDriving on steep hills or throughmountains is different than drivingon flat or rolling terrain. See“Mountain Mode” under DriverSelected Operating Modes onpage 9‑22. Tips for driving in theseconditions include:. Keep the vehicle serviced and in
good shape.. Check all fluid levels and brakes,
tires, cooling system, andelectric drive unit.
. Keep the vehicle in gear whengoing down steep or long hills.
{ WARNING
Coasting downhill in N (Neutral)or with the vehicle turned off isdangerous. The brakes will haveto do all the work of slowing downthe vehicle and could become toohot. Hot brakes may not be ableto slow the vehicle enough tomaintain speed and control. Youcould crash. Always have thevehicle running and in gear(preferably LOW range) whengoing downhill. This will allow theelectric drive unit to assist inslowing and maintaining speed.
. Stay in your own lane. Do notswing wide or cut across thecenter of the road. Drive atspeeds that let you stay in yourown lane.
. Top of hills: Bealert — something couldbe in your lane (stalled car,accident).
. Pay attention to special roadsigns (falling rocks area, windingroads, long grades, passing orno-passing zones) and takeappropriate action.
Winter Driving
Driving on Snow or Ice
Drive carefully when there is snowor ice between the tires and theroad, creating less traction or grip.Wet ice can occur at about 0°C(32°F) when freezing rain begins tofall, resulting in even less traction.Avoid driving on wet ice or infreezing rain until roads can betreated with salt or sand.
Drive with caution, whatever thecondition. Accelerate gently sotraction is not lost. Accelerating tooquickly causes the wheels to spinand makes the surface under thetires slick, so there is even lesstraction.

Black plate (10,1)Chevrolet Volt Owner Manual - 2012
9-10 Driving and Operating
Try not to break the fragile traction.If you accelerate too fast, the drivewheels will spin and polish thesurface under the tires even more.
The Antilock Brake System (ABS)improves vehicle stability duringhard stops on slippery roads, butapply the brakes sooner than whenon dry pavement.
Allow greater following distance onany slippery road and watch forslippery spots. Icy patches canoccur on otherwise clear roads inshaded areas. The surface of acurve or an overpass can remain icywhen the surrounding roads areclear. Avoid sudden steeringmaneuvers and braking whileon ice.
Turn off cruise control on slipperysurfaces.
Blizzard Conditions
Being stuck in snow can be aserious situation. Stay with thevehicle unless there is help nearby.
If possible, use the RoadsideAssistance Program. To gethelp and keep everyone in thevehicle safe:. Turn on the hazard warning
flashers.. Tie a red cloth to an outside
mirror.
{ WARNING
Snow can trap engine exhaustunder the vehicle. This maycause exhaust gases to getinside. Engine exhaust containscarbon monoxide (CO) whichcannot be seen or smelled. It cancause unconsciousness and evendeath.
If the vehicle is stuck in the snow:. Clear away snow from aroundthe base of the vehicle,especially any that is blockingthe exhaust pipe.
(Continued)
WARNING (Continued)
. Check again from time totime to be sure snow doesnot collect there.
. Open a window about 5 cm(2 in) on the side of thevehicle that is away from thewind to bring in fresh air.
. Fully open the air outlets onor under the instrumentpanel.
. Adjust the climate controlsystem to a setting thatcirculates the air inside thevehicle and set the fan speedto the highest setting. See“Climate Control Systems” inthe Index.
For more information aboutcarbon monoxide, see EngineExhaust on page 9‑26.

Black plate (11,1)Chevrolet Volt Owner Manual - 2012
Driving and Operating 9-11
To conserve energy, run the vehiclefor only short periods as needed towarm the vehicle and then shut thevehicle off and close the windowmost of the way to save heat.Repeat this until help arrivesbut only when you feel reallyuncomfortable from the cold. Movingabout to keep warm also helps.
If it takes some time for help toarrive, start the vehicle. The enginemay start to charge the 12‐voltbattery. Turn off unnecessaryaccessories to conserve energy.
If the Vehicle Is StuckSlowly and cautiously spin thewheels to free the vehicle whenstuck in sand, mud, ice, or snow.
The Traction Control System (TCS)must be turned off by pressing theTSC/ESC button. Traction control isnot completely off, but will onlyengage if the maneuver can causedamage to the electric drive unit.
{ WARNING
If the vehicle's tires spin at highspeed, they can explode, and youor others could be injured. Thevehicle can overheat, causing anengine compartment fire or otherdamage. Spin the wheels as littleas possible and avoid goingabove 55 km/h (35 mph).
For information about using tirechains on the vehicle, see TireChains on page 10‑58.
Rocking the Vehicle to Getit Out
Turn the steering wheel left andright to clear the area around thefront wheels. Shift back and forthbetween R (Reverse) and a forwardgear, spinning the wheels as littleas possible. The Traction ControlSystem prevents the tires fromspinning at high speeds. To prevent
electric drive unit wear, wait until thewheels stop spinning before shiftinggears. Release the acceleratorpedal while shifting, and presslightly on the accelerator pedalwhen the electric drive unit is ingear. Slowly spinning the wheels inthe forward and reverse directionscauses a rocking motion that couldfree the vehicle. If that does not getthe vehicle out after a few tries, itmight need to be towed out. If thevehicle does need to be towed out,see Towing the Vehicle onpage 10‑73.
Vehicle Load LimitsIt is very important to know howmuch weight the vehicle cancarry. This weight is called thevehicle capacity weight andincludes the weight of alloccupants, cargo, and allnonfactory‐installed options.

Black plate (12,1)Chevrolet Volt Owner Manual - 2012
9-12 Driving and Operating
Two labels on the vehicleshow how much weight it wasdesigned to carry, the Tire andLoading Information label andthe Certification label.
{ WARNING
Do not load the vehicle anyheavier than the GrossVehicle Weight Rating(GVWR), or either themaximum front or rear GrossAxle Weight Rating (GAWR).This can cause systems tobreak and change the way thevehicle handles. This couldcause loss of control and acrash. Overloading can alsoshorten the life of the vehicle.
Tire and Loading InformationLabel
Label Example
A vehicle-specific Tire andLoading Information label isattached to the center pillar(B-pillar). With the driver dooropen, the label is attachedbelow the door lock post. TheTire and Loading Informationlabel shows the number ofoccupant seating positions (A),
and the maximum vehiclecapacity weight (B) in kilogramsand pounds.
The Tire and LoadingInformation label also showsthe tire size of the originalequipment tires (C) and therecommended cold tire inflationpressures (D). For moreinformation on tires and inflationsee Tires on page 10‑40 andTire Pressure on page 10‑46.
There is also important loadinginformation on the Certificationlabel. It tells you the GrossVehicle Weight Rating (GVWR)and the Gross Axle WeightRating (GAWR) for the frontand rear axle; see “CertificationLabel” later in this section.

Black plate (13,1)Chevrolet Volt Owner Manual - 2012
Driving and Operating 9-13
Steps for Determining CorrectLoad Limit
1. Locate the statement“The combined weight ofoccupants and cargo shouldnever exceed XXX kg orXXX lbs” on your vehicle'splacard.
2. Determine the combinedweight of the driver andpassengers that will be ridingin your vehicle.
3. Subtract the combinedweight of the driver andpassengers from XXX kg orXXX lbs.
4. The resulting figure equalsthe available amount of cargoand luggage load capacity.For example, if the “XXX”amount equals 1400 lbs andthere will be five 150 lbpassengers in your vehicle,
the amount of available cargoand luggage load capacityis 650 lbs (1400 − 750(5 x 150) = 650 lbs).
5. Determine the combinedweight of luggage and cargobeing loaded on the vehicle.That weight may not safelyexceed the available cargoand luggage load capacitycalculated in Step 4.
6. If your vehicle will be towinga trailer, the load from yourtrailer will be transferred toyour vehicle. Consult thismanual to determine how thisreduces the available cargoand luggage load capacity ofyour vehicle.
The vehicle is neither designednor intended to tow a trailer.
Example 1
A. Vehicle Capacity Weightfor Example 1 = 453 kg(1,000 lbs).
B. Subtract Occupant Weight@ 68 kg (150 lbs) × 2 =136 kg (300 lbs).
C. Available Occupant andCargo Weight = 317 kg(700 lbs).

Black plate (14,1)Chevrolet Volt Owner Manual - 2012
9-14 Driving and Operating
Example 2
A. Vehicle Capacity Weight forExample 2 = 453 kg(1,000 lbs).
B. Subtract Occupant Weight@ 68 kg (150 lbs) × 5 =340 kg (750 lbs).
C. Available Cargo Weight =113 kg (250 lbs).
Example 3
A. Vehicle Capacity Weightfor Example 3 = 453 kg(1,000 lbs).
B. Subtract Occupant Weight@ 91 kg (200 lbs) × 5 =453 kg (1,000 lbs).
C. Available Cargo Weight =0 kg (0 lbs).
Refer to the vehicle's Tire andLoading Information label forspecific information about thevehicle's capacity weight and
seating positions. The combinedweight of the driver, passengers,and cargo should never exceedthe vehicle's capacity weight.
Certification Label
Label Example
A vehicle-specific Certificationlabel is found on the center pillar(B-pillar). The label shows thegross weight capacity of thevehicle. This is the GrossVehicle Weight Rating (GVWR)and includes the weight of thevehicle, all occupants, fuel, and

Black plate (15,1)Chevrolet Volt Owner Manual - 2012
Driving and Operating 9-15
cargo. Never exceed the GVWRfor the vehicle, or the GrossAxle Weight Rating (GAWR) foreither the front or rear axle.
Spread out heavy loads equallyon both sides of the vehicle. See“Steps for Determining CorrectLoad Limit” earlier in thissection.
{ WARNING
Do not load the vehicle anyheavier than the GrossVehicle Weight Rating(GVWR), or either themaximum front or rear GrossAxle Weight Rating (GAWR).This can cause systems tobreak and change the way thevehicle handles. This couldcause loss of control and acrash. Overloading can alsoshorten the life of the vehicle.
If you put things inside thevehicle — like suitcases,tools, packages, or anythingelse — they will go as fast asthe vehicle goes. If you have tostop or turn quickly, or if there isa crash, they will keep going.
{ WARNING
Things inside the vehicle canstrike and injure people in asudden stop or turn, or in acrash.
. Put things in the cargoarea of the vehicle. In thecargo area, put them asfar forward as possible.Try to spread the weightevenly.
(Continued)
WARNING (Continued)
. Never stack heavierthings, like suitcases,inside the vehicle so thatsome of them are abovethe tops of the seats.
. Do not leave anunsecured child restraintin the vehicle.
. Secure loose items in thevehicle.
. Do not leave a seat foldeddown unless needed.

Black plate (16,1)Chevrolet Volt Owner Manual - 2012
9-16 Driving and Operating
Starting andOperating
New Vehicle Break-InNotice: The vehicle does notrequire a break-in period. Vehiclebreak‐in is performed duringmanufacturing.
Power Button
The vehicle has an electronicpush‐button start. The POWER Obutton light flashes when the driver
door is open and the vehicle is noton. The flashing light will eventuallytime out. The POWER O buttonlight is on steady when in ON/RUNpower mode. When the vehicle isturned off, the POWER O buttonlight will turn off.
The Remote Keyless Entry (RKE)transmitter must be in the vehicle forthe system to operate. If the vehiclewill not start, place the RKEtransmitter in the transmitter slot.See Remote Keyless Entry (RKE)System Operation on page 2‑2.
ON/RUN: This position is forstarting and driving. With the vehicleoff, and the brake pedal applied,pressing the POWER O button oncewill place the vehicle in ON/RUN.When the READY light is on in theinstrument cluster, the vehicle isready to be driven. This could takeup to 15 seconds at extremely coldtemperatures. See Vehicle ReadyLight on page 5‑27. The engine willonly start if needed. If the vehicledid not start, the instrument cluster
will display a screen with inactivefuel and battery gauges. SeeStarting and Stopping the Vehicleon page 9‑17.
Service Only Mode
This power mode is available forservice and diagnostics, and toverify the proper operation of themalfunction indicator lamp as maybe required for emission inspectionpurposes. With the vehicle off,and the brake pedal not applied,pressing and holding the POWER Obutton for more than five secondswill place the vehicle in ServiceOnly Mode. The instruments andaudio systems will operate as theydo in ON/RUN, but the vehicle willnot be able to be driven. Thepropulsion system will not start inService Only Mode. Push the buttonagain to turn the vehicle off.
Notice: Service Only Mode willdischarge the 12-volt battery. Donot use Service Only Mode for anextended period, or the vehiclemay not start.

Black plate (17,1)Chevrolet Volt Owner Manual - 2012
Driving and Operating 9-17
STOPPING THE VEHICLE/OFF:To turn the vehicle off, push thePOWER O button with the vehiclein P (Park). Retained AccessoryPower (RAP) will remain active untilthe driver door is opened. SeeRetained Accessory Power (RAP)on page 9‑19. When turning off thevehicle, if the vehicle is not inP (Park), the vehicle will go toACC/ACCESSORY and display themessage SHIFT TO PARK in theDriver Information Center (DIC).See Electric Drive Unit Messageson page 5‑47.
If the vehicle must be shut off in anemergency:
1. Brake using a firm and steadypressure. Do not pump thebrakes repeatedly. This maydeplete power assist, requiringincreased brake pedal force.
2. Shift the vehicle to N (Neutral).This can be done while thevehicle is moving. After shifting
to N (Neutral), firmly apply thebrakes and steer the vehicle to asafe location.
3. Come to a complete stop, shiftto P (Park), and turn the vehicleoff by pushing the POWER Obutton.
4. Set the parking brake. SeeElectric Parking Brake onpage 9‑30.
{ WARNING
Turning off the vehicle whilemoving may disable the airbags.While driving, only shut thepropulsion system off in anemergency.
If the vehicle cannot be pulled over,and must be shut off while driving,press and hold the POWER Obutton for longer than two seconds,or press twice in five seconds.
Starting and Stopping theVehicleStarting Procedure
Move the shift lever to P (Park) orN (Neutral). The propulsion systemwill not start in any other position.
Notice: Do not try to shift toP (Park) if the vehicle is movingor the electric drive unit could bedamaged. Shift to P (Park) onlywhen the vehicle is stopped.
Notice: The vehicle is designedto work with the electronics inthe vehicle. If you add electricalparts or accessories, you couldchange the way the vehicleoperates. Before adding electricalequipment, check with yourdealer. If you do not, the vehiclemight not perform properly. Anyresulting damage would not becovered by the vehicle warranty.
The Remote Keyless Entry (RKE)transmitter must be in the vehicle.Press the brake pedal and push andrelease the POWER O button.

Black plate (18,1)Chevrolet Volt Owner Manual - 2012
9-18 Driving and Operating
If the RKE transmitter is not in thevehicle or something is interferingwith the transmitter, a messagedisplays in the Driver InformationCenter (DIC). See Key and LockMessages on page 5‑48.
If the vehicle will not start due to alow RKE transmitter battery, thevehicle can still be driven. See“Starting the Vehicle with a LowTransmitter Battery” in RemoteKeyless Entry (RKE) SystemOperation on page 2‑2. A Welcome, Ready, and Good‐bye
audio message will be heard inthe vehicle and animated on theinstrument cluster when opening thedriver door upon entry, when thevehicle is ready to be driven, andwhen the vehicle is turned off.
The instrument cluster displays anactive fuel or battery gauge, alongwith an audio startup cue, when thevehicle is ready to be driven. Thiscould take up to 15 seconds atextremely cold temperatures. Theengine will only start if needed.If the vehicle did not start, theinstrument cluster will display a
screen with inactive fuel and batterygauges. See Starting and Stoppingthe Vehicle on page 9‑17.
Restarting Procedure
If the vehicle must be restartedwhile it is still moving, move the shiftlever to N (Neutral) and press thePOWER O button twice withoutpressing the brake pedal. Thepropulsion system will not restart inany other position.
Computers determine when theengine needs to run. The enginemay start, if required, when thepropulsion system is on. Somevehicle conditions that force theengine to run are:. Cold ambient temperatures.. The hood is open or not
completely latched.. The high voltage battery has a
low charge.

Black plate (19,1)Chevrolet Volt Owner Manual - 2012
Driving and Operating 9-19
. The engine is needed tomaintain the high voltage batterytemperature.
. The engine needs to run formaintenance.
See Maintenance Modes onpage 9‑24.
A chime will sound if the driver dooris opened while the vehicle is in ON/RUN. Always press the POWER Obutton to turn the vehicle off beforeexiting.
Stopping ProcedureFor information on how to turn thevehicle off, see Power Button onpage 9‑16.
Retained AccessoryPower (RAP)The following features will operatefor up to 10 minutes or until thedriver door is opened:. Audio System. Power Windows. Accessory Power Outlets
Shifting Into Park
{ WARNING
It can be dangerous to get out ofthe vehicle if the shift lever is notfully in P (Park) with the parkingbrake firmly set. The vehicle canroll. If you have left the propulsionsystem on, the vehicle can movesuddenly. You or others could beinjured. To be sure the vehicle willnot move, even when you are onfairly level ground, use the stepsthat follow.
1. Hold the brake pedal down andset the parking brake.
See Electric Parking Brake onpage 9‑30 for more information.
2. Move the shift lever into P (Park)by pushing the lever all the waytoward the front of the vehicle.
3. Turn the vehicle off.
Leaving the Vehicle with thePropulsion System On
{ WARNING
It can be dangerous to leavethe vehicle with the propulsionsystem on. The vehicle couldmove suddenly if the shift leveris not fully in P (Park) with theparking brake firmly set. And,if you leave the vehicle with thepropulsion system on, it couldoverheat and even catch fire. Youor others could be injured. Do notleave the vehicle with thepropulsion system on.
If you have to leave the vehicle withthe propulsion system on, be surethe vehicle is in P (Park) and theparking brake is firmly set beforeyou leave it. After you have movedthe shift lever into P (Park), holddown the regular brake pedal.

Black plate (20,1)Chevrolet Volt Owner Manual - 2012
9-20 Driving and Operating
See if you can move the shift leveraway from P (Park) without firstpulling it toward you. If you can, itmeans that the shift lever was notfully locked into P (Park).
Torque Lock
Torque lock is when the weight ofthe vehicle puts too much force onthe parking pawl in the electric driveunit. This happens when parkingon a hill and shifting the electricdrive unit into P (Park) is not doneproperly and then it is difficult toshift out of P (Park). To preventtorque lock, set the parking brakeand then shift into P (Park).
If torque lock does occur, yourvehicle may need to be pusheduphill by another vehicle to relievethe parking pawl pressure, so youcan shift out of P (Park).
Shifting out of ParkTo shift out of P (Park), the vehiclemust be in ON/RUN, the brakepedal must be applied, and thecharge cord must be unplugged.
The vehicle has an electronic shiftlock release system. The shift lockrelease is designed to:. Prevent the vehicle from turning
off unless the shift lever is inP (Park).
. Prevent moving the shift leverout of P (Park), unless thevehicle is in ON/RUN, the brakepedal is applied, and the chargecord is unplugged.
The shift lock is always functionalexcept in the case of an unchargedor low charged 12‐volt battery (lessthan 9 volts).
If the vehicle has an uncharged12‐volt battery or a 12‐volt batterywith low voltage, try charging orjump starting the 12‐volt battery.See Jump Starting on page 10‑68.
If the console shift lever cannot bemoved out of P (Park):
1. Apply and maintain the regularbrakes.
2. Turn the vehicle on using thePOWER O button. See PowerButton on page 9‑16.
3. Let up on the shift lever andmake sure the shift lever ispushed all the way into P (Park).
4. Press the shift lever button.
5. Move the shift lever into thedesired gear.
If you still cannot move the shiftlever from P (Park), see your dealeror a professional towing service.

Black plate (21,1)Chevrolet Volt Owner Manual - 2012
Driving and Operating 9-21
Parking over ThingsThat Burn
{ WARNING
Things that can burn could touchhot exhaust parts under thevehicle and ignite. Do not parkover papers, leaves, dry grass,or other things that can burn.
Electric VehicleOperating Modes
System OperationThis vehicle is an Extended RangeElectric Vehicle (EREV). It uses anelectric propulsion system to drivethe vehicle at all times. Electricityis the vehicle's primary source ofenergy, while gasoline is thesecondary source.
The vehicle has two modes ofoperation: Electric and ExtendedRange. In both modes, the vehicleis propelled by its electric drive unit.It converts electrical energy intomechanical energy to drive thewheels. The vehicle's performanceremains the same in either mode.See Driving for Better EnergyEfficiency on page 9‑2.
Electric ModeIn Electric Mode, the vehicle doesnot use fuel or produce tailpipeemissions. During this primarymode, the vehicle is powered byelectrical energy stored in the highvoltage battery. The vehicle canoperate in this mode until thebattery has reached a low charge.
There are some conditions when thebattery charge is high enough toprovide Electric Mode operation, butthe engine still runs. They are:. Cold ambient temperatures.. Hot or cold high voltage battery
temperatures.. The hood being open or not
completely closed and latched.. Certain high voltage battery fault
conditions.. Engine Maintenance Mode or
Fuel Maintenance Modebeing run.
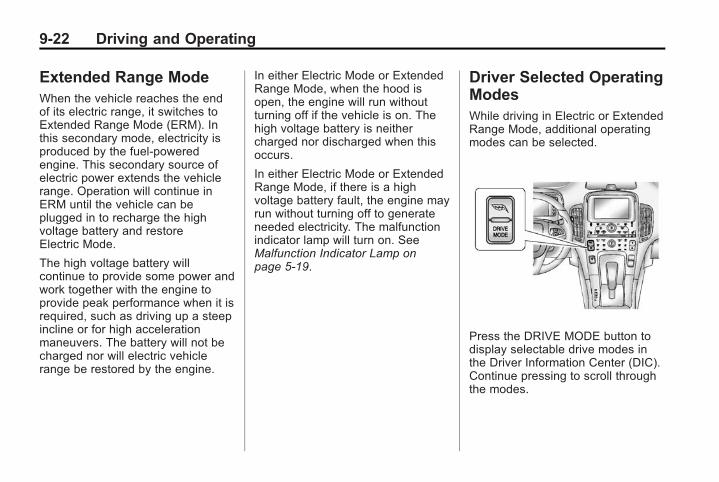
Black plate (22,1)Chevrolet Volt Owner Manual - 2012
9-22 Driving and Operating
Extended Range ModeWhen the vehicle reaches the endof its electric range, it switches toExtended Range Mode (ERM). Inthis secondary mode, electricity isproduced by the fuel‐poweredengine. This secondary source ofelectric power extends the vehiclerange. Operation will continue inERM until the vehicle can beplugged in to recharge the highvoltage battery and restoreElectric Mode.
The high voltage battery willcontinue to provide some power andwork together with the engine toprovide peak performance when it isrequired, such as driving up a steepincline or for high accelerationmaneuvers. The battery will not becharged nor will electric vehiclerange be restored by the engine.
In either Electric Mode or ExtendedRange Mode, when the hood isopen, the engine will run withoutturning off if the vehicle is on. Thehigh voltage battery is neithercharged nor discharged when thisoccurs.
In either Electric Mode or ExtendedRange Mode, if there is a highvoltage battery fault, the engine mayrun without turning off to generateneeded electricity. The malfunctionindicator lamp will turn on. SeeMalfunction Indicator Lamp onpage 5‑19.
Driver Selected OperatingModesWhile driving in Electric or ExtendedRange Mode, additional operatingmodes can be selected.
Press the DRIVE MODE button todisplay selectable drive modes inthe Driver Information Center (DIC).Continue pressing to scroll throughthe modes.

Black plate (23,1)Chevrolet Volt Owner Manual - 2012
Driving and Operating 9-23
Highlight either the Mountain orSport Mode, then release theDRIVE MODE button. Afterthree seconds, the new drive modewill become active.
Pressing the DRIVE MODE buttonagain will return to Normal Mode,and become active afterthree seconds.
At next start, the vehicle will defaultto Normal Mode. Drive modes canthen be selected again as desired.
During some conditions, certaindrive modes may be unavailable.The unavailable mode is grayed outin the DIC menu and cannot beselected.
If in Sport or Mountain Mode, eithermay become unavailable and thevehicle will return to Normal Mode.The indicator light goes off and aDIC message displays. SeePropulsion Power Messages onpage 5‑50.
Sport Mode
Sport Mode provides moreresponsive acceleration thanNormal Mode, but can reduceefficiency. Use Normal Modewhenever possible.
Press the DRIVE MODE button toselect Sport Mode.
Press the DRIVE MODE buttonagain to return to Normal Modeand it becomes active afterthree seconds.
The Sport light comes on whenSport Mode is selected. See SportMode Light on page 5‑23.
Each time the vehicle is started, itwill return to Normal Mode.
Mountain Mode
Mountain Mode should be selectedat the beginning of a trip beforeclimbing steep, uphill gradesand when expecting to drive invery hilly or mountainous terrain.

Black plate (24,1)Chevrolet Volt Owner Manual - 2012
9-24 Driving and Operating
This mode maintains a reserveelectrical charge of the high voltagebattery to provide better gradeclimbing performance. While drivingin Mountain Mode, the vehicle willhave less responsive acceleration.
Mountain Mode will not changenormal vehicle braking performancefor steep downhill grades. See Hilland Mountain Roads on page 9‑9and Electric Drive Unit onpage 9‑28.
Press the DRIVE MODE button toselect Mountain Mode. If steephill driving is expected, it isrecommended to select MountainMode at least 20 minutes beforedriving on steep grades. This willallow the vehicle time to build asufficient battery charge reserve.
If Mountain Mode is not selected forthese conditions, propulsion powermay be reduced and the enginespeed may increase. SeePropulsion Power Messages onpage 5‑50.
The engine may run when MountainMode is selected, depending onhigh voltage battery charge, to buildreserve battery charge for uphillclimbs. If Mountain Mode is enteredwith a sufficient battery chargereserve, the estimated electric rangewill adjust accordingly and anybattery charge reserve still unusedupon exiting Mountain Mode will beadded back to the electric rangedisplay.
Press the Drive Mode button againto return to Normal Mode and itbecomes active after three seconds.
Each time the vehicle is started,it will return to Normal Mode tomaintain a smaller battery chargereserve for normal driving.
Out of Fuel/EngineUnavailableIf the vehicle runs out of fuel, orthe engine will not start due to amalfunction, the vehicle cancontinue to be driven in ElectricMode. The vehicle will have less
responsive acceleration. DICmessages indicate reducedpropulsion power, that the engine isnot available, and the need for fuelor service.
Once the vehicle is refueled, or themalfunction is corrected, the enginewill start the next time the vehicle isturned on to perform a self test, andDIC messages will not be displayed.Once the engine starts successfully,normal operation will continue ineither Electric or Extended RangeMode. The engine will stop runningafter the self test is completed, andbased on the current mode ofoperation. See Fuel SystemMessages on page 5‑48 andService Vehicle Messages onpage 5‑51.
Maintenance ModesEngine Maintenance Mode (EMM)
Engine Maintenance Mode (EMM)runs the engine to keep it ingood working condition afterapproximately six weeks of no or

Black plate (25,1)Chevrolet Volt Owner Manual - 2012
Driving and Operating 9-25
very limited engine operation. EMMwill force the engine to run, even ifthere is a charge to power thevehicle. When EMM is needed, theEMM Request screen appears onthe center stack display at vehiclestart.
If Yes is selected, EMM will begin.The engine will run for a set amountof time without turning off. DuringEMM, a DIC message displays toshow the EMM percentagecomplete.
If No is selected, the EMM Requestscreen will appear when the vehicleis next started. The EMM requestcan be delayed for only one day.
If the EMM request was delayed forone day, EMM will automaticallystart the engine at the next vehiclestart. An EMM Notification screenwill appear in the center stackdisplay.
If the vehicle shuts off during EMM,it will restart the next time thevehicle is driven. A messagedisplays to indicate that EMM isactive.
If EMM is required and the fuel levelis low, EMM may eventually emptythe fuel tank if fuel is not added.This will result in reduced, or nopower. An adequate fuel level must
be maintained in the vehicle to keepit operational. See Propulsion PowerMessages on page 5‑50.
Fuel Maintenance Mode (FMM)
Fuel Maintenance Mode (FMM)tracks average fuel age. Old fuelcan cause engine problems. If lowengine usage causes average fuelage to exceed approximatelyone year, FMM will run the engineto use up the old fuel. The enginewill run until enough fresh fuel isadded to bring the average fuelage into an acceptable range.

Black plate (26,1)Chevrolet Volt Owner Manual - 2012
9-26 Driving and Operating
Allowing more old fuel to be usedup by FMM and adding a largeramount of fresh fuel will maximizethe length of time before anotherfuel maintenance mode is needed.During FMM the engine may turn onand off.
When FMM is needed, the FMMRequest screen appears on thecenter stack display at vehicle start.
If Yes is selected, FMM will begin.FMM will automatically continue ateach vehicle start until fresh fuel isadded.
If No is selected, the FMM Requestscreen will appear when the vehicleis next started. The FMM requestcan be delayed for only one day.
If the FMM request was delayed forone day, FMM will start at the nextvehicle start and display the FMMNotification screen on the centerstack display.
If FMM is required and the fuel levelis low, FMM may eventually emptythe fuel tank if fuel is not added.This will result in reduced, or nopower. An adequate fuel level mustbe maintained in the vehicle to keepit operational. See Propulsion PowerMessages on page 5‑50.
Engine Exhaust
{ WARNING
Engine exhaust contains carbonmonoxide (CO) which cannot beseen or smelled. Exposure to COcan cause unconsciousness andeven death.
Exhaust may enter the vehicle if:. The engine is running inExtended Range Mode inareas with poor ventilation(parking garages, tunnels,or deep snow that may blockunderbody airflow or tailpipes).
. The exhaust smells orsounds strange or different.
. The exhaust system leaksdue to corrosion or damage.
. The vehicle exhaust systemhas been modified, damaged,or improperly repaired.
(Continued)

Black plate (27,1)Chevrolet Volt Owner Manual - 2012
Driving and Operating 9-27
WARNING (Continued)
. There are holes or openingsin the vehicle body fromdamage or aftermarketmodifications that are notcompletely sealed.
If unusual fumes are detected orif it is suspected that exhaust iscoming into the vehicle:
. Drive it only with the windowscompletely down.
. Have the vehicle repairedimmediately.
Never park with the enginerunning in Extended Range Modein an enclosed area such as agarage or a building that has nofresh air ventilation.
Running the VehicleWhile ParkedIt is better not to park with thepropulsion system on. But if youever have to, here are some thingsto know.
{ WARNING
Leaving the engine running inExtended Range Mode in anenclosed area with poorventilation is dangerous. Engineexhaust may enter the vehicle.Engine exhaust contains carbonmonoxide (CO) which cannot beseen or smelled. It can causeunconsciousness and evendeath. Never run the engine inan enclosed area that has nofresh air ventilation. For moreinformation, see Engine Exhauston page 9‑26.
{ WARNING
It can be dangerous to get out ofthe vehicle if the electric drive unitshift lever is not fully in P (Park)with the parking brake firmly set.The vehicle can roll. Do not leavethe vehicle with the propulsionsystem on unless you have to.If you have left the propulsionsystem on, the vehicle can movesuddenly. You or others could beinjured. To be sure the vehicle willnot move, even when you are onlevel ground, always set theparking brake and move the shiftlever to P (Park).
Follow the proper steps to be surethe vehicle will not move. SeeShifting Into Park on page 9‑19.

Black plate (28,1)Chevrolet Volt Owner Manual - 2012
9-28 Driving and Operating
Electric Drive UnitThe vehicle uses an electric driveunit. The shift lever is on theconsole between the seats.
P (Park): This position locks thefront wheels. It is the best positionto use when starting the propulsionsystem because the vehicle cannotmove easily.
{ WARNING
It is dangerous to get out of thevehicle if the shift lever is not fullyin P (Park) with the parking brakefirmly set. The vehicle can roll.
Do not leave the vehicle when thepropulsion system is runningunless you have to. If you haveleft the propulsion systemrunning, the vehicle can movesuddenly. You or others could beinjured. To be sure the vehicle willnot move, even when you are onfairly level ground, always set theparking brake and move the shiftlever to P (Park). See Shifting IntoPark on page 9‑19.
Make sure the shift lever is fullyin P (Park) before starting thepropulsion system. The vehiclehas an electric drive unit shift lockcontrol system. The regular brakemust be fully applied first and thenthe shift lever button pressed before
shifting from P (Park) when thevehicle is in ON/RUN. If you cannotshift out of P (Park), ease pressureon the shift lever, then push the shiftlever all the way into P (Park) asyou maintain brake application.Then press the shift lever buttonand move the shift lever intoanother gear. See Shifting out ofPark on page 9‑20.
R (Reverse): Use this gear toback up.
Notice: Shifting to R (Reverse)while the vehicle is movingforward could damage the electricdrive unit. The repairs wouldnot be covered by the vehiclewarranty. Shift to R (Reverse) onlyafter the vehicle is stopped.
To rock the vehicle back and forth toget out of snow, ice, or sand withoutdamaging the electric drive unit, seeIf the Vehicle Is Stuck on page 9‑11.
N (Neutral): In this position, thepropulsion system does not connectwith the wheels.

Black plate (29,1)Chevrolet Volt Owner Manual - 2012
Driving and Operating 9-29
D (Drive): This position is fornormal driving. It provides the bestfuel economy. If more power isneeded for passing, and thevehicle is:. Going less than 56 km/h
(35 mph), push the acceleratorpedal about halfway down.
. Going about 56 km/h (35 mph) ormore, push the accelerator allthe way down.
Notice: If the vehicle seems toaccelerate slowly or not respondwhen you go faster, and youcontinue to drive the vehicle thatway, you could damage theelectric drive unit. Have thevehicle serviced right away.
L (Low): This position reducesvehicle speed without using thebrakes. You can use L (Low) onhills. It can help control vehiclespeed going down steep mountainroads along with using the brakesoff and on. You can use L (Low) onvery steep hills, in deep snow,or in mud.
Notice: Spinning the tires orholding the vehicle in oneplace on a hill using only theaccelerator pedal may damagethe electric drive unit. The repairwill not be covered by the vehiclewarranty. If you are stuck, do notspin the tires. When stopping ona hill, use the brakes to hold thevehicle in place.
Brakes
Antilock BrakeSystem (ABS)This vehicle has the Antilock BrakeSystem (ABS), an advancedelectronic braking system that helpsprevent a braking skid.
When propulsion is active and thevehicle begins to drive away, ABSchecks itself. A momentary motor orclicking noise might be heard whilethis test is going on, and it mighteven be noticed that the brakepedal moves a little. This is normal.
If there is a problem with ABS, thiswarning light stays on. See AntilockBrake System (ABS) Warning Lighton page 5‑23.

Black plate (30,1)Chevrolet Volt Owner Manual - 2012
9-30 Driving and Operating
If driving safely on a wet road and itbecomes necessary to slam on thebrakes and continue braking toavoid a sudden obstacle, acomputer senses that the wheelsare slowing down. If one of thewheels is about to stop rolling, thecomputer will separately work thebrakes at each wheel.
ABS can change the brake pressureto each wheel, as required, fasterthan any driver could. This can helpthe driver steer around the obstaclewhile braking hard.
As the brakes are applied, thecomputer keeps receiving updateson wheel speed and controlsbraking pressure accordingly.
Remember: ABS does not changethe time needed to get a foot up tothe brake pedal or always decreasestopping distance. If you get tooclose to the vehicle in front of you,there will not be enough time toapply the brakes if that vehicle
suddenly slows or stops. Alwaysleave enough room up ahead tostop, even with ABS.
Using ABS
Do not pump the brakes. Just holdthe brake pedal down firmly and letABS work. You might hear the ABSpump or motor operating and feelthe brake pedal pulsate, but this isnormal.
Braking in Emergencies
ABS allows the driver to steer andbrake at the same time. In manyemergencies, steering can helpmore than even the very bestbraking.
Electric Parking Brake
The vehicle has an Electric ParkingBrake (EPB). TheY switch is onthe center stack. The EPB canalways be activated, even if thevehicle is off. To prevent drainingthe 12‐volt battery, avoid repeatedcycles of the EPB system when thevehicle is off.
In case of insufficient electricalpower, the EPB cannot be appliedor released.

Black plate (31,1)Chevrolet Volt Owner Manual - 2012
Driving and Operating 9-31
Before leaving the vehicle, checkthe Electric Parking Brake Light toensure the parking brake is applied.
EPB Apply
The EPB can be applied anytimethe vehicle is stopped. The EPB isapplied by momentarily lifting up ontheY switch. Once fully applied,the Electric Parking Brake Light willbe on. While the brake is beingapplied, the Electric Parking BrakeLight will flash until full apply isreached. If the light does not comeon, or remains flashing, have thevehicle serviced. Do not drive thevehicle if the Electric Parking BrakeLight is flashing. See your dealer.
If the EPB is applied while thevehicle is in motion, a chime willsound, and the DIC messageRELEASE PARKING BRAKE willbe displayed. The vehicle willdecelerate as long as the switch isheld in the up position. Releasing
theY switch during thedeceleration will release the parkingbrake. If theY switch is held inthe up position until the vehiclecomes to a stop, the EPB willremain applied.
If the Electric Parking Brake Lightflashes continuously, the EPB isonly partially applied or released,or there is a problem with the EPB.The DIC message SERVICEPARKING BRAKE will be displayed.If this light flashes continuously,release the EPB, and attempt toapply it again. If this light continuesto flash, do not drive the vehicle.See your dealer.
If the Service Electric Parking BrakeLight is on, the EPB has detected asystem problem and is operatingwith reduced functionality. To applythe EPB when this light is on, liftup on theY switch and hold it inthe up position. Full applicationof the parking brake by the EPBsystem may take a longer period
of time than normal when thislight is on. Continue to holdtheY switch until the ElectricParking Brake Light remains on.If the Service Electric Parking BrakeLight is on, see your dealer.
If the EPB fails to apply, the rearwheels should be blocked toprevent vehicle movement.
For maximum EPB force whenparking on a hill, pull the EPBswitch twice.
EPB Release
To release the EPB, place thevehicle in ON/RUN, apply and holdthe brake pedal, and push downmomentarily on theY switch.If attempting to release the EPBwithout the brake pedal applied, achime will sound, and the DICmessage STEP ON BRAKE TORELEASE PARK BRAKE will bedisplayed. The EPB is releasedwhen the Electric Parking BrakeLight is off.

Black plate (32,1)Chevrolet Volt Owner Manual - 2012
9-32 Driving and Operating
If the Service Electric ParkingBrake Light is on, the EPB hasdetected a system problem,and is operating with reducedfunctionality. To release the EPBwhen this light is on, push downon theY switch and hold it inthe down position. EPB releasemay take a longer period of timethan normal when this light is on.Continue to hold theY switch untilthe Electric Parking Brake Light isoff. If the light is on, see your dealer.
Notice: Driving with the parkingbrake on can overheat the brakesystem and cause prematurewear or damage to brake systemparts. Make sure that the parkingbrake is fully released and theElectric Parking Brake Light is offbefore driving.
Automatic EPB Release
The EPB will automatically release ifthe vehicle is running, placed intogear, and an attempt is made todrive away. Avoid rapid accelerationwhen the EPB is applied, topreserve parking brake lining life.
See Electric Parking Brake Light onpage 5‑22, Service Electric ParkingBrake Light on page 5‑22, andBrake System Messages onpage 5‑46.
Regenerative BrakingRegenerative braking takes some ofthe energy from the moving vehicleand turns it back into electricalenergy. This energy is then storedback into the high voltage batterysystem, contributing to increasedenergy efficiency.
The hydraulic disc brakes work withthe regenerative braking to ensureeffective braking, such as when ahigh braking demand is requested.
The braking system is computercontrolled and blends theregenerative braking with theconventional hydraulic disc brakesto meet any requirements fordeceleration. The controllerinterprets the braking requestand uses regenerative braking,conventional hydraulic braking, or acombination of both as necessary.Because the controller applies thehydraulic brakes through its highpressure accumulator, you mayoccasionally hear the motor‐drivenpump when it recharges the system.This is normal.
See Warning Lights, Gauges, andIndicators on page 5‑9 and DriverInformation Center (DIC) onpage 5‑43. In the event of acontroller problem, the brake pedalmay be harder to push and thestopping distance may be longer.

Black plate (33,1)Chevrolet Volt Owner Manual - 2012
Driving and Operating 9-33
Ride Control Systems
Traction ControlSystem (TCS)The vehicle has a Traction ControlSystem (TCS) that limits wheel spin.The system operates if it sensesthat one or both of the drive wheelsare slipping or beginning to losetraction. When this happens, thesystem brakes the spinning wheel(s)and/or reduces power to limitwheel spin.
The system may be heard or feltwhile it is working, but this isnormal.
To assist with directional control ofthe vehicle, TCS automaticallycomes on whenever the vehicleis turned on. To limit wheel spin,especially in slippery roadconditions, the system shouldalways be left on. But, TCS can beturned off if needed.
When the vehicle is started andbegins to move, the systemperforms several diagnostic checksto ensure there are no problems.
The system may be heard or feltwhile it is working. This is normaland does not mean there is aproblem with the vehicle. Thesystem should initialize before thevehicle reaches 32 km/h (20 mph).In some cases, it may takeapproximately 3.2 km (2 mi) ofdriving before the system initializes.
The TCS may activate on dry orrough roads or under conditionssuch as heavy acceleration whileturning or abrupt changes in outputfrom the electric drive unit. Whenthis happens, a reduction inacceleration may be noticed, or anoise or vibration may be heard.This is normal.
d flashes to indicate that TCS isactive. See Traction Control System(TCS)/StabiliTrak® Light onpage 5‑24 for more information.
If there is a problem detected withTCS, SERVICE TRACTIONCONTROL is displayed on theDriver Information Center (DIC).See Ride Control System Messageson page 5‑50. When this messageis displayed and d comes on andstays on, the vehicle is safe to drivebut the system is not operational.Driving should be adjustedaccordingly.
If d comes on and stays on, resetthe system:
1. Stop the vehicle.
2. Turn the engine off and wait15 seconds.
3. Start the engine.

Black plate (34,1)Chevrolet Volt Owner Manual - 2012
9-34 Driving and Operating
If d still comes on and stays on, thevehicle needs service.
Notice: Do not repeatedly brakeor accelerate heavily when TCS isoff. The vehicle's driveline couldbe damaged.
TCS can be turned off by pressingand releasing the TCS/ESC buttonlocated on the overhead console.When TCS is turned off, i comes
on, and the appropriate DICmessage also displays. See RideControl System Messages onpage 5‑50. With TCS turned off, thesystem does not limit wheel spin.Driving should be adjustedaccordingly. See Traction Off Lighton page 5‑24 for more information.
Press and release the TCS/ESCbutton again to turn the systemback on.
It may be necessary to turn thesystem off if the vehicle gets stuckin sand, mud, or snow and rockingthe vehicle is required. See If theVehicle Is Stuck on page 9‑11 formore information. See also WinterDriving on page 9‑9 for informationon using TCS when driving in snowyor icy conditions.
Adding non‐GM accessories canaffect vehicle performance. SeeAccessories and Modifications onpage 10‑3 for more information.
Electronic StabilityControl (ESC)The vehicle has an ElectronicStability Control system calledStabiliTrak. It is an advancedcomputer-controlled system thatassists with directional control of thevehicle in difficult driving conditions.
StabiliTrak comes on automaticallywhenever the vehicle is turned on.To assist with directional control ofthe vehicle, the system shouldalways be left on.
The system may be heard or feltwhile it is working, but this isnormal.
StabiliTrak activates when thecomputer senses a differencebetween the intended path and thedirection the vehicle is actuallytraveling. StabiliTrak selectivelyapplies braking pressure to thevehicle brakes to help steer thevehicle in the intended direction.

Black plate (35,1)Chevrolet Volt Owner Manual - 2012
Driving and Operating 9-35
When the vehicle is started andbegins to move, the systemperforms several diagnostic checksto ensure there are no problems.The system may be heard or feltwhile it is working. This is normaland does not mean there is aproblem with the vehicle. Thesystem should initialize before thevehicle reaches 32 km/h (20 mph).In some cases, it may takeapproximately 3.2 km (2 mi) ofdriving before the system initializes.
When StabiliTrak activates,d flashes on the instrument cluster.This also occurs when tractioncontrol is activated. This is normal.Continue to steer the vehicle in theintended direction. A noise may beheard or vibration may be felt inthe brake pedal. This is normal.Continue to steer the vehicle in theintended direction. See TractionControl System (TCS)/StabiliTrak®
Light on page 5‑24 for moreinformation.
If a problem is detectedwith StabiliTrak, SERVICESTABILITRAK is displayed on theDriver Information Center (DIC).See Ride Control System Messageson page 5‑50. When this messageis displayed and d comes on andstays on, the vehicle is safe to drivebut the system is not operational.Driving should be adjustedaccordingly.
If d comes on and stays on, resetthe system:
1. Stop the vehicle.
2. Turn the engine off and wait15 seconds.
3. Start the engine.
If d still comes on and stays on, thevehicle needs service.
. To turn off both StabiliTrak andTCS, press and hold the TCS/ESC button, located on theoverhead console, until i andg illuminate and the appropriateDIC message is displayed. SeeRide Control System Messageson page 5‑50.

Black plate (36,1)Chevrolet Volt Owner Manual - 2012
9-36 Driving and Operating
When StabiliTrak is turned off,the system will not assist withdirectional control of the vehicleor limit wheel spin. Drivingshould be adjusted accordingly.See StabiliTrak® OFF Light onpage 5‑24 for more information.
. Press and release the TCS/ESCbutton again to turn the systemback on.
If cruise control is being used whenStabiliTrak activates, cruise controlwill automatically disengage. Pressthe cruise control RES/+ button toreengage when road conditionsallow. See Cruise Control onpage 9‑36 for more information.
Cruise ControlThe cruise control lets the vehiclemaintain a speed of about 40 km/h(25 mph) or more without keepingyour foot on the accelerator. Cruisecontrol does not work at speedsbelow 40 km/h (25 mph).
With the Traction Control System(TCS) or Electronic Stability Control(ESC), the system may begin tolimit wheel spin while you are usingcruise control. If this happens, thecruise control will automaticallydisengage. See Traction ControlSystem (TCS) on page 9‑33 orElectronic Stability Control (ESC) onpage 9‑34.
{ WARNING
Cruise control can be dangerouswhere you cannot drive safely ata steady speed. So, do not usethe cruise control on windingroads or in heavy traffic.
Cruise control can be dangerouson slippery roads. On such roads,fast changes in tire traction cancause excessive wheel slip, andyou could lose control. Do not usecruise control on slippery roads.

Black plate (37,1)Chevrolet Volt Owner Manual - 2012
Driving and Operating 9-37
The cruise control buttons are onthe steering wheel.
1 (On/Off): Press to turn thecruise control system on and off. Anindicator light will turn on or off inthe instrument cluster.
* (Cancel): Press to disengagecruise control without erasing theset speed from memory.
RES/+ (Resume/Accel): Movethe thumbwheel up to resumeto a previously set speed or toaccelerate.
SET/− (Set/Coast): Move thethumbwheel down to set a speedand activate cruise control or tomake the vehicle decelerate.
Setting Cruise Control
If the cruise button is on when not inuse, it could get bumped and go intocruise when not desired. Keep thecruise control button off when cruiseis not being used.
To set a speed:
1. Press 1 to turn cruisecontrol on.
2. Get up to the speed desired.
3. Move the thumbwheel downtoward SET/− and release it.The desired set speed brieflyappears in the instrumentcluster.
4. Take your foot off the acceleratorpedal.
When the brakes are applied, thecruise control shuts off.
Resuming a Set Speed
If the cruise control is set at adesired speed and then the brakesare applied, the cruise control isdisengaged without erasing the setspeed from memory. Once thevehicle speed is about 40 km/h(25 mph) or greater, move thethumbwheel up toward RES/+briefly and then release it. Thevehicle returns to the previously setspeed and stays there.
Increasing Speed While UsingCruise Control
If the cruise control system isalready activated:. Move the thumbwheel up toward
RES/+ and hold it until thevehicle accelerates to thedesired speed, then release it.
. To increase the speed in smallamounts, move the thumbwheelup toward RES/+ briefly andthen release it. Each time this isdone, the vehicle goes about1.6 km/h (1 mph) faster.

Black plate (38,1)Chevrolet Volt Owner Manual - 2012
9-38 Driving and Operating
Reducing Speed While UsingCruise Control
If the cruise control system isalready activated:. Move the thumbwheel toward
SET/− and hold until the desiredlower speed is reached, thenrelease it.
. To slow down in very smallamounts, move the thumbwheeltoward SET/− briefly. Each timethis is done, the vehicle goesabout 1.6 km/h (1 mph) slower.
Passing Another Vehicle WhileUsing Cruise Control
Use the accelerator pedal toincrease vehicle speed. When youtake your foot off the pedal, thevehicle will slow down to thepreviously set cruise control speed.
Using Cruise Control on Hills
How well the cruise control workson hills depends upon the vehiclespeed, load, and the steepness ofthe hills. When going up steep hills,
you might have to step on theaccelerator pedal to maintainthe vehicle speed. When goingdownhill, you might have to brakeor shift to a lower gear to maintainthe vehicle speed. When the brakesare applied the cruise control isdisengaged.
Ending Cruise Control
There are three ways to end cruisecontrol:. Step lightly on the brake pedal;
when cruise control disengages,the indicator light will not be lit.
. Press*.
. Press 1 to turn the cruisecontrol system off completely.The cruise control cannot beresumed.
Erasing Speed Memory
The cruise control set speed iserased from memory by pressing 1or if the vehicle is turned off.
Object DetectionSystems
Ultrasonic Parking AssistIf available, the Ultrasonic Frontand Rear Parking Assist (UFRPA)system assists the driver withparking and avoiding objects.UFRPA operates at speeds lessthan 8 km/h (5 mph). The sensorson the front and rear bumper detectobjects up to 1.2 m (4 ft) in front ofthe vehicle, 2.5 m (8 ft) behind thevehicle, and at least 25 cm (10 in)off the ground.

Black plate (39,1)Chevrolet Volt Owner Manual - 2012
Driving and Operating 9-39
{ WARNING
The Ultrasonic Front and RearParking Assist (UFRPA) systemdoes not replace driver vision.It cannot detect:
. Objects that are below thebumper, under the vehicle,or too close or far from thevehicle.
. Children, pedestrians,bicyclists, or pets.
If you do not use proper carebefore moving forward and whilebacking up, vehicle damage,injury, or death could occur. Evenwith UFRPA, always check infront of the vehicle before movingforward and behind the vehiclebefore backing up. While movingforward and backing up, be sureto look for objects and check thevehicle mirrors.
How the System Works
When the vehicle is shifted intoR (Reverse) the front and rearsensors are automatically turned on.After the vehicle is shifted out ofR (Reverse), the rear sensors areturned off and the front sensorsstay on until the vehicle is above aspeed of 8 km/h (5 mph). For thefront park assist system to beactive again without shifting intoR (Reverse), the park assist buttonin the overhead console must bepressed. See “Turning the SystemOn and Off” later in this section.
UFRPA operates only at speedsless than 8 km/h (5 mph).
When the vehicle is in N (Neutral),the system may be active. If thevehicle is in a car wash, the sensorsmay detect objects in the car wash.See “Turning the System On andOff” later in this section to turn thesystem off.
High-toned beeps from the frontspeakers are for objects detectednear the front bumper. Low-tonedbeeps from the rear speakers arefor objects detected near the rearbumper. The interval between thebeeps becomes shorter as thevehicle gets closer to the obstacle.When the distance is less than30 cm (12 in) the beeping is acontinuous tone for five seconds.
To be detected, objects must be atleast 25 cm (10 in) off the groundand below hatch level. Objects mustalso be within 1.2 m (4 ft) in front ofthe vehicle and 2.5 m (8 ft) from therear bumper. This distance may beless during warmer or humidweather.
Objects Detected by Both theFront and Rear Sensors
In general, if objects are detected atthe same time near both the frontand rear bumpers while backing up,the beeps only sound to indicatethat objects are close to the rearbumper.

Black plate (40,1)Chevrolet Volt Owner Manual - 2012
9-40 Driving and Operating
However, if an object comes within0.3 m (1 ft) of the front bumper whilethe vehicle is backing up and at thesame time there is another objectfurther than 0.3 m (1 ft) from the rearbumper, then the beeps only soundto indicate the object that is closerto the front bumper.
Turning the System On and Off
The UFRPA system can be turnedon and off by pressing the parkassist button located in theoverhead console.
The LED next to the park assistbutton lights up when the system ison and turns off when it has beendisabled.
When the system is off, PARKASSIST OFF displays on the DriverInformation Center (DIC). Themessage disappears after a shortperiod of time.
UFRPA defaults to the on settingeach time the vehicle is started.
When the System Does NotSeem to Work Properly
The following messages may bedisplayed on the DIC:
SERVICE PARKING ASSIST: Ifthis message occurs, take thevehicle to your dealer to repair thesystem.
PARK ASSIST OFF: If the UFRPAsystem does not activate due to atemporary condition, the messagedisplays on the DIC. This can occurunder the following conditions:. The driver has disabled the
system.. The ultrasonic sensors are not
clean. Keep the vehicle'sbumpers free of mud, dirt, snow,
ice, and slush. For cleaninginstructions, see Exterior Careon page 10‑78.
. The park assist sensors arecovered by frost or ice. Frost orice can form around and behindthe sensors and may not alwaysbe seen; this can occur afterwashing the vehicle in coldweather. The message may notclear until the frost or ice hasmelted.
. An object was hanging out of thehatch during the last drive cycle.Once the object is removed,UFRPA will return to normaloperation.
. An object or cover is attached tothe front of the vehicle.
. The bumper is damaged. Takethe vehicle to your dealer torepair the system.

Black plate (41,1)Chevrolet Volt Owner Manual - 2012
Driving and Operating 9-41
. Other conditions, such asvibrations from a jackhammer orthe compression of air brakes ona very large truck, are affectingsystem performance.
Rear VisionCamera (RVC)The vehicle may have a Rear VisionCamera (RVC) system. Read thisentire section before using it.
The RVC system can assistthe driver when backing up bydisplaying a view of the area behindthe vehicle.
{ WARNING
The RVC system does not displaypedestrians, bicyclists, animals,or any other object locatedoutside the camera's field of view,below the bumper, or under thevehicle.
(Continued)
WARNING (Continued)
Do not back the vehicle usingonly the RVC screen or by usingthe screen during longer, higherspeed backing maneuvers,or where there could becross-traffic. Perceived distancesmay be different from actualdistances.
Failure to use proper care beforebacking may result in injury,death, or vehicle damage. Alwayscheck before backing by checkingbehind and around the vehicle.
How the System Works
When the vehicle is shifted intoR (Reverse), the image of thearea behind the vehicle appearsin the center stack displaywith the message CHECKSURROUNDINGS FOR SAFETY.
The previous screen displayswhen the vehicle is shifted out ofR (Reverse) after approximately10 seconds.
To cancel the delay, do one of thefollowing:. Press a button on the
infotainment system.. Shift into P (Park).. Reach a vehicle speed of
8 km/h (5 mph).
Turning the Rear Vision CameraSystem On or Off
To turn the RVC system on or off:
1. Shift into P (Park).
2. Press the CONFIG button on thecenter stack.
3. Select Display.
4. Select Camera. When acheckmark appears next toCamera, then the RVC systemis on.

Black plate (42,1)Chevrolet Volt Owner Manual - 2012
9-42 Driving and Operating
Symbols
The navigation system may have afeature that lets the driver viewsymbols on the navigation screenwhile using the RVC. The UltrasonicFront and Rear Parking Assist(UFRPA) system must not bedisabled to use the caution symbols.The error message REAR PARKINGASSIST SYMBOLS UNAVAILABLEmay display if UFRPA has beendisabled and the symbols havebeen turned on. See UltrasonicParking Assist on page 9‑38.
The symbols appear and may coveran object when viewing thenavigation screen when an object isdetected by the UFRPA system.
To turn the symbols on or off:
1. Shift into P (Park).
2. Press the CONFIG button on thecenter stack.
3. Select Display.
4. Select Symbols. When acheckmark appears next toSymbols, symbols will appear.
Guidelines
The RVC system has a guidelineoverlay that can help the driver alignthe vehicle when backing into aparking spot.
To turn the guidelines on or off:
1. Shift into P (Park).
2. Press the CONFIG button on thecenter stack.
3. Select Display.
4. Select Guidelines. When acheckmark appears next toGuidelines, guidelines willappear.
Rear Vision Camera ErrorMessages
SERVICE REAR VISION CAMERASYSTEM: If this message appearsin the center stack display, thesystem is not receiving information itrequires from other vehicle systems.
If any other problem occurs or if aproblem persists, see your dealer.
Rear Vision Camera Location
The RVC is located above thelicense plate.

Black plate (43,1)Chevrolet Volt Owner Manual - 2012
Driving and Operating 9-43
The area displayed by the camera islimited.
It does not display objects that areclose to either corner or under thebumper and can vary dependingon vehicle orientation or roadconditions. The distance of theimage that appears on the screen isdifferent from the actual distance.
The following illustration shows thefield of view that the cameraprovides.
A. View displayed by the camera.
B. Corner of the rear bumper.
When the System Does NotSeem To Work Properly
The RVC system may not workproperly or display a clear image if:. The RVC is turned off. See
“Turning the Rear Vision CameraSystem On or Off” earlier in thissection.
. It is dark.
. The sun or the beam ofheadlamps is shining directlyinto the camera lens.
. Ice, snow, mud, or anything elsehas built up on the camera lens.Clean the lens, rinse it withwater, and wipe it with a softcloth.
. The back of the vehicle was inan accident. The position andmounting angle of the cameracan change or the camera canbe affected. Be sure to have thecamera and its position andmounting angle checked at yourdealer.

Black plate (44,1)Chevrolet Volt Owner Manual - 2012
9-44 Driving and Operating
Charging
Plug-In ChargingThis section explains the processfor charging the vehicle's highvoltage battery. Do not allow thevehicle to remain in temperatureextremes for long periods withoutbeing driven or plugged in. It isrecommended that the vehicle beplugged in when temperatures arebelow 0°C (32°F) and above 32°C(90°F) to maximize high voltagebattery life.
The charging system may run fansand pumps that result in soundsfrom the vehicle while it is turnedoff. Additional unexpected clickingsounds may be caused by theelectrical devices used whilecharging.
While the charge cord is pluggedinto the vehicle, the vehicle cannotbe driven.
Charging
Start Charge
1. The charge port door releasebutton is on the driver door innertrim panel. With the vehicle inP (Park), press the button forone second and release to openthe charge port door. The chargeport door can also be openedusing the RKE transmitter. SeeRemote Keyless Entry (RKE)System Operation on page 2‑2.
In cold weather conditions, icemay form around the charge portdoor. The charge port door maynot open on the first attempt.Remove ice from the area andrepeat attempting to open thecharge port door.
2. Open the rear hatch, lift the loadsupport floor covering (A), andremove the charge cord (D).It is located near the tiresealant and compressor kit (C).

Black plate (45,1)Chevrolet Volt Owner Manual - 2012
Driving and Operating 9-45
Pull up on the charge cordhandle (D) to release it from thehandle clip (E). Lift the chargecord up and rearward to removeit from the vehicle. The vehicleplug (B) is stored as shown.
3. Plug the charge cord into theelectrical outlet. See ElectricalRequirements for BatteryCharging on page 9‑52. Verifythat the charge cord statusindicators are both green. SeeCharge Cord on page 9‑50 formore information.
4. Then plug in the vehicle plug ofthe charge cord into the chargeport on the vehicle. Verify thatthe charging status indicatorilluminates on top of theinstrument panel and a hornchirp occurs. See ChargingStatus Feedback on page 9‑47for more information.
5. To arm the charge cord theftalert, lock the vehicle with theRKE transmitter. To disable thisfeature, see “Charge Cord TheftAlert” in Vehicle Personalizationon page 5‑53.
End Charge
1. Unlock the vehicle with the RKEtransmitter to disarm the chargecord theft alert.
2. Unplug the vehicle plug of thecharge cord from the vehicle bysqueezing the vehicle plug leverand pull to remove.
3. Close the charge port door bypressing firmly in the center tolatch properly.
4. Unplug the charge cord from theelectrical outlet.

Black plate (46,1)Chevrolet Volt Owner Manual - 2012
9-46 Driving and Operating
5. Before storing the charge cord,have the charge cord face upand wrap the charge cableneatly counterclockwise aroundthe body of the charge cord.
6. Place the charge cord, facedown, into the storagecompartment with the frontedge (F) of the charge cordbody under the clips (G) locatedin the front of the storagecompartment. The vehicleplug (B) should be on the rightside of the charge cord.
7. Push the charge cord handledown until it locks into thehandle clip at the rear of thestorage compartment.
Delayed ChargingOverrideTo temporarily override a delayedcharge event, unplug the chargecord from the charge port and thenplug it back in within five seconds.A single horn chirp will sound andcharging will begin immediately.
To cancel a temporary override,unplug the charge cord, wait for10 seconds, and then plug thecharge cord back in. A double hornchirp will sound and charging will bedelayed.
See “Programmable Charging”in Charging on page 5‑31 foradvanced charge schedulingoptions.

Black plate (47,1)Chevrolet Volt Owner Manual - 2012
Driving and Operating 9-47
Charging StatusFeedback
The vehicle has a Charging StatusIndicator (CSI) at the center ofthe instrument panel near thewindshield. When the vehicle isplugged in and the vehicle power isoff, the CSI indicates the following:. Solid Green – Vehicle is plugged
in. Battery is not fully charged.Battery is charging.
. Long Flashing Green – Vehicleis plugged in. Battery is not fullycharged. Battery charging isdelayed.
. Short Flashing Green – Vehicleis plugged in. Battery is fullycharged.
. Solid Yellow – Vehicle is pluggedin. It is normal for the CSI to turnyellow for a few seconds afterplugging in a compatible chargecord. The solid yellow may beextended depending on thevehicle and if there is a totalutility interruption via OnStar.See “Utility Interruption ofCharging” later in this section.This may also indicate that thecharging system has detected afault and will not charge thebattery. See “Charge CordStatus Indicators” later in thissection.
The system may be thermallyconditioning the battery during anyof the states above, requiringelectrical energy to be transferred tothe vehicle.
If the vehicle is plugged in andvehicle power is on, the CSI will beon solid green. The same is trueduring a remote start if the vehicle isplugged in.
If the vehicle is plugged in and theCSI is off, a total utility interruptionusing OnStar or a charging faulthas been detected. See “UtilityInterruption of Charging” or “ChargeCord Status Indicators” later in thissection.
This chart indicates vehiclefeedback when the charge cord isplugged in.
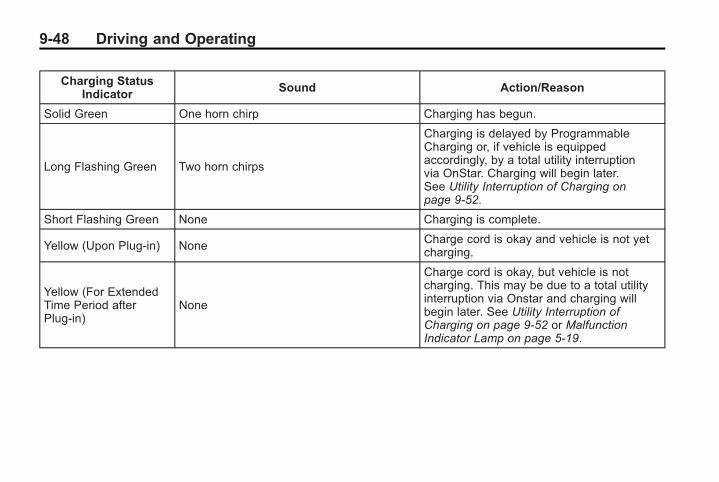
Black plate (48,1)Chevrolet Volt Owner Manual - 2012
9-48 Driving and Operating
Charging StatusIndicator
Sound Action/Reason
Solid Green One horn chirp Charging has begun.
Long Flashing Green Two horn chirps
Charging is delayed by ProgrammableCharging or, if vehicle is equippedaccordingly, by a total utility interruptionvia OnStar. Charging will begin later.See Utility Interruption of Charging onpage 9‑52.
Short Flashing Green None Charging is complete.
Yellow (Upon Plug‐in) NoneCharge cord is okay and vehicle is not yetcharging.
Yellow (For ExtendedTime Period afterPlug‐in)
None
Charge cord is okay, but vehicle is notcharging. This may be due to a total utilityinterruption via Onstar and charging willbegin later. See Utility Interruption ofCharging on page 9‑52 or MalfunctionIndicator Lamp on page 5‑19.

Black plate (49,1)Chevrolet Volt Owner Manual - 2012
Driving and Operating 9-49
Charging StatusIndicator
Sound Action/Reason
Solid Green or LongFlashing Green
Four horn chirpsInsufficient time to fully charge bydeparture time.
None (Upon Plug‐in) None Charge cord connection should be checked.
None (After Green orYellow CSI IndicationObserved)
None
Charge cord connection should be checked.If connection is good, this may be due to atotal utility interruption via OnStar andcharging will begin later. See UtilityInterruption of Charging on page 9‑52 orMalfunction Indicator Lamp on page 5‑19.
None
Repeated horn chirpsTo disable this feature, see “Charge PowerLoss Alert” in Vehicle Personalization onpage 5‑53.To stop this alert, do one of the following:. Unplug the charge cord.
. Press K on the RKE.
. Press and hold 7 on the RKE, thenpress again to stop the panic alarm.
. Press the horn pad.
Electricity was interrupted before chargingwas complete.

Black plate (50,1)Chevrolet Volt Owner Manual - 2012
9-50 Driving and Operating
Charge CordSee Radio Frequency Statement onpage 13‑16 for informationregarding Part 15 of the FederalCommunications Commission (FCC)rules and Industry CanadaStandards RSS-210/220/310.
A. Charge Level Button
B. Charge Level Indicators
C. Charge Cord Status Indicators
D. Vehicle Plug
E. Wall Plug
A portable charge cord used tocharge the vehicle high voltagebattery is stored under the rearluggage compartment.
{ WARNING
There is a risk of electric shockthat may cause personal injury ordeath. Do not use the chargecord if any part of the charge cordis damaged. Do not open orremove the charge cord cover.Service by qualified personnelonly. Connect the charge cord toa properly grounded outlet withcords that are not damaged.
The charge cord used to charge thevehicle is a high‐powered electricaldevice. During normal operation, theAC wall plug of the charge cord mayfeel warm. The AC wall plug must fittightly into an AC outlet that is ingood condition.
{ WARNING
Using the charge cord with aworn or damaged AC outletmay cause burns or start a fire.Periodically, check the AC wallplug and charge cord while thevehicle is charging. If the AC wallplug feels hot, unplug the chargecord and have the AC outletreplaced by a qualified electrician.Replace the charge cord if the ACwall plug or cord are damaged.Do not use an AC outlet that isworn or damaged.
{ WARNING
An extension cord should notbe used to charge the vehicle.Use of an extension cord mayincrease the risk of electric shockor other hazards.
(Continued)

Black plate (51,1)Chevrolet Volt Owner Manual - 2012
Driving and Operating 9-51
WARNING (Continued)
If an extension cord is usedbecause of limited access to120V AC power, use the followingsafeguards:
The 120V AC outlet should beGFCI protected.
The extension cord should be:. GFCI protected.. 12 or 14 gage, 3 conductor.. Rated for outdoor.
Charge Cord Status Indicators
The charge cord status indicatorsilluminate green or flashing red toidentify the charge cord status.When both indicators are green,the vehicle can be charged. If anyindicators are flashing red, thecharge cord will not permit vehiclecharging.
A flashing red AC PRESENT (A)indicates the AC voltage is out ofrange.
Flashing red AC PRESENT (A) andFAULT (B) indicate the AC outletdoes not have a proper safetyground. Charging is not permittedfor safety reasons. The AC outletmust be repaired or another outletsource should be used.
A flashing red FAULT (B) indicates acharge cord fault. The charge cordwill attempt to reset automatically.If the flashing red FAULT (B)continues for more than30 seconds, unplug the chargecord from the wall to reset. If thefault remains, see your dealer forservice.
Charge Level Button
{ WARNING
Using a charge level that exceedsthe electrical circuit or AC outletcapacity may start a fire ordamage the electrical circuit.Have a qualified electricianinspect your electrical circuit andAC outlet capacity before usingthe normal charge level. Use thereduced charge level if theelectrical circuit or AC outletcapacity is not known.
Two charge levels are available bypressing the charge level button.Select reduced or normal level.
The charge level cannot bechanged when the vehicle plugis plugged into the charge port onthe vehicle. If the charge levelbutton is pressed while the vehicleplug is plugged into the chargeport on the vehicle, the chargelevel indicators will flash briefly.

Black plate (52,1)Chevrolet Volt Owner Manual - 2012
9-52 Driving and Operating
To change the charge level, unplugthe vehicle plug from the chargeport on the vehicle and select thedesired charge level.
Normal Level: This level isrecommended. All four charge levelindicators will be lit.
Reduced Level: Use when theelectrical current is limited. Twocharge level indicators will be lit.
Vehicle Plug
The vehicle plug attaches to thecharge port on the vehicle. There isa flashlight built into the vehicle plugthat can be used by squeezing thevehicle plug lever. The flashlight willturn off when the connection iscomplete and the lever is released.
Utility Interruption ofChargingFor participating customers, thisvehicle will respond to remoterequests via OnStar to limit orcompletely block electrical power
grid usage for brief time periods.A utility interruption of charging mayincrease vehicle charge time.
When electrical grid power iscompletely blocked, the vehiclewill delay charging until the utilityinterruption has expired. The vehicleshould be left plugged in so that,when the utility interruption expires,the vehicle can automatically begincharging.
Changing the charge mode toImmediate or performing a delayedcharging override will not disable autility interruption.
A pop‐up will be displayed in thecenter stack display during thekey cycle following any utilityinterruption. See “Charge Override/Interruption Pop‐up” under Chargingon page 5‑31.
Text will be displayed on theinstrument cluster notifying thecustomer that a utility interruptionhas occurred. See InstrumentCluster on page 5‑10.
Electrical Requirementsfor Battery ChargingThe AC outlet must have agrounded, dedicated, 15 amp orgreater, three‐prong wall plug. Thatmeans there should be no othermajor appliances connected to thesame circuit. If it is not a dedicatedcircuit, the current rating of theoutlet circuit breaker could beexceeded and cause it to trip oropen. The vehicle can be chargedin the reduced level mode. See“Charge Level Button” in thissection. Reduced level mode allowsa non‐dedicated circuit to be usedbut increases the charging time.
This vehicle is capable of beingcharged with a variety of standardvehicle charging equipment.
The following are the minimumrequirements for circuits used tocharge this vehicle:. 120V/15Amp. 240V/20Amp

Black plate (53,1)Chevrolet Volt Owner Manual - 2012
Driving and Operating 9-53
Charging equipment with a rating ofat least 240V/20Amp will providethe fastest charging time torecharge the high voltage battery.240V/40Amp circuits provideflexibility for future vehicle chargingneeds. Contact your dealer for moreinformation.
Do not use non‐grounded electricalplug adapters.
Notice: Do not use portable orstationary backup generatingequipment to charge the vehicle.This may cause damage to thevehicle's charging system. Onlycharge the vehicle from utilitysupplied power.
FuelUse of the recommended fuel isan important part of the propermaintenance of this vehicle. To helpkeep the engine clean and maintainoptimum vehicle performance, werecommend the use of gasolineadvertised as TOP TIER DetergentGasoline.
Look for the TOP TIER label on thefuel pump to ensure gasoline meetsenhanced detergency standardsdeveloped by auto companies. A listof marketers providing TOP TIERDetergent Gasoline can be found atwww.toptiergas.com.
Use premium unleaded gasolinewith a posted octane rating of 91 orhigher. If the octane is less than 91,you could damage the engine.If heavy knocking is heard whenusing gasoline rated at 91 octane orhigher, the engine needs service.

Black plate (54,1)Chevrolet Volt Owner Manual - 2012
9-54 Driving and Operating
Gasoline Specifications(U.S. and Canada Only)At a minimum, gasoline shouldmeet ASTM specificationD 4814 in the United Statesor CAN/CGSB‐3.5 or 3.511 inCanada. Some gasolines containan octane-enhancing additivecalled methylcyclopentadienylmanganese tricarbonyl (MMT). Werecommend against the use ofgasolines containing MMT. See FuelAdditives on page 9‑54 foradditional information.
California FuelRequirementsIf the vehicle is certified to meetCalifornia Emissions Standards, it isdesigned to operate on fuels thatmeet California specifications. Seethe underhood emission controllabel. If this fuel is not available instates adopting California EmissionsStandards, the vehicle will operatesatisfactorily on fuels meetingfederal specifications, but emissioncontrol system performance mightbe affected. The malfunctionindicator lamp could turn on and thevehicle might fail a smog‐check test.See Malfunction Indicator Lamp onpage 5‑19. If this occurs, return toyour authorized dealer for diagnosis.If it is determined that the conditionis caused by the type of fuel used,repairs might not be covered by thevehicle warranty.
Fuels in ForeignCountriesNever use leaded gasoline or anyother fuel not recommended in theprevious text on fuel. Costly repairscaused by use of improper fuelwould not be covered by the vehiclewarranty.
To check the fuel availability, ask anauto club, or contact a major oilcompany that does business in thecountry where you will be driving.
Fuel AdditivesTo provide cleaner air, all gasolinesin the United States are nowrequired to contain additives thathelp prevent engine and fuel systemdeposits from forming, allowing theemission control system to workproperly. In most cases, nothingshould have to be added to the fuel.

Black plate (55,1)Chevrolet Volt Owner Manual - 2012
Driving and Operating 9-55
However, some gasolines containonly the minimum amount ofadditive required to meet U.S.Environmental Protection Agencyregulations. To help keep fuelinjectors and intake valves cleanand avoid problems due to dirtyinjectors or valves, look for gasolinethat is advertised as TOP TIERDetergent Gasoline. Look for theTOP TIER label on the fuel pump toensure gasoline meets enhanceddetergency standards developedby the auto companies. A list ofmarketers providing TOP TIERDetergent Gasoline can be found atwww.toptiergas.com.
For customers who do not use TOPTIER Detergent Gasoline regularly,one bottle of GM Fuel SystemTreatment PLUS, added to the fueltank at every engine oil change,can help clean deposits from fuelinjectors and intake valves. GM FuelSystem Treatment PLUS is the onlygasoline additive recommended byGeneral Motors. It is available atyour dealer.
Gasolines containing oxygenates,such as ethers and ethanol, andreformulated gasolines might beavailable in your area. Werecommend that you use thesegasolines, if they comply with thespecifications described earlier.However, E85 (85% ethanol) andother fuels containing more than15% ethanol must not be used invehicles that were not designed forthose fuels.
Notice: This vehicle was notdesigned for fuel that containsmethanol. Do not use fuelcontaining methanol. It cancorrode metal parts in the fuelsystem and also damage plasticand rubber parts. That damagewould not be covered under thevehicle warranty.
Some gasolines that arenot reformulated for lowemissions can contain anoctane-enhancing additive calledmethylcyclopentadienyl manganesetricarbonyl (MMT); ask the attendantwhere you buy gasoline whether thefuel contains MMT. We recommendagainst the use of such gasolines.Fuels containing MMT can reducespark plug life and affect emissioncontrol system performance. Themalfunction indicator lamp mightturn on. If this occurs, return to yourdealer for service.

Black plate (56,1)Chevrolet Volt Owner Manual - 2012
9-56 Driving and Operating
Filling the Tank
{ WARNING
Fuel vapor burns violently and afuel fire can cause bad injuries.To help avoid injuries to you andothers, read and follow all theinstructions on the fuel pumpisland. Turn off the vehicle whenrefueling. Do not smoke near fuelor when refueling the vehicle. Donot use cellular phones. Keepsparks, flames, and smokingmaterials away from fuel. Do notleave the fuel pump unattendedwhen refueling the vehicle. This isagainst the law in some places.Do not re-enter the vehicle whilepumping fuel. Keep children awayfrom the fuel pump; never letchildren pump fuel.
The fuel system on this vehiclerequires a refueling process tocontrol evaporative emissions. Torefuel the vehicle:
1. Press the fuel door button onthe driver door for one second.A WAIT TO REFUEL messagedisplays on the DriverInformation Center.
2. When the READY TO REFUELmessage displays, the fuel dooron the passenger side willunlock. Push the rearward edgeof the fuel door in and release toopen the door.
3. Turn the fuel capcounterclockwise to remove.While refueling, hang the fuelcap tether from the hook on theinside of the fuel door. Completerefueling within 30 minutes ofpushing the fuel door button onthe driver door. If refueling morethan 30 minutes, push the fueldoor button again.
4. After refueling, reinstall the fuelcap by turning it clockwise until itclicks. Close the fuel door.

Black plate (57,1)Chevrolet Volt Owner Manual - 2012
Driving and Operating 9-57
{ WARNING
Fuel can spray out on youif you open the fuel cap tooquickly. If you spill fuel and thensomething ignites it, you could bebadly burned. This spray canhappen if the tank is nearly full,and is more likely in hot weather.Open the fuel cap slowly and waitfor any hiss noise to stop. Thenunscrew the cap all the way.
Do not top off or overfill the tank andwait a few seconds before removingthe nozzle. Clean fuel from paintedsurfaces as soon as possible. SeeExterior Care on page 10‑78.
{ WARNING
If a fire starts while you arerefueling, do not remove thenozzle. Shut off the flow of fuel
(Continued)
WARNING (Continued)
by shutting off the pump or bynotifying the station attendant.Leave the area immediately.
Notice: If a new fuel cap isneeded, be sure to get the righttype of cap from your dealer. Thewrong type of fuel cap might notfit properly, might cause themalfunction indicator lamp tolight, and could damage the fueltank and emissions system. SeeMalfunction Indicator Lamp onpage 5‑19.
Filling a Portable FuelContainer
{ WARNING
Never fill a portable fuel containerwhile it is in the vehicle. Staticelectricity discharge from the
(Continued)
WARNING (Continued)
container can ignite the fuelvapor. You can be badly burnedand the vehicle damaged if thisoccurs. To help avoid injury to youand others:
. Dispense fuel only intoapproved containers.
. Do not fill a container whileit is inside a vehicle, in avehicle's trunk, pickup bed,or on any surface other thanthe ground.
. Bring the fill nozzle in contactwith the inside of the fillopening before operating thenozzle. Contact should bemaintained until the filling iscomplete.
. Do not smoke whilepumping fuel.
. Do not use a cellular phonewhile pumping fuel.

Black plate (58,1)Chevrolet Volt Owner Manual - 2012
9-58 Driving and Operating
Towing
General TowingInformationThe vehicle is neither designed norintended to tow a trailer or anothervehicle.
For information on towing a disabledvehicle, see Towing the Vehicle onpage 10‑73. For information ontowing the vehicle behind anothervehicle such as a motor home, seeRecreational Vehicle Towing onpage 10‑76.
Conversions andAdd-Ons
Add-On ElectricalEquipmentNotice: Do not add anythingelectrical to the vehicle unlessyou check with your dealer first.Some electrical equipment candamage the vehicle and thedamage would not be coveredby the vehicle's warranty. Someadd-on electrical equipment cankeep other components fromworking as they should.
Add-on equipment can drain thevehicle's 12‐volt battery, even if thevehicle is not operating.
The vehicle has an airbag system.Before attempting to add anythingelectrical to the vehicle, seeServicing the Airbag-EquippedVehicle on page 3‑30 and AddingEquipment to the Airbag-EquippedVehicle on page 3‑31.

Black plate (1,1)Chevrolet Volt Owner Manual - 2012
Vehicle Care 10-1
Vehicle Care
General InformationGeneral Information . . . . . . . . . . 10-2California Proposition65 Warning . . . . . . . . . . . . . . . . . 10-2
California PerchlorateMaterials Requirements . . . . 10-3
Accessories andModifications . . . . . . . . . . . . . . . 10-3
Lifting the Vehicle . . . . . . . . . . . . 10-3
Vehicle ChecksDoing Your OwnService Work . . . . . . . . . . . . . . . 10-6
Hood . . . . . . . . . . . . . . . . . . . . . . . . 10-7Engine CompartmentOverview . . . . . . . . . . . . . . . . . . . 10-8
Engine Oil . . . . . . . . . . . . . . . . . . . 10-9Engine Oil Life System . . . . . 10-12Engine Air Cleaner/Filter . . . . 10-12Cooling System (Engine) . . . 10-14Cooling System (HighVoltage Battery) . . . . . . . . . . . 10-15
Cooling System (PowerElectronics and ChargerModules) . . . . . . . . . . . . . . . . . . 10-16
Engine Coolant . . . . . . . . . . . . . 10-16Engine Overheating . . . . . . . . 10-19Washer Fluid . . . . . . . . . . . . . . . 10-19Brakes . . . . . . . . . . . . . . . . . . . . . 10-20Brake Fluid . . . . . . . . . . . . . . . . . 10-21Battery . . . . . . . . . . . . . . . . . . . . . 10-23Electric Drive Unit Shift LockControl Function Check . . . 10-24
Park Brake and P (Park)Mechanism Check . . . . . . . . 10-25
Wiper BladeReplacement . . . . . . . . . . . . . . 10-25
Headlamp AimingHeadlamp Aiming . . . . . . . . . . 10-26
Bulb ReplacementBulb Replacement . . . . . . . . . . 10-26Halogen Bulbs . . . . . . . . . . . . . . 10-26LED Lighting . . . . . . . . . . . . . . . 10-26Headlamps . . . . . . . . . . . . . . . . . 10-27Back-Up Lamps . . . . . . . . . . . . 10-28License Plate Lamp . . . . . . . . 10-28Replacement Bulbs . . . . . . . . . 10-29
Electrical SystemHigh Voltage Devices andWiring . . . . . . . . . . . . . . . . . . . . . 10-30
Electrical SystemOverload . . . . . . . . . . . . . . . . . . 10-30
Engine Compartment FuseBlock . . . . . . . . . . . . . . . . . . . . . 10-31
Instrument Panel Fuse Block(Left Side) . . . . . . . . . . . . . . . . 10-34
Instrument Panel Fuse Block(Right Side) . . . . . . . . . . . . . . . 10-36
Rear Compartment FuseBlock . . . . . . . . . . . . . . . . . . . . . 10-38
Wheels and TiresTires . . . . . . . . . . . . . . . . . . . . . . . . 10-40Winter Tires . . . . . . . . . . . . . . . . 10-40Tire Sidewall Labeling . . . . . . 10-41Tire Designations . . . . . . . . . . . 10-42Tire Terminology andDefinitions . . . . . . . . . . . . . . . . 10-43
Tire Pressure . . . . . . . . . . . . . . . 10-46Tire Pressure MonitorSystem . . . . . . . . . . . . . . . . . . . 10-47
Tire Pressure MonitorOperation . . . . . . . . . . . . . . . . . 10-48
Tire Inspection . . . . . . . . . . . . . . 10-51Tire Rotation . . . . . . . . . . . . . . . 10-52

Black plate (2,1)Chevrolet Volt Owner Manual - 2012
10-2 Vehicle Care
When It Is Time for NewTires . . . . . . . . . . . . . . . . . . . . . . 10-53
Buying New Tires . . . . . . . . . . . 10-54Different Size Tires andWheels . . . . . . . . . . . . . . . . . . . 10-55
Uniform Tire QualityGrading . . . . . . . . . . . . . . . . . . . 10-55
Wheel Alignment and TireBalance . . . . . . . . . . . . . . . . . . . 10-57
Wheel Replacement . . . . . . . . 10-57Tire Chains . . . . . . . . . . . . . . . . . 10-58If a Tire Goes Flat . . . . . . . . . . 10-59Tire Sealant andCompressor Kit . . . . . . . . . . . 10-60
Storing the Tire Sealant andCompressor Kit . . . . . . . . . . . 10-67
Jump StartingJump Starting . . . . . . . . . . . . . . 10-68
TowingTowing the Vehicle . . . . . . . . . 10-73Recreational VehicleTowing . . . . . . . . . . . . . . . . . . . . 10-76
Appearance CareExterior Care . . . . . . . . . . . . . . . 10-78Interior Care . . . . . . . . . . . . . . . . 10-81Cleaning the CenterStack . . . . . . . . . . . . . . . . . . . . . 10-83
Floor Mats . . . . . . . . . . . . . . . . . . 10-84
General InformationFor service and parts needs,visit your dealer. You will receivegenuine GM parts and GM-trainedand supported service people.
Genuine GM parts have one ofthese marks:
California Proposition 65WarningMost motor vehicles, including thisone, contain and/or emit chemicalsknown to the State of California to

Black plate (3,1)Chevrolet Volt Owner Manual - 2012
Vehicle Care 10-3
cause cancer and birth defects orother reproductive harm. Engineexhaust, many parts and systems,many fluids, and some componentwear by-products contain and/oremit these chemicals.
California PerchlorateMaterials RequirementsCertain types of automotiveapplications, such as airbaginitiators, seat belt pretensioners,and lithium batteries contained inRemote Keyless Entry transmitters,may contain perchlorate materials.Special handling may be necessary.For additional information, seewww.dtsc.ca.gov/hazardouswaste/perchlorate.
Accessories andModificationsAdding non‐dealer accessories ormaking modifications to the vehiclecan affect vehicle performance andsafety, including such things asairbags, braking, stability, ride andhandling, emissions systems,aerodynamics, durability, andelectronic systems like antilockbrakes, traction control, and stabilitycontrol. These accessories ormodifications could even causemalfunction or damage not coveredby the vehicle warranty.
Damage to vehicle componentsresulting from modifications or theinstallation or use of non‐GMcertified parts, including controlmodule or software modifications, is
not covered under the terms of thevehicle warranty and may affectremaining warranty coverage foraffected parts.
GM Accessories are designed tocomplement and function with othersystems on the vehicle. See yourdealer to accessorize the vehicleusing genuine GM Accessoriesinstalled by a dealer technician.
Also, see Adding Equipment to theAirbag-Equipped Vehicle onpage 3‑31.
Lifting the VehicleThis vehicle can be lifted with ahoist or a service jack. Do not useany other type of jack to lift thevehicle.

Black plate (4,1)Chevrolet Volt Owner Manual - 2012
10-4 Vehicle Care
Lifting the Vehicle with a Hoist
This vehicle can be lifted with ahoist at the four locations, asillustrated.
Notice: Lifting the vehicleimproperly can damage thevehicle and result in costlyrepairs not covered by thewarranty.
The front lifting points can beaccessed from either side of thevehicle, behind the front tires.
The rear lifting points can beaccessed from either side of thevehicle, in front of the rear tires.
Lifting the Vehicle with aService Jack
{ WARNING
Lifting a vehicle can cause aninjury. The vehicle can slip off thejack and roll over you or otherpeople. You and they could bebadly injured. Find a level placeto lift your vehicle. To helpprevent the vehicle from moving:
1. Set the parking brake firmly.
2. Put the shift lever inP (Park).
3. Turn off the vehicle.
To be even more certain thevehicle will not move, put blocksin front of and behind the wheels.
{ WARNING
Getting under a vehicle when it isjacked up is dangerous. If thevehicle slips off the jack, youcould be badly injured or killed.Never get under a vehicle when itis supported only by a jack.
{ WARNING
Raising the vehicle with thejack improperly positioned candamage the vehicle or the vehiclemay fall and cause you or othersinjury.
When using a jack to lift the vehicle,follow the instructions that camewith the jack and be sure to usethe correct lifting points to avoiddamaging the vehicle.

Black plate (5,1)Chevrolet Volt Owner Manual - 2012
Vehicle Care 10-5
Notice: Lifting the vehicleimproperly can cause damageand result in costly repairs notcovered by the warranty. To liftthe vehicle properly, use thisprocedure.
For additional information, seeyour dealer and the servicemanual.
There are four points where thevehicle can be lifted with aservice jack.
When lifting the vehicle from therear, place the service jack directlyunder the spring seat.
When lifting the vehicle from thefront, place the service jack directlyunder the cradle mount. Ramps maybe needed under the front tires toprovide the necessary clearance forcertain service jacks in this location.
For more information, see DoingYour Own Service Work onpage 10‑6.

Black plate (6,1)Chevrolet Volt Owner Manual - 2012
10-6 Vehicle Care
Vehicle Checks
Doing Your OwnService Work
{ WARNING
Never try to do your ownservice on high voltage batterycomponents. You can be injuredand the vehicle can be damagedif you try to do your own servicework. Service and repair of thesehigh voltage battery componentsshould only be performed by atrained dealer technician with theproper knowledge and tools.
Exposure to high voltage cancause shock, burns, andeven death. The high voltagecomponents in the vehicle canonly be serviced by technicianswith special training.
(Continued)
WARNING (Continued)
High voltage components areidentified by labels. Do notremove, open, take apart,or modify these components.High voltage cable or wiring hasorange covering. Do not probe,tamper with, cut, or modify highvoltage cable or wiring.
{ WARNING
You can be injured and thevehicle could be damaged if youtry to do service work on a vehiclewithout knowing enough about it.
. Be sure you have sufficientknowledge, experience,the proper replacementparts, and tools beforeattempting any vehiclemaintenance task.
(Continued)
WARNING (Continued)
. Be sure to use the propernuts, bolts, and otherfasteners. Metric and Englishfasteners can be easilyconfused. If the wrongfasteners are used, parts canlater break or fall off. Youcould be hurt.
If doing some of your own servicework, use the proper servicemanual. It tells you much moreabout how to service the vehiclethan this manual can. To order theproper service manual, see ServicePublications Ordering Informationon page 13‑12.
This vehicle has an airbag system.Before attempting to do your ownservice work, see Airbag SystemCheck on page 3‑31.

Black plate (7,1)Chevrolet Volt Owner Manual - 2012
Vehicle Care 10-7
Keep a record with all parts receiptsand list the mileage and the dateof any service work performed.See Maintenance Records onpage 11‑14.
HoodTo open the hood:
1. Turn the vehicle off beforeopening the hood. If the vehicleis on, the engine will start whenthe hood is opened. See ElectricMode on page 9‑21 andExtended Range Mode onpage 9‑22.
2. Pull the release handle withthis symbol. It is below theinstrument panel to the left of thesteering wheel.
3. Go to the front of the vehicle andlocate the secondary releaselever under the front center ofthe hood. Push the secondaryhood release lever to the right todisengage.
4. Lift the hood and release thehood prop rod from its retainerabove the radiator support.Place the prop rod securely intothe slotted retainer in the hood.
To close the hood:
1. Before closing the hood, checkthat all filler caps are properlyinstalled. Then, lift the hoodto relieve pressure on thehood prop.
2. Remove the hood prop from theslotted retainer in the hood andreturn it to its retainer above theradiator support. The prop rodmust lock into place whenreturning it to the retainer toprevent hood damage.
3. Lower the hood 20 cm (8 in)above the vehicle and release itso it fully latches. Check tomake sure the hood is firmlyclosed. Repeat the process ifnecessary.

Black plate (8,1)Chevrolet Volt Owner Manual - 2012
10-8 Vehicle Care
Engine Compartment Overview

Black plate (9,1)Chevrolet Volt Owner Manual - 2012
Vehicle Care 10-9
A. Engine Coolant Surge Tank andPressure Cap. See EngineCoolant on page 10‑16.
B. Engine Air Cleaner/Filter onpage 10‑12.
C. Engine Oil Dipstick. See EngineOil on page 10‑9.
D. High Voltage Battery CoolantReservoir and Pressure Cap.See Cooling System (Engine)on page 10‑14 or CoolingSystem (High Voltage Battery)on page 10‑15 or CoolingSystem (Power Electronicsand Charger Modules) onpage 10‑16.
E. Engine Cover.
F. Engine Oil Fill Cap. See EngineOil on page 10‑9.
G. Power Electronics CoolantReservoir and Pressure Cap.See Cooling System (Engine)on page 10‑14 or CoolingSystem (High Voltage Battery)on page 10‑15 or Cooling
System (Power Electronicsand Charger Modules) onpage 10‑16.
H. Brake Fluid Reservoir. See“Brake Fluid” under Brakes onpage 10‑20.
I. High Voltage Cables (OrangeColor).
J. Remote Positive (+) Terminal.See Jump Starting onpage 10‑68.
K. Power Electronics Module.
L. Windshield Washer FluidReservoir. See “Adding WasherFluid” under Washer Fluid onpage 10‑19.
M. Remote Negative (−) Terminal.See Jump Starting onpage 10‑68.
N. Engine Compartment FuseBlock on page 10‑31.
Engine OilTo ensure proper engineperformance and long life, carefulattention must be paid to engineoil. Following these simple, butimportant steps will help protectyour investment:. Always use engine oil approved
to the proper specification and ofthe proper viscosity grade. See“Selecting the Right Engine Oil”in this section.
. Check the engine oil levelregularly and maintain theproper oil level. See “CheckingEngine Oil” and “When to AddEngine Oil” in this section.
. Change the engine oil at theappropriate time. See Engine OilLife System on page 10‑12.
. Always dispose of engine oilproperly. See “What to Do withUsed Oil” in this section.

Black plate (10,1)Chevrolet Volt Owner Manual - 2012
10-10 Vehicle Care
Checking Engine Oil
It is a good idea to check the engineoil level at each fuel fill. In order toget an accurate reading, the vehiclemust be on level ground. Theengine oil dipstick handle is a yellowloop. See Engine CompartmentOverview on page 10‑8 for thelocation of the engine oil dipstick.
Obtaining an accurate oil levelreading is essential:
1. If the engine has been runningrecently, turn off the engine andallow several minutes for the oilto drain back into the oil pan.Checking the oil level too soonafter engine shutoff will notprovide an accurate oil levelreading.
2. Pull out the dipstick and clean itwith a paper towel or cloth, thenpush it back in all the way.Remove it again, keeping the tipdown, and check the level.
When to Add Engine Oil
If the oil is below the cross-hatchedarea at the tip of the dipstick, add1 L (1 qt) of the recommended oiland then recheck the level. See“Selecting the Right Engine Oil” inthis section for an explanation ofwhat kind of oil to use. For engineoil crankcase capacity, seeCapacities and Specifications onpage 12‑2.
Notice: Do not add too much oil.Oil levels above or below theacceptable operating rangeshown on the dipstick are harmfulto the engine. If you find thatyou have an oil level above theoperating range, i.e., the enginehas so much oil that the oil levelgets above the cross-hatched
area that shows the properoperating range, the engine couldbe damaged. You should drainout the excess oil or limit drivingof the vehicle and seek a serviceprofessional to remove theexcess amount of oil.
See Engine Compartment Overviewon page 10‑8 for the location of theengine oil fill cap.
Add enough oil to put the levelsomewhere in the proper operatingrange. Push the dipstick all the wayback in when through.
Selecting the Right Engine Oil
Selecting the right engine oildepends on both the proper oilspecification and viscosity grade.See Recommended Fluids andLubricants on page 11‑12.
Specification
Use and ask for licensed engineoils with the dexos1™ approvedcertification mark. Engine oilsmeeting the requirements for the

Black plate (11,1)Chevrolet Volt Owner Manual - 2012
Vehicle Care 10-11
vehicle should have the dexos1approved certification mark. Thiscertification mark indicates that theoil has been approved to the dexos1specification.
Notice: Failure to use therecommended engine oil orequivalent can result in enginedamage not covered by thevehicle warranty. Check with yourdealer or service provider onwhether the oil is approved to thedexos1 specification.
Viscosity Grade
SAE 5W‐30 is the best viscositygrade for the vehicle. Do not useother viscosity grade oils such asSAE 10W‐30, 10W‐40, or 20W‐50.
If in an area of extreme cold, wherethe temperature falls below −20°F(−29°C), an SAE 0W‐30 oil shouldbe used. An oil of this viscositygrade will provide easier coldstarting for the engine at extremelylow temperatures. When selectingan oil of the appropriate viscositygrade, always select an oil thatmeets the dexos1 specification orequivalent. See “Specification” formore information.
Engine Oil Additives/EngineOil Flushes
Do not add anything to the oil. Therecommended oils with the dexosspecification and displaying thedexos certification mark are all thatis needed for good performance andengine protection.
Engine oil system flushes are notrecommended and could causeengine damage not covered by thevehicle warranty.
What to Do with Used Oil
Used engine oil contains certainelements that can be unhealthy foryour skin and could even causecancer. Do not let used oil stay onyour skin for very long. Clean yourskin and nails with soap and water,or a good hand cleaner. Wash orproperly dispose of clothing or ragscontaining used engine oil. See themanufacturer's warnings about theuse and disposal of oil products.
Used oil can be a threat to theenvironment. If you change yourown oil, be sure to drain all the oilfrom the filter before disposal. Neverdispose of oil by putting it in thetrash or pouring it on the ground,into sewers, or into streams orbodies of water. Recycle it by takingit to a place that collects used oil.

Black plate (12,1)Chevrolet Volt Owner Manual - 2012
10-12 Vehicle Care
Engine Oil Life System
When to Change Engine Oil
This vehicle has a computer systemthat indicates when to change theengine oil and filter. This is basedon a combination of factors whichinclude engine revolutions, enginetemperature, and miles driven.Based on driving conditions, themileage at which an oil change isindicated can vary considerably. Forthe oil life system to work properly,the system must be reset every timethe oil is changed.
When the system has calculatedthat oil life has been diminished, itindicates that an oil change isnecessary. A CHANGE ENGINEOIL SOON message comes on.Change the oil as soon as possiblewithin the next 1 000 km (600 mi).It is possible that, if driving underthe best conditions, the oil lifesystem might indicate that an oilchange is not necessary for up totwo years. The engine oil and filtermust be changed at least once
every two years and, at this time,the system must be reset. Yourdealer has trained service peoplewho will perform this work and resetthe system. It is also important tocheck the oil regularly over thecourse of an oil drain interval andkeep it at the proper level.
If the system is ever resetaccidentally, the oil must bechanged at 5 000 km (3,000 mi)since the last oil change.Remember to reset the oil lifesystem whenever the oil is changed.
How to Reset the Engine OilLife System
Reset the system whenever theengine oil is changed so that thesystem can calculate the nextengine oil change. To reset thesystem:
1. Use the SELECT knob to selectOIL LIFE on the DIC menu.
2. Press SELECT to start the OILLIFE reset procedure.
3. The DIC menu will display “Areyou sure that you want to reset?”Use SELECT to choose YES toreset oil life or NO to exit andreturn to the previous menu.
4. If YES is selected, the DIC menuwill display RESET OIL LIFE fora short time and then 100% OILLIFE will be displayed when OILLIFE is successfully reset.
If the CHANGE ENGINE OIL SOONmessage comes back on when thevehicle is started, the engine oil lifesystem has not reset. Repeat theprocedure.
Engine Air Cleaner/FilterSee Engine Compartment Overviewon page 10‑8 for the location of theengine air cleaner/filter.
When to Inspect the Engine AirFilter
Inspect the air filter at the scheduledmaintenance intervals and replaceit at the first oil change after each80 000 km (50,000 mi) interval.

Black plate (13,1)Chevrolet Volt Owner Manual - 2012
Vehicle Care 10-13
See Maintenance Schedule onpage 11‑3 for more information.If driving in dusty/dirty conditions,inspect the air filter at each engineoil change.
How to Inspect the Engine AirFilter
To inspect the air filter, remove itfrom the engine air cleaner/filterassembly and lightly shake torelease loose dust and dirt. If the airfilter remains covered with dirt, anew air filter is required.
To inspect or replace the air filter:
1. Open the hood. See Hood onpage 10‑7.
2. Locate the engine air cleaner/filter assembly on the passengerside of the engine compartment.See Engine CompartmentOverview on page 10‑8.
A. Retaining Clips
B. Air Duct Clamp
C. Electrical Connector
3. Disconnect the air duct byloosening the air duct clamp (B).
4. Disconnect the electricalconnector (C).
5. Lift the retaining clips (A) fromthe engine air cleaner/filterassembly.
6. Turn and tilt the air cleaner coverslightly upward and slide it out.Remove the air filter.
How to Reinstall the EngineAir Filter
1. Install the air filter into theengine air cleaner/filterassembly. The outer air filterseal must be fitted properly inthe engine air cleaner/filterassembly.
2. Replace the air cleaner cover bylowering it to meet the bottomof the engine air cleaner/filterassembly. Place the retainingclips (A) on the engine aircleaner/filter assembly andsecure. The rear tabs must besecured into the lower portion ofthe air cleaner.

Black plate (14,1)Chevrolet Volt Owner Manual - 2012
10-14 Vehicle Care
3. Reconnect the air duct andtighten the air duct clamp (B).
4. Reconnect the electricalconnector (C).
{ WARNING
Operating the engine with the aircleaner/filter off can cause youor others to be burned. The aircleaner not only cleans the air; ithelps to stop flames if the enginebackfires. Use caution whenworking on the engine and do notdrive with the air cleaner/filter off.
Notice: If the air cleaner/filter isoff, dirt can easily get into theengine, which could damage it.Always have the air cleaner/filterin place when you are driving.
Cooling System (Engine)When it is safe to lift the hood:
A. Engine Coolant Surge Tank andPressure Cap
B. Engine Cooling Fans (Outof View)
{ WARNING
The electric fans under the hoodcan start up even when theengine is not running and cancause injury. Keep hands,clothing, and tools away fromany underhood electric fan.
If the coolant inside the coolantsurge tank is boiling, do not doanything else until it cools down.The vehicle should be parked on alevel surface.
The coolant level should be up tothe cold fill line. If it is not, theremight be a leak at the radiatorhoses, heater hoses, radiator, waterpump, or somewhere else in thecooling system.
{ WARNING
Heater and radiator hoses, andother engine parts, can be veryhot. Do not touch them. If you do,you can be burned.
Do not run the vehicle if there isa leak. If you run the engine, itcould lose all coolant. That couldcause an engine fire, and youcould be burned. Get any leakfixed before you drive the vehicle.

Black plate (15,1)Chevrolet Volt Owner Manual - 2012
Vehicle Care 10-15
If there seems to be no leak, withthe engine on, check to see if theelectric cooling fans are running.If the engine is overheating, the fansshould be running. If it is not, thevehicle needs service. Turn off thevehicle.
Notice: Using coolant other thanDEX-COOL® can cause prematureengine, heater core, or radiatorcorrosion. In addition, the enginecoolant could require changingsooner, at 50 000 km (30,000mi)or 24months, whichever occursfirst. Any repairs would not becovered by the vehicle warranty.Always use DEX-COOL(silicate-free) coolant in thevehicle.
Cooling System (HighVoltage Battery)During vehicle operation andalso during charging, the highvoltage battery cells in thevehicle are kept within a normaloperating temperature range.
If the temperature rises above thistemperature, the battery coolingsystem turns on the air conditioningcompressor and cools the coolantuntil the correct temperature isreached. If the temperature fallsbelow this temperature, a highvoltage heater, located in thebattery, heats the coolant until thecorrect temperature is reached.
What to Use
The high voltage battery coolantreservoir in the vehicle is filled witha 50/50 mixture of DEX-COOLengine coolant and deionized water.If using this mixture, nothing elseneeds to be added.
Checking Coolant
The vehicle must be on a levelsurface when checking the coolantlevel.
The high voltage battery coolantreservoir is located on thepassenger side of the enginecompartment. See EngineCompartment Overview onpage 10‑8 for more information onlocation.
Check to see if coolant is visible inthe high voltage battery coolantreservoir. If coolant is visible but thecoolant level is below the cold fillline, there could be a leak in thecooling system.
The high voltage battery coolantshould only be serviced by aqualified technician.

Black plate (16,1)Chevrolet Volt Owner Manual - 2012
10-16 Vehicle Care
Cooling System (PowerElectronics and ChargerModules)The power electronics and chargermodules are cooled using the samecoolant loop.
The power electronics and chargermodules in the vehicle are keptbelow a maximum temperature.If the temperature rises above thistemperature, the electric coolingfans will turn on and cool thecoolant until the correct temperatureis reached.
What to Use
The power electronics and chargermodules coolant reservoir in thevehicle is filled with a 50/50 mixtureof DEX-COOL engine coolant anddeionized water. If using thismixture, nothing else needs to beadded.
Checking Coolant
The vehicle must be on a levelsurface when checking the coolantlevel.
The power electronics and chargermodules coolant reservoir is locatedon the driver side of the enginecompartment. See EngineCompartment Overview onpage 10‑8 for more information onlocation.
Check to see if coolant is visible inthe power electronics and chargermodules coolant reservoir. If coolantis visible but the coolant level isbelow the cold fill line, there couldbe a leak in the cooling system.
The power electronics and chargermodules coolant should only beserviced by a qualified technician.
Engine CoolantThe engine cooling system in thevehicle is filled with DEX-COOLengine coolant. This coolant isdesigned to remain in the vehicle for5 years or 240 000 km (150,000 mi),whichever occurs first.
The following explains the coolingsystem and how to check and addcoolant when it is low. If there is aproblem with engine overheating,see Engine Overheating onpage 10‑19.
What to Use
{ WARNING
Adding only plain water or someother liquid to the cooling systemcan be dangerous. Plain waterand other liquids, can boil before
(Continued)

Black plate (17,1)Chevrolet Volt Owner Manual - 2012
Vehicle Care 10-17
WARNING (Continued)
the proper coolant mixture will.The coolant warning system is setfor the proper coolant mixture.With plain water or the wrongmixture, the engine could get toohot but you would not get theoverheat warning. The enginecould catch fire and you orothers could be burned. Use a50/50 mixture of deionized waterand DEX-COOL coolant.
Use a 50/50 mixture of deionizedwater and DEX-COOL coolant.If using this mixture, nothing elseneeds to be added. This mixture:. Gives freezing protection down
to −37°C (−34°F), outsidetemperature.
. Gives boiling protection up to129°C (265°F), enginetemperature.
. Protects against rust andcorrosion.
. Will not damage aluminum parts.
. Helps keep the proper enginetemperature.
Notice: If an improper coolantmixture is used, the engine couldoverheat and be badly damaged.The repair cost would not becovered by the vehicle warranty.Too much water in the mixturecan freeze and crack the engine,radiator, heater core, and otherparts.
Never dispose of engine coolant byputting it in the trash, pouring it onthe ground, or into sewers, streams,or bodies of water. Have the coolantchanged by an authorized servicecenter, familiar with legalrequirements regarding usedcoolant disposal. This will helpprotect the environment and yourhealth.
Checking Coolant
The vehicle must be on a levelsurface when checking the coolantlevel.
Check to see if coolant is visible inthe coolant surge tank. If the coolantinside the coolant surge tank isboiling, do not do anything else untilit cools down. If coolant is visiblebut the coolant level is not at orabove the cold fill mark, add a50/50 mixture of deionized waterand DEX-COOL coolant at thecoolant surge tank, but be sure thecooling system is cool before this isdone. See Engine Overheating onpage 10‑19 for more information.
The coolant reservoir is located onthe passenger side of the enginecompartment. See EngineCompartment Overview onpage 10‑8 for more information onlocation.
Black plate (18,1)Chevrolet Volt Owner Manual - 2012
10-18 Vehicle Care
The coolant level should be at orabove the cold fill line on thecoolant surge tank. If it is not, therecould be a leak in the coolingsystem.
How to Add Coolant to theCoolant Surge Tank
{ WARNING
You can be burned if you spillcoolant on hot engine parts.Coolant contains ethylene glycoland it will burn if the engine partsare hot enough. Do not spillcoolant on a hot engine.
Notice: This vehicle has aspecific coolant fill procedure.Failure to follow this procedurecould cause the engine tooverheat and be severelydamaged.
{ WARNING
The electric fans under the hoodcan start up even when theengine is not running and cancause injury. Keep hands,clothing, and tools away from anyunderhood electric fan.
{ WARNING
Steam and scalding liquids from ahot cooling system can blow outand burn you badly. They areunder pressure, and if you turnthe surge tank pressurecap— even a little— they cancome out at high speed. Neverturn the cap when the coolingsystem, including the surge tankpressure cap, is hot. Wait for thecooling system and surge tankpressure cap to cool if you everhave to turn the pressure cap.
If coolant is needed, add the properDEX-COOL coolant mixture at thecoolant surge tank.
The coolant surge tank pressurecap can be removed when thecooling system, including the surgetank pressure cap and upperradiator hose, is no longer hot.
1. Turn the pressure cap slowlycounterclockwise. If a hiss isheard, wait for that to stop.A hiss means there is still somepressure left.
2. Keep turning the cap andremove it.

Black plate (19,1)Chevrolet Volt Owner Manual - 2012
Vehicle Care 10-19
3. Fill the coolant surge tank withthe proper mixture to the coldfill line.
4. Replace the pressure cap.Be sure the pressure cap ishand‐tight and fully seated.
Notice: If the pressure cap is nottightly installed, coolant loss andpossible engine damage mayoccur. Be sure the cap is properlyand tightly secured.
Engine OverheatingThe vehicle has an indicator to warnof engine overheating.
If the decision is made not to lift thehood when this warning appears,get service help right away. SeeRoadside Assistance Program onpage 13‑6.
If the decision is made to lift thehood, make sure the vehicle isparked on a level surface.
Then check to see if the enginecooling fans are running. If theengine is overheating, the fansshould be running. If they are not,do not continue to run the vehicleand have the vehicle serviced.
Notice: Engine damage fromrunning the engine withoutcoolant is not covered by thewarranty.
Washer Fluid
What to Use
When adding windshield washerfluid to the vehicle, be sure to readthe manufacturer's instructionsbefore use. If operating the vehiclein an area where the temperaturemay fall below freezing, use a fluidthat has sufficient protection againstfreezing.
Adding Washer Fluid
The WASHER FLUID LOW ADDFLUID message will appear on theDriver Information Center (DIC)when the fluid level is low. SeeDriver Information Center (DIC) onpage 5‑43 for more information.

Black plate (20,1)Chevrolet Volt Owner Manual - 2012
10-20 Vehicle Care
Open the cap with the washersymbol on it. Add washer fluid untilthe tank is full. See EngineCompartment Overview onpage 10‑8 for reservoir location.
Notice. When using concentratedwasher fluid, follow themanufacturer's instructionsfor adding water.
. Do not mix water withready-to-use washer fluid.Water can cause the solutionto freeze and damage thewasher fluid tank and otherparts of the washer system.Also, water does not clean aswell as washer fluid.
. Fill the washer fluid tank onlythree-quarters full when it isvery cold. This allows forfluid expansion if freezingoccurs, which could damagethe tank if it iscompletely full.
. Do not use engine coolant(antifreeze) in the windshieldwasher. It can damage thewindshield washer systemand paint.
BrakesThis vehicle has disc brakes. Discbrake pads have built-in wearindicators that make a high-pitchedwarning sound when the brake padsare worn and new pads are needed.The sound can come and go or beheard all the time the vehicle ismoving, except when applying thebrake pedal firmly.
{ WARNING
The brake wear warning soundmeans that soon the brakes willnot work well. That could lead toa crash. When the brake wearwarning sound is heard, have thevehicle serviced.
Notice: Continuing to drive withworn-out brake pads could resultin costly brake repair.
Some driving conditions or climatescan cause a brake squeal whenthe brakes are first applied orlightly applied. This does notmean something is wrong with thebrakes.

Black plate (21,1)Chevrolet Volt Owner Manual - 2012
Vehicle Care 10-21
Properly torqued wheel nuts arenecessary to help prevent brakepulsation. When tires are rotated,inspect brake pads for wear andevenly tighten wheel nuts in theproper sequence to torquespecifications in Capacities andSpecifications on page 12‑2.
Brake linings should always bereplaced as complete axle sets.
Brake Pedal Travel
See your dealer if the brake pedaldoes not return to normal height,or if there is a rapid increase inpedal travel. This could be a signthat brake service might berequired.
Brake Adjustment
Every time the brakes are applied,with or without the vehicle moving,the brakes adjust for wear.
Replacing Brake System Parts
The braking system on a vehicle iscomplex. Its many parts have to beof top quality and work well togetherif the vehicle is to have really goodbraking. The vehicle was designedand tested with top-quality brakeparts. When parts of the brakingsystem are replaced, be sure to getnew, approved replacement parts.If this is not done, the brakes mightnot work properly. For example,installing disc brake pads that arewrong for the vehicle, can changethe balance between the front andrear brakes — for the worse. Thebraking performance expected canchange in many other ways if thewrong replacement brake parts areinstalled.
Brake Fluid
The brake master cylinder reservoiris filled with DOT 3 brake fluid asindicated on the reservoir cap. SeeEngine Compartment Overview onpage 10‑8 for the location of thereservoir.
There are only two reasons why thebrake fluid level in the reservoirmight go down:. The brake fluid level goes down
because of normal brake liningwear. When new linings areinstalled, the fluid level goesback up.

Black plate (22,1)Chevrolet Volt Owner Manual - 2012
10-22 Vehicle Care
. A fluid leak in the brakehydraulic system can also causea low fluid level. Have the brakehydraulic system fixed, since aleak means that sooner or laterthe brakes will not work well.
Do not top off the brake fluid.Adding fluid does not correct a leak.If fluid is added when the liningsare worn, there will be too muchfluid when new brake linings areinstalled. Add or remove brake fluid,as necessary, only when work isdone on the brake hydraulic system.
{ WARNING
If too much brake fluid is added, itcan spill on the engine and burn,if the engine is hot enough. Youor others could be burned, andthe vehicle could be damaged.Add brake fluid only when work isdone on the brake hydraulicsystem.
When the brake fluid falls to a lowlevel, the brake warning light comeson. See Brake System WarningLight on page 5‑22.
Checking Brake Fluid
Check brake fluid by looking at thebrake fluid reservoir. See EngineCompartment Overview onpage 10‑8.
With the vehicle not running for atleast one minute, the maximum fluidlevel (A) is at the top of the reservoirbody. With the vehicle running, thefluid level should be in the proper
operating range (B) between theMIN and MAX marks. If it is not,have the brake hydraulic systemchecked to see if there is a leak.
After work is done on the brakehydraulic system, make sure thelevel, with the vehicle running, is inthe proper operating range (B)between the MIN and MAX marks.
What to Add
Use only new DOT 3 brake fluidfrom a sealed container. SeeRecommended Fluids andLubricants on page 11‑12.
Always clean the brake fluidreservoir cap and the area aroundthe cap before removing it. Thishelps keep dirt from entering thereservoir.
Black plate (23,1)Chevrolet Volt Owner Manual - 2012
Vehicle Care 10-23
{ WARNING
With the wrong kind of fluid inthe brake hydraulic system, thebrakes might not work well. Thiscould cause a crash. Always usethe proper brake fluid.
Notice. Using the wrong fluidcan badly damage brakehydraulic system parts. Forexample, just a few drops ofmineral-based oil, such asengine oil, in the brakehydraulic system candamage brake hydraulicsystem parts so badly thatthey will have to be replaced.Do not let someone put inthe wrong kind of fluid.
. If brake fluid is spilled on thevehicle's painted surfaces,the paint finish can bedamaged. Be careful not tospill brake fluid on thevehicle. If you do, wash it offimmediately.
BatteryThis vehicle has a high voltagebattery and a standard 12‐voltbattery.
If the vehicle is in a crash, thesensing system may shut down thehigh voltage system. When thisoccurs, the high voltage battery isdisconnected and the vehicle willnot start. The SERVICE VEHICLESOON message in the DriverInformation Center (DIC) will bedisplayed. Before the vehicle can beoperated again, it must be servicedat your dealer.
See “If a Crash Occurs” underCollision Damage Repair onpage 13‑10 for additionalinformation. If an airbag hasinflated, see What Will You Seeafter an Airbag Inflates? onpage 3‑24.
Only a trained service technicianwith the proper knowledge and toolsshould inspect, test, or replace thehigh voltage battery. See yourdealer if the high voltage batteryneeds service. The dealer hasinformation on how to recycle thehigh voltage battery. There isalso information available athttp://www.recyclemybattery.com.
Keep the vehicle plugged in, evenwhen fully charged, to keep the highvoltage battery temperature readyfor the next drive. This is importantwhen outside temperatures areextremely hot or cold.
A vehicle cover, which can reducesun loading on the vehicle andimprove high voltage battery life, isavailable from your dealer.

Black plate (24,1)Chevrolet Volt Owner Manual - 2012
10-24 Vehicle Care
Refer to the replacement numbershown on the original battery labelwhen a new 12‐volt battery isneeded. The vehicle has anAbsorbed Glass Mat (AGM) 12‐voltbattery. Installation of a standard12‐volt battery will result in reduced12‐volt battery life.
{ WARNING
Battery posts, terminals, andrelated accessories contain leadand lead compounds, chemicalsknown to the State of California tocause cancer and reproductiveharm. Wash hands after handling.
Vehicle Storage
{ WARNING
12‐volt batteries have acid thatcan burn you and gas that canexplode. You can be badlyhurt if you are not careful.
(Continued)
WARNING (Continued)
See Jump Starting on page 10‑68for tips on working around abattery without getting hurt.
Extended Storage
Remove the 12‐volt battery black,negative (−) cable from the batteryto keep the 12‐volt battery fromrunning down or use a battery tricklecharger.
In addition, to avoid potentialdamage to the high voltage battery,perform the following recommendedsteps:. Store the high voltage battery
with 1/2 charge or less.. Always store the vehicle in an
environment between −10°C(14°F) and 30°C (86°F).
. Vehicle storage at extremetemperatures can cause damageto the high voltage battery.
Remember to reconnect the 12‐voltbattery when ready to drive thevehicle.
Electric Drive Unit ShiftLock Control FunctionCheck
{ WARNING
When you are doing thisinspection, the vehicle couldmove suddenly. If the vehiclemoves, you or others could beinjured.
1. Before starting this check, besure there is enough roomaround the vehicle. It should beparked on a level surface.
2. Firmly apply the parking brake.See Electric Parking Brake onpage 9‑30.
Be ready to apply the regularbrake immediately if the vehiclebegins to move.

Black plate (25,1)Chevrolet Volt Owner Manual - 2012
Vehicle Care 10-25
3. With the vehicle off and thebrake not applied, press andhold the POWER O button formore than five seconds to placethe vehicle in Service OnlyMode. See Power Button onpage 9‑16. Without applying theregular brake, try to move theshift lever out of P (Park) withnormal effort. If the shift levermoves out of P (Park), contactyour dealer for service.
Park Brake and P (Park)Mechanism Check
{ WARNING
When you are doing this check,the vehicle could begin to move.You or others could be injuredand property could be damaged.Make sure there is room in frontof the vehicle in case it begins toroll. Be ready to apply the regularbrake at once should the vehiclebegin to move.
Park on a fairly steep hill, with thevehicle facing downhill. Keepingyour foot on the regular brake, setthe electric parking brake.. To check the electric parking
brake's holding ability: With thepropulsion system active and theelectric drive unit in N (Neutral),slowly remove foot pressurefrom the regular brake pedal. Dothis until the vehicle is held bythe electric parking brake only.
. To check the P (Park)mechanism's holding ability:With the propulsion systemactive, shift to P (Park). Thenrelease the electric parkingbrake followed by the regularbrake.
Contact your dealer if service isrequired.
Wiper Blade ReplacementWindshield wiper blades should beinspected for wear and cracking.See Maintenance Schedule onpage 11‑3 for more information.
Replacement blades come indifferent types and are removedin different ways. For proper typeand length, see MaintenanceReplacement Parts on page 11‑13.
Notice: Allowing the wiper bladearm to touch the windshield whenno wiper blade is installed coulddamage the windshield. Anydamage that occurs would not becovered by your warranty. Do notallow the wiper blade arm totouch the windshield.
To replace the windshield wiperblade:
1. Pull the windshield wiperassembly away from thewindshield.

Black plate (26,1)Chevrolet Volt Owner Manual - 2012
10-26 Vehicle Care
2. Press the button in the middle ofthe wiper arm connector, andpull the wiper blade away fromthe arm connector.
3. Remove the wiper blade.
4. Reverse Steps 1 through 3 forwiper blade replacement.
Headlamp AimingHeadlamp aim has been preset atthe factory and should need nofurther adjustment.
However, if the vehicle is damagedin a crash, the headlamp aim maybe affected. Aim adjustment to thelow-beam headlamps may benecessary if oncoming drivers flashtheir high-beam headlamps at you(for vertical aim).
If the headlamps need to bere-aimed, it is recommended thatthe vehicle be taken to a dealer forservice.
Bulb ReplacementFor the proper type of replacementbulbs, see Replacement Bulbs onpage 10‑29.
For any bulb‐changing procedurenot listed in this section, contactyour dealer.
Halogen Bulbs
{ WARNING
Halogen bulbs have pressurizedgas inside and can burst if youdrop or scratch the bulb. You orothers could be injured. Be sureto read and follow the instructionson the bulb package.
LED LightingThis vehicle has several LED lamps.For replacement of any LED lightingassembly, contact your dealer.

Black plate (27,1)Chevrolet Volt Owner Manual - 2012
Vehicle Care 10-27
Headlamps
Driver Side Headlamps
To replace the high/low‐beamheadlamp:
1. Open the hood. See Hood onpage 10‑7.
2. Remove the cover from the backof the headlamp assembly byturning it counterclockwise.
3. Remove the bulb socket fromthe headlamp assembly byturning it counterclockwise.
4. Remove the bulb from thesocket.
5. Install the new bulb in thesocket.
6. Install the bulb socket by turningit clockwise.
7. Install the cover in the back ofthe headlamp assembly byturning it clockwise.
Passenger Side Headlamps
To replace the high/low‐beamheadlamp:
1. Open the hood. See Hood onpage 10‑7.
2. Remove the air cleaner cover.See Engine Air Cleaner/Filter onpage 10‑12.
3. Remove the air cleanerassembly by pulling up torelease the rear two retentionposts from the securinggrommets. Then pull it forward toremove the remaining retentionpost from the securing grommet.
4. Remove the cover from the backof the headlamp assembly byturning it counterclockwise.
5. Remove the bulb from theheadlamp assembly by turning itcounterclockwise.
6. Disconnect the bulb from thewiring harness connector.
7. Install the new bulb in theheadlamp assembly by turning itclockwise.

Black plate (28,1)Chevrolet Volt Owner Manual - 2012
10-28 Vehicle Care
8. Reconnect the wiring harnessconnector.
9. Install the cover on the back ofthe headlamp assembly byturning it clockwise.
10. Install the air cleaner assemblyby lowering the three retentionposts into the grommets.
11. Install the engine air cleaner/filter assembly cover. SeeEngine Air Cleaner/Filter onpage 10‑12.
Back-Up Lamps
The back-up lamp is in the rearfascia.
To replace a bulb:
1. Remove the three inboardscrews from the aero panellocated under the rear fascia.
2. Push up on the aero panel tolocate the bulb socket.
3. Turn the bulb socketcounterclockwise to remove itfrom the bulb assembly.
4. Pull the bulb from the bulbsocket.
5. Push a new bulb straight into thebulb socket.
6. Reinstall the bulb socket bylining up the tabs in the lampassembly and turn it clockwiseto lock it into place.
7. Replace the three inboardscrews from the aero panel.
License Plate LampTo replace one of these bulbs:
1. Press the spring clip on the rightend of the lamp assembly to theleft to unlock the lamp assembly.
2. Pull down on the lamp assemblyto remove it from the fascia.

Black plate (29,1)Chevrolet Volt Owner Manual - 2012
Vehicle Care 10-29
A. Bulb Socket
B. Bulb
C. Lamp Assembly
3. Turn the bulb socket (A)counterclockwise to remove itfrom the lamp assembly (C).
4. Pull the bulb (B) straight out ofthe bulb socket (A).
5. Push the replacement bulbstraight into the bulb socket (A)and turn the bulb socket (A)clockwise to install it into thelamp assembly (C).
6. Reinstall the lamp assembly (C)into the fascia by inserting theleft side first.
7. Push the spring clip side intoplace.
Replacement Bulbs
Exterior LampBulb
Number
Back-Up Lamps 3157K
High/Low‐BeamHeadlamps
HIR2 (9012)
License PlateLamps
W5W LL
For replacement bulbs not listedhere, contact your dealer.

Black plate (30,1)Chevrolet Volt Owner Manual - 2012
10-30 Vehicle Care
Electrical System
High Voltage Devices andWiring
{ WARNING
Exposure to high voltage cancause shock, burns, and evendeath. The high voltagecomponents in the vehicle canonly be serviced by technicianswith special training.
High voltage components areidentified by labels. Do notremove, open, take apart,or modify these components.High voltage cable or wiring hasorange covering. Do not probe,tamper with, cut, or modify highvoltage cable or wiring.
Electrical SystemOverloadThe vehicle has fuses and circuitbreakers to protect against anelectrical system overload.
When the current electrical load istoo heavy, the circuit breaker opensand closes, protecting the circuituntil the current load returns tonormal or the problem is fixed.This greatly reduces the chance ofcircuit overload and fire caused byelectrical problems.
Fuses and circuit breakers protectthe following in the vehicle:. Headlamp Wiring. Windshield Wiper Motor. Power Windows and other
Power Accessories
Replace a bad fuse with a new oneof the identical size and rating.
If there is a problem on the road anda fuse needs to be replaced, thesame amperage fuse can be
borrowed. Choose some feature ofthe vehicle that is not needed to useand replace it as soon as possible.
Headlamp Wiring
An electrical overload may causethe lamps to go on and off, or insome cases to remain off. Have theheadlamp wiring checked right awayif the lamps go on and off orremain off.
Windshield Wipers
If the wiper motor overheats due toheavy snow or ice, the windshieldwipers will stop until the motor coolsand the wiper control is turned off.After removal of the blockage, thewiper motor will restart when thecontrol is then moved to the desiredoperating position.
Although the circuit is protectedfrom electrical overload, overloaddue to heavy snow or ice, maycause wiper linkage damage.Always clear ice and heavy snowfrom the windshield before using thewindshield wipers.

Black plate (31,1)Chevrolet Volt Owner Manual - 2012
Vehicle Care 10-31
If the overload is caused by anelectrical problem and not snow orice, be sure to get it fixed.
Engine CompartmentFuse Block
To open the fuse block cover, pressthe clips at the front and back androtate the cover up to the side.
Notice: Spilling liquid on anyelectrical component on thevehicle may damage it. Alwayskeep the covers on any electricalcomponent.
Engine Compartment Fuse Block
A fuse puller is located in the enginecompartment fuse block.
The vehicle may not be equippedwith all of the fuses, relays, andfeatures shown.
MiniFuses
Usage
1Engine ControlModule – Switched Power
2 Emissions
3 Not Used

Black plate (32,1)Chevrolet Volt Owner Manual - 2012
10-32 Vehicle Care
MiniFuses
Usage
4 Ignition Coils/Injectors
5 Not Used
6a Empty
6b Not Used
7 Empty
8 Empty
9 Heated Mirrors
10Air Conditioning ControlModule
11Traction Power InverterModule – Battery
12 Not Used
13Cabin Heater Pump andValve
14 Not Used
15Traction Power InverterModule and TransmissionControl Module – Battery
MiniFuses
Usage
17Engine ControlModule – Battery
22 Left High‐Beam Headlamp
24 Empty
25 Empty
26 Not Used
31 Not Used
32
Run/Crank – SensingDiagnostic Module (SDM),Instrument Cluster,Passenger Airbag Display,Automatic DimmingInside Rearview Mirror(If Equipped)
33Run/Crank for VehicleIntegration Control Module
34Vehicle Integration ControlModule – Battery
35 Not Used
MiniFuses
Usage
36Power ElectronicsCoolant Pump
37Cabin Heater ControlModule
38
Rechargeable EnergyStorage System (HighVoltage Battery)Coolant Pump
39
Rechargeable EnergyStorage System (HighVoltage Battery) ControlModule
40 Front Windshield Washer
41Right High‐BeamHeadlamp
46 Empty
47 Empty
49 Empty

Black plate (33,1)Chevrolet Volt Owner Manual - 2012
Vehicle Care 10-33
MiniFuses
Usage
50Run/Crank – Rear VisionCamera, AccessoryPower Module
51
Run/Crank for ABS/Rechargeable EnergyStorage System (HighVoltage Battery)
52Engine Control Module/Transmission ControlModule – Run/Crank
53 Traction Power InverterModule – Run/Crank
54
Run/Crank – Fuel SystemControl Module, AirConditioning ControlModule, On BoardCharger
J‐CaseFuses
Usage
16AIR Solenoid(PZEV Only)
18 Empty
19PowerWindow – Front
20 Empty
21Antilock BrakeSystem ElectronicControl Unit
23 Charge Port Door
27 AIR Pump(PZEV Only)
28 Empty
29 Empty
30Antilock BrakeSystem Motor
42 Cooling Fan – Right
43 Front Wipers
44 Charger
J‐CaseFuses
Usage
45 Empty
48 Cooling Fan – Left
Mini Relays Usage
3 Powertrain
4 Heated Mirrors
7 Empty
9AIR Pump(PZEV Only)
11 Empty
12 Empty
13 Empty
14 Run/Crank
MicroRelays
Usage
1 Empty
2AIR Solenoid(PZEV Only)

Black plate (34,1)Chevrolet Volt Owner Manual - 2012
10-34 Vehicle Care
MicroRelays
Usage
6 Empty
8 Empty
10 Empty
Ultra MicroRelays
Usage
5 Charge Port Door
Instrument Panel FuseBlock (Left Side)The left instrument panel fuseblock is on the left side end of theinstrument panel. To access thefuses, open the fuse panel door bypulling out.
To reinstall the door, insert thebottom tab first, then push the doorback into its original location.
Instrument Panel Fuse Block
A fuse puller is located in the enginecompartment fuse block.
The vehicle may not be equippedwith all of the fuses, relays, andfeatures shown.
Fuses Usage
F1Power Outlet – Topof IP Storage Bin
F2 Radio
F3 Instrument Cluster
Fuses Usage
F4 Infotainment Display
F5
Heating, Ventilation& Air Conditioning/Integrated CenterStack Switches
F6
Airbag (SensingDiagnostic Module/Passenger SensingModule)

Black plate (35,1)Chevrolet Volt Owner Manual - 2012
Vehicle Care 10-35
Fuses Usage
F7Data LinkConnector, Left(Primary)
F8 Empty
F9 OnStar
F10
Body ControlModule 1/BodyControl ModuleElectronics/KeylessEntry/Power Moding/Center HighMounted Stoplamp/License PlateLamps/Left DaytimeRunning Lamp/LeftParking Lamps/Hatch ReleaseRelay Control/Washer Pump RelayControl/SwitchIndicator Lights
Fuses Usage
F11Body ControlModule 4/LeftHeadlamp
F12 Empty
F13 Empty
F14 Empty
F15Power Outlet (InsideFloor Console/Rearof Floor Console)
F16 Empty
F17 Empty
F18 Empty
Relays Usage
R1Retained AccessoryPower Relay forPower Outlets
R2 Empty
R3 Empty
R4 Empty
Diodes Usage
DIODE Empty

Black plate (36,1)Chevrolet Volt Owner Manual - 2012
10-36 Vehicle Care
Instrument Panel FuseBlock (Right Side)The right instrument panel fuseblock is on the right side end of theinstrument panel. To access thefuses, open the fuse panel door bypulling out.
To reinstall the door, insert thebottom tab first, then push the doorback into its original location.
Instrument Panel Fuse Block
A fuse puller is located in the enginecompartment fuse block.
The vehicle may not be equippedwith all of the fuses, relays, andfeatures shown.
Fuses Usage
F1Steering Wheel SwitchBacklighting
F2 Empty
F3 Empty
Fuses Usage
F4 Body Control Module 3/Right Headlamp
F5
Body Control Module 2/Body Control ModuleElectronics/Hatch Lamp/Right Daytime RunningLamp/Shifter Lock/SwitchBacklighting

Black plate (37,1)Chevrolet Volt Owner Manual - 2012
Vehicle Care 10-37
Fuses Usage
F6
Body Control Module 5/Retained AccessoryPower Relay Control/RightFront Turn Signal Lamp/Left Rear Stop and TurnSignal Lamp/RightParking Lamps/RemotePRNDL
F7Body Control Module 6/Map Lights/CourtesyLights/Back – up Lamp
F8
Body Control Module 7/Left Front Turn Signal/Right Rear Stop andTurn Signal Lamp/ChildSecurity Lock RelayControl
Fuses Usage
F9 Body Control Module 8/Locks
F10Data Link Connector,Right (Secondary)
F11Universal Garage DoorOpener (If Equipped)
F12 Blower Motor
F13 Empty
F14 Empty
F15 Empty
F16 Empty
F17 Empty
F18 Empty
Relays Usage
R1 Empty
R2 Empty
R3 Empty
R4 Child Lockout Relay
Diodes Usage
DIODE Empty

Black plate (38,1)Chevrolet Volt Owner Manual - 2012
10-38 Vehicle Care
Rear Compartment FuseBlockThe rear compartment fuse blockis on the left side of the rearcompartment behind a removablecover. Open the latch to remove thecover and access the fuse block.
A fuse puller is located in the enginecompartment fuse block.
The vehicle may not have all of thefuses, relays, and features shown.
Fuses Usage
F1 Empty
F2Fuel System ControlModule
F3Passive Start/PassiveEntry Module
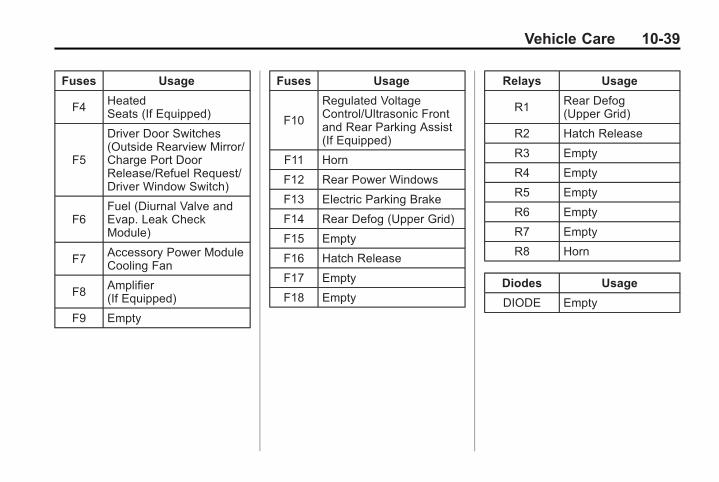
Black plate (39,1)Chevrolet Volt Owner Manual - 2012
Vehicle Care 10-39
Fuses Usage
F4 HeatedSeats (If Equipped)
F5
Driver Door Switches(Outside Rearview Mirror/Charge Port DoorRelease/Refuel Request/Driver Window Switch)
F6Fuel (Diurnal Valve andEvap. Leak CheckModule)
F7Accessory Power ModuleCooling Fan
F8Amplifier(If Equipped)
F9 Empty
Fuses Usage
F10
Regulated VoltageControl/Ultrasonic Frontand Rear Parking Assist(If Equipped)
F11 Horn
F12 Rear Power Windows
F13 Electric Parking Brake
F14 Rear Defog (Upper Grid)
F15 Empty
F16 Hatch Release
F17 Empty
F18 Empty
Relays Usage
R1 Rear Defog(Upper Grid)
R2 Hatch Release
R3 Empty
R4 Empty
R5 Empty
R6 Empty
R7 Empty
R8 Horn
Diodes Usage
DIODE Empty

Black plate (40,1)Chevrolet Volt Owner Manual - 2012
10-40 Vehicle Care
Wheels and Tires
TiresEvery new GM vehicle hashigh-quality tires made by aleading tire manufacturer. Seethe warranty manual forinformation regarding the tirewarranty and where to getservice. For additionalinformation refer to the tiremanufacturer.
{ WARNING
. Poorly maintained andimproperly used tires aredangerous.
. Overloading the tires cancause overheating as a resultof too much flexing. Therecould be a blowout and aserious crash. See VehicleLoad Limits on page 9‑11.
(Continued)
WARNING (Continued)
. Underinflated tires pose thesame danger as overloadedtires. The resulting crashcould cause serious injury.Check all tires frequently tomaintain the recommendedpressure. Tire pressureshould be checked when thetires are cold.
. Overinflated tires are morelikely to be cut, punctured,or broken by a suddenimpact — such as whenhitting a pothole. Keep tires atthe recommended pressure.
. Worn or old tires can cause acrash. If the tread is badlyworn, replace them.
. Replace any tires that havebeen damaged by impactswith potholes, curbs, etc.
(Continued)
WARNING (Continued)
. Improperly repaired tires cancause a crash. Only thedealer or an authorized tireservice center should repair,replace, dismount, and mountthe tires.
. Do not spin the tires inexcess of 55 km/h (35 mph)on slippery surfaces such assnow, mud, ice, etc.Excessive spinning maycause the tires to explode.
Winter TiresConsider installing winter tires onthe vehicle if frequent driving onsnow or ice covered roads isexpected. All season tires providegood overall performance on mostsurfaces, but they may not offerthe traction or the same level ofperformance as winter tires on snowor ice covered roads.

Black plate (41,1)Chevrolet Volt Owner Manual - 2012
Vehicle Care 10-41
Winter tires, in general, aredesigned for increased traction onsnow and ice covered roads. Withwinter tires, there may be decreaseddry road traction, increased roadnoise, and shorter tread life. Afterchanging to winter tires, be alert forchanges in vehicle handling andbraking.
See your dealer for detailsregarding winter tire availability andproper tire selection. Also, seeBuying New Tires on page 10‑54.
If using snow tires:. Use tires of the same brand and
tread type on all four wheelpositions.
. Use only radial ply tires of thesame size, load range, andspeed rating as the originalequipment tires.
Winter tires with the same speedrating as the original equipment tiresmay not be available for H, V, W, Y,and ZR speed rated tires. If winter
tires with a lower speed rating arechosen, never exceed the tire'smaximum speed capability.
Tire Sidewall LabelingUseful information about a tireis molded into its sidewall. Theexamples show a typicalpassenger tire sidewall.
Passenger (P‐Metric) Tire Example
(A) Tire Size: The tire size isa combination of letters andnumbers used to define aparticular tire's width, height,
aspect ratio, construction type,and service description. See the“Tire Size” illustration later in thissection for more detail.
(B) TPC Spec (TirePerformance CriteriaSpecification): Originalequipment tires designed toGM's specific tire performancecriteria have a TPC specificationcode molded onto the sidewall.GM's TPC specifications meetor exceed all federal safetyguidelines.
(C) DOT (Department ofTransportation): TheDepartment of Transportation(DOT) code indicates thatthe tire is in compliance withthe U.S. Department ofTransportation Motor VehicleSafety Standards.

Black plate (42,1)Chevrolet Volt Owner Manual - 2012
10-42 Vehicle Care
(D) Tire Identification Number(TIN): The letters and numbersfollowing the DOT code arethe Tire Identification Number(TIN). The TIN shows themanufacturer and plant code,tire size, and date the tire wasmanufactured. The TIN ismolded onto both sides of thetire, although only one side mayhave the date of manufacture.
(E) Tire Ply Material: The typeof cord and number of plies inthe sidewall and under the tread.
(F) Uniform Tire QualityGrading (UTQG): Tiremanufacturers are required tograde tires based on threeperformance factors: treadwear,traction, and temperatureresistance. For more informationsee Uniform Tire QualityGrading on page 10‑55.
(G) Maximum Cold InflationLoad Limit: Maximum loadthat can be carried and themaximum pressure needed tosupport that load.
Tire Designations
Tire Size
The following is an example of atypical passenger vehicletire size.
(A) Passenger (P‐Metric) Tire:The United States version of ametric tire sizing system. Theletter P as the first character inthe tire size means a passenger
vehicle tire engineered tostandards set by the U.S. Tireand Rim Association.
(B) Tire Width: The three‐digitnumber indicates the tire sectionwidth in millimeters fromsidewall to sidewall.
(C) Aspect Ratio: A two‐digitnumber that indicates the tireheight‐to‐width measurements.For example, if the tire sizeaspect ratio is 60, as shown initem C of the illustration, it wouldmean that the tire's sidewall is60 percent as high as it is wide.
(D) Construction Code: Aletter code is used to indicatethe type of ply construction inthe tire. The letter R meansradial ply construction; theletter D means diagonal orbias ply construction; and theletter B means belted‐bias plyconstruction.

Black plate (43,1)Chevrolet Volt Owner Manual - 2012
Vehicle Care 10-43
(E) Rim Diameter: Diameter ofthe wheel in inches.
(F) Service Description: Thesecharacters represent the loadindex and speed rating of thetire. The load index representsthe load carrying capacity a tireis certified to carry. The speedrating is the maximum speed atire is certified to carry a load.
Tire Terminology andDefinitionsAir Pressure: The amountof air inside the tire pressingoutward on each square inchof the tire. Air pressure isexpressed in kPa (kilopascal)or psi (pounds per square inch).
Accessory Weight: Thecombined weight of optionalaccessories. Some examples ofoptional accessories are, electric
drive unit, power steering, powerbrakes, power windows, powerseats, and air conditioning.
Aspect Ratio: The relationshipof a tire's height to its width.
Belt: A rubber coated layer ofcords that is located betweenthe plies and the tread. Cordsmay be made from steel or otherreinforcing materials.
Bead: The tire bead containssteel wires wrapped by steelcords that hold the tire ontothe rim.
Bias Ply Tire: A pneumatic tirein which the plies are laid atalternate angles less than90 degrees to the centerline ofthe tread.
Cold Tire Pressure: Theamount of air pressure in a tire,measured in kPa (kilopascal)or psi (pounds per square inch)
before a tire has built up heatfrom driving. See Tire Pressureon page 10‑46.
Curb Weight: The weight of amotor vehicle with standard andoptional equipment includingthe maximum capacity of fuel,oil, and coolant, but withoutpassengers and cargo.
DOT Markings: A code moldedinto the sidewall of a tiresignifying that the tire is incompliance with the U.S.Department of Transportation(DOT) Motor Vehicle SafetyStandards. The DOT codeincludes the Tire IdentificationNumber (TIN), an alphanumericdesignator which can alsoidentify the tire manufacturer,production plant, brand, anddate of production.
GVWR: Gross Vehicle WeightRating. See Vehicle Load Limitson page 9‑11.

Black plate (44,1)Chevrolet Volt Owner Manual - 2012
10-44 Vehicle Care
GAWR FRT: Gross Axle WeightRating for the front axle. SeeVehicle Load Limits onpage 9‑11.
GAWR RR: Gross Axle WeightRating for the rear axle. SeeVehicle Load Limits onpage 9‑11.
Intended Outboard Sidewall:The side of an asymmetrical tire,that must always face outwardwhen mounted on a vehicle.
Kilopascal (kPa): The metricunit for air pressure.
Light Truck (LT‐Metric) Tire: Atire used on light duty trucks andsome multipurpose passengervehicles.
Load Index: An assignednumber ranging from 1 to 279that corresponds to the loadcarrying capacity of a tire.
Maximum Inflation Pressure:The maximum air pressure towhich a cold tire can be inflated.The maximum air pressure ismolded onto the sidewall.
Maximum Load Rating: Theload rating for a tire at themaximum permissible inflationpressure for that tire.
Maximum Loaded VehicleWeight: The sum of curbweight, accessory weight,vehicle capacity weight, andproduction options weight.
Normal Occupant Weight: Thenumber of occupants a vehicleis designed to seat multiplied by68 kg (150 lbs). See VehicleLoad Limits on page 9‑11.
Occupant Distribution:Designated seating positions.
Outward Facing Sidewall: Theside of an asymmetrical tire thathas a particular side that faces
outward when mounted on avehicle. The side of the tire thatcontains a whitewall, bearswhite lettering, or bearsmanufacturer, brand, and/ormodel name molding that ishigher or deeper than the samemoldings on the other sidewallof the tire.
Passenger (P-Metric) Tire: Atire used on passenger carsand some light duty trucks andmultipurpose vehicles.
Recommended InflationPressure: Vehiclemanufacturer's recommendedtire inflation pressure as shownon the tire placard. See TirePressure on page 10‑46 andVehicle Load Limits onpage 9‑11.

Black plate (45,1)Chevrolet Volt Owner Manual - 2012
Vehicle Care 10-45
Radial Ply Tire: A pneumatictire in which the ply cords thatextend to the beads are laid at90 degrees to the centerline ofthe tread.
Rim: A metal support for a tireand upon which the tire beadsare seated.
Sidewall: The portion of a tirebetween the tread and the bead.
Speed Rating: Analphanumeric code assigned toa tire indicating the maximumspeed at which a tire canoperate.
Traction: The friction betweenthe tire and the road surface.The amount of grip provided.
Tread: The portion of a tirethat comes into contact withthe road.
Treadwear Indicators: Narrowbands, sometimes called wearbars, that show across the treadof a tire when only 1.6 mm(1/16 in) of tread remains. SeeWhen It Is Time for New Tireson page 10‑53.
UTQGS (Uniform Tire QualityGrading Standards): A tireinformation system that providesconsumers with ratings for atire's traction, temperature,and treadwear. Ratingsare determined by tiremanufacturers usinggovernment testing procedures.The ratings are molded into thesidewall of the tire. See UniformTire Quality Grading onpage 10‑55.
Vehicle Capacity Weight: Thenumber of designated seatingpositions multiplied by68 kg (150 lbs) plus the ratedcargo load. See Vehicle LoadLimits on page 9‑11.
Vehicle Maximum Load on theTire: Load on an individual tiredue to curb weight, accessoryweight, occupant weight, andcargo weight.
Vehicle Placard: A labelpermanently attached to avehicle showing the vehicle'scapacity weight and theoriginal equipment tire sizeand recommended inflationpressure. See “Tire and LoadingInformation Label” under VehicleLoad Limits on page 9‑11.

Black plate (46,1)Chevrolet Volt Owner Manual - 2012
10-46 Vehicle Care
Tire PressureTires need the correct amountof air pressure to operateeffectively.
Notice: Neither tireunderinflation noroverinflation is good.Underinflated tires, or tiresthat do not have enough air,can result in:. Tire overloading andoverheating which couldlead to a blowout.
. Premature orirregular wear.
. Poor handling.
. Reduced fuel economy.
Overinflated tires, or tires thathave too much air, canresult in:. Unusual wear.. Poor handling.
. Rough ride.
. Needless damage fromroad hazards.
The Tire and LoadingInformation label on the vehicleindicates the original equipmenttires and the correct cold tireinflation pressures. Therecommended pressure is theminimum air pressure needed tosupport the vehicle's maximumload carrying capacity.
For additional informationregarding how much weightthe vehicle can carry, and anexample of the Tire and LoadingInformation label, see VehicleLoad Limits on page 9‑11. Howthe vehicle is loaded affectsvehicle handling and ridecomfort. Never load the vehiclewith more weight than it wasdesigned to carry.
When to Check
Check the tires once a monthor more.
How to Check
Use a good quality pocket-typegauge to check the tirepressure. Proper tire inflationcannot be determined by lookingat the tire. Check the tireinflation pressure when the tiresare cold, meaning the vehiclehas not been driven for at leastthree hours or no more than1.6 km (1 mi).
Remove the valve cap from thetire valve stem. Press the tiregauge firmly onto the valve toget the pressure measurement.If the cold tire inflation pressurematches the recommendedpressure on the Tire andLoading Information label, nofurther adjustment is necessary.

Black plate (47,1)Chevrolet Volt Owner Manual - 2012
Vehicle Care 10-47
If the inflation pressure is low,add air until the recommendedpressure is reached. If theinflation pressure in high, presson the metal stem in the centerof the tire valve to release air.Re‐check the tire pressure withthe tire gauge.
Return the valve caps on thevalve stems to keep out dirt andmoisture and prevent leaks.
Tire Pressure MonitorSystemThe Tire Pressure Monitor System(TPMS) uses radio and sensortechnology to check tire pressurelevels. The TPMS sensors monitorthe air pressure in your tires andtransmit tire pressure readings to areceiver located in the vehicle.
Each tire, including the spare(if provided), should be checkedmonthly when cold and inflated tothe inflation pressure recommendedby the vehicle manufacturer on the
vehicle placard or tire inflationpressure label. (If your vehicle hastires of a different size than the sizeindicated on the vehicle placard ortire inflation pressure label, youshould determine the proper tireinflation pressure for those tires.)
As an added safety feature, yourvehicle has been equipped with atire pressure monitoring system(TPMS) that illuminates a low tirepressure telltale when one ormore of your tires is significantlyunder‐inflated.
Accordingly, when the low tirepressure telltale illuminates, youshould stop and check your tires assoon as possible, and inflate themto the proper pressure. Driving on asignificantly under‐inflated tirecauses the tire to overheat and canlead to tire failure. Under‐inflationalso reduces fuel efficiency andtire tread life, and may affect thevehicle's handling and stoppingability.
Please note that the TPMS isnot a substitute for proper tiremaintenance, and it is the driver'sresponsibility to maintain correct tirepressure, even if under‐inflation hasnot reached the level to triggerillumination of the TPMS low tirepressure telltale.
Your vehicle has also beenequipped with a TPMS malfunctionindicator to indicate when thesystem is not operating properly.The TPMS malfunction indicator iscombined with the low tire pressuretelltale. When the system detects amalfunction, the telltale will flash forapproximately one minute and thenremain continuously illuminated.This sequence will continue uponsubsequent vehicle start‐ups aslong as the malfunction exists.

Black plate (48,1)Chevrolet Volt Owner Manual - 2012
10-48 Vehicle Care
When the malfunction indicator isilluminated, the system may not beable to detect or signal low tirepressure as intended. TPMSmalfunctions may occur for a varietyof reasons, including the installationof replacement or alternate tires orwheels on the vehicle that preventthe TPMS from functioning properly.Always check the TPMS malfunctiontelltale after replacing one or moretires or wheels on your vehicle toensure that the replacement oralternate tires and wheels allowthe TPMS to continue to functionproperly.
See Tire Pressure MonitorOperation on page 10‑48 foradditional information.
Federal CommunicationsCommission (FCC) Rules andwith Industry CanadaStandards
See Radio Frequency Statement onpage 13‑16 for informationregarding Part 15 of the Federal
Communications Commission (FCC)Rules and with Industry CanadaStandards RSS-GEN/210/220/310.
Tire Pressure MonitorOperationThis vehicle may have a TirePressure Monitor System (TPMS).The TPMS is designed to warn thedriver when a low tire pressurecondition exists. TPMS sensors aremounted onto each tire and wheelassembly. The TPMS sensorsmonitor the air pressure in the tiresand transmit the tire pressurereadings to a receiver located in thevehicle.
When a low tire pressure conditionis detected, the TPMS illuminatesthe low tire pressure warning light
located on the instrument cluster.If the warning light comes on, stopas soon as possible and inflate thetires to the recommended pressureshown on the Tire Loading andInformation label. See Vehicle LoadLimits on page 9‑11.
A message to check the pressure ina specific tire displays in the DriverInformation Center (DIC). The lowtire pressure warning light and theDIC warning message come on ateach drive cycle until the tires areinflated to the correct inflationpressure. Using the DIC, tirepressure levels can be viewed. Foradditional information and detailsabout the DIC operation anddisplays see Driver InformationCenter (DIC) on page 5‑43.
The low tire pressure warning lightmay come on in cool weather whenthe vehicle is first started, and thenturn off as the vehicle is driven. Thiscould be an early indicator that theair pressure is getting low andneeds to be inflated to the properpressure.
Black plate (49,1)Chevrolet Volt Owner Manual - 2012
Vehicle Care 10-49
A Tire and Loading Informationlabel shows the size of the originalequipment tires and the correctinflation pressure for the tires whenthey are cold. See Vehicle LoadLimits on page 9‑11, for an exampleof the Tire and Loading Informationlabel and its location. Also see TirePressure on page 10‑46.
The TPMS can warn about alow tire pressure condition but itdoes not replace normal tiremaintenance. See Tire Inspectionon page 10‑51, Tire Rotation onpage 10‑52, and Tires onpage 10‑40.
Notice: Tire sealant materials arenot all the same. A non-approvedtire sealant could damage theTPMS sensors. TPMS sensordamage caused by using anincorrect tire sealant is notcovered by the vehiclewarranty. Always use onlythe GM-approved tire sealantavailable through your dealer orincluded in the vehicle.
Factory-installed Tire Inflator Kitsuse a GM-approved liquid tiresealant. Using non-approved tiresealants could damage the TPMSsensors. See Tire Sealant andCompressor Kit on page 10‑60 forinformation regarding the inflator kitmaterials and instructions.
TPMS Malfunction Light andMessage
The TPMS will not function properlyif one or more of the TPMS sensorsare missing or inoperable. When thesystem detects a malfunction, thelow tire pressure warning lightflashes for about one minute andthen stays on for the remainder ofthe vehicle on/off cycle. A DICwarning message also displays.
The malfunction light and DICwarning message come on at eachvehicle on/off cycle until the problemis corrected. Some of the conditionsthat can cause these to comeon are:. One of the road tires has been
replaced with the spare tire,if the vehicle has one. The sparetire does not have a TPMSsensor. The malfunction lightand DIC message should go offafter the road tire is replacedand the sensor matchingprocess is performedsuccessfully. See "TPMS SensorMatching Process" later in thissection.

Black plate (50,1)Chevrolet Volt Owner Manual - 2012
10-50 Vehicle Care
. The TPMS sensor matchingprocess was started but notcompleted or not completedsuccessfully after rotating thetires. The DIC message andmalfunction light should gooff once the TPMS sensormatching process is performedsuccessfully. See “TPMS SensorMatching Process” later in thissection.
. One or more TPMS sensors aremissing or damaged. The DICmessage and the malfunctionlight should go off when theTPMS sensors are installed andthe sensor matching process isperformed successfully. Seeyour dealer for service.
. Replacement tires or wheels donot match the original equipmenttires or wheels. Tires and wheelsother than those recommendedcould prevent the TPMS fromfunctioning properly. See BuyingNew Tires on page 10‑54.
. Operating electronic devices orbeing near facilities using radiowave frequencies similar to theTPMS could cause the TPMSsensors to malfunction.
If the TPMS is not functioningproperly , it cannot detect or signal alow tire condition. See your dealerfor service if the TPMS malfunctionlight and DIC message come onand stay on.
TPMS Sensor MatchingProcess
Each TPMS sensor has a uniqueidentification code. The identificationcode needs to be matched to a newtire/wheel position after rotating thevehicle’s tires or replacing one ormore of the TPMS sensors. Also,the TPMS sensor matching processshould be performed after replacinga spare tire with a road tirecontaining the TPMS sensor. Themalfunction light and the DICmessage should go off at the nextdrive cycle. The sensors arematched to the tire/wheel positions,
using a TPMS relearn tool, in thefollowing order: driver side front tire,passenger side front tire, passengerside rear tire, and driver side rear.See your dealer for service or topurchase a relearn tool.
There are two minutes to matchthe first tire/wheel position, andfive minutes overall to match allfour tire/wheel positions. If it takeslonger, the matching process stopsand must be restarted.
Follow the TPMS sensor matchingprocess:
1. Set the parking brake.
2. Put the vehicle in ON/RUN andplace the vehicle in P (Park).
3. If the DIC display is minimized,press the SELECT knob tomaximize it.
4. Use the SELECT knob to scrollto the Tire Pressure displayscreen.

Black plate (51,1)Chevrolet Volt Owner Manual - 2012
Vehicle Care 10-51
5. Press and hold the SELECTknob for five seconds to beginthe sensor matching process.
A message displays confirmingto begin the process.
6. Use the SELECT knob to selectYES with the highlightedselection, and press theSELECT knob again to confirmthe selection.
The horn sounds twice to signalthe receiver is in relearn modeand the TIRE LEARNINGACTIVE message displays onthe DIC screen.
7. Start with the driver sidefront tire.
8. Place the relearn tool againstthe tire sidewall, near the valvestem. Then press the button toactivate the TPMS sensor.A horn chirp confirms that thesensor identification code hasbeen matched to this tire andwheel position.
9. Proceed to the passengerside front tire, and repeat theprocedure in Step 8.
10. Proceed to the passengerside rear tire, and repeat theprocedure in Step 8.
11. Proceed to the driver side reartire, and repeat the procedurein Step 8. The horn soundstwo times to indicate thesensor identification code hasbeen matched to the driverside rear tire, and the TPMSsensor matching process isno longer active. The TIRELEARNING ACTIVE messageon the DIC display screengoes off.
12. Turn the vehicle off.
13. Set all four tires to therecommended air pressurelevel as indicated on the Tireand Loading Information label.
Tire InspectionWe recommend that the tires,including the spare tire, if thevehicle has one, be inspectedfor signs of wear or damage atleast once a month.
Replace the tire if:. The indicators at three or
more places around the tirecan be seen.
. There is cord or fabricshowing through the tire'srubber.
. The tread or sidewall iscracked, cut, or snaggeddeep enough to show cord orfabric.
. The tire has a bump, bulge,or split.

Black plate (52,1)Chevrolet Volt Owner Manual - 2012
10-52 Vehicle Care
. The tire has a puncture, cut,or other damage that cannotbe repaired well because ofthe size or location of thedamage.
Tire RotationTires should be rotated every12 000 km (7,500 mi). The firstrotation is the most important.See Maintenance Schedule onpage 11‑3.
Tires are rotated to achieve amore uniform wear for all tires.
Any time unusual wear isnoticed, rotate the tires as soonas possible, and check thewheel alignment. Also check fordamaged tires or wheels. SeeWhen It Is Time for New Tireson page 10‑53 and WheelReplacement on page 10‑57.
Use this rotation pattern whenrotating the tires.
Adjust the front and rear tiresto the recommended inflationpressure on the Tire andLoading Information label afterthe tires have been rotated. SeeTire Pressure on page 10‑46and Vehicle Load Limits onpage 9‑11.
Reset the Tire Pressure MonitorSystem. See Tire PressureMonitor Operation onpage 10‑48.
Check that all wheel nuts areproperly tightened. See “WheelNut Torque” under Capacitiesand Specifications onpage 12‑2.
{ WARNING
Rust or dirt on a wheel, oron the parts to which it isfastened, can make wheelnuts become loose after atime. The wheel could comeoff and cause a crash. Whenchanging a wheel, remove anyrust or dirt from places wherethe wheel attaches to thevehicle. In an emergency, acloth or a paper towel can beused, however, use a scraperor wire brush to remove allrust or dirt.

Black plate (53,1)Chevrolet Volt Owner Manual - 2012
Vehicle Care 10-53
Lightly coat the center of thewheel hub with wheel bearinggrease after a wheel change ortire rotation to prevent corrosionor rust build-up. Do not getgrease on the flat wheelmounting surface or on thewheel nuts or bolts.
When It Is Time for NewTiresFactors such as maintenance,temperatures, driving speeds,vehicle loading, and road conditionsaffect the wear rate of the tires.
Treadwear indicators are one wayto tell when it is time for new tires.Treadwear indicators appear whenthe tires have only 1.6 mm (1/16 in)or less of tread remaining. See TireInspection on page 10‑51 and TireRotation on page 10‑52 for moreinformation.
The rubber in tires ages over time.This also applies for the spare tire,if the vehicle has one, even if it isnever used. Multiple conditionsincluding temperatures, loadingconditions, and inflation pressure
maintenance affect how fast agingtakes place. Tires will typicallyneed to be replaced due to wearbefore they may need to bereplaced due to age. Consult the tiremanufacturer for more informationon when tires should be replaced.
Vehicle Storage
Tires age when stored normallymounted on a parked vehicle. Parka vehicle that will be stored for atleast a month in a cool, dry, cleanarea away from direct sunlight toslow aging. This area should befree of grease, gasoline, or othersubstances that can deterioraterubber.
Parking for an extended period cancause flat spots on the tires thatmay result in vibrations whiledriving. When storing a vehicle forat least a month, remove the tiresor raise the vehicle to reduce theweight from the tires.

Black plate (54,1)Chevrolet Volt Owner Manual - 2012
10-54 Vehicle Care
Buying New TiresGM has developed and matchedspecific tires for the vehicle. Theoriginal equipment tires installedon the vehicle, when it was new,were designed to meet GeneralMotors Tire Performance CriteriaSpecification (TPC Spec) systemrating. When replacement tires areneeded, GM strongly recommendsbuying tires with the same TPCSpec rating. This way, the vehiclewill continue to have tires thatare designed to give the sameperformance and vehicle safety,during normal use, as the originaltires.
GM's exclusive TPC Spec systemconsiders over a dozen criticalspecifications that impact theoverall performance of thevehicle, including brake systemperformance, ride and handling,traction control, and tire pressuremonitoring performance. GM's TPCSpec number is molded onto thetire's sidewall near the tire size.
If the tires have an all‐season treaddesign, the TPC spec number willbe followed by MS, for mud andsnow. See Tire Sidewall Labeling onpage 10‑41 for additionalinformation.
GM recommends replacing all thetires at the same time. Uniformtread depth on all tires will help tomaintain the performance of thevehicle. Braking and handlingperformance may be adverselyaffected if all the tires are notreplaced at the same time. SeeTire Inspection on page 10‑51 andTire Rotation on page 10‑52 forinformation on proper tire rotation.
{ WARNING
Tires could explode duringimproper service. Attemptingto mount or dismount a tirecould cause injury or death.Only your dealer or authorizedtire service center shouldmount or dismount the tires.
{ WARNING
Mixing tires of different sizes,brands, or types may causeloss of control of the vehicle,resulting in a crash or othervehicle damage. Use thecorrect size, brand, and typeof tire on all wheels.
{ WARNING
Using bias-ply tires on thevehicle may cause the wheelrim flanges to develop cracksafter many miles of driving.A tire and/or wheel could failsuddenly and cause a crash.Use only radial-ply tires withthe wheels on the vehicle.
If the vehicle tires must be replacedwith a tire that does not have a TPCSpec number, make sure they are

Black plate (55,1)Chevrolet Volt Owner Manual - 2012
Vehicle Care 10-55
the same size, load range, speedrating, and construction (radial) asthe original tires.
Vehicles that have a tire pressuremonitoring system could give aninaccurate low‐pressure warningif non‐TPC Spec rated tires areinstalled. See Tire Pressure MonitorSystem on page 10‑47.
The Tire and Loading InformationLabel indicates the originalequipment tires on the vehicle. SeeVehicle Load Limits on page 9‑11,for the label location and moreinformation about the Tire andLoading Information label.
Different Size Tires andWheelsIf wheels or tires are installed thatare a different size than the originalequipment wheels and tires, vehicleperformance, including its braking,ride and handling characteristics,stability, and resistance to rollovermay be affected. If the vehicle haselectronic systems such as antilock
brakes, rollover airbags, tractioncontrol, and electronic stabilitycontrol, the performance of thesesystems can also be affected.
{ WARNING
If different sized wheels are used,there may not be an acceptablelevel of performance and safetyif tires not recommended forthose wheels are selected. Thisincreases the chance of a crashand serious injury. Only use GMspecific wheel and tire systemsdeveloped for the vehicle, andhave them properly installed by aGM certified technician.
See Buying New Tires onpage 10‑54 and Accessories andModifications on page 10‑3 foradditional information.
Uniform Tire QualityGradingQuality grades can be foundwhere applicable on the tiresidewall between tread shoulderand maximum section width. Forexample:
Treadwear 200 Traction AATemperature A
The following information relatesto the system developed by theUnited States National HighwayTraffic Safety Administration(NHTSA), which grades tiresby treadwear, traction, andtemperature performance. Thisapplies only to vehicles sold inthe United States. The gradesare molded on the sidewallsof most passenger car tires.

Black plate (56,1)Chevrolet Volt Owner Manual - 2012
10-56 Vehicle Care
The Uniform Tire QualityGrading (UTQG) systemdoes not apply to deeptread, winter-type snow tires,space-saver, or temporary usespare tires, tires with nominalrim diameters of 10 to 12 inches(25 to 30 cm), or to somelimited-production tires.
While the tires available onGeneral Motors passenger carsand light trucks may vary withrespect to these grades, theymust also conform to federalsafety requirements andadditional General Motors TirePerformance Criteria (TPC)standards.
All Passenger Car Tires MustConform to Federal SafetyRequirements In Addition ToThese Grades.
Treadwear
The treadwear grade is acomparative rating based on thewear rate of the tire when testedunder controlled conditions ona specified government testcourse. For example, a tiregraded 150 would wear one anda half (1½) times as well on thegovernment course as a tiregraded 100. The relativeperformance of tires dependsupon the actual conditions oftheir use, however, and maydepart significantly from thenorm due to variations in drivinghabits, service practices anddifferences in roadcharacteristics and climate.
Traction – AA, A, B, C
The traction grades, fromhighest to lowest, are AA, A, B,and C. Those grades representthe tire's ability to stop on wetpavement as measured under
controlled conditions onspecified government testsurfaces of asphalt andconcrete. A tire marked C mayhave poor traction performance.Warning: The traction gradeassigned to this tire is based onstraight-ahead braking tractiontests, and does not includeacceleration, cornering,hydroplaning, or peak tractioncharacteristics.
Temperature – A, B, C
The temperature gradesare A (the highest), B, and C,representing the tire's resistanceto the generation of heat andits ability to dissipate heatwhen tested under controlledconditions on a specified indoorlaboratory test wheel. Sustainedhigh temperature can cause thematerial of the tire to degenerateand reduce tire life, andexcessive temperature can lead
Black plate (57,1)Chevrolet Volt Owner Manual - 2012
Vehicle Care 10-57
to sudden tire failure. Thegrade C corresponds to alevel of performance which allpassenger car tires must meetunder the Federal Motor SafetyStandard No. 109. Grades Band A represent higher levels ofperformance on the laboratorytest wheel than the minimumrequired by law. Warning: Thetemperature grade for this tireis established for a tire that isproperly inflated and notoverloaded. Excessive speed,underinflation, or excessiveloading, either separately or incombination, can cause heatbuildup and possible tire failure.
Wheel Alignment and TireBalanceThe tires and wheels were alignedand balanced at the factory toprovide the longest tire life and bestoverall performance. Adjustments towheel alignment and tire balancing
will not be necessary on a regularbasis. However, check thealignment if there is unusual tirewear or if the vehicle is pulling toone side or the other. If the vehiclevibrates when driving on a smoothroad, the tires and wheels mightneed to be rebalanced. See yourdealer for proper diagnosis.
Wheel ReplacementReplace any wheel that is bent,cracked, or badly rusted orcorroded. If wheel nuts keep comingloose, the wheel, wheel bolts andwheel nuts should be replaced.If the wheel leaks air, replace it.Some aluminum wheels can berepaired. See your dealer if any ofthese conditions exist.
Your dealer will know the kind ofwheel that is needed.
Each new wheel should have thesame load-carrying capacity,diameter, width, offset and bemounted the same way as theone it replaces.
Replace wheels, wheel bolts, wheelnuts, or Tire Pressure MonitorSystem (TPMS) sensors with newGM original equipment parts.
{ WARNING
Using the wrong replacementwheels, wheel bolts, or wheelnuts can be dangerous. It couldaffect the braking and handling ofthe vehicle. Tires can lose air,and cause loss of control, causinga crash. Always use the correctwheel, wheel bolts, and wheelnuts for replacement.
Notice: The wrong wheel canalso cause problems with bearinglife, brake cooling, speedometeror odometer calibration,headlamp aim, bumper height,vehicle ground clearance, and tireclearance to the body andchassis.

Black plate (58,1)Chevrolet Volt Owner Manual - 2012
10-58 Vehicle Care
{ WARNING
Rust or dirt on a wheel, oron the parts to which it isfastened, can make wheelnuts become loose after atime. The wheel could comeoff and cause a crash. Whenchanging a wheel, remove anyrust or dirt from places wherethe wheel attaches to thevehicle. In an emergency, acloth or a paper towel can beused, however, use a scraperor wire brush to remove allrust or dirt.
{ WARNING
Never use oil or grease on studsor the threads of the wheel nuts.The wheel nuts might come looseand the wheel could fall off,causing a crash.
{ WARNING
Incorrect wheel nuts or improperlytightened wheel nuts can causethe wheel to become loose andeven come off. This could leadto a crash. Be sure to use thecorrect wheel nuts. If you have toreplace them, be sure to get newGM original equipmentwheel nuts.
Notice: Improperly tightenedwheel nuts can lead to brakepulsation and rotor damage. Toavoid expensive brake repairs,evenly tighten the wheel nuts inthe proper sequence and to theproper torque specification.
Used Replacement Wheels
{ WARNING
Replacing a wheel with a usedone is dangerous. How it hasbeen used or how far it has beendriven may be unknown. It couldfail suddenly and cause a crash.When replacing wheels, use anew GM original equipmentwheel.
Tire Chains
{ WARNING
Do not use tire chains. There isnot enough clearance. Tire chainsused on a vehicle without theproper amount of clearance cancause damage to the brakes,suspension, or other vehicle
(Continued)

Black plate (59,1)Chevrolet Volt Owner Manual - 2012
Vehicle Care 10-59
WARNING (Continued)
parts. The area damaged by thetire chains could cause loss ofcontrol and a crash.
Use another type of tractiondevice only if its manufacturerrecommends it for the vehicle'stire size combination androad conditions. Follow thatmanufacturer's instructions. Toavoid vehicle damage, drive slowand readjust or remove thetraction device if it contacts thevehicle. Do not spin the wheels.If traction devices are used, installthem on the front tires.
If a Tire Goes FlatThis vehicle has a tire sealant andcompressor kit. See Tire Sealantand Compressor Kit on page 10‑60.There is no spare tire, no tirechanging equipment, and no placeto store a tire.
To properly lift this vehicle, seeLifting the Vehicle on page 10‑3.
It is unusual for a tire to blowoutwhile driving, especially if the tiresare maintained properly. See Tireson page 10‑40. If air goes out of atire, it is much more likely to leakout slowly. But if there ever is ablowout, here are a few tips aboutwhat to expect and what to do:
If a front tire fails, the flat tire willcreate a drag that pulls the vehicletoward that side. Take your foot offthe accelerator pedal and grip thesteering wheel firmly. Steer tomaintain lane position, and thengently brake to a stop, well off theroad, if possible.
A rear blowout, particularly on acurve, acts much like a skid andmay require the same correction asused in a skid. Stop pressing theaccelerator pedal and steer tostraighten the vehicle. It may bevery bumpy and noisy. Gentlybrake to a stop, well off the road,if possible.
{ WARNING
Driving on a flat tire will causepermanent damage to the tire.Re-inflating a tire after it hasbeen driven on while severelyunderinflated or flat may cause ablowout and a serious crash.Never attempt to re-inflate a tirethat has been driven on whileseverely underinflated or flat.Have your dealer or an authorizedtire service center repair orreplace the flat tire as soon aspossible.
If a tire goes flat, avoid further tireand wheel damage by driving slowlyto a level place and stopping, welloff the road, if possible.
1. Turn on the hazard warningflashers. See Hazard WarningFlashers on page 6‑3.
2. Set the parking brake firmly.

Black plate (60,1)Chevrolet Volt Owner Manual - 2012
10-60 Vehicle Care
3. Put the shift lever in P (Park).See Shifting Into Park onpage 9‑19.
4. Turn off the engine.
5. Inspect the flat tire.
If the tire has been separated fromthe wheel, has damaged sidewalls,or has a puncture larger than6 mm (¼ in), the tire is too severelydamaged for the tire sealant andcompressor kit to be effective. SeeRoadside Assistance Program onpage 13‑6.
If the tire has a puncture less than6 mm (¼ in) in the tread area ofthe tire, see Tire Sealant andCompressor Kit on page 10‑60.
Tire Sealant andCompressor Kit
{ WARNING
Running the engine in ExtendedRange Mode in an enclosed areawith poor ventilation is dangerous.Engine exhaust may enter thevehicle. Engine exhaust containscarbon monoxide (CO) whichcannot be seen or smelled. It cancause unconsciousness and evendeath. Never run the engine inExtended Range Mode in anenclosed area that has nofresh air ventilation. For moreinformation, see Engine Exhauston page 9‑26.
{ WARNING
Overinflating a tire could causethe tire to rupture and you orothers could be injured. Besure to read and follow the tiresealant and compressor kitinstructions and inflate the tire toits recommended pressure. Donot exceed the recommendedpressure.
{ WARNING
Storing the tire sealant andcompressor kit or otherequipment in the passengercompartment of the vehicle couldcause injury. In a sudden stop orcollision, loose equipment couldstrike someone. Store the tiresealant and compressor kit in itsoriginal location.

Black plate (61,1)Chevrolet Volt Owner Manual - 2012
Vehicle Care 10-61
If this vehicle has a tire sealant andcompressor kit, there may not be aspare tire, tire changing equipment,and on some vehicles there may notbe a place to store a tire.
The tire sealant and compressorcan be used to temporarily sealpunctures up to 6 mm (¼ in) in thetread area of the tire. It can also beused to inflate an underinflated tire.
If the tire has been separated fromthe wheel, has damaged sidewalls,or has a large puncture, the tire istoo severely damaged for the tiresealant and compressor kit to beeffective. See Roadside AssistanceProgram on page 13‑6.
Read and follow all of the tiresealant and compressor kitinstructions.
The kit includes: A. Selector Switch (Sealant/Air orAir Only)
B. On/Off Button
C. Pressure Gauge
D. Pressure Deflation Button(If equipped)
E. Tire Sealant Canister
F. Sealant/Air Hose (Clear)
G. Air Only Hose (Black)
H. Power Plug
Tire Sealant
Read and follow the safe handlinginstructions on the label adhered tothe sealant canister.
Check the tire sealant expirationdate on the sealant canister.The sealant canister should bereplaced before its expiration date.Replacement sealant canisters areavailable at your local dealer. See“Removal and Installation of theSealant Canister” following.

Black plate (62,1)Chevrolet Volt Owner Manual - 2012
10-62 Vehicle Care
There is only enough sealant to sealone tire. After usage, the sealantcanister and sealant/air hoseassembly must be replaced. See“Removal and Installation of theSealant Canister” following.
Using the Tire Sealant andCompressor Kit to TemporarilySeal and Inflate aPunctured Tire
Follow the directions closely forcorrect sealant usage.
When using the tire sealant andcompressor kit during coldtemperatures, warm the kit in a
heated environment for five minutes.This will help to inflate the tirefaster.
If a tire goes flat, avoid further tireand wheel damage by driving slowlyto a level place. Turn on the hazardwarning flashers. See HazardWarning Flashers on page 6‑3.
See If a Tire Goes Flat onpage 10‑59 for other importantsafety warnings.
Do not remove any objects thathave penetrated the tire.
1. Remove the tire sealant andcompressor kit from its storagelocation. See Storing the TireSealant and Compressor Kit onpage 10‑67.
2. Unwrap the sealant/air hose (F)and the power plug (H).
3. Place the kit on the ground.
Make sure the tire valve stem ispositioned close to the groundso the hose will reach it.

Black plate (63,1)Chevrolet Volt Owner Manual - 2012
Vehicle Care 10-63
4. Remove the valve stem capfrom the flat tire by turning itcounterclockwise.
5. Attach the sealant/air hose (F)onto the tire valve stem. Turn itclockwise until it is tight.
6. Plug the power plug (H) into theaccessory power outlet in thevehicle. Unplug all items fromother accessory power outlets.See Power Outlets on page 5‑9.
If the vehicle has an accessorypower outlet, do not use thecigarette lighter.
If the vehicle only has a cigarettelighter, use the cigarette lighter.
Do not pinch the power plugcord in the door or window.
7. Start the vehicle. The vehiclemust be running while using theair compressor.
8. Turn the selector switch (A)counterclockwise to theSealant + Air position.
9. Press the on/off button (B) toturn the tire sealant andcompressor kit on.
The compressor will injectsealant and air into the tire.
The pressure gauge (C) willinitially show a high pressurewhile the compressor pushes thesealant into the tire. Once thesealant is completely dispersedinto the tire, the pressure willquickly drop and start to riseagain as the tire inflates withair only.
10. Inflate the tire to therecommended inflationpressure using the pressuregauge (C). The recommendedinflation pressure can be foundon the Tire and LoadingInformation label. See TirePressure on page 10‑46.
The pressure gauge (C) mayread higher than the actual tirepressure while the compressoris on. Turn the compressor offto get an accurate pressure
reading. The compressor maybe turned on/off until thecorrect pressure is reached.
Notice: If the recommendedpressure cannot be reached afterapproximately 25 minutes, thevehicle should not be drivenfarther. The tire is too severelydamaged and the tire sealant andcompressor kit cannot inflate thetire. Remove the power plug fromthe accessory power outlet andunscrew the inflating hose fromthe tire valve. See RoadsideAssistance Program onpage 13‑6.
11. Press the on/off button (B) toturn the tire sealant andcompressor kit off.
The tire is not sealed and willcontinue to leak air until thevehicle is driven and thesealant is distributed inthe tire; therefore, Steps 12through 18 must be doneimmediately after Step 11.

Black plate (64,1)Chevrolet Volt Owner Manual - 2012
10-64 Vehicle Care
Be careful while handling thetire sealant and compressorkit as it could be warm afterusage.
12. Unplug the power plug (H) fromthe accessory power outlet inthe vehicle.
13. Turn the sealant/air hose (F)counterclockwise to remove itfrom the tire valve stem.
14. Replace the tire valvestem cap.
15. Replace the sealant/airhose (F), and the powerplug (H) back in their originallocation.
16. If the flat tire was able toinflate to the recommendedinflation pressure, remove the
maximum speed label from thesealant canister (E) and placeit in a highly visible location.The label is a reminder not toexceed 90 km/h (55 mph) untilthe damaged tire is repaired orreplaced.
17. Return the equipment to itsoriginal storage location in thevehicle.
18. Immediately drive the vehicle8 km (5 mi) to distribute thesealant in the tire.
19. Stop at a safe location andcheck the tire pressure. Referto Steps 1 through 11 under“Using the Tire Sealant andCompressor Kit withoutSealant to Inflate a Tire (NotPunctured).”
If the tire pressure has fallenmore than 68 kPa (10 psi)below the recommendedinflation pressure, stop drivingthe vehicle. The tire is tooseverely damaged and the tiresealant cannot seal the tire.See Roadside AssistanceProgram on page 13‑6.
If the tire pressure has notdropped more than 68 kPa(10 psi) from the recommendedinflation pressure, inflate thetire to the recommendedinflation pressure.
20. Wipe off any sealant from thewheel, tire, and vehicle.
21. Dispose of the used sealantcanister (E) and sealant/airhose (F) assembly at a localdealer or in accordance withlocal state codes and practices.
22. Replace it with a new canisteravailable from your dealer.

Black plate (65,1)Chevrolet Volt Owner Manual - 2012
Vehicle Care 10-65
23. After temporarily sealing a tireusing the tire sealant andcompressor kit, take thevehicle to an authorized dealerwithin a 161 km (100 mi) ofdriving to have the tire repairedor replaced.
Using the Tire Sealant andCompressor Kit withoutSealant to Inflate a Tire (NotPunctured)
To use the air compressor to inflatea tire with air only and not sealant:
If a tire goes flat, avoid further tireand wheel damage by driving slowlyto a level place. Turn on the hazardwarning flashers. See HazardWarning Flashers on page 6‑3.
See If a Tire Goes Flat onpage 10‑59 for other importantsafety warnings.
1. Remove the tire sealant andcompressor kit from its storagelocation. See Storing the TireSealant and Compressor Kit onpage 10‑67.
2. Unwrap the air only hose (G)and the power plug (H).
3. Place the kit on the ground.
Make sure the tire valve stem ispositioned close to the groundso the hose will reach it.
4. Remove the tire valve stem capfrom the flat tire by turning itcounterclockwise.
5. Attach the air only hose (G) ontothe tire valve stem by turning itclockwise until it is tight.

Black plate (66,1)Chevrolet Volt Owner Manual - 2012
10-66 Vehicle Care
6. Plug the power plug (H) into theaccessory power outlet in thevehicle. Unplug all items fromother accessory power outlets.See Power Outlets on page 5‑9.
If the vehicle has an accessorypower outlet, do not use thecigarette lighter.
If the vehicle only has a cigarettelighter, use the cigarette lighter.
Do not pinch the power plugcord in the door or window.
7. Start the vehicle. The vehiclemust be running while using theair compressor.
8. Turn the selector switch (A)clockwise to the Air Onlyposition.
9. Press the on/off (B) button toturn the compressor on.
The compressor will inflate thetire with air only.
10. Inflate the tire to therecommended inflationpressure using the pressuregauge (C). The recommendedinflation pressure can be foundon the Tire and LoadingInformation label. See TirePressure on page 10‑46.
The pressure gauge (C) mayread higher than the actual tirepressure while the compressoris on. Turn the compressor offto get an accurate reading. Thecompressor may be turned on/off until the correct pressure isreached.
If you inflate the tire higherthan the recommendedpressure you can adjust theexcess pressure by pressingthe pressure deflationbutton (D), if equipped, until theproper pressure reading isreached. This option is onlyfunctional when using the aironly hose (G).
11. Press the on/off button (B) toturn the tire sealant andcompressor kit off.
Be careful while handling thetire sealant and compressor kitas it could be warm afterusage.
12. Unplug the power plug (H) fromthe accessory power outlet inthe vehicle.
13. Disconnect the air onlyhose (G) from the tirevalve stem by turning itcounterclockwise, and replacethe tire valve stem cap.
14. Replace the air only hose (G)and the power plug (H) andcord back in their originallocations.
15. Place the equipment in theoriginal storage location in thevehicle.
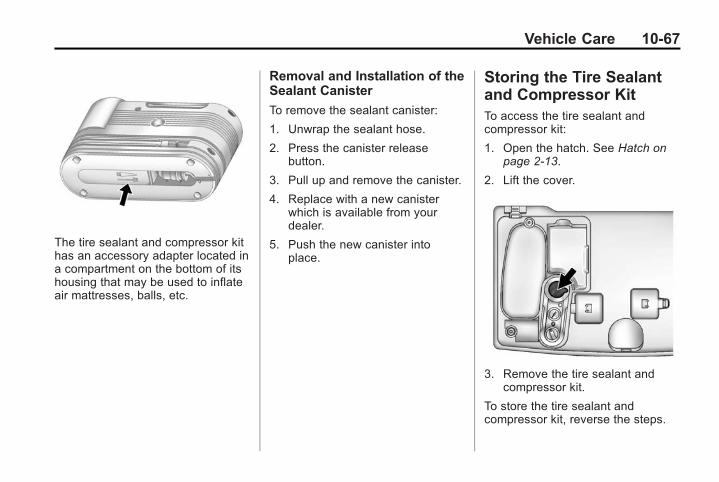
Black plate (67,1)Chevrolet Volt Owner Manual - 2012
Vehicle Care 10-67
The tire sealant and compressor kithas an accessory adapter located ina compartment on the bottom of itshousing that may be used to inflateair mattresses, balls, etc.
Removal and Installation of theSealant Canister
To remove the sealant canister:
1. Unwrap the sealant hose.
2. Press the canister releasebutton.
3. Pull up and remove the canister.
4. Replace with a new canisterwhich is available from yourdealer.
5. Push the new canister intoplace.
Storing the Tire Sealantand Compressor KitTo access the tire sealant andcompressor kit:
1. Open the hatch. See Hatch onpage 2‑13.
2. Lift the cover.
3. Remove the tire sealant andcompressor kit.
To store the tire sealant andcompressor kit, reverse the steps.

Black plate (68,1)Chevrolet Volt Owner Manual - 2012
10-68 Vehicle Care
Jump StartingJump starting is connecting jumpercables between the two vehicles toenable vehicle starting. If the Voltor another vehicle has a run‐down12‐volt battery, it can be jumpstarted using good conditionjumper cables. There are differentprocedures depending on if the Volthas a run‐down battery or anothervehicle has a run‐down battery.Read the appropriate proceduresthat follow.
{ WARNING
The high voltage battery cannotbe jump started either withanother vehicle or batterycharger. Personal injury, death,or damage to the vehicle couldresult.
{ WARNING
Batteries are dangerous and cancause injury. Batteries containacid and can explode or ignite.They contain electricity that canburn. Follow the exact stepsprovided or injuries could occur.
Using an open flame near abattery can cause battery gas toexplode; you or others could behurt. Battery acid can causeblindness.
Be sure the battery in the othervehicle has enough water. Addwater if the level is low. A lowwater level could cause explosivegas to be present.
Battery fluid contains acid thatcan burn. If battery fluid gets ineyes or on skin; flush with waterand get medical help immediately.
{ WARNING
Electric fans can start up evenwhen the engine is not runningand can cause injury. Keephands, clothing, and tools awayfrom any underhood electric fans.
Notice: Ignoring these stepscould result in costly damage tothe vehicle that would not becovered by the warranty.
Trying to start the vehicle bypushing or pulling it will notwork, and it could damage thevehicle.

Black plate (69,1)Chevrolet Volt Owner Manual - 2012
Vehicle Care 10-69
Jump Starting the Volt
If the Volt will not start, the 12‐voltbattery may be run down. To jumpstart the Volt use the underhoodremote positive (+) and negative (−)terminals.
1. The other vehicle used to jumpstart the Volt must have a 12‐voltbattery with a negative groundsystem.
Notice: Only use a vehicle thathas a 12-volt system with anegative ground for jumpstarting. If the other vehicle doesnot have a 12-volt system with anegative ground, both vehiclescan be damaged.
2. Park both vehicles close enoughso that the jumper cables canreach both vehicles' positive (+)and negative (−) terminals. Thevehicles must not touch eachother. It could cause anunwanted ground connectionthat could damage both vehicles'electrical systems.
Put both vehicles in P (Park) foran automatic transmission orelectric drive unit. For a manualtransmission, place the vehiclein Neutral and set the parkingbrake.
Notice: If any accessories are lefton or plugged in during the jumpstarting procedure, they couldbe damaged. The repairs wouldnot be covered by the vehiclewarranty. Whenever possible,turn off or unplug all accessorieson either vehicle when jumpstarting the vehicle.
3. Turn off the ignition on the othervehicle. Turn off the radio, alllamps, and accessories that arenot needed in both vehicles.Unplug accessories from thecigarette lighter or the accessorypower outlets. This avoidssparks and helps save bothbatteries and accessories.
4. Locate the positive (+) andnegative (−) terminals on theother vehicle.
5. Open the hood to locate thepositive (+) and negative (−)terminals on your Volt. Open theaccess cover (A) for the remotepositive (+) terminal. The remotenegative terminal (B) for the Voltis a stud marked GND (−) on thedriver side of the enginecompartment.
6. Check that the jumper cablesdo not have loose or missinginsulation or a shock could resultand the vehicles could bedamaged.

Black plate (70,1)Chevrolet Volt Owner Manual - 2012
10-70 Vehicle Care
Before connecting the jumpercables, here are some basicthings to know. Positive (+)jumper cable goes to positive (+)battery terminal or a remotepositive (+) terminal if available.Negative (−) jumper cable goesto negative (−) battery terminalor a remote negative (−) terminalif available. Do not connectpositive (+) to negative (−) orthere will be a short that maydamage the battery and otherparts of the vehicle.
Notice: If the jumper cables areconnected or removed in thewrong order, electrical shortingmay occur and damage thevehicle. The repairs would not becovered by the vehicle warranty.Always connect and remove thejumper cables in the correctorder, making sure that thecables do not touch each other orother metal.
Connecting the Jumper Cables
1. Connect the red positive (+)jumper cable to the remotepositive (+) terminal (A) of yourVolt. Do not let the other end ofthe cable touch metal.
2. Connect the other end of the redpositive (+) jumper cable to thepositive (+) terminal of the othervehicle.
3. Connect the black negative (−)jumper cable to the negative (−)battery terminal of the othervehicle battery. Do not let theother end touch anything untilthe next step.
4. Connect the other end of theblack negative (−) jumper cableto the remote negative (−)terminal of your Volt.
5. Push the POWER O button tostart. This will wake up theelectronics on the Volt. After theinstrument cluster initializes, theVolt will use power from the highvoltage battery to charge the
12‐volt battery. The jumpercables can then bedisconnected. If the Volt doesnot start, call your dealer orRoadside Assistance. SeeRoadside Assistance Programon page 13‑6.
Disconnecting the Jumper Cables
1. Disconnect the blacknegative (−) jumper cablefrom the Volt. Do not let theother end of the cable touchanything until after the next step.
2. Disconnect the blacknegative (−) jumper cable fromthe other vehicle with the goodbattery.
3. Disconnect the red positive (+)jumper cable from the othervehicle. Do not let the other endof the cable touch anything untilafter the next step.
4. Disconnect the red positive (+)jumper cable from the Volt.

Black plate (71,1)Chevrolet Volt Owner Manual - 2012
Vehicle Care 10-71
5. Return the positive (+) andnegative (−) terminal covers totheir original positions.
Jump Starting Another Vehicle
When using the Volt to jump startanother vehicle with a run‐downbattery, jumper cables areconnected directly to the positive (+)and negative (−) terminals on the12‐volt battery in the rear cargoarea. Do not use the remoteterminals under the hood. Thiscould cause a fuse to overload inthe Volt.
1. Check the other vehicle. It musthave a 12‐volt battery with anegative ground system.
Notice: Only use a vehicle thathas a 12-volt system with anegative ground for jumpstarting. If the other vehicle doesnot have a 12-volt system with anegative ground, both vehiclescan be damaged.
2. Park both vehicles close enoughso that the jumper cables canreach both vehicles' positive (+)and negative (−) terminals.The vehicles must not toucheach other. It could cause anunwanted ground connectionthat could damage both vehicles'electrical systems.
Put both vehicles in P (Park) foran automatic transmission orelectric drive unit. For a manualtransmission, place the vehiclein Neutral and set the parkingbrake.
Notice: If any accessories are lefton or plugged in during the jumpstarting procedure, they couldbe damaged. The repairs wouldnot be covered by the vehiclewarranty. Whenever possible,turn off or unplug all accessorieson either vehicle when jumpstarting the vehicle.
3. Turn off both vehicles. Turnoff the radio, all lamps, andaccessories that are not neededin both vehicles. Unplugaccessories from the cigarettelighter or the accessory poweroutlets. This avoids sparks andhelps save both batteries andaccessories.
4. Locate the positive (+) andnegative (−) terminals on thevehicle with the run‐downbattery.

Black plate (72,1)Chevrolet Volt Owner Manual - 2012
10-72 Vehicle Care
5. Locate the positive (+) andnegative (−) battery terminals onthe Volt. The access cover isunder the load floor accesscover in the rear cargo area.Open the access cover for thepositive (+) terminal cover (A)and the negative (−) terminalcover (B).
6. Check that the jumper cables donot have loose or missinginsulation or a shock could resultand the vehicles could bedamaged.
Before connecting the jumpercables, here are some basicthings to know. Positive (+)jumper cable goes to positive (+)battery terminal or a remotepositive (+) terminal if available.Negative (−) jumper cable goesto remote negative (−) terminal ifavailable, or a heavy, unpaintedmetal engine part or a solidengine ground on the vehiclewith the run‐down battery.
Do not connect positive (+) tonegative (−) or there will be ashort that may damage thebattery or other parts of thevehicle. Do not connect thenegative (−) cable to thenegative (−) terminal on therun‐down battery because thiscan cause sparks.
Notice: If the jumper cables areconnected or removed in thewrong order, electrical shortingmay occur and damage thevehicle. The repairs would not becovered by the vehicle warranty.Always connect and remove the
jumper cables in the correctorder, making sure that thecables do not touch each other orother metal.
Connecting the Jumper Cables
1. Connect the red positive (+)jumper cable to the positive (+)terminal of the other vehicle withthe run‐down battery. Use aremote positive (+) terminal ifavailable. Do not let the otherend touch metal.
2. Connect the other end of the redpositive (+) jumper cable to thepositive (+) battery terminal ofthe Volt.
3. Connect the black negative (−)jumper cable to the negative (−)battery terminal of the Volt. Donot let the other end touchanything until the next step.
4. Make the final connection to aheavy, unpainted metal enginepart or to the remote negative (−)terminal on the other vehiclewith the run‐down battery.

Black plate (73,1)Chevrolet Volt Owner Manual - 2012
Vehicle Care 10-73
5. Press the POWER O button tostart the Volt. This will wake upthe electronics on the Volt. Theengine will only start if it isneeded.
6. Try to start the other vehicle thathad the run‐down battery. If itwill not start after a few tries, itprobably needs service.
Disconnecting the Jumper Cables
1. Disconnect the blacknegative (−) jumper cable fromthe other vehicle that had therun‐down battery. Do not let theother end of the cable touchanything until after the next step.
2. Disconnect the blacknegative (−) jumper cable fromthe Volt.
3. Disconnect the red positive (+)jumper cable from the Volt. Donot let the other end of the cabletouch anything until after thenext step.
4. Disconnect the red positive (+)jumper cable from the othervehicle.
5. Return the positive (+) andnegative (−) terminal covers totheir original positions.
Towing
Towing the VehicleNotice: Incorrectly towing adisabled vehicle may causedamage to the vehicle. Thedisabled vehicle should be towedon a flatbed car carrier. Usecare when there is low groundclearance and/or specialequipment.
Attempting to pull the vehicleonto a flatbed without followingthe proper steps could damagethe vehicle.
Consult your dealer or aprofessional towing service if thedisabled vehicle must be towed.See Roadside Assistance Programon page 13‑6.

Black plate (74,1)Chevrolet Volt Owner Manual - 2012
10-74 Vehicle Care
To load a vehicle onto a flatbedcarrier:
1. The vehicle must be on a flatsurface.
2. The front tires must be properlyinflated. If necessary, move arear tire to the front to replace aflat or damaged tire.
3. Place the tow chain hooks (B)into one of the torque boxopenings (A) behind the frontwheels.
4. Place a 1.2 m (4 ft) X 102 mm(4 in) X 102 mm (4 in) woodbeam (D) under the front cradlecrossmember (C), and on top ofboth tow chains (E) to ensurethe tow chains do not come intocontact with the front fascia (A).
Try to minimize the contact ofthe chains with the flexibleair dam (B).
5. Ramps (B) are required for thefront fascia (C) to clear theflatbed (A). The ramp heightshould be approximately 102 mm(4 in). Lower the flatbed onto theset of ramps.
Notice: If ramps are not used, thefront fascia will come into contactwith the flatbed and may causedamage. Always use ramps.
6. After the front tires are on theflatbed adjust the flatbed upwardto provide additional clearancebetween the air dam, fascia, andflatbed.

Black plate (75,1)Chevrolet Volt Owner Manual - 2012
Vehicle Care 10-75
7. When the fascia has enoughclearance to clear the flatbed,lower the flatbed, and finishpulling the vehicle onto theflatbed.
8. Secure the vehicle to theflatbed (B) using nonabrasivestraps (A) through all four wheelopenings and secure the strapsto the flatbed (B).
If the vehicle is parked off theshoulder of the road, at an anglethat it cannot be pulled onto aflatbed, a hook/chain can be placedinto either of the front torque boxopenings to pull the vehicle onto aflat surface. Make sure that thechains do not come in contact withthe rocker panel (A) or the frontfascia (B).
Notice: When using tow straps tomove the vehicle, damage mayoccur if the tow straps contactthe rear fascia. Do not let the towstraps contact the rear fascia.
If you cannot access the fronttorque box openings, wrap a towstrap through one, or both of therear trailing arms (A) between thebushing and torque tube, and pullthe vehicle onto a flat surface. Donot wrap the tow strap around therear torque tube (B).

Black plate (76,1)Chevrolet Volt Owner Manual - 2012
10-76 Vehicle Care
Recreational VehicleTowingRecreational vehicle towing refers totowing the vehicle behind anothervehicle such as a motor home.The two most common types ofrecreational vehicle towing areknown as dinghy towing and dollytowing. Dinghy towing is towing thevehicle with all four wheels on theground. Dolly towing is towing thevehicle with two wheels on theground and two wheels up on adevice known as a dolly.
Here are some important things toconsider before recreational vehicletowing:. The towing capacity of the
towing vehicle. Read the towvehicle manufacturer'srecommendations.
. How far the vehicle can betowed. Some vehicles haverestrictions on how far and howlong they can tow.
. Whether the vehicle has theproper towing equipment.See your dealer or traileringprofessional for additional adviceand equipmentrecommendations.
. Is the vehicle ready to be towed.Just as preparing the vehicle fora long trip, make sure thevehicle is prepared to be towed.
Dinghy Towing
Notice: If the vehicle is towedwith all four wheels on theground, the drive unit could bedamaged. Repairs would not becovered by the vehicle warranty.Do not tow the vehicle with allfour wheels on the ground.
The vehicle was not designed to betowed with all four wheels on theground. If the vehicle must betowed, a dolly should be used. See“Dolly Towing” that follows for moreinformation.

Black plate (77,1)Chevrolet Volt Owner Manual - 2012
Vehicle Care 10-77
Dolly Towing from the Front
The vehicle can be towed from thefront using a dolly. To tow thevehicle using a dolly, follow thesesteps:
1. Attach the dolly to the towvehicle following the dollymanufacturer's instructions.
2. Drive the front wheels onto thedolly.
3. Put the shift lever in P (Park).
4. Set the parking brake andremove the key.
5. Clamp the steering wheel in astraight-ahead position with aclamping device designed fortowing.
6. Secure the vehicle to the dolly.
7. Release the parking brake.
8. Check for adequate rear fasciato ground clearance.
Dolly Towing from the Rear
Notice: Towing the vehicle fromthe rear, with the front wheels onthe ground, could damage thedrive unit, and front fascia. Donot tow the vehicle from the rearwith the front wheels on theground.

Black plate (78,1)Chevrolet Volt Owner Manual - 2012
10-78 Vehicle Care
Appearance Care
Exterior Care
Washing the Vehicle
To preserve the vehicle's finish,wash it often and out of directsunlight.
Notice: Do not use petroleumbased, acidic, or abrasivecleaning agents as they candamage the vehicle's paint,metal, or plastic parts. If damageoccurs, it would not be coveredby the vehicle's warranty.Approved cleaning productscan be obtained from yourdealer. Follow all manufacturerdirections regarding correctproduct usage, necessary safetyprecautions, and appropriatedisposal of any vehicle careproduct.
Notice: Avoid using highpressure washes closer than30 cm (12 in) to the surface of thevehicle. Use of power washersexceeding 8,274 kPa (1,200 psi)can result in damage or removalof paint and decals.
Rinse the vehicle well, beforewashing and after, to remove allcleaning agents completely. If theyare allowed to dry on the surface,they could stain.
Dry the finish with a soft, cleanchamois or an all-cotton towel toavoid surface scratches and waterspotting.
Finish Care
Application of aftermarket clearcoatsealant/wax materials is notrecommended. If painted surfacesare damaged, see your dealer tohave the damage assessed andrepaired. Foreign materials suchas calcium chloride and other salts,ice melting agents, road oil and tar,
tree sap, bird droppings, chemicalsfrom industrial chimneys, etc., candamage the vehicle's finish if theyremain on painted surfaces. Washthe vehicle as soon as possible.If necessary, use non-abrasivecleaners that are marked safe forpainted surfaces to remove foreignmatter.
Occasional hand waxing or mildpolishing should be done to removeresidue from the paint finish. Seeyour dealer for approved cleaningproducts.
Notice: Machine compoundingor aggressive polishing on abasecoat/clearcoat paint finishmay damage it. Use onlynon-abrasive waxes and polishesthat are made for a basecoat/clearcoat paint finish on thevehicle.
To keep the paint finish looking new,keep the vehicle garaged orcovered whenever possible.

Black plate (79,1)Chevrolet Volt Owner Manual - 2012
Vehicle Care 10-79
Protecting Exterior Bright MetalParts
Regularly clean bright metal partswith water or chrome polish onchrome or stainless steel trim,if necessary.
For aluminum, never use autoor chrome polish, steam, orcaustic soap to clean. A coatingof wax, rubbed to high polish, isrecommended for all bright metalparts.
Front Air Deflector
A. Outer Air Deflector
B. Inner Air Deflector
C. Tab
D. Slot
The front air deflector allows air toflow cleaner under the vehicle.
Should the front air deflectorbecome detached, insert Tab C intoSlot D. Repeat for the other side.
Cleaning Exterior Lamps/Lenses and Emblems
Use only lukewarm or cold water, asoft cloth, and a car washing soapto clean exterior lamps and lenses.Follow instructions under "Washingthe Vehicle" later in this section.
Windshield and Wiper Blades
Clean the outside of the windshieldwith glass cleaner.
Clean rubber blades using lint-freecloth or paper towel soaked withwindshield washer fluid or a milddetergent. Wash the windshieldthoroughly when cleaning theblades. Bugs, road grime, sap, anda buildup of vehicle wash/waxtreatments may cause wiperstreaking.
Replace the wiper blades if theyare worn or damaged. Damagecan be caused by extreme dustyconditions, sand, salt, heat, sun,snow and ice.

Black plate (80,1)Chevrolet Volt Owner Manual - 2012
10-80 Vehicle Care
Weatherstrips
Apply silicone grease onweatherstrips to make them lastlonger, seal better, and not stick orsqueak. See Recommended Fluidsand Lubricants on page 11‑12
Tires
Use a stiff brush with tire cleaner toclean the tires.
Notice: Using petroleum-basedtire dressing products on thevehicle may damage the paintfinish and/or tires. When applyinga tire dressing, always wipe offany overspray from all paintedsurfaces on the vehicle.
Wheels and Trim—Aluminumor Chrome
Use a soft, clean cloth with mildsoap and water to clean the wheels.After rinsing thoroughly with cleanwater, dry with a soft, clean towel.A wax may then be applied.
Keep the wheels clean using a soft,clean cloth with mild soap andwater. Rinse with clean water. Afterrinsing thoroughly, dry with a soft,clean towel. A wax may then beapplied.
Notice: Chrome wheels and otherchrome trim may be damaged ifthe vehicle is not washed afterdriving on roads that have beensprayed with magnesium,calcium, or sodium chloride.These chlorides are used onroads for conditions such as iceand dust. Always wash thechrome with soap and water afterexposure.
Notice: To avoid surface damage,do not use strong soaps,chemicals, abrasive polishes,cleaners, brushes, or cleanersthat contain acid on aluminum orchrome-plated wheels. Use onlyapproved cleaners. Also, neverdrive a vehicle with aluminum orchrome-plated wheels through an
automatic car wash that usessilicone carbide tire cleaningbrushes. Damage could occurand the repairs would not becovered by the vehicle warranty.
Steering, Suspension, andChassis Components
Visually inspect front and rearsuspension and steering system fordamaged, loose, or missing partsor signs of wear. Inspect powersteering lines and hoses for properhook-up, binding, leaks, cracks,chafing, etc. Visually check constantvelocity joints, rubber boots, andaxle seals for leaks.
Body Component Lubrication
Lubricate all key lock cylinders,hood hinges, liftgate hinges, and thesteel fuel door hinge unless thecomponents are plastic. Applyingsilicone grease on weatherstripswith a clean cloth will make themlast longer, seal better, and not stickor squeak.

Black plate (81,1)Chevrolet Volt Owner Manual - 2012
Vehicle Care 10-81
Underbody Maintenance
Use plain water to flush dirt anddebris from the vehicle's underbody.Your dealer or an underbody carwashing system can do this. If notremoved, rust and corrosion candevelop.
Sheet Metal Damage
If the vehicle is damaged andrequires sheet metal repair orreplacement, make sure the bodyrepair shop applies anti-corrosionmaterial to parts repaired orreplaced to restore corrosionprotection.
Original manufacturer replacementparts will provide the corrosionprotection while maintaining thevehicle warranty.
Finish Damage
Quickly repair minor chips andscratches with touch-up materialsavailable from your dealer to avoid
corrosion. Larger areas of finishdamage can be corrected in yourdealer's body and paint shop.
Chemical Paint Spotting
Airborne pollutants can fall uponand attack painted vehicle surfacescausing blotchy, ring-shapeddiscolorations, and small, irregulardark spots etched into the paintsurface.
Interior CareTo prevent dirt particle abrasions,regularly clean the vehicle's interior.Immediately remove any soils. Notethat newspapers or dark garmentsthat can transfer color to homefurnishings can also permanentlytransfer color to the vehicle'sinterior.
Use a soft bristle brush to removedust from knobs and crevices on theinstrument cluster. Using a mildsoap solution, immediately remove
hand lotions, sunscreen, and insectrepellant from all interior surfaces orpermanent damage may result.
Your dealer may have products forcleaning the interior. Use cleanersspecifically designed for thesurfaces being cleaned to preventpermanent damage. To preventoverspray, apply all cleaners directlyto the cleaning cloth. Cleanersshould be removed quickly. Neverallow cleaners to remain on thesurface being cleaned for extendedperiods of time.
Cleaners may contain solvents thatcan become concentrated in theinterior. Before using cleaners, readand adhere to all safety instructionson the label. While cleaning theinterior, maintain adequateventilation by opening the doors andwindows.

Black plate (82,1)Chevrolet Volt Owner Manual - 2012
10-82 Vehicle Care
To prevent damage, do not cleanthe interior using the followingcleaners or techniques:. Never use a razor or any other
sharp object to remove a soilfrom any interior surface.
. Never use a brush with stiffbristles.
. Never rub any surfaceaggressively or with excessivepressure.
. Do not use laundry detergentsor dishwashing soaps withdegreasers. For liquid cleaners,use approximately 20 dropsper 3.78L (1 gal) of water.A concentrated soap solutionwill leave a residue that createsstreaks and attracts dirt. Do notuse solutions that contain strongor caustic soap.
. Do not heavily saturate theupholstery when cleaning.
. Do not use solvents or cleanerscontaining solvents.
Interior Glass
To clean, use a terry cloth fabricdampened with water. Wipe dropletsleft behind with a clean dry cloth.Commercial glass cleaners may beused, if necessary, after cleaningthe interior glass with plain water.
Notice: To prevent scratching,never use abrasive cleaners onautomotive glass. Abrasivecleaners or aggressive cleaningmay damage the rear windowdefogger.
Fabric/Carpet
Start by vacuuming the surfaceusing a soft brush attachment. If arotating brush attachment is beingused during vacuuming, only use iton the floor carpet. Before cleaning,
gently remove as much of thesoil as possible using one of thefollowing techniques:. Gently blot liquids with a paper
towel. Continue blotting until nomore soil can be removed.
. For solid soils, remove as muchas possible prior to vacuuming.
To clean:
1. Saturate a clean lint-freecolorfast cloth with water orclub soda. Microfiber cloth isrecommended to prevent linttransfer to the fabric or carpet.
2. Remove excess moisture bygently wringing until water doesnot drip from the cleaning cloth.
3. Start on the outside edge of thesoil and gently rub toward thecenter. Rotate the cleaning clothto a clean area frequently toprevent forcing the soil in to thefabric.

Black plate (83,1)Chevrolet Volt Owner Manual - 2012
Vehicle Care 10-83
4. Continue gently rubbing thesoiled area until there is nolonger any color transfer fromthe soil to the cleaning cloth.
5. If the soil is not completelyremoved, use a mild soapsolution followed only by clubsoda or plain water.
If the soil is not completelyremoved, it may be necessaryto use a commercial upholsterycleaner or spot lifter. Test a smallhidden area for colorfastness beforeusing a commercial upholsterycleaner or spot lifter. If ringformation occurs, clean the entirefabric or carpet.
Following the cleaning process, apaper towel can be used to blotexcess moisture.
Instrument Panel, Vinyl, andOther Plastic Surfaces
Use a soft microfiber clothdampened with water to removedust and loose dirt. For a more
thorough cleaning, use a softmicrofiber cloth dampened with amild soap solution.
Notice: Soaking or saturatingleather, especially perforatedleather, as well as other interiorsurfaces, may cause permanentdamage. Wipe excess moisturefrom these surfaces aftercleaning and allow them to drynaturally. Never use heat, steam,spot lifters or spot removers. Donot use cleaners that containsilicone or wax-based products.Cleaners containing thesesolvents can permanently changethe appearance and feel of leatheror soft trim and are notrecommended.
Do not use cleaners that increasegloss, especially on the instrumentpanel. Reflected glare can decreasevisibility through the windshieldunder certain conditions.
Notice: Use of air fresheners maycause permanent damage toplastics and painted surfaces.If an air freshener comes incontact with any plastic orpainted surface in the vehicle,blot immediately and clean with asoft cloth dampened with a mildsoap solution. Damage caused byair fresheners would not becovered by the vehicle warranty.
Cleaning the CenterStack
Cleaning the Display
Notice: Using abrasive cleanerswhen cleaning glass surfacescould scratch the glass. Use onlya soft cloth and do not spraycleaner directly on the system asit could affect the mechanicalparts.
Do not apply spray cleaner directlyto the system, the cleaner couldaffect the mechanical parts.
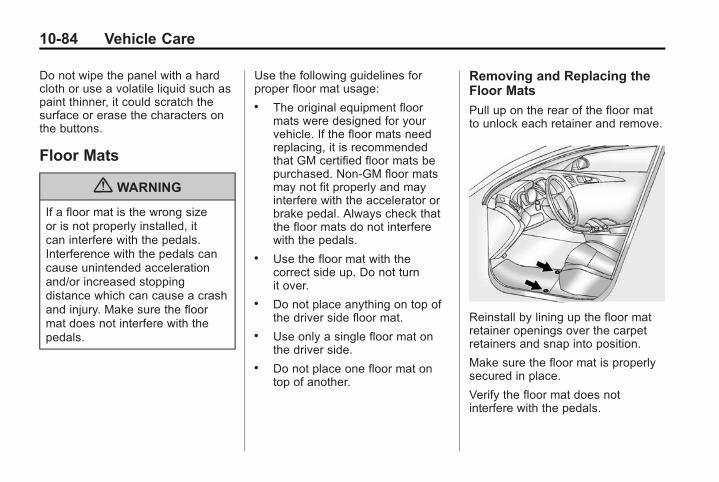
Black plate (84,1)Chevrolet Volt Owner Manual - 2012
10-84 Vehicle Care
Do not wipe the panel with a hardcloth or use a volatile liquid such aspaint thinner, it could scratch thesurface or erase the characters onthe buttons.
Floor Mats
{ WARNING
If a floor mat is the wrong sizeor is not properly installed, itcan interfere with the pedals.Interference with the pedals cancause unintended accelerationand/or increased stoppingdistance which can cause a crashand injury. Make sure the floormat does not interfere with thepedals.
Use the following guidelines forproper floor mat usage:. The original equipment floor
mats were designed for yourvehicle. If the floor mats needreplacing, it is recommendedthat GM certified floor mats bepurchased. Non-GM floor matsmay not fit properly and mayinterfere with the accelerator orbrake pedal. Always check thatthe floor mats do not interferewith the pedals.
. Use the floor mat with thecorrect side up. Do not turnit over.
. Do not place anything on top ofthe driver side floor mat.
. Use only a single floor mat onthe driver side.
. Do not place one floor mat ontop of another.
Removing and Replacing theFloor Mats
Pull up on the rear of the floor matto unlock each retainer and remove.
Reinstall by lining up the floor matretainer openings over the carpetretainers and snap into position.
Make sure the floor mat is properlysecured in place.
Verify the floor mat does notinterfere with the pedals.

Black plate (1,1)Chevrolet Volt Owner Manual - 2012
Service and Maintenance 11-1
Service andMaintenance
General InformationGeneral Information . . . . . . . . . . 11-1
Maintenance ScheduleMaintenance Schedule . . . . . . . 11-3
Special Application ServicesSpecial ApplicationServices . . . . . . . . . . . . . . . . . . . . 11-8
Additional Maintenanceand CareAdditional Maintenanceand Care . . . . . . . . . . . . . . . . . . . 11-8
Recommended Fluids,Lubricants, and PartsRecommended Fluids andLubricants . . . . . . . . . . . . . . . . . 11-12
Maintenance ReplacementParts . . . . . . . . . . . . . . . . . . . . . . 11-13
Maintenance RecordsMaintenance Records . . . . . . 11-14
General InformationYour vehicle is an importantinvestment. This section describesthe required maintenance for thevehicle. Follow this schedule tohelp protect against major repairexpenses resulting from neglect orinadequate maintenance. It mayalso help to maintain the value ofthe vehicle if it is sold. It is theresponsibility of the owner to haveall required maintenance performed.
Your dealer has trained technicianswho can perform requiredmaintenance using genuinereplacement parts. They haveup‐to‐date tools and equipmentfor fast and accurate diagnostics.Many dealers have extendedevening and Saturday hours,courtesy transportation, and onlinescheduling to assist with serviceneeds.
Your dealer recognizes theimportance of providingcompetitively priced maintenanceand repair services. With trainedtechnicians, the dealer is the placefor routine maintenance such as oilchanges and tire rotations andadditional maintenance items liketires, brakes, batteries, and wiperblades.
Notice: Damage caused byimproper maintenance can leadto costly repairs and may not becovered by the vehicle warranty.Maintenance intervals, checks,inspections, recommended fluids,and lubricants are important tokeep the vehicle in good workingcondition.
The Tire Rotation and RequiredServices are the responsibility of thevehicle owner. It is recommendedto have your dealer perform theseservices every 12 000 km/7,500 mi.Proper vehicle maintenance helps tokeep the vehicle in good workingcondition, improves fuel economy,and reduces vehicle emissions.

Black plate (2,1)Chevrolet Volt Owner Manual - 2012
11-2 Service and Maintenance
Because of the way people usevehicles, maintenance needsvary. There may need to bemore frequent checks andservices. The Additional RequiredServices ‐ Normal are forvehicles that:. Carry passengers and cargo
within recommended limits onthe Tire and Loading Informationlabel. See Vehicle Load Limitson page 9‑11.
. Are driven on reasonable roadsurfaces within legal drivinglimits.
. Use the recommended fuel. SeeFuel on page 9‑53.
Refer to the information in theMaintenance Schedule AdditionalRequired Services ‐ Normal chart.
The Additional RequiredServices ‐ Severe are forvehicles that are:. Mainly driven in hilly or
mountainous terrain.. Frequently towing a trailer.. Used for high speed or
competitive driving.. Used for taxi, police, or delivery
service.
Refer to the information in theMaintenance Schedule AdditionalRequired Services ‐ Severe chart.
{ WARNING
Performing maintenance workcan be dangerous and cancause serious injury. Performmaintenance work only if therequired information, proper tools,and equipment are available.If they are not, see your dealer tohave a trained technician do thework. See Doing Your OwnService Work on page 10‑6.

Black plate (3,1)Chevrolet Volt Owner Manual - 2012
Service and Maintenance 11-3
MaintenanceScheduleOwner Checks and Services
At Each Fuel Stop. Check the engine oil level. See
Engine Oil on page 10‑9.
Once a Month. Check the tire inflation
pressures. See Tire Pressure onpage 10‑46.
. Inspect the tires for wear. SeeTire Inspection on page 10‑51.
. Check the windshield washerfluid level. See Washer Fluid onpage 10‑19.
. Engine, power electronics,and high voltage battery packcoolant level checks. SeeCooling System (Engine) onpage 10‑14 or Cooling System(High Voltage Battery) onpage 10‑15 or Cooling System
(Power Electronics and ChargerModules) on page 10‑16 formore information.
Engine Oil Change
Every 24 months or when theCHANGE ENGINE OIL SOONmessage displays, change theengine oil and filter as soon aspossible, within the next 1 000 km/600 mi. The engine oil and filtermust be changed at least onceevery 24 months. After each oiland filter change, the oil life systemmust be reset. See Engine Oil LifeSystem on page 10‑12. Morefrequent changes may be requiredwhen the vehicle is exposed to acorrosive environment, such asareas of high humidity, along anocean coast, and/or areas thatapply road salt during winter.
Your trained dealer technician canperform this work. If the engine oillife system is reset accidentally,service the vehicle within 5 000 km/3,000 mi since the last service.Reset the oil life system when theoil is changed.
Tire Rotation and RequiredServices Every 12 000 km/7,500 mi
Rotate the tires, if recommendedfor the vehicle, and perform thefollowing services. See TireRotation on page 10‑52.. Check engine oil level and oil
life percentage. If needed,change engine oil and filter, andreset oil life system. See EngineOil on page 10‑9 and Engine OilLife System on page 10‑12.
. Check engine coolant level. SeeEngine Coolant on page 10‑16.

Black plate (4,1)Chevrolet Volt Owner Manual - 2012
11-4 Service and Maintenance
. Check windshield washer fluidlevel. See Washer Fluid onpage 10‑19.
. Visually inspect windshieldwiper blades for wear, cracking,or contamination. See ExteriorCare on page 10‑78. Replaceworn or damaged wiper blades.See Wiper Blade Replacementon page 10‑25.
. Check tire inflation pressures.See Tire Pressure onpage 10‑46.
. Inspect tire wear. See TireInspection on page 10‑51.
. Visually check for fluid leaks.
. Inspect engine air cleaner filter.See Engine Air Cleaner/Filter onpage 10‑12.
. Inspect brake system.
. Visually inspect steering,suspension, and chassiscomponents for damaged, loose,or missing parts or signs ofwear. See Exterior Care onpage 10‑78.
. Check restraint systemcomponents. See Safety SystemCheck on page 3‑17.
. Visually inspect fuel system fordamage or leaks.
. Visually inspect exhaust systemand nearby heat shields forloose or damaged parts.
. Lubricate body components. SeeExterior Care on page 10‑78.
. Check electrical drive unit shiftlock control function. SeeElectric Drive Unit Shift LockControl Function Check onpage 10‑24.
. Check parking brake andautomatic transmission parkmechanism. See Park Brake andP (Park) Mechanism Check onpage 10‑25.
. Check accelerator pedal fordamage, high effort, or binding.Replace if needed.
. Visually inspect gas strut forsigns of wear, cracks, or otherdamage. Check the hold openability of the strut. See yourdealer if service is required.
. Check tire sealant expirationdate, if equipped. See TireSealant and Compressor Kit onpage 10‑60.
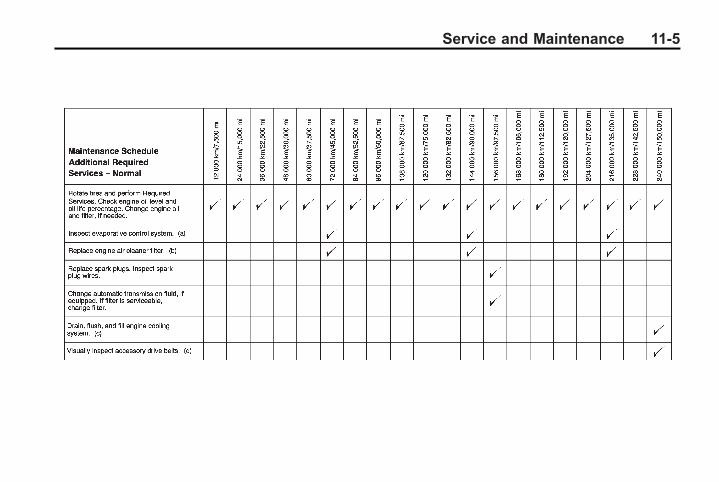
Black plate (5,1)Chevrolet Volt Owner Manual - 2012
Service and Maintenance 11-5

Black plate (6,1)Chevrolet Volt Owner Manual - 2012
11-6 Service and Maintenance
Footnotes — MaintenanceSchedule Additional RequiredServices — Normal
a) Check all fuel and vapor linesand hoses for proper hook‐up,routing, and condition. Check thatthe purge valve, if the vehicle hasone, works properly. Replace asneeded.
b) Or every four years, whichevercomes first.
c) Or every five years, whichevercomes first. See Cooling System(Engine) on page 10‑14 or CoolingSystem (High Voltage Battery) onpage 10‑15 or Cooling System(Power Electronics and ChargerModules) on page 10‑16.
d) Or every 10 years, whichevercomes first. Inspect for fraying,excessive cracking, or damage;replace, if needed.

Black plate (7,1)Chevrolet Volt Owner Manual - 2012
Service and Maintenance 11-7

Black plate (8,1)Chevrolet Volt Owner Manual - 2012
11-8 Service and Maintenance
Footnotes — MaintenanceSchedule Additional RequiredServices — Severe
a) Check all fuel and vapor linesand hoses for proper hook‐up,routing, and condition. Check thatthe purge valve, if the vehicle hasone, works properly. Replace asneeded.
b) Or every four years, whichevercomes first.
c) Or every five years, whichevercomes first. See Cooling System(Engine) on page 10‑14 or CoolingSystem (High Voltage Battery) onpage 10‑15 or Cooling System(Power Electronics and ChargerModules) on page 10‑16.
d) Or every 10 years, whichevercomes first. Inspect for fraying,excessive cracking, or damage;replace, if needed.
Special ApplicationServices. Severe Commercial Use
Vehicles Only: Lubricate chassiscomponents every 5 000 km/3,000 mi.
. Have underbody flushing serviceperformed once a year.
. Have air conditioning systemflushed and refilled anddesiccant replaced everyten years.
AdditionalMaintenance and CareYour vehicle is an importantinvestment and caring for itproperly may help to avoidfuture costly repairs. To maintainvehicle performance, additionalmaintenance services may berequired. It is recommendedthat your dealer perform theseservices — their trained dealertechnicians know your vehiclebest. Your dealer can alsoperform a thorough assessmentwith a multi‐point inspection torecommend when your vehicle mayneed attention. The following list isintended to explain the services andconditions to look for that mayindicate services are required.

Black plate (9,1)Chevrolet Volt Owner Manual - 2012
Service and Maintenance 11-9
Battery
The battery supplies power tostart the engine and operate anyadditional electrical accessories.. To avoid break‐down or failure to
start the vehicle, maintain abattery with full cranking power.
. Trained dealer technicians havethe diagnostic equipment to testthe battery and ensure that theconnections and cables arecorrosion‐free.
Belts. Belts may need replacing if they
squeak or show signs ofcracking or splitting.
. Trained dealer technicianscan inspect the belts andrecommend replacement whennecessary.
Brakes
Brakes stop the vehicle and arecrucial to safe driving.. Signs of brake wear may include
chirping, grinding, or squealingnoises, or difficulty stopping.
. Trained dealer technicians haveaccess to tools and equipmentto inspect the brakes andrecommend quality partsengineered for the vehicle.
Fluids
Proper fluid levels and approvedfluids protect the vehicle’ssystems and components. SeeRecommended Fluids andLubricants on page 11‑12 for GMapproved fluids.. Engine oil and windshield
washer fluid levels should bechecked at every fuel fill.
. Instrument cluster lights maycome on to indicate that fluidsmay be low and need to befilled.
Hoses
Hoses transport fluids and shouldbe regularly inspected to ensurethat there are no cracks or leaks.With a multi‐point inspection, yourdealer can inspect the hoses andadvise if replacement is needed.
Lamps
Properly working headlamps,taillamps, and brake lamps areimportant to see and be seen onthe road.. Signs that the headlamps need
attention include dimming, failureto light, cracking, or damage.The brake lamps need to bechecked periodically to ensurethat they light when braking.
. With a multi‐point inspection,your dealer can check the lampsand note any concerns.

Black plate (10,1)Chevrolet Volt Owner Manual - 2012
11-10 Service and Maintenance
Shocks and Struts
Shocks and struts help aid in controlfor a smoother ride.. Signs of wear may include
steering wheel vibration, bounce/sway while braking, longerstopping distance, or uneventire wear.
. As part of the multi‐pointinspection, trained dealertechnicians can visually inspectthe shocks and struts for signsof leaking, blown seals,or damage, and can advisewhen service is needed.
Tires
Tires need to be properly inflated,rotated, and balanced. Maintainingthe tires can save money, fuel, andcan reduce the risk of tire failure.. Signs that the tires need to be
replaced include three or morevisible treadwear indicators; cordor fabric showing through therubber; cracks or cuts in thetread or sidewall; or a bulge orsplit in the tire.
. Trained dealer technicians caninspect and recommend theright tires. Your dealer can alsoprovide tire/wheel balancingservices to ensure smoothvehicle operation at all speeds.Your dealer sells and servicesname brand tires.
Vehicle Care
To help keep the vehicle lookinglike new, vehicle care products areavailable from your dealer. Forinformation on how to clean andprotect the vehicle’s interior andexterior, see Interior Care onpage 10‑81 and Exterior Care onpage 10‑78.

Black plate (11,1)Chevrolet Volt Owner Manual - 2012
Service and Maintenance 11-11
Wheel Alignment
Wheel alignment is critical forensuring that the tires deliveroptimal wear and performance.. Signs that the alignment may
need to be adjusted includepulling, improper vehiclehandling, or unusual tire wear.
. Your dealer has the requiredequipment to ensure properwheel alignment.
Windshield
For safety, appearance, and thebest viewing, keep the windshieldclean and clear.. Signs of damage include
scratches, cracks, and chips.. Trained dealer technicians can
inspect the windshield andrecommend proper replacementif needed.
Wiper Blades
Wiper blades need to be cleanedand kept in good condition toprovide a clear view.. Signs of wear include streaking,
skipping across the windshield,and worn or split rubber.
. Trained dealer technicians cancheck the wiper blades andreplace them when needed.

Black plate (12,1)Chevrolet Volt Owner Manual - 2012
11-12 Service and Maintenance
Recommended Fluids, Lubricants, and Parts
Recommended Fluids and Lubricants
Usage Fluid/Lubricant
Engine OilUse only engine oil licensed to the dexos1 specfication, or equivalent, ofthe proper SAE viscosity grade. ACDelco dexos1 Synthetic Blend isrecommended. See Engine Oil on page 10‑9.
Engine Cooling SystemPremix DEX-COOL (GM Part No. 12378390, in Canada 10953456).See Engine Coolant on page 10‑16.
High Voltage Battery Cooling System Premix DEX-COOL (GM Part No. 12378390, in Canada 10953456).
Power Electronics Cooling System Premix DEX-COOL (GM Part No. 12378390, in Canada 10953456).
Hydraulic Brake SystemDOT 3 Hydraulic Brake Fluid (GM Part No. 88863461, inCanada 88863462).
Windshield Washer Optikleen® Washer Solvent.
Parking Brake Cable GuidesChassis Lubricant (GM Part No. 12377985, in Canada 88901242) orlubricant meeting requirements of NLGI #2, Category LB or GC‐LB.
Electric Drive Unit DEXRON®-VI Automatic Transmission Fluid
Key Lock CylindersMulti-Purpose Lubricant, Superlube (GM Part No. 12346241, inCanada 10953474).

Black plate (13,1)Chevrolet Volt Owner Manual - 2012
Service and Maintenance 11-13
Usage Fluid/Lubricant
Hood and Hatch Hinges Multi-Purpose Lubricant, Superlube (GM Part No. 12346241, inCanada 10953474).
Weatherstrip ConditioningWeatherstrip Lubricant (GM Part No. 3634770, in Canada 10953518) orDielectric Silicone Grease (GM Part No. 12345579, in Canada 992887).
Maintenance Replacement PartsReplacement parts identified below by name, part number, or specification can be obtained from your dealer.
Part GM Part Number ACDelco Part Number
Engine Air Cleaner/Filter 20871244 A3148C
Engine Oil Filter 55352643 —
Spark Plugs 55564962 —
Wiper Blades
Driver – 65 cm (25.6 in) 22742323 —
Passenger – 65 cm (25.6 in) 22742324 —

Black plate (14,1)Chevrolet Volt Owner Manual - 2012
11-14 Service and Maintenance
Maintenance RecordsAfter the scheduled services are performed, record the date, odometer reading, who performed the service, and thetype of services performed in the boxes provided. Retain all maintenance receipts.
DateOdometerReading
Serviced By Services Performed
Black plate (15,1)Chevrolet Volt Owner Manual - 2012
Service and Maintenance 11-15
DateOdometerReading
Serviced By Services Performed

Black plate (16,1)Chevrolet Volt Owner Manual - 2012
11-16 Service and Maintenance
DateOdometerReading
Serviced By Services Performed

Black plate (1,1)Chevrolet Volt Owner Manual - 2012
Technical Data 12-1
Technical Data
Vehicle IdentificationVehicle IdentificationNumber (VIN) . . . . . . . . . . . . . . 12-1
Service Parts IdentificationLabel . . . . . . . . . . . . . . . . . . . . . . . 12-1
Vehicle DataCapacities andSpecifications . . . . . . . . . . . . . . 12-2
Engine Drive Belt Routing . . . 12-3
Vehicle Identification
Vehicle IdentificationNumber (VIN)
This legal identifier is in the frontcorner of the instrument panel, onthe left side of the vehicle. It can beseen through the windshield fromoutside. The VIN also appears onthe Vehicle Certification and ServiceParts labels and certificates of titleand registration.
Engine Identification
The eighth character in the VINis the engine code. This codeidentifies the vehicle's engine,specifications, and replacementparts. See “Engine Specifications”under Capacities and Specificationson page 12‑2 for the vehicle'sengine code.
Service PartsIdentification LabelThe label is inside the right rearcargo storage door and has thefollowing information:. Vehicle Identification
Number (VIN).. Model designation.. Paint information.. Production options and special
equipment.
Do not remove this label from thevehicle.

Black plate (2,1)Chevrolet Volt Owner Manual - 2012
12-2 Technical Data
Vehicle Data
Capacities and SpecificationsThe following approximate capacities are given in metric and English conversions. Refer to Recommended Fluidsand Lubricants on page 11‑12 for more information.
ApplicationCapacities
Metric English
Air Conditioning Refrigerant R134aFor the air conditioning system refrigerant chargeamount, see the refrigerant label under the hood.
See your dealer for more information.
Cooling Systems
Engine 7.3 L 7.7 qt
High Voltage Battery 6.2 L 6.6 qt
Power Electronics 2.8 L 3.0 qt
Engine Oil with Filter 3.5 L 3.7 qt
Fuel Tank 35.2 L 9.3 gal
Electric Drive Unit 8.45 L 8.93 qt
Wheel Nut Torque 140Y 100 lb ft
All capacities are approximate. When adding, be sure to fill to the approximate level, as recommended in thismanual.

Black plate (3,1)Chevrolet Volt Owner Manual - 2012
Technical Data 12-3
Engine Specifications
Engine VIN Code Electric Drive Unit Spark Plug Gap
1.4L L4 4 Automatic 0.7 mm (0.027 in)
Engine Drive Belt Routing

Black plate (4,1)Chevrolet Volt Owner Manual - 2012
12-4 Technical Data
2 NOTES

Black plate (1,1)Chevrolet Volt Owner Manual - 2012
Customer Information 13-1
CustomerInformation
Customer InformationCustomer SatisfactionProcedure . . . . . . . . . . . . . . . . . . 13-1
Customer AssistanceOffices . . . . . . . . . . . . . . . . . . . . . 13-3
Customer Assistance for TextTelephone (TTY) Users . . . . . 13-4
Online Owner Center . . . . . . . . 13-4GM Mobility ReimbursementProgram . . . . . . . . . . . . . . . . . . . . 13-5
Roadside AssistanceProgram . . . . . . . . . . . . . . . . . . . . 13-6
Scheduling ServiceAppointments . . . . . . . . . . . . . . 13-8
Courtesy TransportationProgram . . . . . . . . . . . . . . . . . . . . 13-8
Collision Damage Repair . . . 13-10Service PublicationsOrdering Information . . . . . . 13-12
Open Source Information . . . 13-13
Reporting Safety DefectsReporting Safety Defects tothe United StatesGovernment . . . . . . . . . . . . . . . 13-13
Reporting Safety Defects tothe CanadianGovernment . . . . . . . . . . . . . . . 13-14
Reporting Safety Defects toGeneral Motors . . . . . . . . . . . 13-14
Vehicle Data Recording andPrivacyVehicle Data Recording andPrivacy . . . . . . . . . . . . . . . . . . . . 13-15
Event Data Recorders . . . . . . 13-15OnStar® . . . . . . . . . . . . . . . . . . . . 13-16Navigation System . . . . . . . . . 13-16Radio FrequencyIdentification (RFID) . . . . . . . 13-16
Radio FrequencyStatement . . . . . . . . . . . . . . . . . 13-16
Customer Information
Customer SatisfactionProcedureYour satisfaction and goodwill areimportant to your dealer and toChevrolet. Normally, any concernswith the sales transaction or theoperation of the vehicle will beresolved by your dealer's sales orservice departments. Sometimes,however, despite the best intentionsof all concerned, misunderstandingscan occur. If your concern has notbeen resolved to your satisfaction,the following steps should be taken:
STEP ONE: Discuss your concernwith a member of dealershipmanagement. Normally, concernscan be quickly resolved at that level.If the matter has already beenreviewed with the sales, service,or parts manager, contact the ownerof your dealership or the generalmanager.

Black plate (2,1)Chevrolet Volt Owner Manual - 2012
13-2 Customer Information
STEP TWO: If after contacting amember of dealership management,it appears your concern cannot beresolved by your dealership withoutfurther help, in the U.S., call theChevrolet Customer AssistanceCenter at 1-877‐486‐5846(1‐877‐4‐Volt Info). In Canada,call General Motors of CanadaCustomer Care Centre at1-800-263-3777 (English),or 1-800-263-7854 (French).
We encourage you to call thetoll-free number in order to give theinquiry prompt attention. Have thefollowing information available togive the Customer Assistancerepresentative:. Vehicle Identification Number
(VIN). This is available from thevehicle registration or title, orthe plate at the top left of theinstrument panel and visiblethrough the windshield.
. Dealership name and location.
. Vehicle delivery date andpresent mileage.
When contacting Chevrolet,remember that your concern willlikely be resolved at a dealer'sfacility. That is why we suggestfollowing Step One first.
STEP THREE — U.S. Owners:Both General Motors and yourdealer are committed to makingsure you are completely satisfiedwith the new vehicle. However,if you continue to remain unsatisfiedafter following the procedureoutlined in Steps One and Two, youcan file with the Better BusinessBureau (BBB) Auto Line® Programto enforce your rights.
The BBB Auto Line Program is anout-of-court program administeredby the Council of Better BusinessBureaus to settle automotivedisputes regarding vehicle repairs orthe interpretation of the New VehicleLimited Warranty. Although you maybe required to resort to this informaldispute resolution program priorto filing a court action, use of theprogram is free of charge and yourcase will generally be heard within
40 days. If you do not agree with thedecision given in your case, youmay reject it and proceed with anyother venue for relief availableto you.
You may contact the BBB AutoLine Program using the toll-freetelephone number or write them atthe following address:
BBB Auto Line ProgramCouncil of Better BusinessBureaus, Inc.4200 Wilson BoulevardSuite 800Arlington, VA 22203-1838
Telephone: 1-800-955-5100www.dr.bbb.org/goauto
This program is available in all50 states and the District ofColumbia. Eligibility is limited byvehicle age, mileage, and otherfactors. General Motors reservesthe right to change eligibilitylimitations and/or discontinue itsparticipation in this program.

Black plate (3,1)Chevrolet Volt Owner Manual - 2012
Customer Information 13-3
STEP THREE — CanadianOwners: In the event that you donot feel your concerns have beenaddressed after following theprocedure outlined in Steps Oneand Two, General Motors of CanadaLimited wants you to be awareof its participation in a no-chargeMediation/Arbitration Program.General Motors of Canada Limitedhas committed to binding arbitrationof owner disputes involvingfactory-related vehicle serviceclaims. The program provides forthe review of the facts involved byan impartial third party arbiter, andmay include an informal hearingbefore the arbiter. The program isdesigned so that the entire disputesettlement process, from the timeyou file your complaint to the finaldecision, should be completed inabout 70 days. We believe our
impartial program offers advantagesover courts in most jurisdictionsbecause it is informal, quick, andfree of charge.
For further information concerningeligibility in the Canadian MotorVehicle Arbitration Plan (CAMVAP),call toll-free 1-800-207-0685, or callthe General Motors Customer CareCentre, 1-800-263-3777 (English),1-800-263-7854 (French),or write to:
The Mediation/Arbitration Programc/o Customer Care CentreGeneral Motors of Canada LimitedMail Code: CA1-163-0051908 Colonel Sam DriveOshawa, Ontario L1H 8P7
The inquiry should be accompaniedby the Vehicle IdentificationNumber (VIN).
Customer AssistanceOfficesChevrolet encourages customersto call the toll-free number forassistance. However, if a customerwishes to write or e-mail Chevrolet,the letter should be addressed to:
United States
Chevrolet Motor DivisionChevrolet Customer AssistanceCenterP.O. Box 33170Detroit, MI 48232-5170www.Chevrolet.com
1-877-486-5846 (1-877-4-Volt Info)1-800-833-2438 (For TextTelephone Devices (TTYs))Roadside Assistance:1-888-811-1926
From Puerto Rico:
1-800-496-9992 (English)1-800-496-9993 (Spanish)
From U.S. Virgin Islands:
1-800-496-9994

Black plate (4,1)Chevrolet Volt Owner Manual - 2012
13-4 Customer Information
Canada
General Motors of Canada LimitedCustomer Care Centre, Mail Code:CA1-163-0051908 Colonel Sam DriveOshawa, Ontario L1H 8P7www.gm.ca
1-800-263-3777 (English)1-800-263-7854 (French)1-800-263-3830 (For TextTelephone devices (TTYs))Roadside Assistance:1-800-268-6800
Overseas
Please contact the local GeneralMotors Business Unit.
Mexico, Central America, andCaribbean Islands/Countries(Except Puerto Rico and U.S.Virgin Islands)
General Motors de Mexico, S. deR.L. de C.V.Customer Assistance CenterAv. Ejercito Nacional #843Col. GranadaC.P. 11520, Mexico, D.F.
01-800-466-0800Long Distance: 011-52-53 29 0800
Customer Assistance forText Telephone (TTY)UsersTo assist customers who are deaf,hard of hearing, or speech-impairedand who use Text Telephones(TTYs), Chevrolet has TTYequipment available at its CustomerAssistance Center. Any TTY userin the U.S. can communicatewith Chevrolet by dialing:1-800-833-2438. TTY users inCanada can dial 1-800-263-3830.
Online Owner Center
Chevrolet Owner Center (U.S.)www.chevyownercenter.com
Information and servicescustomized for your specificvehicle — all in one convenientplace.. Digital owner manual, warranty
information, and more.. Storage for online service and
maintenance records.. Chevrolet dealer locator for
service nationwide.. Exclusive privileges and offers.. Recall notices for your specific
vehicle.. OnStar and GM Cardmember
Services Earnings summaries.

Black plate (5,1)Chevrolet Volt Owner Manual - 2012
Customer Information 13-5
Other Helpful Links
Chevrolet — www.chevrolet.com
Chevrolet Merchandise —www.chevymall.com
Help Center — www.chevrolet.com/pages/mds/helpcenter/faq.do. FAQ. Contact Us
My GM Canada www.gm.ca
My GM Canada is apassword-protected section ofwww.gm.ca where you can saveinformation on GM vehicles, getpersonalized offers, and use handytools and forms with greater ease.
Here are a few of the valuabletools and services you will haveaccess to:. My Showroom: Find and save
information on vehicles andcurrent offers in your area.
. My Dealers: Save details suchas address and phone numberfor each of your preferred GMdealers.
. My Driveway: Access quicklinks to parts and serviceestimates, check trade-invalues, or schedule a serviceappointment by adding thevehicles you own to yourdriveway profile.
. My Preferences: Manage yourprofile and use tools and formswith greater ease.
To sign up, visit the My GM.casection within www.gm.ca.
GM MobilityReimbursement Program
This program is available toqualified applicants for costreimbursement of eligibleaftermarket adaptive equipmentrequired for the vehicle, such ashand controls or a wheelchair/scooter lift for the vehicle.
For more information on the limitedoffer, visit www.gmmobility.com orcall the GM Mobility AssistanceCenter at 1-800-323-9935. TextTelephone (TTY) users, call1-800-833-9935.

Black plate (6,1)Chevrolet Volt Owner Manual - 2012
13-6 Customer Information
General Motors of Canada alsohas a Mobility Program. Call1-800-GM-DRIVE (463-7483)for details. TTY users call1-800-263-3830.
Roadside AssistanceProgramFrom the U.S., call 1‐888‐811‐1926;(Text Telephone (TTY):1‐888‐889‐2438).
From Canada, call 1-800-268-6800.
Service is available 24 hours a day,365 days a year.
Calling for Assistance
When calling Roadside Assistance,have the following informationready:. Your name, home address, and
home telephone number.. Telephone number of your
location.
. Location of the vehicle.
. Model, year, color, and licenseplate number of the vehicle.
. Odometer reading, VehicleIdentification Number (VIN), anddelivery date of the vehicle.
. Description of the problem.
Coverage
Services are provided up to 5 years/160 000 km (100,000mi), whichevercomes first.
In the U.S., anyone driving thevehicle is covered. In Canada, aperson driving the vehicle withoutpermission from the owner is notcovered.
Roadside Assistance is not a part ofthe New Vehicle Limited Warranty.Chevrolet and General Motors ofCanada Limited reserve the right tomake any changes or discontinuethe Roadside Assistance program atany time without notification.
Chevrolet and General Motors ofCanada Limited reserve the rightto limit services or payment to anowner or driver if they decide theclaims are made too often, or thesame type of claim is made manytimes.
Services Provided. Emergency Fuel Delivery:
Delivery of enough fuel for thevehicle to get to the nearestservice station.
. Lock‐Out Service: Service tounlock the vehicle if you arelocked out. A remote unlock maybe available if you have OnStar.For security reasons, the drivermust present identificationbefore this service is given.

Black plate (7,1)Chevrolet Volt Owner Manual - 2012
Customer Information 13-7
. Emergency Tow from a PublicRoad or Highway: Tow to thenearest Chevrolet dealer forwarranty service, or if the vehiclewas in a crash and cannot bedriven. Assistance is also givenwhen the vehicle is stuck in thesand, mud, or snow.
. Flat Tire Change: Service tochange a flat tire with the tiresealant and compressor kit.If the tire has been separatedfrom the wheel, has damagedsidewalls, or has a largepuncture, the tire is too severelydamaged for the tire sealant andcompressor kit to be effective.It is the owner's responsibility forthe repair or replacement of thetire if it is not covered by thewarranty.
. Battery Jump Start: Service tojump start a dead battery.
Services Not Included inRoadside Assistance. Impound towing caused by
violation of any laws.. Legal fines.. Mounting, dismounting,
or changing of snow tires,chains, or other traction devices.
. Towing or services for vehiclesdriven on a non-public road orhighway.
Services Specific to CanadianVehicles. Fuel Delivery: Reimbursement
is approximately $5 Canadian.Diesel fuel delivery may berestricted. Propane and otherfuels are not provided throughthis service.
. Lock-Out Service: Vehicleregistration is required.
. Trip Routing Service: Detailedmaps of North America areprovided when requested eitherwith the most direct route or themost scenic route. There is alimit of six requests per year.Additional travel information isalso available. Allow threeweeks for delivery.
. Trip Interruption Benefits andAssistance: Must be over250 km (150mi) from wherethe trip was started toqualify. General Motors ofCanada Limited requirespre-authorization, originaldetailed receipts, and a copyof the repair orders. Onceauthorization has been received,the Roadside Assistance advisorwill help to make arrangementsand explain how to receivepayment.

Black plate (8,1)Chevrolet Volt Owner Manual - 2012
13-8 Customer Information
. Alternative Service: Ifassistance cannot be providedright away, the RoadsideAssistance advisor may givepermission to get localemergency road service.You will receive payment,up to $100, after sending theoriginal receipt to RoadsideAssistance. Mechanical failuresmay be covered, however anycost for parts and labor forrepairs not covered by thewarranty are the owner'sresponsibility.
Scheduling ServiceAppointmentsWhen the vehicle requires warrantyservice, contact your dealer andrequest an appointment. Byscheduling a service appointmentand advising the service consultantof your transportation needs, yourdealer can help minimize yourinconvenience.
If the vehicle cannot be scheduledinto the service departmentimmediately, keep driving it until itcan be scheduled for service,unless, of course, the problem issafety related. If it is, please callyour dealership, let them know this,and ask for instructions.
If your dealer requests you to bringthe vehicle for service, you areurged to do so as early in the workday as possible to allow forsame-day repair.
Courtesy TransportationProgramTo enhance your ownershipexperience, we and our participatingdealers are proud to offer CourtesyTransportation, a customer supportprogram for vehicles with theBumper-to-Bumper (Base WarrantyCoverage period in Canada) andextended powertrain warranties inboth the U.S. and Canada.
Several Courtesy Transportationoptions are available to assist inreducing inconvenience whenwarranty repairs are required.
Courtesy Transportation is not apart of the New Vehicle LimitedWarranty. A separate bookletentitled “Warranty and OwnerAssistance Information” furnishedwith each new vehicle providesdetailed warranty coverageinformation.
Transportation Options
Warranty service can generally becompleted while you wait. However,if you are unable to wait, GM helpsto minimize inconvenience byproviding several transportationoptions. Depending on thecircumstances, your dealer canoffer one of the following:
Shuttle Service
Shuttle service is the preferredmeans of offering CourtesyTransportation. Dealers may provideshuttle service to get you to your

Black plate (9,1)Chevrolet Volt Owner Manual - 2012
Customer Information 13-9
destination with minimal interruptionof your daily schedule. This includesone‐way or round‐trip shuttle servicewithin reasonable time and distanceparameters of your dealer's area.
Public Transportation or FuelReimbursement
If the vehicle requires overnightwarranty repairs, and publictransportation is used instead ofyour dealer's shuttle service, theexpense must be supported byoriginal receipts and can only be upto the maximum amount allowed byGM for shuttle service. In addition,for U.S. customers, should youarrange transportation througha friend or relative, limitedreimbursement for reasonable fuelexpenses may be available. Claimamounts should reflect actualcosts and be supported by originalreceipts. See your dealer forinformation regarding the allowanceamounts for reimbursement of fuelor other transportation costs.
Courtesy Rental Vehicle
Your dealer may arrange to provideyou with a courtesy rental vehicle orreimburse you for a rental vehiclethat you obtain if the vehicle is keptfor an overnight warranty repair.Rental reimbursement will be limitedand must be supported by originalreceipts. This requires that you signand complete a rental agreementand meet state/provincial, local, andrental vehicle provider requirements.Requirements vary and may includeminimum age requirements,insurance coverage, credit card,etc. You are responsible for fuelusage charges and may also beresponsible for taxes, levies, usagefees, excessive mileage, or rentalusage beyond the completion of therepair.
It may not be possible to provide alike vehicle as a courtesy rental.
Additional ProgramInformation
All program options, such as shuttleservice, may not be available atevery dealer. Please contact yourdealer for specific informationabout availability. All CourtesyTransportation arrangements will beadministered by appropriate dealerpersonnel.
General Motors reserves theright to unilaterally modify,change, or discontinue CourtesyTransportation at any time and toresolve all questions of claimeligibility pursuant to the terms andconditions described herein at itssole discretion.

Black plate (10,1)Chevrolet Volt Owner Manual - 2012
13-10 Customer Information
Collision Damage RepairIf the vehicle is involved in acollision and it is damaged, havethe damage repaired by a qualifiedtechnician using the properequipment and quality replacementparts. Poorly performed collisionrepairs diminish the vehicle resalevalue, and safety performance canbe compromised in subsequentcollisions.
Collision Parts
Genuine GM Collision parts are newparts made with the same materialsand construction methods as theparts with which the vehicle wasoriginally built. Genuine GMCollision parts are the best choice toensure that the vehicle's designedappearance, durability, and safetyare preserved. The use of GenuineGM parts can help maintain the GMNew Vehicle Limited Warranty.
Recycled original equipment partsmay also be used for repair. Theseparts are typically removed from
vehicles that were total losses inprior crashes. In most cases, theparts being recycled are fromundamaged sections of the vehicle.A recycled original equipment GMpart may be an acceptable choiceto maintain the vehicle's originallydesigned appearance and safetyperformance; however, the history ofthese parts is not known. Such partsare not covered by the GM NewVehicle Limited Warranty, and anyrelated failures are not covered bythat warranty.
Aftermarket collision parts are alsoavailable. These are made bycompanies other than GM and maynot have been tested for the vehicle.As a result, these parts may fitpoorly, exhibit premature durability/corrosion problems, and may notperform properly in subsequentcollisions. Aftermarket parts are notcovered by the GM New VehicleLimited Warranty, and any vehiclefailure related to such parts is notcovered by that warranty.
Repair Facility
GM also recommends that youchoose a collision repair facility thatmeets your needs before you everneed collision repairs. Your dealermay have a collision repair centerwith GM-trained technicians andstate‐of‐the‐art equipment, or beable to recommend a collision repaircenter that has GM-trainedtechnicians and comparableequipment.
Insuring the Vehicle
Protect your investment in the GMvehicle with comprehensive andcollision insurance coverage. Thereare significant differences in thequality of coverage afforded byvarious insurance policy terms.Many insurance policies providereduced protection to the GMvehicle by limiting compensationfor damage repairs by usingaftermarket collision parts. Someinsurance companies will notspecify aftermarket collision parts.When purchasing insurance, we

Black plate (11,1)Chevrolet Volt Owner Manual - 2012
Customer Information 13-11
recommend that you ensure that thevehicle will be repaired with GMoriginal equipment collision parts.If such insurance coverage isnot available from your currentinsurance carrier, consider switchingto another insurance carrier.
If the vehicle is leased, the leasingcompany may require you to haveinsurance that ensures repairs withGenuine GM Original EquipmentManufacturer (OEM) parts orGenuine Manufacturer replacementparts. Read the lease carefully, asyou may be charged at the end ofthe lease for poor quality repairs.
If a Crash Occurs
If there has been an injury, callemergency services for help. Do notleave the scene of a crash until allmatters have been taken care of.Move the vehicle only if its positionputs you in danger, or you areinstructed to move it by a policeofficer.
Give only the necessary informationto police and other parties involvedin the crash.
For emergency towing seeRoadside Assistance Program onpage 13‑6.
Gather the following information:. Driver name, address, and
telephone number.. Driver license number.. Owner name, address, and
telephone number.. Vehicle license plate number.. Vehicle make, model, and
model year.. Vehicle Identification
Number (VIN).. Insurance company and policy
number.. General description of the
damage to the other vehicle.
Choose a reputable repair facilitythat uses quality replacement parts.See “Collision Parts” earlier in thissection.
In a crash, the sensing system mayshut down the high voltage system.See Battery on page 10‑23 forimportant safety information. If anairbag has inflated, see What WillYou See after an Airbag Inflates? onpage 3‑24.
Managing the Vehicle DamageRepair Process
In the event that the vehicle requiresdamage repairs, GM recommendsthat you take an active role in itsrepair. If you have a pre-determinedrepair facility of choice, take thevehicle there, or have it towedthere. Specify to the facility that anyrequired replacement collision partsbe original equipment parts, eithernew Genuine GM parts or recycledoriginal GM parts. Remember,recycled parts will not be covered bythe GM vehicle warranty.

Black plate (12,1)Chevrolet Volt Owner Manual - 2012
13-12 Customer Information
Insurance pays the bill for the repair,but you must live with the repair.Depending on your policy limits,your insurance company mayinitially value the repair usingaftermarket parts. Discuss this withthe repair professional, and insist onGenuine GM parts. Remember,if the vehicle is leased, you may beobligated to have the vehiclerepaired with Genuine GM parts,even if your insurance coveragedoes not pay the full cost.
If another party's insurancecompany is paying for the repairs,you are not obligated to accept arepair valuation based on thatinsurance company's collisionpolicy repair limits, as you have nocontractual limits with that company.In such cases, you can have controlof the repair and parts choices aslong as the cost stays withinreasonable limits.
Service PublicationsOrdering Information
Service Manuals
Service Manuals have the diagnosisand repair information on theengines, electric drive unit, axle,suspension, brakes, electrical,steering, body, etc.
Service Bulletins
Service Bulletins give additionaltechnical service informationneeded to knowledgeably serviceGeneral Motors cars and trucks.Each bulletin contains instructionsto assist in the diagnosis andservice of the vehicle.
Owner Information
Owner publications are writtenspecifically for owners and intendedto provide basic operationalinformation about the vehicle.The Owner Manual includes theMaintenance Schedule for allmodels.
In-Portfolio: Includes a Portfolio,Owner Manual, and WarrantyBooklet.
RETAIL SELL PRICE:$35.00 (U.S.) plus handling andshipping fees.
Without Portfolio: OwnerManual only.
RETAIL SELL PRICE:$25.00 (U.S.) plus handling andshipping fees.

Black plate (13,1)Chevrolet Volt Owner Manual - 2012
Customer Information 13-13
Current and Past Models
Technical Service Bulletins andManuals are available for currentand past model GM vehicles.
ORDER TOLL FREE:1-800-551-4123 Monday - Friday8:00 AM - 6:00 PM Eastern Time
For Credit Card Orders Only(VISA-MasterCard-Discover), visitHelm, Inc. at: www.helminc.com
Or write to:
Helm, IncorporatedP.O. Box 07130Detroit, MI 48207
Prices are subject to change withoutnotice and without incurringobligation. Allow ample time fordelivery.
All listed prices are quoted in U.S.funds. Make checks payable in U.S.funds.
Open Source InformationThis vehicle contains open sourcesoftware, including withoutlimitation, software distributedand/or modified under the GNUGeneral Public License, Version 2,June 1991, and the GNU LesserGeneral Public License, Version 2.1,February 1999.
See www.oss.gm.com for additionalinformation and to downloadrelated materials, including withoutlimitation, the previous referred tolicenses and software.
Reporting SafetyDefects
Reporting Safety Defectsto the United StatesGovernmentIf you believe that your vehiclehas a defect which could causea crash or could cause injury ordeath, you should immediatelyinform the National HighwayTraffic Safety Administration(NHTSA) in addition to notifyingGeneral Motors.
If NHTSA receives similarcomplaints, it may open aninvestigation, and if it finds thata safety defect exists in agroup of vehicles, it may ordera recall and remedy campaign.However, NHTSA cannotbecome involved in individualproblems between you, yourdealer, or General Motors.

Black plate (14,1)Chevrolet Volt Owner Manual - 2012
13-14 Customer Information
To contact NHTSA, you maycall the Vehicle Safety Hotlinetoll-free at 1-888-327-4236(TTY: 1-800-424-9153); goto http://www.safercar.gov; orwrite to:
Administrator, NHTSA1200 New Jersey Avenue, S.E.Washington, D.C. 20590
You can also obtain otherinformation about motorvehicle safety fromhttp://www.safercar.gov.
Reporting Safety Defectsto the CanadianGovernmentIf you live in Canada, and youbelieve that the vehicle has a safetydefect, notify Transport Canadaimmediately, and notify GeneralMotors of Canada Limited.Call Transport Canada at1-800-333-0510 or write to:
Transport CanadaRoad Safety Branch80 rue NoelGatineau, QC J8Z 0A1
Reporting Safety Defectsto General MotorsIn addition to notifying NHTSA (orTransport Canada) in a situation likethis, notify General Motors.
Call 1-800-222-1020, or write:
Chevrolet Motor DivisionChevrolet Customer AssistanceCenterP.O. Box 33170Detroit, MI 48232-5170
In Canada, call 1-800-263-3777(English) or 1-800-263-7854(French), or write:
General Motors of Canada LimitedCustomer Care Centre,Mail Code: CA1-163-0051908 Colonel Sam DriveOshawa, Ontario L1H 8P7
Black plate (15,1)Chevrolet Volt Owner Manual - 2012
Customer Information 13-15
Vehicle DataRecording andPrivacyThis GM vehicle has a number ofsophisticated computers that recordinformation about the vehicle’sperformance and how it is driven.For example, the vehicle usescomputer modules to monitor andcontrol engine and electric driveunit performance, to monitor theconditions for airbag deploymentand to deploy airbags in a crash,and to provide antilock braking tohelp the driver control the vehicle.These modules may store data tohelp your dealer technician servicethe vehicle. Some modules mayalso store data about how youoperate the vehicle, such as rate offuel consumption or average speed.These modules may also retain theowner’s personal preferences, suchas radio pre-sets, seat positions,and temperature settings.
Event Data RecordersThis vehicle has an Event DataRecorder (EDR). The main purposeof an EDR is to record, in certaincrash or near crash-like situations,such as an airbag deployment orhitting a road obstacle, data thatwill assist in understanding how avehicle's systems performed. TheEDR is designed to record datarelated to vehicle dynamics andsafety systems for a short period oftime, typically 30 seconds or less.The EDR in this vehicle is designedto record such data as:. How various systems in the
vehicle were operating.. Whether or not the driver and
passenger safety belts werebuckled/fastened.
. How far, if at all, the driver waspressing the accelerator and/orbrake pedal.
. How fast the vehicle wastraveling.
This data can help provide a betterunderstanding of the circumstancesin which crashes and injuries occur.
Important: EDR data is recordedby the vehicle only if a non-trivialcrash situation occurs; no data isrecorded by the EDR under normaldriving conditions and no personaldata (e.g., name, gender, age,and crash location) is recorded.However, other parties, suchas law enforcement, could combinethe EDR data with the type ofpersonally identifying dataroutinely acquired during a crashinvestigation.
To read data recorded by an EDR,special equipment is required, andaccess to the vehicle or the EDR isneeded. In addition to the vehiclemanufacturer, other parties, suchas law enforcement, that have thespecial equipment, can read theinformation if they have access tothe vehicle or the EDR.

Black plate (16,1)Chevrolet Volt Owner Manual - 2012
13-16 Customer Information
GM will not access this data orshare it with others except: with theconsent of the vehicle owner or,if the vehicle is leased, with theconsent of the lessee; in responseto an official request by police orsimilar government office; as part ofGM's defense of litigation throughthe discovery process; or, asrequired by law. Data that GMcollects or receives may also beused for GM research needs or maybe made available to others forresearch purposes, where a need isshown and the data is not tied to aspecific vehicle or vehicle owner.
OnStar®
If the vehicle is equipped with anactive OnStar system, that systemmay also record data in crash ornear crash‐like situations. TheOnStar Terms and Conditionsprovides information on datacollection and use and is availableat www.onstar.com (U.S.) orwww.onstar.ca (Canada), or bypressing theQ button and
speaking to an advisor. See OnStarOverview on page 14‑1 for moreinformation.
Navigation SystemIf the vehicle has a navigationsystem, use of the system mayresult in the storage of destinations,addresses, telephone numbers, andother trip information. Refer to thenavigation manual for informationon stored data and for deletioninstructions.
Radio FrequencyIdentification (RFID)RFID technology is used in somevehicles for functions such as tirepressure monitoring and ignitionsystem security, as well as inconnection with conveniencessuch as key fobs for remote doorlocking/unlocking and starting, andin-vehicle transmitters for garagedoor openers. RFID technology inGM vehicles does not use or record
personal information or link withany other GM system containingpersonal information.
Radio FrequencyStatementThis vehicle has systems thatoperate on a radio frequency thatcomply with Part 15 of the FederalCommunications Commission (FCC)rules and with Industry CanadaStandards RSS‐GEN/210/220/310.
Operation is subject to the followingtwo conditions:
1. The device may not causeharmful interference.
2. The device must accept anyinterference received, includinginterference that may causeundesired operation of thedevice.
Changes or modifications to any ofthese systems by other than anauthorized service facility could voidauthorization to use this equipment.
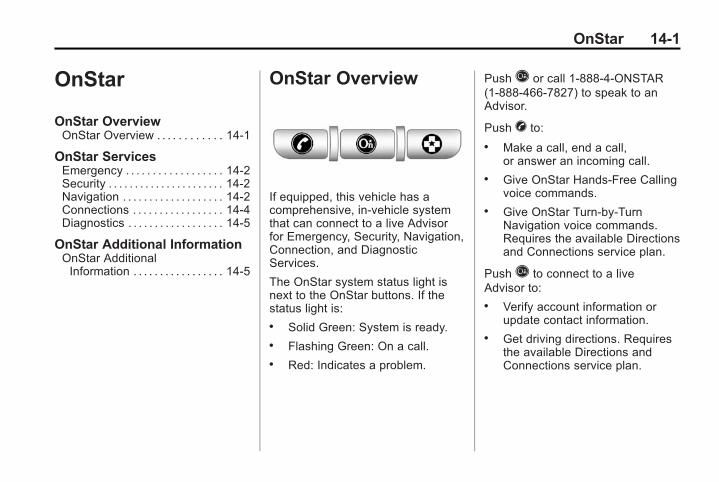
Black plate (1,1)Chevrolet Volt Owner Manual - 2012
OnStar 14-1
OnStar
OnStar OverviewOnStar Overview . . . . . . . . . . . . 14-1
OnStar ServicesEmergency . . . . . . . . . . . . . . . . . . 14-2Security . . . . . . . . . . . . . . . . . . . . . . 14-2Navigation . . . . . . . . . . . . . . . . . . . 14-2Connections . . . . . . . . . . . . . . . . . 14-4Diagnostics . . . . . . . . . . . . . . . . . . 14-5
OnStar Additional InformationOnStar AdditionalInformation . . . . . . . . . . . . . . . . . 14-5
OnStar Overview
If equipped, this vehicle has acomprehensive, in-vehicle systemthat can connect to a live Advisorfor Emergency, Security, Navigation,Connection, and DiagnosticServices.
The OnStar system status light isnext to the OnStar buttons. If thestatus light is:. Solid Green: System is ready.. Flashing Green: On a call.. Red: Indicates a problem.
PushQ or call 1‐888‐4‐ONSTAR(1‐888‐466‐7827) to speak to anAdvisor.
Push X to:
. Make a call, end a call,or answer an incoming call.
. Give OnStar Hands-Free Callingvoice commands.
. Give OnStar Turn-by-TurnNavigation voice commands.Requires the available Directionsand Connections service plan.
PushQ to connect to a liveAdvisor to:. Verify account information or
update contact information.. Get driving directions. Requires
the available Directions andConnections service plan.

Black plate (2,1)Chevrolet Volt Owner Manual - 2012
14-2 OnStar
. Receive On-DemandDiagnostics for a check on thevehicle’s key operating systems.
. Receive Roadside Assistance.
Push] to get a priority connectionto an Emergency Advisor available24/7 to:. Get help for an emergency.. Be a Good Samaritan or
respond to an AMBER Alert.. Get crisis assistance and
evacuation routes.
OnStar Services
EmergencyWith Automatic Crash Response,the built-in system can automaticallyconnect to help in a crash even ifyou cannot ask for it.
Push] to connect to anEmergency Advisor. GPStechnology is used to identify thevehicle location and can providecritical information to emergencypersonnel. The Advisor is alsotrained to offer critical assistance inemergency situations.
SecurityOnStar provides services like StolenVehicle Assistance, Remote IgnitionBlock, and Roadside Assistance,if the vehicle is equipped with theseservices. OnStar can unlock thevehicle doors remotely, if it isequipped with automatic door locks,and can help police locate thevehicle if it is stolen.
NavigationOnStar navigation requires theDirections and Connectionsservice plan.
PushQ to receive directions orhave them sent to the vehiclenavigation screen. Destinationscan also be forwarded to thevehicle from Google Maps™ orMapQuest.com. The OnStarmapping database is continuouslyupdated. Visit www.onstar.com forcoverage maps.
Turn‐by‐Turn Navigation
1. PushQ to connect to a liveAdvisor.
2. Request directions.
3. Directions are downloaded to thevehicle.
4. Follow the voice-guidedcommands.

Black plate (3,1)Chevrolet Volt Owner Manual - 2012
OnStar 14-3
Using Voice CommandsDuring a Planned Route
Cancel Route
1. Push X. System responds:“OnStar ready,” then a tone.Say “Cancel route.” Systemresponds: “Would you like tocancel route directions to yourdestination?”
2. Say “Yes.” System responds:“OK, route canceled.”
3. Say “Goodbye.” Exits voicecommands.
Route Preview
1. Push X. System responds:“OnStar ready,” then a tone.
2. Say “Route Preview.” Systemresponds with the next threemaneuvers.
3. Say “Goodbye.” Exits voicecommands.
Repeat
1. Push X. System responds:“OnStar ready,” then a tone.
2. Say “Repeat.” System respondswith the last direction given, thenresponds with “OnStar ready,”then a tone.
3. Say “Goodbye.” Exits voicecommands.
Get My Destination
1. Push X. System responds:“OnStar ready,” then a tone.
2. Say “Get my destination.”System responds with miles tothe destination, then respondswith “OnStar ready,” then a tone.
3. Say “Goodbye.” Exits voicecommands.
Other Navigation ServicesAvailable from OnStar
OnStar eNav: Allows subscribersto send destinations from GoogleMaps™ and MapQuest.com totheir Turn-by-Turn Navigation orscreen-based navigation system.When ready, the directions will bedownloaded to the vehicle.
Destination Download: PushQ,then request the Advisor todownload directions to thenavigation system in the vehicle.After the call ends, push the “Go”button on the navigation screen tobegin driving directions.
Destinations can also bedownloaded on the go. Forinformation about eNav, DestinationDownload, and coverage maps visitwww.onstar.com.

Black plate (4,1)Chevrolet Volt Owner Manual - 2012
14-4 OnStar
ConnectionsOnStar Hands-Free Calling allowscalls to be made and received fromthe vehicle. The vehicle can alsobe controlled from a cell phonethrough the OnStar mobile app. Seewww.onstar.com for coverage maps.
Hands-Free Calling
1. Push X. System responds:“OnStar ready.”
2. Say “Dial.” System responds:“Please say the name or numberto call.”
3. Say the entire number withoutpausing, including a “1” and thearea code. System responds:“OK calling.”
Retrieve My Number
1. Push X. System responds:“OnStar ready.”
2. Say “My Number.” Systemresponds: “Your OnStarHands-Free Calling number is.”
End a Call
Push X. System responds: “Callended.”
Store a Name Tag for SpeedDialing
1. Push X. System responds:“OnStar ready.”
2. Say “Store.” System responds:“Please say the number youwould like to store.”
3. Say the entire number withoutpausing. System responds:“Please say the name tag.”
4. Pick a name tag. “Systemresponds: ”About to store <nametag>. Does that sound OK?”
5. Say “Yes” or “No” to try again.System responds: “OK, storing<name tag>.”
Place a Call Using a StoredNumber
1. Push X. System responds:“OnStar ready.”
2. Say “Call <name tag>.” Systemresponds: “OK, calling<name tag>.”
Verify Minutes and Expiration
Push X and say “minutes” then“verify” to check how many minutesremain and their expiration date.
OnStar Mobile App
With an iPhone® orAndroid™-based mobile device,an OnStar mobile app can bedownloaded. The vehicle can beremote started, if equipped, orthe doors can be unlocked fromanywhere there is cell phoneservice. It can also check the fuellevel, tire pressure, and oil life.

Black plate (5,1)Chevrolet Volt Owner Manual - 2012
OnStar 14-5
It can connect to an OnStar Advisoranytime. For OnStar mobile appcompatibility or further information,see www.onstar.com.
DiagnosticsOnStar Vehicle Diagnostics willperform a vehicle check everymonth. It will check the engine,transmission, antilock brakes, andmajor vehicle systems. It alsochecks the tire pressures, if thevehicle is equipped with the TirePressure Monitoring System. If adiagnostics check is neededbetween e-mails, pushQ, and anAdvisor can run a check.
OnStar AdditionalInformationTransferring Service
PushQ to request account transfereligibility information. The Advisorcan assist in canceling or removingaccount information. If OnStarreceives information that vehicleownership has changed, OnStarmay send a voice message to thevehicle, requesting updated accountinformation.
Reactivation for SubsequentOwners
PushQ and follow the prompts tospeak to an Advisor as soon aspossible after acquiring the vehicle.The Advisor will update vehiclerecords and will explain the OnStarservice offers and options available.
How OnStar Service Works
Automatic Crash Response,Emergency Services, Crisis Assist,Stolen Vehicle Assistance, VehicleDiagnostics, Remote Door Unlock,Roadside Assistance, Turn-by-TurnNavigation, and Hands-Free Callingare available on most vehicles. Notall OnStar services are availableeverywhere or on all vehicles. Formore information, a full descriptionof OnStar services, systemlimitations, and OnStar terms andconditions, see www.onstar.com(U.S.) or www.onstar.ca (Canada);contact OnStar at 1-888-4-ONSTAR(1‐888‐466‐7827) or TTY1‐877‐248‐2080; or pushQ tospeak with an Advisor. OnStarservices require a vehicle electricalsystem, wireless service, and GPSsatellite technologies to be availableand operating for features tofunction properly. These systemsmay not operate if the battery isdischarged or disconnected.

Black plate (6,1)Chevrolet Volt Owner Manual - 2012
14-6 OnStar
OnStar service cannot work unlessyour vehicle is in a place whereOnStar has an agreement with awireless service provider for servicein that area, and the wirelessservice provider has coverage,network capacity, reception, andtechnology compatible with OnStar’sservice. Service involving locationinformation about the vehicle cannotwork unless GPS signals areavailable, unobstructed, andcompatible with the OnStarhardware. OnStar service may notwork if the OnStar equipment is notproperly installed or it has not beenproperly maintained. If equipmentor software is added, connected,or modified, OnStar service maynot work. Other problems beyondOnStar’s control may preventservice such as hills, tall buildings,tunnels, weather, electrical systemdesign and architecture of thevehicle, damage to the vehicle in acrash, or wireless phone networkcongestion or jamming.
See Radio Frequency Statement onpage 13‑16 for informationregarding Part 15 of the FederalCommunications Commission (FCC)rules and Industry CanadaStandards RSS-GEN/210/220/310.
Services for People withDisabilities
Advisors provide services to helpsubscribers with physical disabilitiesand medical conditions.
PushQ for help with:
. Locating a gas station with anattendant to pump gas.
. Finding a hotel, restaurant, etc.,that meets accessibility needs.
. Providing directions to theclosest hospital or pharmacy inurgent situations.
TTY Users
OnStar has the ability tocommunicate to the deaf,hard‐of‐hearing, or speech‐impairedcustomers while in the vehicle. Theavailable dealer‐installed TTYsystem can provide in-vehicleaccess to all of the OnStar services,except Virtual Advisor and OnStarTurn‐by‐Turn Navigation.
Onstar.com
The website provides access toaccount information, manages theOnStar subscription, and allowsviewing of videos of each service.Get subscription plan pricing andsign up for OnStar VehicleDiagnostics. Click on the “MyAccount” tab on the home page.

Black plate (7,1)Chevrolet Volt Owner Manual - 2012
OnStar 14-7
OnStar Personal IdentificationNumber (PIN)
A PIN is needed to access some ofthe OnStar services, like RemoteDoor Unlock and Stolen VehicleAssistance. You will be prompted tochange the PIN the first time whenspeaking with an Advisor. Tochange the OnStar PIN, call OnStarand provide the Advisor with thecurrent number.
Warranty
OnStar equipment may bewarranted as part of the new-vehiclelimited warranty. The manufacturerof the vehicle furnishes detailedwarranty information.
Languages
The vehicle can be programmed torespond in French or Spanish.PushQ and ask an Advisor.Advisors can speak French orSpanish.
Potential Issues
Some OnStar services are disabledafter five days. OnStar cannotperform Remote Door Unlock orStolen Vehicle Assistance after thevehicle has been off continuouslyfor five days. After five days, OnStarcan contact Roadside Assistanceand a locksmith to help gain accessto the vehicle.
Global PositioningSystem (GPS). Obstruction of the GPS can
occur in a large city with tallbuildings; in parking garages;around airports; in tunnels,underpasses, or parkinggarages; or in an area with verydense trees. If GPS signals arenot available, the OnStar systemshould still operate to callOnStar. However, OnStar couldhave difficulty identifying theexact location.
. In emergency situations, OnStarcan use the last stored GPSlocation to send to emergencyresponders.
. A temporary loss of GPS cancause loss of the ability to senda Turn-by-Turn Navigation route.The Advisor may give a verbalroute or may ask for a call backafter the vehicle is driven into anopen area.
Cellular and GPS Antennas
Avoid placing items over or near theantenna to prevent blocking cellularand GPS signal reception. Cellularreception is required for OnStar tosend remote signals to the vehicle.

Black plate (8,1)Chevrolet Volt Owner Manual - 2012
14-8 OnStar
Unable to Connect to OnStarMessage
If there is limited cellular coverageor the cellular network has reachedmaximum capacity, this messagemay come on. PushQ to try thecall again or try again after driving afew miles into another cellular area.
Vehicle and Power Issues
OnStar services require a vehicleelectrical system, wireless service,and GPS satellite technologies to beavailable and operating for featuresto function properly. These systemsmay not operate if the battery isdischarged or disconnected.
Add-on Electrical Equipment
The OnStar system is integratedinto the electrical architecture of thevehicle. Do not add any electricalequipment. See Add-On ElectricalEquipment on page 9‑58. Addedelectrical equipment may interferewith the operation of the OnStarsystem and cause it to not operate.
Privacy
The complete OnStar PrivacyStatement may be found atwww.onstar.com. Privacy-sensitiveusers of wireless communicationsare cautioned that the privacy of anyinformation sent via wireless cellularcommunications cannot be assured.Third parties may unlawfullyintercept or access transmissionsand private communications withoutconsent.

Black plate (1,1)Chevrolet Volt Owner Manual - 2012
INDEX i-1
AAccessories andModifications . . . . . . . . . . . . . . . . . 10-3
Accessory Power . . . . . . . . . . . . . . 9-19Add-On ElectricalEquipment . . . . . . . . . . . . . . . . . . . 9-58
Additional Information,OnStar® . . . . . . . . . . . . . . . . . . . . . . 14-5
Air Cleaner/Filter, Engine . . . . . 10-12Air Conditioning . . . . . . . . . . . . . . . . 8-1Air Vents . . . . . . . . . . . . . . . . . . . . . . . 8-8AirbagAdding Equipment to theVehicle . . . . . . . . . . . . . . . . . . . . . .3-31
Airbag SystemCheck . . . . . . . . . . . . . . . . . . . . . . . .3-31How Does an AirbagRestrain? . . . . . . . . . . . . . . . . . . .3-24
Passenger SensingSystem . . . . . . . . . . . . . . . . . . . . . .3-26
What Makes an AirbagInflate? . . . . . . . . . . . . . . . . . . . . . .3-23
Airbag System (cont.)What Will You See after anAirbag Inflates? . . . . . . . . . . . . .3-24
When Should an AirbagInflate? . . . . . . . . . . . . . . . . . . . . . .3-22
Where Are the Airbags? . . . . . .3-21AirbagsPassenger Status Indicator . . .5-18Readiness Light . . . . . . . . . . . . . .5-17Servicing Airbag-EquippedVehicles . . . . . . . . . . . . . . . . . . . . .3-30
System Check . . . . . . . . . . . . . . . .3-19Alarm SystemAnti-theft . . . . . . . . . . . . . . . . . . . . . .2-14
AM-FM Radio . . . . . . . . . . . . . . . . . . . 7-7AntennaMulti-band . . . . . . . . . . . . . . . . . . . .7-12
Anti-theftAlarm System . . . . . . . . . . . . . . . .2-14Alarm System Messages . . . . .5-51
Antilock BrakeSystem (ABS) . . . . . . . . . . . . . . . . 9-29Warning Light . . . . . . . . . . . . . . . . .5-23
Appearance CareExterior . . . . . . . . . . . . . . . . . . . . . 10-78Interior . . . . . . . . . . . . . . . . . . . . . . 10-81
Assistance Program,Roadside . . . . . . . . . . . . . . . . . . . . . 13-6
Audio Players . . . . . . . . . . . . . . . . . 7-12CD . . . . . . . . . . . . . . . . . . . . . . . . . . .7-12MP3 . . . . . . . . . . . . . . . . . . . . . . . . . .7-14
Audio SystemRadio Reception . . . . . . . . . . . . . . 7-11Theft-Deterrent Feature . . . . . . . . 7-2
AutomaticClimate Control System . . . . . . . . 8-1Door Locks . . . . . . . . . . . . . . . . . . .2-12
Auxiliary Devices . . . . . . . . . . . . . . 7-15
BBattery . . . . . . . . . . . . . . . . . . . . . . . 10-23Gauge . . . . . . . . . . . . . . . . . . . . . . . .5-15High Voltage . . . . . . . . . . . . . . . . . .5-15Jump Starting . . . . . . . . . . . . . . . 10-68Power Protection . . . . . . . . . . . . . . 6-6

Black plate (2,1)Chevrolet Volt Owner Manual - 2012
i-2 INDEX
Battery and ChargingMessages. . . . . . . . . . . . . . . . . . . . 5-45
Blade Replacement, Wiper . . . 10-25Bluetooth . . . . . . . . . . 7-20, 7-21, 7-25BrakeParking, Electric . . . . . . . . . . . . . .9-30
Brake System Warning Light . . . 5-22Brakes . . . . . . . . . . . . . . . . . . . . . . . . 10-20Antilock . . . . . . . . . . . . . . . . . . . . . . .9-29Fluid . . . . . . . . . . . . . . . . . . . . . . . . 10-21Regenerative Braking . . . . . . . . .9-32System Messages . . . . . . . . . . . .5-46
Braking . . . . . . . . . . . . . . . . . . . . . . . . . 9-5Break-In, New Vehicle . . . . . . . . . 9-16Bulb Replacement . . . . . . . . . . . . 10-29Back-up Lamps . . . . . . . . . . . . . 10-28Halogen Bulbs . . . . . . . . . . . . . . 10-26Headlamp Aiming . . . . . . . . . . . 10-26Headlamps . . . . . . . . . . 10-26, 10-27License Plate Lamps . . . . . . . 10-28
Buying New Tires . . . . . . . . . . . . . 10-54
CCalibration . . . . . . . . . . . . . . . 5-15, 5-42CaliforniaFuel Requirements . . . . . . . . . . .9-54Perchlorate MaterialsRequirements . . . . . . . . . . . . . . .10-3
Warning . . . . . . . . . . . . . . . . . . . . . .10-2Camera, Rear Vision . . . . . . . . . . 9-41Canadian Vehicle Owners . . . . . . . . iiiCapacities andSpecifications . . . . . . . . . . . . . . . . 12-2
Carbon MonoxideEngine Exhaust . . . . . . . . . . . . . . .9-26Hatch . . . . . . . . . . . . . . . . . . . . . . . . .2-13Winter Driving . . . . . . . . . . . . . . . . . 9-9
CargoCover . . . . . . . . . . . . . . . . . . . . . . . . . . 4-2
Cautions, Danger, andWarnings . . . . . . . . . . . . . . . . . . . . . . . . iv
CD Player . . . . . . . . . . . . . . . . . . . . . 7-12Chains, Tire . . . . . . . . . . . . . . . . . . 10-58Charge Cord . . . . . . . . . . . . . . . . . . . 9-50
Charging . . . . . . . . . . . . . . . . . . . . . . 5-31Delay Override . . . . . . . . . . . . . . .9-46Electrical Requirements . . . . . .9-52Plug-In . . . . . . . . . . . . . . . . . . . . . . .9-44Utility Interruption . . . . . . . . . . . . .9-52
Charging Status Screens . . . . . . 9-47Charging System Light . . . . . . . . 5-19CheckEngine Light . . . . . . . . . . . . . . . . . .5-19
Child RestraintsInfants and YoungChildren . . . . . . . . . . . . . . . . . . . . .3-35
Lower Anchors andTethers for Children . . . . . . . . .3-41
Older Children . . . . . . . . . . . . . . . .3-32Securing . . . . . . . . . . . . . . . .3-48, 3-50Systems . . . . . . . . . . . . . . . . . . . . . .3-37
CleaningExterior Care . . . . . . . . . . . . . . . 10-78Interior Care . . . . . . . . . . . . . . . . 10-81
Climate Control SystemsAutomatic . . . . . . . . . . . . . . . . . . . . . . 8-1

Black plate (3,1)Chevrolet Volt Owner Manual - 2012
INDEX i-3
Cluster, Instrument . . . . . . . . . . . . 5-10Collision Damage Repair . . . . . 13-10Compass . . . . . . . . . . . . . . . . 5-15, 5-42Compressor Kit, TireSealant . . . . . . . . . . . . . . . . . . . . . . 10-60
Connections, OnStar® . . . . . . . . . 14-4Control of a Vehicle . . . . . . . . . . . . . 9-5Convex Mirrors . . . . . . . . . . . . . . . . 2-16CoolantEngine . . . . . . . . . . . . . . . . . . . . . . 10-16Engine TemperatureWarning Light . . . . . . . . . . . . . . .5-25
Cooling System . . . . . . . .10-14–10-16Engine Messages . . . . . . . . . . . .5-47
Courtesy TransportationProgram . . . . . . . . . . . . . . . . . . . . . . 13-8
CoverCargo . . . . . . . . . . . . . . . . . . . . . . . . . . 4-2
Cruise Control . . . . . . . . . . . . . . . . . 9-36Light . . . . . . . . . . . . . . . . . . . . . . . . . .5-27Messages . . . . . . . . . . . . . . . . . . . .5-46
Customer Assistance . . . . . . . . . . 13-4Offices . . . . . . . . . . . . . . . . . . . . . . . .13-3Text Telephone (TTY)Users . . . . . . . . . . . . . . . . . . . . . . .13-4
Customer InformationService PublicationsOrdering Information . . . . . . 13-12
Customer SatisfactionProcedure . . . . . . . . . . . . . . . . . . . . 13-1
DDamage Repair, Collision . . . . . 13-10Danger, Warnings, andCautions . . . . . . . . . . . . . . . . . . . . . . . . iv
Data Recorders, Event . . . . . . . 13-15Daytime RunningLamps (DRL) . . . . . . . . . . . . . . . . . . 6-2
Defensive Driving . . . . . . . . . . . . . . . 9-5Delayed Charging Override . . . . 9-46Delayed Locking . . . . . . . . . . . . . . . 2-11Devices, Auxiliary . . . . . . . . . . . . . 7-15Diagnostics, OnStar® . . . . . . . . . . 14-5
Distracted Driving . . . . . . . . . . . . . . . 9-4Dome Lamps . . . . . . . . . . . . . . . . . . . 6-4DoorAjar Messages . . . . . . . . . . . . . . .5-46Delayed Locking . . . . . . . . . . . . . . 2-11Locks . . . . . . . . . . . . . . . . . . . . . . . . .2-10Power Locks . . . . . . . . . . . . . . . . . . 2-11
Drive Belt Routing, Engine . . . . . 12-3Drive Mode Messages . . . . . . . . . 5-46Drive UnitElectric . . . . . . . . . . . . . . . . . . . . . . .9-28
Driver Efficiency Gauge . . . . . . . 5-16Driver InformationCenter (DIC) . . . . . . . . . . . . . . . . . 5-43
Driver Selected OperatingModes . . . . . . . . . . . . . . . . . . . . . . . 9-22
DrivingDefensive . . . . . . . . . . . . . . . . . . . . . . 9-5Drunk . . . . . . . . . . . . . . . . . . . . . . . . . . 9-5Highway Hypnosis . . . . . . . . . . . . . 9-8Hill and Mountain Roads . . . . . . . 9-9If the Vehicle is Stuck . . . . . . . . . 9-11
Black plate (4,1)Chevrolet Volt Owner Manual - 2012
i-4 INDEX
Driving (cont.)Loss of Control . . . . . . . . . . . . . . . . 9-7Off-Road Recovery . . . . . . . . . . . . 9-6Vehicle Load Limits . . . . . . . . . . . 9-11Wet Roads . . . . . . . . . . . . . . . . . . . . 9-8Winter . . . . . . . . . . . . . . . . . . . . . . . . . 9-9
Driving for BetterEnergy Efficiency . . . . . . . 1-27, 9-2
EElectric Drive Unit . . . . . . . . . . . . . 9-28Electric Drive UnitMessages . . . . . . . . . . . . . . . . . . . . 5-47
Electric Drive Unit ShiftLock Control FunctionCheck . . . . . . . . . . . . . . . . . . . . . . . 10-24
Electric Mode . . . . . . . . . . . . . . . . . . 9-21Electric Parking Brake . . . . . . . . . 9-30Electric Parking Brake Light . . . 5-22Electrical Equipment,Add-On . . . . . . . . . . . . . . . . . . . . . . 9-58
Electrical Requirements forBattery Charging . . . . . . . . . . . . . 9-52
Electrical SystemEngine CompartmentFuse Block . . . . . . . . . . . . . . . . 10-31
Instrument PanelFuse Block . . . . . . . . . 10-34, 10-36
Overload . . . . . . . . . . . . . . . . . . . 10-30Rear Compartment FuseBlock . . . . . . . . . . . . . . . . . . . . . . 10-38
Electronic Stability Control . . . . . 9-34Emergency, OnStar® . . . . . . . . . . 14-2Energy EfficiencyDriving . . . . . . . . . . . . . . . . . . . 1-27, 9-2
Energy Information . . . . . . . . . . . . 5-41EngineAir Cleaner/Filter . . . . . . . . . . . 10-12Check and Service EngineSoon Light . . . . . . . . . . . . . . . . . .5-19
Compartment Overview . . . . . . .10-8Coolant . . . . . . . . . . . . . . . . . . . . . 10-16Coolant TemperatureWarning Light . . . . . . . . . . . . . . .5-25
Cooling System . . . . . . 10-14–10-16Cooling System Messages . . .5-47Drive Belt Routing . . . . . . . . . . . .12-3
Engine (cont.)Exhaust . . . . . . . . . . . . . . . . . . . . . .9-26Overheating . . . . . . . . . . . . . . . . 10-19Pressure Light . . . . . . . . . . . . . . . .5-26Running While Parked . . . . . . . .9-27
Engine OilLife System . . . . . . . . . . . . . . . . . 10-12Messages . . . . . . . . . . . . . . . . . . . .5-47
Engine UnavailableOut of Fuel . . . . . . . . . . . . . . . . . . .9-24
Entry Lighting . . . . . . . . . . . . . . . . . . . 6-5Event Data Recorders . . . . . . . . 13-15Exit Lighting . . . . . . . . . . . . . . . . . . . . 6-6Extended Range Mode . . . . . . . . 9-22Extender, Safety Belt . . . . . . . . . . 3-17Exterior Lamp Controls . . . . . . . . . 6-1
FFilter,Engine Air Cleaner . . . . . . . . . 10-12
Flash-to-Pass . . . . . . . . . . . . . . . . . . . 6-2Flashers, Hazard Warning . . . . . . 6-3Flat Tire . . . . . . . . . . . . . . . . . . . . . . 10-59Floor Console Storage . . . . . . . . . . 4-1

Black plate (5,1)Chevrolet Volt Owner Manual - 2012
INDEX i-5
Floor Mats . . . . . . . . . . . . . . . . . . . . 10-84FluidBrakes . . . . . . . . . . . . . . . . . . . . . . 10-21Washer . . . . . . . . . . . . . . . . . . . . . 10-19
Folding Mirrors . . . . . . . . . . . . . . . . 2-16Front SeatsAdjustment . . . . . . . . . . . . . . . . . . . . 3-4Heated . . . . . . . . . . . . . . . . . . . . . . . . 3-7
Fuel . . . . . . . . . . . . . . . . . . . . . . . . . . . 9-53Additives . . . . . . . . . . . . . . . . . . . . .9-54Filling a Portable FuelContainer . . . . . . . . . . . . . . . . . . .9-57
Filling the Tank . . . . . . . . . . . . . . .9-56Fuels in Foreign Countries . . . .9-54Gasoline Specifications . . . . . . .9-54Gauge . . . . . . . . . . . . . . . . . . . . . . . .5-15Low Fuel Warning Light . . . . . . .5-26Requirements, California . . . . .9-54System Messages . . . . . . . . . . . .5-48
Function CheckElectric Drive Unit ShiftLock Control . . . . . . . . . . . . . . 10-24
FusesEngine CompartmentFuse Block . . . . . . . . . . . . . . . . 10-31
Instrument PanelFuse Block . . . . . . . . . 10-34, 10-36
Rear Compartment FuseBlock . . . . . . . . . . . . . . . . . . . . . . 10-38
GGarage Door Opener . . . . . . . . . . 5-62Programming . . . . . . . . . . . . . . . . .5-62
GasolineSpecifications . . . . . . . . . . . . . . . . .9-54
GaugesBattery . . . . . . . . . . . . . . . . . . . . . . .5-15Driver Efficiency . . . . . . . . . . . . . .5-16Fuel . . . . . . . . . . . . . . . . . . . . . . . . . .5-15Odometer . . . . . . . . . . . . . . . . . . . . .5-14Speedometer . . . . . . . . . . . . . . . . .5-14Trip Odometer . . . . . . . . . . . . . . . .5-15Warning Lights andIndicators . . . . . . . . . . . . . . . . . . . . 5-9
General InformationService and Maintenance . . . . . 11-1Towing . . . . . . . . . . . . . . . . . . . . . . . .9-58Vehicle Care . . . . . . . . . . . . . . . . . .10-2
Glove Box . . . . . . . . . . . . . . . . . . . . . . 4-1GM Mobility ReimbursementProgram . . . . . . . . . . . . . . . . . . . . . . 13-5
HHalogen Bulbs . . . . . . . . . . . . . . . . 10-26Hatch . . . . . . . . . . . . . . . . . . . . . . . . . . 2-13Hazard Warning Flashers . . . . . . . 6-3Head Restraints . . . . . . . . . . . . . . . . 3-2Headlamps . . . . . . . . . . . . . . . . . . . 10-27Aiming . . . . . . . . . . . . . . . . . . . . . . 10-26Bulb Replacement . . . . . . . . . . 10-26Daytime RunningLamps (DRL) . . . . . . . . . . . . . . . . . 6-2
Flash-to-Pass . . . . . . . . . . . . . . . . . . 6-2High-Beam On Light . . . . . . . . . .5-27High/Low Beam Changer . . . . . . 6-2Lamps On Reminder . . . . . . . . .5-27

Black plate (6,1)Chevrolet Volt Owner Manual - 2012
i-6 INDEX
Heated Front Seats . . . . . . . . . . . . . 3-7Heated Mirrors . . . . . . . . . . . . . . . . . 2-16Heating and Air Conditioning . . . 8-1High Voltage Battery Gauge . . . 5-15High Voltage Devices andWiring . . . . . . . . . . . . . . . . . . . . . . . 10-30
High-Beam On Light . . . . . . . . . . . 5-27Highway Hypnosis . . . . . . . . . . . . . . 9-8Hill and Mountain Roads . . . . . . . . 9-9Hood . . . . . . . . . . . . . . . . . . . . . . . . . . 10-7Hood, Door, Hatch OpenLight . . . . . . . . . . . . . . . . . . . . . . . . . 5-28
Horn . . . . . . . . . . . . . . . . . . . . . . . . . . . . 5-7How to Wear Safety BeltsProperly . . . . . . . . . . . . . . . . . . . . . . 3-12
IImmobilizer . . . . . . . . . . . . . . . . . . . . 2-15Infants and Young Children,Restraints . . . . . . . . . . . . . . . . . . . . 3-35
InformationEnergy . . . . . . . . . . . . . . . . . . . . . . .5-41
Infotainment . . . . . . . . . . . . . . . . . . . . 7-1
Instrument Cluster . . . . . . . . . . . . . 5-10Instrument PanelStorage Area . . . . . . . . . . . . . . . . . . 4-1
Introduction . . . . . . . . . . . . . . . . . . . . . . . iii
JJump Starting . . . . . . . . . . . . . . . . . 10-68
KKey and Lock Messages . . . . . . . 5-48Keyless EntryRemote (RKE) System . . . . . . . . 2-2
Keys . . . . . . . . . . . . . . . . . . . . . . . . . . . . 2-1
LLabeling, Tire Sidewall . . . . . . . . 10-41Lamp Messages . . . . . . . . . . . . . . . 5-49LampsDaytime Running (DRL) . . . . . . . 6-2Dome . . . . . . . . . . . . . . . . . . . . . . . . . . 6-4Exterior Controls . . . . . . . . . . . . . . . 6-1License Plate . . . . . . . . . . . . . . . 10-28
Lamps (cont.)Malfunction Indicator . . . . . . . . .5-19On Reminder . . . . . . . . . . . . . . . . .5-27Reading . . . . . . . . . . . . . . . . . . . . . . . 6-5
Lap-Shoulder Belt . . . . . . . . . . . . . 3-13LATCH SystemReplacing Parts after aCrash . . . . . . . . . . . . . . . . . . . . . . .3-47
LATCH, Lower Anchors andTethers for Children . . . . . . . . . . 3-41
LED Lighting . . . . . . . . . . . . . . . . . . 10-26Lifting the Vehicle, Tires . . . . . . . 10-3LightReady Indicator . . . . . . . . . . . . . . .5-27StabiliTrak® OFF . . . . . . . . . . . . .5-24Vehicle Ready . . . . . . . . . . . . . . . .5-27
LightingEntry . . . . . . . . . . . . . . . . . . . . . . . . . . 6-5Exit . . . . . . . . . . . . . . . . . . . . . . . . . . . . 6-6Illumination Control . . . . . . . . . . . . 6-4LED . . . . . . . . . . . . . . . . . . . . . . . . 10-26

Black plate (7,1)Chevrolet Volt Owner Manual - 2012
INDEX i-7
LightsAirbag Readiness . . . . . . . . . . . . .5-17Antilock Brake System(ABS) Warning . . . . . . . . . . . . . .5-23
Brake System Warning . . . . . . .5-22Charging System . . . . . . . . . . . . .5-19Cruise Control . . . . . . . . . . . . . . . .5-27Electric Parking Brake . . . . . . . .5-22Engine CoolantTemperature Warning . . . . . . .5-25
Engine Oil Pressure . . . . . . . . . .5-26Flash-to-Pass . . . . . . . . . . . . . . . . . . 6-2High-Beam On . . . . . . . . . . . . . . . .5-27High/Low Beam Changer . . . . . . 6-2Hood, Door, Hatch Open . . . . .5-28Low Fuel Warning . . . . . . . . . . . .5-26Mountain Mode . . . . . . . . . . . . . . .5-23Safety Belt Reminders . . . . . . . .5-16Security . . . . . . . . . . . . . . . . . . . . . .5-27Service Electric ParkingBrake . . . . . . . . . . . . . . . . . . . . . . .5-22
Sport Mode . . . . . . . . . . . . . . . . . . .5-23Tire Pressure . . . . . . . . . . . . . . . . .5-25Traction Control System(TCS)/StabiliTrak® . . . . . . . . . .5-24
Traction Off . . . . . . . . . . . . . . . . . . .5-24
LocksAutomatic Door . . . . . . . . . . . . . . .2-12Delayed Locking . . . . . . . . . . . . . . 2-11Door . . . . . . . . . . . . . . . . . . . . . . . . . .2-10Lockout Protection . . . . . . . . . . . .2-12Power Door . . . . . . . . . . . . . . . . . . . 2-11Safety . . . . . . . . . . . . . . . . . . . . . . . .2-12
Loss of Control . . . . . . . . . . . . . . . . . 9-7Low Fuel Warning Light . . . . . . . . 5-26Lower Anchors and Tethersfor Children (LATCHSystem) . . . . . . . . . . . . . . . . . . . . . . 3-41
MMaintenanceRecords . . . . . . . . . . . . . . . . . . . . .11-14
Maintenance Modes . . . . . . . . . . . 9-24Maintenance ScheduleRecommended Fluidsand Lubricants . . . . . . . . . . . . .11-12
Malfunction Indicator Lamp . . . . 5-19MessagesAirbag System . . . . . . . . . . . . . . . .5-51Anti-theft Alarm System . . . . . . .5-51Brake System . . . . . . . . . . . . . . . .5-46Door Ajar . . . . . . . . . . . . . . . . . . . . .5-46
Messages (cont.)Drive Mode . . . . . . . . . . . . . . . . . . .5-46Electric Drive Unit . . . . . . . . . . . .5-47Engine Cooling System . . . . . . .5-47Engine Oil . . . . . . . . . . . . . . . . . . . .5-47Fuel System . . . . . . . . . . . . . . . . . .5-48Key and Lock . . . . . . . . . . . . . . . . .5-48Lamp . . . . . . . . . . . . . . . . . . . . . . . . .5-49Object Detection System . . . . .5-49Propulsion Power . . . . . . . . . . . . .5-50Ride Control System . . . . . . . . . .5-50Service Vehicle . . . . . . . . . . . . . . .5-51Starting the Vehicle . . . . . . . . . . .5-52Tire . . . . . . . . . . . . . . . . . . . . . . . . . . .5-52Vehicle . . . . . . . . . . . . . . . . . . . . . . .5-45Vehicle Reminder . . . . . . . . . . . . .5-53Vehicle Speed . . . . . . . . . . . . . . . .5-53Washer Fluid . . . . . . . . . . . . . . . . .5-53
MirrorsAutomatic DimmingRearview . . . . . . . . . . . . . . . . . . . .2-17
Convex . . . . . . . . . . . . . . . . . . . . . . .2-16Folding . . . . . . . . . . . . . . . . . . . . . . .2-16Heated . . . . . . . . . . . . . . . . . . . . . . .2-16Power . . . . . . . . . . . . . . . . . . . . . . . .2-16

Black plate (8,1)Chevrolet Volt Owner Manual - 2012
i-8 INDEX
ModeElectric . . . . . . . . . . . . . . . . . . . . . . .9-21Extended Range . . . . . . . . . . . . . .9-22
ModesDriver Selected . . . . . . . . . . . . . . .9-22Maintenance . . . . . . . . . . . . . . . . . .9-24
Monitor System, TirePressure . . . . . . . . . . . . . . . . . . . . 10-47
Mountain Mode Light . . . . . . . . . . 5-23MP3 . . . . . . . . . . . . . . . . . . . . . . . . . . . 7-14Multi-band Antenna . . . . . . . . . . . . 7-12
NNavigationVehicle Data Recordingand Privacy . . . . . . . . . . . . . . . 13-16
Navigation, OnStar® . . . . . . . . . . . 14-2New Vehicle Break-In . . . . . . . . . . 9-16
OObject Detection SystemMessages . . . . . . . . . . . . . . . . . . . . 5-49
Odometer . . . . . . . . . . . . . . . . . . . . . . 5-14Trip . . . . . . . . . . . . . . . . . . . . . . . . . . .5-15
Off-RoadRecovery . . . . . . . . . . . . . . . . . . . . . . 9-6
OilEngine . . . . . . . . . . . . . . . . . . . . . . . .10-9Engine Oil Life System . . . . . 10-12Messages . . . . . . . . . . . . . . . . . . . .5-47Pressure Light . . . . . . . . . . . . . . . .5-26
Older Children, Restraints . . . . . 3-32Online Owner Center . . . . . . . . . . 13-4OnStar®
Additional Information . . . . . . . .14-5Connections . . . . . . . . . . . . . . . . . .14-4Diagnostics . . . . . . . . . . . . . . . . . . .14-5Emergency . . . . . . . . . . . . . . . . . . .14-2Navigation . . . . . . . . . . . . . . . . . . . .14-2Overview . . . . . . . . . . . . . . . . . . . . .14-1Security . . . . . . . . . . . . . . . . . . . . . .14-2
OnStar® System . . . . . . . . . . . . . . . 1-29OrderingService Publications . . . . . . . . 13-12
Out of Fuel/EngineUnavailable . . . . . . . . . . . . . . . . . . 9-24
OutletsPower . . . . . . . . . . . . . . . . . . . . . . . . . 5-9
Overheating, Engine . . . . . . . . . . 10-19Overview, InfotainmentSystem . . . . . . . . . . . . . . . . . . . . . . . . 7-2
Overview, OnStar® . . . . . . . . . . . . 14-1
PParkShifting into . . . . . . . . . . . . . . . . . . .9-19Shifting out of . . . . . . . . . . . . . . . . .9-20
ParkingAssist, Ultrasonic . . . . . . . . . . . . .9-38Brake and P (Park)Mechanism Check . . . . . . . . 10-25
Over Things That Burn . . . . . . .9-21Passenger Airbag StatusIndicator . . . . . . . . . . . . . . . . . . . . . 5-18
Passenger Sensing System . . . 3-26Perchlorate MaterialsRequirements, California . . . . . 10-3
PersonalizationVehicle . . . . . . . . . . . . . . . . . . . . . . .5-53
PhoneBluetooth . . . . . . . . . 7-20, 7-21, 7-25
Plug-In Charging . . . . . . . . . . . . . . 9-44PowerButton . . . . . . . . . . . . . . . . . . . . . . . .9-16Door Locks . . . . . . . . . . . . . . . . . . . 2-11Flows . . . . . . . . . . . . . . . . . . . . . . . . .5-29Mirrors . . . . . . . . . . . . . . . . . . . . . . . .2-16Outlets . . . . . . . . . . . . . . . . . . . . . . . . 5-9

Black plate (9,1)Chevrolet Volt Owner Manual - 2012
INDEX i-9
Power (cont.)Protection, Battery . . . . . . . . . . . . . 6-6Retained Accessory (RAP) . . .9-19Windows . . . . . . . . . . . . . . . . . . . . .2-18
Pregnancy, Using SafetyBelts . . . . . . . . . . . . . . . . . . . . . . . . . 3-17
PrivacyRadio FrequencyIdentification (RFID) . . . . . . . 13-16
ProgramCourtesy Transportation . . . . . .13-8
Proposition 65 Warning,California . . . . . . . . . . . . . . . . . . . . . 10-2
Propulsion PowerMessages . . . . . . . . . . . . . . . . . . . . 5-50
RRadio FrequencyIdentification (RFID) . . . . . . . . 13-16Statement . . . . . . . . . . . . . . . . . . 13-16
RadiosAM-FM Radio . . . . . . . . . . . . . . . . . . 7-7Reception . . . . . . . . . . . . . . . . . . . . 7-11Satellite . . . . . . . . . . . . . . . . . . . . . . . . 7-9
Reading Lamps . . . . . . . . . . . . . . . . . 6-5
Ready Indicator . . . . . . . . . . . . . . . . 5-27Rear Seats . . . . . . . . . . . . . . . . . . . . . 3-8Rear Vision Camera (RVC) . . . . 9-41Rearview MirrorAutomatic Dimming . . . . . . . . . . .2-17
Reclining Seatbacks . . . . . . . . . . . . 3-5Recommended Fluids andLubricants . . . . . . . . . . . . . . . . . . . 11-12
RecordsMaintenance . . . . . . . . . . . . . . . . .11-14
Recreational VehicleTowing . . . . . . . . . . . . . . . . . . . . . . 10-76
Regenerative Braking . . . . . . . . . . 9-32Reimbursement Program,GM Mobility . . . . . . . . . . . . . . . . . . 13-5
Remote Keyless Entry (RKE)System . . . . . . . . . . . . . . . . . . . . . . . . 2-2
Remote Start . . . . . . . . . . . . . . . . . . . 2-7Replacement Bulbs . . . . . . . . . . . 10-29Replacement PartsAirbags . . . . . . . . . . . . . . . . . . . . . . .3-32Maintenance . . . . . . . . . . . . . . . . .11-13
Replacing Airbag System . . . . . . 3-32Replacing LATCH SystemParts after a Crash . . . . . . . . . . . 3-47
Replacing Safety BeltSystem Parts after a Crash . . . 3-18
Reporting Safety DefectsCanadian Government . . . . . . 13-14General Motors . . . . . . . . . . . . . 13-14U.S. Government . . . . . . . . . . . 13-13
RequirementsElectrical Battery Charging . . .9-52
RestraintsWhere to Put . . . . . . . . . . . . . . . . .3-39
Retained AccessoryPower (RAP) . . . . . . . . . . . . . . . . . 9-19
Ride Control Systems . . . . . . . . . 9-34Electronic Stability (ESC) . . . . .9-34Messages . . . . . . . . . . . . . . . . . . . .5-50
RoadsDriving, Wet . . . . . . . . . . . . . . . . . . . 9-8
Roadside AssistanceProgram . . . . . . . . . . . . . . . . . . . . . . 13-6
Rotation, Tires . . . . . . . . . . . . . . . . 10-52Routing, Engine Drive Belt . . . . . 12-3Running the Vehicle WhileParked . . . . . . . . . . . . . . . . . . . . . . . 9-27

Black plate (10,1)Chevrolet Volt Owner Manual - 2012
i-10 INDEX
SSafety Belts . . . . . . . . . . . . . . . . . . . 3-11Care . . . . . . . . . . . . . . . . . . . . . . . . . .3-18Extender . . . . . . . . . . . . . . . . . . . . . .3-17How to Wear Safety BeltsProperly . . . . . . . . . . . . . . . . . . . . .3-12
Lap-Shoulder Belt . . . . . . . . . . . .3-13Reminders . . . . . . . . . . . . . . . . . . . .5-16Replacing after a Crash . . . . . .3-18Use During Pregnancy . . . . . . . .3-17
Safety Defects ReportingCanadian Government . . . . . . 13-14General Motors . . . . . . . . . . . . . 13-14U.S. Government . . . . . . . . . . . 13-13
Safety Locks . . . . . . . . . . . . . . . . . . . 2-12Safety System Check . . . . . . . . . . 3-17Satellite Radio . . . . . . . . . . . . . . . . . . 7-9Scheduling Appointments . . . . . . 13-8Sealant Kit, Tire . . . . . . . . . . . . . . 10-60SeatsAdjustment, Front . . . . . . . . . . . . . . 3-4Head Restraints . . . . . . . . . . . . . . . 3-2Heated Front . . . . . . . . . . . . . . . . . . 3-7Rear . . . . . . . . . . . . . . . . . . . . . . . . . . . 3-8Reclining Seatbacks . . . . . . . . . . . 3-5
Securing ChildRestraints . . . . . . . . . . . . . . 3-48, 3-50
SecurityLight . . . . . . . . . . . . . . . . . . . . . . . . . .5-27Vehicle . . . . . . . . . . . . . . . . . . . . . . .2-14
Security, OnStar® . . . . . . . . . . . . . . 14-2ServiceAccessories andModifications . . . . . . . . . . . . . . . .10-3
Doing Your Own Work . . . . . . . .10-6Engine Soon Light . . . . . . . . . . . .5-19Maintenance Records . . . . . . .11-14Maintenance, GeneralInformation . . . . . . . . . . . . . . . . . . 11-1
Parts Identification Label . . . . .12-1Publications OrderingInformation . . . . . . . . . . . . . . . . 13-12
Scheduling Appointments . . . . .13-8Vehicle Messages . . . . . . . . . . . .5-51
Service Electric ParkingBrake Light . . . . . . . . . . . . . . . . . . . 5-22
Servicing the Airbag . . . . . . . . . . . 3-30ShiftingInto Park . . . . . . . . . . . . . . . . . . . . . .9-19Out of Park . . . . . . . . . . . . . . . . . . .9-20
Signals, Turn andLane-Change . . . . . . . . . . . . . . . . . 6-3
Specifications andCapacities . . . . . . . . . . . . . . . . . . . . 12-2
Speedometer . . . . . . . . . . . . . . . . . . 5-14Sport Mode Light . . . . . . . . . . . . . . 5-23StabiliTrakOFF Light . . . . . . . . . . . . . . . . . . . . .5-24
StartRemote . . . . . . . . . . . . . . . . . . . . . . . . 2-7
Starting and Stopping theVehicle . . . . . . . . . . . . . . . . . . . . . . . 9-17
Starting the VehicleMesssages . . . . . . . . . . . . . . . . . . . 5-52
Status ScreensCharging . . . . . . . . . . . . . . . . . . . . .9-47
Steering . . . . . . . . . . . . . . . . . . . . . . . . 9-6Wheel Adjustment . . . . . . . . . . . . . 5-6Wheel Controls . . . . . . . . . . . . . . . . 5-6
Storage AreasCargo Cover . . . . . . . . . . . . . . . . . . . 4-2Floor Console . . . . . . . . . . . . . . . . . 4-1Glove Box . . . . . . . . . . . . . . . . . . . . . 4-1Instrument Panel . . . . . . . . . . . . . . 4-1Umbrella . . . . . . . . . . . . . . . . . . . . . . . 4-2
Black plate (11,1)Chevrolet Volt Owner Manual - 2012
INDEX i-11
Storing the Tire Sealantand Compressor Kit . . . . . . . . . 10-67
Stuck Vehicle . . . . . . . . . . . . . . . . . . 9-11Sun Visors . . . . . . . . . . . . . . . . . . . . . 2-20Symbols . . . . . . . . . . . . . . . . . . . . . . . . . . ivSystemInfotainment . . . . . . . . . . . . . . . . . . . 7-1
System Operation . . . . . . . . . . . . . 9-21
TText Telephone (TTY) Users . . . 13-4Theft-Deterrent Systems . . . . . . . 2-15Immobilizer . . . . . . . . . . . . . . . . . . .2-15
TiresBuying New Tires . . . . . . . . . . . 10-54Chains . . . . . . . . . . . . . . . . . . . . . . 10-58Designations . . . . . . . . . . . . . . . 10-42Different Size . . . . . . . . . . . . . . . 10-55If a Tire Goes Flat . . . . . . . . . . 10-59Inflation Monitor System . . . . 10-48Inspection . . . . . . . . . . . . . . . . . . 10-51Lifting the Vehicle . . . . . . . . . . . . .10-3Messages . . . . . . . . . . . . . . . . . . . .5-52Pressure Light . . . . . . . . . . . . . . . .5-25Pressure Monitor System . . . 10-47Rotation . . . . . . . . . . . . . . . . . . . . 10-52
Tires (cont.)Sealant andCompressor Kit . . . . . . . . . . . 10-60
Sealant and CompressorKit, Storing . . . . . . . . . . . . . . . . 10-67
Sidewall Labeling . . . . . . . . . . . 10-41Terminology andDefinitions . . . . . . . . . . . . . . . . . 10-43
Uniform Tire QualityGrading . . . . . . . . . . . . . . . . . . . 10-55
Wheel Alignment and TireBalance . . . . . . . . . . . . . . . . . . . 10-57
Wheel Replacement . . . . . . . . 10-57When It Is Time for NewTires . . . . . . . . . . . . . . . . . . . . . . 10-53
Winter . . . . . . . . . . . . . . . . . . . . . . 10-40Total Vehicle Range . . . . . . . . . . . 5-16TowingGeneral Information . . . . . . . . . .9-58Recreational Vehicle . . . . . . . . 10-76Vehicle . . . . . . . . . . . . . . . . . . . . . 10-73
TractionControl System (TCS) . . . . . . . .9-33Control System (TCS)/StabiliTrak® Light . . . . . . . . . . . .5-24
Off Light . . . . . . . . . . . . . . . . . . . . . .5-24
Transportation Program,Courtesy . . . . . . . . . . . . . . . . . . . . . 13-8
Trip Odometer . . . . . . . . . . . . . . . . . 5-15Turn and Lane-ChangeSignals . . . . . . . . . . . . . . . . . . . . . . . . 6-3
UUltrasonic Parking Assist . . . . . . 9-38Umbrella Storage . . . . . . . . . . . . . . . 4-2Uniform Tire QualityGrading . . . . . . . . . . . . . . . . . . . . . 10-55
Universal Remote System . . . . . 5-62Operation . . . . . . . . . . . . . . . . . . . . .5-65Programming . . . . . . . . . . . . . . . . .5-62
Using This Manual . . . . . . . . . . . . . . . . ivUtility Interruption ofCharging . . . . . . . . . . . . . . . . . . . . . 9-52
VVehicleCanadian Owners . . . . . . . . . . . . . . . iiiControl . . . . . . . . . . . . . . . . . . . . . . . . 9-5IdentificationNumber (VIN) . . . . . . . . . . . . . . .12-1
Load Limits . . . . . . . . . . . . . . . . . . . 9-11Messages . . . . . . . . . . . . . . . . . . . .5-45

Black plate (12,1)Chevrolet Volt Owner Manual - 2012
i-12 INDEX
Vehicle (cont.)Personalization . . . . . . . . . . . . . . .5-53Reminder Messages . . . . . . . . . .5-53Security . . . . . . . . . . . . . . . . . . . . . .2-14Speed Messages . . . . . . . . . . . . .5-53Starting and Stopping . . . . . . . . .9-17Total Range . . . . . . . . . . . . . . . . . .5-16Towing . . . . . . . . . . . . . . . . . . . . . . 10-73
Vehicle CareStoring the Tire Sealantand Compressor Kit . . . . . . . 10-67
Tire Pressure . . . . . . . . . . . . . . . 10-46Vehicle IdentificationService Parts IdentificationLabel . . . . . . . . . . . . . . . . . . . . . . . .12-1
Vehicle Ready Light . . . . . . . . . . . 5-27Ventilation, Air . . . . . . . . . . . . . . . . . . 8-8Visors . . . . . . . . . . . . . . . . . . . . . . . . . 2-20Voltage Devices andWiring . . . . . . . . . . . . . . . . . . . . . . . 10-30
WWarningBrake System Light . . . . . . . . . . .5-22
Warning Lights, Gauges, andIndicators . . . . . . . . . . . . . . . . . . . . . 5-9
Warnings . . . . . . . . . . . . . . . . . . . . . . . . . ivCautions and Danger . . . . . . . . . . . .ivHazard Flashers . . . . . . . . . . . . . . . 6-3
Washer Fluid . . . . . . . . . . . . . . . . . 10-19Washer Fluid Messages . . . . . . . 5-53WheelsAlignment and TireBalance . . . . . . . . . . . . . . . . . . . 10-57
Different Size . . . . . . . . . . . . . . . 10-55Replacement . . . . . . . . . . . . . . . 10-57
When It Is Time for NewTires . . . . . . . . . . . . . . . . . . . . . . . . 10-53
Where to Put the Restraint . . . . 3-39
Windows . . . . . . . . . . . . . . . . . . . . . . 2-17Power . . . . . . . . . . . . . . . . . . . . . . . .2-18
WindshieldWiper/Washer . . . . . . . . . . . . . . . . . 5-7
WinterDriving . . . . . . . . . . . . . . . . . . . . . . . . . 9-9
Winter Tires . . . . . . . . . . . . . . . . . . 10-40Wiper Blade Replacement . . . . 10-25Wiring, High VoltageDevices . . . . . . . . . . . . . . . . . . . . . 10-30