2011 owner manual - arimedia.channelblade.com/eprowebsitemedia/3506/2011 mastercraft... · prostar...
TRANSCRIPT
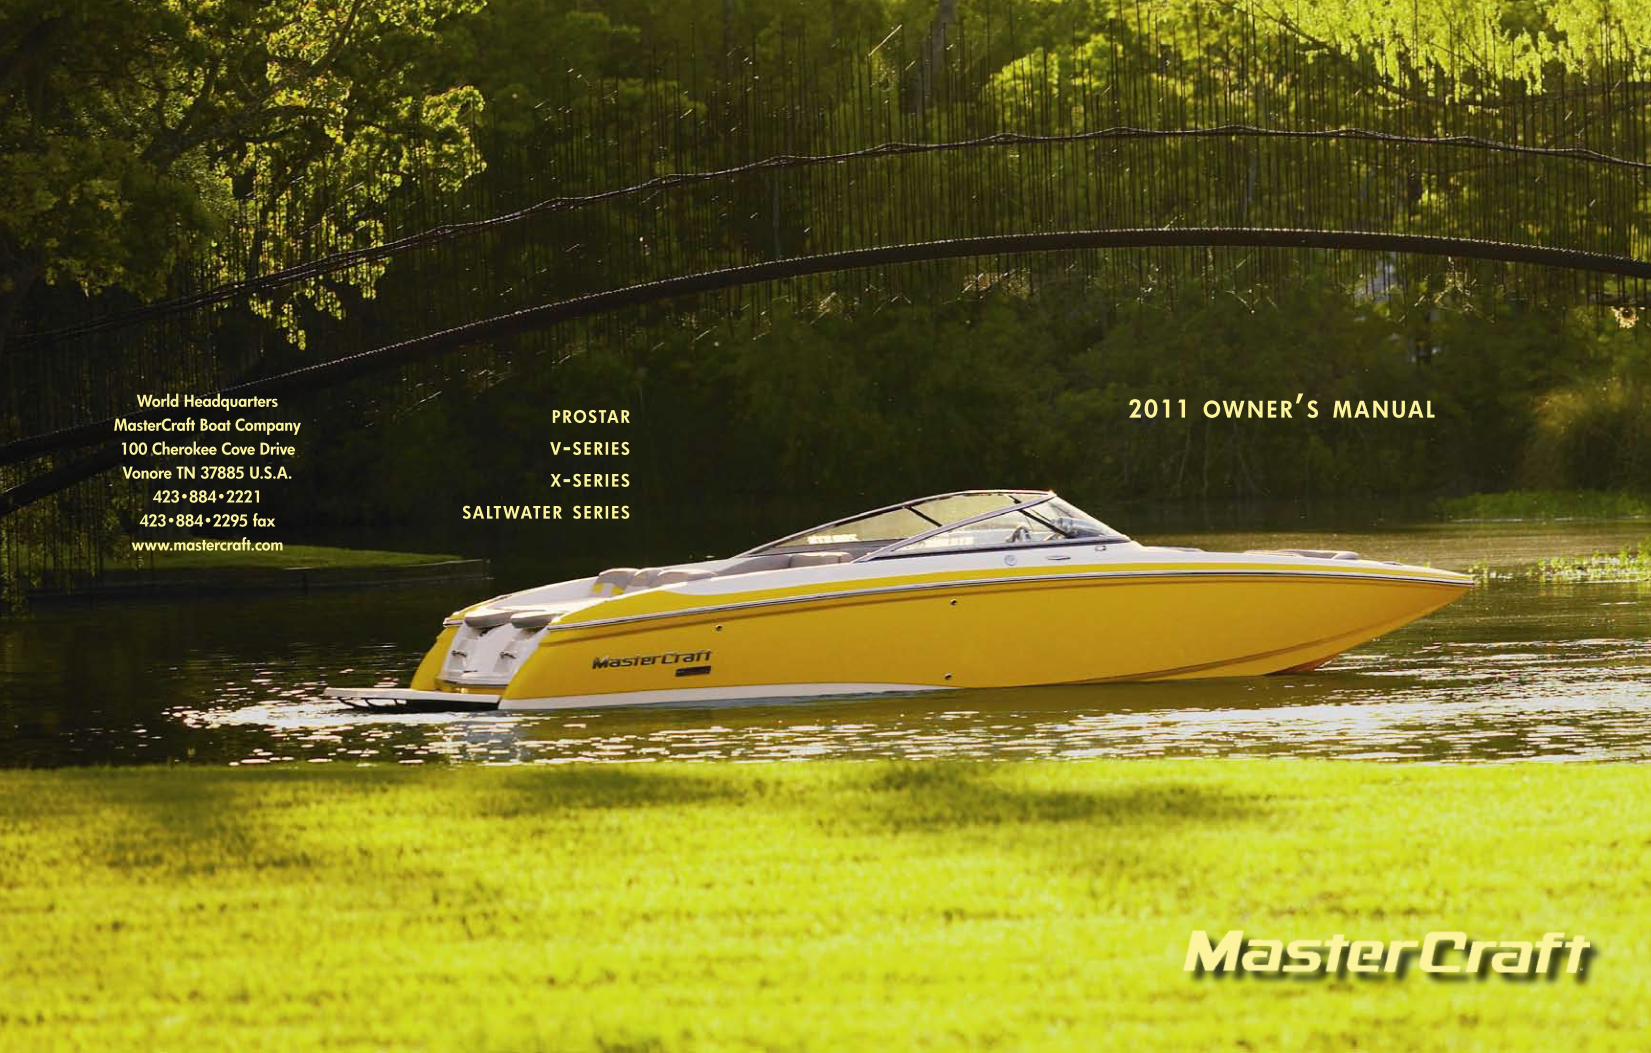
2011 owner’s manualprostar
v-series
x-series
saltwater series
World HeadquartersMasterCraft Boat Company100 Cherokee Cove DriveVonore TN 37885 U.S.A.
423•884•2221423•884•2295 fax
www.mastercraft.com

Congratulations on your boating choice! MasterCraft is the recognized world leader for inboard boats today and has been for over forty (40) years. The quality, innova-tion, selection and value of MasterCraft boats are unmatched in the industry.
Please take a few minutes to read this Owner’s Manual completely in addition to carefully reviewing any additional information provided in the accompanying packet. These publications will help to answer most of the remaining questions you may have regarding the new boat. If you have any additional questions after reading these items publications, please feel free to speak with your dealer. MasterCraft wants you to feel comfortable with your boat (and trailer, where applicable) from the very beginning of your experience as an owner of our products.
All information in this Owner’s Manual is based on the latest product information available at the time of printing. Because of our policy of continuous product im-provement, we reserve the right to make changes at any time, without notice, in specifications and models, and also to discontinue models. We also reserve the right to change specifications, parts or accessories at any time without incurring any ob-ligation to equip the same on models manufactured before the date of the change. MasterCraft recommends checking www.mastercraft.com periodically, specifically the Knowledge Center, for updates and additional information.
Due to changes in specifications, models, parts and/or accessories that may occur after publication of this Owner’s Manual, the Owner’s Manual may not cover every circum-stance that may arise in owning and operating a boat. Also, the illustrations used in this Owner’s Manual are intended only as representative reference views and may not depict actual model component parts. Information regarding certain on-board components furnished by suppliers other than MasterCraft, including the engine and power train components, is provided separately by the manufacturers of those components. This information is available through your dealer. A reasonable effort has been made by MasterCraft and its suppliers to provide the applicable information required to ensure a long-lasting and enjoyable boating experience.
Welcome Aboard!

Throughout this manual the terms “Danger,” “Warning,” and “Caution” appear, alerting the boat owner and/or operator to dangerous or potentially dangerous situations that may arise. Those terms have the following respective meanings whenever they appear herein:
This is the safety alert symbol. It is used to alert you to potential personal injury hazards. Obey all safety messages that follow this symbol to avoid possible injury or death.
DANGER indicates an imminently hazardous situation which, if not avoided, will result in death or serious injury.
WARNING indicates a potentially hazardous situation which, if not avoided, could result in death or serious injury.
CAUTION indicates a potentially hazardous situation which, if not avoided, may result in minor or moderate injury.
CAUTION used without the safety alert symbol indicates a potentially hazard-ous situation which, if not avoided, may result in property damage.
Failure to adhere to and comply with the safety dangers, warnings and cautions that ap-pear in this manual can lead to serious illness, injury or even death and/or damage to your boat or the prop-erty of others. Beyond these warnings, boaters have a personal responsibility to utilize a common sense approach to the boating experience, including keeping individuals off or near the swim platform and the stern area of the boat during the engine operation. Personal flotation devices (“PFDs”) save lives and ensure positive experiences. MasterCraft offers many proactive approaches to the boating experience, but the consumer is ultimately responsible for the positive and safe involvement in boating. Be sure to review the Boating Safety section of this manual, which immediately follows this section. Be-cause of the importance of these dangers, warnings and cautions, they are reprinted here, along with the pages on which you will find them. Please note that the safety information statements presented below are categorized for information purposes only, and are not presented in any particular order of importance. Each of the statements referenced below and in the other sections of this manual provide you with important safe-ty-related information and must be read and followed to avoid injury or damage, as applicable. We strongly encourage you to cross-reference and read the dangers, warnings and cautions within the context in which they are presented by reading and reviewing those sections.
Failure to comply with safety-related information and instructions may result in serious injury or death to you and/or others. Always use common sense when operating the boat or participating in any activities as-sociated with the boat, including, but not limited to, periods of time when the boat engine is shut down and the boat is not in operation. (Page 1-6)
Following the activation of the automatic fire suppression system or a hand-held fire extinguisher, a careful determination should be made as to whether the boat can safely be operated. If there is any doubt or concern whatsoever, the boat should be towed to shore and/or dock for service by an authorized MasterCraft dealer prior to operating again. Failure to follow these instructions could result in death or serious injury/illness. (Pages 1-3, 1-4)Opening an engine compartment when there is indication of a fire inside can cause the fire to flare up and/or spread, which may result in extensive damage or even sinking of the boat and/or serious injury or death to people on board. (Page 1-3)
Dangers, Warnings and Cautions
2011 Owners Manual...Dangers, Warnings and Cautions...Page ii

Gasoline is highly flammable and its vapors may ignite, resulting in fire or explosion. Be sure to keep all sparks and flames away from the area while inspecting the boat’s fuel system. (Page 17-2)
Gasoline is explosive. If a gasoline odor is present or gasoline is visually observed in the bilge area during inspection, DO NOT START YOUR ENGINE! Remove the ignition key from the igni-tion switch and call an authorized MasterCraft dealer for service. (Pages 7-1, 17-8)
Gasoline is extremely flammable and highly explosive under cer-tain conditions. Always stop the engine and never smoke or al-low open flames or sparks within fifty (50) feet of the fueling area when fueling. (Page 7-1)
Take care not to spill gasoline. If gasoline is spilled accidentally, wipe up all traces of it with dry rags immediately and dispose of properly on shore. (Page 7-1)
To prevent a possible explosion, operate the blower for at least four (4) minutes before starting the engine and always when at idle or slow-running speed. Explosive gasoline and/or battery fumes may be present in the engine compartment. Failure to do so may result in serious injury or death! (Pages 5-3, 10-1)
Carbon monoxide is a colorless, tasteless, odorless and poisonous gas that accumulates rapidly and can cause serious injury or death. Exposure to carbon monoxide can be fatal in a matter of minutes. Exposure to even low concentrations of carbon monoxide must not be ignored because the effects of exposure to carbon monoxide can build up and be just as lethal as high concentrations. Carbon monoxide from exhaust pipes of inboard or outboard engines may build up inside and outside the boat in areas near exhaust vents, particularly during slow-speed operations. STAY AWAY from these exhaust vent areas, which are located at the stern of the boat, and DO NOT swim or engage in any watersports or other activities in or near the stern area of the boat, includ-ing, without limitation, the swim platform and the rear sun deck, when the engine is in operation. Under no circumstances should the owner and/or operator allow persons to hold onto the swim platform while the engine is operating and the boat is in motion. These activities (sometimes known as “teak surfing” or “platform drag-ging,” where the participant holds onto the swim platform and is pulled through the water, and/or “body surfs” immediately behind the boat) are extremely dangerous, highly likely to result in death or serious bodily injury, and are a misuse of this product. (Pages 2-1, 6-8, 6-9)
The safety switch lanyard must be attached to the operator whenever the engine is running. Failure to do so may result in death or serious injury! (Page 5-5)
Never override or modify the engine emergency safety shut-off switch in any way. (Page 1-6)
Before starting the engine, open the engine compartment and check for gasoline fumes, fuel and oil leaks or the presence of fuel or oil in the bilge. (Page 10-1)
Do not tow more than two (2) persons at one time on a tow tower. The tow tower approved for use on your boat should be used only for water skis, wakeboards or recreational towables, and not for parasailing, kite flying or towing other boats. Do not add any attachments that are not approved for use on your MasterCraft boat. Do not climb on, sit on, stand on, jump off of or dive off of the tower. Never allow passengers to sit behind the tow rope attachment point. Never allow loose tow rope ends to dangle. Always be certain that all bolts are in place and tight before and during use. When the tower is up, watch for low obstacles such as tree limbs, bridges or power lines. (Page 1-7)
Information regarding the maximum number of people and/or additional weight to the boat is included in the Guide to Individual Models section of this Manual. It is the boat operator’s responsibility to ensure that the boat is never overloaded. Too much additional weight may cause the boat to overturn or sink, which can result in serious bodily injury or death. (Page 11-1)
Boat operators should never attempt to duplicate operational skills of professional drivers. When such ma-neuvers fail, it can result in serious injury or death. (Page 11-2)
Failure to comply with the requirement of operating the blower for at least four (4) minutes before starting the engine may result in serious injury or death to you and/or others. (Page 1-7)
Carbon monoxide is emitted from the engine’s exhaust system. Never run the engine without proper ventila-
2011 Owners Manual...Dangers, Warnings and Cautions...Page iii
tion. Do not run the engine in a confined space or where fumes may be trapped. Do not run the engine when the boat is stationary in calm wind conditions. (Page 5-8)
Carbon monoxide is emitted from the engine’s exhaust system. Never run the engine without proper ventila-tion. Do not run the engine in a confined space or where fumes may be trapped. (Pages 6-5, 6-8)
DO NOT launch or operate the boat if any problem is found during the Safety Check. A problem could lead to an accident during the outing, resulting in death or serious injury. Any and all problems should receive atten-tion immediately. See your authorized MasterCraft dealer’s service department for assistance. (Page 8-1)
Battery electrolyte fluid is dangerous. It contains sulfuric acid, which is poisonous, corrosive and caustic. If elec-trolyte fluid is spilled or placed on any part of the human body, immediately flush the area with large amounts of clean water and immediately seek medical attention. (Page 17-1)
When charging, batteries generate small amounts of dangerous hydrogen gas. This gas is highly explosive. Keep all sparks, flames and smoking well away from the area. Failure to follow instructions when charging a battery may cause an electrical charge or even an explosion of the battery, which could result in death or serious injury. (Pages 6-1, 17-2, 17-3)
The engine box serves as a machinery guard. The engine must be OFF whenever the box is open. Clothing or body parts can get caught in moving parts, causing death or serious injury. Keep away from moving parts! (Pages 5-6, 17-3, 17-4, 17-5)
Adding additional ballast to a MasterCraft boat is not recommended, and can result in impaired visibility, di-minished handling characteristics and instability when operating your boat, and may result in potential struc-tural and/or engine damage to the boat, which damage will not be covered by your warranty. (Page 11-1)
Use of improper parts may cause component or engine failure. Such failure may result in death or serious injury! (Page 13-1)
All boats have weight limits. Failure to adhere to the posted limits can cause operation instability and/or the boat to sink. This may result in serious injury or death, as well as significant damage to the boat, which will not be covered by warranty. (Pages 2-1, 6-6)
All boats have weight limits. Failure to adhere to the posted limits can cause operation instability and/or the boat to sink. This may result in serious injury or death, as well as significant damage to the boat, which will not be cov-ered by warranty. WhEN ThE PlUG ’N PlAy bAllAsT bAGs ARE fIllED, ThE ADDITIONAl WEIGhT Of ThE bAGs AND WATER MUsT bE sUbTRACTED fROM ThE MAxIMUM WEIGhT CAPACITy Of ThE bOAT , WITh ThE REMAINDER lEfT fOR PAssENGERs AND GEAR! ! (Page 6-6)
If the Plug ’n Play bags are removed from the boat, the plumbing plugs must be reinstalled in the boat to pre-vent unwanted and potentially dangerous intrusive of water into the boat. This water can result in the boat sinking, which can result in serious injury or death! (Page 6-6)
When boats are in motion, operators and passengers should always be seated on upholstered designated occupant seating. No other ar-eas should be used during operation, including, but not limited to, the gunwales, towers, sun pads, engine boxes, or any area that is not clearly intended for seating while the boat is underway. People can become dislodged from locations that are not actual seating, which could result in injury during boat motion. (Page 6-7)
While operating attitude adjustment plates use caution. Improper use of plates can cause accidents, which may result in serious in-jury or death. While the boat is underway do not move one plate up or down significantly as this may cause listing. While at higher speeds do not over-trim, as this will cause the bow to lower quickly, resulting in a reduction of speed and may cause the boat to veer. When in following seas or when running an inlet, the plates should be fully retracted. This will allow for optimal performance.
2011 Owners Manual...Dangers, Warnings and Cautions...Page iv

ELECTRO-MECHANICAL ACTUATORS PROVIDE AN INSTANT RESPONSE. WHEN MAKING ADJUST-MENTS, USE SHORT MOMENTARY TAPS OF THE SWITCH. (Page 5-2)
While operating a surf tab plate use care. Improper use of plates can cause accidents, which may result in serious injury or death. While at speeds over 20 mph, the surf tab cannot function at greater than 25 per-cent of maximum movement as more extension can cause instability. ELECTROMECHANICAL ACTUATORS PROVIDE AN INSTANT RESPONSE. WHEN MAKING ADJUSTMENTS, USE SHORT MOMENTARY TAPS OF THE SWITCH. (Page 5-10)
Improperly stored anchors and/or anchor line that has been improperly re-wound through the windlass sys-tem, may create a hazardous situation. People on-board can trip on improperly stored materials, which can result in injury. Improperly stored materials can also move too freely during boat operation and make contact with individuals, again causing injury. Properly store all anchor and lines whether the boat is in operation or not, unless the anchor and line are in use. (Page 6-1)
The platform must be raised and locked into position for use of the platform while boating. No one should be allowed on the platform until the platform is securely locked in place and the engine is OFF. Failure to do so may result in serious injury or death! (Page 6-10)
MasterCraft has determined that for the tower utilized on the current models, the total weight of all acces-sories mounted on the tower should never exceed 85 pounds, regardless of whether the accessories are Mas-terCraft-approved and supplied or have come from an aftermarket supplier. Exceeding this restriction can result in tower failure, which could result in serious injury or death to the boat operator and/or passengers. (Page 6-11)
Engaging the engine synchronization functionality requires prac-tice to master. Because the boat will be in gear and will move dur-ing the process, even after mastering the maneuver boat operators should synchronize engines only on bodies of water of sufficient size to accomplish the maneuver without making contact with other vessels or with inanimate objects, which could cause serious bodily injury or significant damage to the boat. (Page 5-6)
Ski/wakeboard rope should never be attached to anything but ap-proved pylons and towers as it may otherwise break free or cause other items to break under duress. People onboard, as well as ski-ers and/or wakeboarders could be injured. Also, operators and pas-sengers should always pay attention to the rope when the boat is underway as rope can snap back into the boat, which could result in injury. (Page 6-9)
Completely filling the fuel tank prior to storage and then sealing the fuel tank vent does not allow room for necessary expansion. This can result, in extreme conditions, in fuel tank rupture. Such release of fuel into the boat and potentially into the storage area could result in substan-tial damage to the boat and contact with any spark (such as a flame-producing pilot light in a heater) could also result in property damage and serious injury or death. (Page 18-2)
Be sure all fasteners used are approved and rated for marine use. Most fasteners used on MasterCraft boats are stainless steel or specially coated to resist corrosion. (Page 13-1)
All replaced fuel components must meet United States Coast Guard (“USCG”) and American Boat & Yacht Council, Inc. (“ABYC”) standards, and must be Underwriter’s Laboratory (“UL”)-approved. Inferior quality components pose a serious safety threat to you and others, and the use of inferior components may result in serious injury or death. Resulting damage may void the warranty. (Page 17-8)
Do not continue to run the engine if the oil pressure is low. If you do, the engine may become so hot that it, or surrounding components, could catch fire. You or others could be burned and the boat seriously damaged. Check your oil level and add an appropriate amount of approved motor oil before operating again or have your boat serviced by your local authorized dealer’s service department. Note that damage to your engine from inappropriate oil levels can be costly to repair. Such damage is not covered by your warranty. (Page 5-5)
2011 Owners Manual...Dangers, Warnings and Cautions...Page v

Some engine parts become very hot during operation. This inspec-tion must be completed while the engine is cool to prevent burns to your skin. Perform this task before starting the boat.(Pages 17-2, 17-6)
Towers should never have a total aggregate weight of accessories exceeding 85 lbs. (U.S.) total. Excessive weight can cause tower failure and the collapse of a tower or the disconnection of the tower from the deck, which could result in serious bodily injury or damage to the boat that is not covered by warranty. (Page 1-7)
Prior to operation of the boat, verify that the mirror hardware is secure. Failure to do so may result in the mirror detaching from the windshield extrusion. The mirror could hit the operator or a passenger, resulting in injury. (Page 6-5)
Convertible seat backs should always be in the forward-facing po-sition when the boat is underway. Anyone seated facing aft could become dislodged when the boat is underway, which could result in sliding off the seating and making contact with the transom or
swim platform. Jump seats should be secured against the deck with a lock pin accessible under the observer seat to avoid dislodging passengers while the boat is underway. Con-vertible seat backing should always be secured prior to use. Care should be taken to avoid pinching fingers or other skin when sliding the backing. (Page 6-8)
When boating, avoid using the windshield as an aid for balance or getting out of a seat. This causes undue stress to the window frame and could damage it, which may not be covered under warranty. (Page 8-1)
To ensure proper break-in and lubrication, boat owners should not remove the factory break-in oil until after the initial ten (10) hours of operation. At that time, an oil change should be performed on the Indmar engines by an authorized MasterCraft service technician at an authorized MasterCraft dealer. (Page 9-1)
DO NOT use the ski pylon or any portion of any tower for lifting. They are NOT designed to be used as a cen-tral lifting point. Also, DO NOT use the stern ski tow as a lifting ring. The deck may be damaged. See the Stor-age Cradle sub-section of this section. Also never lift a boat with water in the bilge or containing a water-filled device such as a ballast system or sack. The extra stress will put an excessive load on the hull and lifting equip-ment that may seriously damage the boat. Such damage may not be covered by the warranty. (Page 12-1)
Continued operation after the warning light has illuminated may cause severe engine damage. This will void your warranty. (Page 10-3)
Because of the complexity of preparing a boat for proper winter storage, as well as the possibility of extreme damage to the drive train if a preparation error was made during winterization, MasterCraft recommends scheduling an appointment with an authorized MasterCraft dealer’s service department to permit a techni-cian to perform all winterization procedures. (Page 18-1)
Add-on equipment may adversely affect the alternator output or overload the electrical system. Such damage may not be covered by the warranty. (Page 17-2)Failure to follow the engine oil recommendations listed in the engine manual can cause additional engine wear and increase the possibility of engine component failure. Damage to the engine due to incorrect oil us-age can be costly to repair, and is not covered by the warranty! (Page 9-1)
Do not operate the starter motor continuously for more than fifteen (15) seconds without at least two (2) minutes for a “cool-down” period. Failure to do so may cause the starter to overheat, resulting in damage. Failure to release the ignition key after the engine has started may cause damage to the starter motor and drive. (Page 10-1)
Allowing the fuel level in the fuel tank to fall below one-quarter of a tank full may affect the reliability of the fuel pump or result in damage to the fuel pump, which is not covered under warranty. (Pages 5-7, 7-1)
2011 Owners Manual...Dangers, Warnings and Cautions...Page vi
Damage to the engine by use of low-quality gasoline or gasoline with an octane rating below the minimum level listed will void the warranty on the boat. (Page 7-2)
Fuels that are blended to contain methanol or wood alcohol should not be used. These fuels can corrode metal parts in the fuel system and engine. Fuels that contain methanol will damage the engine. Damage caused by the use of unapproved fuels is not covered by warranty. (Page 7-2)
Extended storage with fuel in the system can affect the fuel’s stability and may require system inspection and fuel filter replacement when the unit is placed back into service. (Page 7-2)
Damage to the engine by use of low-quality gasoline or gasoline with an octane rating below the minimum level listed for ILMOR MV8 engines will void the warranty on the engine. (Page 7-3)
Extended storage with fuel in the system can affect fuel stability and may require system inspection and fuel filter replacement when the boat returns to service. (Page 7-3)
Lifting slings must never contact shafts, struts or hardware protruding from the hull. Damage may result that would void the warranty. (Page 12-1)
When the boat is out of the water, it is important to support the hull correctly to avoid any hull damage. Such damage may void the warranty. (Page 12-1)
Crossing cables or jumper cables may result in damage to the electrical components due to incorrect battery connections. Such damages may not be covered by your warranty. (Page 17-4)
Attention must be paid to any leakage occurring in the propeller shaft log area. Water intrusion into the transmission, which can happen if excessive leakage is occurring may cause serious damage. Such damage may not be covered by the warranty. (Page 17-2)
Engines should always be operated within engine manufacturer guidelines. Failure to do so may cause sig-nificant damage to the engine and drive train and is not covered under warranty! (Page 11-3)
Continuing to operate the boat while the temperature is above normal operating parameters may cause seri-ous damage to your engine. Damage to your engine resulting from operating the engine in an overheated condition can be costly to repair. Such damage is not covered by your warranty! (Page 5-11)
Exposure to salt water will cause corrosion leading to significant damage to stainless steel and chrome parts. Failure to thoroughly rinse salt water from all hardware, and to apply protective oil after each exposure to salt water, will accelerate the corrosion of hardware and will void your warranty. (Page 13-1)
The anchor, sometimes accompanied by a windlass, has been provided to assist boaters in remaining in a chosen location. Note that use of the anchor system will not guarantee a properly anchored boat or that the boat will remain in a stationary position. Environmental, bottom conditions, current and tidal conditions must be taken into consideration when anchoring the boat. Only properly trained operators should set the anchor for this system. Establishing a secure anchorage requires practice. Damage to your boat may result due to improper anchoring techniques. (Page 6-1)
The platform must be raised and locked into position for transportation of the boat, as well as use of the plat-form while boating. Leaving the platform down may result in damage to the boat transom during transport that will not be covered by the warranty! (Page 6-6)
Fuel systems on all boats MUST be properly prepared for storage periods exceeding two (2) weeks, as outlined in this Owner’s Manual. Failure to do so will void the warranty. (Page 18-2)
2011 Owners Manual...Dangers, Warnings and Cautions...Page vii

Welcome Aboard .................................................................................. iDangers, Warnings and Cautions ....................................................... ii
safety Knowledge Boating Safety ..............................................................................1-1 General Precautions .....................................................................1-1 Safety Equipment .........................................................................1-2 Required Equipment ....................................................................1-2 Fire Extinguishers .......................................................................1-2 Fire Suppression & Extinguishing (All V-Drives) .....................1-3 Fire Suppression & Extinguishing (Others) ..............................1-3 Fire Port ......................................................................................1-4 Personal Flotation Devices (PFDs) ............................................1-4 PFD Accessibility ........................................................................1-4 Sound Producing Devices ...........................................................1-5 Visual Distress Signals ................................................................1-5 Registration, Numbering and Documentation .........................................................................1-5 Operator’s License ........................................................................1-6 Recommended Equipment ...........................................................1-6 Safety Afloat ..................................................................................1-6 Skiing and Wakeboarding Safety .................................................1-7 Warning Plates and Labels ...........................................................1-7 Operator’s Responsibilities ..........................................................1-8 Float Plan ......................................................................................1-8 Nautical Charts .............................................................................1-8 Weather .........................................................................................1-8 Staying Afloat ...............................................................................1-9 Cold Water Survival ......................................................................1-9 Hypothermia ................................................................................1-9 Immersion Suits ...........................................................................1-9 Inflatable Life Rafts ......................................................................1-9 Anchoring ...................................................................................1-10 Communications ........................................................................1-10 Law Enforcement........................................................................1-10
Common Sense Approach ............................................................2-1
Rules of the Open Water ..............................................................3-1
Steering and Sailing Rules/Sound Signals ...................................3-1 Rules When Encountering Vessels ..............................................3-1 Meeting .........................................................................................3-1 Crossing ........................................................................................3-2 Overtaking ....................................................................................3-1 Other Special Situations ..............................................................3-2 Sailing Vessel Right-of-Way .........................................................3-2 Fishing Vessel Right-of-Way ........................................................3-2 The General Prudential Rule ........................................................3-2 Reading Buoys and Other Markings ............................................3-2
Guide to Individual Models ProStar 190 .....................................................................................4-2 ProStar 197, X-7 .............................................................................4-4 ProStar 214, X-14 ...........................................................................4-6
2011 Owners Manual...Dangers, Warnings and Cautions...Page viii
ProStar 214, X-14 V-Drive .............................................................4-8 X-1 .................................................................................................4-10 200V, X-2 .......................................................................................4-12 215V, X-15 ....................................................................................4-14 225V, X-25 ....................................................................................4-16 235V, X-35 ....................................................................................4-18 245V, X-45 ....................................................................................4-20 255V, X-55 ....................................................................................4-22 X-Star ............................................................................................4-24 280V, X-80 ....................................................................................4-26 CSX 220 .........................................................................................4-28 CSX 265 .........................................................................................4-30 Instrument Panels ........................................................................4-32 Measurements ..............................................................................4-33 Instrument Gauges and Switches ...............................................5-1 12-Volt Receptacle ........................................................................5-1 Accessory Switches .......................................................................5-1 Aft Light Switch ............................................................................5-1 AM/FM Stereo, CD Player, Remote Control iPod and MP3 Player Connections ............................................5-1 Attitude Adjustment or Trim Tab Switch....................................5-2 Ballast Empty/Fill Switches .........................................................5-3 Manual and Automatic Bilge Pump Switch .................................5-3 Blower Switch ...............................................................................5-3 Circuit Breakers ............................................................................5-3 Courtesy Lights Switch ................................................................5-4 Cruise Control Gauge ...................................................................5-4 Display Selector Switch ................................................................5-4 Dual Battery Operation Switch....................................................5-4 Engine Emergency Safety Stop Switch ........................................5-5 Engine Hatch Switch ....................................................................5-5 Engine Oil Pressure Gauge ...........................................................5-5 Engine Synchronizing Switch ......................................................5-6 Fuel Gauge ....................................................................................5-7 Heater Switch................................................................................5-7 Horn ..............................................................................................5-7
Table of Contents
Ignition Key Slot ...........................................................................5-7 Instrument Panel Gauge Backlighting Switch ............................5-8 Low Voltage Battery Alarm ..........................................................5-8 Navigation/Anchor Lights Switch ...............................................5-8 Other Alarms ................................................................................5-8 Refrigerator Switch ......................................................................5-8 Seat Heat Switches .......................................................................5-9 Shift/Throttle Control ..................................................................5-9 Shower and/or Slick Boot Switch ..............................................5-10 Sink Switch .................................................................................5-10 Speedometer ...............................................................................5-10 Surf Tab .......................................................................................5-10 Tachometer .................................................................................5-10 Temperature Gauge ....................................................................5-10 Tower Lights Switch ...................................................................5-11 Underwater Lights Switch .........................................................5-11 Voltmeter ....................................................................................5-11 Wash Down Switch .....................................................................5-11 Variations in Gauges and Switches ............................................5-11 Multi-Function Gauge ................................................................5-12 Video Display Gauge ...................................................................5-12 The BIG ........................................................................................5-15
Comfort and Convenience ...........................................................6-1 Anchor and Windlass ...................................................................6-1 Battery Charger ............................................................................6-1 Canvas Covers ...............................................................................6-2 Coolers ..........................................................................................6-2 Fire Suppression and Extinguishing ............................................6-2 GPS and Chartplotter ...................................................................6-3 Head 6-3 Heater ............................................................................................6-4 Hydraulic Steering System ...........................................................6-5 Ladder ...........................................................................................6-5 Lighting .........................................................................................6-5 Mirrors ..........................................................................................6-5 Livewell/KillBox/Catch Box .........................................................6-6 Plug ’n Play ....................................................................................6-6 Refrigeration .................................................................................6-7 Seat Heaters ..................................................................................6-7 Seating...........................................................................................6-7 Shower or Wash Down .................................................................6-8 Ski/Wakeboard Rope ....................................................................6-9
Stereo Equipment .........................................................................6-9 Swim/Boarding Platform .............................................................6-9 Tables ..........................................................................................6-10 Towers .........................................................................................6-10 Video Screen ...............................................................................6-11 Water Heater ...............................................................................6-11
Preparation Using Care When Fueling.............................................................7-1 Indmar Engines ............................................................................7-2 What Type of Gasoline To Use .....................................................7-2 When the Boat Is Not Used for a While ......................................7-2 Using Oxygenated Fuels or Fuels with Alcohol ...........................7-2 Fuels Outside the U.S. and Canada ..............................................7-2 Volkswagen Diesel Engine ...........................................................7-2 ILMORMARINE Engines .............................................................7-3 What Type of Gasoline To Use .....................................................7-3 Using Oxygenated Fuels or Fuels with Alcohol ...........................7-3 When the Boat Is Not Used for a While ......................................7-3 Fuels Outside the U.S. and Canada ..............................................7-3
Safety Checks and Services .........................................................8-1 Before Each Operation .................................................................8-1 During Operation .........................................................................8-1 After Operation ............................................................................8-1
New Boat Break-In .......................................................................9-1 First Hours of Operation..............................................................9-1 After Break-In ...............................................................................9-1
Starting and Basic Operation ..................................................10-1 Before Starting ...........................................................................10-1 Starting the Engine ....................................................................10-1 Shifting Gears .............................................................................10-2 Underway ....................................................................................10-3 Stopping ......................................................................................10-3
Operational Hints ......................................................................11-1 Loading .......................................................................................11-1 Emergencies ................................................................................11-1 Courtesy ......................................................................................11-1 First Time Operation ..................................................................11-1 Basic Maneuvering .....................................................................11-2 High Speed Operation ................................................................11-2 Unusual Operating Conditions ..................................................11-3 Docking and Tie-Up ....................................................................11-3
Care and Maintenance Lifting the Boat ...........................................................................12-1 Using Lifting Eyes .......................................................................12-1 Using Lifting Slings ....................................................................12-1 Storage Cradle .............................................................................12-1
Corrosion Prevention .................................................................13-1 Galvanic Corrosion .....................................................................13-1 Salt Water Corrosion ..................................................................13-1 Marine Growth ...........................................................................13-1 Stainless Steel and Chrome ........................................................13-1
Cleaning the Boat .......................................................................14-1 Hull . 14-1 Upholstery ..................................................................................14-1
2011 Owners Manual...Dangers, Warnings and Cautions...Page ix

Carpet ..........................................................................................14-2 Teak Wood ...................................................................................14-2 Fiberglass Swim Platform ..........................................................14-3 Windshield ..................................................................................14-3 Canvas Covers .............................................................................14-3 Enclosed Head ............................................................................14-4 Slick Boot ....................................................................................14-4 Acceptable Upholstery Cleaners ................................................14-4 Unacceptable Upholstery Cleaners ............................................14-5
MasterCraft Boat Care Products ..............................................15-1 All Purpose Cleaner ....................................................................15-1 Boat Cleaner & Polish .................................................................15-1 Vinyl Dressing .............................................................................15-1 Glass Cleaner ..............................................................................15-1 Bilge Cleaner ...............................................................................15-1 Hull Cleaner ................................................................................15-1 Spray Wax....................................................................................15-1 Boat Wash & Wax .......................................................................15-2 Microfiber Detailing Cloths .......................................................15-2 Cleaning & Detailing Kit ............................................................15-2 Marine Motor Oil & Filters ........................................................15-2
Scheduled Maintenance Service ...............................................16-1 Frequency and Scheduled Maintenance ....................................16-1 New Boat Break-In ......................................................................16-1 Before Each Use ..........................................................................16-1 After Each Use ............................................................................16-2 Quarterly (Every 50 Hours) .......................................................16-2 Annually (Every 100 Hours) ......................................................16-2
Scheduled Maintenance .............................................................17-1 Before Each Use (Prior to Starting the Engine) .............................17-1 Inspect Seacock Strainer ..........................................................17-1 Inspect Battery Connections & Hold-Downs ..........................17-1 Inspect Throttle & Shift Cables ................................................17-2 Inspect Fuel System for Leaks .................................................17-2 Inspect Exhaust System for Leaks ...........................................17-3 Before Each Use (After Starting the Engine) Check Battery is Fully Charged .................................................17-3 Inspect the Propeller Shaft Log ...............................................17-4 Inspect Fuel System for Leaks .................................................17-4 Inspect Exhaust System for Leaks ...........................................17-3 After Each Use ..............................................................................17-5 General Cleaning and Storage ..................................................17-5 Inspections ................................................................................17-5 Quarterly (Every 50 Hours) .........................................................17-5 Lubricate Engine Starter Gear & Shaft ....................................17-5 Annually (Every 100 Hours) .........................................................17-6
Annual Maintenance ................................................................17-6 Check Engine Mounts ..............................................................17-6 Check Propeller Shaft Coupling Alignment ............................17-6 Inspect Exhaust Flaps for Damage ..........................................17-7 Lubricate Steering System........................................................17-7 Lubricate Shift & Throttle System ...........................................17-7 Check Ballast Pump Impeller ...................................................17-7 Inspect Complete Fuel System for Leakage .............................17-7 Fire Extinguisher and Suppression Units ................................17-8
Storage and Winterization .......................................................18-1 General Preparation ...................................................................18-1 Fuel System Treatment ..............................................................18-1 General Power Package Preparation ..........................................18-1 Other Winterization Preparations ............................................18-2 Ballast System Preparations ......................................................18-3 Re-Activating the Boat After Storage ........................................18-3 Propeller Maintenance ..............................................................19-1 Checking/Repairing Propellers ..................................................19-1 Changing Propellers ...................................................................19-1
Guide to Troubleshooting ..........................................................20-1
Warranty Limited Warranty Statement ...................................................21-1
Warranty Registration and Transfer ......................................22-1
service log ...................................................................................23-1 Index . ............................................................................................24-1
2011 Owners Manual...Dangers, Warnings and Cautions...Page x

TheprecautionslistedinthisOwner’sManualandontheboatarenotall-inclusive.Ifaprocedure,meth-od,toolorpartisnotspecificallyrecommendedbyMasterCraft,usingitmayplaceyouandothersinanun-safesituation;inaddition,youmayrenderyourwarrantyvoid.Remember:Always use common sense when operating, servicing or repairing the boat! Observingthesafetyrecommen-dationsfoundinthisOwner’sManu-al iscritical tokeepingyourboatingexperienceassafeaspossibleduringroutineoperation.Yourfailuretodoso may result in severe personal in-jury or death to you and/or others.Usecautionandcommonsensewhenoperatingyourboat.Donotevertakeunnecessarychances!
General Precautions Be certain that all operators ofyourboatareawareofthesafetyin-formationwithinthisOwner’sMan-ualandthattheyuse ittoconformtoboatsafetyprinciples. Boating safety starts with athorough understanding of boatoperations. In addition to carefulreviewofthisOwner’sManual,youshould also be aware that many
This is the safety alert symbol. It is used to alert you to potential personal injury hazards. Obey all safety messages that follow this symbol to avoid possible injury or death.
DANGER indicates an imminently hazardous situation which, if not avoided, will result in death or serious injury.
WARNING indicates a potentially hazardous situation which, if not avoided, could result in death or serious injury.
CAUTION indicates a potentially hazardous situation which, if not avoided, may result in minor or moderate injury.
CAUTION used without the safety alert symbol indicates a potentially hazardous situa-tion which, if not avoided, may result in property damage.
Your safety, as well as the safety of others with and around you, is a directresultofhowyouoperateandmaintainyourboat.You—andanyonewhowillbeoperatingthisboat—shouldreadandseektofullycomprehendthisOwner’sManual,andanyadditionalinformationprovidedbycomponentmanufacturersandsuppliers.Makesurethatyouunderstandallofthecontrolsandoperatinginstructionsbeforeattemptingtooperatetheboat. Improper operation is extremely dangerous! ThebasicsafetyrulesareoutlinedinthissectionoftheOwner’sManual.Additionalprecautionsthrough-outtheManualarenotedbythefollowingsymbols:
Safety Knowledge
2011 Owners Manual...Safety Knowledge...Page 1-1

2011 Owners Manual...Safety Knowledge...Page 1-2
sourcesofhelpfulinformationareavailable.MasterCrafturgesyoutopursueadditionaltrainingpriortotheindependentoperationofyourboat.However,trainingatanytimefromrecognizedboatingand/orsafetyorganizationsisbeneficial. Thefollowingisalistingofafewagenciesandorganizationsthatoffersafetytrainingand/orinformation:
American Red Cross, National HQ8111 Gatehouse Road, 6th Floor
Falls Church VA 22042(202) 737-8300
www.redcross.org
U.S. A. Water Ski Association1251 Holy Cow RoadPolk City FL 33868
(863) 324-4341www.usawaterski.org
Boat Owners Association of the United States
880 South Pickett StreetAlexandria VA 22304
(703) 823-9550www.boatus.com
National Safe Boating Council2550 M Street NW, Suite 425
Washington DC 20037(202) 296-4588
www.safeboatingcouncil.org
U.S. Coast Guard Auxiliary2100 Second Street SW
Washington DC 20593-001(202) 267-1001www.uscg.mil
Safety Equipment Federal law requires certain safety equipment to be on-board your boat at all times. Responsible boaters carry additional equipment in case of emergency. It is your responsibility to check with the lo-cal boating authorities for any additional requirements and/or equipment over and above the federal requirements.
Required Equipment YourMasterCraftboathasbeenequippedatthefactorywithmostofthefederallyrequiredsafetyequip-mentforinlandwaters(ClassII,26-foot-to-40-footwatercraft).Thisequipmentincludes:• ABYC-approved(AmericanBoat&YachtClub)marinemufflerswithwaterinjection;• USCG-approved(UnitedStatesCoastGuard)marineflamearrestor;• USCG-approvedengineboxventilationwithsparklesspowerblower;• ABYC-approvedelectrichornsound-warningdevice;• USCG-approvedinlandlighting.
Fire Extinguishers TheenginecompartmentofallV-driveandtheCSX265modelsisequippedwithanautomaticfiresuppressionsystemwithamanualoverridethatusesacleanagentcanis-ter,whichishousedintheenginecompartmentandisintegratedwiththefiresuppressionsystem.ThedirectdriveandCSX220modelsareequippedwithafireport,intowhichthecontentsofaclean-agentcanistercanbereleasedintotheenginecompartment. Exceptassetforthbelow,youarealsorequiredbylawtohaveonboardone(1)five-pound,drychemicalfireextinguisherratedforTypeA,BandCfires.The lawrequiresthatforallboatsmorethan26feetinlength,whichincludesthe280V,X-80andCSX265models,youmusthaveonboardtwo(2)five-pound,drychemicalfire

Upper left: FM-200 left: FE-241
extinguishers.Thedrychemicalfireextinguisherisoptionalequipment,whichisnotautomaticallyincludedinyourboatfromthefactory,butitcanbeorderedfromMasterCraftwithyourboatandcanalsobepur-chasedfromanauthorizedMasterCraftdealer. Ifanyofthefiresuppressionsystemcanistersonboardyourboataredischarged(whetheracanisterinanautomaticsystemoraportablefireextinguisher),thentheymustbereplaced.Theautomaticfiresuppres-sionsystemavailableonallV-driveandCSX265modelshasanindicatorlightatthehelmthatwillbegreenifthesystemisfullychargedandwillberediftheautomaticfiresuppressionsystemhasbeendischarged.Ifthecleanagentcanisterassociatedwiththeautomaticfiresuppressionsystemorthecleanagentcanisterusedinconnectionwithafireporthasbeendischarged,thenyoumustcontactyourauthorizedMasterCraftdealertoobtainareplacementforthecleanagenttypeofcanister.Ifthedrychemicalfireextinguisherhasbeendischarged,thenyoumaypurchaseareplacementfive-pounddrychemicalfireextinguisherthatisratedforTypeA,BandCfiresfromanauthorizedMasterCraftdealerorfromanothersource. Fireextinguishersrequireperiodicmaintenance.Monthly,eachfireextinguisheronyourboatshouldbeex-aminedtobesurethatthesealsandtamperindicatorsarenotbrokenormissing.Thepressuregaugesorindica-tors,ifapplicable,shouldreadintheoperablerange.Thereshouldbenoobviousphysicaldamage,rust,corrosion,leakageorcloggednozzles.Additionally,iftheextinguisherhasnotbeenused,itshouldbeweighedannuallytoassurethattheminimumweightasstatedonthelabelstillexists.Anyfireextinguisherthathasbeenpartiallyemptiedmustbereplacedortakentoaqualifiedfireextinguisherservicingcompanyforrecharging.
Fire Suppression and Extinguishing (All V-Drives)Automatic Fire Suppression AllMasterCraftV-drivesareequippedwithanautomaticfiresuppressionsystem.Theautomaticsystem operates from sensors in the engine room and will automatically release a clean-agent,gaseouschemicalthatdoesnotleaveresiduebehind.Inboatssolddomestically,thisistheFE-241system;internationally,itistheFM-200system.Itisalsopossibletoactivatethesystemmanually.Pullthepinshowninthephotobelowwiththeredtag,andthenpulltheredfirehandletosetthesysteminoperation. Incaseofanenginecompartmentfire,shutdowntheengineandblowersbeforemanualdis-charge,or immediately followingtheautomaticdischarge.Boatsareequippedwithadischargeindicationlightattheinstrumentpanel. Afterthesuppressionsystemhasbeenused,thefireextinguishercanisterwillbeempty.Theboatowner/operatorshouldhavethecanisterreplacedassoonaspracticable. V-drive boats have also been specified to carry a hand-held 2.5 lb. monoammonium phos-phateexpellant(drychemical)unit,whichisratedClassA(trash,woodandpaper),ClassB(ULApproved)andClassC(energizedelectricalequipment).Theseunitsshouldbeusedinsituationsotherthanenginecompartmentfires. The280V,X-80,andCSX265modelsarespecifiedtohavetwo(2)ofthedrychemical,hand-heldextinguisherson-board;allotherV-drivesarespecifiedforone(1)drychemical,hand-heldextinguisher.Thisisinadditiontothesuppressionsystemintheenginecompartment. Hand-heldunitsshouldbereplacedorrechargedassoonaspossibleafteruse.Chemicaldis-chargeshouldbecleanedfromallsurfacesassoonaspossibleandpriortorunningtheboatagain,unlessoperationisnecessarytoreturntoshore. Theboatshouldneverbeoperatedfollowingafireuntilafteradeterminationhasbeenmadewhetheroperationmayresultinanotherfire.Ifanydangerofanadditionalfireexists,theboatshouldbetowedtoshoreordockratherthanrunningtheengine(s). ConsumerswhochoosetopurchasefirecontrolequipmentfromresourcesotherthanMasterCraftmustfollowtheinstructionsandrequirementsaslistedwithintheenginecompartmentregardingsuitabilityforthecompartmentvolume.ThesestandardsareestablishedbytheABYC.
2011 Owners Manual...Safety Knowledge...Page 1-3
Following the activation of the automatic fire suppression system or a hand-held fire extin-guisher, a careful determination should be made as to whether the boat can safely be oper-ated. If there is any doubt or concern whatsoever, the boat should be towed to shore and/or dock for service by an authorized MasterCraft dealer prior to operating again. Failure to follow these instructions could result in death or serious injury/illness.
Fire Suppression and Extinguishing (ProStar 190, ProStar 197, X-7, ProStar 214 direct drive, X-14 direct drive, 220 CSX) Thesemodelsarespecifiedfortwo(2)fireextinguishers,bothtobeheldinthevoidbeneaththeob-server’sseatorunderthehelmonthe220CSX.Oneunitisahand-held2.5lb.monoammoniumphosphate

expellant(drychemical)unit,whichshallberatedClassA(trash,woodandpaper),ClassB(ULApproved)andClassC(energizedelectricalequipment).Theseunitsshouldbeusedinfightingallon-boardfiresotherthanenginecompartmentfires. Hand-heldunits(whitebottleshownleft)shouldbereplacedorrechargedassoonaspos-sibleafteruse,orafter12yearsfromdateofmanufacture.Anychemicaldischargeshouldbecleanedfromallsurfacesassoonaspossibleandpriortorunningtheboatagain,unlessopera-tionisnecessarytoreturntoshore. Theotherspecifiedunitisahand-heldfiresuppressionunitFM-200(internationalboats)orFE-241(domesticboats).ThedifferencefromV-drivemodelsisthattheunitisnotmount-ed in theenginecompartment,and itmustbemanuallyoperated (redbottle shown aboveright). Intheeventofanyevidenceofafirewithintheenginecompartment,DONOTOPENTHEENGINECOMPARTMENT(BOX).
Opening an engine compartment when there is indication of a fire inside can cause the fire to flare up and/or spread, which may result in extensive damage or even sinking of the boat and/or serious injury or death to people on board.
Shutdowntheengineandblowers.ContinuouslydischargetheentirecontentsoftheFM-200orFE-241firesuppressionunitthroughthefireportimmediately.
Fire Port Onthesemodels,theenginecompartmentisequippedwithafireportonthesideoftheenginebox.Intheeventofafire,insertthenozzleofthefireextinguisherthroughthefireportpullthesafetypinandpressthehandletoreleasetheclean-agent,gaseouschemicalsinsidetheenginebox. Theboatowner/operatorshouldhavethefireextinguishercanisterreplacedassoonaspracticable. Theboatshouldneverbeoperatedfollowingafireuntilafteradeterminationhasbeenmadewhetheroperationmayresultinanotherfire.Ifanydangerofanadditionalfireexists,theboatshouldbetowedtoshoreordockratherthanrunningtheengine(s).
Following the activation of the automatic fire suppression system or a hand-held fire extinguisher, a careful determination should be made as to whether the boat can safely be operated. If there is any doubt or concern whatsoever, the boat should be towed to shore and/or dock for service by an authorized MasterCraft dealer prior to operating again. Failure to follow these instructions could result in death or serious injury/illness.
Personal Flotation Devices (PFDs) FederallawalsorequiresatleastonewearableTypeI,II,IIIorTypeVPersonalFlotationDevice(“PFD”),foreachpersonon-boardorbeingtowedonwaterskis,wakeboardsorotherrecreationalequipment.ATypeVPFDprovidesperformanceofeitheraTypeI,IIorIIIPFD(asmarkedonitslabel) and must be used according to the label requirements. In addition, one throwable Type IVPFDmustalsobeonboard.As the owner, obtaining the appropriate PFDs is your responsi-bility and determining whether people on-board , including those who are underage, are required to wear PFDs when underway. YourMasterCraftdealercan,andwillbehappyto,assistyouwithyourpurchaseofappropriatePFDs. Note: Requirements for coastal waters and inland waters differ. Check with the local boating authorities for more information.
PFD Accessibility• WearablePFDsmustbereadilyaccessibleintheboat.
• ItshouldbepossibletoputonthePFDswithinareasonableamountoftimeincaseofemergency.• PFDsshouldneverbestowedinplasticbags,inlockedorclosedcompartmentsorhaveothergearstowed
ontopofthem.• TheU.S.CoastGuard,aswellasMasterCraft,recommendsthewearingofPFDsatalltimeswhentheves-
selisunderway,eventhoughitisnotarequirement.ThebestPFDistheonethatisworn–thatis,theonethatcansaveyourlife.
• InflatablePFDsmusthaveafullcylinderandallstatusindicatorsontheinflatormustbegreen,orthedeviceisNOTserviceable,andisNOTconsideredausablePFDforanyoneon-boardthevessel.
2011 Owners Manual...Safety Knowledge...Page 1-4

• CoastGuard-approvedinflatablePFDsareauthorizedforuseonrecreationalboatsbypersonsatleast16yearsofage.
• SomestatesrequirechildrentowearPFDsatalltimes.Checkwithyourstateboatingsafetyofficialsfordetails.BecertaintoequipchildrenwithaPFDthatisappropriateforthesizeofthechild.Thelabelwillindicatetheweightlimitsforuse.
Sound Producing Devices Thenavigationrulesrequiresoundsignalstobemadeundercertaincircumstances.Meeting,crossingandovertakingsituations,whichwillbedescribedinsomedetailshortly,areexamplesofwhensoundsignalsarerequired.Recreationalvesselsarealsorequiredtosoundsignalsduringperiodsofreducedvisibility.YourMasterCraftboatisequippedwithahorn,butyoumayalsopurchaseaftermarketdevicesincaseofpotentialelectricaldisconnectorfailure. Note: The requirement to carry a bell on board no longer applies to vessels operating on International Waters.
Visual Distress Signals Allvesselsusedoncoastalwaters,theGreatLakes,territorialseasandthosewatersconnecteddirectlytothemuptoapointwhereabodyofwaterislessthantwomileswide,mustbeequippedwithU.S.C.G.-approvedvisualdistresssignals.VesselsownedintheUnitedStatesbutoperatingonthehighseasmustbeequippedwithU.S.C.G.-approvedvisualdistresssignals. PyrotechnicvisualdistresssignalsmustbeCoastGuard-approved,inserviceableconditionandreadilyaccessible.Thismeansthat:• Theyaremarkedwithanexpirationdate.Expiredsignalsmaybecarriedasextraequipment,butcannotbe
countedtowardmeetingthevisualdistresssignalrequirement,sincetheymaybeunreliable.• Ifpyrotechnicdevicesareselected,aminimumofthreearerequired.Thatis,threesignalsfordayuseand
threesignalsfornight.Somepyrotechnicsignalsmeetbothdayandnightuserequirements.• Pyrotechnicdevicesshouldbestoredinacool,drylocation,ifpossible.Awatertightcontainerpainted
redororangeandprominentlymarked“DistressSignals”or“Flares”isrecommended. U.S.C.G.-approved pyrotechnic visual distress signals and associated devices include pyrotechnic redflairs,hand-heldoraerial;pyrotechnicorangesmoke,hand-heldorfloating,orlaunchersforaerialredmete-orsorparachuteflares. Non-pyrotechnicdevicesmaybeallowed.Theseincludeanorangedistressflag(daysignalonly)oranelectricdistresslight(whichisacceptablefornightuse).UseofthesedevicesmuststillmeetCoastGuardrequirements,informationforwhichisavailableonlineandfromtheCoastGuard. Under Inland Navigation Rules, a high intensity white light flashing at regular intervals from 50-70timesperminuteisconsideredadistresssignal.SuchdevicesdoNOTcounttowardmeetingthevisualdis-tresssignalrequirement,however.Regulationsprohibitdisplayofvisualdistresssignalsonthewaterunderanycircumstancesexceptwhenassistanceisrequiredtopreventimmediateorpotentialdangertopersonsonboardavessel. Alldistresssignalshavedistinctadvantages.Nosingledeviceisidealunderallconditionsorsuitableforallpurposes.Pyrotechnicsareuniversallyrecognizedasexcellentdistresssignals.However,thereispotentialforinjuryandpropertydamageifnotproperlyhandled.Thesedevicesproduceaveryhotflameandtheresi-duecancauseburnsandigniteflammablematerials. Pistollaunchedandhand-heldparachuteflaresandmeteorshavemanycharacteristicsofafirearmandmustbehandledwithcaution.Insomestatestheyareconsideredafirearmandprohibitedfromuse. Checkwithlocalauthoritiesregardingthebestvisualdistresssignalforuseintheareainwhichyouwillbeboating.
Registration, Numbering and Documentation Althoughitmightnotbeimmediatelyobviousastohowthisrelatestoboatingsafety,infactitcanbecriticalinemergencies.Allundocumentedvesselsequippedwithpropulsionmachinerymustberegisteredinthestateofprincipaluse.Acertificateofnumberwillbeissueduponreg-isteringthevehicle.Thesenumbersmustbedisplayedonyourvessel.Theowner/operatorofthevesselmustcarryavalidcertificateofnumberwheneverthevesselisinuse.Whenmovingtoanewstateofprincipaluse,thecertificateisvalidfor60days.Checkwithyourstateboatingauthor-ityforregistrationrequirements. Numbersmustbepaintedorpermanentlyattachedtoeachsideoftheforwardhalfofthevessel.Thevalidationstickersmustbeaffixedwithinsixinchesoftheregistrationnumber.Withtheexceptionofthevesselfeedecal,nootherlettersornumbersmaybedisplayednearby.Letter-ingmustbeinplain,verticalblockcharactersofnotlessthanthree(3)inchesinheight.Spacesorhyphensbetweenletterandnumbergroupingsmustbeequaltothewidthofaletterotherthan“i”oranumberotherthan“1.” Theownerofavesselmustnotifytheagencywhichissuedthecertificateofnumberwithinfifteen(15)daysifthevesselistransferred,destroyed,abandoned,lost,stolenorrecovered,orifthecertificateofnumber
2011 Owners Manual...Safety Knowledge...Page 1-5

islost,destroyedortheowner’saddresschanged.Ifthecertificateofnumberbecomesinvalidforanyreason,itmustbesurrenderedinthemannerprescribedtotheissuingauthoritywithin15days.
Operator’s License Some states are implementing operator’s license require-ments.Theserequirementsvarywidely.Whetheroperatingaboatlocallyorinaremotelocation,operatorsshouldverifywithstateandlocalauthoritiesregardingwhetheralicenseortrainingisre-quired.Thisshouldbecheckedatleastannually.
Recommended Equipment Theresponsibleboatownerwillavoidpotentialproblemsonanoutingbyhavingadditionalequipmentonboard.Normally,thedecisionregardingtheappropriateequipmenttotakeonindi-vidualoutingsisdependentuponthebodyofwaterandthelengthof the trip. We suggest the following equipment as a minimum(yourMasterCraftdealer canalsoassistyouwithadditional rec-ommendations):
• Ananchorwithatleast75feetofline(insaltwateroperation,particularly);• Amanualbailingdeviceforremovingwater;• Acombinationoar/boathook;• Aday-and-nightvisualdistresssignal;• Afirstaidkitandmanual;• Anairwaybreathingtube;• Awaterproofflashlight;• Anon-electrichornorwhistle;• Asetoflocalnavigationalcharts;• Mooringlinesandfenders;• Extraengineoil;• Atoolkit;and• Aportable,battery-operatedAM/FMradioorweatherradio/scanner.
Safety Afloat Thecauseofmanyboatingaccidentsisoftentheoperator’sfailuretofollowbasicsafetyrulesorwrittenprecautions.Manyaccidentscanbeavoidediftheoperatoriscompletelyfamiliarwiththeboat,itsoperationandcanrecognizepotentiallyhazardoussituationsbeforeanaccidentoccurs.
Failure to comply with safety-related information and instructions may result in serious injury or death to you and/or others. Always use common sense when operating the boat or participating in any activities associated with the boat, including, but not limited to, periods of time when the boat engine is shut down and the boat is not in operation.
• Improperoperationoftheboatisextremelydangerous!Operatorsmustreadandunderstandalloperatingmanualssuppliedwiththeboat,beforeoperation.
• On-boardequipmentmustalwaysconformtothegoverningfederal,stateandlocalregulations.• Alwaysattachtheengineemergencysafetyshut-offlanyardtoapartofyourclothing(suchasabeltloop)
whenoperatingtheboat.
Never override or modify the engine emergency safety shut-off switch in any way.
2011 Owners Manual...Safety Knowledge...Page 1-6
• Neveroperatetheboatwhileundertheinfluenceofalcoholordrugs.• Allpersonsmustbeseatedinadesignatedoccupantseatingareawhiletheboatisinmotion.Neverstand
orallowpassengerstostandintheboatorsitonthemotorboxortower(whereequipped),orany location other than occupant seatingwhileunderway.Youorothersmaybethrownwithinorfromtheboat,whichcouldresultinseriousinjuryordeath.Neverallowoccupantstousesunpadsortransomseatingwhiletheengineisrunning.

• Priortostartingtheengine,youmustopentheengineboxandchecktheenginecompartmentandbilgeforgasolineandoilvapors.Youmustalsooperatetheblowerforatleastfour(4)minutes.Failuretodosomayresultinfireand/oranexplosion.
Failure to comply with the requirement of operating the blower for at least four (4) minutes before starting the engine may result in serious injury or death to you and/or others.
• Never remove or modify any components of the fuel system. Removal or modification of any component of the fuel system may cause a hazardous situation and will void the warranty. The modern MasterCraft fuel delivery lines are pressurized and attempting to loosen or re-move them may result in the uncontrolled release of fuel, which can be environmentally haz-ardous, and may potentially cause injury.
• Neverallowanytypeofsparkoropenflameonboard.Itmayresultinfireorexplosion.
Skiing and Wakeboarding Safety Skiersandwakeboardersareobligatedtobeasawareofthefundamentalsafetyrulesasoperators.Ifyouarenewtowatersports,youshouldseekcertifiedtrainingbeforestarting.Youmayfinditespeciallyhelpfultojoinalocalwater-sportsclub,ifavailable,andtheU.S.W.S.A.(UnitedStatesWaterSkiingAssociation).• Alwaysrememberthatthemajorityofwater-skiingandwakeboardinginjuriesaretheresultofimpacts
withotherobjects,soalwayslookwhereyouaregoingandbeawareofwhatisgoingonaroundyou.• Neverputyourarm,headoranyotherpartofyourbodythroughthehandle/bridleoftheskiorwake-
boardingline,norwrapthelinearoundanypartofthebodyatanytime.• Neverskiorwakeboardatnight.• Neverskiorwakeboarddirectlyinfrontofotherboats.• When adding accessories to the tower, ensure that the total aggregate weight of the accessories
does not exceed 85 lbs. (U.S.). Exceeding the limit may result in structural failure of the tower. MasterCraft strongly encourages the use of MasterCraft towers and accessories only as they have been tested and determined to meet product requirements, including weight.
Towers should never have a total aggregate weight of accessories exceeding 85 lbs. (U.S.) total. Excessive weight can cause tower failure and the collapse of a tower or the disconnection of the tower from the deck, which could result in serious bodily injury or damage to the boat that is not covered by warranty.
• Neverattempttofoldatowerwithoutassistance.Foldingatowerrequiresatleasttwo(2)people.• Neverjumpfromaboatthatismovingatanyspeed,norenterorexitthewaterwhentheengineisrun-
ning(ON).(SeetheCommon Sense ApproachsectionofthisOwner’sManualforadditionalinformationregardingcarbonmonoxideperil.)
• Neverclimb,sitorstandonatower.Thetowerisintendedfortowingonlyasnoted.• Make sure that everyone knows and uses approved skiing/wakeboarding hand signals and adheres to
commonskiing,wakeboardingandboatingcourtesy.• Neverrideontheskiplatformorholdontotheskiplatformwhileinthewaterduringengineoperation,
includingatidle.Carbonmonoxidefumesareexpelledfromthelowertransomareasofyourboatandcancausedeathorseriousillness.
• Theabovemandatesarenotall-inclusive. It is theboater’s responsibility tooperate theboat inasafefashionandbecomefamiliarwithanyandallrulesandregulationsgoverningboatoperation.
Do not tow more than two (2) persons at one time on a tow tower. The tow tower approved for use on your boat should be used only for water skis, wakeboards or recreational towables, and not for parasailing, kite flying or towing other boats. Do not add any attachments that are not approved for use on your MasterCraft boat. Do not climb on, sit on, stand on, jump off of or dive off of the tower. Never allow passengers to sit behind the tow rope attachment point. Never allow loose tow rope ends to dangle. Always be certain that all bolts are in place and tight before and during use. When the tower is up, watch for low obstacles such as tree limbs, bridges or power lines.
Warning Plates and Labels ReadandnoteALLwarningplatesandlabelsfrombowtostern,includingthosethatareinstalledinsidetheenginecompartment,lockersandunderseating.YOU MUST READ AND ADHERE TO ALL CAUTIONS AND WARNINGS IN AND ON YOUR BOAT!
2011 Owners Manual...Safety Knowledge...Page 1-7

Operator’s Responsibilities• Ensuretheboatisintopoperatingconditionandtherearenohazardsthatimpedeyourmovingabout
theboat.• Ensurethebilgeiscleanpriortostarting.• Fileafloatplan,asdescribedbelow,witharelativeorfriend.• Haveacompleteknowledgeoftheoperationandhandlingcharacteristicsofyourboat.• Ensurethattheboatisnotloadedabovethemaximumcapacityandthattheloadisproperlydistrib-
uted.• Havefamiliaritywithyourstartinglocationandyourgoal,andthewaterwaysbetween.• Maintainasafespeedatalltimestoavoidcollisions.• Keepaneyeoutforchangingweatherconditionsandrespondaccordingly.• Knowandpracticethenavigationalrules.Knowandobeyallfederalandstateregulationsandoperate
theboatproperlyaroundallwaterwaymarkers.• Maintainaclear,unobstructedviewatalltimes,especiallyforward.Scanthewaterandavoidtunnelvi-
sion.Manyboatingcollisionsarecausedbyinattention.
Float Plan A“floatplan”isawrittenrecordindicatingtheplanneddestinationandapproximatelengthoftimefortheouting.SampleformsareavailableattheCoastGuard’swebsite.Oneshouldbecompletedandleftwitharela-tiveorfriendpriortoeachtrip.Incaseofanemergencyorfailuretoreturnwithinareasonableperiodoftime,pertinentinformationwillbeavailabletoassistlocalmarinepoliceortheCoastGuardindeterminingwhetherasearchshouldbeperformed.Besuretonotifythefloatplanholderuponreturn.
Nautical Charts Nauticalchartsareespecially importanttoboatersplanningtrips,particularlyonopenwaters.Thesechartsshowthenatureandshapeofthecoast,depthsofwater,generalconfigurationandcharacterofthebottom.Othermarkingsonthenauticalchartsincludeprominentlandmarks,portfacilities,aidstonaviga-tion,andmarinehazards.Changesbroughtaboutbypeopleandnaturerequirethatnauticalchartsbecon-stantlymaintainedandupdatedtoaidsafenavigation. NationalOceanService(NOS)chartsmaybepurchasedeitherdirectlybymailfromtheNOSDistributionBranchorthroughanauthorizedagent.Therearemorethan1,700nauticalchartagentswhosellthem.
FAA/National Aeronautical Charting OfficeDistribution Division, AVN-530
6303 Ivy Lane, Suite 400Greenbelt, MD 20770
Telephone: (301) 436-8301Email: [email protected]
Website: http://naco.faa.gov/
Weather Never leave the dock without first checking the localweather forecast. Weather information is available fromtelevision,radio,localnewspaper,onlineorfromaweatherchannelonaVHFradio. Atcertaintimesoftheyear,weathercanchangerap-idlyandboatersshouldalwayskeepaneyeoutforweatherconditions.Whileboating,payattentiontothefollowing:• Weatherchangesgenerallycomefromthewest.• Watchforcloudbuild-up,especiallyrapid,vertically
risingclouds.• Suddendropintemperature.• Suddenchangeinwinddirectionand/orspeed.• On-boardbarometersshouldbecheckedeverytwo-
to-three hours. A rising barometer indicates fairweatherandariseinwindvelocity;afallingbarom-eterindicatesstormyorrainyweather.
Whattodoinsevereweather:• Reduce speed, keeping enough power to maintain
headway.
2011 Owners Manual...Safety Knowledge...Page 1-8

• PutonPFDs.• Turnonrunninglights.• Headforthenearestshorethatissafetoapproach,ifpossible.• Headbowofboatintowavesatabouta45-degreeangle.• Keepbilgesfreeofwater.• Seatpassengersonbottomoftheboat,nearthecenterline.• Iftheenginefails,tieaseaanchoronalinefromtheboattokeeptheboatheadedintothewaves.A
bucketwillworkasaseaanchorinanemergency.• Anchortheboat,ifnecessary.
Staying Afloat Itiscommonlybelievedthatsomeonedressedinheavycloth-ingorwaderswillexperienceconsiderablymoredifficultystayingafloatiftheyfalloverboard.Thisisnottrue.Airtrappedincloth-ingprovidesflotationandbendingthekneeswilltrapairinwad-ers.Tostayafloat:• Remaincalm.Donotthrashaboutortrytoremoveclothing
orfootwear.Thisleadstoexhaustionandincreasesthelossofairthatmaykeepyouafloat.
• KeepyourPFDon.• Keepyourkneesbent.• Floatonyourbackandpaddleslowlytosafety.
Cold Water Survival Suddenimmersionincoldwatercaninducerapid,uncontrolledbreathing,cardiacarrestandotherphysicalbodyconditions,whichcanleadtodrowning.AlwayswearingaPFDwillhelpsurvivalinrapidimmersionsituations.
Inothersituationswhenentryintocoldwaterisnecessary:• WearaPFD.• Buttonallclothing.• Coveryourheadifpossibleandenterthewaterslowly.• Keepyourheadoutofthewaterifatallpossible.• AssumetheHeatEscapeLesseningPosture(HELP)positionastaughtwithinaCoastGuard-taughtsafe-
tycourse.
Hypothermia Immersioninwaterspeedsthelossofbodyheatandcanleadtohypothermia.Thisistheabnormallow-eringofinternalbodytemperature.Ifaboatcapsizesitwilllikelyfloatonorjustbelowthesurface. Toreducetheeffectsofhypothermia,getinorontheboat.Trytogetasmuchofyourbodyoutofthewateraspossible.Ifyoucan’tgetintheboat,aPFDwillenableyoutokeepyourheadoutofthewater.Thisisveryimportantbecauseabout50percentofbodyheatlossisfromthehead. Itmaybepossibletoreviveadrowningvictimwhohasbeenunderwaterforsometimeandshowsnosignof life.Casesdocumentinstanceswherevictimshavebeenresuscitatedafterextendedperiods.StartCPRimmediatelyandgetthevictimtoahospitalasquicklyaspossible.
Immersion Suits Immersionsuitswilldelaytheeffectsofhypothermiaincoldwaterandareavailablethroughmanyre-tailerswhospecializeinsalesofmarineproducts.Thesuitsshouldbestoredandmaintainedaccordingtothemanufacturer’sinstructions.
Inflatable Life Rafts An inflatable life raft can provide a survival platform for an extended period of time. Be sure theliferaft is largeenoughforeveryoneonboardwhentheboatoperatesoff-shore.Itshouldhavetheap-propriateemergencyequipmentpackandshouldbeprofessionallyservicedperiodically,accordingtothemanufacturer’sinstructions.CoastGuard-approvedliferaftsmustmeetanumberofstringentmaterialandperformancestandards.
2011 Owners Manual...Safety Knowledge...Page 1-9

Anchoring Anchoringisdonefortwoprincipalreasons:first,tostopforfishing,swimming,lunchoranovernightstay,andsecondly,tokeepaboatfromrunningagroundinbadweatherorasaresultofenginefailure. When preparing to anchor, bring the bow of the vessel into thewind or current. Place the engine in neutral. When the boat comestoastop,slowlylowertheanchor.Donotthrowtheanchoroverasit will tend to foul the anchor or tangle line. When the anchor linehas been let out, back down on the anchor with the engine in idlereverse to help set the anchor. After it is firmly set, use referencepoints(landmarks)inrelationtotheboattobesurethattheboatisnotdrifting.Checkthepointsfrequently.
Communications The following applies to salt water boating: Whenboatingoff-shore,carrycommunicationsgearsuchasamarineVHF-FM and/or HF transceiver(s), appropriate to the operating area.Cellularphonecoverageisavailableinmanycoastalareas.However,cel-lularphonesshouldNOTbeconsideredasubstituteforVHF-FMmarinebandradiosforemergencypurposes. SatelliteEPIRBs(406MHz)aredesignedtoquicklyandreliablyalertrescue forces, indicate an accurate distress position, and guide rescueunitstothedistressscene,evenwhenallothercommunicationsfail. Whenactivated,thesatelliteEPIRBtransmitsadistresssignalwith
a beacon-unique identifying code. The system detects the signal, calculates an accurate distress position,checkstheuniqueidentifyingcodeagainsttheEPIRBregistrationdatabase(vesselandpointofcontactinfor-mationsuppliedbytheowner)androutesthedistressalertwithregistrationinformationtotheresponsibleU.S.CoastGuard(orInternational)RescueCoordinationCenter(RCC).406MHzEPIRBswithGPS(internalorattached)alsoprovideanimmediateGPSpositionintheinformationpassedtotheRCC. Geostationarysatellitesmakedetectionalmostimmediate.IftheEPIRBdoesnothavetheabilitytoprovideaGPSposition,theprocesstodetermineapositiontakesaboutanhouronaverageandalmostalwayslessthantwohours.SatelliteEPIRBsalsoincludeahomingbeaconandstrobetohelprescueforcesquicklylocatethedistressscene. Satellitebeaconshavesignificantcoverage,alertingtimeliness,positionaccuracy,andsignalingad-vantagesoverothertypesofEPIRBs(121.5MHz).Beforepurchasingorusingsomethingotherthanthe406MHzEPIRB,besuretounderstandthecapabilitiesandlimitations. Indistresssituations,pressthetransmitbuttonandclearlysay:MAYDAY,MAYDAY,MAYDAY.Followthiswiththevesselnameand/ordescription,thelocation,natureofemergencyandnumberofpeopleon-board.Thenreleasethetransmitbuttonandwaitfor10seconds.Ifthereisnoresponse,repeattheMAYDAYcall. Further information and a complete listing of VHF channels and frequencies is available at: www.navcen.uscg.gov.
Law Enforcement Avesselunderway,whenhailedbyaCoastGuardvesselisrequiredtoheaveto,ormaneuverinsuchamannerthatpermitsaboardingofficertocomeaboard. Otherfederal,stateandlocallawenforcementofficialsmayboardandexamineavessel.TheCoastGuardmayimposeacivilpenaltyupto$1,000forfailuretocomplywithequipmentrequirements;reportaboatingaccident;orcomplywithotherfederalregulations.FailuretocomplywiththeInlandNavigationRulesActof1980canresultinacivilpenaltyupto$5,000.DetailsoftheActareavailableonlineorthroughtheU.S.CoastGuardandtheCoastGuardAuxiliary. Improperuseofaradio-telephoneisacriminaloffense.Theuseofobscene,indecentorprofanelanguageduringradiocommunicationsispunishablebya$10,000fine,imprisonmentfortwoyearsorboth.Otherpen-altiesexistformisuseofaradio,suchasimproperuseofChannel16VHF-FM.Channel16isacallinganddis-tresschannel.Itisnottobeusedforconversationorradiochecks.Suchcommunicationsshouldbeconductedonanauthorizedchannel. Notethattherearestringentrequirementsregarding,pollution,dischargeofoil,dischargeofgarbageandtheoperationanddischargefromsanitationdevices.Itistheboatowner’sandoperator’sresponsibilitytodeterminewhatthelawsandregulationsareandtoensurethatthoselawsandregulationsarerespectedandenforced. DetailsareavailablethroughtheCoastGuard.
2011 Owners Manual...Safety Knowledge...Page 1-10

ThisOwner’sManualhasbeendevelopedtohelpensureanenjoyableexperienceasyouboat,wakeboardandskiwithafabulousMasterCraftboat.Asstatedearlier,thisinformationisnotall-inclusive.Therearemanyfactorstoconsiderandadditionalinformationthatyouneedtoresearchbeforeundertakinganyboatingactivity. InadditiontoreadingthisOwner’sManualorotherrelatedmaterial,andfamiliarizingyourselfwiththeproperoperationoftheMasterCraftboat,youshouldalsoalwaysusecommonsensewhenboating.Forexample,whenanchoringtheboat,youMUSTturnOFFtheengine.Inmostmodels,exhaustfumescontain-ingcarbonmonoxideareemittedfromtheexhaustflapareaofthetransomimmediatelybelowtheswimplatform.No one should ever be on the swim platform or transom while the engine is operating. This includes while using the shower option in those models where the engine must run in order to create hot water. In those instances, showering must never be done on the swim platform or transom as the carbon monoxide fumes are toxic.
Carbon monoxide is a colorless, tasteless, odorless and poisonous gas that accumulates rapidly and can cause serious injury or death. Exposure to carbon monoxide can be fatal in a matter of minutes. Exposure to even low concentrations of carbon monoxide must not be ignored because the effects of exposure to carbon monoxide can build up and be just as lethal as high concentra-tions. Carbon monoxide from exhaust pipes of inboard or outboard engines may build up inside and outside the boat in areas near exhaust vents, particularly during slow-speed operations. STAY AWAY from these exhaust vent areas, which are located at the stern of the boat, and DO NOT swim or engage in any watersports or other activities in or near the stern area of the boat, including, without limitation, the swim platform and the rear sun deck, when the engine is in operation. Under no circumstances should the owner and/or operator allow persons to hold onto the swim platform while the engine is operating and the boat is in motion. These activities (sometimes known as “teak surfing” or “platform dragging,” where the participant holds onto the swim platform and is pulled through the water, and/or “body surfs” immediately behind the boat) are extremely dangerous, highly likely to result in death or serious bodily injury, and are a misuse of this product.
All boats have weight limits. Failure to adhere to the posted limits can cause operation instability and/or the boat to sink. This may result in serious injury or death, as well as significant damage to the boat, which will not be covered by warranty.
Common Sense Approach2011 Owners Manual...Common Sense Approach...Page 2-1
Overloading a boat may cause it to become unstable and may potentially result in the boat’s flota-tion system becoming overwhelmed. Too much weight can sink any boat! Within this Manual and on a label mounted in each boat, except in the 280 and 265 models, is the weight and maximum occupant limit for that specific model. Bear in mind that total weight limits include additional water ballast, gear brought onto the boat, ad-ditional options and all people. Equally critical is how weight is distributed throughout the boat. If too much weight is placed in one area it can have serious impact on maintaining control. Items and people can also shift positions during operation, potentially causing a dangerous situation. Model 280 and 265 are Yacht Certified and do not display a listed weight limit on the boat. See information specific to those models for guidance.

Careshouldalsobetakentoavoidinterferingwiththeboatoperator’slineofsightwhentheboatisunderway.Thisappliesparticularlytoindividualsridinginthebow.Itispossibletoquiteunintentionallyobscurethedriv-er’sview.Evenmomentaryinterferencecanresultinthedriver’sinabilitytorespondtoasituationthatrequiresavoidanceofanothervesselorsubmergedorpartially-submergedobjects.Everyoneonboardshouldalwayspay
attentiontoothervessels,peopleandobjects located incloseproximitytotheboat,activitiestakingplaceinornearthewater,andshouldalwaysbesupportiveoftheboatoperator. MasterCraft strongly encouragesindividuals to wear Personal Flota-tionDevices(PFDs).Inmanystates,itisalegalrequirementforchildrento wear them at all times while onboard. Non-swimmers and swim-mers of limited ability of any ageshouldneverbewithoutaPFDwhileonaboat.
Avoidanyactivitythatmayresultindamagetotheboat,therebyvoid-ingthewarranty.Somethings,suchas avoiding stationary objects, areobvious.However,evenlessobviousactivitiescancausedamagetoaboat,nomatterhowwell-built.Forexam-
ple,whileabeachorshorelinemayseemsoftwhilewalkingonit,runningaboatupontoshoremayresultinsignificantscratchesinthefiberglassfinish.Thecausesofmanykindsofdamageareusuallyquiteobvioustotrainedservicepersonnel.
MasterCraftcannotanticipateeverytypeofactivityorneglectthatcouldresultindamagetotheboatorthatmaycauseillness,injuryorevendeathtoboaters.Theoperator,ownerand/orallpersonsonboardareresponsibleforusingcommonsenseandacarefulthoughtprocesstoensurethateverymeasurehasbeentakentokeepboatingenjoyableformanyyearstocome.AMasterCraftboatcanbethesourceofcountlesshoursoffamilyfun,aswellasbuildingfriendships.ButtheboatingexperienceremainssafeonlyifYOUuseyourheadbefore,duringandafteryourboatingactivity.
AsyouanticipatemanygoodtimesaheadwiththeMasterCraftboat,besurethat,firstandforemost,youarewell-preparedtoberesponsible.
2011 Owners Manual...Common Sense Approach...Page 2-2
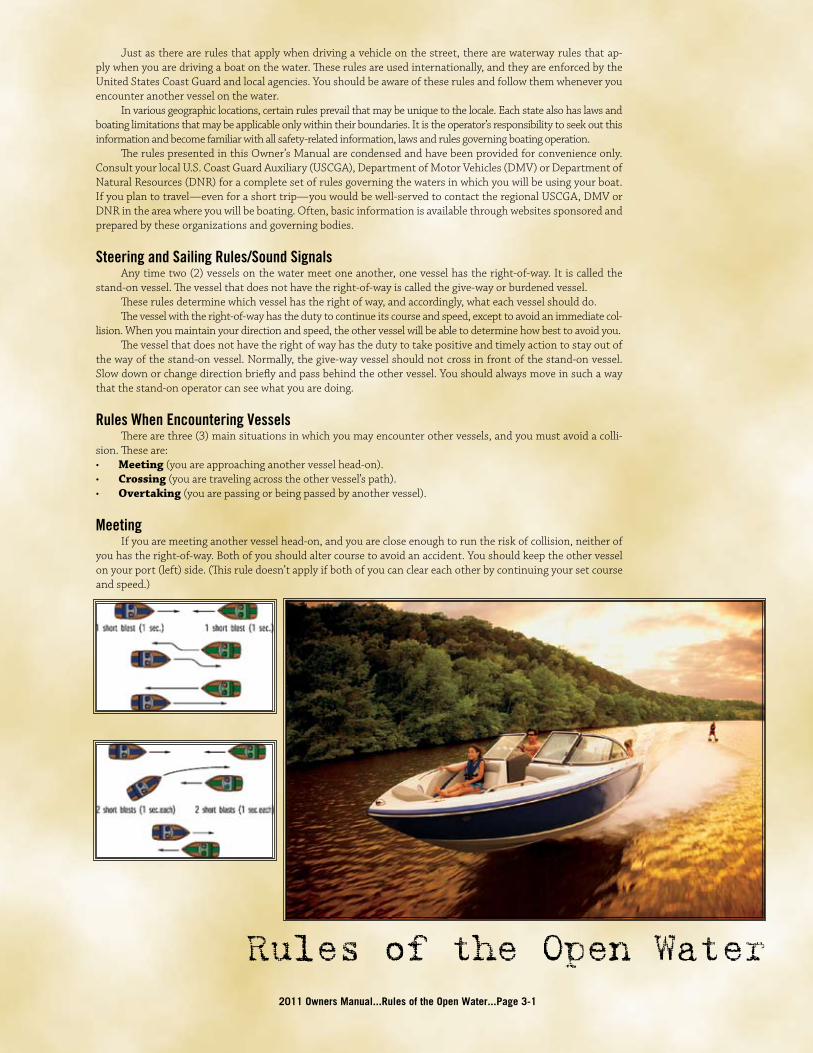
Justastherearerulesthatapplywhendrivingavehicleonthestreet,therearewaterwayrulesthatap-plywhenyouaredrivingaboatonthewater.Theserulesareusedinternationally,andtheyareenforcedbytheUnitedStatesCoastGuardandlocalagencies.Youshouldbeawareoftheserulesandfollowthemwheneveryouencounteranothervesselonthewater. Invariousgeographiclocations,certainrulesprevailthatmaybeuniquetothelocale.Eachstatealsohaslawsandboatinglimitationsthatmaybeapplicableonlywithintheirboundaries.Itistheoperator’sresponsibilitytoseekoutthisinformationandbecomefamiliarwithallsafety-relatedinformation,lawsandrulesgoverningboatingoperation. TherulespresentedinthisOwner’sManualarecondensedandhavebeenprovidedforconvenienceonly.ConsultyourlocalU.S.CoastGuardAuxiliary(USCGA),DepartmentofMotorVehicles(DMV)orDepartmentofNaturalResources(DNR)foracompletesetofrulesgoverningthewatersinwhichyouwillbeusingyourboat.Ifyouplantotravel—evenforashorttrip—youwouldbewell-servedtocontacttheregionalUSCGA,DMVorDNRintheareawhereyouwillbeboating.Often,basicinformationisavailablethroughwebsitessponsoredandpreparedbytheseorganizationsandgoverningbodies.
Steering and Sailing Rules/Sound Signals Anytimetwo(2)vesselsonthewatermeetoneanother,onevesselhastheright-of-way.Itiscalledthestand-onvessel.Thevesselthatdoesnothavetheright-of-wayiscalledthegive-wayorburdenedvessel. Theserulesdeterminewhichvesselhastherightofway,andaccordingly,whateachvesselshoulddo. Thevesselwiththeright-of-wayhasthedutytocontinueitscourseandspeed,excepttoavoidanimmediatecol-lision.Whenyoumaintainyourdirectionandspeed,theothervesselwillbeabletodeterminehowbesttoavoidyou. Thevesselthatdoesnothavetherightofwayhasthedutytotakepositiveandtimelyactiontostayoutofthewayofthestand-onvessel.Normally,thegive-wayvesselshouldnotcrossinfrontofthestand-onvessel.Slowdownorchangedirectionbrieflyandpassbehindtheothervessel.Youshouldalwaysmoveinsuchawaythatthestand-onoperatorcanseewhatyouaredoing.
Rules When Encountering Vessels Therearethree(3)mainsituationsinwhichyoumayencounterothervessels,andyoumustavoidacolli-sion.Theseare:• Meeting(youareapproachinganothervesselhead-on).• Crossing(youaretravelingacrosstheothervessel’spath).• Overtaking(youarepassingorbeingpassedbyanothervessel).
Meeting Ifyouaremeetinganothervesselhead-on,andyouarecloseenoughtoruntheriskofcollision,neitherofyouhastheright-of-way.Bothofyoushouldaltercoursetoavoidanaccident.Youshouldkeeptheothervesselonyourport(left)side.(Thisruledoesn’tapplyifbothofyoucancleareachotherbycontinuingyoursetcourseandspeed.)
Rules of the Open Water2011 Owners Manual...Rules of the Open Water...Page 3-1

Crossing Whentwo(2)power-drivenvesselsarecrossingeachother’spathcloseenoughtoruntheriskofcollision,thevesselthatviewsthecrossingvesseltothestarboard(right)sidemustgiveway.Iftheothervesselistotheport(left)side,youarethestand-onvessel,andprovidedtheothervesselgivesyoutheright-of-way,maintainyourcourseanddirection.
Overtaking Ifyouarepassinganothervessel,youarethegive-wayvessel.Thismeansthattheothervesselisexpectedtomaintainitscourseandspeed.Youmuststayoutofitswayasyouclearit,alteringcourseandspeedasnecessary. Conversely,ifyouarebeingpassedbyanothervessel,youarethestand-onvessel,andyoushouldmaintainyourspeedanddirectionsothatthevesselcanbesteeredaroundyou.
Other Special Situations Thereareadditionalrulestorememberwhenoperatingyourboataroundothervessels,suchas:• Whennavigatinginnarrowchannels,youshouldkeeptotherightwhenitissafeandpracticaltodoso.• Whenpreparingtogoaroundabendthatmayobstructyourviewofotherwatervessels,youshouldsound
aprolongedblastonthehornorwithawhistleforfour(4)tosix(6)seconds.Evenifnoreplyisheard,youshouldstillproceedaroundthebendwithcaution.
Sailing Vessel Right-of-Way Sailingvesselsshouldnormallybegiventheright-of-way.Theexceptionstothisare:• Whenthesailingvesselisovertakingthepower-drivenvessel,thepower-drivenvesselhastheright-of-way.• Sailingvesselsshouldkeepclearofanyfishingvessel.• Inanarrowchannel,asailingvesselshouldnothamperthesafepassageofapower-drivenvesselthatcan
navigateonlyinsuchachannel.
Fishing Vessel Right-of-Way Underinternationalrules,allvesselsthatarefishingwithnets,linesortrawlsareconsideredtobefishingvessels;however,boatswithtrollinglinesarenotconsideredfishingvessels. Fishingvesselshavetherightofway,regardlessofposition,butthesevesselscannotimpedethepassageofothervesselsinnarrowchannels.
The General Prudential RuleThis rule is called Rule 2 in the International Rules and says, “In obeying and construing these rules due regard shall be had to all dangers of navigation and collision, and to any special circumstances, which may render a departure from the above rules necessary in order to avoid immediate danger.”
Reading Buoys and Other Markings ThewatersoftheUnitedStatesaremarkedforsafenavigationbythelateralsystemofbuoyage.Themark-ersandbuoysyouencounterwillhaveanarrangementofshapes,colors,numbersandlightstoshowwhichsideofthebuoyaboatershouldpasswhennavigatinginaparticulardirection. Themarkingsonthesebuoysareorientedfromtheperspectiveofbeingenteredfromaseawarddirection
whiletheboater isgoingtowardtheport.Redbuoysarepassedonthestarboard(right)sidewhenproceed-ing from open water into port, and green buoys arepassedontheport(left)side.Whennavigatingoutofport, your position to the buoys should be reversed:redbuoystoport(left)andgreenbuoystostarboard(right).Manybodiesofwaterareentirelywithintheboundar-iesofasinglestate.TheUniformStateWaterwayMark-ing Systems have been devised for these waters. Thissystem uses buoys and signs with distinctive shapesandcolorstoshowregulatoryoradvisoryinformation.Thesemarkersarewhitewithblacklettersandorangeborders.Theinformationsignifiesspeedzones,restrict-edareas,dangerareasandgeneralinformation.Remember: Markings may vary by geograph-ic location. Always consult appropriate boat-ing authorities before boating in unfamiliar waters.
2011 Owners Manual...Rules of the Open Water...Page 3-2

Guide toIndividual
Models
2011 Owners Manual...Guide to Individual Models...Page 4-1

2011 Owners Manual...Guide to Individual Models...Page 4-2
ProStar 190, 190 Tournament Team
01
02
03
04
05
06
07
08
09
10
11
12
13
14
15
37
36
35
34
33
32
31
30
29
28
27
26
25
24
23
16 17 18 19 20 21 22

2011 Owners Manual...Guide to Individual Models...Page 4-3
ProStar 190, 190 Tournament Team
01 Bowlight 02 Bowcleat 03 StereoCDPlayer(insideglovebox,whereequipped)Sirius SatelliteRadio(whereequipped) 04 Glovebox 05 Battery(locatedinvoidbeneathobserverseat) 06 MTSBallastSystem(whereequipped,beneathobserverseat) 07 Hand-heldfireextinguishers(beneathobserverseat) 08 Amp(whereequipped,beneathobserverseat) 09 iPodinterface(whereequipped) 10 Centerdrainplug 11 Skipylon 12 Fireport 13 Fueltankfiller 14 Sterncleat 15 Ballastvent 16 Swimplatform 17 Engineexhaust(twobelowswimplatform) 18 Transomrailwithtoweye(whereequipped) 19 Transomdrainplug(centerbeneathswimplatform) 20 Under-platformladder(whereequipped) 21 Transomstereoremote(whereequipped) 22 Underwaterlights(twowhereequippedunderswimplatform) 23 Showerwand&switch/SlickBootwand&switch(whereequipped,insidestoragecompartment) 24 Ballastthru-hullvent 25 Sterncleat 26 Sternlightreceptacle(ifequippedwithtower,thelightwillbeincenteraftoftower) 27 RearBallastSystemfill(whereequipped) 28 Enginecompartment 29 Shift/throttlecontrol 30 Steeringwheel 31 Instrumentpanel(detailselsewhereinthissection) 32 Subwoofer(whereequipped) 33 Circuitbreakerpanel(onkickpanelbeneathinstrumentpanel) 34 Bowcleat 35 Bilgethru-hulloutlet 36 Adjustablemirror 37 Built-incooler
Boats may also be equipped with towers, which may include stereo speakers, lights and/or tower-mounted mirror
Storage space is located:Underobserver’sseat(includingintobow)UnderaftseatingUnderaftsunpad

2011 Owners Manual...Guide to Individual Models...Page 4-4
ProStar 197, X-7
01
02
03
04
05
06
07
08
09
10
11
12
13
14
15
39
38
37
36
35
34
33
32
31
30
29
28
27
26
25
24
23
16 17 18 19 20 21 22

2011 Owners Manual...Guide to Individual Models...Page 4-5
ProStar 197, X-7 01 Bowlight 02 Bowcleat 03 StereoCDPlayer(insideglovebox,whereequipped)Sirius SatelliteRadio(whereequipped) 04 Glovebox 05 Battery(locatedinvoidbeneathobserverseat) 06 MTSBallastSystem(whereequipped,beneathobserverseat) 07 Hand-heldfireextinguishers(beneathobserverseat) 08 Amp(whereequipped,beneathobserverseat) 09 iPodinterface(whereequipped) 10 Centerdrainplug 11 Skipylon 12 Fireport 13 Fueltankfiller 14 Sterncleat 15 Ballastvent 16 Swimplatform 17 Engineexhaust(twobelowswimplatform) 18 Transomrailwithtoweye(whereequipped) 19 Transomdrainplug(centerbeneathswimplatform) 20 Under-platformladder(whereequipped) 21 Transomstereoremote(whereequipped) 22 Underwaterlights(twowhereequippedunderswimplatform) 23 Showerwand&switch/SlickBootwand&switch(whereequipped,insidestoragecompartment) 24 Ballastthru-hullvent 25 Sterncleat 26 Sternlightreceptacle(ifequippedwithtower,thelightwillbeincenteraftoftower) 27 RearBallastSystemfill(whereequipped) 28 Enginecompartment 29 Shift/throttlecontrol 30 Steeringwheel 31 Instrumentpanel(detailselsewhereinthissection) 32 Subwoofer(whereequipped) 33 Circuitbreakerpanel(onkickpanelbeneathinstrumentpanel) 34 Bowcleat 35 Bilgethru-hulloutlet 36 Adjustablemirror 37 Built-incooler 38 Foldingwalk-thruseat 39 Bowfillercushion(whereequipped)
Boats may also be equipped with towers (standard on X-7), which may include stereo speakers, lights and/or tower-mounted mirror
Storage space is located:Underobserver’sseatUnderbowseatingUnderaftseatingUnderaftsunpad

2011 Owners Manual...Guide to Individual Models...Page 4-6
ProStar 214, X-14
01
02
03
04
05
06
07
08
09
10
11
12
13
14
15
16
39
38
37
36
35
34
33
32
31
30
29
28
27
26
25
24
17 18 19 20 21 22 23

2011 Owners Manual...Guide to Individual Models...Page 4-7
ProStar 214, X-14 01 Bowlight 02 Bowfillercushion(whereequipped) 03 Bowcleat 04 StereoCDPlayer(insideglovebox,whereequipped)Sirius SatelliteRadio(whereequipped) 05 Glovebox 06 Battery(locatedinvoidbeneathobserverseat) 07 MTSBallastSystem(whereequipped,beneathobserverseat) 08 Hand-heldfireextinguishers(beneathobserverseat) 09 Amp(whereequipped,beneathobserverseat) 10 iPodinterface(whereequipped) 11 Centerdrainplug 12 Skipylon 13 Fireport 14 Ballastthru-hullvent 15 Sterncleat 16 Fueltankfiller 17 Swimplatform 18 Engineexhaust 19 Transomrailwithtoweye 20 Transomdrainplug(centerbeneathswimplatform) 21 Under-platformladder(whereequipped) 22 Showerwand&switch/SlickBootwand&switch(whereequipped,insidestoragecompartment) 23 Transomstereoremote(whereequipped) 24 Underwaterlights(twowhereequippedunderswimplatform) 25 Sternlightreceptacle(ifequippedwithtower,thelightwillbeincenteraftoftower) 26 Fueltankfiller 27 Sterncleat 28 Ballastthru-hullvent 29 Enginecompartment 39 Shift/throttlecontrol 31 Steeringwheel 32 Instrumentpanel(detailselsewhereinthissection) 33 Subwoofer(whereequipped) 34 Circuitbreakerpanel(onkickpanelbeneathinstrumentpanel) 35 Bowcleat 36 Ballastthru-hullvent 37 Bilgethru-hulloutlet 38 Adjustablemirror 39 Foldingwalk-thruseatBoats may also be equipped with towers (standard on X-14), which may include stereo
speakers, lights and/or tower-mounted mirror
Storage space is located:Underobserver’sseatUnderbowseatingUnderaftseatingUnderaftsunpad

2011 Owners Manual...Guide to Individual Models...Page 4-8
ProStar 214V-Drive, X-14V
01
02
03
04
05
06
07
08
09
10
11
12
13
14
15
16
43
42
41
40
39
38
37
36
35
34
33
32
31
30
29
28
27
26
2517 18 19 20 21 22 23 24

2011 Owners Manual...Guide to Individual Models...Page 4-9
ProStar 214 V-drive, X-14V 01 Bowlight 02 Bowfillercushion(whereequipped) 03 Bowcleat 04 StereoCDPlayer(insideglovebox,whereequipped)Sirius SatelliteRadio(whereequipped) 05 Glovebox 06 Battery(locatedinvoidbeneathobserverseat) 07 MTSBallastSystemfill(whereequipped,beneathobserverseat) 08 Hand-heldfireextinguisher(beneathobserverseat) 09 Amp(whereequipped,beneathobserverseat) 10 iPodinterface(whereequipped) 11 Convertiblejumpseat(whereequipped)orwalk-thruseat(whereequipped) 12 Centerdrainplug 13 Skipylon 14 Ballastthru-hullvent 15 Fueltankfiller 16 Sterncleat 17 Swimplatform 18 Engineexhaust(underswimplatform) 19 Transomrailwithtoweye 20 Transomdrainplug(centerbeneathswimplatform) 21 Under-platformladder(whereequipped) 22 Transomstereoremote(whereequipped) 23 Underwaterlights(twowhereequippedunderswimplatform) 24 Aftskipylon 25 Blowerexhaust(topofdeckneartransom) 26 Sternlightreceptacle(ifequippedwithtower,thelightwillbeincenteraftoftower) 27 Showerwand&switch/SlickBootwand&switch(whereequipped,insidestoragecompartment) 28 Sterncleat 29 Automaticfireextinguisher 30 Fueltankfiller 31 Enginecompartment 32 Ballastthru-hullpump-out 33 Cooler(locatedunderseat) 34 Subwoofer(whereequipped) 35 Shift/throttlecontrol 36 Steeringwheel 37 Firesuppressionunitmanualoverride 38 Instrumentpanel(detailselsewhereinthissection) 39 Circuitbreakerpanel(onkickpanelbeneathinstrumentpanel) 40 Bowcleat 41 Ballastthru-hullvent 42 Bilgepump-outoutlet 43 Adjustablemirror
Boats may also be equipped with towers (standard on X-14V), which may include stereo speakers, lights and/or tower-mounted mirror
Storage space is located:Underobserver’sseatUnderbowseatingUnderaftseatingUnderportsideseat
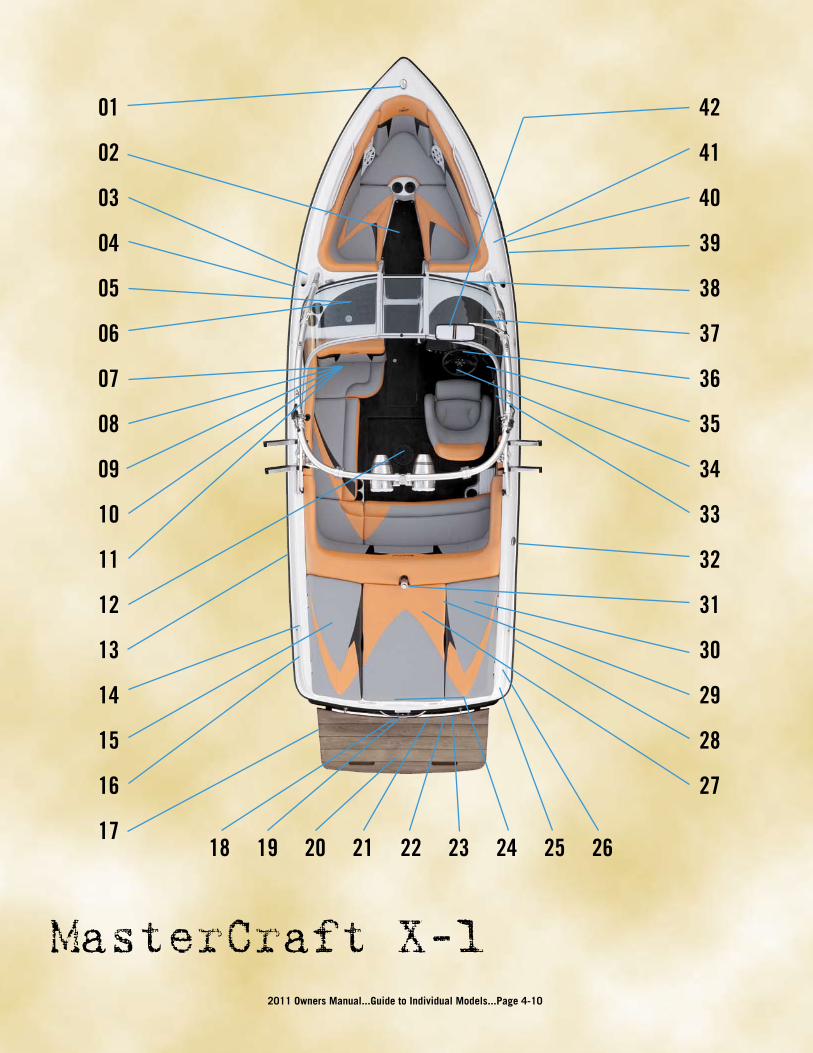
2011 Owners Manual...Guide to Individual Models...Page 4-10
MasterCraft X-1
01
02
03
04
05
06
07
08
09
10
11
12
13
14
15
16
17
42
41
40
39
38
37
36
35
34
33
32
31
30
29
28
27
18 19 20 21 22 23 24 25 26

2011 Owners Manual...Guide to Individual Models...Page 4-11
MasterCraft X-1 01 Bowlight 02 Bowfillercushion(whereequipped) 03 Bowcleat 04 Ballastthru-hullpump-out 05 StereoCDPlayer(insideglovebox,whereequipped)Sirius SatelliteRadio(whereequipped) 06 Glovebox 07 Battery(locatedinvoidbeneathobserverseat) 08 BallastSystemtank(whereequipped,beneathobserverseat) 09 Hand-heldfireextinguisher(beneathobserverseat) 10 Amp(whereequipped,beneathobserverseat) 11 iPodinterface(whereequipped) 12 Centerdrainplug 13 Ballastthru-hullpump-out 14 Fueltankfiller 15 Ballastsystem(undersunpad) 16 Sterncleat 17 Swimplatform 18 Transomrailwithtoweye 19 Transomdrainplug(centerbeneathswimplatform) 20 Under-platformladder(whereequipped) 21 Transomstereoremote(whereequipped) 22 Underwaterlights(twowhereequippedunderswimplatform) 23 Engineexhaust(twobelowswimplatform) 24 Showerwand&switch/SlickBootwand&switch(whereequipped,insidestoragecompartment) 25 Sternlightreceptacle(ifequippedwithtower,thelightwillbeincenteraftoftower) 26 Sterncleat 27 Enginecompartment 28 Ballastthru-hullvent 29 Automaticfireextinguisher 30 Ballastsystem(undersunpad) 31 Skipylon 32 Fueltankfiller 33 Shift/throttlecontrol 34 Steeringwheel 35 Firesuppressionunitmanualoverride 36 Instrumentpanel(detailselsewhereinthissection) 37 Subwoofer(whereequipped) 38 Circuitbreakerpanel(onkickpanelbeneathinstrumentpanel) 39 Ballastthru-hullvent 40 Bilgethru-hulloutlet 41 Bowcleat 42 Adjustablemirror
Boats are equipped with towers, which may include stereo speakers, lights and/or tower-mounted mirror
Storage space is located:Underobserver’sseatUnderbowseatingUnderaftseatingUnderaftsunpad
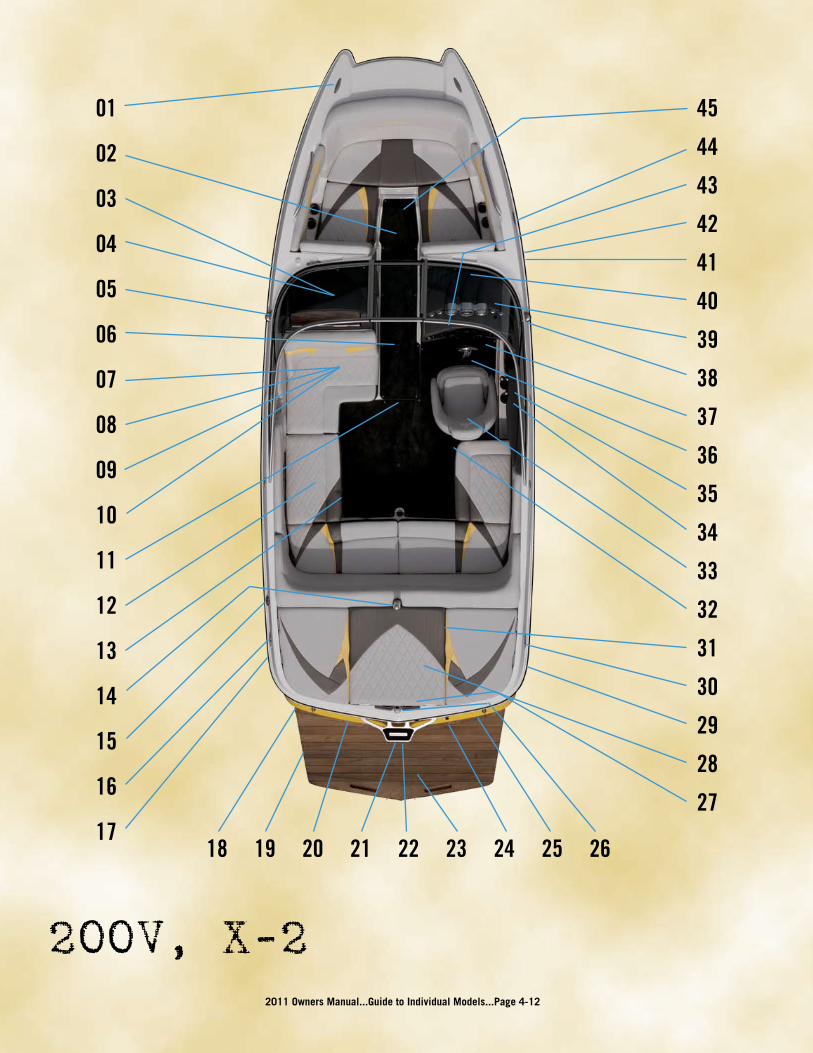
2011 Owners Manual...Guide to Individual Models...Page 4-12
200V, X-2
01
02
03
04
05
06
07
08
09
10
11
12
13
14
15
16
17
45
44
43
42
41
40
39
38
37
36
35
34
33
32
31
30
29
28
27
18 19 20 21 22 23 24 25 26

2011 Owners Manual...Guide to Individual Models...Page 4-13
200V, X-2 01 Bowcleat 02 Bowfillercushion(whereequipped) 03 StereoCDPlayer(insideglovebox,whereequipped);Sirius SatelliteRadio(whereequipped) 04 Glovebox 05 Nav/anchorlight 06 Walk-thruseat(whereequipped) 07 Batteries(includingON-OFFswitch) 08 Amp(whereequipped) 09 Hand-heldfireextinguisher(beneathobserverseat) 10 Heatedobserverseat(whereequipped) 11 Centerdrainplug 12 Cooler(locatedunderseat) 13 Cockpittablemount(whereequipped) 14 Skipylon 15 Fueltankfiller 16 Sterncleat 17 Ballastthru-hullvent 18 Wakeadjustmentplate(locatedunderswimplatform,whereequipped) 19 Swimplatform 20 Engineexhaust 21 Transomrailwithtoweye 22 Transomdrainplug(centerbeneathswimplatform) 23 Under-platformladder(whereequipped) 24 Transomstereoremote(whereequipped) 25 Underwaterlights(twowhereequippedunderswimplatform) 26 Nav/anchorlight(ifequippedwithtower,thelightwillbeincenteraftoftower) 27 Showerwandandswitch/SlickBootwandandswitch(whereequipped,insidecompartment) 28 Enginecompartment 29 Bilgethru-hullvent 30 Sterncleat 31 Automaticfireextinguisher 32 Subwoofer 33 Heatedseat(whereequipped) 34 Armreststereoremote 35 Shift/throttlecontrol 36 Steeringwheel 37 Firesuppressionunitmanualoverride 38 Nav/anchorlight 39 Instrumentpanel(detailselsewhereinthissection) 40 Circuitbreakerpanel(onkickpanelbeneathinstrumentpanel) 41 Ballastthru-hullvent 42 Bilgethru-hulloutlet 43 Adjustablemirror 44 Bowcleat 45 Ballasttanklocatedbeneathfloorboard
Boats may also be equipped with towers (standard on X-2), which may include stereo speakers, lights and/or tower-mounted mirror
Storage space is located:Underobserver’sseatUnderbowseatingUnderaftandwrap-aroundseatingUnderportandstarboardsunpads

2011 Owners Manual...Guide to Individual Models...Page 4-14
215V, X-15
01
02
03
04
05
06
07
08
09
10
11
12
13
14
15
16
17
45
44
43
42
41
40
39
38
37
36
35
34
33
32
31
30
29
28
27
18 19 20 21 22 23 24 25 26

2011 Owners Manual...Guide to Individual Models...Page 4-15
215V, X-15 01 Bowlight 02 Bowcleat 03 Bowfillercushion(whereequipped) 04 StereoCDPlayer(insideglovebox,whereequipped);Sirius SatelliteRadio(whereequipped) 05 Glovebox 06 Walk-thruseat(whereequipped) 07 Amp(whereequipped) 08 Hand-heldfireextinguisher(beneathobserverseat) 09 Heatedobserverseat(whereequipped) 10 Centerdrainplug 11 Cockpittablemount(whereequipped) 12 Batteries(includingON-OFFswitch) 13 Skipylon 14 Fueltankfiller 15 Ballastthru-hullvent 16 Sterncleat 17 Wakeadjustmentplate(locatedunderswimplatform,whereequipped) 18 Swimplatform 19 Engineexhaust 20 Transomrailwithtoweye 21 Transomdrainplug(centerbeneathswimplatform) 22 Under-platformladder(whereequipped) 23 Transomstereoremote(whereequipped) 24 Underwaterlights(twowhereequippedunderswimplatform) 25 Sternlightreceptacle(ifequippedwithtower,thelightwillbeincenteraftoftower) 26 Showerwandandswitch/SlickBootwandandswitch(whereequipped,insidecompartment) 27 Enginecompartment 28 Sterncleat 29 Automaticfireextinguisher 30 Bilgethru-hullvent 31 Fueltankfiller 32 Cooler(underseat) 33 Subwoofer 34 Heatedseat(whereequipped) 35 Armreststereoremote 36 Shift/throttlecontrol 37 iPodinterface(whereequipped) 38 Steeringwheel 39 Firesuppressionunitmanualoverride 40 Instrumentpanel(detailselsewhereinthissection) 41 Circuitbreakerpanel(onkickpanelbeneathinstrumentpanel) 42 Ballastthru-hullvent 43 Bilgethru-hulloutlet 44 Adjustablemirror 45 Bowcleat Ballasttanklocatedbeneathfloorboard
Boats may also be equipped with towers (standard on X-15), which may include stereo speakers, lights and/or tower-mounted mirror
Storage space is located:Underobserver’sseatUnderbowseatingUnderaftandwrap-aroundseatingUnderportandstarboardsunpads
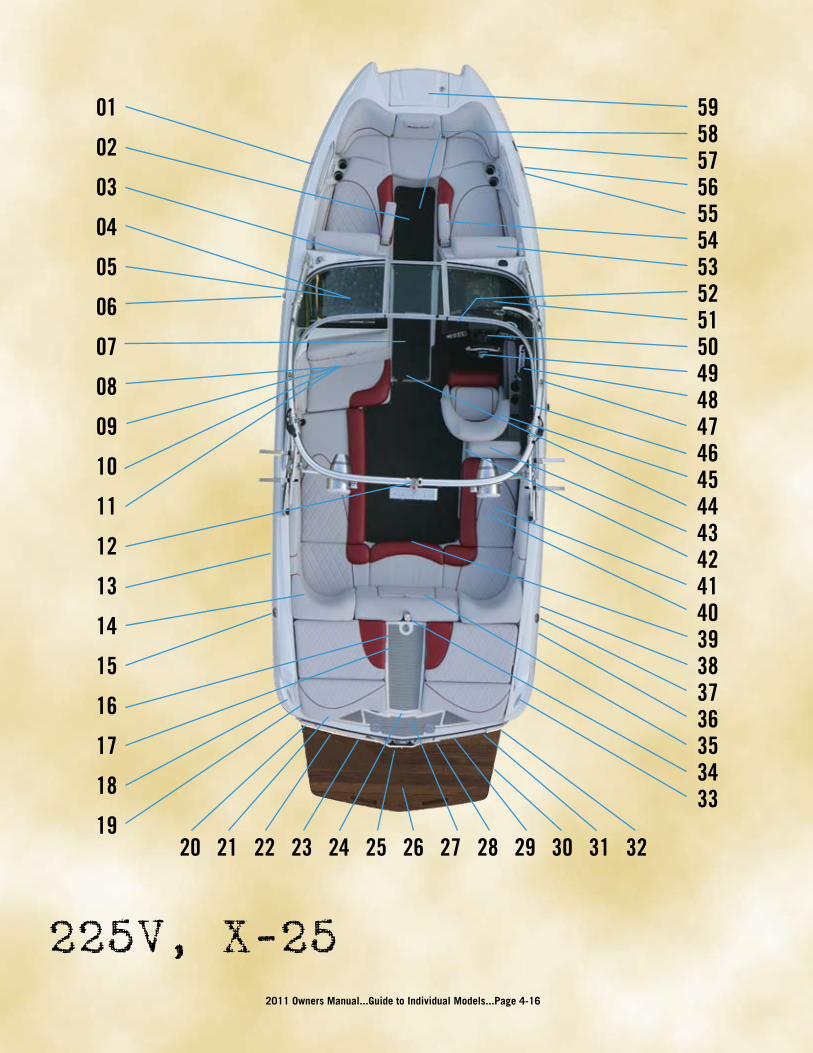
2011 Owners Manual...Guide to Individual Models...Page 4-16
225V, X-25
01
02
03
04
05
06
07
08
09
10
11
12
13
14
15
16
17
18
19
595857565554535251504948474645444342414039383736353433
20212223242526272829303132

2011 Owners Manual...Guide to Individual Models...Page 4-17
225V, X-25 01 Bowcleat 02 Bowfillercushion(whereequipped) 03 Amp(whereequipped) 04 Glovebox 05 StereoCDPlayer(insideglovebox,where
equipped);SiriusSatelliteRadio(whereequipped) 06 Navigationlight 07 Walk-thruseat(whereequipped) 08 Batteries(underobserverseat) 09 Hand-heldfireextinguisher(beneathobserver
seat) 10 Liftingobserverseat 11 Heatedobserverseat(whereequipped) 12 Anchorlight 13 Ballastthru-hullvent 14 BatteriesON-OFFswitch(underaftrearport
seat) 15 Fueltankfill(standarddualfiller) 16 Enginecompartment 17 Walk-overenginehatchwithremovablecushion 18 Sterncleat 19 Showerwand/SlickBootwand(whereequipped,
insidecompartment) 20 SlickBootswitch(ontransom) 21 Flip-upbackrestfortransomseats(forusewhile
notunderway) 22 Underwaterlights(twowhereequipped,under
swimplatform) 23 Engineexhaust 24 Nav/anchorlight(ifequippedwithtower,the
lightwillbecenteraftoftower--see12) 25 Transomdrainplug(center,beneathswimplat-
form) 26 Under-platformladder(whereequipped) 27 Automaticfireextinguisher 28 Showerswitch 29 Transomstereoremote(whereequipped) 30 Swimplatform 31 Engineexhaust 32 Wakeadjustmentplate(locatedunderswimplat-
form,whereequipped) 33 Sterncleat 34 Skipylon 35 Flip-downcupholderforcenteraftseats 36 Bilgethru-hull 37 Fueltankfiller(standarddualfiller)
38 Ballastthru-hullairvent 39 Cockpittablemount(whereequipped) 40 Stainlesssteelhatchstay-overcooler 41 Cooler(locatedunderseat) 42 Subwoofer 43 Removableseatbackforaft-facingseating(aftof
helm) 44 Centerdrainplug 45 Heatedseat(whereequipped) 46 Firesuppressionunitmanualoverride 47 Navigationlight 48 Shift/throttlecontrol 49 Steeringwheel 50 Instrumentpanel(detailsonreverseside) 51 Circuitbreakerpanel(onkickpanelbeneath
instrumentpanel) 52 Adjustablemirror 53 Liftingbowbacks 54 Foldingarmrestinbowbacks 55 Ballastthru-hullvent 56 Bilgethru-hulloutlet 57 Bowcleat 58 Ballasttank(locatedbeneathfloorboard) 59 Anchorlocker
Boats may also be equipped with towers (stan-dard on X-25), which may include stereo speakers, lights and/or tower-mounted mirror
Storage space is located:Underobserver’sseatUnderbowseatingUnderaftandwrap-aroundseatingUnderportandstarboardsunpads

2011 Owners Manual...Guide to Individual Models...Page 4-18
235V, X-35
01
02
03
04
05
06
07
08
09
10
11
12
13
14
15
16
17
18
474645444342
414039383736353433323130292827
19 20 21 22 23 24 25 26

2011 Owners Manual...Guide to Individual Models...Page 4-19
235V, X-35 01 Bowcleat 02 Bowfillercushion(whereequipped) 03 Navigation/anchorlight 04 StereoCDPlayer(insideglovebox,whereequipped);Sirius SatelliteRadio(whereequipped) 05 Amp(whereequipped) 06 iPodinterface(whereequipped) 07 Glovebox 08 Convertibleobserver’sseat 09 Subwoofer(whereequipped) 10 Hand-heldfireextinguisher(beneathobserverseat) 11 Centerdrainplug 12 Cooler(locatedunderseat) 13 Batteries(includingON-OFFswitch) 14 Fueltankfiller 15 Skipylon 16 Freshwatertank(inlocker,whereequipped) 17 Engineexhaust(two,ontopofportandstarboarddeckneartransom) 18 Sterncleat 19 Wakeadjustmentplate(locatedunderswimplatform,whereequipped) 20 Swimplatform 21 Transomrailwithtoweye 22 Transomdrainplug(centerbeneathswimplatform) 23 Under-platformladder(whereequipped) 24 Transomstereoremote(whereequipped) 25 Underwaterlights(fourwhereequippedunderswimplatform) 26 Showerwandandswitch/SlickBootwandandswitch(whereequipped,insidecompartment) 27 Sternlightreceptacle(ifequippedwithtower,thelightwillbeincenteraftoftower) 28 Sterncleat 29 Engineexhaust(two,ontopofportandstarboarddeckneartransom) 30 Enginecompartment 31 Automaticfireextinguisher 32 Fueltankfiller 33 Sinkandshower(whereequipped) 34 Uprightrefrigerator(undersink,whereequipped) 35 Heatedseat(whereequipped) 36 Armreststereoremote 37 Shift/throttlecontrol 38 Steeringwheel 39 Firesuppressionunitmanualoverride 40 Instrumentpanel(detailselsewhereinthissection) 41 Circuitbreakerpanel(onkickpanelbeneathinstrumentpanel) 42 Nav/anchorlight 43 Adjustablemirror 44 Ballasttanklocatedbeneathfloorboard 45 Ladder 46 Anchor 47 Bowcleat
Boats may also be equipped with towers (standard on X-35), which may include stereo speakers, lights and/or tower-mounted mirror
Storage space is located:Underobserver’sseatUnderbowseatingUnderaftandwrap-aroundseating

2011 Owners Manual...Guide to Individual Models...Page 4-20
245V, X-45
01
02
03
04
05
06
07
08
09
10
11
12
13
14
15
16
17
18
19
20
535251504948474645444342414039383736353433
212223242526272829303132

2011 Owners Manual...Guide to Individual Models...Page 4-21
245V, X-45 01 Bowcleat 02 Bowfillercushion(whereequipped) 03 Centerdrainplug 04 StereoCDPlayer(insideglovebox,where
equipped);Sirius SatelliteRadio(whereequipped) 05 Glovebox 06 Nav/anchorlight 07 iPodinterface(whereequipped) 08 Amp(whereequipped) 09 Midshipcleat 10 Hand-heldfireextinguisher(beneathobserver
seat) 11 Heatedobserverseat(whereequipped) 12 Walk-thruseat(whereequipped) 13 Cooler(locatedunderseat) 14 Cockpittablemount(whereequipped) 15 Batteries(includingON-OFFswitch) 16 Fueltankfiller 17 Ballastthru-hullvent 18 Skipylon 19 Sterncleat 20 Engineexhaust(two,ontopofportandstarboard
deckneartransom) 21 Wakeadjustmentplate(locatedunderswimplat-
form,whereequipped) 22 Swimplatform 23 Sundeckfillercushion 24 Transomrailwithtoweye 25 Transomdrainplug(centerbeneathswimplat-
form) 26 Under-platformladder(whereequipped) 27 Transomstereoremote(whereequipped) 28 Underwaterlights(twowhereequippedunder
swimplatform) 29 Sternlightreceptacle(ifequippedwithtower,the
lightwillbeincenteraftoftower) 30 Showerwandandswitch/SlickBootwandand
switch(whereequipped,insidecompartment) 31 Enginecompartment 32 Engineexhaust(two,ontopofportandstarboard
deckneartransom) 33 Sterncleat 34 Bilgethru-hullvent 35 Fueltankfiller 36 Automaticfireextinguisher
37 Subwoofer 38 Heatedseat(whereequipped) 39 Armreststereoremote 40 Shift/throttlecontrol 41 Steeringwheel 42 Midshipcleat 43 Firesuppressionunitmanualoverride 44 Instrumentpanel(detailselsewhereinthis section) 45 Nav/anchorlight 46 Circuitbreakerpanel(onkickpanelbeneath
instrumentpanel) 47 Adjustablemirror 48 Ballastthru-hullvent 49 Bilgethru-hulloutlet 50 Ballasttanklocatedbeneathfloorboard 51 Ladder 52 Anchor 53 Bowcleat
Boats may also be equipped with towers (standard on X-45), which may include stereo speakers, lights and/or tower-mounted mirror
Storage space is located:Underobserver’sseatUnderbowseatingUnderaftandwrap-aroundseatingUnderportandstarboardsunpads

2011 Owners Manual...Guide to Individual Models...Page 4-22
255V, X-55
01
02
03
04
05
06
07
08
09
10
11
12
13
14
15
16
17
18
19
20
51
50
49
48
47
46
45
44
43
42
41
40
39
38
37
36
35
34
33212223242526272829303132

2011 Owners Manual...Guide to Individual Models...Page 4-23
255V, X-55 01 Bowcleat 02 Bowfillercushion(whereequipped) 03 Amp(whereequipped) 04 Head 05 Hand-heldfireextinguisher(insidehead) 06 iPodinterface(insidehead,whereequipped) 07 Nav/anchorlight 08 StereoCDPlayer(whereequipped);SiriusSatellite
Radio(whereequipped) 09 Glovebox 10 Midshipcleat 11 Centerdrainplug(accessplateundercarpetmat) 12 Convertibleobserverseat 13 Subwoofer 14 Batteries(includingON-OFFswitch) 15 Washdownconnection 16 Cooler(locatedunderseat) 17 Fueltankfiller 18 Skipylon 19 Blowerexhaust(two,ontopofportandstarboard
deckneartransom) 20 Sterncleat 21 Freshwatertankfill 22 Wakeadjustmentplate(locatedunderswimplat-
form,whereequipped) 23 Swimplatform 24 Transomrailwithtoweye 25 Transomdrainplug(centerbeneathswimplat-
form) 26 Under-platformladder(whereequipped) 27 Underwaterlights(twowhereequippedunder
swimplatform) 28 Sternlightreceptacle(ifequippedwithtower,the
lightwillbeincenteraftoftower) 29 Automaticfireextinguisher 30 Freshwaterflushport(whereequipped) 31 Sterncleat 32 Enginecompartment 33 Fueltankfiller 34 Uprightrefrigerator(undersink,whereequipped) 35 Sinkandshower(whereequipped) 36 Heatedseat(whereequipped) 37 Armreststereoremote 38 Midshipcleat 39 Shift/throttlecontrol 40 Steeringwheel
41 Firesuppressionunitmanualoverride 42 Instrumentpanel(detailselsewhereinthissec-
tion) 43 Nav/anchorlight 44 Circuitbreakerpanel(onkickpanelbeneath
instrumentpanel) 45 Holdingtankpump-out 46 Adjustablemirror 47 Amp(standardequipment) 48 Ballasttanklocatedbeneathfloorboard 49 Bowcleat 50 Ladder 51 Anchor
Boats may also be equipped with towers (standard on X-55), which may include stereo speak-ers, lights and/or tower-mounted mirror
Storage space is located:Underobserver’sseatUnderbowseatingUnderaftandwrap-aroundseatingUnderportandstarboardsunpads

2011 Owners Manual...Guide to Individual Models...Page 4-24
X-Star
01
02
03
04
05
06
07
08
09
10
11
12
13
14
15
454443424140
3938373635343332313029282726
16171819202122232425

2011 Owners Manual...Guide to Individual Models...Page 4-25
X-Star 01 Bowcleat 02 Bowfillercushion(whereequipped) 03 StereoCDPlayer(insideglovebox,whereequipped);Sirius SatelliteRadio(whereequipped) 04 Glovebox 05 Walk-thruseat(whereequipped) 06 Nav/anchorlight 07 Ballastthru-hullvent 08 Amp(whereequipped) 09 iPodinterface(whereequipped) 10 Hand-heldfireextinguisher(beneathobserverseat) 11 Centerdrainplug(accessplateundercarpetmat) 12 Cockpittablemount(whereequipped) 13 Batteries(includingON-OFFswitch) 14 Fueltankfiller 15 Sterncleat 16 Swimplatform 17 Engineexhaust 18 Transomrailwithtoweye 19 Transomdrainplug(centerbeneathswimplatform) 20 Under-platformladder(whereequipped) 21 Transomstereoremote(whereequipped) 22 Underwaterlights(twowhereequippedunderswimplatform) 23 Showerwandandswitch/SlickBootwandandswitch(whereequipped,insidecompartment) 24 Enginecompartment 25 Sterncleat 26 Bilgethru-hullpump-out 27 Automaticfireextinguisher 28 Nav/anchorlight 29 Fueltankfiller 30 Subwoofer 31 Heatedseat(whereequipped) 32 Armreststereoremote 33 Shift/throttlecontrol 34 Steeringwheel 35 Nav/anchorlight 36 Firesuppressionunitmanualoverride 37 Instrumentpanel(detailselsewhereinthissection) 38 Circuitbreakerpanel(onkickpanelbeneathinstrumentpanel) 39 Ballastthru-hullvent 40 Bilgethru-hulloutlet 41 Adjustablemirror 42 Ballasttanklocatedbeneathfloorboard 43 Ladder 44 Anchor 45 Bowcleat
Boat is also be equipped with a tower, which may include stereo speakers, lights and/or tower-mounted mirror
Storage space is located:Underobserver’sseatUnderbowseatingUnderaftandwrap-aroundseatingUnderportandstarboardsunpads

2011 Owners Manual...Guide to Individual Models...Page 4-26
280V, X-80
01
02
03
04
05
06
07
08
09
10
11
12
13
14
15
16
17
18
19
20
52
51
50
49
48
47
46
45
44
43
42
41
40
39
38
37
36
35
3421222324252627282930313233

2011 Owners Manual...Guide to Individual Models...Page 4-27
280V, X-80 01 Bowcleat 02 Bowfillercushion(whereequipped) 03 Amp(whereequipped) 04 iPodinterface(insidehead,whereequipped) 05 StereoCDPlayer(whereequipped);SiriusSatellite
Radio(whereequipped) 06 Head 07 Hand-heldfireextinguishers(insidehead) 08 Midshipcleat 09 Nav/anchorlight 10 Centerdrainplug(accessplateundercarpetmat) 11 Convertibleobserverseat 12 Subwoofer 13 Cockpittablemount(whereequipped) 14 Batteries(includingON-OFFswitch) 15 Thru-hullpump-out 16 Holdingtankpump-out(whereequipped) 17 Sternlightreceptacle 18 Fueltankfiller 19 Sterncleat 20 Freshwatertankfill 21 Dualtrimtabs 22 Engineexhaust(twounderswimplatform) 23 Sundeckfillcushion 24 Swimplatform 25 Transomdrainplug(centerbeneathswimplat-
form) 26 Under-platformladder(whereequipped) 27 Skipylon 28 Enginecompartment 29 Underwaterlights(twowhereequippedunder
swimplatform) 30 Showerwandandswitch/SlickBootwandand
switch(whereequipped) 31 Automaticfireextinguisher 32 Sterncleat 33 Bilgethru-hulloutlet 34 Fueltankfiller 35 Refrigeratordrawer(underseating,where
equipped) 36 Entertainmentunit(undersink,whereequipped) 37 Freshwatertank,sinkandshower(where
equipped) 38 Heatedseat(whereequipped) 39 Thru-hullpump-out 40 Armreststereoremote
41 Nav/anchorlight 42 Shift/throttlecontrol 43 Steeringwheel 44 Midshipcleat 45 Firesuppressionunitmanualoverride 46 Instrumentpanel(detailselsewhereinthissec-
tion) 47 Circuitbreakerpanel(onkickpanelbeneath
instrumentpanel) 48 Adjustablemirror 49 Ballasttanklocatedbeneathfloorboard 50 Bowcleat 51 Ladder 52 AnchorBoats may also be equipped with towers
(standard on X-80), which may include stereo speakers, lights and/or tower-mounted mirror
Storage space is located:Underobserver’sseatUnderbowseatingUnderaftandwrap-aroundseatingUnderportandstarboardsunpads
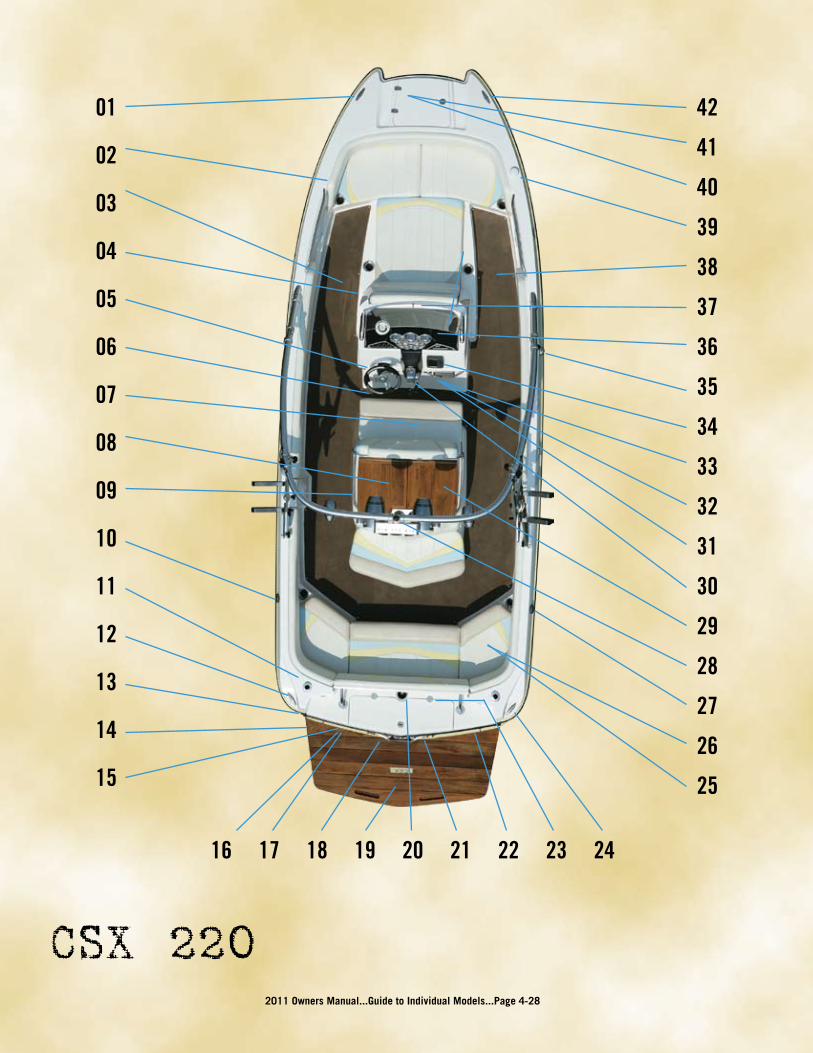
2011 Owners Manual...Guide to Individual Models...Page 4-28
CSX 220
01
02
03
04
05
06
07
08
09
10
11
12
13
14
15
42
41
40
39
38
37
36
35
34
33
32
31
30
29
28
27
26
25
16 17 18 19 20 21 22 23 24

2011 Owners Manual...Guide to Individual Models...Page 4-29
CSX 220 01 Bowcleat 02 SiriusSatelliteRadioantenna(whereequipped) 03 Bowfillercushion(whereequipped) 04 Circuitbreakerpanel 05 Steeringwheel 06 Hand-heldfireextinguisher(underhelm) 07 Centerdrainplug(beneathseating) 08 Enginecompartmentandseacock(seastrainer)access 09 Fireport 10 Fueltankfiller 11 Freshwatertankfill 12 Sterncleat 13 Freshwaterflushport 14 Swimplatform 15 Blowerexhaust(two,underswimplatform) 16 Telescopic,removablediveladder(whereequipped) 17 Zincanodebondingsystem(underswimplatform) 18 Transomdrainplug(center,beneathswimplatform) 19 Under-platformladder(whereequipped) 20 Skipylon 21 Underwaterlights(four,whereequipped,underswimplatform) 22 Transomstereoremote(whereequipped) 23 SlickBootwandandswitch(whereequipped) 24 Sterncleat 25 Batteries(includingON-OFFswitch) 26 Batterycircuitbreakerpanel 27 Fueltankfiller 28 Anchorlight 29 Shower,sinkandcooleraccess;showerwandandswitch 30 Shift/throttlecontrol 31 Amp(whereequipped) 32 Subwoofer(whereequipped) 33 iPodinterface(whereequipped) 34 StereoCDPlayer(whereequipped);SiriusSatelliteRadio(whereequipped) 35 Nav/anchorlight 36 Instrumentpanel(detailselsewhereinthissection) 37 Windshield-mountedmirror 38 Bowfillercushion(whereequipped) 39 GPSantenna 40 Bowladder 41 Anchor 42 Bowcleat
Boats may be equipped with towers, which include a storage box, red & white dome lights, navigation lights, and may also have cockpit floodlights and/or Xtreme mirror
Storage space is located:UnderbowseatingUnderaftseating

2011 Owners Manual...Guide to Individual Models...Page 4-30
CSX 265
01
02
03
04
05
06
07
08
09
10
11
12
13
14
15
16
17
18
19
20
51
50
49
48
47
46
45
44
43
42
41
40
39
38
37
36
35
34
21222324252627282930313233
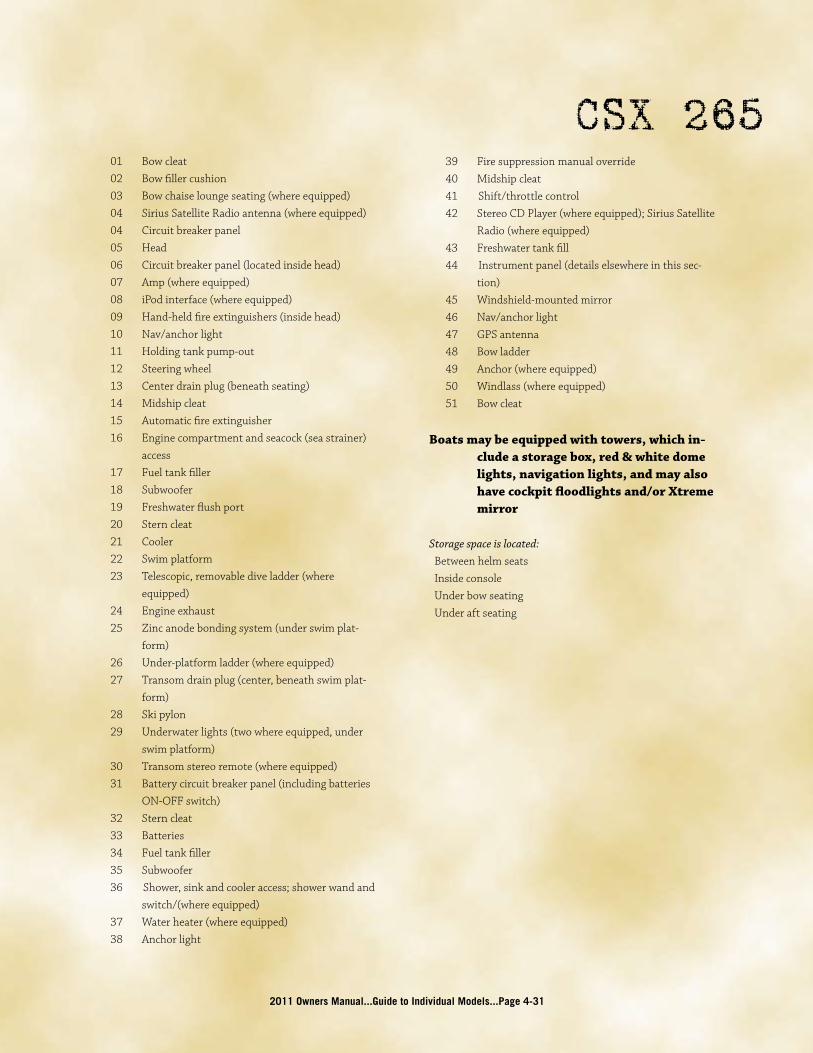
2011 Owners Manual...Guide to Individual Models...Page 4-31
CSX 265 01 Bowcleat 02 Bowfillercushion 03 Bowchaiseloungeseating(whereequipped) 04 SiriusSatelliteRadioantenna(whereequipped) 04 Circuitbreakerpanel 05 Head 06 Circuitbreakerpanel(locatedinsidehead) 07 Amp(whereequipped) 08 iPodinterface(whereequipped) 09 Hand-heldfireextinguishers(insidehead) 10 Nav/anchorlight 11 Holdingtankpump-out 12 Steeringwheel 13 Centerdrainplug(beneathseating) 14 Midshipcleat 15 Automaticfireextinguisher 16 Enginecompartmentandseacock(seastrainer)
access 17 Fueltankfiller 18 Subwoofer 19 Freshwaterflushport 20 Sterncleat 21 Cooler 22 Swimplatform 23 Telescopic,removablediveladder(where
equipped) 24 Engineexhaust 25 Zincanodebondingsystem(underswimplat-
form) 26 Under-platformladder(whereequipped) 27 Transomdrainplug(center,beneathswimplat-
form) 28 Skipylon 29 Underwaterlights(twowhereequipped,under
swimplatform) 30 Transomstereoremote(whereequipped) 31 Batterycircuitbreakerpanel(includingbatteries
ON-OFFswitch) 32 Sterncleat 33 Batteries 34 Fueltankfiller 35 Subwoofer 36 Shower,sinkandcooleraccess;showerwandand
switch/(whereequipped) 37 Waterheater(whereequipped) 38 Anchorlight
39 Firesuppressionmanualoverride 40 Midshipcleat 41 Shift/throttlecontrol 42 StereoCDPlayer(whereequipped);SiriusSatellite
Radio(whereequipped) 43 Freshwatertankfill 44 Instrumentpanel(detailselsewhereinthissec-
tion) 45 Windshield-mountedmirror 46 Nav/anchorlight 47 GPSantenna 48 Bowladder 49 Anchor(whereequipped) 50 Windlass(whereequipped) 51 Bowcleat
Boats may be equipped with towers, which in-
clude a storage box, red & white dome lights, navigation lights, and may also have cockpit floodlights and/or Xtreme mirror
Storage space is located:BetweenhelmseatsInsideconsoleUnderbowseatingUnderaftseating

2011 Owners Manual...Guide to Individual Models...Page 4-32
Instrument Panels
ProStar 190, ProStar 197, X-1, X-7, ProStar 214, X-14, 214V, X-14V Top row of gauges from left:Oil pressure gaugeEngine temperature gaugeSpeedometerMulti-function/tachometerSpeedometer or Perfect Pass VoltmeterFuel gauge Lower left panel:HornSeat Heat switchHeater switchCourtesy lights switch Lower right panel:Speedo adjustment switchNav/anchor lights switchBilge pump switchBlower switchIgnition key slot
X-Star, 280V, X-80Top row of gauges from left:TachometerSpeedometerVideo display gauge Middle left panel:Oil pressure gaugeEngine temperature gauge Middle right panel:VoltmeterFuel gauge Lower left panel:HornCourtesy lights switchShower switchHeater switchBallast port switchBallast KGB switchBallast starboard switch Lower right panel:Tower light switchBlower switchBilge pump switchNav/anchor lights switchIgnition switch
200V, 215V, 225V, 245V, X-2, X-15,X-25, X-45 Top row of gauges from left:Oil pressure gaugeEngine temperature gaugeVideo display gauge (where equipped)
SpeedometerPerfect Pass (option)Fuel gaugeVoltmeter Lower left panel:HornSeat heat switchHeater switchWash down switchCourtesy lights switch12-volt receptacle Lower right panel:Display selector switchNav/anchor lights switchForward bilge switchAft bilge switchBlower switchIgnition key slot
235V, X-35, 255V, X-55 Top row of gauges from left:Oil pressure gaugeEngine temperature gaugeTachometer gaugeSpeedometer with displayUnused billet fillerFuel gaugeVoltmeter Top row of gauges from left with optional Video Display:Oil pressure gaugeEngine temperature gaugeTachometer gaugeVideo Display ScreenSpeedometer gaugeFuel gaugeVoltmeter Lower left panel:HornSeat Heat switchHeater switchWash down switchCourtesy lights switch12-volt receptacle Lower right panel:Display “Disp” switch (on Video Display Screen-equipped, dash dimmer)Nav/anchor lights switchForward bilge switchAft bilge switchBlower switchIgnition key slot
CSX 265 Gauge panel upper:Port engine tachometerVideo display gaugeStarboard engine tachometer Gauge panel lower:Port engine multiple gauge: gas (upper left); voltmeter (upper right); engine temperature (lower left); oil pressure (lower right).Starboard engine multiple gauge: gas (up-per left); voltmeter (upper right); engine temperature (lower left); oil pressure (lower right). Switch panel, upper row:Navigation/anchor light switchCourtesy light switchTower light switch, forwardTower light switch, aft Switch panel, lower row:Three (3) bilge switchesBlower switchEngine hatch switch
CSX 220 Upper panel:TachometerSpeedometerPerfect Pass (option)Display selector (multi-purpose gauge)Starboard switch: speedometer calibrationEngine temperature gaugeOil temperature gauge VoltmeterFuel gauge Port side switches, top row from left:Navigation/anchor light switchForward/aft tower light switchCourtesy light switch Port side switches, bottom row from left:Forward bilge auto/manual switchAft bilge auto/manual switchFreshwater switchUp/down motor box hatch actuator switchOn/off bilge blower switch Center switches:Port ballast system fill/empty switchKGB ballast system fill/empty switchStarboard ballast system fill/empty switch Starboard side console:GloveboxGarmin GPS/chartplotter/sounder (optional)Clarion stereo AM/FM radio and CD player (optional)12-volt courtesy outletMP3/iPod input Below steering helm:Emergency engine safety switch Ignition switch

2011 Owners Manual...Guide to Individual Models...Page 4-33
Measurements
MariStar 255, X-55Length of Boat ............................................ 25’5”Width Amidship............................................ 102”Boat Weight ...............................4,850-5,000 lbs.Length of Boat w/Platform ......................... 27’8”Towing Length ............................................ 31’2” Fuel Capacity ..................................... 90 gallonsTotal Weight Capacity ...18 people or 3,000 lbs.
X-StarLength of Boat ............................................ 24’9”Width Amidship............................................ 100”Boat Weight ......................................... 4,250 lbs.Length of Boat w/Platform ......................... 24’6”Towing Length ................................................ 24’Towing Width ............................................... 100”Fuel Capacity ..................................... 57 gallonsTotal Weight Capacity ...12 people or 1,770 lbs.
MariStar 280, X-80, 280 STSLength of Boat ............................................ 28’3”Width Amidship............................................ 114”Boat Weight ........................ 6,200 lbs./6,420 lbs.Length of Boat w/Platform ......................... 28’3”Towing Width ............................................... 114”Fuel Capacity ................................... 100 gallonsTotal Weight Capacity ......................................... ................ Yacht certified; no capacity rating
CSX 220Length of Boat ............................................ 21’5”Width Amidship............................................ 102”Boat Weight ......................................... 4,300 lbs.Length of Boat w/Platform ......................... 23’7”Fuel Capacity ..................................... 46 gallonsTotal Weight Capacity ...12 people or 1,595 lbs.
CSX 265Length of Boat ............................................ 26’5”Width Amidship............................................ 114”Boat Weight ......................................... 7,750 lbs.Length of Boat w/Platform ......................... 29’2”Fuel Capacity ................................... 125 gallonsTotal Weight Capacity ........................................ ................ Yacht certified; no capacity rating
MariStar 200, X-2Length of Boat ................................................ 20’Width Amidship.............................................. 96”Boat Weight ...............................3,350-3,500 lbs.Length of Boat w/Platform ......................... 22’1”Towing Length ............................................ 22’9”Towing Width ............................................... 100”Fuel Capacity ..................................... 45 gallonsTotal Weight Capacity ...11 people or 1,609 lbs.
MariStar 215, X-15Length of Boat ............................................ 21’8”Width Amidship............................................ 100”Boat Weight ...............................3,425-3,575 lbs.Length of Boat w/Platform ......................... 23’9”Towing Length ............................................ 24’1”Fuel Capacity ..................................... 45 gallonsTotal Weight Capacity ...14 people or 2,325 lbs.
MariStar 225, X-25Length of Boat ............................................ 21’6”Width Amidship............................................ 102”Boat Weight ...............................4,150-4,370 lbs.Length of Boat w/Platform .................. 23’7-1/2”Towing Length ................................... 26’10-1/2”Towing Width ............102” (without guide poles)Fuel Capacity .................................... 53 gallonsTotal Weight Capacity ...16 people or 2,440 lbs.
MariStar 235, X-35Length of Boat ............................................ 23’5”Width Amidship............................................ 102”Boat Weight ...............................4,650-4,900 lbs. Length of Boat w/Platform ......................... 25’3”Towing Length ............................................ 25’8”Fuel Capacity ..................................... 60 gallonsTotal Weight Capacity ...16 people or 2,400 lbs.
MariStar 245, X-45Length of Boat ............................................ 24’2”Width Amidship............................................ 102”Boat Weight ...............................4,730-4,950 lbs.Length of Boat w/Platform ......................... 26’4”Towing Length ............................................ 26’1”Towing Width ............................................... 100”Fuel Capacity ..................................... 90 gallonsTotal Weight Capacity ...18 people or 2,928 lbs.
ProStar 190Length of Boat ............................................ 19’8”Width Amidship.............................................. 91”Boat Weight ......................................... 2,620 lbs.Length of Boat w/Platform ......................... 21’6”Towing Length ............................................... 22”Towing Width ............................................... 100”Fuel Capacity ..................................... 28 gallonsTotal Weight Capacity .....7 people or 1,087 lbs.
ProStar 197, X-7Length of Boat ............................................ 19’8”Width Amidship.............................................. 91”Boat Weight ...............................2,800-3,070 lbs.Length of Boat w/Platform ......................... 21’6”Towing Length ................................................ 22’Towing Width ............................................... 100”Fuel Capacity ..................................... 28 gallonsTotal Weight Capacity .....7 people or 1,087 lbs.
ProStar 214, X-14Length of Boat ............................................ 21’4”Width Amidship.............................................. 96”Boat Weight ...............................3,100-3,300 lbs.Length of Boat w/Platform ......................... 23’8”Towing Length ............................................ 24’4”Towing Width ............................................... 100”Fuel Capacity ..................................... 40 gallonsTotal Weight Capacity ...11 people or 1,525 lbs.
ProStar 214V, X-14VLength of Boat ............................................ 21’4”Width Amidship.............................................. 96”Boat Weight .................................. 3,400 lbs. est.Length of Boat w/Platform ......................... 23’8”Towing Length ............................................ 24’4”Towing Width ............................................... 100”Fuel Capacity ..................................... 34 gallonsTotal Weight Capacity ...11 people or 1,450 lbs.
X-1Length of Boat ............................................ 20’7”Width Amidship.............................................. 90”Boat Weight ......................................... 3,200 lbs.Length of Boat w/Platform ......................... 22’6”Towing Length ............................................ 22’3”Towing Width ................................................. 96”Fuel Capacity ..................................... 33 gallonsTotal Weight Capacity ...11 people or 1,615 lbs.
Overloading a boat may cause it to become unstable and may potentially result in the boat’s flotation system becoming overwhelmed. Too much weight can sink any boat! Within this Manual and on a label mounted in each boat, except in the 280 and 265 models, is the weight and maximum occupant limit for that specific model. Bear in mind that total weight limits include additional water ballast, gear brought onto the boat, additional options and all people. Equally critical is how weight is distributed throughout the boat. If too much weight is placed in one area it can have serious impact on maintaining control. Items and people can also shift positions during operation, potentially causing a dangerous situation.
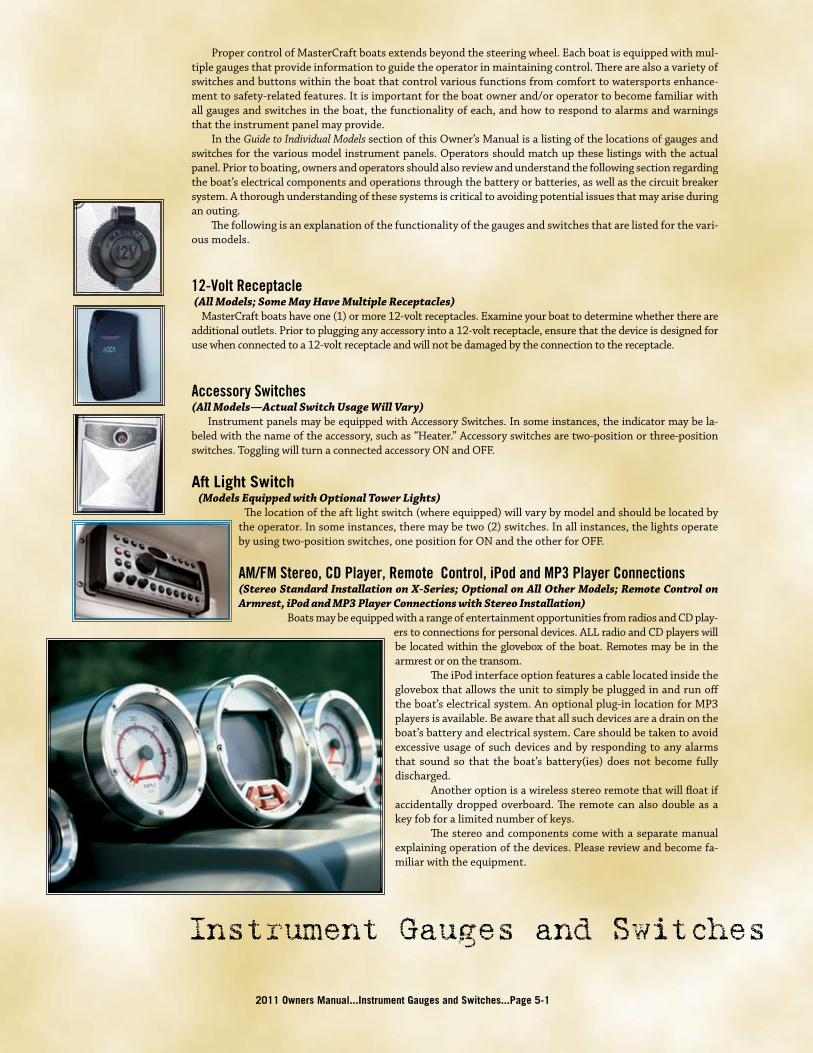
2011 Owners Manual...Instrument Gauges and Switches...Page 5-1
Instrument Gauges and Switches
Proper control of MasterCraft boats extends beyond the steering wheel. Each boat is equipped with mul-tiple gauges that provide information to guide the operator in maintaining control. There are also a variety of switches and buttons within the boat that control various functions from comfort to watersports enhance-ment to safety-related features. It is important for the boat owner and/or operator to become familiar with all gauges and switches in the boat, the functionality of each, and how to respond to alarms and warnings that the instrument panel may provide. In the Guide to Individual Models section of this Owner’s Manual is a listing of the locations of gauges and switches for the various model instrument panels. Operators should match up these listings with the actual panel. Prior to boating, owners and operators should also review and understand the following section regarding the boat’s electrical components and operations through the battery or batteries, as well as the circuit breaker system. A thorough understanding of these systems is critical to avoiding potential issues that may arise during an outing. The following is an explanation of the functionality of the gauges and switches that are listed for the vari-ous models.
12-Volt Receptacle (All Models; Some May Have Multiple Receptacles) MasterCraft boats have one (1) or more 12-volt receptacles. Examine your boat to determine whether there are additional outlets. Prior to plugging any accessory into a 12-volt receptacle, ensure that the device is designed for use when connected to a 12-volt receptacle and will not be damaged by the connection to the receptacle.
Accessory Switches (All Models—Actual Switch Usage Will Vary) Instrument panels may be equipped with Accessory Switches. In some instances, the indicator may be la-beled with the name of the accessory, such as “Heater.” Accessory switches are two-position or three-position switches. Toggling will turn a connected accessory ON and OFF.
Aft Light Switch (Models Equipped with Optional Tower Lights)
The location of the aft light switch (where equipped) will vary by model and should be located by the operator. In some instances, there may be two (2) switches. In all instances, the lights operate by using two-position switches, one position for ON and the other for OFF.
AM/FM Stereo, CD Player, Remote Control, iPod and MP3 Player Connections (Stereo Standard Installation on X-Series; Optional on All Other Models; Remote Control on Armrest, iPod and MP3 Player Connections with Stereo Installation) Boats may be equipped with a range of entertainment opportunities from radios and CD play-
ers to connections for personal devices. ALL radio and CD players will be located within the glovebox of the boat. Remotes may be in the armrest or on the transom. The iPod interface option features a cable located inside the glovebox that allows the unit to simply be plugged in and run off the boat’s electrical system. An optional plug-in location for MP3 players is available. Be aware that all such devices are a drain on the boat’s battery and electrical system. Care should be taken to avoid excessive usage of such devices and by responding to any alarms that sound so that the boat’s battery(ies) does not become fully discharged. Another option is a wireless stereo remote that will float if accidentally dropped overboard. The remote can also double as a key fob for a limited number of keys. The stereo and components come with a separate manual explaining operation of the devices. Please review and become fa-miliar with the equipment.

Attitude Adjustment or Trim Tab Switch(All MariStars and CSX 265) MasterCraft utilizes Lenco attitude adjustment plate kits on several models. Dual plate kits are available on the MariStar 280, X-80, 280 STS and CSX 265 models; a single plate kit is used on the MariStar 200, X-2, 215, X-15, 230, X-30, 235, X-35, 245 and X-45. On the dual attitude adjustment plate system, the plates operate independently of each other to provide optimal performance by redirecting water flow near the transom of the boat. These plates have been designed to improve the overall attitude of a boat. If used properly, the plates will improve the ride, reduce drag, increase speed and improve the fuel efficiency of the boat. The operation of the attitude adjustment plates is basic. The plane or planes are mounted with the actuator(s) on the transom of the boat. When the plate(s) is/are lowered, the water flow is redirected, creat-ing an upward force at the stern of the boat. When the stern rises, the bow will lower. Since these actuators are electromechanical, they provide an im-mediate response at the touch of the switch. The switch adjustments are based on the position of the bow. On the dual attitude adjustment plate system, the right side of the switch controls the starboard plate and the left side of the switch controls the port plate. On the single plate system, there is only one switch control. The system is set up this way to minimize the guesswork while underway. To lower the starboard bow, press the right (starboard) switch where it reads DOWN. To lower the port bow, press the left (port) switch where it reads DOWN. On the single plate system, press DOWN. Since our models have different weights, lengths, speed and performance, it will take some practice for the operator to under-stand how your boat reacts with the attitude adjustment plates in-stalled. The plates will allow your boat to get on plane faster and continue planing at lower speeds. This will improve visibility and the overall safety of your boat. When making adjustments with the attitude adjustment plates, use short momentary taps of the switch. Continued practice will help you become familiar with how the plates perform.
Special Conditions Head Sea: Lower both plates by tapping slightly BOW DOWN on both sides of a dual system, BOW DOWN on a single system. This will bring the bow down while maintaining speed. This also allows the hull of the boat to absorb the impact of the waves. This adjustment will result in a more efficient and smoother ride. Changes should be made in small increments to ensure maintaining control of the boat. Following Sea: Make sure the plates are fully retracted by pressing BOW UP on both sides of a dual sys-tem, and BOW UP on a single system. This will bring the plate(s) up to a fully retracted position, decreasing lift in the stern and allowing the bow to rise. If the plate(s) is/are deployed, the bow may dig. Windy Chop: To raise the windward side of the boat on dual systems, press BOW UP on that side. If this is not sufficient press BOW DOWN on the leeward side of the boat. Do not over-trim when attempting this. This will allow the windward side of the boat to rise and will minimize spray. Shallow Water/Hole Shot: Lower both plates completely on a dual system by pressing BOW DOWN on both sides (the single plate on a single system). This provides lift in the stern of the boat and will keep the bow down. As you throttle up and speed increases, raise the tab(s) by pressing BOW UP on both sides of a dual system, and BOW UP on the single system. Uneven Load: When equipped with a dual system, if one side of the boat is higher than the other while running, press BOW DOWN on the switch on that side. This will lower the tab on the listing side (low side) to bring the boat level. Porpoising: To stop porpoising, press BOW DOWN on both sides of a dual plate system, BOW DOWN on a single system. The plate(s) needs only to be deployed slightly to correct this adverse situation.
While operating attitude adjustment plates use caution. Improper use of plates can cause accidents, which may result in serious injury or death. While the boat is underway do not move one plate up or down significantly as this may cause listing. While at higher speeds do not over-trim, as this will cause the bow to lower quickly, resulting in a reduction of speed and may cause the boat to veer. When in following seas or when running an inlet, the plates should be fully retracted. This will allow for optimal performance. ELECTROMECHANICAL ACTUATORS PROVIDE AN INSTANT RESPONSE. WHEN MAKING ADJUSTMENTS, USE SHORT MOMENTARY TAPS OF THE SWITCH.
2011 Owners Manual...Instrument Gauges and Switches...Page 5-2

Ballast Empty/Fill Switches (On Ballast-equipped Models Only) On boat models equipped with a ballast system, a separate three-position switch will allow for the filling or emptying of the ballast tanks and/or bags. Be aware that the engine must operate at 1500 RPM dur-ing the fill and empty processes. Check engine specifications for related engine idle speed, which may be too low for the empty/fill operation to be properly accomplished; it is likely that the boat will need to be in motion during the filling and emptying of the ballast system. Failure to increase engine RPM to the required level may result in malfunction or permanent damage to the ballast pumps that force the water through the system. Such damage is not covered under your warranty. The ballast controls vary in location by model, and the operator should determine exact location prior to use. The three-position switches are clearly marked; FILL, OFF (in center), and EMPTY. An LED light is in the tip of each switch. At the conclusion of the FILL process, the light will blink six times in succession, pause for two-to-three seconds, and then blink an additional six times. This signals that the FILL process is complete. If the system senses any potential problems, the LED lights may blink from one to five times (each signifies individual issues). If this occurs, see an authorized MasterCraft dealer for analysis and correction. Do not attempt to correct the issue on your own or continue to FILL the ballast as it may result in damage to the system.
Manual and Automatic Bilge Pump Switch (All Models) The bilge pumps on all V-drive models will be in the automatic mode when the ignition key is turned ON. Some models may have two (2) switches, one for the forward bilge and one for the aft. In these instances, the switches will be marked. The manual and automatic bilge discharge system is never completely off. When in the automatic (default) position, a sensor alerts the system to discharge water from the bilge area. Boat operators are advised to leave the switch in the automatic position, unless there appears to be excess water in the bilge. In that event, the bilge pump can be manually activated by turning the bilge pump switch to the manual ON position. Return the switch to the automatic position when finished emptying the bilge. Leaving the switch in manual mode can result in damage to the pump and may not be covered by warranty!
Blower Switch(All Models) A two-position switch activates the engine box ventilation blower. Push the top half of the switch to turn the blower ON. Note: The blower must operate for a minimum of four (4) minutes before starting the engine at any time. The blower must also be operated during idle and slow-speed running, but is not necessary during cruising speed.
To prevent a possible explosion, operate the blower for at least four (4) minutes before starting the engine and always when at idle or slow-running speed. Explosive gasoline and/or battery fumes may be present in the engine compartment. Failure to operate the blower as instructed may cause improper ventilation of the boat engine and bilge areas, and fuel vapors can accumulate in this area, causing a fire or explosion which may result in serious injury or death!
Circuit Breakers (All Models) All major boat circuits are protected from shorting and overload by re-settable circuit breakers. If a problem develops with one of the following circuits, switch OFF the circuit and wait for approximately one (1) minute. Then fully push the appropriate breaker button and switch ON the circuit. If the circuit continues to trip, there is a problem somewhere that must be attended to immediately. See your autho-rized MasterCraft service department to resolve this matter. The location of the main circuit breaker board is under the dash panel. In some models, there is an additional breaker panel to assist with the accessory load, and where equipped is located near the battery box. There may also be a waterproof fuse for the stereo amplifier, where equipped. If the boat’s accessories are malfunctioning, check and then re-set breakers as necessary. The engines are also equipped with breaker systems. The main 35A circuit breaker protects the engine electrical system and components from overload. If the engine will not turn over with the bat-tery switch in the ON position, locate the red breaker re-set button (labeled “35”) in the engine. There
will be an audible click. Try again to start the engine. If the breaker trips again, the engine requires attention. Immediately take your boat to your authorized MasterCraft service department.
2011 Owners Manual...Instrument Gauges and Switches...Page 5-3

In addition to the 35A circuit breaker, the engines are equipped with additional component overload protection, including a 15A ATO fuse for the fuel pump, a 15A ATO fuse for the injectors and a 15A ATO fuse for the ECM unit. If you suspect that any of these fuses may not be operating as designed, you should take your boat to your authorized MasterCraft service department for inspection and repair. If during maintenance or inspection it becomes necessary to remove or re-position any of the engine’s wiring or wire harness(es) verify that the wiring has been returned to its original position and that all harnesses are routed correctly before attempting to use the boat again. If a wiring clip or retainer breaks, replace it immediately. Wiring is specifically routed to eliminate problems related to engine heat and spray or immersion in liquids. Electrical problems may result if wiring is moved from its original position!
Courtesy Lights Switch(All Models) This switch is a two-position switch that activates the courtesy lights within the boat. Turning the switch upwards will turn the lights ON, and turning it downwards will turn the lights OFF. Note that on boats equipped with the optional underwater lights (transom below the water line), this same switch operates those lights. Also note that the underwater lights should never be operated unless the boat is in the water. Even though these are L.E.D. lights, they generate some heat and require the cool-ing effect of the water to avoid premature burn-out of the bulb.
Cruise Control Gauge(Where Equipped) Boats equipped with cruise control systems come with short manuals that describe how to operate and maintain the cruise control system. Refer to the appropriate manual prior to operation of the system. Boats featuring the “simple” cruise system function the same as an automobile with an ON/OFF switch and +/- to increase or decrease speed. For boats equipped with dual engines, see also the Engine Synchronizing Switch in-structions of this section. The engine synchronizing switch must be ON for the cruise to work on dual-engine boats. Also review the operating instructions from the cruise control provider.
Display Selector Switch(ProStar 190, ProStar 197, X-7) On the models equipped with the Multi-Function gauge, this switch allows the operator to toggle between func-tions.
Dual Battery Operation Switch(All MariStar Models and Similar X Series, X-Star, CSX 220, CSX 265)MariStar and X-Star: For normal operation the battery switch should be placed in the ON position. This allows the engine and all accessories to receive power. The engine will recharge both batteries with the switch ON. For transportation and storage, the battery switch should be placed in the OFF position to allow both batter-ies to be isolated from all circuits. Note: The switch knob may be removed when it is in the OFF position. This is a security feature.
If the engine will not start because the battery is discharged, the engine may be started from the house bat-tery by placing the switch in the COMBINE BATTERIES position. After the engine is started, the switch should be returned to the ON position and NOT allowed to remain in the COMBINE Batteries mode. MariStar 280 and X-80: For normal operation the port and starboard battery switches should be placed in the ON position. The COMBINE BATTERIES switch should remain OFF. The engine and all accessories will re-ceive power. Note: The port battery is a dedicated start battery for the port engine and the starboard battery provides starting current of the starboard engine while also providing power for accessory circuits. For transportation and storage, all battery switches should be placed in the OFF position to isolate both batteries from all cir-cuits. NOTE: The switch knob may be removed when it is in the OFF position. This is a security feature. If either battery becomes discharged, start the engine with the remaining charged battery and THEN set the COMBINE BATTERIES switch to ON. The remaining engine may then be started. Return the COMBINE BATTERIES switch to OFF. The COMBINE BATTERIES switch should NOT be left ON.
2011 Owners Manual...Instrument Gauges and Switches...Page 5-4

2011 Owners Manual...Instrument Gauges and Switches...Page 5-5
CSX 220 and 265: The CSX 220 and CSX 265 are equipped with dual batteries. One battery is reserved to pro-vide engine-starting power and the other provides power for all electrical accessories. These batteries are located under the starboard rear seat cushion. To facilitate access, the batteries are mounted on a sliding tray, which is secured with a pin. Remove the pin to slide the tray forward for battery maintenance. Outside this compartment, located on the side of the deck under the starboard seat is the battery switch box. For normal operation of the boat, the switch should be set to ON. For transportation and storage, the switch should be moved to OFF. In the event of a failure of the starter battery, the two batteries may be combined to provide additional power to start the engine. This can be done by setting the battery switch to COMBINE BATTERIES and starting the engine as normal. After the engine is started, the switch should be returned to the ON position. The battery charger inlet connector is also located in the battery switch box. Please see information provided by the charger manufacturer. Battery chargers installed by MasterCraft are of the charger/maintainer variety. The charger may be left connected to the batteries indefinitely.
Engine Emergency Safety Stop Switch(All Models) The engine emergency safety stop switch, which is attached to the lanyard, is an ignition cut-off switch designed to stop the engine in the event the operator is thrown or moves too far away from the helm. The lanyard is equipped with a hook on one end that should be attached to your clothing or PFD, and the opposite end has a slide that fits over the ignition switch. Be sure that the slide is firmly attached to the igni-tion switch before starting. The ignition switch is located near the throttle control box, the armrest or on the instrument panel. If the slide is left off or is loose, the engine will crank but will not start. Operators should NEVER attempt to override this safety system!
The safety switch lanyard must be attached to the operator whenever the engine is running. Failure to do so may result in death or serious injury!
Engine Hatch Switch (MariStar 280/X-80, CSX-220, CSX-265) Where equipped, an engine hatch cover switch allows the cover to open and close electronically. The three-posi-tion switch is pressed up to open and down to close the hatch.
The engine box serves as a machinery guard. The engine must be OFF whenever the box is open. Clothing or body parts can get caught in moving parts, causing death or serious injury. Keep away from moving parts!
Engine Oil Pressure Gauge(All Models) The engine oil pressure gauge indicates the pressure of the lubricating oil inside the engine. The average pressure ranges are between six (6) pounds per square inch (PSI) at 1000 RPM to 40 PSI or more at cruise-range speeds. A reading of pressure below 5 PSI at 1000 RPM may be caused by a low oil level or other poten-tially serious problems that result in low oil pressure. If you experience low oil pressure, stop your engine immediately and check your oil level before operating again.
Do not continue to run the engine if the oil pressure is low. If you do, the engine may become so hot that it, or surrounding components, could catch fire. You or others could be burned and the boat seriously damaged. Check your oil level and add an appropriate amount of approved motor oil before operating again or have your boat serviced by your local authorized dealer’s service department. Note that damage to your engine from inappropriate oil levels can be costly to repair. Such damage is not covered by your warranty.

2011 Owners Manual...Instrument Gauges and Switches...Page 5-6
Engine Synchronizing Switch(MariStar 280, X-80 and CSX 265) This two-position switch allows the engines to operate in synchronization. Do not engage the switch unless the engines are running but still in neutral (for safety’s sake)! Prior to engaging the synchronizing switch, ensure that you are in a large body of water. Avoid a tight cove or narrow river, and docks, dams or other ob-jects that may protrude into the body of water. Be certain that there is a minimum of other vessels or traffic as you will need room to perform this procedure.
Engaging the engine synchronization functionality requires practice to master. Because the boat will be in gear and will move during the process, even after mastering the maneuver boat operators should synchronize engines only on bodies of water of sufficient size to accomplish the maneuver without making contact with other vessels or with inanimate objects, which could cause serious bodily injury or significant damage to the boat.
The port engine will have an RPM blip after the Synch switch is activated and the throttle is moved to wide-open throttle on the MariStar 280, X-80 and CSX 265. If the engine actually accelerates to wide-open throttle, then the Synch function did not take control of the port engine. In this instance, reduce the speed and return to Step 1.
The engines can be run at different levels of throttle BUT NOT WHEN UTILIZING THE SYNCH FUNCTION! NOTE: DO NOT engage the Engine Synchronizing Switch when loading or unloading the boat from a trailer OR when docking. These maneuvers require a sensitive touch.
Port engine shifter
Port engine throttle
Starboard engine throttle
Starboard engine shifter
MariStar 280, X-80
MariStar 280, X-80Note: The MariStar 280 is equipped with a four-lever control. (See above image.)
Step 1: Start both engines. While at idle and in neutral (shifter not moved), press up on the Synch switch to turn the synchronization function ON.
Step 2: Push the port throttle to wide-open throttle. There will be a slight rise in RPMs to the engine (but the boat should not move forward as the shifting and throttle response are controlled with separate levers). With the Synch switch ON, however, the engine will very quickly return to idle.
Step 3: Using the starboard throttle, run the boat up to the de-sired speed. At this point, the system will begin functioning with both engines in synch. The starboard throttle will con-trol the speed for both engines as long as the synch switch is ON.
Note: Before disengaging the synch functionality, move ALL levers back to idle, beginning with the starboard throttle and shifter, and then the port throttle and shifter. When the boat returns to idle, the engine synchronizing switch can be turned off. Failure to follow this procedure may result in erratic handling of the boat, which may be beyond the boat operator’s ability to handle.
CSX 265 The CSX 265 is equipped with a two-lever control. See above image.)
Step 1: Start both engines. While at idle, press up on the Synch switch to turn the synchronization func-tion ON.

Step 2: Push the port throttle to wide-open throttle. There will be a slight rise in RPMs to the engine, which will cause the boat to move forward. (This occurs because the shifting and throttle response are controlled with the same lever.) With the Synch switch ON, however, the engine will very quickly return to idle, but the port engine remains in forward gear.
Step 3: Using the starboard throttle, run the boat up to the de-sired speed. At this point, the system will begin functioning with both engines in synch. The starboard throttle will con-trol the speed for both engines as long as the synch switch is ON.
Note: Before disengaging the synch functionality, move ALL levers back to idle, beginning with the starboard throt-tle and shifter, and then the port throttle and shifter. When the boat returns to idle, the engine synchronizing switch can be turned off. Failure to follow this procedure may result in erratic handling of the boat, which may be beyond the boat operator’s ability to handle.
Port engine combined shifter/throttle
Starboard engine
combined shifter/throttle
CSX 265
Allowing the fuel level in the fuel tank to fall below one-quarter of a tank full may affect the reliability of the fuel pump or result in damage to the fuel pump, which is not covered under warranty.
Heater Switch(Optional Installation for All Models) Among the accessory options available for your boat is a heater function. The heater’s three-position switch is turned up for ON (LOW), or turned down for ON (HIGH). The center position is OFF. Warmed air from an electrically powered heater box will be blown from vents within the boat deck.
Horn(All Models) The horn is sounded by means of a button on the instrument panel. Pressing the button emits a loud and recognizable noise.
Ignition Key Slot(All Models) MasterCraft boats come equipped with an ignition key, which must be inserted in the ignition key slot and used to activate the boat’s electrical system. This, in turn, will allow the boat to be started and operated.
2011 Owners Manual...Instrument Gauges and Switches...Page 5-7
Fuel Gauge(All Models) Fuel gauge readings are only approximate. This gauge is activated with the ignition switch. The rocking mo-tion of the boat during normal operation will cause the fuel gauge to fluctuate. For a more accurate reading, make sure that the boat is level and there is little or no motion present. MasterCraft recommends that operators do not run the boat below a quarter of a tank, except as neces-sary to return to shore, and not until the boat has been operated enough times to develop an understanding of how the fuel gauge readings relate to the visual inspection of fuel left in the tank. Extending fuel usage beyond the known capability of the boat may cause the boat to run out of fuel and may leave you stranded off-shore. Although it may be possible to see fuel in the bottom of the fuel tank, you still may not be able to operate the boat. The fuel pick-up system was designed to avoid introducing the small amount of water and debris that unavoidably accumulate in the bottom of the tank. Rather than relying on visual inspection, you should pay attention to the fuel gauge. Further, it is not recommended to allow the fuel to fall below one-quarter of a tank full at any time as it may result in damage to the fueling system. (See the Fueling section of this Owner’s Manual.)

2011 Owners Manual...Instrument Gauges and Switches...Page 5-8
The key will be in one of four (4) positions:• Off• Accessory (including running the stereo without the engine running)• ON (engine is running)• Start (turn the key to engage the engine starter, then release to allow the key to automatically return to
the ON position) Never leave the ignition switch in the ON position without the engine running, as this will cause the bat-tery to discharge.Note: The MariStar 280STS is equipped with two (2) ignitions, one (1) for each engine, allowing the engines to oper-ate independently of each other. Be sure to turn both ignitions OFF when the engine is not in use.
Instrument Panel Gauge Backlighting Switch(All models equipped with the Video Display Gauge System) A three-position switch allows the operator to change the instrument panel backlighting for the gauges. Press-ing the top of the switch will cause the lights to brighten, and pressing down will dim the lights.
Low Voltage Battery Alarm(All Models) In the event that the stereo has been functioning when the boat is not ON and running, the voltage drain on the battery (or batteries) may result in difficulties with re-starting the boat. It may also cause intermittent erroneous or fluctuating gauge readings. When the voltage level reaches 11.5 volts or below, the system will shut off the stereo and sound the alarm for a period of two (2) minutes to give boaters sufficient time to ad-just. Generally, the appropriate action is to leave the stereo OFF, as well as disengaging any other peripheral electrical components, and keying ON the engine. Running the engine at a moderate rate for several minutes without the additional drain of stereo and unnecessary electrical equipment will allow the alternator to re-charge the battery or batteries, unless the battery(ies) have been used to the extent of their life span.
Carbon monoxide is emitted from the engine’s exhaust system. Never run the engine without proper ventilation. Do not run the engine in a confined space or where fumes may be trapped. Do not run the engine when the boat is stationary in calm wind conditions.
Navigation/Anchor Lights Switch(All Models) A three-position switch serves to activate exterior lighting. Turning the switch in the up position will acti-vate bow and stern lights, the middle position is OFF, and the down position is for stern-only lighting.
Other Alarms(All Models) Sensors check the oil pressure, engine and transmission temperatures. If the system detects readings outside the acceptable range, the system shuts off the stereo and sounds the alarm for a period of one (1) minute. This signals the need to return to shore as soon as possible and seek assistance from your authorized MasterCraft dealer’s service department to diagnose and, if necessary, repair the problem.
Refrigerator Switch(MariStar 280, X-80, CSX 265, X-65) This switch will run the refrigerator when turned ON. The refrigerator runs off the boat’s electrical and battery system. Therefore, care should be given to ensure that the battery is not drained to such an extent that the voltmeter alarm sounds.

2011 Owners Manual...Instrument Gauges and Switches...Page 5-9
Seat Heat Switches (Optional All Models for Driver’s Seat; Certain Models for Observer’s Seat)A two-position switch allows heat to be turned ON for the driver’s seat. In some models, an optional observer seat heat switch is available and will be found on the deck below the observer seat cushion. Note that this switch will operate only when the ignition is in the ON position.
Shift/Throttle Control(All Models) With the exception of the MariStar 280, X-80 and CSX-265, a one-hand, single-lever control operates as both a gear shifter and a throttle. The lever automatically locks in the neutral position (straight up and down) for safety. The lever can be moved from neutral only by raising the lifter under the ball knob. Shifting is ac-complished by moving the lever forward or backward. Center (straight up) is neutral. Moving the lever forward engages the running gear; moving it back from center puts the drive train into reverse. Never attempt to shift without the engine running! During regular warm-up of the engine, it is possible to temporarily increase the engine RPMs without mov-ing the boat. To accomplish this, push in the button located at the bottom of the shift/throttle lever with one hand and pull up the “umbrella” (aluminum surround below the top of the knob). Move the lever to desired position and then simultaneously release the button and umbrella. The engine will run with increased RPMs and can be increased or decreased by moving the lever. Returning the handle to the neutral position (as shown in illustration above) will bring the system back to neutral and reduce the engine RPMs to pre-set levels. This function should be done sparingly. Over-revving the engine for any extended period can cause undue wear and tear on the engine. Avoid advancing to wide-open-throttle and holding the RPMs at that level.
In the MariStar 280 and X-80 the boat is equipped with a four-lever control. The port side lever closest to the driver is the port engine shifter, which allows the boat to move forward when shifted forward, and backward when shifted aft. The next lever is the starboard engine shifter and performs the same function. If both engines are running and the boat is moving, the shifters should be shifted together and in the same direction. Doing otherwise can damage the system. The next middle lever is the port engine throttle, which allows the boat to feed fuel into the engine and operate in motion. Pushing forward on it will signal the system that fuel should be sent to the port engine. The engines can be run at different levels of throttle. The CSX 265 has a two-lever control. On the port side is the port engine shifter/throttle control, and pushing forward will move the boat forward. The starboard side lever is the starboard engine shifter/throttle control. The engines can be run at different levels of throttle. This system allows greater maneuverability in docking, as well as when the boat is in operation. How-ever, it requires more practice and skill in order to avoid potential damage to the boat. See Engine Synchronizing Switch in this section of the Owner’s Manual for more details. During regular warm-up of the engine, it is possible to temporarily increase the engine RPMs without moving the boat. To accomplish this, pull outward (lateral to the unit) on the engine shift/throttle control. The engine will run with increased RPMs and can be increased or decreased by moving the lever. Returning the handle to the neutral position (as shown in illustration above) will bring the system back to neutral and reduce the engine RPMs to pre-set levels. This function should be done sparingly. Over-revving the engine for any extended period can cause undue wear and tear on the engine. Avoid advancing to wide-open-throttle and holding the RPMs at that level.
Port engine shifter
Port engine throttle
Starboard engine throttle
Starboard engine shifter
MariStar 280, X-80
Port engine combined shifter/throttle
Starboard engine
combined shifter/throttle
CSX 265

2011 Owners Manual...Instrument Gauges and Switches...Page 5-10
Shower and/or Slick Boot Switch(Optional Installations on Most Models) A single three-position switch mounted in an aft position storage area controls the optional shower and optional Slick Boot functions. The switch is marked for each. Turn the switch toward the Shower marking to turn ON the shower. Return to center for OFF. Turn to the other direction to turn ON the Slick Boot. Return to center for OFF. These instructions work whether the boat is equipped with one (1) or both of the options, but will not be found in boats that are not equipped with either option.
Sink Switch (MariStar 280 and X-80)On the face plate panel adjacent to the sink is a two-position switch. Turning the switch ON allows water to run through the faucet into the sink. The water comes from a freshwater tank that requires manual refilling when the water has run out. Be sure to turn OFF the switch after running water, and especially when the freshwater tank has run dry.
Speedometer(All Models) The speedometer indicates the forward speed of the boat in miles per hour (unless the boat is equipped with a speedometer that measures kilometers per hour, which is available in the optional European package.) To calibrate the speedometer, you need an accurately measured course of 850 feet and a certified stopwatch, which is accurate to within one-hundredths (.01) of a second. (This can be done with GPS, when equipped.) To calibrate to A.W.S.A. official tournament rules:• Approach the course at 36 miles per hour (MPH) as indicated on the speedometer. Hold the speed steady
and have an observer check the course time with a stopwatch.• If the course time is between 15.88 and 16.28 seconds, no adjustments are necessary.• If the course time is not within that tolerance range, press up or down on the calibration rocker switch to
adjust the speedometer’s speed interpretation.
Surf Tab Switch(All MariStars and CSX 265) On boats equipped with a surf tab switch, it will be located on the armrest. Shown is a trim tab (upper switch) with a surf tab switch (lower tab). (See the Attitude Adjustment or Trim Tab Switch explanation elsewhere in this section for information on how to utilize that functionality.) The surf tab switch is pressed LEFT to list the boat to port (or left), raising the right (starboard) side of the boat. Press RIGHT to list the boat to right (starboard) and lift the left (port) side of the boat. This information will also appear in the BIG or Video Display Gauge, as equipped. Note that the functionality of the Surf Tab Switch operates at 100 percent of available movement when the boat operates at less than 20 mph. Over 20 mph, for safety reasons, the tab will automati-cally move to 25 percent maximum function.
While operating a surf tab plate use care. Improper use of plates can cause accidents, which may result in serious injury or death. While at speeds over 20 mph, the surf tab cannot function at greater than 25 percent of maximum movement as more extension can cause instability. ELECTROMECHANI-CAL ACTUATORS PROVIDE AN INSTANT RESPONSE. WHEN MAKING ADJUSTMENTS, USE SHORT MOMENTARY TAPS OF THE SWITCH.
Tachometer(All Models) On boats not equipped with a multi-function gauge, a separate tachometer gauge is found. The tachom-eter indicates the engine speed in crankshaft revolutions per minute (RPM).
Temperature Gauge(All Models) The temperature gauge indicates the water temperature inside the engine’s cooling system as measured in degrees Fahrenheit. The normal operating temperature will range from 140 degrees Fahrenheit to 190 degrees Fahrenheit. Engines with electronic fuel injection also have a control circuit inside the engine control module that will cause the engine to run at reduced speeds if the module senses that the engine is running too hot. If you notice that your speed has reduced during normal operation, but you have not manually slowed the throttle, monitor your tempera-ture gauge. If the gauge indicates excessive temperatures during operation, slow down immediately and turn off the engine. This indicates an engine problem that needs to be checked by the dealer!

Continuing to operate the boat while the temperature is above normal operating parameters may cause serious damage to your engine. Damage to your engine resulting from operating the engine in an overheated condition can be costly to repair. Such damage is not covered by your warranty!
2011 Owners Manual...Instrument Gauges and Switches...Page 5-11
Tower Lights Switch(Optional Installation for All Models) The location of the tower lights switch (where equipped) varies by model and should be located by the opera-tor. In some instances, there may be two (2) switches. In all instances, the lights operate by using two-position switches, one position for ON and the other for OFF.
Underwater Lights Switch(All Models) This switch is a two-position switch that activates the courtesy lights within the boat as well as the underwa-ter lights (where equipped), simultaneously. Turning the switch upwards will turn the lights ON, and turning it downwards will turn the lights OFF. Also note that the underwater lights should never be operated unless the boat is in the water. Even though these are L.E.D. lights, they generate some heat and require the cooling effect of the water to avoid premature burn-out of the bulb.
Voltmeter(All Models) The voltmeter registers the electrical activity necessary to operate your boat. If the battery (or batteries, in boat models requiring two [2]) is low or non-functional, or if various electrical items on the boat, such as stereo equipment, are draining the battery(ies) and impacting the boat’s ability to function properly, the voltmeter will likely be the first gauge to indicate that you have an electrical problem. The voltmeter cannot tell you which bat-tery is draining on boats with two (2) batteries, but rather functions as a general alarm to alert boaters regarding potential issues. On boats equipped with two (2) batteries, the alarm indicates severe drain on the engine starting battery. To determine which battery is the engine starting battery, read the markings on the battery cables.
Wash Down Switch(Optional Installation for all MariStars CSX 220, CSX 265, and X-Star, including Saltwater Series) A water tank option within available models can provide a fresh-water wash of the boat interior. The tank will be eight (8) or twenty-five (25) gallons capacity, depending on the boat model. The two-position switch is pressed up for ON and down for OFF.
Variations in Gauges and Switches Please note that not every gauge or switch explained in this Owner’s Manual is found on every model. Some equipment is optional and not every option is available on all models of MasterCraft boats. Also, MasterCraft utilizes a variety of gauge and switch styles from the gauges or switches pictured in this Owners Manual. These differences between the various styles of gauges and switches are not in functionality. If a boat is equipped with a gauge or switch that is labeled as described above, it will operate in the same fashion as the description even if its appearance is different, as the appearance changes periodically. If the owner and/or operators are uncertain about a gauge’s or switch’s purpose, do not operate the boat until consulting with an authorized MasterCraft dealer. Some gauges monitor information that is critical to safe and long-term use of the boat. Some switches can affect maneuverability, as well as operations that impact long-term use of the boat.
_________________________________________________________

Each boat will be equipped with either a Multi-Function gauge, a Video Display (VDIG) gauge, or a BIG (Boat Instrument Gauge). These gauges are programmed to perform multiple scans, read-outs and readings for the operator. Because they are more complex than a single-action gauge, it is important for the boat operator to carefully review the functionality prior to first-time operation. The display information can be critical to safe and enjoyable operation of the boat!
Multi-Function Gauge(ProStar 190, ProStar 197, X-7, X-1, base MariStar models only) This gauge provides several functions of interest and support to the boater. As a tachometer, it indicates the engine speed in crankshaft revolutions per minute (RPM). As you toggle to the hourmeter, it registers the accumulated engine operating time. Use the hourmeter to keep accurate logs for scheduled maintenance. (See also the Maintenance Section and Service Log.) Replacing the computer (known as the MMDC) will erase the registered hours. The hourmeter counts hours only when the engine is above 300 rpm. The option exists to change the display to metric from the hours screen. This is done by holding down the gauge selection display button for three (3) seconds. When prompted, select English or metric display. Wait an additional three (3) seconds and the display will return to normal operation. Toggle to the air temperature gauge (optional) to get an approximate reading of the ambient air tem-perature above the water’s surface. Toggle to the clock for the convenience of determining the time. It can be adjusted by depressing the gauge selection display button when the clock is displayed. After three (3) seconds the colon will stop flash-ing. The hours are adjusted by pressing the button down, while minutes are adjusted by pressing up. After three (3) additional seconds the clock will return to normal operation.
Alarms of the Multi-Function Gauge In addition to the displays noted above, the multi-function gauge also displays several alarms. The follow-ing messages will be displayed if an alarm occurs:VOLT = Voltage falls below 11.5 volts. This message indicates that the battery has discharged to an
extent that may jeopardize engine cranking and starting if action is not taken. Start the engine to at least idle, and allow the battery to re-charge.
OIL = Oil pressure is below 4 p.s.i. when the RPM is below 1000 RPM or the oil pressure is below 10 p.s.i. and above 1000 RPM. This message will occur only when the engine is running. Stop the engine and check the oil level as soon as this can be safely done.
TEMP = High engine temperature alarm. This message will occur only when the engine is running. If the engine does not automatically reduce speed to the “limp home” level, manually reduce speed and return to the dock as soon as this can be safely done. It may be necessary to shut down the engine and seek a tow to the dock.
TRAN = Transmission alarm. This message will occur only when the engine is running. Stop the engine and check the transmission oil level as soon as this can be safely done.
While air temperature readings are an optional addition to the gauge, the lake temperature reading is standard on the gauge. This comes from the paddle wheel located under the boat. If the sensor becomes open or shorts out in the line to the battery, it will read 32 degrees F. If the sensor is shorted to the ground wire, it will read 150 degrees F. The SELF TEST feature of the multi-function gauge is located on the lake tempera-ture gauge. With the lake temperature displayed, hold down the gauge selection display button for three (3) seconds or until the self test has started. During the self-test, all the segments on the display will light up. Also during the self test, the gauges will re-set, go to mid-scale and then to full-scale. After two (2) sweeps the system will return to normal.
Video Display Gauge(Standard on X-Star, X-2, X-14, X-14V, X-15, X-25, X-35, X-45, X-55, X-80, MariStar 280; Optional on MariStar 200, MariStar 225, MariStar 235, MariStar 245, MariStar 255, MariStar 280, ProStar 214 and ProStar 214-V) Many MasterCraft boats feature a color display gauge. The video display gauge is capable of displaying engine, boat, and Perfect Pass speed control information. Information is divided into manageable pages or screens and organized into a straightforward menu struc-ture for presentation to the driver. Display controls, conveniently located along the bottom of the gauge, allow rapid navigation of the menu structure to display any desired information. Display navigation is intuitive. Pressing the MENU button brings up a display of the available information organized and illustrated as file tabs with each tab representing a screen of information. Repeatedly pressing the MENU button shuffles the tabs to bring a new tab to the top of the stack. Pressing the SELECT button initiates the screen represented by the tab on the top of the stack. The system anticipates the need to display information and automatically brings up certain screens when
2011 Owners Manual...Instrument Gauges and Switches...Page 5-12

they are necessary. For example, the system automatically displays a related screen when it senses any of the following events: • Adjusting the trim brings up the Trim screen• Adjusting the ballast brings up the Ballast screen• Pushing the Perfect Pass button brings up the Perfect Pass screen• Any alarm condition brings up a warning screen.
Selecting the DEPTH tab goes to the screen illustrated. This screen digitally displays depth, water temperature, air temperature, and illustrates the depth trend. The system also has a user adjustable depth alarm that can be adjusted from the SETUP tab.
Selecting the BALLAST tab goes to the screen illustrated below. It allows the driver to see the status of all the ballast tanks installed in the boat. This tab is a plug and play tab so uninstalled ballast tanks do not appear on the screen.
Selecting the TRIM tab goes to one of the screens illustrated below. These screens display the position of the installed single-trim tab or dual-trim tabs.
Selecting the MAIN tab goes to the screen illustrated in the next column. Any information available to the instrumentation system may be selected by the driver to be displayed in this screen. This screen is orga-nized into four (4) quadrants with the user-selected information digitally displayed in each quadrant. To change the information displayed simply:• Press the UP or DOWN arrows to highlight the quadrant that you wish to change• Press SELECT to access the pull-down menu• Using the UP or DOWN arrows highlight the desired information.• Press SELECT again to store the change
2011 Owners Manual...Instrument Gauges and Switches...Page 5-13

MasterCraft boats equipped with the video display gauge feature integrated Perfect Pass Wakeboard Pro speed control software. The Perfect Pass application can be entered by selecting the CRUISE tab on the MENU screen or pressing the remote Perfect Pass button. Perfect Pass is turned on and off by pressing the remote perfect pass button. Please refer to the Perfect Pass manual for detailed operating instructions. All screens display a Perfect Pass icon when the Perfect Pass system is turned ON.
Selecting the SET UP tab goes to the pick list illustrated below. It contains all the system controls of the video display gauge. This tab permits control of alarms, speedometer calibration, brightness and contrast adjustment to name a few. Using the UP and DOWN arrows highlight the desired item and press SELECT. Make the desired changes and press MENU to save and exit.
All system Warning Messages are displayed on the video display gauge. They will stay on for a minimum of 10 seconds but can be acknowledged and hidden by pressing the MENU button. Once acknowledged after 10 seconds the alarm will go away for 5 minutes. If the alarm is still active it will return after 5 minutes have elapsed.
2011 Owners Manual...Instrument Gauges and Switches...Page 5-14

2011 Owners Manual...Guide to Individual Models...Page 5-15
The BIG( May be standard on X-Star, X-2, X-15, X-35, X-45, X55, X-80; Optional on 200V, 225V, 235V, 245V, 255V, and 280V)
Switch Pad
Screen Navigation UsetheLEFTandRIGHTarrowbuttonstoscrollthroughthemainscreens.
UsetheUPandDOWNarrowbuttonstonavigatetothesecondaryscreensfromthemainscreens.

2011 Owners Manual...Guide to Individual Models...Page 5-16
Quicklist Screen TheQuicklistscreendisplaysthecurrentrider’ssettingsontheleftsideofthescreenandalistofQuick-listActionsontheright.Theactiveportionofthescreenishighlightedwithalargeredframe.ArrowUPorDOWNtohighlightanyactioninthelistwithasolidredboxandpressENTERtoselectthataction. The ADD and EDIT actions are very similar. ADD creates a new rider in the LIST and EDIT allowschangestobemadetoanexistingriderintheLIST. ToADDanewrider,arrowdowntoADDandpressENTERtoactivatetheADDmode.Thelargeredframewillmovetotheleftsideofthescreenandablankriderprofileisactive.ArrowUPorDOWNtomovethesmallerredhighlightboxovertheridersettingyouwishtochangeandpressENTERtoactivatetheitem.Thelargeredframewillmovetotheactiverightsideofthescreen.UsethePLUSandMINUSbuttonstochangethevalueoftheitem,thenpressENTERtocompletethechangeandbouncebacktotheleftsideofthescreen.Repeattheprocessasneededforeachitemyouwishtoedit. ToEDITanexistingrider,youmustfirstselectthatriderfromthelistifnotalreadyactive.ArrowDOWNtohighlightLISTandpressENTER.ArrowUPorDOWNtothedesiredriderandpressENTER.Thisriderisnowactive.ArrowUPtohighlightEDITandpressENTERtoactivatetheEDITmode.Changetherider’ssettingsjustasyoudidwhenaddinganewrider.Allchangesareautomaticallysavedtotherider’sprofile.
EDIT
RIDERNAMEcanbeupto14 characters.Ifthenameisless than14,keeppushingENTER untilthehighlightboxbounces backtotheleftsideofthescreen.
ADD
SAVECURRENTwillcreateariderthatusesallthecurrentboatsettings.Theboatsettingscanbeballastlevels,trimsettings,andspeedsettings.Theridernamemaybeeditedifdesired.

2011 Owners Manual...Instrument Gauges and Switches...Page 5-17
DELETEwillremovethedisplayedrider.
EXPORTwillsavethecurrentridertotheUSBFlashDrive.
LISTwillshowallcurrentridersthathavebeencreatedinthesystem.
IMPORTwilltakeanyexportedfilesofftheUSBFlashDriveintothesys-tem.Thisfunctionwilloverwriteanyriderswiththesamename.
RESET TO DEFAULT will erase the RIDER LIST and replace it with thefactorydefaults.
TRIM & BALLAST SCREEN
TheTrimandBallastscreendisplaystabpositionandballasttanklevels.TheinformationisPlug’nPlay;there-fore,ifatankortrimsensorisnotpresent,thedatewillbeautomaticallyremoved.

DIGITAL DATA SCREEN
TheDigitalDataScreendisplayssevendifferentparameters.Youcanchoosewhatisdisplayedexceptforthemaindepthchart.Tomakechanges,pressENTERandahighlightboxwillappear.Useanyarrowkeytomovethehighlightboxtooneofthefour(4)parametersinthemainscreenarea.PressENTERoverthehigh-lighteditemandalistofchoicesappears.ArrowDOWNtowhatyouwouldliketodisplayandpressENTER.Afterafewsecondsthehighlightboxwilldisappear.
PERFECT PASS SCREEN Use the CRUISE button to turn Per-fect Pass ON and OFF. Use the “+”, “-“ andtheENTERbuttonstonavigatethroughthePerfectPassscreens.TheDOWNarrowwillbringuptheRiderList.
ZERO-OFF SCREEN UsetheCRUISEbuttontoturnZeroOffONandOFF.Usethe“+”and“-“buttonstochangetheSetPointofZeroOff.TheDOWNarrowbringsuptheRiderList.
RADIO SCREEN Inthismode,thefunctionoftheSwitchPad button is illustrated on the big screen.The radio screen allows you to control theradiothesamewaytheClarionremotedoes.PresstheENTERbuttontoenterthecontrolmode.Thedisplaywillturngreen,indicatingthat the Switch Pad is now controlling theradio. Ifnobuttonsarepressedforfive(5)seconds, the control returns to normal op-eration.
2011 Owners Manual...Instrument Gauges and Switches...Page 5-18

SET-UP SCREENS
RESET FACTORY SETTINGS Returnsall settingstotheoriginalfactory settings. Use the ENTER but-ton to activate the reset mode. PresstheHOMEbuttontoexit.
BRIGHTNESS CONTROL Achievedbyadjustingthelightlev-els for both DAY and NIGHT. The sys-tem will activate the NIGHT lightingwhenthenavigationlightsareon.Usethe ENTER button to select the DAYandNIGHTslidebars.Theupanddownbuttons control the adjustment. PresstheHOMEbuttontoexit.
ADJUST FUEL ALARM AlsoadjustedintheSETUPMENU.Use the ENTER button to activate theFUEL ALARM edit screen. Press theHOMEbuttontoexit.
ADJUST SHALLOW ALARM AlsoadjustedintheSETUPMENU.UsetheENTERbuttontoactivate theDepth Alarm Edit Screen. Use the UPand DOWN arrows to set the desireddepth.PresstheHOMEbuttontoexit.
UPDATE VIPER The BIG software may be upgradedby copying the new software to a USBFlash Drive and inserting it into theUSBportlocatedatthehelm.Thefileonthe flash drive must be named: Viper.App.mem. Press the ENTER button toactivatetheupdateorturntheignitionOFF and then ON. When the install iscomplete, the BIG will reset and auto-matically resume normal operation. Besuretoremovetheflashdrivetoavoidanupdateonthenextignitioncycle.
SPEEDOMETER CALIBRATION Press theENTERbutton, thenusethe UP and DOWN buttons to changethespeed.Thismustbedonewhileus-ingaGPSor radargunasa reference.PresstheHOMEbuttontoexit.
SET UINTS[EnglishorMetric] ToentertheUnitSelectionScreen,press the ENTER button. Use the UPand DOWN buttons to highlight Eng-lishorMetric.PresstheENTERbuttonagaintoselect.PresstheHOMEbuttontoexit.
2011 Owners Manual...Instrument Gauges and Switches...Page 5-19

OIL CHANGE SERVICE RESET Theboatwillpromptyouwhentherecommended oil change interval hasoccurred. This screen will allow you toresettheintervalcounter.PresstheEN-TERbuttontoresetthealarm.
DEALER SERVICE RESET The dealer has to reset the DEAL-ER SERVICE REQUIRED alarm in thisscreen.
DEALER INFO PAGE Willdisplayeitherthe factorycon-tact information or the dealer contactinformation.
VIPER DIAGNOSTICS A tool for the technician to use intesting the system. Press the HOMEbuttontoexit.
GAUGE DIAGNOSTICS Will put the system into an auto-maticgaugesweeptestmode.PresstheENTER button to activate. Press theHOMEbuttontoexit.
ACTIVE ENGINE FAULTS This is a tool used to determinewhat faults are currently active in theengineECM.Theywilldisappearwhennolongeractive.
INACTIVE ENGINE FAULTS
2011 Owners Manual...Instrument Gauges and Switches...Page 5-20

2011 Owners Manual...Instrument Gauges and Switches...Page 5-21
BALLAST CONFIGURATION Thisisusedtosetthefillandemptytimes for the Jabsco ballast pumps.They can be adjusted by pressing theENTER button and using the UP andDOWNbuttons.
HOME MENU[EnableorDisable]
ABOUT VIPER Givesyouthecurrentsoftwarere-visionontheboat.
FEATURE UNLOCK Therearetwowaystounlockanewfeature.Inbothcases,youwillneedtogototheMedallionwebsite[www.medallioinis.com]toretrievetheunlockcode.
Step1: Get the SERIAL NUMBERfromyoursystembygoingtoeitherABOUTVIPERorFEA-TURE ENABLE in the setupscreens.
Step2: IfusingtheIMPORTinsetup,copy the file to a USB FlashDriveandpresstheIMPORTbutton to read the file fromtheUSBFlashDrive.
Step3: If using the FEATURE EN-ABLE SETUP, you will needtoselectthefeaturetobeun-locked.
Step4: Entertheunlockcodetoen-ablethefeature.
ALARMS AND WARNINGS Engine Temp is a warning received from the en-gineECM.SeeadditionalinformationunderTemperatureGaugeintheInstrumentsandGaugessectionofthisOwn-er’sManual.

2011 Owners Manual...Instrument Gauges and Switches...Page 5-22
Low Battery will appear when the battery falls to 11.5volts.
Oil LevelisawarningreceivedfromtheengineECM.See Engine Oil Pressure Gauge in the Instruments andGaugessectionofthisOwner’sManual.
Service Required is a warning received from theECM. Contact an authorized MasterCraft dealer immedi-ately.
Loss of CAN isawarningthatwilloccurwhenthedatafromtheengineECMisinterrupted.Contactanau-thorizedMasterCraftdealerimmediately.
Dealer Service Needed requires a dealer to reset.ContactanauthorizedMasterCraftdealerassoonasprac-ticable.
Low FuelisanalarmthatwillappearwhenthelevelreachesthelimitthathasbeenchosenintheSETUPscreen.SeeUsingCareWhenFuelingsectionofthisOwner’sMan-ual. Pay particular attention to recommended fuel levels;specifically, avoid allowing the setting to go below one-quarterofatank.
Oil PressureisawarningreceivedfromtheengineECM. See Engine Oil Pressure Gauge in the InstrumentsandGaugessectionofthisOwner’sManual.
Shallow DepthisanalarmthatwillappearwhenthelevelreachesthelimitthathasbeenchosenintheSETUPscreen.
Check EngineisawarningreceivedfromtheengineECM.RefertoinformationintheInstrumentsandGaugessectionofthisOwner’sManualandcontactanauthorizedMasterCraftdealer.
Oil Change Neededisawarningthatwillappearaf-terthefirst10hoursofoperation.Itwillreappearevery50hoursafterthattoserveasaremindertochangetheoil.ThewarningisresetintheSETUPscreen.
Fire Extinguisher Discharged is a warning thatwillappearwhenthefireextinguisherisdischarged.


MasterCraftofferssignificantstandardandoptionalitemstomaketheboatingexperiencemoreenjoy-able.Someoftheseitemscomewiththeirowninstructionsandinformationfromtheoriginalmanufacturer.Inthoseinstances,suchaswiththestereoequipment,themanual is includedwiththeboat.Inotherin-stances,somegeneralinformationisprovidedinthissection. If,atanytime,youareuncertainabouttheuseorcareofanythingontheboat,neverhesitatetocontactyourauthorizedMasterCraftdealerforadditionalinformationandguidance.
Anchor and Windlass Somemodelsareequippedwithanchors,andtherewillbeadesignatedstorageareaorstowagelocationontheboat.Checkwithyourdealerifyouareuncertainaboutthisareaasitisimportanttokeeptheanchorstowedwhenitisnotinuse.Insomemodels,theanchorisusedinconcertwithawindlass,orwinch,particularlyininstanceswheretheboatisexpectedtobeusedindeeperwater.Thewindlassisapoweredwinchtoraisetheanchorandline.
Comfort and Convenience
2011 Owners Manual...Comfort and Convenience...Page 6-1
Improperly stored anchors and/or anchor line that has been improperly re-wound through the windlass system, may create a hazardous situation. People on-board can trip on improperly stored materials, which can result in injury. Improperly stored materials can also move too freely during boat operation and make contact with individuals, again causing injury. Properly store all anchor and lines whether the boat is in operation or not, unless the anchor and line are in use.
To lower the anchor when accompanied by a windlass system, leave the engine(s) running to providesufficientpower.Raisetheanchordoorandremoveanypinsorlinessecuringtheanchorinthebowroller.Removethehandcontrolfromtheunder-sideofthedoor.Standclearoftheanchorandchain.PresstheONbuttontoenablethewindlass.PresstheDOWNbuttontolowertheanchor.
The anchor, sometimes accompanied by a windlass, has been provided to assist boaters in remain-ing in a chosen location. Note that use of the anchor system will not guarantee a properly anchored boat or that the boat will remain in a stationary position. Environmental, bottom conditions, current and tidal conditions must be taken into consideration when anchoring the boat. Only properly trained operators should set the anchor for this system. Establishing a secure anchorage requires practice. Damage to your boat may result due to improper anchoring techniques.
Toraisetheanchorwhenaccompaniedbyawindlasssystem,starttheenginestoprovidesufficientpow-er.Raisetheanchorlockerdoor.Removethehandcontrolfromtheundersideofthedoor.Standclearoftheanchorandchain.PresstheONbuttontoenablethesystem,andpresstheUPbuttontoraisetheanchor.Properlystowtheanchorandline.
Battery Charger Asaconvenience,abatterychargerisofferedasanoption.Thechargerisdesignedtorechargethebatteriesandalsotoextendthebattery’slifeinapplicationswhereitisstoredforlongperiodsoftime.Thesearethree-stageelectronicchargers,completelyautomatic,lightweight,andsilent.Unlikemostautomotivechargers,thischargerwillnotboilofftheelectrolytesinproperlyinstalledandmaintainedbatteries.TheredandgreenLEDlights,whicharemountedonthecharger face, indicatewhentheunit isrechargingandmaintainingthebatteries. Beforechargingabattery,donotoperatethechargerifthecablesoranLEDisdamaged.BesurethatallaccessoriesareOFF.Ifthebatteryorbatteriesmustberemovedfromtheproduct,alwaysremovethegroundedterminalfromthebatteryfirst.Besurethattheareaaroundthebatteryiswellventilatedwhilethebatteryis

beingcharged.Alsoensurethatthebatteryterminalsarefreeofcorrosion.(SeetheScheduled MaintenancesectionofthisOwner’sManualforadditionalbatteryinformation.) Ifthebatterychargereverappearstobemalfunctioning,seeyourauthorizedMasterCraftdealerforas-sistance.
2011 Owners Manual...Comfort and Convenience...Page 6-2
When charging, batteries generate small amounts of dangerous hydrogen gas. This gas is highly explo-sive. Keep all sparks, flames and smoking well away from the area. Failure to follow instructions when charging a battery may cause an electrical charge or even an explosion of the battery, which could result in death or serious injury.
Canvas Covers OneofthemostpopularoptionsforMasterCraftboatsarethevarietyofcan-vascoversavailable.SpeakwithanauthorizedMasterCraftdealerfordetailsaboutwhatisavailableforeachmodel.MasterCraftstronglyrecommendshavinganau-thorizedMasterCraftdealerperformtheinstallationassnapinstallationcancause“crazing”(unwantedspider-web-likelinesinthegelcoat)iftheinstallationisnotdonecorrectly. On-goingcareofthecanvasisrequiredtokeepthematerialingoodconditionfor the lifeof theboat.SeeCleaning the Boat sectionof thisOwner’sManual formoreinformation. Notethattowingwithunapprovedcoversontheboatmayresultindamagetothegelcoat.MasterCraftrecommendstheuseofourtowablecoveronlyfortowing.Othercanvasandcovershavebeendevelopedandareavailableonlythroughautho-rizedMasterCraftdealersforavarietyofuses.
Coolers Onmanymodels,aremovablecoolerisincluded,particularlyonmodelsthatdonothavecoldplatesorarefrigerator.AswithanysimilarIgloo-typecooler,rou-tinecleaningwithwarmsoapywaterisadvisedaftereachuse.Checkalsowhetheranythingfrominsidethecoolerhasbeenspilledorinsomemannerendedupinthestorageareainwhichthecooleriskept.Thisshouldbecleanedupimmediatelytoavoidmold,mildew,stainsorotherdamagethatisnotcoveredunderwarranty. Fooditemsoranythingthatcancreateanodorshouldnotbeleftinthecooler.Neithershouldanythingthatcanleakbeleftintheseunitsastheycouldpotentiallydamagethecooler,andthistypeofdamageisnotcoveredunderwarranty.
Fire Suppression and Extinguishing TheenginecompartmentofallV-driveandtheCSX265modelsisequippedwithanautomaticfiresuppressionsystemwithamanualoverridethatusesacleanagentcanister,whichishousedintheenginecompartmentandisintegratedwiththefiresuppressionsystem.ThedirectdriveandCSX220modelsareequippedwithafireport,intowhichthecontentsofaclean-agentcanistercanbereleasedintotheenginecompartment. Exceptassetforthbelow,youarealsorequiredbylawtohaveonboardone(1)five-pound,drychemicalfireextinguisher rated forTypeA,BandCfires.The lawrequiresthatforallboatsmorethan26feetinlength,whichincludesthe280V,X-80andCSX265models,youmusthaveonboardtwo(2)five-pound,drychemicalfireextinguishers,ratedforClassA,BandCfires.Thedrychemicalfireextinguisherisop-tionalequipment,whichisnotautomaticallyincludedinyourboatfromthefactory,butitcanbeorderedfromMasterCraftwithyourboatandcanalsobepurchasedfromanauthorizedMasterCraftdealer.
Ifanyofthefiresuppressionsystemcanistersonboardyourboataredischarged(whetheracanisterinanautomaticsystemoraportablefireextinguisher),thentheymustbereplaced.TheautomaticfiresuppressionsystemavailableonallV-driveandCSX265modelshasanindicatorlightatthehelmthatwillbegreenifthesystemisfullychargedandwillberediftheautomaticfiresuppressionsystemhasbeendischarged.Ifthecleanagentcanisterassociatedwiththeautomaticfiresuppressionsystemorthecleanagentcanisterusedin

connectionwithafireporthasbeendischarged,thenyoumustcontactyourauthorizedMasterCraftdealertoobtainareplacementforthecleanagenttypeofcanister.Ifthedrychemicalfireextinguisherhasbeendischarged,thenyoumaypurchaseareplacementfive-pounddrychemicalfireextinguisherthatisratedforTypeA,BandCfiresfromanauthorizedMasterCraftdealerorfromanothersource. Fireextinguishersrequireperiodicmaintenance.Monthly,eachfireextinguisheronyourboatshouldbeexam-inedtobesurethatthesealsandtamperindicatorsarenotbrokenormissing.Thepressuregaugesorindicators,ifapplicable,shouldreadintheoperablerange.Thereshouldbenoobviousphysicaldamage,rust,corrosion,leakageorcloggednozzles.Additionally,iftheextinguisherhasnotbeenused,itshouldbeweighedannuallytoassurethattheminimumweightasstatedonthelabelstillexists.Anyfireextinguisherthathasbeenpartiallyemptiedmustbereplacedortakentoaqualifiedfireextinguisherservicingcompanyforrecharging. Considerableadditionalinformationregardingtheproperuseofthefiresuppressionandextinguishingfunc-tionsonMasterCraftboatsisincludedintheBoating SafetysectionofthisOwner’sManual.Becertaintothor-oughlyreviewandunderstandthatinformationpriortouseoftheboatthefirsttime.MasterCraftrecommendsthatboatownersincludeacheckofthefiresuppressionandextinguisherunitsduringtheannualmaintenancetobesurethattheyarealwaysreadyforuse.Someunitsmaynotrequireannualchecks;refertothesignageandlabelingontheindividualunitsforfurtherguidance.
GPS and Chartplotter AllGPSandchartplottersystemscomewithextensiveinstructionmanu-als. Please refer to these manuals or the manufacturer’s website for detailsandguidance.
Head The following information is provided for the head installed in a 280V orX-80: Preparing the head for use:Step 1: Withtheseatlidclosed,pulltheflushhandletoopentheslidevalve.Then
pushtoclose.Thisrelievesairpressurethatmaybecreatedinthelowerholdingtankduetochangesintemperatureoraltitude.
Step 2: Removethewatercapandfilltheuppertankuntilitreachesabout1inch(25mm)belowtheopening.Replacethecap.
Step 3: Pulltheflushhandletoopenslidevalve.
Step 4: Pourdeodorantdirectlyintothelowertank,thenclosetheslidevalve.DoNOTpourdeodorantintothebowlwiththeslidevalveclosed.
Step 5: Stroketheairpumpabout15timesoruntilairemitsthroughthereliefvalveonthewatercap.Donotover-pressurizetheuppertankbycoveringthereliefvalve.Donotlettheuppertankpressur-izewhenitisdisconnectedfromthelowertank.
In using the toilet:Step 1: Beforeeachuse,withtheseatlidclosed,pulltheflushhandletoopentheslidevalve,thenpush
toclose.Thisrelievesairpressurethatmaybecreatedinthelowerholdingtankduetochangesintemperatureoraltitude.
Step 2: Pulltheflushhandletoreleasewasteinthelowertank.
Step 3: Pushtheflushbuttontorinsethebowl.Pushtheflushhandletoclosetheslidevalve.
To empty the holding tank:Step 1: Whenthetanklevelindicatorshows“FULL,”orattheendofanouting,emptythelowertank.
Step 2: Pullupontherearlatchtoseparatetheuppertankfromthelowertank.Carrythelowertanktoanauthorizedwastedisposalareaoranormaltoilet.(DO NOT DISPOSE WASTE IN ANY LOCATION, INCLUDING NAVIGABLE BODIES OF WATER, WHERE SUCH DISPOSAL IS ILLEGAL OR CRE-ATES AN ENVIRONMENTAL HAZARD.)
2011 Owners Manual...Comfort and Convenience...Page 6-3

Step 3:Rotatethedischargespoutawayfromthetankandopentheventontopoftheholdingtank.Emptythetank.Step 4:Ifwaterisavailable,rinsethelowertankbeforereassemblingtheportabletoilet.
OntheCSX265head,thefollowinginstructionsshouldbefollowed: Before operation:Step 1: Fillthefreshwatertankandadddeodoranttotheholdingtankthroughthetoiletbowl.
Step 2: Turnontheinletwatersupply.
Step 3:Turnontheelectricalpowertothesystem.(Thebreakerpanelislocatedintheheadcompartment.)
Step 4: Flushwaterintothesystembydepressingtheflushlever(nearthedeck)untilwaterstartsflowingtothevacuumpump,whichrequiresapproximately15seconds.Thevacuumpumpwillrunforapproxi-mately60-to-90seconds.Whenthesystemreachesoperationatthevacuumlevel,itwillshutoff.
Step 5: Rememberthatthevacuumpumpstartsautomatically.Shutoffthesystembeforeservicinganddonotleavetheboatwiththetoiletsystembreakeron.(Thebreakerpanelislocatedintheheadcompartment.)Neverusedrainopeners,alcohol,solvents,etc.,inthesystemasthesearelikelytodamagethehead.
Head operation:Step 1: Toaddwatertotheheadbeforeusing,raisetheflushlever(nearthedeck)untilthedesiredwater
levelisreached.Generally,morewaterisneededonlywhenflushingsolids.
Step 2: Toflushthehead,presstheflushleversharplydowntothedeckuntilthecontentsclearthebowl.Asharppoppingnoiseisnormalwhenthevacuumsealisbroken.Holdtheleverdownforthree(3)seconds.Afterflushing,lettheleversnapbackintoposition.Iftheflushleverisaccidentallyreleasedbeforewasteclearsthebowl,donotflushagainuntilthevacuumpumpstopsrunning.Asmallamountofwaterremainsinthebowlafterflushing.
Step 3: Do not dispose of sanitary napkins or other non-dissolving items in the head. These items cancausepluggingofthesystem.
Following operation:Step 1: Disposeofwasteproperly.(DO NOT DISPOSE OF WASTE IN ANY LOCATION, INCLUDING
NAVIGABLE BODIES OF WATER, WHERE SUCH DISPOSAL IS ILLEGAL OR CREATES AN ENVIRONMENTAL HAZARD.)
Step 2: Keepthesystemclean,usingmilddetergentorcleaner.
Bothtypesofheadsaresuppliedwithin-depthinstructions,whichwillbefoundintheheadandshouldberemovedandreadpriortothefirstuseofthesystem.StoretheinstructionswiththisOwner’sManualandotherimportantmaterialregardingtheboat. Useonlyrapid-dissolvetoiletpaperwiththeseheadsystems,andonlydeodorantspeciallyformulatedforthistypeofheadsystem.Seeinstructionsfordetails.Intheeventthatanythingfromthehead’sbowlorholdingtankescapes,itshouldbecleanedassoonaspracticable.Failuretocleananyspillagemayresultinunpleasantodors,mildew,moldanddamagetothedeckorotherareasoftheboat.Thisisnotcoveredunderwarranty. SeetheStorage & WinterizationsectionofthisOwner’sManualforimportantinformationregardingtheprepa-
rationoftheheadforstorage.
Heater AllMasterCraftmodelsofferaheateroption.Theheater’sthree-positionswitchisturnedupforON(LOW),orturneddownforON(HIGH).ThecenterpositionisOFF.Warmedairfromanelectricallypoweredheaterboxwillbeblownfromventswithintheboatdeck.Inregularuse,theheatershouldnotrequireanyroutinemain-tenance.However,itisadvisabletoavoidplacingitemsinfrontofthevents,par-ticularlywhentheheaterisinuse.Theheatedaircomingoutcouldcausedamage. Neverruntheheaterinaconfinedspace,suchasagarageorshop.Fumesfrom
2011 Owners Manual...Comfort and Convenience...Page 6-4

theenginecanhavedeadlyconsequences.Seealsothe Common Sense Approach sectionofthisOwner’sMan-ualregardingcarbonmonoxidedanger.
Carbon monoxide is emitted from the engine’s exhaust system. Never run the engine without proper ventilation. Do not run the engine in a confined space or where fumes may be trapped.
Hydraulic Steering System Somemodelsofferahydraulicsteeringsystemasanoption.Atanytime, ifthe steering is sluggish, difficult, or shows any signs of not working smoothlyandproperly,theboatshouldimmediatelybetakentoanauthorizedMasterCraftdealerforattention.Thehydraulicsteeringsystemisnotaccessibletothecon-sumerforrepairormaintenance,allofwhichshouldbedonebyanauthorizedMasterCraftdealer.
Ladders Somemodelsareequippedwithladders,whichmaybelocatedattheboworundertheswimplatformaft.Allladdershavestowablepositionandoperationalposition. Be sure to stow ladders prior to operation of the boat. Undue pres-surefromthewaterwhileunderwaycouldpotentiallydamagetheladder.Whenopeningorclosingtheladder,becarefulnottopinchfingersorotherskinasallladdershavesomekindofcatchtoholdtheminpositionandprovideprotectionforpeopleastheyboard.
Lighting Somemodelsmaybeequippedwithincandescentbulbsinthehead,storageareasorinsomeinstancesintheforwardandaft-facinglights.Theselightsarereplaceableaswouldbeanyincandescentlightbulb. OtherlightingthatisL.E.D.willrequirereplacementalongwiththehousinginwhichtheyarecontained.This includestheunderwater lights,courtesy lightsandotherauxiliarylighting.TheselightswillneedtobereplacedbyanauthorizedMas-terCraftdealer.Also note that the underwater lights should never be operated unless the boat is in the water. Even though these are L.E.D. lights, they generate some heat and require the cooling effect of the water to avoid premature burn-out of the bulb.
Mirrors WhetherutilizingthestandardmirrorortheoptionalExtrememirror,justasyouwouldinacar,youshouldalwayscheckthatthemirrorisproperlylocatedtoviewbehindtheboatwhileitisunderway.Alsobesurethatitissecurelyattachedtothewindshieldextrusion.Undernormaloperation,thereisacertainamountofvibrationandovertimethiscancausebracketsandhardwaretoworkloose.
Prior to operation of the boat, verify that the mirror hardware is secure. Failure to do so may result in the mirror detaching from the windshield extrusion. The mirror could hit the operator or a passenger, resulting in injury.
2011 Owners Manual...Comfort and Convenience...Page 6-5

Livewell/Kill Box/Catch Box OneoftheoptionsontheCSXmodelsisafishingpackage.Theboxestoholdcatchareremovable.Waterisaddedmanuallytotheboxeswhendesired.Besuretoremovethewaterandcatchattheconclusionoftheexcursion.Leavingthewaterand/orcatchcanresultinunpleasantodors,mildew,moldandotherdamagetotheboxthatisnotcoveredunderwarranty.
Plug ’n Play ThePlug’nPlayballastsystemgivesconsumerstheabilitytomixandmatchballastloadsasanoptiononV-Seriesboats.Iforderedasanoption,theplumbingforthePlug’nPlaywillcomefromthefactoryreadytoinstallbagsforwardandaft.MasterCraftstronglyrecommendsusingonlythePlug’nPlaybagsfromFlyHigh
astheyhavebeencustomizedtofitneatlyinstorageareas.Therearbagstakeintoconsider-ationsuchfactorsasbulkheaddimensionsandtherawwaterstrainerlocationofeachspecificmodel.Theforwardbagsarebuilttothedimensionsofthestorageareaundertheseatsandaroundobstructionssuchasstereoamplifiersandwiring.Notethatthebagsareintendedtobeleftinsidethestoragecompartmentsevenwhennotfilledwithwater.Thebags,particularlyiftheyarewet,shouldnotbeleftincontactwithupholsteryanywhereintheboat. The most important consideration in developing these additional ballast bags was toworkwithinthemaximumcapacityofeachMasterCraftmodelinwhichtheyareequipped.WHEN THE PLUG ’N PLAY BALLAST BAGS ARE FILLED, THE ADDITIONAL WEIGHT OF THE BAGS AND WATER MUST BE SUBTRACTED FROM THE MAxIMUM WEIGHT CAPACITY OF THE BOAT , WITH THE REMAINDER LEFT FOR PASSENGERS AND GEAR!Itisalwaystheoperator’sresponsibilitytoensuretheweightoftheirspecificMasterCraftboat,personsaboard,ballastandgasolineweight,andallgeararewithinCoastGuardlimits. Anobjectiveinengineeringthissystemwasforthesecondaryballastbagstofillandemptywith
theexistingballastpumpsattheflipofaswitch.Inordertoaccomplishthis,theauto-fill-and-emptysystemthatisequippedonallboatswithoutthePlug’nPlayoptionisbypassed.Run-dryprotectionismaintainedwiththePlug’nPlaysystembymaintainingathermocouple,whichshutsthepumpoffautomaticallyuponsensinghightemperaturesthatwouldoccurifapumpisaccidentallyleftrunning.Althoughtheotherauto-fillfunctionswillnotworkwithPlug’nPlay(exceptRunDry),allotherpresentsstillworkintheQuicklist.Thesystemiseasytousebut requires monitoringtoensureeverythingfillstocapacityandthenismanuallyswitchedoffbeforeuse.Al-thoughyoucanusetheBIG’sBallastscreentoseeifthetanksarefull(orlistenfortheoverflow),therearenosendingunitsinballastbags,sonobaglevelreadoutisavailableontheBIG.The operator should open the front and rear storage areas where the bags are located to watch the actual bags themselves to see when they are full. To reiterate, there is NO Auto Shut-off feature for Plug ’n Play.
All boats have weight limits. Failure to adhere to the posted limits can cause operation instability and/or the boat to sink. This may result in serious injury or death, as well as significant damage to the boat, which will not be covered by warranty. WHEN THE PLuG ’N PLAy BALLAST BAGS ArE FiLLED, THE ADDiTiONAL WEiGHT OF THE BAGS AND WATEr MuST BE SuBTrACTED FrOM THE MAxiMuM WEiGHT CAPACiTy OF THE BOAT , WiTH THE rEMAiNDEr LEFT FOr PASSENGErS AND GEAr!
HereareafewadditionalthingstoknowaboutPlug’nPlay:1. Toinstallthebags,youwillneedtoremovetheplugsthatwillcomewithalltheplumbing.MasterCraftrecom-
mendsyoukeeptrackoftheseplugsandplacethembackintheplumbingwhenandifthebagsareremoved.Without the plugs or bags in place, water will make its way into the boat through these lines.
2011 Owners Manual...Comfort and Convenience...Page 6-6
2. Oncethebagsareinstalled,youarereadytogo.Inordertofilltheballastbags,afterthehardtanksarefilledfindthePlug’nPlayswitchesandsimplymovetheswitchtotherightsotheindicatorlightturnsfromgreenlight(tanks)toaredlight(bags).Thisactivatestheelectronicvalvethatswitcheswaterflowfromthehardtankstothebags.Oncered,thebagsarereadytofillbyselectingtheappropriateballastswitch.PleasenotethatthePlug’nPlayswitchescontroltheforwardandaftsystemsseparately.PressingandholdingtheUpbuttonwillcausethecentertabtoretractandthenthesurftabswillretract.
if the Plug ’n Play bags are removed from the boat, the plumbing plugs must be reinstalled in the boat to prevent unwanted and potentially dangerous intrusive of water into the boat. This water can result in the boat sinking, which can result in serious injury or death!

refrigeration Somemodelsofferoptionalrefrigeration.Inthe280VandX-80models,itisarefrigeratorunit,whichisfreeofCFCs,andinstructionsareprovidedbythemanufacturer.IntheCSX265models,coldplatesareprovidedinthetwostoragebinsundertheseatthatareimmediatelyaftofthesteeringhelm.Theselargestainlesssteelplatesattachtothewallinsidethestoragebin,throughwhichcoolantcirculates,similartotheopera-tionofaregularrefrigerator. Notethattherefrigeratorandthecoldplatesfunctionofftheboat’selectricalsys-tem.AttentionshouldbepaidtotheVoltmeter(s)tobecertainthatthesesystemsdonotover-draintheelectricalsystem. Onthe280VandX-80refrigeratorunitnotethatitcanbeusedinanambientairtemperaturerangeof-4degreesFahrenheit(-20Celsius)to130F(55C),andamaximumof90percentairhumidityinconstantoperation.Thedevicecancoolgoods inatemperaturerangeof28degreesF(-2C)to53degreesF(12C). It isequippedwithabatterymonitorthatswitchesthecompressoroffandonagain,protectingthebatteryandthecompressoragainstdamage. Therefrigeratorissuitableforcoolingfood.Ifyouwishtocoolmedicine,pleasechecktodeterminewhetherthecoolingcapacity issufficientforthemedicine inquestion. Fooditemsoranythingthatcancreateanodorshouldnotbeleftintherefrig-eratororcoldplateareas.Neithershouldanythingthatcan leakbe left in theseunitsastheycouldpotentiallydamagetheunits,andthistypeofdamage isnotcoveredunderwarranty.Thecondenserontherefrigeratorshouldbekeptfreeofdust,dirtandanythingthatinhibits itsproperoperation.Themanufactureralsorecommendsleavingthedrawerslightlyopenifitwillnotbeusedforaperiodoftime.Thishelpspreventunpleasantodorsfromforming. Refrigerator cleaning instructions have been provided by the manufacturer.NotethatitshouldalwaysbeOFF,andshouldneverbecleanedunderflowingwaterorsubmergedinanykindofbodyofwater, including,butnot limitedto,asink.Donotuseabrasivecleaningagents.Ifitisnecessarytodefrosttheinterior,neverremovelayersoficewithhardorsharptoolsastheycandamagetheplasticofthevaporizer.Allowtheunittoairdefrost. Therefrigeratoroperatesbyopeningthecoolboxdoorandturningthethermostatknobclockwise.Shut-tingitoffrequiresturningthethermostatknobcounterclockwise.
Seat Heaters Forrealcomfort,somemodelsofferaseatheateroption,whichwillbeforthedriver’sseat,andsometimesintheobserver’sseat.Itisnotofferedforanyotherseat-ingintheboat.NotethattheignitionmustbeONfortheseatheatertowork.Theheater(s)operatebyaswitchonthecontrolpanel.IftheswitchisturnedONandtheseatdoesnotwarmup,orappearstobecometoowarm,turntheswitchtoOFFandseekassistancefromyourauthorizedMasterCraftdealerinremedyingtheissue.
Seating ComfortableseatingisahallmarkofMasterCraft.Notonlydoestheseatingenhancetheoverallboatingexperiencebutitalsoisthedesignatedareaforoperatorsandpassengerstobewhiletheboatisunderway.
2011 Owners Manual...Comfort and Convenience...Page 6-7
When boats are in motion, operators and passengers should always be seated on upholstered designated occupant seating. No other areas should be used during operation, including, but not limited to, the gunwales, towers, sun pads, engine boxes, or any area that is not clearly intended for seating while the boat is underway. People can become dislodged from locations that are not actual seating, which could result in injury during boat motion.

Somespecializedoptionalseatingaddsmorecomfort.Convertibleseatsallowtheseatbacktobemovedforwardorback,changingtheorientation.Notethatthereisabuttonthatisdepressedtoallowtheseatbacktoslide.Besurethattheseatbacklockingmechanismissecurelyengagedbeforeusingtheseatback.Failuretoengagethelockingmechanismmayallowunintendedmovementthatcouldresultinaper-sonlosingbalanceorevenfalling.TheconvertibleseatbackatthetransomseatingisintendedtobeusedonlywhentheboatisstationaryandtheengineisOFF.Theseatbackmustbeintheforwardfacingposition,neveraftfacing,whentheengineisrun-ningortheboatisunderway.Positionedaftfacing,theseatbackoffersnosecuritytopersonsseatedatthebackoftheboatandtheycouldslideoffandintothewater,withthepossibilityofmakingcontactwiththetransomorswimplatform,whichcouldresultininjury.Also,whiletheseatbackispositionedtoallowaftseating,individualsmaybeexposedtocarbonmonoxideiftheengineisrunning.
Optionaljumpseatsalsohavelatchestoholdtheminplace.Opentheobserverseatadjacenttothejumpseatandnotethatthereisalockpinthatshouldbeinsertedtoholdthejumpseatsecureagainstthesidedeckoftheobserverseat.Failuretodothiscouldallowthejumpseattomoveduringboatoperation,whichcouldresultinpassengerinjury.
2011 Owners Manual...Comfort and Convenience...Page 6-8
Carbon monoxide is a colorless, tasteless, odorless and poisonous gas that accumulates rapidly and can cause serious injury or death. Exposure to carbon monoxide can be fatal in a matter of minutes. Exposure to even low concentrations of carbon monoxide must not be ignored because the effects of exposure to carbon monoxide can build up and be just as lethal as high concentrations. Carbon monoxide from exhaust pipes of inboard or outboard engines may build up inside and outside the boat in areas near exhaust vents, particularly during slow-speed operations. STAy AWAy from these exhaust vent areas, which are located at the stern of the boat, and DO NOT swim or engage in any watersports or other activities in or near the stern area of the boat, including, without limitation, the swim platform and the rear sun deck, when the engine is in operation. under no circumstances should the owner and/or operator allow persons to hold onto the swim platform while the engine is operating and the boat is in motion. These activities (sometimes known as “teak surfing” or “plat-form dragging,” where the participant holds onto the swim platform and is pulled through the water, and/or “body surfs” immediately behind the boat) are extremely dangerous, highly likely to result in death or serious bodily injury, and are a misuse of this product.
Convertible seat backs should always be in the forward-facing position when the boat is underway. Anyone seated facing aft could become dislodged when the boat is underway, which could result in sliding off the seating and making contact with the transom or swim platform. Jump seats should be secured against the deck with a lock pin accessible under the observer seat to avoid dislodging pas-sengers while the boat is underway. Convertible seat backing should always be secured prior to use. Care should be taken to avoid pinching fingers or other skin when sliding the backing.
Shower or Wash Down Manymodelsofferashowerorwashdownoption.Asinglethree-positionswitchmountedinanaftpositionstorageareacontrolstheoptionalshowerandoptionalSlickBootfunctions.Theswitchismarkedforeach.TurntheswitchtowardtheShowermarkingtoturnONtheshower.ReturntocenterforOFF.Turntotheotherdirec-tiontoturnONtheSlickBoot.ReturntocenterforOFF.Theseinstructionsworkwhethertheboatisequippedwithone(1)orbothoftheoptions,butwillnotbefoundinboatsthatarenotequippedwitheitheroption. OnVSeries,CSX220or265,theX-StarandtheSaltwaterSeriesatankoptionwithinavailablemodelscanprovideafresh-waterwashoftheboatinterior.Thetankwillbeeight(8),ten(10)ortwenty-five(25)gallonscapacity,dependingontheboatmodel.Thetwo-positionswitchispressedupforONanddownforOFF. Do not use the shower with the engine running.
Carbon monoxide is emitted from the engine’s exhaust system. Never run the engine without proper ventilation. Do not run the engine in a confined space or where fumes may be trapped.
Routinemaintenanceisnotrequiredbeyondoccasionallycheckingthelinesandshowerheadtobecertaintheseelementsarenotdamagedinanyfashion.BecertaintofollowtheStorage & Winterizationsection’sin-structionsfoundelsewhereinthisOwner’sManual.
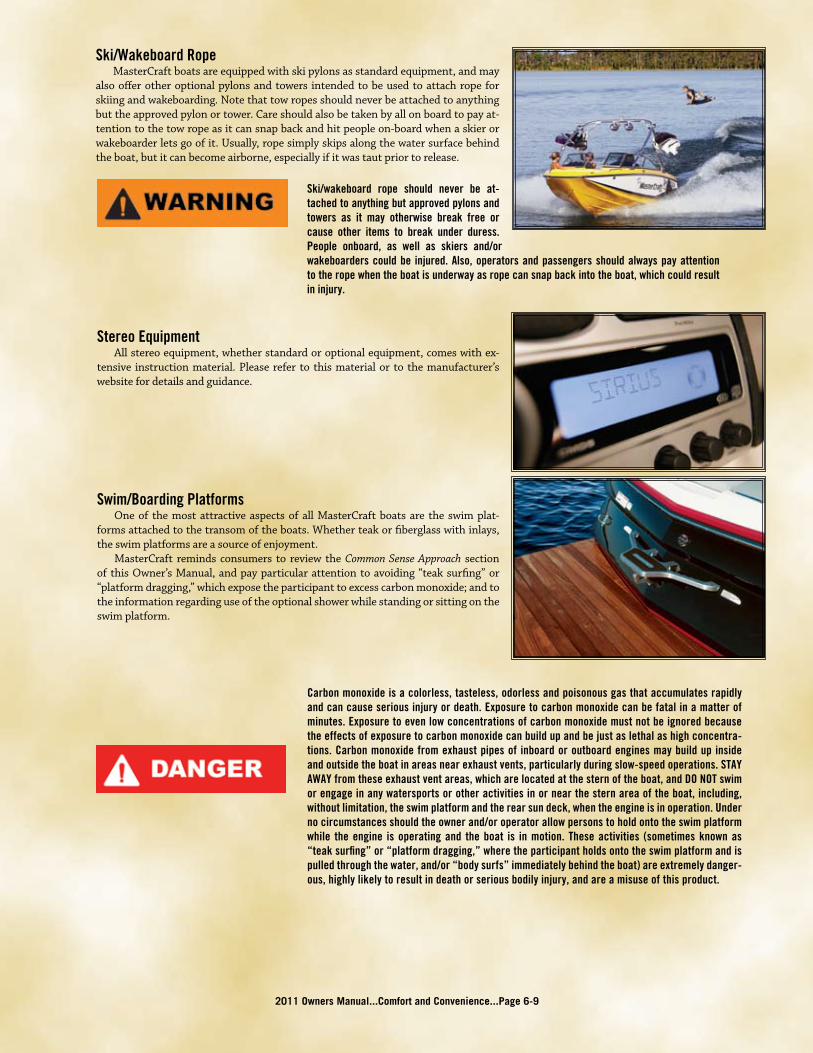
2011 Owners Manual...Comfort and Convenience...Page 6-9
Ski/Wakeboard rope MasterCraftboatsareequippedwithskipylonsasstandardequipment,andmayalsoofferotheroptionalpylonsandtowers intendedtobeusedtoattachropeforskiingandwakeboarding.Notethattowropesshouldneverbeattachedtoanythingbuttheapprovedpylonortower.Careshouldalsobetakenbyallonboardtopayat-tentiontothetowropeasitcansnapbackandhitpeopleon-boardwhenaskierorwakeboarderletsgoofit.Usually,ropesimplyskipsalongthewatersurfacebehindtheboat,butitcanbecomeairborne,especiallyifitwastautpriortorelease.
Carbon monoxide is a colorless, tasteless, odorless and poisonous gas that accumulates rapidly and can cause serious injury or death. Exposure to carbon monoxide can be fatal in a matter of minutes. Exposure to even low concentrations of carbon monoxide must not be ignored because the effects of exposure to carbon monoxide can build up and be just as lethal as high concentra-tions. Carbon monoxide from exhaust pipes of inboard or outboard engines may build up inside and outside the boat in areas near exhaust vents, particularly during slow-speed operations. STAy AWAy from these exhaust vent areas, which are located at the stern of the boat, and DO NOT swim or engage in any watersports or other activities in or near the stern area of the boat, including, without limitation, the swim platform and the rear sun deck, when the engine is in operation. under no circumstances should the owner and/or operator allow persons to hold onto the swim platform while the engine is operating and the boat is in motion. These activities (sometimes known as “teak surfing” or “platform dragging,” where the participant holds onto the swim platform and is pulled through the water, and/or “body surfs” immediately behind the boat) are extremely danger-ous, highly likely to result in death or serious bodily injury, and are a misuse of this product.
Ski/wakeboard rope should never be at-tached to anything but approved pylons and towers as it may otherwise break free or cause other items to break under duress. People onboard, as well as skiers and/or wakeboarders could be injured. Also, operators and passengers should always pay attention to the rope when the boat is underway as rope can snap back into the boat, which could result in injury.
Stereo Equipment Allstereoequipment,whetherstandardoroptionalequipment,comeswithex-tensive instructionmaterial.Pleaserefertothismaterialortothemanufacturer’swebsitefordetailsandguidance.
Swim/Boarding Platforms Oneof themostattractiveaspectsofallMasterCraftboatsare theswimplat-formsattachedtothetransomoftheboats.Whetherteakorfiberglasswithinlays,theswimplatformsareasourceofenjoyment. MasterCraft reminds consumers to review the Common Sense Approach sectionofthisOwner’sManual,andpayparticularattentiontoavoiding“teaksurfing”or“platformdragging,”whichexposetheparticipanttoexcesscarbonmonoxide;andtotheinformationregardinguseoftheoptionalshowerwhilestandingorsittingontheswimplatform.

2011 Owners Manual...Comfort and Convenience...Page 6-10
Someplatformsfeatureabracket,whichallowstheplatformtofolddown,re-ducing the amount of room required for storage. Note that the platforms them-selvesarefairlyheavy,andreleasingthebracketmayresultintheplatformfallingdownandstrikingthetransomwithexcessiveforce.Pleaseprovidesupporttotheplatformatthetimeofreleasingthebracket,andslowly lowertheplatformintoplacefortowingorstorage.
Manymodelsareequippedwithaswimplatformthatmaybefoldeddown.Todeter-minewhethertheboatissoequipped,lookbeneaththeplatformandseeifthebracketwithpinappearsasinthephoto.Ifso,theswimplatformcanbefolded.Todosoprop-erly,followtheseinstructions:
FoldingDownthePlatform Removethesafetyhingepinsineachswimplatformbracket. Beginbyliftingtheplatformaboutfour(4)inchesupwardwhileeasingtheplatformawayfromtheboattransom.Thiswillallowtheplatformtomovefreelyonthehinge. NOTE:Ensurethereisnotightnesswhiletheswimplatformisbeingfolded.Thereshouldbenobindingduringthisaction.
The platform must be raised and locked into position for transportation of the boat, as well as use of the platform while boating. Leaving the platform down may result in dam-age to the boat transom during transport that will not be covered by the warranty!
SecuringthePlatformStep 1: Lifttheplatformtoapproximately20degreesanglefromtheboat.
Step 2: Lightlypushtheplatform(donotshovenorjam)towardthetransomtoallowtheplatformtosetinplace.
Step 3: Verifythattheplatformisinthelockedpositionandwillnotfalldown.Failuretoverifythattheplatformislockedmayresultintheplatformfallingwhilesomeoneisonitandcouldresultinin-jury.
Step 4: Insertone(1)safetyhingepinintoeachplatformbracketasshowninthetopphoto.
The platform must be raised and locked into position for use of the platform while boating. No one should be allowed on the platform until the platform is securely locked in place and the engine is OFF. Failure to do so may result in serious injury or death!
Tables Ifthecockpittableoptionwasselectedfortheapplicablemodels,thetablecanberemovedandstored.Indoingso,ensurethatthetableandlegaresecure inastoragecompartment.Iftheyareleftoutonthedeckoftheboat,theymayshiftormoveandcauseinjury.Storedaway,theyshouldalsobesituatedsothatthemetaltopandbottomofthelegcannotrubagainstthetabletopandcausescratches.Thistypeofdamagewillnotbecoveredunderwarranty. ThebowtableoptionontheCSX265doesnotremoveforstorage.Therefore,careshouldbetakentocleanitregularlyandavoiddamagefromsprayorUVrays. SeetheCleaning the BoatsectionofthisOwner’sManualfor informationoncleaningthesurfacesofalltables.
Towers ManyMasterCraftmodelsarenowequippedwithatower,whetheraspartofastandardpackageorasanoptionaladdition.Again,MasterCraftstronglyencouragestheoccupantsoftheboattoreviewtheCom-mon Sense ApproachandtheBoating Safety sectionsofthisOwner’sManualpriortouseoftheboatandthe

towercomponent. Occupantsoftheboatshouldneverstand,sitorjumpfromthetower.NothingbutMasterCraft-approvedtowingshouldbeattempted.(SeeBoating SafetysectionofthisOwner’sManual.) Boatownersarestronglyurgedtopurchasetoweraccessoriesonlythroughanauthorized MasterCraft dealer. MasterCraft has carefully determined the maxi-mumamountofaccessoriesandtotalweightthatthetowercansafelyhold.Ignor-ingthisinformationcouldresultininjurytotheboatoperatorand/orpassengers.
2011 Owners Manual...Comfort and Convenience...Page 6-11
MasterCraft has determined that for the tower utilized on the current models, the total weight of all accessories mounted on the tower should never exceed 85 pounds, regardless of whether the accessories are MasterCraft-approved and supplied or have come from an aftermarket supplier. Exceeding this restriction can result in tower failure, which could result in serious injury or death to the boat opera-tor and/or passengers.
Video Screen TheCSX265offersavideoscreenthatdropsdownfromtheT-Topoption.Seetheaccompanyinginstructionalinformationtodeterminehowtousetheunit.(See image above.)
Water Heater OntheCSX265model,afour-gallonhotwaterheaterisanoption.Unliketheshoweroptiononothermodels,whichdrawsheatfromarunningengine,theCSX265waterheaterfunctionsasahotwaterretentiontankaftertheenginehasrun. Theshoweris locatedintheheadcompartmentandatthetransom.Water isdrawninbywayofapumpthatisturnedonatthebreakerpanelintheheadcom-partment.Theheatisprovidedbyrunningtheportsideenginefor15-to-20min-utes.Afterthewaterhasbeenheated,however,theinsulatedtankwillretainthehotwaterforseveralhours.Thisallowstheshowertoberunwithouttheenginerunning,and if theengine isOFF, it ispossibletoshowerwhilestandingontheswimplatform.(SeeCommon Sense Approach sectionforcautionsregardingusingtheshowerwiththeenginerunning.) Thewaterpumpedintotheheatercomesfromafreshwaterholdingtank,andit can be left in the water heater when the boat is not in use, EXCEPT duringextendedperiodsofstorage.Aswithanypartoftheboatinwhichthereiswater,itmustberemovedatthetimetheboatiswinterizedtoavoidfreezingthatmaycausedamagetotheboat,theholdingtankorthewaterheater.Thewaterisre-movedbyrunningtheshoweruntilallthewaterhascomeoutorbydisconnectingtheplumbingfittingsintheforwardservicebayunderthehelmseats.


MasterCraftboatsareequippedwithahighlyinnovativefuelsystem.Thissystemisdesignedtoprovideyearsoftrouble-freeservice.Someofthelatestinnovationsrelatedtofuelhandlingsafetyarealsoincorpo-ratedintothefueldeliverysystem. Thesystemusesafuelpumpmountedinacapsulethatisinstalleddirectlyinthefueltank.Asimilarsystemhasbeenusedinautomotivevehiclesformanyyearsandhasdemonstratedreliableservice.Thepumpsysteminyourboatwasspecificallydesignedforthemarineenvironmentandcontainsanumberofaddedsafetycomponentsthatareuniquetothemarineenvironment.Becauseofthespecialnatureofthedesign,therearenouser-serviceableparts.AnypartsinneedofserviceormaintenancewillneedtobeaddressedbyanauthorizedMasterCraftdealer.TheauthorizedMasterCraftdealerthereisequippedwiththespecialtoolsnecessarytodisassembleandservicethefuelcapsuleandassociatedparts.Replacement parts must meet OEM requirements as specified by MasterCraft. Thefuel lineintheboat’sbilgeareathatgoesfromthetanktotheengineisaspecialmulti-layerarmoredlinethatiscoveredwithaspecialmaterialknownasafiresleeve.Thefiresleeveaffordsprotec-tiontothefuellineintheunlikelyeventofaboatfire. Thesleeveiscoloredorangeforeasyidentificationofthefuelline.MasterCraftrecommendsdailyinspec-tionofthebilgeforforeignmaterialsandthepossibilityofgasoroilleakagedetection.Aspartofyourdailyinspection,includeavisualcheckoftheorangefire-sleevedfuelline.Ifyouseedamagetothesleeveorlineorinanywaysuspectdamageorfuelleakage,DO NOT START THE BOAT!ImmediatelycallanauthorizedMasterCraftservicingdealerandlethimorherassessthesituation.Eveniftheoutingiscanceled,leakingfuelcancauseseriousdamagetotheenvironmentandmaybeapotentiallyhazardoussituationforpeopleandpropertyinthearea.Therefore,itiscriticaltoattendtoanyindicationthatthereisfuellinedamageorfuelleakageassoonaspossible.
Preparation2011 Owners Manual...Using Care When Fueling...Page 7-1
Using Care When Fueling
Gasoline is extremely flammable and highly explosive under certain conditions. Always stop the engine and never smoke or allow open flames or sparks within fifty (50) feet of the fueling area when fueling.
Take care not to spill gasoline. If gasoline is spilled accidentally, wipe up all traces of it with dry rags immediately and dispose of properly on shore.
Gasoline is explosive. If a gasoline odor is present or gasoline is visually observed in the bilge area during inspection, DO NOT START YOUR ENGINE! Re-move the ignition key from the ignition switch and call an authorized MasterCraft dealer for service.
Allowing the fuel level in the fuel tank to fall below one-quarter of a tank full may affect the reliability of the fuel pump or result in damage to the fuel pump, which is not covered under warranty.

Indmar Engines ThefollowinginformationappliestoboatsequippedwithIndmarengines(whichincludestheRPT-1,MCX,LY6and8.1L):
What Type of Gasoline To Use AllstandardIndmarEFIenginesrunonunleadedfuelof89octaneorhigher.Indmarrecommendspur-chasingfuelfromasupplierthatadvertisesavailabilityoffuelthatmeets“TOPTIER”specifications.Thisfuelhasadditivesanddetergentsthatwillreducethebuild-upofdepositsintheengine. ThegoaloftheTOPTIERdetergentgasolinestandardsistocreateawinningsituationforgasolineretailers,enginemanufacturersandboatoperators.Currently,manygasolineretailersprovidefuelswithlower-qualityadditivepackagesthatcanbuildupdepositsonfuelinjectorsandintakevalves.Otherscanbuildupdepositsincombustionchambersandmayleadtointakevalvessticking.Theselowerlevelsofaddi-tivescanhaveanegativeimpactonengineperformanceandvehicleresponsiveness. ForacurrentlistofgasolineretailerssupplyingTOPTIERgasoline,gotowww.toptiergas.comandclickonRETAILERS.
Damage to the engine by use of low-quality gasoline or gasoline with an octane rating below the minimum level listed will void the warranty on the boat.
Fuels that are blended to contain methanol or wood alcohol should not be used. These fuels can cor-rode metal parts in the fuel system and engine. Fuels that contain methanol will damage the engine. Damage caused by the use of unapproved fuels is not covered by warranty.
When the Boat Is Not Used for a While IndmarrecommendstheregularuseofSta-Bil®fuelstabilizerforboatuserswhoseoutingsconsumelessthanatankoffueleverytwo(2)weeks.Today’sfuelsaremoresusceptibletodegradation,andtheuseofaqual-itystabilizerwillhelpensurefewerproblemsfortheoccasionalboater. Iftheboathasnotbeenusedformorethanthirty(30)daysandfuelremainsinthetank(evenstabilizedfuel),theenginemayrunpoorlyuntilthe“old”fuelisusedup.Themanufacturerwillnotpayforrepairstocomponentsthatareinoperableordamagedfromoldand/orpoorqualityfuel,asthisisnotcoveredundertheenginewarranty.
Extended storage with fuel in the system can affect the fuel’s stability and may require system inspection and fuel filter replacement when the unit is placed back into service.
Using Oxygenated Fuels or Fuels with Alcohol MTBE(methyltertiarybutylether)isanoxygenateandoctaneenhancer.Thiscompoundmaybeblendedwithfuel.Fuelthatisnomorethanfifteenpercent(15%)MTBEisacceptableforuseintheIndmarengine. Ethylalcohol,ethanolorgrainalcoholisacceptableaslongasitisablendandtheblendedfuelcontainsnomorethantenpercent(10%)ethanol.
Fuels Outside the United States and Canada If theIndmar-equippedboat isoperatedoutsidetheUSAorCanada,unleadedfuelsmaybedifficulttoobtain.Leadedfuelsarenotrecommendedasenginecomponentswilllastlongerusingunleadedfuel.
Volkswagen Diesel Engine IftheMasterCraftboatisequippedwithaVolkswagendieselengine,refertotheownersmanualthatcomeswithitforimportantinformationregardingfuelingandstartingtheengine.
2011 Owners Manual...Using Care When Fueling...Page 7-2

ILMORMARINE EnginesWhat Type of Gasoline To Use TheILMORMV8engine (5.7,6.0and6.2L) requiresaminimumof87octanefuel.Theoctanenumberisbasedonthepumpoctanenumber,whichis(R+M)/2,whereRistheresearchoctanenumberandMisthemotoredoctanenumber. For better performance, 93 octane fuel is recommended. Fuelsotherthanspecifiedwillnegativelyalterperformance,emissionsandcoulddamagetheengine.Useofloweroctanefuelswillcausesparkknock(pinging).Continuedheavysparkknockcancausesevereenginedamage.Theengineshaveknockdetectionsystemsthatofferthebestengineperformancebycon-trollingknockthroughpreciseignitiontiming.Thehigheroctanefuelwillcauselessknockfortheignitionsystemtoprocessandadjustfor. Poorqualityoroldfuelscancauseproblemssuchaslossofperformance,roughidling,hardstartingandhesitation.Iftheengineexperiencesanyofthesesymptoms,firsttryanotherbrandofgasolineand/orreplacetheoldgasolinewithfreshgasoline. ManyenginemanufacturersbelievetheU.S.EnvironmentalProtectionAgency’s(EPA’s)detergentlevelsingasolinesdonotprovidesufficientdepositcontrolstoallowforoptimalengineperformance.Asaresult,TOPTIERDetergentGasolinestandardswerecreatedtoensuregasolineshaveallthenecessaryadditivesanddetergentstoreducethebuild-upofdepositsinanengine.ILMORrecommendspurchasingfuelfromasupplierthatconfirmstheirfuelmeetsTOPTIERspecifications.ForalistofTOPTIERretailers,checkwww.toptiergas.com,andclickon“Retailers.”
Damage to the engine by use of low-quality gasoline or gasoline with an octane rating below the minimum level listed for ILMOR MV8 engines will void the warranty on the engine.
Using Oxygenated Fuels or Fuels with Alcohol E-85 fuelsarenottobeused!Useofthisfuelmaycauseengineperformancetosufferandmaydamagevitalfuelsystemcomponents. Fuelthatisnomorethan15percentMTBE(methyltertiarybutylether)maybeusedintheMV8en-gine.MTBEisanoxygenateandoctanebooster.MTBEisusedinfuelstomeetgovernmentmandates.How-ever,becauseofenvironmentalconcernsMTBEisbeingphasedoutandreplacedwithethanolormethanol. Leaded fuels may NOT be used in the MV8 engine. Gasolinecontaininglevelshigherthan10percentethanolormethanolisNOT TO BE USEDintheMV8engine.Thisisprimarilyduetothefactthatthealcoholinthefuelabsorbswater.Waterinthefuelcancausecorrosionandextensivedamageinthefuelsystem.Ifthepresenceofalcoholinthegasolineisunknown,frequentinspectionsofthefuelsystemarerequired.
When the Boat Is Not Used for a While ILMOR recommendstheuseofSta-Bil®fuelstabilizeriftheboatconsumeslessthanatankoffueleverycoupleofweeks.Today’sfuelsaremoresusceptibletodegradation,andtheuseofaqualitystabilizerhelpsensurefewerproblemsiftheboatisusedonlyonalimitedbasis. Iftheboathasnotbeenrunformorethanthirty(30)daysandfuelremainsinthetank—evenstabilizedfuel—theenginemayrunwithreducedperformanceuntiltheexistingfuelhasbeenused.Themanufacturerwillnotpayforrepairstocomponentsthataredamagedfrompoorqualityfuelasthisisnotcoveredundertheenginewarranty.
2011 Owners Manual...Using Care When Fueling...Page 7-3
Extended storage with fuel in the system can affect fuel stability and may require system inspection and fuel filter replace-ment when the boat returns to service.
Fuels Outside the United States and Canada If the boat is operated outsidetheUnitedStatesorCanada,itmaybemoredifficulttoobtainlead-freefuel.Astheenginecomponentsaremanufac-turedtofunctionproperlyonlywithunleadedgasoline,itmaybenecessarytosearchforrefinedunleadedgasoline.
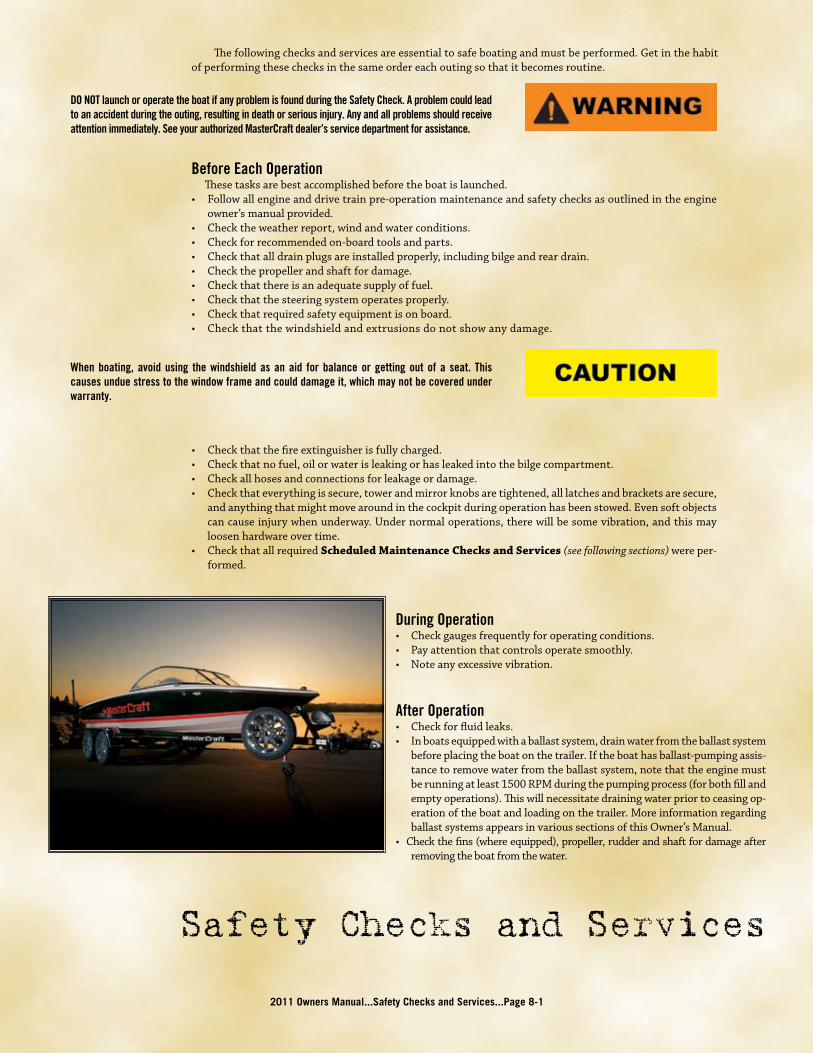
2011 Owners Manual...Safety Checks and Services...Page 8-1
Safety Checks and Services
Thefollowingchecksandservicesareessentialtosafeboatingandmustbeperformed.Getinthehabitofperformingthesechecksinthesameordereachoutingsothatitbecomesroutine.
DO NOT launch or operate the boat if any problem is found during the Safety Check. A problem could lead to an accident during the outing, resulting in death or serious injury. Any and all problems should receive attention immediately. See your authorized MasterCraft dealer’s service department for assistance.
Before Each OperationThesetasksarebestaccomplishedbeforetheboatislaunched.• Followallengineanddrivetrainpre-operationmaintenanceandsafetychecksasoutlinedintheengine
owner’smanualprovided.• Checktheweatherreport,windandwaterconditions.• Checkforrecommendedon-boardtoolsandparts.• Checkthatalldrainplugsareinstalledproperly,includingbilgeandreardrain.• Checkthepropellerandshaftfordamage.• Checkthatthereisanadequatesupplyoffuel.• Checkthatthesteeringsystemoperatesproperly.• Checkthatrequiredsafetyequipmentisonboard.• Checkthatthewindshieldandextrusionsdonotshowanydamage.
When boating, avoid using the windshield as an aid for balance or getting out of a seat. This causes undue stress to the window frame and could damage it, which may not be covered under warranty.
• Checkthatthefireextinguisherisfullycharged.• Checkthatnofuel,oilorwaterisleakingorhasleakedintothebilgecompartment.• Checkallhosesandconnectionsforleakageordamage.• Checkthateverythingissecure,towerandmirrorknobsaretightened,alllatchesandbracketsaresecure,
andanythingthatmightmovearoundinthecockpitduringoperationhasbeenstowed.Evensoftobjectscancauseinjurywhenunderway.Undernormaloperations,therewillbesomevibration,andthismayloosenhardwareovertime.
• CheckthatallrequiredScheduled Maintenance Checks and Services (see following sections) wereper-formed.
During Operation• Checkgaugesfrequentlyforoperatingconditions.• Payattentionthatcontrolsoperatesmoothly.• Noteanyexcessivevibration.
After Operation• Checkforfluidleaks.• Inboatsequippedwithaballastsystem,drainwaterfromtheballastsystem
beforeplacingtheboatonthetrailer.Iftheboathasballast-pumpingassis-tancetoremovewaterfromtheballastsystem,notethattheenginemustberunningatleast1500RPMduringthepumpingprocess(forbothfillandemptyoperations).Thiswillnecessitatedrainingwaterpriortoceasingop-erationoftheboatandloadingonthetrailer.MoreinformationregardingballastsystemsappearsinvarioussectionsofthisOwner’sManual.
•Checkthefins(whereequipped),propeller,rudderandshaftfordamageafterremovingtheboatfromthewater.

2011 Owners Manual...New Boat Break-In...Page 9-1
New Boat Break-In
Thefirstfifty(50)hoursofoperationarethemostimportantfortheboat.Properbreak-inwillensuremaxi-mumperformanceandthelongestpossiblepower-trainlife.Thebreak-inperiodallowsmovingpartswithintheengineandtransmissiontowear-inproperly.AllMasterCraftboatsarelake-testedonthewaterbeforeleavingthefactory,butthebreak-inmustcontinueforthefirstfifty(50)hoursofyourownership.
To ensure proper break-in and lubrication, boat owners should not remove the factory break-in oil until after the initial ten (10) hours of operation. At that time, an oil change should be performed on the Indmar engines by an authorized MasterCraft service technician at an authorized MasterCraft dealer.
Failure to follow the break-in procedure exactly as stated will void the engine warranty! NOTE: Before operating the boat for the first time you must read the engine manufacturer’s man-ual completely in addition to this Manual! Pleasefollowthebreak-inprocedurecarefully.Closeattentiontothefollowingisveryimportant:
• Maintain the proper oil level. Until thepistonrings, cylinderandotherworking internalpartsarethoroughlyseated,oilconsumptioncanbehighandmustbecarefullywatched.(Thiscontinuestobeim-portantafterbreak-in,aswell).
• Pay close attention to the gauges.Itisimportanttostoptheengineimmediatelyifthegaugesindicateaproblem.Lowoilpressureandoverheatingareseriousissuesandrequireimmediateattention.
• Abnormal vibration or noises.Thesesymptomscanprecedetroubleandshouldnotbeignored.Oc-casionally,hardwaremayworkloose,mountingsmayneedtobetightenedorthedrivelinemayrequireattention.
• Fuel, oil or water leaks. Leakscanposeaserioussafetythreat.Ifoneoccurs,itismostlikelytodosoafterafewhoursofoperation.
• Vary the engine speed. Neverruntheengineformorethanthree(3)minutesatanyconstantRPMdur-ingthebreak-inperiod.Doingthiswillassistintheproperbreak-inofringsandbearings.
• Plane the boat quickly. Operatingtheboatatlowspeedsplacesanexcessiveloadontheengine.Planequickly,thenbackdowntoaslowerspeed.
First Hours of Operation Eachenginemanufacturerhasdetailedandspecificrequirementsforproperenginebreak-in.Thatinfor-mationisfoundintheenginemanualsupplied,andmustbefollowedexactlyasindicated.Failuretodosocouldcauseenginedamageand/orfailurethatisnotcoveredunderwarranty.
After Break-In Oncethebreak-inperiodisover,theboatmaybeoperatedcontinuouslyatanyspeed,butnotbeyondthemaximumindicatedintheenginemanual. Theenginesareequippedwithrev-limiterswhichwillcauseaflutteringsoundwhenreached.Iftheboathasthecorrectpropellerset-up,operatorsshouldneverreachthelimiter,butifthathappens,itisasignalthatyoushouldreducethethrottleandcheckwithanauthorizedMasterCraftdealertodeterminethecause. Alwaysrememberthatduringnormaloperationyoushouldallowtheenginetowarmupgradually.Besuretheengineiswarmbeforeaccelerating.Paycarefulattentiontothegauges.Also,checktheoillevelfre-quentlyduringthefirstfifty(50)hoursofoperationsincethepistonringsandcylindersrequirethatmuchtimetoseatproperly. SeetheScheduled Maintenance Checks and Services sectionformoredetails.
Failure to follow the engine oil recommendations listed in the engine manual can cause additional engine wear and increase the possibility of engine component failure. Damage to the engine due to incorrect oil usage can be costly to repair, and is not covered by the warranty!

2011 Owners Manual...Starting and Basic Operation...Page 10-1
Starting and Basic Operation
NOTE: If you are operating this boat for the first time, you must follow the engine and drive train break-in procedures as described in the previous section and the engine manual. Failure to follow these procedures may result in serious damage and may void any warranties!
Before Starting FamiliarizeyourselfwiththecontrolsandindicatorsusedonthisMasterCraftboat.PerformallSafetyChecksandServicesasdescribedearlier.AlsoperformallScheduledMaintenanceChecksandServices.
Step 1: Lift theenginecoverand inspect thebilgeandenginecompartment foranyfluid/vapor leakage.MasterCraftrecommendsliftingtheenginecompartmentcoverforinspectionbeforeeachuse.
Step 2: Checkthehulldrainplugs.Makesuretheyareinstalledandsecure.Step 3: Operatethebilgeblowerforatleastfour(4)minutes.LeavethebilgeblowerONthroughthestarting
processanduntiltheboathasplaned.
To prevent a possible explosion, operate the blower for at least four (4) minutes before starting the engine and always when at idle or slow-running speed. Explosive gasoline and/or battery fumes may be present in the engine compartment. Failure to do so may result in serious injury or death!
Before starting the engine, open the engine compartment and check for gasoline fumes, fuel and oil leaks or the presence of fuel or oil in the bilge.
NOTE: Always start the engine with the control lever in the neutral position or with the shift disen-gaged. Your boat is equipped with a neutral-start safety switch that will not allow the engine to be started when in gear.
Starting the EngineStep 1: Attachtheemergencyenginesafetyswitchtether(lanyard)toanarticleofyourclothingandtothe
switch.Step 2: Fornormalstarting,leavethethrottleleverinneutral.Theelectroniccontrolswillmeterthecorrect
fuelandairautomatically.Step 3: Turnthekeyswitchtothestartpositionandholduntiltheenginestarts.Releasethekeyassoonas
theenginestarts.
Do not operate the starter motor continuously for more than fifteen (15) seconds without at least two (2) minutes for a “cool-down” period. Failure to do so may cause the starter to overheat, resulting in damage. Failure to release the ignition key after the engine has started may cause damage to the starter motor and drive.
Note: While the engine is warming up, check to see that all lights and gauges operate properly. Check that the steer-ing system operates freely. There should be no apparent leaks under pressure. Re-engage the control lever after warm-up by returning the lever to neutral and pushing the throttle button back into the engage position.

Shifting Gears Whenshiftinggears,alwaysmovethecontrol leversmoothlyandquicklyintogear.Donothesitate.Slowgearengagementcoulddamagetheshiftingmechanisminthetransmission. NOTE: When shifting from forward to reverse or reverse to forward, be sure to stop the control lever in the neutral position and allow the engine to fall between 600-800 RPM before completing the shift. Withtheexceptionofthe280V,X-80andCSX-265,aone-hand,single-levercontroloperatesasbothagearshifterandathrottle.Theleverautomaticallylocksintheneutralposition(straightupanddown)forsafe-ty.Thelevercanbemovedfromneutralonlybyraisingthelifterundertheballknob.Shiftingisaccomplishedbymovingtheleverforwardorbackward.Center(straightup)isneutral.Movingtheleverforwardengagestherunninggear;movingitbackfromcenterputsthedrivetrainintoreverse. Never attempt to shift without the engine running! Duringregularwarm-upoftheengine,itispossibletotemporarilyincreasetheengineRPMswithoutmovingtheboat.Toaccomplishthis,push inthebutton locatedatthebottomoftheshift/throttle leverwithonehandandpullupthe“umbrella”(aluminumsurroundbelowthetopoftheknob).Movethelevertodesiredpositionandthensimultaneouslyreleasethebuttonandumbrella.TheenginewillrunwithincreasedRPMsandcanbeincreasedordecreasedbymovingthelever.Returningthehandletotheneutralposition(asshowninillustrationabove)willbringthesystembacktoneutralandreducetheengineRPMstopre-setlevels. Thisfunctionshouldbedonesparingly.Over-revvingtheengineforanyextendedperiodcancauseunduewearandtearontheengine.Avoidadvancingtowide-open-throttleandholdingtheRPMsatthatlevel.
Inthe280VandX-80theboatisequippedwithafour-levercontrol.Theportsideleverclosesttothedriveristheportengineshifter,whichallowstheboattomoveforwardwhenshiftedforward,andbackwardwhenshiftedaft.Thenextleveristhestarboardengineshifterandperformsthesamefunction.Ifbothen-ginesarerunningandtheboatismoving,theshiftersshouldbeshiftedtogetherandinthesamedirection.Doingotherwisecandamagethesystem. Thenextmiddleleveristheportenginethrottle,whichallowstheboattofeedfuelintotheengineandoperateinmotion.Pushingforwardonitwillsignalthesystemthatfuelshouldbesenttotheportengine.Theenginescanberunatdifferentlevelsofthrottle. TheCSX265hasatwo-levercontrol.Ontheportsideistheportengineshifter/throttlecontrol,andpushingforwardwillmovetheboatforward.Thestarboardsideleveristhestarboardengineshifter/throttlecontrol.Theenginescanberunatdifferentlevelsofthrottle. Thissystemallowsgreatermaneuverabilityindocking,aswellaswhentheboatisinoperation.How-ever, it requires more practice and skill in order to avoid potential damage to the boat. See Engine Synchronizing Switch in this section of the Owner’s Manual for more details. Duringregularwarm-upoftheengine,itispossibletotemporarilyincreasetheengineRPMswithoutmovingtheboat.Toaccomplishthis,pulloutward(lateraltotheunit)ontheengineshift/throttlecontrol.TheenginewillrunwithincreasedRPMsandcanbeincreasedordecreasedbymovingthelever.Returningthehandletotheneutralposition(asshowninillustrationabove)willbringthesystembacktoneutralandreducetheengineRPMstopre-setlevels. Thisfunctionshouldbedonesparingly.Over-revvingtheengineforanyextendedperiodcancauseunduewearandtearontheengine.Avoidadvancingtowide-open-throttleandholdingtheRPMsatthatlevel.
Port engine shifter
Port engine throttle
Starboard engine throttle
Starboard engine shifter
280V, X-80
Port engine combined shifter/throttle
Starboard engine
combined shifter/throttle
CSX 265
2011 Owners Manual...Starting and Basic Operation...Page 10-2

Underway Iftheoilpressuregaugeindicateslowornooilpressure,immediatelystoptheboatasoutlinedbelowandchecktheoillevel.Ifthetemperaturegaugeindicatesoverheating,immediatelystoptheboatasoutlinedbelowandchecktherawwaterimpellerforblockage.DONOToperatetheboatuntilthecauseforthewarn-inghasbeenfoundandcorrected.
Continued operation after the warning light has illuminated may cause severe engine damage. This will void your warranty.
StoppingStep 1: Slowlybringthecontrollevertotheneutralposition.Iftheboathasbeendrivenforalongperiod
of timeorathighspeed,allowtheenginea2-3minutecool-downperiodat low idle (600-800RPM).
Step 2: TurntheignitionkeytotheOFFpositiontostoptheengine.Step 3: If any problems were encountered during operation, have the boat inspected by an authorized
MasterCraftdealer.Requestanynecessaryrepairsbeforeresumingoperationoftheboat.
2011 Owners Manual...Starting and Basic Operation...Page 10-3

2011 Owners Manual...Operational Hints...Page 11-1
Operational Hints
MasterCrafturgesallwhowillbeoperatingtheboattoseekcertifiedinstructionfromthelocalboatingauthorities.Thissection isdesignedtopresentthemostbasicoperationalprinciples. It isNOTintendedtocoverallconditionsencounteredduringoperation.Therefore, theprinciplespresented inthisOwner’sManualarelimitedtothefactsrelateddirectlytotheoperationoftheboat,whiletheresponsibilityfortheproperapplicationoftheseprinciplesbelongswiththeboatownerand/oroperator.
Adding additional ballast to a MasterCraft boat is not recommended, and can result in impaired visibility, diminished handling characteristics and instability when operating your boat, and may result in potential structural and/or engine damage to the boat, which damage will not be covered by your warranty.
Information regarding the maximum number of people and/or additional weight to the boat is included in the Guide to Individual Models section of this Manual. It is the boat operator’s responsibility to ensure that the boat is never overloaded. Too much additional weight may cause the boat to overturn or sink, which can result in serious bodily injury or death.
Loading Neveroverloadtheboat.Themaximumweightcapacityaslistedonthecertificationplateincludesallitemsaddedtotheboat(includingpersonsandgear).Properdistributionofweightiscriticaltoboatperfor-mance.Allocatetheloadasevenlyaspossible.Themaximumweightcapacityincludesfilled,factory-installedballasttanksand/orballastbags,addedbythecustomer. The maximum weight capacity is calculated with full factory installed fuel and ballast tanks. The weight of occupants, gear and water in any ballast bags added by the customer reduces the capacity of the boat.Failure to adhere to the total maximum capacity may result in too much strain on the drive train or may sink the boat. This is not covered under warranty! See the Common Sense Approach section of this Owner’s Manual regarding weight.
Emergencies Knowhowtouseandspotdistresssignals,andtoofferassistanceifpossible.Remember,youmayneedassistancesomeday.
Courtesy Alwaysrespecttherightsofothersonthewater.Keepwidewhenpassing,slowdownincrowdedareas,bealertandbeawareofyourwakeandwash.
First Time Operation Whentakingtothewaterforthefirsttime,youmustkeepinmindafewgeneralguidelines:• Practice makes perfect!Startincalmwaterwithnowindor
currentandplentyofroomuntilyougetthefeelfortheboatanditscontrols.
• Proceed slowly!Giveyourselftimetothink,reactandmaneuver.• Recognize outside forces!Checkthewinddirectionandve-
locity,aswellaswatercurrentsandwaves.• Have a crew on hand!Havefriendsorfamilyreadywithfend-
ers,linesandaboathooktoassistyouwhendocking,aswellaslaunchingandloading.
• Remember that a boat is not an automobile!Boatscannotbe maneuvered and stopped like a car. Boats steer from thestern(rear)andhavenobrakes.

Basic Maneuvering Steeringresponseisdependentuponthree(3)factors:rudderposition,motionandthrottle.Whilehigh-speedmaneuveringisrelativelyeasyandtakeslittlepractice,slow-speedmaneuveringisfarmoredifficultandrequirestimeandpracticetomaster.Withbothsteeringandpropulsionattherearoftheboat,theinitiationofaturnpushesthesternoftheboatawayfromthedirectionoftheturn.Thesternfollowsalargerturningcirclethanthebow.Thisisespeciallyimportanttorememberwhenmakingmaneuverswithinclosequarters. Whiletheeffectsofunequalpropellerthrust(torquesteering),wind,andcurrentmaynotalwaysbepresent,apracticeddriverwillusethemtohis/heradvantage. Unequalthrustisaphenomenonsharedbyallsingle-engine,propeller-drivenboats.Withtherudderinthestraight-aheadposition,acounterclockwiserotationpropellertendstocausetheboattodrivetoportwhengoingforward,andtostarboardwhengoingbackward. Athighspeed,thereiscompensationforthiseffect,anditisvirtuallynon-existent.But,atslowspeed—andespeciallyduringbacking—theeffectcanbeverypronounced.Thisisthemainreasonthatmostexperi-enceddriversapproachwiththedocktothestarboardoftheboat. Stopping—orcheckingheadway—isatechniquethatmustbemastered.Withnobrakes,reversemustbeusedtostoptheboat.Themomentumoftheboatwillvaryaccordingtotheload.Makeitapracticetoslowtono-wakespeedbeforeshiftingintoreverse. Whenpracticingmaneuveringtechniques,alwaysdosoinopenwaterthatisfreeoftraffic.Adequatepracticemaymakethedifferencebetweenapleasurableboatingexperienceorapotentiallydamaging(attheveryleast,embarrassing)one.
High Speed Operation MasterCraftboatsaredesignedtobeahigh-performanceboat.Professionaldriverswithadvancedoperat-ingskillsperformhigh-speedmaneuversandturnson-a-dime.DONOTattempttoduplicateorsimulatethesefeats.Paid,professionaldriverslogthousandsofhoursonthewaterandcarefullychoreographeverymove.
Plansaremadeinadvanceintheeventtheroutinemustbeaborted.Maneuversofthisnaturecouldcauseseriousinjuryordeath,aswellasdamagetoyourMasterCraftboatthatwillnotbecoveredunderwarranty.
Boat operators should never attempt to duplicate operational skills of professional drivers. When such maneuvers fail, it can result in serious injury or death.
Forthebestengineperformanceandlongevity,thewide-open-throttle(WOT)engineoperationmustbenearthetopof,butwithin,thespecifiedWOToperatingrange.ToadjusttheWOToperatingrange,selectapropellerwiththeproperdiameterandpitch.Thepropellersuppliedontheboatwaschosenforbestall-aroundperformanceunderaverageoperatingconditions. Load,weather,altitudeandboatconditionallaffectWOTengineoperation.Iftheboatisusedforseveraldif-
ferentapplicationssuchaswakeboarding,barefootingandcruising,itmaybenecessarytohavetwo(2)ormorepropellersofdifferingsizeandpitchtoallowtheenginetooperateintheWOTrangeforeachapplication. Proppingtheboatshouldbedoneaftertheboatisloadedinthemannerinwhichitwouldnormallybeloadedforeachap-plication.Forexample,inproppingtheboatforwakeboarding,filltheballasttanksandaddthepeopleandgearthatnormallywouldbeexpectedintheboat.Taketheboatoutandafterwarm-up,runitatwide-open-throttleandnotethemaximumRPM.EFIenginesareequippedwithRPMlimiterstopreventover-revving.TakenoteiftheRPMlimiterisactivated. IftheWOTRPMishigherthanthemaximumRPMinyourengine’sWOToperatingrange,theboatisunder-propped.Install-ingahigher-pitchedpropellerwillreducetheWOTRPMs.Anen-ginethatisover-revvingmayquicklyexperiencecatastrophicdam-age,whichwillnotbecoveredunderwarranty. IftheWOTRPMislowerthantheminimumRPMinyourengine’sWOToperatingrange,theboatisover-propped.Installing
2011 Owners Manual...Operational Hints...Page 11-2

2011 Owners Manual...Operational Hints...Page 11-3
alower-pitchedpropellerwillincreaseWOTRPMs. Anengine that isunder-revving is “lugging.”Thisplacesa tremendous loadonthepistons,crankshaftandbearingsandcancausedetonation,pistonseizureandotherenginedamage,which
willnotbecoveredunderwarranty.
Engines should always be operated within engine manufacturer guidelines. Failure to do so may cause significant damage to the engine and drive train and is not covered under warranty!
Elevationandweatheralsohaveaverynoticeableeffectonthewide-open-throttlepowerofanengine.Sinceoxygengetsthinneraselevationincreases,theenginebeginstostarveforair.Humidity,barometricpres-sureandtemperaturehaveanoticeableeffectonthedensityofairsinceheatandhumiditythintheair. Thisphenomenoncanbecomeparticularlyapparentwhenanengineisproppedforuseonacool,drydayinspringandthenisoperatedonahot,humiddayinsummer,anddoesnothavethesameperformance.Althoughsomeperformancecanberegainedbydroppingtoalower-pitchpropeller,thebasicconditionstillexists.Thepropelleristoolargeindiameterforthereducedpoweroutput.Anexperiencedmarinedealer candeterminehowmuchdiametertoremovefromalower-pitchpropellerforspecifichigh-elevationlocations. MasterCraft’senginemanufacturerssuggestthatconsumersconsult with the dealer from whom the boat was purchased re-gardingthebestpropellerfortheapplicationinwhichtheboatwillprimarilyberun.However,beawarethatchangingthepropellermayvoidthewarranty.Again,workingwithanauthorizedMas-terCraftdealerisyourbestbettoensureexcellentperformance.
Unusual Operating Conditions Ifthebodyofwaterisunknown,talktolocalboatersaboutthetypeofobstaclesthatmaybeencounteredbeneaththewa-ter’ssurface.Rocks,treestumpsandsandbarsarealldangerousanddamaging.Beespeciallywaryofriversandman-madelakes.Rapidlychangingconditionscancausedailychangesinunderwa-terhazards. Stay well clear of floating debris. What looks to be a smallbranchinthewatermaywellturnouttobeanentiretree. Whentravelingthroughweedyareas,keepaneyeontheen-ginetemperaturegauge.Weedscaughtupandblockingthewaterflowthroughtherawwaterintakeortrans-missioncoolerwillcausetrouble.Also,afterleavingtheweedyarea,shifttoneutralforafewsecondsandthentoreverseforafewsecondstounwindanyweedsthatmayhavewrappedaroundthepropeller.
Docking and Tie-Up Approachthedockslowly,withthestarboardsideoftheboatifpossible.Thenaturaltendencytotorquesteerwiththerotationofthepropelleratslowspeedsmakesdockingeasieronthatside.Also,usewindandcurrenttoyouradvantagewhendocking. Beforetyinguptheboat,besuretouseenoughdockbumperstoprotecttheboatfromdamage.Ifpos-sible,tie-upwiththebowtowardthewaves.Usegoodqualitydouble-braidednylonline.Tie-uponlytotheliftingortie-downeyes.Neverusethehandrailsorskipylon. Iftheboatistobemooredforalongperiodoftime,usechafingprotectorstoprotectthegelcoatfinish.Leavealittleslackinthelines,allowingforsomewavemovementortidalactionwhereapplicable. Iftheboatistobekeptinornearwaterfortheseason,considerthepurchaseofaboatliftandbottompaintforthehull.Theseliftspreventthebuild-upofmarinegrowthonthehullaswellasprotectingtheboatfromdamagetypicalofon-waterstorage,suchasblistering.Makesuretheboatliftsupportsthehullcor-rectly.Seethenextsection,Lifting the Boat.

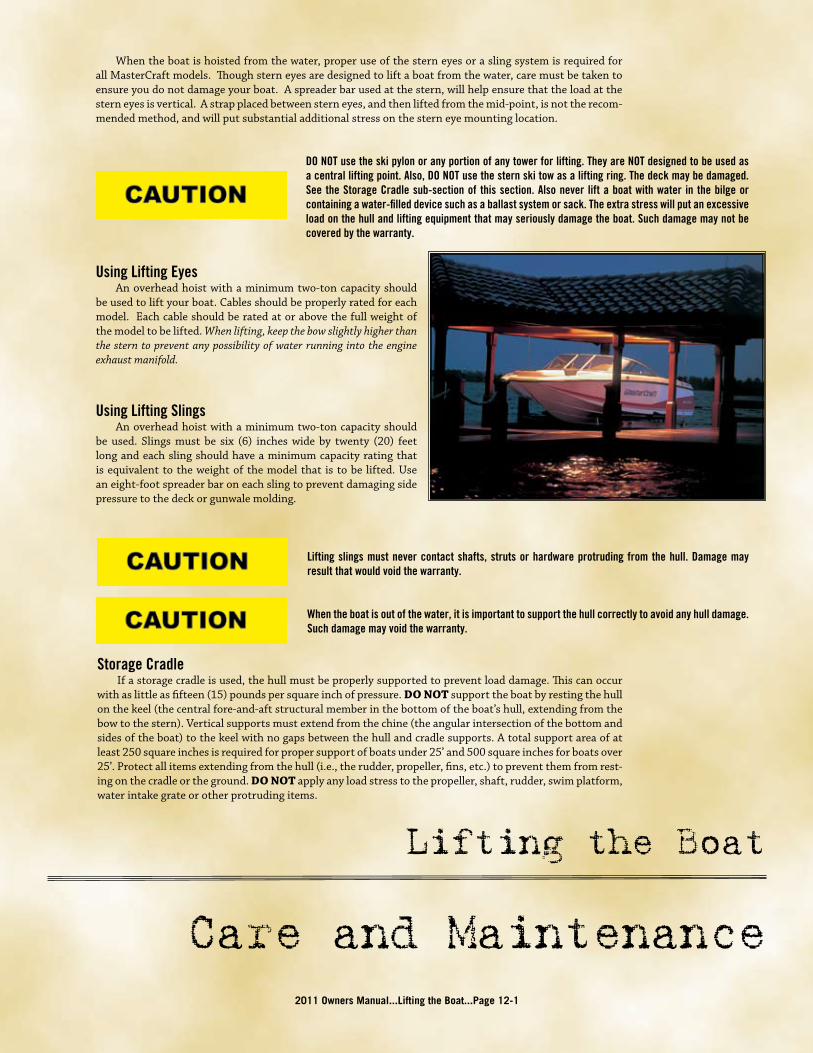
Whentheboatishoistedfromthewater,properuseofthesterneyesoraslingsystemisrequiredforallMasterCraftmodels.Thoughsterneyesaredesignedtoliftaboatfromthewater,caremustbetakentoensureyoudonotdamageyourboat.Aspreaderbarusedatthestern,willhelpensurethattheloadatthesterneyesisvertical.Astrapplacedbetweensterneyes,andthenliftedfromthemid-point,isnottherecom-mendedmethod,andwillputsubstantialadditionalstressonthesterneyemountinglocation.
Care and Maintenance
Lifting the Boat
2011 Owners Manual...Lifting the Boat...Page 12-1
DO NOT use the ski pylon or any portion of any tower for lifting. They are NOT designed to be used as a central lifting point. Also, DO NOT use the stern ski tow as a lifting ring. The deck may be damaged. See the Storage Cradle sub-section of this section. Also never lift a boat with water in the bilge or containing a water-filled device such as a ballast system or sack. The extra stress will put an excessive load on the hull and lifting equipment that may seriously damage the boat. Such damage may not be covered by the warranty.
Using Lifting Eyes Anoverheadhoistwithaminimumtwo-toncapacityshouldbeusedtoliftyourboat.Cablesshouldbeproperlyratedforeachmodel.Eachcableshouldberatedatorabovethefullweightofthemodeltobelifted.When lifting, keep the bow slightly higher than the stern to prevent any possibility of water running into the engine exhaust manifold.
Using Lifting Slings Anoverheadhoistwithaminimumtwo-toncapacityshouldbe used. Slings must be six (6) inches wide by twenty (20) feetlongandeachslingshouldhaveaminimumcapacityratingthatisequivalenttotheweightofthemodelthat istobe lifted.Useaneight-footspreaderbaroneachslingtopreventdamagingsidepressuretothedeckorgunwalemolding.
Lifting slings must never contact shafts, struts or hardware protruding from the hull. Damage may result that would void the warranty.
When the boat is out of the water, it is important to support the hull correctly to avoid any hull damage. Such damage may void the warranty.
Storage Cradle Ifastoragecradleisused,thehullmustbeproperlysupportedtopreventloaddamage.Thiscanoccurwithaslittleasfifteen(15)poundspersquareinchofpressure.DO NOT supporttheboatbyrestingthehullonthekeel(thecentralfore-and-aftstructuralmemberinthebottomoftheboat’shull,extendingfromthebowtothestern).Verticalsupportsmustextendfromthechine(theangularintersectionofthebottomandsidesoftheboat)tothekeelwithnogapsbetweenthehullandcradlesupports.Atotalsupportareaofatleast250squareinchesisrequiredforpropersupportofboatsunder25’and500squareinchesforboatsover25’.Protectallitemsextendingfromthehull(i.e.,therudder,propeller,fins,etc.)topreventthemfromrest-ingonthecradleortheground.DO NOTapplyanyloadstresstothepropeller,shaft,rudder,swimplatform,waterintakegrateorotherprotrudingitems.

2011 Owners Manual...Corrosion Prevention...Page 13-1
Corrosion Prevention
NOTE: DAMAGE DUE TO CORROSION IS NOT COVERED UNDER WARRANTY!
Galvanic Corrosion Galvaniccorrosion(electrolysis)totheboatisthedecompositionofmetalduetotheeffectsofelectrolyticaction.Whentwo(2)dissimilarmetalsareimmersedinaconductivefluid(e.g.,saltwater),anelectriccurrentisproduced,muchliketheactionofabattery.Asthecurrentflows,ittakeswithittinybitsofthesoftermetal.Ifleftunchecked,severedamagemayoccurovertime. Iftheboatisoperatedinsalt,pollutedorbrackishwaters,eventemporarily,theboatshouldbeequippedwithatransom-mountedzincanodetopreventdamagetothosemetalpartscomingincontactwiththewater. Thezincis,bydesign,self-sacrificing.Itisslowlyerodedawaybyelectrolyticactionandrequiresperiodicinspectionfordeterioration. Ifthezincshowsextremeerosion,itmustbereplacedtocontinueprotection,ordamagetoothermetalpartsmayresult. MasterCraftSaltwaterSeriesboatscomeequippedwiththezincanode.Forfreshwaterboatsthatmaybeoperatedinpollutedorbrackishwater,anauthorizedMasterCraftdealercanprovideguidanceinsecuringandinstallingazincanodeforprotection.
Salt Water Corrosion TheboathasbeendesignedforoperationinfreshwaterunlessitisamodelintheMasterCraftSaltwaterSeries.Ifoperatingafresh-watermodeltemporarilyinsalt,pollutedorbrackishwater,thoroughlyflushtheboatwithfreshwaterassoonaspossibleafterward.Theentireenginecoolingsystemshouldbeflushedwithfreshwaterforatleastten(10)minutesaftereachuseinsuchwaters. Boatsoperatedcontinuouslyinsaltwatershouldbeequippedwiththeclosedcoolingsystemtopreserveenginelife.
Marine GrowthIfacceleratedmarinegrowthisaproblemintheareainwhichtheboatwillgenerallybeoperated,ananti-foulingbottompaintmaybenecessarytoslowgrowthwhileprotectingthegelcoat.
Beforeselectingabottompaint,talkwithotherboatersandanauthorizedMasterCraftdealer’sservicede-partmenttodeterminetheproductthatworksbestinthearea.Manylocalvariablesmayalsoaffecttheselec-tionofpaint.Besuretofollowthepaintmanufacturer’sdirectionsexactly.
Be sure all fasteners used are approved and rated for marine use. Most fasteners used on MasterCraft boats are stainless steel or specially coated to resist corrosion.
Use of improper parts may cause component or engine failure. Such failure may result in death or serious injury!
Stainless Steel and ChromeStainlesssteelandchrome-platedpartsarenottotallyresistanttocorrosion.Occasionalcleaningandpolishingwithamarinechrome-and-stainlesspolishwillmaintainandextendthelifeoftheseparts.Insaltwaterareas,itisimperativethatyouthoroughlyrinseallhardwarewithfreshwaterandapplyalightcoatingofprotectiveoiltoenhancetheappearanceaftereachuse.
Exposure to salt water will cause corrosion leading to significant damage to stainless steel and chrome parts. Failure to thoroughly rinse salt water from all hardware, and to apply protective oil after each exposure to salt water, will accelerate the corrosion of hardware and will void your warranty.
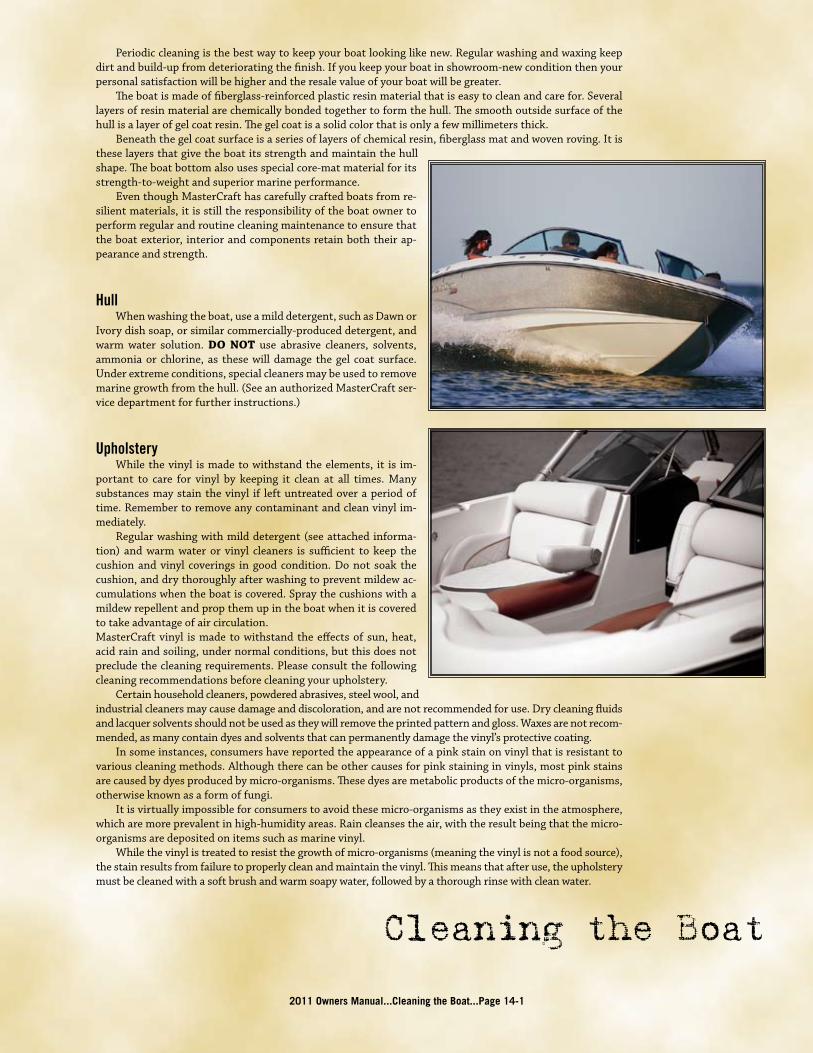
2011 Owners Manual...Cleaning the Boat...Page 14-1
Cleaning the Boat
Periodiccleaningisthebestwaytokeepyourboatlookinglikenew.Regularwashingandwaxingkeepdirtandbuild-upfromdeterioratingthefinish.Ifyoukeepyourboatinshowroom-newconditionthenyourpersonalsatisfactionwillbehigherandtheresalevalueofyourboatwillbegreater. Theboatismadeoffiberglass-reinforcedplasticresinmaterialthatiseasytocleanandcarefor.Severallayersofresinmaterialarechemicallybondedtogethertoformthehull.Thesmoothoutsidesurfaceofthehullisalayerofgelcoatresin.Thegelcoatisasolidcolorthatisonlyafewmillimetersthick. Beneaththegelcoatsurfaceisaseriesoflayersofchemicalresin,fiberglassmatandwovenroving.Itistheselayersthatgivetheboatitsstrengthandmaintainthehullshape.Theboatbottomalsousesspecialcore-matmaterialforitsstrength-to-weightandsuperiormarineperformance. EventhoughMasterCrafthascarefullycraftedboatsfromre-silientmaterials,itisstilltheresponsibilityoftheboatownertoperformregularandroutinecleaningmaintenancetoensurethattheboatexterior, interiorandcomponentsretainboththeirap-pearanceandstrength.
Hull Whenwashingtheboat,useamilddetergent,suchasDawnorIvorydishsoap,orsimilarcommercially-produceddetergent,andwarm water solution. DO NOT use abrasive cleaners, solvents,ammonia or chlorine, as these will damage the gel coat surface.Underextremeconditions,specialcleanersmaybeusedtoremovemarinegrowthfromthehull.(SeeanauthorizedMasterCraftser-vicedepartmentforfurtherinstructions.)
Upholstery Whilethevinyl ismadetowithstandtheelements, it is im-portant to care for vinyl by keeping it clean at all times. Manysubstancesmaystainthevinyl if leftuntreatedoveraperiodoftime.Remembertoremoveanycontaminantandcleanvinylim-mediately. Regularwashingwithmilddetergent(seeattachedinforma-tion) and warm water or vinyl cleaners is sufficient to keep thecushion and vinyl coverings in good condition. Do not soak thecushion,anddrythoroughlyafterwashingtopreventmildewac-cumulationswhentheboatiscovered.Spraythecushionswithamildewrepellentandpropthemupintheboatwhenitiscoveredtotakeadvantageofaircirculation.MasterCraftvinyl ismadetowithstandtheeffectsofsun,heat,acidrainandsoiling,undernormalconditions,butthisdoesnotprecludethecleaningrequirements.Pleaseconsultthefollowingcleaningrecommendationsbeforecleaningyourupholstery. Certainhouseholdcleaners,powderedabrasives,steelwool,andindustrialcleanersmaycausedamageanddiscoloration,andarenotrecommendedforuse.Drycleaningfluidsandlacquersolventsshouldnotbeusedastheywillremovetheprintedpatternandgloss.Waxesarenotrecom-mended,asmanycontaindyesandsolventsthatcanpermanentlydamagethevinyl’sprotectivecoating. Insomeinstances,consumershavereportedtheappearanceofapinkstainonvinylthatisresistanttovariouscleaningmethods.Althoughtherecanbeothercausesforpinkstaininginvinyls,mostpinkstainsarecausedbydyesproducedbymicro-organisms.Thesedyesaremetabolicproductsofthemicro-organisms,otherwiseknownasaformoffungi. Itisvirtuallyimpossibleforconsumerstoavoidthesemicro-organismsastheyexistintheatmosphere,whicharemoreprevalentinhigh-humidityareas.Raincleansestheair,withtheresultbeingthatthemicro-organismsaredepositedonitemssuchasmarinevinyl. Whilethevinylistreatedtoresistthegrowthofmicro-organisms(meaningthevinylisnotafoodsource),thestainresultsfromfailuretoproperlycleanandmaintainthevinyl.Thismeansthatafteruse,theupholsterymustbecleanedwithasoftbrushandwarmsoapywater,followedbyathoroughrinsewithcleanwater.

Thissituationisworsenediftheboatisstoredwithoutproperventilationoriftheboatcoverisputonwhilethevinylisstillwet,creatingasituationinwhichallformsoffungi(moldandmildew)thrive. Failure to follow these instructions in the proper care of upholstery may cause your warranty to be voided! Thecleaningtablepresentedinthissectionisofferedonlyasasuggestionandasanaidinattemptingtodealwithstains.Wedonotguaranteethatthecleaningmethodswillwork.Stainsfromanyexternalsourceareunlikelytobecoveredbywarranty.
Carpet Occasionallywashingwithmilddetergentandwarmwaterorhouseholdcarpetcleanerswillhelpkeepthecarpetclean.Thoroughlyhosethedetergentoutofthecarpetandintothebilge.(Thisisagoodtimetocleanthebilgealso.)Allowtheboattoremainuncoveredtoairdryforseveraldaystopreventanymildeworodorcausedbymoisture.
Teak Wood Full teak platforms: If shoes are worn when walking on the teak, they should be proper boating shoes. Black-soled shoes are likely to scuff the surface, resulting in marks that may be difficult to remove or even leave permanent marks that are not
covered under warranty.Regularcleaningandoilingofteakwoodwillmaintainitsorigi-nalappearance.Unprotectedwoodwillturngrayandcouldsplitorseparate.Ifthishappensitmayvoidthewarranty.Newteakplatformshavebeensealedandfinishedwithanoil-based,woodpreservativebythemanufacturer.Platformswillkeepthenewlookandlastformany,manyyearsifproperlymaintained.Forbestresultsre-oiltheplatformandallowittodrybeforethefirstuse.Iftheboatspendsalotoflongweekendsonthelakewiththeswimplatforminthewateroriftheplatformsitsuncoveredinthesun,itshouldbeoiledoneortwotimesamonthduringthefirstseason;thenasneededafterthat.Theplatformshouldbecov-eredwhennotinuseorwhenstoredforthewinter.Manyproductssuchasboiledlinseedoil,tongueoil,teakoilandotheroutdoorwoodpreservativescanbefoundatmarinas,paintstoresorhomeimprovementstores.Someoilssuchaslinseedoilshouldbethinnedwithathinner likemineralspiritsbeforeuse.(70percentoil-30percentthinner.)Whenoilingaplatform,applyacoatofoilwithawetcloth,workintotheseams,endgrainandedges.Allowtheoiltosetapproxi-
mately15minutesandthenwipeofftheexcessoilwithadrycloth.Do not let the oil dry on the platform in the sun.Excessoilshouldberemovedwithadrycloth.
Teak inlay platforms:Wear proper boating shoes. Avoid black-soled shoes as they are likely to scuff the surface, resulting in marks that
may be difficult to remove or even leave permanent marks that are not covered under warranty.Theteakinlayplatformsfeatureaspeciallydevelopedsyntheticsurface that isdurableand long-lasting,providedpropercare isgiventotheinlaysurface.Thismaintenanceisdifferentfromthefullteakplatformcare.Fortheinlay,note:• Inlaysdonotrequireoilingorspecialsealants.• Inlayscanbemaintainedbypressurewashing.• DoNOTplacehotmetalsofanykindontheinlaysurface. Thiswillcreateapermanentmark.• DoNOTuseacetonetocleantheinlay(orfiberglasssurround).• DoNOTuseoil,bleach,varnish,paintorlacquer.• DoNOTuseapowersander.Mostspillswillbrushawaywithsoapandwater,usingabristledbrushandboatdeckcleaner.Aftercleaning,rinsewithwaterand
2011 Owners Manual...Cleaning the Boat...Page 14-2

allowtoairdry.Sandedareaswillappearlighteraftersandingandwillblendinwiththesurroundingareaswithinadayortwo.Ifachemicalstainisallowedtodryandsoapandwaterdonotremoveit,thesurfacecanbelightlysandedwith60-gritsandpaper.Sandthestaininthesamedirectionastheblackcaulkseams.Sanded areas will appear lighter after sanding and will blend inwiththesurroundingareaswithinadayortwo. If bleach is used on areas surrounding the teak inlay deck,first spray thesurfacewithwater todiluteanybleach thatmayrunontothedecksurface.Aftercleaningtheotherarea(s)withbleach,re-sprayboththebleachedsurfacesandtheteaksurfacestorinseawayanybleachresidue.Note that bleach should never be applied directly to the teak!
Fiberglass Swim Platform Thefiberglassswimplatformrequiresthesamekindofregu-lar—andgentle—cleaningthattherestoftheboatneeds.Aftercleaningoffanyenvironmentaldebris,washwithmildsoapandwarmwater.AvoidtheuseofArmorAllorsimilartypesofrubber-shineproductsasthesewillspeedthedecayoftherubberratherthanprotectingit.
Windshield In cleaning tempered glass windshields, the normal glasscleaners (from spray bottles or aerosol cans) work best. Whiletheglassisverystrong,itcanbescratchedifanythingabrasiveisused.Harshchemicalsorsolventsshouldbeavoidedbecausetheymayaffectthevinylgasketsorpowder-coatedfinishontheextru-sions. More care should be taken when cleaning the clear Eisen-glasscurtains,whichareanoptiononsomeboatmodels.Eisen-glass curtainsareusuallymadewithclearvinyl sheeting,whichismuchsofterandmorepronetoscratchingandhazingthanthewindshieldglassis,onlysoftclothsandmilddetergentsshouldbeused.
Canvas Covers ThematerialusedinconstructingBiminitopsandboatcov-ersismadefrom100percentsolution-dyedpolyesterfiberwithaurethanecoatingtoprovideexcellentwaterrepellencyandmildewresistance.Thisdesignallowsthematerialtobeeasilymaintained.Byfollowingafewsimplecareandcleaningsteps,thefabricwillcontinuetolookgoodandmaintainitsfinequalitiesforseasonstocome.
Important Background Information Because the fabrics are woven, they are breathable. It’s alsoimportanttoknowthatthesefabricsaretreatedwithafluorocar-bonfinish,whichenhanceswaterrepellency.Thisfinishrequiresreplenishmentaftervigorouscleaning. Polyester fabricwillnotsupportthegrowthofmildew.Moldandmildewneedsomethingonwhichtogrowandpolyesterfabricisnotadesirablesubstanceforsuchgrowth.Dirtordustonthefab-ric,however,isaperfectsourceformildewgrowth,whichmakesregularcleaningofthefabricimportant. Thereisnosettimeforwhenthefabricshouldbecleaned,andthelocalenvironmenthasagreatdealtodowithdeterminingcleaningfrequency.Cleaningisrequiredlessfrequentlyinadryenvironmentthaninahumidonewhereheavyfoliageexists. The material has an applied finish that deters mold and mildew growth, but it does not make it mold-proof. Keeping the fabric free of dirt and foreign substances is important in deterring mold growth.
2011 Owners Manual...Cleaning the Boat...Page 14-3

Cleaning Oneofthebestwaystokeepthemateriallookingfreshandnew,andtodelaytheneedfordeeporvigor-ouscleaning,istohoseofffabricswithclearwateronatleastamonthlybasiswithcleanwater.Thispracticewillhelppreventdirtfrombecomingdeeplyembeddedinthefabric,anditwilleliminatetheneedformorefrequentandmorevigorouscleanings. Inmostenvironments,athoroughcleaningwillbeneededapproximatelyeverytwo(2)years. Thefabriccanbecleanedwhilestillintheboat.Whencleaning,itisimportanttoobservethefollowing:• Alwaysuseanaturalsoap—neverdetergent.• Watershouldbecoldtolukewarm,butnevermorethan100degrees.• Airdryonly.Neverapplyheattothefabric. Beginbybrushingoffloosedirt,andthenhosedownthematerial.Prepareacleaningmixtureofwaterandamild,naturalsoapthatisfreeofdetergents.Useasoft-bristlebrushtoclean,allowingthesoaptosoakin.Rinsethoroughlyandallowthefabrictothoroughlyairdry. Ifstubbornstainspersist,youcanuseadilutedchlorinebleach/soapmixtureforspotcleaningofmildew,roofrun-offandothersimilarstains.Pleasekeepinmindthatchlorinebleachwillnotchangethecolorofthefabric,butchlorinebleachwilleventuallybreakdownthefiberofanyfabric.Therefore,thiscleaningmethodshouldbeusedasinfrequentlyaspossible.Thecleaningmixtureshouldbemixedasfollows:• Fourounces(one-halfcup)ofchlorinebleach.• Twoounces(one-fourthcup)ofnaturalsoap.• Onegallonofwater. Cleanwithasoft-bristlebrushandallowthemixturetosoaknolongerthantwenty(20)minutes.Rinsethoroughlyandallowtocompletelyairdry.Repeatifnecessary. Ifthetoporboatcoverissuitableinsizeforawashingmachine,thesestepsshouldbefollowed:• Useonlynaturalsoaps—nodetergent.• Washandrinseincoldwater.• Airdry.(Neverputthefabricinadryer.) Aspartofthefinishingprocess,thematerialhasbeentreatedwithafluorocarbonfinish,whichenhanceswaterrepellency.Thisfinishisdesignedtolastforseveralyears,butitmustbereplenishedafterathoroughcleaning.Basedontestresults,themanufacturerrecommends303HighTechFabricGuard™asthepreferredre-treatmentproduct.Aftercleaningandairdrying,apply303inathin,evencoat.Whenithasdried,applyasecondthin,evencoat.Thesetwo(2)lightcoatingsaremoreeffectiveinrestoringfabricwaterresistancethanasingleheavycoating.Keepinmindthat303HighTechFabricGuard™willworkonlyaswellasitisapplied.ThismeansthatthefabricmustbefreeofdirtanddetergentsortheFabricGuardwillwashawaywiththedirtparticles.Fabricsshouldberetreatedafterthoroughcleaningorafterfive(5)yearsofuse.
Enclosed HeadAnoptiononsomemodelsistheenclosed,portablehead.Thisconvenience should be emptied on-shore within an acceptableholdingtank,septicsystemorsewer.Itshouldneverbeemptiedwithin the boating body of water or on-shore, except in an ap-provedreceptacle!Theheadshouldbecleanedaftereachouting.Afterthoroughlycleaningwithamilddetergent,addaneutralizingchemicalmadeespecially for portable heads, such as that found in RV centers.Theneutralizingchemicalwillhelpdealwithpotentialodorsthatmightotherwisebefoul.
Slick Boot The optional Slick Boot should periodically be dismantled,cleanedandthewandthoroughlyrinsed.TheSlickBootmaterialcansometimesbecomegelled,particularlyincolderweather.
Acceptable Upholstery CleanersMasterCraft Vinyl DressingVinyl Finish Vinyl CleanerDish Soap (such as Dawn or Ivory)303 High Tech Fabric Guard™
2011 Owners Manual...Cleaning the Boat...Page 14-4
Unacceptable Upholstery Cleaners409 (it states not for use on vinyl!)FantastikMurphy’s SoapSimple GreenDC PlusArmorallTop Kote SealantSon of a GunAny and all citrus-based cleanersRoll OffBleach/Baking SodaTurtle Wax/Tar RemoverAPCOTanneryHarbor MasterAny product not listed above in the list of Acceptable Upholstery Cleaners!Do not use any silicone-based protectants because they will extract the plasticizers, leaving the vinyl hard and brittle. (Eventually cracking will occur.)
Certain household cleaners, powdered abrasives, steel wool, and solvent cleaners can cause dam-age and discoloration and are not recommended. Dry cleaning fluids and lacquer solvents should not be used as they will remove printed pattern and gloss. Do not use bleach as it will deteriorate the thread.
Common Stains Steps 1 2 3 Chewing Gum D A Motor Oil B Spray Paint B Mildew or Wet Leaves* C B A Yellow Mustard A B C Oil-Base Paint D B Suntan Lotion* A B Tar/Asphalt D B Lipstick A B Latex Paint A B Crayon D B Ketchup A B Grease D B Ballpoint Ink* E B A Household Soil A B Permanent Marker* E B C Coffee, Tea, Chocolate B
DO NOT USE 409 CLEANER OR SILICONE-BASED PRODUCTS!!!A = Medium-soft brush; warm soapy water/rinse/dry.B = Vinyl finish cleaner.C = One (1) tablespoon ammonia, one-fourth (1/4) cup of hydrogen peroxide, three-fourths (3/4 cup of water/rinse/dry.D = Wipe or scrape off excess (chill gum with ice).E = Denatured alcohol/rinse/dry.*Sun tan lotion, shoe polish, wet leaves and some other products contain dyes that stain perma-nently.
Vinyl upholstery should be covered when not in use to protect from further sun exposure, tree debris, air pollutants and acid rain. For storage, vinyl should be cleaned, protected, covered and stored in a dry, well-ventilated area.
2011 Owners Manual...Cleaning the Boat...Page 14-5
2011 Owners Manual...MasterCraft Boat Care Products...Page 15-1
MasterCraft Boat Care Products
AtMasterCraftwehavemadeveryefforttoproducethemostenvironmentallyfriendlyproductsavail-ableforourboatcareline.Weunderstandthatasloversoftheoutdoors,weshoulddoourparttopreserveourenvironmentforthenextgenerationofboaters.
MasterCraft All Purpose Cleaner MasterCraftAllPurposeCleanersafelyandeffectivelyremovesgrease,oil,cosmetics,glue,blood,mil-dew,soapscum, ink,birddroppings,spiderdroppings,scuffmarks,petstains,dust,pollen,fingerprints,food,beverages,seasaltresidueandmorefromallmarinesurfacesaboveandbelowdeck.(SeeCleaningtheBoatsectionofthisOwner’sManualalso.)MasterCraftAllPurposeCleanerisidealforcleaningplastics,rub-ber,metal,fiberglass,stainlesssteel,railings,steeringwheelsandcoolers.MasterCraftAllPurposeCleanerwillleavesurfacescleanandrestoreoptimumbrilliance. Part # 559125.
MasterCraft Boat Cleaner & Polish MasterCraftBoat&PWCCleaner&Polishisspeciallyformulatedtoremovedirt,grease,bugs,birdandspiderdroppings,roadgrimefromtowing,andwaterspotsoncontact.Thisdetailerrequiresnowaterandleavesashowroomshinethatprotectsagainstsundamage,ozonedamageanddirtaccumulationinoneeasystep. Part #559129.
MasterCraft Vinyl Dressing MasterCraftVinylDressing isaone-stepformulafortherestorationandprotectionofvinyl, rubber,plasticsandleather.Whendry,MasterCraftVinylDressingleavesatransparentandwater-repellentglosscoatingthatbeautifiesandrestoressurfaces.ItsUVprotectionhelpstopreventdryingandcracking. Part #559126.
MasterCraft Glass Cleaner Formulatedspecificallyformarineapplications,MasterCraftGlassCleanerwillleaveyourmarinesur-facesstreak-freeandamazinglyclear.Won’tharmtintedwindowsorEisenglass.MasterCraftGlassCleanercontainsnoammonia,anditisfastdrying.Useonwindshields,mirrors,chromeandmore. Part #559127.
MasterCraft Bilge Cleaner MasterCraftBilgeCleanerisspeciallyformulatedtodissolveoil,grease,gasoline,dieselfuel,andsludge.
MasterCraft Bilge Cleaner will effortlessly remove those toughodor-causingelementsthatcanmakeadayonthewaterlessen-joyable.Safeforfiberglass,woodandmetalboats,andrequiresnoscrubbing.Part #559124.
MasterCraft Hull CleanerMasterCraftHullCleaneristheproductofchoicefortheremov-alofwaterstains,ironandmetaldepositsandmarinealgaefromfiberglassboathullsandbottoms.Thisnon-acidbasedcleaner issafeforyou,yourboatandtheenvironment.Part #559121.

MasterCraft Spray Wax MasterCraftSprayWaxisasimplewaytogiveyourmarinecraftthatshowroomshinewhilegainingtheimportantUVprotectionthathelpstopreventdamagefromthesun.Simplysprayonandbuffofftomain-taintheoriginallusterandprotectyourinvestment. Part #559123.
MasterCraft Boat Wash & Wax MasterCraftBoatWash&Waxisformulatedasapremium-gradeconcentratedboatwashandwax.Thissuperhighsudsingformulahassuperiorcleaningandrinsingpropertiesinordertominimizestreakingandspottingoncleanedsurfaces.ItisneutralinpH,andcontainsnoharshchemicalsorphosphates.Itwillnotaffectanyknownfinishesincludingfragilegelcoatmaterials,andleavesasuperbright,clearshineafterrinsing.Inhibitedtopreventcorrosionofsteelpipingandequipment. Part #559122.
MasterCraft Microfiber Detailing Cloths MasterCraftMicrofiberDetailingClothsaretheproductofrecentdevelopmentsinthemanufactureandmake-upoffine-qualitydetailingtowels.Theyfeatureasoftsurfacethatisidealforhigh-qualitycleaninganddetailing.Theyareperfectforuseindryingorpolishingyourboat,motorcycle,car,oranyreflectivesurfaceandcanabsorbuptoseventimestheirdryweightinwater.You’llbeamazedathowwelltheseclothswork. Part #559128.
MasterCraft Cleaning & Detailing Kit TheMasterCraftCleaning&DetailingKitcombinessevendif-ferentproductsinahandyreusablebucket.ThekitincludesMas-terCraftAllPurposeCleaner,GlassCleaner,BoatWash&Wax,Vi-nylDressing,BoatCleaner&Polish,MicrofiberDetailingClothsandwashsponge. Part #559120.
MasterCraft Marine Motor Oil & Filters Inadditiontotakingcareofthevisiblepartsofyourboat,youneedtothinkaboutwhatyoucan’tsee.Thelifeofyourmarineen-gineisdependentuponproperlubrication,regardlessofitsmake.That iswhywe’vedevelopedMasterCraftMarineMotorOilandFilters. This premium marine motor oil was formulated specificallyforMasterCrafttouseinhigh-performancemarineengines.TheMarine Motor Oil provides high viscosity and film strength forengineprotectioninhigh-loadapplications.MasterCraftMarineMotorOil isdesigned toprotectagainst corrosion,wear,oxida-tion,varnishandsludgedeposits.Whenusedasdirected,thisoilassurescompliancewithMasterCraftwarrantyrequirements,asdothefilters. MasterCraftMarineMotorOilandFiltersareexclusiveproductsavailableonlythroughautho-rizedMasterCraftdealerships!MasterCraftMarineMotorOilPart #81051000, andMasterCraftOilFilterPart #81501001.
NOTE: The parts order numbers have been provided to aid consumers in placing orders with an authorized MasterCraft dealer. These quality products are available ONLY through an autho-rized dealer!
2011 Owners Manual...MasterCraft Boat Care Products...Page 15-2

2011 Owners Manual...Scheduled Maintenance Service...Page 16-1
MasterCraft Maintenance Service
Frequency and Scheduled MaintenancePropercare,maintenanceandadjustmentwillcontributetothepeakperformanceoftheMasterCraftboat,whilealsoextendingtheoverallservicelifeandtheresalevalue.Thepagesthatfollowprovideinstructionsonhowtoaccomplishthe required checks, inspections and services listed. An authorizedMasterCraftservicedepartmentisthebestsourceforpropermain-tenance.Note: The engine and drive train require scheduled main-tenance checks and services in addition to the boat’s other maintenance requirements. Read and understand the en-gine owner’s manual that has been provided, and follow the maintenance schedule to ensure proper operation and qual-ity service over the life of the boat and drive train. Failure to follow the maintenance requirements and instructions listed in this and all other manuals may result in damage to the components, systems and equipment of the boat, which resulting damage would not be covered by warranty! Safety issues are also directly impacted by proper maintenance!
Thefollowingdefinitionsapplytomaintenance: Check—Verifytheoperationalreadinessbyphysicalmeasurement,i.e.,measuringtheoillevelwiththedipstickgaugeoralignmentwithafeelergauge. Inspect—Determinetheoperationalreadinessbyexamination,i.e.,bysight,soundorfeel. Change—Tasksrequiredperiodicallytokeeptheboatinproperoperatingcondition,i.e.,drain,replen-ishorservice.
New Boat Break-In Note: MasterCraft recommends the following functions be performed by authorized MasterCraft technicians at an authorized MasterCraft dealer.• Lubricatetheenginestarterdrivegearandshaft.(SeeQuarterly Maintenance also.)• Checkthealignmentofthepropellershaft.(SeeAnnual Maintenance also.)• HaveanauthorizedMasterCraftservicedepartmentchangethefuelfilterafterthefirstfifty(50)hours
ofoperation,andthenagainatonehundred(100)hoursforIndmarengines.Thefuelfiltershouldbechanged annually even if less than one hundred (100) hours are run during the previous season. TheVolkswagen diesel engine requires oil and filter changes every two hundred (200) hours, or annually,whichevercomesfirst.
Before Each Use Before the engine has been started:• Reviewtheenginemanualandtrailermanualbeforeeachouting.• ReviewtheSafety Checks and ServicessectionofthisOwner’sManual.Thereareimportantfunctionsthat
mustbefollowedbefore,duringandaftereveryouting,withoutfail!• Inspecttherawwaterintakewaterstrainerforblockage.Ifthereisblockage,alsocheckthetransmission
cooler(whereequipped).• Forboatsoperatinginsaltwater,checkandcleanasnecessarytheseacockstrainer.• Checkthecoolingsystemlevel(freshwatercooling-equippedboatsonly).Seetheengineowner’smanual
fordetails.• Inspectthebatteryconnectionsandhold-downs.• Inspectthedrivetrainforlooseormissinghardware.• Inspectthethrottleandshiftcablesforkinks,wearandinterferencewithothercomponents.• Inspectthepropellershaftlogforexcessivewaterentry.• Inspectthefuelsystemlinesandconnectionsforleaks.• Inspecttheexhaustsystemforleaks. As you start the engine:• Checkthatthevoltmeterregistersafullychargedbattery.

After Each Use• RefertotheCleaning the Boat andCorrosion PreventionsectionsofthisOwner’sManualforguidanceona
thoroughapproachtomaintenance.Alsopayattentiontotheinformationprovidedregardingthemainte-nanceofteakplatformsandaccessoriesbecausethewoodrequiresperiodicmaintenanceaswell.
• Boats equipped with an optional flushing system for use in salt water or brackish water shouldoperatetheflushingsystem.
Quarterly (Every Fifty [50] Hours) Note: MasterCraft recommends that the following functions be performed by authorized Master-Craft technicians at an authorized MasterCraft dealer. Before the engine has been started or after it has cooled:• Lubricatetheenginestartergearandshaft.• Checkthesafetyequipment.
Annually (Every One Hundred [100] Hours) Note: MasterCraft recommends that the following be per-formed by authorized MasterCraft technicians at an autho-rized MasterCraft dealer.
Before the engine has been started or after it has cooled:• Replacethefuelfilter(tobeperformedbyanauthorizedMas-
terCrafttechnicianonly).• Checkthepropellershaftcoupleralignment.• Lubricatethesteeringsystem.• Lubricatethethrottleandshiftcables.• Checktheenginemounts.• Inspectthecompletefuelsystemforleakage.• Checkthefireextinguisherandsuppressionunitson-board.
Details follow in the next few sections.
MasterCraft recommends that many of these functions be performed by authorized MasterCraft technicians at an authorized MasterCraft dealer!
2011 Owners Manual...Scheduled Maintenance Service...Page 16-2

Before Each Use (Prior to Starting the Engine)
ReviewtheSafety Checks and ServicessectionofthisOwner’sManual.Thereareimportantfunctionsthatmustbefollowedbefore,duringandaftereveryouting,withoutfail!TheSafety Checks and Servicesnotesthatalldrainplugsmustbereinstalledpriortooperatingtheboat!
Inspect Seacock Strainer(whereequipped) Because a clogged seacock strainer puts undue strain on the engine(s), the strainer should be checked prior to starting the boat. Boats with closed cooling systems are not equipped with this. The seacock strainer is standard on boats built for operation in salt water.
Step 1: Removetheplasticwingnutontopofthestrainer.Liftthecover.Step 2:Removethefilterandinspectfordebris.Manuallycleanthestrainer.Step 3:Returnthefilterinplaceandrecover.Tightenthewingnut,butdonotover-tightenasitmay
eventuallystripthethreadsholdingthewingnutinplace.
Inspect the Battery Connections and Hold-DownsBecause poor connections or hold-downs may result in erroneous voltmeter readings, MasterCraft recom-mends doing this before starting the boat.
Step 1: EnsuretheengineisOFFandtheenginesafetystartingswitchdisconnected.Be certain that the throttle/shift control lever is in neutral. Locatethebattery.Batteriesareplacedinavarietyoflocations,dependingonthemodel.Checkundertheobserverseatorbehindtherearseat.
Step 2:Checkthatthebatterypostconnectionsarecleanandtight.Ifnot:
• Loosenandremovethenegativeterminalconnectionfirst.Becarefulnotto touchthepositiveterminalwiththewrench.• Loosenandremovethepositiveterminalconnection.• Removethebatteryhold-downsandremovethebatteryfromtheboat.• Cleancorrosionfromthebatterypostswithabatteryterminalcleaner.• Cleanthebatterywithawater-and-baking-sodasolution.Usecaretoavoidallowingthesolutiontoenterthebatteryvents.Rinsethebatterywithfreshwater.
2011 Owners Manual...Scheduled Maintenance...Page 17-1
Scheduled Maintenance
Battery electrolyte fluid is dangerous. It contains sulfuric acid, which is poisonous, corrosive and caustic. If electrolyte fluid is spilled or placed on any part of the human body, immediately flush the area with large amounts of clean water and immediately seek medical attention.
• Useabatteryterminalcleaningbrushtoremovecorrosionfromtheinsideofthebatteryterminals.Cleantheterminalswithawater-and-baking-sodasolutionandrinsewithfreshwater.
• Checkthebatteryboxthatnormallyholdsthebatteryinplacetodeterminewhetherthereisevidenceofbatteryfluidinsideit.Batteryfluidsarecorrosiveandcancausepermanentdamagetothebatterybox.Iffluidisevident,washouttheboxwiththewater-and-baking-sodasolutionthatisusedinclean-ingtheterminals.Rinsewithfreshwateranddrywithacloth.
• Reconnectthepositiveterminalfirst,thenthenegative.Tightentheterminals.Coatbothterminalscom-pletelywithathincoveringofmarinegrease.Besurethattherubberbootcoversthepositiveterminalcompletely.
Note: The boat’s engine is designed to work with the standard electronics installed in the boat. Adding other electrical components or accessories can change the way the fuel injection controls the engine or the overall electrical system functions. Before adding electrical equipment, consult an au-thorized MasterCraft dealer’s service department. Otherwise, the engine may not perform properly.

Add-on equipment may adversely affect the alternator output or overload the electrical system. Such damage may not be covered by the warranty.
2011 Owners Manual...Scheduled Maintenance...Page 17-2
Ifareplacementbatteryisrequired,becertaintoselectamarinebatterywithatleastseven-hundred-fifty(750)cold-cranking-ampsatzerodegrees(0o)Fahrenheit.Beforedisconnectingthebattery,makesurethe ignitionkeyandallaccessoriesare intheOFFposition.Alsoremembertore-attachthecables intheproperorder,withthenegativecableconnectedtothenegative[-]postandthepositivecableconnectedtothepositive[+]post.
When charging, batteries generate small amounts of dangerous hydrogen gas. This gas is highly explo-sive. Keep all sparks, flames and smoking well away from the area. Failure to follow instructions when charging a battery may cause an electrical charge or even an explosion of the battery, which could result in death or serious injury.
MasterCraftrecommendstheuseofaspiral-celltypebattery,suchastheOptimabrand.Thesebatteriesexceedotherbatteriesinholdingandextendingacharge.
Inspect the Throttle and Shift Cables for Kinks, Wear and Interference (RTP-1 and Twin MCX Installations Only)
Some engine parts become very hot during operation. This inspection must be completed while the engine is cool to prevent burns to your skin. Perform this task before starting the boat.
Step 1: EnsuretheengineisOFFandtheenginesafetystartingswitchdisconnected.Be certain that the throttle/shift control lever is in neutral.
Step 2: Opentheenginecompartmentandlocatethethrottleandshiftcables.Followeachcablebackunderthefloorboardsandfeelforanykinksandwearontheouterjacket.Anysignofcabledamageiscauseforreplacement.SeeyourauthorizedMasterCraftdealer’sservicedepartmentifyounoticeanycabledamage.
Inspect the Fuel System for Leaks This function should be performed prior to starting the engine; and then again after about three (3)-to-five (5) minutes to determine whether any leaks are apparent.
Step 1: FirstensuretheengineisOFFandtheenginesafetystartingswitchisdisconnected.Be certain that the throttle/shift control lever is in neutral. Theenginemustbecool.
Gasoline is highly flammable and its vapors may ignite, resulting in fire or explosion. Be sure to keep all sparks and flames away from the area while inspecting the boat’s fuel system.
Step 2: Opentheenginecompartmentandvisuallycheckasmuchofthefuelsystemfromthetanktotheengineasyoucansee.Iftheodorofgasolineisstrongorifyouseevisualevi-denceoffueloutsidethesystem,ceasealloperationsandtaketheboatimmediatelytoanauthorizedMasterCraftdealer’sservicedepartmenttodeterminethesourceoftheleak.Theleakmustberepairedbeforetheengineisrestarted.BecausethelinesonlatemodelMasterCraftboatsarepressurized, theycanbedisconnectedand/orremovedONLYbyusingspecializedtoolsthatarenotavailabletothepublic.

The engine box serves as a machinery guard. The engine must be OFF whenever the box is open. Clothing for body parts can get caught in moving parts, causing death or serious injury. Keep away from moving parts!
2011 Owners Manual...Scheduled Maintenance...Page 17-3
This is important! Fuel leakage can lead to a build-up of potentially explosive fumes within the engine compartment. DO NOT IGNORE OR OVERLOOK THIS INSPECTION AND REPAIR AS NECESSARY!
Inspect the Exhaust System for LeaksThis function should be performed prior to starting the engine; and then again after about three (3)-to-five (5) minutes to determine whether any leaks are apparent.
Step 1:FirstensurethattheengineisOFFandthattheenginesafetystartingswitchisdisconnected.Be certain that the throttle/shift control lever is in neutral.Theenginemustbecool.
The engine box serves as a machinery guard. The engine must be OFF whenever the box is open. Clothing or body parts can get caught in moving parts, causing death or serious injury. Keep away from moving parts.
Step 2: Opentheenginecompartmentandvisuallychecktheexhaustsystemfromtheenginetothetran-somforanyobviousdamagetoexhaustlinesorthemuffler.
Step 3: Ifleakageisapparent,tightenthehoseclamps,beingcarefultoavoidcrimpingthehose.Iftheleak-ageissignificant,orisoccurringatalocationotherthanthejoints(suchasasplitinahose),seeyourauthorizedMasterCraftdealer’sservicedepartmentforpartsandservice.Thisisimportant!Exhaust fumes can cause illness or impairment, including carbon monoxide poisoning. Equally important to consider, leakage can lead to a build-up of potentially explosive fumes within the engine compartment. DO NOT IGNORE OR OVERLOOK THIS INSPEC-TION! REPAIR AS NECESSARY!
Before Each Use (After Starting the Engine)
Check That the Battery Is Fully ChargedAs the boat is started, check all gauges, but pay particular attention to the voltmeter.Whilestartingtheengine,checkthatthevoltmeterreadsbetween12.4and14.5volts.Anerraticreadingmaybeasignoflowvoltage.Thevoltmeteristhebestindicationofthestateofyourbattery.However,itisnotfool-proof.Whilethereadingmayindicatethatthebatteryisproducingcurrent,ifduringapreviousoperationyouhadreasontosuspectaproblemwithyourbattery,checkwithanauthorizedMasterCraftdealer’sservicedepartment. Currentmodelsareequippedwithalow-voltagebatteryalarm.IntheeventthatthestereohasbeenfunctioningwhentheboatengineisOFF,thevoltagedrainonthebatterymayresultindifficultiesre-startingtheboat.Toavoidthissituation,whenthevoltagelevelfallsto11.5volts,thesystemwillshut
offthestereosystemandsoundanalarmforaperiodoftwo(2)minutestoallowtheoperatortimetoturntheignitionkeyONandstarttheengine.Doingsowillallowtheengine’salternatortorechargethebattery. Chargedeadbatterieswithabatterychargerbeforeattemptingtostarttheengine.(SomeMaster-Craftmodelsofferanoptionalbatterycharger;butneverjump-startthebattery.)Jump-starting from another boat or battery is dangerous!Chargingadeadbatteryfromanenginewillputunduestressonthealternator,whichmaycauseittofail.

When charging, batteries generate small amounts of dangerous hydrogen gas. This gas is highly explosive. Keep all sparks, flames and smoking well away from the area. Failure to follow instruc-tions when charging a battery may cause an electrical charge or even an explosion of the battery, which could cause death or serious injury.
Crossing cables or jumper cables may result in damage to the electrical components due to incor-rect battery connections. Such damages may not be covered by your warranty.
2011 Owners Manual...Scheduled Maintenance...Page 17-4
Inspect the Propeller Shaft Log for Water Entry After approximately three (3)-to-five (5) minutes of boat operation in the water, shut off the engine and open the engine compartment. Be careful to avoid burns from contact with hot engine parts. The boat is equipped with a dripless shaft log and if it is showing any signs of dripping, the boat must be taken to an authorized MasterCraft dealer’s service department for correction.
The engine box serves as a machinery guard. The engine must be OFF whenever the box is open. Clothing or body parts can get caught in moving parts, causing death or serious injury. Keep away from moving parts!
Attention must be paid to any leakage occurring in the propeller shaft log area. Water intrusion into the transmission, which can happen if excessive leakage is occurring may cause serious damage. Such damage may not be covered by the warranty.
Inspect the Fuel System for LeaksThis function should be performed after about three (3)-to-five (5) minutes of running the engine to determine whether any leaks are apparent.
The engine box serves as a machinery guard. The engine must be OFF whenever the box is open. Clothing or body parts can get caught in moving parts, causing death or serious injury. Keep away from moving parts!
Afterthree(3)-to-five(5)minutesofoperation,shutdowntheengineandensurethattheen-ginesafetystartingswitchisdisconnected.Be certain that the throttle/shift control lever is in neutral.Again,inspectthefuelsystemaswellaspossible.Iftheodorofgasolineisstrongorifyouseevisualevidenceoffueloutsidethesystem,ceasealloperationsandtaketheboatimmediatelytoanauthorizedMasterCraftdealer’sservicedepartmenttodeterminethesourceoftheleak.Theleakmustberepairedbeforetheengineisrestarted.BecausethelinesonlatemodelMasterCraftboatsarepressurized,theycanbedisconnectedand/orremovedONLYbyusingspecializedtoolsthatarenotavailabletothepublic.
This is important! Fuel leakage can lead to a build-up of potentially explosive fumes within the engine compartment. DO NOT IGNORE OR OVERLOOK THIS INSPECTION AND RE-PAIR AS NECESSARY!

Inspect the Exhaust System for LeaksThis function should be performed after about three (3)-to-five (5) minutes to determine whether any leaks are apparent.
Step 1:FirstensurethattheengineisOFFandthattheenginesafetystartingswitchisdisconnected.Be certain that the throttle/shift control lever is in neutral.Theenginemustbecool.
2011 Owners Manual...Scheduled Maintenance...Page 17-5
The engine box serves as a machinery guard. The engine must be OFF whenever the box is open. Clothing or body parts can get caught in moving parts, causing death or serious injury. Keep away from moving parts.
Step 2: Opentheenginecompartmentandvisuallychecktheexhaustsystemfromtheenginetothetran-somforanyobviousdamagetoexhaustlinesorthemuffler.
Step 3: If leakageisapparent,tightenthehoseclamps,beingcarefultoavoidcrimpingthehose.Iftheleakageissignificant,orisoccurringatalocationotherthanthejoints(suchasasplitinahose),seeyourauthorizedMasterCraftdealer’sservicedepartmentforpartsandservice.Thisisimpor-tant!Exhaust fumes can cause illness or impairment, including carbon monoxide poison-ing. Equally important to consider, leakage can lead to a build-up of potentially explosive fumes within the engine compartment. DO NOT IGNORE OR OVERLOOK THIS INSPEC-TION! REPAIR AS NECESSARY!
After Each UseGeneral Cleaning and Storage RefertotheCorrosion PreventionandCleaning the BoatsectionsofthisOwner’sManual.Aftereachout-ing,theboatshouldreceiveageneralcleaninganddryingpriortobeingstored.Eveniftheboatiskeptinaslip,owners/operatorsshouldwipedowntheinteriorandshouldperiodicallyremovetheboatfromthewaterforageneralcleaning.
Inspections AsnotedintheBeforeEachUsesection,somefunctionsthereneedtobeperformedfollowinguseoftheboat,suchascheckingtheintakestrainerorseacockstrainerifevidencehasshownthatdebriscollectsduringtheouting.Wetdebrisisofteneasiertoremove.
Quarterly(Every Fifty [50] Hours) MasterCraft recommends that your quarterly—or fifty (50) hour—maintenance requirements be performed by an authorized MasterCraft dealer. The staff there has the proper equipment and techni-cal training to best meet your service needs.
Lubricate the Engine Starter Gear and ShaftSome engine parts become very hot during operation. This maintenance must be completed while the engine is cool to prevent burns to your skin. Perform this task before starting the boat.
Step 1: EnsuretheengineisOFFandtheenginesafetystartingswitchisdisconnected.Be certain that the throttle/shift control lever is in neutral.Theenginemustbecool.Step 2:Disconnectthepositive(+)batteryterminal.Step 3:Opentheenginecoverandlocatethestarteronthelowerstarboardsideoftheengine.Step 4:Disconnectthestarterandcarefullyremoveit.Step 5:Lubricatethestarterbendixwithalightcoatingofwaterproofgreaseorwhitelithiumgrease.

Step 6: Returnthestartertotheengineandreconnect.Afterclosingtheenginecompartment,reconnectthepositive(+)batteryterminal.
MasterCraft recommends that your quarterly—or fifty (50) hour—maintenance requirements be performed by an authorized MasterCraft dealer. The staff there has the proper equipment and tech-nical training to best meet your service needs.
Annually(Every One Hundred [100] Hours) MasterCraft recommends that your annual—or one hundred (100) hour—maintenance require-ments be performed by an authorized MasterCraft dealer. The staff there has the proper equipment and technical training to best meet your service needs.
Annual Maintenance Someboatownerschoosetopersonallyexecutesomemaintenanceproceduresontheirboats.Mas-terCrafthasprovidedinformationonseveralprocedures.Forsafetyreasons,afewmustbeperformedbyauthorizedMasterCraftservicetechniciansonly,suchasanythinginvolvingchecksandrepairsonthefuelline,whichisunderpressure. Thesemattersmustbeaddressedonaregularbasis,atonehundred(100)hoursorannually,whichevercomesfirst,andtheseproceduresareinadditiontoseasonalpreparationandwinterization(seeStorageandWinterizationsectionforadditionaldetails).Alloftheseissuesareextremelyimportanttocontinuedboatingpleasure,aswellaslonglifefortheboat,andthecriticalmatterofsafety. EveniftheannualmaintenanceworkiscompletedbyanauthorizedMasterCraftservicetechnician,boatownersandoperatorsshouldstillreviewthissectionandensurethattheyhavesomeunderstandingofwhatisnecessarytokeeptheboatintopcondition.
MasterCraft recommends that your annual—or one hundred (100) hour—maintenance require-ments be performed by an authorized MasterCraft dealer. The staff there has the proper equip-ment and technical training to best meet your service needs.
Check the Engine Mounts
2011 Owners Manual...Scheduled Maintenance...Page 17-6
Some engine parts become very hot during operation. This inspection must be completed while the engine is cool to prevent burns to your skin. Perform this task before starting the boat.
Step 1: EnsuretheengineisOFFanddisconnecttheenginesafetystartingswitch.Be sure that the throttle/shift control lever is in neutral.Theenginemustbecool.
Step 2: Opentheengineboxandlocatethefour(4)motormounts.Step 3: Check the tightness of the mounting hardware and adjustment lock-nuts. Tighten any
loosehardwaresecurely.
Check the Propeller Shaft Coupling AlignmentStep 1: EnsuretheengineisOFFanddisconnecttheenginesafetystartingswitch.Be sure that
the throttle/shift control lever is in neutral.Theenginemustbecool.Step 2: Opentheengineboxandlocatethepropellershaftcoupling.Step 3: Removethecouplingboltsandslidethecouplingapartonlyslightlysothatthepilotflange
onthepropellershaftsideisstillseatedinthepilotboreofthetransmissionside.Step 4: Usingafeelergauge,measurethegapbetweenthecouplinghalvesatfourplaces.Rotate
thecouplingflangestogetheronecompleterevolution,stoppingevery90otocheckclear-ancewiththefeelergauge.
Step 5: Alignmentissatisfactorywhentheflangesareparallelwithin0.003inch.Step 6: Ifthealignmentisnotsatisfactory,anadjustmentmustbemade.Specialtoolsandproce-
duresarerequiredforproperadjustmentandshouldbemadeonlybyatrainedtechnician.SeeyourMasterCraftdealer.
Step 7: Ifalignmentissatisfactory,re-installtheflangeboltsandtightensecurely.Step 8: Watertesttoensurethatthereisnovibration.Ifavibrationisnoticeable,seeyourMasterCraft
dealerimmediately.

Inspect the Exhaust Flaps for DamageStep 1:EnsuretheengineisOFFanddisconnecttheenginesafetystartingswitch.Be sure that the
throttle/shift control lever is in neutral.Step 2:Inspecttheexhaustflaphingeforsignsofdeterioration.Replacetheflapifnecessary.
Lubricate the Steering System Because this process should be completed while all movable components of the drive train are NOT in mo-tion, MasterCraft recommends this be done while the boat is out of the water.
Step 1:EnsuretheengineisOFFanddisconnecttheenginesafetystartingswitch.Besurethat thethrottle/shiftcontrolleverisinneutral.Theenginemustbecool.Step 2:Removetheaccesspanelinthereartrunkcompartmentindirectdriveboats.InV-drive enginesthesteeringislocatedintheenginecompartment,beneaththeengine.Step 3:Turnthesteeringwheelsothatthemaximumamountofsteeringcableisseen.Step 4:Usesolventtocleanoldlubricantfromthecableend,pivotandruddershaft.Step 5:Spreadagenerousamountofwhitelithiumgreaseoverthecableend.Workthe steeringwheelbackandforthandre-applygreaseifnecessary.Step 6:Usingtheflexibleendofagreasegun,givetwo(2)fullshotsofwhitelithiumgrease tothetwo(2)greasefittings:oneontheruddershaft,andoneonthepivot.Cleanup anyoldgreasepurgedfromtheareas.Step 7:Rotatethesteeringwheelbackandforthseveraltimestoworkthelubricantin.Step 8:Re-installtheaccesspanel.
Lubricate the Shift and Throttle System Because this process should be completed while all movable components of the drive train are NOT in motion, Mas-terCraft recommends this be done while the boat is out of the water.
Step 1:EnsuretheengineisOFFanddisconnecttheenginesafetystartingswitch.Be sure that the throttle/shift control lever is in neutral.Theenginemustbecool.Step 2:Opentheengineboxandlocatetheshiftandthrottlecableends.Step 3:Shifttofull-throttle-forward.Step 4:Lubricatethecableendsandconnectionswithacoatingofwaterproofmarinemulti- purposegrease.Step 5:Lubricatethepivotsandlinkageswithalightgrease.Step 6:Shiftthecontrolleverfromfull-throttle-forwardtofull-throttle-reverseseveraltimesto workthelubricantin.
Check the Ballast Pump ImpellerThis applies only to boats equipped with some type of ballast system. The number of ballast pumps varies from system
to system. Authorized MasterCraft dealers can provide guidance to locate any and all pumps.
Step 1:Removetwo(2)ofthecoverscrewsandretainthescrewsforthereinstallationprocess. Swingthecoveroutofthewaytoallowaccesstotheimpellerlocation.Step 2: Usingneedle-nosepliers,pulltheoldimpelleroutofthecasing.Step 3: Installanewimpeller.(Itisintentionallylargerthanthecase.Whilegently squeezingitin,ensurethatthepaddlewheelsangleinthesamedirection— counterclockwise—allthewayaround.)Step 4:Slidetheplatebackintoplace.Nosiliconeisnecessary.Duetothebuilt-ingasket, tighteningthescrewsshouldpreventleakage.
Inspect the Complete Fuel System for LeakageAlthoughtheboatengineissimilartoanautomobileengine,theenginecompartmentdifferssubstantially.Theundersideofanautomobileenginecompartmentistotallyopentotheatmosphere.Thisallowscomplete
2011 Owners Manual...Scheduled Maintenance...Page 17-7

aircirculationandventilation.Aboatengineishousedinaclosedcompartment,theundersideofwhichisthebottom(hull)oftheboat. Theenclosedenginecompartmentlimitstheventilationofgasolineandoilfumes.Becausecon-finedgasolinevaporsmixedwithalittleaircanformanexplosiveatmosphere,itisimportanttobeespeciallyvigilantinperformingthefollowingtwo(2)operations:
Step 1: Inspecttheboatbilgeareaundertheenginefortheevidenceofoilandgasoline—oranygasolineodor.Thisinspectionshouldtakeplacethefirsttimetheboatisstartedeachday.Raisetheenginecoverandvisuallylookatthebilgeareaundertheengine.
Step 2: Runthebilgeblowerforatleastfour(4)minutestoventilatethebilgeareaeachtimebeforestartingtheengine.
2011 Owners Manual...Scheduled Maintenance...Page 17-8
Gasoline is explosive. If a gasoline odor is present or gasoline is visually observed in the bilge area during inspection, DO NOT START YOUR ENGINE! Remove the ignition key from the ignition switch and call an authorized MasterCraft dealer for service.
Note: If there is evidence of loose fuel fittings, deteriorated lines or other problems associated with the fuel system, call an authorized MasterCraft dealer. Fuel system service on later-model MasterCraft boats requires special service tools and special training. Due to the potential for serious consequences when errors occur in servicing the fuel system, MasterCraft strongly encourages all boat owners and operators to seek professional assistance from an authorized MasterCraft dealer’s service department whenever any service or perceived problems occur within the fuel system.
All replaced fuel components must meet United States Coast Guard (“USCG”) and American Boat & Yacht Council, Inc. (“ABYC”) standards, and must be Underwriter’s Laboratory (“UL”)-approved. Inferior quality components pose a serious safety threat to you and others, and the use of inferior components may result in serious injury or death. Resulting damage may void the warranty.
Fire Extinguisher and Suppression Units MasterCraftrecommendsthatboatownersincludeacheckofthefiresuppressionandextinguisherunitsduringtheannualmaintenancetobesurethattheyarealwaysreadyforuse.Someunitsmaynotrequirean-nualchecks;refertothesignageandlabelingontheindividualunitsforfurtherguidance.
Other Maintenance Boatownersarerequiredtoperformroutineregularmaintenanceaswellasannualrequirements,asout-linedintheengineowner’smanual.Somestandardoroptionalequipmentonboatsmaycomewiththeirownprinted information that includes maintenance required to keep such components in excellent long-termoperatingcondition.Alwaysfollowtheseinstructions.
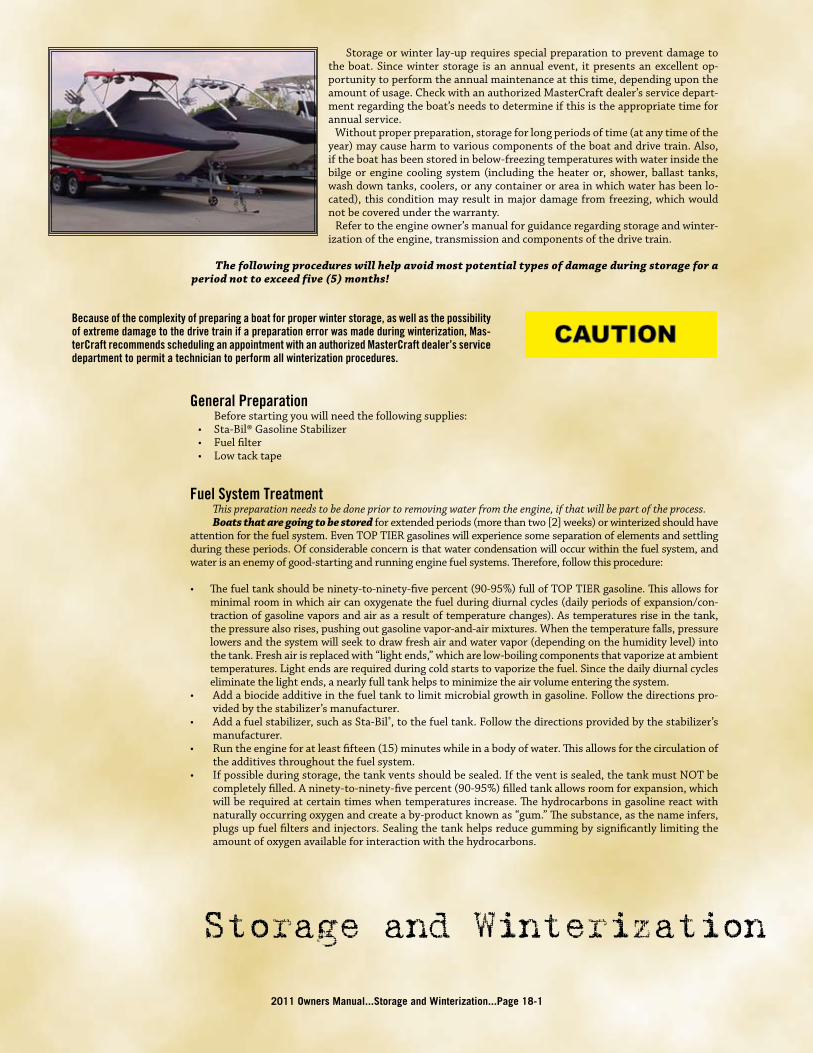
2011 Owners Manual...Storage and Winterization...Page 18-1
Storage and Winterization
Storageorwinterlay-uprequiresspecialpreparationtopreventdamagetotheboat.Sincewinterstorage isanannualevent, itpresentsanexcellentop-portunitytoperformtheannualmaintenanceatthistime,dependingupontheamountofusage.CheckwithanauthorizedMasterCraftdealer’sservicedepart-mentregardingtheboat’sneedstodetermineifthisistheappropriatetimeforannualservice. Withoutproperpreparation,storageforlongperiodsoftime(atanytimeoftheyear)maycauseharmtovariouscomponentsoftheboatanddrivetrain.Also,iftheboathasbeenstoredinbelow-freezingtemperatureswithwaterinsidethebilgeorenginecoolingsystem(including theheateror, shower,ballast tanks,washdowntanks,coolers,oranycontainerorareainwhichwaterhasbeenlo-cated),thisconditionmayresultinmajordamagefromfreezing,whichwouldnotbecoveredunderthewarranty. Refertotheengineowner’smanualforguidanceregardingstorageandwinter-izationoftheengine,transmissionandcomponentsofthedrivetrain.
The following procedures will help avoid most potential types of damage during storage for a period not to exceed five (5) months!
Because of the complexity of preparing a boat for proper winter storage, as well as the possibility of extreme damage to the drive train if a preparation error was made during winterization, Mas-terCraft recommends scheduling an appointment with an authorized MasterCraft dealer’s service department to permit a technician to perform all winterization procedures.
General Preparation Beforestartingyouwillneedthefollowingsupplies:• Sta-Bil®GasolineStabilizer• Fuelfilter• Lowtacktape
Fuel System Treatment This preparation needs to be done prior to removing water from the engine, if that will be part of the process. Boats that are going to be storedforextendedperiods(morethantwo[2]weeks)orwinterizedshouldhaveattentionforthefuelsystem.EvenTOPTIERgasolineswillexperiencesomeseparationofelementsandsettlingduringtheseperiods.Ofconsiderableconcernisthatwatercondensationwilloccurwithinthefuelsystem,andwaterisanenemyofgood-startingandrunningenginefuelsystems.Therefore,followthisprocedure:
• Thefueltankshouldbeninety-to-ninety-fivepercent(90-95%)fullofTOPTIERgasoline.Thisallowsforminimalroominwhichaircanoxygenatethefuelduringdiurnalcycles(dailyperiodsofexpansion/con-tractionofgasolinevaporsandairasaresultoftemperaturechanges).Astemperaturesriseinthetank,thepressurealsorises,pushingoutgasolinevapor-and-airmixtures.Whenthetemperaturefalls,pressurelowersandthesystemwillseektodrawfreshairandwatervapor(dependingonthehumiditylevel)intothetank.Freshairisreplacedwith“lightends,”whicharelow-boilingcomponentsthatvaporizeatambienttemperatures.Lightendsarerequiredduringcoldstartstovaporizethefuel.Sincethedailydiurnalcycleseliminatethelightends,anearlyfulltankhelpstominimizetheairvolumeenteringthesystem.
• Addabiocideadditiveinthefueltanktolimitmicrobialgrowthingasoline.Followthedirectionspro-videdbythestabilizer’smanufacturer.
• Addafuelstabilizer,suchasSta-Bil®,tothefueltank.Followthedirectionsprovidedbythestabilizer’smanufacturer.
• Runtheengineforatleastfifteen(15)minuteswhileinabodyofwater.Thisallowsforthecirculationoftheadditivesthroughoutthefuelsystem.
• Ifpossibleduringstorage,thetankventsshouldbesealed.Iftheventissealed,thetankmustNOTbecompletelyfilled.Aninety-to-ninety-fivepercent(90-95%)filledtankallowsroomforexpansion,whichwillberequiredatcertaintimeswhentemperaturesincrease.Thehydrocarbonsingasolinereactwithnaturallyoccurringoxygenandcreateaby-productknownas“gum.”Thesubstance,asthenameinfers,plugsupfuelfiltersandinjectors.Sealingthetankhelpsreducegummingbysignificantlylimitingtheamountofoxygenavailableforinteractionwiththehydrocarbons.

2011 Owners Manual...Storage and Winterization...Page 18-2
Completely filling the fuel tank prior to storage and then sealing the fuel tank vent does not allow room for necessary expansion. This can result, in extreme conditions, in fuel tank rupture. Such release of fuel into the boat and potentially into the storage area could result in substantial damage to the boat and contact with any spark (such as a flame-producing pilot light in a heater) could also result in property damage and serious injury or death.
Itisdesirabletokeepthefuel’stemperaturebelow80F.(26C.)Thegummingwillincreaseastempera-turesincrease. Notethat fuelstabilizersworkONLY infreshgasoline.Stabilizerswillnotcureoxygenatedgasoline.AddingastabilizerwhentheboatisbeingpreparedforoutingsafterstoragewillNOTcleanthegummingthathasoccurredorremovewaterfromthefueltankorotherwiseeliminateanyproblemsthathaveoccurredduetofailuretoproperlypreparethefuelingsystemforstorage. EnginemanufacturerssuggestusingFederalorStateofCaliforniareformulatedgasolinewheneverpos-sibleasitstoresaswellorbetterthanconventionalgasoline. Even quality gasoline that has been properly prepared for storage should never be stored for a pe-riod to exceed one (1) year.
Fuel systems on all boats MUST be properly prepared for storage periods exceeding two (2) weeks, as outlined in this Owner’s Manual. Failure to do so will void the warranty.
General Power Package PreparationStep 1: Lubricatethethrottleandshiftlinkagesandcableswithmulti-purposegrease.Step 2: MasterCraft recommends that batteries be removed from the boat for winter storage. Batteries
shouldbefullychargedbeforebeingstoredinacool,drylocation,protectedfromtheelementsandfullyre-chargedbeforebeingre-installedintheboat.Never store batteries close to heat, spark or flame-producing devices.
Step 3: Leavetheengineboxcoverproppedopenabouttwoinches(2”)toventilatetheenginecompartment.
Other Winterization PreparationsStep 1: Removethebilgedrainplug immediatelyaftertakingtheboatoutofthewater.Afterageneral
bow-to-sternwashing,raisethebowoftheboathigherthanthesterntoallowasmuchwateraspossibletodrainfromthebilge,whileperformingotherstoragepreparations.
Step 2: Thoroughlycleanthehull,deckandinterioroftheboatassoonasitisremovedfromthewater.Cleaningatthistimeiseasierbecauseanymarinegrowthisstillwet.Besuretoallowafewdaysofairdryingtopreventmildewthatresultsfromtrappedmoisture.(SeetheCleaningsectionofthisManual.)
Step 3: Applyacoatofwaxtotheentiresurfaceoftheboat.WesuggestMasterCraftPremiumMarineWaxforexcellentcoverage.
Step 4: Iftheboatisequippedwithaheater,showerorballastbags/tanks,besuretodisconnectthehosesanddrainanyremainingwaterinthelinestoavoidfreezing.Evensmallamountsofwaterinanyoftheseareascancausesignificantdamageuponfreezingandsuchdamageisnotcoveredunderthewarranty!
Note: Be sure that hoses will not become entangled in the engine V-belt when the engine turns over or the hose and/or the belt will be damaged.
Step 5: Useducttapetosealtheexhaustflapstopreventdirtandnestingrodentsfromentering.Step 6: OnCSX265modelsequippedwiththehotwaterheater,anywaterinthetankmustberemovedto
avoidtheriskoffreezinganddamagetothetank.Thewaterpumpedintotheheatercomesfromafreshwaterholdingtank,anditcanbeleftinthewaterheaterwhentheboatisnotinuse,EXCEPTduringextendedperiodsofstorage.Aswithanypartoftheboatinwhichthereiswater,itmustberemovedatthetimetheboatiswinterizedtoavoidfreezingthatmaycausedamagetotheboat,theholdingtankorthewaterheater.Thewaterisremovedbyrunningtheshoweruntilallthewaterhascomeoutorbydisconnectingtheplumbingfittingsintheforwardservicebayunderthehelmseats.
Step 7: On255V,X-55,280VandX-80equippedwithheads,cleanthetankswithamildcleanerorwarmsoapywaterthatwillnotharmthefinish.Avoidallpetroleum-basedhouseholdcleaners.Storetheheaddryandclean.Failuretodosomaycauseunnecessaryodorsanddamagetothetanks,andthisisnotcoveredunderwarranty.
OnCSX265modelsequippedwithheads,thoroughlyflushthesystemwithfreshwater.Emptytheholdingtankandshutoffthewatersupplytothehead,removingtheinletwaterline.Donotremovethebrasscaponthebottomofthevalve.Presstheflushleveruntilallwaterisdrainedfromthesystem.
Ifusinganti-freezeinthishead,drainthepotablewatertankandaddfreshwateranti-freezetothepotablewatertank.Flushtheanti-freezeandwatermixturethroughtheheadandintothewasteholdingtank.Thenemptytheholdingtank.Neveruseautomotive-typeanti-freezeinthisfreshwatersystem.

2011 Owners Manual...Storage and Winterization...Page 18-3
Step 8:MasterCraftrecommendsthebatteryorbatteriesberemovedfromtheboatforwinterstorage.Batteriesshouldbefullychargedbeforebeingstoredinacool,drylocation,protectedfromtheelementsandfullyre-chargedbeforebeingre-installedintheboat.Step 9:Ifthetowerwillbeloweredduringstorage,becertainthatthetowerdoesnotrestontheboatupholsteryoronanysupportthatrestsontheupholstery.Thetowerorsupport(s)mayleaveapermanentimprintontheupholstery.Thisisnotcoveredunderwarranty.Step 10:Covertheboatwithaboatcoverortarp.
Note: If the boat is to be stored outside and subject to accumulations of snow, water and ice, a support should be made for the boat cover so that it will not sag, rip or tear, there-by allowing water to enter the boat. Two-inch diameter PVC plumbing pipe is ideal for this purpose. It is readily available at local hardware stores, and it is easy to work with. Also, its rounded shape will prevent damage to the canvas.
Ballast System PreparationsStep 1:Attachahosetothestarboardsideballasthosethatcomesoutofthedeckattherearseat.Step 2: Placetheotherendintoagallonofnon-toxic,RV-typeanti-freeze.Step 3:Turnthepumpontoemptyandpumpanti-freezeintothesystemuntilanti-freezecomesoutofthethru-hullontheside.Step 4:Turnthepumpontofillandpumpanti-freezebackintothejug.
Re-Activating the Boat After StorageStep 1:Removetheducttapefromtheexhaustflaps.Step 2:Fullychargethebatteryandinstallitintheboat,followingallsafetyprecautionsassociatedwith
changingbatteries.
IMPORTANT NOTE: Often, batteries that have been stored over winter will require re-charging. If the battery is charged by utilizing a battery charger, use only a three-stage or more battery charger. It is important that the operator never turn a battery charger immediately to “start,” as the sudden jolt of voltage may cause damage to the electrical system, particularly control modules for ballast system. Regardless of whether it is during the re-activation process or at any time, care should also be used in charging the battery.
Step 3: Followall instructionsforreactivatingthedrivetrainasdetailed intheengineowner’smanual.NOTE:Duetothecomplexnatureofthereactivationprocess,MasterCraftrecommendshavinganauthorizedMasterCraftdealerperformthisfunction.
Step 4: Ensurethatalldrainplugsthroughouttheboatanddrivetrainhavebeenreinstalledtoavoidun-wantedintrusionofwater.
Step 5: Ifapplicable,reconnectthehosestoyourheaterorshower.Step 6: Checktheenginecompartmentandbilgeforsignsofnestinganimals.Cleanasnecessary.Step 7: Checktheentireenginesystemforfluid,oilandcoolantlevels.Addasnecessary.Step 8: Checktheentireengineforcracksorleakscausedbyfreezedamage.Step 9: Checkallhoseclampsfortightness. Install thebilgedrainplugandthereardrainplug inboats
equippedwithcertaintypesofballastsystems.Step 10: Greasethepropellershafttaperandinstallthepropeller.Step 11: Fullyre-chargeandre-installthebatteryorbatteries.Step 12: PerformthedailymaintenanceasnotedpreviouslyinthisOwner’sManual.Ifitwasnotdoneprior
tostorage,performtheannualmaintenanceaswell.Step 13: Iftheboatisequippedwiththeoptionalfreshwatercoolingsystemandwasdrainedforstorage,fill
thesystemwithfreshcoolantsolutionperinstructions.Step 14: Checkthealignmentbetweentheoutputflangeonthetransmissionandthepropellershaftflange.
Ifthemaximumfeelergaugethatcanclipbetweentheflangefacesatanypointis0.003”,theunitisproperlyaligned.Ifathickergaugecanbeinsertedatanypoint,theenginemustbere-adjusteduntilproperalignmentisobtained.ThisshouldbeperformedbyanauthorizedMasterCraftdealer’sservicedepartment.
Step 15: Forallmodels,withtheboatinthewater,cyclethekeyONandthenOFFtwo(2)orthree(3)times,allowingten(10)secondsbetweenkeycycles,beforecrankingtheengine.Thisallowsthefuelpumptoprimethefuellines;thenstarttheengine.Intheeventtheenginedoesnotrespond,allowatwo-minutecool-downperiodforeverythirty(30)secondsofcranking.Whentheenginefires,keepaclosewatchoverthegaugereadingsandcheckforleakageandabnormalnoises.Keepspeedslowforthefirstfifteen(15)minutestoallowtheenginetoreachnormaloperatingtemperatures.
Step 16: InProStar197sequippedwithballastbags,whenreconnectingthehook-ups,besuretosqueezetheprongstohelpslidetheconnectorbackon.Dishsoaporsomesimilarproductwillhelpslidetheconnectsbacktogether.Notethattheredringgoesovertheraisedringtoensureaworkingconnection.

2011 Owners Manual...Propeller Maintenance...Page 19-1
Propeller Maintenance
Propellerdamageiscausedbystrikingsolidobjects.Ifthepropellerisnotrotatingatthetimeitstrikesasolidobject,thedamageisusuallyconfinedtojustonebladeandmaybedifficulttosee.Ifthepropellerisrotatingwhenitstrikesanobject,usuallytheresultingdamagecaneasilybeseenonallblades.
Checking/Repairing PropellersStep 1: EnsuretheengineisOFFandtheemergencysafetystopswitchisdisconnected.
Step 2: Clampasmallrulescaletotheshaftstrut,paralleltotheshaftsothattheendofthescaleis3/32-inchesfromtheleadingedgeofapropellerblade.
Step 3: Rotatethepropellerslowly.Thereshouldbenomorethan3/32-inchvariancebetweentheblades.Ifthepropellerisdamaged,seeanauthorizedMasterCraftdealer.
Changing PropellersStep 1: EnsuretheengineisOFFandtheenginesafetystartingswitchisdisconnected.
Step 2: Removeanddiscardthecotterpin.
Step 3: Removethepropellernut.
Step 4: Tapthecenterhubofthepropellerwitharubbermallettoreleasethepropeller.Inspecttheshaftandpropellersplinesfordamage.
Step 5: Thoroughlycleanandapplyalightcoatofwaterproofmarinemulti-purposegreasetothesplinedareaoftheshaftandpropeller.
Step 6: Alignthesplinesandcarefullyinstallthepropellerontotheshaft.DO NOT FORCE THE PROPEL-LER INTO PLACE.
Step 7: Installthepropellernutandtorqueto50-ft-lbs.
Step 8: Installanewcotterpinandbendtheendsaroundtheshafttolockthepropellerontheshaft.

2011 Owners Manual...Troubleshooting...Page 20-1
Troubleshooting
ThefollowingchartwillassistyouinfindingandcorrectingminormechanicalandelectricalproblemswithyourMasterCraftboat.Enginemanualsincludetroubleshootingsuggestionsregardingdrivetrainissues.Tocorrectaproblem,firstdeterminewhatthesymptomis.Startwiththefirstcauseandeliminatethepos-sibilityofeachuntiltheproblemiscorrected.Duetothespecializedskillandtoolsneededtocorrectmajorissues,thatinformationhasnotbeendiscussedbelow.Ifaproblemisnotaddressedherein,pleasecontactanauthorizedMasterCraftdealer’sservicedepartment.
Whenexperiencingaproblem,checkthesurroundingsbeforeshuttingdowntheboat.Ifasuddenstopwouldplaceotherboatersinjeopardy,continueonuntilitissafetosloworstoptoanalyzethesituation.Alwaysbeawareofthesurroundingsandhowactionsmayimpactotherboaters!
Throttle/shifting problems. Corrodedcables. Cleanandlubricatethecables. Lowtransmissionoillevel. Replenishtransmissionfluid. Stickingtransmissionshiftdetentball. Cleanandlubricatethedetentball. Kinkincable(s). HaveauthorizedMasterCrafttechnician replacethecable(s).
Steering problems. Corrodedcable. Cleanandlubricatethecable. Rudderworn. SeeauthorizedMasterCraftdealer’s servicedepartment. Excessive vibration. Bentstrut. Replacethestrut. Fouledpropeller. Removeobjectsfromthepropellershaftandrudder. Damagedpropeller. Replacethepropeller. Misalignedpropellershaftcoupling. Seekproperalignment. Bentpropellershaft. SeeauthorizedMasterCraftdealer’s servicedepartment. Electrical problems. Opencircuitbreakerorblownfuse. Re-setthecircuitbreakerorreplacethefuse. Loosewiringconnectionsorcorrosion. Cleanandtightenwiringconnections. Defectivesendingunit. Replacethesendingunit. Shortedwiringharness. Havethewiringharnessrepaired. Defectiveswitchorgauge. SeeauthorizedMasterCraftdealer’s servicedepartment. No speedometer reading. Defectivespeedometer. Havethespeedometercheckedorreplaced. Defectivespeedometerpaddlewheel. Havepaddlewheelcheckedorreplaced. Incorrect speedometer reading. Impropercalibration. Followcalibrationinstructionsin Instruments and Gaugessection ofthisManual. Gauges do not work or the Breakerhastripped. Re-setthebreaker. accessory does not work. Fusehasblown. Replacethefuse. Lowbattery. Checkthebatteryvoltageforalooseground. Insufficientbatterysupply. Replacebatterywithonethathasatleast750CCAs.

1. Disclaimer and Limitation of ImpliedWarranties. THE EXPRESS LIMITED WARRANTY SET FORTH HERE-IN IS IN LIEU OF ALL OTHER WARRANTIES AND REP-RESENTATIONS, EXPRESS OR IMPLIED, AND TO THE MAXIMUM EXTENT PERMITTED BY APPLICABLE LAW, MASTERCRAFT DISCLAIMS, AND THE OWNER HEREBY EXPRESSLY WAIVES, ANY AND ALL OTHER WARRAN-TIES OR REPRESENTATIONS OF ANY KIND OR NA-TURE, INCLUDING, BUT NOT LIMITED TO, IMPLIED WARRANTIES OF MERCHANTABILITY AND FITNESS FOR A PARTICULAR PURPOSE, OTHER THAN THOSE WARRANTIES WHICH ARE IMPLIED BY, AND ARE IN-CAPABLE OF EXCLUSION, RESTRICTION OR MODIFI-CATION UNDER APPLICABLE LAW. THE TERM OF ANY IMPLIED WARRANTIES THAT CANNOT BE DISCLAIMED UNDER APPLICABLE LAW, INCLUDING, BUT NOT LIM-ITED TO, IMPLIED WARRANTIES OF MERCHANTABIL-ITY AND FITNESS FOR A PARTICULAR PURPOSE, SHALL BE LIMITED TO THE DURATION OF THE EXPRESS WAR-RANTY PERIODS APPLICABLE TO THE RESPECTIVE COMPONENTS. SOME STATES DO NOT ALLOW THE EXCLUSION OF IMPLIED WARRANTIES AND/OR DO NOT ALLOW LIMITATIONS ON THE AMOUNT OF TIME AN IMPLIED WARRANTY LASTS, SO THE ABOVE LIMITATIONS MAY NOT APPLY TO YOU. THIS LIMITED WARRANTY GIVES YOU SPECIFIC LEGAL RIGHTS. YOU MAY HAVE OTHER RIGHTS WHICH VARY FROM STATE TO STATE.
2. LimitedWarrantyandTerm.MasterCraftBoatCompany,LLC.(“MasterCraft”) warrants to the original retail purchaser that the following components of each new boat shall be free from material defects in materials and workmanship to the extent set forth below, under normal use and when oper-ated and maintained in accordance with MasterCraft’s instructions, for the period indicated:
2.1. Deck,Hull,LinerandStringers.From the date of the original retail purchase, the deck, hull, liner and stringer system (collectively, “Structural Components”) is warranted for as long as the original purchaser owns the boat.
2.2. GelCoat. On condition that the consumer has provided maintenance and care as described in the Corrosion and Cleaning the Boat sections of the MasterCraft Owner’s Manual, the gel coat, which is applied to all MasterCraft boats at the factory, will be warranted for a period of one (1) year from the date of the original retail purchase of the boat or the initial use of the boat, whichever first occurs, for stress crazing of the gel coat. However, no warranty is provided, and MasterCraft expressly disclaims any warranty for, scratching, discoloration or fading of the gel coat because environmental operating conditions and customer maintenance/care are factors that have a significant effect on the condition and durability of the gel coat.
2.3. OtherComponentParts(ExcludingEngineandTransmission.MasterCraft provides the following warranty for other component parts of your MasterCraft boat:
(a) Instrumentation is warranted for three (3) years, except depth finders and Zero Off; (b) marine carpeting for five (5) years; (c) upholstery vinyl material for five (5) years, plus upholstery stitching for one (1) year; and (d) fuel pump assembly for two (2) years provided the customer follows maintenance and care
requirements. All other components (excluding engine and transmission), including upholstery stitching, are
warranted for a period of one (1) year. All warranties are from the date of the original retail purchase of the boat or the initial use of the boat, whichever first occurs.
2.4. TrailerandTrailerComponentParts.The brake calipers are warranted for a period of two (2) years; all other components are warranted for a period of one (1) year from the date of the original retail purchase of the boat or the initial use of the boat, whichever first occurs. See the Trailer Owner’s Manual for more details.
Limited Warranty Statement
2011 Owners Manual...Limited Warranty Statement...Page 21-1

2.5. WarrantyPeriod. All express warranties are for the time period set forth in this Section 2, unless a longer warranty period is required by applicable law, in which case such longer warranty period will apply.
3. EngineandTransmission.The engines used in MasterCraft boats are supplied by Indmar Products Company, Inc., in Millington, Tennessee (“Indmar”); ILMORMARINE L.L.C., in Mooresville, North Caro-lina (“ILMORMARINE”); or Volkswagen Marine Engines in Tampa, Florida (“Volkswagen Marine”). These companies provide a separate warranty of three (3) years from the date of the original retail purchase of the boat or the initial use of the boat, whichever first occurs, for the engine and transmission. A state-ment of the Indmar Power Train Warranty, ILMORMARINE Limited Warranty or the Volkswagen Marine Warranty is provided separately to the original retail purchaser. MasterCraft provides no independent warranty with regard to the engine and transmission; however, the owner may contact MasterCraft at the address or telephone number listed in Section 7 of this Limited Warranty to obtain contact informa-tion for making claims or inquiries under the applicable engine manufacturer’s warranty. Contact infor-mation for Volkswagen Marine is provided in the warranty statement provided at the time of purchase to the original retail purchaser.
4. WarrantyConditions,LimitationsandExclusions. MasterCraft boats are manufactured by trained craftspersons from high-quality materials and components. However, conditions outside MasterCraft’s control require specific limitations on, and exclusions from, coverage under this Limited Warranty. The Limited Warranty on the Structural Components set forth in Section 2 of this Warranty does not cover or include any other components fastened or applied to the hull or deck. This Limited Warranty con-stitutes the final, complete and exclusive statement of warranty terms, and no other person or entity is authorized to make any other warranties or representations on behalf of MasterCraft. Furthermore, the Limited Warranty set forth in Section 2 (including all subsections) hereof does not cover the following:
(a) damage caused by misuse, negligence, accident; collision or impact with any object; (b) damage caused by any improper alteration or modification to the boat or any of its component
parts or accessories, including damage resulting from alteration, modification, repair or replace-ment in such a way as to increase the cubic-inch capacity or horsepower output of the engine and boat as originally manufactured;
(c) damage caused by the use of improper or contaminated fuel or fluids; (d) damage caused by the use of customer-applied chemicals or accidental spills; (e) damage caused by failure to maintain the boat in accordance with the maintenance provisions in
the Owner’s Manual or improper maintenance of the boat; (f) damage caused by the failure to comply with any recall or request for repair; (g) damage resulting from the use of the boat for any racing, speed, commercial competition or performance
demonstration; (h) damage resulting from use of the boat for rental, commercial or industrial purposes; (i) damage to hardware and other components fastened or adhered to the hull, deck or liner; (j) damage caused by fire, theft, freezing, vandalism, explosion, lightning, wind, hail storms, flooding or other
natural disaster; (k) damage to any component parts and accessories not manufactured by MasterCraft, including but
not limited to, the engine, drivetrain, transmission, propeller, shift and throttle control levers and cables, pumps, blowers, windshields, canvas, upholstery, tower and accessories, instrumentation
and steering systems; however, such items may be warranted by the individual manufacturer, and if possible, MasterCraft will provide the
2011 Owners Manual...Limited Warranty Statement...Page 21-2
owner with a copy of the manufacturer’s warranty: (l) damage caused by use of any non-MasterCraft trailer; (m) damage caused by improper support of the boat on davits,
hoist system or boat lift of any kind; (n) damage to paints, varnishes, gel coat surfaces and colors,
chrome-plated or anodized finishes, floor and floor covers and any other surface coatings, as well as damage due to in-water storage without proper barrier coat and bottom paints (NOTE: Although MasterCraft uses the highest-grade gel coat materials, a condition may develop where the bottom of the boat may show signs of discoloration and/or blisters if the boat is left in the water for long pe-riods of time, which is defined as in excess of thirty (30) days); therefore, a proper barrier coat and bottom paint should be used whenever it is anticipated that the boat will be left in the water for an extended period of time);

(o) damage to the trailer and its parts or components due to abrasions, rock chips, rust, improper care or maintenance, or use in salt or brackish water; however, the finishes of galvanized trail-ers, which are designed for use in salt or brackish water, are warranted to be free from damage resulting from use in salt or brackish water for one (1) year from the date of the original retail purchase or the initial use of the trailer, whichever first occurs;
(p) damage caused by dealer-installed options or accessories; (q) damage caused by consumer-installed options or accessories; and/or (r) all warranty coverage will expire after ninety (90) days on boats used for commercial purposes.
5. LimitationofLiability.
5.1. LiabilityLimitation:ExclusionofConsequentialDamages.This Limited Warranty is for the benefit of the owner and MasterCraft, and shall not create or evidence any right in any third party. THE REPAIR OR REPLACEMENT OF DEFECTIVE COMPONENT PARTS AS PROVIDED UNDER THIS LIMITED WARRANTY IS THE EXCLUSIVE REMEDY OF THE CONSUMER. TO THE MAXIMUM EXTENT PERMITTED BY APPLICABLE LAW, IN NO EVENT SHALL MASTER-CRAFT BE LIABLE FOR ANY INCIDENTAL, CONSEQUENTIAL, SPECIAL, INDIRECT, PUNI-TIVE OR EXEMPLARY DAMAGES OR LOST PROFITS WHATSOEVER ARISING OUT OF THE USE OR INABILITY TO USE THE BOAT OR ANY COMPONENT PART THEREOF, OR FOR ANY BREACH OF THIS LIMITED WARRANTY OR OTHERWISE, EVEN IF MASTERCRAFT HAS BEEN ADVISED OF THE POSSIBILITY OF SUCH DAMAGES OR SUCH DAMAGES COULD REASONABLY HAVE BEEN FORESEEN BY MASTERCRAFT. However, some states do not allow the exclusion or limitation of incidental or consequential damages, so the above limitation or ex-clusion may not apply to you.
5.2. Purchase Price Limitation. In any event, Master-Craft’s entire liability under any provision of this Lim-ited Warranty shall be limited to the repair or replace-ment of the boat, trailer or component part, or the refund of the purchase price paid by the consumer for the boat, trailer or component part found to be defec-tive within the applicable warranty period. This shall constitute MasterCraft’s sole liability and obligation in the event of any claim arising out of its performance or non-performance of any provision of this Limited War-ranty. Because some states and jurisdictions do not al-low the exclusion or limitation of liability, the above limitations may not apply to you.
6. TransferofLimitedWarranty. Upon the first sale, con-veyance or other transfer of the boat or trailer by the origi-nal retail purchaser, any remaining unexpired Limited War-ranty coverage shall be transferred to the second owner and shall remain in effect for the remainder of the applicable warranty period(s) set forth in Sections 2.1, 2.2, 2.3 and 2.4 hereof (which warranty periods begin to run from the date of the original retail purchase of the boat or trailer, or the first use of the boat or trailer, whichever first occurs, as applicable), upon delivery of the warranty transfer card and payment of the applicable warranty transfer fee to MasterCraft. With respect to the Lifetime Limited Warranty (granted only to the original retail purchaser) on the Structural Components set forth in Section 2.1 hereof, if the sale, conveyance or other transfer of the boat by the original retail purchaser to another person or entity occurs within three (3) years of the date of the original retail purchase of the boat by the original retail purchaser, then the Limited Warranty on the Structural Components shall be transferred to the second owner and shall continue in effect for a period of ten (10) years from the date of the original retail purchase of the boat by the original retail purchaser. If the sale, transfer or conveyance of the boat by the original retail purchaser occurs more than three (3) years after the date of the original retail pur-chase of the boat, then the Limited Warranty on Structural Components (as well as all other warranties) shall be void as of the date of transfer and shall not be transferable to the second owner.
Only one (1) transfer under the provisions of this Section 6 (from the original retail purchaser to the
second owner), within the applicable time period, may be made. In the event of a sale or transfer of the boat or trailer by a second owner to a subsequent purchaser, all coverage under this Limited Warranty shall immediately be terminated and the Limited Warranty shall become null and void. No transfer of
2011 Owners Manual...Limited Warranty Statement...Page 21-3

this Limited Warranty will operate to extend the warranty periods set forth in Section 2 hereof. In or-der to effectuate the transfer of the Limited Warranty, the original retail purchaser and the new owner must properly fill out the warranty transfer card found in the back of the Owner’s Manual and deliver the completed card, together with a check made payable to “MasterCraft Boat Company, LLC.” in the amount of the warranty transfer fee, via U.S. Mail, postage prepaid, to MasterCraft at the address shown on the warranty transfer card. The card and check for the warranty transfer must be post-marked within the time period specified above in this Section 6 in order for the warranty transfer from the original retail purchaser to the second owner to be effective.
7. WarrantyClaims.In order to maintain warranty service under this Limited Warranty, the owner must return the defective boat or component part to an authorized MasterCraft dealer’s service department, or to MasterCraft’s factory at the below address, within the applicable warranty period. For questions regarding warranty service or to obtain information regarding warranty service or to obtain informa-tion regarding the nearest authorized MasterCraft dealer, please contact MasterCraft at the following address or telephone number:
MasterCraft Boat Company, LLC Attention: Warranty/Customer Service Department 100 Cherokee Cove Drive Vonore, Tennessee 37885 1-423-884-2221
Subject to the terms of this Limited Warranty, any covered boat or component part with a material defect in materials or workmanship that is returned to an authorized MasterCraft dealer’s service department or MasterCraft’s factory during the appropriate warranty period will be repaired or replaced, at MasterCraft’s sole option, without charge to the owner for parts and labor. This provision is subject to the following terms and conditions:
(a) MasterCraft shall be obligated only to repair or replace those items that prove defective, in Mas-terCraft’s sole discretion, upon examination by a MasterCraft authorized dealer service depart-ment or MasterCraft’s own personnel, as applicable;
(b) MasterCraft warrants its repairs or replacements only for the remainder of the applicable war-ranty period;
(c) MasterCraft shall, in its sole discretion, fulfill its obligation to repair or replace any defective item at its factory or authorized service department;
(d) The owner shall be responsible for all costs associated with the transportation of the boat, towing bills, trailer or component part(s) to the authorized MasterCraft service department and for any return transportation.
8. No Modification of Warranty.No oral or written information, advice or communication of any na-ture by or from MasterCraft or its representatives, employees, dealers, agents, distributors or suppliers shall create a warranty or in any manner increase or modify the scope of this Limited Warranty in any manner whatsoever.
2011 Owners Manual...Limited Warranty Statement...Page 21-4

ForthefirstpurchaseofaspecificMasterCraftboat,theboatmustberegistered.Youshouldbeawarethatunderfederallaw,completionoftheregistrationprocessisarequirementandshouldbecompletedasfollows:
1. Dealermustcompletethewarrantyregistrationatdateofsale.2. Dealermustsecurebuyer’ssignature!3. DealermustnotifyMasterCraft,viaelectronicregistrationthattheboathasbeenpurchased,andallre-
quiredinformationmustbesubmitted.Asboatowner,youshouldensurethatthedealerhascompliedwiththisrequirement.ThisisthemethodofprovidinginformationthatwillallowMasterCrafttonotifyyouincaseofanymandatoryrecallsorotherissuesrequiringyourattention.
IftheMasterCraftboatissubsequentlysoldbytheoriginalpurchaser,MasterCraftoffersatransferablewarrantytothesecondowner.InaccordancewiththeMasterCraftLimitedWarranty,theremainingwar-rantyagainststructuraldefectsinthehullanddeckwillbetransferredtothenewownerwhenthefollowinghasbeenaccomplishedandverifiedwithinfourteen(14)daysofthesaledate:• Receiptofthecompletedformbelow.• Copyofthesalesinvoice.• Paymentof$450. Uponverification,theremainingwarrantywilltransfer,retroactivetothesaledate.
Forward form and payment to:MasterCraftBoatCompany,LLC
100CherokeeCoveDriveVonoreTN37885
Warranty Registration Transfer(forward this copy to MasterCraft)
Boat Serial Number __________________________________________________________________________________________________
Model No. __________________________________________________________________________________________________________
Engine Make _______________________________________________________________________________________________________
Serial No. __________________________________________________________________________________________________________
Trans. Type ________________________________________________________________________________________________________
Serial No. __________________________________________________________________________________________________________
Please Print
Previous Owner ____________________________________________________________________________________________________
New Owner’s Name _________________________________________________________________________________________________
Street Address _____________________________________________________________________________________________________
City ______________________________________________________________________________________________________________
State _______________________________________________________ Zip Code ____________________________________________
Home Phone (___________) _________________________________________________________________________________________
Business Phone (__________) ________________________________________________________________________________________
Date of Purchase ___________________________________________________________________________________________________
Warranty Registration & Transfer
2011 Owners Manual...Warranty Registration and Transfer...Page 22-1

Service Log2011 Owners Manual...Service Log...Page 23-1
As Needed Date Date Date Date
Replace raw water impeller
Replace ballast impeller(s)
Add/change oil filter
Every 50 Hours Date Date Date Date
Lubricate starter gear and shaft
Change engine oil and filter
Check all safety equipment
Every 100 Hours Date Date Date Date
Replace impeller
Engine tune-up
Change transmission fluid
Check engine mounts
Check prop shaft coupling alignment
Inspect exhaust flaps
Lubricate steering system
Lubricate shift and throttle system
Check/replace ballast pump impeller
Inspect complete fuel system
Change fuel filter

Index2011 Owners Manual...Index...Page 24-1
12-VoltReceptacle...........................................................................5-1190TournamentTeam...................................................................4-2190,ProStar.....................................................................................4-2197,ProStar.....................................................................................4-4200V.............................................................................................. 4-12214V-Drive,ProStar.......................................................................4-8214,ProStar.....................................................................................4-6215V.............................................................................................. 4-14220,CSX....................................................................................... 4-28225V.............................................................................................. 4-16235V.............................................................................................. 4-18245V.............................................................................................. 4-20255V.............................................................................................. 4-22265,CSX....................................................................................... 4-30280V.............................................................................................. 4-26
AcceptableUpholsteryCleaners.................................................. 14-4AccessorySwitches..........................................................................5-1AftLightSwitch..............................................................................5-1AfterBreak-In..................................................................................9-1AfterEachUse.............................................................................. 16-2AfterOperation...............................................................................8-1Alarm,LowVoltageBattery............................................................5-8Alarms,Other..................................................................................5-8Alignment,PropellerShaftCoupling.......................................... 17-6AM/FMStereo,CDPlayer,etc........................................................5-1AnchorandWindlass......................................................................6-1AnchorLightsSwitch,Navigation..................................................5-8Anchoring..................................................................................... 1-10AnnualMaintenance.................................................................... 17-6AttitudeAdjustmentorTrimTabSwitch......................................5-2AutomaticFireSuppression...........................................................1-3
BacklightingSwitch,InstrumentPanelGauge..............................5-8BallastEmpty/FillSwitches............................................................5-3BallastPumpImpeller,Check..................................................... 17-7BallastSystemPreparations(Storage)........................................ 18-3BasicManeuvering....................................................................... 11-2BasicOperation,Startingand..................................................... 10-1BatteryAlarm,LowVoltage............................................................5-8BatteryCharger...............................................................................6-1BatteryConnectionsandHold-Downs,Inspect......................... 17-1BatteryFullyCharged,CheckThatthe....................................... 17-3BatteryOperationSwitch,Dual.....................................................5-4BeforeEachOperation....................................................................8-1BeforeEachUse............................................................................ 16-1BeforeStarting............................................................................. 10-1BIG,The........................................................................................ 5-15BilgePumpSwitch,ManualandAutomatic..................................5-3BlowerSwitch..................................................................................5-3BoardingPlatforms,Swim..............................................................6-9BoatCareProducts,MasterCraft................................................ 15-1Breakers,Circuit..............................................................................5-3Break-In,After.................................................................................9-1Break-In,NewBoat.........................................................................9-1BuoysandOtherMarkings,Reading.............................................3-2
CanvasCovers(Cleaning)............................................................ 14-3CanvasCovers.................................................................................6-2CareandMaintenance................................................................. 12-1Carpet(Cleaning)......................................................................... 14-2CatchBox,Livewell/KillBox..........................................................6-6Cautions,DangersandWarnings...................................................... iiCDPlayer,RemoteControl,etc......................................................5-1ChangingPropellers..................................................................... 19-1Chartplotter,GPSand....................................................................6-3Charts,Nautical..............................................................................1-8Checking/RepairingPropellers.................................................... 19-1Chrome,StainlessSteel............................................................... 13-1CircuitBreakers...............................................................................5-3Cleaners,AcceptableUpholstery................................................. 14-4Cleaners,UnacceptableUpholstery............................................ 14-5CleaningandStorage,General.................................................... 17-5CleaningtheBoat......................................................................... 14-1ColdWaterSurvival........................................................................1-9ComfortandConvenience..............................................................6-1CommonSenseApproach...............................................................2-1Communications.......................................................................... 1-10Conditions,UnusualOperating.................................................. 11-3Coolers.............................................................................................6-2CorrosionPrevention................................................................... 13-1Corrosion,Galvanic...................................................................... 13-1Corrosion,SaltWater................................................................... 13-1CourtesyLightsSwitch...................................................................5-4Courtesy........................................................................................ 11-1Covers,Canvas(Cleaning)........................................................... 14-3Covers,Canvas................................................................................6-2Cradle,Storage............................................................................. 12-1Crossing...........................................................................................3-2CruiseControlGauge......................................................................5-4CSX220........................................................................................ 4-28CSX265........................................................................................ 4-30
Dangers,WarningsandCautions...................................................... iiDashPanels.................................................................................. 4-32DisplaySelectorSwitch...................................................................5-4DockingandTie-Up..................................................................... 11-3Documentation,Registration,Numberingand.............................1-5DualBatteryOperationSwitch......................................................5-4DuringOperation............................................................................8-1
Emergencies................................................................................. 11-1EmergencySafetyStopSwitch,Engine.........................................5-5Empty/FillSwitches,Ballast...........................................................5-3EncounteringVessels,RulesWhen................................................3-1EngineEmergencySafetyStopSwitch..........................................5-5EngineHatchSwitch.......................................................................5-5EngineMounts,Checkthe.......................................................... 17-6EngineOilPressureGauge.............................................................5-5EngineStarterGearandShaft,Lubricatethe............................ 17-5EngineSynchronizingSwitch.........................................................5-6Engine,ILMORMARINE.................................................................7-3Engine,Startingthe..................................................................... 10-1Engine,VolkswagenDiesel.............................................................7-2

2011 Owners Manual...Index...Page 24-2
Engines,Indmar..............................................................................7-2Equipment,Recommended............................................................1-6Equipment,Required......................................................................1-2Equipment,Safety...........................................................................1-2ExhaustFlaps,Inspect................................................................. 17-7ExhaustSystemforLeaks,Inspect....................................17-3,17-5FiberglassSwimPlatform(Cleaning)......................................... 14-3
FillSwitches,BallastEmpty...........................................................5-3FireExtinguisherandSuppressionUnits(Maintenance).......... 17-8FirePort...........................................................................................1-4FireSuppressionandExtinguishing..............................................1-3FireSuppressionandExtinguishing..............................................6-2FirstHoursofOperation................................................................9-1FirstTimeOperation................................................................... 11-1FishingVesselRight-of-Way...........................................................3-2FloatPlan.........................................................................................1-8FrequencyandScheduledMaintenance..................................... 16-1FuelGauge.......................................................................................5-7FuelSystemforLeaks,Inspect...........................................17-2,17-4FuelSystemTreatment................................................................ 18-1Fueling,UsingCareWhen..............................................................7-1FuelsOutsideUnitedStatesandCanada............................... 7-2,7-3
GalvanicCorrosion....................................................................... 13-1GasolinetoUse,WhatType................................................... 7-2,7-3Gauge,CruiseControl.....................................................................5-4Gauge,EngineOilPressure............................................................5-5Gauge,Fuel......................................................................................5-7Gauge,Multi-Function................................................................ 5-12Gauge,Temperature..................................................................... 5-10Gauge,VideoDisplay................................................................... 5-12GaugesandSwitches,Instrument..................................................5-1Gears,Shifting.............................................................................. 10-2GeneralCleaningandStorage..................................................... 17-5GeneralPowerPackagePreparation............................................ 18-2GeneralPrecautions........................................................................1-1GeneralPrudentialRule..................................................................3-2GPSandChartplotter.....................................................................6-3GuidetoIndividualModels............................................................4-1
HatchSwitch,Engine......................................................................5-5Head(Cleaning)........................................................................... 14-4Head.................................................................................................6-3HeatSwitches,Seat.........................................................................5-9HeaterSwitch..................................................................................5-7Heater..............................................................................................6-4Heater,Water............................................................................... 6-11Heaters,Seat...................................................................................6-7HighSpeedOperation................................................................. 11-2Hints,Operational....................................................................... 11-1Horn.................................................................................................5-7Hull(Cleaning)............................................................................. 14-1HydraulicSteeringSystem.............................................................6-5Hypothermia...................................................................................1-9
IgnitionKeySlot.............................................................................5-7ILMORMARINEEngines................................................................7-3ImmersionSuits..............................................................................1-9Impeller,CheckBallastPump...................................................... 17-7IndmarEngines...............................................................................7-2InflatableLifeRafts........................................................................1-9Inspections................................................................................... 17-5
InstrumentGaugesandSwitches...................................................5-1InstrumentPanelGaugeBacklightingSwitch...............................5-8InstrumentPanels........................................................................ 4-32iPodandMP3etc............................................................................5-1
KeySlot,Ignition............................................................................5-7KillBox/CatchBox,Livewell..........................................................6-6
Labels,WarningPlatesand............................................................1-7Ladders............................................................................................6-5LawEnforcement......................................................................... 1-10Leaks,InspectExhaustSystemfor....................................17-3,17-5Leaks,InspectFuelSystemfor...........................................17-2,17-4License,Operator’s..........................................................................1-6LifeRafts,Inflatable.......................................................................1-9LiftingEyes,Using....................................................................... 12-1LiftingSlings,Using..................................................................... 12-1LiftingtheBoat............................................................................ 12-1LightSwitch,Aft.............................................................................5-1Lighting...........................................................................................6-5LightsSwitch,Courtesy..................................................................5-4LightsSwitch,Tower.................................................................... 5-11LightsSwitch,Underwater.......................................................... 5-11LimitedWarrantyStatement...................................................... 21-1Livewell/KillBox/CatchBox...........................................................6-6Loading......................................................................................... 11-1LowVoltageBatteryAlarm.............................................................5-8
MaintenanceService,MasterCraft.............................................. 16-1Maintenance,Annual................................................................... 17-6Maintenance,Careand................................................................ 12-1Maintenance,Other..................................................................... 17-8Maintenance,Propeller................................................................ 19-1ManualandAutomaticBilgePumpSwitch...................................5-3MarineGrowth............................................................................. 13-1Markings,ReadingBuoysandOther.............................................3-2MasterCraftBoatCareProducts................................................. 15-1Measurements.............................................................................. 4-33Meeting............................................................................................3-1Mirrors.............................................................................................6-5MP3PlayerConnections................................................................5-1Multi-FunctionGauge................................................................. 5-12
NauticalCharts...............................................................................1-8Navigation/AnchorLightsSwitch..................................................5-8NewBoatBreak-In(MaintenanceService)................................. 16-1NewBoatBreak-In..........................................................................9-1NumberingandDocumentation,Registration..............................1-5
OilPressureGauge,Engine............................................................5-5OperatingConditions,Unusual.................................................. 11-3Operation,After..............................................................................8-1Operation,BeforeEach...................................................................8-1Operation,During...........................................................................8-1Operation,FirstHoursof...............................................................9-1Operation,FirstTime.................................................................. 11-1Operation,HighSpeed................................................................ 11-2Operation,StartingandBasic..................................................... 10-1OperationalHints........................................................................ 11-1Operator’sLicense...........................................................................1-6Operator’sResponsibilities.............................................................1-8OtherAlarms...................................................................................5-8OtherMaintenance...................................................................... 17-8

2011 Owners Manual...Index...Page 24-3
OtherSpecialSituations.................................................................3-2Overtaking.......................................................................................3-2OxygenatedFuelsorFuelswithAlcohol................................ 7-2,7-3
PersonalFlotationDevices(PFDs).................................................1-4PFDAccessibility.............................................................................1-4PlatesandLabels,Warning............................................................1-7Platforms,Swim/Boarding.............................................................6-9Plug’nPlay......................................................................................6-6Precautions,General......................................................................1-1Preparation......................................................................................7-1Prevention,Corrosion.................................................................. 13-1Products,MasterCraftBoatCare................................................ 15-1PropellerMaintenance................................................................. 19-1PropellerShaftCouplingAlignment........................................... 17-6PropellerShaftforWaterEntry,Inspect.................................... 17-4ProStar190......................................................................................4-2ProStar197......................................................................................4-4ProStar214V-Drive........................................................................4-8ProStar214......................................................................................4-6
Rafts,InflatableLife.......................................................................1-9Re-ActivatingBoatAfterStorage................................................ 18-3ReadingBuoysandOtherMarkings..............................................3-2Receptacle,12-Volt..........................................................................5-1RecommendedEquipment.............................................................1-6Refrigeration...................................................................................6-7RefrigeratorSwitch.........................................................................5-8Registration&Transfer,Warranty............................................. 22-1Registration,NumberingandDocumentation..............................1-5RemoteControl,iPod,etc...............................................................5-1RequiredEquipment.......................................................................1-2Responsibilities,Operator’s............................................................1-8Right-of-Way,FishingVessel..........................................................3-2Right-of-Way,Sailing......................................................................3-2Rope,Ski/Wakeboard......................................................................6-9Rule,TheGeneralPrudential..........................................................3-2RulesWhenEncounteringVessels.................................................3-1Rules/SoundSignals,SteeringandSailing....................................3-1
SafetyAfloat....................................................................................1-6SafetyChecksandServices.............................................................8-1SafetyEquipment............................................................................1-2SafetyKnowledge............................................................................1-1SafetyStopSwitch,EngineEmergency.........................................5-5Safety,SkiingandWakeboarding...................................................1-7SailingRules/SoundSignals,Steeringand....................................3-1SailingVesselRight-of-Way............................................................3-2SaltWaterCorrosion.................................................................... 13-1SeacockStrainer,Inspect............................................................. 17-1SeatHeatSwitches..........................................................................5-9SeatHeaters.....................................................................................6-7Seating.............................................................................................6-7ServiceLog................................................................................... 23-1ShaftCouplingAlignment,Propeller.......................................... 17-6ShaftLog,InspectthePropeller................................................. 17-4Shaft,LubricateEngineStarterGearand................................... 17-5ShiftandThrottleSystem,Lubricate.......................................... 17-7ShiftCables,InspectThrottleand............................................... 17-2Shift/ThrottleControl.....................................................................5-9ShiftingGears............................................................................... 10-2Showerand/orSlickBootSwitch................................................ 5-10ShowerorWashDown....................................................................6-8
SinkSwitch................................................................................... 5-10Ski/WakeboardRope.......................................................................6-9SkiingandWakeboardingSafety....................................................1-7SlickBoot(Cleaning)................................................................... 14-4SlickBootSwitch,Showerand/or............................................... 5-10Slings,UsingLifting..................................................................... 12-1SoundProducingDevices...............................................................1-5SoundSignals,SteeringandSailingRules.....................................3-1SpecialSituations,Other................................................................3-2Speedometer................................................................................. 5-10StainlessSteelandChrome......................................................... 13-1StarterGearandShaft,LubricateEngine................................... 17-5StartingandBasicOperation...................................................... 10-1StartingtheEngine...................................................................... 10-1Starting,Before............................................................................ 10-1StayingAfloat..................................................................................1-9SteeringandSailingRules/SoundSignals.....................................3-1SteeringSystem,Hydraulic............................................................6-5SteeringSystem,Lubricate.......................................................... 17-7StereoEquipment...........................................................................6-9Stopping....................................................................................... 10-3StorageandWinterization.......................................................... 18-1StorageCradle.............................................................................. 12-1Storage,GeneralCleaningand.................................................... 17-5Strainer,InspectSeacock............................................................. 17-1SurfTabSwitch............................................................................ 5-10Survival,ColdWater.......................................................................1-9Swim/BoardingPlatforms..............................................................6-9Switch,AftLight.............................................................................5-1Switch,AttitudeAdjustmentorTrimTab.....................................5-2Switch,Blower.................................................................................5-3Switch,CourtesyLights..................................................................5-4Switch,DisplaySelector..................................................................5-4Switch,DualBatteryOperation.....................................................5-4Switch,EngineEmergencySafetyStop.........................................5-5Switch,EngineHatch......................................................................5-5Switch,EngineSynchronizing........................................................5-6Switch,Heater.................................................................................5-7Switch,InstrumentPanelGaugeBacklighting..............................5-8Switch,ManualandAutomaticBilgePump..................................5-3Switch,Navigation/AnchorLights.................................................5-8Switch,Refrigerator........................................................................5-8Switch,Showerand/orSlickBoot............................................... 5-10Switch,Sink.................................................................................. 5-10Switch,SurfTab........................................................................... 5-10Switch,TowerLights.................................................................... 5-11Switch,WashDown..................................................................... 5-11Switches,Accessory........................................................................5-1Switches,BallastEmpty/Fill...........................................................5-3Switches,InstrumentGaugesand..................................................5-1Switches,SeatHeat.........................................................................5-9SynchronizingSwitch,Engine........................................................5-6
TableofContents............................................................................viiiTables............................................................................................ 6-10Tachometer................................................................................... 5-10TeakWood(Cleaning).................................................................. 14-2TemperatureGauge...................................................................... 5-10TheBIG......................................................................................... 5-15ThrottleandShiftCables,Inspect............................................... 17-2ThrottleControl,Shift....................................................................5-9Tie-Up,Dockingand.................................................................... 11-3TournamentTeam,190..................................................................4-2

2011 Owners Manual...Index...Page 24-4
TowerLightsSwitch..................................................................... 5-11Towers........................................................................................... 6-10Transfer,WarrantyRegistration................................................. 22-1Treatment,FuelSystem............................................................... 18-1TrimTabSwitch,AttitudeAdjustmentor.....................................5-2Troubleshooting........................................................................... 20-1TypeofGasolinetoUse,What............................................... 7-2,7-3
UnacceptableUpholsteryCleaners............................................. 14-5UnderwaterLightsSwitch........................................................... 5-11Underway..................................................................................... 10-3UnusualOperatingConditions................................................... 11-3Upholstery(Cleaning)................................................................. 14-1UpholsteryCleaners,Acceptable................................................. 14-4UpholsteryCleaners,Unacceptable............................................ 14-5UsingCareWhenFueling...............................................................7-1UsingLiftingEyes........................................................................ 12-1UsingLiftingSlings...................................................................... 12-1
VariationsinGaugesandSwitches............................................. 5-11VideoDisplayGauge.................................................................... 5-12VideoScreen................................................................................. 6-11VisualDistressSignals....................................................................1-5VolkswagenDieselEngine..............................................................7-2Voltmeter...................................................................................... 5-11V-Series200................................................................................. 4-12V-Series215................................................................................. 4-14V-Series225................................................................................. 4-16V-Series235................................................................................. 4-18V-Series245................................................................................. 4-20V-Series255................................................................................. 4-22V-Series280................................................................................. 4-26
WakeboardRope,Ski......................................................................6-9WakeboardingSafety,Skiingand...................................................1-7WarningPlatesandLabels.............................................................1-7WarningsandCautions,Dangers...................................................... iiWarrantyRegistration&Transfer.............................................. 22-1WarrantyStatement,Limited..................................................... 21-1WashDownSwitch...................................................................... 5-11WashDown,Showeror...................................................................6-8WaterHeater................................................................................ 6-11Weather...........................................................................................1-8WelcomeAboard................................................................................. iWhenBoatIsNotUsedforaWhile....................................... 7-2,7-3Windlass,Anchorand.....................................................................6-1Windshield(Cleaning)................................................................. 14-3WinterizationPreparations,Other............................................. 18-2Winterization,Storageand......................................................... 18-1
X-1................................................................................................. 4-10X-14..................................................................................................4-6X-14V...............................................................................................4-8X-15............................................................................................... 4-14X-2................................................................................................. 4-12X-25............................................................................................... 4-16X-35............................................................................................... 4-18X-45............................................................................................... 4-20X-55............................................................................................... 4-22X-7....................................................................................................4-4X-80............................................................................................... 4-26X-Star............................................................................................ 4-24