2011 chevrolet impala owner manual m · chevrolet impala owner manual - 2011 black plate (3,1)...
TRANSCRIPT

Black plate (1,1)Chevrolet Impala Owner Manual - 2011
2011 Chevrolet Impala Owner Manual M
In Brief . . . . . . . . . . . . . . . . . . . . . . . . 1-1Instrument Panel . . . . . . . . . . . . . . 1-2Initial Drive Information . . . . . . . . 1-3Vehicle Features . . . . . . . . . . . . . 1-14Performance andMaintenance . . . . . . . . . . . . . . . . 1-18
Keys, Doors and Windows . . . 2-1Keys and Locks . . . . . . . . . . . . . . . 2-2Doors . . . . . . . . . . . . . . . . . . . . . . . . 2-10Vehicle Security. . . . . . . . . . . . . . 2-11Exterior Mirrors . . . . . . . . . . . . . . . 2-14Interior Mirrors . . . . . . . . . . . . . . . . 2-15Windows . . . . . . . . . . . . . . . . . . . . . 2-16Roof . . . . . . . . . . . . . . . . . . . . . . . . . . 2-18
Seats and Restraints . . . . . . . . . 3-1Head Restraints . . . . . . . . . . . . . . . 3-2Front Seats . . . . . . . . . . . . . . . . . . . . 3-3Rear Seats . . . . . . . . . . . . . . . . . . . . 3-8Safety Belts . . . . . . . . . . . . . . . . . . 3-10Airbag System . . . . . . . . . . . . . . . . 3-26Child Restraints . . . . . . . . . . . . . . 3-42
Storage . . . . . . . . . . . . . . . . . . . . . . . 4-1Storage Compartments . . . . . . . . 4-1Additional Storage Features . . . 4-2
Instruments and Controls . . . . 5-1Controls . . . . . . . . . . . . . . . . . . . . . . . 5-2Warning Lights, Gauges, andIndicators . . . . . . . . . . . . . . . . . . . 5-10
Information Displays . . . . . . . . . . 5-26Vehicle Messages . . . . . . . . . . . . 5-30Vehicle Personalization . . . . . . . 5-39Universal Remote System . . . . 5-45
Lighting . . . . . . . . . . . . . . . . . . . . . . . 6-1Exterior Lighting . . . . . . . . . . . . . . . 6-1Interior Lighting . . . . . . . . . . . . . . . . 6-5Lighting Features . . . . . . . . . . . . . . 6-6
Infotainment System . . . . . . . . . 7-1Introduction . . . . . . . . . . . . . . . . . . . . 7-1Radio . . . . . . . . . . . . . . . . . . . . . . . . . . 7-6Audio Players . . . . . . . . . . . . . . . . 7-15Phone . . . . . . . . . . . . . . . . . . . . . . . . 7-21
Climate Controls . . . . . . . . . . . . . 8-1Climate Control Systems . . . . . . 8-1Air Vents . . . . . . . . . . . . . . . . . . . . . . . 8-5Maintenance . . . . . . . . . . . . . . . . . . . 8-5
Driving and Operating . . . . . . . . 9-1Driving Information . . . . . . . . . . . . . 9-2Starting and Operating . . . . . . . 9-17Engine Exhaust . . . . . . . . . . . . . . 9-24Automatic Transmission . . . . . . 9-25Brakes . . . . . . . . . . . . . . . . . . . . . . . 9-28Ride Control Systems . . . . . . . . 9-29Cruise Control . . . . . . . . . . . . . . . . 9-32Fuel . . . . . . . . . . . . . . . . . . . . . . . . . . 9-35Towing . . . . . . . . . . . . . . . . . . . . . . . 9-41Conversions and Add-Ons . . . 9-48
Vehicle Care . . . . . . . . . . . . . . . . . 10-1General Information . . . . . . . . . . 10-2Vehicle Checks . . . . . . . . . . . . . . . 10-4Headlamp Aiming . . . . . . . . . . . 10-32Bulb Replacement . . . . . . . . . . 10-33

Black plate (2,1)Chevrolet Impala Owner Manual - 2011
2011 Chevrolet Impala Owner Manual M
Electrical System . . . . . . . . . . . . 10-37Wheels and Tires . . . . . . . . . . . 10-42Jump Starting . . . . . . . . . . . . . . . 10-75Towing . . . . . . . . . . . . . . . . . . . . . . 10-79Appearance Care . . . . . . . . . . . 10-81
Service and Maintenance . . . 11-1General Information . . . . . . . . . . 11-1Scheduled Maintenance . . . . . . 11-2Recommended Fluids,Lubricants, and Parts . . . . . . . 11-6
Maintenance Records . . . . . . . . 11-9
Technical Data . . . . . . . . . . . . . . . 12-1Vehicle Identification . . . . . . . . . 12-1Vehicle Data . . . . . . . . . . . . . . . . . . 12-2
Customer Information . . . . . . . 13-1Customer Information . . . . . . . . 13-1Reporting Safety Defects . . . . 13-14Vehicle Data Recording andPrivacy. . . . . . . . . . . . . . . . . . . . 13-15
Index . . . . . . . . . . . . . . . . . . . . . i-1
Black plate (3,1)Chevrolet Impala Owner Manual - 2011
Introduction iii
The names, logos, emblems,slogans, vehicle model names,and vehicle body designs appearingin this manual including, butnot limited to, GM, the GM logo,CHEVROLET, the CHEVROLETEmblem, IMPALA, and the IMPALAEmblem are trademarks and/orservice marks of General MotorsLLC, its subsidiaries, affiliates,or licensors.
This manual describes featuresthat may or may not be on yourspecific vehicle either becausethey are options that you didnot purchase or due to changessubsequent to the printing of thisowner manual. Please refer to thepurchase documentation relatingto your specific vehicle to confirmeach of the features found on yourvehicle. For vehicles first soldin Canada, substitute the name"General Motors of Canada Limited"for Chevrolet Motor Divisionwherever it appears in this manual.
Keep this manual in the vehicle forquick reference.
Canadian Vehicle Owners
Propriétaires Canadiens
A French language copy of thismanual can be obtained from yourdealer or from:
On peut obtenir un exemplaire dece guide en français auprès duconcessionnaire ou à l'adressesuivante:
Helm, IncorporatedP.O. Box 07130Detroit, MI 48207
1-800-551-4123Numéro de poste 6438de langue françaisewww.helminc.com
Litho in U.S.A.Part No. 20782813 B Second Printing ©2010 General Motors LLC. All Rights Reserved.

Black plate (4,1)Chevrolet Impala Owner Manual - 2011
iv Introduction
Using this ManualTo quickly locate informationabout the vehicle, use the Indexin the back of the manual. It is analphabetical list of what is in themanual and the page numberwhere it can be found.
Danger, Warnings, andCautionsWarning messages found on vehiclelabels and in this manual describehazards and what to do to avoid orreduce them.
Danger indicates a hazard with ahigh level of risk which will result inserious injury or death.
Warning or Caution indicates ahazard that could result in injury ordeath.
{ WARNING
These mean there is somethingthat could hurt you or otherpeople.
Notice: This means there issomething that could resultin property or vehicle damage.This would not be covered bythe vehicle's warranty.
A circle with a slash through itis a safety symbol which means“Do Not,” “Do not do this,” or“Do not let this happen.”
SymbolsThe vehicle has components andlabels that use symbols instead oftext. Symbols are shown along withthe text describing the operationor information relating to a specificcomponent, control, message,gauge, or indicator.
M : This symbol is shown whenyou need to see your owner manualfor additional instructions orinformation.
* : This symbol is shown whenyou need to see a service manualfor additional instructions orinformation.

Black plate (5,1)Chevrolet Impala Owner Manual - 2011
Introduction v
Vehicle Symbol Chart
Here are some additional symbolsthat may be found on the vehicleand what they mean. For moreinformation on the symbol, referto the Index.
9 : Airbag Readiness Light
# : Air Conditioning
! : Antilock Brake System (ABS)
% : Audio Steering Wheel Controlsor OnStar®
$ : Brake System Warning Light
" : Charging System
I : Cruise Control
B : Engine Coolant Temperature
O : Exterior Lamps
# : Fog Lamps
. : Fuel Gauge
+ : Fuses
3 : Headlamp High/Low-BeamChanger
j : LATCH System ChildRestraints
* : Malfunction Indicator Lamp
: : Oil Pressure
} : Power
/ : Remote Vehicle Start
> : Safety Belt Reminders
7 : Tire Pressure Monitor
d : Traction Control
M : Windshield Washer Fluid

Black plate (6,1)Chevrolet Impala Owner Manual - 2011
vi Introduction
2 NOTES

Black plate (1,1)Chevrolet Impala Owner Manual - 2011
In Brief 1-1
In Brief
Instrument PanelInstrument Panel . . . . . . . . . . . . . . 1-2
Initial Drive InformationInitial Drive Information . . . . . . . . 1-3Remote Keyless Entry (RKE)System . . . . . . . . . . . . . . . . . . . . . . 1-4
Remote Vehicle Start . . . . . . . . . 1-4Door Locks . . . . . . . . . . . . . . . . . . . 1-5Trunk Release . . . . . . . . . . . . . . . . 1-5Windows . . . . . . . . . . . . . . . . . . . . . . 1-6Seat Adjustment . . . . . . . . . . . . . . 1-6Second Row Seats . . . . . . . . . . . 1-8Head Restraint Adjustment . . . . 1-8Safety Belts . . . . . . . . . . . . . . . . . . . 1-8
Sensing System for PassengerAirbag . . . . . . . . . . . . . . . . . . . . . . . 1-8
Mirror Adjustment . . . . . . . . . . . . . 1-9Steering WheelAdjustment . . . . . . . . . . . . . . . . . 1-10
Interior Lighting . . . . . . . . . . . . . . 1-10Exterior Lighting . . . . . . . . . . . . . 1-10Windshield Wiper/Washer . . . . 1-11Climate Controls . . . . . . . . . . . . . 1-12
Vehicle FeaturesRadio(s) . . . . . . . . . . . . . . . . . . . . . 1-14Satellite Radio . . . . . . . . . . . . . . . 1-15Portable Audio Devices . . . . . . 1-16Bluetooth® . . . . . . . . . . . . . . . . . . . 1-16Steering Wheel Controls . . . . . 1-16Cruise Control . . . . . . . . . . . . . . . 1-17Power Outlets . . . . . . . . . . . . . . . 1-18
Performance and MaintenanceTraction ControlSystem (TCS) . . . . . . . . . . . . . . 1-18
Electronic StabilityControl (ESC) . . . . . . . . . . . . . . 1-19
Tire Pressure Monitor . . . . . . . . 1-19Engine Oil Life System . . . . . . 1-20Fuel E85 (85% Ethanol) . . . . . 1-20Driving for Better FuelEconomy . . . . . . . . . . . . . . . . . . . 1-20
Roadside AssistanceProgram . . . . . . . . . . . . . . . . . . . . 1-21
OnStar® . . . . . . . . . . . . . . . . . . . . . 1-21
Black plate (2,1)Chevrolet Impala Owner Manual - 2011
1-2 In Brief
Instrument Panel

Black plate (3,1)Chevrolet Impala Owner Manual - 2011
In Brief 1-3
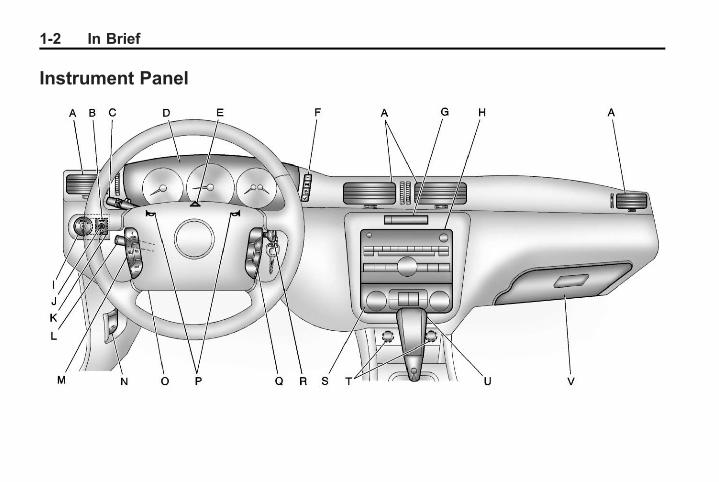
A. Air Vents on page 8‑5.
B. Remote Trunk Release Button.See Trunk on page 2‑10.
C. Turn and Lane-Change Signalson page 6‑4.
D. Instrument Cluster onpage 5‑11.
E. Hazard Warning Flashers onpage 6‑4.
F. Driver Information Center (DIC)on page 5‑26.
G. Passenger Airbag StatusIndicator on page 5‑16.
H. Infotainment on page 7‑1.
I. Exterior Lamp Controls onpage 6‑1.
J. Instrument Panel IlluminationControl on page 6‑5.
K. Traction Control System (TCS)on page 9‑29 (If Equipped).
L. Steering Wheel Adjustment onpage 5‑2.
M. Cruise Control on page 9‑32.
N. Hood Release. See Hood onpage 10‑5.
O. Data Link Connector (DLC)(Out of View). See MalfunctionIndicator Lamp on page 5‑17.
P. Horn on page 5‑3.
Q. Steering Wheel Controls onpage 5‑3 (If Equipped).
R. Ignition Positions on page 9‑17.
S. Climate Control Systems onpage 8‑1.
T. Power Outlets on page 5‑8.
U. Center Console Shift Lever(If Equipped). See Shifting IntoPark on page 9‑21.
V. Glove Box on page 4‑1.
Initial DriveInformationThis section provides a briefoverview about some of theimportant features that may ormay not be on your specificvehicle.
For more detailed information, referto each of the features which can befound later in this owner manual.

Black plate (4,1)Chevrolet Impala Owner Manual - 2011
1-4 In Brief
Remote KeylessEntry (RKE) SystemThe RKE transmitter is used toremotely lock and unlock the doorsfrom up to 60 m (195 ft) away fromthe vehicle.
Press K to unlock the driver door.Press again within five seconds tounlock all remaining doors.
Press Q to lock all doors.
Lock and unlock feedback canbe personalized. See VehiclePersonalization on page 5‑39for additional information.
Press and holdV forapproximately one secondto open the trunk.
PressL and release to locate thevehicle.
PressL and hold for more thantwo seconds to sound the panicalarm.
PressL again to cancel the panicalarm.
See Keys on page 2‑2 and RemoteKeyless Entry (RKE) SystemOperation on page 2‑3.
Remote Vehicle StartWith this feature the engine can bestarted from outside of the vehicle.
Starting the Vehicle
1. Aim the RKE transmitter at thevehicle.
2. Press Q.3. Immediately after completing
Step 2, press and hold/ untilthe turn signal lamps flash.
When the vehicle starts, the parkinglamps will turn on and remain onas long as the engine is running.The doors will be locked andthe climate control system maycome on.
The engine will continue to run for10 minutes. Repeat the steps for a10-minute time extension. Remotestart can be extended only once.

Black plate (5,1)Chevrolet Impala Owner Manual - 2011
In Brief 1-5
Canceling a Remote Start
To cancel a remote start:. Aim the RKE transmitter
at the vehicle and press andhold/ until the parking lampsturn off.
. Turn on the hazard warningflashers.
. Turn the ignition on and thenback off.
See Remote Vehicle Start onpage 2‑5.
Door Locks
Manual Locks
From outside the vehicle, usethe key in the door or the RemoteKeyless Entry (RKE) transmitter tolock or unlock the vehicle. From theinside, pull up or push down on themanual door lock knobs.
See Door Locks on page 2‑7.
Power Door Locks
Power door lock switches arelocated on the front doors nearthe handle.
Q : Press the bottom of the switchto lock all doors.
K : Press the top of the switch tounlock all doors.
For more information, see:. Power Door Locks on page 2‑8.. Delayed Locking on page 2‑8.
Trunk ReleaseIn addition to the trunk releasebutton on the RKE transmitter, thereis a remote releaseV buttonlocated on the left side of theinstrument panel.
For more information, see Trunk onpage 2‑10.

Black plate (6,1)Chevrolet Impala Owner Manual - 2011
1-6 In Brief
Windows
The power window switchesare on the driver door armrest.Each passenger door has a switchthat controls only that window.
Press the front of the switch to thefirst position to open the window.Pull the switch up to close it.
For more information, see PowerWindows on page 2‑16.
Seat Adjustment
Manual Seats
To adjust a manual seat:
1. Lift the bar under the front edgeof the seat cushion to unlockthe seat.
2. Slide the seat to the desiredposition and release the bar.
3. Try to move the seat back andforth to be sure the seat islocked in place.
See Seat Adjustment on page 3‑3.
To adjust the seatback, see “ManualReclining Seatbacks” underReclining Seatbacks on page 3‑5.

Black plate (7,1)Chevrolet Impala Owner Manual - 2011
In Brief 1-7
Power Seats
To adjust a power seat, if equipped:. Move the seat forward or
rearward by sliding the controlforward or rearward.
. Raise or lower the front or rearof the seat cushion by movingthe front or rear of the controlup or down.
See Power Seat Adjustment onpage 3‑4.
Power Reclining Seatback
To adjust a power seatback,if equipped:. Tilt the top of the control
rearward to recline.. Tilt the top of the control forward
to raise.
See “Power Reclining Seatbacks”under Reclining Seatbacks onpage 3‑5.
Manual Lumbar
Move the lever up or down toincrease or decrease lumbarsupport.
See Lumbar Adjustment onpage 3‑4 for more information.

Black plate (8,1)Chevrolet Impala Owner Manual - 2011
1-8 In Brief
Second Row SeatsOn vehicles with the flip and foldfeature, the bottom seat cushionscan be flipped forward and theseatback folded down to createan extended cargo area.
The vehicle also has an under seatstorage area.
See Rear Seats (Split Folding) onpage 3‑8 for more information.
Head RestraintAdjustmentDo not drive until the head restraintsfor all occupants are installed andadjusted properly.
To achieve a comfortable seatingposition, change the seatbackrecline angle as little as necessarywhile keeping the seat and thehead restraint height in the properposition.
For more information see HeadRestraints on page 3‑2 and SeatAdjustment on page 3‑3.
Safety Belts
Refer to the following sections forimportant information on how to usesafety belts properly.. Safety Belts on page 3‑10.. How to Wear Safety Belts
Properly on page 3‑14.. Lap-Shoulder Belt on page 3‑19.
. Lap Belt on page 3‑23.
. Lower Anchors and Tethers forChildren (LATCH System) onpage 3‑51.
Sensing System forPassenger AirbagThe passenger sensing system willturn off the right front passengerfrontal airbag under certainconditions. The driver airbags,seat‐side impact airbags, androof‐rail airbags are not affectedby this.
The passenger airbag statusindicator will be visible on theinstrument panel when the vehicleis started.

Black plate (9,1)Chevrolet Impala Owner Manual - 2011
In Brief 1-9
United States
Canada
See Passenger Sensing System onpage 3‑34 for important information.
Mirror Adjustment
Exterior Mirrors
Controls for the outside powermirrors are on the driver doorarmrest.
Press the left or right side ofthe selector located above thecontrol pad to adjust the driveror passenger mirror. Then pressthe control pad to move the mirrorin the desired direction.
See Power Mirrors on page 2‑14.
Interior Mirror
Vehicles with a manual rearviewmirror can be adjusted by holdingthe mirror in the center to moveit for a clearer view behind thevehicle. Adjust the mirror to avoidglare from the headlamps behind.Pull the lever, located at the bottomof the mirror for nighttime use.Return the lever to its originalposition for the day position.
See Manual Rearview Mirror onpage 2‑15.
On vehicles with an automaticdimming rearview mirror, the mirrorwill automatically adjust to reducethe glare of lights from behind thevehicle. See Automatic DimmingRearview Mirror on page 2‑15.

Black plate (10,1)Chevrolet Impala Owner Manual - 2011
1-10 In Brief
Steering WheelAdjustment
The tilt wheel lever is located on theleft side of the steering column.
To adjust the steering wheel:
1. Hold the wheel and pull the levertoward you.
2. Move the steering wheel upor down.
3. Release the lever to lock thesteering wheel in place.
Do not adjust the steering wheelwhile driving.
Interior LightingDome Lamp
The center mounted dome lampoverhead comes on when a dooris opened. This lamp can also beturned on by turning the instrumentpanel brightness control clockwise.
Reading Lamps
The vehicle has reading lamps thatalso act as the dome lamp. Pressthe button near each lamp to turnthem on and off.
Map Lamps
The vehicle has map lamps on therearview mirror. Push the buttonnear each lamp to turn the maplamps on and off.
For more information on interiorlighting, see:. Exterior Lighting on page 1‑10.. Courtesy Lamps on page 6‑5.
. Delayed Entry Lighting onpage 6‑7.
. Delayed Exit Lighting onpage 6‑7.
. Parade Dimming on page 6‑7.
Exterior Lighting
The exterior lamps control is locatedon the instrument panel to the left ofthe steering wheel.

Black plate (11,1)Chevrolet Impala Owner Manual - 2011
In Brief 1-11
P : Briefly turn to this positionto manually turn the automaticlamp control and Daytime RunningLamps (DRL) off or on. For vehiclesfirst sold in Canada, the off positiononly works when the vehicle isshifted into the P (Park) position.
AUTO: Automatically operates theheadlamps and other exterior lampsat normal brightness.
; : Turns on the parking lampsand taillamps.
2 : Turns on the headlamps andother exterior lamps.
# : (If Equipped) Turns on the foglamps.
For more information, see:. Exterior Lamp Controls on
page 6‑1.. Fog Lamps on page 6‑5.. Daytime Running Lamps (DRL)/
Automatic Headlamp System onpage 6‑3.
Windshield Wiper/Washer
The lever is located on the left sideof the steering column.
8 : Single wipe, turn to8, thenrelease. Several wipes, hold theband on8 longer.
9 : Turns the windshieldwipers off.
6 : Turn the band up for morefrequent wipes or down for lessfrequent wipes.
6 : Slow wipes.
? : Fast wipes.
Windshield Washer
Push the paddleL at the top of thelever to spray washer fluid on thewindshield.
See Windshield Wiper/Washer onpage 5‑4.

Black plate (12,1)Chevrolet Impala Owner Manual - 2011
1-12 In Brief
Climate ControlsThis vehicle may have a dual or single climate control system. The heating,cooling, defrost, defog, and ventilation can be controlled with either of thesesystems.
Dual Zone with Optional Heated Seat Controls
A. Fan Control
B. Outside Air
C. Recirculation
D. Air Delivery Mode Control
E. Air Conditioning
F. Driver and Passenger HeatedSeats
G. Driver and PassengerTemperature Controls
H. Rear Window Defogger

Black plate (13,1)Chevrolet Impala Owner Manual - 2011
In Brief 1-13
Single Zone
A. Fan Control
B. Outside Air
C. Temperature Control
D. Recirculation
E. Air Delivery Mode Control
F. Air Conditioning
G. Rear Window Defogger
See Climate Control Systems onpage 8‑1.

Black plate (14,1)Chevrolet Impala Owner Manual - 2011
1-14 In Brief
Vehicle Features
Radio(s)
Radio with CD (MP3)
O : Press to turn the system onand off. Turn to increase ordecrease the volume.
BAND: Press to choose betweenFM, AM, or XM™, if equipped.
f : Select radio stations.
© ¨ : Seek or scan stations.
4 : Press to display additional textinformation related to the currentFM-RDS or XM station; or CD,MP3, or WMA song. If informationis available during XM, CD, MP3,or WMA playback, the song titleinformation displays on the topline of the display and artistinformation displays on the bottomline. When information is notavailable, “No Info” displays.
For more information about theseand other radio features, seeInfotainment on page 7‑1.
Black plate (15,1)Chevrolet Impala Owner Manual - 2011
In Brief 1-15
Storing a Favorite Station
Depending on which radio thevehicle has, radio stations arestored as either favorites orpresets.
For radios with a FAV button,a maximum of 36 stations canbe stored as favorites using the6 softkeys located below the radiostation frequency tabs and by usingthe radio FAV button. Press FAVto go through up to 6 pages offavorites, each having 6 favoritestations available per page. Eachpage of favorites can contain anycombination of AM, FM, or XMstations.
For radios without a FAV button, upto 18 stations (6 FM1, 6 FM2, and6 AM), can be programmed on the6 numbered buttons.
See Operation on page 7‑2.
Setting the Clock
To set the time and date for theRadio with CD (MP3):
1. Turn the radio on.
2. Press H and the HR, MIN, MM,DD, and YYYY (hour, minute,month, day, and year) display.
3. Press the pushbutton locatedbelow any one of the tabs thatyou want to change.
4. Increase or decrease the time ordate by turning f clockwise orcounterclockwise.
For detailed instructions on settingthe clock for your specific audiosystem, see Clock on page 5‑7.
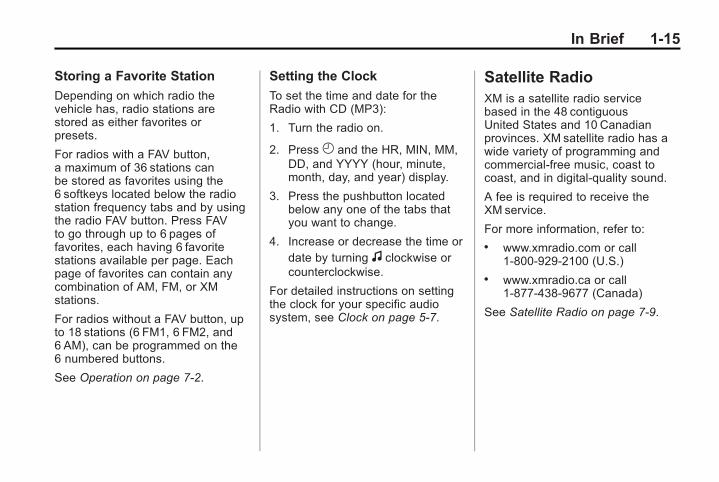
Satellite RadioXM is a satellite radio servicebased in the 48 contiguousUnited States and 10 Canadianprovinces. XM satellite radio has awide variety of programming andcommercial-free music, coast tocoast, and in digital-quality sound.
A fee is required to receive theXM service.
For more information, refer to:. www.xmradio.com or call
1-800-929-2100 (U.S.). www.xmradio.ca or call
1-877-438-9677 (Canada)
See Satellite Radio on page 7‑9.

Black plate (16,1)Chevrolet Impala Owner Manual - 2011
1-16 In Brief
Portable Audio DevicesThis vehicle may have an auxiliaryinput jack, located on the audiofaceplate. External devices suchas iPods®, MP3 players, etc. canbe connected to the auxiliary inputjack using a 3.5 mm (1/8 in) inputjack cable.
See “Using the Auxiliary InputJack” under Auxiliary Devices onpage 7‑21.
Bluetooth®
For vehicles with a Bluetoothsystem, it allows users with aBluetooth‐enabled cell phone tomake and receive hands-free callsusing the vehicle’s audio systemand controls.
The Bluetooth‐enabled cell phonemust be paired with the Bluetoothsystem before it can be used in thevehicle. Not all phones will supportall functions. For more information,visit www.gm.com/bluetooth.
For more information, see Bluetoothon page 7‑21.
Steering Wheel Controls
If equipped, these controls arelocated on the right side of thesteering wheel.
w : Press to go to the next radiostation stored as a favorite, or thenext track if a CD is playing.

Black plate (17,1)Chevrolet Impala Owner Manual - 2011
In Brief 1-17
b g : Press to silence the vehiclespeakers only. Press again to turnthe sound on. Press and hold longerthan two seconds to interact withthe OnStar® or Bluetooth systems,if equipped.
cx : Press to go to theprevious radio station stored as afavorite, the next track if a CD isplaying, reject an incoming call,or end a current call.
SRCE : Press to choose betweenthe radio, CD, and auxiliaryinput jack.
+ e − e : Press to increase ordecrease volume.
¨ : Press to go to the next radiostation while in AM, FM, or XM.Press to go to the next track orchapter while sourced to the CD.
For more information, see SteeringWheel Controls on page 5‑3.
Cruise Control
The cruise control buttons arelocated on the left side of thesteering wheel.
J : Press to turn cruise control onand off. The indicator is lit whencruise control is on.
+RES: Press briefly to make thevehicle resume to a previouslyset speed, or press and hold toaccelerate.
SET−: Press to set the speed andactivate cruise control or make thevehicle decelerate.
[ : Press to disengage cruisecontrol without erasing the setspeed from memory.
For more information, see CruiseControl on page 9‑32.

Black plate (18,1)Chevrolet Impala Owner Manual - 2011
1-18 In Brief
Power OutletsThe vehicle has three 12‐voltoutlets which can be used to plugin electrical equipment, such as acell phone or MP3 player.
On vehicles with a center console,one outlet is located insidethe center floor console andtwo outlets are located at thefront of the console bin underthe instrument panel.
On vehicles without a centerconsole, two are located under theclimate controls and another outletfor the rear seat passengers is atthe rear of the center front seat.
Remove the cover to access andreplace when not in use.
See Power Outlets on page 5‑8.
Performance andMaintenance
Traction ControlSystem (TCS)The vehicle may have a tractioncontrol system which limitswheel spin. The system turnson automatically every time thevehicle is started.. For vehicles with traction control,
press and release i on theinstrument panel to turn offtraction control. F illuminatesand the appropriate DICmessage displays. See RideControl System Messages onpage 5‑35.
. For vehicles with traction controland electronic stability control,press and release 5 on theinstrument panel to turn offtraction control. F illuminatesand the appropriate DICmessage displays. See RideControl System Messages onpage 5‑35.
. Press and release the buttonagain to turn on traction control.
For more information, see TractionControl System (TCS) onpage 9‑29.
Black plate (19,1)Chevrolet Impala Owner Manual - 2011
In Brief 1-19
Electronic StabilityControl (ESC)The Electronic Stability Controlsystem assists with directionalcontrol of the vehicle in difficultdriving conditions. The systemturns on automatically every timethe vehicle is started.. To turn off both traction
control and ElectronicStability Control, press andhold 5 on the instrument
panel until F illuminates andthe appropriate DIC messagedisplays. See Ride ControlSystem Messages on page 5‑35.
. Press and release the buttonagain to turn on both systems.
For more information, see ElectronicStability Control (ESC) onpage 9‑31.
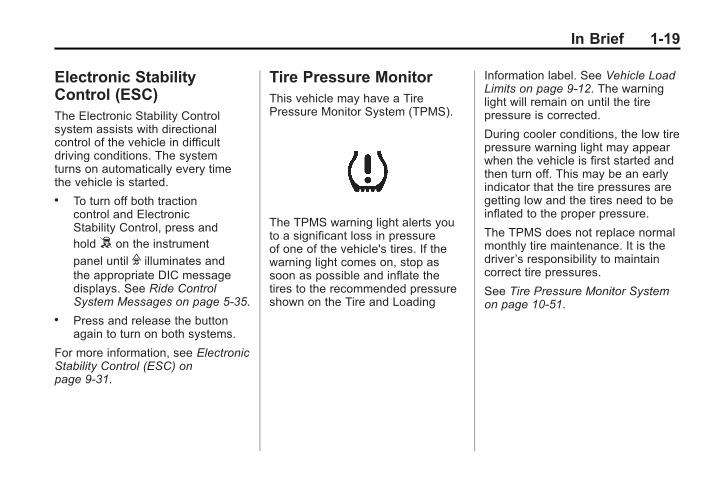
Tire Pressure MonitorThis vehicle may have a TirePressure Monitor System (TPMS).
The TPMS warning light alerts youto a significant loss in pressureof one of the vehicle's tires. If thewarning light comes on, stop assoon as possible and inflate thetires to the recommended pressureshown on the Tire and Loading
Information label. See Vehicle LoadLimits on page 9‑12. The warninglight will remain on until the tirepressure is corrected.
During cooler conditions, the low tirepressure warning light may appearwhen the vehicle is first started andthen turn off. This may be an earlyindicator that the tire pressures aregetting low and the tires need to beinflated to the proper pressure.
The TPMS does not replace normalmonthly tire maintenance. It is thedriver’s responsibility to maintaincorrect tire pressures.
See Tire Pressure Monitor Systemon page 10‑51.

Black plate (20,1)Chevrolet Impala Owner Manual - 2011
1-20 In Brief
Engine Oil Life SystemThe engine oil life system calculatesengine oil life based on vehicle useand displays a DIC message whenit is necessary to change the engineoil and filter. The oil life systemshould be reset to 100% onlyfollowing an oil change.
Resetting the Oil Life System
1. Display OIL LIFE REMAININGon the DIC.
2. Press and hold the SET/RESETbutton on the DIC for more thanfive seconds. The oil life willchange to 100%.
See Engine Oil Life System onpage 10‑11.
Fuel E85 (85% Ethanol)Vehicles that have a FlexFuel badgeand a yellow fuel cap can use eitherunleaded gasoline or ethanol fuelcontaining up to 85% ethanol (E85).See Fuel E85 (85% Ethanol) onpage 9‑38. For all other vehicles,use only the unleaded gasolinedescribed under RecommendedFuel on page 9‑35.
Driving for Better FuelEconomyDriving habits can affect fuelmileage. Here are some drivingtips to get the best fuel economypossible.. Avoid fast starts and accelerate
smoothly.. Brake gradually and avoid
abrupt stops.
. Avoid idling the engine for longperiods of time.
. When road and weatherconditions are appropriate,use cruise control.
. Always follow posted speedlimits or drive more slowly whenconditions require.
. Keep vehicle tires properlyinflated.
. Combine several trips into asingle trip.
. Replace the vehicle's tires withthe same TPC Spec numbermolded into the tire's sidewallnear the size.
. Follow recommended scheduledmaintenance.
Black plate (21,1)Chevrolet Impala Owner Manual - 2011
In Brief 1-21
Roadside AssistanceProgramU.S.: 1-800-243-8872
TTY Users: 1-888-889-2438
Canada: 1-800-268-6800
As the owner of a new Chevrolet,you are automatically enrolled inthe Roadside Assistance program.
See Roadside Assistance Programon page 13‑6 for more information.
Roadside Assistance and OnStar
If you have an active OnStarsubscription, press theQ buttonand the current GPS location willbe sent to an OnStar advisor whowill assess your problem, contactRoadside Assistance, and relayyour exact location to get the helpyou need.
Online Owner Center
The Online Owner Center is acomplimentary service that includesonline service reminders, vehiclemaintenance tips, online ownermanual, special privileges,and more.
Sign up today at:www.chevyownercenter.com(U.S.) or www.gm.ca (Canada).
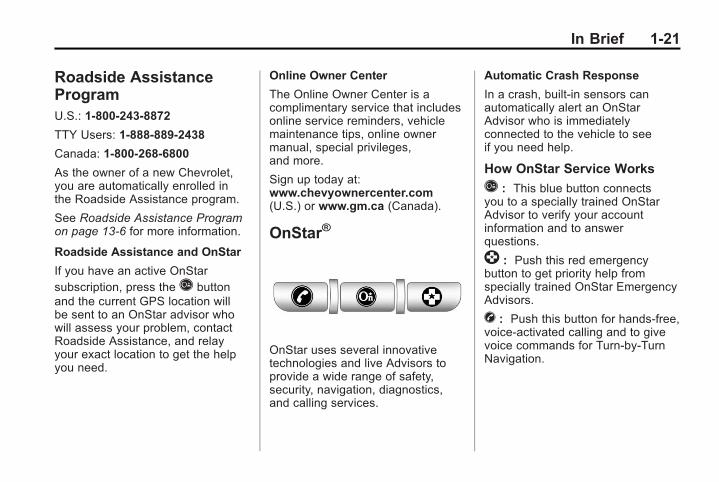
OnStar®
OnStar uses several innovativetechnologies and live Advisors toprovide a wide range of safety,security, navigation, diagnostics,and calling services.
Automatic Crash Response
In a crash, built‐in sensors canautomatically alert an OnStarAdvisor who is immediatelyconnected to the vehicle to seeif you need help.
How OnStar Service Works
Q : This blue button connectsyou to a specially trained OnStarAdvisor to verify your accountinformation and to answerquestions.
] : Push this red emergencybutton to get priority help fromspecially trained OnStar EmergencyAdvisors.
X : Push this button for hands‐free,voice‐activated calling and to givevoice commands for Turn‐by‐TurnNavigation.
Black plate (22,1)Chevrolet Impala Owner Manual - 2011
1-22 In Brief
Crisis Assist, Stolen VehicleAssistance, Vehicle Diagnostics,Remote Door Unlock, RoadsideAssistance, Turn‐by‐TurnNavigation, and Hands‐FreeCalling are available on mostvehicles. Not all OnStar servicesare available on all vehicles.For more information see theOnStar Owner's Guide or visitwww.onstar.com (U.S.) orwww.onstar.ca (Canada), contactOnStar at 1-888-4-ONSTAR(1‐888‐466‐7827) or TTY1‐877‐248‐2080, or pushQ tospeak with an OnStar Advisor24 hours a day, 7 days a week.
For a full description of OnStarservices and system limitations,see the OnStar Owner's Guidein the glove box.
OnStar service is subject to theOnStar Terms and Conditionsincluded in the OnStar GloveBox Kit.
OnStar service requires wirelesscommunication networks and theGlobal Positioning System (GPS)satellite network. Not all OnStarservices are available everywhereor on all vehicles at all times.
OnStar service can’t work unlessyour vehicle is in a place whereOnStar has an agreement witha wireless service provider forservice in that area, and thewireless service provider hascoverage, network capacity,reception, and technologycompatible with OnStar service.Service involving locationinformation about your vehiclecan’t work unless GPS signalsare available, unobstructed,and compatible with the OnStarhardware. The vehicle has to havea working electrical system andadequate battery power for theOnStar equipment to operate.
OnStar service may not work if theOnStar equipment isn’t properlyinstalled or you haven’t maintainedit and your vehicle is in goodworking order and in compliancewith all government regulations.If you try to add, connect, or modifyany equipment or software in yourvehicle, OnStar service may notwork. Other problems OnStar can’tcontrol may prevent service to you,such as hills, tall buildings, tunnels,weather, electrical system designand architecture of your vehicle,damage to important parts of yourvehicle in a crash, or wireless phonenetwork congestion or jamming.
See Radio Frequency Statement onpage 13‑17 for informationregarding Part 15 of the FederalCommunications Commission(FCC) rules and Industry CanadaStandards RSS-210/220/310.

Black plate (23,1)Chevrolet Impala Owner Manual - 2011
In Brief 1-23
OnStar Steering WheelControls
This vehicle may havea b g /cx Talk/Mute buttonthat can be used to interact withOnStar Hands-Free Calling.See Steering Wheel Controls onpage 5‑3 for more information.
On some vehicles, the mute buttoncan be used to dial numbers intovoice mail systems, or to dial phoneextensions. See the OnStar Owner'sGuide for more information.
Your Responsibility
Increase the volume of the radioif the OnStar Advisor cannot beheard.
If the light next to the OnStarbuttons is red, the systemmay not be functioningproperly. PushQ and requesta vehicle diagnostic check.If the light appears clear(no light is appearing), yourOnStar subscription has expiredand all services have beendeactivated. PushQ to confirmthat the OnStar equipment is active.
OnStar®
If the vehicle is equipped with anactive OnStar system, that systemmay also record data in crashor near crash-like situations.The OnStar Terms and Conditionsprovides information on datacollection and use and is availablein the OnStar Glove Box Kit,at www.onstar.com (U.S.) orwww.onstar.ca (Canada), or bypushingQ and speaking to anAdvisor.

Black plate (24,1)Chevrolet Impala Owner Manual - 2011
1-24 In Brief
2 NOTES

Black plate (1,1)Chevrolet Impala Owner Manual - 2011
Keys, Doors and Windows 2-1
Keys, Doors andWindows
Keys and LocksKeys . . . . . . . . . . . . . . . . . . . . . . . . . . 2-2Remote Keyless Entry (RKE)System . . . . . . . . . . . . . . . . . . . . . . 2-2
Remote Keyless Entry (RKE)System Operation . . . . . . . . . . . 2-3
Remote Vehicle Start . . . . . . . . . 2-5Door Locks . . . . . . . . . . . . . . . . . . . 2-7Power Door Locks . . . . . . . . . . . . 2-8Delayed Locking . . . . . . . . . . . . . . 2-8Automatic Door Locks . . . . . . . . . 2-8Lockout Protection . . . . . . . . . . . . 2-9Safety Locks . . . . . . . . . . . . . . . . . . 2-9
DoorsTrunk . . . . . . . . . . . . . . . . . . . . . . . . 2-10
Vehicle SecurityVehicle Security . . . . . . . . . . . . . . 2-11Anti-Theft Alarm System . . . . . 2-11Immobilizer . . . . . . . . . . . . . . . . . . 2-12Immobilizer Operation . . . . . . . 2-12
Exterior MirrorsConvex Mirrors . . . . . . . . . . . . . . 2-14Power Mirrors . . . . . . . . . . . . . . . . 2-14Heated Mirrors . . . . . . . . . . . . . . . 2-15
Interior MirrorsManual Rearview Mirror . . . . . . 2-15Automatic Dimming RearviewMirror . . . . . . . . . . . . . . . . . . . . . . . 2-15
WindowsWindows . . . . . . . . . . . . . . . . . . . . . 2-16Power Windows . . . . . . . . . . . . . 2-16Sun Visors . . . . . . . . . . . . . . . . . . . 2-17
RoofSunroof . . . . . . . . . . . . . . . . . . . . . . 2-18

Black plate (2,1)Chevrolet Impala Owner Manual - 2011
2-2 Keys, Doors and Windows
Keys and Locks
Keys
{ WARNING
Leaving children in a vehicle withthe ignition key is dangerous formany reasons. Children or otherscould be badly injured or evenkilled. They could operate thepower windows or other controlsor even make the vehicle move.The windows will function with thekeys in the ignition and childrencould be seriously injured or killedif caught in the path of a closingwindow. Do not leave the keys ina vehicle with children.
The key can be used for the ignitionand the driver's door. If the vehicleis a taxi model, the key can also beused in the trunk.
See your dealer if a replacementkey or additional key is needed.
Notice: If the keys get lockedin the vehicle, it may have tobe damaged to get them out.Always carry a spare key.
If you are locked out of your vehicle,contact Roadside Assistance. SeeRoadside Assistance Program onpage 13‑6 for more information.
Remote KeylessEntry (RKE) SystemSee Radio FrequencyStatement on page 13‑17 forinformation regarding Part 15of the Federal CommunicationsCommission (FCC) rules andIndustry Canada StandardsRSS-210/220/310.
If there is a decrease in the RKEoperating range:. Check the distance.
The transmitter may betoo far from the vehicle.
. Check the location. Othervehicles or objects may beblocking the signal.
. Check the transmitter's battery.See “Battery Replacement” laterin this section.
. If the transmitter is still notworking correctly, see yourdealer or a qualified technicianfor service.

Black plate (3,1)Chevrolet Impala Owner Manual - 2011
Keys, Doors and Windows 2-3
Remote Keyless Entry(RKE) System OperationThe Remote Keyless Entry (RKE)transmitter functions work up to60 m (195 ft) away from the vehicle.
There are other conditions whichcan affect the performance of thetransmitter. See Remote KeylessEntry (RKE) System on page 2‑2.
With Remote Start Shown,Without Remote Start Similar
/ (Remote Vehicle Start): Forvehicles with this feature, press tostart the engine from outside thevehicle using the RKE transmitter.See Remote Vehicle Start onpage 2‑5 for additional information.
Q (Lock): Press to lock all thedoors. If enabled through theDriver Information Center (DIC),the parking lamps flash once toindicate locking has occurred.If enabled through the DIC, thehorn chirps when Q is pressedagain within five seconds.See Vehicle Personalization onpage 5‑39 for additional information.
Pressing Q may arm thecontent theft‐deterrent system.See Anti-Theft Alarm System onpage 2‑11.
K (Unlock): Press once tounlock the driver door. If K ispressed again within five seconds,all remaining doors unlock.The interior lamps come onand stay on for 20 seconds oruntil the ignition is turned on.If enabled through the DIC,the parking lamps flash twiceto indicate unlocking has occurred.See Vehicle Personalization onpage 5‑39.
Pressing K on the RKE transmitterdisarms the content theft‐deterrentsystem. See Anti-Theft AlarmSystem on page 2‑11.
V (Remote Trunk Release):Press and hold for aboutone second to open the trunk.The transmission must be inP (Park).
Black plate (4,1)Chevrolet Impala Owner Manual - 2011
2-4 Keys, Doors and Windows
L (Vehicle Locator/PanicAlarm): Press and release tolocate the vehicle. The turn signallamps flash and the horn soundsthree times. Press and holdL formore than two seconds to activatethe panic alarm. The turn signallamps flash and the horn soundsrepeatedly for 30 seconds. Thealarm turns off when the ignitionis turned to ON/RUN orL ispressed again. The ignition mustbe in LOCK/OFF for the panicalarm to work.
Programming Transmitters tothe Vehicle
Only RKE transmittersprogrammed to the vehiclewill work. If a transmitter islost or stolen, a replacementcan be purchased and programmedthrough your dealer. Whenthe replacement transmitter isprogrammed to the vehicle, allremaining transmitters must alsobe programmed. Any lost or stolentransmitters no longer work oncethe new transmitter is programmed.Each vehicle can have up to eighttransmitters programmed to it.See your dealer to program newtransmitters.
Battery Replacement
Replace the battery if theREPLACE BATTERY IN REMOTEKEY message displays in the DIC.See “REPLACE BATTERY INREMOTE KEY” under Key andLock Messages on page 5‑34for additional information.
Notice: When replacing thebattery, do not touch any ofthe circuitry on the transmitter.Static from your body coulddamage the transmitter.
Black plate (5,1)Chevrolet Impala Owner Manual - 2011
Keys, Doors and Windows 2-5
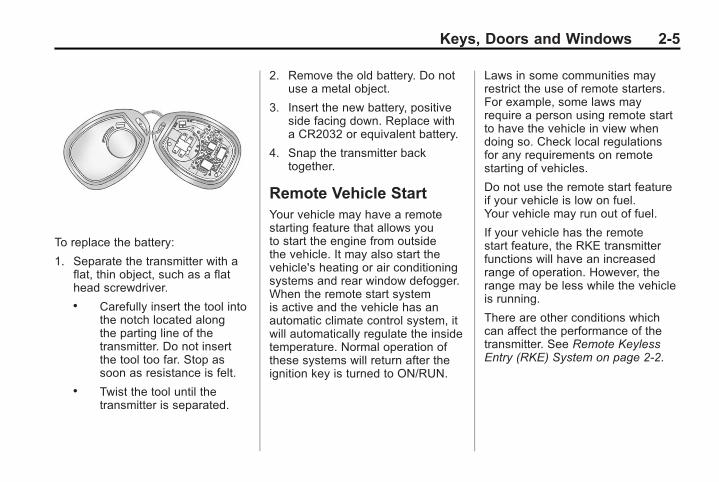
To replace the battery:
1. Separate the transmitter with aflat, thin object, such as a flathead screwdriver.. Carefully insert the tool into
the notch located alongthe parting line of thetransmitter. Do not insertthe tool too far. Stop assoon as resistance is felt.
. Twist the tool until thetransmitter is separated.
2. Remove the old battery. Do notuse a metal object.
3. Insert the new battery, positiveside facing down. Replace witha CR2032 or equivalent battery.
4. Snap the transmitter backtogether.
Remote Vehicle StartYour vehicle may have a remotestarting feature that allows youto start the engine from outsidethe vehicle. It may also start thevehicle's heating or air conditioningsystems and rear window defogger.When the remote start systemis active and the vehicle has anautomatic climate control system, itwill automatically regulate the insidetemperature. Normal operation ofthese systems will return after theignition key is turned to ON/RUN.
Laws in some communities mayrestrict the use of remote starters.For example, some laws mayrequire a person using remote startto have the vehicle in view whendoing so. Check local regulationsfor any requirements on remotestarting of vehicles.
Do not use the remote start featureif your vehicle is low on fuel.Your vehicle may run out of fuel.
If your vehicle has the remotestart feature, the RKE transmitterfunctions will have an increasedrange of operation. However, therange may be less while the vehicleis running.
There are other conditions whichcan affect the performance of thetransmitter. See Remote KeylessEntry (RKE) System on page 2‑2.

Black plate (6,1)Chevrolet Impala Owner Manual - 2011
2-6 Keys, Doors and Windows
/ (Remote Start): This button willbe on the RKE transmitter if youhave remote start.
To start the vehicle using the remotestart feature:
1. Aim the transmitter at thevehicle.
2. Press and release Q, thenimmediately press andhold/ for two to four secondsor until the vehicle's turn signallamps flash. The doors will lock.
When the vehicle starts, theparking lamps turn on andremain on while the engineis running.
The remote start feature providestwo separate starts per ignitioncycle, each with 10 minutes ofengine running time, or one start
with a time extension. The first startmust expire or be canceled to gettwo separate 10-minute starts.
If it is the first remote start since thevehicle has been driven, repeat theprevious steps, while the engine isstill running, to extend the enginerunning time by 10 minutes from thetime you repeat the steps for remotestarting. The remote start runningtime can be extended one time andonly after the first remote start.
After entering the vehicle during aremote start, insert and turn the keyto ON/RUN to drive the vehicle.
The engine will shut offautomatically after 10 minutes,unless a time extension has beendone or the vehicle's key is insertedinto the ignition switch and turned toON/RUN.
To manually shut off a remote start,do any of the following.. Aim the RKE transmitter at the
vehicle and press and releasethe remote start button.
. Turn on the hazard warningflashers.
. Turn the ignition switch out ofLOCK/OFF and then back toLOCK/OFF.
After the engine has been startedtwo times, or one time with a timeextension, the vehicle's ignitionmust be turned to ON/RUN usingthe key before the remote startprocedure can be used again.See Ignition Positions on page 9‑17for information regarding the ignitionpositions on your vehicle.

Black plate (7,1)Chevrolet Impala Owner Manual - 2011
Keys, Doors and Windows 2-7
The remote vehicle start featurewill not operate if any of the followoccur:. The vehicle's key is in the
ignition.. The vehicle's hood is open.. The hazard warning flashers
are on.. The check engine light is on.
See Malfunction Indicator Lampon page 5‑17.
. The engine coolant temperatureis too high.
. The oil pressure is low.
. The content theft-deterrent alarmhas been activated.
. Two remote vehicle starts,or one start with a timeextension, have already beenprovided for that ignition cycle.
Door Locks
{ WARNING
Unlocked doors can bedangerous.
. Passengers, especiallychildren, can easily openthe doors and fall out of amoving vehicle. When a dooris locked, the handle will notopen it. The chance of beingthrown out of the vehicle ina crash is increased if thedoors are not locked. So,all passengers should wearsafety belts properly andthe doors should be lockedwhenever the vehicle isdriven.
. Young children who get intounlocked vehicles may beunable to get out. A child canbe overcome by extreme heatand can suffer permanent
(Continued)
WARNING (Continued)
injuries or even death fromheat stroke. Always lock thevehicle whenever leaving it.
. Outsiders can easily enterthrough an unlocked doorwhen you slow down or stopthe vehicle. Locking the doorscan help prevent this fromhappening.
From the outside, use the key inthe driver door or use the RemoteKeyless Entry (RKE) transmitterto lock and unlock the vehicle.From the inside, use the manualor power door locks.
To lock or unlock the driver sidedoor from the outside with the key,insert the key and turn it clockwiseor counterclockwise.
To lock or unlock the door from theinside, push or pull the manuallock knob.

Black plate (8,1)Chevrolet Impala Owner Manual - 2011
2-8 Keys, Doors and Windows
Power Door Locks
A power door lock switch is locatedon both front doors next to the doorhandle.
Press the top of the switch to unlockall doors or press the bottom of theswitch to lock all doors.
If the vehicle has the optionalcontent theft-deterrent systemand it is armed, the power doorlock switches will be disabled.You must use the RKE transmitteror the key to unlock the doors whenthe system is armed. See Anti-TheftAlarm System on page 2‑11.
Delayed LockingThis feature allows the driver todelay the actual locking of thedoors. When the driver powerdoor lock switch is pressed withthe key removed from the ignition,and the driver door open, a chimewill sound three times to signalthat the delayed locking systemis active. When all doors havebeen closed, the doors will lockautomatically after several seconds.If any door is opened before this,the timer will reset itself once allthe doors have been closed again.
Pressing the driver or passengerpower door lock switch again or theRKE transmitter button will overridethis feature.
Personal Choice Programming
The delayed locking feature canbe turned on or off, using theDriver Information Center (DIC) toprogram this feature. See “DELAYDOOR LOCK” under VehiclePersonalization on page 5‑39.
Automatic Door LocksThe doors will automatically lockwhen the shift lever is moved outof P (Park). The automatic doorlocking feature cannot be disabled.
Programmable Automatic DoorUnlock
The vehicle is programmed so thatwhen the shift lever is moved intoP (Park) all doors will unlock.
With the vehicle stopped andthe engine running, doorunlocking can be programmedthrough prompts displayed on theDriver Information Center (DIC).These prompts allow the driver tochoose various unlock settings.For programming information,see Vehicle Personalization onpage 5‑39.

Black plate (9,1)Chevrolet Impala Owner Manual - 2011
Keys, Doors and Windows 2-9
Lockout ProtectionThis feature helps prevent you fromlocking the doors while the key isin the ignition. Always remember totake your key with you when exitingthe vehicle.
If the lock switch is pressed on thedoor that is open and the key is inthe ignition, all of the doors will lockand then the open door will unlock.A chime sounds continuously untilthe driver door is closed.
Safety LocksRear door security locks preventpassengers from opening the reardoors from the inside.
The rear door security locks arelocated on the inside edge of eachrear door. The rear doors must beopened to access them.
To assist in finding the lock, thevehicle has the following:
To use the lock:
1. Insert the key into the securitylock slot and turn it so the slot isin the horizontal position.
2. Close the door.
3. Do the same for the otherrear door.
To open a rear door when thesecurity lock is on, do the following:
1. Unlock the door by using theRemote Keyless Entry (RKE)transmitter, if the vehicle hasone, by pressing the power doorlock switch, or by lifting the reardoor manual lock.
2. Open the door from the outside.
To cancel the rear doorsecurity lock:
1. Unlock the door and open it fromthe outside.
2. Insert the key into the securitylock slot and turn it so the slot isin the vertical position.
3. Do the same for the otherrear door.

Black plate (10,1)Chevrolet Impala Owner Manual - 2011
2-10 Keys, Doors and Windows
Doors
Trunk
{ WARNING
Exhaust gases can enter thevehicle if it is driven with theliftgate, trunk/hatch open, orwith any objects that passthrough the seal between thebody and the trunk/hatch orliftgate. Engine exhaust containsCarbon Monoxide (CO) whichcannot be seen or smelled.It can cause unconsciousnessand even death.
(Continued)
WARNING (Continued)
If the vehicle must be driven withthe liftgate, or trunk/hatch open:
. Close all of the windows.
. Fully open the air outletson or under the instrumentpanel.
. Adjust the Climate Controlsystem to a setting thatbrings in only outside airand set the fan speed to thehighest setting. See ClimateControl System in the Index.
. If the vehicle is equipped witha power liftgate, disable thepower liftgate function.
For more information aboutcarbon monoxide, see EngineExhaust on page 9‑24.
Trunk Release
To open the trunk from the outside,press the trunk release button onthe RKE transmitter, if equipped.
Remote Trunk Release
G (Remote Trunk Release):Press the button located next to theexterior lamps control on the leftside of the instrument panel to openthe trunk. The shift lever must be inP (Park).
The trunk can also be opened bylowering the rear seat and pullingthe emergency trunk release handlelocated inside the trunk. See RearSeats (Split Folding) on page 3‑8and “Emergency Trunk ReleaseHandle” following.

Black plate (11,1)Chevrolet Impala Owner Manual - 2011
Keys, Doors and Windows 2-11
Emergency Trunk ReleaseHandle
Notice: Do not use theemergency trunk release handleas a tie-down or anchor pointwhen securing items in the trunkas it could damage the handle.The emergency trunk releasehandle is only intended to aid aperson trapped in a latched trunk,enabling them to open the trunkfrom the inside.
There is a glow-in-the-dark trunkrelease handle located on the latchinside the trunk . This handle willglow following exposure to light.Pull the release handle to openthe trunk from the inside.
Vehicle SecurityThis vehicle has theft-deterrentfeatures; however, they do notmake it impossible to steal.
Anti-Theft Alarm SystemYour vehicle may have the optionalcontent theft-deterrent alarmsystem.
To activate the theft-deterrentsystem:
1. Open the door.
2. Lock the door with the powerdoor lock switch or the RemoteKeyless Entry (RKE) transmitter.If you are using the RKEtransmitter, the door doesnot need to be open.
3. Close all doors.

Black plate (12,1)Chevrolet Impala Owner Manual - 2011
2-12 Keys, Doors and Windows
Once armed, the alarm will go off ifsomeone tries to enter the vehiclewithout using the RKE transmitteror a key or turns the ignition onwith an incorrect key. The horn willsound and the turn signal lamps willflash for about 30 seconds.
When the alarm is armed, thetrunk may be opened with theRKE transmitter. The power doorlock switches are disabled and thedoors remain locked. You must useyour RKE transmitter or your key tounlock the doors when the systemis armed.
Arming with the Power LockSwitch
The alarm system will arm whenyou use either power lock switchto lock the doors while any door isopen and the key is removed fromthe ignition. The alarm system willnot arm if the trunk is open whenyou use either power lock switchto lock the doors.
Arming with the RKETransmitter
The alarm system will arm whenyou use your RKE transmitter tolock the doors, if the key is not inthe ignition.
Disarming with the RKETransmitter
The alarm system will disarm whenyou use your RKE transmitter tounlock the doors.
The first time a remote unlockcommand is received, three flasheswill be seen and three horn chirpsheard to indicate an alarm conditionhas occurred since last arming.
Disarming with Your Key
The alarm system will disarmwhen you use your key to unlockthe doors or insert your key inthe ignition and turn it from theLOCK/OFF position.
ImmobilizerSee Radio FrequencyStatement on page 13‑17 forinformation regarding Part 15of the Federal CommunicationsCommission (FCC) rules andIndustry Canada StandardsRSS-210/220/310.
Immobilizer OperationThis vehicle has PASS-Key® III+(Personalized Automotive SecuritySystem) theft-deterrent system.PASS-Key III+ is a passivetheft-deterrent system.
The system is automatically armedwhen the key is removed from theignition.
The system is automaticallydisarmed when the key is turnedto ON/RUN, ACC/ACCESSORY,or START from the LOCK/OFFposition.
Black plate (13,1)Chevrolet Impala Owner Manual - 2011
Keys, Doors and Windows 2-13
You do not have to manually arm ordisarm the system.
The security light will come on ifthere is a problem with armingor disarming the theft-deterrentsystem.
When the PASS-Key III+ systemsenses that someone is using thewrong key, it prevents the vehiclefrom starting. Anyone using atrial-and-error method to start thevehicle will be discouraged becauseof the high number of electrical keycodes.
If the engine does not start andthe security light on the instrumentpanel cluster comes on when tryingto start the vehicle, there may bea problem with the theft-deterrentsystem. Turn the ignition off andtry again.
If the engine still does not start,and the key appears to beundamaged, try another ignitionkey. At this time, you may also wantto check the fuse. See Fuses andCircuit Breakers on page 10‑38.If the engine still does not startwith the other key, the vehicleneeds service. If the vehicle doesstart, the first key may be faulty.See your dealer who can servicethe PASS-Key III+ to have a newkey made.
It is possible for the PASS-Key III+decoder to learn the transpondervalue of a new or replacement key.Up to 10 keys may be programmedfor the vehicle. The followingprocedure is for programmingadditional keys only. If all thecurrently programmed keys arelost or do not operate, you mustsee your dealer or a locksmithwho can service PASS-Key III+ tohave keys made and programmedto the system.
See your dealer or a locksmith whocan service PASS-Key III+ to get anew key blank cut exactly as theignition key that operates thesystem.
To program the new additional key:
1. Verify that the new key hasa 1 stamped on it.
2. Insert the original, alreadyprogrammed key in the ignitionand start the engine. If theengine will not start, see yourdealer for service.
3. After the engine has started,turn the key to LOCK/OFF,and remove the key.

Black plate (14,1)Chevrolet Impala Owner Manual - 2011
2-14 Keys, Doors and Windows
4. Insert the new key to beprogrammed and turn it tothe ON/RUN position withinfive seconds of turning theignition to the LOCK/OFFposition in Step 3.
The security light will turnoff once the key has beenprogrammed.
5. Repeat Steps 1 through 4 ifadditional keys are to beprogrammed.
If you lose or damage yourPASS-Key III+ key, see yourdealer or a locksmith who canservice PASS-Key III+ to havea new key made.
Do not leave the key or devicethat disarms or deactivates thetheft-deterrent system in the vehicle.
Exterior Mirrors
Convex Mirrors
{ WARNING
A convex mirror can make things,like other vehicles, look fartheraway than they really are. If youcut too sharply into the right lane,you could hit a vehicle on theright. Check the inside mirror orglance over your shoulder beforechanging lanes.
The passenger side mirror is convexshaped. A convex mirror's surface iscurved so more can be seen fromthe driver seat.
Power Mirrors
Controls for the outside powermirrors are located on the driverdoor armrest.
1. Press the left or right side of theselector switch located abovethe control pad, to select thedriver or passenger mirror.

Black plate (15,1)Chevrolet Impala Owner Manual - 2011
Keys, Doors and Windows 2-15
2. Press one of the four buttonslocated on the control pad tomove the mirror to the desireddirection.
3. Adjust each outside mirror sothat a little of the vehicle andthe area behind it can be seen.
Keep the selector switch in thecenter position when not adjustingeither outside mirror.
Heated MirrorsFor vehicles with heated mirrors:
= (Rear Window Defogger):Press to heat the outside rearviewmirrors. See “Rear WindowDefogger” under Climate ControlSystems on page 8‑1 for moreinformation.
Interior Mirrors
Manual Rearview MirrorAdjust the inside rearview mirrorfor a clear view of the area behindyour vehicle. To avoid glare of theheadlamps from behind, push thetab forward for daytime and pull itfor nighttime use.
Vehicles with OnStar® have threecontrol buttons at the bottom of themirror. See your dealer for moreinformation about OnStar and howto subscribe to it. See the OnStarOwner's Guide for more informationabout the services OnStar provides.
Automatic DimmingRearview MirrorThe vehicle may have an automaticdimming inside rearview mirror.
Automatic dimming reduces theglare from the headlamps of thevehicle behind you. The dimmingfeature comes on and the indicatorlight illuminates each time theignition is turned to start.
O (On/Off): Press to turn thedimming feature on or off.
Vehicles with OnStar have threeadditional control buttons for theOnStar system. See your dealerfor more information about OnStarand how to subscribe to it. Seethe OnStar Owner Guide for moreinformation about the servicesOnStar provides.
Cleaning the Mirror
Do not spray glass cleaner directlyon the mirror. Use a soft toweldampened with water.
Black plate (16,1)Chevrolet Impala Owner Manual - 2011
2-16 Keys, Doors and Windows
Windows
{ WARNING
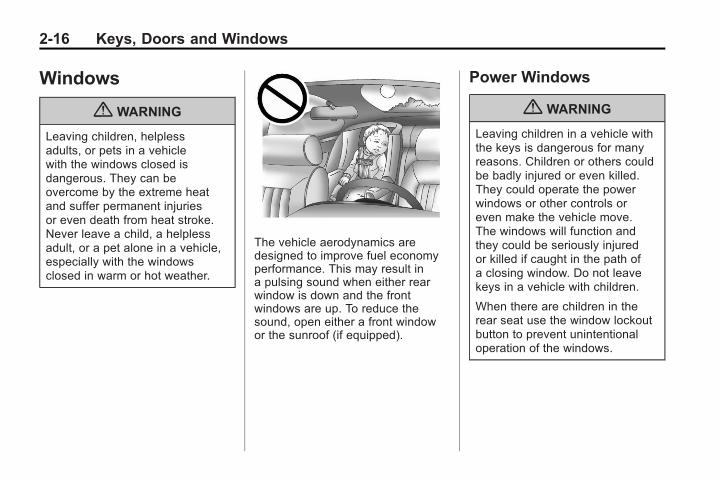
Leaving children, helplessadults, or pets in a vehiclewith the windows closed isdangerous. They can beovercome by the extreme heatand suffer permanent injuriesor even death from heat stroke.Never leave a child, a helplessadult, or a pet alone in a vehicle,especially with the windowsclosed in warm or hot weather.
The vehicle aerodynamics aredesigned to improve fuel economyperformance. This may result ina pulsing sound when either rearwindow is down and the frontwindows are up. To reduce thesound, open either a front windowor the sunroof (if equipped).
Power Windows
{ WARNING
Leaving children in a vehicle withthe keys is dangerous for manyreasons. Children or others couldbe badly injured or even killed.They could operate the powerwindows or other controls oreven make the vehicle move.The windows will function andthey could be seriously injuredor killed if caught in the path ofa closing window. Do not leavekeys in a vehicle with children.
When there are children in therear seat use the window lockoutbutton to prevent unintentionaloperation of the windows.
Black plate (17,1)Chevrolet Impala Owner Manual - 2011
Keys, Doors and Windows 2-17
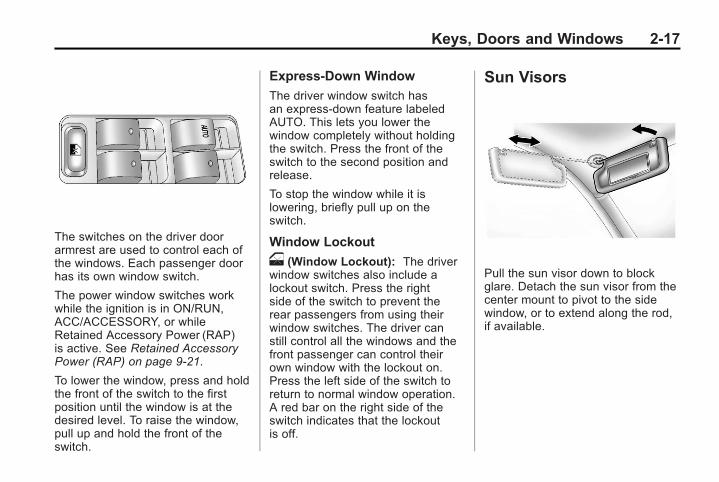
The switches on the driver doorarmrest are used to control each ofthe windows. Each passenger doorhas its own window switch.
The power window switches workwhile the ignition is in ON/RUN,ACC/ACCESSORY, or whileRetained Accessory Power (RAP)is active. See Retained AccessoryPower (RAP) on page 9‑21.
To lower the window, press and holdthe front of the switch to the firstposition until the window is at thedesired level. To raise the window,pull up and hold the front of theswitch.
Express-Down Window
The driver window switch hasan express-down feature labeledAUTO. This lets you lower thewindow completely without holdingthe switch. Press the front of theswitch to the second position andrelease.
To stop the window while it islowering, briefly pull up on theswitch.
Window Lockout
o (Window Lockout): The driverwindow switches also include alockout switch. Press the rightside of the switch to prevent therear passengers from using theirwindow switches. The driver canstill control all the windows and thefront passenger can control theirown window with the lockout on.Press the left side of the switch toreturn to normal window operation.A red bar on the right side of theswitch indicates that the lockoutis off.
Sun Visors
Pull the sun visor down to blockglare. Detach the sun visor from thecenter mount to pivot to the sidewindow, or to extend along the rod,if available.

Black plate (18,1)Chevrolet Impala Owner Manual - 2011
2-18 Keys, Doors and Windows
Roof
Sunroof
On vehicles with a sunroof,the sunroof switches are onthe overhead console.
The sunroof can only be operatedwhen the ignition is in ON/RUNor ACC/ACCESSORY, or whenRetained Accessory Power (RAP)is active. See Retained AccessoryPower (RAP) on page 9‑21.
Q (Vent/Express-Open): Pressthis switch once to vent the sunroofwhen it is closed. When using thevent, the sunshade should be fullyopened. The sunshade can beopened or closed manually bysliding it rearward or forward.
From the vent position, pressthis switch again to activate theexpress-open feature. Press theclose switch to stop movement ofthe sunroof. The sunshade willautomatically open when usingexpress‐open.
A deflector will automatically popup when the sunroof is opened.The deflector will retract when thesunroof is closed.
R (Close): Press and hold thisswitch until the sunroof motor stopsto close the sunroof, or release theswitch when the desired positionhas been reached.
Dirt and debris may collect on thesunroof seal or in the track. Thiscould cause an issue with sunroofoperation, noise or plugging thewater drainage system. Periodicallyopen the sunroof and remove anyobstacles or loose debris. Wipe thesunroof seal and roof sealing areausing a clean cloth, mild soap, andwater. Do not remove grease fromsunroof.
Black plate (1,1)Chevrolet Impala Owner Manual - 2011
Seats and Restraints 3-1
Seats andRestraints
Head RestraintsHead Restraints . . . . . . . . . . . . . . . 3-2
Front SeatsSeat Adjustment . . . . . . . . . . . . . . 3-3Center Seat . . . . . . . . . . . . . . . . . . . 3-4Power Seat Adjustment . . . . . . . 3-4Lumbar Adjustment . . . . . . . . . . . 3-4Reclining Seatbacks . . . . . . . . . . 3-5Heated Front Seats . . . . . . . . . . . 3-7
Rear SeatsRear Seats (Split Folding) . . . . . 3-8
Safety BeltsSafety Belts . . . . . . . . . . . . . . . . . . 3-10How to Wear Safety BeltsProperly . . . . . . . . . . . . . . . . . . . . 3-14
Lap-Shoulder Belt . . . . . . . . . . . 3-19Safety Belt Use DuringPregnancy . . . . . . . . . . . . . . . . . . 3-23
Lap Belt . . . . . . . . . . . . . . . . . . . . . 3-23
Safety Belt Extender . . . . . . . . . 3-24Safety System Check . . . . . . . . 3-25Safety Belt Care . . . . . . . . . . . . . 3-25Replacing Safety Belt SystemParts After a Crash . . . . . . . . . 3-25
Airbag SystemAirbag System . . . . . . . . . . . . . . . 3-26Where Are the Airbags? . . . . . 3-28When Should an AirbagInflate? . . . . . . . . . . . . . . . . . . . . . 3-30
What Makes an AirbagInflate? . . . . . . . . . . . . . . . . . . . . . 3-31
How Does an AirbagRestrain? . . . . . . . . . . . . . . . . . . . 3-32
What Will You See After anAirbag Inflates? . . . . . . . . . . . . 3-32
Passenger SensingSystem . . . . . . . . . . . . . . . . . . . . . 3-34
Servicing the Airbag-EquippedVehicle . . . . . . . . . . . . . . . . . . . . . 3-40
Adding Equipment to theAirbag-Equipped Vehicle . . . 3-40
Airbag System Check . . . . . . . . 3-41Replacing Airbag SystemParts After a Crash . . . . . . . . . 3-42
Child RestraintsOlder Children . . . . . . . . . . . . . . . 3-42Infants and YoungChildren . . . . . . . . . . . . . . . . . . . . 3-45
Child Restraint Systems . . . . . 3-47Where to Put the Restraint . . . 3-49Lower Anchors and Tethersfor Children (LATCHSystem) . . . . . . . . . . . . . . . . . . . . 3-51
Replacing LATCH SystemParts After a Crash . . . . . . . . . 3-56
Securing Child Restraints(Rear Seat Position) . . . . . . . . 3-57
Securing Child Restraints(Center Front SeatPosition) . . . . . . . . . . . . . . . . . . . 3-59
Securing Child Restraints(Right Front SeatPosition) . . . . . . . . . . . . . . . . . . . 3-59
Black plate (2,1)Chevrolet Impala Owner Manual - 2011
3-2 Seats and Restraints
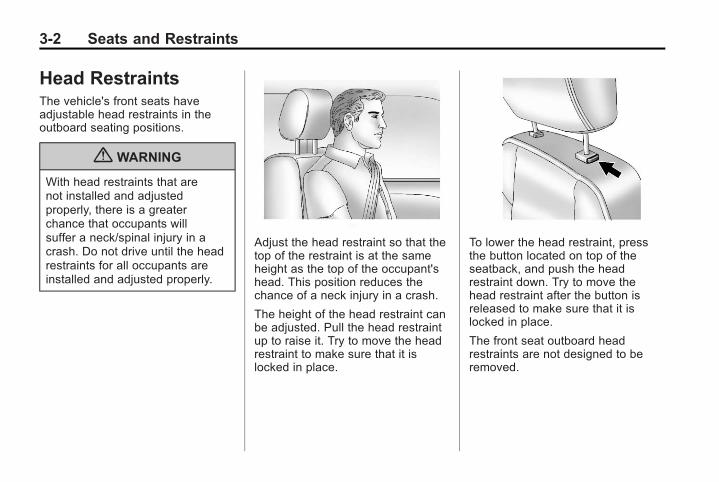
Head RestraintsThe vehicle's front seats haveadjustable head restraints in theoutboard seating positions.
{ WARNING
With head restraints that arenot installed and adjustedproperly, there is a greaterchance that occupants willsuffer a neck/spinal injury in acrash. Do not drive until the headrestraints for all occupants areinstalled and adjusted properly.
Adjust the head restraint so that thetop of the restraint is at the sameheight as the top of the occupant'shead. This position reduces thechance of a neck injury in a crash.
The height of the head restraint canbe adjusted. Pull the head restraintup to raise it. Try to move the headrestraint to make sure that it islocked in place.
To lower the head restraint, pressthe button located on top of theseatback, and push the headrestraint down. Try to move thehead restraint after the button isreleased to make sure that it islocked in place.
The front seat outboard headrestraints are not designed to beremoved.

Black plate (3,1)Chevrolet Impala Owner Manual - 2011
Seats and Restraints 3-3
Rear Seat
The vehicle's rear seat has headrestraints in the outboard seatingpositions that cannot be adjusted.
The vehicle's rear seat has aheadrest in the center seatingposition that cannot be adjusted.
The rear seat head restraints andheadrest are not designed to beremoved.
Front Seats
Seat Adjustment
{ WARNING
You can lose control of thevehicle if you try to adjust amanual driver seat while thevehicle is moving. The suddenmovement could startle andconfuse you, or make you pusha pedal when you do not want to.Adjust the driver seat only whenthe vehicle is not moving.
To adjust the seat:
1. Lift the bar under the front edgeof the seat cushion to unlockthe seat.
2. Slide the seat to the desiredposition and release the bar.
3. Try to move the seat back andforth to be sure the seat islocked in place.
Black plate (4,1)Chevrolet Impala Owner Manual - 2011
3-4 Seats and Restraints
Center Seat
The vehicle may have a front centerseat. There are cupholders onthe underside of the seat cushion.To use them, flip the seat cushionforward. The seat can also be usedas a storage area by lowering theseatback. See Center ConsoleStorage on page 4‑2.
The seatback doubles as anarmrest for the driver or frontpassenger when the center seatis unoccupied.
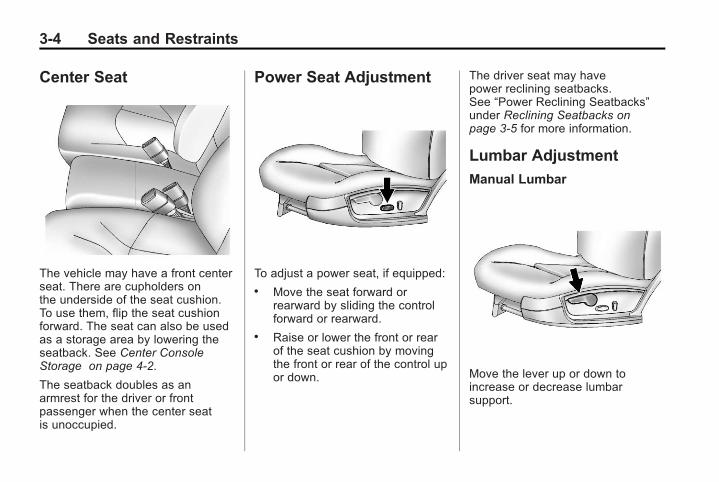
Power Seat Adjustment
To adjust a power seat, if equipped:. Move the seat forward or
rearward by sliding the controlforward or rearward.
. Raise or lower the front or rearof the seat cushion by movingthe front or rear of the control upor down.
The driver seat may havepower reclining seatbacks.See “Power Reclining Seatbacks”under Reclining Seatbacks onpage 3‑5 for more information.
Lumbar Adjustment
Manual Lumbar
Move the lever up or down toincrease or decrease lumbarsupport.

Black plate (5,1)Chevrolet Impala Owner Manual - 2011
Seats and Restraints 3-5
Reclining Seatbacks
{ WARNING
Sitting in a reclined position whenthe vehicle is in motion can bedangerous. Even when buckledup, the safety belts cannot dotheir job when reclined like this.
The shoulder belt cannot do itsjob because it will not be againstyour body. Instead, it will be infront of you. In a crash, you couldgo into it, receiving neck or otherinjuries.
(Continued)
WARNING (Continued)
The lap belt cannot do its jobeither. In a crash, the beltcould go up over your abdomen.The belt forces would be there,not at your pelvic bones. Thiscould cause serious internalinjuries.
For proper protection when thevehicle is in motion, have theseatback upright. Then sit wellback in the seat and wear thesafety belt properly.
Do not have a seatback reclined ifthe vehicle is moving.

Black plate (6,1)Chevrolet Impala Owner Manual - 2011
3-6 Seats and Restraints
Manual Reclining Seatbacks
{ WARNING
You can lose control of thevehicle if you try to adjust amanual driver seat while thevehicle is moving. The suddenmovement could startle andconfuse you, or make you pusha pedal when you do not want to.Adjust the driver seat only whenthe vehicle is not moving.
{ WARNING
If either seatback is not locked, itcould move forward in a suddenstop or crash. That could causeinjury to the person sitting there.Always push and pull on theseatbacks to be sure they arelocked.
To recline a manual seatback:
1. Lift the lever.
2. Move the seatback to thedesired position, and thenrelease the lever to lock theseatback in place.
3. Push and pull on the seatback tomake sure it is locked.
To return the seatback to the uprightposition:
1. Lift the lever fully withoutapplying pressure to theseatback, and the seatback willreturn to the upright position.
2. Push and pull on the seatback tomake sure it is locked.
Power Reclining Seatbacks
To adjust a power seatback,if equipped:. Tilt the top of the control
rearward to recline.. Tilt the top of the control forward
to raise.

Black plate (7,1)Chevrolet Impala Owner Manual - 2011
Seats and Restraints 3-7
Heated Front Seats
{ WARNING
If you cannot feel temperaturechange or pain to the skin, theseat heater may cause burnseven at low temperatures.To reduce the risk of burns,people with such a conditionshould use care when usingthe seat heater, especially forlong periods of time. Do notplace anything on the seat thatinsulates against heat, suchas a blanket, cushion, cover,or similar item. This may causethe seat heater to overheat.An overheated seat heatermay cause a burn or maydamage the seat.
If available, the buttons are on theclimate control panel. To operate,the ignition must be on.
Press L or M to heat the driveror passenger seat cushion andseatback.
Press the button once for thehighest setting. With each pressof the button, the heated seatwill change to the next lowersetting, and then to the off setting.The lights indicate two for thehighest setting and one for thelowest.
The passenger seat may takelonger to heat up.
The heated seat are canceledeach time the ignition is turned off.To use this feature after restartingthe vehicle, press the desired buttonagain.

Black plate (8,1)Chevrolet Impala Owner Manual - 2011
3-8 Seats and Restraints
Rear Seats
Rear Seats (Split Folding)
Flip and Fold Feature
On vehicles with this feature, theseat cushions flip forward and theseatbacks fold down to create anextended flat cargo area.
To flip the seat cushion and fold theseatback:
1. Make sure the front seats arenot reclined. The seat cushionwill not flip forward completelyif the front seats are reclined.
2. Flip the seat cushion forwardby pulling up on the tab in thecenter of the seat cushion wherethe seatback meets the seatcushion.
3. Lower the seatback by pullingforward on the tab on theoutboard side of the seatback.

Black plate (9,1)Chevrolet Impala Owner Manual - 2011
Seats and Restraints 3-9
To return the seats to the normalposition:
{ WARNING
If either seatback is not locked, itcould move forward in a suddenstop or crash. That could causeinjury to the person sitting there.Always push and pull on theseatbacks to be sure they arelocked.
1. Raise the seatback and makesure it latches.
{ WARNING
A safety belt that is improperlyrouted, not properly attached,or twisted will not provide theprotection needed in a crash.The person wearing the belt couldbe seriously injured. After raisingthe rear seatback, always checkto be sure that the safety beltsare properly routed and attached,and are not twisted.
2. Make sure the safety beltsare properly stowed over theseatback in all three seatingpositions.
3. Flip the bottom seat cushionback into place. Push downfirmly on the seat cushion tomake sure it is secure.
When the seat is not in use, theseatback should be placed in theupright, locked position, and theseat cushion should be in the downposition.
Under Seat Storage
The vehicle has a storage areaunder the rear seat. See RearStorage on page 4‑2 for moreinformation.

Black plate (10,1)Chevrolet Impala Owner Manual - 2011
3-10 Seats and Restraints
Safety BeltsThis section of the manualdescribes how to use safety beltsproperly. It also describes somethings not to do with safety belts.
{ WARNING
Do not let anyone ride wherea safety belt cannot be wornproperly. In a crash, if you oryour passenger(s) are notwearing safety belts, the injuriescan be much worse. You can hitthings inside the vehicle harderor be ejected from the vehicle.You and your passenger(s) canbe seriously injured or killed.In the same crash, you mightnot be, if you are buckled up.Always fasten your safety belt,and check that your passenger(s)are restrained properly too.
{ WARNING
It is extremely dangerous to ridein a cargo area, inside or outsideof a vehicle. In a collision, peopleriding in these areas are morelikely to be seriously injured orkilled. Do not allow people to ridein any area of your vehicle thatis not equipped with seats andsafety belts. Be sure everyonein the vehicle is in a seat andusing a safety belt properly.
This vehicle has indicators as areminder to buckle the safety belts.See Safety Belt Reminders onpage 5‑14 for additional information.
In most states and in all Canadianprovinces, the law requires wearingsafety belts. Here is why:
You never know if you will be ina crash. If you do have a crash,you do not know if it will be aserious one.
A few crashes are mild, and somecrashes can be so serious that evenbuckled up, a person would notsurvive. But most crashes are inbetween. In many of them, peoplewho buckle up can survive andsometimes walk away. Withoutsafety belts they could have beenbadly hurt or killed.
After more than 40 years of safetybelts in vehicles, the facts are clear.In most crashes buckling up doesmatter ... a lot!
Black plate (11,1)Chevrolet Impala Owner Manual - 2011
Seats and Restraints 3-11
Why Safety Belts Work
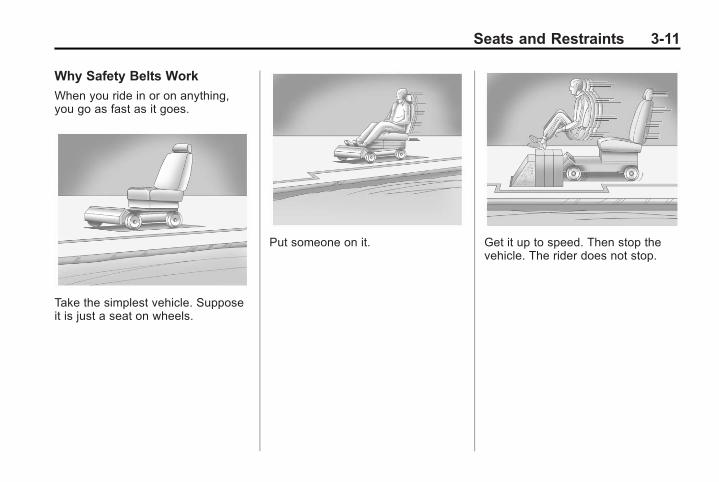
When you ride in or on anything,you go as fast as it goes.
Take the simplest vehicle. Supposeit is just a seat on wheels.
Put someone on it. Get it up to speed. Then stop thevehicle. The rider does not stop.

Black plate (12,1)Chevrolet Impala Owner Manual - 2011
3-12 Seats and Restraints
The person keeps going untilstopped by something. In a realvehicle, it could be the windshield...
or the instrument panel... or the safety belts!
With safety belts, you slow downas the vehicle does. You get moretime to stop. You stop over moredistance, and your strongest bonestake the forces. That is why safetybelts make such good sense.

Black plate (13,1)Chevrolet Impala Owner Manual - 2011
Seats and Restraints 3-13
Questions and Answers AboutSafety Belts
Q: Will I be trapped in the vehicleafter a crash if I am wearing asafety belt?
A: You could be — whether youare wearing a safety belt ornot. But your chance of beingconscious during and after anaccident, so you can unbuckleand get out, is much greater ifyou are belted. And you canunbuckle a safety belt, even ifyou are upside down.
Q: If my vehicle has airbags, whyshould I have to wear safetybelts?
A: Airbags are supplementalsystems only; so they workwith safety belts — not insteadof them. Whether or not anairbag is provided, all occupantsstill have to buckle up to get themost protection. That is true notonly in frontal collisions, butespecially in side and othercollisions.
Q: If I am a good driver, and Inever drive far from home,why should I wear safetybelts?
A: You may be an excellent driver,but if you are in a crash — evenone that is not your fault — youand your passenger(s) can behurt. Being a good driver doesnot protect you from thingsbeyond your control, suchas bad drivers.
Most accidents occur within40 km (25mi) of home. Andthe greatest number of seriousinjuries and deaths occurat speeds of less than65 km/h (40 mph).
Safety belts are for everyone.
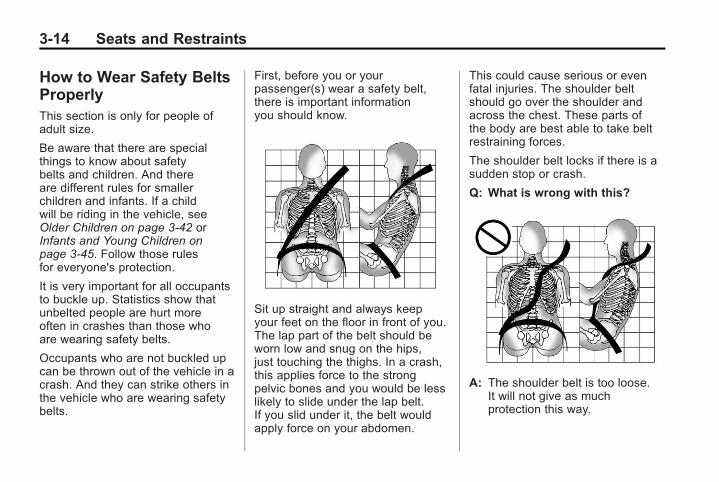
Black plate (14,1)Chevrolet Impala Owner Manual - 2011
3-14 Seats and Restraints
How to Wear Safety BeltsProperlyThis section is only for people ofadult size.
Be aware that there are specialthings to know about safetybelts and children. And thereare different rules for smallerchildren and infants. If a childwill be riding in the vehicle, seeOlder Children on page 3‑42 orInfants and Young Children onpage 3‑45. Follow those rulesfor everyone's protection.
It is very important for all occupantsto buckle up. Statistics show thatunbelted people are hurt moreoften in crashes than those whoare wearing safety belts.
Occupants who are not buckled upcan be thrown out of the vehicle in acrash. And they can strike others inthe vehicle who are wearing safetybelts.
First, before you or yourpassenger(s) wear a safety belt,there is important informationyou should know.
Sit up straight and always keepyour feet on the floor in front of you.The lap part of the belt should beworn low and snug on the hips,just touching the thighs. In a crash,this applies force to the strongpelvic bones and you would be lesslikely to slide under the lap belt.If you slid under it, the belt wouldapply force on your abdomen.
This could cause serious or evenfatal injuries. The shoulder beltshould go over the shoulder andacross the chest. These parts ofthe body are best able to take beltrestraining forces.
The shoulder belt locks if there is asudden stop or crash.
Q: What is wrong with this?
A: The shoulder belt is too loose.It will not give as muchprotection this way.

Black plate (15,1)Chevrolet Impala Owner Manual - 2011
Seats and Restraints 3-15
{ WARNING
You can be seriously hurt if theshoulder belt is too loose. In acrash, you would move forwardtoo much, which could increaseinjury. The shoulder belt should fitsnugly against your body.
Q: What is wrong with this?
A: The lap belt is too loose.It will not give nearly as muchprotection this way.
{ WARNING
You can be seriously hurt if thelap belt is too loose. In a crash,you could slide under the lapbelt and apply force on yourabdomen. This could causeserious or even fatal injuries.The lap belt should be wornlow and snug on the hips,just touching the thighs.

Black plate (16,1)Chevrolet Impala Owner Manual - 2011
3-16 Seats and Restraints
Q: What is wrong with this?
A: The belt is buckled in the wrongbuckle.
{ WARNING
You can be seriously injured ifthe belt is buckled in the wrongplace like this. In a crash, thebelt would go up over yourabdomen. The belt forces wouldbe there, not on the pelvic bones.This could cause serious internalinjuries. Always buckle the beltinto the buckle nearest you.
Q: What is wrong with this?
A: The belt is over an armrest.

Black plate (17,1)Chevrolet Impala Owner Manual - 2011
Seats and Restraints 3-17
{ WARNING
You can be seriously injuredif the belt goes over an armrestlike this. The belt would be muchtoo high. In a crash, you canslide under the belt. The beltforce would then be applied onthe abdomen, not on the pelvicbones, and that could causeserious or fatal injuries. Be surethe belt goes under the armrests.
Q: What is wrong with this?
A: The shoulder belt is worn underthe arm. It should be worn overthe shoulder at all times.
{ WARNING
You can be seriously injuredif you wear the shoulder beltunder your arm. In a crash, yourbody would move too far forward,which would increase the chanceof head and neck injury. Also,the belt would apply too muchforce to the ribs, which are notas strong as shoulder bones.You could also severely injureinternal organs like your liver orspleen. The shoulder belt shouldgo over the shoulder and acrossthe chest.

Black plate (18,1)Chevrolet Impala Owner Manual - 2011
3-18 Seats and Restraints
Q: What is wrong with this?
A: The belt is behind the body.
{ WARNING
You can be seriously injured bynot wearing the lap-shoulderbelt properly. In a crash, youwould not be restrained by theshoulder belt. Your body couldmove too far forward increasingthe chance of head and neckinjury. You might also slideunder the lap belt. The beltforce would then be appliedright on the abdomen. That couldcause serious or fatal injuries.The shoulder belt should go overthe shoulder and across thechest.
Q: What is wrong with this?
A: The belt is twisted acrossthe body.

Black plate (19,1)Chevrolet Impala Owner Manual - 2011
Seats and Restraints 3-19
{ WARNING
You can be seriously injured by atwisted belt. In a crash, you wouldnot have the full width of the beltto spread impact forces. If a beltis twisted, make it straight so itcan work properly, or ask yourdealer to fix it.
Lap-Shoulder BeltAll seating positions in the vehiclehave a lap-shoulder belt except forthe center front passenger position(if equipped), which has a lap belt.See Lap Belt on page 3‑23 for moreinformation.
The following instructions explainhow to wear a lap-shoulder beltproperly.
1. Adjust the seat, if the seat isadjustable, so you can sit upstraight. To see how, see “Seats”in the Index.
2. Pick up the latch plate and pullthe belt across you. Do not let itget twisted.
The lap-shoulder belt may lock ifyou pull the belt across you veryquickly. If this happens, let thebelt go back slightly to unlock it.Then pull the belt across youmore slowly.
If the shoulder portion of apassenger belt is pulled outall the way, the child restraintlocking feature may be engaged.If this happens, let the belt goback all the way and start again.
Engaging the child restraintlocking feature in the right frontseating position may affect thepassenger sensing system.See Passenger Sensing Systemon page 3‑34.
3. Push the latch plate into thebuckle until it clicks.
If the latch plate will not go fullyinto the buckle, check if thecorrect buckle is being used.
Pull up on the latch plate tomake sure it is secure. If the beltis not long enough, see SafetyBelt Extender on page 3‑24.
Position the release button onthe buckle so that the safety beltcould be quickly unbuckled ifnecessary.

Black plate (20,1)Chevrolet Impala Owner Manual - 2011
3-20 Seats and Restraints
4. If equipped with a shoulderbelt height adjuster, moveit to the height that is rightfor you. See “Shoulder BeltHeight Adjuster” in this sectionfor instructions on use andimportant safety information.
5. To make the lap part tight, pullup on the shoulder belt.
It may be necessary to pullstitching on the safety beltthrough the latch plate to fullytighten the lap belt on smalleroccupants.
To unlatch the belt, push the buttonon the buckle. The belt shouldreturn to its stowed position.
Before a door is closed, be surethe belt is out of the way. If a dooris slammed against a safety belt,damage can occur to both thesafety belt and the vehicle.
Shoulder Belt Height Adjuster
The vehicle has shoulder belt heightadjusters for the driver and rightfront passenger positions.
Adjust the height so the shoulderportion of the belt is on theshoulder and not falling off of it.The belt should be close to, butnot contacting, the neck. Impropershoulder belt height adjustmentcould reduce the effectivenessof the safety belt in a crash.See How to Wear Safety BeltsProperly on page 3‑14.

Black plate (21,1)Chevrolet Impala Owner Manual - 2011
Seats and Restraints 3-21
Squeeze the buttons (A) on thesides of the height adjuster andmove the height adjuster to thedesired position.
You can move the adjuster up justby pushing up on the shoulder beltguide.
After the adjuster is set to thedesired position, try to move itdown without squeezing the buttonsto make sure it has locked intoposition.
Safety Belt Pretensioners
This vehicle has safety beltpretensioners for front outboardoccupants. Although the safetybelt pretensioners cannot be seen,they are part of the safety beltassembly. They can help tightenthe safety belts during the earlystages of a moderate to severefrontal and near frontal crashif the threshold conditions forpretensioner activation are met.And, if the vehicle has side impactairbags, safety belt pretensionerscan help tighten the safety beltsin a side crash.
Pretensioners work only once.If the pretensioners activate in acrash, they will need to be replaced,and probably other new parts forthe vehicle's safety belt system.See Replacing Safety Belt SystemParts After a Crash on page 3‑25.
Rear Safety Belt ComfortGuides
This vehicle may have rearshoulder belt comfort guides foreach outboard passenger positionin the rear seat. If not, they areavailable through your dealer.The guides may provide addedsafety belt comfort for older childrenwho have outgrown booster seatsand for some adults. When installedand properly adjusted, the comfortguide positions the belt away fromthe neck and head.
Here is how to install a comfortguide to the safety belt:
1. Pull the guide out from thepocket on the edge of theseatback.

Black plate (22,1)Chevrolet Impala Owner Manual - 2011
3-22 Seats and Restraints
2. Place the guide over the belt,and insert the two edges of thebelt into the slots of the guide.
3. Be sure that the belt isnot twisted and it lies flat.The elastic cord must be underthe belt and the guide on top.
{ WARNING
A safety belt that is not properlyworn may not provide theprotection needed in a crash.The person wearing the belt couldbe seriously injured. The shoulderbelt should go over the shoulderand across the chest. These partsof the body are best able to takebelt restraining forces.

Black plate (23,1)Chevrolet Impala Owner Manual - 2011
Seats and Restraints 3-23
4. Buckle, position, and releasethe safety belt as describedpreviously in this section. Makesure the shoulder portion of thebelt is on the shoulder and notfalling off of it. The belt shouldbe close to, but not contacting,the neck.
To remove and store the comfortguide, squeeze the belt edgestogether so that the safety beltcan be removed from the guide.Slide the guide into the storagepocket on the edge of the seatback.
Safety Belt Use DuringPregnancySafety belts work for everyone,including pregnant women. Like alloccupants, they are more likely tobe seriously injured if they do notwear safety belts.
A pregnant woman should weara lap-shoulder belt, and the lapportion should be worn as lowas possible, below the rounding,throughout the pregnancy.
The best way to protect the fetus isto protect the mother. When a safetybelt is worn properly, it is more likelythat the fetus will not be hurt in acrash. For pregnant women, as foranyone, the key to making safetybelts effective is wearing themproperly.
Lap BeltThis section is only for the lap belt.To learn how to wear a lap-shoulderbelt, see Lap-Shoulder Belt onpage 3‑19.
The vehicle may have a centerseating position. When you sit inthe center front seating position,you have a lap safety belt, whichhas no retractor.

Black plate (24,1)Chevrolet Impala Owner Manual - 2011
3-24 Seats and Restraints
To make the belt longer, tilt the latchplate and pull it along the belt.
Buckle, position, and release it thesame way as the lap part of alap-shoulder belt.
To make the belt shorter, pull its freeend as shown until the belt is snug.
If the belt is not long enough, seeSafety Belt Extender on page 3‑24.
Make sure the release button on thebuckle is positioned so you wouldbe able to unbuckle the safety beltquickly if necessary.
Safety Belt ExtenderIf the vehicle's safety belt will fastenaround you, you should use it.
But if a safety belt is not longenough, your dealer will order youan extender. When you go in toorder it, take the heaviest coat youwill wear, so the extender will belong enough for you. To help avoidpersonal injury, do not let someoneelse use it, and use it only for theseat it is made to fit. The extenderhas been designed for adults.Never use it for securing child seats.To wear it, attach it to the regularsafety belt. For more information,see the instruction sheet that comeswith the extender.

Black plate (25,1)Chevrolet Impala Owner Manual - 2011
Seats and Restraints 3-25
Safety System CheckNow and then, check that thesafety belt reminder light, safetybelts, buckles, latch plates,retractors, and anchorages areworking properly. Look for anyother loose or damaged safetybelt system parts that might keepa safety belt system from doingits job. See your dealer to haveit repaired. Torn or frayed safetybelts may not protect you in a crash.They can rip apart under impactforces. If a belt is torn or frayed,get a new one right away.
Make sure the safety belt reminderlight is working. See Safety BeltReminders on page 5‑14 for moreinformation.
Keep safety belts clean and dry.See Safety Belt Care on page 3‑25.
Safety Belt CareKeep belts clean and dry.
{ WARNING
Do not bleach or dye safety belts.It may severely weaken them.In a crash, they might not be ableto provide adequate protection.Clean safety belts only with mildsoap and lukewarm water.
Replacing Safety BeltSystem Parts After aCrash
{ WARNING
A crash can damage the safetybelt system in the vehicle.A damaged safety belt systemmay not properly protect theperson using it, resulting inserious injury or even deathin a crash. To help make surethe safety belt systems areworking properly after a crash,have them inspected and anynecessary replacements madeas soon as possible.
After a minor crash, replacement ofsafety belts may not be necessary.But the safety belt assemblies thatwere used during any crash mayhave been stressed or damaged.
Black plate (26,1)Chevrolet Impala Owner Manual - 2011
3-26 Seats and Restraints
See your dealer to have the safetybelt assemblies inspected orreplaced.
New parts and repairs may benecessary even if the safety beltsystem was not being used at thetime of the crash.
Have the safety belt pretensionerschecked if the vehicle has been in acrash, or if the airbag readiness lightstays on after you start the vehicleor while you are driving. See AirbagReadiness Light on page 5‑15.
Airbag SystemThe vehicle has the followingairbags:. A frontal airbag for the driver.. A frontal airbag for the right front
passenger.. A seat‐mounted side impact
airbag for the driver.. A seat‐mounted side impact
airbag for the right frontpassenger.
. A roof-rail airbag for the driverand passenger directly behindthe driver.
. A roof-rail airbag for the rightfront passenger and passengerseated directly behind the rightfront passenger.
All of the airbags in the vehicle willhave the word AIRBAG embossedin the trim or on an attached labelnear the deployment opening.
For frontal airbags, the wordAIRBAG will appear on the middlepart of the steering wheel for thedriver and on the instrument panelfor the right front passenger.
With seat‐mounted side impactairbags, the word AIRBAG willappear on the side of the seatbackclosest to the door.
With roof-rail airbags, the wordAIRBAG will appear along theheadliner or trim.
Airbags are designed to supplementthe protection provided by safetybelts. Even though today's airbagsare also designed to help reducethe risk of injury from the force ofan inflating bag, all airbags mustinflate very quickly to do their job.

Black plate (27,1)Chevrolet Impala Owner Manual - 2011
Seats and Restraints 3-27
Here are the most important thingsto know about the airbag system:
{ WARNING
You can be severely injured orkilled in a crash if you are notwearing your safety belt— evenif you have airbags. Airbags aredesigned to work with safetybelts, but do not replace them.Also, airbags are not designed todeploy in every crash. In somecrashes safety belts are your onlyrestraint. See When Should anAirbag Inflate? on page 3‑30.
Wearing your safety belt during acrash helps reduce your chanceof hitting things inside the vehicleor being ejected from it. Airbagsare “supplemental restraints” tothe safety belts. Everyone in yourvehicle should wear a safety beltproperly—whether or not there isan airbag for that person.
{ WARNING
Airbags inflate with great force,faster than the blink of an eye.Anyone who is up against, orvery close to, any airbag when itinflates can be seriously injuredor killed. Do not sit unnecessarilyclose to any airbag, as you wouldbe if you were sitting on the edgeof the seat or leaning forward.Safety belts help keep you inposition before and during acrash. Always wear a safety belt,even with airbags. The drivershould sit as far back as possiblewhile still maintaining control ofthe vehicle.
Occupants should not lean onor sleep against the door or sidewindows in seating positions withseat-mounted side impact airbagsand/or roof-rail airbags.
{ WARNING
Children who are up against,or very close to, any airbagwhen it inflates can be seriouslyinjured or killed. Airbags pluslap-shoulder belts offer protectionfor adults and older children, butnot for young children and infants.Neither the vehicle safety beltsystem nor its airbag systemis designed for them. Youngchildren and infants need theprotection that a child restraintsystem can provide. Alwayssecure children properly inthe vehicle. To read how, seeOlder Children on page 3‑42 orInfants and Young Children onpage 3‑45.

Black plate (28,1)Chevrolet Impala Owner Manual - 2011
3-28 Seats and Restraints
There is an airbag readiness lighton the instrument panel cluster,which shows the airbag symbol.
The system checks the airbagelectrical system for malfunctions.The light tells you if there is anelectrical problem. See AirbagReadiness Light on page 5‑15for more information.
Where Are the Airbags?
The driver frontal airbag is in themiddle of the steering wheel.
The right front passenger frontalairbag is in the instrument panel onthe passenger side.

Black plate (29,1)Chevrolet Impala Owner Manual - 2011
Seats and Restraints 3-29
Driver Side Shown,Passenger Side Similar
The seat‐mounted side impactairbags for the driver and right frontpassenger are in the side of theseatbacks closest to the door.
Driver Side Shown,Passenger Side Similar
The roof-rail airbags for the driver,right front passenger, and secondrow outboard passengers are in theceiling above the side windows.
{ WARNING
If something is between anoccupant and an airbag, theairbag might not inflate properlyor it might force the object into
(Continued)
WARNING (Continued)
that person causing severeinjury or even death. The pathof an inflating airbag must bekept clear. Do not put anythingbetween an occupant and anairbag, and do not attach or putanything on the steering wheelhub or on or near any otherairbag covering.
Do not use seat accessoriesthat block the inflation path of aseat-mounted side impact airbag.
Never secure anything to theroof of a vehicle with roof-railairbags by routing a rope or tiedown through any door or windowopening. If you do, the path of aninflating roof-rail airbag will beblocked.

Black plate (30,1)Chevrolet Impala Owner Manual - 2011
3-30 Seats and Restraints
When Should an AirbagInflate?Frontal airbags are designedto inflate in moderate to severefrontal or near-frontal crashesto help reduce the potential forsevere injuries mainly to thedriver's or right front passenger'shead and chest. However, theyare only designed to inflate if theimpact exceeds a predetermineddeployment threshold. Deploymentthresholds are used to predict howsevere a crash is likely to be in timefor the airbags to inflate and helprestrain the occupants.
Whether the frontal airbags willor should deploy is not based onhow fast your vehicle is traveling.It depends largely on what you hit,the direction of the impact, and howquickly your vehicle slows down.
Frontal airbags may inflateat different crash speeds.For example:. If the vehicle hits a stationary
object, the airbags could inflateat a different crash speed than ifthe vehicle hits a moving object.
. If the vehicle hits an object thatdeforms, the airbags couldinflate at a different crash speedthan if the vehicle hits an objectthat does not deform.
. If the vehicle hits a narrow object(like a pole), the airbags couldinflate at a different crash speedthan if the vehicle hits a wideobject (like a wall).
. If the vehicle goes into an objectat an angle, the airbags couldinflate at a different crash speedthan if the vehicle goes straightinto the object.
Thresholds can also vary withspecific vehicle design.
Frontal airbags are not intended toinflate during vehicle rollovers, rearimpacts, or in many side impacts.
In addition, the vehicle hasdual-stage frontal airbags.Dual-stage airbags adjust therestraint according to crash severity.The vehicle has electronic frontalsensors, which help the sensingsystem distinguish between amoderate frontal impact and amore severe frontal impact.For moderate frontal impacts,dual-stage airbags inflate at alevel less than full deployment.For more severe frontal impacts,full deployment occurs.
Black plate (31,1)Chevrolet Impala Owner Manual - 2011
Seats and Restraints 3-31
The vehicle has seat-mountedside impact and roof-rail airbags.See Airbag System on page 3‑26.Seat-mounted side impact androof-rail airbags are intended toinflate in moderate to severe sidecrashes. Seat-mounted side impactand roof-rail airbags will inflate ifthe crash severity is above thesystem's designed threshold level.The threshold level can vary withspecific vehicle design.
Roof-rail airbags are not intended toinflate in rollovers or rear impacts.A seat-mounted side impact airbagis intended to deploy on the sideof the vehicle that is struck. Bothroof-rail airbags will deploy wheneither side of the vehicle is struck.
In any particular crash, no onecan say whether an airbag shouldhave inflated simply because ofthe damage to a vehicle or becauseof what the repair costs were.For frontal airbags, inflation isdetermined by what the vehicle hits,the angle of the impact, and howquickly the vehicle slows down.For seat-mounted side impact androof-rail airbags, deployment isdetermined by the location andseverity of the side impact.
What Makes an AirbagInflate?In a deployment event, the sensingsystem sends an electrical signaltriggering a release of gas from theinflator. Gas from the inflator fills theairbag causing the bag to break outof the cover and deploy. The inflator,the airbag, and related hardware areall part of the airbag module.
Frontal airbag modules arelocated inside the steering wheeland instrument panel. For vehicleswith seat‐mounted side impactairbags, there are airbags modulesin the side of the front seatbacksclosest to the door. For vehicleswith roof-rail airbags, there areairbag modules in the ceiling of thevehicle, near the side windows thathave occupant seating positions.

Black plate (32,1)Chevrolet Impala Owner Manual - 2011
3-32 Seats and Restraints
How Does an AirbagRestrain?In moderate to severe frontal ornear frontal collisions, even beltedoccupants can contact the steeringwheel or the instrument panel. Inmoderate to severe side collisions,even belted occupants can contactthe inside of the vehicle.
Airbags supplement theprotection provided by safetybelts. Frontal airbags distributethe force of the impact moreevenly over the occupant's upper
body, stopping the occupant moregradually. Seat-mounted side impactand roof-rail airbags distribute theforce of the impact more evenlyover the occupant's upper body.
But airbags would not help inmany types of collisions, primarilybecause the occupant's motionis not toward those airbags.See When Should an AirbagInflate? on page 3‑30 for moreinformation.
Airbags should never be regardedas anything more than a supplementto safety belts.
What Will You See Afteran Airbag Inflates?After the frontal airbags andseat-mounted side impact airbagsinflate, they quickly deflate, soquickly that some people may noteven realize an airbag inflated.Roof-rail airbags may still be at leastpartially inflated for some time afterthey deploy. Some components ofthe airbag module may be hot forseveral minutes. For location of theairbag modules, see What Makesan Airbag Inflate? on page 3‑31.

Black plate (33,1)Chevrolet Impala Owner Manual - 2011
Seats and Restraints 3-33
The parts of the airbag that comeinto contact with you may be warm,but not too hot to touch. There maybe some smoke and dust comingfrom the vents in the deflatedairbags. Airbag inflation does notprevent the driver from seeing outof the windshield or being able tosteer the vehicle, nor does it preventpeople from leaving the vehicle.
{ WARNING
When an airbag inflates, theremay be dust in the air. This dustcould cause breathing problemsfor people with a history ofasthma or other breathing trouble.To avoid this, everyone in thevehicle should get out as soonas it is safe to do so. If you have
(Continued)
WARNING (Continued)
breathing problems but cannotget out of the vehicle after anairbag inflates, then get fresh airby opening a window or a door.If you experience breathingproblems following an airbagdeployment, you should seekmedical attention.
The vehicle has a feature that mayautomatically unlock the doors, turnon the interior lamps and hazardwarning flashers, and shut off thefuel system after the airbags inflate.You can lock the doors, turn off theinterior lamps and hazard warningflashers by using the controls forthose features.
{ WARNING
A crash severe enough toinflate the airbags may havealso damaged important functionsin the vehicle, such as the fuelsystem, brake and steeringsystems, etc. Even if the vehicleappears to be drivable after amoderate crash, there may beconcealed damage that couldmake it difficult to safely operatethe vehicle.
Use caution if you should attemptto restart the engine after a crashhas occurred.

Black plate (34,1)Chevrolet Impala Owner Manual - 2011
3-34 Seats and Restraints
In many crashes severe enoughto inflate the airbag, windshieldsare broken by vehicle deformation.Additional windshield breakagemay also occur from the right frontpassenger airbag.. Airbags are designed to inflate
only once. After an airbaginflates, you will need somenew parts for the airbag system.If you do not get them, theairbag system will not be thereto help protect you in anothercrash. A new system will includeairbag modules and possiblyother parts. The service manualfor your vehicle covers the needto replace other parts.
. The vehicle has a crashsensing and diagnostic modulewhich records information aftera crash. See Vehicle DataRecording and Privacy onpage 13‑15 and Event DataRecorders on page 13‑16.
. Let only qualified technicianswork on the airbag systems.Improper service can meanthat an airbag system willnot work properly. See yourdealer for service.
Passenger SensingSystemThe vehicle has a passengersensing system for the right frontpassenger position. The passengerairbag status indicator will be visibleon the instrument panel when thevehicle is started.
United States
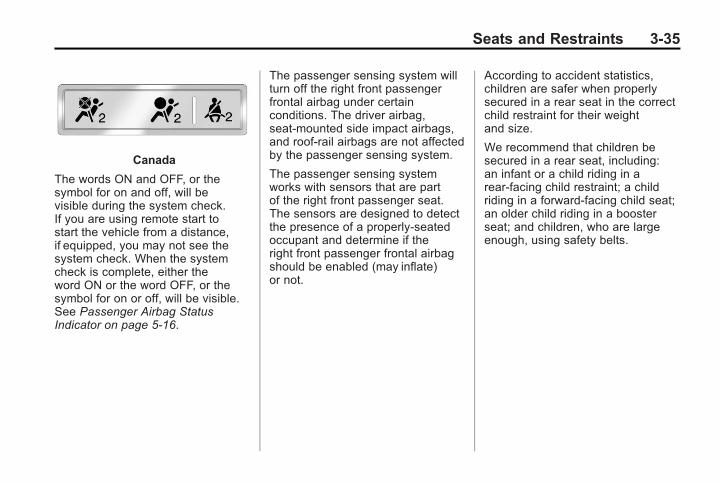
Black plate (35,1)Chevrolet Impala Owner Manual - 2011
Seats and Restraints 3-35
Canada
The words ON and OFF, or thesymbol for on and off, will bevisible during the system check.If you are using remote start tostart the vehicle from a distance,if equipped, you may not see thesystem check. When the systemcheck is complete, either theword ON or the word OFF, or thesymbol for on or off, will be visible.See Passenger Airbag StatusIndicator on page 5‑16.
The passenger sensing system willturn off the right front passengerfrontal airbag under certainconditions. The driver airbag,seat‐mounted side impact airbags,and roof‐rail airbags are not affectedby the passenger sensing system.
The passenger sensing systemworks with sensors that are partof the right front passenger seat.The sensors are designed to detectthe presence of a properly-seatedoccupant and determine if theright front passenger frontal airbagshould be enabled (may inflate)or not.
According to accident statistics,children are safer when properlysecured in a rear seat in the correctchild restraint for their weightand size.
We recommend that children besecured in a rear seat, including:an infant or a child riding in arear-facing child restraint; a childriding in a forward-facing child seat;an older child riding in a boosterseat; and children, who are largeenough, using safety belts.

Black plate (36,1)Chevrolet Impala Owner Manual - 2011
3-36 Seats and Restraints
A label on the sun visor says,“Never put a rear-facing child seatin the front.” This is because the riskto the rear-facing child is so great,if the airbag deploys.
{ WARNING
A child in a rear-facing childrestraint can be seriouslyinjured or killed if the rightfront passenger airbag inflates.This is because the back of therear-facing child restraint wouldbe very close to the inflatingairbag. A child in a forward-facingchild restraint can be seriouslyinjured or killed if the right frontpassenger airbag inflates andthe passenger seat is in aforward position.
(Continued)
WARNING (Continued)
Even if the passenger sensingsystem has turned off the rightfront passenger frontal airbag,no system is fail-safe. No onecan guarantee that an airbag willnot deploy under some unusualcircumstance, even though theairbag is turned off.
Secure rear-facing childrestraints in a rear seat, even ifthe airbag is off. If you secure aforward-facing child restraint inthe right front seat, always movethe front passenger seat as farback as it will go. It is better tosecure the child restraint in arear seat.
The passenger sensing system isdesigned to turn off the right frontpassenger frontal airbag if:. The right front passenger seat is
unoccupied.. The system determines that an
infant is present in a childrestraint.
. A right front passenger takeshis/her weight off of the seat fora period of time.
. Or, if there is a critical problemwith the airbag system or thepassenger sensing system.
When the passenger sensingsystem has turned off the right frontpassenger frontal airbag, the offindicator will light and stay lit toremind you that the airbag is off.See Passenger Airbag StatusIndicator on page 5‑16.
Black plate (37,1)Chevrolet Impala Owner Manual - 2011
Seats and Restraints 3-37
The passenger sensing system isdesigned to turn on (may inflate)the right front passenger frontalairbag anytime the system sensesthat a person of adult size is sittingproperly in the right front passengerseat. When the passenger sensingsystem has allowed the airbag to beenabled, the on indicator will lightand stay lit to remind you that theairbag is active.
For some children, includingchildren in child restraints, and forvery small adults, the passengersensing system may or may notturn off the right front passengerfrontal airbag, depending uponthe person's seating postureand body build. Everyone in thevehicle who has outgrown childrestraints should wear a safetybelt properly—whether or notthere is an airbag for that person.
{ WARNING
If the airbag readiness light evercomes on and stays on, it meansthat something may be wrongwith the airbag system. To helpavoid injury to yourself or others,have the vehicle serviced rightaway. See Airbag ReadinessLight on page 5‑15 for moreinformation, including importantsafety information.
If the On Indicator is Lit for aChild Restraint
If a child restraint has been installedand the on indicator is lit:
1. Turn the vehicle off.
2. Remove the child restraint fromthe vehicle.
3. Remove any additional itemsfrom the seat such as blankets,cushions, seat covers, seatheaters, or seat massagers.
4. Reinstall the child restraintfollowing the directionsprovided by the child restraintmanufacturer and refer toSecuring Child Restraints (RearSeat Position) on page 3‑57or Securing Child Restraints(Center Front Seat Position) onpage 3‑59 or Securing ChildRestraints (Right Front SeatPosition) on page 3‑59.

Black plate (38,1)Chevrolet Impala Owner Manual - 2011
3-38 Seats and Restraints
5. If, after reinstalling the childrestraint and restarting thevehicle, the on indicator isstill lit, turn the vehicle off.Then slightly recline the vehicleseatback and adjust the seatcushion, if adjustable, to makesure that the vehicle seatbackis not pushing the child restraintinto the seat cushion.
Also make sure the childrestraint is not trapped underthe vehicle head restraint.If this happens, adjust thehead restraint. See HeadRestraints on page 3‑2.
6. Restart the vehicle.
The passenger sensing system mayor may not turn off the airbag for achild in a child restraint dependingupon the child's seating posture andbody build. It is better to secure thechild restraint in a rear seat.
If the Off Indicator is Lit for anAdult-Size Occupant
If a person of adult-size is sittingin the right front passenger seat,but the off indicator is lit, it could bebecause that person is not sittingproperly in the seat. If this happens,use the following steps to allow the
system to detect that person andenable the right front passengerfrontal airbag:
1. Turn the vehicle off.
2. Remove any additional materialfrom the seat, such as blankets,cushions, seat covers, seatheaters, or seat massagers.
3. Place the seatback in the fullyupright position.
4. Have the person sit upright inthe seat, centered on the seatcushion, with legs comfortablyextended.
5. Restart the vehicle and have theperson remain in this position fortwo to three minutes after the onindicator is lit.

Black plate (39,1)Chevrolet Impala Owner Manual - 2011
Seats and Restraints 3-39
Additional Factors AffectingSystem Operation
Safety belts help keep thepassenger in position on theseat during vehicle maneuversand braking, which helps thepassenger sensing systemmaintain the passenger airbagstatus. See “Safety Belts” and“Child Restraints” in the Index foradditional information about theimportance of proper restraint use.
A thick layer of additional material,such as a blanket or cushion,or aftermarket equipment suchas seat covers, seat heaters, andseat massagers can affect howwell the passenger sensing systemoperates. We recommend thatyou not use seat covers or otheraftermarket equipment except whenapproved by GM for your specificvehicle. See Adding Equipment tothe Airbag-Equipped Vehicle onpage 3‑40 for more informationabout modifications that can affecthow the system operates.
A wet seat can affect theperformance of the passengersensing system. Here is how:. The passenger sensing system
may turn off the passengerairbag when liquid is soakedinto the seat. If this happens,the off indicator will be lit, andthe airbag readiness light on theinstrument panel will also be lit.
. Liquid pooled on the seat thathas not soaked in may make itmore likely that the passengersensing system will enable(turn on) the passenger airbagwhile a child restraint or childoccupant is on the seat. If thepassenger airbag is turned on,the on indicator will be lit.
If the passenger seat gets wet, drythe seat immediately. If the airbagreadiness light is lit, do not installa child restraint or allow anyoneto occupy the seat. See AirbagReadiness Light on page 5‑15for important safety information.
The on indicator may be lit ifan object, such as a briefcase,handbag, grocery bag, laptop orother electronic device, is put onan unoccupied seat. If this is notdesired, remove the object fromthe seat.
{ WARNING
Stowing of articles under thepassenger seat or between thepassenger seat cushion andseatback may interfere with theproper operation of the passengersensing system.

Black plate (40,1)Chevrolet Impala Owner Manual - 2011
3-40 Seats and Restraints
Servicing theAirbag-Equipped VehicleAirbags affect how the vehicleshould be serviced. There areparts of the airbag system inseveral places around the vehicle.Your dealer and the service manualhave information about servicingthe vehicle and the airbag system.To purchase a service manual, seeService Publications OrderingInformation on page 13‑13.
{ WARNING
For up to 10 seconds after theignition is turned off and thebattery is disconnected, an airbagcan still inflate during improperservice. You can be injured if youare close to an airbag when itinflates. Avoid yellow connectors.They are probably part of theairbag system. Be sure to followproper service procedures, andmake sure the person performingwork for you is qualified to do so.
Adding Equipment to theAirbag-Equipped VehicleQ: Is there anything I might add
to or change about the vehiclethat could keep the airbagsfrom working properly?
A: Yes. If you add things thatchange the vehicle's frame,bumper system, height, frontend or side sheet metal, theymay keep the airbag systemfrom working properly. Changingor moving any parts of the frontseats, safety belts, the airbagsensing and diagnostic module,steering wheel, instrumentpanel, roof-rail airbag modules,ceiling headliner or pillar garnishtrim, front sensors, side impactsensors, or airbag wiring canaffect the operation of theairbag system.

Black plate (41,1)Chevrolet Impala Owner Manual - 2011
Seats and Restraints 3-41
In addition, the vehicle has apassenger sensing systemfor the right front passengerposition, which includes sensorsthat are part of the passenger'sseat. The passenger sensingsystem may not operate properlyif the original seat trim isreplaced with non-GM covers,upholstery or trim, or withGM covers, upholstery ortrim designed for a differentvehicle. Any object, such asan aftermarket seat heater ora comfort enhancing pad ordevice, installed under or ontop of the seat fabric, couldalso interfere with the operationof the passenger sensingsystem. This could eitherprevent proper deploymentof the passenger airbag(s) orprevent the passenger sensingsystem from properly turningoff the passenger airbag(s).See Passenger SensingSystem on page 3‑34.
If you have any questions,call Customer Assistance.The phone numbers andaddresses for CustomerAssistance are in Step Twoof the Customer SatisfactionProcedure in this manual.See Customer SatisfactionProcedure on page 13‑1.
Q: Because I have a disability,I have to get my vehiclemodified. How can I find outwhether this will affect myairbag system?
A: If you have questions,call Customer Assistance.The phone numbers andaddresses for CustomerAssistance are in Step Twoof the Customer SatisfactionProcedure in this manual.See Customer SatisfactionProcedure on page 13‑1.
In addition, your dealer and theservice manual have informationabout the location of the airbagsensors, sensing and diagnosticmodule and airbag wiring.
Airbag System CheckThe airbag system does not needregularly scheduled maintenanceor replacement. Make sure theairbag readiness light is working.See Airbag Readiness Light onpage 5‑15 for more information.
Notice: If an airbag covering isdamaged, opened, or broken,the airbag may not work properly.Do not open or break the airbagcoverings. If there are anyopened or broken airbag covers,have the airbag covering and/orairbag module replaced. For thelocation of the airbag modules,see What Makes an AirbagInflate? on page 3‑31. See yourdealer for service.

Black plate (42,1)Chevrolet Impala Owner Manual - 2011
3-42 Seats and Restraints
Replacing Airbag SystemParts After a Crash
{ WARNING
A crash can damage theairbag systems in the vehicle.A damaged airbag systemmay not work properly andmay not protect you and yourpassenger(s) in a crash, resultingin serious injury or even death.To help make sure the airbagsystems are working properlyafter a crash, have theminspected and any necessaryreplacements made as soonas possible.
If an airbag inflates, you will needto replace airbag system parts.See your dealer for service.
If the airbag readiness light stays onafter the vehicle is started or comeson when you are driving, the airbagsystem may not work properly.Have the vehicle serviced rightaway. See Airbag Readiness Lighton page 5‑15 for more information.
Child Restraints
Older Children
Older children who have outgrownbooster seats should wear thevehicle safety belts.

Black plate (43,1)Chevrolet Impala Owner Manual - 2011
Seats and Restraints 3-43
The manufacturer's instructions thatcome with the booster seat state theweight and height limitations for thatbooster. Use a booster seat with alap-shoulder belt until the childpasses the fit test below:. Sit all the way back on the seat.
Do the knees bend at the seatedge? If yes, continue. If no,return to the booster seat.
. Buckle the lap-shoulder belt.Does the shoulder belt rest onthe shoulder? If yes, continue.If no, try using the rear safetybelt comfort guide. See “RearSafety Belt Comfort Guides”under Lap-Shoulder Belt onpage 3‑19 for more information.If the shoulder belt still does notrest on the shoulder, then returnto the booster seat.
. Does the lap belt fit low andsnug on the hips, touching thethighs? If yes, continue. If no,return to the booster seat.
. Can proper safety belt fit bemaintained for the length ofthe trip? If yes, continue. If no,return to the booster seat.
Q: What is the proper way towear safety belts?
A: An older child should wear alap-shoulder belt and get theadditional restraint a shoulderbelt can provide. The shoulderbelt should not cross the faceor neck. The lap belt shouldfit snugly below the hips, justtouching the top of the thighs.This applies belt force to thechild's pelvic bones in a crash.It should never be worn over theabdomen, which could causesevere or even fatal internalinjuries in a crash.
Also see “Rear Safety Belt ComfortGuides” under Lap-Shoulder Belt onpage 3‑19.
According to accident statistics,children and infants are saferwhen properly restrained in a childrestraint system or infant restraintsystem secured in a rear seatingposition.
In a crash, children who are notbuckled up can strike other peoplewho are buckled up, or can bethrown out of the vehicle. Olderchildren need to use safety beltsproperly.

Black plate (44,1)Chevrolet Impala Owner Manual - 2011
3-44 Seats and Restraints
{ WARNING
Never do this.
Never allow two children to wearthe same safety belt. The safetybelt can not properly spread theimpact forces. In a crash, the twochildren can be crushed togetherand seriously injured. A safetybelt must be used by only oneperson at a time.
{ WARNING
Never do this.
Never allow a child to wear thesafety belt with the shoulder beltbehind their back. A child can beseriously injured by not wearingthe lap-shoulder belt properly.In a crash, the child would not berestrained by the shoulder belt.The child could move too far
(Continued)
WARNING (Continued)
forward increasing the chance ofhead and neck injury. The childmight also slide under the lapbelt. The belt force would thenbe applied right on the abdomen.That could cause serious or fatalinjuries. The shoulder belt shouldgo over the shoulder and acrossthe chest.

Black plate (45,1)Chevrolet Impala Owner Manual - 2011
Seats and Restraints 3-45
Infants and YoungChildrenEveryone in a vehicle needsprotection! This includes infantsand all other children. Neither thedistance traveled nor the age andsize of the traveler changes theneed, for everyone, to use safetyrestraints. In fact, the law in everystate in the United States and inevery Canadian province sayschildren up to some age must berestrained while in a vehicle.
{ WARNING
Children can be seriously injuredor strangled if a shoulder beltis wrapped around their neckand the safety belt continuesto tighten. Never leave childrenunattended in a vehicle and neverallow children to play with thesafety belts.
Airbags plus lap‐shoulder beltsoffer protection for adults and olderchildren, but not for young childrenand infants. Neither the vehicle'ssafety belt system nor its airbagsystem is designed for them. Everytime infants and young children ridein vehicles, they should have theprotection provided by appropriatechild restraints.
Children who are not restrainedproperly can strike other people,or can be thrown out of the vehicle.
{ WARNING
Never do this.
Never hold an infant or a childwhile riding in a vehicle. Due tocrash forces, an infant or a childwill become so heavy it is notpossible to hold it during a crash.For example, in a crash at only
(Continued)
WARNING (Continued)
40 km/h (25 mph), a 5.5 kg (12 lb)infant will suddenly becomea 110 kg (240 lb) force on aperson's arms. An infant shouldbe secured in an appropriaterestraint.

Black plate (46,1)Chevrolet Impala Owner Manual - 2011
3-46 Seats and Restraints
{ WARNING
Never do this.
Children who are up against,or very close to, any airbag whenit inflates can be seriously injuredor killed. Never put a rear-facingchild restraint in the right frontseat. Secure a rear-facing childrestraint in a rear seat. It is alsobetter to secure a forward-facingchild restraint in a rear seat. If youmust secure a forward-facingchild restraint in the right frontseat, always move the frontpassenger seat as far backas it will go.
Q: What are the different types ofadd-on child restraints?
A: Add-on child restraints, whichare purchased by the vehicleowner, are available in fourbasic types. Selection of aparticular restraint shouldtake into consideration notonly the child's weight, height,and age but also whether or notthe restraint will be compatiblewith the motor vehicle in whichit will be used.
For most basic types of childrestraints, there are manydifferent models available.When purchasing a childrestraint, be sure it is designedto be used in a motor vehicle.If it is, the restraint will have alabel saying that it meets federalmotor vehicle safety standards.
The restraint manufacturer'sinstructions that come with therestraint state the weight andheight limitations for a particularchild restraint. In addition, thereare many kinds of restraintsavailable for children withspecial needs.

Black plate (47,1)Chevrolet Impala Owner Manual - 2011
Seats and Restraints 3-47
{ WARNING
To reduce the risk of neck andhead injury during a crash, infantsneed complete support. This isbecause an infant's neck is notfully developed and its headweighs so much compared withthe rest of its body. In a crash,an infant in a rear-facing childrestraint settles into the restraint,so the crash forces can bedistributed across the strongestpart of an infant's body, the backand shoulders. Infants shouldalways be secured in rear-facingchild restraints.
{ WARNING
A young child's hip bones are stillso small that the vehicle's regularsafety belt may not remain lowon the hip bones, as it should.Instead, it may settle up aroundthe child's abdomen. In a crash,the belt would apply force on abody area that is unprotected byany bony structure. This alonecould cause serious or fatalinjuries. To reduce the risk ofserious or fatal injuries duringa crash, young children shouldalways be secured in appropriatechild restraints.
Child Restraint Systems
(A) Rear‐Facing Infant Seat
A rear-facing infant seat (A)provides restraint with the seatingsurface against the back of theinfant.
The harness system holds the infantin place and, in a crash, acts tokeep the infant positioned in therestraint.

Black plate (48,1)Chevrolet Impala Owner Manual - 2011
3-48 Seats and Restraints
(B) Forward-Facing Child Seat
A forward-facing child seat (B)provides restraint for the child'sbody with the harness.
(C) Booster Seats
A booster seat (C) is a child restraintdesigned to improve the fit ofthe vehicle's safety belt system.A booster seat can also help achild to see out the window.
Securing an Add-On ChildRestraint in the Vehicle
{ WARNING
A child can be seriously injuredor killed in a crash if the childrestraint is not properly securedin the vehicle. Secure the childrestraint properly in the vehicleusing the vehicle safety belt orLATCH system, following theinstructions that came with thatchild restraint and the instructionsin this manual.
To help reduce the chance ofinjury, the child restraint mustbe secured in the vehicle. Childrestraint systems must be securedin vehicle seats by lap belts or thelap belt portion of a lap-shoulderbelt, or by the LATCH system.See Lower Anchors and Tethersfor Children (LATCH System) onpage 3‑51 for more information.

Black plate (49,1)Chevrolet Impala Owner Manual - 2011
Seats and Restraints 3-49
Children can be endangered in acrash if the child restraint is notproperly secured in the vehicle.
When securing an add-on childrestraint, refer to the instructionsthat come with the restraint whichmay be on the restraint itself or in abooklet, or both, and to this manual.The child restraint instructionsare important, so if they are notavailable, obtain a replacementcopy from the manufacturer.
Keep in mind that an unsecuredchild restraint can move around in acollision or sudden stop and injurepeople in the vehicle. Be sure toproperly secure any child restraintin the vehicle — even when nochild is in it.
In some areas, Certified ChildPassenger Safety Technicians(CPSTs) are available to inspectand demonstrate how to correctlyuse and install child restraints.In the U.S., refer to theNational Highway Traffic SafetyAdministration (NHTSA) websiteto locate the nearest child safetyseat inspection station. For CPSTavailability in Canada, check withTransport Canada or the ProvincialMinistry of Transportation office.
Securing the Child within theChild Restraint
{ WARNING
A child can be seriously injuredor killed in a crash if the childis not properly secured in thechild restraint. Secure the childproperly following the instructionsthat came with that child restraint.
Where to Put theRestraintAccording to accident statistics,children and infants are saferwhen properly restrained in a childrestraint system or infant restraintsystem secured in a rear seatingposition.
We recommend that children andchild restraints be secured in a rearseat, including: an infant or a childriding in a rear-facing child restraint;a child riding in a forward-facingchild seat; an older child riding in abooster seat; and children, who arelarge enough, using safety belts.

Black plate (50,1)Chevrolet Impala Owner Manual - 2011
3-50 Seats and Restraints
A label on your sun visor says,“Never put a rear-facing child seatin the front.” This is because the riskto the rear-facing child is so great,if the airbag deploys.
{ WARNING
A child in a rear-facing childrestraint can be seriouslyinjured or killed if the rightfront passenger airbag inflates.This is because the back of therear-facing child restraint wouldbe very close to the inflatingairbag. A child in a forward-facingchild restraint can be seriouslyinjured or killed if the right frontpassenger airbag inflates and thepassenger seat is in a forwardposition.
The vehicle may have apassenger sensing systemwhich is designed to turn offthe right front passenger frontalairbag under certain conditions.
(Continued)
WARNING (Continued)
Even if the passenger sensingsystem, if equipped, hasturned off the right frontpassenger frontal airbag, nosystem is fail-safe. No onecan guarantee that an airbagwill not deploy under someunusual circumstance, eventhough it is turned off.
Secure rear-facing child restraintsin a rear seat, even if theairbag is off. If you secure aforward-facing child restraint inthe right front seat, always movethe front passenger seat as farback as it will go. It is better tosecure the child restraint in arear seat.
See Passenger Sensing Systemon page 3‑34 for additionalinformation.
{ WARNING
A child in a child restraint in thecenter front seat can be badlyinjured or killed by the frontalairbags if they inflate. Neversecure a child restraint in thecenter front seat. It is alwaysbetter to secure a child restraintin a rear seat.
Do not use child restraints in thecenter front seat position.
When securing a child restraint ina rear seating position, study theinstructions that came with yourchild restraint to make sure it iscompatible with this vehicle.
Child restraints and booster seatsvary considerably in size, and somemay fit in certain seating positionsbetter than others. Always makesure the child restraint is properlysecured.

Black plate (51,1)Chevrolet Impala Owner Manual - 2011
Seats and Restraints 3-51
Depending on where you placethe child restraint and the size ofthe child restraint, you may notbe able to access adjacent safetybelt assemblies or LATCH anchorsfor additional passengers or childrestraints. Adjacent seatingpositions should not be used if thechild restraint prevents access toor interferes with the routing of thesafety belt.
Wherever a child restraint isinstalled, be sure to secure thechild restraint properly.
Keep in mind that an unsecuredchild restraint can move around in acollision or sudden stop and injurepeople in the vehicle. Be sure toproperly secure any child restraint inyour vehicle— even when no childis in it.
Lower Anchors andTethers for Children(LATCH System)The LATCH system holds a childrestraint during driving or in a crash.This system is designed to makeinstallation of a child restraint easier.The LATCH system uses anchors inthe vehicle and attachments on thechild restraint that are made for usewith the LATCH system.
Make sure that a LATCH-compatiblechild restraint is properly installedusing the anchors, or use thevehicle's safety belts to secure therestraint, following the instructionsthat came with that restraint, andalso the instructions in this manual.
When installing a child restraintwith a top tether, you must alsouse either the lower anchors or thesafety belts to properly secure thechild restraint. A child restraint mustnever be installed using only the toptether and anchor.
In order to use the LATCHsystem in your vehicle, you needa child restraint that has LATCHattachments. The child restraintmanufacturer will provide you withinstructions on how to use thechild restraint and its attachments.The following explains how toattach a child restraint with theseattachments in your vehicle.
Not all vehicle seating positions orchild restraints have lower anchorsand attachments or top tetheranchors and attachments.

Black plate (52,1)Chevrolet Impala Owner Manual - 2011
3-52 Seats and Restraints
Lower Anchors
Lower anchors (A) are metalbars built into the vehicle. Thereare two lower anchors for eachLATCH seating position that willaccommodate a child restraintwith lower attachments (B).
Top Tether Anchor
A top tether (A, C) anchors thetop of the child restraint to thevehicle. A top tether anchor isbuilt into the vehicle. The top tetherattachment (B) on the child restraintconnects to the top tether anchorin the vehicle in order to reduce theforward movement and rotation ofthe child restraint during driving orin a crash.
Your child restraint may havea single tether (A) or a dualtether (C). Either will have asingle attachment (B) to securethe top tether to the anchor.
Some child restraints that havea top tether are designed for usewith or without the top tether beingattached. Others require the toptether always to be attached.In Canada, the law requires thatforward-facing child restraints havea top tether, and that the tetherbe attached. Be sure to read andfollow the instructions for your childrestraint.

Black plate (53,1)Chevrolet Impala Owner Manual - 2011
Seats and Restraints 3-53
Lower Anchor and Top TetherAnchor Locations
Rear Seat
i (Top Tether Anchor): Seatingpositions with top tether anchors.
j (Lower Anchor): Seatingpositions with two lower anchors.
To assist you in locating the loweranchors, each seating position withlower anchors has two labels, nearthe crease between the seatbackand the seat cushion.
To assist you in locating the toptether anchors, the top tether anchorsymbol is located on the cover.
The top tether anchors are locatedunder the covers on the rearseatback filler panel behind eachhead restraint. Be sure to use ananchor located on the same side ofthe vehicle as the seating positionwhere the child restraint will beplaced.

Black plate (54,1)Chevrolet Impala Owner Manual - 2011
3-54 Seats and Restraints
Do not secure a child restraint in aposition without a top tether anchorif a national or local law requiresthat the top tether be attached, orif the instructions that come withthe child restraint say that the toptether must be attached.
According to accident statistics,children and infants are saferwhen properly restrained in a childrestraint system or infant restraintsystem secured in a rear seatingposition. See Where to Put theRestraint on page 3‑49 foradditional information.
Securing a Child RestraintDesigned for the LATCHSystem
{ WARNING
If a LATCH-type child restraint isnot attached to anchors, the childrestraint will not be able to protectthe child correctly. In a crash, thechild could be seriously injuredor killed. Install a LATCH-typechild restraint properly usingthe anchors, or use the vehiclesafety belts to secure therestraint, following the instructionsthat came with the child restraintand the instructions in thismanual.
{ WARNING
Do not attach more than onechild restraint to a single anchor.Attaching more than one childrestraint to a single anchor couldcause the anchor or attachmentto come loose or even breakduring a crash. A child or otherscould be injured. To reduce therisk of serious or fatal injuriesduring a crash, attach only onechild restraint per anchor.
Black plate (55,1)Chevrolet Impala Owner Manual - 2011
Seats and Restraints 3-55
{ WARNING
Children can be seriously injuredor strangled if a shoulder beltis wrapped around their neckand the safety belt continues totighten. Buckle any unused safetybelts behind the child restraintso children cannot reach them.Pull the shoulder belt all the wayout of the retractor to set the lock,if the vehicle has one, after thechild restraint has been installed.
Notice: Do not let the LATCHattachments rub against thevehicle’s safety belts. This maydamage these parts. If necessary,move buckled safety belts toavoid rubbing the LATCHattachments.
Do not fold the empty rearseat with a safety belt buckled.This could damage the safetybelt or the seat. Unbuckle andreturn the safety belt to itsstowed position, before foldingthe seat.
1. Attach and tighten thelower attachments to thelower anchors. If the childrestraint does not have lowerattachments or the desiredseating position does not havelower anchors, secure the childrestraint with the top tether andthe safety belts. Refer to yourchild restraint manufacturerinstructions and the instructionsin this manual.
1.1. Find the lower anchorsfor the desired seatingposition.
1.2. Put the child restraint onthe seat.
1.3. Attach and tighten thelower attachments on thechild restraint to the loweranchors.
2. If the child restraint manufacturerrecommends that the top tetherbe attached, attach and tightenthe top tether to the top tetheranchor, if equipped. Refer to thechild restraint instructions andthe following steps:
2.1. Find the top tether anchor.
2.2. Push on the depressionat the rear of the coverand swing the lid opento expose the top tetheranchor.

Black plate (56,1)Chevrolet Impala Owner Manual - 2011
3-56 Seats and Restraints
2.3. Route, attach, and tightenthe top tether accordingto your child restraintinstructions and thefollowing instructions:
If the position you areusing has a fixed headrestand you are using a singletether, route the tether overthe head restraint.
If the position you are usinghas a fixed headrest andyou are using a dual tether,route the tether around thehead restraint.
3. Before placing a child in thechild restraint, make sureit is securely held in place.To check, grasp the childrestraint at the LATCH pathand attempt to move itside‐to‐side and back‐and‐forth.There should be no more than2.5 cm (1 in) of movement,for proper installation.
Replacing LATCH SystemParts After a Crash
{ WARNING
A crash can damage theLATCH system in the vehicle.A damaged LATCH system maynot properly secure the childrestraint, resulting in seriousinjury or even death in a crash.To help make sure the LATCHsystem is working properly aftera crash, see your dealer to havethe system inspected and anynecessary replacements madeas soon as possible.
If the vehicle has the LATCH systemand it was being used during acrash, new LATCH system partsmay be needed.
New parts and repairs may benecessary even if the LATCHsystem was not being used atthe time of the crash.
Black plate (57,1)Chevrolet Impala Owner Manual - 2011
Seats and Restraints 3-57
Securing Child Restraints(Rear Seat Position)When securing a child restraint ina rear seating position, study theinstructions that came with thechild restraint to make sure it iscompatible with this vehicle.
If the child restraint has the LATCHsystem, see Lower Anchors andTethers for Children (LATCHSystem) on page 3‑51 for how andwhere to install the child restraintusing LATCH. If a child restraintis secured in the vehicle using asafety belt and it uses a top tether,see Lower Anchors and Tethersfor Children (LATCH System) onpage 3‑51 for top tether anchorlocations.
Do not secure a child seat in aposition without a top tether anchorif a national or local law requiresthat the top tether be anchored,or if the instructions that come withthe child restraint say that the topstrap must be anchored.
In Canada, the law requires thatforward-facing child restraints havea top tether, and that the tether beattached.
If the child restraint does not havethe LATCH system, you will beusing the safety belt to securethe child restraint in this position.Be sure to follow the instructionsthat came with the child restraint.Secure the child in the child restraintwhen and as the instructions say.
If more than one child restraintneeds to be installed in the rearseat, be sure to read Where toPut the Restraint on page 3‑49.
1. Put the child restraint onthe seat.
2. Pick up the latch plate, and runthe lap and shoulder portions ofthe vehicle safety belt through oraround the restraint. The childrestraint instructions will showyou how.
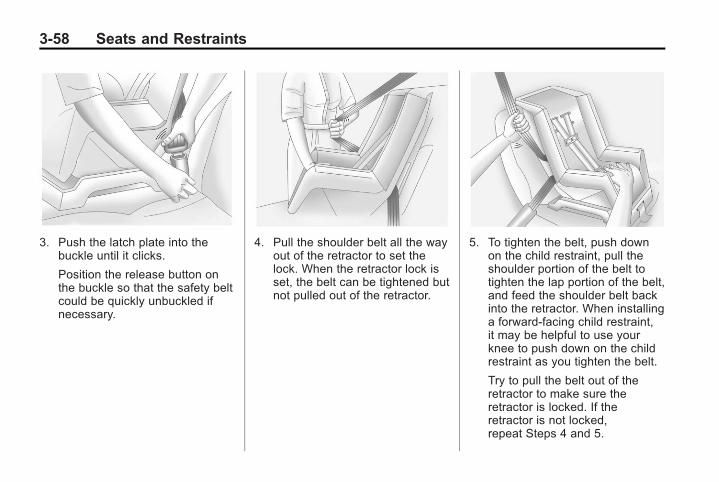
Black plate (58,1)Chevrolet Impala Owner Manual - 2011
3-58 Seats and Restraints
3. Push the latch plate into thebuckle until it clicks.
Position the release button onthe buckle so that the safety beltcould be quickly unbuckled ifnecessary.
4. Pull the shoulder belt all the wayout of the retractor to set thelock. When the retractor lock isset, the belt can be tightened butnot pulled out of the retractor.
5. To tighten the belt, push downon the child restraint, pull theshoulder portion of the belt totighten the lap portion of the belt,and feed the shoulder belt backinto the retractor. When installinga forward-facing child restraint,it may be helpful to use yourknee to push down on the childrestraint as you tighten the belt.
Try to pull the belt out of theretractor to make sure theretractor is locked. If theretractor is not locked,repeat Steps 4 and 5.

Black plate (59,1)Chevrolet Impala Owner Manual - 2011
Seats and Restraints 3-59
6. If the child restraint has a toptether, follow the child restraintmanufacturer's instructionsregarding the use of the toptether. See Lower Anchors andTethers for Children (LATCHSystem) on page 3‑51 for moreinformation.
7. Before placing a child in thechild restraint, make sure it issecurely held in place. To check,grasp the child restraint at thesafety belt path and attemptto move it side‐to‐side andback‐and‐forth. When the childrestraint is properly installed,there should be no more than2.5 cm (1 in) of movement.
To remove the child restraint,unbuckle the vehicle safety belt andlet it return to the stowed position.If the top tether is attached to a toptether anchor, disconnect it.
Securing Child Restraints(Center Front SeatPosition)
{ WARNING
A child in a child restraint in thecenter front seat can be badlyinjured or killed by the frontalairbags if they inflate. Neversecure a child restraint in thecenter front seat. It is alwaysbetter to secure a child restraintin a rear seat.
Do not use child restraints in thecenter front seat position.
Securing Child Restraints(Right Front SeatPosition)This vehicle has airbags. A rearseat is a safer place to securea forward-facing child restraint.See Where to Put the Restraint onpage 3‑49.
In addition, the vehicle has apassenger sensing system whichis designed to turn off the rightfront passenger frontal airbag undercertain conditions. See PassengerSensing System on page 3‑34 andPassenger Airbag Status Indicatoron page 5‑16 for more information,including important safetyinformation.

Black plate (60,1)Chevrolet Impala Owner Manual - 2011
3-60 Seats and Restraints
A label on the sun visor says,“Never put a rear-facing child seatin the front.” This is because the riskto the rear-facing child is so great,if the airbag deploys.
{ WARNING
A child in a rear-facing childrestraint can be seriouslyinjured or killed if the rightfront passenger airbag inflates.This is because the back of therear-facing child restraint wouldbe very close to the inflatingairbag. A child in a forward-facingchild restraint can be seriouslyinjured or killed if the right frontpassenger airbag inflates and thepassenger seat is in a forwardposition.
(Continued)
WARNING (Continued)
Even if the passenger sensingsystem has turned off the rightfront passenger frontal airbag,no system is fail-safe. No onecan guarantee that an airbag willnot deploy under some unusualcircumstance, even though it isturned off.
Secure rear-facing childrestraints in a rear seat, even ifthe airbag is off. If you secure aforward-facing child restraint inthe right front seat, always movethe front passenger seat as farback as it will go. It is better tosecure the child restraint in arear seat.
See Passenger Sensing Systemon page 3‑34 for additionalinformation.
If the child restraint has the LATCHsystem, see Lower Anchors andTethers for Children (LATCHSystem) on page 3‑51 for how andwhere to install the child restraintusing LATCH. If a child restraint issecured using a safety belt and ituses a top tether, see for top tetheranchor locations.
Do not secure a child seat in aposition without a top tether anchorif a national or local law requiresthat the top tether be anchored, or ifthe instructions that come with thechild restraint say that the top strapmust be anchored.
In Canada, the law requires thatforward-facing child restraints havea top tether, and that the tether beattached.

Black plate (61,1)Chevrolet Impala Owner Manual - 2011
Seats and Restraints 3-61
You will be using the lap-shoulderbelt to secure the child restraint inthis position. Follow the instructionsthat came with the child restraint.
1. Move the seat as far back asit will go before securing theforward-facing child restraint.
When the passenger sensingsystem has turned off theright front passenger frontalairbag, the off indicator onthe passenger airbag statusindicator should light and staylit when the vehicle is started.See Passenger Airbag StatusIndicator on page 5‑16.
2. Put the child restraint onthe seat.
3. Pick up the latch plate, and runthe lap and shoulder portions ofthe vehicle's safety belt throughor around the restraint. The childrestraint instructions will showyou how.
4. Push the latch plate into thebuckle until it clicks.
Position the release button onthe buckle so that the safety beltcould be quickly unbuckled ifnecessary.
5. Pull the shoulder belt all the wayout of the retractor to set thelock. When the retractor lock isset, the belt can be tightened butnot pulled out of the retractor.
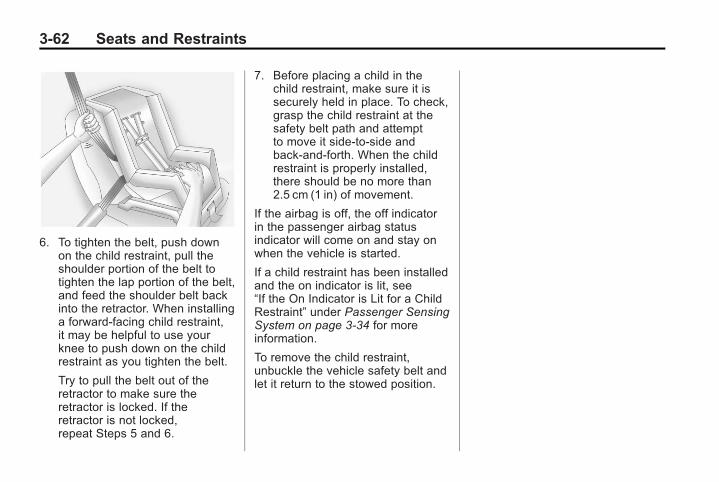
Black plate (62,1)Chevrolet Impala Owner Manual - 2011
3-62 Seats and Restraints
6. To tighten the belt, push downon the child restraint, pull theshoulder portion of the belt totighten the lap portion of the belt,and feed the shoulder belt backinto the retractor. When installinga forward-facing child restraint,it may be helpful to use yourknee to push down on the childrestraint as you tighten the belt.
Try to pull the belt out of theretractor to make sure theretractor is locked. If theretractor is not locked,repeat Steps 5 and 6.
7. Before placing a child in thechild restraint, make sure it issecurely held in place. To check,grasp the child restraint at thesafety belt path and attemptto move it side‐to‐side andback‐and‐forth. When the childrestraint is properly installed,there should be no more than2.5 cm (1 in) of movement.
If the airbag is off, the off indicatorin the passenger airbag statusindicator will come on and stay onwhen the vehicle is started.
If a child restraint has been installedand the on indicator is lit, see“If the On Indicator is Lit for a ChildRestraint” under Passenger SensingSystem on page 3‑34 for moreinformation.
To remove the child restraint,unbuckle the vehicle safety belt andlet it return to the stowed position.

Black plate (1,1)Chevrolet Impala Owner Manual - 2011
Storage 4-1
Storage
Storage CompartmentsGlove Box . . . . . . . . . . . . . . . . . . . . 4-1Cupholders . . . . . . . . . . . . . . . . . . . 4-1Sunglasses Storage . . . . . . . . . . 4-1Armrest Storage . . . . . . . . . . . . . . 4-1Rear Storage . . . . . . . . . . . . . . . . . 4-2Center Console Storage . . . . . . 4-2
Additional Storage FeaturesConvenience Net . . . . . . . . . . . . . 4-2
StorageCompartments
Glove BoxLift up on the glove box lever toopen it.
CupholdersCupholders may be built into thefront center console, front portionof the front center seat, and reararmrest of the vehicle.
Sunglasses StorageA storage compartment forsunglasses may be located abovethe rearview mirror. Push on thecover to open the compartment.
Armrest StorageFor vehicles with a rear seatarmrest, pull the tab on thearmrest forward to access it.

Black plate (2,1)Chevrolet Impala Owner Manual - 2011
4-2 Storage
Rear StorageFor vehicles with a split folding rearseat, there are two storage areasunderneath. Pull the tab(s) locatedby the passenger side safety beltbuckle and the driver side rearseat to access the storage areas.See Rear Seats (Split Folding) onpage 3‑8 for more information.
Center Console StorageFor vehicles with a front centerconsole storage area, open it bypulling up on the latch locatedin the front of the console cover.There may be a removable trayinside.
Additional StorageFeatures
Convenience NetFor vehicles with a conveniencenet, it is located in the rear. Use itto store small loads as far forwardas possible. The net should not beused to store heavy loads.
Black plate (1,1)Chevrolet Impala Owner Manual - 2011
Instruments and Controls 5-1
Instruments andControls
ControlsSteering Wheel Adjustment . . . 5-2Steering Wheel Controls . . . . . . 5-3Horn . . . . . . . . . . . . . . . . . . . . . . . . . . 5-3Windshield Wiper/Washer . . . . . 5-4Compass . . . . . . . . . . . . . . . . . . . . . 5-5Clock . . . . . . . . . . . . . . . . . . . . . . . . . 5-7Power Outlets . . . . . . . . . . . . . . . . . 5-8Cigarette Lighter . . . . . . . . . . . . . . 5-9Ashtrays . . . . . . . . . . . . . . . . . . . . . 5-10
Warning Lights, Gauges, andIndicatorsWarning Lights, Gauges, andIndicators . . . . . . . . . . . . . . . . . . 5-10
Instrument Cluster . . . . . . . . . . . 5-11Speedometer . . . . . . . . . . . . . . . . 5-12Odometer . . . . . . . . . . . . . . . . . . . . 5-12Tachometer . . . . . . . . . . . . . . . . . . 5-12Fuel Gauge . . . . . . . . . . . . . . . . . . 5-12
Engine Coolant TemperatureGauge . . . . . . . . . . . . . . . . . . . . . . 5-13
Safety Belt Reminders . . . . . . . 5-14Airbag Readiness Light . . . . . . 5-15Passenger Airbag StatusIndicator . . . . . . . . . . . . . . . . . . . . 5-16
Charging System Light . . . . . . 5-17MalfunctionIndicator Lamp . . . . . . . . . . . . . 5-17
Brake System WarningLight . . . . . . . . . . . . . . . . . . . . . . . 5-20
Antilock Brake System (ABS)Warning Light . . . . . . . . . . . . . . 5-21
Electronic Stability Control(ESC) Indicator Light . . . . . . . 5-21
Traction Control System(TCS) Warning Light . . . . . . . 5-22
Engine Coolant TemperatureWarning Light . . . . . . . . . . . . . . 5-23
Tire Pressure Light . . . . . . . . . . 5-23Engine Oil Pressure Light . . . . 5-24Security Light . . . . . . . . . . . . . . . . 5-25High-Beam On Light . . . . . . . . . 5-25Front Fog Lamp Light . . . . . . . . 5-25Cruise Control Light . . . . . . . . . 5-25
Information DisplaysDriver InformationCenter (DIC) . . . . . . . . . . . . . . . 5-26
Vehicle MessagesVehicle Messages . . . . . . . . . . . 5-30Battery Voltage and ChargingMessages . . . . . . . . . . . . . . . . . . 5-30
Brake System Messages . . . . 5-31Door Ajar Messages . . . . . . . . . 5-31Engine Cooling SystemMessages . . . . . . . . . . . . . . . . . . 5-32
Engine Oil Messages . . . . . . . . 5-33Engine Power Messages . . . . 5-33Fuel System Messages . . . . . . 5-34Key and Lock Messages . . . . . 5-34Lamp Messages . . . . . . . . . . . . . 5-34Ride Control SystemMessages . . . . . . . . . . . . . . . . . . 5-35
Airbag System Messages . . . . 5-36Anti-Theft Alarm SystemMessages . . . . . . . . . . . . . . . . . . 5-36
Service Vehicle Messages . . . 5-36Tire Messages . . . . . . . . . . . . . . . 5-37

Black plate (2,1)Chevrolet Impala Owner Manual - 2011
5-2 Instruments and Controls
Transmission Messages . . . . . 5-38Vehicle ReminderMessages . . . . . . . . . . . . . . . . . . 5-38
Washer Fluid Messages . . . . . 5-38
Vehicle PersonalizationVehicle Personalization . . . . . . 5-39
Universal Remote SystemUniversal Remote System . . . 5-45Universal Remote SystemProgramming . . . . . . . . . . . . . . . 5-45
Universal Remote SystemOperation . . . . . . . . . . . . . . . . . . 5-51
Controls
Steering WheelAdjustment
The tilt wheel lever is located on theleft side of the steering column.
To adjust the steering wheel:
1. Hold the wheel and pull the levertoward you.
2. Move the steering wheel upor down.
3. Release the lever to lock thesteering wheel in place.
Do not adjust the steering wheelwhile driving.

Black plate (3,1)Chevrolet Impala Owner Manual - 2011
Instruments and Controls 5-3
Steering Wheel Controls
Vehicles with audio steering wheelcontrols could differ depending onthe vehicle's options. Some audiocontrols can be adjusted at thesteering wheel.
w (Next): Press to go to the nextradio station stored as a favorite,or the next track if a CD is playing.
cx (Previous/End): Pressto go to the previous radio stationstored as a favorite, go to the nexttrack if a CD is playing, reject anincoming call, or end a current call.
b g (Mute/Push to Talk): Pressto silence the vehicle speakersonly. Press again to turn the soundon. For vehicles with OnStar®
or Bluetooth® systems, pressand hold b g for longer thantwo seconds to interact with thosesystems. See the OnStar Owner'sGuide and Bluetooth on page 7‑21for more information.
SRCE (Source): Press to choosebetween the radio (AM, FM, XM),CD, and auxiliary input jack.
+ e − e (Volume): Press toincrease or to decrease the radiovolume.
¨ (Seek): Press to go to the nextradio station while in AM, FM,or XM™. Press ¨ to go to the nexttrack or chapter while sourced tothe CD.
HornPress near or on the horn symbolson the steering wheel pad to soundthe horn.

Black plate (4,1)Chevrolet Impala Owner Manual - 2011
5-4 Instruments and Controls
Windshield Wiper/Washer
Turn the band with the wiper symbolto control the windshield wipers.
8 (Mist): Single wipe, turnto8, then release. Several wipes,
hold the band on8 longer.
9 (Off): Turns the windshieldwipers off.
6 (Adjustable Interval Wipes):Turn the band up for more frequentwipes or down for less frequentwipes.
6 (Low Speed): Slowwipes.
? (High Speed): Fast wipes.
Clear ice and snow from the wiperblades before using them. If frozento the windshield, carefully loosen orthaw them. Damaged wiper bladesshould be replaced. See WiperBlade Replacement on page 10‑31.
Heavy snow or ice can overload thewiper motor. A circuit breaker willstop the motor until it cools down.
Windshield Washer
Push the paddleL at the top ofthe lever to spray washer fluid onthe windshield. The wipers run forseveral sweeps and then eitherstop or return to the preset speed.The ignition key must be inACC/ACCESSORY or ON/RUNfor this to work. See WasherFluid on page 10‑25.
{ WARNING
In freezing weather, do not usethe washer until the windshieldis warmed. Otherwise thewasher fluid can form ice on thewindshield, blocking your vision.
When the vehicle is low on washerfluid, the WASHER FLUID LOWADD FLUID displays in the DriverInformation Center (DIC) for60 seconds. When the ignition isturned off, this message displaysagain for three seconds to remindyou that the fluid level is low.
Until the fluid reservoir is refilled,every time the vehicle is started,the WASHER FLUID LOW ADDFLUID message displays in theDriver Information Center (DIC)for 60 seconds. See WasherFluid Messages on page 5‑38.

Black plate (5,1)Chevrolet Impala Owner Manual - 2011
Instruments and Controls 5-5
CompassThis vehicle may have a compass inthe Driver Information Center (DIC).
Compass Zone
Your dealer will set the correct zonefor your location.
Under certain circumstances,such as during a long distancecross-country trip or moving toa new state or province, it willbe necessary to compensate forcompass variance by resetting thezone through the DIC if the zoneis not set correctly.
Compass variance is the differencebetween the earth's magneticnorth and true geographic north.
If the compass is not set to the zonewhere you live, the compass maygive false readings. The compassmust be set to the variance zonein which the vehicle is traveling.
To adjust for compass variance,use the following procedure:
Compass Variance (Zone)Procedure
1. Do not set the compass zonewhen the vehicle is moving.Only set it when the vehicleis in P (Park).
PressT until PRESS V TOCHANGE COMPASS ZONEdisplays.
2. Find the vehicle's currentlocation and variance zonenumber on the map.
Zones 1 through 15 areavailable.
3. Press V to scroll throughand select the appropriatevariance zone.

Black plate (6,1)Chevrolet Impala Owner Manual - 2011
5-6 Instruments and Controls
4. Press3 until the vehicleheading, for example, N forNorth, is displayed in the DIC.
5. If calibration is necessary,calibrate the compass.See “Compass CalibrationProcedure” following.
Compass Calibration
The compass can be manuallycalibrated. Only calibrate thecompass in a magnetically cleanand safe location, such as anopen parking lot, where drivingthe vehicle in circles is not adanger. It is suggested to calibrateaway from tall buildings, utilitywires, manhole covers, or otherindustrial structures, if possible.
If CAL should ever appear in theDIC display, the compass shouldbe calibrated.
If the DIC display does not show aheading, for example, N for North,or the heading does not changeafter making turns, there may bea strong magnetic field interferingwith the compass. Such interferencemay be caused by a magnetic CBor cell phone antenna mount, amagnetic emergency light, magneticnote pad holder, or any othermagnetic item. Turn off the vehicle,move the magnetic item, then turnon the vehicle and calibrate thecompass.
To calibrate the compass, use thefollowing procedure:
Compass Calibration Procedure
1. Before calibrating the compass,make sure the compass zoneis set to the variance zone inwhich the vehicle is located.See “Compass Variance (Zone)Procedure” earlier in thissection.
Do not operate any switchessuch as window, sunroof,climate controls, seats, etc.during the calibration procedure.
2. PressT until PRESS V TOCALIBRATE COMPASSdisplays.
3. Press V to start the compasscalibration.
4. The DIC will displayCALIBRATING: DRIVE INCIRCLES. Drive the vehiclein tight circles at less than8 km/h (5 mph) to completethe calibration. The DIC willdisplay CALIBRATIONCOMPLETE for a few secondswhen the calibration is complete.The DIC display will then returnto PRESS V TO CALIBRATECOMPASS.

Black plate (7,1)Chevrolet Impala Owner Manual - 2011
Instruments and Controls 5-7
Clock
Without Date Display
AM/FM Base Radio with a SingleCD Player
This radio has a H button for settingthe time.
To set the time:
1. Press the H button until the hourbegins flashing on the display.Press H a second time and theminutes begin flashing on thedisplay.
2. To increase or decrease thetime, do one of the followingwhile the hours or minutes areflashing:
. Turn the f knob.
. Press ¨ SEEK or © SEEK.
. Press\ FWD ors REV.
3. Press the H button again untilthe clock display stops flashingto set the currently displayedtime, or wait five seconds untilthe flashing stops and thecurrent time displayed isautomatically set.
To change the time default settingfrom 12 hour to 24 hour, pressthe H button until 12H or 24H isdisplayed. Once 12H or 24H isdisplayed, turn the f knob to thedesired option to select the setting.Press the H button again to applythe setting, or let the screentime out.
With Date Display
Single CD (MP3) Player
This radio has a H button for settingthe time.
To set the time and date:
1. Turn the radio on.
2. Press the H button and the HR,MIN, MM, DD, and YYYY (hour,minute, month, day, and year)display.
3. Press the pushbutton locatedunder any one of the tabs to bechanged.

Black plate (8,1)Chevrolet Impala Owner Manual - 2011
5-8 Instruments and Controls
4. To increase the time or date,do one of the following:. Press the pushbutton below
the selected tab.
. Turn the f knob clockwise.
. Press ¨ SEEK.
. Press\ FWD.
5. To decrease the time or date,do one of the following:
. Turn the f knobcounter‐clockwise.
. Press © SEEK.
. Presss REV.
The date does not automaticallydisplay. To see the date pressthe H button while the radio is on.The date with display times out aftera few seconds and goes back to thenormal radio and time display.
To change the time default settingfrom 12 hour to 24 hour or tochange the date default setting frommonth/day/year to day/month/year:
1. Press the H button and then thepushbutton located under theforward arrow tab. The time 12Hand 24H, and the date MM/DD/YYYY (month, day, and year)and DD/MM/YYYY (day, month,and year) displays.
2. Press the pushbutton locatedunder the desired option.
3. Press the H or MENU buttonagain to apply the selecteddefault, or let the screentime out.
Power OutletsThe vehicle has three 12‐voltoutlets which can be used to plugin electrical equipment, such as acell phone or MP3 player.
On vehicles with a center console,one outlet is located inside thecenter floor console and two outletsare located at the front of theconsole bin under the instrumentpanel.
On vehicles without a centerconsole, two are located under theclimate controls and another outletfor the rear seat passengers is atthe rear of the center front seat.

Black plate (9,1)Chevrolet Impala Owner Manual - 2011
Instruments and Controls 5-9
Remove the cover to access andreplace when not in use.
{ WARNING
Power is always supplied to theoutlets. Do not leave electricalequipment plugged in when thevehicle is not in use because thevehicle could catch fire and causeinjury or death.
Notice: Leaving electricalequipment plugged in for anextended period of time whilethe vehicle is off will drain thebattery. Always unplug electricalequipment when not in use anddo not plug in equipment thatexceeds the maximum 20 ampererating.
Certain accessory plugs may notbe compatible with the accessorypower outlet and could overloadvehicle and adapter fuses. If aproblem is experienced, see yourdealer.
When adding electrical equipment,be sure to follow the properinstallation instructions includedwith the equipment. See Add-OnElectrical Equipment on page 9‑48.
Notice: Hanging heavyequipment from the poweroutlet can cause damage notcovered by the vehicle warranty.The power outlets are designedfor accessory power plugs only,such as cell phone charge cords.
Cigarette LighterThe vehicle may have a cigarettelighter. The cigarette lighter maybe located in the console, if thevehicle has one; otherwise, it maybe located in the center armrest ofthe front seat.
Notice: Holding a cigarette lighterin while it is heating does not letthe lighter back away from theheating element when it is hot.Damage from overheating canoccur to the lighter or heatingelement, or a fuse could beblown. Do not hold a cigarettelighter in while it is heating.
To use the lighter, just push it in allthe way and let go. When it is ready,it will pop back out by itself.

Black plate (10,1)Chevrolet Impala Owner Manual - 2011
5-10 Instruments and Controls
AshtraysThe vehicle may have an ashtray.The ashtray may be located in theconsole, if the vehicle has one;otherwise, it may be located in thecenter armrest of the front seat.
Notice: If papers, pins, or otherflammable items are put in theashtray, hot cigarettes or othersmoking materials could ignitethem and possibly damage thevehicle. Never put flammableitems in the ashtray.
Warning Lights,Gauges, andIndicatorsWarning lights and gauges cansignal that something is wrongbefore it becomes serious enoughto cause an expensive repair orreplacement. Paying attention tothe warning lights and gaugescould prevent injury.
Warning lights come on when therecould be a problem with a vehiclefunction. Some warning lights comeon briefly when the engine is startedto indicate they are working.
Gauges can indicate when therecould be a problem with a vehiclefunction. Often gauges and warninglights work together to indicate aproblem with the vehicle.
When one of the warning lightscomes on and stays on whiledriving, or when one of the gaugesshows there may be a problem,check the section that explains whatto do. Follow this manual's advice.Waiting to do repairs can be costlyand even dangerous.

Black plate (11,1)Chevrolet Impala Owner Manual - 2011
Instruments and Controls 5-11
Instrument Cluster
English Uplevel Shown, Base and Metric Similar

Black plate (12,1)Chevrolet Impala Owner Manual - 2011
5-12 Instruments and Controls
SpeedometerThe speedometer shows thevehicle speed in both kilometersper hour (km/h) and miles perhour (mph).
OdometerThe odometer shows how far thevehicle has been driven in eithermiles (used in the United States)or in kilometers (used in Canada).
This vehicle has a tamper-resistantodometer. If the odometer displaysERROR, it probably has beentampered with and the numbersmight not be accurate.
If the vehicle needs a new odometerinstalled, it must be set to themileage total of the old odometer.
If that is not possible, then it will beset at zero and a label must be puton the driver door to show the oldmileage reading of the vehicle whenthe new odometer was installed.
TachometerThe tachometer displays theengine speed in revolutionsper minute (rpm).
Notice: If the engine is operatedwith the tachometer in the shadedwarning area, the vehicle couldbe damaged, and the damageswould not be covered by thevehicle warranty. Do not operatethe engine with the tachometerin the shaded warning area.
Fuel Gauge
English

Black plate (13,1)Chevrolet Impala Owner Manual - 2011
Instruments and Controls 5-13
Metric
When the ignition is on, the fuelgauge indicates about how muchfuel is left in the fuel tank.
An arrow on the fuel gaugeindicates the side of the vehiclethe fuel door is on.
Here are four things that someowners ask about. None of theseshow a problem with the fuel gauge:. At the gas station, the gas pump
shuts off before the gaugereads full.
. It takes a little more or lessfuel to fill up than the gaugeindicated. For example, thegauge may have indicated thetank was half full, but it actuallytook a little more or less thanhalf the fuel tank's capacity tofill the tank.
. The gauge moves a littlewhen while turning a corneror speeding up.
. The gauge does not go backto empty when the ignition isturned off.
Engine CoolantTemperature Gauge
English

Black plate (14,1)Chevrolet Impala Owner Manual - 2011
5-14 Instruments and Controls
Metric
This gauge shows the enginecoolant temperature. If thegauge pointer moves toward the“H” (United States) or torwardthe shaded thermostat (Canada),it means that the engine coolanthas overheated. If the vehicle hasbeen operating under normal drivingconditions, pull off the road, stop thevehicle, and turn off the engine assoon as possible.
See Engine Overheating onpage 10‑21 for more information.
Safety Belt Reminders
Driver Safety Belt ReminderLight
When the engine is started, a chimesounds for several seconds toremind a driver to fasten the safetybelt, unless the driver safety belt isalready buckled.
The safety belt light comes on andstays on for several seconds, thenflashes for several more.
This chime and light are repeatedif the driver remains unbuckledand the vehicle is in motion. If thedriver safety belt is already buckled,neither the chime nor the lightcomes on.
Passenger Safety BeltReminder Light
Several seconds after the engineis started, a chime sounds forseveral seconds to remind thefront passenger to buckle theirsafety belt. This only occurs ifthe passenger airbag is enabled.See Passenger Sensing System onpage 3‑34 for more information.The passenger safety belt reminderlight, located on the instrumentpanel, comes on and stays on forseveral seconds and then flashesfor several more.

Black plate (15,1)Chevrolet Impala Owner Manual - 2011
Instruments and Controls 5-15
This chime and light are repeated ifthe passenger remains unbuckledand the vehicle is in motion.
If the passenger safety belt isbuckled, neither the chime northe light comes on.
The front passenger safety beltreminder light and chime mayturn on if an object is put onthe seat such as a briefcase,handbag, grocery bag, laptop orother electronic device. To turn offthe reminder light and/or chime,remove the object from the seator buckle the safety belt.
Airbag Readiness LightThe system checks the airbag'selectrical system for possiblemalfunctions. If the light stayson it indicates there is an electricalproblem. The system checkincludes the airbag sensor, thepretensioners, the airbag modules,the wiring and the crash sensingand diagnostic module. For moreinformation on the airbag system,see Airbag System on page 3‑26.
The airbag readiness light flashesfor a few seconds when the engineis started. If the light does not comeon then, have it fixed immediately.
{ WARNING
If the airbag readiness light stayson after the vehicle is started orcomes on while driving, it meansthe airbag system might not beworking properly. The airbags inthe vehicle might not inflate in acrash, or they could even inflatewithout a crash. To help avoidinjury, have the vehicle servicedright away.
If there is a problem with theairbag system, an airbag DriverInformation Center (DIC) messagecan also come on. See AirbagSystem Messages on page 5‑36for more information.

Black plate (16,1)Chevrolet Impala Owner Manual - 2011
5-16 Instruments and Controls
Passenger Airbag StatusIndicatorThe vehicle has the passengersensing system. See PassengerSensing System on page 3‑34for important safety information.The instrument panel has apassenger airbag status indicator.
United States
Canada
When the vehicle is started, thepassenger airbag status indicatorwill light ON and OFF, or the symbolfor on and off, for several secondsas a system check. If you are usingremote start, if equipped, to startthe vehicle from a distance, youmay not see the system check.Then, after several more seconds,the status indicator will light eitherON or OFF, or either the on or offsymbol to let you know the statusof the right front passenger frontalairbag.
If the word ON or the on symbol islit on the passenger airbag statusindicator, it means that the rightfront passenger frontal airbag isenabled (may inflate).
If the word OFF or the off symbol islit on the airbag status indicator, itmeans that the passenger sensingsystem has turned off the right frontpassenger frontal airbag.
If, after several seconds, bothstatus indicator lights remain on,or if there are no lights at all, theremay be a problem with the lightsor the passenger sensing system.See your dealer for service.
{ WARNING
If the airbag readiness light evercomes on and stays on, it meansthat something may be wrongwith the airbag system. To helpavoid injury to yourself or others,have the vehicle serviced rightaway. See Airbag ReadinessLight on page 5‑15 for moreinformation, including importantsafety information.
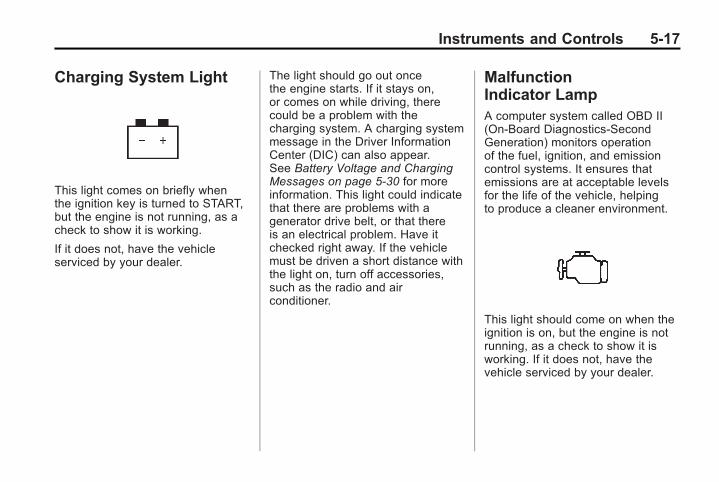
Black plate (17,1)Chevrolet Impala Owner Manual - 2011
Instruments and Controls 5-17
Charging System Light
This light comes on briefly whenthe ignition key is turned to START,but the engine is not running, as acheck to show it is working.
If it does not, have the vehicleserviced by your dealer.
The light should go out oncethe engine starts. If it stays on,or comes on while driving, therecould be a problem with thecharging system. A charging systemmessage in the Driver InformationCenter (DIC) can also appear.See Battery Voltage and ChargingMessages on page 5‑30 for moreinformation. This light could indicatethat there are problems with agenerator drive belt, or that thereis an electrical problem. Have itchecked right away. If the vehiclemust be driven a short distance withthe light on, turn off accessories,such as the radio and airconditioner.
MalfunctionIndicator LampA computer system called OBD II(On-Board Diagnostics-SecondGeneration) monitors operationof the fuel, ignition, and emissioncontrol systems. It ensures thatemissions are at acceptable levelsfor the life of the vehicle, helpingto produce a cleaner environment.
This light should come on when theignition is on, but the engine is notrunning, as a check to show it isworking. If it does not, have thevehicle serviced by your dealer.

Black plate (18,1)Chevrolet Impala Owner Manual - 2011
5-18 Instruments and Controls
If the malfunction indicator lampcomes on and stays on while theengine is running, this indicatesthat there is an OBD II problemand service is required.
Malfunctions often are indicated bythe system before any problem isapparent. Being aware of the lightcan prevent more serious damageto the vehicle. This system assiststhe service technician in correctlydiagnosing any malfunction.
Notice: If the vehicle iscontinually driven with thislight on, after a while, theemission controls might notwork as well, the vehicle fueleconomy might not be as good,and the engine might not runas smoothly. This could lead tocostly repairs that might not becovered by the vehicle warranty.
Notice: Modifications made to theengine, transmission, exhaust,intake, or fuel system of thevehicle or the replacementof the original tires with otherthan those of the same TirePerformance Criteria (TPC) canaffect the vehicle's emissioncontrols and can cause thislight to come on. Modificationsto these systems could leadto costly repairs not coveredby the vehicle warranty. Thiscould also result in a failureto pass a required EmissionInspection/Maintenancetest. See Accessories andModifications on page 10‑3.
This light comes on during amalfunction in one of two ways:
Light Flashing: A misfire conditionhas been detected. A misfireincreases vehicle emissions andcould damage the emission controlsystem on the vehicle. Diagnosisand service might be required.
To prevent more serious damage tothe vehicle:. Reduce vehicle speed.. Avoid hard accelerations.. Avoid steep uphill grades.. If towing a trailer, reduce the
amount of cargo being hauledas soon as it is possible.
If the light continues to flash, whenit is safe to do so, stop the vehicle.Find a safe place to park thevehicle. Turn the vehicle off, wait atleast 10 seconds, and restart theengine. If the light is still flashing,follow the previous steps and seeyour dealer for service as soon aspossible.

Black plate (19,1)Chevrolet Impala Owner Manual - 2011
Instruments and Controls 5-19
Light On Steady: An emissioncontrol system malfunction hasbeen detected on the vehicle.Diagnosis and service might berequired.
The following may correct anemissions system malfunction:. Make sure the fuel cap is fully
installed. See Filling the Tank onpage 9‑39. The diagnosticsystem can determine if thefuel cap has been left off orimproperly installed. A loose ormissing fuel cap allows fuel toevaporate into the atmosphere.A few driving trips with the capproperly installed should turn thelight off.
. Make sure the electrical systemis not wet. The system couldbe wet if the vehicle was driventhrough a deep puddle ofwater. The condition is usuallycorrected when the electricalsystem dries out. A few drivingtrips should turn the light off.
. Make sure to fuel the vehiclewith quality fuel. Poor fuel qualitycauses the engine not to run asefficiently as designed and cancause: stalling after start-up,stalling when the vehicle ischanged into gear, misfiring,hesitation on acceleration,or stumbling on acceleration.These conditions might go awayonce the engine is warmed up.
If one or more of theseconditions occurs, change thefuel brand used. It will requireat least one full tank of theproper fuel to turn the light off.
See Recommended Fuel onpage 9‑35.
If none of the above have madethe light turn off, your dealer cancheck the vehicle. The dealerhas the proper test equipmentand diagnostic tools to fix anymechanical or electrical problemsthat might have developed.
Emissions Inspection andMaintenance Programs
Some state/provincial andlocal governments may haveprograms to inspect the on-vehicleemission control equipment.For the inspection, the emissionsystem test equipment is connectedto the vehicle’s Data LinkConnector (DLC).
The DLC is under the instrumentpanel to the left of the steeringwheel. See your dealer if assistanceis needed.
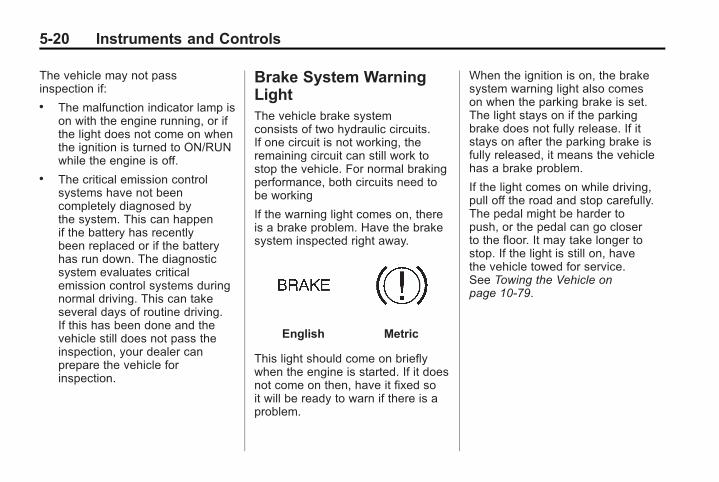
Black plate (20,1)Chevrolet Impala Owner Manual - 2011
5-20 Instruments and Controls
The vehicle may not passinspection if:. The malfunction indicator lamp is
on with the engine running, or ifthe light does not come on whenthe ignition is turned to ON/RUNwhile the engine is off.
. The critical emission controlsystems have not beencompletely diagnosed bythe system. This can happenif the battery has recentlybeen replaced or if the batteryhas run down. The diagnosticsystem evaluates criticalemission control systems duringnormal driving. This can takeseveral days of routine driving.If this has been done and thevehicle still does not pass theinspection, your dealer canprepare the vehicle forinspection.
Brake System WarningLightThe vehicle brake systemconsists of two hydraulic circuits.If one circuit is not working, theremaining circuit can still work tostop the vehicle. For normal brakingperformance, both circuits need tobe working
If the warning light comes on, thereis a brake problem. Have the brakesystem inspected right away.
English Metric
This light should come on brieflywhen the engine is started. If it doesnot come on then, have it fixed soit will be ready to warn if there is aproblem.
When the ignition is on, the brakesystem warning light also comeson when the parking brake is set.The light stays on if the parkingbrake does not fully release. If itstays on after the parking brake isfully released, it means the vehiclehas a brake problem.
If the light comes on while driving,pull off the road and stop carefully.The pedal might be harder topush, or the pedal can go closerto the floor. It may take longer tostop. If the light is still on, havethe vehicle towed for service.See Towing the Vehicle onpage 10‑79.

Black plate (21,1)Chevrolet Impala Owner Manual - 2011
Instruments and Controls 5-21
{ WARNING
The brake system might not beworking properly if the brakesystem warning light is on.Driving with the brake systemwarning light on can lead to acrash. If the light is still on afterthe vehicle has been pulled offthe road and carefully stopped,have the vehicle towed forservice.
Antilock Brake System(ABS) Warning Light
The Antilock Brake System (ABS)light comes on briefly when theengine is started.
If it does not, have the vehicleserviced by your dealer. If thesystem is working normally theindicator light then goes off.
If the ABS light stays on, turn theignition off. If the light comes onwhile driving, stop as soon as it issafely possible and turn the ignitionoff. Then start the engine again toreset the system. If the ABS lightstays on, or comes on again whiledriving, the vehicle needs service.If the regular brake system warninglight is not on, the vehicle still hasbrakes, but not antilock brakes.If the regular brake system warninglight is also on, the vehicle does nothave antilock brakes and there isa problem with the regular brakes.See Brake System Warning Light onpage 5‑20.
See Brake System Messages onpage 5‑31 for all brake related DICmessages.
Electronic StabilityControl (ESC) IndicatorLight
This light comes on briefly while theengine is started. If it does not, havethe vehicle serviced by your dealer.If the system is working normally theindicator light will then go off.
This light can come on afterthe vehicle is first driven andthe STABILITRAK NOT READYmessage appears in the DriverInformation Center (DIC). SeeElectronic Stability Control (ESC) onpage 9‑31 for more information.

Black plate (22,1)Chevrolet Impala Owner Manual - 2011
5-22 Instruments and Controls
If the light stays on, or comeson while driving a SERVICESTABILITRAK message appearsin the DIC. This indicates thatthere may be a problem with theElectronic Stability Control (ESC)system and the vehicle may needservice. When this warning light ison and the SERVICE STABILITRAKmessage appears on the DIC, theESC system does not assist incontrolling the vehicle.
When the system is active, the lightflashes while the system is assistingin controlling the vehicle.
See Electronic Stability Control(ESC) on page 9‑31 and RideControl System Messages onpage 5‑35 for more information.
Traction Control System(TCS) Warning Light
For vehicles with a Traction ControlSystem (TCS) and StabiliTrak®
warning light, this light comes onbriefly when the engine is started.
If it does not, have the vehicleserviced by your dealer. If thesystem is working normally theindicator light then goes off.
When the system is active, thelight flashes while the system islimiting wheel spin or assistingwith controlling the vehicle.
If it stays on or comes on whiledriving a SERVICE TRACTIONCONTROL message appears inthe Driver Information Center (DIC).This indicates that there could bea problem with the traction controlsystem and the vehicle may needservice. When this warning light ison and the SERVICE TRACTIONCONTROL message appears onthe DIC, the system does not limitwheel spin.
If the traction control system ismanually turned off, this light comeson and the TRACTION CONTROLOFF message appears on the DIC.
See Traction Control System (TCS)on page 9‑29 and Ride ControlSystem Messages on page 5‑35for more information.

Black plate (23,1)Chevrolet Impala Owner Manual - 2011
Instruments and Controls 5-23
Engine CoolantTemperature WarningLight
This light comes on briefly whilestarting the vehicle.
If it does not, have the vehicleserviced by the dealer. If the systemis working normally the indicatorlight goes off.
Notice: Driving with the enginecoolant temperature warning lighton could cause the vehicle tooverheat. See Engine Overheatingon page 10‑21. The vehicle'sengine could be damaged, andit might not be covered by thevehicle warranty. Never drive withthe engine coolant temperaturewarning light on.
The engine coolant temperaturewarning light comes on when theengine has overheated.
If this happens pull over and turnoff the engine as soon as possible.See Engine Overheating onpage 10‑21 for more information.
Tire Pressure Light
For vehicles with the Tire PressureMonitor System (TPMS), this lightcomes on briefly when the engineis started. It provides informationabout tire pressures and the TPMS.

Black plate (24,1)Chevrolet Impala Owner Manual - 2011
5-24 Instruments and Controls
When the Light is On Steady
This indicates that one or moreof the tires are significantlyunderinflated.
A tire pressure message canaccompany the light. See TireMessages on page 5‑37 for moreinformation. Stop as soon aspossible, and inflate the tires tothe pressure value shown on theTire and Loading Information label.See Tire Pressure on page 10‑49for more information.
When the Light Flashes First andThen is On Steady
This indicates that there may be aproblem with the TPMS. The lightflashes for about a minute andstays on steady for the remainderof the ignition cycle. This sequencerepeats with every ignition cycle.See Tire Pressure MonitorOperation on page 10‑52 formore information.
Engine Oil Pressure Light
{ WARNING
Do not keep driving if the oilpressure is low. The engine canbecome so hot that it catches fire.Someone could be burned. Checkthe oil as soon as possible andhave the vehicle serviced.
Notice: Lack of proper engineoil maintenance can damage theengine. The repairs would not becovered by the vehicle warranty.Always follow the maintenanceschedule for changing engine oil.
This light comes on briefly whilestarting the engine. If it does not,have the vehicle serviced by yourdealer. If the system is workingnormally, the indicator light thengoes off.
If the light comes on and stays on, itmeans that oil is not flowing throughthe engine properly. The vehiclecould be low on oil and it mighthave some other system problem.

Black plate (25,1)Chevrolet Impala Owner Manual - 2011
Instruments and Controls 5-25
Security Light
For information regarding this lightand the vehicle's security system,see Anti-Theft Alarm System onpage 2‑11.
High-Beam On Light
This light comes on when thehigh-beam headlamps are in use.
See Headlamp High/Low-BeamChanger on page 6‑3 for moreinformation.
Front Fog Lamp Light
The fog lamp lights come on whenthe fog lamps are in use.
The lights go out when the foglamps are turned off. See FogLamps on page 6‑5 for moreinformation.
Cruise Control Light
The cruise control light comes onwhenever the cruise control is set.
The light goes out when the cruisecontrol is turned off. See CruiseControl on page 9‑32 for moreinformation.

Black plate (26,1)Chevrolet Impala Owner Manual - 2011
5-26 Instruments and Controls
Information Displays
Driver InformationCenter (DIC)Your vehicle has a DriverInformation Center (DIC).
All messages will appear inthe DIC display located belowthe speedometer in the instrumentpanel cluster. The DIC buttons arelocated on the instrument panel,to the right of the instrument panelcluster.
The DIC comes on when the ignitionis on. After a short delay, the DICwill display the information that waslast displayed before the enginewas turned off.
The DIC displays trip, fuel, andvehicle system information, andwarning messages if a systemproblem is detected. The bottomline of the DIC shows the shift lever
position indicator. See AutomaticTransmission on page 9‑25 formore information.
If your vehicle has thesefeatures, the DIC also displaysthe compass direction and theoutside air temperature whenviewing the trip and fuel information.The compass direction appearson the top right corner of theDIC display. The outside airtemperature automatically appearsin the bottom right corner of theDIC display. If there is a problemwith the system that controls thetemperature display, the numberswill be replaced with dashes. If thisoccurs, have the vehicle servicedby your dealer.
The DIC also allows some featuresto be customized. See VehiclePersonalization on page 5‑39for more information.
DIC Operation and Displays
The DIC has different displayswhich can be accessed by pressingthe DIC buttons located on theinstrument panel, to the right ofthe instrument panel cluster.
DIC Buttons
The buttons are the trip/fuel,vehicle information, customization,and set/reset buttons. The buttonfunctions are detailed in thefollowing pages.

Black plate (27,1)Chevrolet Impala Owner Manual - 2011
Instruments and Controls 5-27
3 (Trip/Fuel): Press thisbutton to display the odometer,trip odometers, fuel range, averageeconomy, instantaneous economy,Active Fuel Management™ indicatoron vehicles with this feature, andaverage speed.
T (Vehicle Information): Pressthis button to display the oil life,units, tire pressure readings,and compass zone and compasscalibration on vehicles with thisfeature.
U (Customization): Pressthis button to customize thefeature settings on your vehicle.See Vehicle Personalization onpage 5‑39 for more information.
V (Set/Reset): Press this button toset or reset certain functions and toturn off or acknowledge messageson the DIC.
Trip/Fuel Menu Items
3 (Trip/Fuel): Press this buttonto scroll through the following menuitems:
Odometer
Press the trip/fuel button untilODOMETER displays. This displayshows the distance the vehicle hasbeen driven in either miles (mi) orkilometers (km).
Trip A and Trip B
Press the trip/fuel button untilTRIPA or TRIP B displays.This display shows the currentdistance traveled in either miles (mi)or kilometers (km) since the lastreset for each trip odometer.Both trip odometers can beused at the same time.
Each trip odometer can be resetto zero separately by pressing theset/reset button while the desiredtrip odometer is displayed.
The trip odometer has a featurecalled the retro-active reset. Thiscan be used to set the trip odometerto the number of miles (kilometers)driven since the ignition was lastturned on. This can be used if thetrip odometer is not reset at thebeginning of the trip.
To use the retro-active reset feature,press and hold the set/reset buttonfor at least four seconds. The tripodometer will display the numberof miles (mi) or kilometers (km)driven since the ignition was lastturned on and the vehicle wasmoving. Once the vehicle beginsmoving, the trip odometer willaccumulate mileage. For example,if the vehicle was driven 8 km(5 miles) before it is started again,and then the retro-active resetfeature is activated, the displaywill show 8 km (5 miles). As thevehicle begins moving, the displaywill then increase to 8.2 km(5.1 miles), 8.4 km (5.2 miles), etc.

Black plate (28,1)Chevrolet Impala Owner Manual - 2011
5-28 Instruments and Controls
If the retro-active reset feature isactivated after the vehicle is started,but before it begins moving, thedisplay will show the number ofmiles (mi) or kilometers (km) thatwere driven during the last ignitioncycle.
Fuel Range
Press the trip/fuel button untilFUEL RANGE displays. Thisdisplay shows the approximatenumber of remaining miles (mi)or kilometers (km) the vehicle canbe driven without refueling.
The fuel range estimate is basedon an average of the vehicle's fueleconomy over recent driving historyand the amount of fuel remainingin the fuel tank. This estimate willchange if driving conditions change.For example, if driving in traffic andmaking frequent stops, this displaymay read one number, but if thevehicle is driven on a freeway, the
number may change even thoughthe same amount of fuel is in thefuel tank. This is because differentdriving conditions produce differentfuel economies. Generally, freewaydriving produces better fueleconomy than city driving.
If your vehicle is low on fuel,the FUEL LEVEL LOW messagedisplays. See Fuel SystemMessages on page 5‑34 formore information.
Average Economy
Press the trip/fuel button untilAVG ECONOMY displays. Thisdisplay shows the approximateaverage miles per gallon (mpg) orliters per 100 kilometers (L/100 km).This number is calculated basedon the number of mpg (L/100 km)recorded since the last time thismenu item was reset. To reset thisdisplay to zero, press and hold theset/reset button.
Instantaneous Economy
Press the trip/fuel button until INSTECONOMY displays. This displayshows the current fuel economy at aparticular moment and will changefrequently as driving conditionschange. This display shows theinstantaneous fuel economy inmiles per gallon (mpg) or liters per100 kilometers (L/100 km). Unlikeaverage economy, this screencannot be reset.
Average Speed
Press the trip/fuel button untilAVERAGE SPEED displays.This display shows the averagespeed of the vehicle in milesper hour (mph) or kilometersper hour (km/h). This average iscalculated based on the variousvehicle speeds recorded since thelast reset of this value. To reset thevalue, press and hold the set/resetbutton. The display will returnto zero.

Black plate (29,1)Chevrolet Impala Owner Manual - 2011
Instruments and Controls 5-29
Blank Display
This display shows no information.
Vehicle Information MenuItems
T (Vehicle Information): Pressthis button to scroll through thefollowing menu items:
Oil Life
Press the vehicle informationbutton until OIL LIFE REMAININGdisplays. This display shows anestimate of the oil's remaininguseful life. If you see 99%OIL LIFEREMAINING on the display, thatmeans 99% of the current oil liferemains. The engine oil life systemwill alert you to change the oil ona schedule consistent with yourdriving conditions.
When the remaining oil life islow, the CHANGE ENGINE OILSOON message will appearon the display. See EngineOil Messages on page 5‑33.You should change the oil assoon as possible. See EngineOil on page 10‑7. In additionto the engine oil life systemmonitoring the oil life, additionalmaintenance is recommendedin the Maintenance Schedulein this manual. See ScheduledMaintenance on page 11‑2 formore information.
Remember, you must reset theOIL LIFE yourself after each oilchange. It will not reset itself. Also,be careful not to reset the OIL LIFEaccidentally at any time other thanwhen the oil has just been changed.It cannot be reset accurately untilthe next oil change. To reset theengine oil life system, see EngineOil Life System on page 10‑11.
Units
Press the vehicle informationbutton until UNITS displays.This display allows you to selectbetween English or Metric units ofmeasurement. Once in this display,press the set/reset button to selectbetween ENGLISH or METRICunits.
Tire Pressure
On vehicles with the Tire PressureMonitor System (TPMS), thepressure for each tire can be viewedin the DIC. The tire pressure will beshown in either pounds per squareinch (psi) or kilopascals (kPa). Pressthe vehicle information button untilthe DIC displays FRONT TIRESPSI (kPa) LEFT ## RIGHT ##. Pressthe vehicle information button againuntil the DIC displays REAR TIRESPSI (kPa) LEFT ## RIGHT ##.

Black plate (30,1)Chevrolet Impala Owner Manual - 2011
5-30 Instruments and Controls
If a low tire pressure conditionis detected by the system whiledriving, a message advising you toadd air to a specific tire will appearin the display. See Tire Pressure onpage 10‑49 and Tire Messages onpage 5‑37 for more information.
If the tire pressure display showsdashes instead of a value, theremay be a problem with your vehicle.If this consistently occurs, see yourdealer for service.
Change Compass Zone
Your vehicle may have this feature.To change the compass zonethrough the DIC, see Compass onpage 5‑5.
Calibrate Compass
Your vehicle may have this feature.The compass can be manuallycalibrated. To calibrate the compassthrough the DIC, see Compass onpage 5‑5.
Blank Display
This display shows no information.
Vehicle MessagesMessages are displayed on the DICto notify the driver that the status ofthe vehicle has changed and thatsome action may be needed bythe driver to correct the condition.Multiple messages may appear oneafter another. Some messages maynot require immediate action, butyou can press the set/reset buttonto acknowledge that you receivedthe message and clear it from theDIC display. Pressing any of theDIC buttons also acknowledgesand clears any messages. Somemessages cannot be cleared fromthe DIC display because they aremore urgent. These messagesrequire action before they canbe cleared. You should take anymessages that appear on thedisplay seriously and rememberthat clearing the messages will onlymake the messages disappear, notcorrect the problem. The followingare the possible messages that canbe displayed and some informationabout them.
Battery Voltage andCharging Messages
BATTERY SAVER ACTIVE
This message displays whenthe system detects that thebattery voltage is dropping beyonda reasonable level. The batterysaver system starts reducingcertain features of the vehicle thatyou may be able to notice. At thepoint that the features are disabled,this message is displayed. It meansthat the vehicle is trying to save thecharge in the battery.
Turn off all unnecessaryaccessories to allow the batteryto recharge.
The normal battery voltage range is11.5 to 15.5 volts.

Black plate (31,1)Chevrolet Impala Owner Manual - 2011
Instruments and Controls 5-31
SERVICE BATTERYCHARGING SYSTEM
This message displays when thereis a problem with the generator andbattery charging systems. Drivingwith this problem could drain thebattery. Turn off all unnecessaryaccessories. Stop and turn off thevehicle as soon as it is safe todo so. Have the electrical systemchecked by your dealer immediately.
Brake System Messages
SERVICE BRAKE SYSTEM
This message displays whenservice is required on the brakesystem. Have the brake systemserviced by your dealer as soon aspossible. The brake system warninglight also appears on the instrumentpanel cluster when this messageappears on the DIC. See BrakeSystem Warning Light onpage 5‑20.
Door Ajar Messages
DRIVER DOOR OPEN
This message displays when thedriver door is not closed properly.Make sure that the door is closedcompletely.
HOOD OPEN
If your vehicle has the remote startfeature, this message displays whenthe hood is not closed properly.Make sure that the hood is closedcompletely. See Hood on page 10‑5.
LEFT REAR DOOR OPEN
This message displays when thedriver side rear door is not closedproperly. Make sure that the dooris closed completely.
PASSENGER DOOR OPEN
This message displays when thefront passenger door is not closedproperly. Make sure that the dooris closed completely.
RIGHT REAR DOOR OPEN
This message displays when thepassenger side rear door is notclosed properly. Make sure thatthe door is closed completely.
TRUNK OPEN
This message displays when thetrunk is not closed completely.Make sure that the trunk is closedcompletely. See Trunk onpage 2‑10.

Black plate (32,1)Chevrolet Impala Owner Manual - 2011
5-32 Instruments and Controls
Engine Cooling SystemMessages
ENGINE HOT A/C(Air Conditioning) OFF
This message displays whenthe engine coolant becomeshotter than the normal operatingtemperature. To avoid added strainon a hot engine, the air conditioningcompressor is automatically turnedoff. When the coolant temperaturereturns to normal, the A/C operationautomatically resumes. You cancontinue to drive your vehicle.If this message continues to appear,have the system repaired by yourdealer as soon as possible toavoid compressor damage.
ENGINE OVERHEATED IDLEENGINE
Notice: If you drive yourvehicle while the engine isoverheating, severe enginedamage may occur. If anoverheat warning appearson the instrument panel clusterand/or DIC, stop the vehicleas soon as possible. Do notincrease the engine speedabove normal idling speed.See Engine Overheating onpage 10‑21 for more information.
This message displays when theengine coolant temperature is toohot. Stop and allow the vehicle toidle until it cools down.
ENGINE OVERHEATED STOPENGINE
Notice: If you drive the vehiclewhile the engine is overheating,severe engine damage mayoccur. If an overheat warningappears on the instrument panelcluster and/or DIC, stop thevehicle as soon as possible.See Engine Overheating onpage 10‑21 for more information.
This message displays along with acontinuous chime when the enginehas overheated. Stop and turn theengine off immediately to avoidsevere engine damage. See EngineOverheating on page 10‑21.

Black plate (33,1)Chevrolet Impala Owner Manual - 2011
Instruments and Controls 5-33
SERVICE A/C(Air Conditioning) SYSTEM
This message displays whenthe electronic sensors that controlthe air conditioning and heatingsystems are no longer working.Have the climate control systemserviced by your dealer if younotice a drop in heating and airconditioning efficiency.
Engine Oil Messages
CHANGE ENGINE OIL SOON
This message displays whenservice is required for the vehicle.See your dealer. See EngineOil on page 10‑7 and ScheduledMaintenance on page 11‑2 formore information.
Acknowledging the CHANGEENGINE OIL SOON message willnot reset the OIL LIFE REMAINING.That must be done at the OIL LIFEscreen under the vehicle information
menu. See “Oil Life” under DriverInformation Center (DIC) onpage 5‑26 and Engine Oil LifeSystem on page 10‑11.
OIL PRESSURE LOW STOPENGINE
Notice: If you drive the vehiclewhile the engine oil pressureis low, severe engine damagemay occur. If a low oil pressurewarning appears on the DriverInformation Center (DIC), stopthe vehicle as soon as possible.Do not drive the vehicle until thecause of the low oil pressure iscorrected. See Engine Oil onpage 10‑7 for more information.
This message displays when thevehicle's engine oil pressure is low.The oil pressure light also appearson the instrument panel cluster.See Engine Oil Pressure Light onpage 5‑24.
Stop the vehicle immediately,as engine damage can resultfrom driving a vehicle with low oilpressure. Have the vehicle servicedby your dealer as soon as possiblewhen this message is displayed.
Engine Power Messages
ENGINE POWER IS REDUCED
This message displays when thevehicle's engine power is reduced.Reduced engine power can affectthe vehicle's ability to accelerate.If this message is on, but thereis no reduction in performance,proceed to your destination.The performance may be reducedthe next time the vehicle is driven.The vehicle may be driven at areduced speed while this messageis on, but acceleration and speedmay be reduced. Anytime thismessage stays on, the vehicleshould be taken to your dealerfor service as soon as possible.
Black plate (34,1)Chevrolet Impala Owner Manual - 2011
5-34 Instruments and Controls
Fuel System Messages
FUEL LEVEL LOW
This message displays when yourvehicle is low on fuel. Refill the fueltank as soon as possible. See FuelGauge on page 5‑12 and Fillingthe Tank on page 9‑39 for moreinformation.
TIGHTEN GAS CAP
This message may be displayedif the gas cap is not on, or is notfully tightened. Check the gascap to ensure that it is on properly.See Filling the Tank on page 9‑39for more information.
Key and Lock Messages
REPLACE BATTERY INREMOTE KEY
This message displays when thebattery in the Remote KeylessEntry (RKE) transmitter needs tobe replaced. To replace the battery,see “Battery Replacement” underRemote Keyless Entry (RKE)System Operation on page 2‑3.
Lamp Messages
AUTOMATIC LIGHTCONTROL OFF
This message displays when theautomatic headlamps are turnedoff. See Exterior Lamp Controls onpage 6‑1 for more information.
AUTOMATIC LIGHTCONTROL ON
This message displays when theautomatic headlamps are turnedon. See Exterior Lamp Controls onpage 6‑1 for more information.
TURN SIGNAL ON
This message displays as areminder to turn off the turn signalif you drive your vehicle for morethan about 1.2 km (0.75 mile) witha turn signal on. See Turn andLane-Change Signals on page 6‑4.
This message displays and a chimesounds only when the ignition is inON/RUN. The message will notdisappear until the turn signal ismanually turned off, or a turn iscompleted.
Black plate (35,1)Chevrolet Impala Owner Manual - 2011
Instruments and Controls 5-35
Ride Control SystemMessages
SERVICE STABILITRAK
If your vehicle has ElectronicStability Control (ESC), thismessage displays if there hasbeen a problem detected with ESC.The ESC/TCS light also appearson the instrument panel cluster.See Electronic Stability Control(ESC) on page 9‑31 for moreinformation.
If this message turns on while youare driving, pull off the road assoon as possible and stop carefully.Try resetting the system by turningthe ignition off and then back on.If this message still stays on orturns back on again while you aredriving, your vehicle needs service.Have the system inspected by yourdealer as soon as possible.
SERVICE TRACTIONCONTROL
If your vehicle has the TractionControl System (TCS), this messagedisplays when the system is notfunctioning properly. A warninglight also appears on the instrumentpanel cluster. See Traction ControlSystem (TCS) Warning Light onpage 5‑22. See Traction ControlSystem (TCS) on page 9‑29 formore information. Have the TCSserviced by your dealer as soonas possible.
STABILITRAK NOT READY
If your vehicle has ElectronicStability Control (ESC), thismessage may display and theESC/TCS light on the instrumentpanel cluster may be on after firstdriving the vehicle and exceeding30 km/h (19 mph) for 30 seconds.The ESC system is not functionaluntil the light has turned off. SeeElectronic Stability Control (ESC) onpage 9‑31 for more information.
TRACTION CONTROL OFF
If your vehicle has the TractionControl System (TCS), thismessage displays when the TCSturns off. See Traction ControlSystem (TCS) on page 9‑29 formore information.
This message may display whenthe ignition is in ON/RUN anddisappears after 10 seconds,unless it is acknowledged oran urgent warning appears.
Any of the following conditions maycause the TCS to turn off:. The TCS is turned off by
pressing the traction controlbutton. See Traction ControlSystem (TCS) on page 9‑29for more information.
. The battery is low.
. There is a TCS failure.See your dealer for service.

Black plate (36,1)Chevrolet Impala Owner Manual - 2011
5-36 Instruments and Controls
TRACTION CONTROL ON
If your vehicle has the TractionControl System (TCS), this messagedisplays when the TCS is turned on.See Traction Control System (TCS)on page 9‑29 for more information.
Airbag System Messages
SERVICE AIR BAG
This message displays when thereis a problem with the airbag system.Have your vehicle serviced by yourdealer immediately. See AirbagReadiness Light on page 5‑15for more information.
Anti-Theft Alarm SystemMessages
SERVICE THEFT SYSTEM
This message displays when thereis a problem with the theft-deterrentsystem programmed in the key.A fault has been detected in thesystem which means that thesystem is disabled and it is notprotecting the vehicle. The vehicleusually restarts; however, you maywant to take the vehicle to yourdealer before turning off the engine.See Immobilizer Operation onpage 2‑12 for more information.
THEFT ATTEMPTED
This message displays if thecontent theft-deterrent system hasdetected a break-in attempt whileyou were away from your vehicle.See Anti-Theft Alarm System onpage 2‑11 for more information.
Service Vehicle Messages
ERROR
This message displays whileviewing the odometer or tripodometers if there is a problemwith the instrument panel cluster.See your dealer for service.
SERVICE POWER STEERING
This message displays whena problem is detected with thepower steering system. When thismessage is displayed, you maynotice that the effort required tosteer the vehicle increases or feelsheavier, but you will still be able tosteer the vehicle. Have your vehicleserviced by your dealer immediately.

Black plate (37,1)Chevrolet Impala Owner Manual - 2011
Instruments and Controls 5-37
SERVICE VEHICLE SOON
This message displays when anon-emissions related malfunctionoccurs. Have the vehicle servicedby your dealer as soon as possible.
STARTING DISABLEDSERVICE THROTTLE
This message displays if the startingof the engine is disabled due to theelectronic throttle control system.Have your vehicle serviced by yourdealer immediately.
This message only appears whilethe ignition is in ON/RUN, and willnot disappear until the problem isresolved.
This message cannot beacknowledged.
Tire Messages
SERVICE TIRE MONITORSYSTEM
On vehicles with the Tire PressureMonitor System (TPMS), thismessage displays if a part onthe TPMS is not working properly.The tire pressure light also flashesand then remains on during thesame ignition cycle. See TirePressure Light on page 5‑23.Several conditions may causethis message to appear. See TirePressure Monitor Operation onpage 10‑52 for more information.If the warning comes on and stayson, there may be a problem withthe TPMS. See your dealer.
TIRE LEARNING ACTIVE
On vehicles with the Tire PressureMonitor System (TPMS), thismessage displays when the TPMSis re-learning the tire positions onyour vehicle. The tire positions mustbe re-learned after rotating the tiresor after replacing a tire or sensor.See Tire Inspection on page 10‑56,Tire Rotation on page 10‑56,Tire Pressure Monitor System onpage 10‑51, and Tire Pressure onpage 10‑49 for more information.

Black plate (38,1)Chevrolet Impala Owner Manual - 2011
5-38 Instruments and Controls
TIRE LOW ADD AIR TO TIRE
On vehicles with the Tire PressureMonitor System (TPMS), thismessage displays when thepressure in one or more of thevehicle's tires is low. This messagealso displays LEFT FRT (left front),RIGHT FRT (right front), LEFT RR(left rear), or RIGHT RR (right rear)to indicate the location of the lowtire. The low tire pressure warninglight will also come on. See TirePressure Light on page 5‑23.You can receive more than onetire pressure message at a time.To read the other messages thatmay have been sent at the sametime, press the set/reset button.If a tire pressure message appearson the DIC, stop as soon as youcan. Have the tire pressureschecked and set to those shownon the Tire and Loading Information
label. See Tires on page 10‑42,Vehicle Load Limits on page 9‑12,and Tire Pressure on page 10‑49.The DIC also shows the tirepressure values. See DriverInformation Center (DIC) onpage 5‑26.
Transmission Messages
SERVICE TRANSMISSION
This message displays when thereis a problem with the transmission.See your dealer for service.
TRANSMISSION HOT IDLEENGINE
This message displays when thetransmission fluid in your vehicle istoo hot. Stop the vehicle and allowit to idle until it cools down. If thewarning message continues todisplay, have the vehicle servicedby your dealer as soon as possible.
Vehicle ReminderMessages
ICE POSSIBLE DRIVEWITH CARE
This message displays whenthe outside air temperature iscold enough to create icy roadconditions. Adjust your drivingaccordingly.
Washer Fluid Messages
WASHER FLUID LOW ADDFLUID
This message displays when thewindshield washer fluid is low.Fill the windshield washer reservoiras soon as possible. See EngineCompartment Overview onpage 10‑6 for the location of thewindshield washer reservoir. Also,see Washer Fluid on page 10‑25for more information.

Black plate (39,1)Chevrolet Impala Owner Manual - 2011
Instruments and Controls 5-39
VehiclePersonalizationYour vehicle has customizationcapabilities that allow you toprogram certain features to onepreferred setting. Customizationfeatures can only be programmedto one setting on the vehicle andcannot be programmed to apreferred setting for two differentdrivers.
All of the customization options maynot be available on your vehicle.Only the options available will bedisplayed on the DIC.
The default settings for thecustomization features were setwhen your vehicle left the factory,but may have been changed fromtheir default state since then.
The customization preferences areautomatically recalled.
To change customizationpreferences, use the followingprocedure.
Entering the FeatureSettings Menu
1. Turn the ignition on and placethe vehicle in P (Park).
To avoid excessive drain on thebattery, it is recommended thatthe headlamps are turned off.
2. Press the customizationbutton to enter the featuresettings menu.
If the menu is not available,FEATURE SETTINGSAVAILABLE IN PARK willdisplay. Before entering themenu, make sure the vehicleis in P (Park).
Feature Settings Menu Items
The following are customizationfeatures that allow you to programsettings to the vehicle:
DISPLAY IN ENGLISH
This feature will only display if alanguage other than English hasbeen set. This feature allows you tochange the language in which theDIC messages appear to English.
Press the customization button untilthe PRESS V TO DISPLAY INENGLISH screen appears on theDIC display. Press the set/resetbutton once to display all DICmessages in English.

Black plate (40,1)Chevrolet Impala Owner Manual - 2011
5-40 Instruments and Controls
DISPLAY LANGUAGE
This feature allows you to selectthe language in which the DICmessages will appear.
Press the customization button untilthe DISPLAY LANGUAGE screenappears on the DIC display. Pressthe set/reset button once to accessthe settings for this feature. Thenpress the customization button toscroll through the following settings:
ENGLISH (default): All messageswill appear in English.
FRANCAIS: All messages willappear in French.
ESPANOL: All messages willappear in Spanish.
NO CHANGE: No change will bemade to this feature. The currentsetting will remain.
To select a setting, press theset/reset button while the desiredsetting is displayed on the DIC.
AUTO DOOR UNLOCK
This feature allows you toselect whether or not to turnoff the automatic door unlockingfeature. It also allows you toselect which doors and whenthe doors will automatically unlock.See “Programmable AutomaticDoor Unlock” under AutomaticDoor Locks on page 2‑8 formore information.
Press the customization button untilAUTO DOOR UNLOCK appears onthe DIC display. Press the set/resetbutton once to access the settingsfor this feature. Then press thecustomization button to scrollthrough the following settings:
OFF: None of the doors willautomatically unlock.
DRIVER AT KEY OUT: Only thedriver door will unlock when the keyis taken out of the ignition.
DRIVER IN PARK: Only the driverdoor will unlock when the vehicle isshifted into P (Park).
ALL AT KEY OUT: All of the doorswill unlock when the key is takenout of the ignition.
ALL IN PARK (default): All of thedoors will unlock when the vehicle isshifted into P (Park).
NO CHANGE: No change will bemade to this feature. The currentsetting will remain.
To select a setting, press theset/reset button while the desiredsetting is displayed on the DIC.

Black plate (41,1)Chevrolet Impala Owner Manual - 2011
Instruments and Controls 5-41
REMOTE DOOR LOCK
This feature allows you to select thetype of feedback you will receivewhen locking the vehicle with theRemote Keyless Entry (RKE)transmitter. You will not receivefeedback when locking the vehiclewith the RKE transmitter if any ofthe doors are open. See RemoteKeyless Entry (RKE) SystemOperation on page 2‑3 for moreinformation.
Press the customization button untilREMOTE DOOR LOCK appears onthe DIC display. Press the set/resetbutton once to access the settingsfor this feature. Then press thecustomization button to scrollthrough the following settings:
HORN & LIGHTS OFF: There willbe no feedback when you press thelock button on the RKE transmitter.
LIGHTS ONLY: The exterior lampswill flash when you press the lockbutton on the RKE transmitter.
HORN ONLY: The horn will soundon the second press of the lockbutton on the RKE transmitter.
HORN & LIGHTS ON (default):The exterior lamps will flash whenyou press the lock button on theRKE transmitter, and the horn willsound when the lock button ispressed again within five secondsof the previous command.
NO CHANGE: No change will bemade to this feature. The currentsetting will remain.
To select a setting, press theset/reset button while the desiredsetting is displayed on the DIC.
REMOTE DOOR UNLOCK
This feature allows you to select thetype of feedback you will receivewhen unlocking the vehicle withthe Remote Keyless Entry (RKE)transmitter. You will not receivefeedback when unlocking thevehicle with the RKE transmitter ifthe doors are open. See RemoteKeyless Entry (RKE) SystemOperation on page 2‑3 for moreinformation.
Press the customization buttonuntil REMOTE DOOR UNLOCKappears on the DIC display. Pressthe set/reset button once to accessthe settings for this feature. Thenpress the customization button toscroll through the following settings:
LIGHTS OFF: The exterior lampswill not flash when you pressthe unlock button on the RKEtransmitter.

Black plate (42,1)Chevrolet Impala Owner Manual - 2011
5-42 Instruments and Controls
LIGHTS ON (default): The exteriorlamps will flash when you pressthe unlock button on the RKEtransmitter.
NO CHANGE: No change will bemade to this feature. The currentsetting will remain.
To select a setting, press theset/reset button while the desiredsetting is displayed on the DIC.
EXIT LIGHTING
This feature allows you to selectthe amount of time you wantthe exterior lamps to remain onwhen it is dark enough outside.This happens after the key isturned from ON/RUN to LOCK/OFF.
Press the customization buttonuntil EXIT LIGHTING appears onthe DIC display. Press the set/resetbutton once to access the settingsfor this feature. Then press thecustomization button to scrollthrough the following settings:
OFF: The exterior lamps will notturn on.
30 SECONDS (default): Theexterior lamps will stay on for30 seconds.
1MINUTE: The exterior lamps willstay on for one minute.
2MINUTES: The exterior lamps willstay on for two minutes.
NO CHANGE: No change will bemade to this feature. The currentsetting will remain.
To select a setting, press theset/reset button while the desiredsetting is displayed on the DIC.
APPROACH LIGHTING
This feature allows you to selectwhether or not to have the exteriorlights turn on briefly during lowlight periods after unlocking thevehicle using the Remote KeylessEntry (RKE) transmitter.
Press the customization button untilAPPROACH LIGHTING appears onthe DIC display. Press the set/resetbutton once to access the settingsfor this feature. Then press thecustomization button to scrollthrough the following settings:
OFF: The exterior lights will notturn on when you unlock the vehiclewith the RKE transmitter.
ON (default): If it is dark enoughoutside, the exterior lights will turnon briefly when you unlock thevehicle with the RKE transmitter.

Black plate (43,1)Chevrolet Impala Owner Manual - 2011
Instruments and Controls 5-43
The lights will remain on for20 seconds or until the lock buttonon the RKE transmitter is pressed,or the vehicle is no longer off.See Remote Keyless Entry (RKE)System Operation on page 2‑3for more information.
NO CHANGE : No change will bemade to this feature. The currentsetting will remain.
To select a setting, press theset/reset button while the desiredsetting is displayed on the DIC.
CHIME VOLUME
This feature allows you to select thevolume level of the chime.
Press the customization button untilCHIME VOLUME appears on theDIC display. Press the set/resetbutton once to access the settingsfor this feature. Then press thecustomization button to scrollthrough the following settings:
NORMAL: The chime volume willbe set to a normal level.
LOUD: The chime volume will beset to a loud level.
NO CHANGE: No change will bemade to this feature. The currentsetting will remain.
There is no default for chimevolume. The volume will stayat the last known setting.
To select a setting, press theset/reset button while the desiredsetting is displayed on the DIC.
REMOTE START
If your vehicle has this feature, itallows you to turn the remote startoff or on. The remote start featureallows you to start the engine fromoutside of the vehicle using theRemote Keyless Entry (RKE)transmitter. See Remote VehicleStart on page 2‑5 for moreinformation.
Press the customization button untilREMOTE START appears on theDIC display. Press the set/resetbutton once to access the settingsfor this feature. Then press thecustomization button to scrollthrough the following settings:
OFF: The remote start feature willbe disabled.
ON (default): The remote startfeature will be enabled.
NO CHANGE: No change will bemade to this feature. The currentsetting will remain.
To select a setting, press theset/reset button while the desiredsetting is displayed on the DIC.
Black plate (44,1)Chevrolet Impala Owner Manual - 2011
5-44 Instruments and Controls
FACTORY SETTINGS
This feature allows you to set all ofthe customization features back totheir factory default settings.
Press the customization button untilFACTORY SETTINGS appears onthe DIC display. Press the set/resetbutton once to access the settingsfor this feature. Then press thecustomization button to scrollthrough the following settings:
RESTORE ALL (default): Thecustomization features will be setto their factory default settings.
DO NOT RESTORE: Thecustomization features will not beset to their factory default settings.
To select a setting, press theset/reset button while the desiredsetting is displayed on the DIC.
EXIT FEATURE SETTINGS
This feature allows you to exit theFEATURE SETTINGS menu.
Press the customization buttonuntil FEATURE SETTINGSPRESS V TO EXIT appears in theDIC display. Press the set/resetbutton once to exit the menu.
If you do not exit, pressing thecustomization button again willreturn you to the beginning ofthe FEATURE SETTINGS menu.
Exiting the FeatureSettings Menu
The feature settings menu will beexited when any of the followingoccurs:. The vehicle is shifted out of
P (Park).. The vehicle is no longer in
ON/RUN.. The trip/fuel or vehicle
information DIC buttonsare pressed.
. The end of the feature settingsmenu is reached and exited.
. A 40-second time period haselapsed with no selection made.

Black plate (45,1)Chevrolet Impala Owner Manual - 2011
Instruments and Controls 5-45
Universal RemoteSystemSee Radio FrequencyStatement on page 13‑17 forinformation regarding Part 15of the Federal CommunicationsCommission (FCC) rules andIndustry Canada StandardsRSS-210/220/310.
Universal Remote SystemProgramming
This vehicle may have the UniversalHome Remote System.
This system provides a wayto replace up to three remotecontrol transmitters used toactivate devices such as garagedoor openers, security systems,and home automation devices.
Do not use this system with anygarage door opener that does nothave the stop and reverse feature.This includes any garage dooropener model manufacturedbefore April 1, 1982.
Read the instructions completelybefore attempting to program thetransmitter. Because of the stepsinvolved, it may be helpful to haveanother person available to assistin programming the transmitter.
Be sure to keep the originalremote control transmitter foruse in other vehicles, as well asfor future programming. Only theoriginal remote control transmitteris needed for Fixed Codeprogramming. The programmedbuttons should be erased when thevehicle is sold or the lease ends.See “Erasing Universal HomeRemote Buttons” in this section.
Park the vehicle outside of thegarage when programming a garagedoor. Be sure that people andobjects are clear of the garage dooror gate that is being programmed.

Black plate (46,1)Chevrolet Impala Owner Manual - 2011
5-46 Instruments and Controls
Programming Universal HomeRemote — Rolling Code
For questions or help programmingthe Universal Home RemoteSystem, call 1-866-572-2728or go to www.learcar2u.com.
Most garage door openers sold after1996 are Rolling Code units.
Programming a garage door openerinvolves time-sensitive actions, soread the entire procedure beforestarting. Otherwise, the device willtime out and the procedure will haveto be repeated.
To program up to three devices:
1. From inside the vehicle,press the two outside buttonsat the same time for one totwo seconds, and immediatelyrelease them.
2. In the garage, locate thegarage door opener receiver(motor-head unit). Locatethe “Learn” or “Smart” button.It can usually be found wherethe hanging antenna wire isattached to the motor-headunit and may be a coloredbutton. Press this button.After pressing this button,complete the following stepsin less than 30 seconds.

Black plate (47,1)Chevrolet Impala Owner Manual - 2011
Instruments and Controls 5-47
3. Immediately return to thevehicle. Press and hold theUniversal Home Remote buttonthat will be used to control thegarage door until the garagedoor moves. The indicatorlight, above the selected button,should slowly blink. This buttonmay need to be held for up to20 seconds.
4. Immediately, within one second,release the button whenthe garage door moves.The indicator light will blinkrapidly until programming iscomplete.
5. Press and release the samebutton again. The garage doorshould move, confirming thatprogramming is successfuland complete.
To program another Rolling Codedevice such as an additional garagedoor opener, a security device,or home automation device, repeatSteps 1 through 5, choosing adifferent function button in Step 3than what was used for the garagedoor opener.
If these instructions do not work,the garage door opener is probablya Fixed Code unit. Follow theProgramming instructions thatfollow for a Fixed Code garagedoor opener.
Programming Universal HomeRemote — Fixed Code
For questions or help programmingthe Universal Home RemoteSystem, call 1-866-572-2728or go to www.learcar2u.com.
Most garage door openers soldbefore 1996 are Fixed Code units.
Programming a garage door openerinvolves time-sensitive actions, soread the entire procedure beforestarting. Otherwise, the device willtime out and the procedure will haveto be repeated.

Black plate (48,1)Chevrolet Impala Owner Manual - 2011
5-48 Instruments and Controls
To program up to three devices:
1. To verify that the garage dooropener is a Fixed Code unit,remove the battery cover onthe hand held transmittersupplied by the manufacturerof the garage door openermotor. If there are a row of dipswitches similar to the graphicabove, the garage door openeris a Fixed Code unit. If you donot see a row of dip switches,
return to the previous sectionfor Programming UniversalHome Remote – Rolling Code.
Your hand-held transmittercan have between 8 to 12 dipswitches depending on thebrand of transmitter.
The garage door opener receiver(motor head unit) could alsohave a row of dip switchesthat can be used whenprogramming the UniversalHome Remote. If the totalnumber of switches on themotor head and hand-heldtransmitter is different, or if thedip switch settings are different,use the dip switch settings onthe motor head unit to programthe Universal Home Remote.The motor head dip switchsettings can also be usedwhen the original hand heldtransmitter is not available.
Example of Eight Dip Switcheswith Two Positions
Example of Eight Dip Switcheswith Three Positions
The panel of switches might notappear exactly as they do inthe examples above, but theyshould be similar.

Black plate (49,1)Chevrolet Impala Owner Manual - 2011
Instruments and Controls 5-49
The switch positions on thehand-held transmitter could belabeled, as follows:. A switch in the up position
could be labeled as “Up,”“+,” or “On.”
. A switch in the downposition could be labeledas “Down,” “−,” or “Off.”
. A switch in the middleposition could be labeled as“Middle,” “0,” or “Neutral.”
2. Write down the 8 to 12 switchsettings from left to right asfollows:. When a switch is in the up
position, write “Left.”. When a switch is in the
down position, write “Right.”
. If a switch is set betweenthe up and down position,write “Middle.”
The switch settings writtendown in Step 2 will nowbecome the button strokesto be entered into theUniversal Home Remote inStep 4. Be sure to enter theswitch settings written downin Step 2, in order from leftto right, into the UniversalHome Remote, whencompleting Step 4.
3. From inside your vehicle, firstfirmly press all three buttonsat the same time for aboutthree seconds. Releasethe buttons to put theUniversal Home Remoteinto programming mode.
A. Left Button("Up," "+," or "On.")
B. Middle Button("Middle," "0," or "Neutral.")
C. Right Button("Down," "-," or "Off.")

Black plate (50,1)Chevrolet Impala Owner Manual - 2011
5-50 Instruments and Controls
4. The indicator lights will blinkslowly. Enter each switchsetting from Step 2 into yourvehicle's Universal HomeRemote. You will have two andone-half minutes to completeStep 4. Now press one button onthe Universal Home Remote foreach switch setting as follows:. If you wrote “Left,” press
the left button in thevehicle.
. If you wrote “Right,” pressthe right button in thevehicle.
. If you wrote “Middle,” pressthe middle button in thevehicle.
5. After entering all of the switchpositions, again, firmly press andrelease all three buttons at thesame time. The indicator lightswill turn on.
6. Press and hold the buttonthat will be used to controlthe garage door until the garagedoor moves. The indicatorlight above the selected buttonshould slowly blink. This buttonmay need to be held for up to55 seconds.
7. Immediately release the buttonwhen the garage door moves.The indicator light will blinkrapidly until programming iscomplete.
8. Press and release the samebutton again. The garage doorshould move, confirming thatprogramming is successful andcomplete.
To program another Fixed Codedevice such as an additional garagedoor opener, a security device,or home automation device, repeatSteps 1 through 8, choosing adifferent button in Step 6 than whatwas used for the garage dooropener.

Black plate (51,1)Chevrolet Impala Owner Manual - 2011
Instruments and Controls 5-51
Universal Remote SystemOperationPress and hold the appropriatebutton for at least half of a second.The indicator light will come onwhile the signal is being transmitted.
Reprogramming UniversalHome Remote Buttons
Any of the three buttons can bereprogrammed by repeating theinstructions.
Erasing Universal HomeRemote Buttons
The programmed buttons should beerased when the vehicle is sold orthe lease ends.
To erase either Rolling Code orFixed Code on the Universal HomeRemote device:
1. Press and hold the 2 outsidebuttons at the same time forapproximately 20 seconds,until the indicator lights, locateddirectly above the buttons, beginto blink rapidly.
2. Once the indicator lights beginto blink, release both buttons.The codes from all buttons willbe erased.
For help or information on theUniversal Home Remote System,call the customer assistance phonenumber under Customer AssistanceOffices on page 13‑3.

Black plate (52,1)Chevrolet Impala Owner Manual - 2011
5-52 Instruments and Controls
2 NOTES

Black plate (1,1)Chevrolet Impala Owner Manual - 2011
Lighting 6-1
Lighting
Exterior LightingExterior Lamp Controls . . . . . . . . 6-1Headlamp High/Low-BeamChanger . . . . . . . . . . . . . . . . . . . . . 6-3
Flash-to-Pass . . . . . . . . . . . . . . . . . 6-3Daytime Running Lamps(DRL)/Automatic HeadlampSystem . . . . . . . . . . . . . . . . . . . . . . 6-3
Hazard Warning Flashers . . . . . 6-4Turn and Lane-ChangeSignals . . . . . . . . . . . . . . . . . . . . . . 6-4
Fog Lamps . . . . . . . . . . . . . . . . . . . . 6-5
Interior LightingInstrument Panel IlluminationControl . . . . . . . . . . . . . . . . . . . . . . 6-5
Courtesy Lamps . . . . . . . . . . . . . . 6-5Dome Lamps . . . . . . . . . . . . . . . . . 6-6Reading Lamps . . . . . . . . . . . . . . . 6-6
Lighting FeaturesEntry Lighting . . . . . . . . . . . . . . . . . 6-6Delayed Entry Lighting . . . . . . . . 6-7Delayed Exit Lighting . . . . . . . . . 6-7Parade Dimming . . . . . . . . . . . . . . 6-7Battery Load Management . . . . 6-7Battery Power Protection . . . . . . 6-8
Exterior Lighting
Exterior Lamp Controls
The exterior lamps control is locatedon the instrument panel to the left ofthe steering wheel.

Black plate (2,1)Chevrolet Impala Owner Manual - 2011
6-2 Lighting
It controls the following systems:. Headlamps. Taillamps. Parking Lamps. License Plate Lamps. Instrument Panel Lights. Fog Lamps (If Equipped)
The exterior lamps control hasfour positions:
O (Off): Turns off the automaticheadlamps and daytime runninglamps (DRL). Turning the headlampcontrol to the off position againwill turn the automatic headlampsor DRL back on. For vehicles firstsold in Canada, the off position onlyworks when the vehicle is shiftedinto the P (Park) position.
AUTO (Automatic): Automaticallyturns on the headlamps at normalbrightness, together with thefollowing:. Parking Lamps. Instrument Panel Lights. Taillamps. License Plate Lamps
; (Parking Lamps): Turns onthe parking lamps together with thefollowing:. Instrument Panel Lights. Taillamps. License Plate Lamps
2 (Headlamps): Turns on theheadlamps together with thefollowing lamps listed below.When the headlamps are turnedon while the vehicle is on, theheadlamps will turn off automatically10 minutes after the ignition isturned off. When the headlampsare turned on while the vehicle isoff, the headlamps will stay on for10 minutes before automaticallyturning off to prevent the batteryfrom being drained. Turn theheadlamp control to off and thenback to the headlamp on positionto make the headlamps stay onfor an additional 10 minutes.. Parking Lamps. Taillamps. License Plate Lamps. Instrument Panel Lights
# (Fog Lamps) (If Equipped):Turns on the fog lamps.
See Fog Lamps on page 6‑5.

Black plate (3,1)Chevrolet Impala Owner Manual - 2011
Lighting 6-3
Headlamp High/Low-Beam ChangerTo change the headlamps from lowbeam to high beam, push the turnsignal/multifunction lever awayfrom you.
This instrument panel clusterlight3 comes on if the high‐beamlamps are turned on while theignition is in ON/RUN.
To change the headlamps from highbeam to low beam, pull the turnsignal lever toward you.
Flash-to-PassThis feature is used to signal tothe vehicle ahead that you wantto pass.
If the headlamps are off or inthe low‐beam position, pull theturn signal lever toward you tomomentarily switch to high beams.
Release the lever to turn thehigh-beam headlamps off.
Daytime RunningLamps (DRL)/AutomaticHeadlamp SystemDaytime Running Lamps (DRL) canmake it easier for others to see thefront of your vehicle during the day.Fully functional daytime runninglamps are required on all vehiclesfirst sold in Canada.
The DRL system makes thelow-beam headlamps come onat a reduced brightness whenthe following conditions are met:. The ignition is in the ON/RUN
position.. The exterior lamps control is
in AUTO.. The engine is running.
When the DRL are on, the regularheadlamps, taillamps, sidemarker,and other lamps are not on.The instrument panel and clusterare also not on.
The headlamps automaticallychange from DRL to the regularheadlamps depending on thedarkness of the surroundings.The other lamps that come onwith the headlamps will alsocome on.
When it is bright enough outside,the headlamps go off and the DRLcome on.
The regular headlamp systemshould be turned on when needed.
Do not cover the light sensor on topof the instrument panel because itworks with the DRL.
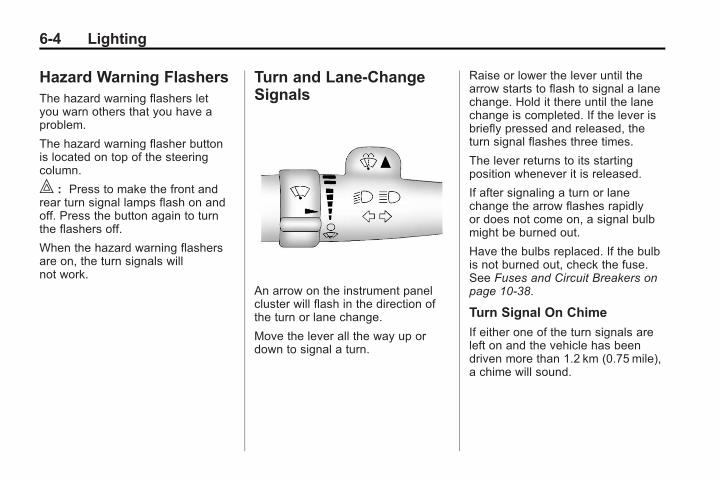
Black plate (4,1)Chevrolet Impala Owner Manual - 2011
6-4 Lighting
Hazard Warning FlashersThe hazard warning flashers letyou warn others that you have aproblem.
The hazard warning flasher buttonis located on top of the steeringcolumn.
| : Press to make the front andrear turn signal lamps flash on andoff. Press the button again to turnthe flashers off.
When the hazard warning flashersare on, the turn signals willnot work.
Turn and Lane-ChangeSignals
An arrow on the instrument panelcluster will flash in the direction ofthe turn or lane change.
Move the lever all the way up ordown to signal a turn.
Raise or lower the lever until thearrow starts to flash to signal a lanechange. Hold it there until the lanechange is completed. If the lever isbriefly pressed and released, theturn signal flashes three times.
The lever returns to its startingposition whenever it is released.
If after signaling a turn or lanechange the arrow flashes rapidlyor does not come on, a signal bulbmight be burned out.
Have the bulbs replaced. If the bulbis not burned out, check the fuse.See Fuses and Circuit Breakers onpage 10‑38.
Turn Signal On Chime
If either one of the turn signals areleft on and the vehicle has beendriven more than 1.2 km (0.75 mile),a chime will sound.
Black plate (5,1)Chevrolet Impala Owner Manual - 2011
Lighting 6-5
Fog Lamps# (Fog Lamps): For vehicleswith fog lamps, the button is locatedon the exterior lamps control.The exterior lamps control is locatedon the instrument panel to the leftof the steering column.
The ignition must be in the ON/RUNposition for the fog lamps tocome on.
Press # to turn the fog lamps onor off. A light will come on in theinstrument panel cluster.
When the headlamps are changedto high beam, the fog lamps alsogo off.
Some localities have laws thatrequire the headlamps to be onalong with the fog lamps.
Interior Lighting
Instrument PanelIllumination ControlD (Instrument PanelBrightness): The knob with thissymbol on it is located next to theexterior lamps control to the left ofthe steering wheel. Push the knobin all the way until it extends outand then turn the knob clockwiseor counterclockwise to brighten ordim the lights. Push the knob backin when finished.
Courtesy LampsWhen a door is opened, thecourtesy lamps automaticallycome on. They make it easyfor you to enter and leave yourvehicle. You can also manuallyturn these lamps on by fully turningthe instrument panel brightnesscontrol clockwise.
The reading lamps, located on therearview mirror, can be turned onor off independent of the automaticcourtesy lamps, when the doors areclosed.

Black plate (6,1)Chevrolet Impala Owner Manual - 2011
6-6 Lighting
Dome LampsThe center mounted dome lampoverhead comes on when a dooris opened. This lamp can also beturned on by turning the instrumentpanel brightness control clockwise.
Reading LampsThe vehicle has reading lamps thatalso act as the dome lamp. Pressthe button near each lamp to turnthem on and off.
Map Lamps
The vehicle has map lamps on therearview mirror. Press the buttonnear each lamp on the mirror toturn the map lamps on and off.
Lighting Features
Entry LightingFor vehicles with courtesy lamps,they come on and stay on for a settime whenever the unlock symbolis pressed on the Remote KeylessEntry (RKE) transmitter.
If a door is opened, the lamps stayon while it is open and then turn offautomatically about 20 secondsafter the door is closed. If the unlocksymbol is pressed and no door isopened, the lamps turn off afterabout 20 seconds.
Entry lighting includes a featurecalled theater dimming. With theaterdimming, the lamps do not turnoff at the end of the delay time.Instead, they slowly dim and thengo out. The delay time is canceledif the ignition key is turned toON/RUN or the power door lockswitch is pressed. The lamps willdim right away.
When the ignition is on, illuminatedentry is inactive, which means thecourtesy lamps will not come onunless a door is opened.
Black plate (7,1)Chevrolet Impala Owner Manual - 2011
Lighting 6-7
Delayed Entry LightingDelayed entry lighting illuminatesthe interior for a period of time afterall the doors have been closed.
The ignition must be off for delayedentry lighting to work. Immediatelyafter all the doors have been closed,the delayed entry lighting featurecontinues to work until one of thefollowing occurs:. The ignition is in ON/RUN.. The doors are locked.. An illumination period of about
25 seconds has elapsed.
If during the illumination perioda door is opened, the timedillumination period is canceledand the interior lamps remain on.
Delayed Exit LightingThis feature illuminates the interiorfor a period of time after the key isremoved from the ignition.
The ignition must be off for delayedexit lighting to work. When the keyis removed, interior illuminationactivates and remains on untilone of the following occurs:. The ignition is in ON/RUN.. The power door locks are
activated.. An illumination period of
20 seconds has elapsed.
If during the illumination perioda door is opened, the timedillumination period will be canceledand the interior lamps will remainon because a door is open.
Parade DimmingParade mode automatically prohibitsthe dimming of the instrument paneldisplays during the daylight whilethe headlamps are on so that thedisplays are still able to be seen.
Battery LoadManagementThe vehicle has Electric PowerManagement (EPM) that estimatesthe battery's temperature and stateof charge. It then adjusts the voltagefor best performance and extendedlife of the battery.
When the battery's state ofcharge is low, the voltage is raisedslightly to quickly bring the chargeback up. When the state of chargeis high, the voltage is loweredslightly to prevent overcharging.

Black plate (8,1)Chevrolet Impala Owner Manual - 2011
6-8 Lighting
If the vehicle has a voltmeter gaugeor a voltage display on the DriverInformation Center (DIC), you maysee the voltage move up or down.This is normal. If there is a problem,an alert will be displayed.
The battery can be discharged atidle if the electrical loads are veryhigh. This is true for all vehicles.This is because the generator(alternator) may not be spinningfast enough at idle to produceall the power that is needed forvery high electrical loads.
A high electrical load occurs whenseveral of the following are on,such as: headlamps, high beams,fog lamps, rear window defogger,climate control fan at high speed,heated seats, engine cooling fans,trailer loads, and loads pluggedinto accessory power outlets.
EPM works to prevent excessivedischarge of the battery. It does thisby balancing the generator's outputand the vehicle's electrical needs.It can increase engine idle speedto generate more power, wheneverneeded. It can temporarily reducethe power demands of someaccessories.
Normally, these actions occurin steps or levels, without beingnoticeable. In rare cases at thehighest levels of corrective action,this action may be noticeable tothe driver. If so, a Driver InformationCenter (DIC) message might bedisplayed, such as BATTERYSAVER ACTIVE. If this messagesdisplays, it is recommended thatthe driver reduce the electrical loadsas much as possible. See DriverInformation Center (DIC) onpage 5‑26.
Battery Power ProtectionThis feature helps prevent thebattery from being drained, if theinterior courtesy lamps, reading/map lamps, visor vanity lamps,or trunk lamp are accidentally lefton. If any of these lamps are lefton, they automatically turn off after10 minutes, if the ignition is off.The lamps will not come back onagain until one of the followingoccurs:. The ignition is turned on.. The exterior lamps control is
turned off, then on again.
The headlamps will time out after10 minutes, if they are manuallyturned on with the ignition on or off.
Black plate (1,1)Chevrolet Impala Owner Manual - 2011
Infotainment System 7-1
InfotainmentSystem
IntroductionInfotainment . . . . . . . . . . . . . . . . . . . 7-1Theft-Deterrent Feature . . . . . . . 7-2Operation . . . . . . . . . . . . . . . . . . . . . 7-2
RadioAM-FM Radio . . . . . . . . . . . . . . . . . 7-6Satellite Radio . . . . . . . . . . . . . . . . 7-9Radio Reception . . . . . . . . . . . . . 7-13Backglass Antenna . . . . . . . . . . 7-14Satellite Radio Antenna . . . . . . 7-15
Audio PlayersCD Player . . . . . . . . . . . . . . . . . . . 7-15Auxiliary Devices . . . . . . . . . . . . 7-21
PhoneBluetooth . . . . . . . . . . . . . . . . . . . . 7-21
Introduction
InfotainmentDetermine which radio the vehiclehas and read the following pages tobecome familiar with its features.
{ WARNING
Taking your eyes off the roadfor extended periods couldcause a crash resulting ininjury or death to you or others.Do not give extended attention toentertainment tasks while driving.
This system provides access tomany audio and non-audio listings.
To minimize taking your eyes off theroad while driving, do the followingwhile the vehicle is parked:. Become familiar with the
operation and controls of theaudio system.
. Set up the tone, speakeradjustments, and presetradio stations.
For more information, see DefensiveDriving on page 9‑2.
Notice: Contact your dealerbefore adding any equipment.
Adding audio or communicationequipment could interfere withthe operation of the engine,radio, or other systems, andcould damage them. Followfederal rules covering mobileradio and telephone equipment.
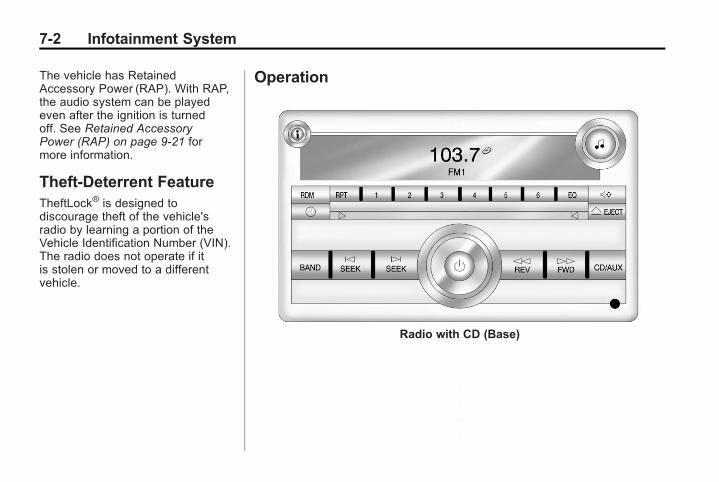
Black plate (2,1)Chevrolet Impala Owner Manual - 2011
7-2 Infotainment System
The vehicle has RetainedAccessory Power (RAP). With RAP,the audio system can be playedeven after the ignition is turnedoff. See Retained AccessoryPower (RAP) on page 9‑21 formore information.
Theft-Deterrent FeatureTheftLock® is designed todiscourage theft of the vehicle'sradio by learning a portion of theVehicle Identification Number (VIN).The radio does not operate if itis stolen or moved to a differentvehicle.
Operation
Radio with CD (Base)

Black plate (3,1)Chevrolet Impala Owner Manual - 2011
Infotainment System 7-3
Radio with CD (MP3)
The vehicle has one of these radiosas its infotainment system.
Softkeys
The Radio with CD (MP3) has sixsoftkeys located below the radiodisplay. Softkeys are used to controlfunctions that appear on the radiodisplay as tabs directly above thesoftkeys.
Using the Radio
O (Power/Volume): Press to turnthe system on and off. Turn toincrease or decrease the volume.
(Information): Press to switch thedisplay between the radio stationfrequency and the time. While theignition is off, press this button todisplay the time.
Speed Compensated Volume(SCV): Radios with the SpeedCompensated Volume (SCV)feature automatically adjust theradio volume to compensate forroad and wind noise as the vehiclespeeds up or slows down, so thatthe volume level is consistent.

Black plate (4,1)Chevrolet Impala Owner Manual - 2011
7-4 Infotainment System
To activate SCV:
1. Set the radio volume to thedesired level.
2. Press MENU to display the radiosetup menu.
3. Press the softkey under theAUTO VOLUM tab on the radiodisplay.
4. Press the softkey under thedesired Speed CompensatedVolume setting (OFF, Low, Med,or High) to select the level ofradio volume compensation.The display times out afterapproximately 10 seconds.Each higher setting allowsfor more radio volumecompensation at fastervehicle speeds.
Setting the Tone (Bass/Treble)Radio with CD
To adjust the bass or treble:
1. Press the f knob until Bass orTreble displays.
2. To adjust the setting, do one ofthe following:
. Turn the f knob.
. Press ¨ SEEK or © SEEK.
. Press\ FWD ors REV.
EQ (Equalization): Press thisbutton to choose bass and trebleequalization settings designedfor different types of music.Selecting MANUAL or changingbass or treble, returns the EQ tothe manual bass and treble settings.
Unique EQ settings can be savedfor each source.
Setting the Tone(Bass/Midrange/Treble)Radio with CD (MP3)
BASS/MID/TREB (Bass, Midrange,or Treble): To adjust the bass,midrange, or treble:
1. Press the f knob until the tonecontrol tabs display.
2. Highlight the desired tonecontrol tab by doing one ofthe following:
. Press the f knob.
. Press the softkey under thedesired tab.
3. Adjust the setting by doing oneof the following:
. Turn the f knob clockwiseor counterclockwise.
. Press ¨ SEEK or © SEEK.
. Press\ FWD ors REV.

Black plate (5,1)Chevrolet Impala Owner Manual - 2011
Infotainment System 7-5
If a station's frequency is weak or ifthere is static, decrease the treble.
To quickly adjust bass, midrange,or treble to the middle position,press the softkey positioned underthe BASS, MID, or TREB tab formore than two seconds. A beepsounds and the level adjusts tothe middle position.
To quickly adjust all tone andspeaker controls to the middleposition, press the f knob formore than two seconds until abeep sounds.
EQ (Equalization): Press thisbutton to choose bass and trebleequalization settings designed fordifferent types of music. SelectingMANUAL or changing bass or treblereturns the EQ to the manual bassand treble settings.
Unique EQ settings can be savedfor each source.
If the radio has a Bose® audiosystem, the EQ settings are eitherMANUAL or TALK.
Adjusting the Speakers(Balance/Fade) Radio with CD
To adjust the balance or fade:
1. Press the` button or press
the f knob until the speakercontrol label displays.
2. To adjust the setting, do one ofthe following:
. Turn the f knob.
. Press ¨ SEEK or © SEEK.
. Press\ FWD ors REV.
Adjusting the Speakers(Balance/Fade) Radio withCD (MP3)
BAL/FADE (Balance/Fade):To adjust the balance or fade:
1. Press the f knob until thespeaker control tabs display.
2. Highlight the desired speakercontrol tab by doing one of thefollowing:
. Press the f knob.
. Press the softkey under thedesired tab.
3. Adjust the setting by doing oneof the following:
. Turn the f knob clockwiseor counterclockwise.
. Press ¨ SEEK or © SEEK.
. Press\ FWD ors REV.

Black plate (6,1)Chevrolet Impala Owner Manual - 2011
7-6 Infotainment System
To quickly adjust all speaker andtone controls to the middle position,press the f knob for more thantwo seconds.
If the Rear Seat Audio (RSA) isturned on, the radio disables FADEand mutes the rear speakers.
Radio Messages
Calibration Error: Displays ifthe radio is no longer calibratedproperly for the vehicle. The vehiclemust be returned to your dealer forservice.
Loc or Locked: Displays when theTheftLock® system has activated.Take the vehicle to your dealer forservice.
If any error occurs repeatedly orif an error cannot be corrected,contact your dealer.
Radio
AM-FM Radio
Radio Data System (RDS)
The radio may have RDS. The RDSfeature is available for use only onFM stations that broadcast RDSinformation. This system relies uponreceiving specific information fromthese stations and only works whenthe information is available. Whilethe radio is tuned to an FM-RDSstation, the station name or callletters display. In rare cases, a radiostation could broadcast incorrectinformation that causes the radiofeatures to work improperly. If thishappens, contact the radio station.
4 (Information) (RDS Features):For vehicles with RDS features,press 4 to display additionaltext information related tothe current FM-RDS station.If information is available, thesong title information displayson the top line of the display andartist information displays on thebottom line. When information isnot available, “NO INFO” displays.
Auto Text (RDS Features): Ifadditional information is availablefor the current song being played,Auto Text will automaticallypage/scroll the informationevery three seconds above theFAV presets on the radio display.By default, Auto Text is enabled.
Black plate (7,1)Chevrolet Impala Owner Manual - 2011
Infotainment System 7-7
To change the Auto Text setting:
1. Press MENU to display the radiosetup menu.
2. Press the softkey underAUTO TXT tab on the radiodisplay.
3. Press the softkey under the ONor OFF tab on the radio display.
If 4 is pressed and the song titleor artist information is longerthan what can be displayed, theextra information will page everythree seconds when Auto Textis activated.
Finding a Station
BAND: Press to choosebetween FM1, FM2, AM, or XM™(if equipped) on the Radio with CD(Base). Press to choose betweenFM, AM, XM (if equipped) on theRadio with CD (MP3).
f (Tune): Turn to select radiostations.
© SEEK: Press to seek or scanstations with a strong signal in theselected band.. To seek stations, press and
release © SEEK to go to theprevious station and stay there.
. To scan stations, press and hold© SEEK for a few seconds untilthe radio beeps once. The radiogoes to a station, plays for a fewseconds, then goes to the nextstation. Press © SEEK again tostop scanning.
. To scan preset stations in theselected band, press and hold© SEEK for four seconds until adouble beep sounds. The radiogoes to a stored preset, playsfor a few seconds, then goesto the next stored preset. Press© SEEK again to stop scanningpreset stations.
¨ SEEK: Press to seek or scanstations with a strong signal in theselected band.. To seek stations, press and
release ¨ SEEK to go to thenext station and stay there.
. To scan stations, press and hold¨ SEEK for a few seconds untilthe radio beeps once. The radiogoes to a station, plays for a fewseconds, then goes to the nextstation. Press ¨ SEEK again tostop scanning.
. To scan preset stations in theselected band, press and hold¨ SEEK for four seconds until adouble beep sounds. The radiogoes to a stored preset, playsfor a few seconds, then goesto the next stored preset. Press¨ SEEK again to stop scanningpreset stations.

Black plate (8,1)Chevrolet Impala Owner Manual - 2011
7-8 Infotainment System
Storing Radio Stations
Drivers are encouraged to storeradio station while the vehicle isparked. See Defensive Driving onpage 9‑2. Tune to stored radiostations using the presets, favoritesbutton, and steering wheel controls,if the vehicle has this feature.
Radios that have a FAV buttonstore radio stations as favorites, upto 36 stations can be programmedas favorites using the 6 softkeysbelow the radio station frequencytabs and by using the FAV button.Press the FAV button to go throughup to 6 pages of favorites, eachhaving 6 favorite stations availableper page. Each page of favoritescan contain any combination of AM,FM, or XM, if equipped, stations.
Radios that do not have aFAV button store radio stationsas presets, up to 18 stations(6 FM1, 6 FM2, and 6 AM), can beprogrammed on the 6 numberedpushbuttons.
Storing a Radio Station as aPreset, Radio with CD (Base)
Radios that have numberedpushbuttons store radio stationsas presets.
Up to 18 stations (6 FM1, 6 FM2,and 6 AM), can be programmedon the six numbered buttons.
To store preset stations:
1. Tune to a radio station.
2. Press and hold one of the6 numbered pushbuttons for3 seconds until a beep sounds.
3. Repeat Steps 1 and 2 to storeadditional radio stations.
Storing a Radio Station as aFavorite, Radio with CD (MP3)
Radios that have a FAV button storeradio stations as favorites.
To store a station as a favorite:
1. Tune to a radio station.
2. Press the FAV button to displaythe page where the station willbe stored.
3. Press and hold one of the6 softkeys until a beep sounds.
4. Repeat Steps 1 through 3 tostore additional radio stations.
The number of favorites pages canbe set up using the MENU button.To set up the number of favoritespages:
1. Press the MENU button.
2. Press the softkey located belowthe FAV 1-6 tab.
3. Select the number of favoritespages by pressing the softkeylocated below the displayedpage numbers.
4. Press the FAV button, or letthe menu time out, to returnto the original main radioscreen showing the radiostation frequency tabs andto begin the process ofprogramming favorites.
Black plate (9,1)Chevrolet Impala Owner Manual - 2011
Infotainment System 7-9
Satellite Radio
XM™ Satellite Radio Service
XM is a satellite radio servicethat is based in the 48 contiguousUnited States and 10 Canadianprovinces. XM Satellite Radiohas a wide variety of programmingand commercial-free music,coast-to-coast, and in digital-qualitysound. A service fee is requiredto receive the XM service. If XMService needs to be reactivated, theradio will display “No SubscriptionPlease Renew” on channel XM1.For more information, contactXM at www.xmradio.com orcall 1-800-929-2100 in the U.S.and www.xmradio.ca or call1-877-438-9677 in Canada.
4 (Information) (XM SatelliteRadio Service): For vehicleswith XM, press 4 to displayadditional text informationrelated to the current XM channel.If information is available, thesong title information displayson the top line of the display andartist information displays on thebottom line. When information isnot available, “NO INFO” displays.
Auto Text (Satellite RadioService): If additional informationis available for the current songbeing played, Auto Text willautomatically page/scroll theinformation every three secondsabove the FAV presets on theradio display. By default, AutoText is enabled.
To change the Auto Text setting:
1. Press MENU to display the radiosetup menu.
2. Press the softkey underAUTO TXT tab on the radiodisplay.
3. Press the softkey under the ONor OFF tab on the radio display.
If 4 is pressed and the song titleor artist information is longerthan what can be displayed, theextra information will page everythree seconds when Auto Text isactivated.
Black plate (10,1)Chevrolet Impala Owner Manual - 2011
7-10 Infotainment System
Finding an XM Channel
BAND: Press to switch betweenAM, FM, or XM, if equipped.
f (Tune): Turn to manually selectan XM channel.
© SEEK: Press to go to theprevious XM channel.. To scan stations, press and hold
© SEEK for a few seconds untilthe radio beeps once. The radiogoes to a cahnnel, plays for afew seconds, then goes to thenext station. Press © SEEKagain to stop scanning.
¨ SEEK: Press to go to the nextXM channel.. To scan stations, press and hold
¨ SEEK for a few seconds untilthe radio beeps once. The radiogoes to a station, plays for a fewseconds, then goes to the nextstation. Press ¨ SEEK again tostop scanning.
s REV: Press to go to theprevious XM category.
\ FWD: Press to go to the nextXM category.
Finding a Category (CAT)Channel
To find XM channels in a category:
1. Press the CAT button to displaythe category tabs. Continuepressing the CAT button until thedesired category name displays.. Radios with CD and DVD
can also navigate thecategory list by pressingthe\ FWD or thes REVbutton.
2. Press either of the two softkeysbelow the desired category tabto immediately tune to the firstXM station in that category.
To go to the previous or next XMstation in the selected category,do one of the following:
. Turn the f knob.
. Press the softkey below theright or left arrows in thecategory tab.
. Press © SEEK or ¨ SEEK.
3. To exit the category searchmode, press the FAV buttonor BAND button to display thefavorites again.

Black plate (11,1)Chevrolet Impala Owner Manual - 2011
Infotainment System 7-11
Adding and Removing Categories
Categories cannot be added orremoved while the vehicle is movingfaster than 8 km/h (5 mph).
To add or remove a category:
1. Press the MENU button.
2. Press the softkey located belowthe XM CAT tab.
3. Turn the f knob to display thecategory you want to add orremove.
4. Press the softkey located underthe Add or Remove tab.
To restore all removedcategories, press the softkeyunder the Restore All tab.
5. Repeat the steps to removemore categories.
Storing XM Channels
Drivers are encouraged to storeradio station while the vehicle isparked. See Defensive Driving onpage 9‑2. Tune to stored radiostations using the presets, favoritesbutton, and steering wheel controls,if the vehicle has this feature.
Up to 36 stations can beprogrammed as favorites usingthe 6 softkeys below the radiostation frequency tabs and byusing the FAV button. Press theFAV button to go through up to6 pages of favorites, each having6 favorite stations available perpage. Each page of favorites cancontain any combination of AM,FM, or XM, if equipped, stations.
Storing an XM Channel as aFavorite
To store a station as a favorite:
1. Tune to an XM channel.
2. Press the FAV button to displaythe page where the station willbe stored.
3. Press and hold one of the6 softkeys until a beep sounds.
4. Repeat Steps 1 through 3 tostore additional radio stations.

Black plate (12,1)Chevrolet Impala Owner Manual - 2011
7-12 Infotainment System
The number of favorites pages canbe set up using the MENU button.To set up the number of favoritespages:
1. Press the MENU button.
2. Press the softkey located belowthe FAV 1-6 tab.
3. Select the number of favoritespages by pressing the softkeylocated below the displayedpage numbers.
4. Press the FAV button, or letthe menu time out, to returnto the original main radioscreen showing the radiostation frequency tabs andto begin the process ofprogramming favorites.
XM Radio Messages
XL (Explicit LanguageChannels): These channels,or any others, can be blocked ata customer's request, by calling1-800-929-2100 in the U.S. and1-877-438-9677 in Canada.
XM Updating: The encryptioncode in the receiver is beingupdated, and no action is required.This process should take no longerthan 30 seconds.
No XM Signal: The systemis functioning correctly, but thevehicle is in a location that isblocking the XM signal. Whenthe vehicle is moved into an openarea, the signal should return.
Loading XM: The audio system isacquiring and processing audio andtext data. No action is needed. Thismessage should disappear shortly.
Channel Off Air: This channel isnot currently in service. Tune in toanother channel.
Channel Unauth : This channel isblocked or cannot be received withyour XM subscription package.
Channel Unavail: This previouslyassigned channel is no longerassigned. Tune to another station.If this station was one of thepresets, choose another stationfor that preset button.
No Artist Info: No artistinformation is available at thistime on this channel. The systemis working properly.
No Title Info: No song titleinformation is available at thistime on this channel. The systemis working properly.
No CAT Info: No categoryinformation is available at thistime on this channel. The systemis working properly.
No Information: No text orinformational messages areavailable at this time on thischannel. The system is workingproperly.

Black plate (13,1)Chevrolet Impala Owner Manual - 2011
Infotainment System 7-13
No Subscription Please Renew:XM subscription needs to bereactivated. Contact XM atwww.xmradio.com or call1-800-929-2100 in the U.S.and www.xmradio.ca or call1-877-438-9677 in Canada.
CAT Not Found: There are nochannels available for the selectedcategory. The system is workingproperly.
XM Theftlocked: The XM receiverin the vehicle could have previouslybeen in another vehicle. For securitypurposes, XM receivers cannot beswapped between vehicles. If thismessage is received after havingthe vehicle serviced, check withyour dealer.
XM Radio ID: If tuned to channel 0,this message alternates with theXM Radio 8 digit radio ID label.This label is needed to activatethe service.
Unknown: If this message isreceived when tuned to channel 0,there could be a receiver fault.Consult with your dealer.
Check Antenna: If this messagedoes not clear within a short periodof time, the receiver or antennacould have a fault. Consult withyour dealer.
Check XM Receivr: If thismessage does not clear within ashort period of time, the receivercould have a fault. Consult withyour dealer.
XM Not Available: If this messagedoes not clear within a short periodof time, the receiver could have afault. Consult with your dealer.
Radio ReceptionFrequency interference andstatic can occur during normalradio reception if items suchas cell phone chargers, vehicleconvenience accessories, andexternal electronic devices areplugged into the accessory poweroutlet. If there is interference orstatic, unplug the item from theaccessory power outlet.
AM
The range for most AM stations isgreater than for FM, especially atnight. The longer range can causestation frequencies to interferewith each other. For better radioreception, most AM radio stationsboost the power levels during theday, and then reduce these levelsduring the night. Static can alsooccur when things like storms andpower lines interfere with radioreception. When this happens, tryreducing the treble on the radio.

Black plate (14,1)Chevrolet Impala Owner Manual - 2011
7-14 Infotainment System
FM Stereo
FM signals only reach about16 to 65 km (10 to 40 mi). Althoughthe radio has a built-in electroniccircuit that automatically works toreduce interference, some staticcan occur, especially around tallbuildings or hills, causing thesound to fade in and out.
XM™ Satellite Radio Service
XM Satellite Radio Service givesdigital radio reception from coastto coast in the 48 contiguousUnited States, and in Canada.Just as with FM, tall buildings orhills can interfere with satellite radiosignals, causing the sound to fadein and out. In addition, travelingor standing under heavy foliage,bridges, garages, or tunnels maycause loss of the XM signal for aperiod of time.
Cellular Phone Usage
Cellular phone usage may causeinterference with the vehicle'sradio. This interference may occurwhen making or receiving phonecalls, charging the phone's battery,or simply having the phone on.This interference causes anincreased level of static whilelistening to the radio. If static isreceived while listening to theradio, unplug the cellular phoneand turn it off.
Backglass AntennaThe AM-FM antenna is integratedwith the rear window defogger,located in the rear window. Makesure that the inside surface of therear window is not scratched andthat the lines on the glass are notdamaged. If the inside surface is
damaged, it could interfere withradio reception. For proper radioreception, the antenna connectorneeds to be properly attached tothe post on the glass.
If a cellular telephone antennaneeds to be attached to the glass,make sure that the grid lines for theAM-FM antenna are not damaged.There is enough space betweenthe grid lines to attach a cellulartelephone antenna withoutinterfering with radio reception.
Notice: Using a razor blade orsharp object to clear the insiderear window can damage the rearwindow antenna and/or the rearwindow defogger. Repairs wouldnot be covered by the vehiclewarranty. Do not clear the insiderear window with sharp objects.

Black plate (15,1)Chevrolet Impala Owner Manual - 2011
Infotainment System 7-15
Notice: Do not apply aftermarketglass tinting with metallic film.The metallic film in some tintingmaterials will interfere withor distort the incoming radioreception. Any damage causedto your backglass antenna dueto metallic tinting materials willnot be covered by the vehiclewarranty.
Satellite Radio AntennaThe XM Satellite Radio antennais located on the roof of thevehicle. Keep the antenna clearof obstructions for clear radioreception.
If the vehicle has a sunroof, theperformance of the XM system(if equipped) may be affected ifthe sunroof is open.
Audio Players
CD PlayerSome CD players can play MP3CD-R or CD-RW discs. See “MP3”later in this section for moreinformation.
The CD player can play the smaller8 cm (3 in) single discs with anadapter ring.
Care of the CD Player
Do not add labels to a disc. It couldget caught in the CD player. Use amarking pen to write on the top ofthe disc if a description is needed.
Do not use CD lens cleaners.They could damage the CD player.
Notice: If a label is added to aCD, more than one CD is insertedinto the slot at a time, or anattempt is made to play scratchedor damaged CDs, the CD playercould be damaged. While usingthe CD player, use only CDs ingood condition without any label,load one CD at a time, and keepthe CD player and the loading slotfree of foreign materials, liquids,and debris.
If an error displays, see “CDMessages” later in this section.

Black plate (16,1)Chevrolet Impala Owner Manual - 2011
7-16 Infotainment System
Care of CDs
Store a disc in its original case ora protective case and away fromdirect sunlight and dust. If thebottom of a disc is damaged it maynot play properly or at all. Do nottouch the bottom of a disc whilehandling it, pick it up by graspingthe outer edges or the edge of thehole and the outer edge.
If the surface of a disc is dirty, takea soft, lint‐free cloth or dampen aclean, soft cloth in a mild, neutraldetergent solution mixed with water,and clean it. Make sure the wipingprocess starts from the center tothe edge.
Inserting a Disc
Insert the disc partway into the slot,label side up. The player pulls it inand the disc begins playing.
Use an adapter ring when playingthe smaller 8 cm (3 in) discs.Smaller discs with the adapterring are loaded the same wayas a full-size disc.
Ejecting a Disc
Z EJECT: Press to eject thedisc. If the disc is not removed afterseveral seconds, the CD playerautomatically pulls the disc back in.
Playing a CD
When a CD is inserted into theplayer, the CD symbol displays.As each new track starts to play,the track number displays.
If the ignition or radio is turned offwhen a CD is in the player, the CDstays in the player. If the ignitionor radio is turned on when a CD isin the player, the CD starts to playwhere it stopped, if it was the lastselected audio source.
Buttons and Knobs
The buttons and knobs on the radiocontrol the following features.
f (Tune): Turn to select tracks onthe CD.
© SEEK: Press to go to the startof the current track, if more than10 seconds have played. Pressand hold or press multiple timesto continue moving backwardthrough the tracks on the CD.
¨ SEEK: Press to go to the nexttrack. Press and hold or pressmultiple times to continue movingforward through the tracks onthe CD.
s REV (Reverse): Press and holdto reverse playback quickly within atrack. Sound is heard at a reducedvolume and the elapsed time of thetrack displays. Release to resumeplaying the track.

Black plate (17,1)Chevrolet Impala Owner Manual - 2011
Infotainment System 7-17
\ FWD (Fast Forward): Pressand hold to advance playbackquickly within a track. Sound isheard at a reduced volume andthe elapsed time of the trackdisplays. Release to resumeplaying the track.
4 (Information): Press to displayavailable additional informationabout the current track.
BAND: Press to listen to the radiowhile a CD is playing. The CDremains inside the CD player.
CD/AUX (CD/Auxiliary): Pressto play a CD while listening to theradio or a portable audio device.Press this button again and thesystem automatically searches foran auxiliary input device, such as aportable audio player. If a portableaudio player is not connected,No Aux Input Device Found maydisplay.
Softkeys
The six softkeys below the radiodisplay are used to control functionsthat display as tabs.
The softkeys below the radio displaycontrol the following features.
RDM (Random): Tracks can belistened to in random, rather thansequential order.
To use random:
1. Press the softkey below theRDM tab until Random CurrentDisc displays.
2. Press the softkey again to turnoff random play.
MP3 Supported Files
The Radio with CD (MP3) has thecapability of playing an MP3 CD-Ror CD-RW disc.
The radio can also play discs thatcontain both uncompressed CDaudio and MP3 files. When a disccontains both types of audio, the CDplayer reads all MP3 files first, thenthe uncompressed CD audio files.
Supported File and FolderStructure
The radio supports:. Up to 50 folders.. Up to 8 folders in depth.. Up to 50 playlists.. Up to 255 files.. Playlists with an .m3u or
.wpl extension.. Files with an .mp3 or .cda file
extension.

Black plate (18,1)Chevrolet Impala Owner Manual - 2011
7-18 Infotainment System
Root Directory
The root directory is treated as afolder. Files are stored in the rootdirectory when the disc or storagedevice does not contain folders.Files accessed from the rootdirectory of a disc display asF1 ROOT.
Empty Folder
Folders that do not contain files areskipped, and the player advances tothe next folder that contains files.
File Naming
The song name that displays is thesong name that is contained in theID3 tag. If the song name is notpresent in the ID3 tag, then theradio displays the file name withoutthe file extension as the track name.
Track names longer than32 characters or 4 pages areshortened. The display does notshow parts of words on the lastpage of text and the extensionof the filename is not displayed.
Playlists
Discs that have playlists thatwere created using WinAmp™,MusicMatch™, or Real Jukebox™software can be accessed; however,there is no playlist editing capabilityusing the radio. These playlists aretreated as special folders containingcompressed audio song files.
Playing an MP3
Order of Play
Tracks are played in the followingorder:. Play begins from the first track
in the first playlist and continuessequentially through all tracksin each playlist. When the lasttrack of the last playlist hasplayed, play continues fromthe first track of the first playlist.
. Play begins from the first trackin the first folder and continuessequentially through all tracks ineach folder. When the last trackof the last folder has played,play continues from the firsttrack of the first folder.
When playback starts from a newfolder, the new track name displaysunless folder mode has beenchosen as the default display, thenthe new folder name displays.

Black plate (19,1)Chevrolet Impala Owner Manual - 2011
Infotainment System 7-19
Buttons and Knobs
The buttons and knobs on the radiocontrol the following features.
f (Tune): Turn to select MP3 fileson the disc.
© SEEK: Press to go to the start ofthe track, if more than 10 secondshave played. Press and hold orpress multiple times to continuemoving backward through tracks.
¨ SEEK: Press to go to the nexttrack. Press and hold or pressmultiple times to continue movingforward through tracks.
s REV (Reverse): Press andhold to reverse playback quickly.Sound is heard at a reduced volumeand the elapsed time of the trackdisplays. Releases REV toresume playing.
\ FWD (Fast Forward): Pressand hold to advance playbackquickly. Sound is heard at a reducedvolume and the elapsed time of thetrack displays. Release\ FWD toresume playing.
4 (Information): Press to displayavailable additional informationabout the current track.
BAND: Press to listen to theradio while an MP3 disc is playing.The MP3 disc remains inside theCD player.
CD/AUX (CD/Auxiliary): Press toplay an MP3 disc while listening tothe radio or a portable audio device.Press this button again and thesystem automatically searches foran auxiliary input device, such as aportable audio player. If a portableaudio player is not connected,No Aux Input Device Found maydisplay.
Softkeys
The six softkeys below the radiodisplay are used to control functionsthat display as tabs.
The softkeys below the radio displaycontrol the following features.
Sc (Previous Folder): Pressthe softkey below Sc to go to thefirst track in the previous folder.
c T (Next Folder): Press thesoftkey belowc T to go to thefirst track in the next folder.
RDM (Random): MP3 files canbe listened to on a CD in random,rather than sequential order.To use random:
1. Press the softkey under theRDM tab until Random CurrentDisc displays to play songs fromthe current CD in random order.
2. Press the same softkey again toturn off random play.

Black plate (20,1)Chevrolet Impala Owner Manual - 2011
7-20 Infotainment System
h (Music Navigator): Press thesoftkey belowh to have the filesplayed in order by artist or album.The player scans the disc to sortthe files by artist and album ID3 taginformation. It can take severalminutes to scan the disc dependingon the number of files on the disc.The radio may begin playing whileit is scanning in the background.
When the scan is finished, thedisc begins playing files in orderby artist. The current artist playingis shown on the second line of thedisplay. Once all songs by that artistare played, the player moves to thenext artist in alphabetical order andbegins playing files by that artist.
To listen to files by another artist,press the softkey located beloweither arrow tab. The disc goesto the next or previous artist inalphabetical order. Continuepressing either softkey below thearrow tab until the desired artistdisplays.
To change from playback by artist toplayback by album:
1. Press the softkey located belowthe Sort By tab.
2. Press one of the softkeys belowthe Album tab from the sortscreen.
3. Press the softkey below theBack tab to return to the mainmusic navigator screen.
The album name displays on thesecond line between the arrowsand songs from the current albumbegins to play. Once all songsfrom that album have played, theplayer moves to the next album inalphabetical order on the disc andbegins playing MP3 files from thatalbum.
To exit music navigator mode, pressthe softkey below the Back tab toreturn to normal MP3 playback.
CD Player Messages
CHECK DISC: If an error messagedisplays and/or the disc comes out,it could be for one of the followingreasons:. The CD player is very hot.
When the temperature returnsto normal, the disc should play.
. The road is very rough. Whenthe road becomes smoother,the disc should play.
. The disc is dirty, scratched, wet,or upside down.
. The air is very humid. If so, waitabout an hour and try again.
. A problem occurred whileburning the disc.
. The label is caught in the CDplayer.
If the disc is not playing correctlyfor any other reason, try a knowngood disc.

Black plate (21,1)Chevrolet Impala Owner Manual - 2011
Infotainment System 7-21
If any error occurs repeatedly orif an error cannot be corrected,contact your dealer. If the radiodisplays an error message, write itdown and provide it to your dealerwhen reporting the problem.
Auxiliary Devices
Using the Auxiliary Input Jack
The radio system has an auxiliaryinput jack located on the lowerright side of the faceplate. This isnot an audio output; do not plugthe headphone set into the frontauxiliary input jack. However, anexternal audio device such as aniPod, laptop computer, MP3 player,CD changer, or cassette tape playercan be connected to the auxiliaryinput jack as another source foraudio listening.
Drivers are encouraged to setup any auxiliary device while thevehicle is in P (Park). See DefensiveDriving on page 9‑2 for moreinformation on driver distraction.
To use a portable audio player,connect a 3.5 mm (1/8 in) cable tothe radio's front auxiliary input jack.While a device is connected, pressthe radio CD/AUX button to beginplaying audio from the device overthe vehicle speakers.
O (Power/Volume): Turn toincrease or decrease the volumeof the portable player. Additionalvolume adjustments might need tobe made from the portable device.
BAND: Press to listen to the radiowhile a portable audio device isplaying. The portable audio devicecontinues playing until it is stoppedor turned off.
CD/AUX (CD/Auxiliary): Press toplay a CD while a portable audiodevice is playing. Press again andthe system begins playing audiofrom the connected portable audioplayer. If a portable audio player isnot connected, No Aux Input DeviceFound may display.
Phone
BluetoothFor vehicles equipped withBluetooth capability, the systemcan interact with many cell phones,allowing:. Placement and receipt of calls in
a hands-free mode.. Sharing of the cell phone’s
address book or contact listwith the vehicle.
To minimize driver distraction,before driving, and with the vehicleparked:. Become familiar with the
features of the cell phone.Organize the phone book andcontact lists clearly and deleteduplicate or rarely used entries.If possible, program speed dialor other shortcuts.
. Review the controls andoperation of the infotainmentand navigation system.

Black plate (22,1)Chevrolet Impala Owner Manual - 2011
7-22 Infotainment System
. Pair cell phone(s) to the vehicle.The system may not work withall cell phones. See “Pairing” inthis section for more information.
. If the cell phone has voicedialing capability, learn touse that feature to access theaddress book or contact list.See “Voice Pass-Thru” in thissection for more information.
. See “Storing and Deleting PhoneNumbers” in this section formore information.
{ WARNING
When using a cell phone, it canbe distracting to look too longor too often at the screen ofthe phone or the infotainment(navigation) system. Takingyour eyes off the road too longor too often could cause a crashresulting in injury or death. Focusyour attention on driving.
A Bluetooth system can use aBluetooth‐capable cell phone witha Hands‐Free Profile to make andreceive phone calls. The systemcan be used while the key is in theON/RUN or ACC/ACCESSORYposition. The range of the Bluetoothsystem can be up to 9.1 m (30 ft).Not all phones support all functions,and not all phones are guaranteedto work with the in-vehicle Bluetoothsystem. See www.gm.com/bluetoothfor more information on compatiblephones.
Voice Recognition
The Bluetooth system uses voicerecognition to interpret voicecommands to dial phone numbersand name tags.
For additional information, say“Help” while you are in a voicerecognition menu.
Noise: Keep interior noise levelsto a minimum. The system may notrecognize voice commands if thereis too much background noise.
When to Speak: A short tonesounds after the system respondsindicating when it is waiting for avoice command. Wait until the toneand then speak.
How to Speak: Speak clearly in acalm and natural voice.

Black plate (23,1)Chevrolet Impala Owner Manual - 2011
Infotainment System 7-23
Audio System
When using the in‐vehicleBluetooth system, sound comesthrough the vehicle's front audiosystem speakers and overridesthe audio system. Use the audiosystem volume knob, during acall, to change the volume level.The adjusted volume level remainsin memory for later calls. To preventmissed calls, a minimum volumelevel is used if the volume is turneddown too low.
Bluetooth Controls
Use the buttons located on thesteering wheel to operate thein‐vehicle Bluetooth system.See Steering Wheel Controls onpage 5‑3 for more information.
b g (Push To Talk): Press toanswer incoming calls, confirmsystem information, and startspeech recognition.
cx (Phone On Hook): Press toend a call, reject a call, or cancel anoperation.
Pairing
A Bluetooth cell phone must bepaired to the Bluetooth systemand then connected to the vehiclebefore it can be used. See the cellphone manufacturer's user guide forBluetooth functions before pairingthe cell phone. If a Bluetooth phoneis not connected, calls will be madeusing OnStar Hands‐Free Calling,if equipped. Refer to the OnStarOwner's Guide for more information.
Pairing Information. Up to five cell phones can be
paired to the Bluetooth system.. The pairing process is disabled
when the vehicle is moving.. Pairing only needs to be
completed once, unless thepairing information on the cellphone changes or the cell phoneis deleted from the system.
. Only one paired cell phone canbe connected to the Bluetoothsystem at a time.
. If multiple paired cell phonesare within range of the system,the system connects to the firstavailable paired cell phone in theorder that they were first pairedto the system. To connect to adifferent paired phone, see“Connecting to a DifferentPhone” later in this section.
Pairing a Phone
1. Press and hold b g fortwo seconds.
2. Say “Bluetooth.”
3. Say “Pair.” The system respondswith instructions and a four‐digitPersonal Identification Number(PIN). The PIN is used in Step 5.

Black plate (24,1)Chevrolet Impala Owner Manual - 2011
7-24 Infotainment System
4. Start the pairing process on thecell phone that you want to pair.For help with this process, seethe cell phone manufacturer'suser guide.
5. Locate the device named “YourVehicle” in the list on the cellphone. Follow the instructionson the cell phone to enter thePIN that was provided in Step 3.After the PIN is successfullyentered, the system prompts youto provide a name for the pairedcell phone. This name will beused to indicate which phonesare paired and connected to thevehicle. See “Listing All Pairedand Connected Phones” later inthis section for more information.
6. Repeat Steps 1 through 5 to pairadditional phones.
Listing All Paired and ConnectedPhones
The system can list all cell phonespaired to it. If a paired cell phone isalso connected to the vehicle, thesystem responds with “is connected”after that phone name.
1. Press and hold b g fortwo seconds.
2. Say “Bluetooth.”
3. Say “List.”
Deleting a Paired Phone
If the phone name you want todelete is unknown, see “Listing AllPaired and Connected Phones.”
1. Press and hold b g fortwo seconds.
2. Say “Bluetooth.”
3. Say “Delete.” The system askswhich phone to delete.
4. Say the name of the phone youwant to delete.
Connecting to a Different Phone
To connect to a different cell phone,the Bluetooth system looks for thenext available cell phone in theorder in which all the available cellphones were paired. Dependingon which cell phone you want toconnect to, you may have to usethis command several times.
1. Press and hold b g fortwo seconds.
2. Say “Bluetooth.”
3. Say “Change phone.”. If another cell phone is
found, the response willbe “<Phone name> is nowconnected.”
. If another cell phone is notfound, the original phoneremains connected.

Black plate (25,1)Chevrolet Impala Owner Manual - 2011
Infotainment System 7-25
Storing and Deleting PhoneNumbers
The system can store up to30 phone numbers as name tagsin the Hands‐Free Directory that isshared between the Bluetooth andOnStar systems, if equipped.
The following commands are usedto delete and store phone numbers.
Store: This command will storea phone number, or a group ofnumbers as a name tag.
Digit Store: This command allowsa phone number to be stored as aname tag by entering the digits oneat a time.
Delete: This command is used todelete individual name tags.
Delete All Name Tags: Thiscommand deletes all storedname tags in the Hands‐FreeCalling Directory and the OnStarTurn‐by‐Turn DestinationsDirectory, if equipped.
Using the “Store” Command
1. Press and hold b g fortwo seconds.
2. Say “Store.”
3. Say the phone number or groupof numbers you want to storeall at once with no pauses, thenfollow the directions given by thesystem to save a name tag forthis number.
Using the “Digit Store” Command
If an unwanted number isrecognized by the system, say“Clear” at any time to clear thelast number.
To hear all of the numbersrecognized by the system,say “Verify” at any time.
1. Press and hold b g fortwo seconds.
2. Say “Digit Store.”
3. Say each digit, one at a time,that you want to store. Aftereach digit is entered, the systemrepeats back the digit it heardfollowed by a tone. After thelast digit has been entered,say “Store,” and then follow thedirections given by the system tosave a name tag for this number.
Using the “Delete” Command
1. Press and hold b g fortwo seconds.
2. Say “Delete.”
3. Say the name tag you want todelete.

Black plate (26,1)Chevrolet Impala Owner Manual - 2011
7-26 Infotainment System
Using the “Delete All Name Tags”Command
This command deletes all storedname tags in the Hands‐FreeCalling Directory and the OnStarTurn‐by‐Turn Destinations Directory,if equipped.
To delete all name tags:
1. Press and hold b g fortwo seconds.
2. Say “Delete all name tags.”
Listing Stored Numbers
The list command will list all storednumbers and name tags.
Using the “List” Command
1. Press and hold b g fortwo seconds.
2. Say “Directory.”
3. Say “Hands‐Free Calling.”
4. Say “List.”
Making a Call
Calls can be made using thefollowing commands.
Dial or Call: The dial orcall command can be usedinterchangeably to dial a phonenumber or a stored name tag.
Digit Dial: This command allowsa phone number to be dialed byentering the digits one at a time.
Re‐dial: This command is used todial the last number used on the cellphone.
Using the “Dial” or “Call”Command
1. Press and hold b g fortwo seconds.
2. Say “Dial” or “Call.”
3. Say the entire number withoutpausing, or say the name tag.
Once connected, the person calledwill be heard through the audiospeakers.
Using the “Digit Dial” Command
The digit dial command allows aphone number to be dialed byentering the digits one at a time.After each digit is entered, thesystem repeats back the digit itheard followed by a tone.
If an unwanted number isrecognized by the system, say“Clear” at any time to clear thelast number.
To hear all of the numbersrecognized by the system,say “Verify” at any time.
1. Press and hold b g fortwo seconds.
2. Say “Digit Dial.”
3. Say each digit, one at a time,that you want to dial. After eachdigit is entered, the systemrepeats back the digit it heardfollowed by a tone. After thelast digit has been entered,say “Dial.”

Black plate (27,1)Chevrolet Impala Owner Manual - 2011
Infotainment System 7-27
Once connected, the person calledwill be heard through the audiospeakers.
Using the “Re‐dial” Command
1. Press and hold b g fortwo seconds.
2. After the tone, say “Re‐dial.”
Once connected, the person calledwill be heard through the audiospeakers.
Receiving a Call
When an incoming call is received,the audio system mutes and a ringtone is heard in the vehicle.
. Press b g to answer the call.
. Presscx to ignore a call.
Call Waiting
Call waiting must be supported onthe cell phone and enabled by thewireless service carrier.
. Press b g to answer anincoming call when anothercall is active. The original callis placed on hold.
. Press b g again to return to theoriginal call.
. To ignore the incoming call, noaction is required.
. Presscx to disconnect thecurrent call and switch to the callon hold.
Three‐Way Calling
Three‐way calling must besupported on the cell phone andenabled by the wireless servicecarrier.
1. While on a call, press b g.2. Say “Three‐way call.”
3. Use the dial or call command todial the number of the third partyto be called.
4. Once the call is connected,press b g to link all callerstogether.
Ending a Call
Presscx to end a call.

Black plate (28,1)Chevrolet Impala Owner Manual - 2011
7-28 Infotainment System
Muting a Call
During a call, all sounds from insidethe vehicle can be muted so that theperson on the other end of the callcannot hear them.
. To mute a call, press b g, andthen say “Mute call.”
. To cancel mute, press b g, andthen say “Un‐mute call.”
Transferring a Call
Audio can be transferred betweenthe Bluetooth system and the cellphone.
The cell phone must be pairedand connected with the Bluetoothsystem before a call can betransferred. The connection processcan take up to two minutes after theignition is turned to ON/RUN.
Transferring Audio from theBluetooth System to a Cell Phone
During a call with the audio in thevehicle:
1. Press b g.2. Say “Transfer Call.”
Transferring Audio to theBluetooth System from a CellPhone
During a call with the audio on thecell phone, press b g. The audiotransfers to the vehicle. If the audiodoes not transfer to the vehicle,use the audio transfer feature onthe cell phone. See your cell phonemanufacturer's user guide for moreinformation.
Voice Pass-Thru
Voice pass‐thru allows access tothe voice recognition commands onthe cell phone. See your cell phonemanufacturer's user guide to see ifthe cell phone supports this feature.
To access contacts stored in the cellphone:
1. Press and hold b g fortwo seconds.
2. Say “Bluetooth.” The systemresponds “Bluetooth ready,”followed by a tone.
3. Say “Voice.” The systemresponds “OK, accessing<phone name>.”
The cell phone's normal promptmessages will go through their cycleaccording to the phone's operatinginstructions.

Black plate (29,1)Chevrolet Impala Owner Manual - 2011
Infotainment System 7-29
Dual Tone Multi-Frequency(DTMF) Tones
The Bluetooth system can sendnumbers and the numbers storedas name tags during a call.You can use this feature whencalling a menu‐driven phonesystem. Account numbers canalso be stored for use.
Sending a Number or Name TagDuring a Call
1. Press b g. The systemresponds “Ready,” followedby a tone.
2. Say “Dial.”
3. Say the number or name tagto send.
Clearing the System
Unless information is deleted outof the in‐vehicle Bluetooth system,it will be retained indefinitely.This includes all saved name tags inthe phone book and phone pairinginformation. For information on howto delete this information, see theprevious section “Deleting a PairedPhone” and the previous sectionson deleting name tags.
Other Information
The Bluetooth® word mark andlogos are owned by the Bluetooth®
SIG, Inc. and any use of such marksby General Motors is under license.Other trademarks and trade namesare those of their respective owners.

Black plate (30,1)Chevrolet Impala Owner Manual - 2011
7-30 Infotainment System
2 NOTES

Black plate (1,1)Chevrolet Impala Owner Manual - 2011
Climate Controls 8-1
Climate Controls
Climate Control SystemsClimate Control Systems . . . . . . 8-1
Air VentsAir Vents . . . . . . . . . . . . . . . . . . . . . . 8-5
MaintenancePassenger Compartment AirFilter . . . . . . . . . . . . . . . . . . . . . . . . . 8-5
Climate Control SystemsThis vehicle may have a dual or single climate control system. The heating,cooling, defrost, defog and ventilation can be controlled with this system.For vehicles with heated seats, see Heated Front Seats on page 3‑7.
Dual Zone with Optional Heated Seat Controls
A. Fan Control
B. Outside Air
C. Recirculation
D. Air Delivery Mode Control
E. Air Conditioning
F. Driver and Passenger HeatedSeats
G. Driver and PassengerTemperature Controls
H. Rear Window Defogger
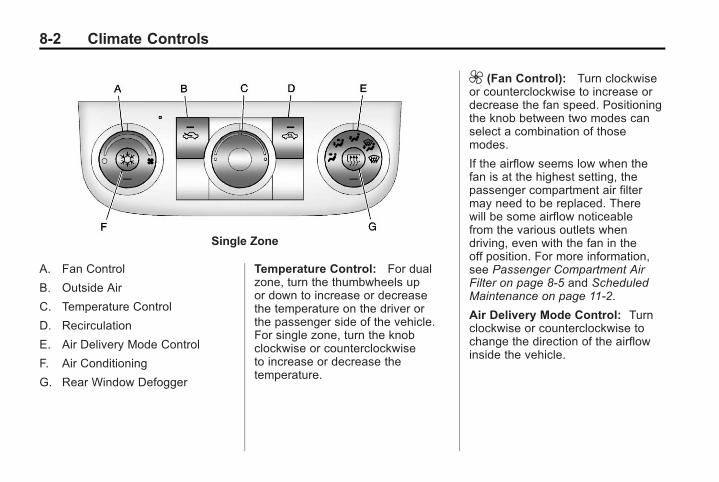
Black plate (2,1)Chevrolet Impala Owner Manual - 2011
8-2 Climate Controls
Single Zone
A. Fan Control
B. Outside Air
C. Temperature Control
D. Recirculation
E. Air Delivery Mode Control
F. Air Conditioning
G. Rear Window Defogger
Temperature Control: For dualzone, turn the thumbwheels upor down to increase or decreasethe temperature on the driver orthe passenger side of the vehicle.For single zone, turn the knobclockwise or counterclockwiseto increase or decrease thetemperature.
9 (Fan Control): Turn clockwiseor counterclockwise to increase ordecrease the fan speed. Positioningthe knob between two modes canselect a combination of thosemodes.
If the airflow seems low when thefan is at the highest setting, thepassenger compartment air filtermay need to be replaced. Therewill be some airflow noticeablefrom the various outlets whendriving, even with the fan in theoff position. For more information,see Passenger Compartment AirFilter on page 8‑5 and ScheduledMaintenance on page 11‑2.
Air Delivery Mode Control: Turnclockwise or counterclockwise tochange the direction of the airflowinside the vehicle.

Black plate (3,1)Chevrolet Impala Owner Manual - 2011
Climate Controls 8-3
To change the current mode, selectone of the following:
H (Vent): Air is directed to theinstrument panel outlets.
) (Bi-Level): Air is dividedbetween the instrument paneloutlets and the floor outlets.
6 (Floor): Air is directed to thefloor outlets, with some of the airdirected to the windshield andside window outlets. In this mode,the system automatically selectsoutside air.
- (Defog): This mode clears thewindshield of fog or moisture. Air isdirected equally to the windshieldand the floor outlets. When defogis selected, the system turns offrecirculation and runs the airconditioning compressor unlessthe outside temperature is below4°C (40°F).
0 (Defrost): This mode clearsthe windshield of fog or frostmore quickly. Air is directed tothe windshield with some air to
the side window vents and the floorvents. When defrost is selected,the system automatically forcesoutside air into the vehicle. The airconditioning compressor will runautomatically in this setting, unlessthe outside temperature is below4°C (40°F).
# (Air Conditioning): Pressto turn the air conditioning systemon or off. An indicator light comeson to show that it is on. The airconditioning can be selected in anymode as long as the fan is on andthe outside temperature is abovefreezing. A flashing indicator lightindicates that the air conditioningcompressor is currently notavailable.
On hot days, open the windows tolet hot inside air escape; then closethem. This helps to reduce the timeit takes for the vehicle to cool down.It also helps the system to operatemore efficiently.
For quick cool down on hot days, dothe following:
1. Select theH mode.
2. Press the# button.
3. Select the coolest temperaturefor both zones.
4. Select the highest9 speed.
5. When the coolest temperatureis selected in the A/C mode,the system automatically goesinto the recirculation mode toimprove cooling.
Using these settings together forlong periods of time may cause theair inside the vehicle to become toodry. To prevent this from happening,after the air inside the vehicle hascooled, turn the recirculationmode off.
The air conditioning systemremoves moisture from the air,so a small amount of water maydrip under the vehicle while idlingor after turning off the engine.This is normal.

Black plate (4,1)Chevrolet Impala Owner Manual - 2011
8-4 Climate Controls
: (Outside Air): Press to turnon outside air. An indicator lightcomes on to show that it is on.Outside air will circulate throughoutthe vehicle.
? (Recirculation): Press toturn on the recirculation mode.An indicator light comes on toshow that it is on.
This mode helps to quickly heator cool the air inside the vehicleonce the temperature inside thevehicle is equal to or better thanthe outside temperature. It can beused to prevent outside air andodors from entering the vehicle.The recirculation mode is notavailable in outside air, floor, defog,or defrost modes. If the button isselected while in these modes,the indicator flashes three times.
Rear Window Defogger
The rear window defogger uses awarming grid to remove fog from therear window.
< (Rear Window Defogger):The rear window defogger turnsoff automatically after it has beenactivated for 10 minutes. It can beturned off manually, by pressingthe button again or by turning theignition to the LOCK/OFF position.The rear window defogger canbe turned on again for additionalwindow clearing. The length ofdefogger operation will increaseif the vehicle is being driven.
For vehicles with heated outsiderearview mirrors, the mirrors heatto help clear fog or frost from thesurface of the mirror when the rearwindow defog button is pressed.See Power Mirrors on page 2‑14.
Do not drive the vehicle until all thewindows are clear.
Notice: Do not use anythingsharp on the inside of the rearwindow. If you do, you couldcut or damage the warming grid,and the repairs would not becovered by the vehicle warranty.Do not attach a temporary vehiclelicense, tape, a decal, or anythingsimilar to the defogger grid.

Black plate (5,1)Chevrolet Impala Owner Manual - 2011
Climate Controls 8-5
Air VentsUse the thumbwheel locatedbelow or to the side of the outlet, tochange the direction of the air flow.
Operation Tips. Clear away any ice, snow,
or leaves from the air inlets atthe base of the windshield thatmay block the flow of air intothe vehicle.
. Use of non-GM approved hooddeflectors may adversely affectthe performance of the system.
. Keep the path under the frontseats clear of objects to helpcirculate the air inside thevehicle more effectively.
. If the airflow seems low whenthe fan is at the highest setting,the passenger compartment airfilter, if equipped, may need toreplaced. For more information,see Passenger CompartmentAir Filter on page 8‑5 andScheduled Maintenance onpage 11‑2.
. If fogging reoccurs while invent or bi-level modes withmild temperature throughoutthe vehicle, turn on the airconditioner to reduce windshieldfogging.
Maintenance
Passenger CompartmentAir FilterThe vehicle has a passengercompartment particulate airfilter. It is located in the enginecompartment, below the air inletgrille on the passenger side.
The filter traps most of thepollen from air entering theclimate control system. It needsto be changed periodically toensure system performance.For information on how oftento change the passengercompartment air filter, seeScheduled Maintenance onpage 11‑2.

Black plate (6,1)Chevrolet Impala Owner Manual - 2011
8-6 Climate Controls
To change the passengercompartment air filter:
1. Turn off the ignition when thewindshield wipers are in the upposition.
2. Raise the vehicle hood.
3. Pull back the hood weatherstripfrom the passenger side of thevehicle halfway to center.
4. Remove the air inlet grilleretainers.
5. Lift the air inlet grille anddisconnect the washer hoseat the quick-connect.
6. Remove the air inlet grille.
7. Remove the water deflectorplate.
8. Remove the old passengercompartment air filter.
9. Reverse the steps to install thenew air filter.
For best climate control systemperformance, reinstall the air filter.
For the type of filter to use, seeMaintenance Replacement Parts onpage 11‑8.

Black plate (1,1)Chevrolet Impala Owner Manual - 2011
Driving and Operating 9-1
Driving andOperating
Driving InformationDefensive Driving . . . . . . . . . . . . . 9-2Drunk Driving . . . . . . . . . . . . . . . . . 9-2Control of a Vehicle . . . . . . . . . . . 9-3Braking . . . . . . . . . . . . . . . . . . . . . . . 9-3Steering . . . . . . . . . . . . . . . . . . . . . . . 9-4Off-Road Recovery . . . . . . . . . . . . 9-5Loss of Control . . . . . . . . . . . . . . . . 9-6Driving on Wet Roads . . . . . . . . . 9-7Highway Hypnosis . . . . . . . . . . . . 9-8Hill and Mountain Roads . . . . . . 9-8Winter Driving . . . . . . . . . . . . . . . . . 9-9If the Vehicle is Stuck . . . . . . . . 9-11Vehicle Load Limits . . . . . . . . . . 9-12
Starting and OperatingNew Vehicle Break-In . . . . . . . . 9-17Ignition Positions . . . . . . . . . . . . 9-17Starting the Engine . . . . . . . . . . 9-19Engine Heater . . . . . . . . . . . . . . . 9-20Retained AccessoryPower (RAP) . . . . . . . . . . . . . . . 9-21
Shifting Into Park . . . . . . . . . . . . 9-21Shifting Out of Park . . . . . . . . . . 9-23Parking Over ThingsThat Burn . . . . . . . . . . . . . . . . . . 9-24
Engine ExhaustEngine Exhaust . . . . . . . . . . . . . . 9-24Running the Vehicle WhileParked . . . . . . . . . . . . . . . . . . . . . 9-25
Automatic TransmissionAutomatic Transmission . . . . . 9-25
BrakesAntilock BrakeSystem (ABS) . . . . . . . . . . . . . . 9-28
Parking Brake . . . . . . . . . . . . . . . 9-29
Ride Control SystemsTraction ControlSystem (TCS) . . . . . . . . . . . . . . 9-29
Electronic StabilityControl (ESC) . . . . . . . . . . . . . . 9-31
Cruise ControlCruise Control . . . . . . . . . . . . . . . 9-32
FuelFuel . . . . . . . . . . . . . . . . . . . . . . . . . 9-35Recommended Fuel . . . . . . . . . 9-35Gasoline Specifications (U.S.and Canada Only) . . . . . . . . . . 9-36
California FuelRequirements . . . . . . . . . . . . . . 9-36
Fuels in Foreign Countries . . . 9-36Fuel Additives . . . . . . . . . . . . . . . 9-37Fuel E85 (85% Ethanol) . . . . . 9-38Filling the Tank . . . . . . . . . . . . . . 9-39Filling a Portable FuelContainer . . . . . . . . . . . . . . . . . . . 9-41
TowingGeneral TowingInformation . . . . . . . . . . . . . . . . . 9-41
Driving Characteristics andTowing Tips . . . . . . . . . . . . . . . . 9-42
Trailer Towing . . . . . . . . . . . . . . . . 9-45Towing Equipment . . . . . . . . . . . 9-47
Conversions and Add-OnsAdd-On ElectricalEquipment . . . . . . . . . . . . . . . . . 9-48

Black plate (2,1)Chevrolet Impala Owner Manual - 2011
9-2 Driving and Operating
Driving Information
Defensive DrivingDefensive driving means “alwaysexpect the unexpected.” The firststep in driving defensively is to wearthe safety belt. See Safety Belts onpage 3‑10.
{ WARNING
Assume that other road users(pedestrians, bicyclists, and otherdrivers) are going to be carelessand make mistakes. Anticipatewhat they might do and be ready.In addition:
. Allow enough followingdistance between you andthe driver in front of you.
. Focus on the task of driving.
(Continued)
WARNING (Continued)
Driver distraction can causecollisions resulting in injury orpossible death. These simpledefensive driving techniquescould save your life.
Drunk Driving
{ WARNING
Drinking and then driving isvery dangerous. Your reflexes,perceptions, attentiveness, andjudgment can be affected byeven a small amount of alcohol.You can have a serious — oreven fatal — collision if youdrive after drinking.
Do not drink and drive or ride witha driver who has been drinking.Ride home in a cab; or if you arewith a group, designate a driverwho will not drink.
Death and injury associated withdrinking and driving is a globaltragedy.
Alcohol affects four things thatanyone needs to drive a vehicle:judgment, muscular coordination,vision, and attentiveness.
Police records show thatalmost 40 percent of all motorvehicle-related deaths involvealcohol. In most cases, thesedeaths are the result of someonewho was drinking and driving.In recent years, more than17,000 annual motor vehicle-relateddeaths have been associated withthe use of alcohol, with about250,000 people injured.
For persons under 21, it is againstthe law in every U.S. state to drinkalcohol. There are good medical,psychological, and developmentalreasons for these laws.
The obvious way to eliminate theleading highway safety problem isfor people never to drink alcoholand then drive.
Black plate (3,1)Chevrolet Impala Owner Manual - 2011
Driving and Operating 9-3
Medical research shows thatalcohol in a person's systemcan make crash injuries worse,especially injuries to the brain,spinal cord, or heart. This meansthat when anyone who has beendrinking — driver or passenger — isin a crash, that person's chance ofbeing killed or permanently disabledis higher than if the person had notbeen drinking.
Control of a VehicleThe following three systemshelp to control the vehicle whiledriving — brakes, steering, andaccelerator. At times, as whendriving on snow or ice, it is easy toask more of those control systemsthan the tires and road can provide.Meaning, you can lose control ofthe vehicle. See Traction ControlSystem (TCS) on page 9‑29.
Adding non‐dealer accessoriescan affect vehicle performance.See Accessories and Modificationson page 10‑3.
BrakingSee Brake System Warning Light onpage 5‑20.
Braking action involves perceptiontime and reaction time. Decidingto push the brake pedal isperception time. Actually doingit is reaction time.
Average reaction time is aboutthree‐fourths of a second. Butthat is only an average. It mightbe less with one driver and aslong as two or three seconds ormore with another. Age, physicalcondition, alertness, coordination,and eyesight all play a part. So doalcohol, drugs, and frustration. Buteven in three‐fourths of a second,a vehicle moving at 100 km/h(60 mph) travels 20 m (66 ft).That could be a lot of distancein an emergency, so keepingenough space between thevehicle and others is important.
And, of course, actual stoppingdistances vary greatly with thesurface of the road, whether it ispavement or gravel; the conditionof the road, whether it is wet, dry,or icy; tire tread; the condition of thebrakes; the weight of the vehicle;and the amount of brake forceapplied.
Avoid needless heavybraking. Some people drive inspurts — heavy accelerationfollowed by heavy braking — ratherthan keeping pace with traffic.This is a mistake. The brakesmight not have time to cool betweenhard stops. The brakes will wearout much faster with a lot of heavybraking. Keeping pace with thetraffic and allowing realistic followingdistances eliminates a lot ofunnecessary braking. That meansbetter braking and longer brake life.

Black plate (4,1)Chevrolet Impala Owner Manual - 2011
9-4 Driving and Operating
If the engine ever stops whilethe vehicle is being driven, brakenormally but do not pump thebrakes. If the brakes are pumped,the pedal could get harder to pushdown. If the engine stops, there willstill be some power brake assist butit will be used when the brake isapplied. Once the power assist isused up, it can take longer to stopand the brake pedal will be harderto push.
Adding non‐dealer accessoriescan affect vehicle performance.See Accessories and Modificationson page 10‑3.
Steering
Power Steering
If power steering assist is lostbecause the engine stops or thepower steering system is notfunctioning, the vehicle can besteered but it will take more effort.
Steering Tips
It is important to take curves at areasonable speed.
Traction in a curve depends on thecondition of the tires and the roadsurface, the angle at which thecurve is banked, and vehicle speed.While in a curve, speed is the onefactor that can be controlled.
If there is a need to reduce speed,do it before entering the curve, whilethe front wheels are straight.
Try to adjust the speed so you candrive through the curve. Maintain areasonable, steady speed. Wait toaccelerate until out of the curve,and then accelerate gently intothe straightaway.
Steering in Emergencies
There are times when steeringcan be more effective than braking.For example, you come over a hilland find a truck stopped in yourlane, or a car suddenly pulls outfrom nowhere, or a child darts outfrom between parked cars and stopsright in front of you. These problemscan be avoided by braking— if youcan stop in time. But sometimes youcannot stop in time because thereis no room. That is the time forevasive action— steering aroundthe problem.

Black plate (5,1)Chevrolet Impala Owner Manual - 2011
Driving and Operating 9-5
The vehicle can perform verywell in emergencies like these.First apply the brakes. See Brakingon page 9‑3. It is better to removeas much speed as possible froma collision. Then steer aroundthe problem, to the left or rightdepending on the space available.
An emergency like this requiresclose attention and a quick decision.If holding the steering wheel at the
recommended 9 and 3 o'clockpositions, it can be turned a full180 degrees very quickly withoutremoving either hand. But you haveto act fast, steer quickly, and just asquickly straighten the wheel onceyou have avoided the object.
The fact that such emergencysituations are always possible is agood reason to practice defensivedriving at all times and wear safetybelts properly.
Off-Road RecoveryThe vehicle's right wheels can dropoff the edge of a road onto theshoulder while driving.
If the level of the shoulder isonly slightly below the pavement,recovery should be fairly easy.
Black plate (6,1)Chevrolet Impala Owner Manual - 2011
9-6 Driving and Operating
Ease off the accelerator andthen, if there is nothing in theway, steer so that the vehiclestraddles the edge of the pavement.Turn the steering wheel 8 to 13 cm(3 to 5 in), about one-eighth turn,until the right front tire contactsthe pavement edge. Then turn thesteering wheel to go straight downthe roadway.
Loss of ControlLet us review what driving expertssay about what happens when thethree control systems— brakes,steering, and acceleration— do nothave enough friction where the tiresmeet the road to do what the driverhas asked.
In any emergency, do not give up.Keep trying to steer and constantlyseek an escape route or area ofless danger.
Skidding
In a skid, a driver can losecontrol of the vehicle. Defensivedrivers avoid most skids by takingreasonable care suited to existingconditions, and by not overdrivingthose conditions. But skids arealways possible.
The three types of skidscorrespond to the vehicle's threecontrol systems. In the brakingskid, the wheels are not rolling.In the steering or cornering skid,too much speed or steering in acurve causes tires to slip andlose cornering force. And in theacceleration skid, too much throttlecauses the driving wheels to spin.
If the vehicle starts to slide, easeyour foot off the accelerator pedaland quickly steer the way youwant the vehicle to go. If you startsteering quickly enough, the vehiclemay straighten out. Always be readyfor a second skid if it occurs.
Of course, traction is reduced whenwater, snow, ice, gravel, or othermaterial is on the road. For safety,slow down and adjust your drivingto these conditions. It is importantto slow down on slippery surfacesbecause stopping distance will belonger and vehicle control morelimited.

Black plate (7,1)Chevrolet Impala Owner Manual - 2011
Driving and Operating 9-7
While driving on a surface withreduced traction, try to avoidsudden steering, acceleration,or braking, including reducingvehicle speed by shifting to a lowergear. Any sudden changes couldcause the tires to slide. You maynot realize the surface is slipperyuntil the vehicle is skidding. Learnto recognize warning clues— suchas enough water, ice, or packedsnow on the road to make amirrored surface— and slowdown when you have any doubt.
If the vehicle has the AntilockBrake System (ABS), remember: Ithelps avoid only the braking skid.If the vehicle does not have ABS,then in a braking skid, where thewheels are no longer rolling, releaseenough pressure on the brakesto get the wheels rolling again.This restores steering control.Push the brake pedal down steadilywhen you have to stop suddenly.As long as the wheels are rolling,you will have steering control.
Driving on Wet RoadsRain and wet roads can reducevehicle traction and affect yourability to stop and accelerate.Always drive slower in these typesof driving conditions and avoiddriving through large puddles anddeep‐standing or flowing water.
{ WARNING
Wet brakes can cause crashes.They might not work as well ina quick stop and could causepulling to one side. You couldlose control of the vehicle.
After driving through a largepuddle of water or a car/vehiclewash, lightly apply the brakepedal until the brakes worknormally.
(Continued)
WARNING (Continued)
Flowing or rushing water createsstrong forces. Driving throughflowing water could cause thevehicle to be carried away. If thishappens, you and other vehicleoccupants could drown. Do notignore police warnings and bevery cautious about trying todrive through flowing water.
Hydroplaning
Hydroplaning is dangerous.Water can build up under thevehicle's tires so they actuallyride on the water. This can happenif the road is wet enough and youare going fast enough. When thevehicle is hydroplaning, it has littleor no contact with the road.
There is no hard and fast rule abouthydroplaning. The best advice is toslow down when the road is wet.

Black plate (8,1)Chevrolet Impala Owner Manual - 2011
9-8 Driving and Operating
Other Rainy Weather Tips
Besides slowing down, other wetweather driving tips include:. Allow extra following distance.. Pass with caution.. Keep windshield wiping
equipment in good shape.. Keep the windshield washer fluid
reservoir filled.. Have good tires with proper
tread depth. See Tires onpage 10‑42.
. Turn off cruise control.
Highway HypnosisAlways be alert and pay attentionto your surroundings while driving.If you become tired or sleepy, finda safe place to park the vehicleand rest.
Other driving tips include:. Keep the vehicle well ventilated.. Keep interior temperature cool.. Keep your eyes moving — scan
the road ahead and to the sides.. Check the rearview mirror and
vehicle instruments often.
Hill and Mountain RoadsDriving on steep hills or throughmountains is different than drivingon flat or rolling terrain. Tips fordriving in these conditions include:. Keep the vehicle serviced and in
good shape.. Check all fluid levels and brakes,
tires, cooling system, andtransmission.
. Shift to a lower gear when goingdown steep or long hills.
{ WARNING
If you do not shift down, thebrakes could get so hot that theywould not work well. You wouldthen have poor braking or evennone going down a hill. You couldcrash. Shift down to let the engineassist the brakes on a steepdownhill slope.

Black plate (9,1)Chevrolet Impala Owner Manual - 2011
Driving and Operating 9-9
{ WARNING
Coasting downhill in N (Neutral)or with the ignition off isdangerous. The brakes willhave to do all the work of slowingdown and they could get so hotthat they would not work well.You would then have poor brakingor even none going down a hill.You could crash. Always have theengine running and the vehiclein gear when going downhill.
. Stay in your own lane.Do not swing wide or cutacross the center of the road.Drive at speeds that let youstay in your own lane.
. Top of hills: Bealert — somethingcould be in your lane(stalled car, accident).
. Pay attention to special roadsigns (falling rocks area, windingroads, long grades, passing orno-passing zones) and takeappropriate action.
Winter Driving
Driving on Snow or Ice
Drive carefully when there issnow or ice between the tiresand the road, creating less tractionor grip. Wet ice can occur at about0°C (32°F) when freezing rainbegins to fall, resulting in evenless traction. Avoid driving on wetice or in freezing rain until roadscan be treated with salt or sand.
Drive with caution, whatever thecondition. Accelerate gently sotraction is not lost. Accelerating tooquickly causes the wheels to spinand makes the surface under thetires slick, so there is even lesstraction.
Try not to break the fragile traction.If you accelerate too fast, the drivewheels will spin and polish thesurface under the tires even more.
The Antilock Brake System (ABS)on page 9‑28 improves vehiclestability during hard stops onslippery roads, but apply the brakessooner than when on dry pavement.
Allow greater following distanceon any slippery road and watchfor slippery spots. Icy patches canoccur on otherwise clear roads inshaded areas. The surface of acurve or an overpass can remainicy when the surrounding roadsare clear. Avoid sudden steeringmaneuvers and braking whileon ice.
Turn off cruise control on slipperysurfaces.
Black plate (10,1)Chevrolet Impala Owner Manual - 2011
9-10 Driving and Operating
Blizzard Conditions
Being stuck in snow can be aserious situation. Stay with thevehicle unless there is help nearby.If possible, use the RoadsideAssistance Program on page 13‑6.To get help and keep everyone inthe vehicle safe:. Turn on the hazard warning
flashers.. Tie a red cloth to an outside
mirror.
{ WARNING
Snow can trap engine exhaustunder the vehicle. This maycause exhaust gases to getinside. Engine exhaust containsCarbon Monoxide (CO) whichcannot be seen or smelled.It can cause unconsciousnessand even death.
(Continued)
WARNING (Continued)
If the vehicle is stuck in the snow:. Clear away snow from aroundthe base of your vehicle,especially any that is blockingthe exhaust pipe.
. Check again from time totime to be sure snow doesnot collect there.
. Open a window about5 cm (2 in) on the side ofthe vehicle that is away fromthe wind to bring in fresh air.
. Fully open the air outletson or under the instrumentpanel.
. Adjust the climate controlsystem to a setting thatcirculates the air insidethe vehicle and set the fanspeed to the highest setting.See Climate Control Systemin the Index.
(Continued)
WARNING (Continued)
For more information aboutcarbon monoxide, see EngineExhaust on page 9‑24.
Snow can trap exhaust gasesunder your vehicle. This cancause deadly CO (CarbonMonoxide) gas to get inside.CO could overcome you andkill you. You cannot see it orsmell it, so you might not knowit is in your vehicle. Clear awaysnow from around the base ofyour vehicle, especially any thatis blocking the exhaust.
Run the engine for short periodsonly as needed to keep warm,but be careful.

Black plate (11,1)Chevrolet Impala Owner Manual - 2011
Driving and Operating 9-11
To save fuel, run the engine for onlyshort periods as needed to warmthe vehicle and then shut the engineoff and close the window most ofthe way to save heat. Repeat thisuntil help arrives but only when youfeel really uncomfortable from thecold. Moving about to keep warmalso helps.
If it takes some time for helpto arrive, now and then whenyou run the engine, push theaccelerator pedal slightly so theengine runs faster than the idlespeed. This keeps the batterycharged to restart the vehicleand to signal for help with theheadlamps. Do this as little aspossible to save fuel.
If the Vehicle is StuckSlowly and cautiously spin thewheels to free the vehicle whenstuck in sand, mud, ice, or snow.
If the vehicle has a traction system,it can often help to free a stuckvehicle. Refer to the vehicle'straction system in the Index. If stucktoo severely for the traction systemto free the vehicle, turn the tractionsystem off and use the rockingmethod.
{ WARNING
If the vehicle's tires spin at highspeed, they can explode, andyou or others could be injured.The vehicle can overheat,causing an engine compartmentfire or other damage. Spin thewheels as little as possible andavoid going above 55 km/h(35 mph).
For information about using tirechains on the vehicle, see TireChains on page 10‑64.

Black plate (12,1)Chevrolet Impala Owner Manual - 2011
9-12 Driving and Operating
Rocking the Vehicle to Getit Out
Turn the steering wheel left andright to clear the area around thefront wheels. Turn off any tractionor stability system. Shift back andforth between R (Reverse) and aforward gear, spinning the wheelsas little as possible. To preventtransmission wear, wait until thewheels stop spinning before shiftinggears. Release the acceleratorpedal while shifting, and presslightly on the accelerator pedalwhen the transmission is in gear.Slowly spinning the wheels in theforward and reverse directionscauses a rocking motion that couldfree the vehicle. If that does notget the vehicle out after a fewtries, it might need to be towedout. If the vehicle does need to betowed out, see Towing the Vehicleon page 10‑79.
Vehicle Load LimitsIt is very important to know howmuch weight your vehicle cancarry. Two labels on your vehicleshow how much weight it mayproperly carry, the Tire andLoading Information label andthe Vehicle Certification label.
{ WARNING
Do not load the vehicleany heavier than theGross Vehicle WeightRating (GVWR), or either themaximum front or rear GrossAxle Weight Rating (GAWR).This can cause systems tobreak and change the way thevehicle handles. This couldcause loss of control and acrash. Overloading can alsoshorten the life of the vehicle.
Tire and Loading InformationLabel
Label Example
A vehicle-specific Tire andLoading Information labelis attached to the vehicle'scenter pillar (B-pillar). Withthe driver door open, you willfind the label attached belowthe door lock post (striker).

Black plate (13,1)Chevrolet Impala Owner Manual - 2011
Driving and Operating 9-13
The Tire and LoadingInformation label lists thenumber of occupant seatingpositions (A), and the maximumvehicle capacity weight (B)in kilograms and pounds.The vehicle capacity weightincludes the weight of alloccupants, cargo, and allnonfactory‐installed options.
The Tire and LoadingInformation label also liststhe tire size of the originalequipment tires (C) andthe recommended coldtire inflation pressures (D).For more information ontires and inflation, seeTires on page 10‑42 andTire Pressure on page 10‑49.
There is also important loadinginformation on the Certificationlabel. It tells you the GrossVehicle Weight Rating (GVWR)and the Gross Axle WeightRating (GAWR) for the front andrear axle, see “CertificationLabel” later in this section.
Steps for Determining CorrectLoad Limit
1. Locate the statement“The combined weightof occupants and cargoshould never exceed XXX kgor XXX lbs” on your vehicle'splacard.
2. Determine the combinedweight of the driver andpassengers that will beriding in your vehicle.
3. Subtract the combinedweight of the driver andpassengers from XXX kgor XXX lbs.
4. The resulting figure equalsthe available amount of cargoand luggage load capacity.For example, if the “XXX”amount equals 1400 lbsand there will be five 150 lbpassengers in your vehicle,the amount of available cargoand luggage load capacityis 650 lbs (1400 − 750(5 x 150) = 650 lbs).

Black plate (14,1)Chevrolet Impala Owner Manual - 2011
9-14 Driving and Operating
5. Determine the combinedweight of luggage and cargobeing loaded on the vehicle.That weight may not safelyexceed the available cargoand luggage load capacitycalculated in Step³4.
6. If your vehicle will be towinga trailer, the load from yourtrailer will be transferred toyour vehicle. Consult thismanual to determine howthis reduces the availablecargo and luggage loadcapacity for your vehicle.
If your vehicle can tow a trailer,see Trailer Towing on page 9‑45for important information ontowing a trailer, towing safetyrules, and trailering tips.
Example 1
A. Maximum Vehicle CapacityWeight for Example 1 = 453 kg(1,000 lbs)
B. Subtract Occupant Weight @68 kg (150 lbs) × 2 = 136 kg(300 lbs)
C. Available Occupant and CargoWeight = 317 kg (700 lbs)
Example 2
A. Maximum Vehicle CapacityWeight for Example 2 = 453 kg(1,000 lbs)
B. Subtract Occupant Weight @68 kg (150 lbs) × 5 = 340 kg(750 lbs)
C. Available CargoWeight = 113 kg (250 lbs)

Black plate (15,1)Chevrolet Impala Owner Manual - 2011
Driving and Operating 9-15
Example 3
A. Maximum Vehicle CapacityWeight for Example 3 = 453 kg(1,000 lbs)
B. Subtract Occupant Weight @91 kg (200 lbs) × 5 = 453 kg(1,000 lbs)
C. Available CargoWeight = 0 kg (0 lbs)
Refer to your vehicle's Tire andLoading Information label forspecific information about your
vehicle's maximum vehiclecapacity weight and seatingpositions. The combinedweight of the driver, passengers,and cargo should never exceedyour vehicle's maximum vehiclecapacity weight.
Certification Label
A vehicle-specific Certificationlabel is found on the rear edgeof the driver door.
The label shows the grossweight capacity of your vehicle,called the Gross Vehicle WeightRating (GVWR). The GVWRincludes the weight of thevehicle, all occupants, fuel,and cargo.
Never exceed the GVWR foryour vehicle or the Gross AxleWeight Rating (GAWR) for eitherthe front or rear axle.
If there is a heavy load, it shouldbe spread out.

Black plate (16,1)Chevrolet Impala Owner Manual - 2011
9-16 Driving and Operating
{ WARNING
Do not load the vehicleany heavier than the GrossVehicle Weight Rating(GVWR), or either themaximum front or rear GrossAxle Weight Rating (GAWR).This can cause systems tobreak and change the way thevehicle handles. This couldcause loss of control and acrash. Overloading can alsoshorten the life of the vehicle.
Notice : Overloading thevehicle may cause damage.Repairs would not be coveredby the vehicle warranty.Do not overload the vehicle.
If things like suitcases, tools,packages, or anything elseare put inside the vehicle,they will go as fast as thevehicle goes. If you have tostop or turn quickly, or if thereis a crash, they will keep going.
{ WARNING
Things inside the vehicle canstrike and injure people in asudden stop or turn, or in acrash.
. Put things in the cargoarea of the vehicle. In thecargo area, put them asfar forward as possible.Try to spread the weightevenly.
(Continued)
WARNING (Continued)
. Never stack heavierthings, like suitcases,inside the vehicle so thatsome of them are abovethe tops of the seats.
. Do not leave anunsecured child restraintin the vehicle.
. Secure loose items in thevehicle.
. Do not leave a seat foldeddown unless needed.
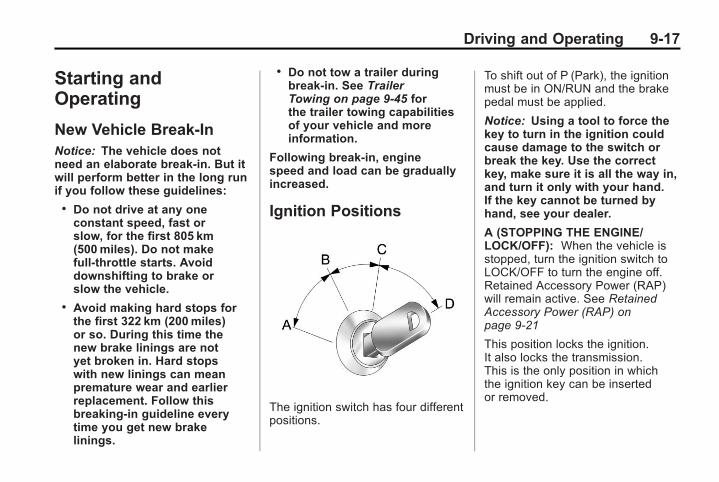
Black plate (17,1)Chevrolet Impala Owner Manual - 2011
Driving and Operating 9-17
Starting andOperating
New Vehicle Break-InNotice: The vehicle does notneed an elaborate break-in. But itwill perform better in the long runif you follow these guidelines:. Do not drive at any oneconstant speed, fast orslow, for the first 805 km(500miles). Do not makefull-throttle starts. Avoiddownshifting to brake orslow the vehicle.
. Avoid making hard stops forthe first 322 km (200miles)or so. During this time thenew brake linings are notyet broken in. Hard stopswith new linings can meanpremature wear and earlierreplacement. Follow thisbreaking-in guideline everytime you get new brakelinings.
. Do not tow a trailer duringbreak-in. See TrailerTowing on page 9‑45 forthe trailer towing capabilitiesof your vehicle and moreinformation.
Following break‐in, enginespeed and load can be graduallyincreased.
Ignition Positions
The ignition switch has four differentpositions.
To shift out of P (Park), the ignitionmust be in ON/RUN and the brakepedal must be applied.
Notice: Using a tool to force thekey to turn in the ignition couldcause damage to the switch orbreak the key. Use the correctkey, make sure it is all the way in,and turn it only with your hand.If the key cannot be turned byhand, see your dealer.
A (STOPPING THE ENGINE/LOCK/OFF): When the vehicle isstopped, turn the ignition switch toLOCK/OFF to turn the engine off.Retained Accessory Power (RAP)will remain active. See RetainedAccessory Power (RAP) onpage 9‑21
This position locks the ignition.It also locks the transmission.This is the only position in whichthe ignition key can be insertedor removed.
Black plate (18,1)Chevrolet Impala Owner Manual - 2011
9-18 Driving and Operating
Do not turn the engine off when thevehicle is moving. This will cause aloss of power assist in the brakeand steering systems and disablethe airbags.
In an emergency:
1. Brake using a firm and steadypressure. Do not pump thebrakes repeatedly. This maydeplete power assist, requiringincreased brake pedal force.
2. Shift the vehicle to neutral.This can be done while thevehicle is moving. After shiftingto neutral, firmly apply thebrakes and steer the vehicleto a safe location.
3. Come to a complete stop, shiftto P (Park), and turn the ignitionto LOCK/OFF. On vehicles withan automatic transmission, theshift lever must be in P (Park)to turn the ignition switch tothe LOCK/OFF position.
4. Set the parking brake.See Parking Brake on page 9‑29
The steering can bind with thewheels turned off center. If thishappens, move the steering wheelfrom left to right while turning thekey to ACC/ACCESSORY. If thisdoesn't work, then the vehicleneeds service.
B (ACC/ACCESSORY): This is theposition in which you can operatethe radio and windshield wiperswhile the engine is off. To useACC/ACCESSORY, turn the keyclockwise.
C (ON/RUN): This position canbe used to operate the electricalaccessories and to display someinstrument panel cluster warningand indicator lights. The switchstays in this position when theengine is running.
If you leave the key in theACC/ACCESSORY or ON/RUNposition with the engine off, thebattery could be drained. You maynot be able to start the vehicle ifthe battery is allowed to drain foran extended period of time.
D (START): This is the position thatstarts the engine. When the enginestarts, release the key. The ignitionswitch returns to ON/RUN fordriving.
A warning chime will sound andthe Driver Information Center (DIC)will display DRIVER DOOR OPENwhen the driver door is opened, theignition is in ACC/ACCESSORY orLOCK/OFF, and the key is in theignition. See Door Ajar Messageson page 5‑31 for more information.

Black plate (19,1)Chevrolet Impala Owner Manual - 2011
Driving and Operating 9-19
Starting the EngineMove the shift lever to P (Park) orN (Neutral). The engine will not startin any other position. To restart theengine when the vehicle is alreadymoving, use N (Neutral) only.
Notice: Do not try to shift toP (Park) if the vehicle is moving.If you do, you could damage thetransmission. Shift to P (Park)only when the vehicle is stopped.
Starting Procedure
1. With your foot off the acceleratorpedal, turn the ignition toSTART. When the enginestarts, let go of the key.The idle speed will slowdown as the engine warms.Do not race the engineimmediately after startingit. Operate the engine andtransmission gently to allowthe oil to warm up andlubricate all moving parts.
The vehicle has aComputer-ControlledCranking System. This featureassists in starting the engineand protects components.If the ignition key is turnedto the START position, andthen released when the enginebegins cranking, the enginewill continue cranking for afew seconds or until the vehiclestarts. If the engine doesnot start and the key is heldin START, cranking will bestopped after 15 seconds toprevent cranking motor damage.To prevent gear damage, thissystem also prevents crankingif the engine is already running.Engine cranking can be stoppedby turning the ignition switchto the ACC/ACCESSORY orLOCK/OFF position.
When the Low Fuel warninglamp is on and the FUEL LEVELLOW message is displayed inthe Driver Information Center(DIC), the Computer‐ControlledCranking System is disabledto prevent possible vehiclecomponent damage. Whenthis happens, hold the ignitionswitch in the START positionto continue engine cranking.
Notice: Cranking the engine forlong periods of time, by returningthe key to the START positionimmediately after cranking hasended, can overheat and damagethe cranking motor, and drain thebattery. Wait at least 15 secondsbetween each try, to let thecranking motor cool down.

Black plate (20,1)Chevrolet Impala Owner Manual - 2011
9-20 Driving and Operating
2. If the engine does not start after5‐10 seconds, especially in verycold weather (below −18°C or0°F), it could be flooded with toomuch gasoline. Try pushing theaccelerator pedal all the way tothe floor and holding it there asyou hold the key in START forup to a maximum of 15 seconds.Wait at least 15 secondsbetween each try, to allow thecranking motor to cool down.When the engine starts, let goof the key and accelerator. If thevehicle starts briefly but thenstops again, repeat these steps.This clears the extra gasolinefrom the engine. Do not racethe engine immediately afterstarting it. Operate the engineand transmission gently untilthe oil warms up and lubricatesall moving parts.
Notice: The engine is designedto work with the electronics inthe vehicle. If you add electricalparts or accessories, you couldchange the way the engineoperates. Before adding electricalequipment, check with yourdealer. If you do not, the enginemight not perform properly. Anyresulting damage would not becovered by the vehicle warranty.
Engine HeaterThe engine coolant heater canprovide easier starting andbetter fuel economy during enginewarm‐up in cold weather conditionsat or below −18°C (0°F). Vehicleswith an engine coolant heatershould be plugged in at leastfour hours before starting.
To Use the Engine Heater
1. Turn off the engine.
2. Open the hood and unwrapthe electrical cord. The cord isattached to the underside of thediagonal brace, which is locatedabove the engine air cleaner/filter assembly.
3. Plug it into a normal, grounded110-volt AC outlet.
{ WARNING
Plugging the cord into anungrounded outlet could causean electrical shock. Also, thewrong kind of extension cordcould overheat and cause a fire.You could be seriously injured.Plug the cord into a properlygrounded three-prong 110-volt ACoutlet. If the cord will not reach,use a heavy-duty three-prongextension cord rated for at least15 amps.

Black plate (21,1)Chevrolet Impala Owner Manual - 2011
Driving and Operating 9-21
4. Before starting the engine, besure to unplug and store thecord as it was before to keep itaway from moving engine parts,and prevent damage.
The length of time the heater shouldremain plugged in depends onseveral factors. Ask a dealer in thearea where you will be parking thevehicle for the best advice on this.
Retained AccessoryPower (RAP)These vehicle accessories can beused for up to 10 minutes after theengine turned off:. Audio System. Power Windows
The radio will work when the key isin ON/RUN or ACC/ACCESSORY.Once the key is turned fromON/RUN to LOCK/OFF the radiowill continue to work 10 minutesor until the driver door is opened.
The power windows will continue towork for up to 10 minutes or untilany door is opened.
Shifting Into Park
{ WARNING
It can be dangerous to get out ofthe vehicle if the shift lever is notfully in P (Park) with the parkingbrake firmly set. The vehicle canroll. If you have left the enginerunning, the vehicle can movesuddenly. You or others could beinjured. To be sure the vehicle willnot move, even when you are onfairly level ground, use the stepsthat follow. If you are pulling atrailer, see Driving Characteristicsand Towing Tips on page 9‑42.
Steering Column Shift Lever
If the vehicle has a steering columnshift lever, use this procedure toshift the vehicle into P (Park):
1. Hold the brake pedal down.
2. Move the shift lever into P (Park)by pulling the shift lever towardyou and moving it up as far as itwill go.
3. With your foot still holdingthe brake pedal down, set theparking brake. See ParkingBrake on page 9‑29 for moreinformation.
4. Turn the ignition key toLOCK/OFF.
5. Remove the key and take it withyou. If you can leave the vehiclewith the ignition key in yourhand, the vehicle is in P (Park).
Black plate (22,1)Chevrolet Impala Owner Manual - 2011
9-22 Driving and Operating
Console Shift Lever
If the vehicle is equipped witha console shift lever, use thisprocedure to shift the vehicleinto P (Park):
1. Hold the brake pedal down.
2. Move the shift lever into P (Park)by pushing the lever all the waytoward the front of the vehicle.
3. While keeping the brake pedalapplied, set the parking brake.See Parking Brake on page 9‑29for more information.
4. Turn the ignition key toLOCK/OFF.
5. Remove the key and take it withyou. If you can leave the vehiclewith the ignition key in yourhand, the vehicle is in P (Park).
Leaving the Vehicle With theEngine Running
{ WARNING
It can be dangerous to leave thevehicle with the engine running.The vehicle could move suddenlyif the shift lever is not fully inP (Park) with the parking brakefirmly set. And, if you leave thevehicle with the engine running,it could overheat and evencatch fire. You or others couldbe injured. Do not leave thevehicle with the engine running.
If you have to leave the vehiclewith the engine running, be sureyour vehicle is in P (Park) and theparking brake is firmly set beforeyou leave it. See Parking Brake onpage 9‑29 for more information.
Torque Lock
Torque lock is when the weightof the vehicle puts too muchforce on the parking pawl in thetransmission. This happens whenparking on a hill and shifting thetransmission into P (Park) is notdone properly and then it is difficultto shift out of P (Park). To preventtorque lock, set the parking brakeand then shift into P (Park). To findout how, see “Shifting Into Park” inthis section.
If torque lock does occur, yourvehicle may need to be pusheduphill by another vehicle to relievethe parking pawl pressure, so youcan shift out of P (Park).
Black plate (23,1)Chevrolet Impala Owner Manual - 2011
Driving and Operating 9-23
Shifting Out of Park
Automatic TransmissionShift Lock
The vehicle has an electronic shiftlock release system. The shift lockrelease is designed to:. Prevent ignition key removal
unless the shift lever is inP (Park).
. Prevent movement of the shiftlever out of P (Park), unless theignition is in ON/RUN and theregular brake pedal is applied.
The shift lock is always functionalexcept in the case of a anuncharged or low voltage(less than 9 volt) battery.
If the vehicle has an unchargedbattery or a battery with low voltage,try charging or jump starting thebattery. See Jump Starting onpage 10‑75.
Console Shift
If the console shift lever cannot bemoved out of P (Park):
1. Apply and maintain the regularbrakes.
2. Turn the ignition to ON/RUNposition. See Ignition Positionson page 9‑17 for moreinformation.
3. Let up on the shift lever andmake sure the shift lever ispushed all the way into P (Park).
4. Press the shift lever button.
5. Then, move the shift into thedesired gear.
If you still cannot move the shiftlever from P (Park), consult yourdealer or a professional towingservice.
Column Shift
If the column shift lever cannot bemoved out of P (Park):
1. Apply and maintain the regularbrakes.
2. Turn the ignition key to theON/RUN position. See IgnitionPositions on page 9‑17 for moreinformation.
3. Shift out of the P (Park) positionto the N (Neutral) position.
4. Move the vehicle to a safelocation.
If you still cannot move the shiftlever from P (Park), consult yourdealer or a professional towingservice.

Black plate (24,1)Chevrolet Impala Owner Manual - 2011
9-24 Driving and Operating
Parking Over ThingsThat Burn
{ WARNING
Things that can burn could touchhot exhaust parts under thevehicle and ignite. Do not parkover papers, leaves, dry grass,or other things that can burn.
Engine Exhaust
{ WARNING
Engine exhaust contains carbonmonoxide (CO) which cannot beseen or smelled. Exposure to COcan cause unconsciousness andeven death.
Exhaust may enter the vehicle if:. The vehicle idles in areaswith poor ventilation (parkinggarages, tunnels, deep snowthat may block underbodyairflow or tail pipes).
. The exhaust smells orsounds strange or different.
. The exhaust system leaksdue to corrosion or damage.
. The vehicle exhaust systemhas been modified, damagedor improperly repaired.
(Continued)
WARNING (Continued)
. There are holes or openingsin the vehicle body fromdamage or after marketmodifications that are notcompletely sealed.
If unusual fumes are detected orif it is suspected that exhaust iscoming into the vehicle:
. Drive it only with the windowscompletely down.
. Have the vehicle repairedimmediately.
Never park the vehicle with theengine running in an enclosedarea such as a garage or abuilding that has no fresh airventilation.
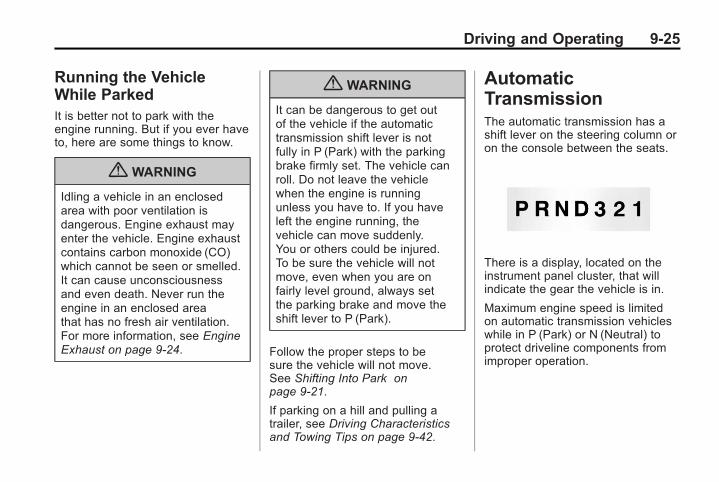
Black plate (25,1)Chevrolet Impala Owner Manual - 2011
Driving and Operating 9-25
Running the VehicleWhile ParkedIt is better not to park with theengine running. But if you ever haveto, here are some things to know.
{ WARNING
Idling a vehicle in an enclosedarea with poor ventilation isdangerous. Engine exhaust mayenter the vehicle. Engine exhaustcontains carbon monoxide (CO)which cannot be seen or smelled.It can cause unconsciousnessand even death. Never run theengine in an enclosed areathat has no fresh air ventilation.For more information, see EngineExhaust on page 9‑24.
{ WARNING
It can be dangerous to get outof the vehicle if the automatictransmission shift lever is notfully in P (Park) with the parkingbrake firmly set. The vehicle canroll. Do not leave the vehiclewhen the engine is runningunless you have to. If you haveleft the engine running, thevehicle can move suddenly.You or others could be injured.To be sure the vehicle will notmove, even when you are onfairly level ground, always setthe parking brake and move theshift lever to P (Park).
Follow the proper steps to besure the vehicle will not move.See Shifting Into Park onpage 9‑21.
If parking on a hill and pulling atrailer, see Driving Characteristicsand Towing Tips on page 9‑42.
AutomaticTransmissionThe automatic transmission has ashift lever on the steering column oron the console between the seats.
There is a display, located on theinstrument panel cluster, that willindicate the gear the vehicle is in.
Maximum engine speed is limitedon automatic transmission vehicleswhile in P (Park) or N (Neutral) toprotect driveline components fromimproper operation.
Black plate (26,1)Chevrolet Impala Owner Manual - 2011
9-26 Driving and Operating
There are several different positionsfor the shift lever.
P (Park): This position locks thefront wheels. It is the best positionto use when the engine is startedbecause the vehicle cannot moveeasily.
{ WARNING
It can be dangerous to get out ofthe vehicle if the shift lever is notfully in P (Park) with the parkingbrake firmly set. The vehicle canroll. If you have left the enginerunning, the vehicle can movesuddenly. You or others could beinjured. To be sure the vehicle willnot move, even when you are onfairly level ground, use the stepsthat follow. If you are pulling atrailer, see Driving Characteristicsand Towing Tips on page 9‑42.
Make sure the shift lever is fullyin P (Park) before starting theengine. The vehicle has anautomatic transmission shift lockcontrol system. You must fully applythe brakes first, then press the shiftlever button before you can shiftfrom P (Park) while the ignition is inON/RUN. If you cannot shift out ofP (Park), ease pressure on the shiftlever and push the shift lever all theway into P (Park) as you maintainbrake application. Then press theshift lever button and move the shiftlever into another gear. See ShiftingOut of Park on page 9‑23.
R (Reverse): Use this gear toback up.
Notice: Shifting to R (Reverse)while the vehicle is movingforward could damage thetransmission. The repairs wouldnot be covered by the vehiclewarranty. Shift to R (Reverse)only after the vehicle is stopped.
To rock the vehicle back and forth toget out of snow, ice, or sand withoutdamaging the transmission, see Ifthe Vehicle is Stuck on page 9‑11.
N (Neutral): In this position, theengine does not connect with thewheels. To restart the engine whenthe vehicle is already moving,use N (Neutral) only. Also, useN (Neutral) when the vehicle isbeing towed.
{ WARNING
Shifting into a drive gear while theengine is running at high speed isdangerous. Unless your foot isfirmly on the brake pedal, thevehicle could move very rapidly.You could lose control and hitpeople or objects. Do not shiftinto a drive gear while the engineis running at high speed.

Black plate (27,1)Chevrolet Impala Owner Manual - 2011
Driving and Operating 9-27
Notice: Shifting out of P (Park)or N (Neutral) with the enginerunning at high speed maydamage the transmission.The repairs would not be coveredby the vehicle warranty. Be surethe engine is not running at highspeed when shifting the vehicle.
D (Drive) : This position is fornormal driving. It provides the bestfuel economy. If you need morepower for passing, and you are:. Going less than 55 km/h
(35 mph), push the acceleratorpedal about halfway down.
. Going about 55 km/h (35 mph) ormore, push the accelerator pedalall the way down.
The transmission will shift downto the next gear and the vehiclewill have more power.
Downshifting the transmission inslippery road conditions could resultin skidding, see “Skidding” underLoss of Control on page 9‑6.
Notice: Driving the vehicle if younotice that it is moving slowlyor not shifting gears as youincrease speed may damage thetransmission. Have the vehicleserviced right away. You candrive in 2 (Second) when you aredriving less than 35mph (55 km/h)and D (Drive) for higher speedsuntil then.
3 (Third): This position is alsoused for normal driving. However,it reduces vehicle speed more thanD (Drive) without using the brakes.You might choose 3 (Third) insteadof D (Drive) when driving on hilly,winding roads, when towing a trailer,so there is less shifting betweengears and when going down asteep hill.
2 (Second): This position reducesvehicle speed even more than3 (Third) without using the brakes.You can use 2 (Second) on hills.It can help control vehicle speedas you go down steep mountainroads. You would also want touse the brakes off and on.
Notice: Driving in 2 (Second) formore than 25miles (40 km) or atspeeds over 55mph (90 km/h)may damage the transmission.Also, shifting into 2 (Second) atspeeds above 65mph (105 km/h)can cause damage. Drive in3 (Third) or D (Drive) insteadof 2 (Second).
1 (First): This position reducesvehicle speed even more than2 (Second) without using the brakes.You can use it on very steep hills,or in deep snow or mud. If the shiftlever is in 1 (First) while the vehicleis moving forward, the transmissionwill not shift into first gear until thevehicle is going slowly enough.
Notice: Spinning the tiresor holding the vehicle in oneplace on a hill using only theaccelerator pedal may damagethe transmission. The repair willnot be covered by the vehiclewarranty. If you are stuck, do notspin the tires. When stopping ona hill, use the brakes to hold thevehicle in place.

Black plate (28,1)Chevrolet Impala Owner Manual - 2011
9-28 Driving and Operating
Brakes
Antilock BrakeSystem (ABS)This vehicle has the AntilockBrake System (ABS), an advancedelectronic braking system that helpsprevent a braking skid.
When the engine is started and thevehicle begins to drive away, ABSchecks itself. A momentary motor orclicking noise might be heard whilethis test is going on, and it mighteven be noticed that the brakepedal moves a little. This is normal.
If there is a problem with ABS, thiswarning light stays on. See AntilockBrake System (ABS) Warning Lighton page 5‑21.
If driving safely on a wet roadand it becomes necessary toslam on the brakes and continuebraking to avoid a sudden obstacle,a computer senses that the wheelsare slowing down. If one of thewheels is about to stop rolling,the computer will separatelywork the brakes at each wheel.
ABS can change the brake pressureto each wheel, as required, fasterthan any driver could. This can helpthe driver steer around the obstaclewhile braking hard.
As the brakes are applied, thecomputer keeps receiving updateson wheel speed and controlsbraking pressure accordingly.
Remember: ABS does not changethe time needed to get a foot up tothe brake pedal or always decreasestopping distance. If you get too
close to the vehicle in front of you,there will not be enough time toapply the brakes if that vehiclesuddenly slows or stops. Alwaysleave enough room up ahead tostop, even with ABS.
Using ABS
Do not pump the brakes. Just holdthe brake pedal down firmly and letABS work. You might hear the ABSpump or motor operating and feelthe brake pedal pulsate, but this isnormal.
Braking in Emergencies
ABS allows the driver to steer andbrake at the same time. In manyemergencies, steering can helpmore than even the very bestbraking.

Black plate (29,1)Chevrolet Impala Owner Manual - 2011
Driving and Operating 9-29
Parking Brake
The parking brake is located to theleft of the brake pedal, near thedriver door.
To set the parking brake, hold thebrake pedal down, then push downthe parking brake pedal.
To release the parking brake, holdthe brake pedal down and pushthe parking brake pedal. When youlift your foot off the parking brakepedal, the pedal will follow it to thereleased position.
A warning chime will sound and abrake warning light located on theinstrument panel cluster will comeon, if the parking brake is set, theignition is on, and the vehicle speedis greater than 8 km/h (5 mph).
Notice: Driving with the parkingbrake on can overheat the brakesystem and cause prematurewear or damage to brake systemparts. Make sure that the parkingbrake is fully released and thebrake warning light is off beforedriving.
If you are towing a trailer andparking on any hill, see DrivingCharacteristics and Towing Tips onpage 9‑42.
Ride Control Systems
Traction ControlSystem (TCS)The vehicle may have aTraction Control System (TCS)that limits wheel spin. This isespecially useful in slippery roadconditions. The system operatesonly if it senses that one or bothof the front wheels are spinningor beginning to lose traction. Whenthis happens, the system reducesengine power and may also upshiftthe transmission and apply the frontbrakes to limit wheel spin.
This light will flash when the TCS islimiting wheel spin.

Black plate (30,1)Chevrolet Impala Owner Manual - 2011
9-30 Driving and Operating
The system may be heard or feltwhile it is working, but this isnormal.
If cruise control is being used whenTCS begins to limit wheel spin,the cruise control will automaticallydisengage. Cruise control may bereengaged when road conditionsallow. See Cruise Control onpage 9‑32.
The TCS operates in alltransmission shift lever positions.But the system can upshift thetransmission only as high asthe shift lever position chosen,so use the lower gears onlywhen necessary. See AutomaticTransmission on page 9‑25.
When the system is on, this warninglight comes on and stays on if thereis a problem.
A SERVICE TRACTION CONTROLmessage also appears on the DIC.When this warning light is on, thesystem will not limit wheel spin.Adjust your driving accordingly.See Ride Control System Messageson page 5‑35 for more information.
To limit wheel spin, especiallyin slippery road conditions, TCSshould always be left on. But thesystem can be turned off if needed.Turn the system off if the vehiclegets stuck in sand, mud, or snowand rocking the vehicle is required.See If the Vehicle is Stuck onpage 9‑11 for more information.
To turn the system on or off, pressthe Traction Control button locatedon the instrument panel.
When the system is turned off, thetraction control warning light comeson and TRACTION CONTROL OFFappears on the DIC. If the tractioncontrol system is limiting wheel spinwhen the button is pressed to turnthe system off, the warning lightcomes on and the system will turnoff right away.
Press the Traction Control buttonagain to turn the system back on.The Traction Control warning lightshould go off.
Adding non‐dealer accessories canaffect the vehicle's performance.See Accessories and Modificationson page 10‑3 for more information.

Black plate (31,1)Chevrolet Impala Owner Manual - 2011
Driving and Operating 9-31
Electronic StabilityControl (ESC)Your vehicle may have anElectronic Stability Control (ESC)system which combines antilockbrake, traction, and stability controlsystems and helps the drivermaintain directional control of thevehicle in most driving conditions.
When you first start your vehicleand begin to drive away, the systemperforms several diagnostic checksto ensure there are no problems.You may hear or feel the systemworking. This is normal and doesnot mean there is a problem withyour vehicle. The system shouldinitialize before the vehicle reaches32 km/h (20 mph).
If the system fails to turn on oractivate, the ESC/TCS light willbe on solid, and the SERVICESTABILITRAK message will bedisplayed.
For more information, see RideControl System Messages onpage 5‑35.
This light will flash on the instrumentpanel cluster when the ESC systemis both on and activated.
You may also feel or hear thesystem working; this is normal.
When the light is on solid and theSERVICE STABILITRAK messageis displayed, the system will notassist the driver in maintainingdirectional control of the vehicle.Adjust your driving accordingly.See Ride Control SystemMessages on page 5‑35.
The Electronic StabilityControl (ESC) system isautomatically enabled wheneveryou start your vehicle. To assistthe driver with vehicle directionalcontrol, especially in slippery roadconditions, you should always leavethe system on. But, you can turnESC off if you ever need to.
If the vehicle is in cruise controlwhen the system begins to assistthe driver maintain directionalcontrol of the vehicle, the ESC/TCSlight will flash and the cruise controlwill automatically disengage. Whenroad conditions allow you to usecruise again, you may re-engagethe cruise control. See CruiseControl on page 9‑32.

Black plate (32,1)Chevrolet Impala Owner Manual - 2011
9-32 Driving and Operating
The ESC/TCS button is located onthe instrument panel.
The traction control system can beturned off or back on by pressingthe ESC/TCS button. To disableboth traction control and ESC,press and hold the button briefly.
When the ESC system is turnedoff, the TRACTION CONTROL OFFmessage will appear, and theESC/TCS light will be on solid towarn the driver that both tractioncontrol and ESC are disabled.
It is recommended to leave thesystem on for normal drivingconditions, but it may be necessaryto turn the system off if your vehicleis stuck in sand, mud, ice, or snow,
and you want to “rock” your vehicleto attempt to free it. It may also benecessary to turn off the systemwhen driving in extreme off-roadconditions where high wheel spin isrequired. See If the Vehicle is Stuckon page 9‑11.
ESC may also turn off automaticallyif it determines that a problem existswith the system. The SERVICESTABILITRAK message and theESC/TCS light will be on solid towarn the driver that ESC is disabledand requires service. If the problemdoes not clear after restartingthe vehicle, you should see yourdealer for service. See Ride ControlSystem Messages on page 5‑35for more information.
Adding non‐dealer accessories canaffect your vehicle's performance.See Accessories and Modificationson page 10‑3 for more information.
Cruise ControlWith cruise control, you canmaintain a speed of about 40 km/h(25 mph) or more without keepingyour foot on the accelerator. Cruisecontrol does not work at speedsbelow about 40 km/h (25 mph).
{ WARNING
Cruise control can be dangerouswhere you cannot drive safely ata steady speed. So, do not usethe cruise control on windingroads or in heavy traffic.
Cruise control can be dangerouson slippery roads. On such roads,fast changes in tire traction cancause excessive wheel slip, andyou could lose control. Do not usecruise control on slippery roads.
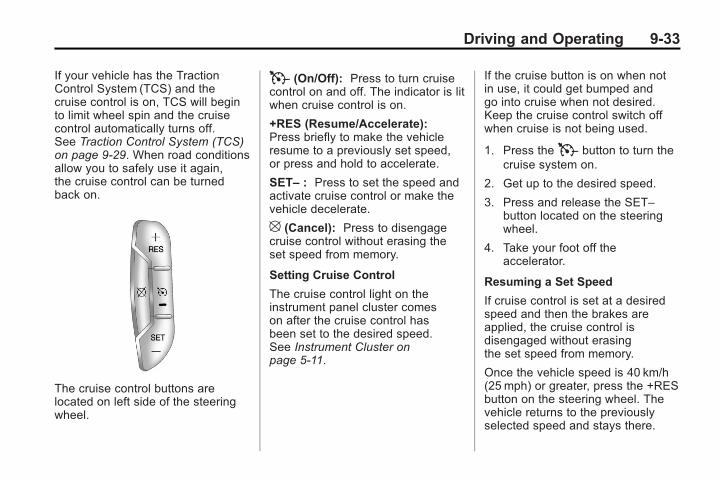
Black plate (33,1)Chevrolet Impala Owner Manual - 2011
Driving and Operating 9-33
If your vehicle has the TractionControl System (TCS) and thecruise control is on, TCS will beginto limit wheel spin and the cruisecontrol automatically turns off.See Traction Control System (TCS)on page 9‑29. When road conditionsallow you to safely use it again,the cruise control can be turnedback on.
The cruise control buttons arelocated on left side of the steeringwheel.
T (On/Off): Press to turn cruisecontrol on and off. The indicator is litwhen cruise control is on.
+RES (Resume/Accelerate):Press briefly to make the vehicleresume to a previously set speed,or press and hold to accelerate.
SET– : Press to set the speed andactivate cruise control or make thevehicle decelerate.
[ (Cancel): Press to disengagecruise control without erasing theset speed from memory.
Setting Cruise Control
The cruise control light on theinstrument panel cluster comeson after the cruise control hasbeen set to the desired speed.See Instrument Cluster onpage 5‑11.
If the cruise button is on when notin use, it could get bumped andgo into cruise when not desired.Keep the cruise control switch offwhen cruise is not being used.
1. Press theT button to turn thecruise system on.
2. Get up to the desired speed.
3. Press and release the SET–button located on the steeringwheel.
4. Take your foot off theaccelerator.
Resuming a Set Speed
If cruise control is set at a desiredspeed and then the brakes areapplied, the cruise control isdisengaged without erasingthe set speed from memory.
Once the vehicle speed is 40 km/h(25 mph) or greater, press the +RESbutton on the steering wheel. Thevehicle returns to the previouslyselected speed and stays there.
Black plate (34,1)Chevrolet Impala Owner Manual - 2011
9-34 Driving and Operating
Increasing Speed While UsingCruise Control
If the cruise control system isalready activated:. Press and hold the +RES button
on the steering wheel until thedesired speed is reached, thenrelease it.
. To increase vehicle speed insmall increments, press the+RES button. Each time this isdone, the vehicle goes about1.6 km/h (1 mph) faster.
Reducing Speed While UsingCruise Control
If the cruise control system isalready activated:. Press and hold the SET– button
on the steering wheel until thelower speed desired is reached,then release it.
. To slow down in small amounts,press the SET– button briefly.Each time this is done, thevehicle goes about 1.6 km/h(1 mph) slower.
Passing Another Vehicle WhileUsing Cruise Control
Use the accelerator pedal toincrease vehicle speed. Whenyou take your foot off the pedal,the vehicle will slow down to thecruise speed you set earlier.
Using Cruise Control on Hills
How well the cruise control will workon hills depends upon the vehiclespeed, load and the steepnessof the hills. When going up steephills, you might have to step onthe accelerator pedal to maintainyour speed. When going downhill,you might have to brake or shift toa lower gear to keep your speeddown. If the brakes are appliedthe cruise control will turn off.
Ending Cruise Control
There are three ways to end cruisecontrol:. To disengage cruise control,
step lightly on the brake pedal.
. Press the [ button on thesteering wheel.
. To turn off the cruise control,press theT button on thesteering wheel.
Erasing Speed Memory
The cruise control set speedmemory is erased from memoryby pressingT or if the ignitionis turned off.
Black plate (35,1)Chevrolet Impala Owner Manual - 2011
Driving and Operating 9-35
FuelUse of the recommended fuelis an important part of the propermaintenance of this vehicle.To help keep the engine cleanand maintain optimum vehicleperformance, we recommendthe use of gasoline advertised asTOP TIER Detergent Gasoline.
Look for the TOP TIER label onthe fuel pump to ensure gasolinemeets enhanced detergencystandards developed by autocompanies. A list of marketersproviding TOP TIER DetergentGasoline can be found atwww.toptiergas.com.
Vehicles that have a FlexFuel badgeand a yellow fuel cap can use eitherunleaded gasoline or ethanol fuelcontaining up to 85% ethanol (E85).See Fuel E85 (85% Ethanol) onpage 9‑38. For all other vehicles,use only the unleaded gasolinedescribed under RecommendedFuel on page 9‑35.
Recommended FuelUse regular unleaded gasolinewith a posted octane rating of 87 orhigher. If the octane rating is lessthan 87, an audible knocking noise,commonly referred to as sparkknock, might be heard when driving.If this occurs, use a gasoline ratedat 87 octane or higher as soonas possible. If heavy knocking isheard when using gasoline ratedat 87 octane or higher, the engineneeds service.

Black plate (36,1)Chevrolet Impala Owner Manual - 2011
9-36 Driving and Operating
Gasoline Specifications(U.S. and Canada Only)At a minimum, gasolineshould meet ASTM specificationD 4814 in the United Statesor CAN/CGSB‐3.5 or 3.511 inCanada. Some gasolines containan octane-enhancing additivecalled methylcyclopentadienylmanganese tricarbonyl (MMT).We recommend against the useof gasolines containing MMT.See Fuel Additives on page 9‑37for additional information.
California FuelRequirementsIf the vehicle is certified to meetCalifornia Emissions Standards,it is designed to operate on fuelsthat meet California specifications.See the underhood emission controllabel. If this fuel is not available instates adopting California EmissionsStandards, the vehicle will operatesatisfactorily on fuels meetingfederal specifications, but emissioncontrol system performance mightbe affected. The malfunctionindicator lamp could turn on and thevehicle might fail a smog‐check test.See Malfunction Indicator Lamp onpage 5‑17. If this occurs, return toyour authorized dealer for diagnosis.If it is determined that the conditionis caused by the type of fuel used,repairs might not be covered by thevehicle warranty.
Fuels in ForeignCountriesNever use leaded gasoline or anyother fuel not recommended in theprevious text on fuel. Costly repairscaused by use of improper fuelwould not be covered by the vehiclewarranty.
To check the fuel availability, askan auto club, or contact a major oilcompany that does business in thecountry where you will be driving.

Black plate (37,1)Chevrolet Impala Owner Manual - 2011
Driving and Operating 9-37
Fuel AdditivesTo provide cleaner air, allgasolines in the United States arenow required to contain additivesthat help prevent engine and fuelsystem deposits from forming,allowing the emission controlsystem to work properly. In mostcases, nothing should have to beadded to the fuel. However, somegasolines contain only the minimumamount of additive required to meetU.S. Environmental ProtectionAgency regulations. To help keepfuel injectors and intake valvesclean and avoid problems dueto dirty injectors or valves, lookfor gasoline that is advertised asTOP TIER Detergent Gasoline.Look for the TOP TIER label onthe fuel pump to ensure gasolinemeets enhanced detergencystandards developed by the autocompanies. A list of marketersproviding TOP TIER DetergentGasoline can be found atwww.toptiergas.com.
For customers who do not useTOP TIER Detergent Gasolineregularly, one bottle of GM FuelSystem Treatment PLUS, addedto the fuel tank at every engine oilchange, can help clean depositsfrom fuel injectors and intakevalves. GM Fuel System TreatmentPLUS is the only gasoline additiverecommended by General Motors.It is available at your dealer.
Gasolines containing oxygenates,such as ethers and ethanol,and reformulated gasolinesmight be available in your area.We recommend that you use thesegasolines, if they comply with thespecifications described earlier.However, E85 (85% ethanol) andother fuels containing more than10% ethanol must not be used invehicles that were not designedfor those fuels.
Notice: This vehicle was notdesigned for fuel that containsmethanol. Do not use fuelcontaining methanol. It cancorrode metal parts in the fuelsystem and also damage plasticand rubber parts. That damagewould not be covered under thevehicle warranty.
Some gasolines that arenot reformulated for lowemissions can contain anoctane-enhancing additivecalled methylcyclopentadienylmanganese tricarbonyl (MMT);ask the attendant where you buygasoline whether the fuel containsMMT. We recommend againstthe use of such gasolines. Fuelscontaining MMT can reducespark plug life and affect emissioncontrol system performance. Themalfunction indicator lamp mightturn on. If this occurs, return toyour dealer for service.

Black plate (38,1)Chevrolet Impala Owner Manual - 2011
9-38 Driving and Operating
Fuel E85 (85% Ethanol)Vehicles that have a FlexFuel badgeand a yellow fuel cap can use eitherunleaded gasoline or ethanol fuelcontaining up to 85% ethanol (E85).For all other vehicles, use only theunleaded gasoline described underRecommended Fuel on page 9‑35.
We encourage the use of E85 invehicles that are designed to use it.The ethanol in E85 is a “renewable”fuel, meaning it is made fromrenewable sources such as cornand other crops.
Many service stations will not havean 85% ethanol fuel (E85) pumpavailable. The U.S. Departmentof Energy has an alternative fuelswebsite (www.afdc.energy.gov/afdc/locator/stations/) that can help youfind E85 fuel. Those stations thatdo have E85 should have a labelindicating ethanol content. Do notuse the fuel if the ethanol contentis greater than 85%.
At a minimum, E85 should meetASTM Specification D 5798.By definition, this means thatfuel labeled E85 will have anethanol content between 70%and 85%. Filling the fuel tank withfuel mixtures that do not meetASTM specifications can affectdriveability and could cause themalfunction indicator lamp tocome on.
To ensure quick starts in thewintertime, the E85 fuel mustbe formulated properly for yourclimate according to ASTMspecification D 5798. If you havetrouble starting on E85, it could bebecause the E85 fuel is not properlyformulated for your climate. If thishappens, switching to gasoline oradding gasoline to the fuel tank canimprove starting. For good startingand heater efficiency below 0°C(32°F), the fuel mix in the fuel tankshould contain no more than 70%ethanol. It is best not to alternaterepeatedly between gasoline andE85. If you do switch fuels, it isrecommended that you add asmuch fuel as possible — do notadd less than 11 L (3 gal) whenrefueling. You should drive thevehicle immediately after refuelingfor at least 11 km (7 mi) to allowthe vehicle to adapt to the changein ethanol concentration.

Black plate (39,1)Chevrolet Impala Owner Manual - 2011
Driving and Operating 9-39
E85 has less energy per liter(gallon) than gasoline, so you willneed to refill the fuel tank moreoften when using E85 than whenyou are using gasoline. See Fillingthe Tank on page 9‑39.
Notice: Some additives are notcompatible with E85 fuel and canharm the vehicle's fuel system.Do not add anything to E85.Damage caused by additiveswould not be covered by thevehicle warranty.
Notice: This vehicle was notdesigned for fuel that containsmethanol. Do not use fuelcontaining methanol. It cancorrode metal parts in the fuelsystem and also damage plasticand rubber parts. That damagewould not be covered under thevehicle warranty.
Filling the Tank
{ WARNING
Fuel vapor burns violently and afuel fire can cause bad injuries.To help avoid injuries to you andothers, read and follow all theinstructions on the fuel pumpisland. Turn off the engine whenrefueling. Do not smoke nearfuel or when refueling the vehicle.Do not use cellular phones.Keep sparks, flames, andsmoking materials away fromfuel. Do not leave the fuel pumpunattended when refueling thevehicle. This is against the law insome places. Do not re-enter thevehicle while pumping fuel. Keepchildren away from the fuel pump;never let children pump fuel.
The tethered fuel cap is locatedbehind a hinged fuel door on thedriver side of the vehicle. If thevehicle has E85 fuel capability,the fuel cap will be yellow and statethat E85 or gasoline can be used.See Fuel E85 (85% Ethanol) onpage 9‑38.
To remove the fuel cap, turn itslowly counterclockwise.

Black plate (40,1)Chevrolet Impala Owner Manual - 2011
9-40 Driving and Operating
While refueling, hang the tetheredfuel cap on the hook on the inside ofthe fuel door.
{ WARNING
Fuel can spray out on youif you open the fuel cap tooquickly. If you spill fuel and thensomething ignites it, you couldbe badly burned. This spray canhappen if the tank is nearly full,and is more likely in hot weather.Open the fuel cap slowly and waitfor any hiss noise to stop. Thenunscrew the cap all the way.
Be careful not to spill fuel. Do nottop off or overfill the tank and waita few seconds after you havefinished pumping before removingthe nozzle. Clean fuel from paintedsurfaces as soon as possible.See Exterior Care on page 10‑81.
When replacing the fuel cap, turnit clockwise until it clicks. Makesure the cap is fully installed. Thediagnostic system can determine ifthe fuel cap has been left off orimproperly installed. This wouldallow fuel to evaporate into theatmosphere. See MalfunctionIndicator Lamp on page 5‑17.
The TIGHTEN GAS CAP messagedisplays on the Driver InformationCenter (DIC) if the fuel cap is notproperly installed. See Fuel SystemMessages on page 5‑34 for moreinformation.
{ WARNING
If a fire starts while you arerefueling, do not remove thenozzle. Shut off the flow of fuelby shutting off the pump or bynotifying the station attendant.Leave the area immediately.
Notice: If a new fuel cap isneeded, be sure to get the righttype of cap from your dealer.The wrong type of fuel cap mightnot fit properly, might causethe malfunction indicator lampto light, and could damage thefuel tank and emissions system.See Malfunction Indicator Lampon page 5‑17.

Black plate (41,1)Chevrolet Impala Owner Manual - 2011
Driving and Operating 9-41
Filling a Portable FuelContainer
{ WARNING
Never fill a portable fuel containerwhile it is in the vehicle. Staticelectricity discharge from thecontainer can ignite the fuelvapor. You can be badly burnedand the vehicle damaged if thisoccurs. To help avoid injury toyou and others:
. Dispense fuel only intoapproved containers.
. Do not fill a container whileit is inside a vehicle, in avehicle's trunk, pickup bed,or on any surface otherthan the ground.
(Continued)
WARNING (Continued)
. Bring the fill nozzle in contactwith the inside of the fillopening before operating thenozzle. Contact should bemaintained until the fillingis complete.
. Do not smoke whilepumping fuel.
. Do not use a cellular phonewhile pumping fuel.
TowingGeneral TowingInformationOnly use towing equipment thathas been designed for the vehicle.Contact your dealer or traileringdealer for assistance with preparingthe vehicle for towing a trailer.
See the following trailer towinginformation in this section:. For information on driving
while towing a trailer, see“Driving Characteristics andTowing Tips.”
. For maximum vehicle and trailerweights, see “Trailer Towing.”
. For information on equipmentto tow a trailer, see “TowingEquipment.”
For information on towing a disabledvehicle, see Towing the Vehicle onpage 10‑79. For information ontowing the vehicle behind anothervehicle such as a motor home, seeRecreational Vehicle Towing onpage 10‑79.

Black plate (42,1)Chevrolet Impala Owner Manual - 2011
9-42 Driving and Operating
Driving Characteristicsand Towing Tips
Pulling a Trailer
Here are some important points:. There are many different
laws, including speed limitrestrictions, having to do withtrailering. Make sure the rigwill be legal, not only whereyou live but also where youwill be driving. A good sourcefor this information can be stateor provincial police.
. Do not tow a trailer at all duringthe first 1600 km (1,000 miles)the new vehicle is driven.The engine, transmissionor other parts could bedamaged. The repairswould not be covered bythe vehicle's warranty.
. Then, during the first 800 km(500 miles) that a trailer istowed, do not drive over 80 km/h(50 mph) and do not make startsat full throttle. This helps theengine and other parts of thevehicle wear in at the heavierloads.
. Obey speed limit restrictionswhen towing a trailer. Do notdrive faster than the maximumposted speed for trailers, or nomore than 90 km/h (55 mph), tosave wear on the vehicle's parts.
. Do not tow a trailer when theoutside temperature is above38°C (100°F).
Three important considerationshave to do with weight:. the weight of the trailer,. the weight of the trailer tongue. and the total weight on the
vehicle's tires.
Driving with a Trailer
Towing a trailer requires a certainamount of experience. Get to knowthe rig before setting out for theopen road. Get acquainted withthe feel of handling and brakingwith the added weight of the trailer.And always keep in mind thatthe vehicle you are driving is nowlonger and not as responsive asthe vehicle is by itself.
Before starting, check all trailerhitch parts and attachments, safetychains, electrical connectors, lamps,tires and mirror adjustments. If thetrailer has electric brakes, start thevehicle and trailer moving and thenapply the trailer brake controller byhand to be sure the brakes areworking. This checks the electricalconnection at the same time.
During the trip, check occasionallyto be sure that the load is secure,and that the lamps and any trailerbrakes are still working.

Black plate (43,1)Chevrolet Impala Owner Manual - 2011
Driving and Operating 9-43
Following Distance
Stay at least twice as far behind thevehicle ahead as you would whendriving the vehicle without a trailer.This can help to avoid situationsthat require heavy braking andsudden turns.
Passing
More passing distance is neededwhen towing a trailer. Because therig is longer, it is necessary to gomuch farther beyond the passedvehicle before returning to the lane.
Backing Up
Hold the bottom of the steeringwheel with one hand. Then,to move the trailer to the left,move that hand to the left.To move the trailer to the right,move your hand to the right.Always back up slowly and,if possible, have someoneguide you.
Making Turns
Notice: Making very sharp turnswhile trailering could cause thetrailer to come in contact withthe vehicle. The vehicle couldbe damaged. Avoid making verysharp turns while trailering.
When turning with a trailer, makewider turns than normal. Do thisso the trailer will not strike softshoulders, curbs, road signs,trees or other objects. Avoid jerkyor sudden maneuvers. Signal wellin advance.
Turn Signals When Towing aTrailer
The arrows on the instrument panelflash whenever signaling a turn orlane change. Properly hooked up,the trailer lamps also flash, tellingother drivers the vehicle is turning,changing lanes or stopping.
When towing a trailer, the arrows onthe instrument panel flash for turnseven if the bulbs on the trailer areburned out. For this reason youmay think other drivers are seeingthe signal when they are not. It isimportant to check occasionally tobe sure the trailer bulbs are stillworking.

Black plate (44,1)Chevrolet Impala Owner Manual - 2011
9-44 Driving and Operating
Driving on Grades
Notice: Do not tow on steepcontinuous grades exceeding9.6 km (6 miles). Extended,higher than normal engineand transmission temperaturesmay result and damage thevehicle. Frequent stops arevery important to allow theengine and transmissionto cool.
Reduce speed and shift to alower gear before starting downa long or steep downgrade. If thetransmission is not shifted down,the brakes might have to be usedso much that they would get hotand no longer work well.
On a long uphill grade, shift downand reduce the vehicle's speed toaround 70 km/h (45 mph) to reducethe possibility of the engine and thetransmission overheating. If theengine does overheat, see EngineOverheating on page 10‑21.
Parking on Hills
{ WARNING
Parking the vehicle on a hillwith the trailer attached can bedangerous. If something goeswrong, the rig could start to move.People can be injured, and boththe vehicle and the trailer can bedamaged. When possible, alwayspark the rig on a flat surface.
If parking the rig on a hill:
1. Press the brake pedal, but donot shift into P (Park) yet. Turnthe wheels into the curb if facingdownhill or into traffic if facinguphill.
2. Have someone place chocksunder the trailer wheels.
3. When the wheel chocks are inplace, release the brake pedaluntil the chocks absorb the load.
4. Reapply the brake pedal. Thenapply the parking brake and shiftthe transmission into P (Park).
5. Release the brake pedal.
Leaving After Parking on a Hill
1. Apply and hold the brake pedalwhile you:. start the engine,. shift into a gear, and. release the parking brake.
2. Let up on the brake pedal.
3. Drive slowly until the trailer isclear of the chocks.
4. Stop and have someone pick upand store the chocks.
Maintenance When TrailerTowing
The vehicle needs servicemore often when pulling a trailer.See Scheduled Maintenance onpage 11‑2 for more information.

Black plate (45,1)Chevrolet Impala Owner Manual - 2011
Driving and Operating 9-45
Things that are especially importantin trailer operation are automatictransmission fluid, engine oil, belts,cooling system and brake system.It is a good idea to inspect thesebefore and during the trip.
Check periodically to see that allhitch nuts and bolts are tight.
Engine Cooling When TrailerTowing
The cooling system may temporarilyoverheat during severe operatingconditions. See Engine Overheatingon page 10‑21.
Changing a Tire When TrailerTowing
If the vehicle gets a flat tire whiletowing a trailer, be sure to securethe trailer and disconnect it from thevehicle before changing the tire.
Trailer Towing
{ WARNING
The driver can lose control whenpulling a trailer if the correctequipment is not used or thevehicle is not driven properly.For example, if the trailer is tooheavy, the brakes may not workwell— or even at all. The driverand passengers could beseriously injured. The vehicle mayalso be damaged; the resultingrepairs would not be covered bythe vehicle warranty. Pull a traileronly if all the steps in this sectionhave been followed. Ask yourdealer for advice and informationabout towing a trailer with thevehicle.
Notice: Pulling a trailerimproperly can damage thevehicle and result in costlyrepairs not covered by thevehicle warranty. To pull a trailercorrectly, follow the advice inthis section and see your dealerfor important information abouttowing a trailer with the vehicle.
The vehicle can tow a trailer if it isequipped with the proper trailertowing equipment. To identify thetrailering capacity of the vehicle,read the information in “Weightof the Trailer” that appears later inthis section. Trailering is differentthan just driving the vehicle byitself. Trailering means changesin handling, acceleration, braking,durability and fuel economy.Successful, safe trailering takescorrect equipment, and it has tobe used properly.
Black plate (46,1)Chevrolet Impala Owner Manual - 2011
9-46 Driving and Operating
The following information has manytime-tested, important trailering tipsand safety rules. Many of these areimportant for the safety of the driverand the passengers. So please readthis section carefully before pulling atrailer.
Load-pulling components suchas the engine, transmission,axles, wheel assemblies andtires are forced to work harderagainst the drag of the addedweight. The engine is required tooperate at relatively higher speedsand under greater loads, generatingextra heat. The trailer also addsconsiderably to wind resistance,increasing the pulling requirements.
Weight of the Trailer
How heavy can a trailer safely be?
It should never weigh more than454 kg (1,000 lbs). But even thatcan be too heavy.
It depends on how the rig is used.For example, speed, altitude, roadgrades, outside temperature andhow much the vehicle is used topull a trailer are all important. It candepend on any special equipmenton the vehicle, and the amount oftongue weight the vehicle can carry.See “Weight of the Trailer Tongue”later in this section for moreinformation.
Maximum trailer weight is calculatedassuming only the driver is inthe tow vehicle and it has all therequired trailering equipment.The weight of additional optionalequipment, passengers and cargo inthe tow vehicle must be subtractedfrom the maximum trailer weight.
Ask your dealer for traileringinformation or advice, or write us atour Customer Assistance Offices.See Customer Assistance Officeson page 13‑3 for more information.
Weight of the Trailer Tongue
The tongue load (A) of any traileris an important weight to measurebecause it affects the total grossweight of the vehicle. The GrossVehicle Weight (GVW) includesthe curb weight of the vehicle,any cargo carried in it, and thepeople who will be riding in thevehicle. If there are a lot of options,equipment, passengers or cargoin the vehicle, it will reduce thetongue weight the vehicle cancarry, which will also reduce thetrailer weight the vehicle can tow.

Black plate (47,1)Chevrolet Impala Owner Manual - 2011
Driving and Operating 9-47
If towing a trailer, the tongue loadmust be added to the GVW becausethe vehicle will be carrying thatweight, too. See Vehicle Load Limitson page 9‑12 for more informationabout the vehicle's maximum loadcapacity.
Using a weight-carrying hitch,the trailer tongue (A) should weigh10 to 15 percent of the total loadedtrailer weight (B).
After loading the trailer, weighthe trailer and then the tongue,separately, to see if the weights areproper. If they are not, adjustmentsmight be made by moving someitems around in the trailer.
Total Weight on the Vehicle'sTires
Be sure the vehicle's tires areinflated to the upper limit for coldtires. These numbers can be foundon the Certification/Tire label. SeeVehicle Load Limits on page 9‑12.Make sure not to go over the GVWlimit for the vehicle, including theweight of the trailer tongue.
Towing Equipment
Hitches
It is important to have the correcthitch equipment. Crosswinds, largetrucks going by and rough roads area few reasons why the right hitch isneeded. Here are some rules tofollow:. The rear bumper on the vehicle
is not intended for hitches. Donot attach rental hitches or otherbumper-type hitches to it. Useonly a frame-mounted hitch thatdoes not attach to the bumper.
. Will any holes be made in thebody of the vehicle when thetrailer hitch is installed? If thereare, then be sure to seal theholes later when the hitch isremoved. If the holes are notsealed, dirt, water, and deadlycarbon monoxide (CO) fromthe exhaust can get into thevehicle. See Engine Exhaust onpage 9‑24 in the Index for moreinformation.
Black plate (48,1)Chevrolet Impala Owner Manual - 2011
9-48 Driving and Operating
Safety Chains
Always attach chains betweenthe vehicle and the trailer. Crossthe safety chains under the tongueof the trailer to help prevent thetongue from contacting the roadif it becomes separated from thehitch. Instructions about safetychains may be provided by thehitch manufacturer or by thetrailer manufacturer. Follow themanufacturer's recommendationfor attaching safety chains anddo not attach them to the bumper.Always leave just enough slack sothe rig can turn. Never allow safetychains to drag on the ground.
Trailer Brakes
Because the vehicle has antilockbrakes, do not try to tap into thevehicle's hydraulic brake system.If you do, both brake systems willnot work well, or at all.
Does your trailer have its ownbrakes? Be sure to read and followthe instructions for the trailer brakesso you will be able to install, adjustand maintain them properly.
Conversions andAdd-Ons
Add-On ElectricalEquipmentNotice: Do not add anythingelectrical to the vehicle unlessyou check with your dealer first.Some electrical equipment candamage the vehicle and thedamage would not be coveredby the vehicle's warranty. Someadd-on electrical equipment cankeep other components fromworking as they should.
Add-on equipment can drain thevehicle's 12‐volt battery, even if thevehicle is not operating.
The vehicle has an airbagsystem. Before attempting to addanything electrical to the vehicle,see Servicing the Airbag-EquippedVehicle on page 3‑40 and AddingEquipment to the Airbag-EquippedVehicle on page 3‑40.

Black plate (1,1)Chevrolet Impala Owner Manual - 2011
Vehicle Care 10-1
Vehicle Care
General InformationGeneral Information . . . . . . . . . . 10-2California Proposition65 Warning . . . . . . . . . . . . . . . . . 10-3
California PerchlorateMaterials Requirements . . . . 10-3
Accessories andModifications . . . . . . . . . . . . . . . 10-3
Vehicle ChecksDoing Your OwnService Work . . . . . . . . . . . . . . . 10-4
Hood . . . . . . . . . . . . . . . . . . . . . . . . 10-5Engine CompartmentOverview . . . . . . . . . . . . . . . . . . . 10-6
Engine Oil . . . . . . . . . . . . . . . . . . . 10-7Engine Oil Life System . . . . . 10-11Automatic TransmissionFluid . . . . . . . . . . . . . . . . . . . . . . 10-12
Engine Air Cleaner/Filter . . . . 10-15Cooling System . . . . . . . . . . . . 10-16Engine Coolant . . . . . . . . . . . . . 10-17Engine Overheating . . . . . . . . 10-21Overheated EngineProtectionOperating Mode . . . . . . . . . . . 10-24
Power Steering Fluid . . . . . . . 10-24Washer Fluid . . . . . . . . . . . . . . . 10-25Brakes . . . . . . . . . . . . . . . . . . . . . 10-26Brake Fluid . . . . . . . . . . . . . . . . . 10-27Battery . . . . . . . . . . . . . . . . . . . . . 10-29Starter Switch Check . . . . . . . 10-29Automatic Transmission ShiftLock Control FunctionCheck . . . . . . . . . . . . . . . . . . . . . 10-30
Ignition Transmission LockCheck . . . . . . . . . . . . . . . . . . . . . 10-30
Park Brake and P (Park)Mechanism Check . . . . . . . . 10-30
Wiper BladeReplacement . . . . . . . . . . . . . . 10-31
Headlamp AimingHeadlamp Aiming . . . . . . . . . . 10-32
Bulb ReplacementBulb Replacement . . . . . . . . . . 10-33Halogen Bulbs . . . . . . . . . . . . . . 10-33Headlamps, Front TurnSignal, Sidemarker, andParking Lamps . . . . . . . . . . . . 10-33
Taillamps, Turn Signal,Sidemarker, Stoplamps,and Back-Up Lamps . . . . . . 10-35
License Plate Lamp . . . . . . . . 10-36Replacement Bulbs . . . . . . . . . 10-37
Electrical SystemElectrical SystemOverload . . . . . . . . . . . . . . . . . . 10-37
Fuses and CircuitBreakers . . . . . . . . . . . . . . . . . . 10-38
Engine Compartment FuseBlock . . . . . . . . . . . . . . . . . . . . . 10-38
Instrument Panel FuseBlock . . . . . . . . . . . . . . . . . . . . . 10-41

Black plate (2,1)Chevrolet Impala Owner Manual - 2011
10-2 Vehicle Care
Wheels and TiresTires . . . . . . . . . . . . . . . . . . . . . . . . 10-42Tire Sidewall Labeling . . . . . . 10-43Tire Designations . . . . . . . . . . . 10-45Tire Terminology andDefinitions . . . . . . . . . . . . . . . . 10-46
Tire Pressure . . . . . . . . . . . . . . . 10-49Tire Pressure MonitorSystem . . . . . . . . . . . . . . . . . . . 10-51
Tire Pressure MonitorOperation . . . . . . . . . . . . . . . . . 10-52
Tire Inspection . . . . . . . . . . . . . . 10-56Tire Rotation . . . . . . . . . . . . . . . 10-56When It Is Time for NewTires . . . . . . . . . . . . . . . . . . . . . . 10-57
Buying New Tires . . . . . . . . . . . 10-58Different Size Tires andWheels . . . . . . . . . . . . . . . . . . . 10-60
Uniform Tire QualityGrading . . . . . . . . . . . . . . . . . . . 10-61
Wheel Alignment and TireBalance . . . . . . . . . . . . . . . . . . . 10-63
Wheel Replacement . . . . . . . . 10-63Tire Chains . . . . . . . . . . . . . . . . . 10-64If a Tire Goes Flat . . . . . . . . . . 10-65Tire Changing . . . . . . . . . . . . . . 10-66Compact Spare Tire . . . . . . . . 10-74
Jump StartingJump Starting . . . . . . . . . . . . . . 10-75
TowingTowing the Vehicle . . . . . . . . . 10-79Recreational VehicleTowing . . . . . . . . . . . . . . . . . . . . 10-79
Appearance CareExterior Care . . . . . . . . . . . . . . . 10-81Interior Care . . . . . . . . . . . . . . . . 10-85Floor Mats . . . . . . . . . . . . . . . . . . 10-89
General InformationFor service and parts needs,visit your dealer. You will receivegenuine GM parts and GM-trainedand supported service people.
Genuine GM parts have one ofthese marks:
Black plate (3,1)Chevrolet Impala Owner Manual - 2011
Vehicle Care 10-3
California Proposition65 WarningMost motor vehicles, including thisone, contain and/or emit chemicalsknown to the State of California tocause cancer and birth defects orother reproductive harm. Engineexhaust, many parts and systems,many fluids, and some componentwear by-products contain and/oremit these chemicals.
California PerchlorateMaterials RequirementsCertain types of automotiveapplications, such as airbaginitiators, seat belt pretensioners,and lithium batteries contained inRemote Keyless Entry transmitters,may contain perchlorate materials.Special handling may be necessary.For additional information, seewww.dtsc.ca.gov/hazardouswaste/perchlorate.
Accessories andModificationsAdding non‐dealer accessories ormaking modifications to the vehiclecan affect vehicle performanceand safety, including such thingsas airbags, braking, stability, rideand handling, emissions systems,aerodynamics, durability, andelectronic systems like antilockbrakes, traction control, andstability control. These accessoriesor modifications could even causemalfunction or damage not coveredby the vehicle warranty.
Damage to vehicle componentsresulting from modifications orthe installation or use of non‐GMcertified parts, including control

Black plate (4,1)Chevrolet Impala Owner Manual - 2011
10-4 Vehicle Care
module or software modifications,is not covered under the terms ofthe vehicle warranty and may affectremaining warranty coverage foraffected parts.
GM Accessories are designed tocomplement and function with othersystems on the vehicle. Your GMdealer can accessorize the vehicleusing genuine GM Accessories.When you go to your GM dealerand ask for GM Accessories, youwill know that GM-trained andsupported service technicians willperform the work using genuineGM Accessories.
Also, see Adding Equipment tothe Airbag-Equipped Vehicle onpage 3‑40.
Vehicle Checks
Doing Your OwnService Work
{ WARNING
You can be injured and thevehicle could be damaged if youtry to do service work on a vehiclewithout knowing enough about it.
. Be sure you have sufficientknowledge, experience,the proper replacementparts, and tools beforeattempting any vehiclemaintenance task.
(Continued)
WARNING (Continued)
. Be sure to use theproper nuts, bolts, andother fasteners. Metric andEnglish fasteners can beeasily confused. If the wrongfasteners are used, partscan later break or fall off.You could be hurt.
If doing some of your own servicework, use the proper servicemanual. It tells you much more

Black plate (5,1)Chevrolet Impala Owner Manual - 2011
Vehicle Care 10-5
about how to service the vehiclethan this manual can. To order theproper service manual, see ServicePublications Ordering Informationon page 13‑13.
This vehicle has an airbag system.Before attempting to do your ownservice work, see Servicing theAirbag-Equipped Vehicle onpage 3‑40.
Keep a record with all parts receiptsand list the mileage and the dateof any service work performed. SeeMaintenance Records on page 11‑9.
HoodTo open the hood, do the following:
1. Pull the interior hood releasehandle with this symbol on it.It is located to the left of theparking brake pedal. 2. Then go to the front of the
vehicle and release thesecondary hood latch, locatednear the center of the hood front,by pushing the latch to the right.
3. Lift the hood.
Before closing the hood, be sureall the filler caps are on properly.Then pull the hood down and closeit firmly.

Black plate (6,1)Chevrolet Impala Owner Manual - 2011
10-6 Vehicle Care
Engine Compartment Overview3.5 L V6 Engine Shown, 3.9 L V6 Engine Similar

Black plate (7,1)Chevrolet Impala Owner Manual - 2011
Vehicle Care 10-7
A. Windshield Washer FluidReservoir. See “Adding WasherFluid” under Washer Fluid onpage 10‑25.
B. Battery. See Battery onpage 10‑29.
C. Underhood Fuse Block.See Engine CompartmentFuse Block on page 10‑38.
D. Remote Positive (+) Terminal.See Jump Starting onpage 10‑75.
E. Coolant Recovery Tank.See “Checking Coolant” underCooling System on page 10‑16.
F. Pressure Cap. See CoolingSystem on page 10‑16.
G. Power Steering Fluid Cap.See Power Steering Fluid onpage 10‑24.
H. Engine Oil Fill Cap. See “Whento Add Engine Oil” underEngine Oil on page 10‑7.
I. Engine Oil Dipstick.See “Checking Engine Oil”under Engine Oil on page 10‑7.
J. Automatic TransmissionFluid Dipstick (Out of View).See “Checking the Fluid Level”under Automatic TransmissionFluid on page 10‑12.
K. Brake Master CylinderReservoir. See “Brake Fluid”under Brakes on page 10‑26.
L. Engine Air Cleaner/Filter.See Engine Air Cleaner/Filteron page 10‑15.
Engine OilTo ensure proper engineperformance and long life,careful attention must be paidto engine oil. Following thesesimple, but important steps willhelp protect your investment:. Always use engine oil approved
to the proper specification andof the proper viscosity grade.See “Selecting the Right EngineOil” in this section.
. Check the engine oil levelregularly and maintain theproper oil level. See “CheckingEngine Oil” and “When to AddEngine Oil” in this section.
. Change the engine oil at theappropriate time. See EngineOil Life System on page 10‑11.
. Always dispose of engine oilproperly. See “What to Do withUsed Oil” in this section.

Black plate (8,1)Chevrolet Impala Owner Manual - 2011
10-8 Vehicle Care
Checking Engine Oil
It is a good idea to check theengine oil level at each fuel fill.In order to get an accuratereading, the vehicle must beon level ground. The engine oildipstick handle is a yellow loop.See Engine Compartment Overviewon page 10‑6 for the location ofthe engine oil dipstick.
Obtaining an accurate oil levelreading is essential:
1. If the engine has been runningrecently, turn off the engine andallow several minutes for the oilto drain back into the oil pan.Checking the oil level too soonafter engine shutoff will notprovide an accurate oil levelreading.
2. Pull out the dipstick and cleanit with a paper towel or cloth,then push it back in all the way.Remove it again, keeping the tipdown, and check the level.
When to Add Engine Oil
If the oil is below the cross-hatchedarea at the tip of the dipstick,add 1 L (1 qt) of the recommendedoil and then recheck the level.See “Selecting the Right Engine Oil”in this section for an explanation ofwhat kind of oil to use. For engineoil crankcase capacity, seeCapacities and Specifications onpage 12‑2.
Notice: Do not add too muchoil. Oil levels above or belowthe acceptable operating rangeshown on the dipstick are harmfulto the engine. If you find thatyou have an oil level above theoperating range, i.e., the enginehas so much oil that the oil levelgets above the cross-hatchedarea that shows the properoperating range, the enginecould be damaged. You shoulddrain out the excess oil or limitdriving of the vehicle and seek aservice professional to removethe excess amount of oil.
See Engine Compartment Overviewon page 10‑6 for the location of theengine oil fill cap.
Add enough oil to put the levelsomewhere in the proper operatingrange. Push the dipstick all the wayback in when through.

Black plate (9,1)Chevrolet Impala Owner Manual - 2011
Vehicle Care 10-9
Selecting the Right Engine Oil
Selecting the right engine oildepends on both the proper oilspecification and viscosity grade:
Specification
Use and ask for engine oils withthe dexos™ certification mark.Oils meeting the requirements ofthe vehicle should have the dexoscertification mark on the container.This certification mark indicates thatthe oil has been approved to thedexos specification.
This vehicle was filled at the factorywith dexos‐approved engine oil.
Notice: Use only engine oilthat is approved to the dexosspecification or an equivalentengine oil of the appropriateviscosity grade. Engineoils approved to the dexosspecification will show thedexos symbol on the container.
Failure to use the recommendedengine oil or equivalent canresult in engine damage notcovered by the vehicle warranty.If you are unsure whether theoil is approved to the dexosspecification, ask your serviceprovider.
Use of Substitute Engine Oils ifdexos is unavailable: In the eventthat dexos‐approved engine oil isnot available at an oil change orfor maintaining proper oil level,you may use substitute engine oildisplaying the API Starburst symboland of SAE 5W-30 viscosity grade.

Black plate (10,1)Chevrolet Impala Owner Manual - 2011
10-10 Vehicle Care
Use of oils that do not meet thedexos specification, however, mayresult in reduced performance undercertain circumstances.
Viscosity Grade
SAE 5W-30 is the best viscositygrade for the vehicle. Do notuse other viscosity oils such asSAE 10W‐30, 10W‐40, or 20W-50.
Cold Temperature Operation:In an area of extreme cold,where the temperature fallsbelow −29°C (−20°F), anSAE 0W-30 oil should be used.An oil of this viscosity gradewill provide easier cold startingfor the engine at extremely lowtemperatures. When selecting anoil of the appropriate viscositygrade, be sure to always selectan oil that meets the requiredspecification, dexos. See“Specification” earliern in thissection for more information.

Black plate (11,1)Chevrolet Impala Owner Manual - 2011
Vehicle Care 10-11
Engine Oil Additives/EngineOil Flushes
Do not add anything to the oil.The recommended oils with thedexos specification and displayingthe dexos certification mark are allthat is needed for good performanceand engine protection.
Engine oil system flushes are notrecommended and could causeengine damage not covered bythe vehicle warranty.
What to Do with Used Oil
Used engine oil contains certainelements that can be unhealthyfor your skin and could even causecancer. Do not let used oil stay onyour skin for very long. Clean yourskin and nails with soap and water,or a good hand cleaner. Wash orproperly dispose of clothing or ragscontaining used engine oil. See themanufacturer's warnings about theuse and disposal of oil products.
Used oil can be a threat to theenvironment. If you change yourown oil, be sure to drain all theoil from the filter before disposal.Never dispose of oil by puttingit in the trash or pouring it on theground, into sewers, or into streamsor bodies of water. Recycle it bytaking it to a place that collectsused oil.
Engine Oil Life System
When to Change Engine Oil
This vehicle has a computer systemthat indicates when to change theengine oil and filter. This is basedon engine revolutions and enginetemperature, and not on mileage.Based on driving conditions, themileage at which an oil change isindicated can vary considerably.For the oil life system to workproperly, the system must be resetevery time the oil is changed.
When the system has calculatedthat oil life has been diminished,it indicates that an oil change isnecessary. A CHANGE ENGINEOIL SOON message comes on.

Black plate (12,1)Chevrolet Impala Owner Manual - 2011
10-12 Vehicle Care
See Engine Oil Messages onpage 5‑33. Change the oil assoon as possible within the next1 000 km (600mi). It is possiblethat, if driving under the bestconditions, the oil life systemmight indicate that an oil changeis not necessary for up to a year.The engine oil and filter must bechanged at least once a year and,at this time, the system must bereset. Your dealer has trainedservice people who will performthis work and reset the system.It is also important to check theoil regularly over the course ofan oil drain interval and keepit at the proper level.
If the system is ever resetaccidentally, the oil must bechanged at 5 000 km (3,000 mi)since the last oil change.Remember to reset the oil lifesystem whenever the oil is changed.
How to Reset the Engine OilLife System
Reset the system whenever theengine oil is changed so that thesystem can calculate the nextengine oil change. Always resetthe engine oil life to 100% afterevery oil change. It will not resetitself. To reset the system:
1. Display OIL LIFE REMAININGon the DIC.
2. Press and hold the SET/RESETbutton on the DIC for more thanfive seconds. The oil life willchange to 100%.
If the CHANGE ENGINE OIL SOONmessage comes back on when thevehicle is started, the engine oil lifesystem has not reset. Repeat theprocedure.
Automatic TransmissionFluid
When to Check and ChangeAutomatic Transmission Fluid
A good time to check the automatictransmission fluid level is when theengine oil is changed.
Change the fluid and filter atthe intervals listed in ScheduledMaintenance on page 11‑2, and besure to use the transmission fluidlisted in Recommended Fluids andLubricants on page 11‑6.

Black plate (13,1)Chevrolet Impala Owner Manual - 2011
Vehicle Care 10-13
How to Check AutomaticTransmission Fluid
Because this operation can be alittle difficult, it may be decided tohave this done at the dealer servicedepartment.
If not taken to the dealer, be sure tofollow all the instructions here, or afalse reading on the dipstick couldresult.
Notice: Too much or toolittle fluid can damage thetransmission. Too much canmean that some of the fluidcould come out and fall onhot engine parts or exhaustsystem parts, starting a fire.Too little fluid could causethe transmission to overheat.Be sure to get an accuratereading if checking thetransmission fluid.
Wait at least 30 minutes beforechecking the transmission fluidlevel if you have been driving:. When outside temperatures are
above 32°C (90°F).. At high speed for quite a while.. In heavy traffic— especially in
hot weather.. While pulling a trailer.
To get the right reading, the fluidshould be at normal operatingtemperature, which is 82°C to 93°C(180°F to 200°F).
Get the vehicle warmed up bydriving about 24 km (15 mi) whenoutside temperatures are above10°C (50°F). If it is colder than10°C (50°F), the vehicle mayhave to be driven longer.
Checking the Fluid Level
Prepare your vehicle as follows:
1. Park the vehicle on a levelplace. Keep the engine running.
2. With the parking brake applied,place the shift lever in P (Park).
3. With your foot on the brakepedal, move the shift leverthrough each gear range,pausing for about three secondsin each range. Then, positionthe shift lever in P (Park).
4. Let the engine run at idle forthree to five minutes.
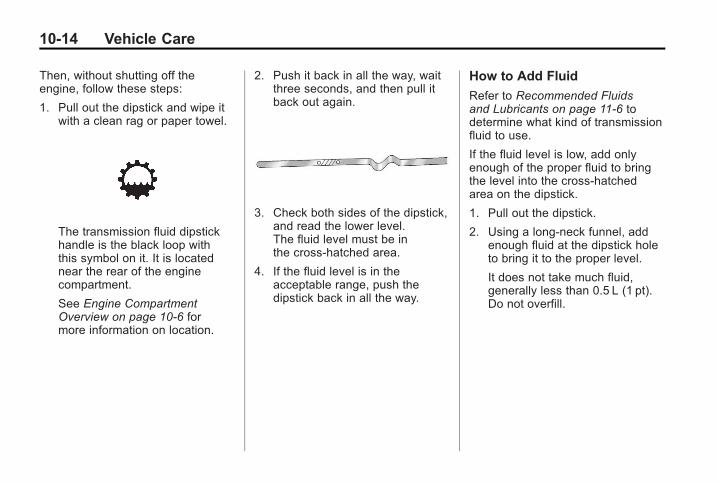
Black plate (14,1)Chevrolet Impala Owner Manual - 2011
10-14 Vehicle Care
Then, without shutting off theengine, follow these steps:
1. Pull out the dipstick and wipe itwith a clean rag or paper towel.
The transmission fluid dipstickhandle is the black loop withthis symbol on it. It is locatednear the rear of the enginecompartment.
See Engine CompartmentOverview on page 10‑6 formore information on location.
2. Push it back in all the way, waitthree seconds, and then pull itback out again.
3. Check both sides of the dipstick,and read the lower level.The fluid level must be inthe cross-hatched area.
4. If the fluid level is in theacceptable range, push thedipstick back in all the way.
How to Add Fluid
Refer to Recommended Fluidsand Lubricants on page 11‑6 todetermine what kind of transmissionfluid to use.
If the fluid level is low, add onlyenough of the proper fluid to bringthe level into the cross-hatchedarea on the dipstick.
1. Pull out the dipstick.
2. Using a long-neck funnel, addenough fluid at the dipstick holeto bring it to the proper level.
It does not take much fluid,generally less than 0.5 L (1 pt).Do not overfill.
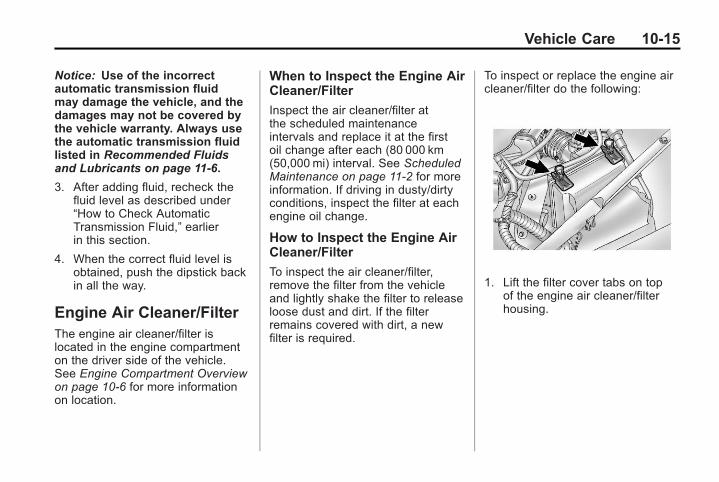
Black plate (15,1)Chevrolet Impala Owner Manual - 2011
Vehicle Care 10-15
Notice: Use of the incorrectautomatic transmission fluidmay damage the vehicle, and thedamages may not be covered bythe vehicle warranty. Always usethe automatic transmission fluidlisted in Recommended Fluidsand Lubricants on page 11‑6.
3. After adding fluid, recheck thefluid level as described under“How to Check AutomaticTransmission Fluid,” earlierin this section.
4. When the correct fluid level isobtained, push the dipstick backin all the way.
Engine Air Cleaner/FilterThe engine air cleaner/filter islocated in the engine compartmenton the driver side of the vehicle.See Engine Compartment Overviewon page 10‑6 for more informationon location.
When to Inspect the Engine AirCleaner/Filter
Inspect the air cleaner/filter atthe scheduled maintenanceintervals and replace it at the firstoil change after each (80 000 km(50,000 mi) interval. See ScheduledMaintenance on page 11‑2 for moreinformation. If driving in dusty/dirtyconditions, inspect the filter at eachengine oil change.
How to Inspect the Engine AirCleaner/Filter
To inspect the air cleaner/filter,remove the filter from the vehicleand lightly shake the filter to releaseloose dust and dirt. If the filterremains covered with dirt, a newfilter is required.
To inspect or replace the engine aircleaner/filter do the following:
1. Lift the filter cover tabs on topof the engine air cleaner/filterhousing.
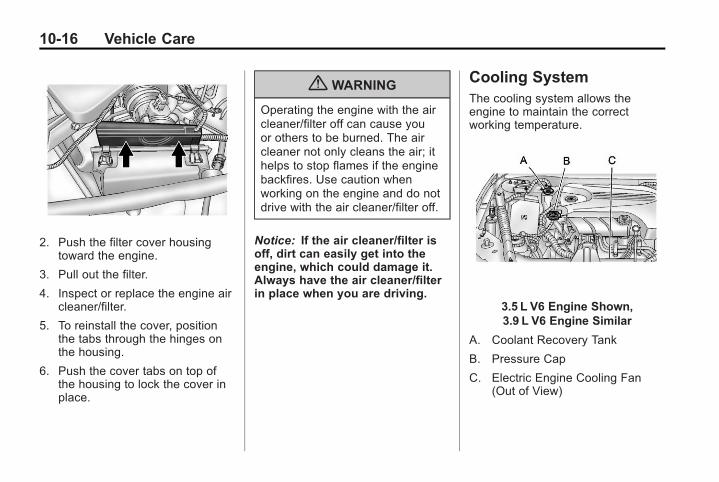
Black plate (16,1)Chevrolet Impala Owner Manual - 2011
10-16 Vehicle Care
2. Push the filter cover housingtoward the engine.
3. Pull out the filter.
4. Inspect or replace the engine aircleaner/filter.
5. To reinstall the cover, positionthe tabs through the hinges onthe housing.
6. Push the cover tabs on top ofthe housing to lock the cover inplace.
{ WARNING
Operating the engine with the aircleaner/filter off can cause youor others to be burned. The aircleaner not only cleans the air; ithelps to stop flames if the enginebackfires. Use caution whenworking on the engine and do notdrive with the air cleaner/filter off.
Notice: If the air cleaner/filter isoff, dirt can easily get into theengine, which could damage it.Always have the air cleaner/filterin place when you are driving.
Cooling SystemThe cooling system allows theengine to maintain the correctworking temperature.
3.5 L V6 Engine Shown,3.9 L V6 Engine Similar
A. Coolant Recovery Tank
B. Pressure Cap
C. Electric Engine Cooling Fan(Out of View)

Black plate (17,1)Chevrolet Impala Owner Manual - 2011
Vehicle Care 10-17
{ WARNING
An electric engine cooling fanunder the hood can start upeven when the engine is notrunning and can cause injury.Keep hands, clothing, and toolsaway from any underhoodelectric fan.
{ WARNING
Heater and radiator hoses, andother engine parts, can be veryhot. Do not touch them. If you do,you can be burned.
(Continued)
WARNING (Continued)
Do not run the engine if thereis a leak. If you run the engine, itcould lose all coolant. That couldcause an engine fire, and youcould be burned. Get any leakfixed before you drive the vehicle.
Notice: Using coolant other thanDEX-COOL® can cause prematureengine, heater core, or radiatorcorrosion. In addition, the enginecoolant could require changingsooner, at 50 000 km (30,000mi)or 24months, whichever occursfirst. Any repairs would notbe covered by the vehiclewarranty. Always use DEX-COOL(silicate-free) coolant in thevehicle.
Engine CoolantThe cooling system in the vehicleis filled with DEX-COOL® enginecoolant. This coolant is designed toremain in the vehicle for 5 years or240 000 km (150,000 mi), whicheveroccurs first.
The following explains the coolingsystem and how to check and addcoolant when it is low. If there is aproblem with engine overheating,see Engine Overheating onpage 10‑21.
Black plate (18,1)Chevrolet Impala Owner Manual - 2011
10-18 Vehicle Care
What to Use
{ WARNING
Adding only plain water or someother liquid to the cooling systemcan be dangerous. Plain waterand other liquids, can boil beforethe proper coolant mixture will.The coolant warning system isset for the proper coolant mixture.With plain water or the wrongmixture, the engine could gettoo hot but you would not get theoverheat warning. The enginecould catch fire and you orothers could be burned. Use a50/50 mixture of clean, drinkablewater and DEX-COOL coolant.
Use a 50/50 mixture of clean,drinkable water and DEX-COOLcoolant. If using this mixture,nothing else needs to be added.This mixture:. Gives freezing protection down
to −37°C (−47°F), outsidetemperature.
. Gives boiling protection upto 129°C (265°F), enginetemperature.
. Protects against rust andcorrosion.
. Will not damage aluminum parts.
. Helps keep the proper enginetemperature.
Notice: If an improper coolantmixture is used, the engine couldoverheat and be badly damaged.The repair cost would not becovered by the vehicle warranty.Too much water in the mixturecan freeze and crack the engine,radiator, heater core, and otherparts.
Notice: If extra inhibitorsand/or additives are used inthe vehicle cooling system,the vehicle could be damaged.Use only the proper mixture ofthe engine coolant listed in thismanual for the cooling system.See Recommended Fluids andLubricants on page 11‑6 formore information.
Never dispose of engine coolantby putting it in the trash, pouringit on the ground, or into sewers,streams, or bodies of water.Have the coolant changed by anauthorized service center, familiarwith legal requirements regardingused coolant disposal. This will helpprotect the environment and yourhealth.
Black plate (19,1)Chevrolet Impala Owner Manual - 2011
Vehicle Care 10-19
Checking Coolant
The vehicle must be on a levelsurface when checking the coolantlevel.
Check to see if coolant is visiblein the coolant recovery tank. If thecoolant inside the coolant recoverytank is boiling, do not do anythingelse until it cools down. If coolant isvisible but the coolant level is not ator above the COLD FILL line, adda 50/50 mixture of clean, drinkablewater and DEX-COOL coolant at thecoolant recovery tank, but be surethe cooling system is cool beforethis is done.
The coolant recovery tank islocated in the rear of the enginecompartment on the passengerside of the vehicle. See EngineCompartment Overview onpage 10‑6.
When the engine is cold, the coolantlevel should be at or above theCOLD FILL line on the coolantrecovery tank. To check the coolantlevel, look for the COLD FILL line onthe side of the coolant recovery tankthat faces the engine. If the level isnot correct, there may be a leak inthe cooling system.
How to Add Coolant to theRecovery Tank
{ WARNING
You can be burned if you spillcoolant on hot engine parts.Coolant contains ethylene glycoland it will burn if the engine partsare hot enough. Do not spillcoolant on a hot engine.
Notice: This vehicle has aspecific coolant fill procedure.Failure to follow this procedurecould cause the engine tooverheat and be severelydamaged.
If coolant is needed, add the properDEX-COOL coolant mixture at thecoolant recovery tank.
When the coolant level in thecoolant recovery tank is at theCOLD FILL line, start the vehicle.
If the overheat warning continues,there is one more thing you can try.The proper coolant mixture can beadded directly to the cooling systemthrough the coolant fill neck on theengine, but be sure the system iscool before doing it.

Black plate (20,1)Chevrolet Impala Owner Manual - 2011
10-20 Vehicle Care
How to Add Coolant to theRadiator
{ WARNING
An electric engine cooling fanunder the hood can start upeven when the engine is notrunning and can cause injury.Keep hands, clothing, and toolsaway from any underhoodelectric fan.
{ WARNING
Steam and scalding liquidsfrom a hot cooling system canblow out and burn you badly.
(Continued)
WARNING (Continued)
They are under pressure, and ifyou turn the surge tank pressurecap— even a little— they cancome out at high speed. Neverturn the cap when the coolingsystem, including the surge tankpressure cap, is hot. Wait for thecooling system and surge tankpressure cap to cool if you everhave to turn the pressure cap.
If coolant is needed, add the propermixture directly to the radiator, butbe sure the cooling system is coolbefore this is done.
1. Remove the pressure cap whenthe cooling system, includingthe pressure cap and upperradiator hose is no longer hot.Turn the pressure cap slowlycounterclockwise.
If a hiss is heard, wait for that tostop. A hiss means that there isstill some pressure left.
2. Keep turning the pressure capand remove it.

Black plate (21,1)Chevrolet Impala Owner Manual - 2011
Vehicle Care 10-21
3. Fill the cooling system withthe proper DEX-COOL coolantmixture, up to the base of thefiller neck. See “What to use”for more information about theproper coolant mixture. Rinse orwipe any spilled coolant from theengine and the compartment.
4. Then fill the coolant recoverytank to the COLD FILL line.
5. Install the coolant recoverytank cap and the pressure cap.After a day or two of driving,when the engine is cold, checkthe coolant level in the recoverytank. If it is low, refill it to theCOLD FILL line.
If the coolant in the recovery tankis constantly low, have a dealerservice department inspect thevehicle for leaks.
Notice: If the pressure cap isnot tightly installed, coolant lossand possible engine damage mayoccur. Be sure the cap is properlyand tightly secured.
Engine OverheatingThe vehicle has several indicatorsto warn of engine overheating.
There is a coolant temperaturegauge and a warning light onthe instrument panel that indicatean overheated engine condition.See Engine Coolant TemperatureGauge on page 5‑13 and EngineCoolant Temperature Warning Lighton page 5‑23.
In addition, there is an ENGINEOVERHEATED IDLE ENGINEand an ENGINE OVERHEATEDSTOP ENGINE message displayedon the vehicle Driver InformationCenter (DIC). See Engine CoolingSystem Messages on page 5‑32for more information.

Black plate (22,1)Chevrolet Impala Owner Manual - 2011
10-22 Vehicle Care
If it is decided not to lift the hoodwhen this warning appears, butinstead get service help right away,see Roadside Assistance Programon page 13‑6.
If it is decided to lift the hood, makesure the vehicle is parked on a levelsurface.
Then check to see if the enginecooling fans are running. If theengine is overheating, both fansshould be running. If they are not,do not continue to run the engineand have the vehicle serviced.
Notice: Engine damage fromrunning the engine withoutcoolant is not covered by thewarranty.
Notice: If the engine catches firewhile driving with no coolant, thevehicle can be badly damaged.The costly repairs would notbe covered by the vehiclewarranty. See Overheated EngineProtection Operating Mode onpage 10‑24 for information ondriving to a safe place in anemergency.
If Steam is Coming from theEngine Compartment
{ WARNING
Steam from an overheated enginecan burn you badly, even if youjust open the hood. Stay awayfrom the engine if you see or hearsteam coming from it. Turn it offand get everyone away from thevehicle until it cools down. Waituntil there is no sign of steamor coolant before you openthe hood.
(Continued)
Black plate (23,1)Chevrolet Impala Owner Manual - 2011
Vehicle Care 10-23
WARNING (Continued)
If you keep driving when thevehicles engine is overheated,the liquids in it can catch fire.You or others could be badlyburned. Stop the engine if itoverheats, and get out of thevehicle until the engine is cool.
See Overheated EngineProtection Operating Mode onpage 10‑24 for information ondriving to a safe place in anemergency.
If No Steam is Coming fromthe Engine Compartment
If an engine overheat warning isdisplayed but no steam can be seenor heard, the problem may not betoo serious. Sometimes the enginecan get a little too hot when thevehicle:. Climbs a long hill on a hot day. Stops after high-speed driving. Idles for long periods in traffic. Tows a trailer
If the overheat warning is displayedwith no sign of steam:
1. Turn the air off.
2. Turn the heater on to the highesttemperature and to the highestfan speed. Open the windows asnecessary.
3. In heavy traffic, let the engineidle in N (Neutral) while stopped.If it is safe to do so, pull offthe road, shift to P (Park)or N (Neutral) and let theengine idle.

Black plate (24,1)Chevrolet Impala Owner Manual - 2011
10-24 Vehicle Care
If the temperature overheat gaugeis no longer in the overheat zoneor an overheat warning no longerdisplays, the vehicle can be driven.Continue to drive the vehicle slowlyfor about 10 minutes. Keep a safevehicle distance from the vehicle infront. If the warning does not comeback on, continue to drive normally.
If the warning continues, pullover, stop, and park the vehicleright away.
If there is no sign of steam,idle the engine for three minuteswhile parked. If the warning is stilldisplayed, turn off the engine until itcools down. Also, see "OverheatedEngine Protection Operating Mode"in this section.
Overheated EngineProtectionOperating ModeThis emergency operatingmode allows the vehicle tobe driven to a safe place inan emergency situation. If anoverheated engine conditionexists, an overheat protectionmode which alternates firinggroups of cylinders helps preventengine damage. In this mode,a significant loss in power andengine performance will be noticed.The coolant temperature gaugewill indicate an overheat conditionexists. Driving extended km (mi)and/or towing a trailer in theoverheat protection mode shouldbe avoided.
Notice: After driving in theoverheated engine protectionoperating mode, to avoid enginedamage, allow the engine to coolbefore attempting any repair.The engine oil will be severelydegraded. Repair the cause ofcoolant loss, change the oiland reset the oil life system.See Engine Oil on page 10‑7.
Power Steering Fluid
The power steering fluidreservoir is located toward therear of the engine compartment onthe passenger side of the vehicle.See Engine Compartment Overviewon page 10‑6 for reservoir location.

Black plate (25,1)Chevrolet Impala Owner Manual - 2011
Vehicle Care 10-25
When to Check Power SteeringFluid
It is not necessary to regularlycheck power steering fluid unlessthere is a leak suspected in thesystem or an unusual noise isheard. A fluid loss in this systemcould indicate a problem. Have thesystem inspected and repaired.
How to Check Power SteeringFluid
To check the power steering fluid,do the following:
1. Turn the key off and let theengine compartment cool down.
2. Wipe the cap and the top of thereservoir clean.
3. Unscrew the cap and wipe thedipstick with a clean rag.
4. Replace the cap and completelytighten it.
5. Remove the cap again and lookat the fluid level on the dipstick.
The fluid level shouldbe somewhere within thecross‐hatched area on thedipstick. If the fluid is at theADD mark, fluid should beadded.
What to Use
To determine what kind of fluid touse, see Recommended Fluids andLubricants on page 11‑6. Alwaysuse the proper fluid.
Notice: Use of the incorrect fluidmay damage the vehicle and thedamages may not be covered bythe vehicle's warranty. Alwaysuse the correct fluid listed inRecommended Fluids andLubricants on page 11‑6.
Washer Fluid
What to Use
When the vehicle needs windshieldwasher fluid, be sure to read themanufacturer's instructions beforeuse. If operating the vehicle in anarea where the temperature mayfall below freezing, use a fluid thathas sufficient protection againstfreezing.
Adding Washer Fluid
A WASHER FLUID LOW ADDFLUID message will be displayedon the Driver Information Center(DIC) when windshield washer fluidneeds to be added to the vehicle.See Washer Fluid Messages onpage 5‑38 for more information.
Black plate (26,1)Chevrolet Impala Owner Manual - 2011
10-26 Vehicle Care
Open the cap with the washersymbol on it. Add washer fluiduntil the tank is full.
See Engine Compartment Overviewon page 10‑6 for more informationon location.
Notice:. When using concentratedwasher fluid, follow themanufacturer's instructionsfor adding water.
. Do not mix water withready-to-use washer fluid.Water can cause the solutionto freeze and damage thewasher fluid tank and otherparts of the washer system.Also, water does not clean aswell as washer fluid.
. Fill the washer fluid tankonly three-quarters fullwhen it is very cold. Thisallows for fluid expansionif freezing occurs, whichcould damage the tank ifit is completely full.
. Do not use engine coolant(antifreeze) in the windshieldwasher. It can damage thewindshield washer systemand paint.
BrakesThis vehicle has disc brakes.Disc brake pads have built-in wearindicators that make a high-pitchedwarning sound when the brake padsare worn and new pads are needed.The sound can come and go or beheard all the time the vehicle ismoving, except when applyingthe brake pedal firmly.
{ WARNING
The brake wear warning soundmeans that soon the brakes willnot work well. That could lead toa crash. When the brake wearwarning sound is heard, havethe vehicle serviced.
Notice: Continuing to drive withworn-out brake pads could resultin costly brake repair.
Black plate (27,1)Chevrolet Impala Owner Manual - 2011
Vehicle Care 10-27
Some driving conditions or climatescan cause a brake squeal whenthe brakes are first applied orlightly applied. This does not meansomething is wrong with the brakes.
Properly torqued wheel nutsare necessary to help preventbrake pulsation. When tires arerotated, inspect brake pads forwear and evenly tighten wheel nutsin the proper sequence to torquespecifications in Capacities andSpecifications on page 12‑2.
Brake linings should always bereplaced as complete axle sets.
Brake Pedal Travel
See your dealer if the brake pedaldoes not return to normal height,or if there is a rapid increase inpedal travel. This could be asign that brake service mightbe required.
Brake Adjustment
Every time the brakes are applied,with or without the vehicle moving,the brakes adjust for wear.
Replacing Brake System Parts
The braking system on a vehicle iscomplex. Its many parts have to beof top quality and work well togetherif the vehicle is to have really goodbraking. The vehicle was designedand tested with top-quality brakeparts. When parts of the brakingsystem are replaced, be sure to getnew, approved replacement parts.If this is not done, the brakes mightnot work properly. For example,installing disc brake pads that arewrong for the vehicle, can changethe balance between the front andrear brakes — for the worse. Thebraking performance expected canchange in many other ways if thewrong replacement brake parts areinstalled.
Brake Fluid
The brake master cylinder reservoiris filled with DOT 3 brake fluid asindicated on the reservoir cap. SeeEngine Compartment Overview onpage 10‑6 for the location of thereservoir.
There are only two reasons whythe brake fluid level in the reservoirmight go down:. The brake fluid level goes down
because of normal brake liningwear. When new linings areinstalled, the fluid level goesback up.
. A fluid leak in the brakehydraulic system can also causea low fluid level. Have the brakehydraulic system fixed, since aleak means that sooner or laterthe brakes will not work well.

Black plate (28,1)Chevrolet Impala Owner Manual - 2011
10-28 Vehicle Care
Do not top off the brake fluid.Adding fluid does not correct aleak. If fluid is added when thelinings are worn, there will be toomuch fluid when new brake liningsare installed. Add or remove brakefluid, as necessary, only when workis done on the brake hydraulicsystem.
{ WARNING
If too much brake fluid is added,it can spill on the engine andburn, if the engine is hot enough.You or others could be burned,and the vehicle could bedamaged. Add brake fluid onlywhen work is done on the brakehydraulic system.
When the brake fluid falls to a lowlevel, the brake warning light comeson. See Brake System WarningLight on page 5‑20.
What to Add
Use only new DOT 3 brakefluid from a sealed container.See Recommended Fluids andLubricants on page 11‑6.
Always clean the brake fluidreservoir cap and the areaaround the cap before removing it.This helps keep dirt from enteringthe reservoir.
{ WARNING
With the wrong kind of fluid inthe brake hydraulic system,the brakes might not work well.This could cause a crash. Alwaysuse the proper brake fluid.
Notice:. Using the wrong fluidcan badly damage brakehydraulic system parts.For example, just a fewdrops of mineral-based oil,such as engine oil, in thebrake hydraulic system candamage brake hydraulicsystem parts so badly thatthey will have to be replaced.Do not let someone put inthe wrong kind of fluid.
. If brake fluid is spilled on thevehicle's painted surfaces,the paint finish can bedamaged. Be careful notto spill brake fluid on thevehicle. If you do, wash itoff immediately.

Black plate (29,1)Chevrolet Impala Owner Manual - 2011
Vehicle Care 10-29
BatteryRefer to the replacement numbershown on the original battery labelwhen a new battery is needed.See Engine Compartment Overviewon page 10‑6 for battery location.
{ DANGER
Battery posts, terminals, andrelated accessories contain leadand lead compounds, chemicalsknown to the State of Californiato cause cancer and reproductiveharm. Wash hands after handling.
Vehicle Storage
{ WARNING
Batteries have acid that can burnyou and gas that can explode.You can be badly hurt if you arenot careful. See Jump Starting onpage 10‑75 for tips on workingaround a battery withoutgetting hurt.
Infrequent Usage: Remove theblack, negative (−) cable from thebattery to keep the battery fromrunning down.
Extended Storage: Remove theblack, negative (−) cable from thebattery or use a battery tricklecharger.
Starter Switch Check
{ WARNING
When you are doing thisinspection, the vehicle couldmove suddenly. If the vehiclemoves, you or others could beinjured.
1. Before starting this check, besure there is enough roomaround the vehicle.
2. Firmly apply both the parkingbrake and the regular brake.See Parking Brake onpage 9‑29.
Do not use the acceleratorpedal, and be ready to turn offthe engine immediately if itstarts.
3. Try to start the engine in eachgear. The vehicle should startonly in P (Park) or N (Neutral).If the vehicle starts in any otherposition, contact your dealer forservice.

Black plate (30,1)Chevrolet Impala Owner Manual - 2011
10-30 Vehicle Care
Automatic TransmissionShift Lock ControlFunction Check
{ WARNING
When you are doing thisinspection, the vehicle couldmove suddenly. If the vehiclemoves, you or others could beinjured.
1. Before starting this check,be sure there is enough roomaround the vehicle. It shouldbe parked on a level surface.
2. Firmly apply the parkingbrake. See Parking Brake onpage 9‑29.
Be ready to apply the regularbrake immediately if the vehiclebegins to move.
3. With the engine off, turn theignition on, but do not start theengine. Without applying theregular brake, try to move theshift lever out of P (Park) withnormal effort. If the shift levermoves out of P (Park), contactyour dealer for service.
Ignition TransmissionLock CheckWhile parked, and with the parkingbrake set, try to turn the ignitionto LOCK/OFF in each shift leverposition.. The ignition should turn to
LOCK/OFF only when theshift lever is in P (Park).
. The ignition key should comeout only in LOCK/OFF.
Contact your dealer if service isrequired.
Park Brake and P (Park)Mechanism Check
{ WARNING
When you are doing this check,the vehicle could begin to move.You or others could be injuredand property could be damaged.Make sure there is room in frontof the vehicle in case it begins toroll. Be ready to apply the regularbrake at once should the vehiclebegin to move.

Black plate (31,1)Chevrolet Impala Owner Manual - 2011
Vehicle Care 10-31
Park on a fairly steep hill, with thevehicle facing downhill. Keepingyour foot on the regular brake,set the parking brake.. To check the parking brake's
holding ability: With the enginerunning and the transmission inN (Neutral), slowly remove footpressure from the regular brakepedal. Do this until the vehicle isheld by the parking brake only.
. To check the P (Park)mechanism's holding ability:With the engine running, shiftto P (Park). Then release theparking brake followed by theregular brake.
Contact your dealer if service isrequired.
Wiper Blade ReplacementWindshield wiper blades shouldbe inspected for wear or cracking.See Scheduled Maintenance onpage 11‑2 for more informationon wiper blade inspection.
Replacement blades come indifferent types and are removedin different ways. Here's how toremove the wiper blade:
1. Pull the windshield wiper armconnector away from thewindshield.
2. While holding the wiper arm,pull the clip up from the bladeconnecting point, and pull theblade assembly down toward thewindshield to remove it from thewiper arm.
3. Install the new wiper blade ontothe wiper arm and snap the clipdown into place.

Black plate (32,1)Chevrolet Impala Owner Manual - 2011
10-32 Vehicle Care
To remove and replace the wiperblade element do the following:
1. The wiper blade element hastwo notches at one end whichare engaged by the bottom clawset of the wiper blade. At thenotched end of the wiper blade,pull the wiper blade elementfrom the wiper blade assembly.
2. To replace the element, start atthe heel end of the wiper blade,which is the end nearest tothe base of the wiper arm, andslide the wiper blade element,notched end last, into the wiperblade claw sets.
3. To engage the last claw into thenotched end of the wiper bladeelement, squeeze the wiperblade element at the notchedarea, and push the wiper bladeelement so the claw fits into thenotch.
4. Be sure the two wiper bladeelement notches are engagedby the last claw set, and thatall the other claws are properlyengaged in the slots of the wiperblade element on both sides.
A. Correct Installation
B. Incorrect Installation
For the proper type and sizeof windshield wiper blades,see Maintenance ReplacementParts on page 11‑8.
Headlamp AimingHeadlamp aim has been presetat the factory and should need nofurther adjustment.
However, if the vehicle is damagedin a crash, the headlamp aim maybe affected. Aim adjustment tothe low-beam headlamps may benecessary if oncoming drivers flashtheir high-beam headlamps at you(for vertical aim).
If the headlamps need to bere-aimed, it is recommended thatthe vehicle be taken to the dealerfor service.

Black plate (33,1)Chevrolet Impala Owner Manual - 2011
Vehicle Care 10-33
Bulb ReplacementFor the proper type of replacementbulbs, see Replacement Bulbs onpage 10‑37.
For any bulb‐changing procedurenot listed in this section, contactyour dealer.
Halogen Bulbs
{ WARNING
Halogen bulbs have pressurizedgas inside and can burst if youdrop or scratch the bulb. You orothers could be injured. Be sureto read and follow the instructionson the bulb package.
Headlamps, Front TurnSignal, Sidemarker, andParking Lamps
A. Sidemarker
B. Low-Beam Headlamp
C. High-Beam Headlamp
D. Parking/Turn Signal Lamp
To replace one of these bulbs:
1. Open the hood. See Hood onpage 10‑5.
2. Remove the screw from theheadlamp assembly.

Black plate (34,1)Chevrolet Impala Owner Manual - 2011
10-34 Vehicle Care
3. Pull up on the plastic headlampretainer and remove it.
4. Pull the headlamp assemblyaway from the vehicle andremove the electrical connector.
5. Remove the round dust caps togain access to the bulbs.
6. Turn the old bulbcounterclockwise andremove it from the retainingring by pulling it away fromthe headlamp.
7. Remove the electrical connectorfrom the bulb by raising the locktab and pulling the connectoraway from the bulb's base.
8. Install the electrical connector tothe bulb.
9. Install the new bulb by insertingthe smallest tab on the bulbbase into the matching notch inthe retaining ring. Turn the bulba quarter-turn clockwise until itstops.
10. Reinstall the dust caps.
11. Push the headlamp assemblytoward the vehicle.

Black plate (35,1)Chevrolet Impala Owner Manual - 2011
Vehicle Care 10-35
12. Push down on the plasticheadlamp retainer to reinstall it.
13. Reinstall the screw from theheadlamp assembly.
Taillamps, Turn Signal,Sidemarker, Stoplamps,and Back-Up Lamps
A. Rear Sidemarker Lamp
B. Back-up Lamp
C. Stoplamp/Taillamp/Turn Signal

Black plate (36,1)Chevrolet Impala Owner Manual - 2011
10-36 Vehicle Care
To replace one of these bulbs:
1. Open the trunk. See Trunk onpage 2‑10.
2. Remove the convenience net(if equipped). Unhook the netfrom the upper wing nut.
3. Turn the upper wing nutcounterclockwise and remove it.
4. Pull the carpet away from therear of the vehicle.
5. Turn the two hex nutscounterclockwise toremove them.
6. Pull out the taillamp assemblyand disconnect the wiringharness.
7. Turn the bulb socketcounterclockwise to remove it.
8. Pull the old bulb straight out toremove it.
9. Push the new bulb straight inuntil it clicks to install it.
10. Reverse steps 1 through 7 toreinstall.
License Plate LampTo replace one of these bulbs:
1. Turn the lamp assemblycounterclockwise and pullthe lamp assembly out of theconnector.
2. Pull the old bulb from the lampassembly, keeping the bulbstraight as you pull it out.
3. Install the new bulb.
4. Reverse Steps 1 through 3 toreinstall the license plate lamp.

Black plate (37,1)Chevrolet Impala Owner Manual - 2011
Vehicle Care 10-37
Replacement Bulbs
Exterior Lamp BulbNumber
Back-Up 921LL
Front Parking/Turn Signal
3157NAK
LicensePlate Lamp
194LL
Headlamps
High-Beam H9
Low-Beam H11
Sidemarker 194LL
Stoplamp,Taillamp, andTurn Signal
3057
For replacement bulbs not listedhere, contact your dealer.
Electrical System
Electrical SystemOverloadThe vehicle has fuses and circuitbreakers to protect against anelectrical system overload.
When the current electrical load istoo heavy, the circuit breaker opensand closes, protecting the circuituntil the current load returns tonormal or the problem is fixed.This greatly reduces the chanceof circuit overload and fire causedby electrical problems.
Fuses and circuit breakers protectthe following in the vehicle:. Headlamp Wiring. Windshield Wiper Motor. Power Windows and Other
Power Accessories
Replace a bad fuse with a new oneof the identical size and rating.
If there is a problem on the roadand a fuse needs to be replaced,the same amperage fuse can beborrowed. Choose some feature ofthe vehicle that is not needed to useand replace it as soon as possible.

Black plate (38,1)Chevrolet Impala Owner Manual - 2011
10-38 Vehicle Care
Headlamp Wiring
An electrical overload may causethe lamps to go on and off, or insome cases to remain off. Havethe headlamp wiring checked rightaway if the lamps go on and off orremain off.
Windshield Wipers
If the wiper motor overheats due toheavy snow or ice, the windshieldwipers will stop until the motor coolsand will then restart.
Although the circuit is protectedfrom electrical overload, overloaddue to heavy snow or ice maycause wiper linkage damage.Always clear ice and heavy snowfrom the windshield before usingthe windshield wipers.
If the overload is caused by anelectrical problem and not snowor ice, be sure to get it fixed.
Fuses and CircuitBreakersThe wiring circuits in the vehicleare protected from short circuits bya combination of fuses and circuitbreakers. This greatly reduces thechance of fires caused by electricalproblems.
Look at the silver-colored bandinside the fuse. If the band is brokenor melted, replace the fuse. Be sureyou replace a bad fuse with a newone of the identical size and rating.
Engine CompartmentFuse BlockThe Engine Compartment FuseBlock is in the engine compartment.See Engine Compartment Overviewon page 10‑6 for more informationon location.
Notice: Spilling liquid on anyelectrical component on thevehicle may damage it. Alwayskeep the covers on any electricalcomponent.
The vehicle may not have all of thefuses, relays, and features shown.
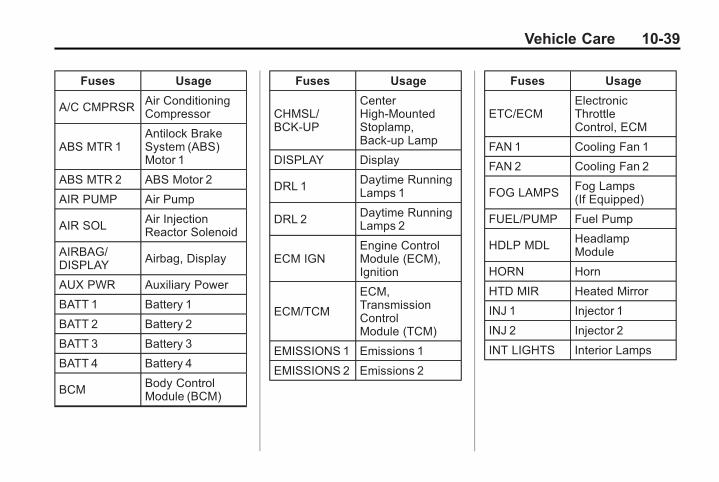
Black plate (39,1)Chevrolet Impala Owner Manual - 2011
Vehicle Care 10-39
Fuses Usage
A/C CMPRSR Air ConditioningCompressor
ABS MTR 1Antilock BrakeSystem (ABS)Motor 1
ABS MTR 2 ABS Motor 2
AIR PUMP Air Pump
AIR SOLAir InjectionReactor Solenoid
AIRBAG/DISPLAY
Airbag, Display
AUX PWR Auxiliary Power
BATT 1 Battery 1
BATT 2 Battery 2
BATT 3 Battery 3
BATT 4 Battery 4
BCMBody ControlModule (BCM)
Fuses Usage
CHMSL/BCK‐UP
CenterHigh‐MountedStoplamp,Back‐up Lamp
DISPLAY Display
DRL 1Daytime RunningLamps 1
DRL 2Daytime RunningLamps 2
ECM IGNEngine ControlModule (ECM),Ignition
ECM/TCM
ECM,TransmissionControlModule (TCM)
EMISSIONS 1 Emissions 1
EMISSIONS 2 Emissions 2
Fuses Usage
ETC/ECMElectronicThrottleControl, ECM
FAN 1 Cooling Fan 1
FAN 2 Cooling Fan 2
FOG LAMPSFog Lamps(If Equipped)
FUEL/PUMP Fuel Pump
HDLP MDLHeadlampModule
HORN Horn
HTD MIR Heated Mirror
INJ 1 Injector 1
INJ 2 Injector 2
INT LIGHTS Interior Lamps

Black plate (40,1)Chevrolet Impala Owner Manual - 2011
10-40 Vehicle Care
Fuses Usage
INT LTS/PNL DIM
Interior Lamps,Instrument PanelDimmer
LT HI BEAMDriver SideHigh‐BeamHeadlamp
LT LO BEAMDriver SideLow‐BeamHeadlamp
LT PARKDriver SideParking Lamp
LT SPOT Left Spot
LT T/SIGDriver Side TurnSignal Lamp
ONSTAR OnStar®
PWR DROP/CRANK
Power Drop,Crank
RADIO Audio System
RT HI BEAMPassenger SideHigh‐BeamHeadlamp
Fuses Usage
RT LO BEAMPassenger SideLow‐BeamHeadlamp
RT PARKPassenger SideParking Lamp
RT SPOT Right Spot
RT T/SIGPassenger SideTurn Signal Lamp
RVC SENRegulatedVoltage ControlSensor
STRG WHL Steering Wheel
STRTR Starter
TRANS Transmission
WPR Wiper
WSW Windshield Wiper
Relay Usage
A/CCMPRSR
Air ConditioningCompressor
FAN 1 Cooling Fan 1
FAN 2 Cooling Fan 2
FAN 3 Cooling Fan 3
FUEL/PUMP Fuel Pump
PWR/TRN Powertrain
REARDEFOG Rear Defogger
STRTR Starter

Black plate (41,1)Chevrolet Impala Owner Manual - 2011
Vehicle Care 10-41
Instrument Panel FuseBlock
The fuse block is on the passengerside of the vehicle in the carpetmolding. Remove the fuse blockdoor to access the fuses.
The vehicle may not be equippedwith all of the fuses, relays, andfeatures shown.
Fuses Usage
AIRBAG Airbags
AMP Amplifier
AUX Auxiliary Outlets
CNSTR Canister
DR/LCK Door Locks
HTD/SEAT Heated Seats
PWR/MIR Power Mirrors
PWR/SEAT Power Seats
PWR/WNDW Power Window
RAPRetainedAccessory Power
S/ROOF Sunroof
TRUNK Trunk
TRUNK Trunk Relay
XM XM™ Radio
Black plate (42,1)Chevrolet Impala Owner Manual - 2011
10-42 Vehicle Care
Wheels and Tires
TiresEvery new GM vehicle hashigh-quality tires made bya leading tire manufacturer.See the warranty manualfor information regardingthe tire warranty and whereto get service. For additionalinformation refer to the tiremanufacturer.
{ WARNING
. Poorly maintained andimproperly used tires aredangerous.
. Overloading the tires cancause overheating as aresult of too much flexing.There could be a blowout anda serious crash. See VehicleLoad Limits on page 9‑12.
(Continued)
WARNING (Continued)
. Underinflated tires pose thesame danger as overloadedtires. The resulting crashcould cause serious injury.Check all tires frequently tomaintain the recommendedpressure. Tire pressureshould be checked whenthe tires are cold.
. Overinflated tires are morelikely to be cut, punctured,or broken by a suddenimpact — such as whenhitting a pothole. Keeptires at the recommendedpressure.
. Worn or old tires can causea crash. If the tread is badlyworn, replace them.
(Continued)
WARNING (Continued)
. Replace any tires that havebeen damaged by impactswith potholes, curbs, etc.
. Improperly repaired tirescan cause a crash. Only thedealer or an authorized tireservice center should repair,replace, dismount, and mountthe tires.
. Do not spin the tires inexcess of 55 km/h (35 mph)on slippery surfaces suchas snow, mud, ice, etc.Excessive spinning maycause the tires to explode.

Black plate (43,1)Chevrolet Impala Owner Manual - 2011
Vehicle Care 10-43
Tire Sidewall LabelingUseful information about atire is molded into its sidewall.The examples below show atypical passenger vehicle tireand a compact spare tiresidewall.
Passenger (P‐Metric) Tire Example
(A) Tire Size: The tire sizeis a combination of letters andnumbers used to define aparticular tire's width, height,aspect ratio, construction type,
and service description. See the“Tire Size” illustration later in thissection for more detail.
(B) TPC Spec (TirePerformance CriteriaSpecification): Originalequipment tires designed toGM's specific tire performancecriteria have a TPC specificationcode molded onto the sidewall.GM's TPC specifications meetor exceed all federal safetyguidelines.
(C) DOT (Departmentof Transportation): TheDepartment of Transportation(DOT) code indicates thatthe tire is in compliancewith the U.S. Departmentof Transportation MotorVehicle Safety Standards.
(D) Tire IdentificationNumber (TIN): The lettersand numbers following the DOT(Department of Transportation)code are the Tire IdentificationNumber (TIN). The TIN showsthe manufacturer and plantcode, tire size, and date the tirewas manufactured. The TIN ismolded onto both sides of thetire, although only one side mayhave the date of manufacture.
(E) Tire Ply Material: The typeof cord and number of plies inthe sidewall and under the tread.
(F) Uniform Tire QualityGrading (UTQG): Tiremanufacturers are requiredto grade tires based on threeperformance factors: treadwear,traction, and temperatureresistance. For more informationsee Uniform Tire QualityGrading on page 10‑61.

Black plate (44,1)Chevrolet Impala Owner Manual - 2011
10-44 Vehicle Care
(G) Maximum Cold InflationLoad Limit: Maximum loadthat can be carried and themaximum pressure neededto support that load.
Compact Spare Tire Example
(A) Tire Ply Material: The typeof cord and number of plies inthe sidewall and under the tread.
(B) Temporary Use Only:The compact spare tire ortemporary use tire has a treadlife of approximately 5 000 km(3,000 mi) and should not bedriven at speeds over 105 km/h(65 mph). The compact sparetire is for emergency use whena regular road tire has lost airand gone flat. If the vehiclehas a compact spare tire,see Compact Spare Tire onpage 10‑74 and If a Tire GoesFlat on page 10‑65.
(C) Tire Identification Number(TIN): The letters and numbersfollowing the DOT (Departmentof Transportation) code is theTire Identification Number (TIN).
The TIN shows themanufacturer and plantcode, tire size, and datethe tire was manufactured.The TIN is molded onto bothsides of the tire, although onlyone side may have the dateof manufacture.
(D) Maximum Cold InflationLoad Limit: Maximum loadthat can be carried and themaximum pressure neededto support that load.
(E) Tire Inflation: Thetemporary use tire or compactspare tire should be inflatedto 420 kPa (60 psi). For moreinformation on tire pressure andinflation see Tire Pressure onpage 10‑49.

Black plate (45,1)Chevrolet Impala Owner Manual - 2011
Vehicle Care 10-45
(F) Tire Size: A combinationof letters and numbers define atire's width, height, aspect ratio,construction type, and servicedescription. The letter T as thefirst character in the tire sizemeans the tire is for temporaryuse only.
(G) TPC Spec (TirePerformance CriteriaSpecification): Originalequipment tires designed toGM's specific tire performancecriteria have a TPC specificationcode molded onto the sidewall.GM's TPC specifications meetor exceed all federal safetyguidelines.
Tire Designations
Tire Size
The following is an exampleof a typical passenger vehicletire size.
(A) Passenger (P‐Metric) Tire:The United States version ofa metric tire sizing system.The letter P as the firstcharacter in the tire sizemeans a passenger vehicletire engineered to standardsset by the U.S. Tire and RimAssociation.
(B) Tire Width: The three‐digitnumber indicates the tire sectionwidth in millimeters fromsidewall to sidewall.
(C) Aspect Ratio: A two‐digitnumber that indicates the tireheight‐to‐width measurements.For example, if the tire sizeaspect ratio is 60, as shown initem C of the illustration, it wouldmean that the tire's sidewall is60 percent as high as it is wide.
(D) Construction Code: Aletter code is used to indicatethe type of ply construction inthe tire. The letter R meansradial ply construction; theletter D means diagonal orbias ply construction; and theletter B means belted‐bias plyconstruction.
Black plate (46,1)Chevrolet Impala Owner Manual - 2011
10-46 Vehicle Care
(E) Rim Diameter: Diameter ofthe wheel in inches.
(F) Service Description: Thesecharacters represent the loadindex and speed rating of thetire. The load index representsthe load carrying capacity a tireis certified to carry. The speedrating is the maximum speed atire is certified to carry a load.
Tire Terminology andDefinitionsAir Pressure: The amountof air inside the tire pressingoutward on each square inchof the tire. Air pressure isexpressed in psi (pounds persquare inch) or kPa (kilopascal).
Accessory Weight: Thecombined weight of optionalaccessories. Some examplesof optional accessories are,automatic transmission, powersteering, power brakes, powerwindows, power seats, and airconditioning.
Aspect Ratio: The relationshipof a tire's height to its width.
Belt: A rubber coated layer ofcords that is located betweenthe plies and the tread. Cordsmay be made from steel orother reinforcing materials.
Bead: The tire bead containssteel wires wrapped by steelcords that hold the tire ontothe rim.
Bias Ply Tire: A pneumatictire in which the plies are laidat alternate angles less than90 degrees to the centerlineof the tread.
Cold Tire Pressure: Theamount of air pressure in a tire,measured in kPa (kilopascal)or psi (pounds per square inch)before a tire has built up heatfrom driving. See Tire Pressureon page 10‑49.
Curb Weight: The weight of amotor vehicle with standard andoptional equipment includingthe maximum capacity of fuel,oil, and coolant, but withoutpassengers and cargo.

Black plate (47,1)Chevrolet Impala Owner Manual - 2011
Vehicle Care 10-47
DOT Markings: A codemolded into the sidewall ofa tire signifying that the tireis in compliance with the U.S.Department of Transportation(DOT) Motor Vehicle SafetyStandards. The DOT codeincludes the Tire IdentificationNumber (TIN), an alphanumericdesignator which can alsoidentify the tire manufacturer,production plant, brand, anddate of production.
GVWR: Gross Vehicle WeightRating. See Vehicle Load Limitson page 9‑12.
GAWR FRT: Gross AxleWeight Rating for the front axle.See Vehicle Load Limits onpage 9‑12.
GAWR RR: Gross AxleWeight Rating for the rear axle.See Vehicle Load Limits onpage 9‑12.
Intended Outboard Sidewall:The side of an asymmetrical tire,that must always face outwardwhen mounted on a vehicle.
Kilopascal (kPa): The metricunit for air pressure.
Light Truck (LT‐Metric) Tire: Atire used on light duty trucks andsome multipurpose passengervehicles.
Load Index: An assignednumber ranging from 1 to 279that corresponds to the loadcarrying capacity of a tire.
Maximum Inflation Pressure:The maximum air pressure towhich a cold tire can be inflated.The maximum air pressure ismolded onto the sidewall.
Maximum Load Rating:The load rating for a tire at themaximum permissible inflationpressure for that tire.
Maximum Loaded VehicleWeight: The sum of curbweight, accessory weight,vehicle capacity weight, andproduction options weight.
Normal Occupant Weight:The number of occupants avehicle is designed to seatmultiplied by 68 kg (150 lbs).See Vehicle Load Limits onpage 9‑12.
Occupant Distribution:Designated seating positions.
Outward Facing Sidewall:The side of an asymmetrical tirethat has a particular side thatfaces outward when mountedon a vehicle. The side of thetire that contains a whitewall,bears white lettering, or bearsmanufacturer, brand, and/ormodel name molding that ishigher or deeper than the samemoldings on the other sidewallof the tire.

Black plate (48,1)Chevrolet Impala Owner Manual - 2011
10-48 Vehicle Care
Passenger (P-Metric) Tire:A tire used on passenger carsand some light duty trucks andmultipurpose vehicles.
Recommended InflationPressure: Vehiclemanufacturer's recommendedtire inflation pressure asshown on the tire placard.See Tire Pressure onpage 10‑49 and VehicleLoad Limits on page 9‑12.
Radial Ply Tire: A pneumatictire in which the ply cords thatextend to the beads are laid at90 degrees to the centerline ofthe tread.
Rim: A metal support for a tireand upon which the tire beadsare seated.
Sidewall: The portion of a tirebetween the tread and the bead.
Speed Rating: Analphanumeric code assigned toa tire indicating the maximumspeed at which a tire canoperate.
Traction: The friction betweenthe tire and the road surface.The amount of grip provided.
Tread: The portion of a tirethat comes into contact withthe road.
Treadwear Indicators: Narrowbands, sometimes called wearbars, that show across thetread of a tire when only 1.6 mm(1/16 in) of tread remains.See When It Is Time for NewTires on page 10‑57.
UTQGS (Uniform TireQuality Grading Standards):A tire information systemthat provides consumerswith ratings for a tire's traction,temperature, and treadwear.Ratings are determinedby tire manufacturers usinggovernment testing procedures.The ratings are molded intothe sidewall of the tire.See Uniform Tire QualityGrading on page 10‑61.
Vehicle Capacity Weight:The number of designatedseating positions multiplied by68 kg (150 lbs) plus the ratedcargo load. See Vehicle LoadLimits on page 9‑12.

Black plate (49,1)Chevrolet Impala Owner Manual - 2011
Vehicle Care 10-49
Vehicle Maximum Load on theTire: Load on an individual tiredue to curb weight, accessoryweight, occupant weight, andcargo weight.
Vehicle Placard: A labelpermanently attached to avehicle showing the vehiclecapacity weight and theoriginal equipment tire sizeand recommended inflationpressure. See “Tire and LoadingInformation Label” under VehicleLoad Limits on page 9‑12.
Tire PressureTires need the correct amountof air pressure to operateeffectively.
Notice: Neither tireunderinflation noroverinflation is good.Underinflated tires, or tiresthat do not have enough air,can result in:. Tire overloading andover-heating which couldlead to a blowout.
. Premature orirregular wear.
. Poor handling.
. Reduced fuel economy.
Overinflated tires, or tiresthat have too much air, canresult in:. Unusual wear.. Poor handling.. Rough ride.. Needless damage fromroad hazards.
A vehicle-specific Tire andLoading Information labelis attached to the vehicle.This label shows the vehicle'soriginal equipment tires and thecorrect inflation pressures forthe tires when they are cold.The recommended cold tireinflation pressure, shown on thelabel, is the minimum amount ofair pressure needed to supportthe vehicle's maximum loadcarrying capacity.

Black plate (50,1)Chevrolet Impala Owner Manual - 2011
10-50 Vehicle Care
For additional informationregarding how much weightthe vehicle can carry, andan example of the Tire andLoading Information label,see Vehicle Load Limits onpage 9‑12. How you load thevehicle affects vehicle handlingand ride comfort. Never loadthe vehicle with more weightthan it was designed to carry.
When to Check
Check the tires once a month ormore. Do not forget to check thecompact spare tire, if the vehiclehas one. The compact spareshould be at 420 kPa (60 psi).For additional informationregarding the compact sparetire, see Compact Spare Tire onpage 10‑74.
How to Check
Use a good quality pocket-typegauge to check tire pressure.You cannot tell if the tires areproperly inflated simply bylooking at them. Radial tires maylook properly inflated even whenthey are underinflated. Checkthe tire's inflation pressure whenthe tires are cold. Cold meansthe vehicle has been sitting forat least three hours or drivenno more than 1.6 km (1 mi).
Remove the valve cap from thetire valve stem. Press the tiregauge firmly onto the valve toget a pressure measurement.
If the cold tire inflation pressurematches the recommendedpressure on the Tire andLoading Information label,no further adjustment isnecessary. If the inflationpressure is low, add air untilyou reach the recommendedamount.
If you overfill the tire, releaseair by pushing on the metal stemin the center of the tire valve.Re‐check the tire pressure withthe tire gauge.
Be sure to put the valve capsback on the valve stems.They help prevent leaks bykeeping out dirt and moisture.
Black plate (51,1)Chevrolet Impala Owner Manual - 2011
Vehicle Care 10-51
Tire Pressure MonitorSystemThe Tire Pressure Monitor System(TPMS) uses radio and sensortechnology to check tire pressurelevels. The TPMS sensors monitorthe air pressure in your tires andtransmit tire pressure readings toa receiver located in the vehicle.
Each tire, including the spare(if provided), should be checkedmonthly when cold and inflated tothe inflation pressure recommendedby the vehicle manufacturer onthe vehicle placard or tire inflationpressure label. (If your vehicle hastires of a different size than the sizeindicated on the vehicle placard ortire inflation pressure label, youshould determine the proper tireinflation pressure for those tires.)
As an added safety feature, yourvehicle has been equipped witha tire pressure monitoring system(TPMS) that illuminates a lowtire pressure telltale when one ormore of your tires is significantlyunder‐inflated.
Accordingly, when the low tirepressure telltale illuminates, youshould stop and check your tires assoon as possible, and inflate themto the proper pressure. Driving ona significantly under‐inflated tirecauses the tire to overheat and canlead to tire failure. Under‐inflationalso reduces fuel efficiency andtire tread life, and may affect thevehicle's handling and stoppingability.
Please note that the TPMS isnot a substitute for proper tiremaintenance, and it is the driver'sresponsibility to maintain correcttire pressure, even if under‐inflationhas not reached the level to triggerillumination of the TPMS low tirepressure telltale.
Your vehicle has also beenequipped with a TPMS malfunctionindicator to indicate when thesystem is not operating properly.The TPMS malfunction indicator iscombined with the low tire pressuretelltale. When the system detects amalfunction, the telltale will flash forapproximately one minute and thenremain continuously illuminated.This sequence will continue uponsubsequent vehicle start‐ups aslong as the malfunction exists.

Black plate (52,1)Chevrolet Impala Owner Manual - 2011
10-52 Vehicle Care
When the malfunction indicatoris illuminated, the system maynot be able to detect or signal lowtire pressure as intended. TPMSmalfunctions may occur for a varietyof reasons, including the installationof replacement or alternate tires orwheels on the vehicle that preventthe TPMS from functioning properly.Always check the TPMS malfunctiontelltale after replacing one or moretires or wheels on your vehicle toensure that the replacement oralternate tires and wheels allowthe TPMS to continue to functionproperly.
See Tire Pressure MonitorOperation on page 10‑52 foradditional information.
Federal CommunicationsCommission (FCC) andIndustry Canada
See Radio FrequencyStatement on page 13‑17 forinformation regarding Part 15of the Federal CommunicationsCommission (FCC) rules andIndustry Canada StandardsRSS-210/220/310.
Tire Pressure MonitorOperationThis vehicle may have a TirePressure Monitor System (TPMS).The TPMS is designed to warnthe driver when a low tire pressurecondition exists. TPMS sensors aremounted onto each tire and wheelassembly, excluding the spare tireand wheel assembly. The TPMSsensors monitor the air pressurein the tires and transmit the tirepressure readings to a receiverlocated in the vehicle.
When a low tire pressure conditionis detected, the TPMS illuminatesthe low tire pressure warning lightlocated on the instrument cluster.If the warning light comes on, stopas soon as possible and inflate thetires to the recommended pressureshown on the Tire and LoadingInformation label. See VehicleLoad Limits on page 9‑12.
A message to check the pressurein a specific tire displays in theDriver Information Center (DIC).The low tire pressure warninglight and the DIC warning messagecome on at each ignition cycle untilthe tires are inflated to the correctinflation pressure. Using the DIC,tire pressure levels can be viewed.
Black plate (53,1)Chevrolet Impala Owner Manual - 2011
Vehicle Care 10-53
For additional information anddetails about the DIC operationand displays, see Driver InformationCenter (DIC) on page 5‑26 andTire Messages on page 5‑37.
The low tire pressure warning lightmay come on in cool weather whenthe vehicle is first started, and thenturn off as the vehicle is driven.This could be an early indicatorthat the air pressure is getting lowand needs to be inflated to theproper pressure.
A Tire and Loading Informationlabel shows the size of the originalequipment tires and the correctinflation pressure for the tires whenthey are cold. See Vehicle LoadLimits on page 9‑12, for an exampleof the Tire and Loading Informationlabel and its location. Also see TirePressure on page 10‑49.
The TPMS can warn about alow tire pressure condition butit does not replace normal tiremaintenance. See Tire Inspectionon page 10‑56, Tire Rotation onpage 10‑56, and Tires onpage 10‑42.
Notice: Tire sealant materials arenot all the same. A non-approvedtire sealant could damage theTPMS sensors. TPMS sensordamage caused by usingan incorrect tire sealant isnot covered by the vehiclewarranty. Always use onlythe GM-approved tire sealantavailable through your dealeror included in the vehicle.
TPMS Malfunction Light andMessage
The TPMS will not functionproperly if one or more of theTPMS sensors are missing orinoperable. When the systemdetects a malfunction, the low tirepressure warning light flashes forabout one minute and then stayson for the remainder of the ignitioncycle. A DIC warning message alsodisplays. The malfunction light andDIC warning message come on ateach ignition cycle until the problemis corrected. Some of the conditionsthat can cause these to comeon are:. One of the road tires has been
replaced with the spare tire.The spare tire does not have aTPMS sensor. The malfunctionlight and the DIC messageshould go off after the roadtire is replaced and the sensormatching process is performedsuccessfully. See “TPMS SensorMatching Process” later in thissection.

Black plate (54,1)Chevrolet Impala Owner Manual - 2011
10-54 Vehicle Care
. The TPMS sensor matchingprocess was not done ornot completed successfullyafter rotating the tires. Themalfunction light and the DICmessage should go off aftersuccessfully completing thesensor matching process.See “TPMS Sensor MatchingProcess” later in this section.
. One or more TPMS sensorsare missing or damaged. Themalfunction light and the DICmessage should go off when theTPMS sensors are installed andthe sensor matching processis performed successfully.See your dealer for service.
. Replacement tires or wheels donot match the original equipmenttires or wheels. Tires and wheelsother than those recommendedcould prevent the TPMS fromfunctioning properly. See BuyingNew Tires on page 10‑58.
. Operating electronic devices orbeing near facilities using radiowave frequencies similar to theTPMS could cause the TPMSsensors to malfunction.
If the TPMS is not functioningproperly, it cannot detect or signal alow tire condition. See your dealerfor service if the TPMS malfunctionlight and DIC message come onand stay on.
TPMS Sensor MatchingProcess
Each TPMS sensor has a uniqueidentification code. The identificationcode needs to be matched to anew tire/wheel position after rotatingthe vehicle’s tires or replacingone or more of the TPMS sensors.Also, the TPMS sensor matchingprocess should be performed afterreplacing a spare tire with a roadtire containing the TPMS sensor.The malfunction light and the DICmessage should go off at the nextignition cycle. The sensors arematched to the tire/wheel positions,using a TPMS relearn tool, in thefollowing order: driver side front tire,passenger side front tire, passengerside rear tire, and driver side rear.See your dealer for service or topurchase a relearn tool.

Black plate (55,1)Chevrolet Impala Owner Manual - 2011
Vehicle Care 10-55
There are two minutes to matchthe first tire/wheel position, andfive minutes overall to match allfour tire/wheel positions. If it takeslonger, the matching process stopsand must be restarted.
The TPMS sensor matchingprocess is:
1. Set the parking brake.
2. Turn the ignition to ON/RUN withthe engine off.
3. Press the Remote KeylessEntry (RKE) transmitter's Qand " buttons at the same timefor approximately five seconds.The horn sounds twice to signalthe receiver is in relearn modeand the TIRE LEARNINGACTIVE message displayson the DIC screen.
4. Start with the driver sidefront tire.
5. Place the relearn tool againstthe tire sidewall, near the valvestem. Then press the buttonto activate the TPMS sensor.A horn chirp confirms that thesensor identification code hasbeen matched to this tire andwheel position.
6. Proceed to the passengerside front tire, and repeat theprocedure in Step 5.
7. Proceed to the passengerside rear tire, and repeat theprocedure in Step 5.
8. Proceed to the driver side reartire, and repeat the procedurein Step 5. The horn soundstwo times to indicate the sensoridentification code has beenmatched to the driver side reartire, and the TPMS sensormatching process is no longeractive. The TIRE LEARNINGACTIVE message on the DICdisplay screen goes off.
9. Turn the ignition to LOCK/OFF.
10. Set all four tires to therecommended air pressurelevel as indicated on the Tireand Loading Information label.

Black plate (56,1)Chevrolet Impala Owner Manual - 2011
10-56 Vehicle Care
Tire InspectionGM recommends that the tires,including the spare tire, if thevehicle has one, be inspectedfor signs of wear or damage atleast once a month.
Replace the tire if:. The indicators at three or
more places around the tirecan be seen.
. There is cord or fabricshowing through the tire'srubber.
. The tread or sidewall iscracked, cut, or snaggeddeep enough to show cordor fabric.
. The tire has a bump, bulge,or split.
. The tire has a puncture, cut,or other damage that cannotbe repaired well because ofthe size or location of thedamage.
Tire RotationTires should be rotatedevery 12 000 km (7,500 mi).See Scheduled Maintenance onpage 11‑2.
The purpose of a regular tirerotation is to achieve a uniformwear for all tires on the vehicle.This will ensure that the vehiclecontinues to perform most like itdid when the tires were new.
Any time you notice unusualwear, rotate the tires as soonas possible and check wheelalignment. Also check fordamaged tires or wheels.
See When It Is Time for NewTires on page 10‑57 and WheelReplacement on page 10‑63.
When rotating the vehicle's tires,always use the correct rotationpattern shown here.
Do not include the compactspare tire in the tire rotation.

Black plate (57,1)Chevrolet Impala Owner Manual - 2011
Vehicle Care 10-57
After the tires have beenrotated, adjust the front and rearinflation pressures as shown onthe Tire and Loading Informationlabel. See Tire Pressure onpage 10‑49 and Vehicle LoadLimits on page 9‑12.
Reset the Tire Pressure MonitorSystem. See Tire PressureMonitor Operation onpage 10‑52.
Make certain that all wheelnuts are properly tightened.See “Wheel Nut Torque” underCapacities and Specifications onpage 12‑2.
{ WARNING
Rust or dirt on a wheel, or on theparts to which it is fastened, canmake wheel nuts become looseafter time. The wheel could comeoff and cause an accident. Whenchanging a wheel, remove anyrust or dirt from places wherethe wheel attaches to the vehicle.In an emergency, use a cloth ora paper towel to do this; but besure to use a scraper or wirebrush later, if needed, to get allthe rust or dirt off. See If a TireGoes Flat on page 10‑65.
Lightly coat the center of thewheel hub with wheel bearinggrease after a wheel change ortire rotation to prevent corrosionor rust build-up. Do not getgrease on the flat wheelmounting surface or on thewheel nuts or bolts.
When It Is Time for NewTiresFactors such as maintenance,temperatures, driving speeds,vehicle loading, and road conditionsaffect the wear rate of the tires.
Treadwear indicators are oneway to tell when it is time for newtires. Treadwear indicators appearwhen the tires have only 1.6 mm(1/16 in) or less of tread remaining.

Black plate (58,1)Chevrolet Impala Owner Manual - 2011
10-58 Vehicle Care
See Tire Inspection on page 10‑56and Tire Rotation on page 10‑56 formore information.
The rubber in tires ages over time.This also applies for the spare tire,if the vehicle has one, even if it isnever used. Multiple conditionsincluding temperatures, loadingconditions, and inflation pressuremaintenance affect how fast agingtakes place. Tires will typicallyneed to be replaced due to wearbefore they may need to bereplaced due to age. Consult the tiremanufacturer for more informationon when tires should be replaced.
Vehicle Storage
Tires age when stored normallymounted on a parked vehicle.Park a vehicle that will be storedfor at least a month in a cool, dry,clean area away from direct sunlightto slow aging. This area should befree of grease, gasoline, or othersubstances that can deterioraterubber.
Parking for an extended periodcan cause flat spots on the tiresthat may result in vibrations whiledriving. When storing a vehicle forat least a month, remove the tiresor raise the vehicle to reduce theweight from the tires.
Buying New TiresGM has developed and matchedspecific tires for the vehicle.The original equipment tiresinstalled on the vehicle, whenit was new, were designedto meet General MotorsTire Performance CriteriaSpecification (TPC Spec)system rating. If you needreplacement tires, GM stronglyrecommends that you gettires with the same TPC Specrating. This way, the vehiclewill continue to have tires thatare designed to give the sameperformance and vehicle safety,during normal use, as theoriginal tires.

Black plate (59,1)Chevrolet Impala Owner Manual - 2011
Vehicle Care 10-59
GM's exclusive TPC Specsystem considers over a dozencritical specifications thatimpact the overall performanceof the vehicle, including brakesystem performance, rideand handling, traction control,and tire pressure monitoringperformance. GM's TPC Specnumber is molded onto the tire'ssidewall near the tire size. If thetires have an all‐season treaddesign, the TPC Spec numberwill be followed by an MSfor mud and snow. See TireSidewall Labeling on page 10‑43for additional information.
GM recommends replacing tiresin sets of four. This is becauseuniform tread depth on all tires
will help keep the vehicleperforming most like it didwhen the tires were new.Replacing less than a full setof tires can affect the brakingand handling performance of thevehicle. See Tire Inspection onpage 10‑56 and Tire Rotation onpage 10‑56 for information onproper tire rotation.
{ WARNING
Tires could explode duringimproper service. Attempting tomount or dismount a tire couldcause injury or death. Only yourdealer or authorized tire servicecenter should mount or dismountthe tires.
{ WARNING
Mixing tires could cause youto lose control while driving.If you mix tires of differentsizes, brands, or types(radial and bias-belted tires),the vehicle may not handleproperly, and you could havea crash. Using tires of differentsizes, brands, or types mayalso cause damage to thevehicle. Be sure to use thecorrect size, brand, and typeof tires on all wheels. It isall right to drive with thecompact spare temporarily,as it was developed for useon the vehicle. See CompactSpare Tire on page 10‑74.

Black plate (60,1)Chevrolet Impala Owner Manual - 2011
10-60 Vehicle Care
{ WARNING
Using bias-ply tires on thevehicle may cause the wheelrim flanges to develop cracksafter many miles of driving.A tire and/or wheel could failsuddenly and cause a crash.Use only radial-ply tires withthe wheels on the vehicle.
If you must replace the vehicle'stires with those that do nothave a TPC Spec number,make sure they are the samesize, load range, speed rating,and construction type (radialand bias‐belted tires) as thevehicle's original tires.
Vehicles that have a tirepressure monitoring systemcould give an inaccuratelow‐pressure warning ifnon‐TPC Spec rated tiresare installed on the vehicle.Non‐TPC Spec rated tires maygive a low‐pressure warningthat is higher or lower than theproper warning level you wouldget with TPC Spec rated tires.See Tire Pressure MonitorSystem on page 10‑51.
The vehicle's original equipmenttires are listed on the Tireand Loading Information label.See Vehicle Load Limits onpage 9‑12 for more informationabout the Tire and LoadingInformation label and itslocation on the vehicle.
Different Size Tires andWheelsIf wheels or tires are installed thatare a different size than the originalequipment wheels and tires, vehicleperformance, including its braking,ride and handling characteristics,stability, and resistance to rollovermay be affected. If the vehicle haselectronic systems such as antilockbrakes, rollover airbags, tractioncontrol, and electronic stabilitycontrol, the performance of thesesystems can also be affected.
Black plate (61,1)Chevrolet Impala Owner Manual - 2011
Vehicle Care 10-61
{ WARNING
If different sized wheelsare used, there may notbe an acceptable level ofperformance and safety iftires not recommended forthose wheels are selected.This increases the chance ofa crash and serious injury.Only use GM specific wheeland tire systems developedfor the vehicle, and have themproperly installed by a GMcertified technician.
See Buying New Tires onpage 10‑58 and Accessoriesand Modifications on page 10‑3for additional information.
Uniform Tire QualityGradingQuality grades can be foundwhere applicable on the tiresidewall between tread shoulderand maximum section width.For example:
Treadwear 200 Traction AATemperature A
The following information relatesto the system developed by theUnited States National HighwayTraffic Safety Administration(NHTSA), which grades tiresby treadwear, traction, andtemperature performance.This applies only to vehiclessold in the United States.The grades are molded on thesidewalls of most passenger cartires. The Uniform Tire Quality
Grading (UTQG) systemdoes not apply to deeptread, winter-type snow tires,space-saver, or temporary usespare tires, tires with nominalrim diameters of 10 to 12 inches(25 to 30 cm), or to somelimited-production tires.
While the tires available onGeneral Motors passengercars and light trucks may varywith respect to these grades,they must also conform tofederal safety requirements andadditional General Motors TirePerformance Criteria (TPC)standards.
All Passenger Car Tires MustConform to Federal SafetyRequirements In AdditionTo These Grades.

Black plate (62,1)Chevrolet Impala Owner Manual - 2011
10-62 Vehicle Care
Treadwear
The treadwear grade is acomparative rating basedon the wear rate of the tirewhen tested under controlledconditions on a specifiedgovernment test course.For example, a tire graded150 would wear one and ahalf (1½) times as well onthe government course asa tire graded 100. The relativeperformance of tires dependsupon the actual conditions oftheir use, however, and maydepart significantly from thenorm due to variations indriving habits, servicepractices and differencesin road characteristics andclimate.
Traction – AA, A, B, C
The traction grades, fromhighest to lowest, are AA, A, B,and C. Those grades representthe tire's ability to stop onwet pavement as measuredunder controlled conditionson specified governmenttest surfaces of asphalt andconcrete. A tire marked C mayhave poor traction performance.Warning: The traction gradeassigned to this tire is basedon straight-ahead brakingtraction tests, and does notinclude acceleration, cornering,hydroplaning, or peak tractioncharacteristics.
Temperature – A, B, C
The temperature gradesare A (the highest), B, and C,representing the tire's resistanceto the generation of heat andits ability to dissipate heatwhen tested under controlledconditions on a specifiedindoor laboratory test wheel.Sustained high temperature cancause the material of the tireto degenerate and reduce tirelife, and excessive temperaturecan lead to sudden tire failure.The grade C corresponds to alevel of performance which allpassenger car tires must meetunder the Federal Motor SafetyStandard No. 109. Grades Band A represent higherlevels of performance on thelaboratory test wheel thanthe minimum required by law.

Black plate (63,1)Chevrolet Impala Owner Manual - 2011
Vehicle Care 10-63
Warning: The temperaturegrade for this tire is establishedfor a tire that is properlyinflated and not overloaded.Excessive speed, underinflation,or excessive loading, eitherseparately or in combination,can cause heat buildup andpossible tire failure.
Wheel Alignment and TireBalanceThe tires and wheels werealigned and balanced at thefactory to provide the longest tirelife and best overall performance.Adjustments to wheel alignment andtire balancing will not be necessaryon a regular basis. However, checkthe alignment if there is unusual tirewear or if the vehicle is pulling toone side or the other. If the vehiclevibrates when driving on a smoothroad, the tires and wheels mightneed to be rebalanced. See yourdealer for proper diagnosis.
Wheel ReplacementReplace any wheel that is bent,cracked, or badly rusted orcorroded. If wheel nuts keepcoming loose, the wheel, wheelbolts, and wheel nuts should bereplaced. If the wheel leaks air,replace it. Some aluminum wheelscan be repaired. See your dealerif any of these conditions exist.
Your dealer will know the kind ofwheel that is needed.
Each new wheel should havethe same load-carrying capacity,diameter, width, offset, and bemounted the same way as theone it replaces.
Replace wheels, wheel bolts,wheel nuts, or Tire Pressure MonitorSystem (TPMS) sensors with newGM original equipment parts.
{ WARNING
Using the wrong replacementwheels, wheel bolts, or wheelnuts can be dangerous. It couldaffect the braking and handlingof the vehicle. Tires can lose air,and cause loss of control, causinga crash. Always use the correctwheel, wheel bolts, and wheelnuts for replacement.
Notice: The wrong wheel canalso cause problems withbearing life, brake cooling,speedometer or odometercalibration, headlamp aim,bumper height, vehicle groundclearance, and tire or tire chainclearance to the body andchassis.
See If a Tire Goes Flat onpage 10‑65 for more information.

Black plate (64,1)Chevrolet Impala Owner Manual - 2011
10-64 Vehicle Care
Used Replacement Wheels
{ WARNING
Replacing a wheel with a usedone is dangerous. How it hasbeen used or how far it has beendriven may be unknown. It couldfail suddenly and cause a crash.When replacing wheels, use anew GM original equipmentwheel.
Tire Chains
{ WARNING
Do not use tire chains. There isnot enough clearance. Tire chainsused on a vehicle without theproper amount of clearance cancause damage to the brakes,suspension or other vehicle parts.The area damaged by the tirechains could cause you to losecontrol of the vehicle and you orothers may be injured in a crash.
(Continued)
WARNING (Continued)
Use another type of tractiondevice only if its manufacturerrecommends it for use on thevehicle and tire size combinationand road conditions. Followthat manufacturer's instructions.To help avoid damage to thevehicle, drive slowly, readjustor remove the device if it iscontacting the vehicle, and do notspin the vehicle's wheels. If youdo find traction devices that willfit, install them on the front tires.

Black plate (65,1)Chevrolet Impala Owner Manual - 2011
Vehicle Care 10-65
If a Tire Goes FlatIt is unusual for a tire to blowoutwhile you are driving, especiallyif you maintain the vehicle's tiresproperly. If air goes out of a tire,it is much more likely to leak outslowly. But if you should ever havea blowout, here are a few tips aboutwhat to expect and what to do:
If a front tire fails, the flat tirecreates a drag that pulls the vehicletoward that side. Take your footoff the accelerator pedal and gripthe steering wheel firmly. Steer tomaintain lane position, and thengently brake to a stop, well off theroad, if possible.
A rear blowout, particularly on acurve, acts much like a skid andmay require the same correctionyou would use in a skid. In any rearblowout remove your foot from theaccelerator pedal. Get the vehicle
under control by steering the wayyou want the vehicle to go. It maybe very bumpy and noisy, but youcan still steer. Gently brake to astop, well off the road, if possible.
{ WARNING
Driving on a flat tire will causepermanent damage to the tire.Re-inflating a tire after it hasbeen driven on while severelyunderinflated or flat may causea blowout and a serious crash.Never attempt to re-inflate atire that has been driven onwhile severely underinflatedor flat. Have your dealer or anauthorized tire service centerrepair or replace the flat tire assoon as possible.
{ WARNING
Lifting a vehicle and gettingunder it to do maintenance orrepairs is dangerous without theappropriate safety equipment andtraining. If a jack is provided withthe vehicle, it is designed only forchanging a flat tire. If it is used foranything else, you or others couldbe badly injured or killed if thevehicle slips off the jack. If a jackis provided with the vehicle, onlyuse it for changing a flat tire.
If a tire goes flat, avoid further tireand wheel damage by driving slowlyto a level place, well off the road,if possible. Turn on the hazardwarning flashers. See HazardWarning Flashers on page 6‑4.

Black plate (66,1)Chevrolet Impala Owner Manual - 2011
10-66 Vehicle Care
{ WARNING
Changing a tire can bedangerous. The vehicle canslip off the jack and roll overor fall causing injury or death.Find a level place to change thetire. To help prevent the vehiclefrom moving:
1. Set the parking brake firmly.
2. Put an automatictransmission shift lever inP (Park), or shift a manualtransmission to 1 (First) orR (Reverse).
3. Turn off the engine and donot restart while the vehicleis raised.
4. Do not allow passengers toremain in the vehicle.
5. Place wheel blocks onboth sides of the tire at theopposite corner of the tirebeing changed.
When the vehicle has a flat tire (B),use the following example as aguide to assist in the placementof wheel blocks (A).
A. Wheel Block
B. Flat Tire
The following information explainshow to repair or change a tire.
Tire Changing
Removing the Spare Tire andTools
The equipment you will need islocated in the trunk.
1. Open the trunk. See Trunk onpage 2‑10.
2. Remove the convenience net ifthe vehicle has one.
3. Remove the spare tire cover.
4. Turn the wing nutcounterclockwise and remove it.
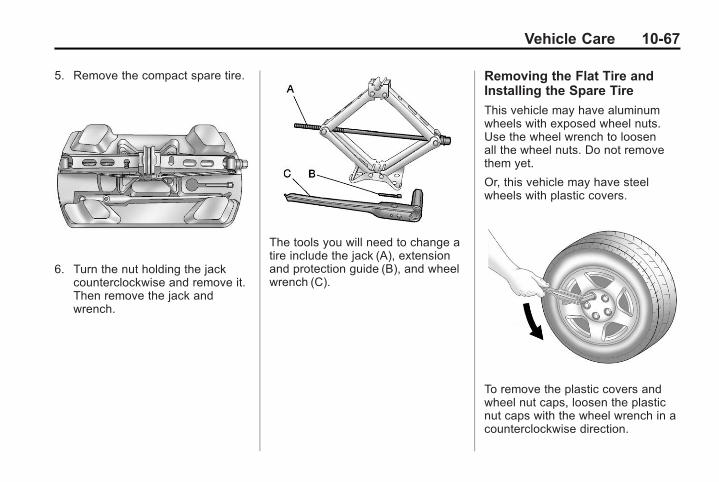
Black plate (67,1)Chevrolet Impala Owner Manual - 2011
Vehicle Care 10-67
5. Remove the compact spare tire.
6. Turn the nut holding the jackcounterclockwise and remove it.Then remove the jack andwrench.
The tools you will need to change atire include the jack (A), extensionand protection guide (B), and wheelwrench (C).
Removing the Flat Tire andInstalling the Spare Tire
This vehicle may have aluminumwheels with exposed wheel nuts.Use the wheel wrench to loosenall the wheel nuts. Do not removethem yet.
Or, this vehicle may have steelwheels with plastic covers.
To remove the plastic covers andwheel nut caps, loosen the plasticnut caps with the wheel wrench in acounterclockwise direction.

Black plate (68,1)Chevrolet Impala Owner Manual - 2011
10-68 Vehicle Care
If needed, finish loosening themwith your fingers. The plastic nutcaps will not come off.
If needed, use the flat end of thewheel wrench and pry along theedge of the cover until it comes off.The edge of the wheel cover couldbe sharp, so do not try to removeit with your bare hands. Do notdrop the cover or lay it face down,as it could become scratched ordamaged. Store the wheel coverin the trunk until the flat tire isrepaired or replaced.
Once you have removed the wheelcover, use the following procedureto remove the flat tire and install thespare tire.
1. Do a safety check beforeproceeding. See If a TireGoes Flat on page 10‑65.
2. Turn the wheel wrenchcounterclockwise once oneach wheel nut to loosen it.Do not remove them yet.
3. For all wheel types, findthe jacking location usingthe diagram above and thecorresponding jacking notcheslocated on the bottom side of theplastic molding. The notches inthe plastic molding are markedwith a triangle shape to help youfind them.
The front location is about17.7 cm (7.0 in) from the rearedge of the front wheel well.The rear location is about11.4 cm (4.5 in) from the frontedge of the rear wheel well.

Black plate (69,1)Chevrolet Impala Owner Manual - 2011
Vehicle Care 10-69
4. Put the compact spare tirenear you.
{ WARNING
Getting under a vehicle when itis jacked up is dangerous. If thevehicle slips off the jack you couldbe badly injured or killed. Neverget under a vehicle when it issupported only by a jack.
{ WARNING
Raising the vehicle with thejack improperly positioned candamage the vehicle and evenmake the vehicle fall. To helpavoid personal injury and vehicledamage, be sure to fit the jacklift head into the proper locationbefore raising the vehicle.
{ WARNING
Lifting a vehicle and gettingunder it to do maintenance orrepairs is dangerous without theappropriate safety equipment andtraining. If a jack is provided withthe vehicle, it is designed only forchanging a flat tire. If it is used foranything else, you or others couldbe badly injured or killed if thevehicle slips off the jack. If a jackis provided with the vehicle, onlyuse it for changing a flat tire.
5. Raise the vehicle by turning thejack handle clockwise. Raisethe vehicle far enough off theground to install the compactspare tire.
6. Remove all wheel nuts and theflat tire.
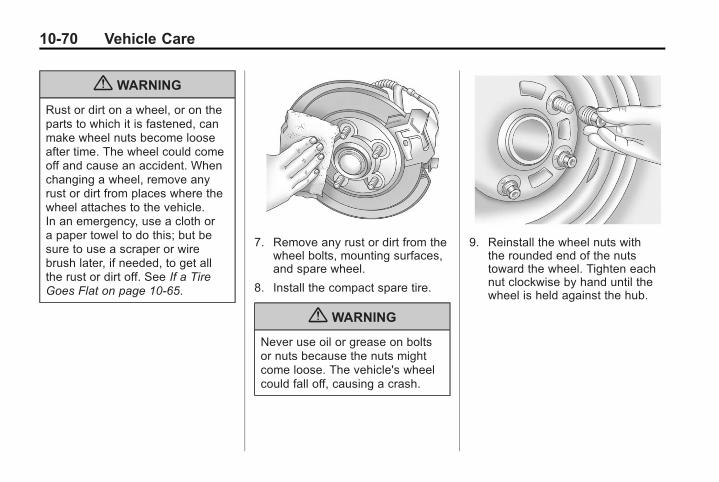
Black plate (70,1)Chevrolet Impala Owner Manual - 2011
10-70 Vehicle Care
{ WARNING
Rust or dirt on a wheel, or on theparts to which it is fastened, canmake wheel nuts become looseafter time. The wheel could comeoff and cause an accident. Whenchanging a wheel, remove anyrust or dirt from places where thewheel attaches to the vehicle.In an emergency, use a cloth ora paper towel to do this; but besure to use a scraper or wirebrush later, if needed, to get allthe rust or dirt off. See If a TireGoes Flat on page 10‑65.
7. Remove any rust or dirt from thewheel bolts, mounting surfaces,and spare wheel.
8. Install the compact spare tire.
{ WARNING
Never use oil or grease on boltsor nuts because the nuts mightcome loose. The vehicle's wheelcould fall off, causing a crash.
9. Reinstall the wheel nuts withthe rounded end of the nutstoward the wheel. Tighten eachnut clockwise by hand until thewheel is held against the hub.

Black plate (71,1)Chevrolet Impala Owner Manual - 2011
Vehicle Care 10-71
10. Lower the vehicle byturning the jack handlecounterclockwise. Lowerthe jack completely.
{ WARNING
Wheel nuts that are improperly orincorrectly tightened can causethe wheels to become loose orcome off. The wheel nuts shouldbe tightened with a torque wrench
(Continued)
WARNING (Continued)
to the proper torque specificationafter replacing. Follow thetorque specification supplied bythe aftermarket manufacturerwhen using accessory lockingwheel nuts. See Capacities andSpecifications on page 12‑2 fororiginal equipment wheel nuttorque specifications.
Notice: Improperly tightenedwheel nuts can lead to brakepulsation and rotor damage.To avoid expensive brake repairs,evenly tighten the wheel nutsin the proper sequence and tothe proper torque specification.See Capacities and Specificationson page 12‑2 for the wheel nuttorque specification.
11. Tighten the wheel nuts firmlyin a crisscross sequence asshown.
Notice: Wheel covers will not fiton the vehicle's compact spare.If you try to put a wheel cover onthe compact spare, the cover orthe spare could be damaged.

Black plate (72,1)Chevrolet Impala Owner Manual - 2011
10-72 Vehicle Care
Storing a Flat or Spare Tireand Tools
{ WARNING
Storing a jack, a tire, or otherequipment in the passengercompartment of the vehicle couldcause injury. In a sudden stop orcollision, loose equipment couldstrike someone. Store all thesein the proper place.
After the compact spare tire hasbeen installed on the vehicle,store the flat tire in the trunk.
When storing a full-size tire,use the extension with the extensionprotector, located in the foamholder, to help avoid wheel surfacedamage.
To store a full-size tire:
1. Install the tools in their originallocation in the trunk area andsecure.
2. Place the tire valve stem facingdown and the protector/guideplaced through a wheel bolthole and threaded onto thebolt screw.
3. Remove the protector and attachthe retainer securely
4. Store the cover as far forward aspossible.
When storing a compact spare tirein the trunk, put the protector backin the foam holder.
The compact spare is for temporaryuse only. Replace the compactspare tire with a full-size tire assoon as you can. See CompactSpare Tire on page 10‑74. Use thisas a guide for storing the compactspare tire and tools. Compact Spare Tire

Black plate (73,1)Chevrolet Impala Owner Manual - 2011
Vehicle Care 10-73
A. Cover
B. Retainer
C. Compact Spare Tire
D. Wing Nut
E. Jack
F. Wheel Wrench
G. Extension Protector
H. Foam Holder
I. Bolt Screw
Full-Size Flat Tire
A. Retainer
B. Full-Size Flat Tire
C. Protective Guide
D. Extension Bolt Screw
E. Wing Nut
F. Jack
G. Wheel Wrench
H. Foam Holder
I. Bolt Screw

Black plate (74,1)Chevrolet Impala Owner Manual - 2011
10-74 Vehicle Care
Compact Spare Tire
{ WARNING
Driving with more than onecompact spare tire at a timecould result in loss of brakingand handling. This could leadto a crash and you or otherscould be injured. Use only onecompact spare tire at a time.
Although the compact spare tirewas fully inflated when the vehiclewas new, it can lose air after atime. Check the inflation pressureregularly. It should be 420 kPa(60 psi).
After installing the compact spareon the vehicle, you should stop assoon as possible and make surethe spare tire is correctly inflated.The compact spare is made toperform well at speeds up to105 km/h (65 mph) for distances upto 5 000 km (3,000miles), so youcan finish your trip and have thefull-size tire repaired or replacedwhere you want. You must calibratethe tire inflation monitor system afterinstalling or removing the compactspare. See Tire Pressure MonitorSystem on page 10‑51. The systemmay not work correctly when thecompact spare is installed on thevehicle. Of course, it's best toreplace the spare with a full-sizetire as soon as you can. The sparewill last longer and be in goodshape in case you need it again.
Notice: When the compactspare is installed, do not takethe vehicle through an automaticcar wash with guide rails. Thecompact spare can get caught onthe rails which can damage thetire, wheel and other parts of thevehicle.
Do not use the compact spare onother vehicles.
And do not mix the compact sparetire or wheel with other wheels ortires. They will not fit. Keep thespare tire and its wheel together.
Notice: Tire chains will not fitthe compact spare. Using themcan damage the vehicle and candamage the chains too. Do notuse tire chains on the compactspare.

Black plate (75,1)Chevrolet Impala Owner Manual - 2011
Vehicle Care 10-75
Jump StartingFor more information about thevehicle battery, see Battery onpage 10‑29.
If your vehicle's battery has rundown, you may want to use anothervehicle and some jumper cables tostart your vehicle. Be sure to usethe following steps to do it safely.
{ WARNING
Batteries can hurt you. They canbe dangerous because:
. They contain acid that canburn you.
. They contain gas that canexplode or ignite.
. They contain enoughelectricity to burn you.
If you do not follow these stepsexactly, some or all of thesethings can hurt you.
Notice: Ignoring these stepscould result in costly damage tothe vehicle that would not becovered by the warranty.
Trying to start the vehicle bypushing or pulling it will notwork, and it could damage thevehicle.
1. Check the other vehicle. It musthave a 12‐volt battery with anegative ground system.
Notice: Only use a vehiclethat has a 12-volt system witha negative ground for jumpstarting. If the other vehicle doesnot have a 12-volt system with anegative ground, both vehiclescan be damaged.
2. Get the vehicles close enoughso the jumper cables can reach,but be sure the vehicles arenot touching each other. If theyare, it could cause a groundconnection you do not want.You would not be able to startyour vehicle, and the badgrounding could damagethe electrical systems.
To avoid the possibility ofthe vehicles rolling, set theparking brake firmly on bothvehicles involved in the jumpstart procedure. Put anautomatic transmissionin P (Park) or a manualtransmission in N (Neutral)before setting the parkingbrake.
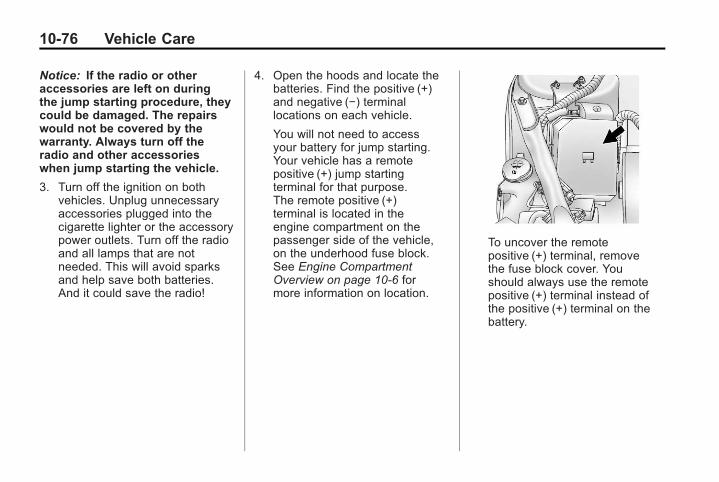
Black plate (76,1)Chevrolet Impala Owner Manual - 2011
10-76 Vehicle Care
Notice: If the radio or otheraccessories are left on duringthe jump starting procedure, theycould be damaged. The repairswould not be covered by thewarranty. Always turn off theradio and other accessorieswhen jump starting the vehicle.
3. Turn off the ignition on bothvehicles. Unplug unnecessaryaccessories plugged into thecigarette lighter or the accessorypower outlets. Turn off the radioand all lamps that are notneeded. This will avoid sparksand help save both batteries.And it could save the radio!
4. Open the hoods and locate thebatteries. Find the positive (+)and negative (−) terminallocations on each vehicle.
You will not need to accessyour battery for jump starting.Your vehicle has a remotepositive (+) jump startingterminal for that purpose.The remote positive (+)terminal is located in theengine compartment on thepassenger side of the vehicle,on the underhood fuse block.See Engine CompartmentOverview on page 10‑6 formore information on location.
To uncover the remotepositive (+) terminal, removethe fuse block cover. Youshould always use the remotepositive (+) terminal instead ofthe positive (+) terminal on thebattery.
Black plate (77,1)Chevrolet Impala Owner Manual - 2011
Vehicle Care 10-77
{ WARNING
An electric fan can start up evenwhen the engine is not runningand can injure you. Keep hands,clothing and tools away from anyunderhood electric fan.
{ WARNING
Using an open flame near abattery can cause battery gas toexplode. People have been hurtdoing this, and some have beenblinded. Use a flashlight if youneed more light.
Be sure the battery has enoughwater. You do not need to addwater to the battery installed inyour new vehicle. But if a batteryhas filler caps, be sure the rightamount of fluid is there. If it is low,
(Continued)
WARNING (Continued)
add water to take care of thatfirst. If you do not, explosive gascould be present.
Battery fluid contains acid thatcan burn you. Do not get it onyou. If you accidentally get it inyour eyes or on your skin, flushthe place with water and getmedical help immediately.
{ WARNING
Fans or other moving engineparts can injure you badly. Keepyour hands away from movingparts once the engine is running.
5. Check that the jumper cablesdo not have loose or missinginsulation. If they do, you couldget a shock. The vehicles couldbe damaged too.
Before you connect the cables,here are some basic things youshould know. Positive (+) will goto positive (+) or to a remotepositive (+) terminal if the vehiclehas one. Negative (−) will go to aheavy, unpainted metal enginepart or to a remote negative (−)terminal if the vehicle has one.
Do not connect positive (+) tonegative (−), or you will geta short that would damagethe battery and maybe otherparts too. And do not connectthe negative (−) cable to thenegative (−) terminal on thedead battery because thiscan cause sparks.
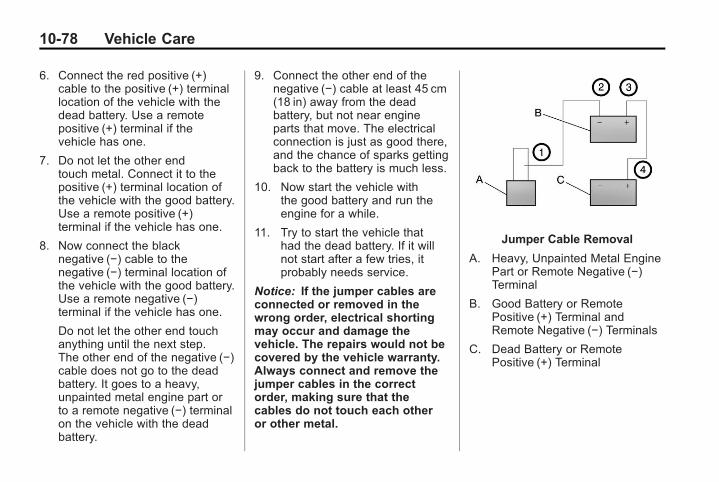
Black plate (78,1)Chevrolet Impala Owner Manual - 2011
10-78 Vehicle Care
6. Connect the red positive (+)cable to the positive (+) terminallocation of the vehicle with thedead battery. Use a remotepositive (+) terminal if thevehicle has one.
7. Do not let the other endtouch metal. Connect it to thepositive (+) terminal location ofthe vehicle with the good battery.Use a remote positive (+)terminal if the vehicle has one.
8. Now connect the blacknegative (−) cable to thenegative (−) terminal location ofthe vehicle with the good battery.Use a remote negative (−)terminal if the vehicle has one.
Do not let the other end touchanything until the next step.The other end of the negative (−)cable does not go to the deadbattery. It goes to a heavy,unpainted metal engine part orto a remote negative (−) terminalon the vehicle with the deadbattery.
9. Connect the other end of thenegative (−) cable at least 45 cm(18 in) away from the deadbattery, but not near engineparts that move. The electricalconnection is just as good there,and the chance of sparks gettingback to the battery is much less.
10. Now start the vehicle withthe good battery and run theengine for a while.
11. Try to start the vehicle thathad the dead battery. If it willnot start after a few tries, itprobably needs service.
Notice: If the jumper cables areconnected or removed in thewrong order, electrical shortingmay occur and damage thevehicle. The repairs would not becovered by the vehicle warranty.Always connect and remove thejumper cables in the correctorder, making sure that thecables do not touch each otheror other metal.
Jumper Cable Removal
A. Heavy, Unpainted Metal EnginePart or Remote Negative (−)Terminal
B. Good Battery or RemotePositive (+) Terminal andRemote Negative (−) Terminals
C. Dead Battery or RemotePositive (+) Terminal
Black plate (79,1)Chevrolet Impala Owner Manual - 2011
Vehicle Care 10-79
To disconnect the jumper cablesfrom both vehicles, do the following:
1. Disconnect the blacknegative (−) cable from thevehicle that had the deadbattery.
2. Disconnect the blacknegative (−) cable from thevehicle with the good battery.
3. Disconnect the red positive (+)cable from the vehicle with thegood battery.
4. Disconnect the red positive (+)cable from the other vehicle.
5. Return the fuse block cover to itsoriginal position.
Towing
Towing the VehicleNotice: To avoid damage,the disabled vehicle should betowed with all four wheels offthe ground. Care must be takenwith vehicles that have lowground clearance and/or specialequipment. Always flatbed ona car carrier.
Consult your dealer or aprofessional towing serviceif the disabled vehicle must betowed. See Roadside AssistanceProgram on page 13‑6.
To tow the vehicle behind anothervehicle for recreational purposes,such as behind a motor home, see“Recreational Vehicle Towing” in thissection.
Recreational VehicleTowingRecreational vehicle towing meanstowing the vehicle behind anothervehicle such as a motor home.The two most common types ofrecreational vehicle towing areknown as dinghy towing and dollytowing. Dinghy towing is towing thevehicle with all four wheels on theground. Dolly towing is towing thevehicle with two wheels on theground and two wheels up on adevice known as a dolly.

Black plate (80,1)Chevrolet Impala Owner Manual - 2011
10-80 Vehicle Care
Here are some important things toconsider before recreational vehicletowing:. What is the towing capacity
of the towing vehicle?Be sure to read the towvehicle manufacturer'srecommendations.
. What is the distance that will betravelled? Some vehicles haverestrictions on how far and howlong they can tow.
. Is the proper towing equipmentgoing to be used? See yourdealer or trailering professionalfor additional advice andequipment recommendations.
. Is the vehicle ready to betowed? Just as preparing thevehicle for a long trip, makesure the vehicle is preparedto be towed.
Dinghy Towing
Notice: If the vehicle istowed with all four wheelson the ground, the drivetraincomponents could be damaged.The repairs would not be coveredby the vehicle warranty. Do nottow the vehicle with all fourwheels on the ground.
The vehicle was not designed tobe towed with all four wheels onthe ground. If the vehicle mustbe towed, a dolly should be used.See “Dolly Towing” that follows formore information.
Dolly Towing
Use the following procedure to dollytow the vehicle from the front:
1. Attach the dolly to the towvehicle following the dollymanufacturer's instructions.
2. Drive the front wheels onto thedolly.
3. Shift the transmission toP (Park).
4. Firmly set the parking brake.

Black plate (81,1)Chevrolet Impala Owner Manual - 2011
Vehicle Care 10-81
5. Use an adequate clampingdevice designed for towing toensure that the front wheels arelocked into the straight position.
6. Secure the vehicle to the dollyfollowing the manufacturer'sinstructions.
7. Release the parking brake onlyafter the vehicle being towed isfirmly attached to the towingvehicle.
8. Turn the ignition to LOCK/OFFand remove the key.
Appearance Care
Exterior CareIf dirt and/or contaminants buildup in the glass seals, use a clothand water to clean the glass seals.Silicone grease on weatherstripswill make them last longer, sealbetter, and not stick or squeak.Apply silicone grease with a cleancloth. During very cold, dampweather frequent application maybe required. See RecommendedFluids and Lubricants on page 11‑6.
Washing the Vehicle
The best way to preserve thevehicle's finish is to keep it cleanby washing it often.
Notice: Certain cleaners containchemicals that can damagethe emblems or nameplates onthe vehicle. Check the cleaningproduct label. If it states that itshould not be used on plasticparts, do not use it on the vehicleor damage may occur and itwould not be covered by thewarranty.
Do not wash the vehicle indirect sunlight. Use a car washingsoap. Do not use cleaning agentsthat are petroleum based orthat contain acid or abrasives,as they can damage the paint,metal or plastic on the vehicle.

Black plate (82,1)Chevrolet Impala Owner Manual - 2011
10-82 Vehicle Care
Approved cleaning products can beobtained from your dealer. Follow allmanufacturers' directions regardingcorrect product usage, necessarysafety precautions and appropriatedisposal of any vehicle careproduct.
Rinse the vehicle well, beforewashing and after to remove allcleaning agents completely. If theyare allowed to dry on the surface,they could stain.
Dry the finish with a soft, cleanchamois or an all-cotton towel toavoid surface scratches and waterspotting.
High pressure car washes maycause water to enter the vehicle.Avoid using high pressurewashes closer than 30 cm (12 in)to the surface of the vehicle. Use ofpower washers exceeding 8 274 kPa(1,200 psi) can result in damage orremoval of paint and decals.
Cleaning ExteriorLamps/Lenses
Use only lukewarm or cold water,a soft cloth and a car washing soapto clean exterior lamps and lenses.Follow instructions under “Washingthe Vehicle.”
Finish Care
Occasional waxing or mild polishingof the vehicle by hand may benecessary to remove residue fromthe paint finish. Approved cleaningproducts can be obtained from yourdealer.
If the vehicle has a basecoat/clearcoat paint finish, the clearcoatgives more depth and gloss tothe colored basecoat. Alwaysuse waxes and polishes that arenon-abrasive and made for abasecoat/clearcoat paint finish.
Notice: Machine compoundingor aggressive polishing on abasecoat/clearcoat paint finishmay damage it. Use onlynon-abrasive waxes and polishesthat are made for a basecoat/clearcoat paint finish on thevehicle.
Foreign materials such as calciumchloride and other salts, ice meltingagents, road oil and tar, tree sap,bird droppings, chemicals fromindustrial chimneys, etc., candamage the vehicle's finish if theyremain on painted surfaces. Washthe vehicle as soon as possible.If necessary, use non-abrasivecleaners that are marked safefor painted surfaces to removeforeign matter.
Exterior painted surfaces aresubject to aging, weather andchemical fallout that can taketheir toll over a period of years.To help keep the paint finish lookingnew, keep the vehicle garaged orcovered whenever possible.

Black plate (83,1)Chevrolet Impala Owner Manual - 2011
Vehicle Care 10-83
Protecting Exterior Bright MetalParts
Bright metal parts should becleaned regularly to keep theirluster. Washing with water is all thatis usually needed. However, chromepolish may be used on chrome orstainless steel trim, if necessary.
Use special care with aluminumtrim. To avoid damaging protectivetrim, never use auto or chromepolish, steam or caustic soapto clean aluminum. A coating ofwax, rubbed to high polish, isrecommended for all bright metalparts.
Windshield and Wiper Blades
Clean the outside of the windshieldwith glass cleaner.
Clean the rubber blades usinga lint free cloth or paper towelsoaked with windshield washerfluid or a mild detergent. Washthe windshield thoroughly whencleaning the blades. Bugs, roadgrime, sap and a buildup of vehiclewash/wax treatments may causewiper streaking. Replace the wiperblades if they are worn or damaged.
Wipers can be damaged by:. Extreme dusty conditions. Sand and salt. Heat and sun. Snow and ice, without proper
removal
Aluminum Wheels
Notice: Using strong soaps,chemicals, abrasive polishes,cleaners, brushes, or cleanersthat contain acid on aluminumor chrome-plated wheels, coulddamage the surface of thewheel(s). The repairs wouldnot be covered by the vehiclewarranty. Use only approvedcleaners on aluminum orchrome-plated wheels.
Keep the wheels clean using asoft, clean cloth with mild soapand water. Rinse with clean water.After rinsing thoroughly, dry with asoft clean towel. A wax may thenbe applied.
Notice: Using chrome polish onaluminum wheels could damagethe wheels. The repairs wouldnot be covered by the vehiclewarranty. Use chrome polishon chrome wheels only.

Black plate (84,1)Chevrolet Impala Owner Manual - 2011
10-84 Vehicle Care
The surface of these wheels issimilar to the painted surface ofthe vehicle. Do not use strongsoaps, chemicals, abrasivepolishes, abrasive cleaners,cleaners with acid, or abrasivecleaning brushes on them becausethey could damage the surface.Do not use chrome polish onaluminum wheels.
Notice: Driving the vehiclethrough an automatic car washthat has silicone carbide tirecleaning brushes, could damagethe aluminum or chrome-platedwheels. The repairs would not becovered by the vehicle warranty.Never drive a vehicle that hasaluminum or chrome-platedwheels through an automaticcar wash that uses siliconecarbide tire cleaning brushes.
Tires
To clean the tires, use a stiff brushwith tire cleaner.
Notice: Using petroleum-basedtire dressing products on thevehicle may damage the paintfinish and/or tires. When applyinga tire dressing, always wipe offany overspray from all paintedsurfaces on the vehicle.
Sheet Metal Damage
If the vehicle is damaged andrequires sheet metal repair orreplacement, make sure the bodyrepair shop applies anti-corrosionmaterial to parts repaired orreplaced to restore corrosionprotection.
Original manufacturer replacementparts will provide the corrosionprotection while maintaining thevehicle warranty.
Finish Damage
Any stone chips, fractures or deepscratches in the finish should berepaired right away. Bare metal willcorrode quickly and may developinto major repair expense.
Minor chips and scratches can berepaired with touch-up materialsavailable from your dealer. Largerareas of finish damage can becorrected in your dealer's bodyand paint shop.
Chemicals used for ice and snowremoval and dust control can collecton the underbody. If these are notremoved, corrosion and rust candevelop on the underbody partssuch as fuel lines, frame, floor pan,and exhaust system even thoughthey have corrosion protection.
At least every spring, flush thesematerials from the underbodywith plain water. Clean any areaswhere mud and debris can collect.
Black plate (85,1)Chevrolet Impala Owner Manual - 2011
Vehicle Care 10-85
Dirt packed in close areas of theframe should be loosened beforebeing flushed. Your dealer or anunderbody car washing systemcan do this.
Underbody Maintenance
Chemicals used for ice and snowremoval and dust control can collecton the underbody. If these are notremoved, corrosion and rust candevelop on the underbody partssuch as fuel lines, frame, floor pan,and exhaust system even thoughthey have corrosion protection.
At least every spring, flush thesematerials from the underbodywith plain water. Clean any areaswhere mud and debris can collect.Dirt packed in close areas of theframe should be loosened beforebeing flushed. Your dealer or anunderbody car washing systemcan do this.
Chemical Paint Spotting
Some weather and atmosphericconditions can create a chemicalfallout. Airborne pollutants can fallupon and attack painted surfaceson the vehicle. This damage cantake two forms: blotchy, ring-shapeddiscolorations, and small, irregulardark spots etched into the paintsurface.
Although no defect in the paint jobcauses this, we will repair, at nocharge to the owner, the surfacesof new vehicles damaged by thisfallout condition within 12 monthsor 20 000 km (12,000miles) ofpurchase, whichever occurs first.
Interior CareThe interior will continue to lookits best if it is cleaned often.Dust and dirt can accumulate onthe upholstery and cause damageto the carpet, fabric, leather, andplastic surfaces. Stains should beremoved quickly as extreme heatcould cause them to set rapidly.
Lighter colored interiors mayrequire more frequent cleaning.Newspapers and garments that cantransfer color to home furnishingscan also transfer color to theinterior.
Remove dust from small buttonsand knobs with a small brush withsoft bristles.

Black plate (86,1)Chevrolet Impala Owner Manual - 2011
10-86 Vehicle Care
Your dealer has products forcleaning the interior. Whencleaning the interior, only usecleaners specifically designedfor the surfaces that are beingcleaned. Permanent damage canresult from using cleaners onsurfaces for which they were notintended. Apply the cleaner directlyto the cleaning cloth to preventover-spray. Remove any accidentalover-spray from other surfacesimmediately.
Notice: Using abrasive cleanerswhen cleaning glass surfaceson the vehicle, could scratch theglass and/or cause damage tothe rear window defogger. Whencleaning the glass on the vehicle,use only a soft cloth and glasscleaner.
Cleaners can contain solvents thatcan become concentrated in theinterior. Before using cleaners,read and adhere to all safetyinstructions on the label. Whilecleaning the interior, maintainadequate ventilation by openingthe doors and windows.
Do not clean the interior using thefollowing cleaners or techniques:. Never use a knife or any other
sharp object to remove a soilfrom any interior surface.
. Never use a stiff brush. It cancause damage to the interiorsurfaces.
. Never apply heavy pressure orrub aggressively with a cleaningcloth. Use of heavy pressure candamage the interior and doesnot improve the effectivenessof soil removal.
. Use only mild, neutral-pHsoaps. Avoid laundry detergentsor dishwashing soaps withdegreasers. Using too muchsoap will leave a residue thatleaves streaks and attractsdirt. For liquid cleaners, about20 drops per 3.78 L (1 gal) ofwater is a good guide.
. Do not heavily saturate theupholstery while cleaning.
. Cleaners that contain solventscan damage the interior.

Black plate (87,1)Chevrolet Impala Owner Manual - 2011
Vehicle Care 10-87
Fabric/Carpet
Use a vacuum cleaner with a softbrush attachment to remove dustand loose dirt. A canister vacuumwith a beater bar in the nozzlemay only be used on floor carpetand carpeted floor mats. For soils,always try to remove them first withplain water or club soda. Beforecleaning, gently remove as muchof the soil as possible using oneof the following techniques:. For liquids: gently blot the
remaining soil with a papertowel. Allow the soil to absorbinto the paper towel until nomore can be removed.
. For solid dry soils: remove asmuch as possible and thenvacuum.
To clean:
1. Saturate a lint-free, clean whitecloth with water or club soda.
2. Remove excess moisture.
3. Start on the outside edge of thesoil and gently rub toward thecenter. Continue cleaning, usinga clean area of the cloth eachtime it becomes soiled.
4. Continue to gently rub thesoiled area.
5. If the soil is not completelyremoved, use a mild soapsolution and repeat the cleaningprocess that was used with plainwater.
If any of the soil remains, acommercial fabric cleaner or spotlifter may be necessary. Test a smallhidden area for colorfastness beforeusing a commercial upholsterycleaner or spot lifter. If the locallycleaned area gives any impressionthat a ring formation may result,clean the entire surface.
A paper towel can be used to blotexcess moisture from the fabric orcarpet after the cleaning process.

Black plate (88,1)Chevrolet Impala Owner Manual - 2011
10-88 Vehicle Care
Leather/Leatherette
Leather, and lighter colored leatherin particular, will need more frequentcleaning to prevent the buildup ofdust, dirt, and colors transferredfrom other items so that these donot become permanent stains.
To remove dust, a soft clothdampened with water canbe used. If a more thoroughcleaning is necessary, a soft clothdampened with a mild soap solutioncan be used. Your dealer has a GMapproved leather cleaner availablethat provides superior cleaningperformance when used regularlyon finished automotive leathers.Allow the leather to dry naturally.
Do not use heat, steam, spotlifters or spot removers, or shoepolish on leather. Many commercialleather cleaners and coatings thatare sold to preserve and protectleather may permanently changethe appearance and feel of theleather and are not recommended.Do not use silicone or wax-basedproducts, or those containingorganic solvents to clean theinterior because they can alterthe appearance by increasing thegloss in a non-uniform manner.
Instrument Panel, Vinyl andother Plastic Surfaces
To remove dust, a soft clothdampened with water can beused. If a more thorough cleaningis necessary, a clean soft clothdampened with a mild soap solutioncan be used to gently remove dustand dirt. Never use spot liftersor removers on plastic surfaces.Many commercial cleaners andcoatings that are sold to preserveand protect soft plastic surfacesmay permanently change theappearance and feel of the interiorand are not recommended. Do notuse silicone or wax-based products,or those containing organic solventsto clean the interior becausethey can alter the appearanceby increasing the gloss in anon-uniform manner.
Black plate (89,1)Chevrolet Impala Owner Manual - 2011
Vehicle Care 10-89
Some commercial products mayincrease gloss on the instrumentpanel. The increase in gloss maycause annoying reflections in thewindshield and even make it difficultto see through the windshield undercertain conditions.
Notice: Air fresheners containsolvents that may causedamage to plastics andpainted surfaces. Follow themanufacturer’s instructionswhen using air fresheners in thevehicle. If air freshener comesin contact with paint or a plasticsurface, blot immediately with asoft cloth. Damage caused byusing air fresheners would not becovered by the vehicle warranty.
Care of Safety Belts
Keep belts clean and dry.
{ WARNING
Do not bleach or dye safety belts.It may severely weaken them.In a crash, they might not be ableto provide adequate protection.Clean safety belts only with mildsoap and lukewarm water.
Floor Mats
{ WARNING
If a floor mat is the wrong sizeor is not properly installed, it caninterfere with the acceleratorpedal and/or brake pedal.Interference with the pedals can
(Continued)
WARNING (Continued)
cause unintended accelerationand/or increased stoppingdistance which can cause acrash and injury. Make sure thefloor mat does not interfere withthe accelerator or brake pedal.
Use the following guidelines forproper floor mat usage.. The original equipment floor
mats were designed for yourvehicle. If the floor mats needreplacing, it is recommendedthat GM certified floor mats bepurchased. Non-GM floor matsmay not fit properly and mayinterfere with the accelerator orbrake pedal. Always check thatthe floor mats do not interferewith the pedals.

Black plate (90,1)Chevrolet Impala Owner Manual - 2011
10-90 Vehicle Care
. Use the floor mat with thecorrect side up. Do not turnit over.
. Do not place anything on top ofthe driver side floor mat.
. Use only a single floor mat onthe driver side.
. Do not place one floor mat ontop of another.
Removing and Replacing theFloor Mat
The driver side floor mat is held inplace by one hook-type retainer.
1. Pull up on the rear of the mat toremove it from the hooks.
2. Reinstall the floor mat by liningup the openings on the floor matover the hooks and push it downinto position.
3. Make sure the floor mat isproperly secured and verify thatit does not interfere with theaccelerator or brake pedals.
Black plate (1,1)Chevrolet Impala Owner Manual - 2011
Service and Maintenance 11-1
Service andMaintenance
General InformationGeneral Information . . . . . . . . . . 11-1
Scheduled MaintenanceScheduled Maintenance . . . . . 11-2
Recommended Fluids,Lubricants, and PartsRecommended Fluids andLubricants . . . . . . . . . . . . . . . . . . 11-6
Maintenance ReplacementParts . . . . . . . . . . . . . . . . . . . . . . . 11-8
Maintenance RecordsMaintenance Records . . . . . . . . 11-9
General InformationNotice: Maintenanceintervals, checks, inspections,recommended fluids, andlubricants are necessary tokeep this vehicle in goodworking condition. Damagecaused by failure to followscheduled maintenance mightnot be covered by the vehiclewarranty.
As the vehicle owner, you areresponsible for the scheduledmaintenance in this section.We recommend having yourdealer perform these services.Proper vehicle maintenance helpsto keep the vehicle in good workingcondition, improves fuel economy,and reduces vehicle emissions forbetter air quality.
Because of all the different wayspeople use vehicles, maintenanceneeds vary. The vehicle might needmore frequent checks and services.Please read the information underScheduled Maintenance. To keepthe vehicle in good condition, seeyour dealer.
The maintenance schedule is forvehicles that:. Carry passengers and cargo
within recommended limits onthe Tire and Loading Informationlabel. See Vehicle Load Limitson page 9‑12.
. Are driven on reasonable roadsurfaces within legal drivinglimits.
. Use the recommended fuel.See Recommended Fuel onpage 9‑35.

Black plate (2,1)Chevrolet Impala Owner Manual - 2011
11-2 Service and Maintenance
{ WARNING
Performing maintenance workcan be dangerous. Some jobscan cause serious injury. Performmaintenance work only if youhave the required know-how andthe proper tools and equipment.If in doubt, see your dealer tohave a qualified technician dothe work. See Doing Your OwnService Work on page 10‑4.
At your dealer, you can becertain that you will receive thehighest level of service available.Your dealer has specially trainedservice technicians, uses genuinereplacement parts, as well as,up‐to‐date tools and equipmentto ensure fast and accuratediagnostics.
The proper replacement parts,fluids, and lubricants to use arelisted in Recommended Fluidsand Lubricants on page 11‑6 andMaintenance Replacement Parts onpage 11‑8. We recommend the useof genuine parts from your dealer.
Rotation of New Tires
To maintain ride, handling, andperformance of the vehicle, it isimportant that the first rotationservice for new tires be performed.Tires should be rotated every12 000 km/7,500 miles. See TireRotation on page 10‑56.
ScheduledMaintenanceWhen the Change Engine OilSoon Message Displays
Change engine oil and filter.See Engine Oil on page 10‑7.An Emission Control Service.
When the CHANGE ENGINE OILSOON message displays, serviceis required for the vehicle assoon as possible, within the next1 000 km/600 miles. If driving underthe best conditions, the engine oillife system might not indicate theneed for vehicle service for morethan a year. The engine oil and filtermust be changed at least once ayear and the oil life system mustbe reset. Your dealer has trainedservice technicians who will performthis work and reset the system.
Black plate (3,1)Chevrolet Impala Owner Manual - 2011
Service and Maintenance 11-3
If the engine oil life system is resetaccidentally, service the vehiclewithin 5 000 km/3,000 miles sincethe last service. Reset the oil lifesystem whenever the oil is changed.See Engine Oil Life System onpage 10‑11.
Every Engine Oil Change. Change engine oil and
filter. Reset oil life system.See Engine Oil on page 10‑7and Engine Oil Life System onpage 10‑11. An Emission ControlService.
. Engine coolant level check.See Engine Coolant onpage 10‑17.
. Engine cooling systeminspection. Visual inspectionof hoses, pipes, fittings, andclamps and replacement,if needed.
. Windshield washer fluid levelcheck. See Washer Fluid onpage 10‑25.
. Windshield wiper bladeinspection for wear, cracking,or contamination and windshieldand wiper blade cleaning,if contaminated. See ExteriorCare on page 10‑81. Wornor damaged wiper bladereplacement. See Wiper BladeReplacement on page 10‑31.
. Tire inflation pressurescheck. See Tire Pressure onpage 10‑49.
. Tire wear inspection. See TireInspection on page 10‑56.
. Rotate tires if necessary.See Tire Rotation onpage 10‑56.
. Fluids visual leak check(or every 12 months, whicheveroccurs first). A leak in anysystem must be repaired andthe fluid level checked.
. Engine air cleaner filterinspection. See Engine AirCleaner/Filter on page 10‑15.
. Brake system inspection(or every 12 months, whicheveroccurs first).
. Steering and suspensioninspection. Visual inspectionfor damaged, loose, or missingparts or signs of wear.
. Body hinges and latches,key lock cylinders, foldingseat hardware, and rearcompartment hinges lubrication.See Recommended Fluidsand Lubricants on page 11‑6.More frequent lubrication maybe required when the vehicleis exposed to a corrosiveenvironment. Applying siliconegrease on weatherstrips witha clean cloth makes them lastlonger, seal better, and notstick or squeak.
. Restraint system componentcheck. See Safety SystemCheck on page 3‑25.

Black plate (4,1)Chevrolet Impala Owner Manual - 2011
11-4 Service and Maintenance
. Fuel system inspection fordamage or leaks.
. Exhaust system and nearby heatshields inspection for loose ordamaged components.
Additional Required Services
Every 12 000 km/7,500Miles. Rotate tires. Tires should
be rotated every 12 000 km/7,500 miles. See Tire Rotationon page 10‑56.
At Each Fuel Stop. Engine oil level check.
See Engine Oil on page 10‑7.. Engine coolant level check.
See Engine Coolant onpage 10‑17.
. Windshield washer fluid levelcheck. See Washer Fluid onpage 10‑25.
Once a Month. Tire inflation pressures
check. See Tire Pressure onpage 10‑49.
. Tire wear inspection. See TireInspection on page 10‑56.
. Sunroof track and sealinspection, if equipped.See Sunroof on page 2‑18.
Once a Year. See Starter Switch Check on
page 10‑29.. See Automatic Transmission
Shift Lock Control FunctionCheck on page 10‑30.
. See Ignition Transmission LockCheck on page 10‑30.
. See Park Brake and P (Park)Mechanism Check onpage 10‑30.
. Accelerator pedal check fordamage, high effort, or binding.Replace if needed.
. Throttle system inspectionfor interference, bindingor for damaged or missingparts. Replace parts asneeded. Replace anycomponents that have higheffort or excessive wear.Do not lubricate acceleratoror cruise control cables.
. Underbody flushing service.
. Hood/Decklid/Liftgate/LiftglassSupport Gas Strut Service:Visually inspect gas strut,if equipped, for signs of wear,cracks, or other damage.Check the hold open abilityof the gas strut. Contact yourdealer if service is required.

Black plate (5,1)Chevrolet Impala Owner Manual - 2011
Service and Maintenance 11-5
First Engine Oil Change AfterEvery 40 000 km/25,000Miles. Passenger compartment
air filter replacement (or every24 months, whichever occursfirst). More frequent replacementmay be needed if you drivein areas with heavy traffic,areas with poor air quality,or areas with high dust levels.Replacement may also beneeded if you notice reducedair flow, windows fogging up,or odors. Your dealer can helpyou determine when it is theright time to replace the filter.
First Engine Oil Change AfterEvery 80 000 km/50,000Miles. Engine air cleaner filter
replacement. See Engine AirCleaner/Filter on page 10‑15.
. Automatic transmission fluid andfilter change (severe service) forvehicles mainly driven in heavycity traffic in hot weather, in hillyor mountainous terrain, whenfrequently towing a trailer,
or used for taxi, police,or delivery service.See Automatic TransmissionFluid on page 10‑12.
. Evaporative control systeminspection. Check all fuel andvapor lines and hoses for properhook‐up, routing, and condition.Check that the purge valve,if the vehicle has one, worksproperly. Replace as needed.An Emission Control Service.The U.S. EnvironmentalProtection Agency or theCalifornia Air ResourcesBoard has determined thatthe failure to perform thismaintenance item will notnullify the emission warrantyor limit recall liability prior tothe completion of the vehicle'suseful life. We, however,urge that all recommendedmaintenance services beperformed at the indicatedintervals and the maintenancebe recorded.
First Engine Oil Change AfterEvery 160 000 km/100,000Miles. Automatic transmission fluid and
filter change (normal service).See Automatic TransmissionFluid on page 10‑12.
. Spark plug replacement andspark plug wires inspection.See Engine Coolant onpage 10‑17. An EmissionControl Service.
First Engine Oil Change AfterEvery 240 000 km/150,000Miles. Engine cooling system drain,
flush, and refill (or every fiveyears, whichever occurs first).See Engine Coolant onpage 10‑17. An EmissionControl Service.
. Engine drive belts inspectionfor fraying, excessive cracks,or obvious damage (or every10 years, whichever occursfirst). Replace, if needed.

Black plate (6,1)Chevrolet Impala Owner Manual - 2011
11-6 Service and Maintenance
Recommended Fluids, Lubricants, and Parts
Recommended Fluids and LubricantsFluids and lubricants identified below by name, part number, or specification can be obtained from your dealer.
Usage Fluid/Lubricant
Engine Oil
The engine requires engine oil approved to the dexos specification.Oils meeting this specification can be identified with the dexos certificationmark. Look for and use only an engine oil that displays the dexoscertification mark of the proper viscosity grade. See Engine Oil onpage 10‑7.
Engine Coolant 50/50 mixture of clean, drinkable water and use only DEX-COOL Coolant.See Engine Coolant on page 10‑17.
Hydraulic Brake SystemDOT 3 Hydraulic Brake Fluid (GM Part No. 12377967,in Canada 89021320).
Windshield Washer Optikleen® Washer Solvent.
Power Steering System GM Power Steering Fluid (GM Part No. 89021184, in Canada 89021186).

Black plate (7,1)Chevrolet Impala Owner Manual - 2011
Service and Maintenance 11-7
Usage Fluid/Lubricant
Automatic Transmission DEXRON®‐VI Automatic Transmission Fluid.
Key Lock CylindersMulti-Purpose Lubricant, Superlube (GM Part No. 12346241,in Canada 10953474).
Hood Latch Assembly, SecondaryLatch, Pivots, Spring Anchor, and
Release Pawl
Lubriplate Lubricant Aerosol (GM Part No. 12346293, in Canada 992723)or lubricant meeting requirements of NLGI #2, Category LB or GC-LB.
Hood and Door HingesMulti-Purpose Lubricant, Superlube (GM Part No. 12346241, inCanada 10953474).
Weatherstrip ConditioningWeatherstrip Lubricant (GM Part No. 3634770, in Canada 10953518) orDielectric Silicone Grease (GM Part No. 12345579, in Canada 992887).

Black plate (8,1)Chevrolet Impala Owner Manual - 2011
11-8 Service and Maintenance
Maintenance Replacement PartsReplacement parts identified below by name, part number, or specification can be obtained from your dealer.
Maintenance Replacement Parts
Part GM Part Number ACDelco Part Number
Engine Air Cleaner/Filter 10350737 A2962C
Engine Oil Filter
3.5L and 3.9L V6 Flexible Fuel Engines 19210285 PF61
Passenger Compartment Air Filter 15284938 CF132
Spark Plugs
3.5L and 3.9L V6 Flexible Fuel Engines 12591131 41‐100
Wiper Blades
Driver Side ‐ 55.0 cm (21.7 in) 15941731 —
Passenger Side ‐ 55.0 cm (21.7 in) 15941732 —

Black plate (9,1)Chevrolet Impala Owner Manual - 2011
Service and Maintenance 11-9
Maintenance RecordsAfter the scheduled services are performed, record the date, odometer reading, who performed the service, and thetype of services performed in the boxes provided. Retain all maintenance receipts.
Maintenance Record
DateOdometerReading
Serviced By Services Performed

Black plate (10,1)Chevrolet Impala Owner Manual - 2011
11-10 Service and Maintenance
Maintenance Record (cont.)
Date OdometerReading
Serviced By Services Performed
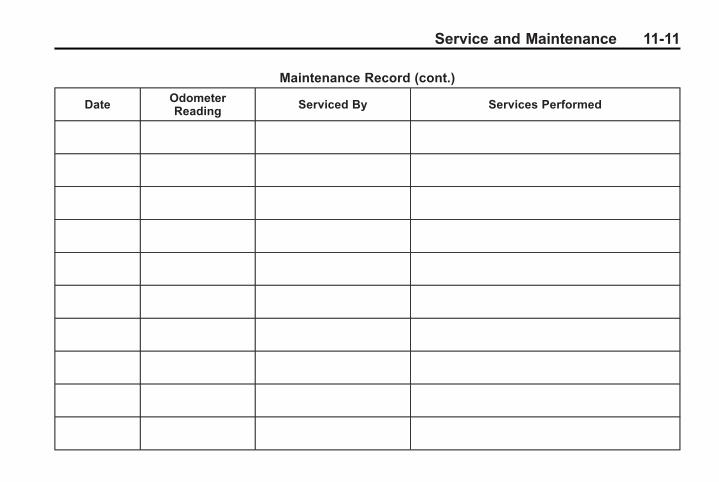
Black plate (11,1)Chevrolet Impala Owner Manual - 2011
Service and Maintenance 11-11
Maintenance Record (cont.)
Date OdometerReading
Serviced By Services Performed
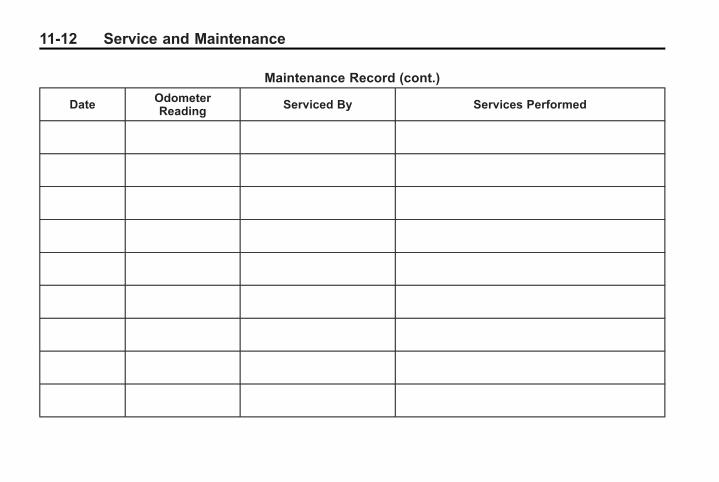
Black plate (12,1)Chevrolet Impala Owner Manual - 2011
11-12 Service and Maintenance
Maintenance Record (cont.)
Date OdometerReading
Serviced By Services Performed

Black plate (1,1)Chevrolet Impala Owner Manual - 2011
Technical Data 12-1
Technical Data
Vehicle IdentificationVehicle IdentificationNumber (VIN) . . . . . . . . . . . . . . 12-1
Service Parts IdentificationLabel . . . . . . . . . . . . . . . . . . . . . . . 12-1
Vehicle DataCapacities andSpecifications . . . . . . . . . . . . . . 12-2
Engine Drive Belt Routing . . . 12-3
Vehicle Identification
Vehicle IdentificationNumber (VIN)
This legal identifier is in the frontcorner of the instrument panel, onthe left side of the vehicle. It can beseen through the windshield fromoutside. The VIN also appears onthe Vehicle Certification and ServiceParts labels and certificates of titleand registration.
Engine Identification
The eighth character in the VINis the engine code. This codeidentifies the vehicle's engine,specifications, and replacementparts. See “Engine Specifications”under Capacities and Specificationson page 12‑2 for the vehicle'sengine code.
Service PartsIdentification LabelThis label, in the trunk, has thefollowing information:. Vehicle Identification
Number (VIN).. Model designation.. Paint information.. Production options and special
equipment.
Do not remove this label from thevehicle.

Black plate (2,1)Chevrolet Impala Owner Manual - 2011
12-2 Technical Data
Vehicle Data
Capacities and SpecificationsThe following approximate capacities are given in metric and English conversions. See Recommended Fluids andLubricants on page 11‑6 for more information.
ApplicationCapacities
Metric English
Air Conditioning Refrigerant R134aFor the air conditioning system refrigerant chargeamount, see the refrigerant label located under the
hood. See your dealer for more information.
Automatic Transmission (Bottom Pan Removal) 7.0 L 7.4 qt
Cooling System Including Reservoir
3.5L and 3.9L V6 FlexFuel Engines 10.0 L 10.6 qt
Engine Oil with Filter
3.5L and 3.9L V6 FlexFuel Engines 3.8 L 4.0 qt
Fuel Tank 66.2 L 17.5 gal
Wheel Nut Torque 140Y 100 lb ft
All capacities are approximate. When adding, be sure to fill to the approximate level, as recommended in thismanual. Recheck fluid level after filling.
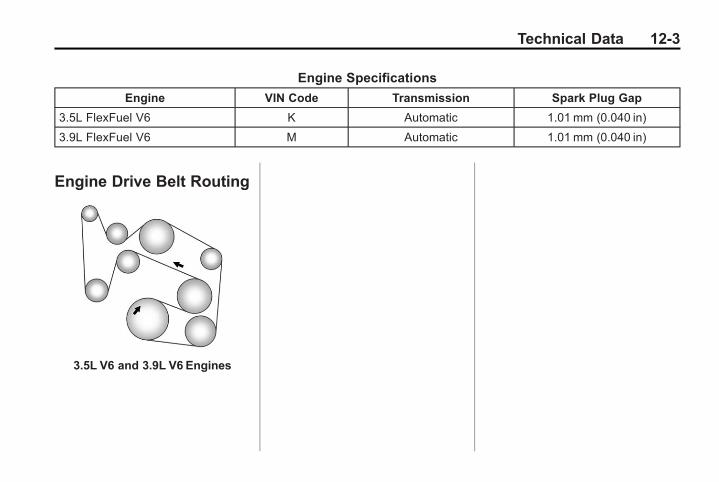
Black plate (3,1)Chevrolet Impala Owner Manual - 2011
Technical Data 12-3
Engine Specifications
Engine VIN Code Transmission Spark Plug Gap
3.5L FlexFuel V6 K Automatic 1.01 mm (0.040 in)
3.9L FlexFuel V6 M Automatic 1.01 mm (0.040 in)
Engine Drive Belt Routing
3.5L V6 and 3.9L V6 Engines

Black plate (4,1)Chevrolet Impala Owner Manual - 2011
12-4 Technical Data
2 NOTES

Black plate (1,1)Chevrolet Impala Owner Manual - 2011
Customer Information 13-1
CustomerInformation
Customer InformationCustomer SatisfactionProcedure . . . . . . . . . . . . . . . . . . 13-1
Customer AssistanceOffices . . . . . . . . . . . . . . . . . . . . . 13-3
Customer Assistance for TextTelephone (TTY) Users . . . . . 13-4
Online Owner Center . . . . . . . . 13-5GM Mobility ReimbursementProgram . . . . . . . . . . . . . . . . . . . . 13-6
Roadside AssistanceProgram . . . . . . . . . . . . . . . . . . . . 13-6
Scheduling ServiceAppointments . . . . . . . . . . . . . . 13-8
Courtesy TransportationProgram . . . . . . . . . . . . . . . . . . . . 13-9
Collision Damage Repair . . . 13-10Service PublicationsOrdering Information . . . . . . 13-13
Reporting Safety DefectsReporting Safety Defects tothe United StatesGovernment . . . . . . . . . . . . . . . 13-14
Reporting Safety Defects tothe CanadianGovernment . . . . . . . . . . . . . . . 13-15
Reporting Safety Defects toGeneral Motors . . . . . . . . . . . 13-15
Vehicle Data Recording andPrivacyVehicle Data Recording andPrivacy . . . . . . . . . . . . . . . . . . . . 13-15
Event Data Recorders . . . . . . 13-16OnStar® . . . . . . . . . . . . . . . . . . . . 13-17Radio FrequencyIdentification (RFID) . . . . . . . 13-17
Radio FrequencyStatement . . . . . . . . . . . . . . . . . 13-17
Customer Information
Customer SatisfactionProcedureYour satisfaction and goodwillare important to the dealer and toChevrolet. Normally, any concernswith the sales transaction or theoperation of the vehicle will beresolved by the dealer's sales orservice departments. Sometimes,however, despite the best intentionsof all concerned, misunderstandingscan occur. If your concern has notbeen resolved to your satisfaction,the following steps should be taken:
STEP ONE: Discuss yourconcern with a member ofdealership management. Normally,concerns can be quickly resolvedat that level. If the matter hasalready been reviewed with thesales, service, or parts manager,contact the owner of the dealershipor the general manager.

Black plate (2,1)Chevrolet Impala Owner Manual - 2011
13-2 Customer Information
STEP TWO: If after contacting amember of dealership management,it appears your concern cannotbe resolved by the dealershipwithout further help, in the U.S.,call the Chevrolet CustomerAssistance Center at1-800-222-1020. In Canada,call General Motors of CanadaCustomer Communication Centreat 1-800-263-3777 (English),or 1-800-263-7854 (French).
We encourage you to call thetoll-free number in order to giveyour inquiry prompt attention.Have the following informationavailable to give the CustomerAssistance representative:. Vehicle Identification
Number (VIN). This is availablefrom the vehicle registration ortitle, or the plate at the top leftof the instrument panel andvisible through the windshield.
. Dealership name and location.
. Vehicle delivery date andpresent mileage.
When contacting Chevrolet,remember that your concern willlikely be resolved at a dealer'sfacility. That is why we suggestfollowing Step One first.
STEP THREE — U.S. Owners:Both General Motors and thedealer are committed to makingsure you are completely satisfiedwith the new vehicle. However,if you continue to remain unsatisfiedafter following the procedureoutlined in Steps One and Two,you can file with the Better BusinessBureau (BBB) Auto Line® Programto enforce your rights.
The BBB Auto Line Programis an out-of-court programadministered by the Council ofBetter Business Bureaus to settleautomotive disputes regardingvehicle repairs or the interpretationof the New Vehicle LimitedWarranty. Although you may berequired to resort to this informaldispute resolution program priorto filing a court action, use of theprogram is free of charge and your
case will generally be heard within40 days. If you do not agree withthe decision given in your case,you may reject it and proceed withany other venue for relief availableto you.
You may contact the BBB AutoLine Program using the toll-freetelephone number or write themat the following address:
BBB Auto Line ProgramCouncil of Better BusinessBureaus, Inc.4200 Wilson BoulevardSuite 800Arlington, VA 22203-1838
Telephone: 1-800-955-5100www.dr.bbb.org/goauto
This program is available inall 50 states and the District ofColumbia. Eligibility is limited byvehicle age, mileage, and otherfactors. General Motors reservesthe right to change eligibilitylimitations and/or discontinueits participation in this program.

Black plate (3,1)Chevrolet Impala Owner Manual - 2011
Customer Information 13-3
STEP THREE — CanadianOwners: In the event that youdo not feel your concerns havebeen addressed after following theprocedure outlined in Steps Oneand Two, General Motors of CanadaLimited wants you to be awareof its participation in a no-chargeMediation/Arbitration Program.General Motors of Canada Limitedhas committed to binding arbitrationof owner disputes involvingfactory-related vehicle serviceclaims. The program provides forthe review of the facts involved byan impartial third party arbiter, andmay include an informal hearingbefore the arbiter. The program isdesigned so that the entire disputesettlement process, from the timeyou file your complaint to the finaldecision, should be completed inabout 70 days. We believe ourimpartial program offers advantagesover courts in most jurisdictionsbecause it is informal, quick, andfree of charge.
For further information concerningeligibility in the Canadian MotorVehicle Arbitration Plan (CAMVAP),call toll-free 1-800-207-0685,or call the General MotorsCustomer CommunicationCentre, 1-800-263-3777 (English),1-800-263-7854 (French),or write to:
The Mediation/Arbitration Programc/o Customer CommunicationCentreGeneral Motors of Canada LimitedMail Code: CA1-163-0051908 Colonel Sam DriveOshawa, Ontario L1H 8P7
The inquiry should be accompaniedby the Vehicle IdentificationNumber (VIN).
Customer AssistanceOfficesChevrolet encourages customersto call the toll-free number forassistance. However, if a customerwishes to write or e-mail Chevrolet,the letter should be addressed to:
United States
Chevrolet Motor DivisionChevrolet Customer AssistanceCenterP.O. Box 33170Detroit, MI 48232-5170www.Chevrolet.com
1-800-222-10201-800-833-2438 (For TextTelephone Devices (TTYs))Roadside Assistance:1-800-243-8872
Black plate (4,1)Chevrolet Impala Owner Manual - 2011
13-4 Customer Information
From Puerto Rico:
1-800-496-9992 (English)1-800-496-9993 (Spanish)
From U.S. Virgin Islands:
1-800-496-9994
Canada
General Motors of Canada LimitedCustomer Communication Centre,Mail Code: CA1-163-0051908 Colonel Sam DriveOshawa, Ontario L1H 8P7www.gm.ca
1-800-263-3777 (English)1-800-263-7854 (French)1-800-263-3830 (For TextTelephone devices (TTYs))Roadside Assistance:1-800-268-6800
Overseas
Please contact the localGeneral Motors Business Unit.
Mexico, Central America, andCaribbean Islands/Countries(Except Puerto Rico andU.S. Virgin Islands)
General Motors de Mexico,S. de R.L. de C.V.Customer Assistance CenterAv. Ejercito Nacional #843Col. GranadaC.P. 11520, Mexico, D.F.
01-800-466-0800Long Distance: 011-52-53 29 0800
Customer Assistancefor Text Telephone (TTY)UsersTo assist customers who are deaf,hard of hearing, or speech-impairedand who use Text Telephones(TTYs), Chevrolet has TTYequipment available at its CustomerAssistance Center. Any TTYuser in the U.S. can communicatewith Chevrolet by dialing:1-800-833-2438. TTY users inCanada can dial 1-800-263-3830.

Black plate (5,1)Chevrolet Impala Owner Manual - 2011
Customer Information 13-5
Online Owner Center
Chevrolet Owner Center (U.S.)www.chevyownercenter.com
Information and servicescustomized for your specificvehicle — all in one convenientplace.. Digital owner manual, warranty
information, and more.. Storage for online service and
maintenance records.. Chevrolet dealer locator for
service nationwide.. Exclusive privileges and offers.. Recall notices for your specific
vehicle.. OnStar and GM Cardmember
Services Earnings summaries.
Other Helpful Links
Chevrolet — www.chevrolet.com
Chevrolet Merchandise —www.chevymall.com
Help Center — www.chevrolet.com/pages/mds/helpcenter/faq.do. FAQ. Contact Us
My GM Canada www.gm.ca
My GM Canada is apassword-protected sectionof www.gm.ca where you cansave information on GM vehicles,get personalized offers, and usehandy tools and forms withgreater ease.
Here are a few of the valuabletools and services you will haveaccess to:. My Showroom: Find and save
information on vehicles andcurrent offers in your area.
. My Dealers: Save details suchas address and phone numberfor each of your preferred GMdealers.
. My Driveway: Access quicklinks to parts and serviceestimates, check trade-invalues, or schedule a serviceappointment by adding thevehicles you own to yourdriveway profile.
. My Preferences: Manage yourprofile and use tools and formswith greater ease.
To sign up, visit the My GM.casection within www.gm.ca.
Black plate (6,1)Chevrolet Impala Owner Manual - 2011
13-6 Customer Information
GM MobilityReimbursement Program
This program is available toqualified applicants for costreimbursement of eligibleaftermarket adaptive equipmentrequired for the vehicle, such ashand controls or a wheelchair/scooter lift for the vehicle.
For more information on the limitedoffer, visit www.gmmobility.com orcall the GM Mobility AssistanceCenter at 1-800-323-9935.Text Telephone (TTY) users,call 1-800-833-9935.
General Motors of Canadaalso has a Mobility Program.Call 1-800-GM-DRIVE (463-7483)for details. TTY users call1-800-263-3830.
Roadside AssistanceProgramFor U.S.‐purchased vehicles,call 1‐800‐243‐8872; (TextTelephone (TTY): 1‐888‐889‐2438).
For Canadian‐purchased vehicles,call 1-800-268-6800.
Service is available 24 hours a day,365 days a year.
Calling for Assistance
When calling Roadside Assistance,have the following informationready:. Your name, home address, and
home telephone number.. Telephone number of your
location.. Location of the vehicle.. Model, year, color, and license
plate number of the vehicle.. Odometer reading, Vehicle
Identification Number (VIN),and delivery date of the vehicle.
. Description of the problem.
Black plate (7,1)Chevrolet Impala Owner Manual - 2011
Customer Information 13-7
Coverage
Services are provided up to5 years/160 000 km (100,000 mi),whichever comes first.
In the U.S., anyone driving thevehicle is covered. In Canada, aperson driving the vehicle withoutpermission from the owner is notcovered.
Roadside Assistance is not a part ofthe New Vehicle Limited Warranty.Chevrolet and General Motors ofCanada Limited reserve the right tomake any changes or discontinuethe Roadside Assistance programat any time without notification.
Chevrolet and General Motors ofCanada Limited reserve the rightto limit services or payment to anowner or driver if they decide theclaims are made too often, or thesame type of claim is made manytimes.
Services Provided. Emergency Fuel Delivery:
Delivery of enough fuel for thevehicle to get to the nearestservice station.
. Lock‐Out Service: Serviceto unlock the vehicle if you arelocked out. A remote unlock maybe available if you have OnStar.For security reasons, the drivermust present identificationbefore this service is given.
. Emergency Tow from a PublicRoad or Highway: Tow to thenearest Chevrolet dealer forwarranty service, or if the vehiclewas in a crash and cannot bedriven. Assistance is also givenwhen the vehicle is stuck in thesand, mud, or snow.
. Flat Tire Change: Service tochange a flat tire with the sparetire. The spare tire, if equipped,must be in good condition andproperly inflated. It is the owner'sresponsibility for the repair orreplacement of the tire if it isnot covered by the warranty.
. Battery Jump Start: Service tojump start a dead battery.
Services Not Included inRoadside Assistance. Impound towing caused by
violation of any laws.. Legal fines.. Mounting, dismounting,
or changing of snow tires,chains, or other traction devices.
. Towing or services for vehiclesdriven on a non-public road orhighway.

Black plate (8,1)Chevrolet Impala Owner Manual - 2011
13-8 Customer Information
Services Specific toCanadian-Purchased Vehicles. Fuel Delivery: Reimbursement
is approximately $5 Canadian.Diesel fuel delivery may berestricted. Propane and otherfuels are not provided throughthis service.
. Lock-Out Service: Vehicleregistration is required.
. Trip Routing Service: Detailedmaps of North America areprovided when requested eitherwith the most direct route or themost scenic route. There is alimit of six requests per year.Additional travel informationis also available. Allowthree weeks for delivery.
. Trip Interruption Benefitsand Assistance: Must beover 250 kilometers fromwhere your trip was startedto qualify. General Motorsof Canada Limited requirespre-authorization, originaldetailed receipts, and a copyof the repair orders. Onceauthorization has been received,the Roadside Assistance advisorwill help to make arrangementsand explain how to receivepayment.
. Alternative Service: Ifassistance cannot be providedright away, the RoadsideAssistance advisor maygive permission to get localemergency road service.You will receive payment, up to$100, after sending the originalreceipt to Roadside Assistance.Mechanical failures may becovered, however any cost forparts and labor for repairs notcovered by the warranty arethe owner responsibility.
Scheduling ServiceAppointmentsWhen the vehicle requireswarranty service, contact the dealerand request an appointment. Byscheduling a service appointmentand advising the service consultantof your transportation needs, thedealer can help minimize yourinconvenience.
If the vehicle cannot be scheduledinto the service departmentimmediately, keep driving it untilit can be scheduled for service,unless, of course, the problem issafety related. If it is, please callthe dealership, let them know this,and ask for instructions.
If the dealer requests you to bringthe vehicle for service, you areurged to do so as early in the workday as possible to allow for thesame-day repair.

Black plate (9,1)Chevrolet Impala Owner Manual - 2011
Customer Information 13-9
Courtesy TransportationProgramTo enhance your ownershipexperience, we and our participatingdealers are proud to offer CourtesyTransportation, a customer supportprogram for vehicles with theBumper-to-Bumper (Base WarrantyCoverage period in Canada),extended powertrain, and/orhybrid‐specific warranties inboth the U.S. and Canada.
Several Courtesy Transportationoptions are available to assist inreducing inconvenience whenwarranty repairs are required.
Courtesy Transportation is not apart of the New Vehicle LimitedWarranty. A separate bookletentitled “Warranty and OwnerAssistance Information” furnishedwith each new vehicle providesdetailed warranty coverageinformation.
Transportation Options
Warranty service can generallybe completed while you wait.However, if you are unableto wait, GM helps to minimizeinconvenience by providing severaltransportation options. Dependingon the circumstances, the dealercan offer one of the following:
Shuttle Service
Shuttle service is the preferredmeans of offering CourtesyTransportation. Dealers may provideshuttle service to get you to yourdestination with minimal interruptionof your daily schedule. This includesone‐way or round‐trip shuttle servicewithin reasonable time and distanceparameters of the dealer's area.
Public Transportation or FuelReimbursement
If the vehicle requires overnightwarranty repairs, and publictransportation is used insteadof the dealer's shuttle service,the expense must be supportedby original receipts and can onlybe up to the maximum amountallowed by GM for shuttle service.In addition, for U.S. customers,should you arrange transportationthrough a friend or relative, limitedreimbursement for reasonablefuel expenses may be available.Claim amounts should reflectactual costs and be supported byoriginal receipts. See the dealer forinformation regarding the allowanceamounts for reimbursement of fuelor other transportation costs.

Black plate (10,1)Chevrolet Impala Owner Manual - 2011
13-10 Customer Information
Courtesy Rental Vehicle
The dealer may arrange toprovide you with a courtesyrental vehicle or reimburse youfor a rental vehicle that youobtain if the vehicle is kept foran overnight warranty repair.Rental reimbursement will belimited and must be supportedby original receipts. This requiresthat you sign and complete arental agreement and meetstate/provincial, local, and rentalvehicle provider requirements.Requirements vary and mayinclude minimum age requirements,insurance coverage, credit card,etc. You are responsible for fuelusage charges and may also beresponsible for taxes, levies, usagefees, excessive mileage, or rentalusage beyond the completion ofthe repair.
It may not be possible to provide alike vehicle as a courtesy rental.
Additional ProgramInformation
All program options, such as shuttleservice, may not be available atevery dealer. Please contact thedealer for specific informationabout availability. All CourtesyTransportation arrangementswill be administered by appropriatedealer personnel.
General Motors reserves theright to unilaterally modify,change, or discontinue CourtesyTransportation at any time andto resolve all questions of claimeligibility pursuant to the termsand conditions described hereinat its sole discretion.
Collision Damage RepairIf the vehicle is involved in acollision and it is damaged,have the damage repaired by aqualified technician using the properequipment and quality replacementparts. Poorly performed collisionrepairs diminish the vehicle resalevalue, and safety performance canbe compromised in subsequentcollisions.
Collision Parts
Genuine GM Collision parts arenew parts made with the samematerials and construction methodsas the parts with which the vehiclewas originally built. Genuine GMCollision parts are the best choice toensure that the vehicle's designedappearance, durability, and safetyare preserved. The use of GenuineGM parts can help maintain the GMNew Vehicle Limited Warranty.

Black plate (11,1)Chevrolet Impala Owner Manual - 2011
Customer Information 13-11
Recycled original equipmentparts may also be used for repair.These parts are typically removedfrom vehicles that were total lossesin prior crashes. In most cases,the parts being recycled are fromundamaged sections of the vehicle.A recycled original equipment GMpart may be an acceptable choiceto maintain the vehicle's originallydesigned appearance and safetyperformance; however, the historyof these parts is not known. Suchparts are not covered by the GMNew Vehicle Limited Warranty, andany related failures are not coveredby that warranty.
Aftermarket collision parts arealso available. These are madeby companies other than GM andmay not have been tested for thevehicle. As a result, these partsmay fit poorly, exhibit prematuredurability/corrosion problems,and may not perform properly insubsequent collisions. Aftermarketparts are not covered by the GMNew Vehicle Limited Warranty,and any vehicle failure relatedto such parts is not covered bythat warranty.
Repair Facility
GM also recommends that youchoose a collision repair facilitythat meets your needs beforeyou ever need collision repairs.The dealer may have a collisionrepair center with GM-trainedtechnicians and state‐of‐the‐artequipment, or be able torecommend a collision repaircenter that has GM-trainedtechnicians and comparableequipment.
Insuring The Vehicle
Protect your investment in theGM vehicle with comprehensiveand collision insurance coverage.There are significant differencesin the quality of coverage affordedby various insurance policy terms.Many insurance policies providereduced protection to the GMvehicle by limiting compensationfor damage repairs by usingaftermarket collision parts. Someinsurance companies will notspecify aftermarket collision parts.When purchasing insurance, werecommend that you ensure thatthe vehicle will be repaired with GMoriginal equipment collision parts.If such insurance coverage isnot available from your currentinsurance carrier, consider switchingto another insurance carrier.

Black plate (12,1)Chevrolet Impala Owner Manual - 2011
13-12 Customer Information
If the vehicle is leased, the leasingcompany may require you to haveinsurance that ensures repairs withGenuine GM Original EquipmentManufacturer (OEM) parts orGenuine Manufacturer replacementparts. Read the lease carefully, asyou may be charged at the end ofthe lease for poor quality repairs.
If a Crash Occurs
If there has been an injury, callemergency services for help.Do not leave the scene of a crashuntil all matters have been takencare of. Move the vehicle only if itsposition puts you in danger, or youare instructed to move it by a policeofficer.
Give only the necessary informationto police and other parties involvedin the crash.
For emergency towing seeRoadside Assistance Program onpage 13‑6.
Gather the following information:. Driver name, address, and
telephone number.. Driver license number.. Owner name, address, and
telephone number.. Vehicle license plate number.. Vehicle make, model, and
model year.. Vehicle Identification
Number (VIN).. Insurance company and policy
number.. General description of the
damage to the other vehicle.
Choose a reputable repair facilitythat uses quality replacement parts.See “Collision Parts” earlier in thissection.
If the airbag has inflated, see WhatWill You See After an AirbagInflates? on page 3‑32.
Managing the Vehicle DamageRepair Process
In the event that the vehicle requiresdamage repairs, GM recommendsthat you take an active role in itsrepair. If you have a pre-determinedrepair facility of choice, take thevehicle there, or have it towedthere. Specify to the facility thatany required replacement collisionparts be original equipment parts,either new Genuine GM partsor recycled original GM parts.Remember, recycled parts willnot be covered by the GMvehicle warranty.
Insurance pays the bill for therepair, but you must live with therepair. Depending on your policylimits, your insurance companymay initially value the repair usingaftermarket parts. Discuss thiswith the repair professional, andinsist on Genuine GM parts.
Black plate (13,1)Chevrolet Impala Owner Manual - 2011
Customer Information 13-13
Remember, if the vehicle is leased,you may be obligated to have thevehicle repaired with GenuineGM parts, even if your insurancecoverage does not pay the full cost.
If another party's insurancecompany is paying for the repairs,you are not obligated to accepta repair valuation based on thatinsurance company's collisionpolicy repair limits, as you haveno contractual limits with thatcompany. In such cases, youcan have control of the repairand parts choices as long as thecost stays within reasonable limits.
Service PublicationsOrdering Information
Service Manuals
Service Manuals have thediagnosis and repair informationon the engines, transmission, axle,suspension, brakes, electrical,steering, body, etc.
Service Bulletins
Service Bulletins give additionaltechnical service informationneeded to knowledgeably serviceGeneral Motors cars and trucks.Each bulletin contains instructionsto assist in the diagnosis andservice of the vehicle.
Owner Information
Owner publications are writtenspecifically for owners and intendedto provide basic operationalinformation about the vehicle.The Owner Manual includes theMaintenance Schedule for allmodels.
In-Portfolio: Includes a Portfolio,Owner Manual, and WarrantyBooklet.
RETAIL SELL PRICE:$35.00 (U.S.) plus handling andshipping fees.
Without Portfolio: OwnerManual only.
RETAIL SELL PRICE:$25.00 (U.S.) plus handling andshipping fees.
Black plate (14,1)Chevrolet Impala Owner Manual - 2011
13-14 Customer Information
Current and Past Models
Technical Service Bulletins andManuals are available for currentand past model GM vehicles.
ORDER TOLL FREE:1-800-551-4123 Monday - Friday8:00 AM - 6:00 PM Eastern Time
For Credit Card Orders Only(VISA-MasterCard-Discover), visitHelm, Inc. at: www.helminc.com.
Or write to:
Helm, IncorporatedP.O. Box 07130Detroit, MI 48207
Prices are subject to changewithout notice and without incurringobligation. Allow ample time fordelivery.
All listed prices are quoted inU.S. funds. Make checks payablein U.S. funds.
Reporting SafetyDefects
Reporting Safety Defectsto the United StatesGovernmentIf you believe that your vehiclehas a defect which could causea crash or could cause injury ordeath, you should immediatelyinform the National HighwayTraffic Safety Administration(NHTSA) in addition to notifyingGeneral Motors.
If NHTSA receives similarcomplaints, it may open aninvestigation, and if it findsthat a safety defect exists in agroup of vehicles, it may ordera recall and remedy campaign.
However, NHTSA cannotbecome involved in individualproblems between you, yourdealer, or General Motors.
To contact NHTSA, you maycall the Vehicle Safety Hotlinetoll-free at 1-888-327-4236(TTY: 1-800-424-9153); goto http://www.safercar.gov;or write to:
Administrator, NHTSA1200 New Jersey Avenue, S.E.Washington, D.C. 20590
You can also obtain otherinformation about motorvehicle safety fromhttp://www.safercar.gov.

Black plate (15,1)Chevrolet Impala Owner Manual - 2011
Customer Information 13-15
Reporting Safety Defectsto the CanadianGovernmentIf you live in Canada, and youbelieve that the vehicle has asafety defect, notify TransportCanada immediately, and notifyGeneral Motors of Canada Limited.Call them at 1-800-333-0510 orwrite to:
Transport CanadaRoad Safety Branch2780 Sheffield RoadOttawa, Ontario K1B 3V9
Reporting Safety Defectsto General MotorsIn addition to notifying NHTSA(or Transport Canada) in a situationlike this, notify General Motors.
Call 1-800-222-1020, or write:
Chevrolet Motor DivisionChevrolet Customer AssistanceCenterP.O. Box 33170Detroit, MI 48232-5170
In Canada, call 1-800-263-3777(English) or 1-800-263-7854(French), or write:
General Motors of Canada LimitedCustomer Communication Centre,Mail Code: CA1-163-0051908 Colonel Sam DriveOshawa, Ontario L1H 8P7
Vehicle DataRecording andPrivacyThis GM vehicle has a number ofsophisticated computers that recordinformation about the vehicle’sperformance and how it is driven.For example, the vehicle usescomputer modules to monitor andcontrol engine and transmissionperformance, to monitor theconditions for airbag deploymentand deploy airbags in a crash, and,if so equipped, to provide antilockbraking to help the driver control thevehicle. These modules may storedata to help the dealer technicianservice the vehicle. Some modulesmay also store data about how youoperate the vehicle, such as rate offuel consumption or average speed.These modules may also retain theowner’s personal preferences, suchas radio pre-sets, seat positions,and temperature settings.
Black plate (16,1)Chevrolet Impala Owner Manual - 2011
13-16 Customer Information
Event Data RecordersThis vehicle has an Event DataRecorder (EDR). The main purposeof an EDR is to record, in certaincrash or near crash-like situations,such as an airbag deployment orhitting a road obstacle, data thatwill assist in understanding howa vehicle's systems performed.The EDR is designed to recorddata related to vehicle dynamicsand safety systems for a shortperiod of time, typically 30 secondsor less. The EDR in this vehicle isdesigned to record such data as:. How various systems in the
vehicle were operating.. Whether or not the driver and
passenger safety belts werebuckled/fastened.
. How far, if at all, the driver waspressing the accelerator and/orbrake pedal.
. How fast the vehicle wastraveling.
This data can help provide a betterunderstanding of the circumstancesin which crashes and injuries occur.
Important: EDR data is recordedby the vehicle only if a non-trivialcrash situation occurs; no data isrecorded by the EDR under normaldriving conditions and no personaldata (e.g., name, gender, age,and crash location) is recorded.However, other parties, such aslaw enforcement, could combinethe EDR data with the type ofpersonally identifying dataroutinely acquired during acrash investigation.
To read data recorded by an EDR,special equipment is required, andaccess to the vehicle or the EDR isneeded. In addition to the vehiclemanufacturer, other parties, suchas law enforcement, that have thespecial equipment, can read theinformation if they have access tothe vehicle or the EDR.
GM will not access this data orshare it with others except: withthe consent of the vehicle owneror, if the vehicle is leased, with theconsent of the lessee; in responseto an official request by police orsimilar government office; as partof GM's defense of litigation throughthe discovery process; or, asrequired by law. Data that GMcollects or receives may also beused for GM research needs ormay be made available to others forresearch purposes, where a need isshown and the data is not tied to aspecific vehicle or vehicle owner.

Black plate (17,1)Chevrolet Impala Owner Manual - 2011
Customer Information 13-17
OnStar®
If the vehicle is equipped withan active OnStar system, thatsystem may also record data incrash or near crash‐like situations.The OnStar Terms and Conditionsprovides information on datacollection and use and is availablein the OnStar glove box kit,at www.onstar.com (U.S.) orwww.onstar.ca (Canada), orby pressing theQ button andspeaking to an advisor.
Radio FrequencyIdentification (RFID)RFID technology is used in somevehicles for functions such as tirepressure monitoring and ignitionsystem security, as well as inconnection with conveniencessuch as key fobs for remote doorlocking/unlocking and starting, andin-vehicle transmitters for garagedoor openers. RFID technology inGM vehicles does not use or recordpersonal information or link withany other GM system containingpersonal information.
Radio FrequencyStatementThis vehicle has systems thatoperate on a radio frequency thatcomply with Part 15 of the FederalCommunications Commission (FCC)rules and with Industry CanadaStandards RSS‐210/220/310.
Operation is subject to the followingtwo conditions:
1. The device may not causeinterference.
2. The device must accept anyinterference received, includinginterference that may causeundesired operation of thedevice.
Changes or modifications to any ofthese systems by other than anauthorized service facility could voidauthorization to use this equipment.

Black plate (18,1)Chevrolet Impala Owner Manual - 2011
13-18 Customer Information
2 NOTES

Black plate (1,1)Chevrolet Impala Owner Manual - 2011
INDEX i-1
AAccessories andModifications . . . . . . . . . . . . . . . . . 10-3
Accessory Power . . . . . . . . . . . . . . 9-21Add-On ElectricalEquipment . . . . . . . . . . . . . . . . . . . 9-48
AdjustmentsLumbar, Front Seats . . . . . . . . . . . 3-4
Air Cleaner/Filter, Engine . . . . . 10-15Air Filter, PassengerCompartment . . . . . . . . . . . . . . . . . 8-5
Air Vents . . . . . . . . . . . . . . . . . . . . . . . 8-5Airbag SystemCheck . . . . . . . . . . . . . . . . . . . . . . . .3-41How Does an AirbagRestrain? . . . . . . . . . . . . . . . . . . .3-32
Passenger SensingSystem . . . . . . . . . . . . . . . . . . . . . .3-34
What Makes an AirbagInflate? . . . . . . . . . . . . . . . . . . . . . .3-31
Airbag System (cont.)What Will You See Afteran Airbag Inflates? . . . . . . . . . .3-32
When Should an AirbagInflate? . . . . . . . . . . . . . . . . . . . . . .3-30
Where Are the Airbags? . . . . . .3-28AirbagsAdding Equipment to theVehicle . . . . . . . . . . . . . . . . . . . . . .3-40
Passenger Status Indicator . . .5-16Readiness Light . . . . . . . . . . . . . .5-15Servicing Airbag-EquippedVehicles . . . . . . . . . . . . . . . . . . . . .3-40
System Check . . . . . . . . . . . . . . . .3-26Alarm SystemAnti-Theft . . . . . . . . . . . . . . . . . . . . . 2-11
AM-FM Radio . . . . . . . . . . . . . . . . . . . 7-6AntennaSatellite Radio . . . . . . . . . . . . . . . .7-15
Anti-TheftAlarm System . . . . . . . . . . . . . . . . 2-11Alarm System Messages . . . . .5-36
Antilock BrakeSystem (ABS) . . . . . . . . . . . . . . . . 9-28Warning Light . . . . . . . . . . . . . . . . .5-21
Appearance CareExterior . . . . . . . . . . . . . . . . . . . . . 10-81Interior . . . . . . . . . . . . . . . . . . . . . . 10-85
Armrest Storage . . . . . . . . . . . . . . . . 4-1Ashtrays . . . . . . . . . . . . . . . . . . . . . . . 5-10Assistance Program,Roadside . . . . . . . . . . . . . . . . . . . . . 13-6
Audio Players . . . . . . . . . . . . . . . . . 7-15CD . . . . . . . . . . . . . . . . . . . . . . . . . . .7-15
Audio SystemBackglass Antenna . . . . . . . . . . .7-14Radio Reception . . . . . . . . . . . . . .7-13Theft-Deterrent Feature . . . . . . . . 7-2
AutomaticDoor Locks . . . . . . . . . . . . . . . . . . . . 2-8
Automatic Transmission . . . . . . . 9-25Fluid . . . . . . . . . . . . . . . . . . . . . . . . 10-12Shift Lock ControlFunction Check . . . . . . . . . . . 10-30
Auxiliary Devices . . . . . . . . . . . . . . 7-21

Black plate (2,1)Chevrolet Impala Owner Manual - 2011
i-2 INDEX
BBattery . . . . . . . . . . . . . . . . . . . . . . . 10-29Jump Starting . . . . . . . . . . . . . . . 10-75Load Management . . . . . . . . . . . . . 6-7Power Protection . . . . . . . . . . . . . . 6-8Voltage and ChargingMessages . . . . . . . . . . . . . . . . . . .5-30
Blade Replacement, Wiper . . . 10-31Bluetooth . . . . . . . . . . . . . . . . . . . . . . 7-21Brake System Warning Light . . . 5-20Brakes . . . . . . . . . . . . . . . . . . . . . . . . 10-26Antilock . . . . . . . . . . . . . . . . . . . . . . .9-28Fluid . . . . . . . . . . . . . . . . . . . . . . . . 10-27Parking . . . . . . . . . . . . . . . . . . . . . . .9-29System Messages . . . . . . . . . . . .5-31
Braking . . . . . . . . . . . . . . . . . . . . . . . . . 9-3Break-In, New Vehicle . . . . . . . . . 9-17Bulb Replacement . . . . . . . . . . . . 10-37Fog Lamps . . . . . . . . . . . . . . . . . . . . 6-5Halogen Bulbs . . . . . . . . . . . . . . 10-33Headlamp Aiming . . . . . . . . . . . 10-32Headlamps . . . . . . . . . . . . . . . . . 10-33
Bulb Replacement (cont.)Headlamps, Front TurnSignal, Sidemarker, andParking Lamps . . . . . . . . . . . . 10-33
License Plate Lamps . . . . . . . 10-36Taillamps, Turn Signal,Sidemarker, Stoplamps,and Backup Lamps . . . . . . . . 10-35
Buying New Tires . . . . . . . . . . . . . 10-58
CCalibration . . . . . . . . . . . . . . . . . . . . . . 5-5CaliforniaFuel Requirements . . . . . . . . . . .9-36Perchlorate MaterialsRequirements . . . . . . . . . . . . . . .10-3
Warning . . . . . . . . . . . . . . . . . . . . . .10-3Canadian Vehicle Owners . . . . . . . . iiiCapacities andSpecifications . . . . . . . . . . . . . . . . 12-2
Carbon MonoxideEngine Exhaust . . . . . . . . . . . . . . .9-24Trunk . . . . . . . . . . . . . . . . . . . . . . . . .2-10Winter Driving . . . . . . . . . . . . . . . . . 9-9
Cautions, Danger, andWarnings . . . . . . . . . . . . . . . . . . . . . . . . iv
CD Player . . . . . . . . . . . . . . . . . . . . . 7-15Center Console Storage . . . . . . . . 4-2Center Seat . . . . . . . . . . . . . . . . . . . . 3-4Chains, Tire . . . . . . . . . . . . . . . . . . 10-64ChargingSystem Light . . . . . . . . . . . . . . . . .5-17
CheckEngine Light . . . . . . . . . . . . . . . . . .5-17IgnitionTransmission Lock . . . . . . . . 10-30
Child RestraintsInfants and YoungChildren . . . . . . . . . . . . . . . . . . . . .3-45
Lower Anchors andTethers for Children . . . . . . . . .3-51
Older Children . . . . . . . . . . . . . . . .3-42Securing . . . . . . . . . . . . . . . .3-57, 3-59Systems . . . . . . . . . . . . . . . . . . . . . .3-47
Cigarette Lighter . . . . . . . . . . . . . . . . 5-9Circuit Breakers . . . . . . . . . . . . . . 10-38CleaningExterior Care . . . . . . . . . . . . . . . 10-81Interior Care . . . . . . . . . . . . . . . . 10-85

Black plate (3,1)Chevrolet Impala Owner Manual - 2011
INDEX i-3
Climate Control Systems . . . . . . . 8-1Air Conditioning . . . . . . . . . . . . . . . 8-1Heating . . . . . . . . . . . . . . . . . . . . . . . . 8-1
Clock . . . . . . . . . . . . . . . . . . . . . . . . . . . 5-7Cluster, Instrument . . . . . . . . . . . . 5-11Collision Damage Repair . . . . . 13-10Compact Spare Tire . . . . . . . . . . 10-74Compass . . . . . . . . . . . . . . . . . . . . . . . 5-5Control of a Vehicle . . . . . . . . . . . . . 9-3Convenience Net . . . . . . . . . . . . . . . 4-2Convex Mirrors . . . . . . . . . . . . . . . . 2-14CoolantEngine . . . . . . . . . . . . . . . . . . . . . . 10-17Engine TemperatureGauge . . . . . . . . . . . . . . . . . . . . . .5-13
Engine TemperatureWarning Light . . . . . . . . . . . . . . .5-23
Cooling System . . . . . . . . . . . . . . . 10-16Engine Messages . . . . . . . . . . . .5-32
Courtesy Lamps . . . . . . . . . . . . . . . . 6-5Courtesy TransportationProgram . . . . . . . . . . . . . . . . . . . . . . 13-9
Cruise Control . . . . . . . . . . . . . . . . . 9-32Light . . . . . . . . . . . . . . . . . . . . . . . . . .5-25
Cupholders . . . . . . . . . . . . . . . . . . . . . 4-1
Customer Assistance . . . . . . . . . . 13-4Offices . . . . . . . . . . . . . . . . . . . . . . . .13-3Text Telephone (TTY)Users . . . . . . . . . . . . . . . . . . . . . . .13-4
Customer InformationService PublicationsOrdering Information . . . . . . 13-13
Customer SatisfactionProcedure . . . . . . . . . . . . . . . . . . . . 13-1
DDamage Repair, Collision . . . . . 13-10Danger, Warnings, andCautions . . . . . . . . . . . . . . . . . . . . . . . . iv
Data Recorders, Event . . . . . . . 13-16Daytime RunningLamps/AutomaticHeadlamp System . . . . . . . . . . . . 6-3
Defensive Driving . . . . . . . . . . . . . . . 9-2Delayed Entry Lighting . . . . . . . . . 6-7Delayed Exit Lighting . . . . . . . . . . . 6-7Delayed Locking . . . . . . . . . . . . . . . . 2-8Devices, Auxiliary . . . . . . . . . . . . . 7-21Dome Lamps . . . . . . . . . . . . . . . . . . . 6-6
DoorAjar Messages . . . . . . . . . . . . . . .5-31Delayed Locking . . . . . . . . . . . . . . . 2-8Locks . . . . . . . . . . . . . . . . . . . . . . . . . . 2-7Power Locks . . . . . . . . . . . . . . . . . . . 2-8
Driver InformationCenter (DIC) . . . . . . . . . . . . . . . . . 5-26
DrivingCharacteristics andTowing Tips . . . . . . . . . . . . . . . . .9-42
Defensive . . . . . . . . . . . . . . . . . . . . . . 9-2Drunk . . . . . . . . . . . . . . . . . . . . . . . . . . 9-2Highway Hypnosis . . . . . . . . . . . . . 9-8Hill and Mountain Roads . . . . . . . 9-8If the Vehicle is Stuck . . . . . . . . . 9-11Loss of Control . . . . . . . . . . . . . . . . 9-6Off-Road Recovery . . . . . . . . . . . . 9-5Vehicle Load Limits . . . . . . . . . . .9-12Wet Roads . . . . . . . . . . . . . . . . . . . . 9-7Winter . . . . . . . . . . . . . . . . . . . . . . . . . 9-9
Driving for Better FuelEconomy . . . . . . . . . . . . . . . . . . . . . 1-20
Black plate (4,1)Chevrolet Impala Owner Manual - 2011
i-4 INDEX
EE85 Fuel . . . . . . . . . . . . . . . . . . . . . . . 9-38Electrical Equipment,Add-On . . . . . . . . . . . . . . . . . . . . . . 9-48
Electrical SystemEngine CompartmentFuse Block . . . . . . . . . . . . . . . . 10-38
Fuses and CircuitBreakers . . . . . . . . . . . . . . . . . . 10-38
Instrument Panel FuseBlock . . . . . . . . . . . . . . . . . . . . . . 10-41
Overload . . . . . . . . . . . . . . . . . . . 10-37Electronic Stability Control . . . . . 9-31Electronic Stability ControlIndicator Light . . . . . . . . . . . . . . . . 5-21
EngineAir Cleaner/Filter . . . . . . . . . . . 10-15Check and Service EngineSoon Light . . . . . . . . . . . . . . . . . .5-17
Compartment Overview . . . . . . .10-6Coolant . . . . . . . . . . . . . . . . . . . . . 10-17Coolant TemperatureGauge . . . . . . . . . . . . . . . . . . . . . .5-13
Engine (cont.)Coolant TemperatureWarning Light . . . . . . . . . . . . . . .5-23
Cooling System . . . . . . . . . . . . . 10-16Cooling System Messages . . .5-32Drive Belt Routing . . . . . . . . . . . .12-3Exhaust . . . . . . . . . . . . . . . . . . . . . .9-24Heater . . . . . . . . . . . . . . . . . . . . . . . .9-20Overheated ProtectionOperating Mode . . . . . . . . . . . 10-24
Overheating . . . . . . . . . . . . . . . . 10-21Power Messages . . . . . . . . . . . . .5-33Pressure Light . . . . . . . . . . . . . . . .5-24Running While Parked . . . . . . . .9-25Starting . . . . . . . . . . . . . . . . . . . . . . .9-19
Engine OilLife System . . . . . . . . . . . . . . . . . .10-11Messages . . . . . . . . . . . . . . . . . . . .5-33
Entry Lighting . . . . . . . . . . . . . . . . . . . 6-6Equipment, Towing . . . . . . . . . . . . 9-47Event Data Recorders . . . . . . . . 13-16Extender, Safety Belt . . . . . . . . . . 3-24Exterior Lamp Controls . . . . . . . . . 6-1
FFilter,Engine Air Cleaner . . . . . . . . . 10-15
Flash-to-Pass . . . . . . . . . . . . . . . . . . . 6-3Flashers, Hazard Warning . . . . . . 6-4Flat Tire . . . . . . . . . . . . . . . . . . . . . . 10-65Changing . . . . . . . . . . . . . . . . . . . 10-66
Floor Mats . . . . . . . . . . . . . . . . . . . . 10-89FluidAutomatic Transmission . . . . 10-12Brakes . . . . . . . . . . . . . . . . . . . . . . 10-27Power Steering . . . . . . . . . . . . . 10-24Washer . . . . . . . . . . . . . . . . . . . . . 10-25
Fog LampsBulb Replacement . . . . . . . . . . . . . 6-5
Front Fog LampsLight . . . . . . . . . . . . . . . . . . . . . . . . . .5-25
Front SeatsAdjustment . . . . . . . . . . . . . . . . . . . . 3-3Heated . . . . . . . . . . . . . . . . . . . . . . . . 3-7
Black plate (5,1)Chevrolet Impala Owner Manual - 2011
INDEX i-5
Fuel . . . . . . . . . . . . . . . . . . . . . . . . . . . 9-35Additives . . . . . . . . . . . . . . . . . . . . .9-37E85 (85% Ethanol) . . . . . . . . . . .9-38Filling a Portable FuelContainer . . . . . . . . . . . . . . . . . . .9-41
Filling the Tank . . . . . . . . . . . . . . .9-39Fuels in Foreign Countries . . . .9-36Gasoline Specifications . . . . . . .9-36Gauge . . . . . . . . . . . . . . . . . . . . . . . .5-12Recommended . . . . . . . . . . . . . . .9-35Requirements, California . . . . .9-36System Messages . . . . . . . . . . . .5-34
Fuel EconomyDriving . . . . . . . . . . . . . . . . . . . . . . . .1-20
FusesEngine CompartmentFuse Block . . . . . . . . . . . . . . . . 10-38
Fuses and CircuitBreakers . . . . . . . . . . . . . . . . . . 10-38
Instrument Panel FuseBlock . . . . . . . . . . . . . . . . . . . . . . 10-41
GGarage Door Opener . . . . . . . . . . 5-45Programming . . . . . . . . . . . . . . . . .5-45
GasolineSpecifications . . . . . . . . . . . . . . . . .9-36
GaugesEngine CoolantTemperature . . . . . . . . . . . . . . . .5-13
Fuel . . . . . . . . . . . . . . . . . . . . . . . . . .5-12Odometer . . . . . . . . . . . . . . . . . . . . .5-12Speedometer . . . . . . . . . . . . . . . . .5-12Tachometer . . . . . . . . . . . . . . . . . . .5-12Warning Lights andIndicators . . . . . . . . . . . . . . . . . . .5-10
General InformationService and Maintenance . . . . . 11-1Towing . . . . . . . . . . . . . . . . . . . . . . . .9-41Vehicle Care . . . . . . . . . . . . . . . . . .10-2
Glove Box . . . . . . . . . . . . . . . . . . . . . . 4-1GM Mobility ReimbursementProgram . . . . . . . . . . . . . . . . . . . . . . 13-6
HHalogen Bulbs . . . . . . . . . . . . . . . . 10-33Hazard Warning Flashers . . . . . . . 6-4Head Restraints . . . . . . . . . . . . . . . . 3-2HeadlampsAiming . . . . . . . . . . . . . . . . . . . . . . 10-32Bulb Replacement . . . . . . . . . . 10-33Daytime RunningLamps/AutomaticHeadlamp System . . . . . . . . . . . 6-3
Flash-to-Pass . . . . . . . . . . . . . . . . . . 6-3Headlamps, Front TurnSignal, Sidemarker, andParking Lamps . . . . . . . . . . . . 10-33
High-Beam On Light . . . . . . . . . .5-25High/Low Beam Changer . . . . . . 6-3
Heated Front Seats . . . . . . . . . . . . . 3-7Heated Mirrors . . . . . . . . . . . . . . . . . 2-15HeaterEngine . . . . . . . . . . . . . . . . . . . . . . . .9-20
Heating and Air Conditioning . . . 8-1

Black plate (6,1)Chevrolet Impala Owner Manual - 2011
i-6 INDEX
High-Beam On Light . . . . . . . . . . . 5-25Highway Hypnosis . . . . . . . . . . . . . . 9-8Hill and Mountain Roads . . . . . . . . 9-8Hood . . . . . . . . . . . . . . . . . . . . . . . . . . 10-5Horn . . . . . . . . . . . . . . . . . . . . . . . . . . . . 5-3How to Wear Safety BeltsProperly . . . . . . . . . . . . . . . . . . . . . . 3-14
IIgnition Positions . . . . . . . . . . . . . . 9-17Ignition Transmission LockCheck . . . . . . . . . . . . . . . . . . . . . . . 10-30
Immobilizer . . . . . . . . . . . . . . . . . . . . 2-12Infants and Young Children,Restraints . . . . . . . . . . . . . . . . . . . . 3-45
Infotainment . . . . . . . . . . . . . . . . . . . . 7-1Instrument Cluster . . . . . . . . . . . . . 5-11Introduction . . . . . . . . . . . . . . . . . . . . . . . iii
JJump Starting . . . . . . . . . . . . . . . . . 10-75
KKey and Lock Messages . . . . . . . 5-34Keyless EntryRemote (RKE) System . . . . . . . . 2-3
Keys . . . . . . . . . . . . . . . . . . . . . . . . . . . . 2-2
LLabeling, Tire Sidewall . . . . . . . . 10-43Lamp Messages . . . . . . . . . . . . . . . 5-34LampsCourtesy . . . . . . . . . . . . . . . . . . . . . . . 6-5Dome . . . . . . . . . . . . . . . . . . . . . . . . . . 6-6Exterior Controls . . . . . . . . . . . . . . . 6-1License Plate . . . . . . . . . . . . . . . 10-36Malfunction Indicator . . . . . . . . .5-17Reading . . . . . . . . . . . . . . . . . . . . . . . 6-6
Lap Belt . . . . . . . . . . . . . . . . . . . . . . . 3-23Lap-Shoulder Belt . . . . . . . . . . . . . 3-19LATCH SystemReplacing Parts After aCrash . . . . . . . . . . . . . . . . . . . . . . .3-56
LATCH, Lower Anchors andTethers for Children . . . . . . . . . . 3-51
Lighter, Cigarette . . . . . . . . . . . . . . . 5-9LightingDelayed Entry . . . . . . . . . . . . . . . . . 6-7Delayed Exit . . . . . . . . . . . . . . . . . . . 6-7Entry . . . . . . . . . . . . . . . . . . . . . . . . . . 6-6Illumination Control . . . . . . . . . . . . 6-5Parade Dimming . . . . . . . . . . . . . . . 6-7
LightsAirbag Readiness . . . . . . . . . . . . .5-15Antilock Brake System(ABS) Warning . . . . . . . . . . . . . .5-21
Brake System Warning . . . . . . .5-20Charging System . . . . . . . . . . . . .5-17Cruise Control . . . . . . . . . . . . . . . .5-25Engine CoolantTemperature Warning . . . . . . .5-23
Engine Oil Pressure . . . . . . . . . .5-24Flash-to-Pass . . . . . . . . . . . . . . . . . . 6-3Front Fog Lamps . . . . . . . . . . . . .5-25High-Beam On . . . . . . . . . . . . . . . .5-25

Black plate (7,1)Chevrolet Impala Owner Manual - 2011
INDEX i-7
Lights (cont.)High/Low Beam Changer . . . . . . 6-3Safety Belt Reminders . . . . . . . .5-14Security . . . . . . . . . . . . . . . . . . . . . .5-25Tire Pressure . . . . . . . . . . . . . . . . .5-23Traction Control System(TCS) Warning . . . . . . . . . . . . . .5-22
LocksAutomatic Door . . . . . . . . . . . . . . . . 2-8Delayed Locking . . . . . . . . . . . . . . . 2-8Door . . . . . . . . . . . . . . . . . . . . . . . . . . . 2-7Lockout Protection . . . . . . . . . . . . . 2-9Power Door . . . . . . . . . . . . . . . . . . . . 2-8Safety . . . . . . . . . . . . . . . . . . . . . . . . . 2-9
Loss of Control . . . . . . . . . . . . . . . . . 9-6Lower Anchors andTethers for Children(LATCH System) . . . . . . . . . . . . . 3-51
Lumbar Adjustment . . . . . . . . . . . . . 3-4Front Seats . . . . . . . . . . . . . . . . . . . . 3-4
MMaintenanceRecords . . . . . . . . . . . . . . . . . . . . . . 11-9
Maintenance ScheduleRecommended Fluids andLubricants . . . . . . . . . . . . . . . . . . . 11-6
Scheduled Maintenance . . . . . . 11-2Malfunction Indicator Lamp . . . . 5-17MessagesAirbag System . . . . . . . . . . . . . . . .5-36Anti-Theft Alarm System . . . . . .5-36Battery Voltage andCharging . . . . . . . . . . . . . . . . . . . .5-30
Brake System . . . . . . . . . . . . . . . .5-31Door Ajar . . . . . . . . . . . . . . . . . . . . .5-31Engine Cooling System . . . . . . .5-32Engine Oil . . . . . . . . . . . . . . . . . . . .5-33Engine Power . . . . . . . . . . . . . . . .5-33Fuel System . . . . . . . . . . . . . . . . . .5-34Key and Lock . . . . . . . . . . . . . . . . .5-34Lamp . . . . . . . . . . . . . . . . . . . . . . . . .5-34
Messages (cont.)Ride Control System . . . . . . . . . .5-35Service Vehicle . . . . . . . . . . . . . . .5-36Tire . . . . . . . . . . . . . . . . . . . . . . . . . . .5-37Transmission . . . . . . . . . . . . . . . . .5-38Vehicle . . . . . . . . . . . . . . . . . . . . . . .5-30Vehicle Reminder . . . . . . . . . . . . .5-38Washer Fluid . . . . . . . . . . . . . . . . .5-38
MirrorsAutomatic DimmingRearview . . . . . . . . . . . . . . . . . . . .2-15
Convex . . . . . . . . . . . . . . . . . . . . . . .2-14Heated . . . . . . . . . . . . . . . . . . . . . . .2-15Manual Rearview . . . . . . . . . . . . .2-15Power . . . . . . . . . . . . . . . . . . . . . . . .2-14
Monitor System, TirePressure . . . . . . . . . . . . . . . . . . . . 10-51
NNet, Convenience . . . . . . . . . . . . . . 4-2New Vehicle Break-In . . . . . . . . . . 9-17

Black plate (8,1)Chevrolet Impala Owner Manual - 2011
i-8 INDEX
OOdometer . . . . . . . . . . . . . . . . . . . . . . 5-12Off-RoadRecovery . . . . . . . . . . . . . . . . . . . . . . 9-5
OilEngine . . . . . . . . . . . . . . . . . . . . . . . .10-7Engine Oil Life System . . . . . .10-11Messages . . . . . . . . . . . . . . . . . . . .5-33Pressure Light . . . . . . . . . . . . . . . .5-24
Older Children, Restraints . . . . . 3-42Online Owner Center . . . . . . . . . . 13-5OnStar® System . . . . . . . . . . . . . . . 1-21Operation, InfotainmentSystem . . . . . . . . . . . . . . . . . . . . . . . . 7-2
OutletsPower . . . . . . . . . . . . . . . . . . . . . . . . . 5-8
Overheated EngineProtectionOperating Mode . . . . . . . . . . . . . 10-24
Overheating, Engine . . . . . . . . . . 10-21
PParade Dimming . . . . . . . . . . . . . . . . 6-7ParkShifting Into . . . . . . . . . . . . . . . . . . .9-21Shifting Out of . . . . . . . . . . . . . . . .9-23
ParkingBrake . . . . . . . . . . . . . . . . . . . . . . . . .9-29Brake and P (Park)Mechanism Check . . . . . . . . 10-30
Over Things That Burn . . . . . . .9-24Passenger Airbag StatusIndicator . . . . . . . . . . . . . . . . . . . . . 5-16
Passenger Compartment AirFilter . . . . . . . . . . . . . . . . . . . . . . . . . . 8-5
Passenger Sensing System . . . 3-34Perchlorate MaterialsRequirements, California . . . . . 10-3
PersonalizationVehicle . . . . . . . . . . . . . . . . . . . . . . .5-39
PhoneBluetooth . . . . . . . . . . . . . . . . . . . . .7-21
PowerDoor Locks . . . . . . . . . . . . . . . . . . . . 2-8Mirrors . . . . . . . . . . . . . . . . . . . . . . . .2-14Outlets . . . . . . . . . . . . . . . . . . . . . . . . 5-8Protection, Battery . . . . . . . . . . . . . 6-8Retained Accessory (RAP) . . .9-21Seat Adjustment . . . . . . . . . . . . . . . 3-4Steering Fluid . . . . . . . . . . . . . . . 10-24Windows . . . . . . . . . . . . . . . . . . . . .2-16
Pregnancy, Using SafetyBelts . . . . . . . . . . . . . . . . . . . . . . . . . 3-23
PrivacyRadio FrequencyIdentification (RFID) . . . . . . . 13-17
ProgramCourtesy Transportation . . . . . .13-9
Proposition 65 Warning,California . . . . . . . . . . . . . . . . . . . . . 10-3

Black plate (9,1)Chevrolet Impala Owner Manual - 2011
INDEX i-9
RRadio FrequencyIdentification (RFID) . . . . . . . . 13-17Statement . . . . . . . . . . . . . . . . . . 13-17
RadiosAM-FM Radio . . . . . . . . . . . . . . . . . . 7-6Reception . . . . . . . . . . . . . . . . . . . .7-13Satellite . . . . . . . . . . . . . . . . . . . . . . . . 7-9
Reading Lamps . . . . . . . . . . . . . . . . . 6-6Rear Seats . . . . . . . . . . . . . . . . . . . . . 3-8Rear Storage . . . . . . . . . . . . . . . . . . . 4-2Rearview Mirrors . . . . . . . . . . . . . . 2-15Automatic Dimming . . . . . . . . . . .2-15
Reclining Seatbacks . . . . . . . . . . . . 3-5Recommended Fluids andLubricants . . . . . . . . . . . . . . . . . . . . 11-6
Recommended Fuel . . . . . . . . . . . 9-35RecordsMaintenance . . . . . . . . . . . . . . . . . . 11-9
Recreational VehicleTowing . . . . . . . . . . . . . . . . . . . . . . 10-79
Reimbursement Program,GM Mobility . . . . . . . . . . . . . . . . . . 13-6
Remote Keyless Entry(RKE) System . . . . . . . . . . . . .2-2, 2-3
Remote Vehicle Start . . . . . . . . . . . 2-5Replacement Bulbs . . . . . . . . . . . 10-37Replacement PartsAirbags . . . . . . . . . . . . . . . . . . . . . . .3-42Maintenance . . . . . . . . . . . . . . . . . . 11-8
Replacing Airbag System . . . . . . 3-42Replacing LATCH SystemParts After a Crash . . . . . . . . . . . 3-56
Replacing Safety BeltSystem Parts After aCrash . . . . . . . . . . . . . . . . . . . . . . . . 3-25
Reporting Safety DefectsCanadian Government . . . . . . 13-15General Motors . . . . . . . . . . . . . 13-15U.S. Government . . . . . . . . . . . 13-14
RestraintsWhere to Put . . . . . . . . . . . . . . . . .3-49
Retained AccessoryPower (RAP) . . . . . . . . . . . . . . . . . 9-21
Ride Control Systems . . . . . . . . . 9-31Electronic Stability (ESC) . . . . .9-31Messages . . . . . . . . . . . . . . . . . . . .5-35
RoadsDriving, Wet . . . . . . . . . . . . . . . . . . . 9-7
Roadside AssistanceProgram . . . . . . . . . . . . . . . . . . . . . . 13-6
RoofSunroof . . . . . . . . . . . . . . . . . . . . . . .2-18
Rotation, Tires . . . . . . . . . . . . . . . . 10-56Routing, Engine Drive Belt . . . . . 12-3Running the Vehicle WhileParked . . . . . . . . . . . . . . . . . . . . . . . 9-25
SSafety Belts . . . . . . . . . . . . . . . . . . . 3-10Care . . . . . . . . . . . . . . . . . . . . . . . . . .3-25Extender . . . . . . . . . . . . . . . . . . . . . .3-24How to Wear Safety BeltsProperly . . . . . . . . . . . . . . . . . . . . .3-14
Lap Belt . . . . . . . . . . . . . . . . . . . . . .3-23Lap-Shoulder Belt . . . . . . . . . . . .3-19Reminders . . . . . . . . . . . . . . . . . . . .5-14Replacing After a Crash . . . . . .3-25Use During Pregnancy . . . . . . . .3-23
Safety Defects ReportingCanadian Government . . . . . . 13-15General Motors . . . . . . . . . . . . . 13-15U.S. Government . . . . . . . . . . . 13-14
Safety Locks . . . . . . . . . . . . . . . . . . . . 2-9Safety System Check . . . . . . . . . . 3-25Satellite Radio . . . . . . . . . . . . . . . . . . 7-9
Black plate (10,1)Chevrolet Impala Owner Manual - 2011
i-10 INDEX
Scheduled Maintenance . . . . . . . 11-2Scheduling Appointments . . . . . . 13-8SeatsAdjustment, Front . . . . . . . . . . . . . . 3-3Center Seat . . . . . . . . . . . . . . . . . . . 3-4Head Restraints . . . . . . . . . . . . . . . 3-2Heated Front . . . . . . . . . . . . . . . . . . 3-7Lumbar Adjustment, Front . . . . . 3-4Power Adjustment, Front . . . . . . 3-4Rear . . . . . . . . . . . . . . . . . . . . . . . . . . . 3-8Reclining Seatbacks . . . . . . . . . . . 3-5
Securing ChildRestraints . . . . . . . . . . . . . . 3-57, 3-59
SecurityLight . . . . . . . . . . . . . . . . . . . . . . . . . .5-25Vehicle . . . . . . . . . . . . . . . . . . . . . . . 2-11
ServiceAccessories andModifications . . . . . . . . . . . . . . . .10-3
Doing Your Own Work . . . . . . . .10-4Engine Soon Light . . . . . . . . . . . .5-17Maintenance Records . . . . . . . . 11-9Maintenance, GeneralInformation . . . . . . . . . . . . . . . . . . 11-1
Service (cont.)Parts Identification Label . . . . .12-1Publications OrderingInformation . . . . . . . . . . . . . . . . 13-13
Scheduling Appointments . . . . .13-8Vehicle Messages . . . . . . . . . . . .5-36
Servicing the Airbag . . . . . . . . . . . 3-40Shift Lock Control FunctionCheck, AutomaticTransmission . . . . . . . . . . . . . . . . 10-30
ShiftingInto Park . . . . . . . . . . . . . . . . . . . . . .9-21Out of Park . . . . . . . . . . . . . . . . . . .9-23
SidemarkerBulb Replacement . . . . . . . . . . 10-35
Signals, Turn andLane-Change . . . . . . . . . . . . . . . . . 6-4
Spare TireCompact . . . . . . . . . . . . . . . . . . . . 10-74
Specifications andCapacities . . . . . . . . . . . . . . . . . . . . 12-2
Speedometer . . . . . . . . . . . . . . . . . . 5-12Start Vehicle, Remote . . . . . . . . . . 2-5Starter Switch Check . . . . . . . . . 10-29
Starting the Engine . . . . . . . . . . . . 9-19Steering . . . . . . . . . . . . . . . . . . . . . . . . 9-4Fluid, Power . . . . . . . . . . . . . . . . 10-24Wheel Adjustment . . . . . . . . . . . . . 5-2Wheel Controls . . . . . . . . . . . . . . . . 5-3
Stoplamps and Back-Up LampsBulb Replacement . . . . . . . . . . 10-35
StorageRear . . . . . . . . . . . . . . . . . . . . . . . . . . . 4-2
Storage AreasArmrest . . . . . . . . . . . . . . . . . . . . . . . . 4-1Center Console . . . . . . . . . . . . . . . . 4-2Convenience Net . . . . . . . . . . . . . . 4-2Glove Box . . . . . . . . . . . . . . . . . . . . . 4-1Sunglasses . . . . . . . . . . . . . . . . . . . . 4-1
Stuck Vehicle . . . . . . . . . . . . . . . . . . 9-11Sun Visors . . . . . . . . . . . . . . . . . . . . . 2-17Sunglass Storage . . . . . . . . . . . . . . . 4-1Sunroof . . . . . . . . . . . . . . . . . . . . . . . . 2-18Symbols . . . . . . . . . . . . . . . . . . . . . . . . . . ivSystemInfotainment . . . . . . . . . . . . . . . . . . . 7-1

Black plate (11,1)Chevrolet Impala Owner Manual - 2011
INDEX i-11
TTachometer . . . . . . . . . . . . . . . . . . . . 5-12TaillampsBulb Replacement . . . . . . . . . . 10-35
Text Telephone (TTY) Users . . . 13-4Theft-Deterrent Systems . . . . . . . 2-12Immobilizer . . . . . . . . . . . . . . . . . . .2-12
Time . . . . . . . . . . . . . . . . . . . . . . . . . . . . 5-7TiresBuying New Tires . . . . . . . . . . . 10-58Chains . . . . . . . . . . . . . . . . . . . . . . 10-64Changing . . . . . . . . . . . . . . . . . . . 10-66Compact Spare . . . . . . . . . . . . . 10-74Designations . . . . . . . . . . . . . . . 10-45Different Size . . . . . . . . . . . . . . . 10-60If a Tire Goes Flat . . . . . . . . . . 10-65Inflation Monitor System . . . . 10-52Inspection . . . . . . . . . . . . . . . . . . 10-56Messages . . . . . . . . . . . . . . . . . . . .5-37Pressure Light . . . . . . . . . . . . . . . .5-23Pressure Monitor System . . . 10-51Rotation . . . . . . . . . . . . . . . . . . . . 10-56
Tires (cont.)Sidewall Labeling . . . . . . . . . . . 10-43Terminology andDefinitions . . . . . . . . . . . . . . . . . 10-46
Uniform Tire QualityGrading . . . . . . . . . . . . . . . . . . . 10-61
Wheel Alignment and TireBalance . . . . . . . . . . . . . . . . . . . 10-63
Wheel Replacement . . . . . . . . 10-63When It Is Time for NewTires . . . . . . . . . . . . . . . . . . . . . . 10-57
TowingDriving Characteristics . . . . . . . .9-42Equipment . . . . . . . . . . . . . . . . . . . .9-47General Information . . . . . . . . . .9-41Recreational Vehicle . . . . . . . . 10-79Trailer . . . . . . . . . . . . . . . . . . . . . . . .9-45Vehicle . . . . . . . . . . . . . . . . . . . . . 10-79
TractionControl System (TCS) . . . . . . . .9-29Control System WarningLight . . . . . . . . . . . . . . . . . . . . . . . .5-22
Trailer Towing . . . . . . . . . . . . . . . . . 9-45
TransmissionAutomatic . . . . . . . . . . . . . . . . . . . . .9-25Fluid, Automatic . . . . . . . . . . . . 10-12Messages . . . . . . . . . . . . . . . . . . . .5-38
Transportation Program,Courtesy . . . . . . . . . . . . . . . . . . . . . 13-9
Trunk . . . . . . . . . . . . . . . . . . . . . . . . . . 2-10Turn and Lane-ChangeSignals . . . . . . . . . . . . . . . . . . . . . . . . 6-4
Turn SignalBulb Replacement . . . . . . . . . . 10-35
UUniform Tire QualityGrading . . . . . . . . . . . . . . . . . . . . . 10-61
Universal Remote System . . . . . 5-45Operation . . . . . . . . . . . . . . . . . . . . .5-51Programming . . . . . . . . . . . . . . . . .5-45
Using this Manual . . . . . . . . . . . . . . . . iv

Black plate (12,1)Chevrolet Impala Owner Manual - 2011
i-12 INDEX
VVehicleCanadian Owners . . . . . . . . . . . . . . . iiiControl . . . . . . . . . . . . . . . . . . . . . . . . 9-3IdentificationNumber (VIN) . . . . . . . . . . . . . . .12-1
Load Limits . . . . . . . . . . . . . . . . . . .9-12Messages . . . . . . . . . . . . . . . . . . . .5-30Personalization . . . . . . . . . . . . . . .5-39Reminder Messages . . . . . . . . . .5-38Remote Start . . . . . . . . . . . . . . . . . . 2-5Security . . . . . . . . . . . . . . . . . . . . . . 2-11Towing . . . . . . . . . . . . . . . . . . . . . . 10-79
Vehicle CareTire Pressure . . . . . . . . . . . . . . . 10-49
Vehicle IdentificationService Parts IdentificationLabel . . . . . . . . . . . . . . . . . . . . . . . .12-1
Ventilation, Air . . . . . . . . . . . . . . . . . . 8-5Visors . . . . . . . . . . . . . . . . . . . . . . . . . 2-17
WWarningBrake System Light . . . . . . . . . . .5-20
Warning Lights, Gauges,and Indicators . . . . . . . . . . . . . . . . 5-10
Warnings . . . . . . . . . . . . . . . . . . . . . . . . . ivCautions and Danger . . . . . . . . . . . .ivHazard Flashers . . . . . . . . . . . . . . . 6-4
Washer Fluid . . . . . . . . . . . . . . . . . 10-25Washer Fluid Messages . . . . . . . 5-38WheelsAlignment and TireBalance . . . . . . . . . . . . . . . . . . . 10-63
Different Size . . . . . . . . . . . . . . . 10-60Replacement . . . . . . . . . . . . . . . 10-63
When It Is Time for NewTires . . . . . . . . . . . . . . . . . . . . . . . . 10-57
Where to Put the Restraint . . . . 3-49Windows . . . . . . . . . . . . . . . . . . . . . . 2-16Power . . . . . . . . . . . . . . . . . . . . . . . .2-16
WindshieldWiper/Washer . . . . . . . . . . . . . . . . . 5-4
Winter Driving . . . . . . . . . . . . . . . . . . 9-9Wiper Blade Replacement . . . . 10-31