2) understanding fish - food and agriculture organization · most fish breathe dissolved oxygen...
TRANSCRIPT
99
2) Understanding Fish
A) Fish Anatomy
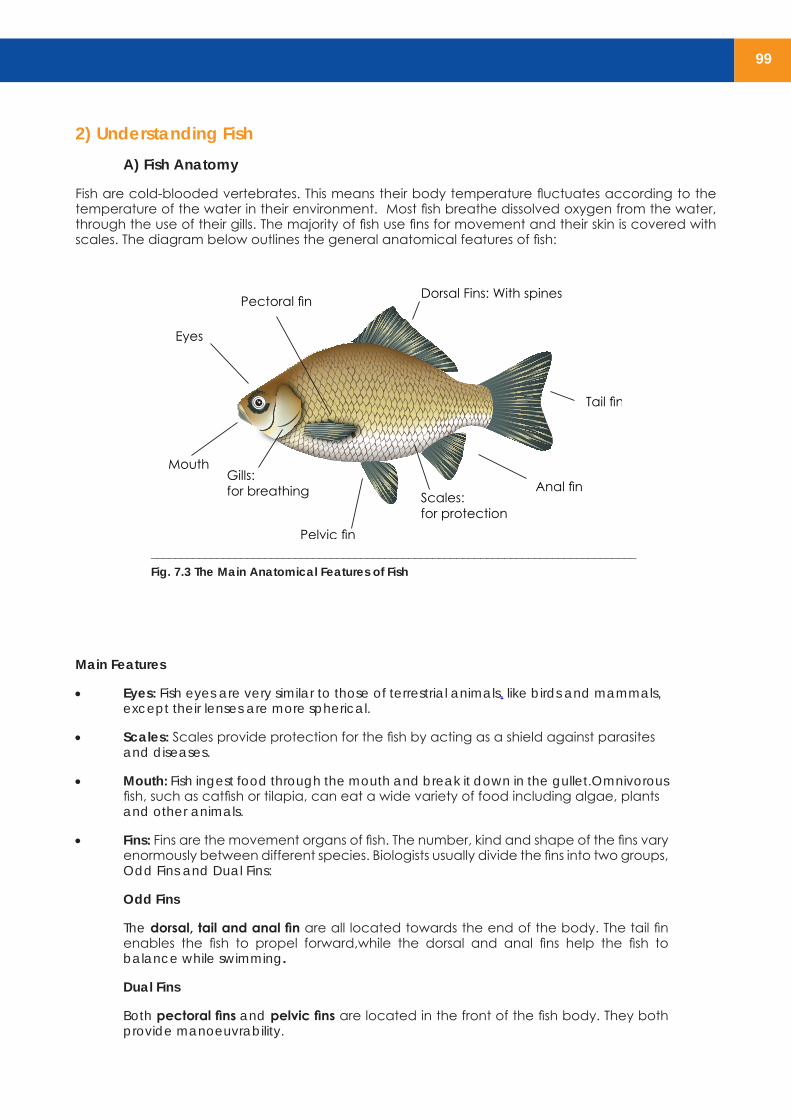
Fish are cold-blooded vertebrates. This means their body temperature fluctuates according to the temperature of the water in their environment. Most fish breathe dissolved oxygen from the water, through the use of their gills. The majority of fish use fins for movement and their skin is covered with scales. The diagram below outlines the general anatomical features of fish:
Main Features
• Eyes: Fish eyes are very similar to those of terrestrial animals, like birds and mammals, except their lenses are more spherical.
• Scales: Scales provide protection for the fish by acting as a shield against parasites and diseases.
• Mouth: Fish ingest food through the mouth and break it down in the gullet.Omnivorous fish, such as catfish or tilapia, can eat a wide variety of food including algae, plants and other animals.
• Fins: Fins are the movement organs of fish. The number, kind and shape of the fins vary enormously between different species. Biologists usually divide the fins into two groups, Odd Fins and Dual Fins:
Odd Fins
The dorsal, tail and anal fin are all located towards the end of the body. The tail fin enables the fish to propel forward,while the dorsal and anal fins help the fish to balance while swimming.
Dual Fins
Both pectoral fins and pelvic fins are located in the front of the fish body. They both provide manoeuvrability.
_________________________________________________________________________________
Fig. 7.3 The Main Anatomical Features of Fish
100
Fish Respiration
Fish breathe oxygen using their gills which are located in the side of the head. Gills consist of structures called filaments(see next picture). Each filament contains a blood vessel net-work that provides a large surface area for the exchange of oxygen and carbon dioxide. Fish exchange gases by pulling oxygen-rich water through their mouths and pumping it over their gills. In their natural habitat, oxygen is supplied by two main sources:
1) Algae-like plants producing oxygen from photosynthesis
2) Water movement from wind or waves enriching the water with atmospheric oxygen.
As discussed in Chapter 3, in aquaponic systems there is a need for additional aeration to supply a sufficient amount of oxygen to support the large amount of fish stocked in the aquaponic systems. Air pumps are recommended to support this additional oxygenation in the system.
Excretion
Fish release ammonia through their gills and urine. A percentage of nitrogen (protein, amino acids, ammonia) is also present in the solid wastes and is expelled through their anus. The excretion of am-monia is an osmotic regulation process. As such, it is very important to maintain 0-1mg.L of ammonia in the fish tank or else fish won’t be able to excrete.
B) Reproduction and Life Cycle of Fish
The reproductive organs of fish include testes and ovaries. Some fish are hermaphrodites, having both testes and ovaries, either simultaneously, or at different phases in their life cycle. Over 97% of all known fish are oviparous, that is, the eggs develop outside the mother’s body. Examples of oviparous fish include salmon, goldfish, cichlids, tuna, and eels. In the majority of these species, fertilization takes place outside the mother’s body, whereby the male and female fish shed their sex cells into the surrounding water.
Fish Life Cycle
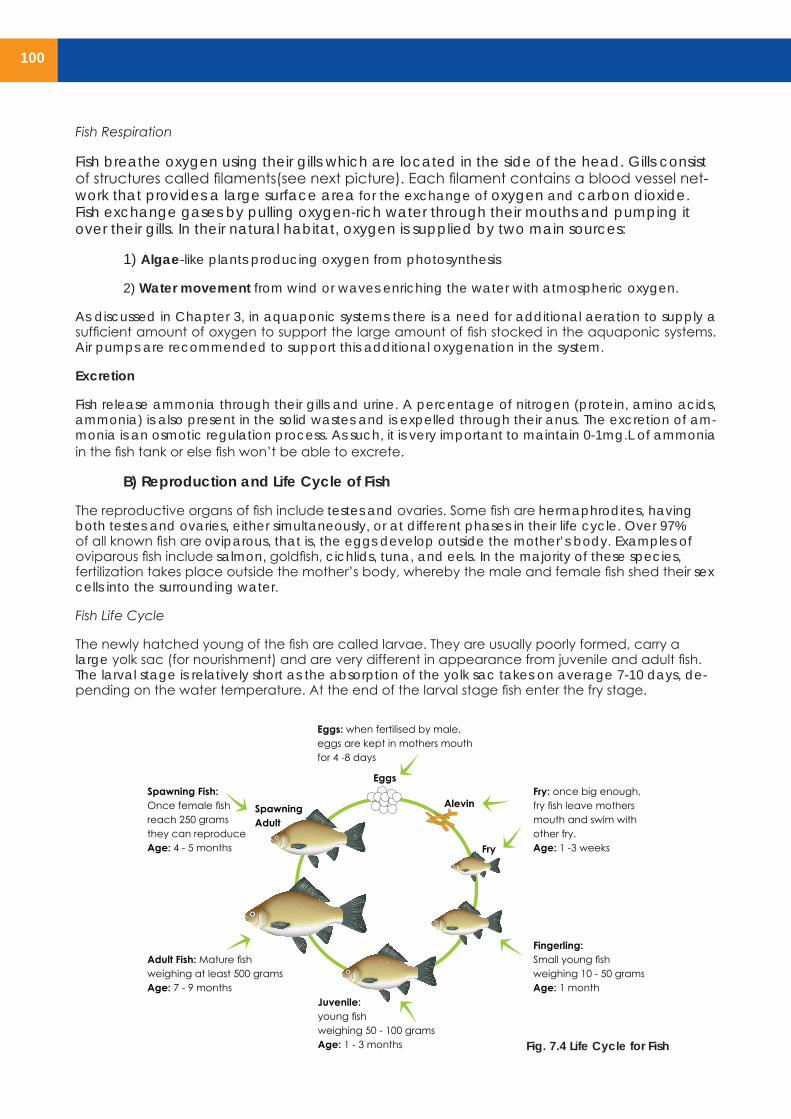
The newly hatched young of the fish are called larvae. They are usually poorly formed, carry a large yolk sac (for nourishment) and are very different in appearance from juvenile and adult fish. The larval stage is relatively short as the absorption of the yolk sac takes on average 7-10 days, de-pending on the water temperature. At the end of the larval stage fish enter the fry stage.
At fry and fingerling stage, fish begin eating solid food at a rate of roughly 10% of their body weight per day. As the fish begin to grow, the percentage body weight of food per day will decrease. Fish weighing 10 grams may consume 10% of their body weight per day, whereas fish weighing 300 grams may consume only 1 or 2 % of their body weight depending on the feeding management and envi-ronmental conditions. At this stage, most aquaculture grown fish are roughly 4-6 months and the fe-males reach their sexual maturity.
3) Fish Feed & Nutrition
Nutrition
Standard manufactured fish feed pellets come highly recommended, as they are a whole food. This means they have the correct balance of protein, carbohydrate, fats, vitamins & minerals needed for fish. Of all the nutrients available in fish feed, protein is the most important component for building fish mass. Omnivorous fish such as tilapia & common carp need in their growout stage roughly 25-35% protein in their diet, while carnivorous fish need up to 45% protein in order to grow at optimal levels. In general fish at younger stages (fry and fingerlings) require a diet richer in protein than the growout stage. Regarding tilapia, the initial diet should have a % protein of 40% or more.
Fish Food Pellets
There are a number of different sizes of fish food pellets, ranging from 2-10mm. The recommended size of fish food pellets depends completely on the size of the fish. Obviously fish at early fingerling stage (10-30 grams) will not be able to ingest the larger pellets, as their mouths are too small. A simple method to remove this problem is to always use medium sized pellets (2-4mm). This way fish will be able to eat at fingerling stage right up to maturity but large fish will waste energy eating pellets that are too small.
Fish food pellets are also designed to either float at the surface or sink to the bottom of the tank, de-pending on the feeding habits of the fish. It is important to know the eating habit of the specific fish you are growing, so you can supply the correct type of food pellet. Floating pel-lets are advantageous as it’s very easy to identify how much the fish are eating. It is more difficult to identify with sinking pellets. It is possible to train your fish to feed according to the food pellets available; however some fish simply won’t change their feeding culture.
There are general rules for aquaculture production that also apply in aquaponic fish production. These include:
• Never overfeed your fish: Uneaten food waste from over-feeding can consume a substantial amount of oxygen as it begins decomposing. In addition, decomposing food can increase the amount of ammonia and nitrite to toxic levels in a relatively short period of time.
• Remove uneaten food after 30 mins: In general fish will normally eat all they need to eat in a 30-minute period. After this length of time, remove any food left uneaten to prevent it sinking to the bottom and decomposing. If uneatean food is found, lower the amount of feed given the next time.
Fig. 7.4 Life Cycle for Fish
Fig. 7.5 Fish Food Pellets

101
At fry and fingerling stage, fish begin eating solid food at a rate of roughly 10% of their body weight per day. As the fish begin to grow, the percentage body weight of food per day will decrease. Fish weighing 10 grams may consume 10% of their body weight per day, whereas fish weighing 300 grams may consume only 1 or 2 % of their body weight depending on the feeding management and envi-ronmental conditions. At this stage, most aquaculture grown fish are roughly 4-6 months and the fe-males reach their sexual maturity.
3) Fish Feed & Nutrition
Nutrition
Standard manufactured fish feed pellets come highly recommended, as they are a whole food. This means they have the correct balance of protein, carbohydrate, fats, vitamins & minerals needed for fish. Of all the nutrients available in fish feed, protein is the most important component for building fish mass. Omnivorous fish such as tilapia & common carp need in their growout stage roughly 25-35% protein in their diet, while carnivorous fish need up to 45% protein in order to grow at optimal levels. In general fish at younger stages (fry and fingerlings) require a diet richer in protein than the growout stage. Regarding tilapia, the initial diet should have a % protein of 40% or more.
Fish Food Pellets
There are a number of different sizes of fish food pellets, ranging from 2-10mm. The recommended size of fish food pellets depends completely on the size of the fish. Obviously fish at early fingerling stage (10-30 grams) will not be able to ingest the larger pellets, as their mouths are too small. A simple method to remove this problem is to always use medium sized pellets (2-4mm). This way fish will be able to eat at fingerling stage right up to maturity but large fish will waste energy eating pellets that are too small.
Fish food pellets are also designed to either float at the surface or sink to the bottom of the tank, de-pending on the feeding habits of the fish. It is important to know the eating habit of the specific fish you are growing, so you can supply the correct type of food pellet. Floating pel-lets are advantageous as it’s very easy to identify how much the fish are eating. It is more difficult to identify with sinking pellets. It is possible to train your fish to feed according to the food pellets available; however some fish simply won’t change their feeding culture.
There are general rules for aquaculture production that also apply in aquaponic fish production. These include:
• Never overfeed your fish: Uneaten food waste from over-feeding can consume a substantial amount of oxygen as it begins decomposing. In addition, decomposing food can increase the amount of ammonia and nitrite to toxic levels in a relatively short period of time.
• Remove uneaten food after 30 mins: In general fish will normally eat all they need to eat in a 30-minute period. After this length of time, remove any food left uneaten to prevent it sinking to the bottom and decomposing. If uneatean food is found, lower the amount of feed given the next time.
Fig. 7.4 Life Cycle for Fish
Fig. 7.5 Fish Food Pellets

102
Chapter 8 (Unit Management) will further discuss feeding strategies over a season that will comple-ment the aquaponics eco-system and enable you to balance your unit. Also, see Annex 4 on how to produce homemade fish food pellets if manufactured pellets are not available or too expensive to buy.
Food Conversation Ratio for Fish
For every living creature (including humans) there is a certain efficiency for food utilization. This utili-zation efficiency can measured using the Food Conversion Ratio (FCR). Food Conversion Ratio (FCR) describes the amount of food (in kg) that is required to grow 1 kg of animal biomass.
Examples of different FCRs:
• Cows/Cattle: 7-10:1 (meaning it takes 7kg of food to production 1 kg of cow biomass)
• Chicken (poultry): 3:1 (3kg to produce 1 kg of chicken biomass)
• Fish (i.e. Tilapia): 1.8:1 (1.8 kg to production 1 kg of fish biomass)
From the examples above; you can see very clearly that fish production is a far more sustainable method of producing protein than cattle production, as it has a much lower food conversion ratio. When growing fish over a season you can track their FCR by dividing the total grams of food supplied by their weight gain every 6-8 weeks of growing time (weight gain = final fish weight – previous fish weight. Considering no fish are being harvested in the meantime).
103
4) Water quality tolerance ranges for fish:
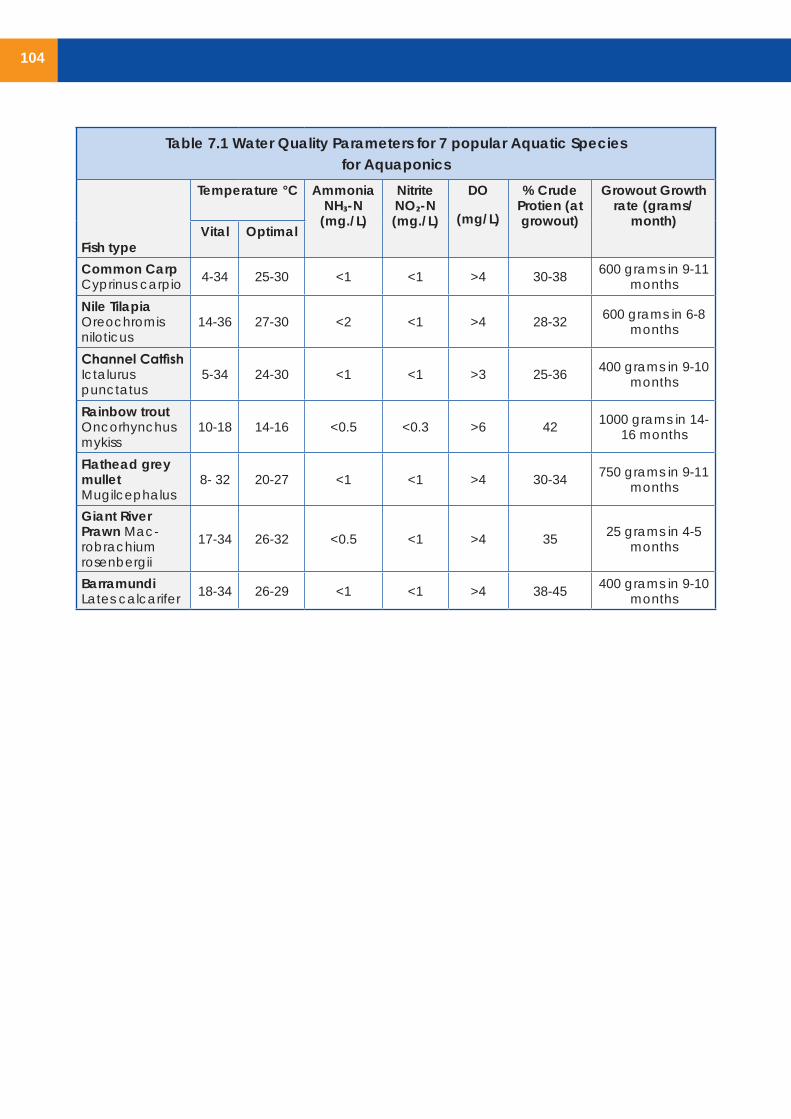
We already spoke in depth about water quality for aquaponics in Chapter 2. However, regarding fish specifically, the summary with concluding table on 7 aquatic species below outlines the most important water quality parameters to keep track of:
Ammonia (NH₃): Toxic over levels of 1 mg/L
Nitrite (NO₂): Toxic over levels of 1 mg/L
Nitrate (NO₃): can be harmful in levels over 400 mg/L
pH: Fish can tolerate levels 6-9 but will thrive in levels of 6.5-8.5. Substantial changes in pH over short periods of time (changes of 0.3 pH over a period of 12-24 hours) can be problematic or even lethal for fish. Therefore it is important to keep your water pH as stable as possible.
Dissolved Oxygen (DO): 4-5 mg/L(varies greatly per fish type)
Most domestic growers will not have the ability to check the oxygen level in their units, as digital ox-ygen meters are very expensive and cheaper aquarium test kits are not widely available. Yet if you follow the rule of thumb of max 20kg of fish per 1000 litres, oxygen levels should never get dangerously low as long as there’s significant dynamic flow into the fish tank from the pump. Also, if feasible, air pumps should be used: for every 1 cubic meter that grows 20 kg of fish, we need to supply 5-8 litres per minute of air coming from the 2-3 air stones in 2-3 different locations in the fish tank of small scale units. Make sure that the water isn’t bubbling too vigorously in a way that disrupts the fish swimming.
N.B.:A very clear sign for lack of oxygen is fish grasping for air: fish swim close to the surface of the water and start piping (opening their mouths to get oxygen from the outside air).
Temperature: Tropical fish, such as tilapia, prefer 22-32 °C; temperate water fish, such as, common-carp, 4-30°C; Cold water fish, such as trout, prefer 10-18 °C.
Fish are cold blooded and therefore their ability to adjust to a large range of water temperatures is low. A steady temperature within their correct tolerance range will keep fish in their optimal condi-tions to guarantee fast growth and excellent FCR. In addition optimal temperatures (and thus less stress) reduce the risk of diseases. Thermal isolation (isolating the fish tank to heat it using insulation), water heaters and coolers (although these may be costly in areas where energy is expensive) will help you to achieve a steady temperature level.
Light and Darkness: The light level in the fish tank should be reduced to prevent algae growth. How-ever it should not be completely dark as fish will experience fear and stress when you expose a com-pletely dark tank to light during the day. Simply speaking, there should be some natural light, ideally through shading, to prevent algae growth and to keep the fish stress-free. Also, it is recommend to harvest or grade fish in darkness to prevent fish from being stressed.
104
Table 7.1 Water Quality Parameters for 7 popular Aquatic Species for Aquaponics
Fish type
Temperature °C Ammonia NH₃-N
(mg./L)
Nitrite NO₂-N (mg./L)
DO
(mg/L)
% Crude Protien (at growout)
Growout Growth rate (grams/
month)Vital Optimal
Common Carp Cyprinus carpio 4-34 25-30 <1 <1 >4 30-38 600 grams in 9-11
months
Nile Tilapia Oreochromis niloticus
14-36 27-30 <2 <1 >4 28-32 600 grams in 6-8 months
Channel Catfish Ictalurus punctatus
5-34 24-30 <1 <1 >3 25-36 400 grams in 9-10 months
Rainbow trout Oncorhynchus mykiss
10-18 14-16 <0.5 <0.3 >6 42 1000 grams in 14-16 months
Flathead grey mullet Mugilcephalus
8- 32 20-27 <1 <1 >4 30-34 750 grams in 9-11 months
Giant River Prawn Mac-robrachium rosenbergii
17-34 26-32 <0.5 <1 >4 35 25 grams in 4-5 months
Barramundi Lates calcarifer 18-34 26-29 <1 <1 >4 38-45 400 grams in 9-10
months
105
5) Types of fish grown in aquaponics:Several types of fish have recorded excellent growth rates in aquaponic units. A selection of appli-cable fish for aquaponics are as follows: tilapia, common carp, silver carp, grass carp, barramundi, jade perch, catfish, trout, salmon, murray cod, and largemouth bass. Some species of fish, which are available worldwide, grow particularly well in aquaponics and these are discussed in more detail below (tilapia, carp, catfish and trout). The most important thing to know about fish is whether you can get your choosen species locally. If not, you need to look for an available species they will grow in aquaponics.
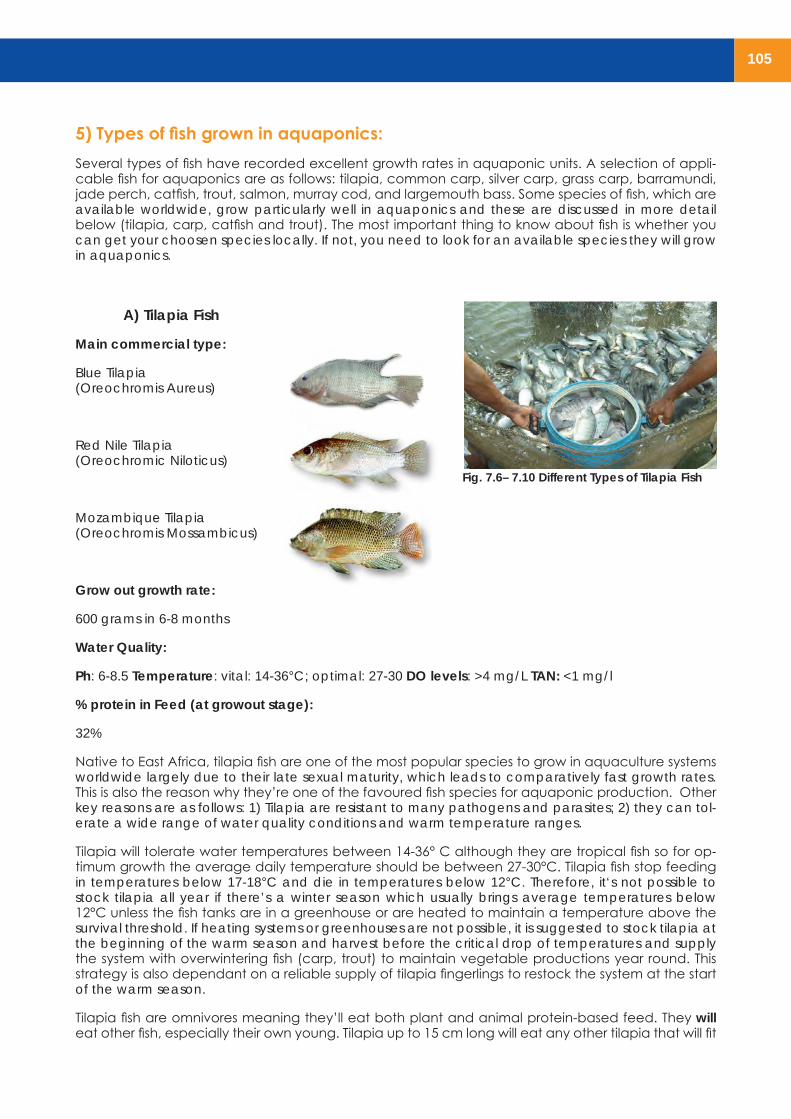
A) Tilapia Fish
Main commercial type:
Blue Tilapia (Oreochromis Aureus)
Red Nile Tilapia (Oreochromic Niloticus)
Mozambique Tilapia (Oreochromis Mossambicus)
Grow out growth rate:
600 grams in 6-8 months
Water Quality:
Ph: 6-8.5 Temperature: vital: 14-36°C; optimal: 27-30 DO levels: >4 mg/L TAN: <1 mg/l
% protein in Feed (at growout stage):
32%
Native to East Africa, tilapia fish are one of the most popular species to grow in aquaculture systems worldwide largely due to their late sexual maturity, which leads to comparatively fast growth rates. This is also the reason why they’re one of the favoured fish species for aquaponic production. Other key reasons are as follows: 1) Tilapia are resistant to many pathogens and parasites; 2) they can tol-erate a wide range of water quality conditions and warm temperature ranges.
Tilapia will tolerate water temperatures between 14-36° C although they are tropical fish so for op-timum growth the average daily temperature should be between 27-30°C. Tilapia fish stop feeding in temperatures below 17-18°C and die in temperatures below 12°C. Therefore, it‘s not possible to stock tilapia all year if there’s a winter season which usually brings average temperatures below 12°C unless the fish tanks are in a greenhouse or are heated to maintain a temperature above the survival threshold. If heating systems or greenhouses are not possible, it is suggested to stock tilapia at the beginning of the warm season and harvest before the critical drop of temperatures and supply the system with overwintering fish (carp, trout) to maintain vegetable productions year round. This strategy is also dependant on a reliable supply of tilapia fingerlings to restock the system at the start of the warm season.
Tilapia fish are omnivores meaning they’ll eat both plant and animal protein-based feed. They will eat other fish, especially their own young. Tilapia up to 15 cm long will eat any other tilapia that will fit
Fig. 7.6– 7.10 Different Types of Tilapia Fish

106
in their mouths; when larger than 15cms, they are generally too slow to catch anything smaller, and cease to be a problem in this regard They can be aggressive especially in low densities, since males start to become territorial. Tilapia are prolific breeders therefore it’s recommended to grow males only (which also grow faster than females). They are also mouth breeders. In ideal conditions, tilapia can grow from fingerling size (10-20 grams) to 500 grams in roughly 6 months.
B) Carp Fish
Main commercial types: Common Carp (CyprinusCarpio)
Silver Carp (HypophthaimthysMolitrix)
Grass Carp (CtenopharyngodonIdella)
Growout Growth Rate:
Fingerling to 600 grams in 9-11 months
Water Quality:
Ph 6-8.5; Temperature vital: 4-34°C; optimal: 25-30 DO Levels >4 TAN <1 mg/L
% Protein in feed (at growout stage):
30-38%
Native to Eastern Europe and Asia, Carp are currently the third most cultured fish species globally. Traditionally speaking, Carp are bottom-feeder omnivores but they can be easily trained to eat float-ing pellet feed. In the wild, Carp will eat a large range of foods, although they have a preference for feeding on invertebrates such as water insects, insect larvae, worms, mollusks and zooplankton. Some carp species will also eat the stalks, leaves and seeds of aquatic and terrestrial plants, as well as decaying vegetation.
Like tilapia, Carp are tolerant to relatively low oxygen levels and poor water quality but they have a much larger tolerance range for water temperature. Carp can exist in temperature as low as 4°C and as high 34°C making them an ideal selection for aquaponics in temperate, tropical and arid re-gions. Best growth rates are obtained when temperature ranges between 25 °C and 30 °C. In these conditions they can grow from fingerling to harvest size (600 grams) in under a year (10 months). Growth rates will dramatically decrease with temperatures below 12 °C. Male Carp are smaller than counterparts yet they can still grow up to 40kg and 1 - 1.2 meters in length in the wild.
Other carp species (Koi)
Koiare colourful, miniature carp. They are considered to be ornamental fish rather than food fish. Koi have a high toler-ance for a variety of water conditions and can therefore be a good fish for an aquaponic system. They can also be sold to individuals or pet stores for considerably more money than fish sold as food. Koi is a popular choice for vegetarian aquaponic growers.
Fig. 7.11 – 7.14 Carp Fish
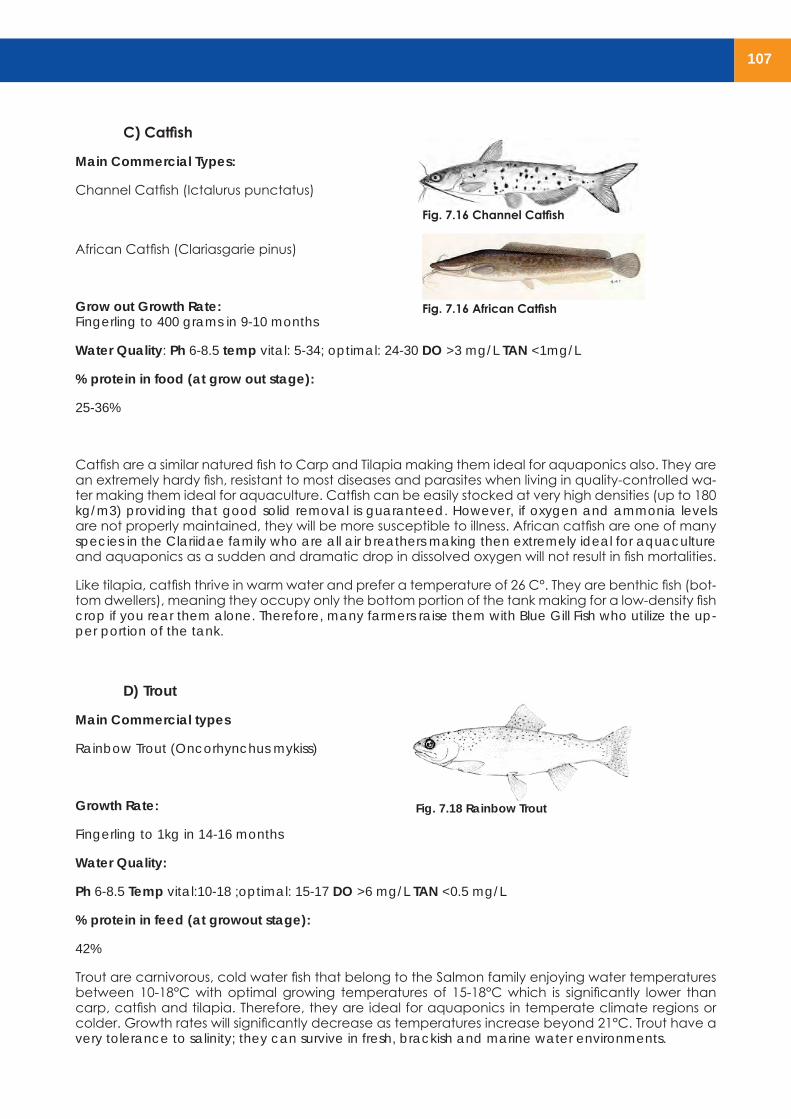
C) Catfish
Main Commercial Types:
Channel Catfish (Ictalurus punctatus)
African Catfish (Clariasgarie pinus)
Grow out Growth Rate: Fingerling to 400 grams in 9-10 months
Water Quality: Ph 6-8.5 temp vital: 5-34; optimal: 24-30 DO >3 mg/L TAN <1mg/L
% protein in food (at grow out stage):
25-36%
Catfish are a similar natured fish to Carp and Tilapia making them ideal for aquaponics also. They are an extremely hardy fish, resistant to most diseases and parasites when living in quality-controlled wa-ter making them ideal for aquaculture. Catfish can be easily stocked at very high densities (up to 180 kg/m3) providing that good solid removal is guaranteed. However, if oxygen and ammonia levels are not properly maintained, they will be more susceptible to illness. African catfish are one of many species in the Clariidae family who are all air breathers making then extremely ideal for aquaculture and aquaponics as a sudden and dramatic drop in dissolved oxygen will not result in fish mortalities.
Like tilapia, catfish thrive in warm water and prefer a temperature of 26 C°. They are benthic fish (bot-tom dwellers), meaning they occupy only the bottom portion of the tank making for a low-density fish crop if you rear them alone. Therefore, many farmers raise them with Blue Gill Fish who utilize the up-per portion of the tank.
D) Trout
Main Commercial types
Rainbow Trout (Oncorhynchus mykiss)
Growth Rate:
Fingerling to 1kg in 14-16 months
Water Quality:
Ph 6-8.5 Temp vital:10-18 ;optimal: 15-17 DO >6 mg/L TAN <0.5 mg/L
% protein in feed (at growout stage):
42%
Trout are carnivorous, cold water fish that belong to the Salmon family enjoying water temperatures between 10-18°C with optimal growing temperatures of 15-18°C which is significantly lower than carp, catfish and tilapia. Therefore, they are ideal for aquaponics in temperate climate regions or colder. Growth rates will significantly decrease as temperatures increase beyond 21°C. Trout have a very tolerance to salinity; they can survive in fresh, brackish and marine water environments.
Fig. 7.15 Koi Fish In Aquaponics System
Fig. 7.16 Channel Catfish
Fig. 7.18 Rainbow Trout
107
C) Catfish
Main Commercial Types:
Channel Catfish (Ictalurus punctatus)
African Catfish (Clariasgarie pinus)
Grow out Growth Rate: Fingerling to 400 grams in 9-10 months
Water Quality: Ph 6-8.5 temp vital: 5-34; optimal: 24-30 DO >3 mg/L TAN <1mg/L
% protein in food (at grow out stage):
25-36%
Catfish are a similar natured fish to Carp and Tilapia making them ideal for aquaponics also. They are an extremely hardy fish, resistant to most diseases and parasites when living in quality-controlled wa-ter making them ideal for aquaculture. Catfish can be easily stocked at very high densities (up to 180 kg/m3) providing that good solid removal is guaranteed. However, if oxygen and ammonia levels are not properly maintained, they will be more susceptible to illness. African catfish are one of many species in the Clariidae family who are all air breathers making then extremely ideal for aquaculture and aquaponics as a sudden and dramatic drop in dissolved oxygen will not result in fish mortalities.
Like tilapia, catfish thrive in warm water and prefer a temperature of 26 C°. They are benthic fish (bot-tom dwellers), meaning they occupy only the bottom portion of the tank making for a low-density fish crop if you rear them alone. Therefore, many farmers raise them with Blue Gill Fish who utilize the up-per portion of the tank.
D) Trout
Main Commercial types
Rainbow Trout (Oncorhynchus mykiss)
Growth Rate:
Fingerling to 1kg in 14-16 months
Water Quality:
Ph 6-8.5 Temp vital:10-18 ;optimal: 15-17 DO >6 mg/L TAN <0.5 mg/L
% protein in feed (at growout stage):
42%
Trout are carnivorous, cold water fish that belong to the Salmon family enjoying water temperatures between 10-18°C with optimal growing temperatures of 15-18°C which is significantly lower than carp, catfish and tilapia. Therefore, they are ideal for aquaponics in temperate climate regions or colder. Growth rates will significantly decrease as temperatures increase beyond 21°C. Trout have a very tolerance to salinity; they can survive in fresh, brackish and marine water environments.
Fig. 7.15 Koi Fish In Aquaponics System
Fig. 7.16 Channel Catfish
Fig. 7.18 Rainbow Trout
Fig. 7.16 African Catfish

108
Rainbow trout is the most common trout species grown in aquaculture systems mainly in the U.S., or in sea cages in Northern Europe (Norway) and in parts of South America (Chile). Rainbow trout are long, thin fish with spots all over the top and sides the body and can come in a variety of colours from brown to blue green and always with reddish strips along both sides. Trout fish demand higher water quality than tilapia or carp, particularly with regards to DO and ammonia. Thus, frequent wa-ter quality monitoring and backup systems for air and water pumps are essential for growing trout in aquaponics systems. Trout are considered as ‘oily fish’ meaning they have a high nutritional content, in particular Vitamin A, D and Omega 3 fatty acid, making them an excellent choice to grow for domestic consumption.
E) Crustaceans (prawns)
Main Commercial types
Giant River Prawn Macrobrachium-rosenbergii
Growth Rate:
25grams in 4months
Water Quality: Ph 6-8.5 Temp vital: 17-34; optimal: 28-32; DO >4 mg/L TAN <1 mg/L
% protein in feed (at growout stage):
42%
The term “prawns”refers to a very diverse group of stalk-eyed decapod freshwater crustaceans with long narrow muscular abdomens, long antenna and slender legs. They can be found feeding near the bottom of most coastlines and estuaries, as well as in fresh water systems. They usually live from one to seven years and most species are omnivores.
Shrimp/prawns can be a great addition to an aquaponic system. They consume uneaten fish food, fish waste and whatever organic material they find in the water or on the bottom. As such, they help to clean and support system health, and accelerate organic material decomposition. It is better to grow shrimp and fish simultaneously in an aquaponic system, as shrimp don’t produce enough waste for the plants. This is because they cannot be grown with similar high densities to fish. Shrimp are very territorial, so they need a lot of lateral space. The horizontal surface area determines the number of shrimp you can raise, although if possible, you can use layers of netting to increase surface area and increase quantity.
In ideal conditions, shrimp have a 4 month growing cycle meaning it is possible to grow three crops annually. Most shrimp have similar needs which include hard water, warm temperatures (24-31 C°) and good water quality, but you should aim to meet the ideal conditions of the particular species you decide to grow. Prawns should be grown in the fish tanks only.
Fig. 7.19 Rainbow Trout Macrobrachium Rosenbergii
109
6) Stocking Fish in Your System
In the first section of Chapter 8 we will discuss everything you need to know regarding the amount of fish you can stock and grow in aquaponic units. But for now, we will briefly mention the safest way to stock your fish into new tanks.
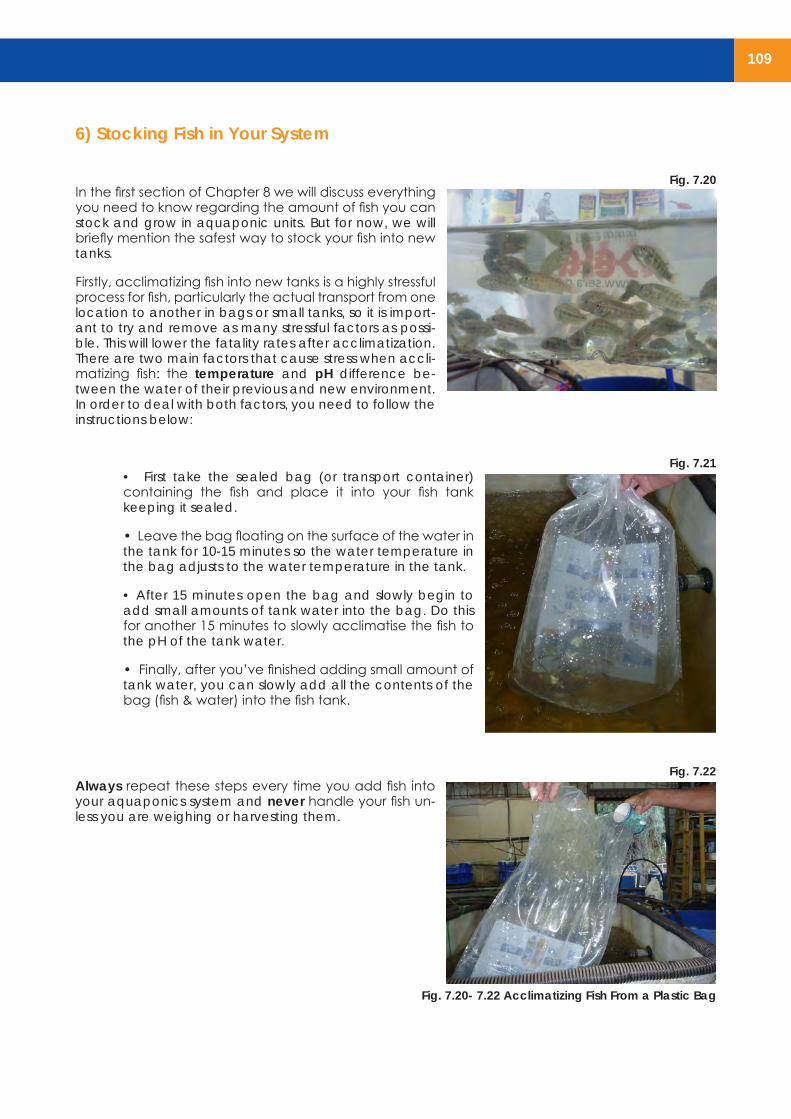
Firstly, acclimatizing fish into new tanks is a highly stressful process for fish, particularly the actual transport from one location to another in bags or small tanks, so it is import-ant to try and remove as many stressful factors as possi-ble. This will lower the fatality rates after acclimatization. There are two main factors that cause stress when accli-matizing fish: the temperature and pH difference be-tween the water of their previous and new environment. In order to deal with both factors, you need to follow the instructions below:
• First take the sealed bag (or transport container) containing the fish and place it into your fish tank keeping it sealed.
• Leave the bag floating on the surface of the water in the tank for 10-15 minutes so the water temperature in the bag adjusts to the water temperature in the tank.
• After 15 minutes open the bag and slowly begin to add small amounts of tank water into the bag. Do this for another 15 minutes to slowly acclimatise the fish to the pH of the tank water.
• Finally, after you’ve finished adding small amount of tank water, you can slowly add all the contents of the bag (fish & water) into the fish tank.
Always repeat these steps every time you add fish into your aquaponics system and never handle your fish un-less you are weighing or harvesting them.
Fig. 7.20- 7.22 Acclimatizing Fish From a Plastic Bag
Fig. 7.20
Fig. 7.21
Fig. 7.22

110
7) Fish Health & Disease prevention
Knowing Your Fish
In this final section of the chapter we’ll discuss key aspects of fish heath and practical methods to identify unhealthy fish and prevent fish disease. But first, In order to maintain healthy and happy fish in your aquaponic system, you must know and understand the following:
1) How to maintain a low stress environment for fish (good water quality, care when trans porting fish, stable pH and temperature)
2) The tolerance ranges & optimum fish growth rates of the species you are growing
3) Keep track of fish behaviour on a daily basis
4) Signs or symptoms of stress & disease within your chosen species
5) Aquaponic fish production management (Chapter 8), including fish stocking density and fish feed rates
Fish Health & Wellbeing
The main indicator of fish wellbeing is their behaviour. In order to maintain healthy fish we need to recognize the signs of happy fish and the signs of stress and discomfort. So what is good fish be-haviour and/or signs of healthy fish?
• Swimming in patterns with straight tails and extended fins
• Large appetites and good growth rates
• No marks along the body or the fins
• They do not try to suck air from the upper layer of the water
• Sharp shiny eyes
Stress
Stress has been mentioned several times in this chapter and it is simply the result of fish living in con-ditions that are not the optimum or within their range of tolerance. The result of stress is the reduction of the fish‘s ability to fight off diseases and heal itself (suppression of immune system). If fish are in stress-inducing water conditions for an extended period of time and if different bacteria, fungi and/or parasites are also present in the water, then fish will inevitably develop diseases.
Causes of Stress Symptoms of Stress
Quick or constant change in water temperature Loss of appetite
Quick changes in level of pH (More than 0.5/day)
Unusual behaviour such as resting at the surface or bottom of tank
High levels of ammonia, nitrite and other toxins Rubbing or scraping the sides of the tank
Sub-optimum oxygen levels (For tilapia, less than 3 mg/litre ) Piping at the water surface
Malnourishment and/or overcrowding Fins are clamped close to their body
N.B. Multiple symptoms of stress can be observed at once
111
Fish disease
There are 3 major pathogens (micro organisms) that cause fish disease: fungus, bacteria or parasites; all of which can easily enter or previously exist in the water of a unit. New healthy fish added to a unit may also harbour some of these pathogens however clinical signs of disease may not occur as long as the fish remain unstressed.
Dealing with Fish disease
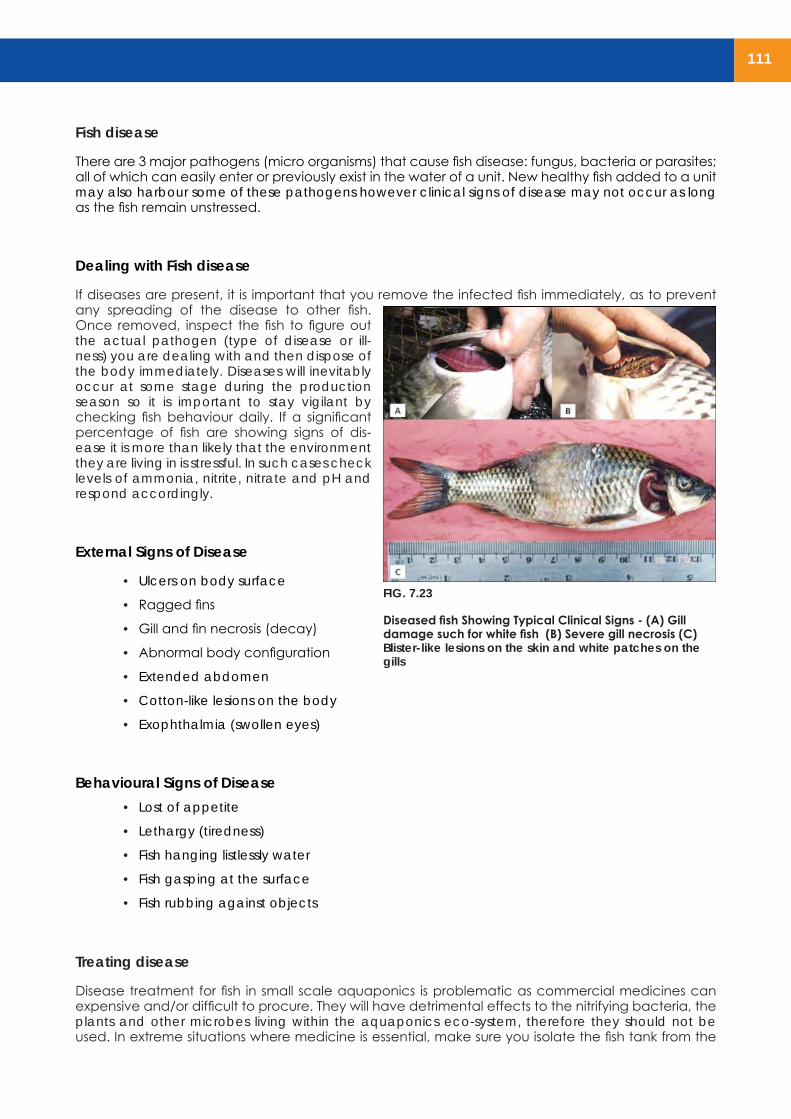
If diseases are present, it is important that you remove the infected fish immediately, as to prevent any spreading of the disease to other fish. Once removed, inspect the fish to figure out the actual pathogen (type of disease or ill-ness) you are dealing with and then dispose of the body immediately. Diseases will inevitably occur at some stage during the production season so it is important to stay vigilant by checking fish behaviour daily. If a significant percentage of fish are showing signs of dis-ease it is more than likely that the environment they are living in is stressful. In such cases check levels of ammonia, nitrite, nitrate and pH and respond accordingly.
External Signs of Disease
• Ulcers on body surface
• Ragged fins
• Gill and fin necrosis (decay)
• Abnormal body configuration
• Extended abdomen
• Cotton-like lesions on the body
• Exophthalmia (swollen eyes)
Behavioural Signs of Disease
• Lost of appetite
• Lethargy (tiredness)
• Fish hanging listlessly water
• Fish gasping at the surface
• Fish rubbing against objects
• YING FISH
Treating disease
Disease treatment for fish in small scale aquaponics is problematic as commercial medicines can expensive and/or difficult to procure. They will have detrimental effects to the nitrifying bacteria, the plants and other microbes living within the aquaponics eco-system, therefore they should not be used. In extreme situations where medicine is essential, make sure you isolate the fish tank from the
FIG. 7.23
Diseased fish Showing Typical Clinical Signs - (A) Gill damage such for white fish (B) Severe gill necrosis (C) Blister-like lesions on the skin and white patches on the gills
112
plants and bio-filter during treatment. Thus, for small scale aquaponics, prevention is far more import-ant to focus on. Key preventative measures for fish disease will be listed below but first we’ll explain one aquaponic-safe method for treating one of the most common fish diseases: White Spot.
White Spot/Ich
White spot disease is caused by a parasite named Ichthyophthirus (Ich). It is a common parasite that can infect most freshwater fish species and be fatal if not treated. The mature parasite (trophont) leaves the fish and settles on the fish tanks floor where it produces a cyst (tomont). Eventually the cyst breaks open releasing up to 1000 new individual parasites (tomites) into the water which must find a host within 24-48 hours to survive. The whole life cycle takes 2-14 days depending on water temperature.
White spot disease appears as small white cysts (up to 1mm) covering the body of the fish (giving appearance that the fish has been sprinkled with grains of salt). Fish will often rub again objects in an attempt to remove the parasite. Fish may also display lethargy and reduced appetite.
Salt bath treatment
Infected fish can be removed from the main fish tank and placed into a salt bath, using Iodine free salt, which provides a toxic/fatal environment for the parasite. The salt concentration for the bath should not exceed 1 kg of salt per 100 litres. Infected fish are held in the bath for 20-30minutes and then moved to an isolation tank containing 1-2 grams of salt per litre for another 5-7 days. During this time, any tomites emerging in the aquaponic unit will fail to find a host in time and die. Do not use any of the salt bath water when moving the fish back into the tank as the sodium concentrations will negatively impact the plants.
Disease Prevention
The list below outlines some key actions for preventing disease. This list also summaries major lessons for growing fish in aquaponics:
• Make sure you source your fish from a reliable, professional hatchery
• Never add fish to your system that look diseased in any way (fin rot, red streaks across body, blood shot eyes etc.)
• If possible, quarantine new fish in an isolation tank for up to 45 days before adding them into your tank to make sure they are healthy and disease free. A salt bath for all new fish to re move parasites or any other fish disease is also recommended (follow the salt bath guidelines given above)
• Keep water quality parameters at optimum levels and avoid sharp pH, ammonia and wa ter temperature changes in your unit
• Make sure there is adequate biological filtration (bacteria) and aeration in your system to keep ammonia levels less than 1 mg/L
• Feed the fish a balanced and nutritious diet. As with vegetables, one of the most important methods to prevent disease is to make sure fish have all the essential nutrients to develop an effective immune system
• Make sure the fish tank is shaded from direct sunlight but not in complete darkness
• Use one fish net for each fish tanks as they can transfer parasites into other tanks
• Keep the fish food in a cool dry and dark place to prevent mold
• Avoid loud noise, flickering lights or vibration near the fish tank

113

114
Chapter 8) Unit Management & Troubleshooting
Introduction
In previous chapters we’ve learned about the importance of bacteria; the key factors when building the 3 methods of aquaponic units and how to properly care for both fish and plants in a single aqua-ponics unit. In this chapter we’ll set out principles and “rules of thumb” for the important questions when deciding how to design an aquaponics unit including: how many fish and plants can you grow in one unit? How much fish feed do we give per day? How large should the fish tanks be? And how much bio-filter media is needed?
The second section of this chapter will list all the important management phases from starting a unit to production management over an entire growing season. There will also be an in-depth discussion regarding the management of fish and plants during the first 3 months of production.
Finally, this chapter sets out practical daily, weekly and monthly check lists for managing a unit over a growing season and what to do if problems arise. By the end of the chapter the reader will have a firm understanding of how to design and manage a properly balanced unit.
1) Aquaponics Calculations: Determining the Size of Your Unit
A) How many fish and plants can you grow in one unit?
This question is answered using the feed rate ratio described in Chapter 2. The feed rate ratio is the most important calculation for aquaponics as it helps you balance the biomass of fish and plants together so they both continue to thrive symbiotically within the aquaponics eco-system.
The ratio tells you how much fish feed you should give per square meter of vegetable growing space in your unit per day. Below is a table showing you the fish feed amounts per vegetable type for the 3 methods of aquaponics production. The amount of feed per square meter for fruiting veg-etables is roughly 1/3 more than for leafy greens, simply because they demand more nutrients.
Leafy Green Plants Fruiting Vegetables20-50 grams of fish feed (32-35% protein) per 1
square meter
50-80 grams of fish feed (32-35% protein) per 1
square meter
Although extremely helpful, this feed ratio is really only a guide, particularly for small scale units as there are several examples of units thriving with a feed rate as low as 20 grams per day. There are many variables involved with this ratio including fish type, water temperature, % protein etc., which may change significantly over a growing season that may force you to change the feeding rate. So as explained in chapter 2, always combine information on the level of nitrate, the condition of the fish and plants along with the fish feed ratio guideline when deciding how many grams to feed per day. If the nitrate levels are too high (above 120 mg/l) then decrease the feed rate per day. If nitrate levels are too low (Below 5 mg/l) then slowly increase the feed rate per day.

115
So how many plants does this mean?
When working out exactly how many fish and plants to grow, we recommend focusing on the plant aspect of the ratio, as the plants will most likely be the most profitable aspect of the unit in small-scale aquaponics. On average you can grow:
Leafy green vegetables per square meter 20-25
Fruiting vegetables per square meter 4-12
So for example:
If we want to grow roughly 100 leafy green vegetables to 250 grams each we will need 4 square meters of growing space. Then, ap-plying the feed rate ratio, we can feed a maximum of 200 grams per day to make sure there are ample nutrients for the vegetables (50 grams X 4 square meters).
Note: the averages above are only guide-lines. It’s entirely possible to grow more than 25 lettuces in 1 square meter (as see in fig. 8.1) or up to 50 green onions per square meter . Ultimately the total number will depend on type of plant and the de-sired harvest size/weight of the plant.
So how many actual fish can I grow?
For balancing an aquaponics unit the actual number of fish is not as important as the total biomass of fish in the tank. The guideline for small scale aquaponics is maintaining a constant carrying capacity of fish of 10-20kg per 1000 litres of fish tank space during a growing season.
So, when taking the example above of 100 leafy green vegetables for 4 square meters of growing space, we know that we can add a maximum of 200 grams of feed to the unit per day. So we need to have enough fish in our unit to eat all of this food.
On average fish will consume the equivalent of 1-2% of their body weight per day, provided that they weigh over 50 grams. If the nutrient requirements for plants are supplied by 200 g of feed per day the standing stock of fish could be either 10 kg fed at 2% of body weight (BW) per day or 20 kg of fish fed at 1% BW/day.
In the ‘adding fish’ section of this chapter we will discuss how to maintain a constant carrying capac-ity of fish using a staggered fish stocking method to produce the maximum amount of fish throughout the year.
B) How much fish food do I feed each day?
Fig. 8.1 Over 40 Lettuce heads in 1 sq. Meter Bed
116
As discussed above, we use the feed rate ratio to determine the amount of fish feed per day. We focus on the plant side of the ratio and multiply the amount of grams needed per square meter for whichever vegetables grown (leafy green or fruiting vegetables) by the total number of square me-ters in your unit.
• Example: If you have 6 square meters of grow space in a unit and you’re growing leafy greens, you need to feed a maximum of 300 grams per day (6 square meters X 50 grams for leafy greens)
Finally, fish feeding is also based on nitrate levels recorded each week. Reduce the feeding amounts if nitrates are too high (+120 mg/L) and slowly increase the amounts if they are less than 5 mg/L.
C) How much water do I need in my fish tank?
There are some basic rules to follow when answering this question:
• For a small-scale aquaponics unit with a fish tank volume of 1000 liters, the maximum carrying capacity of fish is 20 kgs. If your total weight of fish is any greater than 20kgs per cubic meter (1000 liters) then you will need more sophisticated aeration techniques to keep the dis-solved oxygen levels stable. You will also require a more complex filtration system. We strongly discourage exceeding the stocking density of 20kgs per cubic meter for new aquaponic farmers, particularly if constant electricity is not guaranteed. It is simply too risky as all the fish could die within an hour if the electricity cuts off on a unit with a very large stocking density.
• If designing a unit with a fish tank volume much smaller than 1000 liters, use a rule of 2kgs per 100 liters of fish tank space. If your tank is smaller than 500 liters then use a rule of 1kg per 100 liters (it’s not recommended to grow fish for consumption in a tank smaller than 500 liter).
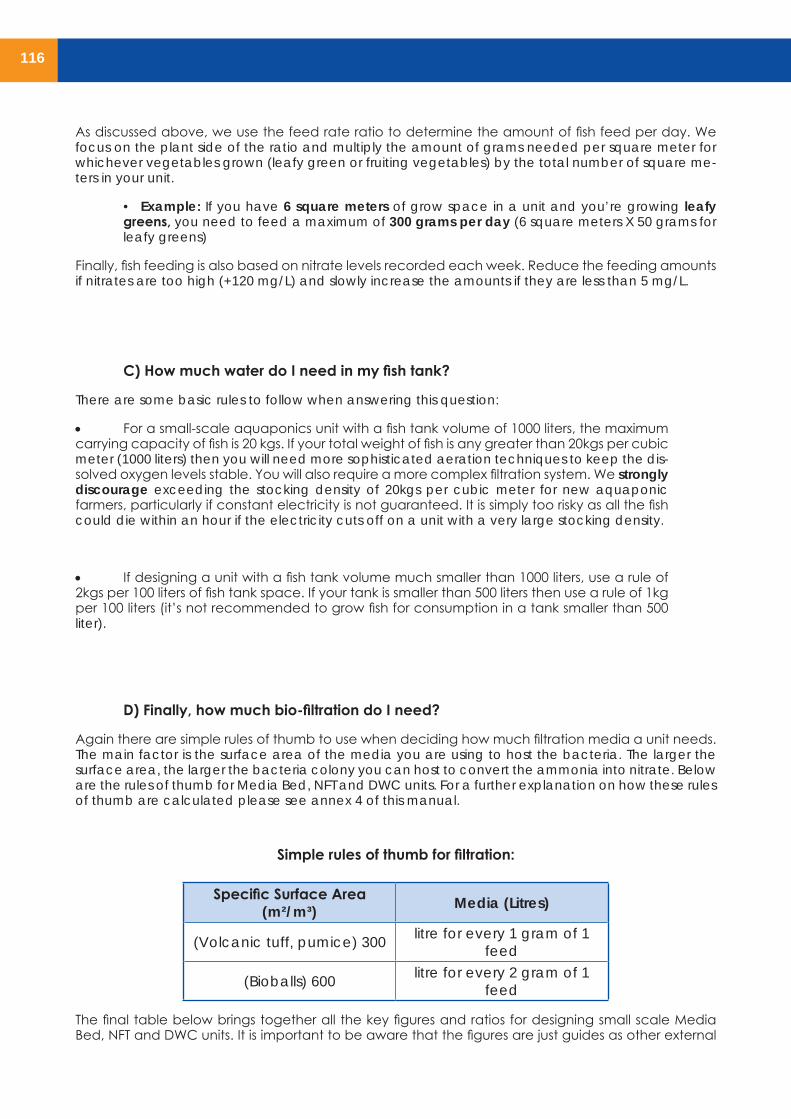
D) Finally, how much bio-filtration do I need?
Again there are simple rules of thumb to use when deciding how much filtration media a unit needs. The main factor is the surface area of the media you are using to host the bacteria. The larger the surface area, the larger the bacteria colony you can host to convert the ammonia into nitrate. Below are the rules of thumb for Media Bed, NFT and DWC units. For a further explanation on how these rules of thumb are calculated please see annex 4 of this manual.
Simple rules of thumb for filtration:
Specific Surface Area (m²/m³) Media (Litres)
(Volcanic tuff, pumice) 300 litre for every 1 gram of 1
feed
(Bioballs) 600 litre for every 2 gram of 1
feed
The final table below brings together all the key figures and ratios for designing small scale Media Bed, NFT and DWC units. It is important to be aware that the figures are just guides as other external

117
factors (climate conditions, access constant electricity) may change the design on the ground. Also, please note the footnotes below explaining the figures and the applicability of each column per aquaponic method.
Table: Practical System Design Guide for Small Scale Units
Fish tank
size (L)
Recom-mended Max. Fish Density (Kg/L)1
Ave. Feed rate per
day2
Recomend-ed Pump
Flow Rate Per Hour (L/hr)
Mechanical Separator &
Bio-filter
Volumes (L)3
Minimum Volume of Bio-Filtration Media (L)4
Plant Growing Space5
(m²) Volcanic Tuff (300 m²/m³)
Bioballs (600 m²/
m³)
200 2 50 800 20 50 25 1
500 10 100 1200 20-50 100 50 2
1000 20 200 2000 100-200 200 100 4
1500 30 300 2500 200-300 300 150 6
2000 40 400 3200 300-400 400 200 8
3000 60 600 4500 400-500 600 300 12
1) The recommended fish density is based on the initial rule of thumb: max. 20kgs/ 1000 if fish tank volume. It is possible to increase past this density once adequate aeration, mechanical separation and bio-filtration is ensured but it is not recom-mended for new /beginner aquaponic farmers.
2) Max feed rate per day is based on the rule of thumb: 1% feed per body mass of fish over 100 grams and the average feed-ing rate of both feed rate ratios for leafy greens (20-50 grams) and fruiting vegetables (50-80 grams)
3) The volumes for mechanical separator and bio-filter per fish tank size follow the rule of thumb: 10-30% of total fish tank vol-ume. In reality the containers will also depend on the size and cost of barrel containers available. Bio-filters are only applicable for NFT and DWC units, while mechanical separators are applicable for NFT, DWC units and Media Bed units with a fish density above 10kg/1000 liters.
4) These figures assume the bacteria are in optimal conditions all the time. If not, for a certain period of time (winter), extra filtration media may need to be added as a buffer. A great indicator for sufficient biofiltration is ammonia consistently <1mg/l
5) Figures for plant growing space include leafy greens and fruiting vegetables
Table 8.1
118
2) Aquaponics Unit Management: The First 4 Weeks
A) Preparing your unit: Week 1
• After you have finished building the system, it is time to prepare for the routine running of the system. Aquaponic unit management doesn’t require a lot of time and effort yet it is important to remember that a well functioning system requires at least 5-10 minutes during the day.
• Before stocking the fish and planting the vegetables, it’s crucial to make sure that all your equipment is working properly, especially the water pump, air pump and water heaters (if heaters are necessary). It is essential to check that the NFT pipes and media beds are steady and balanced horizontally. Start running water in the system and make sure that there are no leaks or loose plumbing connections. If so tighten or fix them immediately.
Media Bed Unit Preparations: The growing media (volcanic gravel, expanded clay or lime stone gravel) should be well washed. Fill the beds with the media and let the water run through it; the water should be clear. Remove any sedimentation if present, by flushing out the beds with water.
• If using an electric timer to flood and drain the beds, it’s important to synchronize between the time it takes to fill the growing beds and the flow rate of the water entering the bed.
• If using a bell siphon instead, you should check that the water flow rate in the beds is large enough to activate the siphon, but not too strong, otherwise it will prevent the suction from stopping.
NFT & DWC Unit Preparations: Make sure that the water flowing into each grow pipe/DWC trough is flowing at right rate (1-2 litres per minute for NFTs; 2-4 hours retention time for DWCs). Higher flow rates will negatively impact the plant roots.
• Finally, cycle the water in all system types for two days in order to let any chlorine present in the water dissipates into the atmosphere (You can speed up the process by using constant aeration for 24 hours). If using collected rainwater, you can skip this two-day cycling measure. Likewise the system can be filled immediately if the source water has been dissipated in stor age containers.
B) System ‘cycling’ (cultivating bacteria): Week 2-6
Once the unit has passed the initial component checks and has been running for 2-3 days with no problems, it is time to ‘cycle’ the unit. As discussed in Chapter 5 (Bacteria) system cycling is the term that describes the initial process of building a bacteria colony when you first start an aquaponics unit. Normally, this is a 3-6 week process that involves soaking an ammonia source in your unit to favour nitrifying bacteria proliferation. The steps involved have been clearly outlined in Chapter 5 and they should be followed every time you start a new unit.
You can speed up the 3-4 week bacteria cultivation process by either:
• Using water from an existing aquaponics unit
• Nitrifying bacteria products - It is possible, athough expensive to buy a small containers of live nitrifying bacteria which can be poured straight into the unit
• Integrating some sponge filters from active NFT units which are full of bacteria
119
During the cycling process, it is vital to test ammonia, nitrite and nitrate levels every 3-5 days to make sure the concentrations do not become harmful for bacteria (ammonia levels above 4 mg/L). The unit has completed the cycling process when nitrate levels begin to rise after ammonia and nitrite levels fall close zero (<1) mg/L.
3) Adding Plants: Management Practices to Consider Over a Growing Season
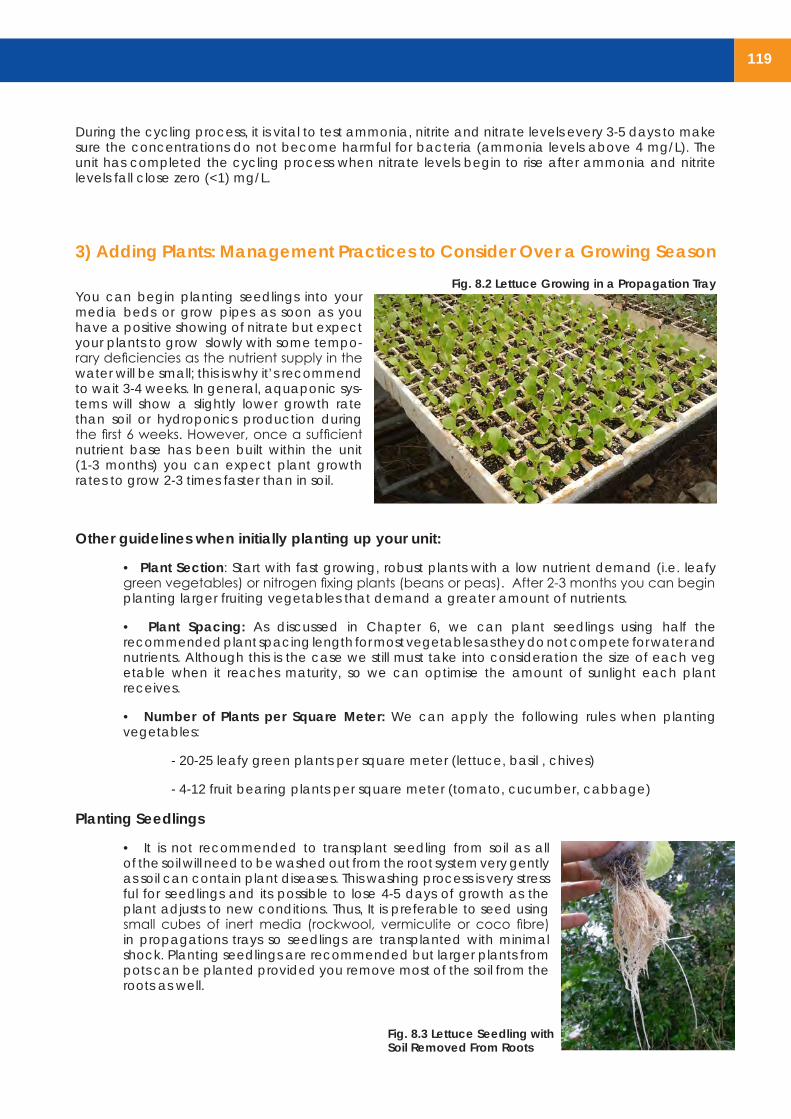
You can begin planting seedlings into your media beds or grow pipes as soon as you have a positive showing of nitrate but expect your plants to grow slowly with some tempo-rary deficiencies as the nutrient supply in the water will be small; this is why it’s recommend to wait 3-4 weeks. In general, aquaponic sys-tems will show a slightly lower growth rate than soil or hydroponics production during the first 6 weeks. However, once a sufficient nutrient base has been built within the unit (1-3 months) you can expect plant growth rates to grow 2-3 times faster than in soil.
Other guidelines when initially planting up your unit:
• Plant Section: Start with fast growing, robust plants with a low nutrient demand (i.e. leafy green vegetables) or nitrogen fixing plants (beans or peas). After 2-3 months you can begin planting larger fruiting vegetables that demand a greater amount of nutrients.
• Plant Spacing: As discussed in Chapter 6, we can plant seedlings using half the recommended plant spacing length for most vegetables as they do not compete for water and nutrients. Although this is the case we still must take into consideration the size of each veg etable when it reaches maturity, so we can optimise the amount of sunlight each plant receives.
• Number of Plants per Square Meter: We can apply the following rules when planting vegetables:
- 20-25 leafy green plants per square meter (lettuce, basil , chives)
- 4-12 fruit bearing plants per square meter (tomato, cucumber, cabbage)
Planting Seedlings
• It is not recommended to transplant seedling from soil as all of the soil will need to be washed out from the root system very gently as soil can contain plant diseases. This washing process is very stress ful for seedlings and its possible to lose 4-5 days of growth as the plant adjusts to new conditions. Thus, It is preferable to seed using small cubes of inert media (rockwool, vermiculite or coco fibre) in propagations trays so seedlings are transplanted with minimal shock. Planting seedlings are recommended but larger plants from pots can be planted provided you remove most of the soil from the roots as well.
Fig. 8.2 Lettuce Growing in a Propagation Tray
Fig. 8.3 Lettuce Seedling with Soil Removed From Roots
120
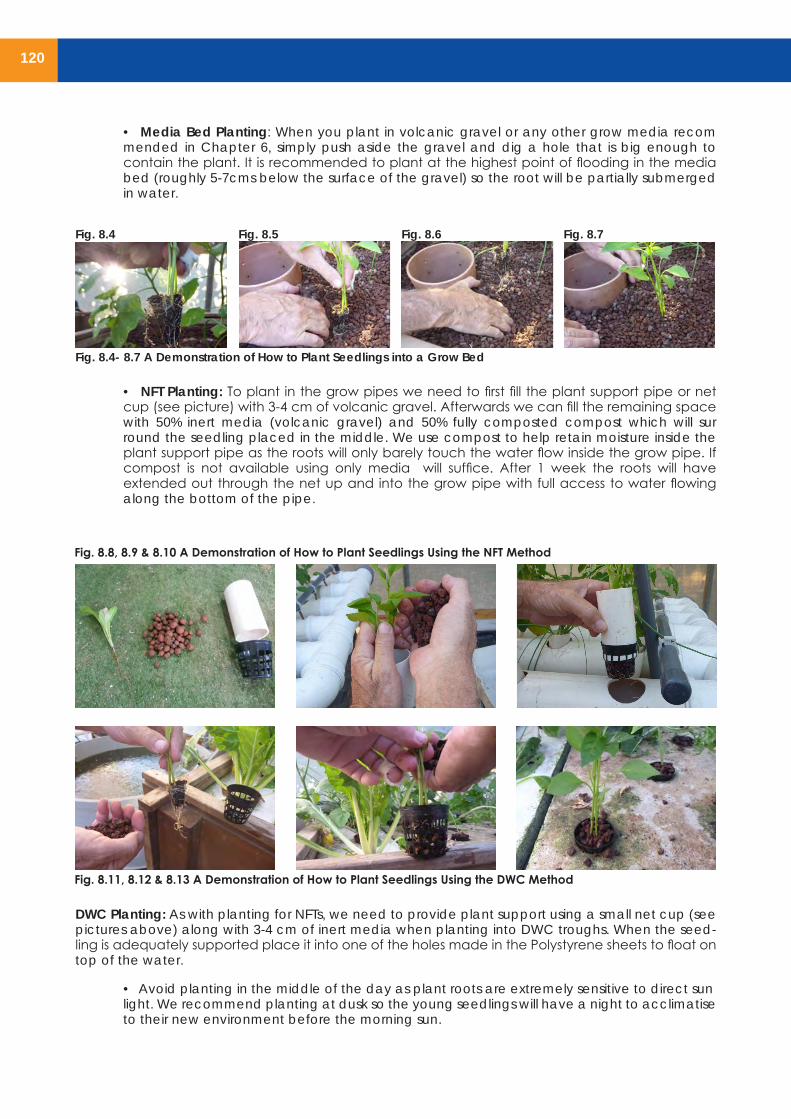
• Media Bed Planting: When you plant in volcanic gravel or any other grow media recom mended in Chapter 6, simply push aside the gravel and dig a hole that is big enough to contain the plant. It is recommended to plant at the highest point of flooding in the media bed (roughly 5-7cms below the surface of the gravel) so the root will be partially submerged in water.
• NFT Planting: To plant in the grow pipes we need to first fill the plant support pipe or net cup (see picture) with 3-4 cm of volcanic gravel. Afterwards we can fill the remaining space with 50% inert media (volcanic gravel) and 50% fully composted compost which will sur round the seedling placed in the middle. We use compost to help retain moisture inside the plant support pipe as the roots will only barely touch the water flow inside the grow pipe. If compost is not available using only media will suffice. After 1 week the roots will have extended out through the net up and into the grow pipe with full access to water flowing along the bottom of the pipe.
DWC Planting: As with planting for NFTs, we need to provide plant support using a small net cup (see pictures above) along with 3-4 cm of inert media when planting into DWC troughs. When the seed-ling is adequately supported place it into one of the holes made in the Polystyrene sheets to float on top of the water.
• Avoid planting in the middle of the day as plant roots are extremely sensitive to direct sun light. We recommend planting at dusk so the young seedlings will have a night to acclimatise to their new environment before the morning sun.
Fig. 8.4- 8.7 A Demonstration of How to Plant Seedlings into a Grow Bed
Fig. 8.8, 8.9 & 8.10 A Demonstration of How to Plant Seedlings Using the NFT Method
Fig. 8.11, 8.12 & 8.13 A Demonstration of How to Plant Seedlings Using the DWC Method
Fig. 8.4 Fig. 8.5 Fig. 8.6 Fig. 8.7

121
Growing From Seed
It is possible to sow seeds straight into the media bed but the flood and drain mechanism (the bell siphon) will make things difficult as seeds are easily dispersed within the bed. We would recommend re-moving the siphon while sowing seeds in the bed and then replacing it when the first leaves begin to appear (although larger plants may suffer slightly without the bell siphon). Alternatively, seeds can also be sown in grow media such as coco fibre, us-ing propagation trays, and later transplanted to the media bed.
5 Steps to Sow Seeds Using Homemade Propagation Trays:
1) Take an empty egg box and fill the holes with grow media such as compost or coconut fibre
2) Sow the seeds in holes roughly 0.5 cm deep.
3) Place in the shade away from sun and irrigate every second day for about 1-2 weeks.
4) During this time the seed will germinate and begin sprouting. Once the first leaves appear, you can begin placing the egg box in shaded sunlight for a few hours a day, until the seedling is ready to be transplanted (2-3 weeks depend ing on the plant).
5) Seedlings may need initial fertilization, especially phophorus to strengthen their root systems and be better fit for transplant.
6) Release the seedling from the egg box using a small blunt instrument, wash away the remaining compost and plant into your unit at dusk.
Plant Management After 3 Months
By now your unit should have leafy green vegetables ready to harvest. Your unit should also have enough of a nutrient base to begin planting larger fruiting vegetables. The following points below detail the final guidelines for growing plants after the initial 3 month period:
• Ensure Continual Harvesting and Replanting: As discussed in Chapter 6, it is vital that you stagger your planting over time in order to prevent having to harvest your crop all at once. If this happens, nutrient levels will spike post-harvest, which may stress the fish. Alternatively you can plant a num ber of vegetables that can be continually harvested throughout the season making sure there are always plants taking up nutrients in your unit.
• Harvesting Approaches: When harvesting full plants from media beds (i.e. lettuce) make sure to take out the whole root system. Also, shake the gravel stuck in-between the
Fig. 8.14 Planting Seeds into a Bed Using Cotton Wool (Used to retain moisture for seeds)
Fig. 8.15 using an Empty Egg Box as a Propagation Tray
Fig. 8.16 Removing All Roots from the NFT Pipe

122
roots and place gravel back in the media bed. Make sure you remove the whole root system in NFT and DWC pipes/troughs also. Place the discarded plant roots into a compost bin to re-cycle the plant waste. Do not harvest all the plant at once as this will cause a nitrate spike.
• Stabilizing pH: It is vital for good plant growth to maintain the pH at 7 or just below, so plants will have access to all the nutrients available in the water. Add small amounts of acid or base periodically to maintain optimum pH levels (See Chapter 3).
• Organic Fertilizers: If deficiencies occur you can begin using organic liquid fertilizer as either diluted foliar feed for plant leaves or poured straight into the root zone. The following chapter lists methods to produce simple, homemade aquaponic-safe fertilizers including: compost tea, seaweed tea and vermiculture liquid fertilizer. Deficiencies many occur when:
o Water temperatures are low (winter months) leading to lower fish appetites
o The number of plants per square meter is way above the recommended amount
o PH levels are not optimal
• Aquaponic-safe Pesticide: Over time if pests begin to be problematic you can begin using aquaponic-safe natural pesticides as discussed in Chapter 6 including: garlic and chilli spray ash, nicotine tea or lavender tea.
• Follow Seasonal Planting Advice: To an extent, aquaponic food production methods enable you to extend past soil grown planting seasons, particularly if your unit is housed inside a greenhouse. However, it is still strongly recommended to follow local seasonal planting advice.
Plants Summary
• Start a unit with nitrogen fixing plants (beans, peas) and/or plants that have low nutrient demand and fast growing rates• After the first 3 – 6 months begin planting any plants from the list recom mended for aquaponics keeping in line with seasonal plant advice in the region.• It is very important to remove most substrate from the roots before you plant the seedlings • Leave sufficient spacing in the grow beds, NFT pipes or DWC troughs between plants according their size when mature.• Organic fertilizers may be necessary to add to the water if deficiencies occur which are largely due to either: 1) cold water temperatures during winter months, 2) plant densities above the recommended amounts or a combination of both.• Maintain an average temperature of roughly 18-30°C and a pH of approximately 6-7, depending on the type of crop cultivated.
123
4) Adding Fish: Management Practices to Consider Over a Growing Season
When the 3-5 week cycling process has completed (ammonia and nitrite are at zero and nitrates are beginning to rise), it is safe to start adding fish into the fish tanks. The fish must be properly acclima-tised to the new water which is at least a 30 minute process (explained in Chapter 7). When purchas-ing fingerlings from a local hatchery, make sure the fish are showing all the normal signs of healthy fish and check to make sure there are no visual signs of disease.
Feeding Fish
When the aquaponics unit is fully established and running for about 3 months, the fish feed amounts per day are calculated using the Feed Rate Ratio. However, for the first 2-3 months when the fish are still small it is advised to follow a feeding schedule based on a percentage of their estimated body weight and by observing the fish behaviour during feeding to determine their appetite and adjust the ration accordingly. This amount will be much less than the total amount per day when using the feed rate ratio, but this won’t be a problem for the overall balance of the unit, as the seedlings will also be quite small during the first 4 weeks. In addition the diet supplied to juvenile fish should be richer in protein
Feeding rate for the first 1-3 months:
• Newly stocked fingerling-sized fish will roughly weigh about 50 grams and they can be fed about 3% of their body weight per day. So, if 40 fingerlings are initially added to the unit, you can feed roughly 60 grams per day (3% of 50 grams x 40 fingerlings). Make sure to split the 60 grams into 2-3 feeding times per day for fingerling sized fish.
• After 2-3 months feeding at this rate, the 40 fish will have grown to about 80-100 grams. At this size you can begin calculating the amount of food per day using the feed rate ratio (grams/sq.meter/day). If this total is much larger than what you’ve been previously feeding using the % body weight then slowly increase the amounts up to the feed rate ratio total over a period of a few weeks. This will help the fish adjust to the new feeding amount and could save a lot of feed that may be left uneaten.
Along with the guidelines mentioned above, there are some other important general recommenda-tions for feeding fish:
• Divide the feeding amount into 2-3 feedings every day – it is healthier for the fish and also healthier for the plants (an even distribution of nutrients throughout the day).
• Divide the fish feed across the entire surface of the water so all the fish will can eat.
• Stand a meter away from the tank when the fish are feeding so they won’t be afraid of your shadow.
• Always remove any uneaten fish food after 30 minutes.
Final comments about fish feeding: One of the major indicators of healthy fish is a good appetite, so it is important to observe their general feeding habits. If their appetite declines or if they stop feeding altogether this will be a major sign for an aquaponic grower that something is wrong with the unit (most likely high ammonia or nitrite levels). Also, fish appetite is directly related to water temperature, particularly for topical fish like tilapia, so make sure to adjust or even stop feeding during colder win-ter months.

124
Expected Growth Rates
Fish growth rates largely depend on the species and also the food type, the level of stress in the tanks and the average water temperature. Yet this simplified example can be used to demonstrate potential growth rates in aquaponic units:
With a stocking density of roughly 10-20 Kg per cubic meter and a temperature of 25 C°, we can es-timate that an 50 gram Tilapia fish will reach a weight of 500 grams in 30 weeks with 1% body weight feed rate (Tilapia fish are popular to grow as they are one of the fastest growing cultured fish).
Obviously this growth rate will take longer if the fish are stressed at any stage or if the water tempera-ture drops. When growing fish, always remember the total fish biomass should not be more than 20 Kg per cubic meter in fish tanks.
Growing Fish Over Seasons:
As with growing plants in aquaponics, it is also very important to try and have a constant weight of fish in the tanks at all times so they will eat all of the food per day, as calculated using the fish feed ratio. A constant weight means a constant nutrient supply for plants so no deficiencies will develop. We can achieve this by using a similar method when growing plants over seasons called staggered stocking.
This technique involves stocking a system with new fingerlings of roughly 50 grams in stages or every 3 months. When using this method, you avoid the need to harvest all the fish all at once. Instead you can harvest a fraction of the total biomass every 3 months allowing you to roughly keep a constant weight of fish at all times. With this method you can have up to 3 different stocking weights in one tank so it’s important that you use a fish feed pellet size that will cater for all fish sizes.
N.B. Do not introduce fingerlings of 10 grams into tanks with fish larger than 250 grams as the larger fish may harm or eat them. Both tilapia and trout will eat smaller fish; 1-1/2 cm fish will eat new fry; 5 cm fish will eat 1-1/2 cm fish; 15 cm fish will eat 5 cm fish, and so on. A technique to keep all of these fish safely in the same fish tank is to isolate the smaller ones in a floating frame, which is a floating cage made of 3 cm PVC pipe, with plastic mesh wired to the outside, forming a mesh cube. It is important to make the sides of the mesh come 15 cm higher than the top PVC pipe in the floating frame (above the water level in the tank) so that bigger fish outside the floating frame cannot jump in and eat the smaller ones inside the frame. Each size class of fish that can possibly be eaten by another size class must be kept in separate floating frames in the main fish tank. As they increase in size and reach the size where they cannot be eaten by the larger fish in the tank proper, they can be moved into the tank.
Below are simple charts following the potential growth rates of tilapia fish in one tank over a year using the staggered stocking method. The key thing to highlight in this graph is the total weight of the fish tank per month after the 3rd month (March). Taking the values for total biomass from April to December, on average the total fish mass is roughly 16-18kgs. N.B this chart is a basic guideline depicting optimum conditions for fish growth. In reality factors like water temperature and stressful environments for fish will distort the figures presented here.
MonthJan 1st
(initial stocking)
Jan 31st Feb 28th
Mar 31st
April 30th
May 31st
June 30th
(1) Adding the 1st group of 30 fish @ 50gm/fish 1.5kg 3.75kg 6kg 8.25kg 10.5kg 12.75kg 15kg
(2) Adding the 2nd group of 30 fish @ 50gm/fish 1.5kg 3.75kg 6kg 8.25kg
Total fish mass (kg) 1.5kg 3.75kg 6kg 9.75kg 14.25kg 18.75kg 23.25kg
125
Month July 1st
July 31st
Aug 31st
Sept 30th
Oct 31st
Nov 30th
Dec 31st
2ndgroup of 30 fish contd… 8.25kg 10.5kg 12.75kg 15kg
(3) Adding 3rd group of 30 fish @ 50gm/fish 1.5kg 3.75kg 6kg 8.25kg 10.5kg 12.75kg 15kg
(4) Adding the 4th 30 group of 30 fish @ 50 gm/fish
1.5kg 3.75kg 6kg 8.25kg
Total fish mass (kg) 9.75kg 14.25kg 18.75kg 23.25kg 14.25kg 18.75kg 23.25kg
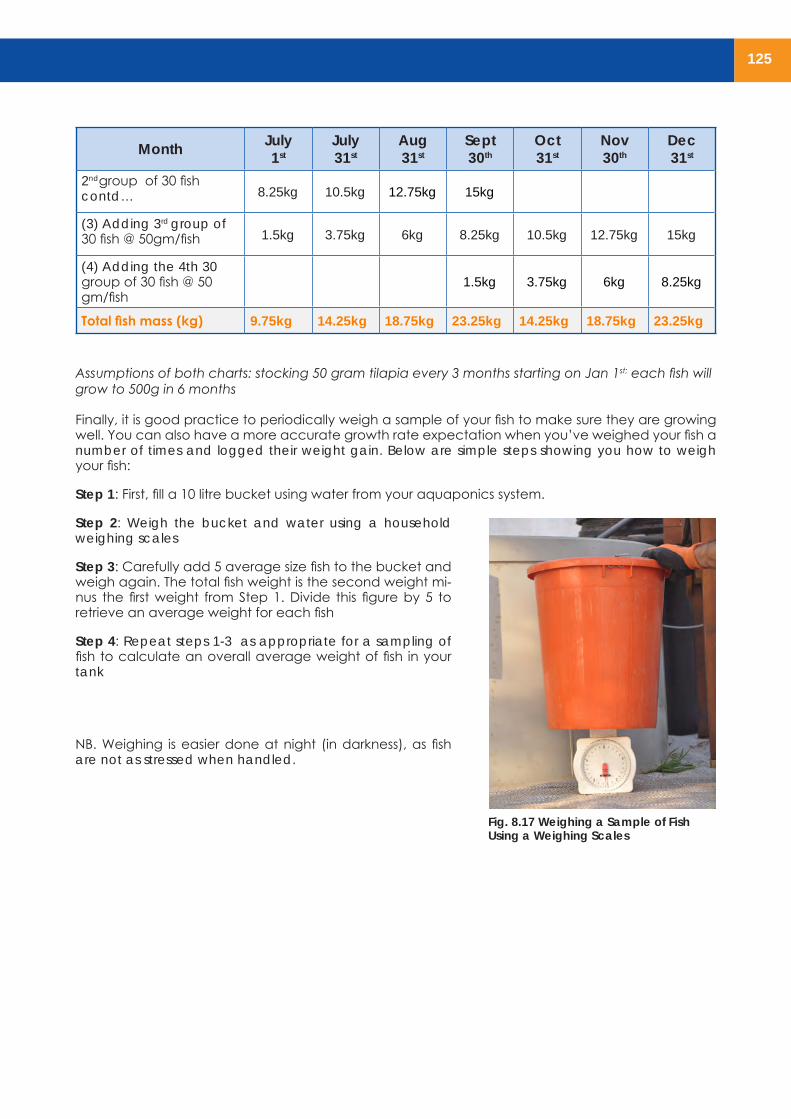
Assumptions of both charts: stocking 50 gram tilapia every 3 months starting on Jan 1st; each fish willgrow to 500g in 6 months Finally, it is good practice to periodically weigh a sample of your fish to make sure they are growing well. You can also have a more accurate growth rate expectation when you’ve weighed your fish a number of times and logged their weight gain. Below are simple steps showing you how to weigh your fish:
Step 1: First, fill a 10 litre bucket using water from your aquaponics system.
Step 2: Weigh the bucket and water using a household weighing scales
Step 3: Carefully add 5 average size fish to the bucket and weigh again. The total fish weight is the second weight mi-nus the first weight from Step 1. Divide this figure by 5 to retrieve an average weight for each fish
Step 4: Repeat steps 1-3 as appropriate for a sampling of fish to calculate an overall average weight of fish in your tank
NB. Weighing is easier done at night (in darkness), as fish are not as stressed when handled.
Fig. 8.17 Weighing a Sample of Fish Using a Weighing Scales

126
127
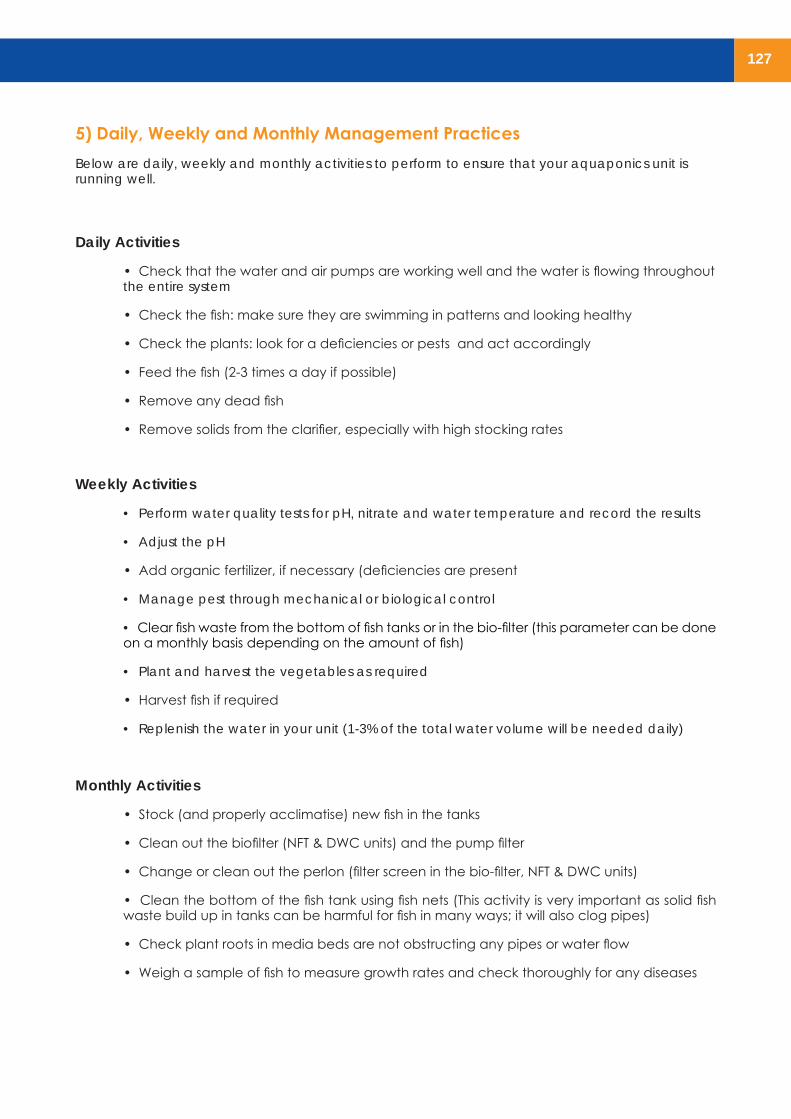
5) Daily, Weekly and Monthly Management PracticesBelow are daily, weekly and monthly activities to perform to ensure that your aquaponics unit is running well.
Daily Activities
• Check that the water and air pumps are working well and the water is flowing throughout the entire system
• Check the fish: make sure they are swimming in patterns and looking healthy
• Check the plants: look for a deficiencies or pests and act accordingly
• Feed the fish (2-3 times a day if possible)
• Remove any dead fish
• Remove solids from the clarifier, especially with high stocking rates
Weekly Activities
• Perform water quality tests for pH, nitrate and water temperature and record the results
• Adjust the pH
• Add organic fertilizer, if necessary (deficiencies are present
• Manage pest through mechanical or biological control
• Clear fish waste from the bottom of fish tanks or in the bio-filter (this parameter can be done on a monthly basis depending on the amount of fish)
• Plant and harvest the vegetables as required
• Harvest fish if required
• Replenish the water in your unit (1-3% of the total water volume will be needed daily)
Monthly Activities
• Stock (and properly acclimatise) new fish in the tanks
• Clean out the biofilter (NFT & DWC units) and the pump filter
• Change or clean out the perlon (filter screen in the bio-filter, NFT & DWC units)
• Clean the bottom of the fish tank using fish nets (This activity is very important as solid fish waste build up in tanks can be harmful for fish in many ways; it will also clog pipes)
• Check plant roots in media beds are not obstructing any pipes or water flow
• Weigh a sample of fish to measure growth rates and check thoroughly for any diseases

128
6) Safety at Work
Below is a list of measures to take to ensure safety for you and for the fish and plants you are growing:
Measures Related to the Electrical Appliances:
• Never work with exposed wires or faulty electric pumps and use standard electrical boxes
• Do not install an electric-device or a cable over a water tank or biofilter (NFT or DWC unit)
• Keep the water away from electricity or electrical appliances
• Protect any electrical cables or sockets from the rain using plastic sheeting for outdoor electrical boxes
Protecting the unit from us
Humans carry most of the pathogens that fish are sensitive to. Therefore it is important to wash hands with soap before and after any contact with the plants or the fish. Also:
• Avoid warm-blooded animal waste getting near the fish tank
• Avoid touching the water in the tank or the plant’s root
• Every couple of weeks it is good to soak the fish net in chlorine and then wash them with clean water and dry them thoroughly.
• Wear protective gloves while working with the fish
• Be extra cautious with fish spikes on their back. In case of a severe sting – disinfect the wound and seek medical advice.
• If using acid or alkali to adjust the pH make sure to keep the acid container stored in a cool dry place away from children at all times.
129
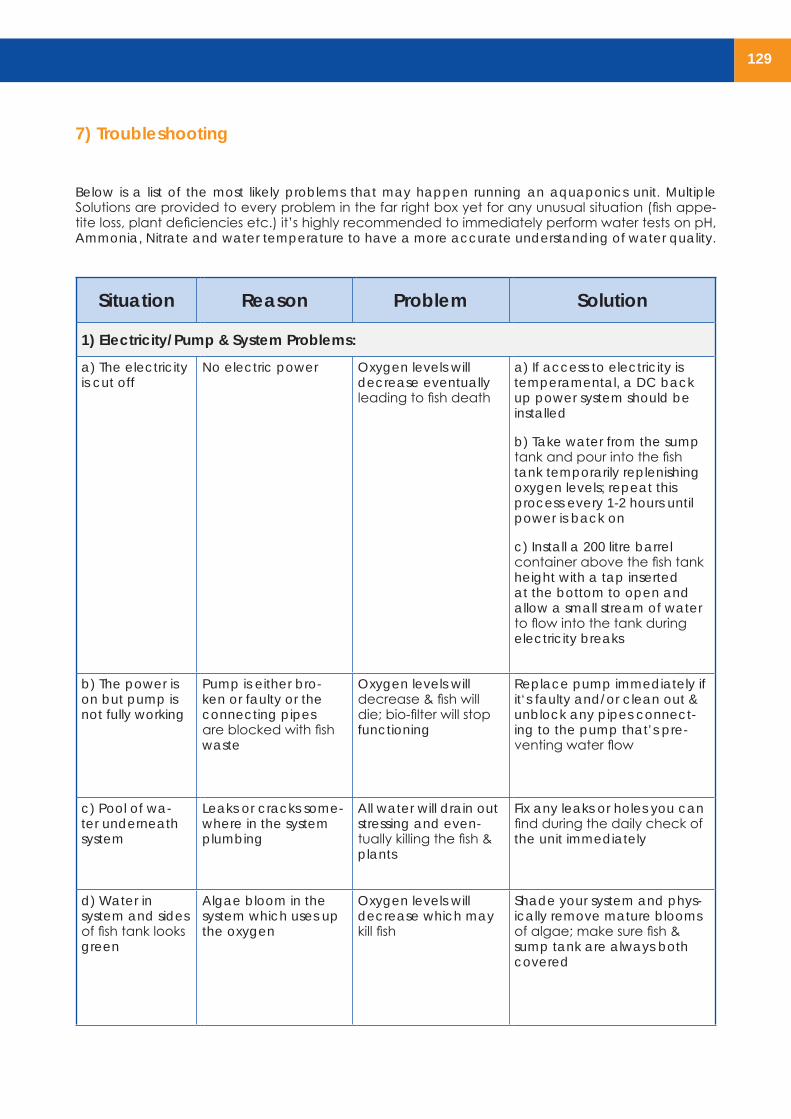
7) Troubleshooting
Below is a list of the most likely problems that may happen running an aquaponics unit. Multiple Solutions are provided to every problem in the far right box yet for any unusual situation (fish appe-tite loss, plant deficiencies etc.) it’s highly recommended to immediately perform water tests on pH, Ammonia, Nitrate and water temperature to have a more accurate understanding of water quality.
Situation Reason Problem Solution
1) Electricity/Pump & System Problems:
a) The electricity is cut off
No electric power Oxygen levels will decrease eventually leading to fish death
a) If access to electricity is temperamental, a DC back up power system should be installed
b) Take water from the sump tank and pour into the fish tank temporarily replenishing oxygen levels; repeat this process every 1-2 hours until power is back on
c) Install a 200 litre barrel container above the fish tank height with a tap inserted at the bottom to open and allow a small stream of water to flow into the tank during electricity breaks
b) The power is on but pump is not fully working
Pump is either bro-ken or faulty or the connecting pipes are blocked with fish waste
Oxygen levels will decrease & fish will die; bio-filter will stop functioning
Replace pump immediately if it‘s faulty and/or clean out & unblock any pipes connect-ing to the pump that’s pre-venting water flow
c) Pool of wa-ter underneath system
Leaks or cracks some-where in the system plumbing
All water will drain out stressing and even-tually killing the fish & plants
Fix any leaks or holes you can find during the daily check of the unit immediately
d) Water in system and sides of fish tank looks green
Algae bloom in the system which uses up the oxygen
Oxygen levels will decrease which may kill fish
Shade your system and phys-ically remove mature blooms of algae; make sure fish & sump tank are always both covered
130
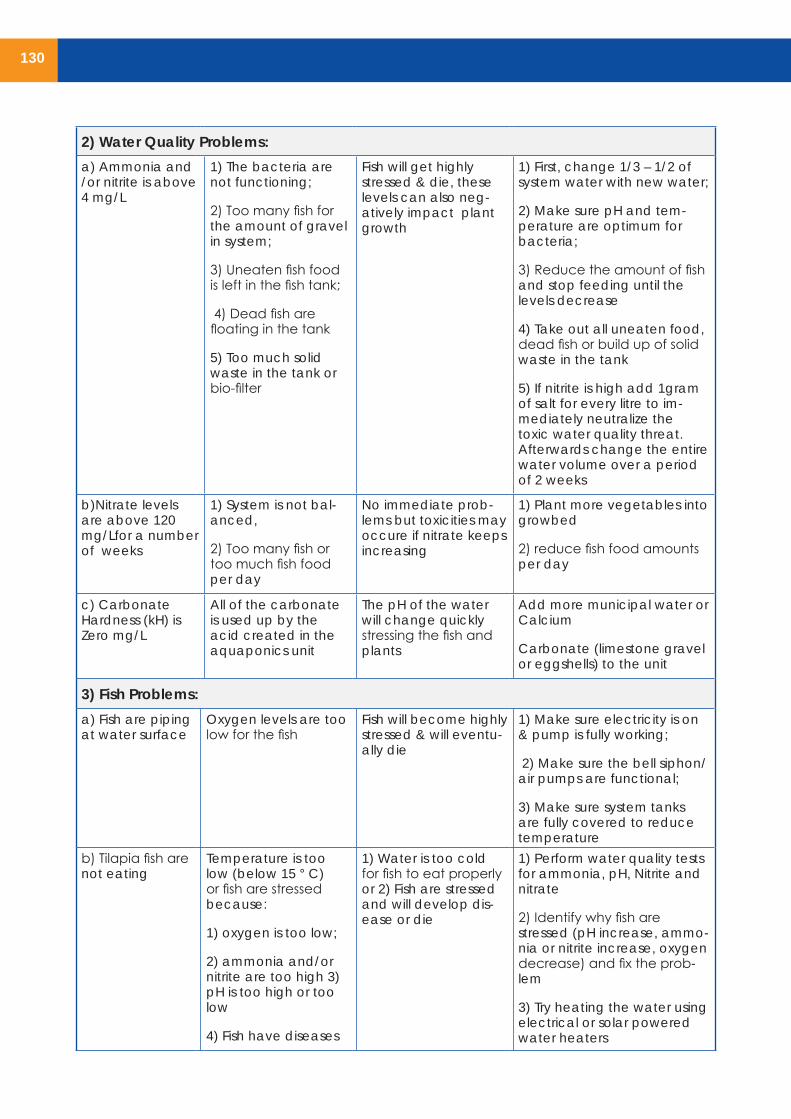
2) Water Quality Problems:
a) Ammonia and /or nitrite is above 4 mg/L
1) The bacteria are not functioning;
2) Too many fish for the amount of gravel in system;
3) Uneaten fish food is left in the fish tank;
4) Dead fish are floating in the tank
5) Too much solid waste in the tank or bio-filter
Fish will get highly stressed & die, these levels can also neg-atively impact plant growth
1) First, change 1/3 – 1/2 of system water with new water;
2) Make sure pH and tem-perature are optimum for bacteria;
3) Reduce the amount of fish and stop feeding until the levels decrease
4) Take out all uneaten food, dead fish or build up of solid waste in the tank
5) If nitrite is high add 1gram of salt for every litre to im-mediately neutralize the toxic water quality threat. Afterwards change the entire water volume over a period of 2 weeks
b)Nitrate levels are above 120 mg/Lfor a number of weeks
1) System is not bal-anced,
2) Too many fish or too much fish food per day
No immediate prob-lems but toxicities may occure if nitrate keeps increasing
1) Plant more vegetables into growbed
2) reduce fish food amounts per day
c) Carbonate Hardness (kH) is Zero mg/L
All of the carbonate is used up by the acid created in the aquaponics unit
The pH of the water will change quickly stressing the fish and plants
Add more municipal water or Calcium
Carbonate (limestone gravel or eggshells) to the unit
3) Fish Problems:
a) Fish are piping at water surface
Oxygen levels are too low for the fish
Fish will become highly stressed & will eventu-ally die
1) Make sure electricity is on & pump is fully working;
2) Make sure the bell siphon/air pumps are functional;
3) Make sure system tanks are fully covered to reduce temperature
b) Tilapia fish are not eating
Temperature is too low (below 15 ° C) or fish are stressed because:
1) oxygen is too low;
2) ammonia and/or nitrite are too high 3) pH is too high or too low
4) Fish have diseases
1) Water is too cold for fish to eat properly or 2) Fish are stressed and will develop dis-ease or die
1) Perform water quality tests for ammonia, pH, Nitrite and nitrate
2) Identify why fish are stressed (pH increase, ammo-nia or nitrite increase, oxygen decrease) and fix the prob-lem
3) Try heating the water using electrical or solar powered water heaters
131
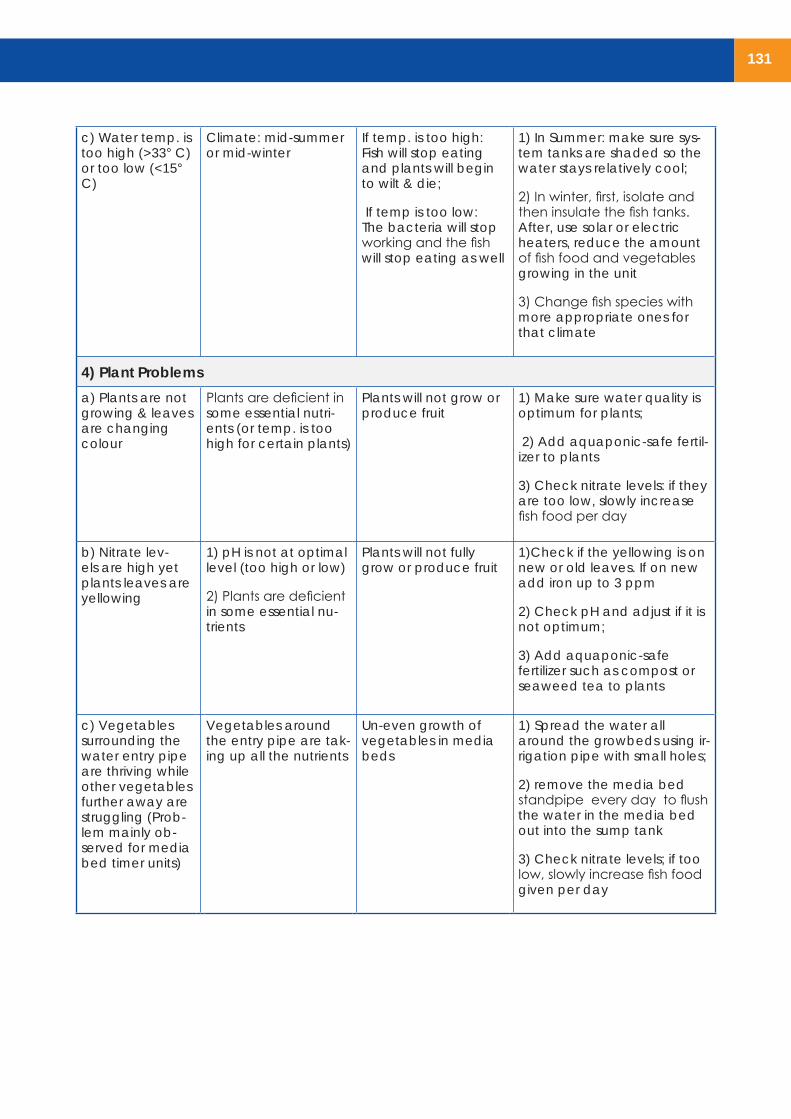
c) Water temp. is too high (>33° C) or too low (<15° C)
Climate: mid-summer or mid-winter
If temp. is too high: Fish will stop eating and plants will begin to wilt & die;
If temp is too low: The bacteria will stop working and the fish will stop eating as well
1) In Summer: make sure sys-tem tanks are shaded so the water stays relatively cool;
2) In winter, first, isolate and then insulate the fish tanks. After, use solar or electric heaters, reduce the amount of fish food and vegetables growing in the unit
3) Change fish species with more appropriate ones for that climate
4) Plant Problems
a) Plants are not growing & leaves are changing colour
Plants are deficient in some essential nutri-ents (or temp. is too high for certain plants)
Plants will not grow or produce fruit
1) Make sure water quality is optimum for plants;
2) Add aquaponic-safe fertil-izer to plants
3) Check nitrate levels: if they are too low, slowly increase fish food per day
b) Nitrate lev-els are high yet plants leaves are yellowing
1) pH is not at optimal level (too high or low)
2) Plants are deficient in some essential nu-trients
Plants will not fully grow or produce fruit
1)Check if the yellowing is on new or old leaves. If on new add iron up to 3 ppm
2) Check pH and adjust if it is not optimum;
3) Add aquaponic-safe fertilizer such as compost or seaweed tea to plants
c) Vegetables surrounding the water entry pipe are thriving while other vegetables further away are struggling (Prob-lem mainly ob-served for media bed timer units)
Vegetables around the entry pipe are tak-ing up all the nutrients
Un-even growth of vegetables in media beds
1) Spread the water all around the growbeds using ir-rigation pipe with small holes;
2) remove the media bed standpipe every day to flush the water in the media bed out into the sump tank
3) Check nitrate levels; if too low, slowly increase fish food given per day
132
133
Chapter 9) Additional topics on Small Scale Aquaponics
Chapter Introduction:
This final chapter attempts to bring other minor yet important topics on management of small scale aquaponic units. To start we’ll discuss essential production inputs and methods that secure them sus-tainability. There are several inputs that every aquaponic grower must use during a growing season which are as follows: fish feed, electricity, seeds/seedlings, fish fingerlings, supplemental plant fertilizer and water to replenish the unit. All of these inputs can be bought yet there are simple methods of producing many of them domestically using sustainable practices. These methods may reduce the unit running costs per year and help keep production as environmentally friendly as possible. We will first look at alternative organic fertilizers followed by fish feed alternatives. Afterwards we will make some comments about using recycled materials to build or expand your initial aquaponics unit. Fi-nally we will look at renewable energy solutions that are applicable for aquaponics. Links to other resources online for some of the more complicated methods will be provided at the end of each section.
Following this we’ll briefly mention some safety tips to remove the threat of one of the most common situations: draining of all the unit’s water. Finally we’ll briefly discuss how a small scale aquaponic unit can enhance other domestic food production activities in urban or peri-urban areas.
1) Sustainable solutions for aquaponic production inputs: A) Alternative Organic Plant Fertilizers
In Chapter 6 we learned that over time an aquaponics unit that is growing the maximum amount of plants may develop some nutrient deficiencies. Although fish food pellets are a whole food for fish, meaning they provide everything that a fish needs to grow, they do not necessarily have all the right quantities of nutrients for plants (in particular, iron and potassium). Plant deficiencies can also arise in sub-optional growing conditions (cold, winter months). Thus, supplementary plant fertilizers may be necessary, particularly if you’re going high nutrient demanding fruiting vegetables. In aquaponic food production we refrain from using standard chemical fertilizers as the concentrations may be harmful for fish. Instead we can rely on organic fertilizers that can be easily produced domestically using household food waste. Below is a list of methods to produce organic fertilizers.
1. Compost (Solid Material and Liquid Fertilizer)
Compost is a rich fertilizer that is made from broken down organic matter (food waste). We can use compost for replenishing organic material in soil and we can also produce compost liquid fer-tilizer (compost tea) that can be added to the aquaponic water to boost the supply of nutrients. Household food waste can be used as the organic matter needed to produce compost. This waste is stored in a compost container (composter). Within a composter, aerobic bacteria, microbes and other organisms break the organic matter into simple nutrients for plants to consume. The final sub-stance that is produced is called humus, which is comprised of about 65% organic matter. The whole process from food waste to humus can take up to 6 months depending on the temperature inside the composter and quality of aeration.
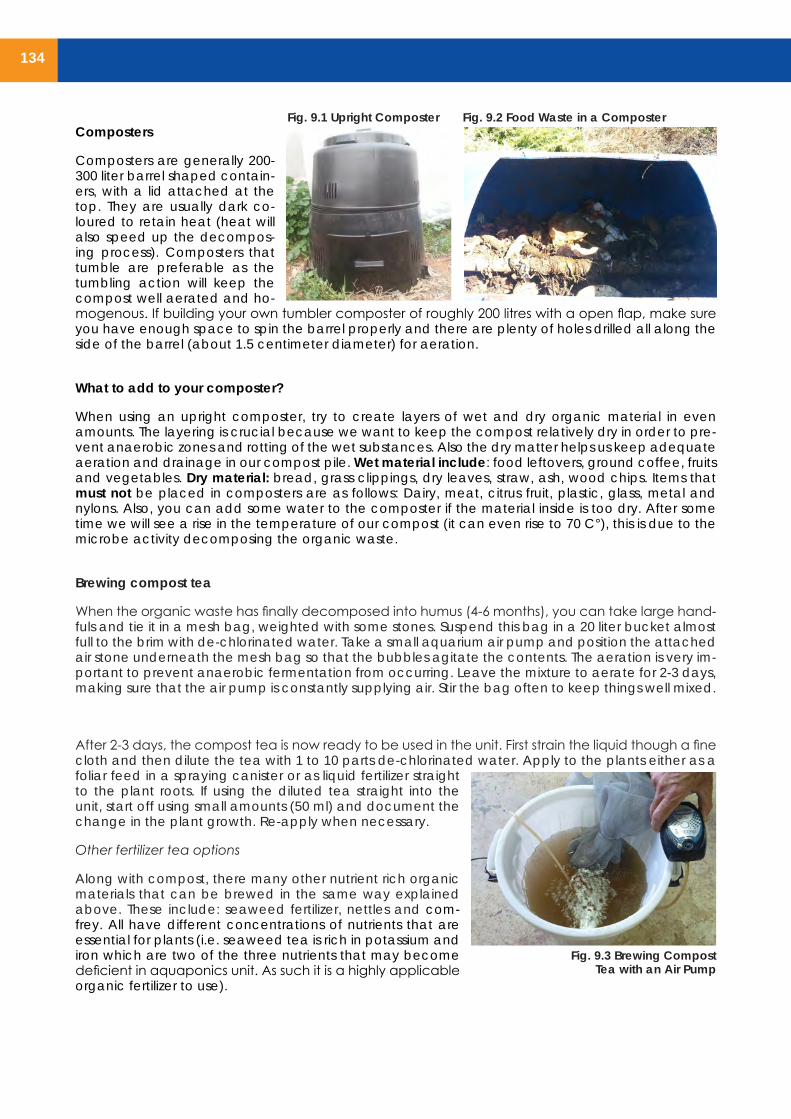
134
Composters
Composters are generally 200-300 liter barrel shaped contain-ers, with a lid attached at the top. They are usually dark co-loured to retain heat (heat will also speed up the decompos-ing process). Composters that tumble are preferable as the tumbling action will keep the compost well aerated and ho-mogenous. If building your own tumbler composter of roughly 200 litres with a open flap, make sure you have enough space to spin the barrel properly and there are plenty of holes drilled all along the side of the barrel (about 1.5 centimeter diameter) for aeration.
What to add to your composter?
When using an upright composter, try to create layers of wet and dry organic material in even amounts. The layering is crucial because we want to keep the compost relatively dry in order to pre-vent anaerobic zones and rotting of the wet substances. Also the dry matter helps us keep adequate aeration and drainage in our compost pile. Wet material include: food leftovers, ground coffee, fruits and vegetables. Dry material: bread, grass clippings, dry leaves, straw, ash, wood chips. Items that must not be placed in composters are as follows: Dairy, meat, citrus fruit, plastic, glass, metal and nylons. Also, you can add some water to the composter if the material inside is too dry. After some time we will see a rise in the temperature of our compost (it can even rise to 70 C°), this is due to the microbe activity decomposing the organic waste.
Brewing compost tea
When the organic waste has finally decomposed into humus (4-6 months), you can take large hand-fuls and tie it in a mesh bag, weighted with some stones. Suspend this bag in a 20 liter bucket almost full to the brim with de-chlorinated water. Take a small aquarium air pump and position the attached air stone underneath the mesh bag so that the bubbles agitate the contents. The aeration is very im-portant to prevent anaerobic fermentation from occurring. Leave the mixture to aerate for 2-3 days, making sure that the air pump is constantly supplying air. Stir the bag often to keep things well mixed.
After 2-3 days, the compost tea is now ready to be used in the unit. First strain the liquid though a fine cloth and then dilute the tea with 1 to 10 parts de-chlorinated water. Apply to the plants either as a foliar feed in a spraying canister or as liquid fertilizer straight to the plant roots. If using the diluted tea straight into the unit, start off using small amounts (50 ml) and document the change in the plant growth. Re-apply when necessary.
Other fertilizer tea options
Along with compost, there many other nutrient rich organic materials that can be brewed in the same way explained above. These include: seaweed fertilizer, nettles and com-frey. All have different concentrations of nutrients that are essential for plants (i.e. seaweed tea is rich in potassium and iron which are two of the three nutrients that may become deficient in aquaponics unit. As such it is a highly applicable organic fertilizer to use).
Fig. 9.3 Brewing Compost Tea with an Air Pump
Fig. 9.1 Upright Composter Fig. 9.2 Food Waste in a Composter
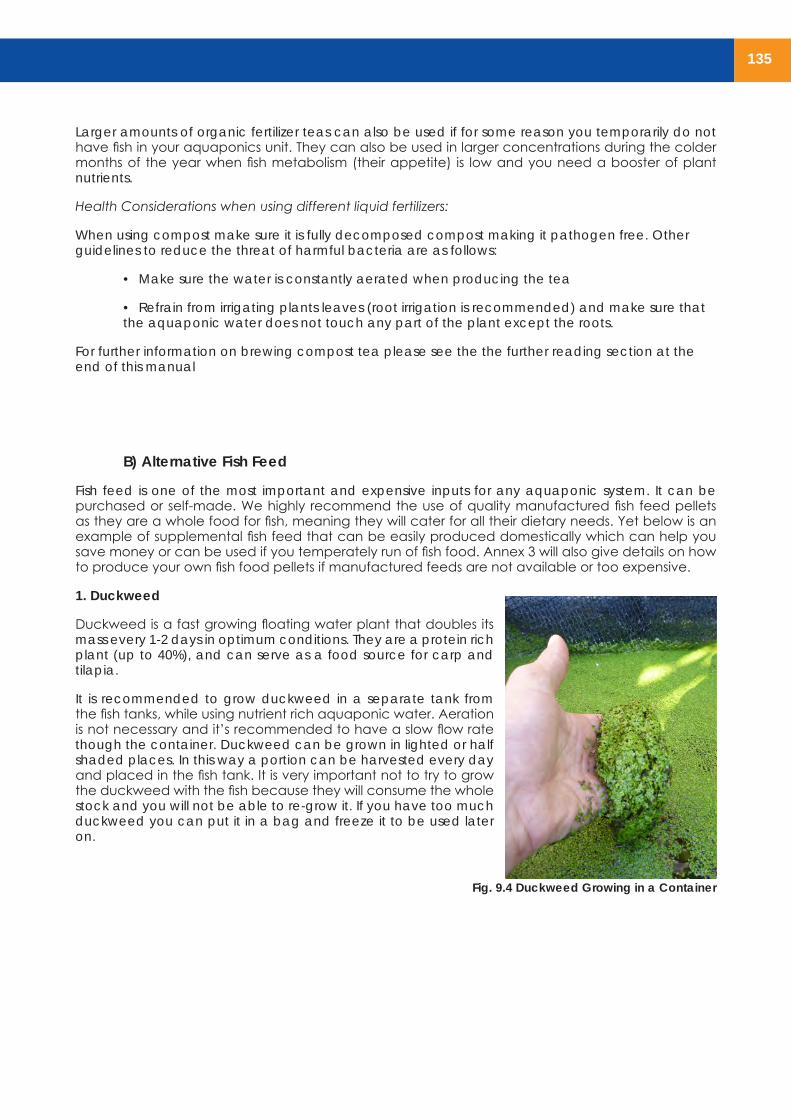
135
Larger amounts of organic fertilizer teas can also be used if for some reason you temporarily do not have fish in your aquaponics unit. They can also be used in larger concentrations during the colder months of the year when fish metabolism (their appetite) is low and you need a booster of plant nutrients.
Health Considerations when using different liquid fertilizers:
When using compost make sure it is fully decomposed compost making it pathogen free. Other guidelines to reduce the threat of harmful bacteria are as follows:
• Make sure the water is constantly aerated when producing the tea
• Refrain from irrigating plants leaves (root irrigation is recommended) and make sure that the aquaponic water does not touch any part of the plant except the roots.
For further information on brewing compost tea please see the the further reading section at the end of this manual
B) Alternative Fish Feed
Fish feed is one of the most important and expensive inputs for any aquaponic system. It can be purchased or self-made. We highly recommend the use of quality manufactured fish feed pellets as they are a whole food for fish, meaning they will cater for all their dietary needs. Yet below is an example of supplemental fish feed that can be easily produced domestically which can help you save money or can be used if you temperately run of fish food. Annex 3 will also give details on how to produce your own fish food pellets if manufactured feeds are not available or too expensive.
1. Duckweed
Duckweed is a fast growing floating water plant that doubles its mass every 1-2 days in optimum conditions. They are a protein rich plant (up to 40%), and can serve as a food source for carp and tilapia.
It is recommended to grow duckweed in a separate tank from the fish tanks, while using nutrient rich aquaponic water. Aeration is not necessary and it’s recommended to have a slow flow rate though the container. Duckweed can be grown in lighted or half shaded places. In this way a portion can be harvested every day and placed in the fish tank. It is very important not to try to grow the duckweed with the fish because they will consume the whole stock and you will not be able to re-grow it. If you have too much duckweed you can put it in a bag and freeze it to be used later on.
Fig. 9.4 Duckweed Growing in a Container
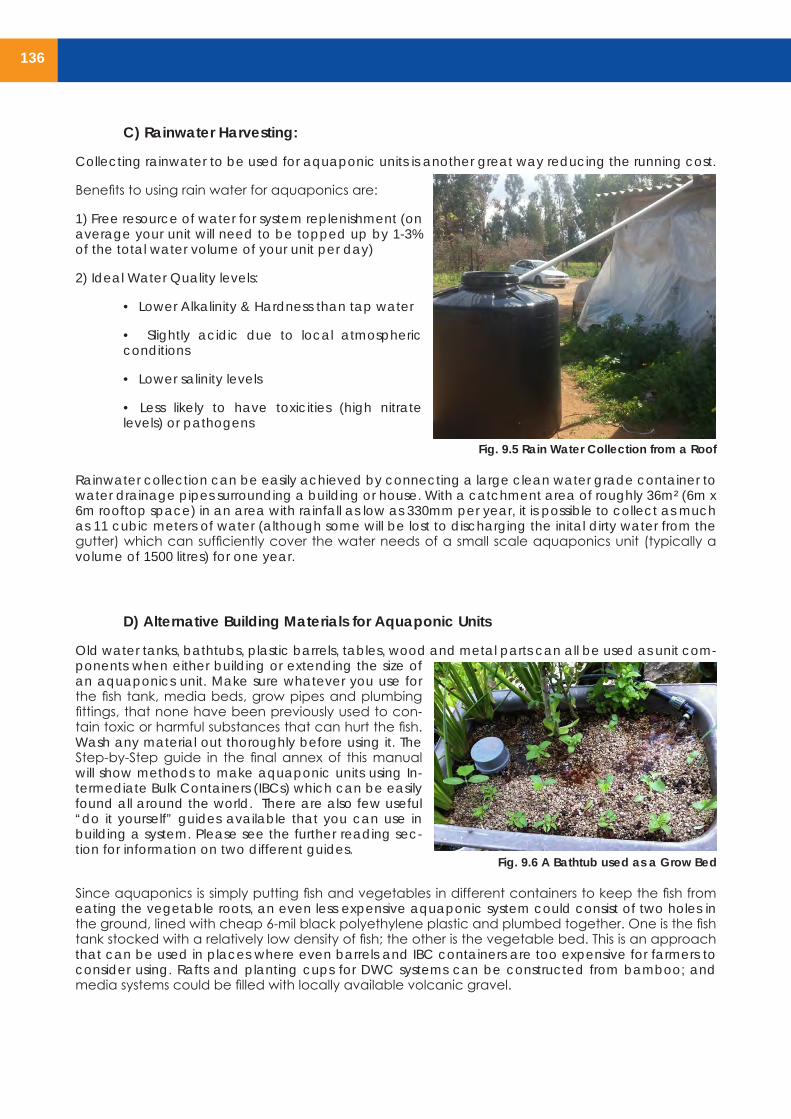
136
C) Rainwater Harvesting:
Collecting rainwater to be used for aquaponic units is another great way reducing the running cost.
Benefits to using rain water for aquaponics are:
1) Free resource of water for system replenishment (on average your unit will need to be topped up by 1-3% of the total water volume of your unit per day)
2) Ideal Water Quality levels:
• Lower Alkalinity & Hardness than tap water
• Slightly acidic due to local atmospheric conditions
• Lower salinity levels
• Less likely to have toxicities (high nitrate levels) or pathogens
Rainwater collection can be easily achieved by connecting a large clean water grade container to water drainage pipes surrounding a building or house. With a catchment area of roughly 36m² (6m x 6m rooftop space) in an area with rainfall as low as 330mm per year, it is possible to collect as much as 11 cubic meters of water (although some will be lost to discharging the inital dirty water from the gutter) which can sufficiently cover the water needs of a small scale aquaponics unit (typically a volume of 1500 litres) for one year.
D) Alternative Building Materials for Aquaponic Units
Old water tanks, bathtubs, plastic barrels, tables, wood and metal parts can all be used as unit com-ponents when either building or extending the size of an aquaponics unit. Make sure whatever you use for the fish tank, media beds, grow pipes and plumbing fittings, that none have been previously used to con-tain toxic or harmful substances that can hurt the fish. Wash any material out thoroughly before using it. The Step-by-Step guide in the final annex of this manual will show methods to make aquaponic units using In-termediate Bulk Containers (IBCs) which can be easily found all around the world. There are also few useful “do it yourself” guides available that you can use in building a system. Please see the further reading sec-tion for information on two different guides.
Since aquaponics is simply putting fish and vegetables in different containers to keep the fish from eating the vegetable roots, an even less expensive aquaponic system could consist of two holes in the ground, lined with cheap 6-mil black polyethylene plastic and plumbed together. One is the fish tank stocked with a relatively low density of fish; the other is the vegetable bed. This is an approach that can be used in places where even barrels and IBC containers are too expensive for farmers to consider using. Rafts and planting cups for DWC systems can be constructed from bamboo; and media systems could be filled with locally available volcanic gravel.
Fig. 9.5 Rain Water Collection from a Roof
Fig. 9.6 A Bathtub used as a Grow Bed
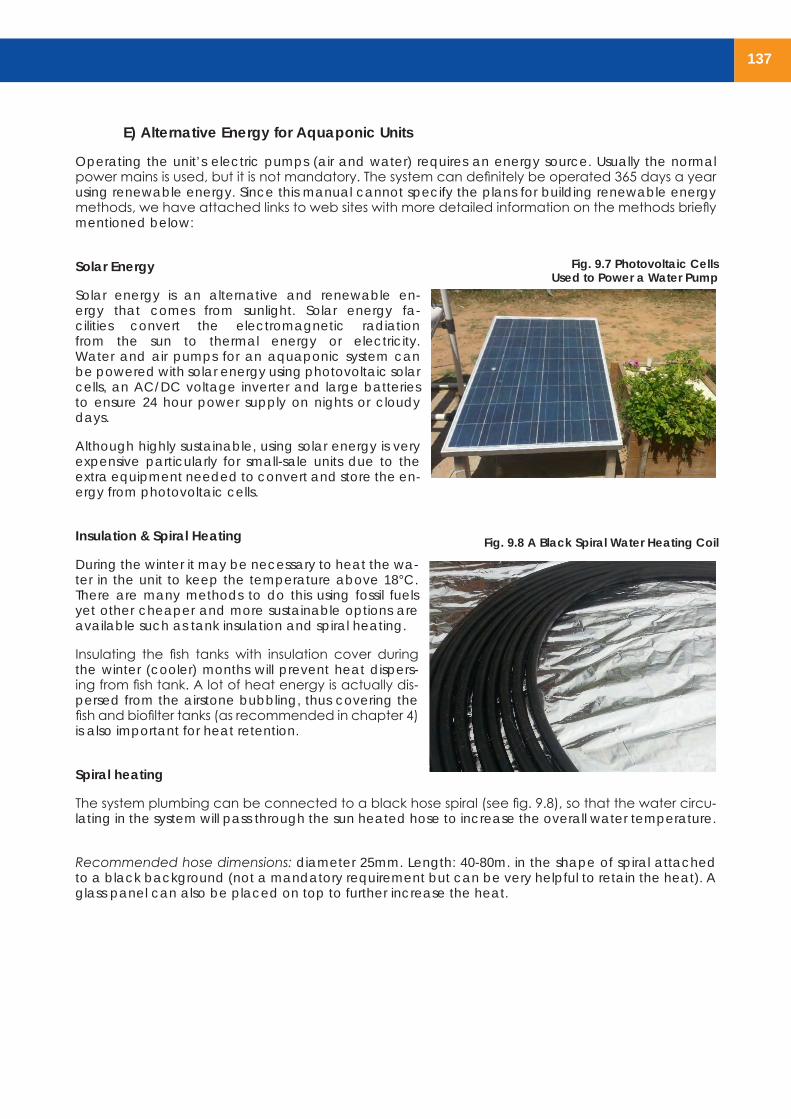
137
E) Alternative Energy for Aquaponic Units
Operating the unit’s electric pumps (air and water) requires an energy source. Usually the normal power mains is used, but it is not mandatory. The system can definitely be operated 365 days a year using renewable energy. Since this manual cannot specify the plans for building renewable energy methods, we have attached links to web sites with more detailed information on the methods briefly mentioned below:
Solar Energy
Solar energy is an alternative and renewable en-ergy that comes from sunlight. Solar energy fa-cilities convert the electromagnetic radiation from the sun to thermal energy or electricity. Water and air pumps for an aquaponic system can be powered with solar energy using photovoltaic solar cells, an AC/DC voltage inverter and large batteries to ensure 24 hour power supply on nights or cloudy days.
Although highly sustainable, using solar energy is very expensive particularly for small-sale units due to the extra equipment needed to convert and store the en-ergy from photovoltaic cells.
Insulation & Spiral Heating
During the winter it may be necessary to heat the wa-ter in the unit to keep the temperature above 18°C. There are many methods to do this using fossil fuels yet other cheaper and more sustainable options are available such as tank insulation and spiral heating.
Insulating the fish tanks with insulation cover during the winter (cooler) months will prevent heat dispers-ing from fish tank. A lot of heat energy is actually dis-persed from the airstone bubbling, thus covering the fish and biofilter tanks (as recommended in chapter 4) is also important for heat retention.
Spiral heating
The system plumbing can be connected to a black hose spiral (see fig. 9.8), so that the water circu-lating in the system will pass through the sun heated hose to increase the overall water temperature.
Recommended hose dimensions: diameter 25mm. Length: 40-80m. in the shape of spiral attached to a black background (not a mandatory requirement but can be very helpful to retain the heat). A glass panel can also be placed on top to further increase the heat.
Fig. 9.7 Photovoltaic Cells Used to Power a Water Pump
Fig. 9.8 A Black Spiral Water Heating Coil
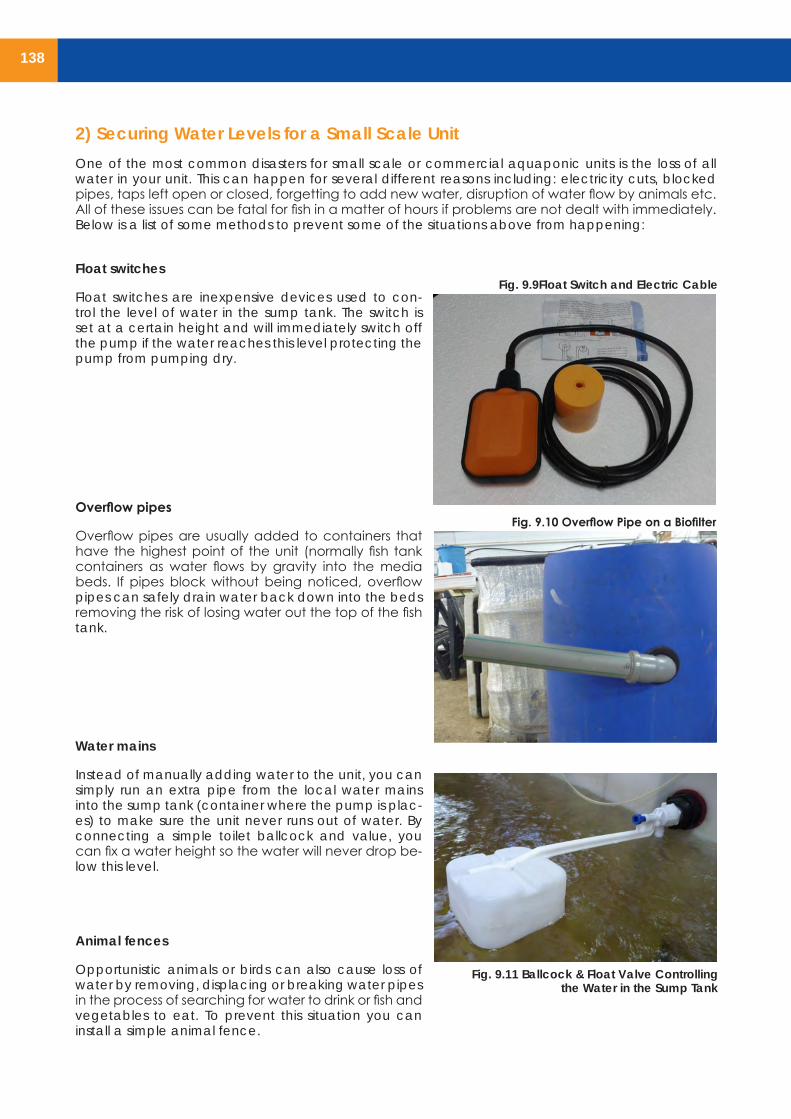
138
2) Securing Water Levels for a Small Scale Unit
One of the most common disasters for small scale or commercial aquaponic units is the loss of all water in your unit. This can happen for several different reasons including: electricity cuts, blocked pipes, taps left open or closed, forgetting to add new water, disruption of water flow by animals etc. All of these issues can be fatal for fish in a matter of hours if problems are not dealt with immediately. Below is a list of some methods to prevent some of the situations above from happening:
Float switches
Float switches are inexpensive devices used to con-trol the level of water in the sump tank. The switch is set at a certain height and will immediately switch off the pump if the water reaches this level protecting the pump from pumping dry.
Overflow pipes
Overflow pipes are usually added to containers that have the highest point of the unit (normally fish tank containers as water flows by gravity into the media beds. If pipes block without being noticed, overflow pipes can safely drain water back down into the beds removing the risk of losing water out the top of the fish tank.
Water mains
Instead of manually adding water to the unit, you can simply run an extra pipe from the local water mains into the sump tank (container where the pump is plac-es) to make sure the unit never runs out of water. By connecting a simple toilet ballcock and value, you can fix a water height so the water will never drop be-low this level.
Animal fences
Opportunistic animals or birds can also cause loss of water by removing, displacing or breaking water pipes in the process of searching for water to drink or fish and vegetables to eat. To prevent this situation you can install a simple animal fence.
Fig. 9.10 Overflow Pipe on a Biofilter
Fig. 9.11 Ballcock & Float Valve Controlling the Water in the Sump Tank
Fig. 9.9Float Switch and Electric Cable