2 • through the needle online table of contents
TRANSCRIPT

w w w . t h r o u g h t h e n e e d l e . c o m
Spanish Shawl
Bobbin Play on Piping
13ISSUE
Tufted Swirls Runner
PerfectHeir loom
Buttonholes

Snowflake Quilt 4 Christine Boxer was inspired by a quilt made by Emily Allen Kain in the early 1940’s.
Then, the applique pieces would have been painstakingly cut by hand. Now, it takes the BERNINA CutWork Tool under an hour to cut them for you. Design your own quilt, or download files to recreate Christine’s Snowflake Quilt from the BERNINA USA web site.
Bobbin Play on Piping8 This decorative embellishment looks hand-embroidered, but it’s actually created quickly
and easily on your sewing machine! Heavy threads wound on the bobbin form the pretty stitches, sewn from the wrong side of the bias strips used to wrap the cord. Voila! Beautiful cord to use on any home dec project!
Accessory Spotlight: Freemotion Couching Foot #4311 Create beautiful couched designs with Freemotion Couching Foot #43. Designed for use
with cords 2 mm in diameter, this foot can be used for digitized as well as freemotion couching.
Tufted Swirls Bed Runner12 It’s amazing what can be done with just a single embroidery motif! The embroidered
squares on this elegant bed runner feature just one of the beautiful designs in the BERNINA Exclusive Sensational Swirls #21003 embroidery collection.
Spanish Shawl16 Spanish hemstitching joins two rectangular shawls to create this lovely elegant wrap.
After you select and test your stitches, it takes less than 30 minutes to finish the project!
Perfect Heirloom Buttonholes18 How many times have you accidently slit a buttonhole too far? Even after years of sewing,
we all feel a little anxious when it’s time to cut buttonhole open. Ed Roux shares his technique for creating perfectly stitched and cut buttonholes using BERNINA Embroidery Software 6 and the BERNINA CutWork Accessory.
2 • T H R O U G H T H E N E E D L E O N L I N E
Table of Contents
Manag ing Ed i to r / Crea t i ve D i rec to r Jo LeichteCont r ibu t ing Ed i to r Barbara Wei land Talber tGraph ic Ar t i s t Lisa Kl ingbei l
Cont r ibu t ing Authors Susan Beck Debbi Lashbrook
Through the Needle Onl ine i s pub l i shed s ix t imes a year by BERNINA o f Amer ica , Inc . fo r mach ine s t i t chers and embro iderers o f a l l t ypes and a l l sk i l l l eve ls .
Th is pub l i ca t ion may be shared and reproduced in i t s o r ig ina l fo rmat , w i th the s t ipu la t ion tha t c red i t be g iven to Through the Needle Onl ine .
3702 Pra i r ie Lake Cour t , Aurora , IL 60504 bern inausa.com th roughtheneed le .com
©BERNINA o f Amer ica , Inc . , 2012
Sensational Swirls Collection 21003 © OESD 2012
did you know?There are clickable
links throughout this
magazine!
Click on the Table of
Contents to jump directly
to an article.
The Last Word22 Valuable coupons, a list of quick links, and a sneak
peek inside the next issue of Through the Needle ONLINE.

Needle NotesI S S U E 1 3 • 3
Details. It’s often the littlest things that take a project from well done to spectacular. In this issue of Through the Needle ONLINE we present an assortment of techniques for creating beautifully-stitched details.
It’s late. You’ve almost finished stitching a tailored jacket, and can’t wait to wear it. The buttonholes are done, and all that’s left is cutting them open. Oops! Sliced right through the end! We’ve all done it, and now Ed Roux has developed a technique for digitizing not only the buttonhole stitches, but cutting the slits as well. No more ruined buttonholes!
Piping adds definition to seams and edges in garments and home décor projects, but for a truly spectacular effect, try Deb Cacciamani’s bobbin play-embellished piping. It’s so easy! And your friends will think you spent hours embroidering by hand. BERNINA’s new Spanish Hemstitch Attachment #47 creates beautiful fagotted seams, and is featured in Debbi Lashbrook’s elegant — but simple to make — shawl.
Cutting hundreds of little fabric pieces for an appliqued quilt is time-consuming. Christine Boxer shows how to digitize the shapes and use the BERNINA CutWork Software and Accessory to produce them, saving hours of cutting time!
The embroidered squares of Dawn Schneider’s Tufted Swirls bed runner look complex, but are created from just one design — copied, pasted, rotated, and mirror imaged, and then combined to form a variety of square forms.
What are your favorite tips and techniques for beautifully-stitched details? We’d love to know! Send them to [email protected] and we’ll make a list to post on our blog, WeAllSew.com. For even more ideas, check out past issues of Through the Needle ONLINE at ThroughTheNeedle.com.
Happy Sewing!
Jo Leichte Editor
Project by Juliette Lanvers
The simple, elegant design of this fabric cone will make any special gift truly precious. Simplicity in the making, striking in presentation. Use various fabric types for effect: elegant linen, rustic burlap or any fabric that suits your fancy … or the occasion. Take it to the next level with a touch of embroidery. (Monogram!!) Once given, the cone can have many uses, from hanging lavender on a door handle to presenting cookies, sweets and candies on a plate. Visit WeAllSew.com for more project instructions and sewing tips!
Gifting Cone

4 • T H R O U G H T H E N E E D L E O N L I N E
by CHRISTINE BOXER
The inspiration for this quilt was a photo of a quilt made in the early 1940’s by Emily Allen Kain, pictured in Quilts: The Fabric of Friendship by the York County Quilt Documentation Project (Schiffer Book for Designers and Collectors). I loved the look and clean lines of the design and decided to create my own version using BERNINA software and the large embroidery area of the BERNINA 830’s Jumbo Hoop.
The blocks for my quilt are 12” finished squares, and the quilt is 60” square. The quilt took less than a week to cut and stitch, including the quilting I digitized to fill the spaces between the appliqued designs. I changed thread colors while quilting, using blue thread on the cream portions and cream on the blue parts. Each applique and quilting design fit inside the Jumbo Hoop, making the whole process very efficient.
Use the directions that follow to create your own applique designs for quilt blocks. To make a snowflake quilt like mine, download the free Snowflake_Quilt.ART file at www.ThroughTheNeedle.com.
sof twarePROJECT
Creating the ArtworkI created an image of the block design, then opened BERNINA Embroidery Software 6, selected the Art Canvas tab, and used the Scan function to bring the picture into the software.
The next step was to return to Embroidery Canvas and outline the shapes using the Closed Object tool, Single Stitch. Using left and right clicks, I digitized outlines for one of the flower shapes, one set of leaves, and the flower center (including the center circle), using a different color for each section.
To create the snowflake pattern, I selected the leaves and the diamond (but not the flower), activated the Wreath tool, and changed the number of repeats to 6. I positioned the center point of the wreath over the center of the circle, and then left clicked to finish.
Snowflake Quilt
Finished size: 60" x 60"

I S S U E 1 3 • 5
Tip: It is good digitizing practice to save the design as this point and continue saving it each time you have completed a change.
Open the CutWork software and select Create New > Next.
Place a check in the From Embroidery option and use the Browse feature to locate and open the saved file; in this case, Leaves.EXP.
Choose the type of fabric you want to use; since these files would be used for my quilt, I selected Cotton from the Embroidery Normal drop down menu. Click Next, and select Finish from the next screen.
Click on the Manage Hoop Option button and select BERNINA Jumbo Hoop #44 or your largest embroidery hoop.
Digitizing the AppliqueTo make my applique design, I simply selected all (Ctrl+A) and changed the design to one color – this would be used for the placement lines. While still selected, I duplicated it and changed it to a different color and selected blanket stitch (or choose your favorite applique stitch instead).
I planned to stabilize my fabric with an adhesive backing and pre-cut it using the BERNINA CutWork Software and Accessory, eliminating the need for a tack-down stitch to hold the pieces in position. Instead, I fused the applique pieces into position when I arrived at that step.
The final step for the applique part of the design was enlarging it to fit the hoop. I clicked on the Grid icon, then selected Jumbo Hoop #26 from the drop down menu. (This is a good place to Save the design again.)
To prepare the files needed for the cutwork portion (the next design phase), I selected the outline stitch part of the center circle, and then selected Copy, opened a New file, and selected Paste to place the design.
I saved the new file in EXP format to prepare it for the CutWork software. I digitized the leaves, the center flower, and the diamond in the same way.
Digitizing the CutWorkTo create your own CutWork files for the snowflake applique – or a wreathed design of your own – follow the instructions below.
Select the artwork – in this case, the leaf set – then click on the Duplicate button.
Using the arrow keys, move the copy alongside the original design, leaving space for the stitching that will be placed around each shape prior to cutting.
6 • T H R O U G H T H E N E E D L E O N L I N E
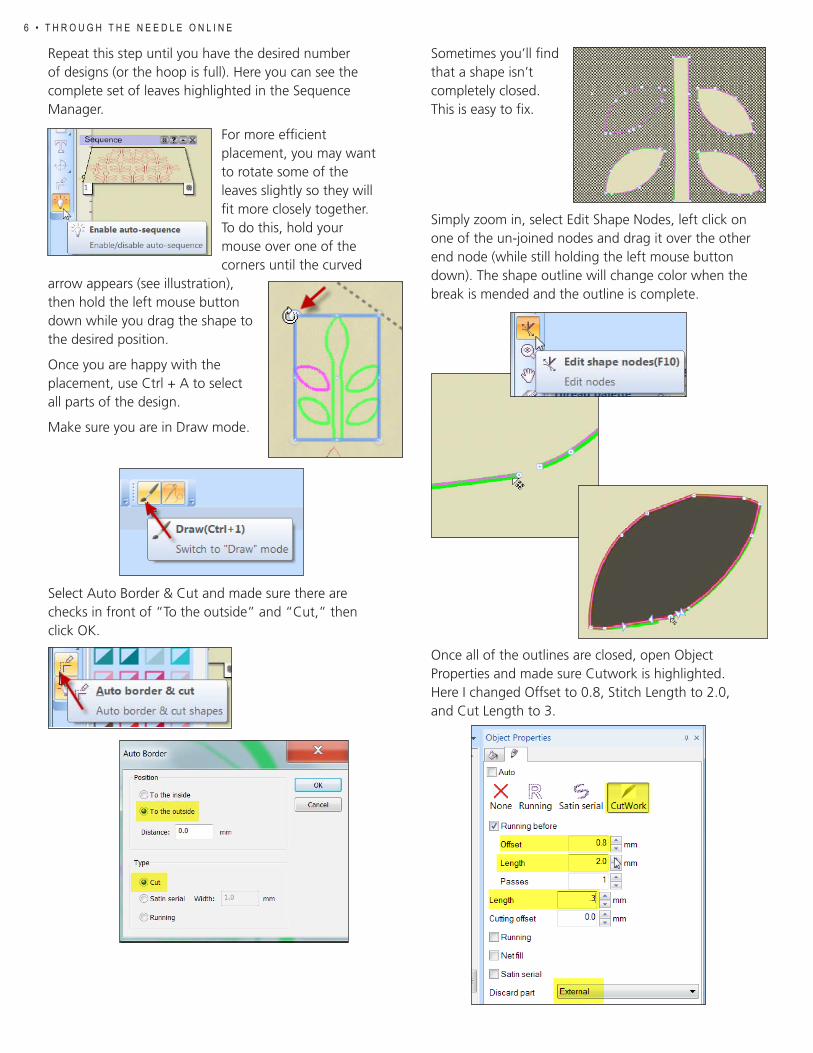
Repeat this step until you have the desired number of designs (or the hoop is full). Here you can see the complete set of leaves highlighted in the Sequence Manager.
For more efficient placement, you may want to rotate some of the leaves slightly so they will fit more closely together. To do this, hold your mouse over one of the corners until the curved
arrow appears (see illustration), then hold the left mouse button down while you drag the shape to the desired position.
Once you are happy with the placement, use Ctrl + A to select all parts of the design.
Make sure you are in Draw mode.
Simply zoom in, select Edit Shape Nodes, left click on one of the un-joined nodes and drag it over the other end node (while still holding the left mouse button down). The shape outline will change color when the break is mended and the outline is complete.
Select Auto Border & Cut and made sure there are checks in front of “To the outside” and “Cut,” then click OK.
Sometimes you’ll find that a shape isn’t completely closed. This is easy to fix.
Once all of the outlines are closed, open Object Properties and made sure Cutwork is highlighted. Here I changed Offset to 0.8, Stitch Length to 2.0, and Cut Length to 3.

Christine BoxerChristine lives in Adelaide, South Australia and works with Otto & Penny Sewing Centre. She has been quilting and making patchwork for over forty years and has lost count of the number of quilts she’s made. She has not always been good at keeping records, as something new seems to always take precedent over older projects. Last year Christine made her daughter’s wedding dress and vowed that she would not make any new quilts while working on the dress. She only made and finished four and started another two!
Finally, to finish the file before sending it to the embroidery machine, open the Sequence Manager, select the bottom tray (#1) and press the Delete key on the computer keyboard.
The file is now ready: All of the shapes are complete and the outer portion (the part to be discarded) is shaped. If you look closely you can see the row of stitching just barely outside the edges of the leaves.
(Basting outlines can also be downloaded from the BERNINA USA web site). After opening the embroidery file it was easy to follow the on-screen prompts and cut the applique pieces. To duplicate my quilt, you will need sets of leaves, diamonds, and center flowers for 25 blocks – 9 sets of blue for the center blocks and 16 sets of cream for the border blocks. The blocks finish to 12” square.
Completing the Quilt Applique the leaves and flowers to the blue and cream background fabric pieces. Join the squares in rows as shown in the photo, and press the seam allowances in opposite directions from row to row. Sew the rows together and press the seam allowances in one direction. Layer with batting and backing, quilt, and bind.
Save the design as a .DRAW file in case you want to open it and make changes to it later. Select File > Export > Bernina CutWork to send it to your embroidery machine or USB stick.
Repeat as needed; I followed the same process to prepare the diamond, flower, and flower center files.
Cutting the AppliquesAt the embroidery machine I hooped a very stiff, heavy tear-away stabilizer – OESD HydroFix Tearaway. I also fused double-sided paper-backed adhesive – Lite Steam-a-Seam 2 – to the back of all my fabrics. I stacked six layers together and used the BERNINA 830’s basting file feature to tack the fabrics to the stabilizer.
I S S U E 1 3 • 7

8 • T H R O U G H T H E N E E D L E O N L I N E
by DEB CACCIAMANI
This decorative piping looks painstakingly hand-embroidered, but it’s actually embellished quickly and easily on your sewing machine! The heavy thread is wound onto the bobbin, the bias strips are placed wrong side up under the presser foot, and the pretty stitches form on the hidden right side of the fabric. Voila! Beautiful embellished cord to use on any home dec project!
Load the Bobbin ThreadSelect a heavy decorative thread or fine cord and hand-wind it onto a bobbin.
basicSEWING
Select a needle thread to coordinate with the bobbin thread.
Decrease the bobbin tension just a little at a time, until the decorative thread pulls smoothly through the bobbin tension.
•CB and rotary bobbin cases: It is recommended that a secondary bobbin case be used for bobbin play, leaving the sewing bobbin case perfectly calibrated for sewing. Carefully loosen the bobbin tension screw one quarter turn at a time, pulling the thread each time to check the tension. If it does not pull easily, turn the screw another quarter turn and try again.
•8 Series bobbin basket: Insert the multifunction tool and move the wheel three clicks to the left; depending on the weight of your thread, it may require 4 clicks. Be sure to return your bobbin tension to normal after completing the bobbin play process.
Bobbin Play on Piping
Placemat pattern: “Fundamentally Fun Table Runner and Placemats” by Nicole Chambers, Tiger Lily Press
YLI Metallic Ribbon Floss, Avanti fibers by Fabulous Fibers and Embellishments (on card), YLI Candlelight Metallic Yarn, YLI Pearl Crown Rayon, and Superior Threads Razzle Dazzle by Ricky Tims.
BERNINA 830 bobbin loaded with Superior Threads Razzle
Dazzle metallic thread

I S S U E 1 3 • 9
Cut the Binding StripsCut fabric into 2½”-wide strips. If the binding will be used on curves, cut the strips on the bias. If the piping will not be curved, they can be cut on-grain, selvage to selvage.
Using diagonal seams, sew the strips together to make one long 2½”-wide strip. Press the seam allowances open.
Cut OESD Clean & Tear stabilizer into 2½”-wide strips.
Stitch the Bobbin PlaySelect a very open decorative stitch; satin stitches do not work well.
•Increase stitch length to the maximum length on your machine
•Increase stitch width to maximum width on your machine
Make any needed adjustments to the stitch. If you can see your needle thread on the right side of the fabric, increase the top tension to adjust for the thickness of the bobbin thread. If you decide you don’t like this stitch, simply choose another one.
Stitch the full length of the strip, adding additional stabilizer strips as needed. Press.
Wrap the CordSelect straight stitch and adjust the length to 2.0 mm.
Attach the appropriate presser foot to your machine.
•7-8 mm cord: Double Cording Foot #60/60C
•4-6 mm cord: Double Cording Foot #59/95C
•4-5 mm cord: Bulky Overlock Foot #12/12C
Wrap the embellished fabric strip around the cord, wrong side of fabric against the cord. Place the wrapped cord under the presser foot.
Adjust the needle position to stitch close to the cord. The embellished piping is finished and ready to be added to your project.
Loosened tension on the BERNINA 8 Series bobbin basket.
Attach Reverse Pattern Foot #1/1C or Clear Foot #34/34C to your sewing machine. Position it to stitch along the center of the strip.
Place the stabilizer strip face down on the fabric strip.
Turn the handwheel to move the needle down through the fabric and up again.
Pull the bobbin thread up through the fabric. This will prevent the heavy bobbin thread from becoming tangled underneath.
If possible, adjust the motor speed to slow. Sew slowly — this is not a race!
Sew a few inches, then check the stitching. Since you cannot see how your stitching looks, it will be a fun surprise when you reach behind the needle and turn the fabric over!
Open decorative stitches.
Stitch slowly!
Turn over to see the bobbin play.

1 0 • T H R O U G H T H E N E E D L E O N L I N E
Double Cord Foot #60/60C is heavy and balanced so the fabric does not shift.
Attaching bobbin play piping to placemat.
Deb CacciamaniSewing has been my passion since I was a child. I was frequently at my mother’s sewing machine, creating skirts, blouses, pants, and even suits. I lived my entire life near
Pittsburgh, PA (Go Steelers!) and in 2002 became a BERNINA dealer. Last year I moved to Portland, Oregon — I guess it was time for a change! Now I am a BERNINA Resource Teacher in District W (the Pacific Northwest). I travel the west coast presenting BERNINA machine, software, and accessory workshops.
My experience covers a wide range, including garments, home décor (table runners, draperies, etc.), embroidery software, machine embroidering, and quilting. I particularly enjoy changing a pattern to make it my own by adding special details: embroidery, decorative stitching, couching, pintucks, bobbinwork, piping, machine quilting… I could go on and on! My motto: There is more to life than a straight stitch!

I S S U E 1 3 • 1 1
Create beautiful freemotion or digitized couched designs with Freemotion Foot #43. Designed for use with cords 2 mm (3/32”) in diameter, this foot holds the cord under the needle so a straight stitch can sew it in place. The clear sole offers great visibility of the cord and the entire stitching area.
Freemotion Couching Foot #43 by SUSAN BECK
accessory
Tips
1. First time use only: Attach the cord guide (included with the foot) to the end of the machine (near the thread cutter) following the instructions included with the foot. This guide will remain on the sewing machine and will not interfere with other sewing tasks. Note: Select the guide appropriate for your model; the guide for the 8 Series machines (shown at right) is unique and does not fit other models; both are included with the presser foot.
SPOTLIGHT
2. Use a new Universal or Microtex Sharp needle for best results.
3. Use a flexible cord, 2 mm in diameter. The cord must be uniform in diameter (no thick and thin or slubbed areas). Always test cords before using them in a project.
5. Thread the needle with thread that matches or blends with the cord; monofilament is also a good choice for inconspicuous stitching.
6. Create a guide using a fabric marker to draw the pattern on the fabric, or create designs spontaneously as you guide the fabric under the needle.
7. Before starting to stitch, turn the machine OFF and then back ON; this resets the initial position of the needle, ensuring that it is aligned with the opening in the presser foot.
8. Use the straight stitch only; any other stitch or width will cause the needle to hit the foot.
9. When digitizing designs using BERNINA Embroidery Software 6, be sure to allow room for the foot to maneuver close to the edges of the hoop if needed. For many hoops, a Foot #43 option is included in the software.
10. Mix freemotion couching with other techniques such as felting and applique.
yarnguide
needle opening
4. Use the wire threader included with the foot to place the cord through the guide at the edge of the foot and down into the needle opening. Pull the cord to the back of the foot.

1 2 • T H R O U G H T H E N E E D L E O N L I N E
by DAWN SCHNEIDER
The embroidered squares on this elegant bed runner feature just one of the beautiful designs in the BERNINA Exclusive Sensational Swirls #21003 embroidery collection. It’s amazing what can be done with just a single embroidery motif using the BERNINA 830’s onscreen design features. The possibilities are endless!
Supplies•BERNINA Exclusive Sensational Swirls Embroidery
Collection, design #21003-24
• 5/8 yard of fabric for embroidery background
•1¼ yards of fabric for the borders
•11/3 yards of fabric for the backing
•1 yard of 90”-wide batting
•OESD MediumWeight Tear-Away Stabilizer
•505 Temporary Fabric Adhesive Spray
•Isacord thread
•Bottom Line bobbin fill to blend with the embroidery fabric
•Double needle, size 3,0
•Microtex Sharp needle, size 80/12
•#2 polycord
•Marking pencil
•Hand-sewing needle
•Large oval hoop with plastic template
•Dual Feed Open Embroidery Foot #20D
•Dual Feed Patchwork Foot #37D or Dual Feed Patchwork Foot with Guide #57D
•Pintuck and Decorative Stitch Foot with Clear Sole #46C
•Spanish Hemstitch Attachment #47
•Cording attachment
Tufted Swirls Bed Runner
Finished size: 16" x 80"
embroide ryPROJECT

I S S U E 1 3 • 1 3
BLOCK 2•Press the New Motif icon.
•Select the My Designs folder and choose the Master Block motif.
•Select motif 1 and press Right/Left Mirror Image.
•Select motif 2 and press Up/Down Mirror Image.
•Select motif 3 and press Right/Left Mirror Image.
•Select motif 4 and press Up/Down Mirror image.
•Press Retrieve until all items are selected.
•Press the Save icon, then press New.
BLOCK 3•Press the New Motif icon.
•Open the Master Block motif.
•Select motif 1 and press Up/Down and Right/Left Mirror Image.
•Select motif 2 and press Right/Left Mirror Image.
•Select motif 3 and press Up/Down and Right/Left Mirror Image.
•Select motif 4 and press Right/Left Mirror image.
•Press Retrieve until all items are selected.
•Press the Save icon, then press New.
BLOCK 4•Press the New Motif icon.
•Open the Master Block motif.
•Select motif 2 and press Right/Left Mirror Image.
•Select motif 4 and press Right/Left Mirror image.
•Press Retrieve until all items are selected.
•Press the Save icon, then press New.
Set Up the Master Block •Select design #21002-24
from the Sensational Swirls collection.
•Select the Large Oval Hoop and activate the grid.
•Click the Rotate icon two times to rotate the design 90°.
•Select the Proportional Rescale icon and adjust the size to 90%.
•Select the Endless Embroidery option.
•Confirm that you have four pattern repeats.
•Deactivate the reference arrows, as this will not be a multi-hooped project.
•Select the green checkmark to confirm your selection.
•This is the Master Block and will be the basis for the other blocks.
•Select the Save icon. To finish the save, touch the flashing New icon.
Create the Bed Runner Blocks
BLOCK 1•With the Master Block open,
press the Retrieve Motif icon twice to select and highlight motif 2.
•Select Mirror Image Up/Down.
•Select motif 3 and press Right/Left Mirror Image.
•Select motif 4 and press Up/Down and Right/Left Mirror Image.
BERNINA 830 Embroidery Tools
Rescale Motif Proportionally
Rotate Motif
Endless Embroidery
Vertical Mirror Image
New Motif
Save
Retrieve Motif
Horizontal Mirror Image
•Press Retrieve until all items are selected.
•Press the Save icon, then press New.

1 4 • T H R O U G H T H E N E E D L E O N L I N E
BLOCK 5•Press the New Motif icon.
•Open the Master Block motif.
•Select motif 1 and press Up/Down Mirror Image.
•Select motif 2 and press Up/Down Mirror Image.
•Select motif 3 and press Right/Left Mirror Image.
•Select motif 4 and press Right/Left Mirror image.
•Press Retrieve until all items are selected.
•Press the Save icon, then press New.
Stitch the Embroidery Designs•Cut five 9½” squares from the embroidery
background fabric.
•Mark vertical and horizontal center lines on each square.
•Cut five 10”x 15” rectangles of batting and five 10” x 15” rectangles of OESD MediumWeight Tear-Away Stabilizer.
•Spray the stabilizer with 505 adhesive and place the batting on top.
Tip: Spraying the stabilizer rather than the batting ensures that the sticky adhesive will be removed with the stabilizer rather than staying on the batting. This will prevent your project from “gripping” the bed of your machine when you remove the stabilizer and construct the blocks.
•Spray the batting and place the embroidery fabric on top, right side up.
•Align the vertical and horizontal lines of the gridded plastic hoop template with the vertical and horizontal lines on the fabric. This will help keep everything centered in the hoop.
•Hoop all three layers.
•Begin the embroidery process. Use the Basting Box and Color Re-sequencing features to optimize the stitching process.
•Repeat this process to embroider the remaining blocks.
•Trim the blocks to 8¼” square, centering the embroidery in each square.
Prepare and Pintuck the Border Fabric•Cutting across the fabric width, cut eight 5” strips.
•Mark reference lines at 1” and 3½” from one raw edge of each strip.
•Attach the Cording Attachment to the bed of your machine and feed the 2 mm cording through the guide.
•Attach Pintuck and Decorative Stitch Foot #46C to your machine.
•Insert the Double needle and thread it with Isacord embroidery thread. Load the bobbin with matching or blending Bottom Line bobbin thread and install it in the machine.
•Align the 1” reference line with the center of Pintuck Foot #46C and stitch the length of the 5”-wide strip. The cord will automatically be placed inside the pintuck as you stitch.
•Position the second pintuck in the far left groove and stitch a third pintuck. You now have three pintucks, evenly spaced 9 mm apart.
•Repeat the pintucking process for the remaining seven strips.
•Align the 3½” reference line with the center of Pintuck Foot #46C and stitch the length of the 5”-wide strip.
•Place the just-stitched pintuck in the groove one step left of the center of the foot. Stitch a second row of pintucks.
•Repeat for the remaining seven strips.
•Position the just-stitched pintuck in the far left groove of the foot. Stitch a second pintuck.

Construct the Blocks•Cut the pintucked strips into ten 16” and ten 8¼”
pieces. To make the best use of your fabric, cut the 16” pieces first.
•Remove the Double needle and replace it with a Microtex Sharp needle.
•Paying attention to the orientation of the stitched designs, sew an 8¼” strip to the right and left edge of each embroidered block.
•Stitch a 16” strip to the upper and lower edge of each block.
•Cut five 16” squares of batting and five 16” squares of backing fabric.
•Spray-baste batting to the wrong side of each embroidered and bordered block.
•Place the backing fabric and stitched blocks right sides together. Do not spray baste!
•Using one of the Patchwork Feet, stitch around each block using a ¼”-wide seam allowance, leaving a 2” opening in one side for turning.
•Turn the blocks right side out and hand-stitch the openings closed. Press.
•Attach Dual Feed Open Embroidery Foot #20D to the machine.
•Quilt the layers together using 9 mm-wide decorative stitches between the sets of pintucks.
Join the Finished Blocks•Attach Spanish Hemstitch Attachment #47 to the
machine bed.
•Thread the needle and bobbin with the same thread.
•With Dual Feed Open Embroidery Foot #20D still on the machine, select stitch #725.
•Place the edges of two blocks together, one on each side of the hemstitch attachment. Stitch, joining the two blocks.
•Repeat for the remaining blocks, piecing together a five-block strip to complete the runner.
I S S U E 1 3 • 1 5

Test the stitch with the Spanish Hemstitch Attachment before working on the shawl. If the edges are difficult to handle, you may wish to apply a small amount of spray starch to them for added stability.
Stitch the shawls together between neckline and the elbow as shown in the diagram. Enjoy a great, simple, and fast project!
1 6 • T H R O U G H T H E N E E D L E O N L I N E
I just completed my first project using the newest of BERNINA’s attachments, the Spanish Hemstitch Attachment. Wow! This project took less than an hour to complete. After you test the stitches you want to use on your shawl, it will take less than 30 minutes to finish the project!
Purchase two rectangular shawls of the same size and design. Decide if you want to make the shawl symmetric or asymmetric. If you want the shawl to be symmetric, locate and mark the center of each shawl at one long edge. From this mark, measure out 6-8”, depending on the width of your shoulders. Mark this point. From each of these marks, measure out 8-10” and make a mark. This basically corresponds to the distance between the end of your shoulder and your elbow. (See diagram A)
Set up the attachment without cord, following the instructions on page 17.
Decide on the decorative stitch you wish to use to join the two edges of the shawl. Select the stitch and set the width at your machine's maximum stitch width setting. It takes more time to select a stitch than to make the project! I used — #725 — for the shawl shown here, with a 9 mm stitch width. Other stitch options are shown here. Make sure the needle penetrates the fabric at the far left and far right, and avoid stitch patterns with long reverse sections.
Spanishby DEBBI LASHBROOK
upcyc ledPROJECT
Shawl
A
symmetric
B
asymmetric

Spanish Hemstitch Attachment #47This attachment is used to create the look of hand-sewn fagotting entirely by machine, joining two pieces of fabric while creating a space between them for decorative stitches. To provide a sturdy foundation for the stitches, the fabric edges may be corded, folded, hemmed, faced, or otherwise finished.
Contents of the Set•Four spacers/cord guides
•Fastening plate with attaching screw
•Screwdriver
Preparation•Attach the slide-on table to the machine freearm.
•Attach the appropriately sized spacer to the fastening plate by pressing down into the oval slot and sliding the cord guide to the farthest end until it locks.
•Insert positioning pin A of the plate into the opening on the freearm.
•Position the post of the cord guide in the opening of the stitch plate.
•Attach the fastening plate to the bed of the machine using screw B.
•Attach Open Embroidery Foot #20/20C to the machine.
•Select a decorative stitch with a width of 5.5 to 9 mm. (Set stitch length as desired.)
•Select the center needle position.
For an asymmetric opening, such as I used for the red shawl shown in the photo, simply decide where the center of the neckline will be, mark the neckline and elbow marks as above, and stitch between the marks to join the two rectangles (See Diagram B, page 16).
If desired, add a button about 6” from each end of the neckline. Attach them to the shawl using Button Sew-On Foot #18.
Join the Edges•Thread the machine as usual.
•Lower and raise the needle, then gently pull on the needle thread to bring the bobbin thread to the top.
•If cording is desired, place the cord in the groove of the cord guide. Note: The hemstitching on the shawl does not contain cord.
•Hold both thread tails behind the presser foot for the first few stitches.
•Guide the fabric edges along the cord guide with both hands – one on the right, one on the left.
Spanish Hemstitch Attachment #47 samples courtesy of Teri Debolt, Education Manager of BERNINA Sewing Centers of Dallas and Plano, TX.
Fabric edges finished with perle cotton applied using Clear Embroidery Foot #39, joined using an entredeux stitch.
Tubing created using Bias Binder #88, attached to fabric edge using a feather stitch and 60 weight cotton thread.
I S S U E 1 3 • 1 7
www.ThroughTheNeedle.com
Be sure to visit our web site for previous issues of Through the Needle ONLINE, as well as bonus project files.
fastening plate
spacer/cord guide

1 8 • T H R O U G H T H E N E E D L E O N L I N E
by ED ROUX
Buttonholes are one of the last things added to any garment project and one of the most scrutinized. Even now, after years of sewing, when I add buttonholes to any garment I do it with a tiny bit of trepidation. They have to be perfectly placed, perfectly spaced and identical in every way. Moreover, after the buttonhole slit is cut, there is no turning back!
BERNINA Embroidery Software 6 provides the ultimate in buttonhole-stitching precision, allowing us to create embroidery design files containing any number of identical, evenly-spaced buttonholes to stitch on our embroidery machines. Having learned to precisely place these files within a hoop, the only thing I needed to worry about was cutting the slits.
BERNINA to the rescue again! The following steps demonstrate how I created an embroidery motif buttonhole design file for my Christina Christening Gown with BERNINA Embroidery Software 6, DesignerPlus level, adding a color stop for cutting the slits with the BERNINA CutWork Accessory. You can adapt this process for your own projects.
Digitize the ButtonholesThree keyhole buttonholes were planned for the Christina bodice back, placed horizontally within a 2” span, perpendicular to the left edge of the bodice back opening. Each buttonhole required a 0.6” slit to accommodate a 7/16” (11 mm) buttonhole.
One of the rules of embroidering is to use the smallest hoop possible. Open a New file in BERNINA Embroidery Software 6, then select the artista 50 x 72 normal hoop.
he ir loomSEWING
To begin the design process, select Arrange > Add Buttonholes from the main menu bar and input “3” in the Settings box. Click OK.
Click and hold over the area where you want to place the first buttonhole. You will see an outline of a floating Measure Tool tip.
Drag the cursor to the right until the Measure Tooltip indicates the desired distance between the end buttonholes (2”). Click to complete the placement.
PerfectHeirloom
Buttonholes

I S S U E 1 3 • 1 9
Select all three buttonhole objects, then select the Object Properties icon.
From the Buttonhole tab, select the Keyhole/Point Buttonhole Type and change the Slit Length to 0.6”. Leave the Angle at Vertical and keep all the other attributes at their default settings. Click OK. (For more information on these settings, press the F1 key or review pages 214-15 of the on-screen manual.)
Add Buttonhole SlitsStill working within BERNINA Embroidery Software 6, we want to add a color stop so the needle can be removed and replaced with the BERNINA CutWork Accessory for cutting the buttonhole slits.
To do so, first ensure that Outline stitch is set to Single.
Select a different color from the color menu; I chose green. The color doesn’t matter; there just has to be a color change to create a color stop in the embroidery file.
Note: Your embroidery system is color blind. It doesn’t know what thread color you are using, or whether you actually do change thread colors.
To digitize the first buttonhole slit, select the Open Object tool and draw a straight line inside the leftmost buttonhole, leaving a slight margin between the ends of the line and the inside ends of the buttonhole. Click to complete the line.
With the line selected, open Object Properties, select the Outline Stitch tab, and change the Stitch Length value to 0.1 mm. The 0.1 mm stitch length will allow the BERNINA CutWork Accessory to make clean cuts following the outline of the digitized object.
With the line selected, select Copy and then Paste the line two times for a total of three lines. Move one copy into the rightmost buttonhole. We’ll place the center line in the next step.
Press and hold the Ctrl key on the keyboard and click on each slit. With all three slits selected, click on the Align Top (Horizontal) tool; the tops of the three slits are aligned.
Click on the Space Horizontally button. The center slit jumps into position inside the middle buttonhole. This also works for multiple buttonholes. For instance, if you digitized five buttonholes and slits, you could position those at the ends and then use the alignment tools to accurately position those in between.

2 0 • T H R O U G H T H E N E E D L E O N L I N E
Save the file and click the Write to Machine icon to send the design to your USB stick or BERNINA embroidery system. You now have a buttonhole design to stitch on your embroidery machine and slits to be cut by the BERNINA CutWork Accessory.
Prepare your Embroidery MachineReplace the regular stitch plate with the appropriate CutWork Stitch Plate for your machine. Don’t forget this important step! The CutWork Stitch Plate must be installed when using the CutWork Accessory.
If this feature is available, deactivate the upper thread sensor. When using the CutWork Accessory there will not be any thread in the threading pathway.
Note: On BERNINA 8 Series models, the sensor is turned off by opening the Setup Program and clicking on the eye until it closes.
Prepare the HoopCut a piece of sticky cut-away stabilizer, such as OESD Stabil-Stick, that extends at least an inch beyond the edges of the small hoop’s outer edges. Completely remove the paper backing and place the sticky side of the stabilizer on the back of the hoop (do not hoop the stabilizer). Firmly hold the hoop and pull all edges of the stabilizer so it is tight and taut inside the hoop.
Make a Test SampleAlways embroider a test sample using the same thread, needle, and fabric that will be used for the final product.
Place a piece of the project fabric over the hoop (do not hoop it) so it is affixed to the sticky side of the stabilizer. Smooth it in place with your fingers. For the Christina, I used a piece of organza over a piece of cotton batiste.
Attach the hoop to your embroidery machine.
Note: I stitched the Christina on my BERNINA 830, which has a basting box option. I used this feature to secure the fabric to the sticky stabilizer. Basting box files for other BERNINA embroidery machines are available at the BERNINA USA web site.
Stitch the first color of the buttonhole file, using the needle and thread you will be using in the final product.
Next, replace the needle with the BERNINA CutWork Accessory so that you can cut the buttonhole slits. Since the buttonholes in this file are parallel to the embroidery arm, turn the CutWork Accessory dial to Position 1. (If your buttonholes are perpendicular to the embroidery arm, use Position 3 instead.)
Remove the upper thread.
Press the Start/Stop button to cut the buttonhole slits and complete the “stitching” of this embroidery file. Note that because BERNINA CutWork Software was not used to create this file, you will not get the usual alerts to change between the needle and the CutWork Accessory.
Keep this test sample to use as a template for the final embroidery.

Ed RouxEd Roux began teaching himself to sew at the age of 10 because he was intrigued with how flat pieces of fabric evolve into 3-dimensional garments. Ed first learned about the BERNINA brand in his early 20’s when a co-worker recommended that he buy a BERNINA if he was interested in doing “serious” sewing. That recommendation stayed on the forefront of his mind until he was able to purchase his first BERNINA, an artista 180E. He now has four BERNINA sewing machines, plus BERNINA Embroidery Software 6, that he utilizes as extensions of his analytical and artistic skills. In that regard, Ed strives to ensure his next project is always more challenging than his last.
For more on heirloom sewing and Ed's “Christina Christening Gown,” see Ed’s articles in Through the Needle ONLINE Issue 12 and on BERNINA of America’s www.WeAllSew.com blog.
I S S U E 1 3 • 2 1
Embroider and Cut the ButtonholePrepare the hoop in the same manner as for the test sample.
On the sticky stabilizer, use a ruler and disappearing ink to draw a straight center alignment line and additional lines as needed to assist you in positioning the bodice back. Align and press the fabric over the lines so it is tacked securely to the sticky stabilizer.
Place the test sample on top of your garment and position the hoop on your screen so the center of the embroidery motif is positioned correctly on your fabric.
Remove the test sample. Embroider and cut the buttonholes as you did for the test sample.
This process of stitching buttonholes and cutting the slits has completed removed my fear of creating buttonholes, especially on the Christina, which presented a significant investment in materials and was extremely time-intensive to create.

Stretch your accessory knowledge!Create this fun fabric book to showcase stitched techniques using various presser feet and accessories. Download a page at a time and build this mixed-media project as you build your sewing skills. Check back often for new pages!
Click HERE to follow along!
The Last WordA sneak peek at what’s coming in Through the Needle ONLINE, Issue #14:
Until October ...What have you been sewing? We hope this issue of Through the Needle ONLINE has inspired you to try something new and make your own adaptations of our projects. We love seeing your creations; send e-mail and photos to [email protected].
Quick LinksThese are the main links featured in this issue; see the articles for links to specific products, projects, and technique information. Please visit our sponsors and contributors for more inspiration, information, and stitching fun!
•www.throughtheneedle.com •www.berninaUSA.com •www.WeAllSew.com•www.benartex.com•www.embroideryonline.com •www.bernina8series.com/EN/•www.facebook.com/berninausa•www.rickytims.com/seminars•www.patchworkplusquiltshop.com•www.opsewing.com.au
Felted Wool HatA bit of felting with the BERNINA Needle Punch Accessory and some no-sew fabric flowers transform a boring old knit cap into a charming hat you’ll love wearing all winter long! A great upcycle project from Jennifer Kreta, CS Sewing in Traverse City, Michigan.
Monogrammed Patchwork Table Topper Karen Donnelly, Patchwork Plus Quilt Shop, Marcellus, NY, created these pretty patchwork table toppers for her daughter’s wedding. Each is personalized with their monogram — transformed into a pretty swirl design and featured in the center of each topper. A special memento for a special day!
August 2012 SpecialProfessional FinishesCreate professional-looking hems quickly and easily on a variety of fabrics, using straight or decorative stitching. Each specially designed hemmer foot provides the best solution for different hem and stitch widths. Visit your BERNINA Dealer to find the hemmer that best suits your project, or collect them all!For August 2012 only, get 25% OFF BERNINA Hemmer Feet #61, #62, #63, #64, #66, #68, and #69.Offer good August 2012 at participating BERNINA dealers in the United States. Coupon may not be combined with any other offer.
All Hemmer Feet(61, 62, 63, 64, 66,
68, and 69)
25% OFF
2 2 • T H R O U G H T H E N E E D L E O N L I N E