2 11 2 11 3 11 3 11 3 12 4 13 6 13 6 13 6 13 6 13 6 13 7 ... · pdf filebass (eb ... a variety...
TRANSCRIPT

Deutsch
EnglishFrançais
ItalianoEspañol
PortuguêsN
ederlands
Before using this unit, carefully read the sections entitled “USING THE UNIT SAFELY” and “IMPORTANT NOTES” (separate sheet “Read Me First” and Owner’s Manual p. 15). These sections provide important information concerning the proper operation of the unit. Additionally, in order to feel assured that you have gained a good grasp of every feature of your new unit, read the Owner’s Manual in its entirety. This manual should be saved and kept on hand as a convenient reference.Copyright © 2014 BOSS CORPORATIONAll rights reserved. No part of this publication may be reproduced in any form without the written permission of BOSS CORPORATION.
Owner’s Manual (this document)Read this first. It explains the basic things you need to know in order to use the GP-10.
PDF Manual (download from the Web)• Parameter Guide
This explains the parameters and audio signal flow of the GP-10.• Sound List
This is a list of the sounds built into the GP-10.• MIDI Implementation
This is detailed information about MIDI messages.
To obtain the PDF manual1. Enter the following URL in your computer.
http: //www.roland.com/manuals/
2. Choose “GP-10” as the product name.
Owner’s Manual
Connections . . . . . . . . . . . . . . . . . . . . . . . . . . . . . . . . . . . . . . . . . . . . . . . . . . . . . . . . . . . . . . . . . . 2Turning the Power On/Off . . . . . . . . . . . . . . . . . . . . . . . . . . . . . . . . . . . . . . . . . . . . . . . . 2
Initial Setup . . . . . . . . . . . . . . . . . . . . . . . . . . . . . . . . . . . . . . . . . . . . . . . . . . . . . . . . . . . . . . . . . . 3Specifying the Output System (Sys: Output) . . . . . . . . . . . . . . . . . . . . . . . . . . . . . . . 3Setting Up the GK Pickups . . . . . . . . . . . . . . . . . . . . . . . . . . . . . . . . . . . . . . . . . . . . . . . . 3
Basic Operation Guide . . . . . . . . . . . . . . . . . . . . . . . . . . . . . . . . . . . . . . . . . . . . . . . . . . . . . . . . 4
Modeling/Poly FX/Alternate Tuning Settings . . . . . . . . . . . . . . . . . . . . . . . . . . . . . . . . . . . 6Modeling Settings (Mdl: ) . . . . . . . . . . . . . . . . . . . . . . . . . . . . . . . . . . . . . . . . . . . . . . . . . 6
Electric Guitar (EG: ) . . . . . . . . . . . . . . . . . . . . . . . . . . . . . . . . . . . . . . . . . . . . . . . 6Acoustic (AC: ) . . . . . . . . . . . . . . . . . . . . . . . . . . . . . . . . . . . . . . . . . . . . . . . . . . . . 6Bass (EB: ) . . . . . . . . . . . . . . . . . . . . . . . . . . . . . . . . . . . . . . . . . . . . . . . . . . . . . . . . . 6Synthesizer (Synth: ) . . . . . . . . . . . . . . . . . . . . . . . . . . . . . . . . . . . . . . . . . . . . . . 7Poly FX (PolyFx: ) . . . . . . . . . . . . . . . . . . . . . . . . . . . . . . . . . . . . . . . . . . . . . . . . . . 8
Alternate Tuning Settings (AltTune: ) . . . . . . . . . . . . . . . . . . . . . . . . . . . . . . . . . . . . . . 812-String Guitar Settings (12Str: ) . . . . . . . . . . . . . . . . . . . . . . . . . . . . . . . . . . 8String Bend Function Settings (StrBend: ) . . . . . . . . . . . . . . . . . . . . . . . . . . 8
Other Modeling Settings (Mdl: ) . . . . . . . . . . . . . . . . . . . . . . . . . . . . . . . . . . . . . . . . . . 8
Effects/Patch Settings . . . . . . . . . . . . . . . . . . . . . . . . . . . . . . . . . . . . . . . . . . . . . . . . . . . . . . . . . 9Effects Settings . . . . . . . . . . . . . . . . . . . . . . . . . . . . . . . . . . . . . . . . . . . . . . . . . . . . . . . . . . 9
Preamp (Amp: ) . . . . . . . . . . . . . . . . . . . . . . . . . . . . . . . . . . . . . . . . . . . . . . . . . . . 9FX (FX: ) . . . . . . . . . . . . . . . . . . . . . . . . . . . . . . . . . . . . . . . . . . . . . . . . . . . . . . . . . . . 9Wah (Wah: ) . . . . . . . . . . . . . . . . . . . . . . . . . . . . . . . . . . . . . . . . . . . . . . . . . . . . . .10Chorus (Chorus: ) . . . . . . . . . . . . . . . . . . . . . . . . . . . . . . . . . . . . . . . . . . . . . . . . .10Delay (Delay: ) . . . . . . . . . . . . . . . . . . . . . . . . . . . . . . . . . . . . . . . . . . . . . . . . . . . .10Reverb (Reverb: ) . . . . . . . . . . . . . . . . . . . . . . . . . . . . . . . . . . . . . . . . . . . . . . . . .10EQ (EQ: ) . . . . . . . . . . . . . . . . . . . . . . . . . . . . . . . . . . . . . . . . . . . . . . . . . . . . . . . . .11Noise Suppressor (NS: ) . . . . . . . . . . . . . . . . . . . . . . . . . . . . . . . . . . . . . . . . . . .11Foot Volume (FV: ) . . . . . . . . . . . . . . . . . . . . . . . . . . . . . . . . . . . . . . . . . . . . . . . .11Settings for Normal Pickup (Nrml PU: ) . . . . . . . . . . . . . . . . . . . . . . . . . . . .11Volume Balance of the Modeling and the Normal Pickup (Mixer: ) . .11FX Chain . . . . . . . . . . . . . . . . . . . . . . . . . . . . . . . . . . . . . . . . . . . . . . . . . . . . . . . . .11
Patch Settings (Patch: ) . . . . . . . . . . . . . . . . . . . . . . . . . . . . . . . . . . . . . . . . . . . . . . . . . .11Patch Volume (Patch: Level) . . . . . . . . . . . . . . . . . . . . . . . . . . . . . . . . . . . . . . .11Patch Tempo Settings (Patch: Tempo) . . . . . . . . . . . . . . . . . . . . . . . . . . . . .11GK Set Selection for the Patch (Patch: GK Set) . . . . . . . . . . . . . . . . . . . . .11Pedal and Switch Settings for Each Patch (Ctl: ) . . . . . . . . . . . . . . . . . . . .11Assign Settings (Asgn 1–8: ). . . . . . . . . . . . . . . . . . . . . . . . . . . . . . . . . . . . . . .12
System Settings . . . . . . . . . . . . . . . . . . . . . . . . . . . . . . . . . . . . . . . . . . . . . . . . . . . . . . . . . . . . .13Specifying the Output System (Sys: Output) . . . . . . . . . . . . . . . . . . . . . . . . . . . . . .13Settings of the GK Pickups (GK: ) . . . . . . . . . . . . . . . . . . . . . . . . . . . . . . . . . . . . . . . . .13System Settings for the Pedals and Switches (SysCtl: ) . . . . . . . . . . . . . . . . . . . .13USB Audio Settings (USBAudio: ). . . . . . . . . . . . . . . . . . . . . . . . . . . . . . . . . . . . . . . . .13Guitar Performance MIDI Output Settings (MIDI: ) . . . . . . . . . . . . . . . . . . . . . . . .13Tuner Settings (Tuner: ) . . . . . . . . . . . . . . . . . . . . . . . . . . . . . . . . . . . . . . . . . . . . . . . . .13Adjusting the Display’s Contrast (Sys: Contrast) . . . . . . . . . . . . . . . . . . . . . . . . . .14Panel Lock Settings (Sys: Knob Lock) . . . . . . . . . . . . . . . . . . . . . . . . . . . . . . . . . . . . .14Auto Off Settings (Sys: Auto Off) . . . . . . . . . . . . . . . . . . . . . . . . . . . . . . . . . . . . . . . . .14Limiting the Patches Selectable in the Play Screen (Sys: Patch Extent) . . . . .14Adjusting the Expression Pedal (Calibration) . . . . . . . . . . . . . . . . . . . . . . . . . . . . .14Restoring the Factory Settings (Factory Reset) . . . . . . . . . . . . . . . . . . . . . . . . . . .14
Patch Operations . . . . . . . . . . . . . . . . . . . . . . . . . . . . . . . . . . . . . . . . . . . . . . . . . . . . . . . . . . . .14Exchanging Patches (Exchange) . . . . . . . . . . . . . . . . . . . . . . . . . . . . . . . . . . . . . . . . .14Inserting a Patch (Insert) . . . . . . . . . . . . . . . . . . . . . . . . . . . . . . . . . . . . . . . . . . . . . . . .14Initializing a Patch (Initialize) . . . . . . . . . . . . . . . . . . . . . . . . . . . . . . . . . . . . . . . . . . . .14
USING THE UNIT SAFELY . . . . . . . . . . . . . . . . . . . . . . . . . . . . . . . . . . . . . . . . . . . . . . . . . . . . .15
IMPORTANT NOTES . . . . . . . . . . . . . . . . . . . . . . . . . . . . . . . . . . . . . . . . . . . . . . . . . . . . . . . . . .15
Troubleshooting . . . . . . . . . . . . . . . . . . . . . . . . . . . . . . . . . . . . . . . . . . . . . . . . . . . . . . . . . . . . .16
Error Message List . . . . . . . . . . . . . . . . . . . . . . . . . . . . . . . . . . . . . . . . . . . . . . . . . . . . . . . . . . .16
Main Specifications . . . . . . . . . . . . . . . . . . . . . . . . . . . . . . . . . . . . . . . . . . . . . . . . . . . . . . . . . .16
Cutting-edge modeling guitar powered by COSMThe GP-10 provides a wide range of modeling guitars powered by COSM technology, including Stratocaster, Telecaster, Les Paul, Jazz Guitar, Acoustic Guitar, and Sitar. In addition, it can also create new dimensions of sound that are unavailable from conventional electric guitars, such as a Wide Range model that gives you a fat sound while preserving the wide range of a single-coil pickup, and a Bright Humbucker model that keeps the rich mid- and low-range of a humbucker while offering a crisp high end.
A variety of alternate tuningsYou can choose from alternate tunings such as Drop-D, Open-G, and D-MODAL. Without swapping guitars or changing the string tension, you can instantly switch between a wide variety of alternate tunings. There’s also a 12-string guitar mode. You can even use “USER” to specify your own tuning.
Powerful effects and amp modelingHigh quality effects and amp modeling are built in. There is also a dedicated “Poly FX” specifically for the GK pickup, which allows you to extract an independent string signal for each string. This lets you experience completely new sounds that were impossible for a guitar of the past, equipped with a conventional pickup.

2
EXP 2/CTL 3, 4 jack (Connecting to External Pedals)
Connections
OUTPUT jacksConnect these jacks to your guitar amp or to PA (LINE).
* If your system is monaural, use only the L/MONO jack.
USB ( ) portUse a commercially available USB 2.0 cable to connect this port to your computer. It can be used to transfer USB MIDI and USB audio data. You must install the USB driver before connecting the GP-10 to your computer. Download the USB driver and the GP-10 special software from the Roland website. For details, refer to Readme.htm which is included in the download.
http: //www.roland.com/support/
AUX IN jackUse a stereo mini-plug cable to connect your audio player here.
* To adjust the input level of the AUX IN jack, adjust the volume of the connected device (audio player, etc.).
PHONES jackConnect a set of headphones (sold separately) here.
* When you connect a stereo-mini plug to this jack, the internal guitar amp simulator will be automatically on so that you can also enjoy the powerful guitar sound with your headphones. In this case, the sound from OUTPUT jacks will have the same effect.
* To prevent malfunction and equipment failure, always turn down the volume, and turn off all the units before making any connections.
DC IN jackConnect the included AC adaptor here.
* Use only the included AC adaptor. Using any other adaptor may cause overheating and malfunction.
Turning the Power On/OffThis turns the power on/off.
* After you’ve made connections correctly, be sure to turn on the power in the order of the GP-10 first, and then the connected system. Powering-on in the incorrect order may cause malfunctions or damage. When turning the power off, power-off the connected system first, and then the GP-10.
* This unit is equipped with a protection circuit. A brief interval (a few seconds) after turning the unit on is required before it will operate normally.
* Before turning the unit on/off, always be sure to turn the volume down. Even with the volume turned down, you might hear some sound when switching the unit on/off. However, this is normal and does not indicate a malfunction.
Auto Off functionThe power to this unit will be turned off automatically after a predetermined amount of time has passed since it was last used for playing music, or its buttons or controls were operated (Auto Off function).If you do not want the power to be turned off automatically, disengage the Auto Off function (p. 14).
* Any settings that you are in the process of editing will be lost when the power is turned off. If you have any settings that you want to keep, you should save them beforehand.
* To restore power, turn the power on again.
If you connect an expression pedal (sold separately: Roland EV-5, FL-500H/L) or footswitch (sold separately: FS-5U, FS-6) to the EXP 2/CTL 3,4 jack, you can use a pedal to control the volume or to turn effects on/off.
For details on the settings, refer to “Pedal and Switch Settings for Each Patch (Ctl: )” (p. 11), “System Settings for the Pedals and Switches (SysCtl: )” (p. 13).
POLARITY switch
When Connecting an FS-5U When Connecting Two FS-5Us When Connecting an FS-6When connecting EV-5
Cable: Stereo 1/4” phone type
1/4” phone type x 2
MODE/POLARITY switch
Cable:
1/4” phone type 1/4” phone type
Ctl 3 Ctl 4 Ctl 3 Ctl 4 Ctl 3Exp 2
Connect the GK-compatible guitar only with dedicated GK cable (supplied with Roland GK-compatible devices and optional GK cables). Use of any other cable may result in damage or malfunction.
To prevent the inadvertent disruption of power to your unit (should the plug be pulled out accidentally), and to avoid applying undue stress to the DC IN jack, anchor the power cord using the cord hook, as shown in the illustration.
Security slot (N)http: //www.kensington.com/
GUITAR IN jackUse this control if you’re directly inputting a conventional guitar.
* If you use a 1/4” phone plug to make connections, the modeling and alternate tuning functions will not operate. Only the effect functions will operate.
GUITAR OUT jackNormal pickup signals of the guitar are output.
* Use only the specified expression pedal (Roland EV-5, FL-500H/L; sold separately). By connecting any other expression pedals, you risk causing malfunction and/or damage to the unit.
GK IN connectorConnect a guitar equipped with a GK pickup (Roland GK-3/GK-2A) or a GK-compatible guitar such as the Roland V-Guitar GC-1 to this connector.
Cable: Stereo 1/4” phone type
Stereo 1/4” phone type

3
Deutsch
EnglishFrançais
ItalianoEspañol
PortuguêsN
ederlands
Initial Setup
Before using the GP-10 for the first time, you’ll need to make the following initial settings.
Basic procedure for initial setup1. Press the [SYSTEM] button.
2. Use the [K] [J] buttons to select the desired parameter. Then use the [VALUE] knob to edit the value.
GK1:Type GK-3
Select a parameter
Edit the value
3. Press the [EXIT] button to return to the play screen.
MEMOYou can use the following button operations to jump to the +/, marks of this document (p. 13–).
Buttons Jump destination Buttons Jump destination[SYSTEM] Next + mark [J] + [K] Next , + mark[EXIT] + [SYSTEM] Previous + mark [K] + [J] Previous , + mark
* [J] + [K] mean that you should “hold down [J] and press [K].”
Specifying the Output System (Sys: Output)
Choose “Sys: Output,” and specify the device (amp) that’s connected to the OUTPUT jacks.
Sys:OutputLINE/PHONES
* If headphones are connected, this will automatically be “LINE/PHONES” regardless of the Output setting.
Value Explanation
LINE/PHONES This is the appropriate setting when using headphones, or for when the GP-10 is connected to a keyboard amp, mixer, or digital recorder.
JC-120 Choose this setting if the GP-10 is connected to the guitar input of a Roland JC-120 guitar amp.
SMALL AMP Choose this setting if the GP-10 is connected to a small guitar amp.
COMBO AMP
Choose this setting if the GP-10 is connected to the guitar input of a combo-type guitar amp (i.e., an amp that contains the amp and speaker in a single unit) other than the JC-120. Depending on the guitar amp you’re using, using the “JC-120” setting might produce better results.
STACK AMPChoose this setting if the GP-10 is connected to the guitar input of a stack-type guitar amp (i.e., an amp in which the amp and speaker are separate units).
JC-120 RETURN Choose this setting if the GP-10 is connected to the JC-120’s RETURN jack.
COMBO RETURN Choose this setting if the GP-10 is connected to the RETURN jack of a combo-type guitar amp.
STACK RETURNChoose this setting if the GP-10 is connected to the RETURN jack of a stack-type guitar amp. You should also choose the “STACK RETURN” setting when using the GP-10 with a guitar power amp and a speaker cabinet.
Setting Up the GK PickupsGK settings are extremely important in order to play the GP-10 with the best possible sound. You must be sure to make these settings correctly.
MEMO: GK settingsYou can store three different sets of GK settings (GK Setting: 1–3). If you’re switching between three different guitars to use with the GP-10, you can make separate GK settings for each guitar. If you’re using only one guitar with the GP-10, choose “1” (the default setting).
Specifying the pickup type
Choose “GK1: Type,” and specify the type of pickup that’s installed on your guitar.”
GK1:Type GK-3
Value Explanation Value ExplanationGK-3 Roland GK-3 PIEZO F
Piezo Pickup
FishmanGK-2A Roland GK-2A PIEZO G Graph TechGC-1 Roland V-Guitar GC-1 PIEZO L L.R. BaggsPIEZO Piezo Pickup (flat response) PIEZO R RMC
* A piezo pickup is a type of pickup that is mounted on the bridge of the guitar, and uses a piezoelectric element to detect the vibrations of the strings.
* Choose “GK-2A” if you’re using a commercially available guitar that’s equipped with GK pickup.
Specifying your guitar’s scale length
Choose “Scale,” and specify your guitar’s scale length (the distance between the bridge and nut).
GK1:Scale ST
Choose “ST” for a standard Stratocaster type, or choose “LP” for a Les Paul type. Alternatively, choose the closest value in the range of 500–660 mm.
* This parameter is not shown if you select “GC-1” as the pickup type.
Specifying the distance from the bridge
Choose “Distance 1”–”Distance 6,” and specify the distance (mm) from the center of the pickup to the bridge saddle.
GK1:Distance 1 20.0mm* If the pickup type is set to “GC-1” or one of the piezo-
type pickups, this setting is not necessary.
Adjusting the pickup sensitivity
What is Pickup Sensitivity?
If the distance between each string and the GK pickup is different, the volume will also be different. The pickup sensitivity adjustment allows you to compensate for this difference in volume.
GK-pickup “
1. Choose “Sens,” and adjust the sensitivity for the 6th string.
GK1:Sens 6 [■■■■■■■■] 50Play the 6th string as strongly as you ever expect to play it in actual performance, and use the [VALUE] knob to adjust the sensitivity as high as possible without allowing the meter to reach the full-scale position.
* If the level meter reaches the full-scale position, the level is excessive. Lower the sensitivity.
* Depending on the guitar you’re using, the level meter might reach full-scale even if the sensitivity is at minimum. If this is the case, adjust the distance between the divided pickup and the string so it’s somewhat greater than the recommendation.
2. In the same way, adjust the sensitivity for the 5th through 1st strings as well.
3. Check the volume balance of the six strings.Play each of the strings 6–1 at normal strength; if a string sounds unusually loud, lower the sensitivity of that string to minimize any discrepancy in volume between the strings.
This completes the initial setup. Now you’re ready to play the GP-10!
GK:Setting1
Check the following points before using the GP-10
Is the GK-pickup correctly installed?• After reading the instructions in the GK-pickup Owner’s Manual, check the
installation once more.• On the Roland website, the “How to install the GK pickup” page provides an
explanation and photos on how to attach a GK pickup. Be sure to take a look!http: //www.roland.com/GK/
You must set the GK pickup select switch to the “MIX” position!If the switch is set to any position other than MIX, the unit won’t operate correctly (there will be no sound).Roland GK-3 users Roland V-Guitar GC-1 users
You must set this to the center (MIX) position!

4
Basic Operation Guide
Adjusting the VolumeThis adjusts the volume.
Selecting a PatchGuitar modeling, alternate tuning, and effect settings can be recalled as 99 different “patches” (sounds).
1. Use the [I] [H] pedals or [PATCH] knob to select a patch.
Dual SyncPatch number
Patch name
Switching the DisplayYou can use the [K] [J] buttons to switch the screens in the display.
Saving a PatchIf you select a different patch or turn off the power after editing the settings, edited settings will be lost. If you want to keep the data, you must save it.
1. Press the [WRITE] button.
Save-Destination Patch
NumberWrite to #01 Dual Sync
2. Use the [PATCH/VALUE] knob to select the save-destination.If you decide to cancel, press the [EXIT] button.
3. Press the [WRITE] button.
4. Edit the name.You can give names to patches using up to 12 characters.
Patch:Name Edit Dual Sync
Use the [K] [J] buttons to move the cursor to the character that you want to edit, and turn the [VALUE] knob to edit the character.You can also use the following buttons.
Button FunctionINS (MODELING) Inserts a blank space at the cursor position.
DEL (EFFECTS) Deletes the character at the cursor position and shifts all characters after it to the left.
CAPS (SYSTEM) Alternately switches the letter at the cursor position between uppercase and lowercase.
5. Press the [WRITE] button twice to save.
Controlling the Volume/Effect (Expression Pedal)
By strongly pressing the toe end of the pedal, you can turn the pedal effect on and off (PEDAL SW indicator will light/go out).Pedal effect is off: • The pedal controls volume (default).
Pedal effect is on: • The pedal controls the effect (e. g. : wah) that you select with the [PEDAL FX] knob.* You are free to assign the pedals to other functions if you like.& “Pedal and Switch Settings for Each Patch (Ctl: )” (p. 11), “System Settings for the Pedals and Switches (SysCtl: )” (p. 13)
Using the Pedals for Control ([CTL 1], [CTL 2] pedals)
By default, the [CTL 1] and [CTL 2] pedals control a function that’s assigned by each patch.* You are free to assign the pedals to other functions if you like. & “Pedal and Switch Settings for Each Patch (Ctl: )” (p. 11), “System Settings for the Pedals and Switches (SysCtl: )” (p. 13)
The controllers of the GK pickupYou can also use the [S1] (DOWN) /[S2] (UP) buttons and the volume knob of the GK pickup to control the parameters.
Tuning the Guitar (Tuner Mode)
Press the [I] [H] pedals simultaneously to enter Tuner mode.* To achieve the alternate tunings as described on the tuning control, tune your
guitar to correct standard tuning (E A D G B E).* If you want to tune GUITAR IN (the normal guitar input), disconnect the GK IN
connection.
1. Press the [I] [H] pedals simultaneously.* You can also enter Tuner mode by pressing the [J] button in the Play screen.
2. Play a single open note on the string to be tuned.The name of the note closest to the pitch of the string played appears in the display.
. . . . . E>>>>>>>>█<<<<<<<
3. Tune your instrument so that the center indicator of the display is lit.
Setting the standard pitchIn Tuner mode, you can press the [J] button to change the standard pitch of the tuner.
Pitch435–445 Hz (default: 440 Hz)
* When you operate the expression pedal, please be careful not to get your fingers pinched between the movable part and the panel. In places where small children are present, make sure that an adult provides supervision and guidance.
Dual Sync . . . . . E>>>>>>>>█<<<<<<<
Tuner:Pitch A=440Hz
Patch:Level 100
Play (patch select) screenSelect a patch.& “Selecting a Patch” (p. 4)
Tuner mode screenTune your guitar.& “Tuning the Guitar (Tuner Mode)” (p. 4)
Standard pitch setting screenHere you can change the standard pitch of the tuner.
Patch level screenAdjust the volume of the patch.& “Patch Volume (Patch: Level)” (p. 11)
* The explanations in this manual include illustrations that depict what should typically be shown by the display. Note, however, that your unit may incorporate a newer, enhanced version of the system (e.g., includes newer sounds), so what you actually see in the display may not always match what appears in the manual.

Basic Operation Guide
5
Deutsch
EnglishFrançais
ItalianoEspañol
PortuguêsN
ederlands
Basic Procedure for Editing the SettingsEditing the GP-10’s settings is a simple and consistent procedure. Before you continue, please take a moment to learn the basic editing procedures.
1. Press the button for the type of item you want to edit.
Modeling/Poly FX/Alternate Tuning Settings&p. 6
Effects/Patch Settings&p. 9
System Settings (Settings for the Entire GP-10) &p. 13
2. Use the [K] [J] buttons to select the desired parameter. Then use the [VALUE] knob to edit the value.
GK1:Type GK-3
Select a parameter
Edit the value
You can use the following button operations to jump to the +/, marks of this document (p. 6–).
Buttons Jump destination Buttons Jump destination[MODELING/ALT TUNE], [EFFECTS],or [SYSTEM] Next + mark [J] + [K] Next , + mark
[EXIT] + buttons above Previous + mark [K] + [J] Previous , + mark
* [J] + [K] mean that you should “hold down [J] and press [K].”
3. Press the [EXIT] button to return to the play screen.
Press the [MODELING/ALT TUNE] button and edit the parameters.& “Modeling Settings (Mdl: )” (p. 6)
Selecting an electric guitarParameter ValueMdl: On/Off ONMdl: Type E. GTR (electric guitar) EG: Type & Refer to “Electric Guitar (EG: )” (p. 6)EG: PU Select Selects the pickup position.
Selecting an acousticParameter ValueMdl: On/Off ONMdl: Type ACOUSTIC (acoustic) AC: Type & Refer to “Acoustic (AC: )” (p. 6)
Selecting a bassParameter ValueMdl: On/Off ONMdl: Type E. BASS (bass) EB: Type & Refer to “Bass (EB: )” (p. 6)
Selecting a guitar synthesizerParameter ValueMdl: On/Off ONMdl: Type SYNTH (guitar synthesizer) Synth: Type & Refer to “Synthesizer (Synth: )” (p. 7)
Selecting a Poly FXThe Poly FX are effects specifically designed for the GK pickup, which individually extracts the signal of each string.
Parameter ValueMdl: On/Off ONMdl: Type POLY FXPolyFx: Type & Refer to “Poly FX (PolyFx: )” (p. 8)
Press the [EFFECTS] button and edit the parameters.& “Effects Settings” (p. 9)
AmpParameter ExplanationAmp: On/Off Turns the Amp on/offAmp: Type Type of Amp
FX (Overdrive etc.) Parameter ExplanationFX: On/Off Turns the FX on/offFX: Type Type of FX
WahParameter ExplanationWah: On/Off Turns the Wah on/offWah: Type Type of Wah
ChorusParameter ExplanationChorus: On/Off Turns the Chorus on/offChorus: Mode Type of Chorus
DelayParameter ExplanationDelay: On/Off Turns the Delay on/offDelay: Type Type of Delay
ReverbParameter ExplanationReverb: On/Off Turns the Reverb on/offReverb: Type Type of Reverb
EqualizerParameter ExplanationEQ: On/Off Turns the Equalizer on/off
Noise suppressorParameter ExplanationNS: On/Off Turns the noise suppressor on/off
Press the [MODELING/ALT TUNE] button and edit the parameters.& “Alternate Tuning Settings (AltTune: )” (p. 8)
* If the Modeling Type is “SYNTH” or “POLY FX,” the Alternate Tuning or12-String Guitar function cannot be used.
Selecting an alternate tuningParameter ExplanationAltTune: On/Off Turns the Alternate Tuning function on/off.
AltTune: Type
OPEN D, E, G, A Tuning that produces a major chord when you play the open strings.
DROP D–ADROP-D is a tuning in which only the 6th string is dropped to D. The other tunings are the variations that are transposed downward parallel to Drop D.
D-MODAL Tuning that drops the 6th, 2nd, and 1st string by a whole step to create an ethnic feel.
NASHVL Tuning that raises the 6th, 5th, 4th, and 3rd strings by one octave; like a 12-string guitar’s supplementary strings by themselves.
-12–+12 STEP Raises/lowers the tuning of all strings in semitone steps.
USER User tuning in which each string can be specified individually.
Selecting a 12-string guitarParameter Explanation
12Str: On/OffTurn this on if you want the sound of a 12-string guitar. It transforms the sound of a 6-string guitar into the sound of a 12-string guitar equipped with an additional course of strings.
Example: Applying an open-G tuning to a Telecaster (rear pickup)
Parameter ValueMdl: On/Off ONMdl: Type E. GTREG: Type TEEG: PU Select REARAltTune: On/Off ONAltTune: Type OPEN G
Example: Transforming an acoustic guitar into a 12-string guitar
Parameter ValueMdl: On/Off ONMdl: Type ACOUSTICAC: Type MA28AltTune: On/Off OFF12Str: On/Off ON
Selecting a Modeling Guitar
Selecting an Alternate Tuning
Applying Effects

6
Modeling Settings (Mdl: )
Press the [MODELING/ALT TUNE] button to edit.
* The parameters shown depend on the modeling type you’ve selected.
MEMOFor details on +/, marks, refer to “Basic Procedure for Editing the Settings” (p. 5).
Parameter ExplanationOn/Off Turns the Modeling on/off (mute).
Type
Type of ModelingE. GTR Electric guitarACOUSTIC AcousticE. BASS BassSYNTH Guitar synthesizerPOLY FX Poly FX
Electric Guitar (EG: ) Parameter Explanation
Type
Type of Electric Guitar
CLA ST This models a Fender Stratocaster, a guitar with three traditional single-coil pickups.
MOD ST This models a guitar with three EMG active single-coil pickups.
TE This models a Fender Telecaster, a guitar with two single-coil pickups often used in blues and country music.
LP This models a Gibson Les Paul Standard, a guitar with two humbucking pickups often used in rock.
P90This models a Gibson Les Paul Junior, a guitar with two single-coil pickups affectionately referred to as “dog ear” or “soap bar” pickups.
335 This models a Gibson ES-335 Dot, a well-known semi-hollow body guitar with two humbucking pickups.
L4This models a Gibson L-4 CES, a hollow body guitar suitable for jazz, equipped with two humbucking pickups and strung with flat-wound strings.
RICK This models a Rickenbacker 360, a semi-hollow body guitar with two unique single-coil pickups.
LIPS This models a Danelectro 56-U3, a guitar with three pickups with a distinctive silver “lipstick-style” appearance.
WIDE RANGE
This produces the fat sound typical of a larger number of coil windings than on a conventional single-coil pickup.
BRIGHT HUM
A conventional humbucking pickup places two coils side by side, causing the high frequencies to be cancelled; however, this model produces a tone that preserves these high frequencies while retaining the characteristics of a humbucking pickup.
FRETLESS This models a fretless guitar.
PU Select *1
Selects the pickup position.REAR Rear pickupR+C *1 Rear and center pickupsCENTER *1 Center pickupC+F *1 Center and front pickupsFRONT Front pickupR+F *2 Rear and front pickupsALL *3 All pickups*1 CLA-ST, MOD-ST, LIPS only*2 TE, LP, P-90, RICK, 335, L4, BRIGHT HUM, WIDE RANGE only*3 LIPS only
Tone Type *2 Selects the fretless tone type.Sens *2 This controls the input sensitivity of the FRETLESS.Depth *2 This controls the rate of the harmonics.Attack *2 Adjusts the attack of the picking sound.Resonance *2 Adds a characteristically resonant quality to the sound.Direct Level *2 Adjusts the volume of the direct sound.Volume Sets the volume. With a setting of 0, there will be no sound.
Tone Adjusts the tone. The standard value is 100; lowering the value creates a softer tone.
*1 Other than FRETLESS*2 FRETLESS only
Acoustic (AC: )
Parameter Explanation
Type
Type of Acoustic
MA28 The sound of a Martin D-28. Older model known for its exquisitely balanced sound.
TRP-0 The sound of a Martin 000-28. This model features a full low-end resonance and crisp, distinct contour.
GB45 The sound of a Gibson J-45. This vintage model features a unique, seasoned tone with good response.
GB SML The sound of a Gibson B-25. Featuring a compact body, this vintage model is often used in blues.
GLD40The sound of a Guild D-40. This model features warm resonance from the body along with a delicate string resonance.
NYLON This models a nylon-string guitar.RESO This models a Dobro-type resonator guitar.BANJO This models a conventional five-string banjo.
SITAR This models a Coral electric sitar. The sitar’s distinctive buzz and tonal change are modeled.
Body *1Adjusts the body resonation. Raising the value produces more of a sense of the guitar body in the sound. Lower the value in conditions where feedback is prone to occur.
Attack *2Specifies the strength of the attack when you pluck the string strongly. As this setting is increased, the attack will be sharper, and the sound will be crisper.
PU Select *3
Selects the pickup position.FRONT Front pickupR+F Rear and front pickupsREAR Rear pickupPIEZO Piezo pickup
Sens *3 Adjusts the input sensitivity.Color *3 Adjusts the overall tone quality of the sitar.Decay *3 Adjusts the time it takes following the attack for the tone to change.
BUZZ *3 Adjusts the amount of characteristic buzz produced by the buzz bridge when the strings make contact with it.
Attack Level *3 Adjusts the volume level of the attack
Resonance *4 Adjusts the body resonation. The resonation increases as the value is raised.
Sustain *5
You can specify how the resulting volume will be affected by changes (loud/soft dynamics) in the guitar string vibrations that are input.Adjusts the range (time) over which low-level signals are boosted. Larger values will result in longer sustain.
Tone Adjusts the tone of the body. The standard value is 0; raising the value boosts the high range.
Volume Sets the volume. With a setting of 0, there will be no sound.
*1 Other than RESO and BANJO*2 NYLON and BANJO only*3 SITAR only*4 RESO and BANJO only*5 RESO only
Bass (EB: )
Parameter Explanation
Type
Type of BassJB This models a Fender Jazz Bass.PB This models a Fender Precision Bass.FRETLESS This models a fretless bass.
Rear Volume *1 Volume of the rear pickupFront Volume *1 Volume of the front pickupTone Type *2 Selects the fretless tone type.Sens *2 This controls the input sensitivity of the FRETLESS.Depth *2 This controls the rate of the harmonics.Attack *2 Adjusts the attack of the picking sound.Resonance *2 Adds a characteristically resonant quality to the sound.Direct Level *2 Adjusts the volume of the direct sound.Volume Sets the volume. With a setting of 0, there will be no sound.Tone Adjusts the tone.
*1 JB only*2 FRETLESS only
Modeling/Poly FX/Alternate Tuning Settings

Modeling/Poly FX/Alternate Tuning Settings
7
Deutsch
EnglishFrançais
ItalianoEspañol
PortuguêsN
ederlands
Synthesizer (Synth: )
Parameter Explanation
Type
Type of Synthesizer
GR-300 This models the Roland GR-300, the famed analog polyphonic guitar synthesizer of yesteryear.
OSC SYNTH This is an analog synth modeling sound generated by a DSP oscillator.
WAVE SYNTH
This algorithm creates synth sounds by directly processing the string signal from the Divided pickup. It allows a natural feeling of playability.
GR-300 (GR300: )Parameter Explanation
Mode
This setting determines whether the HEXA-VCO (sawtooth wave) or the HEXA-DISTORTION (rectangular wave) is played, or if both are played.VCO The HEXA-VCO sound is played.
V+D The HEXA-VCO and HEXA-DISTORTION sounds are played simultaneously.
DIST The HEXA-DISTORTION sound is played.Volume Sets the volume. With a setting of 0, there will be no sound.Comp Sw When this is set to ON, the HEXA-VCO’s decay time is extended.
Cutoff Adjusts the cutoff frequency, setting the brightness (hardness) of the sound.
Resonance Adjusts the resonance (distinctiveness of the sound).
EnvModSw
This automatically changes the VCF cutoff frequency according to the amplitude of the string vibration. This allows you to change the tone with a wah-like effect each time you pick a string.
ON
This causes the VCF cutoff frequency to change from a high to low frequency each time the string is picked. This produces a wah-like effect, with the sound going from high frequencies to low.
INV
As opposed to the ON setting, this allows you to have the VCF cutoff frequency change from a low to high frequency each time the string is picked. This produces a reverse wah-like effect, with the sound going from high frequencies to low.
EnvModSensAdjusts the input sensitivity for the envelope modulation function. As the value is raised, the change from the envelope modulation broadens with even weaker picking.
EnvModAtck Adjusts the attack time for the change in the envelope modulation produced by picking. Raising the value slows the attack for this change.
Pitch Sw
This setting allows you to switch A, B and OFF the pitch shift, which enables the pitch of the HEXA-VCO sound to shift in response
* PITCH SHIFT is applied only to the HEXA-VCO, not the HEXADISTORTION. Set MODE to VCO or V+D when using the pitch shift function.
P. Shift AP. Shift B
This sets the amount of shift in pitch from the original sound in semitone increments.
P. Fine AP. Fine B
This finely adjusts the pitch. A setting of -50 lowers the pitch one semitone; +50 raises the pitch by one semitone.
P. Duet
When DUET is set to ON, then in addition to the HEXA-VCO, a sawtooth wave is played at the same pitches as the source sound, adding greater breadth to the sound.
MEMOSetting HEXA-VCO pitch shifts to values such as PITCH+/-12 (up or down an octave), +/-7 (perfect fifth), or +/-5 (perfect fourth) produces a thicker sound like that from a synthesizer.You can add further depth to the sound by setting PITCH FINE to +/-5, thus slightly shifting the pitch of the HEXA-VCO.
Sweep Sw This SWEEP function smoothly changes the amount of pitch shift when the amount of pitch shift is changed with “Pitch Sw.”
Sweep Rise
Adjusts the amount of time for the pitch to shift when the “Pitch Sw” parameter is switched and the sound changes to a higher pitch. When set to zero, the pitch changes instantly; at higher values, the pitch rises more slowly.
Sweep Fall
Adjusts the amount of time for the pitch to shift when the “Pitch Sw” parameter is switched and the sound changes to a lower pitch. When set to zero, the pitch changes instantly; at higher values, the pitch falls more slowly.
Vibrato Sw You can apply an electronic vibrato effect to the HEXA-VCO.Vib Rate Adjusts the rate of the vibrato. Vib Depth Adjusts the depth of the vibrato.
OSC synth (OSC: )Parameter Explanation
Mode
This creates the waveform that determines the character of the sound, and also specifies the pitch. The GP-10 has two oscillators: OSC 1 and OSC 2.SINGLE Only OSC 1 is used.DUAL OSC 1 and OSC 2 are used.
SYNC
This is oscillator sync. It generates a complex waveform by forcibly resetting OSC 2 to the beginning of its cycle in synchronization with the OSC 1 frequency.
OSC 2
OSC 1
RING
This is a ring modulator. It generates a complex waveform by multiplying OSC 1 and OSC 2.
OSC 1OSC 2
Volume Sets the volume. With a setting of 0, there will be no sound.
Parameter Explanation
Waveform 1/2
Selects the waveform that is the basis of the sound.SIN R Sine waveSAW T Sawtooth waveTRI S Triangle waveSQR U Square wavePW V Pulse width NOISE Noise
Pitch 1/2 Adjusts the pitch.Pitch Fine 1/2 Adjusts the pitch more finely than the Pitch parameter.PW Width 1/2 Specifies the pulse width.PW Mod Rate 1/2 Specifies the amount (depth) of LFO applied to Pulse Width.
P. Env Attck 1/2P. Env Decay 1/2
Specifies the attack/decay time of the pitch envelope.
P. Env Depth 1/2 Specifies the depth to which the envelope will modulate the pitch.Level 1/2 Adjusts the volume of the OSC.
Filter Type
Type of filterBYPASS The filter is not used.
LPF This type of filter cuts the frequency range that is above the cutoff frequency, making the sound more mellow.
HPF This type of filter cuts the frequency range that is below the cutoff frequency, emphasizing the high-frequency range.
BPF This type of filter passes only the range of frequencies in the region of the cutoff frequency, cutting the other frequencies.
PKG This type of filter boosts the range of frequencies in the region of the cutoff frequency.
Filter Slope-12 dB
Selects the slope (steepness) of the low-pass filter.
ex. LPF
-24 dB
Filter Cutoff Specifies the cutoff frequency.FltrCtOffFlw Specifies how the cutoff frequency will be affected by the note position.
Fltr Reso
Resonance emphasizes the sound in the region of the filter cutoff frequency.Increasing the resonance setting will increase this emphasis, producing a distinctive sound that is characteristic of synthesizers.
FltrVeloSens Specifies how the filter envelope depth is affected by your picking dynamics.
FltrEnvAttckFltrEnvDecayFltrEnvSustnFltrEnvRels
Specifies the attack/decay/sustain level/ release time of the filter envelope.
FltrEnvDepthSpecifies the depth and direction of the cutoff frequency change.Higher values make the cutoff frequency move upward.Lower values make the cutoff frequency move downward.
AmpVeloSens Specifies how the volume is affected by your picking dynamics.
AmpEnvAttckAmpEnvDecayAmpEnvSustnAmpEnvRels
Specifies the attack/decay/sustain level/ release time of the amp envelope.
LFO 1/2 Shape
Selects the LFO waveform.SIN R Sine waveSAW UP T Sawtooth waveSAW DOWN Sawtooth wave (negative polarity)TRI S Triangle waveSQR U Square waveRANDOM Random waveS&H W Sample and Hold
LFO1/2 RATE Determines the speed of the LFO.LFO1/2 PtchDpt1/2 Allows the LFO to modulate the pitch, producing a vibrato effect.LFO1/2 FltDepth Allows the LFO to modulate the FILTER CUTOFF (cutoff frequency),
LFO1/2 AmpDepth Allows the LFO to modulate the AMP LEVEL (volume), producing a tremolo effect.
LFO1/2 Dly Time Specifies the time from when a note is played until the LFO begins to apply.
LFO1/2 Fade Time Specifies the time until the LFO reaches its maximum amplitude.
Poly/Mono If this is set to MONO, only a single note will sound even if you play a chord.
ChromaticTurn this “ON” if you want to play tones in semitone increments.If this is “ON,” the pitch will change in semitone steps even when you bend notes.
Portamento Allows you to create a smooth change in pitch from one note to the next.Porta Rate Adjusts the speed at which the pitch changes.
Porta Mode
Selects how portamento is applied.* This is valid only in POLY mode.
MODE 1 For each string, portamento starts from the pitch of the last note played on that string
MODE 2 Portamento starts from the pitch of the last note played on any string

Modeling/Poly FX/Alternate Tuning Settings
8
Parameter Explanation
Hold Mode
Specifies the Hold effect controlled by the [CTL 1] [CTL 2] pedals.* In order to use the Hold effect, make settings for “Patch: CTL” (p. 11) or
“Sys: CTL” (p. 13).
MODE 1 Notes that are newly played while Hold is on will also be held.
MODE 2 Newly played notes are not accepted while Hold is on.
MODE 3 While Hold is on, notes newly played on a string that’s being held are accepted.
LowVeloCut Adjust this if simply touching a string causes a note to be unintentionally triggered. Raising this value will make it more difficult to trigger notes.
Wave synth (WAVE: )Parameter Explanation
TypeSelects the wave type on which the synth sound is based.SAW Creates a synth sound with a sawtooth waveform.SQUARE Creates a synth sound with a square waveform.
Volume Sets the volume. With a setting of 0, there will be no sound.
Cutoff Adjusts the cutoff frequency at which the filter cuts off the sound’s harmonic components
Resonance Adjusts the resonance (distinctiveness of the sound).Octave If this is on, the pitch is one octave lower.
Poly FX (PolyFx: )
Parameter Explanation
Type
DISTORTION Distortion that allows chords to resonate clearly and beautifully
CRYSTAL A sound with a metallic resonance and a transparent character
RICH MODULATION Rich and spacious modulation soundSLOW PAD Deep, fantasy-like pad-type sound
TOUCH WAH You can produce a wah effect with the filter changing in response to the guitar level.
DISTORTION/CRYSTAL/RICH MODULATION/SLOW PAD (PFxDist: /PFxCrystal: /PFxRichMod: /PFxSlowPad: )Parameter ExplanationGtrVol Adjusts the volume of the guitar input.
Gain *1 Adjusts the amount of distortion.
GainBal *1Adjusts the distortion balance between the low and high strings.Higher settings make the lower strings distort more.Lower settings make the higher strings distort more.
Color
DISTORTION Adjusts the amount of separation for chords. Higher settings produce chords less muddy.
CRYSTAL Adjusts the tonal character of the high-frequency range. Higher settings make the tonal character more metallic.
RICH MODULATION
Adjusts the depth of the effect. Higher settings make the modulation effect stronger.
SLOW PAD Adjusts the strength of the attack. Higher settings strengthen the attack.Tone Adjusts the brightness of the sound. Higher settings brighten the sound.Level Volume
*1 DISTORTION only
TOUCH WAH (PFxTWah: )Parameter Explanation
Mode
Selects the wah mode.
LPF Low pass filter. This creates a wah effect over a wide frequency range.
BPF Band pass filter. This creates a wah effect in a narrow frequency range.
Polar
Selects the direction in which the filter will change in response to the input.DOWN The frequency of the filter will fall.UP The frequency of the filter will rise.
SensAdjusts the sensitivity at which the filter will change in the direction determined by the polarity setting. Higher values will result in a stronger response. With a setting of 0, the strength of picking will have no effect.
Freq Adjusts the center frequency of the Wah effect.Decay This sets the time needed for the filter to finish its sweep.
Peak
Adjusts the way in which the wah effect applies to the area around the center frequency.Higher values will produce a stronger tone which emphasizes the wah effect more. With a value of 50 a standard wah sound will be produced.
ToneType Selects the tone type.Comp Sw Turns the compressor on/off.Comp Sus Larger values will result in longer sustain.Comp Atk Adjusts the strength of the picking attack when the strings are played.Volume Volume
Alternate Tuning Settings (AltTune: )
Press the [MODELING/ALT TUNE] button to edit.
* If the Modeling Type is “SYNTH” or “POLY FX,” the Alternate Tuning/12-String Guitar/String Bend function cannot be used.
Parameter ExplanationOn/Off Turns the Alternate Tuning function on/off.
Type
OPEN D, E, G, A
Tuning that produces a major chord when you play the open strings.
DROP D–ADROP-D is a tuning in which only the 6th string is dropped to D. The other tunings are the variations that are transposed downward parallel to Drop D.
D-MODAL Tuning that drops the 6th, 2nd, and 1st string by a whole step to create an ethnic feel.
NASHVLTuning that raises the 6th, 5th, 4th, and 3rd strings by one octave; like a 12-string guitar’s supplementary strings by themselves.
-12–+12 STEP Raises/lowers the tuning of all strings in semitone steps.
USER User tuning in which each string can be specified individually.Shift 1–6 *1 Specifies the amount of shift in semitones for each string.
Fine 1–6 *1 Finely adjusts the pitch of each string. -50 is half a semitone down; +50 is half a semitone up.
*1 USER only
12-String Guitar Settings (12Str: )
Press the [MODELING/ALT TUNE] button to edit.
Parameter Explanation
On/OffTurn this on if you want the sound of a 12-string guitar. It transforms the sound of a 6-string guitar into the sound of a 12-string guitar equipped with an additional course of strings.
TypeNORMAL The conventional tuning of a 12-string guitar.
USER A user tuning that specifies the pitch of each supplementary string.
PitchShft 1–6 *1 Specifies the amount of shift in semitones for each string.
PitchFine 1–6 *1 Finely adjusts the pitch of each string. -50 is half a semitone down; +50 is half a semitone up.
Level 1–6 *1 Adjusts the volume level for each secondary string.
Delay 1–6 *1 Adjusts the time the sound of each secondary string is delayed relative to the respective main string.
*1 USER only
String Bend Function Settings (StrBend: )
Press the [MODELING/ALT TUNE] button to edit.
Parameter ExplanationOn/Off Turns the String Bend function on/off.
Depth 1–6This sets the amount of pitch shift in each string when the bend is set to 100.The amount of shift from the current pitch is set in semitone increments.
Control
When set to 0, bending causes no shift in the pitch; when set to 100, the strings’ pitches are shifted by the amount set in Depth 1–6. Normally, this pitch bend is set to 0, and the setting 0–100 assigned with Control Assign is used.
* This setting cannot be saved to patches. This is reset to 0 when patches are switched.
Other Modeling Settings (Mdl: )
Parameter Explanation
NS On/Off *1Turns the noise suppressor on/off.This effect suppresses noise or hum that is picked up by the guitar’s pickup.
NS Threshold *1
Adjust this according to the level of the noise. Set this to a higher value if the noise level is high, or to a lower value if the noise level is low. Adjust this so that the decay of your guitar still sounds natural.
* Setting this higher than necessary may cause no sound to be produced when the guitar is played at low volume.
NS Release *1 Adjusts the time from when the noise suppressor begins to function until the noise level reaches “0.”
String Lv 1–6 Specifies the output level of each string.String Pan 1–6 Specifies the left/right pan of each string.
*1 For some modeling types, the noise suppressor parameters are not shown.

9
Deutsch
EnglishFrançais
ItalianoEspañol
PortuguêsN
ederlands
Effects/Patch Settings
Effects SettingsPress the [EFFECTS] button to edit.
* The parameters shown depend on the type of effect that you select.
MEMOFor details on +/, marks, refer to “Basic Procedure for Editing the Settings” (p. 5).
Preamp (Amp: )
COSM technology is used to simulate the response of the preamp, the size of the speakers, and the type of cabinet.
Parameter ExplanationOn/Off Turns this effect on/off.
Type
Type of AmpNATURL CLEAN
An unembellished, clean sound that minimizes the amp’s idiosyncrasies, such as its trebly character and boomy low end.
FULL RANGEAn amp with a broad frequency range and an extremely flat response.Good for acoustic guitar.
COMBO CRUNCH
Crunch sound that allows the nuances of your picking to be expressed even more faithfully than on conventional combo amps.
STACK CRUNCH
Great-feeling crunch sound that responds well to picking dynamics while retaining all the defining characteristics of a 4 x 12” speaker cabinet.
HiGAIN STACK
High-gain sound of a vintage Marshall specially revamped in a way that is possible only with COSM modeling technology.
POWER DRIVE
A straight drive sound that works well in a broad range of situations, from backing to lead. A sound like this cannot be obtained from any existing combo amp or stack amp.
EXTREME LEAD
A new type of sound that smoothes out the uneven frequency response that is typical of existing large stack amps.
CORE METAL A large stack sound that has been tweaked extensively in the pursuit of the ultimate metal sound.
JC-120 This models the sound of the Roland JC-120.CLEAN TWIN This models a Fender Twin Reverb.PRO CRUNCH This models a Fender Pro Reverb.
TWEED This models a Fender Bassman 4 x 10” Combo.DELUXE CRUNCH This models a Fender Deluxe Reverb.
VO DRIVEThis models the drive sound of a VOX AC-30TB.This is a sound that it suited to sixties-style British rock.
VO LEAD This models the lead sound of the VOX AC-30TB.
MATCH DRIVE
This models the sound input to left input on a Matchless D/C-30.A simulation of the modern tube amp widely used in styles from blues and rock.
BG LEADThis models the lead sound of the MESA/ Boogie combo amp.The sound of a tube amp typical of the late ‘70s to ‘80s.
BG DRIVE This models a MESA/Boogie with TREBLE SHIFT SW on.
MS1959 IThis models the sound input to Input I on a Marshall 1959.This is a trebly sound suited to hard rock.
MS1959 I+II The sound of connecting inputs I and II of the guitar amp in parallel, creating a sound with a stronger low end than I.
R-FIER VINTAGE
This models the sound of the Channel 2 VINTAGE Mode on the Mesa/Boogie DUAL Rectifier.
R-FIER MODERN
This models the sound of the Channel 2 MODERN Mode on the Mesa/Boogie DUAL Rectifier.
T-AMP LEAD This models a Hughes & Kettner Triamp AMP3.SLDN This models a Soldano SLO-100. This is the typical sound of the ‘80s.5150 DRIVE This models the lead channel of a Peavey EVH 5150.BGNR UB METAL This models the heavily distorted sound of a Bogner Uberschall.
ORNG ROCK REVERB This models an Orange Rockerverb.
BASS CLEAN Clean sound suitable for bass.BASS CRUNCH Crunch sound with a natural distortion, suitable for bass.
BASS HiGAIN High-gain sound suitable for bass.
Gain Adjusts the distortion of the amp.
LevelAdjusts the volume of the entire preamp.
* Be careful not to raise the Level setting too high.Bass Adjusts the tone for the low frequency range.Middle Adjusts the tone for the middle frequency range.Treble Adjusts the tone for the high frequency range.
PresenceAdjusts the tone for the ultra high frequency range.
* The Presence parameter functions as a high-cut filter with some Amp Types.
BrightTurns the bright setting on/off.
* The Bright parameter setting is available only with certain Amp Types.
Gain Sw
Provides for selection from three levels of distortion: LOW, MIDDLE, and HIGH. Distortion will successively increase for settings of LOW, MIDDLE and HIGH.
* The sound of each Type is created on the basis that the Gain Sw is set to MIDDLE.
Solo Sw Switches the tone to one suitable for solos.Solo Level Adjusts the volume level when the Solo Sw is ON.T-Comp Adjusts the sense of compression of the amp.Speaker Type *1
Selects the speaker type. “ORIGIN” is the built-in speaker of the amp you selected with Amp: Type.
Parameter Explanation
Mic Type *1
Selects the simulated mic type.
DYN57 This is the sound of the Shure SM-57. General dynamic mic used for instruments and vocals. Optimal for use in miking guitar amps.
DYN421 This is the sound of the Sennheiser MD-421. Dynamic mic with extended low end.
CND451 This is the sound of the AKG C451B. Small condenser mic for use with instruments.
CND87 This is the sound of the Neumann U87. Condenser mic with flat response.
FLATSimulates a mic with perfectly flat response. Produces a sonic image close to that of listening to the sound directly from the speakers (on site).
Mic Distance *1
Simulates the distance between the mic and speaker.OFF MIC Microphone is placed at a distance from the speaker.ON MIC Microphone is placed so it’s near the speaker.
Mic Position *1
This simulates the mic position.
CENTER Simulates the condition that the mic is set in the middle of the speaker cone.
1–10 cm Simulates the condition that the mic is moved away from the center of the speaker cone.
Mic Level *1 Adjusts the volume of the mic.Direct Level *1 Adjusts the volume of the direct sound.
*1 This is enabled when the Sys: Output parameter is set to LINE/PHONE.
FX (FX: )
You can select the effect to be used from the following.
Parameter ExplanationOn/Off Turns this effect on/off.
Type
Type of FXOD/DS This effect distorts the sound to create long sustain.
COMPRESSORThis is an effect that produces a long sustain by evening out the volume level of the input signal. You can also use it as a limiter to suppress only the sound peaks and prevent distortion.
LIMITER The limiter attenuates loud input levels to prevent distortion.EQ This adjusts the tone as a equalizer.T. WAH A wah effect is produced according to your picking dynamics.
PITCH SHIFTER This effect changes the pitch of the original sound (up or down) within a range of two octaves.
HARMONISTHarmonist is an effect where the amount of shifting is adjusted according to an analysis of the guitar input, allowing you to create harmony based on diatonic scales.
PEDAL BEND This lets you use the pedal to get a pitch bend effect.
PHASER By adding varied-phase portions to the direct sound, the phaser effect gives a whooshing, swirling character to the sound.
FLANGER The flanging effect gives a twisting, jet-airplane-like character to the sound.
TREMOLO Tremolo is an effect that creates a cyclic change in volume.
PAN
With the volume level of the left and right sides alternately changing, when playing sound in stereo, you can get an effect that makes the guitar sound appear to fly back and forth between the speakers.
ROTARY This produces an effect like the sound of a rotary speaker.
UNI-VThis models a Uni-Vibe.Although this resembles a phaser effect, it also provides a unique undulation that you can’t get with a regular phaser.
CHORUS In this effect, a slightly detuned sound is added to the original sound to add depth and breadth.
DELAY This effect adds delayed sound to the direct sound, giving more body to the sound or creating special effects.
OD/DS (FxODDS: )Parameter Explanation
Type
Type of OD/DS
MID BOOSTThis is a booster with unique characteristics in the midrange.Making the connection before the amp produces sound suitable for solos.
CLEAN BOOST This not only functions as a booster, but also produces a clean tone that has punch even when used alone.
TREBLE BOOST This is a booster that has bright characteristics.
CRUNCH A lustrous crunch sound with an added element of amp distortion.
NATURAL OD This is an overdrive sound that provides distortion with a natural feeling.
WARM OD This is a warm overdrive.FAT DS A distortion sound with thick distortion.
LEAD DS Produces a distortion sound with both the smoothness of an overdrive along with a deep distortion.
METAL DS A distortion sound that is ideal for performances of heavy riffs.OCT FUZZ A fuzz sound with rich harmonic content.
BLUES ODThis is a crunch sound of the BOSS BD-2.This produces distortion that faithfully reproduces the nuances of picking.
OD-1This models the sound of the BOSS OD-1.This produces sweet, mild distortion.
T-SCREAM This models an Ibanez TS-808.TURBO OD This is the high-gain overdrive sound of the BOSS OD-2.DISTORTION This gives a basic, traditional distortion sound.RAT This models a Proco RAT.GUV DS This models a Marshall GUV’ NOR.DST+ This models a MXR DISTORTION+.

Effects/Patch Settings
10
Parameter Explanation
Type
METAL ZONEThis models the sound of the BOSS MT-2.It produces a wide range of metal sounds, from old style to slash metal.
‘60S FUZZThis models a Fuzz Face.It produces a fat fuzz sound.
MUFF FUZZ This models an Electro-Harmonix Big Muff π.Drive Adjusts the depth of distortion.Tone Adjusts the tone.Level Adjusts the volume of the effect sound.Bottom Adjusts the tone for the low frequency range. D. Level Adjusts the volume of the direct sound.Solo Sw Switches the tone to one suitable for solos.Solo Lv Adjusts the volume level when the Solo Sw is ON.
About the Other FX Parameters
Ref.For details on all FX (effects) parameters, refer to the “Parameter Guide” (PDF file) which you can download from the Roland website (http: //www.roland.com/manuals/).”
Wah (Wah: )
You can control the wah effect in real time by adjusting the expression pedal.* Assign a controller to the expression pedal. Set the Patch: Controller setting EXPPDL ON Func (p. 11)
to “WAH.” If you operate the expression pedal when it’s on, it functions as a wah.
Parameter ExplanationOn/Off Turns this effect on/off.
Type
Type of wah
CRY WAH This models the sound of the Cry Baby wah pedal popular in the ‘70s.
VO WAH This models the sound of the VOX V846.FAT WAH This is a wah sound featuring a bold tone.LIGHT WAH This wah has a refined sound with no unusual characteristics.
7-STRING WAH This expanded wah features a variable range compatible with seven-string and baritone guitars.
RESO WAH This completely original effect offers enhancements on the characteristic resonances produced by analog synth filters.
Pedal Position Adjusts the position of the wah pedal.Pedal Min Selects the tone produced when the heel of the expression Pedal is depressed.Pedal Max Selects the tone produced when the toe of the expression Pedal is depressed.E. Level Adjusts the volume of the effect sound.D. Level Adjusts the volume of the direct sound.
Chorus (Chorus: )
In this effect, a slightly detuned sound is added to the original sound to add depth and breadth.
Parameter ExplanationOn/Off Turns this effect on/off.
Mode
Type of Chorus
MONO This chorus effect outputs the same sound from both L channel and R channel.
STEREO1 This is a stereo chorus effect that adds different chorus sounds to L channel and R channel.
STEREO2This stereo chorus uses spatial synthesis, with the direct sound output in the L channel and the effect sound output in the R channel.
Rate
Adjusts the rate of the chorus effect.* When set to BPM, the value of each parameter will be set according to the
value of the “Patch: Tempo” specified for each patch. This makes it easier to achieve effect sound settings that match the tempo of the song.
Depth Adjusts the depth of the chorus effect.
Pre Delay
Adjusts the time needed for the effect sound to be output after the direct sound has been output. By setting a longer pre delay time, you can obtain an effect that sounds like more than one sound is being played at the same time (doubling effect).
Low Cut This sets the frequency at which the low cut filter begins to take effect. When FLAT is selected, the low cut filter will have no effect.
Hi Cut This sets the frequency at which the high cut filter begins to take effect. When FLAT is selected, the high cut filter will have no effect.
E. Level Adjusts the volume of the effect sound.D. Level Adjusts the volume of the direct sound.
Delay (Delay: )
This effect adds delayed sound to the direct sound, giving more body to the sound or creating special effects.
Parameter ExplanationOn/Off Turns this effect on/off.
Parameter Explanation
Type
Type of DelaySINGLE This is a simple monaural delay.
PANThis delay is specifically for stereo output. This allows you to obtain the tap delay effect that divides the delay time, then deliver them to L and R channels.
STEREO The direct sound is output from the left channel, and the effect sound is output from the right channel.
DUAL-S
This is a delay comprising two different delays connected in series. Each delay time can be set in a range from 1 to 1000 ms.
D1 D2 D1: DELAY 1 D2: DELAY 2
DUAL-P
This is a delay comprising two delays connected in parallel. Each delay time can be set in a range from 1 to 1000 ms.
D1
D2
DUAL-L/R
This is a delay with individual settings available for the left and right channels. Delay 1 goes to the left channel, Delay 2 to the right.
D1
D2
L
R
REVERSE This produces an effect where the sound is played back in reverse.
ANALOG This gives a mild analog delay sound. The delay time can be set within the range of 1 to 2000 ms.
TAPEThis setting provides the characteristic wavering sound of the tape echo. The delay time can be set within the range of 1 to 3400 ms.
MODULATE This delay adds a pleasant wavering effect to the sound.
Time
Determines the delay time.* When set to BPM, the value of each parameter will be set according to the
value of the “Patch: Tempo” specified for each patch. This makes it easier to achieve effect sound settings that match the tempo of the song.
Feedback Sets the amount of delay sound returned to the input. A higher value will increase the number of the delay repeats.
High Cut Sets the frequency at which the high cut filter begins to take effect. When FLAT is selected, the high cut filter will have no effect.
E. Level Adjusts the volume of the effect sound.D. Level Adjusts the volume of the direct sound.
Pan Tap Time *1 Adjusts the delay time of the left channel delay. This setting adjusts the L channel delay time relative to the R channel delay time (considered as 100%).
D1/2 Time *2 Determines the delay time.
D1/2 F. Back *2 Adjusts the amount of feedback of the DELAY 1 (or DELAY 2). A higher value will increase the number of the delay repeats.
D1/2 HiCut *2 This sets the frequency at which the high cut filter begins to take effect. When FLAT is selected, the high cut filter will have no effect.
D1/2 E. Level *2 Adjusts the volume of the DELAY 1 (or DELAY 2).Mod Rate *3 Adjusts the modulation rate of the delay sound.Mod Depth *3 Adjusts the modulation depth of the delay sound.
*1 PAN only*2 DUAL-S, DUAL-P, DUAL-L/R only*3 MOD only
Reverb (Reverb: )
This effect adds reverberation to the sound.
Parameter ExplanationOn/Off Turns this effect on/off.
Type
Type of Reverb
AMBIENCE
Simulates an ambience mic (off-mic, placed at a distance from the sound source) used in recording and other applications. Rather than emphasizing the reverberation, this reverb is used to produce a sense of openness and depth.
ROOM Simulates the reverberation in a small room. Provides warm reverberations.
HALL1 Simulates the reverberation in a concert hall. Provides clear and spacious reverberations.
HALL2 Simulates the reverberation in a concert hall. Provides mild reverberations.
PLATESimulates plate reverberation (a reverb unit that uses the vibration of a metallic plate). Provides a metallic sound with a distinct upper range.
SPRING This simulates the sound of a guitar amp’s built-in spring reverb.
MODULATE This reverb adds the wavering sound found in hall reverb to provide an extremely pleasant reverb sound.
Time Adjusts the length (time) of reverberation.Pre Delay Adjusts the time until the reverb sound appears.Low CutHigh Cut
This sets the frequency at which the low/high cut filter begins to take effect. When FLAT is selected, the low/high cut filter will have no effect.
Density Adjusts the density of the reverb sound.
Spring Sns *1 Adjusts the sensitivity of the spring effect. When the value is set higher, the effect is obtained even with a weak picking.
E. Level Adjusts the volume of the effect sound.D. Level Adjusts the volume of the direct sound.
*1 Type = SPRING only

Effects/Patch Settings
11
Deutsch
EnglishFrançais
ItalianoEspañol
PortuguêsN
ederlands
EQ (EQ: )
This adjusts the tone as a equalizer.
Parameter ExplanationOn/Off Turns this effect on/off.Low Gain Adjusts the low frequency range tone.Hi Gain Adjusts the high frequency range tone.
Low Mid Freq Specifies the center of the frequency range that will be adjusted by the Low-Mid Gain.
Low Mid Q Adjusts the width of the area affected by the EQ centered at the Low-Mid Frequency. Higher values will narrow the area.
Low Mid Gain Adjusts the low-middle frequency range tone.
Hi Mid Freq Specifies the center of the frequency range that will be adjusted by the High-Mid Gain.
Hi Mid Q Adjusts the width of the area affected by the EQ centered at the High-Mid Frequency. Higher values will narrow the area.
Hi Mid Gain Adjusts the high-middle frequency range tone.
Low Cut This sets the frequency at which the low cut filter begins to take effect. When FLAT is selected, the low cut filter will have no effect.
Hi Cut This sets the frequency at which the high cut filter begins to take effect. When FLAT is selected, the high cut filter will have no effect.
Level Adjusts the overall volume level of the equalizer.
Noise Suppressor (NS: )
This effect reduces the noise and hum picked up by guitar pickups.
Parameter ExplanationOn/Off Turns this effect on/off.
Threshold
Adjust this parameter as appropriate for the volume of the noise. If the noise level is high, a higher setting is appropriate. If the noise level is low, a lower setting is appropriate. Adjust this value until the decay of the guitar sound is as natural as possible.
* High settings for the threshold parameter may result in there being no sound when you play with your guitar volume turned down.
Release Adjusts the time from when the noise suppressor begins to function until the noise level reaches “0.”
Foot Volume (FV: )
This is a volume control effect. Normally, this is controlled with the Expression Pedal.
Parameter Explanation
Min Sets the volume when the heel of the EXP Pedal is depressed.
Max Sets the volume when the toe of the EXP Pedal is depressed.
Curve You can select how the actual volume changes relative to the amount the pedal is pressed.
Level Adjusts the volume.
Settings for Normal Pickup (Nrml PU: )
Parameter ExplanationOn/Off Normal pickup on/off (mute)Volume Adjusts the volume of the normal pickup.
Cable Sim
Compensates the sound of the normal pickups when a GK guitar is connected. With a GK pickup, the signal of the normal pickup is connected via a cable of approximately 20 cm, so there will be more high frequencies than a conventional guitar cable. By setting this parameter appropriately for the length of guitar cable you normally use, you can get closer to a natural guitar sound. If you connect your guitar to the GUITAR IN jack (normal guitar input), set this to “OFF.”
Volume Balance of the Modeling and the Normal Pickup (Mixer: )
Parameter ExplanationMdl In Lv Adjusts the Mixer input level of the Modeling.N. PU In Lv Adjusts the Mixer input level of the normal pickup.Balance Adjusts the volume balance of the Modeling and the normal pickup.
FX ChainYou can change the order in which the effects are connected.
1. Press the [EFFECTS] button several times to access the “FX Chain” screen.
2. Use the [K] [J] buttons to select an effect (underline), and use the [VALUE] knob to move the selected effect left or right.
Select an effect (underline)
Move the selected effect left or right
* M: Modeling, N: Normal pickup* Uppercase means that the effect is on; lowercase means that the effect is off. You can hold down
the [EFFECTS] button to switch an effect on/off.* FV cannot be turned off.
Patch Settings (Patch: )
Press the [EFFECTS] button to edit.
MEMOFor details on +/, marks, refer to “Basic Procedure for Editing the Settings” (p. 5).
Patch Volume (Patch: Level)
Parameter ExplanationLevel Specifies the volume of the patch.
Patch Tempo Settings (Patch: Tempo)
Parameter ExplanationTempo Specifies the tempo for tempo-synchronized effects.
GK Set Selection for the Patch (Patch: GK Set)
Parameter Explanation
GK SetIf you swap guitars depending on the patch, set “SYSTEM – GK: Setting” to “Patch Setting,” and select the GK Set (1–3) you specified for the guitar that you use.
Pedal and Switch Settings for Each Patch (Ctl: )
For each patch, you can individually specify the functions that are assigned to the [CTL 1], [CTL 2] pedals and the expression pedals. If you want these pedals to always have the same function regardless of the patch, you can specify this using the system setting “Sys: Controller” (p. 13).
* This is available if the Sys: Controller (p. 13) is set to “PATCH SETTING.”
Parameter Explanation
CTL 1–4 FuncGKSW 1–2 FuncEXPSW Func
Settings for the GP-10’s [CTL 1], [CTL 2] pedals, external footswitches (CTL 3, CTL 4), the GK pickup’s [S1], [S2] buttons, and the expression pedal switch.OFF OffPU SEL UP *1PU SEL DOWN *1
Switches the pickup of the modeling guitar.
12-STRING ON/OFF Switches the 12-string guitar function on/off.ALT TUNE ON/OFF Switches the alternate tuning function on/off.MODELING ON/OFF Switches the modeling function on/off.NORMAL PU ON/OFF Switches the normal pickup input on/off.AMP SOLO SW FX ON/OFF EQ ON/OFF WAH ON/OFF, CHORUS ON/OFF DELAY ON/OFF REVERB ON/OFF
Switches AMP or each effect on/off.
HOLD “HOLD” for the OSC synth
TAP TEMPO *1 Sets the tempo to the timing at which you press the pedal.
LED ON/OFF *2 LED on/off
Mode
This sets the behavior of the value each time the switch is operated.
MOMENTARYThe normal state is Off (minimum value), with the switch On (maximum value) only while the footswitch is depressed.
TOGGLE The setting is toggled On (maximum value) or Off (minimum value) with each press of the footswitch.
EXP 1 off FuncEXP 1 on FuncEXP 2 FuncGKVOL Func
Settings for the GK pickup’s GK volume, the GP-10’s expression pedal (when the pedal switch is OFF and when it is ON), and the external expression pedal.OFF OffFOOT VOL Foot volume (volume pedal)PATCH LEVEL Adjusts the volume of the patch.MODELING VOL Adjusts the volume of the modeling.NORMAL PU VOL Adjusts the volume of the normal pickup.
MIXER Adjusts the volume balance of the Modeling and the normal pickup.
STRING BEND *3 Adjusts the pitch of the modeling.
MODELINGControls the principal parameter for each modeling.
* For details on the parameter, refer to the “Parameter Guide” (PDF).
FX AMP WAH CHORUS DELAY REVERB EQ
Controls the principal parameter for each effect.* For details on the parameter, refer to the “Parameter
Guide” (PDF).
*1 Other than EXPSW Func*2 Other than GKSW 1, 2 Func, CTL 3, 4*2 Other than SysCtl

Effects/Patch Settings
12
Example settingWhen a specific patch is selected, use the expression pedal to control the volume of the modelingSelect the patch whose settings you want to edit, then make the following parameter settings.
Button Parameter Value[SYSTEM] SysCtl: EXP1on Fnc PATCH SETTING[EFFECTS] Ctl: EXP1on Func MODELING VOL
Assign Settings (Asgn 1–8: )
For each parameter, you can specify, in detail, which controller will control which parameter. You can use Assign 1–8 to make eight different sets of settings.
* This is available if the Sys: Controller (p. 13) is set to “PATCH SETTING.”
Parameter ExplanationOn/Off Turns Assign 1–8 on/off.
Target Selects the parameter that will be controlled. For details on the parameters, refer to the explanations of each parameter in this manual.
Target MinTarget Max
Specifies the range of change for the parameter. The values will depend on the parameter that’s assigned by Target.
Source
Selects the controller to which the function will be assigned.
CTL 1–CTL 4 [CTL 1] [CTL 2] pedals of this unit and external footswitch (CTL 3, CTL 4)
GK S1, GK S2 [S1] [S2] buttons of the GK pickup
GK VOL Volume knob of the GK pickupEXP1 SW Expression pedal switchEXP1 ON Expression pedal when the expression pedal switch is onEXP1 OFF Expression pedal when the expression pedal switch is offEXP2 External expression pedal
INT PDL
Internal pedalThe virtual expression pedal will begin operating when started by the specified trigger (Int Pedal Trig), modifying the parameter specified by “Target.”For details on the parameters that can be assigned to the internal pedal, refer to “Int Pedal Time” and “Int Pedal Curve.”
WAVE PDL
Wave pedalThe virtual expression pedal will cyclically modify the parameter specified by “Target” in a fixed wave form.
CC#1–31, CC#64–95 Control change number from an external MIDI device
Src ModeMOMENTARY
The value will normally be off (minimum value), and will be on (maximum value) only while the control is being operated.
* If you want to use the internal pedal or wave pedal, set to “MOMENTARY.”
TOGGLE The value will toggle between off (minimum) and on (maximum) each time the control is operated.
S. Range MinS. Range Max
Within the operating range of the source, this specifies the range that will control the target parameter.The target parameter will be controlled within the range specified. Normally, you should leave Range Min at “0” and Range Max at “127.”
Int Pdl Trig *1
Specifies how the motion of the internal pedal will be triggered.PATCH CHANGE Triggered when you switch patches.
CTL 1–4 Triggered when you operate the [CTL] pedal.EXP1 SW Triggered when you operate the expression pedal switch.
EXP1 OFF LOW Triggered when you move the expression pedal to minimum.
EXP1 OFF MID Triggered when you depress the expression pedal through the center value.
EXP1 OFF HI Triggered when you move the expression pedal to maximum.
EXP1 ON LOW Triggered when you move the expression pedal to minimum while the expression pedal switch is on.
EXP1 ON MID Triggered when you depress the expression pedal through the center value while the expression pedal switch is on.
EXP1 ON HI Triggered when you move the expression pedal to maximum while the expression pedal switch is on.
EXP2 Triggered when you move the external expression pedal.GK S1GK S2
Triggered when you operate the [S1]/[S2] button of the GK pickup.
Int Pdl Time *1 Specifies the time over which the internal pedal will move from the released (heel) position to the depressed (toe) position.
Int Pdl Curve *1LINEAR, SLOW RISE, FAST RISE
Select one of the following curves to specify the change produced by the internal pedal.LINEAR SLOW RISE FAST RISE
Wav Pdl Rate *2 Specifies the time for one cycle of the wave pedal.
Parameter Explanation
WPdWavFrm *2 SAW, TRI, SIN
Select one of the following to specify the change produced by the wave pedal.
SAW TRIANGLE SINE
*1 Source=INT PDL only*2 Source=WAVE PDL only
Example settingMake smoothly bend up one octave when you press the [CTL 1] pedalSelect the patch whose settings you want to edit, and then make the following parameter settings.
Button Parameter Value[SYSTEM] SysCtl: CTL1 Func PATCH SETTING
[EFFECTS]
Fx: Type PEDAL BENDAsgn1: On/Off ONAsgn1: Target FXP.BND: POSITIONAsgn1: Target Min 0Asgn1: Target Max 100Asgn1: Source INT PDLAsgn1: Src Mode MOMENTARYAsgn1: S. Range Min 0Asgn1: S. Range Max 127Asgn1: Int Pdl Trig CTL 1
Asgn1: Int Pdl Time 20(Adjust the time over which the pitch rises an octave.)
Asgn1: Int Pdl CurveLINEAR(You can select a different curve to modify the way in which the change occurs.)
For guitar solos, you want to be able to step on the [CTL 1] pedal to switch AMP to solo modeButton Parameter Value[SYSTEM] Sys: CTL 1 Func PATCH SETTING
[EFFECTS]
Asgn1: On/Off ONAsgn1: Target AMP: SOLO SWAsgn1: Target Min OFFAsgn1: Target Max ONAsgn1: Source CTL 1Asgn1: Src Mode TOGGLEAsgn1: S. Range Min 0Asgn1: S. Range Max 127Asgn2: On/Off ONAsgn2: Target AMP: GAIN SWAsgn2: Target Min LOWAsgn2: Target Max MIDAsgn2: Source CTL 1Asgn2: Src Mode TOGGLEAsgn2: S. Range Min 0Asgn2: S. Range Max 127

13
Deutsch
EnglishFrançais
ItalianoEspañol
PortuguêsN
ederlands
System Settings
Press the [SYSTEM] button to edit.
MEMOFor details on +/, marks, refer to “Basic Procedure for Editing the Settings” (p. 5).
Specifying the Output System (Sys: Output)
Parameter ExplanationOutput Refer to “Specifying the Output System (Sys: Output)” (p. 3).
Settings of the GK Pickups (GK: )
Parameter Explanation
Connect
The GP-10 comes equipped with a function that automatically determines whether or not a GK connection exists and switches the internal settings accordingly. This makes it possible for you to all functions other than a Modeling/Alternate Tuning (effects, tuner, etc.) when you’ve connected only to the GUITAR INPUT. You should ordinarily use AUTO (default). In cases where the auto-detect function does not operate correctly, (for example, when you are using a Divided pickup other than the GK-3), change the setting.
AUTO The presence of a GK connection is detected automatically and the internal settings are switched accordingly.
OFF Settings appropriate for a GUITAR INPUT connection are always used.ON Settings appropriate for a GK connection are always used.
Setting Refer to “MEMO: GK settings” (p. 3) and “GK Set Selection for the Patch (Patch: GK Set)” (p. 11).
Settings of the GK set 1–3 (GK 1–3: )
Parameter ExplanationType Refer to “Setting Up the GK Pickups” (p. 3).Scale *1 Refer to “Specifying your guitar’s scale length” (p. 3).Distance 1–6 *3 Refer to “Specifying the distance from the bridge” (p. 3).Sens 1–6 Refer to “Adjusting the pickup sensitivity” (p. 3).
PU Phase *1 This sets the phase for the divided pickup and normal pickup. Set this to “NORMAL,” and if the low-frequency range is cut, set this to “INVERSE.”
PU Direction *1This sets the direction for the divided pickup’s installation.NORMAL Positioned such that the cable exits near the 6th string.REVERSE Positioned such that the cable exits near the 1st string.
Piezo Tone L *2 Adjusts the low-frequency range.Piezo Tone H *2 Adjusts the high-frequency range.
Sw Position *1 This exchanges the function for the GK-3’s, GK-2A’s or GC-1’s [S1], [S2] buttons (REVERSE).
Dwn Tune Shift If the guitar you’re using has been tuned down, specify the number of chromatic steps by which it has been down-tuned.
Nrml PU Gain Adjusts the input level of the normal pickup.
*1 This is not shown if “GC-1” is selected as the pickup type.*2 This setting applies if the PU TYPE is set to “PIEZO–.”*3 This parameter is not shown if you select “GC-1” or one of the piezo-type pickups as the pickup
type.
System Settings for the Pedals and Switches (SysCtl: )Specifies the functions that are assigned to the [CTL 1], [CTL 2] pedals and the expression pedal. With the factory settings, “PATCH SETTING” is selected; each pedal is assigned the most suitable function for that patch. If you want the pedals to operate in the same way regardless of which patch is selected, choose something other than “PATCH SETTING.”
Parameter Explanation
CTL 1–4 FuncGKSW 1–2 FuncEXPSW Func
Settings for the GP-10’s [CTL 1], [CTL 2] pedals, external footswitches (CTL 3, CTL 4), the GK pickup’s [S1], [S2] buttons, and the expression pedal switch.PATCH SETTING
Choose this if you want the function of the pedals and switches to change for each patch.
PATCH UP Moves from the current patch number to a number that is larger by the value of the Patch Up setting.
PATCH DOWN Moves from the current patch number to a number that is smaller by the value of the Patch Down setting.
PATCH SELMoves to the patch that is specified by the Patch Select.
* For details on other values, refer to “Pedal and Switch Settings for Each Patch (Ctl: )” (p. 11).
TUNER ON/OFF Turn the tuner on/off.
Mode
This sets the behavior of the value each time the switch is operated.
MOMENTARY The normal state is Off (minimum value), with the switch On (maximum value) only while the footswitch is depressed.
TOGGLE The setting is toggled On (maximum value) or Off (minimum value) with each press of the footswitch.
C1–4 Pat. UpC1–4 Pat. DwnGKSW1–2PUpGKSW1–2PDwn
Specifies the distance of the increment/decrement from the current patch number when PATCH UP/DOWN is selected and you press the pedal or switch.
C1–4 Pat. Sel Specifies the patch number to which you will move directly when PATCH SEL is selected and you press the pedal or switch.
EXP 1 off FnEXP 1 on FncEXP 2 FuncGKVOL Func
Settings for the GK pickup’s GK volume, the GP-10’s expression pedal (when the pedal switch is OFF and when it is ON), and external expression pedals.
PATCH SETTING
Choose this if you want the function of the pedals to change for each patch.
* For details on other values, refer to “Pedal and Switch Settings for Each Patch (Ctl: )” (p. 11).
Asgn Hld Sw Specifies whether the state of the expression pedal and GK volume will be (ON) or will not be (OFF) reflected by the next patch when you switch patches.
Example settingIn all patches, switch delay on/off by pressing the [CTL] pedalMake the following parameter settings.
Buttons Parameter Value[SYSTEM] SysCtl: CTL 1 Func DELAY ON/OFF
In all patches, use the [CTL 1], [CTL 2] pedals to increase/decrease the patch number by tenButtons Parameter Value
[SYSTEM]
SysCtl: CTL 1 Func PATCH DOWNSysCtl: CTL 2 Func PATCH UPSysCtl: C1 Pat. Down 10SysCtl: C2 Pat. Up 10
USB Audio Settings (USBAudio: )
Parameter ExplanationIn Lv Adjusts the volume of the digital audio signal from USB (computer).Out Lv Adjusts the volume of the digital audio signal output to USB (computer).
Routing
Specifies the routing for USB audio. You can record the sound of the GP-10 into your DAW, play back the recorded sound from your DAW and monitor it on the GP-10, or re-guitar/re-amp your recording. For details, refer to the “Parameter Guide” (PDF).
What does it mean to Re-Guitar/Re-Amp?This is the technique in which an original signal unprocessed by modeling or effects is recorded on the DAW, allowing you to modify the modeling sound or amp sound later to create the final result. This gives you the freedom to change the sound after you’ve finished recording.
Guitar Performance MIDI Output Settings (MIDI: )
Parameter ExplanationOn/Off If this is “OFF,” guitar performance data will not be transmitted from MIDI OUT.
ModeMONO In this mode, one channel per string is used, thus using a total of six
channels.
POLY In this mode, the messages for all six strings are transmitted over a single channel.
ChromaticWhen using string bending or other such techniques to gradually change the pitch with the guitar or bass, you can set the GP-10 so that the pitch of the MIDI messages being output changes in semitone increments.
Hold Pedal
Specifies the pedal to which the Hold function is assigned.OFF The Hold pedal is not assigned.CTL 1 The [CTL 1] pedal is the Hold pedal.CTL 2 The [CTL 2] pedal is the Hold pedal.
Pedal Bend
Specifies whether expression pedal operations transmit pitch bend messages.OFF Pitch bend is not transmitted.DOWN Bend-down data is transmitted.UP Bend-up data is transmitted.
Bend Range Specifies the maximum range of change for pitch bend messages.Data Thin If this is “ON,” pitch bend data will be thinned-out to reduce the volume of MIDI data.
String ChSpecifies the MIDI channel used to transmit guitar performance data. If Mode is set to “MONO,” the data will be transmitted using six channels starting with the channel you specify here.
DynamicsAdjusts the sensitivity of the tone’s volume (velocity) change.The further you raise this setting, the more easy it becomes to produce higher values for velocity.
Play Feel
Adjusts the velocity change curve of the tone.
FEEL1–4
FEEL1 is the mode that gives sounds the broadest variation in volume based on the picking dynamics. As the setting number is increased, it becomes easier to produce high volume sounds even with weaker picking. This allows you to play with consistent volume, whether you tap the strings or use rough picking.
NO DYNA In this mode, sounds are played at a fixed volume regardless of the picking strength.
Low Velo Cut Adjust this if simply touching a string causes a note to be unintentionally triggered. Raising this value will make it more difficult to trigger notes.
Tuner Settings (Tuner: )
Parameter ExplanationPitch Specifies the reference pitch.
Sound
MUTE Sound will not be output while tuning.
BYPASSWhile tuning, the sound from the GK IN connector/GUITAR IN jack will be output without change. All modelings and effects will be off.
EFFECT Allows you to tune while hearing the current effect/modeling sound.
Function
ENABLE From the Play screen, pressing the [I] and [H] pedals simultaneously will enter Tuner mode.
DISABLE
From the Play screen, pressing the [I] and [H] pedals simultaneously will not enter Tuner mode.
* From the Play screen, pressing the [J] button will enter Tuner mode.

Patch Operations
14
Adjusting the Display’s Contrast (Sys: Contrast)
Parameter ExplanationContrast Adjusts the contrast of the display.
Panel Lock Settings (Sys: Knob Lock)
Parameter Explanation
Knob LockIf this is ON, patch selection using the [PATCH/VALUE] knob is disabled. This prevents the patch number from being changed if your toe contacts the [PATCH/VALUE] knob when you operate the pedal.
Auto Off Settings (Sys: Auto Off)
Parameter Explanation
Auto Off
The GP-10 can turn off its power automatically. The power will turn off automatically when 10 hours have passed since you last played or operated the unit. With the factory settings, this function is turned “ON” (power-off in 10 hours). If you want to have the power remain on all the time, turn it “OFF.”
Limiting the Patches Selectable in the Play Screen (Sys: Patch Extent)
Parameter Explanation
Patch Extent If this is “ON,” the patches that can be selected in the Play screen are limited to the range you specify. You can use this to prevent unwanted patches from being selected during a live performance.Example: If you want to select only patch numbers 20–35, specify as follows.• Patch Extent: ON• Min: 20• Max: 35
Min
Max
Adjusting the Expression Pedal (Calibration)
The GP-10’s expression pedal has been set for optimal operation at the factory. However, extended use and certain operating environments can result in the pedal going out of adjustment.If you encounter problems such as the expression pedal’s ON/OFF switch not functioning or the volume pedal not fully cutting off the sound, you can use the following procedure to readjust the pedal.
1. Press the [SYSTEM] button several times to select the “Calibration.”The display shows “Set EXP1 to MIN.”
2. Move the heel of the expression pedal all the way down, then release the pedal and press the [WRITE] button. The display shows “Set EXP1 to MAX.”
3. Move the toe of the expression pedal all the way down, then release the pedal and press the [WRITE] button. A value indicating the current stiffness (EXP1Sw: Threshold) of the expression pedal switch appears in the display.Value: 1–16 (default: 8)
4. Use the [VALUE] knob to adjust the stiffness (THRESHOLD) of the expression pedal switch.The lower the value, the more easily the switch will respond, even when pressed lightly.
* These values are not initialized when you execute Factory Reset.
Restoring the Factory Settings (Factory Reset)
Restoring the GP-10’s system settings (System parameters) to their original factory default settings is referred to as “Factory Reset.”
1. Press the [SYSTEM] button several times until the “Factory Reset” appears.
2. Use the [VALUE] knob to specify the areas that will be returned to their factory-set state.
Value ExplanationSYSTEM + PATCH System parameter settings + User patch settingsPATCH User patch settings
3. Press the [WRITE] button.Confirmation screen appears.If you decide to cancel, press the [EXIT] button.
4. If you want to proceed with the factory reset, press the [WRITE] button.
Patch Operations& For details on saving a patch (Write), refer to “Saving a Patch” (p. 4).
Exchanging Patches (Exchange)
You can exchange patches with one another, rearranging the patches.
1. Select an exchange-source patch.
2. Press the [WRITE] button.
3. Use the [K] [J] buttons until “Exchange” appears in the display.
Exchange-destination patch
NumberExchange with#90 Init Patch
4. Turn the [VALUE] knob to select the exchange-destination patch.
5. Press the [WRITE] button; the patches will be exchanged.
Inserting a Patch (Insert)
To insert a patch, choose “Insert” in step 3 of the Exchange procedure.Example: If you insert patch 1 at patch 30, patch 30 and subsequent patches shift upward by one patch (patch 30 becomes patch 31).
* When you execute Insert, the last patch (patch 99) is deleted.
Insert-destination patch
NumberInsert to #90 Init Patch
Initializing a Patch (Initialize)
This operation initializes a patch.
1. Select the patch that you want to initialize.
2. Press the [WRITE] button.
3. Use the [K] [J] buttons until “Initialize” appears in the display.
Patch to be initialized
NumberInitialize #01 Dual Sync
4. Press the [WRITE] button; the patch will be initialized.

15
Deutsch
EnglishFrançais
ItalianoEspañol
PortuguêsN
ederlands
USING THE UNIT SAFELY
IMPORTANT NOTES
WARNINGTo completely turn off power to the unit, pull out the plug from the outletEven with the power switch turned off, this unit is not completely separated from its main source of power. When the power needs to be completely turned off, turn off the power switch on the unit, then pull out the plug from the outlet. For this reason, the outlet into which you choose to connect the power cord’s plug should be one that is within easy reach and readily accessible.
Concerning the Auto Off functionThe power to this unit will be turned off automatically after a predetermined amount of time has passed since it was last used for playing music, or its buttons or controls were operated (Auto Off function). If you do not want the power to be turned off automatically, disengage the Auto Off function (p. 14).
WARNINGUse only the supplied AC adaptor and the correct voltageBe sure to use only the AC adaptor supplied with the unit. Also, make sure the line voltage at the installation matches the input voltage specified on the AC adaptor’s body. Other AC adaptors may use a different polarity, or be designed for a different voltage, so their use could result in damage, malfunction, or electric shock.
CAUTIONTake care so as not to get fingers pinchedWhen handling the following moving parts, take care so as not to get fingers, etc., pinched. An adult should always be in charge of handling these items.• Expression pedal (p. 4)
Placement
• Depending on the material and temperature of the surface on which you place the unit, its rubber feet may discolor or mar the surface. You can place a piece of felt or cloth under the rubber feet to prevent this from happening. If you do so, please make sure that the unit will not slip or move accidentally.
Maintenance
• For everyday cleaning wipe the unit with a soft, dry cloth or one that has been slightly dampened with water. To remove stubborn dirt, use a cloth impregnated with a mild, non-abrasive detergent. Afterwards, be sure to wipe the unit thoroughly with a soft, dry cloth.
Repairs and Data
• Before sending the unit away for repairs, be sure to make a backup of the data stored within it; or you may prefer to write down the needed information. Although we will do our utmost to preserve the data stored in your unit when we carry out repairs, in some cases, such as when the memory section is physically damaged, restoration of the stored content may be impossible. Roland assumes no liability concerning the restoration of any stored content that has been lost.
Additional Precautions
• Any data stored within the unit can be lost as the result of equipment failure, incorrect operation, etc. To protect yourself against the irretrievable loss of data, try to make a habit of creating regular backups of the data you’ve stored in the unit.
• Roland assumes no liability concerning the restoration of any stored content that has been lost.
• Never strike or apply strong pressure to the display.
• Use only the specified expression pedal (Roland EV-5, FV-500H/L; sold separately). By connecting any other expression pedals, you risk causing malfunction and/or damage to the unit.
• When you operate the expression pedal, please be careful not to get your fingers pinched between the movable part and the panel. In places where small children are present, make sure that an adult provides supervision and guidance.
• ASIO is a trademark and software of Steinberg Media Technologies GmbH.
• This product contains eCROS integrated software platform of eSOL Co.,Ltd. eCROS is a trademark of eSOL Co., Ltd. in Japan.
• Roland, BOSS, COSM, V-Guitar, and METAL ZONE are either registered trademarks or trademarks of Roland Corporation in the United States and/or other countries.
• The product names mentioned in this document are registered trademarks or trademarks of their respective owners. In this manual, these names are used because it is the most practical way of describing the sounds that are simulated using COSM technology.
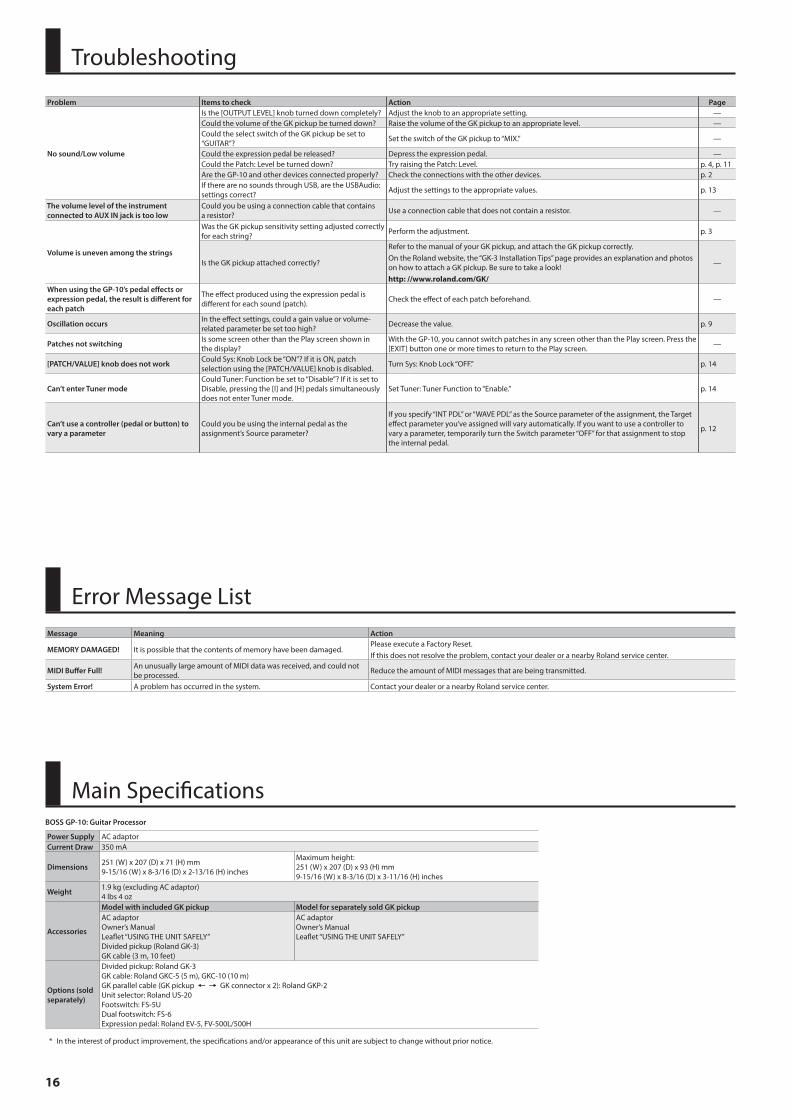
16
Troubleshooting
Error Message List
Main Specifications
Message Meaning Action
MEMORY DAMAGED! It is possible that the contents of memory have been damaged.Please execute a Factory Reset.If this does not resolve the problem, contact your dealer or a nearby Roland service center.
MIDI Buffer Full! An unusually large amount of MIDI data was received, and could not be processed. Reduce the amount of MIDI messages that are being transmitted.
System Error! A problem has occurred in the system. Contact your dealer or a nearby Roland service center.
Problem Items to check Action Page
No sound/Low volume
Is the [OUTPUT LEVEL] knob turned down completely? Adjust the knob to an appropriate setting. —Could the volume of the GK pickup be turned down? Raise the volume of the GK pickup to an appropriate level. —Could the select switch of the GK pickup be set to “GUITAR”? Set the switch of the GK pickup to “MIX.” —
Could the expression pedal be released? Depress the expression pedal. —Could the Patch: Level be turned down? Try raising the Patch: Level. p. 4, p. 11Are the GP-10 and other devices connected properly? Check the connections with the other devices. p. 2If there are no sounds through USB, are the USBAudio: settings correct? Adjust the settings to the appropriate values. p. 13
The volume level of the instrument connected to AUX IN jack is too low
Could you be using a connection cable that contains a resistor? Use a connection cable that does not contain a resistor. —
Volume is uneven among the strings
Was the GK pickup sensitivity setting adjusted correctly for each string? Perform the adjustment. p. 3
Is the GK pickup attached correctly?
Refer to the manual of your GK pickup, and attach the GK pickup correctly.On the Roland website, the “GK-3 Installation Tips” page provides an explanation and photos on how to attach a GK pickup. Be sure to take a look!http: //www.roland.com/GK/
—
When using the GP-10’s pedal effects or expression pedal, the result is different for each patch
The effect produced using the expression pedal is different for each sound (patch). Check the effect of each patch beforehand. —
Oscillation occurs In the effect settings, could a gain value or volume-related parameter be set too high? Decrease the value. p. 9
Patches not switching Is some screen other than the Play screen shown in the display?
With the GP-10, you cannot switch patches in any screen other than the Play screen. Press the [EXIT] button one or more times to return to the Play screen. —
[PATCH/VALUE] knob does not work Could Sys: Knob Lock be “ON”? If it is ON, patch selection using the [PATCH/VALUE] knob is disabled. Turn Sys: Knob Lock “OFF.” p. 14
Can’t enter Tuner modeCould Tuner: Function be set to “Disable”? If it is set to Disable, pressing the [I] and [H] pedals simultaneously does not enter Tuner mode.
Set Tuner: Tuner Function to “Enable.” p. 14
Can’t use a controller (pedal or button) to vary a parameter
Could you be using the internal pedal as the assignment’s Source parameter?
If you specify “INT PDL” or “WAVE PDL” as the Source parameter of the assignment, the Target effect parameter you’ve assigned will vary automatically. If you want to use a controller to vary a parameter, temporarily turn the Switch parameter “OFF” for that assignment to stop the internal pedal.
p. 12
BOSS GP-10: Guitar Processor
Power Supply AC adaptorCurrent Draw 350 mA
Dimensions 251 (W) x 207 (D) x 71 (H) mm9-15/16 (W) x 8-3/16 (D) x 2-13/16 (H) inches
Maximum height: 251 (W) x 207 (D) x 93 (H) mm9-15/16 (W) x 8-3/16 (D) x 3-11/16 (H) inches
Weight 1.9 kg (excluding AC adaptor)4 lbs 4 oz
Accessories
Model with included GK pickup Model for separately sold GK pickupAC adaptorOwner’s ManualLeaflet “USING THE UNIT SAFELY”Divided pickup (Roland GK-3)GK cable (3 m, 10 feet)
AC adaptorOwner’s ManualLeaflet “USING THE UNIT SAFELY”
Options (sold separately)
Divided pickup: Roland GK-3GK cable: Roland GKC-5 (5 m), GKC-10 (10 m)GK parallel cable (GK pickup #" GK connector x 2): Roland GKP-2Unit selector: Roland US-20Footswitch: FS-5UDual footswitch: FS-6Expression pedal: Roland EV-5, FV-500L/500H
* In the interest of product improvement, the specifications and/or appearance of this unit are subject to change without prior notice.


For the USA
DECLARATION OF CONFORMITYCompliance Information Statement
Model Name :Type of Equipment :Responsible Party :
Address :Telephone :
Model Name :Type of Equipment :Responsible Party :
Address :Telephone :
Model Name :Type of Equipment :Responsible Party :
Address :Telephone :
V-STUDIO 20 (Model Number: VS-20)USB Audio ControllerCakewalk Inc.268 Summer Street, Boston, MA 0221002210(617) 423-9004
FP-80Digital PianoRoland Corporation U.S.5100 S. Eastern Avenue Los Angeles, CA 90040-2938(323) 890-3700
GP-10Guitar SynthesizerRoland Corporation U.S.5100 S. Eastern Avenue, Los Angeles, CA 90040-2938(323) 890-3700
For the USA
FEDERAL COMMUNICATIONS COMMISSIONRADIO FREQUENCY INTERFERENCE STATEMENT
This equipment has been tested and found to comply with the limits for a Class B digital device, pursuant to Part 15 of the FCC Rules. These limits are designed to provide reasonable protection against harmful interference in a residential installation. This equipment generates, uses, and can radiate radio frequency energy and, if not installed and used in accordance with the instructions, may cause harmful interference to radio communications. However, there is no guarantee that interference will not occur in a particular installation. If this equipment does cause harmful interference to radio or television reception, which can be determined by turning the equipment off and on, the user is encouraged to try to correct the interference by one or more of the following measures:
– Reorient or relocate the receiving antenna.– Increase the separation between the equipment and receiver.– Connect the equipment into an outlet on a circuit different from that to which the receiver is connected.– Consult the dealer or an experienced radio/TV technician for help.
This device complies with Part 15 of the FCC Rules. Operation is subject to the following two conditions: (1) this device may not cause harmful interference, and (2) this device must accept any interference received, including interference that may cause undesired operation.
This equipment requires shielded interface cables in order to meet FCC class B limit.Any unauthorized changes or modifications not expressly approved by the party responsible for compliance could void the user’s authority to operate the equipment.
WARNINGThis product contains chemicals known to cause cancer, birth defects and other reproductive harm, including lead.
For C.A. US (Proposition 65)
For Canada
CAN ICES-3 (B)/NMB-3 (B)
For Korea

For EU Countries
For China

* 5 1 0 0 0 3 9 0 4 0 - 0 2 *
Information When you need repair service, call your nearest Roland Service Center or authorized Roland distributor in your country as shown below.
AFRICAREUNIONMARCEL FO-YAM Sarl25 Rue Jules Hermann, Chaudron - BP79 97 491 Ste Clotilde Cedex, REUNION ISLAND TEL: (0262) 218-429
SOUTH AFRICAPaul Bothner(PTY)Ltd.Royal Cape Park, Unit 24 Londonderry Road, Ottery 7800 Cape Town, SOUTH AFRICA TEL: (021) 799 4900
ASIACHINARoland Shanghai Electronics Co.,Ltd.5F. No.1500 Pingliang Road, Yangpu Shanghai 200090, CHINA TEL: (021) 5580-0800Toll Free: 4007-888-010
Roland Shanghai Electronics Co.,Ltd. (BEIJING OFFICE)3F, Soluxe Fortune Building63 West Dawang Road, Chaoyang Beijing, CHINA TEL: (010) 5960-2565/0777Toll Free: 4007-888-010
HONG KONGTom Lee Music 11/F Silvercord Tower 130 Canton RdTsimshatsui, Kowloon,HONG KONGTEL: 852-2737-7688
Parsons Music Ltd. 8th Floor, Railway Plaza, 39 Chatham Road South, T.S.T, Kowloon, HONG KONG TEL: 852-2333-1863
INDIARivera Digitec (India) Pvt. Ltd.411, Nirman Kendra Mahalaxmi Flats Compound Off. Dr. Edwin Moses Road, Mumbai-400011, INDIA TEL: (022) 2493 9051
INDONESIAPT. Citra IntiramaRuko Garden Shopping Arcade Unit 8 CR, Podomoro City Jl.Letjend. S.Parman Kav.28Jakarta Barat 11470, INDONESIA TEL: (021) 5698-5519/5520
KAZAKHSTANAlatau Dybystary141 Abylai-Khan ave, 1st floor, 050000 Almaty, KAZAKHSTAN TEL: (727) 2725477FAX: (727) 2720730
KOREACosmos Corporation27, Banpo-daero, Seocho-gu, Seoul, KOREA TEL: (02) 3486-8855
MALAYSIA/SINGAPORERoland Asia Pacific Sdn. Bhd.45-1, Block C2, Jalan PJU 1/39, Dataran Prima, 47301 Petaling Jaya, Selangor, MALAYSIATEL: (03) 7805-3263
PHILIPPINESG.A. Yupangco & Co. Inc.339 Gil J. Puyat Avenue Makati, Metro Manila 1200, PHILIPPINES TEL: (02) 899 9801
TAIWANROLAND TAIWAN ENTERPRISE CO., LTD.9F-5, No. 112 Chung ShanNorth Road Sec. 2 Taipei 104,TAIWAN R.O.C.TEL: (02) 2561 3339
THAILANDTheera Music Co. , Ltd.100-108 Soi Verng Nakornkasem, New Road, Sumpantawong, Bangkok 10100, THAILAND TEL: (02) 224-8821
VIET NAM VIET THUONG CORPORATION 386 CACH MANG THANG TAM ST. DIST.3, HO CHI MINH CITY, VIET NAMTEL: (08) 9316540
OCEANIAAUSTRALIA/ NEW ZEALAND Roland Corporation Australia Pty.,Ltd. 38 Campbell Avenue, Dee Why West. NSW 2099, AUSTRALIA
For Australia TEL: (02) 9982 8266
For New Zealand TEL: (09) 3098 715
CENTRAL/LATIN AMERICA
ARGENTINAInstrumentos Musicales S.A.Av.Santa Fe 2055 (1123) Buenos Aires, ARGENTINA TEL: (011) 4508-2700
BARBADOSA&B Music Supplies LTD12 Webster Industrial Park Wildey, St.Michael, BARBADOS TEL: (246) 430-1100
BRAZILRoland Brasil Ltda.Rua San Jose, 211 Parque Industrial San Jose Cotia - Sao Paulo - SP, BRAZIL TEL: (011) 4615 5666
CHILEComercial Fancy II S.A.Rut.: 96.919.420-1 Nataniel Cox #739, 4th Floor Santiago - Centro, CHILE TEL: (02) 384-2180
COLOMBIACENTRO MUSICAL S.A.S.Parque Industrial del Norte Bodega 130GIRARDOTA - ANTIOQUIA, COLOMBIA TEL: (454) 57 77 EXT 115
COSTA RICAJUAN Bansbach Instrumentos MusicalesAve.1. Calle 11, Apartado 10237, San Jose, COSTA RICA TEL: 258-0211
CURACAOZeelandia Music Center Inc.Orionweg 30 Curacao, Netherland Antilles TEL: (305) 5926866
DOMINICAN REPUBLICInstrumentos Fernando GiraldezCalle Roberto Pastoriza #325 Sanchez Naco Santo Domingo, DOMINICAN REPUBLIC TEL: (809) 683 0305
ECUADORMas MusikaRumichaca 822 y Zaruma Guayaquil - ECUADOR TEL: (593-4) 2302364
EL SALVADOROMNI MUSIC75 Avenida Norte y Final Alameda Juan Pablo II, Edificio No.4010 San Salvador, EL SALVADOR TEL: 262-0788
GUATEMALACasa InstrumentalCalzada Roosevelt 34-01,zona 11 Ciudad de Guatemala, GUATEMALA TEL: (502) 599-2888
HONDURASAlmacen Pajaro Azul S.A. de C.V.BO.Paz Barahona 3 Ave.11 Calle S.O San Pedro Sula, HONDURAS TEL: (504) 553-2029
MARTINIQUEMusique & SonZ.I.Les Mangle 97232 Le Lamentin, MARTINIQUE F.W.I. TEL: 596 596 426860
MEXICOCasa Veerkamp, s.a. de c.v.Av. Toluca No. 323, Col. Olivar de los Padres 01780 Mexico D.F., MEXICO TEL: (55) 5668-6699
Faly MusicSucursal Capu Blvd. Norte N.3213Col. Nueva Aurora Cp.72070 Puebla, Puebla, MEXICO TEL: 01 (222) 2315567 o 97FAX: 01 (222) 2266241
Gama Music S.A. de C.V.Madero Pte. 810 Colonia CentroC.P. 64000 Monterrey, Nuevo León, MEXICO TEL: 01 (81) 8374-1640 o 8372-4097www.gamamusic.com
ProsceniaMorelos No. 2273Col. Arcos SurC.P. 44120 Guadalajara, Jalisco, MEXICO TEL: 01(33) 3630-0015
NICARAGUABansbach Instrumentos Musicales NicaraguaAltamira D'Este Calle Principal de la Farmacia 5ta.Avenida 1 Cuadra al Lago.#503 Managua, NICARAGUA TEL: (505) 277-2557
PANAMASUPRO MUNDIAL, S.A.Boulevard Andrews, Albrook, Panama City, REP. DE PANAMA TEL: 315-0101
PARAGUAYWORLD MUSICJebai Center 2018, CentroCIUDAD DE ESTE, PARAGUAY TEL: (595) 615 059
PERUAUDIONET DISTRIBUCIONES MUSICALES SAC Jr. Ramon Dagnino N°201- Jesús MaríaDISTRITO DE JESUS MARIALIMA, PERU TEL: 9 983 47 301 - 51 433 80 83
TRINIDADAMR LtdGround Floor Maritime Plaza Barataria TRINIDAD W.I. TEL: (868) 638 6385
URUGUAYTodo Musica S.A.Francisco Acuna de Figueroa 1771 C.P.: 11.800 Montevideo, URUGUAY TEL: (02) 924-2335
VENEZUELAInstrumentos Musicales Allegro,C.A.Av.las industrias edf.Guitar import #7 zona Industrial de Turumo Caracas, VENEZUELA TEL: (212) 244-1122
EUROPEBELGIUM/FRANCE/ HOLLAND/ LUXEMBOURGRoland Central Europe N.V.Houtstraat 3, B-2260, Oevel (Westerlo) BELGIUM TEL: (014) 575811
BOSNIA AND HERZEGOVINAMix-AP Music78000 Banja Luka, Veselina Maslese 3, BOSNIA AND HERZEGOVINA TEL: 65 403 168
CROATIAART-CENTARDegenova 3. HR - 10000 Zagreb, CROATIA TEL: (1) 466 8493
EUROMUSIC AGENCYK. Racina 1/15HR - 40000 CAKOVEC, CROATIATel: 40-370-841
CZECH REPUBLICCZECH REPUBLIC DISTRIBUTOR s.r.oPod Bání 8180 00 Praha 8, CZECH REP. TEL: 266 312 557
DENMARK/ESTONIA/LATVIA/LITHUANIA Roland Scandinavia A/SSkagerrakvej 7, DK-2150 Nordhavn, DENMARK TEL: 39166200
FINLANDRoland Scandinavia As, Filial FinlandVanha Nurmijarventie 62 01670 Vantaa, FINLAND TEL: (0) 9 68 24 020
GERMANY/AUSTRIAROLAND Germany GmbH.Adam-Opel-Strasse 4, 64569 Nauheim, GERMANY TEL: 6152 95546-00
GREECE/CYPRUSSTOLLAS S.A. Music Sound Light155, New National Road Patras 26442, GREECE TEL: 2610 435400
HUNGARYRoland East Europe Ltd.2045. Törökbálint, FSD Park 3. ép., HUNGARY TEL: (23) 511 011
IRELANDRoland IrelandE2 Calmount Park, Calmount Avenue, Dublin 12, Republic of IRELAND TEL: (01) 4294444
ITALYRoland Italy S. p. A. Viale delle Industrie 8, 20020 Arese, Milano, ITALY TEL: (02) 937781
MACEDONIAMK MJUZIK Bratstvo Edinstvo 92208 Lozovo, MACEDONIA TEL: 70 264 458
MONTENEGROMAX-APP. Fah 92Przno, Kamenovo bb86000 Budva, MONTENEGRO TEL: 33 452-820
NORWAYRoland Scandinavia Avd. Kontor NorgeLilleakerveien 2 Postboks 95 Lilleaker N-0216 Oslo, NORWAY TEL: 2273 0074
POLANDROLAND POLSKA SP. Z O.O.ul. Katy Grodziskie 16B 03-289 Warszawa, POLAND TEL: (022) 678 9512
PORTUGALRoland Iberia SL.Branch Office PortoEdifício Tower Plaza Rotunda Eng. Edgar Cardoso 23, 4-B4400-676 Vila Nova de Gaia, PORTUGAL TEL: (+351) 22 608 00 60
ROMANIAPro Music Concept SRL440221 Satu Mare B-dul Independentei nr. 14/a., ROMANIA TEL: (0361) 807-333
RUSSIARoland Music LLCDorozhnaya ul.3,korp.6 117 545 Moscow, RUSSIA TEL: (495) 981-4967
SERBIAMusic APSutjeska br. 5 XS - 24413 PALIC, SERBIATEL: (0) 24 539 395
SLOVAKIADAN Distribution, s.r.o.Povazská 18. SK - 940 01 Nové Zámky, SLOVAKIA TEL: (035) 6424 330
SPAINRoland Systems Group EMEA, S.L.Paseo García Faria, 33-35 08005 Barcelona, SPAIN TEL: 93 493 91 00
SWEDEN Roland Scandinavia A/S SWEDISH SALES OFFICEMårbackagatan 31, 4 tr.SE-123 43 Farsta, SWEDEN TEL: (0) 8 683 04 30
SWITZERLANDRoland (Switzerland) AG Landstrasse 5, Postfach, CH-4452 Itingen, SWITZERLAND TEL: (061) 975-9987
TURKEY ZUHAL DIS TICARET A.S.Galip Dede Cad. No.33 Beyoglu, Istanbul, TURKEY TEL: (0212) 249 85 10
UKRAINEEURHYTHMICS Ltd.P.O.Box: 37-a. Nedecey Str. 30 UA - 89600 Mukachevo, UKRAINE TEL: (03131) 314-40
UNITED KINGDOM Roland (U.K.) Ltd.Atlantic Close, SWANSEA SA7 9FJ, UNITED KINGDOM TEL: (01792) 702701
MIDDLE EASTBAHRAINMoon StoresNo.1231&1249 Rumaytha Building Road 3931, Manama 339, BAHRAIN TEL: 17 813 942
EGYPTAl Fanny Trading Office9, EBN Hagar Al Askalany Street, ARD E1 Golf, Heliopolis, Cairo 11341, EGYPT TEL: (022)-417-1828
IRANMOCO INC.Jadeh Makhsous Karaj (K-9), Nakhe Zarin Ave.Jalal Street, Reza Alley No.4 Tehran 1389716791, IRAN TEL: (021)-44545370-5
ISRAELHalilit P. Greenspoon & Sons Ltd.8 Retzif Ha'alia Hashnia St. Tel-Aviv-Yafo ISRAEL TEL: (03) 6823666
JORDANMUSIC HOUSE CO. LTD. FREDDY FOR MUSIC P. O. Box 922846 Amman 11192, JORDAN TEL: (06) 5692696
KUWAITEASA HUSAIN AL-YOUSIFI & SONS CO.Al-Yousifi Service Center P.O.Box 126 (Safat) 13002, KUWAIT TEL: 00 965 802929
LEBANONChahine S.A.L.George Zeidan St., Chahine Bldg., Achrafieh, P.O.Box: 16-5857 Beirut, LEBANON TEL: (01) 20-1441
OMANTALENTZ CENTRE L.L.C.Malatan House No.1 Al Noor Street, Ruwi SULTANATE OF OMAN TEL: 2478 3443
QATARAL-EMADI TRADING & CONTRACTING CO.P.O. Box 62, Doha, QATAR TEL: 4423-554
SAUDI ARABIAAdawliah Universal Electronics APLBehind Pizza Inn Prince Turkey Street Adawliah Building, PO BOX 2154, Al Khobar 31952, SAUDI ARABIA TEL: (03) 8643601
SYRIATechnical Light & Sound CenterPO Box 13520 Bldg No.49 Khaled Abn Alwalid St.Damascus, SYRIA TEL: (011) 223-5384
U.A.E.Adawliah Universal Electronics APLOmar bin alkhattab street, fish round about, nayef area, deira, Dubai, U.A.E. TEL: (04) 2340442
NORTH AMERICACANADA Roland Canada Ltd. (Head Office)5480 Parkwood Way Richmond B. C., V6V 2M4, CANADA TEL: (604) 270 6626
Roland Canada Ltd. (Toronto Office)170 Admiral Boulevard Mississauga On L5T 2N6, CANADA TEL: (905) 362 9707
U. S. A. Roland Corporation U.S.5100 S. Eastern Avenue Los Angeles, CA 90040-2938, U. S. A. TEL: (323) 890 3700
As of Nov. 1, 2013 (ROLAND)