1f95 391 op 37 6528c - jackson systems€¦ · 1f95-391 operating ... next program period in...
TRANSCRIPT

Thermostat With Humidity ControlDigital 7-Day Programmable
90 SeriesTM
P R E M I U M
1F95-391Operating InstructionsRetain for Future Use
WHITE-RODGERS

Premium optionsto customize the thermostatto fit your application.
Easy, Menu-Driven Set-Upand Programming
765432
12
11
10
98
17 16 15 14 13
1
1
Introduction Configuration TroubleshootingProgramming Features FAQs Index
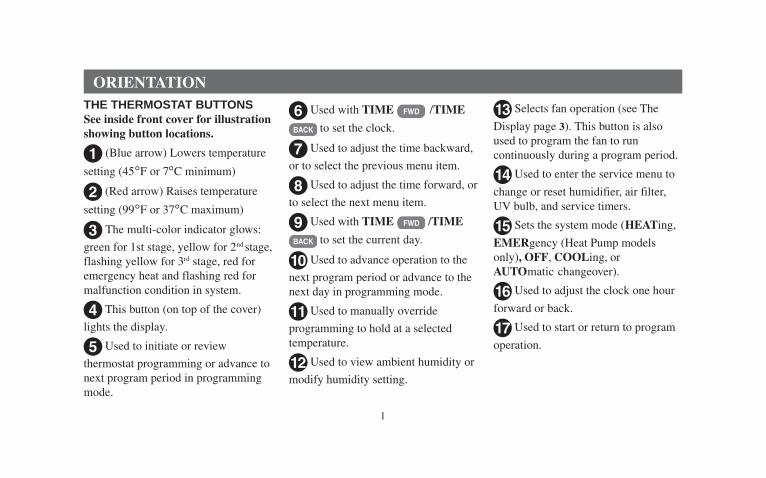
THE THERMOSTAT BUTTONSSee inside front cover for illustrationshowing button locations.
1 (Blue arrow) Lowers temperature
setting (45°F or 7°C minimum)
2 (Red arrow) Raises temperature
setting (99°F or 37°C maximum)
3 The multi-color indicator glows:
green for 1st stage, yellow for 2nd stage,
flashing yellow for 3rd stage, red foremergency heat and flashing red formalfunction condition in system.
4 This button (on top of the cover)
lights the display.
5 Used to initiate or review
thermostat programming or advance tonext program period in programmingmode.
6 Used with TIME FWD /TIME
BACK to set the clock.
7 Used to adjust the time backward,
or to select the previous menu item.
8 Used to adjust the time forward, or
to select the next menu item.
9 Used with TIME FWD /TIME
BACK to set the current day.
10 Used to advance operation to the
next program period or advance to thenext day in programming mode.
11 Used to manually override
programming to hold at a selectedtemperature.
12 Used to view ambient humidity or
modify humidity setting.
ORIENTATION
13 Selects fan operation (see The
Display page 3). This button is alsoused to program the fan to runcontinuously during a program period.
14 Used to enter the service menu to
change or reset humidifier, air filter,UV bulb, and service timers.
15 Sets the system mode (HEATing,
EMERgency (Heat Pump modelsonly), OFF, COOLing, orAUTOmatic changeover).
16 Used to adjust the clock one hour
forward or back.
17 Used to start or return to program
operation.
2
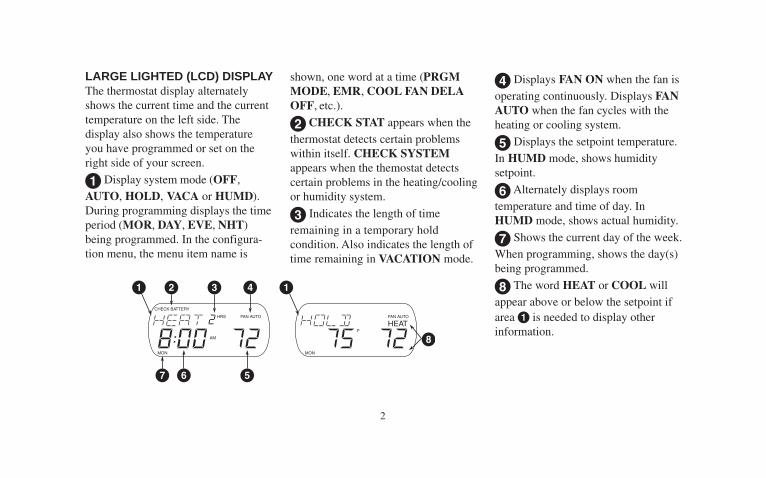
LARGE LIGHTED (LCD) DISPLAYThe thermostat display alternatelyshows the current time and the currenttemperature on the left side. Thedisplay also shows the temperatureyou have programmed or set on theright side of your screen.
1 Display system mode (OFF,AUTO, HOLD, VACA or HUMD).During programming displays the timeperiod (MOR, DAY, EVE, NHT)being programmed. In the configura-tion menu, the menu item name is
shown, one word at a time (PRGMMODE, EMR, COOL FAN DELAOFF, etc.).
2 CHECK STAT appears when thethermostat detects certain problemswithin itself. CHECK SYSTEMappears when the themostat detectscertain problems in the heating/coolingor humidity system.
3 Indicates the length of timeremaining in a temporary holdcondition. Also indicates the length oftime remaining in VACATION mode.
4 Displays FAN ON when the fan isoperating continuously. Displays FANAUTO when the fan cycles with theheating or cooling system.
5 Displays the setpoint temperature.In HUMD mode, shows humiditysetpoint.
6 Alternately displays roomtemperature and time of day. InHUMD mode, shows actual humidity.
7 Shows the current day of the week.When programming, shows the day(s)being programmed.
8 The word HEAT or COOL willappear above or below the setpoint ifarea 1 is needed to display otherinformation.
FAN AUTOHRS
CHECK BATTERY
F
AM
MON
FAN AUTO
HEATHEATHRS
CHECK BATTERY
F
AM
MON WED THU FRI SAT SUNTUEWED THU FRI SAT SUNTUE
1 12 3 4
5
8
67

3
INTRODUCTION
Introduction ..................................................... 3Configuration ..............................................4-11Manual Operation and Programming ......12-17Features .................................................... 18-26FAQs .......................................................... 27-32Troubleshooting ....................................... 33-37Index ............................................................... 38Use the tabs at the bottom of the page to quicklylocate sections.
Introduction Configuration TroubleshootingProgramming Features FAQs Index
Thank you for purchasing yournew White-Rodgers 90 Seriesthermostat with humidity control.White-Rodgers has been producingenergy saving controls for over 60years. We have been designing andproducing the White-Rodgers 90Series family of electronic pro-grammable thermostats since 1982.White-Rodgers 90 Series is thethird generation of the electronicprogrammable family. We believeyou will find that the White-Rodgers 90 Series is the most userfriendly and technologicallyadvanced thermostat and humiditycontrol available today.
You will find information aboutthermostat buttons (page 1) anddisplay beginning on page 2.

4
CONFIGURATIONThe configuration menu allows you to set thermostat operating characteristics to your system or personal requirements.
To enter the menu, press TIME FWD and TIME BACK once at the same time. Press TIME FWD to advance through themenu options. Press arrow keys to change options.
1
Step Press Button(s) Displayed Press or to select: COMMENTS Ref (Factory Default) Page
0 F(0)
5 LO to5 HI
Adjusts temperature display higher or lower.
2 EMR(ON)
OFF ONON L
Selects EMR option ON or OFF or ON L.
TIME FWD
TIME FWD
3 RH(0)
20 LO to 20 HI
Adjusts humidity display.TIME FWD
4 DRY(OFF)
LO or HI to OFF To reduce or eliminate condensation during cold weather. Use LO setting first, if condensation persists use HI setting.
TIME FWD
5 OPTM CMFT(ON)
OFF Enables improved dehumidification in cooling mode if humidity is above setting.
TIME FWD
6 OPTM DHUM(OFF)
ON Available if OPTM CMFT is ON. Provides extra dehumidification if humidity is above setting. May reduce temperature setpoint by up to 3 degrees.
TIME FWD
User Configuration Menu
6
6
7
7
7
8

5
User Configuration Menu (Continued)
Configuration
7 (F) C Adjusts temperature display between F or C TIME FWD
8 SET FAN(0)
0 HRS (OFF) to 6 HRS
Set Fan (one shot) option. Set the duration of the one shot option.
TIME FWD
9 BEEP(ON)
OFF Turns beeper ON or OFF.TIME FWD
10 HEAT FAST(ON)
OFF ON allows second stage to energize if setpoint is raised 3 or more degrees. OFF (economy) minimizes second stage operation on setpoint changes.
TIME FWD
11 COOL FAST(OFF)
OFF ON allows second stage to energize if setpoint is lowered 3 or more degrees. OFF (economy) minimizes second stage operation on setpoint changes.
TIME FWD
12 Enables Remote Sensor A (connected to SA).TIME FWD REMT SEN A(OFF)
ON
13 Enables Remote Sensor B (connected to SA).TIME FWD REMT SEN B(OFF)
ON
14 Enables Remote Sensor C (connected to SA).TIME FWD REMT SEN C(OFF)
ON
15 STAT SEN L(ON)
OFF OFF Disables Thermostat Sensor. (Only available if remote sensor A, B, or C is connected).
TIME FWD
8
8
8
9&10
9
9&10
9&10
9&10
8

6
User Configuration Menu (Continued)
CONFIGURATION MENUFEATURESAdjustable Temperature Display.(User menu, Item 1), The roomtemperature display can be adjusted toread higher or lower by following theUser menu and adjusting the tempera-ture to a higher or lower value. Thethermostat is calibrated at the factory todisplay a very accurate room tempera-ture, but due to various conditions and/or personal preference, you may wish toadjust the thermostat display higher orlower (up to 5°F). For example, if thethermostat displays a room temperatureof 70° and you want it to display 73° thedisplay can be adjusted to read 73°. To
adjust, refer to the CONFIGURATIONsection (page 4, step 1).
Selectable Energy ManagementRecovery (EMR).(User menu, Step 2) EMR causes thethermostat to start operating the systemearly in order to make the buildingtemperature reach your programsetpoint at the time you specify. Inmultistage heating, the thermostat willstart 8 minutes early for every 1°Fdifference between the room tempera-ture and the next programmedtemperature. In cooling and heat pumpapplications, the thermostat uses 15minutes per °F. For heating applica-
tions in large buildings where extratime to reach the set temperature maybe desired, EMR Long may beselected. When EMR ON L is selectedin the user menu (page 4, item 2) thethermostat uses 15 minutes per °F.EXAMPLE: If the temperature in theroom is 65°F and the thermostat isprogrammed for 70°F at 7 AM, thethermostat will start approximately 40minutes early. The difference between theroom temperature (65°F) and the setpoint(70°F) is 5° and 5° X 8 minutes per °F =40 minutes. The setpoint on the displaywill actually change to display 70° about40 minutes early. The maximum time thethermostat can start early in heating is 75
16 Enables outdoor temperature sensor. Requires optional F145-1378 outdoor sensor.
TIME FWD TEMP OUT(OFF)
ON 10

7
minutes (or 3 hours, 45 minutes if EMRON L is selected). The maximum time incooling and heat pump applications is 3hours and 45 minutes. Cooling or heatpump applications start earlier because ittakes longer to reach the desiredtemperature. This feature also minimizesthe use of the auxiliary stages if conditionsare such that the compressor stages areadequate to reach the desired setpoint.To select or deselect this feature, refer tothe CONFIGURATION section (page 4,step 2).
Adjustable Humidity Display (RH)(User Menu step 3) The roomhumidity display can be adjusted toread higher or lower by following theconfiguration menu and adjusting thehumidity to a higher or lower value.The thermostat is calibrated at thefactory to display a very accurateroom humidity, but due to various
conditions and/or personal preference,you may wish to adjust the thermostatdisplay higher or lower (up to +/-20%). For example, if the thermostatdisplays room humidity of 40% butyou want it to display 43% you canadjust it. To adjust, refer to theCONFIGURATION section (page 4,step 3).
Programmable AutomaticHumidity Reduction (DRY)(User Menu step 4)This feature automatically lowershumidity setting when the outsidetemperature drops. This is to preventthe interior windows/walls fromreaching the dew point where watercondenses on surfaces. To achieveautomatic humidity reduction, thethermostat lowers the humidity whenfurnace cycles are long. When thefurnace runs shorter cycles, it increases
humidity. For suggested settings seetable below.
Programmable DehumidificationOptimal Comfort Mode (OPTMCMFT)(User Menu step 5)When turned onthis feature automatically reducesindoor humidity during calls forcooling if humidity is 2% abovesetting. Humidity is set by pressing theHumidity button when in the appropri-ate mode, in this case Cooling, andpressing the or buttons toset desired humidity (range 40 to 95)level followed by pressing RunProgram. This dehumidificationfeature uses less energy by maintainingtemperature and dehumidifying onlywhen a call for Cooling is required.
Configuration

8
Programmable DehumidificationOptimal Dehumidification Mode(OPTM DHUM)(User Menu step 6)When turned onthis feature automatically reducesindoor humidity if humidity is 2%above setting. Humidity is set bypressing the HUMIDITY buttonwhen in the appropriate mode, in thiscase Cooling, and pressing the or buttons to set desiredhumidity level followed by pressing
RUN PROGRAM. This dehumidifi-cation feature may use more energyby making dehumidification a priorityinitiating a call for cooling if humidityis 2% above desired setting. Thisfeature may also over-cool thecondition space by up to 3 degrees toachieve the desired humidity level.
Fahrenheit or CelsiusTemperature Display.(User menu, Step 7) This thermostatis factory set to display temperature inFahrenheit. If you prefer, you mayconfigure the thermostat to displayCelsius. See the CONFIGURATIONSection, page 5.
Single Period Fan Control.(User menu, Step 8) This featureallows you to have the fan run for apredetermined period of time bypressing the FAN key twice within 1.5seconds. If a time is set in the Usermenu (page 4, step 8) the display willshow FAN, # hrs and PRG FAN ONfor six seconds. After six seconds thedisplay will continue to indicate PRGFAN ON for the time period selected.After this time period, the fan willreturn to normal operation. To return the
fan to normal operation before the end ofthe time period, press the FAN button.
Beeper on.(User menu, Step 9) The thermostathas a beeper that will emit a tone whenany key is pressed. In the user menu, theBEEP feature can be turned OFF using
or to provide silent keyoperation.
Heat Fast.(User menu, Step 10) This feature,when set to ON, will bring the secondstage of heating on any time youmanually raise the temperature three ormore degrees above room temperature.If HEAT FAST is set to OFF, thethermostat will delay the second stagefrom 0 to 30 minutes based on how wellthe first stage is keeping up with yoursetting.

9
Cool Fast.(User menu, Step 11) This feature,when set to ON, will bring the secondstage of cooling on any time youmanually lower the temperature threeor more degrees below room tempera-ture. If COOL FAST is set to OFF,the thermostat will delay the secondstage from 0 to 30 minutes based onhow well the first stage is keeping upwith your setting.
Optional Remote TemperatureSense.(User menu, Step 12,13,14,15) Up tothree remote sensors (F145-1328) canbe attached to this thermostat to senseindoor temperature at locations awayfrom the thermostat. Each sensor maybe located as far as 300 feet away fromthe thermostat. This is an excellentfeature if the thermostat is in a poorlocation for sensing temperature or if
you want to install the thermostat in aseparate room to prevent tampering.After installing and connecting theremote sensor(s) to the thermostat, theinstaller can enable each remote indoortemperature sensor (A, B, and/or C).When operating with remote sensor(s),the thermostat will calculate anaverage of the sensed temperatures inall enabled sensor locations (A, B, Cand/or L), then display the averagetemperature as the room temperature.The temperature at each remote sensorcan be displayed by pressing the lightbutton twice within one second. Withthe thermostat in program run or holdmode. Temperatures at the outdoor andindoor remote sensors will bedisplayed with subsequent presses ofthe light button in the following order(if connected): outdoor sensor, sensorL, A, B, C. You can also assign eachsensor different priorities during
different program periods. This allowsthe system to maintain a comfortableenvironment by giving higher priorityto occupied locations. At the sametime, giving lower priority to unoccu-pied locations enhances efficientsystem operation. EXAMPLE: Yourhome has bedrooms on the upper leveland a guest bedroom on the mainlevel, along with the living room,kitchen, etc. The thermostat (sensor L)is located in the hall on the main level.Remote sensors are located on theupper level (sensor A) and the guestbedroom (sensor B). The lower levelwould be occupied in the DAYand EVE periods. The upper levelwould be occupied in the NHT andMOR periods. With no guest in theguest bedroom, the sensors could beprogrammed as follows:
Configuration
10
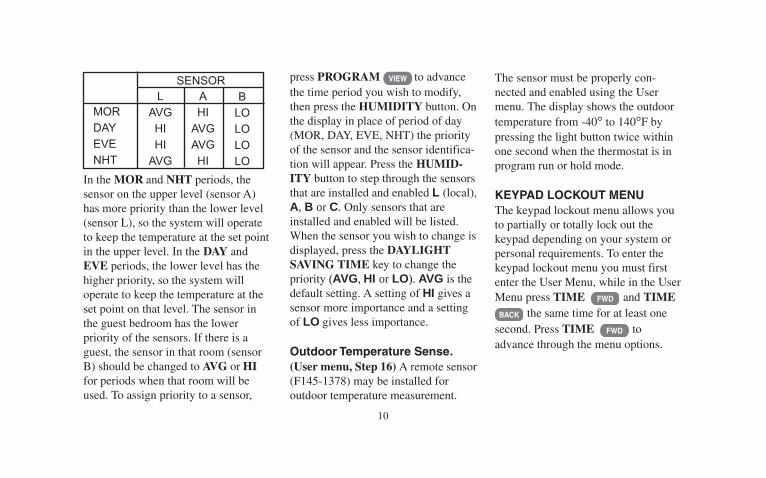
In the MOR and NHT periods, thesensor on the upper level (sensor A)has more priority than the lower level(sensor L), so the system will operateto keep the temperature at the set pointin the upper level. In the DAY andEVE periods, the lower level has thehigher priority, so the system willoperate to keep the temperature at theset point on that level. The sensor inthe guest bedroom has the lowerpriority of the sensors. If there is aguest, the sensor in that room (sensorB) should be changed to AVG or HIfor periods when that room will beused. To assign priority to a sensor,
press PROGRAM VIEW to advancethe time period you wish to modify,then press the HUMIDITY button. Onthe display in place of period of day(MOR, DAY, EVE, NHT) the priorityof the sensor and the sensor identifica-tion will appear. Press the HUMID-ITY button to step through the sensorsthat are installed and enabled L (local),A, B or C. Only sensors that areinstalled and enabled will be listed.When the sensor you wish to change isdisplayed, press the DAYLIGHTSAVING TIME key to change thepriority (AVG, HI or LO). AVG is thedefault setting. A setting of HI gives asensor more importance and a settingof LO gives less importance.
Outdoor Temperature Sense.(User menu, Step 16) A remote sensor(F145-1378) may be installed foroutdoor temperature measurement.
The sensor must be properly con-nected and enabled using the Usermenu. The display shows the outdoortemperature from -40° to 140°F bypressing the light button twice withinone second when the thermostat is inprogram run or hold mode.
KEYPAD LOCKOUT MENUThe keypad lockout menu allows youto partially or totally lock out thekeypad depending on your system orpersonal requirements. To enter thekeypad lockout menu you must firstenter the User Menu, while in the UserMenu press TIME FWD and TIME
BACK the same time for at least onesecond. Press TIME FWD toadvance through the menu options.
LAVGHIHI
AVG
AHI
AVGAVGHI
BLOLOLOLO
MORDAYEVENHT
SENSOR
11
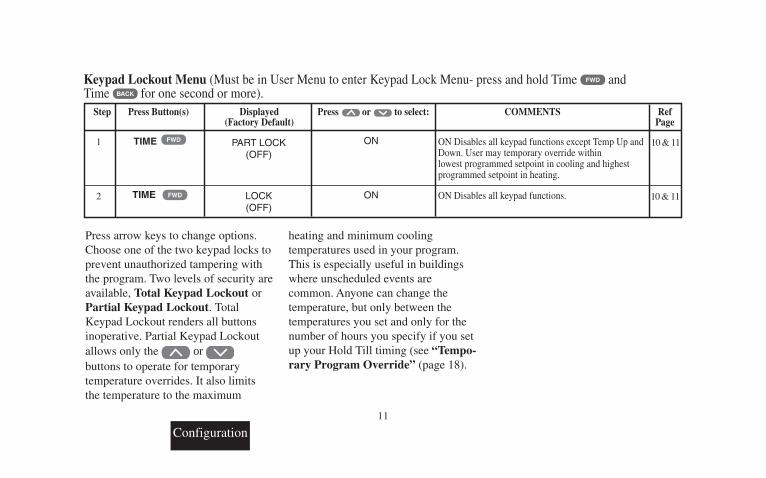
1
Step Press Button(s) Displayed Press or to select: COMMENTS Ref (Factory Default) Page
PART LOCK(OFF)
ON
2 LOCK(OFF)
ON
ON Disables all keypad functions except Temp Up and Down. User may temporary override within lowest programmed setpoint in cooling and highestprogrammed setpoint in heating.
ON Disables all keypad functions.
TIME FWD
TIME FWD
Keypad Lockout Menu (Must be in User Menu to enter Keypad Lock Menu- press and hold Time and Time for one second or more).
FWD
BACK
10 & 11
10 & 11
Press arrow keys to change options.Choose one of the two keypad locks toprevent unauthorized tampering withthe program. Two levels of security areavailable, Total Keypad Lockout orPartial Keypad Lockout. TotalKeypad Lockout renders all buttonsinoperative. Partial Keypad Lockoutallows only the or buttons to operate for temporarytemperature overrides. It also limitsthe temperature to the maximum
heating and minimum coolingtemperatures used in your program.This is especially useful in buildingswhere unscheduled events arecommon. Anyone can change thetemperature, but only between thetemperatures you set and only for thenumber of hours you specify if you setup your Hold Till timing (see “Tempo-rary Program Override” (page 18).
Configuration

12
MANUAL OPERATION(Bypassing the Program)Your White-Rodgers 90 Seriesthermostat can be used to controltemperature manually (withoutprogramming). For manual operation,press SYSTEM to select HEAT orCOOL, then press PROGRAM
HOLD . Use or to set thetemperature as desired.
PROGRAMMED OPERATIONPlanning Your ProgramThe sample schedule (pages 14 & 15)shows the factory-installed programsfor heating and cooling. The heatingand cooling programs are separate,and must be programmed individually.To use the factory program, set theclock and press PROGRAM RUN
with the thermostat set to Heat, Cool,or Auto. Fill out the blank schedules(pages 16 & 17) with the time andtemperatures you want in yourprogram. Fill in every space for yourprogram.The same temperature can berepeated more than once if you do notwant the temperature to change overseveral time periods. This is useful forhomes or businesses that are occupiedall day and only want a setbacktemperature at night.
Entering Your ProgramTo Set the Clock:1. Press PROGRAM RUN .
2. Press SET TIME . The display willshow the hour. Use TIME FWD orTIME BACK to set to the current hourand AM/PM designation.
3. Press SET TIME again. The displaywill show minutes. Use TIME FWD
or TIME BACK to set to the currentminutes.
4. Press PROGRAM RUN .
To Set the Day:
5. Press SET DAY . The display willindicate a day of the week. Use TIME
FWD or TIME BACK to set to thecurrent day of the week.
6. Press PROGRAM RUN .
To Set the Program:7. Press the SYSTEM button to selectHEAT (for heating program) or COOL(for cooling program).
8. Press PROGRAM VIEW one time.The display will show MOR, thesettings for time and temperature andMON.
PROGRAMMING

13
9. If you program Monday the firsttime you press PROGRAM VIEW itwill be copied to the rest of the week.To program the other days of the weekpress ADV. DAY to until you reach theday you wish to change and followSteps 10, 11 & 12. You can also copythe program from one day to another.To copy, press HOLD /COPY. Thedisplay will show COPY, and all theother days of week will be flashing.Press HOLD /COPY again to copy theday in to the rest of the week or pressTIME FWD or TIME BACK until youreach the day you want to copy to andpress HOLD /COPY.
10.Press TIME FWD or TIME BACK
to set the time on the display asselected in your HEATING orCOOLING SCHEDULE. Be sure tocheck the AM or PM on the display.
11. Press the or button toadjust the temperature to match your
schedule. If you want the fan ONcontinuously during this period, pressthe FAN button.
12.Press PROGRAM VIEW one time.MOR on the display will change toDAY. Repeat steps 10 and 11 to entertime and temperature for this period.
13.Press PROGRAM VIEW tocontinue through the entire schedule,entering time and temperature for eachperiod. When you are satisfied thatyour program matches your schedule,press PROGRAM RUN . Program-ming is now complete for this modeand your program is running.
14.To program the other mode, repeatthe procedure from step 6.
Programming

14
62°F (16°C)
62°F (16°C)
62°F (16°C)
62°F (16°C)
62°F (16°C)
62°F (16°C)
62°F (16°C)
5:00 PM
5:00 PM
5:00 PM
5:00 PM
5:00 PM
5:00 PM
5:00 PM 10:00 PM
10:00 PM
10:00 PM
10:00 PM
10:00 PM
10:00 PM
10:00 PM
62°F (16°C)
62°F (16°C)
62°F (16°C)
62°F (16°C)
62°F (16°C)
62°F (16°C)
62°F (16°C)
MON
TUE
WED
THU
FRI
SAT
SUN
6:00 AM 70°F (21° 07MA 00:8)C °F (21°C)
6:00 AM 70°F (21° 07MA 00:8)C °F (21°C)
6:00 AM 70°F (21° 07MA 00:8)C °F (21°C)
6:00 AM 70°F (21° 07MA 00:8)C °F (21°C)
6:00 AM 70°F (21° 07MA 00:8)C °F (21°C)
6:00 AM 70°F (21° 07MA 00:8)C °F (21°C)
6:00 AM 70°F (21° 07MA 00:8)C °F (21°C)
1
5 6 5 6 5 6 5 6
2 3 4
1 Morning (MOR)
2 Day (DAY)
3 Evening (EVE)
4 Night (NHT)
5 Start Time
6 Temperature
7-Day Sample HEAT Program Schedule(Shows factory programming)

15
82°F (27°C)
82°F (27°C)
82°F (27°C)
82°F (27°C)
82°F (27°C)
82°F (27°C)
82°F (27°C)
5:00 PM
5:00 PM
5:00 PM
5:00 PM
5:00 PM
5:00 PM
5:00 PM 10:00 PM
10:00 PM
10:00 PM
10:00 PM
10:00 PM
10:00 PM
10:00 PM
85°F (29°C)
85°F (29°C)
85°F (29°C)
85°F (29°C)
85°F (29°C)
85°F (29°C)
85°F (29°C)
MON
TUE
WED
THU
FRI
SAT
SUN
6:00 AM 78°F (25° 87MA 00:8)C °F (25°C)
6:00 AM 78°F (25° 87MA 00:8)C °F (25°C)
6:00 AM 78°F (25° 87MA 00:8)C °F (25°C)
6:00 AM 78°F (25° 87MA 00:8)C °F (25°C)
6:00 AM 78°F (25° 87MA 00:8)C °F (25°C)
6:00 AM 78°F (25° 87MA 00:8)C °F (25°C)
6:00 AM 78°F (25° 87MA 00:8)C °F (25°C)
1
5 6 5 6 5 6 5 6
2 3 4
1 Morning (MOR)
2 Day (DAY)
3 Evening (EVE)
4 Night (NHT)
5 Start Time
6 Temperature
7-Day Sample COOL Program Schedule(Shows factory programming)
Programming

16
7-Day Personal HEATProgram Schedule
1 Morning (MOR)2 Day (DAY)
3 Evening (EVE)
4 Night (NHT)
5 Start Time
6 Temperature
MON
TUE
WED
THU
FRI
SAT
SUN
1
5 6 5 6 5 6 5 6
2 3 4

17
MON
TUE
WED
THU
FRI
SAT
SUN
1
5 6 5 6 5 6 5 6
2 3 4
7-Day Personal COOLProgram Schedule
1 Morning (MOR)
2 Day (DAY)
3 Evening (EVE)
4 Night (NHT)
5 Start Time
6 Temperature
Programming

18
FEATURESPushbutton BacklightThe large numbers and letters on yourLCD screen make it easy to see. In lowlight conditions, press the button ontop of the thermostat and the displaywill light up for three seconds. For tenminutes after pressing the light button,pressing any other button will light thedisplay for ten seconds.
Factory PreprogrammingThis thermostat has been programmedat the factory. The chart in theprogramming examples section liststhese factory settings. If the times andtemperatures are the same as yourschedule, you may simply run thefactory installed program by pressingPROGRAM RUN .
Temporary Program OverrideAny time your program is running andyou would like to override it for aspecific amount of time, press or until the temperature youwant is displayed. The display willindicate HOLD, and the number ofhours remaining in the hold period isindicated with the word HRS. Toadjust the length of time for theoverride, press TIME FWD or TIME
BACK . HOLD TILL will be displayedas well as the HOLD period expirationtime. Press TIME FWD or TIME
BACK buttons until you reach the timeyou would like it to resume theprogram. The TIME FWD or TIME
BACK buttons adjust the time in 15minute increments. This pro-grammed hold time has a 19 hour
maximum and 15-minute minimum.Beyond 19 hours you may wish to usethe vacation hold feature (pages 19 &20). If you need to, you can adjust thetemperature up or down.
Indefinite Program Hold.If you want to operate the thermostat tokeep a set temperature without aprogram running, press PROGRAM
HOLD . The temperature Up or Downbuttons can be used to raise or lowerthe temperature. The thermostat willhold the set temperature until youreturn to the program by pressingPROGRAM RUN .

19
thermostat displays a room tempera-ture of 70° but you want it to display73°, you can adjust it. To adjust, referto the USER CONFIGURATIONsection (page 4, step 1).
Programmable Fan ControlThis feature allows you to have yourfan operate continuously through oneor more programmed time periods.This is useful if you want constant aircirculation in your location during aspecific time period. If you do not usethis feature, the fan will cycle normallywith the heating and cooling system.
Programmable Vacation Time/Temperature Operation.The VACATION mode allows you toprogram the thermostat to hold aconstant temperature for 1 to 29 days.At the end of the day and time youselect, the thermostat will return to
is equal to or higher than the coolingsetpoint this causes is conflict. Thethermostat will indicate a conflict byflashing the setpoint and will resolvethe conflict by choosing a heatingsetpoint thatis an average of the two programsetpoints. The cooling setpoint willbe two degrees higher than the heatingsetpoint.
Adjustable Temperature DisplayThe room temperature display can beadjusted to read higher or lower byfollowing the configuration menu andadjusting the temperature to a higheror lower value. The thermostat iscalibrated at the factory to display avery accurate room temperature, butdue to various conditions and/orpersonal preference, you may wish toadjust the thermostat display higher orlower (up to 5°F). For example, if the
Automatic Heat/CoolChangeoverIf you have a heating/cooling system,the thermostat can be set to automati-cally switch the system from heating tocooling as needed. To set yourthermostat to this operating mode,press the SYSTEM button until AUTOis displayed on the screen. To changethe mode of operation from heating orcooling can be accomplished bypressing the and buttonsat the same time, this will change thesetpoint temperature displayed to thesetpoint of the other mode. This willallow you to modify both the HEATand COOL setpoints to accommodatea HOLD condition while in AutomaticChangeover mode. Note: For properAutomatic Changeover mode theheating setpoint must be at least 1°Flower than the cooling setpoint in eachprogram period. If the heating setpoint
Features

20
normal program operation. To programthe number of days, press the or
to set your temperature thenpress and release the SET DAY
button and VACA HOLD TILL will bedisplayed. The display will also showDAYS (flashing) and the number 5. Tochange the number of vacation days,press TIME FWD or TIME BACK .Press or to set thetemperature you wish to maintainwhile away. While still in the vacationmode, set the time you require yourprogram to resume by pressing SET
TIME once. The current time willdisplay along with the word HRS(flashing). Press TIME FWD to adjustthe time in 15 minute increments. Youmay wish to select a few hours inadvance of your expected return toallow time to reach the desiredtemperature. Your thermostat is now
programmed to hold the temperatureyou selected through your vacation forHEAT, COOL, or AUTO. After 20seconds the display will return to time/temperature alternation, and willdisplay VACA. Pressing PROGRAM
RUN cancels this feature and beginsrunning your normal program.
Keypad Lockout.This security feature allows you to lockout the keypad to prevent unauthorizedtampering with the program. Twolevels of security are available, TotalKeypad Lockout or Partial KeypadLockout. Total Keypad Lockoutrenders all buttons inoperative. PartialKeypad Lockout allows only the or to operate for temporarytemperature overrides. It also limits thetemperature to the maximum heatingand minimum cooling temperaturesused in your program. This is
especially useful in buildings whereunscheduled events are common.Anyone can change the temperature,but only between the temperatures youset and only for four hours or thenumber of hours you specify if you setup your Hold Till timing (seeTemporary Program Override, page18). To select or deselect this feature,refer to the USER CONFIGURATIONsection (page 11, steps 1 and 2).
Thermostat Startup UpAfter Power Loss.The user program and installation andconfiguration settings are stored inpermanent memory indefinitely. Aftera total power loss of 24V to thethermostat for more than 4 hours theclock and day settings will be lost.When power is restored your thermo-stat will maintain a heating tempera-ture of 62°F and a cooling temperature

21
of 85°F. If this happens, set the clockand day of the week (using steps 1through 6 from “Entering YourProgram”, page 12 & 13), then selectHEAT, COOL or AUTO using theSYSTEM button, and press PRO-
GRAM RUN to resume operationwith your previously set program.
CompressorShort Cycle Protection.Your thermostat can be configured toprotect your system against prematurecompressor failure by “locking out”the compressor. This ensures that thecompressor will stay off for at leastfive minutes on each cycle. When thethermostat is in compressor lock-out,the word COOL will flash. During thisperiod, the compressor will not beenergized. See the installationinstructions.
Service Button MenuThe Service button allows setting ofmaintenance reminders for threeoptional equipment accessoriestypically used with forced air heating/cooling systems. The three accessorieshumidifier, air filter, and UV light aredesigned to enhance indoor air quality.A humidifier will add humidity whenconditions would normally make theindoor air uncomfortably dry. Airfilters are designed to clean the airthrough a forced air system. Theseaccessories require routine mainte-nance to provide optimum perfor-mance. The service button mainte-nance reminders are designed so thatthey can be customized to therequirements of each accessory. If yoursystem is a forced air system you mayhave none or all three accessories. Thefourth maintenance reminder is forroutine servicing of your system by a
professional HVAC contractor. Thefourth reminder option may be used inlieu of or in conjunction with the otherreminders. If you’d prefer having aprofessional service your system, theRoutine Maintenance Reminder is theonly reminder you’ll need to set. Todisable a feature that was previouslyselected, press TIME BACK button toshow either REM PAD TIME, REMFLTR TIME, REM UV TIME, orREM SERV TIME and then press the
or arrow to turn OFF.
Features

22
1
Step Press Button(s) Displayed Press or to select: COMMENTS )tluafeD yrotcaF(
PAD TIME(OFF) Hrs
orREM PAD TIME
No. of Hrs
(ON)or
(OFF)
Set Humidifier Maintenance Reminder. SERVICE
3 FLTR TIME(OFF) /Hrs
orREM FLTR TIME
No. of Hrs
(ON)or
(OFF)
Set Air Filter Maintenance Reminder.TIME FWD
Service Button Menu
2 SET PAD TIME(100) Hrs
25 to 1975 Selects time intervals in increments of 25 hours. The RUN time accumulates when the HM terminal is energized.
TIME FWD
(If PAD TIME is ON)
4 SET FLTR TIME(200) Hrs
25 to 1975 Selects time intervals in increments of 25 hours. The RUN time accumulates when the fan is operating.
TIME FWD
(If FLTR TIME is ON)
5 UV TIME(OFF) Days
orREM UV TIME
No. of Days
(ON)or
(OFF)
Selects UV Light Maintenance Reminder.TIME FWD
6 SET UV TIME(375) Days
25 to 1975 Selects time intervals in increments of 25 days. The RUN time is the calendar time from when it is entered or reset.
TIME FWD
(If UV TIME is ON)

23
Returns to Normal Operation.PRGM RUN
7 SERV TIME(OFF) Days
orREM SERV TIME
No. of Days
(ON)or
(OFF)
Selects Routine Maintenance Service Call Reminder.TIME FWD
8 SET SERV TIME(175) Days
25 to 1975 Selects time intervals in increments of 25 days. The RUN time is the calendar time from when it is entered or reset.
TIME FWD
(If SERV TIME is ON)
HumidifierMaintenance Indicator.This feature allows the thermostat todisplay the words CHCK PAD (checkhumidifier) after a set time ofhumidifier operation. This is areminder to maintain or clean yourhumidifier. The factory set interval forCHCK PAD to be displayed is 100hours of humidifier operation. Thisshould be adjusted with respect to thehumidifier’s recommended mainte-nance schedule.
When CHCK PAD is displayed, youcan clear it by pressing SERVICEbutton. This resets the timer and startscounting the hours until the nexthumidifier maintenance. The followingsteps will allow you to change thenumber of hours for humidifiermaintenance.1. If you see CHCK PAD on thedisplay, press the SERVICE buttononce to reset the timer. Press SER-VICE button again the display willshow the number of hours to humidi-fier maintenance.
2. Press TIME FWD or TIME BACK
to change the time to your require-ments.3. Press PROGRAM RUN to returnto the normal operating mode
Air FilterChange-Out Indicator.This feature allows the thermostat todisplay the words CHNG FLTR(change filter) after a set time of fan offan operation. This is a reminder to
Features
Service Button Menu (Continued)
24
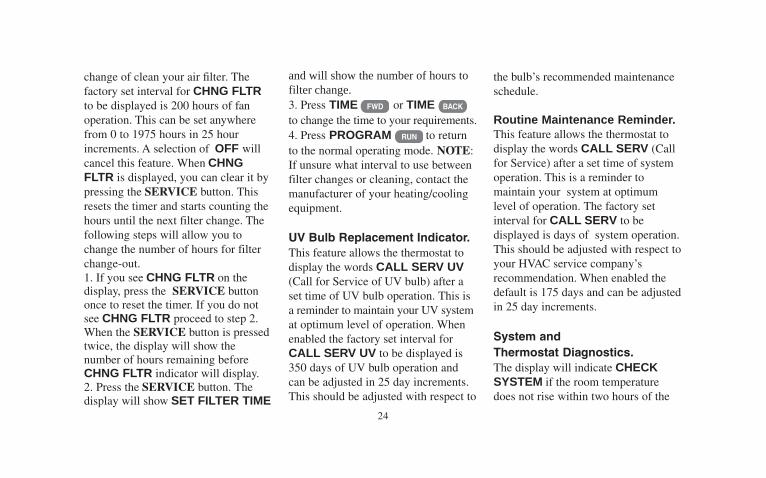
change of clean your air filter. Thefactory set interval for CHNG FLTRto be displayed is 200 hours of fanoperation. This can be set anywherefrom 0 to 1975 hours in 25 hourincrements. A selection of OFF willcancel this feature. When CHNGFLTR is displayed, you can clear it bypressing the SERVICE button. Thisresets the timer and starts counting thehours until the next filter change. Thefollowing steps will allow you tochange the number of hours for filterchange-out.1. If you see CHNG FLTR on thedisplay, press the SERVICE buttononce to reset the timer. If you do notsee CHNG FLTR proceed to step 2.When the SERVICE button is pressedtwice, the display will show thenumber of hours remaining beforeCHNG FLTR indicator will display.2. Press the SERVICE button. Thedisplay will show SET FILTER TIME
and will show the number of hours tofilter change.3. Press TIME FWD or TIME BACK
to change the time to your requirements.4. Press PROGRAM RUN to returnto the normal operating mode. NOTE:If unsure what interval to use betweenfilter changes or cleaning, contact themanufacturer of your heating/coolingequipment.
UV Bulb Replacement Indicator.This feature allows the thermostat todisplay the words CALL SERV UV(Call for Service of UV bulb) after aset time of UV bulb operation. This isa reminder to maintain your UV systemat optimum level of operation. Whenenabled the factory set interval forCALL SERV UV to be displayed is350 days of UV bulb operation andcan be adjusted in 25 day increments.This should be adjusted with respect to
the bulb’s recommended maintenanceschedule.
Routine Maintenance Reminder.This feature allows the thermostat todisplay the words CALL SERV (Callfor Service) after a set time of systemoperation. This is a reminder tomaintain your system at optimumlevel of operation. The factory setinterval for CALL SERV to bedisplayed is days of system operation.This should be adjusted with respect toyour HVAC service company’srecommendation. When enabled thedefault is 175 days and can be adjustedin 25 day increments.
System andThermostat Diagnostics.The display will indicate CHECKSYSTEM if the room temperaturedoes not rise within two hours of the

25
Features
call for heat. After two hours thethermostat will quit calling for heat forone minute (this allows some furnacesto reset) and call for heat again. If thetemperature still does not rise, it willcontinue to call for heat. This normallyindicates the heating system is notworking correctly. You may wish toconsult your furnace manufacturer orservice person. The display willindicate CHECK STAT if one of thefollowing occurs.• One of the buttons is stuck down orin. Check buttons, make sure nothingis pushing them in.• The thermostat sensor is notfunctioning. If using a remote sensor,check connections, wiring and power.• The humidity sensor is not function-ing. After checking the above, pressPROGRAM RUN to reset thedisplay. If this does not clear thedisplay, disconnect power for five
minutes. If these checks fail to solvethe problem, the thermostat should bereplaced.
Adjustable Humidity Display.The room humidity display can beadjusted to read higher or lower byfollowing the configuration menu andadjusting the humidity to a higher orlower value (up to 20% RH). Thesensed humidity is calibrated at thefactory. If you want to adjust it, referto the CONFIGURATION section(page 4, step 3).
Programmable AutomaticHumidity Reduction.This feature automatically lowershumidity when the outside tempera-ture drops. This is to prevent theinterior windows/walls from reachingthe dew point where water condenseson surfaces. To achieve automatic
humidity reduction, the thermostatlowers the humidity when furnacecycles are long. When the furnace runsshorter cycles, it increases humidity.
For suggested settings see table below.
If your window insulation is poor, youneed high humidity reduction. If yourwindow insulation is good, you needlow humidity reduction (factorysetting). Selection of OFF will cancelthis feature. To adjust this feature, referto the CONFIGURATION section(page 4, step 4).
Factory default — no humidityreduction.
Well insulated homes requiring little humidity reduction.
Poorly insulated homes or homes with a lot of condensation on windows/walls.
OFF
LO
HI

26
1F95-391
Press TIME FWD and TIME BACK at the same time to enter the configuration menu. PressTIME FWD until you get to °C then press the or arrow to select °F, pressPROGRAM RUN to return to normal operation.
Press PROGRAM RUN to make certain the thermostat is in the run program mode, thento bypass the program and operate the thermostat manually press the MODE SYSTEM buttonto select Heat or Cool (whichever you prefer) and press HOLD . Use the TEMP orTEMP buttons to set the thermostat on the temperature you want. The temperaturesetting you choose will be held until you manually change it using the TEMP orTEMP buttons. The thermostat will remain in the HOLD mode when you changetemperature and maintain whatever temperature you set. If you decide to return to theprogram, press PROGRAM RUN to cancel the hold feature.
FAQs
1. My thermostat is readingCelsius. How do I change itto Fahrenheit?
2. How do I bypass (notuse) the program?
Humidifier Controland MonitoringWhen the humidity button is pressedwhile in the run mode and in the HEATposition, the actual humidity will bedisplayed on the left side of thedisplay. HUMD is displayed abovethe actual humidity. The humidity set
point is displayed on the right side ofthe display. or buttonmay be pressed to modify the humidityset point (range 5 to 50). Maximumdisplayed humidity is 97% RH andminimum displayed humidity is 2%RH. If the heating system is operatingand there is a demand for humidity,
then the humidifier will operate. If thedemand for humidity is not satisfiedfor ten consecutive heat cycleoperations, the display will show theword HUMD for one second and theword MX for one second signalingmaximum possible humidity isreached.

27
FAQs
FAQs
3. My furnace (air condi-tioning) cycles too fast(slow). Is there an adjust-ment?
4. Why does the blower fankeep running after thesystem has shut off?
1F95-391
The 1F95-391 has a feature called Adjustable Heating and Cooling Cycle times (also calledAnticipation) that allows you to increase or decrease the cycle times in heating and cooling.This is useful if you think your cycle times are too long or too short. The higher the numberyou select, the longer the cycle. The lower the number you select, the shorter the cycle. The1F95-391 is adjusted in the Installer Table (see your installation instructions). The range ofadjustment for HEATING is from 1 to 40. The factory Preset is 05, the range of adjustmentfor COOLING is from 9 to 40. The factory Preset is 24. The cooling will not go below 9because compressors require a longer cycle. See page 6 of your Installation Instructions.
Normally the blower will turn off within a few minutes after the call for heat or cool. Theblower running after the system shuts off may indicate (1) the thermostat is set to FAN ON,(2) the fan has been programmed to run at that time period or (3) something has damaged thethermostat or equipment. If the thermostat display indicates FAN ON, press the fan buttononce to set it to FAN AUTO, meaning the fan will cycle only with the equipment. If thedisplay indicates PRG FAN (Program Fan), sometime during programming, the FAN
button was pushed. To remove PRG FAN (Program Fan), check all of the programmedtimes and temperatures. When you encounter PRG FAN, press the FAN button toremove it from that time period in the program. As a final test, set the thermostat to OFF.Verify that FAN ON or FAN AUTO is not displayed. If the fan continues to run, you maywant to contact your heating and cooling service person for assistance.

28
FAQs
5. Do I have to program astop time for each programperiod?
6. My display light does notwork. Can it be fixed orreplaced?
7. Between Heating andCooling seasons, I want toturn my system off. Will thischange the program?
8. Do I have to reprogrammy thermostat after a poweroutage?
9. How can I get an extracopy of the OperatingManual for my thermostat?
1F95-391
There is no need to select a time to stop a programming period. Starting a new programmingperiod will stop the previous program period.
The display light in the 1F95-391 is not a replaceable item.
Any time you wish to turn your system off, simply press SYSTEM button until the displayshows OFF. This will not affect your thermostat’s programming in any way. To turn thesystem back on, press SYSTEM button until HEAT, OFF, COOL, or AUTO is displayed andpress RUN . The system will begin operating according to the current thermostat program.
The 1F95-391 will retain the last program entered indefinitely without power.
Visit our website at www.white-rodgers.com for operating manuals.

29
1F95-391
Contact a Local Heating & Cooling service person or visit our website atwww.white-rodgers.com to consult our “Where to Buy” Service/Dealer locator.
This feature displays the words CHCK PAD (check humidifier) after a set time of humidifieroperation. This is a reminder to maintain or clean your humidifier. When CHCK PAD isdisplayed, you can clear it by pressing the SERVICE button.
HUMD MX indicates the humidifier has not reached the current humidity setting in the last10 heating cycles. If the condition persists, a service person may recommend additionalhumidifier capacity.
In cooling, as the room temperature falls you will eventually reach the setpoint temperature.The system will continue to run until it reaches the low side of the temperature setting. Asan example: If set to 78 degrees with the room temperature falling the thermostat willcontinue to call for cool as the temperature decreases in the following manner. 78.9, 78.8,78.7, 78.6, 78.5, 78.4, 78.3, 78.2, at approximately 78.2 the thermostat will quit calling forcool. This is why it is not unusual for the room temperature and set temperature to read thesame but the system continues to run. The amount of time it takes for the system to shut off
FAQs
10. What do I do if mysystem is not workingproperly and I need service?
11. What does CHCK PADon the display mean andhow do I reset it?
12.When I push theHumidity button, thedisplay shows HUMD MX.What does this mean?
13.Why does the system runwith the setpoint and roomtemperature the same?
FAQs

30
1F95-391FAQs
is dependent on system sizing, thermostat location, etc. Note: The thermostat display onlydisplays whole numbers. Internally the thermostat calculates decimals.
In heating as the room temperature increases the system will continue to run until thethermostat reaches the high side of the temperature setpoint.
There are 3 possibilities to consider, excluding tampering.
1. Loss of power from the system, 24VAC should be constant to maintain a display.
2. Static electricity or a voltage spike from the heating equipment might be resetting thethermostat. Static electricity can be eliminated by touching something before touching thethermostat to dissipate the static charge. A voltage spike from the equipment can beeliminated using an isolation relay as described in the link below.
http:www.white-rodgers.com/pdfs/instruction_sheets/0037_5426_A.pdf
You can also check the wire routing to verify the thermostat or remote wires are not runningparallel to high voltage lines with high inductive loads which could (in extreme cases)create a voltage spike at the thermostat.
3. Thermostat not functioning properly. A simple test would be to bench test one of the unitsfor a couple of days to see if it resets or move it to another system where a reset has neveroccurred.
(cont.)13.Why does the system runwith the setpoint and roomtemperature the same?
14. How do I reset mythermostat?
31
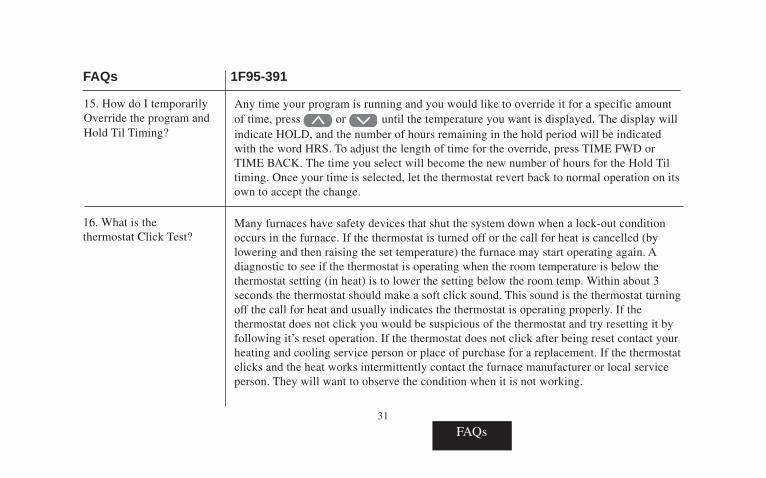
15. How do I temporarilyOverride the program andHold Til Timing?
Any time your program is running and you would like to override it for a specific amountof time, press or until the temperature you want is displayed. The display willindicate HOLD, and the number of hours remaining in the hold period will be indicatedwith the word HRS. To adjust the length of time for the override, press TIME FWD orTIME BACK. The time you select will become the new number of hours for the Hold Tiltiming. Once your time is selected, let the thermostat revert back to normal operation on itsown to accept the change.
16. What is thethermostat Click Test?
Many furnaces have safety devices that shut the system down when a lock-out conditionoccurs in the furnace. If the thermostat is turned off or the call for heat is cancelled (bylowering and then raising the set temperature) the furnace may start operating again. Adiagnostic to see if the thermostat is operating when the room temperature is below thethermostat setting (in heat) is to lower the setting below the room temp. Within about 3seconds the thermostat should make a soft click sound. This sound is the thermostat turningoff the call for heat and usually indicates the thermostat is operating properly. If thethermostat does not click you would be suspicious of the thermostat and try resetting it byfollowing it’s reset operation. If the thermostat does not click after being reset contact yourheating and cooling service person or place of purchase for a replacement. If the thermostatclicks and the heat works intermittently contact the furnace manufacturer or local serviceperson. They will want to observe the condition when it is not working.
1F95-391FAQs
FAQs
32
1F95-391FAQs
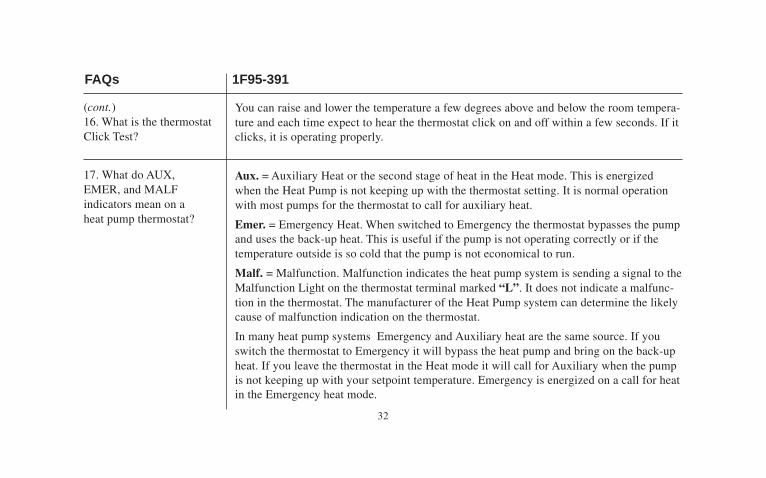
You can raise and lower the temperature a few degrees above and below the room tempera-ture and each time expect to hear the thermostat click on and off within a few seconds. If itclicks, it is operating properly.
Aux. = Auxiliary Heat or the second stage of heat in the Heat mode. This is energizedwhen the Heat Pump is not keeping up with the thermostat setting. It is normal operationwith most pumps for the thermostat to call for auxiliary heat.
Emer. = Emergency Heat. When switched to Emergency the thermostat bypasses the pumpand uses the back-up heat. This is useful if the pump is not operating correctly or if thetemperature outside is so cold that the pump is not economical to run.
Malf. = Malfunction. Malfunction indicates the heat pump system is sending a signal to theMalfunction Light on the thermostat terminal marked “L”. It does not indicate a malfunc-tion in the thermostat. The manufacturer of the Heat Pump system can determine the likelycause of malfunction indication on the thermostat.
In many heat pump systems Emergency and Auxiliary heat are the same source. If youswitch the thermostat to Emergency it will bypass the heat pump and bring on the back-upheat. If you leave the thermostat in the Heat mode it will call for Auxiliary when the pumpis not keeping up with your setpoint temperature. Emergency is energized on a call for heatin the Emergency heat mode.
(cont.)16. What is the thermostatClick Test?
17. What do AUX,EMER, and MALFindicators mean on aheat pump thermostat?

33
IndexTroubleshooting
RESETTING THERMOSTATThe thermostat can be reset back to factory default programs and configuration options. Removing power from the thermostat willnot reset it to the default settings. Before resetting the thermostat you may want to make note of the previously selected configura-tion options and programming.
To reset the thermostat, press and release PROGRAM RUN , then press the FAN , TIME BACK and buttons at thesame time. This will reset the thermostat to factory default programs and configuration. The display will momentarily goblank, and then all segments on the display will momentarily be shown. The thermostat will then go into the AUTO HOLDmode and will maintain a factory preset temperatures of 62°F in Heat or 85°F in Cool. To clear the HOLD TEMPERA-TURE overide press the PROGRAM RUN button.
TROUBLESHOOTING
POSSIBLE CAUSE
1. Blown fuse or tripped circuitbreaker.2. Furnace power switch to OFF.3. Furnace blower compartmentdoor or panel loose or not properlyinstalled.
CORRECTIVE ACTION
Replace fuse or reset breaker.
Turn switch to ON.Replace door panel in proper position to engagesafety interlock or door switch.
SYMPTOM
No Heat/No Cool/No Fan(common problems)

34
SYMPTOM
No Heat (Heat may also beintermittent.)
No Cool
POSSIBLE CAUSE
1. Pilot light not lit.2. Thermostat not set to Heat.
3. Loose connection to thermostat orsystem.4. Furnace Lock-Out Condition.
1. Thermostat not set to Cool.
2. Loose connection to thermostat orsystem.3. Cooling system requires service orthermostat requires replacement.
CORRECTIVE ACTION
Re-light pilot.Press the SYSTEM button until Heat is displayed andraise temperature above room temperature.Verify thermostat and system wires are securelyattached.Many furnaces have safety devices that shut downwhen a lock-out condition occurs. If the heat worksintermittently, contact the furnace manufacturer orlocal service person for assistance.
Press the SYSTEM button to Cool and lower tempera-ture below room temperature.Verify thermostat and system wires are securelyattached.Press the SYSTEM button until Cool is displayed andlower setpoint below room temperature.There may be five minute delay before thethermostat clicks in cooling.

35
SYMPTOM
Heat, Cool or Fan RunsConstantly
CORRECTIVE ACTION
Check each wire connection to verify they are notshorted or touching together. No bare wire shouldstick out from under terminal screws.Try resetting the thermostat as described on page 31.
If the FAN button is pressed to display ON, theblower fan will cycle continuously whether theheating or cooling system is running, press the FANbutton until AUTO is displayed. If the conditionpersists, the manufacturer of your system or serviceperson can instruct you on how to test the Heat/Coolsystem for correct operation. If the system operatescorrectly, replace the thermostat.
POSSIBLE CAUSE
1. Possible short in wiring.
2. Possible short in thermostat.
3. Possible short in heat/cool/fansystem.4. Fan Switch is set to Fan On.
Troubleshooting
36
INDEXSYMPTOM
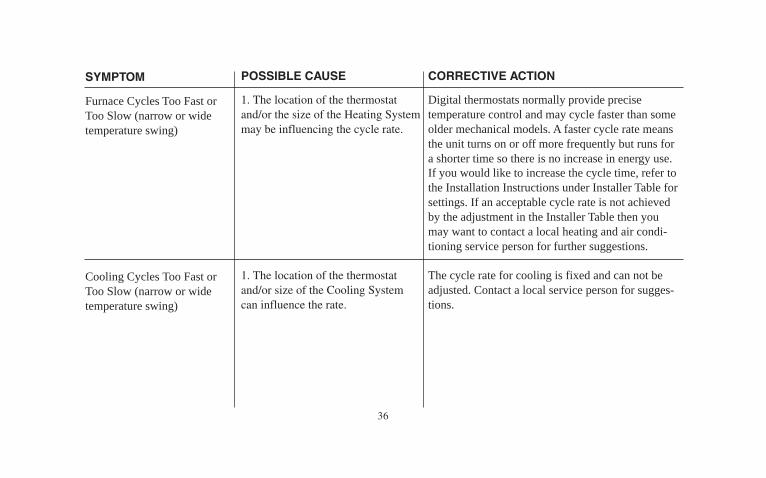
Furnace Cycles Too Fast orToo Slow (narrow or widetemperature swing)
Cooling Cycles Too Fast orToo Slow (narrow or widetemperature swing)
POSSIBLE CAUSE
1. The location of the thermostatand/or the size of the Heating Systemmay be influencing the cycle rate.
1. The location of the thermostatand/or size of the Cooling Systemcan influence the rate.
CORRECTIVE ACTION
Digital thermostats normally provide precisetemperature control and may cycle faster than someolder mechanical models. A faster cycle rate meansthe unit turns on or off more frequently but runs fora shorter time so there is no increase in energy use.If you would like to increase the cycle time, refer tothe Installation Instructions under Installer Table forsettings. If an acceptable cycle rate is not achievedby the adjustment in the Installer Table then youmay want to contact a local heating and air condi-tioning service person for further suggestions.
The cycle rate for cooling is fixed and can not beadjusted. Contact a local service person for sugges-tions.

37
INDEXSYMPTOM
Thermostat Setting andThermostat ThermometerDisagree
Thermostat Does Not FollowProgram
Blank Display and/or KeypadNot Responding
POSSIBLE CAUSE
1. Thermostat thermometer settingrequires adjustment.
1. AM or PM set incorrectly inprogram.2.AM or PM set incorrectly on theclock.3. Voltage spike or static discharge.
1. Voltage spike or static discharge.
CORRECTIVE ACTION
The thermostat can be adjusted +/- 5°F. See theTemperature Display Adjustment in the OperatingManual under configuration.
Check current clock and program settings includingthe AM or PM designations for each time period. If avoltage spike or a static discharge occurs use theReset Operation listed above.
Check heat/cool system for proper operation. If avoltage spike occurs, use the Reset Operation bypressing FAN, TIME BACK , and the temperature
arrow at the same time.
Troubleshooting

38
INDEXAdjustable Humidity Display ------- 25
Adjustable Temperature Display --- 19
Air Filter Change-Out Indicator ---- 23
Automatic Heat/Cool Changeover - 19
Compressor Short-CycleProtection -------------------------- 21
CONFIGURATION -------------------- 4
Configuration Menu Chart ------------ 4
Factory Preprogramming ------------ 18
FAQs ----------------------------------- 26
FEATURES --------------------------- 18
Humidifier Maintenance Indicator - 23
Humidifier Control and Monitoring 26
Indefinite Program Hold(Bypassing the Program) -------- 18
INTRODUCTION --------------------- 3
Thermostat Buttons ----------------- 1
(LCD) Display ---------------------- 2
Keypad Lockout ---------------------- 20
Operation
Manual ----------------------------- 12
Programmed ----------------------- 12
Program
Entering Your ---------------------- 12
Planning Your --------------------- 12
PROGRAMMING ------------------- 12
Programmable Automatic Humidity
Reduction -------------------------- 25
Programmable Fan Control --------- 19
Programmable Vacation Time/Temp 19
Pushbutton Backlight ---------------- 18
Schedule
Sample Programs ----------------- 14
Personal Programs ---------------- 16
Selectable Energy Management
Recovery (EMR) -------------------- 6
Set
Clock ------------------------------- 12
Day --------------------------------- 12
Program ---------------------------- 12
System and Thermostat
Diagnostics ------------------------ 24
Temporary Program Override ------- 18
Thermostat Startup After Total
Power Loss ------------------------ 20
TROUBLESHOOTING ------------- 33

39
NOTES

40
NOTES

41
NOTES

420728
The Emerson logo is atrademark and service markof Emerson Electric Co.
White-Rodgers is a divisionof Emerson Electric Co.
PART NO. 37-6528CReplaces 37-6528B