19cy.jvckenwood.com file19cy.jvckenwood.com
TRANSCRIPT
Hướng dẫn sử dụngAVX cao cấpAVX cơ bản
PC601-00026(AP-LHD)
Cảm ơn bạn đã mua Hệ thống đa phương tiện dùng trên xe hơi chính hãng của TOYOTA.Xin lưu ý rằng hướng dẫn này giải thích tất cả các chức năng và thiết bị, kể cả các tùy chọn.Do đó, bạn có thể tìm thấy một số giải thích về các tính năng hoặc thiết bị không có trong Hệ thống đa phương tiện dùng trên xe hơi của bạn.
TOYOTA DAIHATSU ENGINEERING & MANUFACTURING CO., LTD.

2
Mục lụcThông tin về an toàn quan trọng 4
Các biện pháp phòng ngừa ....................................4
Trước khi sử dụng 5Cách đọc hướng dẫn này .........................................6
Các thao tác cơ bản 7Chức năng nút của bảng điều khiển mặt trước 7
Bật thiết bị .....................................................................8
Cài đặt khu vực ............................................................8
Điều chỉnh âm lượng ................................................9
Các thao tác màn hình cảm ứng ........................ 10
Menu bật lên ............................................................. 10
Chế độ hiển thị đơn giản ...................................... 10
Mô tả màn hình CHỦ .............................................. 11
Mô tả màn hình chọn nguồn .............................. 12
Mô tả màn hình kiểm soát nguồn ..................... 14
Màn hình danh sách ............................................... 14
Kết nối 15Kết nối có dây ........................................................... 15
Điều khiển Bluetooth 16Thông tin sử dụng thiết bị Bluetooth® ............ 16
Đăng ký thiết bị Bluetooth ................................... 17
Cài đặt Bluetooth ..................................................... 18
Phát thiết bị âm thanh Bluetooth ...................... 20
Sử dụng thiết bị rảnh tay ...................................... 22
Cài đặt điện thoại .................................................... 26
T-Link 27Chuẩn bị...................................................................... 27
Kết nối điện thoại thông minh ........................... 27
Thao tác Mirroring .................................................. 27
Đĩa 29Phát đĩa ....................................................................... 29
Thao tác cơ bản với DVD/ Video-CD ................. 29
Thao tác cơ bản với phương tiện Đĩa/CD nhạc .............................................................. 31
Thao tác tìm kiếm .................................................... 32
Thao tác menu đĩa DVD ........................................ 32
Cài đặt DVD................................................................ 33
USB 35Kết nối thiết bị USB ................................................. 35
Thao tác USB cơ bản ............................................... 35
Thao tác tìm kiếm .................................................... 36
iPod/iPhone 38Chuẩn bị...................................................................... 38
Thao tác cơ bản với iPod/iPhone ....................... 39
Thao tác tìm kiếm .................................................... 39
Radio 40Thao tác radio cơ bản ............................................ 40
Thao tác bộ nhớ ....................................................... 41
Thao tác chọn ........................................................... 41
Tin tức mới nhất và Thông tin giao thông ...... 42
Cài đặt radio .............................................................. 43
Các thiết bị ngoại vi khác 44Trình phát âm thanh ngoài (AUX) ...................... 44
Sử dụng camera lùi ................................................. 44

3Tiếng Việt
Vì lý do an toàn, hướng dẫn sử dụng này đưa ra các mục yêu cầu đặc biệt chú ý với các dấu hiệu sau.
CẢNH BÁO• Đây là cảnh báo về bất cứ điều gì có thể gây
tử vong hoặc thương tích nghiêm trọng cho mọi người nếu cố tình bỏ qua cảnh báo. Bạn sẽ được cung cấp thông tin về những gì bạn phải làm hoặc không được làm để giảm thiểu nguy cơ tử vong hoặc thương tích nghiêm trọng cho bản thân và những người khác.
THẬN TRỌNG• Đây là cảnh báo về bất cứ điều gì có thể gây
thương tích cho mọi người nếu cố tình bỏ qua cảnh báo. Bạn sẽ được cung cấp thông tin về những gì bạn phải làm hoặc không được làm để giảm thiểu nguy cơ thương tích cho bản thân và những người khác.
LƯU Ý
• Đây là cảnh báo về bất cứ điều gì có thể gây ra thiệt hại cho xe hoặc thiết bị của xe nếu cố tình bỏ qua cảnh báo. Bạn sẽ được cung cấp thông tin về những gì bạn phải làm hoặc không được làm để tránh hoặc giảm thiểu nguy cơ thiệt hại cho xe và thiết bị của xe.
• Vui lòng đọc tất cả các tài liệu, TOYOTA sẽ không chịu trách nhiệm về hiệu suất sản phẩm không đạt yêu cầu do không tuân theo những hướng dẫn này. Các thay đổi đối với sản phẩm có thể dẫn đến sự khác biệt giữa nội dung của hướng dẫn sử dụng này và các tính năng thực tế của sản phẩm.
Cài đặt 45Điều chỉnh màn hình hiển thị ............................. 45
Điều chỉnh hình ảnh ............................................... 45
Thiết lập hệ thống ................................................... 46
Hệ thống chung ....................................................... 46
Hệ thống giao diện người dùng ........................ 47
Hệ thống vùng kép ................................................. 49
Kiểm soát âm thanh 50Kiểm soát âm thanh chung.................................. 50
Kiểm soát bộ cân bằng .......................................... 51
Bù âm lượng .............................................................. 52
Hiệu ứng âm thanh ................................................. 52
Vị trí nghe/ DTA ........................................................ 53
Điều khiển vô lăng 55Thao tác sử dụng công tắc lái ............................. 55
Xử lý sự cố 57Vấn đề và giải pháp ................................................ 57
Thông báo lỗi ............................................................ 57
Phụ lục 59Phương tiện và tập tin có thể phát ................... 59
Mã vùng trên thế giới ............................................ 61
Mã ngôn ngữ DVD .................................................. 62
Thông số kỹ thuật ................................................... 63
Giới thiệu về thiết bị này ....................................... 65Cài đặt bổ sung ................................................... 68

Thông tin về an toàn quan trọng
4
Đảm bảo lái xe an toànKhông được phát video trong khi đang lái xe để tránh việc người lái xe chăm chú nhìn vào màn hình của thiết bị. Dừng xe ở nơi an toàn và áp dụng chế độ thắng tay khi đậu xe trước khi cho phát video.Có một số chức năng bạn không thể thực hiện trong khi đang lái xe vì lý do tương tự.
THẬN TRỌNG• Để tránh bị đoản mạch, không được đặt hoặc
để bất kỳ đồ vật bằng kim loại nào (như tiền xu hoặc dụng cụ kim loại) bên trong thiết bị.
• Không được để sản phẩm này tiếp xúc với chất lỏng. Việc tiếp xúc với chất lỏng có thể dẫn đến bị điện giật cũng như gây hư hại cho thiết bị, bốc khói, và quá nhiệt.
• Nếu bạn nhận thấy bất kỳ sự bất thường nào như khói, tiếng ồn hoặc mùi lạ khi sử dụng sản phẩm này hoặc bất kỳ dấu hiệu bất thường nào khác trên màn hình LCD, hãy tắt nguồn ngay lập tức và tham khảo ý kiến đại lý của bạn hoặc Trạm bảo dưỡng Toyota gần nhất được ủy quyền. Sử dụng sản phẩm trong điều kiện này có thể dẫn đến tổn hại vĩnh viễn cho hệ thống.
• Không tháo rời hoặc sửa đổi sản phẩm này, vì có các cấu kiện điện áp cao bên trong có thể gây giật điện. Nhớ tham khảo ý kiến đại lý của bạn hoặc Trạm bảo dưỡng Toyota gần nhất được ủy quyền để kiểm tra, điều chỉnh hoặc sửa chữa bên trong.
Thông tin về an toàn quan trọng
Các biện pháp phòng ngừa
LƯU Ý QUAN TRỌNG
Vui lòng đọc kỹ hướng dẫn này để đảm bảo sử dụng đúng cách trước khi dùng sản phẩm này. Điều đặc biệt quan trọng là bạn phải đọc và tuân thủ các CẢNH BÁO và THẬN TRỌNG trong hướng dẫn này. Vui lòng cất hướng dẫn ở nơi an toàn và dễ tiếp cận để tham khảo trong tương lai.
CẢNH BÁO• Không xem hoặc liên tục nhìn vào màn hình
của thiết bị trong khoảng thời gian dài bất cứ khi nào bạn đang lái xe.
• Không vận hành thiết bị trong khi đang lái xe. Hãy tập trung nhìn đường.
• Không ghép nối các thiết bị Bluetooth trong khi đang lái xe, dừng ở bên đường an toàn trước khi thử ghép nối bất kỳ thiết bị nào.
• Đừng tìm cách tự cài đặt hoặc bảo dưỡng sản phẩm này. Nếu người cài đặt hoặc bảo dưỡng sản phẩm này không được đào tạo và không có kinh nghiệm về thiết bị điện tử và phụ kiện ô tô thì việc này có thể gây nguy hiểm, đồng thời có thể khiến bạn có nguy cơ bị điện giật, chấn thương hoặc gặp phải các mối nguy hiểm khác.
• Nếu có chất lỏng hoặc chất lạ lọt vào trong sản phẩm này, hãy dừng xe của bạn ở nơi an toàn, lập tức TẮT công tắc khóa điện (TẮT ACC) và tham khảo ý kiến đại lý của bạn hoặc Trạm bảo dưỡng Toyota gần nhất được ủy quyền. Không sử dụng sản phẩm trong điều kiện này vì làm như vậy có thể dẫn đến hỏa hoạn, điện giật hoặc hỏng hóc khác.

Trước khi sử dụng
5Tiếng Việt
Trước khi sử dụng Thận trọng khi sử dụng thiết bị này
• Bạn có thể chọn ngôn ngữ để hiển thị menu, thẻ tập tin âm thanh, v.v ... Xem phần Cài đặt khu vực (Tr.8).
• Tính năng Hệ thống dữ liệu Radio sẽ không khả dụng tại các khu vực nơi dịch vụ không được hỗ trợ bởi bất kỳ trạm phát sóng nào.
Bảo vệ màn hình• Để bảo vệ màn hình khỏi bị hư hại, không thao
tác trên màn hình bằng bút bi hoặc dụng cụ tương tự có đầu nhọn.
• Nếu bạn dán lớp màng bảo vệ màn hình lên màn hình, điều này có thể cản trở thao tác trên cảm ứng.
Vệ sinh thiết bị• Nếu bản mặt của thiết bị này bị ố, hãy lau bằng
vải mềm khô chẳng hạn như vải silicon. Nếu bản mặt bị ố nặng, hãy lau bằng một miếng vải được làm ẩm bằng chất tẩy rửa trung tính, sau đó lau lại bằng một miếng vải khô mềm sạch.
LƯU Ý
• Các bộ phận cơ khí của thiết bị có thể bị hỏng nếu phun trực tiếp chất tẩy rửa vào thiết bị. Nếu lau bản mặt bằng vải cứng hoặc sử dụng chất lỏng dễ bay hơi như chất pha loãng hoặc cồn có thể làm trầy xước bề mặt hoặc xóa các chữ được in lưới.
Mờ ống kính
Tình trạng ngưng tụ này trên ống kính (còn gọi là mờ ống kính) có thể dẫn đến không cho phép phát đĩa. Trong tình huống như vậy, hãy tháo đĩa ra và chờ cho đến khi sương bay hơi.
Thận trọng khi xử lý đĩa• Không chạm vào bề mặt ghi của đĩa.• Không dán băng dính vào đĩa, hoặc sử dụng
đĩa có băng dính trên đó.• Không sử dụng các phụ kiện loại đĩa.• Vệ sinh đĩa từ chính giữa dần ra phía vành
ngoài.
• Khi lấy đĩa ra khỏi thiết bị này, hãy gỡ đĩa ra theo chiều ngang.
• Nếu lỗ chính giữa đĩa hoặc vành ngoài có gờ sắc, chỉ sử dụng đĩa sau khi đã tháo gờ sắc bằng bút bi, v.v.
• Không được sử dụng đĩa không tròn.
• Không được sử dụng đĩa 8 cm (3 inch).• Không được sử dụng đĩa có màu trên bề mặt
ghi hoặc đĩa bị bẩn.• Thiết bị này chỉ có thể phát các loại đĩa CD sau
đây.
• Thiết bị này có thể không phát chính xác các đĩa không có nhãn.
• Bạn không thể phát đĩa chưa được hoàn thành ghi dữ liệu. (Để biết quy trình hoàn thành ghi dữ liệu, hãy xem phần mềm viết và hướng dẫn sử dụng máy ghi âm của bạn.)
Trước khi tháo ắc-quy xeCó thể cần lưu ý đến các cài đặt khác nhau vì thông tin được lưu trữ trong thiết bị head unit bị xóa bằng cách ngắt kết nối cáp nguồn khỏi ắc-quy (hoặc tự tháo ắc-quy), tuy nhiên, có một số cài đặt sẽ không được đặt lại.
Trong trường hợp gặp sự cốNếu sản phẩm này không hoạt động đúng cách, hãy liên hệ với đại lý của bạn hoặc Trạm bảo dưỡng Toyota gần nhất được ủy quyền.
Khi bạn bật điều hòa của xe trong thời tiết lạnh,có thể hình thành lớp sương trên ống kính bộ phát đĩa của thiết bị do ngưng tụ.

Trước khi sử dụng
6
Cách đọc hướng dẫn này
• Các thao tác được mô tả trong hướng dẫn này có thể áp dụng cho cả model tay lái bên trái và bên phải. Các hình minh họa trong sách hướng dẫn này chủ yếu đề cập đến các model tay lái bên phải. Khác biệt giữa các model tay lái bên phải và bên trái là sự sắp xếp các nút trên bảng điều khiển mặt trước và các phím tắt trên màn hình CHÍNH. Bạn có thể tham khảo phần Các thao tác cơ bản để so sánh trực quan về vị trí nút giữa các model tay lái bên phải và bên trái.
• Các màn hình và bảng điều khiển trong hướng dẫn này chỉ là ví dụ được sử dụng để cung cấp giải thích rõ ràng về các thao tác. Vì lý do này, chúng có thể khác với màn hình và bảng điều khiển thực tế được sử dụng hoặc một số mẫu hiển thị có thể khác nhau.
• Ngôn ngữ hiển thị: Tiếng Anh được sử dụng làm ngôn ngữ mặc định. Bạn có thể chọn ngôn ngữ hiển thị bằng cách truy cập chức năng nút
. Xem phần Cài đặt khu vực (Tr.8).

Các thao tác cơ bản
7Tiếng Việt
Các thao tác cơ bản
Chức năng nút của bảng điều khiển mặt trước
Model tay lái bên phải
3
4
5
6
1 2
7
8
Model tay lái bên trái
7
8
6
1 2
3
4
5
LƯU Ý• Các bộ phận cơ khí của thiết bị có thể bị hỏng nếu phun trực tiếp chất tẩy rửa vào thiết bị. Nếu lau bản mặt bằng
vải cứng hoặc sử dụng chất lỏng dễ bay hơi như chất pha loãng hoặc cồn có thể làm trầy xước bề mặt hoặc xóa các chữ được in lưới.
Số Tên Chức năng1 Disc-loading slot (Khe nhận đĩa) • Khe để đưa đĩa vào.
2 Disc eject (Lấy đĩa ra) • Lấy đĩa ra.• Nhấn và giữ chặt để lấy đĩa ra.
3 Home (Màn hình chính) • Hiển thị màn hình CHÍNH.
4 Cài đặt • Hiển thị menu bật lên.
5 Mute (Tắt tiếng) • Tắt/khôi phục âm thanh.
6 Cảm biến từ xa • Nhận tín hiệu điều khiển từ xa.
7 Power (Nguồn) • Nhấn và giữ: Bật/tắt thiết bị (Tr.8).• Nhấn nhanh: Bật/tắt “chế độ hiển thị đơn giản” (Tr.10).
8 –, + (Âm lượng)
• Điều chỉnh âm lượng Âm lượng sẽ tăng lên 15 khi bạn tiếp tục nhấn ✚.

Các thao tác cơ bản
8
Bật thiết bị
Thiết bị này được bật khi công tắc khóa điện được BẬT và tắt khi công tắc khóa điệnTẮT.1 Đặt công tắc khóa điện ở vị trí BẬT. Thiết bị được bật.
2 Đọc thông báo thận trọng và chạm vào Agree (Đồng ý).
Drive safely and obey traffic rules. Watching this screen andmaking selection while driving can lead to a serious
accident. Read safety instruction in your Owner’s Manual.
CAUTION
• Chạm vào Language (Ngôn ngữ) để thay đổi ngôn ngữ hiển thị.
⃝ Để tắt/bật thiết bị theo cách thủ công:
1 Nhấn và giữ nút .
Thiết bị được tắt/bật.
Cài đặt khu vực
1 Nhấn nút .
Menu bật lên xuất hiện.
2 Chạm vào .
Basic Operations
8
Turning on the Unit
This unit is turned on when the ignition switch is set ON, and turned off when the ignitionis switched.
1 Set the ignition switch turned ON position.hh The unit is turned on.
2 Read the caution message and touch [Agree].
• Touching [Language] changes the display language.
● To turn off/on the unit manually:
1 Press and hold [ ] button.
hh The unit is turned off/on.
Regional Setup
1 Press [ ] button.
hh Popup menu appears.
2 Touch [ ].
hh System screen appears.
3 Touch [Regional].
hh Regional screen appears.
4 Set each item as follows.
■ [Language]Select the desired language.
■ [Time Zone]Select the time zone.
!KL19_AP_En.indb 8 2018/11/09 11:15:16
Drive safely and obey traffic rules. Watching this screen andmaking selection while driving can lead to a serious
accident. Read safety instruction in your Owner’s Manual.
CAUTION
Màn hình hệ thống xuất hiện
3 Chạm vào Regional (Khu vực).
Basic Operations
8
Turning on the Unit
This unit is turned on when the ignition switch is set ON, and turned off when the ignitionis switched.
1 Set the ignition switch turned ON position.hh The unit is turned on.
2 Read the caution message and touch [Agree].
• Touching [Language] changes the display language.
● To turn off/on the unit manually:
1 Press and hold [ ] button.
hh The unit is turned off/on.
Regional Setup
1 Press [ ] button.
hh Popup menu appears.
2 Touch [ ].
hh System screen appears.
3 Touch [Regional].
hh Regional screen appears.
4 Set each item as follows.
■ [Language]Select the desired language.
■ [Time Zone]Select the time zone.
!KL19_AP_En.indb 8 2018/11/09 11:15:16
Drive safely and obey traffic rules. Watching this screen andmaking selection while driving can lead to a serious
accident. Read safety instruction in your Owner’s Manual.
CAUTION
Màn hình khu vực xuất hiện.
4 Đặt từng mục như sau.
Basic Operations
8
Turning on the Unit
This unit is turned on when the ignition switch is set ON, and turned off when the ignitionis switched.
1 Set the ignition switch turned ON position.hh The unit is turned on.
2 Read the caution message and touch [Agree].
• Touching [Language] changes the display language.
● To turn off/on the unit manually:
1 Press and hold [ ] button.
hh The unit is turned off/on.
Regional Setup
1 Press [ ] button.
hh Popup menu appears.
2 Touch [ ].
hh System screen appears.
3 Touch [Regional].
hh Regional screen appears.
4 Set each item as follows.
■ [Language]Select the desired language.
■ [Time Zone]Select the time zone.
!KL19_AP_En.indb 8 2018/11/09 11:15:16
Drive safely and obey traffic rules. Watching this screen andmaking selection while driving can lead to a serious
accident. Read safety instruction in your Owner’s Manual.
CAUTION
■ Language (Ngôn ngữ)Chọn ngôn ngữ mong muốn.
■ Time Zone (Múi giờ)Chọn múi giờ.

Các thao tác cơ bản
9Tiếng Việt
Điều chỉnh âm lượng
Bạn có thể điều chỉnh âm lượng (0 đến 40). Nhấn ✚ để tăng và nhấn ▬ để giảm.Giữ ✚ để tăng âm lượng liên tục lên mức 15.Mức âm lượng 16 đến 40 có thể được điều chỉnh từng bước một.
■ Time Format (Định dạng thời gian)Chọn định dạng hiển thị thời gian.12-Giờ (Mặc định)/ 24-Giờ
■ Clock Adjust (Điều chỉnh đồng hồ)Điều chỉnh ngày và giờ theo cách thủ công. (Tr.9)
Điều chỉnh ngày giờ1 Chạm vào Time Zone (Múi giờ) trên màn
hình Khu vực.
2 Chọn múi giờ.
3 Chạm vào Clock Adjust (Điều chỉnh đồng hồ) trên màn hình Khu vực.
4 Điều chỉnh ngày, sau đó điều chỉnh giờ.
Basic Operations
9English
■ [Time Format] Select the time display format.[12-Hour] (Default)/ [24-Hour]
■ [Clock Adjust]Adjust the date and time manually. (P.9)
Adjusting date and time
1 Touch [Time Zone] on the Regional screen.
2 Select the time zone.
3 Touch [Clock Adjust] on the Regional screen.
4 Adjust the date, then adjust the time.
5 Touch [Set].
Adjusting the volume
You can adjust the volume (0 to 40).Press [ ] to increase, and press [ ] to decrease.Holding [ ] increases the volume continuously to level 15.Volume level 16 to 40 can be adjusted one step each.
!KL19_AP_En.indb 9 2018/11/09 11:15:17
5 Chạm vào Set (Đặt).

Các thao tác cơ bản
10
Các thao tác màn hình cảm ứng
Để thực hiện các thao tác trên màn hình, bạn cần chạm, chạm và giữ, vẩy hoặc vuốt để chọn một mục hoặc đổi trang.⃝ ChạmChạm nhẹ vào màn hình để chọn một mục trên màn hình.
⃝ Chạm và giữChạm vào màn hình và giữ ngón tay tại chỗ cho đến khi màn hình hiển thị thay đổi hoặc một thông báo được hiển thị.
⃝ VẩyVẩy nhanh ngón tay sang trái hoặc phải trên màn hình để đổi trang. Bạn có thể cuộn màn hình danh sách lên, xuống bằng cách vẩy lên/ vẩy xuống trên màn hình.
⃝ VuốtVuốt ngón tay lên hoặc xuống trên màn hình để cuộn màn hình lên, xuống.
Menu bật lên
1 Nhấn nút . Menu bật lên xuất hiện.
2 Chạm vào để hiển thị menu bật lên.
Basic Operations
10
Touch screen operations
To perform operations on the screen, you need to touch, touch and hold, flick or swipe to select an item or change pages.
● TouchTouch the screen gently to select an item on the screen.
● Touch and holdTouch the screen and keep your finger in place until the display changes or a message is displayed.
● FlickSlide your finger quickly to the left or right on the screen to change the page.You can scroll a list screen by flicking up/ down on the screen.
● SwipeSlide your finger up or down on the screen to scroll the screen.
Popup menu
1 Press [ ] button.hh Popup menu appears.
2 Touch to display the popup menu.
The contents of the menu are as follows.
• Displays the display control screen. (P.45)
• Displays the picture control screen. (P.45)
• Displays the System screen. (P.46)
• Displays the Audio screen. (P.50)
• Displays the T-Link Setup screen.*1 (P.28)
• Displays the T-Link screen.*1, *2 (P.27)
• Displays the Hands Free screen. (P.22)
• Displays the control screen of the current source.*3
*1 Premium AVX only*2 This menu is not available when a T-Link
source screen is displayed. If you select this menu while using iPod or Bluetooth Audio source, a message “T-Link can not be used while using iPod / Bluetooth Audio. Would you like to switch to T-Link?” will be displayed.
*3 For Premium AVX, this menu is available when a T-Link source screen is displayed.
Simple Display Mode
When Simple Display Mode is enabled, the screen will only display time, date and current playback source information.
1 Press [ ] button.
● To back to the original screen:
1 Press [ ] button.hh AVX displays the original screen.
!KL19_AP_En.indb 10 2018/11/09 11:15:18
Nội dung của menu như sau.
• Hiển thị màn hình điều khiển hiển thị. (Tr.45)
• Hiển thị màn hình điều khiển hình ảnh. (Tr.45)
• Hiển thị màn hình Hệ thống. (Tr.46)
• Hiển thị màn hình Âm thanh. (Tr.50)
• Hiển thị màn hình Cài đặt T-Link.*1 (Tr.28)
• Hiển thị màn hình T-Link. *1, *2 (Tr.27)
• Hiển thị màn hình chế độ Rảnh tay. (Tr.22)
• Hiển thị màn hình điều khiển của nguồn hiện tại.*3
*1 Chỉ AVX cao cấp*2 Menu này không khả dụng khi màn hình
nguồn T-Link được hiển thị. Nếu bạn chọn menu này trong khi sử dụng nguồn iPod hoặc Bluetooth Audio, thông báo “không thể sử dụng T-Link trong khi sử dụng iPod/Bluetooth Audio. Bạn có muốn chuyển sang T-Link không?” sẽ được hiển thị.
*3 Đối với AVX cao cấp, menu này khả dụng khi màn hình nguồn T-Link được hiển thị.
Chế độ hiển thị đơn giản
Khi bật Chế độ hiển thị đơn giản, màn hình sẽ chỉ hiển thị thông tin nguồn phát lại hiện tại, ngày và giờ hiển thị.
1 Nhấn nút .
⃝ Để trở về màn hình ban đầu:
1 Nhấn nút . AVX hiển thị màn hình ban đầu.

Các thao tác cơ bản
11Tiếng Việt
Mô tả màn hình CHỦ
Hầu hết các chức năng có thể được thực hiện từ màn hình CHỦ.
Model tay lái bên phải
1 2 3
Model tay lái bên trái
1 23
1 • Hiển thị màn hình chọn nguồn. (Tr.12)
2 • Thông tin nguồn hiện tại.• Chạm để hiển thị màn hình điều khiển
của nguồn hiện tại.
3 • Các biểu tượng lối tắt nguồn phát lại (Tr.13)
Hiển thị màn hình CHỦ
1 Nhấn nút .
AVX hiển thị màn hình ban đầu.

Các thao tác cơ bản
12
Mô tả màn hình chọn nguồn
Bạn có thể hiển thị biểu tượng của tất cả các nguồn và tùy chọn phát lại trên màn hình chọn nguồn.
21
Chọn nguồn phát lại
1 Nhấn nút . Màn hình CHỦ xuất hiện.
2 Chạm vào .Từ màn hình, bạn có thể chọn các nguồn và chức năng sau đây.
• Hiển thị màn hình chế độ Rảnh tay. (Tr.22)
• Chuyển sang màn hình T-Link từ thiết bị iPhone/Android được kết nối. *1 (Tr.27)
• Chạy trình phát nhạc qua • Bluetooth. (Tr.16)
• Chuyển sang phát từ nguồn Radio. (Tr.40)
• Phát đĩa.(Tr.29)
• Chuyển sang một thiết bị ngoại vi được kết nối với cổng cắm AUX. (Tr.44)
• Phát các tập tin trên thiết bị USB. (Tr.35)
• Phát iPod/iPhone. (Tr.38)
• Tắt nguồn AV. (Tr.13)
• Hiển thị màn hình Nhận dạng giọng nói. (Tr.23)
*1 Chỉ AVX cao cấp.
1 • Trở lại màn hình trước đó.
2 • Đổi nguồn phát lại. Để biết các nguồn phát lại, xem Tr.12.

Các thao tác cơ bản
13Tiếng Việt
Để chọn nguồn phát lại trên màn hình CHỦ
4 mục được hiển thị trên màn hình chọn nguồn với các biểu tượng lớn được hiển thị trên màn hình CHÍNH.Bạn có thể thay đổi các mục được hiển thị trên vùng này bằng cách tùy chỉnh màn hình chọn nguồn. (Tr.13)
Để tắt nguồn AV
1 Nhấn nút . Màn hình CHỦ xuất hiện.
2 Chạm vào .
3 Chạm vào AV Off (Tắt nguồn AV).
Tùy chỉnh các nút lối tắt trên màn hình CHỦBạn có thể sắp xếp vị trí của các biểu tượng nguồn theo ý muốn.
1 Nhấn nút . Màn hình CHỦ xuất hiện.
2 Chạm vào .
3 Chạm và giữ biểu tượng mà bạn muốn di chuyển trong chế độ tùy chỉnh.
4 Kéo biểu tượng đến vị trí mong muốn.

Các thao tác cơ bản
14
Mô tả màn hình kiểm soát nguồn
Có một số chức năng có thể được thực hiện từ hầu hết các màn hình.
Các chỉ số
52
1 43
Bảng điều khiển phụ
Tất cả các biểu tượng nguồn
Hiển thị màn hình chọn nguồn. (Tr.12)
Bảng điều khiển phụ
/ : Hiển thị/ẩn bảng điều khiển phụ. Chức năng này có sẵn trong nguồn Disc và USB.
Biểu tượng tắt tiếng được hiển thị trong khi AVX đang tắt tiếng.
Thông tin điện thoại đã kết nối Bluetooth.
Cuộn văn bản
Cuộn văn bản hiển thị.
Màn hình danh sách
Có một số phím chức năng phổ biến trong màn hình danh sách của hầu hết các nguồn.
1
3
4
2
5
Trở lại
Trở lại màn hình trước đó.
Hiển thị cửa sổ chọn loại danh sách.
v.v.
Các phím có các chức năng khác nhau được hiển thị ở đây.
• : Di chuyển đến cấp bậc cao hơn.• : Phát tất cả các bản nhạc trong thư mục
chứa bản nhạc hiện tại.• : Tiến đến chữ bạn đã nhập (tìm kiếm theo
bảng chữ cái).
Hiển thị danh sách tập tin nhạc/phim.
Cuộn văn bản
Cuộn văn bản hiển thị.
LƯU Ý• Tùy thuộc vào nguồn hoặc chế độ hiện tại, một
số phím chức năng có thể không xuất hiện.

Kết nối
15Tiếng Việt
Kết nối có dây
Thiết bị này có thể được kết nối với các thiết bị bên ngoài. Mở nắp cổng trước và kết nối thiết bị bên ngoài qua phụ kiện sau.
Kết nối thiết bị USB
Cáp mở rộng [1]
Cáp USB [1]Thiết bị USB [1]
[1] Được bán riêng
Kết nối iPod/iPhone
Cáp nối cổng Lightning sang USB [1]iPod/iPhone[1]
[1] Được bán riêng
Kết nối Kết nối điện thoại thông minh Android
Cáp nối micro USB với USB [1]
Điện thoại thông minh Android [1]
[1] Được bán riêng
Kết nối thiết bị ngoại vi
Máy phát nhạc [1] chân cắm ø,5 mm [1]
[1] Được bán riêng
CẢNH BÁO• Cài đặt thiết bị USB/ iPod/iPhone/điện thoại
thông minh Android và máy nghe nhạc ở nơi không ảnh hưởng đến việc lái xe an toàn.
LƯU Ý
• Không để thiết bị USB/iPod/ iPhone/điện thoại thông minh Android/Máy nghe nhạc và cáp USB trong xe hơi để tránh hỏng hóc do nhiệt.

Điều khiển Bluetooth
16
Điều khiển BluetoothSử dụng chức năng Bluetooth cho phép bạn sử dụng các chức năng khác nhau như nghe tập tin âm thanh và thực hiện/nhận cuộc gọi.
Thông tin sử dụng thiết bị Bluetooth®
Bluetooth là một công nghệ liên lạc vô tuyến không dây tầm ngắn dành cho các thiết bị di động như điện thoại di động, PC di động và các thiết bị khác.Các thiết bị Bluetooth có thể được kết nối mà không cần cáp và giao tiếp với nhau.
CẢNH BÁO• Trong khi lái xe, không thực hiện các thao tác
phức tạp như quay số, sử dụng danh bạ điện thoại, v.v. Khi bạn thực hiện các thao tác này, hãy dừng xe của bạn ở nơi an toàn.
LƯU Ý
• Một số thiết bị Bluetooth có thể không được kết nối với thiết bị này tùy thuộc vào phiên bản Bluetooth của thiết bị.
• Thiết bị này có thể không tương tác hoạt động với một số thiết bị Bluetooth.
• Điều kiện kết nối có thể khác nhau tùy thuộc vào môi trường của bạn.
• Một số thiết bị Bluetooth bị ngắt kết nối khi thiết bị này bị tắt.
Giới thiệu về điện thoại di động và trình phát nhạc qua Bluetooth
Thiết bị này tuân thủ các thông số kỹ thuật Bluetooth sau:
Phiên bảnBluetooth phiên bản 4.1
Cấu hìnhĐiện thoại di động:HFP (V1.7) (Cấu hình rảnh tay) SPP (Cấu hình cổng nối tiếp)PBAP (Cấu hình truy cập danh bạ điện thoại)
Máy nghe nhạc:A2DP (Cấu hình phân phối âm thanh nâng cao) AVRCP (V1.6) (Cấu hình điều khiển từ xa âm thanh/video)
Bộ giải mã âm thanhSBC, AAC
LƯU Ý
• Các thiết bị hỗ trợ chức năng Bluetooth đã được chứng nhận phù hợp với Tiêu chuẩn Bluetooth theo quy trình do Bluetooth SIG quy định. Tuy nhiên, các thiết bị đó có thể không giao tiếp được với điện thoại di động của bạn tùy thuộc vào loại điện thoại.

Điều khiển Bluetooth
17Tiếng Việt
Đăng ký thiết bị Bluetooth
Cần phải đăng ký trình phát âm thanh Bluetooth hoặc điện thoại di động trong thiết bị này trước khi sử dụng chức năng Bluetooth.Bạn có thể đăng ký tối đa 10 thiết bị Bluetooth.
LƯU Ý
• Có thể đăng ký tối đa 10 thiết bị Bluetooth. Nếu cứ cố gắng tìm cách đăng ký thiết bị Bluetooth thứ 11, thiết bị Bluetooth được kết nối vào ngày gần nhất sẽ bị xóa để đăng ký thiết bị thứ 11.
• AVX này tương thích với chức năng Ghép nối dễ dàng của Apple. Khi iPhone được kết nối với AVX qua cáp USB, hộp thoại kết nối Bluetooth sẽ xuất hiện. Vui lòng chọn chức năng và kết nối iPhone của bạn.
1 Tìm kiếm thiết bị ( “Car Multimedia” (Đa phương tiện của xe hơi)) từ điện thoại thông minh/điện thoại di động của bạn.Hoàn thành các bước từ 1 đến 4 trong vòng 30 giây
2 Thực hiện các thao tác trên điện thoại thông minh/điện thoại di động của bạn theo các thông báo được hiển thị. ⃝ Xác nhận yêu cầu cả trên điện thoại
thông minh/điện thoại di động.
3 Chọn chức năng bạn muốn sử dụng.
■ Phone1 (Điện thoại 1) / Phone2 (Điện thoại 2Chọn số rảnh tay để kết nối.
■ Bluetooth Audio (Âm thanh Bluetooth)Chọn dấu kiểm để sử dụng Âm thanh Bluetooth.
■ T-Link (Chỉ AVX cao cấp)Chọn dấu kiểm để sử dụng T-Link.
4 Chạm vào Yes (Có). Khi hoàn tất truyền và kết nối dữ liệu, biểu tượng kết nối điện thoại Bluetooth sẽ xuất hiện trên màn hình.
LƯU Ý
• Nếu điện thoại di động hỗ trợ PBAP, dữ liệu danh bạ sẽ được tải xuống tự động khi bạn chọn Phone1 (Điện thoại 1) hoặc Phone2 (Điện thoại 2).
• Đối với một số điện thoại di động, bạn có thể cần thao tác trên điện thoại di động để tải xuống dữ liệu danh bạ.
• Nếu Mã PIN được hiển thị trong thông báo, hãy nhập Mã PIN vào điện thoại thông minh/điện thoại di động của bạn. Mã PIN được đặt thành “0000” làm mặc định.

Điều khiển Bluetooth
18
Cài đặt Bluetooth
1 Nhấn nút . Menu bật lên xuất hiện.
2 Chạm vào .
Màn hình hệ thống xuất hiện.
3 Chạm vào Connectivity (Kết nối).
Màn hình kết nối xuất hiện.
4 Đặt từng thông số như sau.■ BluetoothĐặt có sử dụng chức năng Bluetooth không.■ Device Select (Chọn thiết bị)Kết nối thiết bị Bluetooth. (Tr.18)■ Auto Pairing (Tự động ghép nối)Khi đặt thành “ON” (BẬT), chức năng Tự động ghép nối Apple được bật để tự động đăng ký iPod touch hoặc iPhone kết nối với thiết bị này.ON (BẬT) (Mặc định): Bật chức năng Tự động ghép nối Apple.OFF (TẮT) : Tắt chức năng Tự động ghép nối Apple.■ Tên thiết bịĐổi tên thiết bị. (Tr.19)■ Mã PINĐổi Mã PIN. (Tr.19)■ Địa chỉ thiết bịHiển thị địa chỉ điều khiển truy cập phương tiện truyền thông.
Kết nối thiết bị Bluetooth
1 Chạm vào Device Select (Chọn thiết bị) trên màn hình Kết nối.
Bluetooth Control
18
Bluetooth Setup
1 Press [ ] button.hh Popup menu appears.
2 Touch [ ].
hh System screen appears.
3 Touch [Connectivity].
hh Connectivity screen appears.
4 Set each parameter as follows.
■ [Bluetooth]Set whether to use the Bluetooth function.
■ [Device Select]Connect the Bluetooth device. (P.18)
■ [Auto Pairing]When set to “ON”, the Apple Auto Pairing function is turned on to automatically register the iPod touch or iPhone connected to this unit.[ON ](Default): Turns on the Apple Auto
Pairing function.[OFF]: Turns off the Apple Auto Pairing
function.
■ [Device Name]Change the device name. (P.19)
■ [PIN Code]Change the PIN Code. (P.19)
■ [Device Address]Displays the media access control address.
Ñ Connect the Bluetooth device
1 Touch [Device Select] on the Connectivity screen.
2 Touch the name of the device you want to connect.
hh Profile select screen appears.
NOTE• If the icon is lighted, it means that the unit will
use that device.
3 Set each profile as follows.
■ [Phone1], [Phone2]Select when the device is connected with the unit as hands-free phone 1 or 2.
■ [Bluetooth Audio]Select to use as an audio player.
■ [T-Link] (Premium AVX only)Select to use as the T-Link source.
4 Touch [Close].
!KL19_AP_En.indb 18 2018/11/09 11:15:21
2 Chạm vào tên thiết bị mà bạn muốn kết nối.
Bluetooth Control
18
Bluetooth Setup
1 Press [ ] button.hh Popup menu appears.
2 Touch [ ].
hh System screen appears.
3 Touch [Connectivity].
hh Connectivity screen appears.
4 Set each parameter as follows.
■ [Bluetooth]Set whether to use the Bluetooth function.
■ [Device Select]Connect the Bluetooth device. (P.18)
■ [Auto Pairing]When set to “ON”, the Apple Auto Pairing function is turned on to automatically register the iPod touch or iPhone connected to this unit.[ON ](Default): Turns on the Apple Auto
Pairing function.[OFF]: Turns off the Apple Auto Pairing
function.
■ [Device Name]Change the device name. (P.19)
■ [PIN Code]Change the PIN Code. (P.19)
■ [Device Address]Displays the media access control address.
Ñ Connect the Bluetooth device
1 Touch [Device Select] on the Connectivity screen.
2 Touch the name of the device you want to connect.
hh Profile select screen appears.
NOTE• If the icon is lighted, it means that the unit will
use that device.
3 Set each profile as follows.
■ [Phone1], [Phone2]Select when the device is connected with the unit as hands-free phone 1 or 2.
■ [Bluetooth Audio]Select to use as an audio player.
■ [T-Link] (Premium AVX only)Select to use as the T-Link source.
4 Touch [Close].
!KL19_AP_En.indb 18 2018/11/09 11:15:21
Màn hình chọn cấu hình xuất hiện.
LƯU Ý• Nếu biểu tượng bật sáng, điều đó có nghĩa là thiết
bị sẽ sử dụng thiết bị đó.
3 Đặt từng cấu hình như sau.
Bluetooth Control
18
Bluetooth Setup
1 Press [ ] button.hh Popup menu appears.
2 Touch [ ].
hh System screen appears.
3 Touch [Connectivity].
hh Connectivity screen appears.
4 Set each parameter as follows.
■ [Bluetooth]Set whether to use the Bluetooth function.
■ [Device Select]Connect the Bluetooth device. (P.18)
■ [Auto Pairing]When set to “ON”, the Apple Auto Pairing function is turned on to automatically register the iPod touch or iPhone connected to this unit.[ON ](Default): Turns on the Apple Auto
Pairing function.[OFF]: Turns off the Apple Auto Pairing
function.
■ [Device Name]Change the device name. (P.19)
■ [PIN Code]Change the PIN Code. (P.19)
■ [Device Address]Displays the media access control address.
Ñ Connect the Bluetooth device
1 Touch [Device Select] on the Connectivity screen.
2 Touch the name of the device you want to connect.
hh Profile select screen appears.
NOTE• If the icon is lighted, it means that the unit will
use that device.
3 Set each profile as follows.
■ [Phone1], [Phone2]Select when the device is connected with the unit as hands-free phone 1 or 2.
■ [Bluetooth Audio]Select to use as an audio player.
■ [T-Link] (Premium AVX only)Select to use as the T-Link source.
4 Touch [Close].
!KL19_AP_En.indb 18 2018/11/09 11:15:21
■ Phone1 (Điện thoại 1), Phone2 (Điện thoại 2)Chọn khi thiết bị được kết nối với thiết bị dưới dạng điện thoại 1 hoặc 2 rảnh tay.■ Âm thanh BluetoothChọn để sử dụng làm trình phát âm thanh.■ T-Link (Chỉ AVX cao cấp)Chọn để sử dụng làm nguồn T-Link.
4 Chạm vào Close (Đóng).

Điều khiển Bluetooth
19Tiếng Việt
Để xóa thiết bị Bluetooth đã đăng ký
1 Chạm vào Delete (Xóa).
Bluetooth Control
19English
To delete the registered Bluetooth device
1 Touch [Delete].
2 Touch the device name to check.
■ [þ Select All]Selects all Bluetooth devices.
■ [¨ Deselect All]Clears all check marks.
3 Touch [Delete].hh Confirmation message appears.
4 Touch [Yes].
Ñ Change the device name
1 Touch [Device Name] on the Connectivity screen.hh Change Device Name screen appears.
2 Touch and hold [ ].
3 Input the device name.
4 Touch [Enter].
Ñ Change the PIN Code
1 Touch [PIN Code] on the Connectivity screen.hh Change PIN Code screen appears.
2 Touch and hold [ ].
3 Input the PIN Code.
4 Touch [Set].
!KL19_AP_En.indb 19 2018/11/09 11:15:22
2 Chạm vào tên thiết bị để kiểm tra.
Bluetooth Control
19English
To delete the registered Bluetooth device
1 Touch [Delete].
2 Touch the device name to check.
■ [þ Select All]Selects all Bluetooth devices.
■ [¨ Deselect All]Clears all check marks.
3 Touch [Delete].hh Confirmation message appears.
4 Touch [Yes].
Ñ Change the device name
1 Touch [Device Name] on the Connectivity screen.hh Change Device Name screen appears.
2 Touch and hold [ ].
3 Input the device name.
4 Touch [Enter].
Ñ Change the PIN Code
1 Touch [PIN Code] on the Connectivity screen.hh Change PIN Code screen appears.
2 Touch and hold [ ].
3 Input the PIN Code.
4 Touch [Set].
!KL19_AP_En.indb 19 2018/11/09 11:15:22
■ Select All (Chọn tất cả)Chọn tất cả các thiết bị Bluetooth.■ Deselect All (Bỏ chọn tất cả)Xóa tất cả các dấu kiểm.
3 Chạm vào Delete (Xóa). Thông báo xác nhận xuất hiện.
4 Chạm vào Yes (Có).
Đổi tên thiết bị
1 Chạm vào Device Name (Tên thiết bị) trên màn hình Kết nối. Màn hình Đổi tên thiết bị xuất hiện.
2 Chạm và giữ .
3 Nhập tên thiết bị.
Bluetooth Control
19English
To delete the registered Bluetooth device
1 Touch [Delete].
2 Touch the device name to check.
■ [þ Select All]Selects all Bluetooth devices.
■ [¨ Deselect All]Clears all check marks.
3 Touch [Delete].hh Confirmation message appears.
4 Touch [Yes].
Ñ Change the device name
1 Touch [Device Name] on the Connectivity screen.hh Change Device Name screen appears.
2 Touch and hold [ ].
3 Input the device name.
4 Touch [Enter].
Ñ Change the PIN Code
1 Touch [PIN Code] on the Connectivity screen.hh Change PIN Code screen appears.
2 Touch and hold [ ].
3 Input the PIN Code.
4 Touch [Set].
!KL19_AP_En.indb 19 2018/11/09 11:15:22
4 Chạm vào Enter (Nhập).
Đổi Mã PIN
1 Chạm vào PIN Code (Mã PIN) trên màn hình Kết nối. Màn hình Đổi Mã PIN xuất hiện.
2 Chạm và giữ .
3 Nhập Mã PIN.
Bluetooth Control
19English
To delete the registered Bluetooth device
1 Touch [Delete].
2 Touch the device name to check.
■ [þ Select All]Selects all Bluetooth devices.
■ [¨ Deselect All]Clears all check marks.
3 Touch [Delete].hh Confirmation message appears.
4 Touch [Yes].
Ñ Change the device name
1 Touch [Device Name] on the Connectivity screen.hh Change Device Name screen appears.
2 Touch and hold [ ].
3 Input the device name.
4 Touch [Enter].
Ñ Change the PIN Code
1 Touch [PIN Code] on the Connectivity screen.hh Change PIN Code screen appears.
2 Touch and hold [ ].
3 Input the PIN Code.
4 Touch [Set].
!KL19_AP_En.indb 19 2018/11/09 11:15:22
4 Chạm vào Set (Đặt).
Điều khiển Bluetooth
20
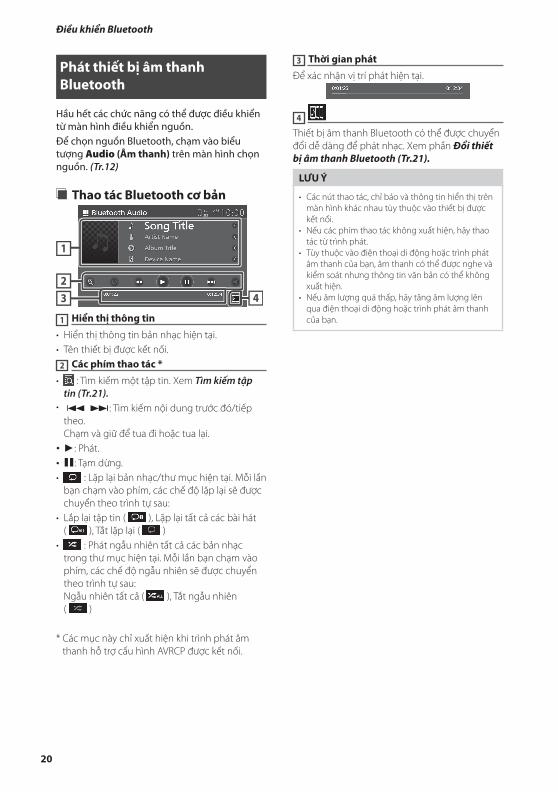
Phát thiết bị âm thanh Bluetooth
Hầu hết các chức năng có thể được điều khiển từ màn hình điều khiển nguồn.Để chọn nguồn Bluetooth, chạm vào biểu tượng Audio (Âm thanh) trên màn hình chọn nguồn. (Tr.12)
Thao tác Bluetooth cơ bản
42
1
3
Hiển thị thông tin
• Hiển thị thông tin bản nhạc hiện tại.• Tên thiết bị được kết nối.
Các phím thao tác *
• : Tìm kiếm một tập tin. Xem Tìm kiếm tập tin (Tr.21).
•
Bluetooth Control
20
Playing the Bluetooth Audio Device
Most functions can be controlled from the source control screen.To select Bluetooth source, touch [Audio] icon on the source selection screen. (P.12)
Ñ Bluetooth basic operation
42
1
3
1 Information display
• Displays the current track information. • Connected device name.
2 Operation keys *
• [ ] : Searches for a file. See File search (P.21).
• [E] [F]: Searches for the previous/next content.Touch and hold to fast forward or fast backward.
• [D]: Plays.• [H]: Pauses.• [ ] : Repeats the current track/folder. Each
time you touch the key, repeat modes are switched in the following sequence:File repeat ( ), All songs repeat ( ), Repeat off ( )
• [ ] : Randomly plays all tracks in the current folder. Each time you touch the key, random modes are switched in the following sequence:All random ( ), Random off ( )
* These items appear only when the audio player which supports AVRCP profile is connected.
3 Playing time
For confirmation of current playing position.
4 [ ]
Bluetooth audio devices can be switched easily to play music. See Bluetooth Audio Device Change (P.21).
NOTE• The operation buttons, indications and
information displayed on the screen differ depending on the connected device.
• If the operation keys do not appear, operate from the player.
• Depending on your mobile phone or audio player, sound may be heard and controlled but text information may not appear.
• If the volume is too low, raise it on your mobile phone or audio player.
!KL19_AP_En.indb 20 2018/11/09 11:15:22
: Tìm kiếm nội dung trước đó/tiếp theo. Chạm và giữ để tua đi hoặc tua lại.
• ►: Phát.• 〓: Tạm dừng.• : Lặp lại bản nhạc/thư mục hiện tại. Mỗi lần
bạn chạm vào phím, các chế độ lặp lại sẽ được chuyển theo trình tự sau:
• Lắp lại tập tin ( ), Lặp lại tất cả các bài hát ( ), Tắt lặp lại ( )
• : Phát ngẫu nhiên tất cả các bản nhạc trong thư mục hiện tại. Mỗi lần bạn chạm vào phím, các chế độ ngẫu nhiên sẽ được chuyển theo trình tự sau: Ngẫu nhiên tất cả ( ), Tắt ngẫu nhiên ( )
* Các mục này chỉ xuất hiện khi trình phát âm thanh hỗ trợ cấu hình AVRCP được kết nối.
Thời gian phát
Để xác nhận vị trí phát hiện tại.
Thiết bị âm thanh Bluetooth có thể được chuyển đổi dễ dàng để phát nhạc. Xem phần Đổi thiết bị âm thanh Bluetooth (Tr.21).
LƯU Ý
• Các nút thao tác, chỉ báo và thông tin hiển thị trên màn hình khác nhau tùy thuộc vào thiết bị được kết nối.
• Nếu các phím thao tác không xuất hiện, hãy thao tác từ trình phát.
• Tùy thuộc vào điện thoại di động hoặc trình phát âm thanh của bạn, âm thanh có thể được nghe và kiểm soát nhưng thông tin văn bản có thể không xuất hiện.
• Nếu âm lượng quá thấp, hãy tăng âm lượng lên qua điện thoại di động hoặc trình phát âm thanh của bạn.

Điều khiển Bluetooth
21Tiếng Việt
Đổi thiết bị âm thanh BluetoothTối đa năm thiết bị âm thanh Bluetooth có thể được kết nối và chuyển đổi dễ dàng để phát nhạc.
1 Chạm vào . Danh sách các thiết bị đã đăng ký được
hiển thị.
2 Chạm vào của tên thiết bị mà bạn muốn kết nối.
• Chạm vào ở bên trái của thiết bị được kết nối ( ) ngắt kết nối thiết bị này.
Bluetooth Control
21English
Ñ Bluetooth Audio Device ChangeUp to five Bluetooth audio device can be connected and switched easily to play music.
1 Touch [ ].hh A list of registered devices is displayed.
2 Touch [ ] of device name you want to connect.• Touching [ ] on the left of the
connected device ( ) disconnects this device.
3 Touch [ ] (white) on the left of the name of the device to be played.[ ] (white) changes to [ ] (Blue) and starts playback.
• (Gray) : Not connected.• (White) : Connected.• (Blue) : During playback.
4 Touch [ ].
NOTE• If a connected Bluetooth audio device is operated
to play music, connections are switched.• When a Bluetooth source is switched to another
one, its settings are deleted and the connection is restored to the connection before source switching.
Ñ File search
1 Touch [ ].
2 Touch the desired file or folder.
When you touch a folder its contents are displayed.
3 Touch the desired item in the content list.hh Playback starts.
NOTE• For operations in the list screen, see List screen
(P.14).
!KL19_AP_En.indb 21 2018/11/09 11:15:23
3 Chạm vào (trắng) ở bên trái tên của thiết bị sẽ được phát.
(trắng) chuyển thành (Xanh dương) và bắt đầu phát lại.
Bluetooth Control
21English
Ñ Bluetooth Audio Device ChangeUp to five Bluetooth audio device can be connected and switched easily to play music.
1 Touch [ ].hh A list of registered devices is displayed.
2 Touch [ ] of device name you want to connect.• Touching [ ] on the left of the
connected device ( ) disconnects this device.
3 Touch [ ] (white) on the left of the name of the device to be played.[ ] (white) changes to [ ] (Blue) and starts playback.
• (Gray) : Not connected.• (White) : Connected.• (Blue) : During playback.
4 Touch [ ].
NOTE• If a connected Bluetooth audio device is operated
to play music, connections are switched.• When a Bluetooth source is switched to another
one, its settings are deleted and the connection is restored to the connection before source switching.
Ñ File search
1 Touch [ ].
2 Touch the desired file or folder.
When you touch a folder its contents are displayed.
3 Touch the desired item in the content list.hh Playback starts.
NOTE• For operations in the list screen, see List screen
(P.14).
!KL19_AP_En.indb 21 2018/11/09 11:15:23
• (Xám) : Chưa kết nối.• (Trắng) : Đã kết nối.• (Xanh dương) : Đang phát lại.
4 Chạm vào .
LƯU Ý
• Nếu thiết bị âm thanh Bluetooth kết nối được vận hành để phát nhạc, các kết nối sẽ được chuyển.
• Khi nguồn Bluetooth được chuyển sang nguồn khác, cài đặt của nguồn sẽ bị xóa và kết nối được khôi phục về kết nối trước khi chuyển đổi nguồn.
Tìm kiếm tập tin
1 Chạm vào .
2 Chạm vào tập tin hoặc thư mục mong muốn.
Bluetooth Control
21English
Ñ Bluetooth Audio Device ChangeUp to five Bluetooth audio device can be connected and switched easily to play music.
1 Touch [ ].hh A list of registered devices is displayed.
2 Touch [ ] of device name you want to connect.• Touching [ ] on the left of the
connected device ( ) disconnects this device.
3 Touch [ ] (white) on the left of the name of the device to be played.[ ] (white) changes to [ ] (Blue) and starts playback.
• (Gray) : Not connected.• (White) : Connected.• (Blue) : During playback.
4 Touch [ ].
NOTE• If a connected Bluetooth audio device is operated
to play music, connections are switched.• When a Bluetooth source is switched to another
one, its settings are deleted and the connection is restored to the connection before source switching.
Ñ File search
1 Touch [ ].
2 Touch the desired file or folder.
When you touch a folder its contents are displayed.
3 Touch the desired item in the content list.hh Playback starts.
NOTE• For operations in the list screen, see List screen
(P.14).
!KL19_AP_En.indb 21 2018/11/09 11:15:23
Khi bạn chạm vào một thư mục nội dung của thư mục đó sẽ được hiển thị.
3 Chạm vào mục mong muốn trong danh sách nội dung. Bắt đầu phát lại.
LƯU Ý
• Để biết các thao tác trên màn hình danh sách, xem phần Màn hình danh sách (Tr.14).

Điều khiển Bluetooth
22
Sử dụng thiết bị rảnh tay
Bạn có thể sử dụng chức năng điện thoại bằng cách kết nối điện thoại Bluetooth với thiết bị này.
Thực hiện cuộc gọi
1 Nhấn nút . Màn hình CHỦ xuất hiện.
2 Chạm vào .
3 Chạm vào Phone (Điện thoại).
Màn hình rảnh tay xuất hiện.
LƯU Ý
• Nếu điện thoại di động của bạn hỗ trợ PBAP, bạn có thể hiển thị danh bạ điện thoại và danh sách cuộc gọi lên màn hình bảng điều khiển cảm ứng khi điện thoại di động được kết nối.– Danh bạ điện thoại: tối đa 1000 mục nhập– Tối đa 50 mục nhập bao gồm các cuộc gọi đã
quay số, cuộc gọi đã nhận và cuộc gọi nhỡ
4 Kéo biểu tượng đến vị trí mong muốn.
Bluetooth Control
22
Using the Hands-Free Unit
You can use the telephone function by connecting the Bluetooth telephone to this unit.
Ñ Make a call
1 Press [ ] button.hh HOME screen appears.
2 Touch [ ].
3 Touch [Phone].hh Hands Free screen appears.
NOTE• If your mobile phone supports PBAP, you can
display the phone book and call lists onto the touch panel screen when the mobile phone is connected.
– Phone book: up to 1000 entries – Up to 50 entries including dialed calls, received calls, and missed calls
4 Select a dialing method.
• [ ]: Call using call history• [ ]: Call using the phonebook• [ ]: Call by entering a phone number
● Select the mobile phone to useWhen you connect two mobile phones1) Touch [ ] to select the phone you want to
use.
● Phone Setup1) Touch [ ].
Phone Setup screen appears. (P.26)
NOTE• Bluetooth hands free sound quality and
performance also depend on mobile phones and carrier conditions.
• Status icons such as battery and antenna icons may differ from those displayed on the mobile phone.
• Setting the mobile phone in the private/ visibility off mode can disable the hands-free function.
Call using call history
1 Touch [ ].
2 Select the phone number from the list.
Call using the phonebookYou can use the phonebook data of the selected mobile phone to make a call. Before starting this procedure, it is necessary to download the phonebook data. For details, see Phonebook transfer (P.25).
1 Touch [ ].
2 Touch [ ].
3 Select the initial.
• Special characters cannot be searched using this function.
!KL19_AP_En.indb 22 2018/11/09 11:15:23
• : Cuộc gọi sử dụng lịch sử cuộc gọi• : Cuộc gọi sử dụng danh bạ điện • : Cuộc gọi bằng cách nhập số điện
thoại⃝ Chọn điện thoại di động để sử dụngKhi bạn kết nối hai điện thoại di động1) Chạm vào để chọn điện thoại bạn muốn
sử dụng.⃝ Cài đặt điện thoại1) Chạm vào .
Màn hình Cài đặt điện thoại xuất hiện. (Tr.26)
LƯU Ý
• Chất lượng âm thanh và hiệu suất âm thanh rảnh tay Bluetooth cũng phụ thuộc vào điện thoại di động và điều kiện nhà mạng.
• Các biểu tượng trạng thái như biểu tượng ắc-quy và ăng ten có thể khác với các biểu tượng được hiển thị trên điện thoại di động.
• Đặt điện thoại di động ở chế độ tắt mức hiển thị/ riêng tư có thể tắt chức năng rảnh tay.
Cuộc gọi sử dụng lịch sử cuộc gọi
1 Chạm vào .
2 Chọn số điện thoại từ danh sách.
Bluetooth Control
22
Using the Hands-Free Unit
You can use the telephone function by connecting the Bluetooth telephone to this unit.
Ñ Make a call
1 Press [ ] button.hh HOME screen appears.
2 Touch [ ].
3 Touch [Phone].hh Hands Free screen appears.
NOTE• If your mobile phone supports PBAP, you can
display the phone book and call lists onto the touch panel screen when the mobile phone is connected.
– Phone book: up to 1000 entries – Up to 50 entries including dialed calls, received calls, and missed calls
4 Select a dialing method.
• [ ]: Call using call history• [ ]: Call using the phonebook• [ ]: Call by entering a phone number
● Select the mobile phone to useWhen you connect two mobile phones1) Touch [ ] to select the phone you want to
use.
● Phone Setup1) Touch [ ].
Phone Setup screen appears. (P.26)
NOTE• Bluetooth hands free sound quality and
performance also depend on mobile phones and carrier conditions.
• Status icons such as battery and antenna icons may differ from those displayed on the mobile phone.
• Setting the mobile phone in the private/ visibility off mode can disable the hands-free function.
Call using call history
1 Touch [ ].
2 Select the phone number from the list.
Call using the phonebookYou can use the phonebook data of the selected mobile phone to make a call. Before starting this procedure, it is necessary to download the phonebook data. For details, see Phonebook transfer (P.25).
1 Touch [ ].
2 Touch [ ].
3 Select the initial.
• Special characters cannot be searched using this function.
!KL19_AP_En.indb 22 2018/11/09 11:15:23
Cuộc gọi sử dụng danh bạ điện thoạiBạn có thể sử dụng dữ liệu danh bạ của điện thoại di động đã chọn để thực hiện cuộc gọi.Trước khi bắt đầu quy trình này, cần phải tải xuống dữ liệu danh bạ điện thoại. Để biết thêm chi tiết, xem phần Chuyển danh bạ điện thoại (Tr.25).
1 Chạm vào .
2 Chạm vào .
3 Chọn chữ đầu.
Bluetooth Control
22
Using the Hands-Free Unit
You can use the telephone function by connecting the Bluetooth telephone to this unit.
Ñ Make a call
1 Press [ ] button.hh HOME screen appears.
2 Touch [ ].
3 Touch [Phone].hh Hands Free screen appears.
NOTE• If your mobile phone supports PBAP, you can
display the phone book and call lists onto the touch panel screen when the mobile phone is connected.
– Phone book: up to 1000 entries – Up to 50 entries including dialed calls, received calls, and missed calls
4 Select a dialing method.
• [ ]: Call using call history• [ ]: Call using the phonebook• [ ]: Call by entering a phone number
● Select the mobile phone to useWhen you connect two mobile phones1) Touch [ ] to select the phone you want to
use.
● Phone Setup1) Touch [ ].
Phone Setup screen appears. (P.26)
NOTE• Bluetooth hands free sound quality and
performance also depend on mobile phones and carrier conditions.
• Status icons such as battery and antenna icons may differ from those displayed on the mobile phone.
• Setting the mobile phone in the private/ visibility off mode can disable the hands-free function.
Call using call history
1 Touch [ ].
2 Select the phone number from the list.
Call using the phonebookYou can use the phonebook data of the selected mobile phone to make a call. Before starting this procedure, it is necessary to download the phonebook data. For details, see Phonebook transfer (P.25).
1 Touch [ ].
2 Touch [ ].
3 Select the initial.
• Special characters cannot be searched using this function.
!KL19_AP_En.indb 22 2018/11/09 11:15:23
• Không thể tìm kiếm các ký tự đặc biệt bằng chức năng này.

Điều khiển Bluetooth
23Tiếng Việt
• Các ký tự đầu tiên có dấu của mỗi mục nhập tên có thể được tìm kiếm bằng ký tự bình thường tương đương của chữ cái đó. chẳng hạn: Ñ có thể được tìm kiếm là N
• Các ký tự có dấu không thể được tìm kiếm ở giữa từ.
4 Chọn người bạn muốn gọi từ danh sách.
Bluetooth Control
23English
• Accented first characters of each name entry can be searched using the equivalent normal character of that letter. i.e. Ñ can be searched as N
• Accented characters cannot be searched in the middle of the word.
4 Select the person you want to call from the list.
5 Select the phone number from the list.
NOTE• You can sort the phone numbers in the list by last
name or first name. For details, see Phone Setup (P.26).
Call by entering a phone number
1 Touch [ ].
2 Enter a phone number with number keys.
3 Touch [ ].
Ñ Voice RecognitionYou can access the voice recognition function of the mobile phone connected to this unit. You can search the mobile phone phonebook by voice. (The functionality depends on the mobile phone.)
1 Press [ ] button.hh HOME screen appears.
2 Touch [ ].
3 Touch [Voice]. (P.12)hh Voice Recognition screen appears.
4 Start speaking.
!KL19_AP_En.indb 23 2018/11/09 11:15:24
5 Chọn số điện thoại từ danh sách.
Bluetooth Control
23English
• Accented first characters of each name entry can be searched using the equivalent normal character of that letter. i.e. Ñ can be searched as N
• Accented characters cannot be searched in the middle of the word.
4 Select the person you want to call from the list.
5 Select the phone number from the list.
NOTE• You can sort the phone numbers in the list by last
name or first name. For details, see Phone Setup (P.26).
Call by entering a phone number
1 Touch [ ].
2 Enter a phone number with number keys.
3 Touch [ ].
Ñ Voice RecognitionYou can access the voice recognition function of the mobile phone connected to this unit. You can search the mobile phone phonebook by voice. (The functionality depends on the mobile phone.)
1 Press [ ] button.hh HOME screen appears.
2 Touch [ ].
3 Touch [Voice]. (P.12)hh Voice Recognition screen appears.
4 Start speaking.
!KL19_AP_En.indb 23 2018/11/09 11:15:24
LƯU Ý
• Bạn có thể sắp xếp các số điện thoại trong danh sách theo họ hoặc tên. Để biết thêm chi tiết, xem phần Cài đặt điện thoại (Tr.26).
Cuộc gọi bằng cách nhập số điện thoại
1 Chạm vào .
2 Nhập một số điện thoại bằng các phím số.
Bluetooth Control
23English
• Accented first characters of each name entry can be searched using the equivalent normal character of that letter. i.e. Ñ can be searched as N
• Accented characters cannot be searched in the middle of the word.
4 Select the person you want to call from the list.
5 Select the phone number from the list.
NOTE• You can sort the phone numbers in the list by last
name or first name. For details, see Phone Setup (P.26).
Call by entering a phone number
1 Touch [ ].
2 Enter a phone number with number keys.
3 Touch [ ].
Ñ Voice RecognitionYou can access the voice recognition function of the mobile phone connected to this unit. You can search the mobile phone phonebook by voice. (The functionality depends on the mobile phone.)
1 Press [ ] button.hh HOME screen appears.
2 Touch [ ].
3 Touch [Voice]. (P.12)hh Voice Recognition screen appears.
4 Start speaking.
!KL19_AP_En.indb 23 2018/11/09 11:15:24
3 Chạm vào .
Nhận dạng giọng nóiBạn có thể truy cập chức năng nhận dạng giọng nói của điện thoại di động được kết nối với thiết bị này. Bạn có thể tìm kiếm danh bạ điện thoại di động bằng giọng nói. (Chức năng phụ thuộc vào điện thoại di động.)
1 Nhấn nút . Màn hình CHỦ xuất hiện.
2 Chạm vào .
3 Chạm vào Voice (Giọng nói). (Tr.12)
Màn hình nhận dạng giọng nói xuất hiện.
4 Bắt đầu nói.

Điều khiển Bluetooth
24
Nhận cuộc gọi
1 Chạm vào để trả lời cuộc gọi điện thoại hoặc để từ chối cuộc gọi đang tới.
Bluetooth Control
24
Ñ Receive a call
1 Touch [ ] to answer a phone call or
[ ] to reject an incoming call.
NOTE• While monitoring the picture from the view
camera, this screen does not appear even if a call comes in.
To end call
1 While talking, touch [ ].
Ñ Operations during a call
● Adjust the volume of your voice 1) Touch [ ].2) Touch [ ] or [ ] for [Microphone Level].
● Adjust the receiver volumePress the [–] or [+] button.
● Mute your voice
Touch [ ] to mute or not to mute your voice.
● Output the dial tone
Touch [ ] to display the tone input screen.You can send tones by touching desired keys on the screen.
● Switching between speaking voice output destinations
Touching [ ]/ [ ] each time switches speaking voice output destinations between the mobile phone and the speaker.
● Call-waitingWhen you receive a new call while talking on the phone, you can answer the newly received call by touching [ ]. The current call is put on hold.
Each time you touch [ ], the caller will change to the other one.
When you touch [ ], the current call will end to be switched to the call waiting on hold.
● To close the Hands-Free popup screenTouching [ ] to close the Hands-Free popup screen. To display it again, touch [ ] at the top of the screen.
!KL19_AP_En.indb 24 2018/11/09 11:15:24
LƯU Ý
• Trong khi giám sát hình ảnh từ camera quan sát, màn hình này không xuất hiện ngay cả khi có cuộc gọi đến.
Để kết thúc cuộc
1 Trong khi nói, chạm vào .
Các thao tác trong lúc thực hiện cuộc gọi
Bluetooth Control
24
Ñ Receive a call
1 Touch [ ] to answer a phone call or
[ ] to reject an incoming call.
NOTE• While monitoring the picture from the view
camera, this screen does not appear even if a call comes in.
To end call
1 While talking, touch [ ].
Ñ Operations during a call
● Adjust the volume of your voice 1) Touch [ ].2) Touch [ ] or [ ] for [Microphone Level].
● Adjust the receiver volumePress the [–] or [+] button.
● Mute your voice
Touch [ ] to mute or not to mute your voice.
● Output the dial tone
Touch [ ] to display the tone input screen.You can send tones by touching desired keys on the screen.
● Switching between speaking voice output destinations
Touching [ ]/ [ ] each time switches speaking voice output destinations between the mobile phone and the speaker.
● Call-waitingWhen you receive a new call while talking on the phone, you can answer the newly received call by touching [ ]. The current call is put on hold.
Each time you touch [ ], the caller will change to the other one.
When you touch [ ], the current call will end to be switched to the call waiting on hold.
● To close the Hands-Free popup screenTouching [ ] to close the Hands-Free popup screen. To display it again, touch [ ] at the top of the screen.
!KL19_AP_En.indb 24 2018/11/09 11:15:24
⃝ Điều chỉnh âm lượng giọng nói của bạn1) Chạm vào .2) Chạm vào hoặc để điều chỉnh Mức
micrô.
Bluetooth Control
24
Ñ Receive a call
1 Touch [ ] to answer a phone call or
[ ] to reject an incoming call.
NOTE• While monitoring the picture from the view
camera, this screen does not appear even if a call comes in.
To end call
1 While talking, touch [ ].
Ñ Operations during a call
● Adjust the volume of your voice 1) Touch [ ].2) Touch [ ] or [ ] for [Microphone Level].
● Adjust the receiver volumePress the [–] or [+] button.
● Mute your voice
Touch [ ] to mute or not to mute your voice.
● Output the dial tone
Touch [ ] to display the tone input screen.You can send tones by touching desired keys on the screen.
● Switching between speaking voice output destinations
Touching [ ]/ [ ] each time switches speaking voice output destinations between the mobile phone and the speaker.
● Call-waitingWhen you receive a new call while talking on the phone, you can answer the newly received call by touching [ ]. The current call is put on hold.
Each time you touch [ ], the caller will change to the other one.
When you touch [ ], the current call will end to be switched to the call waiting on hold.
● To close the Hands-Free popup screenTouching [ ] to close the Hands-Free popup screen. To display it again, touch [ ] at the top of the screen.
!KL19_AP_En.indb 24 2018/11/09 11:15:24
⃝ Điều chỉnh âm lượng máy thuNhấn nút – hoặc + .
Bluetooth Control
24
Ñ Receive a call
1 Touch [ ] to answer a phone call or
[ ] to reject an incoming call.
NOTE• While monitoring the picture from the view
camera, this screen does not appear even if a call comes in.
To end call
1 While talking, touch [ ].
Ñ Operations during a call
● Adjust the volume of your voice 1) Touch [ ].2) Touch [ ] or [ ] for [Microphone Level].
● Adjust the receiver volumePress the [–] or [+] button.
● Mute your voice
Touch [ ] to mute or not to mute your voice.
● Output the dial tone
Touch [ ] to display the tone input screen.You can send tones by touching desired keys on the screen.
● Switching between speaking voice output destinations
Touching [ ]/ [ ] each time switches speaking voice output destinations between the mobile phone and the speaker.
● Call-waitingWhen you receive a new call while talking on the phone, you can answer the newly received call by touching [ ]. The current call is put on hold.
Each time you touch [ ], the caller will change to the other one.
When you touch [ ], the current call will end to be switched to the call waiting on hold.
● To close the Hands-Free popup screenTouching [ ] to close the Hands-Free popup screen. To display it again, touch [ ] at the top of the screen.
!KL19_AP_En.indb 24 2018/11/09 11:15:24
⃝ Tắt tiếng giọng nói
Chạm vào để tắt tiếng hoặc không tắt tiếng giọng nói.⃝ Xuất âm quay số
Chạm vào để hiển thị màn hình nhập âm. Bạn có thể gửi âm báo bằng cách chạm vào các phím mong muốn trên màn hình.⃝ Chuyển đổi giữa các điểm đến đầu ra
giọng nói
Chạm vào / trong mỗi lần chuyển đổi điểm đến đầu ra giọng nói giữa điện thoại di động và loa.⃝ Cuộc gọi chờKhi bạn nhận được một cuộc gọi mới trong khi nói chuyện điện thoại, bạn có thể trả lời cuộc gọi mới nhận được bằng cách chạm vào . Cuộc gọi hiện tại được giữ máy.
Mỗi lần bạn chạm vào , người gọi sẽ đổi sang người khác.
Khi bạn chạm vào , cuộc gọi hiện tại sẽ kết thúc để được chuyển sang cuộc gọi chờ.⃝ Để đóng màn hình bật lên chế độ Rảnh
tay Chạm vào để đóng màn hình bật lên chế độ Rảnh tay. Để hiển thị lại màn hình này, chạm vào ở đầu màn hình.

Điều khiển Bluetooth
25Tiếng Việt
Chuyển danh bạ điện thoạiBạn có thể chuyển dữ liệu danh bạ từ điện thoại Bluetooth của mình bằng PBAP.
1 Chạm vào .
2 Chạm vào .
Bluetooth Control
25English
Ñ Phonebook transferYou can transfer phonebook data from your Bluetooth phone using PBAP.
1 Touch [ ].
2 Touch [ ].
hh Phonebook data transfer starts.
NOTE• If the Phonebook contains more than 1000
entries, Phonebook data cannot be transferred. • The phonebook data of up to 10 Bluetooth
devices can be stored.• When you connect the mobile phone of which
the phonebook data is downloaded before, the downloaded data will be displayed.
• If you download the phonebook data from the same device again, the data will be overwritten.
Phonebook deletion
1 Touch [ ].
2 Touch the name to check.
■ [ ]
Checks all boxes.
■ [ ]
Clears all check marks.
3 Touch [ ].hh Confirmation message appears.
4 Touch [Yes].
!KL19_AP_En.indb 25 2018/11/09 11:15:25
Việc chuyển dữ liệu danh bạ điện thoại bắt đầu.
LƯU Ý
• Nếu Danh bạ điện thoại chứa hơn 1000 mục nhập, thì không thể chuyển dữ liệu Danh bạ điện thoại.
• Có thể lưu trữ dữ liệu danh bạ điện thoại của tối đa 10 thiết bị Bluetooth.
• Khi bạn kết nối điện thoại di động có dữ liệu danh bạ điện thoại được tải xuống trước đó, dữ liệu đã tải xuống sẽ được hiển thị.
• Nếu bạn tải xuống dữ liệu danh bạ điện thoại từ cùng một thiết bị, dữ liệu sẽ bị ghi đè.
Xóa danh bạ từ điện thoại
1 Chạm vào .
2 Chạm vào tên để kiểm tra.
Bluetooth Control
25English
Ñ Phonebook transferYou can transfer phonebook data from your Bluetooth phone using PBAP.
1 Touch [ ].
2 Touch [ ].
hh Phonebook data transfer starts.
NOTE• If the Phonebook contains more than 1000
entries, Phonebook data cannot be transferred. • The phonebook data of up to 10 Bluetooth
devices can be stored.• When you connect the mobile phone of which
the phonebook data is downloaded before, the downloaded data will be displayed.
• If you download the phonebook data from the same device again, the data will be overwritten.
Phonebook deletion
1 Touch [ ].
2 Touch the name to check.
■ [ ]
Checks all boxes.
■ [ ]
Clears all check marks.
3 Touch [ ].hh Confirmation message appears.
4 Touch [Yes].
!KL19_AP_En.indb 25 2018/11/09 11:15:25
■ Đánh dấu vào tất cả các hộp.
■ Xóa tất cả các dấu kiểm.
3 Chạm vào . Thông báo xác nhận xuất hiện.
4 Chạm vào Yes (Có).

Điều khiển Bluetooth
26
Cài đặt điện thoại
Bạn có thể thực hiện nhiều cài đặt khác nhau cho chức năng Rảnh tay.
1 Nhấn nút . Màn hình CHỦ xuất hiện.
2 Chạm vào .
3 Chạm vào Phone (Điện thoại).
Màn hình rảnh tay xuất hiện.
4 Chạm vào .
Bluetooth Control
26
Phone Setup
You can make various settings for the Hands-Free function.
1 Press [ ] button.hh HOME screen appears.
2 Touch [ ].
3 Touch [Phone].hh Hands Free screen appears.
4 Touch [ ].
hh Phone Setup screen appears.
5 Set each function as follows.
■ [Select Phone Device]Select the mobile phone to use as the Hands-Free phone 1 or 2 from the registered device list.
Touching [ ] or [ ] switches the selected phone device.
■ [Auto Response]*Set the automatic response time to pick-up an incoming call.[OFF ](Default): Turns off the Automatic
response function.[1]/ [5]/ [10]/ [15]/ [20]/ [25]/ [30]: Sets the
ringing time (second).
■ [Sort Order]Set how to sort the data in the mobile phone phonebook.[First Name/Last Name]: Sorts data by the
first name.[Last Name/First Name ](Default): Sorts data
by the last name.
■ [Echo Cancel]Adjust the level of echo cancellation.Default is “0”.
■ [Noise Reduction]Reduce the noise generated in the surrounding environment without changing the microphone volume. Use this function when the voice of caller is not clear. Default is “0”.
■ [Reception Volume]Adjust the receiver volume.Default is “15”.
■ [Incoming Ring Tone Volume]Adjust the ring tone volume of a new incoming call while talking.Default is “15”.
* Either the auto response time set on this unit or the time set on the mobile phone, whichever is shorter takes effect.
!KL19_AP_En.indb 26 2018/11/09 11:15:25
Màn hình Cài đặt điện thoại xuất hiện.
5 Đặt từng chức năng như sau.
Bluetooth Control
26
Phone Setup
You can make various settings for the Hands-Free function.
1 Press [ ] button.hh HOME screen appears.
2 Touch [ ].
3 Touch [Phone].hh Hands Free screen appears.
4 Touch [ ].
hh Phone Setup screen appears.
5 Set each function as follows.
■ [Select Phone Device]Select the mobile phone to use as the Hands-Free phone 1 or 2 from the registered device list.
Touching [ ] or [ ] switches the selected phone device.
■ [Auto Response]*Set the automatic response time to pick-up an incoming call.[OFF ](Default): Turns off the Automatic
response function.[1]/ [5]/ [10]/ [15]/ [20]/ [25]/ [30]: Sets the
ringing time (second).
■ [Sort Order]Set how to sort the data in the mobile phone phonebook.[First Name/Last Name]: Sorts data by the
first name.[Last Name/First Name ](Default): Sorts data
by the last name.
■ [Echo Cancel]Adjust the level of echo cancellation.Default is “0”.
■ [Noise Reduction]Reduce the noise generated in the surrounding environment without changing the microphone volume. Use this function when the voice of caller is not clear. Default is “0”.
■ [Reception Volume]Adjust the receiver volume.Default is “15”.
■ [Incoming Ring Tone Volume]Adjust the ring tone volume of a new incoming call while talking.Default is “15”.
* Either the auto response time set on this unit or the time set on the mobile phone, whichever is shorter takes effect.
!KL19_AP_En.indb 26 2018/11/09 11:15:25
■ Select Phone Device (Chọn thiết bị điện thoại)Chọn điện thoại di động để sử dụng làm Điện thoại rảnh tay 1 hoặc 2 từ danh sách thiết bị đã đăng ký.
Bluetooth Control
26
Phone Setup
You can make various settings for the Hands-Free function.
1 Press [ ] button.hh HOME screen appears.
2 Touch [ ].
3 Touch [Phone].hh Hands Free screen appears.
4 Touch [ ].
hh Phone Setup screen appears.
5 Set each function as follows.
■ [Select Phone Device]Select the mobile phone to use as the Hands-Free phone 1 or 2 from the registered device list.
Touching [ ] or [ ] switches the selected phone device.
■ [Auto Response]*Set the automatic response time to pick-up an incoming call.[OFF ](Default): Turns off the Automatic
response function.[1]/ [5]/ [10]/ [15]/ [20]/ [25]/ [30]: Sets the
ringing time (second).
■ [Sort Order]Set how to sort the data in the mobile phone phonebook.[First Name/Last Name]: Sorts data by the
first name.[Last Name/First Name ](Default): Sorts data
by the last name.
■ [Echo Cancel]Adjust the level of echo cancellation.Default is “0”.
■ [Noise Reduction]Reduce the noise generated in the surrounding environment without changing the microphone volume. Use this function when the voice of caller is not clear. Default is “0”.
■ [Reception Volume]Adjust the receiver volume.Default is “15”.
■ [Incoming Ring Tone Volume]Adjust the ring tone volume of a new incoming call while talking.Default is “15”.
* Either the auto response time set on this unit or the time set on the mobile phone, whichever is shorter takes effect.
!KL19_AP_En.indb 26 2018/11/09 11:15:25
Chạm vào hoặc chuyển đổi thiết bị điện thoại đã chọn.
■ Auto Response * (Tự động trả lời)Đặt thời gian trả lời tự động để nhận cuộc gọi đến.
OFF (TẮT) (Mặc định): Tắt chức năng trả lời tự động.1 / 5 / 10 / 15 / 20 / 25 / 30 : Đặt thời gian đổ chuông (giây).
■ Sort Order (Thứ tự sắp xếp)Đặt cách sắp xếp dữ liệu trong danh bạ điện thoại di động.First Name/Last Name (Tên/Họ) : Sắp xếp
dữ liệu theo tên.Last Name/First Name (Họ/Tên) (Mặc định):
Sắp xếp dữ liệu theo họ.
■ Echo Cancel (Khử tiếng vang)Điều chỉnh mức khử tiếng vang. Mặc định là “0”.
■ Noise Reduction (Giảm tiếng ồn)Giảm tiếng ồn phát ra trong môi trường xung quanh mà không thay đổi âm lượng micrô. Sử dụng chức năng này khi giọng nói của người gọi không rõ ràng. Mặc định là “0”.
■ Reception Volume (Âm lượng nhận) Điều chỉnh âm lượng máy nhận. Mặc định là “15”.
■ Incoming Ring Tone Volume (Âm lượng nhạc chuông cuộc gọi đến)Điều chỉnh âm lượng nhạc chuông của cuộc gọi đến mới trong khi nói chuyện.Mặc định là “15”.
* Thời gian trả lời tự động được đặt trên thiết bị này hoặc thời gian được đặt trên điện thoại di động, tùy theo thời gian nào ngắn hơn sẽ có hiệu lực.

T-Link
27Tiếng Việt
T-Link (Chỉ AVX cao cấp)
Bạn có thể hiển thị cùng một màn hình của điện thoại thông minh trên màn hình của thiết bị bằng nguồn T-Link.
Chuẩn bị
1 Tải xuống “T-Link” trực tiếp từ App Store hoặc Google Play. Cài đặt các ứng dụng liên kết trực tuyến trên thiết bị iPhone hoặc Android của bạn.
2 Ghép nối điện thoại thông minh của bạn với AVX qua Bluetooth.Bắt buộc phải kết nối T-Link.Xem Đăng ký thiết bị Bluetooth (Tr.17) và Kết nối thiết bị Bluetooth (Tr.18).
LƯU Ý
• T-Link, đây là một Ứng dụng miễn phí.• Thiết bị tương thích
– Phiên bản iOS 11 trở lên– Phiên bản Android 5.0 (Lollipop) trở lên/Linux
kernel phiên bản 3.5 trở lên– Hỗ trợ BluetoothTrong khi sử dụng T-Link, nhiệt độ điện thoại thông minh có thể tăng lên do các yếu tố dưới đây.- Tiếp tục chạy Ứng dụng Nav và /hoặc Ứng dụng
phát nhạc.- Tiếp tục chạy Wi-Fi, GPS và Bluetooth.Nếu bạn thấy rằng Điện thoại thông minh của mình bị nóng, vui lòng ngừng sử dụng T-Link và ngắt kết nối USB.
Kết nối điện thoại thông minh
Kết nối iPhone1 Tải ứng dụng T-Link về iPhone của bạn.2 Trên iPhone của bạn, khởi chạy “Settings”
(Cài đặt). Chạm vào “Control Center” (Trung tâm điều khiển) và sau đó “Customize Controls” (Tùy chỉnh kiểm soát).
3 Chạm vào “Screen Recording” (Ghi màn hình) và thêm vào danh sách “INCLUDE” (BAO GỒM).
4 Khởi chạy Trung tâm điều khiển của iPhone, chạm và giữ biểu tượng Ghi màn hình và sau đó chạm vào “T-Link” và bắt đầu phát sóng.
5 Kết nối iPhone của bạn với AVX qua cáp nối cổng Lightning sang USB. (Tr.15)
Kết nối thiết bị Android1 Tải xuống Ứng dụng T-Link về điện thoại
thông minh Android của bạn.2 Kết nối điện thoại thông minh của bạn với
AVX qua cáp USB. (Tr.15)Khi Ứng dụng T-Link được khởi chạy, hộp thoại cài đặt sẽ xuất hiện.Vui lòng đặt “T-Link” thành BẬT.
LƯU Ý
• Bạn có thể kiểm tra hướng dẫn “cách thức” trong Ứng dụng T-Link.
• Khi bạn sử dụng T-Link lần đầu tiên, các điều khoản dịch vụ của T-Link sẽ được hiển thị. Cần phải đồng ý với các điều khoản dịch vụ của T-Link để sử dụng chức năng này.
Thao tác Mirroring
1 Thao tác trên điện thoại thông minh của bạn để kích hoạt Ứng dụng T-Link, sau đó kết nối với thiết bị này. (Tr.27)
2 Nhấn nút . Màn hình CHỦ xuất hiện.
3 Chạm vào .
4 Chạm vào [T-Link]. (Tr.12)
Màn hình thông báo thận trọng được hiển thị
5 Đọc thông báo thận trọng và chạm vào [Agree] (Đồng ý).
27English
!KL19_AP_En.indb 27 2018/11/09 11:15:25
T-Link
T-Link (Premium AVX)
You can display the same screen of the smartphone on the monitor of the unit using the T-Link source.
Preparation
1 Download “T-Link” from App Store or Google Play.Install the “T-Link” on your iPhone or Android device.
2 Pair your smartphone with AVX via Bluetooth.T-Link connection is required.See Register the Bluetooth device (P.17) and Connect the Bluetooth device (P.18).
Connecting an Android device
1 Download T-Link App to your Android smartphone.
2 Connect your smartphone with AVX via USB cable. (P.15)When T-Link App is launched, a setting dialog appears.Please set “T-Link” to ON.
NOTE• You can check “how to” tutorial in T-Link App.• When you use T-Link �rst time, T-Link terms of
service are displayed. It is necessary to agree to the T-Link terms of service to use this function.
Mirroring Operation
1 Operate your smartphone to activate T-Link App, then connect to this unit. (P.27)
2 Press [ ] button.HOME screen appears.
3 Touch [ ].
4 Touch [T-Link]. (P.12)The caution message screen is displayed.
5 Read the caution message and touch [Agree].
T-Link screen appears.
NOTE• T-Link, it's a free App.
While using T-Link, Smartphone temperature may be increased due to the below factors. - Keep running Nav App and /or Music streaming App. - Keep running Wi-Fi, GPS and Bluetooth.If you recognize that your Smartphone gets hot, please stop using T-Link and disconnect USB.
• Compatible devices – iOS version 11 or later – Android version 5.0 (Lollipop) or later/Linux kernel version 3.5 or later
– Bluetooth support
Connecting a smartphone
Connecting an iPhone1 Download T-Link App to your iPhone.
2 On your iPhone, launch “Settings”. Touch “Control Center” and then “Customize Controls”.
3 Touch “Screen Recording” and add to “INCLUDE” list.
4 Launch Control Center of your iPhone, touch and hold Screen Recording icon and then touch “T-Link” and start broadcast.
5 Connect your iPhone with AVX via Lightning to USB cable. (P.15)
1. Do not operate this function from this product and /or Smartphone while driving. Watching thisscreen on this product and /or Smartphone while driving can lead to a serious accident. Please drive safely and obey traffic rule.
2. Please read the safety instructions in the operating manual before use.
CAUTION !
You will enter T-Link mode.
Agree
Màn hình T-Link xuất hiện.
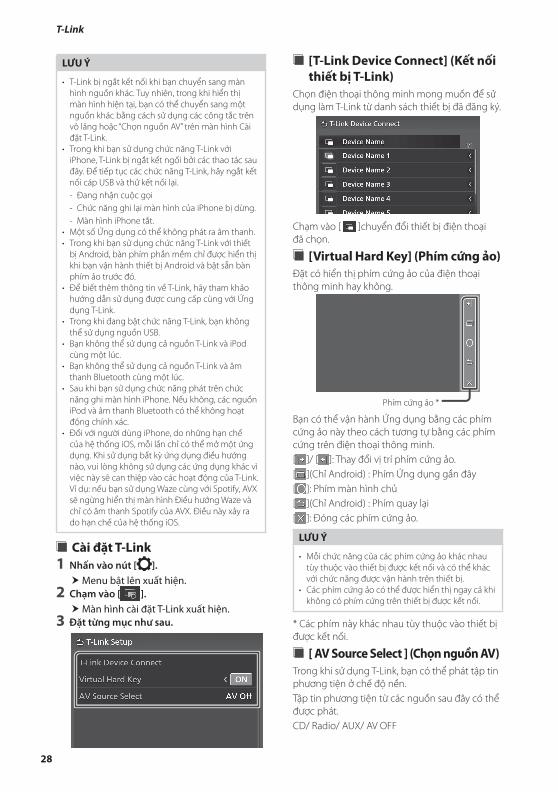
T-Link
28
LƯU Ý
• T-Link bị ngắt kết nối khi bạn chuyển sang màn hình nguồn khác. Tuy nhiên, trong khi hiển thị màn hình hiện tại, bạn có thể chuyển sang một nguồn khác bằng cách sử dụng các công tắc trên vô lăng hoặc “Chọn nguồn AV” trên màn hình Cài đặt T-Link.
• Trong khi bạn sử dụng chức năng T-Link với iPhone, T-Link bị ngắt kết ngối bởi các thao tác sau đây. Để tiếp tục các chức năng T-Link, hãy ngắt kết nối cáp USB và thử kết nối lại.- Đang nhận cuộc gọi- Chức năng ghi lại màn hình của iPhone bị dừng.- Màn hình iPhone tắt.
• Một số Ứng dụng có thể không phát ra âm thanh.• Trong khi bạn sử dụng chức năng T-Link với thiết
bị Android, bàn phím phần mềm chỉ được hiển thị khi bạn vận hành thiết bị Android và bật sẵn bàn phím ảo trước đó.
• Để biết thêm thông tin về T-Link, hãy tham khảo hướng dẫn sử dụng được cung cấp cùng với Ứng dụng T-Link.
• Trong khi đang bật chức năng T-Link, bạn không thể sử dụng nguồn USB.
• Bạn không thể sử dụng cả nguồn T-Link và iPod cùng một lúc.
• Bạn không thể sử dụng cả nguồn T-Link và âm thanh Bluetooth cùng một lúc.
• Sau khi bạn sử dụng chức năng phát trên chức năng ghi màn hình iPhone. Nếu không, các nguồn iPod và âm thanh Bluetooth có thể không hoạt động chính xác.
• Đối với người dùng iPhone, do những hạn chế của hệ thống iOS, mỗi lần chỉ có thể mở một ứng dụng. Khi sử dụng bất kỳ ứng dụng điều hướng nào, vui lòng không sử dụng các ứng dụng khác vì việc này sẽ can thiệp vào các hoạt động của T-Link. Ví dụ: nếu bạn sử dụng Waze cùng với Spotify, AVX sẽ ngừng hiển thị màn hình Điều hướng Waze và chỉ có âm thanh Spotify của AVX. Điều này xảy ra do hạn chế của hệ thống iOS.
Cài đặt T-Link1 Nhấn vào nút [ ]. Menu bật lên xuất hiện.
2 Chạm vào [ ]. Màn hình cài đặt T-Link xuất hiện.
3 Đặt từng mục như sau.
T-Link
NOTE• T-Link is discontinued when you switch to
another source screen. However, while displayingthe current screen, you can switch to another source by using the steering wheel switches or “AV Source Select” on the T-Link Setup screen.While you use the T-Link function with an iPhone , T-Link is discontinued by the followingoperations. To resume the T-Link functions,disconnect the USB cable and try connecting it again.– Receiving a call– iPhone's screen recording function is stopped.– iPhone screen is turned o�.Some Apps may not sound.While you use the T-Link function with an Androiddevice, the software keyboard is displayed only when you operate the Android device and enable the virtual keyboard beforehand.For more information on T-Link, refer to the instruction manual supplied with T-Link App.While the T-Link function is enabled, you cannot use USB source. You cannot use both T-Link and iPod source at the same time.You cannot use both T-Link and Bluetooth Audio source at the same time.After you end to use the T-Link function, stop broadcast on iPhone’s screen recording function. Otherwise iPod and Bluetooth Audio sources may not work correctly.For iPhone users, due to iOS system limitations, only one application can be open at a time. Whenusing any navigation application, please refrain from using other applications as this will interferewith T-Link operations.For example, if you use Waze together with Spotify,AVX will stop dispalying Waze Navigation screen and only Spotify sound comes from AVX. This occurs due to iOS system limitations.
•
•
•
•
•
•
.
•
•
Select the desired smartphone to use as T-Link from the registered device list.
Touching [ ] switches the selected phone device.
Set whether to display the virtual hard key of the smartphone.
Virtual hard keys*
You can operate the App by these virtual hard keys in a similar way by the hard keys on the smartphone.[ ] / [ ] : Changes the virtual hard keys position.[ ] (Android only) : Recent Apps key[ ] : Home key[ ] (Android only) : Back key[ ] : Closes the virtual hard keys.
NOTE• Each function of the virtual hard keys di�ers
depending on the connected device and may di�er from the function operated on the device.
• The virtual hard keys can be displayed even if there is no hard key on the connected device.
* These keys di�er depending on the connected device.
While using T-Link, you can play media �le in the background.The media �le from the following sources can be played.CD/ Radio/ AUX/ AV O�
28
!KL19_AP_En.indb 28 2018/11/09 11:15:26
[T-Link Device Connect ]
Virtual Hard Key[ ]
[AV Source Select ]
T-Link Setup1 Press [ ] button.
Popup menu appears.
2 Touch [ ] .T-Link Setup screen appears.
3 Set each item as follows.
•
[T-Link Device Connect] (Kết nối thiết bị T-Link)
Chọn điện thoại thông minh mong muốn để sử dụng làm T-Link từ danh sách thiết bị đã đăng ký.
T-Link
NOTE• T-Link is discontinued when you switch to
another source screen. However, while displayingthe current screen, you can switch to another source by using the steering wheel switches or “AV Source Select” on the T-Link Setup screen.While you use the T-Link function with an iPhone , T-Link is discontinued by the followingoperations. To resume the T-Link functions,disconnect the USB cable and try connecting it again.– Receiving a call– iPhone's screen recording function is stopped.– iPhone screen is turned o�.Some Apps may not sound.While you use the T-Link function with an Androiddevice, the software keyboard is displayed only when you operate the Android device and enable the virtual keyboard beforehand.For more information on T-Link, refer to the instruction manual supplied with T-Link App.While the T-Link function is enabled, you cannot use USB source. You cannot use both T-Link and iPod source at the same time.You cannot use both T-Link and Bluetooth Audio source at the same time.After you end to use the T-Link function, stop broadcast on iPhone’s screen recording function. Otherwise iPod and Bluetooth Audio sources may not work correctly.For iPhone users, due to iOS system limitations, only one application can be open at a time. Whenusing any navigation application, please refrain from using other applications as this will interferewith T-Link operations.For example, if you use Waze together with Spotify,AVX will stop dispalying Waze Navigation screen and only Spotify sound comes from AVX. This occurs due to iOS system limitations.
•
•
•
•
•
•
.
•
•
Select the desired smartphone to use as T-Link from the registered device list.
Touching [ ] switches the selected phone device.
Set whether to display the virtual hard key of the smartphone.
Virtual hard keys*
You can operate the App by these virtual hard keys in a similar way by the hard keys on the smartphone.[ ] / [ ] : Changes the virtual hard keys position.[ ] (Android only) : Recent Apps key[ ] : Home key[ ] (Android only) : Back key[ ] : Closes the virtual hard keys.
NOTE• Each function of the virtual hard keys di�ers
depending on the connected device and may di�er from the function operated on the device.
• The virtual hard keys can be displayed even if there is no hard key on the connected device.
* These keys di�er depending on the connected device.
While using T-Link, you can play media �le in the background.The media �le from the following sources can be played.CD/ Radio/ AUX/ AV O�
28
!KL19_AP_En.indb 28 2018/11/09 11:15:26
[T-Link Device Connect ]
Virtual Hard Key[ ]
[AV Source Select ]
T-Link Setup1 Press [ ] button.
Popup menu appears.
2 Touch [ ] .T-Link Setup screen appears.
3 Set each item as follows.
•
Chạm vào [ ]chuyển đổi thiết bị điện thoại đã chọn.
[Virtual Hard Key] (Phím cứng ảo)Đặt có hiển thị phím cứng ảo của điện thoại thông minh hay không.
Phím cứng ảo *
Bạn có thể vận hành Ứng dụng bằng các phím cứng ảo này theo cách tương tự bằng các phím cứng trên điện thoại thông minh.[ ]/ [ ]: Thay đổi vị trí phím cứng ảo.[ ](Chỉ Android) : Phím Ứng dụng gần đây[ ]: Phím màn hình chủ[ ](Chỉ Android) : Phím quay lại[ ]: Đóng các phím cứng ảo.
LƯU Ý
• Mỗi chức năng của các phím cứng ảo khác nhau tùy thuộc vào thiết bị được kết nối và có thể khác với chức năng được vận hành trên thiết bị.
• Các phím cứng ảo có thể được hiển thị ngay cả khi không có phím cứng trên thiết bị được kết nối.
* Các phím này khác nhau tùy thuộc vào thiết bị được kết nối.
[ AV Source Select ] (Chọn nguồn AV)Trong khi sử dụng T-Link, bạn có thể phát tập tin phương tiện ở chế độ nền.Tập tin phương tiện từ các nguồn sau đây có thể được phát.CD/ Radio/ AUX/ AV OFF

Đĩa
29Tiếng Việt
Đĩa CẢNH BÁO
• Không được phát video trong khi đang lái xe để tránh việc người lái xe chăm chú nhìn vào màn hình của thiết bị. Dừng xe ở nơi an toàn và áp dụng chế độ thắng tay khi đậu xe trước khi cho phát video.
Phát đĩa
Đưa đĩa vào1 Cho đĩa vào khe.
Thiết bị tải đĩa và phát lại bắt đầu.
THẬN TRỌNG• Không đặt bất cứ vật gì ngoài đĩa vào khe nhận
đĩa.
⃝ Bắt đầu phát lại đĩa theo cách thủ công
1 Nhấn nút . Màn hình CHỦ xuất hiện.
2 Chạm vào .
3 Chạm vào Disc (Đĩa).
Lấy đĩa ra
1 Nhấn nút . Khi lấy đĩa ra, hãy gỡ đĩa ra theo chiều ngang.
LƯU Ý
• Để lấy đĩa ra, nhấn và giữ trong 2 giây.
Thao tác cơ bản với DVD/ Video-CD
Hầu hết các chức năng có thể được điều khiển từ màn hình điều khiển nguồn và màn hình phát lại.
LƯU Ý• Ảnh chụp màn hình dưới đây là dành cho DVD.
Ảnh này có thể khác với ảnh dành cho Video-CD.
1 Khi các nút thao tác không được hiển thị trên màn hình, chạm vào màn hình hiển thị.
Màn hình điều khiển
1
6
23
5
4
Bảng điều khiển phụDVD
Video-CD
Màn hình Video
7
Vùng hiển thị thông tin
Hiển thị thông tin sau đây.• Linear PCM, v.v.: Định dạng âm thanh• Số tiêu đề, Số chương: Số tiêu đề và số
chương DVD• Số bản nhạc/Số ảnh nền: Số bản nhạc hoặc
ảnh nền Video-CD. Số ảnh nền chỉ được hiển thị khi bật Điều khiển phát lại (PBC).

Đĩa
30
• Ẩn: Ẩn màn hình điều khiển. Các phím thao tác
• : Lặp lại nội dung hiện tại. Mỗi lần bạn chạm vào phím, các chế độ lặp lại sẽ được chuyển theo trình tự sau: DVD: Lặp lại tiêu đề ( ), Lặp lại chương ( ), Tắt lặp lại ( ) Video-CD (PBC Bật): Không lặp lại Video-CD (PBC Tắt): Lặp lại bản nhạc ( ), Tắt lặp lại ( )
•
Bluetooth Control
20
Playing the Bluetooth Audio Device
Most functions can be controlled from the source control screen.To select Bluetooth source, touch [Audio] icon on the source selection screen. (P.12)
Ñ Bluetooth basic operation
42
1
3
1 Information display
• Displays the current track information. • Connected device name.
2 Operation keys *
• [ ] : Searches for a file. See File search (P.21).
• [E] [F]: Searches for the previous/next content.Touch and hold to fast forward or fast backward.
• [D]: Plays.• [H]: Pauses.• [ ] : Repeats the current track/folder. Each
time you touch the key, repeat modes are switched in the following sequence:File repeat ( ), All songs repeat ( ), Repeat off ( )
• [ ] : Randomly plays all tracks in the current folder. Each time you touch the key, random modes are switched in the following sequence:All random ( ), Random off ( )
* These items appear only when the audio player which supports AVRCP profile is connected.
3 Playing time
For confirmation of current playing position.
4 [ ]
Bluetooth audio devices can be switched easily to play music. See Bluetooth Audio Device Change (P.21).
NOTE• The operation buttons, indications and
information displayed on the screen differ depending on the connected device.
• If the operation keys do not appear, operate from the player.
• Depending on your mobile phone or audio player, sound may be heard and controlled but text information may not appear.
• If the volume is too low, raise it on your mobile phone or audio player.
!KL19_AP_En.indb 20 2018/11/09 11:15:22
: Tìm kiếm nội dung trước đó/tiếp theo Chạm và giữ để tua đi hoặc tua lại.
• ►〓 : Phát hoặc tạm dừng• ■ : Tạm dừng.
Thời gian phát (Chỉ DVD)
Để xác nhận vị trí phát hiện tại. Bạn có thể kéo vòng tròn sang trái hoặc phải để thay đổi vị trí phát.
Phím chức năng (Chỉ DVD)
• Highlight (Tô sáng): Chạm vào để hiển thị màn hình tô sáng Video DVD. Xem phần Điều khiển tô sáng (Tr.33).
• Menu: Chạm vào để hiển thị màn hình điều khiển menu đĩa Video DVD. Xem phần Thao tác đĩa DVD (Tr.32).
(Chỉ màn hình điều khiển DVD chính)
Chạm vào để hiển thị màn hình Cài đặt DVD. Xem phần Cài đặt DVD (Tr.33).
6 (Chỉ màn hình điều khiển DVD chính) Chạm vào bên trái màn hình để hiển thị bảng điều khiển chức năng. Chạm lại để đóng bảng điều khiển.• : Tua đi hoặc tua lại đĩa. Mỗi lần bạn
chạm vào phím, tốc độ sẽ thay đổi. 2 lần, 10 lần.• (Chỉ DVD) : Phát ở chế độ tiến hoặc lùi
chuyển động chậm.• PBC (Chỉ Video-CD): Chạm để bật hoặc tắt điều
khiển Phát lại (PBC).• Audio (Chỉ Video-CD): Chạm để chuyển kênh
đầu ra âm thanh.– 1chLL/2chLL : Xác định đầu ra âm thanh bên
trái của kênh 1 hoặc 2.– 1chLR/2chLR : Xác định đầu ra âm thanh
đơn âm của kênh 1 hoặc 2.
– 1chRR/2chRR : Xác định đầu ra âm thanh bên phải của kênh 1 hoặc 2.
– 1chST/2chST : Xác định đầu ra âm thanh nổi của kênh 1 hoặc 2.
– LL : Xác định đầu ra âm thanh bên trái.– LR : Xác định đầu ra âm thanh đơn âm.– RR : Xác định đầu ra âm thanh bên phải.– ST : Xác định đầu ra âm thanh nổi.
7 Vùng hiển thị phím
Chạm để hiển thị màn hình điều khiển.
LƯU Ý
• Màn hình điều khiển biến mất khi không có thao tác nào được thực hiện trong vòng 5 giây.
• Nếu bạn sử dụng điều khiển từ xa, bạn có thể chuyển trực tiếp đến hình ảnh mong muốn bằng cách nhập số chương, số ảnh nền, thời gian phát, v.v. (Tr.58).

Đĩa
31Tiếng Việt
Thao tác cơ bản với phương tiện Đĩa/CD nhạc
Hầu hết các chức năng có thể được điều khiển từ màn hình điều khiển nguồn và màn hình phát lại.
LƯU Ý
• Trong hướng dẫn này, “CD nhạc” có nghĩa là đĩa CD chung chứa các bản nhạc. “Phương tiện đĩa” có nghĩa là đĩa CD/DVD chứa các tập tin âm thanh hoặc video.
• Ảnh chụp màn hình dưới đây là dành cho phương tiện đĩa. Ảnh này có thể khác với ảnh dành cho CD.
Màn hình điều khiển
Tập tin nhạc
34 5
1
2
Tập tin video
6
Bảng điều khiển phụ
CODEC (AVX cao cấp)
Khi phát một nguồn có độ phân giải cao, thông tin định dạng của nguồn sẽ được hiển thị. (Chỉ phương tiện đĩa)
Thông tin bản nhạc
Hiển thị thông tin củabản nhạc/ tập tin hiện tại. Chỉ hiển thị tên tập tin và tên thư mục nếu không có thông tin thẻ (Chỉ phương tiện đĩa)
Các phím thao tác
• : Hiển thị danh sách Nhạc (chỉ dành cho CD nhạc) hoặc Danh sách thư mục (Chỉ dành cho phương tiện đĩa). Để biết chi tiết về thao tác tìm kiếm, xem phần Thao tác tìm kiếm (Tr.32).
•
Bluetooth Control
20
Playing the Bluetooth Audio Device
Most functions can be controlled from the source control screen.To select Bluetooth source, touch [Audio] icon on the source selection screen. (P.12)
Ñ Bluetooth basic operation
42
1
3
1 Information display
• Displays the current track information. • Connected device name.
2 Operation keys *
• [ ] : Searches for a file. See File search (P.21).
• [E] [F]: Searches for the previous/next content.Touch and hold to fast forward or fast backward.
• [D]: Plays.• [H]: Pauses.• [ ] : Repeats the current track/folder. Each
time you touch the key, repeat modes are switched in the following sequence:File repeat ( ), All songs repeat ( ), Repeat off ( )
• [ ] : Randomly plays all tracks in the current folder. Each time you touch the key, random modes are switched in the following sequence:All random ( ), Random off ( )
* These items appear only when the audio player which supports AVRCP profile is connected.
3 Playing time
For confirmation of current playing position.
4 [ ]
Bluetooth audio devices can be switched easily to play music. See Bluetooth Audio Device Change (P.21).
NOTE• The operation buttons, indications and
information displayed on the screen differ depending on the connected device.
• If the operation keys do not appear, operate from the player.
• Depending on your mobile phone or audio player, sound may be heard and controlled but text information may not appear.
• If the volume is too low, raise it on your mobile phone or audio player.
!KL19_AP_En.indb 20 2018/11/09 11:15:22
: Tìm kiếm nội dung trước đó/tiếp theo. Chạm và giữ để tua đi hoặc tua lại đĩa.
• ►〓 : Phát hoặc tạm dừng.• : Lặp lại bản nhạc/thư mục hiện tại. Mỗi lần
bạn chạm vào phím, chế độ lặp lại sẽ chuyển theo trình tự sau; Lặp lại Bản nhạc/Tập tin ( ), Lặp lại thư mục ( ) (Chỉ phương tiện đĩa), Lặp lại tất cả ( )
• : Phát ngẫu nhiên tất cả các bản nhạc trong thư mục/đĩa hiện tại. Mỗi lần bạn chạm vào phím, chế độ ngẫu nhiên sẽ chuyển theo trình tự sau; Bản nhạc ngẫu nhiên ( ) (Chỉ CD nhạc), Thư mục ngẫu nhiên ( ) (Chỉ phương tiện đĩa), Tắt ngẫu nhiên ( ) Bảng điều khiển phụ (Chỉ phương tiện đĩa)
Chạm vào bên trái màn hình để hiển thị bảng điều khiển chức năng. Chạm lại để đóng bảng điều khiển.
• : Tìm kiếm thư mục trước đó/tiếp theo. Thời gian phát
Để xác nhận vị trí phát hiện tại. Bạn có thể kéo vòng tròn sang trái hoặc phải để thay đổi vị trí phát.
6 Ẩn (Chỉ tập tin Video)
Ẩn màn hình điều khiển.Màn hình Video
7
7 Vùng hiển thị phím (Chỉ tập tin Video)
Chạm để hiển thị màn hình điều khiển.

Đĩa
32
Thao tác tìm kiếm (Chỉ phương tiện Đĩa/CD nhạc)
Bạn có thể tìm kiếm một bản nhạc/ tập tin.
LƯU Ý
• Để biết các thao tác trên màn hình danh sách, xem phần Màn hình danh sách (Tr.14).
• Ảnh chụp màn hình dưới đây là dành cho phương tiện đĩa. Ảnh này có thể khác với ảnh dành cho CD.
1 Chạm vào . Màn hình Danh sách thư mục xuất hiện.
2 Chạm vào mục mong muốn trong danh sách nội dung.
Disc
32
Search Operation (Music CD/ Disc media only)
You can search for a track/file.
NOTE• For operations in the list screen, see List screen
(P.14).• The screen shot below is for disc media. It may be
different from the one for CD.
1 Touch [ ].hh Folder List screen appears.
2 Touch the desired item in the content list.
■ (Disc media only)You can search for the other folder and select to play all files in the folder.When you touch a folder, its contents are displayed.
DVD Disc Menu Operation
You can set up some functions using the DVD-VIDEO disc menu.
1 Touch the display during playback.
2 Touch [Menu].hh Menu Control screen appears.
3 Perform your desired operation as follows.
■ To display the top menuTouch [Top].*
■ To display the menuTouch [Menu].*
■ To display the previous menuTouch [Return].*
■ To enter selected itemTouch [Enter].
■ To enable direct operationTouch [Highlight] to enter the highlight control mode (P.33).
■ To move the cursorTouch [R], [S], [C], [D].
■ To switch among subtitle languagesTouch [Subtitle]. Each time you touch this key, subtitle languages are switched.
■ To switch among audio languagesTouch [Audio]. Each time you touch this key, audio languages are switched.
!KL19_AP_En.indb 32 2018/11/09 11:15:28
■ (Chỉ phương tiện đĩa)Bạn có thể tìm kiếm thư mục khác và chọn phát tất cả các tập tin trong thư mục.Khi bạn chạm vào một thư mục, nội dung của thư mục đó sẽ được hiển thị.
Thao tác menu đĩa DVD
Bạn có thể thiết lập một số chức năng bằng menu đĩa DVD-VIDEO.
1 Chạm vào màn hình hiển thị trong khi phát lại.
Disc
32
Search Operation (Music CD/ Disc media only)
You can search for a track/file.
NOTE• For operations in the list screen, see List screen
(P.14).• The screen shot below is for disc media. It may be
different from the one for CD.
1 Touch [ ].hh Folder List screen appears.
2 Touch the desired item in the content list.
■ (Disc media only)You can search for the other folder and select to play all files in the folder.When you touch a folder, its contents are displayed.
DVD Disc Menu Operation
You can set up some functions using the DVD-VIDEO disc menu.
1 Touch the display during playback.
2 Touch [Menu].hh Menu Control screen appears.
3 Perform your desired operation as follows.
■ To display the top menuTouch [Top].*
■ To display the menuTouch [Menu].*
■ To display the previous menuTouch [Return].*
■ To enter selected itemTouch [Enter].
■ To enable direct operationTouch [Highlight] to enter the highlight control mode (P.33).
■ To move the cursorTouch [R], [S], [C], [D].
■ To switch among subtitle languagesTouch [Subtitle]. Each time you touch this key, subtitle languages are switched.
■ To switch among audio languagesTouch [Audio]. Each time you touch this key, audio languages are switched.
!KL19_AP_En.indb 32 2018/11/09 11:15:28
2 Chạm vào Menu. Màn hình điều khiển Menu xuất hiện.
3 Thực hiện thao tác mà bạn mong muốn như sau.
Disc
32
Search Operation (Music CD/ Disc media only)
You can search for a track/file.
NOTE• For operations in the list screen, see List screen
(P.14).• The screen shot below is for disc media. It may be
different from the one for CD.
1 Touch [ ].hh Folder List screen appears.
2 Touch the desired item in the content list.
■ (Disc media only)You can search for the other folder and select to play all files in the folder.When you touch a folder, its contents are displayed.
DVD Disc Menu Operation
You can set up some functions using the DVD-VIDEO disc menu.
1 Touch the display during playback.
2 Touch [Menu].hh Menu Control screen appears.
3 Perform your desired operation as follows.
■ To display the top menuTouch [Top].*
■ To display the menuTouch [Menu].*
■ To display the previous menuTouch [Return].*
■ To enter selected itemTouch [Enter].
■ To enable direct operationTouch [Highlight] to enter the highlight control mode (P.33).
■ To move the cursorTouch [R], [S], [C], [D].
■ To switch among subtitle languagesTouch [Subtitle]. Each time you touch this key, subtitle languages are switched.
■ To switch among audio languagesTouch [Audio]. Each time you touch this key, audio languages are switched.
!KL19_AP_En.indb 32 2018/11/09 11:15:28
■ Để hiển thị menu trên cùngChạm vào Top (Trên cùng).*■ Để hiển thị menuChạm vào Menu.*■ Để hiển thị menu trước đóChạm vào Return (Quay lại).*■ Để nhập mục đã chọnChạm vào Enter (Nhập).■ Để kích hoạt thao tác trực tiếpChạm vào Highlight (Tô sáng) để vào chế độ điều khiển tô sáng (Tr.33).■ Để di chuyển con trỏChạm vào, ,,,.■ Để chuyển đổi giữa các ngôn ngữ phụ
đề Chạm vào Subtitle (Phụ đề). Mỗi lần bạn chạm vào phím này, ngôn ngữ phụ đề sẽ được chuyển đổi.■ Để chuyển đổi giữa các ngôn ngữ âm
thanh Chạm vào Audio (Âm thanh). Mỗi lần bạn chạm vào phím này, ngôn ngữ âm thanh sẽ được chuyển đổi.

Đĩa
33Tiếng Việt
■ Để chuyển đổi giữa các góc ảnhChạm vào Angle (Góc). Mỗi lần bạn chạm vào phím này, các góc ảnh sẽ được chuyển đổi.■ Để đóng màn hình Điều khiển menuChạm vào Hide (Ẩn).
* Các phím này có thể không hoạt động tùy thuộc vào đĩa.
Điều khiển tô sángĐiều khiển tô sáng cho phép bạn điều khiển menu DVD bằng cách chạm trực tiếp vào phím menu trên màn hình.
1 Chạm vào Highlight (Tô sáng) trên màn hình Điều khiển menu.
2 Chạm vào mục bạn muốn trên màn hình.
Disc
33English
■ To switch among picture anglesTouch [Angle]. Each time you touch this key, picture angles are switched.
■ To close the Menu Control screenTouch [Hide].
* These keys may not function depending on the disc.
Ñ Highlight controlHighlight control lets you control the DVD menu by touching the menu key directly on the screen.
1 Touch [Highlight] on the Menu Control screen.
2 Touch your desired item on the screen.
NOTE• The highlight control function is cancelled
automatically if you do not operate for a predetermined period of time.
DVD Setup
You can set up the DVD playback functions.
1 Touch the display during playback.
2 Touch [ ].
hh DVD Setup screen appears.
3 Set each function as follows.
■ [Menu Language] / [Subtitle Language] / [Audio Language]
See Language setting (P.34).
■ [Dynamic Range Control]Sets the dynamic range.[Wide]: The dynamic range is wide.[Normal]: The dynamic range is normal.[Dialog] (Default): Makes the total sound
volume larger than the volumes in other modes. This is effective only when the Dolby Digital software is in use.
!KL19_AP_En.indb 33 2018/11/09 11:15:29
LƯU Ý
• Chức năng điều khiển tô sáng bị hủy tự động nếu bạn không hoạt động trong một khoảng thời gian định trước.
Cài đặt DVD
Bạn có thể cài đặt các chức năng phát lại DVD.
1 Chạm vào màn hình hiển thị trong khi phát lại.
Disc
33English
■ To switch among picture anglesTouch [Angle]. Each time you touch this key, picture angles are switched.
■ To close the Menu Control screenTouch [Hide].
* These keys may not function depending on the disc.
Ñ Highlight controlHighlight control lets you control the DVD menu by touching the menu key directly on the screen.
1 Touch [Highlight] on the Menu Control screen.
2 Touch your desired item on the screen.
NOTE• The highlight control function is cancelled
automatically if you do not operate for a predetermined period of time.
DVD Setup
You can set up the DVD playback functions.
1 Touch the display during playback.
2 Touch [ ].
hh DVD Setup screen appears.
3 Set each function as follows.
■ [Menu Language] / [Subtitle Language] / [Audio Language]
See Language setting (P.34).
■ [Dynamic Range Control]Sets the dynamic range.[Wide]: The dynamic range is wide.[Normal]: The dynamic range is normal.[Dialog] (Default): Makes the total sound
volume larger than the volumes in other modes. This is effective only when the Dolby Digital software is in use.
!KL19_AP_En.indb 33 2018/11/09 11:15:29
2 Chạm vào .
Disc
33English
■ To switch among picture anglesTouch [Angle]. Each time you touch this key, picture angles are switched.
■ To close the Menu Control screenTouch [Hide].
* These keys may not function depending on the disc.
Ñ Highlight controlHighlight control lets you control the DVD menu by touching the menu key directly on the screen.
1 Touch [Highlight] on the Menu Control screen.
2 Touch your desired item on the screen.
NOTE• The highlight control function is cancelled
automatically if you do not operate for a predetermined period of time.
DVD Setup
You can set up the DVD playback functions.
1 Touch the display during playback.
2 Touch [ ].
hh DVD Setup screen appears.
3 Set each function as follows.
■ [Menu Language] / [Subtitle Language] / [Audio Language]
See Language setting (P.34).
■ [Dynamic Range Control]Sets the dynamic range.[Wide]: The dynamic range is wide.[Normal]: The dynamic range is normal.[Dialog] (Default): Makes the total sound
volume larger than the volumes in other modes. This is effective only when the Dolby Digital software is in use.
!KL19_AP_En.indb 33 2018/11/09 11:15:29
Màn hình Cài đặt DVD xuất hiện.
3 Đặt từng chức năng như sau.
Disc
33English
■ To switch among picture anglesTouch [Angle]. Each time you touch this key, picture angles are switched.
■ To close the Menu Control screenTouch [Hide].
* These keys may not function depending on the disc.
Ñ Highlight controlHighlight control lets you control the DVD menu by touching the menu key directly on the screen.
1 Touch [Highlight] on the Menu Control screen.
2 Touch your desired item on the screen.
NOTE• The highlight control function is cancelled
automatically if you do not operate for a predetermined period of time.
DVD Setup
You can set up the DVD playback functions.
1 Touch the display during playback.
2 Touch [ ].
hh DVD Setup screen appears.
3 Set each function as follows.
■ [Menu Language] / [Subtitle Language] / [Audio Language]
See Language setting (P.34).
■ [Dynamic Range Control]Sets the dynamic range.[Wide]: The dynamic range is wide.[Normal]: The dynamic range is normal.[Dialog] (Default): Makes the total sound
volume larger than the volumes in other modes. This is effective only when the Dolby Digital software is in use.
!KL19_AP_En.indb 33 2018/11/09 11:15:29
■ Menu Language (Ngôn ngữ menu)/ Subtitle Language (Ngôn ngữ phụ đề)/ Audio Language (Ngôn ngữ âm thanh)
Xem phần Cài đặt ngôn ngữ (Tr.34).■ Dynamic Range Control (Kiểm soát
dải tần nhạy sáng)Đặt dải tần nhạy sáng.Rộng : Dải tần nhạy sáng rộng.Bình thường : Dải tần nhạy sáng bình
thường.Hộp thoại (Mặc định): Tăng tổng âm lượng
lớn hơn âm lượng trong các chế độ khác. Mục này chỉ hiệu quả khi phần mềm Dolby Digital được sử dụng.

Đĩa
34
■ Screen Ratio (Tỷ lệ màn hình)Đặt chế độ hiển thị màn hình.16:9 (Mặc định): Hiển thị hình ảnh rộng.4:3 LB : Hiển thị hình ảnh rộng ở định dạng
Hộp thư (có các sọc đen ở trên cùng và dưới cùng của màn hình).
4:3 PS : Hiển thị hình ảnh rộng ở định dạng Pan & Scan (hiển thị hình ảnh được cắt ở đầu bên phải và bên trái).
Cài đặt ngôn ngữCài đặt này dành cho các ngôn ngữ được sử dụng cho menu, phụ đề và giọng nói.
1 Chạm vào mục mong muốn;Menu Language (Ngôn ngữ menu), Subtitle Language (Ngôn ngữ phụ đề),Audio Language (Ngôn ngữ âm thanh). Màn hình Đặt ngôn ngữ xuất hiện.
2 Chọn ngôn ngữ.
Disc
34
■ [Screen Ratio]Sets the screen display mode.[16:9 ](Default): Displays wide pictures.[4:3 LB]: Displays wide pictures in the Letter
Box format (having black stripes at the top and bottom of screen).
[4:3 PS]: Displays wide pictures in the Pan & Scan format (showing pictures cut at the right and left ends).
Ñ Language settingThis setting is for the languages used for the menu, subtitle, and voice.
1 Touch the desired item; [Menu Language], [Subtitle Language], [Audio Language].hh Language Set screen appears.
2 Select a language.
For language codes, refer to DVD Language Codes (P.64).Touch [Close] to set the entered language and return to the DVD Setup screen.
NOTE• To set the DVD’s original language as the audio
language, touch [Original].• The selectable languages on each setting is
varied depends on the disc.
!KL19_AP_En.indb 34 2018/11/09 11:15:29
Để biết thêm về mã ngôn ngữ, tham khảo phần Mã ngôn ngữ DVD (Tr.64).Chạm vào Close (Đóng) để đặt ngôn ngữ đã nhập và quay lại màn hình Cài đặt DVD.
LƯU Ý
• Để đặt ngôn ngữ ban đầu của DVD làm ngôn ngữ âm thanh, chạm vào Original (Ban đầu).
• Các ngôn ngữ có thể chọn trên mỗi cài đặt được thay đổi tùy theo đĩa.

USB
35Tiếng Việt
USB CẢNH BÁO
• Không được phát video trong khi đang lái xe để tránh việc người lái xe chăm chú nhìn vào màn hình của thiết bị. Dừng xe ở nơi an toàn và áp dụng chế độ thắng tay khi đậu xe trước khi cho phát video.
Kết nối thiết bị USB
1 Kết nối thiết bị USB với cổng USB. (Tr.15)
2 Nhấn nút . Màn hình CHỦ xuất hiện.
3 Chạm vào .
4 Chạm vào USB. (Tr.12)
Ngắt kết nối thiết bị USB
1 Nhấn nút . Màn hình CHỦ xuất hiện.
2 Chạm vào một nguồn khác ngoài USB.
3 Tháo thiết bị USB.
Ngắt kết nối thiết bị USBBạn có thể sử dụng thiết bị USB loại có bộ nhớ lớn với thiết bị này.Từ “thiết bị USB” xuất hiện trong hướng dẫn này cho biết thiết bị bộ nhớ flash.⃝ Giới thiệu về hệ thống tập tinHệ thống tập tin nên là một trong những hệ thống sau đây. • FAT16 • FAT32 • exFAT • NTFS
THÔNG BÁO
• Lắp đặt thiết bị USB ở nơi không ảnh hưởng đến việc lái xe an toàn.
• Bạn không thể kết nối thiết bị USB qua bộ chia USB và Đầu đọc nhiều thẻ.
• Hãy sao lưu các tập tin âm thanh được sử dụng với thiết bị này. Các tập tin có thể bị xóa tùy thuộc vào điều kiện hoạt động của thiết bị USB. Chúng tôi sẽ không bồi thường cho bất kỳ thiệt hại phát sinh từ các sự việc dữ liệu bị xóa.
Thao tác USB cơ bản
Hầu hết các chức năng có thể được điều khiển từ màn hình điều khiển nguồn và màn hình phát lại.
Màn hình điều khiểnTập tin nhạc
USB
35English
USB
# WARNING• Any video won't be played while driving to
prevent driver's eyes from fixing on the unit's display. Stop the vehicle in a safe place and apply the parking brake before performing such function.
Connecting a USB device
1 Connect the USB device to the USB port. (P.15)
2 Press [ ] button.hh HOME screen appears.
3 Touch [ ].
4 Touch [USB]. (P.12)
Ñ Disconnect the USB device
1 Press [ ] button.hh HOME screen appears.
2 Touch a source other than [USB].
3 Detach the USB device.
Ñ Usable USB deviceYou can use a mass-storage-class USB device with this unit. The word “USB device” appearing in this manual indicates a flash memory device.
● About the file systemThe file system should be the one of the following.
• FAT16 • FAT32 • exFAT • NTFS
NOTICE• Install the USB device in the place where it will
not affect safe driving.• You cannot connect a USB device via a USB hub
and Multi Card Reader.• Take backups of the audio files used with this
unit. The files can be erased depending on the operating conditions of the USB device.We shall have no compensation for any damage arising from any erased data.
USB Basic Operation
Most functions can be controlled from the source control screen and playback screen.
Control screenMusic file
34 5
1
2
Video file
6
Sub-control panel
1 CODEC (Premium AVX)
When a high-resolution source is played, its format information is displayed. (Music file only)
2 Track information
Displays the information on the current file.Only a file name and a folder name are displayed if there is no tag information.
!KL19_AP_En.indb 35 2018/11/09 11:15:29
Tập tin video
USB
35English
USB
# WARNING• Any video won't be played while driving to
prevent driver's eyes from fixing on the unit's display. Stop the vehicle in a safe place and apply the parking brake before performing such function.
Connecting a USB device
1 Connect the USB device to the USB port. (P.15)
2 Press [ ] button.hh HOME screen appears.
3 Touch [ ].
4 Touch [USB]. (P.12)
Ñ Disconnect the USB device
1 Press [ ] button.hh HOME screen appears.
2 Touch a source other than [USB].
3 Detach the USB device.
Ñ Usable USB deviceYou can use a mass-storage-class USB device with this unit. The word “USB device” appearing in this manual indicates a flash memory device.
● About the file systemThe file system should be the one of the following.
• FAT16 • FAT32 • exFAT • NTFS
NOTICE• Install the USB device in the place where it will
not affect safe driving.• You cannot connect a USB device via a USB hub
and Multi Card Reader.• Take backups of the audio files used with this
unit. The files can be erased depending on the operating conditions of the USB device.We shall have no compensation for any damage arising from any erased data.
USB Basic Operation
Most functions can be controlled from the source control screen and playback screen.
Control screenMusic file
34 5
1
2
Video file
6
Sub-control panel
1 CODEC (Premium AVX)
When a high-resolution source is played, its format information is displayed. (Music file only)
2 Track information
Displays the information on the current file.Only a file name and a folder name are displayed if there is no tag information.
!KL19_AP_En.indb 35 2018/11/09 11:15:29
Bảng điều khiển phụ
USB
35English
USB
# WARNING• Any video won't be played while driving to
prevent driver's eyes from fixing on the unit's display. Stop the vehicle in a safe place and apply the parking brake before performing such function.
Connecting a USB device
1 Connect the USB device to the USB port. (P.15)
2 Press [ ] button.hh HOME screen appears.
3 Touch [ ].
4 Touch [USB]. (P.12)
Ñ Disconnect the USB device
1 Press [ ] button.hh HOME screen appears.
2 Touch a source other than [USB].
3 Detach the USB device.
Ñ Usable USB deviceYou can use a mass-storage-class USB device with this unit. The word “USB device” appearing in this manual indicates a flash memory device.
● About the file systemThe file system should be the one of the following.
• FAT16 • FAT32 • exFAT • NTFS
NOTICE• Install the USB device in the place where it will
not affect safe driving.• You cannot connect a USB device via a USB hub
and Multi Card Reader.• Take backups of the audio files used with this
unit. The files can be erased depending on the operating conditions of the USB device.We shall have no compensation for any damage arising from any erased data.
USB Basic Operation
Most functions can be controlled from the source control screen and playback screen.
Control screenMusic file
34 5
1
2
Video file
6
Sub-control panel
1 CODEC (Premium AVX)
When a high-resolution source is played, its format information is displayed. (Music file only)
2 Track information
Displays the information on the current file.Only a file name and a folder name are displayed if there is no tag information.
!KL19_AP_En.indb 35 2018/11/09 11:15:29
CODEC (AVX cao cấp)
Khi phát một nguồn có độ phân giải cao, thông tin định dạng của nguồn sẽ được hiển thị. (Chỉ tập tin nhạc)
Thông tin bản nhạc
Hiển thị thông tin trên tập tin hiện tại.Chỉ tên tập tin và tên thư mục được hiển thị nếu không có thông tin thẻ.

USB
36
Các phím thao tác
• : Tìm kiếm bản nhạc/tập tin. Để biết chi tiết về thao tác tìm kiếm, xem phần Thao tác tìm kiếm (Tr.36).
•
Bluetooth Control
20
Playing the Bluetooth Audio Device
Most functions can be controlled from the source control screen.To select Bluetooth source, touch [Audio] icon on the source selection screen. (P.12)
Ñ Bluetooth basic operation
42
1
3
1 Information display
• Displays the current track information. • Connected device name.
2 Operation keys *
• [ ] : Searches for a file. See File search (P.21).
• [E] [F]: Searches for the previous/next content.Touch and hold to fast forward or fast backward.
• [D]: Plays.• [H]: Pauses.• [ ] : Repeats the current track/folder. Each
time you touch the key, repeat modes are switched in the following sequence:File repeat ( ), All songs repeat ( ), Repeat off ( )
• [ ] : Randomly plays all tracks in the current folder. Each time you touch the key, random modes are switched in the following sequence:All random ( ), Random off ( )
* These items appear only when the audio player which supports AVRCP profile is connected.
3 Playing time
For confirmation of current playing position.
4 [ ]
Bluetooth audio devices can be switched easily to play music. See Bluetooth Audio Device Change (P.21).
NOTE• The operation buttons, indications and
information displayed on the screen differ depending on the connected device.
• If the operation keys do not appear, operate from the player.
• Depending on your mobile phone or audio player, sound may be heard and controlled but text information may not appear.
• If the volume is too low, raise it on your mobile phone or audio player.
!KL19_AP_En.indb 20 2018/11/09 11:15:22
: Tìm kiếm bản nhạc/tập tin trước đó/tiếp theo. Chạm và giữ để tua đi hoặc tua lại.
• ►〓 : Phát hoặc tạm dừng.• : Lặp lại bản nhạc/thư mục hiện tại. Mỗi lần
bạn chạm vào phím, các chế độ lặp lại sẽ được chuyển theo trình tự sau: Lặp lại tập tin ( ), Lặp lại thư mục ( ), Lặp lại tất cả ( )
• : Phát ngẫu nhiên tất cả các bản nhạc trong thư mục hiện tại. Mỗi lần bạn chạm vào phím, các chế độ ngẫu nhiên sẽ được chuyển theo trình tự sau: Tập tin ngẫu nhiên ( ), Tắt ngẫu nhiên ( ) Bảng điều khiển phụ
Chạm vào bên trái màn hình để hiển thị bảng điều khiển chức năng. Chạm lại để đóng bảng điều khiển.
• : Tìm kiếm thư mục trước đó/tiếp theo. Thời gian phát
Để xác nhận vị trí phát hiện tại. Bạn có thể kéo vòng tròn sang trái hoặc phải để thay đổi vị trí phát.
USB
36
3 Operation keys
• [[ ] : Searches track/file. For details on search operation, see Search Operation (P.36).
• E] [F] : Searches the previous/next track/file.Touch and hold to fast forward or fast backward.
• [DH] : Plays or pauses.• [ ] : Repeats the current track/folder. Each
time you touch the key, repeat modes are switched in the following sequence:File repeat ( ), Folder repeat ( ), Repeat all ( )
• [ ] : Randomly plays all tracks in the current folder. Each time you touch the key, random modes are switched in the following sequence:File random ( ), Random off ( )
4 Sub-control panel
Touch the left side of the screen to display the function panel. Touch again to close the panel.
• [ ] [ ] : Searches for the previous/next folder.
5 Playing time
For confirmation of current playing position. You can drag the circle left or right to change the playing position.
6 [Hide] (Video file only)
Hides the control screen.
Video screen
7
7 Key display area (Video file only)
Touch to display the control screen.
Search Operation
You can search music or video files by the following operations.
1 Touch [ ] on the USB control screen.
2 Touch [S].
3 Select a list type.
NOTE• For operations on the list screen, see List screen
(P.14).
Ñ Category searchYou can search for a file by selecting a category.
1 Touch [Category List].
2 Select whether you search audio files or video files .
3 Touch the desired category.
hh The list corresponding to your selection appears.
4 Touch to select the desired item in the list. Repeat this step until you find the desired file.
!KL19_AP_En.indb 36 2018/11/09 11:15:30
6 Ẩn (Chỉ tập tin Video)
Ẩn màn hình điều khiển.
Màn hình Video
7
7 Vùng hiển thị phím (Chỉ tập tin Video)
Chạm để hiển thị màn hình điều khiển.
Thao tác tìm kiếm
Bạn có thể tìm kiếm tập tin nhạc hoặc video bằng các thao tác sau đây.
1 Chạm vào trên màn hình điều khiển USB.
2 Chạm vào ▼.
USB
36
3 Operation keys
• [[ ] : Searches track/file. For details on search operation, see Search Operation (P.36).
• E] [F] : Searches the previous/next track/file.Touch and hold to fast forward or fast backward.
• [DH] : Plays or pauses.• [ ] : Repeats the current track/folder. Each
time you touch the key, repeat modes are switched in the following sequence:File repeat ( ), Folder repeat ( ), Repeat all ( )
• [ ] : Randomly plays all tracks in the current folder. Each time you touch the key, random modes are switched in the following sequence:File random ( ), Random off ( )
4 Sub-control panel
Touch the left side of the screen to display the function panel. Touch again to close the panel.
• [ ] [ ] : Searches for the previous/next folder.
5 Playing time
For confirmation of current playing position. You can drag the circle left or right to change the playing position.
6 [Hide] (Video file only)
Hides the control screen.
Video screen
7
7 Key display area (Video file only)
Touch to display the control screen.
Search Operation
You can search music or video files by the following operations.
1 Touch [ ] on the USB control screen.
2 Touch [S].
3 Select a list type.
NOTE• For operations on the list screen, see List screen
(P.14).
Ñ Category searchYou can search for a file by selecting a category.
1 Touch [Category List].
2 Select whether you search audio files or video files .
3 Touch the desired category.
hh The list corresponding to your selection appears.
4 Touch to select the desired item in the list. Repeat this step until you find the desired file.
!KL19_AP_En.indb 36 2018/11/09 11:15:30
3 Chọn một loại danh sách.
USB
36
3 Operation keys
• [[ ] : Searches track/file. For details on search operation, see Search Operation (P.36).
• E] [F] : Searches the previous/next track/file.Touch and hold to fast forward or fast backward.
• [DH] : Plays or pauses.• [ ] : Repeats the current track/folder. Each
time you touch the key, repeat modes are switched in the following sequence:File repeat ( ), Folder repeat ( ), Repeat all ( )
• [ ] : Randomly plays all tracks in the current folder. Each time you touch the key, random modes are switched in the following sequence:File random ( ), Random off ( )
4 Sub-control panel
Touch the left side of the screen to display the function panel. Touch again to close the panel.
• [ ] [ ] : Searches for the previous/next folder.
5 Playing time
For confirmation of current playing position. You can drag the circle left or right to change the playing position.
6 [Hide] (Video file only)
Hides the control screen.
Video screen
7
7 Key display area (Video file only)
Touch to display the control screen.
Search Operation
You can search music or video files by the following operations.
1 Touch [ ] on the USB control screen.
2 Touch [S].
3 Select a list type.
NOTE• For operations on the list screen, see List screen
(P.14).
Ñ Category searchYou can search for a file by selecting a category.
1 Touch [Category List].
2 Select whether you search audio files or video files .
3 Touch the desired category.
hh The list corresponding to your selection appears.
4 Touch to select the desired item in the list. Repeat this step until you find the desired file.
!KL19_AP_En.indb 36 2018/11/09 11:15:30
LƯU Ý
• Để biết các thao tác trên màn hình danh sách, xem phần Màn hình danh sách (Tr.14) .
Tìm kiếm thể loạiBạn có thể tìm kiếm một tập tin bằng cách chọn một thể loại.
1 Chạm vào Category List (Danh sách thể loại).
2 Chọn xem bạn tìm kiếm tập tin âm thanh hay tập tin video .
3 Chạm vào thể loại mong muốn.
USB
36
3 Operation keys
• [[ ] : Searches track/file. For details on search operation, see Search Operation (P.36).
• E] [F] : Searches the previous/next track/file.Touch and hold to fast forward or fast backward.
• [DH] : Plays or pauses.• [ ] : Repeats the current track/folder. Each
time you touch the key, repeat modes are switched in the following sequence:File repeat ( ), Folder repeat ( ), Repeat all ( )
• [ ] : Randomly plays all tracks in the current folder. Each time you touch the key, random modes are switched in the following sequence:File random ( ), Random off ( )
4 Sub-control panel
Touch the left side of the screen to display the function panel. Touch again to close the panel.
• [ ] [ ] : Searches for the previous/next folder.
5 Playing time
For confirmation of current playing position. You can drag the circle left or right to change the playing position.
6 [Hide] (Video file only)
Hides the control screen.
Video screen
7
7 Key display area (Video file only)
Touch to display the control screen.
Search Operation
You can search music or video files by the following operations.
1 Touch [ ] on the USB control screen.
2 Touch [S].
3 Select a list type.
NOTE• For operations on the list screen, see List screen
(P.14).
Ñ Category searchYou can search for a file by selecting a category.
1 Touch [Category List].
2 Select whether you search audio files or video files .
3 Touch the desired category.
hh The list corresponding to your selection appears.
4 Touch to select the desired item in the list. Repeat this step until you find the desired file.
!KL19_AP_En.indb 36 2018/11/09 11:15:30
Danh sách tương ứng với lựa chọn của bạn xuất hiện.
4 Chạm để chọn mục mong muốn trong danh sách. Lặp lại bước này cho đến khi bạn tìm thấy tập tin mong muốn.

USB
37Tiếng Việt
Tìm kiếm thư mụcBạn có thể tìm kiếm một tập tin theo phân cấp.
1 Chạm vào Folder List (Danh sách thư mục).
2 Chạm vào thư mục mong muốn.
USB
37English
Ñ Folder searchYou can search for a file according to hierarchy.
1 Touch [Folder List].
2 Touch the desired folder.
When you touch a folder its contents are displayed.
3 Touch to select your desired item in the list. Repeat this step until you find the desired file.
!KL19_AP_En.indb 37 2018/11/09 11:15:30
Khi bạn chạm vào một thư mục nội dung của thư mục đó sẽ được hiển thị.
3 Chạm để chọn mục bạn muốn trong danh sách. Lặp lại bước này cho đến khi bạn tìm thấy tập tin mong muốn.

iPod/iPhone
38
iPod/iPhone
Chuẩn bị
iPod/iPhone có thể kết nốiCác model có cổng Lightning có thể được kết nối với thiết bị này.
CẢNH BÁO• Đảm bảo thật an toàn cho iPod khi lái xe.
Không để iPod rơi xuống sàn, tại đây iPod có thể bị kẹt dưới bàn đạp phanh hoặc chân ga.
THÔNG BÁO• Toyota không chịu trách nhiệm đối với dữ liệu
bị mất từ iPod, ngay cả khi dữ liệu đó bị mất trong khi sử dụng sản phẩm này. Vui lòng sao lưu dữ liệu iPod của bạn thường xuyên.
• Không để iPod dưới ánh sáng trực tiếp của mặt trời trong thời gian dài. Tiếp xúc trong thời gian dài với ánh sáng mặt trời trực tiếp có thể dẫn đến iPod bị trục trặc do nhiệt độ cao.
• Không để iPod ở bất kỳ vị trí nào có nhiệt độ cao.
LƯU Ý
• Khi bạn bật thiết bị này, iPod/iPhone sẽ được sạc qua thiết bị.
• Nếu bạn khởi động lại chế độ phát lại sau khi kết nối iPod, nhạc được phát bởi iPod sẽ được phát trước tiên.
Kết nối iPod/iPhone
1 Kết nối iPod/iPhone với cổng USB. (Tr.14)
2 Nhấn nút . Màn hình CHỦ xuất hiện.
3 Chạm vào .
4 Chạm vào iPod. (Tr.11)
⃝ Để ngắt kết nối iPod/iPhone được kết nối với cáp:
1 Tháo iPod/iPhone.

iPod/iPhone
39Tiếng Việt
Thao tác cơ bản với iPod/iPhone
iPod/iPhone
39English
iPod/iPhone Basic Operation
23
1
1 Track information
Displays the information on the current file.
2 Operation keys
• [ ] : Searches for a track/file. For details on search operation, see Search Operation (P.39).
• E] [F] : Searches for the previous/next track/file.Touch and hold to fast forward or fast backward.
• [DH] : Plays or pauses.• [ ] : Repeats the current track/album. Each
time you touch the key, repeat modes are switched in the following sequence:Song repeat ( ), All songs repeat ( ), Repeat off ( )
• [ ] : Randomly plays all tracks in the current album. Each time you touch the key, random modes are switched in the following sequence:Song random ( ), Random off ( )
3 Playing time
For confirmation of current playing position. You can drag the circle left or right to change the playing position.
Search Operation
You can search music files by the following operation.
NOTE• For operations on the list screen, see List screen
(P.14).
1 Touch [ ] on the iPod/iPhone control screen.
2 Touch the desired category.
hh The list corresponding to your selection appears.
3 Touch to select the desired item in the list. Repeat this step until you find the desired file.
!KL19_AP_En.indb 39 2018/11/09 11:15:31
Hiển thị thông tin
Hiển thị thông tin trên tập tin hiện tại. Các phím thao tác
• : Tìm kiếm một bản nhạc/tập tin. Để biết chi tiết về thao tác tìm kiếm, xem phần Thao tác tìm kiếm (Tr.39).
•
Bluetooth Control
20
Playing the Bluetooth Audio Device
Most functions can be controlled from the source control screen.To select Bluetooth source, touch [Audio] icon on the source selection screen. (P.12)
Ñ Bluetooth basic operation
42
1
3
1 Information display
• Displays the current track information. • Connected device name.
2 Operation keys *
• [ ] : Searches for a file. See File search (P.21).
• [E] [F]: Searches for the previous/next content.Touch and hold to fast forward or fast backward.
• [D]: Plays.• [H]: Pauses.• [ ] : Repeats the current track/folder. Each
time you touch the key, repeat modes are switched in the following sequence:File repeat ( ), All songs repeat ( ), Repeat off ( )
• [ ] : Randomly plays all tracks in the current folder. Each time you touch the key, random modes are switched in the following sequence:All random ( ), Random off ( )
* These items appear only when the audio player which supports AVRCP profile is connected.
3 Playing time
For confirmation of current playing position.
4 [ ]
Bluetooth audio devices can be switched easily to play music. See Bluetooth Audio Device Change (P.21).
NOTE• The operation buttons, indications and
information displayed on the screen differ depending on the connected device.
• If the operation keys do not appear, operate from the player.
• Depending on your mobile phone or audio player, sound may be heard and controlled but text information may not appear.
• If the volume is too low, raise it on your mobile phone or audio player.
!KL19_AP_En.indb 20 2018/11/09 11:15:22
: Tìm kiếm bản nhạc/tập tin trước đó/tiếp theo. Chạm và giữ để tua đi hoặc tua lại.
• ►〓 : Phát hoặc tạm dừng.• : Lặp lại bản nhạc/album hiện tại. Mỗi lần
bạn chạm vào phím, các chế độ lặp lại sẽ được chuyển theo trình tự sau: Lặp lại bài hát ( ), Lặp lại tất cả các bài hát ( ), Tắt lặp lại ( )
• : Phát ngẫu nhiên tất cả các bản nhạc trong album hiện tại. Mỗi lần bạn chạm vào phím, các chế độ ngẫu nhiên sẽ được chuyển theo trình tự sau: Bài hát ngẫu nhiên ( ), Tắt ngẫu nhiên ( ) Thời gian phát
Để xác nhận vị trí phát hiện tại. Bạn có thể kéo vòng tròn sang trái hoặc phải để thay đổi vị trí phát.
iPod/iPhone
39English
iPod/iPhone Basic Operation
23
1
1 Track information
Displays the information on the current file.
2 Operation keys
• [ ] : Searches for a track/file. For details on search operation, see Search Operation (P.39).
• E] [F] : Searches for the previous/next track/file.Touch and hold to fast forward or fast backward.
• [DH] : Plays or pauses.• [ ] : Repeats the current track/album. Each
time you touch the key, repeat modes are switched in the following sequence:Song repeat ( ), All songs repeat ( ), Repeat off ( )
• [ ] : Randomly plays all tracks in the current album. Each time you touch the key, random modes are switched in the following sequence:Song random ( ), Random off ( )
3 Playing time
For confirmation of current playing position. You can drag the circle left or right to change the playing position.
Search Operation
You can search music files by the following operation.
NOTE• For operations on the list screen, see List screen
(P.14).
1 Touch [ ] on the iPod/iPhone control screen.
2 Touch the desired category.
hh The list corresponding to your selection appears.
3 Touch to select the desired item in the list. Repeat this step until you find the desired file.
!KL19_AP_En.indb 39 2018/11/09 11:15:31
Thao tác tìm kiếm
Bạn có thể tìm kiếm tập tin nhạc bằng thao tác sau đây.
LƯU Ý
• Để biết các thao tác trên màn hình danh sách, xem phần Màn hình danh sách (Tr.14) .
1 Chạm vào trên màn hình điều khiển iPod/iPhone.
2 Chạm vào thể loại mong muốn.
iPod/iPhone
39English
iPod/iPhone Basic Operation
23
1
1 Track information
Displays the information on the current file.
2 Operation keys
• [ ] : Searches for a track/file. For details on search operation, see Search Operation (P.39).
• E] [F] : Searches for the previous/next track/file.Touch and hold to fast forward or fast backward.
• [DH] : Plays or pauses.• [ ] : Repeats the current track/album. Each
time you touch the key, repeat modes are switched in the following sequence:Song repeat ( ), All songs repeat ( ), Repeat off ( )
• [ ] : Randomly plays all tracks in the current album. Each time you touch the key, random modes are switched in the following sequence:Song random ( ), Random off ( )
3 Playing time
For confirmation of current playing position. You can drag the circle left or right to change the playing position.
Search Operation
You can search music files by the following operation.
NOTE• For operations on the list screen, see List screen
(P.14).
1 Touch [ ] on the iPod/iPhone control screen.
2 Touch the desired category.
hh The list corresponding to your selection appears.
3 Touch to select the desired item in the list. Repeat this step until you find the desired file.
!KL19_AP_En.indb 39 2018/11/09 11:15:31
Danh sách tương ứng với lựa chọn của bạn xuất hiện.
3 Chạm để chọn mục mong muốn trong danh sách. Lặp lại bước này cho đến khi bạn tìm thấy tập tin mong muốn.

Radio
40
Radio
Thao tác radio cơ bản
Hầu hết các chức năng có thể được điều khiển từ màn hình điều khiển nguồn.Để nhập nguồn Radio, chạm vào biểu tượng Radio trong màn hình chọn nguồn. (Tr.12)
Model tương thích RDS
Radio
40
Radio
Radio Basic Operation
Most functions can be controlled from the source control screen.To enter Radio source, touch [Radio] icon in the source selection screen. (P.12)
RDS-compatible model
1
23
4 5 6
Non-RDS-compatible model
1
2
5
1 Information display
Displays the information of the current station: FrequencyTouching this area allows you to switch the displaying RDS information. (RDS-compatible model only)Type A: PS name, Radio Text/Song Name, Artist Name, PTYType B: PS name
2 Preset keys
Recalls the memorized station. When touched for 2 seconds, stores the current receiving station in memory.
3 [PTY] (FM only)*
Searches a program by setting program type. For details, see Search by program type (P.41).
4 [TI] (FM only)*
Sets the traffic information mode on. For details, see To activate TI Standby Reception (P.42).
5 Operation keys
• [E] [F] : Switches to the previous/next frequency manually.Touch and hold to tunes in a station with good reception automatically.
• [BAND]: Switches the band (FM1/ FM2, AM).• [MONO](FM only) : Switches the FM stereo
broadcast to in monaural reception. This is effective to reduce the noise.
• [AUTO.P]: Presets stations automatically. For details, see Auto preset memory (P.41).
• [LOCAL.S](FM only) : Receives only the stations with good reception.
6 [ ] (FM only)*
[Displays the Radio Setup screen. For details, see Radio Setup (P.43).
* RDS-compatible model only
!KL19_AP_En.indb 40 2018/11/09 11:15:31
Model không tương thích RDS
Radio
40
Radio
Radio Basic Operation
Most functions can be controlled from the source control screen.To enter Radio source, touch [Radio] icon in the source selection screen. (P.12)
RDS-compatible model
1
23
4 5 6
Non-RDS-compatible model
1
2
5
1 Information display
Displays the information of the current station: FrequencyTouching this area allows you to switch the displaying RDS information. (RDS-compatible model only)Type A: PS name, Radio Text/Song Name, Artist Name, PTYType B: PS name
2 Preset keys
Recalls the memorized station. When touched for 2 seconds, stores the current receiving station in memory.
3 [PTY] (FM only)*
Searches a program by setting program type. For details, see Search by program type (P.41).
4 [TI] (FM only)*
Sets the traffic information mode on. For details, see To activate TI Standby Reception (P.42).
5 Operation keys
• [E] [F] : Switches to the previous/next frequency manually.Touch and hold to tunes in a station with good reception automatically.
• [BAND]: Switches the band (FM1/ FM2, AM).• [MONO](FM only) : Switches the FM stereo
broadcast to in monaural reception. This is effective to reduce the noise.
• [AUTO.P]: Presets stations automatically. For details, see Auto preset memory (P.41).
• [LOCAL.S](FM only) : Receives only the stations with good reception.
6 [ ] (FM only)*
[Displays the Radio Setup screen. For details, see Radio Setup (P.43).
* RDS-compatible model only
!KL19_AP_En.indb 40 2018/11/09 11:15:31
Hiển thị thông tin
Hiển thị thông tin của trạm hiện tại: Tần sốChạm vào vùng này cho phép bạn chuyển đổi thông tin RDS hiển thị. (Chỉ dành cho model tương thích RDS)Loại A: Tên PS, Văn bản Radio/Tên bài hát, Tên nghệ sĩ, PTYLoại B: Tên PS
Các phím cài sẵn
Nhớ lại các trạm ghi nhớ.Khi được chạm trong vòng 2 giây, lưu trạm nhận hiện tại trong bộ nhớ.
PTY (Chỉ FM)*
Tìm kiếm một chương trình bằng cách thiết lập loại chương trình. Để biết thêm chi tiết, xem Tìm kiếm theo tên chương trình (Tr.41).
TI (Chỉ FM)*
Đặt chế độ thông tin giao thông bật. Để biết thêm chi tiết, xem Để kích hoạt Nhận chế độ chờ TI (Tr.42).
Các phím thao tác
•
Bluetooth Control
20
Playing the Bluetooth Audio Device
Most functions can be controlled from the source control screen.To select Bluetooth source, touch [Audio] icon on the source selection screen. (P.12)
Ñ Bluetooth basic operation
42
1
3
1 Information display
• Displays the current track information. • Connected device name.
2 Operation keys *
• [ ] : Searches for a file. See File search (P.21).
• [E] [F]: Searches for the previous/next content.Touch and hold to fast forward or fast backward.
• [D]: Plays.• [H]: Pauses.• [ ] : Repeats the current track/folder. Each
time you touch the key, repeat modes are switched in the following sequence:File repeat ( ), All songs repeat ( ), Repeat off ( )
• [ ] : Randomly plays all tracks in the current folder. Each time you touch the key, random modes are switched in the following sequence:All random ( ), Random off ( )
* These items appear only when the audio player which supports AVRCP profile is connected.
3 Playing time
For confirmation of current playing position.
4 [ ]
Bluetooth audio devices can be switched easily to play music. See Bluetooth Audio Device Change (P.21).
NOTE• The operation buttons, indications and
information displayed on the screen differ depending on the connected device.
• If the operation keys do not appear, operate from the player.
• Depending on your mobile phone or audio player, sound may be heard and controlled but text information may not appear.
• If the volume is too low, raise it on your mobile phone or audio player.
!KL19_AP_En.indb 20 2018/11/09 11:15:22
: Chuyển sang tần số trước đó/tiếp theo theo cách thủ công. Chạm và giữ để điều chỉnh giai điệu trong một trạm với khả năng thu sóng tốt tự động.
• BAND (DẢI ÂM TẦN): Chuyển dải âm tần (FM1/ FM2, AM).
• MONO (ĐƠN KÊNH) (Chỉ FM): Chuyển đổi phát sóng âm thanh nổi FM sang tiếp nhận đơn âm. Thao tác này có tác dụng để giảm tiếng ồn.
• AUTO.P (CÀI ĐẶT TRƯỚC TỰ ĐỘNG): Đặt trước các trạm tự động. Để biết thêm chi tiết, xem Bộ nhớ cài sẵn tự động (Tr.41).
• LOCAL.S (TRẠM ĐỊA PHƯƠNG) (Chỉ FM) : Chỉ nhận các trạm có khả năng thu sóng tốt.
6 (Chỉ FM)*
Hiển thị màn hình Cài đặt Radio. Để biết thêm chi tiết, xem Cài đặt Radio (Tr.43).
* Chỉ model tương thích RDS

Radio
41Tiếng Việt
Thao tác bộ nhớ
Bộ nhớ cài sẵn tự độngBạn có thể lưu các trạm trong bộ nhớ tự động.
1 Chạm vào AUTO.P (CÀI ĐẶT TRƯỚC TỰ ĐỘNG).
Radio
41English
Memory Operation
Ñ Auto preset memoryYou can store stations in memory automatically.
1 Touch [AUTO.P].
2 Touch [Yes].
hh Auto preset memory starts.
NOTE• For RDS-compatible model, the stations in which
the auto preset memory function tunes are limited depending on the settings.
– When the AF function is set to "AF" or "AF Regional" in Radio Setup screen and the traffic information mode is set to off, only the Radio Data System stations are stored.
– When the traffic information mode is set to on, only the Radio Data System stations that include the TI information are stored.
Ñ Manual memoryYou can store the current receiving station in memory.
1 Select a station you wish to store in memory.
2 Touch [P#] (#:1-6) in which you want to store the station for 2 seconds until a beep sounds.
Selecting Operation
Ñ Preset selectYou can select memorized station.
1 Touch desired preset station.
Ñ Search by program type (FM only) (RDS-compatible model only)
You can tune to a station with a specific program type when listening to FM.
1 Touch [PTY].
hh PTY Search screen appears.
2 Select a program type from the list.
3 Touch [Search].
You can search a station of the selected program type.
!KL19_AP_En.indb 41 2018/11/09 11:15:31
2 Chạm vào Yes (Có).
Radio
41English
Memory Operation
Ñ Auto preset memoryYou can store stations in memory automatically.
1 Touch [AUTO.P].
2 Touch [Yes].
hh Auto preset memory starts.
NOTE• For RDS-compatible model, the stations in which
the auto preset memory function tunes are limited depending on the settings.
– When the AF function is set to "AF" or "AF Regional" in Radio Setup screen and the traffic information mode is set to off, only the Radio Data System stations are stored.
– When the traffic information mode is set to on, only the Radio Data System stations that include the TI information are stored.
Ñ Manual memoryYou can store the current receiving station in memory.
1 Select a station you wish to store in memory.
2 Touch [P#] (#:1-6) in which you want to store the station for 2 seconds until a beep sounds.
Selecting Operation
Ñ Preset selectYou can select memorized station.
1 Touch desired preset station.
Ñ Search by program type (FM only) (RDS-compatible model only)
You can tune to a station with a specific program type when listening to FM.
1 Touch [PTY].
hh PTY Search screen appears.
2 Select a program type from the list.
3 Touch [Search].
You can search a station of the selected program type.
!KL19_AP_En.indb 41 2018/11/09 11:15:31
Bộ nhớ cài sẵn tự động bắt đầu.
LƯU Ý
• Đối với model tương thích RDS, các trạm trong đó các giai điệu chức năng bộ nhớ cài sẵn tự động bị giới hạn tùy thuộc vào cài đặt.– Khi chức năng AF được đặt thành “AF” hoặc
“Vùng AF” trong màn hình Cài đặt radio và chế độ thông tin giao thông được đặt thành tắt, chỉ các trạm Hệ thống dữ liệu radio được lưu trữ.
– Khi chế độ thông tin giao thông được đặt thành bật, chỉ các trạm Hệ thống dữ liệu radio bao gồm thông tin TI được lưu trữ.
Bộ nhớ thủ côngBạn có thể lưu trữ trạm nhận hiện tại trong bộ nhớ.
1 Chọn một trạm bạn muốn lưu trữ trong bộ nhớ.
2 Chạm vào số P# (#số: 1-6) trong đó bạn muốn lưu trữ trạm trong 2 giây cho đến khi có tiếng bíp.
Thao tác chọn
Chọn cài sẵnBạn có thể chọn trạm ghi nhớ.
1 Chạm vào trạm cài sẵn mong muốn.
Radio
41English
Memory Operation
Ñ Auto preset memoryYou can store stations in memory automatically.
1 Touch [AUTO.P].
2 Touch [Yes].
hh Auto preset memory starts.
NOTE• For RDS-compatible model, the stations in which
the auto preset memory function tunes are limited depending on the settings.
– When the AF function is set to "AF" or "AF Regional" in Radio Setup screen and the traffic information mode is set to off, only the Radio Data System stations are stored.
– When the traffic information mode is set to on, only the Radio Data System stations that include the TI information are stored.
Ñ Manual memoryYou can store the current receiving station in memory.
1 Select a station you wish to store in memory.
2 Touch [P#] (#:1-6) in which you want to store the station for 2 seconds until a beep sounds.
Selecting Operation
Ñ Preset selectYou can select memorized station.
1 Touch desired preset station.
Ñ Search by program type (FM only) (RDS-compatible model only)
You can tune to a station with a specific program type when listening to FM.
1 Touch [PTY].
hh PTY Search screen appears.
2 Select a program type from the list.
3 Touch [Search].
You can search a station of the selected program type.
!KL19_AP_En.indb 41 2018/11/09 11:15:31
Tìm kiếm theo loại chương trình (chỉ dành cho FM) (chỉ dành cho model tương thích RDS)
Bạn có thể điều chỉnh đến một trạm phát có loại chương trình cụ thể khi nghe FM.
1 Chạm vào PTY .
Radio
41English
Memory Operation
Ñ Auto preset memoryYou can store stations in memory automatically.
1 Touch [AUTO.P].
2 Touch [Yes].
hh Auto preset memory starts.
NOTE• For RDS-compatible model, the stations in which
the auto preset memory function tunes are limited depending on the settings.
– When the AF function is set to "AF" or "AF Regional" in Radio Setup screen and the traffic information mode is set to off, only the Radio Data System stations are stored.
– When the traffic information mode is set to on, only the Radio Data System stations that include the TI information are stored.
Ñ Manual memoryYou can store the current receiving station in memory.
1 Select a station you wish to store in memory.
2 Touch [P#] (#:1-6) in which you want to store the station for 2 seconds until a beep sounds.
Selecting Operation
Ñ Preset selectYou can select memorized station.
1 Touch desired preset station.
Ñ Search by program type (FM only) (RDS-compatible model only)
You can tune to a station with a specific program type when listening to FM.
1 Touch [PTY].
hh PTY Search screen appears.
2 Select a program type from the list.
3 Touch [Search].
You can search a station of the selected program type.
!KL19_AP_En.indb 41 2018/11/09 11:15:31
Màn hình Tìm kiếm PTY xuất hiện.
2 Chọn một loại chương trình từ danh sách.
3 Chạm vào Search (Tìm kiếm).
Radio
41English
Memory Operation
Ñ Auto preset memoryYou can store stations in memory automatically.
1 Touch [AUTO.P].
2 Touch [Yes].
hh Auto preset memory starts.
NOTE• For RDS-compatible model, the stations in which
the auto preset memory function tunes are limited depending on the settings.
– When the AF function is set to "AF" or "AF Regional" in Radio Setup screen and the traffic information mode is set to off, only the Radio Data System stations are stored.
– When the traffic information mode is set to on, only the Radio Data System stations that include the TI information are stored.
Ñ Manual memoryYou can store the current receiving station in memory.
1 Select a station you wish to store in memory.
2 Touch [P#] (#:1-6) in which you want to store the station for 2 seconds until a beep sounds.
Selecting Operation
Ñ Preset selectYou can select memorized station.
1 Touch desired preset station.
Ñ Search by program type (FM only) (RDS-compatible model only)
You can tune to a station with a specific program type when listening to FM.
1 Touch [PTY].
hh PTY Search screen appears.
2 Select a program type from the list.
3 Touch [Search].
You can search a station of the selected program type.
!KL19_AP_En.indb 41 2018/11/09 11:15:31
Bạn có thể tìm kiếm một trạm của loại chương trình đã chọn.

Radio
42
Tin tức mới nhất và Thông tin giao thông (chỉ dành cho FM) (model tương thích với RDS)
Bạn có thể nghe và xem thông tin giao thông, tin tức và bản tin báo động tự động khi những bản tin này bắt đầu. Sau khi thông báo hoàn tất, radio sẽ quay lại trạm ban đầu.
Radio
42
Breaking News and Traffic Information (FM only) (RDS-compatible model)
You can listen and watch the traffic information, news, and alarm bulletin automatically when these bulletin starts. Once the bulletin is complete, the radio will return to its original station.
1
2
1 Information text
Displays the Traffic Information, News, and Alarm message.
2 [OFF] (Traffic Information/ News only)
Traffic Information: Sets the Traffic Information function off and return to the original screen.
News: Sets the news bulletin interruption function off and return to the original screen.
NOTE• It is necessary to have the Traffic Information
function set to on in order to have the Traffic Information screen appear automatically. (P.42)
• It is necessary to have the news bulletin interruption function set to on in order to have the News screen appear automatically. (P.43)
• The volume setting during reception of traffic information is automatically stored. The next time the traffic information/news/alarm bulletin is received, this unit recalls the volume setting automatically.
Ñ To activate TI Standby Reception
1 Touch [BAND] to switch to FM band.
2 Touch [TI].
hh Traffic information mode is set.
!KL19_AP_En.indb 42 2018/11/09 11:15:32
Văn bản thông tin
Hiển thị thông tin giao thông, tin tức và thông báo báo động.
TẮT (Chỉ đối với Thông tin/Tin tức giao thông)
Thông tin giao thông: Đặt chức năng Thông tin giao thông tắt và trở về màn hình ban đầu.
Tin tức: Đặt chức năng gián đoạn bản tin tắt và trở về màn hình ban đầu.
LƯU Ý
• Cần phải bật chức năng Thông tin giao thông để màn hình Thông tin giao thông tự động xuất hiện. (Tr.42)
• Cần phải bật chức năng gián đoạn bản tin bật để màn hình Tin tức tự động xuất hiện. (Tr.43)
• Cài đặt âm lượng trong khi nhận thông tin giao thông được lưu trữ tự động. Lần tiếp theo nhận được thông tin giao thông/tin tức/báo động, thiết bị này sẽ tự động gợi lại cài đặt âm lượng.
Để kích hoạt Nhận chế độ chờ TI
1 Chạm vào BAND (DẢI ÂM TẦN) để chuyển sang băng tần FM.
Radio
42
Breaking News and Traffic Information (FM only) (RDS-compatible model)
You can listen and watch the traffic information, news, and alarm bulletin automatically when these bulletin starts. Once the bulletin is complete, the radio will return to its original station.
1
2
1 Information text
Displays the Traffic Information, News, and Alarm message.
2 [OFF] (Traffic Information/ News only)
Traffic Information: Sets the Traffic Information function off and return to the original screen.
News: Sets the news bulletin interruption function off and return to the original screen.
NOTE• It is necessary to have the Traffic Information
function set to on in order to have the Traffic Information screen appear automatically. (P.42)
• It is necessary to have the news bulletin interruption function set to on in order to have the News screen appear automatically. (P.43)
• The volume setting during reception of traffic information is automatically stored. The next time the traffic information/news/alarm bulletin is received, this unit recalls the volume setting automatically.
Ñ To activate TI Standby Reception
1 Touch [BAND] to switch to FM band.
2 Touch [TI].
hh Traffic information mode is set.
!KL19_AP_En.indb 42 2018/11/09 11:15:32
2 Chạm vào TI .
Radio
42
Breaking News and Traffic Information (FM only) (RDS-compatible model)
You can listen and watch the traffic information, news, and alarm bulletin automatically when these bulletin starts. Once the bulletin is complete, the radio will return to its original station.
1
2
1 Information text
Displays the Traffic Information, News, and Alarm message.
2 [OFF] (Traffic Information/ News only)
Traffic Information: Sets the Traffic Information function off and return to the original screen.
News: Sets the news bulletin interruption function off and return to the original screen.
NOTE• It is necessary to have the Traffic Information
function set to on in order to have the Traffic Information screen appear automatically. (P.42)
• It is necessary to have the news bulletin interruption function set to on in order to have the News screen appear automatically. (P.43)
• The volume setting during reception of traffic information is automatically stored. The next time the traffic information/news/alarm bulletin is received, this unit recalls the volume setting automatically.
Ñ To activate TI Standby Reception
1 Touch [BAND] to switch to FM band.
2 Touch [TI].
hh Traffic information mode is set.
!KL19_AP_En.indb 42 2018/11/09 11:15:32
Chế độ thông tin giao thông được đặt.

Radio
43Tiếng Việt
Cài đặt radio (chỉ dành cho FM) (model tương thích RDS)
Bạn có thể đặt các thông số liên quan đến radio.
1 Chạm vào Band (Dải âm tần)để chuyển sang băng tần FM.
2 Chạm vào .
Radio
43English
Radio Setup (FM only) (RDS-compatible model)
You can set radio related parameters.
1 Touch [Band] to switch to FM band.
2 Touch [ ].
hh Radio Setup screen appears.
3 Set each item as follows.
■ [News]Sets a news bulletin interrupt time. Default is “OFF”.
■ [AF Search][AF]: When station reception is poor,
automatically switches to the station that is broadcasting the same program over the same Radio Data System network.
[AF Regional]: Limits the station to only in the specific region while using the “AF” control.
[OFF] (Default): Cancels this function.
■ [Auto TP Seek]When traffic information station reception is poor, automatically searches for a station that can be received better. Default is “ON”.
■ [[PTY Language]Selects a display language for the PTY function.
■ [Antenna Control]Allows you to turn off the Radio Data System function to prevent the motor-driven antenna from extending. Default is “ON”.
!KL19_AP_En.indb 43 2018/11/09 11:15:32
Màn hình Cài đặt Radio xuất hiện.
3 Đặt từng mục như sau.
Radio
43English
Radio Setup (FM only) (RDS-compatible model)
You can set radio related parameters.
1 Touch [Band] to switch to FM band.
2 Touch [ ].
hh Radio Setup screen appears.
3 Set each item as follows.
■ [News]Sets a news bulletin interrupt time. Default is “OFF”.
■ [AF Search][AF]: When station reception is poor,
automatically switches to the station that is broadcasting the same program over the same Radio Data System network.
[AF Regional]: Limits the station to only in the specific region while using the “AF” control.
[OFF] (Default): Cancels this function.
■ [Auto TP Seek]When traffic information station reception is poor, automatically searches for a station that can be received better. Default is “ON”.
■ [[PTY Language]Selects a display language for the PTY function.
■ [Antenna Control]Allows you to turn off the Radio Data System function to prevent the motor-driven antenna from extending. Default is “ON”.
!KL19_AP_En.indb 43 2018/11/09 11:15:32
■ News (Tin tức)Đặt một thời gian gián đoạn bản tin. Mặc định là “TẮT”.■ AF Search (Tìm kiếm AF)AF: Khi khả năng thu sóng của trạm kém, tự
động chuyển sang trạm đang phát cùng một chương trình trên cùng một mạng Hệ thống dữ liệu radio.
AF Regional (Khu vực AF): Giới hạn trạm chỉ trong khu vực cụ thể khi sử dụng điều khiển “AF”.
OFF (TẮT) (Mặc định): Hủy bỏ chức năng này.■ Auto TP Seek (Tìm kiếm TP tự động)Khi khả năng thu sóng của trạm thông tin giao thông kém, tự động tìm kiếm một trạm có thể thu sóng tốt hơn. Mặc định là “BẬT”.■ PTY Language (Ngôn ngữ PTY)Chọn ngôn ngữ hiển thị cho chức năng PTY.
■ Antenna Control (Điều khiển ăng-ten)Cho phép bạn tắt chức năng Hệ thống dữ liệu radio để tránh tình trạng ăng-ten điều khiển bằng động cơ mở rộng. Mặc định là “BẬT”.

Các thiết bị ngoại vi khác
44
Các thiết bị ngoại vi khác
Trình phát âm thanh ngoài (AUX)
1 Kết nối một thiết bị ngoại vi với cổng cắm AUX. (Tr.15)
2 Chọn [AUX] làm nguồn. (Tr.12)
3 Bật thiết bị được kết nối và bắt đầu phát nguồn.
Sử dụng camera lùi
Nếu bạn thêm camera lùi, vui lòng tham khảo các cài đặt bên dưới.
Cài đặt Camera
1 Nhấn vào nút [ ]. Menu bật lên xuất hiện.
2 Chạm vào [ ]. Màn hình hệ thống xuất hiện.
3 Chạm vào [Camera].
44
!KL19_AP_En.indb 44 2018/11/09 11:15:33
Other External Components
Other External Components
Using the back cameraExternal audio players (AUX)
1 Connect an external component to the AUX input terminal. (P.15)
2 Select [AUX] as the source. (P.12)
3 Turn on the connected component and start playing the source.
Camera Setup
1 Press [ ] button.Popup menu appears.
2 Touch [ ].System screen appears.
3 Touch [Camera].
Camera screen appears.
4 Set item as follows.
[Camera Connection]Set whether to use the rear view camera.
OFF
If you add back camera, please refer the below settings.
Màn hình camera xuất hiện.
4 Đặt mục như sau.
44
!KL19_AP_En.indb 44 2018/11/09 11:15:33
Other External Components
Other External Components
Using the back cameraExternal audio players (AUX)
1 Connect an external component to the AUX input terminal. (P.15)
2 Select [AUX] as the source. (P.12)
3 Turn on the connected component and start playing the source.
Camera Setup
1 Press [ ] button.Popup menu appears.
2 Touch [ ].System screen appears.
3 Touch [Camera].
Camera screen appears.
4 Set item as follows.
[Camera Connection]Set whether to use the rear view camera.
OFF
If you add back camera, please refer the below settings.
■ [Camera Connection] (Kết nối camera)Đặt có sử dụng camera quan sát phía sau không.

Cài đặt
45Tiếng Việt
Cài đặt
Điều chỉnh màn hình hiển thị
1 Nhấn nút . Menu bật lên xuất hiện.
2 Chạm vào .
Setup
45English
Setup
Display Adjust
1 Press [ ] button.hh Popup menu appears.
2 Touch [ ].
hh Display control screen appears.
3 Adjust each setting as follows.
■ [ ]
If it is hard to see the image on the screen evenly, adjust the viewing angle. The smaller the (negative) value, the more whitish the image on the screen looks."0" (Default)/ "1"/ "2"/ "3"
■ [ ]
Adjust the backlight. ("-4" to "4")
Picture Adjust
You can adjust the image quality of video, menu screen, etc.
1 Press [ ] button.hh Popup menu appears.
2 Touch [ ].
hh Picture control screen appears.
3 Adjust each setting as follows.
■ [ ] [ ] [ ]
Adjust each setting.
■ [ ] (Camera only)Adjust the tint. ("-4" to "4")
■ [ ] (Video file only)Select a screen mode.[Full]: Displays video at the ratio of 16:9.[Normal]: Displays video at the ratio of 4:3.[Auto]:
DVD and Video-CD: 16:9 video is displayed in the Full mode and 4:3 video is displayed in the Normal mode. USB device and disc media: Displays video fully (vertically or horizontally) with no ratio change.
NOTE• Settings to adjust vary depending on the current
source.
!KL19_AP_En.indb 45 2018/11/09 11:15:33
Màn hình điều khiển hiển thị xuất hiện.
3 Điều chỉnh từng cài đặt như sau.
Setup
45English
Setup
Display Adjust
1 Press [ ] button.hh Popup menu appears.
2 Touch [ ].
hh Display control screen appears.
3 Adjust each setting as follows.
■ [ ]
If it is hard to see the image on the screen evenly, adjust the viewing angle. The smaller the (negative) value, the more whitish the image on the screen looks."0" (Default)/ "1"/ "2"/ "3"
■ [ ]
Adjust the backlight. ("-4" to "4")
Picture Adjust
You can adjust the image quality of video, menu screen, etc.
1 Press [ ] button.hh Popup menu appears.
2 Touch [ ].
hh Picture control screen appears.
3 Adjust each setting as follows.
■ [ ] [ ] [ ]
Adjust each setting.
■ [ ] (Camera only)Adjust the tint. ("-4" to "4")
■ [ ] (Video file only)Select a screen mode.[Full]: Displays video at the ratio of 16:9.[Normal]: Displays video at the ratio of 4:3.[Auto]:
DVD and Video-CD: 16:9 video is displayed in the Full mode and 4:3 video is displayed in the Normal mode. USB device and disc media: Displays video fully (vertically or horizontally) with no ratio change.
NOTE• Settings to adjust vary depending on the current
source.
!KL19_AP_En.indb 45 2018/11/09 11:15:33
■ Nếu khó nhìn rõ hình ảnh trên màn hình, hãy điều chỉnh góc nhìn. Giá trị (âm) càng nhỏ, hình ảnh trên màn hình càng trắng.“0”(Mặc định/ “1”/ “2”/ “3”■ Điều chỉnh đèn nền. (“-4” đến “4”)
Điều chỉnh hình ảnh
Bạn có thể điều chỉnh chất lượng hình ảnh của video, màn hình menu, v.v.
1 Nhấn nút .Menu bật lên xuất hiện.
2 Chạm vào .
Setup
45English
Setup
Display Adjust
1 Press [ ] button.hh Popup menu appears.
2 Touch [ ].
hh Display control screen appears.
3 Adjust each setting as follows.
■ [ ]
If it is hard to see the image on the screen evenly, adjust the viewing angle. The smaller the (negative) value, the more whitish the image on the screen looks."0" (Default)/ "1"/ "2"/ "3"
■ [ ]
Adjust the backlight. ("-4" to "4")
Picture Adjust
You can adjust the image quality of video, menu screen, etc.
1 Press [ ] button.hh Popup menu appears.
2 Touch [ ].
hh Picture control screen appears.
3 Adjust each setting as follows.
■ [ ] [ ] [ ]
Adjust each setting.
■ [ ] (Camera only)Adjust the tint. ("-4" to "4")
■ [ ] (Video file only)Select a screen mode.[Full]: Displays video at the ratio of 16:9.[Normal]: Displays video at the ratio of 4:3.[Auto]:
DVD and Video-CD: 16:9 video is displayed in the Full mode and 4:3 video is displayed in the Normal mode. USB device and disc media: Displays video fully (vertically or horizontally) with no ratio change.
NOTE• Settings to adjust vary depending on the current
source.
!KL19_AP_En.indb 45 2018/11/09 11:15:33
Màn hình điều khiển hiển thị xuất hiện.
3 Điều chỉnh từng cài đặt như sau.
Setup
45English
Setup
Display Adjust
1 Press [ ] button.hh Popup menu appears.
2 Touch [ ].
hh Display control screen appears.
3 Adjust each setting as follows.
■ [ ]
If it is hard to see the image on the screen evenly, adjust the viewing angle. The smaller the (negative) value, the more whitish the image on the screen looks."0" (Default)/ "1"/ "2"/ "3"
■ [ ]
Adjust the backlight. ("-4" to "4")
Picture Adjust
You can adjust the image quality of video, menu screen, etc.
1 Press [ ] button.hh Popup menu appears.
2 Touch [ ].
hh Picture control screen appears.
3 Adjust each setting as follows.
■ [ ] [ ] [ ]
Adjust each setting.
■ [ ] (Camera only)Adjust the tint. ("-4" to "4")
■ [ ] (Video file only)Select a screen mode.[Full]: Displays video at the ratio of 16:9.[Normal]: Displays video at the ratio of 4:3.[Auto]:
DVD and Video-CD: 16:9 video is displayed in the Full mode and 4:3 video is displayed in the Normal mode. USB device and disc media: Displays video fully (vertically or horizontally) with no ratio change.
NOTE• Settings to adjust vary depending on the current
source.
!KL19_AP_En.indb 45 2018/11/09 11:15:33
■ Điều chỉnh từng cài đặt.■ (Chỉ dành cho camera)Điều chỉnh tông màu. (“-4” đến “4”)■ (Chỉ dùng cho tập tin video)Chọn chế độ màn hình.Full (toàn màn hình): Hiển thị video theo tỷ lệ 16:9. Normal (Bình thường): Hiển thị video theo tỷ lệ 4:3. Auto (Tự động):
DVD và Video-CD: Video 16:9 được hiển thị ở chế độ Toàn màn hình và video 4:3 được hiển thị ở chế độ Bình thường.Thiết bị USB và phương tiện đĩa: Hiển thị video đầy đủ (theo chiều dọc hoặc chiều ngang) mà không thay đổi tỷ lệ.
LƯU Ý
• Cài đặt để điều chỉnh khác nhau tùy thuộc vào nguồn hiện tại.

Cài đặt
46
Thiết lập hệ thống
1 Nhấn vào nút . Menu bật lên xuất hiện.
2 Chạm vào .
Setup
46
System Setup
1 Press [ ] button.hh Popup menu appears.
2 Touch[ ].
See the following section for each setting.
• General systems (P.46)• Regional systems (P.8)• Connectivity systems (P.18)• User interface systems (P.47)• Dual Zone systems (P.49)• Camera systems (P.44)
General SystemsYou can confirm the information of this unit.
1 Press [ ] button.hh Popup menu appears.
2 Touch [ ].hh System screen appears.
3 Touch [General].
hh General screen appears.
4 Set each parameter as follows.
■ [Software Information]Confirm the software version of this unit. (P.46)
■ [Open Source Licenses]Display the open source licenses.
■ [Restore Factory Default]Touch [Restore Factory Default] and then touch [Yes] to set all the settings to the initial default settings.
Ñ Software InformationYou can confirm the software version of this unit.
1 Touch [Software Information] in the General screen.
2 Confirm the software version.
!KL19_AP_En.indb 46 2018/11/09 11:15:34
Xem phần sau đây cho mỗi cài đặt.• Hệ thống chung (Tr.46)• Hệ thống khu vực (Tr.8)• Hệ thống kết nối (Tr.18)• Hệ thống giao diện người dùng (Tr.47)• Hệ thống Vùng kép (Tr.49)• Hệ thống Camera (Tr.44)
Hệ thống chung
Bạn có thể xác nhận thông tin của thiết bị này.
1 Nhấn vào nút . Menu bật lên xuất hiện.
2 Chạm vào . Màn hình hệ thống xuất hiện.
3 Chạm vào General (Chung).
Setup
46
System Setup
1 Press [ ] button.hh Popup menu appears.
2 Touch[ ].
See the following section for each setting.
• General systems (P.46)• Regional systems (P.8)• Connectivity systems (P.18)• User interface systems (P.47)• Dual Zone systems (P.49)• Camera systems (P.44)
General SystemsYou can confirm the information of this unit.
1 Press [ ] button.hh Popup menu appears.
2 Touch [ ].hh System screen appears.
3 Touch [General].
hh General screen appears.
4 Set each parameter as follows.
■ [Software Information]Confirm the software version of this unit. (P.46)
■ [Open Source Licenses]Display the open source licenses.
■ [Restore Factory Default]Touch [Restore Factory Default] and then touch [Yes] to set all the settings to the initial default settings.
Ñ Software InformationYou can confirm the software version of this unit.
1 Touch [Software Information] in the General screen.
2 Confirm the software version.
!KL19_AP_En.indb 46 2018/11/09 11:15:34
Màn hình chung xuất hiện.
4 Đặt từng thông số như sau.■ Software Information (Thông tin phần mềm)Xác nhận phiên bản phần mềm của thiết bị này. (Tr.46)■ Open Source Licenses (Giấy phép nguồn mở)Hiển thị giấy phép nguồn mở.■ Restore Factory Default (Khôi phục mặc định của nhà sản xuất)Chạm vào Restore Factory Default (Khôi phục mặc định của nhà sản xuất) và sau đó chạm vào Yes (Có) để đặt tất cả các cài đặt về cài đặt mặc định ban đầu.
Software Information (Thông tin phần mềm)
Bạn có thể xác nhận phiên bản phần mềm của thiết bị này.
1 Chạm vào Software Information (Thông tin phần mềm) trong màn hình Chung.
2 Xác nhận phiên bản phần mềm.
Setup
46
System Setup
1 Press [ ] button.hh Popup menu appears.
2 Touch[ ].
See the following section for each setting.
• General systems (P.46)• Regional systems (P.8)• Connectivity systems (P.18)• User interface systems (P.47)• Dual Zone systems (P.49)• Camera systems (P.44)
General SystemsYou can confirm the information of this unit.
1 Press [ ] button.hh Popup menu appears.
2 Touch [ ].hh System screen appears.
3 Touch [General].
hh General screen appears.
4 Set each parameter as follows.
■ [Software Information]Confirm the software version of this unit. (P.46)
■ [Open Source Licenses]Display the open source licenses.
■ [Restore Factory Default]Touch [Restore Factory Default] and then touch [Yes] to set all the settings to the initial default settings.
Ñ Software InformationYou can confirm the software version of this unit.
1 Touch [Software Information] in the General screen.
2 Confirm the software version.
!KL19_AP_En.indb 46 2018/11/09 11:15:34

Cài đặt
47Tiếng Việt
Hệ thống giao diện người dùng
1 Nhấn vào nút . Menu bật lên xuất hiện.
2 Chạm vào . Màn hình hệ thống xuất hiện.
3 Chạm vào User Interface (Giao diện người dùng).
Setup
47English
User Interface Systems
1 Press [ ] button.hh Popup menu appears.
2 Touch [ ].hh System screen appears.
3 Touch [User Interface].
hh User Interface screen appears.
4 Set each parameter as follows.
■ [Beep]Turn the key touch tone on or off.Default is “ON”.
■ [Background]You can change the background image. (P.47)
■ [Key Illumination Color]You can change the key color. (P.48)
Ñ Change the background image
1 Touch [Background] on the User Interface screen.
2 Select an image.
*1
*1 Register an original image in advance.
To register an original imageYou can load an image from the connected USB device and set it as the background image.Before starting this procedure, it is necessary to connect the device which has the image to load.
1 Touch [User Select] on the Background screen.
2 Select the image to load.
!KL19_AP_En.indb 47 2018/11/09 11:15:34
Màn hình Giao diện người dùng xuất hiện.
4 Đặt từng thông số như sau.
Setup
47English
User Interface Systems
1 Press [ ] button.hh Popup menu appears.
2 Touch [ ].hh System screen appears.
3 Touch [User Interface].
hh User Interface screen appears.
4 Set each parameter as follows.
■ [Beep]Turn the key touch tone on or off.Default is “ON”.
■ [Background]You can change the background image. (P.47)
■ [Key Illumination Color]You can change the key color. (P.48)
Ñ Change the background image
1 Touch [Background] on the User Interface screen.
2 Select an image.
*1
*1 Register an original image in advance.
To register an original imageYou can load an image from the connected USB device and set it as the background image.Before starting this procedure, it is necessary to connect the device which has the image to load.
1 Touch [User Select] on the Background screen.
2 Select the image to load.
!KL19_AP_En.indb 47 2018/11/09 11:15:34
■ Beep (Tiếng kêu bíp)Bật hoặc tắt âm chạm phím. Mặc định là “BẬT”.■ Background (Nền)Bạn có thể thay đổi hình nền.(Tr.47)■ Key Illumination Color (Màu chiếu sáng chính)Bạn có thể thay đổi màu chính. (Tr.48)
Thay đổi hình nền
1 Chạm vào Background (Nền) trên màn hình Giao diện người dùng.
2 Chọn ảnh.
Setup
47English
User Interface Systems
1 Press [ ] button.hh Popup menu appears.
2 Touch [ ].hh System screen appears.
3 Touch [User Interface].
hh User Interface screen appears.
4 Set each parameter as follows.
■ [Beep]Turn the key touch tone on or off.Default is “ON”.
■ [Background]You can change the background image. (P.47)
■ [Key Illumination Color]You can change the key color. (P.48)
Ñ Change the background image
1 Touch [Background] on the User Interface screen.
2 Select an image.
*1
*1 Register an original image in advance.
To register an original imageYou can load an image from the connected USB device and set it as the background image.Before starting this procedure, it is necessary to connect the device which has the image to load.
1 Touch [User Select] on the Background screen.
2 Select the image to load.
!KL19_AP_En.indb 47 2018/11/09 11:15:34
*1 Đăng ký trước một hình ảnh gốc.
Để đăng ký một hình ảnh gốcBạn có thể tải hình ảnh từ thiết bị USB được kết nối và đặt nó làm hình nền.Trước khi bắt đầu quy trình này, cần phải kết nối thiết bị có hình ảnh để tải.
1 Chạm vào User Select (Chọn người dùng) trên màn hình Nền.
2 Chọn ảnh để tải.
Setup
47English
User Interface Systems
1 Press [ ] button.hh Popup menu appears.
2 Touch [ ].hh System screen appears.
3 Touch [User Interface].
hh User Interface screen appears.
4 Set each parameter as follows.
■ [Beep]Turn the key touch tone on or off.Default is “ON”.
■ [Background]You can change the background image. (P.47)
■ [Key Illumination Color]You can change the key color. (P.48)
Ñ Change the background image
1 Touch [Background] on the User Interface screen.
2 Select an image.
*1
*1 Register an original image in advance.
To register an original imageYou can load an image from the connected USB device and set it as the background image.Before starting this procedure, it is necessary to connect the device which has the image to load.
1 Touch [User Select] on the Background screen.
2 Select the image to load.
!KL19_AP_En.indb 47 2018/11/09 11:15:34

Cài đặt
48
3 Chạm vào Enter (Nhập).
Setup
48
3 Touch [Enter].
hh The selected image is loaded and the display returns to the Background screen.
NOTE
• Touching [ ] rotates the image counter-clockwise.
• Touching [ ] rotates the image clockwise.• Picture files: JPEG (.jpg, .jpeg), PNG (.png), BMP
(.bmp)
Ñ Change the key color
1 Touch [Key Color] on the User Interface screen.
2 Select a key color.
3 Touch [ ].
To register an original colorYou can register your original color.
1 Touch [User] on the Key Color screen.
2 Touch [Adjust].
3 Use [-] and [+] to adjust each color value.
4 Touch [ ].
!KL19_AP_En.indb 48 2018/11/09 11:15:35
Hình ảnh đã chọn được tải và màn hình sẽ trở về màn hình Nền.
LƯU Ý
• Chạm vào xoay hình ảnh ngược chiều kim đồng hồ.
• Chạm vào xoay hình ảnh theo chiều kim đồng hồ.
• Tập tin hình ảnh: JPEG (.jpg, .jpeg), PNG (.png), BMP (.bmp)
Thay đổi màu chính
1 Chạm vào Key Color (Màu chính) trên màn hình Giao diện người dùng.
2 Chọn một màu chính.
Setup
48
3 Touch [Enter].
hh The selected image is loaded and the display returns to the Background screen.
NOTE
• Touching [ ] rotates the image counter-clockwise.
• Touching [ ] rotates the image clockwise.• Picture files: JPEG (.jpg, .jpeg), PNG (.png), BMP
(.bmp)
Ñ Change the key color
1 Touch [Key Color] on the User Interface screen.
2 Select a key color.
3 Touch [ ].
To register an original colorYou can register your original color.
1 Touch [User] on the Key Color screen.
2 Touch [Adjust].
3 Use [-] and [+] to adjust each color value.
4 Touch [ ].
!KL19_AP_En.indb 48 2018/11/09 11:15:35
3 Chạm vào .Để đăng ký một màu gốcBạn có thể đăng ký màu gốc của bạn.
1 Chạm vào User (Người dùng) trên màn hình Màu chính.
2 Chạm vào Adjust (Điều chỉnh).
3 Sử dụng - và + để điều chỉnh mỗi giá trị màu.
Setup
48
3 Touch [Enter].
hh The selected image is loaded and the display returns to the Background screen.
NOTE
• Touching [ ] rotates the image counter-clockwise.
• Touching [ ] rotates the image clockwise.• Picture files: JPEG (.jpg, .jpeg), PNG (.png), BMP
(.bmp)
Ñ Change the key color
1 Touch [Key Color] on the User Interface screen.
2 Select a key color.
3 Touch [ ].
To register an original colorYou can register your original color.
1 Touch [User] on the Key Color screen.
2 Touch [Adjust].
3 Use [-] and [+] to adjust each color value.
4 Touch [ ].
!KL19_AP_En.indb 48 2018/11/09 11:15:35
4 Chạm vào .

Cài đặt
49Tiếng Việt
Hệ thống vùng kép
Bạn có thể chọn các nguồn khác nhau cho các vị trí phía trước và phía sau trong xe.
LƯU Ý
• Chức năng này có sẵn cho xe đi kèm với Hệ thống vùng kép.
• Chức năng này không khả dụng trên những chiếc xe dưới đây.– Không được trang bị loa phía sau.– Không được trang bị Màn hình phía sau.
1 Nhấn vào nút . Menu bật lên xuất hiện.
2 Chạm vào . Màn hình hệ thống xuất hiện.
3 Chạm vào Dual Zone (Vùng kép).
Setup
49English
Dual Zone Systems
You can select different sources for front and rear positions in the vehicle.
NOTE• This function is available for the vehicle comes
with Dual Zone System.• This function doesn’t work in below cars.
– No rear speakers are equipped. – No Rear Monitor is equipped.
1 Press [ ] button.hh Popup menu appears.
2 Touch [ ].hh System screen appears.
3 Touch [Dual Zone].
hh Dual Zone screen appears.
4 Touch [Zone Select].
5 Touch [Dual Zone].
6 Set each source as follows.
■ [Zone Select]Touch [Single Zone] to turn off the dual zone function.
■ [Front Source]/[Rear Source]Select a source for each.Rear Source; OFF/ Disc/ USB/ AUX
■ [Rear Volume]Adjust the rear source volume.
NOTE• When you select the source which does not
include a video as Rear Source, the rear monitor won't display any image.
• When the "Zone Select" is set to "Dual Zone", the following functions are not available.
– Fader (P.50) – Equalizer Control/ Sound Effect/ Listening Position/DTA (P.51, 52, 53)
– High-resolution Sound Source File Playback (Premium AVX only)
Selectable combinations
Front Source Rear SourceT-Link OFF
Bluetooth audio OFF/ Disc (DVD/Video-CD)/ AUX
Radio OFF/ Disc/ USB/ AUX
Disc (DVD/Video-CD)
OFF/ Disc/ USB/ AUX
Disc (Music CD/ Disc media)
OFF/ AUX
AUX OFF/ Disc/ USB/ AUX
USB OFF/ Disc (DVD/Video-CD)/ USB/ AUX
iPod OFF/ Disc (DVD/Video-CD)/ AUX
!KL19_AP_En.indb 49 2018/11/09 11:15:35
Màn hình Vùng kép xuất hiện.
4 Chạm vào Zone Select (Chọn nguồn).
Setup
49English
Dual Zone Systems
You can select different sources for front and rear positions in the vehicle.
NOTE• This function is available for the vehicle comes
with Dual Zone System.• This function doesn’t work in below cars.
– No rear speakers are equipped. – No Rear Monitor is equipped.
1 Press [ ] button.hh Popup menu appears.
2 Touch [ ].hh System screen appears.
3 Touch [Dual Zone].
hh Dual Zone screen appears.
4 Touch [Zone Select].
5 Touch [Dual Zone].
6 Set each source as follows.
■ [Zone Select]Touch [Single Zone] to turn off the dual zone function.
■ [Front Source]/[Rear Source]Select a source for each.Rear Source; OFF/ Disc/ USB/ AUX
■ [Rear Volume]Adjust the rear source volume.
NOTE• When you select the source which does not
include a video as Rear Source, the rear monitor won't display any image.
• When the "Zone Select" is set to "Dual Zone", the following functions are not available.
– Fader (P.50) – Equalizer Control/ Sound Effect/ Listening Position/DTA (P.51, 52, 53)
– High-resolution Sound Source File Playback (Premium AVX only)
Selectable combinations
Front Source Rear SourceT-Link OFF
Bluetooth audio OFF/ Disc (DVD/Video-CD)/ AUX
Radio OFF/ Disc/ USB/ AUX
Disc (DVD/Video-CD)
OFF/ Disc/ USB/ AUX
Disc (Music CD/ Disc media)
OFF/ AUX
AUX OFF/ Disc/ USB/ AUX
USB OFF/ Disc (DVD/Video-CD)/ USB/ AUX
iPod OFF/ Disc (DVD/Video-CD)/ AUX
!KL19_AP_En.indb 49 2018/11/09 11:15:35
5 Chạm vào Dual Zone (Vùng kép).
Setup
49English
Dual Zone Systems
You can select different sources for front and rear positions in the vehicle.
NOTE• This function is available for the vehicle comes
with Dual Zone System.• This function doesn’t work in below cars.
– No rear speakers are equipped. – No Rear Monitor is equipped.
1 Press [ ] button.hh Popup menu appears.
2 Touch [ ].hh System screen appears.
3 Touch [Dual Zone].
hh Dual Zone screen appears.
4 Touch [Zone Select].
5 Touch [Dual Zone].
6 Set each source as follows.
■ [Zone Select]Touch [Single Zone] to turn off the dual zone function.
■ [Front Source]/[Rear Source]Select a source for each.Rear Source; OFF/ Disc/ USB/ AUX
■ [Rear Volume]Adjust the rear source volume.
NOTE• When you select the source which does not
include a video as Rear Source, the rear monitor won't display any image.
• When the "Zone Select" is set to "Dual Zone", the following functions are not available.
– Fader (P.50) – Equalizer Control/ Sound Effect/ Listening Position/DTA (P.51, 52, 53)
– High-resolution Sound Source File Playback (Premium AVX only)
Selectable combinations
Front Source Rear SourceT-Link OFF
Bluetooth audio OFF/ Disc (DVD/Video-CD)/ AUX
Radio OFF/ Disc/ USB/ AUX
Disc (DVD/Video-CD)
OFF/ Disc/ USB/ AUX
Disc (Music CD/ Disc media)
OFF/ AUX
AUX OFF/ Disc/ USB/ AUX
USB OFF/ Disc (DVD/Video-CD)/ USB/ AUX
iPod OFF/ Disc (DVD/Video-CD)/ AUX
!KL19_AP_En.indb 49 2018/11/09 11:15:35
6 Đặt từng nguồn như sau.
Setup
49English
Dual Zone Systems
You can select different sources for front and rear positions in the vehicle.
NOTE• This function is available for the vehicle comes
with Dual Zone System.• This function doesn’t work in below cars.
– No rear speakers are equipped. – No Rear Monitor is equipped.
1 Press [ ] button.hh Popup menu appears.
2 Touch [ ].hh System screen appears.
3 Touch [Dual Zone].
hh Dual Zone screen appears.
4 Touch [Zone Select].
5 Touch [Dual Zone].
6 Set each source as follows.
■ [Zone Select]Touch [Single Zone] to turn off the dual zone function.
■ [Front Source]/[Rear Source]Select a source for each.Rear Source; OFF/ Disc/ USB/ AUX
■ [Rear Volume]Adjust the rear source volume.
NOTE• When you select the source which does not
include a video as Rear Source, the rear monitor won't display any image.
• When the "Zone Select" is set to "Dual Zone", the following functions are not available.
– Fader (P.50) – Equalizer Control/ Sound Effect/ Listening Position/DTA (P.51, 52, 53)
– High-resolution Sound Source File Playback (Premium AVX only)
Selectable combinations
Front Source Rear SourceT-Link OFF
Bluetooth audio OFF/ Disc (DVD/Video-CD)/ AUX
Radio OFF/ Disc/ USB/ AUX
Disc (DVD/Video-CD)
OFF/ Disc/ USB/ AUX
Disc (Music CD/ Disc media)
OFF/ AUX
AUX OFF/ Disc/ USB/ AUX
USB OFF/ Disc (DVD/Video-CD)/ USB/ AUX
iPod OFF/ Disc (DVD/Video-CD)/ AUX
!KL19_AP_En.indb 49 2018/11/09 11:15:35
■ Zone Select (Chọn vùng)Chạm vào Single Zone (Vùng đơn) để tắt chức năng vùng kép.
■ Front Source (Nguồn trước)/ Rear Source (Nguồn sau)Chọn một nguồn cho mỗi phần.Nguồn sau; OFF/ Disc/ USB/ AUX
■ Rear Volume (Âm lượng phía sau)Điều chỉnh âm lượng nguồn phía sau.
LƯU Ý
• Khi bạn chọn nguồn không bao gồm video làm Nguồn phía sau, màn hình phía sau sẽ không hiển thị bất kỳ hình ảnh nào.
• Khi “Zone Select” (Chọn vùng) được đặt thành “Dual Zone” (Vùng kép), các chức năng sau đây không có sẵn.– Bộ chỉnh âm lượng (Tr.50)– Kiểm soát bộ cân bằng/ Hiệu ứng âm thanh/ Vị
trí nghe/DTA (Tr.51, 52, 53)– Phát lại tập tin nguồn âm thanh độ phân giải
cao (chỉ dành cho AVX cao cấp)
Kết hợp có thể lựa chọn
Nguồn trước Nguồn sau
T-Link TẮT
Âm thanh Bluetooth
TẮT/ Đĩa (DVD/Video-CD)/ AUX
Radio TẮT/ Đĩa/ USB/ AUX
Đĩa (DVD/ Video-CD)
TẮT/ Đĩa/ USB/ AUX
Đĩa (Phương tiện Đĩa/CD nhạc)
TẮT/ AUX
AUX TẮT/ Đĩa/ USB/ AUX
USB TẮT/ Đĩa (DVD/Video-CD)/ USB/ AUX
iPod TẮT/ Đĩa (DVD/Video-CD)/ AUX

Kiểm soát âm thanh
50
Kiểm soát âm thanhBạn có thể điều chỉnh các cài đặt khác nhau như cân bằng âm thanh.
1 Nhấn nút . Menu bật lên xuất hiện.
2 Chạm vào .
Controlling Audio
50
Controlling AudioYou can adjust various settings such as audio balance.
1 Press [ ] button.hh Popup menu appears.
2 Touch [ ].
See the following section for each setting.
• Controlling equalizer (P.51)• Set listening position/ DTA (P.53)• Controlling general audio (Fader/Balance)
(P.50)• Set volume offset (P.52)• Set sound effect (P.52)
Controlling General Audio
1 Press [ ] button.hh Popup menu appears.
2 Touch [ ].hh Audio screen appears.
3 Touch [Fader/Balance].
4 Set each parameter as follows.
■ [Fader]/[Balance]Adjust the volume balance around the touched area.[ ] and [ ] adjust the right and left volume balance.[ ] and [ ] adjust the front and rear volume balance.
■ [Center]Clear the adjustment.
!KL19_AP_En.indb 50 2018/11/09 11:15:36
Xem phần sau đây cho mỗi cài đặt.• Kiểm soát bộ cân bằng (Tr.51)• Đặt vị trí nghe/ DTA (Tr.53)• Kiểm soát âm thanh chung (Bộ điều chỉnh
âm lượng/Cân bằng) (Tr.50)• Đặt bù âm lượng (Tr.52)• Đặt hiệu ứng âm thanh (Tr.52)
Kiểm soát âm thanh chung
1 Nhấn nút . Menu bật lên xuất hiện.
2 Chạm vào . Màn hình âm thanh xuất hiện.
3 Chạm vào Fader/Balance (Bộ điều chỉnh âm lượng/Cân bằng).
Controlling Audio
50
Controlling AudioYou can adjust various settings such as audio balance.
1 Press [ ] button.hh Popup menu appears.
2 Touch [ ].
See the following section for each setting.
• Controlling equalizer (P.51)• Set listening position/ DTA (P.53)• Controlling general audio (Fader/Balance)
(P.50)• Set volume offset (P.52)• Set sound effect (P.52)
Controlling General Audio
1 Press [ ] button.hh Popup menu appears.
2 Touch [ ].hh Audio screen appears.
3 Touch [Fader/Balance].
4 Set each parameter as follows.
■ [Fader]/[Balance]Adjust the volume balance around the touched area.[ ] and [ ] adjust the right and left volume balance.[ ] and [ ] adjust the front and rear volume balance.
■ [Center]Clear the adjustment.
!KL19_AP_En.indb 50 2018/11/09 11:15:36
4 Đặt từng thông số như sau.
Controlling Audio
50
Controlling AudioYou can adjust various settings such as audio balance.
1 Press [ ] button.hh Popup menu appears.
2 Touch [ ].
See the following section for each setting.
• Controlling equalizer (P.51)• Set listening position/ DTA (P.53)• Controlling general audio (Fader/Balance)
(P.50)• Set volume offset (P.52)• Set sound effect (P.52)
Controlling General Audio
1 Press [ ] button.hh Popup menu appears.
2 Touch [ ].hh Audio screen appears.
3 Touch [Fader/Balance].
4 Set each parameter as follows.
■ [Fader]/[Balance]Adjust the volume balance around the touched area.[ ] and [ ] adjust the right and left volume balance.[ ] and [ ] adjust the front and rear volume balance.
■ [Center]Clear the adjustment.
!KL19_AP_En.indb 50 2018/11/09 11:15:36
■ Fader / Balance (Bộ điều chỉnh âm lượng/Cân bằng)Điều chỉnh cân bằng âm lượng xung quanh vùng được chạm.
và điều chỉnh cân bằng âm lượng bên phải và bên trái.
và điều chỉnh cân bằng âm lượng phía trước và phía sau.■ Center (Giữa)Xóa điều chỉnh.

Kiểm soát âm thanh
51Tiếng Việt
Kiểm soát bộ cân bằng
Bạn có thể điều chỉnh bộ cân bằng bằng cách chọn cài đặt tối ưu hóa cho từng thể loại.
1 Nhấn nút . Menu bật lên xuất hiện.
2 Chạm vào . Màn hình hệ thống xuất hiện.
3 Chạm vào Equalizer (Bộ cân bằng).
Controlling Audio
51English
Equalizer Control
You can adjust equalizer by selecting the optimized setting for each category.
1 Press [ ] button.hh Popup menu appears.
2 Touch [ ].hh Audio screen appears.
3 Touch [Equalizer].
4 Touch the screen and set the Graphic Equalizer as desired.
■ Gain level (area in dotted frame)Adjust the gain level by touching each frequency bar.You can select a frequency bar and adjust its level by [ ], [ ].
■ [Preset Select]Display the screen for selecting the preset equalizer curve. (P.51)
■ [Preset Memory]Saves the adjusted equalizer curve as “User”.
■ [ ]Initialize (flatten) the current EQ curve.
■ [All Sources]Apply the adjusted equalizer curve to all sources. Touch [All Sources] and then touch [OK] on the confirmation screen.
■ [ON]/[OFF] (Bass Extend Settings)When turned on, the frequencies lower than 62.5 Hz is set to the same gain level (62.5 Hz).
Ñ Recall the EQ curve
1 Touch [Preset Select].
2 Select an EQ curve.
NOTE• This AVX equips the below vehicle type EQ
settings. – Sedan – C.SUV, H/B (Compact SUV and Hatchback) – MPV – SUV,PU (SUV and Pick Up Truck) – Van
• The EQ setting is optimized for each vehicle type and produce clean, distortion-free natural sound at any listening level.
!KL19_AP_En.indb 51 2018/11/09 11:15:36
4 Chạm vào màn hình và đặt Bộ cân bằng đồ họa theo mong muốn.
Controlling Audio
51English
Equalizer Control
You can adjust equalizer by selecting the optimized setting for each category.
1 Press [ ] button.hh Popup menu appears.
2 Touch [ ].hh Audio screen appears.
3 Touch [Equalizer].
4 Touch the screen and set the Graphic Equalizer as desired.
■ Gain level (area in dotted frame)Adjust the gain level by touching each frequency bar.You can select a frequency bar and adjust its level by [ ], [ ].
■ [Preset Select]Display the screen for selecting the preset equalizer curve. (P.51)
■ [Preset Memory]Saves the adjusted equalizer curve as “User”.
■ [ ]Initialize (flatten) the current EQ curve.
■ [All Sources]Apply the adjusted equalizer curve to all sources. Touch [All Sources] and then touch [OK] on the confirmation screen.
■ [ON]/[OFF] (Bass Extend Settings)When turned on, the frequencies lower than 62.5 Hz is set to the same gain level (62.5 Hz).
Ñ Recall the EQ curve
1 Touch [Preset Select].
2 Select an EQ curve.
NOTE• This AVX equips the below vehicle type EQ
settings. – Sedan – C.SUV, H/B (Compact SUV and Hatchback) – MPV – SUV,PU (SUV and Pick Up Truck) – Van
• The EQ setting is optimized for each vehicle type and produce clean, distortion-free natural sound at any listening level.
!KL19_AP_En.indb 51 2018/11/09 11:15:36
■ Gain level (Mức bù) (vùng trong khung chấm) Điều chỉnh mức bù bằng cách chạm vào từng thanh tần số.Bạn có thể chọn một thanh tần số và điều chỉnh mức của thanh tần số bằng nút , .■ Preset Select (Chọn cài sẵn)Hiển thị màn hình để chọn đường cong bộ cân bằng cài sẵn. (Tr.51)■ Preset Memory (Bộ nhớ cài sẵn)Lưu đường cong bộ cân bằng đã điều chỉnh thành “User” (Người dùng).■ Khởi tạo (làm phẳng) đường cong EQ hiện tại.■ All Sources (Tất cả các nguồn)Áp dụng đường cong bộ cân bằng được điều chỉnh cho tất cả các nguồn. Chạm vào All Sources (Tất cả các nguồn) và sau đó chạm vào OK trên màn hình xác nhận.
■ ON (BẬT)/ OFF (TẮT) (Cài đặt mở rộng âm trầm)Khi được bật, các tần số thấp hơn 62,5 Hz được đặt thành cùng mức bù (62,5 Hz).
Gợi lại đường cong EQ
1 Chạm vào Preset Select (Chọn cài sẵn).
2 Chọn đường cong EQ.
Controlling Audio
51English
Equalizer Control
You can adjust equalizer by selecting the optimized setting for each category.
1 Press [ ] button.hh Popup menu appears.
2 Touch [ ].hh Audio screen appears.
3 Touch [Equalizer].
4 Touch the screen and set the Graphic Equalizer as desired.
■ Gain level (area in dotted frame)Adjust the gain level by touching each frequency bar.You can select a frequency bar and adjust its level by [ ], [ ].
■ [Preset Select]Display the screen for selecting the preset equalizer curve. (P.51)
■ [Preset Memory]Saves the adjusted equalizer curve as “User”.
■ [ ]Initialize (flatten) the current EQ curve.
■ [All Sources]Apply the adjusted equalizer curve to all sources. Touch [All Sources] and then touch [OK] on the confirmation screen.
■ [ON]/[OFF] (Bass Extend Settings)When turned on, the frequencies lower than 62.5 Hz is set to the same gain level (62.5 Hz).
Ñ Recall the EQ curve
1 Touch [Preset Select].
2 Select an EQ curve.
NOTE• This AVX equips the below vehicle type EQ
settings. – Sedan – C.SUV, H/B (Compact SUV and Hatchback) – MPV – SUV,PU (SUV and Pick Up Truck) – Van
• The EQ setting is optimized for each vehicle type and produce clean, distortion-free natural sound at any listening level.
!KL19_AP_En.indb 51 2018/11/09 11:15:36
LƯU Ý
• AVX này trang bị các cài đặt EQ loại xe bên dưới.– Sedan– C.SUV, H/B (Compact SUV và Hatchback)– MPV– SUV,PU (SUV và Pick Up Truck)– Van
• Cài đặt EQ được tối ưu hóa cho từng loại xe và tạo ra âm thanh tự nhiên trong, không bị méo ở mọi cấp độ nghe.

Kiểm soát âm thanh
52
Bù âm lượng
Điều chỉnh chính xác âm lượng của nguồn hiện tại để giảm thiểu chênh lệch âm lượng giữa các nguồn khác nhau.
1 Nhấn nút . Menu bật lên xuất hiện.
2 Chạm vào . Màn hình hệ thống xuất hiện.
3 Chạm vào Volume Offset (Bù âm lượng).
Controlling Audio
52
Volume Offset
Finely adjust the volume of the current source to minimize the difference in volume between different sources.
1 Press [ ] button.hh Popup menu appears.
2 Touch [ ].hh Audio screen appears.
3 Touch [Volume Offset].
4 Touch [+] or [-] to adjust the level.
■ [Initialize]Returns to the initial settings.Touch [Initialize] and then touch [Yes] on the confirmation screen.
NOTE• If you have increased the volume first, then
reduce the volume using “Volume Offset”. Switching the current source to another source suddenly may output extremely loud sound.
Sound Effect
You can set sound effects.
1 Press [ ] button.hh Popup menu appears.
2 Touch [ ].hh Audio screen appears.
3 Touch [Sound Effect].
4 Set each parameter as follows.
■ [Bass Boost]Set the amount of bass boost. “OFF”/ “1”/ “2”/ “3”
■ [Loudness]Set the amount of boost of low and high tones.“OFF”, “Low”, “High”
■ [Auto Sound Level]AVX automatically adjust EQ setting based of volume level or vehicle speed.The function is varied depends on vehicle or vehicle grade.“OFF”, “ON”
■ [Space Enhancement]Select the feeling of sound space enhancement.“OFF”/ “Small”/ “Medium”/ “Large”.This setting is not available for the Radio source.
!KL19_AP_En.indb 52 2018/11/09 11:15:37
4 Chạm vào + hoặc - để điều chỉnh mức.
Controlling Audio
52
Volume Offset
Finely adjust the volume of the current source to minimize the difference in volume between different sources.
1 Press [ ] button.hh Popup menu appears.
2 Touch [ ].hh Audio screen appears.
3 Touch [Volume Offset].
4 Touch [+] or [-] to adjust the level.
■ [Initialize]Returns to the initial settings.Touch [Initialize] and then touch [Yes] on the confirmation screen.
NOTE• If you have increased the volume first, then
reduce the volume using “Volume Offset”. Switching the current source to another source suddenly may output extremely loud sound.
Sound Effect
You can set sound effects.
1 Press [ ] button.hh Popup menu appears.
2 Touch [ ].hh Audio screen appears.
3 Touch [Sound Effect].
4 Set each parameter as follows.
■ [Bass Boost]Set the amount of bass boost. “OFF”/ “1”/ “2”/ “3”
■ [Loudness]Set the amount of boost of low and high tones.“OFF”, “Low”, “High”
■ [Auto Sound Level]AVX automatically adjust EQ setting based of volume level or vehicle speed.The function is varied depends on vehicle or vehicle grade.“OFF”, “ON”
■ [Space Enhancement]Select the feeling of sound space enhancement.“OFF”/ “Small”/ “Medium”/ “Large”.This setting is not available for the Radio source.
!KL19_AP_En.indb 52 2018/11/09 11:15:37
■ Initialize (Khởi tạo)Trở lại các cài đặt ban đầu.Chạm vào Initialize (Khởi tạo) và sau đó chạm vào Yes (Có) trên màn hình xác nhận.
LƯU Ý
• Nếu bạn đã tăng âm lượng trước, thì hãy giảm âm lượng bằng cách sử dụng “Volume Offset” (Bù âm lượng). Việc đột ngột chuyển đổi nguồn hiện tại sang nguồn khác có thể phát ra âm thanh cực lớn.
Hiệu ứng âm thanh
Bạn có thể đặt hiệu ứng âm thanh.
1 Nhấn nút . Menu bật lên xuất hiện.
2 Chạm vào . Màn hình hệ thống xuất hiện.
3 Chạm vào Sound Effect (Hiệu ứng âm thanh).
Controlling Audio
52
Volume Offset
Finely adjust the volume of the current source to minimize the difference in volume between different sources.
1 Press [ ] button.hh Popup menu appears.
2 Touch [ ].hh Audio screen appears.
3 Touch [Volume Offset].
4 Touch [+] or [-] to adjust the level.
■ [Initialize]Returns to the initial settings.Touch [Initialize] and then touch [Yes] on the confirmation screen.
NOTE• If you have increased the volume first, then
reduce the volume using “Volume Offset”. Switching the current source to another source suddenly may output extremely loud sound.
Sound Effect
You can set sound effects.
1 Press [ ] button.hh Popup menu appears.
2 Touch [ ].hh Audio screen appears.
3 Touch [Sound Effect].
4 Set each parameter as follows.
■ [Bass Boost]Set the amount of bass boost. “OFF”/ “1”/ “2”/ “3”
■ [Loudness]Set the amount of boost of low and high tones.“OFF”, “Low”, “High”
■ [Auto Sound Level]AVX automatically adjust EQ setting based of volume level or vehicle speed.The function is varied depends on vehicle or vehicle grade.“OFF”, “ON”
■ [Space Enhancement]Select the feeling of sound space enhancement.“OFF”/ “Small”/ “Medium”/ “Large”.This setting is not available for the Radio source.
!KL19_AP_En.indb 52 2018/11/09 11:15:37
4 Đặt từng thông số như sau.
Controlling Audio
52
Volume Offset
Finely adjust the volume of the current source to minimize the difference in volume between different sources.
1 Press [ ] button.hh Popup menu appears.
2 Touch [ ].hh Audio screen appears.
3 Touch [Volume Offset].
4 Touch [+] or [-] to adjust the level.
■ [Initialize]Returns to the initial settings.Touch [Initialize] and then touch [Yes] on the confirmation screen.
NOTE• If you have increased the volume first, then
reduce the volume using “Volume Offset”. Switching the current source to another source suddenly may output extremely loud sound.
Sound Effect
You can set sound effects.
1 Press [ ] button.hh Popup menu appears.
2 Touch [ ].hh Audio screen appears.
3 Touch [Sound Effect].
4 Set each parameter as follows.
■ [Bass Boost]Set the amount of bass boost. “OFF”/ “1”/ “2”/ “3”
■ [Loudness]Set the amount of boost of low and high tones.“OFF”, “Low”, “High”
■ [Auto Sound Level]AVX automatically adjust EQ setting based of volume level or vehicle speed.The function is varied depends on vehicle or vehicle grade.“OFF”, “ON”
■ [Space Enhancement]Select the feeling of sound space enhancement.“OFF”/ “Small”/ “Medium”/ “Large”.This setting is not available for the Radio source.
!KL19_AP_En.indb 52 2018/11/09 11:15:37
■ Bass Boost (Tăng âm trầm)Đặt mức tăng âm trầm. “TẮT”/ “1”/ “2”/ “3”
■ Loudness (Âm lượng)Đặt mức tăng của âm thấp và âm cao.“TẮT”, “Thấp”, “Cao”
■ Auto Sound Level (Mức âm thanh tự động)AVX tự động điều chỉnh cài đặt EQ dựa trên mức âm lượng hoặc tốc độ xe.Chức năng được thay đổi tùy thuộc vào xe hoặc cấp độ xe.“TẮT”, “BẬT”
■ Space Enhancement (Tăng cường không gian)Chọn cảm giác tăng cường không gian âm thanh.“TẮT”/ “Nhỏ”/ “Vừa”/ “Lớn”.Cài đặt này không khả dụng cho nguồn Radio.

Kiểm soát âm thanh
53Tiếng Việt
■ K2 Technology (Công nghệ K2)TẮT/BẬT chức năng K2.Công nghệ ngoại suy và bổ sung với thuật toán độc quyền, dải tần số cao bị cắt khi mã hóa.
■ Sound Response (Hồi đáp âm thanh)Hầu như khiến cho âm thanh trở nên trung thực hơn bằng cách sử dụng hệ thống Bộ xử lý tín hiệu số (DSP).Chọn mức từ “TẮT”/ “1”/ “2”/ “3”.
■ Sound Lift (Nâng âm thanh)Bạn có thể điều chỉnh độ cao của loa hầu như phù hợp với vị trí nghe của bạn. “TẮT”/ “Thấp”/ “Vừa”/ “Cao”.
Vị trí nghe/ DTA
Vị trí nghe/DTA cho phép bạn cải thiện trường âm thanh tùy thuộc vào vị trí ghế bạn ngồi.Vị trí nghe/DTA cho phép bạn đặt “Listening Position” (Vị trí nghe) và “Front Focus” (Lấy nét trước). Bạn không thể đặt cả hai cùng một lúc.
1 Nhấn nút . Menu bật lên xuất hiện.
2 Chạm vào . Màn hình hệ thống xuất hiện.
3 Chạm vài Position/DTA (Vị trí/DTA).
Controlling Audio
53English
■ [K2 Technology]Turn ON/OFF the K2 function.Technology to extrapolate and supplement with proprietary algorithm, the high-frequency range that is cut off when encoding.
■ [Sound Response]Virtually make the sound more realistic using the Digital Signal Processor (DSP) system.Select the level from “OFF”/ “1”/ “2”/ “3”.
■ [Sound Lift]You can adjust the height of speakers virtually to suit your listening position.“OFF”/ “Low”/ “Middle”/ “High”.
Listening Position/ DTA
Listening Position/DTA allows you to improve the sound field depending on the position of the seat you sit. Listening Position/DTA allows you to set “Listening Position” and “Front Focus”. You cannot set both at the same time.
1 Press [ ] button.hh Popup menu appears.
2 Touch [ ].hh Audio screen appears.
3 Touch [Position/DTA].
• Set up Listening Position (P.53)• Set up Front Focus (P.54)
Ñ Listening PositionAdjust the sound delay time so that the sounds from different speakers arrive at the listener sitting on the selected seat at the same time.
1 Touch [Listening Position] on the Position/DTA screen.
2 Select a listening position from [Front R] (Right front), [Front L] (Left front), [Front All] (All front), and [All].
Position DTA controlYou can fine-adjust your listening position.
1 Touch [Adjust].
2 Touch [Delay].
3 Touch [ ] or [ ] to adjust the delay time of the selected speaker.
4 Touch [Level].
!KL19_AP_En.indb 53 2018/11/09 11:15:37
• Cài đặt Vị trí nghe (Tr.53)• Cài đặt Lấy nét trước (Tr.54)
Vị trí ngheĐiều chỉnh thời gian trễ âm thanh để âm thanh từ các loa khác nhau đến người nghe ngồi trên ghế được chọn cùng một lúc.
1 Chạm vào Listening Position (Vị trí nghe) trên màn hình Vị trí/DTA.
2 Chọn vị trí nghe từ Front R (Phía trước bên phải), Front L (Phía trước bên trái), Front All (Tất cả phía trước), và All (Tất cả).
Controlling Audio
53English
■ [K2 Technology]Turn ON/OFF the K2 function.Technology to extrapolate and supplement with proprietary algorithm, the high-frequency range that is cut off when encoding.
■ [Sound Response]Virtually make the sound more realistic using the Digital Signal Processor (DSP) system.Select the level from “OFF”/ “1”/ “2”/ “3”.
■ [Sound Lift]You can adjust the height of speakers virtually to suit your listening position.“OFF”/ “Low”/ “Middle”/ “High”.
Listening Position/ DTA
Listening Position/DTA allows you to improve the sound field depending on the position of the seat you sit. Listening Position/DTA allows you to set “Listening Position” and “Front Focus”. You cannot set both at the same time.
1 Press [ ] button.hh Popup menu appears.
2 Touch [ ].hh Audio screen appears.
3 Touch [Position/DTA].
• Set up Listening Position (P.53)• Set up Front Focus (P.54)
Ñ Listening PositionAdjust the sound delay time so that the sounds from different speakers arrive at the listener sitting on the selected seat at the same time.
1 Touch [Listening Position] on the Position/DTA screen.
2 Select a listening position from [Front R] (Right front), [Front L] (Left front), [Front All] (All front), and [All].
Position DTA controlYou can fine-adjust your listening position.
1 Touch [Adjust].
2 Touch [Delay].
3 Touch [ ] or [ ] to adjust the delay time of the selected speaker.
4 Touch [Level].
!KL19_AP_En.indb 53 2018/11/09 11:15:37
Kiểm soát Vị trí Position DTABạn có thể tinh chỉnh vị trí nghe của bạn.
1 Chạm vào Adjust (Điều chỉnh).
2 Chạm vào Delay (Độ trễ).
3 Chạm vào hoặc để điều chỉnh thời gian trễ của loa đã chọn.
Controlling Audio
53English
■ [K2 Technology]Turn ON/OFF the K2 function.Technology to extrapolate and supplement with proprietary algorithm, the high-frequency range that is cut off when encoding.
■ [Sound Response]Virtually make the sound more realistic using the Digital Signal Processor (DSP) system.Select the level from “OFF”/ “1”/ “2”/ “3”.
■ [Sound Lift]You can adjust the height of speakers virtually to suit your listening position.“OFF”/ “Low”/ “Middle”/ “High”.
Listening Position/ DTA
Listening Position/DTA allows you to improve the sound field depending on the position of the seat you sit. Listening Position/DTA allows you to set “Listening Position” and “Front Focus”. You cannot set both at the same time.
1 Press [ ] button.hh Popup menu appears.
2 Touch [ ].hh Audio screen appears.
3 Touch [Position/DTA].
• Set up Listening Position (P.53)• Set up Front Focus (P.54)
Ñ Listening PositionAdjust the sound delay time so that the sounds from different speakers arrive at the listener sitting on the selected seat at the same time.
1 Touch [Listening Position] on the Position/DTA screen.
2 Select a listening position from [Front R] (Right front), [Front L] (Left front), [Front All] (All front), and [All].
Position DTA controlYou can fine-adjust your listening position.
1 Touch [Adjust].
2 Touch [Delay].
3 Touch [ ] or [ ] to adjust the delay time of the selected speaker.
4 Touch [Level].
!KL19_AP_En.indb 53 2018/11/09 11:15:37
4 Chạm vào Level (Mức).

Kiểm soát âm thanh
54
5 Chạm vào hoặc để điều chỉnh mức âm thanh của loa đã chọn.
Controlling Audio
54
5 Touch [ ] or [ ] to adjust the sound level of the selected speaker.
NOTE• To initialize the Delay and Level settings, touch [Initialize] and [Yes] on the confirmation screen.
Ñ Front FocusYou can focus the imaginary sound image on the front of the selected seat.
1 Touch [Front Focus] on the Position/DTA screen.
2 Select a front focus position.For [Front All] and [All], select Priority L or R depending on which side you want to put the imaginary sound image.
Front Focus fine adjustment
1 Touch [Adjust].
2 Touch [Delay].
3 Set each parameter as follows.
■ [Sound Image LR (Front)]Focus the sound image on the front of front seats.
■ [Sound Image LR (Rear)]Focus the sound image on the front of rear seats.
■ [Size of the Virtual Sound Field]Adjust the size of sound image to meet your taste. If the sound image is shifted from the front, move it back by [Sound Image LR (Front)] or [Sound Image LR (Rear)].
4 Touch [Level].
5 Touch [ ] or [ ] to adjust the sound level of the selected speaker.
NOTE• To initialize the Delay and Level settings, touch [Initialize] and [Yes] on the confirmation screen.
!KL19_AP_En.indb 54 2018/11/09 11:15:37
LƯU Ý
• Để khởi tạo cài đặt Độ trễ và Mức, chạm vào Initialize (Khởi tạo) và Yes (Có) trên màn hình xác nhận.
Lấy nét trướcBạn có thể lấy nét hình ảnh âm thanh tưởng tượng vào mặt trước của ghế được chọn.
1 Chạm vào Front Focus (Lấy nét trước) trên màn hình Vị trí/DTA.
2 Chọn vị trí lấy nét trước.Đối với Front All (Tất cả phía trước) và All (Tất cả) , chọn mức độ ưu tiên L hoặc R tùy thuộc vào phía bạn muốn đặt hình ảnh âm thanh tưởng tượng.
Controlling Audio
54
5 Touch [ ] or [ ] to adjust the sound level of the selected speaker.
NOTE• To initialize the Delay and Level settings, touch [Initialize] and [Yes] on the confirmation screen.
Ñ Front FocusYou can focus the imaginary sound image on the front of the selected seat.
1 Touch [Front Focus] on the Position/DTA screen.
2 Select a front focus position.For [Front All] and [All], select Priority L or R depending on which side you want to put the imaginary sound image.
Front Focus fine adjustment
1 Touch [Adjust].
2 Touch [Delay].
3 Set each parameter as follows.
■ [Sound Image LR (Front)]Focus the sound image on the front of front seats.
■ [Sound Image LR (Rear)]Focus the sound image on the front of rear seats.
■ [Size of the Virtual Sound Field]Adjust the size of sound image to meet your taste. If the sound image is shifted from the front, move it back by [Sound Image LR (Front)] or [Sound Image LR (Rear)].
4 Touch [Level].
5 Touch [ ] or [ ] to adjust the sound level of the selected speaker.
NOTE• To initialize the Delay and Level settings, touch [Initialize] and [Yes] on the confirmation screen.
!KL19_AP_En.indb 54 2018/11/09 11:15:37
Hiệu chỉnh chính xác Lấy nét trước
1 Chạm vào Adjust (Điều chỉnh).
2 Chạm vào Delay (Độ trễ).
3 Đặt từng thông số như sau.
Controlling Audio
54
5 Touch [ ] or [ ] to adjust the sound level of the selected speaker.
NOTE• To initialize the Delay and Level settings, touch [Initialize] and [Yes] on the confirmation screen.
Ñ Front FocusYou can focus the imaginary sound image on the front of the selected seat.
1 Touch [Front Focus] on the Position/DTA screen.
2 Select a front focus position.For [Front All] and [All], select Priority L or R depending on which side you want to put the imaginary sound image.
Front Focus fine adjustment
1 Touch [Adjust].
2 Touch [Delay].
3 Set each parameter as follows.
■ [Sound Image LR (Front)]Focus the sound image on the front of front seats.
■ [Sound Image LR (Rear)]Focus the sound image on the front of rear seats.
■ [Size of the Virtual Sound Field]Adjust the size of sound image to meet your taste. If the sound image is shifted from the front, move it back by [Sound Image LR (Front)] or [Sound Image LR (Rear)].
4 Touch [Level].
5 Touch [ ] or [ ] to adjust the sound level of the selected speaker.
NOTE• To initialize the Delay and Level settings, touch [Initialize] and [Yes] on the confirmation screen.
!KL19_AP_En.indb 54 2018/11/09 11:15:37
■ Sound Image LR (Front) (Hình ảnh âm thanh LR (Phía trước) Lấy nét hình ảnh âm thanh ở phía trước ghế trước.
■ Sound Image LR (Rear) (Hình ảnh âm thanh LR (Phía sau))Lấy nét hình ảnh âm thanh ở phía sau ghế trước.
■ Size of the Virtual Sound Field (Kích thước của trường âm thanh ảo) Điều chỉnh kích thước của hình ảnh âm thanh để đáp ứng sở thích của bạn. Nếu hình ảnh âm thanh bị dịch chuyển từ phía trước, hãy di chuyển hình ảnh trở lại bằng Sound Image LR (Front) (Hình ảnh âm thanh LR (Phía trước)) hoặc Sound Image LR (Rear) (Hình ảnh âm thanh LR (Phía sau)).
4 Chạm vào Level (Mức).
5 Chạm vào hoặc để điều chỉnh mức âm thanh của loa đã chọn.
Controlling Audio
54
5 Touch [ ] or [ ] to adjust the sound level of the selected speaker.
NOTE• To initialize the Delay and Level settings, touch [Initialize] and [Yes] on the confirmation screen.
Ñ Front FocusYou can focus the imaginary sound image on the front of the selected seat.
1 Touch [Front Focus] on the Position/DTA screen.
2 Select a front focus position.For [Front All] and [All], select Priority L or R depending on which side you want to put the imaginary sound image.
Front Focus fine adjustment
1 Touch [Adjust].
2 Touch [Delay].
3 Set each parameter as follows.
■ [Sound Image LR (Front)]Focus the sound image on the front of front seats.
■ [Sound Image LR (Rear)]Focus the sound image on the front of rear seats.
■ [Size of the Virtual Sound Field]Adjust the size of sound image to meet your taste. If the sound image is shifted from the front, move it back by [Sound Image LR (Front)] or [Sound Image LR (Rear)].
4 Touch [Level].
5 Touch [ ] or [ ] to adjust the sound level of the selected speaker.
NOTE• To initialize the Delay and Level settings, touch [Initialize] and [Yes] on the confirmation screen.
!KL19_AP_En.indb 54 2018/11/09 11:15:37
LƯU Ý
• Để khởi tạo cài đặt Độ trễ và Mức, chạm vào Initialize (Khởi tạo) và Yes (Có) trên màn hình xác nhận.

Điều khiển vô lăng
55Tiếng Việt
Điều khiển vô lăngThiết bị này có thể được vận hành bằng cách sử dụng các công tắc trên vô lăng.
LƯU Ý
• Điều khiển vô lăng được thay đổi tùy thuộc vào xe và cấp độ xe.
Thao tác sử dụng công tắc lái
Tên phím Nhấn Nhấn và giữ
Tăng âm lượng Tăng âm lượng liên tục
Giảm âm lượng Giảm âm lượng liên tục
MODE Nguồn chuyển đổi BẬT/TẮT tiếng
Chọn trạm phát radio cài sẵnChọn bản nhạc, tập tin, chương tiếp theo
Tìm kiếm trạm phát radio Chuyển tiếp tìm kiếm
Chọn trạm phát radio cài sẵnChọn bản nhạc, tập tin, chương trước đó
Tìm kiếm trạm phát radio Tìm kiếm ngược
Nhận cuộc gọi đến Thực hiện cuộc gọi điện thoại
Bỏ, từ chối cuộc gọi đến Kết thúc cuộc gọi điện thoại
Bỏ, từ chối cuộc gọi đến Kết thúc cuộc gọi điện thoại
VOICE
Khởi động Nhận dạng giọng nói của điện thoại thông minh (phụ thuộc vào điện thoại thông minh)
Kết thúc Nhận dạng giọng nói của điện thoại thông minh

Điều khiển vô lăng
56
Chế độ tìm kiếm trực tiếpSử dụng điều khiển từ xa, bạn có thể chuyển trực tiếp đến tập tin, bài hát, chương mong muốn v.v. bằng cách nhập số tương ứng với nội dung.
LƯU Ý
• Thao tác này không thể được thực hiện cho thiết bị USB và iPod.
1 Nhấn nút MODE (CHẾ ĐỘ) nhiều lần cho đến khi nguồn mong muốn xuất hiện.
2 Nhấn nút DIRECT (TRỰC TIẾP) để chọn nội dung.Các nội dung có sẵn khác nhau tùy thuộc vào loại nguồn.■ DVDSố tiêu đề/Số chương
■ Video-CD 1.X và 2.X (TẮT PBC)Số bản nhạc
■ Video-CD 2.X (BẬT PBC)Số ảnh nền/Số bản nhạc
■ Music CDSố bản nhạc
■ RadioGiá trị tần số
3 Nhập số lượng nội dung bạn muốn phát bằng bàn phím số.
4 Đối với DVD hoặc Video-CD, music CD, nhấn nút ENT.Đối với Radio, nhấn nút
Bluetooth Control
20
Playing the Bluetooth Audio Device
Most functions can be controlled from the source control screen.To select Bluetooth source, touch [Audio] icon on the source selection screen. (P.12)
Ñ Bluetooth basic operation
42
1
3
1 Information display
• Displays the current track information. • Connected device name.
2 Operation keys *
• [ ] : Searches for a file. See File search (P.21).
• [E] [F]: Searches for the previous/next content.Touch and hold to fast forward or fast backward.
• [D]: Plays.• [H]: Pauses.• [ ] : Repeats the current track/folder. Each
time you touch the key, repeat modes are switched in the following sequence:File repeat ( ), All songs repeat ( ), Repeat off ( )
• [ ] : Randomly plays all tracks in the current folder. Each time you touch the key, random modes are switched in the following sequence:All random ( ), Random off ( )
* These items appear only when the audio player which supports AVRCP profile is connected.
3 Playing time
For confirmation of current playing position.
4 [ ]
Bluetooth audio devices can be switched easily to play music. See Bluetooth Audio Device Change (P.21).
NOTE• The operation buttons, indications and
information displayed on the screen differ depending on the connected device.
• If the operation keys do not appear, operate from the player.
• Depending on your mobile phone or audio player, sound may be heard and controlled but text information may not appear.
• If the volume is too low, raise it on your mobile phone or audio player.
!KL19_AP_En.indb 20 2018/11/09 11:15:22
hoặc
Bluetooth Control
20
Playing the Bluetooth Audio Device
Most functions can be controlled from the source control screen.To select Bluetooth source, touch [Audio] icon on the source selection screen. (P.12)
Ñ Bluetooth basic operation
42
1
3
1 Information display
• Displays the current track information. • Connected device name.
2 Operation keys *
• [ ] : Searches for a file. See File search (P.21).
• [E] [F]: Searches for the previous/next content.Touch and hold to fast forward or fast backward.
• [D]: Plays.• [H]: Pauses.• [ ] : Repeats the current track/folder. Each
time you touch the key, repeat modes are switched in the following sequence:File repeat ( ), All songs repeat ( ), Repeat off ( )
• [ ] : Randomly plays all tracks in the current folder. Each time you touch the key, random modes are switched in the following sequence:All random ( ), Random off ( )
* These items appear only when the audio player which supports AVRCP profile is connected.
3 Playing time
For confirmation of current playing position.
4 [ ]
Bluetooth audio devices can be switched easily to play music. See Bluetooth Audio Device Change (P.21).
NOTE• The operation buttons, indications and
information displayed on the screen differ depending on the connected device.
• If the operation keys do not appear, operate from the player.
• Depending on your mobile phone or audio player, sound may be heard and controlled but text information may not appear.
• If the volume is too low, raise it on your mobile phone or audio player.
!KL19_AP_En.indb 20 2018/11/09 11:15:22
. Nội dung tương ứng với số bạn đã nhập
được phát.

Xử lý sự cố
57Tiếng Việt
Xử lý sự cố
Vấn đề và giải pháp
Nếu bạn gặp vấn đề khi vận hành sản phẩm này, hãy tham khảo phần này. Các vấn đề phổ biến nhất được liệt kê dưới đây, cùng với các nguyên nhân và giải pháp có khả năng. Nếu không thể tìm thấy giải pháp cho vấn đề của bạn tại đây, hãy liên hệ với đại lý của bạn hoặc Trung tâm bảo dưỡng Toyota gần nhất.
LƯU Ý
• Một số chức năng của thiết bị này có thể bị vô hiệu hóa bởi một số cài đặt được thực hiện trên thiết bị này.
• Những sự việc có vẻ là sự cố trong thiết bị của bạn có thể chỉ là kết quả của thao tác sai.
Giới thiệu về cài đặt• Không thể chọn đích đầu ra của nguồn phụ trong
vùng kép.• Không thể điều chỉnh âm lượng của loa phía sau.Chức năng vùng kép bị vô hiệu hóa. Đặt chức năng vùng kép thành bật. Xem Hệ thống
vùng kép (Tr.49).
Không thể thiết lập bộ cân bằng.Chức năng vùng kép được bật. Đặt chức năng vùng kép thành tắt. Xem Hệ thống
vùng kép (Tr.49).
Giới thiệu về thao tác âm thanhKhông thể chọn thư mục.Chức năng phát ngẫu nhiên được bật. Tắt chức năng ngẫu nhiên.
Không thể thực hiện phát lặp lại trong khi phát lại Video-CD.Chức năng PBC được bật. Tắt chức năng PBC.
Đĩa được chỉ định không phát, nhưng thay vào đó phát một đĩa khác thay thế.Đĩa khá bẩn. Vệ sinh đĩa. Xem phần Thận trọng khi xử lý đĩa
(Tr.5).Đĩa bị trầy xước nghiêm trọng. Thay vào đó hãy thử một đĩa khác.
Âm thanh bỏ qua khi một tập tin âm thanh đang được phát.Đĩa bị trầy xước hoặc bẩn. Vệ sinh đĩa. Xem phần Thận trọng khi xử lý đĩa
(Tr.5).Điều kiện ghi âm không tốt. Ghi lại tập tin hoặc sử dụng đĩa khác.
T-Link không có âm thanh. Xác minh rằng thiết bị đã cài đặt T-Link được chọn
trong cài đặt kết nối Bluetooth. Tăng âm lượng trên điện thoại thông minh của bạn. Hãy thử một ứng dụng âm nhạc khác. Một số ứng
dụng không hỗ trợ phát lại T-Link.(Ứng dụng Apple Music không hỗ trợ phát lại trong T-Link.)
Nguồn iPod hoặc Bluetooth không phát ra âm thanh. Nếu bạn đã sử dụng nguồn T-Link trước đó, hãy xác
minh rằng chức năng ghi màn hình iPhone đã được dừng.
Không thể vận hành T-Link bằng bảng điều khiển cảm ứng. Các chức năng hoạt động có sẵn có thể khác với các
chức năng hoạt động trên thiết bị. Một số chức năng không hoạt động bằng cách vận hành trên thiết bị này tùy thuộc vào thiết bị được kết nối.
Thông báo lỗi
Khi bạn không vận hành thiết bị chính xác, nguyên nhân lỗi sẽ xuất hiện dưới dạng thông báo trên màn hình.
Có lỗi trong hệ thống dây loa. Vui lòng kiểm tra các kết nối.Mạch bảo vệ đã được kích hoạt do dây loa bị chập hoặc đã tiếp xúc với khung xe. Dây hoặc cách điện dây loa khi thích hợp và tắt
nguồn và bật lại.
Lỗi nhiệtKhi nhiệt độ bên trong của thiết bị này tăng lên 60 °C trở lên, mạch bảo vệ được kích hoạt và bạn có thể không thể vận hành thiết bị. Sử dụng lại thiết bị sau khi giảm nhiệt độ của thiết
bị.
Lỗi cơ họcĐầu đĩa bị trục trặc. Lấy đĩa ra và thử lắp lại.
Lỗi đĩaKhông thể lắp đĩa không thể phát được. Đổi đĩa. Xem phần Các phương tiện và tập tin có
thể phát (Tr.61).
Lỗi đọcĐĩa khá bẩn. Vệ sinh đĩa. Xem phần Thận trọng khi xử lý đĩa
(Tr.5).Đĩa bị lộn ngược. Cho đĩa vào với mặt được dán nhãn ngửa lên.

Xử lý sự cố
58
Lỗi mã vùngĐĩa bạn muốn phát có mã vùng không thể phát được với thiết bị này. Xem phần Mã vùng trên thế giới (Tr.63) hoặc thử
đĩa khác.
Lỗi 07–67Thiết bị không hoạt động chính xác do một số lý do hoặc khác. Tắt nguồn rồi bật lại.
Không có thiết bị (Thiết bị USB)Thiết bị USB được chọn làm nguồn mặc dù không có thiết bị USB nào được kết nối. Thay đổi nguồn thành bất kỳ nguồn nào khác ngoài
USB/iPod. Kết nối thiết bị USB và thay đổi lại nguồn thành USB.
Ngắt kết nối ( trình phát âm thanh Bluetooth)Trình phát âm thanh qua iPod/Bluetooth được chọn làm nguồn mặc dù không có trình phát âm thanh qua iPod/Bluetooth nào được kết nối. Thay đổi nguồn thành bất kỳ nguồn nào khác ngoài
iPod/Âm thanh Bluetooth. Kết nối trình phát âm thanh iPod/Bluetooth và thay đổi lại nguồn thành iPod/Bluetooth.
Không có tập tin phương tiệnThiết bị USB được kết nối không chứa tập tin âm thanh có thể phát. Phương tiện được phát mà không có dữ liệu được ghi lại rằng thiết bị có thể phát. Xem phần Các phương tiện và tập tin có thể phát
(Tr.61) và thử một thiết bị USB khác.
Thiết bị USB trên hiện trạng phát hiện.Thiết bị USB đã kết nối được đánh giá dung lượng hiện tại cao hơn giới hạn cho phép. Kiểm tra thiết bị USB. Một số sự cố có thể đã xảy ra
với thiết bị USB được kết nối. Thay đổi nguồn thành bất kỳ nguồn nào khác ngoài
USB. Tháo thiết bị USB.

Phụ lục
59Tiếng Việt
Phụ lục
Phương tiện và tập tin có thể phát
Bạn có thể phát các loại phương tiện và tập tin khác nhau trên thiết bị này.
Danh sách đĩa có thể phát đượcLoại đĩa / Tiêu chuẩn Hỗ trợ Ghi chú
DVD DVD Video ⃝DVD Audio ×
DVD-VR ×
DVD-R*1 ⃝ • MP3/ WMA/ AAC/ WAV/ FLAC/ Vorbis/ MPEG1/ MPEG2/ MPEG4/ H.264/ WMV/ MKV phát lại
• Phát lại đa viền/ Đa luồng (Phát lại phụ thuộc vào điều kiện tác giả)
DVD-RW ⃝DVD+R ⃝DVD+RW ⃝DVD-R DL (Lớp đôi) ⃝ Chỉ định dạng video
DVD+R DL (Lớp đôi) ⃝DVD-RAM ×
CD Music CD*1 ⃝CD-ROM ⃝ • MP3/ WMA/ AAC/ WAV/ FLAC/ Vorbis phát lại
• Hỗ trợ đa luồng.• Không hỗ trợ viết gói
CD-R ⃝CD-RW ⃝DTS-CD ⃝Video CD (VCD) ⃝Super video CD ⃝Photo CD ×
CD-EXTRA △ Chỉ có thể phát phiên CD nhạc.
HDCD △ Chất lượng âm thanh CD nhạc bình thường
CCCD ×
Khác DualDisc ×
Super audio CD △ Chỉ có thể phát lớp CD.
⃝ : Có thể phát lại. *1 Không tương thích với đĩa 8 cm (3 inch).△ : Một phần có thể phát lại.× : Không thể phát lại.
■ Sử dụng DualDiscKhi phát “DualDisc” trên thiết bị này, bề mặt của đĩa không được phát có thể bị trầy xước trong khi đĩa được đưa vào hoặc lấy ra. Vì bề mặt CD nhạc không phù hợp với tiêu chuẩn CD, nên có lẽ không thể phát lại.(“DualDisc” là đĩa có một mặt chứa tín hiệu chuẩn DVD và mặt khác chứa tín hiệu CD nhạc.)
■ Giới thiệu về định dạng đĩaĐịnh dạng đĩa nên là một trong những định dạng sau đây.• ISO 9660 Level 1/2• Joliet• Romeo• Tên tập tin dài

Phụ lục
60
Giới thiệu về tập tinCác tập tin âm thanh và video sau đây được hỗ trợ.
■ Các tập tin âm thanh có thể phát
Định dạng Tốc độ bit Tần số lấy mẫu Số lượng bit
AAC-LC (.m4a) MPEG2/4 AAC LC HE-AAC(V1,V2)
8 – 320kbps, VBR 16 – 48 kHz 16 bit
MP3 (.mp3) MPEG 1/2 Audio Layer 3 8 – 320kbps, VBR 16 – 48 kHz 16 bit
WMA (.wma) Cấu hình Windows Media Audio L3 tiêu chuẩn
8 – 320kbps 16 – 48 kHz 16 bit
Linear PCM(WAVE)
Định dạng âm thanh dạng sóng RIFF
– 16 – 48 kHz (Đĩa),16 – 192 kHz (USB)
16/ 24 bit
FLAC (.flac) flac – 16 – 48 kHz (Đĩa),16 – 192 kHz (USB)
16/ 24 bit
Vorbis (.ogg) vorbis VBR 16 – 48 kHz 16 bit
DSD (.dsf, .dff )* DSF, DSDIFF – 2,8 MHz, 5,6 MHz, 11,2 MHz 1 bit
• Nếu nhạc của CD bình thường và các hệ thống phát lại khác được ghi trong cùng một đĩa, chỉ có hệ thống phát lại được ghi ở lần đặt đầu tiên được phát.
• Các tập tin WMA và AAC có DRM không thể phát.• Âm thanh DSD được chuyển đổi thành âm thanh PCM trước khi phát lại.• Thẻ EmChinks của DSDIFF không được hỗ trợ.• Mặc dù các tập tin âm thanh tuân thủ các tiêu chuẩn được liệt kê ở trên, chúng có thể không được phát tùy thuộc vào
loại hoặc điều kiện của phương tiện hoặc thiết bị.• Thiết bị này hỗ trợ phát lại các tập tin Âm thanh có độ phân giải cao.• Khuyến nghị rằng cấu hình hệ thống âm thanh trên xe hơi có tất cả các sản phẩm tương thích Âm thanh độ phân giải
cao từ đầu phát đến loa để thưởng thức âm thanh chất lượng cao.* DSD chỉ khả dụng đối với AVX cao cấp.
■ Các tập tin video được chấp nhận
Cấu hình Kích cỡ hình ảnh tối đa Tố độ bit tối đa Định dạng âm thanh
MPEG-1 (.mpg, .mpeg) – 352 × 240, 352 × 288 1,5 Mbps MPEG Audio Layer 2
MPEG-2 (.mpg, .mpeg) MP@ML 720 × 480, 720 × 576 8 Mbps MPEG Audio Layer 2
H.264/MPEG-4 AVC (.mp4, .m4v, .avi, .flv, .f4v)
Cấu hình cơ sở, cấu hình chính
1920 × 1080 (30 fps) 8 Mbps MP3, AAC
MPEG-4 (.mp4, .avi) Cấu hình đơn giản nâng cao
1920 × 1080 (30 fps) 8 Mbps MP3, AAC
WMV (.wmv) Cấu hình chính 1920 × 1080 (30 fps) 8 Mbps WMA
MKV (.mkv)Định dạng video tuân theo H.264/MPEG-4 AVC, MPEG-4, WMV
MP3, AAC, WMA, Vorbis, FLAC
• Thiết bị này chỉ có thể phát lại các tập tin nhỏ hơn 4 GB.
■ Giới hạn về cấu trúc của tập tin và thư mụcPhương tiện đĩa Thiết bị USB
Số lớp thư mục tối đa 8 8
Số lượng tập tin tối đa (mỗi thư mục) 999 999
Số lượng tập tin thư mục (mỗi thư mục) 5000 9999
Số lượng tập tin thư mục (mỗi thư thiết bị) 5000 Không giới hạn
• Bạn có thể nhập tên thư mục và tên tập tin có 255 ký tự byte trở xuống.• Không thể phát các tập tin trong thư mục có tên thư mục bắt đầu bằng dấu chấm (.).

Phụ lục
61Tiếng Việt
Mã vùng trên thế giới
Đầu đĩa DVD được cấp mã vùng theo quốc gia hoặc khu vực được bán trên thị trường, như thể hiện trong bản đồ sau.
1
2
4
1
5
4
5
2
1
2
6
3
■ Dấu đĩa DVD
ALL
Cho biết số vùng. Các đĩa có dấu này có thể được phát bằng bất kỳ đầu DVD nào.
8
Cho biết số lượng ngôn ngữ âm thanh được ghi. Tối đa 8 ngôn ngữ có thể được ghi lại trong một bộ phim. Bạn có thể chọn một ngôn ngữ yêu thích.
32
Cho biết số lượng ngôn ngữ có phụ đề được ghi. Tối đa 32 ngôn ngữ có thể được ghi lại.
9
Nếu một đĩa DVD có cảnh được quay từ nhiều góc, bạn có thể chọn một góc yêu thích.
16:9 LB
Cho biết loại màn hình dùng cho hình ảnh. Dấu bên trái cho biết hình ảnh rộng (16:9) được hiển thị trên màn hình TV tiêu chuẩn (4:3) với dải màu đen ở cả trên cùng và dưới cùng của màn hình (hộp chữ).
■ Dấu hiệu quy định về thao tácVới DVD này, một số chức năng của thiết bị này chẳng hạn như chức năng phát có thể bị hạn chế tùy thuộc vào vị trí mà DVD đang phát. Trong trường hợp này, các dấu sau đây sẽ xuất hiện trên màn hình. Để biết thêm thông tin, tham khảo hướng dẫn sử dụng đĩa.
Dấu cấm
■ Đĩa có thời gian sử dụng giới hạnKhông để đĩa có thời gian sử dụng giới hạn trong thiết bị này. Nếu bạn tải một đĩa đã hết hạn, bạn có thể không thể lấy đĩa đó khỏi thiết bị này.

Phụ lục
62
Mã ngôn ngữ DVD
Mã Ngôn ngữaa Tiếng Afarab Tiếng Abkhaziaaf Tiếng Afrikaansam Tiếng Amharaar Tiếng Ả Rậpas Tiếng Assamay Tiếng Aymaraaz Tiếng Azerbaijanba Tiếng Bashkirbe Tiếng Belarusbg Tiếng Bulgariabh Tiếng Bhojpuribi Tiếng Bislamabn Tiếng Bengalbo Tiếng Tây Tạngbr Tiếng Bretonca Tiếng Catalunyaco Tiếng Corsecs Tiếng Séccy Tiếng Walesda Tiếng Đan Mạchde Tiếng Đứcdz Tiếng Bhutanel Tiếng Hy Lạpen Tiếng Anheo Tiếng Esperantoes Tiếng Tây Ban Nhaet Tiếng Estoniaeu Tiếng Basquefa Tiếng Ba Tưfi Tiếng Phần Lanfj Tiếng Fijifo Tiếng Faroefr Tiếng Phápfy Tiếng Frisiaga Tiếng Irelandgd Tiếng Gael Scotlandgl Tiếng Galiciagn Tiếng Guaranigu Tiếng Gujaratha Tiếng Hausahe Tiếng Hebrewhi Tiếng Hindihr Tiếng Croatiahu Tiếng Hungaryhy Tiếng Armenia
Mã Ngôn ngữia Tiếng Interlinguaie Tiếng Interlingueik Tiếng Inupiatid Tiếng Indonesiais Tiếng Icelandit Tiếng Ýja Tiếng Nhậtjv Tiếng Javaka Tiếng Gruziakk Tiếng Kazakhkl Tiếng Greenlandkm Tiếng Campuchiakn Tiếng Kannadako Tiếng Hàn Quốcks Tiếng Kashmirku Tiếng Kurdky Tiếng Kyrgyzla Tiếng Latinhlb Tiếng Luxembourgln Tiếng Lingalalo Tiếng Làolt Tiếng Litvalv Tiếng Latviamg Tiếng Malagasymi Tiếng Maorimk Tiếng Macedoniaml Tiếng Malayalammn Tiếng Mông Cổmo Tiếng Moldovamr Tiếng Marathims Tiếng Mã Laimt Tiếng Maltamy Tiếng Miến Điệnna Tiếng Naurune Tiếng Nepalnl Tiếng Hà Lanno Tiếng Na-uyoc Tiếng Occitanom Tiếng Oromoor Tiếng Oriyapa Tiếng Punjabpl Tiếng Ba Lanps Tiếng Pashtunpt Tiếng Bồ Đào Nhaqu Tiếng Quechuarm Tiếng Romansh
Mã Ngôn ngữrn Tiếng Kirundiro Tiếng Rumaniru Tiếng Ngarw Tiếng Kinyarwandasa Tiếng Phạnsd Tiếng Sindhsg Tiếng Sanghosh Tiếng Serbia-Croatiasi Tiếng Sinhalask Tiếng Slovaksl Tiếng Sloveniasm Tiếng Samoasn Tiếng Shonaso Tiếng Somalisq Tiếng Albaniasr Tiếng Serbiass Tiếng Swazist Tiếng Sothosu Tiếng Sundasv Tiếng Thụy Điểnsw Tiếng Swahilita Tiếng Tamilte Tiếng Telugutg Tiếng Tajikth Tiếng Tháiti Tiếng Tigrinyatk Tiếng Turkmentl Tiếng Tagalogtn Tiếng Tswanato Tiếng Tongatr Tiếng Thổ Nhĩ Kỳts Tiếng Tsongatt Tiếng Tatartw Tiếng Twiuk Tiếng Ukrainaur Tiếng Urduuz Tiếng Uzbekvi Tiếng Việtvo Tiếng Volapukwo Tiếng Wolofxh Tiếng Xhosayo Tiếng Yorubazh Tiếng Trungzu Tiếng Zulu

Phụ lục
63Tiếng Việt
Thông số kỹ thuật
■ Phần màn hìnhKích cỡ ảnh : rộng 6,8 inch (chéo) : 151,8 mm (R) × 79,68 mm (C)
Hệ thống hiển thị : Bảng điều khiển TN LCD trong suốt
Hệ thống truyền động : Hệ ma trận hoạt hiệu dụng TFT
Số điểm ảnh : 1.152.000 (800N x 480D x RGB)
Điểm ảnh thực : 99,99 %
Bố trí điểm ảnh : Bố trí dải RGB
Đèn nền : LED
■ Phần đầu phát DVDBộ biến đổi kỹ thuật số/ tương tự : 24/ 32 bit
Bộ giải mã âm thanh : Linear PCM/ Dolby Audio/ MP3/ WMA/ AAC/ WAV/
FLAC/ Vorbis
Bộ giải mã video : MPEG1/ MPEG2/ MPEG4/ WMV/ H.264/ MKV
Méo âm & méo rung : Dưới giới hạn đo được
Tần số đáp ứng • 96 kHz : 20 – 44.000 Hz • 48 kHz : 20 – 22.000 Hz • 44.1 kHz : 20 – 20.000 Hz
Tổng méo hài hòa : 0,030 % (1 kHz)
Tỉ số tín hiệu trên nhiễu (dB) : 75 dB
Dải tần nhạy sáng : 75 dB
Định dạng đĩa : DVD-Video/ VIDEO-CD/ CD-DA/ DVD-R/DVD-RW/
DVD+R/+RW
Định lượng số bit : 16/ 20/ 24 bit
■ Phần giao diện USBChuẩn USB : USB 2.0 tốc độ cao
Hệ thống tập tin : FAT 16/ 32, exFAT, NTFS
Điện áp nguồn tối đa : DC 5 V 1,0 A × 1
Bộ biến đổi kỹ thuật số/ tương tự : 24/ 32 bit
Bộ giải mã âm thanh : MP3/ WMA/ AAC/ WAV/ FLAC/ Vorbis/ DSD*
* DSD chỉ khả dụng đối với AVX cao cấp.
Bộ giải mã video : MPEG1/ MPEG2/ MPEG4/ WMV/ H.264/ MKV
■ Phần BluetoothCông nghệ : Bluetooth Ver.4.1
Tần số : 2,402 – 2,480 GHz
Công suất ra : +4dBm (MAX), 0dBm (AVE), Power Class2
Biên độ truyền dữ liệu tối đa : Xấp xỉ 10m đường thẳng (32,8 ft)
Bộ giải mã âm thanh : SBC/ AAC
Cấu hình (Hỗ trợ đa cấu hình) • HFP (V1.7) (Cấu hình rảnh tay) • SPP (Cấu hình cổng nối tiếp) • A2DP (Cấu hình phân bổ âm thanh tiên tiến) • AVRCP (V1.6) (Cấu hình điều khiển âm thanh/hình
ảnh từ xa) • PBAP (Cấu hình truy cập danh bạ điện thoại)
■ Phần FM tunerDải tần số (bước) : 87,5 MHz – 108,0 MHz (50 kHz)
Độ nhạy khả dụng (S/N: 30 dB) : 9,3 dBf (0,8 μV/ 75 Ω)
Độ nhạy tĩnh (S/N: 46 dB) : 15,2 dBf (1,6 μV/ 75 Ω)
Tần số đáp ứng : 30 Hz – 15 kHz
Tỉ số tín hiệu trên nhiễu (dB) : 60 dB (ĐƠN KÊNH)
Độ chọn lọc (± 400 kHz) : Trên 80 dB
Tách âm thanh nổi : 45 dB (1 kHz)

Phụ lục
64
■ Phần AM tunerDải tần số (bước) : 531 kHz – 1602 kHz (9 kHz)
Độ nhạy khả dụng : 28 dBμ (25 μV)
■ Phần VideoHệ thống màu của Đầu vào video ngoại vi : NTSC
Mức âm thanh ngoại vi vào tối đa (chân cắm mini) : 2 V/ 25 kΩMức video ra : 1 Vp-p/ 75 Ω
■ Phần âm thanhCông suất tối đa (Trước & Sau) : 50 W × 4
Công suất ra thông thường (Trước & Sau) Công suất toàn dải (dưới 10% THD)
: 20 W × 4
Dải tần số đầu ra : 20 – 88.000 Hz
Trở kháng loa : 4 – 8 Ω
Bộ cân bằng âm Dải âm tần: 13 tần số
Dải âm tần (DẢI ÂM TẦN 1 – 13) : 62,5/ 100/ 160/ 250/ 400/ 630/ 1k/ 1,6k/ 2,5k/ 4k/ 6,3k/ 10k/ 16k Hz
Bù : -9/-8/-7/-6/-5/-4/-3/-2/-1/0/1/2/3/4/5/6/7/8/9 dB
■ Thông số chungĐiện áp hoạt động : 14,4 V (có thể cho phép 10,5 – 16 V)
Điện áp tiêu thụ tối đa : 15 A
Kích thước (R × D × C) : 205 × 104 × 163,6 mm
Trọng lượng : 2,1 kg
LƯU Ý
• Mặc dù các điểm ảnh thực cho bảng điều khiển tinh thể lỏng được đưa ra là 99,99% trở lên, 0,01% điểm ảnh có thể không sáng hoặc có thể sáng không chính xác.
Thông số kỹ thuật có thể thay đổi mà không thông báo.

Phụ lục
65Tiếng Việt
Giới thiệu về thiết bị này
■ Nhãn hiệu thương mại và giấy phép
• Logo và nhãn của từ Bluetooth® là nhãn hiệu thương mại được đăng ký bởi Bluetooth SIG, Inc. và việc sử dụng các nhãn hiệu này của JVC KENWOOD đã được cấp phép. Các nhãn hiệu thương mại và tên thương mại khác thuộc các chủ sở hữu tương ứng.
• Được sản xuất theo giấy phép của Dolby Laboratories. Biểu tượng Dolby, Dolby Audio và double-D là nhãn hiệu thương mại của Dolby Laboratories.
• là nhãn hiệu thương mại của DVD Format/Logo Licensing Corporation được đăng ký ở Hoa Kỳ, Nhật Bản và các quốc gia khác.
• Sản phẩm này kết hợp các công nghệ chống sao chép được bảo vệ bởi các bằng sáng chế đăng tại Hoa Kỳ và các quyền sở hữu trí tuệ khác của Rovi Corporation. Cấm sao chép ngược và tháo rời sản phẩm.
• Microsoft và Windows Media là nhãn hiệu thương mại được đăng ký hoặc nhãn hiệu thương mại của Micro-soft Corporation ở Hoa Kỳ và/hoặc các quốc gia khác.
• Phần mềm này dựa một phần vào hoạt động của independent JPEG Group.
• Logo “AAC” là nhãn hiệu thương mại của Dolby Laboratories.
• Việc sử dụng nhãn Made for Apple có nghĩa là phụ kiện đã được thiết kế để kết nối riêng cho (các) sản phẩm Apple được xác định và đã được nhà phát triển chứng nhận để đáp ứng theo tiêu chuẩn của Apple. Apple không chịu trách nhiệm vận hành thiết bị này hoặc sự tuân thủ của thiết bị này với các tiêu chuẩn về an toàn và quản lý. Lưu ý rằng việc sử dụng phụ kiện này với một sản phẩm của Apple có thể ảnh hưởng đến hiệu suất không dây.
• Apple, iPhone, iPod, iPod touch, iTunes và Lightning là thương hiệu của Apple Inc., được đăng ký ở Hoa Kỳ và các nước khác.
• Android, Google Play và các nhãn hiệu khác là thương hiệu của Google LLC.
• Sản phẩm này bao gồm các phông chữ FontAvenue® được cấp phép bởi NEC Corporation. FontAvenue là nhãn hiệu đã đăng ký của NEC Corporation.
• Sản phẩm này bao gồm công nghệ “Ubiquitous
QuickBoot TM” được phát triển bởi Ubiquitous Corp Ubiquitous QuickBoot TM là thương hiệu của
• Ubiquitous Corp. Copyright© 2017 Ubiquitous Corp. Bảo lưu mọi quyền.
• SẢN PHẨM NÀY ĐƯỢC CẤP PHÉP THEO GIẤY PHÉP
DANH MỤC BẰNG SÁNG CHẾ AVC CHO CÁ NHÂN NGƯỜI DÙNG HOẶC CÁC MỤC ĐÍCH SỬ DỤNG KHÁC THEO ĐÓ NGƯỜI DÙNG SẼ KHÔNG NHẬN ĐƯỢC THÙ LAO ĐỂ (i) MÃ HÓA VIDEO THEO TIÊU CHUẨN AVC (“AVC VIDEO”) VÀ/HOẶC (ii) GIẢI MÃ VIDEO AVC ĐƯỢC MÃ HÓA BỞI MỘT NGƯỜI TIÊU DÙNG THAM GIA VÀ HOẠT ĐỘNG CÁ NHÂN/VÀ/HOẶC THU ĐƯỢC TỪ NHÀ CUNG CẤP VIDEO. KHÔNG CẤP PHÉP HOẶC HÀM Ý CẤP PHÉP CHO BẤT KỲ MỤC ĐÍCH SỬ DỤNG NÀO KHÁC. ĐỂ BIẾT THÔNG TIN BỔ SUNG TỪ MPEG L.L.C. VUI LÒNG TRUY CẬP HTTP://WWW.MPEGLA.COM
• SẢN PHẨM NÀY ĐƯỢC CẤP PHÉP THEO GIẤY PHÉP DANH MỤC BẰNG SÁNG CHẾ HÌNH ẢNH MPEG-4 CHO MỤC ĐÍCH SỬ DỤNG CỦA CÁ NHÂN VÀ PHI THƯƠNG MẠI CỦA NGƯỜI TIÊU DÙNG ĐỂ (i) MÃ HÓA VIDEO THEO TIÊU CHUẨN HÌNH ẢNH MPEG-4 (“MPEG-4 VIDEO”) VÀ/HOẶC (ii) GIẢI MÃ VIDEO MPEG-4 ĐƯỢC MÃ HÓA BỞI NGƯỜI TIÊU DÙNG THAM GIA VÀO HOẠT ĐỘNG CÁ NHÂN VÀ PHI THƯƠNG MẠI VÀ/HOẶC NHẬN ĐƯỢC TỪ NHÀ CUNG CẤP VIDEO ĐƯỢC CẤP PHÉP BỞI MPEG LA ĐỂ CUNG CẤP VIDEO MPEG-4. KHÔNG CẤP GIẤY PHÉP HOẶC HÀM Ý CẤP PHÉP CHO BẤT KỲ MỤC ĐÍCH SỬ DỤNG NÀO KHÁC. ĐỂ BIẾT THÔNG TIN BỔ SUNG BAO GỒM THÔNG TIN LIÊN QUAN ĐẾN SỬ DỤNG THƯƠNG MẠI, NỘI BỘ, QUẢNG CÁO VÀ XIN GIẤY PHÉP TỪ MPEG LA, LLC. VUI LÒNG TRUY CẬP HTTP://WWW.MPEGLA.COM.
• SẢN PHẨM NÀY ĐƯỢC CẤP PHÉP THEO GIẤY PHÉP DANH MỤC BẰNG SÁNG CHẾ VC-1 CHO MỤC ĐÍCH SỬ DỤNG CỦA CÁ NHÂN VÀ PHI THƯƠNG MẠI CỦA NGƯỜI TIÊU DÙNG ĐỂ (i) MÃ HÓA VIDEO THEO TIÊU CHUẨN VC-1 (“VIDEO VC-1”) VÀ/HOẶC (ii) GIẢI MÃ VIDEO VC-1 ĐƯỢC MÃ HÓA BỞI MỘT NGƯỜI TIÊU DÙNG THAM GIA VÀO HOẠT ĐỘNG CÁ NHÂN VÀ PHI THƯƠNG MẠI VÀ/HOẶC THU ĐƯỢC TỪ CÁC NHÀ CUNG CẤP VIDEO KHÁC ĐƯỢC CẤP GIẤY PHÉP ĐỂ CUNG CẤP VIDEO VC-1. KHÔNG CẤP GIẤY PHÉP HOẶC HÀM Ý CẤP PHÉP CHO BẤT KỲ MỤC ĐÍCH SỬ DỤNG NÀO KHÁC. ĐỂ BIẾT THÔNG TIN BỔ SUNG TỪ MPEG LA, L.L.C, VUI LÒNG TRUY CẬP HTTP://WWW.MPEGLA. COM
• libFLAC Bản quyền (C) 2000-2009 Josh Coalson Bản quyền (C) 2011-2013 Xiph.Org Foundation Được phép phân phối lại và sử dụng theo dạng nguồn và dữ liệu nhị phân, có hoặc không có sửa đổi với điều kiện đáp ứng các điều kiện sau:

Phụ lục
66
– :Việc phân phối lại mã nguồn phải giữ lại thông báo bản quyền trên, danh sách các điều kiện này và tuyên bố từ bỏ quyền.
– :Việc phân phối lại dưới dạng dữ liệu nhị phân phải sao chép lại thông báo bản quyền trên, danh sách các điều kiện này và tuyên bố từ bỏ quyền trong tài liệu này và/hoặc các tài liệu khác được cung cấp khi phân phối.
– :Không được sử dụng tên của Xiph.org Foundation hay tên của những người đóng góp để công nhận hoặc quảng cáo các sản phẩm có sử dụng phần mềm này mà không có văn bản cho phép từ trước.
PHẦN MỀM NÀY ĐƯỢC CUNG CẤP BỞI CÁC CHỦ SỞ HỮU BẢN QUYỀN VÀ NHỮNG NGƯỜI ĐÓNG GÓP VÀ BẤT KỲ SỰ BẢO ĐẢM RÕ RÀNG HOẶC NGỤ Ý NÀO, BAO GỒM, NHƯNG KHÔNG GIỚI HẠN, CÁC BẢO ĐẢM NGỤ Ý VỀ KHẢ NĂNG CÓ THỂ BÁN ĐƯỢC VÀ TÍNH PHÙ HỢP CHO MỤC ĐÍCH CỤ THỂ, ĐỀU BỊ TỪ BỎ. TRONG BẤT KỲ TRƯỜNG HỢP NÀO, QUỸ HOẶC NHỮNG NGƯỜI ĐÓNG GÓP CHO QUỸ KHÔNG CHỊU TRÁCH NHIỆM ĐỐI VỚI HƯ HẠI TRỰC TIẾP, GIÁN TIẾP, NGẪU NHIÊN, ĐẶC BIỆT, MANG TÍNH RĂN ĐE, HOẶC HẬU QUẢ (BAO GỒM, NHƯNG KHÔNG GIỚI HẠN, THU MUA HÀNG HÓA HOẶC DỊCH VỤ THAY THẾ; MẤT CÔNG DỤNG, DỮ LIỆU, HOẶC LỢI NHUẬN; HOẶC GIÁN ĐOẠN KINH DOANH) GÂY RA VÀ DỰA TRÊN NGUYÊN TẮC TRÁCH NHIỆM, TRONG HỢP ĐỒNG, TRÁCH NHIỆM TUYỆT ĐỐI, HAY VI PHẠM DÂN SỰ (BAO GỒM CẢ SỰ SƠ SUẤT HOẶC THEO CÁCH KHÁC) PHÁT SINH THEO BẤT KỲ CÁCH NÀO TỪ VIỆC SỬ DỤNG PHẦN MỀM NÀY, KỂ CẢ NẾU ĐƯỢC THÔNG BÁO VỀ KHẢ NĂNG XẢY RA HƯ HẠI ĐÓ.
• libvorbis Bản quyền (c) 2002-2008 Xiph.org Foundation Được phép phân phối lại và sử dụng theo dạng nguồn và dữ liệu nhị phân, có hoặc không có sửa đổi với điều kiện đáp ứng các điều kiện sau:– :Việc phân phối lại mã nguồn phải giữ lại thông
báo bản quyền trên, danh sách các điều kiện này và tuyên bố từ bỏ quyền.
– :Việc phân phối lại dưới dạng dữ liệu nhị phân phải sao chép lại thông báo bản quyền trên, danh sách các điều kiện này và tuyên bố từ bỏ quyền trong tài liệu này và/hoặc các tài liệu khác được cung cấp khi phân phối.
– :Không được sử dụng tên của Xiph.org Foundation hay tên của những người đóng góp để công nhận hoặc quảng cáo các sản phẩm có sử dụng phần mềm này mà không có văn bản cho phép từ trước.
PHẦN MỀM NÀY ĐƯỢC CUNG CẤP BỞI CÁC CHỦ SỞ HỮU BẢN QUYỀN VÀ NHỮNG NGƯỜI ĐÓNG GÓP VÀ BẤT KỲ SỰ BẢO ĐẢM RÕ RÀNG HOẶC NGỤ Ý NÀO, BAO GỒM,NHƯNG KHÔNG GIỚI HẠN, CÁC BẢO ĐẢM NGỤ Ý VỀ KHẢ NĂNG CÓ THỂ BÁN ĐƯỢC VÀ TÍNH PHÙ HỢP CHO MỤC ĐÍCH CỤ THỂ, ĐỀU BỊ TỪ BỎ. TRONG BẤT KỲ TRƯỜNG HỢP NÀO, QUỸ HOẶC NHỮNG NGƯỜI ĐÓNG GÓP CHO QUỸ KHÔNG CHỊU TRÁCH NHIỆM ĐỐI VỚI HƯ HẠI TRỰC TIẾP, GIÁN TIẾP, NGẪU NHIÊN, ĐẶC BIỆT, MANG TÍNH RĂN ĐE, HOẶC HẬU QUẢ (BAO GỒM, NHƯNG KHÔNG GIỚI HẠN, THU MUA HÀNG HÓA
HOẶC DỊCH VỤ THAY THẾ; MẤT CÔNG DỤNG, DỮ LIỆU, HOẶC LỢI NHUẬN; HOẶC GIÁN ĐOẠN KINH DOANH) GÂY RA VÀ DỰA TRÊN NGUYÊN TẮC TRÁCH NHIỆM, TRONG HỢP ĐỒNG, TRÁCH NHIỆM TUYỆT ĐỐI, HAY VI PHẠM DÂN SỰ (BAO GỒM CẢ SỰ SƠ SUẤT HOẶC THEO CÁCH KHÁC) PHÁT SINH THEO BẤT KỲ CÁCH NÀO TỪ VIỆC SỬ DỤNG PHẦN MỀM NÀY, KỂ CẢ NẾU ĐƯỢC THÔNG BÁO VỀ KHẢ NĂNG XẢY RA HƯ HẠI ĐÓ.
• libogg Bản quyền (c) 2002. Xiph.org Foundation Được phép phân phối lại và sử dụng theo dạng nguồn và dữ liệu nhị phân, có hoặc không có sửa đổi với điều kiện đáp ứng các điều kiện sau:– :Việc phân phối lại mã nguồn phải giữ lại thông
báo bản quyền trên, danh sách các điều kiện này và tuyên bố từ bỏ quyền.
– :Việc phân phối lại dưới dạng dữ liệu nhị phân phải sao chép lại thông báo bản quyền trên, danh sách các điều kiện này và tuyên bố từ bỏ quyền trong tài liệu này và/hoặc các tài liệu khác được cung cấp khi phân phối.
– :Không được sử dụng tên của Xiph.org Foundation hay tên của những người đóng góp để công nhận hoặc quảng cáo các sản phẩm có sử dụng phần mềm này mà không có văn bản cho phép từ trước.
PHẦN MỀM NÀY ĐƯỢC CUNG CẤP BỞI CÁC CHỦ SỞ HỮU BẢN QUYỀN VÀ NHỮNG NGƯỜI ĐÓNG GÓP VÀ BẤT KỲ SỰ BẢO ĐẢM RÕ RÀNG HOẶC NGỤ Ý NÀO, BAO GỒM, NHƯNG KHÔNG GIỚI HẠN, CÁC BẢO ĐẢM NGỤ Ý VỀ KHẢ NĂNG CÓ THỂ BÁN ĐƯỢC VÀ TÍNH PHÙ HỢP CHO MỤC ĐÍCH CỤ THỂ, ĐỀU BỊ TỪ BỎ. TRONG BẤT KỲ TRƯỜNG HỢP NÀO, QUỸ HOẶC NHỮNG NGƯỜI ĐÓNG GÓP CHO QUỸ KHÔNG CHỊU TRÁCH NHIỆM ĐỐI VỚI HƯ HẠI TRỰC TIẾP, GIÁN TIẾP, NGẪU NHIÊN, ĐẶC BIỆT, MANG TÍNH RĂN ĐE, HOẶC HẬU QUẢ (BAO GỒM, NHƯNG KHÔNG GIỚI HẠN, THU MUA HÀNG HÓA HOẶC DỊCH VỤ THAY THẾ; MẤT CÔNG DỤNG, DỮ LIỆU, HOẶC LỢI NHUẬN; HOẶC GIÁN ĐOẠN KINH DOANH) GÂY RA VÀ DỰA TRÊN NGUYÊN TẮC TRÁCH NHIỆM, TRONG HỢP ĐỒNG, TRÁCH NHIỆM TUYỆT ĐỐI, HAY VI PHẠM DÂN SỰ (BAO GỒM CẢ SỰ SƠ SUẤT HOẶC THEO CÁCH KHÁC) PHÁT SINH THEO BẤT KỲ CÁCH NÀO TỪ VIỆC SỬ DỤNG PHẦN MỀM NÀY, KỂ CẢ NẾU ĐƯỢC THÔNG BÁO VỀ KHẢ NĂNG XẢY RA HƯ HẠI ĐÓ.
■ Nhãn dán sản phẩm sử dụng laze
Nhãn dán được dán vào khung/sườn sản phẩm và cho biết sản phẩm sử dụng tia laze đã được phân loại là Loại 1. Điều này có nghĩa là sản phẩm này đang sử dụng tia laze loại yếu. Không có nguy cơ phát bức xạ nguy hiểm bên ngoài sản phẩm.

Phụ lục
67Tiếng Việt
■ CẢNH BÁO FCCThiết bị này có thể tạo ra hoặc sử dụng năng lượng tần số radio. Thay đổi hoặc sửa đổi thiết bị này có thể gây nhiễu có hại trừ khi các sửa đổi được phê duyệt rõ ràng tronghướng dẫn sử dụng. Người dùng có thể mất quyền vận hành thiết bị này nếu thực hiện những thay đổi hoặc sửa đổi trái phép.
LƯU Ý
• Thiết bị này đã được thử nghiệm và công nhận tuân thủ các giới hạn đối với thiết bị kỹ thuật số Hạng B, theo Phần 15 của Quy tắc FCC. Những giới hạn này được thiết kế để cung cấp sự bảo vệ hợp lý chống lại tình trạng gây nhiễu có hại khi lắp đặt ở khu dân cư.
• Thiết bị này tạo, sử dụng và có thể phát ra năng lượng tần số radio và, nếu không được cài đặt và sử dụng theo hướng dẫn có thể gây nhiễu có hại cho việc truyền thông radio. Tuy nhiên, không có gì đảm bảo rằng tình trạng nhiễu sẽ không xảy ra trong lần cài đặt cụ thể. Nếu thiết bị này gây nhiễu có hại cho việc thu sóng radio hoặc truyền hình, tình trạng này có thể được xác định bằng cách tắt và bật thiết bị, người dùng được khuyến khích thử khắc phục nhiễu bằng một hoặc nhiều biện pháp sau đây:– Xoay hoặc di chuyển các ăng ten thu.– Tăng khoảng cách giữa các thiết bị và máy thu.– Kết nối thiết bị qua ổ cắm trên một mạch điện
khác với mạch điện mà máy thu được kết nối.– Tham khảo ý kiến đại lý hoặc kỹ thuật viên radio/
TV có kinh nghiệm để được giúp đỡ.
Tuyên bố về sự phù hợp liên quan đến Chỉ thị RE 2014/53/EUTuyên bố về sự phù hợp liên quan đến Chỉ thị RoHS 2011/65/EUNhà sản xuất:JVC KENWOOD Corporation 3-12, Moriyacho, Kanagawa-ku, Yokohama-shi, Kanagawa 221-0022, NHẬT BẢNĐại diện EU:JVCKENWOOD Europe B.V. Amsterdamseweg 37, 1422 AC UITHOORN, HÀ LAN
Tiếng ViệtTheo đây, JVC KENWOOD tuyên bố rằng thiết bị radio DDXGT701R/ DDXGT702L/ DDXGT704R/ DDXGT501R/ DDXGT502L tuân thủ Chỉ thị 2014/53/EU. Toàn văn tuyên bố về sự phù hợp với EU có thể được tìm thấy tại địa chỉ internet sau đây:
FrançaisPar la présente, JVC KENWOOD déclare que l’équipement radio DDXGT701R/ DDXGT702L/ DDXGT704R/ DDXGT501R/ DDXGT502L est conforme à la directive 2014/53/UE. L’intégralité de la déclaration de conformité UE est disponible à l’adresse Internet suivante :
EspañolPor la presente, JVC KENWOOD declara que el equipo de radio DDXGT701R/ DDXGT702L/ DDXGT704R/ DDXGT501R/ DDXGT502L cumple la Directiva 2014/53/EU. El texto completo de la declaración de conformidad con la UE está disponible en la siguiente dirección de internet:
PortuguêsDeste modo, a JVC KENWOOD declara que o equipamento de rádio DDXGT701R/ DDXGT702L/ DDXGT704R/ DDXGT501R/ DDXGT502L está em conformidade com a Diretiva 2014/53/UE. O texto integral da declaração de conformidade da UE está disponível no seguinte endereço de internet:
URL: http://www.kenwood.com/cs/ce/eudoc/

T-Link
68
T-Link (Chỉ dùng cho AVX cao cấp _ Cài đặt bổ sung)
Tải xuống "T-Link" từ App Store và cài đặt "T-Link" trên iPhone của bạn.
2
4
5
3
1
6

69Tiếng Việt
T-Link (Chỉ dùng cho AVX cao cấp _ Cài đặt bổ sung)
Cách sử dụng “T-Link” với iPhone T-Link của bạn hoạt động với iOS11 trở lên.
⃝ Đảm bảo rằng biểu tượng ghi màn hình có màu đỏ, sau đó kết nối cáp USB.
7
8
9
10
11
12
13
Sẵn sàng sử dụng chức năng T-link. .

THÔNG BÁO CHO CHỦ SỞ HỮUVui lòng giữ lại tập sách này và viết số sê-ri của sản phẩm này để nhận dạng và báo cáo chính xác cho cảnh sát địa phương trong trường hợp bị trộm cắp.
Cách xác nhận số sê-ri của thiết bị này.1 Nhấn nút [ ].2 Chạm vào [ ].3 Chạm vào [General] (Chung).4 Chạm vào [Software Information] (Thông tin phần mềm).5 Xác nhận số sê-ri.
Số sê-ri _____________________________________
Tên model nhà sản xuất AVX cao cấp [DDXGT702L] AVX cơ bản [DDXGT502L]

ENGLISHAdditional Copyrights• Apple, iPhone, iPod, iPod touch, iTunes, Apple
Music, and Lightning are trademarks of Apple Inc., registered in the U.S. and other countries.
• App Store is a service mark of Apple Inc., registered in the U.S. and other countries.
• Waze is a trademark of Google LLC.• IOS is a trademark or registered trademark of
Cisco in the U.S. and other countries and is used under license.
• SPOTIFY and the Spotify logo are among the registered trademark of Spotify AB.
• Linux® is the registered trademark of Linus Torvalds in the U.S. and other countries.
• Wi-Fi® is a registered trademark of Wi-Fi Alliance®.
INDONESIAHak Cipta Tambahan• Apple, iPhone, iPod, iPod touch, iTunes,
Apple Music, dan Lightning adalah merek dagang dari Apple Inc., terdaftar di AS dan di negara lain.
• App Store adalah merek layanan dari Apple Inc., yang terdaftar di A.S. dan negara lainnya.
• Waze adalah merek dagang dari Google LLC.• IOS is a trademark or registered trademark of
Cisco in the U.S. and other countries and is used under license.
• SPOTIFY and the Spotify logo are among the registered trademark of Spotify AB.
• Linux® is the registered trademark of Linus Torvalds in the U.S. and other countries.
• Wi-Fi® is a registered trademark of Wi-Fi Alliance®.
MALAYLampiran Hak Cipta Tambahan• Apple, iPhone, iPod, iPod touch, iTunes, Apple
Music dan Lightning adalah tanda dagangan Apple Inc., yang didaftarkan di A.S. dan negara-negara lain.
• App Store ialah tanda perkhidmatan Apple Inc., didaftarkan di A.S. dan negara lain.
• Waze ialah tanda dagangan Google LLC.• IOS is a trademark or registered trademark of
Cisco in the U.S. and other countries and is used under license.
• SPOTIFY and the Spotify logo are among the registered trademark of Spotify AB.
• Linux® is the registered trademark of Linus Torvalds in the U.S. and other countries.
• Wi-Fi® is a registered trademark of Wi-Fi Alliance®.
ภาษาไทย
ลขิสิทธ์ิเพิม่เตมิ• Apple, iPhone, iPod, iPod touch, iTunes, Apple
Music และ Lightning เป็นเคร่ืองหมายการค้าของ Apple Inc., ซ่ึงจดทะเบียน ในประเทศสหรัฐอเมริกา และประเทศอืน่ๆ
• App Store เป็นเคร่ืองหมายบริการของ Apple Inc. ซ่ึงจดทะเบียนในสหรัฐอเมริกาและในประเทศอืน่ๆ
• Waze เป็นเคร่ืองหมายการค้าของ Google LLC• IOS is a trademark or registered trademark of
Cisco in the U.S. and other countries and is used under license.
• SPOTIFY and the Spotify logo are among the registered trademark of Spotify AB.
• Linux® is the registered trademark of Linus Torvalds in the U.S. and other countries.
• Wi-Fi® is a registered trademark of Wi-Fi Alliance®.
TIẾNG VIỆTBản Quyền Bổ Sung• Apple, iPhone, iPod, iPod touch, iTunes,
Apple Music, và Lightning là thương hiệu của Apple Inc., được đăng ký ở Hoa Kỳ và các nước khác.
• App Store là nhãn hiệu dịch vụ của Apple Inc., được đăng ký tại Mỹ và các quốc gia khác.
• Waze là một nhãn hiệu của Google LLC.• IOS is a trademark or registered trademark
of Cisco in the U.S. and other countries and is used under license.
• SPOTIFY and the Spotify logo are among the registered trademark of Spotify AB.
• Linux® is the registered trademark of Linus Torvalds in the U.S. and other countries.
• Wi-Fi® is a registered trademark of Wi-Fi Alliance®.
中文
著作權聲明•Apple,iPhone,iPod,iPodtouch,iTunes,AppleMusic 和 Lightning 是 AppleInc. 在美國或其他國家冊的商標。
•AppStore 是AppleInc.在美國及其他國家或地區註冊的服務商標。
•Waze是GoogleLLC的商標。•IOSisatrademarkorregisteredtrademarkofCiscointheU.S.andothercountriesandisusedunderlicense.
•SPOTIFYandtheSpotifylogoareamongtheregisteredtrademarkofSpotifyAB.
•Linux®istheregisteredtrademarkofLinusTorvaldsintheU.S.andothercountries.
•Wi-Fi®isaregisteredtrademarkofWi-FiAlliance®.
العربيةحقوق طبع محفوظة اضافيه
تُعد Apple و iPhone و iPod و iPod touch و iTunes و Apple Music و Lightning عالمات تجارية مسجلة لشركة
Apple Inc. المسجلة في الواليات المتحدة ودول أخرى.
.Apple Inc، مسجلة لشركة App Store عالمات خدمة ُعد في الواليات المتحدة ودول أخرى.
.Google LLC هي عالمة تجارية لشركة Waze• IOS is a trademark or registered trademark of
Cisco in the U.S. and other countries and is used under license.
• SPOTIFY and the Spotify logo are among the registered trademark of Spotify AB.
• Linux® is the registered trademark of Linus Torvalds in the U.S. and other countries.
• Wi-Fi® is a registered trademark of Wi-Fi Alliance®.
PORTUGUÊSDireitos Autorais Adicionais• Apple, iPhone, iPod, iPod touch, iTunes, Apple
Music e Lightning são marcas registradas da Apple Inc., registradas nos EUA e em outros países.
• App Store é uma marca de serviço da Apple Inc., registrada nos EUA e em outros países.
• Waze é uma marca registrada da Google LLC.• IOS is a trademark or registered trademark of
Cisco in the U.S. and other countries and is used under license.
• SPOTIFY and the Spotify logo are among the registered trademark of Spotify AB.
• Linux® is the registered trademark of Linus Torvalds in the U.S. and other countries.
• Wi-Fi® is a registered trademark of Wi-Fi Alliance®.
ESPAÑOLDerechos de Autor adicionales• Apple, iPhone, iPod, iPod touch, iTunes, Apple
Music y Lightning son marcas comerciales de Apple Inc., registradas en los EE. UU. y en otros países.
• App Store es una marca de servicio de Apple Inc., registrada(s) en EE UU y en otros países.
• Waze es una marca comercial de Google LLC.• IOS is a trademark or registered trademark of
Cisco in the U.S. and other countries and is used under license.
• SPOTIFY and the Spotify logo are among the registered trademark of Spotify AB.
• Linux® is the registered trademark of Linus Torvalds in the U.S. and other countries.
• Wi-Fi® is a registered trademark of Wi-Fi Alliance®.
FRANÇAISDroits d’auteurs additionnels• Apple, iPhone, iPod, iPod touch, iTunes,
Apple Music et Lightning sont des marques commerciales d’Apple Inc., déposées aux États-Unis et dans d’autres pays.
• App Store est une marque de service d’Apple Inc. déposée aux États-Unis et dans d’autres pays.
• Waze est une marque de Google LLC.• IOS is a trademark or registered trademark of
Cisco in the U.S. and other countries and is used under license.
• SPOTIFY and the Spotify logo are among the registered trademark of Spotify AB.
• Linux® is the registered trademark of Linus Torvalds in the U.S. and other countries.
• Wi-Fi® is a registered trademark of Wi-Fi Alliance®.
Premium AVX/Basic AVX
19CY_AVX_Copyrights.indd 1 2019/07/09 8:08