1416452 owasp webgoat and webscarab for print
TRANSCRIPT
OWASP WEBGOAT PROJECT 2007 DRAFT

2
OWASP WEBGOAT PROJECT
FROM WWW.OWASP.ORG
WebGoat in action
WebGoat is a deliberately insecure J2EE web application maintained by OWASP designed to teach web application security lessons. In each lesson, users must demonstrate their understanding of a security issue by exploiting a real vulnerability in the WebGoat application. For example, in one of the lessons the user must use SQL injection to steal fake credit card numbers. The application is a realistic teaching environment, providing users with hints and code to further explain the lesson.
Why the name "WebGoat"? Developers should not feel bad about not knowing security. Even the best programmers make security errors. What they need is a scapegoat, right? Just blame it on the 'Goat!

WebGoat documentation (draft)
3
GOALS
Web application security is difficult to learn and practice. Not many people have full blown web applications like online book stores or online banks that can be used to scan for vulnerabilities. In addition, security professionals frequently need to test tools against a platform known to be vulnerable to ensure that they perform as advertised. All of this needs to happen in a safe and legal environment. Even if your intentions are good, we believe you should never attempt to find vulnerabilities without permission.
The primary goal of the WebGoat project is simple: create a de-facto interactive teaching environment for web application security. In the future, the project team hopes to extend WebGoat into becoming a security benchmarking platform and a Java-based Web site Honeypot.
Check out the project roadmap and find some tasks that you can help with right away.
DOWNLOAD
You can download WebGoat from the OWASP Source Code Center at Sourceforge. There are versions with and without Java, and installation only requires unzipping the download and running a start script. For convenience, a ready-to-deploy WAR file is also made available to drop right into your J2EE application server.
You can download the WebGoat source code from Google code.
The WebGoat distributions are now available at Google code downloads. The Windows WebGoat release (unzip, click, and run) is only available at Sourceforge due to file size limits.
4
OVERVIEW
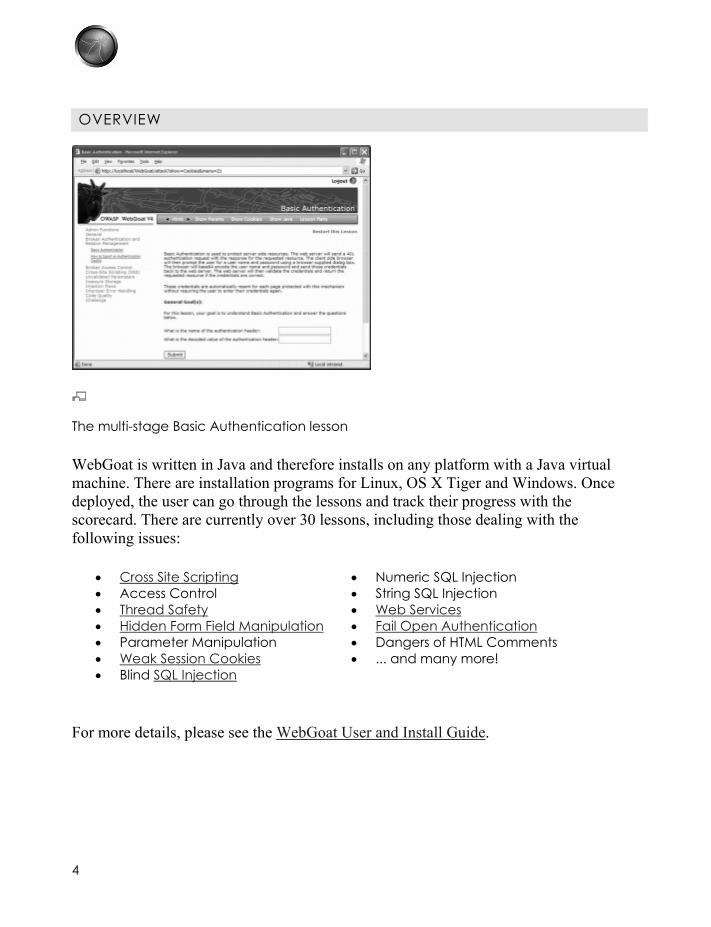
The multi-stage Basic Authentication lesson
WebGoat is written in Java and therefore installs on any platform with a Java virtual machine. There are installation programs for Linux, OS X Tiger and Windows. Once deployed, the user can go through the lessons and track their progress with the scorecard. There are currently over 30 lessons, including those dealing with the following issues:
• Cross Site Scripting • Access Control • Thread Safety • Hidden Form Field Manipulation • Parameter Manipulation • Weak Session Cookies • Blind SQL Injection
• Numeric SQL Injection • String SQL Injection • Web Services • Fail Open Authentication • Dangers of HTML Comments • ... and many more!
For more details, please see the WebGoat User and Install Guide.
WebGoat documentation (draft)
5
NEWEST RELEASE
WebGoat 5.1 Release Candidate 1 is available. This new release is platform independent. This release features:
* a new "show solution" feature * Phishing lesson * New database lessons - for Oracle database only * Multi-stage architecture which allows random access to lab stages
WebGoat 5.0
WebGoat 5.0 has been released. Special thanks to the many people who have sent comments and suggestions and those who have put in the effort to contribute their time to this release.
The 5.0 release would not have been possible without the efforts of Sherif Koussa and OWASP Autumn of Code 2006.
Please send all comments to webgoat AT owasp.org regarding this release candidate. A final release is scheduled for the end of January
FUTURE DEVELOPMENT
WebGoat 5.1 - Estimated release date: Fall 2007
WebGoat 5.1 - Is now available via svn at google code
If you would like to become a member of the WebGoat source code project hosted at Google Code contact Bruce Mayhew at webgoat AT owasp.org.
New Features in 5.1
6
• Thanks to the OWASP Spring of Code project, Erwin Geirhart has provided a complete solutions guide that is avaliable via a new "show solution" button
• New database lessons
• XSS phishing lesson is available via the source code project at Google. Using a standard search feature, your mission is to create a "login" form on the page, steal the user credentials, and post the credentials to the WebGoat Catcher servlet.
• Catcher servlet. Want to prove your attack works? You can now write lessons where the attack can send sensitive information to the Catcher servlet. The Catcher servlet will write the posted values into the originating lesson's properties file.
• Documentation. A draft version of how to solve the WebGoat Labs is available at WebGoat Google Code Downloads
PROJECT CONTRIBUTORS
The WebGoat project is run by Bruce Mayhew. He can be contacted at webgoat AT owasp.org. WebGoat distributions are currently maintained on [SourceForge]. The WebGoat framework makes it extremely easy to add additional lessons. We are actively seeking developers to add new lessons as new web technologies emerge. If you are interested in volunteering for the project, or have a comment, question, or suggestion, please join the WebGoat [mailing list].
PROJECT SPONSORS
The WebGoat project is sponsored by

The WebGoat v5 User & Install Guide - Draft
i
The WebGoat v5 User & Install Guide

The WebGoat v5 User & Install Guide - Draft
ii
Copyright © 2003-2006 The OWASP Foundation.
This document is released under the GNU documentation license and is a Copyright of the OWASP Foundation. Please read and understand the license and copyright conditions. A copy of the license, and its terms, can be found at http://www.gnu.org/licenses/gpl.html. A copy of this document in a transparent format as per the GNU Free Document License requirements is available from the OWASP web site. The original format of this work and this rendering of it are opaque under that license.
Trademarks Java, Java Web Server, and JSP are registered trademarks of Sun Microsystems, Inc. Microsoft Internet Explorer® is a registered trademark of Microsoft Corporation. Firefox® is a registered applicable is a trademark of the Mozilla Foundation. All other products and company names may be trademark of their respective owners. User of a term in this document should not be regarded as affecting the validity of any trademark or service mark.
Author Credits Version 2: Anonymous Contributor Initial Draft Version 4: Robert Sullivan ([email protected]) Contributing Author:
Document History - January 2004 Release v2 - March 2006 Release v4 initial draft - December 2006 Release v5 initial draft

The WebGoat v5 User & Install Guide - Draft
iii
Contents 1. Introduction............................................................................................1
Overview................................................................................................1 2. Objectives ..............................................................................................4 3. Tools required ........................................................................................5
Application Assessment Proxy ..............................................................5 Application Spider .................................................................................5
4. Using WebGoat......................................................................................7 5. Installation..............................................................................................7
Installing Java and Tomcat ....................................................................7 Installing to Windows ............................................................................7 Installing to Linux..................................................................................7 Installing to OS X (Tiger 10.4+)............................................................7 Running..................................................................................................8 Building..................................................................................................8
6. Getting Started .......................................................................................9 7. Lesson Plans.........................................................................................11 8. Basic Operation....................................................................................14 9. Proxy Utilization..................................................................................17 10. Ready to Go! ......................................................................................19 11. How to write a new WebGoat lesson.................................................20
Step 1: Set up the framework...............................................................20 Step 2: Implement createContent.........................................................20 Step 3: Implement the other methods ..................................................21 Step 4: Build and test <this must have changed in v5> .......................23 Step 5: Give back to the community....................................................23
Figures Figure 1: Sign In Page................................................................................9 Figure 2: Welcome Page..........................................................................10 Figure 3: Show Lesson Plan ....................................................................13 Figure 4: Show HTML.............................................................................15 Figure 5: Show Params & Cookies..........................................................16 Figure 6: Show Java.................................................................................17 Figure 7: LAN Settings............................................................................18 Figure 8: A WebScarab Session ..............................................................18

The WebGoat v5 User & Install Guide - Draft
1
1. Introduction
Overview The WebGoatv5 application is designed to illustrate typical security flaws within web-applications. It is intended to teach a structured approach to testing for, and exploiting such vulnerabilities within the context of an Application Security Assessment. A full Application Security Assessment testing methodology is being documented by http://www.owasp.org/testing/ and this will provide a superset of the issues demonstrated within the WebGoat. If may include a formal design and code review, for example. The WebGoat lessons aim to give practical training and examples relating ot the Implementation Review phase of the OWASP Web Application Security Testing Methodology. The WebGoatv5 Application provides a testing platform for a typical application security assessment. The assessor is given the same information and rights as a typical customer or client of an on-line application.
- The application is web based - The attack simulations are remote
All of the described techniques may be performed from any connected location.
- The testing is black-box Source code is not supplied, but it can be viewed and downloaded.
- Credentials and operational information is provided
Of course, the teaching aspect of WebGoat means that certain information will be revealed that would not typically be available. This makes it possible to guide the tester through an assessment process.

The WebGoat v5 User & Install Guide - Draft
2
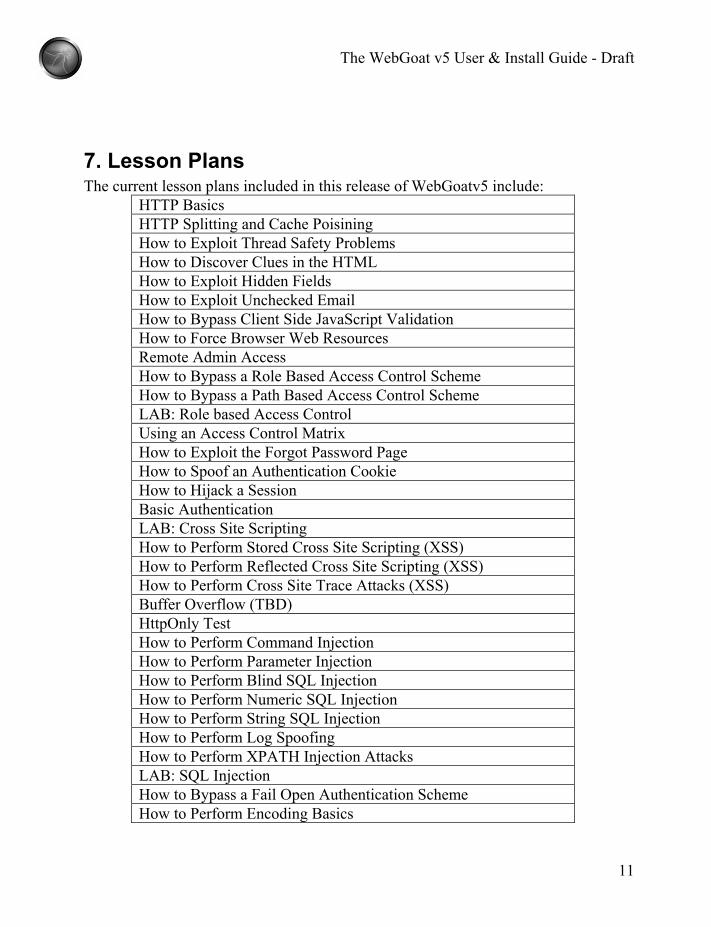
The current lesson plans provided in WebGoatv5 include:
HTTP Basics HTTP Splitting and Cache Poisining How to Exploit Thread Safety Problems How to Discover Clues in the HTML How to Exploit Hidden Fields How to Exploit Unchecked Email How to Bypass Client Side JavaScript Validation How to Force Browser Web Resources Remote Admin Access How to Bypass a Role Based Access Control Scheme How to Bypass a Path Based Access Control Scheme LAB: Role based Access Control Using an Access Control Matrix How to Exploit the Forgot Password Page How to Spoof an Authentication Cookie How to Hijack a Session Basic Authentication LAB: Cross Site Scripting How to Perform Stored Cross Site Scripting (XSS) How to Perform Reflected Cross Site Scripting (XSS) How to Perform Cross Site Trace Attacks (XSS) Buffer Overflow (TBD) HttpOnly Test How to Perform Command Injection How to Perform Parameter Injection How to Perform Blind SQL Injection How to Perform Numeric SQL Injection How to Perform String SQL Injection How to Perform Log Spoofing How to Perform XPATH Injection Attacks LAB: SQL Injection How to Bypass a Fail Open Authentication Scheme How to Perform Encoding Basics Denial of Service from Multiple Logins
The WebGoat v5 User & Install Guide - Draft
3
How to Create a Soap Request How to Perform WSDL Scanning How to Perform Web Service SAX Injection How to Perform Web Service SQL Injection How to Perform Web Service SQL Injection How to Perform DOM Injection Attack How to Perform XML Injection Attacks How to Perform JSON Injection Attacks How to Perform Silent Transaction Attacks How to Add a New Lesson The Challenge
Future releases of WebGoat will include more lessons and functionality. Should you have any suggestions for improvement or new lessons please contact [email protected] with your ideas.
The WebGoat v5 User & Install Guide - Draft
4
2. Objectives Having followed the testing techniques within WebGoat, a tester should be able to:
- Understand the high-level interaction processes within a web-application - Determine information within client visible data which data which could be
useful in an attack - Identify and understand data and user interactions which may expose the
application to attack - Perform tests against those interactions to expose flaws in their operation - Execute attacks against the application to demonstrate and exploit
vulnerabilities

The WebGoat v5 User & Install Guide - Draft
5
3. Tools required There are a number of tools to aid the wily application security assessor. By far the most relevant to this type of security assessment are local proxies and web/application spiders. To complete the full set of WebGoat lessons a web-proxy will be required.
Application Assessment Proxy A normal web-proxy typically receives, processes and forwards HTTP and HTTPS traffic between the client and server. This is normally to provide a single point through which all web traffic passes – for example to monitor usage, improve performance through caching or apply security policies. An application proxy tool is designed to intercept all HTTP and HTTPS communication between the local client browser and the server-side. It acts as a man-in-the-middle where all interaction may be monitored, reviewed and (importantly) modified. Through such a tool, the assessor can determine exactly what data is passed between the Client and Server. Furthermore, they may analyze and modify the data in order to test the impact of the application. It is essential for many of the lessons within WebGoat that an application assessment proxy, or software with equivalent functionality be used. The following is recommended: WebScarab: http://www.owasp.org/webscarab
Application Spider Spidering or crawling a site should identify and follow all of the intended pages and links within a web site & application, and optionally store a local copy. The results can then be analyzed to define a comprehensive list of target scripts, forms, pages and fields within the application for use in later testing.
The WebGoat v5 User & Install Guide - Draft
6
Mirrored content can also be analyzed for relevant information far more quickly than through a manual or ‘on the wire’ analysis. The following are recommended:
- HHTrack – www.httrack.com - Form Scalpel – http://www.ugc-labs.co.uk/tools/formscalpel/ - WebScarab – www.owasp.org/webscarab

The WebGoat v5 User & Install Guide - Draft
7
4. Using WebGoat Having identified the objectives and required tools, we may now get started with the WebGoat lessons.
5. Installation WebGoat is a platform independent environment. It utilizes Apache Tomcat and the JAVA development environment. Installers are provided for Microsoft Windows and UN*X environments, together with notes for installation on other platforms.
Installing Java and Tomcat 1. <This section may not be needed, update for v5>
Installing to Windows 1. Unzip the Windows_WebGoat-x.x.zip to your working environment 2. To start Tomcat, browse to the WebGoat directory unzipped above and double click "webgoat.bat" 3. Start your browser and browse to: http://localhost/WebGoat/attack This link is case-sensitive. Make sure to use a large ‘W’ and ‘G’.
Installing to Linux 1. Download and install Java JDK 1.5 from Sun (http://java.sun.com) 2. Unzip the Unix_WebGoat-x.x.zip to your working directory 3. Edit the following line in webgoat.sh, set JAVA_HOME to your JDK1.5 path. JAVA_HOME="SET ME TO YOUR JAVA 1.5 JDK PATH" 4. Since the latest version runs on a privileged port, you will need to start/stop WebGoat as root. sudo sh webgoat.sh start sudo sh webgoat.sh stop
Installing to OS X (Tiger 10.4+) 1. Unzip the Unix_WebGoat-x.x.zip to your working directory
The WebGoat v5 User & Install Guide - Draft
8
2. Since the latest version runs on a privileged port, you will need to start/stop WebGoat as root. sudo sh webgoat.sh start sudo sh webgoat.sh stop
Running 1. Start your browser and browse to: http://localhost/WebGoat/attack Notice the capital 'W' and 'G' 2. Login in as: user = guest, password = guest
Building Skip these steps if you just want to run WebGoat <this section is incomplete>

The WebGoat v5 User & Install Guide - Draft
9
6. Getting Started In order to start using WebGoat, Tomcat must be launched using the startup script/bat in the Tomcat bin directory. For WebGoat to operate it must have permission to run as a server and allow some uncommon web behavior. When WebGoat is running it will make the host machine vulnerable to attack. If the machine is connected to the internet it should be disconnected. Running a personal firewall may prevent WebGoat from operating correctly. Disable any personal firewall while running WebGoat. From a browser, the Tomcat server can be accessed on localhost port 80, e.g. http://127.0.0.1:8080 WebGoat resides in the WebGoat directory, and the lessons can be found at: http://127.0.0.1:8080/WebGoat/attack
Figure 1: Sign In Page
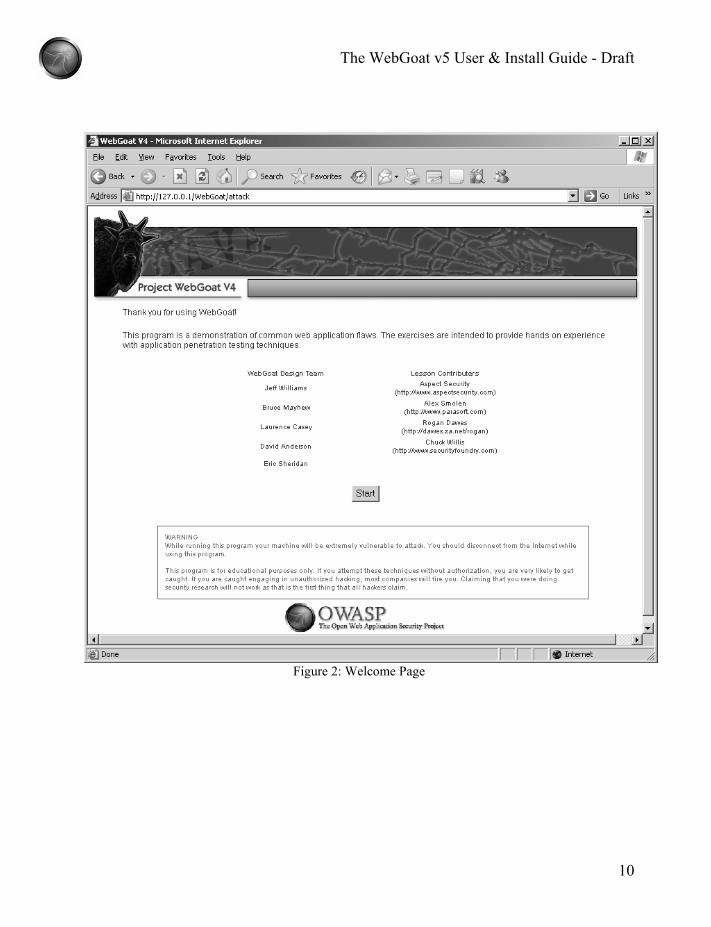
WebGoat resides in the WebGoat directory, and the lessons can be found at: http://127.0.0.1/WebGoat/attack. The WebGoat application enforces role based security. A login dialog requests credentials. Login as userid=guest, password=guest. After a successful login the Tomcat server will show the WebGoat welcome page.
The WebGoat v5 User & Install Guide - Draft
10
Figure 2: Welcome Page
The WebGoat v5 User & Install Guide - Draft
11
7. Lesson Plans The current lesson plans included in this release of WebGoatv5 include:
HTTP Basics HTTP Splitting and Cache Poisining How to Exploit Thread Safety Problems How to Discover Clues in the HTML How to Exploit Hidden Fields How to Exploit Unchecked Email How to Bypass Client Side JavaScript Validation How to Force Browser Web Resources Remote Admin Access How to Bypass a Role Based Access Control Scheme How to Bypass a Path Based Access Control Scheme LAB: Role based Access Control Using an Access Control Matrix How to Exploit the Forgot Password Page How to Spoof an Authentication Cookie How to Hijack a Session Basic Authentication LAB: Cross Site Scripting How to Perform Stored Cross Site Scripting (XSS) How to Perform Reflected Cross Site Scripting (XSS) How to Perform Cross Site Trace Attacks (XSS) Buffer Overflow (TBD) HttpOnly Test How to Perform Command Injection How to Perform Parameter Injection How to Perform Blind SQL Injection How to Perform Numeric SQL Injection How to Perform String SQL Injection How to Perform Log Spoofing How to Perform XPATH Injection Attacks LAB: SQL Injection How to Bypass a Fail Open Authentication Scheme How to Perform Encoding Basics

The WebGoat v5 User & Install Guide - Draft
12
Denial of Service from Multiple Logins How to Create a Soap Request How to Perform WSDL Scanning How to Perform Web Service SAX Injection How to Perform Web Service SQL Injection How to Perform Web Service SQL Injection How to Perform DOM Injection Attack How to Perform XML Injection Attacks How to Perform JSON Injection Attacks How to Perform Silent Transaction Attacks How to Add a New Lesson The Challenge
For each lesson within WebGoat, an overview and objectives are provided. These are accessed through the Show Lesson Plan button.

The WebGoat v5 User & Install Guide - Draft
13
Figure 3: Show Lesson Plan
These lesson plans describe the operation of each aspect of the target application, the areas of interest relating to the security assessment and the type of attack that should be attempted.

The WebGoat v5 User & Install Guide - Draft
14
8. Basic Operation At each stage of an application security assessment, it is important to understand the operation of the target. This typically involves:
- Examining client side content, such as HTML and script - Analyzing communications between the client and server - Reviewing cookies and other local data
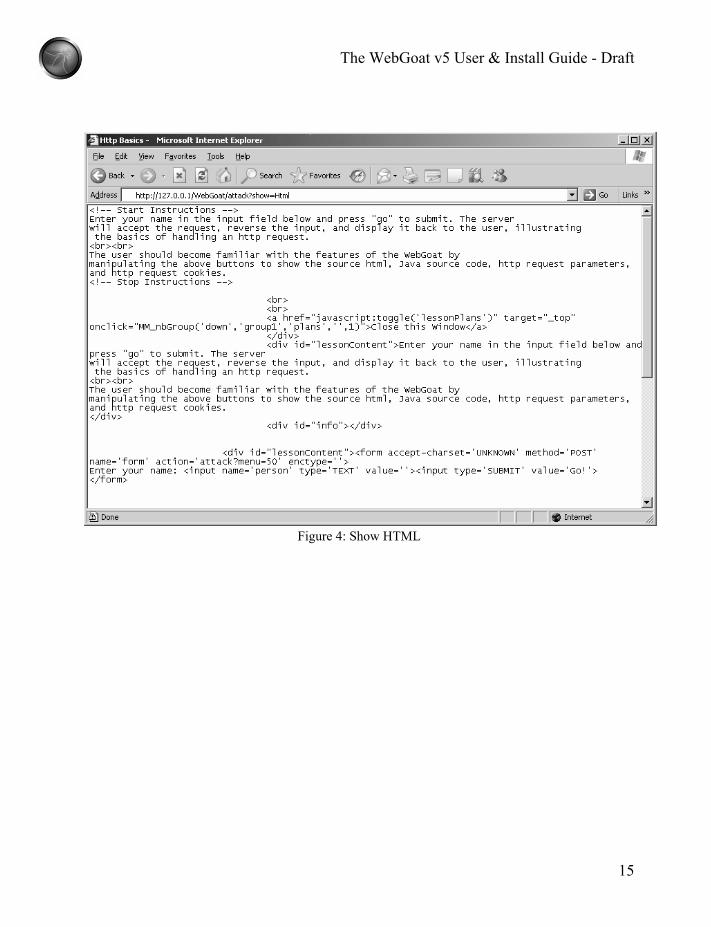
The browser typically makes it simple to view HTML source. WebGoat expands on that with operations to Show Params, Show HTML, Show Cookies and Show Java. Under normal circumstances the browser provides a feature to view HTML source. For Microsoft Internet Explorer this is “Source” under the View menu. For Firefox this is “Page Source” under the view menu. The Show HTML feature of WebGoat shows only the HTML that is relevant for the current lesson. This view does not include HTML for side and top bars.
The WebGoat v5 User & Install Guide - Draft
15
Figure 4: Show HTML
The WebGoat v5 User & Install Guide - Draft
16
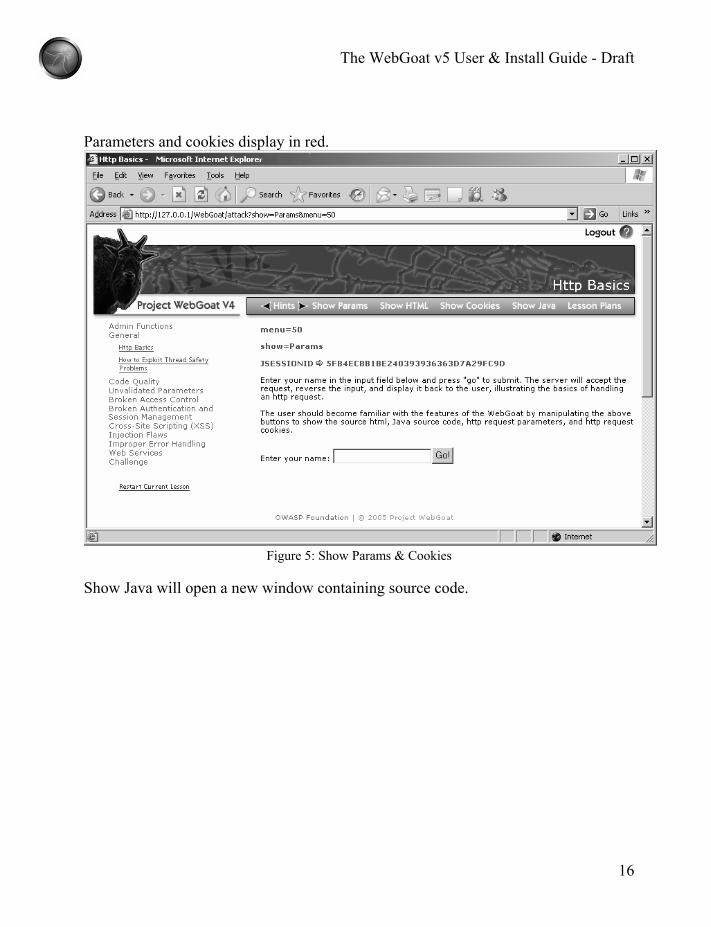
Parameters and cookies display in red.
Figure 5: Show Params & Cookies
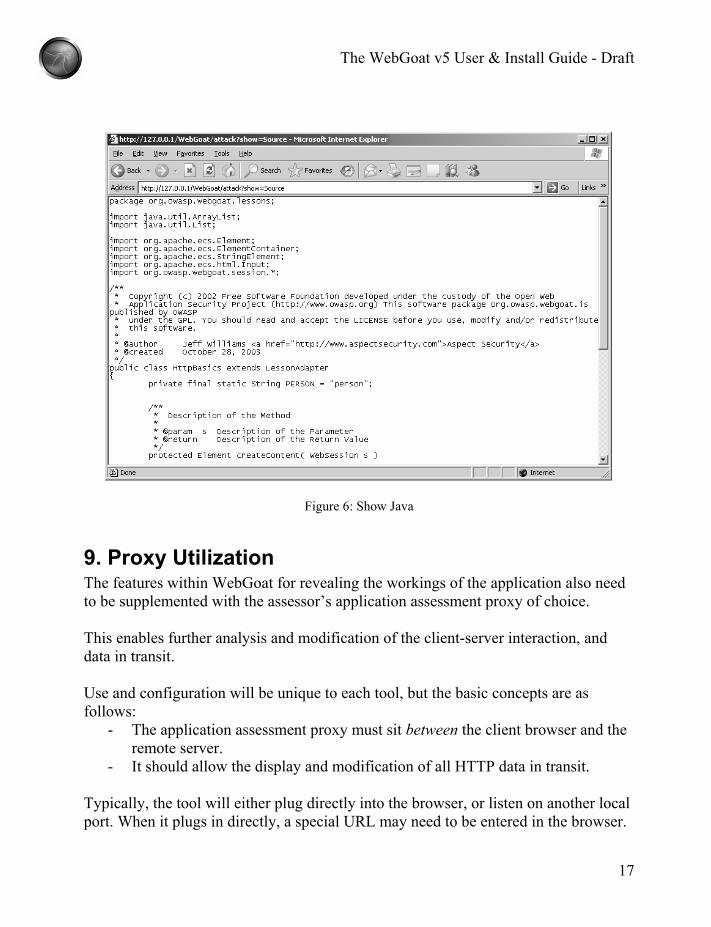
Show Java will open a new window containing source code.
The WebGoat v5 User & Install Guide - Draft
17
Figure 6: Show Java
9. Proxy Utilization The features within WebGoat for revealing the workings of the application also need to be supplemented with the assessor’s application assessment proxy of choice. This enables further analysis and modification of the client-server interaction, and data in transit. Use and configuration will be unique to each tool, but the basic concepts are as follows:
- The application assessment proxy must sit between the client browser and the remote server.
- It should allow the display and modification of all HTTP data in transit. Typically, the tool will either plug directly into the browser, or listen on another local port. When it plugs in directly, a special URL may need to be entered in the browser.

The WebGoat v5 User & Install Guide - Draft
18
When the tool listens on a port, the browser will probably need to be configured to use the proxy. In Microsoft Internet Explorer this can be done from the tool menu by choosing:
1. Choose the “Tools/Internet Options” menu item. 2. Choose the “Connections” tab 3. Hit the “LAN Settings…” button. 4. On the Local Area Network Settings dialog check the Proxy server
checkbox. 5. Uncheck the “bypass proxy server” box 6. Enter the address and port where the proxy tool will be listening. The
default listening port for WebScarab is <complete this>
Figure 7: LAN Settings
Now, when receiving or sending data from the client browser it is possible to intercept, analyze and modify HTTP requests to test the application for security flaws in the target.
< a figure is needed here> Figure 8: A WebScarab Session

The WebGoat v5 User & Install Guide - Draft
19
- In using proxies of this kind, a number of capabilities become available to the assessor, including:
- All GET/POST parameters are available for modification, regardless of their hidden status
- Cookies, both persistent and non-persistent may be modified when entering or leaving the browser
- All client-side data validation can be bypassed, as the parameters can be modified immediately before being sent to the server
- Information regarding the caching of data (e.g. Pragma: no-cache) is exposed for analysis
- Server: and other headers are revealed, which may be useful for enumeration of the remote web-server and application-server technologies
10. Ready to Go! All that remains is to start the WebGoat lessons.
One Last Point If the problems or solutions do not reveal themselves to you, there are hints available to guide you through the lessons. Don’t be too eager, though – application testing is 10% technique and 90% lateral thinking. You will learn and remember much more if you struggle through the puzzles posed by the lessons. This will force you through a large number of failed attempts and finally a flash of insight that brings you to the solution. You can blame it on the Goat, but you can’t rely on him.
The WebGoat v5 User & Install Guide - Draft
20
11. How to write a new WebGoat lesson All you have to do is implement the abstract methods in LessonAdapter. WebGoat uses the Element Construction Set from the Jakarta project. You should read up on the API for ECS at http://jakarta.apache.org/site/downloads/downloads_ecs.cgi WebGoat uses WTP. More information about Eclipse WTP can be found here http://www.eclipse.org/webtools/
Step 1: Set up the framework Source for the class NewLesson.java
Step 2: Implement createContent Creating the content for a lesson is fairly simple. There are two main parts:
1. Handle the input from the user’s last request 2. Generate the next screen for the user
This all happens within the createContent metnod. Remember that each lesson should be handled on a single page. Therefore it is important to design the lesson to work on one page.
Sample createContent Method A good generic pattern for the createContent method is shown below: // define a constant for the filed name Private static final String INPUT = “input”; Protected Element createContent(WebSession s) { ElementContainer ec = new ElementContainer(); try { // get some input from the user // see ParameterParser for details String userInput = s.getParser().getStringParameter(INPUT, “”);
The WebGoat v5 User & Install Guide - Draft
21
// do something with the input // -- SQL query? // -- Runtime.exec? // -- Some other dangerous thing // generate some output – a string and an input field ec.addElement(new StringElement(“Enter a string: “)); ec.addElement( new Input(Input.TEXT, INPUT, userinput)); } catch (Exception e) { s.setMessage(“Error generating “ + this.getClass().getName()); e.printStackTrace(); } return(ec); } ECS is quite powerful. See the Encoding lesson for an example of how to use it to create a table with rows and rows of output.
Step 3: Implement the other methods The LessonAdapter class requires more methods to make a lesson fully functional. These methods allow the WebGoat user to navigate to the lesson and display lesson information. Each method is fairly simple and should only take a few minutes to implement.
Additional LessonAdapter Methods Method Description 1 getHints Return hints to the framework one at a time 2 getCredits Return credits to the framework for display 3 getInstructions This method will load the instructions HTML file from
lesson_plans directory if you create one. 4 getRanking Sets the order of the lessons within a category. The lowest
ranked lesson appears at the top. 5 getTitle The title is rendered as HTML protected List getHints() {
The WebGoat v5 User & Install Guide - Draft
22
// Hints will be returned to the user in the order they // appear below. The user must click on “next hint” // before the hint will be didplayed. List hints = new ArrayList();
hints.add( "There are no hints defined." ); return hints; } public Element getCredits() { return new StringElement(""); } /** * Gets the ranking attribute of the LessonAdapter object. * The ranking denotes the order in which
* the menu item will appear in menu list for each category. The * lowest number will appear as the first lesson.
* * @return The ranking value */ public Integer getRanking() { return new Integer(10); } /** * Fill in a descriptive title for this lesson. * This will appear above the control area at the * top of the page. This field will be rendered as html. * * @return The title value */ public String getTitle() { return "Untitled Lesson " + getScreenId(); }
The WebGoat v5 User & Install Guide - Draft
23
Step 4: Build and test <this must have changed in v5> After the new lesson is implemented ant can be used to build and deploy the new web application. First you want to remove the webgoat.war and the webgoat directory from the webapps directory. Next, cd to the webgoat directory and type:
ant install this will compile the new lesson and “install” the path into Tomcat. The lesson only needs to be installed once. If changes are made to the web application and another test is needed type:
ant reload
Step 5: Give back to the community If you have come up with a lesson that you think helps to teach people about web application security, please contribute it by sending it to the people who maintain the WebGoat application.

2
DETAILED INSTRUCTIONS FOR ADDING A LESSON 2007 DRAFT

WebGoat documentation (draft)
3
DETAILED INSTRUCTIONS FOR ADDING A LESSON All you have to do is implement the abstract methods in LessonAdapter. Follow the outline below. WebGoat uses the Element Construction Set from the Jakarta project. You should read up on the API for ECS at http://jakarta.apache.org/site/downloads/downloads_ecs.cgi. In addition you can look at the other lessons for examples of how to use the ECS.
STEP 1: SET UP THE FRAMEWORK import java.util.*; import org.apache.ecs.*; import org.apache.ecs.html.*; // Add copyright text - use text from another lesson public class NewLesson extends LessonAdapter { protected Element createContent(WebSession s) { return( new StringElement( "Hello World" ) ); } public String getCategory() { } protected List getHints() { } protected String getInstructions() {
4
} protected Element getMenuItem() { } protected Integer getRanking() { } public String getTitle() { } }
STEP 2: IMPLEMENT CREATECONTENT Creating the content for a lesson is fairly simple. There are two main parts: (1) handling the input from the user's last request, (2) generating the next screen for the user. This all happens within the createContent method. Remember that each lesson should be handled on a single page, so you'll need to design your lesson to work that way. A good generic pattern for the createContent method is shown below: // define a constant for the field name private static final String INPUT = "input"; protected Element createContent(WebSession s) { ElementContainer ec = new ElementContainer(); try { // get some input from the user -- see ParameterParser // for details String userInput = s.getParser().getStringParameter(INPUT, "");

WebGoat documentation (draft)
5
// do something with the input // -- SQL query? // -- Runtime.exec? // -- Some other dangerous thing // generate some output -- a string and an input field ec.addElement(new StringElement("Enter a string: ")); ec.addElement( new Input(Input.TEXT, INPUT, userInput) ); // Tell the lesson tracker the lesson has completed. // This should occur when the user has 'hacked' the lesson. makeSuccess(s); } catch (Exception e) { s.setMessage("Error generating " + this.getClass().getName()); e.printStackTrace(); } return (ec); } ECS is quite powerful -- see the Encoding lesson for an example of how to use it to create a table with rows and rows of output.
STEP 3: IMPLEMENT THE OTHER METHODS The other methods in the LessonAdapter class help the lesson plug into the overall WebGoat framework. They are simple and should only take a few minutes to implement. public String getCategory() { // The default category is "General" Only override this // method if you wish to create a new category or if you // wish this lesson to reside within a category other the // "General"

6
return( "NewCategory" ); // or use an existing category } protected List getHints() { // Hints will be returned to the user in the order they // appear below. The user must click on the "next hint" // button before the hint will be displayed. List hints = new ArrayList(); hints.add("A general hint to put users on the right track"); hints.add("A hint that gives away a little piece of the problem"); hints.add("A hint that basically gives the answer"); return hints; } protected String getInstructions() { // Instructions will rendered as html and will appear below // the area and above the actual lesson area. // Instructions should provide the user with the general setup // and goal of the lesson. return("The text that goes at the top of the page"); } protected Element getMenuItem() { // This is the text of the link that will appear on // the left hand menus under the appropriate category. // Their is a limited amount of horizontal space in // this area before wrapping will occur. return( "MyLesson" ); } protected Integer getRanking() { // The ranking denotes the order in which the menu item // will appear in menu list for each category. The lowest

WebGoat documentation (draft)
7
// number will appear as the first lesson. return new Integer(10); } public String getTitle() { // The title of the lesson. This will appear above the // control area at the top of the page. This field will // be rendered as html. return ("My Lesson's Short Title"); }
STEP 4: BUILD AND TEST Once you've implemented your new lesson, you can test the lesson by starting the Tomcat server (within Eclipse). See the "HOW TO create the WebGoat workspace.txt" document in the WebGoat root.
STEP 5: GIVE BACK TO THE COMMUNITY If you've come up with a lesson that you think helps to teach people about web application security, please contribute it by sending it to the people who maintain the WebGoat application. Thanks! The WebGoat Team.

8
WebGoat documentation (draft)
9
SOLVING THE WEBGOAT LABS 2007 DRAFT

10
NOTES
1) Labs are programming exercises 2) All user login passwords are the same as the first name.
ARCHITECTURE OVERVIEW
1) All labs use a custom Action Handler that is invoked from the main WebGoat servlet
HammerHead.java
Browser
Controller
HammerHead
Servlet
View
main.jsp
Model
ActionHandlers
&
WebSession
Database
Request
Response
Forward
Delegate

WebGoat documentation (draft)
11
2) The Action Handler (lesson objects) will execute their business logic, load the data into the WebGoat WebSession object, and then turn control over to the view component (JSP)
3) The WebGoat presentation only allows for a lesson to write into the Lesson Content portion of the webpage.
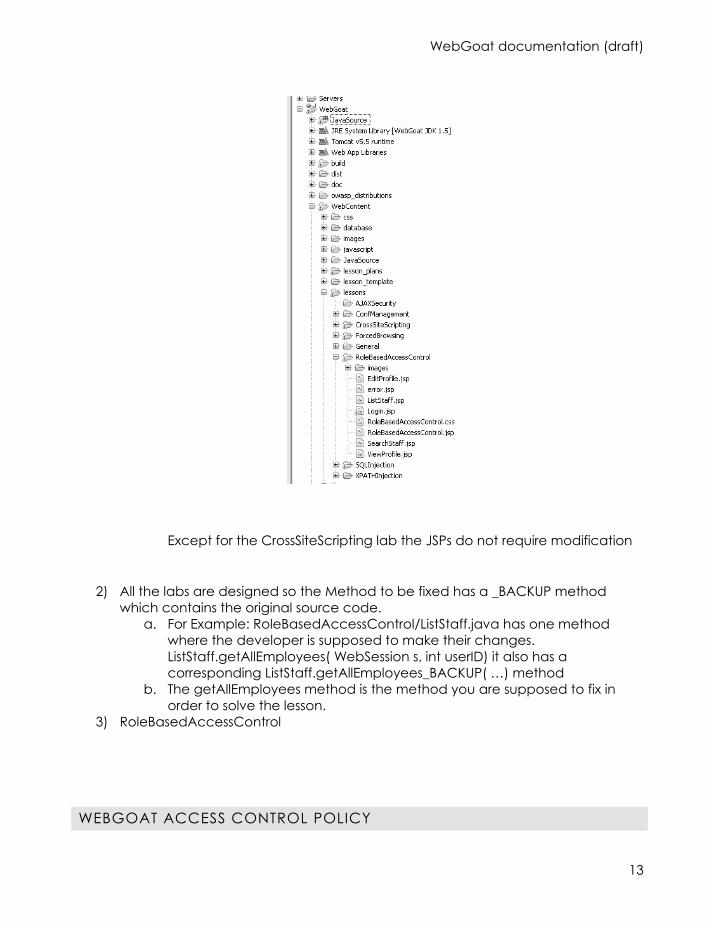
WHERE TO PUT YOUR CODE 1) After identifying the ActionHandler for your lesson all the classes involved for that
lesson will be in that folder. a. For Example: RoleBasedAccessControl java files would be in the
org.owasp.webgoat.lessons.instructor.RoleBasedAccessControl folder inside the Eclipse Package Explorer view.
Navigation
Bar
Main Header
Sub-view Page
EditProfile.jsp
ListStaff
Login
SearchStaff
ViewProfile
Lesson Page
CrossSiteScripting.jsp
RoleBasedAccessControl.jsp
SQLInjection.jsp
main.jsp
Lesson Header
Lesson Content

12
The action handler for RoleBasedAccessControl would be RoleBasedAccessControl.java. This is entry point into WebGoat for this Lab
b. For Example: RoleBasedAccesControl JSPs would be in the
WebContent/Lessons/RoleBasedAccessControl folder inside the Eclipse Package Explorer
WebGoat documentation (draft)
13
Except for the CrossSiteScripting lab the JSPs do not require modification
2) All the labs are designed so the Method to be fixed has a _BACKUP method
which contains the original source code. a. For Example: RoleBasedAccessControl/ListStaff.java has one method
where the developer is supposed to make their changes. ListStaff.getAllEmployees( WebSession s, int userID) it also has a corresponding ListStaff.getAllEmployees_BACKUP( …) method
b. The getAllEmployees method is the method you are supposed to fix in order to solve the lesson.
3) RoleBasedAccessControl
WEBGOAT ACCESS CONTROL POLICY

14
WEBGOAT LAB DATABASE SCHEMA
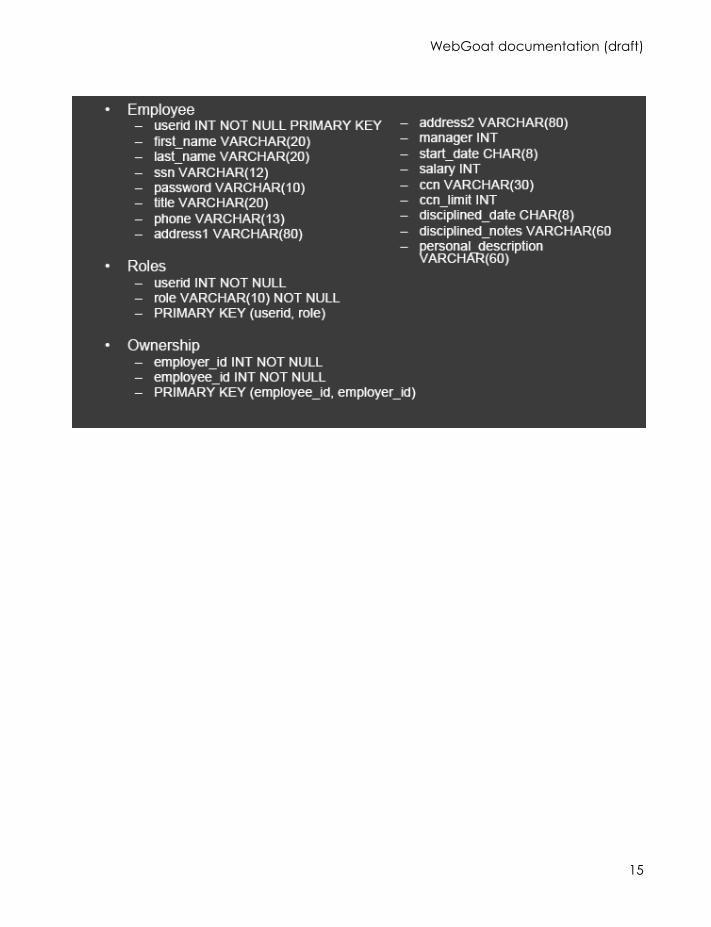
WebGoat documentation (draft)
15

16
WEBGOAT LAB ORGANIZATION CHART

2
OWASP WEBSCARAB PROJECT 2007 DRAFT

WebScarab documentation (draft)
3
Table of Contents
OWASP Webscarab Project ..........................................................................................................4
OWASP WebScarab Project Roadmap.......................................................................................9
WebScarab Getting Started .......................................................................................................10
Scripting in WebScarab................................................................................................................17
How to test session identifier strength with WebScarab..........................................................23
How to modify proxied conversations .......................................................................................29
Fuzzing with WebScarab ..............................................................................................................34
Chaining WebScarab onto another proxy ...............................................................................39
WebScarab SSL Certificates ........................................................................................................43
Webscarab XSS-CRLF plugin .......................................................................................................49
OWASP WebScarab NG Project .................................................................................................51
OWASP WebScarab NG Project Technical Info.......................................................................56
4
OWASP WEBSCARAB PROJECT
Welcome to the WebScarab Project
WebScarab is a framework for analysing applications that communicate using the HTTP and HTTPS protocols. It is written in Java, and is thus portable to many platforms. WebScarab has several modes of operation, implemented by a number of plugins. In its most common usage, WebScarab operates as an intercepting proxy, allowing the operator to review and modify requests created by the browser before they are sent to the server, and to review and modify responses returned from the server before they are received by the browser. WebScarab is able to intercept both HTTP and HTTPS communication. The operator can also review the conversations (requests and responses) that have passed through WebScarab.
You may also be interested in testing the Next Generation of WebScarab.
CONTENTS
[hide]
• 1 Screenshots • 2 Overview • 3 Download • 4 Features • 5 Future development • 6 Extensibility • 7 Project Contributors
SCREENSHOTS
Here's the main window of WebScarab. Check the WebScarab Getting Started guide for more screenshots of WebScarab in action.

WebScarab documentation (draft)
5
OVERVIEW
There is no shiny red button on WebScarab, it is a tool primarily designed to be used by people who can write code themselves, or at least have a pretty good understanding of the HTTP protocol. If that sounds like you, welcome! Download WebScarab, sign up for the mailing list on the OWASP subscription page, and enjoy! You can read a brief tutorial to explain the basic workings.
WebScarab is designed to be a tool for anyone who needs to expose the workings of an HTTP(S) based application, whether to allow the developer to debug otherwise difficult problems, or to allow a security specialist to identify vulnerabilities in the way that the application has been designed or implemented.
DOWNLOAD
You can download WebScarab from the OWASP Source Code Center at Sourceforge. Then install them likewise:
• Linux: java -jar ./webscarab-selfcontained-[numbers].jar • Windows: double-click the installer jar file
6
A Mac OS X package of the latest version can usually be found on Corsaire's download page.
You can also try the Java Web Start version, which was signed by Rogan Dawes.
FEATURES
A framework without any functions is worthless, of course, and so WebScarab provides a number of plugins, mainly aimed at the security functionality for the moment. Those plugins include:
• Fragments - extracts Scripts and HTML comments from HTML pages as they are seen via the proxy, or other plugins
• Proxy - observes traffic between the browser and the web server. The WebScarab proxy is able to observe both HTTP and encrypted HTTPS traffic, by negotiating an SSL connection between WebScarab and the browser instead of simply connecting the browser to the server and allowing an encrypted stream to pass through it. Various proxy plugins have also been developed to allow the operator to control the requests and responses that pass through the proxy.
• Manual intercept - allows the user to modify HTTP and HTTPS requests and responses on the fly, before they reach the server or browser.
• Beanshell - allows for the execution of arbitrarily complex operations on requests and responses. Anything that can be expressed in Java can be executed.
• Reveal hidden fields - sometimes it is easier to modify a hidden field in the page itself, rather than intercepting the request after it has been sent. This plugin simply changes all hidden fields found in HTML pages to text fields, making them visible, and editable.
• Bandwidth simulator - allows the user to emulate a slower network, in order to observe how their website would perform when accessed over, say, a modem.
• Spider - identifies new URLs on the target site, and fetches them on command.
• Manual request - Allows editing and replay of previous requests, or creation of entirely new requests.

WebScarab documentation (draft)
7
• SessionID analysis - collects and analyses a number of cookies (and eventually URL-based parameters too) to visually determine the degree of randomness and unpredictability.
• Scripted - operators can use BeanShell to write a script to create requests and fetch them from the server. The script can then perform some analysis on the responses, with all the power of the WebScarab Request and Response object model to simplify things.
• Parameter fuzzer - performs automated substitution of parameter values that are likely to expose incomplete parameter validation, leading to vulnerabilities like Cross Site Scripting (XSS) and SQL Injection.
• Search - allows the user to craft arbitrary BeanShell expressions to identify conversations that should be shown in the list.
• Compare - calculates the edit distance between the response bodies of the conversations observed, and a selected baseline conversation. The edit distance is "the number of edits required to transform one document into another". For performance reasons, edits are calculated using word tokens, rather than byte by byte.
• SOAP - There is a plugin that parses WSDL, and presents the various functions and the required parameters, allowing them to be edited before being sent to the server.
• Extensions - automates checks for files that were mistakenly left in web server's root directory (e.g. .bak, ~, etc). Checks are performed for both, files and directories (e.g. /app/login.jsp will be checked for /app/login.jsp.bak, /app/login.jsp~, /app.zip, /app.tar.gz, etc). Extensions for files and directories can be edited by user.
• XSS/CRLF - passive analysis plugin that searches for user-controlled data in HTTP response headers and body to identify potential CRLF injection (HTTP response splitting) and reflected cross-site scripting (XSS) vulnerabilities.
FUTURE DEVELOPMENT
Features will probably include:
• Enhancing the SOAP plugin, improving support for complex schemas, and different encodings
8
• Combining the Search and Compare plugins, so that you can compare only specific responses
EXTENSIBILITY
As a framework, WebScarab is extensible. Each feature above is implemented as a plugin, and can be removed or replaced. New features can be easily implemented as well. The sky is the limit! If you have a great idea for a plugin, please let us know about it on the list.
PROJECT CONTRIBUTORS
The WebScarab project is run by Rogan Dawes of Aspect Security. He can be contacted at rogan AT dawes.za.net
WebScarab documentation (draft)
9
OWASP WEBSCARAB PROJECT ROADMAP
FROM OWASP
Jump to: navigation, search
The project's overall goal is to...
Provide a robust tool that assists the user to identify weaknesses in HTTP(S) based applications. In its simplest form, it provides an intercepting proxy that allows the user to observe and manipulate requests sent to the server, and the responses returned from the server.
In the near term, we are focused on the following tactical goals...
1. migration from the current messy code base to a hopefully cleaner implementation, based on the Spring Framework and the Spring Rich Client platform. This will provide a database-backed archive, as well as a more user-friendly user interface, with input validation, and proper feedback
2. reimplementing the current functionality of WebScarab in the "next generation" code
Retrieved from "http://www.owasp.org/index.php/OWASP_WebScarab_Project_Roadmap"

10
WEBSCARAB GETTING STARTED
FROM OWASP
Jump to: navigation, search
WebScarab has a large amount of functionality, and as such can be quite intimidating to the new user. But, for the simplest case, intercepting and modifying requests and responses between a browser and HTTP/S server, there is not a lot that needs to be learned.
Initially, I will assume that you have full unrestricted access to the Internet (that is, you are not behind a proxy). For the sake of simplicity, I will also assume that you are using Internet Explorer. If you need to use a proxy to get out of your corporate network, , see Chaining_WebScarab_onto_another_proxy
This is what WebScarab looks like at startup. There are a few major areas that might need explanation.
Firstly, the toolbar provides access to the various plugins, as well as the Summary window (main view), and messages (log) window.

WebScarab documentation (draft)
11
The Summary window is split into two parts. On the top is a tree table which will show the layout of the sites that you have visited, and some attributes of the various URLs. Below that is a table showing all of the conversations that have been seen by WebScarab, normally sorted in reverse by ID, so that more recent conversations are at the top of the table. The sort order can be changed by clicking in the column headers if desired.
In order to start using WebScarab as a proxy, you need to configure your browser to use WebScarab as a proxy. This is configured in IE using the Tools menu. Select Tools -> Internet Options -> Connections -> LAN Settings to get the proxy configuration dialog.
WebScarab defaults to using port 8008 on localhost for its proxy. You need to configure IE to relay requests to WebScarab, rather than fetching them itself, as shown in the above image. Make sure that all checkboxes are unchecked, except for "Use a proxy server". Once you have configured IE to use the proxy, select Ok on all dialogs to get back to the browser. Browse to a non-SSL website, and then switch to WebScarab.

12
You should see something similar to the next image. If you don't, or you get an error while browsing, you should go back and check your proxy settings in Internet Explorer as described above. If the proxy settings are correct, one possibility is that there is already another program that is using port 8008, and preventing WebScarab from using it. If so, you should stop that other program. I will also show you how to tell WebScarab how to use a different port a bit later.
NOTE: If you are using WebScarab to test a site that is running the same computer as the browser (i.e. localhost or 127.0.0.1), and you are using IE7, you will need to add a dot "." after the hostname to force IE7 to use the proxy that you have configured. This is NOT a bug in WebScarab, but an unfortunate design decision (I assume) made by the developers of IE. Basically, it will ignore any proxy settings if it thinks that the server you are trying to reach is on the local machine. One way of tricking it is to add the dot, as in http://localhost./WebGoat/attack. This will force IE to use your configured proxy.
Here you can see the tree of URL's, which represents the site layout, as well as the individual conversations that have passed through WebScarab. To see the details of a particular conversation, you can double-click on a row in the table, and a window showing the request and the details of the response will open. You can see the request and response in a variety of forms. The view shown here is the "Parsed" view, where the headers are broken out into a table, and the request or response content is presented according to its Content-Type header. You can also choose the "Raw" format, where the request or response is presented exactly as it would be seen on the wire.

WebScarab documentation (draft)
13
You can step from one conversation (request/response) to the next in the conversation window using the "previous" and "next" buttons, as well as jumping directly to a particular conversation using the drop down combo box.
Now that you are familiar with the basic workings of WebScarab, and have made sure that your browser is correctly configured, the next step is to intercept some requests, and modify them before they are sent to the server.
You enable proxy intercepts via the Proxy plugin, accessible via the "Proxy" button on the toolbar. Then choose the "Manual Edit" tab. Once you click the "Intercept Requests" checkbox, you can choose which request methods you wish to intercept (most commonly GET or POST), and can even choose multiple methods using "Ctrl-click". Select "GET" for the moment.

14
Now go back to your browser, and click on a link. You should see something like the following window appear (it may only flash in the task bar initially, just select it. Future windows will pop-up properly).

WebScarab documentation (draft)
15
You can now edit any part of the request you choose. Note that the headers are shown already URL-decoded, and anything that you type in will be URL-encoded automatically. If you do not want this to happen, you should use the Raw mode. In some cases, using the Raw mode may be the easiest anyway, especially if you have something that you wish to paste in.
Once you are happy with your changes, click on the "Accept changes" button to allow the modified request to be sent to the server. If you decide that you wish to revert the changes that you have made so far, you can click on the "Cancel changes" button to allow the original request to be sent to the server. You can also click on the "Abort request" button if you don't want to send a request to the server at all. This will send an error back to the browser. Finally, if there are multiple intercept windows opened (e.g the browser is using several threads simultaneously), you can release all the requests using the "Cancel ALL intercepts" button.
WebScarab will continue to intercept all requests that match the method you specified until you uncheck the "Intercept requests" checkbox, either in the intercept conversation window, or in the "Manual Edit" tab of the Proxy plugin. But you may be wondering why WebScarab does not intercept requests for images, stylesheets, javascript, etc. If you go back to the "Manual Edit" tab, you will see a field labeled "Exclude paths matching:". This field contains a regular expression which is matched against the request URL. If there is a match, the request is never intercepted.
You can also configure WebScarab to intercept responses, in case you want to change the behaviour of some parts of the page. For example, you can disable JavaScript validation, change the list of possible items in a SELECT field, etc.
TIPS AND TRICKS
If you are using IE and you would like WebScarab to automatically update your proxy settings for you, you need to complete the following steps. Note: This only works with the -installer version of WebScarab!
• Change to the Full-Featured interface (Tools -> Use Full-featured Interface), then go to the Proxy->Listeners tab.
• Select the only listener showing, and click "Stop". • About 2/3 of the way down the screen are several input fields, corresponding to
the columns in the listener table. • Each box should be filled in with the value from the most recently stopped proxy.
16
• At this point, you can check the "Primary" checkbox, and then click "Start".
Your IE proxy settings will automatically be updated to point to WebScarab, and will be reset when you exit WebScarab. This setting will be saved, and used on subsequent runs of WebScarab.
Retrieved from "http://www.owasp.org/index.php/WebScarab_Getting_Started"

WebScarab documentation (draft)
17
SCRIPTING IN WEBSCARAB
FROM OWASP
Jump to: navigation, search
CONTENTS
[hide]
• 1 Overview • 2 How is the scripting implemented? • 3 So, what can I do with it?
o 3.1 Modifying conversations using Proxy->BeanShell o 3.2 Modifying conversations using the Script Manager
• 4 Ok, so what's this Scripted plugin good for, then? • 5 And Search? I never managed to get that to work right
OVERVIEW
WebScarab has built-in support for scripting. This is intended to allow the advanced user to perform custom processing within WebScarab. This scripting support is used/available in several places:
• Proxy -> BeanShell plugin • Tools -> Script Manager • The Scripted plugin • The Search plugin
I will explain each of these in more detail below.
HOW IS THE SCRIPTING IMPLEMENTED?
The Scripting functionality is implemented in two different ways, depending on where it is being used.
18
In the Proxy -> BeanShell plugin, and the Search plugin use the BeanShell interpreter directly embedded into the plugin. The Script Manager and the Scripted plugin make use of the Apache Bean Scripting Framework. In theory, you should be able to make use of any language supported by BSF in these two places, assuming you adjust the classpath to appropriately include the right scripting jars.
SO, WHAT CAN I DO WITH IT?
Well, you should take a look at the hooks that exist in the Script Manager for a full list, but the major things are modifying proxied conversations (Proxy -> BeanShell or Script Manager -> Intercept {Request|Response} ) , or submitting your own requests using the Scripted plugin.
MODIFYING CONVERSATIONS USING PROXY->BEANSHELL
This is the standard script that is installed by default in the Proxy->BeanShell plugin.
import org.owasp.webscarab.model.Request; import org.owasp.webscarab.model.Response; import org.owasp.webscarab.httpclient.HTTPClient; import java.io.IOException; public Response fetchResponse(HTTPClient nextPlugin, Request request) throws IOException { response = nextPlugin.fetchResponse(request); return response; }
As you can see, you can make use of any arbitrary Java classes (just import them).
The default script obviously does nothing. Of course, you can easily change that! Simply make use of the methods defined for the Request and Response objects (you'll have to use the source, or else see the online docs).
For example, you might want to change a GET to a POST. This untested script sketches out how you might approach this:
import org.owasp.webscarab.model.Request; import org.owasp.webscarab.model.Response; import org.owasp.webscarab.httpclient.HTTPClient;

WebScarab documentation (draft)
19
import java.io.IOException; public Response fetchResponse(HTTPClient nextPlugin, Request request) throws IOException { // check if we have parameters String query = request.getURL().getQuery(); if (query != null) { // Construct a new HttpUrl object, since they are immutable // This is a bit of a cheat! String url = request.getURL().toString(); url = url.substring(0,url.indexof('?')); request.setURL(new HttpUrl(url)); // now put the original query in the body // we need to update a couple of headers, too request.setHeader("Content-Type", "application/x-www-form-urlencoded"); request.setHeader("Content-Length", "0"); // the setContent method automatically updates the Content-Length header IF it exists request.setContent(query.getBytes()); } response = nextPlugin.fetchResponse(request); return response; }
As you can see, you can do quite a lot in only a few lines of code.
MODIFYING CONVERSATIONS USING THE SCRIPT MANAGER
The Script Manager interface is somewhat different to the Proxy -> BeanShell one. In the first place, intercepting a conversation is split into two parts, intercepting the request, and intercepting the response.
The interface does give some rudimentary instruction. For example, "Intercept Request" says "Called when a new request has been submitted by the browser. Use connection.getRequest() and connection.setRequest(request) to perform changes".
Here is the above script rewritten for the Script Manager interface:
import org.owasp.webscarab.model.Request; import org.owasp.webscarab.model.Response;

20
import org.owasp.webscarab.httpclient.HTTPClient; import java.io.IOException; // NB: This is only a COPY! See below Request request = connection.getRequest(); // check if we have parameters String query = request.getURL().getQuery(); if (query != null) { // Construct a new HttpUrl object, since they are immutable // This is a bit of a cheat! String url = request.getURL().toString(); url = url.substring(0,url.indexof('?')); request.setURL(new HttpUrl(url)); // now put the original query in the body // we need to update a couple of headers, too request.setHeader("Content-Type", "application/x-www-form-urlencoded"); request.setHeader("Content-Length", "0"); // the setContent method automatically updates the Content-Length header IF it exists request.setContent(query.getBytes()); // You have to use connection.setRequest() to make any changes take effect! connection.setRequest(request); }
The important changes to note are the use of the "connection" object, and the fact that the request object that you get is only a copy of the real request. You HAVE to call connection.setRequest() to make your changes effective.
OK, SO WHAT'S THIS SCRIPTED PLUGIN GOOD FOR, THEN?
The Scripted plugin is great for executing a series of requests, that can be calculated. For example, brute forcing a login page using a dictionary of usernames and passwords. Enumerating a site's users based on differeng responses to existing or non-existing accounts. Finding an existing session on a site that uses weak session identifiers. Fuzzing a form. Essentially, the list is limited by your own imagination.
So why use this rather than bash and netcat?
WebScarab documentation (draft)
21
Well, the Scripted plugin provides a nice OO interface to creating requests and analysing responses, which you don't get in bash. But probably the most compelling reasons are:
• It is multi-threaded (currently 4 simultaneous threads, but that could be changed fairly easily). That is something that is not easy to do in shell, or even in Perl (e.g. with libwhisker)
• You can archive interesting responses for later review. Simply call "scripted.addConversation(response)" to add it to the Summary.
The approach to using the Scripted plugin is quite simple. Use the default script as a template, and modify it to suit. This default script provides subroutines to fetch responses one at a time, or in parallel. The easiest way to do it is to create a template request, possibly based on a request from the summary (e.g. request = scripted.getRequest(17) will return a copy of request #17). Then modify the template to suit.
Then modify
boolean hasMoreRequests()
to return false when there are no more requests to fetch, and
Request getNextRequest()
to return the next request to be sent.
Finally, modify fetchSequentially() or fetchParallel() so you can analyse the responses you get back. Yes, this should probably also be put into a method, e.g. analyseResponse(Response response). I'll consider that for a later version.
And you are done. Hit Start to execute your script, and watch it run.
There are a couple of examples in the scripts directory if you used the -installer version, which might give you some ideas.
AND SEARCH? I NEVER MANAGED TO GET THAT TO WORK RIGHT
22
Well, the Search Plugin gives a lot of flexibility in terms of identifying conversations, based on arbitrary criteria. Basically, all you need to do is write a script that returns true for "interesting" conversations, and false for others.
Normally you will use a simple expression such as:
request.getMethod().equals("POST")
to show only POSTs.
However, you can actually create arbitrarily complex scripts.
String method = request.getMethod(); return "POST".equals(method);
Or even import classes, etc.
Retrieved from "http://www.owasp.org/index.php/Scripting_in_WebScarab"

WebScarab documentation (draft)
23
HOW TO TEST SESSION IDENTIFIER STRENGTH WITH WEBSCARAB
FROM OWASP
Jump to: navigation, search
CONTENTS
[hide]
• 1 Objective • 2 Approach • 3 Collecting session identifiers • 4 Analysing the results • 5 Looking at the graph
o 5.1 Plotting the results in an external program o 5.2 Caveats on Predictability and Randomness
OBJECTIVE
To collect and examine a reasonably large sample of session identifiers, to determine if they could be vulnerable to prediction, or brute force attacks.
APPROACH
Identify a request that generates a suitable session identifier. For example, if the identifier is supplied in a cookie, look for responses that include Set-Cookie headers, then use the request repeatedly to obtain more session identifiers. We will then perform some analysis on the resulting series of identifiers. The WebScarab SessionID analysis plugin currently converts the session identifier into a large integer, using a per-position base-conversion algorithm. I'll explain more about the algorithm later, once we have collected some results.
COLLECTING SESSION IDENTIFIERS
24
It is possible to collect session identifiers from both Set-Cookie headers, as well as from within the body of the response. WebScarab will collect all identifiers from all cookies if the radio button is set to "Cookies". It is not necessary to provide a name for the session identifier, as WebScarab will use the site name, path and cookie name to construct a unique identifier. If you choose to extract session identifiers from the body of the response, you have to give it a unique name, and provide a regular expression that defines which part of the response body is considered to be the identifier. This is typically done by using ".*" to indicate all characters leading up to some unique surrounding text, followed by that unique text, then a pattern surrounded by a regex group (e.g. "(....)" would take 4 characters), finally followed by ".*" again to indicate all characters to the end of the body text.
For a more concrete example, let's suppose that the identifier is in a URL query parameter in the body text, and the url parameter is called "id". An example might look like: http://www.example.com/loggedin.aspx?id=<10 alphanumeric characters>
A suitable regex might be: .*loggedin.aspx\?id=(.{10}).*
In order to check that your regular expression is actually correctly matching the text in the response, use the "Test" button to show what would be extracted. The results of the test are not stored for later use.
Once you are satisfied with your configuration, simply enter the number of samples desired, and press "Go". If you decide to interrupt the collection process, you can do so by requesting 0 samples, and pressing "Fetch" again.
ANALYSING THE RESULTS
As mentioned earlier, WebScarab uses a per-position base-conversion algorithm to convert a string into a number. What this really means is that the string is converted to a number using the same approach that one uses to convert a number of one base (e.g. hex - base 16) to another (e.g. decimal - base 10). The major difference is that the base can change for each position/index, according to what characters have actually been observed in that position throughout the sampled series. This means that if you have a constant character in the middle of your series, the base ends up being "1", the only possible value in a base-1 number system is 0, and so the constant character plays no part in actually calculating the numerical value of the total.
Here is a worked example, on a small scale.
WebScarab documentation (draft)
25
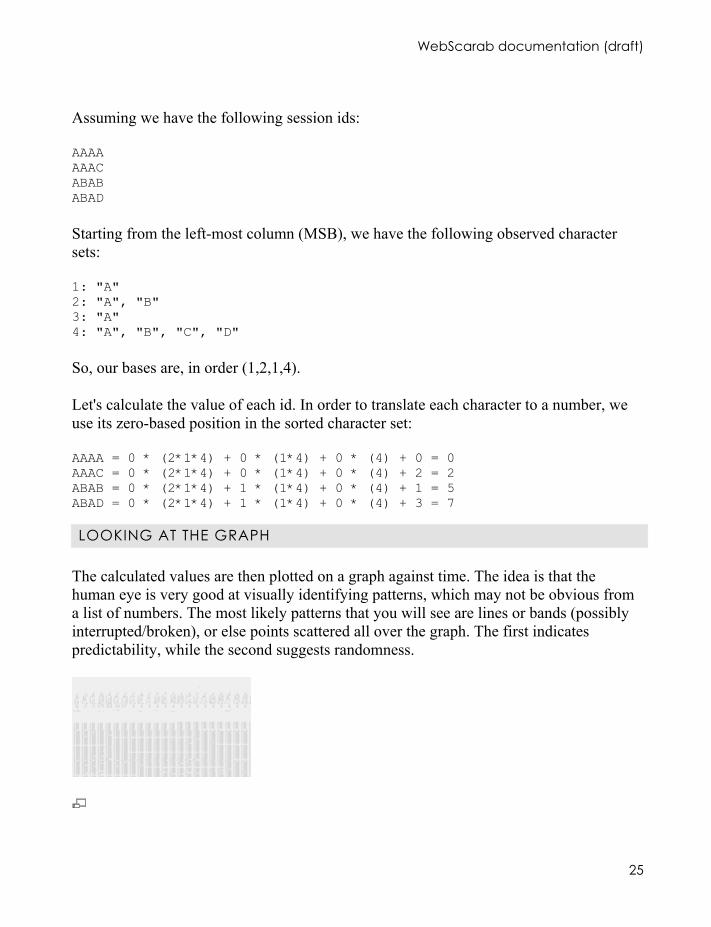
Assuming we have the following session ids:
AAAA AAAC ABAB ABAD
Starting from the left-most column (MSB), we have the following observed character sets:
1: "A" 2: "A", "B" 3: "A" 4: "A", "B", "C", "D"
So, our bases are, in order (1,2,1,4).
Let's calculate the value of each id. In order to translate each character to a number, we use its zero-based position in the sorted character set:
AAAA = 0 * (2*1*4) + 0 * (1*4) + 0 * (4) + 0 = 0 AAAC = 0 * (2*1*4) + 0 * (1*4) + 0 * (4) + 2 = 2 ABAB = 0 * (2*1*4) + 1 * (1*4) + 0 * (4) + 1 = 5 ABAD = 0 * (2*1*4) + 1 * (1*4) + 0 * (4) + 3 = 7
LOOKING AT THE GRAPH
The calculated values are then plotted on a graph against time. The idea is that the human eye is very good at visually identifying patterns, which may not be obvious from a list of numbers. The most likely patterns that you will see are lines or bands (possibly interrupted/broken), or else points scattered all over the graph. The first indicates predictability, while the second suggests randomness.
26
WebScarab ID Analysis
PLOTTING THE RESULTS IN AN EXTERNAL PROGRAM
WebScarab can export the results in a comma delimited format suitable for plotting with your favorite graphing program (e.g. Excel or gnuplot). In some cases (e.g. for writing a formal report) you may find plotting the results in a more full featured program looks better.
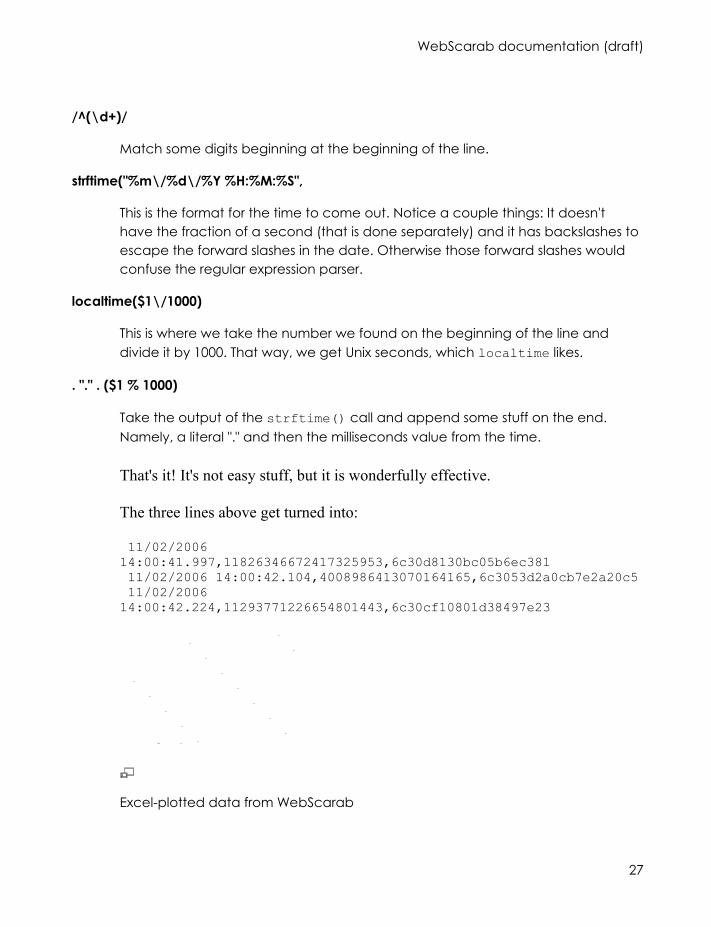
From the Analysis page, click the "Export" button. Save the output to a file. Under Windows, you should probably go ahead and name the file .CSV or .TXT. A couple example lines are shown below:
1162494041997,11826346672417325953,6c30d8130bc05b6ec381 1162494042104,4008986413070164165,6c3053d2a0cb7e2a20c5 1162494042224,11293771226654801443,6c30cf10801d38497e23
Although it is useful to have the precision, the numbers are not in a format most graphing programs can use. The problem is that the first column, the timestamp, is not parseable by Excel. Worse than that, It's not even a Unix timestamp. Traditional Unix timestamps are measured in seconds since 00:00 January 1, 1970. This number, 1162494041997 for example, is actually milliseconds since January 1, 1970.
Have no fear. In one line of perl, you can convert all the timestamps to a format that Excel can grok. Something like: 11/02/2006 14:00:41.997, which is what 1162494041997 really is.
Here's the one line of perl. It assumes the exported data from WebScarab was saved to a file named JSESSIONID.txt:
perl -pi -e 'use POSIX qw(strftime); s/^(\d+)/strftime("%m\/%d\/%Y %H:%M:%S", localtime($1\/1000)) . "." . ($1 % 1000)/e;' JSESSIONID.txt
I didn't say it was a short line.
Here's an explanation of the key components to that line. You don't need to know this in order to use this perl code. If you're wondering what it does, however, this will help you understand.
WebScarab documentation (draft)
27
/^(\d+)/
Match some digits beginning at the beginning of the line.
strftime("%m\/%d\/%Y %H:%M:%S",
This is the format for the time to come out. Notice a couple things: It doesn't have the fraction of a second (that is done separately) and it has backslashes to escape the forward slashes in the date. Otherwise those forward slashes would confuse the regular expression parser.
localtime($1\/1000)
This is where we take the number we found on the beginning of the line and divide it by 1000. That way, we get Unix seconds, which localtime likes.
. "." . ($1 % 1000)
Take the output of the strftime() call and append some stuff on the end. Namely, a literal "." and then the milliseconds value from the time.
That's it! It's not easy stuff, but it is wonderfully effective.
The three lines above get turned into:
11/02/2006 14:00:41.997,11826346672417325953,6c30d8130bc05b6ec381 11/02/2006 14:00:42.104,4008986413070164165,6c3053d2a0cb7e2a20c5 11/02/2006 14:00:42.224,11293771226654801443,6c30cf10801d38497e23
Excel-plotted data from WebScarab
28
If you're familiar with Excel, you'll realize that Excel can handle those date formats just fine. Now you can plot the data in Excel, which gives me a bit more control than WebScarab does directly.
CAVEATS ON PREDICTABILITY AND RANDOMNESS
Predictability and randomness are relative terms. If the algorithm appears to be "predictable", but the key space that you'd have to check is greater than about 100000 items, it is likely to be infeasible to actually find a session belonging to someone else during that session's lifetime. Obviously, this depends on your own CPU power, network bandwidth, the target's CPU power and network bandwidth, the typical lifetime of a session, and a bunch of other factors. Please look at the scale of the numbers before deciding that a predictable identifier is a realistic risk. It is possible for something to be "predictable" in the strictest mathematical sense, but not exploitable in a practical sense.
One very important thing to note about the conversion algorithm is that it works from right (Least Significant Bit) to left (Most Significant Bit), much as one would expect from a numerical conversion. What this means in practice is that if you have a session identifier that has some sequential data at the left, and significant random data to the right, the sequential data will appear to dominate the values, and will result in a straight line graph. Again, check the scale of the numbers before deciding that an identifier is predictable.
WebScarab documentation (draft)
29
HOW TO MODIFY PROXIED CONVERSATIONS
FROM OWASP
Jump to: navigation, search
CONTENTS
[hide]
• 1 Objective • 2 Approach • 3 What methods exist to manipulate the request and response? • 4 Using the Proxy->BeanShell plugin • 5 So, what's with the ScriptManager?
OBJECTIVE
To make repetitive modifications to either requests or responses (or both) as they pass through the proxy
APPROACH
Write a script to make the modifications as desired. Scripts can be written in the Proxy->BeanShell plugin, or attached to Hooks in the ScriptManager interface. Depending on which you choose, the script itself changes a little.
WHAT METHODS EXIST TO MANIPULATE THE REQUEST AND RESPONSE?
The request and response are instances of the Request and Response classes, respectively. These classes both extend the Message class which provides functionality common to both.
The Message class provides the following methods, which are common to both the Request and Response classes:
String[] getHeaderNames()
30
String getHeader(String name) void setHeader(String name, String value) void addHeader(String name, String value) void deleteHeader(String name) NamedValue[] getHeaders() void setheaders(NamedValue[] headers) byte[] getContent() void setContent(byte[] content)
The Request class adds the following methods:
String getMethod() void setMethod(String method) HttpUrl getURL() void setURL(HttpUrl url) void setURL(String url) throws MalformedURLException String getVersion() void setVersion(String version)
The Response class adds the following methods:
String getVersion(); void setVersion(String version); String getStatus(); void setStatus(String status); String getMessage(); void setMessage(String message); String getStatusLine();
USING THE PROXY->BEANSHELL PLUGIN
The Proxy->BeanShell plugin comes supplied with a very simple script to show you how to get access to the request and response objects. Unfortunately, it doesn't provide much assistance on how to go forward from there. Here is an example, showing you how to reject all requests for Flash content:
import org.owasp.webscarab.model.HttpUrl; import org.owasp.webscarab.model.Request; import org.owasp.webscarab.model.Response; import org.owasp.webscarab.httpclient.HTTPClient; import java.io.IOException; public Response fetchResponse(HTTPClient nextPlugin, Request request) throws IOException {
WebScarab documentation (draft)
31
HttpUrl url = request.getURL(); if (url.toString().endsWith(".swf")) throw new IOException("No flash content allowed"); response = nextPlugin.fetchResponse(request); return response; }
Here's an example showing how to replace a particular string in a JavaScript response:
import org.owasp.webscarab.model.Request; import org.owasp.webscarab.model.Response; import org.owasp.webscarab.httpclient.HTTPClient; import java.io.IOException; public Response fetchResponse(HTTPClient nextPlugin, Request request) throws IOException { response = nextPlugin.fetchResponse(request); String cType = response.getHeader("Content-Type"); if (cType != null && cType.endsWith("javascript")) { byte[] bytes = response.getContent(); if (bytes != null) { String content = new String(bytes); content = content.replace("my search string", "my replacement"); response.setContent(content.getBytes()); } } return response; }
SO, WHAT'S WITH THE SCRIPTMANAGER?
The ScriptManager is intended to provide a more generic interface to scripting throughout WebScarab. Each plugin can provide Hooks that can have scripts attached to them. Each Hook provides a brief explanation of how to use it. The Proxy provides 3 hooks:
• Allow Connection
Called when a new connection is received from a browser Use connection.getAddress() and connection.closeConnection() to decide and react
32
This hook is intended to provide a measure of security in installations where WebScarab is allowing connections from non-localhost interfaces. Here is an example of how it may be used:
import java.net.InetAddress; InetAddress from = connection.getAddress(); if (! from.getHostAddress().startsWith("192.168.1.")) connection.closeConnection();
This script rejects all connections from hosts outside the 192.168.1 subnet.
• Intercept Request
Called when a new request has been submitted by the browser Use connection.getRequest() and connection.setRequest(request) to perform changes
Here is an example, corresponding to the one shown above:
import org.owasp.webscarab.model.Request; import org.owasp.webscarab.model.HttpUrl; Request request = connection.getRequest(); HttpUrl url = request.getURL(); if (url.toString().endsWith(".swf")) throw new IOException("No flash content allowed");
• Intercept Response
Called when the request has been submitted to the server, and the response has been received. Use connection.getResponse() and connection.setResponse(response) to perform changes
Here is an example, again corresponding to the one shown above:
import org.owasp.webscarab.model.Response; Response response = connection.getResponse(); String cType = response.getHeader("Content-Type"); if (cType != null && cType.endsWith("javascript")) { byte[] bytes = response.getContent(); if (bytes != null) { String content = new String(bytes);

WebScarab documentation (draft)
33
content = content.replace("my search string", "my replacement"); response.setContent(content.getBytes()); connection.setResponse(response); } }
Note that to actually make your changes take effect, you have to call setResponse(response), since the object you have been modifying is only a copy, not the actual response object.
Retrieved from "http://www.owasp.org/index.php/How_to_modify_proxied_conversations"
34
FUZZING WITH WEBSCARAB
FROM OWASP
Jump to: navigation, search
This document is intended to explain how to use the WebScarab Fuzzer plugin.
I assume that you are familiar with the basic functionality of WebScarab, and have managed to use it as a proxy to view and intercept some conversations already. If not, I suggest reading the "Getting Started" document first.
CONTENTS
[hide]
• 1 Overview • 2 Using the fuzzer • 3 Running the fuzzer • 4 Limitations
OVERVIEW
The Fuzzer plugin is intended to simplify or automate repetitive testing of a web site. In essence, what the fuzzer does is sequentially try each one of a list of values replacing some user-specified parameters in a request that is then sent to the server. The response is then saved into the Summary, where it can be manually reviewed.
The first thing to understand is how the Fuzzer defines a parameter. A parameter is a portion of the request that is considered when creating the response:
• A parameter may be found as part of the path, as is commonly seen in a Wiki. For example it is common to see something like "http://example.com/index.php/Some_Topic". In this case, the string "Some_Topic" is a "Path parameter"

WebScarab documentation (draft)
35
• A parameter may also be found as a "fragment", appended to the path with a semi-colon, before the query portion of the URL. For example, it is common to find session ids in a URL, like "http://example.com/index.php;PHPSESSIONID=some_hex_string"
• A parameter can commonly be found as an URL Query parameter, collected as Name/Value pairs following a "?" in the URL, separated by ampersands, as in "http://example.com/index.php?title=Some_Topic&action=edit", which illustrates 2 query parameters: "title" and "action"
• A parameter may also be found in a Cookie. Of course, cookies are most commonly used to track session state, and fuzzing a cookie is often pointless. However, if data is stored in the cookie, fuzzing it may give promising results, as it is a less commonly tested aspect of a site.
• A parameter may also be found in the body/content portion of a request, typically when the request is sent as a POST. Parameters are most commonly formatted using the same scheme as for encoding URL Query parameters. Of course, POST parameters may be formatted using any scheme supported by the server. WebScarab can currently only support POST's with a Content-Type of "application/x-www-form-urlencoded".
USING THE FUZZER
The fuzzer interface allows a knowledgeable user to construct a new request, specifying the method, basic URL (excluding any path parameters, fragments or query parameters), the request version, any request headers, and the required parameters. Unfortunately, this is rather a tedious and error-prone way of constructing a request to fuzz.
Fortunately, there is a much easier way! Once you have used the proxy for a bit, go to the Summary View, and find a conversation that has parameters that you would like to fuzz. Then right-click on that conversation, and select "Use as fuzz template". This will identify all of the parameters in the request (other than path parameters, which are not possible to identify automatically), and copy all of the relevant information to the Fuzzer plugin interface. If you wish to, you can make any modifications you want at this point, for example, adding or deleting some headers, adding or removing parameters, etc.
Once you have defined the basic structure of the request, you need to define the fuzz sources. A "fuzz source" is a list of alternative inputs to be used a values for one or more parameters. In most cases, you will create a file containing one value per line. If you installed WebScarab using the "installer" version, you should also find two files "xss.txt"

36
and "sql.txt" in the directory in which you installed it. These two files contain a collection of Cross Site Scripting and Sql Injection strings respectively, which may trigger errors in the application you are testing.
Define available fuzz sources by selecting the "Sources" button in the Fuzzer interface. In the dialog, type in a description of the Fuzz source. e.g. for the xss.txt file, type XSS (case is not important). Then use the "browse" button to locate the file containing the strings you wish to use, or type the filename in the "File" field. Once the file has been chosen, click "Add". WebScarab will read the file, and add each item to the list identified by the description you supplied. You can check to see if they were properly read in by clicking on the item in the list on the left hand side. You should see the fuzz strings displayed 1 per line, and the "Items" label should show how many strings were read in.
You can also define a list of strings to use, using a reduced regular expression syntax. By reduced, I mean that the syntax elements that allow for an infinitely large set to be defined is not permitted. For example, the "." character defines 65536 possible characters, and is disallowed. Similarly, the * and + operators allow an indefinite number of characters, and are also disallowed. Finally, the character count syntax that allows a variable number of characters "{3,5}" is also disallowed. This is useful if you wish to attempt to brute force something like a document identifier, that obeys a regular pattern.
Once you have defined your fuzz sources, close the dialog, and return to the main Fuzzer interface.
It would probably be a good idea to explain what each of the columns in the "Parameters" table represent at this point:
• The Location column represents where the parameter is found. The location can be one of "Path", "Fragment", "Query", "Cookie" or "Body", as explained above.
• The Name column represents the name of the parameter.
• The Value column is for the default value of that parameter, if that parameter is not being fuzzed.
• The Priority column allows the user to control how the various fuzz sources increment. Fuzz sources at the same priority increment in lock step. Fuzz sources at different priorities increment sequentially. For example, if you had a list of
WebScarab documentation (draft)
37
known usernames and matching passwords, you would use a username source and a password source with the same priority. However, if you wanted to try each of the usernames with each of the passwords, you would use sources with different priorities.
• The Fuzz Source column allows the user to control which parameters will be fuzzed, and which list of fuzz strings will be used.
Now you can instruct the Fuzzer on which fuzz sources to use for each parameter. The "Fuzz Source" column is editable using a combo box, and you can selected from the defined fuzz sources, or an empty item if you do not want to fuzz that parameter.
As you change the various parameters to be fuzzed, and possibly modify the priorities of the parameters, you should notice the "Total Requests" field updating. If your fuzzed parameters are all at the same priority, the "Total Requests" field will reflect the size of the smallest Fuzz Source. If the fuzzed parameters are at different priorities, the "Total Requests" field will show the product of the sizes of the various Fuzz Sources.
RUNNING THE FUZZER
When you hit the Start button, you'll see the "Current Request" field incrementing, and conversations appearing in the table in the bottom half of the screen, until the "Current Request" field shows one less than the "Total Requests" field. (Yes, this is a bug that should be fixed.) If there are any errors detected while executing the fuzzer, the fuzzer plugin will pause. As long as you do not make any changes to the fuzzer setup, you can resume fuzzing where you left off. (This may or may not be a good idea, depending on the nature of the error)
Once the fuzzer is finished, you can review the resulting conversations by double-clicking on the rows in the Conversation Table in the lower half of the screen, and stepping through the list. Alternatively, you can review them from the Summary pane, at any time. Note that rerunning the fuzzer will clear the table in the Fuzzer, but will not change the conversations already in the Summary.
LIMITATIONS
The Fuzzer is not able to fuzz "compound requests". For example, when submitting values to a function results in a frameset description, and the real interesting result

38
shows up in one of the child frames, WebScarab will not try to retrieve the child frame. For more complex fuzzing, I'd suggest investigating the Scripting plugin.
Retrieved from "http://www.owasp.org/index.php/Fuzzing_with_WebScarab"
WebScarab documentation (draft)
39
CHAINING WEBSCARAB ONTO ANOTHER PROXY
FROM OWASP
Jump to: navigation, search
This document is intended to explain how to configure WebScarab to chain onto an upstream proxy.
I assume that you are familiar with the basic functionality of WebScarab, and have managed to use it as a proxy to view and intercept some conversations already. If not, I suggest reading the "Getting Started" document first.
Stephen Venter 07:37, 16 March 2007 (EDT)
CONTENTS
[hide]
• 1 Overview • 2 Outline of the setup for this example • 3 Step One: Configuring WebScarab to point at my internal network proxy • 4 Step Two: Configuring my web browser to send connections via WebScarab
OVERVIEW
In the case where you are browsing via a proxy server on your local network, such as is often the case with corporate networks, you will need to configure WebScarab to chain onto that proxy server if it is to work correctly.
Some people refer to this as "Using WebScarab behind a firewall", since it is the firewall

40
that will be blocking all outgoing browser traffic, other than the traffic which originates via the proxy server. But really it is the proxy server that is the key to getting WebScarab working in this circumstance.
OUTLINE OF THE SETUP FOR THIS EXAMPLE
To do this you obviously need to know that your proxy server’s IP address (or its hostname that resolves on your LAN) together with the port number that the proxy server listens on. For simplicity sake, let’s assume I have a local LAN with network range 192.168.1.0 /24 (which means it has a netmask of 255.255.255.0)and my proxy server is at IP 192.168.1.10 and it listens on port 8080.
If you are not sure what your proxy server’s IP address is and someone else set up your browser such that it is correctly browsing via the proxy, you may be able to view it within your browser’s configuration settings (where it has been manually configured and is not being automatically picked up by the browser – there are other ways of working it out in that case, but I won’t go into that here).
Since I am using Microsoft Internet Explorer in this example, I see my proxy settings here: Tools -> Internet Options -> Connections -> LAN settings -> Use Proxy Server for your LAN -> Address: 192.168.1.10 Port: 8080
I am running WebScarab locally on my PC, using the standard settings. Thus it will be listening on the standard localhost IP address of 127.0.0.1 on port 8008. Some people like to use the name "localhost", I prefer to use the IP address "127.0.0.1" – but they are interchangeable, so it won’t matter which you use.
STEP ONE: CONFIGURING WEBSCARAB TO POINT AT MY INTERNAL NETWORK PROXY
Note: The port number "3128" is the default value included with the WebScarab setting for chaining onto another proxy server (Tools -> Proxies). It does not necessarily mean

WebScarab documentation (draft)
41
that it is the correct port number you should use for your network. In my example outline above, my local network proxy is configured to listen on a port "8080". So that is the value I have to use in WebScarab in: Tools -> Proxies -> ["Port" box for both the "HTTP Proxy" and "HTTPS Proxy"]
Once I have set that correctly, then WebScarab can make connections out of my network via my local network proxy.
CAUTION!! Make sure that the proxy you specify via Tools -> Proxies does not point back to WebScarab's proxy port, otherwise you will end up creating an infinite loop, since WebScarab will now try to use itself as the upstream proxy and will simply run out of sockets or available memory.
Note: If you are using WebScarab on Windows, and Internet Explorer is correctly accessing the outside network through your designated proxy, you may simply be able to access the WebScarab upstream proxy setting via Tools -> Proxies, and click the "Get IE Settings" button. This only works for the "Installer" version of WebScarab, not the Java WebStart or "selfcontained" versions, since it relies on a native Windows library to read this information.
STEP TWO: CONFIGURING MY WEB BROWSER TO SEND CONNECTIONS VIA WEBSCARAB
This step is the usual one to use for getting WebScarab to work whether or not I am setting it to chain onto another internal proxy]
The number "3128" is NOT the correct number to use in IE. Also, the network proxy server IP is not what I want to use here either anymore (unless I am connecting out to the internet directly without WebScarab in-between).
As outlined above, I am running webscarab locally on the same PC as I am browsing from. So in IE, I need to put the value "127.0.0.1" into the "Address" box and "8008" into the "Port" box as follows: Tools -> Internet Options -> Connections -> LAN settings -> Use Proxy Server for your LAN -> Address: 127.0.0.1 Port: 8008

42
Also, I suggest leaving the box for "Automatically detect settings" un-checked / un-ticked. And same goes for the "Bypass proxy server for local addresses" box. If you are intending to only use WebScarab when making connections to sites outside your local network, it doesn't matter. But if you then try to connect to a website on your local LAN, that setting will result in IE connecting directly to that local web server without proxying via WebScarab. So for safety sake, I suggest keeping that box un-checked too.
Now I have:
• my web browser forwarding connections via WebScarab, which is listening on 127.0.0.1:8008
• and WebScarab forwarding connections out of my network via my network proxy on IP 192.168.1.10 and port number 8080 (a.k.a. WebScarab is chaining onto that proxy 192.168.1.10:8080).

WebScarab documentation (draft)
43
WEBSCARAB SSL CERTIFICATES
FROM OWASP
Jump to: navigation, search
WebScarab can use SSL Certificates in two ways.
First, when you use the proxy to intercept a request to an SSL-protected site, WebScarab makes use of its own internal SSL certificate to negotiate an SSL connection with your browser. Obviously, the certificate that WebScarab presents does not match what your browser is expecting, and so your browser warns you that your communication may be intercepted. Since this is actually our objective, we can simply accept the warning, and choose to continue.
Secondly, the SSL-protected site you are connecting to may require a client-side SSL certificate, in order to identify you. This is known as mutual authentication, and is normally handled by your browser.
CONTENTS
[hide]
• 1 Configuring certificates o 1.1 Server certificates o 1.2 Client certificates
1.2.1 PKCS#12 1.2.2 PKCS#11
• 2 Getting certificates into PKCS#12 files
CONFIGURING CERTIFICATES
SERVER CERTIFICATES
If, for some reason, you want to change the certificate that WebScarab uses to negotiate connections, you will have to rebuild the WebScarab JAR file, and replace the existing

44
server.p12 file with your own PKCS#12 formatted file. The password protecting the PKCS#12 file should be "password", as this is what WebScarab expects.
Here is an example of using the OpenSSL tool to create your own self-signed server certificate:
openssl genrsa 1024 > server.key openssl req -new -x509 -nodes -sha1 -days 3650 -key server.key > server.crt openssl pkcs12 -export -out server.p12 -in server.crt -inkey server.key -name "WebScarab"
The information that you put into the various fields when prompted is unimportant for WebScarab. If the default WebScarab key is inadequate for your purposes, you will most likely have a better idea of what information is important to you (or your client) than anything that I can tell you.
CLIENT CERTIFICATES
Since mutual authentication via SSL does not transit across the proxy (since we now have two connections!), we need to arrange for WebScarab to present your client certificate to the server. This can be somewhat tricky, depending on what kind of certificate you have.
PKCS#12
WebScarab allows you to access client side certificates stored in PKCS#12-formatted files, or (if you are using Java 5 or later) by accessing a PKCS#11-compliant device, for example, a smart-card, or Hardware Security Module (HSM). This functionality is accessed via the Tools->Certificates menu option.
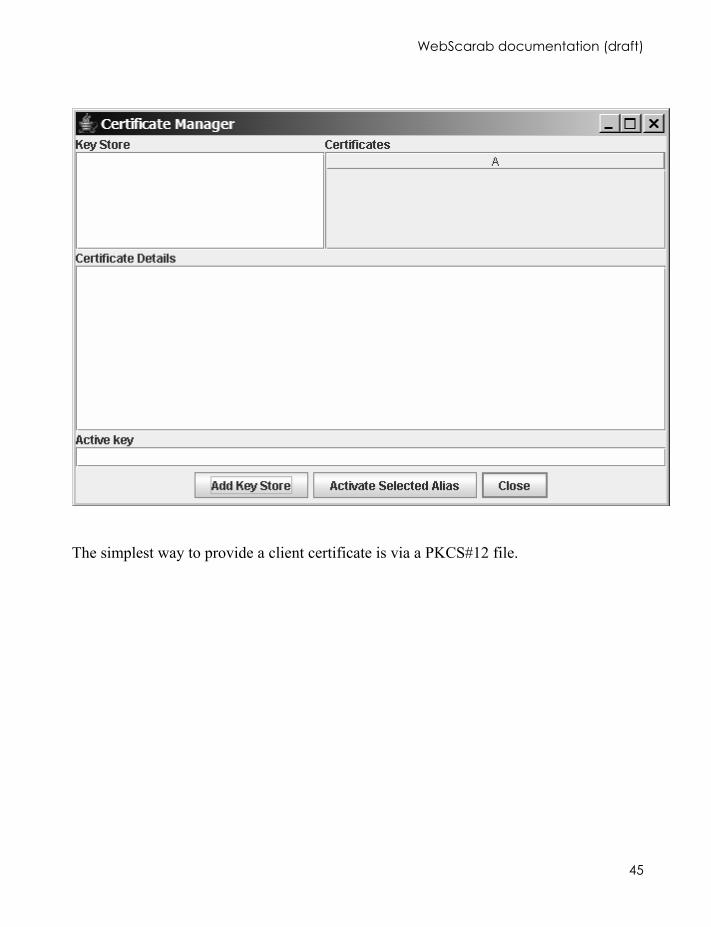
WebScarab documentation (draft)
45
The simplest way to provide a client certificate is via a PKCS#12 file.
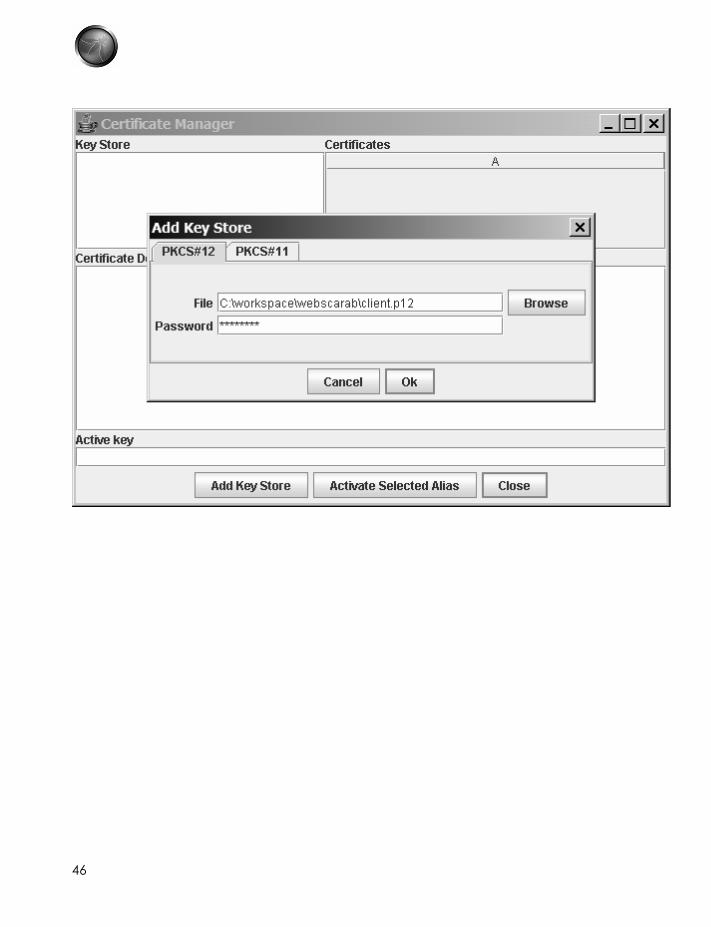
46
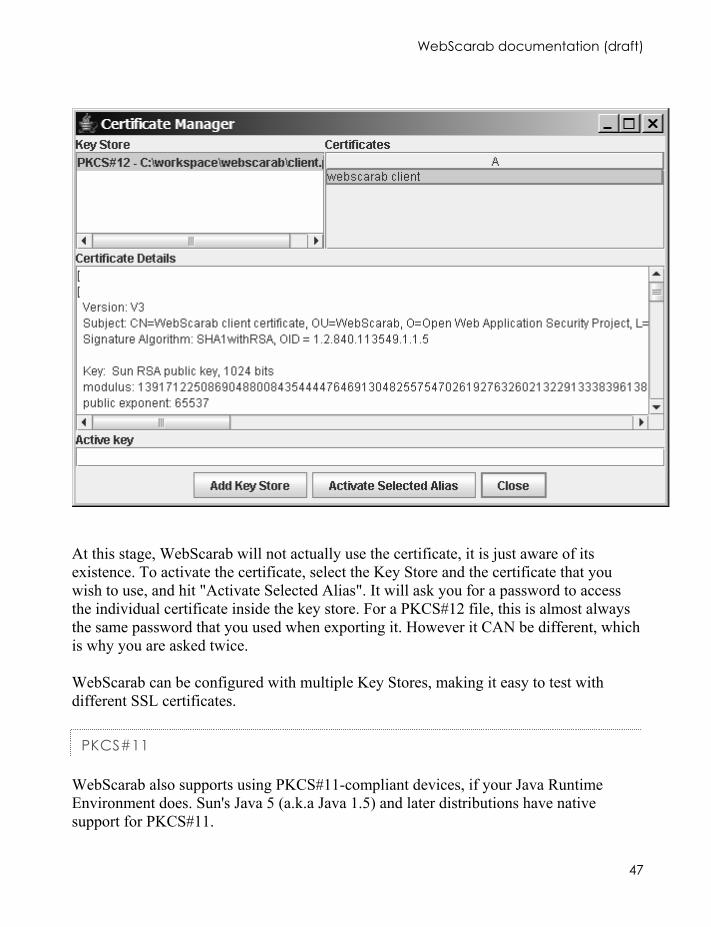
WebScarab documentation (draft)
47
At this stage, WebScarab will not actually use the certificate, it is just aware of its existence. To activate the certificate, select the Key Store and the certificate that you wish to use, and hit "Activate Selected Alias". It will ask you for a password to access the individual certificate inside the key store. For a PKCS#12 file, this is almost always the same password that you used when exporting it. However it CAN be different, which is why you are asked twice.
WebScarab can be configured with multiple Key Stores, making it easy to test with different SSL certificates.
PKCS#11
WebScarab also supports using PKCS#11-compliant devices, if your Java Runtime Environment does. Sun's Java 5 (a.k.a Java 1.5) and later distributions have native support for PKCS#11.

48
Use the PKCS#11 tab when adding a Key Store to specify the shared library path, and the PIN/password to access the smart card. Then select the smart card Key Store, and the specific certificate, and activate that Alias.
GETTING CERTIFICATES INTO PKCS#12 FILES
Since WebScarab requires the certificate to be in a PKCS#12 file (unless it is in a hardware device), you may need to perform some conversion to achieve this.
If your certificate is in PEM or DER format, you can use the OpenSSL command line tool to perform the conversion:
openssl pkcs12 -export -out mycert.p12 -in mycert.crt -inkey mycert.key -name "My Certificate"
If, for example, the certificate is located in the IE certificate store, you can try to export the certificate to a "PFX" file, which is essentially a PKCS#12-formatted file. This may not be possible, since IE has the ability to specify that you cannot export the private key of a particular certificate. If this is set, you cannot create a working PKCS#12 key file. If you have the opportunity to set this property while enrolling to your application, make sure to allow yourself to export the key later. You can choose an arbitrary password
Retrieved from "http://www.owasp.org/index.php/WebScarab_SSL_Certificates"

WebScarab documentation (draft)
49
WEBSCARAB XSS-CRLF PLUGIN
FROM OWASP
Jump to: navigation, search
THE XSS/CRLF INJECTION PLUGIN
OVERVIEW
The XSS/CRLF plugin examines suspicious HTTP requests for cross-site scripting and CRLF injection (HTTP response splitting) vulnerabilities. Unlike other tools, the plugin doesn't crawl the site trying to discover vulnerable URLs, instead it passively analyzes all HTTP conversations passing through WebScarab. The plugin will inspect each request and response to check if:
• Any value of the GET/POST parameters is reflected in the body of the HTTP response, which indicates a potential for a reflected XSS vulnerability;
• Any value of the GET/POST parameters is reflected in the HTTP headers of the HTTP response, which indicates a potential for a CRLF injection vulnerability;
The table in the upper half of the plugin's window will show all suspicious HTTP requests. By clicking the "Check" button, the plugin will attempt to perform a test to check whether the test strings for XSS and CRLF injection vulnerabilities pass through successfully. If check on a particular conversation was successful (i.e. test string went through or new HTTP header was created) the conversation will appear in the table below. If none of the test were successful lower table will be empty.
NOTE: depending on vulnerability specifics and application, automated testing may not produce reliable results (e.g. less than and greater than characters are filtered, however exploitation of XSS is still possible without use of these characters, for example if XSS occurs within the 'script' tag).
For XSS, the plugin will send a user-controlled XSS test string as the value of a potentially vulnerable parameter and check the response body for the presence of the test string, if the string was discovered it may indicate that application is vulnerable to cross-site scripting vulnerability.

50
For CRLF injection (HTTP response splitting), the plugin will again send the user-controlled CRLF test string, which is supposed to create a new HTTP header, as a value of a potentially vulnerable parameter and check the response HTTP headers for the presence of the new HTTP header created by CRLF test string. If the header is present it may indicated that application is vulnerable to response splitting.
LIMITATIONS
Stored cross-site scripting vulnerabilities aren't supported yet.
Retrieved from "http://www.owasp.org/index.php/Webscarab_XSS-CRLF_plugin"
WebScarab documentation (draft)
51
OWASP WEBSCARAB NG PROJECT
FROM OWASP
Jump to: navigation, search
Welcome to the WebScarab (Next Generation) Project
WebScarab-NG is a complete rewrite of the old WebScarab application, with a special focus on making the application more user-friendly. To this end, WebScarab-NG makes use of the Spring Rich Client Platform to provide the user interface features. By using the Spring Rich Client Platform, WebScarab-NG automatically gains things like default buttons, keyboard shortcuts, support for internationalisation, etc.
Another new feature is that session information is now written into a database, rather than into hundreds or thousands of individual files. This makes disk space utilisation and things like archiving of sessions a lot easier.
Ultimately, WebScarab-NG will have all the significant functionality that the old WebScarab had, although it will be reorganised quite significantly, in order to make the application more user friendly.
CONTENTS
[hide]
• 1 New User Interface • 2 Current status • 3 Error feedback • 4 Obtaining WebScarab-NG • 5 Technical information • 6 Feedback • 7 Project Contributors
NEW USER INTERFACE

52
As mentioned above, the user interface has changed quite a lot from the old WebScarab. Apart from the new default Look&Feel (JGoodies), you will see that the conversation viewer has changed quite a lot. The old "Raw" view is still there, but the Parsed version has changed quite dramatically - for the better, I hope you'll agree!
The Parsed view now shows the request and response details in a tree form, rather than in individual text boxes. This makes the interface look a lot cleaner, and more importantly, is a lot more compact. It also makes it a lot easier to include features like automatically breaking out URL parameters, and multiple cookies into their own nodes, where it is a lot easier to view the individual parameters. We also show the request and the response next to each other, rather than one above the other, since most people seem to have more horizontal real-estate than vertical. The split between request and response can easily be adjusted by dragging, as can the split between the headers and the message content.

WebScarab documentation (draft)
53
CURRENT STATUS
At this stage, WebScarab-NG primary feature is the intercepting proxy that allows the operator to observe and modify requests from a browser or other client passing through the proxy. A new feature is the Proxy Control Bar, which is implemented as a "stays on top" tool bar that floats above your browser or other thick client, and allows you to quickly enable or disable request intercepts. It also allows you to annotate or describe the requests as they pass through the proxy. If you type some text into the annotation field, that text will be linked to the next conversation that passes through the proxy, and can later be viewed as part of the conversation history. this can be very helpful to keep track of what you were doing in a multi-step procedure.
For example: Selecting a menu item, entering a value, submitting that value, etc. Often sites are built in such a way that they can result in dozens of conversations resulting from a single action. Annotating that conversation that initiated all the rest makes it very easy to identify them at a later stage.
ERROR FEEDBACK
One of the neat features provided by the Spring Rich Client Platform is the ability to check that the inputs actually make sense, and to provide automated "as you type" feedback to the user.
For example, look at the "Intercept Request" window:
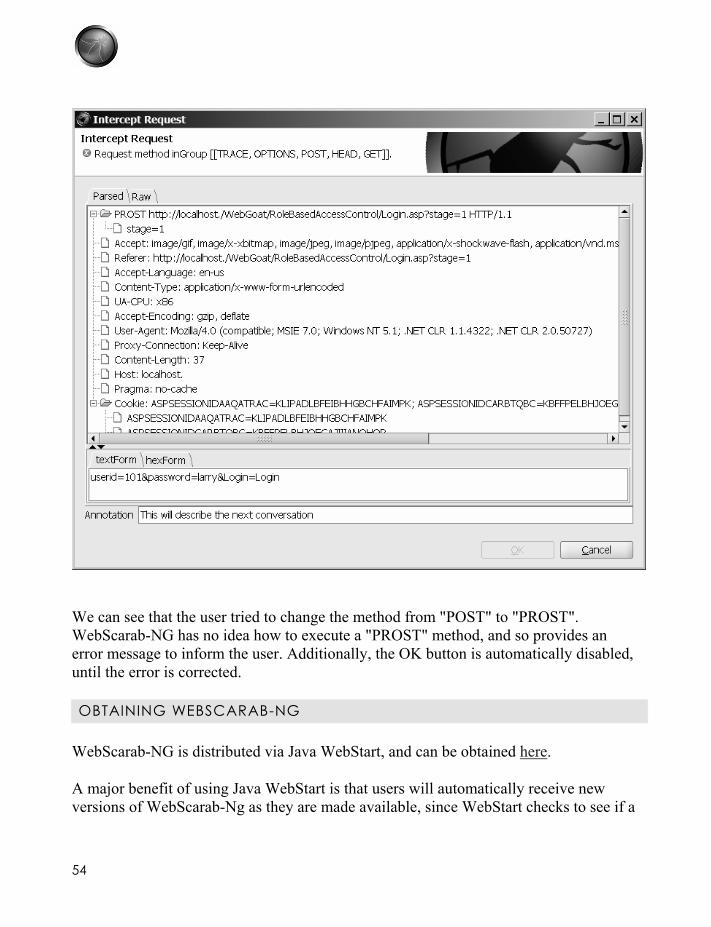
54
We can see that the user tried to change the method from "POST" to "PROST". WebScarab-NG has no idea how to execute a "PROST" method, and so provides an error message to inform the user. Additionally, the OK button is automatically disabled, until the error is corrected.
OBTAINING WEBSCARAB-NG
WebScarab-NG is distributed via Java WebStart, and can be obtained here.
A major benefit of using Java WebStart is that users will automatically receive new versions of WebScarab-Ng as they are made available, since WebStart checks to see if a

WebScarab documentation (draft)
55
new version is available each time it is run. Of course, if it is run with no access to the Internet, it will still run.
Note: there is an issue with signing the application and Java web start if you are using Java 1.6. We are investigating the solution. In the meantime, you can still use WebScarab NG with an older version of Java (without messing up your system). "set PATH="c:\Program Files\Java\jdk1.5.0_06\bin" or whatever "javaws http://dawes.za.net/rogan/webscarab-ng/webstart/WebScarab-ng.jnlp
Depending on demand, once WebScarab NG matures, it will also be made available for offline installation.
For information about what changes have been made, please see the GIT repository
TECHNICAL INFORMATION
Technical information for those interested in digging into it can be found here
FEEDBACK
If you have any comments or suggestions for WebScarab-NG, please feel free to send them to the OWASP WebScarab mailing list
Your feedback is much appreciated, and will be carefully considered for future releases of WebScarab-NG.
PROJECT CONTRIBUTORS
The WebScarab-NG project is run by Rogan Dawes of Aspect Security. He can be contacted at rogan AT dawes.za.net
Retrieved from "http://www.owasp.org/index.php/OWASP_WebScarab_NG_Project"

56
OWASP WEBSCARAB NG PROJECT TECHNICAL INFO
FROM OWASP
Jump to: navigation, search
WebScarab (Next Generation) Technical Information
CONTENTS
[hide]
• 1 Accessing the HSQL Database o 1.1 Getting the JAR o 1.2 Accessing the DB o 1.3 Important tables o 1.4 Database schema changes
• 2 Feedback • 3 Project Contributors
ACCESSING THE HSQL DATABASE
WebScarab-NG defaults to using the HSQLDB database libraries. If you are interested in digging into the DB manually, here's what you need to know.
GETTING THE JAR
Since WebScarab-NG is only available via Java Web Start at the moment, the HSQLDB libraries are unlikely to be anywhere convenient. So download the [| jar], and place it somewhere handy.
ACCESSING THE DB
HSQLDB comes with a graphical client that allows you to explore the database, and execute arbitrary SQL.

WebScarab documentation (draft)
57
You can invoke it by running:
$ java -cp hsqldb-1.8.0.1.jar org.hsqldb.util.DatabaseManager
It will prompt you to connect to the DB, by providing a URL. Simply copy and paste the same URL that you see in the WebScarab-NG dialog.
NOTE: Since it is run "in-process" in WebScarab-NG, it is not possible to access it concurrently from another application. You may be successful running HSQLDB in server mode, and specifying an appropriate URL to WS-NG when it starts, but keep in mind that (at the moment) WS-NG executes "SHUTDOWN" on the DB as it exits, in order to have a clean DB file, and no redo logs, etc. This could be changed if necessary.
IMPORTANT TABLES
Once you have the DB open, it is just SQL ;-)
The key table is the "conversations" table.
conversations.createTable.hsqldb=\ CREATE CACHED TABLE conversations (\ session_id INT NOT NULL, \ id INTEGER GENERATED BY DEFAULT AS IDENTITY\ (START WITH 1) PRIMARY KEY,\ source_id INT NOT NULL,\ request_date TIMESTAMP NOT NULL,\ request_method_id INT NOT NULL,\ request_uri_id INT NOT NULL,\ request_version_id INT NOT NULL,\ request_content_id CHAR(32),\ response_version_id INT NOT NULL,\ response_status CHAR(3) NOT NULL,\ response_message_id INT NOT NULL,\ response_content_id CHAR(32)\ )
This keeps a record of every conversation that WS-NG knows about. The columns should be quite self-explanatory.

58
This table works in conjunction with the headers and named_values tables to record the request and response headers, as well as the blobs table to record the request and response content. The blobs table is indexed by the MD5 sum of the content.
So it is quite easy to reconstruct a conversation by finding the entry in the conversations table, getting the headers from the headers/named_values tables, and the content from the blobs table. And obviously, the other fields are indexed into appropriate tables (method_id -> methods, uri_id -> uris, etc)
Comments on my normalization are welcome - it's been almost 15 years since my databases class at university!
DATABASE SCHEMA CHANGES
Databases created by versions of WebScarab-NG before 20070118 will be incompatible with versions after that date. Certain table columns were renamed to make it easier to accommodate other databases, by avoiding keywords, etc.
If you have an early DB, and would like to regain access to it, you need to run the following script using the DatabaseManager as described above:
ALTER TABLE conversations ALTER COLUMN session RENAME TO session_id; ALTER TABLE conversations ALTER COLUMN source RENAME TO source_id; ALTER TABLE conversations ALTER COLUMN date RENAME TO request_date; ALTER TABLE conversations ALTER COLUMN request_method RENAME TO request_method_id; ALTER TABLE conversations ALTER COLUMN request_uri RENAME TO request_uri_id; ALTER TABLE conversations ALTER COLUMN request_version RENAME TO request_version_id; ALTER TABLE conversations ALTER COLUMN request_content_key RENAME TO request_content_id; ALTER TABLE conversations ALTER COLUMN response_version RENAME TO response_version_id; ALTER TABLE conversations ALTER COLUMN response_message RENAME TO response_message_id; ALTER TABLE conversations ALTER COLUMN response_content_key RENAME TO response_content_id; ALTER TABLE blobs ALTER COLUMN key RENAME TO id; ALTER TABLE blobs ALTER COLUMN size RENAME TO blob_size; ALTER TABLE blobs ALTER COLUMN blob RENAME TO blob_content;

WebScarab documentation (draft)
59
ALTER TABLE headers ALTER COLUMN conversation RENAME TO conversation_id;
which will rename the columns for you.
FEEDBACK
If you have any comments or suggestions for WebScarab-NG, please feel free to send them to the OWASP WebScarab mailing list
Your feedback is much appreciated, and will be carefully considered for future releases of WebScarab-NG.
PROJECT CONTRIBUTORS
The WebScarab-NG project is run by Rogan Dawes of Aspect Security. He can be contacted at rogan AT dawes.za.net
Retrieved from "http://www.owasp.org/index.php/OWASP_WebScarab_NG_Project_Technical_Info"