1.1 section includes - hamilton international...
TRANSCRIPT
Hamilton International Air Cargo Logistics Facility Section 03 45 00
Tradeport International Corporation ARCHITECTURAL PRECAST CONCRETE
July 2014
Chamberlain Architect Services Limited Page 1 of 7
Part 1 General
1.1 SECTION INCLUDES
.1 Architectural and prestressed modular precast concrete wall panels; with integral
insulation.
.2 Supports, anchors, and attachments.
.3 Perimeter and intermediate joint seals.
.4 Grouting under panels.
1.2 RELATED SECTIONS
.1 Section 05 12 00 - Structural Steel: Building structural frame.
.2 Section 07 84 00 – Firestopping.
.3 Section 07 92 00 - Joint Sealers.
1.3 REFERENCES
.1 ASTM A123/A123M-02 - Zinc (Hot-Dip Galvanized) Coatings on Iron and Steel
Products.
.2 ASTM A185-02 - Steel Welded Wire Reinforcement, Plain, for Concrete.
.3 ASTM A307-03/A307M-04 - Carbon Steel Bolts and Studs, 60,000 PSI Tensile Strength.
.4 ASTM A325-04 - Structural Bolts, Steel, Heat Treated 120/105 ksi Minimum Tensile
Strength.
.5 ASTM A325-04M-04 - Structural Bolts, Steel, Heat Treated 830 MPa Minimum Tensile
Strength. ASTM A416/A416M-02 - Steel Strand, Uncoated Seven-Wire for Prestressed
Concrete.
.6 ASTM A416/A416M-02 - Standard Specification for Steel Strand, Uncoated Seven-Wire
for Prestressed Concrete
.7 ASTM A555/A555M-97 (2002) - Standard Specification for General Requirements for
Stainless Steel and Wire Rods.
.8 ASTM A775/A775M-01 - Epoxy-Coated Reinforcing Steel Bars.
.9 ASTM A955/A955M-03b - Standard Specification for Deformed Steel Bars for Concrete
Reinforcement.
.10 ASTM C33-03 - Concrete Aggregates.
.11 ASTM C150-02ae1 - Portland Cement.

Hamilton International Air Cargo Logistics Facility Section 03 45 00
Tradeport International Corporation ARCHITECTURAL PRECAST CONCRETE
July 2014
Chamberlain Architect Services Limited Page 2 of 7
.12 ASTM C260-01- Standard Specification for Air-Entraining Admixtures for Concrete.
.13 ASTM C494/C494M-99a - Standard Specification for Chemical Admixtures for Concrete.
.14 ASTM C1017/C1017M-03 - Standard Specification for Chemical Admixtures for Use in
Producing Flowing Concrete.
.15 CPCI (Canadian Precast/Prestressed Concrete Institute) - Architectural Precast Concrete
Colour and Texture - Selection Guide.
.16 CPCI (Canadian Precast/Prestressed Concrete Institute) - Architectural Precast Concrete.
.17 CSA A23.1-00/A23.2-00 - Concrete Materials and Methods of Concrete Construction /
Methods of Test for Concrete.
.18 CSA A23.3-94 (R2000) - Design of Concrete Structures.
.19 CSA A23.4-00/A251-00 - Precast Concrete - Materials and Construction / Qualification
Code for Architectural Precast Concrete Products.
.20 CSA G164-M92 (R2003) - Hot Dip Galvanizing of Irregularly Shaped Articles.
.21 CSA W55.3-1965 (R2003) - Resistance Welding Qualification Code for Fabrication of
Structural Members Used in Buildings.
.22 CSA W59-03 - Welded Steel Construction (Metal Arc Welding).
.23 CSA W186-M1990 (R2002) - Welding of Reinforcing Bars in Reinforced Concrete
Construction.
1.4 DESIGN REQUIREMENTS
.1 Design units to withstand design loads as calculated in accordance with code, and erection
forces. Calculate structural properties of units in accordance with CSA A23.1/A23.2.
.2 Design units to withstand actual loads such as wind, suction, deflection, and thermal
movement loads.
.3 Seismic Loads: Design and size components to withstand seismic loads and sway
displacement as calculated in accordance with all applicable codes.
.4 Design units to accommodate construction tolerances, deflection of building structural
members, and clearances of intended openings.
.5 Design component connections to accommodate building movement and thermal
movement. Provide adjustment to accommodate misalignment of structure without unit
distortion or damage.
.6 Insulated precast concrete units to achieve R of 20 insulation value or maximum
insulation thickness and R value allowable in panel thicknesses detailed on drawings.
Hamilton International Air Cargo Logistics Facility Section 03 45 00
Tradeport International Corporation ARCHITECTURAL PRECAST CONCRETE
July 2014
Chamberlain Architect Services Limited Page 3 of 7
1.5 SUBMITTALS FOR REVIEW
.1 Section 01 33 00: Procedures for submittals.
.2 Shop Drawings: Indicate layout, unit locations, configuration, unit identification marks,
reinforcement, connection details, support items, location of lifting devices, dimensions,
openings, and relationship to adjacent materials. Provide erection drawings.
.3 Samples: Submit two panels, 12 x 12 inch in size illustrating surface finish, colour and
texture for both panel types.
.4 Provide sealant colour samples.
1.6 SUBMITTALS FOR CLOSEOUT
.1 Section 01 33 00: Procedures for submittals.
.2 Section 01 78 10: Submittals for project closeout.
.3 Maintenance Data: Indicate surface cleaning instructions.
1.7 QUALITY ASSURANCE
.1 Perform Work in accordance with:
.1 CSA A23.1/A23.2 and CSA A23.3, and
.2 CPCI Architectural Precast Concrete Manual.
.2 Welding: CSA W55.3, CSA W59 and CSA W186M.
.3 Fabricator and Erector:
.1 Qualified in accordance with CSA A23.4.
.2 Products of This Section: Manufactured to ISO [9000] [14000] certification
requirements.
.3 Company specializing in performing the work of this section with minimum 5
years documented experience.
.4 Design units under direct supervision of a Professional Structural Engineer experienced in
design of this work and licensed at the place where the Project is located.
1.8 MOCK-UP
.1 Section 01 43 00: Requirements for mock-up.
.2 Fabricate and erect at plant, one (1) full size panel of both types, illustrating shape, lifting
device, and attachment points, and finish in accordance with approved sample.
.3 Include mock-up panel with typical opening, insulated panel.
.4 Locate at plant.
.5 Mock-up may remain as part of the Work.

Hamilton International Air Cargo Logistics Facility Section 03 45 00
Tradeport International Corporation ARCHITECTURAL PRECAST CONCRETE
July 2014
Chamberlain Architect Services Limited Page 4 of 7
1.9 PRE-INSTALLATION MEETING
.1 Section 01 31 00: Pre-installation meeting.
.2 Convene one week prior to commencing work of this section.
1.10 DELIVERY, STORAGE, AND PROTECTION
.1 Section 01 61 00: Transport, handle, store, and protect products.
.2 Handle precast units to position, consistent with their shape and design. Lift and support
only from support points.
.3 Blocking and Lateral Support During Transport and Storage: Clean, non-staining, without
causing harm to exposed surfaces. Provide temporary lateral support to prevent bowing
and warping.
.4 Protect units to prevent staining, chipping, or spalling of concrete.
.5 Mark units with date of production in location not visible to view when in final position in
structure.
Part 2 Products
2.1 MANUFACTURERS
.1 Precon - Model Flexwall.
.2 Substitutions: Or equal.
2.2 MATERIALS
.1 Portland Cement: CSA A23.1/A23.2, Type 10 – Normal, Type 20 - Air Entraining
Portland type ASTM C150, Grey colour for facing mix.
.2 Concrete Materials: CSA A23.1/A23.2, water and sand.
.3 Reinforcing Steel: ASTM A185, welded steel wire fabric, unfinished, ASTM
A416/A416M, Grade 250 ksi and 270 ksi pre-stressing strand, unfinished, ASTM
A775/A775M epoxy coated reinforcing bars, strength and size commensurate with precast
unit design.
.4 Air Entrainment Admixture: ASTM C260 or ASTM C494/C494M.
.5 Provide samples, standard range of finish, texture and colour for Owner/Consultant
selection.
.6 Grout: Non-shrink, minimum 70 Mpa 10,000 psi, 28 day strength.
Hamilton International Air Cargo Logistics Facility Section 03 45 00
Tradeport International Corporation ARCHITECTURAL PRECAST CONCRETE
July 2014
Chamberlain Architect Services Limited Page 5 of 7
2.3 SUPPORT DEVICES
.1 Connecting and Support Devices: CSA G40.20/G40.21, weldable steel hot dip galvanized
to CSA G164.
.2 Primer: Zinc rich type.
2.4 ACCESSORIES
.1 Integral Insulation: Rigid insulation, 2 inches thick value R of 20.
.2 Bearing Pads: High density plastic.
.3 Recessed Reglets: Plastic, shaped and flanged to remain in place once cast, taped closed
to eliminate wet concrete intrusion.
.4 Sealant: Exterior:
.1 Exterior: 1 - component polyurethane sealant: Sonolastic NPI by Sonneborn,
Sikaflex 1 by Sika, Dymonic by Tremco or equal;
.2 Interior: moisture curing urethane sealant: Dymonic by Tremco, Sikaflex 15LM
by Sika or equal.
2.5 MIX
.1 Concrete: Minimum 5000 psi, 28 day strength, maximum water/cement ratio of 0.5.
2.6 FABRICATION
.1 Fabricate in conformance with CSA A23.4/A251.
.2 Maintain plant records and quality control program during production of precast units.
Make records available upon request.
.3 Use rigid moulds, constructed to maintain precast unit uniform in shape, size, and finish.
.4 Maintain consistent quality during manufacture.
.5 Fabricate connecting devices, plates, angles, inserts, bolts, and accessories. Fabricate to
permit initial placement and final attachment.
.6 Embed reinforcing steel, anchors, inserts plates, angles, and other cast-in items.
.7 Cast rigid insulation into units.
.8 Place recessed flashing reglets continuous and straight.
.9 Locate hoisting devices to permit removal after erection.
.10 Cure units to develop concrete quality, and to minimize appearance blemishes such as
non-uniformity, staining, or surface cracking.
Hamilton International Air Cargo Logistics Facility Section 03 45 00
Tradeport International Corporation ARCHITECTURAL PRECAST CONCRETE
July 2014
Chamberlain Architect Services Limited Page 6 of 7
.11 Minor patching in plant is acceptable, providing structural adequacy and appearance of
units is not impaired.
2.7 FINISH - PRECAST UNITS
.1 Precast Concrete Surface Finish: Conform to CPCI - Colour and Texture - Selection
Guide.
.1 Ensure exposed-to-view finish surfaces are uniform in colour and appearance.
.2 Remove cement mortar from areas affected by aggregate retarder in accordance
with retarder manufacturer's instructions.
.3 Protect exposed surfaces with two (2) coats of sealer per precast manufacturer.
2.8 FINISH - SUPPORT DEVICES
.1 Clean surfaces of rust, scale, grease, and foreign matter.
.2 Galvanize after fabrication to 2.0 oz/sq ft in accordance with CSA G164.
2.9 FABRICATION TOLERANCES
.1 Maximum Out of Square: 1/8 inch in 10 feet, non-cumulative.
.2 Variation From Dimensions Indicated on Shop Drawings: Plus or minus 1/8 inch.
.3 Maximum Misalignment of Anchors, Inserts, Openings: 1/8 inch.
.4 Maximum Bowing of Units: Length of bow/ 360.
.5 Location of Reglets: 1/4 inch from true position.
2.10 SOURCE QUALITY CONTROL AND TESTS
.1 Provide testing and analysis of concrete mix in accordance with CSA A23.1/A23.2.
.2 Take 3 concrete test cylinders for every 20 cu yd of concrete placed.
.3 Take 1 slump test for every 3 test cylinders.
Part 3 Execution
3.1 EXAMINATION
.1 Section 01 70 00: Verification of existing conditions prior to beginning work.
.2 Verify that building structure, anchors, devices, and openings are ready to receive work of
this section.

Hamilton International Air Cargo Logistics Facility Section 03 45 00
Tradeport International Corporation ARCHITECTURAL PRECAST CONCRETE
July 2014
Chamberlain Architect Services Limited Page 7 of 7
3.2 PREPARATION
.1 Provide for erection procedures and induced loads during erection. Maintain temporary
bracing in place until final support is provided.
3.3 ERECTION
.1 Erect units without damage to shape or finish. Replace or repair damaged panels.
.2 Erect units level and plumb within allowable tolerances.
.3 Align and maintain uniform horizontal and vertical joints as erection progresses.
.4 When units require adjustment beyond design or tolerance criteria, discontinue affected
work; advise Consultant.
.5 Fasten and Weld units in place. Perform welding in accordance with CSA W59.
.6 Touch-up field welds and scratched or damaged primed painted or galvanized surfaces.
.7 Set vertical units dry, without grout, attaining joint dimension with lead or plastic spacers.
.8 Seal perimeter and intermediate joints.
3.4 ERECTION TOLERANCES
.1 Maximum Variation from Plane of Location: 1/8 inch in 10 feet, non-cumulative.
.2 Maximum Offset from True Alignment Between Two Connecting Units: 1/8 inch.
.3 Joint Tolerance: Plus or minus 1/16 inch.
3.5 ADJUSTING
.1 Section 01 75 19: Adjusting installed work.
.2 Adjust units and secure panels to achieve joint dimensions within tolerances.
3.6 PROTECTION OF FINISHED WORK
.1 Section 01 61 00: Protecting installed work.
.2 Provide non-combustible shields during welding operations.
END OF SECTION

Hamilton International Air Cargo Logistics Facility Section 05 50 00
Tradeport International Corporation METAL FABRICATIONS
July 2014
Chamberlain Architect Services Limited Page 1 of 4
Copyright © 2013 by IRC Group Inc. Page 1 of 4
□
Part 1 General
1.1 SECTION INCLUDES
.1 Shop fabricated ferrous metal items.
.2 Shop fabricated aluminum items.
1.2 RELATED SECTIONS
.1 Section 03 30 00 - Cast-in-place Concrete: Placement of metal fabrications in concrete.
.2 Section 04 26 19 - Reinforced Unit Masonry: Placement of metal fabrications in masonry.
.3 Section 05 12 00 - Structural Steel: Structural steel column anchor bolts.
.4 Section 05 21 00 - Steel Joist Framing: Structural joist bearing plates including anchorage.
.5 Section 05 31 13 - Steel Floor Decking: 05313 - Steel Roof Deck: Bearing plates and angles for metal deck bearing, including anchorage.
.6 Section 05 51 00 - Metal Stairs.
.7 Section 05 52 00 - Metal Railings.
.8 Section 09 91 10 - Painting: Paint finish.
1.3 REFERENCES
.1 AAMA 611 - Specifications for Anodized Architectural Aluminum.
.2 AAMA 2603 - Performance Requirements and Test Procedures for Pigmented Organic Coatings on Aluminum Extrusions and Panels.
.3 AAMA 2605 - Voluntary Specification, Performance Requirements and Test Procedures for Superior Performing Organic Coatings on Aluminum Extrusions and Panels.
.4 ANSI A14.3 - Ladders, Fixed, Safety Requirements.
.5 ASTM A36/A36M - Carbon Structural Steel.
.6 ASTM A53/A53M - Pipe, Steel, Black and Hot-Dipped Zinc Coated, Welded and Seamless.
.7 ASTM A123 - Zinc (Hot-Dip Galvanized) Coatings on Iron and Steel Products.
.8 ASTM A153 - Zinc Coating (Hot-Dip) on Iron and Steel Hardware.
.9 ASTM A283/A283M - Low and Intermediate Tensile Strength Carbon Steel Plates.
.10 ASTM A307 - Carbon Steel Bolts and Studs, 60,000 PSI Tensile Strength.

Hamilton International Air Cargo Logistics Facility Section 05 50 00
Tradeport International Corporation METAL FABRICATIONS
July 2014
Chamberlain Architect Services Limited Page 2 of 4
Copyright © 2013 by IRC Group Inc. Page 2 of 4
□
.11 ASTM A500 - Cold-Formed Welded and Seamless Carbon Steel Structural Tubing in Rounds and Shapes.
.12 ASTM A501 - Hot-Formed Welded and Seamless Carbon Steel Structural Tubing.
.13 ASTM B26/B26M - Aluminum-Alloy Sand Castings.
.14 ASTM B85 - Aluminum-Alloy Die Castings.
.15 ASTM B177 - Engineering Chromium Electroplating.
.16 ASTM B209 - Aluminum and Aluminum-Alloy Sheet and Plate.
.17 ASTM B210 - Aluminum-Alloy Drawn Seamless Tubes.
.18 ASTM B211 - Aluminum and Aluminum-Alloy Bar, Rod, and Wire.
.19 ASTM B221 - Aluminum and Aluminum-Alloy Extruded Bars, Rods, Wire, Profiles, and Tubes.
.20 AWS (American Welding Society) A2.1 - Standard Welding Chart.
.21 AWS (American Welding Society) D1.1 - Structural Welding Code - Steel.
.22 AWS (American Welding Society) D1.2 - Structural Welding Code - Aluminum.
.23 CSA W47.1 - Certification of Companies for Fusion Welding of Steel Structures.
.24 CSA W47.2 - Certification of Companies for Fusion Welding of Aluminum.
.25 CSA W48.1 - Carbon Steel Covered Electrodes for Shielded Metal Arc Welding.
.26 CSA W55.3 - Resistance Welding Qualification Code for Fabricators of Structural Members Used in Buildings.
.27 CSA W59 - Welded Steel Construction (Metal Arc Welding).
.28 CSA W59.2 - Welded Aluminum Construction.
.29 SSPC (The Society for Protective Coatings) (formerly SSPC - Steel Structures Painting Council) - Steel Structures Painting Manual.
1.4 SUBMITTALS FOR REVIEW
.1 Section 01 33 00: Submission procedures.
.2 Shop Drawings: Indicate profiles, sizes, connection attachments, reinforcing, anchorage, size and type of fasteners, and accessories. Include erection drawings, elevations, and details where applicable.
.3 Indicate welded connections using standard AWS A2.1 welding symbols. Indicate net weld lengths.
1.5 QUALITY ASSURANCE
.1 Welders' Certificates: Submit to Section 01 33 00 certifying welders employed on the Work, verifying qualification within the previous 12 months to CSA W47.1 (steel), CSA W47.2 (aluminum), CSA W55.3, CSA W59, CSA W59.2.

Hamilton International Air Cargo Logistics Facility Section 05 50 00
Tradeport International Corporation METAL FABRICATIONS
July 2014
Chamberlain Architect Services Limited Page 3 of 4
Copyright © 2013 by IRC Group Inc. Page 3 of 4
□
1.6 QUALIFICATIONS
.1 Prepare Shop Drawings under direct supervision of a Professional Structural Engineer experienced in design of this work and licensed in the Province of Ontario.
.2 Welders Certificates: Submit to Section 01 33 00, certifying welders employed on the Work, verifying qualification within the previous 12 months.
Part 2 Products
2.1 MATERIALS - STEEL
.1 As indicated on drawings.
2.2 MATERIALS - ALUMINUM
.1 As indicated on drawings
2.3 FABRICATION
.1 Fit and shop assemble items in largest practical sections, for delivery to site.
.2 Fabricate items with joints tightly fitted and secured.
.3 Continuously seal joined members by continuous welds.
.4 Grind exposed joints flush and smooth with adjacent finish surface. Make exposed joints butt tight, flush, and hairline. Ease exposed edges to small uniform radius.
.5 Exposed Mechanical Fastenings: Flush countersunk screws or bolts; unobtrusively located; consistent with design of component, except where specifically noted otherwise.
.6 Supply components required for anchorage of fabrications. Fabricate anchors and related components of same material and finish as fabrication, except where specifically noted otherwise.
2.4 FABRICATION TOLERANCES
.1 Squareness: 3 mm maximum difference in diagonal measurements.
.2 Maximum Offset Between Faces: .5 mm.
.3 Maximum Misalignment of Adjacent Members: 1.5 mm.
.4 Maximum Bow: 3. mm in 1.2 m.
.5 Maximum Deviation From Plane: [1.5 mm in 1.2 m.
2.5 FINISHES - STEEL
.1 Clean surfaces of rust, scale, grease, and foreign matter prior to finishing.
.2 Do not prime surfaces in direct contact with concrete or where field welding is required.

Hamilton International Air Cargo Logistics Facility Section 05 50 00
Tradeport International Corporation METAL FABRICATIONS
July 2014
Chamberlain Architect Services Limited Page 4 of 4
Copyright © 2013 by IRC Group Inc. Page 4 of 4
□
.3 Prime paint items with[one coat.
.4 Structural Steel Members: Galvanize after fabrication to CSA G164.
.5 Non-structural Items: Galvanized after fabrication to CSA G164.
2.6 FINISHES - ALUMINUM
Part 3 Execution
3.1 EXAMINATION
.1 Verify that field conditions are acceptable and are ready to receive work.
3.2 PREPARATION
.1 Clean and strip primed steel items to bare metal where site welding is required.
.2 Supply steel items required to be cast into concrete or embedded in masonry with setting templates to appropriate sections.
3.3 INSTALLATION
.1 Install items plumb and level, accurately fitted, free from distortion or defects.
.2 Provide for erection loads, and for sufficient temporary bracing to maintain true alignment until completion of erection and installation of permanent attachments.
.3 Field weld components indicated on shop drawings.
.4 Perform field welding in accordance with CSA requirements.
.5 Obtain approval prior to site cutting or making adjustments not scheduled.
.6 After erection, prime welds, abrasions, and surfaces not shop primed except surfaces to be in contact with concrete.
3.4 ERECTION TOLERANCES
.1 Maximum Variation From Plumb: 6 mm per story, non-cumulative.
.2 Maximum Offset From True Alignment: 6 mm.
.3 Maximum Out-of-Position: 6 mm.
END OF SECTION

Hamilton International Air Cargo Logistics Facility Section 05 51 00
Tradeport International Corporation METAL STAIRS
July 2014
Chamberlain Architect Services Limited Page 1 of 4
Copyright © 2013 by IRC Group Inc. Page 1 of 4
□
Part 1 General
1.1 SECTION INCLUDES
.1 Steel stair frame of structural sections, with open and closed risers.
.2 Open grate, Checkered plate and Pan to receive concrete fill.
.3 Integral balusters.
1.2 RELATED SECTIONS
.1 Section 03 30 00 - Cast-in-place Concrete: Concrete fill in stair pans and landings; mesh reinforcement for landings.
.2 Section 05 50 00 - Metal Fabrications.
.3 Section 05 52 00 - Metal Railings: Handrails and balusters other than specified in this section.
.4 Section 06 20 00 - Finish Carpentry: Wood handrail.
.5 Section 09 91 10 - Painting: Paint finish.
.6 Section 03 30 00 - Cast-in-place Concrete:
.7 Section 4 26 19 - Reinforced Unit Masonry Placement of metal anchors in masonry.
1.3 REFERENCES
.1 ASTM A36/A36M - Carbon Structural Steel.
.2 ASTM A53/A53M - Pipe, Steel, Black and Hot-Dipped Zinc Coated, Welded and Seamless.
.3 ASTM A123/A123M - Zinc (Hot-Dip Galvanized) Coatings on Iron and Steel Products.
.4 ASTM A283/A283M - Low and Intermediate Tensile Strength Carbon Steel Plates.
.5 ASTM A500 - Cold-Formed Welded and Seamless Carbon Steel Structural Tubing in Rounds and Shapes.
.6 ASTM A501 - Hot-Formed Welded and Seamless Carbon Steel Structural Tubing.
.7 ASTM E935 - Test Methods for Performance of Permanent Metal Railing Systems and Rails for Buildings.
.8 ASTM E985 - Permanent Metal Railing Systems and Rails for Buildings.
.9 AWS (American Welding Society) A2.0 - Standard Welding Chart.
.10 AWS (American Welding Society) D1.1 - Structural Welding Code - Steel.
.11 CSA W47.1 - Certification of Companies for Fusion Welding of Steel Structures.
.12 CSA W48.1 - Carbon Steel Covered Electrodes for Shielded Metal Arc Welding.

Hamilton International Air Cargo Logistics Facility Section 05 51 00
Tradeport International Corporation METAL STAIRS
July 2014
Chamberlain Architect Services Limited Page 2 of 4
Copyright © 2013 by IRC Group Inc. Page 2 of 4
□
.13 CSA W55.3 - Resistance Welding Qualification Code for Fabricators of Structural Members Used in Buildings.
.14 CSA W59 - Welded Steel Construction (Metal Arc Welding).
.15 NAAMM - Metal Stairs Manual.
.16 NAAMM - Metal Bar Grating Manual.
.17 SSPC (The Society for Protective Coatings) (formerly SSPC - Steel Structures Painting Council):
.1 Steel Structures Painting Manual.
.2 Paint 15, Steel Joist Shop Paint.
.3 Paint 20, Zinc Rich Primers.
1.4 DESIGN REQUIREMENTS
.1 Fabricate stair assembly to support a uniform live load of 4.8 kPa and a concentrated load of 14 kPawith deflection of stringer or landing framing not to exceed 1/240 of span.
.2 Railing assembly, wall rails, supported fire rated enclosures and attachments to resist lateral force prescribed by the Ontario Building Code 2006
.3 Fabricate stair assembly to NAAMM - Metal Stairs Manual, Class Industrial Service.
1.5 SUBMITTALS FOR REVIEW
.1 Section 01 33 00: Submission procedures.
.2 Shop Drawings: Indicate profiles, sizes, connection attachments, reinforcing, anchorage, size and type of fasteners, and accessories.
.3 Indicate welded connections using standard AWS A2.0 welding symbols. Indicate net weld lengths.
1.6 QUALITY ASSURANCE
.1 Perform Work in accordance with ASTM E985 - Permanent Metal Railing Systems and Rails for Buildings.
.2 Prepare Shop Drawings under direct supervision of a Professional Structural Engineer experienced in design of this work and licensed in the Province of Ontario.
.3 Welders' Certificates: Submit to Section 01 33 00 certifying welders employed on the Work, verifying qualification within the previous 12 months to CSA W47.1, CSA W55.3, CSA W59, CSA W59.2.
Part 2 Products
2.1 MATERIALS
.1 Steel Sections: CSA G40.21/G40.21

Hamilton International Air Cargo Logistics Facility Section 05 51 00
Tradeport International Corporation METAL STAIRS
July 2014
Chamberlain Architect Services Limited Page 3 of 4
Copyright © 2013 by IRC Group Inc. Page 3 of 4
□
.2 Steel Tubing: CSA G40.20.
.3 Plates: CSA G40.20.
.4 Sheet Steel: ASTM A653/A653M, Grade B Structural Quality galvanized coating.
.5 Tread and Landing Concrete Reinforcement: Mesh as detailed unfinished.
.6 Bolts, Nuts, and Washers: ASTM A325 galvanized to ASTM A153 for galvanized components.
.7 Exposed Mechanical Fastenings: Flush countersunk screws or bolts; consistent with design of stair structure.
.8 Welding Materials: Type required for materials being welded.
.9 Shop and Touch-Up Primer: SSPC 15, Type 1, red oxide.
2.2 COMPONENTS
2.3 FABRICATION - GENERAL
.1 Fit and shop assemble components in largest practical sections, for delivery to site.
.2 Fabricate components with joints tightly fitted and secured.
.3 Continuously seal joined pieces by continuous welds.
.4 Grind exposed joints flush and smooth with adjacent finish surface. Make exposed joints butt tight, flush, and hairline. Ease exposed edges to small uniform radius.
.5 Exposed Mechanical Fastenings: Flush countersunk screws or bolts; unobtrusively located; consistent with design of component, except where specifically noted otherwise.
.6 Supply components required for anchorage of fabrications. Fabricate anchors and related components of same material and finish as fabrication, except where specifically noted otherwise.
.7 Accurately form components required for anchorage of stairs and landings and railings to each other and to building structure.
2.4 FABRICATION - PAN STAIRS [AND LANDINGS]
.1 Fabricate stairs and landings with closed risers and treads of metal pan construction, ready to receive concrete.
.2 Form treads and risers with minimum 3 mm thick sheet steel stock.
.3 Secure tread pans to stringers with clip angles welded in place.
.4 Form stringers with rolled steel channels 300 mm deep. Weld facia plates to channels using 1.8 mm thick steel sheet across channel toes]
.5 Form landings with minimum 3 mm thick sheet stock. Reinforce underside with angles to attain design load requirements.
.6 Prime paint steel components.

Hamilton International Air Cargo Logistics Facility Section 05 51 00
Tradeport International Corporation METAL STAIRS
July 2014
Chamberlain Architect Services Limited Page 4 of 4
Copyright © 2013 by IRC Group Inc. Page 4 of 4
□
2.5 FABRICATION - CHECKERED PLATE STAIRS [AND LANDINGS]
2.6 FINISHES
.1 Clean surfaces of rust, scale, grease, and foreign matter prior to finishing.
.2 Do not prime surfaces in direct contact with concrete or where field welding is required.
.3 Prime paint items with one coat two coats.
Part 3 Execution
3.1 EXAMINATION
.1 Verify that field conditions are acceptable and are ready to receive work.
3.2 PREPARATION
.1 Clean and strip primed steel items to bare metal where site welding is required.
.2 Supply items required to be cast into concrete and or embedded in masonry with setting templates.
3.3 INSTALLATION
.1 Install components plumb and level, accurately fitted, free from distortion or defects.
.2 Provide anchors, plates, angles, hangers and struts] required for connecting stairs to structure.
.3 Allow for erection loads, and for sufficient temporary bracing to maintain true alignment until completion of erection and installation of permanent attachments.
.4 Field weld components indicated on shop drawings. Perform field welding in accordance with CSA W59.
.5 Field bolt and weld to match shop bolting and welding. Conceal bolts and screws whenever possible. Where not concealed, use flush countersunk fastenings.
.6 Mechanically fasten joints butted tight, flush, and hairline. Grind welds smooth and flush.
.7 Obtain approval prior to site cutting or creating adjustments not scheduled..
.8 After erection, prime welds, abrasions, and surfaces not shop primed, except surfaces to be in contact with concrete.
3.4 ERECTION TOLERANCES
.1 Maximum Variation From Plumb: 6 mm per storey, non-cumulative.
.2 Maximum Offset From True Alignment: 6 mm.
END OF SECTION
Hamilton International Air Cargo Logistics Facility Section 05 52 00
Tradeport International Corporation METAL RAILINGS
July 2014
Chamberlain Architect Services Limited Page 1 of 4
Copyright © 2013 by IRC Group Inc. Page 1 of 4
□
Part 1 General
1.1 SECTION INCLUDES
.1 Steel / Aluminum pipe handrails, balusters, and fittings.
1.2 RELATED SECTIONS
.1 Section 03 30 00 - Cast-in-place Concrete: Placement of anchors in concrete.
.2 Section 04 27 13 - Reinforced Unit Masonry Placement of anchors in masonry.
.3 Section 05 51 00 - Metal Stairs: Handrails other than those specified in this section.
.4 Section 06 20 00 - Finish Carpentry: Wood handrail.
.5 Section 08 80 50 - Glazing: Glass baluster infill.
.6 Section 09 91 10 - Painting: Paint finish.
1.3 REFERENCES
.1 ASTM A53/A53M - Pipe, Steel, Black and Hot-Dipped Zinc Coated, Welded and Seamless.
.2 ASTM A123/A123M - Zinc (Hot-Dip Galvanized) Coatings on Iron and Steel Products.
.3 ASTM A500 - Cold-Formed Welded and Seamless Carbon Steel Structural Tubing in Rounds and Shapes.
.4 ASTM A501 - Hot-Formed Welded and Seamless Carbon Steel Structural Tubing.
.5 ASTM B211 - Aluminum and Aluminum-Alloy Bar, Rod, and Wire.
.6 ASTM B221 - Aluminum and Aluminum-Alloy Extruded Bars, Rods, Wire, Profiles, and Tubes.
.7 ASTM B241/B241M - Aluminum and Aluminum-Alloy Seamless Pipe and Seamless Extruded Tube.
.8 ASTM B483/B483M - Aluminum and Aluminum-Alloy Drawn Tubes For General Purpose Applications.
.9 ASTM E935 - Test Methods for Performance of Permanent Metal Railing Systems and Rails for Buildings.
.10 ASTM E985 - Permanent Metal Railing Systems and Rails for Buildings.
.11 AWS (American Welding Society) D1.1 - Structural Welding Code - Steel.
.12 CSA W59 - Welded Steel Construction (Metal Arc Welding).
.13 SSPC (The Society for Protective Coatings) (formerly SSPC - Steel Structures Painting Council) - Steel Structures Painting Manual.

Hamilton International Air Cargo Logistics Facility Section 05 52 00
Tradeport International Corporation METAL RAILINGS
July 2014
Chamberlain Architect Services Limited Page 2 of 4
Copyright © 2013 by IRC Group Inc. Page 2 of 4
□
1.4 DESIGN REQUIREMENTS
.1 Railing assembly, wall rails, and attachments to resist lateral force as prescribed in the Ontario Building Code 2006 at any point without damage or permanent set [OR]
1.5 SUBMITTALS FOR REVIEW
.1 Section 01 33 00: Submission procedures.
.2 Shop Drawings: Indicate profiles, sizes, connection attachments, anchorage, size and type of fasteners, and accessories.
1.6 QUALITY ASSURANCE
.1 Perform welding to CSA W59.
Part 2 Products
2.1 ALUMINUM RAILING SYSTEM
.1 Rails and Posts: 38 mm diameter, extruded tubing
.2 Fittings: Elbows, T-shapes, wall brackets, escutcheons; cast or machined aluminum.
.3 Mounting: Adjustable] brackets and flanges, with aluminum or steel inserts for casting in concrete with aluminum or steel brackets for embedding into masonry. Prepare backing plate for mounting in hollow wall construction.]
.4 Splice Connectors: Concealed spigot cast or machined aluminum.
.5 Exposed Fasteners: Flush countersunk screws or bolts; consistent with design of railing.
.6 Apply one coat of bituminous paint to concealed aluminum surfaces in contact with cementitious or dissimilar materials.
2.2 STEEL RAILING SYSTEM
.1 Steel Tubing: G40.20.
.2 Fittings: Elbows, T-shapes, wall brackets, escutcheons; cast or machined steel.
.3 Mounting: [Adjustable brackets and flanges, with steel inserts for casting in concrete or with steel brackets for embedding in masonry. Prepare backing plate for mounting in hollow wall construction.
.4 Exposed Fasteners: Flush countersunk screws or bolts; consistent with design of railing.
.5 Splice Connectors: Steel concealed spigots .
.6 Galvanizing: To CSA G164

Hamilton International Air Cargo Logistics Facility Section 05 52 00
Tradeport International Corporation METAL RAILINGS
July 2014
Chamberlain Architect Services Limited Page 3 of 4
Copyright © 2013 by IRC Group Inc. Page 3 of 4
□
2.3 FABRICATION
.1 Fit and shop assemble components in largest practical sizes for delivery to site.
.2 Fabricate components with joints tightly fitted and secured. Provide spigots and sleeves to accommodate site assembly and installation.
.3 Provide anchors required for connecting railings to structure.
.4 Exposed Mechanical Fastenings: Flush countersunk screws or bolts; unobtrusively located; consistent with design of component, except where specifically noted otherwise.
.5 Supply components required for anchorage of fabrications. Fabricate anchors and related components of same material and finish as fabrication, except where specifically noted otherwise.
.6 Exterior Components: Continuously seal joined pieces by continuous welds. Drill condensate drainage holes at bottom of members at locations that will not encourage water intrusion.
.7 Interior Components: Continuously seal joined pieces by continuous welds.
.8 Grind exposed joints flush and smooth with adjacent finish surface. Make exposed joints butt tight, flush, and hairline. Ease exposed edges to small uniform radius.
.9 Accurately form components to suit stairs and landings, to each other and to building structure.
.10 Accommodate for expansion and contraction of members and building movement without damage to connections or members.
Part 3 Execution
3.1 EXAMINATION
.1 Verify that field conditions are acceptable and are ready to receive work.
3.2 PREPARATION
.1 Clean and strip primed steel items to bare metal where site welding is required.
.2 Supply items required to be cast into concrete, embedded in masonry and placed in partitions with setting templates, to appropriate sections.
3.3 INSTALLATION
.1 Install in accordance with manufacturer's instructions.
.2 Install components plumb and level, accurately fitted, free from distortion or defects.
.3 Anchor railings to structure with anchors, plates and angles as required.

Hamilton International Air Cargo Logistics Facility Section 05 52 00
Tradeport International Corporation METAL RAILINGS
July 2014
Chamberlain Architect Services Limited Page 4 of 4
Copyright © 2013 by IRC Group Inc. Page 4 of 4
□
.4 Field weld anchors as indicated on shop drawings. Touch-up welds with primer. Grind welds smooth.
.5 Conceal bolts and screws whenever possible. Where not concealed, use flush countersunk fastenings.
.6 Assemble with spigots and sleeves to accommodate tight joints and secure installation.
3.4 ERECTION TOLERANCES
.1 Maximum Variation From Plumb: 6 mm per storey, non-cumulative.
.2 Maximum Offset From True Alignment: 6 mm.
.3 Maximum Out-of-Position: 6 mm.
END OF SECTION

Hamilton International Air Cargo Logistics Facility Section 06 10 00
Tradeport International Corporation ROUGH CARPENTRY
July 2014
Chamberlain Architect Services Limited Page 1 of 5
Part 1 General
1.1 SECTION INCLUDES
.1 Roof curbs, cants, and perimeter nailers.
.2 Blocking in wall and roof openings.
.3 Telephone and electrical panel back boards.
.4 Concealed wood blocking for support of toilet and bath accessories,
and wall cabinets wood trim.
.5 Preservative treatment of wood.
1.2 REFERENCES
.1 ALSC (American Lumber Standards Committee) - Softwood Lumber Standards.
.2 ANSI A208.1 - Mat-Formed Wood Particleboard.
.3 APA (American Plywood Association) Product Guide - Grades and Specifications.
.4 AWPA (American Wood Preservers Association) C1 - All Timber Products Pressure
Treatment.
.5 AWPA (American Wood Preservers Association) C20 - Structural Lumber Fire Retardant
Pressure Treatment.
.6 NFPA (National Forest Products Association) - Grading Rules.
.7 RIS (Redwood Inspection Service): Standard Specifications for Grades of California
Redwood Lumber.
.8 SPIB (Southern Pine Inspection Bureau) - Grading Rules.
.9 WCLIB (West Coast Lumber Inspection Bureau) - Grading Rules.
.10 WWPA (Western Wood Products Association) - Grading Rules.
1.3 SUBMITTALS FOR REVIEW
.1 Product Data: Provide technical data on wood preservative materials.
1.4 SUBMITTALS FOR INFORMATION
.1 Product Data: Provide application instructions.

Hamilton International Air Cargo Logistics Facility Section 06 10 00
Tradeport International Corporation ROUGH CARPENTRY
July 2014
Chamberlain Architect Services Limited Page 2 of 5
1.5 QUALITY ASSURANCE
.1 Perform Work in accordance with the following agencies:
.1 Lumber Grading Agency: Certified by ALSC.
.2 Plywood Grading Agency: Certified by APA
1.6 DELIVERY, STORAGE AND HANDLING
.1 Keep materials under cover and dry. Protect from weather and contact with damp or wet
surfaces. Stack lumber, plywood, and other panels. Provide for air circulation within and
around stacks and under temporary coverings
.2 For lumber and plywood pressure treated with waterborne chemicals, place spacers
between each bundle to provide air circulation
.3 Section 016100: Transport and Handling, Storage and Protection
Part 2 Products
2.1 MATERIALS
.1 Lumber:
Use only grade marked lumber. Lumber and moisture content to conform to official
grading rules of NLGA, for particular lumber and grade, and structurally conform to latest
requirements of Alberta Building Code. Conform to Grading Standards, CSA Standard
0141.
Moist content not greater than 19% at time of installation.
.2 Wood Materials:
Material, straight, sawn square, true, dressed four (4) sides properly sized, shaped to
correct dimensions from nominal sizes indicated or specified.
.3 Plywood:
Douglas fir plywood to CSA 0121-M1978, good one side with waterproof adhesive.
.4 Blocking, Cants, Bucks, Grounds and Nailing Strips:
Douglas fir Graded 122-C, construction or No. 2 Pine, pressure treated in accordance with
CSA 080M.
2.2 ACCESSORIES
.1 Fasteners and Anchors:
.1 Fasteners: Hot dipped galvanized steel for high humidity and treated wood
locations, unfinished steel elsewhere.
.1 Where rough carpentry is exposed to weather, in ground contact, or in
area of high relative humidity, provide fasteners with a hot-dip zinc
coating per ASTM A153 or of Type 304 stainless steel
.2 Nails, Wire, Brads, and Staples: ASTM F1667
Hamilton International Air Cargo Logistics Facility Section 06 10 00
Tradeport International Corporation ROUGH CARPENTRY
July 2014
Chamberlain Architect Services Limited Page 3 of 5
.3 Power-Driven Fasteners: NES NER-272
.4 Wood Screws: ASME B18.6.1
.5 Lag Bolts: ASME B18.2.1
.6 Bolts: Steel bolts complying with ASTM A307, Grade A; with ASTM A563 hex
nuts and, where indicated, flat washers
.7 Anchors: Expansion shield and lag bolt type for anchorage to solid masonry or
concrete, Bolt or ballistic fastener for anchorages to steel.
2.3 FACTORY WOOD TREATMENT
.1 General: Where lumber or plywood is indicated as preservative treated or is specified to
be treated, comply with applicable requirements of AWPA C2 (lumber) and AWPA C9
(plywood). Mark each treated item with the Quality Mark Requirements.
.1 Do not use chemicals containing chromium or arsenic
.2 For exposed items indicated to receive stained finish, use chemical formulations
that do not bleed through, contain colorants, or otherwise adversely affect finishes.
.2 Pressure treat above ground items with waterborne preservatives to a minimum retention
of 0.25 lb/cu. ft. After treatment, kiln-dry lumber and plywood to a maximum moisture
content of 19 and 15 percent, respectively. Treat indicated items and the following:
.1 Wood cants, nailers, curbs, equipment support bases, blocking, stripping, and
similar members in connection with roofing, flashing, vapor barriers, and
waterproofing
.2 Wood sills, sleepers, blocking, furring, stripping, and similar concealed members
in contact with masonry or concrete
.3 Wood framing members less than 18 inches above grade
.4 Wood floor plates installed over concrete slabs directly in contact with earth
Part 3 Execution
3.1 GENERAL
.1 Do all wood framing in accordance with the governing codes.
.2 Machine dressed work shall be slow fed using sharp cutters and finished members shall be
free from drag, feathers, slivers or roughness of any kind.
.3 Frame materials with tight joints rigidly held in place.
.4 Design construction methods for expansion and contraction of the materials.
.5 Erect work plumb, level, square and to required lines.
.6 Be responsible for methods of construction for ensuring that materials are rigidly and
securely attached and will not be loosened by the work of other trades.

Hamilton International Air Cargo Logistics Facility Section 06 10 00
Tradeport International Corporation ROUGH CARPENTRY
July 2014
Chamberlain Architect Services Limited Page 4 of 5
3.2 BLOCKING
.1 Supply and install blocking where required.
.2 Align and plumb faces of furring and blocking to tolerance of 1:600
3.3 ROUGH BUCKS, NAILERS
.1 Install wood bucks and nailers, as indicated and required, including wood bucks and
linings around frames for doors and windows
.2 Except where indicated, otherwise, use material at least 38 mm thick secured with 9 mm
bolts located within 300 mm from ends of members and uniformly spaced at 1200 mm
between.
.3 Countersink bolts where necessary to provide clearance for other work.
3.4 SHEATHING
.1 Secure sheathing to framing members with ends over firm bearing and staggered.
.2 Install telephone and electrical panel back boards with plywood sheathing material where
required. Size the back board by 300 mm inches beyond size of electrical panel.
.3 Telephone and Electrical Panel Boards: 19 mm ( 3/4 inch) thick, square edges, site brush
applied preservative treated.
3.5 ROOF NAILERS, CURBS
.1 Install wood cants, fascia backing, nailers, curbs, parapets and other wood supports for
roofing, sheet metal fork, roof mounted equipment
.2 Secure with galvanized 9 mm bolts, where indicated, galvanized nails elsewhere. Locate
fastenings within 300 mm from ends and uniformly spaced between. Space bolts at 1200
mm and nails at 600 mm centres, except where indicated otherwise
.3 If applicable staple vapour retardant sheet strip to underside of nailers before installation.
Apply strip continuous with 200 mm overlap at joints, free of wrinkles and tears, with at
least 200 mm exposed for overlap on roof deck
.4 Install wood nailers for roof hoppers, dressed, tapered and recessed slightly below top
surface of roof insulation
3.6 SUPPORT FOR MECHANICAL UNITS
.1 Install wood blocking for prefabricated curbs for mechanical units to allow for a level
installation on sloping roof

Hamilton International Air Cargo Logistics Facility Section 06 10 00
Tradeport International Corporation ROUGH CARPENTRY
July 2014
Chamberlain Architect Services Limited Page 5 of 5
3.7 PRESSURE TREATED WOOD
.1 Use wood pressure treated in accordance with governing standards and codes for all wood
members in contact with exterior walls and roofs
.2 Re-treat surfaces exposed by cutting, trimming or boring with liberal brush application of
preservative before installation
3.8 INSTALLATION OF HOLLOW METAL FRAMES
.1 Set frames plumb and square in their exact location and at correct elevation. Firmly block
and brace to prevent shifting. Shim up where required to ensure proper alignment.
.2 Where pressed steel frames are installed in concrete walls, secure frames to concrete using
lead expansion shields and anchor bolts through pipe sleeves. Perform drilling of concrete
as required. Fill recessed bolt heads flush to frame face with approved metal filler and
sand smoothAllow preservative to dry prior to erecting members.
.3 Install fire rated door frames in accordance with requirements of National Fire Code
Volume 4, produced by The National Fire Protection Association (NFPA 80).
3.9 SITE APPLIED WOOD TREATMENT
.1 Apply preservative treatment in accordance with manufacturer's instructions.
.2 Brush apply two coats of preservative treatment on wood in contact with cementitious
materials roofing and related metal flashings.
.3 Allow preservative to dry prior to erecting members.
3.10 GENERAL
.1 Supply and install all other carpentry shown on drawings or as required for completion of
work. Co-operate with other trades in installing items supplied by other sections, cut
openings in woodwork when so required and make good disturbed surfaces
END OF SECTION

Hamilton International Air Cargo Logistics Facility Section 07 20 00 Tradeport International Corporation SBS MODIFIED BITUMINOUS MEMBRANE ROOFING July 2014 Chamberlain Architect Services Limited Page 1 of 34
Copyright 2013 IRC Building Sciences Group Page 1 of 34
PART 1 - GENERAL
1.1 RELATED SECTIONS
.1 Section 01 10 00 – Summary of Work
.2 Section 07 62 00 – Sheet Metal Flashing & Trim
.3 Section 07 92 00 – Joint Sealants
1.2 REFERENCES
.1 Latest edition of all listed references; most stringent requirements to govern in conflicts:
:
.1 American Society for Testing and Materials (ASTM) International:
.1 C208: Cellulosic Fibre, Insulating Board.
.2 C578: Rigid, Cellular Polystyrene Thermal Insulation.
.3 C1289: Faced Rigid Cellular Polyisocyanurate Thermal Insulation Board.
.4 D41: Asphalt Primer Used in Roofing, Dampproofing, and Waterproofing.
.5 D312: Asphalt Used in Roofing.
.6 D2822: Asphalt Roof Cement.
.7 D4601: Standard for Asphalt Coated Glass Fibre Base Sheet Used in Roofing.
.8 D6162: SBS Mod. Bit. Sheets Using Polyester & Glass Fiber Reinforcements.
.9 D6163: SBS Mod. Bit. Sheets Using Glass Fiber Reinforcements.
.10 D6164: SBS Mod. Bit. Sheets Using Polyester Reinforcements.
.2 Canadian Standards Association (CAN/CSA):
.1 A123.2: Asphalt Coated Roofing Sheets.
.2 A123.3: Asphalt Saturated Organic Roofing Felt.
.3 A123.16: Asphalt Coated Glass Base Sheets.
.4 A231.1: Precast Concrete Paving Slabs.
.5 0121M: Douglas Fir Plywood.
.6 0151M: Canadian Softwood Plywood.
.3 Canadian General Standards Board (CAN/CGSB):
.1 37.29M: Rubber-Asphalt Sealing Compound
.2 37-GP-9M: Primer, Asphalt, unfilled, for Asphalt Roofing and Waterproofing.
.3 37-GP-15M: Application of Asphalt Primer for Asphalt Roofing & Waterproofing.
.4 37-GP-56M: Membrane, Bituminous, Prefabricated and Reinforced for Roofing.
.5 51.26M: Thermal Insulation, Urethane and Isocyanurate, Boards, Faced.
.6 51.33M: Vapour Barrier Sheet, Excluding Polyethylene, for use in Construction.
.4 Underwriters Laboratories of Canada (CAN/ULC):
.1 S701: Thermal Insulation, Polystyrene, Boards and Pipe Covering.
.2 S704: Thermal Insulation, Polyurethane and Polyisocyanurate, Boards, Fixed.
.3 S706: Wood Fibre Thermal Insulation for Buildings.
.5 Ontario Industrial Roofing Contractors Association (O.I.R.C.A.): Roofing Manual.
.6 Canadian Roofing Contractors Association (CRCA): Roofing and Waterproofing Manual.\
Hamilton International Air Cargo Logistics Facility Section 07 20 00 Tradeport International Corporation SBS MODIFIED BITUMINOUS MEMBRANE ROOFING July 2014 Chamberlain Architect Services Limited Page 2 of 34
Copyright 2013 IRC Building Sciences Group Page 2 of 34
1.3 SUBMITTALS
.1 Provide with Bid Submission for Roof Work:
.1 W.S.I.B. CAD-7 Report & Clearance Letter,
.2 Sample copy of Manufacturer's Labour, Material, and Workmanship Warranty,
.3 Sample copy of Contractor's Warranty.
.2 Provide to Quality Assurance Observer, within five (5) working days after Notice of Award:
.1 Initial project work schedule showing anticipated progress stages and final completion of work from Start Date. Do not commence Work before project schedule has been
provided and reviewed.
.2 Current W.S.I.B. CAD-7 Report & Clearance Letter for Place of Work.
.3 Provide to Quality Assurance Observer, at Prestart Meeting:
.1 Finalized project work schedule listing start date, anticipated number of working days working, and manpower assignments for project.
.2 Specified Insurance in Owner’s name.
.3 Sample of specified warranties from Manufacturer and Contractor for proposed materials
and products to be installed.
.4 Letter and completed Manufacturer’s project warranty application form sent to “Warranty Provider” advising them of project start and particulars.
.5 Complete Materials List; including installation instructions and product datasheets providing characteristics of all proposed materials to be installed.
.6 Material Safety Data Sheets (MSDS) pertaining to all proposed materials to be used on site to perform Work.
.7 Certifications by manufacturers of roofing and insulating materials that all products supplied comply with all requirements of current identified ASTM and other industry standards or practices.
.8 Letter by Contractor certifying that all specified roof system components are compatible, are approved by Manufacturer, meet specified warranty terms, and are compatible with existing substrates.
.9 Applicable shop drawings for tapered insulation layout and other specified items to be
reviewed by Consultant prior to prefabrication and delivery.
.10 Appropriate securement patterns for mechanical fastening of insulation, and deck overlay boards if applicable.
.11 List of “Trained and Carded Membrane Approved Applicators” to work and be present during performance of Work.
.12 Health & Safety Plan for Specific Work Site including contact list and phone numbers for
project, and twenty-four (24) hour emergency contact numbers.
1.4 CONTRACTOR QUALIFICATION
.1 Roofing Contractor to perform specified Work must:

Hamilton International Air Cargo Logistics Facility Section 07 20 00 Tradeport International Corporation SBS MODIFIED BITUMINOUS MEMBRANE ROOFING July 2014 Chamberlain Architect Services Limited Page 3 of 34
Copyright 2013 IRC Building Sciences Group Page 3 of 34
.1 have a minimum ten (10) years work experience with materials specified or similar
comparable products,
.2 be a member in good standing with Ontario Industrial Roofing Contractors Association (O.I.R.C.A.), and
.3 be licensed and insured for Place of Work.
.2 Roofing Contractor must be pre-approved and certified by Membrane Manufacturer for specified materials and installation type.
.1 Contractor’s installers must be certified and carded for installation of specified materials.
.2 Contractor’s employees and Subcontractors must be WHMIS certified.
.3 Owner reserves right to reject any proposed Subcontractor for reasonable cause.
.3 Any Bidder, when specifically requested, must complete a questionnaire listing Contractor’s qualifications on a form provided by Owner or Consultant, or a CCDC 11 – Contractors’ Qualifications Statement with submission of Bid.
.1 Acceptance or rejection of submitted qualifications for suitability to perform specified Work to be made within three (3) working days.
1.5 QUALITY ASSURANCE
.1 Compatibility between components of roofing system and wall system is essential. Provide written declaration to Consultant stating that materials and components, as assembled in new system will meet this requirement.
.2 Perform Work in accordance with Contracts Documents and Manufacturer's written instructions.
.3 Make no deviation from Project Specifications or approved shop drawings without prior written approval by Consultant and, if applicable, Manufacturer.
.4 Contractor to arrange for a Technical Representative of Manufacturer to review installed roof system wherever a Standard or System Warranty requirement has been specified.
.5 Upon completion of new installation, provide certification that all work has been done in strict accordance with Contract Documents and to Manufacturer’s requirements.
1.6 QUALITY ASSURANCE OBSERVATION
.1 The Owner's Building Envelope Consultant, hereafter known as “Observer”, is an independent Quality Assurance Observation Agency appointed by Owner to observe performance of roof Work:
.1 Arrange Prestart site meeting with Observer no more than three (3) weeks prior to commencement of Work on site. Obtain Observer’s instructions and reference
procedures to be followed on project.
.2 Provide to Observer date when each phase of work will begin, at least forty-eight (48) hours prior to commencement of Work for phase.
.3 Arrange Final Observation and examination of installed roof with both Observer and Manufacturer’s Technical Representative.

Hamilton International Air Cargo Logistics Facility Section 07 20 00 Tradeport International Corporation SBS MODIFIED BITUMINOUS MEMBRANE ROOFING July 2014 Chamberlain Architect Services Limited Page 4 of 34
Copyright 2013 IRC Building Sciences Group Page 4 of 34
.2 Cooperate with Observer and afford all facilities necessary to permit full Quality Assurance
Observations during performance of Work. Act immediately on instructions given by Observer.
.3 When required, provide roof cut-outs and samples in field where directed by Observer and make good without additional cost to Owner.
.4 When initial tests and observations reveal work failing to meet contract requirements, pay for any additional testing and observations required by Observer or third party testing agency for correction of Work, without additional cost to Owner.
.5 Copies of Q.A. Observation Reports to be issued by Observer to Owner and Prime Contractor.
1.7 DELIVERY, STORAGE, AND HANDLING
.1 Site storage is limited. Where applicable, location of storage and related facilities to be
coordinated with Prime/General Contractor.
.2 All materials to be delivered and stored in their original packaging bearing manufacturers label, grade and product weight, including all other related standards, specifications, and like.
.3 All materials to be adequately protected from inclement weather conditions and stored in a dry, well ventilated and weather protected location. Use only dry materials and apply only during weather that will not introduce moisture into roofing system.
.4 Only materials to be installed on same day to be removed from protected location to work site.
.5 During extreme temperature, materials to be stored in a heated location with a 4.4°C (40°F) minimum temperature and removed only as needed.
.6 Modified bitumen rolls to be kept clear of all flames and sparks when not being applied to roof.
.7 All materials in a rolled configuration to be stored on end, elevated off ground, and on a pallet or skid to protect bottom surface from foreign debris and moisture.
.8 Restrict stockpiling of material in one location on roof to prevent exceeding specified deck live load capacity. Avoid point loading that may compromise structural integrity of roof.
.9 Handle and store products in a manner to prevent damage and deterioration.
.10 Remove and replace damaged products at own expense and to satisfaction of Consultant.
1.8 ENVIRONMENTAL REQUIREMENTS
.1 Do not apply roofing materials to damp, wet, or frozen deck or substrates.
.2 Do not expose materials vulnerable to water or sun damage in quantities greater than can be weatherproofed during same day.
.3 All work to be scheduled and executed without exposing interior building areas to effects of
inclement weather. Existing building and its contents to be protected against all risks.
.4 All new and temporary construction, including equipment and accessories, to be secured in such a manner as to preclude wind blow-off and subsequent roof or equipment damage.
.5 Uninterrupted water-stops to be installed at end of each day's work and to be completely removed before proceeding with next day's work. Water-stops to not emit dangerous or unsafe fumes and to not remain in contact with finished roof as installation progresses. Contaminated membrane to be replaced at no cost to Owner.

Hamilton International Air Cargo Logistics Facility Section 07 20 00 Tradeport International Corporation SBS MODIFIED BITUMINOUS MEMBRANE ROOFING July 2014 Chamberlain Architect Services Limited Page 5 of 34
Copyright 2013 IRC Building Sciences Group Page 5 of 34
.6 Arrange work sequence to avoid use of newly constructed roofing as a walking surface or for equipment movement and storage. Where such access is absolutely required, provide all necessary protection and barriers to segregate work area and to prevent damage to adjacent areas. A substantial protection layer consisting of plywood over felt or plywood over insulation board to be provided for all new and existing roof areas that receive rooftop traffic during construction.
.7 Prior to and during application, all dirt, debris and dust to be removed from surfaces by vacuuming, sweeping, blowing with compressed air, and/or similar methods.
.8 Follow all safety regulations as required by OHS (Occupational Health and Safety) and any other
applicable authority having jurisdiction.
.9 All roofing, insulation, flashings and metal work removed during construction to be immediately taken off site to a legal dumping area authorized to receive such materials. Hazardous materials, such as materials containing asbestos, are to be removed and disposed of in strict accordance with applicable Local, Provincial, and National requirements.
.10 All new roofing waste material (i.e., scrap roof membrane, empty cans of adhesive) to be immediately removed from site by Contractor and properly transported to a legal dumping area authorized to receive such material.
.11 Take precautions that storage and/or application of materials and/or equipment does not overload roof deck or building structure.
.12 Flammable adhesives and deck primers to not be stored and not be used in vicinity of open
flames, sparks and excessive heat.
.13 All rooftop contamination that is anticipated or that is occurring to be reported to manufacturer to determine corrective steps to be taken.
.14 Immediately stop work if any unusual or concealed condition is discovered and immediately notify Consultant of such condition in writing in order to obtain additional instruction.
.15 Site cleanup, including both interior and exterior building areas that have been affected by
construction, to be completed to satisfaction of Consultant.
.16 Protective wear to be worn when using solvents or adhesives or as required by job conditions.
1.9 PREPARATORY WORK
.1 Review roof levels and advise Consultant of any deviation from specified tolerances.
.2 Review roof drain locations and number. Advise Consultant of any deviation or alteration from specifications.
.3 Sweep roof deck free of dust or dirt and remove all debris prior to any installation work.
1.10 SAFETY AND PROTECTION
.1 Latest edition of all listed references to apply:
.1 CAN/CSA S269.2M: Access Scaffolding for Construction Purposes.
.2 Fire Commissioner of Canada: FC 301 - Standard for Construction Operations.
.2 Solvents, Adhesives and Membranes:

Hamilton International Air Cargo Logistics Facility Section 07 20 00 Tradeport International Corporation SBS MODIFIED BITUMINOUS MEMBRANE ROOFING July 2014 Chamberlain Architect Services Limited Page 6 of 34
Copyright 2013 IRC Building Sciences Group Page 6 of 34
.1 Store only enough solvents and adhesives on roof for same day’s use. Do not leave adhesives on roof over night. Manufacturer supplied adhesives should be stored in their over night containers. Minimum temperature for solvent based adhesives and primers is -5°C (23°F).
.2 Do not install roof membrane when temperature remains below 5°C (41°F) for self adhering installations. Apply materials in accordance with manufacturer’s recommendations and in accordance with Canadian Modified Bitumen Manufacturer’s Association.
.3 Refer to Manufacturer’s literature for additional guidelines.
.4 Protect walls where hoisting is required.
.5 Protect roofs from damage due to traffic and materials handling until completion.
.6 Keep a fire extinguisher at access to building interior wherever solvent based products are stored or used.
.3 Fire Safety:
.1 Contractor must keep charged and ready fire extinguishers on site at all times, including on roof and at access points to building interior.
.2 Contractor responsible to provide a two (2) hour fire watch at completion of each day’s activities on all projects implementing use of propane torches and/or burners.
.3 A handheld, infrared thermal scanner suitable for roofing applications and fire alert must be kept on site at all times during torching procedures. Fire scanner by Raytek or approved Observer Group equal. Check seams and flashings at hourly intervals for flare ups.
.4 Health and Safety:
.1 Contractor to comply with all safety requirements as per current printed edition of Provincial Occupational Health and Safety Act and with Ontario Industrial Roofing Contractors Association (O.I.R.C.A.) standards.
Hamilton International Air Cargo Logistics Facility Section 07 20 00 Tradeport International Corporation SBS MODIFIED BITUMINOUS MEMBRANE ROOFING July 2014 Chamberlain Architect Services Limited Page 7 of 34
Copyright 2013 IRC Building Sciences Group Page 7 of 34
1.11 WARRANTY
.1 Roof Workmanship Warranty:
.1 On All Low Slope Roof Replacement Areas: Contractor to supply Owner with a two (2) year Contractor’s Warranty for Workmanship on a form acceptable and pre-approved by
Consultant or on Contractor’s letterhead, signed, authorized and executed.
.1 In event any work related to roofing, flashing, or metal is found to be within Contractor’s warranty term, defective or otherwise not in accordance with Contract Documents, Contractor to repair that defect at no cost to Owner. Applicator's warranty obligation to run directly to Owner with a copy sent to Manufacturer.
.2 Roof System Warranty:
.1 On All Low slope Roof Areas: Contractor to supply Owner with Manufacturer’s Labour, Material and Workmanship System Warranty for a period of ten (10) years on roof
replacement areas.
.1 Owner to notify both membrane Manufacturer and Contractor of any leak that occurs during time period while warranties remain in effect.
.2 Provide a Separate Price on Bid Form to extend specified System Warranty period from ten (10) years to twenty (20) years on all roof areas.
.3 All other items not specifically noted above to be supplied with a two (2) year Contractor’s Warranty for materials and workmanship.
.4 Cost of all warranties to be included in Bid Price.
PART 2 - PRODUCTS
2.1 GENERAL
.1 All membrane materials are to be supplied by Siplast or Soprema, meeting manufacturer’s
respective material compatibility requirements to achieve required System Warranty.
.2 Components to be used that are other than those supplied or manufactured by membrane manufacturer may be submitted for review and acceptance by membrane manufacturer.
.3 Membrane Manufacturer's acceptance of any other product is only for a determination of compatibility with products and not for inclusion in manufacturer’s warranty.
.4 Specifications, installation instructions, limitations, and/or restrictions of respective manufacturers must be reviewed by Consultant for acceptability for intended use with membrane manufacturer’s products.
2.2 ROOFING BOARD ADHESIVE
.1 Polyurethane Adhesive for Deck Overlay and Insulation Boards:
.1 Ribbons of one or two component polyurethane foamable adhesive:
.1 INSTA-STIK Adhesive by Flexible Products Company-Roofing Group (DOW),
.2 OlyBond500 Adhesive by OMG Roofing Products,
.3 Para-Stik Adhesive by Siplast,
.4 Duotack by Soprema.

Hamilton International Air Cargo Logistics Facility Section 07 20 00 Tradeport International Corporation SBS MODIFIED BITUMINOUS MEMBRANE ROOFING July 2014 Chamberlain Architect Services Limited Page 8 of 34
Copyright 2013 IRC Building Sciences Group Page 8 of 34
2.3 MECHANICAL FASTENERS:
.1 Fasteners for Deck Overlay and Insulation Boards:
.1 Self tapping, epoxy coated carbon steel or solid stainless steel deck screws approved by membrane Manufacturer to meet warranty requirements, complete with securement
plates in a fastening pattern meeting FM 1-90 requirements:
.2 Acceptable Product on 22 gauge metal roof deck:
.1 #12 Dekfast Fasteners by Dekfast Product Group,
.2 #14 Soprafix fasteners by Soprema,
.3 Parafast Roofing Fasteners by Siplast,
.4 #12 Trufast DP Roofing Fasteners by Trufast.
.3 Acceptable Product on 18 and 20 gauge metal roof deck:
.1 #12 Dekfast Fasteners by Dekfast Product Group,
.2 #14 Soprafix fasteners by Soprema,
.3 Parafast HD Roofing Fasteners by Siplast,
.4 #14 Trufast HD-SS Roofing Fasteners by Trufast.
2.4 DECK OVERLAY BOARD.
.1 16mm (5/8") DensDeck Prime by Georgia-Pacific,
.2 16mm (5/8") Securock Glass-Mat Roof Board by USG.
2.1 SUBSTRATE OVERLAY BOARD
.1 Substrate Overlay Board: Dimensionally stable, laminated board, size to be 4'x5' (1.2m x 1.5m):
.1 Multi-ply, semi-rigid asphaltic roofing recovery board, composed of a mineral fortified asphaltic core formed between two asphaltic saturated fibreglass liners.
.1 3mm (1/8”) ProtectoBaord by IKO,
.2 3mm (1/8”) Sopraboard by Soprema.
.3 6mm (1/4") ProtectoBaord by IKO,
.4 6mm (1/4") Sopraboard by Soprema.
.5 13mm (1/2") ProtectoBaord by IKO.
2.2 HOT MOPPING ASPHALT
.1 For roof slopes up to 6% (1:12):
.1 Hot Type III (3) oxidized asphalt to requirements of CSA A123.4M and ASTM D312. Stored in bulk tankers or individual kegs/cartons and heated to EVT ± 13°C (25°F) for type of bitumen used. Kettle equipped with fume recovery system and recently calibrated
automatic temperature control.
.1 Type III (3) Oxidized Asphalt to CSA A123.4 and ASTM D312.
.2 Sopracolle “E” Modified Asphalt by Soprema.
.3 PA-100 Oxidized Mopping Asphalt by Siplast
.2 For Interply Mopping: SEBS modified bitumen asphalt for mopping of Cap Sheet and Flashings:
.1 Soprasphalte “M” SEBS Modified Asphalt by Soprema,
Hamilton International Air Cargo Logistics Facility Section 07 20 00 Tradeport International Corporation SBS MODIFIED BITUMINOUS MEMBRANE ROOFING July 2014 Chamberlain Architect Services Limited Page 9 of 34
Copyright 2013 IRC Building Sciences Group Page 9 of 34
.2 PA-1000 SEBS Modified Mopping Asphalt by Siplast.
2.3 MEMBRANE PRIMER
.1 General Purpose:
.1 Solvent Based Primer: Composed of volatile solvents, synthetic polymers, and/or adhesive enhancing resins to prepare surfaces for membrane application:
.1 PA-1125 Asphalt Primer by Siplast,
.2 Elastocol 500 (Black) by Soprema,
.2 High-tack for Self Adhering Membranes:
.1 Solvent Based Primer: Composed of volatile solvents, synthetic polymers, and/or
adhesive enhancing resins to prepare surfaces for self adhering membranes:
.1 TA-325 Primer by Siplast,
.2 Elastocol Stick Zero (Red) by Soprema,
.2 Water Based Primer: Emulsion based primer composed with synthetic polymers and/or adhesive enhancing resins to prepare surfaces for self adhering membranes. Do not use on metal surfaces, between membranes, or between two water repellent components:
.1 TA-119 Primer (Red) by Siplast.
.2 Elastocol Stick H2O (Blue) by Soprema,
.3 For Torch Applied Membranes:
.1 Solvent Based Primer: Composed of SBS modified bitumen, volatile solvents, synthetic polymers, and/or adhesive enhancing resins to prepare surfaces for torch applied
membranes:
.1 PA-1125 Asphalt Primer by Siplast,
.2 Elastocol 500 (Black) by Soprema,
.2 Water Based Primer: Emulsion based primer composed with SBS stabilized modified bitumen, synthetic polymers and/or adhesive enhancing resins to prepare surfaces for torch applied membranes. Do not use between membranes or two water repellent
components:
.1 PA-1130 Asphalt Emulsion Primer by Siplast.
.2 Elastocol 350 (Dark Brown) by Soprema,
2.4 VAPOUR RETARDER
.1 Base Sheet Field Membrane:
.1 Self adhering grade modified bitumen, minimum 1.5mm (60 mil) thick, with minimum 85g/m
2 non-woven polyester scrim, random glass fibre mat or composite reinforcement,
impregnated and coated with SBS modified bitumen, and conforming to CGSB 37-GP-56M. Top surface to be sanded with self adhesive bitumen bottom surface covered with polyolefin or silicone release film.
.1 Paradiene 20 SA by Siplast,
.2 Sopraflash Stick by Soprema,
.3 SBS Glass SA Base by Tradesman.

Hamilton International Air Cargo Logistics Facility Section 07 20 00 Tradeport International Corporation SBS MODIFIED BITUMINOUS MEMBRANE ROOFING July 2014 Chamberlain Architect Services Limited Page 10 of 34
Copyright 2013 IRC Building Sciences Group Page 10 of 34
.2 Base Sheet and Tie-in Flashings:
.1 Self adhering grade modified bitumen, minimum 1.5mm (60 mil) thick, with minimum 85g/m
2 non-woven polyester scrim, random glass fibre mat, or composite reinforcement,
impregnated and coated with SBS modified bitumen, and conforming to CGSB 37-GP-56M. Top surface to be sanded with self adhesive bitumen bottom surface covered with polyolefin or silicone release film.
.1 Paradiene 20 SA by Siplast,
.2 Sopraflash Stick by Soprema,
.3 SBS Glass SA Base by Tradesman.
2.5 BASE INSULATION
.1 Base Insulation Type: Closed-cell polyisocyanurate foam rigid insulation boards to ASTM C1289 Type II, Class 1, 2, or 3, Grade 2, manufactured with HCFC-free blowing agent (Pentane) bonded during manufacturing process to inorganic coated glass facers on top and bottom surfaces:
.1 Approved and listed for a Class 1 Roof Assembly to FM Standard 4450 on Insulated Steel Deck Assemblies or FM Standard 4470 on Roof Covers meeting requirements of Factory Mutual Global for durability, 1-90 wind uplift, and fire resistance without use of sprinkler protection.
.2 Meet physical property requirements of ASTM C 1289 and CAN/ULC S704 with a min.
compressive strength of 138 kPa (20 psi).
.3 Dimensional stability change of less than 2% conforming to ASTM D 2126.
.4 Conformity to CAN/ULC S704 and Can/ULC S770 for Long Term Thermal Resistance in
polyisocyanurate insulation. Acceptable Products:
.1 ACFoam III polyisocyanurate by Atlas Roofing Corp.,
.2 Paratherm w/CG facer polyisocyanurate by Siplast,
.3 Sopra-ISO Plus (formerly Colgrip “A”) polyisocyanurate by Soprema.
.2 Base Insulation Thickness: Tapered to suit layout indicated on roof plan drawing:
.1 Tapered insulation to have a slope of 2%; 6mm (0.25") vertically per linear foot (305mm)
horizontally unless noted otherwise on roof plan drawings.
.3 Base Insulation Thickness:
.1 Continuous layer of flat polyisocyanurate insulation boards 125 mm (5.0”) thick (RSI 4.4).
.4 Tapered Drainage Sumps: Closed-cell polyisocyanurate foam rigid insulation boards, Type II, Class 2, Grade 2 to ASTM C1289, manufactured with HCFC-free blowing agent (Pentane) bonded during manufacturing process to inorganic coated glass facers on top and bottom
surfaces:
.1 Size to be 2.4m x 2.4m (8' x 8') and tapered from 38mm (1.5”) at 2% down to a 610mm x 610mm (2' x 2') central flat area 19mm (0.75”) thick.
.2 2.4m x 2.4m (8' x 8') and tapered from 76mm (3.0”) at 2% down to a 610mm x 610mm (2' x 2') central flat area 57mm (2.25”) thick.
.3 1.2m x 1.2m (4' x 4') and tapered from 76mm (3.0”) at 4% down to 51mm (2”) in
thickness at center.

Hamilton International Air Cargo Logistics Facility Section 07 20 00 Tradeport International Corporation SBS MODIFIED BITUMINOUS MEMBRANE ROOFING July 2014 Chamberlain Architect Services Limited Page 11 of 34
Copyright 2013 IRC Building Sciences Group Page 11 of 34
.5 All tapered insulation to be factory cut and mitred, and supplied by Accu-plane Enterprises Inc.,
Beacon Roofing Supply, Everest Supply Inc., or Posi-slope Enterprises Inc.
.1 Submit all shop drawings to Consultant for review prior to prefabrication.
2.6 TAPERED OVERLAY INSULATION
.1 Overlay Insulation Type: Closed-cell polyisocyanurate foam rigid insulation boards to ASTM C1289 Type II, Class 1, 2, or 3, Grade 2, manufactured with HCFC-free blowing agent (Pentane) bonded during manufacturing process to inorganic coated glass facers on top and bottom
surfaces:
.1 Approved and listed for a Class 1 Roof Assembly to FM Standard 4450 on Insulated Steel Deck Assemblies or FM Standard 4470 on Roof Covers meeting requirements of Factory Mutual Global for durability, 1-90 wind uplift, and fire resistance without use of sprinkler protection.
.2 Meet physical property requirements of ASTM C 1289 and CAN/ULC S704 with a min.
compressive strength of 138 kPa (20 psi).
.3 Dimensional stability change of less than 2% conforming to ASTM D 2126.
.4 Conformity to CAN/ULC S704 and Can/ULC S770 for Long Term Thermal Resistance
(LTTR) in polyisocyanurate insulation. Acceptable Products:
.1 ACFoam III polyisocyanurate by Atlas Roofing Corp.,
.2 Paratherm w/CG facer polyisocyanurate by Siplast,
.3 Sopra-ISO Plus (formerly Colgrip “A”) polyisocyanurate by Soprema.
.2 Overlay Insulation Thickness: Tapered to suit layout indicated on roof plan drawing:
.1 Tapered insulation to have a slope of 1%, 2%, or 4% as noted and indicated on roof plan
drawing. Maximum total thickness of base and overlay insulation to be 178mm (7.0”).
.2 Tapered insulation to have a slope of 2%; 6mm (0.25") vertically per 305mm (linear foot) horizontally, except where noted on roof plan drawing.
.3 Tapered Insulation Drain Sumps: Closed-cell polyisocyanurate foam rigid insulation boards to ASTM C1289 Type II, Class 1, 2, or 3, manufactured with HCFC-free blowing agent (Pentane) bonded to inorganic coated glass facers on top and bottom surfaces during manufacturing process:
.1 Size to be 1.2m x 1.2m (4' x 4'), tapered from 51mm (2.0”) at sump edge down to center
of drain at a thickness of 25mm (1.0”).
.2 Size to be 1.2m x 2.4m (4' x 8') in an offset style, tapered from 38mm (1.5”) at sump edge down to center of drain at a thickness of 13mm (0.5”).
.4 Tapered Insulation Crickets: Where indicated on roof plan drawing and at all penetrations and curbs wider than 305mm (1’-0”). Custom cut to suit each installation location:
.1 Closed-cell polyisocyanurate foam rigid insulation boards to ASTM C1289 Type II, Class 1, manufactured with HCFC-free blowing agent bonded to glass fibre reinforced organic felt facers on top and bottom surfaces during manufacturing process:
.2 Tapered at 12.5% from 38mm (1.5”) down to 0mm (0”) over 305mm (1’-0”), in 2.44m (8’-
0”) lengths. Acceptable Products:

Hamilton International Air Cargo Logistics Facility Section 07 20 00 Tradeport International Corporation SBS MODIFIED BITUMINOUS MEMBRANE ROOFING July 2014 Chamberlain Architect Services Limited Page 12 of 34
Copyright 2013 IRC Building Sciences Group Page 12 of 34
.1 305mm (12”) wide Gemini TES panels Atlas Roofing Corporation.
.3 Tapered at 8% from 51mm (2.0”) down to 0mm (0”) over 610mm (2’-0”), in 2.44m (8’-0”)
board lengths. Acceptable Products:
.1 610mm (24”) wide Gemini TES panels Atlas Roofing Corporation.
.5 Tapered Zero-Edge Strips: Closed-cell polyisocyanurate foam rigid insulation boards to ASTM C1289 Type II, Class 1, 2, or 3, Grade 2, manufactured with HCFC-free blowing agent (Pentane) bonded during manufacturing process to glass fibre reinforced, organic felt facers on top and
bottom surfaces:
.6 All tapered insulation to be factory cut and mitred, and supplied by Accu-plane Enterprises Inc., Beacon Roofing Supply, Everest Supply Inc., or Posi-slope Enterprises Inc.
.1 Submit all shop drawings to Consultant for review prior to prefabrication.
2.7 COMPOSITE POLYISO INSULATION
.1 Composite Insulation Type: Factory laminated rigid insulation board composed of:
.1 Closed-cell polyisocyanurate foam rigid insulation boards to ASTM C1289 Type II, Class 1, Grade 2, manufactured with HCFC-free blowing agent (Pentane) bonded during manufacturing process to glass fibre reinforced organic felt facers on top and bottom
surfaces:
.1 Approved and listed for a Class 1 Roof Assembly to FM Standard 4450 on Insulated Steel Deck Assemblies or FM Standard 4470 on Roof Covers meeting requirements of Factory Mutual Global for durability, 1-90 wind uplift, and fire resistance without use of sprinkler protection.
.2 Meet physical property requirements of ASTM C 1289 and CAN/ULC S704 with a
min. compressive strength of 138 kPa (20 psi).
.3 Dimensional stability change of less than 2% conforming to ASTM D 2126.
.4 Conformity to CAN/ULC S704 and Can/ULC S770 for Long Term Thermal
Resistance (LTTR) in polyisocyanurate insulation.
.2 Non-combustible, rigid mineral wool board insulation with factory laminated reinforced SBS modified bitumen base sheet membrane on top side:
.1 Minimum compressive strength of of thickness 96.5 kPa at 25mm (14 psi at 1”).
.2 Board panels to have a membrane selvedge edge width of 86mm (3.375”) for overlapping onto next board.
.3 Top membrane surface to be lightly coated with sand.
.3 Acceptable Product:
.1 Xpress ISO Sanded insulation panels by Soprema.
.2 Composite Insulation Size:
.1 Panel Size: Flat 915mm x 2.4m (36” x 8’-0”) insulation panels, with laminated 99mm x 2.4m (39” x 8’-0”) modified bitumen base sheet.

Hamilton International Air Cargo Logistics Facility Section 07 20 00 Tradeport International Corporation SBS MODIFIED BITUMINOUS MEMBRANE ROOFING July 2014 Chamberlain Architect Services Limited Page 13 of 34
Copyright 2013 IRC Building Sciences Group Page 13 of 34
.2 Panel Thickness: 89mm (3.5”) total thickness with R-Value of 20 (RSI 3.5); composed of
76mm (3.0”) polyisocyanurate and 13mm (0.5”) mineral fibre insulation.
.3 Composite Insulation Cover Strips:
.1 At insulation panel end joints, 330mm (13”) wide strips of 2.5mm (1/8”) thick base sheet membrane with composite reinforcement, impregnated and coated with SBS modified bitumen, and conforming to CGSB 37-GP-56M.
.2 Self Adhering Application: Top surface to be lightly sanded with bottom surface covered
with silicone release film.
.1 Acceptable Product: SopraLap Stick by Soprema.
2.8 COMPOSITE INSULATION - TAPERED DRAIN SUMP
.1 Base Sump Insulation Type: Tapered, closed-cell polyisocyanurate foam rigid insulation boards to ASTM C1289 Type II, Class 1, manufactured with HCFC-free blowing agent (Pentane) bonded during manufacturing process to glass fibre reinforced organic felt facers on top and bottom
surfaces:
.1 Approved and listed for a Class 1 Roof Assembly to FM Standard 4450 on Insulated Steel Deck Assemblies or FM Standard 4470 on Roof Covers meeting requirements of Factory Mutual Global for durability, 1-90 wind uplift, and fire resistance without use of sprinkler protection.
.2 Meet physical property requirements of ASTM C 1289 and CAN/ULC S704 with a min. compressive strength of 138 kPa (20 psi).
.3 Dimensional stability change of less than 2% conforming to ASTM D 2126.
.4 Conformity to CAN/ULC S704 and Can/ULC S770 for Long Term Thermal Resistance in
polyisocyanurate insulation. Acceptable Products:
.1 ACFoam II polyisocyanurate by Atlas Roofing Corp.,
.2 Paratherm polyisocyanurate by Siplast,
.3 Sopra-ISO (formerly Colgrip “B”) polyisocyanurate by Soprema.
.2 Tapered Insulation Suppliers:
.1 All tapered insulation drainage sumps to be factory cut and mitred, and supplied by Accu-plane Enterprises Inc., Beacon Roofing Supply, Everest Supply Inc., or Posi-slope Enterprises Inc.
.1 Submit all shop drawings to Consultant for review prior to prefabrication.
2.9 COVER BOARD
2.10 MODIFIED BITUMEN MEMBRANE – MOP & TORCH APPLICATION
.1 Base Sheet:
.1 Mop grade modified bitumen: Minimum thickness 2.6mm with minimum 180g/m2 non-
woven polyester scrim, random glass fibre mat, or composite reinforcement, impregnated and coated with SBS modified bitumen, and conforming to CGSB 37-GP-56M. Sanded
top and bottom surface.
.1 Paradiene 20 by Siplast,

Hamilton International Air Cargo Logistics Facility Section 07 20 00 Tradeport International Corporation SBS MODIFIED BITUMINOUS MEMBRANE ROOFING July 2014 Chamberlain Architect Services Limited Page 14 of 34
Copyright 2013 IRC Building Sciences Group Page 14 of 34
.2 Sopralene 180 PS 3mm by Soprema.
Base Sheet Flashing: .2 Self Adhering grade modified bitumen: minimum 2.6mm with minimum 180g/m
2 non-
woven polyester scrim, random glass fibre mat, or composite reinforcement, impregnated and coated with SBS modified bitumen, and conforming to CGSB 37-GP-56M. Top surface to be sanded with self adhesive bitumen bottom surface covered with polyolefin or silicone release film.
.1 Paradiene 20 SA by Siplast,
.2 Sopraflash Flam Stick by Soprema.
.2 Cap Sheet:
.1 Torch grade modified bitumen, minimum thickness 3.3mm, with minimum 250g/m2 non-
woven polyester scrim, random glass fibre mat, or composite reinforcement, impregnated and coated with SBS modified bitumen, and conforming to CGSB 37-GP-56M. Top surface to have No. 11 ceramic granules and torch grade bitumen bottom surface covered with sand or thermofusible polyolefin film. Colour of granules to be chosen by Owner from Contractor supplied samples of standard colours.
.1 Paradiene 30 CR FR TG by Siplast,
.2 Soprastar Flam HD GR by Soprema.
.3 Cap Sheet Flashing:
.1 Torch grade modified bitumen, minimum thickness 3.3mm, with minimum 250g/m2 non-
woven polyester scrim, random glass fibre mat, or composite reinforcement, impregnated and coated with SBS modified bitumen, and conforming to CGSB 37-GP-56M. Top surface to have No. 11 ceramic granules and torch grade bitumen bottom surface covered with sand or thermofusible polyolefin film. Colour of granules to be chosen by Owner from Contractor supplied samples of standard colours.
.1 Paradiene 30 CR FR TG by Siplast,
.2 Soprastar Flam HD GR by Soprema.
2.11 LIQUID APPLIED PMMA RESIN MEMBRANE & FLASHINGS
.1 Flexible, polymethylmethacrylate (PMMA) based resin system combined with a thixotropic agent for use in combination with fleece fabric to form a monolithic, reinforced flashing membrane:
.1 Parapro 123 resin flashing system by Siplast,
.2 Alsan RS liquid applied resin flashing system by Soprema.
.3 Parapro 123 Flashing & Parapro Membrane resin system by Siplast,
.4 Alsan RS 230 Flash & Alsan RS 230 Field membrane resin system by Soprema.
.2 PMMA Roof Flashing Components:
.1 PMMA Primer for vertical concrete, wood, and plywood substrates: Pro Primer W by Siplast or Alsan RS 276 Primer by Soprema.
.2 PMMA Primer for horizontal concrete substrates: Pro Primer T by Siplast or Alsan RS 276 Primer by Soprema.
.3 PMMA Primer for asphaltic surfaces and substrates: Alsan RS 222 Primer by Soprema.

Hamilton International Air Cargo Logistics Facility Section 07 20 00 Tradeport International Corporation SBS MODIFIED BITUMINOUS MEMBRANE ROOFING July 2014 Chamberlain Architect Services Limited Page 15 of 34
Copyright 2013 IRC Building Sciences Group Page 15 of 34
.4 PMMA Resin: Polymethylmethacrylate based resin combined with a thixotropic agent. Where applicable, resin colour to be chosen by Owner from standard pallet of available colours from manufacturer.
.5 PMMA Catalyst: Pro Catalyst by Siplast or Alsan RS Catalyst Powder by Soprema.
.6 Thixotropic agent: Liquid additive used to increase viscosity of PMMA-based resin products, allowing resins to be applied over vertical or sloped substrates; Pro Thixo by Siplast or approved equal from Soprema.
.7 Fleece reinforcement: Non-woven, 110 g/m², needle punched, polyester fabric reinforcement as supplied by system manufacturer; Pro Fleece by Siplast or Alsan RS Fleece by Soprema.
.8 Colour finish resin: Pigmented, polymethylmethacrylate (PMMA) based resin for use as a wearing coat over field of finished roof membrane and to provide a desired colour finish; Pro Color Finish by Siplast or Alsan RS 281 Finish by Soprema. Colour to be chosen by Owner from standard pallet of available colours from manufacturer.
.9 Anti-Skid Surfacing: Ceramic granules suitable for broadcast into PMMA based wearing layer; No. 11 Granules by Siplast or Alsan RS Surfacing Aggregate by Soprema. Colour to be chosen by Owner from standard palette of available colours.
.3 PMMA Accessories:
.1 Cleaning solution/solvent: Clear solvent used to clean and prepare transition areas of in-place catalyzed resin to receive subsequent coats of resin and to clean substrate
materials to receive resin; Pro Prep by Siplast or Alsan RS Cleaning Agent by Soprema.
.2 Preparation paste: PMMA based paste used for remediation of depressions in substrate surfaces or other irregularities; Pro Paste Resin by Siplast or Alsan RS Paste by
Soprema.
.3 Repair mortar: Two component, PMMA based, aggregate filled mortar used for remediation of depressions or patching concrete substrates; Pro Repair Mortar by Siplast
or Alsan RS Repair Mortar by Soprema.
.4 Tape: White, flexible, coated cotton cloth tape designed for treatment of insulation panel joints, deck/wall transitions and joints in flashing substrates; Pro Tape by Siplast or approved equal from Soprema.
2.12 MISCELLANEOUS INSULATION
.1 Batt Insulation: Fire resistant, semi rigid, mineral wool batt; Roxul AFB by Roxul Inc.
.2 Polystyrene: Extruded expanded polystyrene foam Type 4 conforming to CAN/CGSB-51.20M:
.1 Roofmate Series by Dow,
.2 Foamular 350 by Owens Corning.
2.13 FASTENERS, PLATES & FASTENING BARS
.1 All fasteners and plates to meet requirements of Factory Mutual Global 4470 Standard for wind uplift and corrosion resistance in roofing.
.2 Steel/aluminum to aluminum:

Hamilton International Air Cargo Logistics Facility Section 07 20 00 Tradeport International Corporation SBS MODIFIED BITUMINOUS MEMBRANE ROOFING July 2014 Chamberlain Architect Services Limited Page 16 of 34
Copyright 2013 IRC Building Sciences Group Page 16 of 34
.1 Tru-Fast DP with Trucote PC-3 corrosion protection fastener c/w EPDM galvanized steel sealing washers or equal approved by membrane Manufacturer, to penetrate substrate by 19mm (3/4").
.3 Termination bar for membrane:
.1 Extruded aluminum, 1.5mm (0.060") thick x 25mm (1") wide x 3.05m (10') long with 6mm x 9.5mm (1/4" x 3/8") slotted holes on 203mm (8") o/c. Acceptable material: TB-120 aluminum termination bar by Tru-Fast or equal approved by membrane Manufacturer.
.4 Termination bar fastener for wood, steel or aluminum:
.1 Tru-Fast Ultra Solid Stainless Steel fastener to penetrate substrate by 19mm (3/4") c/w EPDM galvanized steel sealing washers or Construction Fasteners Inc. Woodgrip #14 screw complete with Sentri coating on threads, Chromagard colour match head and EPDM washer, or equal approved by membrane Manufacturer,
.5 Pre-painted metal flashing to steel or wood:
.1 #14 Colormate fasteners by Leland Industries, Construction Fasteners Inc. Woodgrip #14 screw complete with Sentri coating on threads and Chromagard colour match heads with EPDM washer, or equal approved by membrane Manufacturer, to penetrate substrate by minimum 19mm (3/4").
.6 Membrane to wood:
.1 Galvanized round top roofing nails with minimum 25mm (1") diameter heads or plate and head combination, to penetrate substrate a minimum 32mm (1 1/4").
2.14 ROOFING ACCESSORIES
.1 Roofing accessories to be manufactured from spun aluminum or copper as required, and complete with removable caps where applicable. Unless otherwise designated by Consultant, pitch pockets are strictly prohibited. All units are to have foamed in place closed cell urethane foam insulation sprayed into unit at plant under controlled conditions. Flanges to be primed with rubberized asphalt compatible primer.
.1 Plumbing Stack Flashing: SJ-26/31 by Thaler Metal Industries Inc.,
.2 Tallcone/B-Vent Flashing: MEF-4A by Thaler Metal Industries Inc.,
.3 Electrical Socket Post Flashing: EOP-A12 by Lexcor,
.4 Roof Anchors: FARA Series to suit by Thaler Metal Industries Inc.,
.5 Travel Restraint: FARA-710 or 720 anchors by Thaler Metal Industries Inc.,
.6 Relief Vents: RV-2A by Thaler Metals, flashed-in,
.7 Light Post Support (Wire Through): MERS-730 by Thaler Metal Industries,
.8 Security Camera Support: MERS-730 by Thaler Metal Industries,
.9 Post & Railing Support (Square HSS): ARS-115 by Thaler Metal Industries,
.10 Trellis Post Support (4x4/6x6 Wood): ARS-200 & ARS-210 by Thaler Metals Ind. Inc.,
.11 Rail Post Support (Round HSS): ARS-400 by Thaler Metal Industries,
.12 Flagpole Support (Round Post): ARS-400 by Thaler Metal Industries,
.13 Guy Wire Support: ARS-300 by Thaler Metal Industries,
.14 Antenna Support (Round HSS): ARS-133 b Thaler Metal Industries,
.15 Antenna Support (Triangle base): ARS-575 by Thaler Metal Industries,
.16 Roof Access Ladder (Bolt to Base): ARS-500 by Thaler Metal Industries,
.17 Metal Stair Support: ARS-510, 520, 530 by Thaler Metal Industries,
.18 Miscellaneous Support (Square Base Plate): ARS-550 by Thaler Metal Industries,
.19 Upright Angle Support (Bolt to Legs): ARS-540 by Thaler Metal Industries,
.20 Split Flashing for Round Penetration: SPJ-2 by Thaler Metal Industries,

Hamilton International Air Cargo Logistics Facility Section 07 20 00 Tradeport International Corporation SBS MODIFIED BITUMINOUS MEMBRANE ROOFING July 2014 Chamberlain Architect Services Limited Page 17 of 34
Copyright 2013 IRC Building Sciences Group Page 17 of 34
.21 Ductwork Support: MERS-800 (850) by Thaler Metal Industries,
.22 Mechanical Unit Supports: MERS-900, 910, 920, or 930 by Thaler Metal Industries,
.23 Conduit penetrations: MEF-2C by Thaler Metal Industries,
.24 Conduit penetrations: MEF-AE1-12 (diameter to suit) by Thaler Metal Industries,
.25 Miscellaneous Conduit: Copper gooseneck construction, flashed-in,,
.26 Gasline Supports: Pedslab supports to IRC Detail, max. 2.4m (8’-0”) apart o.c.,
.27 Gasline Penetrations: Copper Gooseneck construction,
.28 HSS column Flashings: Liquid Resin Flashings to IRC Detail,
.29 Walkway Pavers: Pedslab by Brooklin Concrete,
.30 Roof Drain: RD-4C-FLAT by Thaler Metal Industries. Inc., supplied by Mechanical,
.31 Podium Roof Drain: RD-19C-FLAT-BDB by Thaler Metal Inc., supplied by Mechanical,
.32 Multi-Conduit Supports: MERS-700A Series by Thaler, supplied by Mechanical,
.33 Gasline Supports: MERS-600A Series by Thaler Metal Ind. Inc., supplied by Mechanical,
.34 Gasline Penetrations: MEF-AE1-12 to suit diameter by Thaler, supplied by Mechanical,
.35 Flexible Conduit Penetration: MEF-2C or MEF-2A by Thaler, supplied by Mechanical,
.36 B-Vent Flashing: MEF-4A by Thaler Metal Ind. Inc., supplied by Mechanical,
.37 Hot Pipe Flashing: MEF-3A by Thaler Metal Ind. Inc., supplied by Mechanical,
.38 Plumbing Stack Flashing: SJ-31 by Thaler Metal Ind. Inc., supplied by Mechanical,
.39 Stair Stringer Support: ARS-510A by Thaler Metal Ind. Inc., supplied by Mechanical,
.40 HVAC Curb: Prefab metal curbs by Mechanical, flashed-in,
.41 HVAC Sleeper: Built-up Wood, bolted thru deck, by Mechanical, flashed-in,
.2 Membrane Tools: Use tools, hand rollers, weighted rollers, squeegees, etc. as recommended by
membrane Manufacturer for installation of their product to ensure compatibility and avoid
.3 New Roof Drains: Spun copper drain with internal plumbing and hook-up to existing storm water drainage system by Mechanical. New drain to be RD-4C-FLAT by Thaler Metal Industries complete with cast aluminum strainer dome, clamping ring, brass ferrule, M-J coupling, and all related hardware and interior plumbing.
.4 Pourable Sealer: Elastomeric pourable sealer as supplied by Siplast approved equal from
Soprema.
.5 Sealing Compound: Rubberized Sealing Compound to CAN/CGSB-37.29, rubber asphalt type Sopramastic by Soprema or approved equal from Siplast.
.6 Spray Urethane foam: One or two component polyurethane spray foam insulation. Use low pressure spray foam insulation at force sensitive areas.
.7 Firestop Sealant: One component, neutral cure silicone sealant meeting ASTM E84 and CAN4-S115M, designed for firestop applications at joints and through-wall penetrations; TREMstop Fyre-Sil siliconce sealant (red) by Tremco or IRC Group approved equal.
.8 Sheet Metal Flashings and Trim: As per Section 07620 and fabricated from Perspectra Series or Weather-X, 24 gauge prepainted steel. Hook strips to be 2 gauges heavier than flashings. Colour to match existing.
.9 Sealants: As per Section 07920. Colour of sealants to match component applied against.

Hamilton International Air Cargo Logistics Facility Section 07 20 00 Tradeport International Corporation SBS MODIFIED BITUMINOUS MEMBRANE ROOFING July 2014 Chamberlain Architect Services Limited Page 18 of 34
Copyright 2013 IRC Building Sciences Group Page 18 of 34
PART 3 - EXECUTION
3.1 WORKMANSHIP
.1 Perform roofing work which is not specifically covered by these Specifications in accordance with applicable industry standards and good roofing practices of:
.1 Canadian Roofing Contractors Association (CRCA),
.2 Canadian Modified Bitumen Manufacturer’s Association’s recommendations,
.3 Manufacturer’s preprinted and published technical specifications,
.4 ULC Design No. S-107 criteria,
.5 Factory Mutual Global design criteria FM 1-28 and 1.49,
.6 Compliance with local fire insurance requirements,
.7 Compliance with local building codes.
.2 Procedures for application of materials should be in accordance with Manufacturer’s printed instructions and recommendations.
.1 Advise Consultant of adjustments to specified roofing procedures recommended by
Manufacturer or due to site conditions.
.2 Written approval by Consultant is required to make any adjustments to specified procedures.
.3 All work to be carried out in accordance with drawings, and specifications provided.
.1 All supplied drawings and details constitute acceptable installations. Any deviance from these details must first approved by Consultant prior to installation.
.4 While work is in progress, all steps must be taken to safeguard building from damage due to weather, fire, and structural overloading.
.5 Examine underside of roof deck when installing mechanical fasteners, where possible, to avoid
accidental damage to existing services.
.6 Apply each part of roofing system when surfaces are free of moisture for successful application.
.7 Do priming for asphalt roofing in accordance with CAN/CGSB 37-GP-15M and as recommended
by membrane manufacturer.
.1 Adhesives or sealants and liquid primers will not be applied until surfaces are dry.
3.2 EXAMINATION OF SITE CONDITIONS
.1 Examine existing site conditions and substrates upon which work of this section is dependent. Report to Consultant in writing any defects or discrepancies. Commencement of work implies acceptance of existing conditions and assumption of full responsibility for finished condition of
work.
.2 Defective work resulting from application to unsatisfactory conditions will be considered responsibility of those performing work of this section.
3.3 PROTECTION
.1 Adjacent Buildings and Tenants:
.1 Take care to not damage any adjacent or closely located buildings and all related grounds in vicinity of Work during roofing operations.

Hamilton International Air Cargo Logistics Facility Section 07 20 00 Tradeport International Corporation SBS MODIFIED BITUMINOUS MEMBRANE ROOFING July 2014 Chamberlain Architect Services Limited Page 19 of 34
Copyright 2013 IRC Building Sciences Group Page 19 of 34
.2 Protect against infiltration of dust, debris, and other such contaminants and occurrences.
.3 Locate garbage chutes to minimize exposure to adjacent building, its grounds, and its
occupants.
.4 Protect walls by means of tarpaulins where garbage chutes and hoisting equipment are
located and operated.
.5 Cover dumpsters and bins to prevent debris from blowing away.
.6 Do not use spray installation methods on days with significant wind.
.7 Damage to adjacent buildings, grounds, and vehicles to be rectified by Contractor at no additional cost.
.2 Adjacent Roof Areas and Completed Work:
.1 Take care not to damage any previously performed work or existing roofs.
.2 If work area is accessed across existing roof areas, provide protection to existing roof system. Use continuous Protection Walkways consisting of 19mm (0.75”) plywood sheathing over 38mm (1.5”) extruded polystyrene insulation.
.3 Protect newly installed roof work from traffic and damage using Protection Walkways
where warranted by traffic requirements.
.4 Comply with any precautions deemed necessary by Consultant.
.3 Material Storage:
.1 Deliver all materials to site in undamaged condition with original manufacturer’s label intact and clearly visible for easy verification of specified materials.
.2 Provide security fencing at all times for equipment and materials stored at ground level.
.3 Protect rolls from flattening by storing on ends on skids.
.4 Whenever possible, store roof materials off roof at designated, protected storage area.
.4 Structural Integrity of Roof:
.1 Use only equipment that will not adversely affect, damage, or alter roof deck.
.2 Do not create point loads that may adversely affect performance of existing deck when
storing materials on roof.
.5 Inclement Weather:
.1 Immediately halt work during inclement weather, including but not limited to rain fall, snow, drizzle, fog, and hail. Protect exposed building substrates, open building cavities, and moisture sensitive products.
.2 At end of each work day or when stoppage occurs due to inclement weather, provide
suitable protection from elements for completed work and materials out of storage.
.3 Place in to heated storage any temperature sensitive materials such as membranes, adhesives, and sealants when temperature falls below 5 °C (40 °F).
Hamilton International Air Cargo Logistics Facility Section 07 20 00 Tradeport International Corporation SBS MODIFIED BITUMINOUS MEMBRANE ROOFING July 2014 Chamberlain Architect Services Limited Page 20 of 34
Copyright 2013 IRC Building Sciences Group Page 20 of 34
.4 Protect all vents, stacks, drains and related deck openings from inclement weather and
contamination from debris.
.6 Roof Safety, Access, and Egress:
.1 Use warning signs and barriers. Maintain in good order until completion of work.
.2 Access to roof to remain unobstructed.
.3 Keep doorways and fire routes clean and clear of any obstacles.
.4 Protect and safeguard all man-size or larger openings in roof deck with warning flags and suitable temporary barriers or railings.
.7 When Hot Asphalt is used:
.1 Set up warning signs and barriers, and maintain in good order until completion of Work.
.2 Cover walls and adjacent completed work where materials are hoisted and used.
.3 Clean off all drips and smears of bituminous materials immediately.
.8 Damage and Defective Work:
.1 Avoid use on roof of any petroleum based and other chemical products that are corrosive and/or damaging to membrane. Provide protection to membrane from any accidental spills or drips. Any damage to roof system caused by non-compatible products to be cut
out and replaced at no cost to Owner.
.2 Investigate and examine any damage caused by execution of Work for this contract, and repair or replace with new materials to match original finish. Restoration and repair work to be reviewed and approved by Consultant.
.3 Defective Work resulting from application of material on unsatisfactory surface or
substrate to be rectified by Contractor at no additional cost.
.4 Defective Work resulting from improper installation of materials to be rectified by Contractor at no additional cost.
3.4 SURFACE PREPARATION
.1 Preparation:
.1 Examine all roof decks and existing site conditions to ensure that they are in satisfactory condition for commencement of work in this section.
.2 Examine work of other trades for defects and discrepancies and report them to Consultant in writing. Do not proceed with work until surfaces are satisfactory.
.3 Coordinate roof work and cooperate with Electrical and Mechanical.
.2 Substrate Review:
.1 Exposed roof deck surfaces to be reviewed by Contractor with Consultant. Ensure to review entire roof area to satisfy any warranty requirements of Manufacturer of new roof
membrane system.
.1 Notify Consultant of review at least forty-eight (48) hours prior to site review.

Hamilton International Air Cargo Logistics Facility Section 07 20 00 Tradeport International Corporation SBS MODIFIED BITUMINOUS MEMBRANE ROOFING July 2014 Chamberlain Architect Services Limited Page 21 of 34
Copyright 2013 IRC Building Sciences Group Page 21 of 34
.2 Report any anomalies found that may impact soundness and structural integrity of roof system to Consultant and Owner immediately. Areas with damaged decking must be replaced or repaired before any further work may take place on that particular section.
.3 Ensure roof decks are firm, straight, smooth, dry, free of snow, ice, frost, oils, or other contaminants. Decking must be properly cleaned of any dust and debris prior to proceeding with new installation. Test whether specified adhesion to deck will be obtained where required.
.4 On Poured Concrete Decks: Check that moisture levels of concrete across roof deck meet manufacturer’s recommended requirements before installing new roof system.
.5 Prior to application of vapour retarder, examine deck and ensure any defect of level or construction is correct before proceeding with work.
.6 Ensure roof drains have been installed at proper elevations relative to finished roof surface in order to allow for sufficient drainage of roof surface.
.7 Ensure that projections and any equipment (electrical conduit, gas lines etc.) are correctly secured to roof decking where applicable. If any inadequate securement is found, inform
Consultant and halt work around that area until situation is rectified.
.8 Examine existing plywood sheathing, wood blocking, and cant strips. Do not install new roofing unless such items are adequately secured to withstand stresses imposed by
thermal movement of new roofing components.
3.5 CARPENTRY
.1 Refer to detail drawings for carpentry requirements and install wood blocking, plywood, and cant strips to accommodate required slopes, insulation, roofing, and finish sheet metal flashings. Any carpentry alterations to be performed to accepted trade practice.
.2 Add new wood blocking as necessary to maintain minimum heights at perimeters and curbs. Minimum height above finished roof at curb locations and wall bases to be 203mm (8"). Minimum height at parapets is to be 152mm (6") above finished roof membrane unless indicated otherwise
on detail drawings.
.3 Ensure wood blocking and plywood installed at perimeters and curbs is securely fastened to substrate before proceeding with roof installation.
.4 Install new wood blocking and plywood as required to ensure that all curbs and sleepers for H.V.A.C. and mechanical equipment are level.
.5 Wood to wood, wood to metal, wood to masonry or concrete to be secured at 305mm (12”) on
center with alternating fasteners staggered.
.1 Avoid protruding fastener heads. Where possible, all fasteners to be flush or slightly sunk with surface of wood blocking being secured.
.6 All wood blocking and plywood is to be considered part of roof, and to be made watertight by end of each working day to eliminate moisture infiltration into roof system.
:
3.6 DECK OVERLAY BOARD
.1 Mechanically fasten a layer of deck overlay boards with deck screws and securement plates to
metal roof deck to meet FM 1-90 requirements.

Hamilton International Air Cargo Logistics Facility Section 07 20 00 Tradeport International Corporation SBS MODIFIED BITUMINOUS MEMBRANE ROOFING July 2014 Chamberlain Architect Services Limited Page 22 of 34
Copyright 2013 IRC Building Sciences Group Page 22 of 34
.2 Do not use wet or damaged deck overlay panels. Panels must be dry for proper installation.
.3 Custom cut deck overlay boards at perimeters and projections to suit. Install boards tightly
together with no gaps between adjacent boards larger than 3mm (0.125”).
.1 Cut boards as required to fit snug at all perimeters, walls, and roof projections.
.2 Cut straight lines using proper tools and snap chalk lines.
.3 Cut boards cleanly where slope changes direction. Do not break boards by stepping on them to acquire changes in deck slope.
.4 Install sheet panels over metal decking with long axis of each sheet perpendicular to direction of deck flutes or ribs.
.1 Mechanical fasteners to penetrate top flutes only, by no less than 19mm (3/4") and by no more than 32mm (1.25").
.2 Check underside of metal deck before installation to eliminate damaging any existing conditions below deck.
.5 Align side edges of roof board panels over center of top deck flutes.
.6 Butt sheets tightly together with end joints staggered by half width of sheet.
.7 Where cover board is field primed, allow sufficient time for applied primers to dry and flash-off. Roof board surface must be thoroughly dry before installation of membrane.
.8 Ensure recently installed metal deck substrate surfaces are clean and free from oil or grease.
.1 Consult Manufacturer on use of TSP, mineral spirits, Varsol, Acetone, Naptha solvent, or other comparable cleaner. Cleaned deck surface must be dry and free of any cleaner residue.
.9 Do not use wet or damaged deck overlay panels. Panels must be dry for proper installation.
.10 Custom cut deck overlay boards at perimeters and projections to suit. Install boards tightly together with no gaps between adjacent boards larger than 3mm (0.125”).
.1 Cut boards as required to fit snug at all perimeters, walls, and roof projections.
.2 Cut straight lines using proper tools and snap chalk lines.
.3 Cut boards cleanly where slope changes direction. Do not break boards by stepping on them to acquire changes in deck slope..
.11 Where cover board is field primed, allow sufficient time for applied primers to dry and flash-off. Roof board surface must be thoroughly dry before installation of membrane.
3.7 VAPOUR RETARDER
.1 Install one (1) ply modified bitumen vapour retarder with flashings as per Manufacturer’s written guidelines. Installation to be free of blisters, wrinkles and fish-mouths.
.1 Vapour retarder must be installed on same day as primer application.
.2 Do not install when it is raining or snowing, on wet/humid surfaces, or when inclement weather is expected shortly.

Hamilton International Air Cargo Logistics Facility Section 07 20 00 Tradeport International Corporation SBS MODIFIED BITUMINOUS MEMBRANE ROOFING July 2014 Chamberlain Architect Services Limited Page 23 of 34
Copyright 2013 IRC Building Sciences Group Page 23 of 34
.3 Deck substrate must be clean, dry, and free of dirt, dust, grease, or other contaminants.
.2 Primer:
.1 Prime exposed surfaces to receive vapour retarder membranes. Apply primer to clean and dry surfaces with a paint brush, roller or sprayer at temperatures 0°C (31°F) and
above.
.2 Apply primer at a coverage rate between of 0.1 to 0.5 L/m2 (0.25 to 1.22 gallon/100 ft
2) as
recommended by membrane manufacturer for surface type.
.3 Ensure all substrates are fully covered with primer leaving no areas bare and avoid
pooling.
.4 Allow primer to dry completely prior to installation of new vapour retarder membrane.
.3 Field Membrane Installation:
.1 Begin application at bottom of roof slope. Position membrane rolls for alignment and unroll to apply membrane. Do not immediately remove release sheet on self adhering membranes until satisfied with alignment.
.2 Overlap each preceding row of membrane sheet by min. 76mm (3”) on side laps and by a min. 152mm (6”) at end laps. Stagger end laps of adjacent rows by at least 305mm (12”).
.3 Use a 34kg (75lbs) roller to press membrane down onto substrate including laps. Finish
by aligning edge of roller with lower end of side laps and rolling up membrane.
.1 Do not cut membrane to remove trapped air bubbles. Squeeze out air bubbles by pushing roller to edge of laps.
.4 All side and end laps of base sheet to be heat welded or torched to satisfaction of QA Observer.
.5 Carry vapour retarder up all vertical surfaces at parapets and projections a minimum of 152mm (6") to allow for encapsulating of new insulation with roof membrane as indicated on detail drawings.
.6 INSTALL MEMBRANE GUSSET REINFORCEMENT AT ALL INSIDE AND OUTSIDE
CORNERS ON TOP OF BASE SHEET MEMBRANE.
.4 Membrane Flashing Installation:
.1 Ensure all substrates are fully covered with primer leaving no areas bare and allow to
completely dry.
.2 Install membrane flashing onto substrate in strips one membrane roll wide (40” or 1m) and extend over perimeters as shown on detail drawings
.3 Field measure and cut flashing membrane to length required for flashing at each detail and roll up for installation.
.4 Once aligned in position, peel back a portion of release sheet and press membrane onto substrate for initial adherence. Hold membrane flashing tight and peel back release sheet by pulling diagonally.

Hamilton International Air Cargo Logistics Facility Section 07 20 00 Tradeport International Corporation SBS MODIFIED BITUMINOUS MEMBRANE ROOFING July 2014 Chamberlain Architect Services Limited Page 24 of 34
Copyright 2013 IRC Building Sciences Group Page 24 of 34
.5 Overlap each preceding flashing sheet by min. 76mm (3”) on side laps and align bottom edge to a chalk reference line along base sheet membrane. Lap membrane flashing onto field membrane a minimum 102mm (4”).
.6 Use a weighted roller to press membrane down onto substrate including laps. Finish by
aligning edge of roller with lower end of side laps and rolling up membrane.
.1 Do not cut membrane to remove trapped air bubbles. Squeeze out air bubbles by pushing roller to edge of laps.
.7 All side and end laps of base sheet to be heat welded or torched to satisfaction of QA Observer.
3.8 TAPERED DRAIN SUMPS
.1 At all existing roof drain locations, delete a section of mineral fibre board insulation with factory laminated base sheet in a 2.4m x 2.4m (8' x 8') area centered around each drain.
.2 Install a new 2.4m x 2.4m (8’ x 8’) prefabricated, asphalt coated, tapered mineral fibre insulation
sump over exposed and prepared existing B.U.R. membrane.
.3 Fully adhered tapered insulation sump in a full mopping of hot Type III (3) asphalt, applied at a rate no less than 1.25 kg/m
2 (25lbs/100 ft
2).
.4 Walk insulation boards into place to ensure full bonding to substrate.
.5 Provide SBS modified bitumen base sheet membrane over exposed tapered insulation sump and extend past drain area on to base sheet membrane by a minimum of 151mm (4”) on all sides.
.1 Base sheet membrane over insulation sump to be self adhered with primer or installed in
a full mopping of hot asphalt.
3.9 BASE INSULATION
.1 Install a layer of base insulation boards over prepared vapour retarder in accordance with
insulation manufacturer's instructions.
.2 Where applicable, install tapered base insulation according to layout on reviewed shop drawings and roof plan drawing(s). Report any discrepancies to Consultant before proceeding.
.3 Do not install more insulation board than can be covered with membrane by end of work day or before onset of inclement weather.
.4 Do not install warped, curled, damaged, or wet insulation boards.
.5 Adhere base insulation to substrate in a full mopping of hot Type III (3) asphalt, applied at a rate no less than 1.25 kg/m
2 (25lbs/100 ft
2).
.6 At all existing roof drain locations, delete a section of base insulation in an 2.4m x 2.4m (8' x 8')
area centered around each drain.
.1 At each drain location, install a new 2.4m x 2.4m (8’ x 8’) prefabricated, tapered insulation drain sump over prepared substrate.
.7 Install base insulation boards in parallel rows and butt tightly together with joints staggered by one half board length. Where multiple layers of insulation are required, stagger all board joints at least 305mm (12”) between rows.

Hamilton International Air Cargo Logistics Facility Section 07 20 00 Tradeport International Corporation SBS MODIFIED BITUMINOUS MEMBRANE ROOFING July 2014 Chamberlain Architect Services Limited Page 25 of 34
Copyright 2013 IRC Building Sciences Group Page 25 of 34
.8 Custom cut insulation boards as required at perimeters and projections to suit. Field cuts to be
neat and provide tight fit around penetrations, projections, and at perimeters.
.9 For uneven surfaces, trimming or slitting of boards may be necessary. Fill all gaps larger than 3mm (1/8”) with insulation slivers.
3.10 OVERLAY INSULATION
.1 Install a continuous layer of overlay insulation boards over base insulation in accordance with insulation manufacturer's instructions.
.2 Where applicable, install tapered overlay insulation according to layout on reviewed shop
drawings and roof plan drawing(s). Report any discrepancies to Consultant before proceeding.
.3 Do not install more insulation board than can be covered with membrane by end of work day or
before onset of inclement weather.
.4 Do not install warped, curled, damaged, or wet insulation boards.
.5 Adhere overlay insulation in a full mopping of hot Type III (3) asphalt, applied at a rate no less than 1.25 kg/m
2 (25lbs/100 ft
2).
.6 At all existing roof drain locations, delete a section of base insulation in an 2.4m x 2.4m (8' x 8') area centered around each drain.
.1 At each drain location, install a new 2.4m x 2.4m (8’ x 8’) prefabricated, tapered insulation
drain sump over prepared substrate.
.7 Install overlay insulation boards in parallel rows and butt tightly together with joints staggered by one half board length. Where multiple layers of insulation are required, stagger all board joints at
least 305mm (12”) between rows.
.8 Custom cut insulation boards as required at perimeters and projections to suit. Field cuts to be
neat and provide tight fit around penetrations, projections, and at perimeters.
.9 For uneven surfaces, trimming or slitting of boards may be necessary. Fill all gaps larger than 3mm (1/8”) with insulation slivers.
.10 Install tapered insulation crickets over top of overlay insulation in ribbons of polyurethane adhesive. Provide crickets where shown on roof plan, tapered insulation shop drawings, and at all penetrations wider or longer than 305mm (1’-0”) blocking direction of drainage.
3.11 TAPERED INSULATION CRICKETS
.1 Install tapered insulation crickets over top of overlay insulation in ribbons of polyurethane adhesive. Provide crickets where shown on roof plan, tapered insulation shop drawings, and at
all penetrations wider or longer than 305mm (1’-0”) blocking direction of drainage.
3.12 MODIFIED BITUMEN MEMBRANE APPLICATION
.1 Install a two (2) ply, SBS modified bitumen membrane system overtop of prepared substrate. Base sheet layer to be adhered in full mopping of hot asphalt with self adhering flashings. Cap sheet layer and flashings to be torch applied.
.2 General Requirements for Application:

Hamilton International Air Cargo Logistics Facility Section 07 20 00 Tradeport International Corporation SBS MODIFIED BITUMINOUS MEMBRANE ROOFING July 2014 Chamberlain Architect Services Limited Page 26 of 34
Copyright 2013 IRC Building Sciences Group Page 26 of 34
.1 Surface Review: Apply over wood, metal, gypsum board and concrete decks which are clean, smooth, and free of snow, ice, moisture, and debris. Concrete decks must have all holes filled with quick drying cement and rough patches removed.
.2 Application of Primer: Priming is required for all substrates prior to installation. Avoid pooling primer and allow to completely dry before membrane installation. Drying time will vary according to absorptive qualities of material and ambient weather conditions.
.3 First Roll Starting Point: Base sheet to begin at drain level with side lap aligned to centre of drain. Run rolls perpendicular to slope. Cap sheet to be installed over base sheet covering base sheet overlap. Center of cap sheet to align up with centre of drain.
.4 Relaxing of Roll Membrane: ALL ROLL MEMBRANES ARE TO BE FULLY UNROLLED AND ALLOWED TO RELAX FOR A MIN. OF 15 MINUTES PRIOR TO INSTALLATION. Wait longer in cooler temperatures. Trace zig-zag pattern with torch as recommended by
manufacturer over membranes that are covered with thermal-fusible film.
.5 Alignment of Rolls: Completely unroll first roll and align with edge of roof. Reroll
membrane from both ends to centre and apply as per specifications.
.6 Staggering of Sheets: End laps between base and cap sheets to be offset a min. of 610mm (24”). Side laps between base and cap sheets to be offset a min. of 305mm (12”), centered alignment preferred. Laps in same membrane layer to be min. 76mm (3”) wide for side laps and min. 305mm (12”) wide for end laps. When salvage side laps of base and cap sheets are unequal, adjust cap roll width occasionally to maintain alignment.
.7 Procedure to Seal Voids: Where voids are created by overlapping rolls of membrane, cut
off corner of salvage edge where covered by next roll of material.
.8 Salvage Edge Protection: Granules along edge of membrane to be primed prior to application of adhesive to provide good adhesion of laps.
.9 Membrane Flashings: Base flashings to extend min. 102mm (4”) onto field of roof. Cap flashings to overlap base sheet flashings and extend min. 152mm (6”) onto field or roof. Use wider overlap widths where required by manufacturer for warranty requirements.
.10 Bleed-Out at Seams: When torch applying membrane, provide consistent, continuous bleed-out along all seams, no less 3mm (1/8”) and no greater than 6mm (1/4”) in width.
.11 All Seams: Check all seams in all sheets with a round nosed trowel while work is in
progress. Repair found deficiencies immediately and before continuing roof installation.
.12 Base Sheet Seams: Butter all seams and laps. Provide additional bitumen at point of 90° upturns in base sheet flashings. Recheck self adhering membrane seams left exposed within forty-eight (48) hours of installation to repair any revealed seam deficiencies with clean, heated trowel.
.13 Cap Sheet Seams: At all end laps and membrane flashing overlaps, degranulate area (embed granules) of surface to be bonded by embedding ceramic granules into bitumen of membrane using clean, heated trowel to push in. Measure and use straight chalk lines to mark outline of areas requiring degranulation. Achieve a uniform black surface of bitumen across 100% of embedment areas to be overlapped.
.14 Reinforcement: Required at all corners, vents, drains, HVAC units, and gravel stops.

Hamilton International Air Cargo Logistics Facility Section 07 20 00 Tradeport International Corporation SBS MODIFIED BITUMINOUS MEMBRANE ROOFING July 2014 Chamberlain Architect Services Limited Page 27 of 34
Copyright 2013 IRC Building Sciences Group Page 27 of 34
.15 Primer Application: Sanded membrane left exposed overnight or longer to be primed
before continuing membrane installation to ensure good adhesion.
.16 Cold Adhesive Application: Use manufacturer recommended tools and squeegees and ensure recommended rate of adhesive is being applied fully across membrane.
.17 Mop Application: Do not apply hot asphalt more than 1m (39”) ahead of membrane roll.
.18 Torch Application: During windy periods, slow application rate down to ensure good bond with proper level of heat. Stop and periodically check for proper adhesion.
.3 Correction Requirements for Defects and Deficiencies:
.1 Delamination: Membrane may not be fully bonded to substrate due to:
.2 Moisture present on substrate,
.3 Dirt, dust, or other contaminate on substrate acting as a parting agent,
.4 Inadequate application of primer or adhesive.
.2 Misalignment: Alignment of row to starting line is lost due to swerving during application or to roll not being unrolled, aligned, and rerolled straight prior to application.
.1 Misaligned roll to be cut at point where swerve begins and restarted.
.2 Ensure membrane rolls are allowed to relax. Use heat in a zig-zag pattern to relax thermo-fusible films and membrane reinforcement.
.3 Ensure pressure is applied evenly across roll during application to avoid drifting.
.3 Wrinkles: Undulations located on surface of membrane after it has been applied:
.1 Cross-Sheet Undulations: Waves in membrane due to installation in a stop and
go fashion.
.2 Continuous Ridging of Membrane: Formed by movement of substrate
underneath membrane. Ensure substrate is secure before continuing.
.4 Blisters: Pocket of air trapped under membrane where full adhesion was not achieved or trapped moisture released from substrate:
.1 Remove and repair significant blisters.
.2 Cut blister and adhere any loose membrane.
.3 Apply patch membrane over repair area, extend a min. 152mm (6") on all sides.
.5 Membrane Patches: Cap sheet membrane patches to be installed from seam to seam. Minimum size of membrane patch to be 915 x 915 mm (36” x36”).
.4 Base Sheet Field Membrane, Hot Mop Asphalt Installation:
.1 Field measure and cut membrane to length of run required and roll up for installation.
.2 Starting at low point of roof, perpendicular to slope, unroll base sheet, align and re-roll from both ends.
.3 Begin application at bottom of roof slope and position membrane rolls for alignment.
.4 Adhere base sheet in a full mopping of hot Type III (3) asphalt at rate of 1.25 kg/m2 (25
lbs/100 ft2).
Hamilton International Air Cargo Logistics Facility Section 07 20 00 Tradeport International Corporation SBS MODIFIED BITUMINOUS MEMBRANE ROOFING July 2014 Chamberlain Architect Services Limited Page 28 of 34
Copyright 2013 IRC Building Sciences Group Page 28 of 34
.5 Unroll and install base sheet in straight and parallel rows and broom sheet into place to
ensure full contact with substrate.
.6 Overlap each preceding row of membrane sheet by min. 76mm (3”) on side laps and by a min. 152mm (6”) at end laps. Stagger end laps of adjacent rows by at least 305mm (12”).
Turn sheet end up at perimeters a minimum of 76mm (3”) or as detailed in drawings.
.7 MEMBRANE GUSSET REINFORCEMENT TO BE INSTALLED ON TOP OF BASE SHEET MEMBRANE AT ALL INSIDE AND OUTSIDE CORNERS. CONSULTANT TO REVIEW GUSSET INSTALLATION BEFORE INSTALLATION OF CAP SHEET MEMBRANE.
.8 All side and end laps of base sheet to be heat welded as required with hot air gun or torch to satisfaction of QA Observer.
.5 Base Sheet Flashing, Self Adhering Installation:
.1 Where required, prime concrete and wood surfaces at roof projections and around
perimeter to receive new base sheet membrane flashings.
.2 Install membrane flashing onto substrate in strips one membrane roll wide (40” or 1m) and extend over perimeters as shown on detail drawings
.3 Field measure and cut flashing membrane to length required for flashing at each detail and roll up for installation.
.4 Install base sheet flashing starting at outside face of perimeter, running across perimeter detail, and down onto flat of roof.
.5 Once aligned in position, peel back a portion of release sheet and press membrane onto substrate for initial adherence. Hold membrane flashing tight and peel back release sheet by pulling diagonally.
.6 Overlap each preceding flashing sheet by min. 76mm (3”) on side laps and align bottom edge to a chalk reference line along base sheet membrane. Lap membrane flashing onto field membrane a minimum 102mm (4”).
.7 Use a membrane manufacturer recommended weighted roller to press membrane down onto substrate including laps. Finish by aligning edge of roller with lower end of side laps and rolling up membrane.
.1 Do not cut membrane to remove trapped air bubbles. Squeeze out air bubbles
by pushing roller to edge of laps.
.8 Provide preliminary securement of membrane on outside edge or perimeters before installation of finish metal flashings and trim. Fasten top edge of membrane flashings on outside face of perimeter details with round top nails spaced every 229mm (9”) o/c.
.9 All side and end laps of base sheet flashing to be heat welded as required with hot air
gun or torch to satisfaction of QA Observer.
.6 Cap Sheet, Torch Installation:
.1 Complete installation of base sheet flashing prior to installing membrane cap sheet and
cap sheet flashings.
.2 Field measure and cut membrane to length of run required and roll up for installation.
Hamilton International Air Cargo Logistics Facility Section 07 20 00 Tradeport International Corporation SBS MODIFIED BITUMINOUS MEMBRANE ROOFING July 2014 Chamberlain Architect Services Limited Page 29 of 34
Copyright 2013 IRC Building Sciences Group Page 29 of 34
.3 Starting at low point on roof, perpendicular to slope, unroll cap sheet, align and re-roll
from both ends.
.4 Unroll and install cap sheet carefully in straight and parallel rows keeping majority of flame on membrane roll.
.5 Cap sheet to be torched across flat of roof, overtop of base sheet, and terminated at perimeters and vertical surfaces ensuring a good bond.
.6 Lap sheets 76mm (3") for side laps and a minimum 152mm (6") for end laps. Offset
joints in cap sheet 305mm (12") minimum from those of base sheet.
.7 All side and end laps of cap sheet to be heat welded with hot air gun to satisfaction of Consultant.
.7 Cap Sheet Flashing, Torch Installation:
.1 Cap sheet membrane flashing to be torched up and over perimeter details.
.2 Install membrane flashing onto substrate in strips one membrane roll wide (40” or 1m) and extend up perimeters as shown on detail drawings
.3 Field measure and cut flashing membrane to length required for flashing at each detail and roll up for installation.
.4 Set cap sheet to offset base sheet flashing joints by 50% and extend a minimum of
152mm (6”) onto roof. All end lap joints to be a minimum 76mm (3”).
.5 Align bottom edge to a chalk reference line along cap sheet membrane.
.6 Install cap sheet flashing onto field membrane a minimum 102mm (4”) at base of
perimeter detail. Run flashing up vertical and across perimeter detail to outside edge.
.7 Overlap each preceding cap sheet flashing sheet by min. 76mm (3”) on side laps. Offset joints in cap sheet flashing 305mm (12") minimum from those of base sheet flashing.
.8 Properly secure flashings to their support, without sags, blisters, fish-mouths or wrinkles with terminations as indicated on drawings and details.
.9 All side and end laps of cap sheet flashing to be heat welded with hot air gun to
satisfaction of Consultant.
3.13 LIQUID APPLIED RESIN COATING
.1 Where specifically indicated in detail drawings and at any junctions where conventional installation of membrane flashings are not feasible, install new liquid applied resin flashing system.
.2 Resin system to be a layered application consisting of two coats of thixotropic catalyzed
polymethylmethacrylate (PMMA) resin encapsulating a layer of polyester fleece reinforcement.
.3 Installation of liquid applied flashing system to follow in STRICT ACCORDANCE with manufacturer's written instructions.
.4 Ensure that substrates are free from gross irregularities, loose, unsound or foreign material such as dirt, ice, snow, water, grease, oil, bituminous products, release agents, laitance, paint, loose particles/friable matter, rust or any other material that would be detrimental to adhesion of
catalyzed primer and/or resin to substrate.

Hamilton International Air Cargo Logistics Facility Section 07 20 00 Tradeport International Corporation SBS MODIFIED BITUMINOUS MEMBRANE ROOFING July 2014 Chamberlain Architect Services Limited Page 30 of 34
Copyright 2013 IRC Building Sciences Group Page 30 of 34
.1 Some surfaces may require scarification, shot-blasting, or grinding to achieve a suitable substrate. Wipe surfaces with a clean cloth saturated with specified cleaner/solvent to remove grease, oils or dust that may affect adhesion and to cured PMMA surfaces to receive a subsequent coat of resin.
.2 Concrete substrates to receive an application of specified PMMA roofing system to have a maximum moisture content of 6% and a maximum internal relative humidity of 75%.
.5 Preparation of Poured or Precast Concrete Substrates:
.1 Repair and Leveling: Before application of roofing membrane, and after priming, fill all joints, cracks, voids, fractures, depressions, small indentations, and low areas in substrate using specified paste or repair mortar.
.2 Prime cracks and joints with specified PMMA primer and fill cracks and joints using specified preparation paste prior to flashing application. Commence flashing application immediately following catalyzation of preparation paste.
.3 Prime areas of concrete substrate intended for repair using specified PMMA primer. FiIl areas using specified paste or repair mortar and allow to catalyze. Follow paste or repair mortar manufacturer's published minimum and maximum product thickness limitations per lift.
.6 Preparation of Steel and/or Aluminum Substrates:
.1 Grind to generate a "white-metal" surface and remove loose particles. Extend preparation area a minimum of 13mm (½”) beyond termination of roofing/flashing system. Do not used cleaner/solvent after grinding. Notch steel surfaces to provide a rust-stop where detailed.
.7 Field Membrane Application:
.1 Using specified cleaner/solvent, wipe any resin flashing membrane surfaces to be lapped with field membrane. Allow surface to dry for a minimum 20 minutes before continuing work.
.2 Apply an even, generous base coat of field membrane resin using a roller at minimum rate specified by manufacturer to prepared surfaces.
.3 Work fleece reinforcement into wet, catalyzed resin using a roller to fully embed fleece in
resin and remove any trapped air.
.4 Lap fleece layers a minimum of 51mm (2”) and apply an additional coat of catalyzed resin between layers of overlapping fleece.
.5 Use a roller to apply an even top coat of catalyzed resin at minimum rate specified by manufacturer immediately following embedment of fleece. Ensure full saturation of fleece into top coat application.
.6 Ensure that flashing resin is applied to extend a 6mm (0.25”) beyond fleece. Remove tape before catalyzed resin sets. Make allowances for saturation of roller covers and
application equipment.
.7 Make allowances for saturation of roller covers and application equipment.
.8 Allow two (2) hours of cure time prior to exposing finished membrane to foot traffic.
.8 Flashing Membrane Application:

Hamilton International Air Cargo Logistics Facility Section 07 20 00 Tradeport International Corporation SBS MODIFIED BITUMINOUS MEMBRANE ROOFING July 2014 Chamberlain Architect Services Limited Page 31 of 34
Copyright 2013 IRC Building Sciences Group Page 31 of 34
.1 Using masking tape, mask perimeter of area to receive flashing system.
.2 Apply resin primer to substrates requiring additional preparation and allow primer to set.
.3 Pre-cut fleece to ensure a proper fit at transitions and corners prior to membrane application.
.4 Apply an even, generous base coat of flashing resin using a roller at minimum rate
specified by resin manufacturer to prepared surfaces requiring flashing coverage.
.5 Work fleece into wet, catalyzed resin using a brush or roller to fully embed fleece in resin and remove trapped air.
.6 Lap fleece layers a minimum of 51mm (2”) and apply an additional coat of catalyzed resin between layers of overlapping fleece.
.7 Again using a roller, apply an even top coat of catalyzed resin at minimum rate specified by resin manufacturer immediately following embedment of fleece, ensuring full saturation of fleece.
.8 Ensure that flashing resin is applied to extend a 6mm (0.25”) beyond fleece. Remove tape before catalyzed resin sets. Make allowances for saturation of roller covers and application equipment.
.9 Should work be interrupted for more than 12 hours or surface of catalyzed resin becomes dirty or contaminated by elements, wipe surface to be lapped with new flashing resin using specified cleaner/solvent.
.10 Allow surface to dry for a minimum 20 minutes and a maximum 60 minutes before continuing work.
3.14 ROOF PENETRATIONS & ACCESSORIES
.1 Install vent stack flashings, support flashings, and other roof penetration flashings, and seal with roof membrane in accordance with Manufacturer’s instructions and as indicated on detail drawings.
.1 Prime all metal flanges with modified bitumen compatible primer, and allow any solvents to flash-off and dry completely prior to installation.
.2 Set metal flange in bed of manufacturer recommended and system compatible roofing
cement applied over base sheet membrane, ensuring a positive bond.
.3 Install an additional ply of base sheet membrane flashing over metal flange prior to installing cap sheet membrane. Additional ply of base membrane to extend a minimum of 152mm (6”) past all edges of metal flange.
.4 Install cap sheet ply over base flashing ensuring a full bond to base ply membrane.
.5 Apply continuous bead of manufacturer’s recommended and system compatible sealant
around penetration at point where membrane terminates.
3.15 ROOFING BALLAST
.1 Install double rows of concrete pavers with built-in pedestal feet over top of extruded insulation around roof perimeters where shown on roofplan drawings, at roof access doors, and around large HVAC units.
Hamilton International Air Cargo Logistics Facility Section 07 20 00 Tradeport International Corporation SBS MODIFIED BITUMINOUS MEMBRANE ROOFING July 2014 Chamberlain Architect Services Limited Page 32 of 34
Copyright 2013 IRC Building Sciences Group Page 32 of 34
.2 Install two concrete pavers at both top and bottom of each roof access ladder.
.3 Do not structurally overload roof deck by piling-up stone ballast and/or pavers in one spot. Keep
weight distributed across field of roof.
.4 Provide permanent, metal signage affixed to inside face of roof access doors and roof access hatches stating that concrete pavers installed on roof areas are not walkways.
:
3.16 MISCELLANEOUS MECHANICAL & ELECTRICAL
.1 Co-ordinate roofing work with General, if applicable, and other Sub-Contractor trades that may be present on roof.
.2 Unless stated in writing elsewhere, Contractor responsible to:
.1 Coordinate any planned disruptions in advance with Owner to minimize inconvenience.
.2 Paint all gas lines on areas of roof work with exterior grade, yellow paint for metal surfaces; Rust Paint by Tremclad or IRC Group approved equivalent.
3.17 METAL FLASHINGS
.1 After installation of roof membrane and membrane flashings, new perimeter metal and metal flashings to be installed as detailed in Section 07620 and as indicated on detail drawings.
3.18 SEALANTS
.1 After installation of roof membrane and membrane flashings, install sealants as per Section 07 92 00 – Sealants and as recommended by membrane manufacturer.
3.19 ROOF DRAINS
.1 General Practice:
.1 Install new specified drains at all drain locations. Drains to be supplied by Mechanical and install be Roofing Contractor. Interior plumbing and hook-up by Mechanical.
.2 Prior to installation of new roof, ensure that all drains are located at a height where new roof system is able to clear majority of roof top water caused by rainfall within a seventy-two (72) hour period.
.3 Once work has begun, no roof area to be left overnight without adequate provision for
drainage.
.4 Install new drains in accordance with detail drawings and as per manufacturer’s written
instructions and guidelines.
.2 Drain Installation:
.1 Drain body insert to be secured to substrate with min. four (4) fasteners per drain as required to properly secure drain body.
.3 New Drain Installation: Roof Drain or Scupper:
.1 Contractor to supply and install either one new roof drain with internal plumbing and hook-up to existing system or a new scupper drain with mechanically fastened downpipe

Hamilton International Air Cargo Logistics Facility Section 07 20 00 Tradeport International Corporation SBS MODIFIED BITUMINOUS MEMBRANE ROOFING July 2014 Chamberlain Architect Services Limited Page 33 of 34
Copyright 2013 IRC Building Sciences Group Page 33 of 34
to lower adjacent roof area. New drain or scupper installation to include tapered
insulation drainage sump.
.2 New Roof Drain: Install new RD-4C-FLAT by Thaler Metals complete with cast aluminum strainer dome, clamping ring, brass ferrule, M-J coupling, and all related hardware and
interior plumbing.
.3 Scupper Drain: New open-top scupper drain to be min. 152x152mm (6”x6”) fabricated from 24 gauge galvanized metal to suit and complete with gravel stop edge on three sides of flange, set at inside face of parapet. Install scupper drain to suit height of finished perimeter detail. Coordinate location on site with Consultant to suit conditions.
.1 Solder all joints to make continuous water tight seal. Outer face of scupper penetrating through or beyond parapet/perimeter to be encapsulated with prefinished metal cover.
.4 Scupper Drain Downpipe: Affix prefinished metal 152x152mm (6"x6") downpipe to new scupper drain or collector head. Determine suitable location for downpipes and kick-outs
on site with Consultant.
.1 Downpipe to have open-slotted face starting after first 1.2m (4’-0”) of fall.
.2 Use heavy duty securement straps no more than 2.4m (8’) apart and with a minimum of two (2) straps per downpipe.
.3 Provide suitable concrete paver on 25mm (1”) extruded polystyrene insulation as per IRC detail at bottom of downpipe as a splash pad.
3.20 TEMPORARY WATER CUT-OFFS
.1 All membrane flashings to be installed concurrently with roof membrane in order to keep roof system watertight during performance of work.
.2 Temporary waterproof seals to be placed on daily work as required. All temporary water-stops to
be constructed to provide a one hundred (100) percent watertight seal.
.3 New roofing membrane to be carried into water-stop. Water-stop to be sealed to roof deck and/or substrate to prevent water travel and infiltration under new or existing roofing.
.4 Edge of roof membrane to be sealed in a continuous heavy application of sealant. Temporary seals to be removed and cleaned up before proceeding with remaining work.
.5 When work resumes, cut out and dispose of all contaminated membrane. All sealant, contaminated membrane, insulation fillers, etc. to be removed from work area and properly disposed of offsite. Reuse of these materials in new work is strictly prohibited.
.6 If inclement weather occurs while a temporary water-stop is in place, Contractor to provide all
necessary labour required to monitor situation and maintain watertight condition.
.7 If any water is allowed to penetrate under newly completed roofing, then affected area to be cut out, removed, and replaced with new materials at Contractor's own expense.
3.21 CLEAN-UP
.1 Clean up and remove from job site on a daily basis, all rubbish and surplus materials resulting from this work.

Hamilton International Air Cargo Logistics Facility Section 07 20 00 Tradeport International Corporation SBS MODIFIED BITUMINOUS MEMBRANE ROOFING July 2014 Chamberlain Architect Services Limited Page 34 of 34
Copyright 2013 IRC Building Sciences Group Page 34 of 34
.2 Drag a magnetic bar across work area and grounds to ensure removal of all discarded fasteners
and sharp metal debris.
END OF SECTION – 07 52 00
Hamilton International Air Cargo Logistics Facility Section 07 21 13
Tradeport International Corporation BOARD INSULATION
July 2014
Chamberlain Architect Services Limited Page 1 of 3
Part 1 General
1.1 SECTION INCLUDES
.1 Board insulation perimeter foundation wall.
1.2 RELATED SECTIONS
.1 Section 072119 – Foamed-in-place insulation
.2 Section 072600 – Vapour Retarders
.3 Section 072700 – Air Barriers
.4 Section 074143 – Aluminum Composite Panels
.5 Section 074311 – Insulated Metal Panels
.6 Section 075113 – Build-up Asphalt Roofing
.7 Section 075753 – Single Ply Roofing – Fully Adhered
1.3 REFERENCES
.1 ASTM C578 - Rigid, Cellular Polystyrene Thermal Insulation.
1.4 SUBMITTALS
.1 Product Data: if requested, provide data on product characteristics, performance criteria,
limitations.
1.5 ENVIRONMENTAL REQUIREMENTS
.1 Do not install insulation adhesives when temperature or weather conditions are
detrimental to successful installation.
Part 2 Products
.1 Substitutions: Not permitted unless approved.
2.2 INSULATION MATERIALS
.1 Extruded Polystyrene Insulation: ASTM C578 Type VI; cellular type.

Hamilton International Air Cargo Logistics Facility Section 07 21 13
Tradeport International Corporation BOARD INSULATION
July 2014
Chamberlain Architect Services Limited Page 2 of 3
.2 Products/Manufacturers
.1 Where exposed at foundation from FFE to below grade: Styrofoam CT complete
with concrete facing by Dow Canada or equal.
.2 At foundations below grade: Styrofoam perimate complete with vertical drawing
slots by Dow Canada or equal.
.3 At aluminum composite wall panels: Styrofoam Cladmate XL with shiplap edges
by Dow Canada or equal.
.4 At roof: Polyisocyanurate form rigid roof insulated board Type 3, Class 2.
2.3 ADHESIVES
.1 Adhesive Type 1: Type recommended by insulation manufacturer for application.
2.4 ACCESSORIES
.1 Tape: Polyethylene self-adhering type, mesh reinforced, (50 mm) 2 inch wide.
.2 Insulation Fasteners: Installation specific, or required for assembly per related
specification section.
.3 Firring: Galvanized Z-bars at Composite Aluminum Panels.
Part 3 Execution
3.1 EXAMINATION
.1 Verify that substrate, adjacent materials, and insulation boards are dry and ready to receive
insulation and adhesive.
.2 Verify substrate surface is flat, free of honeycomb, fins, irregularities, materials or
substances that may impede adhesive bond.
3.2 INSTALLATION - FOUNDATION PERIMETER
.1 Adhere a 4” (100 mm) wide strip of polyethylene sheet over construction or expansion
joints with double beads of Type 1 full height of adhesive each side of joint.
.2 Apply Type 1 adhesive in three continuous beads per board length.
.3 Install boards on foundation perimeter, horizontally.
.1 Place boards in a method to maximize contact bedding.
.2 Butt edges and ends tight to adjacent board and to protrusions.
.4 Extend boards over control joints, unbounded to foundation 4” (100 mm) on one side of
joint.
.5 Cut and fit insulation tight to protrusions or interruptions to the insulation plane.

Hamilton International Air Cargo Logistics Facility Section 07 21 13
Tradeport International Corporation BOARD INSULATION
July 2014
Chamberlain Architect Services Limited Page 3 of 3
3.3 PROTECTION OF FINISHED WORK
.1 Protect finished Work.
.2 Do not permit work to be damaged prior to covering insulation.
END OF SECTION

Hamilton International Air Cargo Logistics Facility Section 07 21 16
Tradeport International Corporation BLANKET INSULATION
July 2014 Page 1 of 3
Chamberlain Architect Services Limited
Part 1 General
1.1 SECTION INCLUDES
.1 Mineral fibre insulation in exterior wall construction.
.2 Mineral fibre insulation for filling perimeter window and door shim spaces, crevices in
exterior wall.
1.2 RELATED SECTIONS
.1 Section 07 21 13 - Board Insulation.
.2 Section 07 26 00 - Vapour Retarders: Vapour retarder materials to adjacent insulation.
.3 Section 07 27 00 - Air Barriers: Air barrier materials to adjacent insulation.
.4 Section 07 84 00 - Firestopping.
.5 Section 09 21 16 - Gypsum Board Assemblies.
1.3 REFERENCES
.1 ASTM C665 - Mineral-Fibre Blanket Thermal Insulation for Light Frame Construction
and Manufactured Housing.
.2 ASTM E84 - Test Method for Surface Burning Characteristics of Building Materials.
.3 NFPA 255 - Test of Surface Burning Characteristics of Building Materials.
.4 UL 723 - Tests for Surface Burning Characteristics of Building Materials.
1.4 SYSTEM DESCRIPTION
.1 Provide continuity of thermal barrier at building enclosure elements.
.2 Provide thermal protection to vapour retarder in conjunction with vapour retarder
materials in Section 07 26 00
.3 Provide thermal protection to air seal materials at building enclosure elements in
conjunction with air barrier materials in Section 07 27 00.
1.5 SUBMITTALS
.1 Product Data: Provide data on product characteristics, performance criteria, limitations,
.2 Manufacturer's Certificate: Certify that products meet or exceed specified requirements.
1.6 COORDINATION
.1 Coordinate the work with Section 07 26 00 for installation of vapour retarder and Section
07 27 00 for air seal materials.

Hamilton International Air Cargo Logistics Facility Section 07 21 16
Tradeport International Corporation BLANKET INSULATION
July 2014 Page 2 of 3
Chamberlain Architect Services Limited
Part 2 Products
2.1 MANUFACTURERS - INSULATION MATERIALS
.1 “Thermafiber SAFB” by Thermafiber or equa
.2 “ Roxul Plus Steel Stud” by Roxul Inc. or equal
2.2 MATERIALS
.1 Blanket Insulation: ASTM C665; preformed mineral fibre insulation conforming to the
following:
.1 Thermal Resistance: R of 3.7/inch
.2 Facing: Unfaced
.3 Flame/Smoke Properties: 25/50 in accordance with ASTM E84.
.2 Insulation Fasteners: Steel impale spindle and clip on flat metal base, self adhering
backing, length to suit insulation thickness, capable of securely and rigidly fastening
insulation in place;Execution
2.3 EXAMINATION
.1 Verify that substrate, adjacent materials, and insulation are dry and ready to receive
insulation.
2.4 INSTALLATION
.1 Install insulation in accordance with manufacturer's instructions and Section 07 26 00.
.2 Install in exterior wall spaces without gaps or voids. Do not compress insulation.
.3 Trim insulation neatly to fit spaces. Insulate miscellaneous gaps and voids.
.4 Fit insulation tight in spaces and tight to exterior side of mechanical and electrical services
within the plane of insulation.
.5 Install with factory applied vapour retarder membrane facing warm side of building
spaces. Lap ends and side flanges of membrane over framing members.
.6 Metal Framing: Place vapour retarder on warm side of insulation; lap and seal sheet
retarder joints over member face.
.7 Extend vapour retarder tight to full perimeter of adjacent window and door frames and
other items interrupting the plane of membrane. Tape seal in place.
.8 Coordinate work of this section with construction of vapour retarder specified in Section
07 26 00.
.9 Coordinate work of this section with construction of air barrier seal specified in Section
07 27 00.

Hamilton International Air Cargo Logistics Facility Section 07 21 16
Tradeport International Corporation BLANKET INSULATION
July 2014 Page 3 of 3
Chamberlain Architect Services Limited
END OF SECTION

Hamilton International Air Cargo Logistics Facility Section 07 21 29
Tradeport International Corporation FOAMED-IN-PLACE INSULATION
July 2014
Chamberlain Architect Services Limited Page 1 of 5
Part 1 General
1.1 SECTION INCLUDES
.1 Foamed-in-place insulation in exterior walls.
.2 Foamed-in-place insulation at exterior wall crevices requiring a thermal seal.
.3 Foamed-in-place insulation at junctions of dissimilar wall and roof materials to achieve a
thermal and air seal, particularly at freezer roof insulation edges.
1.2 RELATED SECTIONS
.1 072113 – Board Insulation
.2 072600 – Vapour Retarders
.3 072700 – Air Barriers
.4 074311 – Insulated Metal Panels
.5 075113 – Built-up Asphalt Roofing
.6 075153 - Single Ply Roofing-Fully Adhered
1.3 REFERENCES
.1 CAN/ULC-S 705.1-98 (replaces CAN/CGSB-51.23-92): Standard regarding rigid
polyurethane foam spray thermal insulation, intermediate density – materials specifications
.2 CAN/ULC-S705.2-98 (replaces CAN/CGSB-51.39-92): Standard regarding rigid
polyurethane foam spray thermal insulation, intermediate density – installer
responsibilities.
.3 ULC (Underwriters Laboratories of Canada) - List of Equipment and Materials for:
.1 Building Materials.
.2 Fire Resistance.
.3 Firestop Systems and Components.
.4 ITS (Intertek Testing Services) - Certification Listings.
1.4 SUBMITTALS FOR REVIEW
.1 Product Data: Provide data on materials, describing insulation properties, sealer
requirements,insulation stops.
Hamilton International Air Cargo Logistics Facility Section 07 21 29
Tradeport International Corporation FOAMED-IN-PLACE INSULATION
July 2014
Chamberlain Architect Services Limited Page 2 of 5
1.5 SUBMITTALS FOR INFORMATION
.1 Manufacturer's Installation Instructions: Indicate special procedures, perimeter conditions
requiring special attention.
.2 Manufacturer's Certificate: Certify that Products meet or exceed specified requirements.
1.6 QUALITY ASSURANCE
.1 Manufacturer Qualifications: Company specializing in manufacturing the Products
specified in this section with minimum 5 years documented experience and certified by a
third party quality assurance program in accordance with CAN/ULC S705.2-05
Installation Standard.
.2 Applicator Qualifications: Company specializing in performing the work of this section
with minimum 5 years experience approved by manufacturer.
1.7 PROTECTION
.1 Ventilate area to receive insulation by introducing fresh air and exhausting air
continuously during and 24 hours after application to maintain non-toxic, unpolluted safe
working conditions
.2 Provide temporary enclosures to prevent spray from contaminating air beyond application
area
.3 Protect adjacent surfaces and equipment from damage of overspray, fall out, and dusting
of insulation materials.
.4 Close off and seal any ductwork in areas where sprayed insulation is being applied
.5 Protect workers as recommended by insulation manufacturer
1.8 SITE ENVIRONMENTAL REQUIREMENTS
.1 Apply insulation only when surfaces and ambient temperatures are within manufacturers
prescribed limits.
.2 Ventilate area of work as directed by Consultant by use of portable supply and exhaust
fans.
.3 Ventilate enclosed spaces
.4 Materials to be delivered in unopened packages and stored on site in warm, dry place
either on concrete floor on wood platform.
1.9 WASTE MANAGEMENT AND DISPOSAL
.1 Separate and recycle waste materials.
.2 Place materials defined as hazardous or toxic waste in designated containers

Hamilton International Air Cargo Logistics Facility Section 07 21 29
Tradeport International Corporation FOAMED-IN-PLACE INSULATION
July 2014
Chamberlain Architect Services Limited Page 3 of 5
.3 Ensure emptied containers are sealed and stored safely for disposal away of children.
1.10 PATCHING
.1 All patching and repairing of sprayed insulation due cutting by other trades shall be
performed under this section and paid by the trade performing
1.11 PROJECT CONDITIONS
.1 Apply insulation after hangers and supporting clips are installed but before subsequent
construction is erected.
Part 2 Products
2.1 MATERIALS
.1 Insulation: CAN/ULC S705.1 Certified by EcoLogo, and GREENGUARD.
.1 Acceptable Material: Polyurethane foam BASF “WALLTITE ECO”
.2 Substitutions: Approved Equal.
Part 3 Execution
3.1 EXAMINATION
.1 Examine all surfaces and conditions to which the work of this section is to be applied.
Ensure they are adequate to provide a satisfactory application of the specified materials.
Report any deficiencies to the design authority. Install in accordance with CAN/ULC
S705.2
.2 Verify other work on and within spaces to be insulated is complete prior to application.
3.2 PREPARATION
.1 Mask and protect adjacent surfaces from overspray or damage.
.2 Remove any dust, dirt, foreign material, loose paint etc. on surfaces to which the work is
to be applied, which could otherwise create a false bond or staining of insulation. Clean
and seal as required.
.3 Verify bond requirements and compatibility of all surfaces to receive thermal insulation
materials
.4 Ensure that all ducts, piping, equipment, or other items, which would interfere with
application of thermal insulation, are not positioned until thermal insulation work is
completed.
Hamilton International Air Cargo Logistics Facility Section 07 21 29
Tradeport International Corporation FOAMED-IN-PLACE INSULATION
July 2014
Chamberlain Architect Services Limited Page 4 of 5
3.3 APPLICATION
.1 Apply insulation in accordance with manufacturer's instructions.
.2 Apply insulation to a uniform monolithic density without voids.
.3 Apply to a minimum cured thickness as shown on the drawings.
.4 Transition Membrane Self Adhering: SBS modified bitumen, self adhering sheet
membrane complete with a cross-laminated polyethylene film, and having the following
physical properties:
.1 Thickness: 1.0mm(40mils) min
.2 Air Leakage: < 0.005 L/s.m²@ 75 Pa to ASTM E283-91
.3 Vapour Permeance:2.8 ng/Pa.m² (.05 Perms) to ASTM E96
.4 Low Temperature Flexibility: -30C to CGSB 37-GP-56M
.5 Elongation: 200% to ASTM D412-modified
Acceptable material: Tremco ExoAir 110, Blueskin SA as manufactured by Bakor or other
material as accepted by BASF
.5 Through-wall flashing membrane (Self-Adhering): SBS modified bitumen, self-adhering
sheet membrane complete with a cross-laminated polyethylene film, having the following
physical properties:
.1 Thickness: 1 mm (40 mils) min.;
.2 Film Thickness: 0.225mm ( 9.0 mils);
.3 Elongation: 200% to ASTM D412;
.4 Tensile Strength (film): 34500 kPa (5000 psi) ASTN D882;
.5 Vapour permeance: 2.8 ng/Pa.m².s (0.05 perms) to ASTM E96;
.6 Low temperature flexibility: -30LC to CGSB 37-GP-56M;
Acceptable material: Blueskin TWF as manufactured by Bakor
.6 Through-wall flashing and dampproof coursing mastic: Synthetic rubber base compound
having the following characteristics:
.1 Compatible with air/vapour barrier membrane, substrate and insulation materials;
.2 Long term flexibility: Pass CGSB 71-GP-24M
.3 Chemical resistance: Alkalis, mild acid and salt solutions;
Acceptable material: Air-Bloc 21 or 230-21 Adhesive as manufactured by Bakor.
.7 Primer for self-adhering membranes: Synthetic rubber based adhesive type, quick setting,
having the following physical properties:
.1 Colour: Blue
.2 Weight: 0.8 kg/l;
.3 Solids by weight: 35%
Hamilton International Air Cargo Logistics Facility Section 07 21 29
Tradeport International Corporation FOAMED-IN-PLACE INSULATION
July 2014
Chamberlain Architect Services Limited Page 5 of 5
.4 Drying time (initial set): 30 minutes
.5 Acceptable material: Blueskin Primer as manufactured by Bakor
.8 Tamp Smooth surfaces visible in finished work.
3.4 FIELD QUALITY CONTROL
.1 Inspection will include verification of insulation, thickness and density.
3.5 CLEANING
.1 Remove sprayed thermal insulation from material and surfaces not specifically required to
be insulated
.2 Broom clean work areas affected by the Work of this Section
3.6 PROTECTION OF FINISHED WORK
.1 Do not permit subsequent construction work to disturb applied insulation.
END OF SECTION

Hamilton International Air Cargo Logistics Facility Section 07 26 00
Tradeport International Corporation VAPOUR RETARDERS
July 2014
Chamberlain Architect Services Limited Page 1 of 3
Part 1 General
1.1 SECTION INCLUDES
.1 Sheet and sealant materials for controlling vapour diffusion.
1.2 RELATED SECTIONS
.1 072113 – Board Insulation
.2 072116 – Blanket Insulation
.3 072119 – Foamed-in-Place Insulation
.4 072700 – Air Barriers
.5 074143 – Aluminum Composite Panels
.6 074311 – Insulated Metal Panels
.7 075113 – Built-up Asphalt Roofing
.8 075153 - Single Ply Roofing-Fully Adhered
1.3 REFERENCES
.1 ASTM C1193 - Standard Guide for Use of Joint Sealants.
.2 ASTM E96 - Test Methods for Water Vapour Transmission of Materials.
.3 SWRI (Sealant, Waterproofing and Restoration Institute) - Sealant and Caulking Guide
Specification.
.4 CAN/CGSB-51.34-M86, Vapour Barrier, Polyethylene Sheet for use in Building
Construction.
1.4 DEFINITION
.1 Vapour Retarder: A material or assembly of materials that resists water vapour diffusion
through it.
1.5 SYSTEM DESCRIPTION
.1 Materials and installation methods to provide continuity of vapour retarder:
.1 To seal gaps between enclosure components and opening frames.
.2 In conjunction with materials described in Related Sections.

Hamilton International Air Cargo Logistics Facility Section 07 26 00
Tradeport International Corporation VAPOUR RETARDERS
July 2014
Chamberlain Architect Services Limited Page 2 of 3
1.6 PERFORMANCE REQUIREMENTS
.1 Maximum Vapour Permeability (Perm): 0.02 perms measured in accordance with ASTM
E96 Method E at freezer.
1.7 SUBMITTALS
.1 Section 013300: Submittal Procedures.
.2 Product Data: Provide data indicating material characteristics, performance criteria,
limitations.
.3 Manufacturer's Installation Instructions: Indicate preparation and installation
requirements, techniques.
1.8 QUALITY ASSURANCE
.1 Perform Work in accordance with SWRI - Sealant and Caulking Guide Specification
requirements for materials and installation.
1.9 SEQUENCING
.1 Sequence Work to permit installation of materials in conjunction with other retardant
materials and seals, and air barrier assemblies.
.2 Do not install vapour retarder until items penetrating it are in place.
Part 2 Products
2.1 SHEET MATERIALS
.1 Polyethylene film: To CAN/CGSB-51.34-M86, 6mil thick.
.2 Vapour Retarder at Freezer: Sarnafil “Sarnavap 10”, polyethylene LD, with permeance of
0.02 perms, colour blue, complying with CAN/CGSB 51.34 Type 1. Supply in as large
sheets as possible to minimize joints. Sheet size: 183 m length x 6000 mm width.
.3 Sheet Air Barrier and Waterproof Membrane: self-adhering cold applied composite sheet
membrane comprised of 0.9mm (36 mils) of rubberized asphalt integrally bonded to a
0.1mm (4 mils) film of high density, cross-laminated polyethylene for a minimum
thickness of 1.0mm (40 mils).
2.2 ADHESIVES
.1 Adhesive: Compatible with sheet barrier and substrate, permanently non-curing.
2.3 ACCESSORIES
.1 Joint sealing type: air resistant pressure sensitive adhesive tape, type recommended by
vapour barrier manufacturer, 50mm wide for lap joints and perimeter seals, 25mm
elsewhere.

Hamilton International Air Cargo Logistics Facility Section 07 26 00
Tradeport International Corporation VAPOUR RETARDERS
July 2014
Chamberlain Architect Services Limited Page 3 of 3
.2 Sealants: As recommended by manufacturer
.3 Moulded box vapour barrier: factory-moulded polyethylene box for use with recessed
electric switch and outlet device boxes.
Part 3 Execution
3.1 PREPARATION
.1 Remove loose or foreign matter which might impair adhesion.
.2 Clean and prime substrate surfaces to receive adhesive and sealants in accordance with
manufacturers' instructions.
3.2 INSTALLATION
.1 Install materials in accordance with manufacturer’s instructions..
.2 Vapour Retarder for Solid Substrate: Secure sheet barrier to solid construction with tape.
Lap edges and ends and seal with tape to ensure complete continuous seal.
.3 Vapour Retarder for Stud Framed Walls: Secure sheet barrier to stud faces with adhesive.
Lap edges over stud faces, lap ends onto adjacent construction; tape/seal ends to ensure
complete seal.
.4 Vapour Retarder for Wall/Roof Junction: Lap sheet barrier from roof retarder onto wall
vapour retarder continuously. Seal edges and ends continuous with self adhering sheet
membrane.
.5 Vapour Retarder Seal for Openings: Install sheet barrier between window and door
frames and adjacent vapour retarder and seal with continuous self-adhering membrane.
Position laps over firm bearing.
.6 Apply sealants, tapes and adhesives within recommended application temperature ranges.
Consult manufacturer when sealant cannot be applied within these temperature ranges or
where compatibility with adjacent materials may be in doubt.
3.3 SCHEDULES
.1 Wall and Roof Junction: Lap sheet retarder from roof vapour retarder (with 6 inches of
contact over firm bearings) to wall vapour retarder (with 6 inches of contact), ensure
continuous seal.
END OF SECTION

Hamilton International Air Cargo Logistics Facility Section 07 43 11 Tradeport International Corporation INSULATED METAL PANELS July 2014 Chamberlain Architect Services Limited Page 1 of 10
Copyright 2013 IRC Building Sciences Group Page 1 of 10
PART 1 - GENERAL
1.1 SECTION INCLUDES
.1 Insulated metal wall panels.
.2 Flashing and trim integral to insulated panels.
.3 Clips, anchoring devices, fasteners, and accessories for installation of panel system.
1.2 RELATED SECTIONS
.1 Section 05 40 00 - Cold Formed Metal Framing
.2 Section 07 62 00 - Sheet Metal Flashing and Trim.
.3 Section 07 92 00 - Joint Sealers
1.3 REFERENCES
.1 NFPA 259 - Test Method for Potential Heat of Building Materials
.2 NFPA 285 - Evaluation of Fire Propagation Characteristics of Exterior Non-Load Bearing Wall Assemblies
.3 NFPA 286 - Fire Test of Evaluating Conditions of Wall and Ceiling Finish to Roof Fire Growth
.4 AAMA 501.1 - Standard Test Method for Exterior Windows, Curtain Walls and Doors for Water
Penetration Using Dynamic Pressure.
.5 Factory Mutual Research Corporation (FMRC) Standard 4880 - Evaluating Insulated Wall or Wall and Roof/Ceiling Assemblies, Plastic Interior Finish Materials, Plastic Exterior Building Panels, Wall/Ceiling Coating Systems, and Interior or Exterior Finish Systems.
.6 Factory Mutual Research Corporation (FMRC) Standard 4881 - Standard for Class Exterior Wall
Systems.
.7 ASTM A 653 - Standard Specification for Steel Sheet, Zinc-Coated (Galvanized) or Zinc-iron Alloy Coated (Galvannealed) by the Hot-Dip Process.
.8 ASTM A 792 - Standard Specification for Steel Sheet, Aluminum-Zinc Alloy Coated Steel by the Hot-Dip Process
.9 ASTM A 924 - General Requirements for Steel Sheet, Metallic-Coated by the Hot-Dip Process
.10 ASTM C 273 - Shear Properties of Sandwich Core Materials
.11 ASTM C 518 - Standard Test Method for Steady-State Heat Flux Measurements and Thermal Transmission Properties by Means of the Heat Flow Meter Apparatus
.12 ASTM D 1621 - Compressive Properties of Rigid Cellular Plastics
.13 ASTM D 1622 - Apparent Density of Rigid Cellular Plastics
.14 ASTM D 1623 - Tensile and Tensile Adhesion Properties of Rigid Cellular Plastics
.15 ASTM E 18 - Test Methods for Rockwell Hardness of Metallic Finishes

Hamilton International Air Cargo Logistics Facility Section 07 43 11 Tradeport International Corporation INSULATED METAL PANELS July 2014 Chamberlain Architect Services Limited Page 2 of 10
Copyright 2013 IRC Building Sciences Group Page 2 of 10
.16 ASTM E 72 - Standard Test Methods of Conducting Strength Tests of Panels for Building Construction.
.17 ASTM E 84 - Standard Test Method for Surface Burning Characteristics of Building Materials.
.18 ASTM E 90-99 - Laboratory Measurement of Airborne Sound Transmission Loss of Building Partitions and Elements
.19 ASTM E 283 - Standard Method for Determining the Rate of Air Leakage Through Exterior
Windows, Curtain Walls, and Doors Under Specified Pressure Differences Across the Specimen.
.20 ASTM E 330 - Standard Test Method for Structural Performance of Exterior Windows, Curtain Walls and Doors by Uniform Static Air Pressure Difference.
.21 ASTM E 331 - Standard Test Method for Water Penetration of Exterior Windows, Skylights, Doors, and Curtain Walls by Uniform Static Air Pressure Difference.
.22 ASTM E 413-87 - Classification of Rating Sound Insulation
.23 ASTM E 1332-10a - Classification for Rating Outdoor-Indoor Sound Attenuation
.24 ASTM E 1592 - Structural Performance of Metal Roofing and Siding Systems by Uniform Static Air Pressure Difference
.25 ASTM E 1996 - Test Method for Performance of Exterior Impact Protective Systems by
Windborne Debris in Hurricanes, 15 pound
.26 ASTM F 1642 - Standard Test Method for Glazing and Glazing Systems subject to Airblast Loading
.27 CAN 4-S101 - Standard Methods of Fire Endurance Tests of Building Construction and Materials.
.28 CAN/ULC S102 - Standard Method of Test for Surface Burning Characteristics of Building
Materials and Assemblies.
.29 CAN/ULC S126 - Standard Method of Test for Fire Spread Under Roof-Deck Assembly.
.30 CAN/ULC S134 - Fire Test of Exterior Wall Assemblies
.31 CAN/ULC S138 - Fire Growth of Insulated Building Panels in a Full-Scale Room Configuration
.32 US Green Building Council (USGBC): Leadership in Energy and Environmental Design (LEED) Green Building Rating System.
1.4 DESIGN REQUIREMENTS
.1 Structural and Wind load Tests:
.1 Design load/deflection criteria verified from tests per ASTM E 72 "Chamber Method" using a 20 psf (.96 kPa) simulated wind load with a deflection limit of L/180 for exterior
wall panels, L/120 for partition and liner walls and L/240 for ceiling panels.
.2 FM Approval Standard 4881, Standard for Class 1 Exterior Wall Systems. Wind pressures are calculated per FM Global Property Loss Prevention Data Sheet 1-28, ratings are established and support spacing is determined based on FM Approval Standard 4881 listings.
Hamilton International Air Cargo Logistics Facility Section 07 43 11 Tradeport International Corporation INSULATED METAL PANELS July 2014 Chamberlain Architect Services Limited Page 3 of 10
Copyright 2013 IRC Building Sciences Group Page 3 of 10
.3 Large Missile Impact Test: Conducted in accordance with ASTM E 1886 Test Method for Performance of Exterior Windows, Curtain Walls, Doors and Impact Protective Systems and ASTM E 1996 Windborne Debris in Hurricanes.
.2 Thermal Performance:
.1 When tested in accordance with ASTM C 518, "measurement of steady state thermal transmission", the panels shall provide a K-factor of .14 btu/sf/hr./deg. F at a 75 degrees
F (24 degrees C) mean temperature.
.3 Vapor Barrier:
.1 Air Infiltration: Air infiltration shall not exceed .06 cfm per square foot of wall area when
tested in accordance with ASTM E 283 at a static pressure of 12 psf (.576 kPa)
.2 Static Water Penetration: No uncontrolled water penetration through the panel joints at a static pressure of 20 psf (.96 kPa) when tested in accordance with ASTM E 331.
.3 Dynamic Water Penetration: No uncontrolled water penetration through panel joints when subjected to a 95 mph (153 kph) slip stream air flow and application of water for a 15 minute period in accordance with AAMA501.1.
.4 Condensation Resistance Factor: Minimum condensation resistance factor of the panel shall be 92 when tested in general accordance with AAMA 1503.1.
.4 Fire:
.1 Surface Burning Characteristics: Insulated core shall have been tested in accordance with ASTM E 84 and CAN/ULC-S102 for surface burning characteristics. The core shall have a maximum flame spread of 25 and a smoke developed rating of 450.
.2 Factory Mutual Research Corporation (FMRC) Standard 4880, 50 foot (15.24 m) High Corner Test for Unlimited Height Structures: Panel assembly shall not support a self-propagating fire which reaches any limits of the 50 foot (15.24 m) high corner test structure as evidenced by flaming or material damage of the ceiling of the assembly.
.3 National Fire Protection Association - Fire Propagation: Fire assembly shall meet the requirements of NFPA 285 Fire Propagation Characteristics of Exterior Non-Load Bearing Wall Assemblies and NFPA 286 Fire Tests for Evaluating Contribution of Wall and Ceiling Finish to Roof Fire Growth. Heat potential shall be determined using NFPA 259 Test Method for Potential Heat of Building Materials.
.4 Canadian Certifications Flame spread: Evaluation of fire spread over the exterior surface conducted in compliance with CAN/ULC S138 Fire Growth of Insulated Building Panels in a Full-Scale Room Configuration.
.5 IBC Chapter 26: Panel performance under the above test methods, shall meet the requirements of IBC, Chapter on foam plastics.
.5 Bond Strength:
.1 Fatigue Test: Panel shall withstand deflection cycling at L/180 to two million alternate cycles with no evidence of delamination, core cracking or permanent bowing.

Hamilton International Air Cargo Logistics Facility Section 07 43 11 Tradeport International Corporation INSULATED METAL PANELS July 2014 Chamberlain Architect Services Limited Page 4 of 10
Copyright 2013 IRC Building Sciences Group Page 4 of 10
.2 Freeze/Heat Cycling: Panel shall exhibit no delamination, surface blistering or permanent bowing when subjected to cyclic temperature extremes of minus 20 degrees F (minus 28 degrees C) to plus 180 degrees F (plus 82 degrees C) for twenty-one eight hour cycles.
.3 Humidity Test: Panel shall exhibit no delamination or metal corrosion at interface when subjected to a 140 degree F (60 degree C) temperature and 100 percent relative humidity for a total of 1200 hours.
.4 Autoclave Test: Panel shall exhibit no delamination of the foam core from metal skins when exposed to 2 psi (.122 kg/sq. cm) pressure at a temperature of 212 degrees F (100
degrees C) for a total of 2-1/2 hours.
1.5 SUBMITTALS
.1 Submit under provisions of Section 01 33 00.
.2 Product Data: Manufacturer's data sheets on each product to be used, including:
.1 Preparation instructions and recommendations.
.2 Storage and handling requirements and recommendations.
.3 Material type, metal thickness and finish.
.4 Installation methods.
.3 Shop Drawings: Including elevations, fastening patterns, sections of each condition and details as required.
.4 Selection Samples: For each finish product specified, two complete sets of color chips
representing manufacturer's full range of available colors and patterns.
.5 Panel Sample: Submit 1 foot (305 mm) high by full width sample panel for each profile specified indicating the metal, texture, color and finish.
.6 LEED Submittals: Provide documentation of how the requirements of Credit will be met:
.1 EA - Energy and Atmosphere:
.1 EA Credit 1: Optimize Energy Performance: Demonstrate percentage of performance improvement that meets or surpasses ASHRAE/IESNA Standard 90.1-2004.
.2 EA Credit 2: Minimum Energy Performance: Roof panels contribute to higher energy efficiency of a building that must comply with a 10 percent improvement in the performance compared to benchmark rating based on ASHRAE/IESNA Standard 90.1-2007 (with errate but without addenda) in EA
Prerequisite 2.
.2 MR - Material and Resource:
.1 MR Credit 1.1 & 1.2: Building Reuse:
.1 Maintain Existing Walls, Floors and Roof.
.2 Maintain Interior Non-Structural Elements.

Hamilton International Air Cargo Logistics Facility Section 07 43 11 Tradeport International Corporation INSULATED METAL PANELS July 2014 Chamberlain Architect Services Limited Page 5 of 10
Copyright 2013 IRC Building Sciences Group Page 5 of 10
.2 MR Credit 3: Materials Reuse
.3 MR Credit 4: Recycled Content:
.1 Percentage weight of post-consumer and pre-consumer recycled content
using materials with recycled content.
.2 Recycled content value of product assembly by weight.
.3 Indicate total value (cost) of each product used.
.4 MR Credit 6: Rapidly Renewable Materials: Foam core in panels using rapidly renewable buildings materials and products for 2.5 percent of the total value of all building materials and products used in the project (based on cost.)
.3 IEQ - Indoor Environmental Quality:
.1 IEQ Credit 4.1: Low-Emitting Materials, Adhesives and Sealants: Product data on adhesives and sealants to comply with standards of South Coast Air Quality Management District Rule #1168.
.2 Product data for paint and coatings have no VOC's.
.7 Buy American Act Certification: Submit documentation certifying that products comply with provisions of the Buy American Act 41 U.S.C 10a-10d.
.8 Manufacturer's Certificates: Certify products meet or exceed specified requirements.
1.6 QUALITY ASSURANCE
.1 Manufacturer Qualifications: Company specializing in manufacturing factory foamed in place insulated metal panels with a minimum documented experience of ten years.
.2 Installer Qualifications: Company specializing in installation of the products specified for projects of similar size and scope with minimum five years documented experience.
.3 Owner's Building Envelope Consultant, hereafter known as “Observer”, is an independent Quality Assurance Observation Agency appointed by Owner to observe performance of roof Work.
.4 Cooperate with Observer and afford all facilities necessary to permit full Quality Assurance Observations during performance of Work. Act immediately on instructions given by Observer.
.5 Copies of Q.A. Observation Reports to be issued by Observer to Owner, Architect and Prime Contractor.
1.7 DELIVERY, STORAGE, AND HANDLING
.1 Store products in accordance with Manufacturer's written instructions. Store under cover in manufacturer's unopened packaging with labels intact until ready for installation.
.2 Shield foam insulated metal roof panels from direct sunlight until installation.
.3 Store products off the ground, with panels sloped for drainage and covered to protect factory finishes from damage.
Hamilton International Air Cargo Logistics Facility Section 07 43 11 Tradeport International Corporation INSULATED METAL PANELS July 2014 Chamberlain Architect Services Limited Page 6 of 10
Copyright 2013 IRC Building Sciences Group Page 6 of 10
.4 Do not overload roof structure with stored materials. Do not permit material storage or traffic on completed roof surfaces.
1.8 WARRANTY
.1 Manufacturer's Warranty: Manufacturer's two year limited warranty that panels are free from defects in materials and workmanship, beginning from the date of shipment of panels, but excluding coil coatings (paint finishes) covered under a separate warranty. Warranty does not
include interior painted surface of panels.
.2 Submit exterior paint manufacturer's written forty (40) year limited warranty on paint finish for adhesion to the substrate and a thirty (30) year limited warranty on chalk and color fade.
PART 2 - PRODUCTS
2.1 GENERAL
.1 The use of materials other than those specified herein must be approved prior to award of the Contract. If substitute materials are proposed, then the list of materials must be included as part of the Tender Form. This submittal shall include product name, number and data sheets and manufacturer’s specifications and installation instructions.
.2 All materials listed below must be used on the project. Under no circumstances will substitute materials be used unless approval is first received from the Owner. Use of substitute materials without prior approval can result in the removal and replacement of these materials at no cost to the Owner.
2.2 MANUFACTURERS
.1 Acceptable Manufacturer:
.1 Kingspan Insulated Panels Ltd. 12557 Coleraine Drive, Caledon, ON L7E 3B5 (866-442-3594.
.2 Substitution Limitations:
.1 Submit written request for approval of substitutions to the Consultant a minimum of 7 days prior to the date for receipt of bids. Include the following information:
.1 Name of the materials and description of the proposed substitute.
.2 Drawings, cut sheets, performance and test data.
.3 List of projects similar scope and photographs of existing installations.
.4 Test reports indicating compliance with the performance criteria.
.5 Other information necessary for evaluation.
.2 After evaluation by Consultant, approval will be issued in a addendum. No verbal approval will be given.
2.3 INSULATED METAL WALL PANELS
.1 Exterior Face of Panel:
Hamilton International Air Cargo Logistics Facility Section 07 43 11 Tradeport International Corporation INSULATED METAL PANELS July 2014 Chamberlain Architect Services Limited Page 7 of 10
Copyright 2013 IRC Building Sciences Group Page 7 of 10
.1 Material:
.1 Steel coil material shall be in accordance with ASTM A755: [AZ50 Galvalume®/ Zincalume® (55 percent aluminum, 45 percent zinc) in accordance with ASTM A792] [Grade 33, G90 galvanized steel in accordance with ASTM A653 and A924].
.2 Gauge: 24 gauge.
.2 Profile: Shadowline
.3 Texture: Non-directional stucco embossed.
.4 Paint Finish Color: Two Field Colours as indicated on drawings, and up to two accent band colours from full standard range of Manufacturer’s colours category 1,2 and 3. To be selected by Owner and Architect.
.5 Finish System:
.1 Exterior Finish:
.1 1.0 mil. Fluropolymer (PVDF) Two Coat system: 0.2 mil primer with 0.8 mil Kynar 500 (70 percent) SOLID color coat.
.2 Interior Finish:
.1 modified polyester, dry film thickness of 1.0 mil including primer.
PART 3 - EXECUTION
3.1 WORKMANSHIP
.1 Procedures for application of materials should be in accordance with Manufacturer’s printed instructions and recommendations.
.1 Advise Consultant of adjustments to specified procedures recommended by
Manufacturer or due to site conditions.
.2 Written approval by Consultant is required to make any adjustments to specified procedures.
.2 All work to be carried out in accordance with drawings, and specifications provided.
.1 All supplied drawings and details constitute acceptable installations. Any deviance from these details must first approved by Consultant prior to installation.
.3 While work is in progress, all steps must be taken to safeguard building from damage due to weather, fire, and structural overloading.
.4 Examine underside of roof deck when installing mechanical fasteners, where possible, to avoid
accidental damage to existing services.
.5 Apply each part of roofing system when surfaces are free of moisture for successful application.
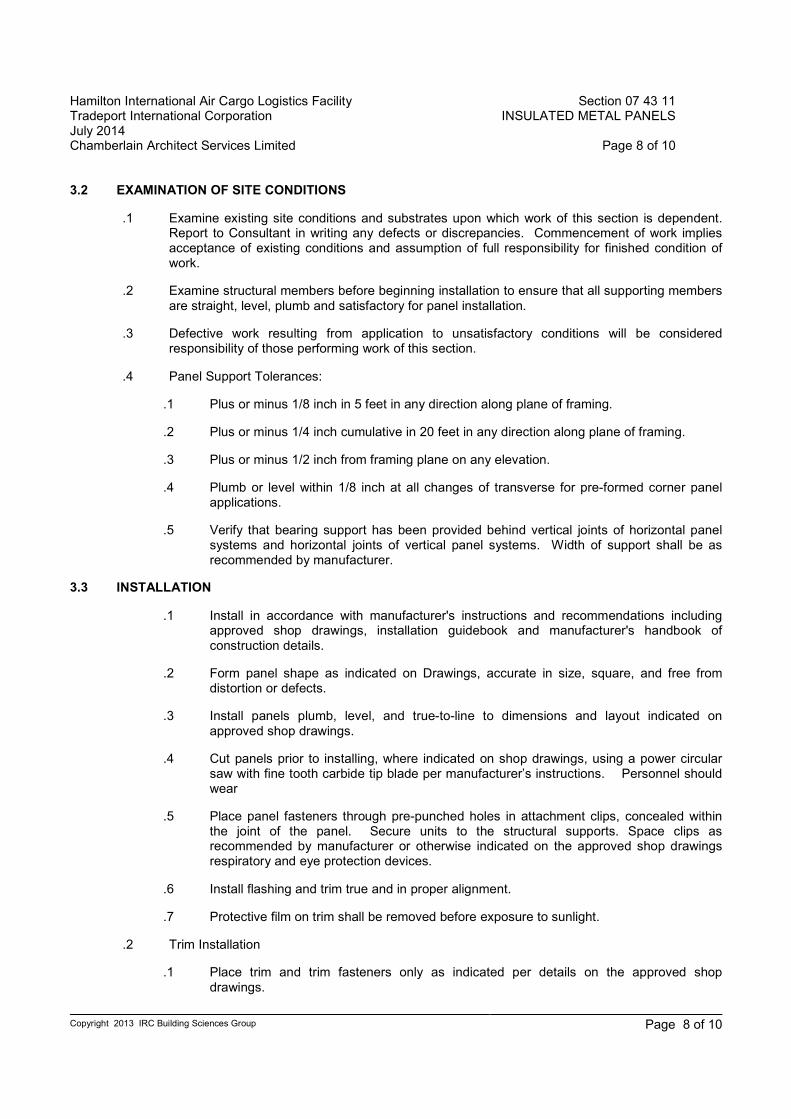
Hamilton International Air Cargo Logistics Facility Section 07 43 11 Tradeport International Corporation INSULATED METAL PANELS July 2014 Chamberlain Architect Services Limited Page 8 of 10
Copyright 2013 IRC Building Sciences Group Page 8 of 10
3.2 EXAMINATION OF SITE CONDITIONS
.1 Examine existing site conditions and substrates upon which work of this section is dependent. Report to Consultant in writing any defects or discrepancies. Commencement of work implies acceptance of existing conditions and assumption of full responsibility for finished condition of work.
.2 Examine structural members before beginning installation to ensure that all supporting members
are straight, level, plumb and satisfactory for panel installation.
.3 Defective work resulting from application to unsatisfactory conditions will be considered responsibility of those performing work of this section.
.4 Panel Support Tolerances:
.1 Plus or minus 1/8 inch in 5 feet in any direction along plane of framing.
.2 Plus or minus 1/4 inch cumulative in 20 feet in any direction along plane of framing.
.3 Plus or minus 1/2 inch from framing plane on any elevation.
.4 Plumb or level within 1/8 inch at all changes of transverse for pre-formed corner panel applications.
.5 Verify that bearing support has been provided behind vertical joints of horizontal panel systems and horizontal joints of vertical panel systems. Width of support shall be as recommended by manufacturer.
3.3 INSTALLATION
.1 Install in accordance with manufacturer's instructions and recommendations including approved shop drawings, installation guidebook and manufacturer's handbook of
construction details.
.2 Form panel shape as indicated on Drawings, accurate in size, square, and free from distortion or defects.
.3 Install panels plumb, level, and true-to-line to dimensions and layout indicated on
approved shop drawings.
.4 Cut panels prior to installing, where indicated on shop drawings, using a power circular saw with fine tooth carbide tip blade per manufacturer’s instructions. Personnel should wear
.5 Place panel fasteners through pre-punched holes in attachment clips, concealed within the joint of the panel. Secure units to the structural supports. Space clips as recommended by manufacturer or otherwise indicated on the approved shop drawings respiratory and eye protection devices.
.6 Install flashing and trim true and in proper alignment.
.7 Protective film on trim shall be removed before exposure to sunlight.
.2 Trim Installation
.1 Place trim and trim fasteners only as indicated per details on the approved shop
drawings.

Hamilton International Air Cargo Logistics Facility Section 07 43 11 Tradeport International Corporation INSULATED METAL PANELS July 2014 Chamberlain Architect Services Limited Page 9 of 10
Copyright 2013 IRC Building Sciences Group Page 9 of 10
.2 Field drill weep holes where appropriate in horizontal trim; minimum 1/4 inch diameter at 24 inches on center.
.3 Place a continuous strip of butyl tube sealant between the inside back face of closure
trims and interior panel faces for proper vapor seal.
.3 Cleaning:
.1 Replace damaged panels and other components of work, which cannot be repaired by
finish touch-up or similar minor repair.
.2 Wipe finished surfaces clean of any filings caused by drilling or cutting to prevent rust staining.
END OF SECTION - 07 43 11

Hamilton International Air Cargo Logistics Facility Section 07 43 11 Tradeport International Corporation INSULATED METAL PANELS July 2014 Chamberlain Architect Services Limited Page 10 of 10
Copyright 2013 IRC Building Sciences Group Page 10 of 10
(This page left blank intentionally)

Hamilton International Air Cargo Logistics Facility Section 07 62 00
Tradeport International Corporation SHEET METAL FLASHING AND TRIM
July 2014
Chamberlain Architect Services Limited Page 1 of 9
Part 1 General
1.1 SECTION INCLUDES
.1 Coping, parapet, cap, and lintel, flashings.
.2 Facias, scuppers, and pitch pockets,
.3 Counterflashings over bituminous base flashings.
.4 Counterflashings for roof hatches.
.5 Counterflashings at roof mounted equipment.
1.2 RELATED SECTIONS
.1 Section 06 10 00 – Rough Carpentry: Wood blocking for metal roofing substrate profiles.
.2 Section 07 52 00: SBS Modified Bituminous Membrane Roofing.
.3 Section 07 72 33 - Roof Hatches.
.4 Section 07 92 00 - Joint Sealants.
1.3 REFERENCES
.1 ASTM A167 - Stainless and Heat-Resisting Chromium-Nickel Steel Plate, Sheet, and
Strip.
.2 ASTM A653/A653M - Steel Sheet, Zinc-Coated (Galvanized) or Zinc-Iron Alloy-Coated
(Galvannealed) by the Hot-Dip Process.
.3 ASTM D4586 - Asphalt Roof Cement, Asbestos-Free.
.4 CRCA (Canadianl Roofing Contractors Association) - Roofing Specifications Manual.
.5 CSA (Canadian Standards Association)
.1 CSA B111-1974 (R1998) Wire Nails, spikes and staples
.6 SMACNA - Architectural Sheet Metal Manual.
1.4 SUBMITTALS
.1 Section 01 33 00: Submission procedures.
.2 Shop Drawings: Indicate material profile, jointing pattern, jointing details, fastening
methods, flashings, terminations, and installation details.
.3 Samples: Submit duplicate samples, 50x50 mm in size illustrating typical of each type of
sheet metal material and finish.

Hamilton International Air Cargo Logistics Facility Section 07 62 00
Tradeport International Corporation SHEET METAL FLASHING AND TRIM
July 2014
Chamberlain Architect Services Limited Page 2 of 9
1.5 QUALITY ASSURANCE
.1 Perform work in accordance with SMACNA and NRCA standard details and
requirements.
1.6 QUALIFICATIONS
.1 Fabricator and Installer: Company specializing in sheet metal flashing work with 5 years
documented experience.
1.7 PRE-INSTALLATION CONFERENCE
.1 Section 01 33 00: Convene one week prior to commencing work of this section.
1.8 DELIVERY, STORAGE, AND HANDLING
.1 Section 01 61 00: Deliver, store, protect and handle products to site.
.2 Stack preformed and prefinished material to prevent twisting, bending, or abrasion, and to
provide ventilation. Slope metal sheets to ensure drainage.
.3 Prevent contact with materials which may cause discolouration or staining.
1.9 COORDINATION
.1 Section 01 33 00: Coordinate work.
Part 2 Products
2.1 SHEET MATERIALS
.1 Pre-Coated Galvanized Steel: ASTM A653/A653M, G90 zinc coating; 0.7mm (22 gauge)
core steel, shop pre-coated with modified silicone coating of colour selected by
Consultant from manufacturers full range.
.2 Acceptable material: “Stelcolour” by Stelco or “Precoat” by Dofasco, 0.7mm thick.
2.2 ACCESSORIES
.1 Fasteners: Galvanized steel or Stainless steel (or Same material and finish as flashing
metal if exposed, with soft neoprene washers – fasteners concealed to extent possible).
.2 Underlayment: ASTM D226 D2178, No. 15 asphalt saturated roofing felt.
.3 Slip Sheet: Rosin sized building paper.
.4 Primer: Zinc chromate type.
.5 Protective Backing Paint: Zinc chromate alkyd.
.6 Sealant: specified in Section 07 92 00.

Hamilton International Air Cargo Logistics Facility Section 07 62 00
Tradeport International Corporation SHEET METAL FLASHING AND TRIM
July 2014
Chamberlain Architect Services Limited Page 3 of 9
.7 Cleats: of same material, and temper as sheet metal minimum 50mm wide. Thickness
1.6mm (16ga.).
.8 Plastic Cement: ASTM D4586, Type I.
.9 Touch-up paint: as recommended by prefinished material manufacturer.
2.3 FABRICATION
.1 Form sections true to shape, accurate in size, square, and free from distortion or defects.
.2 Fabricate cleats of same material as sheet, minimum 50 mm wide, interlockable with
sheet.
.3 Form pieces in longest possible 2400mm lengths. Make allowance for expansion at joints.
.4 Hem exposed edges on underside 13mm; mitre and seam corners.
.5 Form material with flat lock seams.
.6 Fabricate corners from one piece with minimum 450 mm long legs; seam for rigidity, seal
with sealant.
.7 Fabricate vertical faces with bottom edge formed outward 25 mm and hemmed to form
drip.
.8 Fabricate flashings to allow toe to extend 50 mm over roofing. Return and brake edges.
Part 3 Execution
3.1 EXAMINATION
.1 Verify roof openings, curbs, pipes, sleeves, ducts, or vents through roof are solidly set,
reglets in place, and nailing strips located.
.2 Verify roofing termination and base flashings are in place, sealed, and secure.
3.2 PREPARATION
.1 Install starter and edge strips, and cleats before starting installation.
3.3 INSTALLATION
.1 Conform to drawing details SMACNA NRCA CRCA manual.
.2 Secure flashings in place using concealed fasteners. [Use exposed fasteners only where
permitted.]
.3 Apply plastic cement compound between metal flashings and felt flashings.

Hamilton International Air Cargo Logistics Facility Section 07 62 00
Tradeport International Corporation SHEET METAL FLASHING AND TRIM
July 2014
Chamberlain Architect Services Limited Page 4 of 9
.4 Fit flashings tight in place. Make corners square, surfaces true and straight in planes, and
lines accurate to profiles.
.5 Seal metal joints watertight.
.6 Seal metal joints watertight.
3.4 FIELD QUALITY CONTROL
.1 Section 01 43 00: Field inspection.
.2 Inspection will involve surveillance of work during installation to ascertain compliance
with specified requirements.
END OF SECTION

Hamilton International Air Cargo Logistics Facility Section 07 81 12
Tradeport International Corporation INTUMESCENT FIRE RESISTIVE MATERIALS
July 2014
Chamberlain Architect Services Limited Page 1 of 7
Part 1 General
1.1 SECTION INCLUDES
.1 Fireproofing material.
1.2 RELATED SECTIONS
.1 Section Structural Steel Drawings - Building structural substrate surfaces.
.2 Section 07 84 00 - Firestopping.
.3 Section 09 21 16 - Gypsum Board Assemblies: Gypsum board fireproofing.
.4 Section 09 90 00 - Painting
1.3 REFERENCES
.1 CAN4-S101 M – Standard Methods of Fire Endurance Tests o Building construction and
Materials.
.2 CAN4-S102 M – Standard Methods of Test for Surface Burning Characteristics of
Building Materials and Assemblies.
.3 ANSI/UL 263 – 13th Edition.
.4 ASTM E119 – 2000 Edition: Method For Fire Tests of Building Construction and
Materials.
.5 ASTM E605 - Test Methods For Thickness and Density of Sprayed Fire-Resistive
Material (SFRM) Applied to Structural Members.
.6 ASTM E736 - Test Method For Cohesion/Adhesion of Sprayed Fire-Resistive Materials
Applied to Structural Members.
.7 ASTM E761 - Compressive Strength of Sprayed Fire-Resistive Material Applied to
Structural Members.
.8 ULC (Underwriters Laboratories, Inc.) – List of Equipment and Materials.
1.4 PERFORMANCE REQUIREMENTS
.1 Intumescent Fireproofing System: Provide a fire rated assembly rating of 2 hours for Steel
structure supporting a 2 hour fire rated floor assembly to ULC Assembly No.
Z639,Z640,N626,D972 or as appropriate to assembly.
1.5 SUBMITTALS
.1 Section 01 33 00: Submission procedures.

Hamilton International Air Cargo Logistics Facility Section 07 81 12
Tradeport International Corporation INTUMESCENT FIRE RESISTIVE MATERIALS
July 2014
Chamberlain Architect Services Limited Page 2 of 7
.2 Product Data: Provide data indicating product characteristics, performance and limitation
criteria and sufficient for identification at job site.
.3 Test Reports: Indicating the following:
.1 Bond Strength of Fireproofing: ASTM E72, tested to provide minimum bond
strength twenty times weight of fireproofing materials.
.2 Fire test reports of fireproofing application to substrate materials similar to project
conditions.
.3 Reports from reputable independent testing agencies, of product proposed for use,
which indicate conformance to ASTM E119 and ASTM E84.
.4 Manufacturer's Installation Instructions: Indicate special procedures, perimeter conditions
requiring special attention, and listing ULC design references.
.5 Manufacturer's Certificate: Certify that Products meet or exceed OBC and specified
requirements.
.6 Section 01 43 00: Manufacturer's field reports.
.7 Manufacturer's Field Reports: Indicate environmental conditions under which
fireproofing materials were installed.
1.6 QUALIFICATIONS
.1 Manufacturer: Company specializing in manufacturing the products specified in this
section certified by Underwriters Laboratories of Canada.
.2 Applicator: Company specializing in applying the work of this section supervised or
approved by manufacturer.
.3 Product: Manufactured under appropriate test agency Follow-up Program. Each container
or package shall bear the listing company’s label or listing mark.
1.7 REGULATORY REQUIREMENTS
.1 Conform to OBC 2012 code for fire resistance ratings.
.2 Provide certificate of compliance for fireproofing materials to authority having jurisdiction
indicating approval for use on this project.
1.8 ENVIRONMENTAL REQUIREMENTS
.1 Do not apply spray fireproofing when temperature of substrate material and surrounding
air is below 10 degrees C or above 30 degrees C or manufacturer’s recommended storage
and application temperatures..
.2 Provide ventilation in areas to receive fireproofing during and 24 hours after application,
to dry material.
.3 Provide temporary enclosure to prevent spray from contaminating air.

Hamilton International Air Cargo Logistics Facility Section 07 81 12
Tradeport International Corporation INTUMESCENT FIRE RESISTIVE MATERIALS
July 2014
Chamberlain Architect Services Limited Page 3 of 7
1.9 SEQUENCING
.1 Sequence work to permit installation of fireproofing materials to be installed after adjacent
work is complete.
1.10 WARRANTY
.1 Section 01 73 03: Provide five year warranty.
.2 Warranty: Include coverage for fireproofing to remain free from cracking, checking,
dusting, flaking, spalling, separation, and blistering. Reinstall or repair failures.
Part 2 Products
2.1 MANUFACTURERS
.1 3M Fire Protection Products Product 3M FireDam Intumescent Coating WB 1000.
.2 Substitutions: Approved equal by Architect listed in ULC Guide.
2.2 MATERIALS
.1 Designs and materials listed in the ULC Guide. Tested in accordance with the
Standard Method of Fire Tests of Building Construction and Materials, Can/ULC-
S101-07 Edition.
.2 Primer: Of type recommended by fireproofing manufacturer.
.3 Overcoat: Only of type recommended by fireproofing manufacturer..
.4 Water: Clean, potable.
Part 3 Execution
3.1 EXAMINATION
.1 Verify that surfaces are ready to receive work.
.2 Verify that clips, hangers, supports, sleeves, and other items required to penetrate
fireproofing, are in place.
.3 Verify ducts, piping, equipment, or other items which would interfere with application of
fireproofing are not positioned until fireproofing work is complete.
.4 Verify that voids and cracks in substrate are filled, and projections are removed where
fireproofing is exposed to view as a finish material.
.5 Confirm compatibility of surfaces (primers) to receive fireproofing material.

Hamilton International Air Cargo Logistics Facility Section 07 81 12
Tradeport International Corporation INTUMESCENT FIRE RESISTIVE MATERIALS
July 2014
Chamberlain Architect Services Limited Page 4 of 7
3.2 PREPARATION
.1 Examine sizes and conditions of steel to be fireproofed to establish correct thickness and
installation of materials.
.2 Clean substrate of dirt, dust, grease, oil, loose material, frost or other matter which may
effect bond of fireproofing to manufacturer’s recommendations.
.3 Remove incompatible materials which affect bond by scraping, brushing, scrubbing, or
sandblasting.
3.3 PROTECTION
.1 Protect surfaces not scheduled for fireproofing and equipment from damage by overspray,
fall-out, and dusting.
.2 Close off and seal duct work in areas where fireproofing is being applied.
3.4 APPLICATION
.1 Apply primer , fireproofing and overcoat in accordance with manufacturer's instructions.
.2 Apply fireproofing in sufficient thickness to achieve rating with as many passes necessary
to cover with monolithic blanket of uniform density and texture.
.3 Apply overcoat.
3.5 FIELD QUALITY CONTROL
.1 Inspect the installed fireproofing after application and curing for integrity of fire
protection, prior to concealment of Work.
.2 Re-inspect the installed fireproofing for integrity of fire protection, after installation of
subsequent Work.
3.6 CLEANING
.1 Remove excess material, overspray, droppings, and debris.
.2 Remove fireproofing from materials and surfaces not required to be fireproofed.
END OF SECTION

Hamilton International Air Cargo Logistics Facility Section 07 84 00
Tradeport International Corporation FIRESTOPPING
July 2014
Chamberlain Architect Services Limited Page 1 of 3
Part 1 General
1.1 SECTION INCLUDES
.1 Fireproof fire-stopping materials and accessories.
1.2 RELATED SECTIONS
1.3 REFERENCES
.1 ASTM E84 - Test Method for Surface Burning Characteristics of Building Materials.
.2 ASTM E119 - Method for Fire Tests of Building Construction and Materials.
.3 ASTM E814 - Test Method of Fire Tests of Through-Penetration Fire Stops.
.4 ULC (Underwriters Laboratories of Canada) - List of Equipment and Materials for:
.1 Building Materials.
.2 Fire Resistance.
.3 Firestop Systems and Components.
1.4 DEFINITION
.1 Firestopping: A sealing or stuffing material or assembly placed in spaces between
building materials to arrest the movement of smoke, heat, gases, or fire through wall or
floor openings.
1.5 SYSTEM DESCRIPTION
.1 Firestopping Materials: ULC, ASTM E119, ASTM E814 to achieve a fire rating as noted
on Drawings.
.2 Firestop all interruptions to fire rated assemblies, materials, and components.
1.6 QUALIFICATIONS
.1 Manufacturer: Company specializing in manufacturing the products specified in this
section with minimum 5 years documented experience.
.2 Applicator: Company specializing in performing the work of this section with minimum 5
years documented experience approved by manufacturer.
1.7 ENVIRONMENTAL REQUIREMENTS
.1 Do not apply materials when temperature of substrate material and ambient air is below 15
degrees C 60 degrees F.
.2 Maintain this minimum temperature before, during, and for 3 days after installation of
materials.

Hamilton International Air Cargo Logistics Facility Section 07 84 00
Tradeport International Corporation FIRESTOPPING
July 2014
Chamberlain Architect Services Limited Page 2 of 3
Part 2 Products
.1 Firestopping and smoke seal systems in accordance with ULC-S115-MA5:
.1 Asbestos free materials and systems capable of maintaining an effective barrier
against flame, smoke and gases in compliance with requirements of ULC-S115-
MA5.
.2 Service penetration assemblies certified by ULC in accordance with ULC-S115-
MA5 and listed in ULC Guide No. 40 U19.
.3 Service penetration firestop components certified by ULC in accordance with
ULC-S115-MA5 and installed as described in ULC Guide No. 40 U19.13 and
ULC Guide No. 40 U19.15 under Label Service of ULC.
.4 Fire-resistance rating of installed firestopping assembly to be not less than the
fire-resistance rating of the surrounding assembly.
.5 Firestopping and smoke seals at openings around penetrations for pipes, cables,
ductwork and other items requiring sound and vibration control, electronic seal,
no cementitious or rigid seal at such locations.
2.2 APPROVED MANUFACTURERS
.1 3M Brand Fire Protection Products (800-328-1687)
.2 Tremco, Inc. (800-562-2728)
.3 Hilti, Inc. (800-879-6000)\
2.3 ACCESSORIES
.1 Primer: Type recommended by firestopping manufacturer for specific substrate surfaces
and end use.
.2 Installation Accessories: Clips, collars, fasteners, temporary stops or dams, and other
devices required to position and retain materials in place, to manufacturer’s
recommendations.
Part 3 Execution
3.1 EXAMINATION
.1 Verify openings are ready to receive the work of this section.
3.2 PREPARATION
.1 Clean substrate surfaces of dirt, dust, grease, oil, loose material, or other matter which may
affect bond of firestopping material.
.2 Remove incompatible materials which may affect bond.
.3 Install backing materials to arrest liquid material leakage.

Hamilton International Air Cargo Logistics Facility Section 07 84 00
Tradeport International Corporation FIRESTOPPING
July 2014
Chamberlain Architect Services Limited Page 3 of 3
3.3 APPLICATION
.1 Install material at walls or partition openings which contain penetrating sleeves, piping,
ductwork, conduit and other items, requiring firestopping.
.2 Apply primer and materials in accordance with manufacturer's instructions.
.3 Apply firestopping material in sufficient thickness to achieve rating to uniform density and
texture.
.4 Place foamed material in layers to ensure homogenous density, filling cavities and spaces.
Place sealant to completely seal junctions with adjacent dissimilar materials.
3.4 CLEANING
.1 Clean adjacent surfaces of firestopping materials.
3.5 PROTECTION OF FINISHED WORK
.1 Protect adjacent surfaces from damage by material installation.
END OF SECTION

Hamilton International Air Cargo Logistics Facility Section 07 92 00 Tradeport International Corporation JOINT SEALANTS July 2014 Chamberlain Architect Services Limited Page 1 of 6
Copyright 2013 IRC Building Sciences Group Page 1 of 6
PART 1 - GENERAL
1.1 RELATED SECTIONS
.1 Section 01 11 00 – Summary of Work
.2 Section 07 52 00 – Modified Bituminous Roofing Membrane
.3 Section 07 62 00 – Sheet Metal Flashing & Trim
1.2 REFERENCES
Latest edition of all listed references to apply:
.1 ASTM C920 – Elastomeric Joint Sealants
.2 CAN/CGSB-19.13 – Sealing Compound, One-component, Elastomeric, Chemical Curing
.3 Sealants: Professionals’ Guide, Sealant, Waterproofing and Restoration Institute
.4 SWRI (Sealant, Waterproofing and Restoration Institute) – Sealant and Caulking Guide Specification
1.3 QUALITY ASSURANCE OBSERVATION
.1 Observation of work will be carried out by designated QA Observer.
.2 Prior to mobilizing on site, prepare and install sealant samples for adhesion testing, a minimum of two (2) samples for each substrate combination, according to manufacturers written guidelines. Test sealant in contact with samples of materials to be caulked to ensure that proper adhesion will be obtained and no staining of material will result. Testing to be completed prior to mobilization on site. Do not proceed with Work until samples have been approved.
.3 Adhesion tests on new sealant will be performed at random locations at discretion of Owner’s representative. Any work that is found to be sub-standard, is to be removed and replaced at no
cost to Owner. Contractor is to assist with sealant adhesion tests as directed.
.4 Execute Work of this Section by Subcontractors approved by manufacturers of materials incorporated in Work; who has equipment, adequate for Project, and skilled tradesmen to perform it expeditiously; and is known to have been responsible for satisfactory installations similar to that specified during a period of at least immediate past five years.
.5 Remove sealant and re-caulk disapproved joints.
.6 Approved joints will establish minimum acceptable quality of workmanship and will serve as standard by which subsequent Work will be compared for Acceptance.
1.4 DELIVERY, STORAGE, AND HANDLING
.1 Deliver and store materials in original wrappings and containers with manufacturer's seals and labels, intact.
.2 Protect from freezing, moisture, water and contact with ground or floor.

Hamilton International Air Cargo Logistics Facility Section 07 92 00 Tradeport International Corporation JOINT SEALANTS July 2014 Chamberlain Architect Services Limited Page 2 of 6
Copyright 2013 IRC Building Sciences Group Page 2 of 6
1.5 ENVIRONMENTAL AND SAFETY REQUIREMENTS
.1 Comply with requirements of Workplace Hazardous Materials Information System (WHMIS) regarding use, handling, storage, and disposal of hazardous materials; and regarding labeling and provision of material safety data sheets acceptable to local Labour regulations.
.2 Conform to manufacturer's recommended temperatures, relative humidity, and substrate moisture content for application and curing of sealants including special conditions governing use.
1.6 WASTE MANAGEMENT AND DISPOSAL
.1 Place materials defined as hazardous or toxic waste in designated containers.
.2 Ensure emptied containers are sealed and stored safely for disposal away from children.
.3 Dispose of surplus chemical and finishing materials in accordance with federal regulations.
.4 Fold up metal banding, flatten, and place in designated area for recycling.
.5 Use trigger operated spray nozzles for water hoses.
.6 Return solvent and oil soaked rags for contaminant recovery and laundering or for proper disposal.
.7 Use least toxic sealants, adhesives, sealers, and finishes necessary to comply with requirements
of this section.
.8 Close and seal tightly all partly used sealant containers and store protected in well ventilated fire-safe area at moderate temperature.
.9 Place used hazardous sealant tubes and other containers in areas designated for hazardous materials.
PART 2 - PRODUCTS
2.1 SEALANT MATERIALS
.1 Sealants and caulking compounds must:
.1 meet or exceed all applicable governmental and industrial safety and performance standards.
.2 be manufactured and transported in such a manner that all steps of process, including disposal of waste products arising therefrom, will meet requirements of all applicable governmental acts, by laws and regulations including.
.2 Sealant and caulking compounds must be accompanied by detailed instructions for proper application so as to minimize health concerns and maximize performance, and information describing proper disposal methods.
.3 Caulking that emits strong odours, contains toxic chemicals or is not certified as mould resistant to not be used in or near air handling units.
2.2 SEALANT MATERIAL DESIGNATIONS
.1 Acceptable single component neutral cure silicone sealants for skylight related work include:

Hamilton International Air Cargo Logistics Facility Section 07 92 00 Tradeport International Corporation JOINT SEALANTS July 2014 Chamberlain Architect Services Limited Page 3 of 6
Copyright 2013 IRC Building Sciences Group Page 3 of 6
.1 CWS by Dow Corning; or
.2 795 by Dow Corning
.2 Acceptable single component, moisture curing, polyurethane sealants for reglets and other roofing related flashing termination work include:
.1 Dymonic by Tremco; or
.2 CWS by Dow Corning
.3 Butyl (for concealed skylight related sealant joints): Tremco Curtainwall Sealant or approved alternate.
.4 Primers:
.1 Primers to be as recommended by sealant manufacturer.
.5 Cleaners:
.1 Acceptable cleaners:
.1 Xylol
.2 Methylethylketone (MEK)
.3 Isopropyl Alcohol
.2 Surfaces to receive silicone sealants to not be cleaned with Xylol.
.3 All substrate materials to be cleaned with compatible cleaners.
.6 Preformed Compressible and Non-Compressible back-up materials.
.1 Polyethylene:
.1 Extruded closed cell foam backer rod.
.2 Size: oversize 30 to 50 %.
.2 Bond Breaker Tape.
.1 Polyethylene bond breaker tape.
.7 Compatibility: All materials in a sealant system to be compatible with each other, with substrate and any coating or waterproofing to be installed. sealants used with elastomeric coating or
waterproofing systems must be approved by coating or waterproofing manufacturer.
2.3 JOINT PRIMER
.1 Non-corrosive and non-staining type, compatible with joint forming materials and sealant. Primer
as recommended by sealant manufacturer.
2.4 INSULATION
.1 Acceptable spray in place polyurethane foam insulations include but are not limited to the following:
.1 Walltite ECO by BASF; or

Hamilton International Air Cargo Logistics Facility Section 07 92 00 Tradeport International Corporation JOINT SEALANTS July 2014 Chamberlain Architect Services Limited Page 4 of 6
Copyright 2013 IRC Building Sciences Group Page 4 of 6
.2 approved equivalent
.2 Applicator must be an approved applicator by the foam Manufacturer
PART 3 - EXECUTION
3.1 PROTECTION
.1 Protect existing facades from staining or contamination.
.2 Protect public from falling debris during installation.
.3 At end of each day's work or when stoppage occurs due to inclement weather, provide protection for completed work and materials out of storage. At no time shall unsealed joints be left open. If
protection is required, then entire drop/bay to be adequately protected.
3.2 EXAMINATION
.1 Before commencing Work, verify that joint configuration and surfaces have been provided as specified under Work of other Sections to meet intent of sealant Specification, that joint conditions will not adversely affect execution, performance or quality of completed Work and that they can be put into acceptable condition by means of preparation specified in this Section. Verify Site conditions together with manufacturer's representative of sealant to be applied.
.2 Examine existing conditions and substrates upon which work of this section is dependent. Report to Consultant in writing any defects or discrepancies. Commencement of work implies acceptance of existing conditions and assuming full responsibility for finished condition of work.
.3 Ascertain that sealers applied to sealant substrates are compatible with sealant used and that full bond between sealant and substrate is attained. Request samples of sealed or coated substrate from their fabricators for testing of compatibility and bond if necessary.
.4 Examine sealant configuration for width and depth. Depth of joint should be 1/2 joint width with a minimum depth of 6mm (0.25”) and a maximum depth of 13mm (0.5”) unless specified otherwise. For fillet joints, a minimum of 6mm (0.25”) adhesion between sealant and substrate must be
achieved on both sides of joint unless specified otherwise.
.5 Defective work resulting from application to unsatisfactory joint conditions will be considered
responsibility of those performing work of this section.
3.3 SURFACE PREPARATION
.1 Prepare surfaces in accordance with manufacturer's directions.
.2 Where existing, remove sealant completely. In no case shall new sealant be applied over old. In
addition:
.1 Remove existing sealants, dust, oil, grease, oxidation, mill scale, coatings and all other loose material by cutting, brushing, scrubbing, scraping and/or grinding. In no case,
however, shall components be damaged during surface preparation.
.2 Clean substrates with recommended solvent cleaner. Apply solvent with a clean cloth, pad or soft paper towel. Applicator cloth or towel to not leave fiber residue on substrate surface. Surface should be wiped clean and dried with a second clean cloth to ensure removal of contaminants. If substrate surfaces is still not clean, repeat procedures as needed. Change cloths frequently to prevent depositing contaminants from cloth onto substrate surface.

Hamilton International Air Cargo Logistics Facility Section 07 92 00 Tradeport International Corporation JOINT SEALANTS July 2014 Chamberlain Architect Services Limited Page 5 of 6
Copyright 2013 IRC Building Sciences Group Page 5 of 6
.3 Use method of surface preparation suitable for substrate, as recommended by sealant
manufacturer and that does not damage existing finishes.
.3 Examine joint sizes and conditions to establish correct depth to width relationship for installation of backup materials and sealants.
.4 Do not apply sealants to joint surfaces treated with sealer, curing compound, water repellent, or other coatings unless tests have been performed to ensure compatibility of materials. Remove coatings as required.
.5 Ensure joint surfaces are dry and frost free.
.6 Remove loose particles present or resulting from routing by sweeping particles out with a dry brush, blowing out joints with oil free compressed air or by vacuuming joints prior to solvent
cleaning.
3.4 PRIMING
.1 Where necessary to prevent staining or for neat appearance, mask adjacent surfaces prior to
priming and caulking.
.2 Prime sides of joints in accordance with sealant manufacturer's instructions immediately prior to caulking.
.3 Use only primer approved by sealant manufacturer for particular installation, applying in strict accordance with manufacturers printed recommendations.
.4 Always pour primers onto rag or brush, do not dip rag or brush into container.
.5 Prime only as much area that can be packed and caulked in a single day.
.6 Do not apply excess primer, and apply primer only to areas which it will be contacted by sealant.
3.5 BACKUP MATERIAL
.1 Apply bond breaker tape where installation of backer rod is not possible, three point adhesion needs to be eliminated or throat to width ratio needs to be created as per manufacturers recommendations.
.2 When using backing material comprised of tubular or rod stock, avoid lengthwise stretching of
material. Do not twist or braid backer material.
.3 Provide a stiff blunt-surfaced wood or plastic installation tool, having shoulders designed to ride on finished surface and a protrusion of required dimensions to assure a uniform depth of backup material below sealant. Do not puncture exterior skin or surface of backer material. A screwdriver is prohibited for use on this project.
.4 Using approved tool, smoothly and uniformly place backup material to depth indicated on drawings or otherwise required, compressing backer material 25% to 50% and securing a positive fit.
.5 Install backing material to a depth to provide a caulked joint meeting depth requirement as set out in sealant manufacturer's specifications.
3.6 MIXING
.1 Mix materials in strict accordance with sealant manufacturer's instructions.

Hamilton International Air Cargo Logistics Facility Section 07 92 00 Tradeport International Corporation JOINT SEALANTS July 2014 Chamberlain Architect Services Limited Page 6 of 6
Copyright 2013 IRC Building Sciences Group Page 6 of 6
3.7 APPLICATION
.1 Sealant:
.1 Apply sealant in accordance with manufacturer's written instructions.
.2 Mask edges of joint where irregular surface or sensitive joint border exist to provide neat joint.
.3 Apply sealant in continuous beads.
.4 Apply sealant using gun with proper size nozzle.
.5 Ensure that new sealant is adhered to substrates a minimum of 6 to 10 mm at each side of joint.
.6 Use sufficient pressure to fill voids and joints solid.
.7 Form surface of sealant with full bead, smooth, free from ridges, wrinkles, sags, air pockets, embedded impurities.
.8 Tool exposed surfaces before skinning begins to give slightly concave shape. Tooling to be performed by proper metal or wood tool. Finger tooling joints will not be accepted.
.9 Remove excess compound promptly as work progresses and upon completion.
.2 Curing:
.1 Cure sealants in accordance with sealant manufacturer's instructions.
.2 Do not cover up sealants until proper curing has taken place.
3.8 CLEAN-UP
.1 Clean adjacent surfaces immediately and leave work neat and clean.
.2 Remove excess and droppings, using recommended cleaners as work progresses.
.3 Remove masking tape after initial set of sealant.
END OF SECTION – 07 92 00

Hamilton International Air Cargo Logistics Facility Section 08 12 13
Tradeport International Corporation HOLLOW METAL FRAMES
July 2014
Chamberlain Architect Services Limited Page 1 of 5
Part 1 General
1.1 SECTION INCLUDES
.1 Non-rated, fire rated, thermally insulated steel frames.
.2 Interior and Exterior glazed light frames.
1.2 RELATED SECTIONS
.1 Section 08 13 13 - Standard Hollow Metal Doors.
.2 Section 08 71 00 - Door Hardware.
.3 Section 09 91 10 - Painting.
1.3 REFERENCES
.1 ANSI A117.1 - Accessible and Usable Buildings and Facilities.
.2 ASTM A653/A653M - Steel Sheet, Zinc-Coated (Galvanized) or Zinc-Iron Alloy-Coated
(Galvannealed) by the Hot-Dip Process.
.3 ASTM E2074- Fire Tests of Door Assemblies, Including Positive Pressure Testing of Side-
Hinged and Pivoted Swinging Door Assemblies.
.4 CSDFMA (Canadian Steel Door and Frame Manufacturers Association).
.5 DHI - Door Hardware Institute: The Installation of Commercial Steel Doors and Steel Frames,
Insulated Steel Doors in Wood Frames and Builder's Hardware.
.6 NFPA 80 - Fire Door, Fire Windows.
.7 NFPA 252 - Fire Tests for Door Assemblies.
.8 SDI-100 - Standard Steel Doors and Frames.
.9 UL 10B - Fire Tests of Door Assemblies.
1.4 SUBMITTALS FOR REVIEW
.1 Section 013300 – Submittal Procedures.
.2 Product Data: Indicate frame configuration and finishes.
.3 Shop Drawings: Indicate frame elevations, reinforcement, anchor types and spacings, location of
cut-outs for hardware, and finish.

Hamilton International Air Cargo Logistics Facility Section 08 12 13
Tradeport International Corporation HOLLOW METAL FRAMES
July 2014
Chamberlain Architect Services Limited Page 2 of 5
1.5 SUBMITTALS FOR INFORMATION
.1 Manufacturer's Installation Instructions: Indicate special installation instructions.
.2 Manufacturer's Certificate: Certify that Products meet or exceed specified requirements.
1.6 QUALITY ASSURANCE
.1 Conform to requirements of CSDFMA.
.2 Manufacturer: Company specializing in manufacturing the Products specified in this section with
minimum three years experience.
1.7 REGULATORY REQUIREMENTS
.1 Fire Rated Frame Construction: Conform to ASTM E2074.
.2 Installed Frame Assembly: Conform to NFPA 80 for fire rated class same as fire door.
1.8 DELIVERY, STORAGE, AND PROTECTION
.1 Accept frames on site in manufacturer's packaging. Inspect for damage.
1.9 PROJECT CONDITIONS
.1 Coordinate the work with frame opening construction, door, and hardware installation.
.2 Sequence installation to ensure wire connections are achieved in an orderly and expeditious
manner.
Part 2 Products
2.1 FRAMES
.1 Frames: To suit CSDFMA, SDI-100 Grade and Model of door specified in Section 08 13 13.
Exterior and Interior frame thickness: 16 gauge, welded.
Thermal Brake: Rigid polyvinylchloride (PVC) extrusion.
Exterior Frame Insulation: Frame to be filled and insulated with 24kg/m3 density loose batt type
fiberglass material to suit.
Primer: Rust Inhibitive touch up only.
Door silencers: Single Stud rubber/neoprene type
2.2 ACCESSORIES
.1 Removable Stops: Rolled steel shape, mitred corners; prepared for countersink style screws.

Hamilton International Air Cargo Logistics Facility Section 08 12 13
Tradeport International Corporation HOLLOW METAL FRAMES
July 2014
Chamberlain Architect Services Limited Page 3 of 5
.2 Bituminous Coating: Fibred asphalt emulsion.
.3 Primer: Zinc chromate type.
.4 Weatherstripping:
2.3 FABRICATION
.1 Exterior frame product shall be supplied profile welded (PW).
.2 Thermally broken sections shall not be assembled by means of screws, grommets or other
fasteners and welds shall not cause thermal transfers between interior and exterior surfaces of the
frame sections.
.3 Interior frame product shall be supplied profile welded (PW)
.4 Frame product shall be square, free of defects, wraps or buckles.
.5 Corner joints shall be profile welded (PW) (continuously welded on the inside of the profiles’
faces, rabbets, returns and soffit intersections with exposed faces filled and ground to a smooth,
uniform, seamless surface
.6 Joints at mullions, transom bars, sills or center rails shall be coped accurately, butted and tightly
fitted, with faces securely welded, matching corner joint faces
.7 Mullions shall be fabricated with continuous 20 gauge galvanneal steel internal reinforcing clips.
.8 Frame product shall be fabricated with integral door stops having a minimum height of 16mm.
.9 Glazing stops shall be formed 20 gauge steel, 16mm height channel, accurately fitted, butted at
corners and fastened to frame sections with #6 x 32mm oval head scrulox (self-drilling) type
screws at 300mm on center maximum
.10 Mullions for Double Doors: Fixed type, of same profiles as jambs.
.11 Transom Bars for Glazed Lights: Fixed type, of same profiles as jamb and head.
.12 Fabricate frames with hardware reinforcement plates welded in place.
.13 Reinforce frames wider than 1 200mm (48 inches) with roll formed steel channels fitted tightly
into frame head, flush with top.
.14 Terminate door stops 150 mm (6 inches) above finished floor. Cut stop at 45 degree angle and
close.
.15 Prepare frames for silencers. Provide three single silencers for single doors and mullions of
double doors on strike side. Provide two single silencers on frame head at double doors without
mullions.
.16 Attach fire rated label to each fire rated door unit.

Hamilton International Air Cargo Logistics Facility Section 08 12 13
Tradeport International Corporation HOLLOW METAL FRAMES
July 2014
Chamberlain Architect Services Limited Page 4 of 5
.17 Blank reinforce drill and tap frames for mortised, template hardware and electronic hardware
using templates provided by finish hardware supplier. Reinforce frames for surface mounted
hardware.
2.4 FRAME ANCHORAGE
1. Frame product shall be provided with anchorage appropriate to floor, wall and frame construction.
2. Each wall anchor shall be located immediately above or below each hinge reinforcement on the
hinge jamb and directly opposite on the strike jamb, except as indicated below.
3. Frame product installed in unit masonry partitions shall be provided with 4.0mm diameter steel
wire anchors, 18 gauge steel adjustable stirrup and strap or “T” type anchors as conditions dictate.
4. Where frame product is installed prior to construction of the adjacent wall, each jamb shall be
provided with 16 gauge steel floor anchors. Each anchor shall be provided with two (2) holes for
mounting to the floor and shall be securely welded to the inside of the jamb.
5. Floor anchors for thermally broken exterior frames shall be designed so as not to permit thermal
transfers from exterior to interior surfaces of the frame sections.
6. Frame product installed in drywall partitions shall be provided with 20 gauge steel snap-in or “Z”
type stud type anchor.
7. Jambs of frames in previously placed concrete, masonry or structural steel shall be punched and
dimpled to accept machine bolt anchors, 6.4mm diameter, located not more than 150mm from the
top and bottom of each jamb. Anchor preparations and guides shall also be located immediately
above or below the intermediate hinge reinforcings and directly opposite on the strike jamb. Each
preparation shall be provided with 16 gauge anchor bolt guides.
8. Anchor bolts and expansion shell anchors for the above preparations shall be provided by the
contractor responsible for installation.
9. After sufficient tightening of the anchor bolts, the heads shall be welded do as to provide a non-
removable application. Welded bolt head and dimple shall be filled and ground to present a
smooth uniform surface by the contractor responsible for installation, prior to finish painting.
10. Where indicated on the Architects’ schedules or details, channel extensions shall be provided
from the top of the frame assembly to the underside of the structure above. Extensions shall be
fabricated from 12 gauge steel formed channel, mounting angles welded to inside of frame head
and adjusting brackets. Formed channels, adjusting brackets and fasteners shall be shipped loose.
Channels shall be mechanically connected to mounting angles and adjusting brackets with
supplied fasteners, on site, by contractor responsible for installation.
2.5 FINISH
.1 Steel Sheet: Galvanized to ASTM A653/A653M Z180.
.2 Remove weld slag and spatter from exposed surfaces

Hamilton International Air Cargo Logistics Facility Section 08 12 13
Tradeport International Corporation HOLLOW METAL FRAMES
July 2014
Chamberlain Architect Services Limited Page 5 of 5
.3 All tool marks, abrasions and surface blemishes shall be filled and sanded to present smooth and
uniform surfaces
.4 On exposed surfaces where zinc has been removed during fabrication, frame product shall receive
a factory applied touch-up primer
.5 Primer shall be fully cured prior to shipment.
Part 3 Execution
3.1 EXAMINATION
.1 Verify that opening sizes and tolerances are acceptable.
3.2 INSTALLATION
.1 Install frames in accordance with CSDFMA and SDI-100
.2 Coordinate with masonry and gypsum board, wall construction for anchor placement.
.3 Coordinate installation of glass and glazing.
.4 Coordinate installation of frames with installation of hardware specified in Section 08 71 00 and
doors in Section 08 13 13.
.5 Install roll formed steel reinforcement channels between two abutting frames. Anchor to structure
and floor.
.6 Manufacturer’s nameplates on frames and screens are not permitted.
3.3 ERECTION TOLERANCES
.1 Maximum Diagonal Distortion: 1.5 mm, measured with straight edges, crossed corner to corner.
END OF SECTION

Hamilton International Air Cargo Logistics Facility Section 08 13 13
Tradeport International Corporation HOLLOW METAL DOORS
July 2014
Chamberlain Architect Services Limited Page 1 of 7
Part 1 General
1.1 SECTION INCLUDES
.1 Non-rated, fire rated, thermally insulated steel doors.
.2 Glass and glazing.
1.2 RELATED SECTIONS
.1 Section 08 12 13 - Standard Hollow Metal Frames.
.2 Section 08 71 00 - Door Hardware.
1.3 REFERENCES
.1 ANSI A117.1 - Accessible and Usable Buildings and Facilities.
.2 ASTM A653/A653M - Steel Sheet, Zinc-Coated (Galvanized) or Zinc-Iron Alloy-Coated
(Galvannealed) by the Hot-Dip Process.
.3 ASTM C1363 - Method for Thermal Performance of Building Assemblies by Means of a
Hot-Box Apparatus.
.4 ASTM E2074 - Fire Tests of Door Assemblies, Including Positive Pressure Testing of
Side-Hinged and Pivoted Swinging Door Assemblies.
.5 ASTM E413 - Classification for Rating of Sound Insulation.
.6 CSDFMA (Canadian Steel Door and Frame Manufacturers Association).
.7 DHI (Door Hardware Institute) - The Installation of Commercial Steel Doors and Steel
Frames, Insulated Steel Doors in Wood Frames and Builder's Hardware.
.8 NFPA 80 - Fire Doors, Fire Windows.
.9 NFPA 252 - Fire Tests for Door Assemblies.
.10 SDI-100 - Standard Steel Doors and Frames.
.11 UL 10B - Fire Tests of Door Assemblies.
1.4 SUBMITTALS FOR REVIEW
.1 Section 013300 – Submittal Procedures.
.2 Product Data: Indicate door configurations, location of cut-outs for hardware
reinforcement.
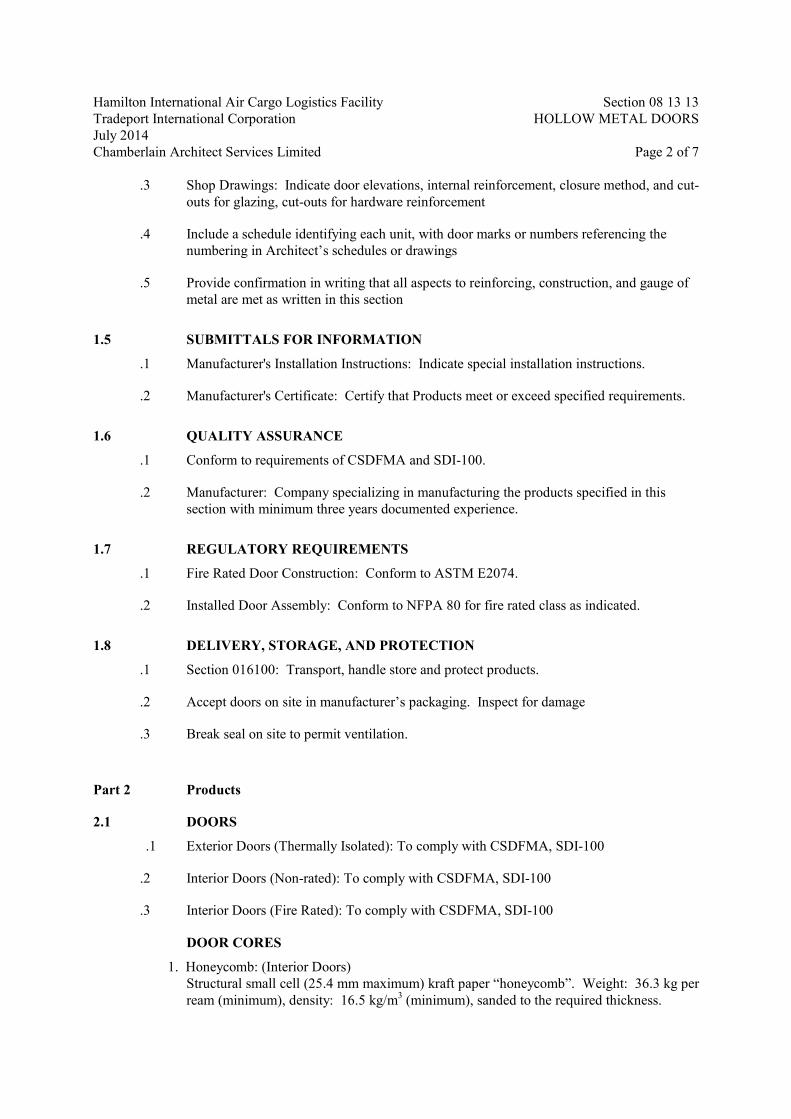
Hamilton International Air Cargo Logistics Facility Section 08 13 13
Tradeport International Corporation HOLLOW METAL DOORS
July 2014
Chamberlain Architect Services Limited Page 2 of 7
.3 Shop Drawings: Indicate door elevations, internal reinforcement, closure method, and cut-
outs for glazing, cut-outs for hardware reinforcement
.4 Include a schedule identifying each unit, with door marks or numbers referencing the
numbering in Architect’s schedules or drawings
.5 Provide confirmation in writing that all aspects to reinforcing, construction, and gauge of
metal are met as written in this section
1.5 SUBMITTALS FOR INFORMATION
.1 Manufacturer's Installation Instructions: Indicate special installation instructions.
.2 Manufacturer's Certificate: Certify that Products meet or exceed specified requirements.
1.6 QUALITY ASSURANCE
.1 Conform to requirements of CSDFMA and SDI-100.
.2 Manufacturer: Company specializing in manufacturing the products specified in this
section with minimum three years documented experience.
1.7 REGULATORY REQUIREMENTS
.1 Fire Rated Door Construction: Conform to ASTM E2074.
.2 Installed Door Assembly: Conform to NFPA 80 for fire rated class as indicated.
1.8 DELIVERY, STORAGE, AND PROTECTION
.1 Section 016100: Transport, handle store and protect products.
.2 Accept doors on site in manufacturer’s packaging. Inspect for damage
.3 Break seal on site to permit ventilation.
Part 2 Products
2.1 DOORS
.1 Exterior Doors (Thermally Isolated): To comply with CSDFMA, SDI-100
.2 Interior Doors (Non-rated): To comply with CSDFMA, SDI-100
.3 Interior Doors (Fire Rated): To comply with CSDFMA, SDI-100
DOOR CORES
1. Honeycomb: (Interior Doors)
Structural small cell (25.4 mm maximum) kraft paper “honeycomb”. Weight: 36.3 kg per
ream (minimum), density: 16.5 kg/m3 (minimum), sanded to the required thickness.
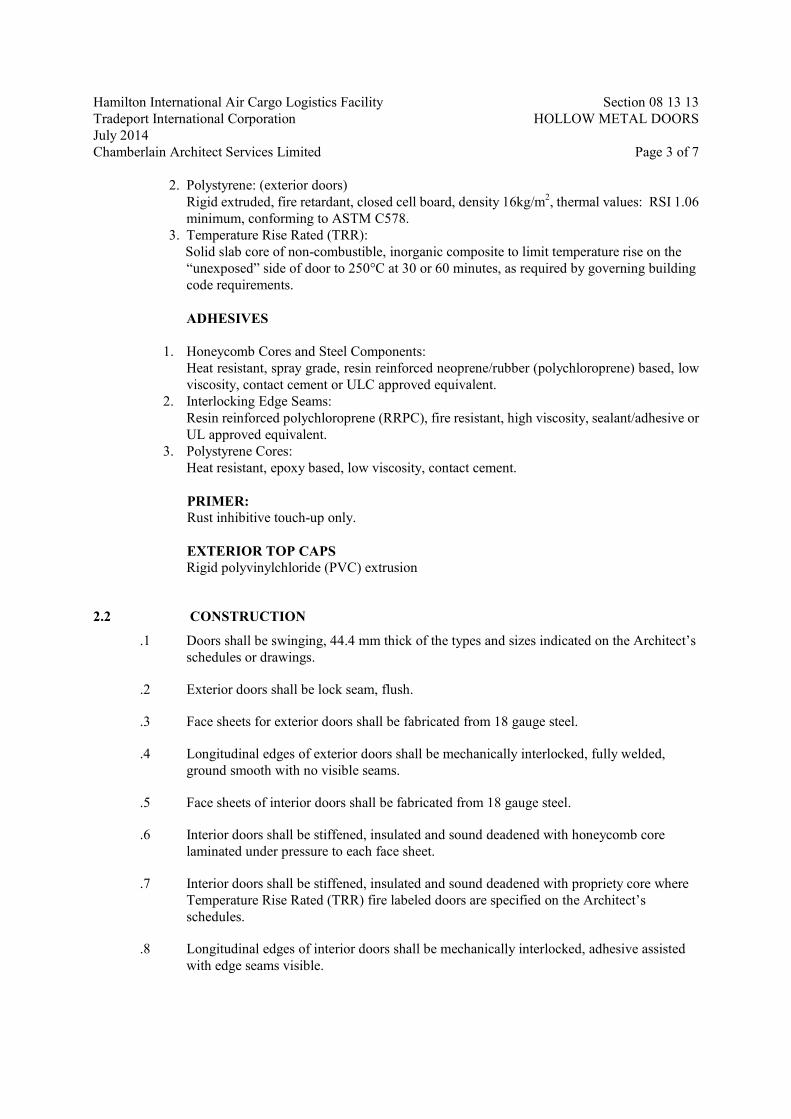
Hamilton International Air Cargo Logistics Facility Section 08 13 13
Tradeport International Corporation HOLLOW METAL DOORS
July 2014
Chamberlain Architect Services Limited Page 3 of 7
2. Polystyrene: (exterior doors)
Rigid extruded, fire retardant, closed cell board, density 16kg/m2, thermal values: RSI 1.06
minimum, conforming to ASTM C578.
3. Temperature Rise Rated (TRR):
Solid slab core of non-combustible, inorganic composite to limit temperature rise on the
“unexposed” side of door to 250°C at 30 or 60 minutes, as required by governing building
code requirements.
ADHESIVES
1. Honeycomb Cores and Steel Components:
Heat resistant, spray grade, resin reinforced neoprene/rubber (polychloroprene) based, low
viscosity, contact cement or ULC approved equivalent.
2. Interlocking Edge Seams:
Resin reinforced polychloroprene (RRPC), fire resistant, high viscosity, sealant/adhesive or
UL approved equivalent.
3. Polystyrene Cores:
Heat resistant, epoxy based, low viscosity, contact cement.
PRIMER:
Rust inhibitive touch-up only.
EXTERIOR TOP CAPS
Rigid polyvinylchloride (PVC) extrusion
2.2 CONSTRUCTION
.1 Doors shall be swinging, 44.4 mm thick of the types and sizes indicated on the Architect’s
schedules or drawings.
.2 Exterior doors shall be lock seam, flush.
.3 Face sheets for exterior doors shall be fabricated from 18 gauge steel.
.4 Longitudinal edges of exterior doors shall be mechanically interlocked, fully welded,
ground smooth with no visible seams.
.5 Face sheets of interior doors shall be fabricated from 18 gauge steel.
.6 Interior doors shall be stiffened, insulated and sound deadened with honeycomb core
laminated under pressure to each face sheet.
.7 Interior doors shall be stiffened, insulated and sound deadened with propriety core where
Temperature Rise Rated (TRR) fire labeled doors are specified on the Architect’s
schedules.
.8 Longitudinal edges of interior doors shall be mechanically interlocked, adhesive assisted
with edge seams visible.

Hamilton International Air Cargo Logistics Facility Section 08 13 13
Tradeport International Corporation HOLLOW METAL DOORS
July 2014
Chamberlain Architect Services Limited Page 4 of 7
.9 Door faces of all steel doors shall be fabricated without visible seams, free of scale,
pitting, coil brakes, buckles and waves
.10 Formed edges shall be true and straight with a minimum radius for the thickness of steel
used.
.11 Lock and hinge edges shall be beveled 3 mm in 50 mm unless builders’ hardware or door
swing dictates otherwise
.12 Prepare doors for continuous hinges where indicated.
.13 Top and bottom of doors shall be provided with inverted, recessed, 16 gauge steel end
channels, welded to each face sheet at 150 mm on center maximum.
.14 Exterior doors shall be provided with factory installed flush PVC top caps.
.15 Unless ineligible due to design, size, hardware or glazing specified on the Architects’ or
hardware Suppliers’ schedules or details, fire labeled doors shall be provided for those
openings requiring fire protection ratings and temperature rise ratings, as determined and
scheduled by the Architect.
.16 Exterior doors shall be internally reinforced with 20 gauge continuous; interlocking steel
stiffeners at 150mm O.C. max, with voids between stiffeners filled and insulated with
polystyrene.
.17 Thermally Broken Doors - thermal Break: Rigid Polyvinylchloride (PVC) Extrusion.
2.3 HARDWARE PREPARATIONS
.1 Doors shall be factory blanked, reinforced, drilled and tapped for fully templated mortised
hardware only, in accordance with the final approved schedule and templates provided by
the hardware supplier
.2 Doors shall be factory blanked and reinforced only for mortised hardware that is not fully
template
.3 Doors shall be factory reinforced only for surface mounted hardware
.4 Templated holes 12.7mm diameter and larger shall be factory prepared, except mounting
and through bolt holes, which shall be by the contractor responsible for installation on site,
at the time of application. Templated holes less than 12.7mm diameter shall be factory
prepared only when required for the function of the device (for knobs, levers, cylinders,
thumb or turn pieces) or when these holes over-lap function
.5 Drilling and tapping for surface mounted hardware or mortised hardware that is not fully
templated shall be by the contractor responsible for installation on site, at the time of
application
.6 Hinge and pivot reinforcements shall be 10 gauge steel minimum high frequency type
reinforcing
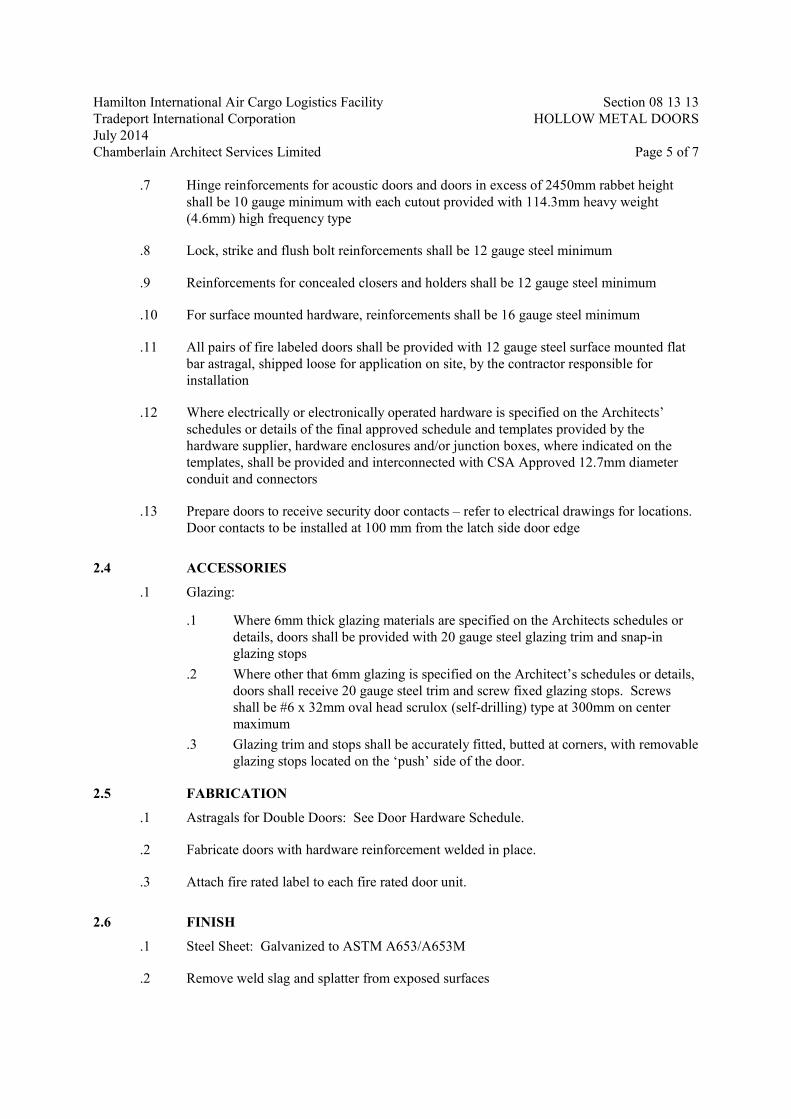
Hamilton International Air Cargo Logistics Facility Section 08 13 13
Tradeport International Corporation HOLLOW METAL DOORS
July 2014
Chamberlain Architect Services Limited Page 5 of 7
.7 Hinge reinforcements for acoustic doors and doors in excess of 2450mm rabbet height
shall be 10 gauge minimum with each cutout provided with 114.3mm heavy weight
(4.6mm) high frequency type
.8 Lock, strike and flush bolt reinforcements shall be 12 gauge steel minimum
.9 Reinforcements for concealed closers and holders shall be 12 gauge steel minimum
.10 For surface mounted hardware, reinforcements shall be 16 gauge steel minimum
.11 All pairs of fire labeled doors shall be provided with 12 gauge steel surface mounted flat
bar astragal, shipped loose for application on site, by the contractor responsible for
installation
.12 Where electrically or electronically operated hardware is specified on the Architects’
schedules or details of the final approved schedule and templates provided by the
hardware supplier, hardware enclosures and/or junction boxes, where indicated on the
templates, shall be provided and interconnected with CSA Approved 12.7mm diameter
conduit and connectors
.13 Prepare doors to receive security door contacts – refer to electrical drawings for locations.
Door contacts to be installed at 100 mm from the latch side door edge
2.4 ACCESSORIES
.1 Glazing:
.1 Where 6mm thick glazing materials are specified on the Architects schedules or
details, doors shall be provided with 20 gauge steel glazing trim and snap-in
glazing stops
.2 Where other that 6mm glazing is specified on the Architect’s schedules or details,
doors shall receive 20 gauge steel trim and screw fixed glazing stops. Screws
shall be #6 x 32mm oval head scrulox (self-drilling) type at 300mm on center
maximum
.3 Glazing trim and stops shall be accurately fitted, butted at corners, with removable
glazing stops located on the ‘push’ side of the door.
2.5 FABRICATION
.1 Astragals for Double Doors: See Door Hardware Schedule.
.2 Fabricate doors with hardware reinforcement welded in place.
.3 Attach fire rated label to each fire rated door unit.
2.6 FINISH
.1 Steel Sheet: Galvanized to ASTM A653/A653M
.2 Remove weld slag and splatter from exposed surfaces

Hamilton International Air Cargo Logistics Facility Section 08 13 13
Tradeport International Corporation HOLLOW METAL DOORS
July 2014
Chamberlain Architect Services Limited Page 6 of 7
.3 All tool marks, abrasions and surface blemishes shall be filled and sanded to present
smooth uniform surfaces
.4 On exposed surfaces where zinc coating has been removed during fabrication, doors shall
receive a factory applied touch-up primer
.5 Primer shall be fully cured prior to shipment
Part 3 Execution
3.1 EXAMINATION
.1 Verification of existing conditions before starting work.
.2 Verify that opening sizes and tolerances are acceptable.
3.2 INSTALLATION
.1 Install doors in accordance with CSDFMA, SDI-100.
.2 Coordinate installation of glass and glazing.
.3 Install door louvres, plumb and level.
.4 Coordinate installation of doors with installation of frames and hardware
.5 Secure anchorages and connections to adjacent construction
.6 Fire labeled product shall be installed in accordance with NFPA-80
.7 Brace frame product rigidly in position while building-in. Remove temporary steel
shipping jamb spreaders. Install wood spreaders at mid points of frame rabbet height and
at floor level to maintain frame widths. Provide vertical support at center of head for
openings exceeding 1250mm in width. Remove wood spreaders after product has been
built-in
.8 Frame product in unit masonry shall be fully grouted in place
.9 Steel surfaces shall be kept free of grout, tar or other bonding materials or sealers
.10 Exposed surfaces that have been scratched or otherwise marred during shipment,
installation or handling shall be touched-up with a rust inhibitive primer.
.11 Exposed field welds shall be finished to present a smooth uniform surface and shall be
touched-up with a rust inhibitive primer
.12 Any grout or other bonding material shall be cleaned from products immediately following
installation

Hamilton International Air Cargo Logistics Facility Section 08 13 13
Tradeport International Corporation HOLLOW METAL DOORS
July 2014
Chamberlain Architect Services Limited Page 7 of 7
3.3 ERECTION TOLERANCES
.1 Maximum Diagonal Distortion: 1.5mm measured with straight edge, corner to corner.
3.4 ADJUSTING
.1 Adjust installed work.
.2 Adjust door for smooth and balanced door movement.
3.5 SCHEDULE – See Architectural Drawing A601
END OF SECTION
Hamilton International Air Cargo Logistics Facility Section 08 33 23
Tradeport International Corporation HIGH SPEED OVERHEAD COILING DOORS
July 2014
Chamberlain Architect Services Limited Page 1 of 8
Part 1 General
1.1 SECTION INCLUDES
.1 High speed roll-up doors include, but are not limited to, following:
.1 Complete operating high speed roll-up door assemblies, including hardware,
operators and installation accessories, to suit door openings and operation
.2 Related Work in other sections:
.1 Electrical power source; power and control wiring, conduit and final connections
to pre-wired control boxes, activators and like devices as applicable
.2 Field Painting
.3 Opening preparation
1.2 RELATED SECTIONS
.1 Section 05 12 00 – Structural Steel.
.2 Section 08 71 00 - Door Hardware.
.3 Section 09 91 10 – Painting.
1.3 REFERENCES
.1 ASTM A480/A480M - General Requirements for Flat-Rolled Stainless Heat-Resisting
Steel Plate, Sheet, and Strip.
.2 ASTM A653/A653M - Steel Sheet, Zinc-Coated (Galvanized) or Zinc-Iron Alloy-Coated
(Galvannealed) by the Hot-Dip Process.
.3 ASTM B221 - Aluminum and Aluminum-Alloy Extruded Bars, Rods, Wire, Profiles, and
Tubes.
.4 UL 325 - Door, Drapery, Gate, Louvre, and Window Operators and Systems.
1.4 SYSTEM DESCRIPTION
.1 Design Requirements:
.1 Ultra-Safe: door to have a flexible, durable, lightweight panel that operates in side
guides and is free of rigid parts such as stiffeners, bottom bars or intermediate bars
that could potentially injure users.
.2 Crash-Forgiving: door to have a flexible panel free of rigid parts that could be
bent or broken and that would have to be replaced in case of a collision.
.3 Self-re-Inserting: door to immediately release from its side guides and to
automatically reset itself after an opening cycle, simply by pushing a button.

Hamilton International Air Cargo Logistics Facility Section 08 33 23
Tradeport International Corporation HIGH SPEED OVERHEAD COILING DOORS
July 2014
Chamberlain Architect Services Limited Page 2 of 8
.4 Tightly-Sealed: door to completely seal the opening, forming a near perfect barrier
against draft, humidity, noise, dust, light, birds and insects.
.5 Wind-Resistant: door to resist and operate at pressure differences from 4.29 psf up
to 35 psf, depending on the environment and the door type. (Wind resistance to
110 MPH for an 18’ wide exterior door)
.6 Traffic-Compatible: door to open and close at speeds up to 8ft/sec and to adjust to
limited access times. Door to start closing immediately and not to remain open any
longer than necessary.
.7 Low-Maintenance: door to be free of wearing parts such as stiffeners, extension or
compression springs, cables, spiral cables or motor brakes.
.2 Service: Each roll-up door and all accessories shall be suitable for intended service,
installation conditions and like characteristics.
.3 Loading: door to withstand a minimum uniform loading pressure, both positive (acting
inward) and negative (acting outward), acting normal to plane and over gross area of door,
of uniform static air pressure meeting requirements of ASTM E330, as follows:
.1 Exterior Doors
.2 Interior doors.
.4 Clear Open Position: When door is in full open position, entire door, including any
accessories, shall clear jambs and head of door opening. In addition, vertical-operating
doors shall be of such a design that all of the components of the door blade are above the
top of the opening’s header when the door is in the full open position.
.5 Electrical criteria
.1 General: doors to have associated electrical motors, control devices, enclosures and like equipment and devices as required meeting applicable requirements of NEMA standards for type, enclosure, function and like characteristics relative to operation, location and environment of door.
.2 Available Electrical Power:
.1 Operators: Shall have the option of being supplied with either a 230 volts, single phase, 60 Hz power feed or a 230/460 volts, three phase, 60 Hz, power feed, except as otherwise required
.2 Control voltage to be 24VAC or 120VAC
.3 Components:
.1 Electrical components shall be UL labeled.
.2 Control devices shall be of a design suitable for a commercial
application..
.3 Electrical components shall be factory wired where possible and ready for
project site wiring.
.4 Enclosures: Controllers, control devices and like items shall have enclosure types as required for space in which component is to be located as follows:
.1 General: NEMA Type 4, watertight and dust-tight, enclosure.
.5 Control Location: Provide electrical control devices for doors on side of adjacent spaces with warmest operating temperature, except for exterior doors or as otherwise required

Hamilton International Air Cargo Logistics Facility Section 08 33 23
Tradeport International Corporation HIGH SPEED OVERHEAD COILING DOORS
July 2014
Chamberlain Architect Services Limited Page 3 of 8
1.5 QUALITY ASSURANCE
.1 Product qualifications: provide roll-up doors indicated under same category, each as a
complete unit, including hardware, accessories and installation components, produced by
one manufacturer for the entire work.
.2 Installer qualifications: an authorized installer of door manufacturer shall install roll-up
doors. Installer shall maintain a service center with parts inventory and maintenance
personnel trained by door manufacturer.
1.6 SUBMITTALS FOR REVIEW
.1 Section 01 33 00: Submission procedures.
.2 Product Data: Submit product specifications, technical data and installation instructions
of manufacturer for each roll-up door and accessories. Include complete description of
each type door control and operation system. Provide general construction, component
connections and details.
.3 Shop Drawings: Submit shop drawings for special components and installations that are
not fully detailed by manufacturer. Provide a schedule of doors using same reference
designation as indicated on Drawings. Indicate pertinent dimensioning, anchorage
methods, hardware locations, and installation details.
.4 Samples: If requested, submit two door slats, 12 inch in size illustrating shape, colour and
finish texture.
1.7 WARRANTY
.1 Coverage: Contractor, installer and manufacturer shall sign Warranty.
.2 Time period: Entire door limited warranty for 1 year on material – Extended limited
warranty time period for motor to 5 years and curtain to 5 years for manufacturer’s defects.
1.8 SUBMITTALS FOR INFORMATION
.1 Section 01 33 00: Submission procedures.
.2 Manufacturer's Instructions: Indicate installation sequence and procedures, adjustment
and alignment procedures.
1.9 SUBMITTALS FOR CLOSEOUT
.1 Section 01 73 03: Procedures for submittals.
.2 Maintenance Data: Furnish operating and maintenance data for roll-up doors and
accessories. Include instructions for operation, adjustment, maintenance, including
cleaning and repair, product data of manufacturer for each material and component, and
schedules and parts lists.Indicate lubrication requirements and frequency, periodic
adjustments required.

Hamilton International Air Cargo Logistics Facility Section 08 33 23
Tradeport International Corporation HIGH SPEED OVERHEAD COILING DOORS
July 2014
Chamberlain Architect Services Limited Page 4 of 8
.3 Instructions: Provide instructions and demonstrations to designated personnel of Owner
covering operation, adjustments and maintenance of roll-up doors. Furnish services of an
authorized and qualified representative of door manufacturer to provide instructions and
demonstrations
1.10 REGULATORY REQUIREMENTS AND STANDARDS
.1 Provide certificate of compliance from ULC indicating approval of door and operating
hardware assembly.
.2 ASTM: American Society for Testing and Materials
.3 CSA
.4 NEMA: National Electrical Manufacturer's Association
Part 2 Products
2.1 MANUFACTURERS
.1 Manufacturers:
.1 Dynaco
.1 Type D2: Freezer -22 deg F (Power M2)
.2 Type D: Power All Weather M2
.2 Substitutions: Approved equal.
2.2 MATERIALS
.1 Door Types One and Two:
.1 Width: As shown on drawings: up to 16’ wide.
.2 Pressure resistance: resist and operate at pressures up to 16.75 lbs/sf without the
use of any wind bars either pressing against the fabric or attached onto the fabric.
Also the door is to be able to handle these conditions without the use of a solid
bottom beam.
.3 Wind speed: to 110 mph. (wind speed is indicative, not including any
multiplication coefficients taking into account the configuration of the building)
.4 Curtain Bottom: Fitted with angles to provide reinforcement and positive contact
with floor in closed position.
.5 Operating speed Door Type One: Opening speed : 96” /sec. – closing speed: 48”
/sec. Door to be gear driven, without ballast
.6 Operating Speed Door type Two: Opening speed : 96” /sec. – closing speed: 48”
/sec. Door to be gear driven, with flexible soft bottom design
.2 Door panel fabric to be of a minimum weight of 27 oz/sq.yd. To be available in the
following standard colors: brown, yellow, gray, blue, red, green, orange, white or black.
.3 SAFE PANEL: doors shall be equipped with a panel free of stiffeners or bars. With
disconnected photocells and safety edge, if any, the doors should provide the highest level

Hamilton International Air Cargo Logistics Facility Section 08 33 23
Tradeport International Corporation HIGH SPEED OVERHEAD COILING DOORS
July 2014
Chamberlain Architect Services Limited Page 5 of 8
of safety. The panel shall be of such a weight and thickness that it can mold to any object
or person it comes in contact with. To be documented by the manufacturer.
.4 SELF-RE-INSERTING: fabric door panel must release immediately upon impact from
side guides without tearing the fabric. After a collision and upon activation the door panel
will automatically reinsert itself into the side guides:
.5 Cover for side frames shall remain in place at all times. Doors that require side covers to
be unfastened and opened to reset a breakaway feature will not be allowed.
.6 SELF-RE-INSERTING feature must be totally operational in all stages of the door’s
opening and closing cycle as well as be independent of the driving direction of the vehicle.
.7 SEALING: door has to provide an extremely good barrier against wind, humidity, noise,
dust, light, birds or insects. Therefore the sealing on both sides of the door has to be
achieved with the panel held in a continuous way in the side guides. The door must have
on top a flexible omega-shaped flap pushing against a header profile and beneath a
flexible bottom flap adapting itself to the irregularities of the floor.
.8 LOW MAINTENANCE: the door shall be free of wearing parts such as stiffeners,
traction- or compression springs, cables, straps, spiral cables, motor brakes and
mechanical limit switches.
.9 Provide electric motor assembly of design, type, size and capacity as determined and
furnished by door manufacturer for size, weight, performance function and other
characteristics of the door. Operators using brakes and clutches to stop door are not
allowed. Operator to be controlled by a variable speed drive.
.10 Electric control panel to be a NEMA 4 rated enclosure, fully assembled and ready for
connection. All components and the layout of such components should be UL listed.
Control panel should contain a rotary disconnect switch, an emergency stop push button
and an open/close reset push button.
.11 Reversing infrared photocell with a transmitter and receiver to be provided and located
within the door side frame.
.12 Control box to contain a Solid State electronic controller – Circuit board design
technology, as well as an Absolute Encoder receiver.
2.3 OPTIONS
.1 Vision panels transparent PVC, thickness 1/12”, W 24” x H 24”: window center line at ± 5’3” above the floor (maximum number recommended by manufacturer per door).
.2 Vision banner transparent PVC, thickness 1/12”, Width door x H 1’ 6 1/2”: window
center line at ± 5’3” above the floor.
.3 Supplementary infra-red photocell placed at a pre-determined height from the floor, type
transmitter-receiver (a limit switch disables the photocell before the bottom of the door
panel arrives at the height of the supplementary photocell).

Hamilton International Air Cargo Logistics Facility Section 08 33 23
Tradeport International Corporation HIGH SPEED OVERHEAD COILING DOORS
July 2014
Chamberlain Architect Services Limited Page 6 of 8
.4 Frame cover in stainless steel (AISI 304).
.5 Motor cover in galvanized steel.
.6 Motor cover in stainless steel (AISI 304).
.7 Drum hood in galvanized steel.
.8 Drum hood in stainless steel (AISI 304).
.9 Shafts and drum in stainless steel (AISI 304).
.10 Frame and covers painted in a special color.
.11 Reduced lintel or reduced lateral spacing.
.12 Control Box in fiberglass, H 20” x W 20” x D 8”. Degree of protection: NEMA 4, with
open push button and emergency stop; after unlocking of emergency stop, the operation of
the door is reset by pushing the Reset button.
.13 Control Box in stainless steel (AISI 304), H 20” x W 20” x D 8”. Degree of protection:
NEMA 4X, with open push button and emergency stop; after unlocking emergency stop,
the operation of the door is reset by pushing the Reset button.
.14 Control Box which gives a warning before closing: two orange lights go on when the door
opens, after the opening of the door they go off; they go on again ± 2 seconds (adjustable)
before the door closes until the door is completely closed.
.15 Control Box which gives a warning before opening: two orange lights go on ± 2 seconds
(adjustable) before the door opens, they stay on, without interruption, until the door is
completely closed.
.16 Orange flashing light NEMA 12 which works during the opening and closing of the door.
.17 Orange flashing light NEMA 4 (waterproof) which works during the opening and closing
of the door.
.18 Airlock function: only possible between two new DYNACO doors. Each door has its own
control box and its own opening commands, but opens only when the other door is closed.
The control boxes are not the same: one has priority, the other has not. Delivered with an
ON/OFF switch, thus isolating the two doors in order to obtain independent function (the
door which needs this selector needs to be specified.).
.19 Traffic lights: 1 pair of lights, ∅ 5.90”, voltage: 120V.
.20 Automatic opening in case of power failure: this option requires the use of a UPS
(Uninterruptible Power Supply) containing a battery that supplies sufficient power to
activate the door; this UPS is placed between the network and the control box. A relay
installed in the control box detects a power failure and immediately opens the door, which
remains open during the power failure. The power of the UPS depends on the power of
the motor of the door.

Hamilton International Air Cargo Logistics Facility Section 08 33 23
Tradeport International Corporation HIGH SPEED OVERHEAD COILING DOORS
July 2014
Chamberlain Architect Services Limited Page 7 of 8
.21 Semi-automatic opening in case of power failure: this option requires the use of a UPS
(Uninterruptible Power Supply) containing a battery that supplies sufficient tension to
activate the door; this UPS is placed between the network and the control box. In case of
power failure the door remains closed, a voluntary opening command is necessary to open
the door, which remains open during the power failure. The power of the UPS depends on
the power of the motor of the door.
.22 High speed opening: opening 5ft/s or 8 ft/s, closing 2.6ft/s or 4ft/s, according to the type
of door.
.23 Information on open or closed door.
.24 Logo up to 1 sq. yard.
.25 Fore frame.
Part 3 Execution
3.1 EXAMINATION
.1 Section 01 73 03: Verification of existing conditions before starting work.
.2 Verify that opening sizes, tolerances and conditions are acceptableGeneral: Examine
substrates and conditions under which roll-up doors are to be installed for compliance with
specifications and to determine if conditions affecting performance of roll-up doors are
satisfactory. Do not proceed with work until unsatisfactory conditions have been resolved.
3.2 INSTALLATION
.1 Install door unit assembly in accordance with manufacturer's instructions.
.2 Use anchorage devices to securely fasten assembly to wall construction and building
framing without distortion or stress.
.3 Securely and rigidly brace components suspended from structure.
.4 Fit and align assembly including hardware; level and plumb, to provide smooth operation.
.5 Coordinate installation of sealants and backing materials at frame perimeter as specified in
Section 07 92 00.
3.3 ERECTION TOLERANCES
.1 Maintain dimensional tolerances and alignment with adjacent work.
3.4 ADJUSTING
.1 Adjust door, hardware and operating assemblies for smooth and noiseless operation.

Hamilton International Air Cargo Logistics Facility Section 08 33 23
Tradeport International Corporation HIGH SPEED OVERHEAD COILING DOORS
July 2014
Chamberlain Architect Services Limited Page 8 of 8
3.5 CLEANING
.1 Section 01 73 03: Cleaning installed work.
.2 Clean door and components.
.3 Remove labels and visible markings.
END OF SECTION

Hamilton International Air Cargo Logistics Facility Section 08 36 13
Tradeport International Corporation SECTIONAL DOORS
July 2014
Chamberlain Architect Services Limited Page 1 of 5
Part 1 General
1.1 RELATED SECTIONS
.1 Section 05500 – Metal Fabrications
Steel (plate, angle and channel) door frames.
.2 Section 08800 - Glazing
.3 Section 09911 - Painting
1.2 REFERENCES
.1 American Society for Testing and Materials (ASTM)
.1 ASTM A366/A 366M-97e1, Specification for Steel, Carbon, Cold-Rolled Sheet,
Commercial Quality.
1.3 DESIGN REQUIREMENTS
.1 Design exterior door assembly to withstand windload of 20 psf, with a maximum
horizontal deflection of 1/240 of opening width.
.2 Design door panel assemblies with thermal insulation factor of R16 (Minimum).
.3 Design door assembly to withstand minimum 100,000 cycles per annum, and 10 years
total life cycle.
1.4 SHOP DRAWINGS
.1 Submit shop drawings in accordance with Section 01330 – Submittal Procedures.
.2 Indicate sizes, service rating, types, materials, operating mechanisms, glazing locations
and details, hardware and accessories, required clearances and electrical connections.
1.5 CLOSEOUT SUBMITTALS
.1 Provide operation and maintenance data for overhead door hardware for incorporation into
manual specified in Section 01780 – Closeout Submittals
1.6 EXTRA MATERIALS
.1 Provide spare parts in accordance with Section 01780 – Closeout Submittals.
.2 Provide spare parts for overhead doors as follows:
.1 Door panels: as per Owner
.2 Door rollers: as per Owner
.3 Weatherstripping: as per Owner

Hamilton International Air Cargo Logistics Facility Section 08 36 13
Tradeport International Corporation SECTIONAL DOORS
July 2014
Chamberlain Architect Services Limited Page 2 of 5
.4 Springs and cables: as per Owner
.3 Store where directed. Identify each part and reference to appropriate door.
Part 2 Products
2.1 ACCEPTABLE MANUFACTURERS
.1 Overhead Door, Thermacore 592 Series
.2 Or equal approved by Architect.
2.2 MATERIALS
.1 Galvanized steel sheet commercial quality Z275 zinc coating.
.2 Primer: CAN/CGSB-1.181-99, for galvanized steel surfaces.
.3 Insulation: to meet design requirements.
.4 Glazing: thermal
.5 Cable: multi-strand galvanized steel aircraft cable.
2.3 DOORS
.1 Fabricate 2” thick insulated, flush doors of interlocking roll formed steel sections as
indicated.
.2 Fabricate panel frames in a continuous box frame with vertical stiffeners at 600 mm
centres.
.3 Install glazing for vision panels. Sizes and number of vision panels – (2) as shown on
drawings – maximum per manufacturer.
.4 Fabricate doors from pre-painted steel stock.
2.4 HEAVY DUTY INDUSTRIAL HARDWARE
.1 Tract: vertical lift hardware with 3” size galvanized steel track. Or alternate low rise tract
to suite overhead clearance conditions.
.2 Track Supports: continuous galvanized steel angle track supports.
.3 Spring counter balance: heavy duty oil tempered torsion spring with manufacturers
standard brackets.
.4 Top roller carrier: galvanized steel, adjustable.
.5 Rollers: full floating grease packed hardened steel, ball bearing solid steel tire.

Hamilton International Air Cargo Logistics Facility Section 08 36 13
Tradeport International Corporation SECTIONAL DOORS
July 2014
Chamberlain Architect Services Limited Page 3 of 5
.6 Roller brackets: adjustable, minimum 2.5 mm galvanized steel.
.7 Hinges: heavy duty, stainless steel.
.8 Cable: 6mm diameter galvanized steel aircraft cable.
2.5 NUMBERS
.1 Provide 18” high, Helvetica sequential vinyl numbers on outer face of doors, sequence and
location as per Consultant.
2.6 ACCESSORIES
.1 Track guards: 5mm thick formed sheet 1500 mm high track guards.
.2 Pusher springs.
.3 Handles
.1 Flat bar door latch with night latch and electric interlock switch.
.2 Handles: handle operated from inside.
.4 Weather Stripping
.1 Sills: bulb type full width extruded neoprene weatherstrip.
.2 Jambs and head: extruded aluminum and arctic grade vinyl weatherstrip to
manfacturer’s standard.
.5 Finish ferrous hardware items with minimum zinc coating of 300 g/m2 to
CAN/CSA-G164-M92 (R1998).
.6 Continuous hot dip galvanized bent steel plate at head and jambs, typical, to wrap precast
concrete wall panels per architectural details 1/A302 & 2/A502.
2.7 PRE-FINISHED STEEL SHEET
.1 Prefinished steel with factory applied silicone modified polyester.
.1 Class F1S F2S
.2 Colour selected by Consultant from manufacturer’s standard range.
.3 Specular gloss: 30 units +/-5 in accordance with ASTM D 523-89(1999).
.4 Coating thickness: not less than 25 micrometres.
.5 Resistance to accelerated weathering for chalk rating of 8, colour fade 5 units or
less and erosion rate less than 20% to ASTM D 822-01 as follows:
.1 Outdoor exposure period 1000 hours.
.2 Humidity resistance exposure period 1000 hours.
2.8 OPERATORS
.1 Equip doors for operation by:

Hamilton International Air Cargo Logistics Facility Section 08 36 13
Tradeport International Corporation SECTIONAL DOORS
July 2014
Chamberlain Architect Services Limited Page 4 of 5
.1 Hand, handle on inside face of door
.2 Cable fail safe device.
.1 Able to stop door immediately if cable breaks on door free fall. Braking capacity
500 kg.
2.9 ELECTRICAL OPERATOR
.1 Electrical jack shaft type operator.
.2 Electrical motors, controller units, remote pushbutton stations, relays and other electrical
components: to CSA approval.
.3 Power supply: co-ordinate with Electrical Engineer.
.4 Controller units: co-ordinate with Control Panel supplier.
.5 Operation:
.1 Pushbutton stations: surface mounted, between door locations, with “OPEN-
STOP-CLOSE” “SECURITY LOCKOUT” designations on pushbuttons in
English and French.
.2 Cable control: pendant hung control to open and electric eyes time limit switch to
close.
.6 Safety switch: combination roll rubber with limit switches for full length of bottom rail of
bottom section of door, to reverse door to open position when coming in contact with
object on closing cycle.
.7 For jack shaft operators:
.1 Provide floor level disconnect device to allow for manual operation in event of
power failure.
.2 Equip Operator with:
.1 Electrical interlock switch to disconnect power to operator when in
manual operation
.8 Automatic illumination complete with time delay, self extinguishing.
.9 Door speed: 1 foot per second.
.10 Control transformer: for 24 VAC control voltage.
.11 Mounting brackets; galvanized steel, size and gauge to suit conditions.
Part 3 Execution
3.1 INSTALLATION
.1 Install door unit assembly in accordance with manufacturer's instructions.
.2 Rigidly support rail and operator and secure to supporting structure.

Hamilton International Air Cargo Logistics Facility Section 08 36 13
Tradeport International Corporation SECTIONAL DOORS
July 2014
Chamberlain Architect Services Limited Page 5 of 5
.3 Touch-up steel doors with primer where galvanized finish damaged during fabrication.
.4 Install operator including electrical motors, controller units, pushbutton stations, relays
and other electrical equipment required for door operation.
.5 Lubricate and adjust door operating components to ensure smooth opening and closing of
doors.
.6 Adjust weatherstripping to form a weathertight seal.
END OF SECTION

Hamilton International Air Cargo Logistics Facility Section 08 36 13
Tradeport International Corporation Glazed Aluminum Curtain Walls
July 2014
Chamberlain Architect Services Limited Page 1 of 10
Part 1 General
1.1 SECTION INCLUDES
.1 Aluminum tube framing system with vision glass – inside/outside glazed captured curtain
wall.
.2 Glass infill panels.
.3 Integral air barrier and vapour retarder.
.4 Integral fire stops at floor slabs.
.5 Integral louvres
.6 Perimeter sealant.
1.2 RELATED SECTIONS
.1 Section 07 26 00 - Vapour Retarders: Perimeter vapour seal between curtain wall system
and adjacent construction.
.2 Section 07 27 00 - Air Barriers: Perimeter air seal between curtain wall system and
adjacent construction.
.3 Section 07 84 00 - Firestopping.
.4 Section 07 92 00- Joint Sealants: System perimeter sealant and back-up materials.
.5 Section 08 51 13 - Aluminum Windows.
.6 Section 08 71 00 - Door Hardware - General: Mortised hardware reinforcement
requirements affecting curtain wall framing members.
.7 Section 08 80 50 - Glazing.
1.3 REFERENCES
.1 AA (Aluminum Association) - Designation System for Aluminum Finishes.
.2 AAMA (American Architectural Manufacturers' Association) - Metal Curtain Wall,
Window, Store Front and Entrance - Guide Specifications Manual.
.3 AAMA - Aluminum Curtain Wall Design Guide Manual.
.4 AAMA CW-10 -Curtain Wall Manual #10 - Care and Handling of Architectural
Aluminum from Shop to Site.

Hamilton International Air Cargo Logistics Facility Section 08 36 13
Tradeport International Corporation Glazed Aluminum Curtain Walls
July 2014
Chamberlain Architect Services Limited Page 2 of 10
.5 AAMA CW - 11 - Curtain Wall Manual #11 - Design Windloads for Buildings and
Boundary Layer Wind Tunnel Testing.
.6 AAMA 501 - Methods of Test for Exterior Walls.
.7 AAMA 611 - Specifications for Anodized Architectural Aluminum.
.8 AAMA 1503a - Test Method for Thermal Transmittance and Condensation Resistance of
Windows, Doors, and Glazed Wall Sections.
.9 AAMA T1R - A1 - Sound Control for Aluminum Curtain Walls and Windows.
.10 AAMA RPC - Rain Penetration Control.
.11 ASCE 7 - Calculation of Wind Loads.
.12 ASTM A36/A36M - Carbon Structural Steel.
.13 ASTM A123/A123M - Zinc (Hot-Dip Galvanized) Coatings on Iron and Steel Products.
.14 ASTM A653/A653M - Steel Sheet, Zinc-Coated (Galvanized) or Zinc-Iron Alloy-Coated
(Galvannealed) by the Hot-Dip Process.
.15 ASTM B209 - Aluminum and Aluminum-Alloy Sheet and Plate.
.16 ASTM B221/B221M - Aluminum and Aluminum-Alloy Extruded Bars, Rods, Wire,
Profiles, and Tubes.
.17 ASTM E283 - Test Method For Determining Rate of Air Leakage Through Exterior
Windows, Curtain Walls and Doors Under Specified Pressure Differences Across the
Specimen.
.18 ASTM E330 - Test Method for Structural Performance of Exterior Windows, Curtain
Walls, and Doors by Uniform Static Air Pressure Difference.
.19 ASTM E331 - Test Method for Water Penetration of Exterior Windows, Skylights, Doors,
and Curtain Walls by Uniform Static Air Pressure Difference.
.20 ASTM E413 - Classification for Rating Sound Insulation.
.21 SSPC (The Society for Protective Coatings) (formerly SSPC - Steel Structures Painting
Council):
.1 Steel Structures Painting Manual.
.2 Paint 20, Zinc Rich Primers.
.3 Paint 25 Red Iron Oxide, Zinc Oxide, Raw Linseed Oil and Alkyd Primer
(Without Lead and Chromate Pigments).

Hamilton International Air Cargo Logistics Facility Section 08 36 13
Tradeport International Corporation Glazed Aluminum Curtain Walls
July 2014
Chamberlain Architect Services Limited Page 3 of 10
1.4 SYSTEM DESCRIPTION
.1 Curtain Wall System: Tubular aluminum sections with self supporting framing, factory
prefinished, vision glass, glass spandrel infill; related flashings, anchorage and attachment
devices. Inside/Outside glazed.
.2 System Assembly: Site assembled.
1.5 PERFORMANCE REQUIREMENTS
.1 System Design: Design and size components to withstand dead loads and live loads
caused by positive and negative wind loads acting normal to plane of wall as calculated in
accordance with BC Building Code 2006. Design pressure of .85 kPa (19 lb/sq ft) to be
confirmed.
.2 Seismic Loads: Design and size components to withstand seismic loads and sway
displacement as calculated in accordance with BC Building Code 2006.
.3 Deflection: Limit mullion deflection to L/240 with full recovery of glazing materials.
.4 System Assembly: Accommodate without damage to system, components or deterioration
of seals, movement within system, movement between system and perimeter framing
components, dynamic loading and release of loads, deflection of structural support
framing, tolerance of supporting components, shortening of building concrete structural
columns, creep of concrete structural members, interstory drift, and a mid-span slab edge
deflection.
.5 Thermal Resistance of Wall System (U-factor): When tested in accordance with AAMA
Specification 1503.1 U-factor shall be 0.44 (1” low e insulating glass with warm spacer).
Shading coefficient 0.65 and solar heat gain coefficient SHGC = 0.56.
.6 Sound Attenuation Through Wall System (Exterior to Interior): STC 36, measured in
accordance with ASTME 90 and ASTM E413.
.7 Air Infiltration: Limit air infiltration through assembly to 0.06 cfm/min/sq ft of wall area,
measured at a reference differential pressure across assembly of 6.24 psf as measured in
accordance with ASTM E283.
.8 Condensation Resistance Factor: CRF of 73 frame and 68 glass when measured in
accordance with AAMA 1503a.
.9 Water Leakage: None, when measured in accordance with AAMA 501.
.10 Expansion / Contraction: System to provide for expansion and contraction within system
components caused by a cycling temperature range of 95 degrees C (170F) over a 12 hour
period without causing detrimental affect to system components.
.11 System Internal Drainage: Drain water entering joints, condensation occurring in glazing
channels, or migrating moisture occurring within system, to the exterior by a weep
drainage network.

Hamilton International Air Cargo Logistics Facility Section 08 36 13
Tradeport International Corporation Glazed Aluminum Curtain Walls
July 2014
Chamberlain Architect Services Limited Page 4 of 10
.12 Air and Vapour Seal: Maintain continuous air barrier and vapour retarder throughout
assembly, primarily in line with inside pane of glass and heel bead of glazing compound.
Position thermal insulation on exterior surface of air barrier and vapour retarder.
.13 Not Permitted: Vibration harmonics, wind whistles, noises caused by thermal movement,
thermal movement transmitted to other building elements, loosening, weakening, or
fracturing of attachments or components of system.
.14 Acoustic requirements:
.1 Glazing is to be rated acoustically to OITC 29/STC 36. This will require testing
and ASTM E 90 test reports. Any additional testing required will be at Owner’s
expense.
.2 Windows specified with acoustical glazing upgrades require ASTM E 90 test
reports. When requested, the supplier is to confirm in writing that the glazing, as
installed on site, is equivalent to the tested assemblies and fully conforms with the
Acoustical report available from the Owner. Additional testing required will be
paid for by Owners.
.3 Good quality airtight weatherstrip required on all exterior doors and windows.
Windows to meet or exceed A3 air tightness standard of CSA A440-00, as
referenced in Vancouver Building By-Law (VBBL, Section (.7.2)
1.6 SUBMITTALS FOR REVIEW
.1 Product Data: Provide component dimensions, describe components within assembly,
anchorage and fasteners, glass and infill, internal drainage details and water flow drainage
diagrams.
.2 Design Data: Provide framing member structural and physical characteristics,
calculations, and dimensional limitations.
.3 Shop Drawings: Indicate system dimensions, framed opening requirements and
tolerances, anticipated deflection under load, affected related Work, weep drainage
network, expansion and contraction joint location and details, and field welding required.
.4 Submit two samples 6 x 6 inches (150 x 150 mm) in size exampling prefinished aluminum
surface, specified glass units, insulated infill panels, glazing materials illustrating edge and
corner.
1.7 QUALITY ASSURANCE
.1 Perform Work in accordance with AAMA - Metal Curtain Wall, Window, Store Front and
Entrance - Guide Specifications Manual. AAMA - Aluminum Curtain Wall Design Guide
Manual. Maintain one copy on site.
.2 Manufacturer Qualifications: Company specializing in manufacturing the Products
specified in this section with minimum 10 years experience.
.3 Installer Qualifications: Company specializing in performing the work of this section with
minimum 5 years documented experience and approved by manufacturer.

Hamilton International Air Cargo Logistics Facility Section 08 36 13
Tradeport International Corporation Glazed Aluminum Curtain Walls
July 2014
Chamberlain Architect Services Limited Page 5 of 10
.4 Design structural support framing components under direct supervision of a Professional
Structural Engineer experienced in design of this Work and licensed in the Province of
Alberta.
1.8 REGULATORY REQUIREMENTS
.1 Conform to applicable by-laws for acoustic attenuation, and other applicable local
requirements.
1.9 MOCK-UP
.1 Provide 20x20 feet (6m x 6m) mock-up including intermediate mullion, corner mullion,
vision glass light, insulated infill glass panel and integral louvres. Assemble to illustrate
component assembly including glazing materials, weep drainage system, attachments,
anchors, and perimeter sealant.
.2 Locate where directed by consultant.
.3 Mock-up may remain as part of the Work.
1.10 PRE-INSTALLATION MEETING
.1 Convene one week before starting work of this section.
1.11 DELIVERY, STORAGE, AND PROTECTION
.1 Handle work of this Section in accordance with AAMA - Curtain Wall Manual CW-10.
.2 Protect prefinished aluminum surfaces with wrapping and strippable coating. Do not use
adhesive papers or sprayed coatings which bond when exposed to sunlight or weather.
Puncture wrappings at ends for ventilation.
1.12 ENVIRONMENTAL REQUIREMENTS
.1 Do not install sealants when ambient temperature is less than 5 degrees C.
.2 Maintain this minimum temperature during and after installation of sealants.
1.13 COORDINATION
.1 Coordinate the Work with installation of firestopping, air barrier placement, vapour
retarder placement, installing ductwork to rear of louvres, and adjacent components or
materials.
1.14 WARRANTY
.1 Provide a five year warranty to include coverage for complete system for failure to meet
specified requirements.
.2 Provide a ten year warranty for sealed glazing units.

Hamilton International Air Cargo Logistics Facility Section 08 36 13
Tradeport International Corporation Glazed Aluminum Curtain Walls
July 2014
Chamberlain Architect Services Limited Page 6 of 10
Part 2 Products
2.1 CURTAIN WALL SYSTEM
.1 Manufacturers:
.1 Kawneer Aluminum Curtain Wall: Model 1600 System 3 Inside/outside glazed
captured.
.2 Substitutions: Not permitted without prior approval.
.3 Entry Doors: Refer to Section 084113 Aluminum framed entrances and
storefronts for additional information
.1 Tubular member door framing system by same manufacturer of curtain
wall or storefront framing system in which the doors are mounted, and
compatible with specified framing system.
.2 Thermal Construction: High-performance plastic connectors separate
aluminum members exposed to the exterior from members exposed to the
interior
.3 Provide non-removable glazing stops on outside of door
2.2 MATERIALS
.1 Extruded Aluminum: ASTM B221/B221M.
.2 Sheet Aluminum: ASTM B209/B209M.
.3 Sheet Steel: ASTM A653/A653M; galvanized in accordance with ASTM A653/A653M.
.4 Steel Sections: ASTM A36/A36M; shaped to suit mullion sections.
.5 Fasteners: Stainless steel.
2.3 COMPONENTS
.1 Mullion Profile: 2-1/2x7-1/2 inch nominal dimension for vertical members, 2-1/2x7-1/2
inch nominal dimension for horizontal members or as indicated on drawings and to suit
structural requirements of window openings; thermally broken with interior tubular
section insulated from exterior pressure plate; matching stops and pressure plate of
sufficient size and strength to provide bite on glass and infill panels; drainage holes,
deflector plates and internal flashings to accommodate internal weep drainage system;
internal mullion baffles to eliminate "stack effect" air movement within internal spaces.
.2 Note: Mullion Profile depth can be modified (reduced) if adequate for structural
requirements determined by curtain wall engineer. Coordinate installation requirements
with surrounding materials.
.3 Infill Panel: Internally reinforced, glazing edge sealed permitting internal air movement to
glazing space, outside air barrier line:
.1 Outer Face: 1/4 inch thick tempered glass.
.2 Core: Mineral fibre insulation core with R value of 18.
Hamilton International Air Cargo Logistics Facility Section 08 36 13
Tradeport International Corporation Glazed Aluminum Curtain Walls
July 2014
Chamberlain Architect Services Limited Page 7 of 10
.3 Inner Face: 20ga thick sheet steel galvanized finish (1.25oz/sf coating) with sealed
corners.
.4 Flashings integral with windows: extruded aluminum section to suite frame, finish to
match curtain wall mullion sections where exposed, secured with concealed fastening
method.
.5 Firestopping: Specified in Section 07 84 00.
.6 Vapour Retarder: Specified in Section 07 26 00.
.7 Air Barrier: Specified in Section 07 27 00.
.8 Integral Louvres: as described on drawings and to suit requirements of PTAC units. Same
material and finish as window.
.9 Sills: extruded aluminum; sloped for positive wash; fit under sash, leg 12 m (1/2”)
beyond wall face; jamb angles to terminate sill end.
2.4 GLASS AND GLAZING MATERIALS
.1 Glass Materials: As specified in Section 08 80 50 of Types described below:
.1 Glass in Exterior Lights: Type: insulating, clear, 1/4” (6mm) tempered exterior,
3/8”(4mm) interior lites, low-e film on 3rd surface.
.2 Glass in Entrance and Ground Floor Lights: Type: insulating, clear, 1/4” (6mm)
tempered exterior, 3/8”(4mm) interior lites, low-e film on 3rd surface. Tempered
or laminated glass in doors and side lights.
.3 Glass Infill Panels: Type clear, tempered, back painted with colour to be selected
by Architect.
.2 Glazing Materials: Type to suit application to achieve weather, moisture, and air
infiltration requirements.
2.5 SEALANT MATERIALS
.1 Sealant and Backing Materials: As specified in Section 07 92 00 of Types described
below.
.2 Perimeter Sealant: Type Polyurethane, based to suit application requirements.
.3 Sealant Used Within System (Not Used for Glazing): Type Silicone, based to suit
application requirements
2.6 FABRICATION
.1 Fabricate system components with minimum clearances and shim spacing around
perimeter of assembly, yet enabling installation and dynamic movement of perimeter seal.
.2 Accurately fit and secure joints and corners. Make joints flush, hairline, and
weatherproof.

Hamilton International Air Cargo Logistics Facility Section 08 36 13
Tradeport International Corporation Glazed Aluminum Curtain Walls
July 2014
Chamberlain Architect Services Limited Page 8 of 10
.3 Prepare components to receive anchor devices. Fabricate anchors.
.4 Arrange fasteners and attachments to ensure concealment from view.
.5 Reinforce framing members for external imposed loads.
2.7 FINISHES
.1 Finish Coatings: Conform to AAMA 611.
.2 Exterior Exposed Aluminum Surfaces: AAMA A41 anodized to 0.7 mils minimum
thickness prepared with appropriate pre-treatment, anodized to clear colour. Kawneer
Permanodic Architectural Class 1 Clear Anodic Colour #17 or approved equal.
.3 Exterior Exposed Infill Panel Surfaces: AAMA A41 anodized to 0.7 mils minimum
thickness prepared with appropriate pre-treatment, anodized to clear colour to match
frames.
.4 Interior Exposed Aluminum Surfaces: to match exterior.
.5 Touch-Up Primer for Galvanized Steel Surfaces: SPCC Paint 20 zinc rich.
.6 Concealed Steel Items: Galvanized in accordance with ASTM A123 to 2.0 oz/sq ft
.7 Apply one coat of bituminous paint to concealed aluminum and steel surfaces in contact
with cementitious or dissimilar materials.
Part 3 Execution
3.1 EXAMINATION
.1 Section 01 33 00: Verification of existing conditions before starting work.
.2 Verify dimensions, tolerances, and method of attachment with other work.
.3 Verify wall openings and adjoining air barrier and vapour retarder materials are ready to
receive work of this section.
3.2 INSTALLATION
.1 Install curtain wall system in accordance with manufacturer instructions.
.2 Attach to structure to permit sufficient adjustment to accommodate construction tolerances
and other irregularities.
.3 Provide alignment attachments and shims to permanently fasten system to building
structure.
.4 Align assembly plumb and level, free of warp or twist. Maintain assembly dimensional
tolerances and align with adjacent work.

Hamilton International Air Cargo Logistics Facility Section 08 36 13
Tradeport International Corporation Glazed Aluminum Curtain Walls
July 2014
Chamberlain Architect Services Limited Page 9 of 10
.5 Provide thermal isolation where components penetrate or disrupt building insulation.
.6 Install sill and other flashings.
.7 Coordinate installation of fire stop at each floor slab edge.
.8 Coordinate attachment and seal of perimeter air barrier and vapour retarder materials.
.9 Pack fibrous insulation in shim spaces at perimeter of assembly to maintain continuity of
thermal barrier.
.10 Install operating sash glass in accordance with Section 08 80 50, to glazing method
required to achieve performance criteria.
.11 Install glass and infill panels in accordance with Section 08 80 50, to glazing method
required to achieve performance criteria. The following paragraph indicates installation of
perimeter sealant materials as part of this section.
.12 Install perimeter sealant to method required to achieve performance criteria. Type 1
backing materials, and installation criteria in accordance with Section 07 92 00.
3.3 ERECTION TOLERANCES
.1 Maximum Variation from Plumb: 0.06 inches every 3 ft>> non-cumulative or 0.5 inches
per 100 ft, whichever is less.
.2 Maximum Misalignment of Two Adjoining Members Abutting in Plane: 1/32 inch.
.3 Sealant Space Between Curtain Wall Mullions and Adjacent Construction: Maximum of
¾ inch and minimum of ¼ inch.
3.4 MANUFACTURER'S FIELD SERVICES
.1 Curtain wall product manufacturers to provide field surveillance of the installation of
their Products.
.2 Monitor and report installation procedures, unacceptable conditions and materials.
3.5 CLEANING
.1 Remove protective material from prefinished aluminum surfaces.
.2 Remove Labels and visible markings.
.3 Wash down surfaces with a solution of mild detergent in warm water, applied with soft,
clean wiping cloths. Take care to remove dirt from corners. Wipe surfaces clean.
.4 Remove excess sealant by moderate use of mineral spirits or other solvent acceptable to
sealant manufacturer.

Hamilton International Air Cargo Logistics Facility Section 08 36 13
Tradeport International Corporation Glazed Aluminum Curtain Walls
July 2014
Chamberlain Architect Services Limited Page 10 of 10
3.6 PROTECTION OF FINISHED WORK
.1 Protect finished Work from damage.
END OF SECTION
Hamilton International Air Cargo Logistics Facility Section 08 51 13
Tradeport International Corporation ALUMINUM WINDOWS
July 2014
Chamberlain Architect Services Limited Page 1 of 6
Part 1 General
1.1 SECTION INCLUDES
.1 Extruded aluminum windows with fixed sash.
.2 Factory glazed.
.3 Perimeter sealant.
1.2 REFERENCES
.1 AA (Aluminum Association) - Designation System for Aluminum Finishes.
.2 AAMA 101 - Aluminum, Poly (Vinyl Chloride) (PVC) and Wood Windows and Glass
Doors.
.3 AAMA 611 - Specifications for Anodized Architectural Aluminum.Windows.
.4 AAMA 1503a - Test Method for Thermal Transmittance and Condensation Resistance of
Windows, Doors, and Glazed Wall Sections.
.5 ASCE 7 - Calculation of Wind Loads.
.6 ASTM A123/A123M - Zinc (Hot Dip Galvanized) Coatings on Iron and Steel Products.
.7 ASTM B209 - Aluminum and Aluminum-Alloy Sheet and Plate.
.8 ASTM B221 - Aluminum and Aluminum-Alloy Extruded Bars, Rods, Wire, Profiles, and
Tubes.
.9 ASTM E283 - Test Method for Determining Rate of Air Leakage Through Exterior
Windows, Curtain Walls, and Doors Under Specified Pressure Differences Across the
Specimen.
.10 ASTM E330 - Test Method for Structural Performance of Exterior Windows, Curtain
Walls, and Doors by Uniform Static Air Pressure Difference.
.11 ASTM E331 - Test Method for Water Penetration of Exterior Windows, Skylights, Doors,
and Curtain Walls by Uniform Static Air Pressure Difference.
.12 ASTM E1105 - Test Method for Field Determination of Water Penetration of Installed
Exterior Windows, Skylights, Doors, and Curtain Walls by Uniform or Cyclic Static Air
Pressure Difference.
.13 ASTM F588 - Standard Test Method for Measuring the Forced Entry Resistance of
Window Assemblies, Excluding Glazing Impact.

Hamilton International Air Cargo Logistics Facility Section 08 51 13
Tradeport International Corporation ALUMINUM WINDOWS
July 2014
Chamberlain Architect Services Limited Page 2 of 6
1.3 SYSTEM DESCRIPTION
.1 Windows: Tubular, Single thickness, aluminum sections, factory fabricated, factory
finished, vision glass, related flashings, anchorage and attachment devices.
.2 Configuration: Fixed, non-operable.
.3 Glazing: Interior.
1.4 PERFORMANCE REQUIREMENTS
.1 System Design: Design and size components to withstand dead loads and live loads
caused by positive and negative wind loads acting normal to plane of wall to a design
pressure of 67.5 lb/sq ft as measured in accordance with AAMA Series No. 11 and
ASTM E330.
.2 Deflection: Limit member deflection to flexure limit of glass or 1/200 of the longer
dimension with full recovery of glazing materials.
.3 Assembly: To accommodate, without damage to components or deterioration of seals,
movement between window and perimeter framing, deflection of lintel.
.4 The fixed window thermal transmittance shall be not more than 0.42 BTU/hr.ft2 for NFRC
size, when tested in accordance with CAN/CSA-A440 windows. Overall SHGC of .52
.5 Air Infiltration: Limit air infiltration through assembly to less than 0.10cfm/ft measured at
a reference differential pressure across assembly of 1.57psf as measured in accordance
with ASTM E283.
.6 Vapour Seal: Limit vapour seal with interior atmospheric pressure of 1 inch sp, 72
degrees F, 40 percent RH without seal failure.
.7 Water Leakage: None, when measured in accordance with ASTM E331.
.8 System Internal Drainage: Drain water entering joints, condensation occurring in glazing
channels, or migrating moisture occurring within system, to the exterior by a weep
drainage network.
.9 Air and Vapour Seal: Maintain continuous air barrier and vapour retarder throughout
assembly, primarily in line with inside pane of glass and heel bead of glazing compound.
Position thermal insulation on exterior surface of air barrier and vapour retarder.
1.5 SUBMITTALS FOR REVIEW
.1 Product Data: Provide component dimensions, anchorage and fasteners, glass, internal
drainage details.
.2 Shop Drawings: Indicate opening dimensions, framed opening tolerances, affected related
work; installation requirements.
.3 Submit two samples 12”x12” inches in size illustrating window frame section, mullion
section, factory finished aluminum surfaces, glass units.

Hamilton International Air Cargo Logistics Facility Section 08 51 13
Tradeport International Corporation ALUMINUM WINDOWS
July 2014
Chamberlain Architect Services Limited Page 3 of 6
1.6 SUBMITTALS FOR INFORMATION
.1 Manufacturer's Certificate: Certify that fixed windows meet or exceed specified
requirements and performance criteria tests.
1.7 QUALITY ASSURANCE
.1 Perform Work in accordance with AAMA 101 Designation I.S.2-97
Maintain one copy of each document on site.
.2 Manufacturer and Installer: Company specializing in manufacturing commercial
aluminum windows with minimum 5 years documented experience.
1.8 PRE-INSTALLATION MEETING
.1 Convene one week before starting work of this section.
1.9 DELIVERY, STORAGE, AND PROTECTION
.1 Handle work of this section in accordance with AAMA - Curtain Wall Manual #10.
.2 Protect factory finished aluminum surfaces with [wrapping] [strippable coating]. Do not
use adhesive papers or sprayed coatings that bond when exposed to sunlight or weather.
1.10 ENVIRONMENTAL REQUIREMENTS
.1 Do not install sealants when ambient temperature is less than 5 degrees C
(40 degrees F).
.2 Maintain this minimum temperature during and after installation of sealants.
1.11 WARRANTY
.1 Correct defective Work within a five year period after Date of Substantial Completion.
.2 Provide five years manufacturer warranty for insulated glass units from seal failure,
interpane dusting or misting, and replacement of same.
.3 Warranty: Include coverage for degradation of colour finish.
Part 2 Products
2.1 MANUFACTURERS
.1 990 Series aluminum windows by Alumicor Ltd, size and type indicated on the drawings.
.2 Other Acceptable Manufacturers:
.1 Kawneer - Isoweb PG123 Series.
.2 Or approved equal.

Hamilton International Air Cargo Logistics Facility Section 08 51 13
Tradeport International Corporation ALUMINUM WINDOWS
July 2014
Chamberlain Architect Services Limited Page 4 of 6
2.2 MATERIALS
.1 Extruded aluminum sections: AA6063-T54 alloy and tempered.
.2 Sheet Aluminum: ASTM B209/B209M; alloy, temper.
.3 Steel Sections: Profiled to suit mullion sections.
.4 Fasteners: Stainless steel.
2.3 COMPONENTS
.1 Frames: 38.1mm (1-1/2”) wide x 127 mm (5”) deep profile
thermally broken with interior portion of frame insulated from exterior portion.
.2 Sills: extruded aluminum; sloped for positive wash; fit under sash, leg 12 mm (1/2”)
beyond wall face; jamb angles to terminate sill end.
.3 Fasteners: Stainless steel.
.4 Isolation coating: alkali resistant bituminous paint.
2.4 GLASS AND GLAZING MATERIALS
.1 Glass and Glazing Materials:
.1 Factory sealed double glazed units, 25mm overall thickness. to CAN/CGSB-12.8-
M90, double unit,, low E glass and Argon-filled cavity.
.2 Glass in Exterior Lights: Clear, transparent, insulating, low-e coating on 3rd light,
tempered 6mm thick
.3 Inner light: clear tempered, 6 mm thick
2.5 SEALANT MATERIALS
.1 Perimeter Sealant: Elastomeric air seal around full perimeter of glass and sealed
at corners with silicone sealant.
.2 Sealant Used Within System (Not Used for Glazing): Type Silicone.
2.6 HARDWARE
.1 Not used.
2.7 FABRICATION
.1 Fabricate components with minimum clearances and shim spacing around perimeter of
assembly, yet enabling installation and dynamic movement of perimeter seal.
.2 Accurately fit and secure joints and corners. Make joints flush, hairline, and
weatherproof.
.3 Prepare components to receive anchor devices. Fabricate anchors.
.4 Arrange fasteners and attachments to ensure concealment from view.

Hamilton International Air Cargo Logistics Facility Section 08 51 13
Tradeport International Corporation ALUMINUM WINDOWS
July 2014
Chamberlain Architect Services Limited Page 5 of 6
.5 Prepare components with internal reinforcement for operating hardware.
.6 Provide internal reinforcement in mullions with galvanized steel members to maintain
rigidity.
.7 Permit internal drainage weep holes and channels to migrate moisture to exterior. Provide
internal drainage of glazing spaces to exterior through weep holes.
.8 Factory glaze window units.
2.8 FINISHES
.1 Finish Coatings: Conform to AAMA 2603.
.2 Exterior Exposed Aluminum Surfaces: AAMA A41 anodized, prepared with an anodic
oxide treatment, anodized to clear colour.
.3 Interior Exposed Aluminum Surfaces anodized, prepared with an anodic oxide treatment,
anodized to clear colour.
.4 Select one of the following paragraphs for the primer type required. Select a primer
compatible with finish material. For a high performance finish, careful selection of the
primer is required.
.5 Shop and Touch-Up Primer for Steel Components: SPCC Paint 25 red oxide.
Part 3 Execution
3.1 EXAMINATION
.1 Verify wall openings and adjoining air and vapour seal materials are ready to receive work
of this Section.
3.2 INSTALLATION
.1 Install window frames, glass and glazing in accordance with manufacturers instructions.
3.3 ERECTION TOLERANCES
.1 Maximum Variation from Level or Plumb: 1.5 mm/m (1/16” every 3’-0”)
non-cumulative or 3 mm/3 m (1/8” every 10’-0”), whichever is less.
3.4 CLEANING
.1 Remove protective material from factory finished aluminum surfaces.
.2 Wash surfaces by method recommended and acceptable to sealant and window
manufacturer; rinse and wipe surfaces clean.
.3 Remove excess sealant by moderate use of mineral spirits or other solvent acceptable to
sealant and window manufacturer.

Hamilton International Air Cargo Logistics Facility Section 08 51 13
Tradeport International Corporation ALUMINUM WINDOWS
July 2014
Chamberlain Architect Services Limited Page 6 of 6
3.5 SCHEDULES
.1 For window sizes refer to drawings A7.1 and A7.2.
END OF SECTION

Hamilton International Air Cargo Logistics Facility Section 08 80 50
Tradeport International Corporation GLAZING
July 2014 Page 1 of 8
Chamberlain Architect Services Limited
Part 1 General
1.1 SECTION INCLUDES
.1 Glass and glazing for sections referencing this section for Products and installation.
1. Types of work in this Section include glass and glazing for:
a) Float Glass
b) Tempered Glass
c) Insulated Units
d) Fire Rated Safety Glass
e) Mirrors
1.2 RELATED SECTIONS
.1 Section 08 51 13 - Aluminum Windows: Glazed windows.
.2 Section 08 44 13 - Glazed Aluminum Curtain Walls.
.3 Section 10 28 14 - Toilet And Bath Accessories: Mirrors.
1.3 REFERENCES
.1 ANSI Z97.1 - Safety Performance Specifications and Methods of Test for Glazing
Materials Used in Buildings.
.2 ASTM C542 - Specification for Lock-Strip Gaskets.
.3 ASTM C864 - Dense Elastomeric Compression Seal Gaskets, Setting Blocks, and
Spacers.
.4 ASTM C920 - Elastomeric Joint Sealants.
.5 ASTM C1036 - Flat Glass.
.6 ASTM C1048 - Heat-Treated Flat Glass - Kind HS, Kind FT Coated and Uncoated Glass.
.7 ASTM C1172 - Laminated Architectural Flat Glass.
.8 ASTM C1193 - Use of Joint Sealants.
.9 ASTM D412 -Test Methods for Vulcanized Rubber and Thermoplastic Rubbers and
Thermoplastic Elastomers - Tension.
.10 ASTM D1149 - Test Method for Rubber Deterioration - Surface Ozone Cracking in a
Chamber.
.11 ASTM E84 - Test Method for Surface Burning Characteristics of Building Materials.

Hamilton International Air Cargo Logistics Facility Section 08 80 50
Tradeport International Corporation GLAZING
July 2014 Page 2 of 8
Chamberlain Architect Services Limited
.12 ASTM E283 - Test Method For Determining Rate of Air Leakage Through Exterior
Windows, Curtain Walls and Doors Under Specified Pressure Differences Across the
Specimen.
.13 ASTM E330 - Test Method for Structural Performance of Exterior Windows, Curtain
Walls, and Doors by Uniform Static Air Pressure Difference.
.14 ASTM E546 - Test Method For Frost Point of Sealed Insulating Glass Units.
.15 ASTM E576 - Method For Frost Point of Sealed Insulating Glass Units in the Vertical
Position.
.16 ASTM E773 - Test Method for Accelerated Weathering of Sealed Insulating Glass Units.
.17 ASTM E774 - Classification of the Durability of Sealed Insulating Glass Units.
.18 GANA (Glass Association of North America) - Glazing Manual.
.19 GANA (Glass Association of North America) - Sealant Manual.
.20 GANA (Glass Association of North America) - Laminated Glass Design Guide.
.21 IGMAC (Insulating Glass Manufacturers Association of Canada) - Sealed Insulating
Glass: Glass to Elastomer Edge, Glass to Mastic Edge, Special Glasses.
.22 SIGMA - Sealed Insulated Glass Manufacturers Association.
.23 Laminators Safety Glass Association - Standards Manual.
1.4 PERFORMANCE REQUIREMENTS
.1 Provide glass and glazing materials for continuity of building enclosure vapour retarder
and air barrier:
1) In conjunction with materials described in Section 07 26 00, 07 27 00,
07 92 00.
2) To utilize the inner pane of multiple pane sealed units for the continuity of the
air barrier and vapour retarder seal.
3) To maintain a continuous air barrier and vapour retarder throughout the
glazed assembly from glass pane to heel bead of glazing sealant.
.2 Size glass to withstand dead loads and positive and negative live loads acting normal to
plane of glass as calculated in accordance with governing codes.
.3 Limit glass deflection to 1/200 or flexure limit of glass with full recovery of glazing
materials, whichever is less.
.4 Thermal Resistance of the glazing unit (U-factor): When tested in accordance with
AAMA Specification 1503 U-factor shall be 0.25 (1” low e insulating glass with warm
spacer). Shading coefficient and solar heat gain coefficient SHGC = 0.55

Hamilton International Air Cargo Logistics Facility Section 08 80 50
Tradeport International Corporation GLAZING
July 2014 Page 3 of 8
Chamberlain Architect Services Limited
1.5 SUBMITTALS FOR REVIEW
.1 Product Data on Glass and Types: Provide structural, physical and environmental
characteristics, size limitations, special handling or installation requirements.
.2 Product Data on Glazing Compounds: Provide chemical, functional, and environmental
characteristics, limitations, special application requirements. Identify available colours.
.3 Samples: Submit two samples 12” x 12” in size, exampling glass units, colouration
and design.
.4 Samples: Submit 12 inch long bead of glazing sealant, colour as selected.
1.6 SUBMITTALS FOR INFORMATION
.1 Certificates: Certify that Products meet or exceed specified requirements.
.2 Manufacturer's Certificate: Certify that sealed insulated glass, meets or exceeds specified
requirements.
1.7 QUALITY ASSURANCE
.1 Perform Work in accordance with GANA Glazing Manual, GANA Sealant Manual,
IGMAC for glazing installation methods]. Maintain one copy on site.
.2 Installer Qualifications: Company specializing in performing the work of this section with
minimum 5 years documented experience approved by manufacturer
.3 Single Source Responsibility for Glass: To ensure consistent quality of appearance and
performance, provide materials produced by a single manufacturer or fabricator for each
kind and condition of glass indicated and composed of primary glass obtained from a
single source for each type and class required.
1.8 PRE-INSTALLATION MEETING
.1 Convene one week before starting work of this section.
1.9 ENVIRONMENTAL REQUIREMENTS
.1 Do not install glazing when ambient temperature is less than 10 degrees C (50 degrees F).
.2 Maintain minimum ambient temperature before, during and 24 hours after installation of
glazing compounds.
1.10 WARRANTY
.1 Provide a ten 10 years warranty to include coverage for sealed glass units from seal
failure, interpane dusting or misting, and replacement of same replaced at no cost to the
Owner.

Hamilton International Air Cargo Logistics Facility Section 08 80 50
Tradeport International Corporation GLAZING
July 2014 Page 4 of 8
Chamberlain Architect Services Limited
.2 All material shall be free from manufacturer defects and installation workmanship. Any
material or workmanship judged to be defective shall be replaced at no cost to the Owner.
1.11 EXTRA MATERIALS
.
.1 Provide two of each glass size and each glass type, of insulated glass units.
Part 2 Products
2.1 FLAT GLASS MATERIALS
.1 Manufacturers:
.1 PPG Industries (800-377-5267).
.2 Pilkington North America (800-221-0444).
.3 AFG Industries, Inc. (800-251-0441)
.4 Guardian Industries (248-340-1800)
.5 Old Castle Glass, a CRH Company (800-899-8455)
.6 Viracon, Inc. (800-533-2080)
.7 Substitutions: Not permitted without prior approval.
.2 Float Glass (Type FG-A): ASTM C1036, Type 1 transparent flat, Class 1 clear, Quality
q3 glazing select; 6mm (1/4inch) minimum thick.
.3 Tempered Glass (Type FG-B): ASTM C1048, FT fully tempered, Condition A uncoated,
Type 1 transparent flat, Class 1 clear, Quality q3 glazing select, conforming to ANSI
Z97.1; 6 mm (1/4”) minimum thick.
.4 Low E Glass (Type FG-G): Float type, transparent, clear, coating on inner surface (Side
3) on insulated units, Quality q3, visible light transmittance of 72 percent, solar light
transmittance of 52 percent, shading coefficient of 0.71; 6 mm (1/4”) minimum thick.
Approved manufacturer: "Solarban 60 Low-E Glass"; PPG Industries (800-377-5267)
.5 Spandrel Frit Glass (Type FG-J): ASTM C1048 Kind FT fully tempered, fritted and one
surface coated, flat, colour to match aluminum cladding panel, 6mm (1/4”) thick.
2.2 FIRE-RESISTIVE GLAZING PRODUCTS
.1 Fire-Resistive, Georgian Wired Glass, acceptable to authorities having jurisdiction, showing
product complies with fire-resistive installation indicated, and as follows:
.2 Safety Glass: Shall conform to ANSI Z97.1, ASTM C1048
.3 Polished on both surfaces, transparent with minimum visible light transmission of 85
percent.

Hamilton International Air Cargo Logistics Facility Section 08 80 50
Tradeport International Corporation GLAZING
July 2014 Page 5 of 8
Chamberlain Architect Services Limited
2.3 SEALED INSULATING GLASS MATERIALS
.1 Manufacturers:
.1 Old Castle Glass, a CRH Company
.2 Viracon, Inc.
.3 AFG Industries, Inc
.4 Substitutions: Permitted upon approval.
Insulated Glass Units - Low E (Type SG-B): ASTM E774 and E773; double pane with
silicone sealant edge seal; outer pane of Tempered Glass, inner pane of Low E glass on
clear colour glass cover plate, visible light transmittance of visible light transmittance of
74 percent, solar light transmittance of 72 percent, shading coefficient of 0.71; 6 mm
(1/4”) minimum thick. Argon fill.
Approved manufacturer: "Solarban 60 Low-E Glass"; PPG Industries
Sealing System: Manufacturer’s Standard Dual Seal
Spacer material: For all insulating glass provide a warm edge spacer. Polymer based with
little or no metal content.
2.4 MIRRORS
.1 Approved Manufacturers:
1) Binswanger Mirror, Division of Vitro America
2) Guardian Consolidated
3) Gardner Glass Products
.2 Mirror glazing "select" quality float glass complying with ASTM C1036 and CPSC 16 CFR 1201,
1/4" thick.
.3 Silvering: Provide electro-deposited silvering in two coats.
.4 Exposed edges ground smooth and polished.
.5 Mirror sizes indicated on the drawings. Extend mirror to within 1" of adjacent walls, on each end,
in one piece.
.6 Mirror Adhesive System:
.1 Approved Manufacturers:
1) Edge Seal: "UC-4401" - PPG Industries Inc., Glass Group; or as recommended by
mirror manufacturer.
2) Adhesive: “Mirror-Mastic”; Palmer Products Corp
3) Approved Substitution
.7 Exposed Mirror Clips:
.1 Approved Manufacturers:
1) Top Clip: 9/16” wide x 1-1/4” long; Model No. 318; Knape & Vogt
2) Bottom Clip: Continuous low profile clip at base.
3) Approved substitution
Hamilton International Air Cargo Logistics Facility Section 08 80 50
Tradeport International Corporation GLAZING
July 2014 Page 6 of 8
Chamberlain Architect Services Limited
2.5 GLAZING ACCESSORIES
.1 Lock Strip Gaskets: ASTM C542, ozone-resistant neoprene compound, with lock-strip
(zipper) component that friction-fits into position to retain glass pane/unit, tensile strength
of 14 MPa (2000 psi) tested to ASTM D412, Durometer hardness of 75 tested to ASTM
D1149, sized to accommodate glass thickness.
.2 Setting Blocks: ASTM C864 Neoprene, 80 to 90 Shore A durometer hardness, length of
25 mm for each square metre (0.1 inch for each square foot) of glazing or minimum 100
mm (4 inch) x width of glazing rabbet space minus 1.5 mm (1/16 inch) x height to suit
glazing method and pane weight and area.
.3 Spacer Shims: ASTM C864 Neoprene 50 to 60 Shore A durometer hardness, minimum
75 mm (3 inch) long x one half the height of the glazing stop x thickness to suit
application , self adhesive on one face.
.4 Glazing Tape: Preformed butyl compound with integral resilient tube spacing device10 to
15 Shore A durometer hardness; coiled on release paper.
.5 Glazing Clips: Manufacturer's standard type.
2.6 SOURCE QUALITY CONTROL AND TESTS
.1 Section 01 43 00: Provide testing and analysis of glass.
.2 Provide shop inspection and testing for glass.
.3 Test samples in accordance with ANSI Z97.1,ASTM E773,ASTM E546,ASTM E576.
Part 3 Execution
3.1 EXAMINATION
.1 Verify that openings for glazing are correctly sized and within tolerance.
.2 Verify that surfaces of glazing channels or recesses are clean, free of obstructions that may
impede moisture movement, weeps are clear, and ready to receive glazing.
3.2 PREPARATION
.1 Clean contact surfaces with solvent and wipe dry.
.2 Seal porous glazing channels or recesses with substrate compatible primer or sealer.
.3 Prime surfaces scheduled to receive sealant.
.4 Perform installation in accordance with ASTM C804 for solvent release sealants.
.5 Install sealant in accordance with manufacturer's instructions.

Hamilton International Air Cargo Logistics Facility Section 08 80 50
Tradeport International Corporation GLAZING
July 2014 Page 7 of 8
Chamberlain Architect Services Limited
3.3 INSTALLATION - EXTERIOR WET/DRY METHOD (PREFORMED TAPE AND
SEALANT)
.1 Cut glazing tape to length and set against permanent stops, 5 mm> (3/16 inch)>> below
sight line. Seal corners by butting tape and dabbing with sealant.
.2 Apply heel bead of sealant along intersection of permanent stop with frame ensuring full
perimeter seal between glass and frame to complete the continuity of the air and vapour
seal.
.3 Place setting blocks at 1/4 points with edge block no more than 150 mm (6) inches from
corners.
.4 Rest glazing on setting blocks and push against tape with sufficient pressure to attain full
contact at perimeter of pane or glass unit.
.5 Place glazing tape on glazing pane or unit with tape flush with sight line.
.6 Fill gap between glazing and stop with sealant to depth equal to bite of frame on glazing,
but not more than 9 mm (3/8 inch) below sight line.
.7 Apply cap bead of sealant along void between the stop and the glazing, to uniform line,
flush with sight line. Tool or wipe sealant surface smooth.
3.4 INSTALLATION - INTERIOR DRY METHOD (TAPE AND TAPE)
.1 Cut glazing tape to length and set against permanent stops, projecting 1.6 mm (1/16 inch)
above sight line.
.2 Place setting blocks at 1/4 points with edge block no more than 150 mm (6) inches from
corners.
.3 Rest glazing on setting blocks and push against tape for full contact at perimeter of pane or
unit.
.4 Place glazing tape on free perimeter of glazing in same manner described above.
.5 Install removable stop without displacement of tape. Exert pressure on tape for full
continuous contact.
.6 Knife trim protruding tape.
3.5 INSTALLATION - INTERIOR WET METHOD (COMPOUND AND
COMPOUND)
.1 Install glazing resting on setting blocks. Install applied stop and centre pane by use of
spacer shims at 600 mm (24 inch) centres, kept 6 mm 1/4 inch below sight line.
.2 Locate and secure glazing pane using [spring wire clips] [glazers' clips].
.3 Fill gaps between glazing and stops with glazing compound until flush with sight line.
Tool surface to straight line.

Hamilton International Air Cargo Logistics Facility Section 08 80 50
Tradeport International Corporation GLAZING
July 2014 Page 8 of 8
Chamberlain Architect Services Limited
3.6 FIELD QUALITY CONTROL
.1 Section 01 43 00: Field inspection, and testing,.
.2 Inspection will monitor quality of glazing.
3.7 MANUFACTURER'S FIELD SERVICES
.1 Glass and glazing product manufacturers to provide field surveillance of the installation
of their Products.
.2 Monitor and report installation procedures, and unacceptable conditions .
3.8 CLEANING
.1 Remove glazing materials from finish surfaces.
.2 Remove labels after Work is complete.
.3 Clean glass and adjacent surfaces.
3.9 PROTECTION OF FINISHED WORK
.1 After installation, mark pane with an 'X' by using removable plastic tape or paste.
END OF SECTION
Hamilton International Air Cargo Logistics Facility Section 09 21 16 Tradeport International Corporation GYPSUM BOARD ASSEMBLIES July 2014 Chamberlain Architect Services Limited Page 1 of 5 General
1.1 SECTION INCLUDES
.1 Gypsum board and joint treatment.
.2 Acoustic insulation.
.3 Cementitious backer board.
.4 Light gauge metal stud wall framing.
.5 Metal channel ceiling framing.
1.2 RELATED SECTIONS
.1 Section 07 21 29- Sprayed insulation.
.2 Section 07 84 00 - Firestopping.
1.3 REFERENCES
.1 ASTM C475/C475M-02 - Standard Specification for Joint Compound and Joint Tape for Finishing Gypsum Board.
.2 ASTM C514-01 - Nails for the Application of Gypsum Board.
.3 ASTM C645-04 - Specifications for Non-Structural Steel Framing Members.
.4 ASTM C665-01 - Mineral-Fibre Blanket Thermal Insulation for Light Frame Construction and Manufactured Housing.
.5 ASTM C754-00 - Installation of Steel Framing Members to Receive Screw-Attached Gypsum Board.
.6 ASTM C840-04a - Standard Specification for Application and Finishing of Gypsum Board.
.7 ASTM E90-92(2003) - Standard Test Method for Laboratory Measurement of Airborne-Sound Transmission Loss of Building Partitions and Elements.
.8 ULC - Fire Resistance.
1.4 SYSTEM DESCRIPTION
.1 Acoustic Attenuation for Interior Partitions: in accordance with ASTM E90.
1.5 QUALITY ASSURANCE
.1 Perform Work in accordance with ASTM C840.
.2 Applicator Qualifications: Company specializing in performing the work of this section with minimum three years documented experience.

Hamilton International Air Cargo Logistics Facility Section 09 21 16 Tradeport International Corporation GYPSUM BOARD ASSEMBLIES July 2014 Chamberlain Architect Services Limited Page 2 of 5 1.6 REGULATORY REQUIREMENTS
.1 Conform to applicable code for fire rated assemblies as follows:
.1 Fire Rated Partitions in accordance with listed assemblies by ULC as indicated on drawings .
.2 Fire Rated Ceiling and Soffits. Listed assembly by ULC.
.3 Fire Rated Structural Column Framing: Listed assembly by ULC.
.4 Fire Rated Structural Beam Framing: Listed assembly by ULC.
Part 2 Products
2.1 FRAMING MATERIALS
.1 Studs and Tracks: ASTM C645; galvanized sheet steel, minimum 0.018 inch (0.45mm) thick, C shape, with knurled faces.
.2 Furring, Framing, and Accessories: ASTM C645.
.3 Fasteners: ASTM C514.
.4 Anchorage to Substrate: Tie wire, nails, screws, and other metal supports, of type and size to suit application; to rigidly secure materials in place.
.5 Adhesive: ASTM C557.
2.2 GYPSUM BOARD MATERIALS - INTERIOR
.1 Standard Gypsum Board: ASTM C1396/C1396M, thickness as indicated on drawings, maximum available length in place; ends square cut, tapered edges.
.2 Fire Rated Gypsum Board: ASTM C1396/C1396M, fire resistive type, type X and type C as indicated on drawings, ULC rated; thickness as indicated on drawings, maximum available length in place; ends square cut, tapered edges.
.3 Moisture Resistant Gypsum Board: ASTM C1396/C1396M, maximum available length in place; ends square cut, tapered edges. – Can be used in washrooms except at
showers. Manufacturer: CGC “Humitek” or approved equal
.4 Gypsum Backing Board: ASTM C1396/C1396M, moisture resistant type; 16 mm (5/8 inch) thick; square edges, inorganic coated glass fiber mat faces, ends square cut, maximum available size in place. Manufacturer: - CGC “ÄquaTough Tile Backerboard” or GP “Dens Shield”- Wamscots behind tile. - CGC “AquaTough Interior Panels” or GP “DensArmor Plus” – For painted surfaces.
2.3 GYPSUM BOARD MATERIALS - EXTERIOR
.1 Exterior Gypsum Soffit Board: ASTM C1396/C1396M, moisture resistant fire rated type where indicated, 16 mm (5/8 inch) thick, maximum available length in place; inorganic coated glass fiber mat faces, ends square cut, square edges. Manufacturer: CGC “AquaTouch Interior Panels”

Hamilton International Air Cargo Logistics Facility Section 09 21 16 Tradeport International Corporation GYPSUM BOARD ASSEMBLIES July 2014 Chamberlain Architect Services Limited Page 3 of 5
.2 Gypsum Sheathing Board: ASTM C1396/C1396M, moisture resistant (and fire resistant where indicated) type; 5/8” thick, maximum available size in place; ends square cut, square edges; inorganic coated glass fiber mat faces. Manufacturer: CGC “Securock” or “Fiberock AquaTough Sheathing” or GP “Densglas Gold”
2.4 ACCESSORIES
.1 Acoustic Insulation: ASTM C665; preformed glass fibre, friction fit type, unfaced,
.2 Acoustic Sealant: Non-hardening, non-skinning, for use in conjunction with gypsum board.
.3 Corner Beads: GA-216, Metal corner bead.
.4 Edge Trim: GA-216; Type U casing bead
.5 Joint Materials: ASTM C475; reinforcing tape, joint compound, adhesive and water.
Part 3 Execution
3.1 EXAMINATION
.1 Verify that site conditions are ready to receive work and opening dimensions are as instructed by the manufacturer.
3.2 METAL STUD INSTALLATION
.1 Install studs in accordance with ASTM C754.
.2 Metal Stud Spacing: as indicated on drawings 400 and 600 mm on centre.
.3 Refer to Drawings for indication of partitions extending stud framing through the ceiling to the structure above. Maintain clearance under structural building members to avoid deflection transfer to studs. Provide extended leg ceiling runners.
.4 Door Opening Framing: Install double studs at door frame jambs. Install stud tracks on each side of opening, at frame head height, and between studs and adjacent studs.
.5 Blocking: Screw wood blocking to studs, screw steel channels to studs. Install blocking for support of plumbing fixtures, toilet partitions, wall cabinets, toilet accessories, and hardware.
3.3 WALL FURRING INSTALLATION
.1 Erect furring channels horizontally; space as indicated on drawings. Secure in place on alternate channel flanges at maximum 600 mm on centre.
3.4 FURRING FOR FIRE RATINGS
.1 Install furring as required for fire resistance ratings indicated.

Hamilton International Air Cargo Logistics Facility Section 09 21 16 Tradeport International Corporation GYPSUM BOARD ASSEMBLIES July 2014 Chamberlain Architect Services Limited Page 4 of 5 3.5 CEILING FRAMING INSTALLATION
.1 Install in accordance with ASTM C754.
.2 Coordinate location of hangers with other work.
.3 Install ceiling framing independent of walls, columns, and above ceiling work.
.4 Reinforce openings in ceiling suspension system which interrupt main carrying channels or furring channels, with lateral channel bracing. Extend bracing minimum 24 inches (600 mm) past each end of openings.
.5 Laterally brace entire suspension system.
3.6 ACOUSTIC ACCESSORIES INSTALLATION
.1 Install resilient channels at maximum 24 inches (600 mm) on centre. Locate joints over framing members.
.2 Place acoustic insulation in partitions tight within spaces, around cut openings, behind and around electrical and mechanical items within or behind partitions, and tight to items passing through partitions.
.3 Install acoustic sealant within partitions in accordance with manufacturer's instructions.
3.7 GYPSUM BOARD INSTALLATION
.1 Install gypsum board in accordance with manufacturer’s instructions and requirements of ULC assemblies.
.2 Erect single layer standard gypsum board in most economical direction with ends and edges occurring over firm bearing
.3 Erect single layer fire rated gypsum board vertically, with edges and ends occurring over firm bearing.
.4 Use screws when fastening gypsum board to metal furring or framing.
.5 Double Layer Applications: Secure second layer to first with fasteners. Place second layer perpendicular to first layer. Offset joints of second layer from joints of first layer.
.6 Treat cut edges and holes in moisture resistant gypsum board with sealant.
.7 Place control joints consistent with lines of building spaces.
.8 Place corner beads at external corners Use longest practical length. Place edge trim where gypsum board abuts dissimilar materials.
.9 Install backing board over metal studs in accordance with manufacturer's instructions.

Hamilton International Air Cargo Logistics Facility Section 09 21 16 Tradeport International Corporation GYPSUM BOARD ASSEMBLIES July 2014 Chamberlain Architect Services Limited Page 5 of 5 3.8 JOINT TREATMENT
.1 Tape, fill, and sand exposed joints, edges, and corners to produce smooth surface ready to receive finishes.
.2 Feather coats on to adjoining surfaces so that camber is maximum 1/32 inch (0.8 mm).
.3 Fill and finish joints and corners of backing board.
3.9 TOLERANCES
.1 Maximum Variation of Finished Gypsum Board Surface from True Flatness: 1/8 inch in 10 feet (3mm in 3 m) in any direction.
END OF SECTION

Hamilton International Air Cargo Logistics Facility Section 09 22 16
Tradeport International Corporation NON-STRUCTURAL METAL STUD FRAMING
July 2014
Chamberlain Architect Services Limited Page 1 of 7
Part 1 General
1.1 SECTION INCLUDES
.1 Formed metal framing of studs and furring, at interior locations.
.2 Framing accessories.
1.2 RELATED SECTIONS
.1 Section 06 10 00 – Rough Carpentry: Rough wood blocking within stud framing.
.2 Section 09 21 16 - Gypsum Board Assemblies: Gypsum board on metal studs for
partitioning.
1.3 REFERENCES
.1 ASTM A123/A123M-02 - Standard Specification for Zinc (Hot-Dip Galvanized) Coatings
on Iron and Steel Products.
.2 ASTM A653/A653M-04a - Standard Specification for Steel Sheet, Zinc-Coated
(Galvanized) or Zinc-Iron Alloy-Coated (Galvannealed) by the Hot-Dip Process.
.3 ASTM C645-04 - Standard Specification for Non-Structural Steel Framing Members.
.4 ASTM C754-00 - Standard Specification for Installation of Steel Framing Members to
Receive Screw-Attached Gypsum Panel Products.
.5 ASTM C1002-01 - Steel Self-Piercing, Tapping Screws for the Application of Gypsum
Panel Products or Metal Plaster Bases to Wood Studs or Steel Studs.
.6 ML/SFA 540 - (Metal Lath/Steel Framing Association, Division of National Association
of Architectural Metal Manufacturers) - Lightweight Steel Framing Manual.
.7 SSPC (The Society for Protective Coatings) (formerly SSPC - Steel Structures Painting
Council):
.1 Steel Structures Painting Manual.
.2 Paint 20, Zinc Rich Primers.
1.4 SUBMITTALS FOR REVIEW
.1 Shop Drawings:
.1 Indicate prefabricated work, component details, stud layout, framed openings,
anchorage to structure, type and location of fasteners, and accessories or items
required of other related work.
.2 Describe method for securing studs to tracks, splicing, and for blocking and
reinforcement to framing connections.

Hamilton International Air Cargo Logistics Facility Section 09 22 16
Tradeport International Corporation NON-STRUCTURAL METAL STUD FRAMING
July 2014
Chamberlain Architect Services Limited Page 2 of 7
.2 Product Data:
.1 Provide data describing standard framing member materials and finish, product
criteria, load charts, limitations.
.2 Provide MSDS information for all products.
1.5 SUBMITTALS FOR INFORMATION
.1 Manufacturer's Installation Instructions: Indicate special procedures, perimeter conditions
requiring special attention.
1.6 QUALITY ASSURANCE
.1 Perform Work in accordance with ASTM C754
.2 Single-Source Responsibility for Steel Framing: Obtain steel framing members for
gypsum board assemblies from a single manufacturer, unless otherwise indicated
.3 Installer Qualifications: Company specializing in performing the work of this section with
minimum 5 years documented experience approved by manufacturer.
.4 Design structural elements under direct supervision of a Professional Structural Engineer
experienced in design of this Work and licensed in the Province of Alberta.
.5 Form, fabricate, install, and connect components in accordance with ML/SFA 540.
1.7 PROJECT CONDITIONS
.1 Coordinate the placement of components within the stud framing assembly.
Part 2 Products
2.1 STEEL FRAMING
M ANUFACTURERS
.1 National Gypsum Company
.2 Clark Western Framing Systems
.3 Dietrich Metal Framing, Inc., A Worthington Industries Company
.4 Substitutions: Approved Equal
.5 General: Provide steel framing members complying with the following requirements:
.1 Component Sizes and Spacings: As indicated but not less than that required to
comply with ASTM C 754 under the following maximum deflection and lateral
loading conditions:
.1 Maximum Deflection: L/240 at 5 lb per sq. ft
.2 Protective Coating: G40 Hot-Dip Galvanized Coating per ASTM A653

Hamilton International Air Cargo Logistics Facility Section 09 22 16
Tradeport International Corporation NON-STRUCTURAL METAL STUD FRAMING
July 2014
Chamberlain Architect Services Limited Page 3 of 7
.6 Steel Studs and Runners: ASTM C645, with flange edges of studs bent back 90 deg and
doubled over to form 3/16-inch-wide minimum lip (return) and complying with the
following requirements for minimum thickness of base (uncoated) metal and for depth:
.1 Thickness: Minimum 0.027 inch 22 gage, unless otherwise indicated
.2 Thickness: 0.0329 inch (20 gage) as follows:
.1 For head runner, still runner, jamb, and cripple studs at door and other
openings
.2 In locations to receive cementitious backer units
.3 Depth: 1-5/8inches, 2-1/2 inches, 3-5/8 inches 6 inches, unless otherwise
indicated
.7 Furring:
.1 Steel Resilient Furring Channels: Manufacturer's standard product designed to
reduce sound transmission from steel sheet complying with ASTM A653 or
ASTM A568 to form 1/2 inch deep x 2-5/8 inch channel with single or double-leg
configuration. Minimum 25 gauge, pre-punched for screw attachment
.8 Deflection Track: Manufacturer's standard top runner designed to prevent cracking of
gypsum board applied to interior partitions resulting from deflection of the structure above
fabricated from steel sheet complying with ASTM A653 or ASTM A568. Thickness as
indicated for studs, and width to accommodated depth of studs
.9 Fasteners for Metal Framing: Provide fasteners of type, material, size, corrosion
resistance, holding power, and other properties required to fasten steel framing and furring
members securely to substrates involved; complying with the recommendations of gypsum
board manufacturers for applications indicated
2.2 STEEL FRAMING COMPONENTS FOR SUSPENDED & FURRED CEILINGS
M ANUFACTURERS
.1 Armstrong World Industries, Inc.
.2 Chicago Metalic Corp.
.3 USG Interiors, Inc.
.4 General: Provide components complying with ASTM C754 for conditions indicated
.5 Grid Suspension System for Interior Ceilings: ASTM C645, manufacturer's standard
direct-hung grid suspension system composed of main beams and cross furring members
that interlock to form a modular supporting network
.6 Wire for Hangers and Ties: ASTM A641, Class 1 Zinc Coating, Soft Temper, minimum
0.162 inch diameter
.7 Hanger Rods: ASTM A510 mild steel and zinc coated or protected with rust-inhibitive
paint. Diameter as indicated

Hamilton International Air Cargo Logistics Facility Section 09 22 16
Tradeport International Corporation NON-STRUCTURAL METAL STUD FRAMING
July 2014
Chamberlain Architect Services Limited Page 4 of 7
.8 Channels: Cold-rolled steel, 0.0538-inch-minimum thickness of base (uncoated) metal
and 1/2-inch-wide flanges, and as follows:
.1 Carrying Channels: 2 inches deep, 590 lb. per 1,000 feet, unless otherwise
indicated
.2 Furring Channels: 3/4 inch deep, 300 lb. per 1,000 feet, unless otherwise
indicated
.3 Finish: G-60 hot-dip galvanized coating per ASTM A653 for framing for toilet
rooms and where indicated
.1 Rust-inhibitive paint, unless otherwise indicated
.9 Steel Studs for Furring Channels: ASTM C645, with flange edges bent back 90 deg. and
doubled over to form 3/16-inch minimum lip (return), minimum thickness of base
(uncoated) metal and minimum depth as follows:
.1 Thickness: Minimum 0.0179 inch (25 Gage) , unless otherwise indicated
.2 Depth: 1-5/8" inch, unless otherwise indicated
.3 Protective Coating: ASTM A653,G40 Hot-Dip Galvanized Coating per ASTM
A525
.10 Cast-in-Place and Post-installed Anchors in Concrete: Anchors of type indicated below,
fabricated from corrosion-resistant materials, with holes or loops for attaching hanger
wires, and with capability to sustain, without failure, a load equal to 5 times that imposed
by ceiling construction, as determined by testing according to ASTM E488 conducted by a
qualified independent testing agency
.1 Cast-in-place type designed for attachment to concrete forms
2.3 STEEL FRAMING COMPONENTS AT GLASS FIBER REINFORCED SOFFITS
.1 Framing Components: As indicated and that comply with steel framing components
specified in this Section
.2 Wire Hangers: ASTM A641, Class 1 zinc coating, soft temper, 0.162-inch diameter
.3 Hanger Rods: Mild steel and zinc coated or protected with rust-inhibitive paint
.4 Flat Hangers: Mild steel and zinc coated or protected with rust-inhibitive paint
.5 Channels: Cold-rolled steel, 0.0598-inch minimum thickness of base (uncoated) metal
and 7/16-inch-wide flanges, finish per ASTM A653, G60 hot-dip galvanized coating
.6 Steel Studs and Runners: ASTM C645, with flange edges of studs bent back 90 degrees
and doubled over to form 3/16-inch- (5-mm-) wide minimum lip (return), and protective
coating as per ASTM A653, G40 hot-dip galvanized coating
.7 Fasteners for Metal Framing: Provide fasteners of type, material, size, corrosion
resistance, holding power, and other properties required to fasten steel framing members
securely to substrates

Hamilton International Air Cargo Logistics Facility Section 09 22 16
Tradeport International Corporation NON-STRUCTURAL METAL STUD FRAMING
July 2014
Chamberlain Architect Services Limited Page 5 of 7
Part 3 Execution
3.1 EXAMINATION
.1 Examine substrates with Installer present, to which gypsum board assemblies attach or
abut, installed hollow metal frames, cast-in-anchors, and structural framing, with Installer
present, for compliance with requirements for installation tolerances and other conditions
affecting performance of assemblies specified in this Section. Do not proceed with
installation until unsatisfactory conditions have been corrected.
.2 Verify that rough-in utilities are in proper location
3.2 CEILING ANCHORAGES
.1 Coordinate installation of ceiling suspension systems with installation of overhead
structural assemblies to ensure that inserts and other provisions for anchorages to building
structure have been installed to receive ceiling hangers that will develop their full strength
and at spacing required to support ceilings
3.3 INSTALLATION - STEEL FRAMING, GENERAL
.1 Steel Framing Installation Standard: Install steel framing to comply with ASTM C754
and with ASTM C840 requirements that apply to framing installation
.2 Install supplementary fire-treated wood framing, blocking, and bracing at terminations in
the work and for support of fixtures, equipment services, heavy trim, grab bars, toilet
accessories, furnishings, and similar construction to comply with details indicated and
with recommendations of gypsum board manufacturer, or if none available, with "Gypsum
Construction Handbook" published by United States Gypsum Co.
.3 Do not bridge building expansion and control joints with steel framing or furring
members. Independently frame both sides of joints with framing of furring members or a
indicated
.4 Isolate steel framing from building structure at locations indicated to prevent transfer of
loading imposed by structural movement. Comply with details shown on Drawings
3.4 INSTALLATION - STEEL FRAMING FOR WALLS AND PARTITIONS
.1 Install runners (tracks) at floors, ceilings and structural walls and columns where gypsum
drywall stud system abuts other construction
.2 Installation Tolerances: Install each steel framing and furring member so that fastening
surfaces do not vary more than 1/8 inch from plane of faces of adjacent framing
.3 Extend partition framing full height to structural supports or substrates above suspended
ceilings, except where partitions are indicated to terminate at suspended ceilings.
Continue framing over frames for doors and openings and frame around ducts penetrating
partitions above ceiling to provide support for gypsum board
.4 For STC-rated and fire-resistive-rated partitions requiring partitions to extend to the
underside of floor/roof slabs and decks or other continuous solid structural surfaces to

Hamilton International Air Cargo Logistics Facility Section 09 22 16
Tradeport International Corporation NON-STRUCTURAL METAL STUD FRAMING
July 2014
Chamberlain Architect Services Limited Page 6 of 7
obtain ratings, install framing around structural and other members extending below
floor/roof slabs and decks, as needed, to support gypsum board closures needed to make
partitions continuous from floor to underside of solid structure
.5 Install steel studs and furring in sizes and at spacings indicated but not less than that
required by referenced steel framing installation standard
.1 For single-layer construction: 16 inches on center
.6 Install steel studs so that flanges point in the same direction and gypsum boards can be
installed in the direction opposite to that of the flange.
.7 Frame door openings to comply with details indicated, with GA-600 and with applicable
published recommendations of gypsum board manufacturer. Attach vertical studs at
jambs with screws, wither directly to frames or to jamb anchor clips on door frames;
install runner track section (for cripple studs) at head and secure to jamb studs.
.8 Curved Partitions (if applicable):
.1 Cut top and bottom track (runners) through leg and web at 2-inch intervals for arc
length. In cutting lengths of track, allow for uncut straight lengths of not less than
12 inches at ends of arcs
.2 Bend track to uniform curve and locate straight lengths so they are tangent to arcs
.3 Support outside (cut) leg of track by clinching steel sheet strip, 1-inch-high-by-
thickness of track metal, to inside of cut legs using metal lock fasteners
.4 Install flexible track system in accordance with track manufacturer’s
recommendations
.5 Begin and end each arc with a stud, and space intermediate studs equally along
arcs at stud spacing recommended in writing by gypsum board manufacturer for
radii indicated. On straight lengths of not less than 2 studs at ends of arcs, place
studs 6 inches o.c.
.6 Reinforce, stiffen, and brace framing assemblies to withstand handling, delivery,
and erection stresses. Lift fabricated assemblies to prevent damage or distortion
3.5 INSTALLATION - STEEL FRAMING FOR SUSPENDED AND FURRED
CEILINGS
.1 Screw furring members to metal framing
.2 Suspend ceiling hangers from building structural members and as follows:
.1 Install hangers plumb and free from contact with insulation or other objects within
ceiling plenum that are not part of supporting structural or ceiling suspension
system. Splay hangers only where required to miss obstructions and offset
resulting horizontal forces by bracing, countersplaying, or other equally effective
means
.2 Where width of ducts and other construction within ceiling plenum produces
hanger spacings that interfere with the location of hangers required to support
standard suspension system members, install supplemental suspension members
and hangers in form of trapezes or equivalent devices. Size supplemental

Hamilton International Air Cargo Logistics Facility Section 09 22 16
Tradeport International Corporation NON-STRUCTURAL METAL STUD FRAMING
July 2014
Chamberlain Architect Services Limited Page 7 of 7
suspension members and hangers to support ceiling loads within performance
limits established by referenced standards
.3 Secure wire hangers by looping and wire-tying, either directly to structures or to
inserts, eyescrews, or other devices and fasteners that are secure and appropriate
for substrate, and in a manner that will not cause them to deteriorate or otherwise
fail due to age, corrosion, or elevated temperatures
.4 Secure flat, angle, channel, and rod hangers to structure, including intermediate
framing members, by attaching to inserts, eyescrews, or other devices and
fasteners that are secure and appropriate for structure, as well as for type of hanger
involved, and in a manner that will not cause them to deteriorate or fail due to age,
corrosion, or elevated temperatures
.5 Do not attach hangers to steel deck tabs
.6 Do not attach hangers to steel roof deck. Attach hangers to structural members
.7 Do not connect or suspend steel framing from ducts, pipes or conduit
.8 Sway-brace suspended steel framing with hangers used for support
.3 Install suspended steel framing components in sizes and at spacings indicated but not less
than that required by the referenced steel framing installation standard:
.1 Wire Hangers: 0.1620-inch (8-gauge) diameter, 4 feet o.c
.2 Carrying Channels (Main Runners): 1-1/2, 4 feet o.c
.3 Rigid Furring Channels (Furring Members): 16 inches o.c.
.4 Installation Tolerances: Install steel framing components for suspended ceilings so that
cross-furring members or grid suspension members are level to within 1/8 inch in 12 feet
as measured both lengthwise on each member and transversely between parallel members
.5 Wire-tie or clip furring members to main runners and to other structural supports as
indicated
.6 Grid Suspension System: Attach perimeter wall track or angle where grid suspension
system meets vertical surfaces. Mechanically join main beam and cross-furring members
to each other and butt-cut to fit into wall track
END OF SECTION

Hamilton International Air Cargo Logistics Facility Section 09 30 10
Tradeport International Corporation PORCELAIN FLOOR TILE
July 2014
Chamberlain Architect Services Limited Page 1 of 6
Part 1 General
1.1 SECTION INCLUDES
.1 Porcelain tile floor and base .
.2 Threshold at door openings.
1.2 RELATED SECTIONS
.1 Section 03 35 10 - Concrete Floor Finishing.
1.3 REFERENCES
.1 ANSI A108.1 - Installation of Ceramic Tile with Portland Cement Mortar.
.2 ANSI A108.3 - Quarry Tile and Paver Tile Installed With Portland Cement Mortar.
.3 ANSI A108.4 - Installation of Ceramic Tile with Organic Adhesives or Water Cleanable
Tile Setting Epoxy Adhesive.
.4 ANSI A108.5 - Installation of Ceramic Tile with Dry-Set Portland Cement Mortar or
Latex Portland Cement Mortar.
.5 ANSI A108.6 - Installation of Ceramic Tile with Chemical Resistant, Water Cleanable
Tile Setting and Grouting Epoxy.
.6 ANSI A108.8 - Installation of Ceramic Tile with Chemical Resistant Furan Mortar and
Grout.
.7 ANSI A108.9 - Installation of Ceramic Tile with Modified Epoxy Emulsion Mortar/Grout.
.8 ANSI A108.10 - Installation of Grout in Tilework.
.9 ANSI A118.1 - Dry-Set Portland Cement Mortar.
.10 ANSI A118.3 - Chemical Resistant, Water Cleanable Tile-Setting and Grouting Epoxy
and Water Cleanable Tile Setting Epoxy Adhesive.
.11 ANSI A118.4 - Latex-Portland Cement Mortar.
.12 ANSI A118.5 - Chemical Resistant Furan Mortars and Grouts for Tile Installation.
.13 ANSI A118.6 - Ceramic Tile Grouts.
.14 ANSI A118.8 - Modified Epoxy Emulsion Mortar/Grout.
.15 ANSI A136.1 - Organic Adhesives for Installation of Ceramic Tile.
.16 ANSI A137.1 - Standard Specifications for Ceramic Tile.
Hamilton International Air Cargo Logistics Facility Section 09 30 10
Tradeport International Corporation PORCELAIN FLOOR TILE
July 2014
Chamberlain Architect Services Limited Page 2 of 6
.17 TCA (Tile Council of America) - Handbook for Ceramic Tile Installation.
.18 TTMAC (Terrazzo, Tile, and Marble Association of Canada) - Manual.
1.4 SUBMITTALS
.1 Shop Drawings: Indicate tile layout, patterns, colour arrangement, perimeter conditions,
junctions with dissimilar materials, thresholds.
.2 Product Data: Provide instructions for using adhesives and grouts.
1.5 MAINTENANCE DATA
.1 Maintenance Data: Include recommended cleaning methods, cleaning materials, stain
removal methods, and polishes and waxes.
.2 Provide 24 additional tiles of each type and color of tile required for project for
maintenance use. Store where directed. Clearly identify each box.
.3 Maintenance material to be of same production area as installed material
1.6 QUALIFICATIONS
.1 Manufacturer: Company specializing in manufacturing the Products specified in this
section with minimum five years documented experience.
.2 Installer: Company specializing in performing the work of this section with minimum 5
years documented experience approved by manufacturer.
1.7 DELIVERY, STORAGE, AND HANDLING
.1 Protect adhesives from freezing or overheating in accordance with manufacturer's
instructions.
1.8 ENVIRONMENTAL REQUIREMENTS
.1 Do not install adhesives in an unventilated environment.
.2 Air temperature and structural base temperature at tile installation area must be above 13
degrees C for 24 hours before, during and 24 hours after installation.
1.9 EXTRA MATERIALS
.1 Provide 10 sq m of each size, colour, and surface finish of tile specified.
Part 2 Products
2.1 TILE MANUFACTURERS
.1 Olympia Tile. Product Regal.
Hamilton International Air Cargo Logistics Facility Section 09 30 10
Tradeport International Corporation PORCELAIN FLOOR TILE
July 2014
Chamberlain Architect Services Limited Page 3 of 6
.2 Approved equal.
2.2 CERAMIC TILE MATERIALS
.1 Ceramic Floor Tile: 300 mm x 300 mm (or 300mm x 600mm)
porcelain tile to CAN 2-75-1M77
.2 Finish: Standard and non-slip per Consultant
.3 Colour: Per Owner
2.3 STAIR MATERIALS
.1 Stair Tread: Match paver tile for moisture absorption, surface finish, and colour:
.1 Length: See drawings
.2 Height: See drawings
.3 Nosing: radiused
.4 Tread Surface: non-slip, ribbed.
2.4 SETTING MATERIALS
.1 Cement Mortar: Mixture of 1 part Portland cement, 4 parts dry sand and 1/10 hydraulic
lime. Materials shall conform to the following:
.2 Portland Cement: To CAN3-A, Type 10
.3 Hydrated Lime: To ASTM C-206 or 207, Type 5
.4 Sand: To CSA A82.56, passing 1.6 mm sieve
.5 Water: Potable, containing no contaminants which cause efflorescence
.6 Thin Set Mortar: field mixed, blended sand-Portland cement-latex mortar, “Kerapoxy” by
Mapei.
- Acceptable Alternates: “Laticrete 4237 distributed by Ceratec Inc., or Flextile 52 thin
set.
- Latex Additive:“Cemtex” by Master Builders,“Laticrete 2022”distributed by Ceratec.
2.5 GROUT MATERIALS
.1 Sanded, Portland cement based with Plastijoints acrylic additive, Kerncolour / Floor by
Mapei or similar by Laticrete. Colour as selected by Architect.
.2 Provide grout boost at shower floors and walls and at slop sink floors and walls.

Hamilton International Air Cargo Logistics Facility Section 09 30 10
Tradeport International Corporation PORCELAIN FLOOR TILE
July 2014
Chamberlain Architect Services Limited Page 4 of 6
2.6 SHOWER FLOOR PAN LINER
.1 Material for lining concrete subfloor of showers in locations shown on Drawings shall be
one of the following products :
.2 Manufacturers:
.1 “Chloraloy";
The Noble Co.
.2 "Bituthene 3100";
W.R. Grace Masonry Products
.3 “TEC Hydraflex Crack Isolation and Waterproofing Membrane”
, TEC Specialty Construction Brands
.4 Laticrete 9235 Thin Load Bearing Waterproofing and Crack Isolation Membrane";
" Laticrete International Inc.
.5 Approved equal
2.7 ACCESSORIES
.1 Edging and Transition Strips for floor tile:
.2 Manufacturers:
.1 Schluter Systems
.2 Approved Substitution.
.3 Miter corners and angles. Install in longest lengths possible with closely fitted and aligned
butt joints, and with horizontal leg keyed into the mortar bed. Top edge shall be set flush
with finished floor tile. Clean and remove any mortar stains
Part 3 Execution
3.1 EXAMINATION
.1 Verify that surfaces are ready to receive work.
3.2 PREPARATION
.1 Protect surrounding work from damage or disfiguration.
.2 Vacuum clean surfaces and damp clean.
.3 Seal substrate surface cracks with filler.
.4 Apply sealer to substrate surfaces in accordance with adhesive manufacturer's
instructions.

Hamilton International Air Cargo Logistics Facility Section 09 30 10
Tradeport International Corporation PORCELAIN FLOOR TILE
July 2014
Chamberlain Architect Services Limited Page 5 of 6
3.3 WORKMANSHIP
.1 Install adhesive tile, thresholds, stair treads, and grout in accordance with manufacturer's
instructions to TTMAC Manual.
.2 Back Buttering: For installations indicated, obtain 100% mortar coverage by complying
with applicable special requirements for back buttering of tile in referenced ANSI A108
series of tile installation standards:
- Tile floors in wet areas, including showers, tub enclosures, laundries
- Tile floors composed of tiles 8”x 8” or larger
- Tile floors composed of rib-backed tiles
.3 Fit tile units around corners, fitments, fixtures, drains and other built-in objects to
maintain uniform joint appearance. Make cut edges smooth, even and free from chipping.
Edges resulting from splitting not acceptable.
.4 Maximum surface tolerance: 1:800
.5 Make joints between tiles uniform and approximately 3 mm wide, (maximum 4 mm)
plumb, straight, true, even and with adjacent units flush. Align patterns
.6 Lay out units so perimeter tile are minimum 1/2 size
.7 Install floor tiles as per pattern. Pattern will be supplied by architect at a later date
.8 Place tile joints uniform in width, subject to variance in tolerance allowed in tile size.
Make joints watertight, without voids, cracks, excess mortar, or excess grout.
.9 Sound tile after setting. Replace hollow sounding units.
.10 Make internal angles square, external angles chamfered at 45° with narrow tile strip.
.11 Use bullnose edged tiles at termination of wall tiles, except where tiles abut projecting
surface or differing plane
.12 Seal grouted joints with sealer
.13 Allow tile to set for a minimum of 48 hours prior to grouting.
.14 Grout tile joints.
.15 Apply sealant to junction of tile and dissimilar materials and junction of dissimilar planes.
3.4 INSTALLATION - MORTAR BED METHOD
.1 Install porcelain floor tiles in accordance with TTMAC applicable thinset detail
3.5 CLEANING
.1 Clean tile and grout surfaces.
Hamilton International Air Cargo Logistics Facility Section 09 30 10
Tradeport International Corporation PORCELAIN FLOOR TILE
July 2014
Chamberlain Architect Services Limited Page 6 of 6
.2 Clean grout and setting material from face of tile while materials are workable. Leave tile
face clean and free of all foreign matter
.3 Leave finished installation clean and free of cracked, chipped, broken, unbonded, or
otherwise defective work
.4 Protection: When recommended by tile manufacturer, apply a protective coat of neutral
protective cleaner to completed surface. Protect installed tile work with Kraft paper or
other heavy covering during the construction period to prevent damage. Prohibit all foot
and wheel traffic from using tiled floors for at least 3 days, preferably 7 days
.5 Before final inspection, remove protective coverings and rinse neutral cleaner from all tile
surfaces
END OF SECTION
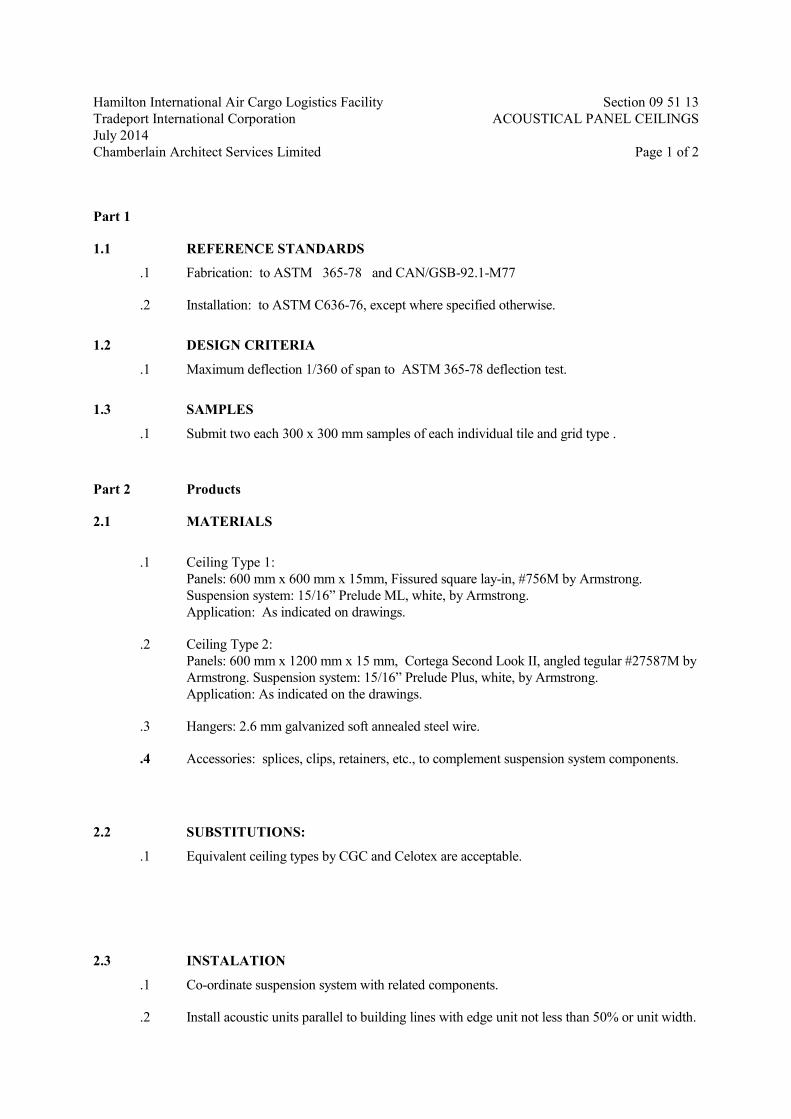
Hamilton International Air Cargo Logistics Facility Section 09 51 13
Tradeport International Corporation ACOUSTICAL PANEL CEILINGS
July 2014
Chamberlain Architect Services Limited Page 1 of 2
Part 1
1.1 REFERENCE STANDARDS
.1 Fabrication: to ASTM 365-78 and CAN/GSB-92.1-M77
.2 Installation: to ASTM C636-76, except where specified otherwise.
1.2 DESIGN CRITERIA
.1 Maximum deflection 1/360 of span to ASTM 365-78 deflection test.
1.3 SAMPLES
.1 Submit two each 300 x 300 mm samples of each individual tile and grid type .
Part 2 Products
2.1 MATERIALS
.1 Ceiling Type 1:
Panels: 600 mm x 600 mm x 15mm, Fissured square lay-in, #756M by Armstrong.
Suspension system: 15/16” Prelude ML, white, by Armstrong.
Application: As indicated on drawings.
.2 Ceiling Type 2:
Panels: 600 mm x 1200 mm x 15 mm, Cortega Second Look II, angled tegular #27587M by
Armstrong. Suspension system: 15/16” Prelude Plus, white, by Armstrong.
Application: As indicated on the drawings.
.3 Hangers: 2.6 mm galvanized soft annealed steel wire.
.4 Accessories: splices, clips, retainers, etc., to complement suspension system components.
2.2 SUBSTITUTIONS:
.1 Equivalent ceiling types by CGC and Celotex are acceptable.
2.3 INSTALATION
.1 Co-ordinate suspension system with related components.
.2 Install acoustic units parallel to building lines with edge unit not less than 50% or unit width.

Hamilton International Air Cargo Logistics Facility Section 09 51 13
Tradeport International Corporation ACOUSTICAL PANEL CEILINGS
July 2014
Chamberlain Architect Services Limited Page 2 of 2
.3 Scribe acoustic units to fit adjacent work. Butt joints tight, terminate edges with moulding.
.4 Support suspension system main runners at 1200 oc maximum with hangers from structure.
Assembly shall support super-imposed loads. Maximum permissible deflection, 1/360 of
span.
.5 Attach cross member to main runner to provide rigid assembly.
.6 Install suspension assembly to manufacturer's written instructions.
.7 Install flush edge moulding at junction of acoustic unit ceiling and other materials around
entire length of joint. Secure to construction. Butt joints neatly, square and true in
alignment.
.8 Set acoustic units in place.
.9 Set all ceiling levels by the use of transit or laser level
.10 Provide for Owner one (1) complete carton of each type of ceiling tile
END OF SECTION

Hamilton International Air Cargo Logistics Facility Section 09 68 23
Tradeport International Corporation CARPET - GLUE DOWN
July 2014
Chamberlain Architect Services Limited Page 1 of 4
Part 1 General
1.1 SECTION INCLUDES
.1 Carpet placed with glue down method.
.2 Accessories.
1.2 RELATED WORK
.1 Resilient tile flooring.
.2 Termination edging of adjacent floor finish.
.3 Wall materials to receive application of base.
.4 Base finish.
1.3 REFERENCES
.1 ASTM D2859 - Test Method for Ignition Characteristics of Finished Textile Floor
Covering Materials.
.2 ASTM E84 - Test Method for Surface Burning Characteristics of Building Materials.
.3 ASTM E648 - Critical Radiant Flux of Floor Covering Systems Using a Radiant Heat
Energy Source.
.4 NFPA 253 - Test for Critical Radiant Flux for Floor Covering Systems Using a Radiant
Heat Energy Source.
1.4 SUBMITTALS
.1 Product Data: Provide data on specified products, describing physical [and performance]
characteristics; sizes, patterns, colours available, and method of installation, [and layout of
flat wire system].
.2 Manufacturer's Installation Instructions: Indicate special procedures, perimeter conditions
requiring special attention.
1.5 QUALIFICATIONS
.1 Manufacturer: Company specializing in manufacturing specified carpet with minimum
three years documented experience.
.2 Installer: Company specializing in installing carpet with minimum three years
documented experience approved by manufacturer.

Hamilton International Air Cargo Logistics Facility Section 09 68 23
Tradeport International Corporation CARPET - GLUE DOWN
July 2014
Chamberlain Architect Services Limited Page 2 of 4
1.6 REGULATORY REQUIREMENTS
.1 Conform to applicable code for flame/smoke rating requirements in accordance with
ASTM E84.
.2 Conform to ASTM D2859 for surface flammability ignition test.]
1.7 ENVIRONMENTAL REQUIREMENTS
.1 Store materials for 3 days prior to installation in area of installation to achieve temperature
stability.
.2 Maintain minimum 21 degrees C ambient temperature 1 days prior to, during and 24 hours
after installation.
1.8 MAINTENANCE DATA
.1 Maintenance Data: Include maintenance procedures, recommended maintenance
materials, and suggested schedule for cleaning.
1.9 EXTRA MATERIAL
.1 Provide 10 sq m of carpeting of each type, colour, and pattern specified.
1.10 WARRANTY
1. Carpet manufacturer to provide the following warranties:
10 year abrasive wear
10 year colour fastness to light
5 year colour fastness to fumes
Lifetime anti-static
10 year no zipper or edge ravel
Part 2 Products
2.1 ACCEPTABLE MANUFACTURERS - CARPETING
.1 Pre-qualification: Must pass flame resistance requirements of CGSB 4-GP-129
.2 Pile Yarn: to be 100% Dupont Antron Lumena Nylon
.3 Carpet to be “Portfolio II” as manufactured by KRAUS CONTRACT
Acceptable Alternate: Logic, as manufactured by Peerless.
.4 Colour: As selected by Owner/Consultant.
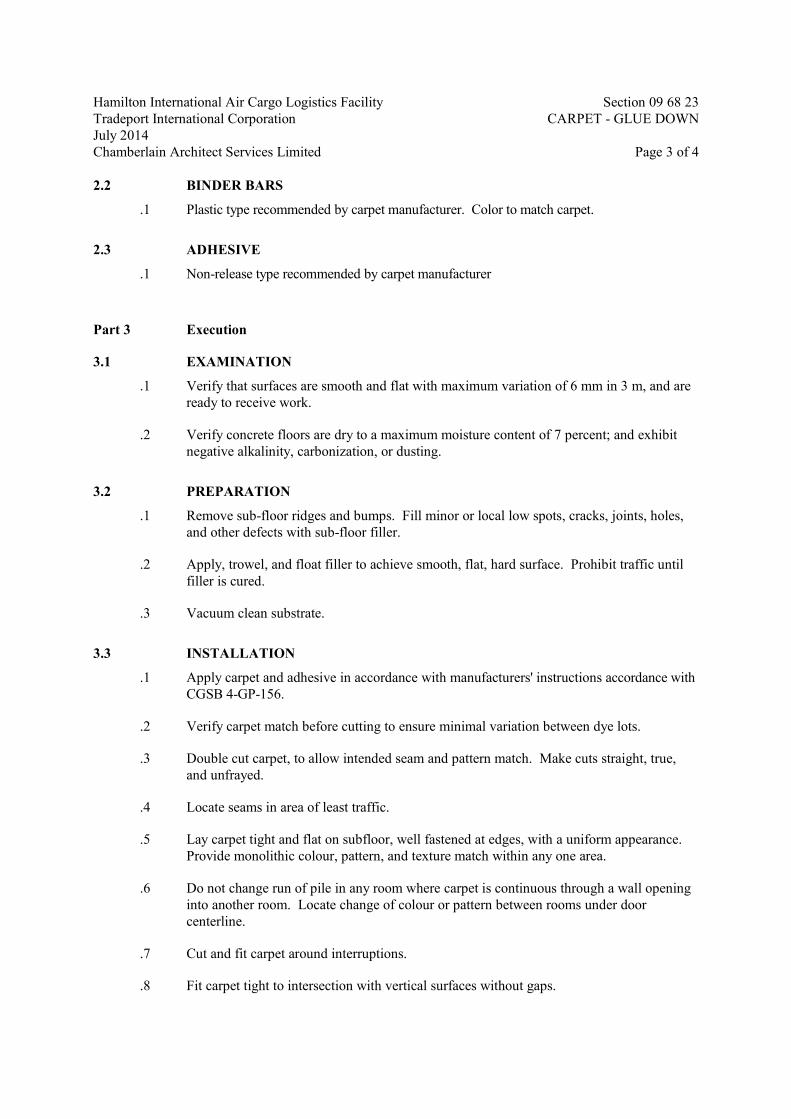
Hamilton International Air Cargo Logistics Facility Section 09 68 23
Tradeport International Corporation CARPET - GLUE DOWN
July 2014
Chamberlain Architect Services Limited Page 3 of 4
2.2 BINDER BARS
.1 Plastic type recommended by carpet manufacturer. Color to match carpet.
2.3 ADHESIVE
.1 Non-release type recommended by carpet manufacturer
Part 3 Execution
3.1 EXAMINATION
.1 Verify that surfaces are smooth and flat with maximum variation of 6 mm in 3 m, and are
ready to receive work.
.2 Verify concrete floors are dry to a maximum moisture content of 7 percent; and exhibit
negative alkalinity, carbonization, or dusting.
3.2 PREPARATION
.1 Remove sub-floor ridges and bumps. Fill minor or local low spots, cracks, joints, holes,
and other defects with sub-floor filler.
.2 Apply, trowel, and float filler to achieve smooth, flat, hard surface. Prohibit traffic until
filler is cured.
.3 Vacuum clean substrate.
3.3 INSTALLATION
.1 Apply carpet and adhesive in accordance with manufacturers' instructions accordance with
CGSB 4-GP-156.
.2 Verify carpet match before cutting to ensure minimal variation between dye lots.
.3 Double cut carpet, to allow intended seam and pattern match. Make cuts straight, true,
and unfrayed.
.4 Locate seams in area of least traffic.
.5 Lay carpet tight and flat on subfloor, well fastened at edges, with a uniform appearance.
Provide monolithic colour, pattern, and texture match within any one area.
.6 Do not change run of pile in any room where carpet is continuous through a wall opening
into another room. Locate change of colour or pattern between rooms under door
centerline.
.7 Cut and fit carpet around interruptions.
.8 Fit carpet tight to intersection with vertical surfaces without gaps.

Hamilton International Air Cargo Logistics Facility Section 09 68 23
Tradeport International Corporation CARPET - GLUE DOWN
July 2014
Chamberlain Architect Services Limited Page 4 of 4
.9 Where wall bases are scheduled, cut carpet tight to walls. Fit carpet tight to vertical
interruptions, leaving no gaps.
3.4 CLEANING
.1 Remove excess adhesive without damage, from floor, base, and wall surfaces.
.2 Clean and vacuum carpet surfaces.
3.5 SCHEDULE
.1 To be determined by Owner/Consultant.
END OF SECTION
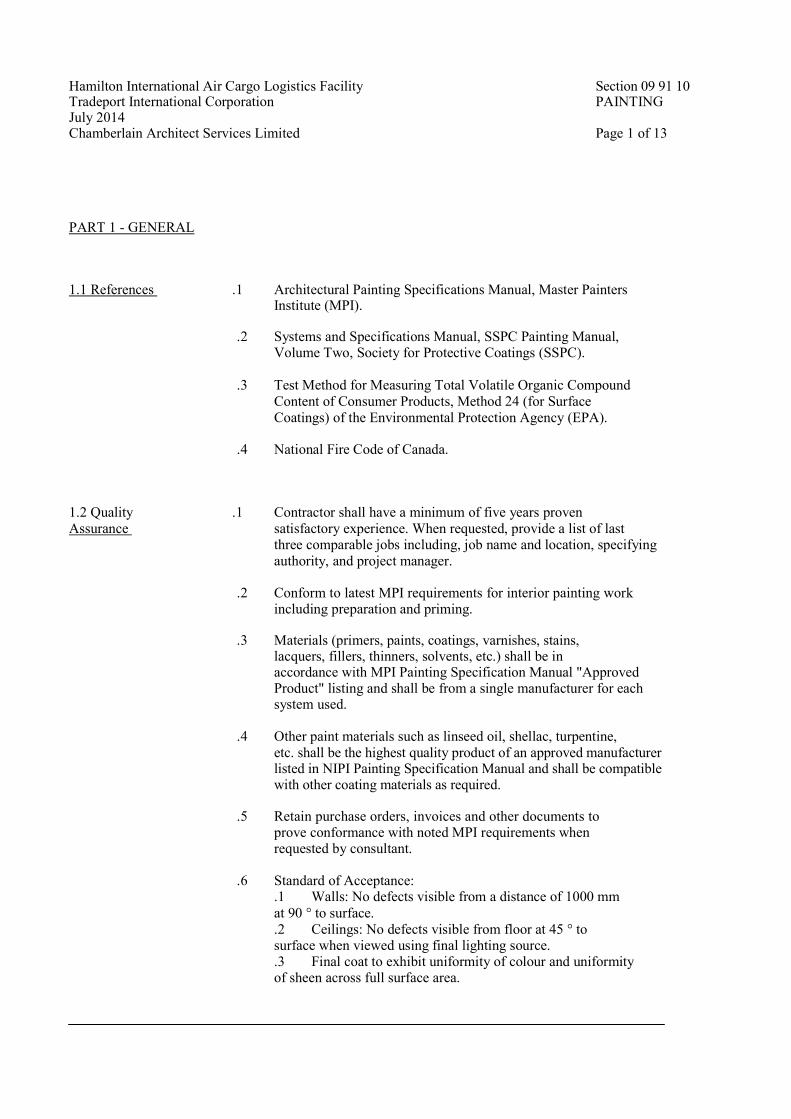
Hamilton International Air Cargo Logistics Facility Section 09 91 10 Tradeport International Corporation PAINTING July 2014 Chamberlain Architect Services Limited Page 1 of 13
PART 1 - GENERAL
1.1 References .1 Architectural Painting Specifications Manual, Master Painters Institute (MPI).
.2 Systems and Specifications Manual, SSPC Painting Manual, Volume Two, Society for Protective Coatings (SSPC).
.3 Test Method for Measuring Total Volatile Organic Compound
Content of Consumer Products, Method 24 (for Surface
Coatings) of the Environmental Protection Agency (EPA).
.4 National Fire Code of Canada.
1.2 Quality .1 Contractor shall have a minimum of five years proven
Assurance satisfactory experience. When requested, provide a list of last three comparable jobs including, job name and location, specifying
authority, and project manager.
.2 Conform to latest MPI requirements for interior painting work including preparation and priming.
.3 Materials (primers, paints, coatings, varnishes, stains, lacquers, fillers, thinners, solvents, etc.) shall be in accordance with MPI Painting Specification Manual "Approved Product" listing and shall be from a single manufacturer for each system used.
.4 Other paint materials such as linseed oil, shellac, turpentine,
etc. shall be the highest quality product of an approved manufacturer listed in NIPI Painting Specification Manual and shall be compatible with other coating materials as required.
.5 Retain purchase orders, invoices and other documents to prove conformance with noted MPI requirements when requested by consultant.
.6 Standard of Acceptance: .1 Walls: No defects visible from a distance of 1000 mm
at 90 ° to surface.
.2 Ceilings: No defects visible from floor at 45 ° to surface when viewed using final lighting source. .3 Final coat to exhibit uniformity of colour and uniformity of sheen across full surface area.

Hamilton International Air Cargo Logistics Facility Section 09 91 10 Tradeport International Corporation PAINTING July 2014 Chamberlain Architect Services Limited Page 2 of 13
1.3 Environmental 1 Provide paint products meeting MPI "Environmentally Performance Friendly" E2 ratings based on VOC (EPA Method 24) content
Requirements levels.
1.4 Scheduling of .1 Schedule painting operations to prevent disruption of Work occupants in and about the building.
1.5 Submittals 1 Submit product data and manufacturer's
installation/application instructions for each paint and cdating product to be used in accordance with Section 01300 Submittal Procedures.
.2 Upon completion, submit records of products used. List products in relation to finish system and include the following: .1 Product name, type and use. .2 Manufacturer's product number. .3 Colour numbers. .4 MPI Environmentally Friendly classification system
rating.
.5 Manufacturer's Material Safety Data Sheets (MSDS).
1.6 Quality Control 1. When requested by Consultant, provide a mock-up of paint designated surface to requirements specified herein, with specified paint or coating showing selected colours, gloss/sheen, textures and workmanship to MPI Painting Specification Manual standards for review and approval. When approved, surface, area, room and/or items shall become acceptable standard of finish quality and workmanship for similar on-site work.
1.7 Extra .1 Submit maintenance materials in accordance with Section Materials 01300 - Submittals.
.2 Submit one - one litre can of each type and colour of finish
coating. Identify colour and paint type in relation to
established colour schedule and finish system.
.3 Deliver to Contractor and store where directed.

Hamilton International Air Cargo Logistics Facility Section 09 91 10 Tradeport International Corporation PAINTING July 2014 Chamberlain Architect Services Limited Page 3 of 13
1.8 Delivery, Handling and Storage
.1 Deliver, store and handle materials in original containers,
sealed, with labels intact.
.2 Labels shall clearly indicate: .1 Manufacturer's name and address. .2 Type of paint or coating. .3 Compliance with applicable standard. .4 Colour number in accordance with established colour schedule.
.3 Remove damaged, opened and rejected materials from site.
.4 Provide and maintain dry, temperature controlled, secure storage.
.5 Observe manufacturer's recommendations for storage and handling.
.6 Store materials and supplies away from heat generating devices.
.7 Store materials and equipment in a well ventilated area with
temperature range 7° C to 30° C.
.8 Store temperature sensitive products above minimum temperature as recommended by manufacturer.
.9 Keep areas used for storage, cleaning and preparation, clean and orderly to approval of Consultant. After completion of operations, return areas to clean condition to approval of Consultant.
.10 Remove paint materials from storage only in quantities required for same day use.
.11 Comply with requirements of Workplace Hazardous Materials Information System (WHMIS) regarding use,
handling storage, and disposal of hazardous materials.
.12 Fire Safety Requirements: .1 Provide one 9 kg Type ABC dry chemical fire extinguisher adjacent to storage area.
.2 Store oily rags, waste products, empty containers and
materials subject to spontaneous combustion in ULC approved,
sealed containers and remove from site on a daily basis.
.3 Handle, store, use and dispose of flammable and combustible materials in accordance with the National Fire Code of Canada.
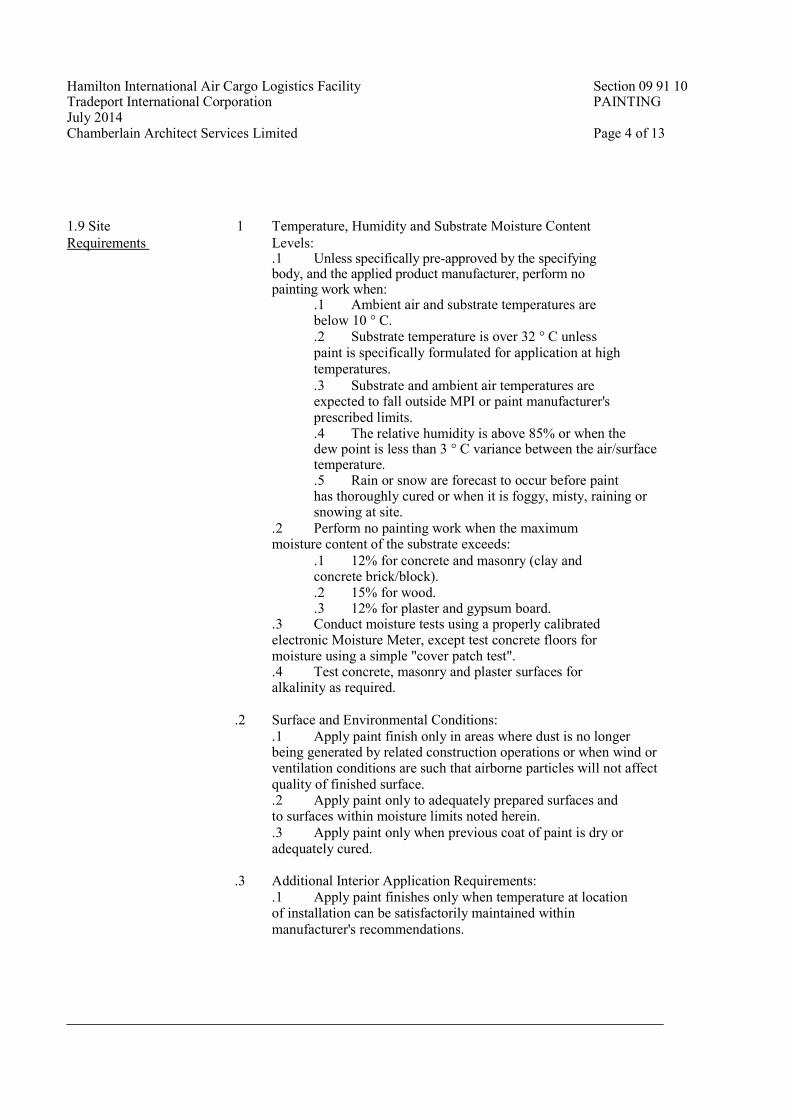
Hamilton International Air Cargo Logistics Facility Section 09 91 10 Tradeport International Corporation PAINTING July 2014 Chamberlain Architect Services Limited Page 4 of 13
1.9 Site 1 Temperature, Humidity and Substrate Moisture Content
Requirements Levels: .1 Unless specifically pre-approved by the specifying body, and the applied product manufacturer, perform no painting work when:
.1 Ambient air and substrate temperatures are below 10 ° C. .2 Substrate temperature is over 32 ° C unless paint is specifically formulated for application at high
temperatures.
.3 Substrate and ambient air temperatures are expected to fall outside MPI or paint manufacturer's prescribed limits. .4 The relative humidity is above 85% or when the dew point is less than 3 ° C variance between the air/surface temperature. .5 Rain or snow are forecast to occur before paint has thoroughly cured or when it is foggy, misty, raining or snowing at site.
.2 Perform no painting work when the maximum moisture content of the substrate exceeds:
.1 12% for concrete and masonry (clay and concrete brick/block). .2 15% for wood. .3 12% for plaster and gypsum board.
.3 Conduct moisture tests using a properly calibrated electronic Moisture Meter, except test concrete floors for moisture using a simple "cover patch test". .4 Test concrete, masonry and plaster surfaces for alkalinity as required.
.2 Surface and Environmental Conditions:
.1 Apply paint finish only in areas where dust is no longer being generated by related construction operations or when wind or ventilation conditions are such that airborne particles will not affect quality of finished surface. .2 Apply paint only to adequately prepared surfaces and to surfaces within moisture limits noted herein.
.3 Apply paint only when previous coat of paint is dry or adequately cured.
.3 Additional Interior Application Requirements:
.1 Apply paint finishes only when temperature at location of installation can be satisfactorily maintained within
manufacturer's recommendations.

Hamilton International Air Cargo Logistics Facility Section 09 91 10 Tradeport International Corporation PAINTING July 2014 Chamberlain Architect Services Limited Page 5 of 13
1.10 Waste 1 Paint, stain and wood preservative finishes and related
Management and materials (thinners, solvents, etc.,) are regarded as Disposal hazardous products and are subject to regulations for
disposal. Information on these controls can be obtained from Provincial Ministries of Environment and Regional levels of Government.
.2 Material which cannot be reused must be treated as hazardous waste and disposed of in an appropriate manner.
.3 Place materials defined as hazardous or toxic waste,
including used sealant and adhesive tubes and containers, in containers or areas designated for hazardous waste:"
.4 To reduce the amount of contaminants entering waterways, sanitary/storm drain systems or into ground the following procedures shall be strictly adhered to: .1 Retain cleaning water for water-based materials to allow sediments to be filtered out.
.2 Retain cleaners, thinners, solvents and excess paint
and place in designated containers and ensure proper disposal.
.3 Return solvent and oil soaked rags used during painting operations for contaminant recovery, proper disposal, or appropriate cleaning and laundering. .4 Dispose of contaminants in an approved legal manner in accordance with hazardous waste regulations. .5 Empty paint cans are to be dry prior to disposal or recycling (where available).
.5 Where paint recycling is available, collect waste paint by type and provide for delivery to recycling or collection facility.
.6 Close and seal tightly partly used sealant and adhesive
containers and store protected in well ventilated fire-safe area at moderate temperature.

Hamilton International Air Cargo Logistics Facility Section 09 91 10 Tradeport International Corporation PAINTING July 2014 Chamberlain Architect Services Limited Page 6 of 13
PART 2 - PRODUCTS
2.1 Materials .1 Paint materials listed in the MPI Approved Products List (APL) are acceptable for use on this project.
.2 Paint materials for paint systems shall be products of a single manufacturer.
.3 Only qualified products with E2 "Environmentally Friendly" rating are acceptable for use on this project.
.4 Paints, coatings, adhesives, solvents, cleaners, lubricants, and other fluids, shall: .1 be water-based water soluble water clean-up. .2 be non-flammable biodegradable. .3 be manufactured without compounds which contribute to ozone depletion in the upper atmosphere. .4 be manufactured without compounds which contribute to smog in the lower atmosphere.
.5 do not contain methylene chloride, chlorinated
hydrocarbons, toxic metal pigments.
.5 Water-borne surface coatings must be manufactured and transported in a manner that steps of process, including disposal of waste products arising therefrom, will meet requirements of applicable governmental acts, by-laws and regulations including, for facilities located in Canada, Fisheries Act and Canadian Environmental Protection Act (CEPA).
.6 Water-borne surface coatings must not be formulated or
manufactured with aromatic solvents, formaldehyde, halogenated solvents, mercury, lead, cadmium, hexavelant chromium or their compounds.
.7 Water-borne surface coatings and recycled water-borne surface coatings must have a flash point of 61.0 ° C or greater.
.8 Both water-borne surface coatings and recycled water-borne surface coatings must be made by a process that does not release:
.1 Matter in undiluted production plant effluent generating a 'Biochemical Oxygen Demand' (BOD) in excess of 15 mg/L to a natural watercourse or a sewage treatment facility lacking secondary
treatment.

Hamilton International Air Cargo Logistics Facility Section 09 91 10 Tradeport International Corporation PAINTING July 2014 Chamberlain Architect Services Limited Page 7 of 13
2.1 Materials .8 (Cont'd) (Cont'd) .2 Total Suspended Solids (TSS) in undiluted production
plant effluent in excess of 15 mg/L to a natural watercourse or a sewage treatment facility lacking secondary treatment.
.9 Water-borne paints and stains, recycled water-borne surface
coatings and water borne varnishes must meet a minimum "Environmentally Friendly" E2 rating.
.10 Recycled water-borne surface coatings must contain 50 %
post-consumer material by volume.
2.2 Colours 1 Consultant will provide Colour Schedule after Contract award.
.2 Colour schedule will be based upon the selection of three
base colours and three accent colours. No more than six colours will be selected for the entire project and no more than three colours will be selected in each area.
.3 Selection of colours will be from manufacturers full range of colours.
.4 Where specific products are available in a restricted range of colours, selection will be based on the limited range.
.5 Second coat in a three coat system to be tinted slightly lighter colour than top coat to show visible difference between coats.
2.3 Mixing and 1 Perform colour tinting operations prior to delivery of paint to Tinting site.
.2 Paste, powder or catalyzed paint mixes shall be mixed in strict accordance with manufacturer's written instructions.
.3 Where thinner is used, addition shall not exceed paint manufacturer's recommendations. Do not use kerosene or any such organic solvents to thin water-based paints.
.4 Thin paint for spraying according in strict accordance with
paint manufacturer's instructions.
.5 Re-mix paint in containers prior to and during application to
ensure break-up of lumps, complete dispersion of settled pigment, and colour and gloss uniformity.

Hamilton International Air Cargo Logistics Facility Section 09 91 10 Tradeport International Corporation PAINTING July 2014 Chamberlain Architect Services Limited Page82 of 13
2.4 Gloss/Sheen 1 Paint gloss shall be defined as the sheen rating of applied
Ratings paint, in accordance with the following values:
Gloss Level Units @ 60° Units @ 85° Category G1 - matte 0 to 5 max. 10 finish G2 - velvet 0 to 10 10 to 35 finish G3 - eggshell 10 to 25 10 to 35
finish
G4 - satin 20 to 35 min. 35 finish G5 - 35 to 70 semi-gloss finish G6 - gloss 70 to 85 finish
G7 - high > 85 gloss finish
.2 Gloss level ratings of painted surfaces shall be as specified
herein as noted on Finish Schedule.
2.5 Interior 1 Concrete Masonry Units: smooth face block Painting Systems .1 INT 4.2A Latex, semi-gloss finish.
.2 Structural Steel and Metal Fabrications: columns, beams, joists, etc.
.1 INT 5.1R High performance architectural latex G6, gloss finish.
.3 Galvanized Metal: doors, frames, railings, misc. steel, pipes, overhead decking, ducts, etc. .1 INT 5.3M High performance architectural latex G4, satin finish.
.4 Dressed Lumber: including doors, door and window frames, casings, mouldings, etc.
.1 INT 6.3Y Clear moisture cured polyurethane gloss finsh (over stain).
.5 Gypsum Board: gypsum wallboard, drywall, "sheet rock type material" .1 INT 9.2B High performance architectural latex G5,
semi-gloss finish for walls; G3, eggshell finish for ceilings.

Hamilton International Air Cargo Logistics Facility Section 09 91 10 Tradeport International Corporation PAINTING July 2014 Chamberlain Architect Services Limited Page 9 of 13
2.5 Interior .6 Painting Systems (Cont'd)
2.6 Exterior .1 Painting Systems
.2
2.7 Special Finish .1 Wall Paint
.2
.3
PART 3 - EXECUTION
3.1 General 1
.2
3.2 Existing .1 Conditions
.2
Canvas and Cotton Coverings: .1 INT 10.1A Latex G1, matt finish.
Structural Steel and Metal Fabrications (Main Entrance Canopy): .1 EXT 5.1A - quick dry enamel, G6 - gloss finish.
Galvanized Metals (Doors, Door Frames): .1 EXT 5.3A - Latex, G5 - semi-gloss finish.
Spray applied special finish wall paint system for Corridor Walls and Stairwells as noted in Room Finish Schedule: Type PT-1.
Acceptable Material: "Polo spec" by Classical Architectural Coatings, or "Fractalis" by Duron Paints and Wallcoverings. Finish: medium to coarse texture, multi coloured finish to be selected from standard range.
Apply over primer as recommended by manufacturer for new walls.
Perform preparation and operations for interior painting in accordance with IVIPI Painting Specifications Manual except where specified otherwise.
Apply paint materials in accordance with paint manufacturer's written application instructions.
Investigate existing substrates for problems related to proper and, complete preparation of surfaces to be painted. Report to Consultant damages, defects, unsatisfactory or unfavourable conditions before proceeding with work.
Conduct moisture testing of surfaces to be painted using a properly calibrated electronic moisture meter, except test concrete floors for moisture using a simple "cover patch test"

Hamilton International Air Cargo Logistics Facility Section 09 91 10 Tradeport International Corporation PAINTING July 2014 Chamberlain Architect Services Limited Page 10 of 13
(Cont'd)
and report findings to Consultant. Do not proceed with work until
conditions fall within acceptable range as recommended by
manufacturer.
Maximum moisture content as follows:
.1 Stucco, Plaster and Gypsum Board: 12%.
.2 Concrete: 12%.
.3 Concrete Block/Brick: 12%.
.4 Wood: 15%.
Protect existing building surfaces and adjacent structures from paint
spatters, markings and other damage by suitable non-staining covers
or masking. If damaged, clean and restore such surfaces as directed
by Consultant.
Protect items that are permanently attached such as Fire Labels on
doors and frames.
Protect factory finished products and equipment. Protect
building occupants in and about the building.
As painting operations progress, place "WET PAINT" signs in
occupied areas to approval of Consultant.
Clean and prepare surfaces in accordance with MPI Painting
Specification Manual requirements. Refer to MPI Manual in regard to
specific requirements and as follows:
.1 Remove dust, dirt, and other surface debris by
vacuuming, wiping with dry, clean cloths or compressed air.
.2 Wash surfaces with a biodegradable detergent and
bleach where applicable and clean warm water using a stiff bristle
brush to remove dirt, oil and other surface contaminants.
.3 Rinse scrubbed surfaces with clean water until
foreign
matter is flushed from surface.
.4 Allow surfaces to drain completely and allow to
dry
thoroughly.
.5 Prepare surfaces for water-based painting,
water-based cleaners should be used in place of organic solvents.
.6 Use trigger operated spray nozzles for water hoses.
.7 Many water-based paints cannot be removed with
water once dried. However, minimize the use of kerosene or any such
organic solvents to clean up water-based paints.
3.2 Existing .2Conditions
(Cont'd)
.3
3.3 Protection 1
.2
.3
.4
.5
3.4 Cleaning and .1Preparation

Hamilton International Air Cargo Logistics Facility Section 09 91 10 Tradeport International Corporation PAINTING July 2014 Chamberlain Architect Services Limited Page 11 of 13
3.4 Cleaning and .2 Prevent contamination of cleaned surfaces by salts, acids, Preparation alkalis, other corrosive chemicals, grease, oil and solvents
(Cont'd) before prime coat is applied and between applications of remaining coats. Apply primer, paint, or pretreatment as soon as possible after cleaning and before deterioration occurs.
.3 Where possible, prime surfaces of new wood surfaces before installation. Use same primers as specified for exposed surfaces. .1 Apply vinyl sealer to MPI #36 over knots, pitch, sap and resinous areas. .2 Apply wood filler to nail holes and cracks. .3 Tint filler to match stains for stained woodwork.
.4 Sand and dust between coats as required to provide adequate adhesion for next coat and to remove defects visible from a distance up to 1000 mm.
.5 Clean metal surfaces to be painted by removing rust, loose mill scale, welding slag, dirt, oil, grease and other foreign substances in accordance with MPI requirements. Remove traces of blast products from surfaces, pockets and corners to be painted by brushing with clean brushes blowing with clean dry compressed air, or vacuum cleaning.
.6 Touch up of shop primers with primer as specified in applicable section. Major touch-up including cleaning and painting of field connections, welds, rivets, nuts, washers, bolts, and damaged or defective paint and rusted areas, shall be by supplier of fabricated material.
3.5 Application .1 Apply paint by brush or roller. Conform to manufacturer's application instructions unless specified otherwise.
.2 Apply special wall coating sprayer in strict accordance with manufacturer's recommendations.
.3 Brush and Roller Application: .1 Apply paint in a uniform layer using brush and/or roller of types suitable for application. .2 Work paint into cracks, crevices and corners. .3 Paint surfaces and corners not accessible to brush using spray, daubers and/or sheepskins. Paint surfaces and corners not accessible to roller using brush, daubers or sheepskins. .4 Brush and/or roll out runs and sags, and over-lap marks. Rolled surfaces shall be free of roller tracking and heavy stipple unless approved by Consultant Engineer.
Hamilton International Air Cargo Logistics Facility Section 09 91 10 Tradeport International Corporation PAINTING July 2014 Chamberlain Architect Services Limited Page 12 of 13
3.5 Application .3 Brush and Roller Application:(Cont'd) (Cont'd) .5 Remove runs, sags and brush marks from finished
work and repaint.
.4 Spray application: .1 Provide and maintain equipment that is suitable for intended purpose, capable of properly atomizing paint to be applied, and equipped with suitable pressure regulators and gauges. .2 Keep paint ingredients properly mixed in containers during paint application either by continuous mechanical agitation or by intermittent agitation as frequently as necessary. .3 Apply paint in a uniform layer, with overlapping at edges of spray pattern. .4 Brush out immediately all runs and sags. .5 Use brushes to work paint into cracks, crevices and places which are not adequately painted by spray.
.5 Apply coats of paint as a continuous film of uniform thickness. Repaint thin spots or bare areas before next coat of paint is applied.
.6 Allow surfaces to dry and properly cure after cleaning and between subsequent coats for minimum time period as recommended by manufacturer.
.7 Sand and dust between coats to remove visible defects.
.8 Finish surfaces both above and below sight lines as specified for surrounding surfaces, including such surfaces as tops of interior cupboards and cabinets and projecting ledges.
.9 Finish inside of cupboards and cabinets as specified for outside surfaces.
.10 Finish closets and alcoves as specified for adjoining rooms.
.11 Finish top, bottom, edges and cutouts of doors after fitting as specified for door surfaces.
3.6 1 Unless otherwise specified, paint finished area exposed Mechanical/Electric conduits, piping, hangers, ductwork and other mechanical al Equipment and electrical equipment with colour and finish to match
adjacent surfaces, except as noted otherwise.

Hamilton International Air Cargo Logistics Facility Section 09 91 10 Tradeport International Corporation PAINTING July 2014 Chamberlain Architect Services Limited Page 13 of 13
3.6 .2 Other unfinished areas: leave exposed conduits, piping, Mechanical/Electric hangers, ductwork and other mechanical and electrical al Equipment equipment in original finish and touch up scratches and
(Cont'd) marks.
.3 Touch up scratches and marks on factory painted finishes and equipment with paint as supplied by manufacturer of equipment.
.4 Do not paint over nameplates.
.5 Keep sprinkler heads free of paint.
.6 Paint inside of ductwork where visible behind grilles, registers and diffusers with primer and one coat of matt black paint.
.7 Paint fire protection piping red.
.8 Paint disconnect switches for fire alarm system and exit light systems in red enamel.
.9 Paint natural gas piping yellow.
.10 Paint both sides and edges of backboards for telephone and electrical equipment before installation. Leave equipment in original finish except for touch-up as required, and paint conduits, mounting accessories and other unfinished items.
.11 Do not paint interior transformers and substation equipment.
3.7 Restoration 1 Clean and re-install all hardware items removed before undertaking painting operations.
.2 Remove protective coverings and warning signs as soon as practical after operations cease.
.3 Remove paint splashings on exposed surfaces that were not painted. Remove smears and spatter immediately as operations progress, using compatible solvent.
.4 Protect freshly completed surfaces from paint droppings and dust. Avoid scuffing newly applied paint.
.5 Restore areas used for storage, cleaning, mixing and handling of paint to clean condition.
__________________________________________END____________________________________

Hamilton International Air Cargo Logistics Facility Section 11 13 13
Tradeport International Corporation LOADING DOCK BUMPERS
July 2014
Chamberlain Architect Services Limited Page 1 of 2
Part 1 General
1.1 SECTION INCLUDES
.1 Dock bumpers of reinforced rubber with attachment frame.
1.2 RELATED SECTIONS
.1 Section 03 11 00 - Concrete Forming: Placement of bumper anchors into concrete.
.2 Section 09 91 10 - Painting: Field painting of exposed steel frame.
.3 Section 11 13 16 - Loading Dock Seals And Shelters.
.4 Section 11 13 20 - Loading Dock Levelers.
1.3 SUBMITTALS FOR REVIEW
.1 Section 01 33 00: Submission procedures.
.2 Product Data: Indicate unit dimensions, method of anchorage, and details of construction.
1.4 SUBMITTALS FOR INFORMATION
.1 Section 01 33 00: Submission procedures.
.2 Manufacturer's Installation Instructions: Indicate special installation requirements.
Part 2 Products
2.1 MANUFACTURERS
.1 Pentalift.
.2 Serco.
.3 Blue Giant.
.4 Substitutions: or approved equal.
2.2 COMPONENTS
.1 Bumpers: Fabric reinforced rubber pads, ozone resistant, laminated and compressed in
position with two galvanized steel rods with threaded ends, washers and nuts; between 3
x 2-1/2 x 1/4 inch galvanized steel angle end plates: Blue Giant DB412 or equal.
.1 Projection From Wall: To confirm.
.2 Vertical Height: To confirm.
.3 Length: To confirm.

Hamilton International Air Cargo Logistics Facility Section 11 13 13
Tradeport International Corporation LOADING DOCK BUMPERS
July 2014
Chamberlain Architect Services Limited Page 2 of 2
.2 Attachment Hardware: "L" shaped anchor rods for casting into concrete.
.3 Touch-up Primer: Zinc rich type.
Part 3 Execution
3.1 EXAMINATION
.1 Section 01 73 03: Verify existing conditions.
.2 Verify that anchor placement is acceptable.
3.2 PREPARATION
.1 Provide integral anchors for placement by Section 03 11 00.
3.3 INSTALLATION
.1 Install dock bumpers in accordance with manufacturer's instructions.
.2 Set plumb and level.
.3 Weld angle end frames to embedded anchors. Touch up weld with primer.
END OF SECTION

Hamilton International Air Cargo Logistics Facility Section 11 13 16
Tradeport International Corporation LOADING DOCK SEALS AND SHELTERS
July 2014
Chamberlain Architect Services Limited Page 1 of 2
Part 1 General
1.1 SECTION INCLUDES
.1 Compression door seals.
.2 Telescopic shelters with support framing.
1.2 RELATED SECTIONS
.1 Section 03 45 00 Precast Concrete. Placement of seal and shelter frame into wall
construction.
.2 Section 11 13 13 - Loading Dock Bumpers.
.3 Section 11 13 20 - Loading Dock Levelers.
1.3 SUBMITTALS FOR REVIEW
.1 Section 01 33 00: Submission procedures.
.2 Shop Drawings: Indicate framed wall opening, dimensions and tolerances, adjacent
construction and fittings required for anchorages, and anchor points.
1.4 SUBMITTALS FOR INFORMATION
.1 Section 01 33 00: Submission procedures.
.2 Manufacturer's Installation Instructions: Indicate special requirements and [________].
1.5 SUBMITTALS AT PROJECT CLOSEOUT
.1 Section 01 73 03: Submission procedures.
.2 Operation Data: Provide operating instructions, identify unit limitations.
.3 Maintenance Data: Provide unit maintenance information, lubrication cycles, spare parts
manual.
Part 2 Products
2.1 MANUFACTURERS
.1 Pentalift.
.2 Blue Giant
.3 Substitutions: or approved equal.

Hamilton International Air Cargo Logistics Facility Section 11 13 16
Tradeport International Corporation LOADING DOCK SEALS AND SHELTERS
July 2014
Chamberlain Architect Services Limited Page 2 of 2
2.2 COMPONENTS
.1 Door Seal & Dock Shelter: Compressible construction: Blue Giant BG400TS or equal
.1 To fit opening/door.
.2 Cushion: Inflatable head and side bags.
.3 Covering Material:
.4 Covering Colour: Grey colour with 5 inch wide yellow stripe continuous.
.5 Header: [Fixed] [Movable] air vented construction.
.6 Seal Shelter Operating Range: To be confirmed.
Part 3 Execution
3.1 EXAMINATION
.1 Section 01 73 03: Verification of existing conditions before starting work.
.2 Verify that rough-in wall opening and anchors are acceptable, correctly sized and aligned
to tolerances.
3.2 PREPARATION
.1 Provide frame and integral anchors for placement by Section 03 45 00.
3.3 ERECTION
.1 Erect seal and shelter components in accordance with manufacturer's instructions.
.2 Set plumb and level.
.3 Attach anchors and fittings to prepared wall construction and opening frame.
3.4 ADJUSTING
.1 Section 01 73 03: Adjusting installed work.
.2 Adjust installed unit for smooth and balanced operation.
END OF SECTION

Hamilton International Air Cargo Logistics Facility Section 11 13 20
Tradeport International Corporation LOADING DOCK LEVELERS
July 2014
Chamberlain Architect Services Limited Page 1 of 3
Part 1 General
1.1 SECTION INCLUDES
.1 Prefabricated steel leveler with guard rails.
.2 Operating hardware.
.3 Mechanical restraint safety vehicle lock.
1.2 RELATED SECTIONS
.1 Section 03 11 00 - Concrete Forming: and safety lock frame loading dock.
.2 Section 03 30 00 - Cast-in-place Concrete: Concrete pit.
.3 Section 05 50 00 - Metal Fabrications: Perimeter guard rails.
.4 Section 09 91 10 - Painting: Field painting of exposed steel members.
.5 Section 11 13 13 - Loading Dock Bumpers.
.6 Section 11 13 16 - Loading Dock Seals And Shelters.
1.3 REFERENCES
.1 ANSI MH14.1 - Industrial Loading Dockboards (Ramps).
1.4 SUBMITTALS FOR REVIEW
.1 Section 01 33 00: Submission procedures.
.2 Product Data: Provide materials and finish, installation details, roughing-in
measurements, operation of unit [and safety lock device].
.3 Shop Drawings: Indicate required opening dimensions, tolerances of opening dimensions.
1.5 SUBMITTALS FOR INFORMATION
.1 Section 01 33 00: Submission procedures.
.2 Manufacturer's Installation Instructions: Indicate special requirements.
1.6 SUBMITTALS AT PROJECT CLOSEOUT
.1 Section 01 73 03: Submission procedures.
.2 Operation Data: Provide operating instructions, identify unit limitations.
.3 Maintenance Data: Provide unit maintenance information, lubrication cycles, spare parts
manual.
Hamilton International Air Cargo Logistics Facility Section 11 13 20
Tradeport International Corporation LOADING DOCK LEVELERS
July 2014
Chamberlain Architect Services Limited Page 2 of 3
Part 2 Products
2.1 MANUFACTURERS
.1 Manufacturers:
.1 Blue Giant.
.2 Pentalift.
.3 Serco.
.4 Substitutions: or approved equal.
2.2 COMPONENTS
.1 Dock Leveler: Blue Giant MA 6008-50 Model or equal
.1 Operation: Hydraulic.
.2 Deck Width: 72 “ inch.
.3 Deck Length: 96” inch.
.4 Capacity: 50,000 lbs.
.5 Run off guard 4” inch.
.2 Vehicle Restraint: Mechanical lock, fabricated and welded steel plate construction, spring
loaded to automatically latch when activated, to conform to semi-trailer vehicle bumper
requirements by code for dimension and placement.
.3 Leveler: Steel checker plate deck, reinforced on underside, welded to fabricated steel
frame; counter balanced with 24” inch long automatically operated plate lip; lip to lock in
vertical position when leveler is at rest at dock level.
.4 Pit Frame: Steel angle channel, welded corners, fitted with anchors for concrete
embedment.
2.3 ACCESSORIES
.1 Bumpers: Fabric reinforced rubber pads, ozone resistant, positioned and anchored:
.1 Projection From Wall: To confirm.
.2 Vertical Height: To confirm.
.3 Length: 24 inches.
.4 Profile: Rectangular [Semi-circular] [T shape] [L shape] .
.2 Attachment Hardware: Galvanized] bolts and expansion shields. "L" shaped anchor rods
for casting into concrete.
.3 Construction Pit Kit: Blue Giant or equal – factory sized panels and anchors remain part of
pit
.4 Dock Lights: Red and green flashing lights with sun visor.
.5 Audible programmable Alarm:

Hamilton International Air Cargo Logistics Facility Section 11 13 20
Tradeport International Corporation LOADING DOCK LEVELERS
July 2014
Chamberlain Architect Services Limited Page 3 of 3
.6 Control: Intergrated system with Electric push button type with LED interior lights.
Mounted with controls for all dock equipment and light on steel stanchion at side of pit.
Blue Giant Gold Series III or approved equal.
2.4 FINISHES
.1 Leveler Platform: Hot dip galvanized. Factory enameled finish.
.2 Leveler Frame: Hot dip galvanized. Factory enameled finish.
.3 Railing: Hot dip galvanized. Factory enameled finish.
.4 Pit Frame: Hot dip galvanized to 380 gm/sq m (1.25 oz/sq ft finish
.5 Vehicle Restraint: Yellow painted hook, galvanized steel hydraulic operating mechanism
tied into controls Blue Giant Strong Arm SVR303 Vehicle restraint or approved equal.
Part 3 Execution
3.1 EXAMINATION
.1 Section 01 73 03: Verification of existing conditions before starting work.
.2 Verify that rough-in opening is acceptable.
3.2 PREPARATION
.1 Provide pit frame and integral anchors for placement by Section 03 11 00.
3.3 INSTALLATION
.1 Install dock leveler and mechanical safety vehicle lock unit in prepared opening in
accordance with manufacturer's instructions.
.2 Set square and level.
.3 Anchor unit securely, flush with dock. Weld back of leveling dock to pit frame.
Touch-up weld with primer.
.4 Anchor safety lock securely.
3.4 ADJUSTING
.1 Section 01 73 03: Adjusting installed work.
.2 Adjust installed unit and safety device for smooth and balanced operation.
END OF SECTION

Hamilton International Air Cargo Logistics Facility Section 34 71 21
Tradeport International Corporation VEHICLE GUARD RAILS
July 2014
Chamberlain Architect Services Limited Page 1 of 6
Part 1 General
1.1 SECTION INCLUDES
.1 Steel guard rail and steel posts.
1.2 RELATED SECTIONS
.1 Section 03 30 00 - Cast-in-place Concrete: Concrete foundation for posts.
1.3 QUALITY ASSURANCE
.1 Guardrail manufacturer to 10 years experience in the manufacture and pre-engineering of guardrail systems. Installer to be firm with 2 years experience in the installation of guardrail systems.
1.4 REFERENCES
.1 AASHTO M180 - Corrugated Sheet Steel Beams for Highway Guardrail.
.2 ASTM A36/A36M - Carbon Structural Steel.
.3 ASTM A123/A123M - Zinc (Hot Dip Galvanized) Coatings on Iron and Steel Products.
.4 ASTM A153 - Zinc Coating (Hot-Dip) on Iron and Steel Hardware.
.5 ASTM A428/A428M - Weight [Mass] of Coating on Aluminum-Coated Iron or Steel Articles.
.6 ASTM A500 - Cold-Formed Welded and Seamless Carbon Steel Structural Tubing in Rounds and Shapes.
.7 ASTM A501 - Hot-Formed Welded and Seamless Carbon Steel Structural Tubing.
.8 ASTM C94/C94M - Ready-mixed Concrete.
.9 AWPA C14 - Wood for Highway Construction - Preservative Treatment by Processes.
1.5 FIXED PRICE
Provide: Guard Rails: Includes rail, accessories, end closures, finished; Intermediate Posts and Terminal Anchor Posts with anchors, etc. as shown on drawings and as required to protect exterior walls, partition walls and columns, and protected walkways in warehouse.

Hamilton International Air Cargo Logistics Facility Section 34 71 21
Tradeport International Corporation VEHICLE GUARD RAILS
July 2014
Chamberlain Architect Services Limited Page 2 of 6
1.6 UNIT PRICE - MEASUREMENT AND PAYMENT
.1 Section 01 20 13: Unit prices. Provide unit prices for components added to drawing requirements.
.2 Guard Rail: By the linear metre. Includes rail, accessories, end closures, finished.
.3 Intermediate Posts: By the unit. posts, anchors to floor.
.4 Slide in guard rails and associated posts.
.5 Terminal Anchor Posts: By the unit. Includes anchors
1.7 SYSTEM DESCRIPTION
.1 Guard Rail Height: Top of rail 1100 mm (42 inches) above finished floor.
.2 Post Spacing: At intervals not exceeding 3 metre (10 feet). And As indicated.
.3 Post base and anchors as recommended by manufacturer
1.8 SUBMITTALS FOR REVIEW
.1 Section 01 33 00: Submission procedures.
.2 Shop Drawings: Indicate plan layout, spacing of components, post foundation dimensions, anchorage, and schedule of components.
.3 Product Data: Provide data on rail, posts, accessories, hardware and structural capabilities of rail section.
1.9 SUBMITTALS FOR INFORMATION
.1 Section 01 33 00: Submission procedures.
.2 Manufacturer's Instructions: Indicate installation requirements , post foundation anchor bolt templates and other installation requirements.
1.10 REGULATORY REQUIREMENTS
.1 Conform to all applicable codes for rail height or location restrictions.
Part 2 Products
2.1 MANUFACTURERS
.1 Manufacturers:
.1 Cogan Wire and Metal Products Ltd., 800-567-2642 Model: Heavy Duty Guardrail/Barrier Rail – Double Rail.

Hamilton International Air Cargo Logistics Facility Section 34 71 21
Tradeport International Corporation VEHICLE GUARD RAILS
July 2014
Chamberlain Architect Services Limited Page 3 of 6
.2 Substitutions: Approved equal.
2.2 MATERIALS
.1 Guard Rail Beam: ASTM A36 rolled steel sections, "W" profile, 305 mm (12 inch) High by 75mm (3”) manufacturered to ASTM A1011 Grade 45, Wide wall thickness 13-guage as required for 10,000lb impact at 4 mph impact, die punched bolt holes for site assembly and attachment to posts, welded steel end plate to ASTM A36 44W bolted to posts. Standard sizes: 305, 610, 915, 1220, 1840, 2145, 2440, 2745, 3050.
.2 Provide Manufacturer’s standard slide in rails and required posts with welded tracks where indicated.
.3 Steel Posts: ASTM A500 Grade 50 structural steel sections, HSS 125 mm x 125mm size, wall thickness as required to suite loads. Welded base plate to ASTM A36 44W and a rigid plastic plug on top.
.4 Hardware: Galv. Steel, bolts, nuts and washers to suit rail profile.
2.3 FINISHES
.1 Components: Galvanized to ASTM A123; 600 g/sq m coating. Powder Coated: Safety Yellow
.2 Hardware: Galvanized to ASTM A153, 600 g/sq m coating.
Part 3 Execution
3.1 INSTALLATION
.1 Install rails and posts and accessories in accordance with manufacturer's instructions.
.2 Set posts plumb, on base plates fastened to concrete slab as recommended by Manufacturer.
.3 Attach rails securely to posts with anchoring hardware.
3.2 INSTALLATION TOLERANCES
.1 Posts - Maximum Variation From Plumb: 6 mm.
.2 Rail - Maximum Offset From True Position: 25 mm.
.3 Rail - Maximum Variation From True Height: 6 mm.
END OF SECTION