1075456-05 - temperature control system - welcome...
TRANSCRIPT

Temperature Control System
Customer Product ManualPart 1075456−05
Issued 5/17
NORDSON CORPORATION • AMHERST, OHIO • USA
For parts and technical support, call the Finishing Customer Support Center at (800) 433-9319.
This document is subject to change without notice.Check http://emanuals.nordson.com for the latest version
and available local languages.

Part 1075456−05 � 2017 Nordson Corporation
tents
Table of ContentsSafety 1. . . . . . . . . . . . . . . . . . . . . . . . . . . . . . . . . . . . . . .
Qualified Personnel 1. . . . . . . . . . . . . . . . . . . . . . . . .Intended Use 1. . . . . . . . . . . . . . . . . . . . . . . . . . . . . .Regulations and Approvals 1. . . . . . . . . . . . . . . . . .Personal Safety 2. . . . . . . . . . . . . . . . . . . . . . . . . . . .
High-Pressure Fluids 2. . . . . . . . . . . . . . . . . . . . .Fire Safety 3. . . . . . . . . . . . . . . . . . . . . . . . . . . . . . . .
Halogenated Hydrocarbon Solvent Hazards 4.Action in the Event of a Malfunction 4. . . . . . . . . . .Disposal 4. . . . . . . . . . . . . . . . . . . . . . . . . . . . . . . . . .
System Overview 5. . . . . . . . . . . . . . . . . . . . . . . . . . . .Chilled Water Loop Operation 7. . . . . . . . . . . . . . . .
Refrigerant Cycle 7. . . . . . . . . . . . . . . . . . . . . . . .Fault Indicators 7. . . . . . . . . . . . . . . . . . . . . . . . . .
Flowsetter Valves 8. . . . . . . . . . . . . . . . . . . . . . . . . .Control Panel Front 9. . . . . . . . . . . . . . . . . . . . . . . . .Control Panel Interior 10. . . . . . . . . . . . . . . . . . . . . . .Chiller Junction Box 11. . . . . . . . . . . . . . . . . . . . . . . .Specifications 12. . . . . . . . . . . . . . . . . . . . . . . . . . . . . .
General Specifications 12. . . . . . . . . . . . . . . . . . . .Refrigeration System Specifications 12. . . . . . . .
Installation 14. . . . . . . . . . . . . . . . . . . . . . . . . . . . . . . . . .Location and Clearances 14. . . . . . . . . . . . . . . . . . . .Mounting 14. . . . . . . . . . . . . . . . . . . . . . . . . . . . . . . . . .Ambient Temperature 14. . . . . . . . . . . . . . . . . . . . . . .Electrical Connections 14. . . . . . . . . . . . . . . . . . . . . .Heat Exchanger Installation 15. . . . . . . . . . . . . . . . . .
Cabinet Mounting 15. . . . . . . . . . . . . . . . . . . . . . . .Remote Mounting 15. . . . . . . . . . . . . . . . . . . . . . . .Heat Exchanger RTD Connections 15. . . . . . . . .
Process Material Connections 16. . . . . . . . . . . . . . .Kits 16. . . . . . . . . . . . . . . . . . . . . . . . . . . . . . . . . . . . . . .Additional Temperature Control Loop 18. . . . . . . . . .Water Treatment 18. . . . . . . . . . . . . . . . . . . . . . . . . . .
Operation 20. . . . . . . . . . . . . . . . . . . . . . . . . . . . . . . . . . .Preparation for First Time Startup 20. . . . . . . . . . . .Filling System 20. . . . . . . . . . . . . . . . . . . . . . . . . . . . . .Temperature Controller Settings 21. . . . . . . . . . . . . .
Chiller Controller 21. . . . . . . . . . . . . . . . . . . . . . . .Process Controller 21. . . . . . . . . . . . . . . . . . . . . . .Changing Material Temperature Setpoint 22. . . .Controller Security 24. . . . . . . . . . . . . . . . . . . . . . .Auto-Tuning 24. . . . . . . . . . . . . . . . . . . . . . . . . . . .
System Shutdown 24. . . . . . . . . . . . . . . . . . . . . . . . . .
Maintenance 25. . . . . . . . . . . . . . . . . . . . . . . . . . . . . . . .System Pressure 25. . . . . . . . . . . . . . . . . . . . . . . . . . .Process Water Temperature 25. . . . . . . . . . . . . . . . . .System Condenser 25. . . . . . . . . . . . . . . . . . . . . . . . .Heat Exchanger 25. . . . . . . . . . . . . . . . . . . . . . . . . . . .Water Level and Quality 26. . . . . . . . . . . . . . . . . . . . .Water Test Kit Instructions 26. . . . . . . . . . . . . . . . . . .
Molybdate Test 26. . . . . . . . . . . . . . . . . . . . . . . . . .pH Test 27. . . . . . . . . . . . . . . . . . . . . . . . . . . . . . . .
Troubleshooting 28. . . . . . . . . . . . . . . . . . . . . . . . . . . . .Troubleshooting: Material Too Warm 30. . . . . . . . . .
Possible Solutions 30. . . . . . . . . . . . . . . . . . . . . . .Troubleshooting: Material Too Cool 31. . . . . . . . . . .
Possible Solutions 31. . . . . . . . . . . . . . . . . . . . . . .Troubleshooting: Water Pressure 31. . . . . . . . . . . . .
Pressure Too High 31. . . . . . . . . . . . . . . . . . . . . . .Pressure Too Low 31. . . . . . . . . . . . . . . . . . . . . . .
Repairs 32. . . . . . . . . . . . . . . . . . . . . . . . . . . . . . . . . . . . .RTD Replacement 32. . . . . . . . . . . . . . . . . . . . . . . . .Heat Exchanger Disassembly and Cleaning 32. . . .
Disassembly 32. . . . . . . . . . . . . . . . . . . . . . . . . . . .Cleaning 33. . . . . . . . . . . . . . . . . . . . . . . . . . . . . . .Assembly 34. . . . . . . . . . . . . . . . . . . . . . . . . . . . . . .
Parts 34. . . . . . . . . . . . . . . . . . . . . . . . . . . . . . . . . . . . . . .Appendix 35. . . . . . . . . . . . . . . . . . . . . . . . . . . . . . . . . . .
E5EN-H Temperature Controller Settings 35. . . . . .Love Chiller Controller Settings 39. . . . . . . . . . . . . . .Honeywell UDC3200 Controller Config. Settings 40Watlow EZ PM6C Controller Config. Settings 44
Contact UsNordson Corporation welcomes requests for information, comments, andinquiries about its products. General information about Nordson can befound on the Internet using the following address:http://www.nordson.com.Address all correspondence to:
Nordson CorporationAttn: Customer Service555 Jackson StreetAmherst, OH 44001
NoticeThis is a Nordson Corporation publication which is protected by copyright.Original copyright date 2007. No part of this document may bephotocopied, reproduced, or translated to another language without theprior written consent of Nordson Corporation. The information containedin this publication is subject to change without notice.
Trademarks
Nordson and the Nordson logo are registered trademarks of NordsonCorporation.
Spectrus is a trademark of General Electric Company.
MolyVer is a registered trademark of the Hach Company.

Change Record i
Part 1075456−05� 2017 Nordson Corporation
Change RecordRevision Date Change
02 6/15 Updated manual to latest configuration.
03 1/16 Added sound level specifications.
04 5/16 Added kits.
05 5/17 Added static mixer kits.

Change Recordii
Part 1075456−05 � 2017 Nordson Corporation

Temperature Control Unit 1
Part 1075456−05� 2017 Nordson Corporation
Temperature Control Unit
Safety Read and follow these safety instructions. Task- and equipment-specificwarnings, cautions, and instructions are included in equipmentdocumentation where appropriate.
Make sure all equipment documentation, including these instructions, isaccessible to persons operating or servicing equipment.
Qualified Personnel Equipment owners are responsible for making sure that Nordson equipmentis installed, operated, and serviced by qualified personnel. Qualifiedpersonnel are those employees or contractors who are trained to safelyperform their assigned tasks. They are familiar with all relevant safety rulesand regulations and are physically capable of performing their assignedtasks.
Intended Use Use of Nordson equipment in ways other than those described in thedocumentation supplied with the equipment may result in injury to personsor damage to property.
Some examples of unintended use of equipment include
� using incompatible materials
� making unauthorized modifications
� removing or bypassing safety guards or interlocks
� using incompatible or damaged parts
� using unapproved auxiliary equipment
� operating equipment in excess of maximum ratings
Regulations and Approvals Make sure all equipment is rated and approved for the environment in whichit is used. Any approvals obtained for Nordson equipment will be voided ifinstructions for installation, operation, and service are not followed.

Temperature Control Unit2
Part 1075456−05 � 2017 Nordson Corporation
Personal Safety To prevent injury, follow these instructions.
� Do not operate or service equipment unless you are qualified.
� Do not operate equipment unless safety guards, doors, or covers areintact and automatic interlocks are operating properly. Do not bypass ordisarm any safety devices.
� Keep clear of moving equipment. Before adjusting or servicing movingequipment, shut off the power supply and wait until the equipmentcomes to a complete stop. Lock out power and secure the equipment toprevent unexpected movement.
� Relieve (bleed off) hydraulic and pneumatic pressure before adjusting orservicing pressurized systems or components. Disconnect, lock out,and tag switches before servicing electrical equipment.
� While operating manual spray guns, make sure you are grounded.Wear electrically conductive gloves or a grounding strap connected tothe gun handle or other true earth ground. Do not wear or carry metallicobjects such as jewelry or tools.
� If you receive even a slight electrical shock, shut down all electrical orelectrostatic equipment immediately. Do not restart the equipment untilthe problem has been identified and corrected.
� Obtain and read Safety Data Sheets (SDS) for all materials used.Follow the manufacturer’s instructions for safe handling and use ofmaterials, and use recommended personal protection devices.
� Make sure the spray area is adequately ventilated.
� To prevent injury, be aware of less-obvious dangers in the workplacethat often cannot be completely eliminated, such as hot surfaces, sharpedges, energized electrical circuits, and moving parts that cannot beenclosed or otherwise guarded for practical reasons.
High-Pressure Fluids High-pressure fluids, unless they are safely contained, are extremelyhazardous. Always relieve fluid pressure before adjusting or servicing highpressure equipment. A jet of high-pressure fluid can cut like a knife andcause serious bodily injury, amputation, or death. Fluids penetrating theskin can also cause toxic poisoning.
If you suffer a fluid injection injury, seek medical care immediately. Ifpossible, provide a copy of the SDS for the injected fluid to the health careprovider.

Temperature Control Unit 3
Part 1075456−05� 2017 Nordson Corporation
The National Spray Equipment Manufacturers Association has created awallet card that you should carry when you are operating high-pressurespray equipment. These cards are supplied with your equipment. Thefollowing is the text of this card:
WARNING: Any injury caused by high-pressure liquid can be serious. Ifyou are injured or even suspect an injury:
� Go to an emergency room immediately.
� Tell the doctor that you suspect an injection injury.
� Show him this card
� Tell him what kind of material you were spraying
MEDICAL ALERT—AIRLESS SPRAY WOUNDS: NOTE TO PHYSICIAN
Injection in the skin is a serious traumatic injury. It is important to treat theinjury surgically as soon as possible. Do not delay treatment to researchtoxicity. Toxicity is a concern with some exotic coatings injected directly intothe bloodstream.
Consultation with a plastic surgeon or a reconstructive hand surgeon maybe advisable.
The seriousness of the wound depends on where the injury is on the body,whether the substance hit something on its way in and deflected causingmore damage, and many other variables including skin microflora residingin the paint or gun which are blasted into the wound. If the injected paintcontains acrylic latex and titanium dioxide that damage the tissue’sresistance to infection, bacterial growth will flourish. The treatment thatdoctors recommend for an injection injury to the hand includes immediatedecompression of the closed vascular compartments of the hand to releasethe underlying tissue distended by the injected paint, judicious wounddebridement, and immediate antibiotic treatment.
Fire Safety To avoid a fire or explosion, follow these instructions.
� Ground all conductive equipment. Use only grounded air and fluidhoses. Check equipment and workpiece grounding devices regularly.Resistance to ground must not exceed one megohm.
� Shut down all equipment immediately if you notice static sparking orarcing. Do not restart the equipment until the cause has been identifiedand corrected.
� Do not smoke, weld, grind, or use open flames where flammablematerials are being used or stored.
� Do not heat materials to temperatures above those recommended bythe manufacturer. Make sure heat monitoring and limiting devices areworking properly.

Temperature Control Unit4
Part 1075456−05 � 2017 Nordson Corporation
Fire Safety (contd)
� Provide adequate ventilation to prevent dangerous concentrations ofvolatile particles or vapors. Refer to local codes or your SDS forguidance.
� Do not disconnect live electrical circuits when working with flammablematerials. Shut off power at a disconnect switch first to preventsparking.
� Know where emergency stop buttons, shutoff valves, and fireextinguishers are located. If a fire starts in a spray booth, immediatelyshut off the spray system and exhaust fans.
� Shut off electrostatic power and ground the charging system beforeadjusting, cleaning, or repairing electrostatic equipment.
� Clean, maintain, test, and repair equipment according to the instructionsin your equipment documentation.
� Use only replacement parts that are designed for use with originalequipment. Contact your Nordson representative for parts informationand advice.
Halogenated Hydrocarbon Solvent Hazards Do not use halogenated hydrocarbon solvents in a pressurized system thatcontains aluminum components. Under pressure, these solvents can reactwith aluminum and explode, causing injury, death, or property damage.Halogenated hydrocarbon solvents contain one or more of the followingelements:
Element Symbol Prefix
Fluorine F “Fluoro-”
Chlorine Cl “Chloro-”
Bromine Br “Bromo-”
Iodine I “Iodo-”
Check your SDS or contact your material supplier for more information. Ifyou must use halogenated hydrocarbon solvents, contact your Nordsonrepresentative for information about compatible Nordson components.
Action in the Event of a Malfunction If a system or any equipment in a system malfunctions, shut off the systemimmediately and perform the following steps:
� Disconnect and lock out system electrical power. Close hydraulic andpneumatic shutoff valves and relieve pressures.
� Identify the reason for the malfunction and correct it before restarting thesystem.
Disposal Dispose of equipment and materials used in operation and servicingaccording to local codes.

Temperature Control Unit 5
Part 1075456−05� 2017 Nordson Corporation
System Overview The Nordson Temperature Control Unit (TCU) maintains coating material atthe desired application temperature.
The temperature control unit heats or cools process water, which thencirculates through an external counter-flow water-jacketed heat exchanger.The coating material passes through the heat exchanger and is heated orcooled to the desired temperature.
The temperature controller contains a process water loop and a chilledwater loop.
See Figure 1.
In the process water loop, water is pumped through an immersion heater(7), out to the heat exchanger (1), and back to the pump (10). The waterflow is regulated by the flowsetter (5) in the return line.
NOTE: Some systems may have two pumps connected in series in theprocess water loop.
The chilled water loop consists of an evaporator (19), 98-l (26-gal) chilledwater reservoir (14), and pump (12). The pump continuously circulates thewater through the evaporator and back into the reservoir. The sealedrefrigeration system removes heat from the water flowing through theevaporator.
An RTD (22) at the heat exchanger material exit senses the coating materialtemperature.
� If the coating material is too cool, the temperature controller (23)proportionally energizes the immersion heater to warm the water flowingthrough the process loop and heat exchanger, warming the coatingmaterial.
� If the coating material is too warm, the temperature controller (23)proportionally opens a solenoid valve (4) on the return line to the chilledwater loop. This allows chilled water to flow into the process loop,cooling the water flowing through the heat exchanger and cooling thecoating material. Water from the process loop returns to the chilledwater loop through the solenoid valve and a flowsetter (6), whichregulates the return flow.
If the coating material temperature deviates from the process temperaturesetpoint by ±2.8 �C (±5 �F), the temperature range fault indicator on theelectrical panel will light.
An adjustable thermostat in the heater assembly acts as a high watertemperature safety switch. If the water temperature exceeds 60�C (140�F),the thermostat opens and power to the heater is disabled. In addition, theheater high temp fault indicator on the electrical panel will light.

Temperature Control Unit6
Part 1075456−05 � 2017 Nordson Corporation
HTR9KW
1HTR
MATERIAL IN MATERIAL OUT
PROCESS
FROM
PROCESSTO
3/4-in
T
P
3/4-in5Y1
3M2 Pump7.2−10GPM 24 PSI
3/4-in
3M1
55�
F S
upply Tem
p7.2 G
PM
@ 9.7 P
SI
7TC1
3/4-in
2S8
RETURN FROMPROCESS
HTR
7S2
VS
C
8S1
8M1
8M28M3
7/8-in OD
S
5/8-in ODS
1/2-in ODS 1/2-in ODS
L
7Y1
7/8-in ODS
1/4-in ODS
5/8-in OD
S
7S33/4-in
7S1
H
1
2 2
3
4
5
6
7
89
10
11
12
13
14
1516
17
18
19
20
21
2223
2425
26
27
2829
Figure 1 Temperature Control Unit Diagram
1. Heat exchanger
2. Service valves − 3.4 in.
3. Strainer − 3.4 in.
4. Solenoid Valve
5. Flowsetter 1−5 gpm
6. Flowsetter 1−4 gpm
7. Immersion heater 9KW
8. Thermometer 0−200 �F
9. Pressure gauge 0−60 PSI
10. Pump − main circulation
11. Chilled water controller
12. Pump − chilled water loop
13. RTD − chilled water
14. Chilled water reservoir
15. Drain valve
16. Float switch
17. Flow switch
18. Low temperature thermostat
19. Evaporator
20. Solenoid coil
21. Expansion valve
22. RTD
23. Temperature controller
24. Sight glass
25. Filter drier
26. Condensing unit
27. Condenser coil/fan
28. Hermetic compressor
29. Pressure refrigerant switch

Temperature Control Unit 7
Part 1075456−05� 2017 Nordson Corporation
Chilled Water Loop Operation See Figure 1.
The chilled water pump runs continuously. An RTD temperature sensor (13)senses the reservoir (14) water temperature and sends a temperaturesignal to the chiller controller (11). The water temperature is displayed asthe Process Value (PV). The setpoint is preset to 10 �C (50 �F) and isdisplayed as the Setpoint Value (SV).
If the water temperature rises 2.8 �C (5 �F) above the setpoint, thecontroller energizes the compressor contactor. Power is provided to thecompressor and condenser fan motors.
If the ambient temperature is low, a fan control switch de-energizes onecondenser fan motor to maintain proper head pressure. It is normal for thefan to cycle on and off while the compressor is running.
As the water temperate decreases to 1 �F below the setpoint, thecompressor, fan motors, and liquid line solenoid are de-energized while thecrankcase heater is still energized, completing the cycle.
Refrigerant Cycle The refrigerant in the hermetic compressor (28) is compressed to ahigh-pressure/high-temperature gas, which flows to the condenser (27). Inthe condenser, the refrigerant is changed into a high-pressure liquid as it iscooled by the air flowing through the condenser fins. The liquid refrigerantthen passes through a shut-off valve, through the liquid receiver, and intothe filter drier (25), which removes any moisture or other contaminants.
The high-pressure liquid then flows through the sight glass (24) to anautomatic expansion valve (21) where it is reduced to a low-pressure liquidbefore it flows into the evaporator (19). The low-pressure liquid refrigerantabsorbs the heat from the water flowing through the evaporator and istransformed into a low-pressure gas. The low-pressure gas is then drawninto the compressor to complete the cycle.
Fault Indicators The water flow switch (17), high- and low-pressure refrigerant switch (29),and low temperature thermostat (18) will disable the refrigeration system if alow water flow, high or low refrigerant pressure, or low water temperaturecondition occurs. These conditions will turn off the chiller on indicator on theelectrical panel and turn on the chiller fault indicator.
In addition, the float switch (16) located in the reservoir will disable the TCUand turn on the low water level fault indicator on the electrical panel if thewater in the reservoir falls below the switch level.
Temperature Control Unit8
Part 1075456−05 � 2017 Nordson Corporation
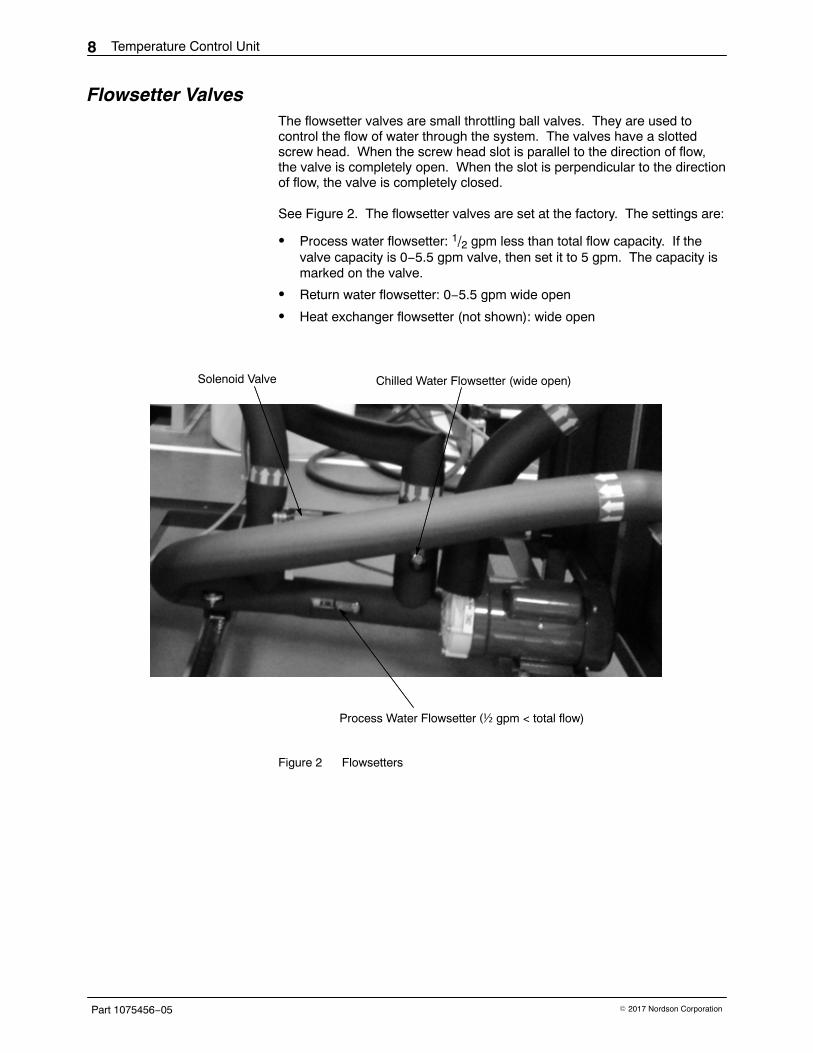
Flowsetter Valves The flowsetter valves are small throttling ball valves. They are used tocontrol the flow of water through the system. The valves have a slottedscrew head. When the screw head slot is parallel to the direction of flow,the valve is completely open. When the slot is perpendicular to the directionof flow, the valve is completely closed.
See Figure 2. The flowsetter valves are set at the factory. The settings are:
� Process water flowsetter: 1/2 gpm less than total flow capacity. If thevalve capacity is 0−5.5 gpm valve, then set it to 5 gpm. The capacity ismarked on the valve.
� Return water flowsetter: 0−5.5 gpm wide open
� Heat exchanger flowsetter (not shown): wide open
Process Water Flowsetter (½ gpm < total flow)
Solenoid Valve Chilled Water Flowsetter (wide open)
Figure 2 Flowsetters

Temperature Control Unit 9
Part 1075456−05� 2017 Nordson Corporation
Control Panel Front
1
2
3
4
5
6
7
8
9
10
11
12
13
Figure 3 Control Panel
Item Control Function
1 Temperature Controller Controls coating material temperature.
2 Power On Lights when system power is on.
3 Master Start Starts chiller pump and provides power to rest of system.
4 Master Stop Stops all system functions except compressor crankcaseheater.
5 Lamp Test Press to turn on all indicator lights to ensure they areworking.
6 System #1 Starts/stops process water pump.
7 Heater High Temperature Fault Lights if water temperature exceeds 60 �C (140 �F).
8 Temperature Range Fault Lights if the coating material temperature deviates fromthe process temperature setpoint by ±2.8 �C (±5 �F).
9 Low Water Level Fault Lights if the water level in the chiller reservoir falls belowthe float switch.
10 Chiller #1 Enables/disables the refrigeration system.
11 Chiller On Lights when the refrigeration system is enabled.
12 Chiller Fault Lights if the water flow switch senses no water flow in thechilled water loop, if the high- or low-pressure refrigerantswitch is tripped, or if the low-temperature thermostatsenses that the water temperature in the reservoir falls to4.4 �C (40 �F).
13 Main Disconnect Turns on and off power to unit. Leave on except whenmaking electrical repairs or for long shutdowns. Refer toWarning placard on panel.

Temperature Control Unit10
Part 1075456−05 � 2017 Nordson Corporation
Control Panel Interior
1F1
1F5
1F2
5F1
2F1 3F1 3F2
Figure 4 Control Panel Interior Fuses, Disconnects, and Controls
Component Function
1F1 Immersion heater
1F2 Compressor and fan motor #1
1F5 Transformer
2F1 24 Vdc power supply
3F1 Chilled water pump
3F2 Process water pump
5F1 System cooling solenoid
24Vdc Power Supply Provides power to 24 volt components: system indicators, switches, andpush buttons

Temperature Control Unit 11
Part 1075456−05� 2017 Nordson Corporation
Chiller Junction Box
7T2
7T1
Low Temperature
Thermostat
Fan SpeedControl
Chiller Controller
Figure 5 Chiller Junction Box
Table 1 Chiller Junction Descriptions
Component Function
7T1 480/24 Vdc Transformer
7T2 480/240 Vac Transformer
Chiller Controller Uses RTD to sense chilled water temperature
Turns refrigeration system on to keep water at 10 �C (50 F�)
Low Temperature Thermostat Shuts off refrigeration system if water temperature falls below4.4�C (40�F)
Reset switch is on top of case
Fan Speed Control Controls main fan speed to maintain constant head pressure

Temperature Control Unit12
Part 1075456−05 � 2017 Nordson Corporation
Specifications
General SpecificationsUS 60 amps minimum, 480 VAC 3 phase 60 HzCE: 40 amps minimum, 400 VAC 3 phase 50 HzElectrical panel rating: NEMA 12, IP rating: 66
Ambient Temperature Range: 7.2−35 �C (45−95 �F)
Maximum Material Flow: 11.3 l/min. (3 gal/min.) maximum flowConditioning Capacity: 20 �F Δ at 3 gpm
50 �F Δ at 1.5 gpm
Heat Exchanger RatingsShell: 6.89 bar (100 psi) max, 7.2−82 �C (45−180 �F)Tube: 344 bar (5000 psi) max, 7.2−82 �C (45−180 �F)
Dimensions: Refer to Figure 6Operating Weight: 1315 lbProcess Heat Exchanger Weight: 300 lb
Operating Sound Level: Full Load Operation − 78.5 dBA
Refrigeration System Specifications Capacity: 36,000 BTU/hourRefrigerant: R134A, 20 lb (20 lb pump down capacity)Saturated Discharge Temp: 112 F (150 psig)Saturated Suction Temp: 40 F (35 psig)
High Pressure Control: Cut out: 265 psigCut in: Manual reset
Low Pressure Control: Cut out: 26 psigCut in: 55 psig
Low Temp Thermostat: Cut out: 40 FCut in: Manual reset
Fan Control #2: Cut in: 180 psigCut out: 140 psig

Temperature Control Unit 13
Part 1075456−05� 2017 Nordson Corporation
69.00
64.00
72.00
77.88 8.30
68.00
6.00
32.00
36.00
34.00
2
Figure 6 Dimensions

Temperature Control Unit14
Part 1075456−05 � 2017 Nordson Corporation
Installation WARNING: Allow only qualified personnel to install this equipment. Allconnections must conform to the applicable codes. Follow the safetyinstructions in this document and all related documentation.
Location and Clearances The heat exchanger can be mounted remotely, up to 15.2 m (50 ft) awayfrom the temperature control unit cabinet, or can be mounted directly to theend of the cabinet, in a vertical position.
Adequate airflow through the cabinet is necessary to insure proper,trouble-free operation. In addition, the cabinet should be located whereadequate make-up air is available to prevent heat build-up.
� A minimum of 91.4 cm (36 in.) clearance should be provided on all foursides of the cabinet to provide for proper airflow and servicing.
� A minimum of 121.9 cm (48 in.) clearance should be provided above thecabinet.
Mounting Mounting pads are provided to rigidly fasten the chiller to a suitable levelmounting surface. The unit must be firmly anchored to the mountingsurface.
Ambient Temperature The temperature control unit is designed to operate at an ambienttemperature range of 7.2−35 �C (45−95 �F). For conditions above or belowthis temperature range, consult your Nordson representative.
Electrical Connections Connect main power to the L1, L2, and L3 terminals at the top of the unitdisconnect.
Optional connections are available on the interlock terminal block for thefollowing:
� Remote control of temperature setpoint (requires changing controllersetting as well as providing 4−20 mA signal)
� Chiller fault/interlock
� Heater high temperature fault/interlock
� Material high temperature fault/interlock
� Low water level fault/interlock
Refer to the wiring diagrams for information on these connections. Allwiring should be shielded multi-core, and must not run parallel to highvoltage or frequency drive power cables.

Temperature Control Unit 15
Part 1075456−05� 2017 Nordson Corporation
Heat Exchanger Installation See Figure 7. The unit is shipped with the heat exchanger secured to theshipping pallet. The heat exchanger can be mounted to the cabinet orremote-mounted up to 15.2 meters (50 ft) away from the cabinet.
The heat exchanger weighs approximately 181.5 kg (400 lb). A liftingbracket is attached to the flange at the outlet end of the heat exchanger.Use the appropriate lifting equipment to move the heat exchanger and avoiddamaging the foam insulation jacket.
Cabinet Mounting The heat exchanger is mounted on the end of the cabinet opposite thecontrols in a vertical position with the material outlet on top (end with RTD).Use the supplied fasteners to secure the brackets to the tapped holes in thecabinet braces.
If cabinet mounting is specified when the unit is ordered, then the requiredlengths of insulated process water hose will be connected to the processwater inlet and outlets at the factory.
Connect the hoses as shown to the heat exchanger process water inletsand outlets.
Remote Mounting Mount the heat exchanger with the bleed valve up, using the brackets andappropriate fasteners. Do not mount the heat exchanger more than15.2 m (50 ft) away from the cabinet.
A 30 m (100 ft) length of process water hose is furnished with the unit. Cutthe hose to the lengths required to reach the heat exchanger and connectthe hoses to the barbed fittings at the inlets and outlets as shown.
Use the provided hose clamps to secure the hoses. Insulate the hoses toprevent heat/cooling losses.
Heat Exchanger RTD Connections Pull the desired length of cable out of the cabinet and connect it to the RTDcable. The cables are terminated in plugs for easyconnection/disconnection.

Temperature Control Unit16
Part 1075456−05 � 2017 Nordson Corporation
Process Material Connections NOTE: This is a counter-flow heat exchanger. The coating material mustflow in the opposite direction as the process water.
Connect the coating material lines to the heat exchanger. The heatexchanger threads are 1 in. NPT.
To eliminate condensation and heat/cooling losses from the coating materiallines, they should be insulated with a minimum 12.7 mm (0.5 in.) thickclosed-cell foam insulation or equivalent.
Make sure all coating material pipe hangers and brackets are insulated orisolated so they do not function as heat sinks.
KitsSee Figure 7.
The following service kits are available for the Temperature Control Unit.
Item Part Part Description— 1609035 KIT, TCU, ¾ hydraulic hose— 1609034 KIT, flushing, heat exchanger1 972110 972110 � CONNECTOR, male, 37, 1 1/16−12 x ¾, stainless steel2 829072 829072 � HOSE, siphon, ¾ inside diameter, 6 feet3 −−−−−− −−−−−− � FITTING, connector, male, 37-degree, 3/4x344 972603 972603 � ELBOW, male, 37, , 1−1/16−12 x ¾, stainless steel5 N/A −−−−−− � NIPPLE, 1 NPT x ¾ NPT, stainless steel6 N/A −−−−−− � VALVE, ball, 2-way, ¾ NPT, lock, stainless steel7 N/A −−−−−− � ELBOW, 37-degree, ¾−14 x ½ NPT, stainless steel8 N/A 1084958 � HOSE, nylon, stainless steel insert9 −−−−−− −−−−−− � BUSHING, pipe, hydraulic, 1x3/4, stainless steel10 N/A � ADAPTER, male run tee, 1 NPT11 N/A −−−−−− � PLUG, pipe, socket, standard, 1 NPT, stainless steel
Item Part Description— 1611020 KIT, TCU, static mixer, 6 ft— 1611021 KIT, TCU, static mixer, 7 ft— 1611022 KIT, TCU, static mixer, 8 ft

Temperature Control Unit 17
Part 1075456−05� 2017 Nordson Corporation
1
2
2
3
9
4
5
9
6
7
8
10 1110
1
2
2
3
4
Figure 7 Typical Process Water and RTD Connections to the Heat Exchanger (Shown without Insulation)

Temperature Control Unit18
Part 1075456−05 � 2017 Nordson Corporation
Additional Temperature Control Loop If required, an additional water loop can be connected to the system toprovide temperature conditioning to water jackets on day tanks or othercomponents of the coating system. The total combined load should notexceed the capacity of the temperature control unit. Contact your Nordsonrepresentative for more information.
Plugs are provided at the heat exchange outlet and inlet connections for3/4 in. NPT barbed hose fittings. Connect insulated hoses to the fittings andclamp the hoses securely.
The flowsetter at the heat exchanger outlet must be used to restrict the flowof water through the heat exchanger and force water through the addedloop. If the external loop requires 1 gpm, then set the flowsetter to 1 gpmless than total flow. For example, if flowsetter has a capacity of 0−5.5 gpm,then set it to 4.5 gpm.
Water Treatment
CAUTION: Use only distilled water or clean tap water. Do not usede-ionized water or well water. De-ionized water will corrode the systemcomponents. Well water is typically high mineralized and will shortensystem component life.
To maintain proper performance of the system over its design life, corrosionmust be minimized. Water should be distilled or clean tap water.De-ionized (DI) water must not be used as it is corrosive to the metals in thesystem.
Corrosion inhibitor must be added to the water on initial fill and each time itis changed. An original fill supply of Corrshield MD405 corrosion inhibitor isincluded with each unit shipped. This is a molybdate-based corrosioninhibitor with an additive to protect copper. It is used in a concentration of1.5 oz per gal of water (44.3 ml per 3.785 l). A one quart (0.95 liter) bottleof Corrshield MD405 is enough to treat 21 gal (79.5 l).
To ensure that the system is protected, a Molybdate Test Kit is alsoincluded. Each time water is added to the system it should be tested toensure that the water contains the proper concentration of corrosioninhibitor.
Biocides prevent algae and other biologicals from contaminating the water.The recommended biocides for use with Corrshield MD405 is SpectrusNX114. The recommended concentration of Spectrus NX114 is 150−PPMwhich is 0.017 oz/gal (0.5 ml/gal).
Biocides that should not be used in the water are:
� oxidizers, such as chlorine, bromine, hydrogen peroxide, iodine, ozone
� catonic, or positively-charged biocides
Temperature Control Unit 19
Part 1075456−05� 2017 Nordson Corporation
The following is a list of materials used in the construction of thetemperature control unit. Use this list if you are going to use a differentbiocide or corrosion inhibitor.
Galvanized steel pipe BrassIron AluminumBuna rubber EPDM rubberStainless steel PTFECopper Nylon

Temperature Control Unit20
Part 1075456−05 � 2017 Nordson Corporation
Operation
Preparation for First Time Startup
CAUTION: The temperature control unit main disconnect must be turnedon 4 hours before starting the system to provide power to the compressorcrankcase heater, which heats the compressor oil and forces the refrigerantout of saturation. Starting the system cold will cause unnecessary wear ordamage to the compressor. The main disconnect should always be left onunless the unit is removed from service for repairs or movement.
1. Remove the panels from the right side of the cabinet.
2. Open the chiller panel and reset the low temperature thermostat next tothe chiller controller. The reset switch is on top of the thermostat.Check the thermostat setting. It should be set to 4.5 �C (40 �F). Closethe panel door when done.
3. Turn the system disconnect switch to the ON position. Do not start thesystem until the end of the 4-hour warm-up period required for therefrigeration system.
4. On the inside of the cabinet, open the compressor and receiver isolationvalves if they are tagged closed for shipping. Close the drain valves.
5. Remove the cover from the reservoir and remove the wire tie from thefloat switch in the reservoir.
6. Open the process water inlet and outlet valves at the cabinet andheat exchanger.
7. Make sure the flowsetter at the heat exchanger outlet is set towide open.
Filling System
CAUTION: Perform the following procedure to fill the system with waterand bleed air out of the system before starting production. Starting thepumps without water in the system could damage them.
1. For new systems only: Make sure the float level switch shippingrestraint is removed before filling the tank.
2. Fill the chiller reservoir with distilled or clean tap water to about101 mm (4 in.) from the top. Add corrosion inhibitor to the water at therecommended concentration.
3. Press the MASTER START button. This starts the chilled water pump.
4. At the heat exchanger, open the bleed valve to allow water from thechilled water loop into the process water loop and to bleed off the air inthe system. When water starts flowing from the valve, turn it off.
5. Turn the CHILLER#1 switch to the ON position.
6. Turn the SYSTEM switch to the ON position. The process water pumpwill start and pump process water through the heat exchanger.
7. See Figure 3. Press the A/M button on the system controller to changeto manual operation. The red MANU LED on the controller should light.

Temperature Control Unit 21
Part 1075456−05� 2017 Nordson Corporation
8. Press the DOWN key to lower the Setpoint Value (green display) to−100. This prevents the heater contactor from energizing while openingthe chilled water solenoid valve and allowing chilled water to flow intothe process water loop.
9. Open the purge valve on the side of the heat exchanger, near the top, topurge the remaining air from the system. Close the valve when all air ispurged from the system.
10. Check the reservoir and add water to make up for the water injected intothe process water loop.
11. Check the pressure gauge at the immersion heater. Normal operatingpressure is 0.55−1.38 bar (8−20 psi).
� If the pressure is below 0.55 bar (8 psi), make sure all air is purgedfrom the system.
� If the pressure is above 2 bar (30 psi), check for a restriction in theprocess loop (closed or partially closed valve, pinched water line).
12. Once the system is fully charged with water and all air has been purgedfrom the system, press the A/M key on the system controller to return itto automatic operation. The red AUTO LED on the controller shouldlight.
The system is now ready for normal operation.
Temperature Controller Settings Two digital temperature controllers are used to run the temperature controlunit: a process controller and a chiller controller.
NOTE: For information on the controller factory settings, refer to theAppendix at the back of this manual.
Chiller Controller The chiller controller is mounted inside the chiller electrical panel. Itcontrols the operation of the refrigeration system.
This controller is pre-set at the factory to maintain the water in the reservoirat 10 �C (50 �F). The controller turns on the refrigeration system when thewater temperature rises 2.8 �C (5 �F) above the setpoint. The controllersettings should not need to be changed.
NOTE: If not using the chiller to cool the material temperature, shut it off.Allowing the chiller to run without using its cooling capacity could cause thecompressor to overheat.
Process Controller The process controller is located on the system electrical panel and labeledTEMPERATURE CONTROLLER. It controls the heating and cooling of thewater in the main circulation loop.
Use the process controller to set the material temperature setpoint andmonitor the system operation. See Figure 8 and the following table for adescription of the controller displays and keys.

Temperature Control Unit22
Part 1075456−05 � 2017 Nordson Corporation
Changing Material Temperature Setpoint The coating material temperature is displayed on the red Process Value(PV) display. The temperature setpoint is displayed on the green SetpointValue (SV) display.
For normal operations, the controller should be set to Automatic mode.The only value that should be changed is the Setpoint Value.
To increase the Setpoint Value, press the UP key.To decrease the Setpoint Value, press the DOWN key.

Temperature Control Unit 23
Part 1075456−05� 2017 Nordson Corporation
No. 1 Display
No. 2 Display
No. 3 Display
Up Key
Programmable Function Key
Auto/Manual Key
Operation Indicators
Temperature Unit
Operation Indicators
Down Key
Mode Key
Level Key
Figure 8 Temperature Controller Displays and Keys
Indicators Description
No. 1 Display
No. 2 Display
No. 3 Display
Displays the process value or parameter name
Displays the set point, parameter operation read value, or variable inputvalue
Displays MV (valve opening), soak time remain, or bank number
Programmable Function Key
Up and Down Keys
Mode Key
Level Key
Function key
Changes values or settings on the Setpoint Display
Changes parameters within a setting level
Switches between setting levels
Operation Indicators SUB1: Auxiliary Output 1 on
SUB2: Auxiliary Output 2 on
SUB3: Auxiliary Output 3 on
HA: Heater burnout, heater short alarm, or heater over-current occurs
RSP: Remote SP operation
OUT1: Heater on
OUT2: Chiller on
STOP: Controller stopped
CMW: Communications writing enabled
MANU: Controller in manual mode
RMT: Controller operated remotely
AT: Auto Tune in progress

Temperature Control Unit24
Part 1075456−05 � 2017 Nordson Corporation
The Temperature Range Fault indicator on the control panel will light if thecoating material temperature varies from the setpoint by 2.8 �C (5 �F) ormore.
NOTE: The Display and Auto/Manual keys are for use in setting systemparameters. They are not used for normal operation of the temperaturecontrol unit.
Controller Security The controller has security levels from 0−6. At level 6, no changes can bemade to the settings. At level 5, only the Setpoint Value can be changed.Levels 4 to 1 provide access to other settings. Access to these levelsshould be given only to industrial engineers or others responsible for thesystem settings.
Refer to the Appendix for the factory controller settings.
Auto-Tuning Auto-tuning is a controller function that adjusts the PID settingsautomatically. To use auto-tuning, the system must be running normally.
Refer to the Omron E5EN−H manual to start the Auto-tune function. Whencomplete, make the following changes:
� Double the Proportional setting (if 1, change to 2; if 5, change to 10)
� Change the Derivative setting to 0
System Shutdown 1. Turn the CHILLER and the SYSTEM switches to the OFF position. The
process water pump and refrigeration system will shut off.
2. Press the MASTER STOP button. The chiller pump will shut off.
NOTE: Do not shut off the main disconnect switch unless making repairs orshutting down the system for an extended period of time or for repairs.
CAUTION: If unit power is off for more than 2 hours then when power isrestored, the user must wait 4 hours before starting the unit. Failure toobserve this caution could result in damage to the refrigeration compressor.

Temperature Control Unit 25
Part 1075456−05� 2017 Nordson Corporation
Maintenance The system should be inspected and cleaned every 90 days.
System PressureObserve the system pressure gauge. Normal operating pressure is0.55−1.38 bar (8−20 psi). Low pressure indicates a pump problem, air inthe system, or a plugged strainer or filter on the return line. High pressureindicates a flow blockage or restriction in the process loop.
Process Water TemperatureCheck the temperature gauge in the cabinet. It should closely track thesetpoint temperature.
Check the temperature displayed on the chiller controller. It should closelytrack the chilled water setpoint temperature. The refrigeration unit shouldturn on when the water temperature rises 2.8 �C (5 �F) above the setpoint.
System CondenserThe condenser fan filters should be replaced or cleaned as needed toensure adequate airflow. The replacement cycle on the air filters dependson the surrounding air quality, ambient air temperature, and system runtime.
Check and clean the condenser coils as necessary. The condenser can becleaned by shutting down the system and brushing the condenser fins witha soft bristle brush, followed by blowing it out with compressed air. Caremust be taken not to bend or flatten the condenser fins when cleaning.
In a severely contaminated area, it may be necessary to chemically cleanthe condenser (consult with your Nordson service representative first).
NOTE: The green indicator should always be visible in the refrigerant sightglass. If it turns yellow, the refrigeration system has developed a leak andallowed moisture to enter.
Heat Exchanger Over time, coating material will inevitably form deposits that restrict flow.Clean the heat exchanger tubing if any decrease in coating material flow isdetected.
Before disassembling the heat exchanger, make sure you have an O-ring kiton hand.
Be careful not to damage the insulation around the heat exchanger. Theinsulation bonnets on either end can be removed to gain access to the inletand outlet flange fasteners.

Temperature Control Unit26
Part 1075456−05 � 2017 Nordson Corporation
Water Level and QualityCheck the level of water in the reservoir. It should be no lower than102 mm (4 in.) from the top. Add more water if necessary. Use onlydistilled water or clean tap water.
Test the corrosion inhibitor concentration and pH with the recommendedtest kit. Add more corrosion inhibitor as necessary. Refer to the followingpages for the test procedure.
NOTE: Always check the corrosion inhibitor concentration after addingmake-up water.
If the system water quality is poor, it may be necessary to flush the systemto remove contaminated water.
See Figure 9. Remove the process water strainer and clean the screenperiodically.
Process WaterStrainer
Figure 9 Process Water Strainer
Water Test Kit Instructions
Molybdate Test The ideal molybdate level is 250−350 ppm.
1. Add 5 ml of water from the reservoir to the square mixing bottle. Thesample should be clear. If it is not, filter it first.
2. Add 20 ml of distilled water to the sample water.

Temperature Control Unit 27
Part 1075456−05� 2017 Nordson Corporation
Molybdate Test (contd)
3. Add the contents of one MolyVer� 1 Molybdenum Reagent PowderPillow to the sample. Swirl to mix.
4. Add the contents of one MolyVer 2 Molybdenum Reagent Powder Pillowto the sample. Swirl to mix.
5. Add the contents of one MolyVer 3 Molybdenum Reagent Powder Pillowto the sample. Swirl to dissolve.
6. If the Corrshield MD 405 corrosion inhibitor is present, a yellow color willdevelop. Wait at least 3 minutes, but no longer than 15, to proceed tothe next step.
7. Fill one of the color viewing tubes to the 5 ml mark with the preparedsample.
8. Insert the tube into the right opening of the color comparator.
9. Add 1 ml of the sample to the second viewing tube. Add distilled waterto the 5 ml mark, then insert the tube into the left side of the comparator.
10. Hold the comparator up to a light source such as the sky or a lamp andlook through the two openings in the front while rotating the color diskuntil a color match is obtained.
11. Read the ppm of molybdate through the scale window of thecomparator.
NOTE: Avoid exposing the color disks to direct sunlight for extendedperiods of time to protect them from fading caused by ultraviolet light.
pH Test The ideal pH is between 7.5 and 8.5.
1. Dip one test strip into a water sample for 10 seconds. Keep the stripmotionless while it is in the water.
2. Remove the strip from the water and match the pH color, then the totalalkalinity color, within 30 seconds.

Temperature Control Unit28
Part 1075456−05 � 2017 Nordson Corporation
Troubleshooting WARNING: Allow only qualified personnel to perform the following tasks.Follow the safety instructions in this document and all other relateddocumentation.
Problem Possible Cause Corrective Action
1. Unit will not operate Power supply Check the power supply to thetemperature control unit.
Circuit breaker tripped Check circuit breakers (refer topage 10). Fix problem that trippedbreaker before restarting.
2. Power on indicator onbut unit will notoperate
Chiller ON indicator off, processwater pump off
Check reservoir level and add waterif below float switch. A low waterlevel will disable the compressor andchilled water pump.
Check float switch operation.Replace if necessary.
Chiller ON indicator off, processwater pump running
Check for proper water flow insystem.
Check the low temperaturethermostat, reset if necessary.
Reset refrigeration system with resetbutton on pressure control.
Check condenser fan filters, clean orreplace as necessary.
Check condenser, clean if necessary.
3. Unit operating but notemperature control
No water circulation Make sure inlet and outlet valves atcabinet and heat exchanger areopen.
Make sure pumps are primed.
Make sure flowsetters are adjustedcorrectly.
Check for air lock in process loop.
Check temperature controllersettings.
SErr code on temperaturecontroller
Defective heat exchanger RTD orRTD wiring. Check wiring.Depressurize system and removeRTD. Test RTD for continuity andresistance (100 Ω across device, 5 Ωacross common)
SErr code on chiller controller Defective reservoir RTD or RTDwiring. Check wiring. Remove RTDand test for continuity and resistance(100 Ω across device, 5 Ω acrosscommon).
Continued...

Temperature Control Unit 29
Part 1075456−05� 2017 Nordson Corporation
Corrective ActionPossible CauseProblem
4. Heater HighTemperature Fault
Immersion heater temperature isover 60 �C (140 �F)
Check for water flow through heater.
Check temperature controllersettings.
5. Material TemperatureRange Fault
Coating material temperature isoutside the setpoint range of ±2.8�C (±5 �F)
This fault commonly appears atstartup. If it persists, make sure thecontroller is adjusted properly andthat the heater or chiller is functioning
6. Chiller Fault Water temperature too low Low temperature thermostat hasdisabled refrigeration unit becausewater temperature is belowthermostat setting (4.4 �C or 40 �F).
Check chiller controller setting.
Check chilled water flow.
Correct problem and resetthermostat.
Low or no chilled water flow Check chilled water pump.
Check flow switch operation.
Refrigeration pressure control:High pressure
Check fan operation.
Check condenser filters. Clean orreplace filters.
Check for air flow across condenser.Clean condenser fins with asoft-bristle brush.
Check ambient temperature. If out ofunit specifications, take steps tolower ambient temperature.
Reset switch after correctingproblem.
Refrigeration pressure control:Low pressure
If ambient temperature out of unitspecifications, take steps to increaseambient temperature.
Chilled water setpoint is too low.Check chiller controller settings.Setpoint should be 10 �C (50 �F).
Loss of refrigerant. Check refrigerantcharge.
Compressor motor overload Check overload setting, monitorcompressor current draw.
7. Low Water Level Fault Water level in reservoir below floatswitch (fault disables pumps,heaters, and control circuits toprevent damage)
If this fault occurs while filling thesystem and purging air from thewater loops, add water to thereservoir.
If this fault occurs during production,check the water loops for leaks.
Temperature Control Unit30
Part 1075456−05 � 2017 Nordson Corporation
Troubleshooting: Material Too Warm
Possible Solutions 1. When cooling is required, output 2 on the temperature controller should
be on. When output 2 energizes, the chilled water solenoid valve shouldopen with an audible click.
2. If Output 2 does not light when cooling is required, the temperaturecontroller may require re-configuration. Refer to the temperaturecontroller (Omron E5EN−H) chart in the Appendix.
3. If output 2 lights but the solenoid valve does not open, check circuitbreaker 5F1 (refer to page 10) and the solenoid valve. Replace thesolenoid valve if necessary.
4. Check the return flowsetters for proper adjustment (refer to page 8).
5. If there is no water flow or pressure in the chilled water circulation loopcheck the chilled water pump circuit breaker or pump (refer to page 10).
6. If there is power to the chilled water pump and there is no flow, checkthe pump and water lines for restrictions or obstructions. Replace thepump if necessary.
7. If the chilled water pump is working correctly, check the refrigerationsystem.
8. The tubing at the water outlet from the evaporator should be cold.
9. Check the reservoir water temperature. The reservoir watertemperature should be 13 �C (55 �F).
10. If the condenser fan #1 is not operating, check the variable speedcontrol (refer to page 11).
11. If the fan is operating, check the condenser coils for dirt or dust buildup.Clean the condenser fins with a soft-bristle brush and compressed air.
12. If the fan is not operating and the circuit breaker is on, or if the fan isoperating and the condenser coils are clean, then there is a problemwith the refrigeration system. Refer to Chiller Fault in theTroubleshooting chart. If you cannot solve the problem, contact aNordson representative.
13. Make sure that all air is bled from the heat exchanger on the materialand the water sides.
14. Check heater amperage with a meter. It may be possible that the solidstate relays are bleeding voltage by and the heaters are being energizedwithout output 1 being on.

Temperature Control Unit 31
Part 1075456−05� 2017 Nordson Corporation
Troubleshooting: Material Too Cool
Possible Solutions 1. When heating is required, output 1 on the temperature controller should
light. When output 1 energizes, the immersion heater should heat thewater.
2. When output 1 on the temperature controller is lit, the coordinating SSRlight should be energized (5K2).
3. If output 1 does not light when heating is required, the temperaturecontroller may require re-configuration. Refer to the temperaturecontroller (Omron E5EN-H) chart in the Appendix.
4. If output 1 lights and no heating occurs, check the heater circuitbreakers 1F1 (refer to page 10). The heater is a 3-phase device. If theheater is heating but is not at full capacity, one element may have failedor one circuit breaker could be faulty.
5. If no problem is found, turn off power at the main disconnect and checkthe continuity and resistance of the heater elements. Replace theheater elements if necessary.
6. If output 1 lights and the heater high temperature indicator is lit, thewater temperature has exceeded the thermostat setting 60 �C (140 �F),which disables the heater. Make sure there are no obstructions to waterflow within the heater and that the temperature controller settings arecorrect.
7. Heater high temperature alarm is on. Refer to Troubleshooting HeaterHigh temperature alarm.
Troubleshooting: Water Pressure
Pressure Too High 1. Make sure all valves in the process water loop, except for the drain
valve, are completely open.
2. Make sure that the water hoses are not kinked or blocked.
3. Shut down the system and remove the strainer screen (refer topage 26). Clean the screen. If the screen is clogged, check the waterquality. If necessary, drain and flush the system.
Pressure Too Low Make sure the process water pump is fully primed with water and the pumpinlet is not blocked. Check the return line to make sure there are norestrictions.

Temperature Control Unit32
Part 1075456−05 � 2017 Nordson Corporation
Repairs
RTD Replacement
WARNING: Depressurize the coating material system before removing theRTD. Failure to relieve all pressure could result in a high pressure fluidinjection injury.
Relieve the coating material system pressure.
Use a 14 mm or 1/2 in. wrench to unscrew and remove the RTD from theheat exchanger head. The RTD is 12 in. long.
Heat Exchanger Disassembly and Cleaning If material flow through the heat exchanger becomes restricted, it can bedisassembled and cleaned.
Materials required:
� O-ring kit
� 1/2 in. torque wrench
� Round steel rod, 12.7 mm x 2133 mm (1/2 in. x 7 ft)
� Rags
� Paper towels
� Solvent
� Loctite 242 or 248 thread adhesive
Disassembly 1. Shut down the temperature control unit (leave disconnect switch ON).
WARNING: Relieve the coating material system pressure beforedisconnecting the coating material lines from the heat exchanger. Failure torelieve all pressure could result in a high pressure fluid injection injury.
2. Depressurize the coating material system and isolate the heatexchanger from the rest of the system.
3. Disconnect the coating material lines from the heat exchanger.
CAUTION: The head assemblies are heavy. Support them while removingthe fasteners. The faces of the head assemblies and the tube sheet aremachined surfaces. Be careful not to damage them.
4. See Figure 10. Using the loosening sequence shown, remove thebolts (4), lock washers (2), and nuts (1) from the head assembly (6).Remove the head assembly.
5. Remove and discard the O-ring (7).
Temperature Control Unit 33
Part 1075456−05� 2017 Nordson Corporation
7
5
4
2
1
9
6
8
3
1
2
3
4
5
6 7
8
9
10
11 12
SEQUENCE FOR LOOSENINGAND TIGHTENING THE BOLTS
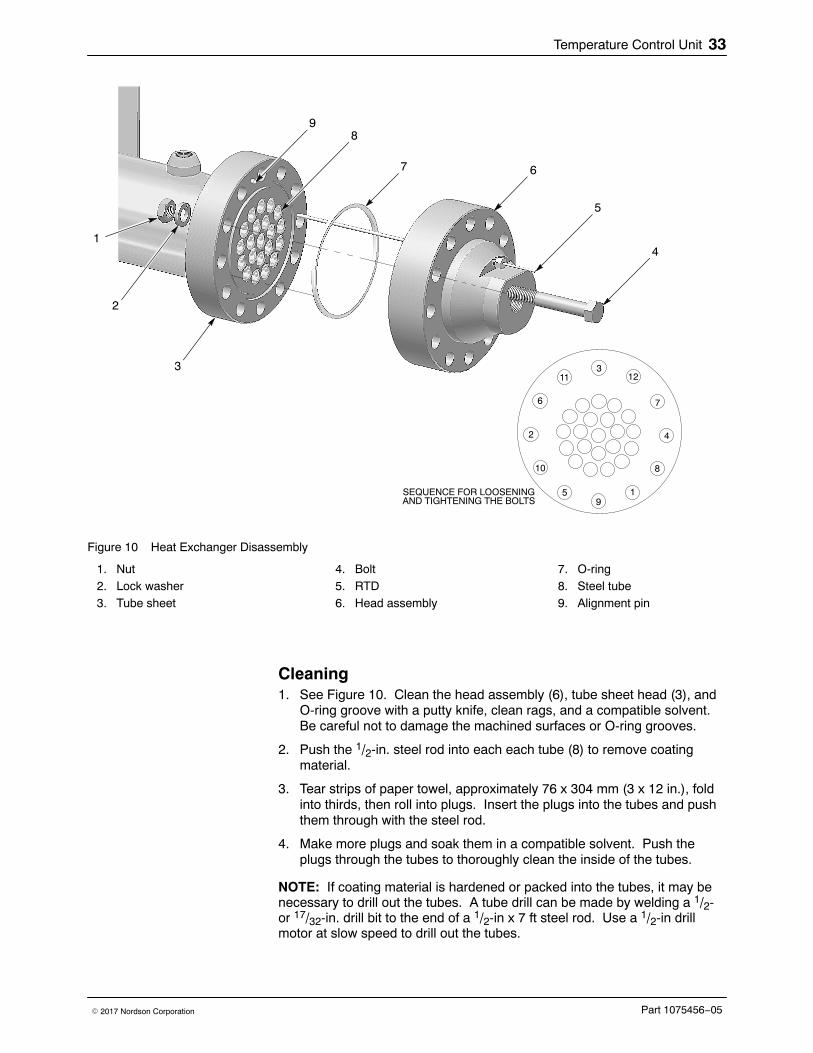
Figure 10 Heat Exchanger Disassembly
1. Nut2. Lock washer3. Tube sheet
4. Bolt5. RTD6. Head assembly
7. O-ring8. Steel tube9. Alignment pin
Cleaning 1. See Figure 10. Clean the head assembly (6), tube sheet head (3), and
O-ring groove with a putty knife, clean rags, and a compatible solvent.Be careful not to damage the machined surfaces or O-ring grooves.
2. Push the 1/2-in. steel rod into each each tube (8) to remove coatingmaterial.
3. Tear strips of paper towel, approximately 76 x 304 mm (3 x 12 in.), foldinto thirds, then roll into plugs. Insert the plugs into the tubes and pushthem through with the steel rod.
4. Make more plugs and soak them in a compatible solvent. Push theplugs through the tubes to thoroughly clean the inside of the tubes.
NOTE: If coating material is hardened or packed into the tubes, it may benecessary to drill out the tubes. A tube drill can be made by welding a 1/2-or 17/32-in. drill bit to the end of a 1/2-in x 7 ft steel rod. Use a 1/2-in drillmotor at slow speed to drill out the tubes.

Temperature Control Unit34
Part 1075456−05 � 2017 Nordson Corporation
Assembly See Figure 10.
1. Install a new O-ring (7) into the groove on the tube sheet (3).
2. If removed during cleaning, install the alignment pin (9) into the tubesheet head (3).
3. Apply Loctite 242 or 248 thread adhesive to the threads of the bolts (4).
4. Align the head assembly (6) to the alignment pin (9). Install the headassembly onto the tube sheet (3) using the bolts (4), lock washers (2),and nuts (1). Only hand-tighten the nuts and bolts.
5. Using the tightening sequence shown, perform the following to tightenthe bolts:
a. Tighten the bolts to 108 N•m (80 ft-lbs).
b. Next, tighten the bolts to 190 N•m (140 ft-lbs)
c. Finally, tighten the bolts to 271 N•m (200 ft-lbs).
6. Connect the coating material lines. Check for leaks when the systemis repressurized.
Parts To order parts, call the Nordson Finishing Customer Support Center at(800) 433-9319 or contact your local Nordson representative.
Refer to the system and electrical panel drawings for bills of material.

Temperature Control Unit 35
Part 1075456−05� 2017 Nordson Corporation
Appendix
E5EN-H Temperature Controller Settings Go to AMoV and set adjustment level and advanced level first.
NOTE: All parameters may or may not be available. Standard parametersfor adjustment are highlighted throughout the table.
Operation Level
Display Definition DefaultSettings
NordsonFactorySettings
PV Process Value (Red)
SV Set Value (Green) Celcius (C) F or C
MV Manipulated Variable (Yellow) Heat %
Display Key Set initial settings − first press menu button 3−4seconds and go to adjustment level
AM Auto Manual oFF oFF
RSP Remote Setpoint
SP-M Local Setpoint
R-S Run/Stop rUn rUn
AL1H Alarm 1 High 0.0 5 F/2.8 C
AL1L Alarm 1 Low 0.0 5 F/2.8 C
AL2H Alarm 2 High 0.0 5 F/2.8 C
AL2L Alarm 2 Low 0.0 5 F/2.8 C
Initial SettingLevel
Press display key and level key for 1 second
Ladj Level Adjust n
AT Auto Tune oFF oFF
CRdA Infrared Communication Use oFF oFF
SPMd To Turn Out Setpoint Local Remote LSP LSP
Ct-1 Heater Current 1 Value Monitor 0.0 0.0
Oc1 Heater Overcurrent Detection 1 50.0 50.0
Ct2 Heater Current 2 Value Monitor 0.0 0.0
Oc2 Heater Overcurrent Detection 2 50.0 50.0
CnS Temperature Input Shift 0.0 0.0
P Proporational Band 8.0 5.0
C Integral Time 233.0 180.0
d Derivative Time 40.0 0.0
Continued...

Temperature Control Unit36
Part 1075456−05 � 2017 Nordson Corporation
Initial SettingLevel
Definition DefaultSettings
NordsonFactorySettings
C-SC 1.0 1.0
C-db Cooling Dead Band 0.0 0.0
SPRt Setpoint Ramp Time Unit oFF oFF
oL-H MV Upper Limit 5.0 105.0
oL-L My Lower Limit 0.0 −105.0
Orl MV Change Rate Limit 0.0 0.0
Adjustment Level Press level key initial setting level (hold bottombutton down for 3−4 seconds)
Set advanced level first
To get to advanced level, press and hold level key until In-T (CN-T) comes up. Then press modekey 20 times until iNiT (CNCT) is showing. Enter “−169” again press level key. To exit, press level
key.
Cn-T Input Type 5 1
d-U C/F Selection C C or Fdepending
SL-H Setpoint Upper Limit 500.0/900.0 130 F/54 C
SL-L Setpoint Lower Point −199.9/−199.9
60 F/15.5 C
CntL Control On/Off or PID Pid Pid
S-HC Standard or Heat/Cool Stnd H-C
PTRN Program Pattern oFF oFF
CP Control Period (Heat) 20.0 20.0
C-CP Control Period (Cool) 20.0 20.0
orEu Direct or Reverse Act or-r or-r
ALt1 Alarm 1 Type 2 Deviationupper limit
1 Deviationupper/
lower limit
ALH1 Alarm 1 Hysteris 0.2 0.2
ALt2 Alarm 2 Type 2 Deviationupper limit
4 Deviationupper/
lower limit
ALH2 Alarm 2 Hysteris 0.2 0.2
tRt Transfer Output Type oFF oFF
Tr-H Transfer Output High 900.0 200.0
Tr-L Transfer Output Low −199.0 0.0
EV-b Bank Numbers Used 1.0 1.0
EV-2 Event Input Assignment 1 NoNE NoNE
EV-3 Event Input Assignment 2 NoNE NoNE
EV-4 Event Input Assignment 3 NoNE NoNE
AMoV Advanced Function Setting Level (see note) 0.0 Password“−169”
Note: Press mode key 20 times to get to AmoV.

Temperature Control Unit 37
Part 1075456−05� 2017 Nordson Corporation
To get to advanced level, press and hold level key until In-T (CN-T) comes up. Then press modekey 20 times until iNiT (CNCT) is showing. Enter −169 again press level key. To exit, press level
key.
AdvancedLevel
Settings
All parameters may or may not be there. Be concernedwith highlighted ones only.
DefaultSetting
NordsonFactorySetting
iNiT Parameter Initialization oFF oFF
SPRU SP Ramp Time Unit M M
SbIN Auxiliary Output 1 Open in Alarm N-O N-O
Sb2N Auxiliary Output 2 Open in Alarm N-O N-O
HbU Heater Burnout Latch oN oFF
ALFA ALFA DO NOT TOUCH 0.65 0.65
At-G At Calculated Gain Width 1.0 1.0
At-H Auto Tune Hysteresis 1.4 1.4
CNF Input Digital Filter 0.0 1.0
PVAD Additional PV Display oFF oFF
odP MV Display oFF oFF
rEt Automatic Return of Display 0 99
A1Lt Alarm 1 Latch oFF oFF
A2Lt Alarm 2 Latch oFF oFF
PRLt Move to Protect Level Time 3.0 3.0
SERo Input Error Output oFF oFF
CoLo PV Change Color RED G-R
PVB PV Stable Band 5.0 5.0
A1oN Alarm 1 ON Delay 0.0 0.0
A2oN Alarm 2 ON Delay 0.0 0.0
A1oF Alarm 1 OFF Delay 0.0 0.0
A2oF Alarm 2 OFF Delay 0.0 0.0
iStP Input Shift Type iNSi iNSi
MVSE MV at Stop and Error Addition oFF oFF
AMAd Auto/Manual Select Addition oN oN
Rt Robust Tuning oFF oFF
HSU HB ON/OFF oN oFF
Out1 Control Output Assignment 1 o o
Out2 Control Output Assignment 2 Co Co
SUB 1 Auxiliary Control 1 Assign AL-1 AL-1
SUB 2 Auxiliary Control 2 Assign AL-2 AL-2
CSEL Character Select oN oN
Continued...

Temperature Control Unit38
Part 1075456−05 � 2017 Nordson Corporation
NordsonFactorySetting
DefaultSetting
All parameters may or may not be there. Be concernedwith highlighted ones only.
AdvancedLevel
Settings
rSPU Remote Setpoint Enable oFF oFF
rSPH Remote Setpoint High Range 130 130 F/54 C
rSPL Remote Setpoint Low Range 60 60 F/15 C
SPtr Setpoint Tracking oFF oFF
RSEo Remote Setpoint Input Error Output oFF oFF
PiDi PiD Set Automatic Selection Data PV PV
PIDH PiD Set Automatic Selection Hysteresis oFF oN
MANL Manual MV Limit Enable oFF oN
CSCA Automatic Cooling Coefficient Adjustment oFF oFF
OCU Heater Overcurrent Use oFF oFF
OCL Heater Overcurrent Latch oN oN
OCH Heater Overcurrent Hysteresis 0.1 0.1
PF PF Setting A-M A-M
SPdP PV/SP Display Screen Selection 4.0 4.0
odSL MV Display Selection o o
PVdP PV Decimal Point Display oN oN
SPSt Process Value Status Display Function oFF oFF
SPVt Setpoint Value Status Display Function oFF oFF
d REF Display Refresh Period 0.25 0.25
RA1 Control Output 1 ON/OFF Count Alarm Set Value 0.0 0.0
RA2 Control Output 2 ON/OFF Count Alarm Set Value 0.0 0.0
RAC Control Output 1 ON/OFF Reset 0.0 0.0
CMoV Move to Calibration Level 0.0 0.0

Temperature Control Unit 39
Part 1075456−05� 2017 Nordson Corporation
Love Chiller Controller Settings
CAUTION: To prevent damage to the chiller unit, do not deviate from thefollowing settings.
Display Definition DefaultSettings
NordsonFactorySettings
Fahrenheit(F)
NordsonFactorySettingsCelsius
(C)
Operation Level
Process Value 0 55 12
Primary Menu − Press Set−Set. Press up or down arrow to adjust. Press set and down arrow toreturn display.
SP Setpoint Adjust 55 12
Secondary Menu − Press Set for 8 seconds. Press Set to access menu parameters
00 Access Code 0 0 0
r0 Differential Hystersis 5 3
r1 Lower Value Setpoint −50 53 11
r2 Higher Value Setpoint 150 90 32
d0 Heating or Cooling Co (Cool) Co (Cool) Co (Cool)
d2 Time for Defrosting 30 00 00
d8 Interval Time Between Defrosts 6 0 0
c0 Minimum Stop Time for Load 00 06 06
c1 Continuous Cycle Time 00 24 24
c2 On Time of Fault Cycle 5 10 10
c3 Off Time of Fault Cycle 5 6 6
P1 Ambient Probe Adjustment 00 00 00
H5 Parameter Access Dode 00 00 00
H6 Probe Type Ptc Ptc Ptc
t0 Maximum Temperature on Display 150 150 83
Temperature Control Unit40
Part 1075456−05 � 2017 Nordson Corporation
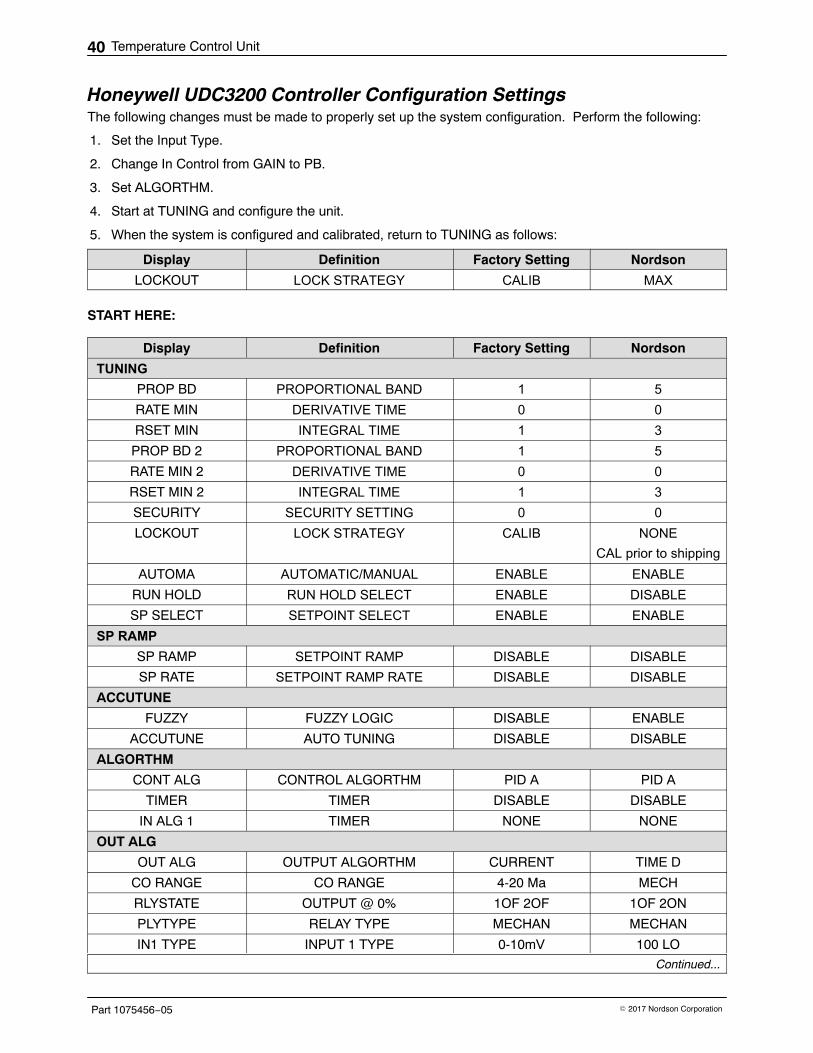
Honeywell UDC3200 Controller Configuration Settings The following changes must be made to properly set up the system configuration. Perform the following:
1. Set the Input Type.
2. Change In Control from GAIN to PB.
3. Set ALGORTHM.
4. Start at TUNING and configure the unit.
5. When the system is configured and calibrated, return to TUNING as follows:
Display Definition Factory Setting Nordson
LOCKOUT LOCK STRATEGY CALIB MAX
START HERE:
Display Definition Factory Setting Nordson
TUNING
PROP BD PROPORTIONAL BAND 1 5
RATE MIN DERIVATIVE TIME 0 0
RSET MIN INTEGRAL TIME 1 3
PROP BD 2 PROPORTIONAL BAND 1 5
RATE MIN 2 DERIVATIVE TIME 0 0
RSET MIN 2 INTEGRAL TIME 1 3
SECURITY SECURITY SETTING 0 0
LOCKOUT LOCK STRATEGY CALIB NONE
CAL prior to shipping
AUTOMA AUTOMATIC/MANUAL ENABLE ENABLE
RUN HOLD RUN HOLD SELECT ENABLE DISABLE
SP SELECT SETPOINT SELECT ENABLE ENABLE
SP RAMP
SP RAMP SETPOINT RAMP DISABLE DISABLE
SP RATE SETPOINT RAMP RATE DISABLE DISABLE
ACCUTUNE
FUZZY FUZZY LOGIC DISABLE ENABLE
ACCUTUNE AUTO TUNING DISABLE DISABLE
ALGORTHM
CONT ALG CONTROL ALGORTHM PID A PID A
TIMER TIMER DISABLE DISABLE
IN ALG 1 TIMER NONE NONE
OUT ALG
OUT ALG OUTPUT ALGORTHM CURRENT TIME D
CO RANGE CO RANGE 4-20 Ma MECH
RLYSTATE OUTPUT @ 0% 1OF 2OF 1OF 2ON
PLYTYPE RELAY TYPE MECHAN MECHAN
IN1 TYPE INPUT 1 TYPE 0-10mV 100 LO
Continued...

Temperature Control Unit 41
Part 1075456−05� 2017 Nordson Corporation
NordsonFactory SettingDefinitionDisplay
INPUT 1
IN1 HI NOT ADJUSTABLE 300 300
IN1 LO NOT ADJUSTABLE -300 -300
RATIO 1 INPUT ACTION RATIO 1 1
BIAS IN1 INPUT BIAS 0 0
FILTER 1 INPUT FILTER 1 1
BURNOUT1 INPUT BURNOUT SETTING NONE NONE
INPUT 2
IN2 TYP INPUT 2 TYPE 1-5V 4-20MA
DISABLE THE ABOVE IF NO REMOTE IS USED
XMITR2 TRANSMITTERCHARACTERIZATION
LIN LIN
IN2 HI INPUT 2 HI LIMIT 2400 130 �F / 54 �C
IN2 LO INPUT 2 LOW LIMIT 0 60 �F / 15 �C
RATIO2 INPUT ACTION RATIO 1 1
BIAS2 INPUT BIAS 0 0
FILTR2 INPUT 2 FILTER 1 1
CONTROL
INP 1 INPUT 1 PV SOURCE PV SOURCE
PID SETS # OF CONTROL PID VALUES 1 ONLY 1 ONLY
LSP’S LOCAL SETPOINT SOURCE 1 ONLY 1 ONLY
RSP SRC REMOTE SETPOINT SOURCE NONE INP 2
AUTOBIAS AUTO BIAS ADJUSTMENT DISABLE DISABLE
SP TRACK SETPOINT TRACKING NONE NONE
PWR MODE POWER ON MODE MANUAL AM SP
SP HiLIM SETPOINT HIGH LIMIT 300 120F
SP LoLIM SETPOINT LOW LIMIT 0 60F
ACTION CONTROL ACTION REVERSE REVERSE
OUT RATE OUTPUT RATE DISABLE DISABLE
OUTLoLIM OUTPUT LOW LIMIT 0 0
OUTHiLIM OUTPUT HIGH LIMIT 100 100
1 Lo LIM 1 LOW LIMIT 0 0
1 Hi LIM 1 HIGH LIMIT 100 100
DROPOFF DROPOFF 0 0
FAILSAFE FAILSAFE OUTPUT 0 50
FAILMODE FAILURE MODE NO LAT NO LAT
MAN OUT MANUAL OUTPUT START 0 50
AUTO OUT AUTO OUTPUT START 0 50
PBorGAIN PROPORTIONAL OR GAIN GAIN PB PCT
MINorRPM MINUTES OR RPM MIN MIN
DISABLE THE ABOVE IF NO REMOTE IS USED
Continued...

Temperature Control Unit42
Part 1075456−05 � 2017 Nordson Corporation
NordsonFactory SettingDefinitionDisplay
OPTIONS
AUXOUT AUXILIARY OUTPUT DISC PV
0 PCT AUXILIARY OUTPUT LOW 0 0
100 PCT AUXILIARY OUTPUT HIGH 100 200
CRANGE AUXILIARY OUTPUT RANGE 4-20 4-20
DIGINT DIGITAL INPUT NONE NONE
COM
COM ADDR COMMUNICATION ADDERSS 3 3
ComSTATE COMMUNICATIONS STATE DISABLE DISABLE
IRENABLE INFERED ENABLED ENABLED ENABLED
BAUD BAUD RATE 19200 19201
TX DELAY TEXT DELAY 1 — — —
ALARMS
A1S1TYPE ALARM 1 TYPE NONE DEV
A1S1 VAL ALARM 1 VALUE 90� 5 �F / 2.8 �C
A1S1 HL ALARM 1 HIGH or LOW HIGH LOW
A1S2TYPE ALARM 1 TYPE NONE DEV
A1S2VAL ALARM 1 VALUE 10� 5 �F / 2.8 �C
A1S2HL ALARM 1-2 HIGH or LOW LOW HIGH
A2S1TYPE ALARM 2 TYPE NONE NONE
A2S1TYPE ALARM 2 TYPE NONE NONE
AL HYST ALARM HYSTERISIS 0.1 0.2
ALM OUT1 ALARM OUTPUT TYPE NO LAT NO LAT
BLOCK ALARM BLOCKING DISABLE DISABLE
DIAGNOST DIAGNOSTICS DISABLE DISABLE
DISPLAY
DECIMAL DISPLAY DECIMAL NONE NONE
TEMPUNIT TEMPERATURE UNITS NONE DEG F or DEG C
PWR FREQ SUPPLY POWER HERTZ 60HZ 60HZ OR 50 HZ
RATIO 2 RATIO 2 DISABLE DISABLE
LANGUAGE DISPLAY LANGUAGE ENGLISH ENGLISH
Continued...

Temperature Control Unit 43
Part 1075456−05� 2017 Nordson Corporation
NordsonFactory SettingDefinitionDisplay
CALIBRATE
CAL IN1 INPUT 1 CALIBRATION DISABLE DISABLE
INPUT 1 INPUT 1 FACTORYCALIBRATED
FACTORYCALIBRATED
INPUT 2 INPUT 2 FACTORYCALIBRATED
FACTORYCALIBRATED
CAL IN2 INPUT CALIBRATION DISABLE DISABLE
CURRENT CONTROL OUTPUT Use proper device to calibrate.
ZERO VAL ZERO VALUE Read meter. SET AT 4 Ma
SPAN VAL SPAN VALUE Read meter. SET AT 20 Ma
AUX OUT RETRANSMIT VALUE — — — CALIB
ZERO VAL ZERO VALUE Read meter. SET AT 4 Ma
SPAN VAL SPAN VALUE Read meter. SET AT 20 Ma

Temperature Control Unit44
Part 1075456−05 � 2017 Nordson Corporation
Watlow EZ PM6C Controller Configuration Settings Upper Display Lower Display Definition Factory Setting Nordson
OPERATIONS − Chapter 5
On the controller, press both arrow buttons for 3 seconds to access the OPERATIONS screen.
NOTE: −−−− in the upper display indicates a sensor error.
ANALOG INPUT MENU
Ai oPEr Analog Input Menu --
1 Ai Analog Input 1 1 1
PV Ain Process value (entertemperature)
##.##
iEr Error status nonE nonE
iCA Calibration Offset 0.00 0.00
MONITOR MENU
Mon oPEr Monitor Menu --
C.MA Control Mode Active Auto Auto
h.Pr Heat Power 0.0 0.0
C.Pr Cool Power 0.0 0.0
C.SP Closed LoopWorking Set Point
75 �F 75 �F / 24 �C
Pv.A Process Value Active ## ##
LOOP MENU
LooP oPEr Loop Menu --
No r,En Remote Enable no no
r,ty Remote Set Point Type Auto Auto
C.M Control Mode Auto Auto
A.tSP Autotune Set Point 90.0 90.0
AUt Autotune Request no no
C.SP Closed Loop Set Point 75 �F 75 �F / 24 �C
id.S Idle Set Point 75 �F 75 �F / 24 �C
h.Pb Heat Proportional Band 25 �F 25 �F / -4 �C
h.hy Heat Hysteresis 3 �F 3 �F / -16 �C
C.Pb Cool Proportional Band 25 �F 25 �F / -4 �C
C.hyl Cool Hysteresis 3 �F 3 �F / -16 �C
ti Time Integral 180.0 180.0
td Time Derivative 0.0 0.0
db Dead Band 0.0 0.0
o.SP Open Loop Set Point 0.0 0.0
Continued...

Temperature Control Unit 45
Part 1075456−05� 2017 Nordson Corporation
NordsonFactory SettingDefinitionLower DisplayUpper Display
ALARM MENU
ALM oPEr Alarm Menu --
1 ALM Alarm #1 --
A.Lo Low Set Point (-5 below SP) 32 �F −5
A.hi High Set Point (+5 above SP) 300 �F +5
CURRENT MENU
Curr oPEr Current Menu --
C.hi High Set Point 50.0 50.0
C.Lo Low Set Point 0.0 0.0
CU.r Read 0.0 0.0
C.Er Error nonE nonE
h.Er Heater Error nonE nonE
SETUP − Chapter 6
On the controller, press both arrow buttons for 6 seconds to access the SETUP screen.
ANALOG INPUT MENU
Ai SEt Analog Input Menu --
1 Ai Analog Input 1 1 1
SEn Sensor Type tC r0.1H
rt.L RTD Leads-wire 2 3
FiL Filter Time 0.5 0.5
i.Er Error Latching oFF oFF
dEC Decimal Whole 0.00
S.bA Sensor Backup Enable oFF oFF
2 Ai Analog Input 2 2 2
SEn Sensor Type tC MA
S.Lo Scale Low 0.0 4.0
S.hi Scale High 20.0 20.0
r.Lo Range Low 0.0 0.0
r.hi Range High 9999.0 200 �F / 93 �C
P.EE Process Error Enable oFF oFF
P.EL Process Error Low 0.0 Default
Alarm #3 and #4leave as defaults
Continued...

Temperature Control Unit46
Part 1075456−05 � 2017 Nordson Corporation
NordsonFactory SettingDefinitionLower DisplayUpper Display
DIGITAL INPUT MENU (Not Used)
dia SEt Digital Input/Output Menu --
5 dia Digital Input or Output 5 5 5
-- dir Direction OtPt OtPt
Fn Function oFF oFF
o.Ct Control Ftb Ftb
o.tb Time Base 0.1 0.1
o.Lo Low Power Scale 0.0% 0.0%
o.hi High Power Scale 100.0% 100.0%
Fi Function Instance None None
LOOP MENU
LooP SEt Loop Menu --
h.Ag Heat Algorithm PID PID
C.Ag Cool Algorithm oFF PID
C.Cr Cool Output Curve oFF oFF
t.tUn Tru-Tune Enable no no
t.bnd Tru-Tune Band 0 0
t.gn Tru-Tune Gain 3 3
t.Agr Autotune Aggressiveness Crit Crit
UFA User Failure Action oFF oFF
FAiL Input Error Failure USEr USEr
MAn Manual Power 0.0 0.0
L.dE Open Loop Detect Enable no no
L.dt Open LoopDetect Time (secs.)
240 240
L.dd Open Loop Detect Deviation 10 �F 10 �F / -12 �C
rP Ramp Action oFF oFF
r.SC Ramp Scale Min Min
r.rt Ramp Rate 1.0 �F 1.0 �F /-17 �C
L.SP Low Set Point -1,999 �F 60 �F / 15 �C
h.SP High Set Point 9,999 �F 130 �F / 54 �C
SP.Lo Set PointLow Limit Open Loop
-100 -100
SP.hi Set PointHigh Limit Open Loop
100.0 100.0
Continued...

Temperature Control Unit 47
Part 1075456−05� 2017 Nordson Corporation
NordsonFactory SettingDefinitionLower DisplayUpper Display
OUTPUT MENU
All settings are not listed. If a setting is not listed, it is a default value.
otPt SEt Output Menu --
1 otPt Output #1 1 1
Fn Function Heat Heat
o.ty Type volts volts
r.Sr Retransmit Source Ai Ai
o.tb Time Base (sec) 20 20
o.Lo Low Power Scale 0.0% 0.0%
o.hi High Power Scale 100.0% 100.0%
2 otPt Output #2 2 2
Fn Function oFF Cool
o.ty Type volts volts
o.tb Time Base (sec) 20 20
o.Lo Low Power Scale 0.0% 0.0%
o.hi High Power Scale 100.0% 100.0%
3 otPt Output #3 3 3
Fn Function oFF rMT
o.ty Type volts MA
r.Sr Retransmit Source Ai Ai
Fi Function Instance 1 1
S.Lo Scale Low (mA) 0.0 4.0
S.hi Scale High (mA) 10.0 20.0
r.Lo Range Low 0.0 �F 0.0 �F / 18 �C
r.hi Range High 9,999 �F 200 �F / 93 �C
o.Lo Low Power Scale 0.0 0.0
o.hi High Power Scale 100.0 100.0
o.CA Calibration Offset 0.0 �F 0.0 �F
4 otPt Output #4 4 4
Fn Function oFF ALM
o.ty Type volts MA
r.Sr Retransmit Source Ai Ai
Fi Function Instance 1 1
Continued...

Temperature Control Unit48
Part 1075456−05 � 2017 Nordson Corporation
NordsonFactory SettingDefinitionLower DisplayUpper Display
ALARM MENU
ALM SEt Alarm Menu --
1 ALM Alarm #1 1 1
R.ty Type oFF dE.AL
Sr.A Source Ai Ai
iS.A Source Instance 1.0 1.0
A.hy Hysteresis 1.0 �F 0.2 �F / -18 �C
A.dL Delay 0.0 5
All settings are not listed. If a setting is not listed, it is a default value.
FUNCTION KEY MENU
Fun SEt Function Key Menu --
Lev Level high high
Fn Digital Input Function none r.En
Fi Instance 0 1
GLOBAL MENU
gLbL SEt Global Menu --
C_F Display Units �FF or C
depending
AC.LF AC Line Frequency 60 Hz 60 Hz
P.tyP Profile Type StPt StPt
gSE Guaranteed Soak Enable oFF oFF
gSd Guaranteed Soak Deviation 10 �F 10 �F / -12 �C
WATLOW Part Number: PM6C3EJ-AR-FJ-AAA
