10” table saw - clarke international spares and … you for purchasing your new clarke 10” table...
TRANSCRIPT

10” TABLE SAW10” TABLE SAWModel: CTS10PLM
Part No. 6500741
OPERATING & MAINTENANCEINSTRUCTIONS
0302

Thank you for purchasing your new CLARKE 10” TABLE SAW which is designed for DIY andhobby use ONLY
Before attempting to operate this machine, please read this instruction manual thoroughlyand follow all directions carefully. In doing so you will ensure the safety of both yourself andothers around you and, at the same time you should look forward to the machine providinglong and trouble free service.
GUARANTEE
This product is guaranteed against faults in manufacture for 12 months from purchase date.
Keep your receipt as proof of puchase. This guarantee is invalid if the product has been found to havebeen abused in any way or not used for the purpose for which it was intended, or to have beentampered with in any way. The reason for return must be clearly stated. This guarantee does ot affectyour statutory rights.
CONTENTS
Specifications ................................................................................................... 3
General Safety Rules ....................................................................................... 4
Additional Safety Rules for Table Saws ......................................................... 5
Electrical Connections .................................................................................... 6
Features ...................................................................................................... 7
Glossory of Terms .............................................................................................. 8
Unpacking and Checking Contents ............................................................. 9
Assembly Instructions ..................................................................................... 10
Mounting the Saw .......................................................................................... 12
Important Checks before Starting ............................................................... 13
Operating Instructions ................................................................................... 14
Starting & Stopping .................................................................. 15
Rip Cutting ................................................................................ 15
Cross Cutting (incl. Mitre Gauge adjustments) .................... 18
Repetitive Cutting .................................................................... 19
Mitre Cutting ............................................................................. 20
Bevel Cross Cutting .................................................................. 20
Compound Mitre Cutting ....................................................... 21
Maintenance .................................................................................................. 21
Changing the Saw Blade ........................................................ 22
Saw Blade Adjustments ........................................................... 22
Trouble Shooting ....................................................................... 24
Parts Lists and Diagrams ........................................................................... 25-30
3
SPECIFICATIONS
Model No .......................................................................CTS1OPLM
Part No ...........................................................................6500741
Motor ..............................................................................230V ~ 50Hz 1 ph
Power rating ..................................................................1,525 Watts
Speed .............................................................................4800 rpm
Fuse rating ......................................................................13Amps
Saw Blade ......................................................................10” diameter, (255 mm)
Bore .................................................................................5/8”(16mm)
Maximum depth of cut ................................................70mm
Gross Weight ..................................................................20.5KG
Table dimensions ...........................................................660x446mm (26”x 17 1/2”) overall
Noise level at operating position ................................98dB LWA(Cutting 50mm soft wood)
Please note that the detaiis and specifications contained herein, are correct at the time at going to print. However, CLARKEINTERNATIONAL reserve the right to change specitications at any time without prior notice. Always check machines’ data label
Use of machineThis machine is designed to rip and cross cut wood exclusively, up to a maximum thickness of 70mm. Itis NOT designed to carry out ‘non-through cut’ operations.
For correct operation it must be fixed and operated as laid down in this manual.
This saw is intended for DIY and hobby use ONLY
Restrictions of useThis saw is NOT suitable for cutting:
• Timber greater than 70mm in thickness,
• Metal. Stone, Rubber, Plastic, Bones, Etc.
• Logs or round timber.
DO NOT use to rebate, tenon, mould or groove.
DO NOT fit any other blades or combination of blades.
DO NOT use as a free standing machine or as a hand held machine.
DO NOT modify the machine or its guards/controls in any way,
DO NOT use with any covers/guards removed.
4
GENERAL SAFETY RULES
WARNING!
As with all machinery, there are certain hazards involved with their operation anduse. Exercising respect and caution will considerably lessen the risk of personal
injury. However, if normal safety precautions are overlooked or ignored, personalinjury to the operator or damage to property may result.
1. READ AND BECOME FAMILIAR with the entire operating manual. Learn the tool’s applications andlimitations as well as the specific potential hazards peculiar to it,
2. CHECK DAMAGED PARTS. Before use of the machine, a guard or other part that may be damagedshould be checked to ensure that it will operate properly and perform its intended function.Check for alignment of moving parts, breakage of parts, mounting, or any other conditions thatmay affect its operation Any damaged part should be properly repaired or replaced.
3. ALWAYS KEEP GUARDS in place and in working order.
4. ALWAYS USE SAFETY GLASSES. Also use face or dust mask if cutting operation is dusty. Everydayeyeglasses do not have impact resistant lenses, they are NOT safety glasses.
5
5. KEEP WORK AREA CLEAN. Cluttered areas and benchesinvite accidents.
6. WEAR EAR PROTECTORS/DEFENDERS.
7. REMOVE ADJUSTING KEYS AND SPANNERS. Form habit ofchecking to see that keys and spanners etc., are removedfrom machine before turning it on.
8. DRUGS, ALCOHOL MEDICATION, Do not operate machinewhilst under the influence of drugs, alcohol or any medication.
9. ALWAYS FEED WORK into the blade against direction of rotationonly.
10. WEAR PROPER APPAREL. Loose clothing orjewellery may getcaught in moving parts. Wear protective hair covering to containlong hair.
11. USE RECOMMENDED ACCESSORIES. The use of improperaccessories could be hazardous. Use ONLY those recommendedin this manual.
12. NEVER STAND ON MACHINE. Injury could occur from a fall.
13. NEVER LEAVE MACHINE RUNNING UNATTENDED. Turn power OFF. DonÆt leave machine until itcomes to a complete stop
14. ALWAYS DISCONNECT MACHINE from electrical supply when making adjustments, changing partsor carrying out maintenance operations.
15. DON’T FORCE THE MACHINE to do ajob for which it was not designed.
16. AVOID DANGEROUS ENVIRONMENT. Don’t use machine in damp orwet locations or expose to rain. Keep your work area well illuminated.DO NOT USE in explosive atmosphere (around paint, flammable liquidsetc.).
17. KEEP CHILDREN AWAY All visitors should be kept a safe distance fromwork area, especially whilst operating the unit.
18. MAINTAIN TOOLS IN TOP CONDITION. Keep the blade sharp andclean for best and safest performance. Follow instructions forchanging accessories.
19. DON’T OVERREACH. Keep your proper footing and balance atall times. For best footing wear rubber soled footwear. Keepfloor clear of oil, scrap wood, etc.
20. MAKE WORKSHOP CHILDPROOF. Take precautions to preventaccess to the machine when it is not in use.
6
ADDITIONAL SAFETY RULES FOR TABLE SAWS
1. ALWAYS use saw Blade Guard, Riving Knife and Antikickback Pawls for every operation.
2. ALWAYS old the work firmly against the Mitre Gauge or Rip Fence.
3. USE push-stick when required. Always use a push-stick for ripping narrow stock. Refer to rippingapplications in instruction manual where push-stick is covered in detai.
4. NEVER perform any operation freehand’ which means using your hands to support or guidethe work piece. Always use either the Rip Fence or the Mitre Gauge to position and guide thework.
5. NEVER stand, or have any part of your body, in line with the path of the saw blade. Keep yourhands out of the line of the saw blade.
6. NEVER reach behind or over the saw blade for any reason.
7. REMOVE the rip fence completely when crosscutting.
8. If off cuts of wood become jammed in the machine, switch off and disconnect from supplybefore removal.
9. NEVER use the Rip Fence as a cut-off gauge when crosscutting.
10. NEVER attempt to free a stalled saw blade without first turning the sawOFF Turn off power switch immediately to prevent motor damage.
11. PROVIDE adequate support to the rear and sides of the saw table orwide or long workpieces.
12. AVOID KICKBACKS (work thrown back toward you) by keeping bladesharp, keeping rip fence parallel to the saw blade, keeping riving knifeand anti kickback pawls and guard in place. Do not release work beforeit is pushed all the way past the saw blade. Do not rip work that is twisted or warped or does nothave a straight edge to guide along the fence.
13. AVOID awkward operations and hand positions where a sudden slip could cause your hand tomove into the saw blade,
14. NEVER use solvents to clean plastic parts. Solvents could possibly dissolveor otherwise damage the material. Only a soft damp cloth should be usedto clean plastic parts.
15. PERMANENTLY MOUNT your table saw before performing any cuttingoperations. Refer to ‘Mounting the Saw’ on page 12
16. NEVER cut metals or materials which may make hazardous dust.
17. ALWAYS use in a well ventilated area. Remove sawdust frequently. Cleanout sawdust from the Interior of the saw to prevent a potential fire hazard.This is particularly important if a dust extraction device is not used. Alwaysclean away sawdust at the end of a days’ operation.
ELECTRICAL CONNECTIONS
WARNING!
If the power cable is worn or cut, or damaged in any way, have it replacedimmediately to avoid shock or fire hazard.
Connect the mains lead to a 230 volt (50Hz) domestic electrical supply via a standard 13 amp BS 1363plug fitted with a 13 amp fuse, or a suitably fused isolator switch.
WARNING! THIS APPLIANCE MUST BE EARTHED.
IMPORTANT: The wires in the mains lead are coloured in accordance with the following code:
Green & Yellow - Earth
Blue - Neutral
Brown - Live
As the colours of the flexible cord of this appliance may not correspond with the coloured markingsidentifying terminals in your plug, proceed as follows:
Connect GREEN & YELLOW coloured cord to plug terminal marked with a letter ‘E’ or Earth symbol“ ”, or coloured GREEN or GREEN & YELLOW.
Connect BROWN coloured cord to plug terminal marked letter ‘L’ or coloured RED.
Connect BLUE coloured cord to plug terminal marked letter ‘N’ or coloured BLACK.
We strongly recommend that this unit is connected to the mains supply via a ResidualCurrent Device (RCD).
IMPORTANT!
If this appliance is fitted with a plug which is moulded onto the electric cable (i.e. non- re-wirable) please note:
1. The plug must be thrown away if it is cut from the electric cable. There is a danger ofelectric shock if it is subsequently inserted into a socket outlet.
2. Never use the plug without the fuse cover fitted.
3. Should you wish to replace a detachable fuse carrier, ensure that the correct replacementis used (as indicated by marking or colour code).
4. Replacement fuse covers can be obtained from your local dealer or most electrical stockists.
Fuse RatingThe fuse in the plug must be replaced with one of the same rating (13 amps) and this replacementmust be ASTA approved to BS1362.
Extension CableIf an extension cable is fitted, ensure the minimum cross section of the conductor is 1 .5mm2 for up to15 metres in length, and 2.5mm2 for up to 25 metres.
7

8
1. The switch panel incorporates the ON and OFF switches.
2 Your saw also teatures an Overload Protection device, so that it the motor is overloaded (due tofeed pressure being too great, dull blade or low voltage), the Overload Relay will intervene, andthe motor will automatically cut out.
3. A Dust Extraction Outlet is provided at the rear of the machine. A vacuum extractor with a suitablefiexible hose (58mm dia.), may be connected and used either permanently or intermiffently asrequired.
4. The Table is provided with two slots, one each side ot the saw blade, running across its entirewidth. These slots are tor use with the Mitre Gauge, when cross cuffing either square or mitres, andis explained under ‘Operation’. A scale on the Mitre Gauge indicates the angle at which theworkpiece is being mitred.
5. Four holes are provided in the base so that the saw may be bolted to a workbench or stand.Please note that the machine MUST be tirmly secured to either a workbench, or a support toensure its complete stability. This is explained in detail under ‘Mounting the Saw’ on page 12.
FEATURES
6. The Blade Tilt Lock Handle locks the tilt mechanism atter the blade is adjusted to its desired position.
7. The Blade Height Adjuster Wheel elevates or lowers the blade, It is also used to tilt the blade from0o to 450o,
8. The Blade Tilt Scale shows the degree the blade is tilted.
9. The Rip Fence is for use when rip cuffing timber. It can be easily moved or locked in place by usingthe rip tence locking handle - lift up to loosen, press down to lock.
10. The Blade Guard protects the operator and must ALWAYS be in place and working properly atall times.
WARNING!NEVER USE MACHINE WITH THE BLADE GUARD REMOVED.
11. Anti-Kickback Pawis are affached to the blade guard bracket, which, when properly maintained,are designed to stop the workpiece tram being kicked back at the operator during operation.
12. The Riving Knife is essential in preventing kickback and in producing a good clean cut, withoutbinding or chaffering taking place.
13. The Table Insert is removable to tacilitate the installation or removal of the saw blade, and mustALWAYS be in place for all cuting operations.
GLOSSARY OF TERMS
Arbour The shaft on which a cuffing tool is mounted.
Crosscut A cuffing or shaping operation made across the width of the workpiece.
Freehand Pertorming a cut without a fence, mitre gauge, fixture, hold down or otherproperdevice to keep the workpiece from twisting during the cut
Heel Misalignment of the blade.
Kerf The amount of material removed by the blade.
Kickback An uncontrolled grabbing, and throwing of the workpiece back toward thefront ofthe saw during a rip type operation.
Leading End The end of the workpiece which, during a rip type operation, is pushed into thecutting tool first.
Push Stick A device used to feed the workpiece through the saw during a narrow rip typeoperation and which helps keep the operator’s hands well away from the blade.
Push Block A device used for rip type operations too narrow to allow use of a push stick.
Resin A sticky, sap base substance that has hardened.
Ripping A cuffing operation along the length of the workpiece.
9
UN-PACKING AND CHECKING CONTENTSThe Table Saw is shipped complete In one carton.
Separate all parts and check to ensure that all components are accounted for, according to thefollowing list, before discarding any packing material.
Should any component be missing or damaged in transit, please contact your CLARKE dealerimmediately, or CLARKE Customer Service Department on 020 8988 7400.
Checking StraightEdge with Comb
Square
2
Fig.1Table of Loose Parts
A Table Saw Assembly.
B Rip Fence (Without Handle).
C Mitre Gauge Assy (With Handle).
D Mitre Gauge Storage
E Rip Fence Storage
F Blade Guard Assy., c/w bracketand anti-kickback pawis
Loose parts in bags
G Arbor Spanner.
H Saw Blade Securing Nut Spanner
J Rip Fence Handle
K Blade Height Adjuster Wheel Handle with nut.
L Support Block c/w Blade Guard MountingBracket and 2pcs M5x12mm screws andlockwashers
M Support Block Mounting Bolt, lockwasher.1 x spacer and 1 x flat washer.
N 1 x Coach Bolt with lock washer and nut.(For securing the Blade Guard Assy to BladeGuard Mounting Bracket).
P Push Stick
Tools Needed for Assembly
1. Combination Square - Must Be True- check as shown in diagram opposite.
2. Phillips Screwdriver
3. Medium Screwdriver
4. 10mm Spanner
ASSEMBLY
Before the machine can be used, the loose parts must first be assembled to it, and certain adjustmentscarried out. Please proceed as follows:
A. Handle (to Blade Height Adjuster Handwheel - see illustration, page 7)
1. Locate the small plastic handle, (item K, Fig. 2). with the centre screw and nut, and screw thenut in fully so that it butts up against the handle.
2. Screw the centre screw, with the handle, intothe rim of the Blade Height Adjuster handwheeluntil the nut binds up against the rim. Back offthe screw slightly and hold it in that position whilstyou screw out the nut until it is tight against therim of the handwheel, thereby locking thecentre screw in position,
When properly assembled, the handle will rotate freely about the screw, with only a small amountof end play.
B. The Saw Blade (If not fitted)
CAUTION!Exercise extreme care when handling the Saw Blade,
The teeth are extremely sharp......carelessness could cause severe personal injury
1. Turn Blade height adjuster handwheel clockwise until the arbour is up as high as it will go. removethe two table Insert screws and lift the table insert out of the recess in the table.
2. Place the open end arbour spanner on the flats on the inner flange to prevent the arbour fromrotating, and remove the blade securing nut using the spanner provided. Remove the outerflange.
3. Manoeuvre the blade gently through the slot in the table, so as not to damage the teeth, andmount it on the arbour, ensuring the TEETH OF THE BLADE ARE POINTING DOWN AT THE FRONT OFTHE TABLE.
4. Replace the outer flange, followed by the blade securing nut, and tighten securely.
5. Replace the table insert in the recess in the table, and secure in place - the turned over edge ofthe insert faces the blade. Ensure the blade rotates truly and freely - by hand.
C. Blade Guard and Bracket Assembly1. From among the loose parts, locate the following.
1.1 1 x Blade Guard Assembly c/w BladeGuard and anti Kickback Pawls.
1.2 1 x Support Block and Blade GuardMounting Bracket (may be attached).
1.3 1 x 55mm Hex. bolt, spacer, lockwasherand flat washer.
NOTE: The Support Black and Blade Guard MountingBracket may be factory assembled,in which case,para. 2 below does not apply
2. Remove the two M5 Screws from the SupportBlock and attach the Blade Guard MountingBracket in the manner shown in fig. 3, usingthe same screws, and ensuring the lockwashers are in place.
Fig.3
Fig.2
2
CAUTIONINEVER start the machine with the Blade Guard removed.
3. Thread the 55mm bolt through the hole in theNON RECESSED end of the Support Block. (seefig 3), with the lock washer, followed by the flatwasher up against the bolt head.
4. Thread the spacer on to the protruding end ofthe 55mm bolt, and screw the bolt into themounting hole at the back edge of the table.
5. Slide the slotted end of the Blade GuardBracket over the lug on the Blade GuardMounting Bracket so that the Blade GuardBracket sits snugly on the table, as shown in fig.4, and secure using the single Coach Bolt, withlock washer and nut supplied.
6. Using a straight edge, check to ensure theGuard Bracket is correctly aligned with the sawblade, If an adjustment is necessary, the guardbracket can be moved left or right, byslackening the Support Block to MountingBracket screws, and adjusting accordingly.Similarly, the Guard Bracket may be rotated byslackening the Support Block mounting bolt.When you are certain it is properly aligned withthe saw blade, tighten all securing bolts andscrews fully.
CAUTIONI
DO NOT force the Rip Fence Handle,,,,, if excessive force is used, the claw (see fig. 6)willdistort. Should this occur it will be necessary to dismantle the Rip Fence assembly
and straighten the claw to ensure the Fence operates satisfactorily
3. With the handle in the vertical position, screw IN the adjuster screw (Fig.6) until you can feelresistance. Check to ensure the fence is now securely locked to the table. This is a questionof‘feel’ and it may be necessary to screw the adjuster screw IN (clockwise), a little more to securethe fence, however, DO NOT overtighten the adjuster screw.
To release the fence, lift the handle up.
Fig.4
Fig.5
D. Rip Fence1. Thread the rip fence locking handle into the cam on
the front block (see fig. 6), and tighten the locknut.
2 Place the fence on the table, and with the clawsecurely located on the back edge (of the table),press the fence locking handle down to the verticalposition. If force is required, do not continue to pushdown, but slacken the adjuster screw (shown in fig.6) a few turns until the handle can be moved easily.
Fig.6
2
4. When sefting the rip fence for ripping a piece of wood, you must always check to ensure that itis parallel to the mitre gauge slot, If there is a small discrepancy, it may be possible to release thelocking handle and reposition the fence so that it is exactly parallel.
If the discrepancy cannot be rectified in this manner, it will be necessary to slacken the twoscrews on top of the fence and move the body of the fence so that it is parallel to the mitregauge slot. When satisfied, tighten the two screws on top of the fence once again.
Your Table Saw is now fully assembled. However, before it can be used, you must ensure that it issecurely and correctly mounted, and checks MUST be made to ensure that all necessary adjustmentsare correct, and that parts are properly aligned.
These details are covered in the following paragraphs.
MOUNTING THE SAW
IMPORTANTIf the saw is to be a permanent fixture, ensure it is sited in an area with adequate illumination and
power supply
DO NOT place it where you will be working in your own light, or where extension cables are required- these are hazardous in a workshop environment,
If the table saw is to be used in a permanent location, it should be fastened securely to a firm supportingsurtace such as a stand or workbench, using the four mounting holes in the base.
A Floor Stand is available from your CLARKE dealer,An ideal accessory, giving complete stability together with portability of the machine,
Model No. CLK2: Part No, 6500711
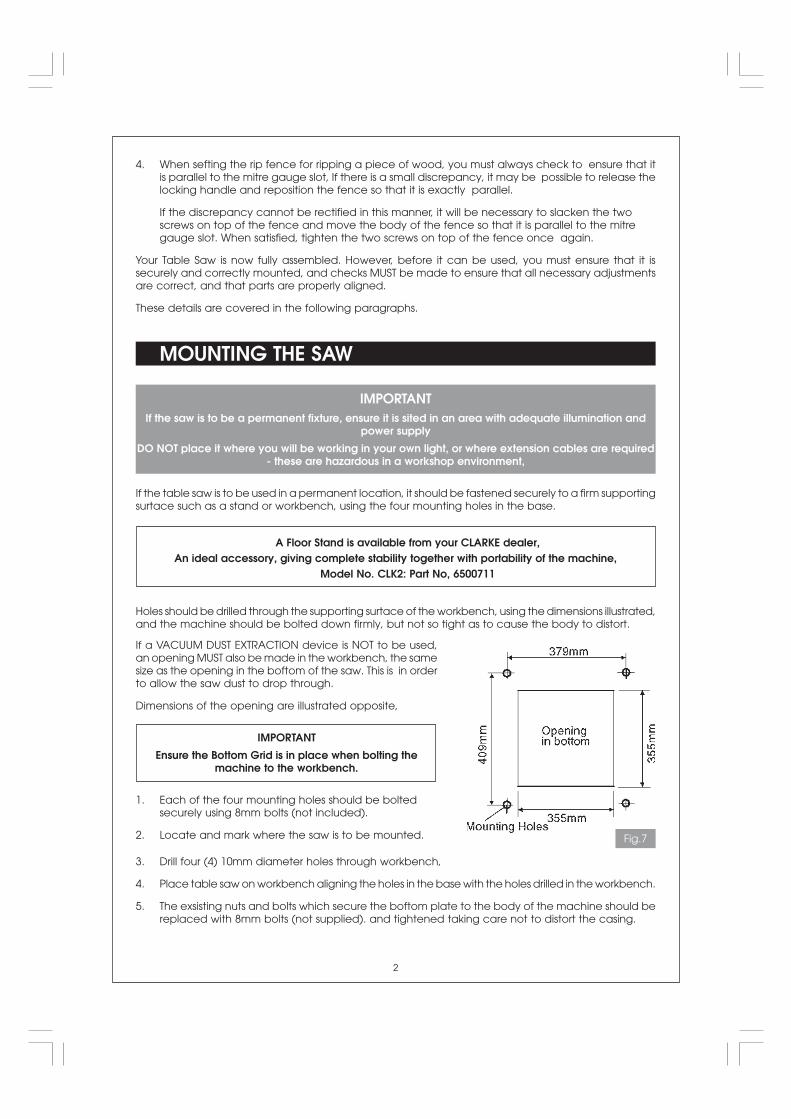
Holes should be drilled through the supporting surtace of the workbench, using the dimensions illustrated,and the machine should be bolted down firmly, but not so tight as to cause the body to distort.
If a VACUUM DUST EXTRACTION device is NOT to be used,an opening MUST also be made in the workbench, the samesize as the opening in the boftom of the saw. This is in orderto allow the saw dust to drop through.
Dimensions of the opening are illustrated opposite,
IMPORTANT
Ensure the Bottom Grid is in place when bolting themachine to the workbench.
1. Each of the four mounting holes should be boltedsecurely using 8mm bolts (not included).
2. Locate and mark where the saw is to be mounted.
3. Drill four (4) 10mm diameter holes through workbench,
4. Place table saw on workbench aligning the holes in the base with the holes drilled in the workbench.
5. The exsisting nuts and bolts which secure the boftom plate to the body of the machine should bereplaced with 8mm bolts (not supplied). and tightened taking care not to distort the casing.
Fig.7
2
Mounting to Plywood
An alternative method of securing your table saw is to fasten the saw base to a mounting board, witha minimum size of 600x600mm. This is to prevent the saw from tipping whilst in use. A good grade ofplywood with a minimum thickness of 19mm is recommended.
1. Follow the instructions for mounting to a workbench, substituting a ‘plywood board’, and using8mm countersunk screws, with lock washers and hex nuts (not included). Screw length must be atleast 12mm more than the thickness of the mounting board.
NOTE: For proper stability holes must be countersunk on bottom side of plywood so screw heads areflush with the bottom surface of the mounting board.
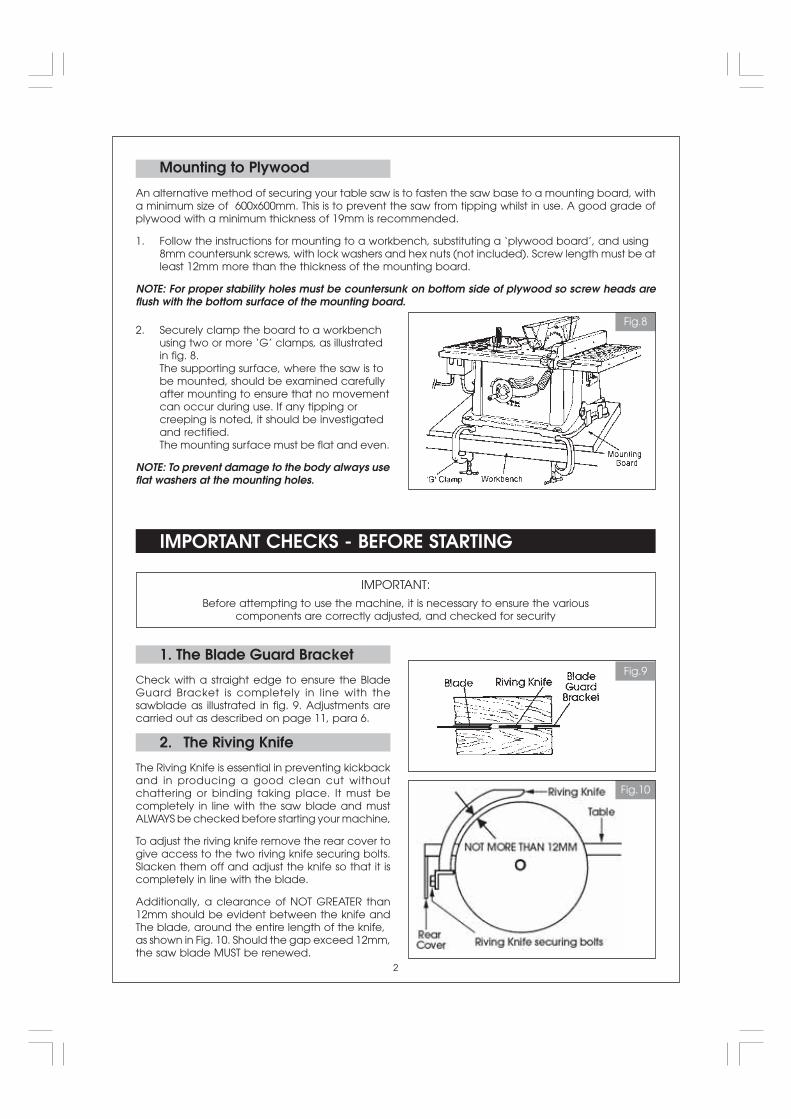
2. Securely clamp the board to a workbenchusing two or more ‘G’ clamps, as illustratedin fig. 8.The supporting surface, where the saw is tobe mounted, should be examined carefullyafter mounting to ensure that no movementcan occur during use. If any tipping orcreeping is noted, it should be investigatedand rectified.The mounting surface must be flat and even.
NOTE: To prevent damage to the body always useflat washers at the mounting holes.
IMPORTANT CHECKS - BEFORE STARTING
IMPORTANT:
Before attempting to use the machine, it is necessary to ensure the variouscomponents are correctly adjusted, and checked for security
1. The Blade Guard Bracket
Check with a straight edge to ensure the BladeGuard Bracket is completely in line with thesawblade as illustrated in fig. 9. Adjustments arecarried out as described on page 11, para 6.
2. The Riving Knife
The Riving Knife is essential in preventing kickbackand in producing a good clean cut withoutchattering or binding taking place. It must becompletely in line with the saw blade and mustALWAYS be checked before starting your machine,
To adjust the riving knife remove the rear cover togive access to the two riving knife securing bolts.Slacken them off and adjust the knife so that it iscompletely in line with the blade.
Additionally, a clearance of NOT GREATER than12mm should be evident between the knife andThe blade, around the entire length of the knife,as shown in Fig. 10. Should the gap exceed 12mm,the saw blade MUST be renewed.
Fig.8
Fig.10
Fig.9
2
Push Block
Should the Riving Knife subsequently become out of shape or misaligned, it must be gently easedback into line, or if the damage is more severe, it must be removed and bent back into shapeaccordingly or replaced.
3. The Saw BladeCheck to ensure the blade is sound. If teeth are chipped, or cracks are apparent, it must be renewed.
4. The Blade GuardEnsure the Blade Guard is in place, pivots freely, and falls under its own weight. (DO NOT overtightenthe mounting bolt).
No further adjustments should be necessary, but before you proceed to use the machine, it isrecommended that you apply a coat of paste wax to the table to reduce friction when pushing theworkpiece. Wipe the table thoroughly with a clean dry cloth.
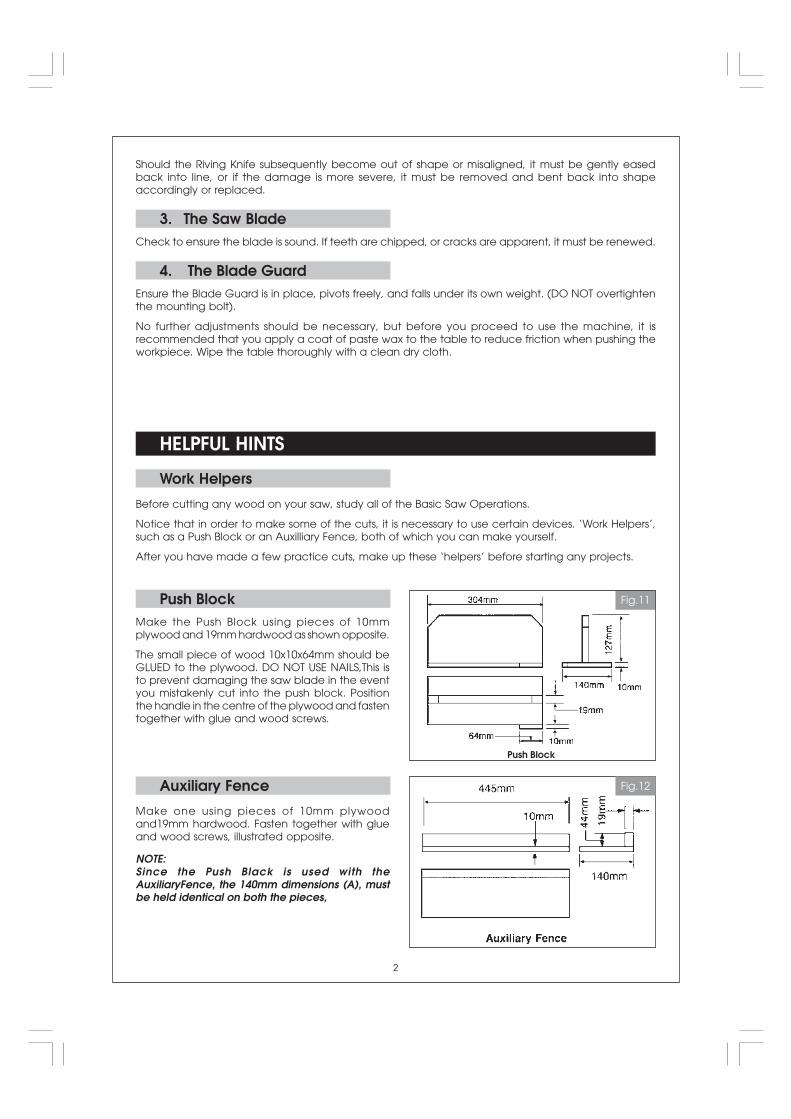
Fig.11Push BlockMake the Push Block using pieces of 10mmplywood and 19mm hardwood as shown opposite.
The small piece of wood 10x10x64mm should beGLUED to the plywood. DO NOT USE NAILS,This isto prevent damaging the saw blade in the eventyou mistakenly cut into the push block. Positionthe handle in the centre of the plywood and fastentogether with glue and wood screws.
Auxiliary Fence
Make one using pieces of 10mm plywoodand19mm hardwood. Fasten together with glueand wood screws, illustrated opposite.
NOTE:Since the Push Black is used with theAuxiliaryFence, the 140mm dimensions (A), mustbe held identical on both the pieces,
HELPFUL HINTS
Work Helpers
Before cutting any wood on your saw, study all of the Basic Saw Operations.
Notice that in order to make some of the cuts, it is necessary to use certain devices. ‘Work Helpers’,such as a Push Block or an Auxilliary Fence, both of which you can make yourself.
After you have made a few practice cuts, make up these ‘helpers’ before starting any projects.
Fig.12
2
OPERATION
1. Starting and Stopping the Machine
The ON and OFF switches are located on the front left of the machine.The left hand, GREEN switch isthe ON switch and is marked with an ‘I’ symbol.
The right hand RED switch is the OFF switch. It is raised and marked with the symbol ‘0’
For additional safety, the ON switch is a ‘NO VOLT RELEASE’ type. This means that if the power isinterrupted for whatever reason whilst the machine is switched ON, the no volt release will automaticallytrip, setting the machine to the OFF position, thereby preventing it from starting again when the poweris restored. The machine may then be restarted by pressing the ON switch.
Your machine also features an OVERLOAD CUTOUT device, so that if the machine is overloaded (dueto feed pressure being too great, a dull blade or low voltage etc.), the overload relay will interveneand the motor will automatically cut out, In this event:
a. Press the OFF bufton and disconnect from the mains supply,
b. Allow the motor to cool for three to five minutes.
b. Plug the machine back into the mains supply, and switch the saw back on.
2. Ripping or Rip Cutting
This is the term used for cutting timber in the same direction as the grain, i.e usually lengthwise.
First ensure the blade is set to 90O as indicated by the pointer showing 0O on the scale on the front ofthe machine. If absolute accuracy is required, check the blade angle with a square or protractor andadjust if necessary by slackening the blade tilt locking handle, moving the blade until it is at 90O andretightening the tilt locking handle. At this point, you should also zero the pointer.
To assist in producing a straight, true cut, a RIP FENCE is used, This is positioned to the right of the sawblade, and may be adjusted to suit the width of cut required. It should be firmly clamped in place.ensuring it is parallel to the blade, by pushing the rip fence handle down. DO NOT force the handle. IfThe handle adjustment is not correct, and too much force is applied, the fence will tend to ride up onthe table and become misaligned. Adjustment should be carried out in accordance with the instructionsgiven on page 11.
Additionally, when positioning the fence for maximum rip, make sure it is fully clamped, and does notextend beyond the edge of the table. Do not rip cut with the fence beyond this position, because itcannot be clamped.
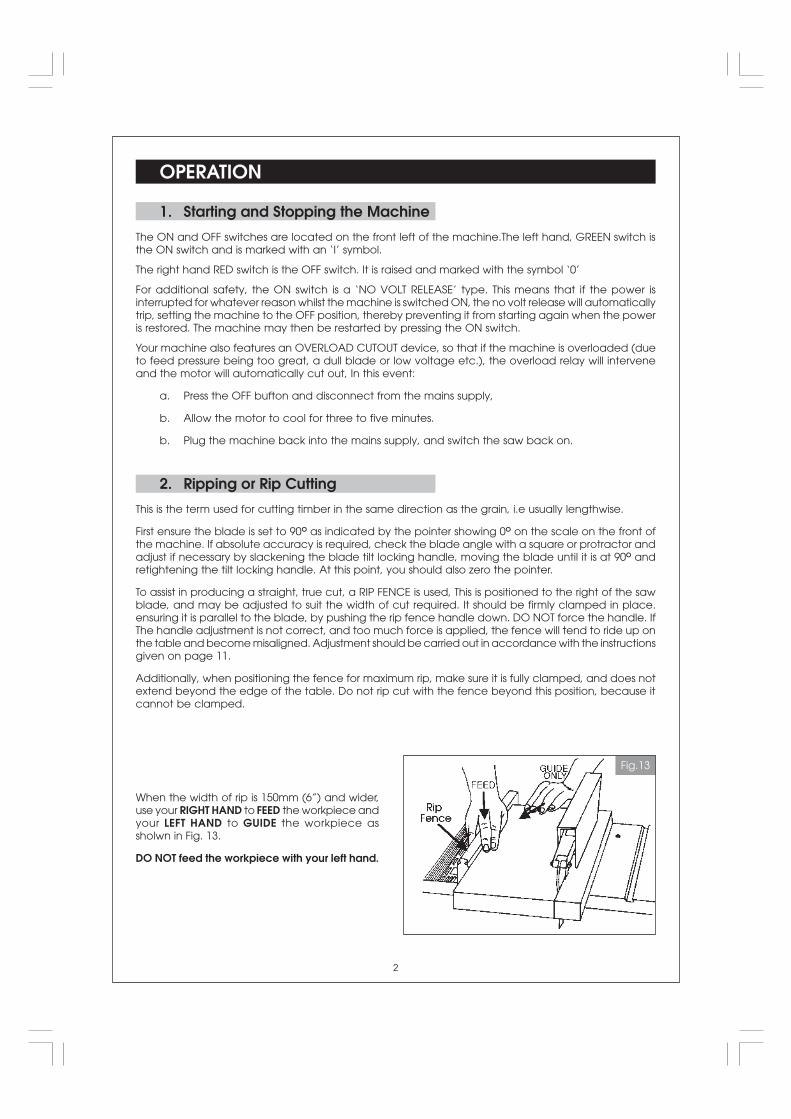
When the width of rip is 150mm (6”) and wider,use your RIGHT HAND to FEED the workpiece andyour LEFT HAND to GUIDE the workpiece assholwn in Fig. 13.
DO NOT feed the workpiece with your left hand.
Fig.13
2

When width of rip is 50 - 150mm (2” - 6”) wideuse a push stick to feed the work. (Fig. 14).
When width of rip is narrower than 50mm (2”),the push stick cannot be used because theguard will interfere. Use the auxiliary fence, andpush block as shown in Fig. 14.
The auxiliary fence is secured to the ripfencewith two ‘G’ clamps as shown in Fig. 15.
Feed the workpiece by hand until the end isapproximately 1” from the front edge ofthetable. Continue to feed using the pushblock on top of auxiliary fence (as shown inFig. 16), until the cut is complete.
When ripping, you should ALWAYSabide by the following rules:
✔ ALWAYS clamp the rip fence securelybefore use, .
✔ ALWAYS remove the mitre gauge fromtable during any operations which utilisethe rip fence.
✔ ALWAYS make sure the blade guard isinstalled for ALL sawing.
✔ ALWAYS set the blade height to thethickness of the workpiece plus 2-3mm.Additional blade exposure would increasethe hazard potential.
✔ ALWAYS keep your hands clear and outof the path of the blade.
✔ ALWAYS switch the machine OFF anddisconnect from the mains supply If theblade stalls or stops whilst cutting,andBEFORE attempting to free the blade.
✔ FREQUENTLY check the action of theAnti-kickback pawls by passing theworkpiece alongside the blade guardbracket whilst the saw is OFF.
Pull the workpiece toward you. If Thepawls do not dig into the workpiece andhold it, the pawls must be resharpened orreplaced.
Fig.16
Fig.15
Fig.14
✔ ALWAYS place the concave side down if the workpiece is warped. This will prevent it from rockingwhilst it is being ripped.
✔ ALWAYS use a push stick when the end of the work approaches the blade, or for short work orwork less than 6” wide,
✔ ALWAYS ensure, before starting to rip.......
A. The Rip Fence is parallel to the saw blade.
B. The Riving Knife and Blade Guard Bkt are properly aligned with the saw blade.
C. The Anti-kickback Pawis are functioning properly.
✔ ALWAYS use a work support when ripping LONG BOARDS or LARGE PANELS. A simple one can bemade by clamping a piece of plywood to a sawhorse (or see p19, ‘Crosscutting’).
2
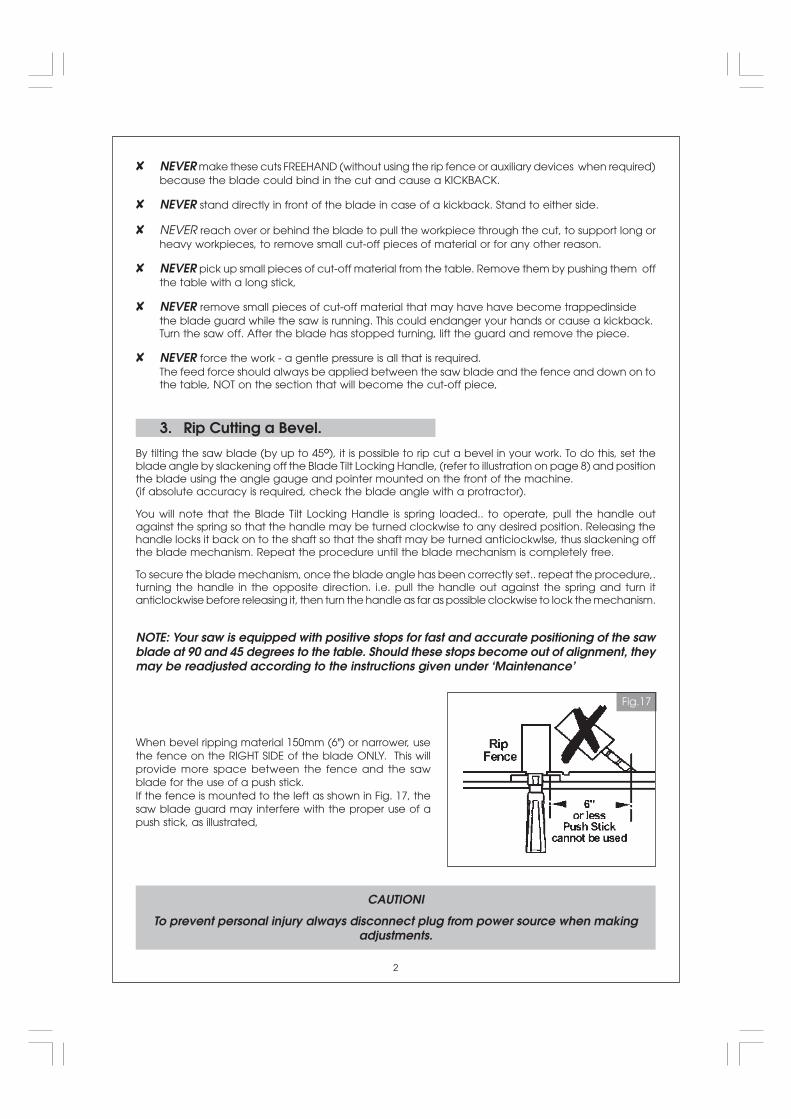
Fig.17
✘ NEVER make these cuts FREEHAND (without using the rip fence or auxiliary devices when required)because the blade could bind in the cut and cause a KICKBACK.
✘ NEVER stand directly in front of the blade in case of a kickback. Stand to either side.
✘ NEVER reach over or behind the blade to pull the workpiece through the cut, to support long orheavy workpieces, to remove small cut-off pieces of material or for any other reason.
✘ NEVER pick up small pieces of cut-off material from the table. Remove them by pushing them offthe table with a long stick,
✘ NEVER remove small pieces of cut-off material that may have have become trappedinsidethe blade guard while the saw is running. This could endanger your hands or cause a kickback.Turn the saw off. After the blade has stopped turning, lift the guard and remove the piece.
✘ NEVER force the work - a gentle pressure is all that is required.The feed force should always be applied between the saw blade and the fence and down on tothe table, NOT on the section that will become the cut-off piece,
3. Rip Cutting a Bevel.
By tilting the saw blade (by up to 45O), it is possible to rip cut a bevel in your work. To do this, set theblade angle by slackening off the Blade Tilt Locking Handle, (refer to illustration on page 8) and positionthe blade using the angle gauge and pointer mounted on the front of the machine.(if absolute accuracy is required, check the blade angle with a protractor).
You will note that the Blade Tilt Locking Handle is spring loaded.. to operate, pull the handle outagainst the spring so that the handle may be turned clockwise to any desired position. Releasing thehandle locks it back on to the shaft so that the shaft may be turned anticiockwlse, thus slackening offthe blade mechanism. Repeat the procedure until the blade mechanism is completely free.
To secure the blade mechanism, once the blade angle has been correctly set.. repeat the procedure,.turning the handle in the opposite direction. i.e. pull the handle out against the spring and turn itanticlockwise before releasing it, then turn the handle as far as possible clockwise to lock the mechanism.
NOTE: Your saw is equipped with positive stops for fast and accurate positioning of the sawblade at 90 and 45 degrees to the table. Should these stops become out of alignment, theymay be readjusted according to the instructions given under ‘Maintenance’
When bevel ripping material 150mm (6") or narrower, usethe fence on the RIGHT SIDE of the blade ONLY. This willprovide more space between the fence and the sawblade for the use of a push stick.If the fence is mounted to the left as shown in Fig. 17, thesaw blade guard may interfere with the proper use of apush stick, as illustrated,
CAUTIONI
To prevent personal injury always disconnect plug from power source when makingadjustments.
2
4. Crosscutting.
Crosscutting is the term used to describe cutsmade in timber across the grain. This type of cutrequires the use of the MITRE GAUGE. This includesbevel cutting, mitre cutting and compound mitrecutting (described later in this chapter).
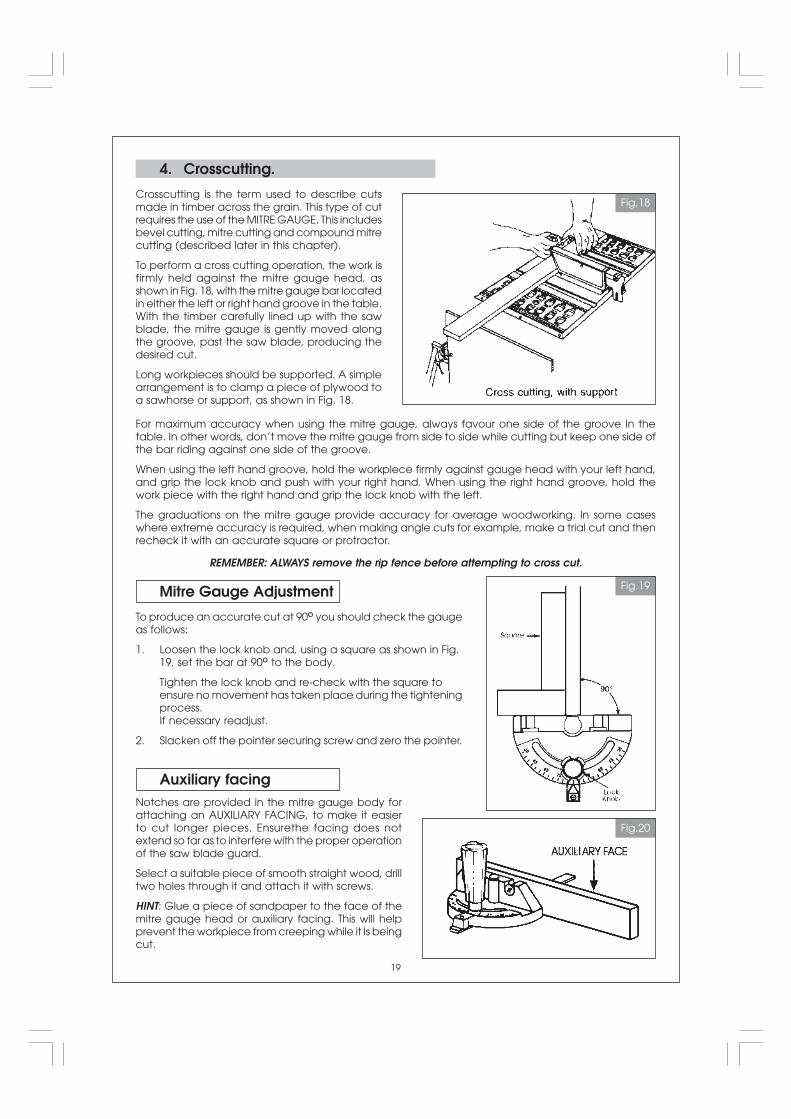
To perform a cross cutting operation, the work isfirmly held against the mitre gauge head, asshown in Fig. 18, with the mitre gauge bar locatedin either the left or right hand groove in the table.With the timber carefully lined up with the sawblade, the mitre gauge is gently moved alongthe groove, past the saw blade, producing thedesired cut.
Long workpieces should be supported. A simplearrangement is to clamp a piece of plywood toa sawhorse or support, as shown in Fig. 18.
For maximum accuracy when using the mitre gauge, always favour one side of the groove In thetable. In other words, don’t move the mitre gauge from side to side while cutting but keep one side ofthe bar riding against one side of the groove.
When using the left hand groove, hold the workplece firmly against gauge head with your left hand,and grip the lock knob and push with your right hand. When using the right hand groove, hold thework piece with the right hand and grip the lock knob with the left.
The graduations on the mitre gauge provide accuracy for average woodworking. In some caseswhere extreme accuracy is required, when making angle cuts for example, make a trial cut and thenrecheck it with an accurate square or protractor.
REMEMBER: ALWAYS remove the rip fence before attempting to cross cut.
Fig.18
Mitre Gauge Adjustment
To produce an accurate cut at 90O you should check the gaugeas follows:
1. Loosen the lock knob and, using a square as shown in Fig.19, set the bar at 90O to the body.
Tighten the lock knob and re-check with the square toensure no movement has taken place during the tighteningprocess.If necessary readjust.
2. Slacken off the pointer securing screw and zero the pointer.
Fig.19
Auxiliary facingNotches are provided in the mitre gauge body forattaching an AUXILIARY FACING, to make it easierto cut longer pieces. Ensurethe facing does notextend so far as to interfere with the proper operationof the saw blade guard.
Select a suitable piece of smooth straight wood, drilltwo holes through it and attach it with screws.
HINT: Glue a piece of sandpaper to the face of themitre gauge head or auxiliary facing. This will helpprevent the workpiece from creeping while it Is beingcut.
Fig.20
19
When crosscutting, you should ALWAYS abide by the following rules:
✔ ALWAYS lock the mitre gauge securely.
✔ ALWAYS remove the rip fence from table during any operations which utilise the mitre gauge.
✔ ALWAYS make sure the blade guard is installed (for ALL sawing operations).
✔ ALWAYS set the saw blade height to the thickness of the wood plus 2-3mm. Additional bladeexposure would increase the hazard potential.
✔ NEVER stand directly In front of the blade in case of a throwback (small cut-off piece caught bythe back of the blade and thrown toward the operator). Always stand to one side of the blade.
✔ ALWAYS keep your hands clear, and out of the path of the blade.
✔ ALWAYS switch the machine OFF and disconnect from the mains supply if the blade stalls or stopswhilst cutting, and before attempting to free it.
✔ ALWAYS place the concave side down if workpiece Is warped. This will prevent it from rockingwhilst it is being cut.
✘ NEVER crosscut freehand (without using the mitre gauge or other auxiliary device) becausethe blade could bind in the cut and cause a kickback or cause your fingers or hand to slip into theblade.
✘ NEVER reach over or behind the blade to pull the workpiece through the cut, to support long orheavy workpieces, to remove cut-off pieces of material, or for any other reason.
✘ NEVER pick up small pieces of cut-off material from the table. Remove them by pushing them offthe table with a long stick. Otherwise they could be thrown back at you by the rear of the blade.
✘ NEVER remove small pieces of cut-off material that may have become trapped inside the bladeguard while the saw is running. This could endanger your hands or cause a kickback. Turn the sawoff. After the blade has stopped turning, lift the guard and remove the piece.
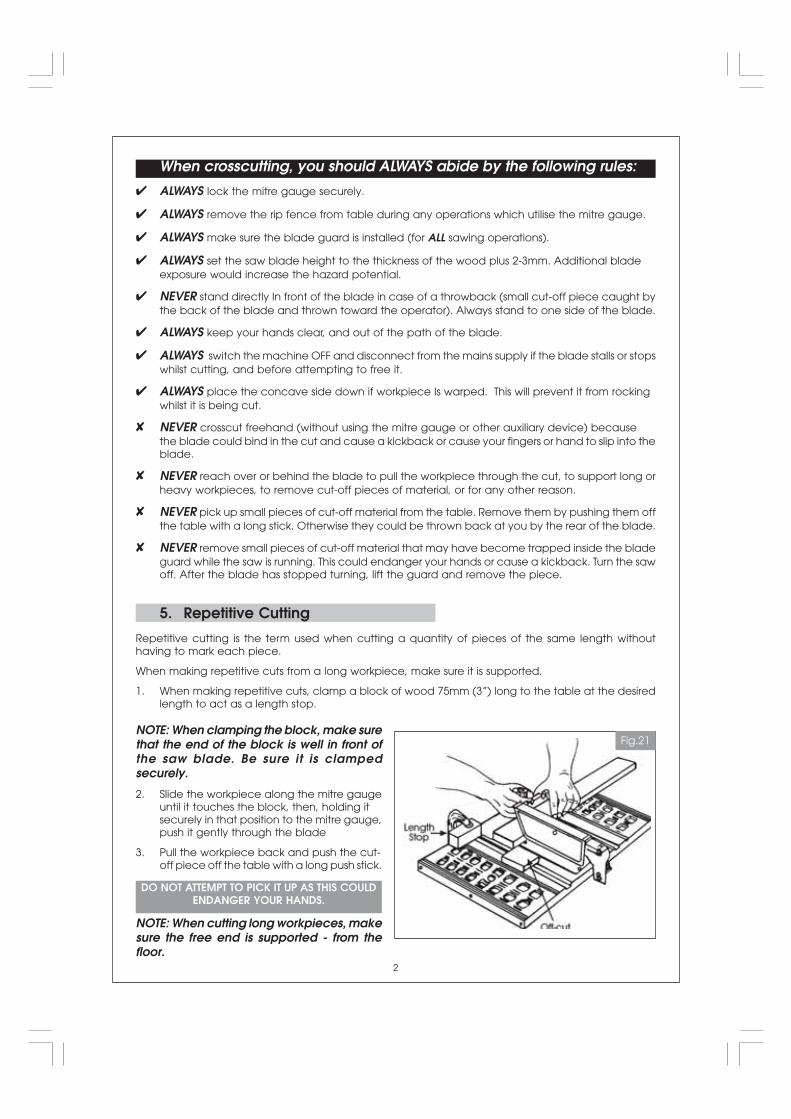
5. Repetitive Cutting
Repetitive cutting is the term used when cutting a quantity of pieces of the same length withouthaving to mark each piece.
When making repetitive cuts from a long workpiece, make sure it is supported.
1. When making repetitive cuts, clamp a block of wood 75mm (3”) long to the table at the desiredlength to act as a length stop.
NOTE: When clamping the block, make surethat the end of the block is well in front ofthe saw blade. Be sure it is clampedsecurely.
2. Slide the workpiece along the mitre gaugeuntil it touches the block, then, holding itsecurely in that position to the mitre gauge,push it gently through the blade
3. Pull the workpiece back and push the cut-off piece off the table with a long push stick.
DO NOT ATTEMPT TO PICK IT UP AS THIS COULDENDANGER YOUR HANDS.
NOTE: When cutting long workpieces, makesure the free end is supported - from thefloor.
Fig.21
2
CAUTION!NEVER use the rip fence as a length stop because the cut-off piece could bind
between the fence and the blade causing a kickback.
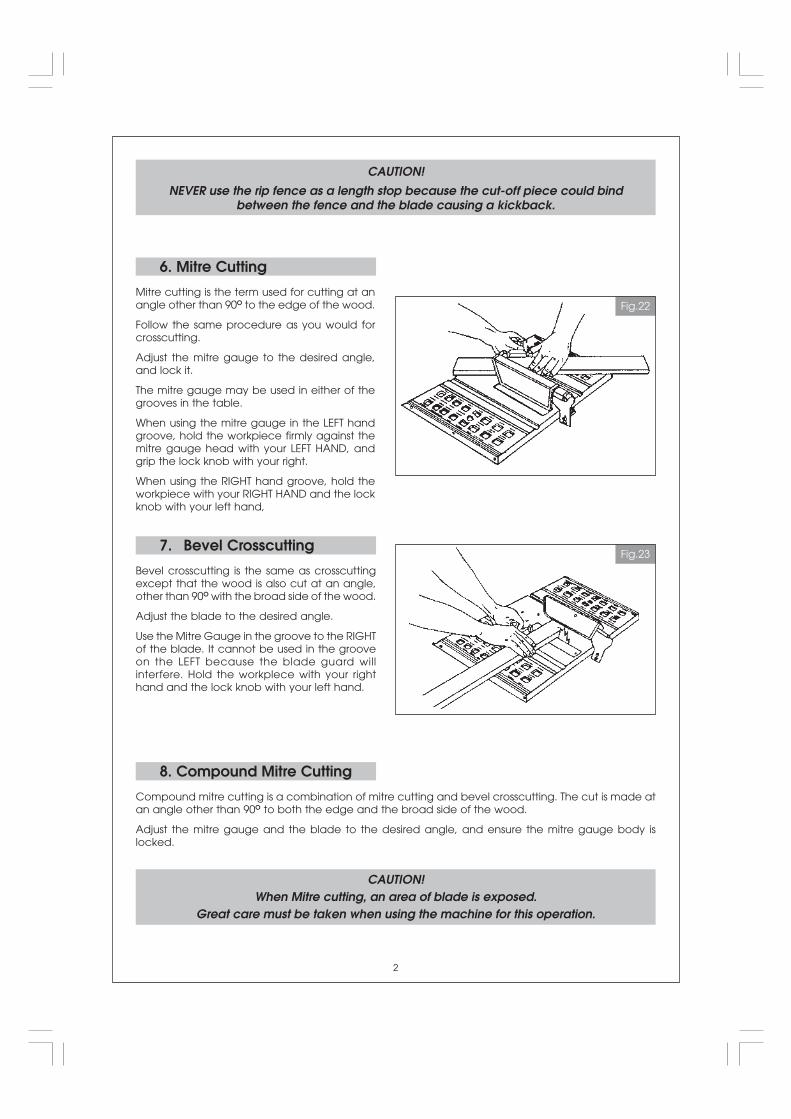
6. Mitre Cutting
Mitre cutting is the term used for cutting at anangle other than 90O to the edge of the wood.
Follow the same procedure as you would forcrosscutting.
Adjust the mitre gauge to the desired angle,and lock it.
The mitre gauge may be used in either of thegrooves in the table.
When using the mitre gauge in the LEFT handgroove, hold the workpiece firmly against themitre gauge head with your LEFT HAND, andgrip the lock knob with your right.
When using the RIGHT hand groove, hold theworkpiece with your RIGHT HAND and the lockknob with your left hand,
8. Compound Mitre Cutting
Compound mitre cutting is a combination of mitre cutting and bevel crosscutting. The cut is made atan angle other than 90O to both the edge and the broad side of the wood.
Adjust the mitre gauge and the blade to the desired angle, and ensure the mitre gauge body islocked.
CAUTION!When Mitre cutting, an area of blade is exposed.
Great care must be taken when using the machine for this operation.
Fig.22
Fig.237. Bevel Crosscutting
Bevel crosscutting is the same as crosscuttingexcept that the wood is also cut at an angle,other than 90O with the broad side of the wood.
Adjust the blade to the desired angle.
Use the Mitre Gauge in the groove to the RIGHTof the blade. It cannot be used in the grooveon the LEFT because the blade guard willinterfere. Hold the workplece with your righthand and the lock knob with your left hand.
2
MAINTENANCE
CAUTION!
For your own safety SWITCH MACHINE OFF and remove plug from power sourcebefore adjusting or maintaining your saw.
Do not allow sawdust to accumulate inside the saw. Use a dust extractor if possible, if not, frequentlyblow out any dust that may accumulate inside the saw cabinet and the motor.
Inspect the power cable frequently. If it is worn or cut, or damaged in any way, have it replacedimmediately.
NOTE: Certain cleaning agents and solvents can damage plastic parts. Some of these are:
gasoline, carbon tetrochloride, chlorinated cleaning solvents, ammonia and householddetergents which contain ammonia. Avoiding the use of these and other types of cleaningagents will minimise the possibility of damage.
A coat of wax applied to the table will help to keep the surface clean and allow workpieces to slidemore freely.
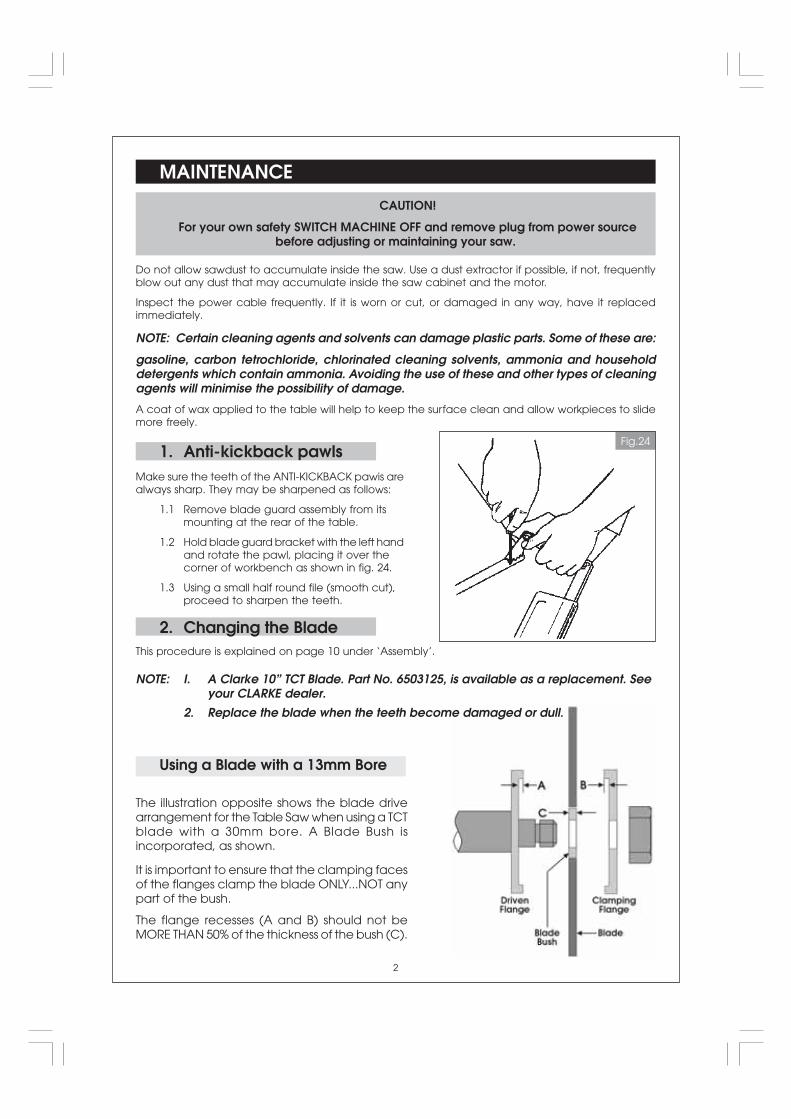
1. Anti-kickback pawlsMake sure the teeth of the ANTI-KICKBACK pawis arealways sharp. They may be sharpened as follows:
1.1 Remove blade guard assembly from itsmounting at the rear of the table.
1.2 Hold blade guard bracket with the left handand rotate the pawl, placing it over thecorner of workbench as shown in fig. 24.
1.3 Using a small half round file (smooth cut),proceed to sharpen the teeth.
2. Changing the BladeThis procedure is explained on page 10 under ‘Assembly’.
NOTE: I. A Clarke 10” TCT Blade. Part No. 6503125, is available as a replacement. Seeyour CLARKE dealer.
2. Replace the blade when the teeth become damaged or dull.
2
The illustration opposite shows the blade drivearrangement for the Table Saw when using a TCTblade with a 30mm bore. A Blade Bush isincorporated, as shown.
It is important to ensure that the clamping facesof the flanges clamp the blade ONLY...NOT anypart of the bush.
The flange recesses (A and B) should not beMORE THAN 50% of the thickness of the bush (C).
Using a Blade with a 13mm Bore
Fig.24
3. Adjusting Blade Parallel to the Mitre Gauge Slots
NOTE:If adjustment cannot be achieved by loosening the alignment screws (C), loosen the twosecondary alignment screws (D). These screws are also secured from below with lack nuts.
This adjustment should ONLY be carried out as a last resort.
Fig.25
Fig.26
Check Front ofblade
Check Rear of blade
Fig.26a
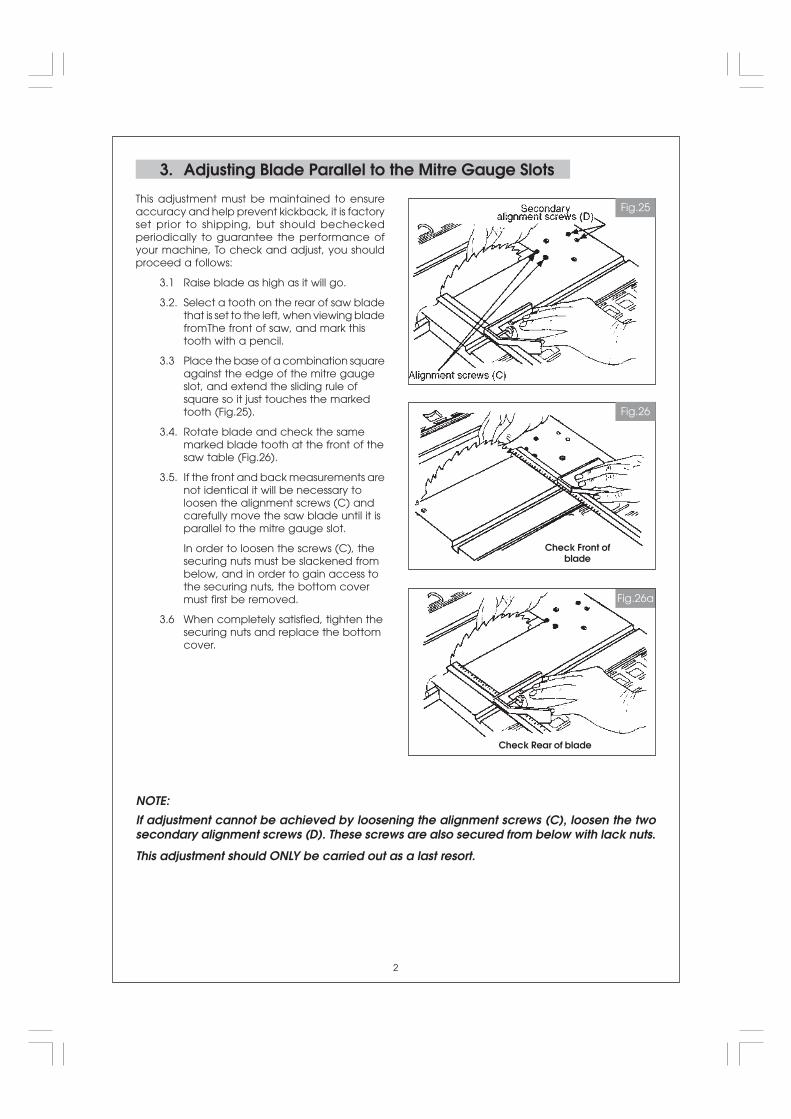
This adjustment must be maintained to ensureaccuracy and help prevent kickback, it is factoryset prior to shipping, but should becheckedperiodically to guarantee the performance ofyour machine, To check and adjust, you shouldproceed a follows:
3.1 Raise blade as high as it will go.
3.2. Select a tooth on the rear of saw bladethat is set to the left, when viewing bladefromThe front of saw, and mark thistooth with a pencil.
3.3 Place the base of a combination squareagainst the edge of the mitre gaugeslot, and extend the sliding rule ofsquare so it just touches the markedtooth (Fig.25).
3.4. Rotate blade and check the samemarked blade tooth at the front of thesaw table (Fig.26).
3.5. If the front and back measurements arenot identical it will be necessary toloosen the alignment screws (C) andcarefully move the saw blade until it isparallel to the mitre gauge slot.
In order to loosen the screws (C), thesecuring nuts must be slackened frombelow, and in order to gain access tothe securing nuts, the bottom covermust first be removed.
3.6 When completely satisfied, tighten thesecuring nuts and replace the bottomcover.
2
4. Adjusting 90 and 45 Degree Positive Stops4A. Adjusting Positive Stop at 90 Degrees
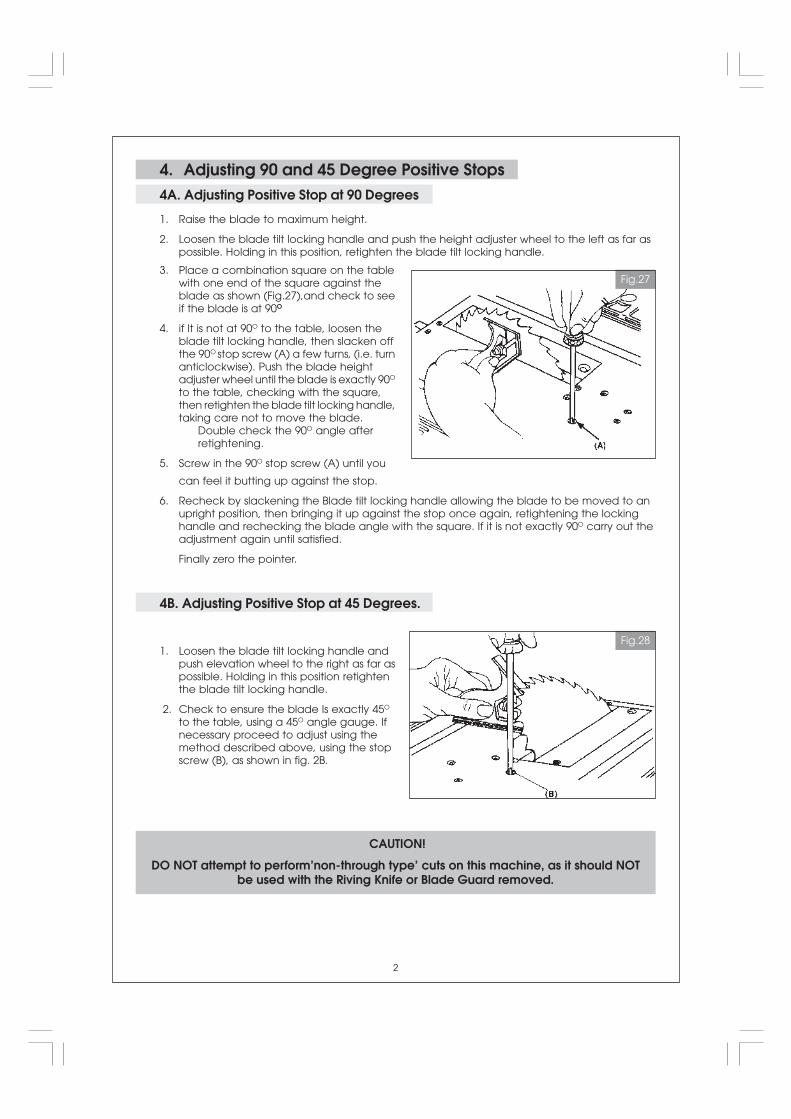
1. Raise the blade to maximum height.
2. Loosen the blade tilt locking handle and push the height adjuster wheel to the left as far aspossible. Holding in this position, retighten the blade tilt locking handle.
3. Place a combination square on the tablewith one end of the square against theblade as shown (Fig.27),and check to seeif the blade is at 90O
4. if It is not at 90O to the table, loosen theblade tilt locking handle, then slacken offthe 90O stop screw (A) a few turns, (i.e. turnanticlockwise). Push the blade heightadjuster wheel until the blade is exactly 90O
to the table, checking with the square,then retighten the blade tilt locking handle,taking care not to move the blade.
Double check the 90O angle afterretightening.
5. Screw in the 90O stop screw (A) until you
Fig.27
can feel it butting up against the stop.
6. Recheck by slackening the Blade tilt locking handle allowing the blade to be moved to anupright position, then bringing it up against the stop once again, retightening the lockinghandle and rechecking the blade angle with the square. If it is not exactly 90O carry out theadjustment again until satisfied.
Finally zero the pointer.
4B. Adjusting Positive Stop at 45 Degrees.
1. Loosen the blade tilt locking handle andpush elevation wheel to the right as far aspossible. Holding in this position retightenthe blade tilt locking handle.
2. Check to ensure the blade Is exactly 45O
to the table, using a 45O angle gauge. Ifnecessary proceed to adjust using themethod described above, using the stopscrew (B), as shown in fig. 2B.
CAUTION!
DO NOT attempt to perform’non-through type’ cuts on this machine, as it should NOTbe used with the Riving Knife or Blade Guard removed.
2
Fig.28
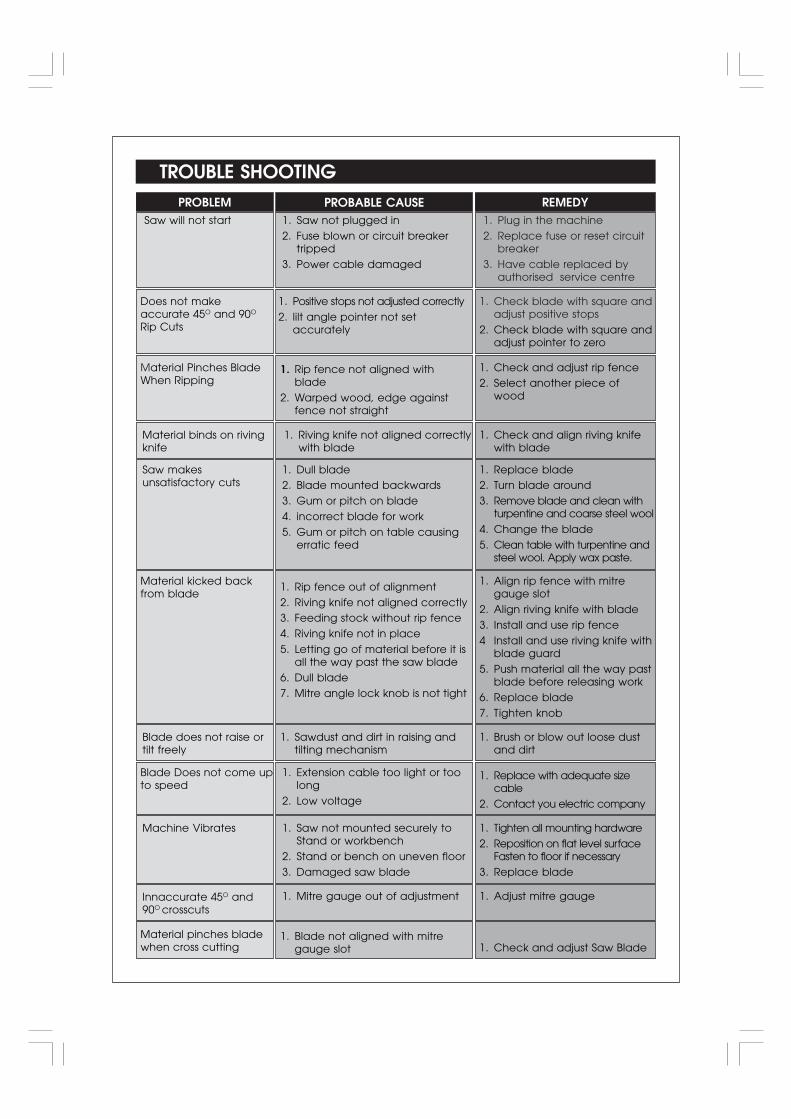
TROUBLE SHOOTINGPROBLEM PROBABLE CAUSE REMEDY
1. Positive stops not adjusted correctly2. lilt angle pointer not set
accurately
1. Check blade with square andadjust positive stops
2. Check blade with square andadjust pointer to zero
Does not makeaccurate 45O and 90O
Rip Cuts
Saw will not start 1. Saw not plugged in2. Fuse blown or circuit breaker
tripped3. Power cable damaged
1. Plug in the machine2. Replace fuse or reset circuit
breaker3. Have cable replaced by
authorised service centre
1. Rip fence not aligned withblade
2. Warped wood, edge againstfence not straight
1. Check and adjust rip fence2. Select another piece of
wood
Material Pinches BladeWhen Ripping
1. Riving knife not aligned correctlywith blade
1. Check and align riving knifewith blade
Material binds on rivingknife
Saw makesunsatisfactory cuts
1. Dull blade2. Blade mounted backwards3. Gum or pitch on blade4. incorrect blade for work5. Gum or pitch on table causing
erratic feed
1. Replace blade2. Turn blade around3. Remove blade and clean with
turpentine and coarse steel wool4. Change the blade5. Clean table with turpentine and
steel wool. Apply wax paste.
Material kicked backfrom blade
1. Rip fence out of alignment2. Riving knife not aligned correctly3. Feeding stock without rip fence4. Riving knife not in place5. Letting go of material before it is
all the way past the saw blade6. Dull blade7. Mitre angle lock knob is not tight
1. Align rip fence with mitregauge slot
2. Align riving knife with blade3. Install and use rip fence4 Install and use riving knife with
blade guard5. Push material all the way past
blade before releasing work6. Replace blade7. Tighten knob
Blade does not raise ortilt freely
1. Sawdust and dirt in raising andtilting mechanism
1. Brush or blow out loose dustand dirt
1. Extension cable too light or toolong
2. Low voltage
1. Replace with adequate sizecable
2. Contact you electric company
Blade Does not come upto speed
1. Saw not mounted securely toStand or workbench
2. Stand or bench on uneven floor3. Damaged saw blade
1. Tighten all mounting hardware2. Reposition on flat level surface
Fasten to floor if necessary3. Replace blade
Machine Vibrates
1. Mitre gauge out of adjustment 1. Adjust mitre gaugeInnaccurate 45O and90O crosscuts
1. Check and adjust Saw BladeMaterial pinches bladewhen cross cutting
1. Blade not aligned with mitregauge slot
Blade Guard Assembly
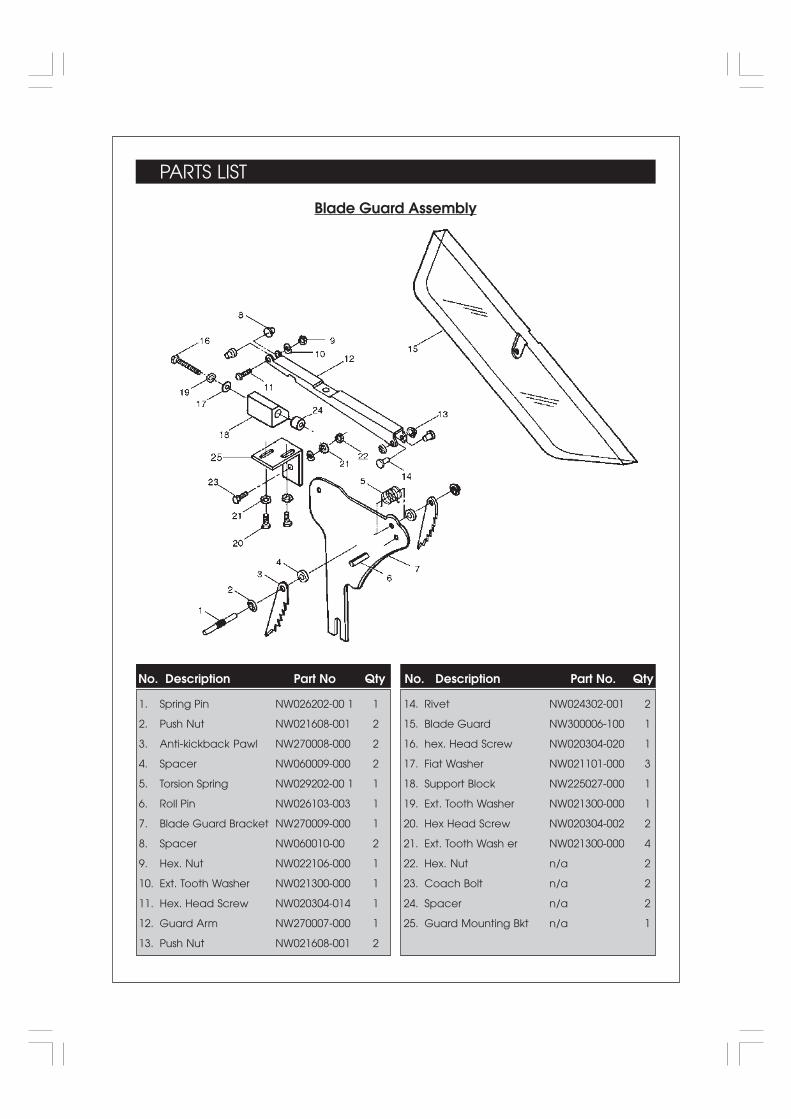
1. Spring Pin
2. Push Nut
3. Anti-kickback Pawl
4. Spacer
5. Torsion Spring
6. Roll Pin
7. Blade Guard Bracket
8. Spacer
9. Hex. Nut
10. Ext. Tooth Washer
11. Hex. Head Screw
12. Guard Arm
13. Push Nut
NW026202-00 1
NW021608-001
NW270008-000
NW060009-000
NW029202-00 1
NW026103-003
NW270009-000
NW060010-00
NW022106-000
NW021300-000
NW020304-014
NW270007-000
NW021608-001
No. Description Part No Qty No. Description Part No. Qty
14. Rivet
15. Blade Guard
16. hex. Head Screw
17. Fiat Washer
18. Support Block
19. Ext. Tooth Washer
20. Hex Head Screw
21. Ext. Tooth Wash er
22. Hex. Nut
23. Coach Bolt
24. Spacer
25. Guard Mounting Bkt
NW024302-001
NW300006-100
NW020304-020
NW021101-000
NW225027-000
NW021300-000
NW020304-002
NW021300-000
n/a
n/a
n/a
n/a
1
2
2
2
1
1
1
2
1
1
1
1
2
2
1
1
3
1
1
2
4
2
2
2
1
PARTS LIST

PARTS LIST
Mitre Gauge Assembly
Rip Fence Assembly
No.Description Part No Qty
1. Mitre Gauge Knob
2. Mitre Gauge Body
3. Plastic Washer
4. Panhead Screw
5. Mitre Gauge Pointer
6. Mitre Gauge Bar
NW303169-000
NW302003-000
NW021502-001
NW020110-002
NW270144-000
NW203009-000
1
1
1
1
1
1
No.Description Part No Qty
1
1
1
1
1
1
2
1
1
1. Clomp Rod
2. Rear Clamp
3. Compression Spring
4. Rear Sliding Pad
5. Rip Fence Body
6. Hex Head Screw
7. Ext. Tooth Lockwasher
8. Rip Fence Pointer
9. Screw
NW290055-001
NW260066-000
NW029136-000
NW303156-000
NW203007-001
NW020304-002
NW021300-000
NW270272-000
NW020112-000
No.Description Part No Qty
1
1
1
1
1
1
1
4
1
10. Rear Clamping Screw
11. Cam Pin
12. Lever Pin
13. Rip Fence Handle
14. Rip Fence Cam
15. Rip Fence Housing
16. Sliding Pad
17. Screw
18. Lever
NW290069-000
NW026202-003
NW026202-005
NW303157-000
NW060054-000
NW225075-000
NW303216-000
NW020206-01 0
NW270190-000

PARTS LIST
No. Description Part No. Qty
1. Table ....................................................................................
2. Table Insert ..........................................................................
3. Pan Head Screw .................................................................
4. Tinnerman Nut .....................................................................
5. Pan Head Screw .................................................................
6. Pan Head Screw .................................................................
7. Pan Head Screw .................................................................
8. Pa8.n Head Screw ..............................................................
9. Front Plate ............................................................................
10. Base .....................................................................................
11. Pan Head Screw .................................................................
12. Blade Height Adjuster Handwheel ....................................
13. Motor Cable ........................................................................
14. Hex. Nut ...............................................................................
15. Knob .....................................................................................
16. Binding Head Screw ...........................................................
17. Fiat Washer ..........................................................................
18. Nylon Washer ......................................................................
19. Blade Tilt Locking Handle ..................................................
20. Grommet .............................................................................
21. Coach Bolt ..........................................................................
22. Warning Label .....................................................................
23. Arbor Nut Spanner ..............................................................
24. Arbor Spanner .....................................................................
25. Dust Port ...............................................................................
26. Fence Storage .....................................................................
27. Mitre Gauge Housing .........................................................
28. Power Cord ..........................................................................
29. Switch Cover .......................................................................
30. Switch Box ...........................................................................
31. Switch Box Mounting Plate ................................................
32. Pan Head Screw .................................................................
33. Suppressor ...........................................................................
34. Capacitor ............................................................................
35. Back Cover .........................................................................
36. Base Plate ............................................................................
37. Name Label .........................................................................
38. Fixing Plate ..........................................................................
39. Reset Switch Assy ...............................................................
40. Nut ........................................................................................
41. Push Stick .............................................................................
NW221005-001
NW270014-000
NW020200-004
NW024501-001
NW020202-002
NW020202-004
NW030800-004
NW020312-002
NW270112-000
NW300061-000
NW020805-002
NW303152-000
n/a
NW022108-000
NW900218-000
NW020003-00
NW021101-004
NW021502-001
NW303012-000
NW330004-000
n/a
NW864006-003
NW040004-001
NW040003-001
NW302036-000
NW302035-000
NW303172-000
NW080111-000
n/a
NW303011-001
n/a
n/a
NW361003-000
n/a
n/a
NW270020-102
n/a
n/a
NW01005-000
n/a
11001
1
1
2
2
1
1
4
4
1
1
4
1
1
1
1
1
1
1
1
1
4
1
1
1
1
1
1
1
1
1
1
5
1
1
1
1
1
1
1
4
1
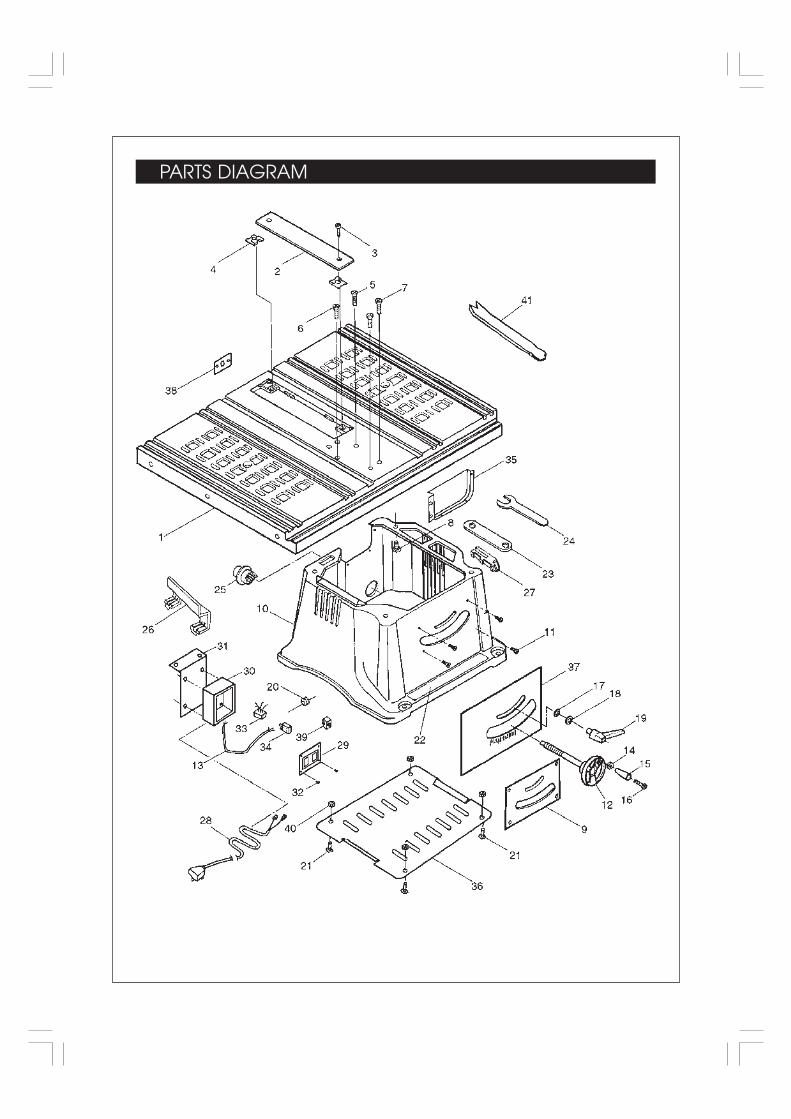
PARTS DIAGRAM

PARTS LIST
Motor And Blade Adjuster Components
1. Pan Head Screw
2. Ext. Tooth Washer
3. Blade Angle Pntr
4. Pointer Spt Brkt
5. Hex Head Screw
6. Ext. Tooth Washer
7. Hex Nut
8. Camp. Spring
9. Wave Washer
10. Nylon Washer
11. Hex Nut
12. Rocker Bar
13. Flat Washer
14. Retaining Ring
15. Mounting Plate
16. Mounting Plate
17. Pivot Rod Bracket
18. Hex Head Screw
19. Self Lock Nut
20. Roil Pin
21. Hex Head Screw
22. Spacer
NW020313-000
NW021302-000
NW872001-001
NW270020-000
NW020306-002
NW021304-000
NW022108-000
NW029139-000
NW021403-001
NW021504-005
NW022105-000
NW290043-001
NW021101-002
NW023201-001
NW270019-000
NW270023-000
NW270024-000
NW020304-004
NW022106-006
NW026103-001
NW028303-002
NW130013-000
No.Description Part No Qty
23. Hex Head Screw
24. Spring Pin
25. Hex Head Screw
27. Spacer
28. Pivot Rod
29. Strap
30. Hex Head Screw
31. Spacer
32. Flat Washer
33. Hex Nut
34. Deflector Plate
35. Ext. Tooth Washer
36. Hex Head Screw
37. Motor Bracket
38. Motor Assembly
39. Blade**40.Outer Washer
41. Arbor Nut
42. Motor Brushes
43. Riving Knife
44. Riving Knife Bkt
NW020313-002
NW026101-001
NW020711-001
NWO6000S-000
NW132008-000
NW270018-000
NW028800-002
NW130011-000
NWO21101-004
NW022106-000
NW270120-000
NW021302-000
NW020313-002
NW270022-000
NW990018-000
NW350003-000
NW270038-000
NW022104-000
NW375002-000
NW270020-100
NW270020-101
No.Description Part No Qty
** A 10in TCT Blade is available as a replacement.
Contact your CLARKE dealer, quoting
Part No. 6503125
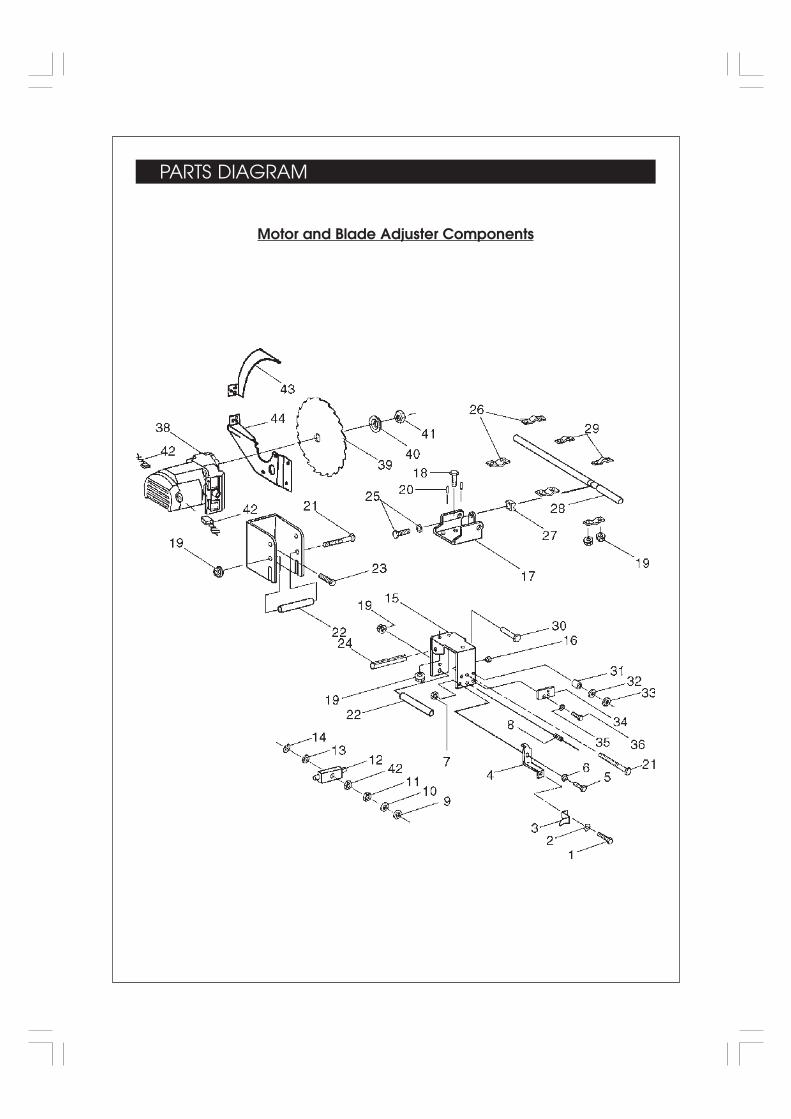
PARTS DIAGRAM
Motor and Blade Adjuster Components