1 welcome igrants 2007-08. 2 table of contents… find the section you need help with slides 3an...
TRANSCRIPT

1
Welcome
iGrants 2007-08

2
Table of Contents…Find The Section You Need Help With
Slides
3 An Overview4-8 Login Credentials…See Your District Security Manager9-13 Links Located On The iGrants Home Page14 Logging Into The System15 Access Previous Year Data16-20 Required Pages…District Administrative Office Role21-27 Transferability and REAP Flexibility28-36 Processing An iGrants Form Package37-39 Some Additional Buttons-Features40-47 Creating and Managing iGrants Budgets48-53 iGrants Administrator’s Role54-58 Communicating with Email59-64 Change Request…Changing Narrative Page Content Post Approval65-73 Revising The Original Approved Budget74 Contact iGrants For Help

3
is an internet system that provides a way to:
• Electronically submit grant applications and other types of official forms to OSPI.
• Electronically receive approval for grant applications and other types of official forms to OSPI.
• Electronically revise/submit grant application data and other types of official forms to OSPI.
An Overview…What Exactly Does iGrants Do?

4
Wait Just A Minute!
Before You Start, You Must Have Login Credentials…See Your District Security Manager (school districts only)
Username: [email protected]: My Password

5
Login Access…See Your District Security Manager To Obtain A User Account
How you gain access to iGrants depends on the organization you are affiliated with. iGrants is part of a large network of OSPI systems referred to as EDS (Educational Data Systems).
Those wishing to gain access to any OSPI systems must first contact their District Security Manager. The District Security Manager is OSPI's single point of contact for creating user accounts, assigning passwords and defining a role or roles for a user.
You may contact your District Security Manager by accessing the iGrants Help menu/Gaining Access page. The link opens an A-Z listing. Press the letter that represents the first letter of your school district to view the name of your District Security Manager.
iGrants serves more than school districts. The procedures for gaining access to iGrants from an organization other than a school district are listed below:
The following organizations do not have district security managers, therefore, the staff must contact OSPI's Customer Support at1-800-725-4311 or [email protected]
•Educational Service Districts•Private Non-Profits•Colleges/Universities
Important! District Security Managers do not set-up roles for ESDs and other organization types such as colleges, universities, non-profits and tribal schools.

6
Access Based On Organization Types…Accessing A Form Package Depends On The Organization Type
iGrants User Role (District Org)
iGrants User Role (colleges, universities,
private / non-profit)
iGrants User Role (Public School Org)
iGrants User Role
(ESD Org)
iGrants District Administrator Role
The iGrants Administrator role has access to all district, school and consortium form packages. Maximum of three administrators per district.
School districts and ESDs typically have a max of two to three iGrants Administrators and multiple iGrants Users. Accessing a school level form package requires the user be assigned the name of the school building, not the name of the school district.
User assigned to a school in order to access one of several school level form packages.
College, Universities, Non-Profit and Tribal Schools are not required to have an iGrants administrator.

7
Organization Type and Role-Proper Assignment Is Key
iGrants User (District): The user below has access to district and consortium form packages only.
iGrants Administrator: This role has access to district, school and consortium form packages withthe ability to send the request for approval email to OSPI.
iGrants User (District and Public School):
The user below has access to district, consortium, and school form packages.

8
Multiple iGrants Admin Accounts-Hold On, Not Too Many
It’s a great idea to have a backup staff member to assist the iGrants administrator in case of illness, vacation leave, etc. This key position is responsible for sending the request for approval email for each form package to OSPI. Therefore, the absence of the iGrants administrator should not delay form packages from being submitted on time.
However, the iGrants administrator role should be reserved for no more than three staff members. When setting up this role, do not assign additional roles such as iGrants User (see below).
In the example above, the iGrants administrators listed, do not need to be assigned the additional role of iGrants User.
The iGrants District Administrator role provides access to all form packages at both the district and school level.

9
Home Page Menu Links…Important Reference Information

10
Resource Information…Allocations
New in 2007-08
Archived Allocations

11
Resource Information…Indirect Rates
New in 2007-08
ArchivedIndirect Rates

12
Competitive Grant Form Packages
New in 2007-08
Competitive Form Package Archive

13
Federal and State Grant Form Packages
New in 2007-08
Federal and State Form Package Archive

14
Now It’s Time To Login…
With the proper login credentials you can now press the Green Authorized User Access Button In TheUpper Right Hand Corner of the iGrants Home Page.
Press This Button To Login
15
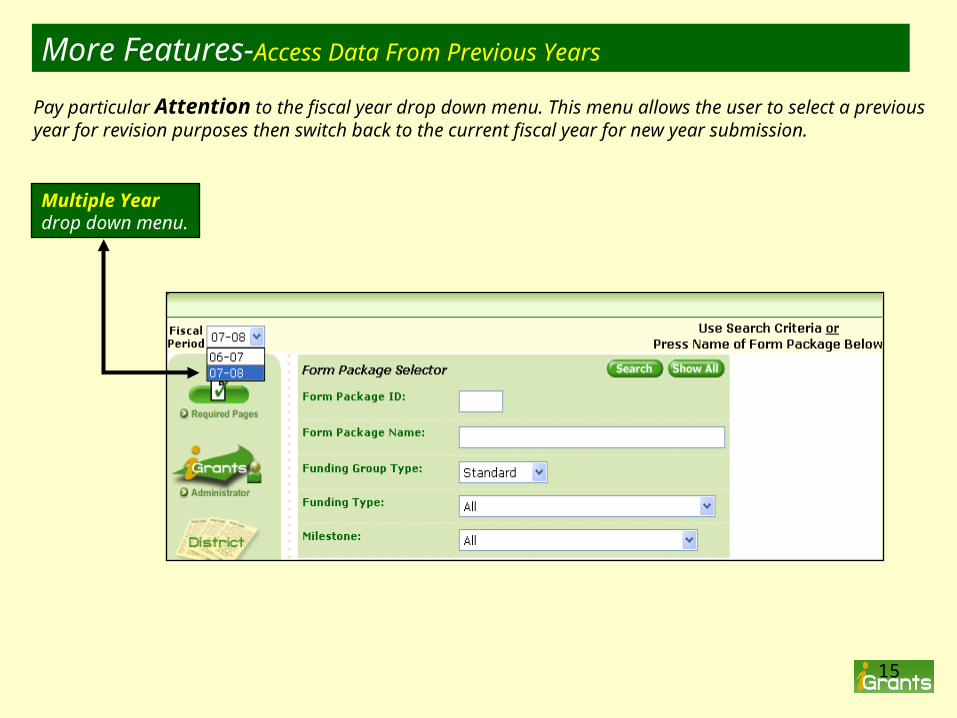
More Features-Access Data From Previous Years
Multiple Year drop down menu.
Pay particular Attention to the fiscal year drop down menu. This menu allows the user to select a previous year for revision purposes then switch back to the current fiscal year for new year submission.

16
Required Pages
The next set of slides (17 thru 20) discuss pages that must be completed by someone within a school district or educational service district’s administration office. These pages are called Required Pages. They are not designed to be completed by a general access user assigned to the completion of a form package.
Note: General access users can now skip to slide 20.
Note: The required pages section does not apply to colleges, universities, non-profits, tribal schools and other non-school district organizations.

17
The Required Pages…They Must Be Completed
The required pages apply to all school districts and educational service districts. There are a total of four buttons for school districts and two for ESDs. All applicable buttons must display a check mark. The check mark displayed in the Required Pages button appears when all individual pages within the button e.g., Assurances, are marked completed. These required pages apply to all grants housed within the iGrants system.
Important!Form packages cannot be fully processed until a check mark is displayed in the Required button below the fiscal period drop down menu.
Note: The required pages section does not apply to colleges, universities, non-profits, tribal schools and other non-school district organizations.
Example of ESD required pages consisting of two buttons only.
18
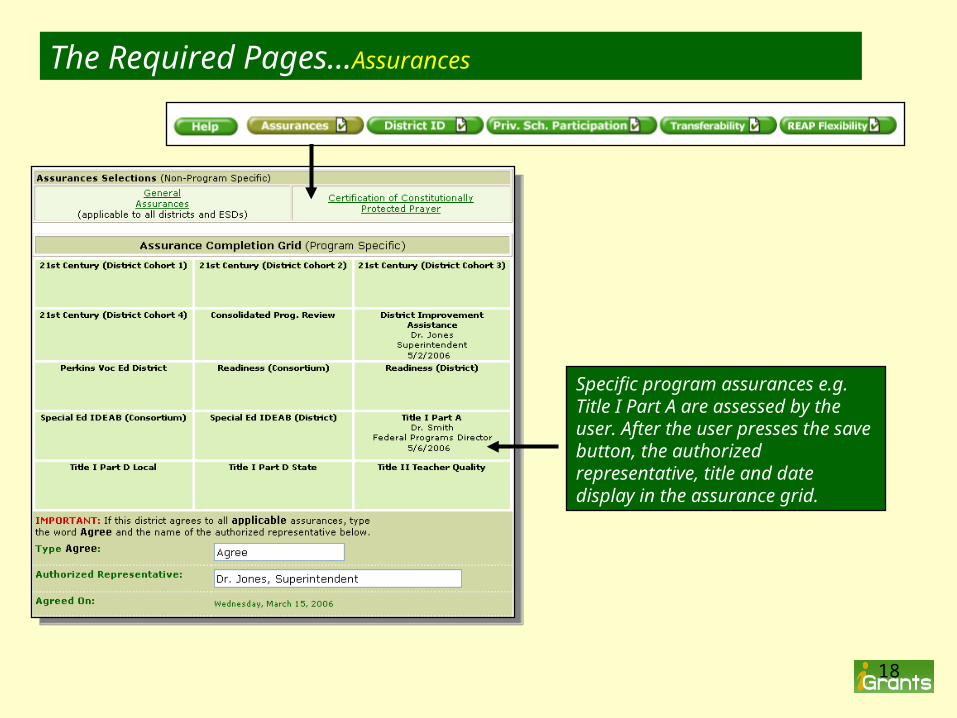
The Required Pages…Assurances
Specific program assurances e.g. Title I Part A are assessed by the user. After the user presses the save button, the authorized representative, title and date display in the assurance grid.

19
This Page is Pre-Populated from the previous year. To change names, press the Add/Edit button and a list of names appear to select from. If the name does not appear, the user must obtain a user account from the district security manager.
The Required Pages…District Identification Page
List of iGrants users having login credentials.

20
The school district must complete this page, only if private school children are being served with federal funds e.g. Title I Part A.
Indicate a Yes response, continue to complete the page and finally mark the page complete by pressing the Mark Completed icon.
The Required Pages…Private School Participation

The Required Pages
Transferability 50% of Allocation
and
REAP Flexibility 100% of Allocation
21
The next few slides are specific to iGrants processing of Transferability and REAP Flexibility amounts. These two features are part of the Required Pages and cannot be fully completed until certain allocations from the U.S. Department of Education have been received and uploaded to iGrants. In order to proceed, so, that other form packages can be submitted, make sure to press the MARK COMPLETED icon to create a check mark in the Transferability and REAP Flexibility buttons.
Districts must indicate a Yes or No response to both Transferability and REAP flexibility options as viewed on the following slides.

22
The Required Pages…Processing Transferability 50% of Allocation
First, indicate a Yes or No response to the question, “Will you be exercising the Transferability Option?” by checking one of the boxes labeled Yes or No. If no, press the Mark Completed icon and move onto the REAP Flexibility button.
If the user attempts to mark the page completed without indicating a Yes or No response, the screen will display…Must select Yes or No

23
The Required Pages…Processing Transferability 50% of Allocation
In this case, the district intends to exercise Transferability, but the allocations from the U.S. Department of Education have not been received and uploaded to iGrants.
Leave the Yes check mark in the box then press the Mark Completed icon to create a check mark in the main Transferability button. Next, move to REAP mark it No then press the Mark Completed icon to create the check mark in the REAP button. Later, come back to this page when all allocations have been announced and uploaded to iGrants.
Leave it checked Yes then press the Mark Completed icon.

24
The Required Pages…Processing Transferability 50% of Allocation
This is perfectly executed. A Yes has been indicated, the transfer has been created, the transfer total adds up to the maximum available to transfer (up to 50% of the allocated amount) and finally the Transferability button has been marked completed. Of course, the system allows for additional “allowable” transfers by pressing the New button.

25
First, indicate a Yes or No response to the question, “Will you be exercising the REAP Flexibility Option?” by checking one of the boxes labeled Yes or No. If no, press the Mark Completed icon to display a check mark in the REAP Flexibility button.
The Required Pages…Processing REAP Flexibility 100% of Allocation
If the user attempts to Mark the page completed without indicating a Yes or No response, the screen will display…Must select Yes or No

26
The Required Pages…Processing REAP Flexibility 100% of Allocation
In this case, the district intends to exercise REAP Flexibility but the allocations from the U.S. Department of Education have not been received and uploaded to iGrants.
Leave the Yes check mark in the box then press the Mark Completed icon to create a check mark in the main REAP Flexibility button. Later, come back to this page when all allocations have been announced and uploaded to iGrants.
Leave it checked Yes then press the Mark Completed icon.

27
The Required Pages…Processing REAP Flexibility 100% of Allocation
This is perfectly executed. A Yes has been indicated, the transfer has been checked, the total adds up to the maximum available amount (up to 100% of the allocated amount) for each program, and finally the REAP Flexibility button has been marked completed.

28
Processing An iGrants
Form Package
The next set of slides (slides 29 thru 30) cover how to select and process a form package.

29
Selecting A Form Package-Several Ways To Choose
Selecting A Form Package:
1. Press the name of the form package or number of the form package listed. Example, Title I Part A Improving Basic Programs – ID# 201.
2. Enter Form Package ID number in the field provided.3. Type the name of the form package into the Form Package Name field.

30
Sorting The List Of Form Packages-Each Column Can Be Sorted
Sorting The List Of Form Packages:
1. Press the underlined header information…ID, Name, Form Pkg. Available Date, Form Pkg. Due Date, Current Form Package Status/Date etc.
Note: The due date is displayed. Pressing thelink that says Form Pkg Due Date sorts the entire pageby the due date.

31
Help Menu-Take 5 Minutes To Learn The Basic System Steps
Pressing the help button displays a page that provides basic incremental steps in processing an iGrants form package. This button is displayed for each form package at all times.

32
Process Buttons–All Form Packages Have Them
Multi-page formsdisplay page numbersin a drop down list.
There are 5 buttons that are consistent among all iGrants form packages. Those buttons are:• Help• Contact• Finish• Notify• Notes
The other buttons listed vary depending on the type of form package. For example, the Applicationbutton is used for programs such as Title I. The RFP button is used for competitive grants. The
Reportbutton is used for various end-of-year and mid year reports. The Self Study button is used for theconsolidated program review form package completed by school districts.

33
Red Asterisks indicatefields that require completion.
Error Checks-Required Fields Must Be Completed

34
These are some of the choices the user has on every form package page.
- Save- Mark Completed- Set Back To Draft- Print one page or - Print all pages
Modified information by the user and when the user last pressed save are also displayed.
Process Icons - Save, Print, Mark Completed

35
Three of the five buttons below, display a completed check mark with the remaining two buttons (finish and notify) unchecked. Unless the remaining two buttons display a completed check mark, the form package will not be able to be fully processed.
Check Marks-No Check Marks Equals No Submission
The Finish and Notify buttons must also display a check mark. The finish button increments the status milestone of the form package to Finished.
The Notify button (school districts and ESDs) notifies internal staff such as the fiscal officerand iGrants administrator to review the form package prior to sending the request for approval email (sent by the iGrants administrator to OSPI).

36
Once all of the buttons display a check mark, the internal review can now take place and finally the iGrants administrator can send the request for approval email to OSPI asking for initiation of the review and approval process.
Check Marks-All Buttons Must Display A Check Mark
In this example, the user has marked all pages completed, therefore, all buttons display a check mark. At this point, internal district review takes place. The last step is for the iGrants administrator to send the Request OSPI Approval email to OSPI.
In the case of colleges and universities, the Notify button sends the request for approval email directly to OSPI.

37
Form Package Features
Some Additional Buttons
Slides 38-39 cover some additional features and buttons.

38
A large monitor e.g., “17”, allows the user to display two browser windows at the same time.
This is handy if the user copies text from one year to the next.
Two Browser Windows-Copy and Paste From One Year To The Next

39
Additional Buttons-Accessing All Budgets Created And Status Information
Pressing the Report Tool, then the Search All button displays the complete list of form package status milestones. This feature also allows the user to export the data to an excel spreadsheet. This type of report is useful for discussing what form packages have been completed and those that have not. It also provides information about the users accessing and saving data.
The All Budgetsbutton displays all budgets for all form packages.

40
Creating And Managing iGrants
Budgets
Slides 41-47 cover budget creation and budget features.

41
To create your first budget in iGrants, select the appropriate form package such as Learning Assistance Program form package 218. Next, press the budget process button.
Creating The First Budget-This Process Applies To All Budgets
In this example, the Budget button displays a blank icon representing a budget has not been created to date.
Start off by pressing the New button.
In this example, the Budget button displays a blank icon representing a budget has not been created to date.
Start off by pressing the New button.
Some form package budgets display multiple Budget Categories such as Cohort 1, 2 and 3. In this case, first select the category then press the New button.

42
A line item is displayed each time the original budget and all revisions are created.
Creating The First Budget-A Line Item For All Budgets
In this example, the original budget has been created and is marked, Original.
In this example, the revision marked with a number 1 Carryover is listed as the latest entry above the original budget.

43
The total amount of a budget, indirect rate, indirect amount and budgeted direct expenditures start with the Budget Indirect Rate Calculator. For most form packages, not all, the allocation amount, indirect rate, indirect amount and budgeted direct expenditures are automatically calculated. Note: Some form packages do not have pre-determined allocations. In those cases, an empty field appears allowing the user to enter the total amount of the budget. Competitive grants contain this feature. Whether it is automatically displayed or the user enters the amount, all remaining calculations are based on the Allocated Budget Amount field.
Budget Calculator-It All Starts Here
All budget calculations are based on the Allocated Budget Amount field, whether it is automatically displayed by the system or hand entered by the user .
Allocated Amount
Indirect Rate
Calculate Indirect
Enter Less Than
Remainder: The amount distributed throughout the matrix.
An amount Less Than, Never Greater Than the Indirect Amount can be entered by the user.
For example, an amount such as $95,000 could be entered. If the amount of 113,364 (one dollar over the allowed amt) is entered, the system will disallow the amount and present an error message.

44
Budget Matrix-Using The Budget Process Icons
The budget Process Icons (surrounded by a black border) are used for the following:
•Saving The Amounts•Printing The Matrix•Re-Calculating The Indirects•Calculating Totals•Marking The Budget Completed

45
Budget Process Icons-How They Work
Press: Delete to delete the budget matrix to start over.
Press: Print to print the budget matrix. You must orientate the page to landscape.
Press: Save to save the amounts entered into each field.
Press: Mark Completed to mark the budget as a completed budget. This must be done.
Press: Re-Calculate Indirects to return to the budget calculator. This is the starting point for all budget creations, revisions and carryover submissions.
Press: Calculate Totals to calculate each column e.g. Salaries-Certificated while saving at the same time.

46
Budget Error Checks-The Budget Total Must Match The Allocation
The budget total must equal the allocation (amount displayed in the budget calculator) or the amount hand entered by the user. If the amount is incorrect, an error message will appear.
In this example, the total budget amount Exceeded the amount displayed in the budget calculator.
To correct this problem, the user must adjust the cells in the matrix or perhaps even the amount located in the indirect field.
In the case of competitive grants where the field is open and the amount is hand entered, the user must either adjust the Allocated Budgeted Amount or adjust amounts within the matrix.

47
More Budget Features-All Budgets Display And Other Features
The History Icon displays the complete history of the created budget.
The Print Icon prints the budget. The user must go to page set up to set the orientation to landscape.
The All Budgets button displayed on the left side of the screen displays all budgets that have been created by all users in the district.

48
The Role of The
iGrants Administrator
Slides 49-53 cover the role of the iGrants administrator. Every school district and ESD should have someone assigned to this very important role. Without the iGrants administrator, none of the iGrants form packages would be submitted to OSPI for approval.
Note: This role does not apply to other organizations such as colleges, universities, non-profits and tribal schools.

49
iGrants Administrator Console- Access To The iGrants Admin Console
To access the list of form packages ready for review and approval to OSPI and other console features, the iGrants administrator must press the icon below.
Pressing the iGrants Administrator icon will allow access to form packages which are ready for OSPI approval.

50
iGrants Administrator Console- Request OSPI Approval
In the example below, two form packages are ready to be submitted to OSPI for review and approval. The current status indicates Under Org. Review. Of course, organization officials should review the contents of the entire form package prior to the iGrants administrator’s login to request approval. The iGrants administrator has the option of pressing the Request OSPI Approval link for each form package, or press the Send All to send all form packages at one time.
Press the Request OSPI Approval link for each form package.
The iGrants administrator can also press the Send All go button to send all form packages listed on the page in for approval.

51
iGrants Administrator Console-Searching Other Milestone Categories
In addition to sending the Request OSPI Approval email, the iGrants administrator can also search for packages in the Finished, Draft and All Status Levels categories.
Press go to list all form packages that have been marked Finished.
Press go to list all form packages that are in Draft status.
Press go to list all form packages - all status levels.
This form package is not ready for OSPI review. The reason is the Notify button and email have not been processed.

52
iGrants Administrator Console- The User List Button
The iGrants administrator can access a list of all users by pressing the User List button.
There is no need for the iGrants District Administrator to also be assigned the role of iGrants User.

53
iGrants Administrator Console- Other Features
Access by assigned staff to each form package, the milestone and last date of the milestone can be accessed by the iGrants administrator by pressing the Activity Usage button.
The iGrants administrator can identify access to form packages by all staff having user credentials.

54
Communicating With
Slides 55-58 cover examples of email messages delivered to organization officials by the iGrants system.
Email plays a key role in ensuring both outside organizations and internal OSPI program staff are informed about numerous events that take place during the course of submitting and approving a form package.

55
1st Email SentReady For Internal Review
Notify button pressed by user.
2nd Email Sent Request OSPI Approval
Sent by the iGrants Administrator
The First Few Emails- Internal Organization Review and Request OSPI Approval
The first email generated by iGrants is sent by pressing the Notify button (last button) located for every form package. The second email generated by iGrants is the Request OSPI Approval sent by the iGrants Administrator.

56
3rd Email SentUnder OSPI Review
This email is an optional email sent by OSPI program staff.
The First Few Emails- Internal Organization Review and Request OSPI Approval
Optional Email Sent Needs More Work
Sent by an OSPI program staff, if there is additional work that is required in order to get the form package to an approvable status. One or many of this type of email can be sent by program staff.

57
Final Approval Email- This Email Represents The Grant Award Notification
Upon determining a form package has been fully reviewed and approved by OSPI staff, the final step in the process is submitting the final approval grant award letter.
This Very Important email contains grant award information such as beginning and ending dates of the grant and CFDA, program and revenue numbers. Print and file this email for audit purposes.

58
Email- Other Email Features/Reminders
iGrants also delivers a number of automated emails triggered at specific dates and times. Most of these emails are specific to competitive grants which are often time sensitive.
iGrants User Reminder: This email is triggered if the user fails to press the Notify button, notifying internal staff to review the contents of the form package prior to requesting approval from OSPI. This notification is sent every 30 days.
iGrants Administrator Reminder: This email is triggered if the iGrants administrator fails to send the Request OSPI Approval email. This notification is sent every 10 days.
iGrants OSPI Staff Reminder: This email is triggered if an OSPI staff member does not press the Begin Review button. This notification is sent every 30 days.
Competitive Grant Due Date Reminder: This email is triggered 10 days prior to a competitive grant’s due date.
Competitive Grant Closure Date Reminder: This email is triggered at 5:00 p.m. on the due date to inform the user that the closing date for a competitive grant has been reached.

59
Revising Grant Page Content
Slides 60-64 discuss how to revise the contents of an approved grant by initiating a Change Request.
Term: Change Request is defined as requesting OSPI to change the grant page content.
Note: During the initial review and approval process of the entire form package which includes the grant and original budget, OSPI program staff may request modifications prior to issuing a final approval. Modifications to any part of the form package including the budget are considered edits only.

60
Change Request- Revising The Contents Of An Application…First Step
Before the user can exercise the Change Request option to formally change the contents within an approved form package, the status of the entire form package must indicate a…Final Approval Issued. In addition, a Change Request notification must be sent to OSPI requesting a page(s) to be unlocked. This is accomplished by pressing the Blue Change Request icon.
On Final Approved form packages, save buttons are unavailable to the user to prevent data changes on pages without first notifying OSPI.The user must notify OSPI of their intention to change the contents of an approved form package by pressing the blue Change Request icon. The icon in turn generates an email that is sent to OSPI program staff.For multiple page forms, request which page(s) is to be unlocked by OSPI.

61
Change Request- OSPI’s Acceptance Of The Change Request
The second step in the process is OSPI’s acceptance of the request to unlock page(s) within the approved form package. The email below is sent back to the user.
The yellow Unlock Page icon is pressed by OSPI program staff to unlock the requested page(s). Pressing this icon in turn generates an email that will be sent back to the user and creates a yellow icon in the application button (seen below).

62
Change Request-Unlocked Page Now Reveals A Save Button
The next step in the process is for the user to update the contents and press the save button. Prior to the change request being accepted, the save button was unavailable to prevent the user from entering data without official approval.
OSPI has accepted the change request. The specific page now says Change Request Accepted.
In addition, a Save button becomes available next to the remaining process buttons.
Note: Prior to the change request being accepted, the save button was unavailable to prevent the user from entering data without official approval.

63
Change Request-Notify OSPI Of Updated Changes
The next step in the process is to notify OSPI that changes have been completed and approval is being
requested. This is done by pressing the Red Icon which generates an email sent to OSPI for review.
Pressing the red Request OSPI Review icon generates an email that is sent to OSPI notifying program staff that all changes have been updated and final approval is requested.

64
Change Request-Approval Of Changes Issued
The final step in the process is issuing the final approval by OSPI. With this last step, OSPI staff press the
Green icon, generating an approval email. At this point, the application button now displays a Green icon.
Issuing a final approval is performed by OSPI staff by pressing the green Approved icon. Pressing the icon generates an approval email and displays a green Approved icon in the application button.

65
Revising The Original Budget
Slides 66-73 discuss how to create and submit a budget revision.
Term: Budget Revision is defined as requesting OSPI to approve proposed changes to cells within an original final approved budget matrix. The first revision is labeled with the number 1.
Note: During the initial review and approval process for the entire form package including the original budget, OSPI program staff may request modifications. Modifications to any part of the form package during the approval process, including the budget, prior to issuing Final Approval are considered edits, not a formal revision.

66
Budget Revision-Final Form Package and Budget…A Must!
Before a formal budget revision can be initiated, the budget line item listed below must indicate a Final Approval status milestone. In addition, the form package must also be issued a final approval. The first revision No. 1 and all other subsequent revisions stem from the original final approved budget matrix.
Two important items to take notice of:1. The Form Package Status Indicates Final Approval Issued with green
icons displayed in all applicable process buttons (application and budget).
2. The status milestone of the budget indicates Final Approval

67
Budget Revision-Press The Create Revision Icon
The first step in the process is to press the Create Revision icon.
Begin the process by pressing the Create Revision icon.

68
Budget Revision-Allocated Budget Amt Plus Indirect Amt Equals Total Costs
The second step is to enter the correct Allocated Budget Amount into the budget indirect rate calculator field provided. Next, press the Calculate button to re-calculate the indirect amount if the choice is to take a lesser amount.
Note: Many form packages display the Allocated Budget Amount without the user having to enter the amount into a field. Form packages that do not have this feature display an open field for both the allocated budget amount and carryover if applicable.
If a lesser indirect amount is taken, enter the amount in the field provided and press the Calculate button.
The cells in the budget matrix along with the indirect amount must equal this total.
After pressing the Calculate button, press the Continue button to move on to the budget matrix.
69
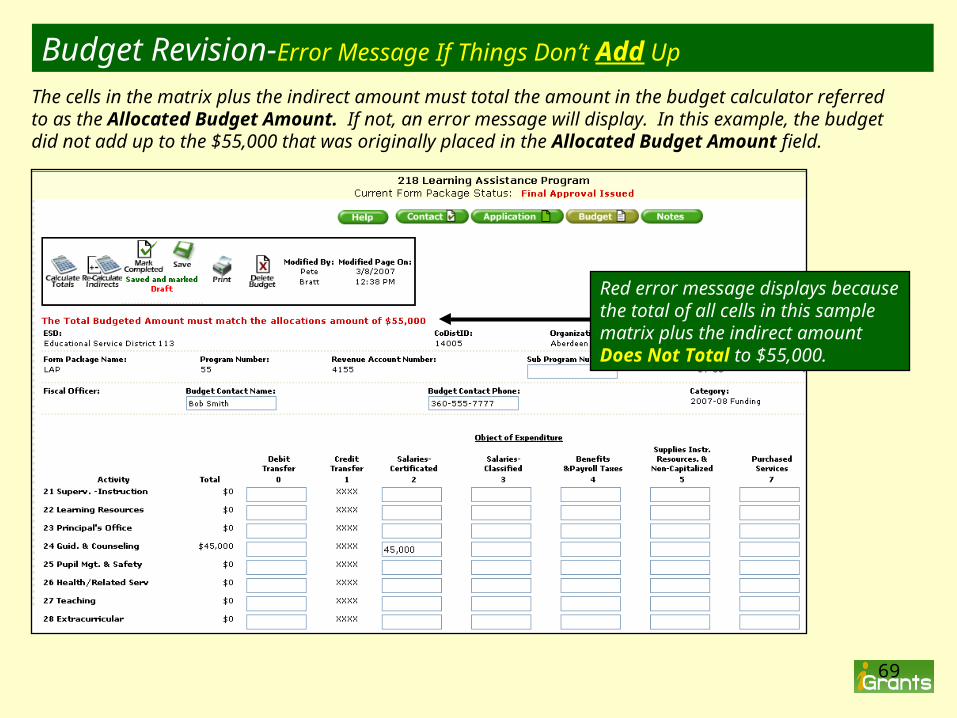
Budget Revision-Error Message If Things Don’t Add Up
The cells in the matrix plus the indirect amount must total the amount in the budget calculator referred to as the Allocated Budget Amount. If not, an error message will display. In this example, the budget did not add up to the $55,000 that was originally placed in the Allocated Budget Amount field.
Red error message displays because the total of all cells in this sample matrix plus the indirect amount Does Not Total to $55,000.

70
Budget Revision-No Error Message Now…All Items Add Up To $55,000
The $52,035 placed in Activity 24 Object 2 plus the $2,965 Indirect Amount, equal the Allocated Budget Amount

71
Budget Revision-With OSPI Program Approval, Multiple Revisions Are Possible
Requirements allowing multiple revisions vary from grant to grant. In some cases, additional narrative is required with each revision.
This is an example of the original and revision number 1 in final lock down mode, with revision number 2 still in the process of being approved.
Below the budget matrix (revisions only) both the previous numbers and newly Revised numbers are displayed.
Additional Narrative Required from these programs.

72
Budget Revision-Marking The Budget Completed
The budget must next be Marked Completed. This methodology exists throughout the iGrants system. Whether it’s a page in an application or budget matrix nothing should be left in Draft status. A check mark must be displayed in order to move on in the process.
This Is Not Correct!Don’t stop here. The budget has not been Marked Completed.
This Is Correct!The budget button now displays a check mark. Next, press the red icon labeled Reg. OSPI Review in order to notify OSPI of the proposed revision.

73
Budget Revision-Informing OSPI…The Final Step
Pressing the red Request OSPI Review icon generates an email format. Remember, OSPI program staff are not aware of the budget revision just created until the Request To Review Submitted Budget Revision Notification email is sent.
Pressing the Request OSPI Review icon generates a notification email to OSPI staff.

74
The End
Call or email us for help: