1 electronic distance measurement - usa track & field · 2017-06-30 · electronic distance...
TRANSCRIPT

Electronic Distance Measurement
Electronic Distance Measurement - Page 1
Electronic Distance Measurement
Electronic Distance Measurement, aka “EDM”, is used in eight field events: high jump,
long jump, triple jump, pole vault, discus, shot put, hammer throw and javelin.
In most events, a tape measure is used to make the measurements, but the process of
getting accurate measurements is troublesome, time consuming and not always entirely
accurate.
Today, measurements can be made with systems that utilize lasers.
At the landing point of the athlete (or the object thrown by the athlete), officials set up
a prism marker. An EDM unit at the base line for the event bounces a laser beam off the
prism and the distance is measured accurately and quickly.
The predominant EMD at this time is the LaserLynx unit, developed by Lynx Developers.
The predominant handheld field event administration (HFEA) software at this time is
FieldLynx, also developed by Lynx Developers.
While it should be noted that this manual is based on the predominant EMD and HFEA
software, it does not mean that the protocol for setup, use and post-competition
procedures would be any different for any other combination of handheld, EMD or
HFEA software.
Electronic Distance Measurement - Page 2
Levels of Certification and Minimum Skill Sets
Electronic Recorder (ER)
This is an objective, skill-based certification and an official may certify at the highest
level at which they can fulfill the corresponding requirements and receive the
recommendation of the Electronic Measurement Judge administering the test.
Grade 1
Provided with a handheld device or other Electronic Recording Device that has been
pre-loaded, and with the event set-up (i.e. scoreboard addresses, database address,
height progressions, number of trials, whether or not there will be finals, etc), the
Grade 1 level official will exhibit the following skills:
1. Check-in athletes
2. Set starting height for each competitor (vertical jumps)
3. Enter marks
4. Enter wind readings (horizontal jumps, outdoor)
5. Set up a final (from multiple flights and from 1 flight)
Grade 2
Provided with a handheld device or other Electronic Recording Device that has been
preloaded, the Grade 2 level official will exhibit the following skills:
1. Accomplish the skills for Grade 1
2. Manage the event set-up
3. Select English or Metric as the means of measurement
4. Height progression (vertical events)
5. Number of trials
6. Number of finalists
7. Add an athlete
8. Send results to a scoreboard
9. Send results to the meet database at the end of each round
Electronic Distance Measurement - Page 3
Grade 3
Provided with a handheld device or other Electronic Recording Device, the Grade 3 level
official will exhibit the following skills:
1. Accomplish the skills for Grade 1
2. Accomplish the skills for Grade 2
3. Set-up scoreboard address/connect to a scoreboard
4. Download the event schedule from the meet database
5. Download an event from the meet database
Electronic Measurer (EM)
This is an objective, skill-based certification and an official may certify at the highest
level at which they can fulfill the corresponding requirements and receive the
recommendation of the Electronic Measurement Judge administering the test.
Grade 1
Provided with an Electronic Recording Device that has been preloaded, a Grade 1 EM
Judge will exhibit the following skills:
1. Accomplish the skills necessary to be a Grade 2 Electronic Recorder (ER)
(FieldLynx operator).
After someone else has set up the Electronic Measuring Device (LaserLynx), perform the
following:
1. Perform all sighting and measurement skills
2. Locate and sight the checkpoint marker to verify calibration
3. Quickly and accurately locate and center on the performance staff reflector
4. Relay to the handheld operator when the mark is to be read (2 man crew)
5. Press/tab the appropriate key/button to record the measurement
Grade 2
Provided with an Electronic Recording Device and the Electronic Measurement Device, a
Grade 2 EM Judge will demonstrate the following skills:
1. Accomplish the skills for Grade 1.
2. Accomplish the skills necessary to be a Grade 2 Electronic Recorder (ER).
Electronic Distance Measurement - Page 4
3. Perform all of the setup skills for the apparatus
4. Center and level the tripod
5. Attach the head unit
6. Level the head unit
7. Attach all cabling needed
8. Calibrate the instrument
9. Set the controls in the handheld device
10. Establish the checkpoint
11. Tear down and pack the device after use
Electronic Measurement Judge (EMJ)
This is an objective, skill-based certification and an official may certify at the highest
level at which they can fulfill the corresponding requirements and receive the
recommendation of the Electronic Measurement Judge administering the test.
Grade 1
1. Perform all the functions of a Grade 3 Electronic Recorder (ER) judge.
2. Perform all the functions of a Grade 2 Electronic Measurer (EM) judge.
3. Capable of supervising either or both a Master level Electronic Measurement
Device (EMD) Judge and Electronic Recording Device (ERD) Judge.
The candidate for EMJ must demonstrate the ability to meet the qualifying skill sets at a
predetermined national gathering of officials (national meets or meetings) to an existing
EMJ.
Electronic Distance Measurement - Page 5
FieldLynx Field Event Software
FieldLynx is a software application for the scoring and administration of field events in
track & field. The FieldLynx software connects with meet management software (Hy-
Tek) and allows operators to access athlete listings, score events, and instantly upload
results to computers or scoreboards on the FinishLynx network. Data entry is simple
and intuitive and the software easily converts marks between Metric and Imperial
measurements.
FieldLynx offers the complete field results production in the palm of your hand (or on a
computer). The FieldLynx software allows users to interface seamlessly with devices and
applications across the venue, including LaserLynx EDM units, scoreboards, wind
gauges, and most track and field database applications. For too long, athletes in field
events have competed in isolation. When field results are recorded manually on a
clipboard, they have to be carried across the venue or re-typed before they can be
shared. With FieldLynx, field event results can be entered directly to a Windows-based
mobile device and shared instantly with scoreboards, officials, or announcers
throughout the venue.
• Athlete Check-ins - Athlete suspension allows participation in other events.
Automatically nominate Athlete UP, ON DECK, and ON HOLD
• Custom Rules - Accommodate different Rule Books, including IAAF, NCAA, and
NFHS high school
• Five Alive Groups - Automatically generates “Alive” group for 3, 4, or 5 alive
groupings. Can reconfigure groups as necessary.
• Metric/English Conversion - Single-click, bi-directional conversions of athlete
marks between English and Metric measurements.
• Shareable - Share results data via both Serial and Ethernet connections
Electronic Distance Measurement - Page 6
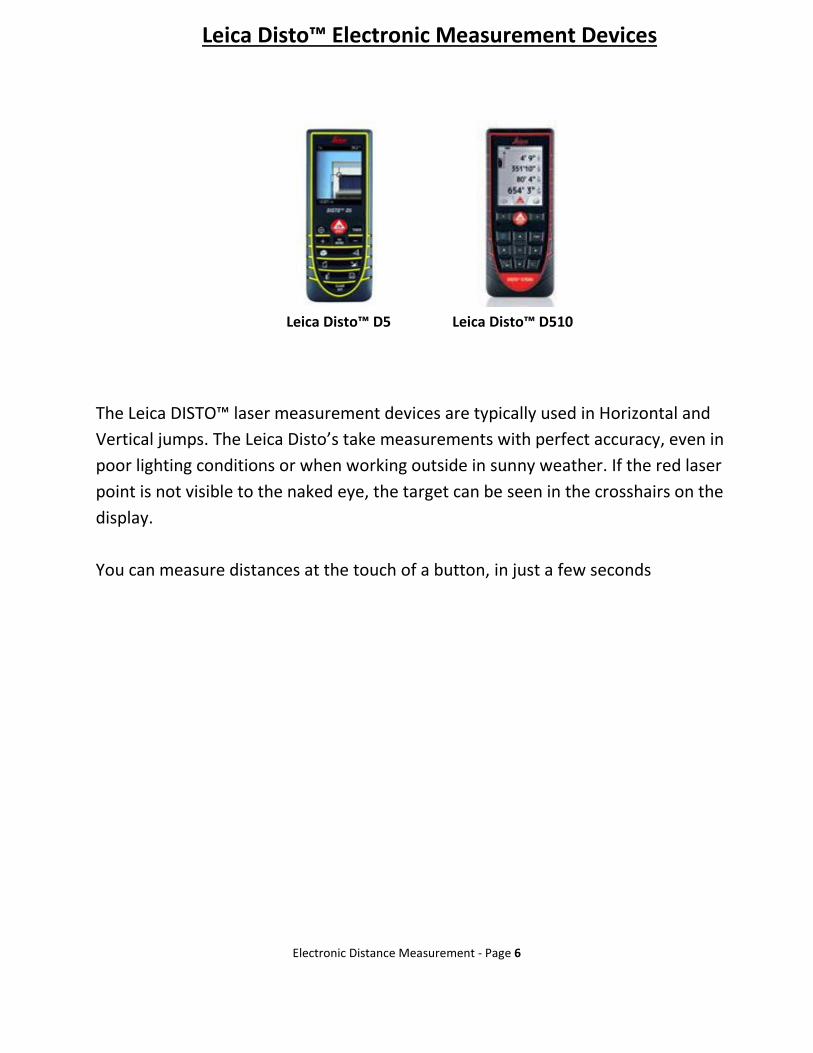
Leica Disto™ Electronic Measurement Devices
Leica Disto™ D5 Leica Disto™ D510
The Leica DISTO™ laser measurement devices are typically used in Horizontal and
Vertical jumps. The Leica Disto’s take measurements with perfect accuracy, even in
poor lighting conditions or when working outside in sunny weather. If the red laser
point is not visible to the naked eye, the target can be seen in the crosshairs on the
display.
You can measure distances at the touch of a button, in just a few seconds
Electronic Distance Measurement - Page 7
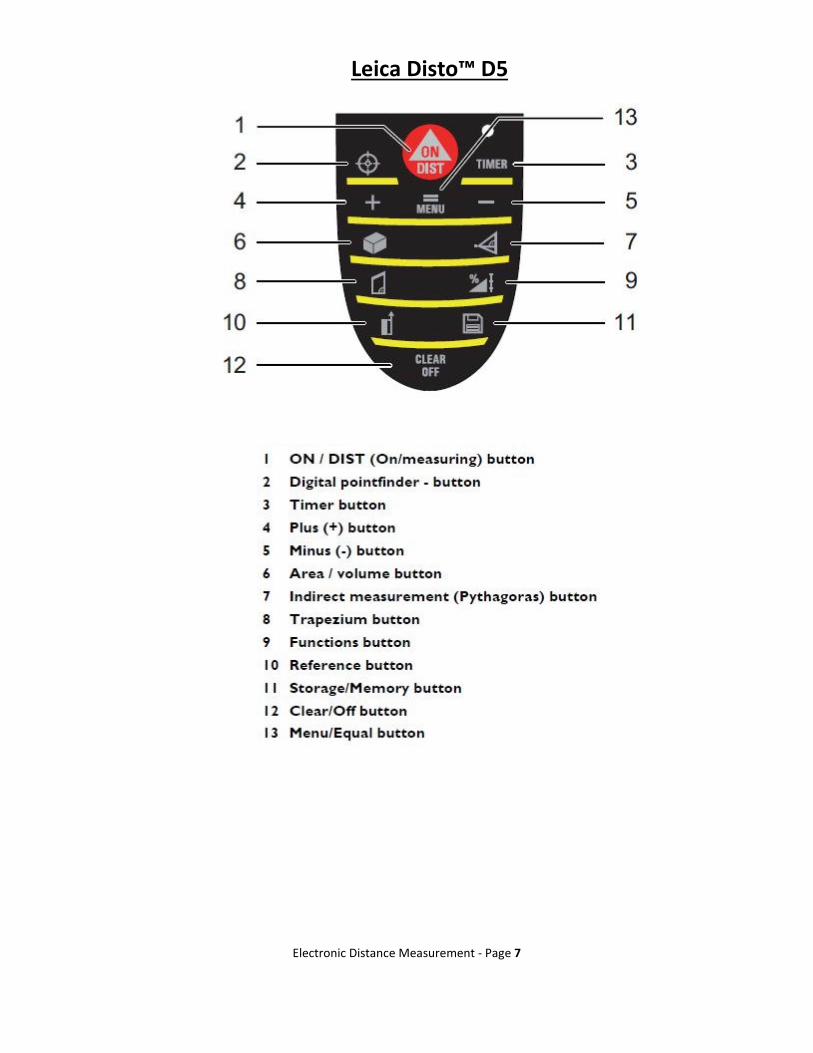
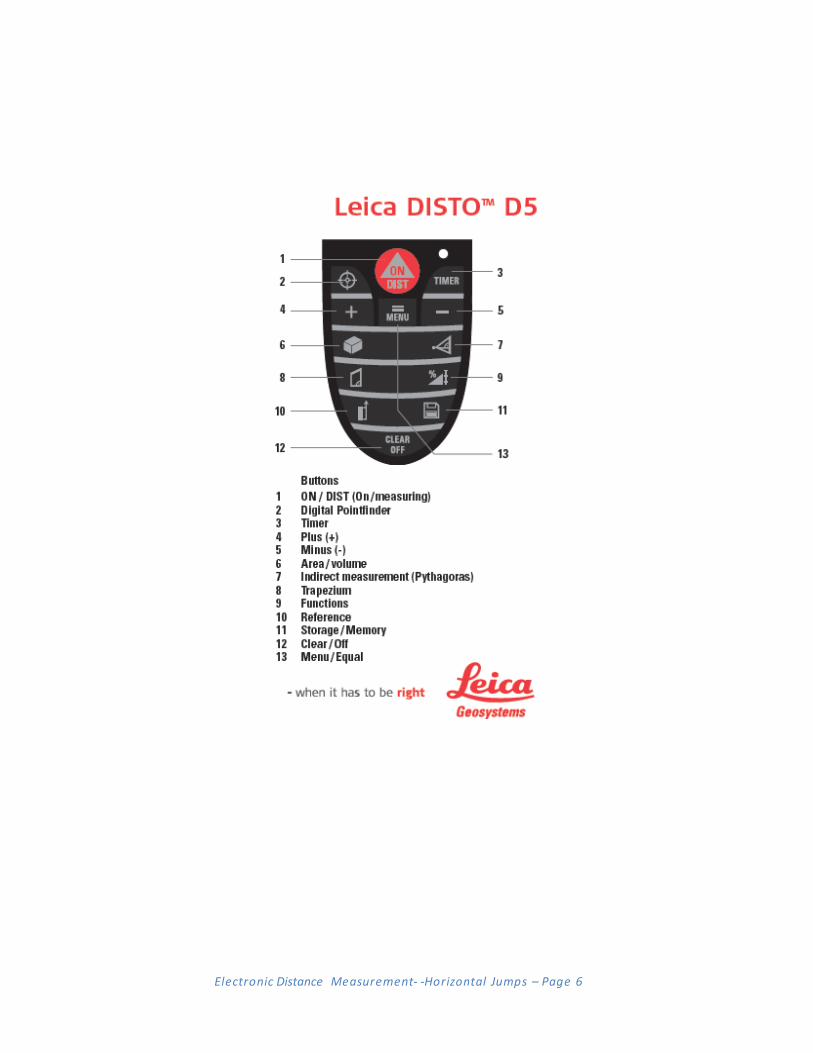
Leica Disto™ D5
Electronic Distance Measurement - Page 8
Electronic Distance Measurement - Page 9
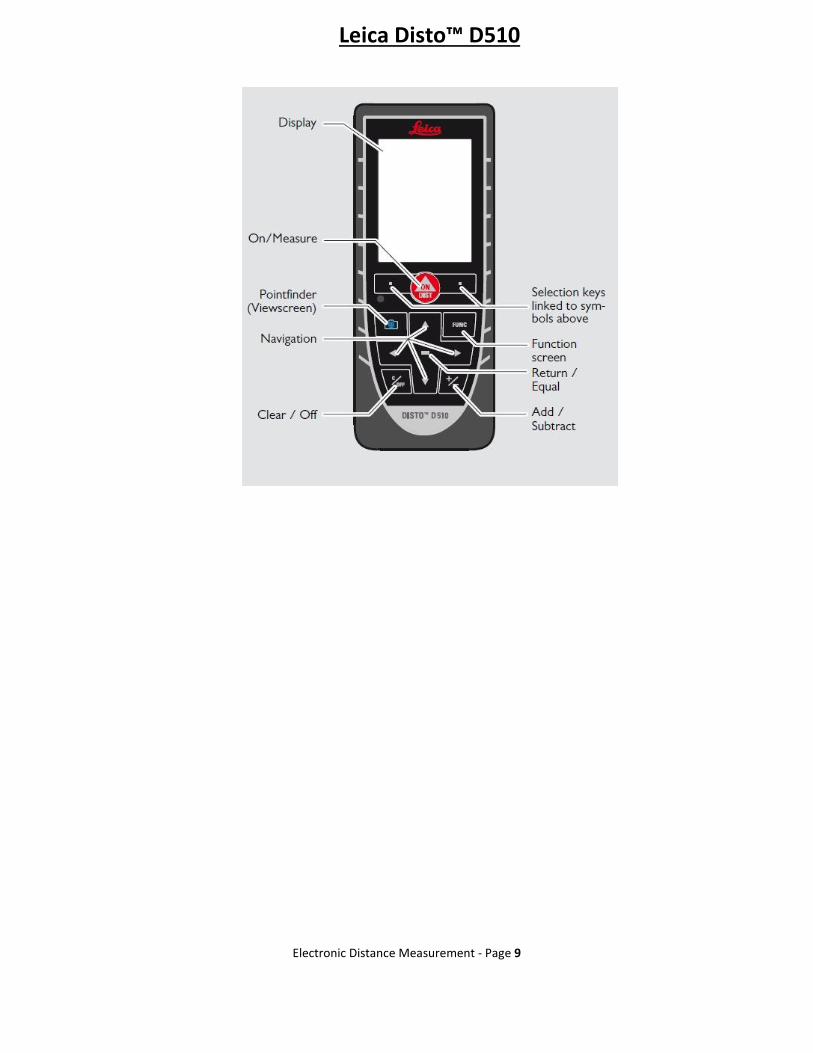
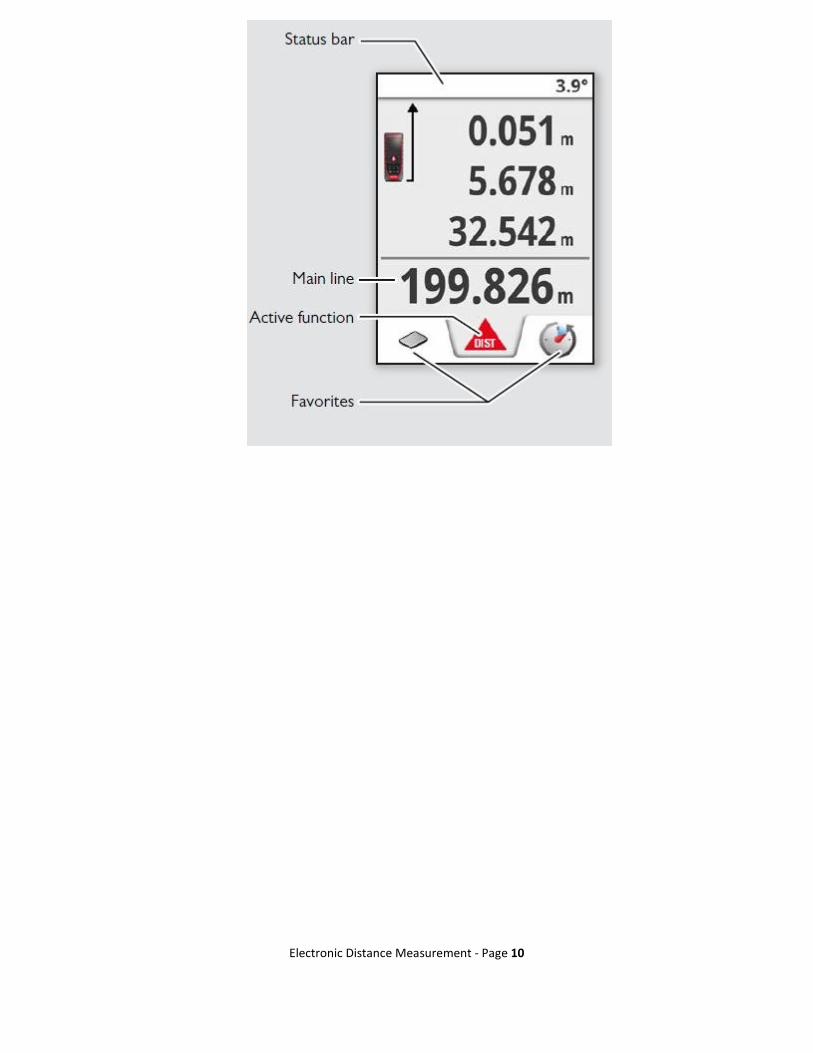
Leica Disto™ D510
Electronic Distance Measurement - Page 10

Electronic Distance Measurement - Page 11
Electronic Distance Measurement - Page 12
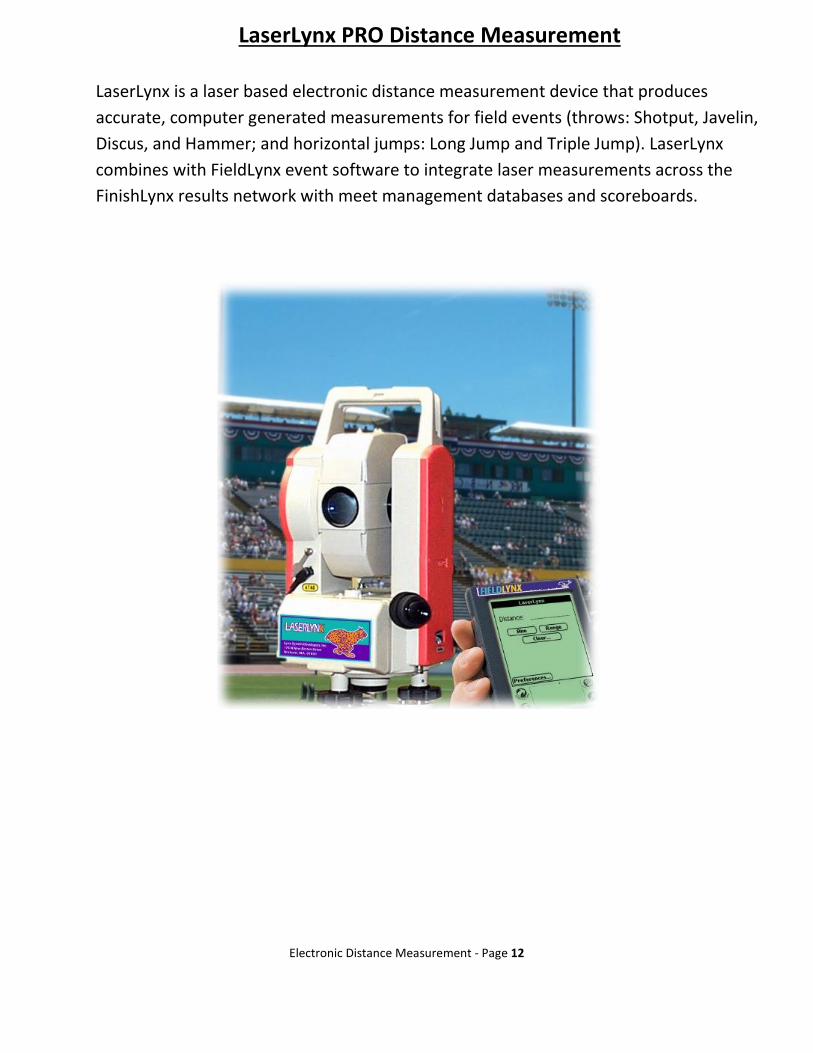
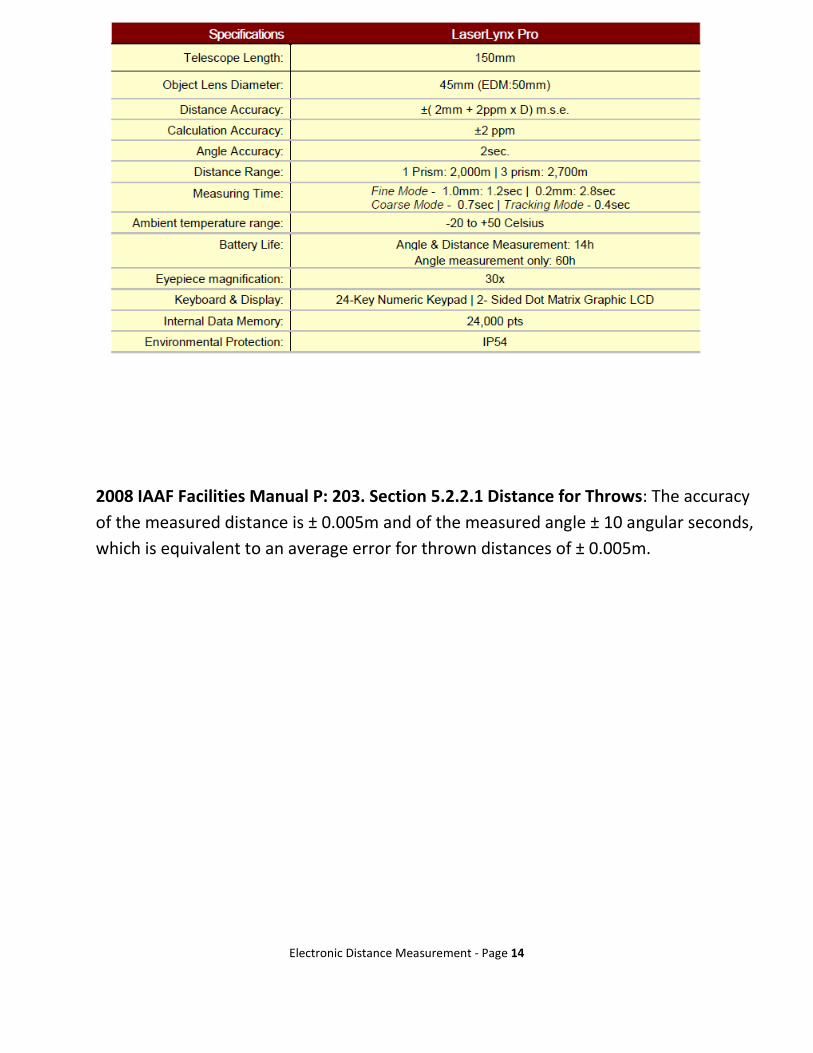
LaserLynx PRO Distance Measurement
LaserLynx is a laser based electronic distance measurement device that produces
accurate, computer generated measurements for field events (throws: Shotput, Javelin,
Discus, and Hammer; and horizontal jumps: Long Jump and Triple Jump). LaserLynx
combines with FieldLynx event software to integrate laser measurements across the
FinishLynx results network with meet management databases and scoreboards.
Electronic Distance Measurement - Page 13
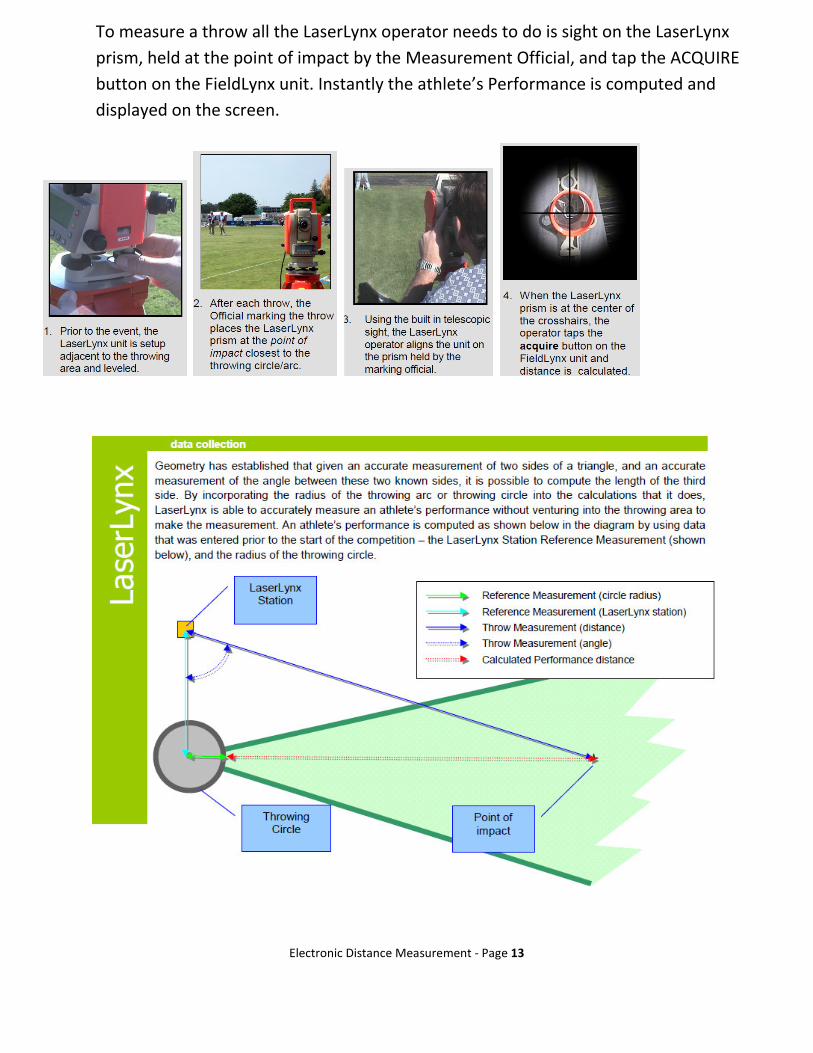
To measure a throw all the LaserLynx operator needs to do is sight on the LaserLynx
prism, held at the point of impact by the Measurement Official, and tap the ACQUIRE
button on the FieldLynx unit. Instantly the athlete’s Performance is computed and
displayed on the screen.
Electronic Distance Measurement - Page 14
2008 IAAF Facilities Manual P: 203. Section 5.2.2.1 Distance for Throws: The accuracy
of the measured distance is ± 0.005m and of the measured angle ± 10 angular seconds,
which is equivalent to an average error for thrown distances of ± 0.005m.
Electronic Distance Measurement - Page 15
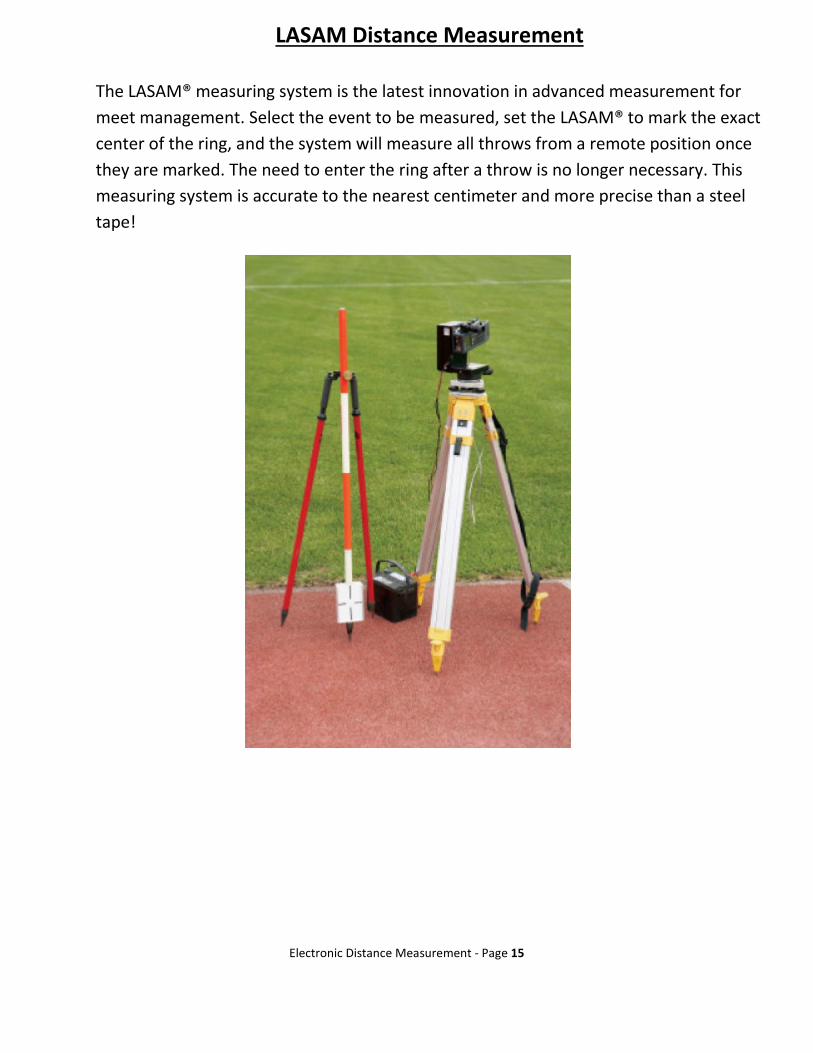
LASAM Distance Measurement
The LASAM® measuring system is the latest innovation in advanced measurement for
meet management. Select the event to be measured, set the LASAM® to mark the exact
center of the ring, and the system will measure all throws from a remote position once
they are marked. The need to enter the ring after a throw is no longer necessary. This
measuring system is accurate to the nearest centimeter and more precise than a steel
tape!
Electronic Distance Measurement
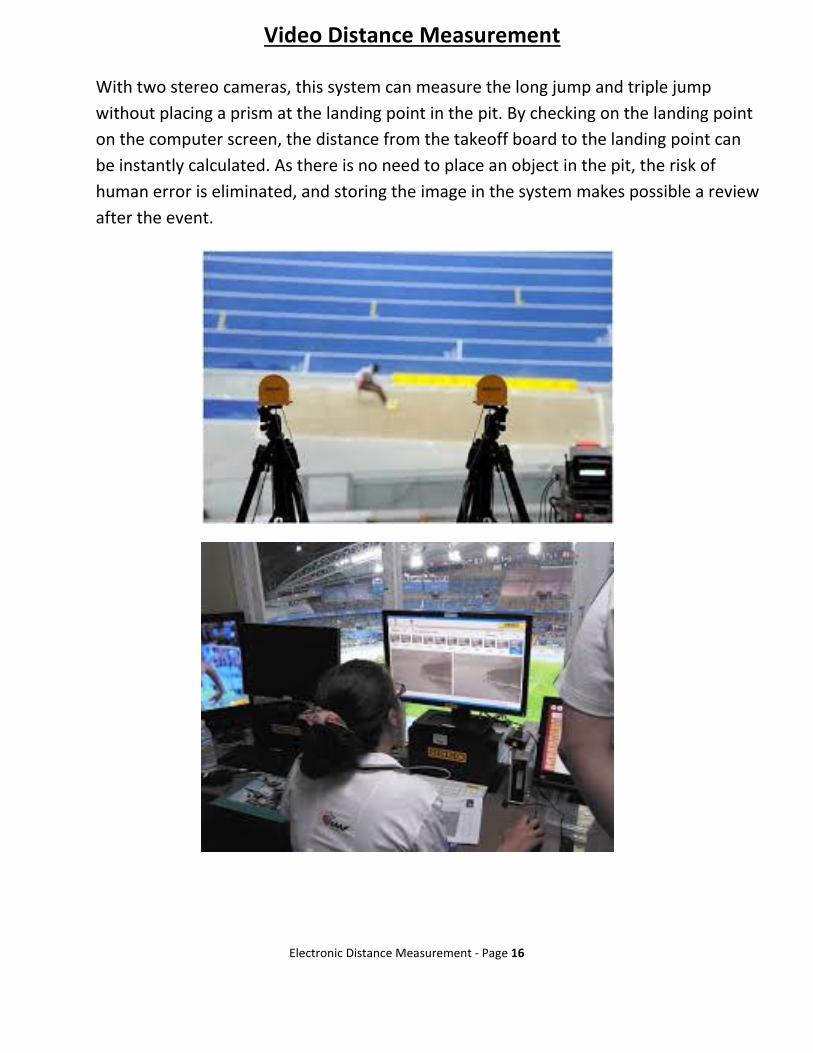
Video Distance Measurement
With two stereo cameras, this system can measure the long jump and triple jump
without placing a prism at the landing point in the pit. By checking on the landing point
on the computer screen, the distance from the takeoff board to the landing point can
be instantly calculated. As there is no need to place
human error is eliminated, and storing the image in the system makes possible a review
after the event.
Electronic Distance Measurement - Page 16
Video Distance Measurement
, this system can measure the long jump and triple jump
without placing a prism at the landing point in the pit. By checking on the landing point
on the computer screen, the distance from the takeoff board to the landing point can
As there is no need to place an object in the pit, the risk of
human error is eliminated, and storing the image in the system makes possible a review
, this system can measure the long jump and triple jump
without placing a prism at the landing point in the pit. By checking on the landing point
on the computer screen, the distance from the takeoff board to the landing point can
object in the pit, the risk of
human error is eliminated, and storing the image in the system makes possible a review
Electronic Distance Measurement - Page 17
Name Association Level Please Print!!!
Street City State Zip Please Print!!!
Phone: e-mail
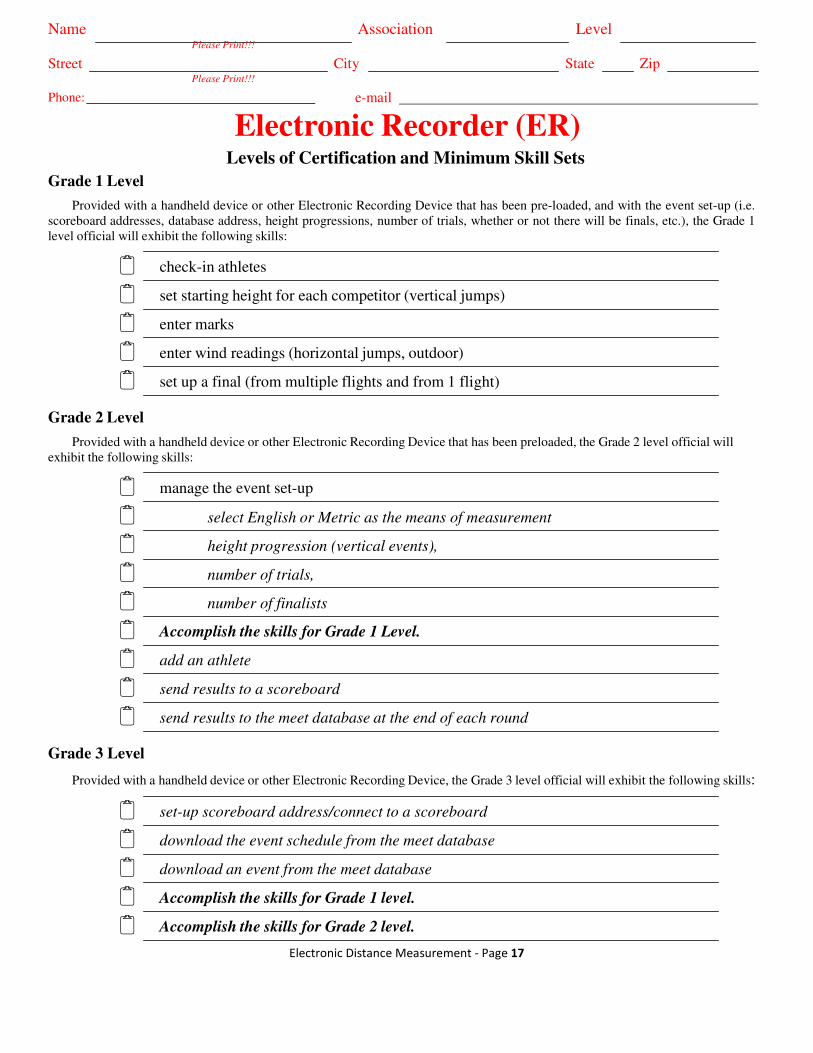
Electronic Recorder (ER) Levels of Certification and Minimum Skill Sets
Grade 1 Level
Provided with a handheld device or other Electronic Recording Device that has been pre-loaded, and with the event set-up (i.e.
scoreboard addresses, database address, height progressions, number of trials, whether or not there will be finals, etc.), the Grade 1
level official will exhibit the following skills:
� check-in athletes
� set starting height for each competitor (vertical jumps)
� enter marks
� enter wind readings (horizontal jumps, outdoor)
� set up a final (from multiple flights and from 1 flight)
Grade 2 Level
Provided with a handheld device or other Electronic Recording Device that has been preloaded, the Grade 2 level official will
exhibit the following skills:
� manage the event set-up
� select English or Metric as the means of measurement
� height progression (vertical events),
� number of trials,
� number of finalists
� Accomplish the skills for Grade 1 Level.
� add an athlete
� send results to a scoreboard
� send results to the meet database at the end of each round
Grade 3 Level
Provided with a handheld device or other Electronic Recording Device, the Grade 3 level official will exhibit the following skills:
� set-up scoreboard address/connect to a scoreboard
� download the event schedule from the meet database
� download an event from the meet database
� Accomplish the skills for Grade 1 level.
� Accomplish the skills for Grade 2 level.
Electronic Distance Measurement - Page 18
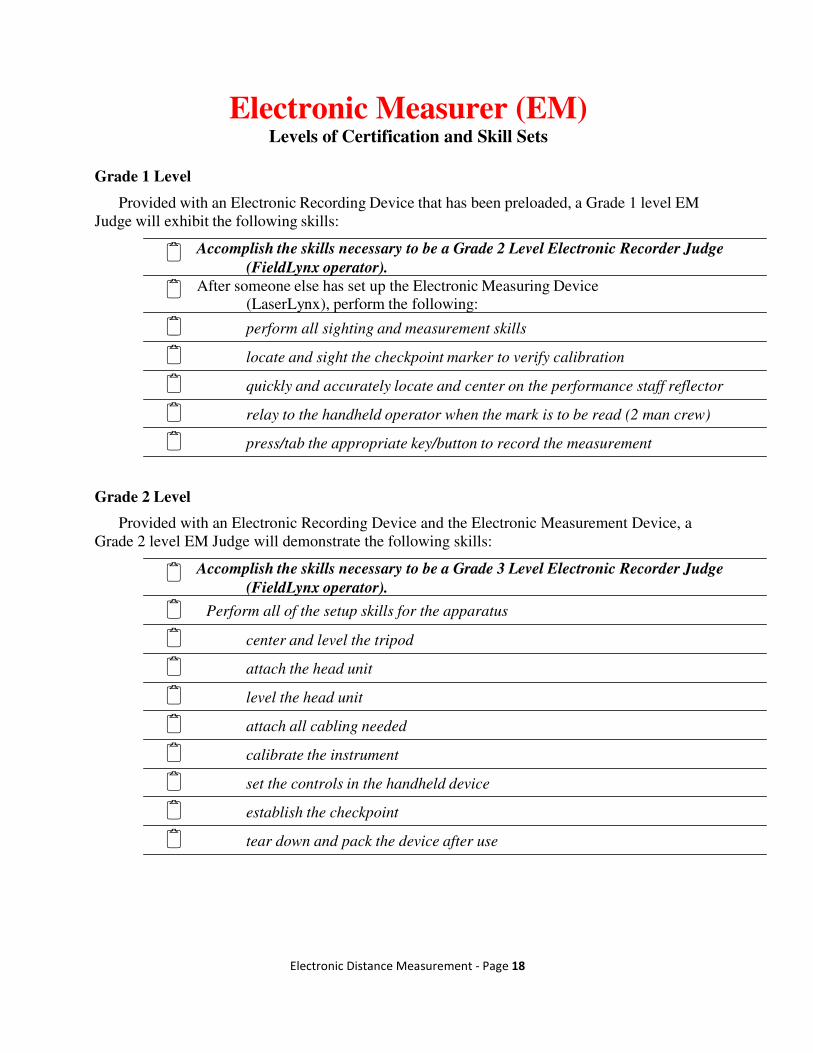
Electronic Measurer (EM) Levels of Certification and Skill Sets
Grade 1 Level
Provided with an Electronic Recording Device that has been preloaded, a Grade 1 level EM
Judge will exhibit the following skills:
� Accomplish the skills necessary to be a Grade 2 Level Electronic Recorder Judge (FieldLynx operator).
� After someone else has set up the Electronic Measuring Device
(LaserLynx), perform the following:
� perform all sighting and measurement skills
� locate and sight the checkpoint marker to verify calibration
� quickly and accurately locate and center on the performance staff reflector
� relay to the handheld operator when the mark is to be read (2 man crew)
� press/tab the appropriate key/button to record the measurement
Grade 2 Level
Provided with an Electronic Recording Device and the Electronic Measurement Device, a
Grade 2 level EM Judge will demonstrate the following skills:
� Accomplish the skills necessary to be a Grade 3 Level Electronic Recorder Judge (FieldLynx operator).
� Perform all of the setup skills for the apparatus
� center and level the tripod
� attach the head unit
� level the head unit
� attach all cabling needed
� calibrate the instrument
� set the controls in the handheld device
� establish the checkpoint
� tear down and pack the device after use

This page left intentionally blank.

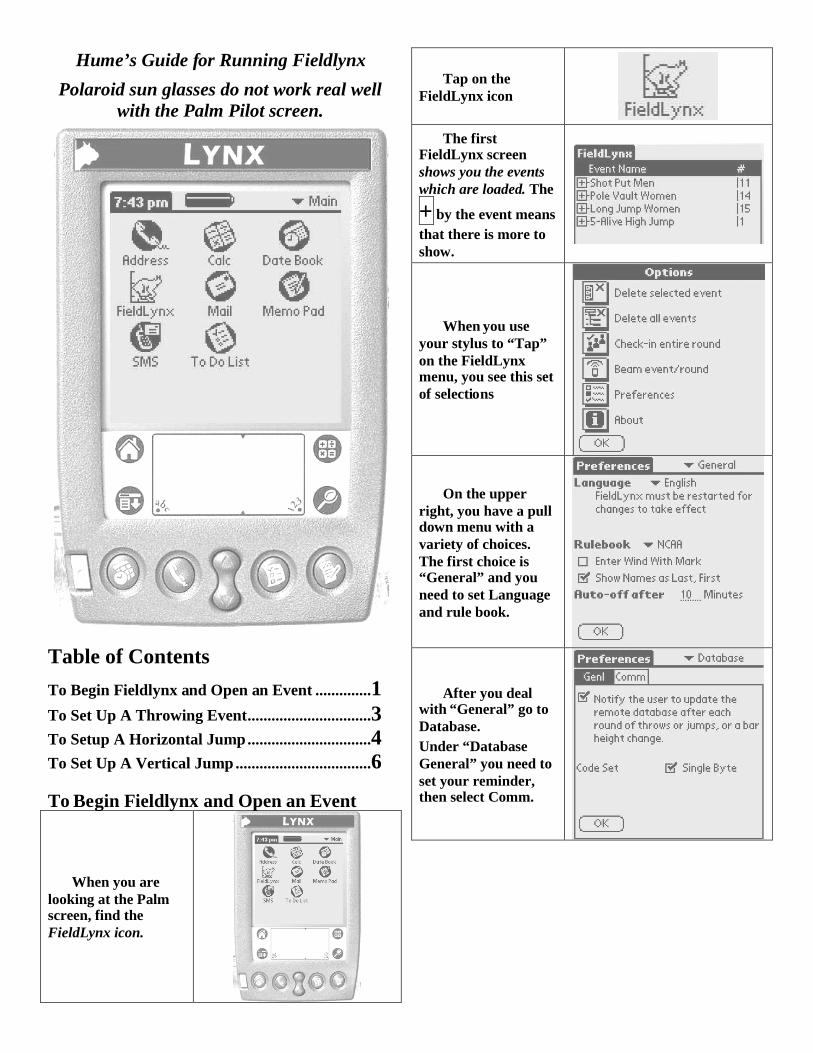
Hume’s Guide for Running Fieldlynx
Polaroid sun glasses do not work real wellwith the Palm Pilot screen.
Table of ContentsTo Begin Fieldlynx and Open an Event ..............1To Set Up A Throwing Event...............................3To Setup A Horizontal Jump...............................4To Set Up A Vertical Jump..................................6
To Begin Fieldlynx and Open an Event
When you arelooking at the Palmscreen, find theFieldLynx icon.
Tap on theFieldLynx icon
The firstFieldLynx screenshows you the eventswhich are loaded. The
+ by the event meansthat there is more toshow.
When you useyour stylus to “Tap”on the FieldLynxmenu, you see this setof selections
On the upperright, you have a pulldown menu with avariety of choices.The first choice is“General” and youneed to set Languageand rule book.
After you dealwith “General” go toDatabase.Under “DatabaseGeneral” you need toset your reminder,then select Comm.
C:\Documents and Settings\Jim\Desktop\FL.LL Clinic Info\ to Big Jim\FieldLynx Notes.6.17.'07.doc…6/17/2007 page 2 of 8
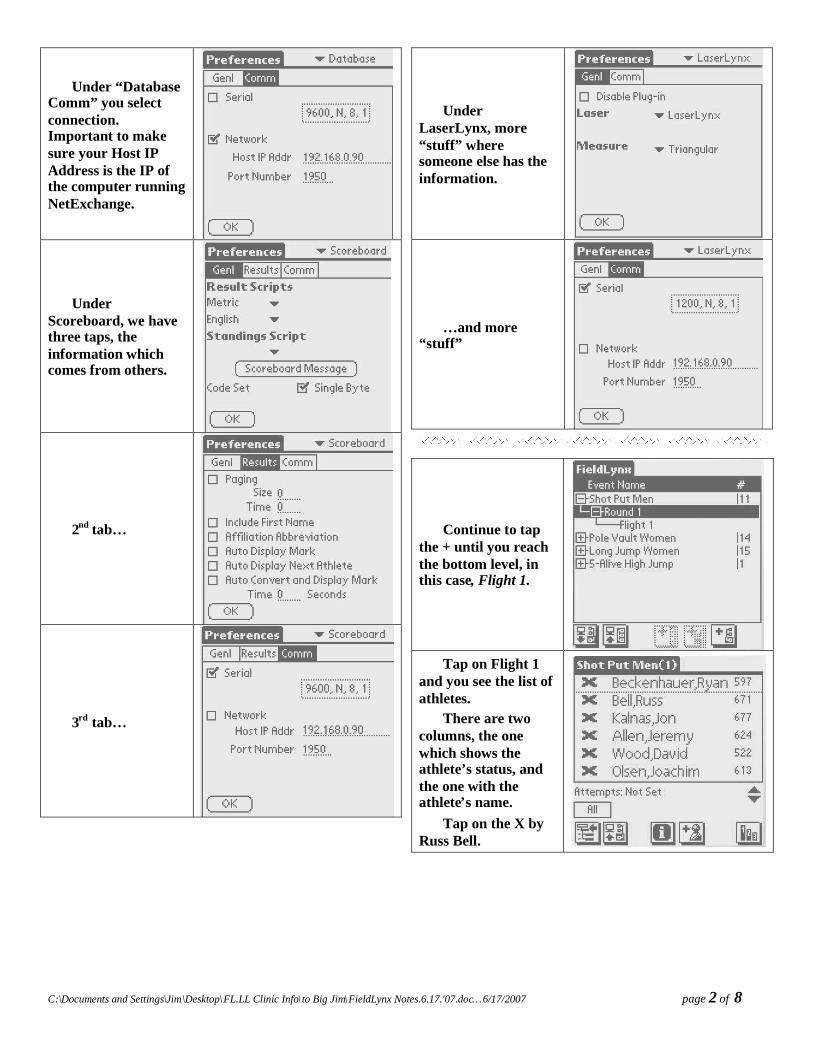
Under “DatabaseComm” you selectconnection.Important to makesure your Host IPAddress is the IP ofthe computer runningNetExchange.
UnderScoreboard, we havethree taps, theinformation whichcomes from others.
2nd tab…
3rd tab…
UnderLaserLynx, more“stuff” wheresomeone else has theinformation.
…and more“stuff”
Continue to tapthe + until you reachthe bottom level, inthis case, Flight 1.
Tap on Flight 1and you see the list ofathletes.
There are twocolumns, the onewhich shows theathlete’s status, andthe one with theathlete’s name.
Tap on the X byRuss Bell.
C:\Documents and Settings\Jim\Desktop\FL.LL Clinic Info\ to Big Jim\FieldLynx Notes.6.17.'07.doc…6/17/2007 page 3 of 8
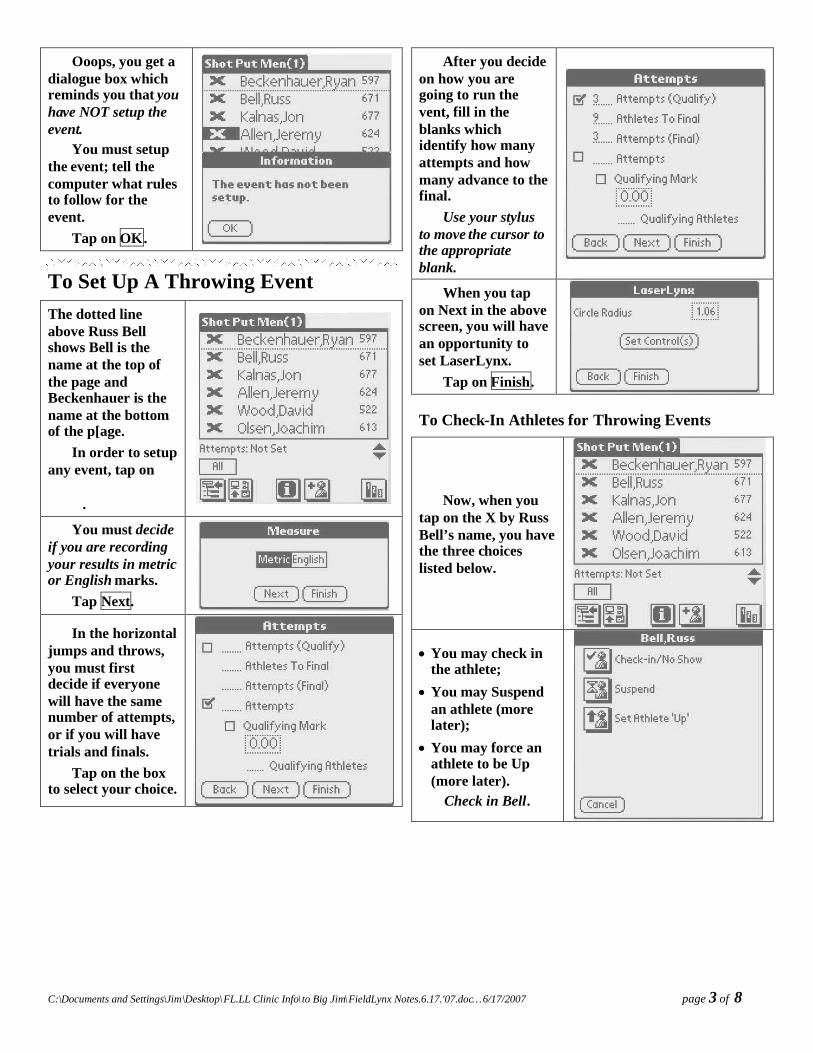
Ooops, you get adialogue box whichreminds you that youhave NOT setup theevent.
You must setupthe event; tell thecomputer what rulesto follow for theevent.
Tap on OK.
To Set Up A Throwing EventThe dotted lineabove Russ Bellshows Bell is thename at the top ofthe page andBeckenhauer is thename at the bottomof the p[age.
In order to setupany event, tap on
.
You must decideif you are recordingyour results in metricor English marks.
Tap Next.
In the horizontaljumps and throws,you must firstdecide if everyonewill have the samenumber of attempts,or if you will havetrials and finals.
Tap on the boxto select your choice.
After you decideon how you aregoing to run thevent, fill in theblanks whichidentify how manyattempts and howmany advance to thefinal.
Use your stylusto move the cursor tothe appropriateblank.
When you tapon Next in the abovescreen, you will havean opportunity toset LaserLynx.
Tap on Finish.
To Check-In Athletes for Throwing Events
Now, when youtap on the X by RussBell’s name, you havethe three choiceslisted below.
You may check inthe athlete;
You may Suspendan athlete (morelater);
You may force anathlete to be Up(more later).
Check in Bell.
C:\Documents and Settings\Jim\Desktop\FL.LL Clinic Info\ to Big Jim\FieldLynx Notes.6.17.'07.doc…6/17/2007 page 4 of 8
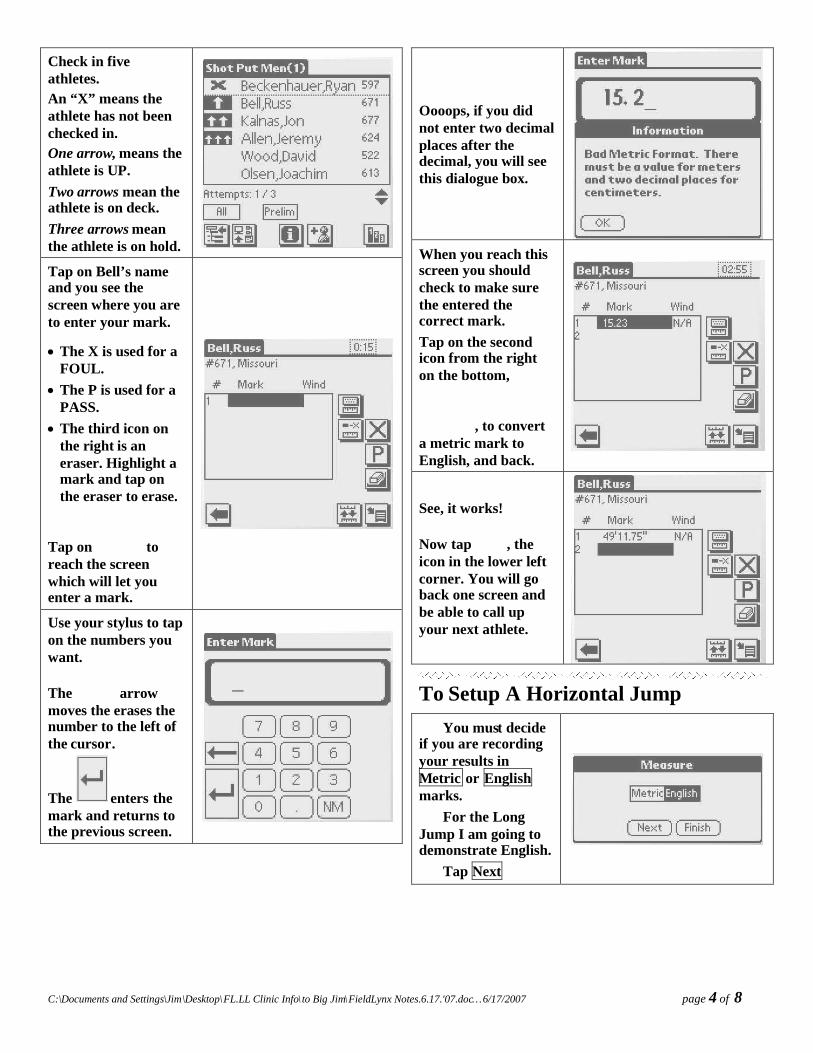
Check in fiveathletes.An “X” means theathlete has not beenchecked in.One arrow, means theathlete is UP.Two arrows mean theathlete is on deck.Three arrows meanthe athlete is on hold.
Tap on Bell’s nameand you see thescreen where you areto enter your mark.
The X is used for aFOUL.
The P is used for aPASS.
The third icon onthe right is aneraser. Highlight amark and tap onthe eraser to erase.
Tap on toreach the screenwhich will let youenter a mark.
Use your stylus to tapon the numbers youwant.
The arrowmoves the erases thenumber to the left ofthe cursor.
The enters themark and returns tothe previous screen.
Oooops, if you didnot enter two decimalplaces after thedecimal, you will seethis dialogue box.
When you reach thisscreen you shouldcheck to make surethe entered thecorrect mark.Tap on the secondicon from the righton the bottom,
, to converta metric mark toEnglish, and back.
See, it works!
Now tap , theicon in the lower leftcorner. You will goback one screen andbe able to call upyour next athlete.
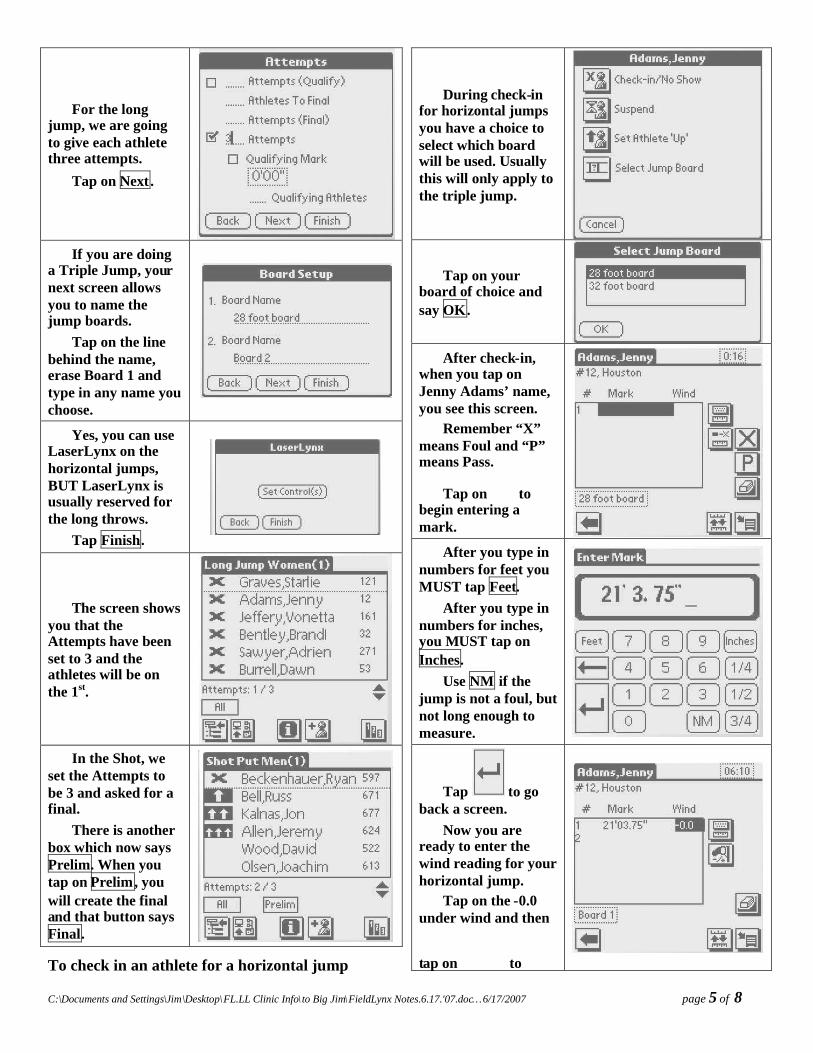
To Setup A Horizontal JumpYou must decide
if you are recordingyour results inMetric or Englishmarks.
For the LongJump I am going todemonstrate English.
Tap Next
C:\Documents and Settings\Jim\Desktop\FL.LL Clinic Info\ to Big Jim\FieldLynx Notes.6.17.'07.doc…6/17/2007 page 5 of 8
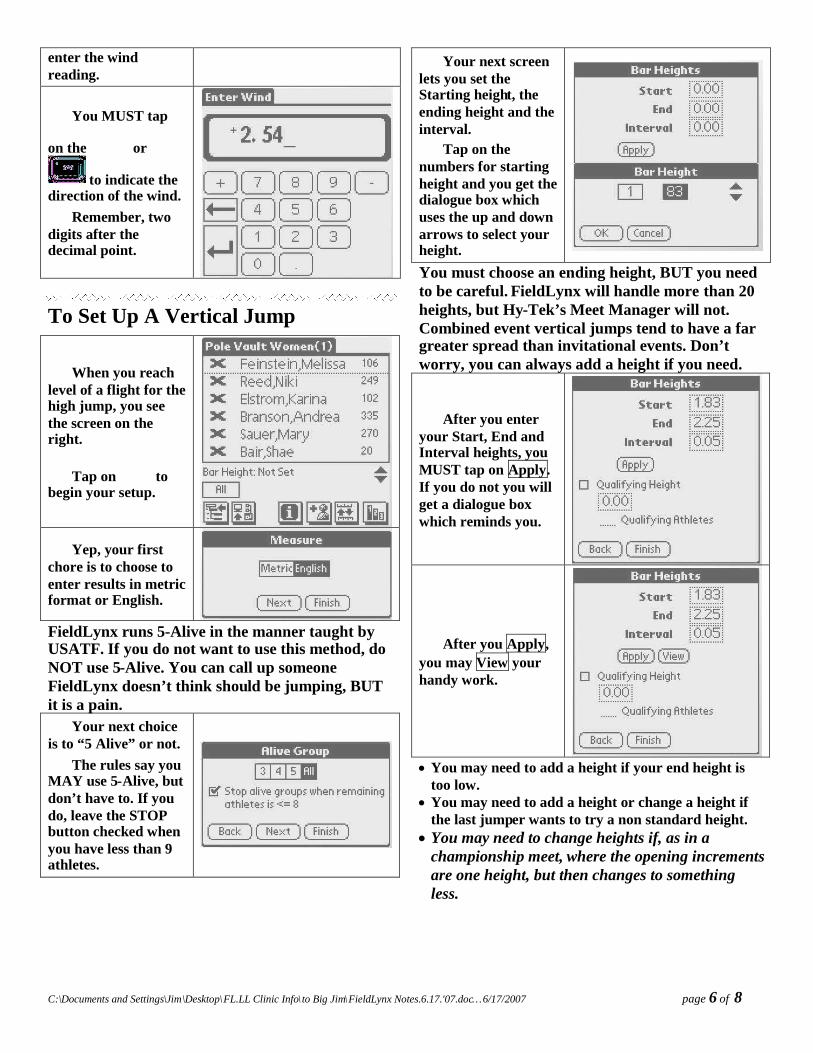
For the longjump, we are goingto give each athletethree attempts.
Tap on Next.
If you are doinga Triple Jump, yournext screen allowsyou to name thejump boards.
Tap on the linebehind the name,erase Board 1 andtype in any name youchoose.
Yes, you can useLaserLynx on thehorizontal jumps,BUT LaserLynx isusually reserved forthe long throws.
Tap Finish.
The screen showsyou that theAttempts have beenset to 3 and theathletes will be onthe 1st.
In the Shot, weset the Attempts tobe 3 and asked for afinal.
There is anotherbox which now saysPrelim. When youtap on Prelim, youwill create the finaland that button saysFinal.
To check in an athlete for a horizontal jump
During check-infor horizontal jumpsyou have a choice toselect which boardwill be used. Usuallythis will only apply tothe triple jump.
Tap on yourboard of choice andsay OK.
After check-in,when you tap onJenny Adams’ name,you see this screen.
Remember “X”means Foul and “P”means Pass.
Tap on tobegin entering amark.
After you type innumbers for feet youMUST tap Feet.
After you type innumbers for inches,you MUST tap onInches.
Use NM if thejump is not a foul, butnot long enough tomeasure.
Tap to goback a screen.
Now you areready to enter thewind reading for yourhorizontal jump.
Tap on the -0.0under wind and then
tap on to
C:\Documents and Settings\Jim\Desktop\FL.LL Clinic Info\ to Big Jim\FieldLynx Notes.6.17.'07.doc…6/17/2007 page 6 of 8
enter the windreading.
You MUST tap
on the or
to indicate thedirection of the wind.
Remember, twodigits after thedecimal point.
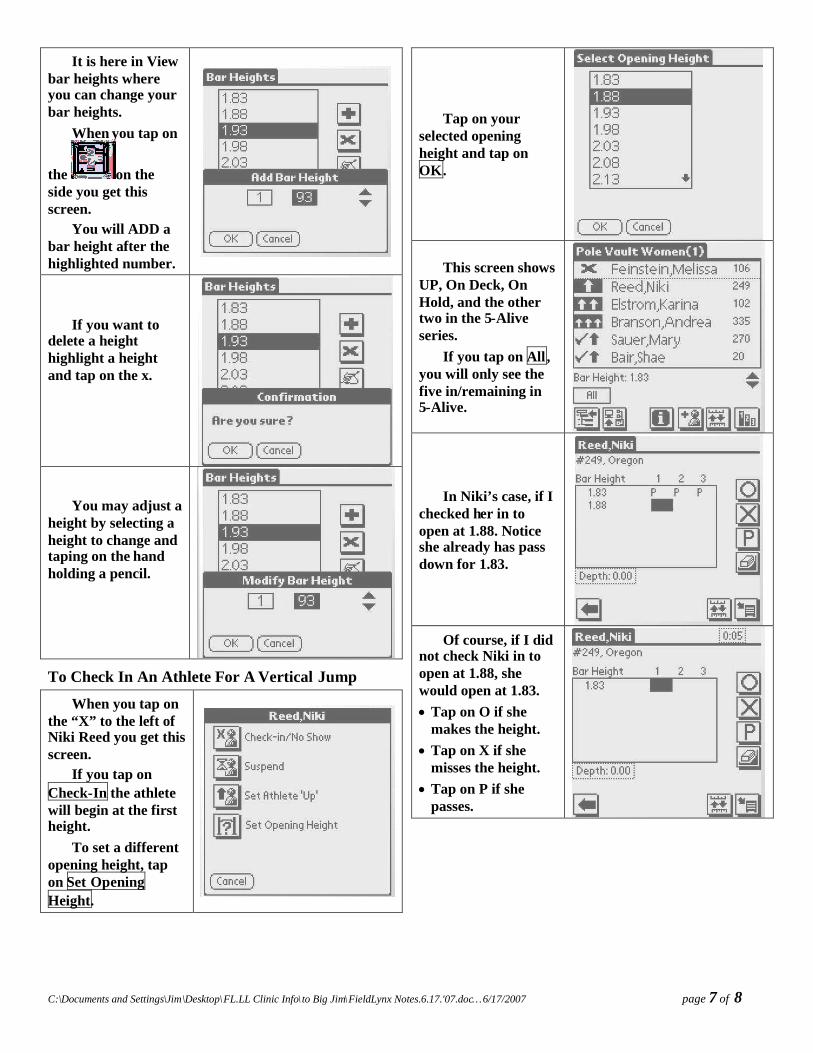
To Set Up A Vertical Jump
When you reachlevel of a flight for thehigh jump, you seethe screen on theright.
Tap on tobegin your setup.
Yep, your firstchore is to choose toenter results in metricformat or English.
FieldLynx runs 5-Alive in the manner taught byUSATF. If you do not want to use this method, doNOT use 5-Alive. You can call up someoneFieldLynx doesn’t think should be jumping, BUTit is a pain.
Your next choiceis to “5 Alive” or not.
The rules say youMAY use 5-Alive, butdon’t have to. If youdo, leave the STOPbutton checked whenyou have less than 9athletes.
Your next screenlets you set theStarting height, theending height and theinterval.
Tap on thenumbers for startingheight and you get thedialogue box whichuses the up and downarrows to select yourheight.
You must choose an ending height, BUT you needto be careful. FieldLynx will handle more than 20heights, but Hy-Tek’s Meet Manager will not.Combined event vertical jumps tend to have a fargreater spread than invitational events. Don’tworry, you can always add a height if you need.
After you enteryour Start, End andInterval heights, youMUST tap on Apply.If you do not you willget a dialogue boxwhich reminds you.
After you Apply,you may View yourhandy work.
You may need to add a height if your end height istoo low.
You may need to add a height or change a height ifthe last jumper wants to try a non standard height.
You may need to change heights if, as in achampionship meet, where the opening incrementsare one height, but then changes to somethingless.
C:\Documents and Settings\Jim\Desktop\FL.LL Clinic Info\ to Big Jim\FieldLynx Notes.6.17.'07.doc…6/17/2007 page 7 of 8
It is here in Viewbar heights whereyou can change yourbar heights.
When you tap on
the on theside you get thisscreen.
You will ADD abar height after thehighlighted number.
If you want todelete a heighthighlight a heightand tap on the x.
You may adjust aheight by selecting aheight to change andtaping on the handholding a pencil.
To Check In An Athlete For A Vertical Jump
When you tap onthe “X” to the left ofNiki Reed you get thisscreen.
If you tap onCheck-In the athletewill begin at the firstheight.
To set a differentopening height, tapon Set OpeningHeight.
Tap on yourselected openingheight and tap onOK.
This screen showsUP, On Deck, OnHold, and the othertwo in the 5-Aliveseries.
If you tap on All,you will only see thefive in/remaining in5-Alive.
In Niki’s case, if Ichecked her in toopen at 1.88. Noticeshe already has passdown for 1.83.
Of course, if I didnot check Niki in toopen at 1.88, shewould open at 1.83.Tap on O if she
makes the height.Tap on X if she
misses the height.Tap on P if she
passes.
C:\Documents and Settings\Jim\Desktop\FL.LL Clinic Info\ to Big Jim\FieldLynx Notes.6.17.'07.doc…6/17/2007 page 8 of 8
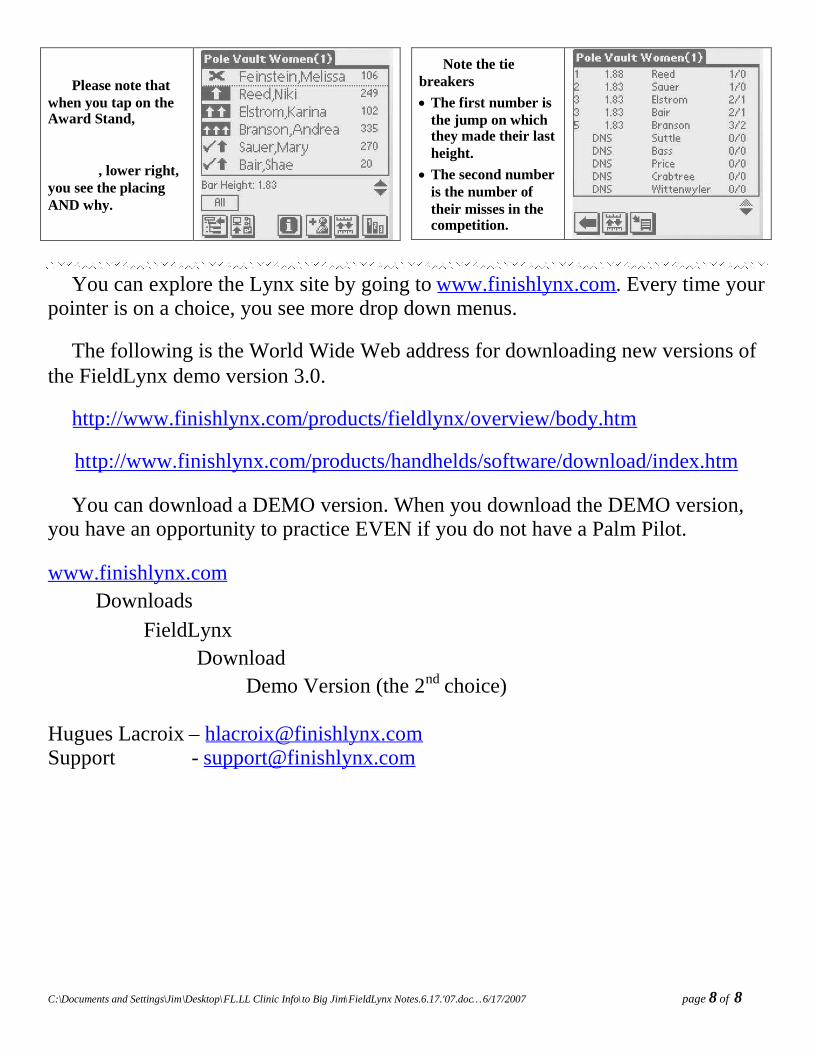
Please note thatwhen you tap on theAward Stand,
, lower right,you see the placingAND why.
Note the tiebreakersThe first number is
the jump on whichthey made their lastheight.
The second numberis the number oftheir misses in thecompetition.
You can explore the Lynx site by going to www.finishlynx.com. Every time yourpointer is on a choice, you see more drop down menus.
The following is the World Wide Web address for downloading new versions ofthe FieldLynx demo version 3.0.
http://www.finishlynx.com/products/fieldlynx/overview/body.htm
http://www.finishlynx.com/products/handhelds/software/download/index.htm
You can download a DEMO version. When you download the DEMO version,you have an opportunity to practice EVEN if you do not have a Palm Pilot.
www.finishlynx.comDownloads
FieldLynxDownload
Demo Version (the 2nd choice)
Hugues Lacroix – [email protected] - [email protected]
FieldLynx Windows ~ Horizontal Jumps Quick Start Guide Page 1
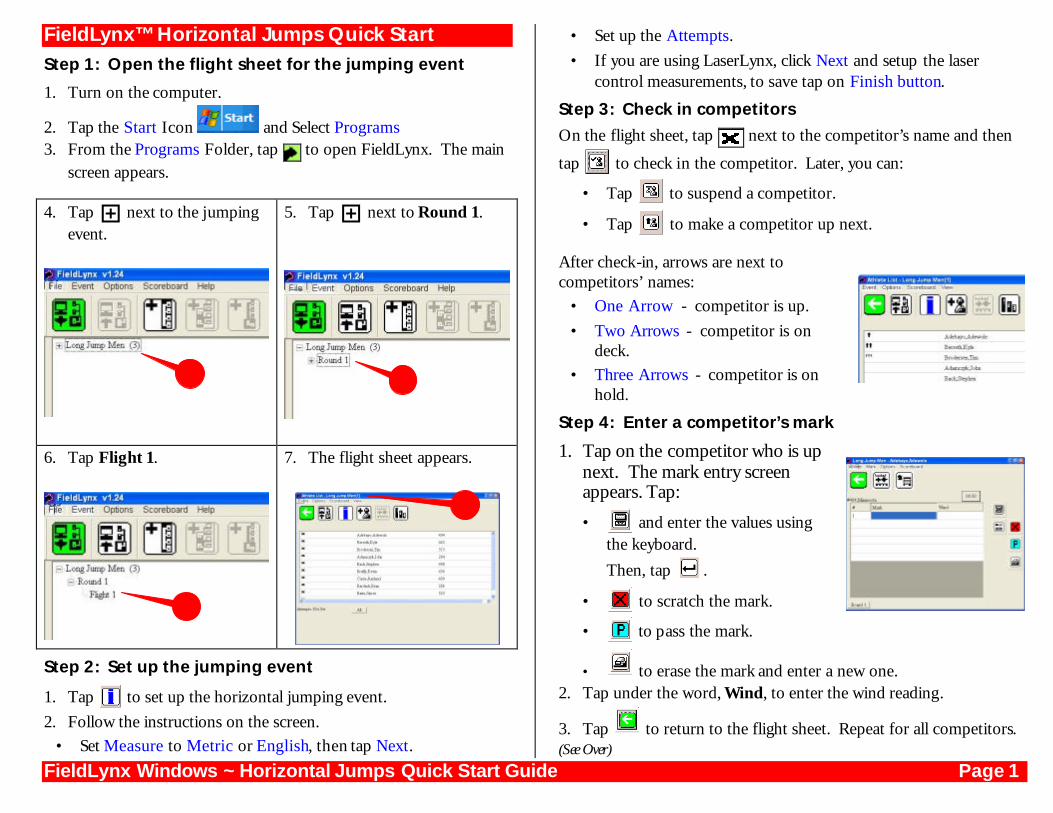
FieldLynx™ Horizontal Jumps Quick Start Step 1: Open the flight sheet for the jumping event
1. Turn on the computer.
2. Tap the Start Icon and Select Programs 3. From the Programs Folder, tap to open FieldLynx. The main
screen appears.
4. Tap next to the jumping event.
5. Tap next to Round 1.
6. Tap Flight 1.
7. The flight sheet appears.
Step 2: Set up the jumping event
1. Tap to set up the horizontal jumping event. 2. Follow the instructions on the screen.
• Set Measure to Metric or English, then tap Next.
• Set up the Attempts. • If you are using LaserLynx, click Next and setup the laser
control measurements, to save tap on Finish button.
Step 3: Check in competitors On the flight sheet, tap next to the competitor’s name and then
tap to check in the competitor. Later, you can:
• Tap to suspend a competitor.
• Tap to make a competitor up next.
After check-in, arrows are next to competitors’ names:
• One Arrow - competitor is up. • Two Arrows - competitor is on
deck. • Three Arrows - competitor is on
hold.
Step 4: Enter a competitor’s mark
1. Tap on the competitor who is up next. The mark entry screen appears. Tap:
• and enter the values using the keyboard. Then, tap .
• to scratch the mark.
• to pass the mark.
• to erase the mark and enter a new one. 2. Tap under the word, Wind, to enter the wind reading.
3. Tap to return to the flight sheet. Repeat for all competitors. (See Over)
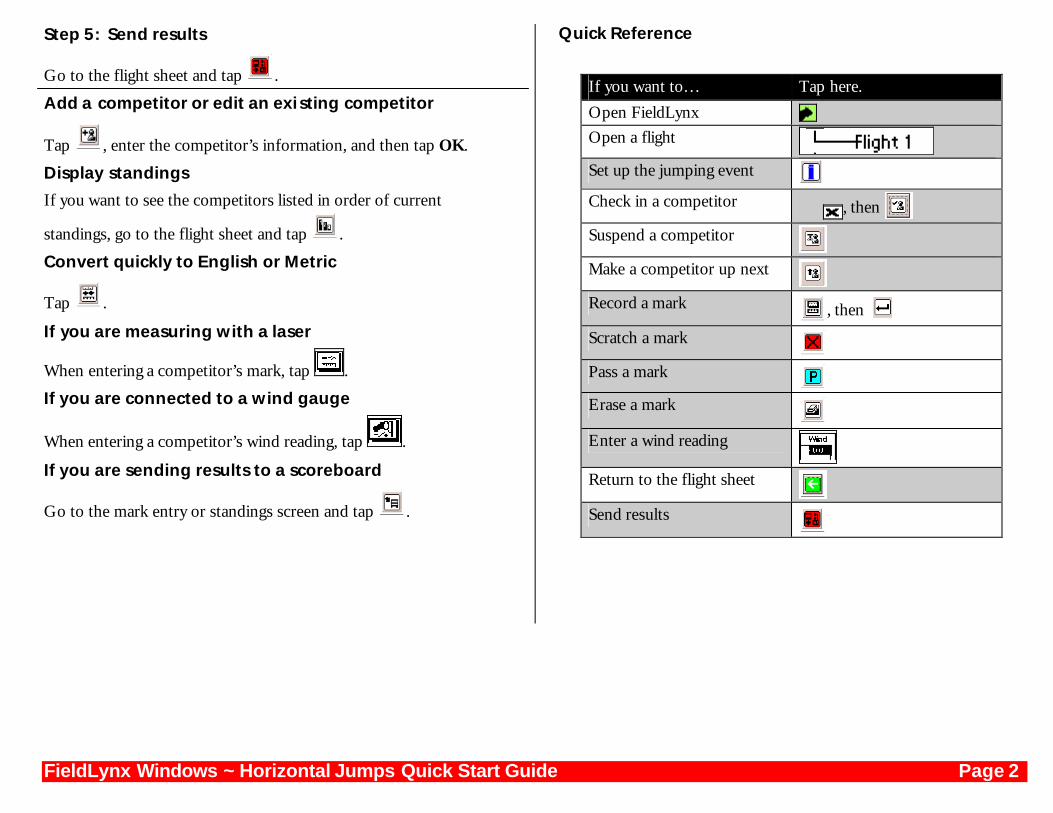
FieldLynx Windows ~ Horizontal Jumps Quick Start Guide Page 2
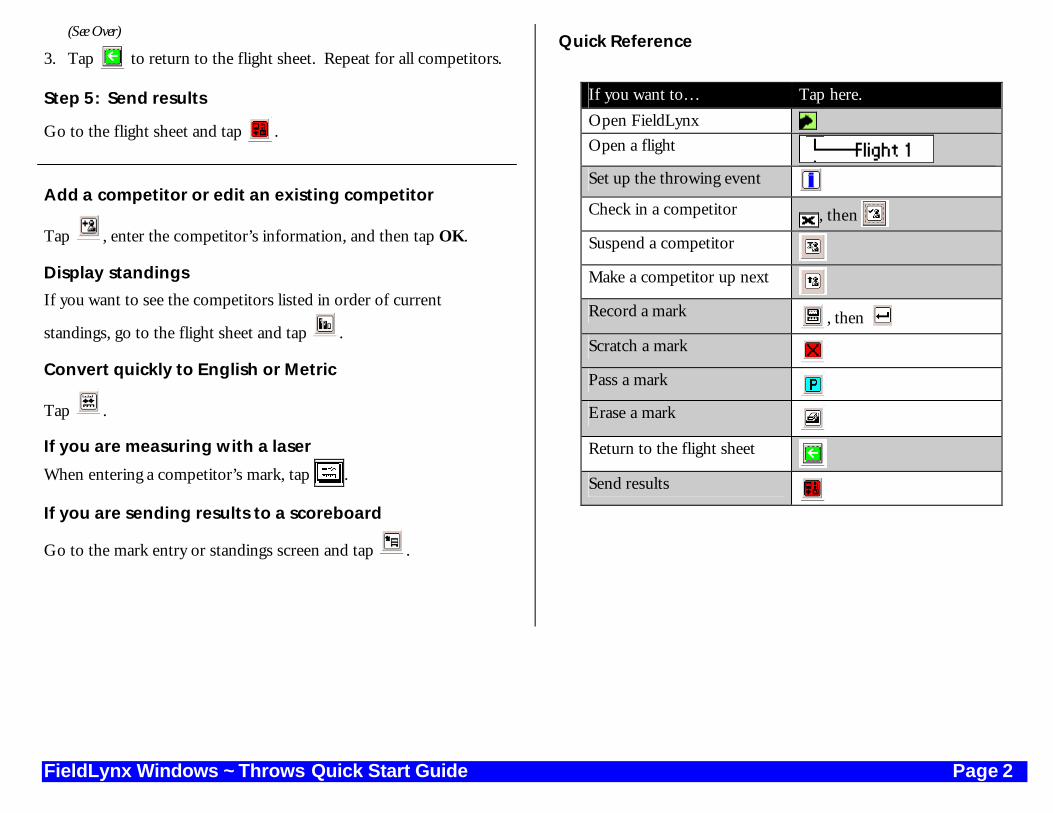
Step 5: Send results
Go to the flight sheet and tap .
Add a competitor or edit an exi sting competitor
Tap , enter the competitor’s information, and then tap OK.
Display standings
If you want to see the competitors listed in order of current
standings, go to the flight sheet and tap .
Convert quickly to English or Metric
Tap .
If you are measuring with a laser
When entering a competitor’s mark, tap .
If you are connected to a wind gauge
When entering a competitor’s wind reading, tap .
If you are sending results to a scoreboard
Go to the mark entry or standings screen and tap .
Quick Reference
If you want to… Tap here. Open FieldLynx
Open a flight
Set up the jumping event
Check in a competitor , then
Suspend a competitor
Make a competitor up next
Record a mark , then
Scratch a mark
Pass a mark
Erase a mark
Enter a wind reading
Return to the flight sheet
Send results
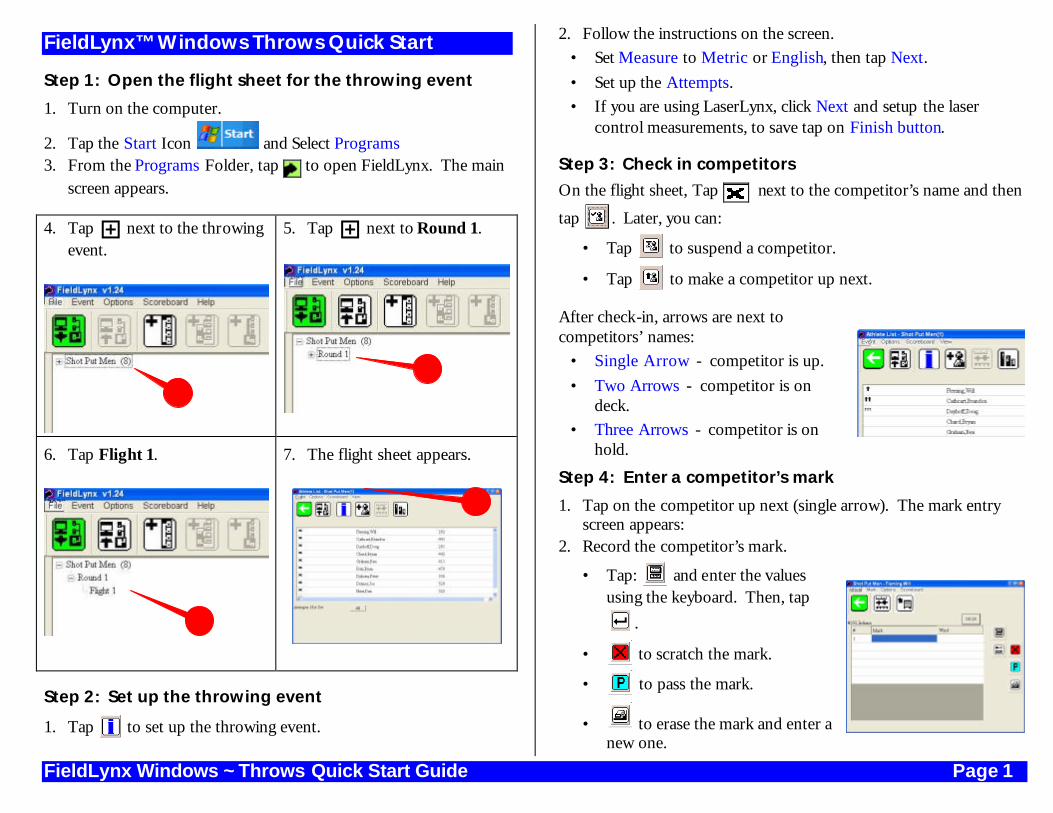
FieldLynx Windows ~ Throws Quick Start Guide Page 1
FieldLynx™ Windows Throws Quick Start
Step 1: Open the flight sheet for the throwing event
1. Turn on the computer.
2. Tap the Start Icon and Select Programs 3. From the Programs Folder, tap to open FieldLynx. The main
screen appears.
4. Tap next to the throwing event.
5. Tap next to Round 1.
6. Tap Flight 1.
7. The flight sheet appears.
Step 2: Set up the throwing event
1. Tap to set up the throwing event.
2. Follow the instructions on the screen. • Set Measure to Metric or English, then tap Next. • Set up the Attempts. • If you are using LaserLynx, click Next and setup the laser
control measurements, to save tap on Finish button.
Step 3: Check in competitors On the flight sheet, Tap next to the competitor’s name and then
tap . Later, you can:
• Tap to suspend a competitor.
• Tap to make a competitor up next.
After check-in, arrows are next to competitors’ names:
• Single Arrow - competitor is up. • Two Arrows - competitor is on
deck. • Three Arrows - competitor is on
hold.
Step 4: Enter a competitor’s mark
1. Tap on the competitor up next (single arrow). The mark entry screen appears:
2. Record the competitor’s mark.
• Tap: and enter the values using the keyboard. Then, tap
.
• to scratch the mark.
• to pass the mark.
• to erase the mark and enter a new one.
FieldLynx Windows ~ Throws Quick Start Guide Page 2
(See Over)
3. Tap to return to the flight sheet. Repeat for all competitors.
Step 5: Send results
Go to the flight sheet and tap .
Add a competitor or edit an existing competitor
Tap , enter the competitor’s information, and then tap OK.
Display standings
If you want to see the competitors listed in order of current
standings, go to the flight sheet and tap .
Convert quickly to English or Metric
Tap .
If you are measuring with a laser
When entering a competitor’s mark, tap .
If you are sending results to a scoreboard
Go to the mark entry or standings screen and tap .
Quick Reference
If you want to… Tap here. Open FieldLynx
Open a flight
Set up the throwing event
Check in a competitor , then
Suspend a competitor
Make a competitor up next
Record a mark , then
Scratch a mark
Pass a mark
Erase a mark
Return to the flight sheet
Send results

FieldLynx Windows ~ Vertical Jumps Quick Start Guide Page 1
FieldLynx™ Windows Vertical Jumps Quick Start
Step 1: Open the flight sheet for the Vertical event 1. Turn on the computer.
2. Tap the Start Icon and Select Programs 3. From the Programs Folder, tap to open FieldLynx. The
main screen appears. 4. Tap next to the jumping
event.
5. Tap next to Round 1.
6. Tap Flight 1.
7. The flight sheet appears.
Step 2: Set up the vertical jumping event
1. Tap to set up the jumping event. 2. Follow the instructions on the screen.
• Set Measure to Metric or English
• Set the Alive group (3, 4, 5, or All) • Set up the Attempts. • Tap on Finish
Step 3: Check in competitors
1. Tap next to the competitor’s name and then tap Later, you can tap in the up/deck/hold area to do the following: • Tap to enter a competitor’s starting height.
• Tap to suspend a competitor.
• Tap to make a competitor up next. 2. After check-in, arrows are next to
competitors’ names: • Single Arrow - competitor is up. • Two Arrows - competitor is on
deck. • Three Arrows - competitor is
on hold.
Step 4: Record a performance
1. Tap on the competitor who is up next (single arrow). The mark entry screen appears:
To record the competitor’s performance. Tap:
• if the competitor clears the height.
• if the competitor misses the height (see over) • if the competitor chooses to pass the attempt.
FieldLynx Windows ~ Vertical Jumps Quick Start Guide Page 2
• to erase the mark and enter a new one.
2. Tap to return to the flight sheet. Repeat for all competitors.
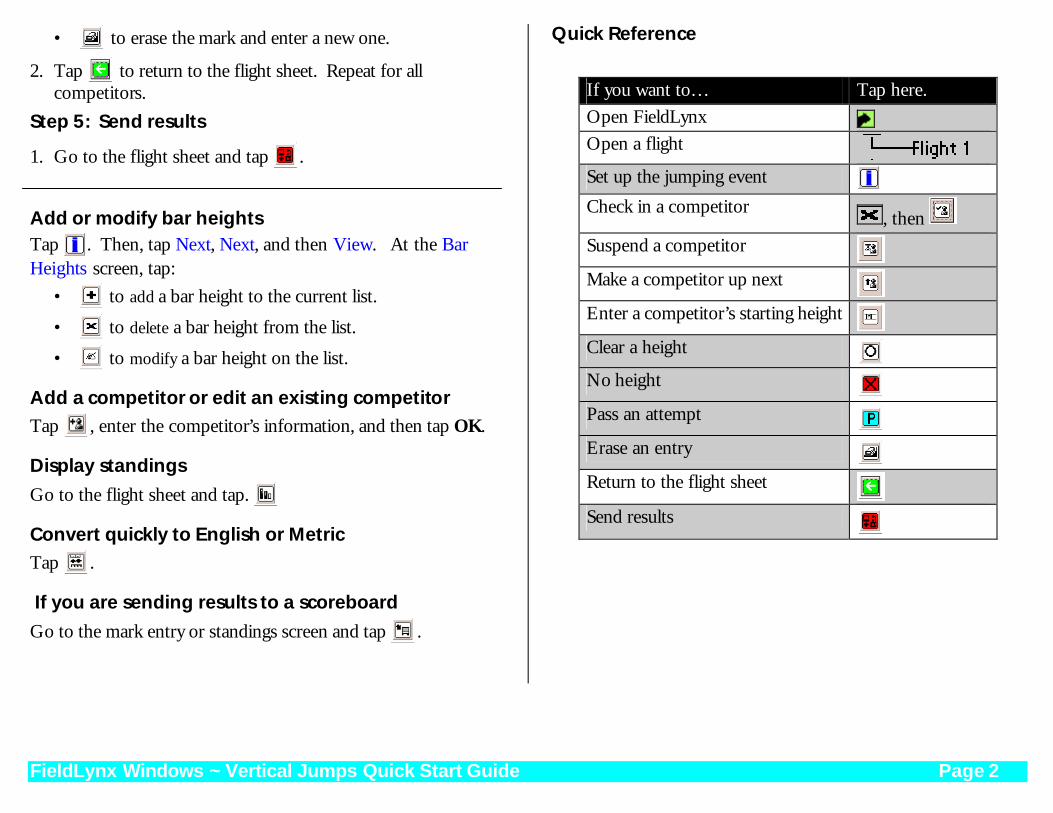
Step 5: Send results
1. Go to the flight sheet and tap .
Add or modify bar heights Tap . Then, tap Next, Next, and then View. At the Bar Heights screen, tap:
• to add a bar height to the current list.
• to delete a bar height from the list.
• to modify a bar height on the list.
Add a competitor or edit an existing competitor Tap , enter the competitor’s information, and then tap OK.
Display standings Go to the flight sheet and tap.
Convert quickly to English or Metric Tap .
If you are sending results to a scoreboard Go to the mark entry or standings screen and tap .
Quick Reference
If you want to… Tap here. Open FieldLynx Open a flight Set up the jumping event Check in a competitor
, then Suspend a competitor
Make a competitor up next
Enter a competitor’s starting height
Clear a height
No height
Pass an attempt
Erase an entry
Return to the flight sheet
Send results
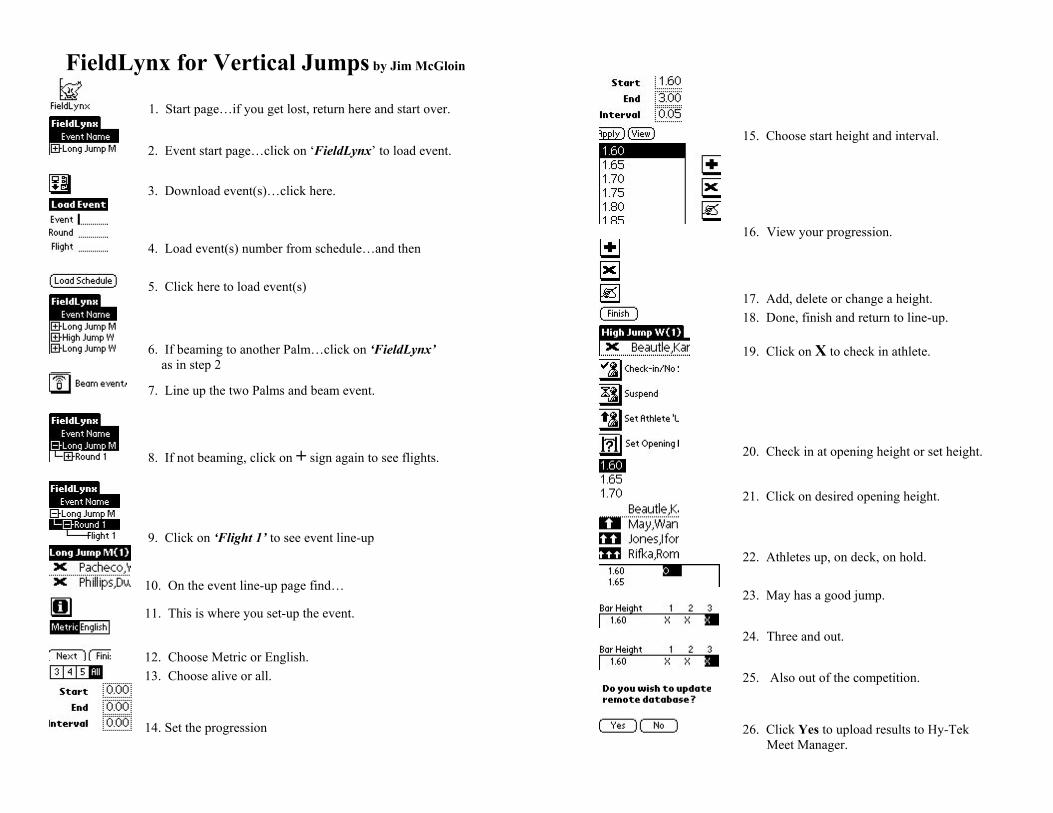
FieldLynx for Vertical Jumps by Jim McGloin
1. Start page…if you get lost, return here and start over.
2. Event start page…click on ‘FieldLynx’ to load event.
3. Download event(s)…click here.
4. Load event(s) number from schedule…and then
5. Click here to load event(s)
6. If beaming to another Palm…click on ‘FieldLynx’ as in step 2
7. Line up the two Palms and beam event.
8. If not beaming, click on + sign again to see flights.
9. Click on ‘Flight 1’ to see event line-up
10. On the event line-up page find…
11. This is where you set-up the event.
12. Choose Metric or English. 13. Choose alive or all.
14. Set the progression
15. Choose start height and interval.
16. View your progression.
17. Add, delete or change a height. 18. Done, finish and return to line-up.
19. Click on X to check in athlete.
20. Check in at opening height or set height.
21. Click on desired opening height.
22. Athletes up, on deck, on hold.
23. May has a good jump.
24. Three and out.
25. Also out of the competition.
26. Click Yes to upload results to Hy-Tek Meet Manager.
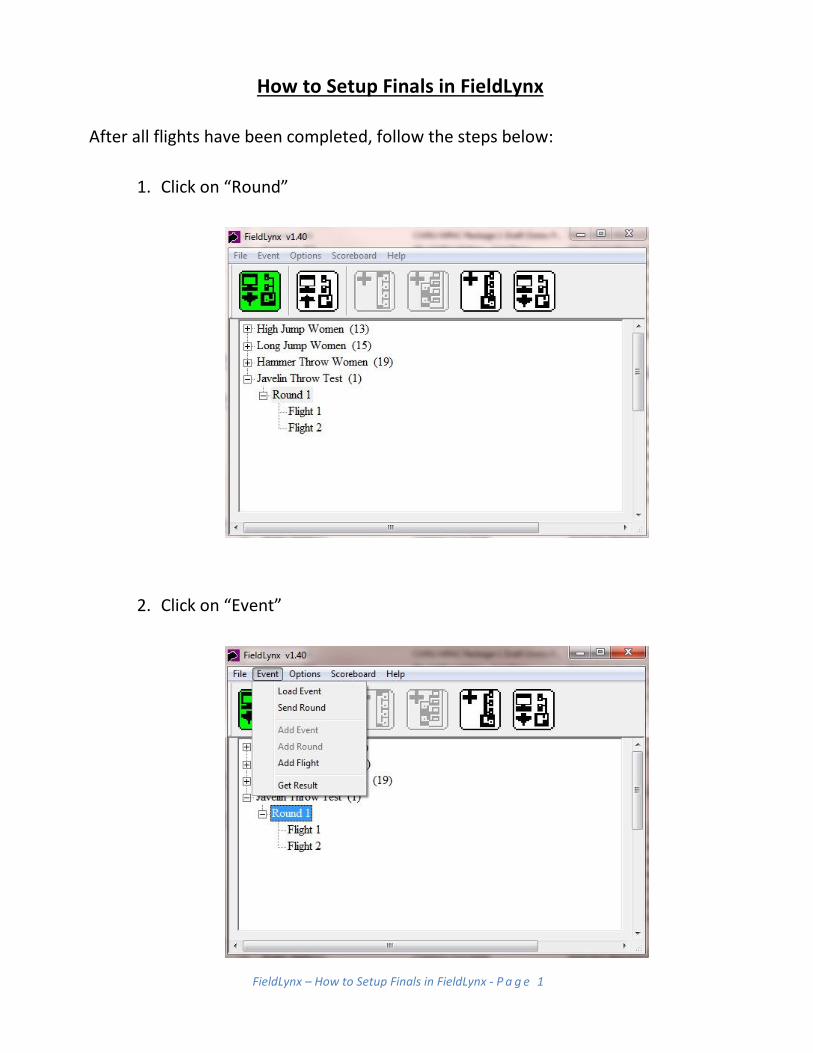
FieldLynx – How to Setup Finals in FieldLynx - P a g e 1
How to Setup Finals in FieldLynx
After all flights have been completed, follow the steps below:
1. Click on “Round”
2. Click on “Event”
FieldLynx – How to Setup Finals in FieldLynx - P a g e 2
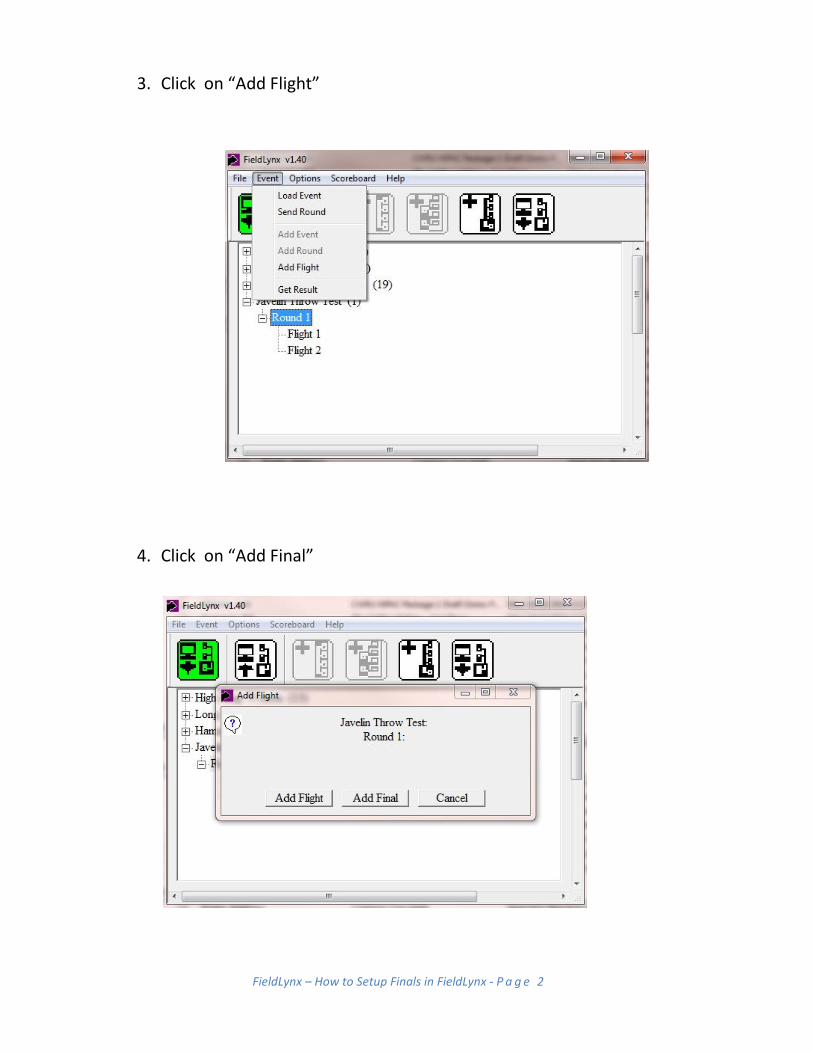
3. Click on “Add Flight”
4. Click on “Add Final”
FieldLynx – How to Setup Finals in FieldLynx - P a g e 3
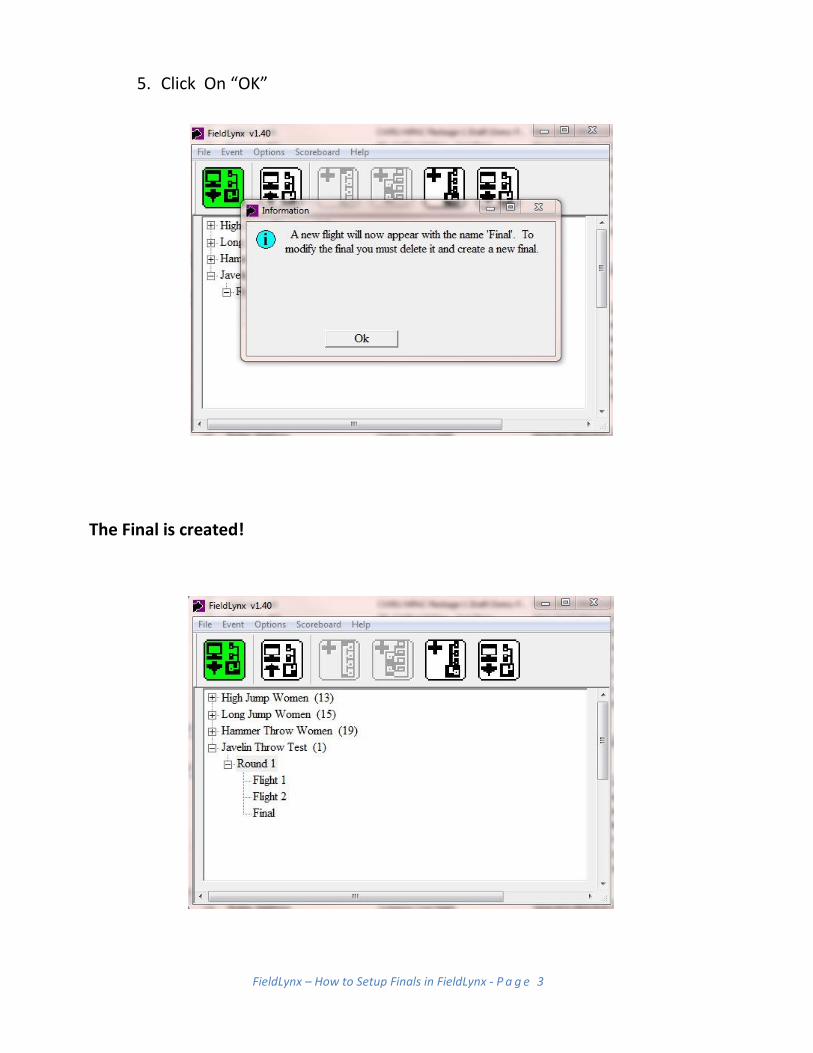
5. Click On “OK”
The Final is created!

FieldLynx – How to Setup Finals in FieldLynx - P a g e 4
This page left intentionally blank.
FieldLynx – How to Combine Results from Multiple Pits into One Final in FieldLynx - P a g e 1
How to Combine Results from Multiple Pits into One Final in
FieldLynx
1. Make sure NetExchange 3.20 is installed and running on the database
computer.
2. Setup each device for "straight" attempts. For example, 3 attempts
(instead of a jump-reorder-jump).
3. Administer each flight on their independent devices.
4. Send the results from each device back to NetExchange.
5. Determine which device will administer the final and load the results
from the other device onto this device.
6. Select the round for this flight.
7. The "Get Results" button now appears on the toolbar. Click on it.
8. Select the flight number that was administered on the other device and
click OK.
9. The results from the other device will appear in the round lists as a
completed flight.
10. Adjust the setup for the flights in order to be able to create a Final.
11. Go into the setup for any of the flights and change from straight
attempts to jump-reorder-jump and enter the correct numbers for initial
attempts, take to final and final attempts.
12. Select the round for the event you are administering and click "Create
Final". Follow the on-screen instructions.

FieldLynx – How to Combine Results from Multiple Pits into One Final in FieldLynx - P a g e 2
This page left intentionally blank.
Electronic Distance Measurement -
Horizontal Jumps
Mark Heckel, Master Official
Three Rivers Association, USA Track & Field
448 Dogwood Lane Hughesville,
PA 17737
570.584.3128
E lec t ron i c Distance M ea s u rem en t- -H ori z on t a l J u m ps – P a ge 2
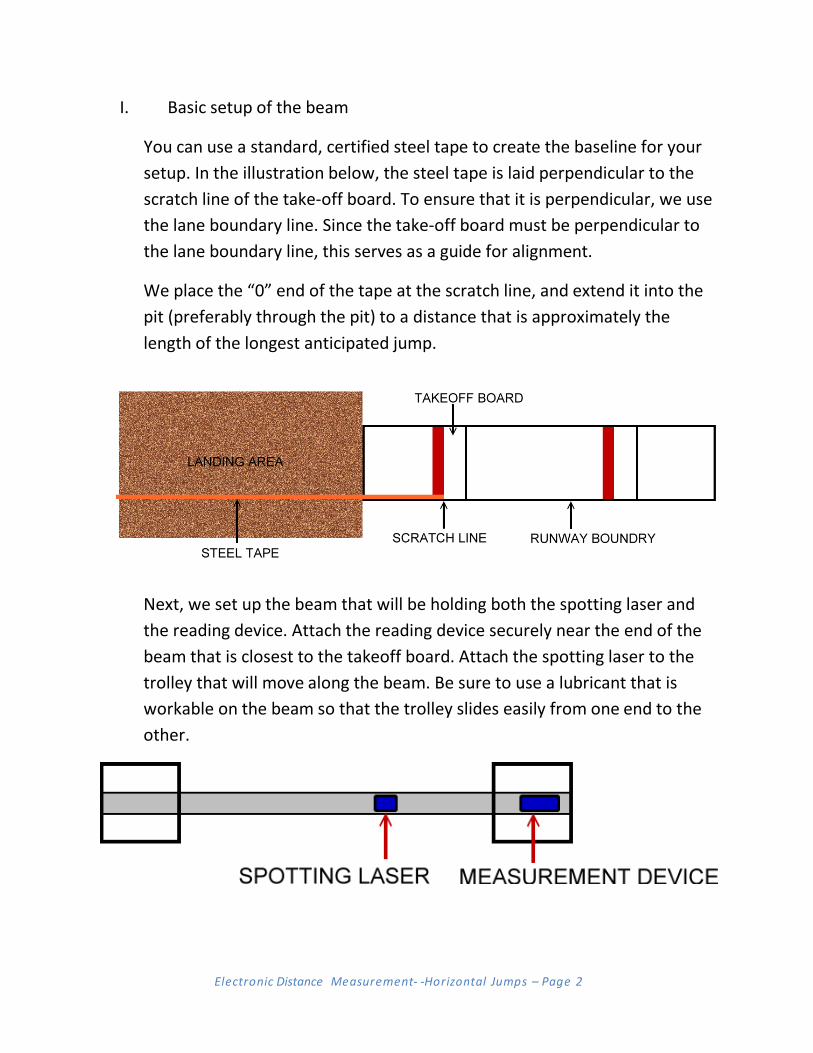
I. Basic setup of the beam
You can use a standard, certified steel tape to create the baseline for your
setup. In the illustration below, the steel tape is laid perpendicular to the
scratch line of the take-off board. To ensure that it is perpendicular, we use
the lane boundary line. Since the take-off board must be perpendicular to
the lane boundary line, this serves as a guide for alignment.
We place the “0” end of the tape at the scratch line, and extend it into the
pit (preferably through the pit) to a distance that is approximately the
length of the longest anticipated jump.
Next, we set up the beam that will be holding both the spotting laser and
the reading device. Attach the reading device securely near the end of the
beam that is closest to the takeoff board. Attach the spotting laser to the
trolley that will move along the beam. Be sure to use a lubricant that is
workable on the beam so that the trolley slides easily from one end to the
other.
E lec t ron i c Distance M ea s u rem en t- -H ori z on t a l J u m ps – P a ge 3
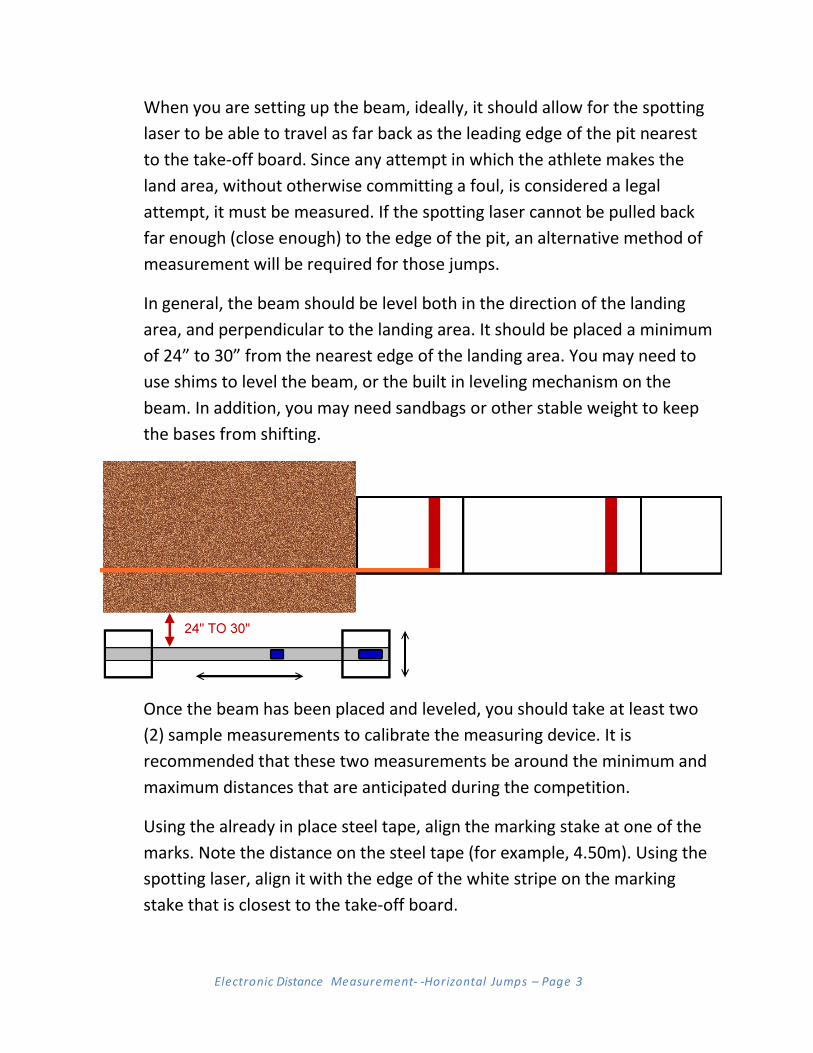
When you are setting up the beam, ideally, it should allow for the spotting
laser to be able to travel as far back as the leading edge of the pit nearest
to the take-off board. Since any attempt in which the athlete makes the
land area, without otherwise committing a foul, is considered a legal
attempt, it must be measured. If the spotting laser cannot be pulled back
far enough (close enough) to the edge of the pit, an alternative method of
measurement will be required for those jumps.
In general, the beam should be level both in the direction of the landing
area, and perpendicular to the landing area. It should be placed a minimum
of 24” to 30” from the nearest edge of the landing area. You may need to
use shims to level the beam, or the built in leveling mechanism on the
beam. In addition, you may need sandbags or other stable weight to keep
the bases from shifting.
Once the beam has been placed and leveled, you should take at least two
(2) sample measurements to calibrate the measuring device. It is
recommended that these two measurements be around the minimum and
maximum distances that are anticipated during the competition.
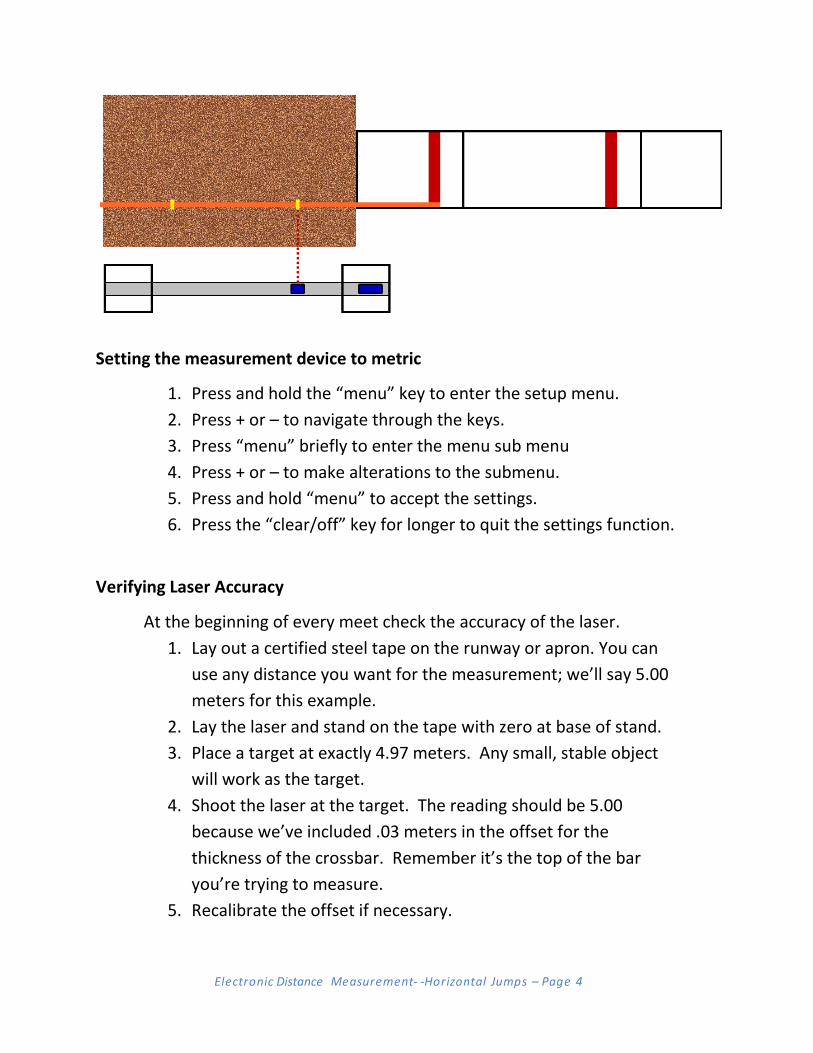
Using the already in place steel tape, align the marking stake at one of the
marks. Note the distance on the steel tape (for example, 4.50m). Using the
spotting laser, align it with the edge of the white stripe on the marking
stake that is closest to the take-off board.
E lec t ron i c Distance M ea s u rem en t- -H ori z on t a l J u m ps – P a ge 4
Setting the measurement device to metric
1. Press and hold the “menu” key to enter the setup menu.
2. Press + or – to navigate through the keys.
3. Press “menu” briefly to enter the menu sub menu
4. Press + or – to make alterations to the submenu.
5. Press and hold “menu” to accept the settings.
6. Press the “clear/off” key for longer to quit the settings function.
Verifying Laser Accuracy
At the beginning of every meet check the accuracy of the laser.
1. Lay out a certified steel tape on the runway or apron. You can
use any distance you want for the measurement; we’ll say 5.00
meters for this example.
2. Lay the laser and stand on the tape with zero at base of stand.
3. Place a target at exactly 4.97 meters. Any small, stable object
will work as the target.
4. Shoot the laser at the target. The reading should be 5.00
because we’ve included .03 meters in the offset for the
thickness of the crossbar. Remember it’s the top of the bar
you’re trying to measure.
5. Recalibrate the offset if necessary.
E lec t ron i c Distance M ea s u rem en t- -H ori z on t a l J u m ps – P a ge 5
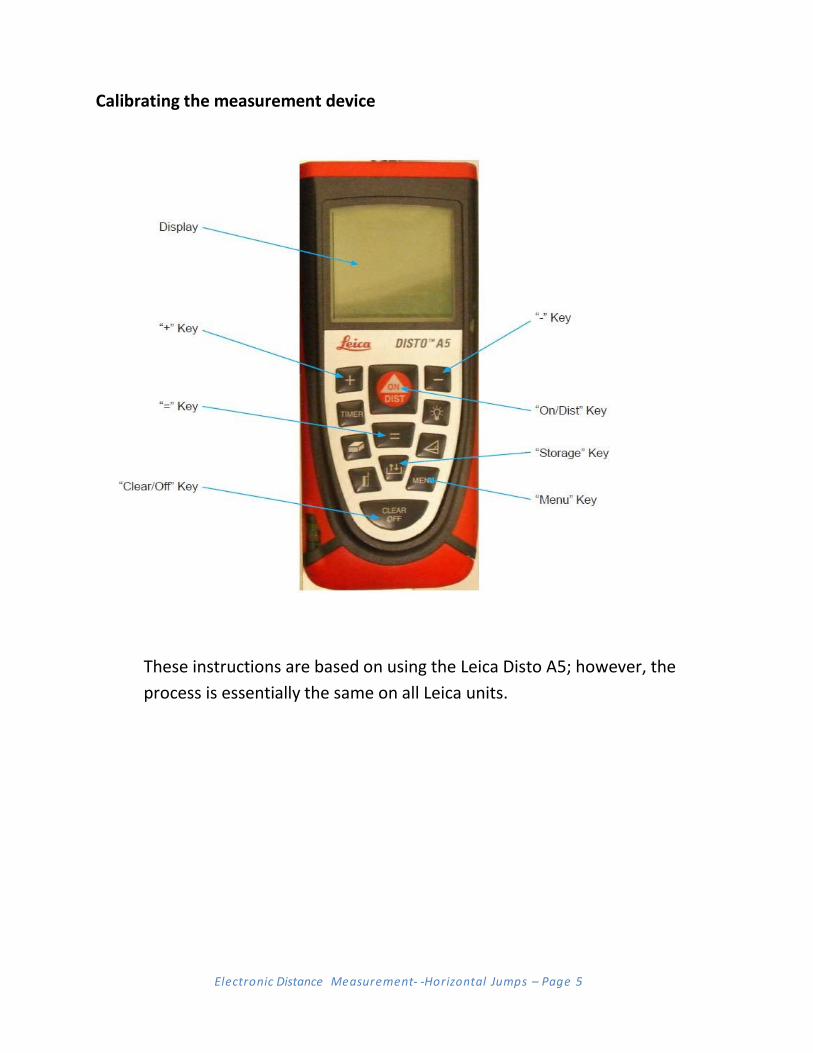
Calibrating the measurement device
These instructions are based on using the Leica Disto A5; however, the
process is essentially the same on all Leica units.
E lec t ron i c Distance M ea s u rem en t- -H ori z on t a l J u m ps – P a ge 6
E lec t ron i c D i s t a n c e M ea s u rem en t – Horizontal Jumps - P a ge 7
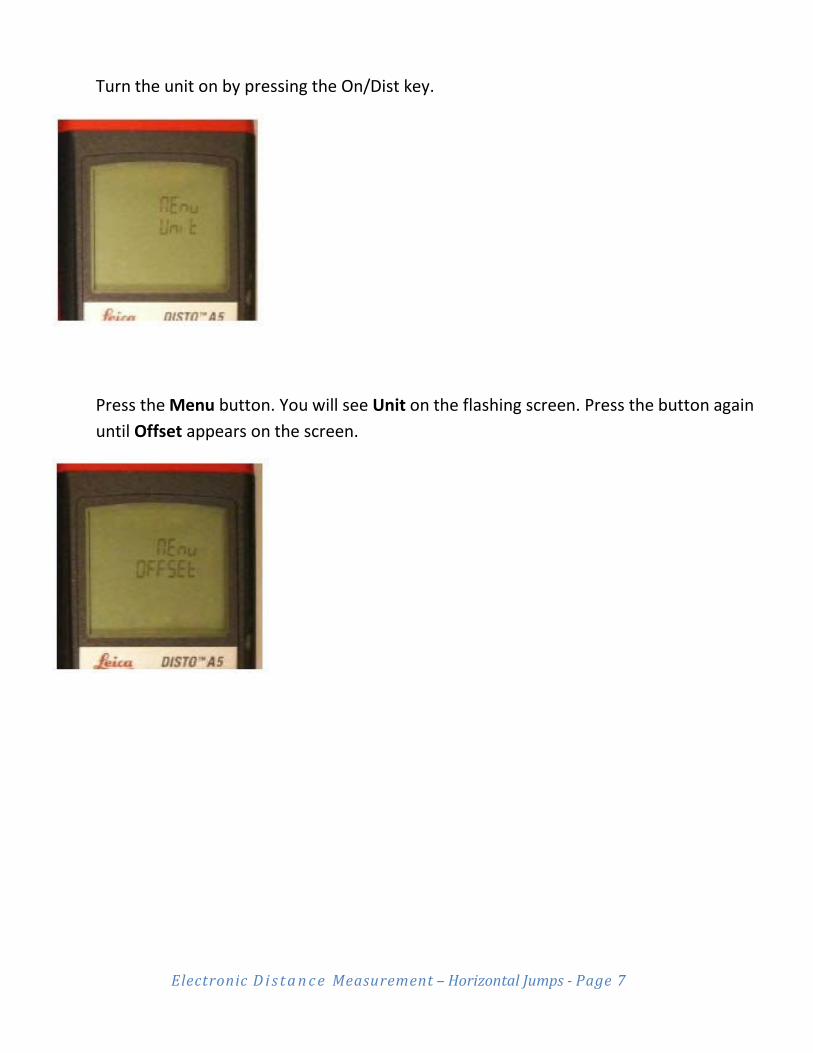
Turn the unit on by pressing the On/Dist key.
Press the Menu button. You will see Unit on the flashing screen. Press the button again
until Offset appears on the screen.
E lec t ron i c D i s t a n c e M ea s u rem en t – Horizontal Jumps - P a ge 8
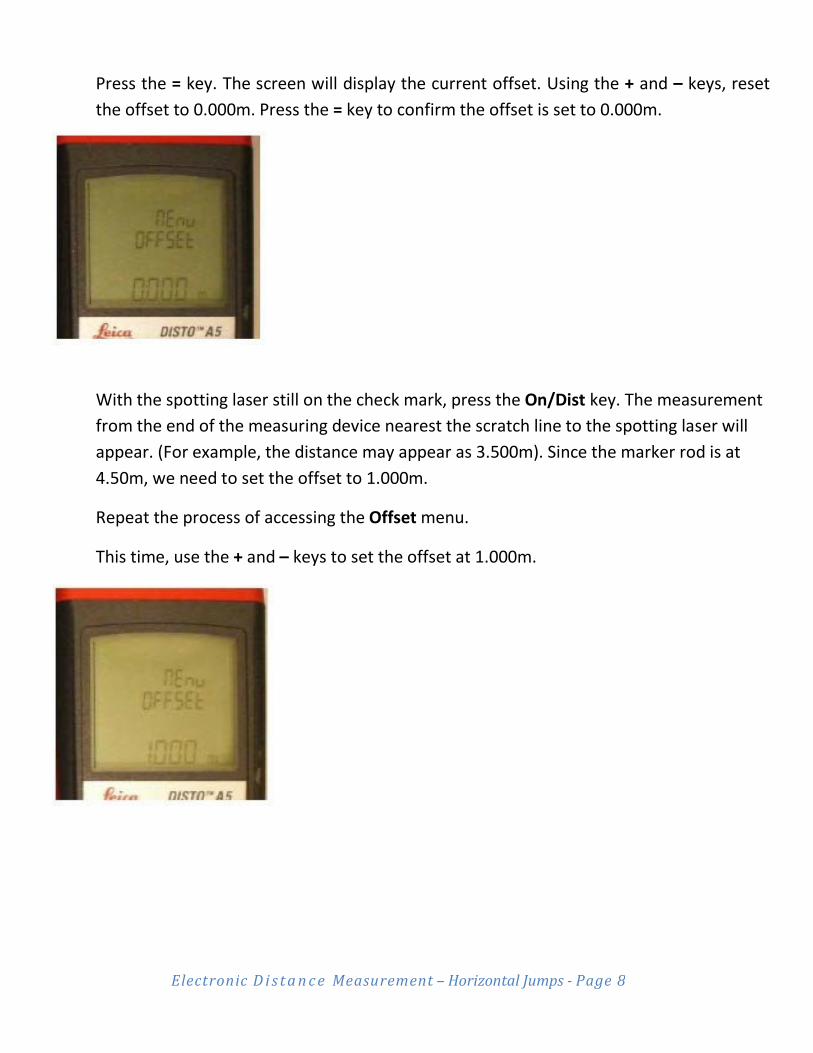
Press the = key. The screen will display the current offset. Using the + and – keys, reset
the offset to 0.000m. Press the = key to confirm the offset is set to 0.000m.
With the spotting laser still on the check mark, press the On/Dist key. The measurement
from the end of the measuring device nearest the scratch line to the spotting laser will
appear. (For example, the distance may appear as 3.500m). Since the marker rod is at
4.50m, we need to set the offset to 1.000m.
Repeat the process of accessing the Offset menu.
This time, use the + and – keys to set the offset at 1.000m.
E lec t ron i c D i s t a n c e M ea s u rem en t – Horizontal Jumps - P a ge 9
Press the = key to confirm the offset and lock it in.
Without moving the spotting laser, press the On/Dist key to take another measurement.
The new distance on the screen should now read approximately 4.500m. Remember that
the last digit to the right is ignored when reading the measurement. A reading of 4.508m
would be 4.50m.
Move the spotting laser to the second checkmark, read and verify the distance.
As an in-event checkmark, pick a distance that you can quickly move the spotting laser
to. Place a small marker, such as a small piece of tape, on the ground outside the landing
area that will not be disturbed. This can serve as a checkmark during the competition.
Record this distance on a separate sheet of paper. Between flights or between trials
and finals, you can move to the check mark and verify that the beam has not moved.
Measuring the landing mark
1. Once the athlete has exited the pit, insert the stake into the sand. Make sure the stake
is placed so the middle of the white tape is inside the depression made by the jumper,
rather than in front of the depression. The tape must be on the side facing the guide
rail.
2. Slide the scope carriage down the rail until the spotting scope beam is aligned with the
edge nearest the take-off board of the white line on the stake. Once it is aligned, step
back from the rail.
3. Record the distance with the measuring laser. Press the On/Dist button to turn the
laser on.
E lec t ron i c D i s t a n c e M ea s u rem en t – Horizontal Jumps - P a ge 10
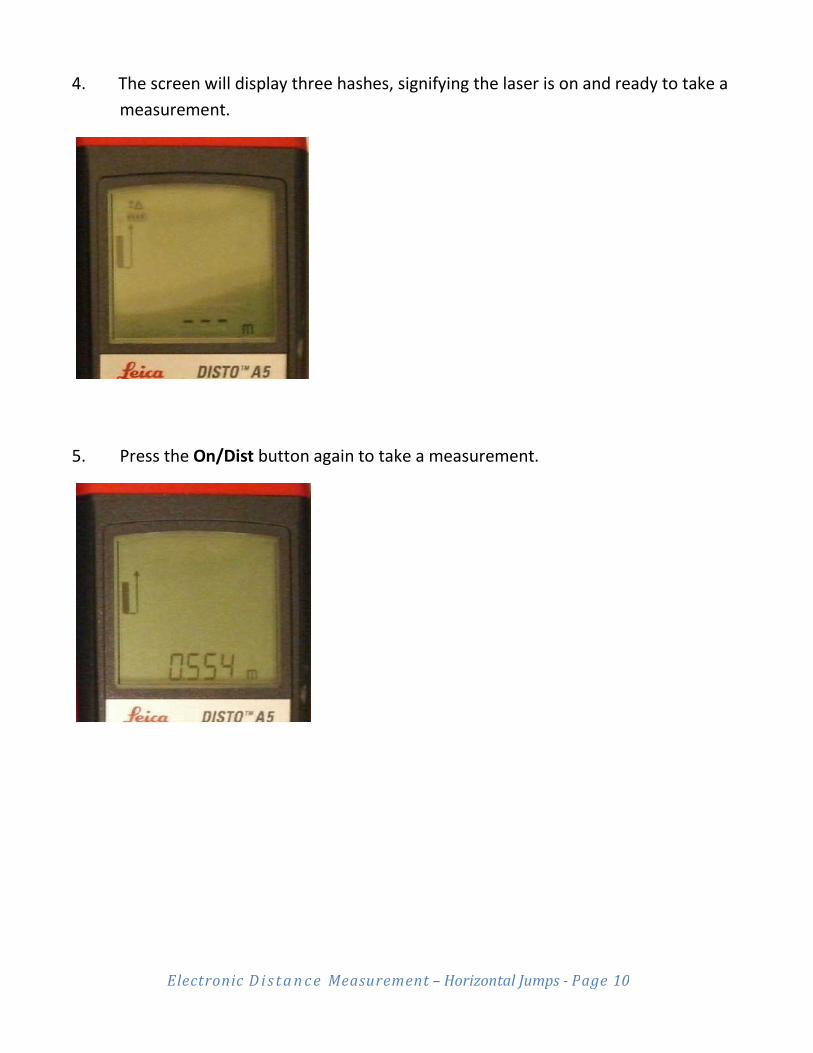
4. The screen will display three hashes, signifying the laser is on and ready to take a
measurement.
5. Press the On/Dist button again to take a measurement.

E lec t ron i c D i s t a n c e M ea s u rem en t – Horizontal Jumps - P a ge 11
6. Press the On/Dist button again to reset the laser but keep the measurement
on screen.
7. Press the On/Dist button again to record the next measurement.
8. If you continue to take measurements by pressing the On/Dist button and do not
press the Clear/Off button in between, the device will display the previous three
measurements taken.
When the competition is over
Even though you have periodically checked your check mark, you should repeat the
process that you used in setting up. Run the steel tape out parallel to the lane
boundary, and measure the same points that you measured during the setup
process. Your measurements should match.
E lec t ron i c D i s t a n c e M ea s u rem en t – Horizontal Jumps - P a ge 12
Notes:
• Be sure to have a couple of towels available to cover the spotting laser and the
measuring device between rounds, especially in wet or sunny conditions.
• You will also need some type of lubricant for the beam. Depending on its material
makeup, silicon or WD-40 will work very well.
• You may need to periodically wipe down the beam, as sand and grit will tend to
accumulate on it.
• Green lasers work best for outdoor competition, while red lasers tend to work best
for indoor competition.
• Have a tablet or small notebook to record your setup measurements and your
checkmark measurement.
• A small torpedo level should be part of your kit to check the level of the beam.
• Have some wood shims in case they are needed to level the beam.
• A steel tape of at least 25’ (long jump) or 50’ (triple jump) should be used.
Normally, these are part of the horizontal events crew bag.
E lec t ron i c D i s t a n c e M ea s u rem en t – Horizontal Jumps - P a ge 13
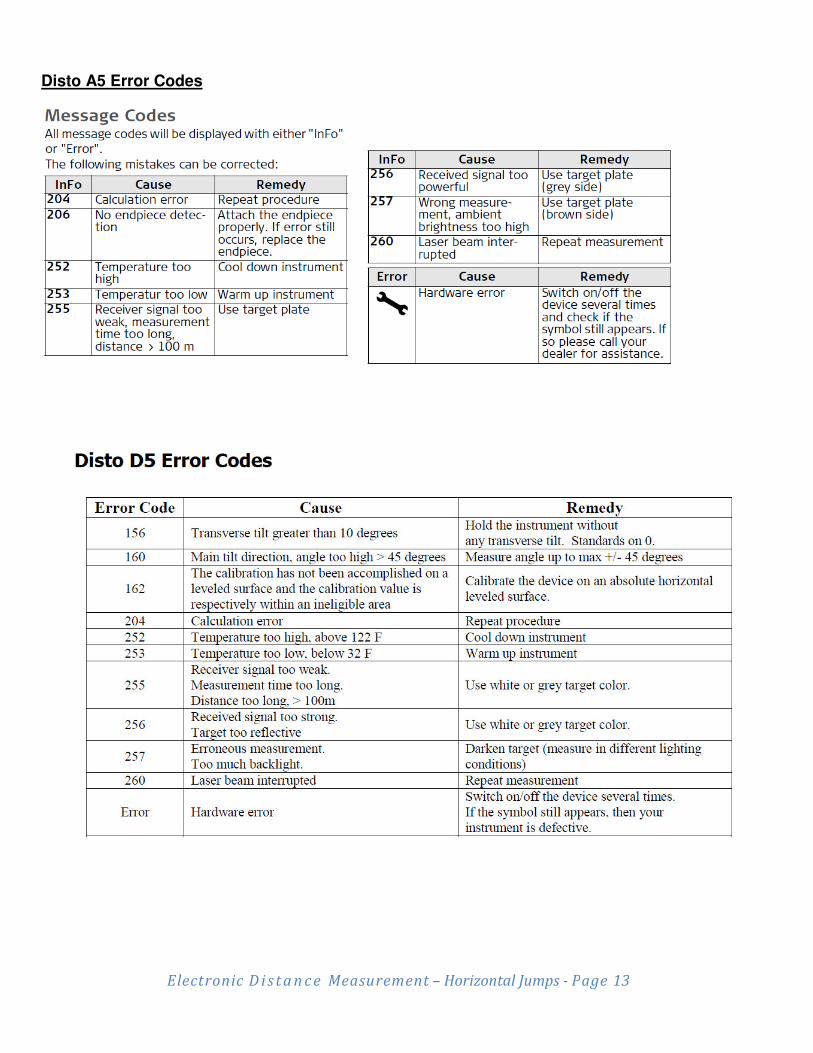
Disto A5 Error Codes

This page left intentionally blank.
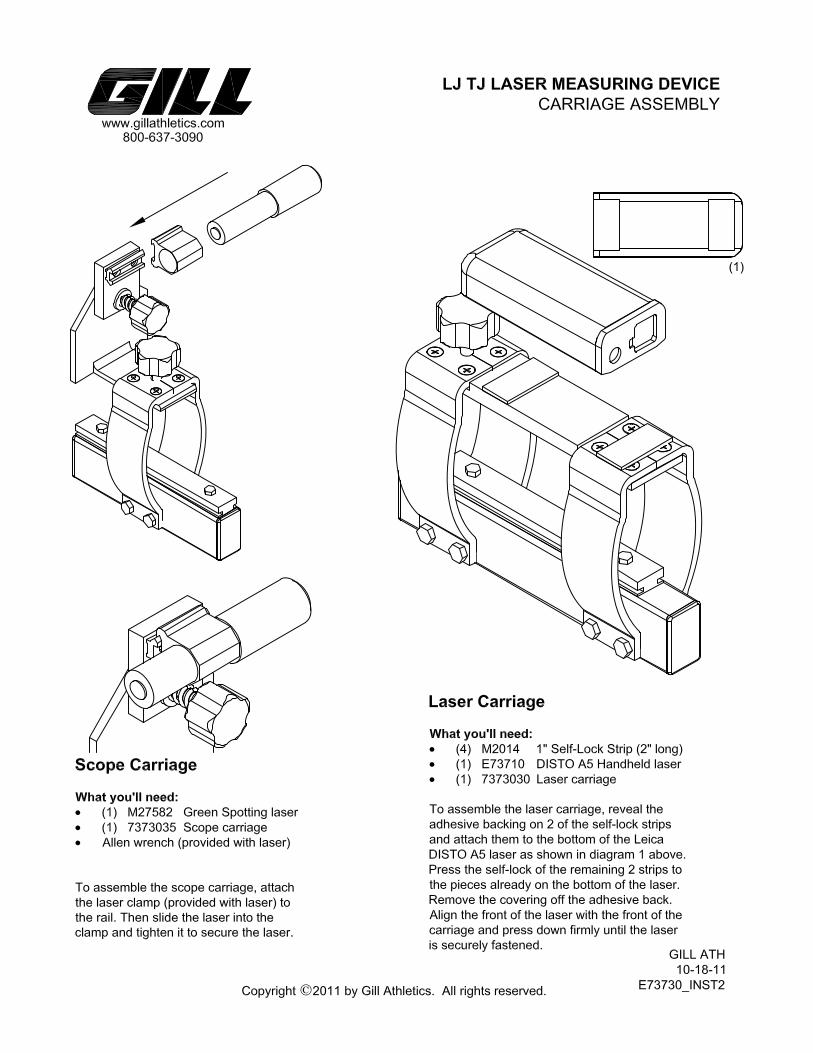

GILL ATH 05/08/07
E73730_INST7
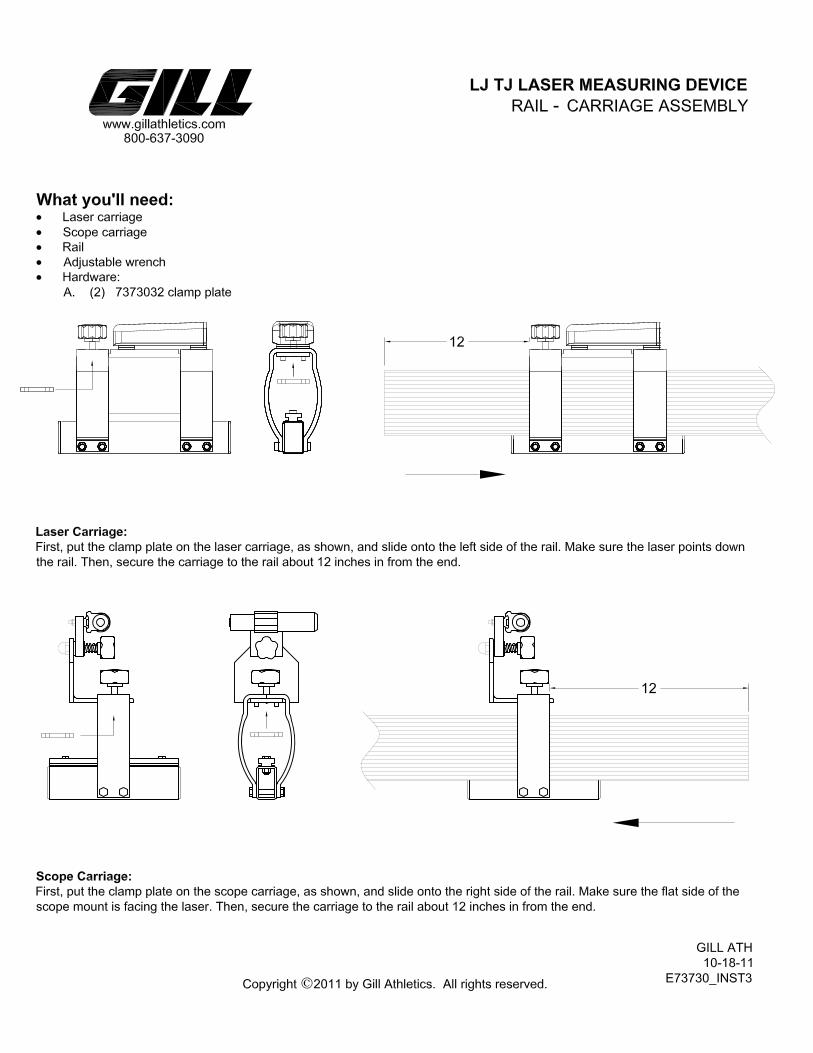
LJ TJ LASER MEASURING DEVICE UNIT OPERATION
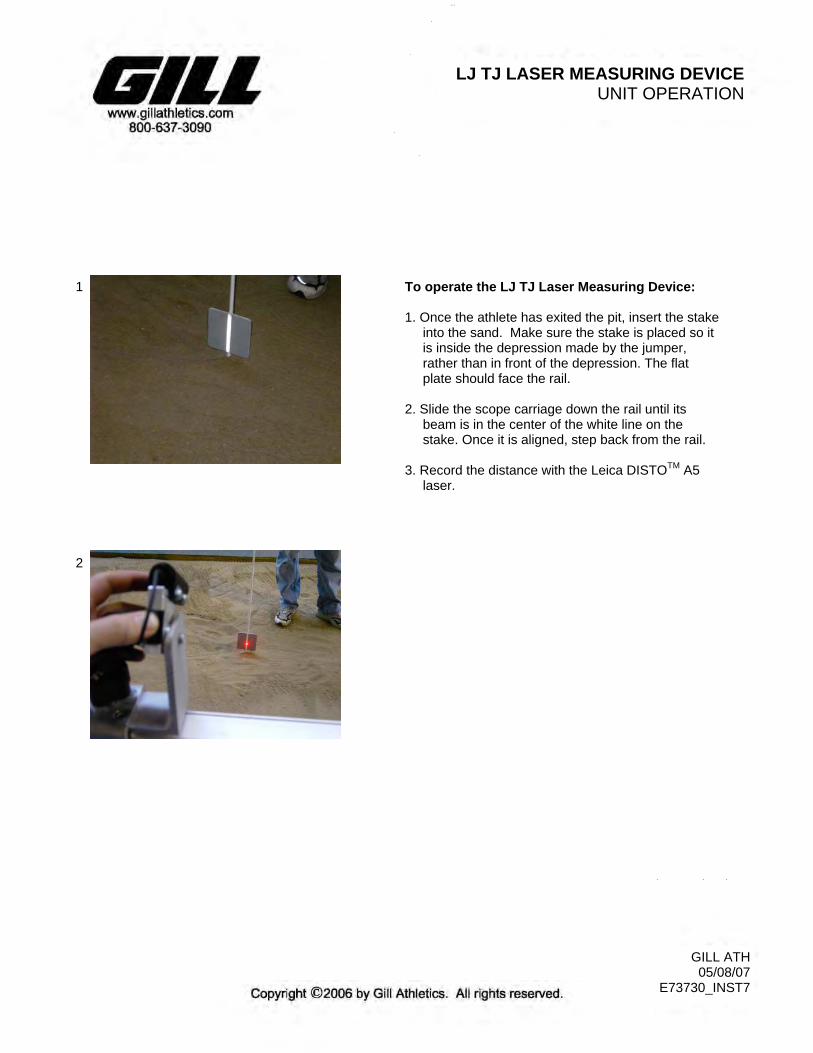
To operate the LJ TJ Laser Measuring Device: 1. Once the athlete has exited the pit, insert the stake
into the sand. Make sure the stake is placed so it is inside the depression made by the jumper, rather than in front of the depression. The flat plate should face the rail.
2. Slide the scope carriage down the rail until its
beam is in the center of the white line on the stake. Once it is aligned, step back from the rail.
3. Record the distance with the Leica DISTOTM A5
laser.
1
2
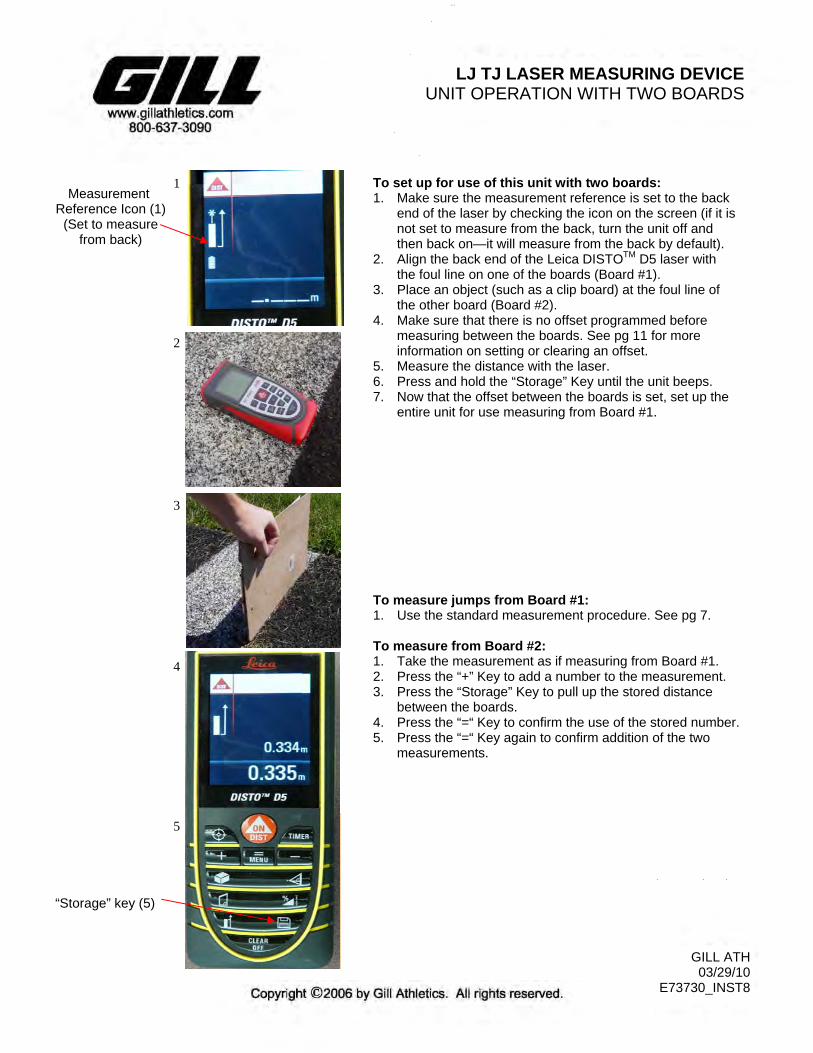
To set up for use of this unit with two boards: 1. Make sure the measurement reference is set to the back
end of the laser by checking the icon on the screen (if it is not set to measure from the back, turn the unit off and then back on—it will measure from the back by default).
2. Align the back end of the Leica DISTOTM D5 laser with the foul line on one of the boards (Board #1).
3. Place an object (such as a clip board) at the foul line of the other board (Board #2).
4. Make sure that there is no offset programmed before measuring between the boards. See pg 11 for more information on setting or clearing an offset.
5. Measure the distance with the laser. 6. Press and hold the “Storage” Key until the unit beeps. 7. Now that the offset between the boards is set, set up the
entire unit for use measuring from Board #1.
To measure jumps from Board #1: 1. Use the standard measurement procedure. See pg 7. To measure from Board #2: 1. Take the measurement as if measuring from Board #1. 2. Press the “+” Key to add a number to the measurement. 3. Press the “Storage” Key to pull up the stored distance
between the boards. 4. Press the “=“ Key to confirm the use of the stored number. 5. Press the “=“ Key again to confirm addition of the two
measurements.
2
4
5
Measurement Reference Icon (1)
(Set to measure from back)
3
GILL ATH 03/29/10
E73730_INST8
LJ TJ LASER MEASURING DEVICE UNIT OPERATION WITH TWO BOARDS
“Storage” key (5)
1
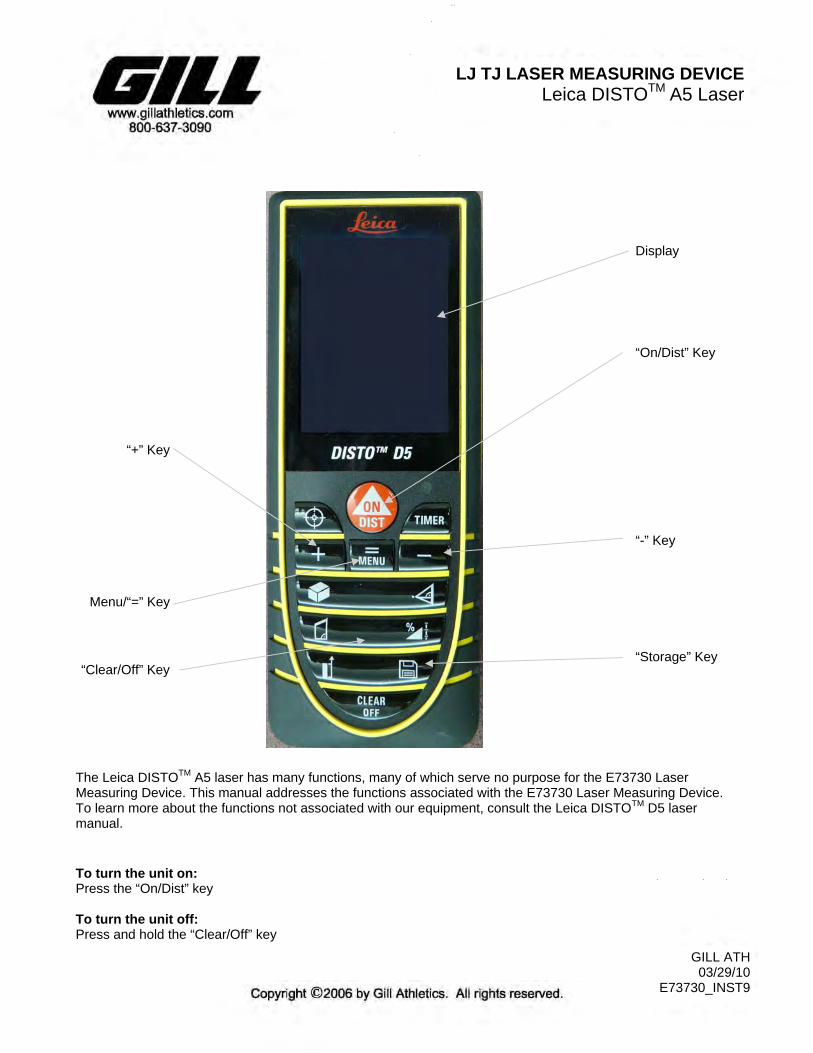
“+” Key
“-” Key
“On/Dist” Key
Display
Menu/“=” Key
“Clear/Off” Key
The Leica DISTOTM A5 laser has many functions, many of which serve no purpose for the E73730 Laser Measuring Device. This manual addresses the functions associated with the E73730 Laser Measuring Device. To learn more about the functions not associated with our equipment, consult the Leica DISTOTM D5 laser manual.
“Storage” Key
LJ TJ LASER MEASURING DEVICE Leica DISTOTM A5 Laser
To turn the unit on: Press the “On/Dist” key To turn the unit off: Press and hold the “Clear/Off” key GILL ATH
03/29/10 E73730_INST9
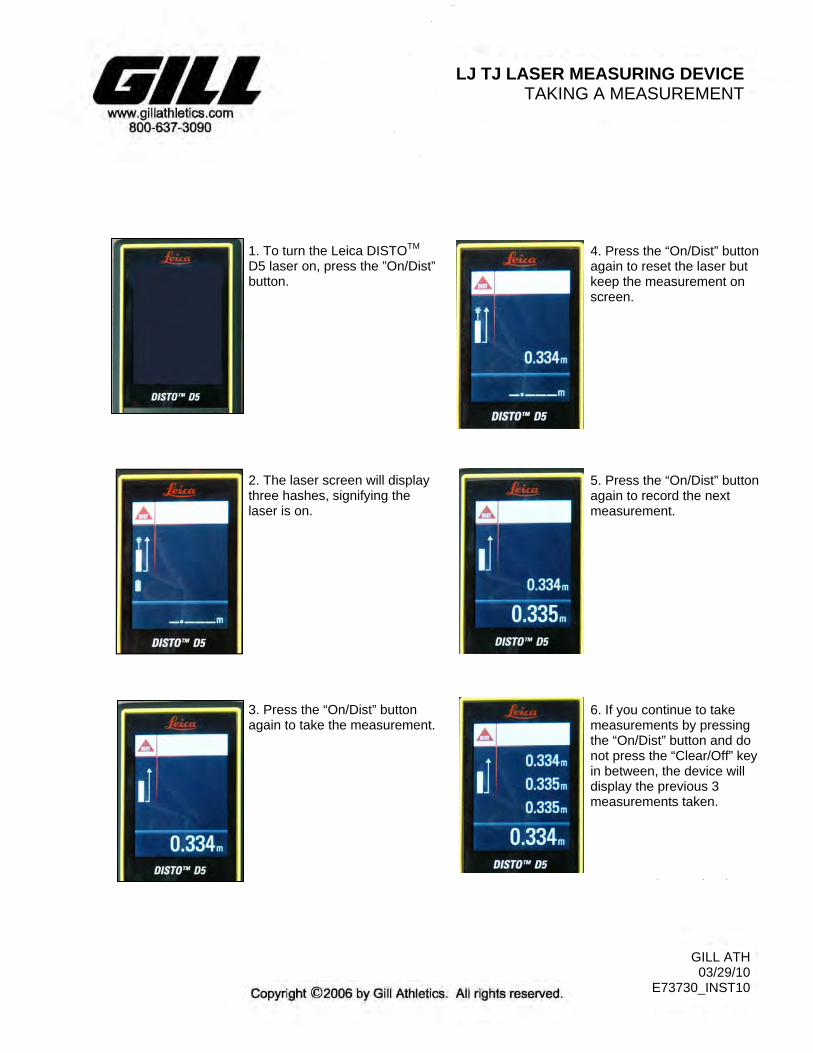
1. To turn the Leica DISTOTM D5 laser on, press the ”On/Dist” button. 2. The laser screen will display three hashes, signifying the laser is on. 3. Press the “On/Dist” button again to take the measurement.
4. Press the “On/Dist” button again to reset the laser but keep the measurement on screen. 5. Press the “On/Dist” button again to record the next measurement. 6. If you continue to take measurements by pressing the “On/Dist” button and do not press the “Clear/Off” key in between, the device will display the previous 3 measurements taken.
LJ TJ LASER MEASURING DEVICE TAKING A MEASUREMENT
GILL ATH 03/29/10
E73730_INST10
GILL ATH 03/29/10
E73730_INST11
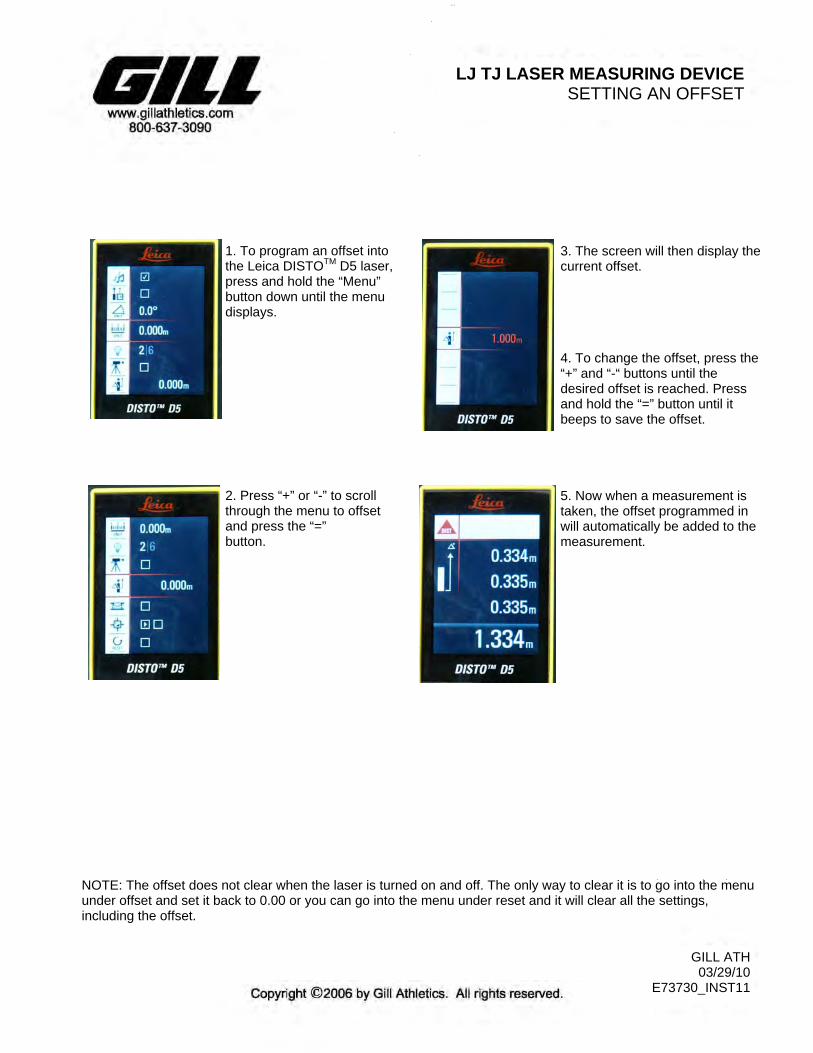
LJ TJ LASER MEASURING DEVICE SETTING AN OFFSET
1. To program an offset into the Leica DISTOTM D5 laser, press and hold the “Menu” button down until the menu displays. 2. Press “+” or “-” to scroll through the menu to offset and press the “=” button.
3. The screen will then display the current offset. 4. To change the offset, press the “+” and “-“ buttons until the desired offset is reached. Press and hold the “=” button until it beeps to save the offset. 5. Now when a measurement is taken, the offset programmed in will automatically be added to the measurement.
NOTE: The offset does not clear when the laser is turned on and off. The only way to clear it is to go into the menu under offset and set it back to 0.00 or you can go into the menu under reset and it will clear all the settings, including the offset.
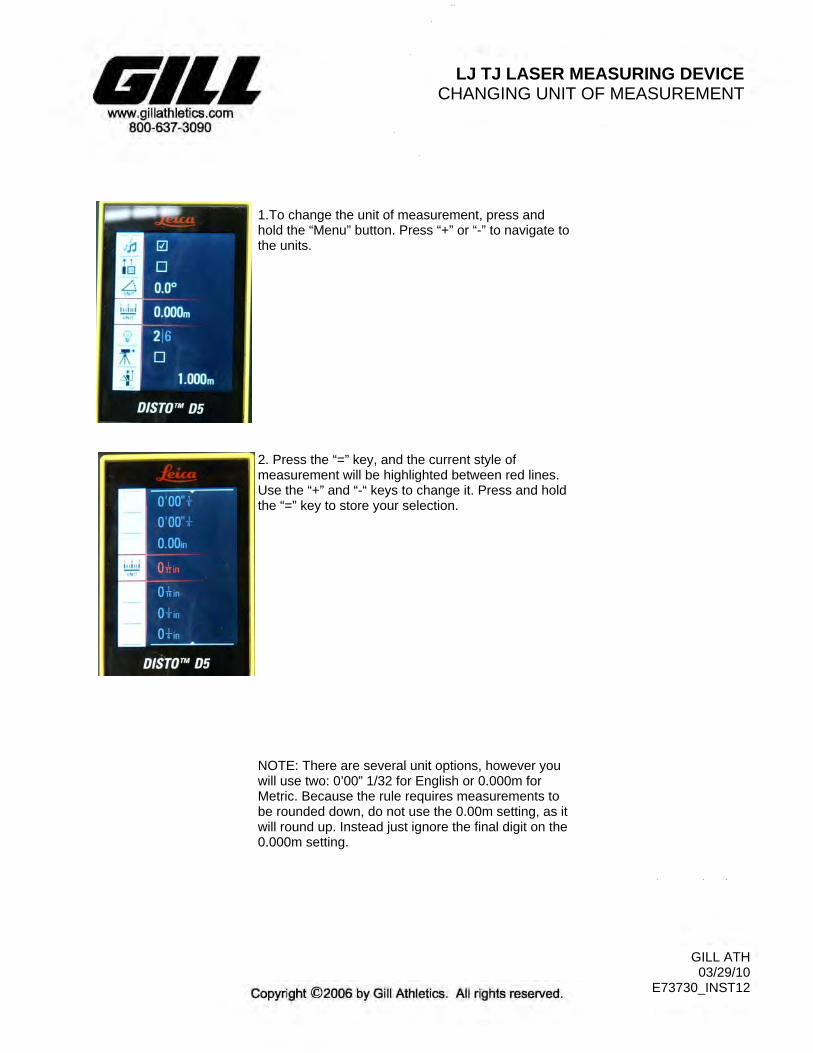
1.To change the unit of measurement, press and hold the “Menu” button. Press “+” or “-” to navigate to the units. 2. Press the “=” key, and the current style of measurement will be highlighted between red lines. Use the “+” and “-“ keys to change it. Press and hold the “=” key to store your selection. NOTE: There are several unit options, however you will use two: 0’00” 1/32 for English or 0.000m for Metric. Because the rule requires measurements to be rounded down, do not use the 0.00m setting, as it will round up. Instead just ignore the final digit on the 0.000m setting.
GILL ATH 03/29/10
E73730_INST12
LJ TJ LASER MEASURING DEVICE CHANGING UNIT OF MEASUREMENT

ElectronicDistanceMeasurement‐VerticalJumps
E lec t ron i c Distance M ea s u rem en t ‐ Ve r t i c a l J u m ps – P a ge 2
Laser Measurement for the Vertical Jumps
Laser measurement for the vertical jumps is becoming more common,
particularly at USATF championship meets. It’s relatively quick & easy to
use and produces very accurate measurements.
The Lieca Disto D5 model laser is a good choice – it has a built in
camera screen which makes targeting the bar easy. While you can
use a laser without a camera screen, it’s more difficult to spot the
laser beam on the bar especially at high heights with a bright sun
background.
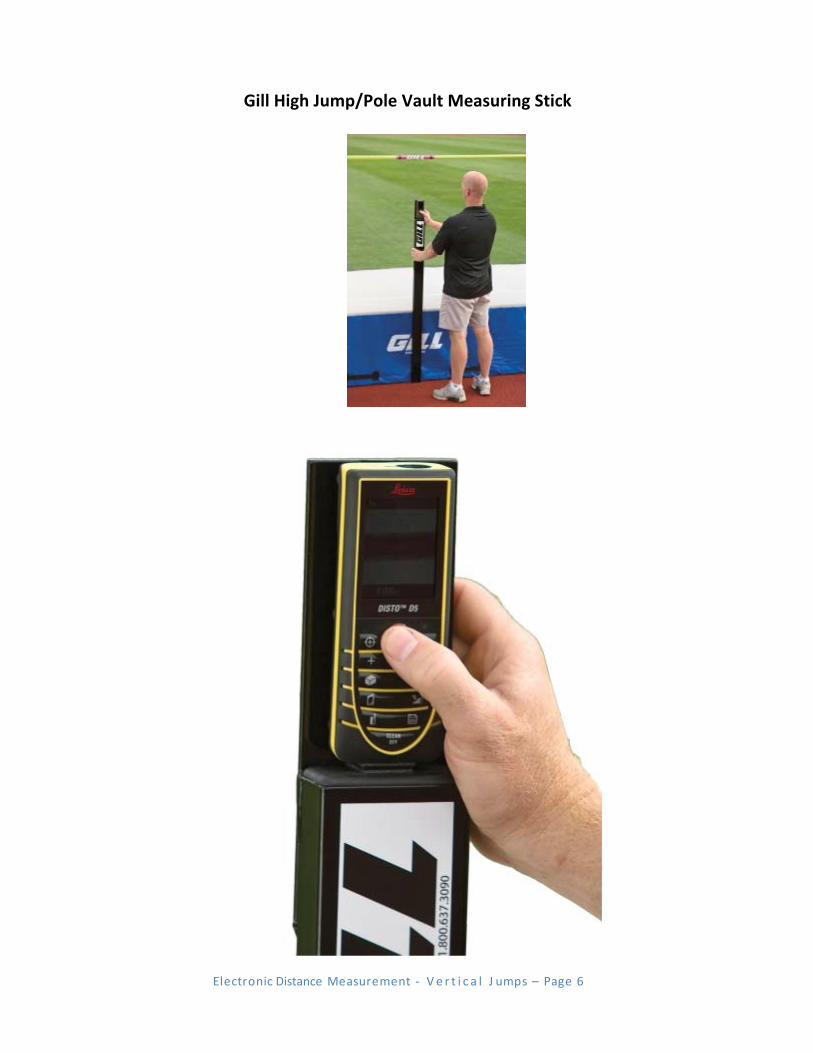
Buy or make a stand for the laser to attach to the laser. You want the
laser camera screen at eye level so it’s easy to see. Also, you don’t
want to be on your knees looking at the laser from the ground. Gill
makes a stand specifically for this purpose.
Step 1: Entering an Offset for the Crossbar & Stand
Calibrate the laser so that the distance you measure is accurate from the
ground to the top of the crossbar.
1. Turn on laser. Leave the laser off the stand for now. 2. Press and hold “menu” key
a. Press + or – to navigate through menu to find the “offset”
function.
b. Press “menu” key briefly to enter the “offset” submenu.
c. Adjust offset value up or down to reach zero by using the + or ‐ key.
d. Set zero value by pressing and holding “menu” key again. To
clear offset press “off” for longer.
3. Now, measure the height of a control object with the laser on the
ground. You can measure the height of a door jamb, or the distance
between two baseboards. Call this “Distance A”.
4. Put the laser on the stand, and measure the height of the control
object again. Call this “Distance B”.

E lec t ron i c Distance M ea s u rem en t ‐ Ve r t i c a l J u m ps – P a ge 3
5. Calculate the difference between the two measurements. “A” – “B”
= “C”
6. Add .030 meters to this calculation “C” to account for the diameter of
the crossbar.
7. Go back to the “offset” menu and do as follows:
a. Press and hold “menu” key
b. Press + or – to navigate through menu. Select “offset” function
in the menu.
c. Press “menu” key briefly to enter the “offset” submenu.
d. Enter calculation “C” as an offset in laser by pressing the + key to desired offset.
8. Set desired value by pressing and holding “menu” key again. To clear
offset press “off” for longer. The laser is now ready.
Step 2: Setting the Measurement to Metric
1. Press and hold the “menu” key to enter the setup menu.
2. Press + or – to navigate through the keys. 3. Press “menu” briefly to enter the menu sub menu
4. Press + or – to make alterations to the submenu.
5. Press and hold “menu” to accept the settings.
6. Press the “clear/off” key for longer to quit the settings function.
Step 3: Verifying Laser Accuracy
At the beginning of every meet check the accuracy of the laser.
1. Lay out a certified steel tape on the runway or apron. You can use any distance you want for the measurement; we’ll say 5.00 meters
for this example.
2. Lay the laser and stand on the tape with zero at base of stand. 3. Place a target at exactly 4.97 meters. Any small, stable object will
work as the target.
4. Shoot the laser at the target. The reading should be 5.00 because we’ve included .03 meters in the offset for the thickness of the
E lec t ron i c Distance M ea s u rem en t ‐ Ve r t i c a l J u m ps – P a ge 4
crossbar. Remember it’s the top of the bar you’re trying to measure.
5. Recalibrate the offset if necessary.
Step 4: Laser Operating Instructions
The laser must bounce off a bar that is neither too dark nor too reflective.
If either situation occurs you will get an error message as shown on bottom
table. Experiment to see if you get a reading. I create a target to ensure I
measure form the exact center of the bar each measurement.
1. Create a target in the exact middle of the bar by wrapping black tape
on both sides of a white tape strip center section. Make the black
tape ends about 6 inches apart. The black lets you see the bar
against a bright background.
2. Draw a cross target on the ground facing side of the white tape strip. 3. Turn on laser unit: Press “on” button 4. Activate monitor: Press “target”
a. Zoom in: Press “target” up to 4X to zoom in.
b. Adjust brightness: Press + or – to adjust brightness. 5. Ensure laser is activated: Press “on” button (indicator shows 0.00).
Check beam with hand.
6. Determine distance: Sight target and press “on” quickly. Result will
display.
7. Clear reading: Press “on” to remove result.
8. Turn off: Press “clear/off” slowly. Always turn the laser off and place under a white towel when not using it outdoors.
You may have to repeat some of the above steps in warm weather or when
the bar color is not perfect, and repeat steps 5 & 6 if you miss hitting the
target.
E lec t ron i c Distance M ea s u rem en t ‐ Ve r t i c a l J u m ps – P a ge 5
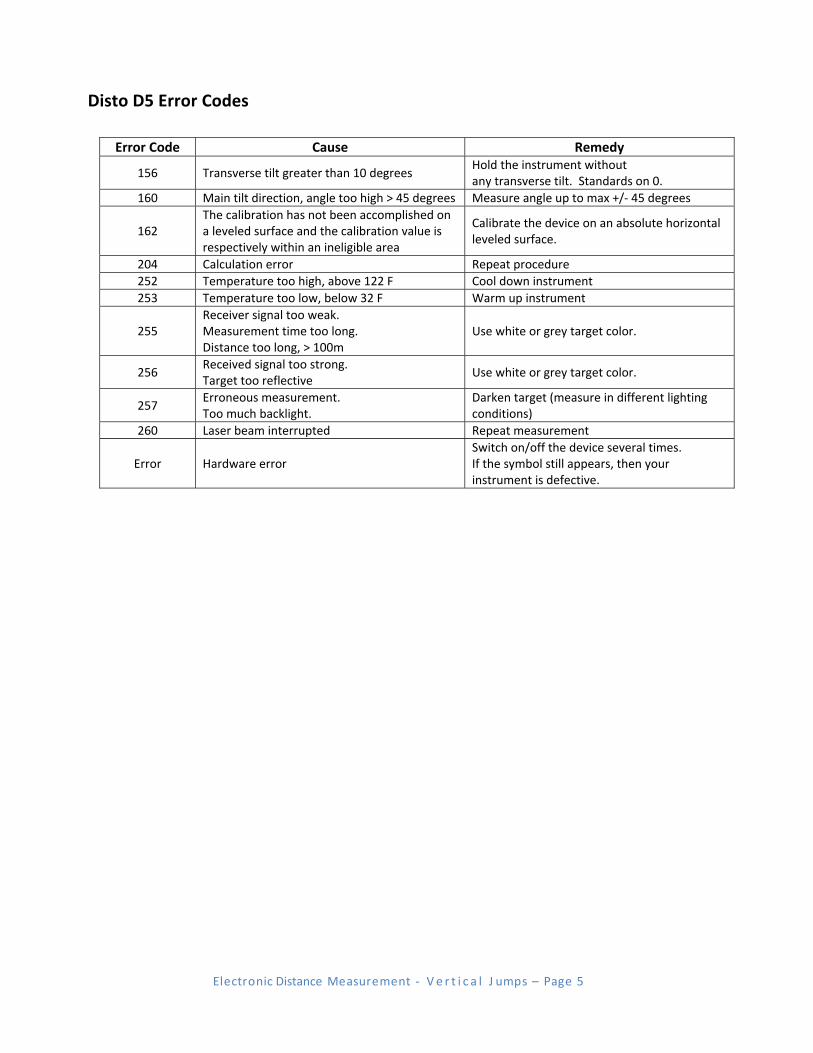
Disto D5 Error Codes
Error Code Cause Remedy
156 Transverse tilt greater than 10 degrees Hold the instrument without any transverse tilt. Standards on 0.
160 Main tilt direction, angle too high > 45 degrees Measure angle up to max +/‐ 45 degrees
162 The calibration has not been accomplished on a leveled surface and the calibration value is respectively within an ineligible area
Calibrate the device on an absolute horizontal leveled surface.
204 Calculation error Repeat procedure
252 Temperature too high, above 122 F Cool down instrument
253 Temperature too low, below 32 F Warm up instrument
255 Receiver signal too weak.Measurement time too long. Distance too long, > 100m
Use white or grey target color.
256 Received signal too strong.Target too reflective
Use white or grey target color.
257 Erroneous measurement.Too much backlight.
Darken target (measure in different lighting conditions)
260 Laser beam interrupted Repeat measurement
Error Hardware error Switch on/off the device several times. If the symbol still appears, then your instrument is defective.
E lec t ron i c Distance M ea s u rem en t ‐ Ve r t i c a l J u m ps – P a ge 6
Gill High Jump/Pole Vault Measuring Stick
www.gillathletics.com800-637-3090
Copyright © 2011 by Gill Athletics. All rights reserved.
GILL ATH03/14/11
E73705_inst1
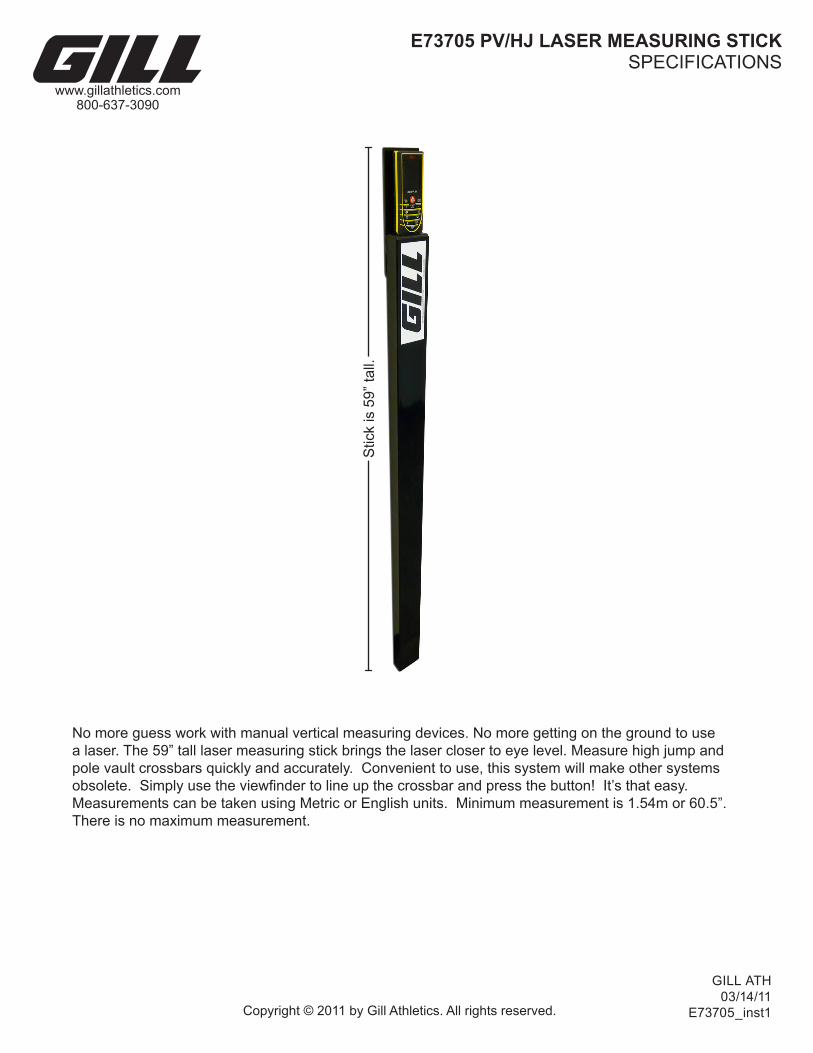
E73705 PV/HJ LASER MEASURING STICKSPECIFICATIONS
No more guess work with manual vertical measuring devices. No more getting on the ground to use a laser. The 59” tall laser measuring stick brings the laser closer to eye level. Measure high jump and pole vault crossbars quickly and accurately. Convenient to use, this system will make other systems obsolete. Simply use the viewfinder to line up the crossbar and press the button! It’s that easy. Measurements can be taken using Metric or English units. Minimum measurement is 1.54m or 60.5”. There is no maximum measurement.
Stic
k is
59”
tall.
www.gillathletics.com800-637-3090
Copyright © 2011 by Gill Athletics. All rights reserved.
GILL ATH03/23/10
E73705_inst2
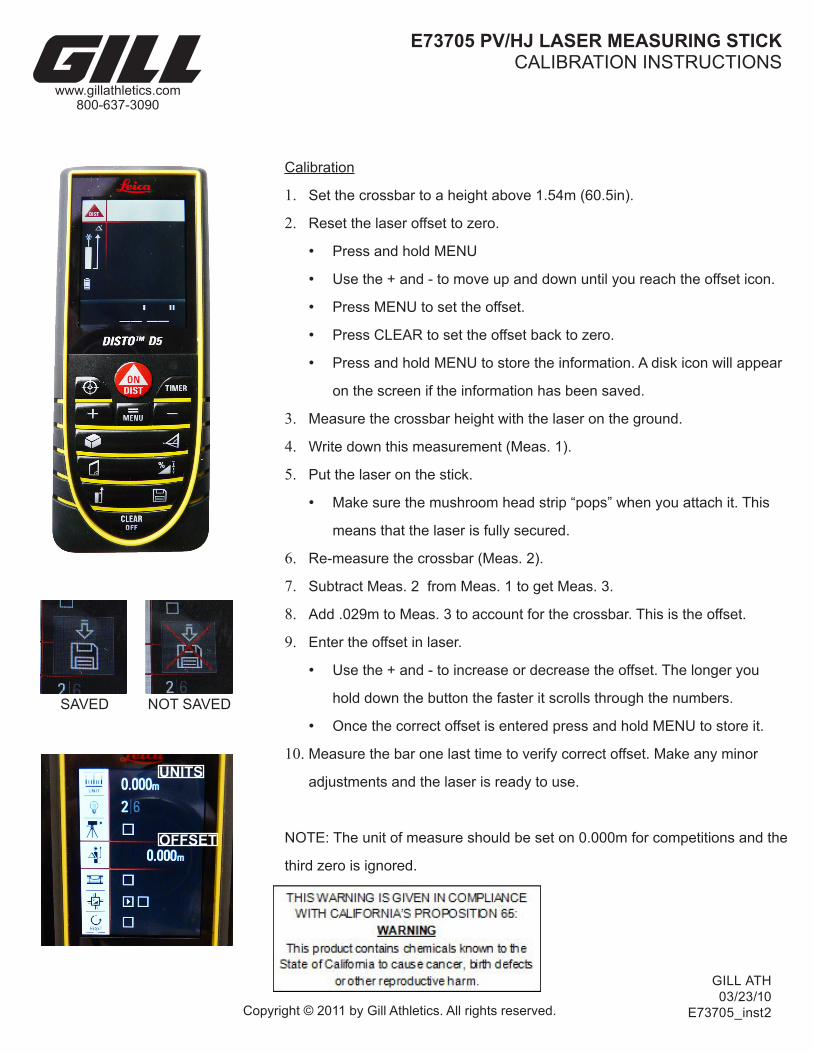
E73705 PV/HJ LASER MEASURING STICKCALIBRATION INSTRUCTIONS
Calibration
1. Set the crossbar to a height above 1.54m (60.5in).
2. Reset the laser offset to zero.
• Press and hold MENU
• Use the + and - to move up and down until you reach the offset icon.
• Press MENU to set the offset.
• Press CLEAR to set the offset back to zero.
• Press and hold MENU to store the information. A disk icon will appear
on the screen if the information has been saved.
3. Measure the crossbar height with the laser on the ground.
4. Write down this measurement (Meas. 1).
5. Put the laser on the stick.
• Make sure the mushroom head strip “pops” when you attach it. This
means that the laser is fully secured.
6. Re-measure the crossbar (Meas. 2).
7. Subtract Meas. 2 from Meas. 1 to get Meas. 3.
8. Add .029m to Meas. 3 to account for the crossbar. This is the offset.
9. Enter the offset in laser.
• Use the + and - to increase or decrease the offset. The longer you
hold down the button the faster it scrolls through the numbers.
• Once the correct offset is entered press and hold MENU to store it.
10. Measure the bar one last time to verify correct offset. Make any minor
adjustments and the laser is ready to use.
NOTE: The unit of measure should be set on 0.000m for competitions and the
third zero is ignored.
UNITS
OFFSET
SAVED NOT SAVED

ElectronicDistanceMeasurement‐LaserLynx
ElectronicMeasurementDevice–LaserLynx‐Page2
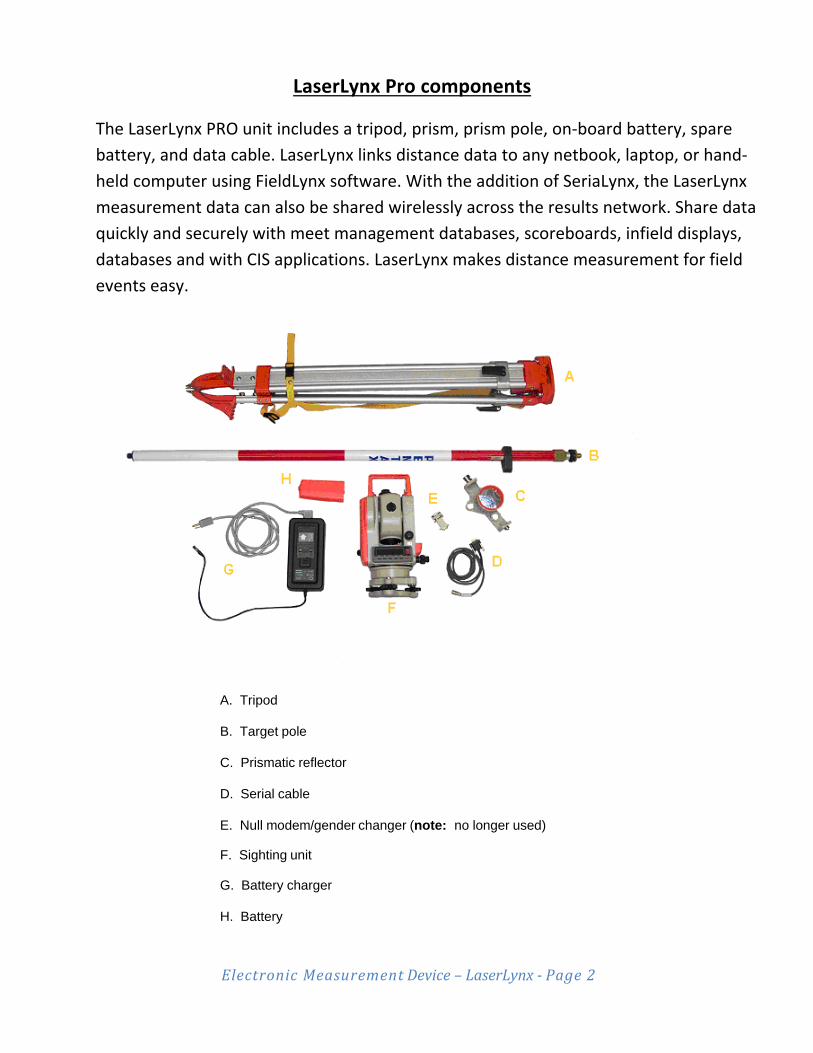
LaserLynx Pro components
The LaserLynx PRO unit includes a tripod, prism, prism pole, on‐board battery, spare
battery, and data cable. LaserLynx links distance data to any netbook, laptop, or hand‐
held computer using FieldLynx software. With the addition of SeriaLynx, the LaserLynx
measurement data can also be shared wirelessly across the results network. Share data
quickly and securely with meet management databases, scoreboards, infield displays,
databases and with CIS applications. LaserLynx makes distance measurement for field
events easy.
A. Tripod
B. Target pole
C. Prismatic reflector
D. Serial cable
E. Null modem/gender changer (note: no longer used)
F. Sighting unit
G. Battery charger
H. Battery
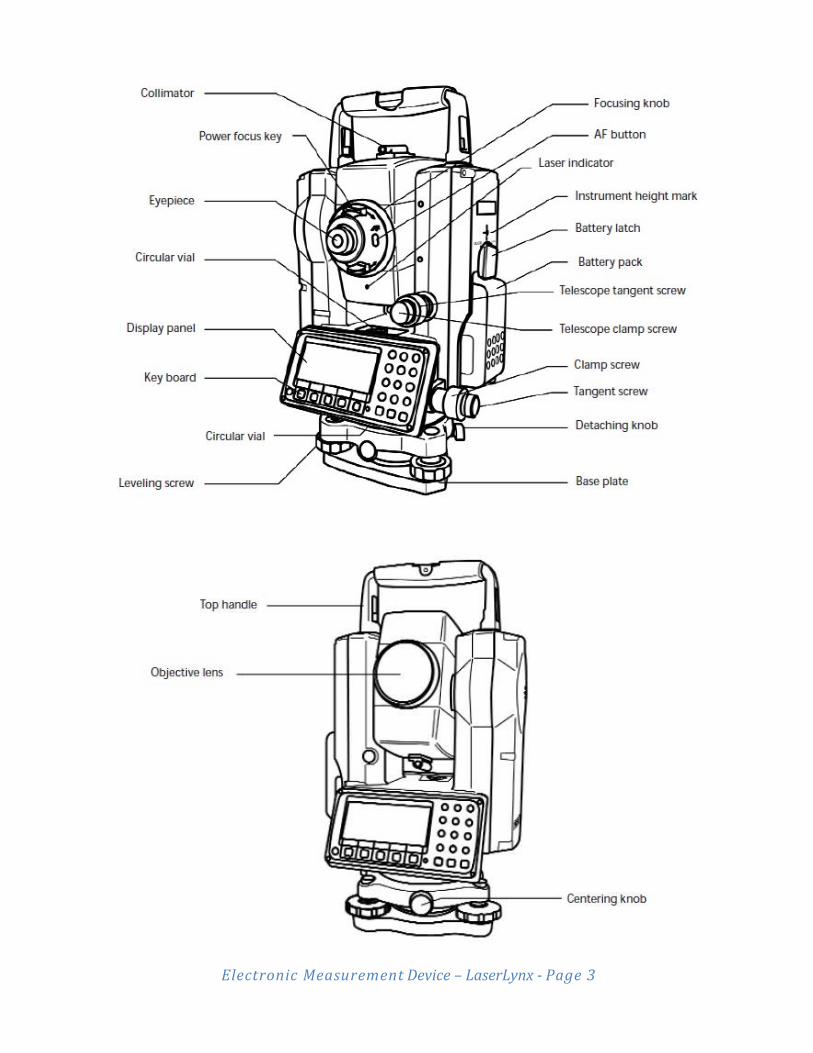
ElectronicMeasurementDevice–LaserLynx‐Page3
ElectronicMeasurementDevice–LaserLynx‐Page4
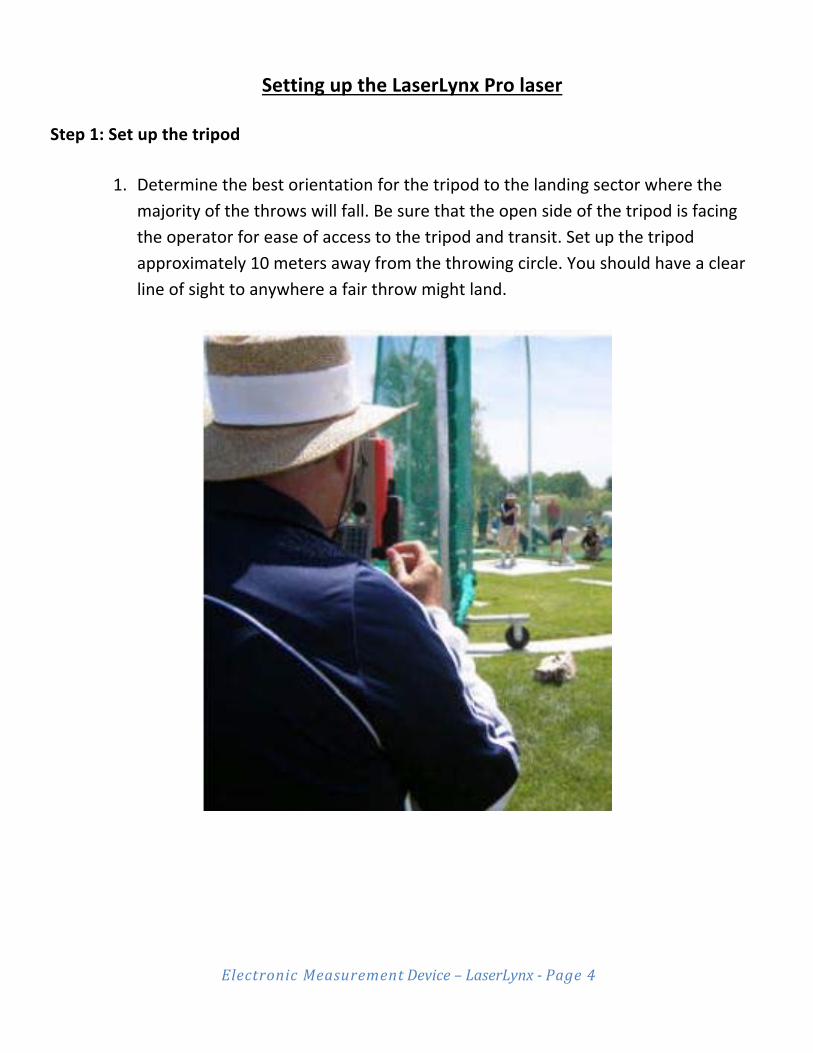
Setting up the LaserLynx Pro laser
Step 1: Set up the tripod
1. Determine the best orientation for the tripod to the landing sector where the
majority of the throws will fall. Be sure that the open side of the tripod is facing
the operator for ease of access to the tripod and transit. Set up the tripod
approximately 10 meters away from the throwing circle. You should have a clear
line of sight to anywhere a fair throw might land.
ElectronicMeasurementDevice–LaserLynx‐Page5
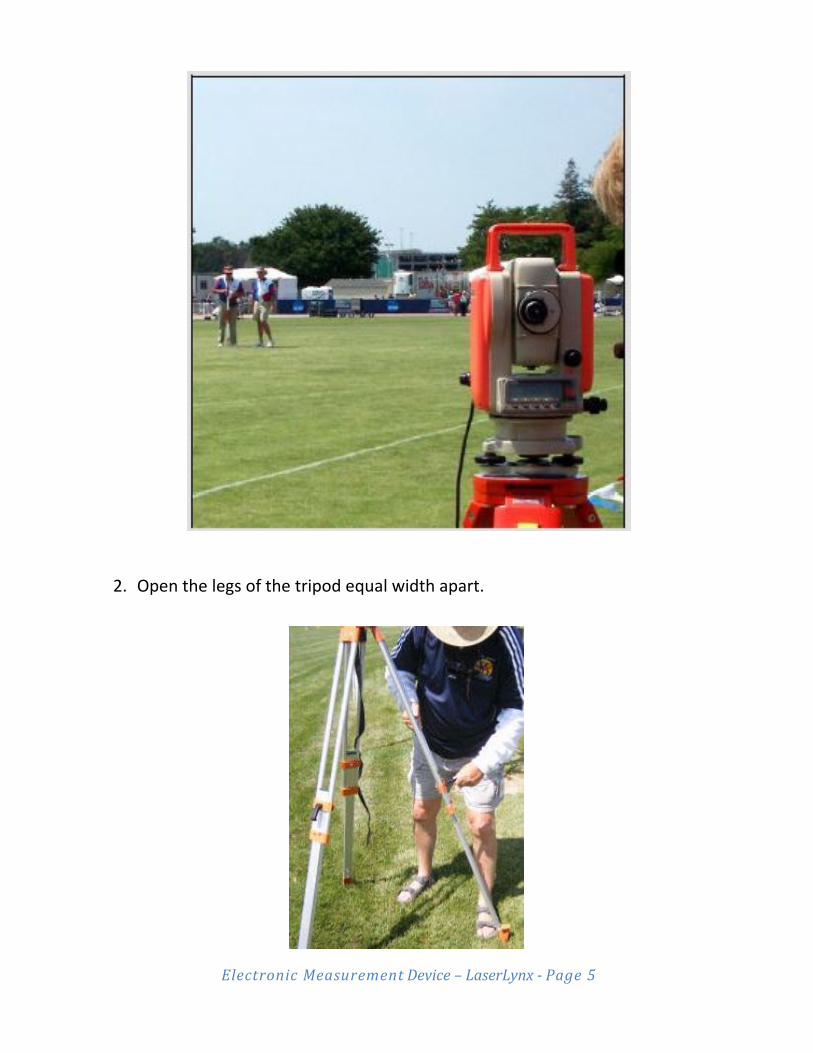
2. Open the legs of the tripod equal width apart.
ElectronicMeasurementDevice–LaserLynx‐Page6
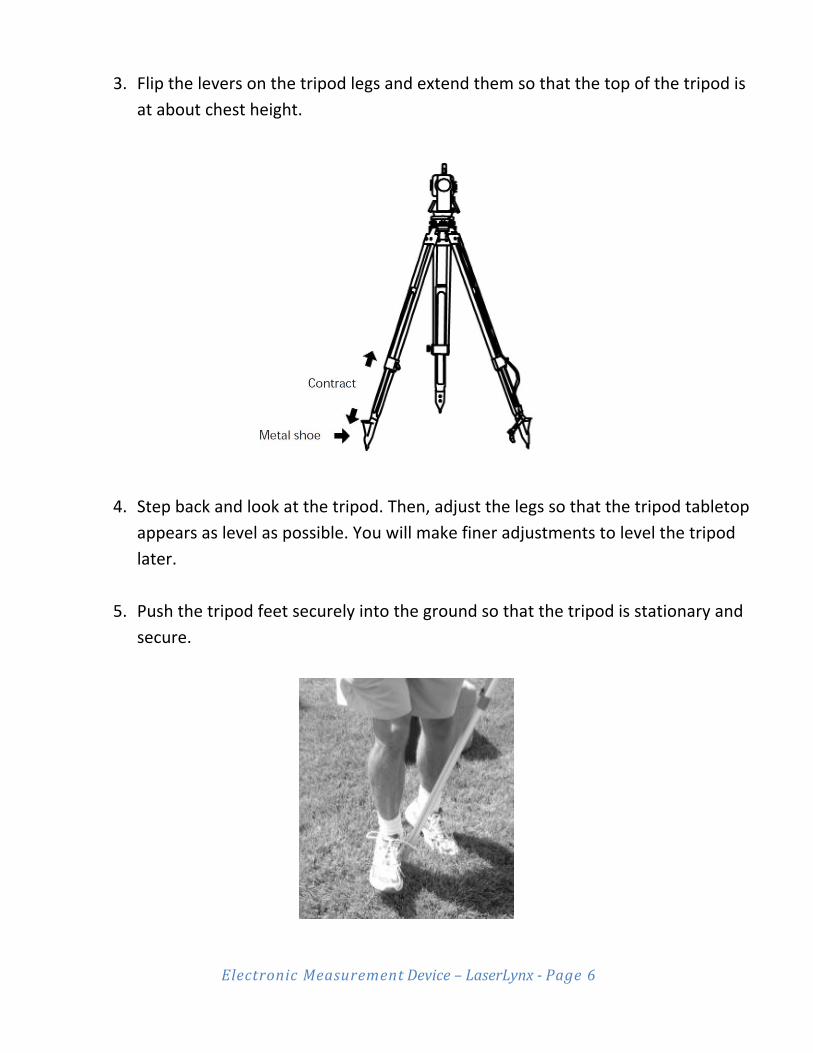
3. Flip the levers on the tripod legs and extend them so that the top of the tripod is
at about chest height.
4. Step back and look at the tripod. Then, adjust the legs so that the tripod tabletop appears as level as possible. You will make finer adjustments to level the tripod
later.
5. Push the tripod feet securely into the ground so that the tripod is stationary and secure.
ElectronicMeasurementDevice–LaserLynx‐Page7
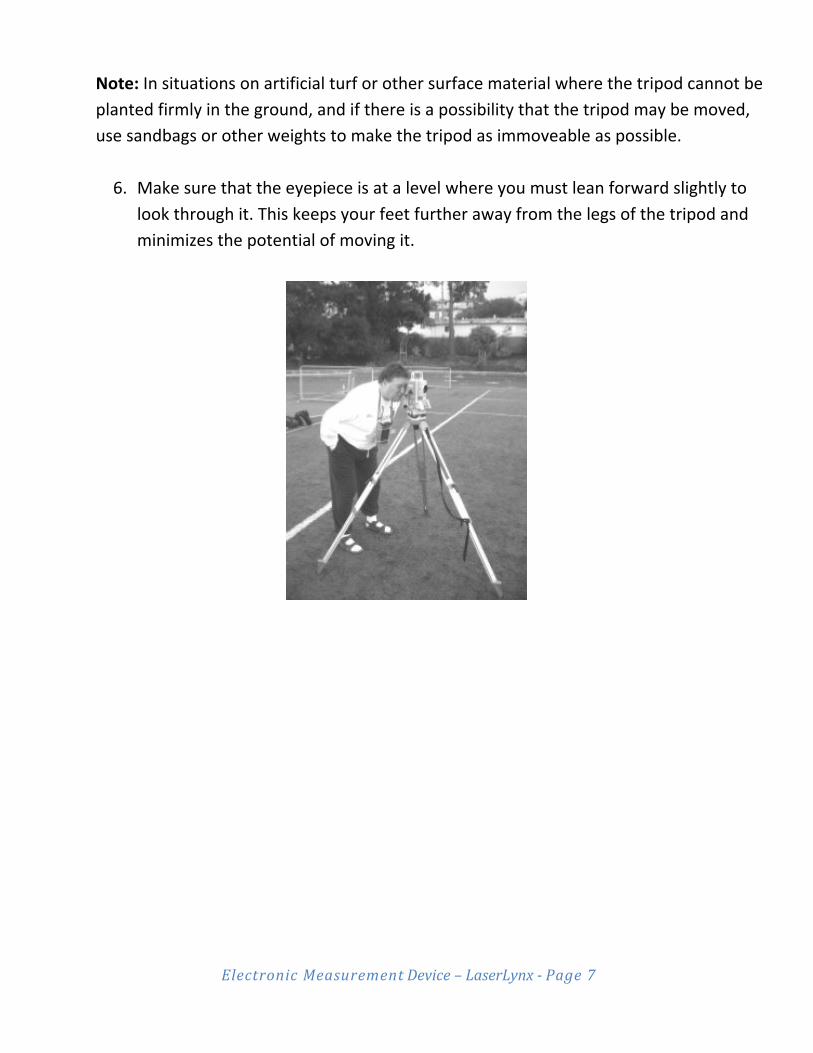
Note: In situations on artificial turf or other surface material where the tripod cannot be
planted firmly in the ground, and if there is a possibility that the tripod may be moved,
use sandbags or other weights to make the tripod as immoveable as possible.
6. Make sure that the eyepiece is at a level where you must lean forward slightly to
look through it. This keeps your feet further away from the legs of the tripod and
minimizes the potential of moving it.
ElectronicMeasurementDevice–LaserLynx‐Page8
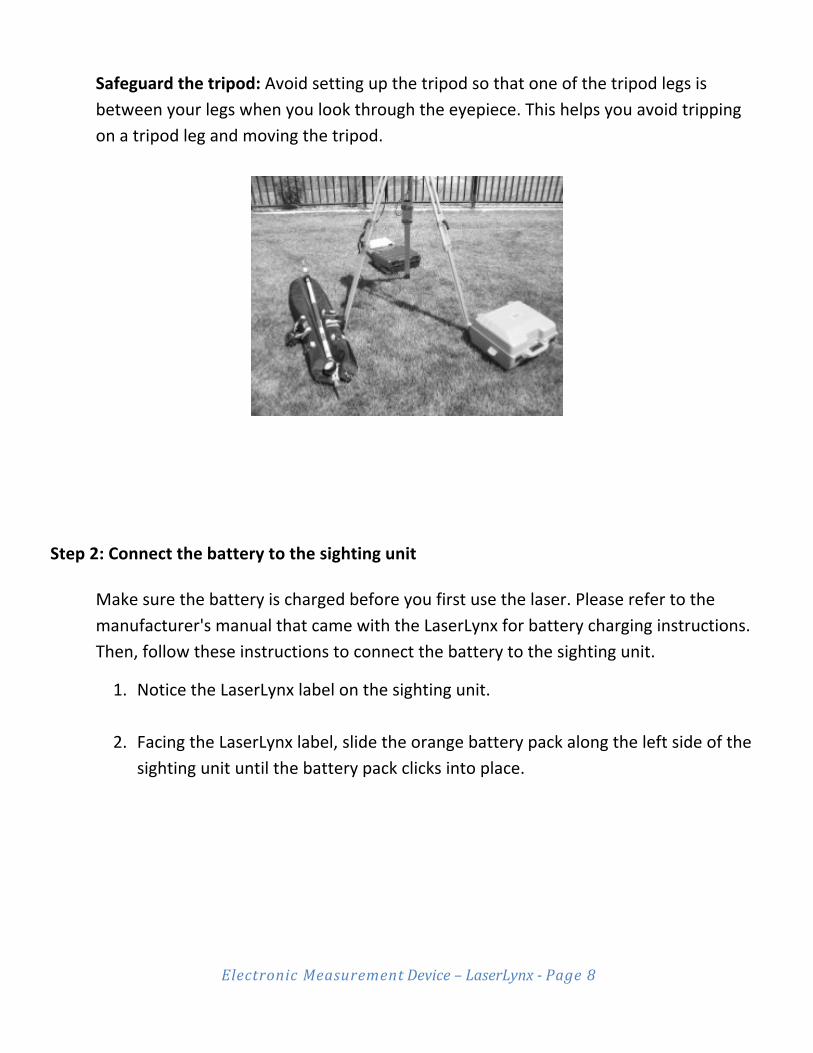
Safeguard the tripod: Avoid setting up the tripod so that one of the tripod legs is
between your legs when you look through the eyepiece. This helps you avoid tripping
on a tripod leg and moving the tripod.
Step 2: Connect the battery to the sighting unit
Make sure the battery is charged before you first use the laser. Please refer to the
manufacturer's manual that came with the LaserLynx for battery charging instructions.
Then, follow these instructions to connect the battery to the sighting unit.
1. Notice the LaserLynx label on the sighting unit.
2. Facing the LaserLynx label, slide the orange battery pack along the left side of the sighting unit until the battery pack clicks into place.
ElectronicMeasurementDevice–LaserLynx‐Page9
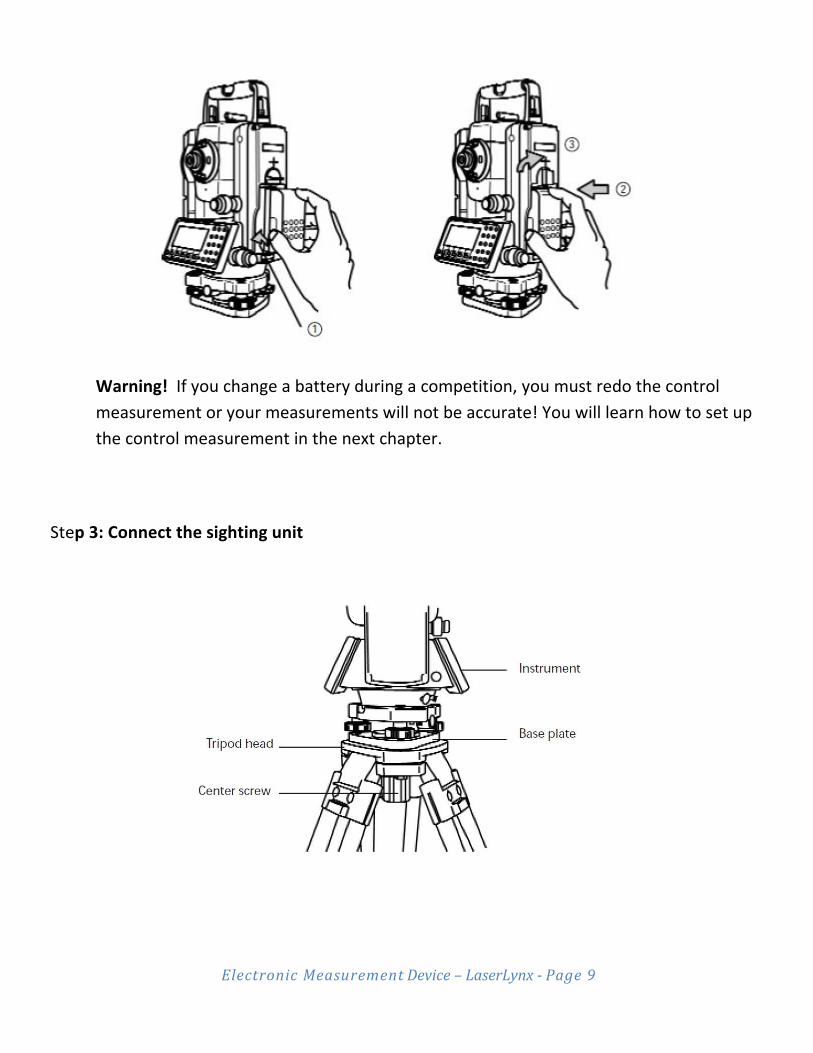
Warning! If you change a battery during a competition, you must redo the control
measurement or your measurements will not be accurate! You will learn how to set up
the control measurement in the next chapter. Step 3: Connect the sighting unit
ElectronicMeasurementDevice–LaserLynx‐Page10
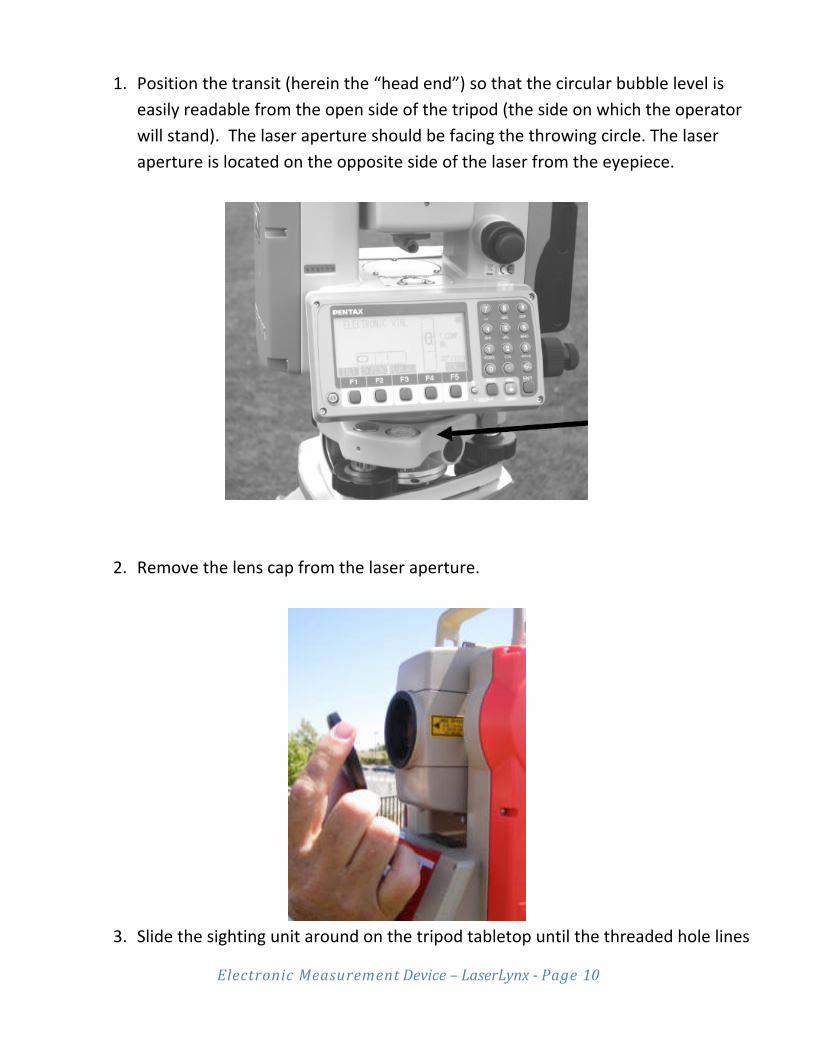
1. Position the transit (herein the “head end”) so that the circular bubble level is easily readable from the open side of the tripod (the side on which the operator
will stand). The laser aperture should be facing the throwing circle. The laser
aperture is located on the opposite side of the laser from the eyepiece.
2. Remove the lens cap from the laser aperture.
3. Slide the sighting unit around on the tripod tabletop until the threaded hole lines

ElectronicMeasurementDevice–LaserLynx‐Page11
up with the securing screw and the handle beneath the tripod tabletop.
4. Turn the handle to secure the sighting unit to the tripod tabletop.
Step 4: Level the tripod
Now that the sighting unit is attached to the tripod, you must make fine adjustments to
level the tripod.
ElectronicMeasurementDevice–LaserLynx‐Page12
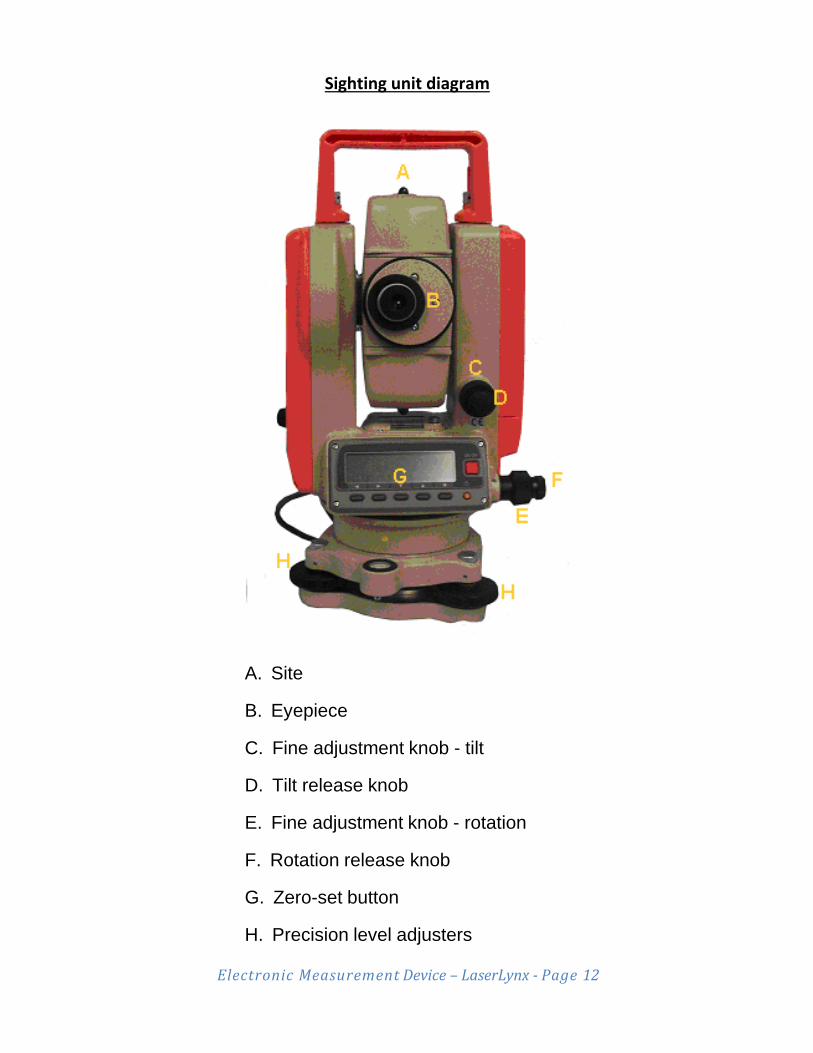
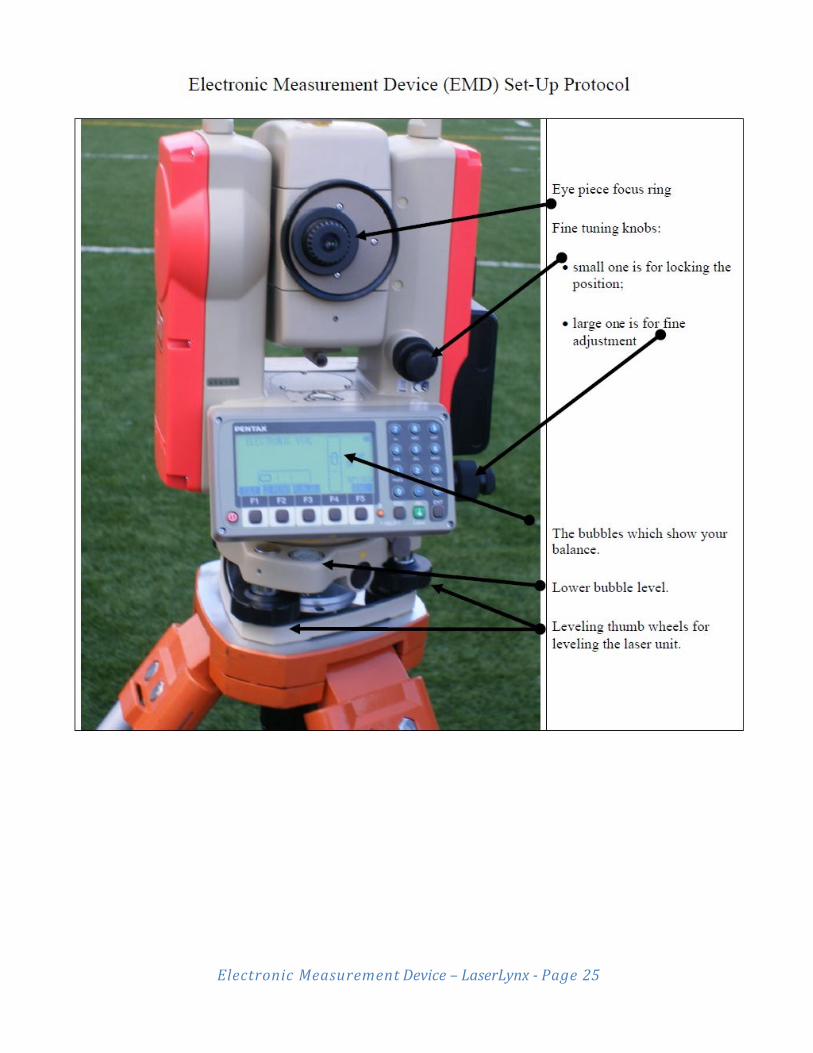
Sighting unit diagram
A. Site B. Eyepiece C. Fine adjustment knob - tilt D. Tilt release knob E. Fine adjustment knob - rotation F. Rotation release knob G. Zero-set button H. Precision level adjusters
ElectronicMeasurementDevice–LaserLynx‐Page13
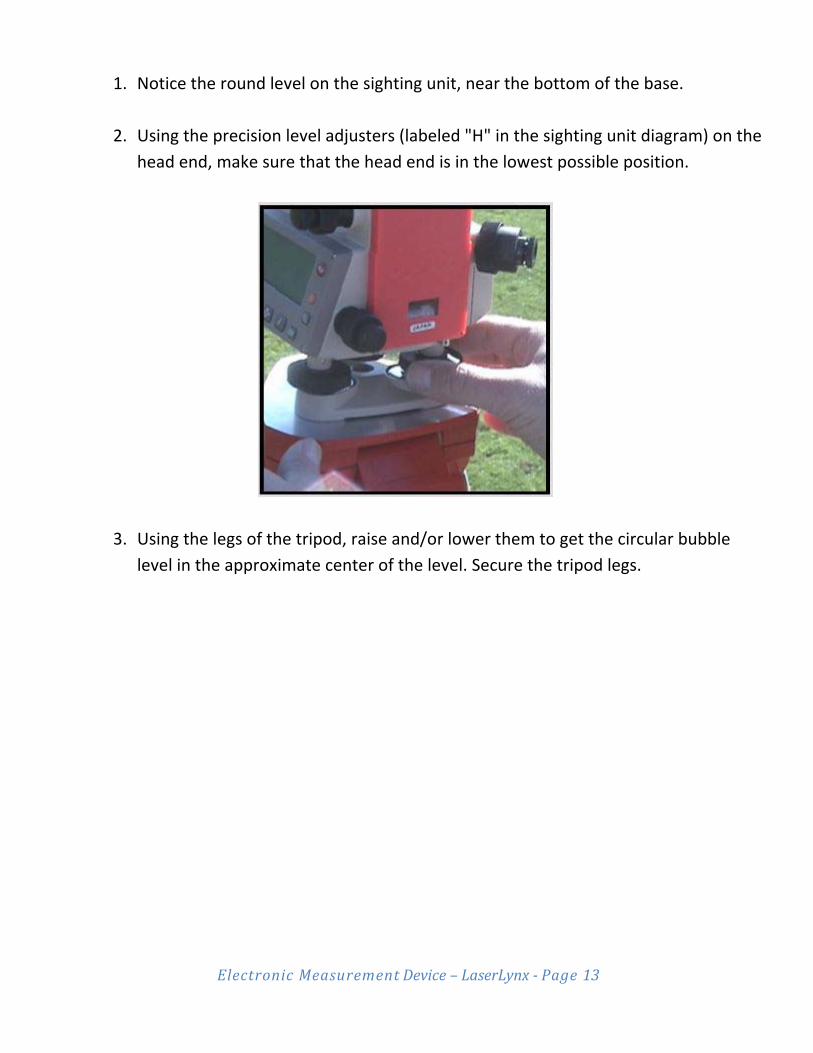
1. Notice the round level on the sighting unit, near the bottom of the base.
2. Using the precision level adjusters (labeled "H" in the sighting unit diagram) on the
head end, make sure that the head end is in the lowest possible position.
3. Using the legs of the tripod, raise and/or lower them to get the circular bubble
level in the approximate center of the level. Secure the tripod legs.
ElectronicMeasurementDevice–LaserLynx‐Page14
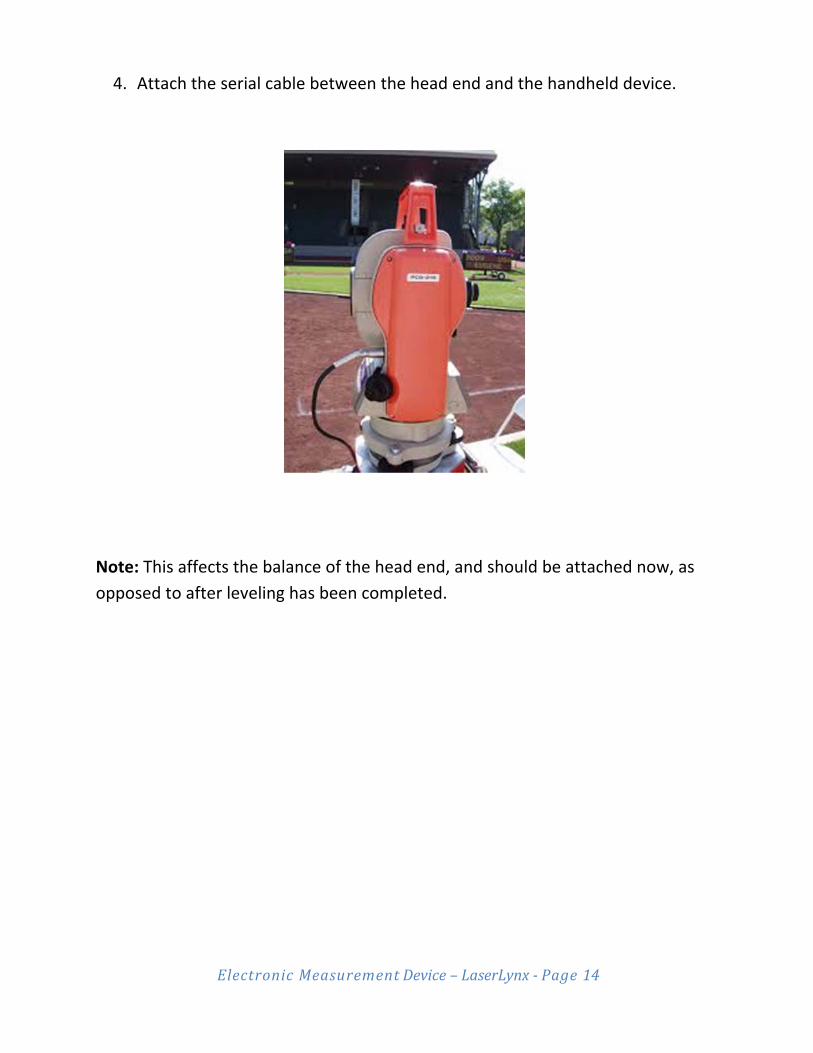
4. Attach the serial cable between the head end and the handheld device.
Note: This affects the balance of the head end, and should be attached now, as
opposed to after leveling has been completed.
ElectronicMeasurementDevice–LaserLynx‐Page15
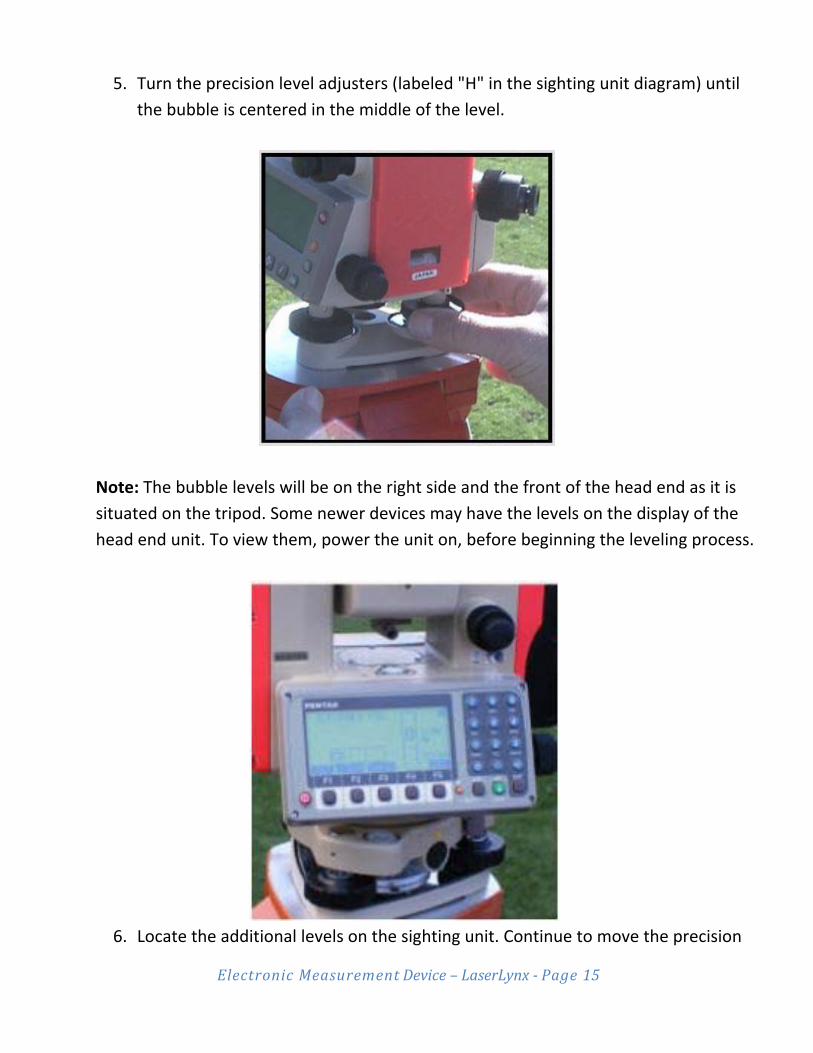
5. Turn the precision level adjusters (labeled "H" in the sighting unit diagram) until
the bubble is centered in the middle of the level.
Note: The bubble levels will be on the right side and the front of the head end as it is
situated on the tripod. Some newer devices may have the levels on the display of the
head end unit. To view them, power the unit on, before beginning the leveling process.
6. Locate the additional levels on the sighting unit. Continue to move the precision
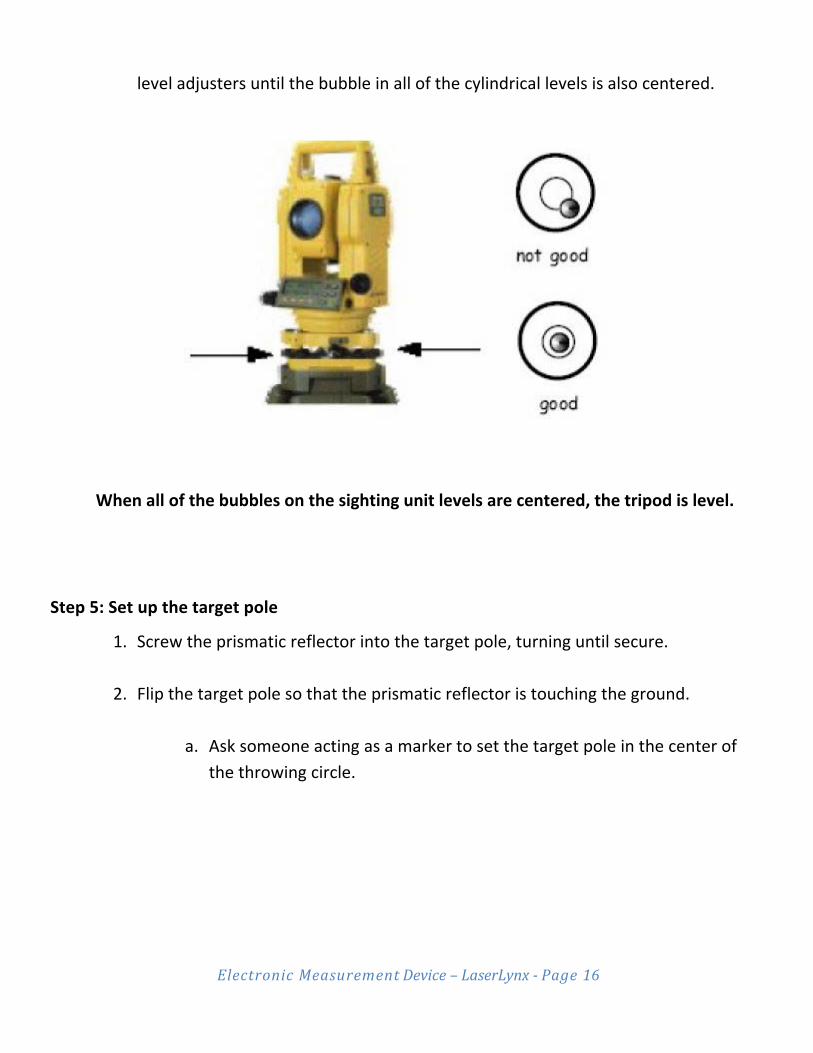
ElectronicMeasurementDevice–LaserLynx‐Page16
level adjusters until the bubble in all of the cylindrical levels is also centered.
When all of the bubbles on the sighting unit levels are centered, the tripod is level. Step 5: Set up the target pole
1. Screw the prismatic reflector into the target pole, turning until secure.
2. Flip the target pole so that the prismatic reflector is touching the ground.
a. Ask someone acting as a marker to set the target pole in the center of
the throwing circle.
ElectronicMeasurementDevice–LaserLynx‐Page17
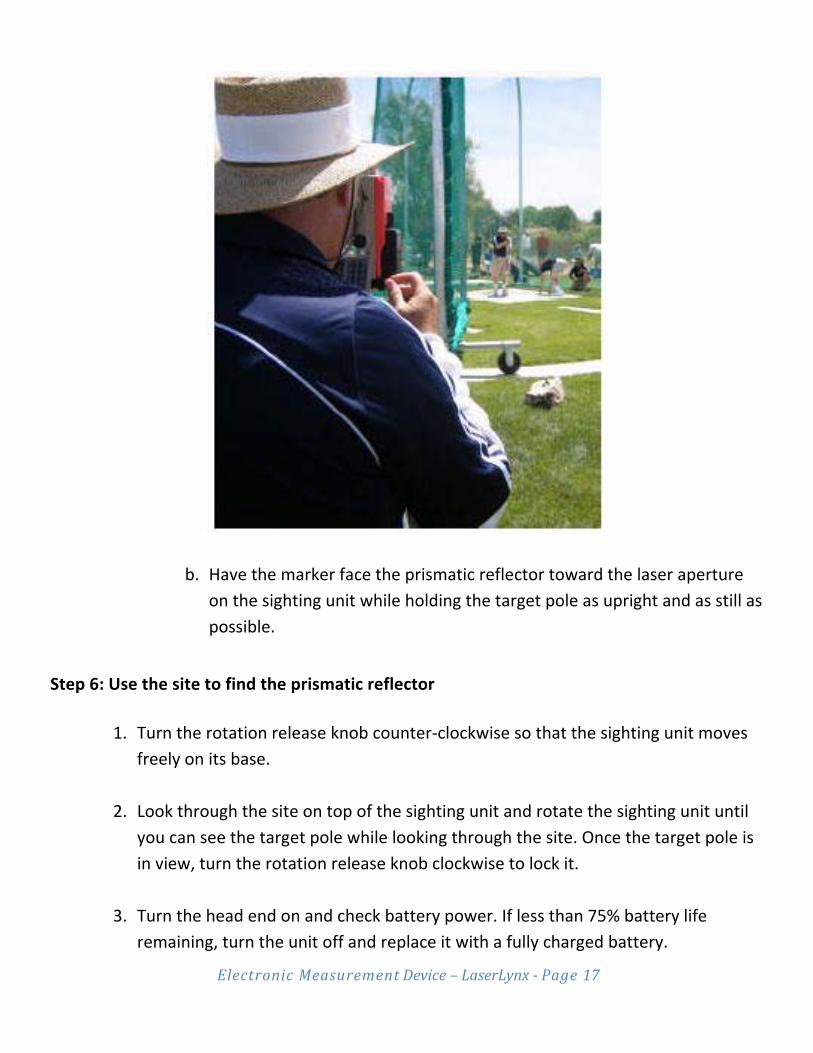
b. Have the marker face the prismatic reflector toward the laser aperture
on the sighting unit while holding the target pole as upright and as still as
possible. Step 6: Use the site to find the prismatic reflector
1. Turn the rotation release knob counter‐clockwise so that the sighting unit moves
freely on its base.
2. Look through the site on top of the sighting unit and rotate the sighting unit until you can see the target pole while looking through the site. Once the target pole is
in view, turn the rotation release knob clockwise to lock it.
3. Turn the head end on and check battery power. If less than 75% battery life remaining, turn the unit off and replace it with a fully charged battery.
ElectronicMeasurementDevice–LaserLynx‐Page18
Note: It is best practice to have an additional battery on hand that is charging. If the
battery needs to be charged, put the fresh battery on the head end and the depleted
battery on the charger.
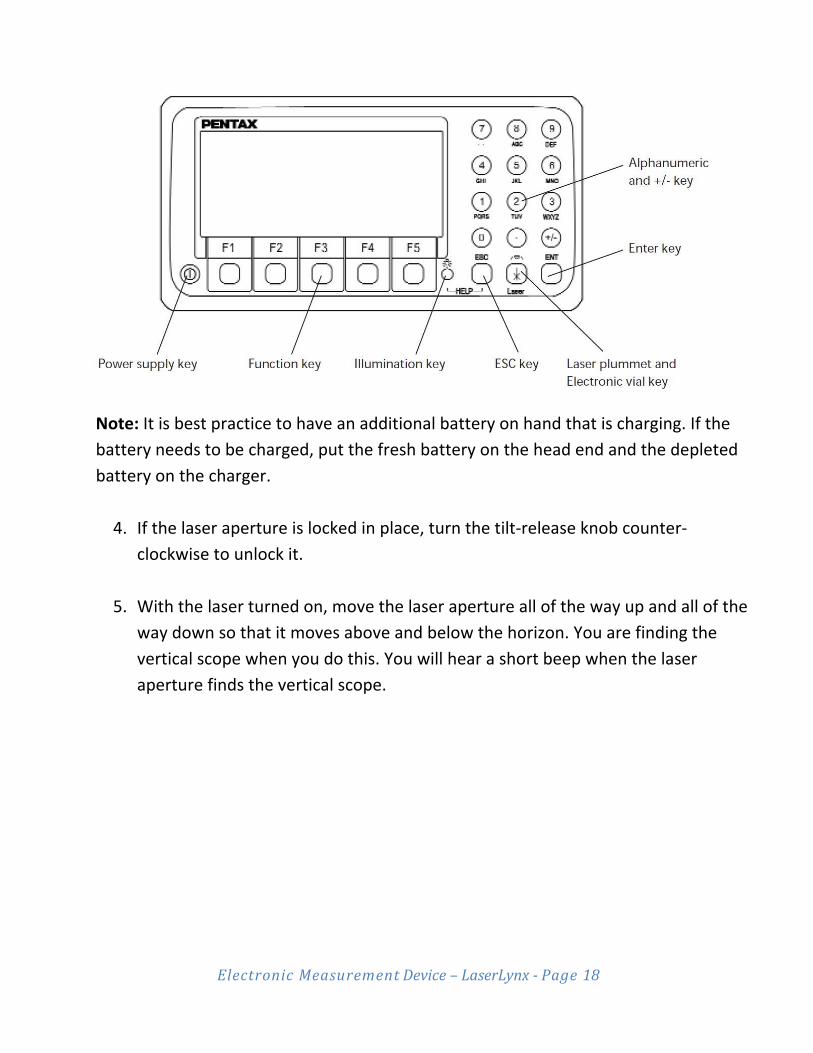
4. If the laser aperture is locked in place, turn the tilt‐release knob counter‐ clockwise to unlock it.
5. With the laser turned on, move the laser aperture all of the way up and all of the
way down so that it moves above and below the horizon. You are finding the
vertical scope when you do this. You will hear a short beep when the laser
aperture finds the vertical scope.
ElectronicMeasurementDevice–LaserLynx‐Page19
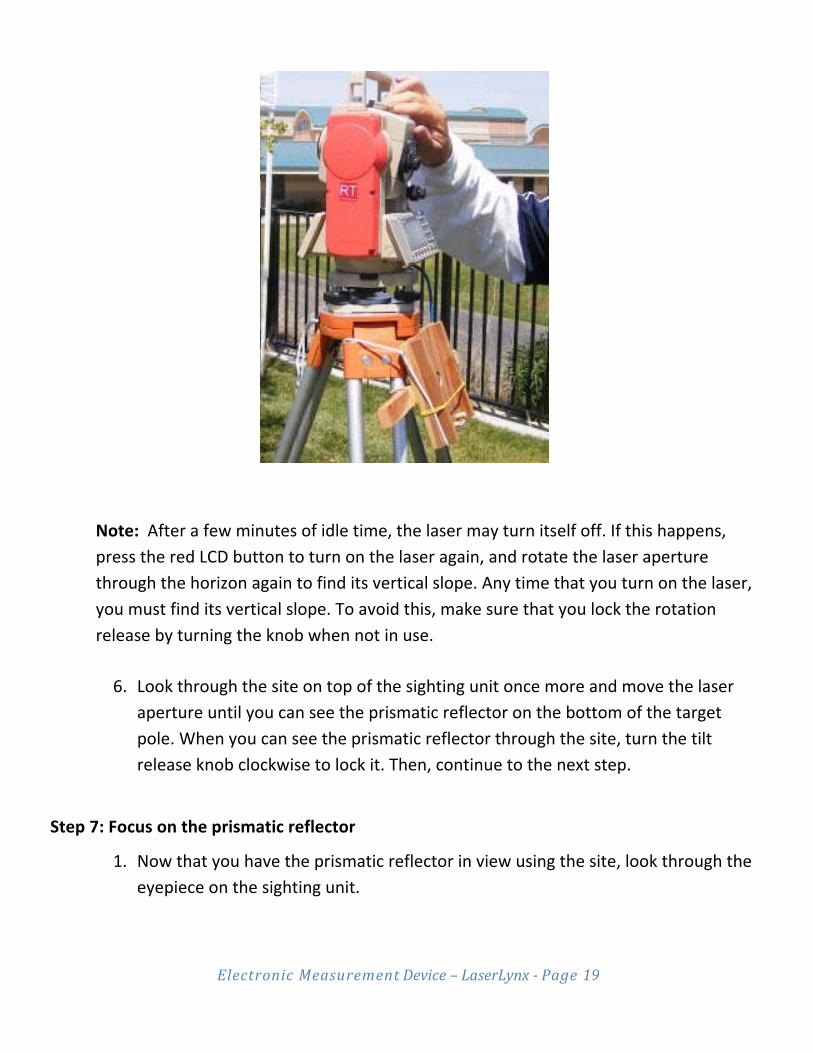
Note: After a few minutes of idle time, the laser may turn itself off. If this happens,
press the red LCD button to turn on the laser again, and rotate the laser aperture
through the horizon again to find its vertical slope. Any time that you turn on the laser,
you must find its vertical slope. To avoid this, make sure that you lock the rotation
release by turning the knob when not in use.
6. Look through the site on top of the sighting unit once more and move the laser
aperture until you can see the prismatic reflector on the bottom of the target
pole. When you can see the prismatic reflector through the site, turn the tilt
release knob clockwise to lock it. Then, continue to the next step. Step 7: Focus on the prismatic reflector
1. Now that you have the prismatic reflector in view using the site, look through the
eyepiece on the sighting unit.
ElectronicMeasurementDevice–LaserLynx‐Page20
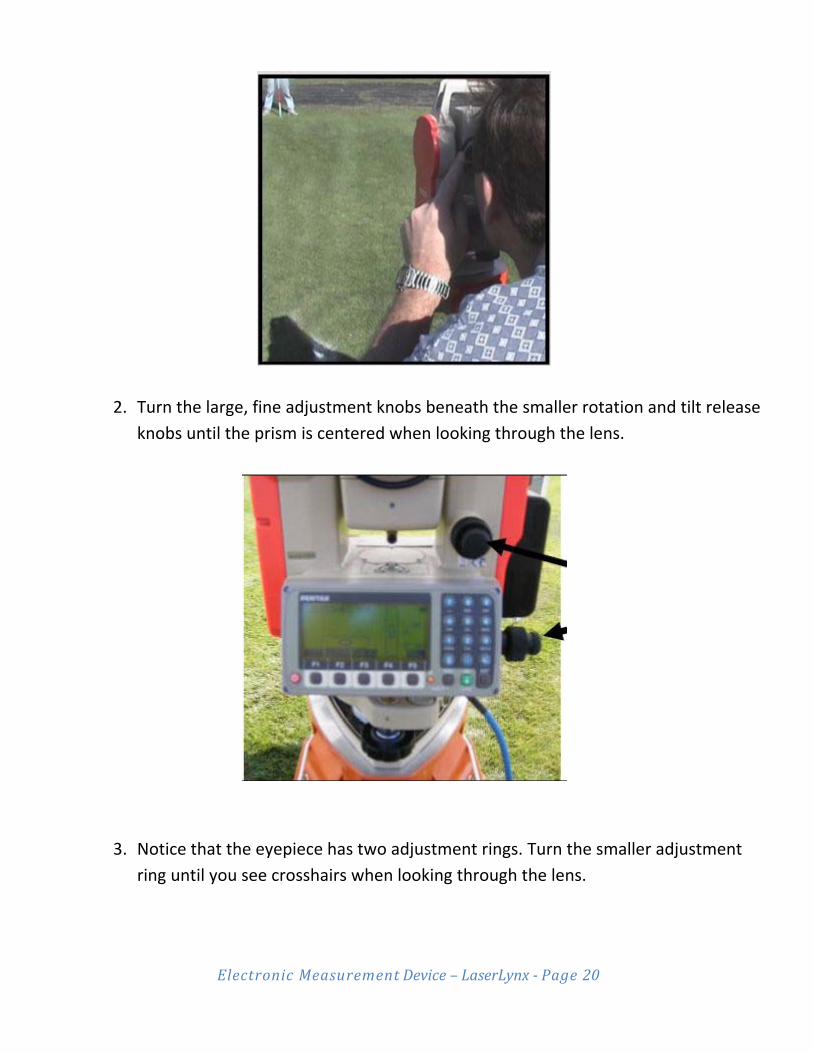
2. Turn the large, fine adjustment knobs beneath the smaller rotation and tilt release
knobs until the prism is centered when looking through the lens.
3. Notice that the eyepiece has two adjustment rings. Turn the smaller adjustment
ring until you see crosshairs when looking through the lens.
ElectronicMeasurementDevice–LaserLynx‐Page21
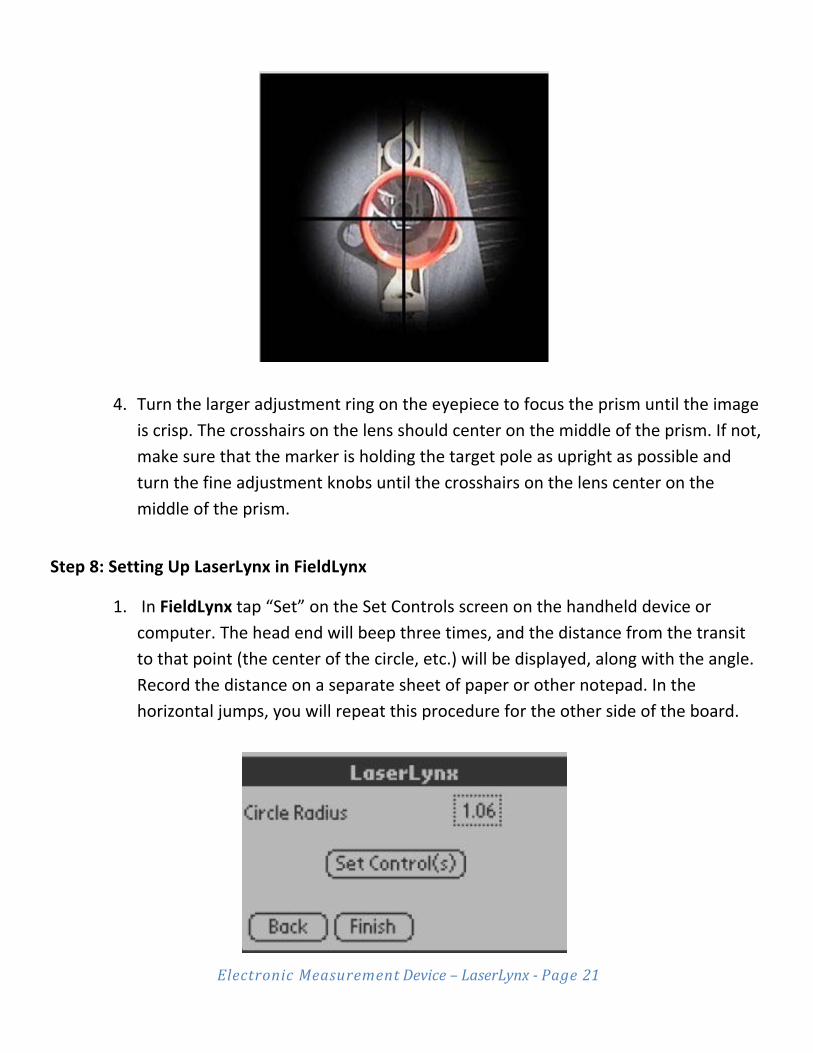
4. Turn the larger adjustment ring on the eyepiece to focus the prism until the image
is crisp. The crosshairs on the lens should center on the middle of the prism. If not,
make sure that the marker is holding the target pole as upright as possible and
turn the fine adjustment knobs until the crosshairs on the lens center on the
middle of the prism. Step 8: Setting Up LaserLynx in FieldLynx
1. In FieldLynx tap “Set” on the Set Controls screen on the handheld device or
computer. The head end will beep three times, and the distance from the transit
to that point (the center of the circle, etc.) will be displayed, along with the angle.
Record the distance on a separate sheet of paper or other notepad. In the
horizontal jumps, you will repeat this procedure for the other side of the board.
ElectronicMeasurementDevice–LaserLynx‐Page22
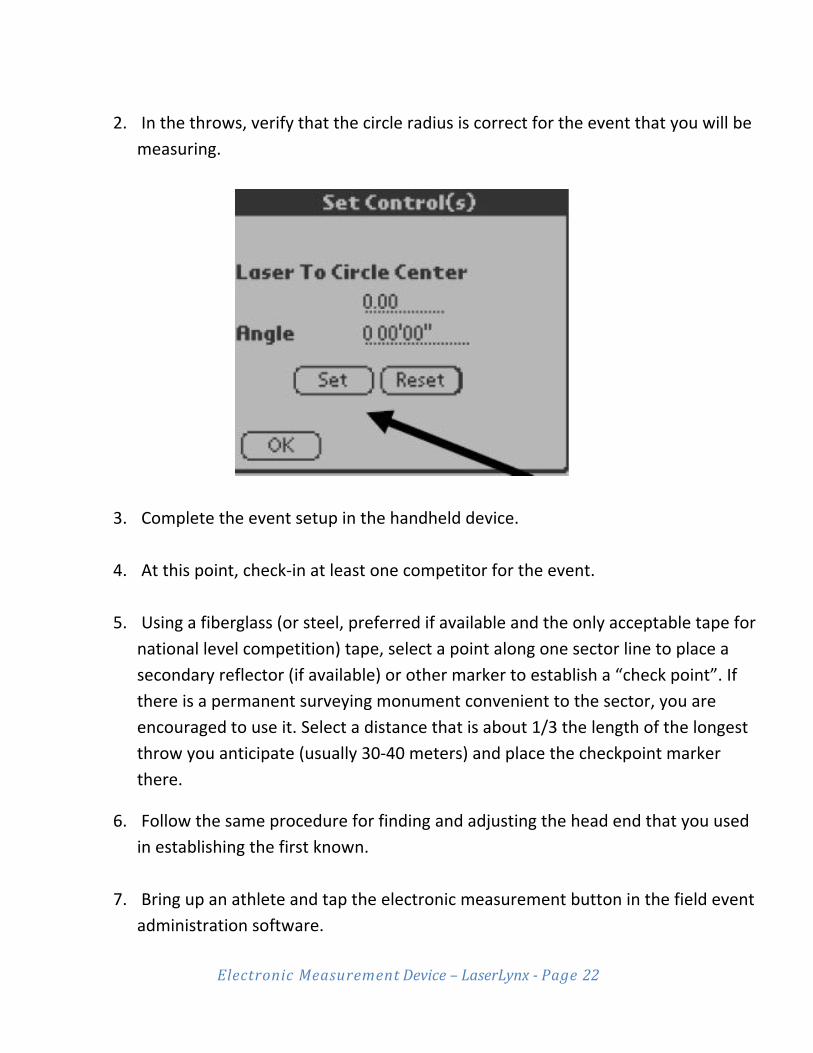
2. In the throws, verify that the circle radius is correct for the event that you will be measuring.
3. Complete the event setup in the handheld device.
4. At this point, check‐in at least one competitor for the event.
5. Using a fiberglass (or steel, preferred if available and the only acceptable tape for national level competition) tape, select a point along one sector line to place a
secondary reflector (if available) or other marker to establish a “check point”. If
there is a permanent surveying monument convenient to the sector, you are
encouraged to use it. Select a distance that is about 1/3 the length of the longest
throw you anticipate (usually 30‐40 meters) and place the checkpoint marker
there.
6. Follow the same procedure for finding and adjusting the head end that you used
in establishing the first known.
7. Bring up an athlete and tap the electronic measurement button in the field event
administration software.
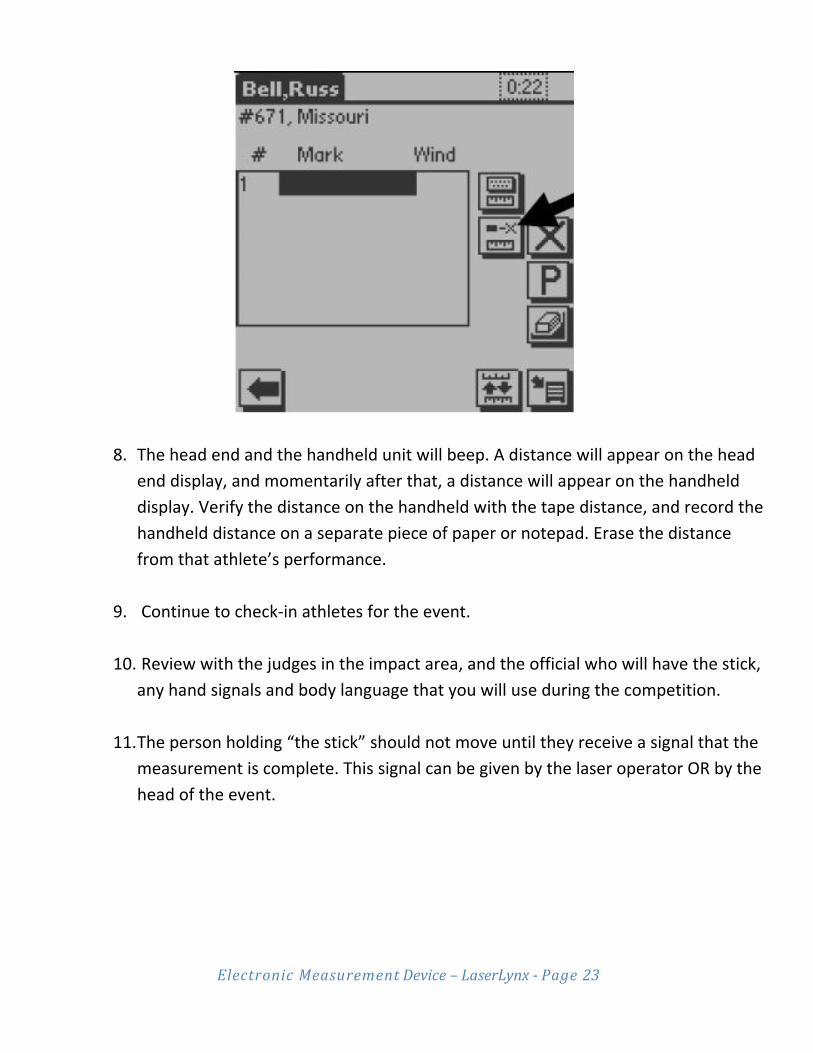
ElectronicMeasurementDevice–LaserLynx‐Page23
8. The head end and the handheld unit will beep. A distance will appear on the head end display, and momentarily after that, a distance will appear on the handheld
display. Verify the distance on the handheld with the tape distance, and record the
handheld distance on a separate piece of paper or notepad. Erase the distance
from that athlete’s performance.
9. Continue to check‐in athletes for the event.
10. Review with the judges in the impact area, and the official who will have the stick,
any hand signals and body language that you will use during the competition.
11. The person holding “the stick” should not move until they receive a signal that the
measurement is complete. This signal can be given by the laser operator OR by the
head of the event.

ElectronicMeasurementDevice–LaserLynx‐Page24
12. The person holding “the stick” should do their best to balance the bubble on the stick, thus assuring a vertical hold for the stick.
ElectronicMeasurementDevice–LaserLynx‐Page25
ElectronicMeasurementDevice–LaserLynx‐Page26
Step 9: Taking a zero‐set measurement
If you are using the LaserLynx Pro, we recommend that before you take the control
measurement, you take a zero‐set measurement for reference. Throughout the
competition, you can reference the zero‐set measurement to make sure that the tripod
has not been moved or bumped. This is especially helpful during indoor competitions,
when the tripod is more likely to be moved or bumped.
1. Set up the tripod.
2. Turn on the laser.
3. Find a fixed point somewhere on the horizon. Select something that will not move
during the competition. For example, use the corner of a wooden sign at the end
of the stadium.
4. Focus the laser on the fixed point.
5. Press the zero‐set button on the laser LCD twice so that it reads 0. On the LaserLynx Pro, the zero‐set button resembles a down arrow, like this: À.
6. Frequently throughout the competition, aim the laser back at the fixed point on
the horizon. When you do so, the LCD on the laser should read
Note: If it reads anything other than 0, it means that the tripod was bumped or moved,
and you must redo the control measurement.
ElectronicMeasurementDevice–LaserLynx‐Page27
Step 10: Use in competition
1. When the first competitor is called up, call them up on your handheld device.
2. If you are working alone, secure the handheld device through a strap on the tripod or by some other means. If you are working as a team, have the handheld
operator watch for called fouls at the circle, while you are watching the flight of
the implement or the jump of the athlete.
3. Use the peep sight to roughly locate the landing of the implement or the athlete in
the landing pit.
4. Lock down the head end using the macro positioning knobs.
5. Use the eyepiece and the micro positioning knobs to find the reflector on the stick.
Once the laser is within the reflector, the transit will beep.
6. Continue to align the cross hair in the eyepiece as close to the center of the reflector as possible.
7. When you are in the center of the reflector, tap the read icon on the handheld
screen. In a two‐man team, simply announce, “read” and have the handheld
operator tap the icon.
8. The head end will beep, and a distance will appear on its LCD screen.
9. Make sure that the display is steady. If the head end beeps again, or if the distance
disappears, make sure that the official with the marking pole has not moved.
10. The distance will appear on the handheld device.
11. If you are using an external performance display board that may be connected
directly or via wireless to the handheld device, the information will appear on the
display.
ElectronicMeasurementDevice–LaserLynx‐Page28
12. Leave the head end in the locked position until the next competitor is in the circle
or on the runway.
Comment: the reason that we do this is so that the throw can be reconstructed if need
be. For example, if an athlete protests a call, the throw must still be measured and
recorded elsewhere in case the protest is upheld. So long as the next throw has not
occurred, even if the official with the stick has moved, the stick can be replaced in
virtually the same spot if the head end is locked and has not moved.
13. Continue through the event.
14. Between flights or rounds, you can verify the distance to your checkpoint to make
sure that nothing has changed.
Note: If a battery needs to be changed, it should only be done at the end of a round, or
preferably a flight. It is better done between flights, or between trials and finals, since
you will have slightly more time to do the recalibration, and this will not overly disrupt
the flow of the competition.
Step 10: Post competition
1. Verify the distance to your checkpoint.
2. If you are the chief electronic measurement judge (EMJ), certify to the field
referee or head field judge that the check measurements match.
Note: In the event of a record, you will also need to sign and verify the record form.
Make note of the pre‐ and post‐competition verification checks, in case the accuracy of
the measurement is called into question.
3. Begin tear down of the equipment. If this is the end of the day’s competition,
remember to remove the reflector from the marking pole for safekeeping.
ElectronicMeasurementDevice–LaserLynx‐Page29
When FieldLynx Fails
It is possible to use an Electronic Measurement Device (i.e. Total Station) to measure a
throw without using a LaserLynx Palm or iPaq or any handheld. The EMD was designed
for surveyors and measuring between two points is pretty basic. You'll still need to
subtract the radius of the circle from the total station calculation, but that can be
performed on a simple calculator.
There are several special functions built into the Pentax 325N Electronic Total Station
that allow the surveyor to handle a variety of measurement situations. One of the
special functions is called Remote Distance Measurement (RDM).
The user manual states, with RDM measurement, the horizontal distance, the slope
distance, difference in height and the percentage of slope between the reference point
and the observation point are measured. The distance between one observation point
and another observation point is measured as well.
For the USATF Official measuring long throws, the base point is the center of the
throwing circle. The various observation points are the landing marks of the javelin,
discuss, hammer or shot. The distance of the throw is the horizontal distance as
measured and displayed on the Pentax 325N Electronic Total Station less the radius of
the throwing circle (i.e. 8 meters for the javelin throw, 1.25 meters for the discus, and
1.06 meters for the hammer, weight and shot.)
Here are steps for using the RDM special function on using the Pentax 325N Electronic
Total Station. Accessing the RDM Special Function
1. Press the [POWER‐SUPPLY] key to turn on the Total Station.
ElectronicMeasurementDevice–LaserLynx‐Page30
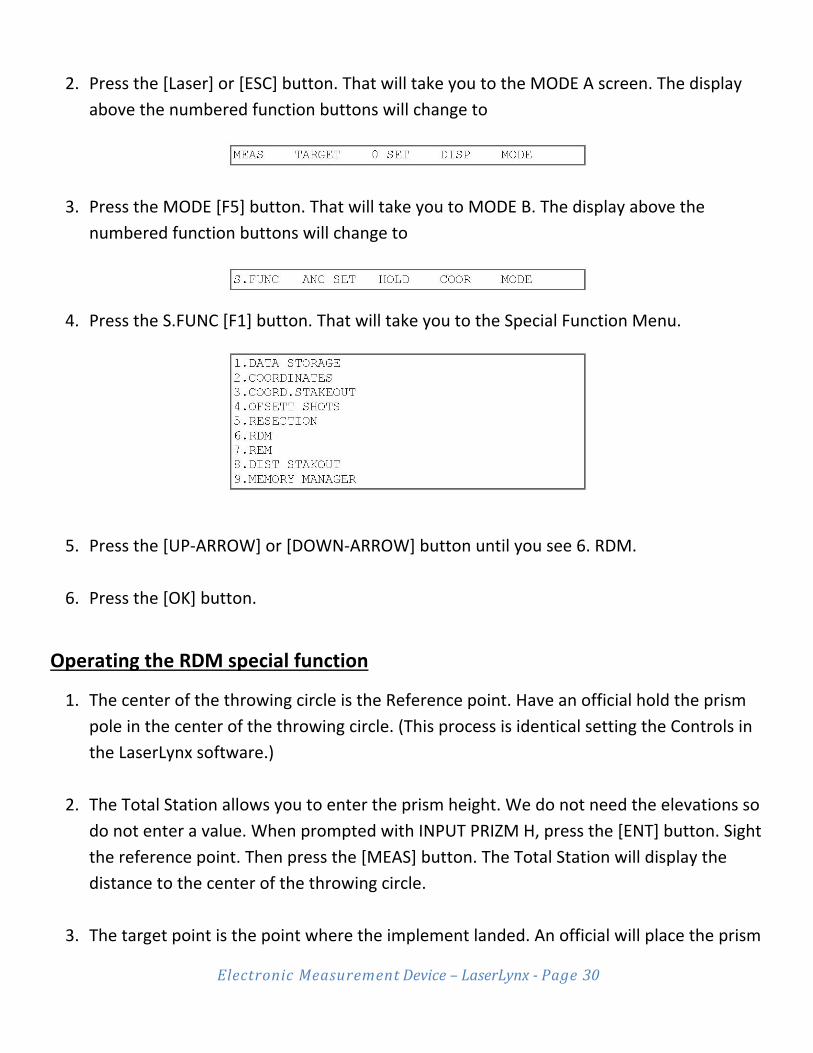
2. Press the [Laser] or [ESC] button. That will take you to the MODE A screen. The display
above the numbered function buttons will change to
3. Press the MODE [F5] button. That will take you to MODE B. The display above the
numbered function buttons will change to
4. Press the S.FUNC [F1] button. That will take you to the Special Function Menu.
5. Press the [UP‐ARROW] or [DOWN‐ARROW] button until you see 6. RDM.
6. Press the [OK] button. Operating the RDM special function
1. The center of the throwing circle is the Reference point. Have an official hold the prism
pole in the center of the throwing circle. (This process is identical setting the Controls in
the LaserLynx software.)
2. The Total Station allows you to enter the prism height. We do not need the elevations so
do not enter a value. When prompted with INPUT PRIZM H, press the [ENT] button. Sight
the reference point. Then press the [MEAS] button. The Total Station will display the
distance to the center of the throwing circle.
3. The target point is the point where the implement landed. An official will place the prism
ElectronicMeasurementDevice–LaserLynx‐Page31
pole at the target point. As before, the Total Station allows you to enter the prism
height. When prompted with INPUT PRIZM H, press the [ENT] button. Then, sight the
target point and press the [MEAS] button. The Total Station will display the distance
between the center of the throwing circle (reference point) and the prism marker in the
field (P1).
4. Use a calculator to subtract the circle radius from value on the display to obtain the
distance the implement was thrown. On the next throw, sight the prism pole at the new
target and press the [ENT] button. The distance between the center of the throwing
circle (reference point) and the prism marker in the field (P1) will display on the screen.
This The Total Station has the ability to display the straight line distance between the last
two throws (P1 and P2). Press the [DIST] button to display the straight line distance
between the last two throws (P‐P). For our task and a measurement official, that
information is unnecessary. Press the [DIST] button again to display the distance
between the center of the throwing circle and the prism marker in the field.
Note: You will notice, after pressing the [MEAS] button, the horizontal distance is
displayed instantly. This is considerable faster than transmitting the raw data from the
total station to a handheld and calculating the distance in the handheld. If you have a
helper to run the calculator, you may be able to measure and display the measurement
as fast as or faster than using a handheld with the total station.
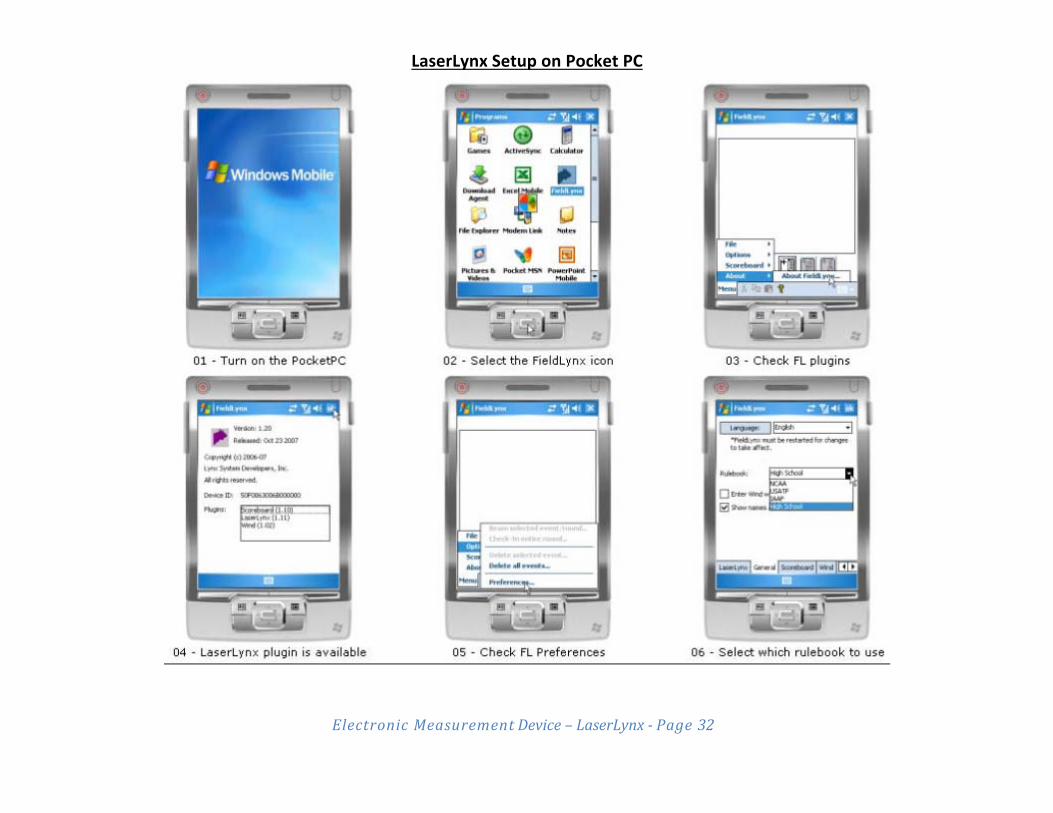
ElectronicMeasurementDevice–LaserLynx‐Page32
LaserLynx Setup on Pocket PC
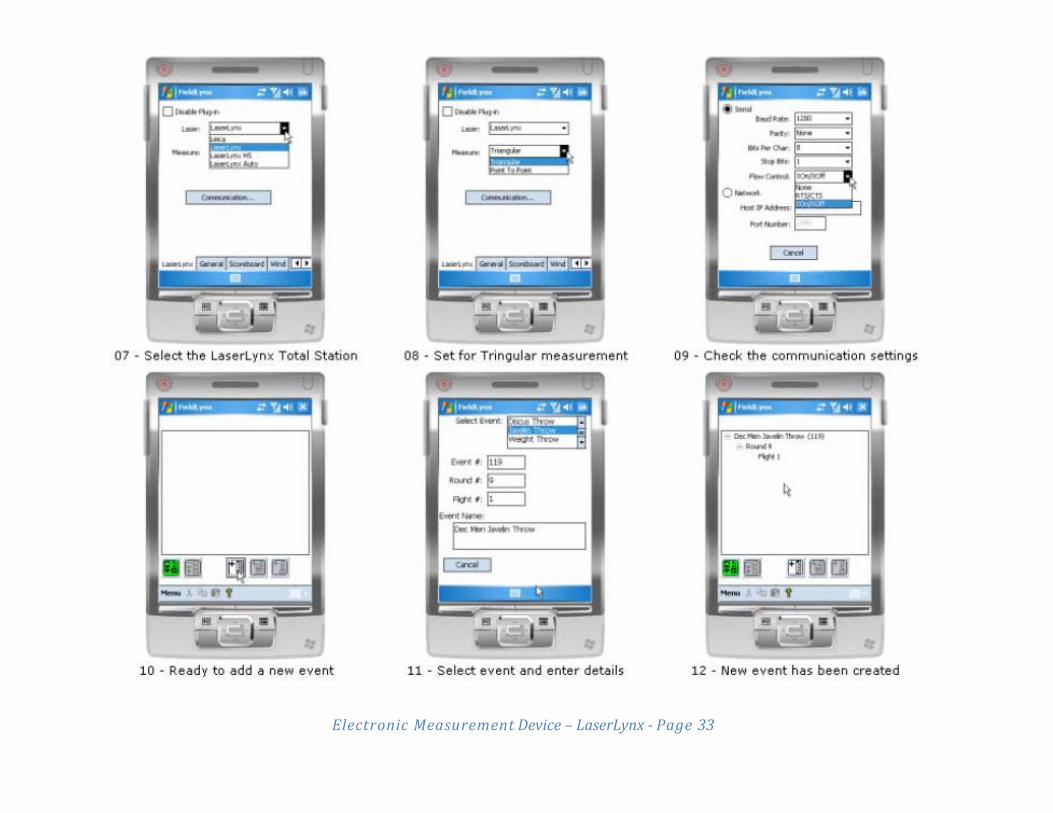
ElectronicMeasurementDevice–LaserLynx‐Page33
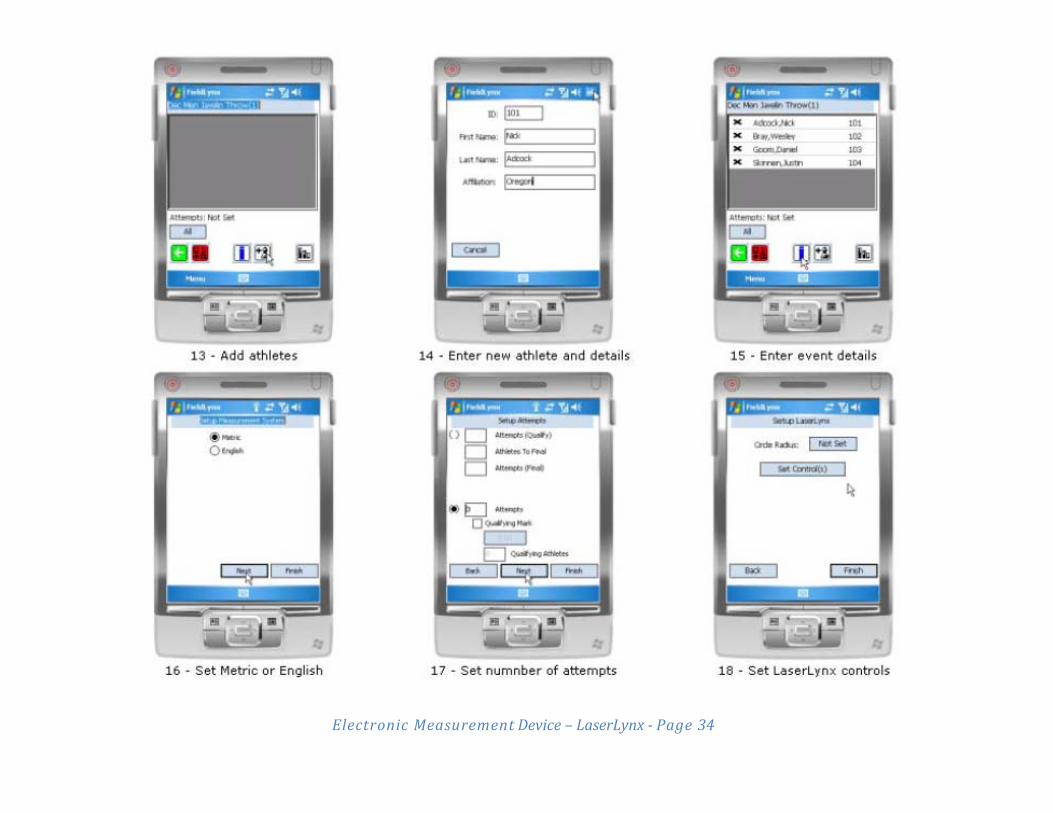
ElectronicMeasurementDevice–LaserLynx‐Page34

ElectronicMeasurementDevice–LaserLynx‐Page35
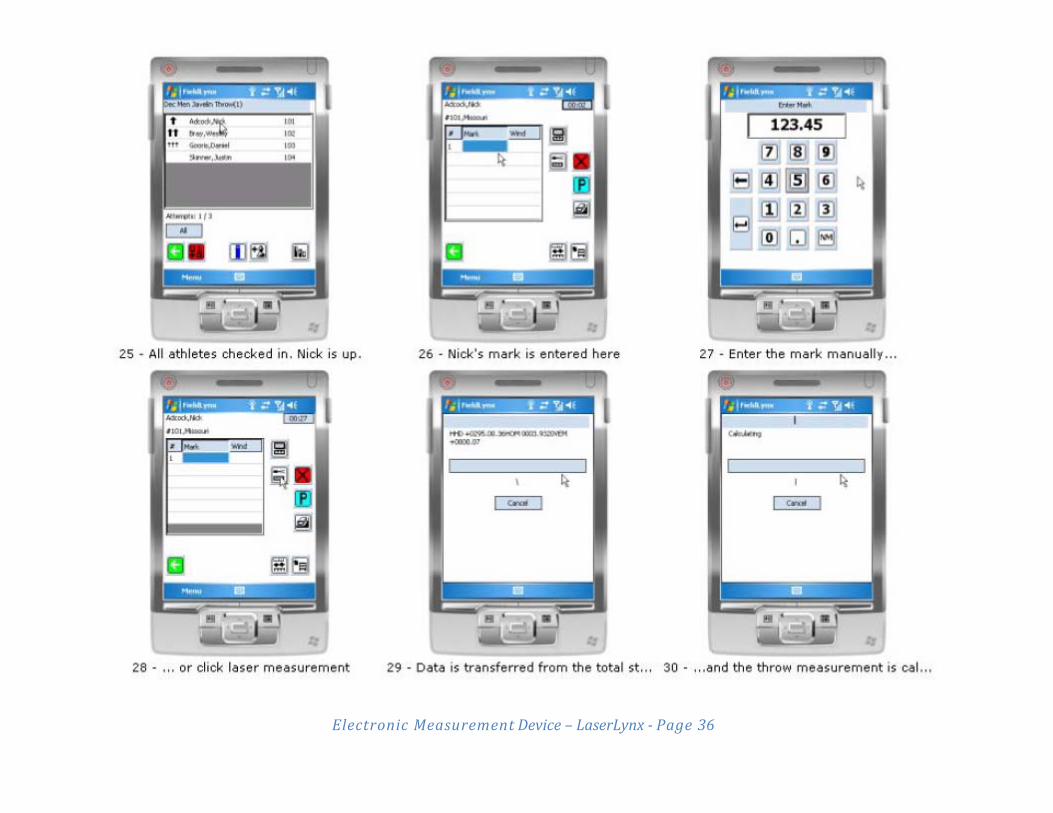
ElectronicMeasurementDevice–LaserLynx‐Page36
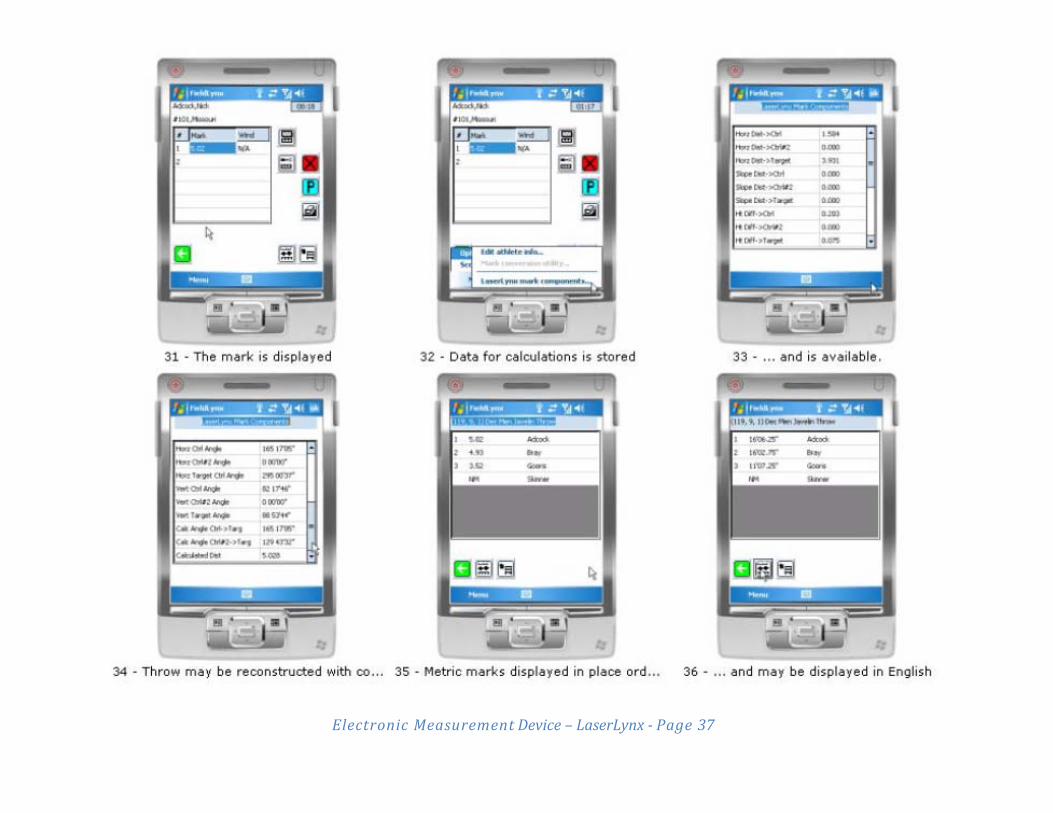
ElectronicMeasurementDevice–LaserLynx‐Page37

ElectronicMeasurementDevice–LaserLynx‐Page38
This page left intentionally blank.
ElectronicDistanceMeasurement‐LASAM
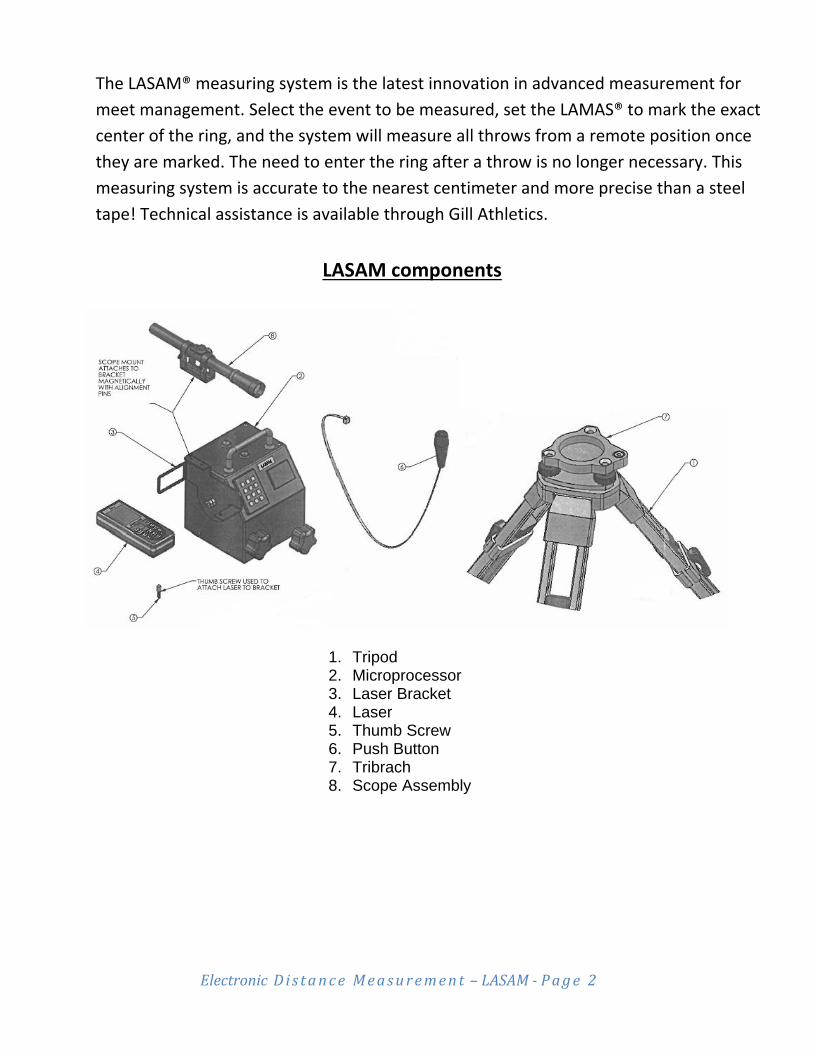
ElectronicDi s tance Measurement – LASAM ‐ Page 2
The LASAM® measuring system is the latest innovation in advanced measurement for
meet management. Select the event to be measured, set the LAMAS® to mark the exact
center of the ring, and the system will measure all throws from a remote position once
they are marked. The need to enter the ring after a throw is no longer necessary. This
measuring system is accurate to the nearest centimeter and more precise than a steel
tape! Technical assistance is available through Gill Athletics.
LASAM components
1. Tripod 2. Microprocessor 3. Laser Bracket 4. Laser 5. Thumb Screw 6. Push Button 7. Tribrach 8. Scope Assembly
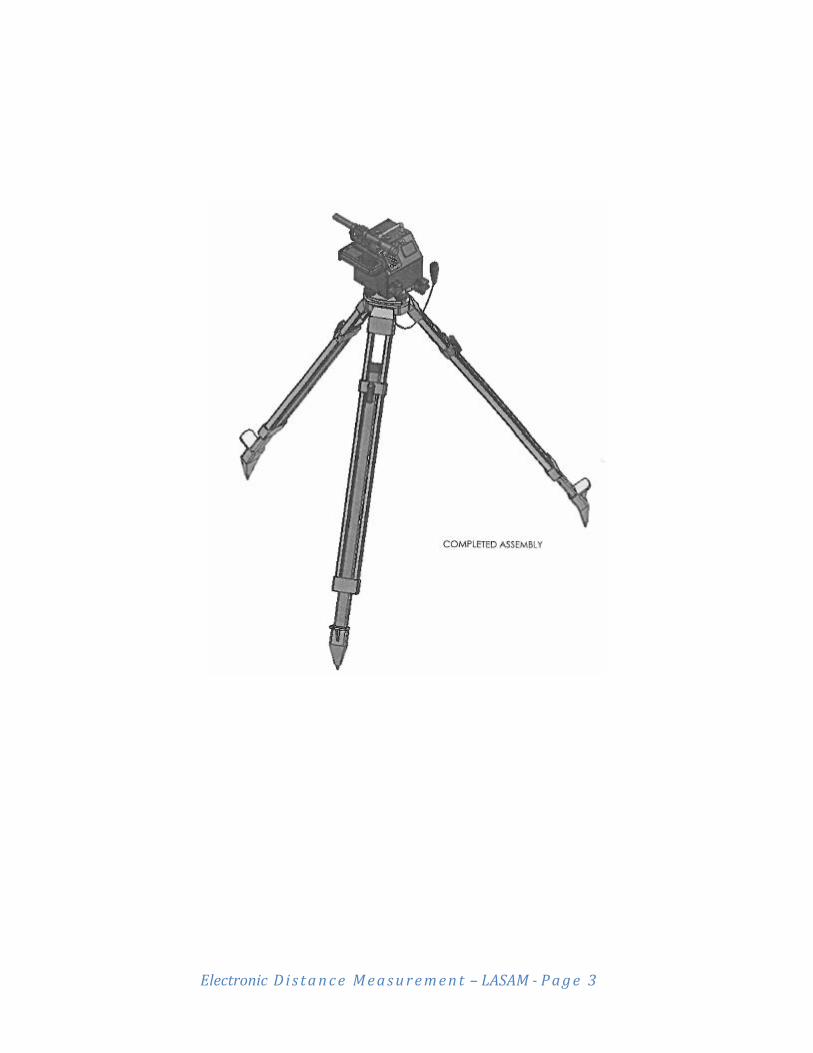
ElectronicDi s tance Measurement – LASAM ‐ Page 3

ElectronicDi s tance Measurement – LASAM ‐ Page 4
1. Target 2. Holder 3. Range Pole 4. Bipod
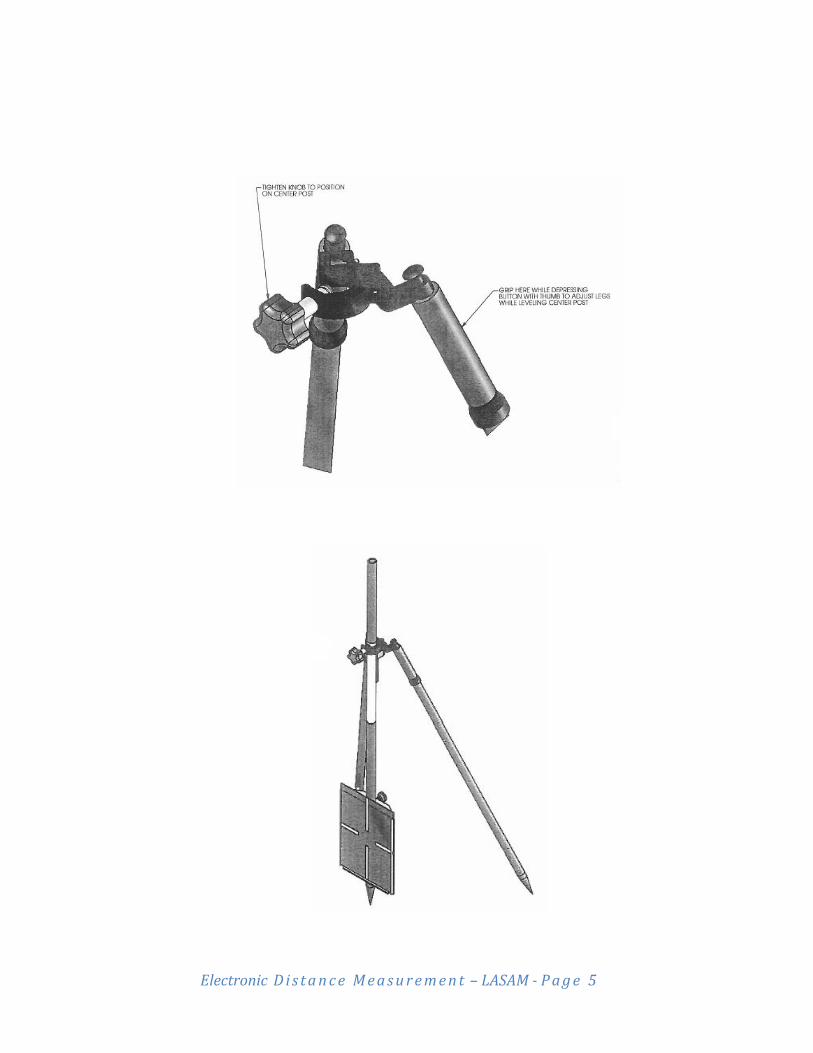
ElectronicDi s tance Measurement – LASAM ‐ Page 5
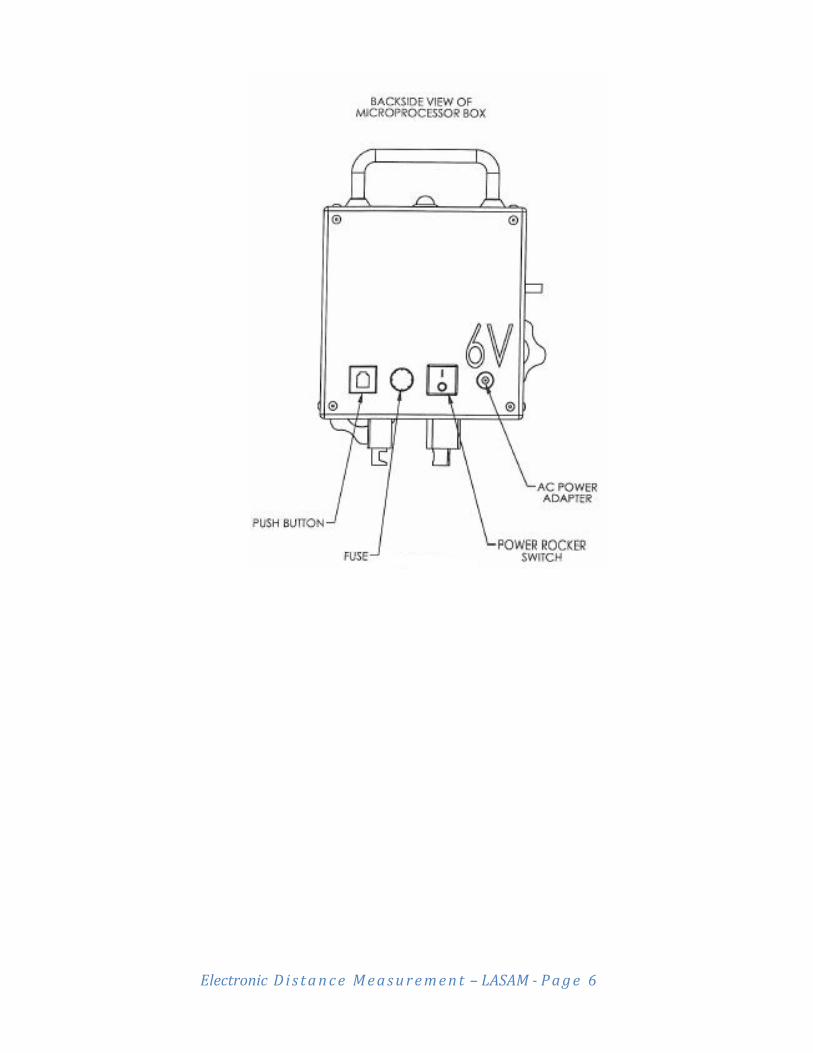
ElectronicDi s tance Measurement – LASAM ‐ Page 6
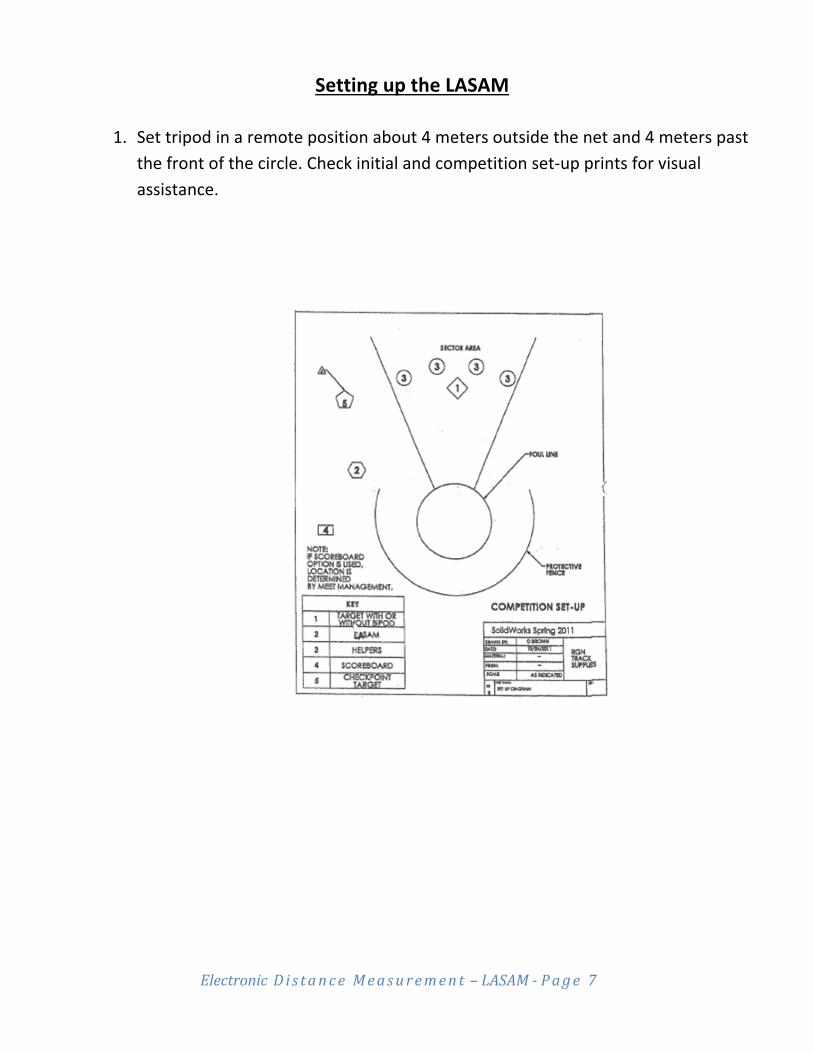
ElectronicDi s tance Measurement – LASAM ‐ Page 7
Setting up the LASAM
1. Set tripod in a remote position about 4 meters outside the net and 4 meters past
the front of the circle. Check initial and competition set‐up prints for visual
assistance.
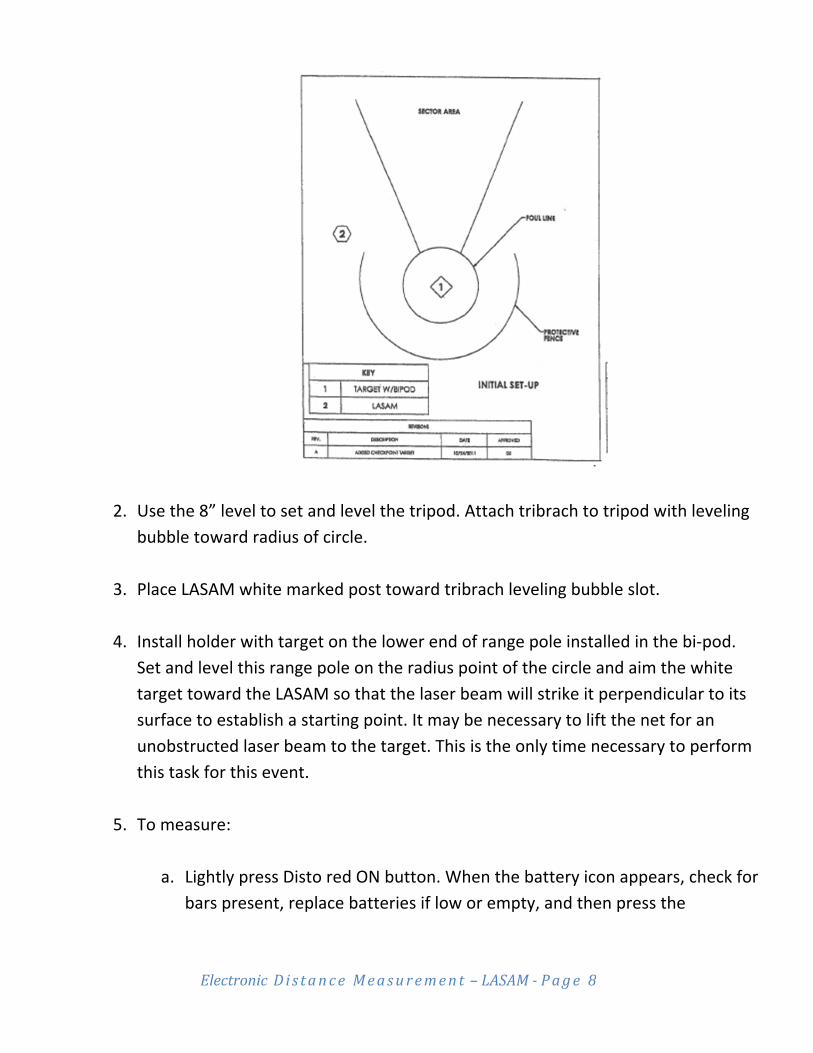
ElectronicDi s tance Measurement – LASAM ‐ Page 8
2. Use the 8” level to set and level the tripod. Attach tribrach to tripod with leveling bubble toward radius of circle.
3. Place LASAM white marked post toward tribrach leveling bubble slot.
4. Install holder with target on the lower end of range pole installed in the bi‐pod. Set and level this range pole on the radius point of the circle and aim the white
target toward the LASAM so that the laser beam will strike it perpendicular to its
surface to establish a starting point. It may be necessary to lift the net for an
unobstructed laser beam to the target. This is the only time necessary to perform
this task for this event.
5. To measure:
a. Lightly press Disto red ON button. When the battery icon appears, check for
bars present, replace batteries if low or empty, and then press the
ElectronicDi s tance Measurement – LASAM ‐ Page 9
bluetooth button.
b. Press LSAM rocker switch on.
c. When the bluetooth icon changes to dark blue color and beeps to indicate
linking up, then follow screen instructions.
d. Press remote control red button to continue.
e. Select measurement unit.
f. Select event.
g. Level Disto to reach 0.0 on Disto screen. The press red remote button.
h. Continue with directions on LASAM screen. Following these sequences
prepares the LASAM for measurement when the lead official is ready to call
athletes for their competitive efforts.
NOTE: When the optional scoreboard is present, press its ON switch prior to
starting this measure process.
6. A scope is provided to aid in locating the red laser dot in the outdoor arena. Some
“sighting in” may be necessary. It is best to do this in your practice time before
competition and with only the Disto on. The Disto point‐finder (left side of ON
button) also called a range‐finder may now be useful. When activated the
operator selects 1x, 2x or 4x, to aid in placing the boxed crosshairs with red dot on
the target. The scope has vertical and horizontal screws to adjust as needed to
bring crosshairs to the laser red dot. When accomplished, turn Disto off as the
scope is now “sighted in” for future use. Excessive use of digital point finder
means extra battery drain.
7. 2‐3 helpers are needed in the sector area for marking landing spots and holding
ElectronicDi s tance Measurement – LASAM ‐ Page 10
the target. The target is reversible. Use the brown surface over 30m and the
reverse side for other distances. Signals of some sort should be established
between target holder and LASAM operator to communicate.
8. It is wise to use the target system set‐up in the bi‐pod configuration until the
helper feels confident in his/her ability to set and plumb up the range pole prior to
signaling ready for measure. When confident, the bi‐pod is not needed. After a
measurement is established, the directions on the LASAM screen will direct the
operator to prepare for the next measurement on the target.
9. Additional caution/advice follows. Press no additional Disto buttons. This may
interfere with the normal set‐up of the device and provide incorrect
measurements. If a button is accidentally pressed do not panic, and if you cannot
clear up the situation, it may better to power the device off and start over.
NOTE: Remember at start up time it is necessary to press TWO DISTO BUTTONS
ONLY – ON and the BLUETOOTH ICON which is just to the right of the ON button.
In normal measurement process the digital point finder may be the only additional
button necessary. DO NOT GO INTO THE MENU OF THE DISTO.
10. To power off the device, press the DISTO CLEAR OFF button and the black rocker off switch 0 symbol on the LASAM.
11. A checkpoint target is included with the LASAM. It is suggested in laser measuring
work that a small target is placed at an inconspicuous spot 1‐2 m outside the
landing sector and its distance of perhaps 15 to 20 m from the competition circle
be recorded. The operator is to use this target merely as a “checkpoint” re‐
measure from time to time during the competition just to make sure all is well
with the measuring work.
NOTE: The LASAM is not waterproof. It is necessary that a pop style tent be
available for rainy conditions.

ElectronicDi s tance Measurement – LASAM ‐ Page 11
NOTE: The device has its own 6V internal battery. A charger is included. Charge
LASAM for 8‐12 hours prior to use. The LASAM black rocker switch must be in the
OFF position when charging. NEVER ATTEMPT TO USE THE LASAM WHILE
CHARGING.
An Auxiliary 6V battery is included for all day track & field competitions. Use the
“S” hook provided to suspend the battery bag below the tribrach. Install the
auxiliary battery power plug into the power jack of the LASAM normally used for
charging. This provides additional long lasting 6V power. A charger is also
provided. Full charge is accomplished in 8‐12 hours.
NOTE: The Disto uses two alkaline or lithium AA batteries. Always keep fresh sets
of batteries with the unit. Replace batteries when battery icon is visible and low
on bars. It is wise to start each competition with new batteries and if a change is
needed during competition take care of it between flights or prior to a finals
session.

ElectronicDi s tance Measurement – LASAM ‐ Page 12
This page left intentionally blank.

This Electronic Distance Measurement (EDM) manual was prepared by Dave
Woytek of the USATF Lake Erie Association.
The information contained in this manual is comprised of instructions and
protocols developed by numerous sources. The information provided was written
so as to apply to any handheld device, any handheld field event administration
(HFEA) software package, and any electronic measurement device (EMD).
FinishLynx, LaserLynx and the FinishLynx logo are registered trademarks of Lynx
System Developers, Inc.
Windows 95, Windows 98, Windows 2000, Windows ME, Windows NT, Windows
XP, Windows Vista, Windows 7, Windows 8, Windows CE (WinCE), and ActiveSync
are registered trademarks of Microsoft Corp.
Palm OS, Palm Computing, Graffiti, and HotSync, are registered trademarks of
Palm, Inc. Palm, the Palm logo, and the HotSync logo are trademarks of Palm, Inc.
Disto is a registered trademark of Leica Geosytems AG.
LASAM® is a registered trademark of Gill Athletics
Acknowledgments
USATF Training Sub-Committee. Electronic Measurement Device (EMD) Protocol
for Long Throws
USATF New England Association. Protocol for setting up the Electronic Distance
Measuring Device.
Heckel, Mark. Electronic Distance Measurement- Horizontal Jumps
Hume, James. Electronic Measurement Device (EMD) Set-Up Protocol
Hume, James. Hume’s Guide for Running FieldLynx
Kuo, Justin. LaserLynx Setup on a Tablet PC
Kuo, Justin. Remote Distance Measurement
McGloin, James. FieldLynx for Vertical Jumps
Gill Athletics. E73705 PV/HJ Laser Measuring Stick
Gill Athletics. E73730 LJ TJ Laser Measuring Device
Lynx Systems Developers, Inc. LaserLynx Lite User’s Guide
Leica Geosytems AG Disto™. A5 Manual
Leica Geosytems AG Disto™. D5 Manual
Leica Geosytems AG Disto™. D510 Manual
PENTAX Industrial Instruments Co., Ltd. PENTAX Electronic Total Station
Instruction Manual
PENTAX Industrial Instruments Co., Ltd. PENTAX Electronic Total Station Quick
Reference Guide
RGN Track Supplies. LASAM® Instruction Manual
Seiko Sports Timing. Electronic Distance Measurement System (EDM)
Seiko Sports Timing. Video Distance Measurement System (VDM)
TimeTronics. EDM Manual
For use by non-profit organizations for athletics officials training purposes only