1 2 - latemodel.cachefly.netlatemodel.cachefly.net/downloads/instructions/atm... · 5 vehicle...
TRANSCRIPT

1
OPERATING INSTRUCTIONS
DASHLINK OBD DONGLE & APP SYSTEM
Introduction
2650-1900-77 Rev. A
DashLink is an App that acts as an advanced in-car computer. It is currently available for iOS and Android devices. DashLink can display information that is missing from the vehicle’s factory dash, as well as calculate additional data not available directly from the vehicle. This data can be customized to display any number or combination of gauges.DashLink is a read-only diagnostic logging tool. It cannot flash, modify, tune, CASE relearn, injector test, or any other bi-directional control, and as such is 100% warranty friendly.
Download and Install the AutoMeter DashLink App from the Google PlayTM Store or App Store® on your mobile device.
Plug the DashLink Dongle into your vehicle’s OBDII Diagnostic Port. It is typically located on the lower left side of the driver’s side foot well.
1 2

2
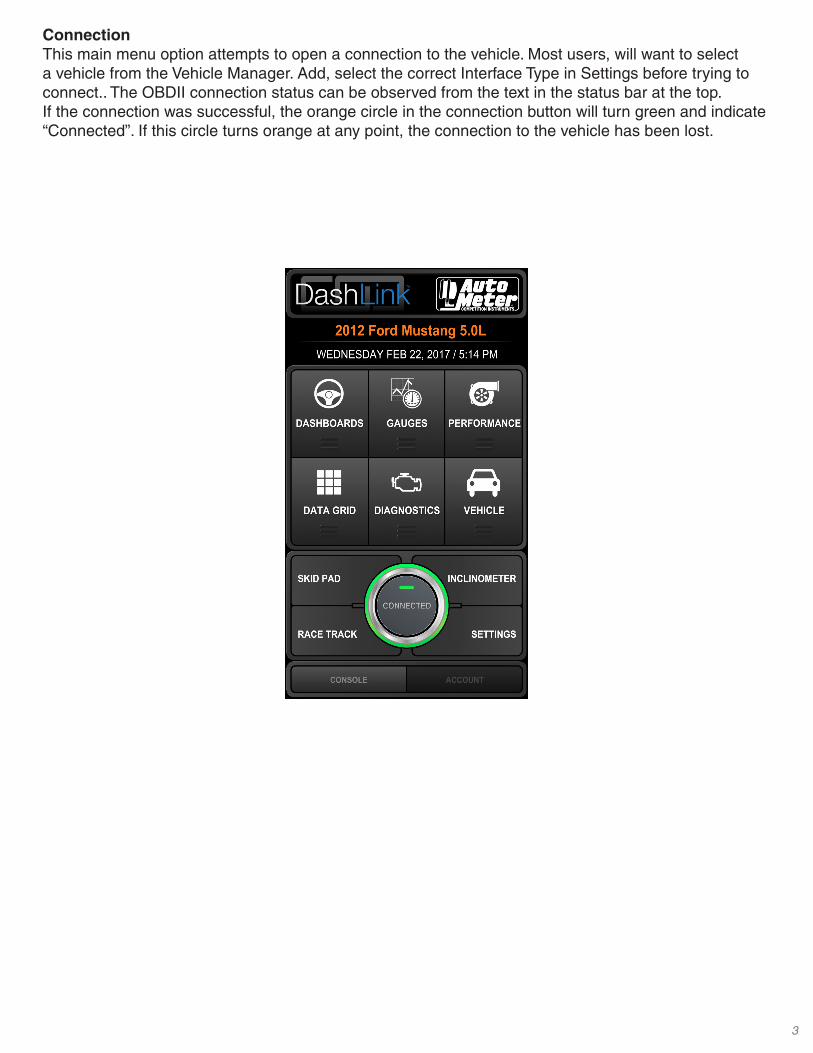
Main MenuThe main menu provides access to all of the different features the App has to offer. At the top the menu will show the currently selected vehicle and the current date/time. The date changes to a status message when the software is busy connecting, or when doing any other lengthy operations. The connection button indicates the current connection status. It is orange when not connected to a vehicle, yellow while a connection is in progress, or green when successfully connected.
The available sub-screens are:
• Connection• Dashboards• Gauges• Performance• Data Grid• Diagnostics• Vehicle Manager• Skid Pad• Inclinometer• Race Track• Settings• Advance Settings• Console
3
ConnectionThis main menu option attempts to open a connection to the vehicle. Most users, will want to select a vehicle from the Vehicle Manager. Add, select the correct Interface Type in Settings before trying to connect.. The OBDII connection status can be observed from the text in the status bar at the top.If the connection was successful, the orange circle in the connection button will turn green and indicate “Connected”. If this circle turns orange at any point, the connection to the vehicle has been lost.

4
Vehicle ManagerThe Vehicle Manager allows creation and management of the list of vehicles. Data logs are stored according to the vehicle currently selected, as well as data such as the fuel economy history and trip stats. Supported PID (Parameter ID) lists and vehicle protocol are also saved. The Vehicle Manager allows the user to revalidate PID’s, which can (in certain cases) provide some extra PIDs. The PID validation will request supported PIDs from the vehicle. A new vehicle profile should be created for each new vehicle connected. Two vehicles of the same model can have different PID sets. For iPhone, press the + button near the top to add a vehicle, or on Android press menu and select Add Vehicle. Tap on each field to enter the information about the vehicle, these can be edited later if needed. If DashLink has a package of enhanced PIDs for the vehicle, it is important to make sure the year/make/model/type are all correct. It is recommended to use the predefined values when possible. If the vehicle does not appear in the predefined values, there are no enhanced PIDs available for the vehicle. Use the ‘other’ field in this case, or leave it blank. Fill in engine displacement, fuel type, and fuel tank size -- the vehicle owner’s manual will usually have this information. Only fill in vehicle settings if the correct values are available. Incorrect values will skew the data calculations. Leave all PID settings blank, unless told by Support to fill these in. Certain vehicle settings are not applied until the next time a connection is established to the vehicle. If the module is already connected, reconnect after changing vehicle settings.
5
Vehicle Advanced SettingsFuel Tank Capacity – Fuel tank capacity is needed for the fuel level, distance to empty, and time to empty. The vehicle owners manual is a good source for this number.Brake Specific Fuel Consumption – BSFC is the amount of fuel consumed to make one horsepower for one hour. This setting is directly related to the horsepower and torque values. Default is .44 if left blank. We suggest .40-.50 for naturally aspirated engines, .50-.60 for forced induction engines, and .30-.40 for turbo diesel engines.Volumetric Efficiency – Volumetric efficiency is needed to tune the accuracy of calculated parameters when either SAE.MAP or SAE.MAF is not available on the vehicle. A value between 60 to 85 is a good starting point. If left blank we use default.MAF PID, MAP PID, Lambda PID – These settings should remain unchanged unless instructed to fill them in by AutoMeter Technical Support.Tire Size Specification – Enter in the tire size from the vehicle, this can be found on the sidewall of the tire. This is used to calculate the gear selection page. An example entry for a tire size would be 255/60R17 .Final Drive Ratios – This value is used for the gear calculations. First, enter the axle ratio, which is the drive ratio/gear ratio/etc. An example would be 3.73 ratio. Enter the transmission ratios for each forward gear. This information is in the vehicle’s owners manual.Additional Weight – This is the sum of the weight of the driver, any passengers, and the contents of the trunk. Note: the weight of the fuel is calculated automatically.Frontal Area – This is the frontal area of the vehicle, this will require additional research to find the value. It is not required.Maximum Engine Speed – This value is used for the gear calculations. Set this value to engine redline.Minimum Engine Speed – This value is used for the gear calculations. Set this value to the minimum allowed speed of the engine in gear of the engine.Shift Point – This value is used for the gear calculations. Set this value to the most economical shift RPM.Speed Correction – This value is used to correct the vehicle speed on the dash display. It is a multiplier, 1.0 is no change.

6
DashboardsThe Dashboard screen allows real time viewing of data through a number of gauges called Skin Sets. A Skin Set is a collection of dashboards, each dashboard defining exactly 1 screen worth of gauges. Change to a different skin set at any time by going to Settings.The default Tuxedo skin is a very detailed skin showing nearly every gauge possibly available from your vehicle. Not all vehicles will support all PIDs, some PIDs may be unable to be displayed.• Performance dashboard for RPM, speed, power, torque, and boost.• The Fuel Economy page shows instant and average MPG, as well as an MPG graph over the last 3 hours. This also displays fuel level remaining and distance to empty. Press the Fuel Economy tab a second time to gain access to a sub menu with a reset button.• The Trip Stats page shows a large number of trip stats, everything from min/max engine speed, to driving time, and even calculated CO2 emissions and fuel costs. Press this tab to reveal additional sub-trips, or a reset button.• The Engine dashboard shows various engine health gauges. MAP, MAF, intake temp, timing advance, and fuel trims are just a few. Touch the Engine tab again to get to the second Engine dashboard.• Fill-up allows the user to enter fuel cost and the number of gallons you added to the tank. This screen is optional and is only used to help calibrate the fuel economy PIDs further. IMPORTANT NOTE: If DashLink is not used for the entire tank, DO NOT USE THIS SCREEN. Using this screen for an incomplete monitoring session will falsely, and drastically, skew your economy numbers.Many gauges are able to be tapped and toggled to a different gauge, other gauges can be tapped to cycle between the current, min, and max values for that gauge. Tapping the gauge in the area of the numbers displayed will switch to the alternate display.

7
GaugesThe Gauges page provides an easy way to add custom or AutoMeter gauges, which can be viewed on the screen. To edit simply touch and hold the screen, an edit button will drop on the screen like the center picture. After pressing the edit button at the top the edit options will open.
Once the edit menu is open, touch a gauge to edit it or move it. Click the bottom buttons to add another page to put gauges on or to add another gauge. To edit a gauge, touch a gauge while the edit bar is at the bottom. This opens a menu like the one pictured on the bottom left. Click on “Edit Gauge” to see the gauge edit menu like the picture on the bottom right. From there select the Style and Type, then set the corresponding PIDs. Be sure to set the Needle PID to one that is supported by the vehicle.
Low Limit is the lowest number on the gauge (can be a negative number), High Limit is the largest number on the gauge. Multiplier is used to make the displayed number smaller(example both RPM 1000, 2000, 3000, etc would be displayed). If the multiplier setting is set to ‘1000’, it would show 1,2,3, etc.) High Limit will be automatically changed with the multiplier.

8
PerformanceThis page can record the vehicles acceleration performance. On the bottom left toggle to change from ¼ mile to 0-60.On the ¼ mile timer, you have the optional start button in red, press that to start the stage light countdown, providing a reaction time with the results, otherwise simply start moving to start the recording. Stop and start again to record a new time. DashLink will fill the bars of each increment as the vehicle crosses 60 feet, 330 feet, 1/8 mile, etc. View the results break down by pressing the green results button.
The 0-60 timer will track 0-60 time by default. When the vehicle starts moving, the timer starts. It will show the time when the vehicle reaches 60. The edit button can be used to change it to any start speed and stop speed (EX: 30-50 MPH). The time will start when the vehicle reaches the starting speed and will stop at the stop speed. To try again, slow down below the minimum speed and start again. The reset button will clear the Fastest and Last ET numbers.
9
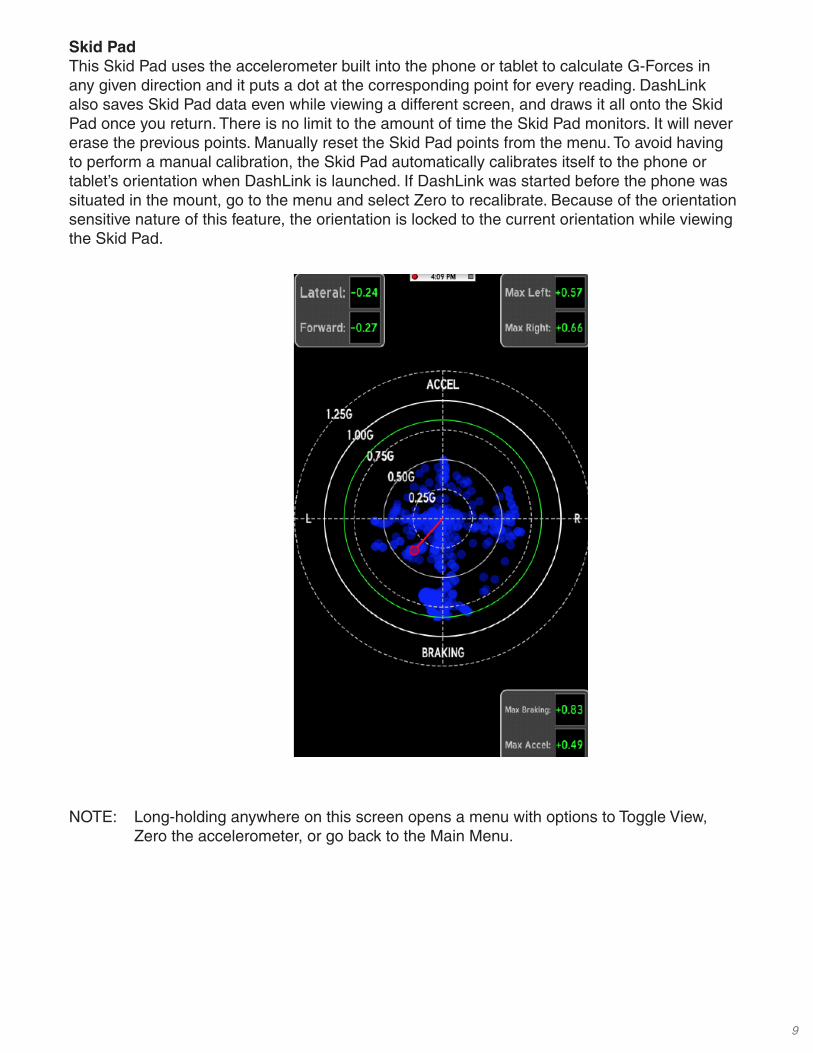
Skid PadThis Skid Pad uses the accelerometer built into the phone or tablet to calculate G-Forces in any given direction and it puts a dot at the corresponding point for every reading. DashLink also saves Skid Pad data even while viewing a different screen, and draws it all onto the Skid Pad once you return. There is no limit to the amount of time the Skid Pad monitors. It will never erase the previous points. Manually reset the Skid Pad points from the menu. To avoid having to perform a manual calibration, the Skid Pad automatically calibrates itself to the phone or tablet’s orientation when DashLink is launched. If DashLink was started before the phone was situated in the mount, go to the menu and select Zero to recalibrate. Because of the orientation sensitive nature of this feature, the orientation is locked to the current orientation while viewing the Skid Pad.
NOTE: Long-holding anywhere on this screen opens a menu with options to Toggle View, Zero the accelerometer, or go back to the Main Menu.
10
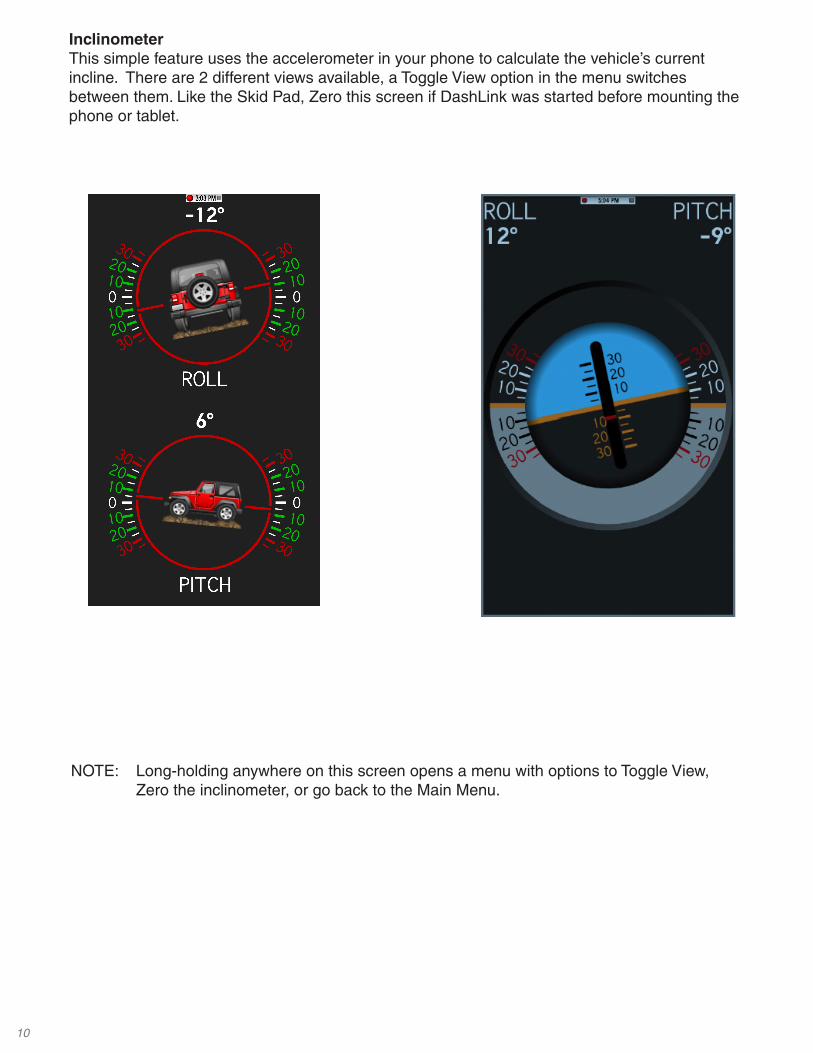
InclinometerThis simple feature uses the accelerometer in your phone to calculate the vehicle’s current incline. There are 2 different views available, a Toggle View option in the menu switches between them. Like the Skid Pad, Zero this screen if DashLink was started before mounting the phone or tablet.
NOTE: Long-holding anywhere on this screen opens a menu with options to Toggle View, Zero the inclinometer, or go back to the Main Menu.
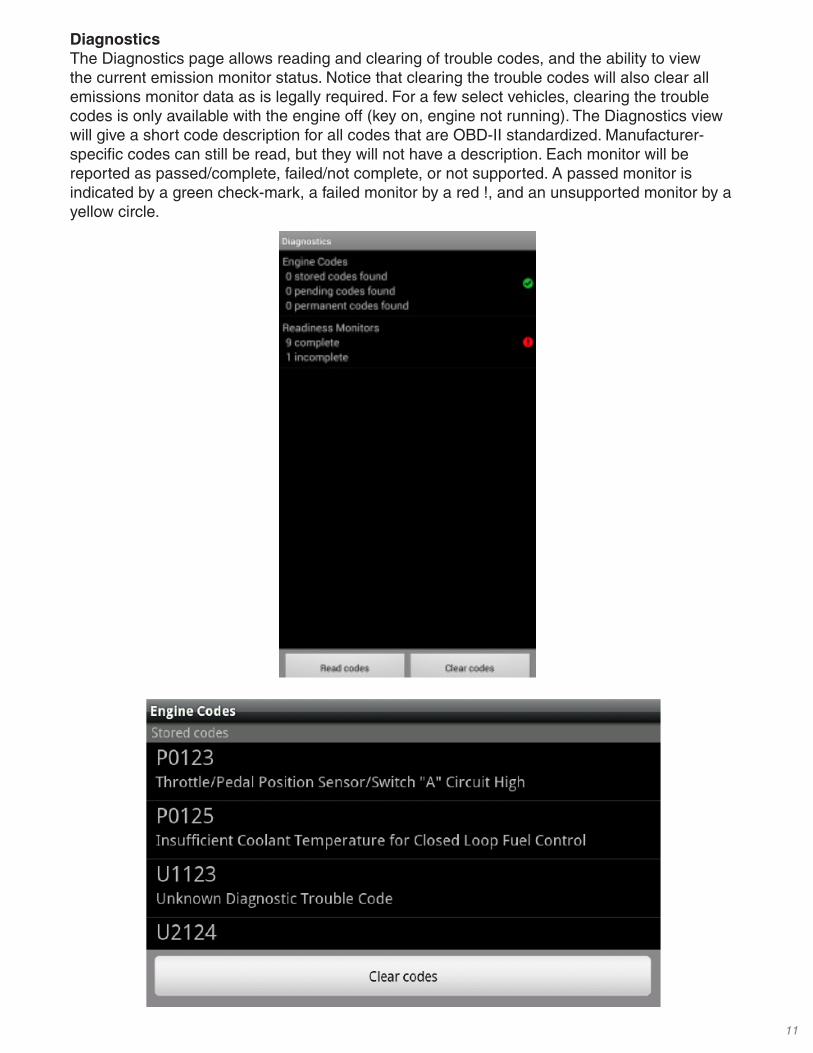
11
DiagnosticsThe Diagnostics page allows reading and clearing of trouble codes, and the ability to view the current emission monitor status. Notice that clearing the trouble codes will also clear all emissions monitor data as is legally required. For a few select vehicles, clearing the trouble codes is only available with the engine off (key on, engine not running). The Diagnostics view will give a short code description for all codes that are OBD-II standardized. Manufacturer-specific codes can still be read, but they will not have a description. Each monitor will be reported as passed/complete, failed/not complete, or not supported. A passed monitor is indicated by a green check-mark, a failed monitor by a red !, and an unsupported monitor by a yellow circle.

12
ConsoleThe Console shows debugging information and may also have extra details about a failed connection.
Data GridWhile data logging is possible from the Dashboards screen, only the data on the current dashboard (not the current Skin Set) will be saved. If dashboards are switched in the middle of a data logging session, the data will change to the new dashboard PID set. The Data Logging view allows selection of which PIDs are being monitored or recorded. You can also see which PIDs are supported by the vehicle, by selecting Add PID and looking for SAE.XXX PIDs with a green check-mark. CALC.XXX PIDs are always shown as supported, and are calculated by DashLink. Notice that Persistent PIDs (see Settings for more information) are monitored while in the Data Logging view, and will still be included in any log files you create.

13
SettingsSee the following sub-sections for information.

14
Settings - General
Start in Dashboards This setting, when enabled, will have DashLink go straight to the Dashboards screen after launching.Show Status Bar This will turn on or off DashLink’s built-in status bar. This bar shows the clock, connection status, and current data logging status.Fullscreen Mode Fullscreen mode is where DashLink will use the entire screen of your device. When on, it will hide the iOS/Android status bar to give more screen area to DashLink.Enable Demo mode This will have many gauges sweep through some demo values while you are not connected to a vehicle. These numbers are not based on the vehicle. Do not expect to see numbers similar to these while using a real vehicle.Loop playback When turned on, this will loop the data log when it reaches the end, instead of ending playback and returning to normal data monitoring. Enable GPS This setting allows users to disable GPS and location data in DashLink to save battery.Enable Accelerometer This setting allows users to disable accelerometer data in DashLink to save battery. Not all screens will function correctly with this turned off.Screen Orientation This setting allows users to force a specific screen orientation, which can be used to ensure DashLink does not change orientation due to cornering/driving forces.
Settings - Setup
Date & Time Configure the date and time formats used in the Trip stats dashboard in the default Tuxedo skin.Currency Symbol This setting will change the currency symbol displayed by the Tuxedo skin. Changing this setting will only change the symbol, it will not convert between different currenciesUnits The Units settings will change the way the CALC PIDs and the Tuxedo dashboards display data. Here you can select between different English and Metric unit systems for many different types of data.Settings - Parameters
Persistent PIDs Persistent PIDs are PIDs that are monitoring the entire time DashLink is running -- regardless of which screen or dashboard is currently being viewed. If you have an older phone and are noticing performance problems, start by turning this setting off.
Notice that disabling Persistent PIDs means that DashLink will not track fuel economy data or trip stats unless you are viewing those dashboards respectively. If DashLink is used mainly for its enhanced fuel economy and trip data, this is best left on.

15
Settings - Manage PID Scripts
This allows you to import custom PID scripts on Android devices.
AUTOMETER PRODUCTS, INC. 413 W. Elm St., Sycamore, IL 60178 (866) 248-6357Email: [email protected]
2650-1900-77 Rev. A 4/4/17© 2017 AutoMeter Products. Inc.
12 MONTH LIMITED WARRANTYAUTOMETER Products, Inc. warrants to the consumer that all AUTOMETER High Performance products purchased from an Authorized AUTOMETER Reseller will be free from defects in material and workmanship for a period of twelve (12) months from date of the original purchase. Products that fail within this 12 month warranty period will be repaired or replaced at AUTOMETER’s option, when determined by AUTOMETER that the product failed due to defects in material or workmanship. This warranty is limited to the repair or replacement of parts in the AUTOMETER High Performance product and the necessary labor done by AUTOMETER to effect the repair or replacement of the AUTOMETER High Performance product. In no event shall AUTOMETER’s cost to repair or replace an AUTOMETER High Performance Product under this warranty exceed the original purchase price of the AUTOMETER High Performance Product. Nor shall AUTOMETER Products, Inc. be responsible for special, incidental or consequential damages or costs incurred due to the failure of an AUTOMETER High Performance Product. This warranty applies only to the original purchaser of the AUTOMETER High Performance Product and is non-transferable. This warranty also applies only to AUTOMETER High Performance Products purchased from an Authorized AUTOMETER Reseller. All implied warranties shall be limited in duration to the said 12 month warranty period. Breaking the instrument seal, improper use or installation, accident, water damage, abuse, unauthorized repairs or alterations voids this warranty. AUTOMETER disclaims any liability for consequential damages due to the breach of any written or implied warranty on all products manufactured by AUTOMETER Products, Inc. For a comprehensive listing of Un-Authorized AUTOMETER Resellers please visit www.autometer.com/autometerlocator/index/unauthorized.