05man1070.a5 cloneselect imager operator...
TRANSCRIPT

Control #: 05MAN1070.A5
Effective Date: xx-xx-xx
ECO #: 3092
CloneSelect Imager OPERATOR MANUAL
SOFTWARE RELEASE 1.3.73.1073
MOLECULAR DEVICES > CLONESELECT IMAGER OPERATOR MANUAL
Molecular Devices > 2 of 69
Contents
Introduction ....................................................................................... 5
CloneSelect Imager ............................................................................................... 5
System Features ................................................................................................... 5
Before Starting ..................................................................................................... 5
Hardware Guide .................................................................................. 6
Layout and Dimensions ......................................................................................... 6
Indicator Lights ............................................................................................. 6
Setup .................................................................................................................... 8
Calibration and Alignment ..................................................................................... 9
Power-Up Procedure ............................................................................................. 9
Starting up CloneSelect Imager ........................................................ 10
CloneSelect Imager Software .............................................................................. 10
Menu Options ...................................................................................................... 11
File Menu ..................................................................................................... 11
View Menu ................................................................................................... 11
Tools Menu .................................................................................................. 12
Help Menu ................................................................................................... 12
Main Navigation Screen ...................................................................................... 13
New Process Tab .......................................................................................... 13
Templates Tab .............................................................................................. 13
Recent Processes Tab .................................................................................... 13
Open Process Button ..................................................................................... 13
CloneSelect Imager Processes .......................................................... 14
Image Microplate ................................................................................................ 14
Imaging Criteria Setup .................................................................................. 14
Select Source ............................................................................................... 16
Load Plate .................................................................................................... 17
Focus .......................................................................................................... 17
Alignment .................................................................................................... 19
Imaging....................................................................................................... 19
Results ........................................................................................................ 19
Remove Plate ............................................................................................... 20
Finish .......................................................................................................... 20
Review Results ................................................................................................... 21
MOLECULAR DEVICES > CLONESELECT IMAGER OPERATOR MANUAL
Molecular Devices > 3 of 69
Load Results ................................................................................................ 21
Analysing Results .......................................................................................... 25
Migration Application ..................................................................................... 38
Batch Microplate Imaging ................................................................................... 46
E-Scope ............................................................................................................... 46
How to Image Using E-Scope ......................................................................... 46
Plate Alignment .................................................................................................. 47
Eject Plate Carrier ............................................................................................... 47
Data Analysis Examples .................................................................... 49
Monoclonality Workflow ...................................................................................... 49
Colony Forming Assay Workflow ......................................................................... 52
Health and Safety ............................................................................. 55
Transport and Storage ........................................................................................ 55
Lifting Points....................................................................................................... 55
External Covers ................................................................................................... 55
Electrical Safety .................................................................................................. 55
Drive Safety ........................................................................................................ 55
Noise Levels ........................................................................................................ 55
Maintenance ..................................................................................... 56
Cleaning CloneSelect Imager .............................................................................. 56
Regular Maintenance .......................................................................................... 56
Daily ........................................................................................................... 56
Weekly ........................................................................................................ 56
Annually ...................................................................................................... 56
General Precautions ............................................................................................ 56
Technical Specifications .................................................................... 57
Dimensions: ........................................................................................................ 57
Operating Environment: ...................................................................................... 57
Electrical Supply: ................................................................................................ 57
Symbols on Equipment ........................................................................................ 57
Appendix A ....................................................................................... 58
Compatible Plate Types ....................................................................................... 58
Appendix B ....................................................................................... 59
Well List File Format ........................................................................................... 59
Appendix C ........................................................................................ 60
Setting up Cell Number Estimation ..................................................................... 60
Setting up a dilution series............................................................................. 60

MOLECULAR DEVICES > CLONESELECT IMAGER OPERATOR MANUAL
Molecular Devices > 4 of 69
Creating a cell number estimation formula ....................................................... 61
Appendix D ....................................................................................... 63
Requesting a License .......................................................................................... 63
Installing a License ............................................................................................. 66
Index ................................................................................................ 68
Contact Details ................................................................................. 69
MOLECULAR DEVICES > CLONESELECT IMAGER OPERATOR MANUAL
Molecular Devices > 5 of 69
Introduction
CloneSelect Imager
CloneSelect™ Imager is an automated CCD camera-based system for imaging and confluence
determination of cells growing in microplates.
Note: CloneSelect Imager is strictly for research use only and is not intended or
recommended for the diagnosis of disease in humans or animals.
If the instrument is used in a manner not specified in this manual the protection provided by
the equipment may be impaired.
For correct functioning of the system, users must have read and write access to the
c:\ProgramData\Genetix\Fusion\CloneSelectImager config folder.
System Features � Automated, rapid confluence determination of cells growing in microplates
� Automatically plots time course of cell growth
� Cell number estimation
� Monoclonality indication
� Colony forming assay
� Fast scan and full scan modes
� Standard and high resolution imaging
� Exports data and images for further analysis
Before Starting
Before using the instrument it is very important to read this manual and understand all the safety instructions. Then follow the procedures as set out in the Power Up section

MOLECULAR DEVICES > CLONESELECT IMAGER OPERATOR MANUAL
Molecular Devices > 6 of 69
Hardware Guide
Layout and Dimensions
Indicator Lights
The indicator lights show the status of the instrument.
Plate Carrier The plate carrier consists of a glass plate surrounded by a vacuum bed seal. The microplate is
placed on the plate carrier so that the skirt is over the vacuum bed seal. When the plate
carrier retracts into the instrument for imaging, two pushers gently push the microplate into
the back right corner of the plate carrier so that the plate is always in the correct position for
imaging.
Before imaging, a vacuum is applied under the plate so that it is held down flat on the glass
plate so that all the wells are in the same focal plane. This obviates the need to autofocus on
every well.
Leveling Feet The leveling feet can be adjusted by loosening the locking nuts and turning the feet until the
instrument is level and stable. Retighten the locking nuts once any adjustments have been
made.
MOLECULAR DEVICES > CLONESELECT IMAGER OPERATOR MANUAL
Molecular Devices > 7 of 69
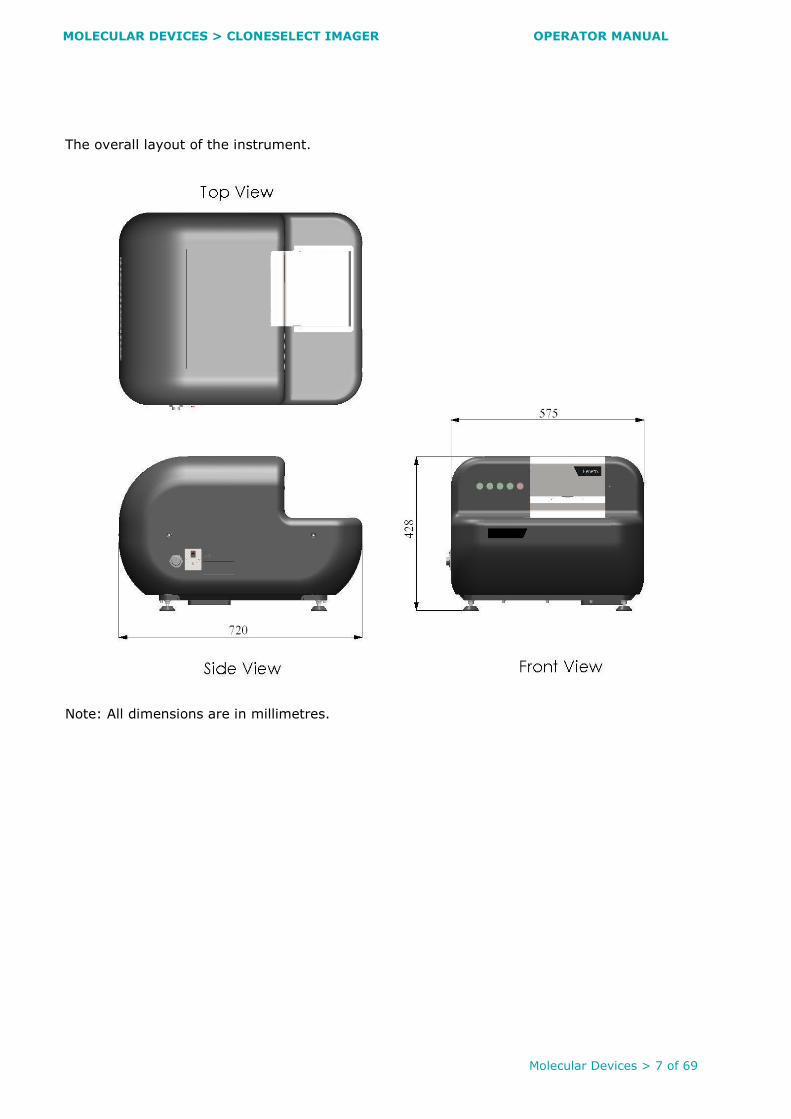
The overall layout of the instrument.
Note: All dimensions are in millimetres.
MOLECULAR DEVICES > CLONESELECT IMAGER OPERATOR MANUAL
Molecular Devices > 8 of 69
Setup
Locating CloneSelect Imager CloneSelect Imager should be situated on a stable, level surface. Level the instrument by
loosening the locking nuts and turning the leveling feet to ensure that it is stable and not able
to move. Retighten the locking nuts after adjustment.
Workstation CloneSelect Imager is supplied with a Dell T3500 Workstation with special hardware and
software to support the imaging function. Do not attempt to use any other workstation to
operate CloneSelect Imager.
The workstation is supplied with Microsoft Windows 7™ and will require security configuration
if it is to be connected to a network. If that is done, ensure that no changes are made to the
configuration of the private network connection to the CloneSelect Imager since that will stop
it operating.
Warning – CloneSelect Imager is optimized for use with Microsoft Windows 7TM and Microsoft OfficeTM with standard English settings. The performance of the system may be affected if these settings are changed.
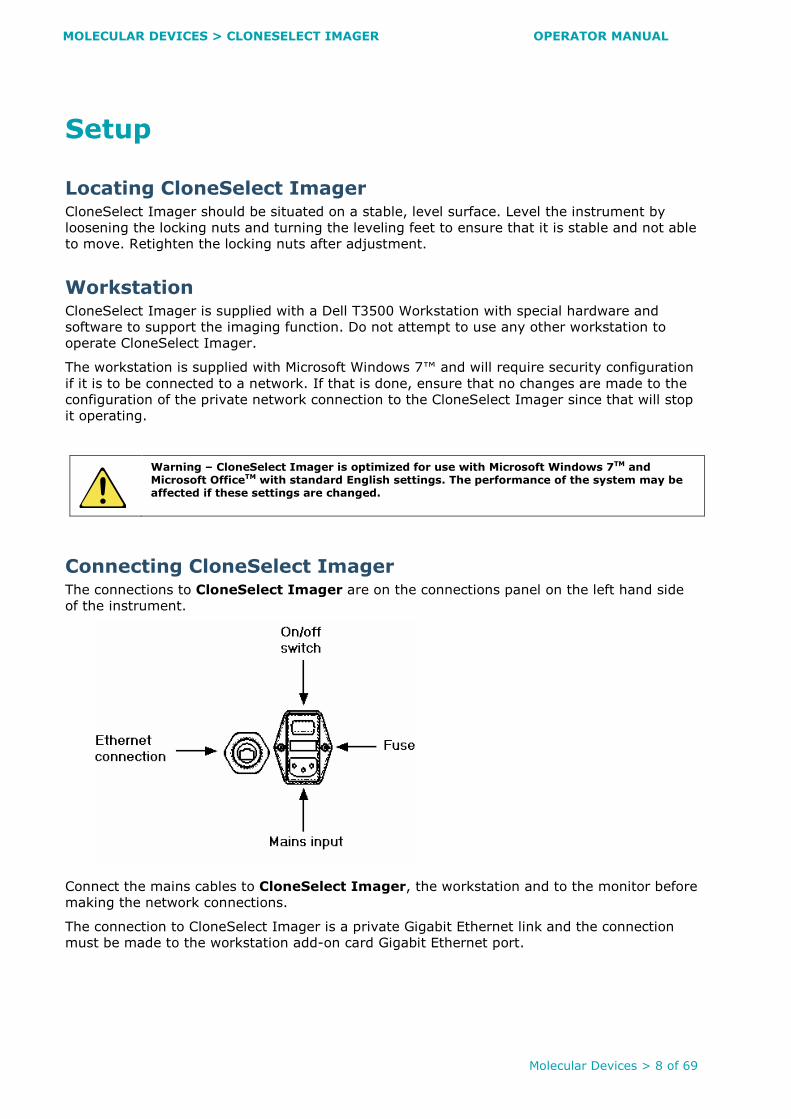
Connecting CloneSelect Imager The connections to CloneSelect Imager are on the connections panel on the left hand side
of the instrument.
Connect the mains cables to CloneSelect Imager, the workstation and to the monitor before
making the network connections.
The connection to CloneSelect Imager is a private Gigabit Ethernet link and the connection
must be made to the workstation add-on card Gigabit Ethernet port.

MOLECULAR DEVICES > CLONESELECT IMAGER OPERATOR MANUAL
Molecular Devices > 9 of 69
Calibration and Alignment Calibration and alignment are performed by a Molecular Devices engineer before CloneSelect
Imager is shipped. If the instrument requires recalibration and alignment follow the
procedure below:
� Select the E-Scope process on the Main Navigation screen.
� Select the PetriWell W1500 plate as the plate to be imaged.
� Start the run and insert the Fixed Cell plate (shipped with instrument) when prompted.
� Align on to well A1 of the Fixed Cell plate.
� On the image selection screen select the lower left hand quadrant image of well D1.
� Adjust the focus until the cells on the Fixed Cell plate are in focus.
� Image wells A12 and H12 and check that the focus is correct in each image (focus should
not be changed at this point, just reviewed).
If the focus is not correct, contact Molecular Devices to arrange for the machine to be re-
aligned.
Power-Up Procedure The recommended power-up procedure is:
� Switch on CloneSelect Imager.
� Wait for the Ready light to illuminate.
� Leave CloneSelect Imager in the ‘Ready’ state for more than 5 minutes prior to use (in
cases where the unit is cold to the touch, wait for 30 minutes prior to use).
� Switch on the workstation and start CloneSelect Imager software by clicking on the
desktop shortcut. The instrument is now ready for use.
Rebooting CloneSelect Imager If the instrument has to be rebooted, switch it off. Wait for 30 seconds then switch on again.
Once the Ready light is illuminated the instrument is ready to run.
MOLECULAR DEVICES > CLONESELECT IMAGER OPERATOR MANUAL
Molecular Devices > 10 of 69
Starting up CloneSelect Imager
Before using CloneSelect Imager, please refer to the relevant sections of this manual for
important setup, maintenance and safety information.
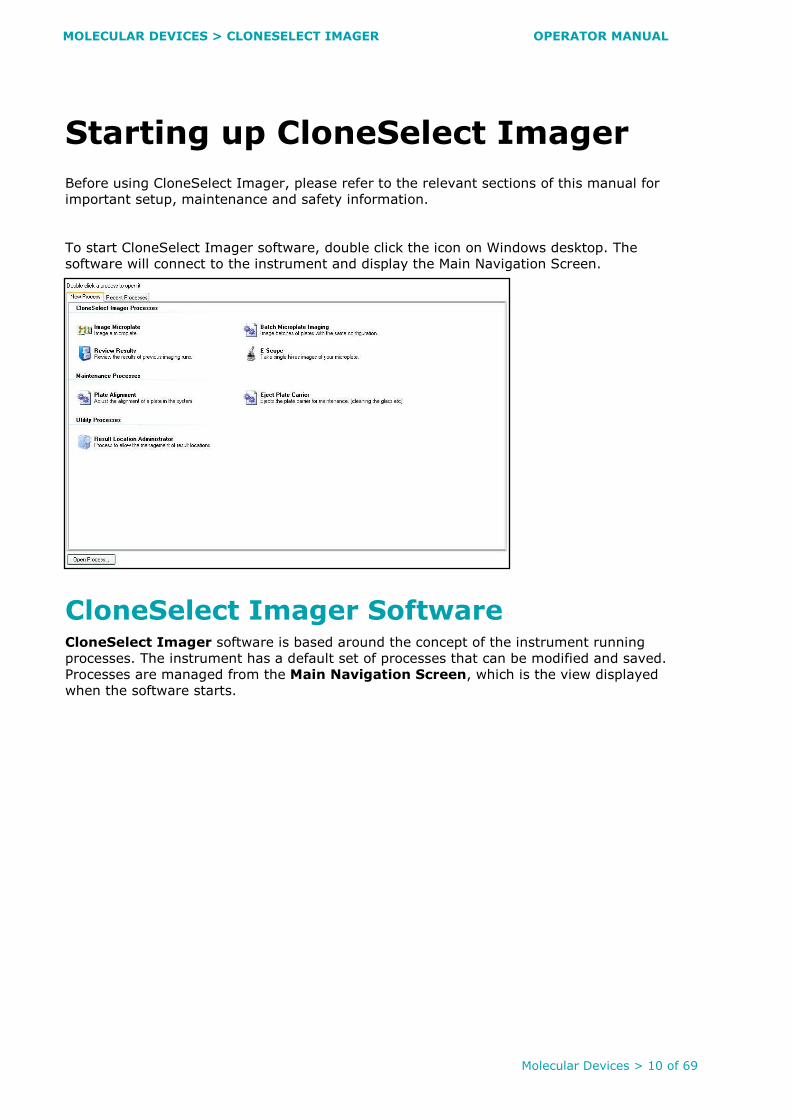
To start CloneSelect Imager software, double click the icon on Windows desktop. The
software will connect to the instrument and display the Main Navigation Screen.
CloneSelect Imager Software CloneSelect Imager software is based around the concept of the instrument running
processes. The instrument has a default set of processes that can be modified and saved.
Processes are managed from the Main Navigation Screen, which is the view displayed
when the software starts.

MOLECULAR DEVICES > CLONESELECT IMAGER OPERATOR MANUAL
Molecular Devices > 11 of 69
Menu Options The same menu is displayed in all the windows, but some item availability may vary between
windows.
File Menu
Open Process
Allows previously saved processes to be opened.
Save Process
Saves the current process.
Save Process As
Allows the current process to be saved with a different name or location.
Close Process
Closes the current process and re-opens the Main Navigation Screen.
Save As Template
Saves the current process as a template.
Recent Processes
Allows a recent process to be selected and opened.
Switch User
Allows a user to log off and another user to sign on when User Authorization is licensed within
the software.
Exit
Exits CloneSelect Imager software.
View Menu
Properties
The view of the process window when a process's properties are being set and prior to
starting the process.
Progress
The view of the process window when a process is executing.
Administrate Properties
Can be used to alter the way properties are displayed. It is not recommended that users alter
these properties.
MOLECULAR DEVICES > CLONESELECT IMAGER OPERATOR MANUAL
Molecular Devices > 12 of 69
Tools Menu
Configuration
Provides access to the configuration settings for the instrument. It is strongly recommended
that only Molecular Devices staff alter these settings.
Hardware Model View
Accesses the datum positions for the instrument. It is strongly recommended that only
Molecular Devices staff alter these settings.
Prepare Error Report
A wizard will create a data file containing the configuration and recent log files to help
Molecular Devices Support diagnose recent problems.
Help Menu
About
Displays the version numbers of the software modules. Most of these have the same version
number so, if asked to provide the software version number, give this number unless
otherwise directed.
Online Support
Opens a web browser on the Online Support web page. This function only operates if the
workstation has an internet connection, e.g. via a network.
CloneSelect Imager User Guide
An electronic summary of this operator manual is available; however this guide is the
comprehensive overview of the CloneSelect Imager software.
MOLECULAR DEVICES > CLONESELECT IMAGER OPERATOR MANUAL
Molecular Devices > 13 of 69
Main Navigation Screen The main screen enables navigation of CloneSelect Imager imaging and maintenance
processes.
New Process Tab
The New Process tab provides CloneSelect Imager Processes for imaging microplates or
reviewing results. It also contains Maintenance Processes for various setup features of the
system.
CloneSelect Imager Processes Image Microplate
Standard imaging of microplates.
Review Results
Review of results from previous runs including confluence, cell number estimation and
monoclonality analysis.
Batch Microplate Imaging
Imaging of batches of plates with the same configuration.
E-Scope
High resolution imaging of microplates.
Maintenance Processes Plate Alignment
Allows the alignment of a plate to be adjusted in the system.
Eject Plate Carrier
Ejects the plate carrier for cleaning and removal of microplates.
Utility Processes Results Location Administrator
Allows the management of the results locations
Templates Tab
Saved templates can be retrieved by clicking on this tab. Template files can be saved as .gft
files using the ‘Save process as template...’ option found in Image Microplate.
Recent Processes Tab
Recent processes can be retrieved by clicking on this tab. Recent processes can be saved as
.gfp files using the ‘Save process’ option found in Image Microplate.
Open Process Button
Opens the same Open Process dialogue box accessed by the File > Open Process menu item.
MOLECULAR DEVICES > CLONESELECT IMAGER OPERATOR MANUAL
Molecular Devices > 14 of 69
CloneSelect Imager Processes
This section explains in detail how to run processes on CloneSelect Imager.
Image Microplate This is the default process for imaging cells in microplates to determine confluence and carry
out further analysis, such as cell number estimation and monoclonality.
In the Main Navigation Screen clicking on Image Microplate, or opening a previously
saved Image Microplate-based process, will open the process. Once opened a summary
window will be displayed in order for the process criteria to be set up.
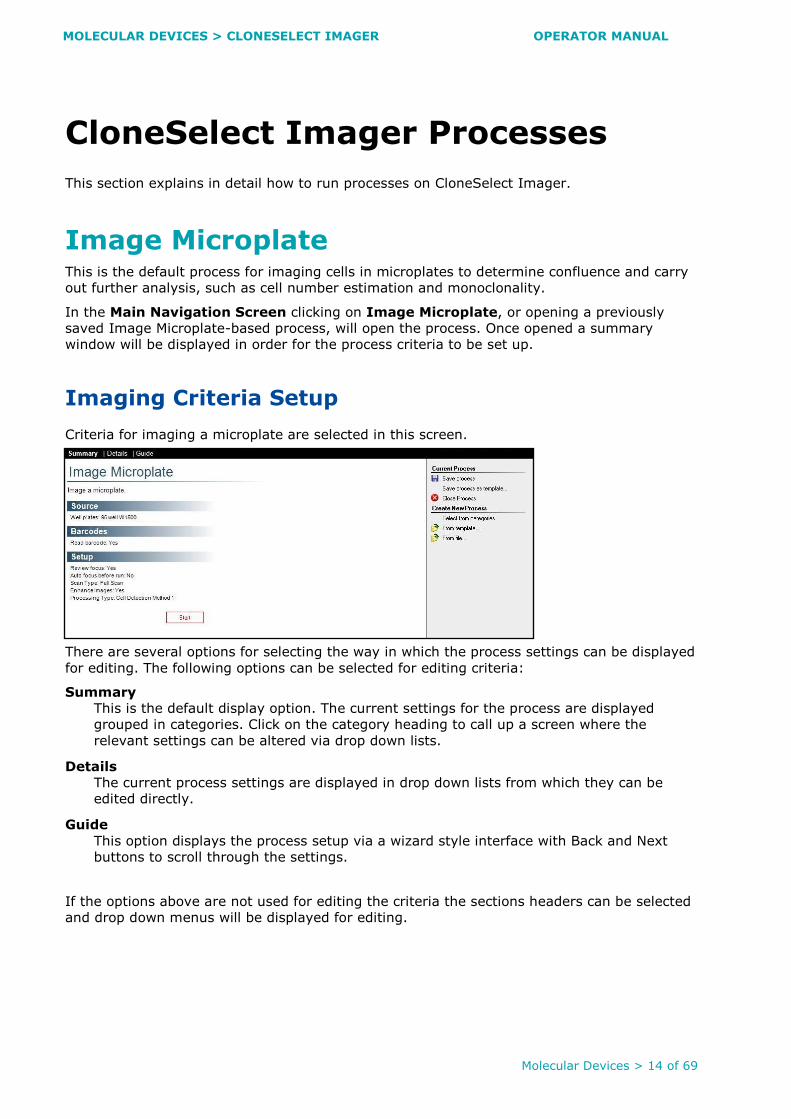
Imaging Criteria Setup
Criteria for imaging a microplate are selected in this screen.
There are several options for selecting the way in which the process settings can be displayed
for editing. The following options can be selected for editing criteria:
Summary
This is the default display option. The current settings for the process are displayed
grouped in categories. Click on the category heading to call up a screen where the
relevant settings can be altered via drop down lists.
Details
The current process settings are displayed in drop down lists from which they can be
edited directly.
Guide
This option displays the process setup via a wizard style interface with Back and Next
buttons to scroll through the settings.
If the options above are not used for editing the criteria the sections headers can be selected
and drop down menus will be displayed for editing.

MOLECULAR DEVICES > CLONESELECT IMAGER OPERATOR MANUAL
Molecular Devices > 15 of 69
Source Select the microplate to be imaged from the drop
down list. The list contains a number of compatible
microplates from a variety of manufacturers. If the
desired plate does not appear in the drop down
menu list, contact Molecular Devices.
Barcodes Enable or disable barcode reading by ticking the
box. If barcode reading is enabled and the
instrument fails to read the barcode, or barcode
reading is not enabled, a screen is displayed
prompting for a barcode/plate name to be entered
manually. The barcode/name can also be edited
within Review Results at a later stage if required.
Setup Review focus
If enabled the Focus window is displayed before the microplate is imaged to allow the
focus and brightness settings to be checked before imaging a microplate. Individual
images can also be saved from the Focus window.
Auto-focus before run
If enabled the instrument carries out an auto focus procedure before imaging the
microplate.
Scan type
Select Full Scan to image the entire area of each well in the microplate. In Partial Scan
an area from the centre of each well is imaged. This speeds up imaging and is suitable
when the data from the centre of each well is representative of the well as a whole.
Enhance Images
Selecting this option will normalize / flatten the background of the images to enhance
them for display.
Processing Types
The following processing types have been developed for cell and colony detection.
Cell Detection Method 1
Formally know as ‘Typical Adherent Cell Confluence’, this algorithm is ideal for settled
suspension cells and adherent cells with good contrast.
Cell Detection Method 2
This algorithm helps to detect cell samples when contrast is low, cells are clumped or at
the edge of the well.
Cell Detection Method 3
This algorithm is designed to detect colonies and distinguish them from any artefacts
around the edges of the colonies.
Start Once the process's properties have been set, click Start to enter the process.
MOLECULAR DEVICES > CLONESELECT IMAGER OPERATOR MANUAL
Molecular Devices > 16 of 69
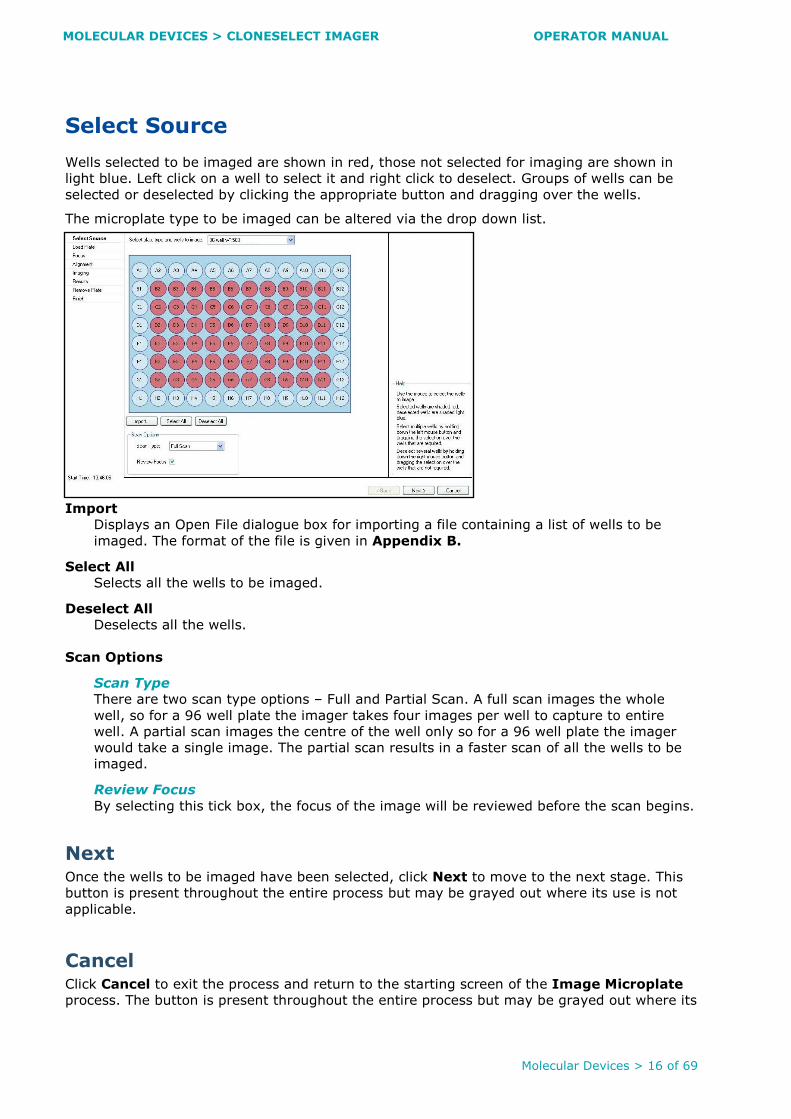
Select Source
Wells selected to be imaged are shown in red, those not selected for imaging are shown in
light blue. Left click on a well to select it and right click to deselect. Groups of wells can be
selected or deselected by clicking the appropriate button and dragging over the wells.
The microplate type to be imaged can be altered via the drop down list.
Import
Displays an Open File dialogue box for importing a file containing a list of wells to be
imaged. The format of the file is given in Appendix B.
Select All
Selects all the wells to be imaged.
Deselect All
Deselects all the wells.
Scan Options
Scan Type
There are two scan type options – Full and Partial Scan. A full scan images the whole
well, so for a 96 well plate the imager takes four images per well to capture to entire
well. A partial scan images the centre of the well only so for a 96 well plate the imager
would take a single image. The partial scan results in a faster scan of all the wells to be
imaged.
Review Focus
By selecting this tick box, the focus of the image will be reviewed before the scan begins.
Next Once the wells to be imaged have been selected, click Next to move to the next stage. This
button is present throughout the entire process but may be grayed out where its use is not
applicable.
Cancel Click Cancel to exit the process and return to the starting screen of the Image Microplate
process. The button is present throughout the entire process but may be grayed out where its
MOLECULAR DEVICES > CLONESELECT IMAGER OPERATOR MANUAL
Molecular Devices > 17 of 69
use is not applicable.
Load Plate
The plate carrier is ejected to enable the loading of the
microplate. Ensure that well A1 is to the back right corner of
the plate carrier.
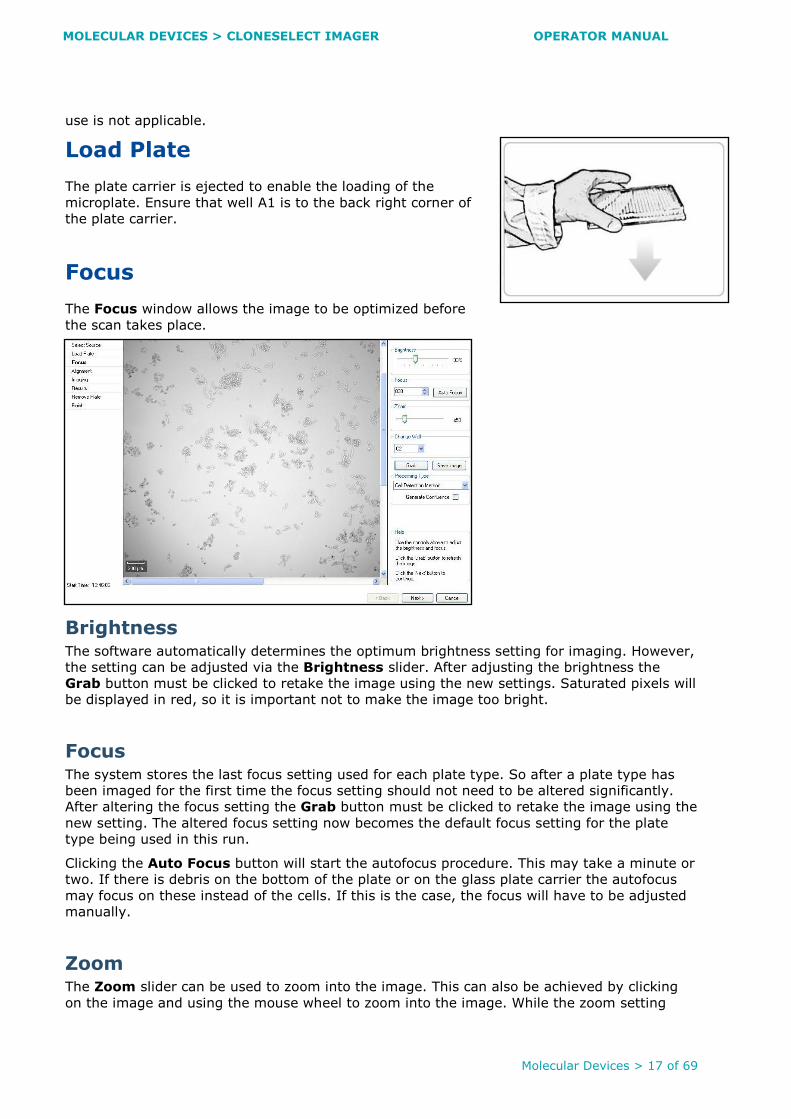
Focus
The Focus window allows the image to be optimized before
the scan takes place.
Brightness The software automatically determines the optimum brightness setting for imaging. However,
the setting can be adjusted via the Brightness slider. After adjusting the brightness the
Grab button must be clicked to retake the image using the new settings. Saturated pixels will
be displayed in red, so it is important not to make the image too bright.
Focus The system stores the last focus setting used for each plate type. So after a plate type has
been imaged for the first time the focus setting should not need to be altered significantly.
After altering the focus setting the Grab button must be clicked to retake the image using the
new setting. The altered focus setting now becomes the default focus setting for the plate
type being used in this run.
Clicking the Auto Focus button will start the autofocus procedure. This may take a minute or
two. If there is debris on the bottom of the plate or on the glass plate carrier the autofocus
may focus on these instead of the cells. If this is the case, the focus will have to be adjusted
manually.
Zoom The Zoom slider can be used to zoom into the image. This can also be achieved by clicking
on the image and using the mouse wheel to zoom into the image. While the zoom setting

MOLECULAR DEVICES > CLONESELECT IMAGER OPERATOR MANUAL
Molecular Devices > 18 of 69
figure (e.g. x 99) displayed to the right of the slider is black the system is zooming optically.
When the figure turns red the system is zooming digitally and some pixilation of the image
may be seen.
Change Well By default focusing is performed on well A1 or the first well of the plate to be imaged if A1 is
not selected to be imaged. Different wells can be selected to focus on from the drop down
list. After selecting the desired well the Grab button must be clicked to display the newly
selected well.
Grab This Grab button must be clicked after altering any settings to retake the image.
Save Image Clicking on Save Image will display a Save File dialogue that will allow the current image
used for focusing to be saved. Images can be saved in .bmp, .jpg or .png format.
Processing Type This drop down menu displays the three Cell Detection Methods to choose from. See page
15 for the description of the three Cell Detection Methods.
Generate Confluence Selecting this box will identify and highlight in green all objects within the well.
Scale Bar A scale bar is displayed in the lower left of the window. This resizes automatically as the
zoom level is altered.
MOLECULAR DEVICES > CLONESELECT IMAGER OPERATOR MANUAL
Molecular Devices > 19 of 69
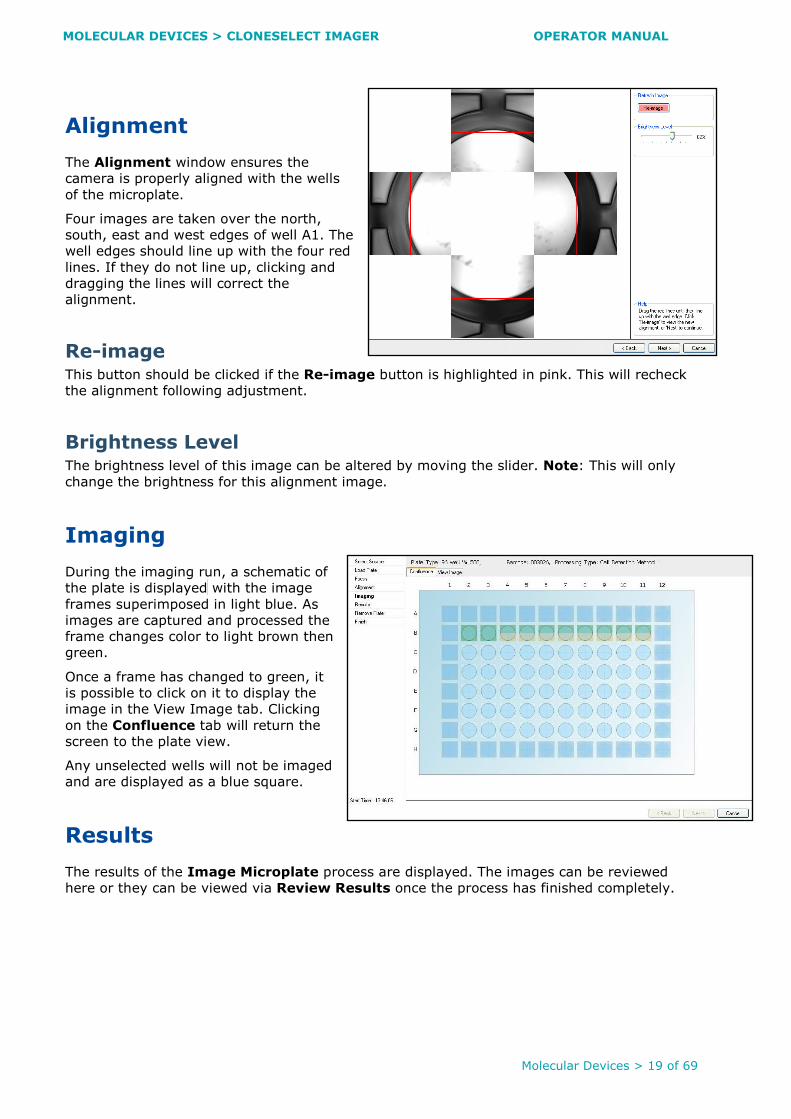
Alignment
The Alignment window ensures the
camera is properly aligned with the wells
of the microplate.
Four images are taken over the north,
south, east and west edges of well A1. The
well edges should line up with the four red
lines. If they do not line up, clicking and
dragging the lines will correct the
alignment.
Re-image This button should be clicked if the Re-image button is highlighted in pink. This will recheck
the alignment following adjustment.
Brightness Level The brightness level of this image can be altered by moving the slider. Note: This will only
change the brightness for this alignment image.
Imaging
During the imaging run, a schematic of
the plate is displayed with the image
frames superimposed in light blue. As
images are captured and processed the
frame changes color to light brown then
green.
Once a frame has changed to green, it
is possible to click on it to display the
image in the View Image tab. Clicking
on the Confluence tab will return the
screen to the plate view.
Any unselected wells will not be imaged
and are displayed as a blue square.
Results
The results of the Image Microplate process are displayed. The images can be reviewed
here or they can be viewed via Review Results once the process has finished completely.

MOLECULAR DEVICES > CLONESELECT IMAGER OPERATOR MANUAL
Molecular Devices > 20 of 69
Remove Plate
When Imaging is complete the microplate will be ejected from the system. Within this screen
there is the option to repeat the imaging with another plate or move onto the next step of
ending the process.
Image Another Plate
Another plate can be imaged using the same configuration. This is achieved by clicking
Image Another Plate instead of Next. The plate carrier remains in the ejected position and
the Select Source screen is displayed ready to continue.
Finish
Clicking Finish will end the process.
The ‘Image Microplate’ page will be displayed. Once returned to this page there are several
options available.
‘Save process’ will save the current process to the ‘Recent Processes’ tab for future
access.
Note: A saved process can be changed.
‘Save process as template…’ will save the current
process to the ‘Template’ tab for future access.
Note: A saved template cannot be changed.
‘Close Process’ will close the process and return to the
Main Navigation Screen.
Results can be viewed via ‘Review Results’ after closing
the process (see Review Results section).
There are also options to select and run a new process or a template from a saved location
using the ‘From template’ and ‘From file’ locations.
MOLECULAR DEVICES > CLONESELECT IMAGER OPERATOR MANUAL
Molecular Devices > 21 of 69
Review Results The Review Results process allows previous imaging runs to be reviewed and also to carry
out further data processing, such as confluence, monitor cell growth, cell number estimation,
monoclonality analysis and migration assay analysis.
When an Image Microplate process has completed the results are automatically displayed
in a Review Results process.
Click on Review Results to start the process.
Load Results
The default location where imaging results are stored is the 'C:\Image Archive' folder. All the
image and data files for each individual run are stored in a folder that is named with the date
and time stamp for the run, e.g. 2005-11-01T11-52-10. Within the Image Archive folder, the
run folders are automatically organized into separate folders for each month, e.g. 2006-10.
When opening the Review Results process on the CloneSelect Imager the user is directed
straight to the results.
Plates imaged on the system are displayed as a list. If free space on the disk is running low,
the bar at the top of the window appears orange and a warning is displayed in the top right
corner. If disk space is getting critically low the bar is colored red.
Right click on a selected run to display the context menu.
If there is more than one copy of the same data set present in
the Image Archive folder, the following error message will be
displayed when trying to open the data set. The duplicated data
should be removed from the Image Archive folder.
If results have been deleted from the Image Archive folder, the data set will still
appear in the Review Results list. If this data set is selected the following error
message will appear.
Delete the data set from the Review Results screen to completly remove it.
MOLECULAR DEVICES > CLONESELECT IMAGER OPERATOR MANUAL
Molecular Devices > 22 of 69
Manage Results
VIEW RESULTS
To view results either double click on the data of interest or click to
highlight the data and then click View.
Multiple data sets can be selected by holding down the Shift or Control
keys while clicking the data of interest to select contiguous or non-
contiguous sets of data, respectively.
EXPORT
Displays a wizard that allows data from the selected results to be exported. A variety of
formats are available.
ARCHIVE
The results for runs stored in the default location (C:\Image Archive) can be archived to
CD/DVD or the network/disk. Click Archive results to open the Archive window.
Note: Archive results is not available for results that are not stored in the default location. To
move such results to other locations or burn to CD/DVD, use Windows Explorer.
Note: Archive to CD/DVD is only available with Windows XP.
Archive to CD/DVD
Select CD/DVD as the archive type.
Archive Name
Give the archive an appropriate name.
Media Type
Select the media type from the drop down list. An explanation of the media types is given
at the right hand side of the screen.
Delete result images once written
If checked, the result files are deleted from the C:\Image Archive folder once the arching
has been performed. Select this if the archiving is being carried out to free space on the
C Drive.
Archive

MOLECULAR DEVICES > CLONESELECT IMAGER OPERATOR MANUAL
Molecular Devices > 23 of 69
Click Archive to start burning the results to CD/DVD.
Archive to Network/Disk
Select Network/Disk as the archive type.
Archive Location
Either type in the location for the archived files or click Browse to display a Save As
Dialogue to select the location.
Remove local copy once move complete
If checked, the results files are deleted from the C:\Image Archive folder once the
archiving has been performed. Select this if the archiving is being carried out to free
space on the C Drive
Archive
Click Archive to send the results to the selected destination.
DELETE
Deletes all the images and results for the selected data set.
RENAME
Barcodes/plate names can be re-named in case of any misnamed plates which will
subsequently be excluded from growth curve data. This can be achieved by clicking on the
barcode/name to be changed and clicking Rename. A small dialogue box will appear in place
of the barcode/name to enable a new barcode/name to be typed in its place.
Results Selection
RESULTS LOCATION
If results have been saved to a different location (not Image Archive) it is possible to browse
to another location using this feature.
MOLECULAR DEVICES > CLONESELECT IMAGER OPERATOR MANUAL
Molecular Devices > 24 of 69
Other Applications
MIGRATION
This option does not appear if the software has not been licensed for this application.
To view the data for a migration assay click on the relevant data set and click on the
Migration link to open the software application.
The migration data analysis screen will open and the data is displayed within three separate
tabs; Overview, Thumbnails and Well Data. When the data is opened the Thumbnails tab will
be grayed out and display ‘Loading…’. This allows extra time for the images to be loaded into
this data tab. Meanwhile, data can be viewed in the other tabs.
The Migration link is disabled and grayed out in the following scenarios:
� The selected results only have 1 time point.
The Migration link is enabled in the following scenarios:
� For a time point series, if different sets of wells have been imaged a message will appear
informing that the migration application is unavailable and the Review Results screen will
remain open to allow selection of other data.
� For a time point series, if there is a mix of Full and Partial scans with the same
plate/barcode the following will happen:
- If there is only one time point for each scan type, the migration option will
not be applicable and will be grayed out.
- If there is only one Full scan data set and more than one Partial data set, the
migration will only be applicable to the Partial scan data and vice versa.
- If there is more than one data
set for both the Full and
Partial scan a message will
appear allowing the selection
of the Full or Partial scans.
For more information on the Migration
application see pages 38 - 44.

MOLECULAR DEVICES > CLONESELECT IMAGER OPERATOR MANUAL
Molecular Devices > 25 of 69
Analysing Results
Once an imaging process has completed the results are displayed in the Results window,
which has several tabs: Confluence, View Image, Cell Number, Loci Count, Plate
Thumbnails, Growth Rate and Summary. This window opens with the Confluence tab
displayed by default.
The Plate Type, Barcode and Processing Type are all displayed above all the tabs to make
it clear which data set is being viewed throughout the processing.
Confluence Tab This tab displays the confluence level for each well, both graphically and as a list.
PLATE CONFLUENCE OVERVIEW
Each well is represented by a pie chart of the confluence level for that well. The pie charts are
color-coded such that low confluence is green and high confluence is red with shades in
between representing the intermediate levels.
Hovering the mouse over the pie chart area causes the percentage
confluence for all the wells to be displayed. Confluence that is detected as
lower than 5 percent is displayed at <5 and confluence above 80 percent is
displayed as >80.
Hovering over a well causes a tool tip to appear displaying the well co-ordinate and the
confluence for that well.
Clicking on a well will display the well image in the View Image tab. Right clicking on the
overview will allow the overview to be copied to clipboard.
MOLECULAR DEVICES > CLONESELECT IMAGER OPERATOR MANUAL
Molecular Devices > 26 of 69
CONFLUENCE DISTRIBUTION
The bar chart at the top right of the window shows the number of wells with a given
confluence level.
Dual Gates
The arrows pointing down at the top of the bar chart can be dragged across the chart. As
both lower and upper arrows are dragged, the corresponding confluence data is
displayed. Any wells that do not fall inside these lower and upper gates will be grayed
out. The text displayed below the chart will update to give the number of wells that fall
within the selected confluence (e.g. 10 out of 36 wells selected for analysis have a
confluence of between xx % and xx %).
Show Cumulative
When checked the individual bars in the chart will merge to show the confluence as
continuous data.
WELL CONFLUENCE
The confluence for each well is displayed in
the list to the right. If desired the well name
can be changed in this list by clicking twice
on the well name of choice.
This option will print a schematic
presentation of the confluence overview
in the plate format. The confluence
values are displayed within the wells
and the plate details are displayed at
the top of the overview.
Export
This will enable the list of wells and the
corresponding confluence to be exported
as a .csv or .xml file. The Data Export
wizard will guide the process of
exporting the confluence data. Cell
Number and Loci Count data can also be
exported at this point (See the relevant
sections for the description of exporting
these data sets).
The wizard provides the option to export
the data for the following time points:
ANNOTATION
By default the Annotation text box displays the number of wells that have been imaged.
This can be edited to more meaningful annotation. Note: This can not be changed when
viewing the data through a remote data viewer.
MOLECULAR DEVICES > CLONESELECT IMAGER OPERATOR MANUAL
Molecular Devices > 27 of 69
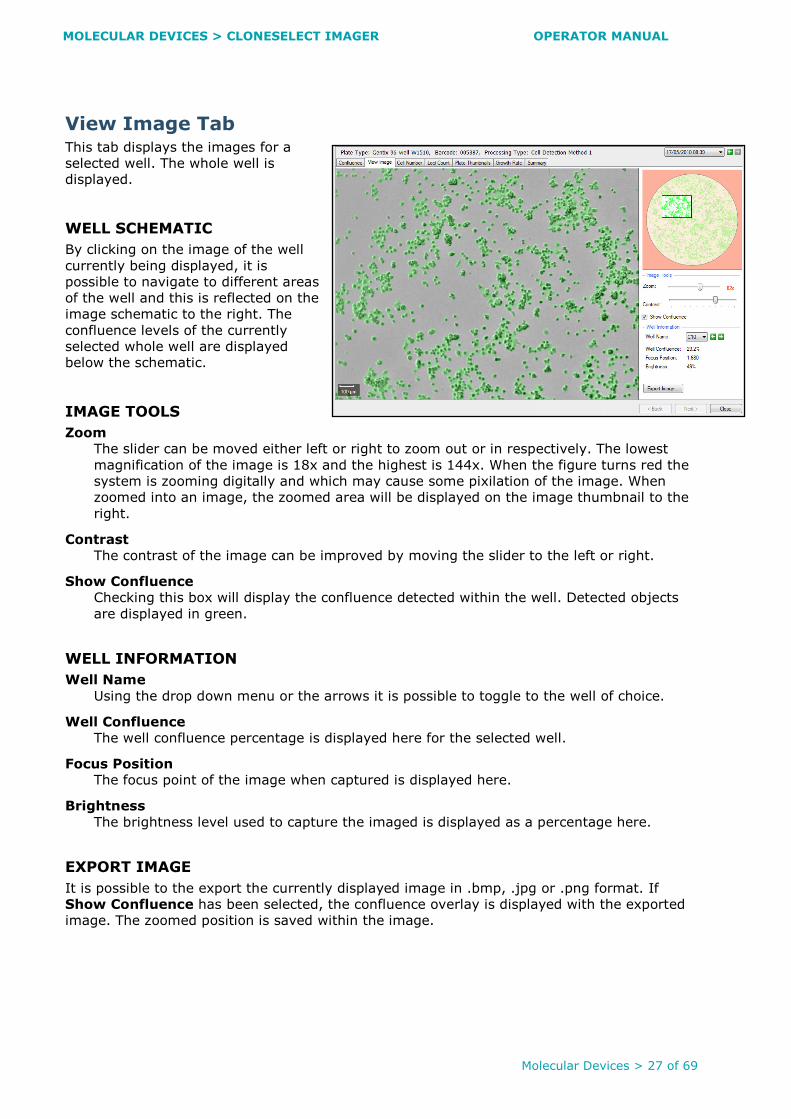
View Image Tab This tab displays the images for a
selected well. The whole well is
displayed.
WELL SCHEMATIC
By clicking on the image of the well
currently being displayed, it is
possible to navigate to different areas
of the well and this is reflected on the
image schematic to the right. The
confluence levels of the currently
selected whole well are displayed
below the schematic.
IMAGE TOOLS
Zoom
The slider can be moved either left or right to zoom out or in respectively. The lowest
magnification of the image is 18x and the highest is 144x. When the figure turns red the
system is zooming digitally and which may cause some pixilation of the image. When
zoomed into an image, the zoomed area will be displayed on the image thumbnail to the
right.
Contrast
The contrast of the image can be improved by moving the slider to the left or right.
Show Confluence
Checking this box will display the confluence detected within the well. Detected objects
are displayed in green.
WELL INFORMATION
Well Name
Using the drop down menu or the arrows it is possible to toggle to the well of choice.
Well Confluence
The well confluence percentage is displayed here for the selected well.
Focus Position
The focus point of the image when captured is displayed here.
Brightness
The brightness level used to capture the imaged is displayed as a percentage here.
EXPORT IMAGE
It is possible to the export the currently displayed image in .bmp, .jpg or .png format. If
Show Confluence has been selected, the confluence overlay is displayed with the exported
image. The zoomed position is saved within the image.

MOLECULAR DEVICES > CLONESELECT IMAGER OPERATOR MANUAL
Molecular Devices > 28 of 69
Cell Number Tab This tab displays the estimated number of cells in each well, both graphically and as a list.
The number of cells is estimated using a formula that can be created for each cell type from
the confluence readings of a standard plate containing known numbers of cells. See
Appendix C for a detailed procedure.
Each well contains a colored fill with the estimated cell number indicated by the color and size
of the fill area, with a large red fill area representing a high cell number and a small blue fill
area representing a low cell number. A color scale is shown to the left of the graphic.
Hovering the mouse over a well displays a tool tip giving the well co-ordinate and the
estimated cell number for that well.
SELECT CELL NUMBER FORMULA
This drop down menu will list all the formulas created
for estimating the number of cells per well.
Remove
Clicking this will remove the currently selected cell
number formula from the drop down menu.
Edit
Clicking this will allow editing to be carried out on
the currently selected cell number formula from
the drop down menu. A graph of cell number
against confluence for the formula is displayed. The handles at each end of the line can
be dragged to edit the formula. The formula is displayed at the top left and the edited
version is displayed immediately below it.
Discard can be clicked to abandon the edits and return to the Cell Number tab or Save
can be clicked to save the changes made to the cell number estimation formula. The
formula name can be changed in the top right hand box. There is also the option to
Regenerate Best Fit. Clicking on this will automatically generate the line of best fit if
required.

MOLECULAR DEVICES > CLONESELECT IMAGER OPERATOR MANUAL
Molecular Devices > 29 of 69
Create New
Clicking this will enable a new cell number estimation formula to be created.
Ensure that the confluence results displayed in the
Confluence Tab are those for a standard plate
containing known numbers of cells. The software
will automatically select up to twelve wells with
confluence values ranging between 10 % and 80 %
and display them at the bottom of the graph.
The name for the new formula should be entered in
the top right hand corner and the cell numbers for
each well should be entered into the corresponding
well number box to the left of the graph. Clicking
Create after all relevant information is entered will
create the new formula.
WELL CELL NUMBER
A list of estimated cell numbers is displayed to the
right of the plate overview.
Export will enable the lists of wells and the
corresponding Cell Number to be exported as a .csv
or .xml file. The Data Export wizard will guide the
process of exporting the Cell Number data.
Confluence and Loci Count data can also be
exported at this point (See the relevant sections for
this description of exporting these data sets).
MOLECULAR DEVICES > CLONESELECT IMAGER OPERATOR MANUAL
Molecular Devices > 30 of 69
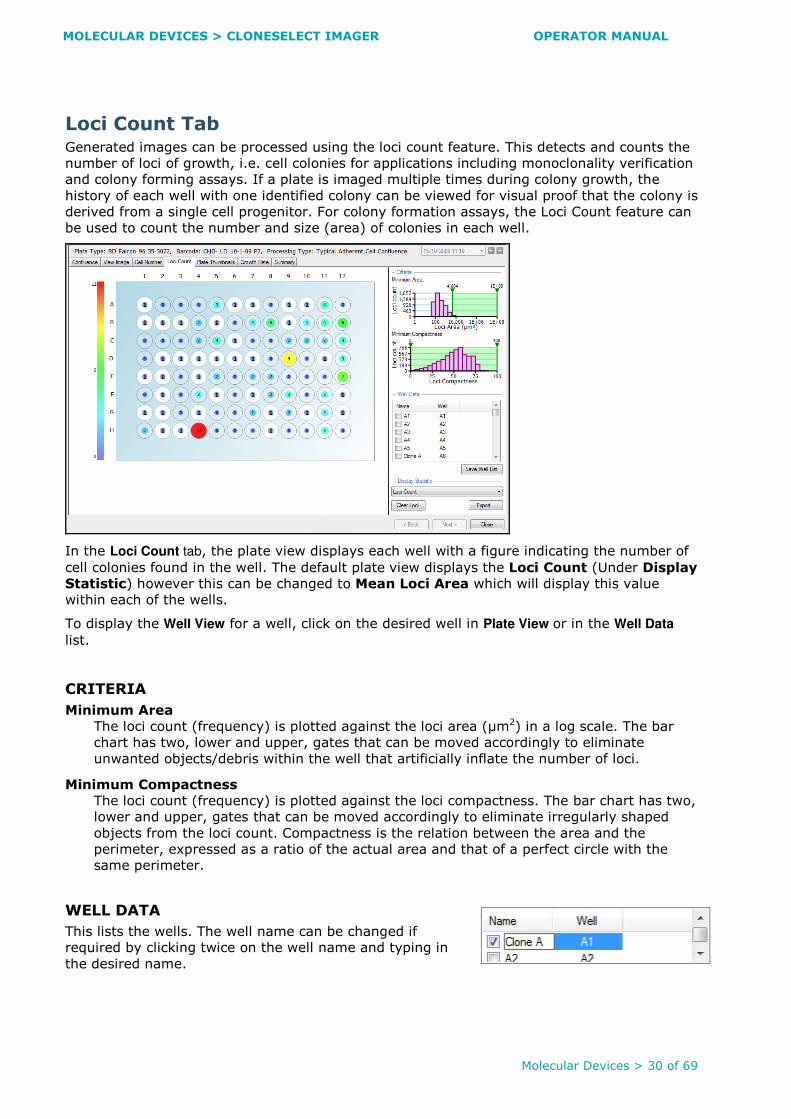
Loci Count Tab Generated images can be processed using the loci count feature. This detects and counts the
number of loci of growth, i.e. cell colonies for applications including monoclonality verification
and colony forming assays. If a plate is imaged multiple times during colony growth, the
history of each well with one identified colony can be viewed for visual proof that the colony is
derived from a single cell progenitor. For colony formation assays, the Loci Count feature can
be used to count the number and size (area) of colonies in each well.
In the Loci Count tab, the plate view displays each well with a figure indicating the number of
cell colonies found in the well. The default plate view displays the Loci Count (Under Display
Statistic) however this can be changed to Mean Loci Area which will display this value
within each of the wells.
To display the Well View for a well, click on the desired well in Plate View or in the Well Data
list.
CRITERIA
Minimum Area
The loci count (frequency) is plotted against the loci area (µm2) in a log scale. The bar
chart has two, lower and upper, gates that can be moved accordingly to eliminate
unwanted objects/debris within the well that artificially inflate the number of loci.
Minimum Compactness
The loci count (frequency) is plotted against the loci compactness. The bar chart has two,
lower and upper, gates that can be moved accordingly to eliminate irregularly shaped
objects from the loci count. Compactness is the relation between the area and the
perimeter, expressed as a ratio of the actual area and that of a perfect circle with the
same perimeter.
WELL DATA
This lists the wells. The well name can be changed if
required by clicking twice on the well name and typing in
the desired name.

MOLECULAR DEVICES > CLONESELECT IMAGER OPERATOR MANUAL
Molecular Devices > 31 of 69
DISPLAY STATISTIC
The drop down menu will display either the ‘Loci Count’ or the ‘Mean Loci Area’ on the
overview.
The ‘Clear Loci’ button allows the loci processing to be cleared. A prompt will appear
warning that all the current loci data will be lost if continuing.
Export will enable the lists of wells and the
corresponding Loci Count to be exported as a
.csv or .xml file. The Data Export wizard will
guide the process of exporting the Loci Count
data.
Confluence and Cell Number data can also be
exported at this point (See the relevant sections
for this description of exporting these data
sets).
The Loci Count criteria are automatically
populated from the gated Minimum Area and
Minimum Compactness graphs.
Histogram Bins: This option is used if the
Colony area distribution box is selected. This
value sets the number of equi-sized bins for
exporting loci frequency counts. The default
value is set to 20 bins.
Colony area distribution: When this box is
selected the colony area distribution data is divided into the number of bins specified in the
Histogram Bins and displayed with any other exported data.
Note: Only wells included/selected in the Well Data list are exported.
Colony area and compactness for all colonies: When this is selected a list of all colonies
in all wells is exported with the area and compactness for each colony.
Note: There is no filtering so all the data is listed.
MOLECULAR DEVICES > CLONESELECT IMAGER OPERATOR MANUAL
Molecular Devices > 32 of 69
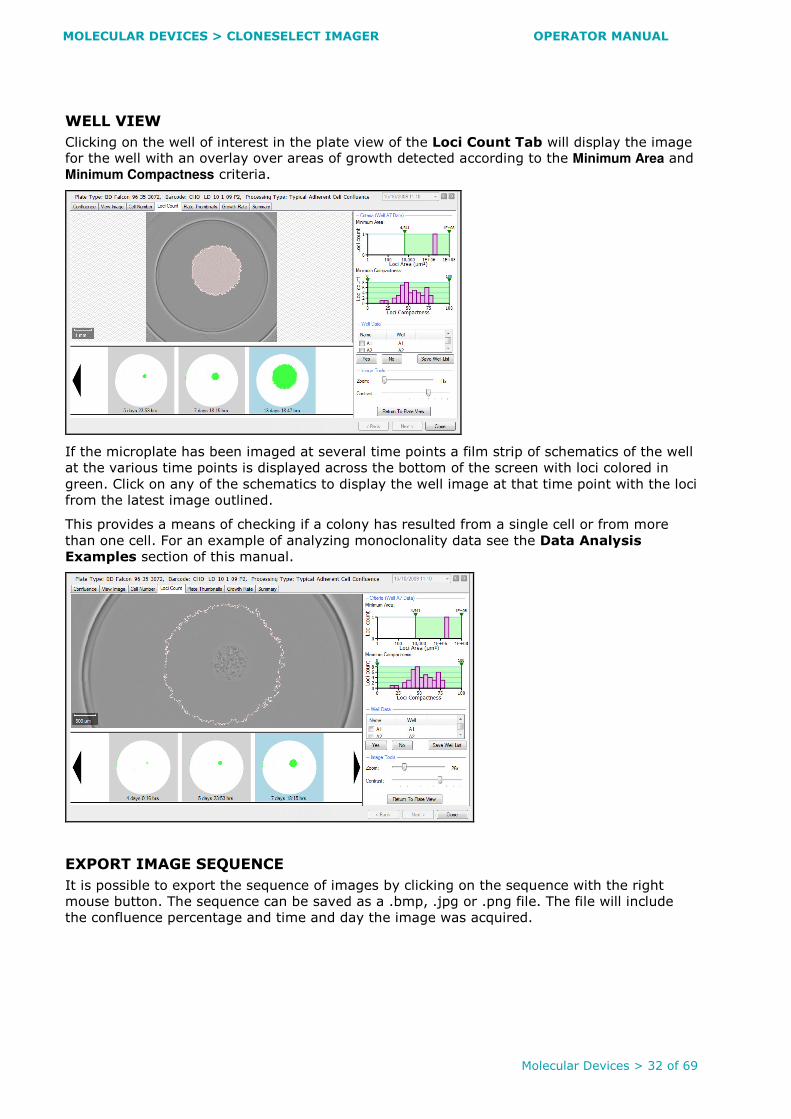
WELL VIEW
Clicking on the well of interest in the plate view of the Loci Count Tab will display the image for the well with an overlay over areas of growth detected according to the Minimum Area and
Minimum Compactness criteria.
If the microplate has been imaged at several time points a film strip of schematics of the well
at the various time points is displayed across the bottom of the screen with loci colored in
green. Click on any of the schematics to display the well image at that time point with the loci
from the latest image outlined.
This provides a means of checking if a colony has resulted from a single cell or from more
than one cell. For an example of analyzing monoclonality data see the Data Analysis
Examples section of this manual.
EXPORT IMAGE SEQUENCE
It is possible to export the sequence of images by clicking on the sequence with the right
mouse button. The sequence can be saved as a .bmp, .jpg or .png file. The file will include
the confluence percentage and time and day the image was acquired.
MOLECULAR DEVICES > CLONESELECT IMAGER OPERATOR MANUAL
Molecular Devices > 33 of 69
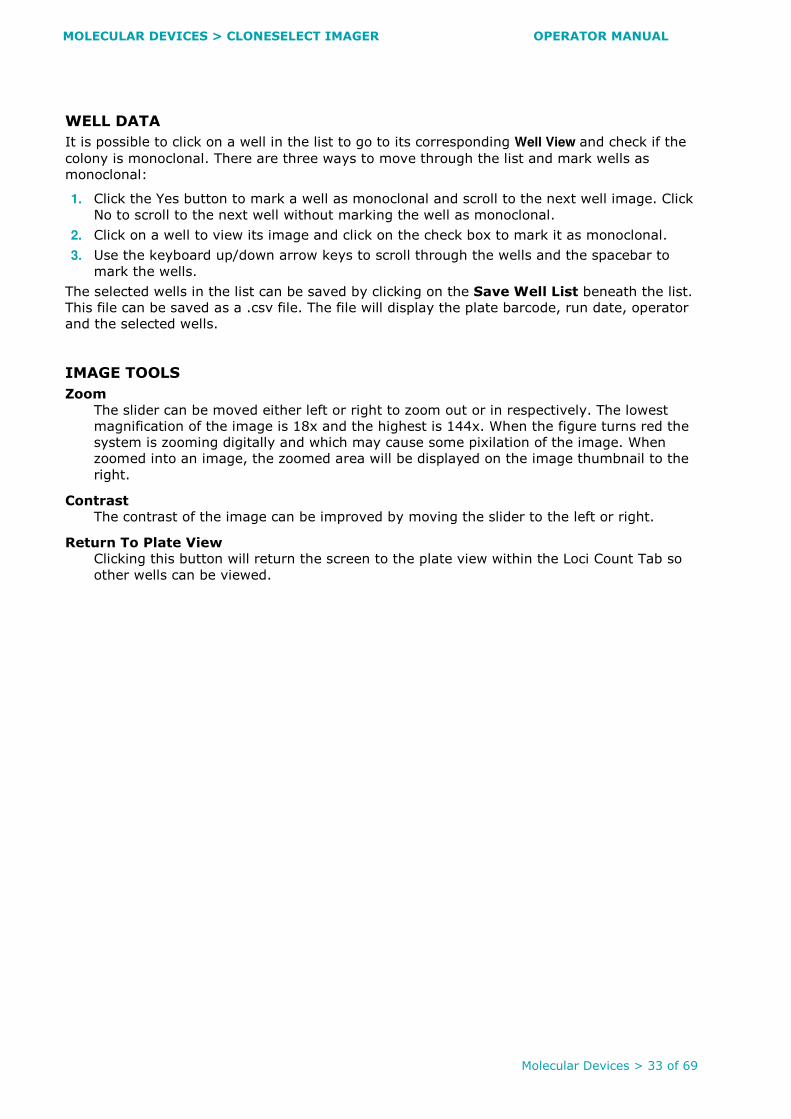
WELL DATA
It is possible to click on a well in the list to go to its corresponding Well View and check if the
colony is monoclonal. There are three ways to move through the list and mark wells as
monoclonal:
1. Click the Yes button to mark a well as monoclonal and scroll to the next well image. Click
No to scroll to the next well without marking the well as monoclonal.
2. Click on a well to view its image and click on the check box to mark it as monoclonal.
3. Use the keyboard up/down arrow keys to scroll through the wells and the spacebar to
mark the wells.
The selected wells in the list can be saved by clicking on the Save Well List beneath the list.
This file can be saved as a .csv file. The file will display the plate barcode, run date, operator
and the selected wells.
IMAGE TOOLS
Zoom
The slider can be moved either left or right to zoom out or in respectively. The lowest
magnification of the image is 18x and the highest is 144x. When the figure turns red the
system is zooming digitally and which may cause some pixilation of the image. When
zoomed into an image, the zoomed area will be displayed on the image thumbnail to the
right.
Contrast
The contrast of the image can be improved by moving the slider to the left or right.
Return To Plate View
Clicking this button will return the screen to the plate view within the Loci Count Tab so
other wells can be viewed.
MOLECULAR DEVICES > CLONESELECT IMAGER OPERATOR MANUAL
Molecular Devices > 34 of 69
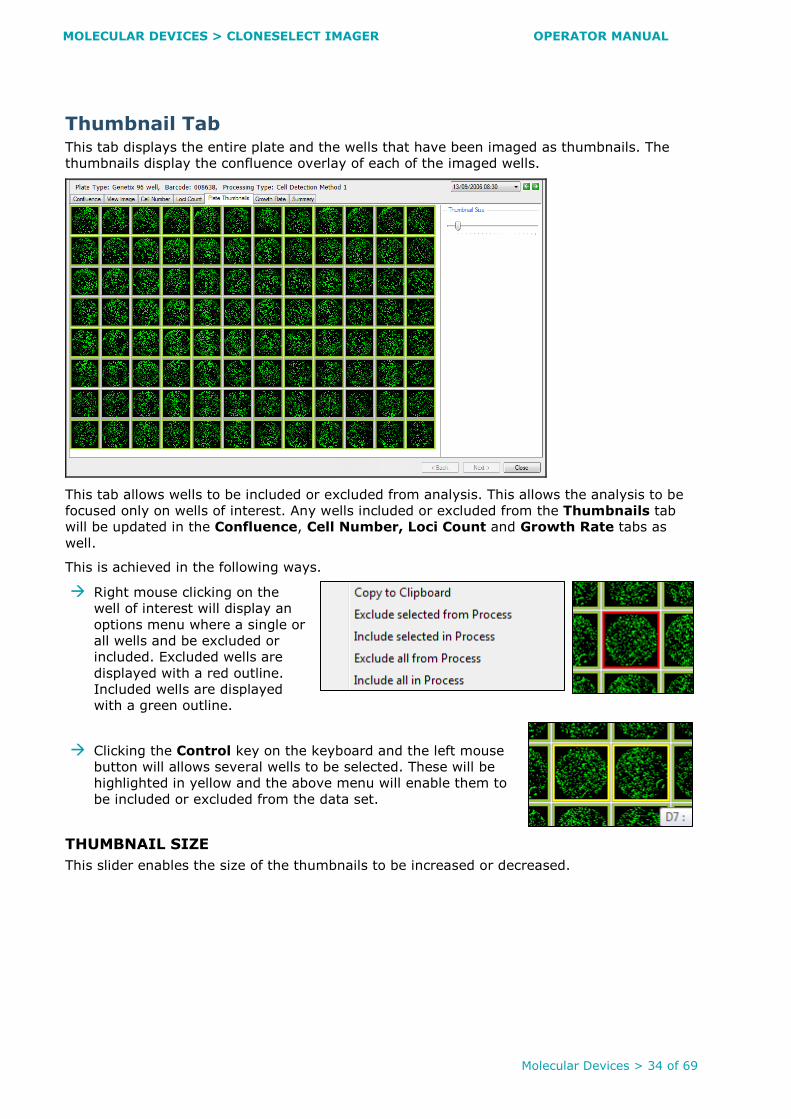
Thumbnail Tab This tab displays the entire plate and the wells that have been imaged as thumbnails. The
thumbnails display the confluence overlay of each of the imaged wells.
This tab allows wells to be included or excluded from analysis. This allows the analysis to be
focused only on wells of interest. Any wells included or excluded from the Thumbnails tab
will be updated in the Confluence, Cell Number, Loci Count and Growth Rate tabs as
well.
This is achieved in the following ways.
� Right mouse clicking on the
well of interest will display an
options menu where a single or
all wells and be excluded or
included. Excluded wells are
displayed with a red outline.
Included wells are displayed
with a green outline.
� Clicking the Control key on the keyboard and the left mouse
button will allows several wells to be selected. These will be
highlighted in yellow and the above menu will enable them to
be included or excluded from the data set.
THUMBNAIL SIZE
This slider enables the size of the thumbnails to be increased or decreased.
MOLECULAR DEVICES > CLONESELECT IMAGER OPERATOR MANUAL
Molecular Devices > 35 of 69
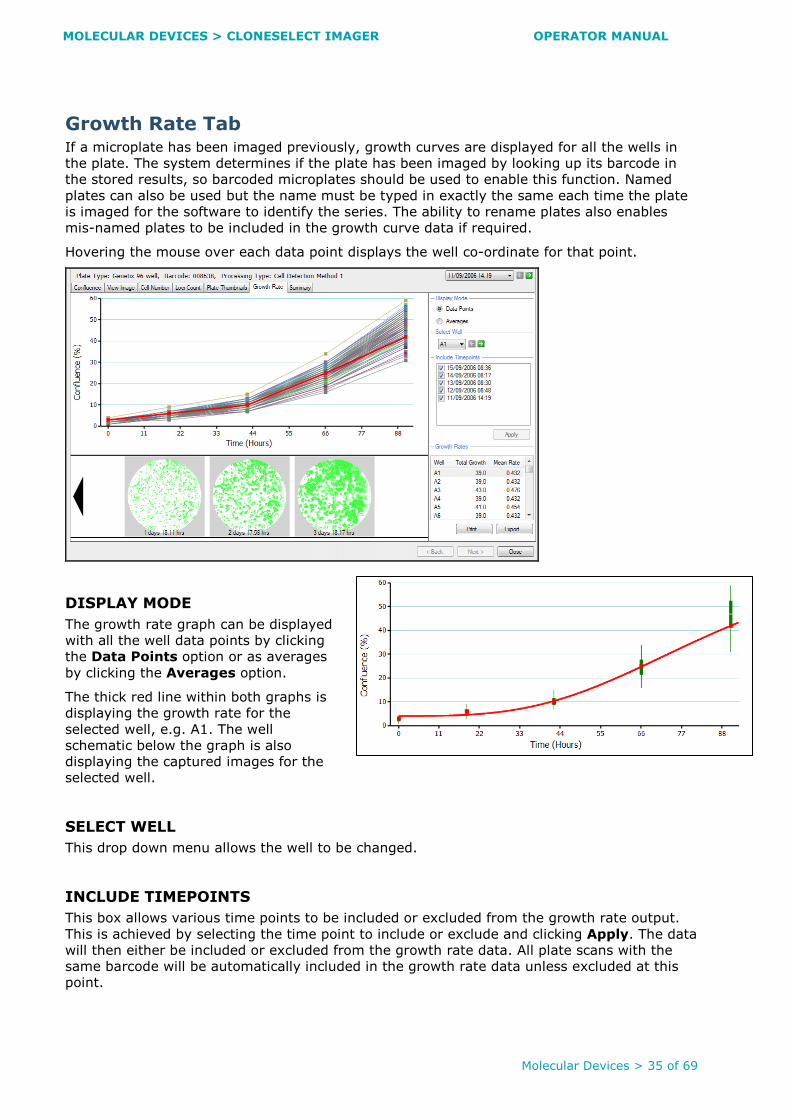
Growth Rate Tab If a microplate has been imaged previously, growth curves are displayed for all the wells in
the plate. The system determines if the plate has been imaged by looking up its barcode in
the stored results, so barcoded microplates should be used to enable this function. Named
plates can also be used but the name must be typed in exactly the same each time the plate
is imaged for the software to identify the series. The ability to rename plates also enables
mis-named plates to be included in the growth curve data if required.
Hovering the mouse over each data point displays the well co-ordinate for that point.
DISPLAY MODE
The growth rate graph can be displayed
with all the well data points by clicking
the Data Points option or as averages
by clicking the Averages option.
The thick red line within both graphs is
displaying the growth rate for the
selected well, e.g. A1. The well
schematic below the graph is also
displaying the captured images for the
selected well.
SELECT WELL
This drop down menu allows the well to be changed.
INCLUDE TIMEPOINTS
This box allows various time points to be included or excluded from the growth rate output.
This is achieved by selecting the time point to include or exclude and clicking Apply. The data
will then either be included or excluded from the growth rate data. All plate scans with the
same barcode will be automatically included in the growth rate data unless excluded at this
point.

MOLECULAR DEVICES > CLONESELECT IMAGER OPERATOR MANUAL
Molecular Devices > 36 of 69
GROWTH RATES
This list displays the Well, Total Growth and
Mean Rate for each well in the data set.
This will print out a paper copy of the growth
curves.
EXPORT
This will enable the list of wells and the
corresponding confluence for each time point in
the growth curve to be exported as a .csv or .xml
file.
The Data Export wizard will guide the
process of exporting the confluence data.
The wizard provides the option to export the
data for the following time points:
Cell Number and Loci Count data can also be
exported at this point (See the relevant
sections for the description of exporting
these data sets).
MOLECULAR DEVICES > CLONESELECT IMAGER OPERATOR MANUAL
Molecular Devices > 37 of 69
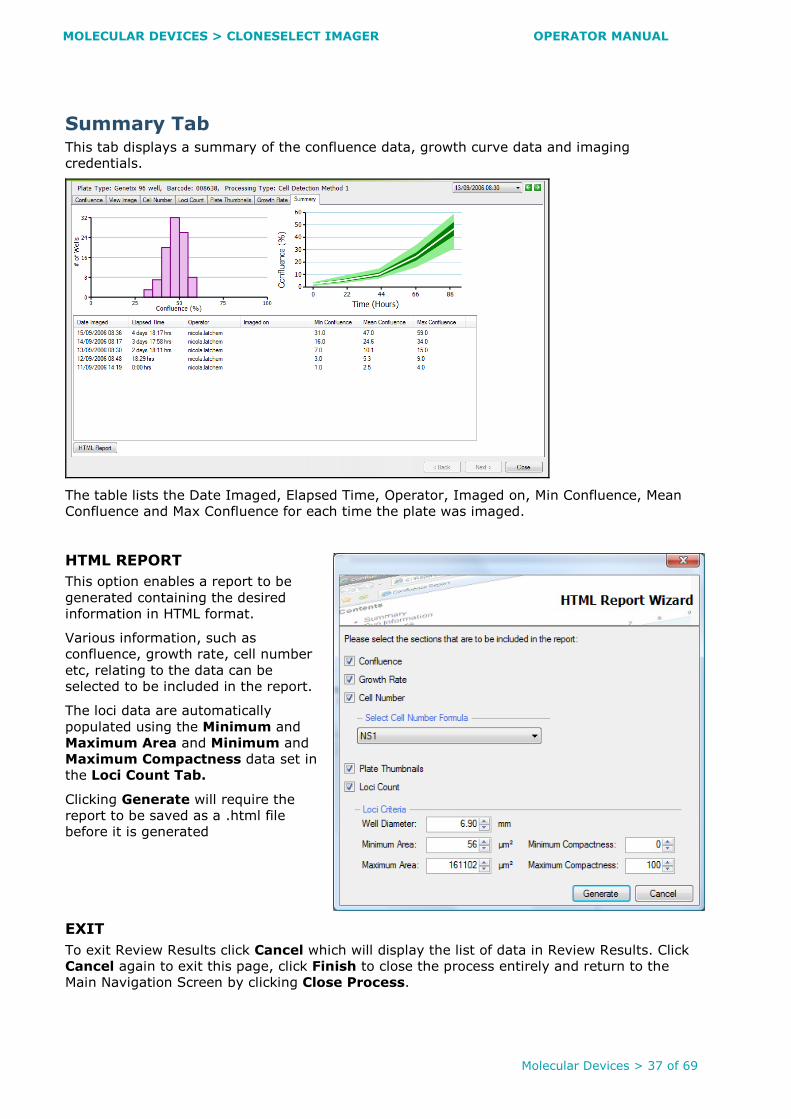
Summary Tab This tab displays a summary of the confluence data, growth curve data and imaging
credentials.
The table lists the Date Imaged, Elapsed Time, Operator, Imaged on, Min Confluence, Mean
Confluence and Max Confluence for each time the plate was imaged.
HTML REPORT
This option enables a report to be
generated containing the desired
information in HTML format.
Various information, such as
confluence, growth rate, cell number
etc, relating to the data can be
selected to be included in the report.
The loci data are automatically
populated using the Minimum and
Maximum Area and Minimum and
Maximum Compactness data set in
the Loci Count Tab.
Clicking Generate will require the
report to be saved as a .html file
before it is generated
EXIT
To exit Review Results click Cancel which will display the list of data in Review Results. Click
Cancel again to exit this page, click Finish to close the process entirely and return to the
Main Navigation Screen by clicking Close Process.

MOLECULAR DEVICES > CLONESELECT IMAGER OPERATOR MANUAL
Molecular Devices > 38 of 69
Migration Application
Migration analysis is carried out on data that has been imaged over a number of time points.
For each data set analyzed the Plate Type, Barcode and Processing Type is displayed at
the top of the screen.
Overview Tab This tab provides an overview of the migration assay data. A heat map is generated and can
be displayed using one of three parameters:
Migration Rate
This is a measure of the rate of increase in cell movement (mm2 per hour) over the entire
time period.
Total Migration
This is a measure of the increase in area of cell movement (mm2) over the entire time
period.
Maximum Migration Rate
This is a measure of the largest rate of increase in cell movement (mm2 per hour)
between any two adjacent time points.
The table to the right of the heat map also displays these statistics for each well. Click on any
of the table headers to reorder the data. It is possible to copy the heat map to the clipboard
by right clicking anywhere on the map.
Click on any well of interest to highlight the well on the information table and on the
Confluence (%) graph. Double click on any well of interest to hyperlink to the Well details
tab.
Export
The data for the well plate can be exported using this function. A wizard will guide the
Data Export process. It is possible to export data for either Selected Time Points or for All
Time points. It is also possible to export the confluence data if required. The data can be

MOLECULAR DEVICES > CLONESELECT IMAGER OPERATOR MANUAL
Molecular Devices > 39 of 69
exported as a CSV, Excel (XML) or XML file.

MOLECULAR DEVICES > CLONESELECT IMAGER OPERATOR MANUAL
Molecular Devices > 40 of 69
Thumbnails Tab This tab provides an overview of each well image and the scratch/wound detection. The
thumbnails can be copied to the clipboard by right clicking anywhere on the thumbnail map.
Zoom
Sliding the bar will enlarge/reduce the entire thumbnail map allowing navigation to any
well of interest. It is possible to click and drag on the thumbnail map to scroll to the well
of interest.
Time points
The drop down menu lists all of the time points the plate has been imaged. A time point
can be selected from the drop down menu or by clicking on the arrows to the side of the
menu. If the time points available are restricted by the End Time Point in the Graph
display of the Well Details tab, only the selected time points will be displayed here.
Start Animation
Clicking this button will animate the thumbnails from the starting time point to the final
time point in order to observe the migration taking place in the wells. If time points are
restricted by the End Time Point option in the Graph display of the Well Details tab,
animation will only occur using the time points available.
MOLECULAR DEVICES > CLONESELECT IMAGER OPERATOR MANUAL
Molecular Devices > 41 of 69
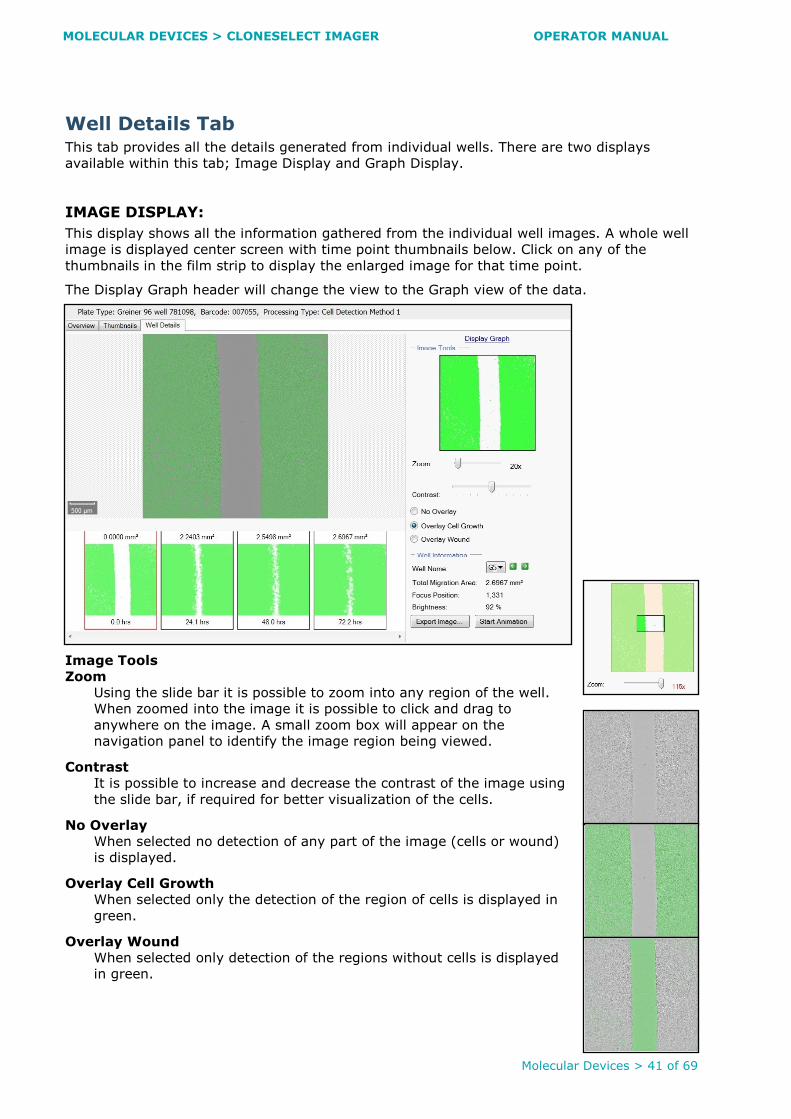
Well Details Tab This tab provides all the details generated from individual wells. There are two displays
available within this tab; Image Display and Graph Display.
IMAGE DISPLAY:
This display shows all the information gathered from the individual well images. A whole well
image is displayed center screen with time point thumbnails below. Click on any of the
thumbnails in the film strip to display the enlarged image for that time point.
The Display Graph header will change the view to the Graph view of the data.
Image Tools
Zoom
Using the slide bar it is possible to zoom into any region of the well.
When zoomed into the image it is possible to click and drag to
anywhere on the image. A small zoom box will appear on the
navigation panel to identify the image region being viewed.
Contrast
It is possible to increase and decrease the contrast of the image using
the slide bar, if required for better visualization of the cells.
No Overlay
When selected no detection of any part of the image (cells or wound)
is displayed.
Overlay Cell Growth
When selected only the detection of the region of cells is displayed in
green.
Overlay Wound
When selected only detection of the regions without cells is displayed
in green.

MOLECULAR DEVICES > CLONESELECT IMAGER OPERATOR MANUAL
Molecular Devices > 42 of 69
MOLECULAR DEVICES > CLONESELECT IMAGER OPERATOR MANUAL
Molecular Devices > 43 of 69
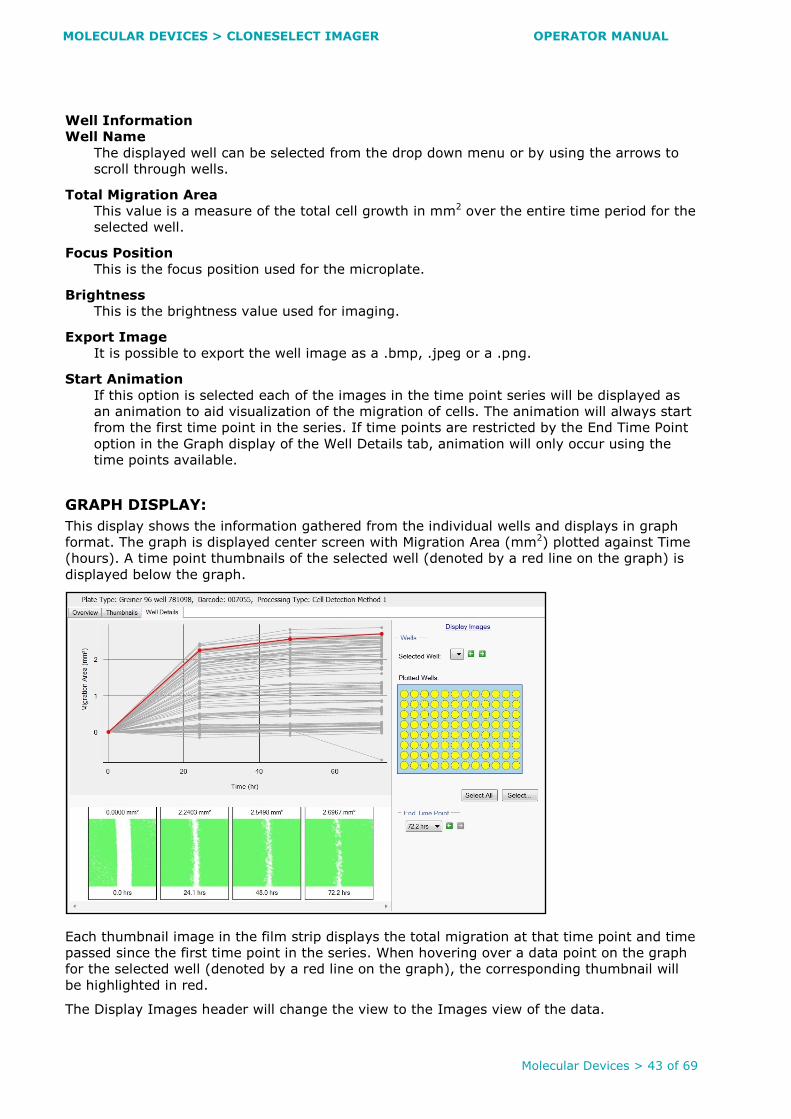
Well Information
Well Name
The displayed well can be selected from the drop down menu or by using the arrows to
scroll through wells.
Total Migration Area
This value is a measure of the total cell growth in mm2 over the entire time period for the
selected well.
Focus Position
This is the focus position used for the microplate.
Brightness
This is the brightness value used for imaging.
Export Image
It is possible to export the well image as a .bmp, .jpeg or a .png.
Start Animation
If this option is selected each of the images in the time point series will be displayed as
an animation to aid visualization of the migration of cells. The animation will always start
from the first time point in the series. If time points are restricted by the End Time Point
option in the Graph display of the Well Details tab, animation will only occur using the
time points available.
GRAPH DISPLAY:
This display shows the information gathered from the individual wells and displays in graph
format. The graph is displayed center screen with Migration Area (mm2) plotted against Time
(hours). A time point thumbnails of the selected well (denoted by a red line on the graph) is
displayed below the graph.
Each thumbnail image in the film strip displays the total migration at that time point and time
passed since the first time point in the series. When hovering over a data point on the graph
for the selected well (denoted by a red line on the graph), the corresponding thumbnail will
be highlighted in red.
The Display Images header will change the view to the Images view of the data.
MOLECULAR DEVICES > CLONESELECT IMAGER OPERATOR MANUAL
Molecular Devices > 44 of 69
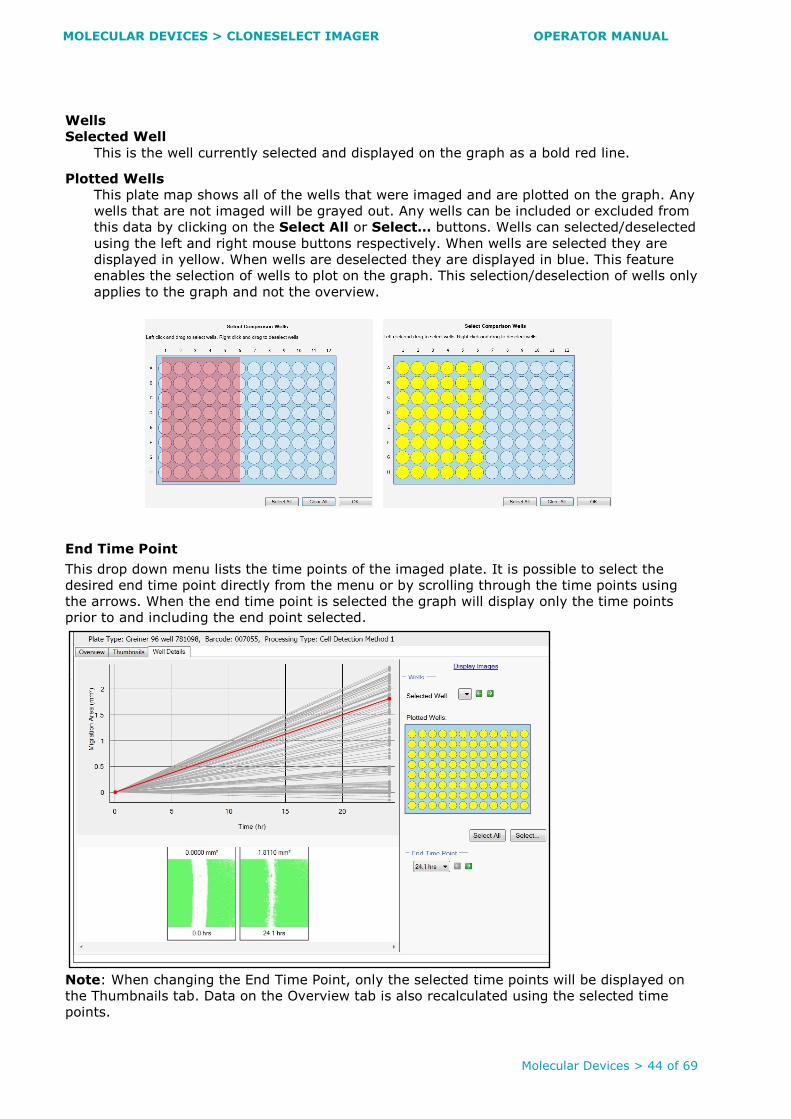
Wells
Selected Well
This is the well currently selected and displayed on the graph as a bold red line.
Plotted Wells
This plate map shows all of the wells that were imaged and are plotted on the graph. Any
wells that are not imaged will be grayed out. Any wells can be included or excluded from
this data by clicking on the Select All or Select… buttons. Wells can selected/deselected
using the left and right mouse buttons respectively. When wells are selected they are
displayed in yellow. When wells are deselected they are displayed in blue. This feature
enables the selection of wells to plot on the graph. This selection/deselection of wells only
applies to the graph and not the overview.
End Time Point
This drop down menu lists the time points of the imaged plate. It is possible to select the
desired end time point directly from the menu or by scrolling through the time points using
the arrows. When the end time point is selected the graph will display only the time points
prior to and including the end point selected.
Note: When changing the End Time Point, only the selected time points will be displayed on
the Thumbnails tab. Data on the Overview tab is also recalculated using the selected time
points.

MOLECULAR DEVICES > CLONESELECT IMAGER OPERATOR MANUAL
Molecular Devices > 45 of 69
MOLECULAR DEVICES > CLONESELECT IMAGER OPERATOR MANUAL
Molecular Devices > 46 of 69
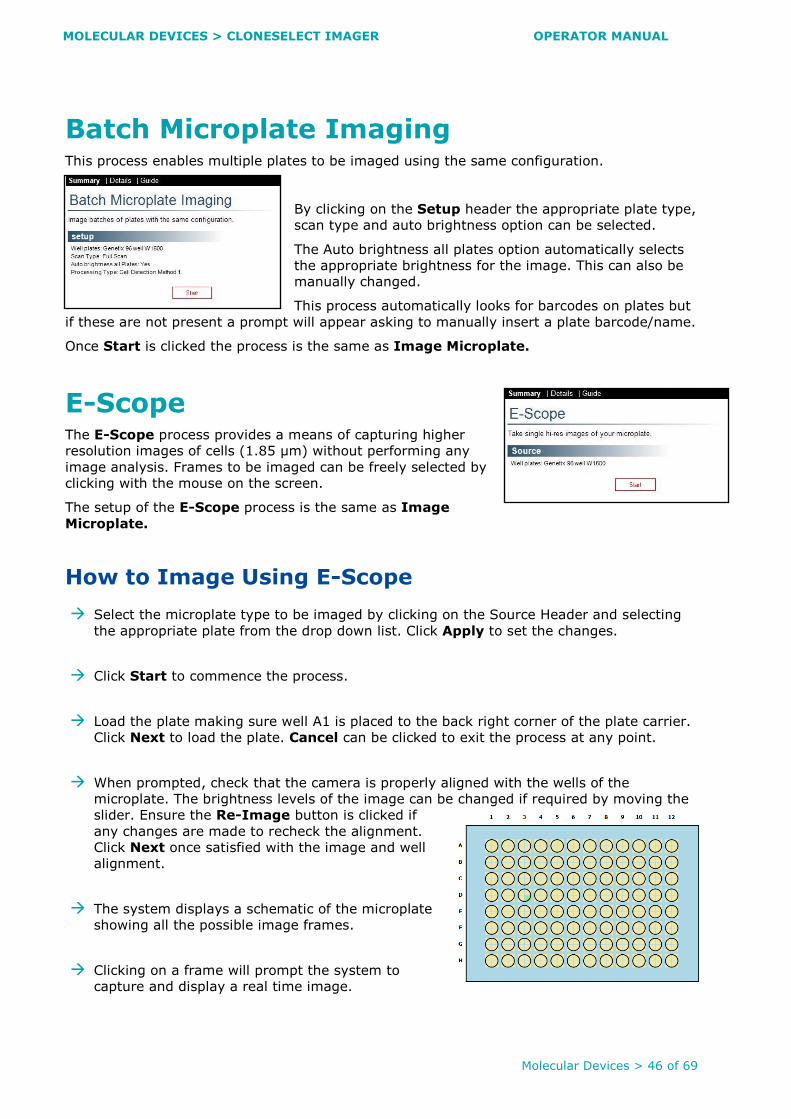
Batch Microplate Imaging This process enables multiple plates to be imaged using the same configuration.
By clicking on the Setup header the appropriate plate type,
scan type and auto brightness option can be selected.
The Auto brightness all plates option automatically selects
the appropriate brightness for the image. This can also be
manually changed.
This process automatically looks for barcodes on plates but
if these are not present a prompt will appear asking to manually insert a plate barcode/name.
Once Start is clicked the process is the same as Image Microplate.
E-Scope The E-Scope process provides a means of capturing higher
resolution images of cells (1.85 µm) without performing any
image analysis. Frames to be imaged can be freely selected by
clicking with the mouse on the screen.
The setup of the E-Scope process is the same as Image
Microplate.
How to Image Using E-Scope
� Select the microplate type to be imaged by clicking on the Source Header and selecting
the appropriate plate from the drop down list. Click Apply to set the changes.
� Click Start to commence the process.
� Load the plate making sure well A1 is placed to the back right corner of the plate carrier.
Click Next to load the plate. Cancel can be clicked to exit the process at any point.
� When prompted, check that the camera is properly aligned with the wells of the
microplate. The brightness levels of the image can be changed if required by moving the
slider. Ensure the Re-Image button is clicked if
any changes are made to recheck the alignment.
Click Next once satisfied with the image and well
alignment.
� The system displays a schematic of the microplate
showing all the possible image frames.
� Clicking on a frame will prompt the system to
capture and display a real time image.
MOLECULAR DEVICES > CLONESELECT IMAGER OPERATOR MANUAL
Molecular Devices > 47 of 69
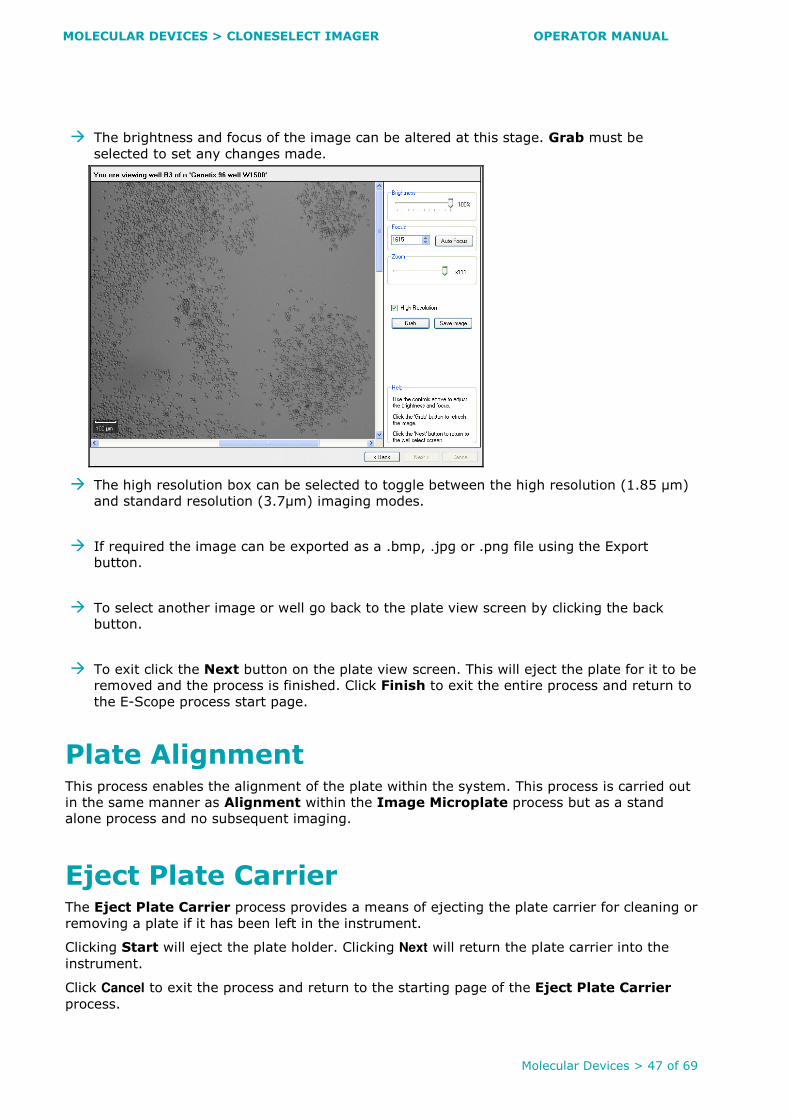
� The brightness and focus of the image can be altered at this stage. Grab must be
selected to set any changes made.
� The high resolution box can be selected to toggle between the high resolution (1.85 µm)
and standard resolution (3.7µm) imaging modes.
� If required the image can be exported as a .bmp, .jpg or .png file using the Export
button.
� To select another image or well go back to the plate view screen by clicking the back
button.
� To exit click the Next button on the plate view screen. This will eject the plate for it to be
removed and the process is finished. Click Finish to exit the entire process and return to
the E-Scope process start page.
Plate Alignment This process enables the alignment of the plate within the system. This process is carried out
in the same manner as Alignment within the Image Microplate process but as a stand
alone process and no subsequent imaging.
Eject Plate Carrier The Eject Plate Carrier process provides a means of ejecting the plate carrier for cleaning or
removing a plate if it has been left in the instrument.
Clicking Start will eject the plate holder. Clicking Next will return the plate carrier into the
instrument.
Click Cancel to exit the process and return to the starting page of the Eject Plate Carrier
process.

MOLECULAR DEVICES > CLONESELECT IMAGER OPERATOR MANUAL
Molecular Devices > 48 of 69
Click Finish to return to the starting page of the Eject Plate Carrier process.
MOLECULAR DEVICES > CLONESELECT IMAGER OPERATOR MANUAL
Molecular Devices > 49 of 69
Data Analysis Examples
Here are some examples of how to use the features of the CloneSelect Imager software to
analyze various data sets.
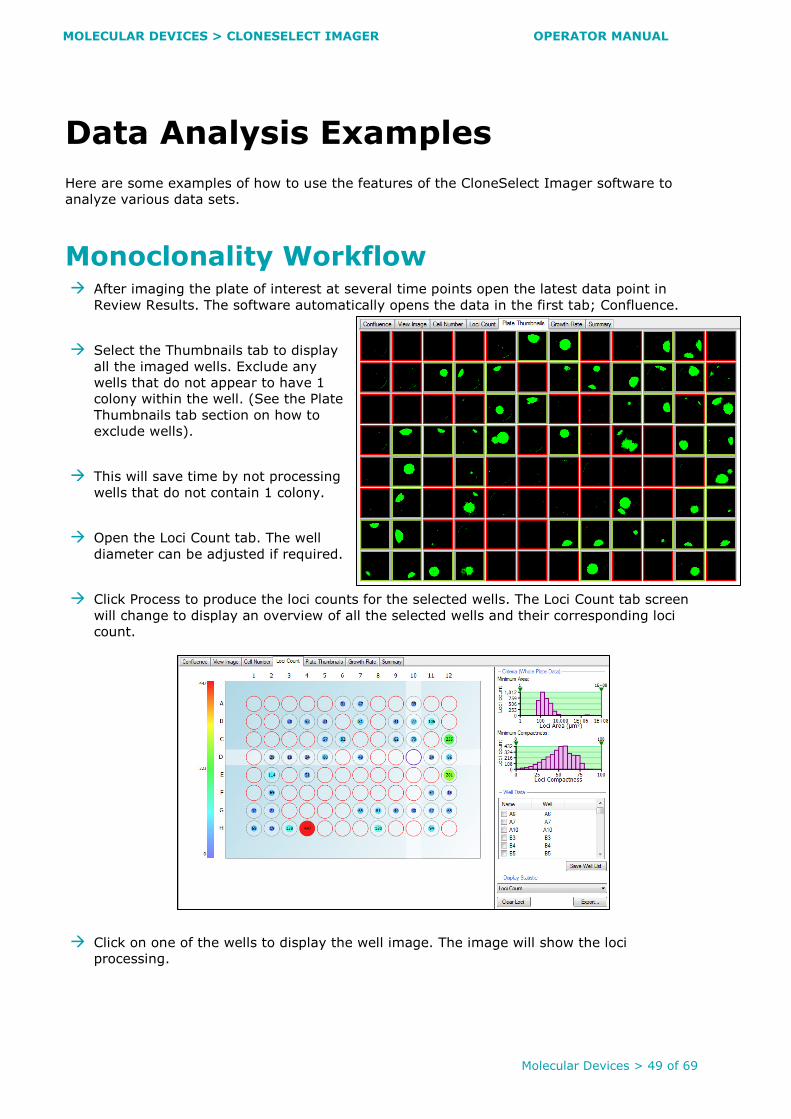
Monoclonality Workflow � After imaging the plate of interest at several time points open the latest data point in
Review Results. The software automatically opens the data in the first tab; Confluence.
� Select the Thumbnails tab to display
all the imaged wells. Exclude any
wells that do not appear to have 1
colony within the well. (See the Plate
Thumbnails tab section on how to
exclude wells).
� This will save time by not processing
wells that do not contain 1 colony.
� Open the Loci Count tab. The well
diameter can be adjusted if required.
� Click Process to produce the loci counts for the selected wells. The Loci Count tab screen
will change to display an overview of all the selected wells and their corresponding loci
count.
� Click on one of the wells to display the well image. The image will show the loci
processing.
MOLECULAR DEVICES > CLONESELECT IMAGER OPERATOR MANUAL
Molecular Devices > 50 of 69
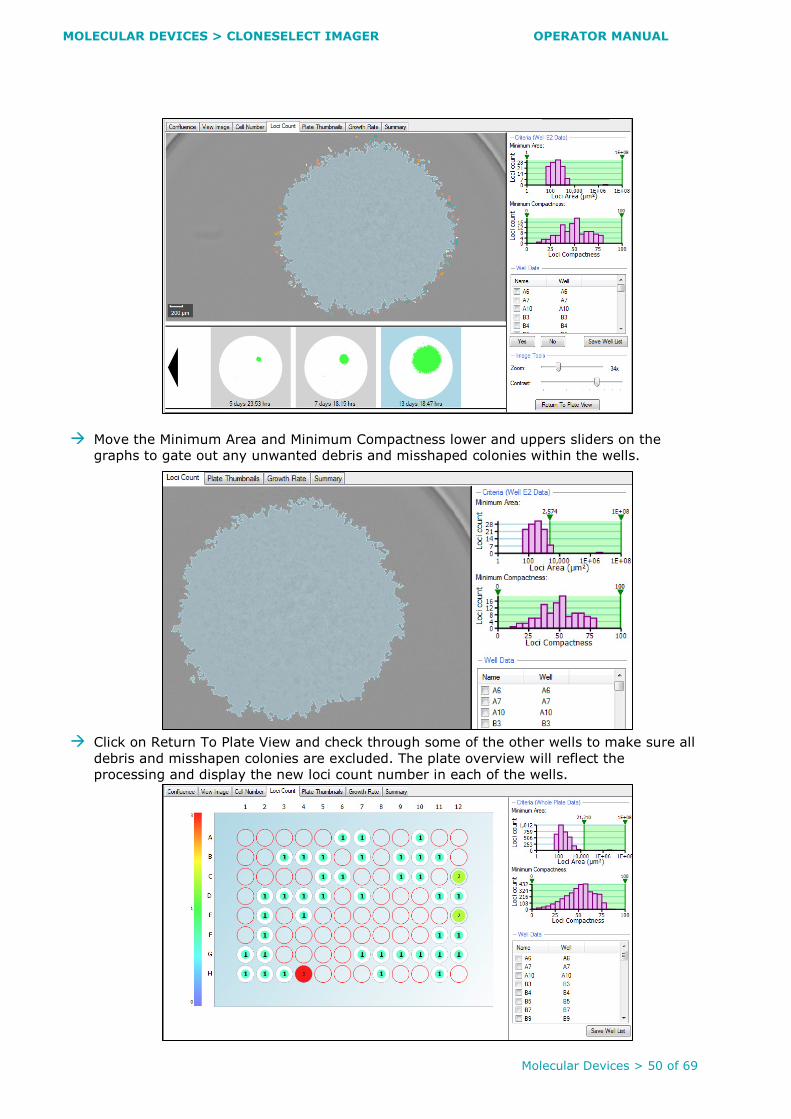
� Move the Minimum Area and Minimum Compactness lower and uppers sliders on the
graphs to gate out any unwanted debris and misshaped colonies within the wells.
� Click on Return To Plate View and check through some of the other wells to make sure all
debris and misshapen colonies are excluded. The plate overview will reflect the
processing and display the new loci count number in each of the wells.

MOLECULAR DEVICES > CLONESELECT IMAGER OPERATOR MANUAL
Molecular Devices > 51 of 69
� Now by clicking through each well in the Well Data list, the well image will appear and
monoclonality can be determined by looking back through the series of well images and
identifying if the colony originated from a single cell.
� If the colony did originate from a single cell the well
can be selected by either ticking the box or clicking
the Yes button. The well name can also be changed to
reflect the clone if required. Once all the wells have
been checked, the list of selected wells containing a
monoclonal colony can be saved and printed for
further use.
MOLECULAR DEVICES > CLONESELECT IMAGER OPERATOR MANUAL
Molecular Devices > 52 of 69
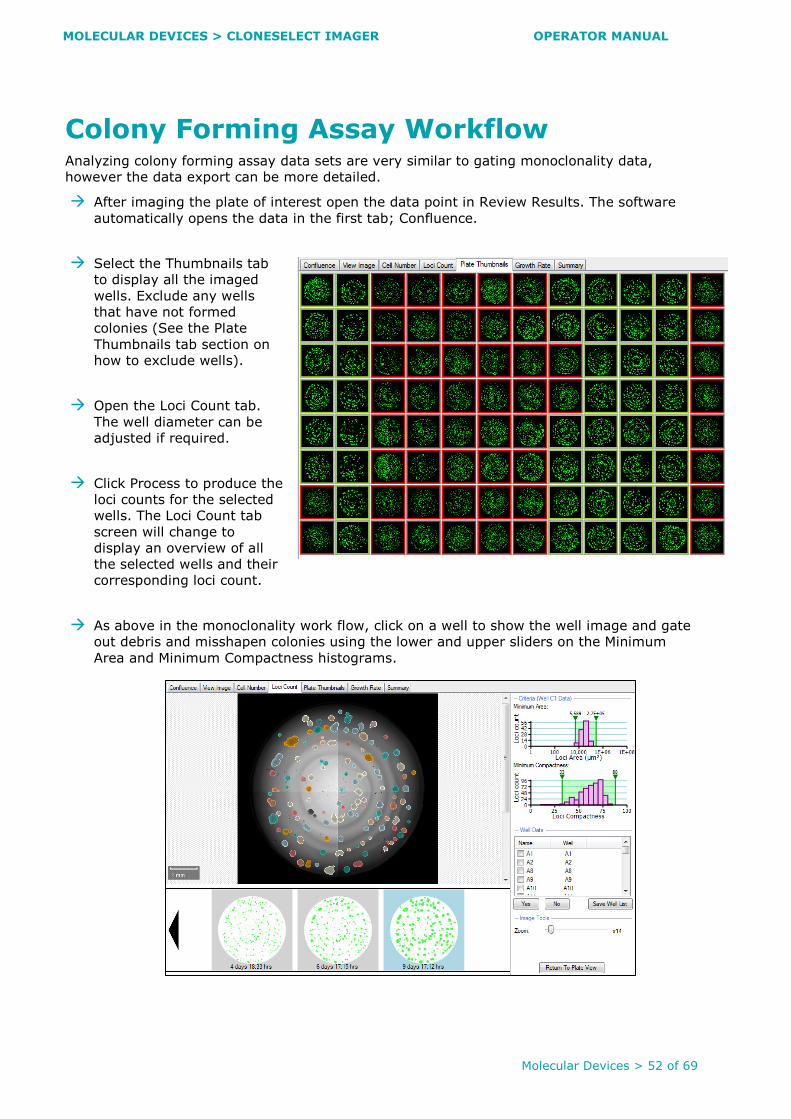
Colony Forming Assay Workflow Analyzing colony forming assay data sets are very similar to gating monoclonality data,
however the data export can be more detailed.
� After imaging the plate of interest open the data point in Review Results. The software
automatically opens the data in the first tab; Confluence.
� Select the Thumbnails tab
to display all the imaged
wells. Exclude any wells
that have not formed
colonies (See the Plate
Thumbnails tab section on
how to exclude wells).
� Open the Loci Count tab.
The well diameter can be
adjusted if required.
� Click Process to produce the
loci counts for the selected
wells. The Loci Count tab
screen will change to
display an overview of all
the selected wells and their
corresponding loci count.
� As above in the monoclonality work flow, click on a well to show the well image and gate
out debris and misshapen colonies using the lower and upper sliders on the Minimum
Area and Minimum Compactness histograms.

MOLECULAR DEVICES > CLONESELECT IMAGER OPERATOR MANUAL
Molecular Devices > 53 of 69
� Once satisfied with the gating of the data and the loci count subsequently produced, the
data can be exported. The Well Data list is mainly used for accepting wells based on
monoclonality so it is not necessary to check any of these wells. The data will be
exported for all wells when exporting the data via the wizard.
� In the Data Export wizard the Loci Count option is selected and the criteria are
automatically populated. The default number of bins is 20, but in the example it has been
changed to 5 bins. The Colony area distribution and Colony area and compactness for all
colonies are selected and Next is clicked to finish exporting the data.
� Within the exported results produced, a summary of the experiment criteria is displayed
in the first rows the spreadsheet (top left).
MOLECULAR DEVICES > CLONESELECT IMAGER OPERATOR MANUAL
Molecular Devices > 54 of 69
When the Colony area distribution is selected, the following information is produced for
each well:
- Name (if changed within the software)
- Well number (eg A1)
- Loci Count (this is the total)
- Mean Loci Area
- Bins equally splitting the loci area range into equal groups so that each
identified loci will fall into one of the corresponding groups based on its size.
For example, out of the 129 identified loci within well A1, 119 of these fall
into the first bin with a loci area range of 5589µm2 to 58498µm2.
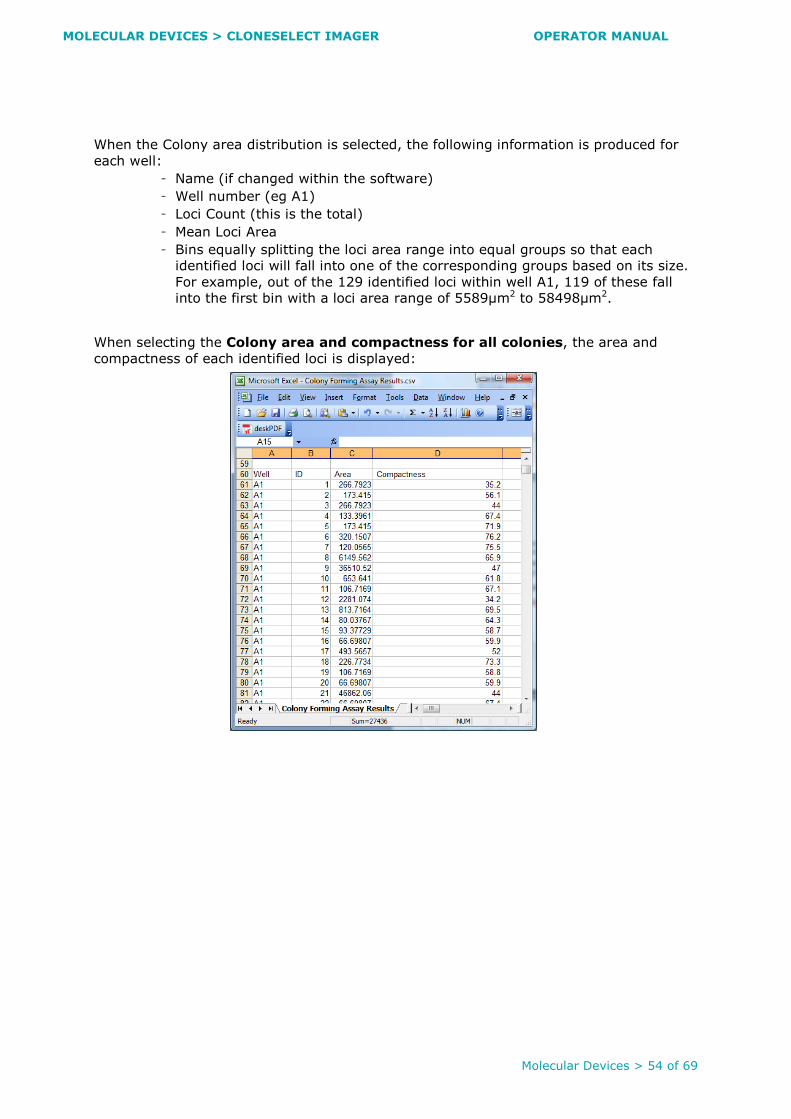
When selecting the Colony area and compactness for all colonies, the area and
compactness of each identified loci is displayed:

MOLECULAR DEVICES > CLONESELECT IMAGER OPERATOR MANUAL
Molecular Devices > 55 of 69
Health and Safety
Transport and Storage CloneSelect Imager must be stored and transported in temperatures within the range –25°C
to +55°C.
Lifting Points CloneSelect Imager is intended for bench top operation. Care should be taken when moving
CloneSelect Imager. It is recommended that 2 people lift it.
External Covers
Warning – If any of the external covers on CloneSelect Imager are removed the power supply is not automatically interrupted. If it is necessary to remove any of the external covers you must ensure that the power is switched off first and do not attempt to use the robot until the covers are replaced.
Electrical Safety
CloneSelect Imager must be connected to a properly earthed power outlet to protect users from the risk of electric shock. The main chassis of the machine is earthed together with all associated electrical components. Do not remove any of the fixed covers, as there are no user serviceable parts inside. All internal work should be referred to Molecular Devices approved service personnel.
Drive Safety
There is a potential pinch hazard with the drive mechanism. Please ensure that you do not attempt to load the plate until the drive has fully extended.
Noise Levels During normal operation the level of airborne noise emitted by the system will not exceed
70db measured at 1 meter.

MOLECULAR DEVICES > CLONESELECT IMAGER OPERATOR MANUAL
Molecular Devices > 56 of 69
Maintenance
Cleaning CloneSelect Imager The machine should be cleaned each day.
Clean the machine using 80% ethanol or dilute detergent and a lint-free cloth. Organic
solvents and abrasive cleaners should not be used, as they will damage the cover.
Do not pour cleaning solution directly on to the machine or other objects; apply using a
suitable lint-free cloth.
Regular Maintenance
Daily
� Ensure that CloneSelect Imager is free from dirt and dust
(see Cleaning CloneSelect Imager - above).
Weekly
� Check operation of equipment
� Check calibration
� Check for damage
Annually
� Maintenance by manufacturer
We would strongly recommend that maintenance be carried out regularly and by a Molecular
Devices-approved service engineer.
Maintenance contracts can be obtained from Molecular Devices, see Contact Details on page
69.
General Precautions � All waste must be disposed of according to local regulation.
� Do not use in explosive environments.

MOLECULAR DEVICES > CLONESELECT IMAGER OPERATOR MANUAL
Molecular Devices > 57 of 69
Technical Specifications
Manufactured by Molecular Devices (New Milton) Ltd.
Dimensions: Total assembled:
Size: 575mm (width) x 720mm (depth) x 438mm
(height)
Excluding ancillary equipment
Weight: 45 kg
Operating Environment: Indoor use only
Temperature: 10°C to 40°C
Humidity: 20 to 80% non-condensing
Altitude: Up to 2000M
Mains supply: +/- 10% Rated Voltage
Transient overvoltage: Installation Category (Overvoltage category) II
Rated pollution: Pollution degree 2
Electrical Supply: Voltage: 100 - 240V AC 50-60 Hz single phase
Power: 100VA
Connections: IEC Input
Fuses: F1 - F3A
Symbols on Equipment Symbol Meaning
Beware moving parts.
Refer to user manual for operating instructions
2007
The year of manufacture is given on the serial number label which is located on the rear of the unit
European Economic Area (EEA)
This mark on the product indicates compliance with the following EEC Directives:
- 98/37/EEC, relating to The Supply of Machinery (Safety) Regulations 1992
- 89/336/EEC with amendments 92/31/EEC, relating to Electromagnetic Compatibility
- 73/23/EEC, the Low Voltage Directive
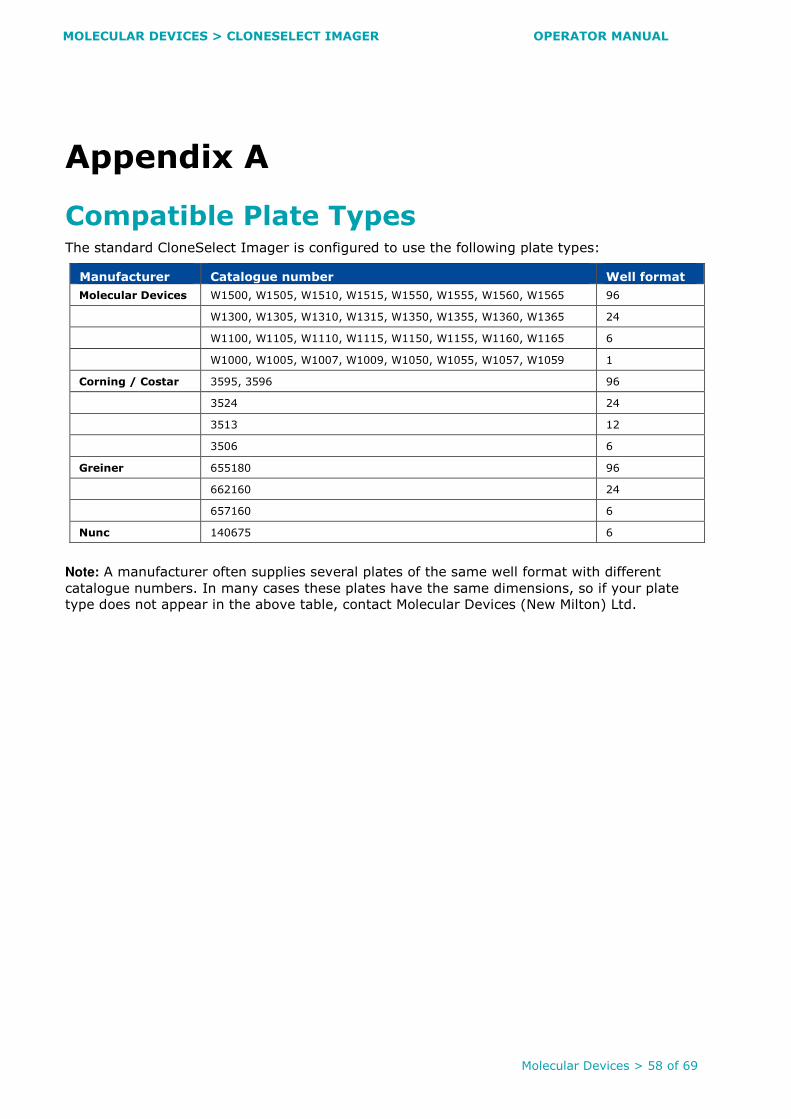
MOLECULAR DEVICES > CLONESELECT IMAGER OPERATOR MANUAL
Molecular Devices > 58 of 69
Appendix A
Compatible Plate Types The standard CloneSelect Imager is configured to use the following plate types:
Manufacturer Catalogue number Well format
Molecular Devices W1500, W1505, W1510, W1515, W1550, W1555, W1560, W1565 96
W1300, W1305, W1310, W1315, W1350, W1355, W1360, W1365 24
W1100, W1105, W1110, W1115, W1150, W1155, W1160, W1165 6
W1000, W1005, W1007, W1009, W1050, W1055, W1057, W1059 1
Corning / Costar 3595, 3596 96
3524 24
3513 12
3506 6
Greiner 655180 96
662160 24
657160 6
Nunc 140675 6
Note: A manufacturer often supplies several plates of the same well format with different
catalogue numbers. In many cases these plates have the same dimensions, so if your plate
type does not appear in the above table, contact Molecular Devices (New Milton) Ltd.

MOLECULAR DEVICES > CLONESELECT IMAGER OPERATOR MANUAL
Molecular Devices > 59 of 69
Appendix B
Well List File Format This appendix describes the format of a Well List file to be imported into an Image
Microplate process via the Select Source window.
The file containing a list of wells to image should be a text file (.txt) with the plate type as the
first line. Each well to be imaged is then entered on a new line. Note that each file describes a
single plate only.
PetriWell 96 well
A6
B5
E8
etc.
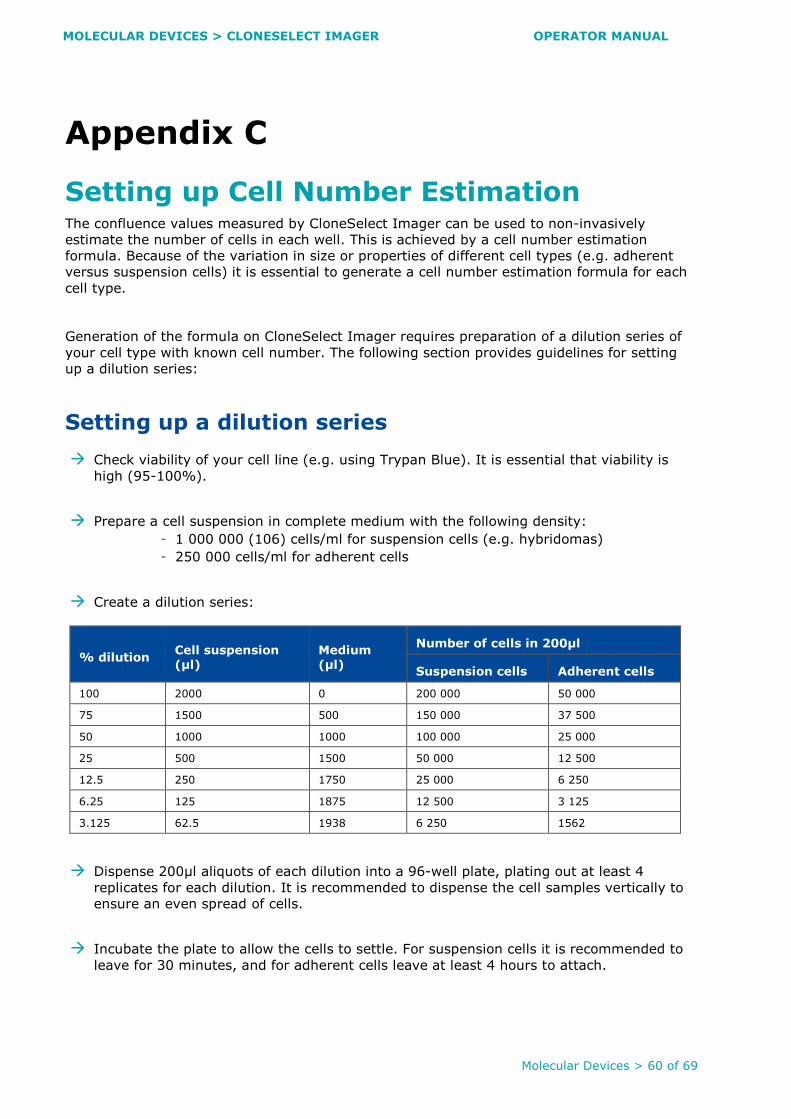
MOLECULAR DEVICES > CLONESELECT IMAGER OPERATOR MANUAL
Molecular Devices > 60 of 69
Appendix C
Setting up Cell Number Estimation The confluence values measured by CloneSelect Imager can be used to non-invasively
estimate the number of cells in each well. This is achieved by a cell number estimation
formula. Because of the variation in size or properties of different cell types (e.g. adherent
versus suspension cells) it is essential to generate a cell number estimation formula for each
cell type.
Generation of the formula on CloneSelect Imager requires preparation of a dilution series of
your cell type with known cell number. The following section provides guidelines for setting
up a dilution series:
Setting up a dilution series
� Check viability of your cell line (e.g. using Trypan Blue). It is essential that viability is
high (95-100%).
� Prepare a cell suspension in complete medium with the following density:
- 1 000 000 (106) cells/ml for suspension cells (e.g. hybridomas)
- 250 000 cells/ml for adherent cells
� Create a dilution series:
% dilution Cell suspension (µl)
Medium (µl)
Number of cells in 200µl
Suspension cells Adherent cells
100 2000 0 200 000 50 000
75 1500 500 150 000 37 500
50 1000 1000 100 000 25 000
25 500 1500 50 000 12 500
12.5 250 1750 25 000 6 250
6.25 125 1875 12 500 3 125
3.125 62.5 1938 6 250 1562
� Dispense 200µl aliquots of each dilution into a 96-well plate, plating out at least 4
replicates for each dilution. It is recommended to dispense the cell samples vertically to
ensure an even spread of cells.
� Incubate the plate to allow the cells to settle. For suspension cells it is recommended to
leave for 30 minutes, and for adherent cells leave at least 4 hours to attach.

MOLECULAR DEVICES > CLONESELECT IMAGER OPERATOR MANUAL
Molecular Devices > 61 of 69
Creating a cell number estimation formula
� Image the dilution series on CloneSelect Imager.
� In the Confluence tab, check that the dilution points with confluence between 5% and
80% have acceptable replicates.
Confluence tab with expected dilution point / confluence percentage
� In the Cell Number tab, click on the Create New button.
Cell Number tab. Viewed with a previously defined cell number formula
� This opens the Cell Number Graphical Display window.
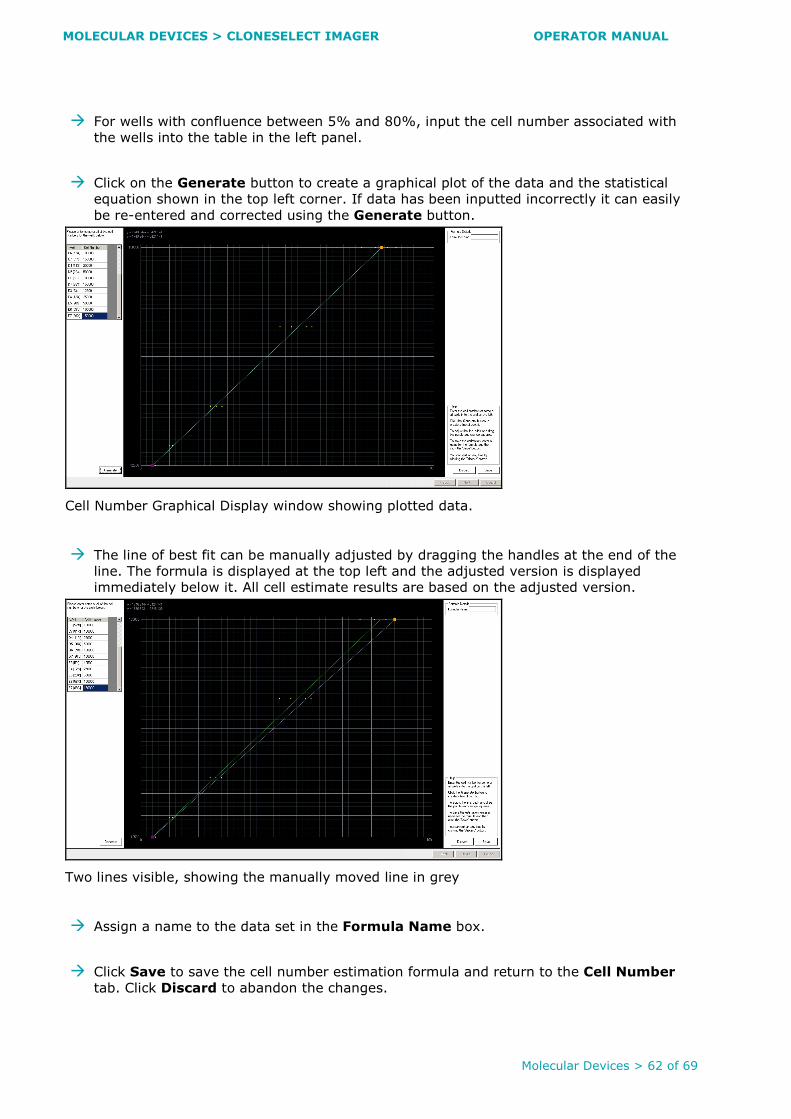
MOLECULAR DEVICES > CLONESELECT IMAGER OPERATOR MANUAL
Molecular Devices > 62 of 69
� For wells with confluence between 5% and 80%, input the cell number associated with
the wells into the table in the left panel.
� Click on the Generate button to create a graphical plot of the data and the statistical
equation shown in the top left corner. If data has been inputted incorrectly it can easily
be re-entered and corrected using the Generate button.
Cell Number Graphical Display window showing plotted data.
� The line of best fit can be manually adjusted by dragging the handles at the end of the
line. The formula is displayed at the top left and the adjusted version is displayed
immediately below it. All cell estimate results are based on the adjusted version.
Two lines visible, showing the manually moved line in grey
� Assign a name to the data set in the Formula Name box.
� Click Save to save the cell number estimation formula and return to the Cell Number
tab. Click Discard to abandon the changes.
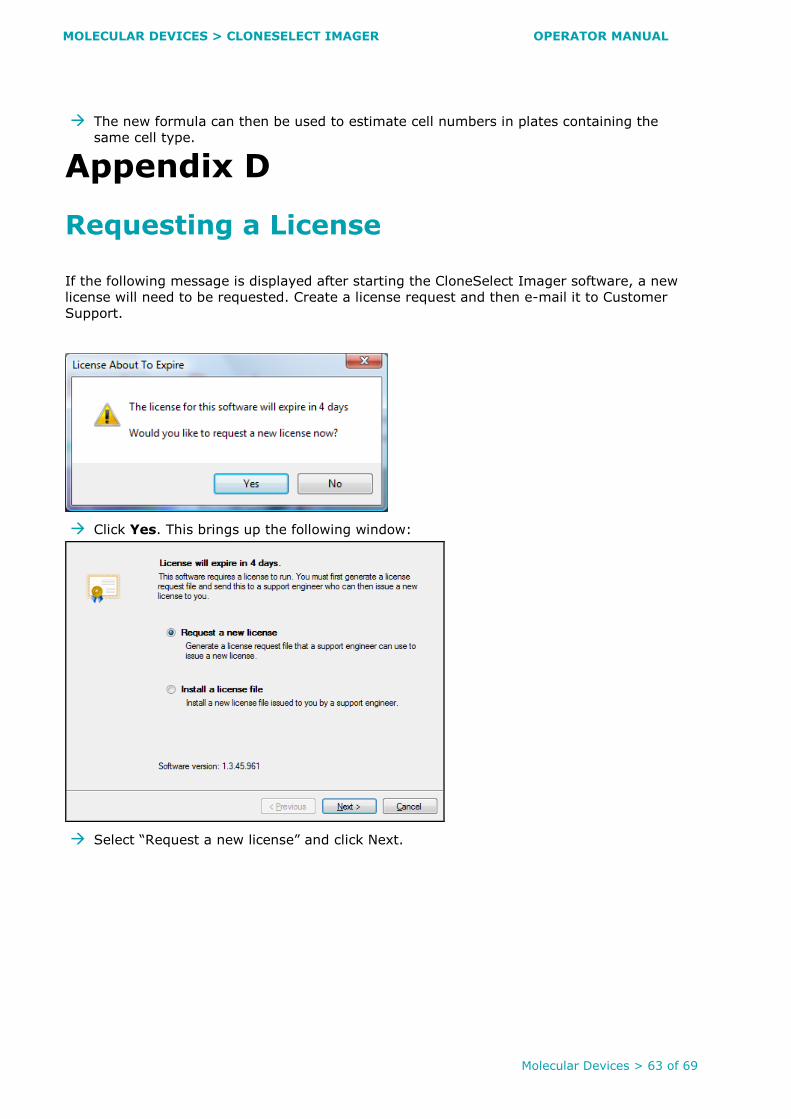
MOLECULAR DEVICES > CLONESELECT IMAGER OPERATOR MANUAL
Molecular Devices > 63 of 69
� The new formula can then be used to estimate cell numbers in plates containing the
same cell type.
Appendix D
Requesting a License
If the following message is displayed after starting the CloneSelect Imager software, a new
license will need to be requested. Create a license request and then e-mail it to Customer
Support.
� Click Yes. This brings up the following window:
� Select “Request a new license” and click Next.

MOLECULAR DEVICES > CLONESELECT IMAGER OPERATOR MANUAL
Molecular Devices > 64 of 69
� Enter the relevant details. Click Next.
� Save file to a location where it is can be attached to an e-mail.
MOLECULAR DEVICES > CLONESELECT IMAGER OPERATOR MANUAL
Molecular Devices > 65 of 69
� E-mail this .req file to a Molecular Devices representative.
� Click Finish.
MOLECULAR DEVICES > CLONESELECT IMAGER OPERATOR MANUAL
Molecular Devices > 66 of 69
Installing a License
� When a license file is received from a Customer Support representative, save the file to a
place accessible on the computer of your instrument.
� Re-open the CloneSelect Imager software.
� Select “Install a license file”:
� Click Next.
� Click Open, and browse to the location where the license (*.License) file was saved.
� Open the file.
MOLECULAR DEVICES > CLONESELECT IMAGER OPERATOR MANUAL
Molecular Devices > 67 of 69
� A window should appear to indicate that the license file was successfully installed:
� Click Finish. The software will now start.
If for any reason the license does not appear to work as expected please contact Customer
Support for assistance.
MOLECULAR DEVICES > CLONESELECT IMAGER OPERATOR MANUAL
Molecular Devices > 68 of 69
Index
A
Alignment .................................................. 9
Annotation ............................................... 26
Archive .................................................... 22
Auto focus before run ................................ 15
Averages ................................................ 35
B
Barcodes .................................................. 15
C
Calibration ................................................. 9
Cancel ..................................................... 16
Cell Detection Method 1 ............................. 15
Cell Detection Method 2 ............................. 15
Cell Detection Method 3 ............................. 15
Close Process’ ........................................ 20 colony forming assay ................................. 48
Contrast .............................................. 27, 33
D
Deselect All .............................................. 16
Details ..................................................... 14
Display Statistic ........................................ 31
Dual Gates ............................................... 26
E
Enhance Images ....................................... 15
Export Image Sequence ............................. 32
F
Focus ....................................................... 17
Full Scan .................................................. 15
G
Grab ........................................................ 18
Guide ...................................................... 14
H
Histogram Bins ....................................... 31 HTML Report ............................................. 37
I
Image Another Plate .................................. 20
Image Microplate ....................................... 14
Import ..................................................... 16
L
Leveling Feet ..............................................6
Load Results ............................................. 21
M
Main Navigation Screen .............................. 10
Mean Loci Area ....................................... 30
Menu Options ............................................ 11
Minimum Area ........................................... 30
Minimum Compactness ............................... 30
N
Next ........................................................ 16
P
Partial Scan .............................................. 15
Plate Carrier ...............................................6
Power-Up Procedure ....................................9
R
Rebooting ...................................................9
Re-image.................................................. 19
Remove Plate ............................................ 20
Rename.................................................... 23
Return To Plate View .................................. 46
Review focus ............................................. 15
Review Focus ............................................ 16
S
Save process as template… .................... 20 Save process’.......................................... 20 Scale Bar .................................................. 18
Scan Options ............................................ 16
Scan type ................................................. 15
Select All .................................................. 16
Show Cumulative ....................................... 26
Source ..................................................... 15
Summary ................................................. 14
W
Well Data ................................................. 30
Well Name ................................................ 27
Workstation ................................................8

MOLECULAR DEVICES > CLONESELECT IMAGER OPERATOR MANUAL
Molecular Devices > 69 of 69
Contact Details
Molecular Devices
Queensway, New Milton
Hampshire BH25 5NN, UK
Tel: +44 (0) 1425 624 600
Fax: +44 (0) 1425 624 700
Web: www.moleculardevices.com/genetix
For all technical queries please contact your nearest Customer Support group. Visit
www.moleculardevices.com/genetix for latest contact details.
Trademarks
ClonePix™, CloneSelect™, CellReporter™, HalfBD®, 'NRich®, SlidePath™, Data Arena™ and Image Arena™ are trademarks of
Molecular Devices (New Milton) Ltd.
Copyright © 2011 by Molecular Devices (New Milton) Ltd
All rights reserved. No part of this publication may be reproduced, stored in a retrieval system, or transmitted,
in any form by any means, electronic, mechanical, by photocopying, recording, or otherwise, without the prior
written permission of Molecular Devices (New Milton) Ltd.
Information furnished by Molecular Devices (New Milton) Ltd is believed to be accurate and reliable; however, no responsibility is assumed by Molecular Devices (New Milton) Ltd, for its use; nor for any infringements of patents or other rights of third parties which
may result from its use. No license is granted by implication or otherwise under any patent rights of Molecular Devices (New Milton)
Ltd.
Revised June 2011