- powered by h5ai v0.28.1 ( ...doc.gibidi.com/instructions-manuali/pass...
TRANSCRIPT
ISTRUZIONI PER L’INSTALLAZIONE
INSTRUCTIONS FOR INSTALLATION
INSTRUCTIONS POUR LE MONTAGE
INSTRUCCIONES PARA EL MONTAJE
INSTRUÇÕES DE INSTALAÇÃO
INSTRUCTIEHANDLEIDING
INSTALLATIONSANLEITUNG
ISO 9002 - Cert. n° 0079
P P P P PASS 600 REGOASS 600 REGOASS 600 REGOASS 600 REGOASS 600 REGO
www.gibidi.com
Sede Legale :Via B.Bonomi, 17 Fraz. Toline 25055 Pisogne (BS)
Ufficio Commerciale : Via Messedaglia, 8/C 37135 Verona ITALY
Tel. 0039 045 8270511 - Fax 0039 045 8270527E-MAIL: [email protected]
Stabilimento: Via Abetone Brennero, 177/B 46025 Poggio Rusco (Mantova) ITALY
Tel. 0039 0386 522011 - Fax 0039 0386 522034E-MAIL: [email protected]

PREDISPOSIZIONI ELETTRICHE
2
APPAREILLAGES ELECTRIQUESELECTRICAL CONNECTIONS
LIGAÇÕES ELÉCTRICAS
EQUIPOS ELECTRICOS
220/230V-50Hz
10 µF
0,147 m/s
50%
12 Nm
-20°C +60°C
ALIMENTAZIONE / ALIMENTATION / POWER SUPPLY / ALIMENTACION / ALIMENTAÇÃO
POTENZA ASSORBITA / PUISSANCE ABSORBEE / ABDORBED POWER / POTENCIAABSORBIDA /POTÊNCIA ABSORVIDA
CORRENTE ASSORBITA / COURANT ABSORBE / ABSORBED CURRENT / CORRIENTEABSORBIDA / CORRENTE ABSORVIDA
TERMICA PROTEZIONE MOTORE / PROTETION THERMIQUE DU MOTEUR / MOTOROVERLOAD /PROTECCION TERMICA DEL MOTOR / PROTECÇÃO TÉRMICA DO MOTOR
CONDENSATORE / CONDENSATEUR / CAPACITOR / CONDENSADOR / CONDENSADOR
COPPIA MAX / COUPLE MAXI / MAX. TORQUE / PAR MAXI / TORQUE MÁX.
VELOCITA’ MAX / VITESSE MAXI / MAX VELOCITYVELOCIDAD MAX / VELOCIDADE MÁX.
°FREQUENZA UTILIZZO / OPERATING FREQUENCY
TEMPERATURA DI ESERCIZIO / TEMPERATURE D’EMPLOI / WORKING TEMPERATURETEMPERATURA DE EJERCICIO / TEMPERATURA DE EXERCÍCIO
PROTEZIONE CONTRO L’UMIDITÁ / PROTECTION CONTRE L’HUMIDITÉPROTECTION AGAINST WETNESS / PROTECCION CONTRA LA HUMEDAD PROTECÇÃOCONTRA A HUMIDADE
OLIO / HUILE / OIL / ACEITE / ÓLEO
260 W
ATF DEXTRON
PASS 600
IP 44
140°
1,2 A
ELEKTRISHE AANSLUITINGENELEKTRISCHE VORBEREITUNGEN

I
F
E
P
UK
1 Motoriduttore. 2 Fotocellula a raggi infrarossi modulati; 2 coppie, 1 interna ed 1 esterna. 3 Antenna del radioricevitore. 4 Costa pneumatica. 5 Pulsantiera. 6 Cremagliera. 7 Selettore a chiave. 8 Cavo coassiale schermato. 9 Linea di alimentazione all’apparecchiatura (attenersi alle Norme vigenti;per l’Italia 46/90).10 Segnalatore a luce lampeggiante a 220 V.ATTENZIONE: è importante che sulla linea di alimentazione venga installato, amonte dell’apparecchiatura, un interruttore magnetotermico onnipolare con aperturaminima dei contatti pari a 3 mm.
1 Motoréducteur. 2 Photocellule à rayon infrarouges modulés; 2 paires (1 interne, 1 externe). 3 Antenne de réception. 4 Seuil pneumatique. 5 Tableau de commande. 6 Crémaillère. 7 Sélecteur à clé. 8 Câble coaxial blindé. 9 Ligne d’alimentation de la platine (respecter les normes en vigueur).10 Clignotant à 220 V.ATTENTION: Sur la ligne d’alimentation, en amont de la platine, il est important demonter un interrupteur magnétothermique omnipolaire ayant une ouverture des contactsminimale de 3 mm.
1 Gearmotor. 2 Two pairs of modulated infrared photocels: one internal and one external. 3 Antenna. 4 Pneumatic strip. 5 Push-button panel. 6 Rack. 7 Key-selector. 8 Screened coaxial cable. 9 Power supply line to equipment (follow regulations in force).10 220-230 V flashing light.WARNING: It is important that an omnipolar magneto-thermal switch with a contactopening of minimum 3 mm is installed on the power supply line, upstream of theequipment.
1 Motorreductor. 2 Fotocélula de rayos infrarrojos modulados; dos pares, uno interior y otro exterior. 3 Antena. 4 Banda pneumática. 5 Botonera. 6 Cremallera. 7 Selector de llave. 8 Cable coaxil blindado. 9 Línea de alimentación al equipo (atenerse a las normas vigentes).10 Destellador a 220 V.ATENCIÓN: es importante instalar en la línea de alimentación, antes del equipo, uninterruptor magnetotérmico omnipolar con abertura mínima de los contactos igual a 3mm.
1 Motorredutor. 2 Fotocélula de raios infravermelhos modulados: 2 pares, 1 interno e 1 externo. 3 Antena do receptor. 4 Costa pneumática. 5 Botoneira. 6 Cremalheira. 7 Selector de chave. 8 Cabo coaxial blindado. 9 Linha de alimentação da aparelhagem (seguir as Normas em vigor).10 Lâmpada pisca-pisca de 220 V.ATENÇÃO: É importante que na linha de alimentação seja montado, a montanteda aparelhagem, um interruptor magnetotérmico omnipolar com aberturamínima dos contactos de 3 mm.
1. Motorreductor 2. 2 paar fotocellen : één aan de binnenzijde, één aan de buitenzijde 3. Antenne 4. Veiligheidsstrip : 2 draden sectie 0,5 mm5 5. Drukknoppaneel : 4 draden sectie 0,5 mm5 6. Tandlat 7. Sleutelcontact : 3 draden sectie 0,5 mm5 8. Coaxkabel 9. Voedingsspanning 220-230 V, 50-60 Hz. : 3 draden sectie 1,5 mm5 min.
(respecteer de van kracht zijnde normen)10. Knipperlicht 220 V : 2 draden sectie 1,5 mm5
OPGELET : Het is heel belangrijk dat er een onderbrekingsschakelaar wordt geplaatstop alle voedingsdraden. De minimum opening van deze schakelcontacten moet 3mm. bedragen.
ND
D
3
1 Getriebemotor. 2 Lichtschranke mit modulierten Infrarotstrahlen; 2 Paar, 1 innen und 1 außen. 3 Antenne des Funkempfängers. 4 Pneumatische Schiene. 5 Druckknopftafel. 6 Zahnstange. 7 Schlüsselwahlschalter. 8 Abgeschirmtes Koaxialkabel. 9 Gerätzuleitung (die geltenden Vorschriften befolgen; in Italien 46/90).10 Blinklicht 220 V.ACHTUNG: Es ist wichtig, daß an der Zuleitung stromauf des Geräts einthermomagnetischer, allpoliger Schalter mit 3 mm Kontaktmindestöffnung angebrachtwird.
4
MONTAGGIO DEL MOTORIDUTTORE
MONTAGE DU MOTOREDUCTEUR
INSTALLATION OF THE GEARMOTOR
MONTAJE DE EL MOTORREDUCTOR
MONTAGEM DO MOTORREDUTOR
PASS 600
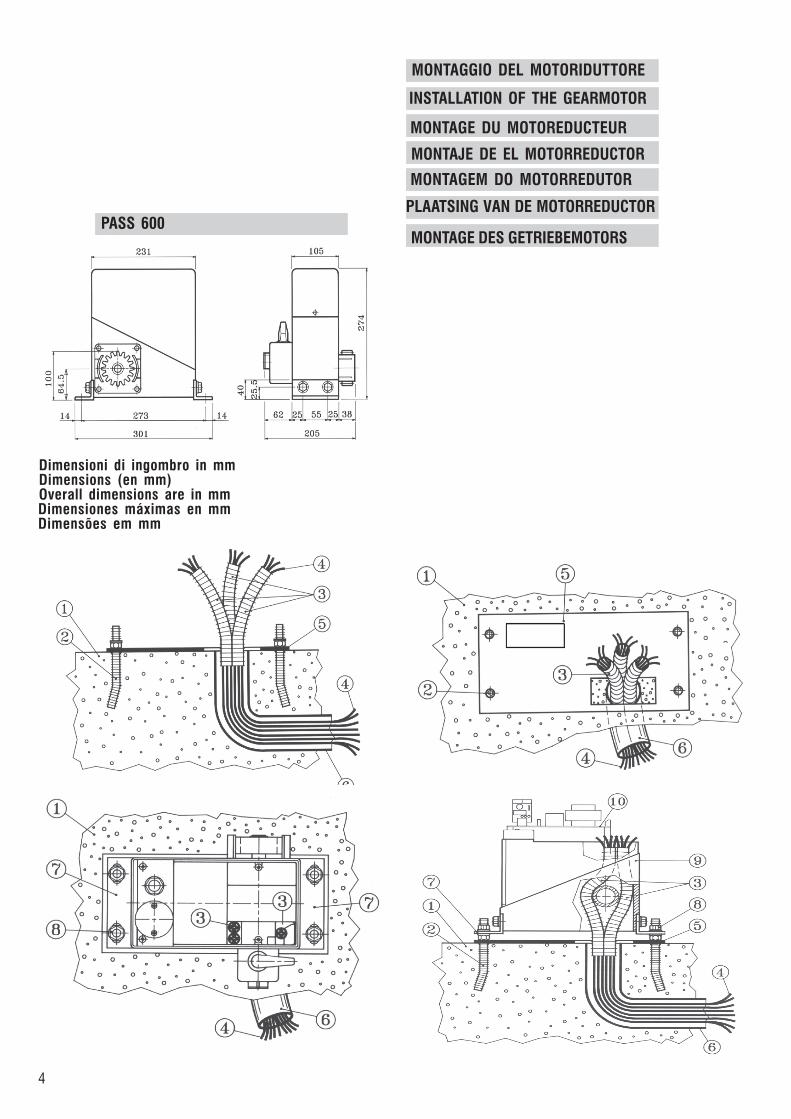
Dimensioni di ingombro in mmDimensions (en mm)Overall dimensions are in mmDimensiones máximas en mmDimensões em mm
PLAATSING VAN DE MOTORREDUCTOR
MONTAGE DES GETRIEBEMOTORS

4 5 6 7 8 910
5
I
MURATURA DELLA PIASTRA DI FISSAGGIO DEL MOTORIDUTTORE 1 2 3
4 5
6 7 8 910
Pavimentazione.Zanche.Guaine per cavi ø 25 minimo. Utilizzare per la protezione dei cavi delleguaine di dimensioni adeguate del tipo pesante approvato. Le guainedevono essere ricoperte da cemento.Cavi elettrici (vedere predisposizioni a pag.5).Piastra di fissaggio che permette la regolazione del motoriduttore in altez-za.Tubo per passaggio cavi.Staffe che permettono la regolazione orizzontale del motoriduttore.Dadi.Motoriduttore.Apparecchiatura elettronica.
F
MAÇONNIERIE DE LA PLAQUE DE FIXATION DU MOTOREDUCTEUR 1 2 3
Sol.Pieds de fixation.Gaines de protection des câbles ø 25 minimum. Pour protéger les câbles,utiliser des gaines appropriées du type approuvé. Les gaines doivent êtrerevêtues de ciment.Câbles électriques (voir les appareillages électriques à la page 5).Plaque de fixation permettant de régler le motoréducteur en hauteur.Tube de passage des câbles.Etriers permettant le réglage horizontal du motoréducteur.Ecrous.Motoréducteur.Platine électronique.
UK
WALLING THE GEARMOTOR FASTENING PLATE 1 2 3
4 5 6 7 8 910
Flooring.Feet.Sheaths for cables ø 25 minimum. Use approved heavy sheaths of thecorrect dimensions to protect the cables. The sheaths have to be coveredby cement.Electrical cables (see page 5).Fastening plate which allows the gearmotor height to be adjusted.Tube for laying down the cable.Brackets that allows horizontal adjustement of the gearmotor.Nuts.Gearmotor.Electronic control unit.
E
1 Pavimentación.2 Piés.3 Vainas para cables ø 25 mínimo. Para la protección de los cablesuitlizar vainas de dimensiones adecuadas de tipo pesado aprobado; lasvainas deben estar recubiertas de cemento.4 Cables eléctricos (ver predisposiciones en pág. 5).5 Placa de anclaje para la regulación de la altura del motorreductor.6 Tubo para pasar los cables.7 Abrazaderas para la regulación horizontal del motorreductor.8 Tuercas.9 Motorreductor.10 Equipo electrónico.
P
1 Piso.2 Peças de fixação.3 Tubos para cabos Ø 25 mín. Para a protecção dos cabos usar tubos dedimensões adequadas, de tipo pesado aprovado. Os tubos devem ser cobertosde cimento.4 Cabos eléctricos (v. predisposição na pág. 5)5 Chapa de fixação para a regulação da altura do motorredutor.6 Tubo para passagem dos cabos.7 Abraçadeiras para a regulação horizontal do motorredutor.8 Porcas9 Motorredutor10 Cartão para a ligação do motor e dos fins-de-curso magnéticos.
MAMPOSTERÍA DE LA PLACA DE ANCLAJE DEL MORORREDUCTOR
ALVENARIA DA PLACA DE FIXAÇÃO DO MOTORREDUTOR
ND
D
1. Fundering2. Verankeringbouten3. Beschermingbuis voor de kabels f 25 mm. Om de kabels te beschermen
is het aangeraden aangepaste beschermingbuizen te gebruiken, aangezienze nadien in cement worden bevestigd.
4. Elektrische kabels (zie p. 4)5. Bevestigingsplaat met de mogelijkheid de motor te regelen in de hoogte6. Kabel geleidingbuis7. Montagesteunen om de motor horizontaal af te regelen8. Moeren9. Motorreductor10. Elektronische sturingskast
PLAATSING VAN DE FUNDERINGSPLAAT VAN DE MOTORREDUCTOR
MAUERUNG DER BEFESTIGUNGSPLATTE DES GETRIEBEMOTORS1. Fußboden.2. Füsse.3. Kabelmäntel min. ø 25. Damit die Kabel geschützt sind, Mäntel angemessenerGröße vom schweren, zugelassenen Typ verwenden. Die Mäntel müssen durchZement abgedeckt werden.4. Stromkabel (siehe Vorbereitungen auf Seite 2).5. Befestigungsplatte, die die Höhenverstellung des Getriebemotors erlaubt.6. Rohre für den Kabeldurchgang.7. Bügel zur waagrechten Verstellung des Getriebemotors.8. Muttern.9. Getriebemotor.10. Elektronisches Steuergerät

6
Figure 1, 2 e 4 - Montaggio cremagliera - N.B.: le quote sul disegno sonoin mmFigs. 1, 2 and 4 - Installing the rack - NOTE: The measurements in thedrawing are in mm
Figures 1, 2 et 4 - Montage de la crémaillière - NOTA: Les cotes rappelées surle croquis sont exprimées en mm.
Figuras 1, 2 y 4 - Montaje de la cremallera - NOTA: Las cotas del gráfico estánen mm
Figuras 1, 2 e 4 - Montagem da cremalheira.N.B. Dimensões em mm.
Fig. 1, 2, 4 - Plaatsing van de tandlat.Opmerking : de afmetingen op de tekening zijn in mm.
Figura 3 - Gioco minimo tra ingranaggio e cremagliera
Fig. 3 - Minimum play between the gear and the rack
Figure 3 - Jeu minimum entre l’engrenage et la crémaillere
Figura 3 - Jeugo mínimo entre engranaje y cremallera
Fig. 3 - Folga mínima entre a engrenagem e a cremalheira.
Fig.3 - Minimum vrije ruimte tussen het tandwiel en de tandlat.
Fig. 4

7
IMONTAGGIO DEI FINE CORSA MAGNETICIPosizionare le due staffe portamagneti (5) sopra la cremagliera (3) alle due estremitàdel cancello (4) in posizione di cancello chiuso e cancello aperto con riferimento alsensore (1) posto sopra la scheda. Montare sulle staffe (5) i due magneti (2) inposizione orizzontale.N.B.: La distanza dei magneti (2) dal cofano del motoriduttore non deve essereinferiore a 15 mm.Posizionare i magneti (2) esattamente in corrispondenza orizzontale del piccolo ma-gnete (1) montato sulla scheda. I magneti (2) sono polarizzati diversamente tra di loro,uno con polarizzazione negativa e l’altro con polarizzazione positiva, pertanto il mon-taggio dei due magneti sulle staffe (5) va verificato controllando i punti d’arrestomuovendo manualmente il cancello in apertura e chiusura.N.B.: Le quote sul disegno sono in mm.
FMONTAGE DES FINS DE COURSE MAGNETIQUESPositionner les deux étriers porte-aimants (5) sur la crémaillère (3) aux deux extrémitésde la grille (4) (grille fermée et grille ouverte). Se référ au capteur (1) situé au-dessusde la carte. Monter les deux aimants (2) sur les étriers (5) en position horizontale.NOTA: La distance des aimants (2) du capot du motoréducteur ne doit pas êtreinférieure à 15 mm.Positionner les aimants (2) exactement au niveau du petit aimant (1) (alignementhorizontal) monté sur la carte. Comme les aimants (2) présentent del pôles oppsées(positif et négatif), lors de leur montage sur les étriers (5) il faudra contrôller les pointd’arrêt. Pour ce faire, ouvrir et fermer manuellement la grille.NOTA: Les cotes rappelées sur le croquis sont exprimées en mm.
UKINSTALLING THE MAGNETIC LIMIT SWITCHESPlace the two brackets that the magnets (5) are mounted on, above the rack (3)at the two ends of the gate (4) with the gate closed and the gate open in relationto the sensor (1) located above the card. Install the two magnets (2) in ahorizontal position on the brackets (5).NOTE: The distance of the magnets (2) from the gearmotor’s cover must notbe less than 15 mm.Place the magnets (2) so that they exactly correspond horizontally with thesmall magnet (1) installed on the card. The magnets (2) are polarized differentlyfrom each other: one has negative polarization and other has positive polarization.Therefore you have to check the installation of the two magnets on the brackets(5). To do this you have to check the stopping points of the gate by manuallyopening and closing it.NOTE: The measurements in the drawing are in mm.
E
Posicionar los imanes (2) en correspondencia horizontal respecto al imán (1)montado sobre la tarjeta. Los imanes (2) están polarizados diferentementeentre sí, uno posee una polaridad negativa y el otro positiva. Por lo tanto,durante el montaje de los imanes sobre las abrazaderas (5) deben verificarselos puntos de detención, moviendo manualmente la puerta en apertura y cierre.NOTAS: Las cotas del gráfico están en mm.
PMONTAGEM DOS FINS-DE-CURSO MAGNÉTICOSPosicionar os dois suportes dos magnetes (5) por cima da cremalheira (3) em ambasas extremidades do portão (4), em posição de portão fechado e portão aberto comreferência ao sensor (1) situado em cima do cartão. Montar nos suportes (5) os doismagnetes (2) em posição horizontal.N.B. A distância dos magnetes (2) ao capot do motorredutor não deve serinferior a 15 mm.Posicionar os magnetes (2) exactamente em correspondência horizontal do pequenomagnete (1) montado no cartão. Os magnetes (2) estão polarizados diversamente entresi, um com polarização negativa e o outro com polarização positiva e portanto amontagem dos dois magnetes nos suportes (5) deve ser verificada controlando ospontos de paragem deslocando manualmente o portão em abertura e em encerramento.N.B. As medidas indicadas no desenho são em mm.
MONTAJE DE LOS FINALES DE CARRERA MAGNÉTICOSPosicionar las dos abrazaderas portaimanes (5) sobre la cremallera (3), en las dosextremidades de la puerta (4), con posición de puerta cerrada y puerta abiertarespecto al sensor (1) ubicado sobre la tarjeta. Montar los dos imanes (2) sobre lasabrazaderas (5) en posición horizontal.NOTAS: La distancia de los imanes (2) al capot del motorreductor no debe serinferior a 15 mm.
ND
D
PLAATSING VAN DE MAGNETISCHE EINDERITSCHAKELAARSPlaats de 2 montagesteunen waarop de magneten (5) gemonteerd zijn, bovende tandlat (3) aan beide zijden van het hekken (4), zowel in open als geslotenstand in relatie tot de sensor (1) bovenop de elektronische kaart. Plaats de 2magneten (2) horizontaal op de montagesteunen (5).OPMERKING : De afstand tussen de magneten (2) en de motorbehuizingmag niet minder bedragen dan 15 mm.Plaats de magneten (2) horizontaal tov. de kleine magneet (1) geïnstalleerd opde print. De magneten (2) zijn verschillend : één is negatief, de andere is positiefgepolariseerd. Hierdoor is het nodig de plaatsing van deze 2 magneten (2) tecontroleren op de montagesteunen (5), door de poort manueel te openen en tesluiten.OPMERKING : De afmetingen op de tekeningen zijn in mm.
MONTAGE DER MAGNETISCHEN ENDSCHALTER
Die zwei Magnethaltebügel (5) oberhalb der Zahnstange an den zwei Enden des Tors(4) bei geschlossenem Tor und bei offenem Tor mit Bezug auf den Sensor (1) oberhalbder Platine anbringen. An den zwei Bügeln (5) waagrecht die zwei Magneten (2)anbringen. N.B.: Der Abstand der Magneten (2) von der Getriebemotorhaube darfnicht geringer als 15 mm sein.
Die zwei Magneten (2) exakt in waagrechter Übereinstimmung mit dem kleinen, an derPlatine befestigten Magneten (1) anbringen. Die Magneten (2) sind unterschiedlichgepolt, einer mit Minuspolung und einer mit Pluspolung. Deshalb ist die Anbringung derzwei Magneten an den Bügeln (5) zu überprüfen, indem man durch manuelles Öffnenund Schließen des Tores die Haltestellen kontrolliert.N.B.: Die Maße auf der Zeichnung sind in mm angegeben.
8
I
F
UK
E
P
SENSORE INDUTTIVO
CAPTEUR INDUCTIF
INDUCTIVE SENSOR
SENSOR INDUCTIVO
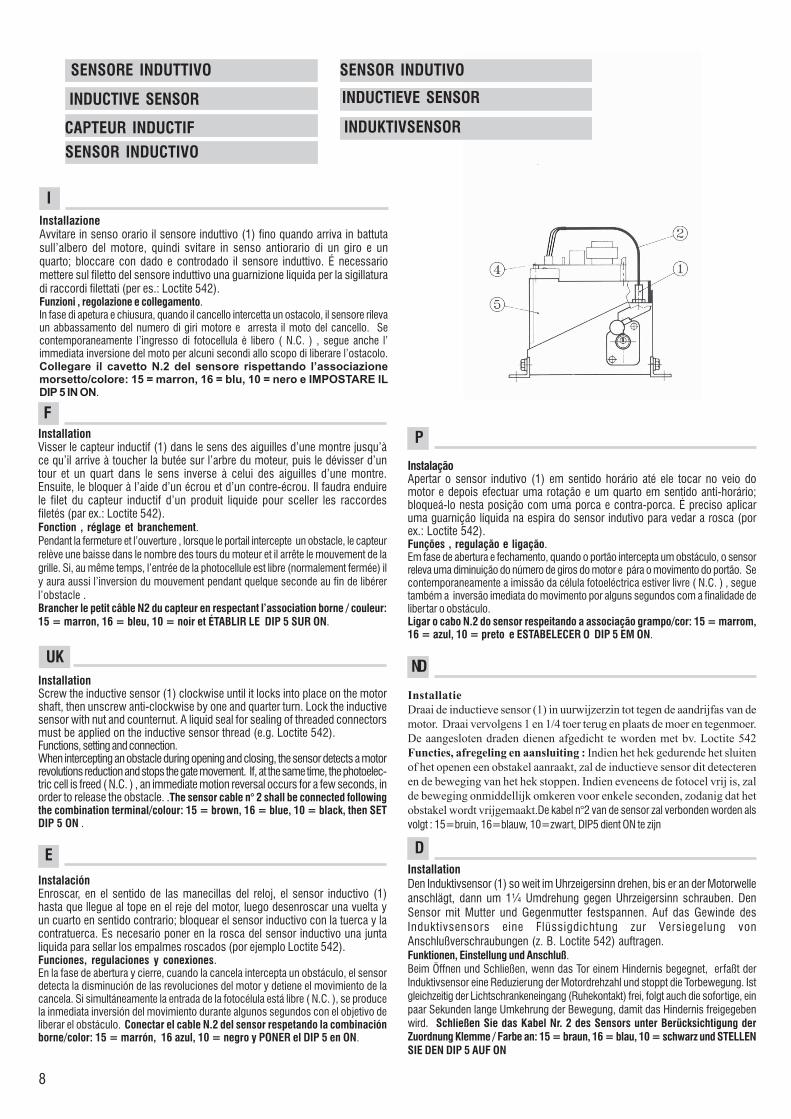
InstallazioneAvvitare in senso orario il sensore induttivo (1) fino quando arriva in battutasull’albero del motore, quindi svitare in senso antiorario di un giro e unquarto; bloccare con dado e controdado il sensore induttivo. É necessariomettere sul filetto del sensore induttivo una guarnizione liquida per la sigillaturadi raccordi filettati (per es.: Loctite 542).Funzioni , regolazione e collegamento.In fase di apetura e chiusura, quando il cancello intercetta un ostacolo, il sensore rilevaun abbassamento del numero di giri motore e arresta il moto del cancello. Secontemporaneamente l’ingresso di fotocellula è libero ( N.C. ) , segue anche l’immediata inversione del moto per alcuni secondi allo scopo di liberare l’ostacolo.Collegare il cavetto N.2 del sensore rispettando l’associazionemorsetto/colore: 15 = marron, 16 = blu, 10 = nero e IMPOSTARE ILDIP 5 IN ON.
InstallationVisser le capteur inductif (1) dans le sens des aiguilles d’une montre jusqu’àce qu’il arrive à toucher la butée sur l’arbre du moteur, puis le dévisser d’untour et un quart dans le sens inverse à celui des aiguilles d’une montre.Ensuite, le bloquer à l’aide d’un écrou et d’un contre-écrou. Il faudra enduirele filet du capteur inductif d’un produit liquide pour sceller les raccordesfiletés (par ex.: Loctite 542).Fonction , réglage et branchement.Pendant la fermeture et l’ouverture , lorsque le portail intercepte un obstacle, le capteurrelève une baisse dans le nombre des tours du moteur et il arrête le mouvement de lagrille. Si, au même temps, l’entrée de la photocellule est libre (normalement fermée) ily aura aussi l’inversion du mouvement pendant quelque seconde au fin de libérerl’obstacle .Brancher le petit câble N2 du capteur en respectant l’association borne / couleur:15 = marron, 16 = bleu, 10 = noir et ÉTABLIR LE DIP 5 SUR ON.
InstallationScrew the inductive sensor (1) clockwise until it locks into place on the motorshaft, then unscrew anti-clockwise by one and quarter turn. Lock the inductivesensor with nut and counternut. A liquid seal for sealing of threaded connectorsmust be applied on the inductive sensor thread (e.g. Loctite 542).Functions, setting and connection.When intercepting an obstacle during opening and closing, the sensor detects a motorrevolutions reduction and stops the gate movement. If, at the same time, the photoelec-tric cell is freed ( N.C. ) , an immediate motion reversal occurs for a few seconds, inorder to release the obstacle. .The sensor cable n° 2 shall be connected followingthe combination terminal/colour: 15 = brown, 16 = blue, 10 = black, then SETDIP 5 ON .
InstalaciónEnroscar, en el sentido de las manecillas del reloj, el sensor inductivo (1)hasta que llegue al tope en el reje del motor, luego desenroscar una vuelta yun cuarto en sentido contrario; bloquear el sensor inductivo con la tuerca y lacontratuerca. Es necesario poner en la rosca del sensor inductivo una juntaliquida para sellar los empalmes roscados (por ejemplo Loctite 542).Funciones, regulaciones y conexiones.En la fase de abertura y cierre, cuando la cancela intercepta un obstáculo, el sensordetecta la disminución de las revoluciones del motor y detiene el movimiento de lacancela. Si simultáneamente la entrada de la fotocélula está libre ( N.C. ), se producela inmediata inversión del movimiento durante algunos segundos con el objetivo deliberar el obstáculo. Conectar el cable N.2 del sensor respetando la combinaciónborne/color: 15 = marrón, 16 azul, 10 = negro y PONER el DIP 5 en ON.
InstalaçãoApertar o sensor indutivo (1) em sentido horário até ele tocar no veio domotor e depois efectuar uma rotação e um quarto em sentido anti-horário;bloqueá-lo nesta posição com uma porca e contra-porca. É preciso aplicaruma guarnição líquida na espira do sensor indutivo para vedar a rosca (porex.: Loctite 542).Funções , regulação e ligação.Em fase de abertura e fechamento, quando o portão intercepta um obstáculo, o sensorreleva uma diminuição do número de giros do motor e pára o movimento do portão. Secontemporaneamente a imissão da célula fotoeléctrica estiver livre ( N.C. ) , seguetambém a inversão imediata do movimento por alguns segundos com a finalidade delibertar o obstáculo.Ligar o cabo N.2 do sensor respeitando a associação grampo/cor: 15 = marrom,16 = azul, 10 = preto e ESTABELECER O DIP 5 EM ON.
ND
InstallatieDraai de inductieve sensor (1) in uurwijzerzin tot tegen de aandrijfas van demotor. Draai vervolgens 1 en 1/4 toer terug en plaats de moer en tegenmoer.De aangesloten draden dienen afgedicht te worden met bv. Loctite 542Functies, afregeling en aansluiting : Indien het hek gedurende het sluitenof het openen een obstakel aanraakt, zal de inductieve sensor dit detecterenen de beweging van het hek stoppen. Indien eveneens de fotocel vrij is, zalde beweging onmiddellijk omkeren voor enkele seconden, zodanig dat hetobstakel wordt vrijgemaakt.De kabel n°2 van de sensor zal verbonden worden alsvolgt : 15=bruin, 16=blauw, 10=zwart, DIP5 dient ON te zijn
D
SENSOR INDUTIVO
INDUCTIEVE SENSOR
INDUKTIVSENSOR
InstallationDen Induktivsensor (1) so weit im Uhrzeigersinn drehen, bis er an der Motorwelleanschlägt, dann um 1¼ Umdrehung gegen Uhrzeigersinn schrauben. DenSensor mit Mutter und Gegenmutter festspannen. Auf das Gewinde desInduktivsensors eine Flüssigdichtung zur Versiegelung vonAnschlußverschraubungen (z. B. Loctite 542) auftragen.Funktionen, Einstellung und Anschluß.Beim Öffnen und Schließen, wenn das Tor einem Hindernis begegnet, erfaßt derInduktivsensor eine Reduzierung der Motordrehzahl und stoppt die Torbewegung. Istgleichzeitig der Lichtschrankeneingang (Ruhekontakt) frei, folgt auch die sofortige, einpaar Sekunden lange Umkehrung der Bewegung, damit das Hindernis freigegebenwird. Schließen Sie das Kabel Nr. 2 des Sensors unter Berücksichtigung derZuordnung Klemme / Farbe an: 15 = braun, 16 = blau, 10 = schwarz und STELLENSIE DEN DIP 5 AUF ON
9
MANOVRA MANUALE
MANOUVRE MANUELLE
MANUAL OPERATION
MANIOBRA MANUAL
MANOBRA MANUAL
I
F
UK
E
P
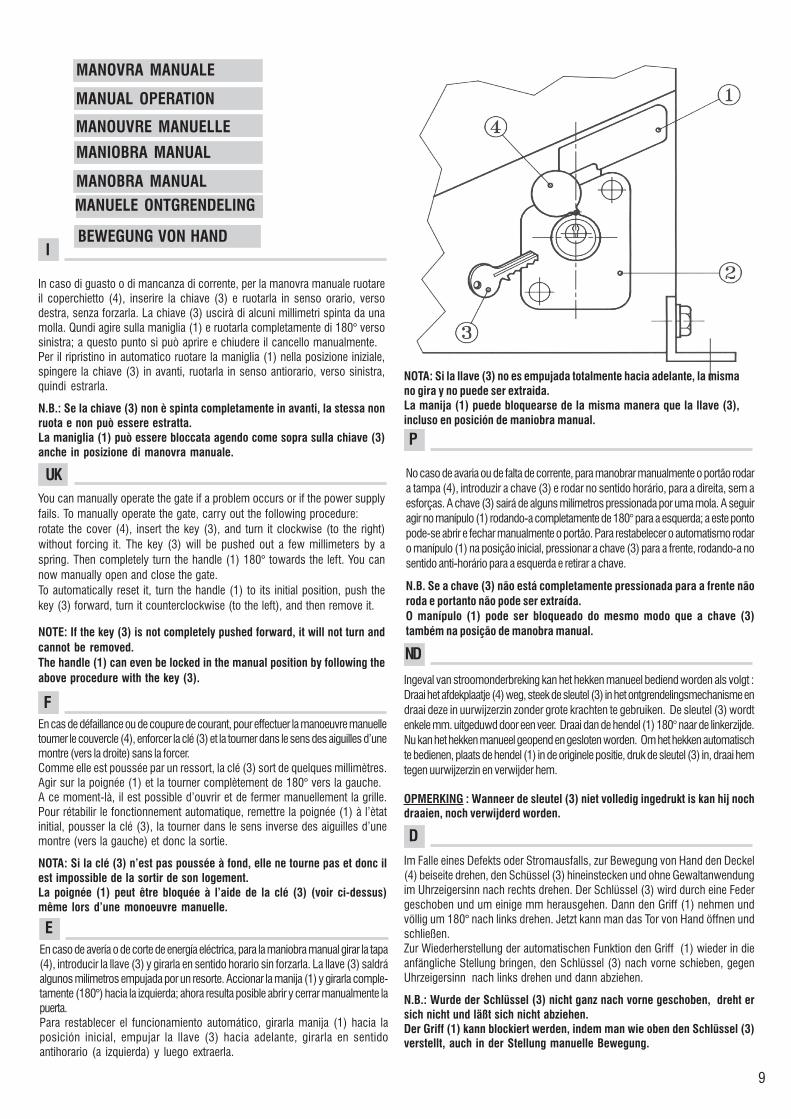
In caso di guasto o di mancanza di corrente, per la manovra manuale ruotareil coperchietto (4), inserire la chiave (3) e ruotarla in senso orario, versodestra, senza forzarla. La chiave (3) uscirà di alcuni millimetri spinta da unamolla. Qundi agire sulla maniglia (1) e ruotarla completamente di 180° versosinistra; a questo punto si può aprire e chiudere il cancello manualmente.Per il ripristino in automatico ruotare la maniglia (1) nella posizione iniziale,spingere la chiave (3) in avanti, ruotarla in senso antiorario, verso sinistra,quindi estrarla.
N.B.: Se la chiave (3) non è spinta completamente in avanti, la stessa nonruota e non può essere estratta.La maniglia (1) può essere bloccata agendo come sopra sulla chiave (3)anche in posizione di manovra manuale.
En cas de défaillance ou de coupure de courant, pour effectuer la manoeuvre manuelletourner le couvercle (4), enforcer la clé (3) et la tourner dans le sens des aiguilles d’unemontre (vers la droite) sans la forcer.Comme elle est poussée par un ressort, la clé (3) sort de quelques millimètres.Agir sur la poignée (1) et la tourner complètement de 180° vers la gauche.A ce moment-là, il est possible d’ouvrir et de fermer manuellement la grille.Pour rétabilir le fonctionnement automatique, remettre la poignée (1) à l’ètatinitial, pousser la clé (3), la tourner dans le sens inverse des aiguilles d’unemontre (vers la gauche) et donc la sortie.
NOTA: Si la clé (3) n’est pas poussée à fond, elle ne tourne pas et donc ilest impossible de la sortir de son logement.La poignée (1) peut être bloquée à l’aide de la clé (3) (voir ci-dessus)même lors d’une monoeuvre manuelle.
You can manually operate the gate if a problem occurs or if the power supplyfails. To manually operate the gate, carry out the following procedure:rotate the cover (4), insert the key (3), and turn it clockwise (to the right)without forcing it. The key (3) will be pushed out a few millimeters by aspring. Then completely turn the handle (1) 180° towards the left. You cannow manually open and close the gate.To automatically reset it, turn the handle (1) to its initial position, push thekey (3) forward, turn it counterclockwise (to the left), and then remove it.
NOTE: If the key (3) is not completely pushed forward, it will not turn andcannot be removed.The handle (1) can even be locked in the manual position by following theabove procedure with the key (3).
En caso de avería o de corte de energía eléctrica, para la maniobra manual girar la tapa(4), introducir la llave (3) y girarla en sentido horario sin forzarla. La llave (3) saldráalgunos milímetros empujada por un resorte. Accionar la manija (1) y girarla comple-tamente (180°) hacia la izquierda; ahora resulta posible abrir y cerrar manualmente lapuerta.Para restablecer el funcionamiento automático, girarla manija (1) hacia laposición inicial, empujar la llave (3) hacia adelante, girarla en sentidoantihorario (a izquierda) y luego extraerla.
No caso de avaria ou de falta de corrente, para manobrar manualmente o portão rodara tampa (4), introduzir a chave (3) e rodar no sentido horário, para a direita, sem aesforças. A chave (3) sairá de alguns milímetros pressionada por uma mola. A seguiragir no manípulo (1) rodando-a completamente de 180° para a esquerda; a este pontopode-se abrir e fechar manualmente o portão. Para restabelecer o automatismo rodaro manípulo (1) na posição inicial, pressionar a chave (3) para a frente, rodando-a nosentido anti-horário para a esquerda e retirar a chave.
N.B. Se a chave (3) não está completamente pressionada para a frente nãoroda e portanto não pode ser extraída.O manípulo (1) pode ser bloqueado do mesmo modo que a chave (3)também na posição de manobra manual.
NOTA: Si la llave (3) no es empujada totalmente hacia adelante, la mismano gira y no puede ser extraida.La manija (1) puede bloquearse de la misma manera que la llave (3),incluso en posición de maniobra manual.
ND
Ingeval van stroomonderbreking kan het hekken manueel bediend worden als volgt :Draai het afdekplaatje (4) weg, steek de sleutel (3) in het ontgrendelingsmechanisme endraai deze in uurwijzerzin zonder grote krachten te gebruiken. De sleutel (3) wordtenkele mm. uitgeduwd door een veer. Draai dan de hendel (1) 180° naar de linkerzijde.Nu kan het hekken manueel geopend en gesloten worden. Om het hekken automatischte bedienen, plaats de hendel (1) in de originele positie, druk de sleutel (3) in, draai hemtegen uurwijzerzin en verwijder hem.
OPMERKING : Wanneer de sleutel (3) niet volledig ingedrukt is kan hij nochdraaien, noch verwijderd worden.
D
MANUELE ONTGRENDELING
Im Falle eines Defekts oder Stromausfalls, zur Bewegung von Hand den Deckel(4) beiseite drehen, den Schüssel (3) hineinstecken und ohne Gewaltanwendungim Uhrzeigersinn nach rechts drehen. Der Schlüssel (3) wird durch eine Federgeschoben und um einige mm herausgehen. Dann den Griff (1) nehmen undvöllig um 180° nach links drehen. Jetzt kann man das Tor von Hand öffnen undschließen.Zur Wiederherstellung der automatischen Funktion den Griff (1) wieder in dieanfängliche Stellung bringen, den Schlüssel (3) nach vorne schieben, gegenUhrzeigersinn nach links drehen und dann abziehen.
N.B.: Wurde der Schlüssel (3) nicht ganz nach vorne geschoben, dreht ersich nicht und läßt sich nicht abziehen.Der Griff (1) kann blockiert werden, indem man wie oben den Schlüssel (3)verstellt, auch in der Stellung manuelle Bewegung.
BEWEGUNG VON HAND

10
I
Installazione (VEDI SCHEMA PAG 20)- Predisporre a monte dell’apparecchiatura un interruttore differenziale o magnetotermico
da 10 A in grado di garantire separazione omnipolare con apertura minima deicontatti pari a 3 mm.
- Differenziare i cavi di potenza (min 1.5 mm2 ) da quelli di segnale ( min 0.5 mm 2).- Eventuali contatti collegati allo stesso ingresso N.C. vanno posti in serie tra loro.- Eventuali contatti collegati allo stesso ingresso N.A.( START ) , vanno posti in
parallelo .
COLLEGAMENTI1-2 : ALIMENTAZIONE 230 Vac 50 Hz.1= FASE , 2 = NEUTRO, CN10 = TERRA ( EARTH ) . Fusibile di protezione ( F1 ) 3A3-4 : Uscita LAMPEGGIATORE 230 Vac - 100 W max. ( vedere anche Dip 4 e Dip 6 )5-6-7 : Uscita MOTORE.5=apre, 6=chiude,7=comune.Condensatore collegato ai connettori Cn8-Cn9 ( Externalcapacitor ).8-9 : Uscita ( SELV ) 24 Vac - 5 W max. per ALIMENTAZIONE ACCESSORI .Fusibile di protezione ( F3 ) 500 mA.12 - 14 : Ingresso N.A. comando START ( vedere anche Dip 3 ).12-13 : Ingresso N.C. per dispositivi di rilevazione ( FOTOCELLULE ).Attivo solo con DIP 7=OFF : solo durante le fasi di chiusura arresta e comanda lariapertura.12 -11 : Ingresso N.C. per comando STOP.Provoca l’ arresto sia in apertura che in chiusura e blocca il tempo pausa inibendo larichiusura automatica.15-16-10 : SENSORE GIRI MOTORE.15 = marrone ; 16 = blu ; 10 = nero ( vedere DIP 5 ) .20-21 : ANTENNA ESTERNA ( 21 = calza )ATTENZIONE : in caso si utilizzi un ricevitore da innesto dotato di proprimorsetti per il collegamento antenna, ignorare il 20-21.
PROGRAMMAZIONE FUNZIONI ( Dip- Switch Sw1 )Attenzione : per memorizzare una nuova configurazione togliere tensione peralcuni secondi.DIP 1 CHIUSURA AUTOMATICA
OFF = AbilitataON = Disabilitata
Dip 2 Funzionamento a UOMO PRESENTEOFF = DisabilitatoON = Abilitato. Il funzionamento avviene solo mediante attiva-zione continua del contatto START ( morsetti 12-14 ). Non appe-na il contatto torna N.A. , il moto si arresta.
Dip 3 Risposta a ripetuti comandi START ( morsetti 12-14 )OFF = “ Programma Condominiale “. APERTURA - solo a FCACHIUSURA - durante la Chiusura , ARRESTO e RIAPERTURA.ON = “ Programma Passo Passo “ . APERTURA - ARRESTO -
CHIUSURA - ARRESTO ecc…Dip 4 Funzionamento Uscita Lampeggiatore ( morsetti
3-4 )OFF = Uscita intermittente ( utilizzare lampeggiatore aluce fissa cod. 70107 ).ON = Uscita sempre attiva ( utilizzare lampeggiatore aluce intermittente cod. 70106 ).
Dip 5 Abilitazione SENSORE INDUTTIVOOFF = Conteggio giri motore abilitato sia durante l’ aper-tura che in chiusura. Il dispositivo interviene a seguitodi urto con un ostacolo determinando l’arresto e l’inver-sione del moto per 2 secondi. ( ATTENZIONE :posizionare in OFF solo nelle versioni dotate di sensoreinduttivo ).ON = DISABILITATO
Dip 6 Prelampeggio di 2 secondiOFF = abilitatoON = disabilitato
Dip 7 Abilitazione ingresso per dispositivi di rilevazione( morsetti 12-13 )OFF = Ingresso abilitato :durante la chiusura arresta ecomanda la riaperturaON = Ingresso disabilitato
Dip 8 - 9 - 10 : mantenere necessariamente in OFF.
REGOLAZIONE TRIMMER
RV1 FORCE : regolare finemente per limitare la FORZA DI SPINTA del cancello motoriz-zato.RV2 WORK : impostare un TEMPO DI LAVORO 5 ÷ 8 secondi superiore rispetto altempo reale di una manovra completa . Regolazione attiva solo con Dip 2 = OFF .RV3 PAUSE : solo con Dip 1 = ON consente di regolare il TEMPO PAUSA al termine delquale il cancello richiude automaticamente .
MESSA IN FUNZIONE E COLLAUDO
Ad alimentazione disinserita :- Impostare i Dip-switch a seconda delle funzioni desiderate;- Verificare la correttezza dei collegamenti poiche’ un errore puo’ danneggiareirreversibilmente l’apparecchiatura;Dare tensione :- Eseguire con cura le regolazioni sui trimmer- Verificare che i LED rossi relativi agli ingressi N.C. risultino accesi, compatibilmentecon le condizioni dell’automazione;- Verificare che il led giallo relativo all’ingresso START si accenda solo a seguito diun comando;- Verificare il corretto funzionamento degli eventuali dispositivi di sicurezza collegatiagli ingressi PHOTO ( 12 -13 ) o STOP ( 11-12 ).- Verificare il corretto senso di marcia ( il primo comando START dopo aver datotensione , se il cancello non è già a FCA determina una apertura ). In caso contrariooccorre invertire tra loro i collegamenti dei morsetti 5-6. A cancello aperto il LED FCA deveessere spento e il led FCC acceso; a cancello chiuso il Led FCC deve risultare spento eil led FCA acceso.
VERSIONE CON RICEVITORE INTEGRATOL’apparecchiatura nella versione con ricevitore 433.92 Mhz integrato puo’ funzionaresia con trasmettitori a dip-switch che con quelli della famiglia Roller ( Rolling Code) e puo’ memorizzare al massimo 200 diversi codici.Apprendimento telecomandi:Alimentando per la prima volta l’apparecchiatura, si verifica che il led DL6 è acceso( ricevitore pronto per la memorizzazione ).Basta premere un tasto del trasmettitore per memorizzare il suo codice nel ricevitore( quel tasto agisce come comando START ).Per altri 6 secondi il led DL6 rimane acceso e si possono così apprendere con lamedesima modalità ulteriori telecomandi della stessa famiglia.La fase di memorizzazione termina spontaneamente con lo spegnimento del led DL6.Per apprendere ulteriori trasmettitori occorre premere il pulsante P1 ( LEARN ), verificarel’accensione del led DL6 quindi premere il tasto del nuovo trasmettitore.Attenzione : dopo aver appreso il primo telecomando, il ricevitore accetta soltanto altritelecomandi della stessa famiglia.Cancellazione totale codici in memoria : premere il tasto P1(il led DL6 si accende )e mantenerlo premuto sino allo spegnimento del led DL6.Al rilascio del pulsante P1, il led DL6 compie un lampeggio poi si riaccende ad indicare
che il ricevitore è pronto per apprendere nuovi telecomandi.
Apprendimento telecomandi famiglia Roller senza accedere alla centralina:quando almeno un telecomando è già stato memorizzato con la procedura sopradescritta , è possibile abilitare l’autoapprendimento di nuovi telecomandi della stessafamiglia senza agire direttamente sulla centrale.Basta infatti premere per alcuni secondi e contemporaneamente i tasti 1 e 2 deltrasmettitore già memorizzato ( in prossimità dalla centrale stessa ) e di seguitopremere il tasto del nuovo telecomando che viene così autoappreso.
SENSORE INDUTTIVOCollegare il cavetto N.2 del sensore rispettando l’associazione morsetto/colore:15 = marrone, 16 = blu, 10 = nero e IMPOSTARE IL DIP 5 IN ON.
CARATTERISTICHE TECNICHE
Temperatura di funzionamento : - 20 ÷ + 55Tensione di Alimentazione : 230 Vac ± 5 %Frequenza : 50 - 60 HzUscita alimentazione accessori : 24 Vac max 200 mAUscita lampeggiatore : 230 Vac max. 100 WPotenza massima gestibile all’uscita motore : 500 WRegolazione elettronica della potenza : min 40% , max 98%Regolazione tempo lavoro : min 5" , max. 90 “Regolazione tempo pausa : min. 5", max. 110 “.
APPARECCHIATURA ELETTRONICA

UK
11
Installation (SEE PAG. 20)- A differential or magnetothermic 10 A switch shall be mounted upstream theequipment, in order to assure an omni polar separation with a minimum contact openingof 3 mm.- The power supply cables (min 1.5 mm²) shall be separated in comparison with thesignal cables (min 0.5 mm²).- Possible contacts connected with the N.C. Inputs shall be arranged in series .- Possible contacts connected with the N.O. inputs shall be arranged in parallel.
CONNECTIONS1-2 : POWER SUPPLY: 230 Vac 50 Hz.1= PHASE , 2 = NEUTRAL, CN10 = EARTH . ( F1 ) 3A Protection fuse3-4 : FLASHING LIGHT connection: 230 Vac - 100 W max. ( see Dip 4 and Dip 6 )5-6-7 : MOTOR connection.5=opening, 6=closing,7=common. External capacitor connected with Cn8-Cn9 connec-tors8-9 : connection ( SELV ) 24 Vac - 5 W max. for ACCESSORIES POWER SUPPLY. ( F3 ) 500 mA protection fuse.12 - 14 : N.O. input for START command ( see Dip 3 ).12-13 : N.C. input for detecting devices ( PHOTOELECTRIC CELLS ).Enabled only when DIP 7=OFF : only during closing, it stops and inverse to a newopening.12 -11 : N.C. input for STOP command.During opening and closing, it stops and it also stops the pause time avoiding a newautomatic closing.15-16-10 : MOTOR REVOLUTIONS SENSOR.15 = brown ; 16 = blue ; 10 = black ( see DIP 5 ) .20-21 : EXTERNAL AERIAL ( 21 = shielding )WARNING : should you utilize a plug in receiver equipped with its own termi-nals to be connected with the aerial, do not consider 20-21.
( Dip- Switch Sw1 ) FUNCTIONS PROGRAMMINGWarning : in order to store a new configuration, the power supply shall bedisconnected for a few seconds.
DIP 1 AUTOMATIC CLOSINGOFF = EnabledON = Disabled
Dip 2 Functioning with DEAD MAN LOGICOFF = DisabledON = Enabled. The functioning only occurs through a continuousactivation of the START command (12-14 terminals ). Once thecontact is N.O. again, the movement stops.
Dip 3 Response to repeated START commands (12-14 terminals )OFF = “ Condominium Programme “. OPENING – only whenopening limit switch is activated, - CLOSING - during closing ,STOPPING and NEW OPENING.ON = “ Step-by-Step Programme “ . OPENING - STOPPING -CLOSING - STOPPING etc…
Dip 4 Functioning of Flashing Light Connection (3-4 terminals )OFF = Blinking output (a flashing light with fixed light code 70107shall be utilized ).ON = Continuous output ( a flashing light code 70106 shall beutilized).
Dip 5 INDUCTIVE SENSOR enablingOFF = Motor revolutions calculation enabled during opening andclosing. The device operates in case of impacts against anobstacle and in this case a stopping as well as a movementreversal for 2 seconds occur. ( WARNING : set in OFFposition only in versions equipped with inductive sensor ).ON = DISABLED
Dip 6 2 seconds preflashingOFF = enabledON = disabled
Dip 7 Input enabling for detecting devices (12-13 terminals )OFF = enabled; only during closing,stops and inverse to a newopeningON = disabled
Dip 8 - 9 - 10 : to be kept in OFF position .
TRIMMER SETTINGRV1 FORCE : precisely to be set, in order to limit the PUSHING FORCE of the motorizedgate.RV2 WORK : set to a WORKING TIME exceeding 5-8 seconds the real time of acomplete cycle. Setting with Dip 2 = OFF enabled.RV3 PAUSE : only with Dip 1 = ON, it allows to set the PAUSE TIME, at the end of thistime the gate will close automatically .
STARTING AND TESTING
With power supply disconnected:- Set the Dip-switches according to the functions you wish;- Assure that connections have been carried out in a correct way, because a possibleerror could damage the equipment in irrepairable way.With power supply connected :- Carefully carry out settings on the trimmers- Assure that the red LED relating to N.C. inputs are ON, according to the operatorconditions;- Assure that the yellow LED referred to START input only is on in case of operation;- Assure that possible safety devices connected with the PHOTO ( 12 -13 ) or STOP( 11-12 ) inputs are functioning correctly.- Assure there is a correct direction ( the first START command after enabling voltagesupply , if the gate is not yet at the opening limit switch, an opening occurs ). If it is not thecase, you shall invert the connections of 5-6 terminals one to the other. When the gate isopen wide, the opening limit switch LED shall be OFF and the closing limit switch LEDshall be ON; when the gate is closed, the closing limit switch LED shall be OFF and theopening limit switch LED shall be ON. VERSION WITH INTEGRATED RECEIVERThe equipment version with integrated 433.92 Mhz receiver can function with dip-switch as well as Roller ( Rolling Code ) transmitters, it can store max 200 differentcodes.Transmitters learning :Supplying the equipment for the first time, assure that LED DL6 is on ( receiver readyfor storage ).You only need to press the button of the transmitter in order to store its code in thereceiver ( that button operates as START command ).The DL6 LED is ON for about 6 seconds and during this time, it is possible to learnfurther transmitters belonging to the same category.The storage phase ends when the DL6 LED is OFF.To learn further transmitters, you only need to press the P1 ( LEARN ) button, assurethat DL6 LED has been ON, then press the new transmitter button.Warning : after learning the first remote control, the receiver only accepts other remotecontrols belonging to the same category ( DIP or ROLLER).Total cancellation of stored codes: press the P1 button (DL6 LED is ON ) and keepit pressed until DL6 LED is OFF .Releasing the P1 button, the DL6 LED flashes once, then, it is ON again to indicate thatthe receiver is ready to learn new transmitters.ROLLER category remote controls learning without accessing the controlequipment :when at least one transmitter has already been stored by the above described proce-dure, it is possible to enable a self-learning of new transmitters belonging to the samecategory, without accessing the control equipment .In fact, you only need to press simultaneously for some seconds buttons 1 and 2 of thealready stored transmitter ( near to the location of the control equipment) then press thenew transmitter button, in order to learn it.
INDUCTIVE SENSORThe sensor cable n° 2 shall be connected following the combination terminal/colour: 15 = brown, 16 = blue, 10 = black, then SET DIP 5 ON .
Technical featuresOperating temperature : - 20 ÷ + 55Power supply voltage : 230 Vac ± 5 %Frequency : 50 - 60 HzAccessories power supply connection : 24 Vac max 200 mAFlashing light connection : 230 Vac max. 100 WMaximum power to be controlled at the motor connection : 500 WElectronic torque regulation : min 40 % , max. 98 %Working time setting : min 5" , max. 90 “
Pause time setting : min. 5", max. 110 “.
CONTROL PANEL

12
F
Installation (VOIR A LA PAGE 20)- Prédisposer dans la partie supérieure de l’appareillage un interrupteur différentielou magnétothermique de 10 A qui peut assurer la séparation omni-polaire avec ouvertureminimale des contactes de 3 mm.- Diversifier les câbles de puissance (min 1.5 mm2 ) de ceux de signal ( min 0.5 mm2 ).- Tous les possibles contactes branchés à la même entrée normalement ferméedoivent être positionnés en série l’un après l’autre.- Tous les possibles contactes branchés à la même entrée normalement ouverte (START ) doivent être positionnés en parallèle.
BRANCHEMENTS1-2 : ALIMENTATION 230 Vac 50 Hz.1= PHASE , 2 = NEUTRE, CN10 TERRE ( EART ) . Fusible de protection ( F1 ) 3A3-4 : Connexion CLIGNOTANT 230 Vac - 100 W max. ( voir aussi Dip 4 e Dip 6 )5-6-7 : Connexion MOTEUR5=ouvre, 6=ferme,7=comune.Condensateur branché aux connecteurs Cn8-Cn9(Condensateur extérieur ).8-9 : Connexion ( SELV ) 24 Vac - 5 W max. pour L’ ALIMENTATION DESACCESSOIRES .Fusible de protection ( F3 ) 500 mA.12 - 14 : Entrée normalement ouverte commande START ( voir aussi Dip 3 ).12-13 : Entrée normalement fermée pour dispositifs de détection ( Cellules photo-electriques ).Active seulement avec DIP 7=OFF : seulement pendant les phases de fermeture ilarrête et commande la re-ouverture.12 -11 : Entrée normalement fermée pour le commande STOP.Il provoque l’arrêt soit pendant l’ouverture soit pendant la fermeture et il bloque le tempspause en interdisant la fermeture automatique.15-16-10 : SENSEUR DES TOURS DU MOTEUR15 = marron ; 16 = bleu ; 10 = noir ( voir DIP 5 ) .20-21 : ANTENNE EXTERNELLE ( 21 = blindage )ATTENTION : Dans le cas où on utilise un récepteur à embrayer pourvu de sespropres bornes pour le branchement avec l’antenne, ignorer le 20-21.
PROGRAMMATION DES FONCTIONS( Dip- Switch Sw1 )Attention : Pour mémoriser une nouvelle configuration couper la tension pendantquelque secondDIP 1 FERMETURE AUTOMATIQUE
OFF = InactiveON = Active
Dip 2 Fonctionnement avec homme présentOFF = InactiveON = Active Le fonctionnement a lieu seulement à traversl’activation continue du contacte START (bornes 12-14). Lefonctionnement s’arrête lorsque le contacte retournenormalement fermé.
Dip 3 Réponse à plusieurs commandes START ( bornes 12-14 )OFF = « Programme dans des immeubles en copropriété «.OUVERTURE- FERMETURE – seulement à partir da la positionde fin de course ouverture -pendant la fermeture , ARRET et RE-OUVERTURE.ON = Programme Séquentiel « Pas à Pas « . OUVERTURE -ARRET - FERMETURE - ARRET etc…
Dip 4 Fonctionnement connexion Clignotant ( bornes 3-4 )OFF = Connexion intermittente ( utiliser le clignotant à lumièrefixe cod. 70107 ).ON = Connexion toujours active ( utiliser le clignotant à lumièreintermittente cod. 70106 ).
Dip 5 Mise en fonction du capteur inductifOFF = Comptage des tours du moteur en fonction soit pendantl’ouverture soit pendant la fermeture. Le dispositif intervient aprèsun choc contre un obstacle et il arrête le mouvement et le renversependant 2 secondes ( ATTENTION : positionner sur OFFseulement dans le cas de versions pourvues de capteur inductif).ON = INTERDIT
Dip 6 Pré-clignotement de 2 secondesOFF = en fonctionON = interdit
Dip 7 Mise en fonction de l’entrée pour dispositifs de relevé(bornes 12-13 )OFF = Entrée en fonctionON = Entrée interdite
Dip 8 - 9 - 10 : à tenir nécessairement dans la position OFF
REGLAGE DE TRIMMER
RV1 FORCE : régler légèrement au fin de limiter le FORCE DE POUSSEE du portailmotoriséRV2 WORK : établir un TEMPS DE TRAVAIL 5 ÷ 8 secondes supérieur par rapport autemps réel d’une manœuvre complète. Réglage actif seulement avec Dip 2= OFFRV3 PAUSE : seulement avec Dip 1 = ON il permet de régler le TEMPS de PAUSE à lafin duquel le portail se ferme automatiquement.
MISE EN FONCTION ET ESSAI
Lorsque l’alimentation est débranchée:- Etablir le dip-switch selon les fonctions désirées ;- Vérifier que les branchements soient corrects parce que une faute peut endommagerirréversiblement l’appareillage ;Donner tension :- Suivre soigneusement les réglages sur les trimmer- Vérifier que les LEDS rouges relatifs aux entrées normalement fermées soientallumés, dans la mesure où les conditions de l’appareillage le permettent ;- Vérifier que le LED jaune relatif à l’entrée START s’allume seulement après uncommande ;- Vérifier le correcte fonctionnement des dispositifs de sécurité possibles branchésaux entrées PHOTO ( 12 -13 ) ou STOP ( 11-12 ).- Vérifier le correcte sens de marche (si le portail n’est déjà arrivée à fin de course enouverture et après avoir donné tension, la première commande START provoque uneouverture). Dans le cas contraire, il faut renverser entre eux les branchements des bornes5-6. Le LED fin de course ouverture doit être éteint lorsque le portail est completementouvert et le LED fin de course fermeture doit être allumé. Le LED fin de course fermeturedoit être éteint lorsque le portail est completement fermé et le LED fin de course enouverture doit être allumé.
VERSION AVEC RÉCEPTEUR INTÉGRÉL’appareil dans la version avec récepteur 433.92 Mhz intégré peut marcher soit avectransmetteurs dip-switch soit avec les transmetteurs de la famille Roller (Rolling Code)et il peut mémoriser jusqu’à 200 codes différents, au maximum.Établissement et mémorisation des télécommandes:Lorsqu’on alimente pour la première fois l’appareillage, le LED DL6 est allumé(récepteur prêt pour la mémorisation).Pour mémoriser le code de l’émetteur dans le récepteur il suffit de presser un boutonde l’émetteur ( ce bouton agit comme commande START ).Le LED DL6 reste allumé pendant d’autres 6 secondes et il est possible d’établir etmémoriser de la même façon d’autres télécommandes de la même famille. La phase demémorisation termine spontanément lorsque le led DL6 s’éteint.Pour établir et mémoriser d’autres transmetteurs il faut presser le bouton P1 (LEARN ),vérifier que le led DL6 soit allumé et presser le bouton du nouvel l’émetteur.Attention : Après avoir mémorisé le premier télécommande, le récepteur accepteseulement des télécommandes de la même famille.Effacement totale des codes dans la mémoire: presser le bouton P1(le led DL6s’ allume ) et le tenir pressé jusqu’au moment où le led DL6 s’éteint.Lorsque On laisse le bouton P1, le led DL6 clignote une seule fois et puis il s’allume denouveau pour indiquer que le récepteur est prêt pour mémoriser des nouveauxtélécommandes.Mémorisation de télécommandes famille Roller sans accéder à la centrale:Il est possible de mettre en fonction l’auto-mémorisation de télécommandes nouveaux- mais de la même famille - sans agir directement sur la centrale lorsque au moins untélécommande a déjà été mémorisé par le procédé susmentionné.Il suffit, en effet, de presser les boutons 1 et 2 du transmetteur déjà mémorisé pendantquelque seconde et au même temps (près de la centrale) et par la suite, presser lebouton du nouveau télécommande qui , cela faisant, est mémorisé automatiquement.
CAPTEUR INDUCTIF.Brancher le petit câble N2 du capteur en respectant l’association borne / couleur:15 = marron, 16 = bleu, 10 = noir et ÉTABLIR LE DIP 5 SUR ON.
Caractéristiques techniquesTempérature de fonctionnement : - 20 ÷ + 55Tension d’Alimentation : 230 Vac ± 5 %Fréquence : 50 - 60 HzConnexion alimentation des accessoires : 24 Vac max 200 mAConnexion du clignotant : 230 Vac max. 100 WPuissance maximale à la connexion du moteur : 500 WRégulation électronique de la puissance : min 40 % , max. 98 %Régulation temps travail : min 5" , max. 90 «Régulation temps pause : min. 5", max. 110 «.
PLATINE ÉLECTRONIQUE
E
13
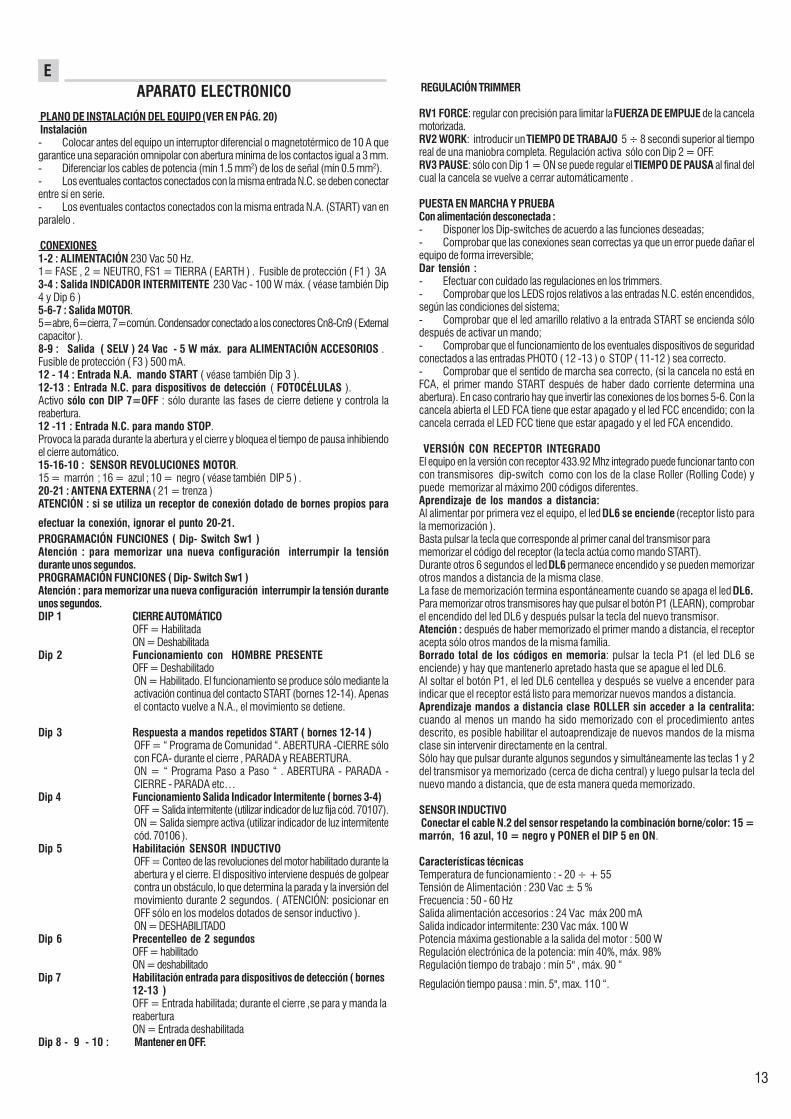
PLANO DE INSTALACIÓN DEL EQUIPO (VER EN PÁG. 20) Instalación- Colocar antes del equipo un interruptor diferencial o magnetotérmico de 10 A quegarantice una separación omnipolar con abertura mínima de los contactos igual a 3 mm.- Diferenciar los cables de potencia (mín 1.5 mm2) de los de señal (mín 0.5 mm2).- Los eventuales contactos conectados con la misma entrada N.C. se deben conectarentre sí en serie.- Los eventuales contactos conectados con la misma entrada N.A. (START) van enparalelo .
CONEXIONES1-2 : ALIMENTACIÓN 230 Vac 50 Hz.1= FASE , 2 = NEUTRO, FS1 = TIERRA ( EARTH ) . Fusible de protección ( F1 ) 3A3-4 : Salida INDICADOR INTERMITENTE 230 Vac - 100 W máx. ( véase también Dip4 y Dip 6 )5-6-7 : Salida MOTOR.5=abre, 6=cierra, 7=común. Condensador conectado a los conectores Cn8-Cn9 ( Externalcapacitor ).8-9 : Salida ( SELV ) 24 Vac - 5 W máx. para ALIMENTACIÓN ACCESORIOS .Fusible de protección ( F3 ) 500 mA.12 - 14 : Entrada N.A. mando START ( véase también Dip 3 ).12-13 : Entrada N.C. para dispositivos de detección ( FOTOCÉLULAS ).Activo sólo con DIP 7=OFF : sólo durante las fases de cierre detiene y controla lareabertura.12 -11 : Entrada N.C. para mando STOP.Provoca la parada durante la abertura y el cierre y bloquea el tiempo de pausa inhibiendoel cierre automático.15-16-10 : SENSOR REVOLUCIONES MOTOR.15 = marrón ; 16 = azul ; 10 = negro ( véase también DIP 5 ) .20-21 : ANTENA EXTERNA ( 21 = trenza )ATENCIÓN : si se utiliza un receptor de conexión dotado de bornes propios para
efectuar la conexión, ignorar el punto 20-21.PROGRAMACIÓN FUNCIONES ( Dip- Switch Sw1 )Atención : para memorizar una nueva configuración interrumpir la tensióndurante unos segundos.PROGRAMACIÓN FUNCIONES ( Dip- Switch Sw1 )Atención : para memorizar una nueva configuración interrumpir la tensión duranteunos segundos.DIP 1 CIERRE AUTOMÁTICO
OFF = HabilitadaON = Deshabilitada
Dip 2 Funcionamiento con HOMBRE PRESENTEOFF = DeshabilitadoON = Habilitado. El funcionamiento se produce sólo mediante laactivación continua del contacto START (bornes 12-14). Apenasel contacto vuelve a N.A., el movimiento se detiene.
Dip 3 Respuesta a mandos repetidos START ( bornes 12-14 )OFF = “ Programa de Comunidad “. ABERTURA -CIERRE sólocon FCA- durante el cierre , PARADA y REABERTURA.ON = “ Programa Paso a Paso “ . ABERTURA - PARADA -CIERRE - PARADA etc…
Dip 4 Funcionamiento Salida Indicador Intermitente ( bornes 3-4)OFF = Salida intermitente (utilizar indicador de luz fija cód. 70107).ON = Salida siempre activa (utilizar indicador de luz intermitentecód. 70106 ).
Dip 5 Habilitación SENSOR INDUCTIVOOFF = Conteo de las revoluciones del motor habilitado durante laabertura y el cierre. El dispositivo interviene después de golpearcontra un obstáculo, lo que determina la parada y la inversión delmovimiento durante 2 segundos. ( ATENCIÓN: posicionar enOFF sólo en los modelos dotados de sensor inductivo ).ON = DESHABILITADO
Dip 6 Precentelleo de 2 segundosOFF = habilitadoON = deshabilitado
Dip 7 Habilitación entrada para dispositivos de detección ( bornes12-13 )OFF = Entrada habilitada; durante el cierre ,se para y manda lareaberturaON = Entrada deshabilitada
Dip 8 - 9 - 10 : Mantener en OFF.
REGULACIÓN TRIMMER
RV1 FORCE: regular con precisión para limitar la FUERZA DE EMPUJE de la cancelamotorizada.RV2 WORK: introducir un TIEMPO DE TRABAJO 5 ÷ 8 secondi superior al tiemporeal de una maniobra completa. Regulación activa sólo con Dip 2 = OFF.RV3 PAUSE: sólo con Dip 1 = ON se puede regular el TIEMPO DE PAUSA al final delcual la cancela se vuelve a cerrar automáticamente .
PUESTA EN MARCHA Y PRUEBACon alimentación desconectada :- Disponer los Dip-switches de acuerdo a las funciones deseadas;- Comprobar que las conexiones sean correctas ya que un error puede dañar elequipo de forma irreversible;Dar tensión :- Efectuar con cuidado las regulaciones en los trimmers.- Comprobar que los LEDS rojos relativos a las entradas N.C. estén encendidos,según las condiciones del sistema;- Comprobar que el led amarillo relativo a la entrada START se encienda sólodespués de activar un mando;- Comprobar que el funcionamiento de los eventuales dispositivos de seguridadconectados a las entradas PHOTO ( 12 -13 ) o STOP ( 11-12 ) sea correcto.- Comprobar que el sentido de marcha sea correcto, (si la cancela no está enFCA, el primer mando START después de haber dado corriente determina unaabertura). En caso contrario hay que invertir las conexiones de los bornes 5-6. Con lacancela abierta el LED FCA tiene que estar apagado y el led FCC encendido; con lacancela cerrada el LED FCC tiene que estar apagado y el led FCA encendido.
VERSIÓN CON RECEPTOR INTEGRADOEl equipo en la versión con receptor 433.92 Mhz integrado puede funcionar tanto concon transmisores dip-switch como con los de la clase Roller (Rolling Code) ypuede memorizar al máximo 200 códigos diferentes.Aprendizaje de los mandos a distancia:Al alimentar por primera vez el equipo, el led DL6 se enciende (receptor listo parala memorización ).Basta pulsar la tecla que corresponde al primer canal del transmisor paramemorizar el código del receptor (la tecla actúa como mando START).Durante otros 6 segundos el led DL6 permanece encendido y se pueden memorizarotros mandos a distancia de la misma clase.La fase de memorización termina espontáneamente cuando se apaga el led DL6.Para memorizar otros transmisores hay que pulsar el botón P1 (LEARN), comprobarel encendido del led DL6 y después pulsar la tecla del nuevo transmisor.Atención : después de haber memorizado el primer mando a distancia, el receptoracepta sólo otros mandos de la misma familia.Borrado total de los códigos en memoria: pulsar la tecla P1 (el led DL6 seenciende) y hay que mantenerlo apretado hasta que se apague el led DL6.Al soltar el botón P1, el led DL6 centellea y después se vuelve a encender paraindicar que el receptor está listo para memorizar nuevos mandos a distancia.Aprendizaje mandos a distancia clase ROLLER sin acceder a la centralita:cuando al menos un mando ha sido memorizado con el procedimiento antesdescrito, es posible habilitar el autoaprendizaje de nuevos mandos de la mismaclase sin intervenir directamente en la central.Sólo hay que pulsar durante algunos segundos y simultáneamente las teclas 1 y 2del transmisor ya memorizado (cerca de dicha central) y luego pulsar la tecla delnuevo mando a distancia, que de esta manera queda memorizado.
SENSOR INDUCTIVO Conectar el cable N.2 del sensor respetando la combinación borne/color: 15 =marrón, 16 azul, 10 = negro y PONER el DIP 5 en ON.
Características técnicasTemperatura de funcionamiento : - 20 ÷ + 55Tensión de Alimentación : 230 Vac ± 5 %Frecuencia : 50 - 60 HzSalida alimentación accesorios : 24 Vac máx 200 mASalida indicador intermitente: 230 Vac máx. 100 WPotencia máxima gestionable a la salida del motor : 500 WRegulación electrónica de la potencia: mín 40%, máx. 98%Regulación tiempo de trabajo : mín 5" , máx. 90 “
Regulación tiempo pausa : min. 5", max. 110 “.
APARATO ELECTRONICO

P
14
Instalação (V. NA PÂG. 20)- Predispor na parte superior da aparelhagem um interruptor diferencial ou magnetotérmicode 10 A capaz de garantir a separação onipolar com abertura mínima dos contactos iguala 3 mm.- Diferenciar os cabos de potência (min 1.5 mm2 ) dos cabos de sinal ( min 0.5 2 ).- Eventuais contactos ligados na mesma entrada N.C. devem ser posicionados emsérie entre eles.- Eventuais contactos ligados na mesma entrada N.A.( START ) , devem serposicionados paralelamente. .
Ligações1-2 : ALIMENTAÇÃO 230 Vac 50 Hz.1= FASE , 2 = NEUTRO, CN10 = TERRA ( EARTH ) . Fusível de protecção ( F1 ) 3A3-4 : Saída LAMPEJANTE 230 Vac - 100 W máx. ( ver também Dip 4 e Dip 6 )5-6-7 : Saída MOTOR.5=abre, 6=fecha,7=comum.Condensador ligado aos conectores Cn8-Cn9 ( Externalcapacitor).8-9 : Saída ( SELV ) 24 Vac - 5 W máx. para ALIMENTAÇÃO ACESSÓRIOS .Fusível de protecção ( F3 ) 500 mA.12 - 14 : Entrada N.A. comando START ( ver também Dip 3 ).12-13 : Entrada N.C. para dispositivos de relevamento (CÉLULA FOTOELÉCTRICA).Activo só com DIP 7=OFF : sómente durante as fases de fechamento paragem econtrola a reabertura.12 -11 : Entrada N.C. para comando STOP.Provoca a paragem tanto em abertura quanto em fechamento e bloqueia o tempo pausainibindo um outro fechamento automático.15-16-10 : SENSOR GIROS MOTOR.15 = marrom ; 16 = azul ; 10 = preto ( ver DIP 5 ) .20-21 : ANTENA EXTERNA ( 21 = protecção cabo )ATENÇÃO :Em caso de uso de receptor com tomada dotado de grampos própriospara a ligação antena, ignorar o item 20-21.
PROGRAMAÇÃO FUNÇÕES ( Dip- Switch Sw1 )Atenção : para memorizar uma nova configuração desligar a eletricidade poralguns segundos.
DIP 1 FECHAMENTO AUTOMÁTICOOFF = AutorizadoON = Não autorizado
Dip 2 Funcionamento com PESSOA PRESENTEOFF = Não autorizadoON = Autorizado. O funcionamento inicia só mediante activaçãocontinua do contacto START ( grampos 12-14 ). Apenas o contactovolta N.A. , o movimento pára.
Dip 3 Resposta a repetidos comandos START ( grampos 12-14 )OFF = “ Programa de Condominio “. ABERTURA -FECHAMENTOsó a FCA autorizado - durante o Fechamento , PARAGEM eREABERTURA.ON = “ Programa Passo Passo “ . ABERTURA - PARAGEM -FECHAMENTO - PARAGEM etc…
Dip 4 Funcionamento Emissione Sinal Lampejante( grampos 3-4)OFF = Saída intermitente ( utilizar sinal lampejante com luz fixacod. 70107 ).ON = Saída sempre activa ( utilizar sinal lampejante com luzintermitente cod. 70106 ).
Dip 5 Autorização SENSOR INDUTIVOOFF = Contagem giros motor autorizada seja durante a aberturacomo durante fechamento. O dispositivo intervem após um choquecom um obstáculo determinando a paragem e a inversão domovimento por 2 segundos. ( ATENÇÃO : posicionarem OFF só nos modelos dotados de sensor indutivo ).ON = NÃO AUTORIZADO
Dip 6 Pré-lampejamento de 2 segundosOFF = autorizadoON = não autorizado
Dip 7 Autorização entrada para dispositivos de relevamento (grampos 12-13 )OFF = entrada autorizada; durante o fechamento PARAGEM eREABERTURAON = entrada não autorizada
Dip 8 - 9 - 10 : manter necessariamente em OFF.
REGULAÇÃO TRIMMER
RV1 FORCE : regular delicadamente para limitar a FORÇA DE IMPULSO do portãomotorizado.RV2 WORK : estabelecer um TEMPO DE TRABALHO 5 ÷ 8 segundos superior comrelação ao tempo real de uma manobra completa . Regulação activa só com Dip 2 = OFF.RV3 PAUSE : só com Dip 1 = ON permite regular o TEMPO PAUSA que quando terminao portão fecha-se automaticamente .
FUNCIONAMENTO INICIAL E TESTE
com alimentação desligada :- Estabelecer os Dip-switch de acordo com as funções desejadas;- Verificar se as ligações estão correctas pois um erro pode danificar irreversivelmentea aparelhagem;com alimentação ligada :- Efectuar as regulações nos trimmers com muito cuidado- Verificar se os LEDS encarnados relativos as imissões N.C. estão acesos,compativelmente com as condições da automação;- Verificar se o led amarelo relativo a imissão START acende só após ter recebidoum comando;- Verificar o correcto funcionamento dos eventuais dispositivos de segurança ligadosnas imissões PHOTO ( 12 -13 ) ou STOP ( 11-12 ).- Verificar o correcto sentido de marcha ( o primeiro comando START após ter ligadoa alimentação , se o portão não está já em FCA determina uma abertura ). Casocontrário, ocorre invertir entre eles as ligações dos grampos 5-6. Com portão aberto oLED FCA deve estar desligado o led FCC aceso; com portão fechado o Led FCC deveestar desligado e o led FCA aceso.
VERSÃO COM RECEPTOR INTEGRADOA aparelhagem na versão com receptor 433.92 Mhz integrado pode funcionar sejacom transmissor com dip-switch como com aqueles da familia Roller ( Rolling Code) e pode memorizar no máximo 200 códigos diversos.Memorização telecomando:Alimentando pela primeira vez a aparelhagem, verifica-se que o led DL6 está aceso( receptor pronto pa ra memorização ).É suficiente apertar um botão do transmissor para memorizar o seu código no receptor(aquele botão funciona como comando START ). O led DL6 permanece aceso por uns6 segundos e é possível assim memorizar com a mesma modalidade ulteriorestelecomandos da mesma familia.A fase de memorização termina espontaneamente com o apagamento do led DL6.Para memorizar ulteriores transmissores ocorre apertar o botão P1 ( LEARN ), verificaro acendimento do led DL6 então apertar o botão do novo transmissor.Atenção : após ter memorizado o primeiro telecomando, o receptor aceita somenteoutros telecomandos da mesma familia.Cancelamento total códigos na memória : apertar o botão P1(o led DL6 acende-se ) e manter o mesmo apertado até quando o led DL6 não se apagar.Quando se solta o botão P1, o led DL6 lampeja uma vez e depois acende novamenteindicando que o receptor está pronto para memorizar novos telecomandos.Memorização telecomandos familia Roller sem aceder a central:quando pelo menos um teleconado já tiver sido memorizado com o procedimentodescrito acima , é possível autorizar a auto-memorização de novos telecomandos damesma familia sem agir diretamente na central.Para isso é sufficiente apertar por alguns segundos e contemporaneamente os botões1 e 2 do transmissor já memorizado ( em proximidade da própria central ) e a seguirapertar o botão do novo telecomando que desse modo é auto-memorizado.
SENSOR INDUTIVOLigar o cabo N.2 do sensor respeitando a associação grampo/cor: 15 = marrom,16 = azul, 10 = preto e ESTABELECER O DIP 5 EM ON.
Características técnicasTemperatura de funcionamento : - 20 ÷ + 55Tensão de Alimentação : 230 Vac ± 5 %Frequência : 50 - 60 HzSaída alimentação acessórios : 24 Vac máx 200 mASaída luz lampejante : 230 Vac máx. 100 WPotência máxima aplicável na saída motor : 500 WRegulação electrónica da potência : min 40 % , máx. 98 %Regulação tempo trabalho : min 5" , máx. 90 “Regulação tempo pausa : min. 5", máx. 110 “.
APARELHAGEM ELECTRÓNICA
15
ND
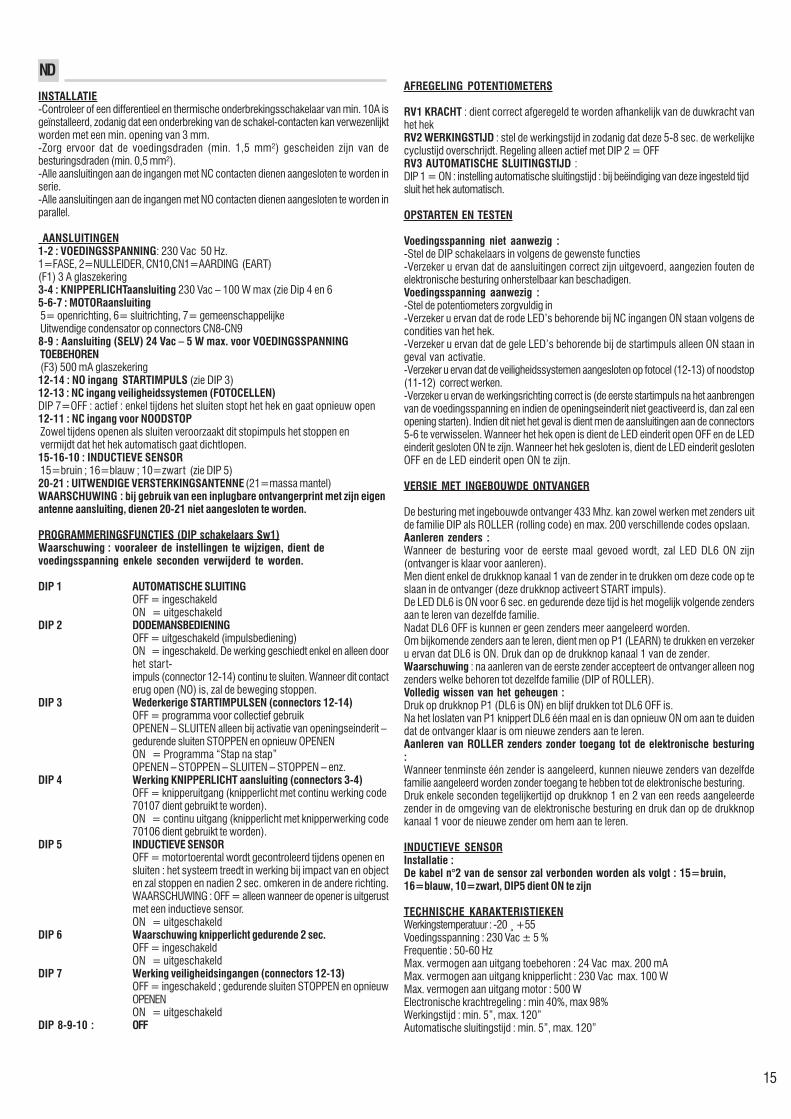
INSTALLATIE-Controleer of een differentieel en thermische onderbrekingsschakelaar van min. 10A isgeïnstalleerd, zodanig dat een onderbreking van de schakel-contacten kan verwezenlijktworden met een min. opening van 3 mm.-Zorg ervoor dat de voedingsdraden (min. 1,5 mm²) gescheiden zijn van debesturingsdraden (min. 0,5 mm²).-Alle aansluitingen aan de ingangen met NC contacten dienen aangesloten te worden inserie.-Alle aansluitingen aan de ingangen met NO contacten dienen aangesloten te worden inparallel.
AANSLUITINGEN1-2 : VOEDINGSSPANNING: 230 Vac 50 Hz.1=FASE, 2=NULLEIDER, CN10,CN1=AARDING (EART)(F1) 3 A glaszekering3-4 : KNIPPERLICHTaansluiting 230 Vac – 100 W max (zie Dip 4 en 65-6-7 : MOTORaansluiting 5= openrichting, 6= sluitrichting, 7= gemeenschappelijke Uitwendige condensator op connectors CN8-CN98-9 : Aansluiting (SELV) 24 Vac – 5 W max. voor VOEDINGSSPANNING TOEBEHOREN (F3) 500 mA glaszekering12-14 : NO ingang STARTIMPULS (zie DIP 3)12-13 : NC ingang veiligheidssystemen (FOTOCELLEN)DIP 7=OFF : actief : enkel tijdens het sluiten stopt het hek en gaat opnieuw open12-11 : NC ingang voor NOODSTOP Zowel tijdens openen als sluiten veroorzaakt dit stopimpuls het stoppen en vermijdt dat het hek automatisch gaat dichtlopen.15-16-10 : INDUCTIEVE SENSOR 15=bruin ; 16=blauw ; 10=zwart (zie DIP 5)20-21 : UITWENDIGE VERSTERKINGSANTENNE (21=massa mantel)WAARSCHUWING : bij gebruik van een inplugbare ontvangerprint met zijn eigenantenne aansluiting, dienen 20-21 niet aangesloten te worden.
PROGRAMMERINGSFUNCTIES (DIP schakelaars Sw1)Waarschuwing : vooraleer de instellingen te wijzigen, dient devoedingsspanning enkele seconden verwijderd te worden.
DIP 1 AUTOMATISCHE SLUITINGOFF = ingeschakeldON = uitgeschakeld
DIP 2 DODEMANSBEDIENINGOFF = uitgeschakeld (impulsbediening)ON = ingeschakeld. De werking geschiedt enkel en alleen doorhet start-impuls (connector 12-14) continu te sluiten. Wanneer dit contacterug open (NO) is, zal de beweging stoppen.
DIP 3 Wederkerige STARTIMPULSEN (connectors 12-14)OFF = programma voor collectief gebruikOPENEN – SLUITEN alleen bij activatie van openingseinderit –gedurende sluiten STOPPEN en opnieuw OPENENON = Programma “Stap na stap”OPENEN – STOPPEN – SLUITEN – STOPPEN – enz.
DIP 4 Werking KNIPPERLICHT aansluiting (connectors 3-4)OFF = knipperuitgang (knipperlicht met continu werking code70107 dient gebruikt te worden).ON = continu uitgang (knipperlicht met knipperwerking code70106 dient gebruikt te worden).
DIP 5 INDUCTIEVE SENSOROFF = motortoerental wordt gecontroleerd tijdens openen ensluiten : het systeem treedt in werking bij impact van en objecten zal stoppen en nadien 2 sec. omkeren in de andere richting.WAARSCHUWING : OFF = alleen wanneer de opener is uitgerustmet een inductieve sensor.ON = uitgeschakeld
DIP 6 Waarschuwing knipperlicht gedurende 2 sec.OFF = ingeschakeldON = uitgeschakeld
DIP 7 Werking veiligheidsingangen (connectors 12-13)OFF = ingeschakeld ; gedurende sluiten STOPPEN en opnieuwOPENENON = uitgeschakeld
DIP 8-9-10 : OFF
AFREGELING POTENTIOMETERS
RV1 KRACHT : dient correct afgeregeld te worden afhankelijk van de duwkracht vanhet hekRV2 WERKINGSTIJD : stel de werkingstijd in zodanig dat deze 5-8 sec. de werkelijkecyclustijd overschrijdt. Regeling alleen actief met DIP 2 = OFFRV3 AUTOMATISCHE SLUITINGSTIJD :DIP 1 = ON : instelling automatische sluitingstijd : bij beëindiging van deze ingesteld tijdsluit het hek automatisch.
OPSTARTEN EN TESTEN
Voedingsspanning niet aanwezig :-Stel de DIP schakelaars in volgens de gewenste functies-Verzeker u ervan dat de aansluitingen correct zijn uitgevoerd, aangezien fouten deelektronische besturing onherstelbaar kan beschadigen.Voedingsspanning aanwezig :-Stel de potentiometers zorgvuldig in-Verzeker u ervan dat de rode LED’s behorende bij NC ingangen ON staan volgens decondities van het hek.-Verzeker u ervan dat de gele LED’s behorende bij de startimpuls alleen ON staan ingeval van activatie.-Verzeker u ervan dat de veiligheidssystemen aangesloten op fotocel (12-13) of noodstop(11-12) correct werken.-Verzeker u ervan de werkingsrichting correct is (de eerste startimpuls na het aanbrengenvan de voedingsspanning en indien de openingseinderit niet geactiveerd is, dan zal eenopening starten). Indien dit niet het geval is dient men de aansluitingen aan de connectors5-6 te verwisselen. Wanneer het hek open is dient de LED einderit open OFF en de LEDeinderit gesloten ON te zijn. Wanneer het hek gesloten is, dient de LED einderit geslotenOFF en de LED einderit open ON te zijn.
VERSIE MET INGEBOUWDE ONTVANGER
De besturing met ingebouwde ontvanger 433 Mhz. kan zowel werken met zenders uitde familie DIP als ROLLER (rolling code) en max. 200 verschillende codes opslaan.Aanleren zenders :Wanneer de besturing voor de eerste maal gevoed wordt, zal LED DL6 ON zijn(ontvanger is klaar voor aanleren).Men dient enkel de drukknop kanaal 1 van de zender in te drukken om deze code op teslaan in de ontvanger (deze drukknop activeert START impuls).De LED DL6 is ON voor 6 sec. en gedurende deze tijd is het mogelijk volgende zendersaan te leren van dezelfde familie.Nadat DL6 OFF is kunnen er geen zenders meer aangeleerd worden.Om bijkomende zenders aan te leren, dient men op P1 (LEARN) te drukken en verzekeru ervan dat DL6 is ON. Druk dan op de drukknop kanaal 1 van de zender.Waarschuwing : na aanleren van de eerste zender accepteert de ontvanger alleen nogzenders welke behoren tot dezelfde familie (DIP of ROLLER).Volledig wissen van het geheugen :Druk op drukknop P1 (DL6 is ON) en blijf drukken tot DL6 OFF is.Na het loslaten van P1 knippert DL6 één maal en is dan opnieuw ON om aan te duidendat de ontvanger klaar is om nieuwe zenders aan te leren.Aanleren van ROLLER zenders zonder toegang tot de elektronische besturing:Wanneer tenminste één zender is aangeleerd, kunnen nieuwe zenders van dezelfdefamilie aangeleerd worden zonder toegang te hebben tot de elektronische besturing.Druk enkele seconden tegelijkertijd op drukknop 1 en 2 van een reeds aangeleerdezender in de omgeving van de elektronische besturing en druk dan op de drukknopkanaal 1 voor de nieuwe zender om hem aan te leren.
INDUCTIEVE SENSORInstallatie :De kabel n°2 van de sensor zal verbonden worden als volgt : 15=bruin,16=blauw, 10=zwart, DIP5 dient ON te zijn
TECHNISCHE KARAKTERISTIEKENWerkingstemperatuur : -20 ̧ +55Voedingsspanning : 230 Vac ± 5 %Frequentie : 50-60 HzMax. vermogen aan uitgang toebehoren : 24 Vac max. 200 mAMax. vermogen aan uitgang knipperlicht : 230 Vac max. 100 WMax. vermogen aan uitgang motor : 500 WElectronische krachtregeling : min 40%, max 98%Werkingstijd : min. 5”, max. 120”Automatische sluitingstijd : min. 5”, max. 120”

16
Installation (siehe S. 20)- sehen Sie vor dem Gerät einen Differential- oder magnetothermischen Schalter zu10 A vor, der eine allpolige Trennung bei einer minimalen Kontaktöffnung von 3 mmgewährleistet.- Trennen Sie die Leistungskabel (min. 1.5 mm2) von den Signalkabeln (min. 0.5mm2).- Eventuelle an den gleichen NC-Eingang angeschlossene Kontakte sind untereinanderin Serie zu schalten.- Eventuelle an den gleichen NA-Eingang angeschlossene Kontakte (START), sinduntereinander parallel zu schalten.Anschlüsse1-2 : STROMVERSORGUNG 230 Vac 50 Hz.1= PHASE, 2 = NULLEITER, CN10 = ERDUNG (EARTH) . Schutzsicherung (F1) 3A3-4 : Ausgang BLINKLEUCHTE 230 Vac - 100 W max. (siehe auch Dip 4 und Dip 6)5-6-7 : Ausgang MOTOR.5=öffnet, 6=schließt, 7=allgemein. Kondensator an die Anschlüsse Cn8-Cn9angeschlossen (Externer Kondensator).8-9 : Ausgang (SELV) 24 Vac - 5 W max. zur STROMVERSOGUNG DES ZUBEHÖRS.Schutzsicherung (F3) 500 mA.12 - 14 : Eingang N.A. Befehl START (siehe auch Dip 3).12-13 : Eingang N.C. für Meßvorrichtungen (FOTOZELLEN).Aktiv nur bei DIP 7=OFF: nur während der Schließphasen wird gestoppt und daserneute Öffnen angesteuert.12 -11 : Eingang N.C. für Befehl STOP.Löst ein Anhalten sowohl beim Öffnen als beim Schließen aus, blockiert die Pausenzeitund verhindert so das automatische Schließen.15-16-10 : SENSOR MOTORDREHZAHL.15 = braun; 16 = blau; 10 = schwarz (siehe DIP 5) .20-21 : EXTERNE ANTELLE (21 = Kabelschuh)ACHTUNG: Bei Einsatz eines Steckempfängers mit eigenen Klemmleisten für denAntennenanschluß sind die Anschlüsse 20-21 zu vernachlässigen.PROGRAMMIERUNG DER FUNKTIONEN (Dip-Schalter Sw1 )Achtung: zur Speicherungeiner neuen Konfiguration muß der Strom für einige Sekunden abgeschaltet werden.
DIP 1 AUTOMATISCHES SCHLIESSENOFF = FreigegebenON = Blockiert
Dip 2 Funktionsweise bei VORHANDENEM BEDIENEROFF = BlockiertON = Freigegeben. Diese Funktionsweise erfolgt nur beidauerhafter Auslösung des Kontaktes START (Klemmleisten12-14). Sobald der Kontakt wieder auf N.A. umschaltet, kommtder Motor zum Stillstand.
Dip 3 Antwort auf wiederholte Befehle START (Klemmen 12-14)OFF = „Programm Wohneigentümergemeinschaft“. ÖFFNEN –nur bei FCA SCHLIESSEN – während des Schließens, STOP undERNEUT ÖFFNEN.ON = „Programm Schrittweise“. ÖFFNEN – STOP – SCHLIESSEN– STOP usw.…
Dip 4 Funktionsweise Ausgang Blinkleuchte (Klemmen 3-4 )OFF = Ausgang Blinker (Blinkleuchte mit festem Licht Code70107 verwenden).ON = Ausgang immer aktiv (Blinkleuchte mit Blinklicht Code70106 verwenden).
Dip 5 Freigabe INDUKTIVSENSOROFF = Zählung Motorumdrehungen sowohl während des Öffnensals des Schließens freigegeben. Die Vorrichtung wird in Folgeeines Stoßes gegen ein Hindernis ausgelöst und bedingt dasAnhalten und die Umkehrung der Bewegung für 2 Sekunden.(ACHTUNG: nur bei den mit Induktivsensor ausgestattetenVersionen auf OFF stellen).ON = BLOCKIERT
Dip 6 Vorblinken von 2 sOFF = freigegebenON = blockiert
Dip 7 Freigabe Eingang für Meßvorrichtungen (Klemmen 12-13 )OFF = Eingang freigegeben: während des Schließens erfolgt einStop und wird das erneute Öffnen angesteuert.ON = Eingang blockiert
Dip 8 - 9 - 10 : notwendigerweise auf OFF belassen
EINSTELLUNG DES TRIMMERRV1 FORCE: Feineinstellung zur Begrenzung der DRUCKKRAFT des motorbetriebenenTors vornehmen.RV2 WORK: eine BETRIEBSZEIT von 5 ÷ 8 s mehr als die reelle Dauer eines komplettenVorgangs einstellen. Einstellung nur bei Dip 2 = OFF aktiv.RV3 PAUSE: nur bei Dip 1 = ON ist die Einstellung der PAUSENZEIT möglich, an derenEnde sich das Tor wieder automatisch schließt.
INBETRIEBNAHME UND ABNAHMEBei abgeschalteter Stromversorgung:- Stellen Sie die Dip-Schalter je nach den gewünschten Funktionen ein;- Überprüfen Sie die Korrektheit der Anschlüsse, da ein Fehler das Gerät beschädigenkann;Spannung zuschalten:- Führen Sie sorgfältig die Einstellungen an den Trimmern aus;- Überprüfen Sie, ob die roten LED für die N.C.-Eingänge entsprechend des Zustandesder Automatisierung eingeschaltet sind;- Überprüfen Sie, ob die gelbe Led für den Eingang START nur in Folge eines Befehlsaufleuchtet;- Überprüfen Sie die richtige Funktionsweise der eventuellen an die Eingänge PHOTO(12-13) oder STOP (11-12) angeschlossenen Sicherheitsvorrichtungen.- Überprüfen Sie die richtige Laufrichtung (der erste Befehl START nach dem Zuschaltender Spannung, wenn das Tor nicht bereits bei FCA ist, löst ein Öffnen aus). Anderenfallsmüssen die Anschlüsse der Klemmen 5-6 miteinander vertauscht werden. Bei offenemTor darf die Led FCA nicht leuchten und die Led FCC muß eingeschaltet sein; beigeschlossenem Tor darf die Led FCC nicht leuchten und die Led FCA muß eingeschaltetsein. VERSION MIT EINGEBAUTEM EMPFÄNGERDas Gerät kann in der Version mit eingebautem Empfänger 433.92 Mhz sowohl mit Dip-Switch-Sendern betrieben werden, als mit denen der Produktfamilie Roller (RollingCode) und kann maximal 200 verschiedene Codes speichern.
Erfassen der Fernbedienung:Wird das Gerät erstmalig mit Strom versorgt, ist festzustellen, daß die Led DL6leuchtet (Empfänger für das Speichern bereit).Es genügt eine Taste des Senders zu betätigen, um dessen Code im Empfänger zuspeichern (diese Taste wirkt als Befehl START).Die Led DL6 bleibt für weitere 6 s eingeschaltet und es können so auf die gleiche Weiseweitere Fernbedienungen der gleichen Produktfamilien erfaßt werden.Die Speicherphase endet unvermittelt mit dem Verlöschen der Led DL6.Sollen weitere Sender erfaßt werden, muß die Taste P1 (LEARN) betätigt werden, dasAufleuchten der Led DL6 abgewartet und dann die Taste des neuen Senders betätigtwerden.Achtung: nach dem Erfassen der ersten Fernbedienung, nimmt der Empfänger nurweitere Fernsteuerungen der gleichen Produktfamilie an.
Vollständiges Löschen der gespeicherten Codes: Betätigen Sie die Taste P1(die LedDL6 leuchtet auf) und halten Sie sie gedrückt, bis die Led DL6 verlischt.Beim Loslassen der Taste P1 blinkt die Led DL6 einmal und leuchtet dann auf, umanzuzeigen, daß der Empfänger für das Erfassen neuer Fernsteuerungen bereit ist.
Erfassen von Fernsteuerungen der Produktfamilie Roller ohne Zugriff auf dasSteuergehäuse:Wenn mindestens eine Fernsteuerung bereits mit dem oben beschriebenen Vorgangerfaßt wurde, ist es möglich die Selbsterfassung neuer Fernsteuerungen der gleichenProduktfamilie einzuschalten, ohne direkt das Steuergehäuse zu betätigen.Es genügt dabei für einige Sekunden gleichzeitig die Tasten 1 und 2 des bereitsgespeicherten Senders zu betätigen (in der Nähe des Steuergehäuses) und danch dieTaste der neuen Fernsteuerung zu drücken, die somit automatisch erfaßt wird.INDUKTIVSENSORSchließen Sie das Kabel Nr. 2 des Sensors unter Berücksichtigung der ZuordnungKlemme / Farbe an: 15 = braun, 16 = blau, 10 = schwarz und STELLEN SIE DENDIP 5 AUF ON.Technische EigenschaftenBetriebstemperatur: - 20 ÷ + 55Versorgungsspannung: 230 Vac ± 5 %Frequenz: 50 - 60 HzVersorgungsausgang Zubehör: 24 Vac max. 200 mAAusgang Blinkleuchte: 230 Vac max. 100 WMaximal am Motorausgang abnehmbare Leistung: 500 WElektronische Leistungsregelung: min. 40 % , max. 98 %Einstellung der Betriebszeit: min. 5" , max. 90 „
Einstellung der Pausenzeit: min. 5", max. 110 „.
DANTRIEBSAGGREAT
17
Avvertenze generaliL’ installazione e l’utilizzo di tale apparecchiatura deve rispettare rigorosamente leindicazioni fornite dal costruttore pena l’annullamento degli estremi di garanzia.Il costruttore non potrà essere considerato responnsabile per danni ad animali , coseo persone derivanti da uso improprio o irragionevole.La Gi.Bi.Di. si riserva il diritto, in qualsiasi momento e senza preavviso alcuno, diapportare modifiche inspirate al miglioramento del prodotto
Advertencias generalesLa garantía caduca en caso de que la instalación y el uso del equipo no respetenrigurosamente las indicaciones suministradas por el fabricante.El fabricante no podrá ser considerado responsable de daños a personas, animales ocosas provocados por un uso erróneo e irracional.Gi.Bi.Di. se reserva el derecho de aportar modificaciones para mejorar el producto encualquier momento y sin previo aviso.
Advertências geraisA instalação e o uso de tal aparelhagem deve respeitar rigorosamente as indicaçõesfornecidas pelo construtor sob pena de anulamento dos termos de garantia.O fabricante não poderá ser considerado responsável por danos a animais , coisasou pessoas derivados de uso impróprio ou irracional.A Gi.Bi.Di. declina toda e qualquer responsabilidade por eventuais erros contidos nopresente manual e reserva-se o direito, em qualquer momento e sem nenhum pré-aviso , de produzir modificações destinadas ao melhoramento do produto .
General precautionsThe installation and the use of this equipment shall strictly comply with the manufac-turer’s indications delivered with this equipment , otherwise there is no warrantyrights.The manufacturer disclaims all responsibility in case of damages to animals , objectsor persons, due to an improper or unreasonable use. Gi.Bi.Di. reserves the right to modify the product in order to improve it, with no needto give prior notice about such modifications .
Instructions généralesL’installation et l’emploi de cet appareil doit respecter rigoureusement les indicationsfournies par le constructeur ; peine l’annulation du droit de garantie.Le constructeur ne pourra pas être considéré le responsable pour dommages àanimales, choses ou personnes dérivants d’un emploi impropre ou incorrecte.La Gi.Bi.Di. se réserve le droit de faire des changements visés à l’amélioration duproduit sans aucun préavis et dans tout moment.
Allgemeine WarnungenDie Installation und Verwendung dieses Steuergeräts müssen sich streng an die vomHersteller erteilten Anweisungen halten, anderenfalls werden die Garantiebedingungennichtig.Der Hersteller kann nicht für Tier-, Sach- oder Personenschäden verantwor tlichbetrachtet werden, die auf einen unsachgemäßen oder unvernünftigen Gebrauchzurückzuführen sind.
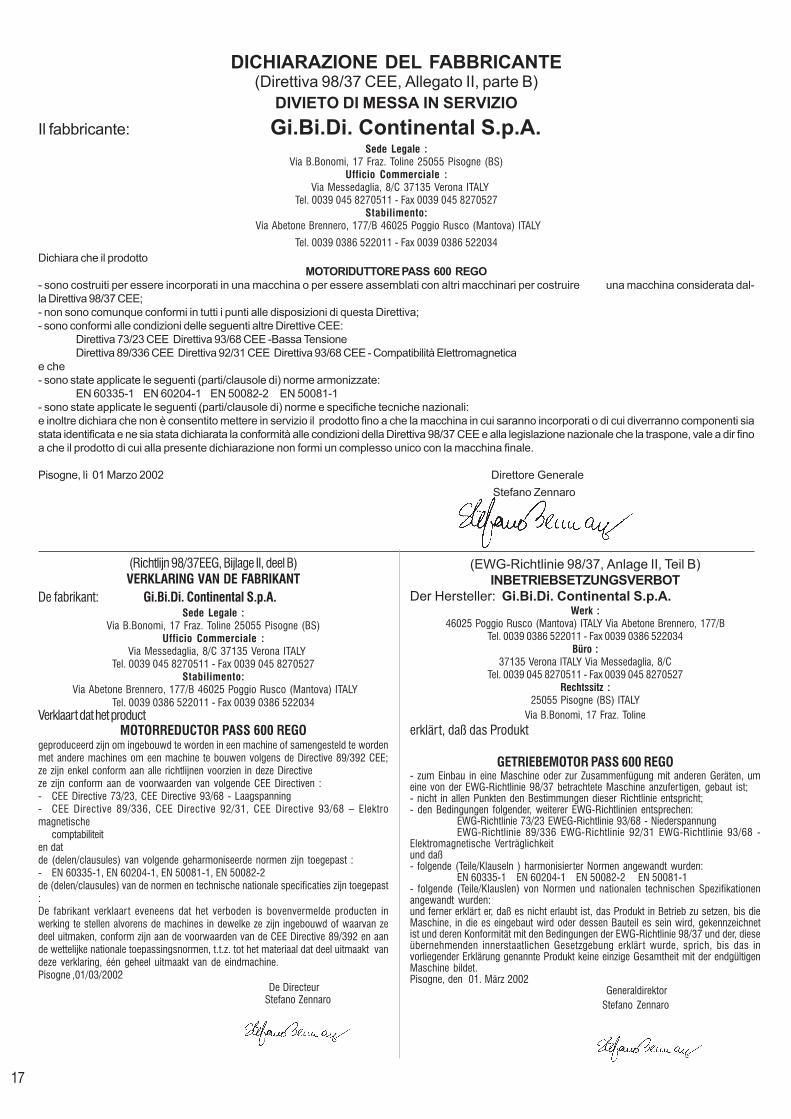
17
DICHIARAZIONE DEL FABBRICANTE(Direttiva 98/37 CEE, Allegato II, parte B)
DIVIETO DI MESSA IN SERVIZIOIl fabbricante: Gi.Bi.Di. Continental S.p.A.
Sede Legale :Via B.Bonomi, 17 Fraz. Toline 25055 Pisogne (BS)
Ufficio Commerciale : Via Messedaglia, 8/C 37135 Verona ITALY
Tel. 0039 045 8270511 - Fax 0039 045 8270527Stabilimento:
Via Abetone Brennero, 177/B 46025 Poggio Rusco (Mantova) ITALY
Tel. 0039 0386 522011 - Fax 0039 0386 522034Dichiara che il prodotto
MOTORIDUTTORE PASS 600 REGO- sono costruiti per essere incorporati in una macchina o per essere assemblati con altri macchinari per costruire una macchina considerata dal-la Direttiva 98/37 CEE;- non sono comunque conformi in tutti i punti alle disposizioni di questa Direttiva;- sono conformi alle condizioni delle seguenti altre Direttive CEE:
Direttiva 73/23 CEE Direttiva 93/68 CEE -Bassa TensioneDirettiva 89/336 CEE Direttiva 92/31 CEE Direttiva 93/68 CEE - Compatibilità Elettromagnetica
e che- sono state applicate le seguenti (parti/clausole di) norme armonizzate:
EN 60335-1 EN 60204-1 EN 50082-2 EN 50081-1- sono state applicate le seguenti (parti/clausole di) norme e specifiche tecniche nazionali:e inoltre dichiara che non è consentito mettere in servizio il prodotto fino a che la macchina in cui saranno incorporati o di cui diverranno componenti siastata identificata e ne sia stata dichiarata la conformità alle condizioni della Direttiva 98/37 CEE e alla legislazione nazionale che la traspone, vale a dir finoa che il prodotto di cui alla presente dichiarazione non formi un complesso unico con la macchina finale.
Pisogne, lì 01 Marzo 2002 Direttore Generale Stefano Zennaro
(Richtlijn 98/37EEG, Bijlage II, deel B)VERKLARING VAN DE FABRIKANT
De fabrikant: Gi.Bi.Di. Continental S.p.A.Sede Legale :
Via B.Bonomi, 17 Fraz. Toline 25055 Pisogne (BS)Ufficio Commerciale :
Via Messedaglia, 8/C 37135 Verona ITALYTel. 0039 045 8270511 - Fax 0039 045 8270527
Stabilimento: Via Abetone Brennero, 177/B 46025 Poggio Rusco (Mantova) ITALY
Tel. 0039 0386 522011 - Fax 0039 0386 522034Verklaart dat het product
MOTORREDUCTOR PASS 600 REGOgeproduceerd zijn om ingebouwd te worden in een machine of samengesteld te wordenmet andere machines om een machine te bouwen volgens de Directive 89/392 CEE;ze zijn enkel conform aan alle richtlijnen voorzien in deze Directiveze zijn conform aan de voorwaarden van volgende CEE Directiven :- CEE Directive 73/23, CEE Directive 93/68 - Laagspanning- CEE Directive 89/336, CEE Directive 92/31, CEE Directive 93/68 – Elektromagnetische
comptabiliteiten datde (delen/clausules) van volgende geharmoniseerde normen zijn toegepast :- EN 60335-1, EN 60204-1, EN 50081-1, EN 50082-2de (delen/clausules) van de normen en technische nationale specificaties zijn toegepast:De fabrikant verklaar t eveneens dat het verboden is bovenvermelde producten inwerking te stellen alvorens de machines in dewelke ze zijn ingebouwd of waarvan zedeel uitmaken, conform zijn aan de voorwaarden van de CEE Directive 89/392 en aande wettelijke nationale toepassingsnormen, t.t.z. tot het materiaal dat deel uitmaakt vandeze verklaring, één geheel uitmaakt van de eindmachine.Pisogne ,01/03/2002
De Directeur Stefano Zennaro
(EWG-Richtlinie 98/37, Anlage II, Teil B)INBETRIEBSETZUNGSVERBOT
Der Hersteller: Gi.Bi.Di. Continental S.p.A.Werk :
46025 Poggio Rusco (Mantova) ITALY Via Abetone Brennero, 177/BTel. 0039 0386 522011 - Fax 0039 0386 522034
Büro :37135 Verona ITALY Via Messedaglia, 8/C
Tel. 0039 045 8270511 - Fax 0039 045 8270527Rechtssitz :
25055 Pisogne (BS) ITALYVia B.Bonomi, 17 Fraz. Toline
erklärt, daß das Produkt
GETRIEBEMOTOR PASS 600 REGO- zum Einbau in eine Maschine oder zur Zusammenfügung mit anderen Geräten, umeine von der EWG-Richtlinie 98/37 betrachtete Maschine anzufertigen, gebaut ist;- nicht in allen Punkten den Bestimmungen dieser Richtlinie entspricht;- den Bedingungen folgender, weiterer EWG-Richtlinien entsprechen:
EWG-Richtlinie 73/23 EWEG-Richtlinie 93/68 - NiederspannungEWG-Richtlinie 89/336 EWG-Richtlinie 92/31 EWG-Richtlinie 93/68 -
Elektromagnetische Verträglichkeitund daß- folgende (Teile/Klauseln ) harmonisierter Normen angewandt wurden:
EN 60335-1 EN 60204-1 EN 50082-2 EN 50081-1- folgende (Teile/Klauslen) von Normen und nationalen technischen Spezifikationenangewandt wurden:und ferner erklärt er, daß es nicht erlaubt ist, das Produkt in Betrieb zu setzen, bis dieMaschine, in die es eingebaut wird oder dessen Bauteil es sein wird, gekennzeichnetist und deren Konformität mit den Bedingungen der EWG-Richtlinie 98/37 und der, dieseübernehmenden innerstaatlichen Gesetzgebung erklär t wurde, sprich, bis das invorliegender Erklärung genannte Produkt keine einzige Gesamtheit mit der endgültigenMaschine bildet.Pisogne, den 01. März 2002
Generaldirektor Stefano Zennaro

19
DÉCLARATION DU FABRICANT(Directive 98/37 CEE, Annexe II, partie B)INTERDICTION DE MISE EN SERVICE
Le constructeur: Gi.Bi.Di. Continental S.p.A.Sede Legale :
Via B.Bonomi, 17 Fraz. Toline 25055 Pisogne (BS)Ufficio Commerciale :
Via Messedaglia, 8/C 37135 Verona ITALYTel. 0039 045 8270511 - Fax 0039 045 8270527
Stabilimento: Via Abetone Brennero, 177/B 46025 Poggio Rusco (Mantova) ITALY
Tel. 0039 0386 522011 - Fax 0039 0386 522034Déclare que les produits
MOTOREDUCTEUR PASS 600 REGOsont fabriqués pour être incorporés à une machine ou être assemblés avec d’autres
machines pour construire une machine selon la Directive 98/37 CEE;ils ne sont cependant pas conformes en tous points aux dispositions prévues par cette
Directive;ils sont conformes aux conditions des autres Directives CEE suivantes:
Directive 73/23 CEE Directive 93/68 CEE - Basse tensionDirective 89/336 CEE Directive 92/31 CEE Directive 93/68 CEE - Compatibilité
Electromagnétiqueet queles (parties/clauses des) normes harmonisées suivantes ont été appliquées:
EN 60335-1 EN 60204-1 EN 50082-2 EN 50081-1
les (parties/clauses des) normes et spécifications techniques nationales ont étéappliquées:
il déclare également qu’il est interdit de mettre les produits ci-dessus en service avantque le produit à laquelle ils seront incorporés ou dont ils feront partie ne soit identifiéeet qu’elle ne soit déclarée conforme aux conditions requises par la Directive 98/37 CEEet à la législation nationale d’application, c’est-à-dire jusqu’à ce que le matériel faisantl’objet de la présente déclaration ne forme un tout avec la machine finale.
Pisogne, le 01 Mars 2002 Directeur Gènèral Stefano Zennaro
DECLARATION OF MANUFACTURER(Directive 98/37 EEC, Attachment II, part B)
PROHIBITION OF OPERATIONThe manufacturer: Gi.Bi.Di. Continental S.p.A.
Stabilimento :Sede Legale :
Via B.Bonomi, 17 Fraz. Toline 25055 Pisogne (BS)Ufficio Commerciale :
Via Messedaglia, 8/C 37135 Verona ITALYTel. 0039 045 8270511 - Fax 0039 045 8270527
Stabilimento: Via Abetone Brennero, 177/B 46025 Poggio Rusco (Mantova) ITALY
Tel. 0039 0386 522011 - Fax 0039 0386 522034declares that the products
GEARMOTOR PASS 600 REGO- are constructed to be incorporated in a machine or to be assembled with othermachinery to construct a machine by the Directive 98/37 EEC;- are not, however, in conformity with all the provisions as per this Directive;- are in conformity with the regulations of the following other EEC Directives; Directive 73/23 EEC Directive 93/68 EEC - Low voltage Directive 89/336 EEC Directive 92/31 EEC Directive 93/68 EEC - Electromagneticcompatibilityand that- he following (parts/clauses of) harmonised regulations have been applied: EN 60335-1 EN 60204-1 EN 50082-2 EN 50081-1
- the following (parts/clauses of) national regulations and technical specificationshave been applied
and furthermore, declares that it is not permitted to star t operation of the productuntil the machine in which they will be incorporated or of which they will becomecomponents has been identified, and its conformity with the provisions of Directive98/37 EEC and national legislation has been declared, that is to say until the productas per this declaration forms a single unit with the final machine.Pisogne, 01 March 2002 Managing Director
Stefano Zennaro
DECLARACIÓN DEL FABRICANTE(Directiva sobre Máquinas 98/37 CEE, Anexo II, Parte B)
PROHIBICIÓN DE PUESTA EN SERVICIOEl Fabricante: Gi.Bi.Di. Continental S.p.A.
Sede Legale :Via B.Bonomi, 17 Fraz. Toline 25055 Pisogne (BS)
Ufficio Commerciale : Via Messedaglia, 8/C 37135 Verona ITALY
Tel. 0039 045 8270511 - Fax 0039 045 8270527Stabilimento:
Via Abetone Brennero, 177/B 46025 Poggio Rusco (Mantova) ITALYTel. 0039 0386 522011 - Fax 0039 0386 522034
Declara que el productoMOTORREDUCTOR PASS 600 REGO
- ha sido fabricado para ser incorporado a una máquina o para ser ensamblado conotras maquinarias y fabricar una máquina considerada por la Directiva sobreMáquinas 98/37 CEE ;
- no es conforme a todos los puntos dispuestos por esta Directiva;
- es conforme a las condiciones de las siguientes otras Directivas CEE:Directiva 73/23 CEE Directiva 93/68 CEE - Baja TensiónDirectiva 89/336 CEE Directiva 92/31 CEE Directiva 93/68 CEE - CompatibilidadElectromagnética;
y que
- se han aplicado las siguientes (partes/cláusulas de) normas armonizadas:EN 60335-1 EN 60204-1 EN 50082-2 EN 50081-1
- se han aplicado las siguientes (partes/cláusulas de) normas y especificacionestécnicas nacionales:
Además, declara que no está permitido poner en servicio del producto hasta que lamáquina a la cual será incorporada o de la cual formará parte haya sido identificada yse haya declarado su conformidad a las condiciones de la Directiva sobre Máquinas98/37 CEE y a la legislación nacional que la transpone, es decir hasta que el productoobjeto de la presente declaración forme un conjunto único con la máquina final.Pisogne, 01 de Marzo de 2002
Director General Stefano Zennaro
DECLARAÇÃO DO FABRICANTE(Directiva 98/37 CEE, Anexo II, parte B)PROIBIÇÃO DE ENTRADA EM SERVIÇO
O Fabricante: Gi.Bi.Di. Continental S.p.A.Sede Legale :
Via B.Bonomi, 17 Fraz. Toline 25055 Pisogne (BS)Ufficio Commerciale :
Via Messedaglia, 8/C 37135 Verona ITALYTel. 0039 045 8270511 - Fax 0039 045 8270527
Stabilimento: Via Abetone Brennero, 177/B 46025 Poggio Rusco (Mantova) ITALY
Tel. 0039 0386 522011 - Fax 0039 0386 522034Declara que o produto
MOTORREDUCOR PASS 600 REGO- são fabricados para serem incorporados numa máquina ou para serem montadoscom outras máquinas para construir uma máquina considerada pela Directiva 98/37CEE ;
- não são contudo conformes em todos os pontos às disposições desta Directiva;
- são conformes às condições das seguintes outras Directivas CEE:Directiva 73/23 CEE Directiva 93/68 CEE - Baixa TensãoDirectiva 89/336 CEE Directiva 92/31 CEE Directiva 93/68 CEE -
Compatibilidade Electromagnética
e que
- foram aplicadas as seguintes (partes/clausulas de) normas harmonizadas: EN 60335-1 EN 60204-1 EN 50082-2 EN 50081-1
- Foram aplicadas as seguintes (partes/clausulas de) normas e especificaçõestécnicas nacionais:
Declara ainda que não é consentido por em serviço o produto até que a máquina emque serão incorporadas ou da qual se tornarão componentes tenha sido identificadae tenha sido declarada a conformidade às condições da Directiva 98/37 CEE e àslegislação nacional que a transpõe, ou seja, até que o produto da qual a presentedeclaração se refere não forme um complexo único com a máquina final.Pisogne, 01 de Março 2002
Mandàtario Stefano Zennaro

APPARECCHIATURA ELETTRONICA
PLATINE ÉLECTRONIQUE
CONTROL PANEL
APARATO ELECTRONICO
APARELHAGEM ELECTRÓNICA
APPARATUUR
ANTRIEBSAGGREAT
20

AIC
3070
- 6
00 -
04/
2002
- G
RAP
HIC
CEN
TER