© 2000 philips consumer communications division of philips ... · the philips guarantee applies...
TRANSCRIPT

© 2000 Philips Consumer CommunicationsDivision of Philips France
All rights reservedPrinted in France

GuaranteeDear Customer,
Thank you for purchasing this Philips product which has been designed andmanufactured to the highest quality standards.
If, unfortunately, something should go wrong with this product Philips guaranteesfree of charge labour and replacement parts irrespective of the country where it isrepaired during a period of 12 months from date of purchase. This internationalPhilips guarantee complements the existing national guarantee obligations to you ofdealers and Philips in the country of purchase and does not affect your statutoryrights as a customer.
The Philips guarantee applies provided the product is handled properly for itsintended use, in accordance with its operating instructions and upon presentation ofthe original invoice or cash receipt, indicating the date of purchase, dealer’s nameand model and production number of the product.
The Philips guarantee shall not apply if:
• the documents have been altered in any way or made illegible;• the model or production number on the product has been altered, deleted, removed
or made illegible;• repairs or product modifications and alterations have been executed by
unauthorised service organisations or persons;• damage is caused by accidents including but not limited to lightning, water or fire,
misuse or neglect.
Please note that the product is not defective under this guarantee in the case wheremodifications become necessary in order for the product to comply with local ornational technical standards that apply in countries for which the product was notoriginally designed and/or manufactured. Therefore always check whether aproduct can be used in a specific country.
In case your Philips product is not working correctly or is defective, please returnyour phone to the place of purchase or the Philips National Service Centre. In theevent you require service whilst in another country a dealer address can be given toyou by the Philips Consumer Help Desk in that country.
In order to avoid unnecessary inconvenience, we advise you to read the operatinginstructions carefully before contacting your dealer.
In case your Philips product is not working correctly or is defective, please contact:
Philips service centre1 Great Central Way
Butlers LeapRugby
Warwickshire, CV213XHUK
Phone: 0870 900 9070
prelim-zenia.book Page 1 Mardi, 20. juin 2000 10:31 10

MAIN ACCESS MENU
Standby mode
Shared phonebook
List of incoming calls and messages
Internal list:base and handsets
List of network services
Miscellaneous settings
Private phonebook
SHARED
PRV PHONEBK
INTERCOM
SERVICES
SETTINGS
CALL LOG
REDIAL
1.1 Earpiece volume (p. 38)
1.2 Loudspeaker volume (p. 38)
1.3 Headset volume (p. 39)
1.4 Ringer type (p. 39)
1.5 Ringer volume (p. 39)
1.6 Key tones (p. 39)
1.7 Earpiece tone (p. 39)
1.8 Loudspeaker tone (p. 39)
1.9 Headset tone(p. 39)
1.0 CLI ringer (p. 39)
2.1 Language (p. 40)
2.2 Back light (p. 40)
2.3 Display contrast (p. 40)
2.4 Keypad lock (p. 41)
2.5 Babysit mode (p. 41)
2.6 Base selection (p. 41)
2.7 Registering handset (p. 41)
3.1 Base ringer type (p. 42)
3.2 Base ringer volume (p. 42)
3.3 Set date & time (p. 42)
3.4 Direct dial keys (p. 43)
3.5 Registration mode (p. 43)
4.1 Answer mode (p. 44)
4.2 Record memo (p. 44)
4.3 Personal OGM (p. 45)
4.4 Record ringer (p. 45)
4.5 Rings before answer (p. 46)
4.6 Voice prompts (p. 46)
4.7 Record quality (p. 46)
4.8 Remote control (p. 46)
List of outgoing calls (redial)
6.1 Call barring (p. 49)
6.2 Prefixes (p. 49)
6.3 Pin code protection (p. 49)
6.4 Change Pin code (p. 50)
Options: AddChangeVoice dialDelete
Options: AddChangeDelete
Options: RenameCancel registration
Options: ChangeDeleteAdd
Options: StorePlayDelete
Options: StoreDeleteDelete all
5.1 Dial mode (p. 47)
5.2 Network type (p. 47)
5.3 Operator type (p. 47)
5.4 Recall type (p. 48)
5.6 View total time (p. 48)
5.7 Music on hold (p. 48)
5.8 Pause insertion (p. 48)
5.9 Automatic prefix (p. 48)
5.0 Prefix setup (p. 48)
Options:1 Handset sounds2 Handset settings3 Base station settings4 Answer phone5 Line settings6 Security
prelim-zenia.book Page III Mardi, 20. juin 2000 10:31 10

Contents 1
ContentsSECURITY ......................................................................................... 8
Security information .................................................................................8Power connection .....................................................................................8Telephone connection ..............................................................................8Environmental protection .........................................................................8
INSTALLATION ............................................................................... 9Choosing the location of the charging unit and base station ....................9
Installing the charging unit on a level surface ................................................9Wall mounting the charging unit ....................................................................9Installing the base station ............................................................................... 9
Installing or replacing batteries ..............................................................10Power supply ..........................................................................................10Charging and discharging batteries ........................................................10Test .........................................................................................................10
USING THE TELEPHONE ............................................................ 11Operating in "standby mode" .................................................................11Making a call from the handset ..............................................................12Making a call from the Zenia Voice 6326 base station ..........................13
Dialling a number using the to direct dial keys..............................13Dialling an emergency number using the key .......................................13
Making a call from the Zenia Voice 6626 base station ..........................14Answering a call from the handset .........................................................14Redial list ................................................................................................15
Purpose .........................................................................................................15Viewing the redial list ..................................................................................15Deleting an entry ..........................................................................................16Storing an entry ............................................................................................17
Answering a call from the base station (6326 and Voice 6626) ............18Adjusting handset or base station volume during a call .........................18Switching on loudspeakers from the handset .........................................18Putting an incoming call on hold ............................................................19Recording a conversation from the Zenia Voice 6626 handset only .....19Call log ...................................................................................................20
Identifying the caller .....................................................................................20Call log function ...........................................................................................20Viewing the list of unanswered calls ............................................................20Viewing the call log ......................................................................................20Deleting an entry from the call log ...............................................................21Storing an entry from the call log .................................................................22
prelim-zenia.book Page 1 Mardi, 20. juin 2000 10:31 10

Contents2
Private and shared phonebooks ..............................................................23Storing your callers telephone numbers .......................................................23Viewing a phonebook entry ..........................................................................24Making a call ................................................................................................24Deleting an entry from a phonebook ............................................................24Modifying a phonebook entry ......................................................................25
Voice dial (Zenia Voice 6626) ...............................................................25Recording voice dial .....................................................................................25Making a call via voice dial ..........................................................................26Listening to a voice dial ...............................................................................27Deleting a voice dial .....................................................................................27
USING THE INTERCOM .............................................................. 28Making an internal call (intercom) ......................................................... 28
From the handset ..........................................................................................28From the base station ....................................................................................28
Transferring an external call to another handset ....................................29From the base station ....................................................................................29From the handset ..........................................................................................29
Answering an internal call .....................................................................30Starting a conference call .......................................................................30Selecting the room monitor (Babysit mode) ..........................................30
USING THE ANSWER PHONE (ZENIA VOICE 6626 ONLY) ......................................................... 31
Using the answer phone from the handset .............................................31Switching the answer phone on or off ..........................................................31Screening and intercepting incoming calls ..................................................32Listening to messages received ....................................................................32Deleting a message received ........................................................................33
Using the answer phone from the base station ....................................... 33Switching the answer phone on or off ..........................................................33Screening and intercepting incoming calls ...................................................33Listening to messages received ....................................................................34Deleting a message .......................................................................................34Deleting all messages ...................................................................................34Recording a personal OGM ..........................................................................34Recording a memo (local message) ..............................................................35
Remote control of the answer phone ......................................................35Checking messages remotely .................................................................35
prelim-zenia.book Page 2 Mardi, 20. juin 2000 10:31 10

Contents 3
SYSTEM CONFIGURATION ........................................................ 36Overview of the configuration menu .....................................................36
Settings ........................................................................................................ 36Using keypad shortcuts ................................................................................ 37
Handset sound settings ...........................................................................381.1 Earpiece volume .................................................................................... 381.2 Loudspeaker volume .............................................................................. 381.3 Headset volume ..................................................................................... 391.4 Ringer type ............................................................................................ 391.5 Ringer volume ....................................................................................... 391.6 Switching key tones on/off .................................................................... 391.7 Earpiece tone ......................................................................................... 391.8 Loudspeaker tone ................................................................................... 391.9 Headset tone ........................................................................................... 391.0 CLI ringer (with caller identification) ................................................... 39
Handset settings ......................................................................................402.1 Selecting a language .............................................................................. 402.2 Switching the screen back light on ........................................................ 402.3 Display contrast ..................................................................................... 402.4 Locking and unlocking the keypad ........................................................ 412.5 Selecting the Babysit mode ................................................................... 412.6 Selecting the base station ....................................................................... 412.7 Registering a handset to a base station .................................................. 41
Base settings ...........................................................................................423.1 Selecting the ringer type (base station) .................................................. 423.2 Adjusting the ringer volume (base station) ............................................ 423.3 Setting date and time ............................................................................. 423.4 Storing direct dial keys (6326 base station only) ................................... 433.5 Putting the base station into registration mode ...................................... 43
Answer phone settings (Zenia Voice 6626) ...........................................444.1 Selecting the answer mode .................................................................... 444.2 Recording a memo (local message) ....................................................... 444.3 Recording a personal OGM ................................................................... 454.4 Recording a personal ringer (Zenia Voice 6626 only) .......................... 454.5 Modifying the number of rings before answer ...................................... 464.6 Activating/ deactivating voice prompts ................................................. 464.7 Record quality ........................................................................................ 464.8 Switching remote control on .................................................................. 46
Line settings ...........................................................................................475.1 Selecting the dial mode .......................................................................... 475.2 Selecting the network type ..................................................................... 475.3 Selecting the operator type .................................................................... 475.4 Selecting flash time ................................................................................ 485.6 Displaying/deleting total time for your calls ......................................... 48
prelim-zenia.book Page 3 Mardi, 20. juin 2000 10:31 10

Contents4
5.7 Switching music on hold on/off .............................................................485.8 Inserting a pause between digits .............................................................485.9 Automatically inserting a prefix .............................................................485.0 Setting up prefixes ..................................................................................48
Security ..................................................................................................496.1 Setting call barring .................................................................................496.2 Setting forbidden prefixes ......................................................................496.3 Activating/ deactivating Pin code protection .........................................496.4 Changing the Pin code ............................................................................50
List of all handsets registered to the base station (RC code) .................50Renaming a handset ......................................................................................50Cancelling the registration of a handset to the base station ..........................50
List of network services .........................................................................51
MAINTENANCE AND TROUBLESHOOTING .......................... 52Base station problems ............................................................................ 52
Zenia 6326 and Zenia Voice 6626 base stations ..........................................52Zenia 6326 base station ................................................................................52Zenia Voice 6626 base station ......................................................................52Zenia 6626 base station (continued) ............................................................53
Problems with the handset .....................................................................54Maintenance ...........................................................................................55Handset indicators ..................................................................................56Base station indicators ........................................................................... 56Character table .......................................................................................56
PERSONAL NOTES ....................................................................... 57
INDEX ............................................................................................. 58
prelim-zenia.book Page 4 Mardi, 20. juin 2000 10:31 10

Base station 5
Zenia 6326 base station
Zenia Voice 6626 base station
Loudspeaker
On/off and busy base station
indicatorMicrophone
Loudspeaker
Message indicator
On/off and busy base station
indicator
Answer phone indicator
Microphone
Dial keys and answer phone controlsWith a view to improving products and services, Philips reserves the right to modify the specifications
mentioned in this publication, at any time and without noticeCopyright Philips 2000 - All rights reserved
Internal call key
Volume control keys
External call key
Volume control keys
External call key
Internal callkey
to keys: direct dial keys
Memo recordkey
prelim-zenia.book Page 5 Mardi, 20. juin 2000 10:31 10

Overview6
Handset overview
Overview of 6326 & 6626 base stations
KEYS DESCRIPTION
• Carries out operation displayed on the last line of the screen.
• Makes, accepts or ends a call.
• Cancels a character during input.• Moves up one menu level.• Enables you to use the "recall" function during a call.• When pressed (for 2 seconds), returns to "standby mode", or
during input, deletes all characters of the line.
• Switches the handset or base station loudspeaker on or off.• Also allows you to make and accept a call.
• During a conversation, increases volume level.
• Allows you to scroll through lists and menus to move around sothat you can insert a character when entering a number or a name.
• When pressed (for 2 seconds), locks or unlocks keypad.
• Allows you to use keypad shortcuts for the configuration menu.
KEYS 6326 BASE STATION DESCRIPTION• Internal call key.
to • Direct dial keys.
• Emergency dial number.
KEYS 6626 BASE STATION DESCRIPTION• Makes, accepts or finishes a call.
• Internal call key.
• Repeat previous message.
• Message play.
• Play next message.
• Record function.
• Play personal OGM.
• Delete message.
• Activate answer phone.
• Stop message play or record.
• Deactivate answer phone.• Memo record function (local message).• Also allows you to use the "recall" function while in a call.
prelim-zenia.book Page 6 Mardi, 20. juin 2000 10:31 10

Handset 7
Handset on charging unit
Overview of display screenDisplayed Indicates battery charge or discharge status.
l DisplayedFlashing
Answer phone is on.Answer phone is receiving or answering a call.
E DisplayedFlashing
Answer phone has messages.Answer phone has new messages.
t DisplayedFlashing
An external call is in progress.Answer phone is receiving or answering a call.An external call is coming in.
DisplayedFlashing
An internal call is in progress.An internal call is coming.
Displayed "Silent" mode is on.
/ DisplayedFlashing
Handset loudspeaker is on.Base station loudspeaker is on.
ADisplayedNot displayed
Link with base station is ok.Handset is not registered to any base station.Handset is out of reach of base station.
Displayed The current entry is at the beginning of the list.
Displayed The current entry is in the middle of the list.
Displayed The current entry is at the end of the list.
Displayed The selected entry of the shared phonebook is associated with a voice recognition signal.
Display
Alphanumerickeypad
Earpiece
Incoming call or new messages indicator
Microphone
10 MAY 10:05Philips 1
SHARED
prelim-zenia.book Page 7 Mardi, 20. juin 2000 10:31 10

Security8
SecurityYour telephone features the most advanced technology for even greater ease andcomfort of use.
Security informationFor all countries, using this product is subject to approval by the authoritiesconcerned. The wording of this approval appears on the label affixed to the back ofthe base station.The marking on the product certifies compliance with technical regulationsapplicable at the date of approval (including user safety and electromagneticinterference) in accordance with the following guidelines: 73/23/CEE, 89/336/CEE,91/263/CEE and 93/68/CEE.• Avoid all contact with liquids.• In order to avoid all risk of electric shock, never try to open the handset or the base
station. Leave repairs to our after-sales service.• Avoid all contact between the battery load contacts and conductor items (keys,
metal clips, jewelry, etc.).
Power connectionThis product is designed for 230 V single-phase alternating current and is notsuitable for IT facilities as defined in the EN 60-950 standard.Mains supply is classified at dangerous voltage security level, as defined in theEN 60-950 standard.This device can only be shut off completely by unplugging the power cable from thewall socket. The socket must be located near the device and easy to reach.This device is not meant to operate in case of power failure. In order to callemergency services, please make sure that you always have access to a telephonenot requiring power supply. If a power cut occurs while in a call, the telephonehangs up automatically and date and time may need resetting.
Telephone connectionElectric voltage of the telephone network corresponds to TNV-3 classification(Telecommunication Network Voltage), as defined in the EN 60-950 standard.
Environmental protectionYour telephone handset also benefits from the Philips EcoDesign program, whichtakes into account the relation between product and environment during its entireservice life.Please remember to observe the local regulations regarding the disposal of yourpackaging materials, exhausted batteries and old phone and where possible promotetheir recycling.European agreement"The equipment has been approved pursuant to Commission Decision 99/303/EC for pan-European single terminal connection to the public switchedtelephone network (PSTN). However, due to differences between the individualPSTNs provided in different countries, the approval does not, of itself, give anunconditional assurance of successful operation on every PSTN networktermination point.In the event of problems, you should contact your equipment supplier in thefirst instance."
: Product for use only in UK.
prelim-zenia.book Page 8 Mardi, 20. juin 2000 10:31 10

Installation 9
Installation : "This equipment is not designed for making emergency telephony calls
when the power fails. Alternative arrangements should be made for accessto emergency services".
Choosing the location of the charging unit and base station
Place the charging unit near a 220 V/ 240 V - 50 Hz wall socket.
In order to reduce possible interference, do not place the charging unit and the basestation at less than 50 cm from any other electronic equipment (telephone, TV set,computer, etc.).
The charging unit and the base station can be placed on a flat surface (desk) or wallmounted.
Do not install the charging unit:
• in a damp room,• near a heat source,• near obstacles, like thick walls or metallic structures.
Installing the charging unit on a level surface• Plug the power cable into the charging unit.• Place the charging unit on a level surface.• Plug the power cable into a wall socket.• Place the telephone handset on the charging unit.
: Only use the power cable supplied with the device.
Wall mounting the charging unit• Drill two holes into the wall, with vertical spacing of 65 mm, and insert the
screws.• Plug the power cable into the charging unit.• Hang the charging unit on the screws.• Plug the power cable into the wall socket.• Place the telephone handset on the charging unit.
: Only use the power cable supplied with the device.
Installing the base stationMake sure the wall socket is connected to the correct 220 V - 240 V mains voltage.
• Plug the power cable into the connector (base station symbol ), then into thewall socket.
• Plug the telephone cable into the connector (base station symbol t), then into thetelephone wall socket.
. . .
prelim-zenia.book Page 9 Mardi, 20. juin 2000 10:31 10

Installation10
Installing or replacing batteriesPower supply
Your telephone handset is powered by two rechargeable NiMh batteries, type AAA/R03.
When replacing the batteries, please use the following model: PHILIPSMULTILIFE R03NM, or PANASONIC 650 mAh.
• Press the top of the battery compartment lidand slide it down.
• Insert new batteries according to the marking.• Slide the lid back in place.
NiMh batteries must be disposed of in accordance with applicable waste disposalregulations.
: Never use non-rechargeable batteries, and only use recommended models.The manufacturer disclaims responsibility if these recommendations are notfollowed.
Charging and discharging batteriesOn first use or when new batteries have been inserted, charge the batteries forat least 12 hours. This precaution will prolong battery life.A symbol located at the top of the display will appear permanently to indicate thebattery charging status.
Each bar of the symbol represents about 1/3 of maximum charging capacity.While the batteries are being charged, the charge indicator flashes and showsthe following symbols in sequence . When the symbol isdisplayed, the batteries are fully charged.
: The charging status indicator is only relevant after the first charging cyclehas been completed.
: After a complete discharge of the batteries, the symbol only appears after afew minutes of charge.
If the symbol is displayed, batteries need charging. During a call, the handsetswitches off after a few minutes.
TestWhen the handset and the base station have been installed, proceed as follows tomake a call:
• Make sure the A symbol on the display is visible (if not, register the handset tothe base station (see “2.7 Registering a handset to a base station”, page 41).
• Press the key; the t symbol is displayed and you hear the tone.• Dial a number; the figures appear on the display and the number is dialled
automatically.If a problem occurs during this test, check the battery charging status (see“Charging and discharging batteries”, page 10), the charging unit and theconnection of the base station to the telephone line and the wall socket.
prelim-zenia.book Page 10 Mardi, 20. juin 2000 10:31 10

Using the telephone 11
Using the telephoneOperating in "standby mode"• Standby display:
• "Standby mode" is the starting point for all other operations.To choose a function from this mode, press the appropriate scroll keys or ,as many times as required, in order to view the various menus which you haveaccess to.
The following menus are at your disposal:
• "SHARED" (Shared phonebook),• "PRV PHONEBK" (Handset phonebook),• "INTERCOM" (Internal list),• "SERVICES" (List of services),• "SETTINGS" (Configuration),• "CALL LOG" (List of incoming calls),• "REDIAL" (List of outgoing calls).The selected menu is displayed on the last line of the screen.
To view one of these menus, press the key, the initial screen of the selectedmenu is displayed.
To go back to "standby mode", press the key for 2 seconds.
10 MAY 10:05Philips 1
SHARED
prelim-zenia.book Page 11 Mardi, 20. juin 2000 10:31 10

Using the telephone12
Making a call from the handsetFrom "standby mode", dial the number on the keypad (upto 26 digits).The dialled number is displayed on two lines as you enter thedigits.
To correct an error:
• move the cursor using the scroll arrows or ,• use the key to delete a character in front of the cursor,• pressing this key for 2 seconds deletes the whole line.
Press the key.The t symbol is displayed at the top of the screen.
The number is dialled automatically and the display shows:
• the indication "Call",• the number called.
Within 10 seconds, the duration of the call will be displayed.
Use the key to put an external line on hold, (see “Puttingan incoming call on hold”, page 19).
To hang up, press the key again.
The display shows:
• the message "END OF CALL",• the total duration of the call.To find out about the total duration of your calls, press the
key.
Within 4 seconds, the handset reverts to "standby mode".
: You can also press the key to answer a call and simultaneously switchon the handset loudspeaker. To hang up, press the key again.
: It is also possible to make a call by pressing the , key before dialling thenumber.
CALL...0123456789
REDIAL
EXTERNAL LINETime 0’13
HOLD
END OF CALLTime 5’30
VIEW TOTALS
PREDIAL012345
RECORD
prelim-zenia.book Page 12 Mardi, 20. juin 2000 10:31 10

Using the telephone 13
Making a call from the Zenia Voice 6326 base stationThe handsfree speakerphone allows calls to be made or accepted without using ahandset .
Dialling a number using the to direct dial keysTo use these keys you must have previously stored the numbers (see “3.4Storing direct dial keys (6326 base station only)”, page 43).
Press the key.The green light starts flashing and you hear the dial tone.
Press one of the direct dial keys to .The number corresponding to the selected key is dialled automatically.
The loudspeaker on the base station amplifies the sound.
You can adjust the loudspeaker volume with the (increase) or (decrease)keys.
To hang up, press the key again.The green light stops flashing.
Dialling an emergency number using the keyFirst of all, the emergency number must have been entered using the telephonehandset (see “3.4 Storing direct dial keys (6326 base station only)”, page 43).Press the key.The emergency number is dialled automatically. The green light starts flashing andyou hear the dial tone.
The loudspeaker and the microphone of the base station are switched onautomatically.
You can adjust the loudspeaker volume with the (increase) or (decrease)keys.
To hang up, press the key again.The green light stops flashing.
prelim-zenia.book Page 13 Mardi, 20. juin 2000 10:31 10

Using the telephone14
Making a call from the Zenia Voice 6626 base stationPress the key.The green light starts flashing and you hear the dial tone.
Dial the number using keys to on the keypad.The number is dialled automatically.
The loudspeaker and the microphone of the base station are switched onautomatically. Speak in the direction of the microphone.
You can adjust the loudspeaker volume using the (increase) or (decrease) keys.
To hang up, press the key again.The green light stops flashing.
Answering a call from the handsetWhen an incoming call is received, the handset rings. The green light and the tsymbol flash.
: You can stop the handset from ringing without answering the call by pressingthe key. Your base station will continue ringing and the symbolappears.
: If the network supplies the caller's number, it appears on the screen. Also, thename is shown if it is stored in one of the phonebooks.
To answer the call, press the key. The t symbol stops flashing.
: You can also press the key to answer the call and switch on the handsetloudspeaker simultaneously.
To hang up, press the key again.
: Caller indentification is subject to network selection.
RINGING
SILENCE
RINGING01712345678
SILENCE
RINGINGSMITH01712345678
SILENCE
prelim-zenia.book Page 14 Mardi, 20. juin 2000 10:31 10

Using the telephone 15
Redial list
PurposeYour ZENIA telephone stores the telephone numbers of the last 10 external callsthat you have made from the handset.
You can view the list, call back your callers directly from the list, or you can modifyit.
You can also store the telephone number in the shared or private phonebook.
Viewing the redial listYou can view the list of outgoing calls when in "standby mode" or during anexternal call.
From "standby mode", press the scroll keys to go tothe "REDIAL" menu (Redial list).
The indication "REDIAL" appears on the last line of thedisplay.
Validate by pressing the key.
The first entry in the redial list appears on the screen.
To scroll through the list, press the scroll keys and as many times as required.
: You can directly dial the telephone number corresponding to the entryviewed by pressing the key.
10 MAY 10:05Philips 1
REDIAL
REDIAL LIST06543210
OPTIONS
prelim-zenia.book Page 15 Mardi, 20. juin 2000 10:31 10

Using the telephone16
Deleting an entryFrom "standby mode", go to the redial list.
The entry corresponding to the last call is displayed.
Scroll through the list by pressing the scroll keys and as many times as required.
The entry to be deleted is displayed.
Press the key.
Using the scroll keys and , select the "Delete" optionto delete the currently displayed entry.
The selected option is displayed.
Validate by pressing the key.
A validation beep is heard and the "Deleted!" prompt isdisplayed.
The current entry is deleted and the next one is displayed.
10 MAY 10:50Philips 1
REDIAL
REDIAL LIST06543210
OPTIONS
REDIAL LISTDelete
SELECT
REDIAL LIST
Deleted!
prelim-zenia.book Page 16 Mardi, 20. juin 2000 10:31 10

Using the telephone 17
Storing an entryFrom "standby mode", go to the redial list.The entry corresponding to the last outgoing call made is displayed.
Scroll through the list by pressing the scroll keys and as many times as required.
The number to be stored is displayed.
Press the key.
Using the scroll keys and , select the "Store"option.The selected option is displayed.
Press the key.
Use the keypad to enter a new name (maximum 14 characters).Depending on the character to be entered, press theappropriate key once or several times (see “Character table”,page 56). Use the key to delete the character in front ofthe cursor.
Press the key to confirm the new name.
The handset prompts you to select the phonebook where youwish to store the telephone number.
Select the phonebook using the scroll keys or (shared or private phonebook).The selected phonebook is displayed on the second line of thedisplay.
Press the key to select phonebook selection.
The confirmation prompt "Stored" is displayed.
The handset goes back to the redial list.
REDIAL LIST01712345678
OPTIONS
REDIAL LISTStore
SELECT
SELECT LISTShared
SELECT
SHARED
Stored
ENTER NAME:
��
RECORD
prelim-zenia.book Page 17 Mardi, 20. juin 2000 10:31 10

Using the telephone18
Answering a call from the base station (6326 and Voice 6626)
The handsfree speakerphone allows calls to be made or accepted without using ahandset .
An incoming call is received. The green light starts flashing.
To answer the call, press the key of the base station.The loudspeaker and the microphone of the base station are switched onautomatically. Speak in the direction of the microphone.
You can adjust the loudspeaker volume with the (increase) or (decrease)keys.
To hang up, press the key again.The green light stops flashing.
Adjusting handset or base station volume during a call1) From handset:There are two volume levels: "Normal" and "High".
During a call, you can increase the earpiece volume by pressing the handset keyonce.
When the call is over, the volume goes back to "Normal" level (default setting).
You can also adjust the initial "Normal" volume (default setting), (see “1.1 Earpiecevolume”, page 38).
2) From base station:During a call or listening to messages, you can adjust the loudspeaker volume bypressing the (increase) or (decrease) key.
Each time you press one of these keys, you select one of three available volumelevels (low, medium, high).
Switching on loudspeakers from the handsetTo switch on the handset loudspeaker during a conversation, press the key. To switch it off, press the key again.
To switch on the base station loudspeaker during a conversation, press thehandset key for 2 seconds. To switch it off, press the key again for 2seconds.
The loudspeaker and the microphone on the base station are switched on so thatseveral people can participate in the conversation.
prelim-zenia.book Page 18 Mardi, 20. juin 2000 10:31 10

Using the telephone 19
Putting an incoming call on holdYou can put a call on hold: The external caller either hears music, if music on holdis activated (see “5.7 Switching music on hold on/off”, page 48), or a waiting tone.
1) From handset
Select the "HOLD" function using the or keys, then confirm with the key.
To switch back to the call, press the key again.
2) From base stationPress the key to put the current call on hold.To switch back to the call, press the key again.
Recording a conversation from the Zenia Voice 6626 handset only
Select the "Record" option using the scroll keys and .
Press the key.The conversation is recorded for a maximum of 2 minutes.
If you want to stop recording, press the key again.
To listen to the recorded conversation, please view the chapter “Listening tomessages received”, page 32.
prelim-zenia.book Page 19 Mardi, 20. juin 2000 10:31 10

Using the telephone20
Call log
Identifying the callerYour ZENIA telephone can display the caller's number. Caller identification isdependant on network selection.
When the telephone rings, your handset(s) display(s) the number and the name ofthe caller if they are supplied via the telephone network. If the number is associatedwith a name in one of the shared or private phonebooks, the name is displayed, too.
Call log functionYour ZENIA telephone can store the last 30 external calls received. Each call logentry specifies:
• the caller's telephone number (subscription required),
• the caller's name, if it is stored in one of your phonebooks, or supplied via thenetwork (subscription required),
• the date and time of call. : When the list is full, the oldest entry is deleted even if you have not read it.
When viewing the list, you can:
• view a new call,• call back your callers directly from the list,• delete one or more numbers,• identify callers who have left a message on the answer phone (Zenia Voice 6626),• listen to messages left by callers, (Zenia Voice 6626),• store a telephone number in the shared or private phonebook.
Viewing the list of unanswered callsThe handset light is flashing to indicate that a newunanswered call is stored.
Press the key to view the list of new incoming calls.
To scroll through the list, press the scroll keys and as many times as required.
Viewing the call logFrom "standby mode", press the scroll keys or , asmany times as required to access the "CALL LOG"menu.
Confirm by pressing the key.
The first entry in the call log is displayed.
To scroll through the list, press the scroll keys and as many times as required.
: If no calls have been received, "List empty!" isdisplayed.
10 MAY 10:30 3 new
VIEW
10 MAY 15:30Philips 1
CALL LOG
CALL LOG01/02 01:59
OPTIONS
prelim-zenia.book Page 20 Mardi, 20. juin 2000 10:31 10

Using the telephone 21
: You can directly call the telephone number corresponding to the entry viewedby pressing the key.
• When viewing the list, if a voice message is associated with the call viewed, theE symbol is displayed, to listen to this message, select the "LISTEN" optionand press the key.
Deleting an entry from the call logFrom "standby mode", go to the call log.The last incoming call received is displayed.
Scroll through the list by pressing the scroll keys and as many times as required.
The entry to be deleted is displayed.
Press the key.
Using the scroll keys and , select the "Delete" option.
Confirm by pressing the key.
A confirmation beep is heard and the "Deleted!" prompt isdisplayed.
The current entry is deleted and the next one is displayed.
If there are no more messages in the call log, the screen shows"List empty!".
CALL LOGDelete
SELECT
CALL LOG
Deleted!
CALL LOG01/02 01:59
OPTIONS
CALL LOG =
List empty!
prelim-zenia.book Page 21 Mardi, 20. juin 2000 10:31 10

Using the telephone22
Storing an entry from the call log : This function is subject to network selection.
From "standby mode", go to the call log.Scroll through the list by pressing the scroll keys and as many times as required.
The number to be stored is displayed.
Press the key.
Using the scroll keys and , select the "Store" option.The selected option is displayed.
Press the key.
Use the keypad to enter a new name (maximum 14 characters).Depending on the character to be entered, press the appropriatekey once or several times (see “Character table”, page 56). Usethe key to delete the character in front of the cursor.
Press the key to confirm the new name.
The handset prompts you to select the phonebook where youwish to store the telephone number.
Select the phonebook using the scroll keys or (shared or private phonebook).
The selected phonebook is displayed on the second line of thedisplay.
Press the key to confirm phonebook selection.
The confirmation prompt "Stored" is displayed.
The handset goes back to the call log.
CALL LOG01/02 01:590165346523
OPTIONS
CALL LOGStore
SELECT
SELECT LISTShared
SELECT
SELECT LIST
Stored
ENTER NAME:
��
RECORD
prelim-zenia.book Page 22 Mardi, 20. juin 2000 10:31 10

Using the telephone 23
Private and shared phonebooksYour telephone comes with two phonebooks, a private one and a shared one: youtherefore have the ability to store telephone numbers either in a private phonebooknot accessible from other handsets, or in a shared common phonebook.
In each phonebook, you can store the telephone number and name of 100 callers,either by transferring them from the call log or the redial list, or by entering themmanually. Entries are automatically sorted in alphabetical order.
Moreover, from the shared phonebook, you can use the voice dial system to dial atelephone number, (see “Voice dial (Zenia Voice 6626)”, page 25).
Storing your callers telephone numbersFrom "standby mode", use the keypad to dial the telephonenumber (up to 26 digits) you wish to store.
Confirm the new number by pressing the key.
: Press the key in order to insert a pause betweendigits.Press the key to insert a call rerouting function.
Use the keypad to enter a new name (maximum 14 characters).Depending on the character to be entered, press the appropriatekey once or several times (see “Character table”, page 56). Usethe key to delete the character in front of the cursor.
Press the key to confirm the new name.The handset prompts you to select the phonebook where youwish to store the new entry.
Select the phonebook using the scroll keys or .
: If you want to use the voice dial option (Zenia Voice 6626only) with this entry, you must select the sharedphonebook.
Press the key to confirm the phonebook selection.
The confirmation prompt "Stored" is displayed.
The handset reverts to "standby mode".
PREDIAL017123
��
RECORD
ENTER NAME:
��
RECORD
SELECT LISTShared
SELECT
SHARED
Stored
prelim-zenia.book Page 23 Mardi, 20. juin 2000 10:31 10

Using the telephone24
Viewing a phonebook entryFrom "standby mode", press the scroll keys or asmany times as required to go to the "SHARED" or "Prvphonebk" menu.
Confirm by pressing the key.
The first entry in the selected phonebook is displayed.
To scroll through the list, press the scroll keys and as many times as required.
To directly access an entry, type in the first letters of the nameto be looked up.
Press the key to confirm the search.The display shows the first names following the characterswhich have been entered.
Refine the search using the and scroll keys.
Making a callHaving looked up a person in the phonebook, thecorresponding name and telephone number are displayed onthe screen.
Press the key to dial the telephone number directly.
Deleting an entry from a phonebookHaving selected the entry to be deleted from the phonebook,the name and telephone number are displayed.
Confirm by pressing the key.
Select the "Delete" option using the scroll keys and .
Confirm by pressing the key.
A validation beep is heard and the "Deleted!" prompt isdisplayed.
The current entry is deleted and the next one is displayed.
SHAREDJohn Smith01712345678
OPTIONS
SHAREDDelete
SELECT
SHARED
Deleted!
SHAREDJohn Smith01712345678
OPTIONS
10 MAY 10:05Philips 1
SHARED
SEARCH FOR:Jo
SEARCH
prelim-zenia.book Page 24 Mardi, 20. juin 2000 10:31 10

Using the telephone 25
Modifying a phonebook entryHaving selected the entry to be modified in the phonebook, thecorresponding name and telephone number are displayed on thescreen.Confirm by pressing .
The validation prompt "Change" is displayed.
Confirm by pressing the key.
Now you can change the telephone number.Press the key to delete a number, hold down the same keyfor 2 seconds to delete the whole line.Enter the modified number.Confirm the new number by pressing the key.Repeat the operation to modify the name if required.Confirm by pressing the key.
Voice dial (Zenia Voice 6626)This function is used to call a person without having to dial or look up the telephonenumber, just by saying a name.
: In order to allow several people to use the voice dial system, the number mustbe copied into the shared phonebook.In order to have the best voice dial, it is better to record it in a quietenvironment.
Recording voice dialFrom "standby mode", go to the shared phonebook.Search for the person whom you wish to associate a voice dial.
Press the key.
Using the scroll keys and , choose the "Voice dial"option.The selected option is displayed.Press the key to confirm the selected option.
A voice dial is displayed.
: This prompt is displayed only if sufficient memory isavailable. Otherwise the "Failed!" prompt appears.
Press the key.
Attempt n° 1 is displayed.
Press the key.
SHARED
ChangeSELECT
ENTER NUMBER:01712345678
DONE
SHAREDJohn Smith01712345678
OPTIONS
SHAREDVoice dial
SELECT
SHAREDAdd tag
SELECT
VOICE DIALAttempt n° 1
RECORD
prelim-zenia.book Page 25 Mardi, 20. juin 2000 10:31 10

Using the telephone26
Press the key.
After 2 seconds you will hear the recording.The handset suggests attempt n° 2.
Press the key.
Again, clearly say the name corresponding to the selectedentry.Within 2 seconds, you will hear the recording.The confirmation prompt "Stored" is displayed; and thenumber is automatically dialled.
At the top right corner of the screen, the voice dial symbol appears.
Making a call via voice dialFrom "standby mode", press the key for 2 seconds:Like for the voice dial recording, clearly say the namecorresponding to the number to be dialled, in a quietenvironment.
The corresponding entry in the shared phonebook is displayed. : The current operation can be cancelled by pressing the
key.
: If the handset does not recognise the voice dial, the errormessage "Not recognised" is displayed and the systemsuggests that you try again.
VOICE DIAL
Recording...
VOICE DIALAttempt n° 2
RECORD
VOICE DIAL
Stored
SHAREDJohn01712345678
OPTIONS
VOICE DIALSpeaknow...
VOICE DIALJohn Smith01712345678
ABORT
prelim-zenia.book Page 26 Mardi, 20. juin 2000 10:31 10

Using the telephone 27
Listening to a voice dial
Select the person from the shared phonebook whose voice dialyou wish to listen to.
Using the scroll keys and , select the "Play tag"function.
Press the key to listen to the voice dial.
Deleting a voice dialFrom "standby mode" go to the shared phonebook.In the shared phonebook, look up the person whose voice dialyou wish to delete.
Press the key.
Using the scroll keys and , choose the "Voice dial"option.
Press the key to confirm the selected option.
Using the scroll key , select the "Delete tag" function.
Press the key to delete the voice dial.
The confirmation prompt "Deleted!" is displayed.
PROBLEM CAUSEBackground noise ! There is too much backgroung noise during the voice dial
recording.
Too long ! The voice dial is too long or you spoke too late.
Too short ! The voice dial is too short or you spoke too early.
Too similar ! There is not difference enough between this voice dial and the previous one.
Too different ! There is too much difference between both recording attempts.
SHAREDJohn Smith01712345678
OPTIONS
SHAREDVoice dial
SELECT
SHAREDDelete tag
SELECT
SHARED
Deleted!
SHAREDPlay tag
SELECT
SHAREDVoice dial
SELECT
prelim-zenia.book Page 27 Mardi, 20. juin 2000 10:31 10

Using the intercom28
Using the intercomUp to 6 handsets (for Zenia 6326 base station) or 8 handsets (for Zenia Voice 6626base station) can be registered to your base station.
This feature offers the following possibilities:
• to make internal calls between 2 handsets (or between handset and base station),• to transfer an external call to another handset,• to accept an internal call from the base station,• to have a conference call with several handsets,• to monitor another room.
: As the internal call is independent from the telephone network, all callsbetween the handset and the base station or between two handsets are totallyfree.
: During an internal call between two handsets, you can answer an externalcall and transfer it to a third handset.
Making an internal call (intercom)
From the handsetFrom "standby mode", press the scroll keys and as many times as required.
Select "INTERCOM".
Press the key.
Press the scroll keys and as many times as required toselect the base station or handsets you wish to call.
Press the key to call or the base station or handsets.
From the base stationYou can call a handset registered to your base station.Press the key.Then press one of the keys to (6326 base station) or to (6626base station) corresponding to the number of the handset you wish to call.
: To call all the available handsets, press the key for 2 seconds.
: If you press the key for 2 seconds, all available handsets will startringing.As soon as one handset answers the others stop ringing.
The corresponding handset starts ringing. : If your handset is not registered to the base station, you will hear an error
beep.The loudspeaker and the microphone of the base station are switched onautomatically when the call is answered.
10 MAY 10:05Philips 1
INTERCOM
INTERNAL LISTBase
prelim-zenia.book Page 28 Mardi, 20. juin 2000 10:31 10

Using the intercom 29
You can adjust the loudspeaker volume using the (increase) or (decrease)keys.
Transferring an external call to another handset
From the base stationDuring the call, press the key to put the external line on hold.The external caller will either hear music (if music on hold is activated, see “5.7Switching music on hold on/off”, page 48) or a waiting tone.
Press one of the direct dial keys to (6326 base station) or to (6626 base station) corresponding to the number of the handset to which youwish to transfer the call ( or to call handset No. 1, or to callhandset No. 2, etc.).
The corresponding handset starts ringing.
You can switch back to the external call by pressing the key once more.
: During a call, pressing the key for at least 2 seconds puts the call on holdand makes to all available handsets ring.
Press the key to transfer the call.
From the handsetWhile you are talking to an external caller, you can transfer the call to anotherhandset or to the base station.
Press the scroll keys or as many times as requiredin order to select "INTERCOM".
Press the key.The external line is put on hold. If music on hold is activated,the caller will hear it.Press the scroll keys or as many times as requiredto select the handset or the base station where the call is tobe transferred to.
EXTERNAL LINETime 0’38
INTERCOM
prelim-zenia.book Page 29 Mardi, 20. juin 2000 10:31 10

Using the intercom30
Confirm the selection by pressing the key. : If the selected handset does not answer, press the
key to retrieve the call.
As soon as the selected handset answers, "CALLING" willappear on the first line of the screen.
Select the "TRANSFER" option.Press the key to transfer the call to the selectedhandset.The external call is transferred to the handset.Your handset reverts to "standby mode".
Answering an internal callThe handset rings.
The symbol located on the handset screen flashes.
Press the or keys to answer this call.
Starting a conference callDuring an external call, you can start a conference call bytransferring the call to another handset.Internally call the other handset with which you wish toshare the call. (see “Transferring an external call toanother handset”, page 29).
When the person has answered, select the "CONF CALL"option using the and keys, then confirm bypressing the key.The external line is connected simultaneously to bothhandsets.
Selecting the room monitor (Babysit mode)On a handset placed in the room to be monitored (e.g., thebaby's room), activate the "Babysit" (see “2.5 Selecting theBabysit mode”, page 41).From the base station or another handset, internally callthe handset placed in the room to be monitored.
During this (free) call, you will hear any noise in the monitoredroom.
INTERNAL LISTBase
SELECT
CALLINGBase
TRANSFER
EXTERNAL LINETime 0’38
CONF CALL
RINGING
SILENCE
10 MAY 10:05BABYSIT
SHARED
prelim-zenia.book Page 30 Mardi, 20. juin 2000 10:31 10

Using the answer phone (Zenia Voice 6626 only) 31
Using the answer phone(Zenia Voice 6626 only)
You can access the answer phone (listening to messages, call screening, messagerecording, configuration) either from a handset registered to the base station (see“Answer phone settings (Zenia Voice 6626)”, page 44) or via the base station.
Your answer phone can operate in the following two answering modes:
• Answer only:Your personal OGM will be played, but your callers cannot leave a message.
• Answer and record:When the personal OGM is over, your callers can leave a message therecording capacity of which is a maximum of 30 minutes (including voiceannouncements and voice messages).
If during your absence callers have left new messages:
• the red light on the base station flashes.• the display shows the number of new messages received.
: When the recording memory is full, the red light on the base station flashesrapidly and an error beep is heard.The red light stops flashing when at least one message has been deleted.
Using the answer phone from the handsetFrom the handset, you can:
• switch the answer phone on or off,• screen and intercept calls,• listen to messages (including memos),• delete a message received.
Switching the answer phone on or offFrom "standby mode" press the scroll keys or as manytimes as required to go to the "SETTINGS" menu.
Confirm by pressing the key.
Press the scroll keys and as many times as required inorder to select "Answer phone".
Confirm by pressing the key.
Confirm "Answer mode" by pressing the key and selectthe desired option:• Answer only, only the personal OGM is played.• Answer and record, the personal OGM is played and then
messages are recorded.• Off, the answer phone is switched off.
SETTINGSAnswerphone
SELECT
ANSWERAnswermode
SELECT
prelim-zenia.book Page 31 Mardi, 20. juin 2000 10:31 10

Using the answer phone (Zenia Voice 6626 only)32
Screening and intercepting incoming callsWhile the answer phone is recording a caller's message:
• the E symbol on the screen flashes,• the t symbol on the screen is displayed.You can listen to the call before deciding to answer by pressing the key.
The / icon on the screen is displayed.
You can listen to your caller’s message via the handset loudspeaker, without beingheard. The answer phone will still be in record mode.
To answer the call that is being screened, press the key.
Listening to messages receivedIf a caller has left a new message during your absence, the green light flashes.
• the display shows the number of new messages,• the E symbol on the screen flashes.
Press the key.
The call log is automatically displayed and the details of thecaller who left the oldest message appears.
: Caller identification is subject to network selection.
A voice message indicates the date and time of the call.
The answer phone starts to play the oldest message, followedby any subsequent message.
: You can repeat the last message by pressing the scroll key .
When the last message has been played, the handset reverts to "standby mode".
The E symbol on the screen stops flashing and the green light goes out.
: You can replay old messages by viewing the call log. Scroll through the calllog using the scroll keys and ; if a message is associated with anentry of the list, the E symbol is displayed.
10 MAY 10:30 3 new
PLAY
CALL LOGJohn Smith01712345678
OPTIONS
CALL LOG10 MAY 10:30
OPTIONS
or
prelim-zenia.book Page 32 Mardi, 20. juin 2000 10:31 10

Using the answer phone (Zenia Voice 6626 only) 33
To listen to this message, select the "PLAY" option, thenconfirm using the key.
Deleting a message receivedYou can delete one or more messages by viewing the call log.
Scroll through the call log using the scroll keys and .
When the message you wish to delete appears, press the key.
Press the scroll keys or as many times as required inorder to select the "Delete" option.
Confirm by pressing the key.
Using the answer phone from the base stationFrom the base station you can:
• switch the answer phone on or off,• screen and intercept calls,• listen to messages (including memos),• delete a message received,• record a personal OGM,• record a memo.
Switching the answer phone on or off Press the key to switch the answer phone on.The red light illuminates.
If you want to switch the answer phone off, press the key.The red light goes out.
Screening and intercepting incoming callsYou can listen to the message before deciding to answer the call by the base stationloudspeaker.
You can adjust the loudspeaker volume using the (increase) or (decrease)keys.
: To stop call screening, press the key as many times as required.
If the answer phone is currently handling a call and you wish to answer it:
Press the key.The answer phone stops and you can talk to the caller.
CALL LOG
PLAY
CALL LOGJohn Smith0171235678
OPTIONS
CALL LOGDelete
SELECT
prelim-zenia.book Page 33 Mardi, 20. juin 2000 10:31 10

Using the answer phone (Zenia Voice 6626 only)34
Listening to messages receivedYou have not read the first message. In that case, the red light flashes and the displayshows the number of new messages received (messages and memos).Press the key to listen to the messages received.A voice indicates the number of new messages you have received.Then, the answer phone starts playing all the new messages, starting with the oldestone.Before each message, a voice indicates the date and time of the call.You can adjust the loudspeaker volume using the (increase) or (decrease)keys.When the answer phone has finished playing the last message:• the answer phone reverts to "standby mode",• the display shows the total number of messages recorded.Press the key to stop message playback.
: When you have listened to all new messages, you can replay all messagesrecorded by pressing the key.
Deleting a messageWhen the answer phone is playing a message you wish to delete, press .A validation beep is issued confirming that the message has been deleted.
Deleting all messagesThe answer phone is in "standby mode" and the red light is on.Press the key for at least 2 seconds to delete all messages received.A validation beep is issued confirming that all messages have been deleted.
Recording a personal OGMTwo different personal OGMs can be recorded:• One for Answer only mode,• The other for Answer and record mode.A standard OGM has already been recorded.
Before recording your personal OGM, check the answer mode of your answerphone (see “4.3 Recording a personal OGM”, page 45) and proceed as follows.
Press the key, then the key."Please speak after the tone" is played, then a beep is heard.
Speak clearly in the direction of and near the base station microphone.When your announcement is finished, press the key to stop recording.
A validation beep is heard confirming the personal OGM has been recorded.
prelim-zenia.book Page 34 Mardi, 20. juin 2000 10:31 10

Using the answer phone (Zenia Voice 6626 only) 35
To listen to your personal OGM, press the key. : To modify your personal OGM, all you have to do is record a new one, by
following the procedure previously described.
Recording a memo (local message)With this function you can leave a memo for another person in your home.With the phone in "standby mode", press the key."Please speak after the tone" is played, then a beep is heard.Speak clearly in the direction of and near the base station microphone.When your message is finished, press the key again to stop recording.A beep is heard confirming the memo has been recorded.The red light flashes and the display updates the number of new messages received.Your memo is played together with the other messages received, by pressing the
key.
Remote control of the answer phoneDial your telephone number. Let it ring 9 times.The answer phone answers the call and a waiting tone is heard.Press the key on the telephone and enter your security code printedunderneath the base station (RC code).Press the telephone key, then hang up.Your answer phone is switched on and ready to receive calls.
: If you have changed your security code, see “6.4 Changing the Pin code”,page 50".
Checking messages remotelyYou can check your calls remotely from any ordinary telephone. Dial yourtelephone number, then while the personal OGM is being played, press the keyof the telephone.Enter your Pin code (see the RC code underneath the base station).The answer phone automatically plays all new messages, starting with the oldest.If your code is wrong, the personal OGM is played again. Press the key againand enter the new code. After three attempts, your answer phone hangs up.While listening:• Press the key to repeat the current message.
• Press the key twice to replay the previous message.
• Press the key to listen to the next message.
Hang up to stop the call.• The answer phone reverts to the mode it was in before your call, unless you have
switched it off by pressing the key. : At the end of this manual you will find a quick reference guide for remote
control of your answer phone.
prelim-zenia.book Page 35 Mardi, 20. juin 2000 10:31 10

System configuration36
System configurationOverview of the configuration menu
You can customise and configure certain functions of the telephone by accessing"SETTINGS".This main menu is divided into six sub-menus, as follows:
1. Handset sounds,2. Handset settings,3. Base station settings,4. Answer phone settings,5. Line settings,6. Security.
These sub-menus are divided into functions each comprising several settings. Thestructure of each sub-menu is represented in table form (see following pages). Thetable also shows for each function or setting, the corresponding keypad shortcut,which gives you faster access to the desired setting.
In each table, the box indicates the ex-factory setting for your telephone.
: Only one setting per function can be active at a time.
SettingsFrom "standby mode", go to "SETTINGS" by pressing thescroll keys and as many times as required.
Confirm by pressing the key.
The first sub-menu appears in the middle of the display.
Select the desired menu using the scroll keys and .
The selected sub-menu appears in the middle of the display.
: For certain menus, the system will request a code.
Enter the Pin via the keypad.As you type it in, stars appear on the second line of the screen.
: You can correct an error using the key.
Confirm by pressing the key.
The designation of the first function appears in the middle ofthe screen.
Press the key to access the selected function.
10 MAY 10:05Philips 1
SETTINGS
SETTINGSHeadsetSounds
SELECT
HANDSETEarpiecevolume
SELECT
ENTER PIN:*** ∆
DONE
SUB-MENU X.XFunction
SELECT
prelim-zenia.book Page 36 Mardi, 20. juin 2000 10:31 10

System configuration 37
The box currently in front of this setting indicates that it iscurrently selected.
If you want to change it, press the scroll keys or asmany times as required and select the desired setting.
The empty " " box in front of this setting indicates that it is notcurrently selected.
Press the key to confirm this setting.
The confirmation prompt "Set" is displayed.
The handset reverts to "standby mode".
Using keypad shortcutsAll sub-menus, functions, or settings are accessible by means of correspondingkeypad shortcuts.
In each table, the number that appears in front of the sub-menu, function, or settingwill enable you to access the desired function more quickly.
From "standby mode", press the key.Enter the short cut corresponding to the sub-menu,function, or setting of your choice.
The keypad shortcut is displayed on the second line of thescreen.
Press the key to confirm the selection.The window corresponding to the selected menu, function, orsetting is displayed.
Select the setting of your choice using the or key,then confirm by pressing the key.
FUNCTION X.X.X Setting 1
SELECT
FUNCTION X.X.Y Setting 2
SELECT
FUNCTION X.X.Y Setting 2
SELECT
FUNCTION X.X.Y
Set
SHORTCUT:��
SELECT
SHORTCUT:1.1.2
SELECT
EARPIECE 1.1.2 Medium
SELECT
prelim-zenia.book Page 37 Mardi, 20. juin 2000 10:31 10

System configuration38
Handset sound settingsSelect "SETTINGS", and by using the key as well as the and scrollkeys, navigate through the menu to access the desired settings.
1.1 Earpiece volumeGo to the "SETTINGS" menu, then to the "Handset sounds" sub-menu andselect "Earpiece volume".Select the desired volume level from the three options available.
1.2 Loudspeaker volumeGo to the "SETTINGS" menu, then to the "Handset sounds" sub-menu andselect "Loudspeaker volume".Select the desired volume level from the three options available.
Sub-menu Functions Shortcuts Settings Selection1 Handset sounds 1.1 Earpiece volume 1.1.1
1.1.21.1.3
LowMediumHigh
1.2 Loudspeaker volume 1.2.11.2.21.2.3
LowMediumHigh
1.3 Headset volume 1.3.11.3.21.3.3
LowMediumHigh
1.4 Ringer type 1.4.11.4.21.4.31.4.41.4.51.4.6
Melody 1Melody 2Melody 3Melody 4Melody 5Melody 6
1.5 Ringer volume 1.5.11.5.21.5.31.5.41.5.5
SilentLowMediumHighProgressive
1.6 Key tones 1.6.11.6.2
OffOn
1.7 Earpiece tone 1.7.11.7.21.7.3
BassStandardTreble
1.8 Loudspeaker tone 1.8.11.8.21.8.3
BassStandardTreble
1.9 Headset tone 1.9.11.9.21.9.3
BassStandardTreble
1.0 CLI ringer 1.0.11.0.21.0.31.0.41.0.51.0.6
Melody 1Melody 2Melody 3Melody 4Melody 5Melody 6
prelim-zenia.book Page 38 Mardi, 20. juin 2000 10:31 10

System configuration 39
1.3 Headset volumeGo to the "SETTINGS" menu, then to the "Handset sounds" sub-menu andselect "Headset volume".Select the desired volume level from the three options available.
1.4 Ringer typeGo to the "SETTINGS" menu, then to the "Handset sounds" sub-menu andselect "Ringer type".Select the desired melody from the six options available.
1.5 Ringer volumeGo to the "SETTINGS" menu, then to the "Handset sounds" sub-menu andselect "Ringer volume".Select the desired volume level from the six options available.
1.6 Switching key tones on/offGo to the "SETTINGS" menu, then to the "Handset sounds" sub-menu andselect "Key tones" to switch this function on or off.
1.7 Earpiece toneGo to the "SETTINGS" menu, then to the "Handset sounds" sub-menu andselect "Earpiece tone".Select the desired tone setting from the three options available.
1.8 Loudspeaker toneGo to the "SETTINGS" menu, then to the "Handset sounds" sub-menu andselect "Loudspeaker tone".Select the desired tone setting from the three options available.
1.9 Headset toneGo to the "SETTINGS" menu, then to the "Handset sounds" sub-menu andselect "Headset tone".Select the desired tone setting from the three options available.
1.0 CLI ringer (with caller identification)When a call is received, you will hear the selected melody on your handset if thenumber supplied by the network corresponds to a telephone number stored in theprivate phonebook.
Go to the "SETTINGS" menu, then to the "Handset sounds" sub-menu andselect "CLI ringer".Select the desired melody from the six options available.
prelim-zenia.book Page 39 Mardi, 20. juin 2000 10:31 10

System configuration40
Handset settingsSelect "SETTINGS", and by using the key as well as the and scrollkeys, navigate through the menu to access the desired settings.
2.1 Selecting a languageGo to the "SETTINGS" menu, then to the "Handset settings" sub-menu andselect "Language".Select the desired language from the various options available.
2.2 Switching the screen back light onIf this function is on, the screen lights for 10 seconds:
• when an incoming call is received,
• when a key is pressed on the keypad,
• when you remove the handset from the charging unit.
Go to the "SETTINGS" menu, then to the "Handset settings" sub-menu andselect "Black light" in order to switch this function on or off.
2.3 Display contrastGo to the "SETTINGS" menu, then to the "Handset settings" sub-menu andselect "Display contrast".Select the desired contrast from the three options available.
Sub-menu Functions Shortcuts Settings Selection2 Handset settings 2.1 Language 2.1.1
2.1.22.1.3
EnglishDeutschFrançais
2.2 Back light 2.2.12.2.2
OffOn
2.3 Display contrast 2.3.12.3.22.3.3
LowMediumHigh
2.4 Lock 2.4.12.4.2
OffOn
2.5 Babysit mode 2.5.12.5.2
OffOn
2.6 Base selection 2.6.12.6.22.6.32.6.4
Base 1Base 2Base 3Base 4
2.7 Register Registering a handset at the base station
prelim-zenia.book Page 40 Mardi, 20. juin 2000 10:31 10

System configuration 41
2.4 Locking and unlocking the keypadYou can lock the keypad in order to avoid the keys from being pressedinadvertently. E.g., when you keep the handset in your pocket.
• to lock the keypadpress the key for 2 seconds,
• to unlock the keypadpress the key for 2 seconds.
• Or go to the "SETTINGS" menu, then to the "Handset settings" sub-menuand select "Keypad lock", in order to activate this function.
2.5 Selecting the Babysit modeThis enables you to hear any noise in a monitored room other than the one you arein.
Go to the "SETTINGS" menu, then to the "Handset settings" sub-menu andselect "Babysit mode". In "standby mode", the screen displays "BABYSIT".
: When activated, the monitoring handset does not ring for an incoming calland beeps are deactivated (see “Selecting the room monitor (Babysitmode)”, page 30).
2.6 Selecting the base stationAlthough a handset can be subscribed to up to 4 base stations it can only operate onone base station at a time.
To simplify the base station selection, rename your handset (default is "Philips").(see “Renaming a handset”, page 50).
Go to the "SETTINGS" menu, then to the "Handset settings" sub-menu andselect "Select base" in order to activate the base station of your choice.
: If the selected base station is not active, your handset will look for the nearestactive base station.
2.7 Registering a handset to a base station• Unplug the base station power cable and plug it back in.
A beep indicates that the base station switches to registration mode for 5 minutes.Go to the "SETTINGS" menu, then to the "Handset settings" sub-menu andselect "Register".The handset prompts you to enter your Pin.
• Enter the RC code printed on the back of the base station, then press the key.A confirmation signal beeps is heard.
prelim-zenia.book Page 41 Mardi, 20. juin 2000 10:31 10

System configuration42
Base settingsSelect "SETTINGS", and by using the key as well as the and scrollkeys, navigate through the menu to access the desired settings.
3.1 Selecting the ringer type (base station)Go to the "SETTINGS" menu, then to the "System settings" sub-menu andselect "Base ringer".Select the desired melody from the various options available, there are six for6326 and seven for 6626 (including the personal ringer).
: For the personal ringer to be activated, it must first have been recorded (see“4.4 Recording a personal ringer (Zenia Voice 6626 only)”, page 45).
3.2 Adjusting the ringer volume (base station)Go to the "SETTINGS" menu, then to the "System settings" sub-menu andselect "Base volume".Select the desired sound level from the five options available.
3.3 Setting date and timeGo to the "SETTINGS" menu, then to the "System settings" sub-menu andselect "Set date & time".The handset prompts you to enter the date and time.
Enter the eight digits of the date and the four digits of the time; they will bedisplayed.
Confirm by pressing the key.
A confirmation beep is heared and the message "Stored" is displayed.
Sub-menu Functions Shortcuts Settings Selection3 Base settings 3.1 Base ringer (type) 3.1.1
3.1.23.1.33.1.43.1.53.1.63.1.7
Melody 1Melody 2Melody 3Melody 4Melody 5Melody 6Personal ringer
3.2 Base ringer 3.2.13.2.23.2.33.2.43.2.5
SilentLowMediumHighProgressive
3.3 Set date & time Update (date/time for the whole system)
3.4 Store direct dial keys (6326 base station)
3.4.13.4.23.4.33.4.43.4.53.4.63.4.7
M 1M 2M 3M 4M 5M 6SOS
3.5 Registration mode Base station is put in registration mode
prelim-zenia.book Page 42 Mardi, 20. juin 2000 10:31 10

System configuration 43
3.4 Storing direct dial keys (6326 base station only)Select the "SETTINGS" menu, then the "System settings"sub-menu and select "Direct dial keys".
Confirm by pressing the key.
The telephone number stored for the M1 key is displayed, orthe message "Empty" appears if no number has yet been storedfor this key.
Using the scroll key, select the direct dial key ( , ,, , or ) for which you wish to store a
telephone number.
The message "Empty" or the number stored for the selected keyis displayed.
Press the key.
Enter the telephone number to be stored.The number is displayed on two lines as you type along.
:You can correct errors using the key.
Confirm by pressing the key.
A confirmation signal beep is heard and the message "Stored" is displayed.
To call from the base station, refer to the paragraph "“Making a call from the ZeniaVoice 6326 base station”, page 13.
3.5 Putting the base station into registration modeA Pin code is already assigned for registration however you may change this.
On an already registered handset, go to the "SETTINGS" menu, then to the"System settings" sub-menu, and select "Registration mode".The handset prompts you to enter a code (from 1 to 8 digits).
Enter the Pin; a confirmation beep is heard and the message "Stored" is displayed.
It is now possible to register another handset.
In order to register another handset to the base station, (see “2.7 Registering ahandset to a base station”, page 41) enter the same code as previously instead of theRC code.
DIAL KEYS 3.4.11 : 01707122 :
CHANGE
DIAL KEYS 3.4.22 : Empty
CHANGE
DIAL KEYS
RECORD
DIAL KEYS 3.4.2
CHANGE
prelim-zenia.book Page 43 Mardi, 20. juin 2000 10:31 10

System configuration44
Answer phone settings (Zenia Voice 6626)Select "SETTINGS", and by using the key and the and scroll keys,navigate through the menu to access the desired settings.
4.1 Selecting the answer modeIf your answerphone is switched off, the l icon disappears from the handset screen.
If you do not want callers to leave messages after your announcement, you canswitch off the message recording function (answer only mode).
To switch back to the answer and record mode, go to the "SETTINGS" menu,then to the "Answer" sub-menu, and select "Answer mode", in order to switchon the option of your choice.
4.2 Recording a memo (local message)Go to the "SETTINGS" menu, then to the "Answer" sub-menu, and select"Record memo".Press the key, then say your message.
Press the key again in order to confirm the message.A confirmation beep is heard, the message "Stored" is displayed.
Your memo will be played back together with other messages received.
Sub-menu Functions Shortcuts Settings Selection4 Answer phone 4.1 Answer mode 4.1.1
4.1.24.1.3
OffAnswer onlyAnswer and record
4.2 Record memo Records a message (memo)4.3 Record pers. OGM Records a personal OGM4.4 Record ringer Records a personal ringer4.5 Rings before answer 4.5.1
4.5.24.5.34.5.4
Toll saver3 rings4 rings5 rings
4.6 Voice prompts 4.6.14.6.24.6.34.6.4
OffMessage onlyMessage and dateAll prompts
4.7 Record quality 4.7.14.7.24.7.3
HighStandardAutomatic
4.8 Remote control 4.8.14.8.2
OffOn
prelim-zenia.book Page 44 Mardi, 20. juin 2000 10:31 10

System configuration 45
4.3 Recording a personal OGMGo to the "SETTINGS" menu, then "Answer phone" sub-menu, and select"Record pers. OGM".The recording window is displayed.
Press the key, then say your personal OGM.
Press the key again in order to confirm the message.A confirmation signal beep is heard, the message "Stored" is displayed.
4.4 Recording a personal ringer (Zenia Voice 6626 only)Go to the "SETTINGS" menu, then to the "Answer" sub-menu, and select "Record ringer".
Press the key to access the selected function.
Press the key again to record your personal ringer.
The message "Recording..." is displayed.
Record your personal ringer.
Press the key at the end of the ringer.
The system plays your personal ringer. : You interrupt the recording procedure by pressing the
key.
The confirmation prompt "Stored" is displayed.
The personal ringer is recorded and activated.
The handset reverts to "standby mode".
To activate this ringer during an incoming call, refer to “1.4 Ringer type”, page 39.
: The record time of the personal ringer is between 5 seconds and 12 minutes.
ANSWERRecordringer
SELECT
RECORD RINGERPress OKand speak...
RECORD
RECORD RINGERRecording...
STOP
RECORD RINGERPlay
ABORT
RECORD RINGER
Stored
prelim-zenia.book Page 45 Mardi, 20. juin 2000 10:31 10

System configuration46
4.5 Modifying the number of rings before answerYou can modify the number of rings (Toll saver, 3, 4, 5) before the answer phoneanswers a call.
Go to the "SETTINGS" menu, then to the "Answer" sub-menu, and select"Rings before answer".Select the option of your choice from the four possibilities available.
: "Toll saver" is the default configuration for the answer phone.
If you have received a message, the answer phone answers after 3 rings.
If there are no messages, it will answer after 5 rings but you have time tohang up before it answers the call.
4.6 Activating/ deactivating voice promptsWhen using the answer phone, voice prompts will provide you with informationabout the call before you listen to the messages.
This information includes:
• The number of messages received,
• Date and time,
• Other prompts for using the system.
Go to the "SETTINGS" menu, then to the "Answer phone" sub-menu, andselect "Voice".Select the option of your choice from the four possibilities available.
4.7 Record qualityWith this setting you can specify the record quality for your messages.
Go to the "SETTINGS" menu, then to the "Answer" sub-menu, and select"Record quality".Select the option of your choice from the three possibilities available.
: With "standard" quality, there is a recording capacity of about 30 minutes.
With "high quality", the recording capacity is about 10 minutes.
In "automatic" mode, the first five minutes of recording will be in highquality, and thereafter in standard quality.
4.8 Switching remote control onIf this function is on, you can check your messages remotely via a tone diallingtelephone.
Go to the "SETTINGS" menu, then to the "Answer" sub-menu, and select"Remote control".
: If this function is switched off, you will not be able to switch your answerphone on via the telephone network.
prelim-zenia.book Page 46 Mardi, 20. juin 2000 10:31 10

System configuration 47
Line settingsSelect "SETTINGS", and by using the key and the and scroll keys,navigate through the menu to access the desired settings.
: Line default settings may vary according to the country.
5.1 Selecting the dial modeGo to the "SETTINGS" menu, then to the "Line settings" sub-menu, andselect "Dial mode".
5.2 Selecting the network typeYour telephone has been configured for use with a public line as defined by localcertification standards (Type 1).
However, you may modify this setting by selecting one of the other 4 typesavailable.
Go to the "SETTINGS" menu, then to the "Line settings" sub-menu, andselect "Network type".Select the network of your choice from the 5 options available.
5.3 Selecting the operator typeYour telephone has been configured for use as defined with the telephone operator(Type 1) for whom the telephone has been approved. However, if you havesubscribed to another operator, the number of your callers may not be displayedcorrectly. In this case, you have 4 other settings to choose from. However, if theproblem remains, please contact our Customer Service.
Sub-menu Function Shortcuts Setting Selection5 Line settings 5.1 Dial mode 5.1.1 Tone
5.2 Network type 5.2.15.2.25.2.35.2.45.2.5
Type 1Type 2Type 3Type 4Type 5
5.3 Operator type 5.3.15.3.25.3.35.3.45.3.5
Type 1Type 2Type 3Type 4Type 5
5.4 Recall type 5.4.15.4.2
Short flashLong flash
5.6 View total time Sets total time5.7 Music on hold 5.7.1
5.7.2OffOn
5.8 Pause insertion 5.8.15.8.2
OffOn
5.9 Automatic prefix 5.9.15.9.2
OffOn
5.0 Prefixes setup
prelim-zenia.book Page 47 Mardi, 20. juin 2000 10:31 10

System configuration48
5.4 Selecting flash timeYou may need to change this when connected to a PABX.
Go to the "SETTINGS" menu, then to the "Line settings" sub-menu, andselect "Recall type".Select one of the two options "Short flash" or "Long flash".
5.6 Displaying/deleting total time for your callsGo to the "SETTINGS" menu, then to the "Line settings" sub-menu, andselect "View total time".You can reset the total time of your calls by pressing the key.
The window that is displayed indicates the total cost and time of the calls you havemade since this function was last reset.
: When a call is over, before the handset reverts to "standby mode", you can
also access this function by pressing the key.
5.7 Switching music on hold on/offGo to the "SETTINGS" menu, then to the "Line settings" sub-menu, andselect "Music on hold", in order to activate or deactivate this function.
5.8 Inserting a pause between digitsIf this function is on, a pause can be integrated automatically after the first digit ofthe number.
Go to the "SETTINGS" menu, then to the "Line settings" sub-menu, andselect "Pause insertion".
5.9 Automatically inserting a prefixWhen this function is on, a prefix can be inserted automatically.
Go to the "SETTINGS" menu, then to the "Line settings" sub-menu, andselect "Automatic prefix".
5.0 Setting up prefixGo to the "SETTINGS" menu, then to the "Line settings" sub-menu, andselect "Prefixes setup".Enter the prefix, then validate by pressing the key.
: The prefix will be transmitted each time the number is dialled; therefore, youmust be sure that it is in line with your needs.
prelim-zenia.book Page 48 Mardi, 20. juin 2000 10:31 10
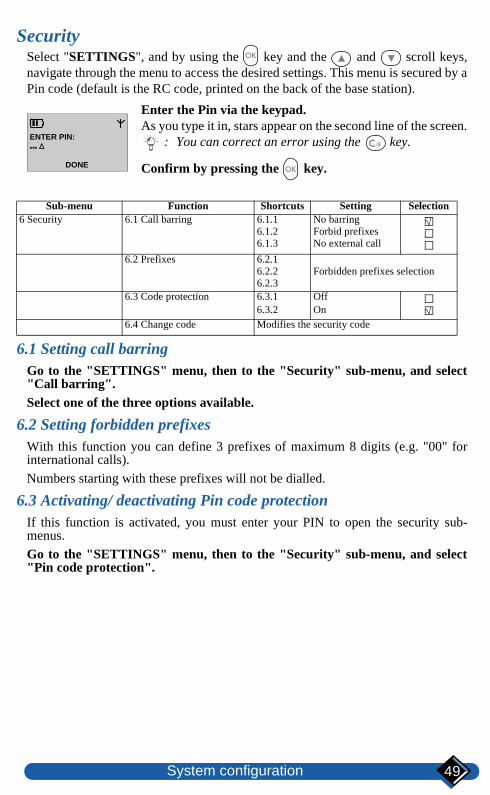
System configuration 49
SecuritySelect "SETTINGS", and by using the key and the and scroll keys,navigate through the menu to access the desired settings. This menu is secured by aPin code (default is the RC code, printed on the back of the base station).
Enter the Pin via the keypad.As you type it in, stars appear on the second line of the screen.
: You can correct an error using the key.
Confirm by pressing the key.
6.1 Setting call barringGo to the "SETTINGS" menu, then to the "Security" sub-menu, and select"Call barring".Select one of the three options available.
6.2 Setting forbidden prefixesWith this function you can define 3 prefixes of maximum 8 digits (e.g. "00" forinternational calls).
Numbers starting with these prefixes will not be dialled.
6.3 Activating/ deactivating Pin code protectionIf this function is activated, you must enter your PIN to open the security sub-menus.
Go to the "SETTINGS" menu, then to the "Security" sub-menu, and select"Pin code protection".
Sub-menu Function Shortcuts Setting Selection6 Security 6.1 Call barring 6.1.1
6.1.26.1.3
No barringForbid prefixesNo external call
6.2 Prefixes 6.2.16.2.26.2.3
Forbidden prefixes selection
6.3 Code protection 6.3.16.3.2
OffOn
6.4 Change code Modifies the security code
ENTER PIN:*** ∆
DONE
prelim-zenia.book Page 49 Mardi, 20. juin 2000 10:31 10

System configuration50
6.4 Changing the Pin codeThis code will be requested for remote control of the answer phone or for telephoneconfiguration. (see “6.3 Activating/ deactivating Pin code protection”, page 49).
The default Pin is printed on the back of the base station (RC code). To change it,proceed as follows:
Go to the "SETTINGS" menu, then to the "Security" sub-menu, and select"Change Pin code"; "Enter new Pin:" is displayed.Enter the new security code, then confirm by pressing the key; "REPEATPIN" is displayed.To confirm, enter the new security code once again, then confirm by pressingthe key; "Stored" is displayed.
: Be careful not to forget this code.
List of all handsets registered to the base station (RC code)This list indicates the name and number of each handset and base station.
Renaming a handsetWith this function you can rename your handset (e.g.: ROOM1, KITCHEN, …).
Go to the "INTERCOM" menu, and select the handset to be renamed from thelist, using the scroll keys and .Press the key to confirm your choice."Rename" is displayed, confirm by pressing the key.Press the key for 2 seconds in order to delete the text, then enter the newname.Confirm by pressing the key again.
Cancelling the registration of a handset to the base stationGo to "INTERCOM", and select the handset to be cancelled.Press the key to confirm your choice.Select "Cancel registration" and confirm by pressing the key.The handset starts searching for another active base and reverts to "standby mode".
prelim-zenia.book Page 50 Mardi, 20. juin 2000 10:31 10

System configuration 51
List of network servicesYour telephone is programmed with a list of telephone services provided by yourmain national operator.
However, to adapt the system to your needs, you can modify, delete or add services(up to 15).
Each service consists of a name (up to 14 characters) and a number (up to 26 digits).
The list of services is managed like a phonebook.
If you require additional information on handling lists, please refer to the paragraph“Private and shared phonebooks”, page 23.
prelim-zenia.book Page 51 Mardi, 20. juin 2000 10:31 10

Maintenance and troubleshooting52
M a in tenance and troub leshoo tingBase station problems
The table below lists the possible problems you may encounter with when using thebase station.
Zenia 6326 and Zenia Voice 6626 base stations
Zenia 6326 base station
Zenia Voice 6626 base station
PROBLEM CAUSE SOLUTION
Green light is off.
The base station is not connected properly, or a power failure has occurred.
Check the connections.
No dial tone. The base station is not properly connected to the telephone socket.
Check the connections.
The handset does not answer when you try to make an internal call.
The handset you are calling is already on external call, or it is out of range of the base station.
Wait for the handset to be available again and retry.
PROBLEM CAUSE SOLUTION
You cannot dial a number with one of the direct dial keys.
No number has been stored for this key.
Store a number for this key (see “3.4 Storing direct dial keys (6326 base station only)”, page 43).
PROBLEM CAUSE SOLUTION
The answer phone does not record your personal OGM.
You do not speak loud enough.
Record another personal OGM and speak louder.
You are not close enough to the microphone of the base station (or handset).
Record another personal OGM and speak closer to the microphone.
prelim-zenia.book Page 52 Mardi, 20. juin 2000 10:31 10

Maintenance and troubleshooting 53
Zenia 6626 base station (continued)
PROBLEM CAUSE SOLUTION
The answer phone does not record your personal OGM.
Memory is full (an error beep is heard).
Delete messages to free sufficient memory.
An error beep is heard from the base station when you try to access the answerphone.
The answer phone is already operating (play or record).
Wait until the answer phone is available and try again.
The answer phone does not record incoming calls.
The answer phone has not been switched on.
Switch the answer phone on (see “4.1 Selecting the answer mode”, page 44) (Zenia 6626).
Message recording is not switched on (answer and record mode).
Switch answer and record mode on (see “4.1 Selecting the answer mode”, page 44) (Zenia 6626).
The answer phone has stopped automatically.
Answer phone memory is full.
Delete messages to free sufficient memory.
The red light is flashing rapidly.
The answer phone's maximum memory has been reached.
Delete messages to free sufficient memory.
A power failure has occurred.
Reset date and time (see “3.3 Setting date and time”, page 42).
Remote control does not work.
You did not enter the correct code.
Retry (see “Checking messages remotely”, page 35).
You did not set a remote control code.
Change the code (see “4.8 Switching remote control on”, page 46).
The answer phone's maximum memory has been reached.
Delete messages to free sufficient memory.
prelim-zenia.book Page 53 Mardi, 20. juin 2000 10:31 10

Maintenance and troubleshooting54
Problems with the handset
PROBLEM CAUSE SOLUTION
No dial tone.
The handset is out of range of the base station (the A symbol is not displayed).
Move closer to the base station and try again.
The handset has not been registered to the base station (the A symbol is not displayed).
Register the handset to the base station (see “2.7 Registering a handset to a base station”, page 41).
The base station is not properly connected to the electricity or the telephone sockets.
Check the connections.
Batteries are low (the symbol is
displayed).
Charge batteries (see “Installing or replacing batteries”, page 10).
When the handset is placed on the charging unit, no beep is heard.
The charging unit is not properly connected to the electricity socket.
Check the connection between charging unit and electricity socket.
Charging contacts are dirty.
Clean them with a clean and dry cloth.
Key tones are deactivated.
Refer to “1.6 Switching key tones on/off”, page 39.
Batteries remain low although the handset has charged for 12 hours.
The charging unit is not properly connected to the electricity socket.
Check the connection between charging unit and electricity socket.
Handset batteries are defective.
Please contact your PHILIPS dealer in order to purchase new batteries.
An error beep is heard from the handset when trying to make an internal call.
Another external call is already in progress from another handset or the base station.
Retry when the current call is finished.
prelim-zenia.book Page 54 Mardi, 20. juin 2000 10:31 10

Maintenance and troubleshooting 55
MaintenanceBefore cleaning the handset or the charging unit, unplug the power cable.
Notes:
Do not use detergents or other chemical cleaning agents. To clean the chargingcontacts of the handset and the charging unit, use a dry, non-fluffy cloth.
PROBLEM CAUSE SOLUTION
An error beep is heard during a call.
Base station not ready. Retry when the other handset has left the menu.
The handset you are calling is already on a call or out of range of the base station.
Wait until the handset is available and retry.
The handset batteries are low (the call may be interrupted).
Charge batteries (see “Charging and discharging batteries”, page 10).
prelim-zenia.book Page 55 Mardi, 20. juin 2000 10:31 10

Maintenance and troubleshooting56
Handset indicatorsGreen light Flashing Indicates an incoming call.
Briefly flashing Indicates one or more messages on the answerphone Zenia 6626.
Base station indicatorsRed light Off Indicates answer phone is off.
On Indicates answer phone is on.
Flashing Indicates new messages.
Flashing rapidly Indicates maximum recording capacity (30 minutes) has beenreached or a recording session is in progress.
Green light Off Indicates base station is not plugged in.
On Indicates base station is plugged in.
Flashing Indicates base is busy.
Character table
Keys 0 1 2 3 4 5 6 7 8 9 * #
Digits 0 1 2 3 4 5 6 7 8 9 * #
Letters
1x press . Space A D G J M P T W
2x press 0 _ B E H K N Q U X
3x press " 1 C F I L O R V Y
4x press ’ ( 2 3 4 5 6 S 8 Z
5x press ? ) À è î ô 7 ù 9
6x press ! [ Â é ï ö ß û Ÿ
7x press , ] Ä ê Ø ü
8x press : & Å ë
9x press ; $ Æ
10x press ... ¥ Ç
11x press *
prelim-zenia.book Page 56 Mardi, 20. juin 2000 10:31 10

Index58
IndexAActivating/ deactivating voice prompts 46Answer phone
checking messages remotely 35deleting a message received 33listening to messages received 32screening incoming calls 32
Answering an external callfrom base station 13from handset 14
Answering an internal call 30Automatic prefix 48
BBack light 40Base station
installation 9personal ringer 45registration mode 43ringer type 42ringer volume 42selecting 41
Batterypower 9
CCall barring 49Call log
deleting 21storing 22viewing 20
Cancelling handset registration 50Changing the Pin code 50Character
entry 23table 56
Checking messages 35CLI ringer 39Conference function 30Contrast 40
DDate 42Deleting a voice dial 27Deleting an entry
from call log 21from phonebook 24
Displaybase station 5
Displaying total cost and time 48
EEarpiece tone 39Emergency number (6326 base station)
dialling 13storing 43
Environmental protection 8External call
from base station 13from handset 12
FFlash 48
HHandset
cancelling registration 50indicator 56registering to the base station 41renaming 50ringer type 39ringer volume 39
Headset tone 39
prelim-zenia.book Page 58 Mardi, 20. juin 2000 10:31 10

Index 59
IIdentifying the caller 20Indicators 56Installation 9Intercom function 28Internal call
from base station 28from handset 28
KKeypad
locking 41overview 7shortcuts 37
LList of handsets 50List of network services 51Loudspeaker tone 39Loudspeakers 18
MMaintenance 55Making a call
from base station 14from handset 12from phonebook 24with voice dial 26
Memo 44Menu
configuration 36Mode
answer 44dial 47standby 11
Modifyingnumber of rings 46phonebook entry 25Pin code 50
NNetwork type 47
OOperator type 47Overview
base station 5handset 7keys 6
PPause between digits 48Personal notes 57Personal OGM 34, 45Phonebooks
deleting an entry 24making a call 24modifying an entry 25viewing 24
Pin code protection 49Power connection 8Putting on hold 19
QQuality
record 46
RReadial list
deleting 16storing 17viewing 15
Recordingconversation 19memo 35personal OGM 34personal ringer 45voice dial 25
prelim-zenia.book Page 59 Mardi, 20. juin 2000 10:31 10

Index60
Rediallist of outgoing calls 15
Redial listdeleting 16storing 17
Redial numberdeleting 16storing 17
SScreening calls 32Security code 50Security information 8Selecting a language 40Selecting the base station 41Setting
forbidden prefixes 49prefixes 48
Setting the earpiece volume 38Setting the headset volume 39Setting the loudspeaker volume 38Setting the ringer volume
base station 42headset 39
Settingsanswer phone 44handset sounds 38line 47security 49system 42
Storingdirect dial keys 43telephone data 23
Storing an entryfrom redial list 17of incoming calls 22
Switching key tones on/off 39Switching music on hold on/off 48Switching on loudspeakers 18Switching the answer phone on/off
from base station 33from handset 31remote control 35
System configuration 36
TTelephone connection 8Telephone function 11Time 42Transferring a call 29
VViewing
call log 20phonebooks 23redial list 15
Voice dialdeleting 27listening 27recording 25
prelim-zenia.book Page 60 Mardi, 20. juin 2000 10:31 10

Remotecontrol(using a tone telephone)
Dial your telephone number.
*After listening to the outgoing message, press the * key, then enter your code (4 digits).
During message playback:Dial
• Stop message playback ........................ 8
• Erase message ..................................... 6
• Replay current message........................ 1
• Replay previous message .................1+1
• Play next message................................ 3
* the answerphone is not switched on, wait for the dial
tone after 9 rings.
1
2
3
Remotecontrol(using a tone telephone)
Dial your telephone number.
*After listening to the outgoing message, press the * key, then enter your code (4 digits).
During message playback:Dial
• Stop message playback ........................8
• Erase message .....................................6
• Replay current message........................1
• Replay previous message .................1+1
• Play next message................................3
* the answerphone is not switched on, wait for the dial
tone after 9 rings.
1
2
3
Remotecontrol(using a tone telephone)
Dial your telephone number.
*After listening to the outgoing message, press the * key, then enter your code (4 digits).
During message playback:Dial
• Stop message playback ........................ 8
• Erase message ..................................... 6
• Replay current message........................ 1
• Replay previous message .................1+1
• Play next message................................ 3
* the answerphone is not switched on, wait for the dial
tone after 9 rings.
1
2
3
Remotecontrol(using a tone telephone)
Dial your telephone number.
*After listening to the outgoing message, press the * key, then enter your code (4 digits).
During message playback:Dial
• Stop message playback ........................8
• Erase message .....................................6
• Replay current message........................1
• Replay previous message .................1+1
• Play next message................................3
* the answerphone is not switched on, wait for the dial
tone after 9 rings.
1
2
3
prelim-zenia.book Page 59 Mardi, 20. juin 2000 10:31 10

Remotecontrol (Cont.)(using a tone telephone)
You have just checked your answerphone
After listening to your messages, you have 20 seconds to:
Dial
• Start message playback ........................... 2
• Check outgoing message ......................5
• Switch off answerphone........................9
• Switch on answerphone ........................7
• Record an outgoing message ............4+5and speak
• Record a local message ....................4+2and speak
• Stop recording......................................8
4
Remotecontrol (Cont.)(using a tone telephone)
You have just checked your answerphone
After listening to your messages, you have 20 seconds to:
Dial
• Start message playback ........................... 2
• Check outgoing message ......................5
• Switch off answerphone ........................9
• Switch on answerphone ........................7
• Record an outgoing message ............4+5and speak
• Record a local message ....................4+2and speak
• Stop recording......................................8
4
Remotecontrol (Cont.)(using a tone telephone)
You have just checked your answerphone
After listening to your messages, you have 20 seconds to:
Dial
• Start message playback ........................... 2
• Check outgoing message ......................5
• Switch off answerphone........................9
• Switch on answerphone ........................7
• Record an outgoing message ............4+5and speak
• Record a local message ....................4+2and speak
• Stop recording......................................8
4
Remotecontrol (Cont.)(using a tone telephone)
You have just checked your answerphone
After listening to your messages, you have 20 seconds to:
Dial
• Start message playback ........................... 2
• Check outgoing message ......................5
• Switch off answerphone ........................9
• Switch on answerphone ........................7
• Record an outgoing message ............4+5and speak
• Record a local message ....................4+2and speak
• Stop recording......................................8
4
ZE
NIA
& Z
EN
IA V
OIC
E E
NG
LIS
H 4
311
256
0265
2
prelim-zenia.book Page 60 Mardi, 20. juin 2000 10:31 10