ybc-5 user manual - arktekarktek.org/ybc-5 arktek user manual 20161101v5.pdf · ybc-5 passive...
TRANSCRIPT
YBC-5
Passive Vaccine Storage Device
User Manual
Caution: Read this entire manual carefully before using the product. Store this manual in a safe and accessible place for later reference as necessary. The device is prequalified for
stationary use only. You need to connect the battery
before you use the device.
1
Table of Contents
TABLE OF FIGURES ........................................................................................................... 2
INTRODUCTION ............................................................................................................... 3
Purpose of This Guide .............................................................................................. 3
The Device ............................................................................................................... 3
Included Accessories ................................................................................................ 3
Device Features ....................................................................................................... 4
Specifications ........................................................................................................... 4
Safety Precautions ................................................................................................... 4
PARTS OVERVIEW ............................................................................................................ 5
PREPARING THE DEVICE FOR USE .................................................................................... 6
Unpacking from Shipment ....................................................................................... 6
Placement................................................................................................................ 6
Ambient Conditions ................................................................................................. 6
Connect the battery ................................................................................................. 6
About Preparation Time........................................................................................... 6
About Conditioning .................................................................................................. 6
FILLING, FREEZING, & CONDITIONING ICE BLOCKS........................................................... 7
VACCINE STACKS ............................................................................................................. 9
DAILY USE ...................................................................................................................... 11
MOVING THE DEVICE ..................................................................................................... 12
CLEANING AND STORAGE .............................................................................................. 13
Cleaning ................................................................................................................. 13
Handling and Storage ............................................................................................. 13
ELECTRONICS ................................................................................................................ 14
The Display Panel ................................................................................................... 14
Temperature Display ............................................................................................. 14
Alarms ................................................................................................................... 14
Power .................................................................................................................... 14
TROUBLESHOOTING ...................................................................................................... 15
ARKTEK DISPOSAL AND RECYCLE CONSIDERATION ........................................................ 16
WARRANTY ................................................................................................................... 17

2
TABLE OF FIGURES
Figure 1: The device ........................................................................................................ 3
Figure 2: Filling ice blocks ................................................................................................ 7
Figure 3: Conditioning the ice blocks ............................................................................... 8
Figure 4: Loading cup stack containers with vaccines ...................................................... 9
Figure 5: Loading the stacks into the device .................................................................. 10
Figure 6: Daily use ......................................................................................................... 11
Figure 7: Lifting the device............................................................................................. 12
Figure 8: Loop rings for securing device ......................................................................... 12
Figure 9: Securing the device for transport .................................................................... 12
Figure 10: Display panel................................................................................................. 14
Figure 11: Alarm display ................................................................................................ 14
Figure 12: Battery cover ................................................................................................ 14
3
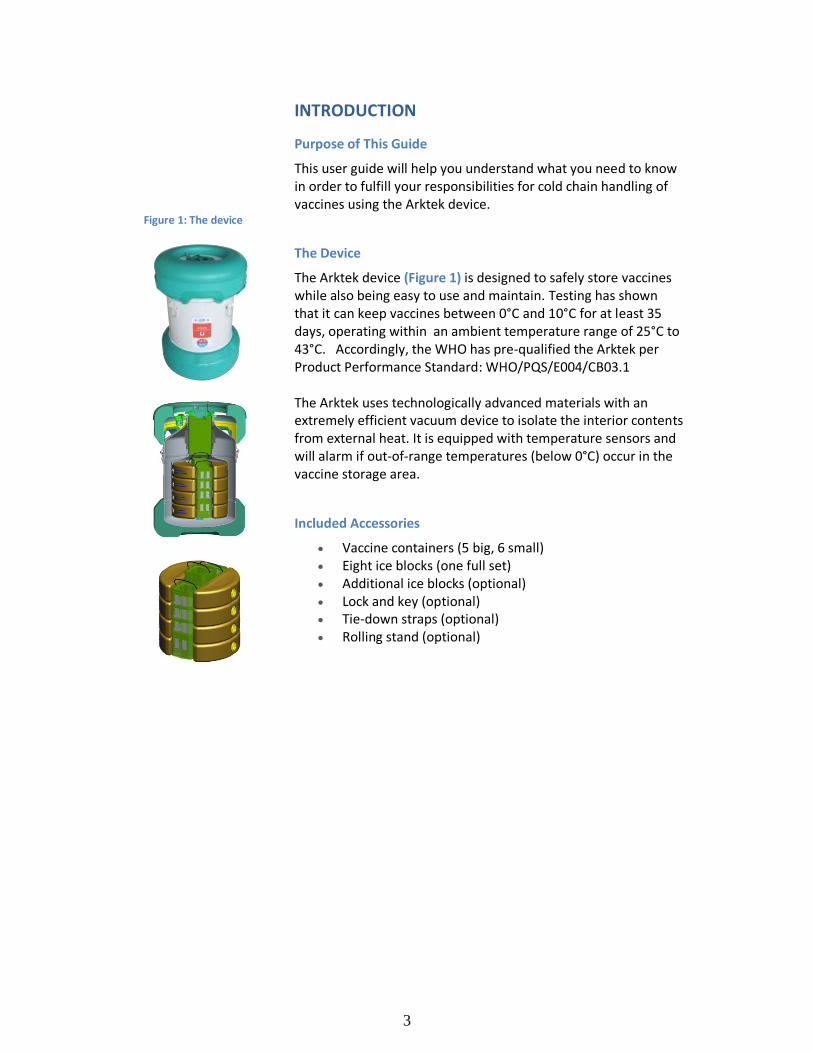
Figure 1: The device
INTRODUCTION
Purpose of This Guide
This user guide will help you understand what you need to know in order to fulfill your responsibilities for cold chain handling of vaccines using the Arktek device.
The Device
The Arktek device (Figure 1) is designed to safely store vaccines while also being easy to use and maintain. Testing has shown that it can keep vaccines between 0°C and 10°C for at least 35 days, operating within an ambient temperature range of 25°C to 43°C. Accordingly, the WHO has pre-qualified the Arktek per Product Performance Standard: WHO/PQS/E004/CB03.1 The Arktek uses technologically advanced materials with an extremely efficient vacuum device to isolate the interior contents from external heat. It is equipped with temperature sensors and will alarm if out-of-range temperatures (below 0°C) occur in the vaccine storage area.
Included Accessories
Vaccine containers (5 big, 6 small) Eight ice blocks (one full set) Additional ice blocks (optional) Lock and key (optional) Tie-down straps (optional) Rolling stand (optional)
4
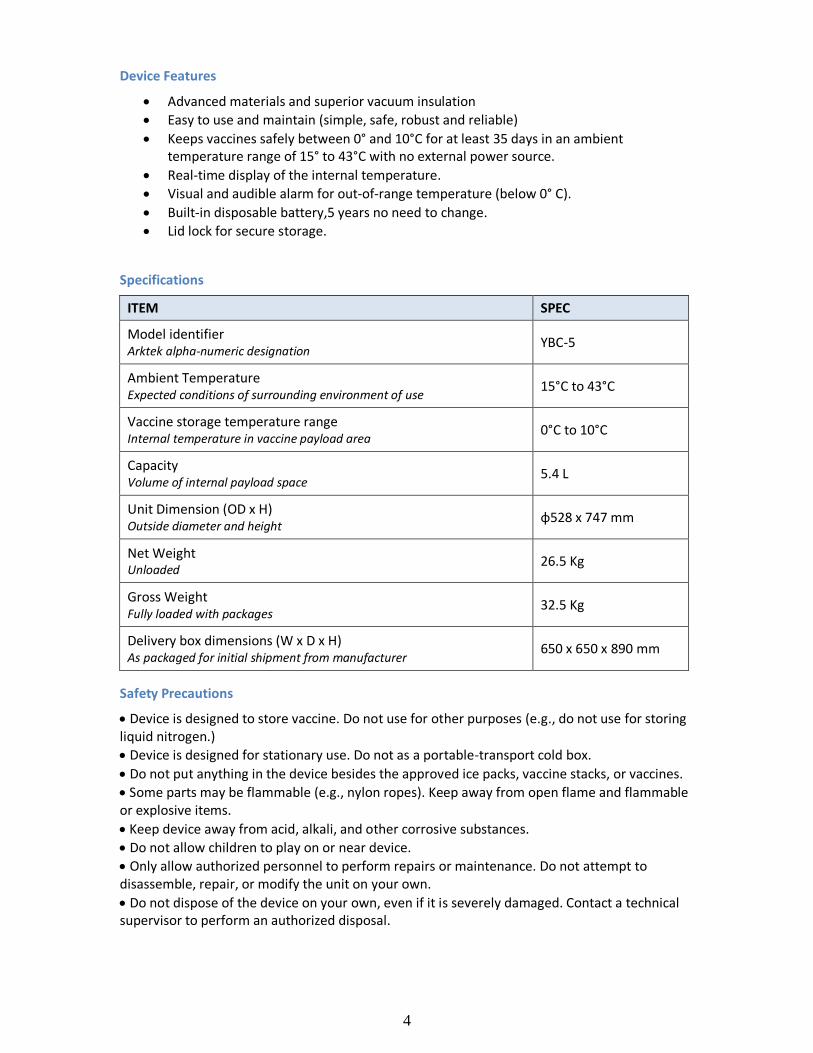
Device Features
Advanced materials and superior vacuum insulation
Easy to use and maintain (simple, safe, robust and reliable)
Keeps vaccines safely between 0° and 10°C for at least 35 days in an ambient temperature range of 15° to 43°C with no external power source.
Real-time display of the internal temperature.
Visual and audible alarm for out-of-range temperature (below 0° C).
Built-in disposable battery,5 years no need to change.
Lid lock for secure storage.
Specifications
ITEM SPEC
Model identifier Arktek alpha-numeric designation
YBC-5
Ambient Temperature Expected conditions of surrounding environment of use
15°C to 43°C
Vaccine storage temperature range Internal temperature in vaccine payload area
0°C to 10°C
Capacity Volume of internal payload space
5.4 L
Unit Dimension (OD x H) Outside diameter and height
φ528 x 747 mm
Net Weight Unloaded
26.5 Kg
Gross Weight Fully loaded with packages
32.5 Kg
Delivery box dimensions (W x D x H) As packaged for initial shipment from manufacturer
650 x 650 x 890 mm
Safety Precautions
Device is designed to store vaccine. Do not use for other purposes (e.g., do not use for storing liquid nitrogen.)
Device is designed for stationary use. Do not as a portable-transport cold box.
Do not put anything in the device besides the approved ice packs, vaccine stacks, or vaccines.
Some parts may be flammable (e.g., nylon ropes). Keep away from open flame and flammable or explosive items.
Keep device away from acid, alkali, and other corrosive substances.
Do not allow children to play on or near device.
Only allow authorized personnel to perform repairs or maintenance. Do not attempt to disassemble, repair, or modify the unit on your own.
Do not dispose of the device on your own, even if it is severely damaged. Contact a technical supervisor to perform an authorized disposal.
5
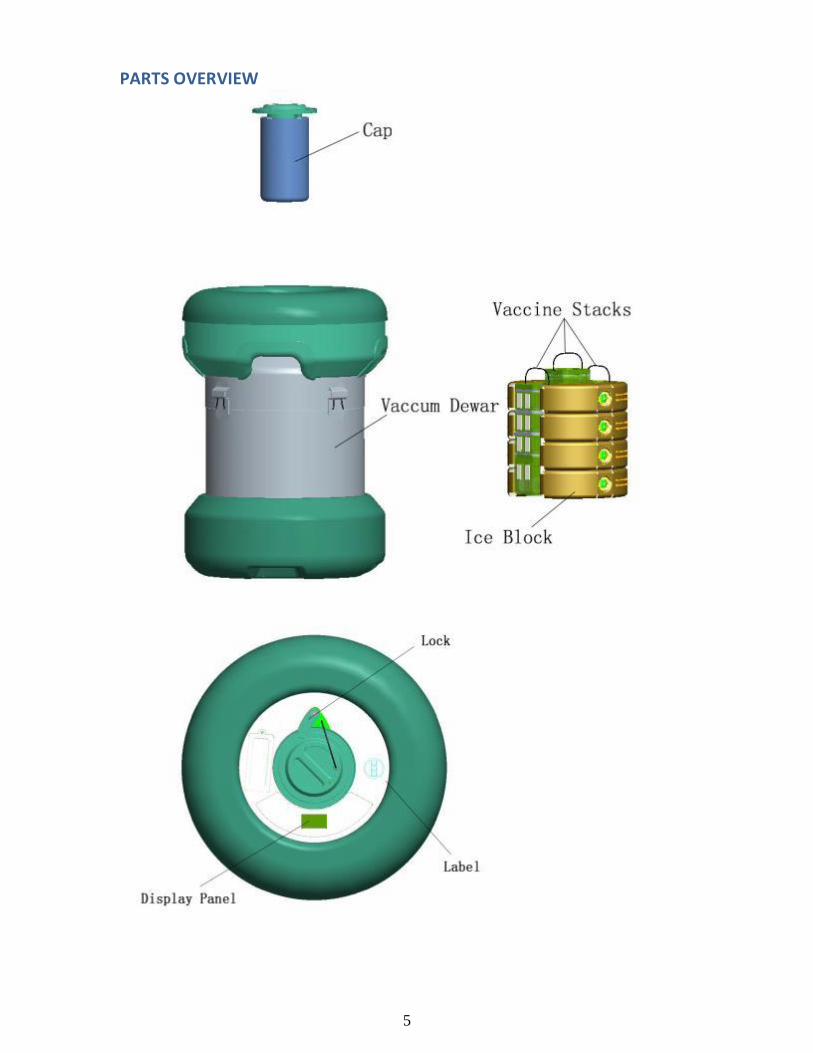
PARTS OVERVIEW
6
PREPARING THE DEVICE FOR USE
Unpacking from Shipment
Remove all packaging material, including the foam base and all adhesive tape holding the device accessories inside and outside.
Check that all parts are not damaged. If you observe any damage, please inform your supervisor.
Placement
Locate and use the device in a dry, well-ventilated place.
Keep it out of direct sunlight and away from any other heat sources.
After loading the vaccine and stacks, the device must remain upright.
Do not roll or drop the device,
Do not stack the Arktek with any other item.
Avoid corrosive environments, such as locations causing exposure to salt water or agricultural fertilizers.
Ambient Conditions
To function optimally per design, use the device within the following conditions:
Ambient temperature: 15 °C to 43 °C.
Relative humidity: 5% to 95%.
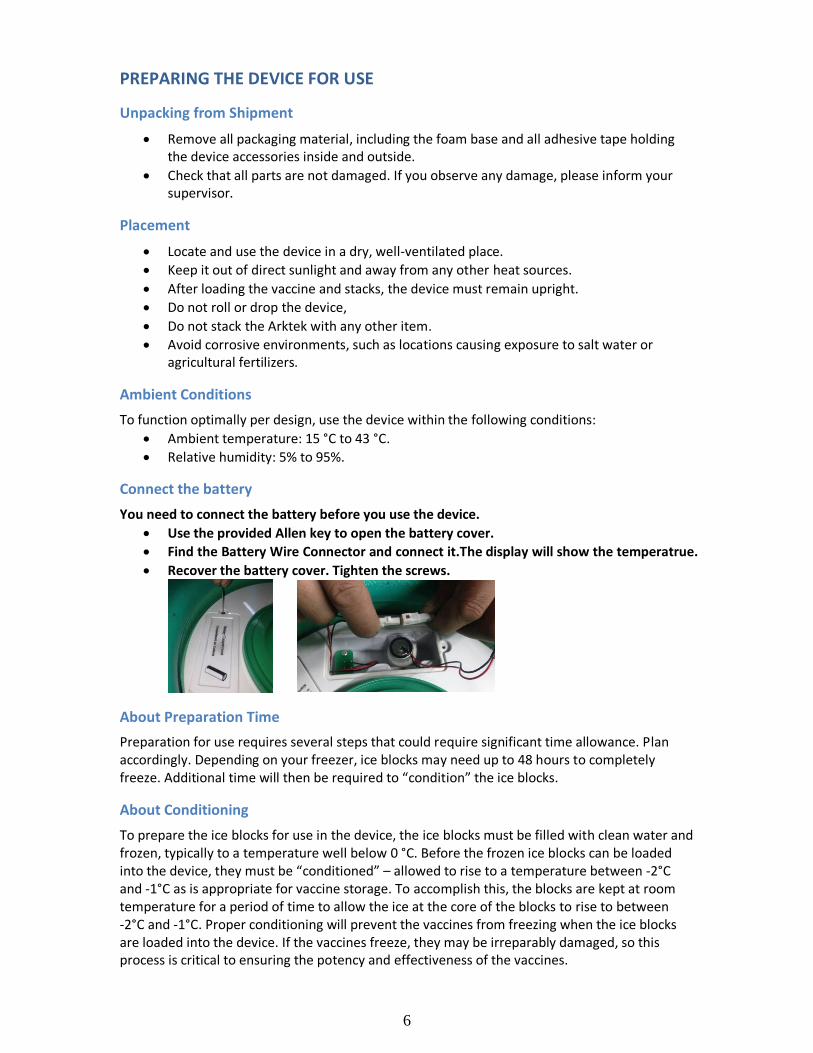
Connect the battery
You need to connect the battery before you use the device.
Use the provided Allen key to open the battery cover.
Find the Battery Wire Connector and connect it.The display will show the temperatrue.
Recover the battery cover. Tighten the screws.
About Preparation Time
Preparation for use requires several steps that could require significant time allowance. Plan accordingly. Depending on your freezer, ice blocks may need up to 48 hours to completely freeze. Additional time will then be required to “condition” the ice blocks.
About Conditioning
To prepare the ice blocks for use in the device, the ice blocks must be filled with clean water and frozen, typically to a temperature well below 0 °C. Before the frozen ice blocks can be loaded into the device, they must be “conditioned” – allowed to rise to a temperature between -2°C and -1°C as is appropriate for vaccine storage. To accomplish this, the blocks are kept at room temperature for a period of time to allow the ice at the core of the blocks to rise to between -2°C and -1°C. Proper conditioning will prevent the vaccines from freezing when the ice blocks are loaded into the device. If the vaccines freeze, they may be irreparably damaged, so this process is critical to ensuring the potency and effectiveness of the vaccines.
7
FILLING, FREEZING, & CONDITIONING ICE BLOCKS
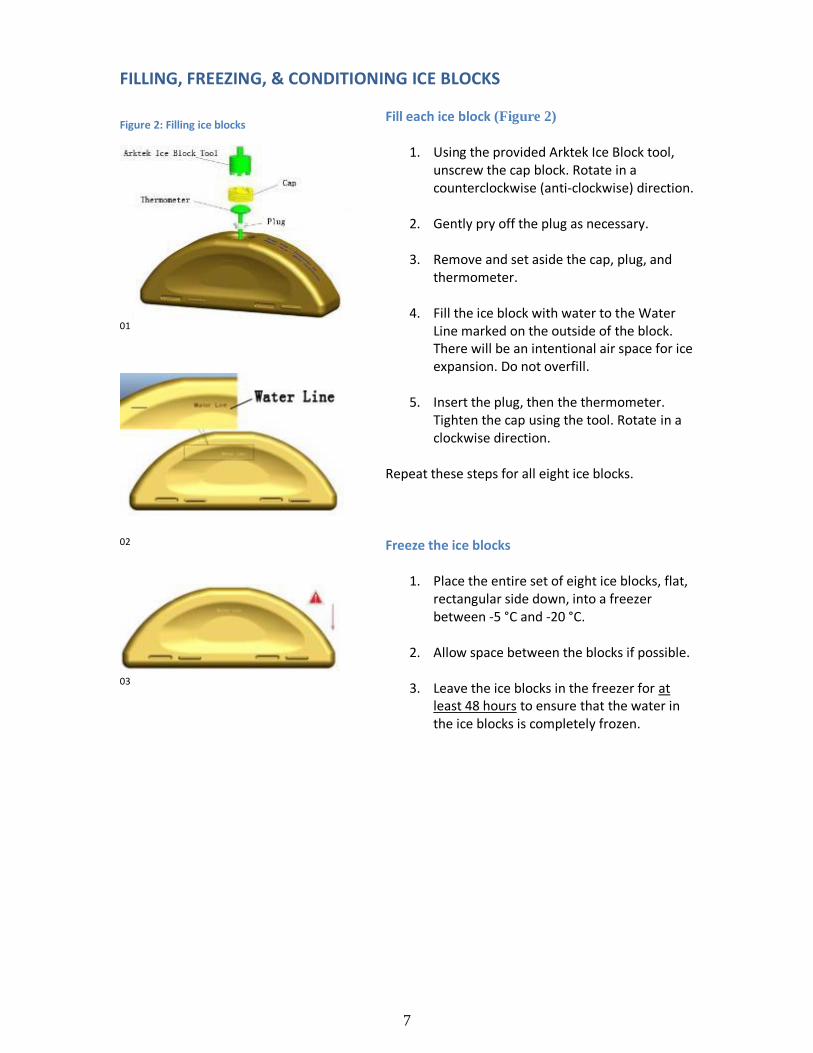
Figure 2: Filling ice blocks
01
02
03
Fill each ice block (Figure 2)
1. Using the provided Arktek Ice Block tool, unscrew the cap block. Rotate in a counterclockwise (anti-clockwise) direction.
2. Gently pry off the plug as necessary.
3. Remove and set aside the cap, plug, and thermometer.
4. Fill the ice block with water to the Water Line marked on the outside of the block. There will be an intentional air space for ice expansion. Do not overfill.
5. Insert the plug, then the thermometer. Tighten the cap using the tool. Rotate in a clockwise direction.
Repeat these steps for all eight ice blocks. Freeze the ice blocks
1. Place the entire set of eight ice blocks, flat, rectangular side down, into a freezer between -5 °C and -20 °C.
2. Allow space between the blocks if possible.
3. Leave the ice blocks in the freezer for at least 48 hours to ensure that the water in the ice blocks is completely frozen.
8
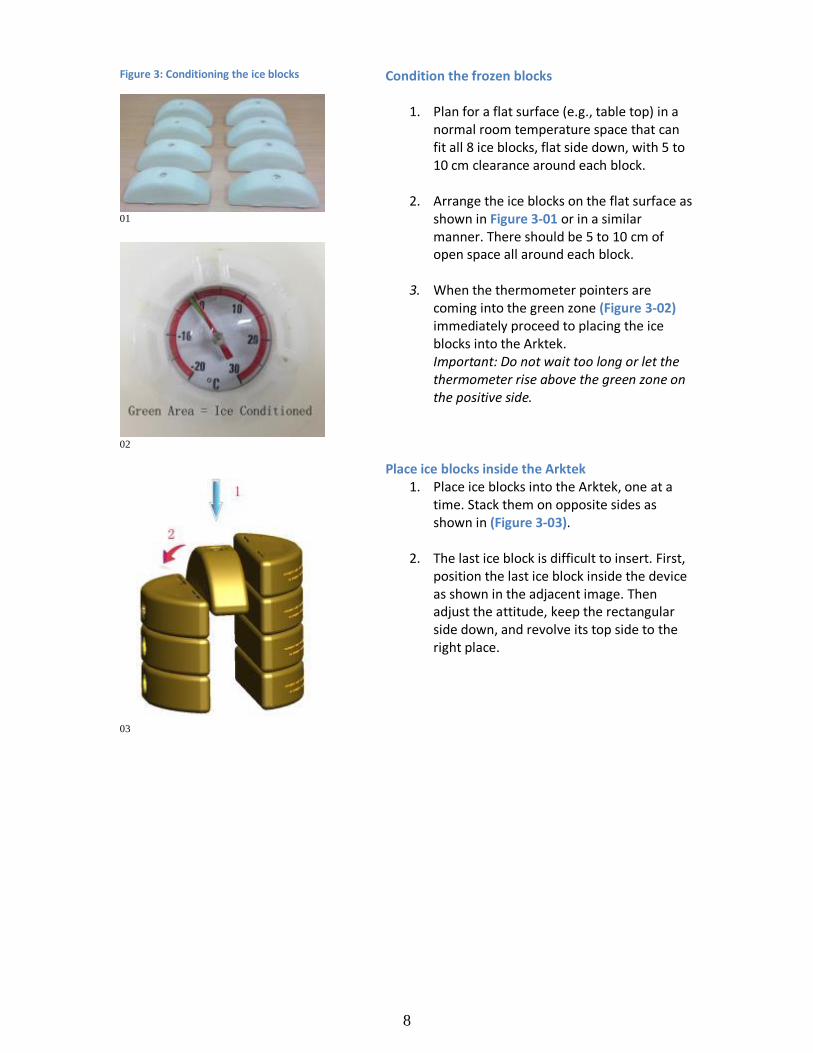
Figure 3: Conditioning the ice blocks
01
02
03
Condition the frozen blocks
1. Plan for a flat surface (e.g., table top) in a normal room temperature space that can fit all 8 ice blocks, flat side down, with 5 to 10 cm clearance around each block.
2. Arrange the ice blocks on the flat surface as shown in Figure 3-01 or in a similar manner. There should be 5 to 10 cm of open space all around each block.
3. When the thermometer pointers are coming into the green zone (Figure 3-02) immediately proceed to placing the ice blocks into the Arktek. Important: Do not wait too long or let the thermometer rise above the green zone on the positive side.
Place ice blocks inside the Arktek
1. Place ice blocks into the Arktek, one at a time. Stack them on opposite sides as shown in (Figure 3-03).
2. The last ice block is difficult to insert. First, position the last ice block inside the device as shown in the adjacent image. Then adjust the attitude, keep the rectangular side down, and revolve its top side to the right place.
9
Figure 4: Loading cup stack containers with vaccines
Cups stacked
Large and Small Cups
Unlatching Cup
Empty cups
Loading Vaccines
Reattached cups
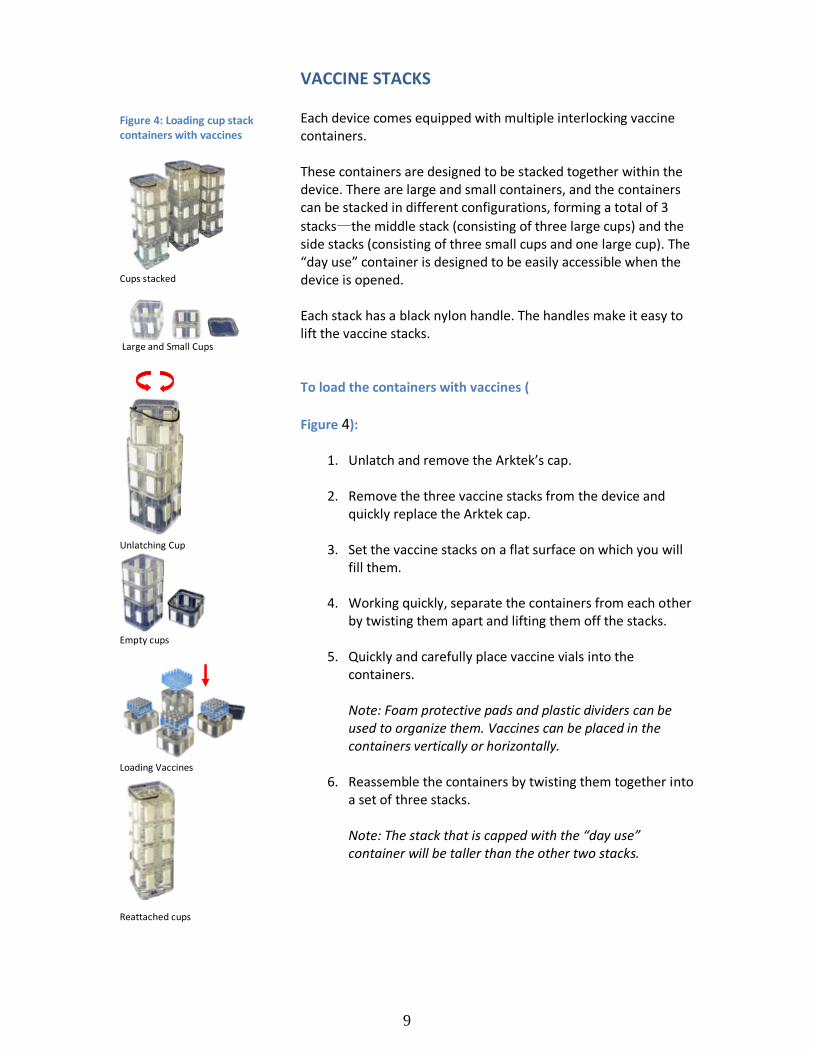
VACCINE STACKS Each device comes equipped with multiple interlocking vaccine containers. These containers are designed to be stacked together within the device. There are large and small containers, and the containers can be stacked in different configurations, forming a total of 3
stacks—the middle stack (consisting of three large cups) and the side stacks (consisting of three small cups and one large cup). The “day use” container is designed to be easily accessible when the device is opened. Each stack has a black nylon handle. The handles make it easy to lift the vaccine stacks. To load the containers with vaccines (
Figure 4):
1. Unlatch and remove the Arktek’s cap.
2. Remove the three vaccine stacks from the device and quickly replace the Arktek cap.
3. Set the vaccine stacks on a flat surface on which you will fill them.
4. Working quickly, separate the containers from each other by twisting them apart and lifting them off the stacks.
5. Quickly and carefully place vaccine vials into the containers. Note: Foam protective pads and plastic dividers can be used to organize them. Vaccines can be placed in the containers vertically or horizontally.
6. Reassemble the containers by twisting them together into a set of three stacks. Note: The stack that is capped with the “day use” container will be taller than the other two stacks.
10
Figure 5: Loading the stacks into the device
Inserting Bilateral Stacks
Inserting Middle Stack
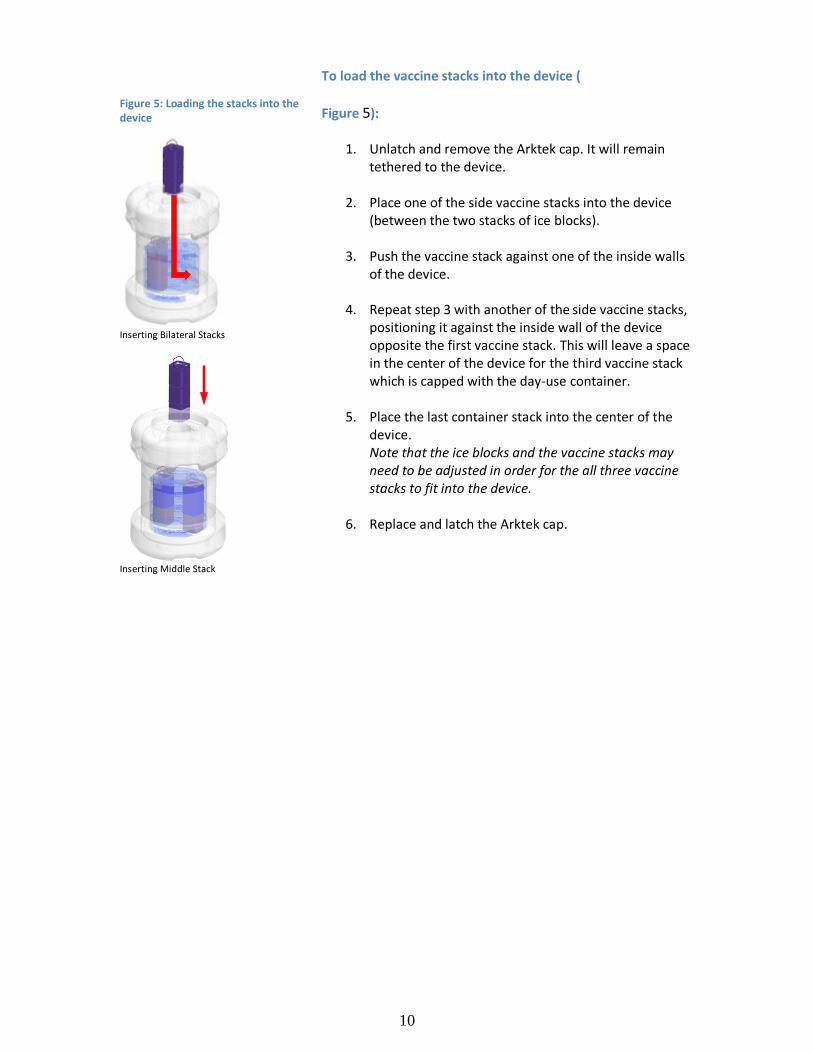
To load the vaccine stacks into the device (
Figure 5):
1. Unlatch and remove the Arktek cap. It will remain tethered to the device.
2. Place one of the side vaccine stacks into the device (between the two stacks of ice blocks).
3. Push the vaccine stack against one of the inside walls of the device.
4. Repeat step 3 with another of the side vaccine stacks, positioning it against the inside wall of the device opposite the first vaccine stack. This will leave a space in the center of the device for the third vaccine stack which is capped with the day-use container.
5. Place the last container stack into the center of the device. Note that the ice blocks and the vaccine stacks may need to be adjusted in order for the all three vaccine stacks to fit into the device.
6. Replace and latch the Arktek cap.
11
Figure 6: Daily use
Remove vaccine stacks
Unlatch cups and lids
Place vaccines in “day use” cup.
Reattach cups. Day cup will be top of center stack.
05 Place vaccine stacks In Arktek
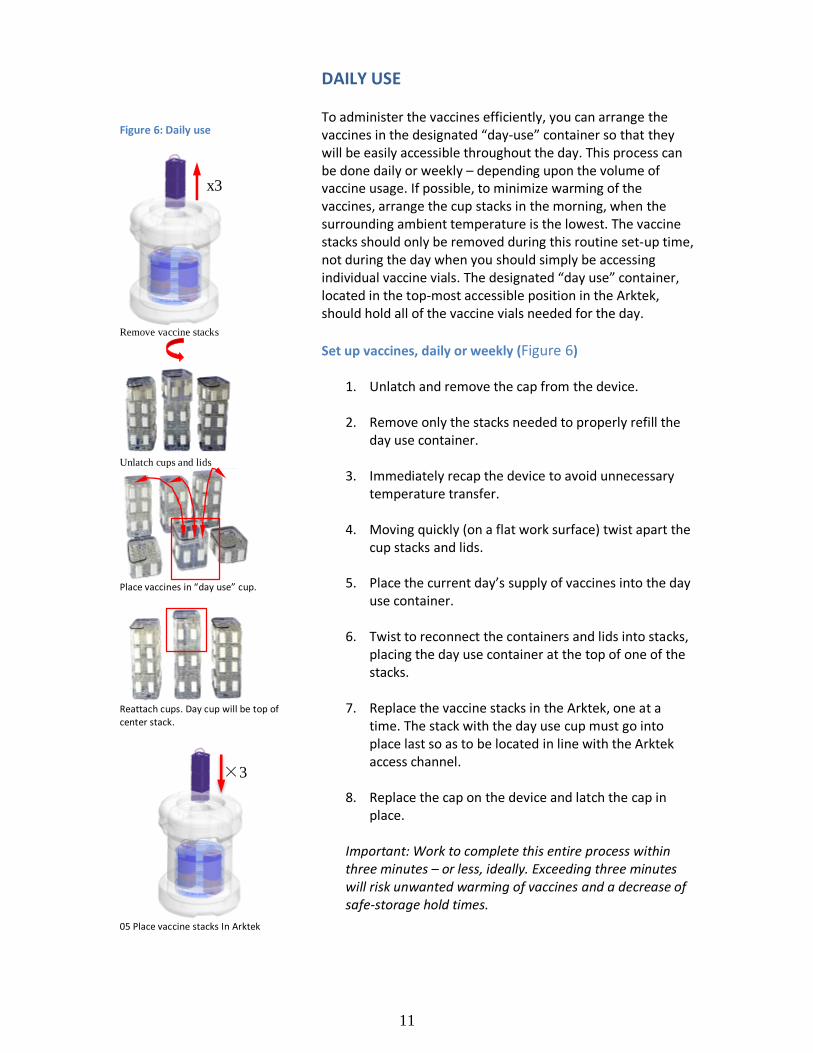
DAILY USE To administer the vaccines efficiently, you can arrange the vaccines in the designated “day-use” container so that they will be easily accessible throughout the day. This process can be done daily or weekly – depending upon the volume of vaccine usage. If possible, to minimize warming of the vaccines, arrange the cup stacks in the morning, when the surrounding ambient temperature is the lowest. The vaccine stacks should only be removed during this routine set-up time, not during the day when you should simply be accessing individual vaccine vials. The designated “day use” container, located in the top-most accessible position in the Arktek, should hold all of the vaccine vials needed for the day.
Set up vaccines, daily or weekly (Figure 6)
1. Unlatch and remove the cap from the device.
2. Remove only the stacks needed to properly refill the day use container.
3. Immediately recap the device to avoid unnecessary temperature transfer.
4. Moving quickly (on a flat work surface) twist apart the cup stacks and lids.
5. Place the current day’s supply of vaccines into the day use container.
6. Twist to reconnect the containers and lids into stacks, placing the day use container at the top of one of the stacks.
7. Replace the vaccine stacks in the Arktek, one at a time. The stack with the day use cup must go into place last so as to be located in line with the Arktek access channel.
8. Replace the cap on the device and latch the cap in place.
Important: Work to complete this entire process within three minutes – or less, ideally. Exceeding three minutes will risk unwanted warming of vaccines and a decrease of safe-storage hold times.
×3
x3
12
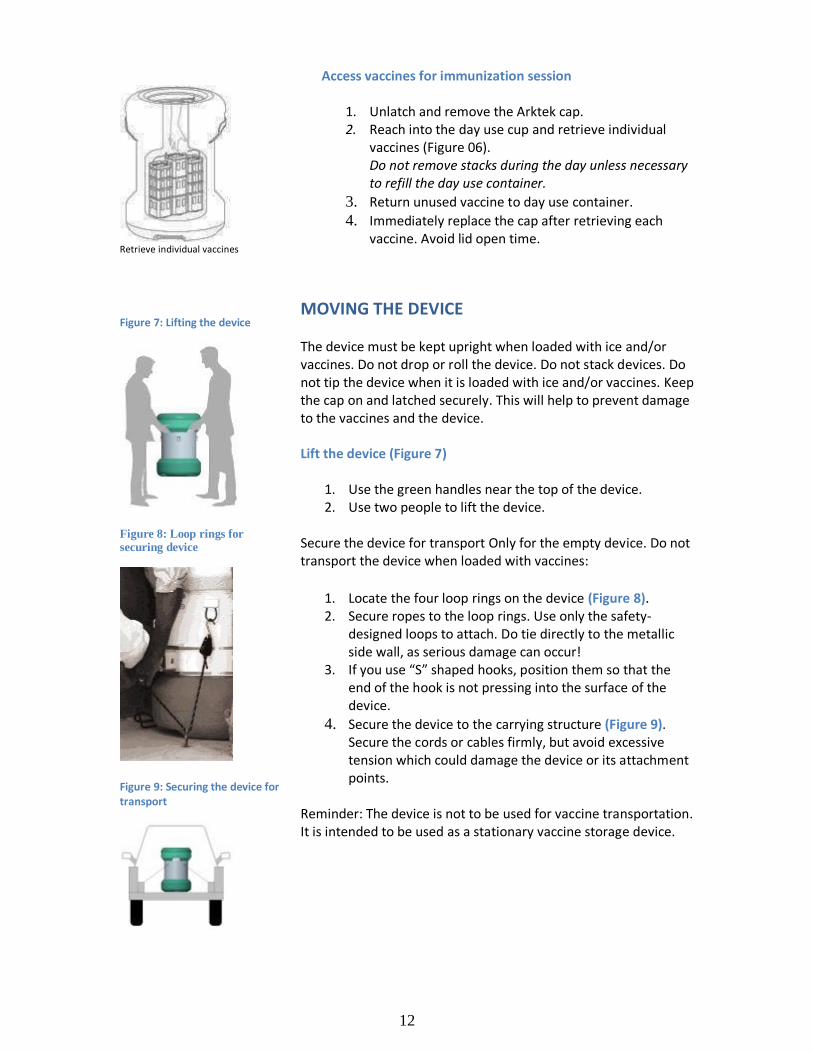
Retrieve individual vaccines
Access vaccines for immunization session
1. Unlatch and remove the Arktek cap. 2. Reach into the day use cup and retrieve individual
vaccines (Figure 06). Do not remove stacks during the day unless necessary to refill the day use container.
3. Return unused vaccine to day use container.
4. Immediately replace the cap after retrieving each vaccine. Avoid lid open time.
Figure 7: Lifting the device
Figure 8: Loop rings for securing device
Figure 9: Securing the device for transport
MOVING THE DEVICE The device must be kept upright when loaded with ice and/or vaccines. Do not drop or roll the device. Do not stack devices. Do not tip the device when it is loaded with ice and/or vaccines. Keep the cap on and latched securely. This will help to prevent damage to the vaccines and the device. Lift the device (Figure 7)
1. Use the green handles near the top of the device. 2. Use two people to lift the device.
Secure the device for transport Only for the empty device. Do not transport the device when loaded with vaccines:
1. Locate the four loop rings on the device (Figure 8). 2. Secure ropes to the loop rings. Use only the safety-
designed loops to attach. Do tie directly to the metallic side wall, as serious damage can occur!
3. If you use “S” shaped hooks, position them so that the end of the hook is not pressing into the surface of the device.
4. Secure the device to the carrying structure (Figure 9). Secure the cords or cables firmly, but avoid excessive tension which could damage the device or its attachment points.
Reminder: The device is not to be used for vaccine transportation. It is intended to be used as a stationary vaccine storage device.

13
CLEANING AND STORAGE
Cleaning
The exterior of the device can be cleaned as needed. The interior of the device should be cleaned before it is reloaded with ice blocks. The device interior should not be cleaned when it is in use, as doing so will reduce vaccine hold time. To clean the exterior of the device:
1. Do not submerge the device. 2. Wash the device with a sponge or soft cloth. 3. Soap and water can be used. However, do not use abrasives or cleaning powders. 4. Dry the device with a towel or allow it to air dry.
To clean the interior of the device
1. Remove the device’s cap. The cap will remain tethered to the device. 2. Remove the vaccine stacks. Follow established cold chain vaccine handling practices with
any remaining vaccines. 3. Clean the containers that comprise the vaccine stacks with soap and water, if needed,
and let dry. 4. Remove the ice blocks. 5. Set the vaccine stacks and ice blocks aside. 6. Clean the inside of the device using a hose, sponge, or cloth. Mild soap and water or a 1%
chlorine bleach solution can be used. Do not scrub the interior with abrasives or cleaning powders.
7. Use caution near the wires on the interior of the device; these are for the sensors that monitor the internal temperature of the device.
8. The device should not be submerged in water. 9. Dry the interior of the device by turning it upside down to drain. 10. Thoroughly wipe down the interior of the device with a towel. The interior of the device
can be air-dried if time allows. 11. When the interior of the device is dry, the device’s cap may be replaced. However, if the
device is going to be used, it should be stored with the cap off.
Handling and Storage
Do not drop or roll the device. Do not stack devices. Keep the cap on and latched securely when loaded. Store the device in a cool place out of direct sunlight. Provide ventilation to prevent temperature build-up. Remove the cap (tethered) during long-term storage.
14
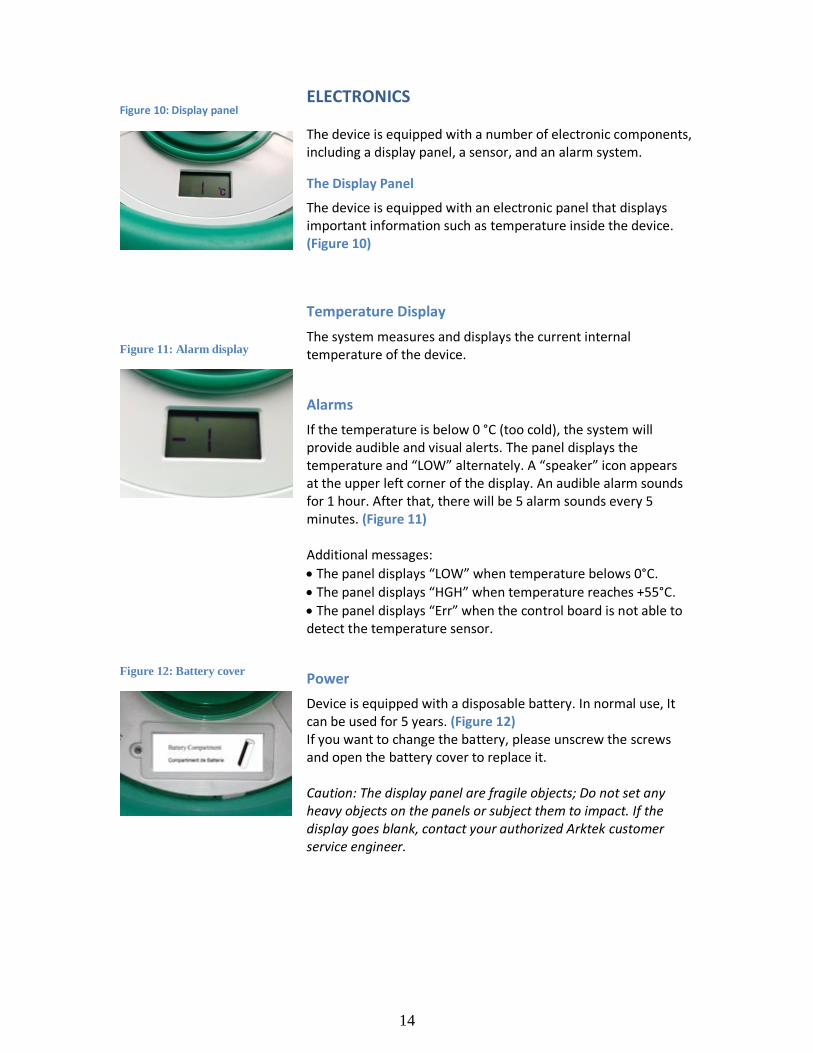
Figure 10: Display panel
ELECTRONICS The device is equipped with a number of electronic components, including a display panel, a sensor, and an alarm system.
The Display Panel
The device is equipped with an electronic panel that displays important information such as temperature inside the device. (Figure 10)
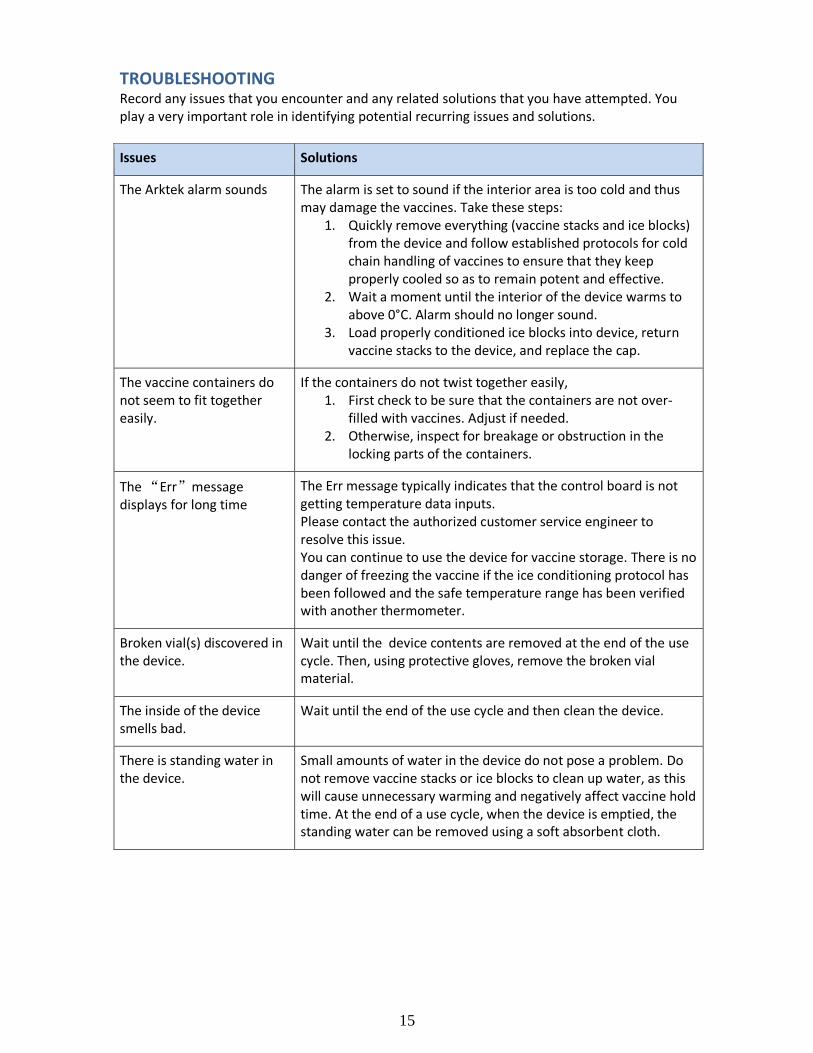
Figure 11: Alarm display
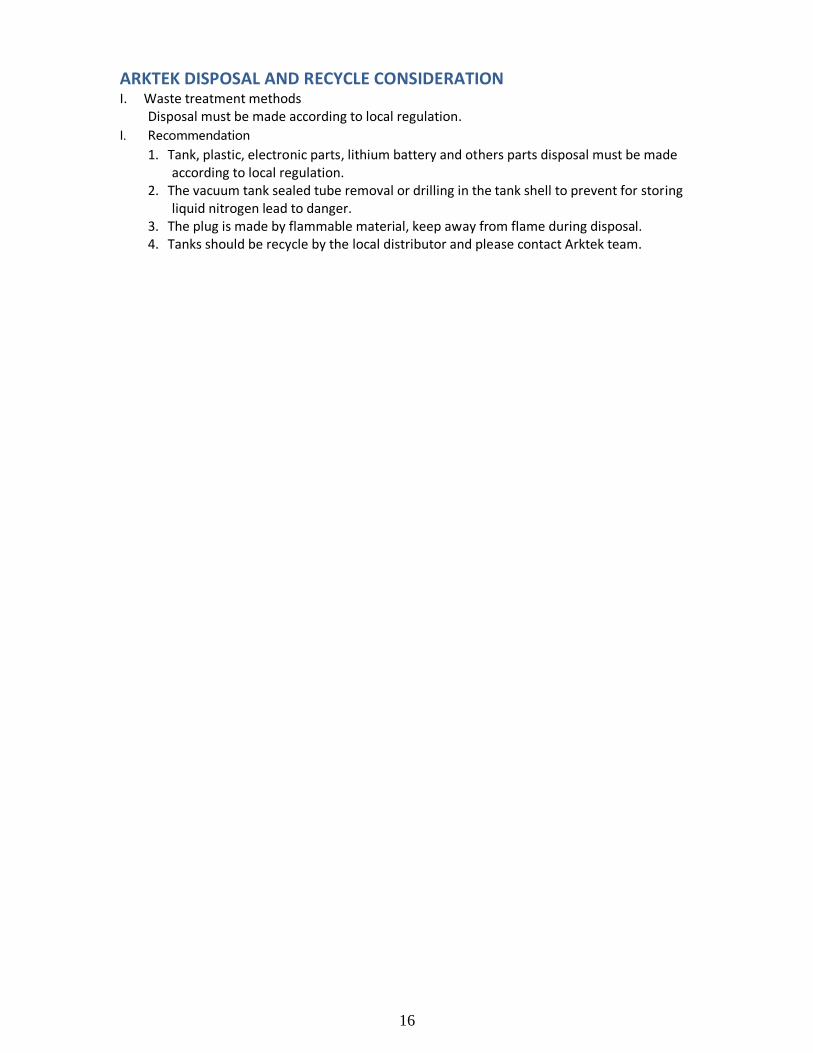
Figure 12: Battery cover
Temperature Display
The system measures and displays the current internal temperature of the device.
Alarms
If the temperature is below 0 °C (too cold), the system will provide audible and visual alerts. The panel displays the temperature and “LOW” alternately. A “speaker” icon appears at the upper left corner of the display. An audible alarm sounds for 1 hour. After that, there will be 5 alarm sounds every 5 minutes. (Figure 11) Additional messages:
The panel displays “LOW” when temperature belows 0°C.
The panel displays “HGH” when temperature reaches +55°C.
The panel displays “Err” when the control board is not able to detect the temperature sensor.
Power
Device is equipped with a disposable battery. In normal use, It can be used for 5 years. (Figure 12) If you want to change the battery, please unscrew the screws and open the battery cover to replace it. Caution: The display panel are fragile objects; Do not set any heavy objects on the panels or subject them to impact. If the display goes blank, contact your authorized Arktek customer service engineer.
15
TROUBLESHOOTING Record any issues that you encounter and any related solutions that you have attempted. You play a very important role in identifying potential recurring issues and solutions.
Issues Solutions
The Arktek alarm sounds The alarm is set to sound if the interior area is too cold and thus may damage the vaccines. Take these steps:
1. Quickly remove everything (vaccine stacks and ice blocks) from the device and follow established protocols for cold chain handling of vaccines to ensure that they keep properly cooled so as to remain potent and effective.
2. Wait a moment until the interior of the device warms to above 0°C. Alarm should no longer sound.
3. Load properly conditioned ice blocks into device, return vaccine stacks to the device, and replace the cap.
The vaccine containers do not seem to fit together easily.
If the containers do not twist together easily, 1. First check to be sure that the containers are not over-
filled with vaccines. Adjust if needed. 2. Otherwise, inspect for breakage or obstruction in the
locking parts of the containers.
The “Err”message displays for long time
The Err message typically indicates that the control board is not getting temperature data inputs. Please contact the authorized customer service engineer to resolve this issue. You can continue to use the device for vaccine storage. There is no danger of freezing the vaccine if the ice conditioning protocol has been followed and the safe temperature range has been verified with another thermometer.
Broken vial(s) discovered in the device.
Wait until the device contents are removed at the end of the use cycle. Then, using protective gloves, remove the broken vial material.
The inside of the device smells bad.
Wait until the end of the use cycle and then clean the device.
There is standing water in the device.
Small amounts of water in the device do not pose a problem. Do not remove vaccine stacks or ice blocks to clean up water, as this will cause unnecessary warming and negatively affect vaccine hold time. At the end of a use cycle, when the device is emptied, the standing water can be removed using a soft absorbent cloth.
16
ARKTEK DISPOSAL AND RECYCLE CONSIDERATION I. Waste treatment methods
Disposal must be made according to local regulation.
I. Recommendation
1. Tank, plastic, electronic parts, lithium battery and others parts disposal must be made according to local regulation.
2. The vacuum tank sealed tube removal or drilling in the tank shell to prevent for storing liquid nitrogen lead to danger.
3. The plug is made by flammable material, keep away from flame during disposal. 4. Tanks should be recycle by the local distributor and please contact Arktek team.

17
WARRANTY
To facilitate inquiries, please copy the model number and serial number in the following table.
Model SN.
To avoid losing the invoice, you can affix it to this page.
(Paste or staple your invoice here.)
Warranty Information Thank you for using the device. Per the warranty card and invoiced date of sale (refer to the invoice), we will provide the following coverage to you. Three-year warranty on the device, included at no extra cost. Under warranty coverage, the manufacturer will repair or replace device components that have failed in the use of the device for its designed intent. Free warranty coverage does not include the following cases:
Damage caused by improper use or improper maintenance.
Damage caused by attempted repairs done by a non-designated repair department.
Damage caused by force majeure.
Damage occurring after the warranty period has expired.

Aucma Global Co., Ltd ADD:NO.315 Qianwangang Road, Economic & Technological Development Qingdao, China
Zip:266000
Tel:+86-0532-88965799 Fax:+86-0532-88965766 Email: [email protected] Website: http://www.arktek.org
Intellectual rights belongs to the Aucma Global Co.,Ltd