x1 action camera x1 - downloads.kaiserbaas.com · before using the x1 action camera, ... x1 action...
TRANSCRIPT
1
x1Complete User Guide
X1 Action Camera

Join the social movement and follow us on
Disclaimers & Warnings
Included Equipment
Product Diagram
Setup
Using your X1
Video Mode
Picture Mode
Playback Mode
Setup Mode
Saving and Viewing Options
Using the X1 as a Webcam
FAQ
Specifications
Support
04
05
06
07
08
10
10
11
12
17
18
18
19
21
ContentsDISCOVER: ADVENTURE
Share your footage with us on social media
#KBdiscover
To view the entire Kaiser Baas product range visit:
www.kaiserbaas.com
3 4
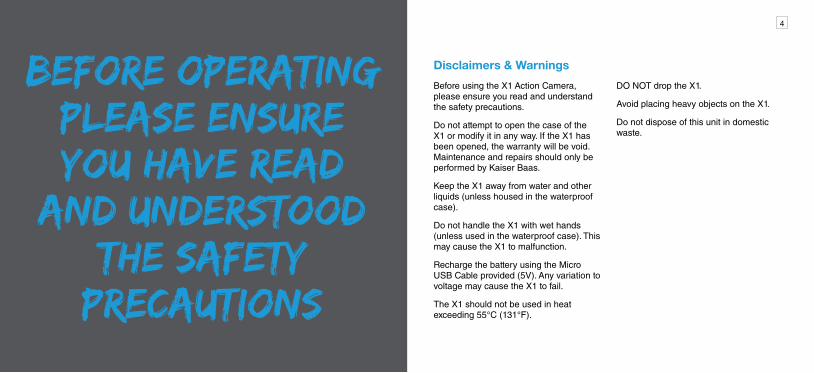
Disclaimers & WarningsBefore using the X1 Action Camera, please ensure you read and understand the safety precautions.
Do not attempt to open the case of the X1 or modify it in any way. If the X1 has been opened, the warranty will be void. Maintenance and repairs should only be performed by Kaiser Baas.
Keep the X1 away from water and other liquids (unless housed in the waterproof case).
Do not handle the X1 with wet hands (unless used in the waterproof case). This may cause the X1 to malfunction.
Recharge the battery using the Micro USB Cable provided (5V). Any variation to voltage may cause the X1 to fail.
The X1 should not be used in heat exceeding 55°C (131°F).
DO NOT drop the X1.
Avoid placing heavy objects on the X1.
Do not dispose of this unit in domestic waste.
Before operating please ensure you have read
and understood the safety
precautions
5 6
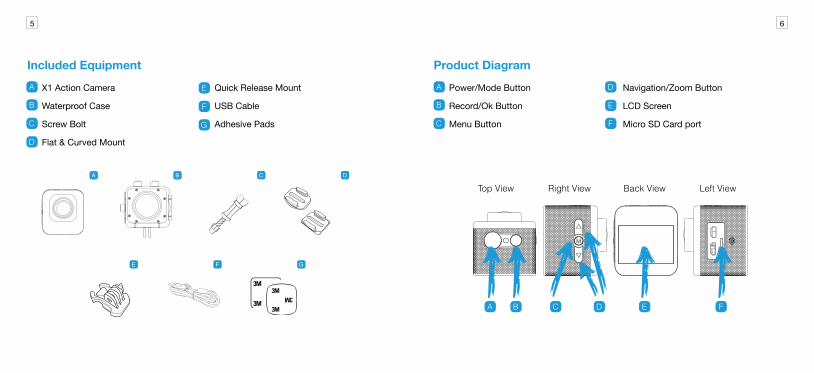
Power/Mode Button
Record/Ok Button
Menu Button
A
E
D
B
FC
Product Diagram
Top View Right View Back View Left View
A B C D E F
Navigation/Zoom Button
LCD Screen
Micro SD Card port
Included Equipment
X1 Action Camera
Waterproof Case
Screw Bolt
Flat & Curved Mount
Quick Release Mount
USB Cable
Adhesive Pads
A
B
E
C
D
F
G
C DA
E F G
B
7 8
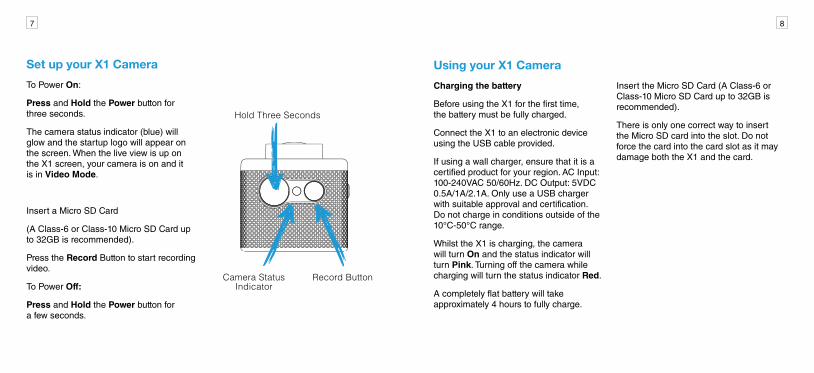
Using your X1 CameraCharging the battery
Before using the X1 for the first time, the battery must be fully charged.
Connect the X1 to an electronic device using the USB cable provided.
If using a wall charger, ensure that it is a certified product for your region. AC Input: 100-240VAC 50/60Hz. DC Output: 5VDC 0.5A/1A/2.1A. Only use a USB charger with suitable approval and certification. Do not charge in conditions outside of the 10°C-50°C range.
Whilst the X1 is charging, the camera will turn On and the status indicator will turn Pink. Turning off the camera while charging will turn the status indicator Red.
A completely flat battery will take approximately 4 hours to fully charge.
Insert the Micro SD Card (A Class-6 or Class-10 Micro SD Card up to 32GB is recommended).
There is only one correct way to insert the Micro SD card into the slot. Do not force the card into the card slot as it may damage both the X1 and the card.
Set up your X1 CameraTo Power On:
Press and Hold the Power button for three seconds.
The camera status indicator (blue) will glow and the startup logo will appear on the screen. When the live view is up on the X1 screen, your camera is on and it is in Video Mode.
Insert a Micro SD Card
(A Class-6 or Class-10 Micro SD Card up to 32GB is recommended).
Press the Record Button to start recording video.
To Power Off:
Press and Hold the Power button for a few seconds.
Hold Three Seconds
Camera Status Indicator
Record Button
9 10
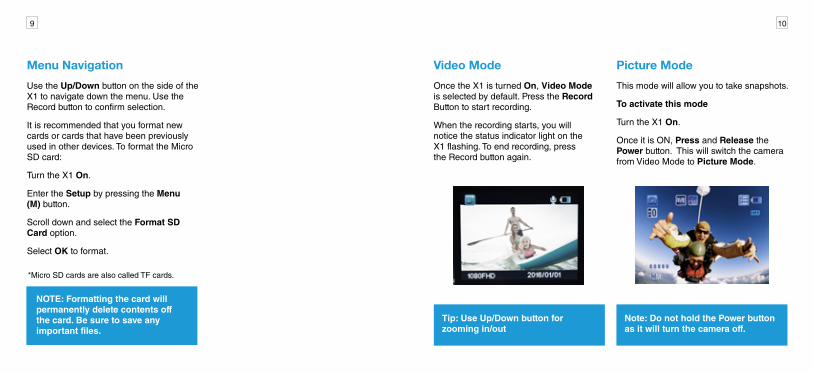
Video Mode Picture ModeOnce the X1 is turned On, Video Mode is selected by default. Press the Record Button to start recording.
When the recording starts, you will notice the status indicator light on the X1 flashing. To end recording, press the Record button again.
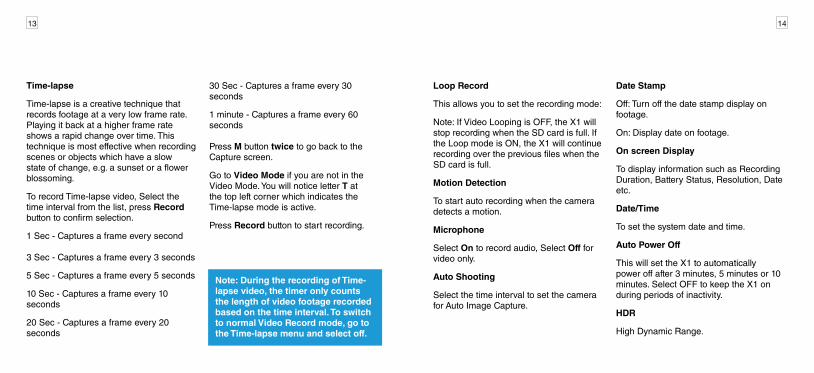
This mode will allow you to take snapshots.
To activate this mode
Turn the X1 On.
Once it is ON, Press and Release the Power button. This will switch the camera from Video Mode to Picture Mode.
Tip: Use Up/Down button for zooming in/out
Note: Do not hold the Power button as it will turn the camera off.
Menu NavigationUse the Up/Down button on the side of the X1 to navigate down the menu. Use the Record button to confirm selection.
It is recommended that you format new cards or cards that have been previously used in other devices. To format the Micro SD card:
Turn the X1 On.
Enter the Setup by pressing the Menu (M) button.
Scroll down and select the Format SD Card option.
Select OK to format.
*Micro SD cards are also called TF cards.
NOTE: Formatting the card will permanently delete contents off the card. Be sure to save any important files.

11 12
Setup ModePress Menu (M) button to access the Setup Menu.
Use Up/Down button to Scroll through and press the Record Button to confirm your selection.
Video Resolution
This allows you to set the video recording resolution:
• 1080P 30fps • VGA 640x480
• 720P 60fps
• 720P 30fps
Picture Resolution
This allows you to set the image resolution to capture Photos.
• 5M
• 3M
• 2M
Playback ModeThis mode will allow you to view captured videos & images.
To go to this mode
Turn the X1 On. Once it is ON, Press and Release the Power button twice. This will take you to Playback mode.
Tip: You can also view the images as a Slide Show. To do this, press M button and Select Slide Show.
You will notice this icon ( ) on the top left corner of the screen.
Note: Do not hold the power button as it will turn the camera off.
Use the Up/Down button to navigate. Press the Record button to start playing.
To Delete file(s)
Press M button when you are in the Playback Mode. Select Delete and press the Record button. You will have the option to choose the current file or all files for deletion.
13 14
Loop Record
This allows you to set the recording mode:
Note: If Video Looping is OFF, the X1 will stop recording when the SD card is full. If the Loop mode is ON, the X1 will continue recording over the previous files when the SD card is full.
Motion Detection
To start auto recording when the camera detects a motion.
Microphone
Select On to record audio, Select Off for video only.
Auto Shooting
Select the time interval to set the camera for Auto Image Capture.
Date Stamp
Off: Turn off the date stamp display on footage.
On: Display date on footage.
On screen Display
To display information such as Recording Duration, Battery Status, Resolution, Date etc.
Date/Time
To set the system date and time.
Auto Power Off
This will set the X1 to automatically power off after 3 minutes, 5 minutes or 10 minutes. Select OFF to keep the X1 on during periods of inactivity.
HDR
High Dynamic Range.
Time-lapse
Time-lapse is a creative technique that records footage at a very low frame rate. Playing it back at a higher frame rate shows a rapid change over time. This technique is most effective when recording scenes or objects which have a slow state of change, e.g. a sunset or a flower blossoming.
To record Time-lapse video, Select the time interval from the list, press Record button to confirm selection.
1 Sec - Captures a frame every second 3 Sec - Captures a frame every 3 seconds
5 Sec - Captures a frame every 5 seconds
10 Sec - Captures a frame every 10 seconds
20 Sec - Captures a frame every 20 seconds
30 Sec - Captures a frame every 30 seconds
1 minute - Captures a frame every 60 seconds Press M button twice to go back to the Capture screen.
Go to Video Mode if you are not in the Video Mode. You will notice letter T at the top left corner which indicates the Time-lapse mode is active.
Press Record button to start recording.
Note: During the recording of Time-lapse video, the timer only counts the length of video footage recorded based on the time interval. To switch to normal Video Record mode, go to the Time-lapse menu and select off.
15 16
Sharpness
To adjust the sharpness of the image.
White Balance
The factory default is Auto. If you switch Auto OFF, remember to adjust when lighting conditions change.
Colour
To adjust the capture colour settings.
ISO
This is the measurement of how sensitive a camera sensor is to light.
We recommend you use the auto feature until you’re more familiar with ISO settings.
Exposure
This allows you to set the light exposure value.
Photo Preview
To enable a quick preview of 2 secs and 5 secs after the photo has been captured.
Language
To set the device language.
Beep Sound
Turn the key tone ON or OFF.
TV Standard
To set the TV Standard NTSC/PAL.
TV Out
To connect to TV via HDMI.
Screensaver
This will set the screensaver to come on after 1 minute, 3 minutes or 5 minutes.
Note: You will need a Micro HDMI to HDMI cable. You may also need to check the TV Standard and set it on the camera as appropriate.
Light Frequency
Selecting the correct light frequency will avoid the possibility of strobing. Strobing is the flickering effect on screen when recording light or other elements. If this occurs, try switching to a different light frequency setting.
Screen Rotation
Rotate the screen.
Format SD Card
This will format the Micro SD card and permanently erase all data on the card. Use wisely.
Default Setting
This will reset the X1 to factory settings.
Connecting to a TV
You can mirror the X1 screen to a compatible TV screen.
1. Connect the Micro HDMI cable-end to the port on the X1 and the HDMI end to HDMI port on the TV.
2. Go to the Setup on X1 and then go to TV Out Settings.
3. Select On and press the Record button to confirm selection.
4. Ensure the right HDMI source is selected on the TV.
17 18
Using the X1 as a webcam FAQThe X1 can be used with your Video Chatting Applications such as Skype, Google+ etc.
To use the X1 as a Webcam:
Connect the X1 to your PC using the Micro USB cable.
Select Webcam Mode when it appears on the screen, press the Record button.
Your computer now will detect the X1 as Webcam.
1. My X1 camera will NOT turn on.
The battery is flat. You need to recharge it (full recharge from flat will take about 4 hours).
2. Why does my camera automatically turn off?
Either the SD card is full or the battery is running low.
3. Why are my Videos and pictures blurred.
A. The lens may be dirty. Clean the lens with a dry, soft cloth.
4. My X1 camera cannot be seen by my computer.
A. Try a different USB cable or different USB port.
Note: You will not be able to record video or take pictures when the X1 is in Webcam Mode.
Saving and Viewing OptionsTransferring files to a PC
1. Use the supplied the Micro USB cable to connect the X1 to the USB port of your computer.
2. Select Mass Storage Mode, press the Record button.
3. Computer will detect the X1 as a Removable Storage Device. Alternatively, you can remove the Micro SD card and use a card reader (not included) to achieve the same result.
Tip: You can also transfer entire folders to your computer
4. Go to the SD card drive, select the file(s) you want to transfer to your computer by highlighting them.
5. Either drag the files to the desired location on your computer (this will make a copy of the file) OR right-click the file, select Copy and right-click in the desired location on your computer and select Paste.
19 20
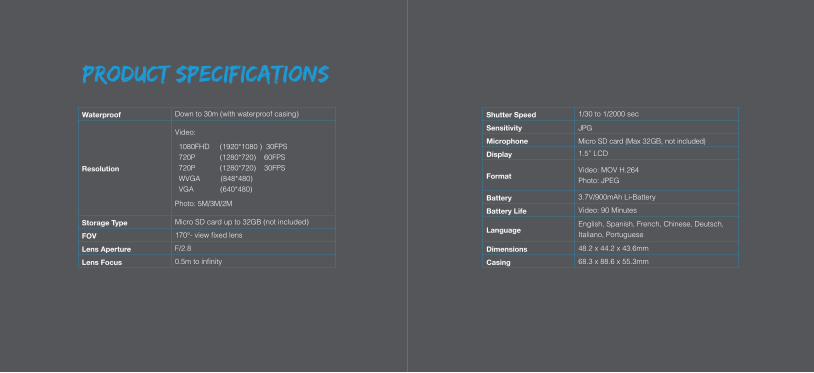
Waterproof Down to 30m (with waterproof casing)
Resolution
Video:
1080FHD (1920*1080 ) 30FPS 720P (1280*720) 60FPS 720P (1280*720) 30FPS WVGA (848*480) VGA (640*480)
Photo: 5M/3M/2M
Storage Type Micro SD card up to 32GB (not included)
FOV 170°- view fixed lens
Lens Aperture F/2.8
Lens Focus 0.5m to infinity
PRODUCT SPECIFICATIONS
Shutter Speed 1/30 to 1/2000 sec
Sensitivity JPG
Microphone Micro SD card (Max 32GB, not included)
Display 1.5” LCD
FormatVideo: MOV H.264Photo: JPEG
Battery 3.7V/900mAh Li-Battery
Battery Life Video: 90 Minutes
LanguageEnglish, Spanish, French, Chinese, Deutsch, Italiano, Portuguese
Dimensions 48.2 x 44.2 x 43.6mm
Casing 68.3 x 88.6 x 55.3mm

21 22
Got a question about your Kaiser Baas Dash Cam?
Live Chat: www.kaiserbaas.com/support
Email: [email protected]
For further information please visit:www.kaiserbaas.com
Kaiser Baas Support

23