workshop: month end best practices - schedschd.ws/hosted_files/imug2017/3a/imug2017 month end best...
TRANSCRIPT
Month End Best Practices
Time: 02:15-03:15 Date: Thursday, June 22, 2017
Page 1 of 22
Workshop: Month End Best Practices
Month-end procedures include selecting a cut-off date for General Ledger, Accounts Payable and Accounts Receivable and closing the period to prevent unwanted entries. The cut-off and closing procedures are optional and are not required; however, closing periods will help keep your records accurate and tidy. The timely closing of periods is a good internal control practice.
At the end of this course you will be able to:
1. set the cut-off date for your financial sub-ledgers and General Ledger;
2. determine if all relevant batches are posted before closing a period;
3. close a period
Month End Close Process
1. Why set a Cut-off Date?
When preparing for a month-end close, you may want to prevent users from affecting the period you are working with, but still be able to make entries yourself. Two separate classes of GL entries, Audit Adjustments and Pre Audit Adjustments can be dated prior to the GL Cut-off date. Audit and Pre Audit adjustments are entered exactly the same way as other journal entries, but the entry screens are accessed from separate menu selections, and they may be reported on separately. Security can be set separately for Journal Entries, Audit Adjustments and Pre Audit Adjustments, so that only certain users can make entries after the GL Cut-Off Date.
2. Set the GL Cut-off Date
The GL Cut-Off date is set for each company. It can be removed. While impractical to set a GL cutoff while working on the close of a period, it is recommended once your results are reported.
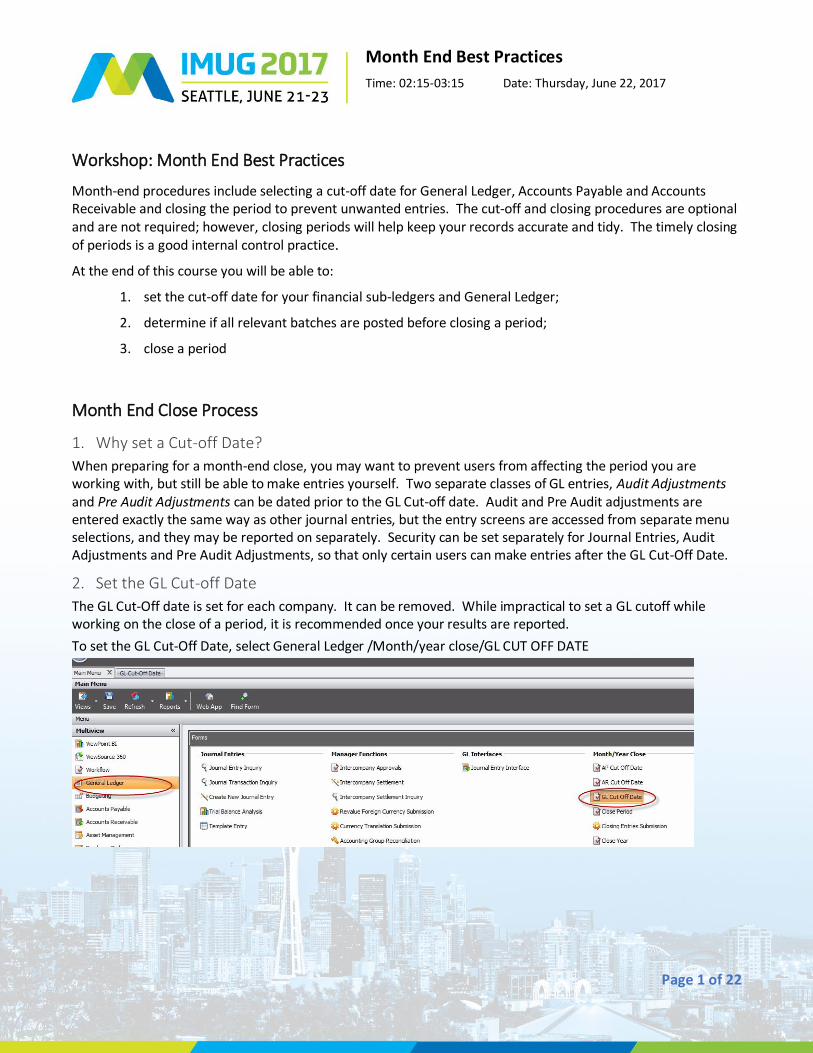
To set the GL Cut-Off Date, select General Ledger /Month/year close/GL CUT OFF DATE
Month End Best Practices
Time: 02:15-03:15 Date: Thursday, June 22, 2017
Page 2 of 22
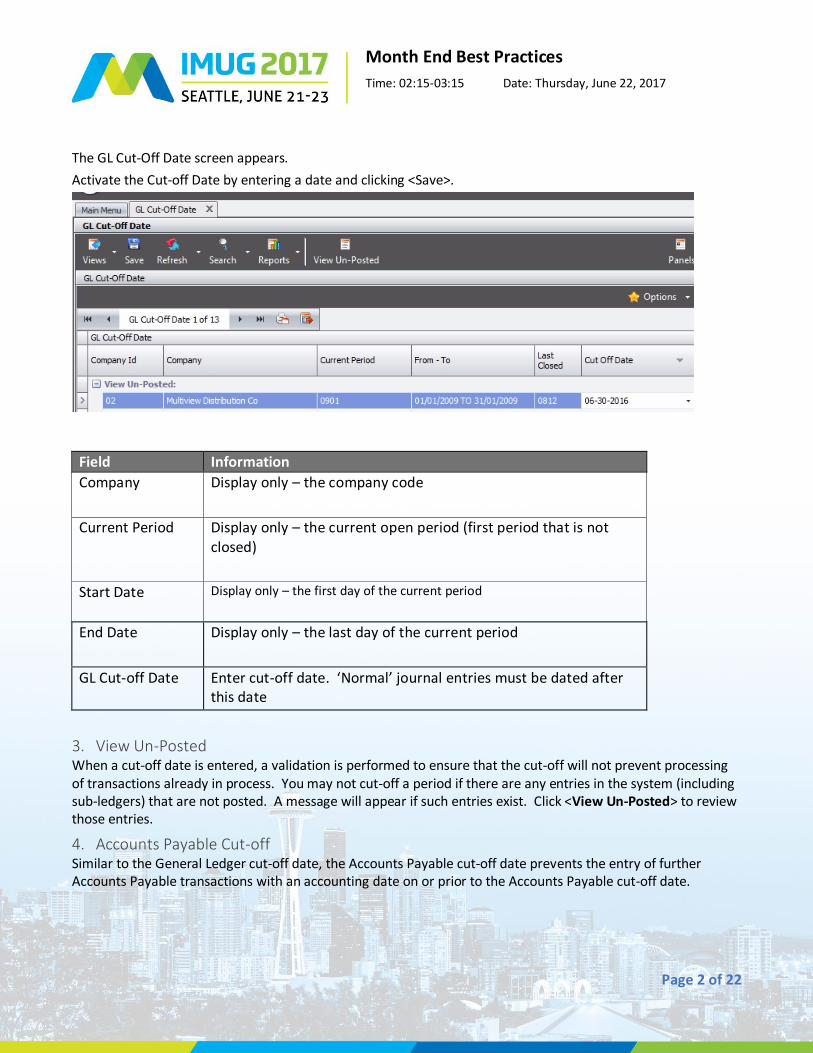
The GL Cut-Off Date screen appears.
Activate the Cut-off Date by entering a date and clicking <Save>.
Field Information
Company Display only – the company code
Current Period Display only – the current open period (first period that is not closed)
Start Date Display only – the first day of the current period
End Date Display only – the last day of the current period
GL Cut-off Date Enter cut-off date. ‘Normal’ journal entries must be dated after this date
3. View Un-Posted When a cut-off date is entered, a validation is performed to ensure that the cut-off will not prevent processing of transactions already in process. You may not cut-off a period if there are any entries in the system (including sub-ledgers) that are not posted. A message will appear if such entries exist. Click <View Un-Posted> to review those entries.
4. Accounts Payable Cut-off Similar to the General Ledger cut-off date, the Accounts Payable cut-off date prevents the entry of further Accounts Payable transactions with an accounting date on or prior to the Accounts Payable cut-off date.

Month End Best Practices
Time: 02:15-03:15 Date: Thursday, June 22, 2017
Page 3 of 22
5. Why set an AP Cut-off Date? Often the AP sub-ledger may be ready to close before the rest of the system. By cutting off AP entry, you can prevent AP vouchers, check runs, etc. from affecting the current period, while permitting entry to continue in all other areas of the system. The AP cut-off date can be set for each company and it can be removed. To set the AP Cut-off Date, select GENERAL LEDGER /MONTH/YEAR CLOSE/AP CUT OFF DATE The functionality of the AP cut-off screens is exactly the same as the GL cut-off screens. Please refer to the section above for descriptions.
6. Accounts Receivable Cut-off Similar to the General Ledger and Accounts Payable cut-off dates, the Accounts Receivable cut-off date prevents further Accounts Receivable entries with an accounting date on or prior to the Accounts Receivable cut-off date.
7. Why set an AR Cut-off Date? Often the AR sub-ledger may be ready to close before the rest of the system. By cutting off AR entry, you can prevent AR vouchers, payments, etc. from affecting the current period, while permitting entry to continue in all other areas of the system. The AR Cut-off Date can be set for each company and it can be removed. To set the AR cut-off date, select General Ledger /Month/year close/AR CUT OFF DATE The functionality of the AR Cut-off screens is exactly the same as the GL Cut-off screens. Please refer to the relevant section above for descriptions.
8. Period Close Closing a period prevents all entries to the closed period of the General Ledger with the exception of the General Ledger Adjustments. You can close periods for one or more of your companies simultaneously. Closing a period will update the Company table with the current period.
9. Cut-off versus Close Entering a GL cut-off date can be thought of as a soft close because certain types of entries are still permitted and the cut-off date can be removed, allowing normal entry to continue. Closing a period is a hard close. Once the period is closed, it cannot be re-opened.
10. Prior Period Adjustments To access the Prior Period Adjustments window, select General Ledger /CREATE NEW JOURNAL ENTRY. Prior period adjustments are entered exactly like journal entries, with the difference that they must have an accounting date in a closed period. Prior period adjustments display separately in trial balances and can be
reported on separately in GL Inquiry, Viewpoint BI.
Month End Best Practices
Time: 02:15-03:15 Date: Thursday, June 22, 2017
Page 4 of 22
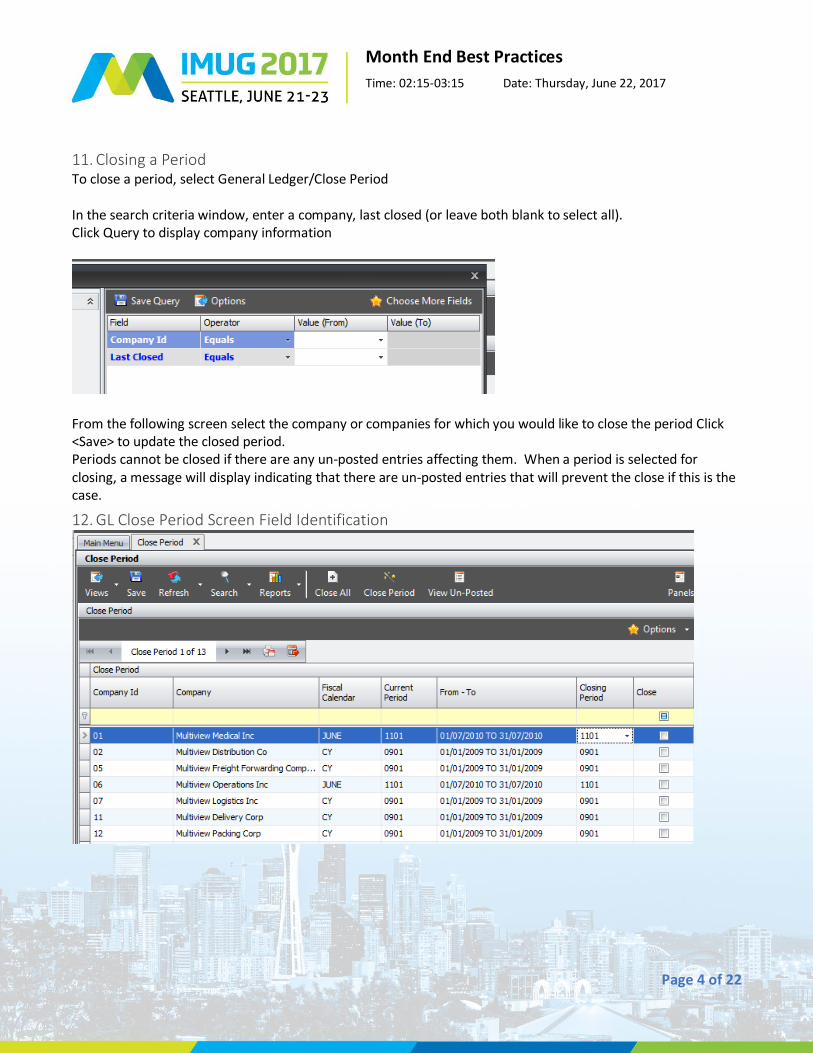
11. Closing a Period To close a period, select General Ledger/Close Period In the search criteria window, enter a company, last closed (or leave both blank to select all). Click Query to display company information
From the following screen select the company or companies for which you would like to close the period Click <Save> to update the closed period. Periods cannot be closed if there are any un-posted entries affecting them. When a period is selected for closing, a message will display indicating that there are un-posted entries that will prevent the close if this is the case.
12. GL Close Period Screen Field Identification
Month End Best Practices
Time: 02:15-03:15 Date: Thursday, June 22, 2017
Page 5 of 22
Field Information Company Display only – the company code.
Period Calendar Display only – the period structure for the company.
Current Period Display only – the current open period (first period that is not closed).
From-To Display only – the first day of the current period to the last day of the closing period
Closing period The period that will be closed – defaults to the current period; if changed to a later period, all periods through the Closing Period will be closed.
Close Check to have the period for this company closed.
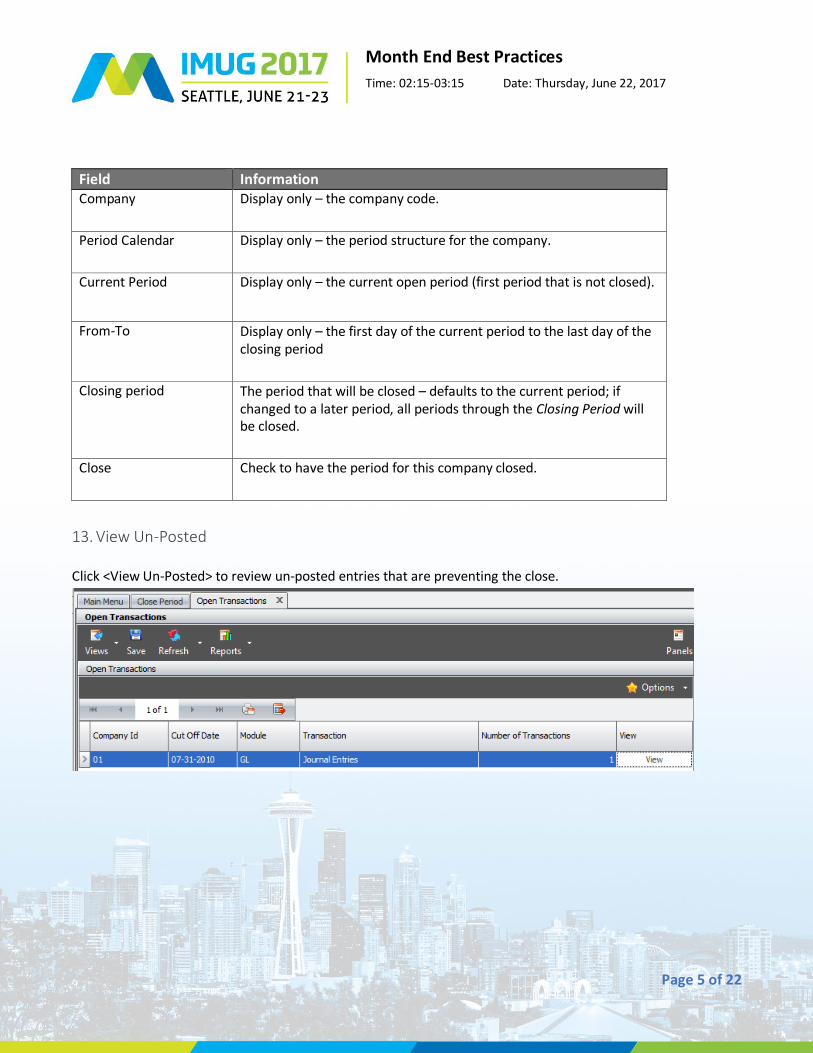
13. View Un-Posted
Click <View Un-Posted> to review un-posted entries that are preventing the close.
Month End Best Practices
Time: 02:15-03:15 Date: Thursday, June 22, 2017
Page 6 of 22
Field Information Module Display only - the module or sub-ledger that has un-posted
transactions for the period
Transaction Display only - the type of transactions
Cutoff Date Display only – the closing date the user is trying to effect
Number of transactions Display only – the number of transactions that are open (note this may not be the same as the number of batches as there can be more than one transaction in a batch)
Click <View > to review the un-posted transactions and post them if they are valid.
1. When the month has been reconciled, and reviewed, post all journal entries for the month using the
mass Journal Entry posting. Note: Alerts can be set up in order to review open entries throughout the
month. See steps below
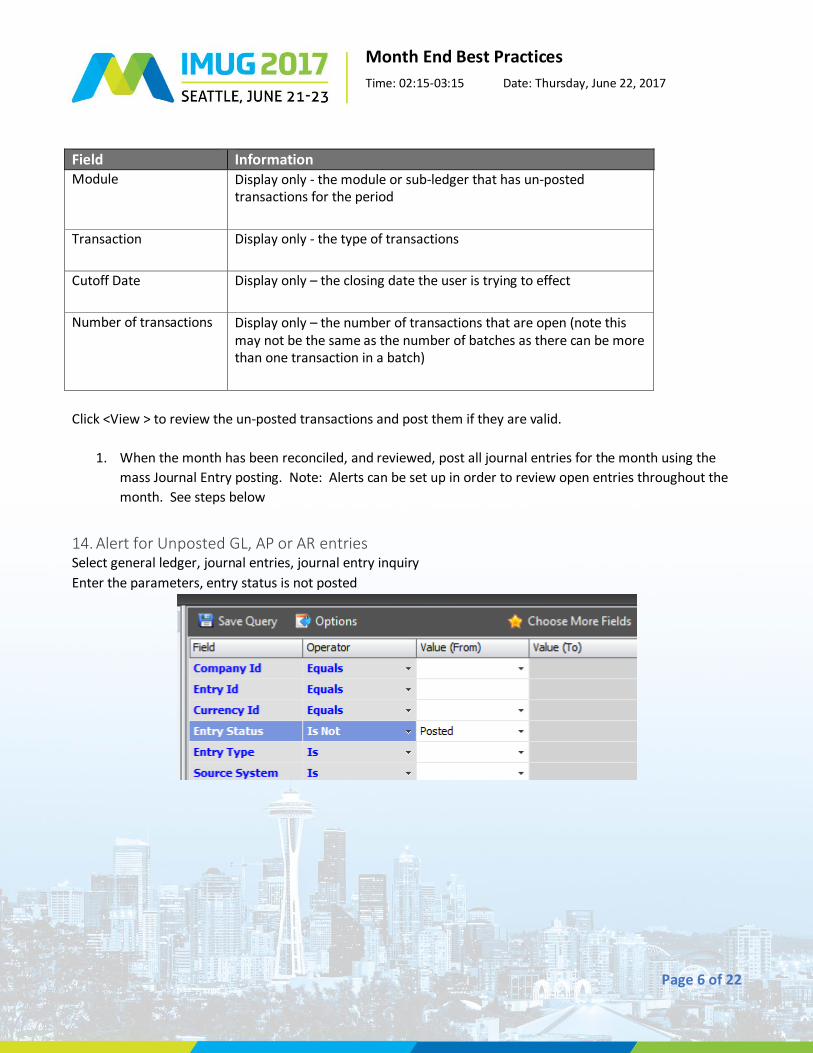
14. Alert for Unposted GL, AP or AR entries Select general ledger, journal entries, journal entry inquiry
Enter the parameters, entry status is not posted
Month End Best Practices
Time: 02:15-03:15 Date: Thursday, June 22, 2017
Page 7 of 22
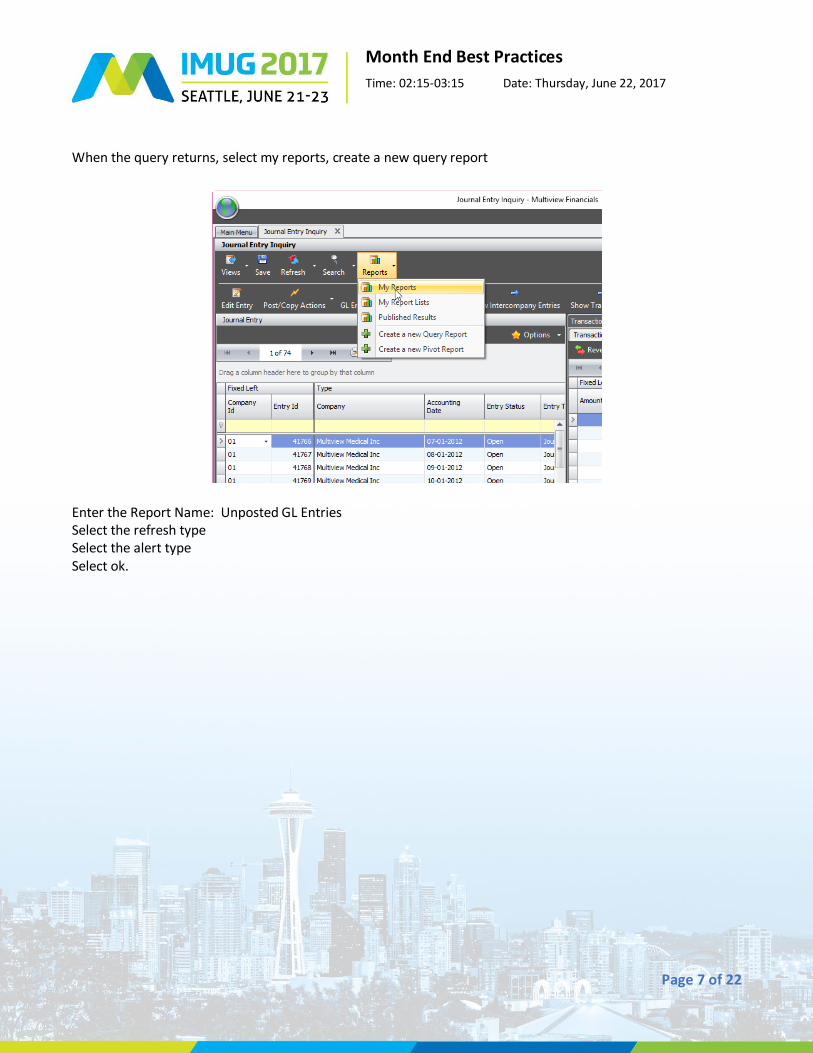
When the query returns, select my reports, create a new query report
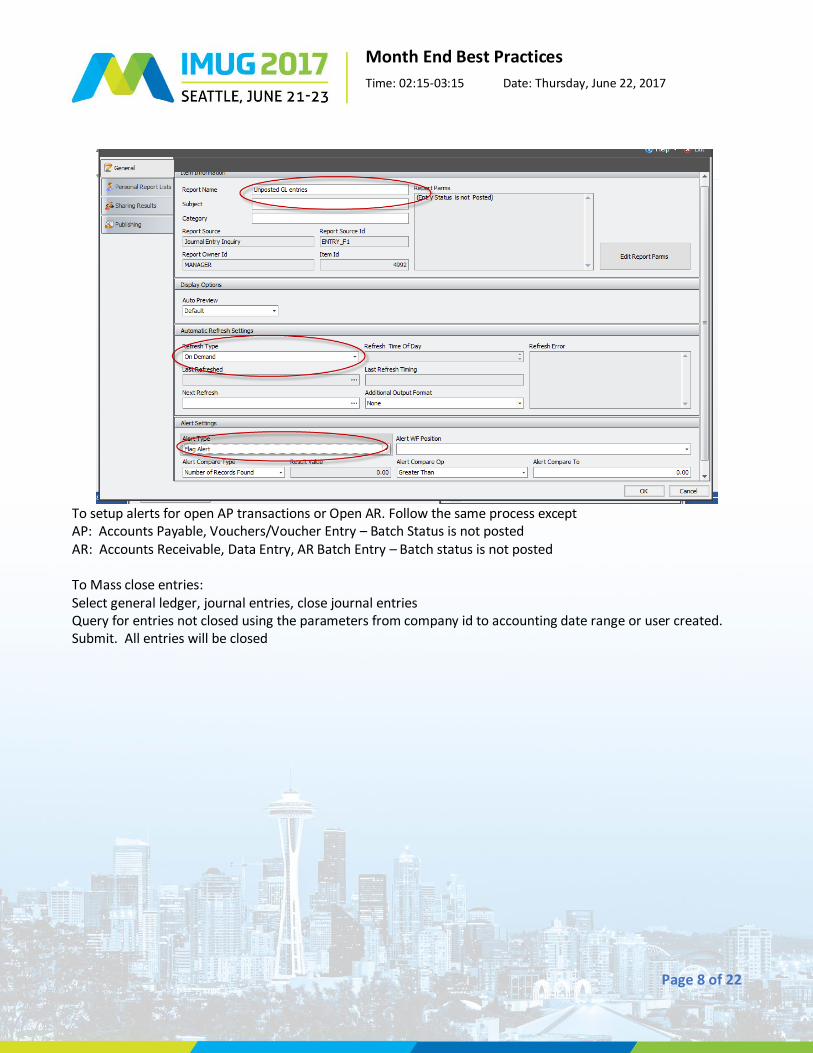
Enter the Report Name: Unposted GL Entries Select the refresh type Select the alert type Select ok.
Month End Best Practices
Time: 02:15-03:15 Date: Thursday, June 22, 2017
Page 8 of 22
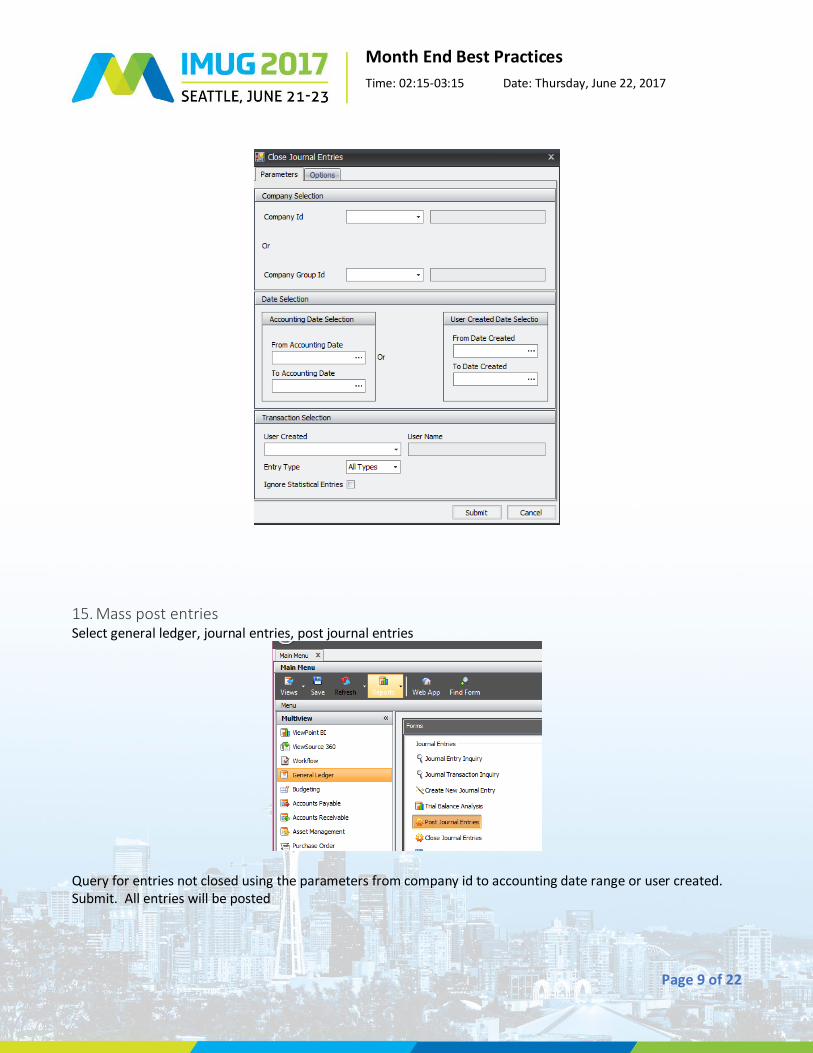
To setup alerts for open AP transactions or Open AR. Follow the same process except AP: Accounts Payable, Vouchers/Voucher Entry – Batch Status is not posted AR: Accounts Receivable, Data Entry, AR Batch Entry – Batch status is not posted To Mass close entries: Select general ledger, journal entries, close journal entries Query for entries not closed using the parameters from company id to accounting date range or user created. Submit. All entries will be closed
Month End Best Practices
Time: 02:15-03:15 Date: Thursday, June 22, 2017
Page 9 of 22
15. Mass post entries Select general ledger, journal entries, post journal entries
Query for entries not closed using the parameters from company id to accounting date range or user created. Submit. All entries will be posted
Month End Best Practices
Time: 02:15-03:15 Date: Thursday, June 22, 2017
Page 10 of 22
Year End Close Process
Yearend close processes within Multiview include the following steps: 1. Create New Fiscal and Reporting Periods 2. Close Revenues and Expenses to Equity Accounts 3. Close Fiscal Year 4. Update ViewPoint Reporting Cubes 5. Update Journal Transaction Summarization
1. Create New Fiscal and Reporting Periods
There are two types of periods maintained in Multiview – Fiscal Year Structure and Reporting Year Structure. The two structures can be the same or different. A fiscal structure only contains period starts and ends. A reporting structure may contain weeks, months, quarters and year. The Reporting Year structure is used in ViewPoint reporting while the Fiscal Year structure is referenced for the Closing Entries Submission.
2. Close Revenues and Expenses to Equity Accounts
Revenue and expense accounts must be closed at the end of the fiscal year. An entry is made to an appropriate equity account (i.e. retained earnings) that reflects the sum of revenues and expenses. Generating closing entries closes out the accounts designated with an account type of revenue or expense to an equity account. All transactions that have been made during the fiscal year will effectively be reversed as of the year-end with the offset going to an equity account. The equity unit/account combination is determined by the settings on the unit table for each transaction being closed. It is a best practice to print your company trial balance for the last period of your fiscal year for a control. It is also a best practice to perform the monthly close process for the last fiscal period in the year before submitting closing entries. This will make sure that any unposted entries are included in the closing entries.
Generate closing entries from the General Ledger Main Menu Month/Year Close Closing Entries
Submission. Company id and fiscal year to be closed are required.
Click OK to submit.
You can Generate Closing Entries as often as required. For example, you may need to re-run closing entries if you made audit adjustments after closing entries were originally generated. You can generate closing entries in a closed year if needed. Closing entries are assigned a unique entry type (Closing Entries) and can therefore be segregated for inquiry and reporting. After the entries have been processed – make sure the equity posting is correct and all income and expenses have been closed to zero – print a company trial balance for the first period of the new fiscal year – the opening balances for revenue and expenses should be zero. Trial Balance Analysis and Closing Entries The Trial Balance Analysis tool is useful for validation of closing entries.
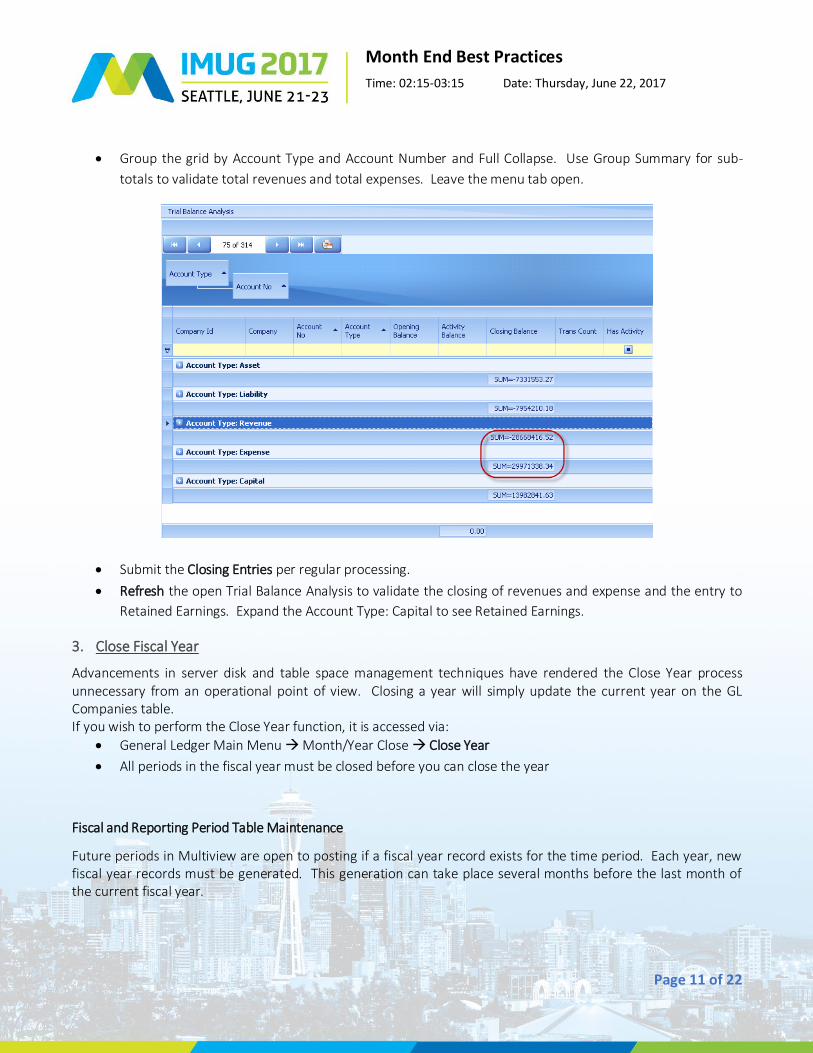
Prior to submitting the closing entries, run a Trial Balance Analysis for the last period of the fiscal year.
Month End Best Practices
Time: 02:15-03:15 Date: Thursday, June 22, 2017
Page 11 of 22
Group the grid by Account Type and Account Number and Full Collapse. Use Group Summary for sub-
totals to validate total revenues and total expenses. Leave the menu tab open.
Submit the Closing Entries per regular processing.
Refresh the open Trial Balance Analysis to validate the closing of revenues and expense and the entry to
Retained Earnings. Expand the Account Type: Capital to see Retained Earnings.
3. Close Fiscal Year
Advancements in server disk and table space management techniques have rendered the Close Year process unnecessary from an operational point of view. Closing a year will simply update the current year on the GL Companies table. If you wish to perform the Close Year function, it is accessed via:
General Ledger Main Menu Month/Year Close Close Year
All periods in the fiscal year must be closed before you can close the year
Fiscal and Reporting Period Table Maintenance
Future periods in Multiview are open to posting if a fiscal year record exists for the time period. Each year, new fiscal year records must be generated. This generation can take place several months before the last month of the current fiscal year.
Month End Best Practices
Time: 02:15-03:15 Date: Thursday, June 22, 2017
Page 12 of 22
Reporting periods also need to be updated to be available for generating ViewPoint reports for future periods. There may be more than one reporting year structure – a new yearly structure must be created for all reporting structure calendars. For example, there will be a Reporting Period structure (usually R01) to match the Fiscal Period structure (usually F01). Reporting Period structures do not have to follow Fiscal Periods. You can create a Reporting Period structure for a calendar year period even if your fiscal year is not calendar. Such reporting structures can then be used in ViewPoint to report fiscal year results on a calendar year basis.
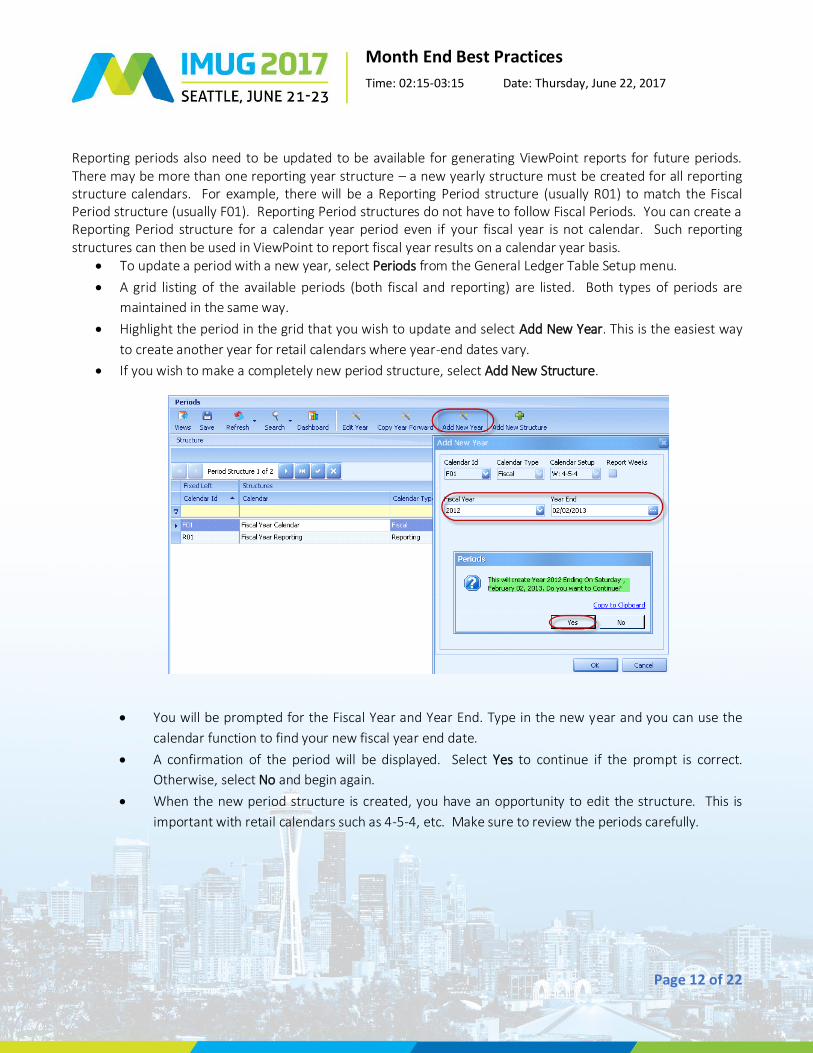
To update a period with a new year, select Periods from the General Ledger Table Setup menu.
A grid listing of the available periods (both fiscal and reporting) are listed. Both types of periods are
maintained in the same way.
Highlight the period in the grid that you wish to update and select Add New Year. This is the easiest way
to create another year for retail calendars where year-end dates vary.
If you wish to make a completely new period structure, select Add New Structure.
You will be prompted for the Fiscal Year and Year End. Type in the new year and you can use the
calendar function to find your new fiscal year end date.
A confirmation of the period will be displayed. Select Yes to continue if the prompt is correct.
Otherwise, select No and begin again.
When the new period structure is created, you have an opportunity to edit the structure. This is
important with retail calendars such as 4-5-4, etc. Make sure to review the periods carefully.
Month End Best Practices
Time: 02:15-03:15 Date: Thursday, June 22, 2017
Page 13 of 22
4. Update ViewPoint Reporting Cubes
The Reporting Period structures are used in the ViewPoint cubes and there can only be one Reporting Period structure per ViewPoint cube. Therefore, if you are reporting using two or more types of Reporting Period structures, you will have the same number of corresponding ViewPoint cubes. In order for ViewPoint to recognize updated periods for reporting, the cubes must be updated. For a successful cube update, you must have first created the new Reporting Period structure in Multiview (see step 3).
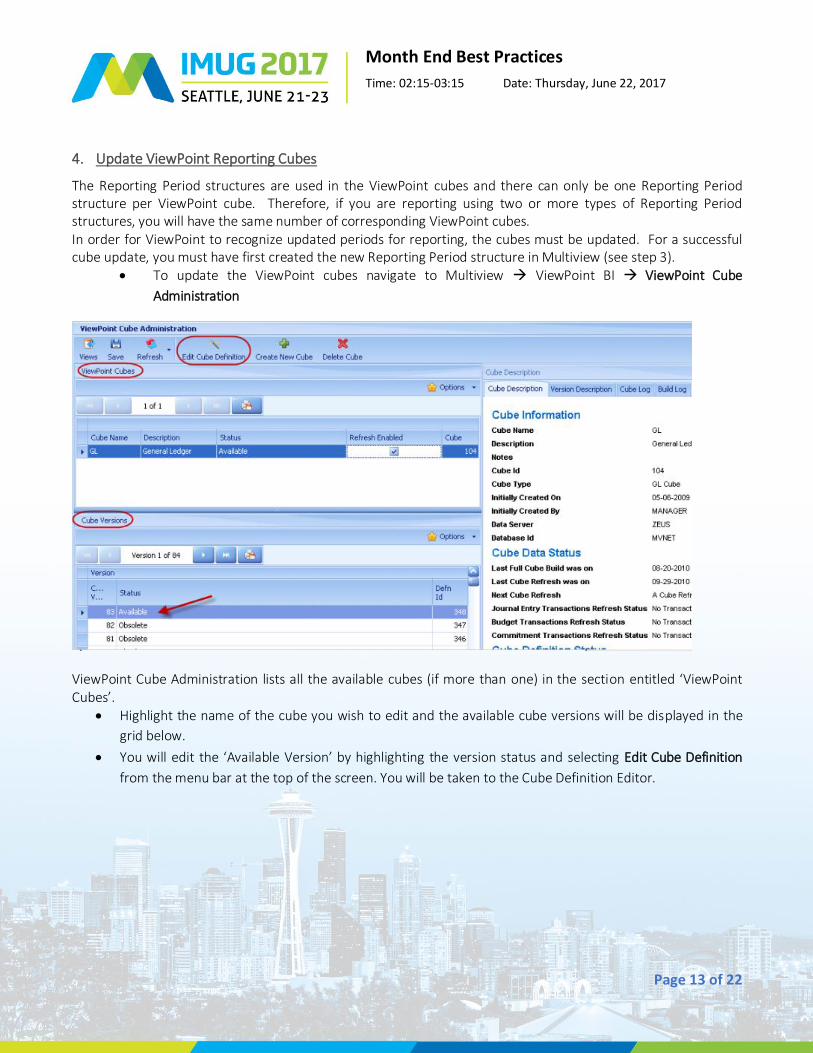
To update the ViewPoint cubes navigate to Multiview ViewPoint BI ViewPoint Cube
Administration
ViewPoint Cube Administration lists all the available cubes (if more than one) in the section entitled ‘ViewPoint Cubes’.
Highlight the name of the cube you wish to edit and the available cube versions will be displayed in the
grid below.
You will edit the ‘Available Version’ by highlighting the version status and selecting Edit Cube Definition
from the menu bar at the top of the screen. You will be taken to the Cube Definition Editor.
Month End Best Practices
Time: 02:15-03:15 Date: Thursday, June 22, 2017
Page 14 of 22
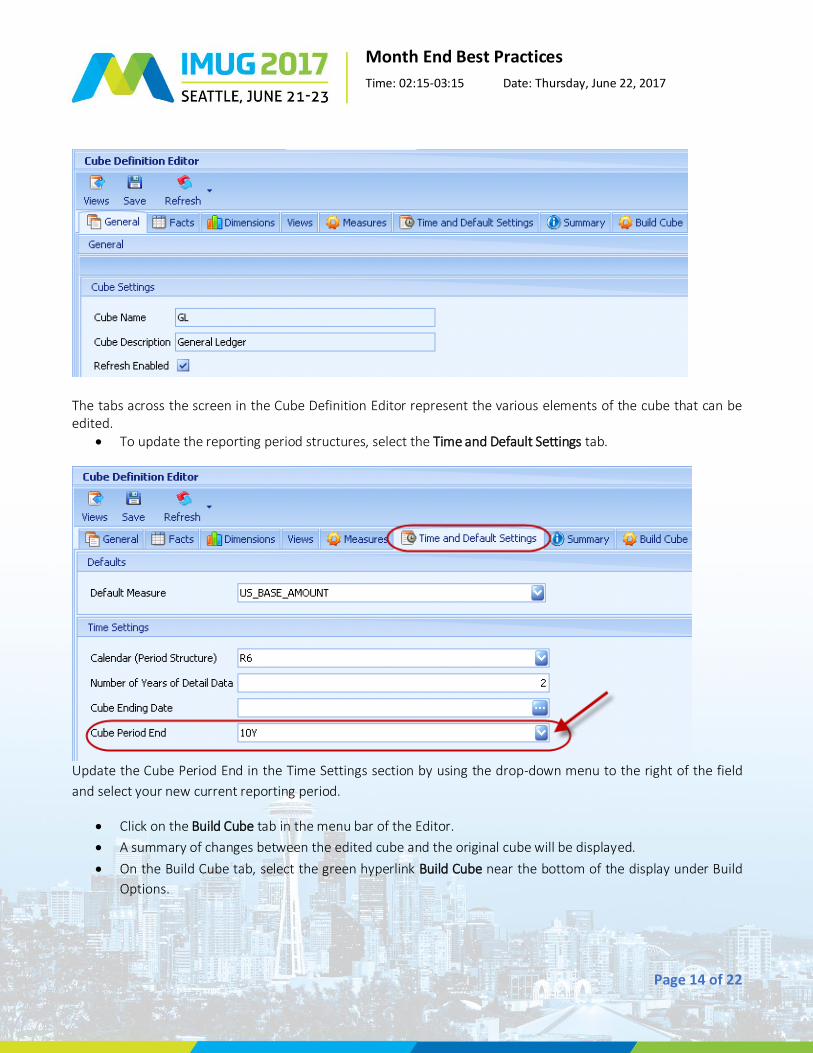
The tabs across the screen in the Cube Definition Editor represent the various elements of the cube that can be edited.
To update the reporting period structures, select the Time and Default Settings tab.
Update the Cube Period End in the Time Settings section by using the drop-down menu to the right of the field
and select your new current reporting period.
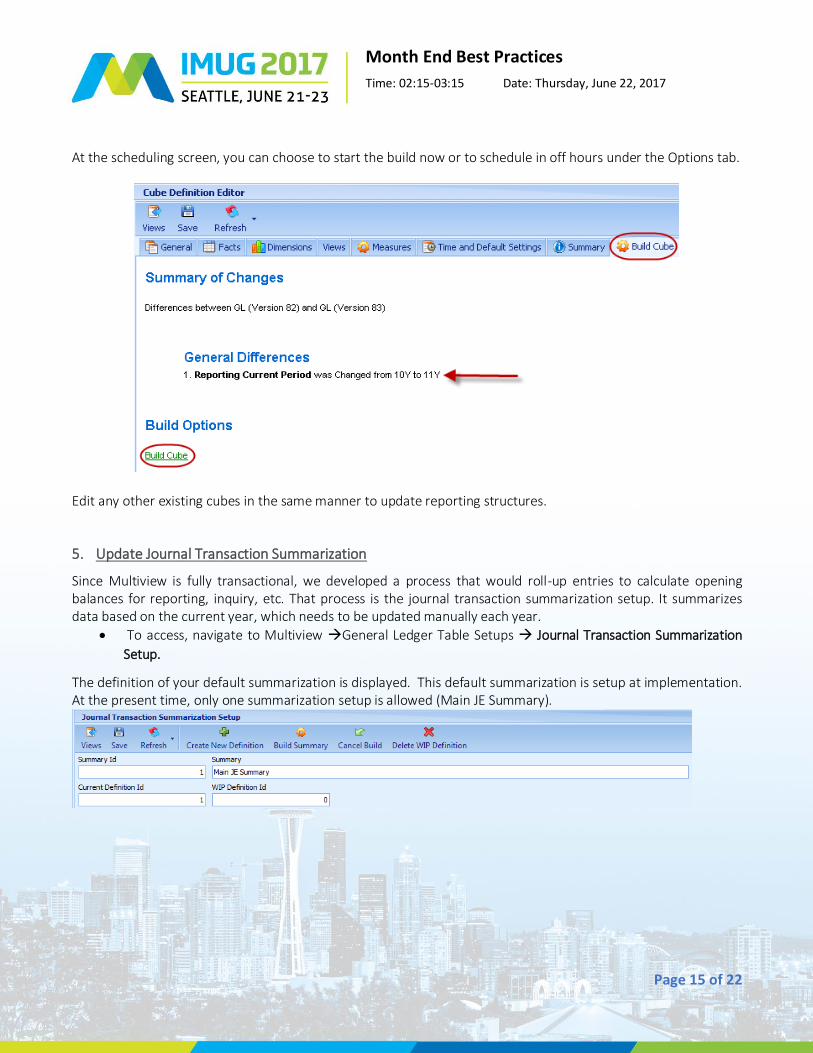
Click on the Build Cube tab in the menu bar of the Editor.
A summary of changes between the edited cube and the original cube will be displayed.
On the Build Cube tab, select the green hyperlink Build Cube near the bottom of the display under Build
Options.
Month End Best Practices
Time: 02:15-03:15 Date: Thursday, June 22, 2017
Page 15 of 22
At the scheduling screen, you can choose to start the build now or to schedule in off hours under the Options tab.
Edit any other existing cubes in the same manner to update reporting structures.
5. Update Journal Transaction Summarization
Since Multiview is fully transactional, we developed a process that would roll-up entries to calculate opening balances for reporting, inquiry, etc. That process is the journal transaction summarization setup. It summarizes data based on the current year, which needs to be updated manually each year.
To access, navigate to Multiview General Ledger Table Setups Journal Transaction Summarization
Setup.
The definition of your default summarization is displayed. This default summarization is setup at implementation. At the present time, only one summarization setup is allowed (Main JE Summary).
Month End Best Practices
Time: 02:15-03:15 Date: Thursday, June 22, 2017
Page 16 of 22
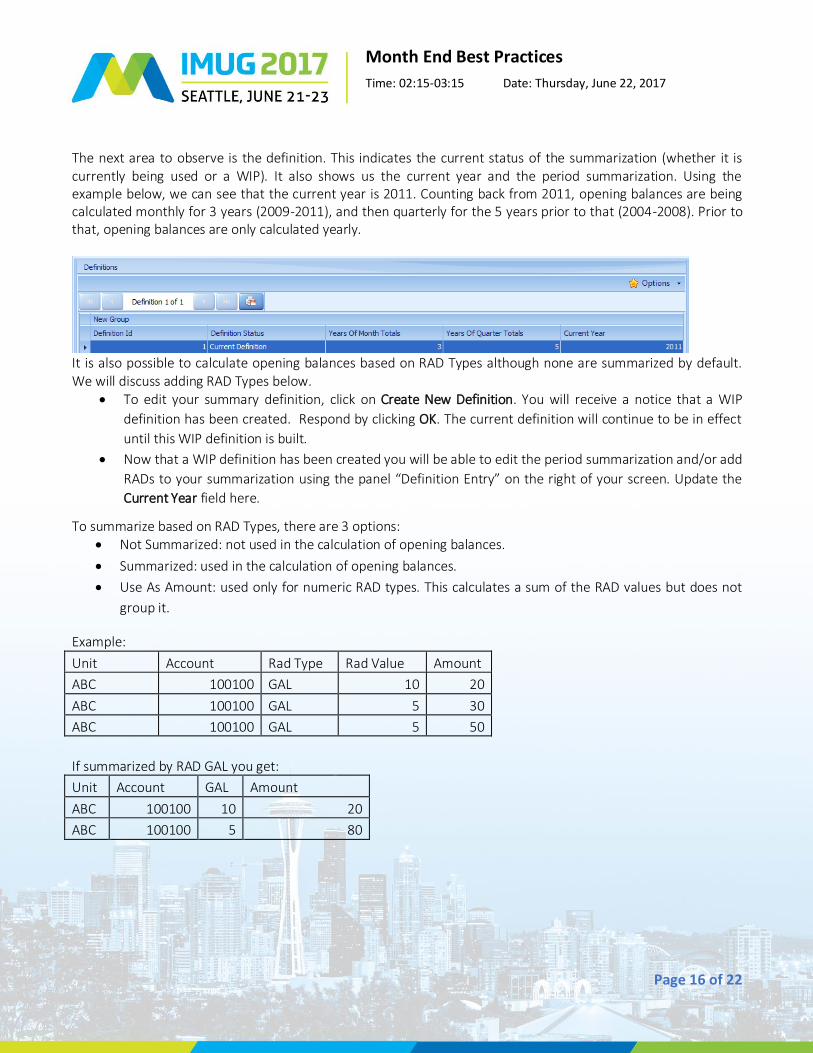
The next area to observe is the definition. This indicates the current status of the summarization (whether it is currently being used or a WIP). It also shows us the current year and the period summarization. Using the example below, we can see that the current year is 2011. Counting back from 2011, opening balances are being calculated monthly for 3 years (2009-2011), and then quarterly for the 5 years prior to that (2004-2008). Prior to that, opening balances are only calculated yearly.
It is also possible to calculate opening balances based on RAD Types although none are summarized by default. We will discuss adding RAD Types below.
To edit your summary definition, click on Create New Definition. You will receive a notice that a WIP
definition has been created. Respond by clicking OK. The current definition will continue to be in effect
until this WIP definition is built.
Now that a WIP definition has been created you will be able to edit the period summarization and/or add
RADs to your summarization using the panel “Definition Entry” on the right of your screen. Update the
Current Year field here.
To summarize based on RAD Types, there are 3 options: Not Summarized: not used in the calculation of opening balances.
Summarized: used in the calculation of opening balances.
Use As Amount: used only for numeric RAD types. This calculates a sum of the RAD values but does not
group it.
Example:
Unit Account Rad Type Rad Value Amount
ABC 100100 GAL 10 20
ABC 100100 GAL 5 30
ABC 100100 GAL 5 50
If summarized by RAD GAL you get:
Unit Account GAL Amount
ABC 100100 10 20
ABC 100100 5 80

Month End Best Practices
Time: 02:15-03:15 Date: Thursday, June 22, 2017
Page 17 of 22
If Use as Amount for RAD GAL you get:
Unit Account GAL Amount
BC 100100 20 100
If don't include RAD GAL you get:
Unit Account Amount
ABC 100100 100
Once the applicable changes have been made to your definition, click the Build Summary button on the menu bar then press the Submit button. Depending on the volume of transactions to roll-up to a summary can take from a few minutes, up to an hour to run.
Business Event Workflow
Multiview’s Workflow is a tool that allows end users to define a series of tasks and approvals to occur when a system event occurs such as sending a PO, receiving a pre-voucher, posting a voucher etc. An administrator creates a workflow diagram, describing the business logic they want to occur when that event happens. The system has the ability to electronically decide which path to take and what types of tasks and/or approvals are required under certain situations, by using data value associated with the item in workflow. The system also allows assignments to be handled conditionally based on electronic data. A business event is simply another type of event that can initiate workflow however, a user must initiate the event instead of the system. This can also be thought of as user defined workflow. Typically, the “diagram” for a business event is a simple check list of tasks to complete. Since there is no data (such as PO data or voucher data) associated with the event, there is no real opportunity to have different conditional paths taken based on that data, or conditional assignments based on the data.
Creating a Business Event Workflow To create a new business event workflow follow these steps:
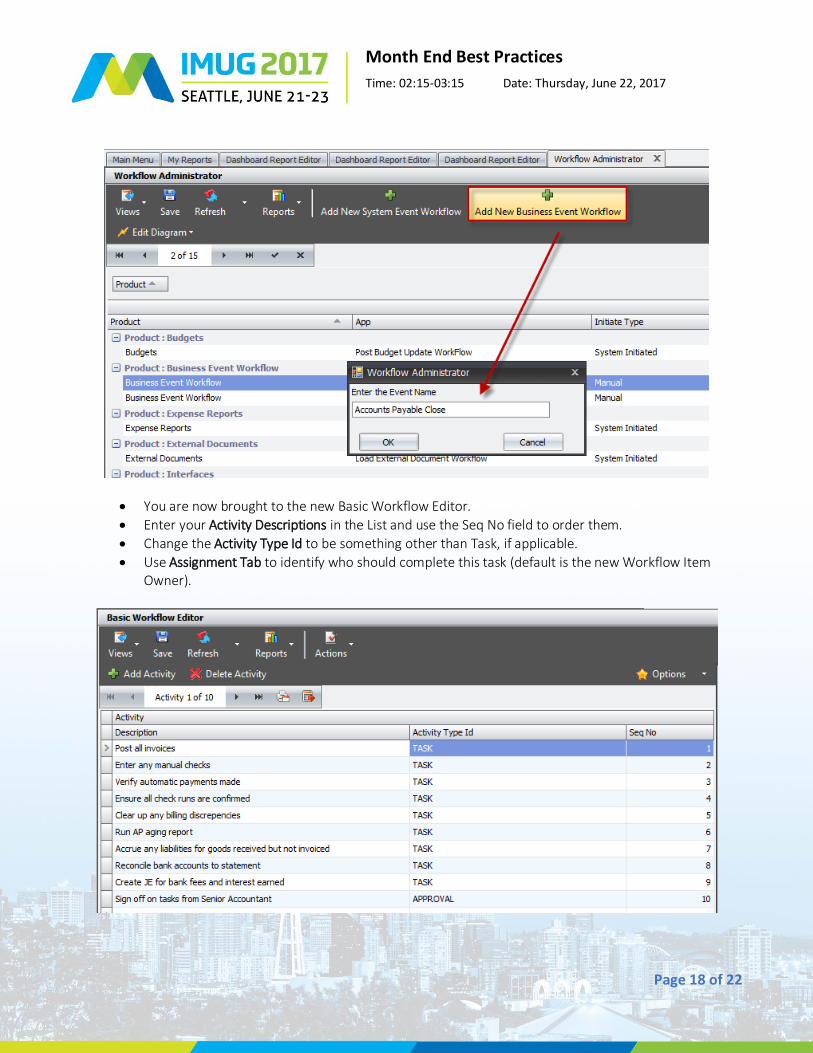
Navigate to Multiview -> Workflow -> Workflow Administrator
Press on the Add New Business Event Workflow button
Enter the Event Name (for example, Accounts Payable Close)
Month End Best Practices
Time: 02:15-03:15 Date: Thursday, June 22, 2017
Page 18 of 22
You are now brought to the new Basic Workflow Editor.
Enter your Activity Descriptions in the List and use the Seq No field to order them.
Change the Activity Type Id to be something other than Task, if applicable.
Use Assignment Tab to identify who should complete this task (default is the new Workflow Item Owner).

Month End Best Practices
Time: 02:15-03:15 Date: Thursday, June 22, 2017
Page 19 of 22
When done, press the Actions button on the top menu bar and select Make this version Current, or exit and use the Workflow Admin, Edit Diagram menu to make it current.
Initiating a new Business Event
Go to Multiview -> Workflow -> Workflow Inquiry (or Workflow Open Items screen) and press the
Add Business Event button.
Select the Event Type you want to start.
Enter a Description (such as the month you are closing)
Press Ok.
Month End Best Practices
Time: 02:15-03:15 Date: Thursday, June 22, 2017
Page 20 of 22
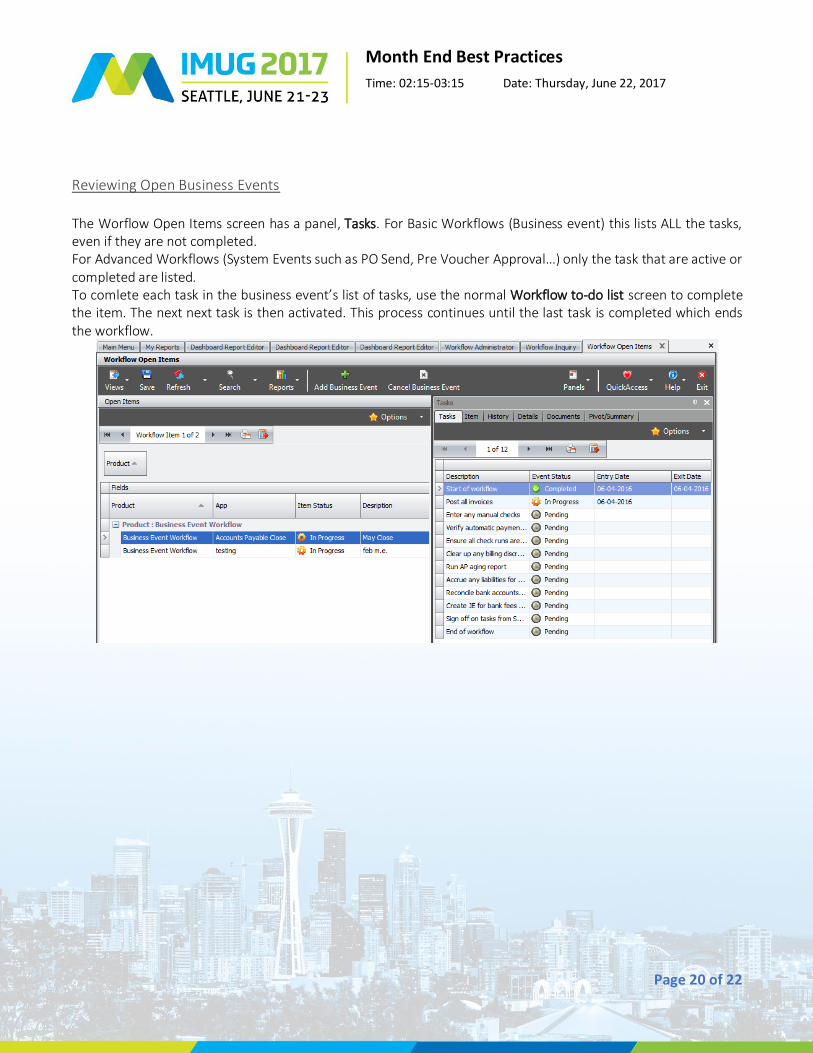
Reviewing Open Business Events The Worflow Open Items screen has a panel, Tasks. For Basic Workflows (Business event) this lists ALL the tasks, even if they are not completed. For Advanced Workflows (System Events such as PO Send, Pre Voucher Approval…) only the task that are active or completed are listed. To comlete each task in the business event’s list of tasks, use the normal Workflow to-do list screen to complete the item. The next next task is then activated. This process continues until the last task is completed which ends the workflow.
Month End Best Practices
Time: 02:15-03:15 Date: Thursday, June 22, 2017
Page 21 of 22
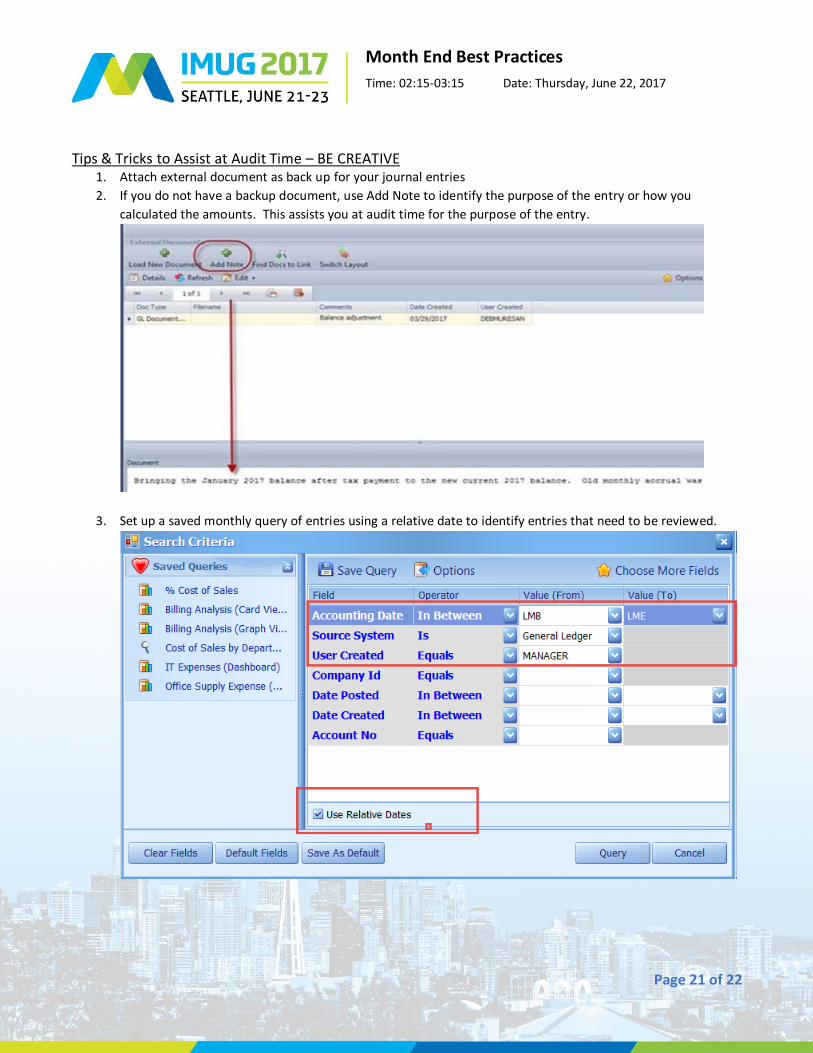
Tips & Tricks to Assist at Audit Time – BE CREATIVE 1. Attach external document as back up for your journal entries
2. If you do not have a backup document, use Add Note to identify the purpose of the entry or how you
calculated the amounts. This assists you at audit time for the purpose of the entry.
3. Set up a saved monthly query of entries using a relative date to identify entries that need to be reviewed.

Month End Best Practices
Time: 02:15-03:15 Date: Thursday, June 22, 2017
Page 22 of 22
4. Use Add Note to document approval or review of a Journal Entry.
5. This will result in documentation within the system of approval.
6. Give auditors Inquiry Only access to Multiview and let them review documentation and approvals within the
system. This will eliminate printing or downloading documents for them.