working with wood & tools - university of...
TRANSCRIPT

Working with Wood & Tools
Unit I Member ManualNational 4-H Wood Science Series
4-H 4421Reprinted September 2006

Working with Wood & ToolsWorking with Wood & Tools
AcknowledgementReprinted for use in Oregon.This educational material has been prepared for 4-H use by the National 4-H Wood Science Committee composed of representatives of Extension, U.S. Department of Agriculture, and the Cooperative Extension Service of the state Land-Grant Universities. Special thanks are extended to the Weyerhaeuser Company Foundation for financial and technical assistance. This material is published by the National 4-H Council, 7100 Connecticut Avenue, Chevy Chase, Maryland 20815.Programs and educational materials of National 4-H Council; Extension, United States Department of Agriculture; and all Cooperative Extension Services of the state Land-Grant Universities are available to all persons regardless of race, color, sex, age, religion, national origin, or handicap. All are equal opportunity employers.
ContentsNote to Parents and Home Helpers 3Introduction 4Marking and Measuring 6Cutting Wood 8Sanding and Smoothing 12Driving and Pulling Nails 14Using Glues and Wood Finishes 16Electric Wood Burning 19Working Plans 20Tool Glossary 31
Note to Parents and Home Helpers
You, as parents or home helpers, are the most important and influential persons in your children’s lives. You can nurture and cultivate
their interest in this project by guiding their planning, helping them carry out their projects, and recognizing them for a job well done.
The information in this manual can provide significant learning experiences for your children. Helping them plan the things they will learn and do, followed by assessing their progress based on these plans, will make their experience more worthwhile. Your children’s project leader usually helps them plan and evaluate their work. If this is not possible for some reason, you could fulfill this need, too.
Help children get the most out of this project:• Become familiar with
the material in this manual.
• Work with them to decide what tools, equipment,
and supplies they will need and what they can realistically expect to obtain.
• Thoroughly review the tasks they are expected to complete, making sure they understand them. DO NOT DO ANY OF THE WORK FOR THEM.
• Assist them in scheduling their time.• Discuss their progress with them from time to time.• Help them distinguish between a good job and a
poor one.• Help them to get to know themselves, including their
strengths and weaknesses, and to improve on their abilities.
• Review their accomplishments based on what goals they have for themselves. Avoid comparing
the progress of any one child with that of other members who may have different goals and equipment.

Working with Wood & Tools
IntroductionHi, Woodworker! This is the first unit of the 4-
H Wood Science series. This manual tells you some important things about using wood tools and building objects with wood.
Remember that the wood you will be using was once a tree in the forest! We know that the forest keeps growing, year after year. It keeps giving us a rich harvest of wood. Many people work with the forest and with forest products.
The forest also can be a fun area as well as a work area. Make a list of fun things people can do in the forest, like watching animals and camping.
Building things out of wood and wood products can be fun, too. In the back of this manual are plans
for some items you may want to make. There also are many other easy-to-build items that you could make. But before you start building anything, discuss your project with your parent or your leader. Make sure you have the materials and tools and work area that you need. Your parent or leader may be able to provide you with a good place to work.
There is a lot to say about wood and wood products! Remember this tip: the more you know about wood, the better you can use it. So get permission to tour places where people work with wood, such as lumberyards, carpenter or cabinet shops, forest areas, or lumber mills.
3
Measure and Mark Saw Boards Drive and Pull Nails
The Wood Science Program gives you a chance to do some fun things!

Working with Wood & Tools
4
Get a notebook and be prepared to jot down drawings, ideas, and important information about wood and wood tools. If you keep a good notebook, you will remember more things about wood as you go along!
The wood that you will be working with may be in the form of lumber, plywood, particleboard, or fiberboard. Even though all of this wood comes from trees, each product looks different and has different uses. In Unit I, you will be working more with lumber and plywood. You will work with other kinds of wood in later manuals.
Some types of wood cost more than others. Wood comes in different grades. The better the grade, the higher the price. You may save money by buying a lower grade and cutting the material you need from the good parts of the piece. Use low-cost lumber if you can find it.
Other things being equal, the heavier the wood, the harder and stronger it is. Some woods are more likely to split than others. Some woods are easier to cut, sand, and finish. Ask your parents, your leader, or the people at the lumberyard about suitable materials.
Sand Wood Build Things Use glue and finishes
And learn how to use wood tools to help you do these things correctly and easily.
Lumber and PlywoodLumber contains a lot of water when it is cut.
Much of this water evaporates into the air. When this happens, the wood begins to shrink! If the wood becomes wet again, it will get bigger, or swell. When wood loses water it also can warp, or change its shape.
Plywood is made by gluing together thin layers of wood. (See the picture below.) The grain in each layer goes in the opposite direction, shown by the arrows. Plywood does not shrink and swell as much as lumber. It does not crack or split as easily, either. But the edges
on plywood are harder to smooth and finish.Some plywood is made for outdoor use. If you
use the indoor plywood outside, it may come apart when it gets wet.
Plywood is normally sold in sheets 4 feet by 8 feet. But many lumberyards do sell smaller pieces. It comes in many thicknesses. Plywood called ¼-inch plywood is ¼ inch thick. ¾-inch plywood is ¾ inch thick.
Things you can doWe can divide all kinds of trees into two basic
wood groups, called hardwoods and softwoods. Hardwoods (such as oak, maple, and cottonwood) have broad, flat leaves. They usually turn colors and lose their leaves in the fall. Softwoods (such as pine and cedar) have needle-like or scale-like leaves and usually keep their leaves through the entire winter.• Make an exhibit showing the two major groups
of wood. Show what kinds of trees are in each group.
• Have your leader, or someone who works with wood, show you how plywood is made.
Plywood has three or more layers of wood. The grain of each is placed in the opposite direction of the layer below it.

Working with Wood & Tools
5
Marking and MeasuringEnglish Measure
If you want to make pieces of a certain size, you will have to measure and mark them before you do any cutting.
Examine a rule and find an inch mark. The mark (") shows inches. Find the number that relates to the inch mark. (1", 2", and so on).
Can you find a long mark that is halfway between the inch marks? This is called the half-inch mark. If the half-inch mark is equally divided into two parts, what is the correct name for each of those parts? If these parts are divided in two again, what would those parts be called? If they were divided still one more time, what would these tiny sections be called?
Look at the drawing below. The inch is divided into a number of smaller sections, all of which are labeled. Check your answers against the labels on the drawings.
Let’s practice a bit. Find the following points on your rule or square: 2", 5", 7½", 3¼", 61⁄8", and 103⁄16". If you have any trouble, ask your parent or leader to help you.
The unit of measurement larger than an inch is a foot. The mark (') shows feet.
There are 12 inches in 1 foot. Some 6-foot rules number the inches from 1 to 72. Others number the inches from 1 to 11, the next number being 1 foot; the next numbers are 1-1, meaning 1 foot, 1 inch, or 13 inches.
Metric MeasureThe metric system, which is coming into wide
use, uses a pure base 10 arithmetic. Each one of the counting units is 10 times larger than a smaller one.
Find a metric rule. The smallest unit of measure on the rule is a millimeter. Can you find two of the short marks on your rule that mark the beginning and the end of a millimeter?
Ten millimeters form a centimeter. A centimeter is actually about this long (______). See if you can find the nine marks between the two larger centimeter marks.
These marks divide the centimeter into 10 millimeters.
Ten centimeters form a decimeter. A decimeter is not shown in the measurement of most rules. Ten decimeters, or 100 centimeters, form a meter. A meter is about 39.37 inches long. One thousand millimeters form a meter.
Tools you will need:
An 8” x 12” steelutility square
A straight rule, yardstick, folding rule, or steel tape
A No. 2 or No. 3 pencil, kept sharp
(Above drawings not to scale)
(Above drawings not to scale)

Working with Wood & Tools
6
Measuring WoodTo build things well, you need to measure the
correct width and thickness of a piece of lumber. For example, if you buy a piece of 2 x 4 at the lumberyard, you should measure it to see how wide and thick it really is. Remember, the wood may have shrunk due to evaporation. If you do not measure the wood, you might find that you bought a piece that is actually too small for your project.
Let’s practice measuring on a piece of scrap lumber. Measure and mark spots ¾", 15⁄8", 3½", and 55⁄8" from the end. Have your parent or leader check your measurements. Did you use a sharp pencil or a dull pencil to mark the spot? Would that make any difference in how accurate your measurement is?
Hold the edge of the rule on the wood and make your mark at the exact spot. You may have watched a cabinetmaker marking his spot with a knife or scratch awl. Why does he use these tools instead of a pencil? Because his measurements will be more accurate.
If you have to measure a long distance, use a long rule. You increase the chances of a mistake if you move a short rule several times to complete the measurement.
Keep practicing until you can measure a certain distance from the end of the board and accurately mark the spot. The next thing to learn is how to make a line squarely across the board.
Squaring a LineA square line makes a perfectly square corner
with the edge of the board. If you would tip the board on edge so that the line pointed upward and the board was level, this line would look perfectly straight up and down. It would not slant toward either end of the board.
To square a line, you may use a tri-square, steel combination frame, utility square, or framing square.
Hold the handle of the square firmly against the edge of the board. Mark along the blade or the other part of the square with a sharp-pointed pencil. Make only one mark with the pencil. Don’t go over it a second time.
Just to see what happens, try holding one end of the handle of the square about 1⁄8" away from the edge of the board. What does this do to the direction of the line?
Some beginning woodworkers like to make lines across the edges and the back of the board as well. You could try this and see if it helps you make a straighter cut with your saw. To mark an edge, hold the handle of the square tightly against the face of the board with the blade of the square over the edge. Mark along the edge of the square.
To make the square line across the back of the board, hold the square handle against the same edge as when you made the mark on the face or the top side.
CAUTION! Remember to:1. Make sure the end you measure from is square to
begin with.2. Examine the end of the board. If you see cracks or
other defects, re-square beyond the damaged area.
Things you can do• Practice squaring lines on a piece of 2 x 4 until
you can make two perfect squares on the surface of the board.
• Measure a piece of 2 x 4. Mark down how wide and how thick it is. Start from the opposite side of the wood and make your measurement again. Is your measurement the same?
When squaring a line, use your utility square to see that the line is straight.

Working with Wood & Tools
7
Cutting WoodAre you ready now to practice making a square
cut with a hand saw along the marks that you drew on the board? Before you do any actual cutting, make sure you read this section very carefully.
If you look closely at the end of your piece of board, you will notice that it is made up of a collection of extremely fine fibers grown together. You could compare these fibers to broom straws that have been glued together.
The crosscut saw is a tool used to cut across the fibers of the wood. The teeth of a crosscut saw are filed and bent so the teeth act as a row of knife points on each side of the saw. The teeth are bent slightly as they go along, the first one to the right, the second to the left, and so on. This bending of the saw teeth is called
Tools you will need:
A crosscut hand saw (20" or 22" – 10 or 11 point hand saw) to cut off boards crosswise and to cut plywood in any directionA rip saw is recommended for cutting with the grain, not to cut end pieces.
Coping saw for cutting curves in thin wood
Safety goggles to keep sawdust and chips out of your eyes
When sawing a large board, use both your hand and your knee to brace it while you cut, or use a clamp.
Sharp points cut wood fibers. The kerf is the slit made by a saw.
Top view of crosscut saw teeth.
“setting.” This design makes the saw cut a strip wider than the blade so the saw can move back and forth easily.
What would a carpenter or cabinetmaker say about making a true and square cut? He or she would say to hold the saw straight up and down, or “square” with the board. What would happen if you held the saw at an angle so the top of the saw would slant to the left or right? Try it, just to see!

Working with Wood & Tools
8
Saw on the waste side of your line. If you saw right on the line, your board may be too short.
Remember, each time you cut the wood you remove some of it. The wood that is removed should be to the outside of the line.
Sometimes you may have to hold the saw flat so the teeth come into contact with the entire surface of the board at the same time. This may be necessary when using a miter box or other guiding device. When you do not have to do this, raise the handle of the saw so the saw blade is at about a 45-degree angle with the surface of the board on ordinary lumber. When sawing plywood, a flatter angle (about 15 degrees) is best.
Try cutting a board in this manner.Do you have a true, accurate, square cut? Did you
push down on the saw? The weight of the saw will make it cut fast enough. Did you hold the cut-off piece so it did not fall on the floor? If it is not held, the last little uncut portion of wood may break off. What could
happen to the nice corners of your piece of wood if it fell on the floor or the ground?
How would you use your square to check the accuracy of the saw cut? Hold the handle of the square tightly against the board and the blade of the square along your new cut. If you can see light between the square and the board, the cut is not square (See the illustration on this page.) Remember to check both crosswise and edgewise of the board.
Youth grip
45° angle for lumber and 15° for plywood
Poor cut
Square cut
Safety NotesHey Kids! Did you know…
1. A saw cuts very quickly. Handle it so that the teeth will not touch your skin.
2. Protect the saw by storing it in a safe place.
3. Prevent cutting your thumbs! Use a squared piece of wood to keep the saw on the cutting line.
4. Sawdust can be very slippery. Sweep it up after you cut.
5. Keep the saw sharp. It cuts much better and takes less work to do the job.
Working with Wood & Tools
9
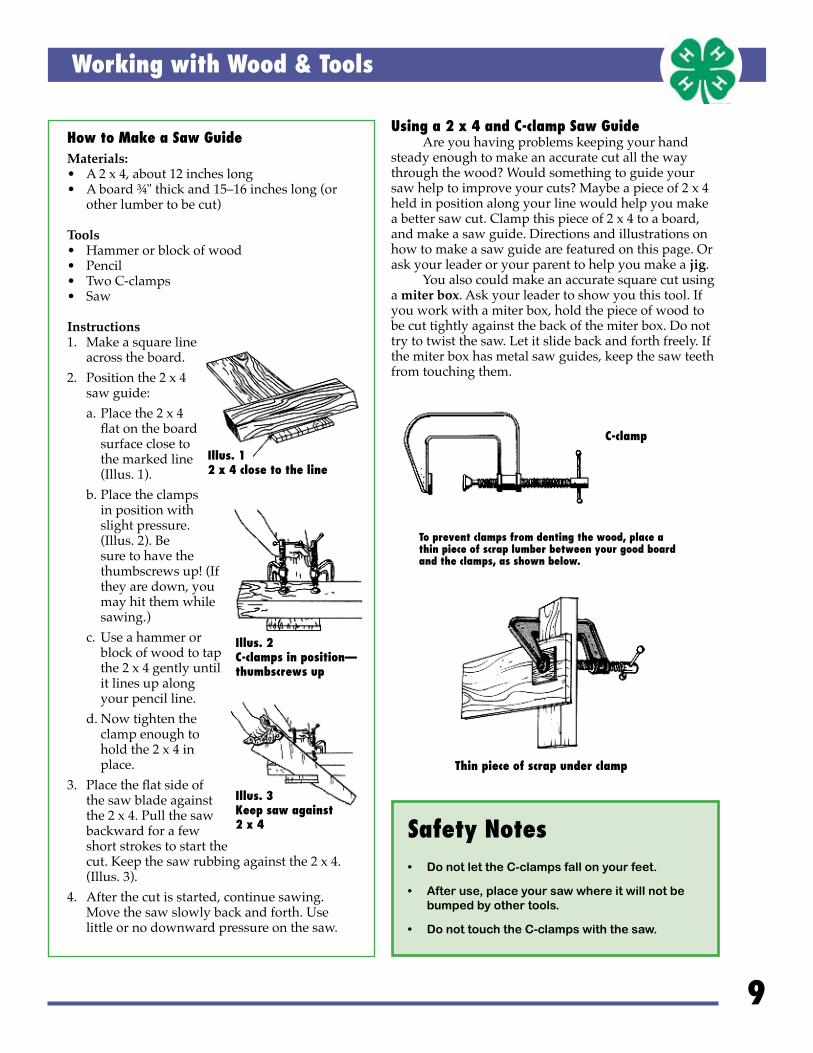
How to Make a Saw Guide Materials: • A 2 x 4, about 12 inches long • A board ¾" thick and 15–16 inches long (or
other lumber to be cut) Tools • Hammer or block of wood • Pencil • Two C-clamps • Saw
Instructions 1. Make a square line
across the board. 2. Position the 2 x 4
saw guide: a. Place the 2 x 4
flat on the board surface close to the marked line (Illus. 1).
b. Place the clamps in position with slight pressure. (Illus. 2). Be sure to have the thumbscrews up! (If they are down, you may hit them while sawing.)
c. Use a hammer or block of wood to tap the 2 x 4 gently until it lines up along your pencil line.
d. Now tighten the clamp enough to hold the 2 x 4 in place.
3. Place the flat side of the saw blade against the 2 x 4. Pull the saw backward for a few short strokes to start the cut. Keep the saw rubbing against the 2 x 4. (Illus. 3).
4. After the cut is started, continue sawing. Move the saw slowly back and forth. Use little or no downward pressure on the saw.
Using a 2 x 4 and C-clamp Saw GuideAre you having problems keeping your hand
steady enough to make an accurate cut all the way through the wood? Would something to guide your saw help to improve your cuts? Maybe a piece of 2 x 4 held in position along your line would help you make a better saw cut. Clamp this piece of 2 x 4 to a board, and make a saw guide. Directions and illustrations on how to make a saw guide are featured on this page. Or ask your leader or your parent to help you make a jig.
You also could make an accurate square cut using a miter box. Ask your leader to show you this tool. If you work with a miter box, hold the piece of wood to be cut tightly against the back of the miter box. Do not try to twist the saw. Let it slide back and forth freely. If the miter box has metal saw guides, keep the saw teeth from touching them.
Illus. 12 x 4 close to the line
Illus. 2C-clamps in position—thumbscrews up
Illus. 3Keep saw against 2 x 4
C-clamp
Thin piece of scrap under clamp
Safety Notes• DonotlettheC-clampsfallonyourfeet.
• Afteruse,placeyoursawwhereitwillnotbebumpedbyothertools.
• DonottouchtheC-clampswiththesaw.
To prevent clamps from denting the wood, place a thin piece of scrap lumber between your good board and the clamps, as shown below.

Working with Wood & Tools
Cutting CurvesThe coping saw is used commonly for cutting
curves in wood. It is a small, inexpensive saw with a narrow blade.
The blade is held in place by spring action of the frame. You bend the frame of some saws to put in the blade. On other saws you loosen or tighten the blade by turning the handle.
As the saw cuts, it tears and breaks fibers on one side of the board. This happens where the teeth come out of the wood on the cutting stroke. Place your pencil mark on the good side of the board. The wood fiber tears will be on the back side. The fiber tearing can be reduced by firmly pressing transparent or masking tape over the area where the teeth come out of the wood.
If you position the blade with the teeth pointing toward the handle of the saw, you will be less likely to break your blade. It will be cutting on the pull stroke instead of the push stroke.
Things you can do• Saw two pieces of wood, one with the saw
straight up and down, the other with the saw at a 45-degree angle. Use your square to check your cuts. Write down in your notebook how the two cut pieces are different, and which cut looks better.
• Make a saw guide, as shown in the illustration on page 9.
• If you have a coping saw, show how you can cut out a curved section in a piece of wood or how you can cut a hole from the center of a board. When cutting a hole, remember to bore a hole through the wood with a bit or drill. Take the saw blade off the handle and put it through the hole by itself before reattaching the handle
• See “Coping Saw Puzzle” in the Working Plans.
Coping saw in upright position
Saw square with the surface
For wood that is ¼" or less in thickness, use a blade with 15 or 20 teeth per inch. This is called a fine tooth blade. On wood ¾" thick, use a blade that has 10 teeth per inch. This blade is a coarse tooth blade.
The coping saw can be used to cut a hole in a small piece of wood. The frame of the saw must go around the outside of the board to do this. Have your leader help you bore a hole through the wood with an auger bit or a twist drill. Remove the saw blade from one end of the saw. Put the saw blade through the hole, and then put the saw blade into the handle again. A utility saw, compass saw, or keyhole saw is used frequently for this purpose.
Coping saw in horizontal position
10

Working with Wood & Tools
Sanding and SmoothingSometimes when you are sawing curves, they
become off-square across the length of the wood. They are rough on the edges and need to be smoothed. You can use a round file, a half-round wood rasp, or sandpaper on a dowel to do the job.
You also may want to smooth out a straight, square, crosscut saw cut. For this type of cut, you can use multi-blade wood-forming tools, rasps, or sandpaper. You also can smooth the saw cuts of the pieces in a kit or pre-cut unit.
When you use a rasp, move the tool lengthwise and diagonally. If you move it crosswise, you will be more likely to break off the edge of the wood.
When sanding the edges or sides of the wood, sand in the direction of the grain of wood. If you sand across the grain, scratch marks will show.
Use either a part of a sheet of sandpaper on a block of wood, or glue a full sheet of sandpaper to a piece of flat plywood. Move your piece of wood across the full sheet of sandpaper that you attached to the plywood. For rough cutting, use coarse grit flint paper or 50-grit garnet paper. For easy smoothing, use fine grit paper or 150- to 200-grit garnet paper.
Crosswise and lengthwise stroke
Keep board straight up and down
Tools you will need:
Coping saw for cutting curves in thin wood.
Multi-blade wood-forming tool to smooth and improve saw cuts
Sanding block to hold your sandpaper (commercial type may be used)
Sandpaper, available in various grades of fine, medium, and coarse grit. (Garnet paper is good, especially for hardwoods. It costs more than flint paper, but cuts faster and lasts longer.) Shown above is a full sheet of sandpaper glued to plywood.
Wood rasp
Shoe or utility rasp
11

Working with Wood & Tools
Smoothing Wood for a FinishSmooth the ends, edges, and sides of your pieces
prior to putting together your project. Then it will be ready for a finish. You may have to do a little touch-up sanding after assembling it. This depends upon how you intend to use the article you have made.
To smooth an end grain with sandpaper or rasp, work from both edges towards the center to prevent the grain from chipping off the corners.
For most exterior use, lumber and plywood as they come from the lumberyard are good enough for finishing. But if the wood is dirty or oily, clean these spots either by sandpapering or washing them with a damp cloth that is not too wet.
Prevent corner chipping.
If you are making a toy, a game, or an article for the home, you may want to sand it. Some plywood is sanded at the factory and requires only a small amount of additional sanding with fine sandpaper. Lumber is not factory sanded. If you look carefully, you may see straight lines or small ridges going across the board, which were made by the planing mill. Your sanding will cut these ridges, producing a flat surface when they are sanded away. You can remove these marks using medium and then fine sandpaper.
Prior to completion, always finish with fine sand-paper. Then carefully wipe off the dust with a clean cloth.
Sand with the grain.
Safety NotesRemember…
Use special care with rasps and files. Handles that are fastened securely will keep sharp ends from jabbing into your hands.
Things you can do• Name some tools that are used in smoothing and
sanding, and show these in an exhibit.• Show what motion should be used when filing
with a rasp, and when rubbing with sandpaper or a sander.
• See “Sandpaper Block” in the Working Plans.
12

Working with Wood & Tools
Tools you will need:
Driving and Pulling NailsThere are many kinds and lengths of nails. Each
is designed to do a special job. There are shingle nails, roofing nails, carpet tacks, and ring-shanked nails. Common nails, box nails, and wire nails have flat heads and are used where neatness is not important. Wire brads and finishing nails are used where neatness is important.
Most nails are ordered by “penny” size. The letter “d” is usually written instead of the word penny. One pound of six-penny nails may be written as 1 lb, 6d nails. The length of 2d to 10d nails can be figured out by multiplying the “d” number times ¼ inch and then adding ½ inch to that number. How long is a 6d nail? To find out, we multiply 6 times ¼, which equals 1½. To that we add ½, which gives us 2. So a 6d nail is 2 inches long.
To drive nails, we generally use a hammer. A hammer also can be used to pull and straighten nails.
See if you can drive several nails into some scrap wood without bending them, and without making hammer marks on the wood. If you do not strike the nail squarely each time with your hammer, what will happen?
If you had to show someone who has never held a hammer before how to drive a nail, how would you teach him or her?
Most beginners start off holding the hammer near the head, and then move their hand further back as they gain experience.
Grasp nail near the head Bent nails may be straightened by holding a hammer or a block against the nail and pounding the leaning side of the nail against the object with another hammer.
Sometimes a short nail can be straightened without holding anything against it.
Wire and common nails
Brads and finishing nails
Nail set to drive nails into surface of the wood without leaving hammer marks
A curve claw hammer with a small handle to pull, drive, and straighten nails. (You could also use a tack hammer.)
Safety goggles
Straightening a long nail
13
Working with Wood & Tools
Nails that are too large, too close to the end of the board, or driven into lumber that is too thin can split the wood. If you must nail near the end of the board or into thin wood, use a small nail or drill a hole a little smaller than the nail.
Safety NotesRemember…
• Keep your fingers out of the hammer’s way.
• Hit the target flat.
• Make sure the hammer head is on tight.
• Throw away damaged hammers.
Things you can do• Practice driving nails into scrap wood. Keep
the nails straight and the wood free of hammer marks. Also practice driving in nails that are near the end of the block of wood.
• Drive nails of different lengths into a block of wood. Stop hammering before the head of the nail reaches the surface of the wood. Then practice pulling out the nails without bending them.
• See “Nail Point Design” and “Letter Holder” in the Working Plans.
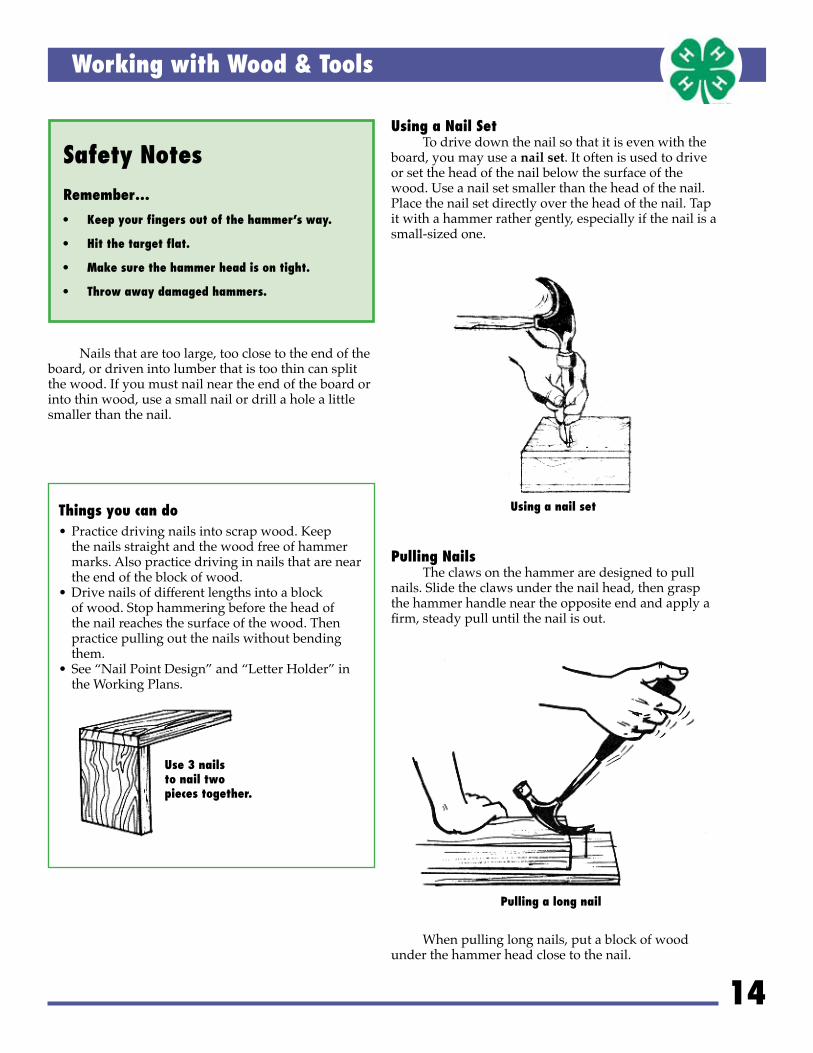
Using a Nail SetTo drive down the nail so that it is even with the
board, you may use a nail set. It often is used to drive or set the head of the nail below the surface of the wood. Use a nail set smaller than the head of the nail. Place the nail set directly over the head of the nail. Tap it with a hammer rather gently, especially if the nail is a small-sized one.
Pulling NailsThe claws on the hammer are designed to pull
nails. Slide the claws under the nail head, then grasp the hammer handle near the opposite end and apply a firm, steady pull until the nail is out.
When pulling long nails, put a block of wood under the hammer head close to the nail.
Use 3 nailsto nail twopieces together.
Using a nail set
Pulling a long nail
14

Working with Wood & Tools
15
Working with glue is an interesting and important part of woodworking. The advanced units of the 4-H Wood Science Program have information on several different kinds of glue. For now, you will do well to use the polyvinyl-resin glues. People know them as “white” or “yellow” glues, which you can buy in a hardware store in plastic squeeze bottles. Although they work well indoors, most of these kinds of glues fail to hold if they remain outdoors in humid weather. For wood materials that will be used outdoors, use a special glue that is prepared for that purpose.
Make sure always to read the directions on the label and follow them carefully.
Apply the proper amount of glue, as shown in Illustration A. When the joint is fastened together, a small amount of glue should squeeze out at the edges. No squeeze-out indicates a shortage of glue (B). Too much squeeze-out indicates a waste of glue (C). Wood covered with glue will not accept stain and finish in the same way as the natural wood, and it looks sloppy.
The pieces to be glued must be held together firmly while the glue is still drying. Do you have anything to hold together the pieces of wood while the glue is drying? Many woodworkers use C-clamps, pipe glue clamps, or a vise. Sometimes, nailing the pieces
together will work. If you do this, leave the nails in the wood after the glue is dry.
Outdoor Wood Finishes and Stains
Illus. ACorrect amount of glue applied
Illus. BNot enough glue! Apply a little more.
Tools you will need:
A 1-inch paintbrush to apply interior or exterior finishes
A homemade bench vise or a factory-made vise
One or two 3-inch C-clamps to hold pieces of wood together for glueing, or to clamp boards together when boring holes
Illus. COops! Too much glue! Wash it off before it dries.
Using Glues and Wood Finishes

Working with Wood & Tools
Finishes made for outdoor use are stronger than the finishes that are made for indoor use. This is why articles made for outdoor use require different finishes than those for indoor use. Some finishes are more difficult to apply than others.
Water repellent or waterseal is the simplest exterior wood finish. Apply it with a brush or dip the article in the finish. To give it a little color effect, you may tint the article lightly with color in oil, with the help of your leader or parent. Articles that have been treated with this material should be retreated each year for several years.
Outdoor wood stains soak into the wood without forming a film on the surface, and so will not peel off. They are easy-to-apply finishes that will make many of your projects look great! You can buy both oil base and latex stains of this type.
Apply the oil-base stain with a brush. Most of the stain will soak into the wood and give it color. One coat usually is enough on smooth wood. If it looks as though some of the stain is going to dry on the surface instead of soaking into the wood, wipe off the excess stain with a cloth. Remember that a cloth soaked in an oil-base stain can easily catch fire. When you are finished, be sure to spread the cloth out to dry in an open place where it would not damage anything should it happen to catch fire.
Special Hints• Follow the instructions carefully when using
water repellent solution, waterseal, and stain.
• Always use a brush, except where you use the dip method of waterseal.
• Do not breathe the vapors.
• Do not splash the materials on your skin.
• Dry any rags soaked with oil. Such rags can start burning by themselves.
• Wash the paint brush used to apply the oil-base stain in paint thinner. Then wash it in water and detergent. Wash latex-stain brushes in cool water with detergent.
On rough surfaces, make a second application of the stain before the first application is totally dry.
Latex stain should be applied with a brush in two coats. Apply the second coat after the first one dries, which takes about 2 hours. You can make small batches of latex stain yourself. Just mix 1 cup of exterior latex house paint with 2 cups of water.
In addition to the above materials, you also may want to use outdoor paint by itself. This type of finish covers the entire surface of the wood with a dark material. Outdoor paints also come in oil base and latex. The oil-base paint should be cleaned with a paint thinner or similar material, while the latex may be cleaned with water.
Applying exterior stain for outside use
16

Working with Wood & Tools
Indoor FinishesThere are two common types of clear indoor
finish materials. Oil finishes soak into the wood. Varnish-like materials form a layer of plastic on top of the wood. For the present, the oil finishes will give you the greater success. In more advanced units, you will learn how to use varnish-like finishes.
Oil finishes are sold at many paint stores. You can even mix your own batch. Either (1) dilute varnish at the rate of one part of varnish to two parts of paint thinner, or (2) dilute linseed oil at the rate of one part linseed oil to four parts of paint thinner.
Here’s how to apply an oil-based finish:1. Start with clean equipment and materials. Avoid dust
in the air or on the wood. Wipe off all the sanding dust.
2. Apply the first coat of finish with a brush onto wood that is dry and clean.
3. Fifteen minutes later, wipe the wood with a dry, clean cloth. This removes the finish that has not soaked into the wood. Remember to dry or dispose of any oil-base rags in order to prevent fire.
4. After 24 hours, sand with 220-grit sandpaper or other material. Wipe off the dust with a clean cloth.
5. Apply the second coat of finish with a brush. Let the finish soak in for 15 minutes. Then, wipe it with a clean, dry cloth to remove the finish material that has not soaked into the wood.
6. After 24 hours, sand again. Then polish with furniture polish or wax if you wish.
17
Special HintsThe oil-base finish can be purchased with color in it so that you can stain the wood at the same time you apply the finish. If you mix your own finish, you can color it by adding either color in oil or universal color.
Wash your paint brush in paint thinner. Then wash it in warm water and detergent. This way, your brush with be ready for you to use again when you need it and will last a long while.
Safety NotesYou are going to be painting and varnishing now. Most paints contain chemicals that could explode around fire or that could be poisonous to you.
• Keep paints away from an open flame. Do all your painting in a room with lots of fresh air.
• Put your clean-up rags into a covered metal can. KEEP THE LID ON IT! Otherwise, “spontaneous combustion” can take place and cause a fire.
Things you can do• Give a talk on the proper way to apply and store
glue.• List the different ways pieces of wood can be held
together while glue is drying. Experiment with some of these ways as time permits.
• As a group, exhibit your wood-stain projects in a public place. Be prepared to explain to your audience how outdoor and indoor finishes are applied.
• See the other fun ideas of things to make in the Work Plans section.

Working with Wood & Tools
Electric Wood BurningPractice Burning Wood!• Plug in your burning tool. Let it heat 3 to 5 minutes.
Keep your fingers away from the hot tip!• Touch your practice wood with the tip to see if it is
hot enough to burn the wood.• When it is hot enough to burn the wood, try this on
your practice wood: a. Make a line from corner to corner of the wood
by slowly moving the tool with very little downward pressure.
b. Make a shorter line. Move the tool very slowly with more pressure.
c. Place the sloping side of the tip on the wood. Move it very slowly for ¼ inch.
d. Touch the wood with the pointed tip several times.
Check Your Work• What movement of the tip made shallow, narrow
lines?• What movement made deep, wide lines?• What kind of mark did the pointed tip make?• What did the sloping side of the tip do? Keep your hot woodburning tool out of the reach of
your brothers and sisters. It might burn their fingers!
Now, for the Real Thing!• Burn your design into the wood you chose for a wall
plaque, hot pad, or other item.
Check Your Work Again• Are the lines free of breaks or gaps? • Is each line uniform in width? • Is every line the same width?
Remember These Facts About Wood• Some woods work better than others for wood
burning. The best ones are balsa, basswood, poplar or aspen, white pine, sugar pine, or close-grain hardwoods. Other good woods include redwood, cedar, and ponderosa pine.
• It is easier to burn a good, uniform line into wood whose grain is not so obvious.
Tools and materials you will need:
• A wood burning tool (see picture)• A scrap piece of wood at least 3 inches on each
side for practice• A pattern or your own design for a wall plaque
or hot pad• A good piece of wood about 5½ inches on a side
or whatever size your own design needs
18

Working with Wood & Tools
Working PlansYou can make any of the following items, or
some of your own. Change the drawings or use other materials if you like. Your project leader will have some ideas, too.
There are several ways to make each article. Use the skills you have learned to experiment a little, or ask your project leader for advice on how to proceed. The most important thing is that you have fun, and do your woodworking safely!
Coping Saw PuzzleMaterials needed• A piece of ¼" plywood or paneling or ¼" medium-
density hardboard about 6" x 8"• One plastic or paper bag or large envelope to hold
the completed puzzleTools needed• Square• Pencil• Saw for square cuts• Coping saw or a jigsaw for curved cutsInstructions1. Draw a wavy line around the piece near the edge.
Keep the line at least ½" and not more than 1¼" from the edge.
19
2. Cut along this line to cut out the center piece.3. Draw more wavy lines on the center piece for the
puzzle.4. Cut along these lines to make your puzzle. Put each
piece in the paper bag or envelope. Do not lose any of the puzzle.
Sandpaper BlockUseHolds ¼ sheet of sandpaper. Most sandpaper is 9" x 11". Sandpaper held on a block lasts much longer than the same paper ruffled up in your hand. The block can be improved slightly by gluing a piece of felt or thin rubber on the sanding side of the block.Materials needed• One piece of wood 2½ to 3” wide and 5½” long (this
can be either ¾ or 11⁄8" thick).• Finish materials described in this publication• Felt or foam rubber if desiredTools needed• Square• Pencil• Saw• Sandpaper (80-grit for rough lumber and 120-grit
for smooth lumber)
InstructionsApply a penetrating finish to all surfaces of the sandpaper block, unless you plan to glue on a piece of felt or thin foam rubber. Do not apply finish to areas to be covered with these materials.

Working with Wood & Tools
20
Nail Point DesignUseMade from ¾" or thinner lumber, the design can be used as a hot-pad or wall plaque. Made from a piece of material 1½" thick, or thicker, it can be used as a paperweight or a decorative object for a shelf.Materials needed:• A piece of lumber about ¾" x 5½" x 5½" • Smoothing or sanding materialsTools needed• Saw• Square• Pencil• Hammer• Plane, wood-forming tool, wood rasp, or coarse
sandpaper if you plan to slope or bevel the edges• 1" wire nails to form a fine line of nail point holes• Six-penny nails to form a medium line of nail point
holes• Ten-penny nails to form a heavy line of nail point
holes• Sandpaper (80-grit for rough wood and 120-grit for
smooth wood)Instructions1. Use your hammer and nails to make lines of nail
point holes to replace your pencil lines.2. Use the sandpaper to sand off the pencil lines. Brush
the dust out of the nail point holes.
Letter Holder Materials needed• One piece of 1 x 2 (actual dimension approximately
¾" x 1½") 6" long• Enough plywood or paneling to cut two pieces each
4" x 6"• Eight 1-inch wire brads• Glue• Smoothing or sanding materials described in this
manualTools needed• Square• Pencil• A saw for square-cuts• A coping saw or jigsaw for curve cuts• Pencil compass• Hammer• Nail set• Sandpaper (80-grit for rough wood and 120-grit for
smooth wood)Instructions1. Cut the center piece to measure 6" long.
2. Mark the cutout lines for the side pieces. Remember, most plywood and paneling has one side better than the other side. Arrange your pieces so the best side of the plywood will be the outside of both the front and back piece. You may want to nail both pieces together and cut them at the same time.
Other ideas• Add designs or decals to the side pieces.• Use different material and change the shape.• Make it larger so it can serve as a napkin holder.

Working with Wood & Tools
21
Wire WiggleyUseYour wire wiggley can have many uses. It can be a table decoration or a paperweight. It can be a decorative ornament to place on a shelf. You also can make it a pencil holder.Materials needed• A piece of wood about ¾" thick and 2½" x 2½" for
base• About 2 feet or so of 19-gauge bright or annealed
iron wire• Sanding and smoothing materials described in this
publicationTools needed• Square• Saw• Pencil• A wire brad, or a wire nail of the same wire gauge as
the wire used, to punch a hole in the block to insert the end of the wire.
• Hammer• Sandpaper (80-grit for rough wood and 120-grit for
smooth wood)Instructions1. Bend your wire to the desired shape.2. Decide where you want one or both ends of the
wire to stick into the wooden base. Make a hole for the wire about 3⁄8" deep into the wood using your hammer and wire nail. Be careful not to mar the wood when you pull out the nail.
Consider making changes in this plan1. Use two or more pieces of wood of different sizes for
the base.2. Slope or gauge out different areas of the end of the
base.3. Use fine aluminum or brass welding rod as a wire.
You may have to use a pair of pliers to bend the rod.

Working with Wood & Tools
22
StiltsMaterials needed• A 1 x 6 at least 10" long• Two pieces of 1 x 2s (pine, fir, or other wood) around
5' long• Six 2-inch nails• Paint or varnish (optional)Tools needed• Square and pencil • Cutting saw • HammerInstructions1. Saw two pieces from a 1" x 6" board as shown in the
diagram. Your final pieces should each measure 3½" and 2" across, and 10" long on the side that touches the pole.
2. Nail these parts to the 5' poles with 6-penny finish nails 2" long. Place each nail 4" apart, the first and last nail being 1" from the edge of the wood. Drive the nails up tight and flush with the surface.
3. A finish is not necessary, but paint or varnish will protect the wood and improve appearance.
4. The length of stilts and height of steps may be changed to suit your size.

Working with Wood & Tools
23
Rabbit PuzzleUseMakes a great present for your brother or sister!Materials needed• A piece of 5/4 or 2 x 4 wood about 3½" long (the 5/4
material is about 11⁄16" thick and the 2 x 4 is about 1½" thick)
• Carbon paper• Whatever finish materials you selectTools needed• Pencil• Coping saw with coarse teeth, or jigsaw with narrow
blade• Sandpaper (80-grit for rough surfaces and 120-grit
for smooth surfaces)Instructions:1. Copy the drawing onto your section of wood, using
the pencil and carbon paper.2. Use your special saw to cut out the pattern from the
wood.3. Rub over the edges with various grades of
sandpaper.4. If you care to decorate your rabbit puzzle, make a
design with your wood burning kit or use a wood finish.

Working with Wood & Tools
24
4. Glue the clothespin to the end of the ¾" x 2" x 2" piece.
5. When the glue dries, screw the pin down.6. Glue the ¾" x 2" x 2" piece to the ¾" x 3" x 3½" piece.
The assembly should be on center and flush with the back.
7. Apply a coat of finish.
Picture FramesMaterials needed• ½" x ¾" stock—size will depend on size of picture• Heavy cardboard—size will depend on size of
picture• Glue• 1" bradsTools needed• Square and pencil• Utility knife• Saw• Hammer• Sandpaper• Stain and varnishInstructions1. Cut the cardboard 1½" longer and 1½" wider
than the picture to be framed.2. Cut two pieces of stock the same length as
the cardboard. Cut two more pieces the width of the picture.
3. Glue and nail the frame together.4. Sand and finish.5. Glue the picture to the cardboard, leaving a ¾"
margin all around.6. Glue the frame to the cardboard. NOTE: A piece of string may be glued or fastened on
small tacks in back of picture to hang on wall. (Tacks should be put into frame.)
Note HolderMaterials needed• One piece of wood ¾" x 2" x 2" (actual dimensions)• One piece of wood ¾" x 3" x 3½"• One clothespin• Two 1½" nails• One ½" woodscrew• Glue• ShellacTools needed• Square and pencil• Saw• Drill• Sandpaper• Brush• Hammer• ScrewdriverInstructions:1. Cut the pieces to size.2. Sand the pieces smooth.3. Drill a hole in one side piece of the clothespin, about
½" from the open end.
Working with Wood & Tools
25
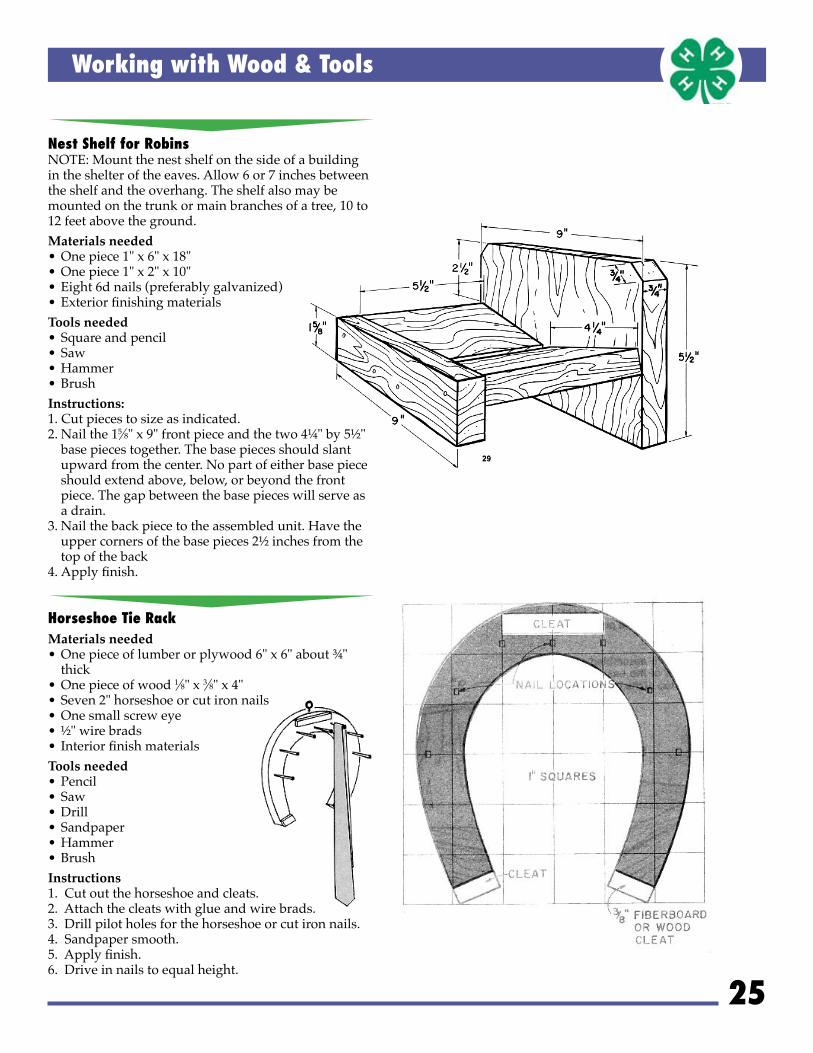
Nest Shelf for RobinsNOTE: Mount the nest shelf on the side of a building in the shelter of the eaves. Allow 6 or 7 inches between the shelf and the overhang. The shelf also may be mounted on the trunk or main branches of a tree, 10 to 12 feet above the ground.Materials needed• One piece 1" x 6" x 18"• One piece 1" x 2" x 10"• Eight 6d nails (preferably galvanized)• Exterior finishing materials Tools needed • Square and pencil• Saw • Hammer • Brush Instructions:1. Cut pieces to size as indicated.2. Nail the 15⁄8" x 9" front piece and the two 4¼" by 5½"
base pieces together. The base pieces should slant upward from the center. No part of either base piece should extend above, below, or beyond the front piece. The gap between the base pieces will serve as a drain.
3. Nail the back piece to the assembled unit. Have the upper corners of the base pieces 2½ inches from the top of the back
4. Apply finish.
Horseshoe Tie RackMaterials needed• One piece of lumber or plywood 6" x 6" about ¾"
thick• One piece of wood 1⁄8" x 3⁄8" x 4"• Seven 2" horseshoe or cut iron nails• One small screw eye• ½" wire brads• Interior finish materialsTools needed• Pencil• Saw• Drill• Sandpaper• Hammer• BrushInstructions1. Cut out the horseshoe and cleats.2. Attach the cleats with glue and wire brads.3. Drill pilot holes for the horseshoe or cut iron nails.4. Sandpaper smooth.5. Apply finish.6. Drive in nails to equal height.

Working with Wood & Tools
26
Tool GlossaryAugerA tool with a central feed screw, a pair of cutting lips, and a crosswise handle used for boring holes in wood
AwlA pointed instrument that makes small holes in wood for marking
C-clampAn instrument used to hold an object tightly together, made in the form of a “C”
Coping sawA saw used for cutting curves in wood
Crosscut saw A saw used to cut easily across the fibers of wood
Garnet paperA type of sandpaper that uses the mineral garnet as its rubbing material
JigA tool used to keep the correct position between a piece of wood and the tool used to work with it
JigsawA saw with fine teeth used for cutting odd-shaped articles
Miter boxA device for guiding a hand saw at the proper angle
Nail setAn instrument used to drive nails into wood without leaving hammer marks
PennyThe size of a nail, indicated by the letter “d”
RaspA coarse file made with cutting points
Trace patternA picture plan that has a full-size outline of the desired shape of the object to be made
Twist drillAn instrument with an edged end that makes holes in wood by revolving into it
Utility squareAn L-shaped rule that forms a 90-degree angle
ViseAn instrument that holds your work close together by squeezing with two mechanical jaws
This publication was produced and distributed in furtherance of the Acts of Congress of May 8 and June 30, 1914. Extension work is a cooperative program of Oregon State University, the U.S. Department of Agriculture, and Oregon counties. Oregon State University Extension Service offers educational programs, activities, and materials—without discrimination based on race, color, religion, sex, sexual orientation, national origin, age, marital status, disability, or disabled veteran or Vietnam-era veteran status. Oregon State University Extension Service is an Equal Opportunity Employer.
Reprinted September 2006