wireless networking best practices guide · oracle micros hardware wireless networking best...
TRANSCRIPT

Oracle® MICROS HardwareWireless Networking Best Practices Guide
E80342-05March 2020

Oracle MICROS Hardware Wireless Networking Best Practices Guide,
E80342-05
Copyright © 2011, 2020, Oracle and/or its affiliates. All rights reserved.
This software and related documentation are provided under a license agreement containing restrictions onuse and disclosure and are protected by intellectual property laws. Except as expressly permitted in yourlicense agreement or allowed by law, you may not use, copy, reproduce, translate, broadcast, modify,license, transmit, distribute, exhibit, perform, publish, or display any part, in any form, or by any means.Reverse engineering, disassembly, or decompilation of this software, unless required by law forinteroperability, is prohibited.
The information contained herein is subject to change without notice and is not warranted to be error-free. Ifyou find any errors, please report them to us in writing.
If this is software or related documentation that is delivered to the U.S. Government or anyone licensing it onbehalf of the U.S. Government, then the following notice is applicable:
U.S. GOVERNMENT END USERS: Oracle programs, including any operating system, integrated software,any programs installed on the hardware, and/or documentation, delivered to U.S. Government end users are"commercial computer software" pursuant to the applicable Federal Acquisition Regulation and agency-specific supplemental regulations. As such, use, duplication, disclosure, modification, and adaptation of theprograms, including any operating system, integrated software, any programs installed on the hardware,and/or documentation, shall be subject to license terms and license restrictions applicable to the programs.No other rights are granted to the U.S. Government.
This software or hardware is developed for general use in a variety of information management applications.It is not developed or intended for use in any inherently dangerous applications, including applications thatmay create a risk of personal injury. If you use this software or hardware in dangerous applications, then youshall be responsible to take all appropriate fail-safe, backup, redundancy, and other measures to ensure itssafe use. Oracle Corporation and its affiliates disclaim any liability for any damages caused by use of thissoftware or hardware in dangerous applications.
Oracle and Java are registered trademarks of Oracle and/or its affiliates. Other names may be trademarks oftheir respective owners.
Intel and Intel Xeon are trademarks or registered trademarks of Intel Corporation. All SPARC trademarks areused under license and are trademarks or registered trademarks of SPARC International, Inc. AMD, Opteron,the AMD logo, and the AMD Opteron logo are trademarks or registered trademarks of Advanced MicroDevices. UNIX is a registered trademark of The Open Group.
This software or hardware and documentation may provide access to or information about content, products,and services from third parties. Oracle Corporation and its affiliates are not responsible for and expresslydisclaim all warranties of any kind with respect to third-party content, products, and services unless otherwiseset forth in an applicable agreement between you and Oracle. Oracle Corporation and its affiliates will not beresponsible for any loss, costs, or damages incurred due to your access to or use of third-party content,products, or services, except as set forth in an applicable agreement between you and Oracle.

Contents
Preface
1 Recommendations
2 Configuring the Workstation 625/655
Connecting the Workstation 625/655 to a Wireless Network 2-1
Configuring Bluetooth on the Workstation 625/655 2-1
3 Configuring the Compact Workstation 310
Connecting the Compact Workstation 310 to a Wireless Network 3-1
Configuring Bluetooth on the Compact Workstation 310 3-1
4 Configuring the Tablet 720
Connecting the Tablet 720 to a Wireless Network 4-1
Configuring Bluetooth on the Tablet 720 4-1
5 Configuring the Tablet 721
Connecting the Tablet 721 to a Wireless Network 5-1
Configuring Bluetooth on the Tablet 721 5-1
6 Configuring the Wireless Workstation 6 Series
Pre-Configuration Requirements for the Wireless WS6 6-1
Configuring the Wireless WS6 and the Mini-PCI Wireless Card 6-1
7 Configuring the Tablet E-Series and the Wireless Card
iii
8 Configuring the Tablet R-Series and the Wireless Card
9 Configuring the Wireless Workstation 5A
Pre-Configuration Requirements for the Microsoft Windows CE Wireless WS5A 9-1
Configuring the Microsoft Windows CE Wireless WS5A for (WPA2-PSK) Wi-FiProtected Access 2 with Pre-Shared Key 9-2
Configuring the Microsoft Windows CE Wireless WS5A for (WPA2) Wi-Fi ProtectedAccess 2 with PEAP Authentication 9-4
Pre-Configuration Requirements for the Microsoft Windows Embedded POSReady2009 Wireless WS5A 9-6
Configuring the Microsoft Windows Embedded POSReady 2009 Wireless WS5Aand the Mini-PCI Wireless Card 9-6
10
Configuring the Wireless Workstation 5
Pre-Configuration Requirements for the Wireless WS5 10-1
Configuring the Wireless WS5 and the Mini-PCI Wireless Card 10-1
11
Configuring the Wireless Workstation 4 LX
Pre-Configuration Requirements for the Wireless WS4 LX 11-1
Configuring the Wireless WS4 LX and the Mini-PCI Wireless Card 11-1
12
Configuring the Wireless PC Workstation 2015
Pre-Configuration Requirements for the Microsoft Windows Embedded POSReady2009 PCWS 2015 12-1
Configuring the Microsoft Windows Embedded POSReady 2009 Wireless PCWS2015 with the Windows Wireless Zero Configuration (WZC) Service 12-2
Configuring the Microsoft Windows Embedded POSReady 2009 Wireless PCWS2015 Using the Ralink WLAN Utility 12-4
Pre-Configuration Requirements for the Microsoft Windows 7 Wireless PCWS 2015 12-6
Configuring the Microsoft Windows 7 Wireless PCWS 2015 and the Mini-PCIWireless Card 12-7
13
Configuring the Wireless Keyboard Workstation 270
Pre-Configuration Requirements for the Wireless KW270 13-1
Configuring the Wireless KW270 and the USB Wireless Card 13-1
iv

14
Configuring the MC40
Pre-Configuration Requirements for the MC40 14-1
Configuring the MC40 14-1
15
Configuring the MC55A
Pre-Configuration Requirements for the MC55A 15-1
Configuring the MC55A 15-1
16
Configuring the DT430
Pre-Configuration Requirements for the DT430 16-1
Configuring the DT430 16-1
v

Preface
Audience
This document is intended for installers, dealers, customer service representatives,training personnel, and MIS/IT personnel.
This document assumes the reader has the following knowledge and expertise:
• Operational understanding of personal computers
• Understanding of basic network concepts
Customer Support
To contact Oracle Customer Support, access My Oracle Support at the following URL:
https://support.oracle.com
When contacting Customer Support, please provide the following:
• Product version and program/module name
• Functional and technical description of the problem (include business impact)
• Detailed step-by-step instructions to re-create
• Exact error message received
• Screen shots of each step you take
Documentation
Oracle Hospitality product documentation is available on the Oracle Help Center at http://docs.oracle.com/en/industries/hospitality/.
Revision History
Date Description of Change
July 2015 • Rebranded to Oracle.• Added information for the WS 6, Tablet E-
Series, Tablet R-Series, MC40, andDT430.
• Removed legacy products no longersupported.
• Updated copyright information.
April 2016 • Added information for the WS6 Series.• Updated the Oracle Help Center link in
the Documentation section.
July 2016 • Added information for the support of theMicrosoft Windows 10 IoT Enterpriseoperating system on the Workstation 610.
Preface
vi
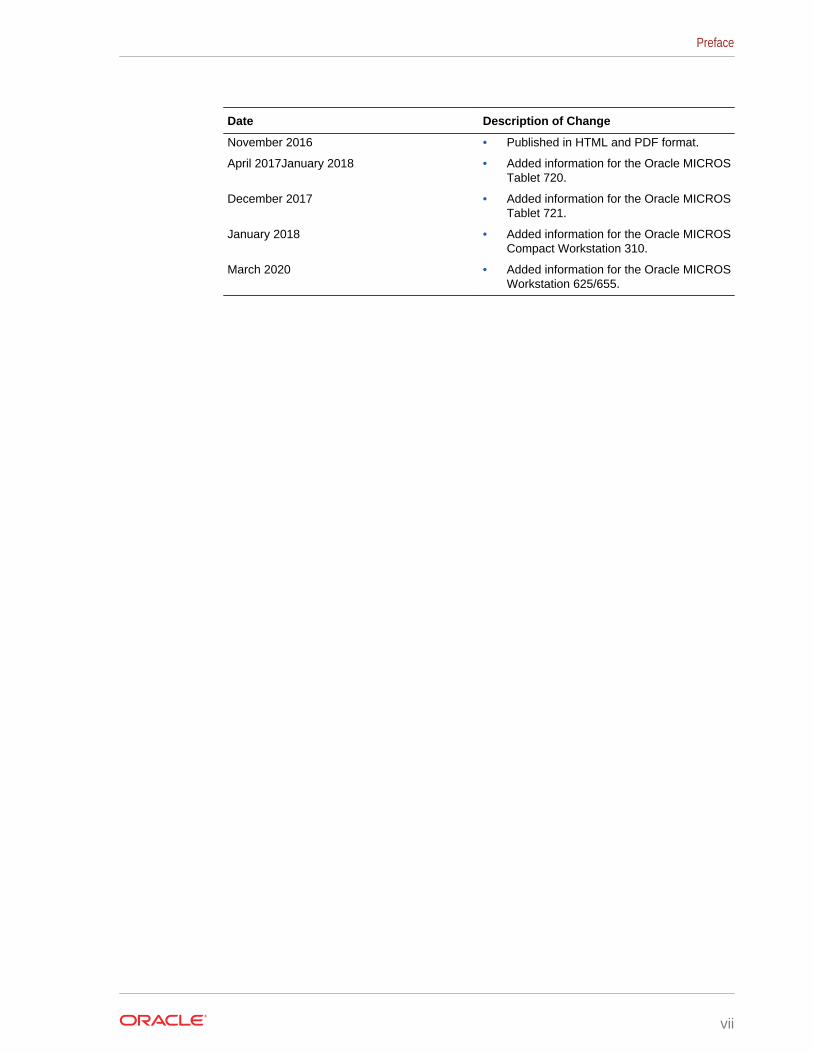
Date Description of Change
November 2016 • Published in HTML and PDF format.
April 2017January 2018 • Added information for the Oracle MICROSTablet 720.
December 2017 • Added information for the Oracle MICROSTablet 721.
January 2018 • Added information for the Oracle MICROSCompact Workstation 310.
March 2020 • Added information for the Oracle MICROSWorkstation 625/655.
Preface
vii
1Recommendations
The PCI DSS Wireless Guidelines Informational Supplement version 2.0 referencesseveral security methods. This document specifies the highest possible securitymethod for each device. However, it is sometimes not practical to use all therecommendations specified in the supplement. See below:
From Section 4.4.1 Summary of Recommendations:
• WPA or WPA2 Enterprise mode with 802.1X authentication and AES encryption isrecommended for WLAN networks.
• It is recommended that WPA2 Personal mode be used with a minimum 13-character random passphrase and AES encryption.
• Pre-Shared Keys should be changed on a regular basis.
• Centralized management systems that can control and configure distributedwireless networks are commended.
• The use of WEP in the CDE is prohibited for all deployment after June 30, 2010.
PCI Wireless requirements can be broken down into two primary categories:
1. Generally applicable wireless requirements. These are requirements that allorganizations should have in place to protect their networks from attacks by way ofrogue or unknown wireless Access Points (APs) and clients. They apply toorganizations regardless of their use of wireless technology and regardless ofwhether the wireless technology is a part of the CDE or not. As a result, they aregenerally applicable to organizations that wish to comply with PCI DSS.
2. Requirements applicable for in-scope wireless networks. These are requirementsthat all organizations that transmit payment card information over wirelesstechnology should have in place to protect those systems. They are specific to theusage of wireless technology that is in scope for PCI DSS compliance, namely theCardholder Data Environment (CDE). These requirements apply in addition to theuniversally applicable set of requirements.
This document assumes that all Access Points operate inside the CDE scope asexplained in the PCI DSS Wireless Implementation Guide 2.0.
For wireless environments, change wireless vendor defaults, including but not limitedto:
• Wireless Equivalency Privacy (WEP) keys
• Default Services Set Identifiers (SSID)
• Default Passwords
• SNMP Community Strings
• Disable SSID Broadcasts
• Enable Wi-Fi protected access (WPA or WPA2) technology for encryption EAPauthentication when WPA-capable
Default settings must be changed before the site goes live to maintain PCI compliancy.
1-1
All wireless encryption keys must be changed at least once a year to maintain PCIcompliancy.
For wireless networks transmitting cardholder data, encrypt the transmissions by usingWi-Fi protected access (WPA or WPA2) technology, IPSEC VPN, or SSL/TLS. Neverrely exclusively on wired equivalent privacy (WEP) to protect confidentiality andaccess to a wireless LAN.
If WEP is used, do the following:
• Use with a minimum 104-bit encryption key and 24 bit-initialization value
• Use ONLY in conjunction with Wi-Fi protected access (WPA or WPA2) technology,VPN, or SSL/TLS
• Rotate shared WEP keys quarterly (or automatically if the technology permits)
• Rotate shared WEP keys whenever there are changes in personnel
• Restrict access based on media access code (MAC) address
Chapter 1
1-2

2Configuring the Workstation 625/655
Select configurations of the Oracle MICROS Workstation 625/655 are equipped withan 802.11 a/b/g/n/ac dual band wireless adapter with Bluetooth 5.0.
All network configuration and security settings are dependent upon the site’sinfrastructure and configuration of the wireless network. If you encounter problemswith the wireless network, see your site administrator.
• Connecting the Workstation 625/655 to a Wireless Network
• Configuring Bluetooth on the Workstation 625/655
Connecting the Workstation 625/655 to a Wireless NetworkSelect configurations of the Oracle MICROS Workstation 625/655 are equipped withan 802.11 a/b/g/n/ac dual band wireless adapter with Bluetooth 5.0. If WEP/WPA/WPA2 is enabled, the SSID and WEP/WPA/WPA2 parameters and the access pointshave to match. Consult your network administrator for proper configuration.
1. To connect the Oracle MICROS Compact Workstation 310 to a wireless network:
a. Tap the Wireless Networks icon in the System Tray.
b. Select the wireless access point from the list of available networks.
c. If you want the device to automatically connect to this wireless network, selectConnect automatically.
d. If required, enter the network’s password.
e. Select Connect. The device is now connected to the selected wirelessnetwork.
2. To manage wireless network connections on the Oracle MICROS CompactWorkstation 310 using the Settings interface:
a. On the Desktop, swipe left from the right edge of the workstation screen, andthen select All settings.
b. Select Network & Internet.
c. Select Wi-Fi from the panel on the left.
d. Select Manage known networks. From here, you can add or remove wirelessnetwork connections.
Configuring Bluetooth on the Workstation 625/655The Oracle MICROS Workstation 625/655 contains Bluetooth 5.0 network technology.
To configure Bluetooth on the Oracle MICROS Workstation 625/655:
1. On the Desktop, swipe left from the right edge of the workstation screen, and thenselect All settings.
2-1

2. Select All settings, and then tap Devices.
3. Select On/Off and ensure Bluetooth is turned on. The Bluetooth icon is shownin the System Tray when Bluetooth is turned on.
4. Select the Bluetooth device from the list of available devices.
Chapter 2Configuring Bluetooth on the Workstation 625/655
2-2
3Configuring the Compact Workstation 310
The Oracle MICROS Compact Workstation 310 is equipped with an embedded802.11ac dual band (2x2) wireless adapter with Bluetooth 4.1 network technology.
All network configuration and security settings are dependent upon the site’sinfrastructure and configuration of the wireless network. If you encounter problemswith the wireless network, see your site administrator.
• Connecting the Compact Workstation 310 to a Wireless Network
• Configuring Bluetooth on the Compact Workstation 310
Connecting the Compact Workstation 310 to a WirelessNetwork
The Oracle MICROS Compact Workstation 310 contains an embedded 802.11ac dualband (2x2) wireless adapter with Bluetooth 4.1. If WEP/WPA/WPA2 is enabled, theSSID and WEP/WPA/WPA2 parameters and the access points have to match. Consultyour network administrator for proper configuration.
1. To connect the Oracle MICROS Compact Workstation 310 to a wireless network:
a. Tap the Wireless Networks icon in the System Tray.
b. Select the wireless access point from the list of available networks.
c. If you want the device to automatically connect to this wireless network, selectConnect automatically.
d. If required, enter the network’s password.
e. Tap Connect. The device is now connected to the selected wireless network.
2. To manage wireless network connections on the Oracle MICROS CompactWorkstation 310 using the Settings interface:
a. On the Desktop, click the Settings icon.
b. Select Network.
c. Select Connections.
d. Click Manage known networks. From here, you can add or remove wirelessnetwork connections.
Configuring Bluetooth on the Compact Workstation 310The Oracle MICROS Compact Workstation 310 contains Bluetooth 4.1 networktechnology.
To configure Bluetooth on the Oracle MICROS Compact Workstation 310:
1. From the Start Menu, tap Settings.
3-1

2. Tap Devices, and then tap Bluetooth.
3. Tap On/Off and ensure Bluetooth is turned on. The Bluetooth icon is shown inthe System Tray when Bluetooth is turned on.
4. Select the Bluetooth device from the list of available devices.
Chapter 3Configuring Bluetooth on the Compact Workstation 310
3-2
4Configuring the Tablet 720
The Oracle MICROS Tablet 720 is equipped with an embedded 802.11a/b/g/n WLANadapter and Bluetooth 4.0 low energy (LE) network technology.
All network configuration and security settings are dependent upon the site’sinfrastructure and configuration of the wireless network. If you encounter problemswith the wireless network, see your site administrator.
• Connecting the Tablet 720 to a Wireless Network
• Configuring Bluetooth on the Tablet 720
Connecting the Tablet 720 to a Wireless NetworkThe Oracle MICROS Tablet 720 contains an embedded 802.11a/b/g/n WLAN adapterequipped with a hidden custom antenna. If WEP/WPA/WPA2 is enabled, the SSID andWEP/WPA/WPA2 parameters and the access points have to match. Consult yournetwork administrator for proper configuration.
1. To connect the Tablet 720 to a wireless network:
a. Tap the Wireless Networks icon in the System Tray.
b. Select the wireless access point from the list of available networks.
c. If you want the device to automatically connect to this wireless network, selectConnect automatically.
d. If required, enter the network’s password.
e. Tap Connect. The device is now connected to the selected wireless network.
2. To manage wireless network connections on the Tablet 720 using the Settingsinterface:
a. On the Desktop, click the Settings icon.
b. Select Network.
c. Select Connections.
d. Click Manage known networks. From here, you can add or remove wirelessnetwork connections.
Configuring Bluetooth on the Tablet 720The Oracle MICROS Tablet 720 contains the Bluetooth 4.0 LE network technology,providing a more energy and power efficient Bluetooth communication range.
To configure Bluetooth on the Tablet 720:
1. From the Start Menu, tap Settings.
2. Tap Devices, and then tap Bluetooth.
4-1

3. Tap On/Off and ensure Bluetooth is turned on. The Bluetooth icon is shown inthe System Tray when Bluetooth is turned on.
4. Select the Bluetooth device from the list of available devices.
Chapter 4Configuring Bluetooth on the Tablet 720
4-2
5Configuring the Tablet 721
Oracle MICROS Tablet 721 features an embedded 802.11a/b/g/n/ac WLAN adapterand Dual Mode Bluetooth 4.2 BLE network technology.
All network configuration and security settings are dependent upon the site’sinfrastructure and configuration of the wireless network. If you encounter problemswith the wireless network, see your site administrator.
• Connecting the Tablet 721 to a Wireless Network
• Configuring Bluetooth on the Tablet 721
Connecting the Tablet 721 to a Wireless NetworkThe Oracle MICROS Tablet 721 contains an embedded 802.11a/b/g/n/ac WLANadapter equipped with a hidden custom antenna. If WEP/WPA/WPA2 is enabled, theSSID and WEP/WPA/WPA2 parameters and the access points have to match. Consultyour network administrator for proper configuration.
1. To connect the Tablet 721 to a wireless network:
a. Tap the Wireless Networks icon in the System Tray.
b. Select the wireless access point from the list of available networks.
c. If you want the device to automatically connect to this wireless network, selectConnect automatically.
d. If required, enter the network’s password.
e. Tap Connect. The device is now connected to the selected wireless network.
2. To manage wireless network connections on the Tablet 721 using the Settingsinterface:
a. On the Desktop, click the Settings icon.
b. Select Network.
c. Select Connections.
d. Click Manage known networks. From here, you can add or remove wirelessnetwork connections.
Configuring Bluetooth on the Tablet 721The Oracle MICROS Tablet 721 contains Dual Mode Bluetooth 4.2 BLE networktechnology.
To configure Bluetooth on the Tablet 721:
1. From the Start Menu, tap Settings.
2. Tap Devices, and then tap Bluetooth.
5-1

3. Tap On/Off and ensure Bluetooth is turned on. The Bluetooth icon is shown inthe System Tray when Bluetooth is turned on.
4. Select the Bluetooth device from the list of available devices.
Chapter 5Configuring Bluetooth on the Tablet 721
5-2

6Configuring the Wireless Workstation 6Series
The Oracle MICROS Workstation 6 (WS6) Series consists of three configurations –the 610, 620, and 650.
• The Oracle MICROS Workstation 610 features an Intel Atom processor and runsthe Microsoft Windows Embedded 8.1 Industry Pro operating system or theMicrosoft Windows 10 IoT Enterprise operating system.
• The Oracle MICROS Workstation 620 features an Intel Celeron processor andruns the Microsoft Windows 10 IoT Enterprise operating system.
• The Oracle MICROS Workstation 650 features an Intel Core i5 processor and runsthe Microsoft Windows 10 IoT Enterprise operating system.
Each workstation supports an optional wireless networking module comprising of alarge PCB module, a small PCB module, and two wireless antennas.
• Pre-Configuration Requirements for the Wireless WS6
• Configuring the Wireless WS6 and the Mini-PCI Wireless Card
Pre-Configuration Requirements for the Wireless WS6Before you can connect the Wireless WS6 to a wireless network, make sure to:
1. Read the PCI DSS Wireless Guideline Informational Supplement version 2.0.
2. Verify that the WS6 has minimum CAL version 13.1.3.115 installed. If CAL needsto be updated, contact your Oracle MICROS representative.
3. Verify that the Wireless Networking Module was installed on the WS6. This mustbe installed before connecting the Wireless WS6 to a wireless network. If youneed to request this part, reference the following part number (PN) anddescription:
• PN: 400633-400-PT
• Description: Wireless Upgrade Kit (802.11 a/b/g/n) for Workstation 6
The MICROS Workstation 6 Series Setup Guide contains installation instructions.
4. Ensure that your site has a WPA2-AES compatible Access Point.
5. Have a USB keyboard for the workstation.
Configuring the Wireless WS6 and the Mini-PCI WirelessCard
All network configuration and security settings are dependent upon the site’sinfrastructure and configuration of the wireless network. If you encounter problemswith the wireless network, contact your site administrator.
6-1
1. To connect the Wireless WS6 to a wireless network:
a. In the lower right corner, click the Wireless Network icon.
b. In the Networks list, select your wireless network.
c. If you want this device to automatically connect to this wireless network, selectConnect automatically.
d. Click Connect.
e. If required, enter the password or network security key for the network.
The device is now connected to the selected wireless network.
2. To manage wireless network connections on the Wireless WS6 using the Settingsinterface:
a. On the Desktop, click the Settings icon.
b. Select Network.
c. Select Connections.
d. Click Manage known networks. From here, you can add or remove wirelessnetwork connections.
Chapter 6Configuring the Wireless WS6 and the Mini-PCI Wireless Card
6-2

7Configuring the Tablet E-Series and theWireless Card
The Tablet E-Series is pre-installed with the Microsoft Windows Embedded 8.1Industry Pro Retail operating system. It comes with a pre-installed, embedded wirelessnetworking module.
All network configuration and security settings are dependent upon the site’sinfrastructure and configuration of the wireless network. If you encounter problemswith the wireless network, see your site administrator.
1. To connect the Tablet E-Series to a wireless network:
a. In the lower right corner, click the Wireless Network icon.
b. In the Networks list, select your wireless network.
c. If you want this device to automatically connect to this wireless network, selectConnect automatically.
d. Click Connect.
e. If required, enter the password or network security key for you the network.The device is now connected to the selected wireless network.
2. To manage wireless network connections on the Tablet E-Series using theSettings interface:
a. On the Desktop, click the Settings icon.
b. Select Network.
c. Select Connections.
d. Click Manage known networks. From here, you can add or remove wirelessnetwork connections.
7-1
8Configuring the Tablet R-Series and theWireless Card
The Tablet R-Series is pre-installed with the Microsoft Windows Embedded CE 6.0operating system. It comes with a pre-installed, embedded wireless networkingmodule.
All network configuration and security settings are dependent upon the site’sinfrastructure and configuration of the wireless network. If you encounter problemswith the wireless network, see your site administrator.
To connect the Tablet E-Series to a wireless network:
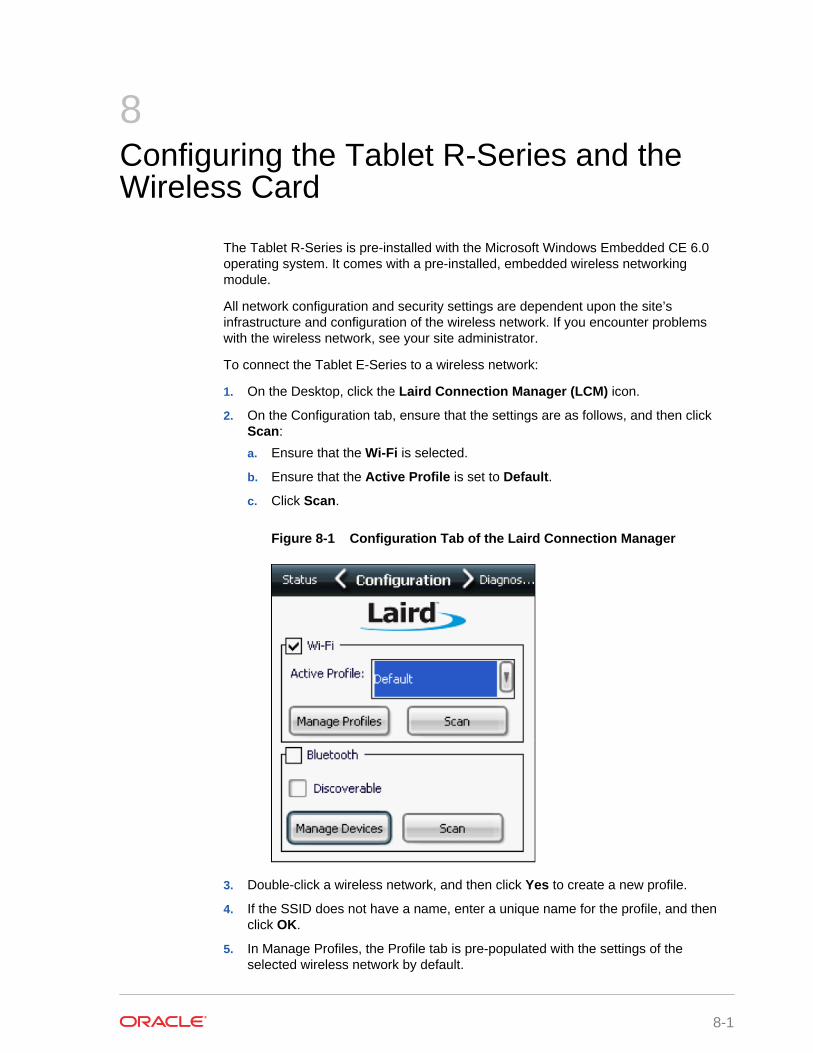
1. On the Desktop, click the Laird Connection Manager (LCM) icon.
2. On the Configuration tab, ensure that the settings are as follows, and then clickScan:
a. Ensure that the Wi-Fi is selected.
b. Ensure that the Active Profile is set to Default.
c. Click Scan.
Figure 8-1 Configuration Tab of the Laird Connection Manager
3. Double-click a wireless network, and then click Yes to create a new profile.
4. If the SSID does not have a name, enter a unique name for the profile, and thenclick OK.
5. In Manage Profiles, the Profile tab is pre-populated with the settings of theselected wireless network by default.
8-1
6. To view the default global settings, click the Global tab.
These settings are dependent upon the site’s infrastructure. Contact your siteadministrator before adjusting.
7. To save the profile and any changes made to the global settings:
a. Click Commit.
b. In the upper right corner of the dialog box, click OK.
8. On the Configuration tab:
a. Set the Active Profile to your newly created profile.
b. Click Scan.
c. Close the Scan dialog box.
The device is now connected to the selected wireless network.
9. To view the status and strength of the wireless connection, click the Status tab.
10. To close the LCM, click OK in the upper right corner of the dialog box.
Chapter 8
8-2
9Configuring the Wireless Workstation 5A
The Workstation 5A (WS5A) is pre-installed with the Microsoft Windows EmbeddedCE 6.0 operating system or the Microsoft Windows Embedded POS Ready 2009operating system. It supports an optional wireless networking module comprised of amini-PCI wireless card.
• Pre-Configuration Requirements for the Microsoft Windows CE Wireless WS5A
• Configuring the Microsoft Windows CE Wireless WS5A for (WPA2-PSK) Wi-FiProtected Access 2 with Pre-Shared Key
• Configuring the Microsoft Windows CE Wireless WS5A for (WPA2) Wi-FiProtected Access 2 with PEAP Authentication
• Pre-Configuration Requirements for the Microsoft Windows Embedded POSReady2009 Wireless WS5A
• Configuring the Microsoft Windows Embedded POSReady 2009 Wireless WS5Aand the Mini-PCI Wireless Card
Pre-Configuration Requirements for the Microsoft WindowsCE Wireless WS5A
This section explains the steps necessary to connect a Wireless WS5A with MicrosoftWindows CE for PCI compliance. When configuring, use the highest encryption levelavailable to the device. It is recommended that the WS5A always be used at aminimum of WPA2-AES.
Before you can connect the Microsoft Windows CE Wireless WS5A to a wirelessnetwork, make sure to:
1. Read the PCI DSS Wireless Guideline Informational Supplement version 2.0.
2. Verify that the WS5A has minimum CAL version 13.1.3.68 installed. If CAL needsto be updated, contact your Oracle MICROS representative.
3. Verify that the Mini-PCI Wireless Card was installed on the WS5A. This must beinstalled before connecting the Wireless WS5A to a wireless network. If you needto request this part, reference the following part number (PN) and description:
• PIN: 400633-115-PT or 400633-220-PT
• Description: KIT, MINI-PCI UPGRADE, WS4LX, WS5, WS5A. Note that thiscard is capable of using WPA2 encryption with AES. Its configuration is PCIcompliant when using WPA2 encryption and placed behind a Firewall.
The Installing the Workstation 5/5A Mini-PCI Wireless Kit document containsinstallation instructions.
4. Ensure that your site has a WPA2-AES compatible Access Point.
5. If using PEAP, have an Authentication device (for example, IAS Server or theWS2000).
9-1
6. Have a USB keyboard for the workstation.
Configuring the Microsoft Windows CE Wireless WS5A for(WPA2-PSK) Wi-Fi Protected Access 2 with Pre-Shared Key
All network configuration and security settings are dependent upon the site’sinfrastructure and configuration of the wireless network. If you encounter problemswith the wireless network, see your site administrator.
To connect the Microsoft Windows CE Wireless WS5A to a wireless network using(WPA2-PSK) Wi-Fi Protected Access 2 with Pre-Shared Key:
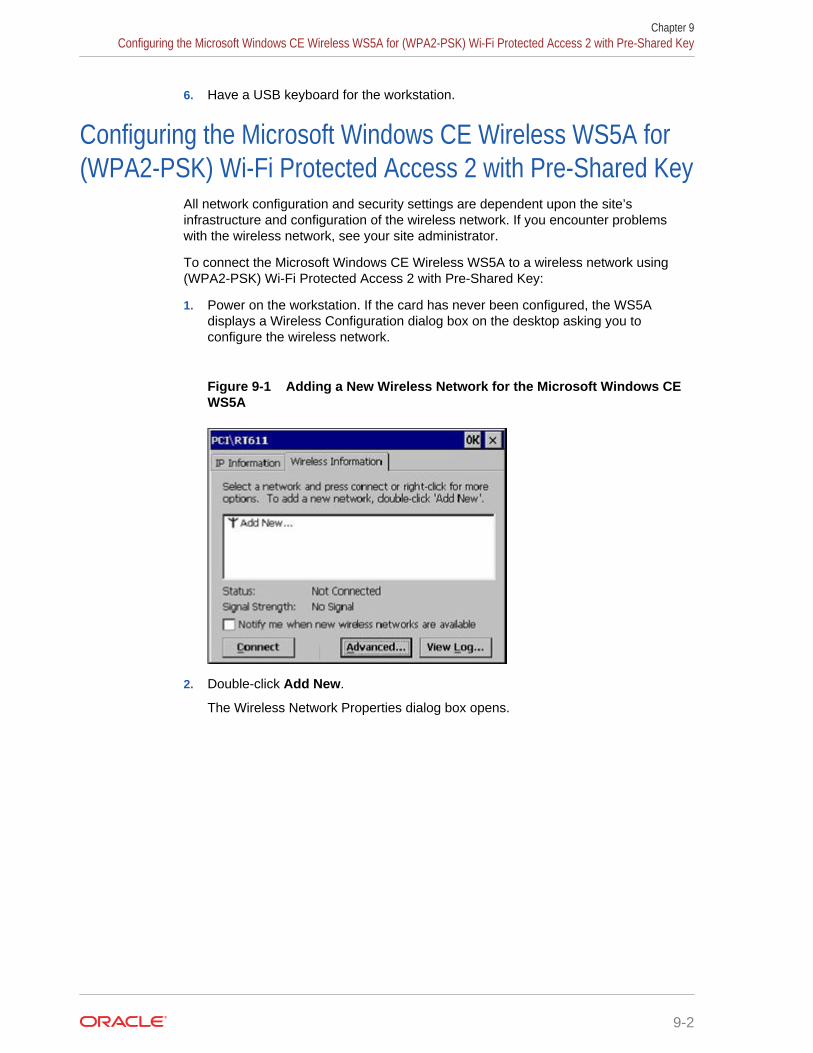
1. Power on the workstation. If the card has never been configured, the WS5Adisplays a Wireless Configuration dialog box on the desktop asking you toconfigure the wireless network.
Figure 9-1 Adding a New Wireless Network for the Microsoft Windows CEWS5A
2. Double-click Add New.
The Wireless Network Properties dialog box opens.
Chapter 9Configuring the Microsoft Windows CE Wireless WS5A for (WPA2-PSK) Wi-Fi Protected Access 2 with Pre-Shared Key
9-2
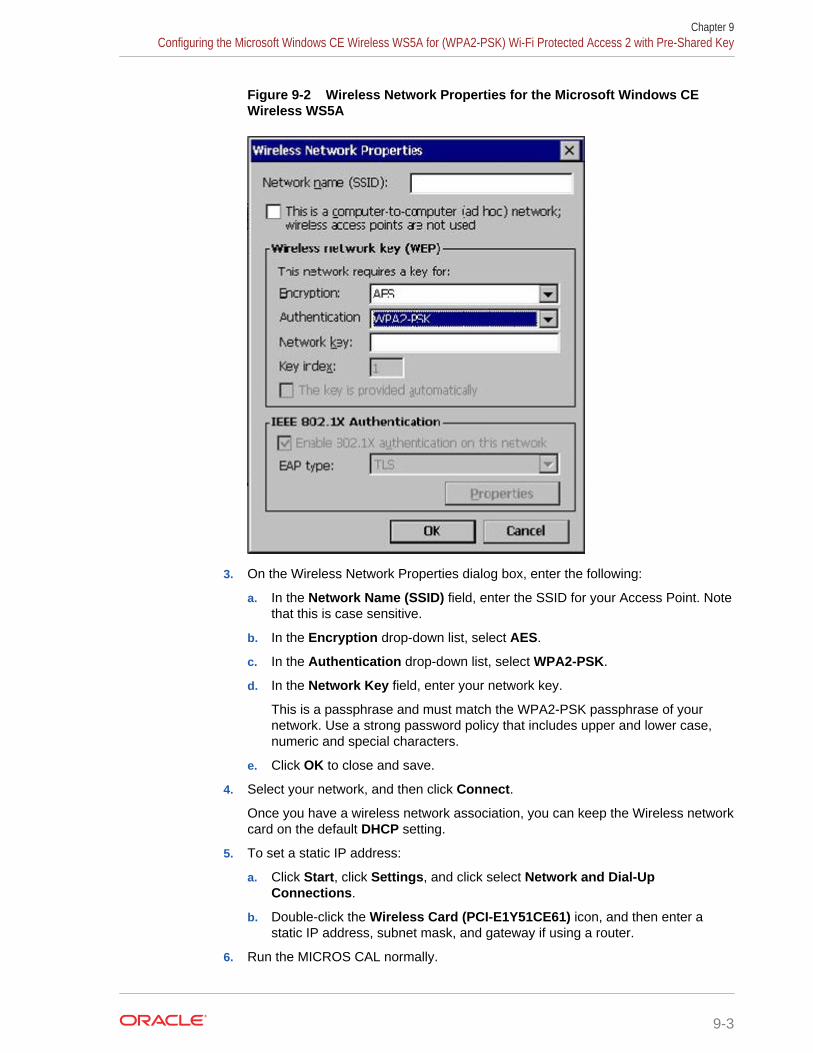
Figure 9-2 Wireless Network Properties for the Microsoft Windows CEWireless WS5A
3. On the Wireless Network Properties dialog box, enter the following:
a. In the Network Name (SSID) field, enter the SSID for your Access Point. Notethat this is case sensitive.
b. In the Encryption drop-down list, select AES.
c. In the Authentication drop-down list, select WPA2-PSK.
d. In the Network Key field, enter your network key.
This is a passphrase and must match the WPA2-PSK passphrase of yournetwork. Use a strong password policy that includes upper and lower case,numeric and special characters.
e. Click OK to close and save.
4. Select your network, and then click Connect.
Once you have a wireless network association, you can keep the Wireless networkcard on the default DHCP setting.
5. To set a static IP address:
a. Click Start, click Settings, and click select Network and Dial-UpConnections.
b. Double-click the Wireless Card (PCI-E1Y51CE61) icon, and then enter astatic IP address, subnet mask, and gateway if using a router.
6. Run the MICROS CAL normally.
Chapter 9Configuring the Microsoft Windows CE Wireless WS5A for (WPA2-PSK) Wi-Fi Protected Access 2 with Pre-Shared Key
9-3

Configuring the Microsoft Windows CE Wireless WS5A for(WPA2) Wi-Fi Protected Access 2 with PEAP Authentication
All network configuration and security settings are dependent upon the site’sinfrastructure and configuration of the wireless network. If you encounter problemswith the wireless network, see your site administrator.
To connect the WS5A to a wireless network using (WPA2) Wi-Fi Protected Access 2with PEAP Authentication:
1. Power on the workstation. If the card has never been configured, the WS5Adisplays a Wireless Configuration dialog box on the desktop asking you toconfigure the wireless network.
Figure 9-3 Adding a New Wireless Network for the Microsoft Windows CEWireless WS5A for PEAP Authentication
2. Double-click Add New.
The Wireless Network Properties dialog box opens.
Chapter 9Configuring the Microsoft Windows CE Wireless WS5A for (WPA2) Wi-Fi Protected Access 2 with PEAP Authentication
9-4
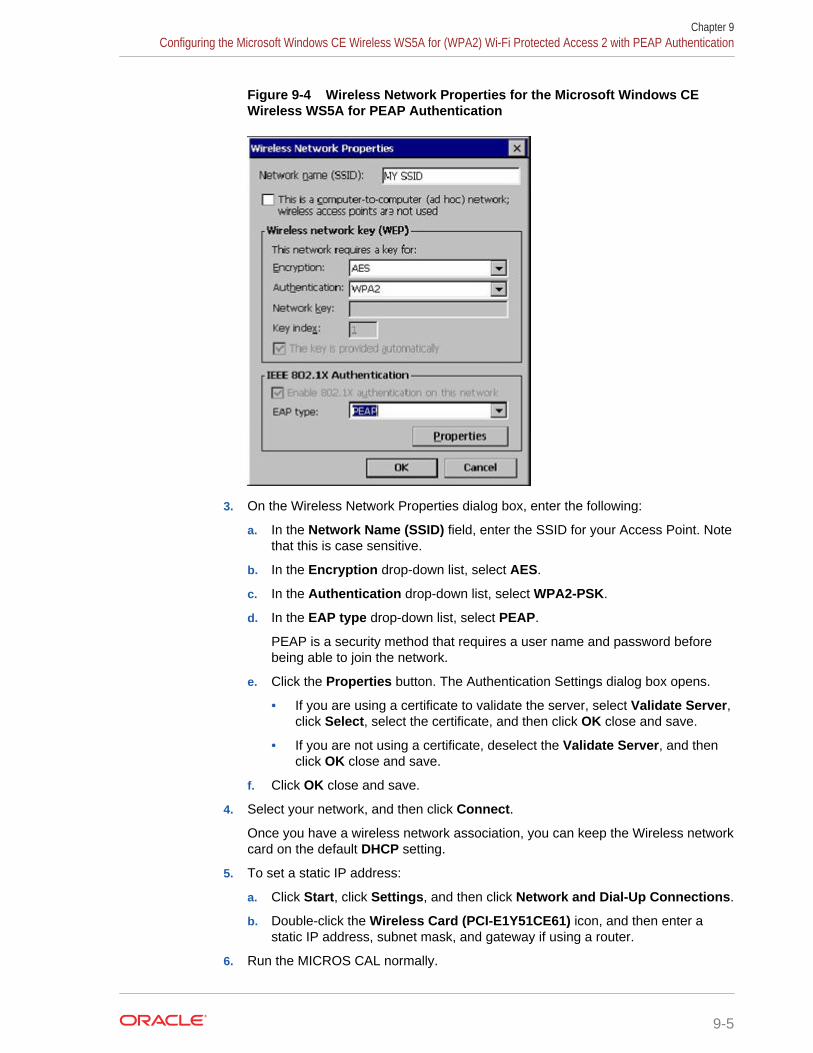
Figure 9-4 Wireless Network Properties for the Microsoft Windows CEWireless WS5A for PEAP Authentication
3. On the Wireless Network Properties dialog box, enter the following:
a. In the Network Name (SSID) field, enter the SSID for your Access Point. Notethat this is case sensitive.
b. In the Encryption drop-down list, select AES.
c. In the Authentication drop-down list, select WPA2-PSK.
d. In the EAP type drop-down list, select PEAP.
PEAP is a security method that requires a user name and password beforebeing able to join the network.
e. Click the Properties button. The Authentication Settings dialog box opens.
• If you are using a certificate to validate the server, select Validate Server,click Select, select the certificate, and then click OK close and save.
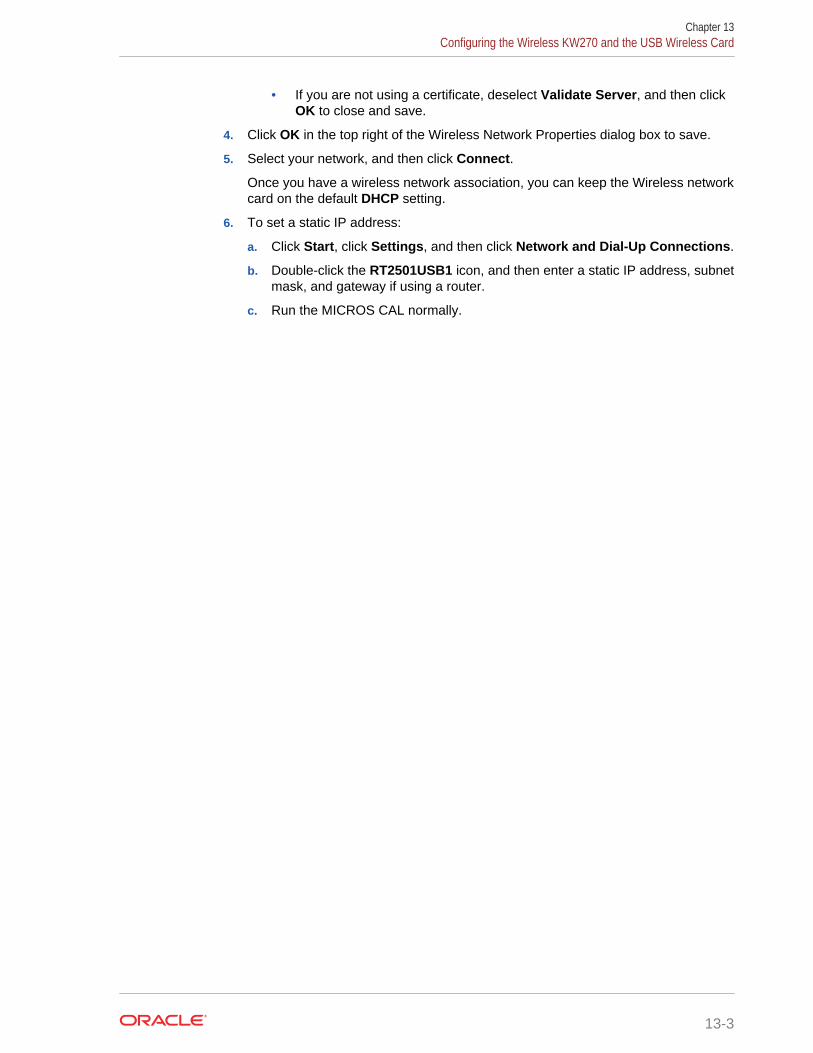
• If you are not using a certificate, deselect the Validate Server, and thenclick OK close and save.
f. Click OK close and save.
4. Select your network, and then click Connect.
Once you have a wireless network association, you can keep the Wireless networkcard on the default DHCP setting.
5. To set a static IP address:
a. Click Start, click Settings, and then click Network and Dial-Up Connections.
b. Double-click the Wireless Card (PCI-E1Y51CE61) icon, and then enter astatic IP address, subnet mask, and gateway if using a router.
6. Run the MICROS CAL normally.
Chapter 9Configuring the Microsoft Windows CE Wireless WS5A for (WPA2) Wi-Fi Protected Access 2 with PEAP Authentication
9-5

Pre-Configuration Requirements for the Microsoft WindowsEmbedded POSReady 2009 Wireless WS5A
This section explains the steps necessary to connect a Microsoft Windows EmbeddedPOSReady 2009 Wireless WS5A for PCI compliance. When configuring, use thehighest encryption level available to the device. It is recommended that the WS5Aalways be used at a minimum of WPA2-AES.
Before you can connect the Microsoft Windows Embedded POSReady 2009 WirelessWS5A to a wireless network, make sure to:
1. Read the PCI DSS Wireless Guideline Informational Supplement version 2.0.
2. Verify that the WS5A has minimum CAL version 13.1.3.68 installed. If CAL needsto be updated, contact your Oracle MICROS representative.
3. Verify that the Mini-PCI Wireless Card was installed on the WS5A. This must beinstalled before connecting the Wireless WS5A to a wireless network. If you needto request this part, reference the following part number (PN) and description:
• PN: 400633-220-PT
• Description: : KIT, MINI-PCI UPGRADE, WS4LX, WS5, WS5A. Note that thiscard is capable of using WPA2 encryption with AES. Its configuration is PCIcompliant when using WPA2 encryption and placed behind a Firewall.
The Installing the Workstation 5/5A Mini-PCI Wireless Kit document containsinstallation instructions.
4. Ensure that your site has a WPA2-AES compatible Access Point.
5. If using PEAP, have an Authentication device (for example, IAS Server or theWS2000).
6. Have a USB keyboard for the workstation.
Configuring the Microsoft Windows Embedded POSReady2009 Wireless WS5A and the Mini-PCI Wireless Card
Follow this procedure if you are using the 802.11i WPA2-Personal security method.
All network configuration and security settings are dependent upon the site’sinfrastructure and configuration of the wireless network. If you encounter problemswith the wireless network, see your site administrator.
To connect the Microsoft Windows Embedded POSReady 2009 Wireless WS5A to awireless network using (WPA-PSK) Wi-Fi Protected Access with Pre-Shared Key:
1. Click Start, click Settings, and then click Network and Dial-Up Connections.
2. Right-click the Wireless Network Connection icon, and then select Properties.
The Wireless Network Connection Properties dialog box opens.
Chapter 9Pre-Configuration Requirements for the Microsoft Windows Embedded POSReady 2009 Wireless WS5A
9-6
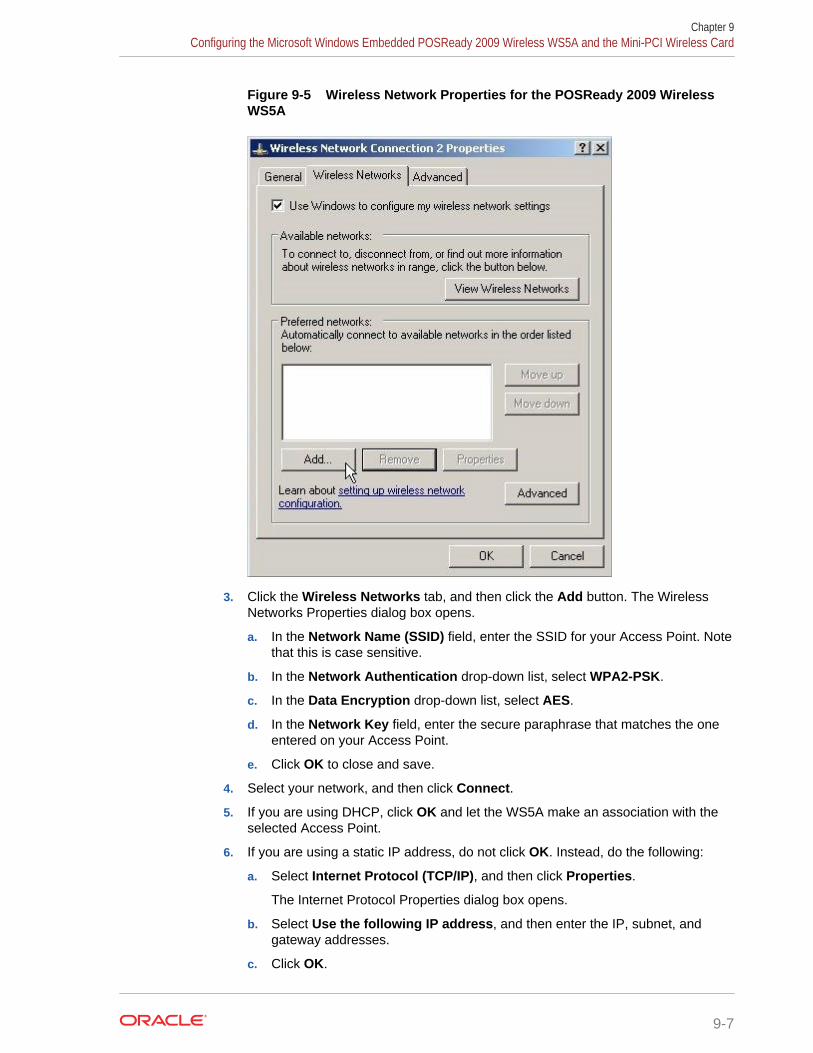
Figure 9-5 Wireless Network Properties for the POSReady 2009 WirelessWS5A
3. Click the Wireless Networks tab, and then click the Add button. The WirelessNetworks Properties dialog box opens.
a. In the Network Name (SSID) field, enter the SSID for your Access Point. Notethat this is case sensitive.
b. In the Network Authentication drop-down list, select WPA2-PSK.
c. In the Data Encryption drop-down list, select AES.
d. In the Network Key field, enter the secure paraphrase that matches the oneentered on your Access Point.
e. Click OK to close and save.
4. Select your network, and then click Connect.
5. If you are using DHCP, click OK and let the WS5A make an association with theselected Access Point.
6. If you are using a static IP address, do not click OK. Instead, do the following:
a. Select Internet Protocol (TCP/IP), and then click Properties.
The Internet Protocol Properties dialog box opens.
b. Select Use the following IP address, and then enter the IP, subnet, andgateway addresses.
c. Click OK.
Chapter 9Configuring the Microsoft Windows Embedded POSReady 2009 Wireless WS5A and the Mini-PCI Wireless Card
9-7

7. Click OK to close and save.
8. Run the MICROS CAL normally.
Chapter 9Configuring the Microsoft Windows Embedded POSReady 2009 Wireless WS5A and the Mini-PCI Wireless Card
9-8
10Configuring the Wireless Workstation 5
The Workstation 5 (WS5) is pre-installed with the Microsoft Windows Embedded CE6.0 operating system. It supports an optional wireless networking module comprised ofa mini-PCI wireless card.
• Pre-Configuration Requirements for the Wireless WS5
• Configuring the Wireless WS5 and the Mini-PCI Wireless Card
Pre-Configuration Requirements for the Wireless WS5Before you can connect the Wireless WS5 to a wireless network, make sure to:
1. Read the PCI DSS Wireless Guideline Informational Supplement version 2.0.
2. Verify that the WS5 has minimum CAL version 7.1.3.68 installed. If CAL needs tobe updated, contact your Oracle MICROS representative.
3. Verify that the Mini-PCI Wireless Card was installed on the WS5. This must beinstalled before connecting the Wireless WS5 to a wireless network. If you need torequest this part, reference the following part number (PN) and description:
• PIN: 400633-220-PT
• Description: Mini-PCI Card, Abocom
Note that this card is capable of using WPA2 encryption with AES. Itsconfiguration is PCI compliant when using WPA2 encryption and placedbehind a Firewall.
The Installing the Workstation 5 Wireless Kit document contains installationinstructions.
4. Ensure that your site has a WPA2 compatible Access Point.
5. Have a USB keyboard for the workstation.
Configuring the Wireless WS5 and the Mini-PCI WirelessCard
All network configuration and security settings are dependent upon the site’sinfrastructure and configuration of the wireless network. If you encounter problemswith the wireless network, see your site administrator.
To connect the Wireless WS5 to a wireless network:
1. Power on the workstation. If the card has never been configured, the WS5displays a Wireless Configuration dialog box on the desktop asking you toconfigure the wireless network.
10-1

Figure 10-1 Add New Wireless Network for the Wireless WS5
2. Double-click Add New.
The Wireless Network Properties dialog box opens.
Figure 10-2 Wireless Network Properties for WS5
3. On the Wireless Network Properties dialog box, enter the following:
Chapter 10Configuring the Wireless WS5 and the Mini-PCI Wireless Card
10-2

a. In the Network Name (SSID) field, enter the SSID for your Access Point. Notethat this is case sensitive.
b. In the Encryption drop-down list, select AES.
c. In the Authentication drop-down list, select WPA2-PSK.
d. In the Network Key field, enter your network key.
This is a passphrase and must match the WPA2-PSK passphrase of yourAccess Point. Use a strong password policy that includes upper and lowercase, numeric and special characters.
e. Click OK to close and save.
4. Select your network, and then click Connect.
Once you have a wireless network association, you can keep the Wireless networkcard on the default DHCP setting.
5. To set a static IP address:
a. Click Start, click Settings, and then click Network and Dial-Up Connections.
b. Double-click the Wireless Network Connection icon, and then enter a staticIP address, subnet mask, and gateway if using a router.
Chapter 10Configuring the Wireless WS5 and the Mini-PCI Wireless Card
10-3
11Configuring the Wireless Workstation 4 LX
The Workstation 4 LX (WS4 LX) is pre-installed with the Microsoft WindowsEmbedded CE 6.0 operating system. It supports an optional wireless networkingmodule comprised of a mini-PCI wireless card.
• Pre-Configuration Requirements for the Wireless WS4 LX
• Configuring the Wireless WS4 LX and the Mini-PCI Wireless Card
Pre-Configuration Requirements for the Wireless WS4 LXBefore you can connect the Wireless WS4 LX to a wireless network, make sure to:
1. Read the PCI DSS Wireless Guideline Informational Supplement version 2.0.
2. Verify that the WS4 LX has minimum CAL version 6.1.3.68 installed. If CAL needsto be updated, contact your Oracle MICROS representative.
3. Verify that the Mini-PCI Wireless Card was installed on the WS4 LX. This must beinstalled before connecting the Wireless WS4 LX to a wireless network. If youneed to request this part, reference the following part number (PN) anddescription:
• PIN: : 400624-150-PT
• Description: Mini-PCI Card, Abocom
Note that this card is capable of using WPA2 encryption with AES. Itsconfiguration is PCI compliant when using WPA2 encryption and placedbehind a Firewall.
The Wireless Card Installation for the PCWS2010/WS4 LX document containsinstallation instructions.
4. Ensure that your site has a WPA2 compatible Access Point.
5. Have a USB keyboard for the workstation.
Configuring the Wireless WS4 LX and the Mini-PCI WirelessCard
All network configuration and security settings are dependent upon the site’sinfrastructure and configuration of the wireless network. If you encounter problemswith the wireless network, see your site administrator.
To connect the Wireless WS4 LX to a wireless network:
1. Power on the workstation. If the card has never been configured, the WS4 LXdisplays a Wireless Configuration dialog box on the desktop asking you toconfigure the wireless network.
11-1

Figure 11-1 Add New Wireless Network for the Wireless WS4 LX
2. Double-click Add New.
The Wireless Network Properties dialog box opens
Figure 11-2 Wireless Network Properties for the Wireless WS4 LX
3. On the Wireless Network Properties dialog box, enter the following:
Chapter 11Configuring the Wireless WS4 LX and the Mini-PCI Wireless Card
11-2
a. In the Network Name (SSID) field, enter the SSID for your Access Point. Notethat this is case sensitive.
b. In the Encryption drop-down list, select AES.
c. In the Authentication drop-down list, select WPA2-PSK.
d. In the Network Key field, enter your network key.
This is a passphrase and must match the WPA2-PSK passphrase of yournetwork. Use a strong password policy that includes upper and lower case,numeric and special characters.
e. Click OK to close and save.
4. Select your network, and then click Connect.
Once you have a wireless network association, you can keep the Wireless networkcard on the default DHCP setting.
5. To set a static IP address:
a. Click Start, click Settings, and then click Network and Dial-Up Connections.
b. Double-click the Wireless Card icon, and then enter a static IP address,subnet mask, and gateway if using a router.
6. Run the MICROS CAL normally.
Chapter 11Configuring the Wireless WS4 LX and the Mini-PCI Wireless Card
11-3
12Configuring the Wireless PC Workstation2015
The PC Workstation (PCWS) 2015 is pre-installed with the Microsoft WindowsEmbedded POS Ready 2009 operating system or the Microsoft Windows 7Professional Embedded operating system. It supports an optional wireless networkingmodule comprised of a mini-PCI wireless card.
• Pre-Configuration Requirements for the Microsoft Windows Embedded POSReady2009 PCWS 2015
• Configuring the Microsoft Windows Embedded POSReady 2009 Wireless PCWS2015 with the Windows Wireless Zero Configuration (WZC) Service
• Configuring the Microsoft Windows Embedded POSReady 2009 Wireless PCWS2015 Using the Ralink WLAN Utility
• Pre-Configuration Requirements for the Microsoft Windows 7 Wireless PCWS2015
• Configuring the Microsoft Windows 7 Wireless PCWS 2015 and the Mini-PCIWireless Card
Pre-Configuration Requirements for the Microsoft WindowsEmbedded POSReady 2009 PCWS 2015
This section explains the steps necessary to connect a Microsoft Windows EmbeddedPOSReady 2009 Wireless PCWS 2015 for PCI compliance. When configuring, use thehighest encryption level available to the device. It is recommended that the PCWS2015 always be used at a minimum of WPA2-AES.
Before you can connect the Microsoft Windows Embedded POSReady 2009 WirelessPCWS 2015 to a wireless network, make sure to:
1. Read the PCI DSS Wireless Guideline Informational Supplement version 2.0.
2. Verify that the PCWS 2015 has minimum CAL version 3.1.3.115 installed. If CALneeds to be updated, contact your Oracle MICROS representative.
3. Verify that the Mini-PCI Wireless Card was installed on the PCWS 2015. This mustbe installed before connecting the Wireless PCWS 2015 to a wireless network. Ifyou need to request this part, reference the following part number (PN) anddescription:
• PN: 400633-225-PT
• Description: SparkLAN WMIR-200N; WIRELESS (802.11a/b/g/n) UPGRADEKIT WS5/WS5A/PCWS2015, INCLUDES MINI-PCI CARD,ANTENNAS, ANDINSTALLATION INSTRUCTIONS.
12-1

Note that this card is capable of using WPA2 encryption with AES. Itsconfiguration is PCI compliant when using WPA2 encryption and placedbehind a Firewall.
For installation instructions, contact your Oracle MICROS representative.
4. Ensure that your site has a WPA2-AES compatible Access Point.
5. If using PEAP, have an Authentication device (for example, IAS Server or theWS2000).
6. Have a USB keyboard for the workstation.
Configuring the Microsoft Windows Embedded POSReady2009 Wireless PCWS 2015 with the Windows Wireless ZeroConfiguration (WZC) Service
All network configuration and security settings are dependent upon the site’sinfrastructure and configuration of the wireless network. If you encounter problemswith the wireless network, see your site administrator.
To connect the POSReady 2009 Wireless PCWS 2015 to a wireless network using(WPA-PSK) Wi-Fi Protected Access with Pre-Shared Key with the Microsoft WindowsWireless Zero Configuration (WZC) Service:
1. Click Start, click Settings, and then click Network Connections.
2. Right-click the Wireless Network Connection icon, and then select Properties.
The Wireless Network Connection Properties dialog box opens.
Chapter 12Configuring the Microsoft Windows Embedded POSReady 2009 Wireless PCWS 2015 with the Windows Wireless Zero
Configuration (WZC) Service
12-2
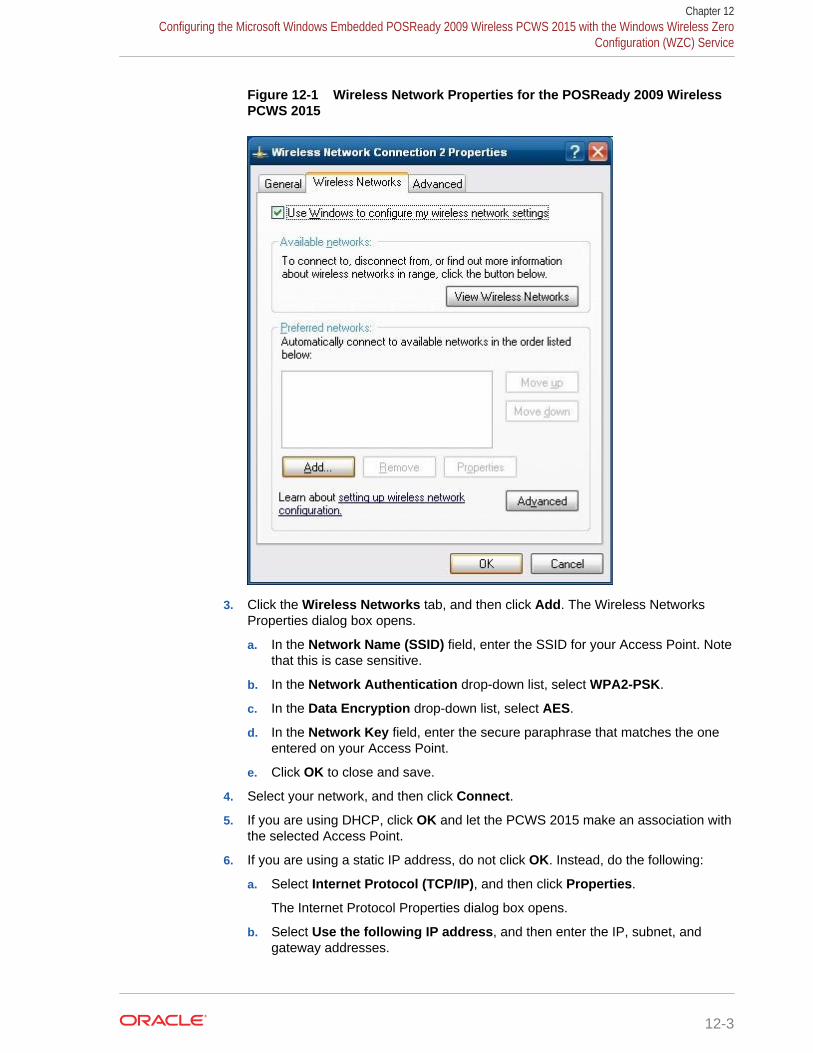
Figure 12-1 Wireless Network Properties for the POSReady 2009 WirelessPCWS 2015
3. Click the Wireless Networks tab, and then click Add. The Wireless NetworksProperties dialog box opens.
a. In the Network Name (SSID) field, enter the SSID for your Access Point. Notethat this is case sensitive.
b. In the Network Authentication drop-down list, select WPA2-PSK.
c. In the Data Encryption drop-down list, select AES.
d. In the Network Key field, enter the secure paraphrase that matches the oneentered on your Access Point.
e. Click OK to close and save.
4. Select your network, and then click Connect.
5. If you are using DHCP, click OK and let the PCWS 2015 make an association withthe selected Access Point.
6. If you are using a static IP address, do not click OK. Instead, do the following:
a. Select Internet Protocol (TCP/IP), and then click Properties.
The Internet Protocol Properties dialog box opens.
b. Select Use the following IP address, and then enter the IP, subnet, andgateway addresses.
Chapter 12Configuring the Microsoft Windows Embedded POSReady 2009 Wireless PCWS 2015 with the Windows Wireless Zero
Configuration (WZC) Service
12-3

c. Click OK.
7. Click OK to close and save.
8. Run the MICROS CAL normally.
Configuring the Microsoft Windows Embedded POSReady2009 Wireless PCWS 2015 Using the Ralink WLAN Utility
All network configuration and security settings are dependent upon the site’sinfrastructure and configuration of the wireless network. If you encounter problemswith the wireless network, see your site administrator.
To connect the POSReady 2009 Wireless PCWS 2015 to a wireless network using(WPA-PSK) Wi-Fi Protected Access with Pre-Shared Key with the Ralink WLAN Utilityand Ralink Configuration Tool:
1. Start the Ralink WLAN Utility.
After the installation of the wireless network module, this utility automaticallyopens.
2. Click the Profile tab, and then click the Add button.
3. Click the System Config secondary tab.
4. In the SSID field, enter the SSID for your Access Point. Note that this is casesensitive.
5. Click the Auth/Encry secondary tab.
Figure 12-2 The Authorization and Encryption tab of Ralink WLAN UtilityTool for the PCWS 2015
Chapter 12Configuring the Microsoft Windows Embedded POSReady 2009 Wireless PCWS 2015 Using the Ralink WLAN Utility
12-4

6. If your Access Point is using WPA2-PSK Personal Mode:
a. For Authentication, select WPA2-PSK.
b. For Encryption, selectAES.
c. In the WPA Preshared Key field, enter the secure paraphrase that matchesthe one entered on your Access Point.
d. Click OK.
7. If your Access Point is setup with WPA2 Enterprise Mode using AES Encryptionand EAP Authentication:
a. For Authentication, select WPA2.
b. For Encryption, selectAES.
c. Click the 802.1x secondary tab.
d. Click the Client Certificate subtab, and then select Use Client Certificate.
e. Select the certificate, and then click OK.
Figure 12-3 The 802.1x tab of Ralink WLAN Utility Tool for the PCWS2015
8. Select the profile you created, and then click Activate.
9. If you are using DHCP:
a. Verify that you have an IP address, sub mask, and default gateway assigned.
b. Click OK to close the Ralink Configuration Utility.
Chapter 12Configuring the Microsoft Windows Embedded POSReady 2009 Wireless PCWS 2015 Using the Ralink WLAN Utility
12-5
c. Run the MICROS CAL normally.
10. If you are using a static IP address:
a. Click OK to close the Ralink Configuration Utility.
b. Click Start, click Settings, and then click Network Connections.
c. Right-click Wireless Network Connection, and then click Properties.
The Internet Protocol Properties dialog box opens.
d. Select Use the following IP address, and then enter the IP, subnet, andgateway addresses.
e. Click OK twice to close and save.
f. Run the MICROS CAL normally.
Pre-Configuration Requirements for the Microsoft Windows7 Wireless PCWS 2015
This section explains the steps necessary to connect a Microsoft Windows 7 WirelessPCWS 2015 for PCI compliance. When configuring, use the highest encryption levelavailable to the device. It is recommended that the PCWS 2015 always be used at aminimum of WPA2-AES.
Before you can connect the Microsoft Windows 7 Wireless PCWS 2015 to a wirelessnetwork, make sure to:
1. Read the PCI DSS Wireless Guideline Informational Supplement version 2.0.
2. Verify that the PCWS 2015 has minimum CAL version 3.1.3.115 installed. If CALneeds to be updated, contact your Oracle MICROS representative.
3. Verify that the Mini-PCI Wireless Card was installed on the PCWS 2015. This mustbe installed before connecting the Wireless PCWS 2015 to a wireless network. Ifyou need to request this part, reference the following part number (PN) anddescription:
• PN: 400633-225-PT
• Description: SparkLAN WMIR-200N; WIRELESS (802.11a/b/g/n) UPGRADEKIT WS5/WS5A/PCWS2015, INCLUDES MINI-PCI CARD,ANTENNAS, ANDINSTALLATION INSTRUCTIONS.
Note that this card is capable of using WPA2 encryption with AES. Itsconfiguration is PCI compliant when using WPA2 encryption and placedbehind a Firewall.
For installation instructions, contact your Oracle MICROS representative.
4. Ensure that your site has a WPA2-AES compatible Access Point.
5. If using PEAP, have an Authentication device (for example, IAS Server or theWS2000).
6. Have a USB keyboard for the workstation.
Chapter 12Pre-Configuration Requirements for the Microsoft Windows 7 Wireless PCWS 2015
12-6

Configuring the Microsoft Windows 7 Wireless PCWS 2015and the Mini-PCI Wireless Card
All network configuration and security settings are dependent upon the site’sinfrastructure and configuration of the wireless network. If you encounter problemswith the wireless network, see your site administrator.
Follow this procedure if you are using the 802.11i WPA2-Personal security method.
To connect the Microsoft Windows 7 Wireless PCWS 2015 to a wireless network using(WPA-PSK) Wi-Fi Protected Access with Pre-Shared Key:
1. Click Start, click Control Panel, and then click Network and Internet.
2. Click Network and Sharing Center.
3. Click Set up a new connection or Network.
4. Click Manually connect to a wireless network, and then click Next.
Figure 12-4 Manually Connect to a Wireless Network for the MicrosoftWindows 7 PCWS 2015
5. In the Network Name field, enter the SSID for your Access Point. Note that this iscase sensitive.
6. In the Security Type drop-down list, select WPA2-Personal.
7. In the Encryption Type drop-down list, select AES.
8. In the Security Key field, select Hide Characters, and then enter the secureparaphrase that matches the one entered on your Access Point.
9. Select Start this connection automatically.
10. Select Connect even if the network is not broadcasting.
Chapter 12Configuring the Microsoft Windows 7 Wireless PCWS 2015 and the Mini-PCI Wireless Card
12-7
Microsoft Windows recommends against connecting to Access Points that do notbroadcast; however, the PCI White Paper v2.0 Section 4.2.1 states that whilesuppressing SSID is not required, broadcasting an SSID that advertises theorganization’s name or is easily identifiable with the organization is notrecommended. Default SSID values should always be changed.
11. Click Next.
If you are using DHCP, the PCWS 2015 automatically makes an association withthe selected Access Point.
12. If you are using a static IP address:
a. In the Network and Sharing Center, click Wireless Network Connection(SSID), and then click Properties.
b. Select Internet Protocol Version 4 (TCP/IPv4), and then click Properties.
The Internet Protocol Properties dialog box opens.
c. Select Use the following IP addresses, and then enter the proper IP, subnet,and gateway addresses.
13. Click OK twice to close and save. You are now associated with your Access Point.
14. Run the MICROS CAL normally.
Chapter 12Configuring the Microsoft Windows 7 Wireless PCWS 2015 and the Mini-PCI Wireless Card
12-8
13Configuring the Wireless KeyboardWorkstation 270
The Keyboard Workstation 270 (KW270) is pre-installed with the Microsoft WindowsEmbedded CE 6.0 operating system. It supports an optional wireless networkingmodule comprised of a USB wireless card.
• Pre-Configuration Requirements for the Wireless KW270
• Configuring the Wireless KW270 and the USB Wireless Card
Pre-Configuration Requirements for the Wireless KW270Before you can connect the KW270 to a wireless network, make sure to:
1. Read the PCI DSS Wireless Guideline Informational Supplement version 2.0.
2. Verify that the KW270 has minimum CAL version 13.1.3.68 installed. If CAL needsto be updated, contact your Oracle MICROS representative.
3. Verify that the USB Wireless Card was installed on the KW270. This must beinstalled before connecting the KW270 to a wireless network. If you need torequest this part, reference the following part number (PN) and description:
• PIN: MD0018-002 -PT
• Description: USB Wireless Card
Note that this card is capable of using WPA2 encryption with AES. Itsconfiguration is PCI compliant when using WPA2 encryption and placedbehind a Firewall.
The Installing the KW270 USB WiFi Option document contains installationinstructions.
4. Ensure that your site has a WPA2 compatible Access Point.
5. If using PEAP, have a RADIUS Server (for example, Internet AuthenticationService).
6. Have a USB keyboard for the workstation.
Configuring the Wireless KW270 and the USB WirelessCard
All network configuration and security settings are dependent upon the site’sinfrastructure and configuration of the wireless network. If you encounter problemswith the wireless network, see your site administrator.
To connect the Wireless KW270 to a wireless network:
13-1
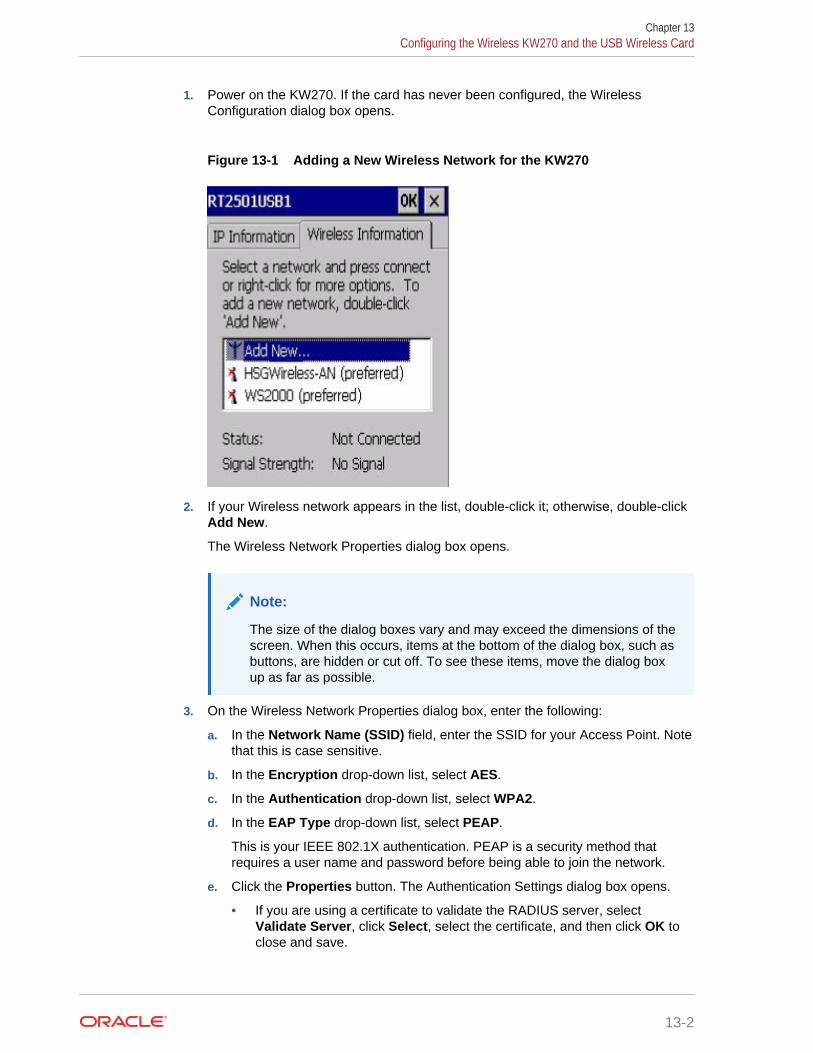
1. Power on the KW270. If the card has never been configured, the WirelessConfiguration dialog box opens.
Figure 13-1 Adding a New Wireless Network for the KW270
2. If your Wireless network appears in the list, double-click it; otherwise, double-clickAdd New.
The Wireless Network Properties dialog box opens.
Note:
The size of the dialog boxes vary and may exceed the dimensions of thescreen. When this occurs, items at the bottom of the dialog box, such asbuttons, are hidden or cut off. To see these items, move the dialog boxup as far as possible.
3. On the Wireless Network Properties dialog box, enter the following:
a. In the Network Name (SSID) field, enter the SSID for your Access Point. Notethat this is case sensitive.
b. In the Encryption drop-down list, select AES.
c. In the Authentication drop-down list, select WPA2.
d. In the EAP Type drop-down list, select PEAP.
This is your IEEE 802.1X authentication. PEAP is a security method thatrequires a user name and password before being able to join the network.
e. Click the Properties button. The Authentication Settings dialog box opens.
• If you are using a certificate to validate the RADIUS server, selectValidate Server, click Select, select the certificate, and then click OK toclose and save.
Chapter 13Configuring the Wireless KW270 and the USB Wireless Card
13-2
• If you are not using a certificate, deselect Validate Server, and then clickOK to close and save.
4. Click OK in the top right of the Wireless Network Properties dialog box to save.
5. Select your network, and then click Connect.
Once you have a wireless network association, you can keep the Wireless networkcard on the default DHCP setting.
6. To set a static IP address:
a. Click Start, click Settings, and then click Network and Dial-Up Connections.
b. Double-click the RT2501USB1 icon, and then enter a static IP address, subnetmask, and gateway if using a router.
c. Run the MICROS CAL normally.
Chapter 13Configuring the Wireless KW270 and the USB Wireless Card
13-3

14Configuring the MC40
The MC40 by Zebra (formerly the Motorola MC40) uses Microsoft WindowsEmbedded Mobile 7, which is capable of utilizing the WPA and WPA2 encryptionsecurity standards. The MC40 is shipped from Oracle MICROS with the CAL pre-loaded and with a pre-installed, embedded wireless networking module.
• Pre-Configuration Requirements for the MC40
• Configuring the MC40
Pre-Configuration Requirements for the MC40Before you can connect the Motorola MC40 to a wireless network, make sure to:
1. Read the PCI DSS Wireless Guideline Informational Supplement version 2.0.
2. Read the product warranty and enclosed documentation that shipped with yourMotorola MC40.
3. Verify that the Motorola MC40 has minimum CAL version 15.1.3.115 installed. IfCAL needs to be updated, contact your Oracle MICROS representative.
4. Ensure that your site has a WPA2 compatible Access Point.
5. Have a fully charged battery.
a. Attach the battery to the MC40 according to the enclosed instructions.
b. Charge the battery for several hours to make sure you have sufficient batterytime to configure the MC40 and to run CAL.
Configuring the MC40All network configuration and security settings are dependent upon the site’sinfrastructure and configuration of the wireless network. If you encounter problemswith the wireless network, see your site administrator.
To connect the MC40 to a wireless network:
1. Click the Fusion icon at the bottom of the screen, and then select ManageProfiles from the menu.
2. Hold the stylus on the Motorola Wireless Out of Box Magic profile, and thenselect Delete to remove this profile. If this profile does not exist, go to the nextstep.
3. Hold the stylus on the empty space in the window, and then select Add. TheWireless LAN Profile Entry dialog box opens.
14-1
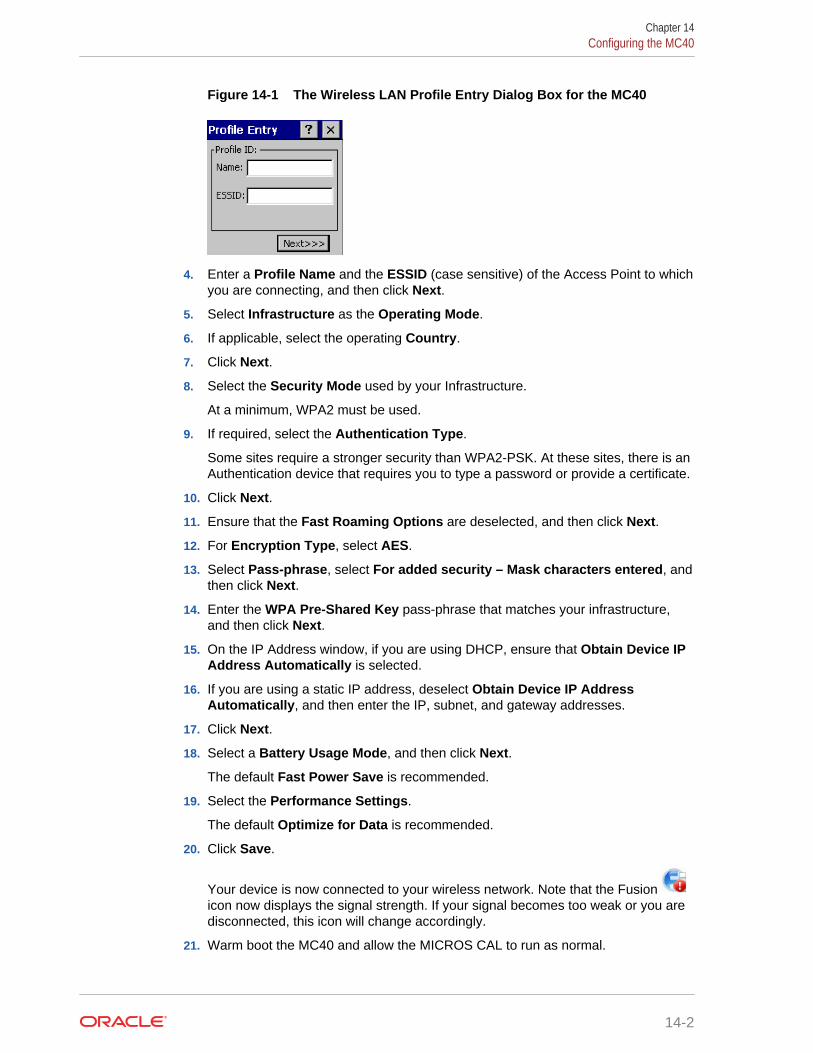
Figure 14-1 The Wireless LAN Profile Entry Dialog Box for the MC40
4. Enter a Profile Name and the ESSID (case sensitive) of the Access Point to whichyou are connecting, and then click Next.
5. Select Infrastructure as the Operating Mode.
6. If applicable, select the operating Country.
7. Click Next.
8. Select the Security Mode used by your Infrastructure.
At a minimum, WPA2 must be used.
9. If required, select the Authentication Type.
Some sites require a stronger security than WPA2-PSK. At these sites, there is anAuthentication device that requires you to type a password or provide a certificate.
10. Click Next.
11. Ensure that the Fast Roaming Options are deselected, and then click Next.
12. For Encryption Type, select AES.
13. Select Pass-phrase, select For added security – Mask characters entered, andthen click Next.
14. Enter the WPA Pre-Shared Key pass-phrase that matches your infrastructure,and then click Next.
15. On the IP Address window, if you are using DHCP, ensure that Obtain Device IPAddress Automatically is selected.
16. If you are using a static IP address, deselect Obtain Device IP AddressAutomatically, and then enter the IP, subnet, and gateway addresses.
17. Click Next.
18. Select a Battery Usage Mode, and then click Next.
The default Fast Power Save is recommended.
19. Select the Performance Settings.
The default Optimize for Data is recommended.
20. Click Save.
Your device is now connected to your wireless network. Note that the Fusion icon now displays the signal strength. If your signal becomes too weak or you aredisconnected, this icon will change accordingly.
21. Warm boot the MC40 and allow the MICROS CAL to run as normal.
Chapter 14Configuring the MC40
14-2

15Configuring the MC55A
The MC55A by Zebra (formerly Motorola MC55A) uses Microsoft Windows EmbeddedHandheld 6.5, which is capable of utilizing the WPA and WPA2 encryption securitystandards. The MC55A is shipped from Oracle MICROS with the CAL pre-loaded andwith a pre-installed, embedded wireless networking module.
• Pre-Configuration Requirements for the MC55A
• Configuring the MC55A
Pre-Configuration Requirements for the MC55ABefore you can connect the MC55A to a wireless network, make sure to:
1. Read the PCI DSS Wireless Guideline Informational Supplement version 2.0.
2. Read the product warranty and enclosed documentation that shipped with yourMotorola MC55A.
3. Verify that the Motorola MC55A has minimum CAL version 15.1.3.115 installed. IfCAL needs to be updated, contact your Oracle MICROS representative.
4. Ensure that your site has a WPA2 compatible Access Point.
5. Have a fully charged battery.
a. Attach the battery to the MC55A according to the enclosed instructions.
b. Charge the battery for several hours to make sure you have sufficient batterytime to configure the MC55A and to run CAL.
Configuring the MC55AAll network configuration and security settings are dependent upon the site’sinfrastructure and configuration of the wireless network. If you encounter problemswith the wireless network, see your site administrator.
To connect the MC55A to a wireless network:
1. Click Start, click Settings, click Connections, and then click Wireless Manager.
The Wireless Manager opens.
2. Ensure that Wi-Fi is set to On.
3. Return to the Home screen.
4. Select the Wi-Fi row, and then click Fusion Menu at the bottom of the screen.
15-1
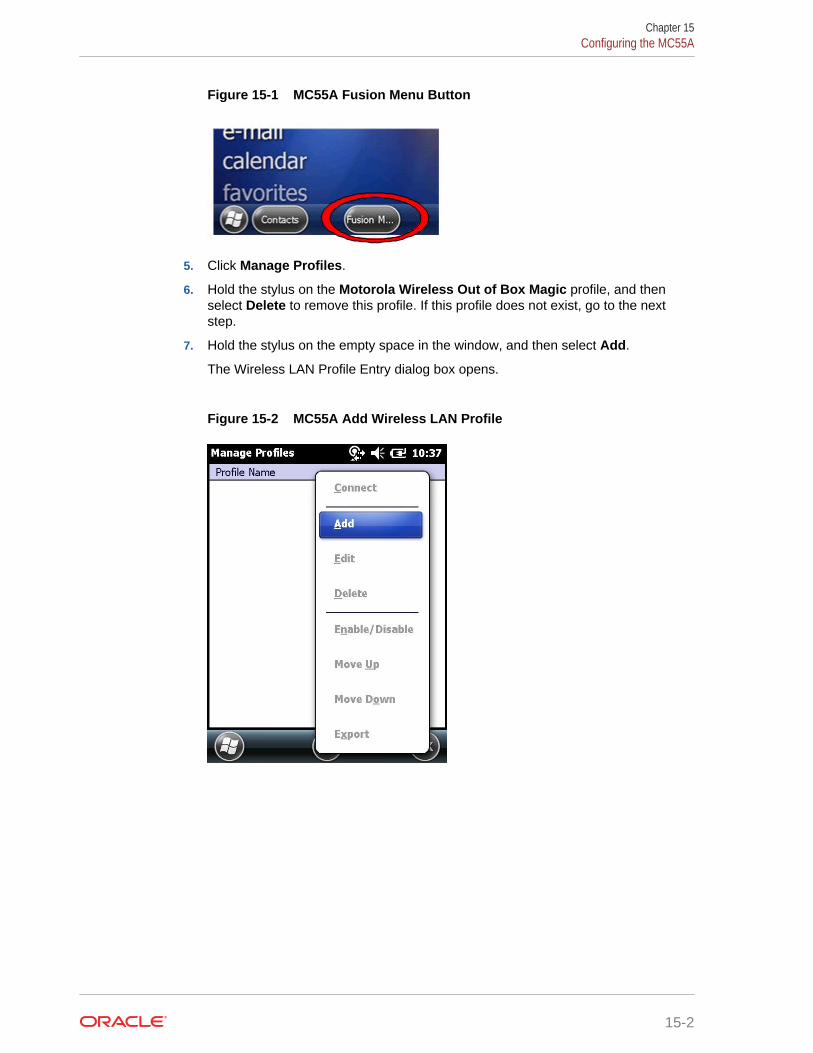
Figure 15-1 MC55A Fusion Menu Button
5. Click Manage Profiles.
6. Hold the stylus on the Motorola Wireless Out of Box Magic profile, and thenselect Delete to remove this profile. If this profile does not exist, go to the nextstep.
7. Hold the stylus on the empty space in the window, and then select Add.
The Wireless LAN Profile Entry dialog box opens.
Figure 15-2 MC55A Add Wireless LAN Profile
Chapter 15Configuring the MC55A
15-2
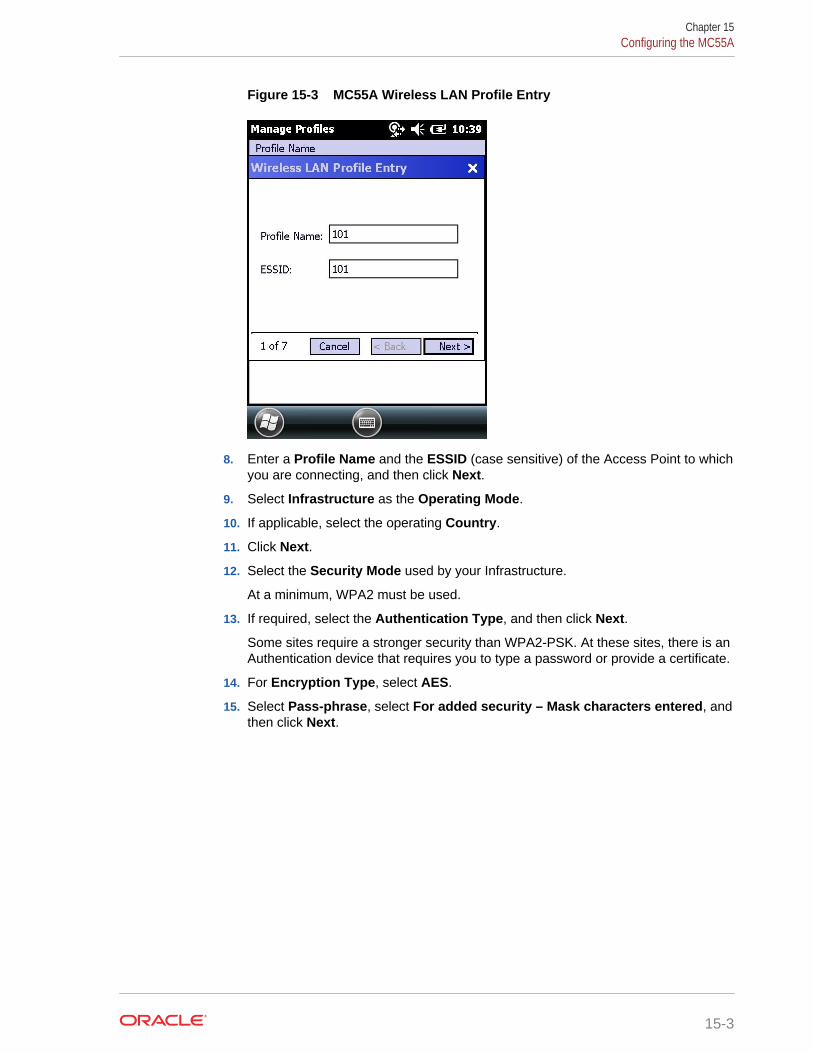
Figure 15-3 MC55A Wireless LAN Profile Entry
8. Enter a Profile Name and the ESSID (case sensitive) of the Access Point to whichyou are connecting, and then click Next.
9. Select Infrastructure as the Operating Mode.
10. If applicable, select the operating Country.
11. Click Next.
12. Select the Security Mode used by your Infrastructure.
At a minimum, WPA2 must be used.
13. If required, select the Authentication Type, and then click Next.
Some sites require a stronger security than WPA2-PSK. At these sites, there is anAuthentication device that requires you to type a password or provide a certificate.
14. For Encryption Type, select AES.
15. Select Pass-phrase, select For added security – Mask characters entered, andthen click Next.
Chapter 15Configuring the MC55A
15-3

Figure 15-4 MC55A Wireless LAN Profile Encryption Type
16. Enter the WPA Pre-Shared Key pass-phrase that matches your infrastructure,and then click Next.
17. On the IP Address window, if you are using DHCP, ensure that Obtain Device IPAddress Automatically is selected.
18. If you are using a static IP address, deselect Obtain Device IP AddressAutomatically, and then enter the IP, subnet, and gateway addresses.
19. Click Next.
20. Set the Transmit Power to Automatic, and then click Next.
21. Select a Battery Usage Mode, and then click Save.
The default Fast Power Save is recommended.
22. Click OK to close and save.
23. Warm boot the MC55A and allow the MICROS CAL to run as normal.
Chapter 15Configuring the MC55A
15-4

16Configuring the DT430
The DT430 uses Microsoft Windows Embedded CE 6, which is capable of utilizing theWPA and WPA2 encryption security standards. The DT430 is shipped from OracleMICROS with the CAL pre-loaded and with a pre-installed, embedded wirelessnetworking module.
• Pre-Configuration Requirements for the DT430
• Configuring the DT430
Pre-Configuration Requirements for the DT430Before you can connect the DT430 to a wireless network, make sure to:
1. Read the PCI DSS Wireless Guideline Informational Supplement version 2.0.
2. Read the product warranty and enclosed documentation that shipped with yourDT430.
3. Verify that the DT430 has minimum CAL version 15.1.3.115 installed. If CALneeds to be updated, contact your Oracle MICROS representative.
4. Ensure that your site has a WPA2 compatible Access Point.
5. Have a fully charged battery.
a. Attach the battery to the DT430 according to the enclosed instructions.
b. Charge the battery for several hours to make sure you have sufficient batterytime to configure the DT430 and to run CAL.
Configuring the DT430All network configuration and security settings are dependent upon the site’sinfrastructure and configuration of the wireless network. If you encounter problemswith the wireless network, see your site administrator.
To connect the DT430 to a wireless network:
1. On the Home screen, double-click the Laird Connection Manager (LCM) icon.
2. On the Configuration tab:
a. Ensure that Wi-Fi is selected.
b. Ensure that the Active Profile is set to Default.
c. Click Scan.
16-1
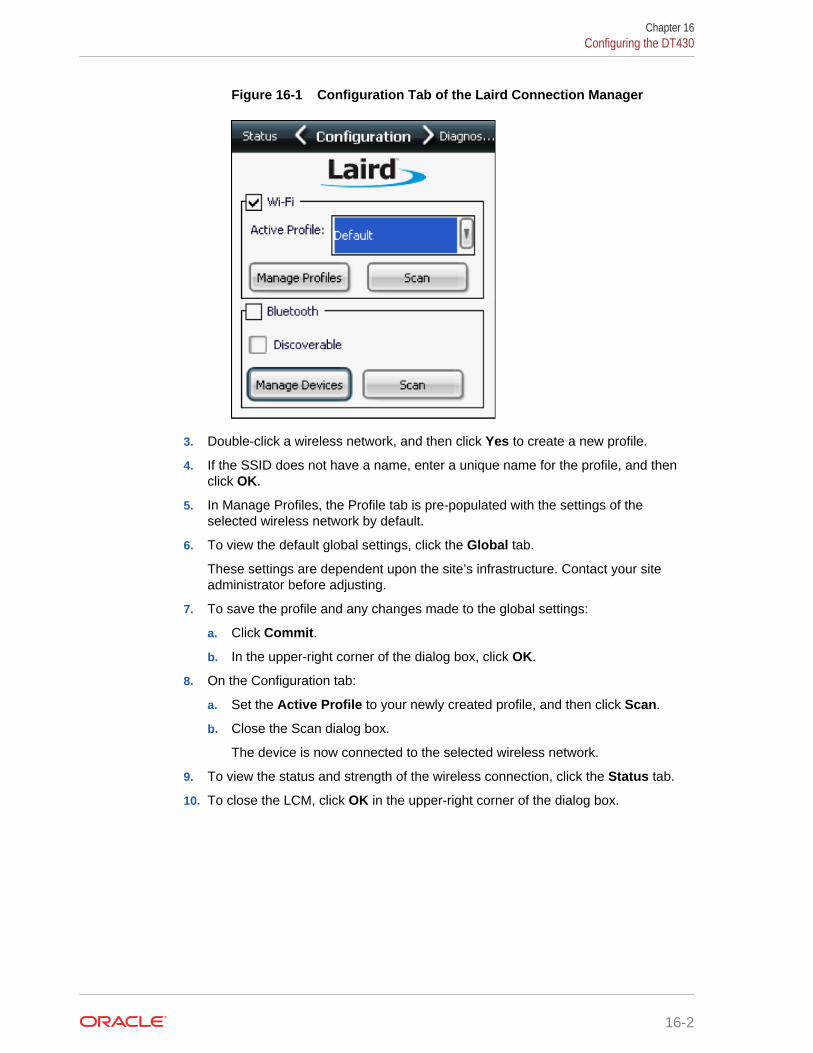
Figure 16-1 Configuration Tab of the Laird Connection Manager
3. Double-click a wireless network, and then click Yes to create a new profile.
4. If the SSID does not have a name, enter a unique name for the profile, and thenclick OK.
5. In Manage Profiles, the Profile tab is pre-populated with the settings of theselected wireless network by default.
6. To view the default global settings, click the Global tab.
These settings are dependent upon the site’s infrastructure. Contact your siteadministrator before adjusting.
7. To save the profile and any changes made to the global settings:
a. Click Commit.
b. In the upper-right corner of the dialog box, click OK.
8. On the Configuration tab:
a. Set the Active Profile to your newly created profile, and then click Scan.
b. Close the Scan dialog box.
The device is now connected to the selected wireless network.
9. To view the status and strength of the wireless connection, click the Status tab.
10. To close the LCM, click OK in the upper-right corner of the dialog box.
Chapter 16Configuring the DT430
16-2