windows server 2016 remote desktop services lab … · w2k16 rds lab build guide page 1 windows...
TRANSCRIPT
W2K16 RDS Lab Build Guide Page 1
Windows Server 2016 Remote Desktop Services Lab Build Prepared By: Jacob Lavender, Microsoft Premier Field Engineer Updated: 27 November 2017
What are RemoteApp programs? RemoteApp programs are simply programs which reside on a Remote Desktop Services Session Host server, which we have taken steps to publish to workstations. These are deployed through RDP files which are downloaded by the workstation through the Remote Desktop website. Where do RemoteApp programs execute? Exactly. This is the crux of the conversation. RemoteApp programs execute on the Session Host. So, when you open a RemoteApp, you are fundamentally opening a Remote Desktop protocol (RDP) connection to a Session Host server within an RDS farm, logging into the Session Host, and then executing the program with the credentials you logged in with. How is this more secure and why do I care? First, it is more secure in that we are not logging into a workstation with an account that has administrative functions within the enterprise. With that said, think of the enterprise as all the servers and infrastructure that an organization has (this is not meant within the context of Enterprise Admin within Active Directory). Second, you should greatly care for multiple reasons. The first among these reasons is that we never want to login and perform functions on a workstation with access to the Internet with an account that has admin rights within the enterprise, unless necessary. Second, we do not want our credentials cached on a machine that is a high-risk asset within the enterprise, such as a workstation with Internet access.
Preparation Steps
What we need:
• Three servers; 1 Connection Broker and 2 Session Host o RDSCB01 o RDSSH01 o RDSSH02
• 1 OU Dedicated to the RDS Servers
• Two GPOs
o RDS Server GPO - This GPO will only apply to the RDS servers and contains RDS specific settings
o RDS Remote App User GPO - This GPO will only apply to the RDS users and will be filtered using a security group
• Three Active Directory Groups
o RDS Remote App Users Group - This group will contain user accounts, both user and administrator, which instruct the client how to connect to the RDS Remote Apps
W2K16 RDS Lab Build Guide Page 2
o RDS Remote Desktop Users Group - This group will contain only administrator accounts. This group will be granted access to the remote desktop of the session host servers. This group will NOT be in the administrators group on the session host servers.
o RDS Servers Computer Security Group: This group will contain all member servers of the RDS Farm.
Preparation Step 1 - Computer Build and Security Groups
Identify the following:
Connection Broker Server Name: _________________________________ Session Host Server Name(s): _________________________________ _________________________________ RDS Farm IP Name: _________________________________ (See the sample below for guidance.)
The RDS Farm IP Name will be used for round robin to the session host servers later in this guide. Do not create an A record with a dedicated IP for this. Instead, later in this guide we will add A Records in DNS which will point to the Session Host servers.
Sample:
Connection Broker Server Name: rdscb01.srv.lab Session Host Server Name(s): rdssh01.srv.lab rdssh02.srv.lab RDS Farm IP Name: rdsfarm.srv.lab
Ensure that all three computers have been joined to the Active Directory domain and placed within the RDS OU.
Create the three Active Directory security groups. In this lab, the security groups will be:
• RDS_RemoteApp_Users o Users who will utilize Remote Applications published vie the RDS Farm.
• RDS_RemoteDesktop_Users
o Users who will be granted login rights to the RDS Farm Session Host Servers.
• RDS_Servers o The Remote Desktop Services servers, to include the Connection Broker and Session Hosts.
Preparation Step 2 - Computer Certificates
• Two certificates are required for the deployment utilizing an RDS Farm with a Connection Broker. ○ Certificate 1 is the RDS Farm Certificate. This is the certificate clients use to setup NLA connections with the
session host servers. ○ Certificate 2 is the Remote App Web Server certificate. It is used to secure the web traffic to the Remote App web
interface.

W2K16 RDS Lab Build Guide Page 3
• See Appendix A for directions on configuring the RDS Farm Certificate Template. This is required prior to proceeding.
• See Appendix B for directions on configuring the RDS Farm Web Server Template. This is required prior to proceeding.
Certificate 1: The RDS Farm Certificate. This certificate should be configured using a specific certificate template
which contains Server Authentication and Remote Desktop Authentication. See Appendix A for how to configure this template.
This certificate should contain the names of all the Connection Broker and Session Host servers as well as the farm name which will be configured for DNS round robin. Those names should have been identified in Preparation Step 1.
1. On the connection broker server request the Farm Certificate using the Certificates MMC Snap-In. Ensure that the
Certificates Snap-In is connected to the computer's certificate store and request the certificate.
2. When prompted to select the certificate template, select the RDS Farm certificate template that was created in Appendix A.

W2K16 RDS Lab Build Guide Page 4
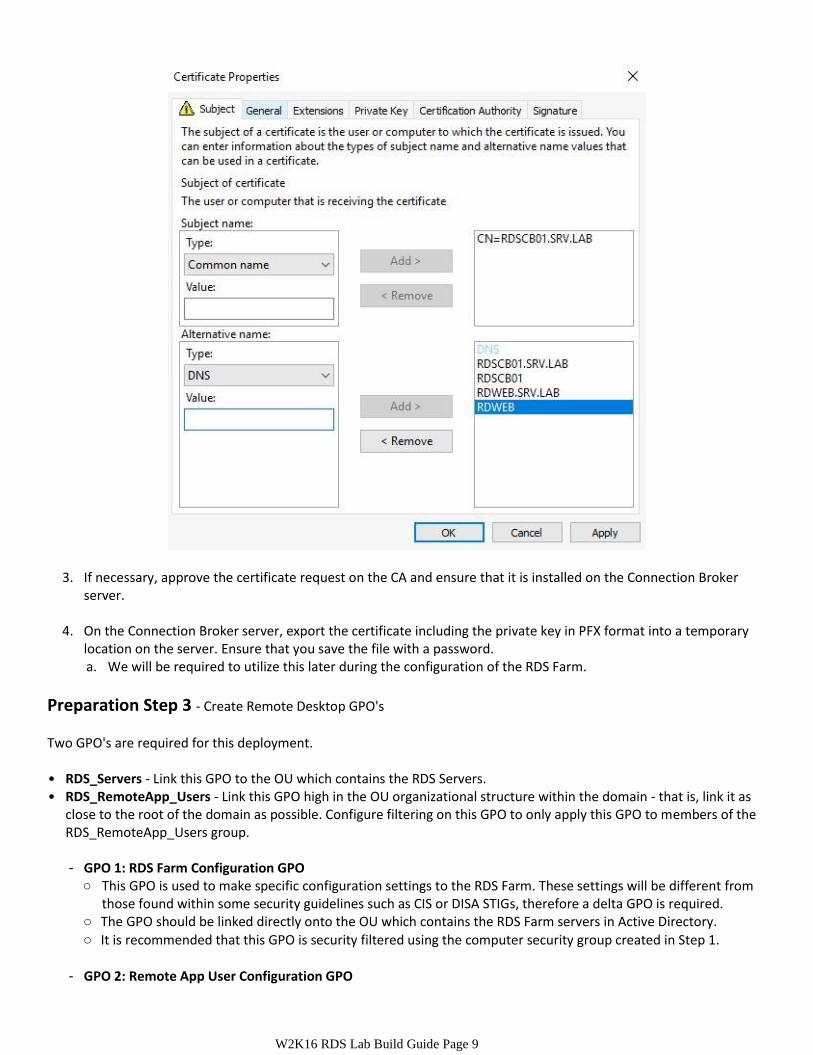
3. For the common name field, utilize the name of the farm.
4. Within the alternative name field, include both the short name and the FQDN of all nodes in the farm to include the farm name. Remember, you will have users who connect by short name and not FQDN so we want to avoid creating any certificate errors.

W2K16 RDS Lab Build Guide Page 5
5. Once the certificate has been requested it will require approval on the CA. Issue the certificate from the CA.
• Once the certificate has been issued, it may be necessary to restart the Connection Broker server to have it pull the certificate.
• If the certificate fails to appear on the server, return to the CA and copy the certificate to file and import it onto the Connect Broker server. Ensure to copy the certificate to P7B format to get the full certificate chain.
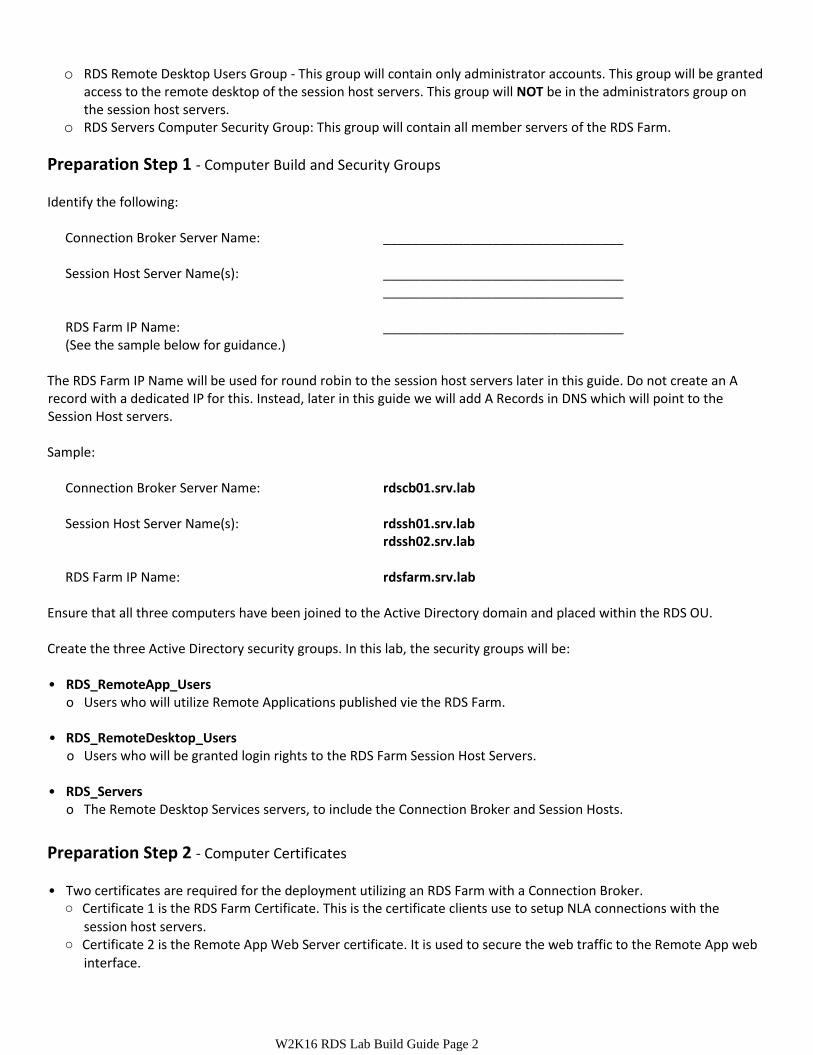
6. Next, export the certificate from the Connection Broker. Ensure that the private key is included. Ensure to protect the private key with a password.
W2K16 RDS Lab Build Guide Page 6
7. Once the certificate has been exported, copy it to the Session Host servers and import it into the machine's Personal Certificates store.
Now that the certificate has been loaded on the Connection Broker and the Session Host servers, we must configure the RDP listener to utilize this certificate. If we do not perform this, users will experience a certificate trust warning when attempting to connect to the farm.
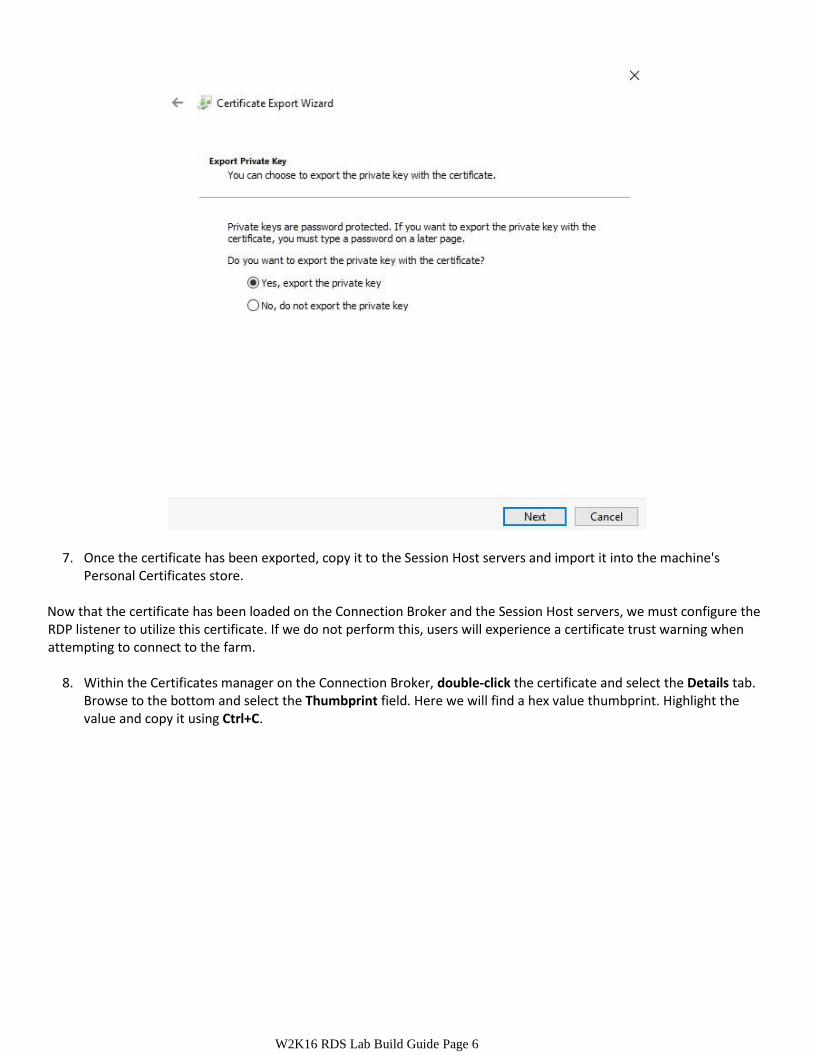
8. Within the Certificates manager on the Connection Broker, double-click the certificate and select the Details tab.
Browse to the bottom and select the Thumbprint field. Here we will find a hex value thumbprint. Highlight the value and copy it using Ctrl+C.

W2K16 RDS Lab Build Guide Page 7
9. Next, open PowerShell as an administrator and past the value into the window using the right-click or right-click + paste option. Take note of the hidden ASCII symbol. This symbol must be deleted, along with all additional spaces between the hex values within the thumbprint.
10. Next, copy the thumbprint into the following command. It may be easiest to open notepad and write the command and insert the thumbprint value, then copy that back to a clean line in PowerShell.
I recommend that you utilize Notepad to write the command first, then save the notepad file. We must perform this function on all servers within the farm and it will be easier to simply move the file with the command to each server.
The following command must be executed under the admin context.

W2K16 RDS Lab Build Guide Page 8
Wmic /namespace:\\root\cimv2\TerminalServices PATH Win32_TSGeneralSetting Set SSLCertificateSHA1Hash="THUMBPRINT"
Example:
Wmic /namespace:\\root\cimv2\TerminalServices PATH Win32_TSGeneralSetting Set SSLCertificateSHA1Hash="94e2cef74ac980c6a1ff58b8f55b71553c4c708"
11. Execute the same command on all the servers within the farm. https://support.microsoft.com/en-us/kb/3042780
Certificate 2: The RDWeb Access Certificate. The RDWeb Access certificate is used to access the RDWeb Access site
and to provide services for the RemoteApp feed URL. This requires a specific template, unless the RDWeb Access URL IP name will be the same as the Connection Broker server. By default, this is the case. However, an alternative name can be assigned to the certificate to simplify access for end users. See Appendix B for configuring the Web Server certificate template.
1. Begin by requesting a certificate on the Connect Broker within the Certificates manager MMC snap-in. For this
function, we will use a Web Server template - specifically, the one that we created in Appendix B. Take note, a new template is not required if you already have a published template that is satisfactory for this purpose.
2. When configuring the subject name, select Common Name and input the necessary data. Configure the Alternative Names to include the server's FQDN and Short Name, as well as the RDWeb URL and Short Name.
W2K16 RDS Lab Build Guide Page 9
3. If necessary, approve the certificate request on the CA and ensure that it is installed on the Connection Broker server.
4. On the Connection Broker server, export the certificate including the private key in PFX format into a temporary
location on the server. Ensure that you save the file with a password. a. We will be required to utilize this later during the configuration of the RDS Farm.
Preparation Step 3 - Create Remote Desktop GPO's
Two GPO's are required for this deployment.
• RDS_Servers - Link this GPO to the OU which contains the RDS Servers. • RDS_RemoteApp_Users - Link this GPO high in the OU organizational structure within the domain - that is, link it as
close to the root of the domain as possible. Configure filtering on this GPO to only apply this GPO to members of the RDS_RemoteApp_Users group. - GPO 1: RDS Farm Configuration GPO ○ This GPO is used to make specific configuration settings to the RDS Farm. These settings will be different from
those found within some security guidelines such as CIS or DISA STIGs, therefore a delta GPO is required. ○ The GPO should be linked directly onto the OU which contains the RDS Farm servers in Active Directory. ○ It is recommended that this GPO is security filtered using the computer security group created in Step 1.
- GPO 2: Remote App User Configuration GPO
W2K16 RDS Lab Build Guide Page 10
○ This GPO is used to configure specific client computer settings for the RDS farm, such as the Remote App feed URL.
○ This GPO can be either linked as close to the users as possible, or ○ Linked high in the OU structure and filtered using the Remote App user security group (not the RDS Servers
security group) established in Step 1. This might be a preferable method for deploying this GPO to ensure that the configuration follows the Remote Desktop farm users despite their location.
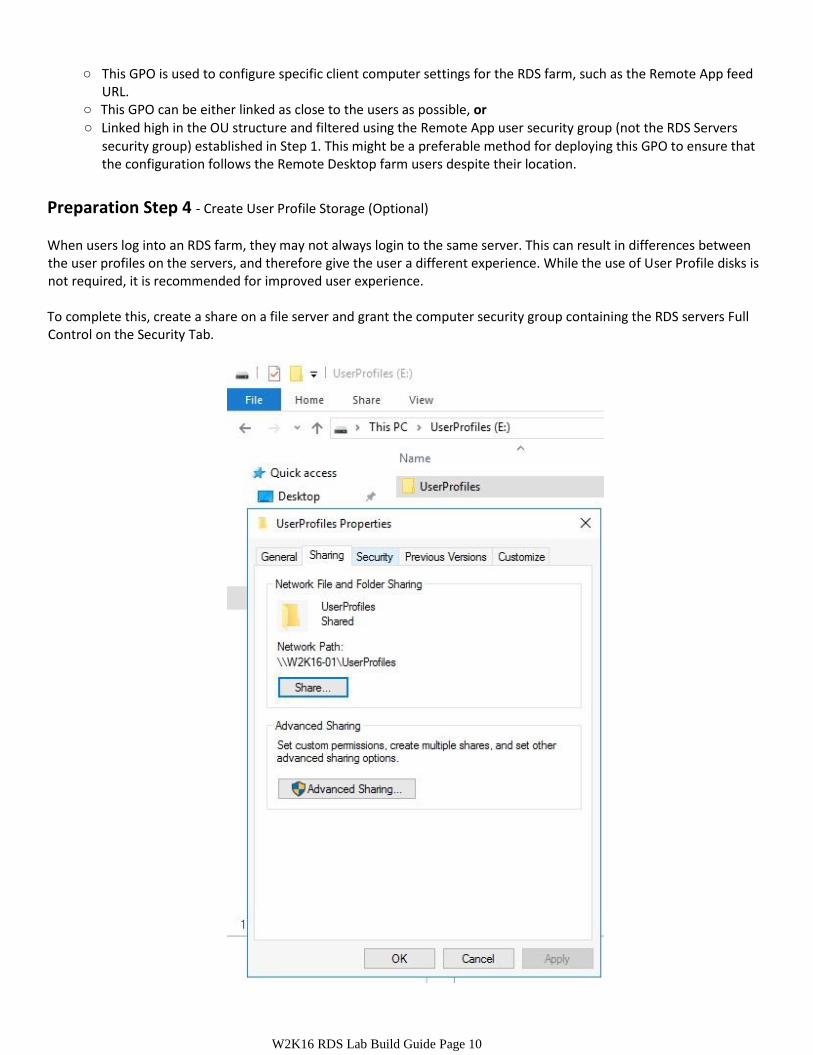
Preparation Step 4 - Create User Profile Storage (Optional)
When users log into an RDS farm, they may not always login to the same server. This can result in differences between the user profiles on the servers, and therefore give the user a different experience. While the use of User Profile disks is not required, it is recommended for improved user experience.
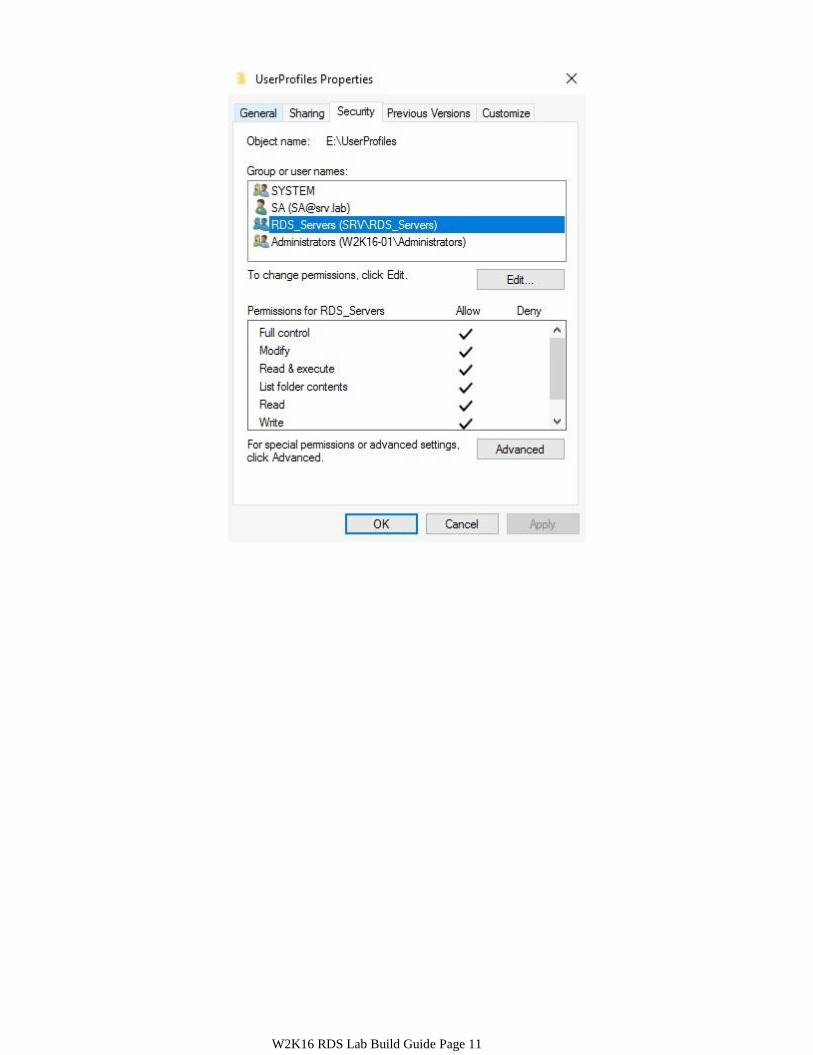
To complete this, create a share on a file server and grant the computer security group containing the RDS servers Full Control on the Security Tab.
W2K16 RDS Lab Build Guide Page 11
W2K16 RDS Lab Build Guide Page 12
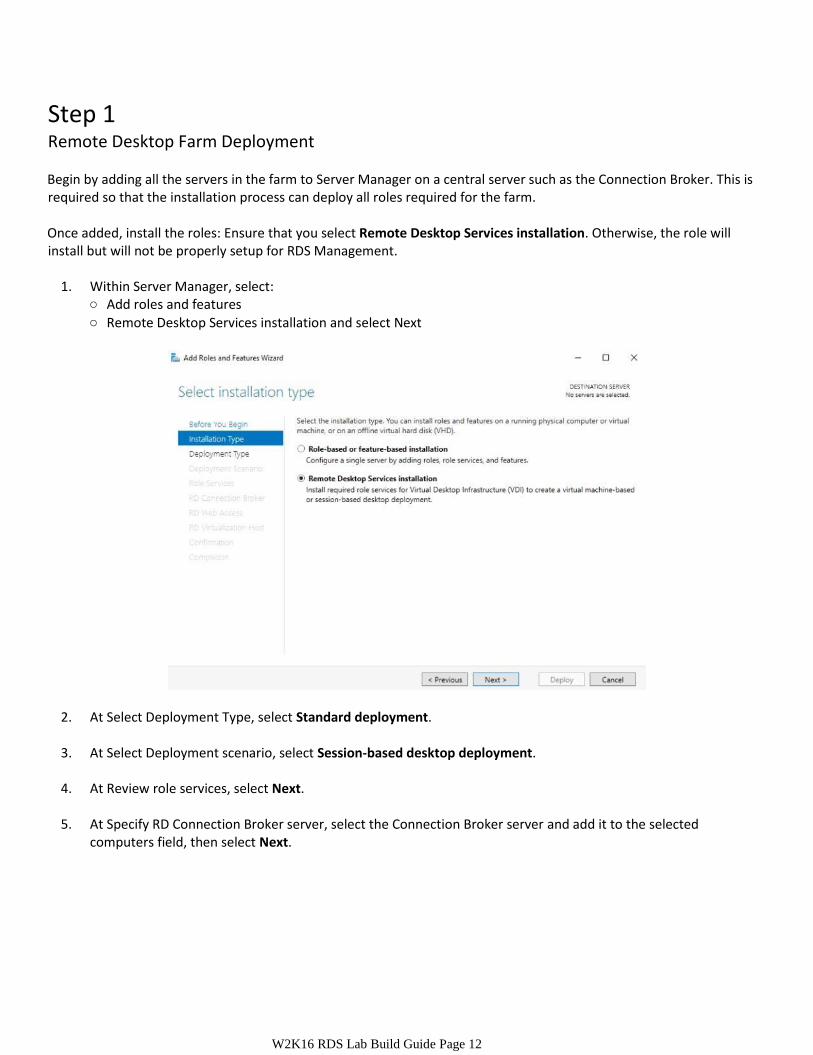
Step 1 Remote Desktop Farm Deployment
Begin by adding all the servers in the farm to Server Manager on a central server such as the Connection Broker. This is required so that the installation process can deploy all roles required for the farm. Once added, install the roles: Ensure that you select Remote Desktop Services installation. Otherwise, the role will install but will not be properly setup for RDS Management.
1. Within Server Manager, select:
○ Add roles and features ○ Remote Desktop Services installation and select Next
2. At Select Deployment Type, select Standard deployment.
3. At Select Deployment scenario, select Session-based desktop deployment.
4. At Review role services, select Next.
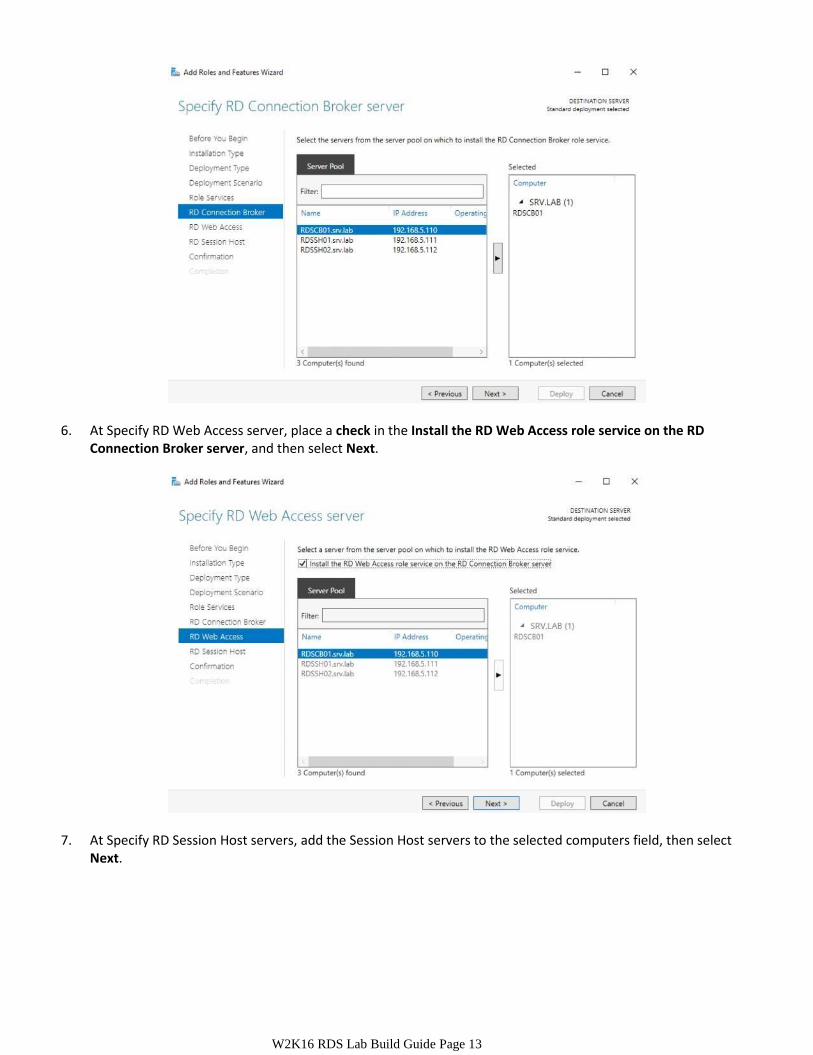
5. At Specify RD Connection Broker server, select the Connection Broker server and add it to the selected computers field, then select Next.
W2K16 RDS Lab Build Guide Page 13
6. At Specify RD Web Access server, place a check in the Install the RD Web Access role service on the RD Connection Broker server, and then select Next.
7. At Specify RD Session Host servers, add the Session Host servers to the selected computers field, then select Next.
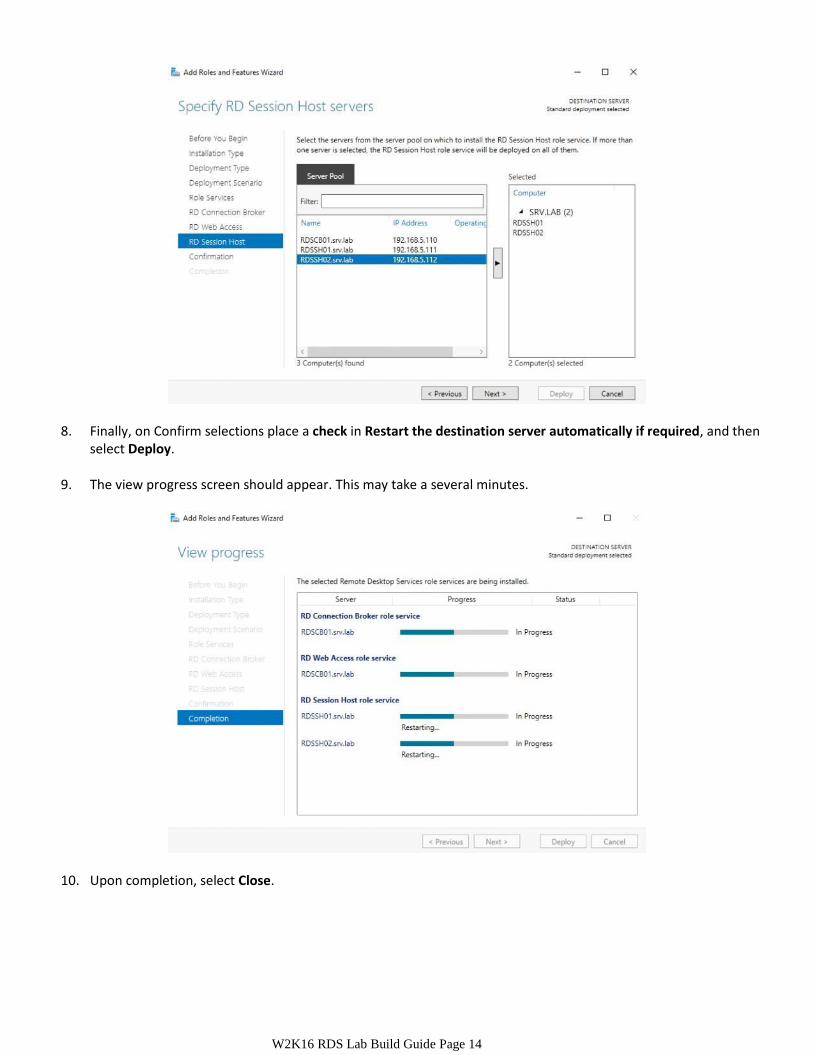
W2K16 RDS Lab Build Guide Page 14
8. Finally, on Confirm selections place a check in Restart the destination server automatically if required, and then select Deploy.
9. The view progress screen should appear. This may take a several minutes.
10. Upon completion, select Close.

W2K16 RDS Lab Build Guide Page 15
W2K16 RDS Lab Build Guide Page 16
Step 2 Configure the Remote Desktop Services Farm
Configuring and managing the Remote Desktop Services Farm is performed through Server Manager. Server Manager must connect to the Remote Desktop Connection Broker server to perform this management. If this step is not being performed from the Connection Broker server, add the Connection Broker server to managed servers on the machine this action is being taken from.
1. Open Server Manager and select the Remote Desktop Services node. This will establish a connection to the
Connection Broker.
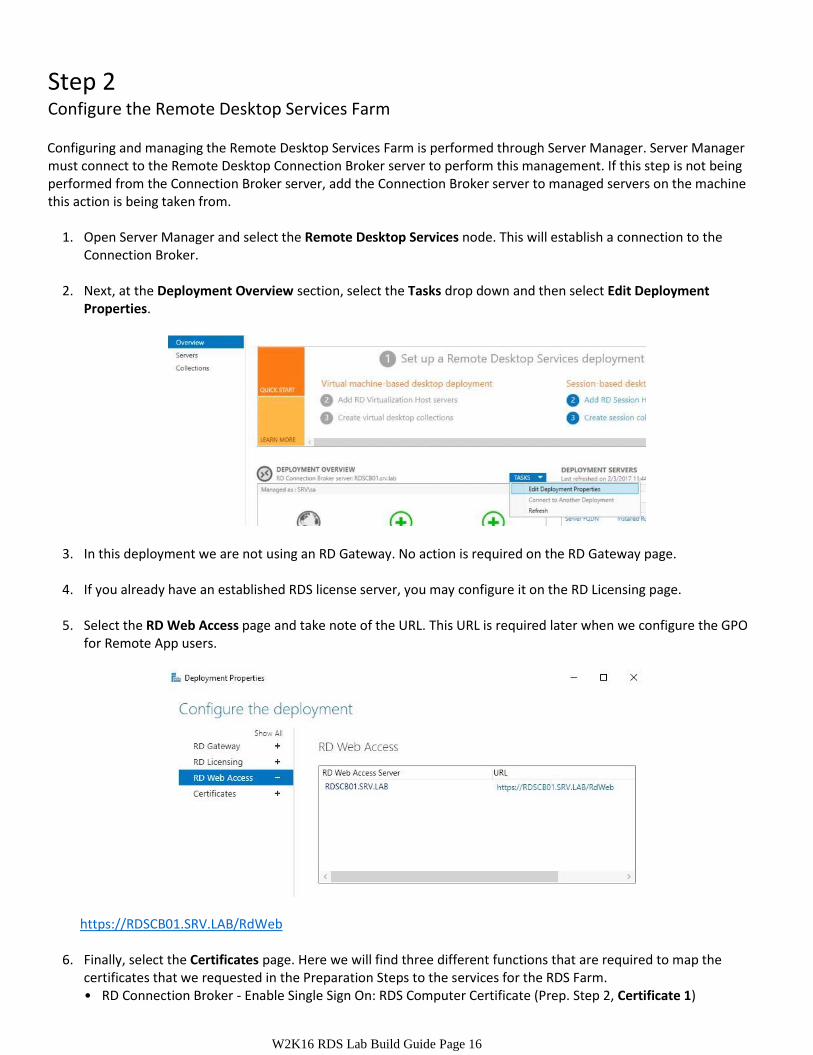
2. Next, at the Deployment Overview section, select the Tasks drop down and then select Edit Deployment Properties.
3. In this deployment we are not using an RD Gateway. No action is required on the RD Gateway page.
4. If you already have an established RDS license server, you may configure it on the RD Licensing page.
5. Select the RD Web Access page and take note of the URL. This URL is required later when we configure the GPO for Remote App users.
https://RDSCB01.SRV.LAB/RdWeb
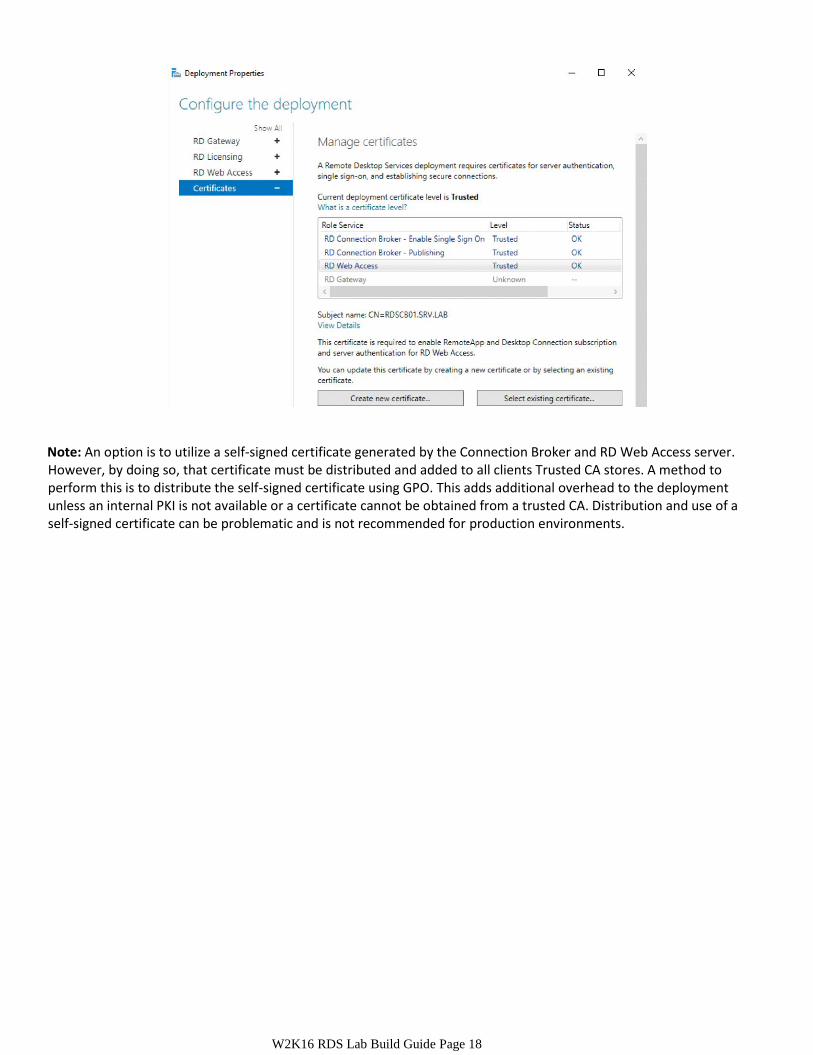
6. Finally, select the Certificates page. Here we will find three different functions that are required to map the
certificates that we requested in the Preparation Steps to the services for the RDS Farm. • RD Connection Broker - Enable Single Sign On: RDS Computer Certificate (Prep. Step 2, Certificate 1)

W2K16 RDS Lab Build Guide Page 17
• RD Connection Broker - Publishing: RDS Computer Certificate (Prep. Step 2, Certificate 1) • RD Web Access: RD Web App Certificate (Prep. Step 2, Certificate 2)
Each certificate must be assigned 1 at a time. Both of the required certificates should have been saved locally on the server within the Preparation Steps.
7. Begin by selecting Select existing certificate.
8. Follow the wizard to select the exported RDS Farm Certificate PFX file.
9. Once the certificate has been selected, input the password used to secure the file.
10. Select Allow the certificate to be added to the Trusted Root Certification Authorities certificate store on the
destination computers. Then select OK. Then select Apply at the Manage certificates page.
11. Repeat this step for each certificate. At the end of this step the following screen should be visible. Select OK to close this screen.
W2K16 RDS Lab Build Guide Page 18
Note: An option is to utilize a self-signed certificate generated by the Connection Broker and RD Web Access server. However, by doing so, that certificate must be distributed and added to all clients Trusted CA stores. A method to perform this is to distribute the self-signed certificate using GPO. This adds additional overhead to the deployment unless an internal PKI is not available or a certificate cannot be obtained from a trusted CA. Distribution and use of a self-signed certificate can be problematic and is not recommended for production environments.
W2K16 RDS Lab Build Guide Page 19
Step 3 Create an RD Collection
1. It is now necessary to create the collection. To perform this function open Server Manager, browse to Remote Desktop Services, then select Collections.
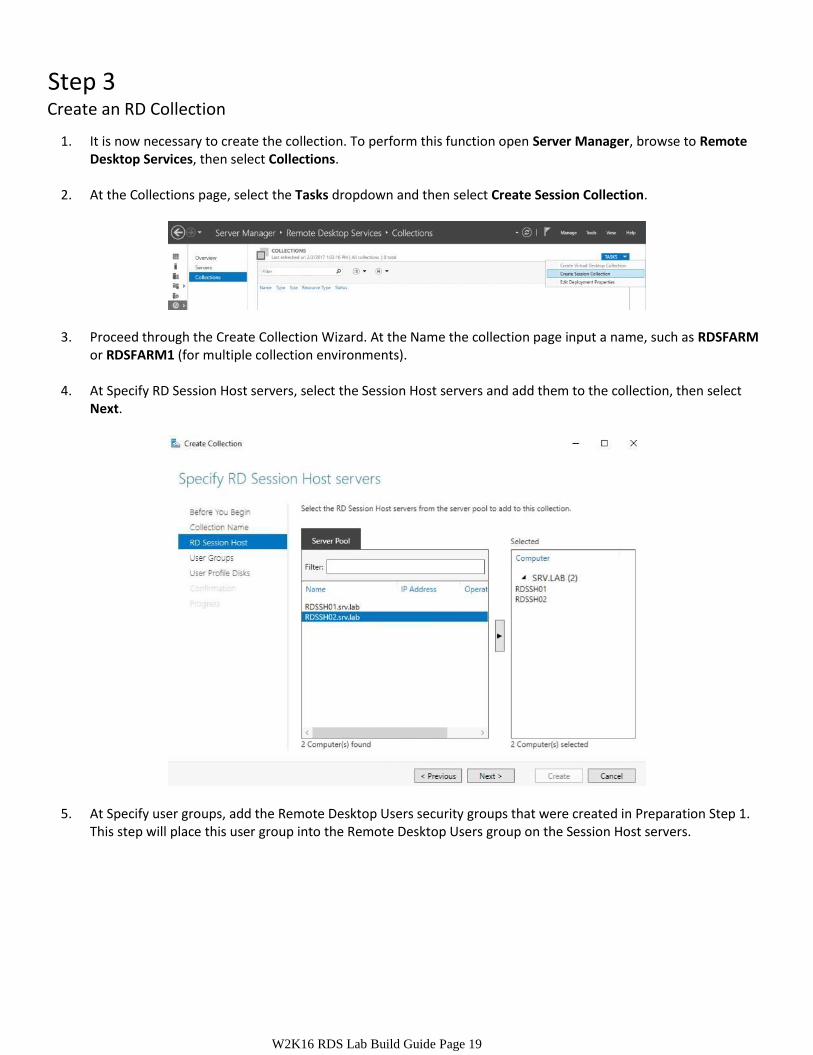
2. At the Collections page, select the Tasks dropdown and then select Create Session Collection.
3. Proceed through the Create Collection Wizard. At the Name the collection page input a name, such as RDSFARM or RDSFARM1 (for multiple collection environments).
4. At Specify RD Session Host servers, select the Session Host servers and add them to the collection, then select
Next.
5. At Specify user groups, add the Remote Desktop Users security groups that were created in Preparation Step 1. This step will place this user group into the Remote Desktop Users group on the Session Host servers.

W2K16 RDS Lab Build Guide Page 20
6. At Specify user profile disks, input an SMB path to the file share that was defined in Preparation Step 4. This was an optional configuration and not required. If this step was skipped, ignore this task. The size of each user's profile disk should be determined for your environment. I would recommend not allowing excessively sized disks.
https://blogs.technet.microsoft.com/enterprisemobility/2012/11/13/easier-user-data-management-with-user-profiledisks-in-windows-server-2012/
7. At Confirm selections, select Create.
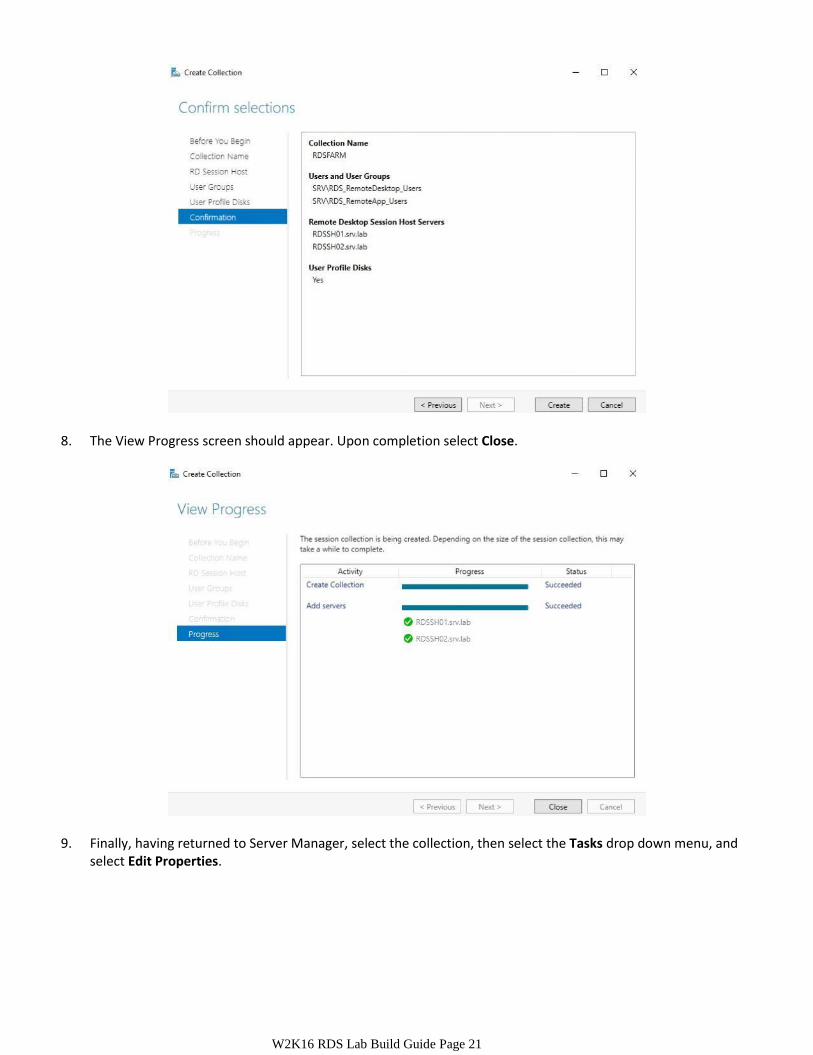
W2K16 RDS Lab Build Guide Page 21
8. The View Progress screen should appear. Upon completion select Close.
9. Finally, having returned to Server Manager, select the collection, then select the Tasks drop down menu, and select Edit Properties.

W2K16 RDS Lab Build Guide Page 22
10. Review the settings found on the following pages and set them according to the requirements of your environment. a. Session b. Security c. Load Balancing d. Client Settings e. User Profile Disks
Note: Some settings may be configured via GPO:
GPO Path: > Computer Configuration > Policies > Administrative Templates > Windows Components > Remote Desktop Services > Remote Desktop Session Host
If you wish to configure these settings via GPO, then modify them within the RDS_Servers GPO that was created within Preparation Step 1.
Recommendations
• Session: These settings can be configured via GPO and should be managed differently from that of other servers
within the domain. Since this is an RDP farm, connections should be allowed to remain active and persistent for longer durations than direct connections to production servers. Consider the following: ○ GPO Path: > Computer Configuration > Policies > Administrative Templates > Windows Components > Remote
Desktop Services > Remote Desktop Session Host ○ End a disconnected session: Consider if it is desirable that a disconnected session survive overnight. ○ Active session limit: Consider how long users should be allowed to maintain an active session. If changes to the
farm are anticipated on a regular basis, setting this to a predefined value of days may be desirable. Otherwise, leaving the limit of "Never" in place is likely satisfactory.
○ Idle session limit: Consider the standard user experience during the work day. If users will be using the RD Farm regularly throughout the day, ensure to configure this setting to have the least impact on the user experience while also maintaining a good security posture for your environment.
○ Configure the remaining settings has desired. ○ Be prepared to modify these settings as time passes to conform to the user experience requirements within your
organization.
• Client Settings - Consider disabling the following: ○ Audio recording ○ All client printer redirection ○ Compare additional settings against DISA STIG requirements
• User Profile Disks - Review this configuration to determine if additional modifications are desired.

W2K16 RDS Lab Build Guide Page 23
Step 4 Configure DNS Round Robin
Configuring DNS for Round Robin (DNS Load Balancing) is required. To perform this function, add A records for the RDS Farm Name that resolves to each of the Session Host IP addresses which are members of the farm.
Established Records: RDSSH01: 192.168.5.111 RDSSH02: 192.168.5.112
New Records: RDSFARM: 192.168.5.111 RDSFARM: 192.168.5.112
If there are multiple Session Host servers, create an A record for the RDP farm name which points to each of the Session Host IP addresses.

W2K16 RDS Lab Build Guide Page 24
How does this work? When a client connects to a Session Host server, the Session Host contacts the Connection Broker to determine the optimal server for the client to log on to. The Connection Broker will then redirect the user to that Session Host if necessary. This is why all Session Host servers must be configured with a certificate for RDP that contains the SAN for the RDP Farm Name. Otherwise, users would receive certificate errors during login. Note: At this point, if you do not plan to publish web applications via Web Access or through RemoteApp, you may stop. See Appendix C for quick info on the RD Web App URL.
Step 5 Publish Applications via RD Web Access
Note: Please see Appendix E for a discussion on deploying RemoteApp applications in environments with primary and secondary (elevated) accounts. This is not a discussion that applies to all organizations. However, if you are deploying this RDS Farm to support increased security within your environment, then you should be using account/permission separation and should therefore read this appendix.
Prior to proceeding in this guide, we must first discuss the concept of Role Based Administration within the context of RemoteApp. When publishing a RemoteApp, we are provided with two options regarding who can use it:
• Everyone • Specified Groups
For this guide, I will demonstrate the deployment of various remote apps using security groups that align to specific applications, detailed below:
• RemoteApp_G1: This group grants access to the Calculator RemoteApp. • RemoteApp_G2: This group grants access to the Hyper-V Manager console RemoteApp.
W2K16 RDS Lab Build Guide Page 25
Within this guide I will publish multiple RemoteApp programs. However, the only two that I will restrict will be the Calculator and the Hyper-V Admin Console.
Why would I do this?
Imagine if I had an accounting department and they were the only set of users who required the Calculator, or another accounting app. This way I can restrict who receives which application on their workstation. The same is true for the Hyper-V Admin Console.
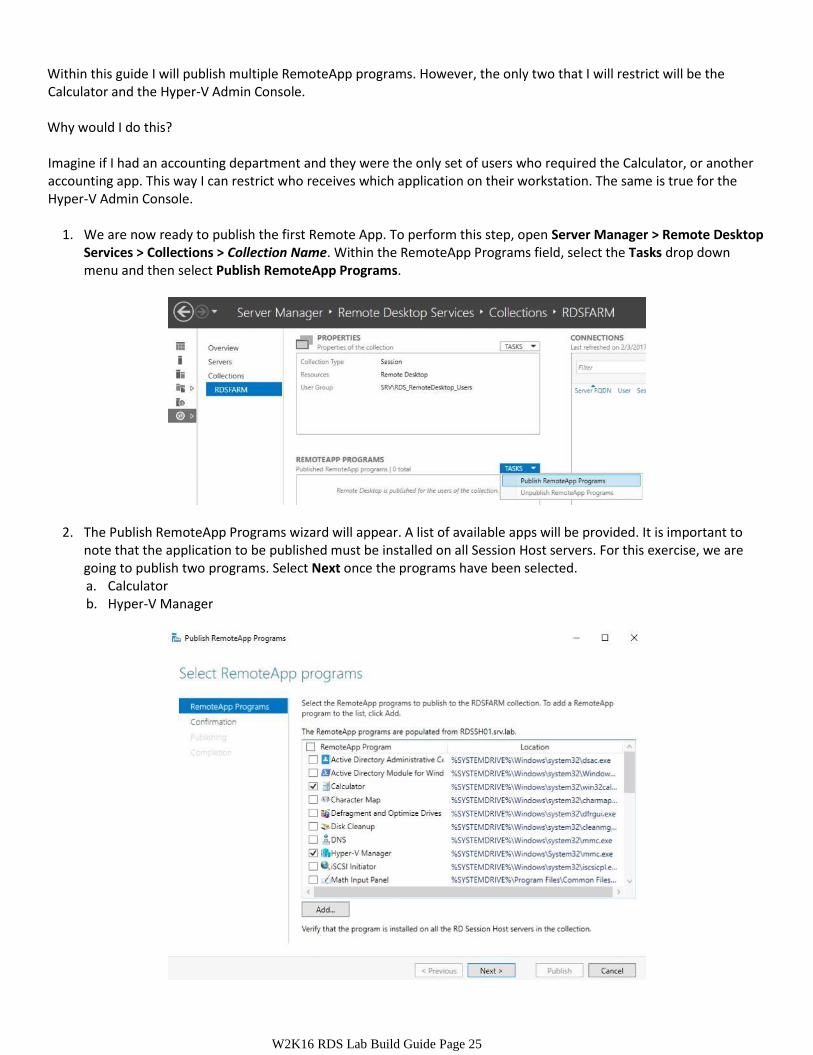
1. We are now ready to publish the first Remote App. To perform this step, open Server Manager > Remote Desktop
Services > Collections > Collection Name. Within the RemoteApp Programs field, select the Tasks drop down menu and then select Publish RemoteApp Programs.
2. The Publish RemoteApp Programs wizard will appear. A list of available apps will be provided. It is important to note that the application to be published must be installed on all Session Host servers. For this exercise, we are going to publish two programs. Select Next once the programs have been selected. a. Calculator b. Hyper-V Manager
W2K16 RDS Lab Build Guide Page 26
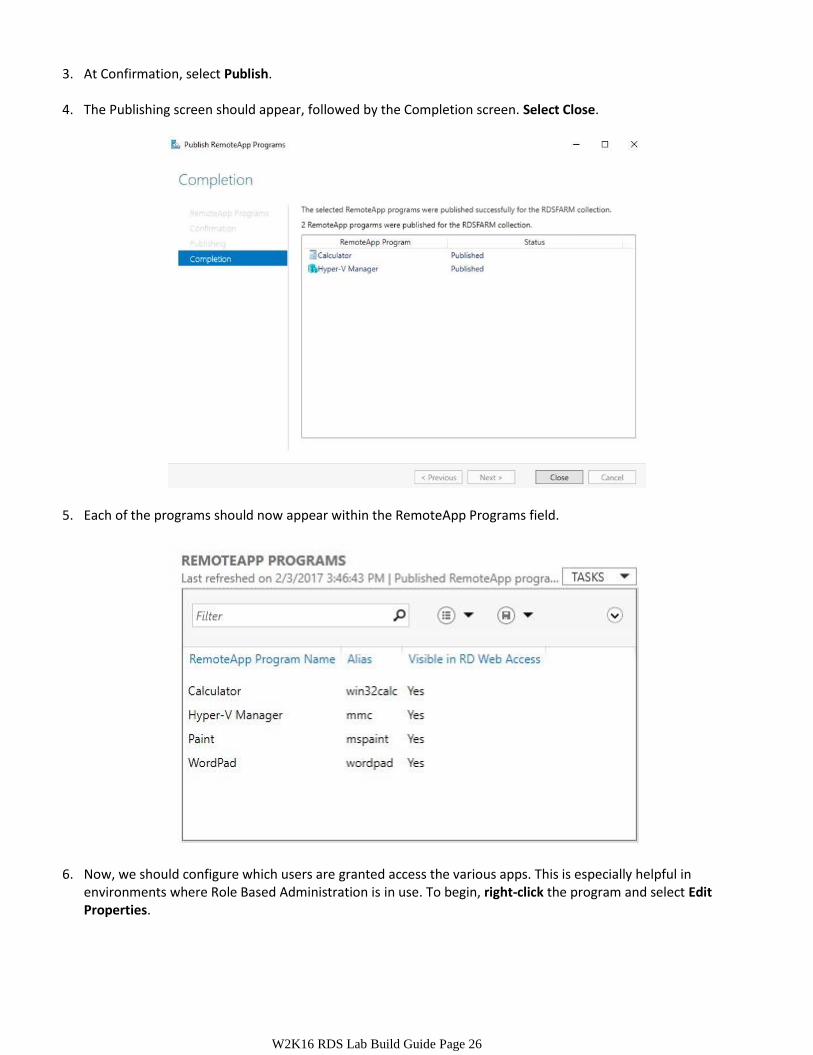
3. At Confirmation, select Publish.
4. The Publishing screen should appear, followed by the Completion screen. Select Close.
5. Each of the programs should now appear within the RemoteApp Programs field.
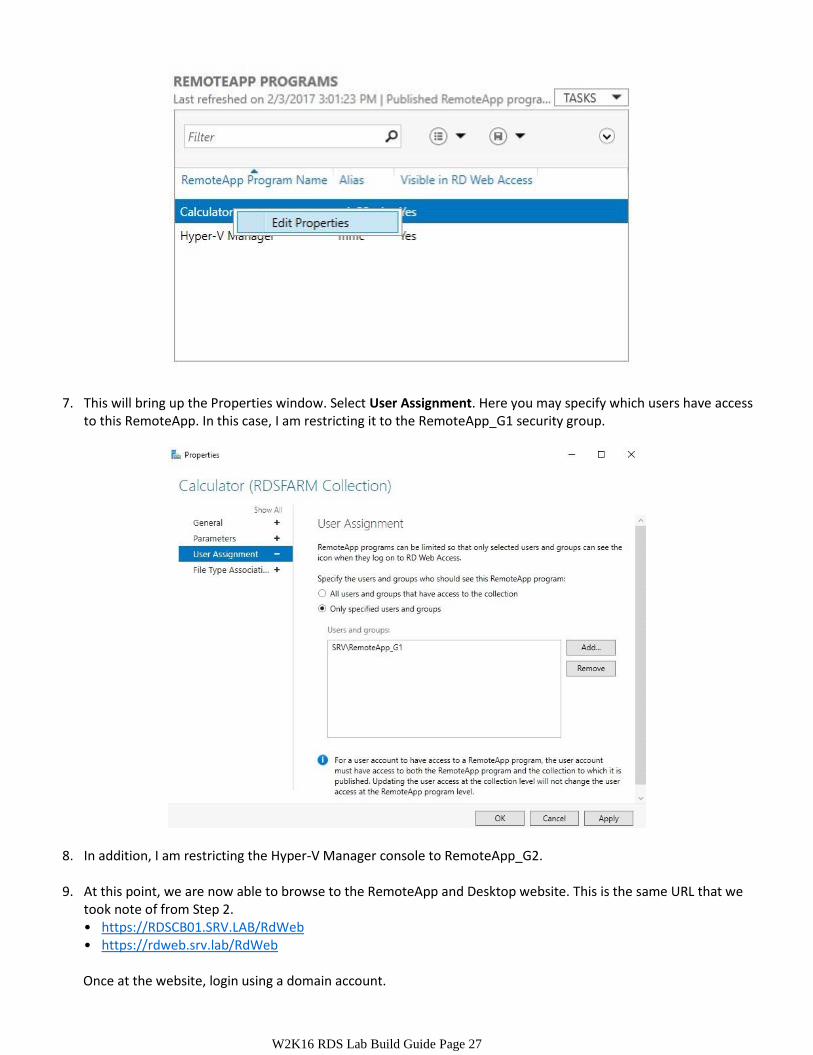
6. Now, we should configure which users are granted access the various apps. This is especially helpful in environments where Role Based Administration is in use. To begin, right-click the program and select Edit Properties.
W2K16 RDS Lab Build Guide Page 27
7. This will bring up the Properties window. Select User Assignment. Here you may specify which users have access to this RemoteApp. In this case, I am restricting it to the RemoteApp_G1 security group.
8. In addition, I am restricting the Hyper-V Manager console to RemoteApp_G2.
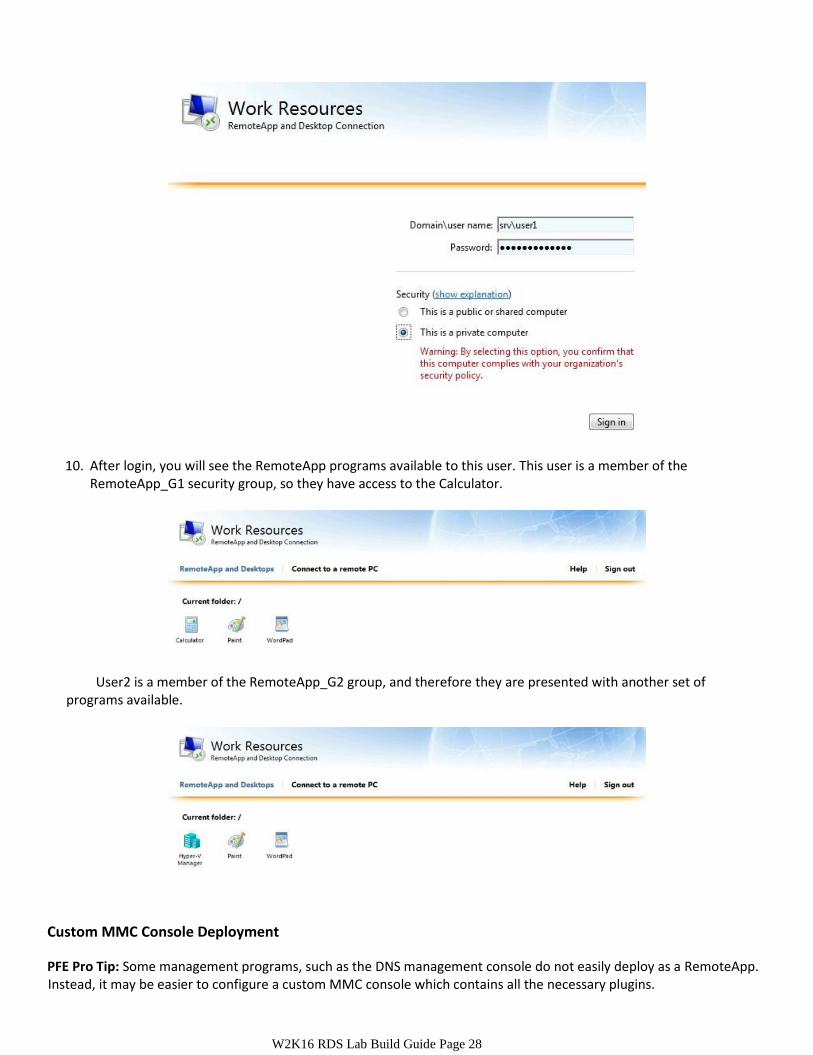
9. At this point, we are now able to browse to the RemoteApp and Desktop website. This is the same URL that we took note of from Step 2. • https://RDSCB01.SRV.LAB/RdWeb • https://rdweb.srv.lab/RdWeb Once at the website, login using a domain account.
W2K16 RDS Lab Build Guide Page 28
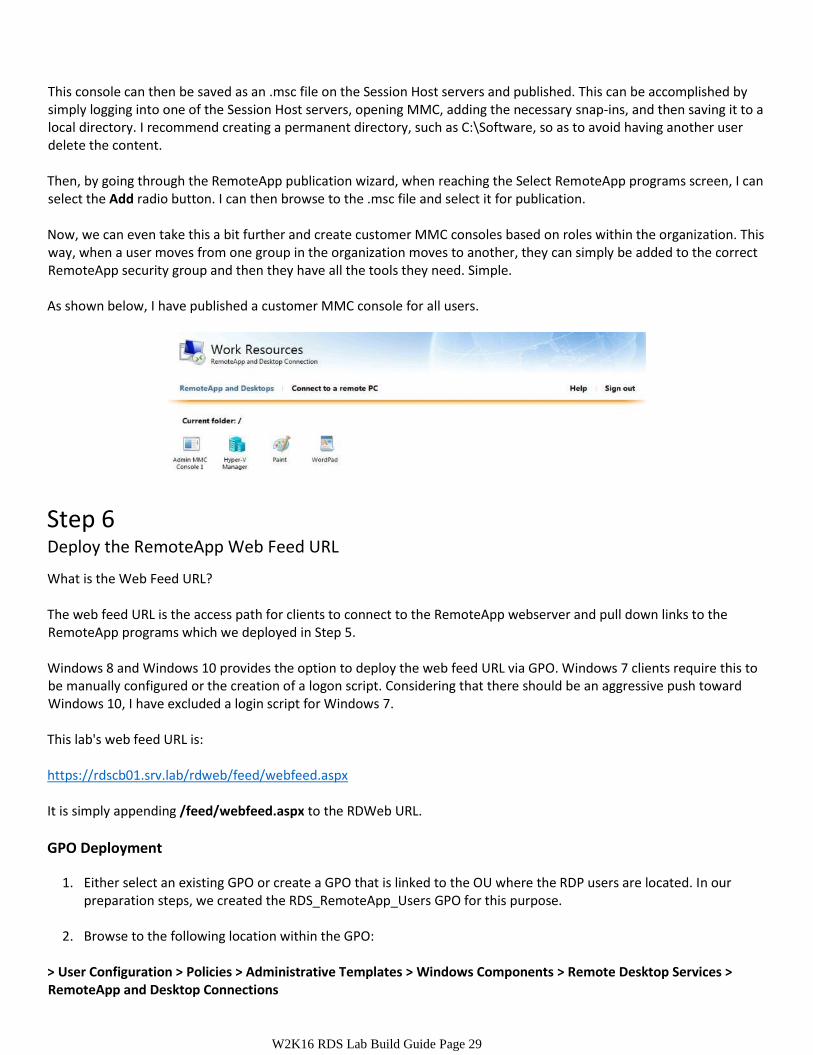
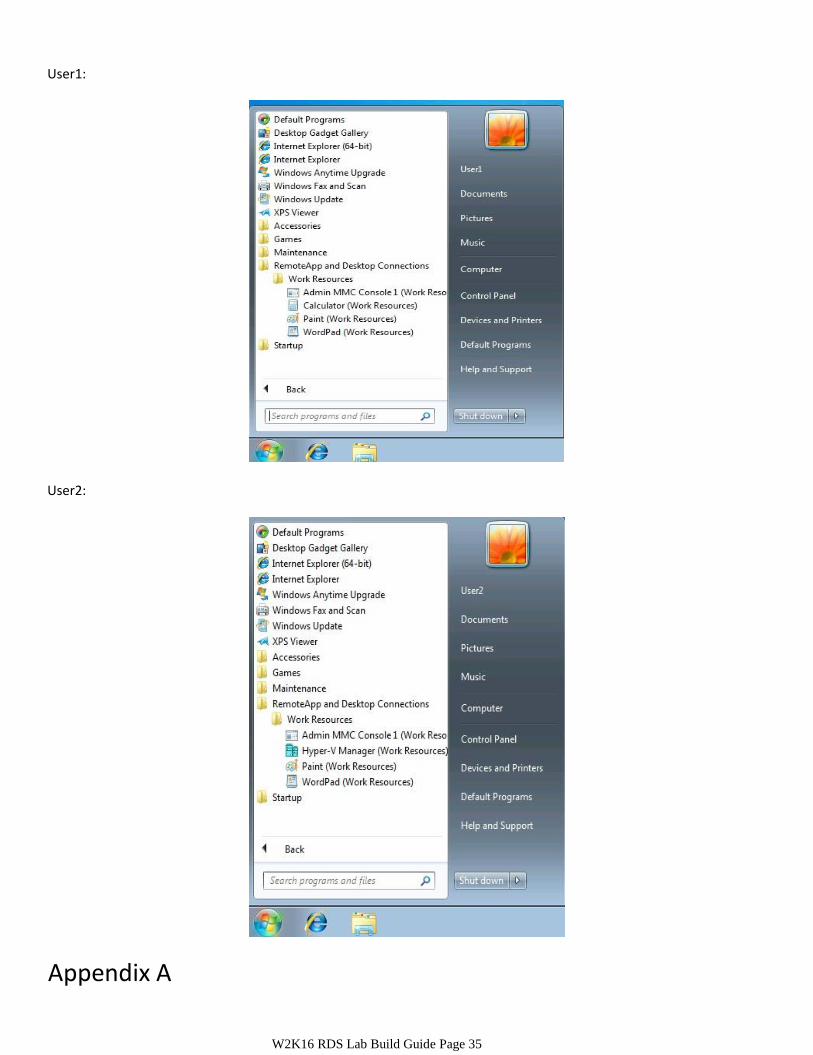
10. After login, you will see the RemoteApp programs available to this user. This user is a member of the RemoteApp_G1 security group, so they have access to the Calculator.
User2 is a member of the RemoteApp_G2 group, and therefore they are presented with another set of programs available.
Custom MMC Console Deployment
PFE Pro Tip: Some management programs, such as the DNS management console do not easily deploy as a RemoteApp. Instead, it may be easier to configure a custom MMC console which contains all the necessary plugins.
W2K16 RDS Lab Build Guide Page 29
This console can then be saved as an .msc file on the Session Host servers and published. This can be accomplished by simply logging into one of the Session Host servers, opening MMC, adding the necessary snap-ins, and then saving it to a local directory. I recommend creating a permanent directory, such as C:\Software, so as to avoid having another user delete the content.
Then, by going through the RemoteApp publication wizard, when reaching the Select RemoteApp programs screen, I can select the Add radio button. I can then browse to the .msc file and select it for publication.
Now, we can even take this a bit further and create customer MMC consoles based on roles within the organization. This way, when a user moves from one group in the organization moves to another, they can simply be added to the correct RemoteApp security group and then they have all the tools they need. Simple.
As shown below, I have published a customer MMC console for all users.
Step 6 Deploy the RemoteApp Web Feed URL
What is the Web Feed URL? The web feed URL is the access path for clients to connect to the RemoteApp webserver and pull down links to the RemoteApp programs which we deployed in Step 5. Windows 8 and Windows 10 provides the option to deploy the web feed URL via GPO. Windows 7 clients require this to be manually configured or the creation of a logon script. Considering that there should be an aggressive push toward Windows 10, I have excluded a login script for Windows 7. This lab's web feed URL is: https://rdscb01.srv.lab/rdweb/feed/webfeed.aspx It is simply appending /feed/webfeed.aspx to the RDWeb URL.
GPO Deployment
1. Either select an existing GPO or create a GPO that is linked to the OU where the RDP users are located. In our preparation steps, we created the RDS_RemoteApp_Users GPO for this purpose.
2. Browse to the following location within the GPO:
> User Configuration > Policies > Administrative Templates > Windows Components > Remote Desktop Services > RemoteApp and Desktop Connections

W2K16 RDS Lab Build Guide Page 30
For the setting of Specify default connection URL, input the web feed URL.
If you are restricting access to the RemoteApp web feed, remember to add the RDS_RemoteApp_Users security group(s). For primary/secondary user account organizations, this will be the group containing the primary user's account. Don't forget that the computer must read the GPO, so remove Authenticated Users and add Domain Computers.
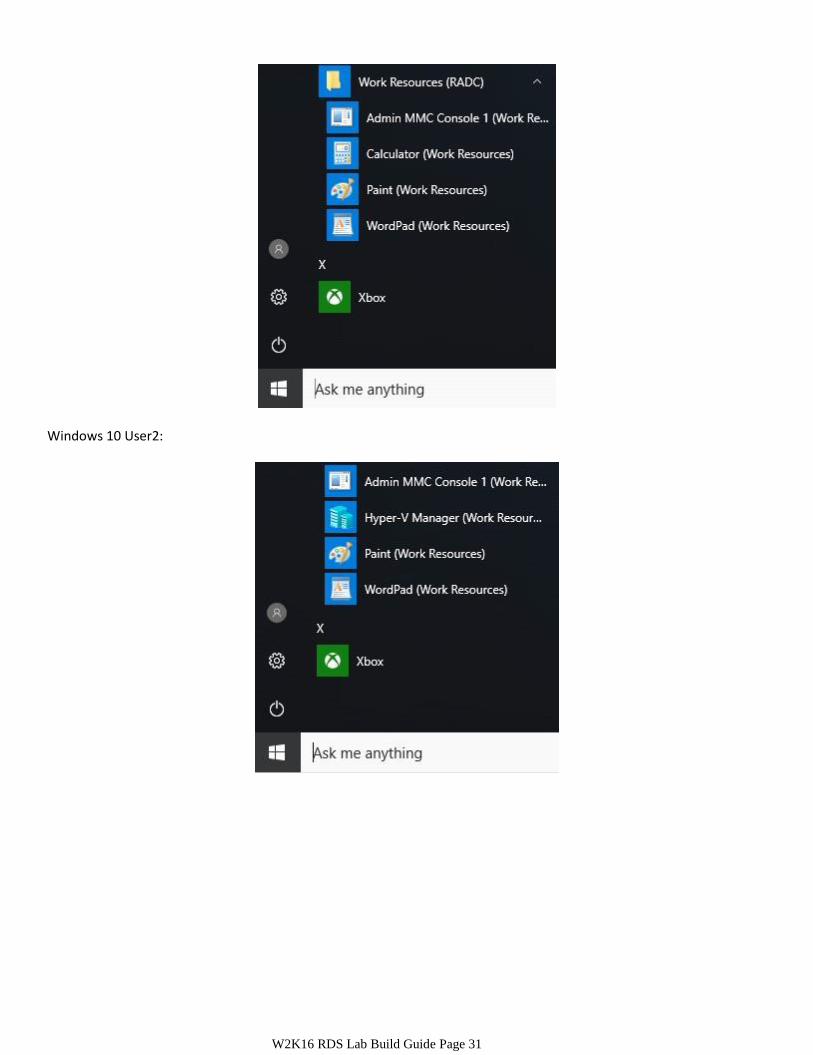
Once the policy applies, clients on Windows 8+ will have a folder populated with their RemoteApp applications.
Windows 10 User1:
W2K16 RDS Lab Build Guide Page 31
Windows 10 User2:

W2K16 RDS Lab Build Guide Page 32
Windows 8.1 User1:
Windows 8.1 User2:
Manually Configure the Web Feed URL - Windows 7
Windows 7 clients do not support receiving the web feed URL via GPO natively. Instead it must be configured manually.
1. To configure the web feed URL manually on Windows 7, open the Control Panel and select RemoteApp and Desktop Connections.

W2K16 RDS Lab Build Guide Page 33
2. Select the option to setup a new connection with RemoteApp and Desktop Connections:
3. Input the web feed URL, and select Next.
W2K16 RDS Lab Build Guide Page 34
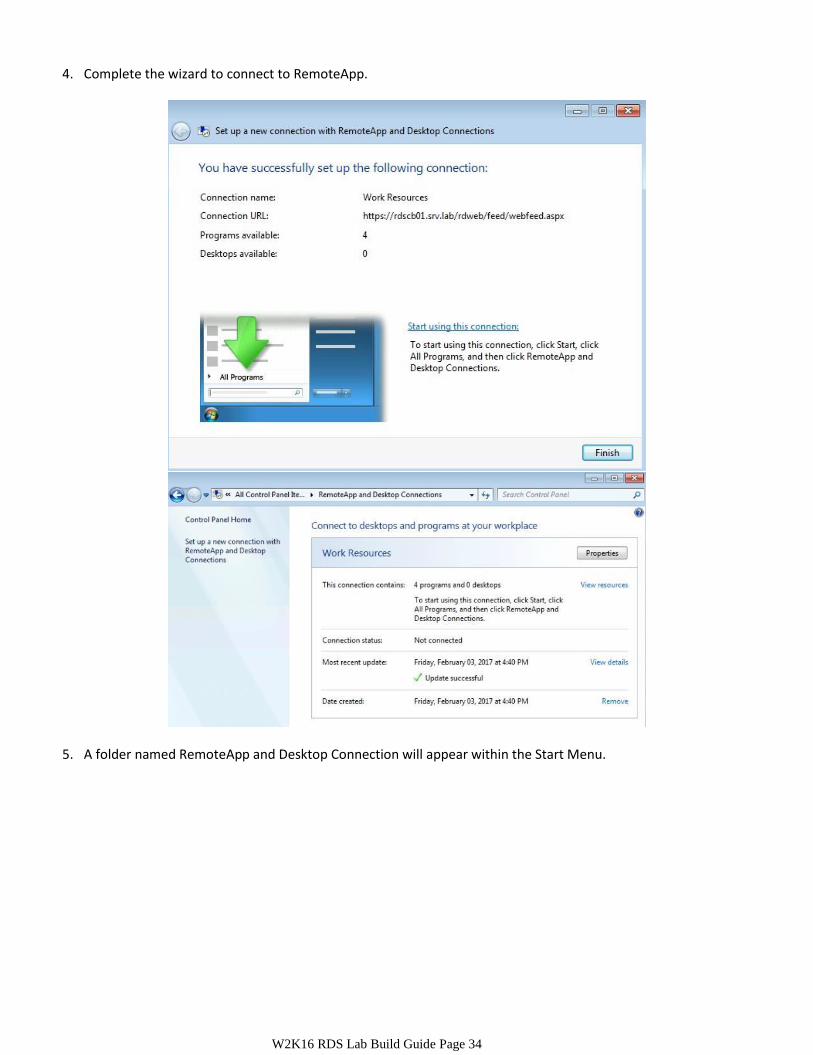
4. Complete the wizard to connect to RemoteApp.
5. A folder named RemoteApp and Desktop Connection will appear within the Start Menu.
W2K16 RDS Lab Build Guide Page 35
User1:
User2:
Appendix A

W2K16 RDS Lab Build Guide Page 36
Appendix A - Configure RDS Farm Certificate Template PFE Pro Tip: When creating the name of your templates within your organization, utilize names that add value and are sustainable over a long period of time. Generic names can be challenging to utilize if there are many PKI administrators, or when management of the PKI changes hands. In this guide I have broken the name into three sections: Section 1 - "Published": This indicates that the template is for publication. That is to say, this is a template that I have customized and will use within my environment. I understand that by looking at its name versus all other templates that I can publish this template and that templates within this name should not be published. Section 2 - "RDS_Farm": This indicates the templates purpose. Section 3 - "27Jan2017": This indicates the date the template was created. This is a means of versioning. This ensures that I understand how old a template is, and if there is a template with a newer date that I should select the one which is most appropriate, likely the newer template.
1. On the issuing CA for your organization, duplicate the Computer template within the Certificate Templates
Console. This will immediately place you on the Compatibility tab. Select the Compatibility Settings appropriate for your environment. Then select the General tab, and fill out the necessary information.
Compatibility Tab
W2K16 RDS Lab Build Guide Page 37
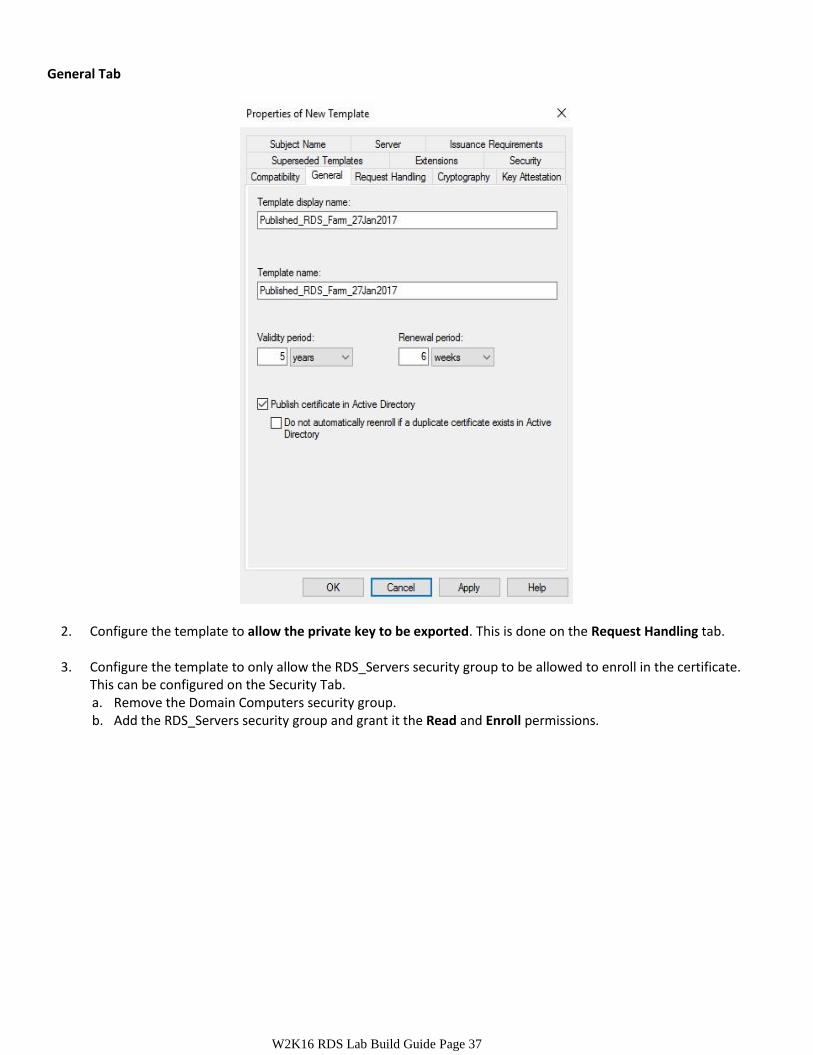
General Tab
2. Configure the template to allow the private key to be exported. This is done on the Request Handling tab.
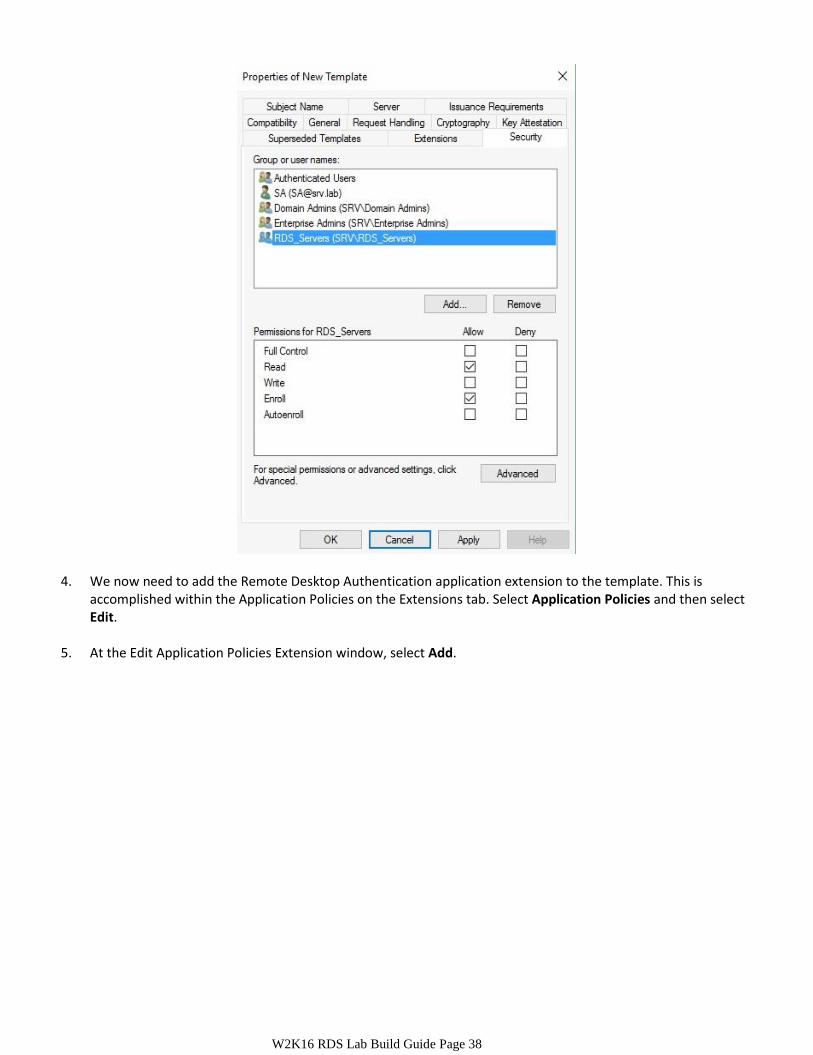
3. Configure the template to only allow the RDS_Servers security group to be allowed to enroll in the certificate. This can be configured on the Security Tab. a. Remove the Domain Computers security group. b. Add the RDS_Servers security group and grant it the Read and Enroll permissions.
W2K16 RDS Lab Build Guide Page 38
4. We now need to add the Remote Desktop Authentication application extension to the template. This is accomplished within the Application Policies on the Extensions tab. Select Application Policies and then select Edit.
5. At the Edit Application Policies Extension window, select Add.
W2K16 RDS Lab Build Guide Page 39
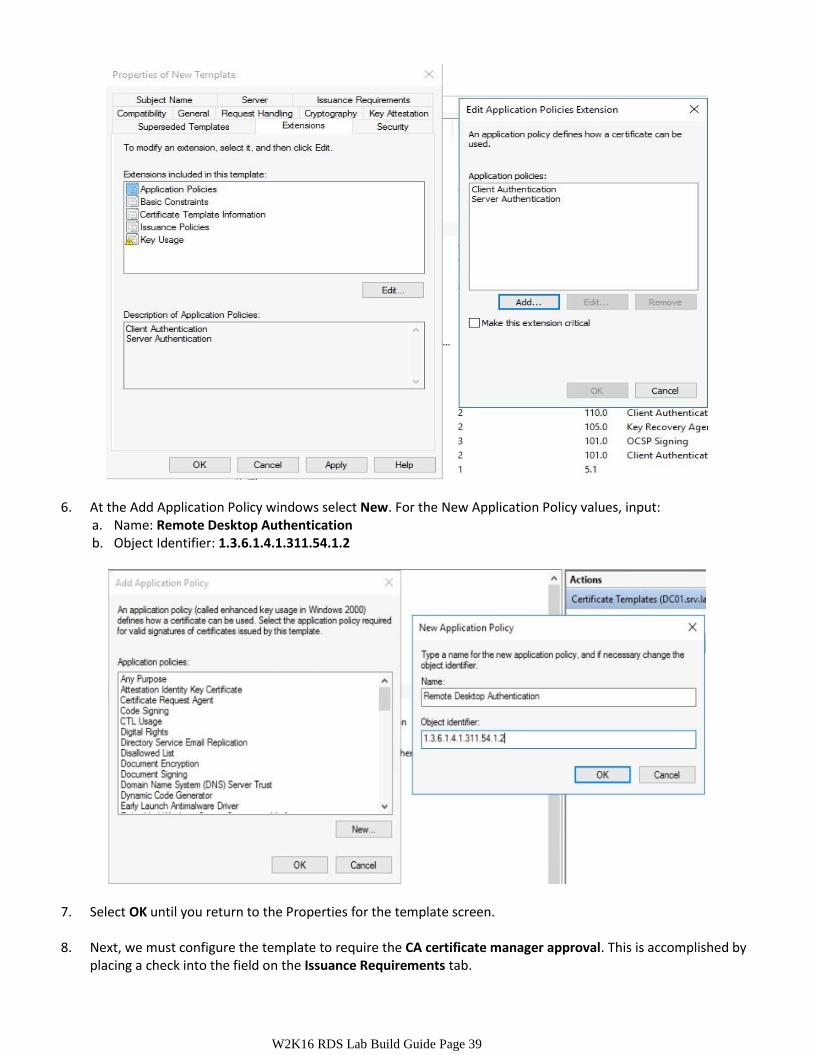
6. At the Add Application Policy windows select New. For the New Application Policy values, input: a. Name: Remote Desktop Authentication b. Object Identifier: 1.3.6.1.4.1.311.54.1.2
7. Select OK until you return to the Properties for the template screen.
8. Next, we must configure the template to require the CA certificate manager approval. This is accomplished by placing a check into the field on the Issuance Requirements tab.

W2K16 RDS Lab Build Guide Page 40
9. Our last configuration step is to require that the request must include a subject name specified by the administrator. Since this specific template will be used on a farm with multiple subject alternative names, we must ensure that they are specified within the request. This is accomplished on the Subject Name tab by selecting the Supply in the request option.
10. The final step is to publish the template. We can accomplish this within the Certification Authority management console. Right click on Certificate Templates, select New, then Certificate Template to Issue.

W2K16 RDS Lab Build Guide Page 41
The Enable Certificate Templates window will appear. Select the template that was created above and select OK.
W2K16 RDS Lab Build Guide Page 42
Appendix B
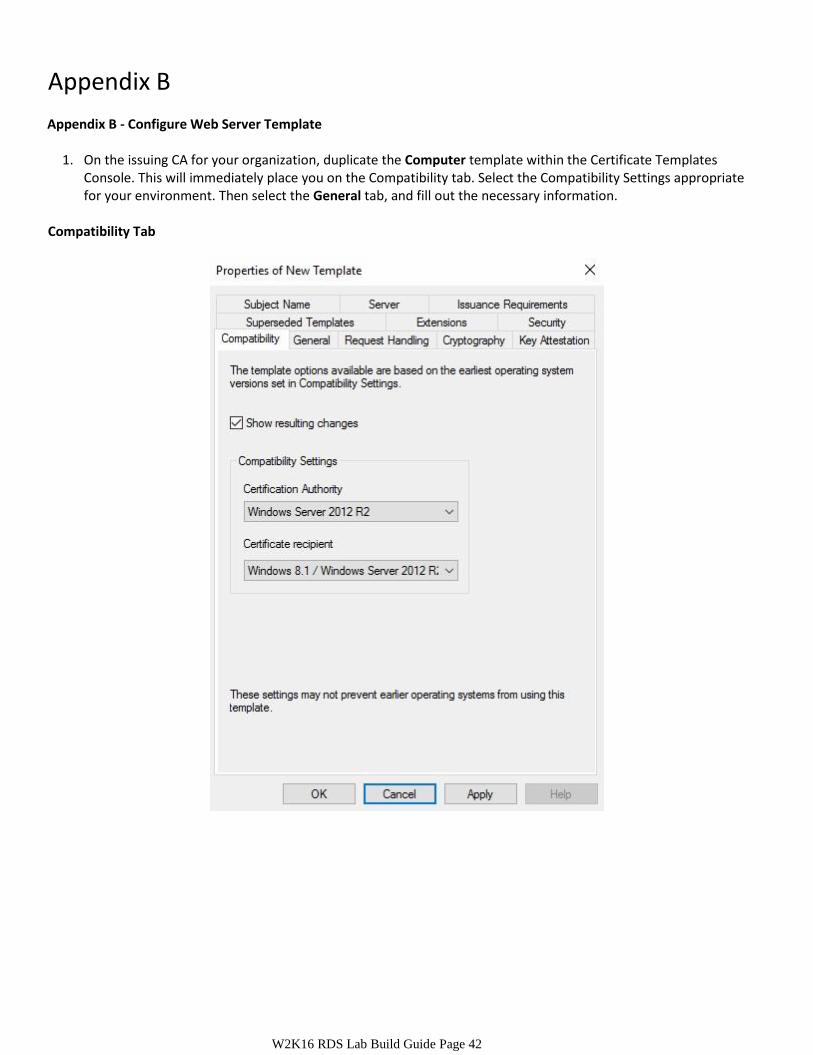
Appendix B - Configure Web Server Template
1. On the issuing CA for your organization, duplicate the Computer template within the Certificate Templates Console. This will immediately place you on the Compatibility tab. Select the Compatibility Settings appropriate for your environment. Then select the General tab, and fill out the necessary information.
Compatibility Tab
W2K16 RDS Lab Build Guide Page 43
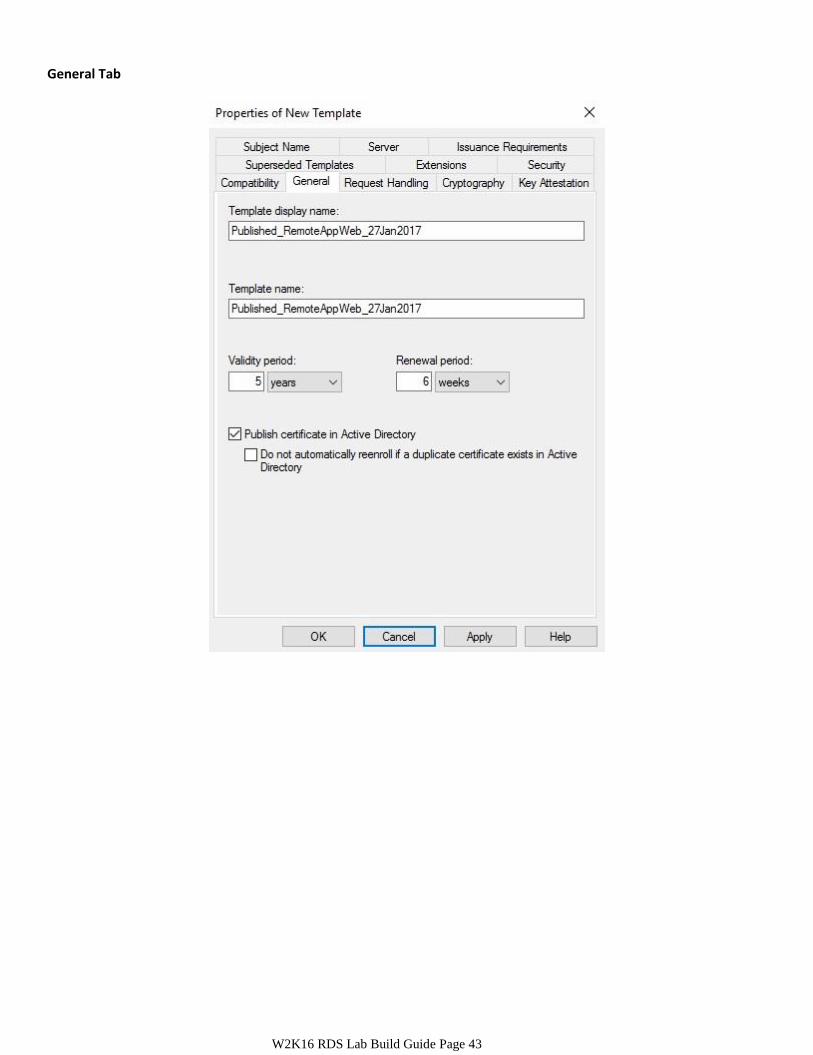
General Tab
W2K16 RDS Lab Build Guide Page 44
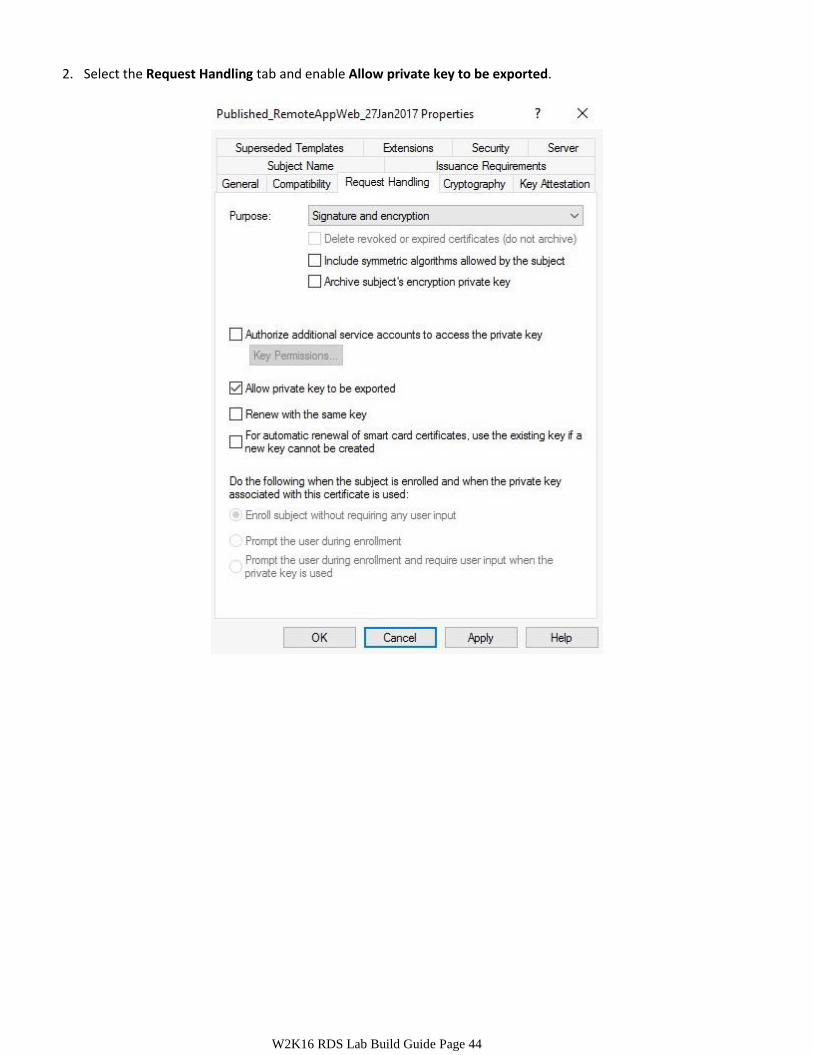
2. Select the Request Handling tab and enable Allow private key to be exported.
W2K16 RDS Lab Build Guide Page 45
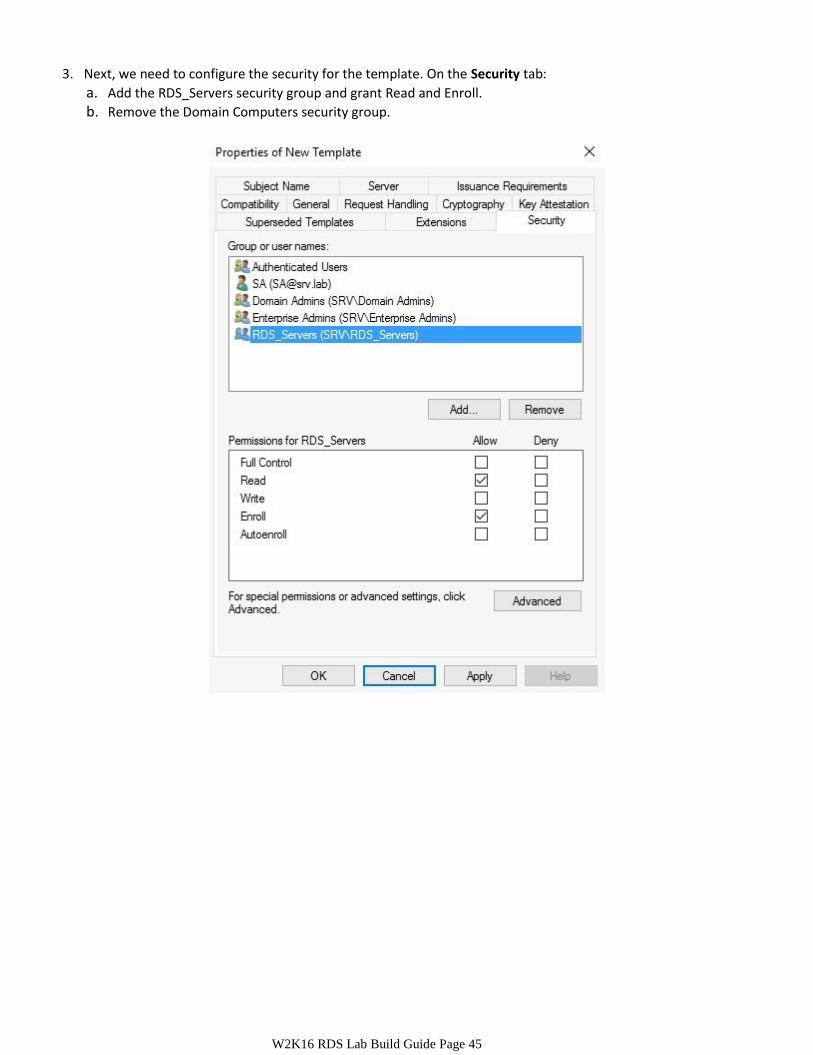
3. Next, we need to configure the security for the template. On the Security tab:
a. Add the RDS_Servers security group and grant Read and Enroll.
b. Remove the Domain Computers security group.
W2K16 RDS Lab Build Guide Page 46
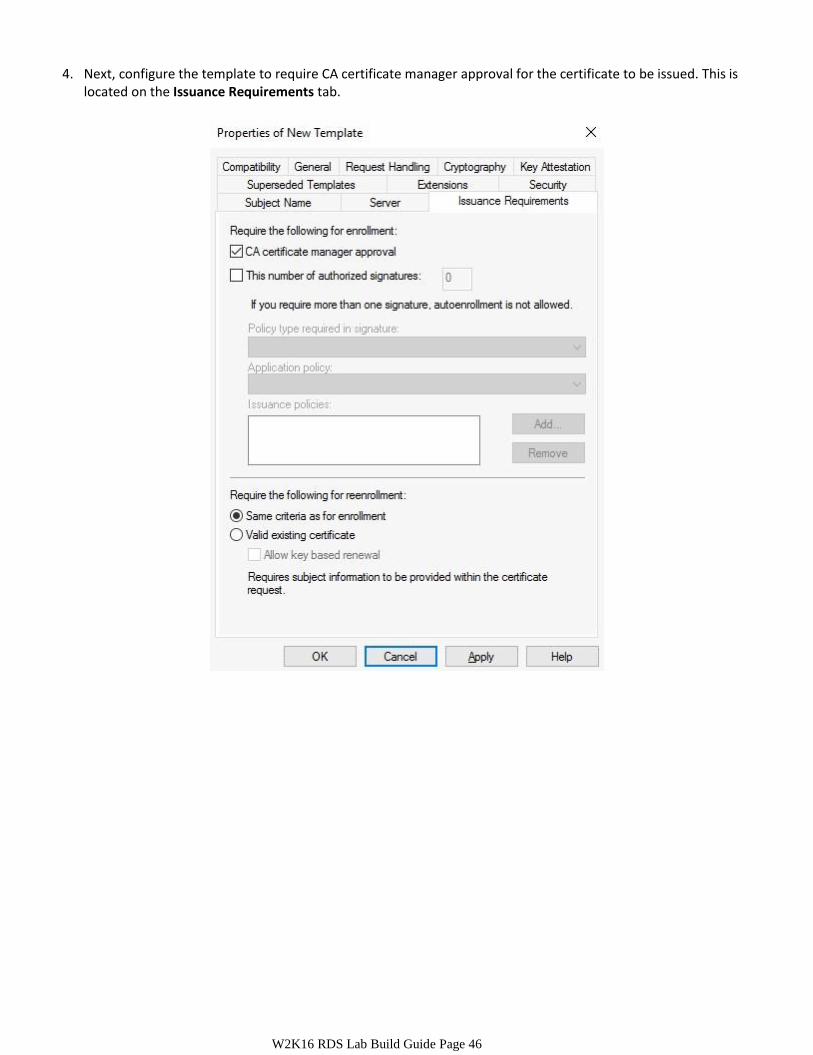
4. Next, configure the template to require CA certificate manager approval for the certificate to be issued. This is located on the Issuance Requirements tab.
W2K16 RDS Lab Build Guide Page 47
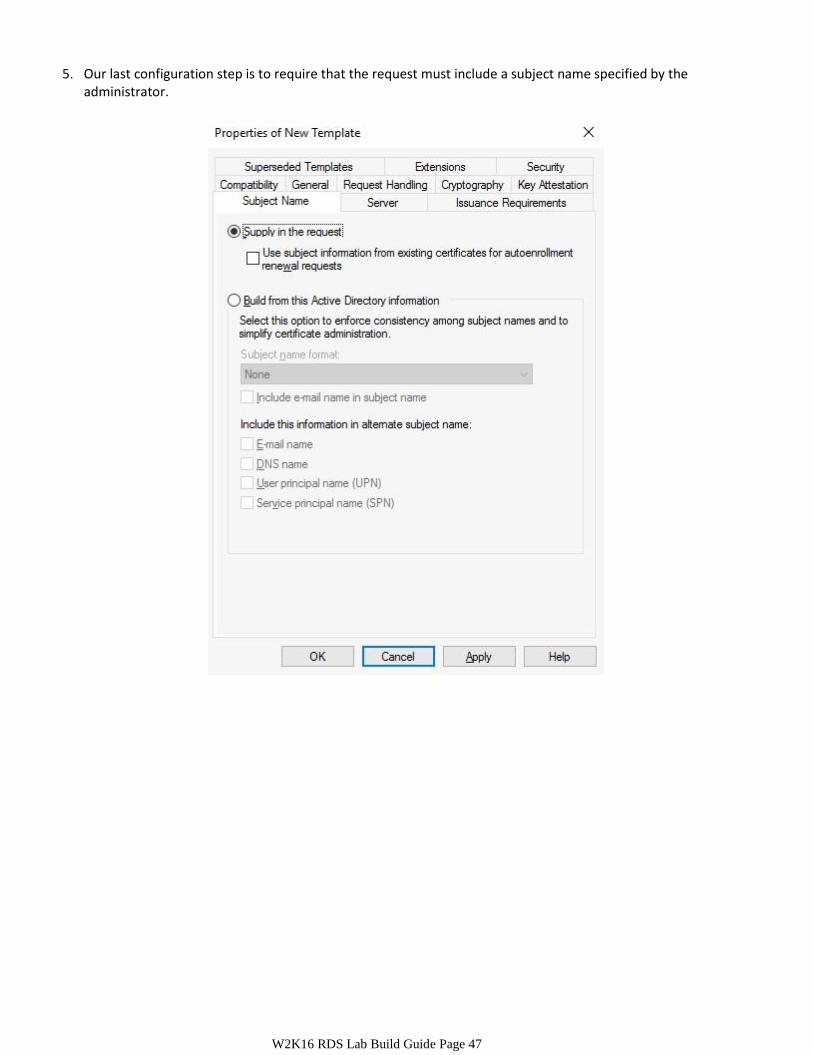
5. Our last configuration step is to require that the request must include a subject name specified by the administrator.

W2K16 RDS Lab Build Guide Page 48
6. The final step for this template is to now publish this template. We can accomplish this within the Certification Authority management console. Right click on Certificate Templates, select New, then Certificate Template to Issue.
The Enable Certificate Templates window will appear. Select the template that was created above and select OK.
W2K16 Build Guides Page 49
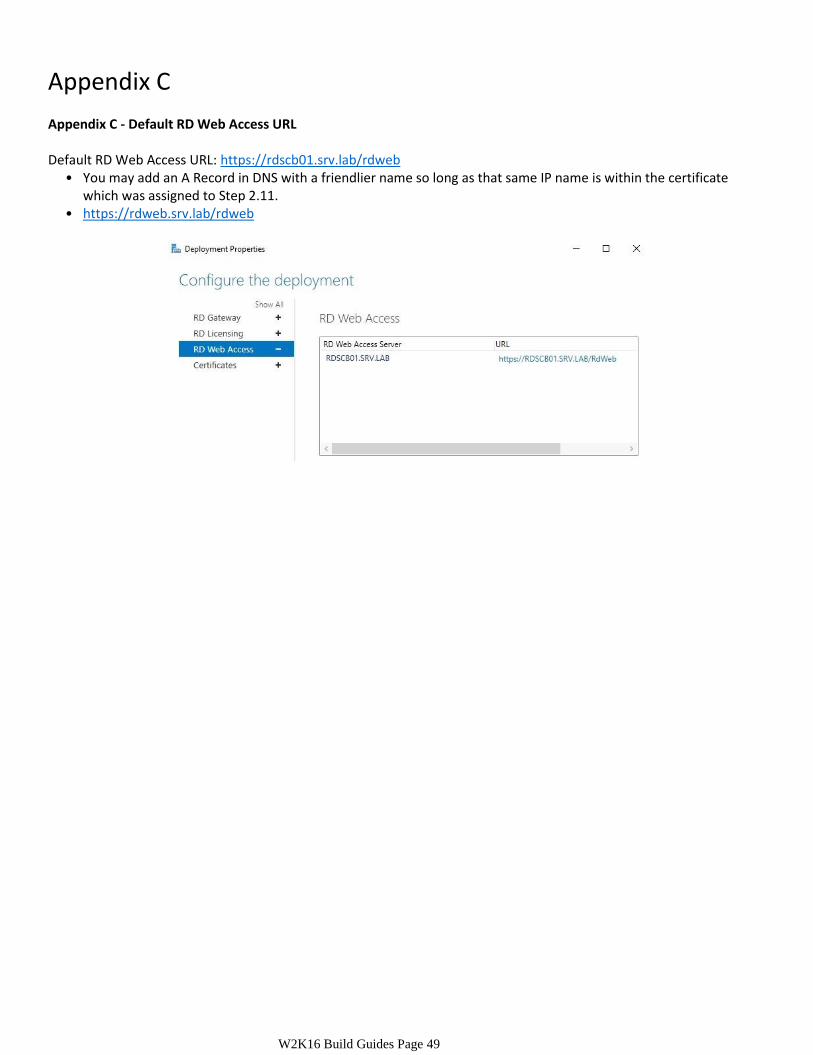
Appendix C Appendix C - Default RD Web Access URL Default RD Web Access URL: https://rdscb01.srv.lab/rdweb
• You may add an A Record in DNS with a friendlier name so long as that same IP name is within the certificate which was assigned to Step 2.11.
• https://rdweb.srv.lab/rdweb
W2K16 Build Guides Page 50
Appendix D Appendix D - GPO Configuration Settings In some environments users have a primary account which RemoteApp programs are assigned, but login to the Session Host servers with a secondary user account. Additional settings may be required for ensure this functions correctly: Setting 1: Computer Configuration --> Policies --> Administrative Templates --> Windows Components --> Remote Desktop Services --> Remote Desktop Session Host --> Security --> Always prompt for password upon connection: Enabled Setting 2: Computer Configuration --> Policies --> Windows Settings --> Security Settings --> Security Options --> Network Access: Do not allow storage of password and credentials for network authentication : Enabled

W2K16 Build Guides Page 51
Appendix E Appendix E - Users with Primary and Secondary User Account using RemoteApp Feed Some organizations, following recommended best practices, require that systems administrators utilize separate accounts for standard user work on their desktops and that of systems administration. This presents a challenge when deploying RemoteApp programs using the web feed URL. Why? The web feed URL is distributed to users via GPO on Windows 8 and Windows 10. To ensure that the primary user account receives the web feed you must use a security group which contains all of primary user accounts. However, the user's primary account is not allowed to login to the session host which the applications are run from. How do we address this? We need two types of groups and a GPO configured to force a prompt for credentials. Type 1 Group: Contains the primary UID’s of users whose workstations must receive the RemoteApp web feed. Type 2 Group: Contains the secondary UID’s of users who must be allowed to login to the Session Host to execute the RemoteApp applications. For this lab, there are two groups configured for this purpose:
• RDS_RemoteApp_Users (Type 1): Security groups which grant access to RemoteApps. These groups are not
required if you do not plan to deploy RemoteApps. These groups should be populated with user's primary accounts. They will NOT be used to grant access to login to the session host servers. Instead, they are used to make the RemoteApps visible on the user’s workstation, however they will not be able to execute the RemoteApp with these credentials.
• RDS_RemoteDesktop_Users (Type 2): This security group grants remote desktop access to the Session Host servers. This security group will be populated with all the user’s elevated accounts that require access to the Remote Desktop Services Farm Session Host servers. In the case of organizations with Primary and Secondary user accounts, this group will ONLY have Secondary user accounts as members. User's primary account should NOT be in this group.
Type 1 Security Groups: RemoteApp_G1; RemoteApp_G2 Type 2 Security Group: RDS_RemoteDesktop_Users The following GPO configuration setting must be set if users access RemoteApps or the RDWeb site using a primary (non-elevated) user account and then launch applications with a secondary (admin) user account: Computer Configuration --> Policies --> Administrative Templates --> Windows Components --> Remote Desktop Services --> Remote Desktop Session Host --> Security --> Always prompt for password upon connection: Enabled What does this mean? Users will have to login the first time they launch a RemoteApp from their desktop. They will not have to login again so long as that session stays active. However, if they disconnect/logout of the RemoteApp which was running on the
W2K16 Build Guides Page 52
Session Host, they will be prompted for their credentials again. How does this work? Primary user accounts are placed in the Type 1 security group(s). These groups are then configured to distribute a RemoteApp Web Feed URL via GPO (Windows 8+) and they grant access to read the applications within the RemoteApp site. This means that the users can see the applications on their local machines via RemoteApp and through the Web Access portal. Secondary user accounts are placed in the Type 2 security group. This group grants the accounts within it the right to login to the RDS farm (Remote Desktop Session Hosts). The GPO forces the servers to require credentials to be provided when attempting to launch the applications, thus allowing users who accessed the Remote Apps or Web Access portal with their primary UID to then provide their secondary UID and gain access.