windows 10 tweaks for edius - sgdvtutorials.com
TRANSCRIPT
WINDOWS 10 TWEAKS FOR EDIUS
Disclaimer
By using any of the tweaks, you acknowledge the risk and accept full
responsibility for any issues. Use at your own risk!
The tweaks listed are grouped by item and not in an
installation order.
Contents:
HOW TO SETUP A SINGLE TEMP FILE
HOW TO CREATE A TEMP FILE DESKTOP SHORTCUT
HOW TO SET UP THE DEFRAG AND OPTIMIZATION PANEL
DRIVE INDEXING
CURRENT INTEL DRIVER VERSION
BLOCKING SPECIFIC WINDOWS 10 DRIVER UPDATES
FOLDER OPTIONS
HOW TO SET UP SYSTEM RESTORE
HOW TO RESTORE TO A PREVIOUS RESTORE POINT
PERFORMANCE OPTIONS
POWER OPTIONS
HOW TO REMOVE THE LOGIN SCREEN
HOW TO CHANGE THE AUTO RESTART AFTER CRASH OPTION
GROUPING START MENU ITEMS
GOD MODE
HOW TO MOUNT AN ISO
USING UWT4: USING ULTIMATE WINDOWS TWEAKER 4 TO TWEAK YOUR
WINDOWS 10 OS

FINALLY, THE TWEAKS
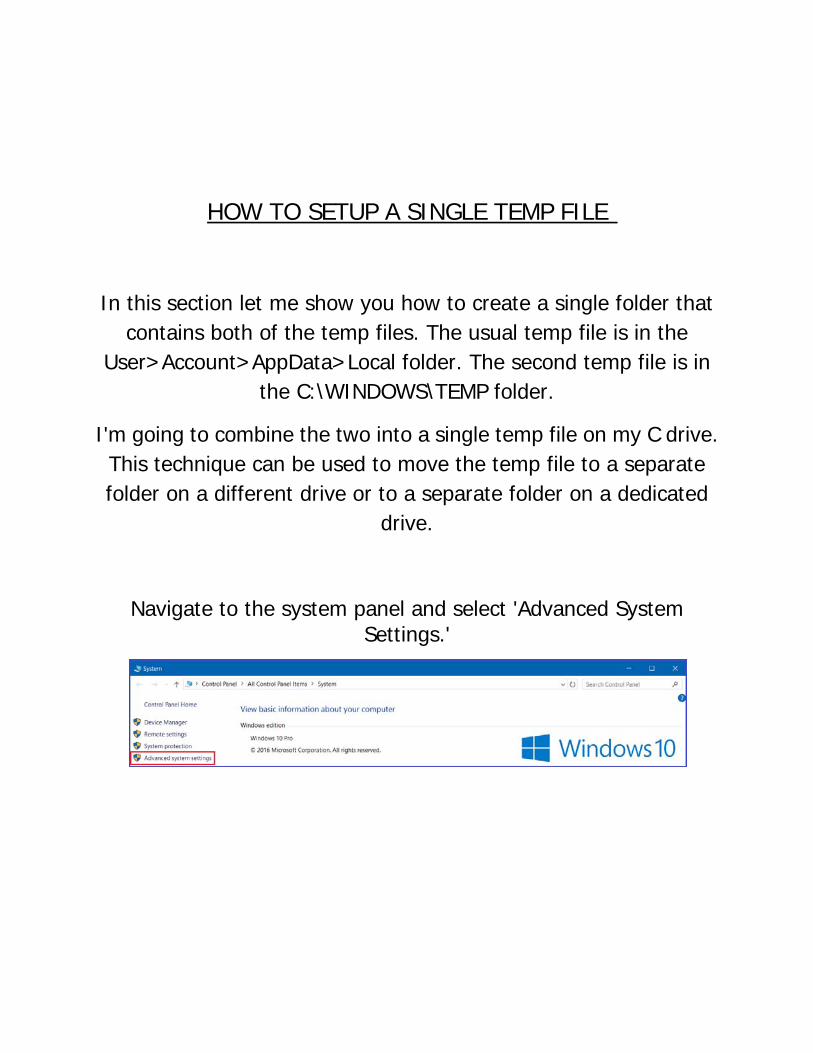
HOW TO SETUP A SINGLE TEMP FILE
In this section let me show you how to create a single folder that contains both of the temp files. The usual temp file is in the
User>Account>AppData>Local folder. The second temp file is in the C:\WINDOWS\TEMP folder.
I'm going to combine the two into a single temp file on my C drive. This technique can be used to move the temp file to a separate folder on a different drive or to a separate folder on a dedicated
drive.
Navigate to the system panel and select 'Advanced System Settings.'

When the System Property panel opens, click the Environment Variables button...
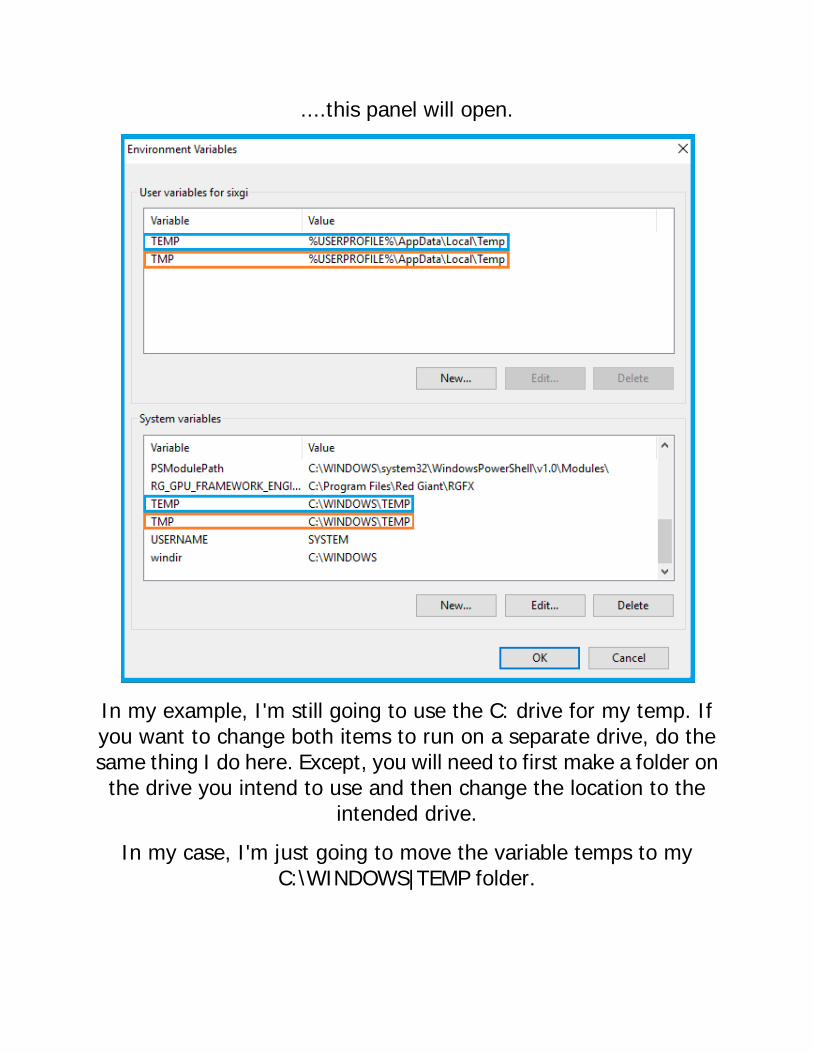
....this panel will open.
In my example, I'm still going to use the C: drive for my temp. If you want to change both items to run on a separate drive, do the same thing I do here. Except, you will need to first make a folder on the drive you intend to use and then change the location to the
intended drive.
In my case, I'm just going to move the variable temps to my C:\WINDOWS|TEMP folder.
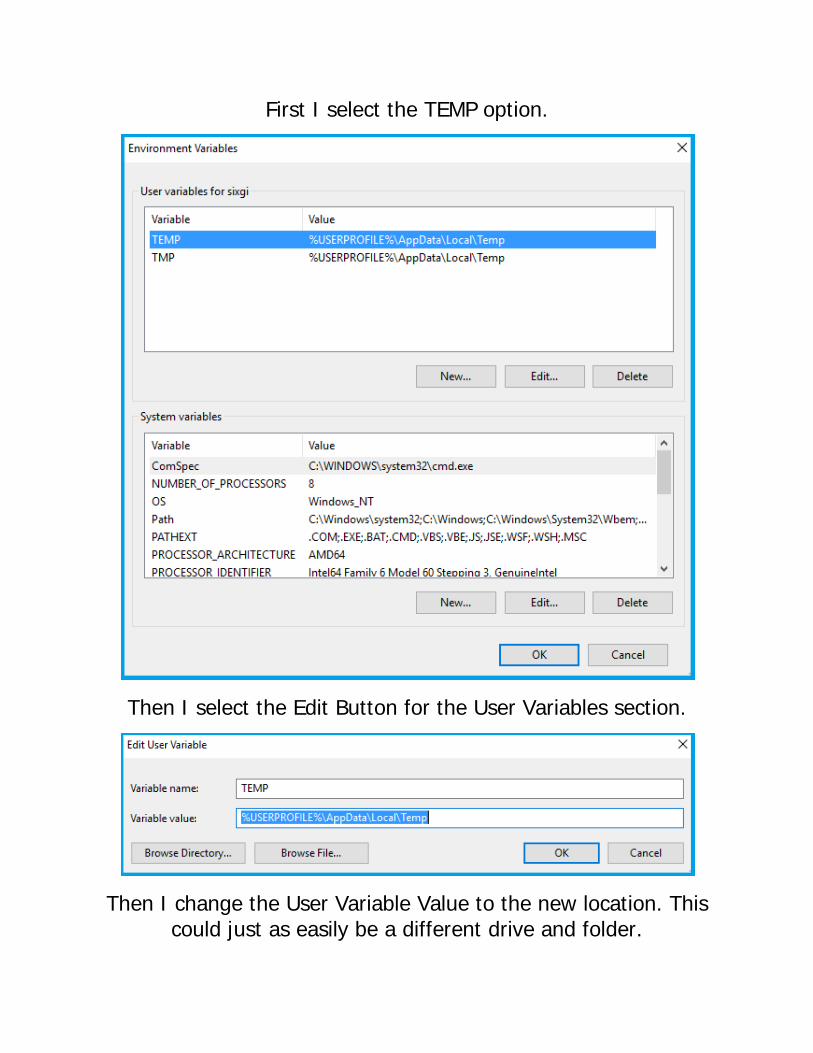
First I select the TEMP option.
Then I select the Edit Button for the User Variables section.
Then I change the User Variable Value to the new location. This could just as easily be a different drive and folder.
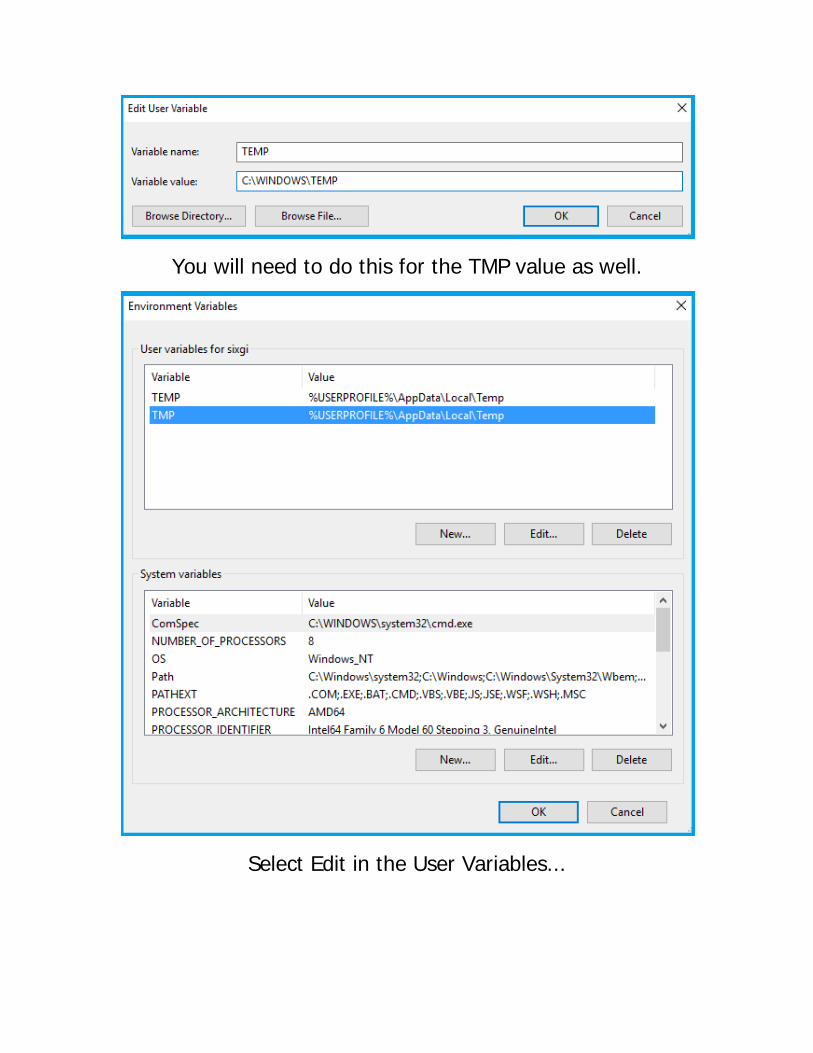
You will need to do this for the TMP value as well.
Select Edit in the User Variables...
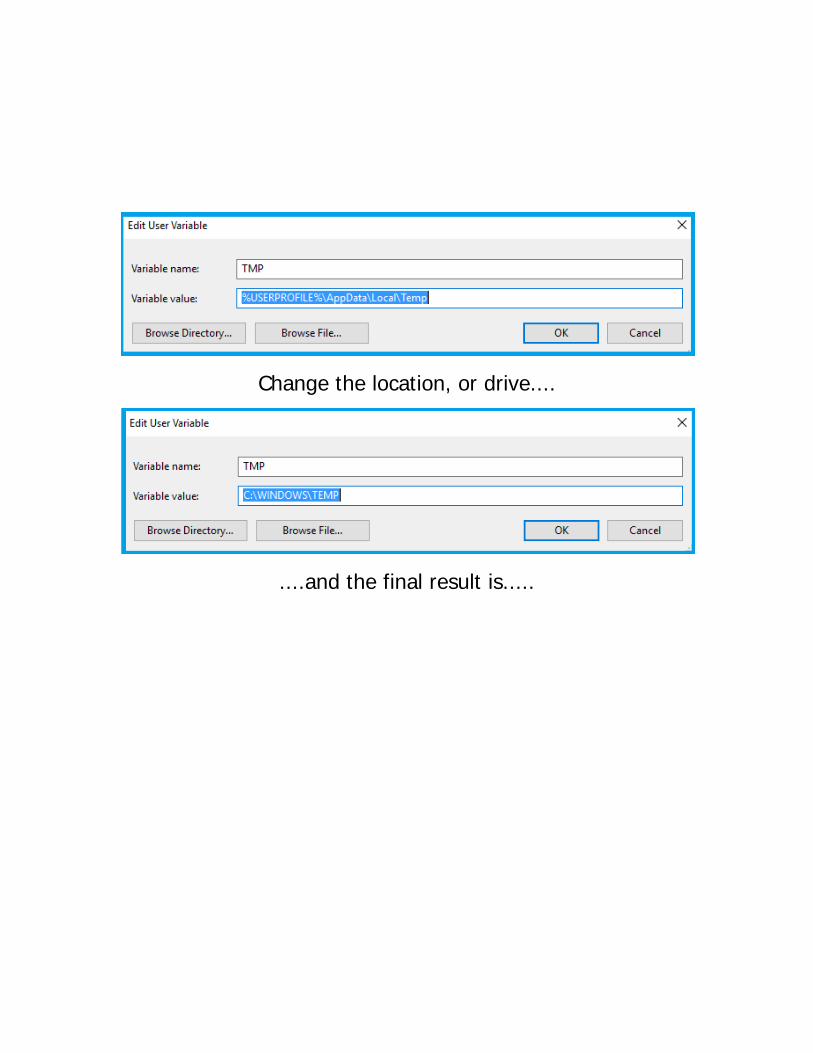
Change the location, or drive....
....and the final result is.....
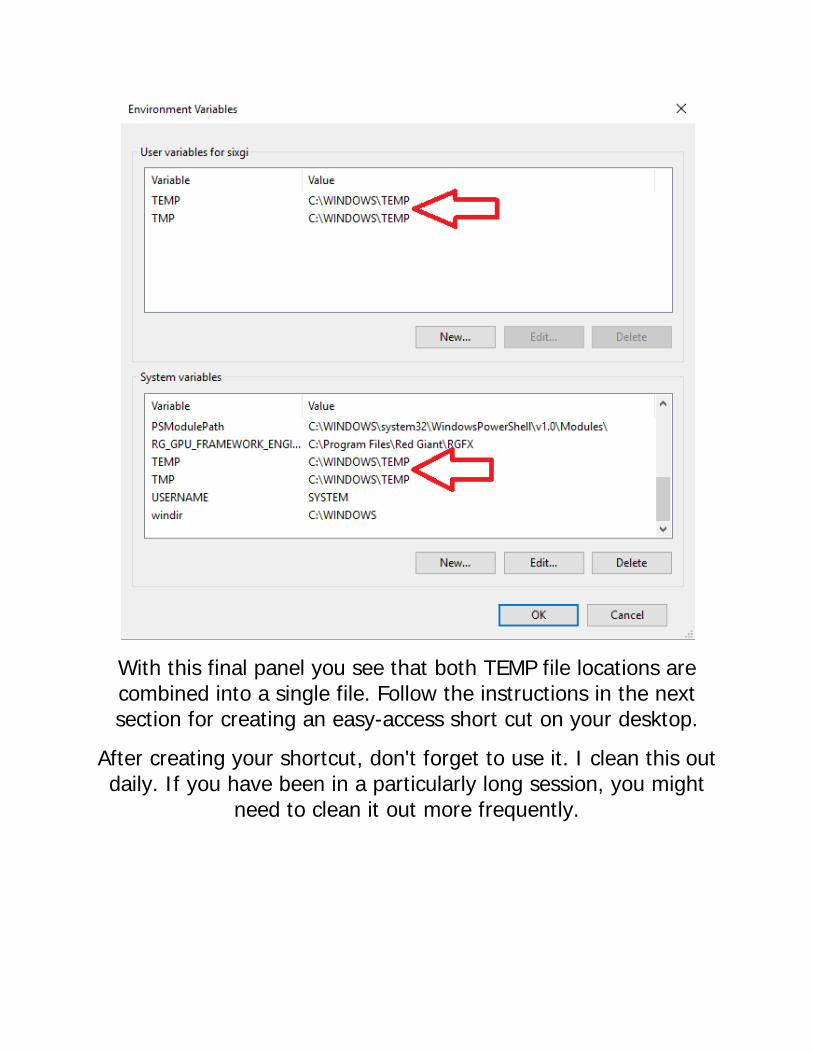
With this final panel you see that both TEMP file locations are combined into a single file. Follow the instructions in the next section for creating an easy-access short cut on your desktop.
After creating your shortcut, don't forget to use it. I clean this out daily. If you have been in a particularly long session, you might
need to clean it out more frequently.
HOW TO CREATE A TEMP FILE DESKTOP SHORTCUT
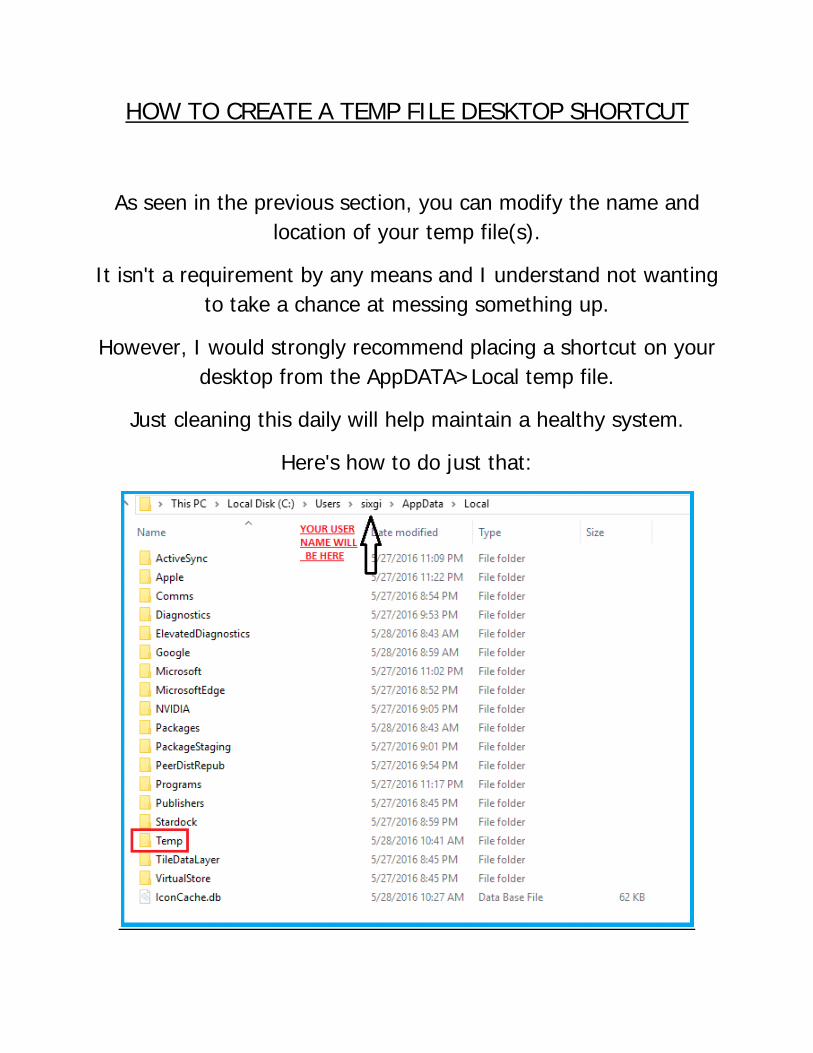
As seen in the previous section, you can modify the name and location of your temp file(s).
It isn't a requirement by any means and I understand not wanting to take a chance at messing something up.
However, I would strongly recommend placing a shortcut on your desktop from the AppDATA>Local temp file.
Just cleaning this daily will help maintain a healthy system.
Here's how to do just that:

This is a tweak of convenience. The temp folder should be cleared out frequently and many forget to do so.
Navigate to Local Disk (C:)>Users>your account name>AppData>Local
You will see the Temp folder in the list.
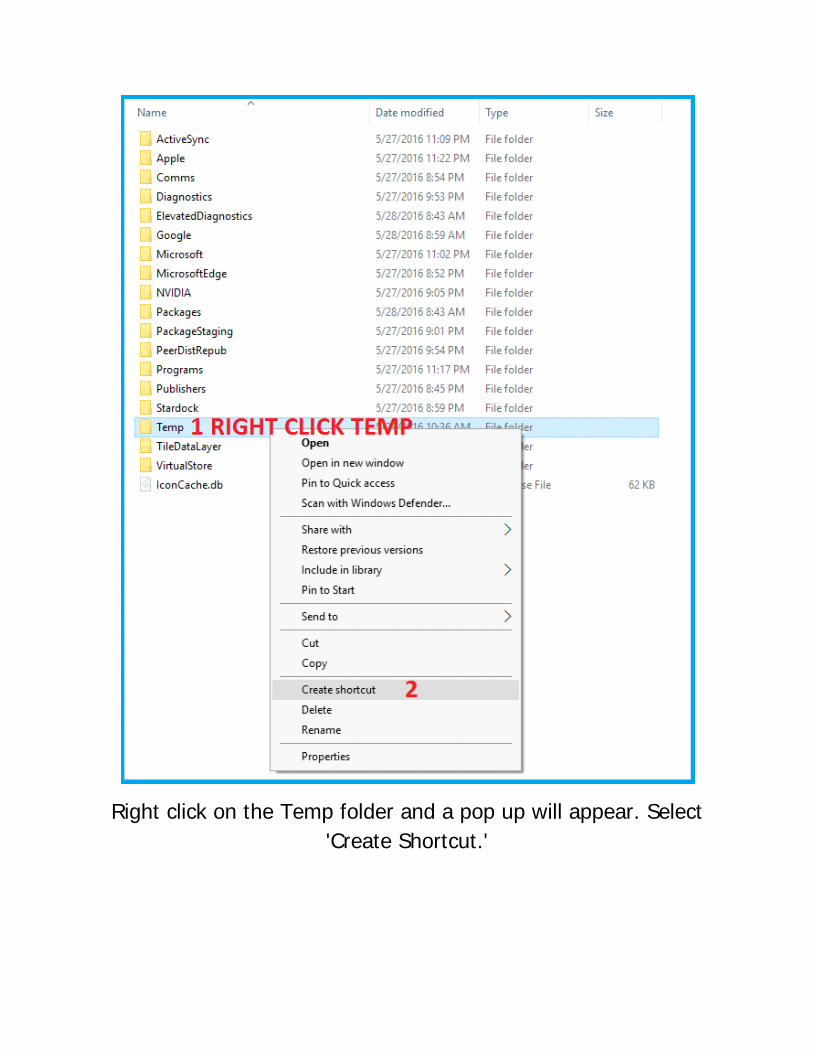
Right click on the Temp folder and a pop up will appear. Select 'Create Shortcut.'
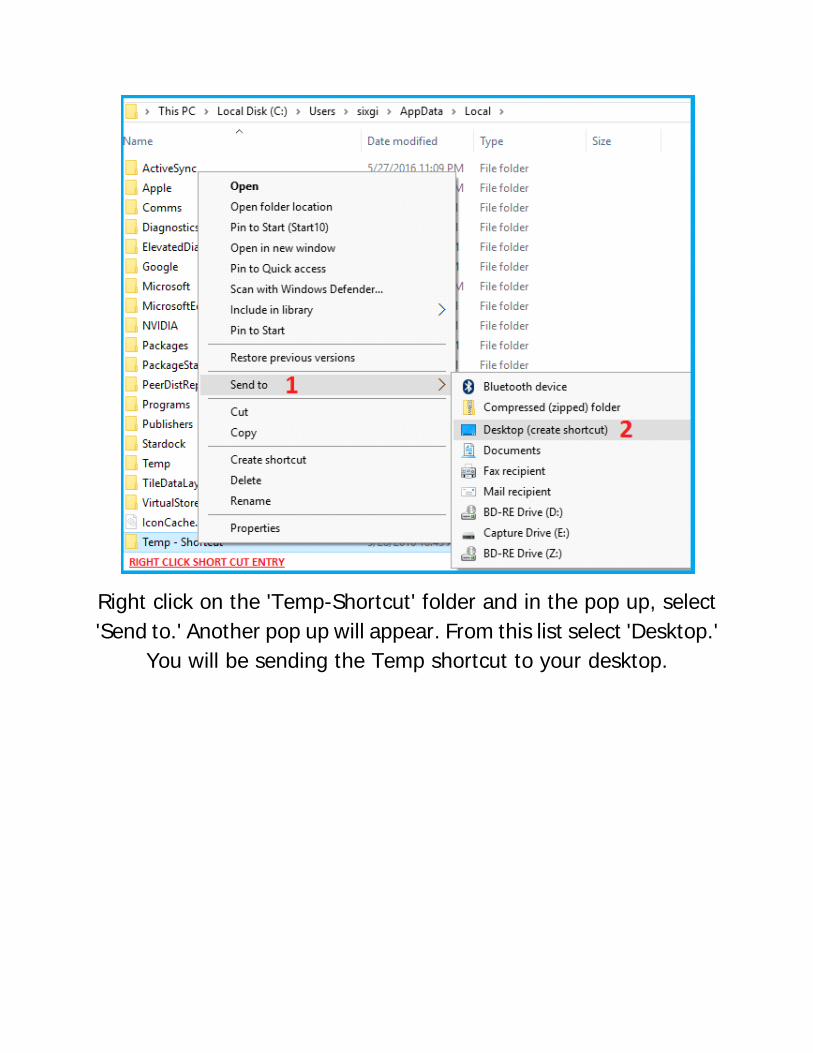
Right click on the 'Temp-Shortcut' folder and in the pop up, select 'Send to.' Another pop up will appear. From this list select 'Desktop.'
You will be sending the Temp shortcut to your desktop.
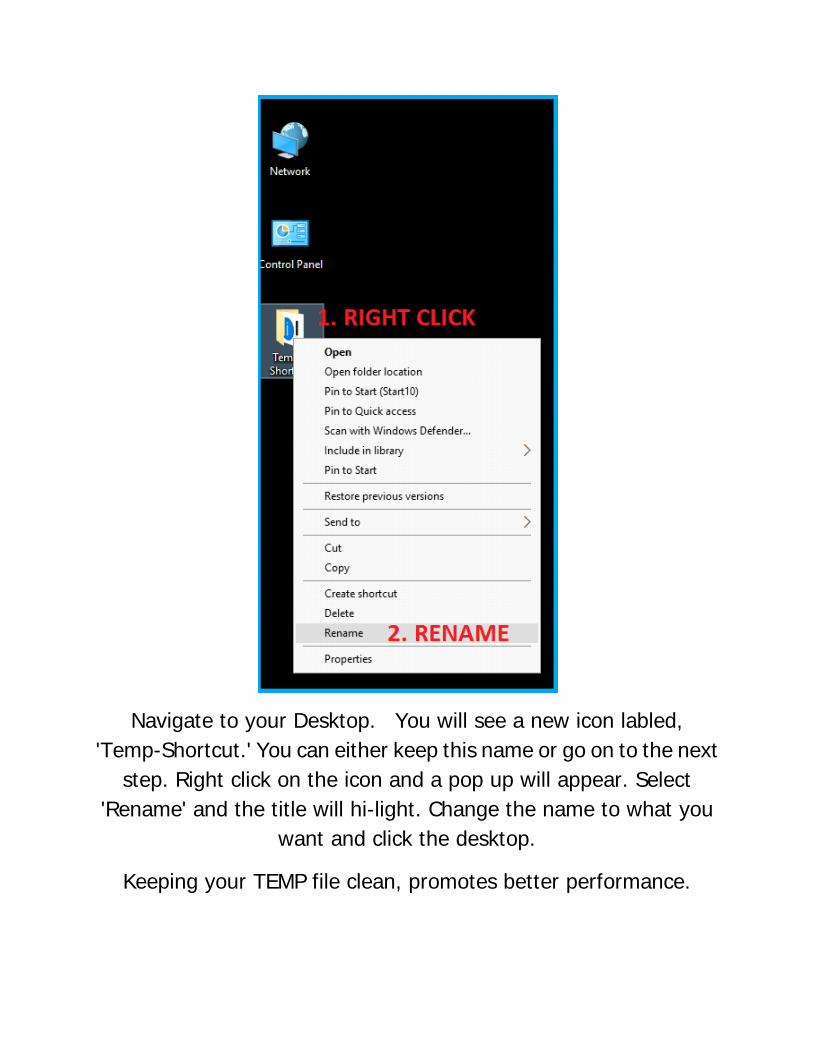
Navigate to your Desktop. You will see a new icon labled, 'Temp-Shortcut.' You can either keep this name or go on to the next
step. Right click on the icon and a pop up will appear. Select 'Rename' and the title will hi-light. Change the name to what you
want and click the desktop.
Keeping your TEMP file clean, promotes better performance.
HOW TO SETUP THE DEFRAG AND OPTIMIZATION PANEL
Before moving forward, if you are coming from Windows 7 you will notice that your SSD trim software will not operate within a
Windows 10 environment.
If you are using a Samsung SSD, as I am, Magician version 4.9.7 will work within Windows 10. However, the Performance
Optimization function is blocked.
This is true for other SSD software as well.
The Defragment and Optimize utility now optimizes your SSD's, and defrags your mechanical drives.
Unfortunately, It is set to automatically run the optimizer on a schedule.
This section explains how to set this to manual. When editing, you do not want this to start up.
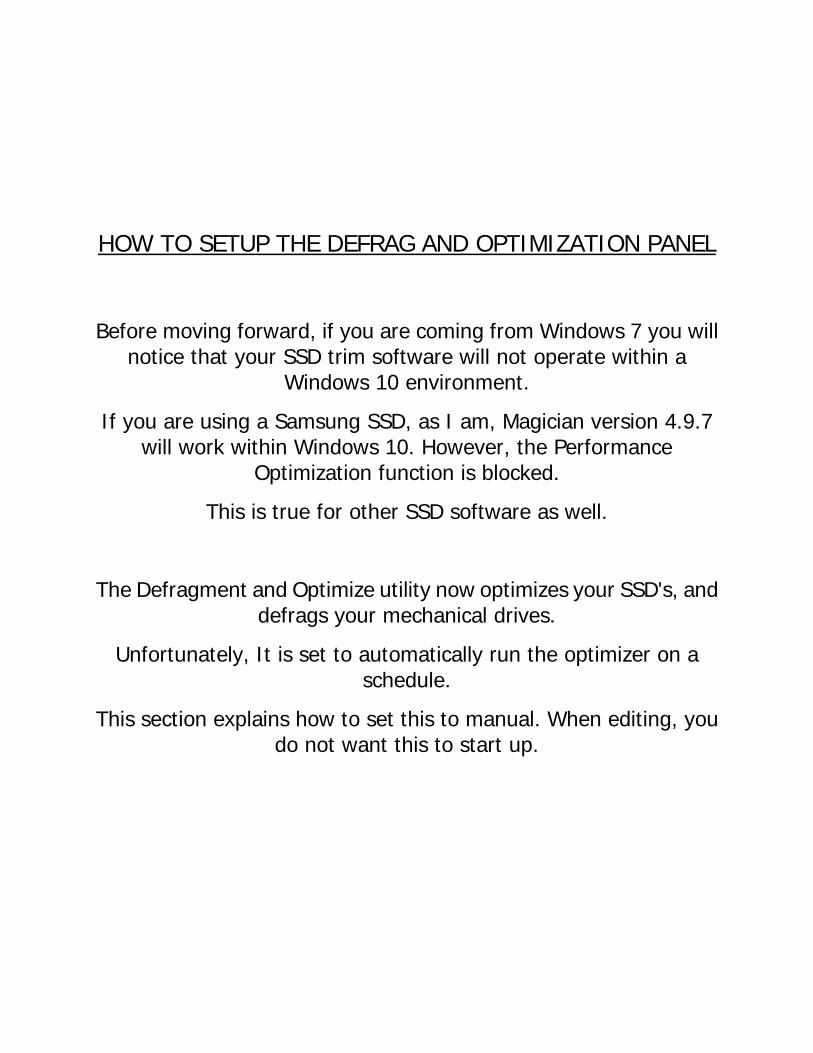
Look for the search box. It could be in several locations. This will depend on the start menu type you have. I'm running Start 10 in modern format and the search box is located within the menu.
Once there, type in 'DEFRAG' and you will see the result at the top of the panel.
Click 'Defragment and Optimize,' and the Defrag panel will open.
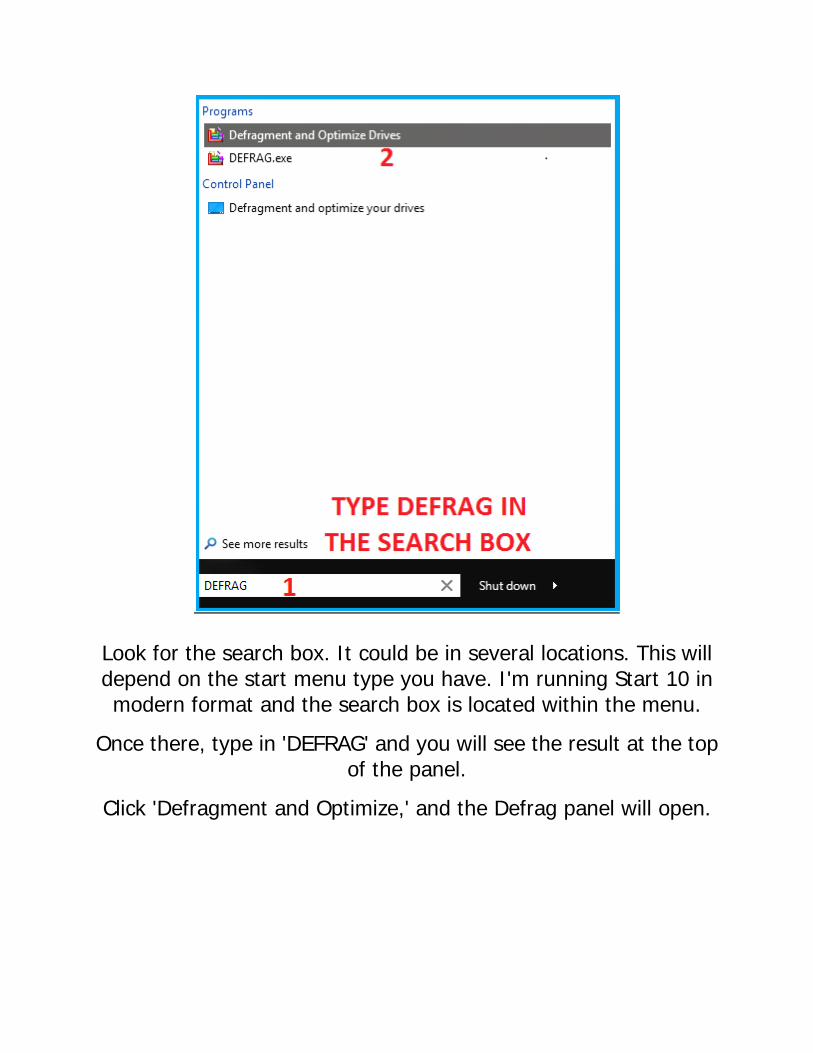
You will see that my C: drive is selected and is reporting that it needs optimization.
The panel is set to run the defragmenter automatically.
Click the 'Change Settings' button and a new panel will open.
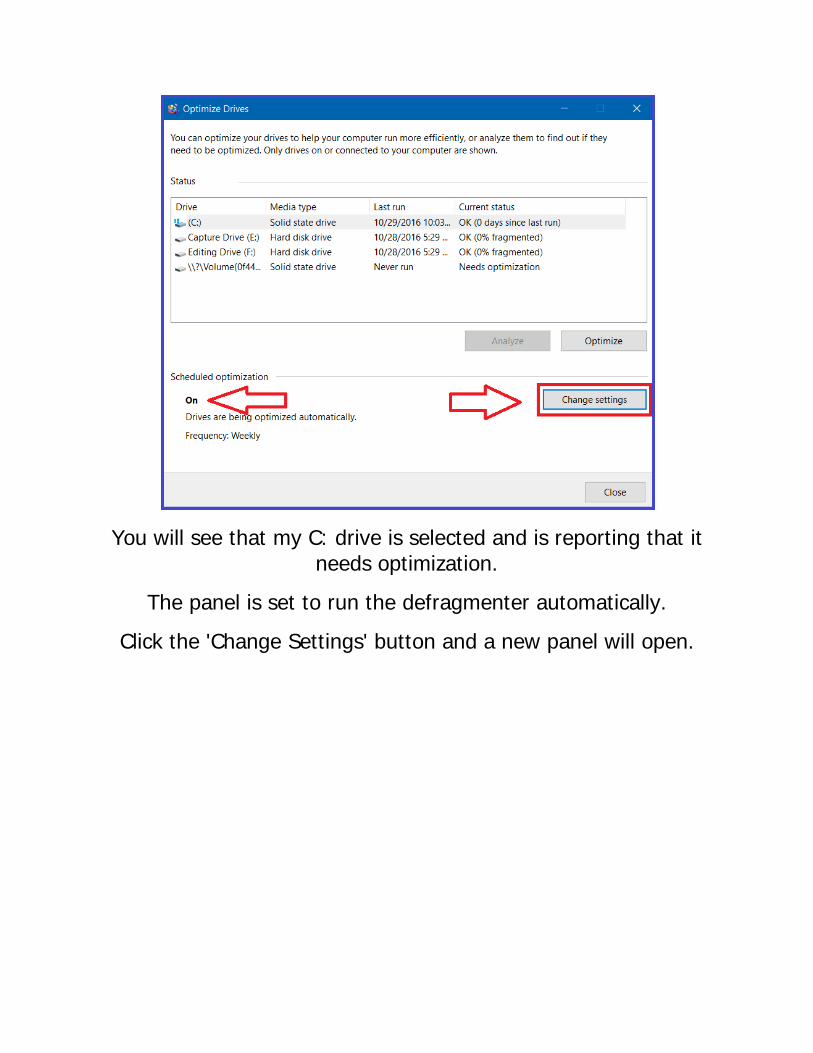
Notice the 'Run on a schedule tick box. Uncheck the tick box as shown in the screen shot. Click 'OK' and you will return to the
Optimize drives panel.
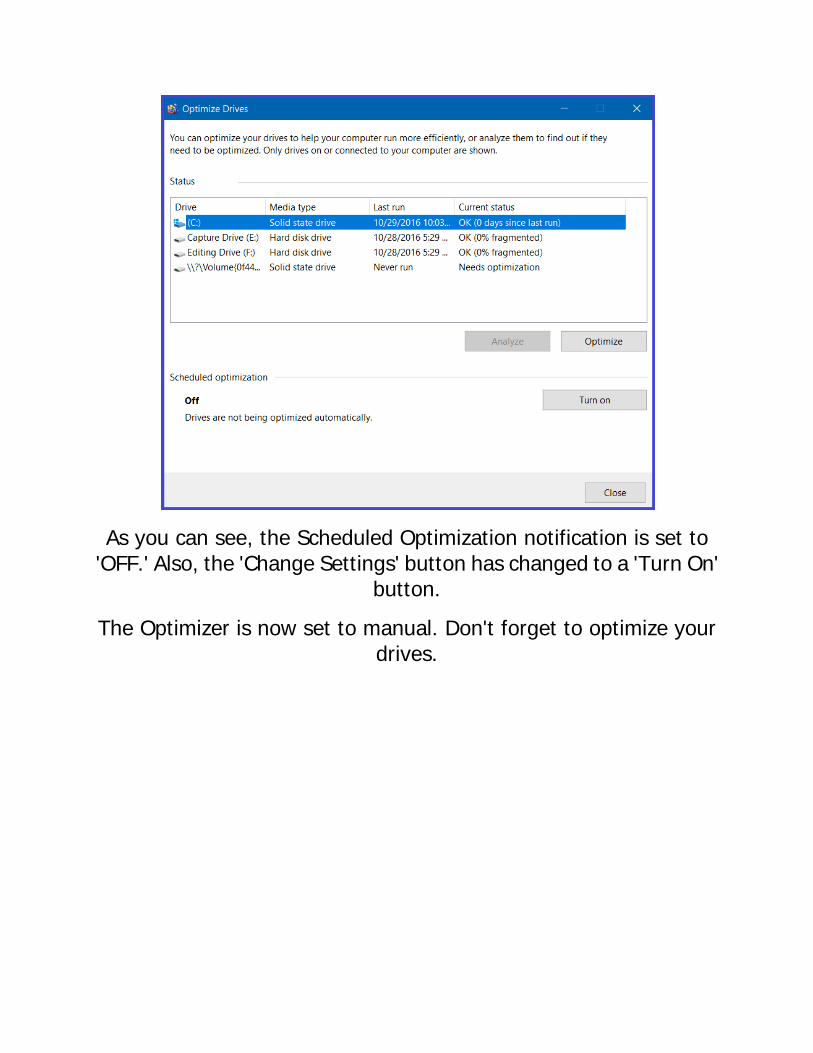
As you can see, the Scheduled Optimization notification is set to 'OFF.' Also, the 'Change Settings' button has changed to a 'Turn On'
button.
The Optimizer is now set to manual. Don't forget to optimize your drives.
DRIVE INDEXING
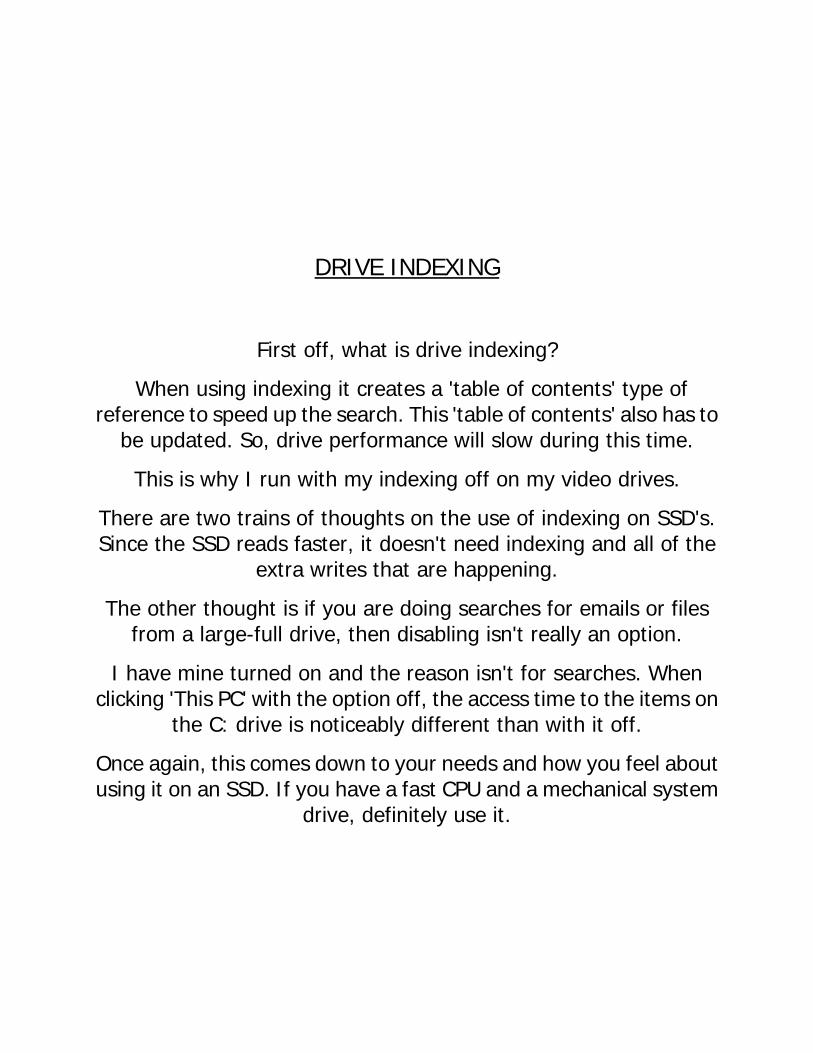
First off, what is drive indexing?
When using indexing it creates a 'table of contents' type of reference to speed up the search. This 'table of contents' also has to
be updated. So, drive performance will slow during this time.
This is why I run with my indexing off on my video drives.
There are two trains of thoughts on the use of indexing on SSD's. Since the SSD reads faster, it doesn't need indexing and all of the
extra writes that are happening.
The other thought is if you are doing searches for emails or files from a large-full drive, then disabling isn't really an option.
I have mine turned on and the reason isn't for searches. When clicking 'This PC' with the option off, the access time to the items on
the C: drive is noticeably different than with it off.
Once again, this comes down to your needs and how you feel about using it on an SSD. If you have a fast CPU and a mechanical system
drive, definitely use it.
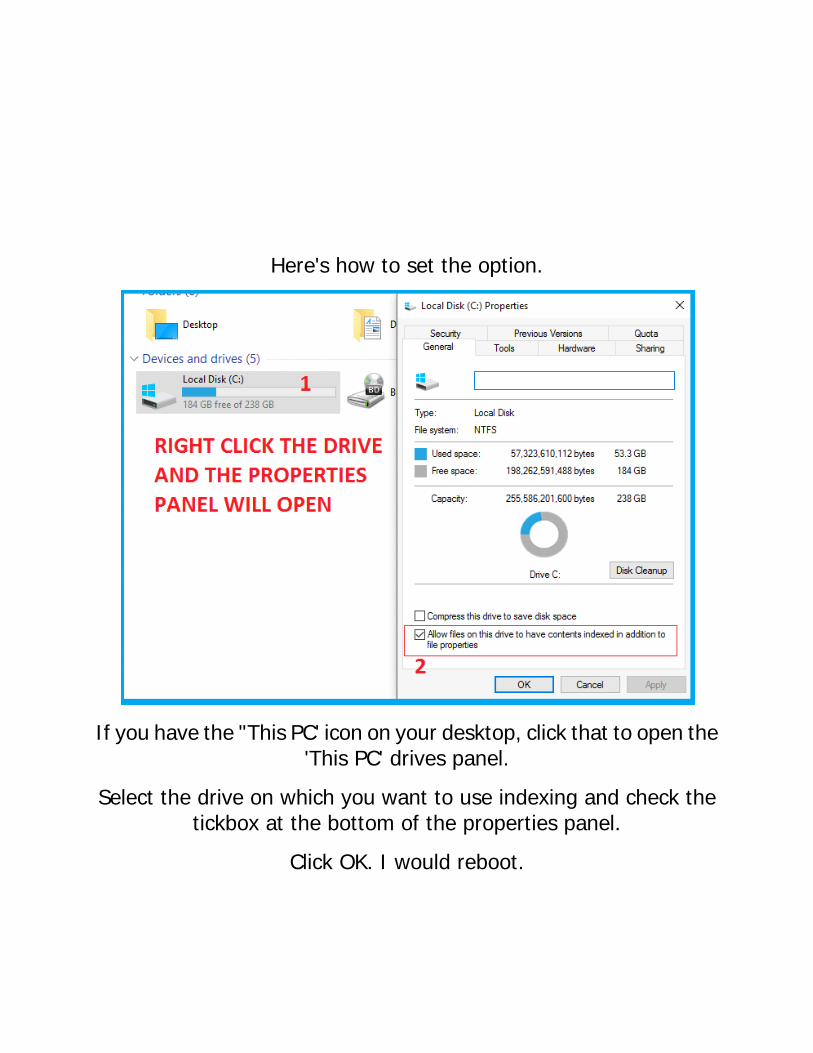
Here's how to set the option.
If you have the "This PC' icon on your desktop, click that to open the 'This PC' drives panel.
Select the drive on which you want to use indexing and check the tickbox at the bottom of the properties panel.
Click OK. I would reboot.
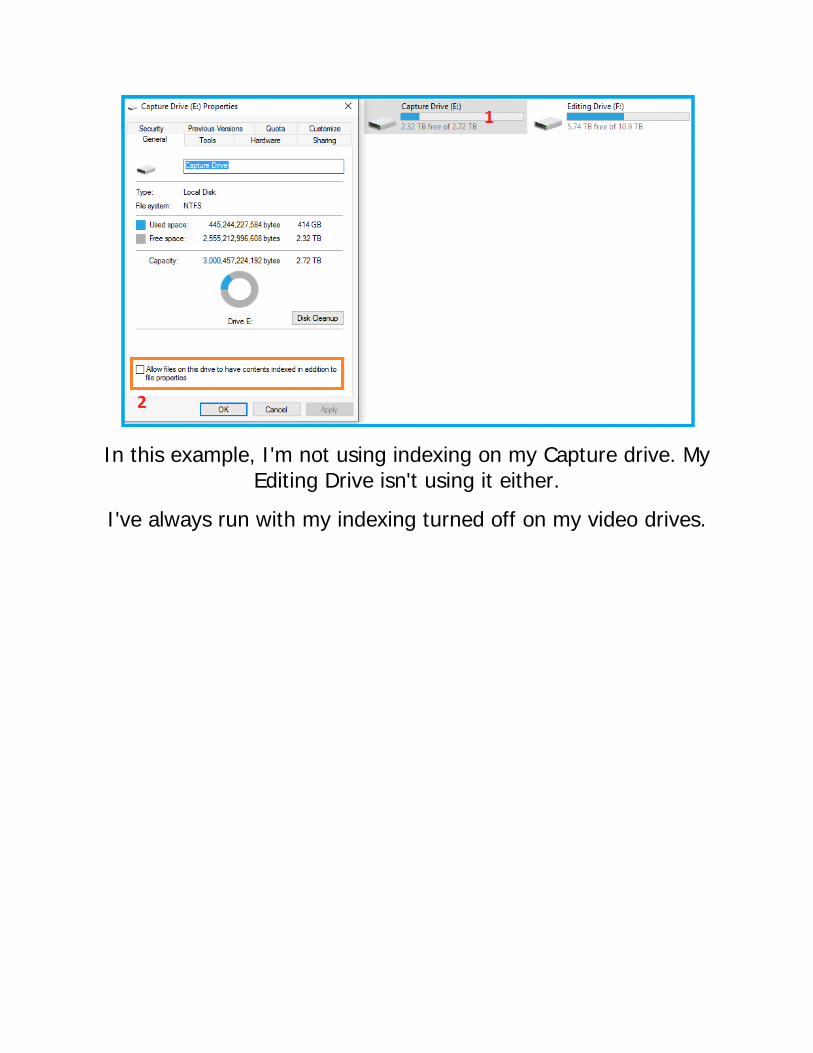
In this example, I'm not using indexing on my Capture drive. My Editing Drive isn't using it either.
I've always run with my indexing turned off on my video drives.
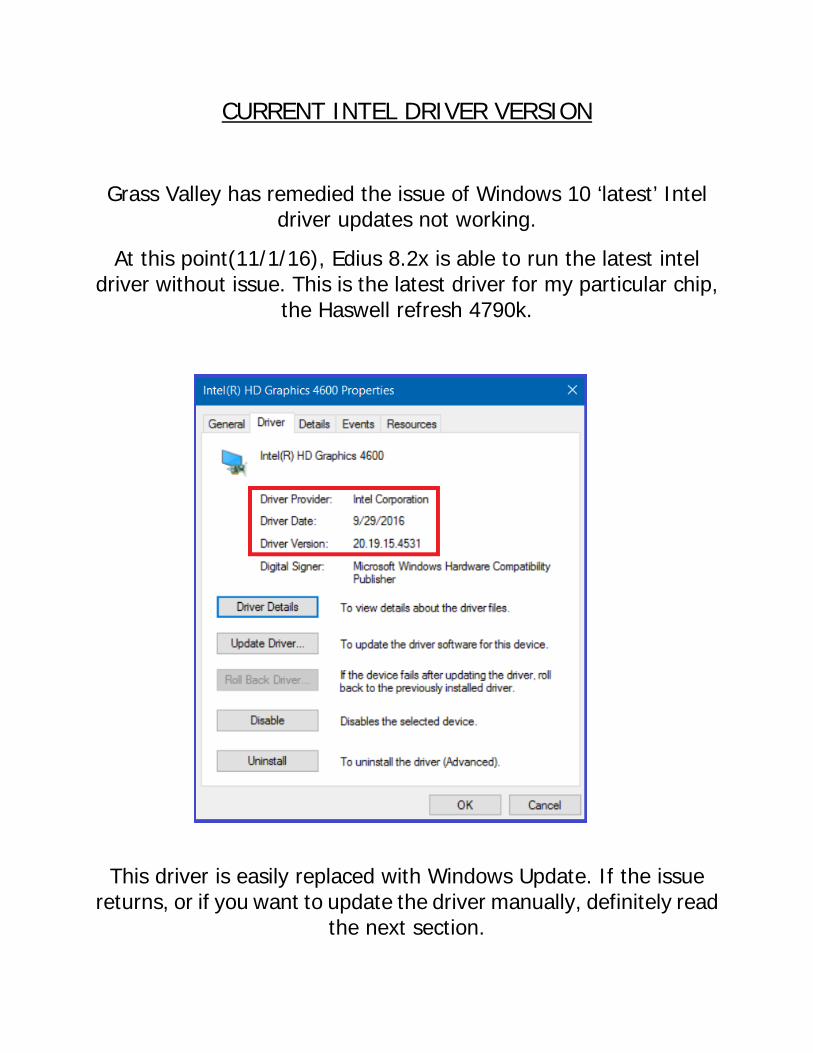
CURRENT INTEL DRIVER VERSION
Grass Valley has remedied the issue of Windows 10 ‘latest’ Intel driver updates not working.
At this point(11/1/16), Edius 8.2x is able to run the latest intel driver without issue. This is the latest driver for my particular chip,
the Haswell refresh 4790k.
This driver is easily replaced with Windows Update. If the issue returns, or if you want to update the driver manually, definitely read
the next section.
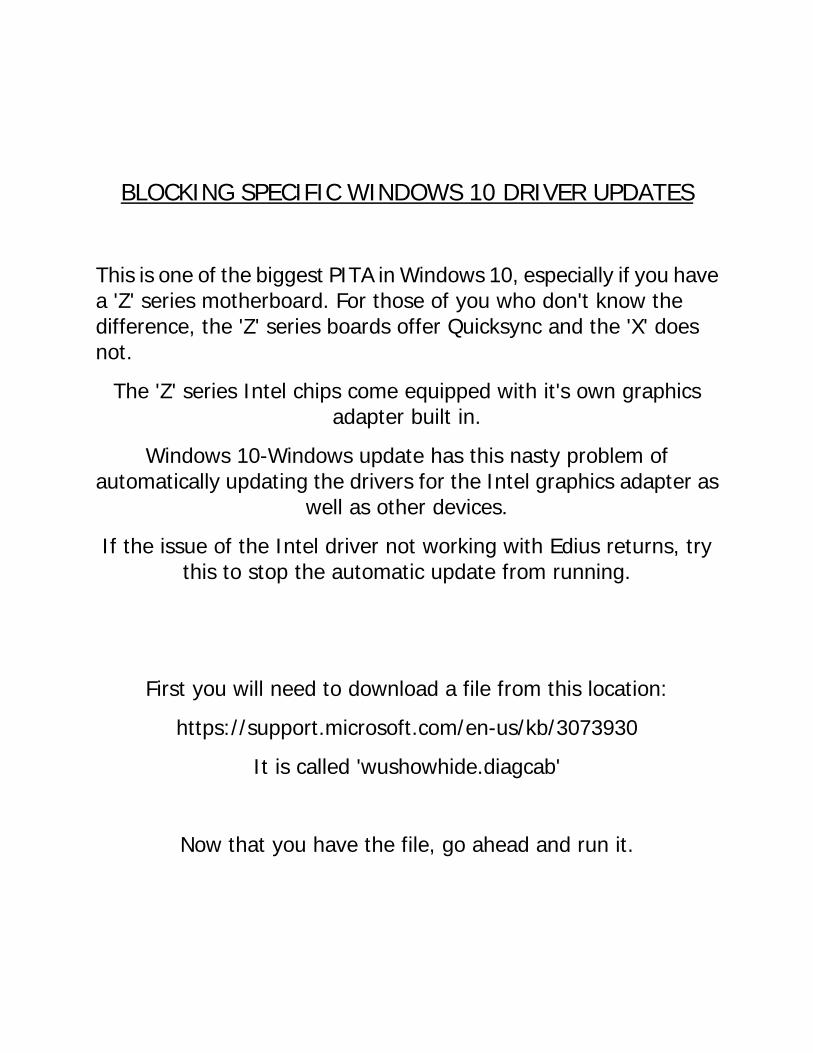
BLOCKING SPECIFIC WINDOWS 10 DRIVER UPDATES
This is one of the biggest PITA in Windows 10, especially if you have a 'Z' series motherboard. For those of you who don't know the difference, the 'Z' series boards offer Quicksync and the 'X' does not.
The 'Z' series Intel chips come equipped with it's own graphics adapter built in.
Windows 10-Windows update has this nasty problem of automatically updating the drivers for the Intel graphics adapter as
well as other devices.
If the issue of the Intel driver not working with Edius returns, try this to stop the automatic update from running.
First you will need to download a file from this location:
https://support.microsoft.com/en-us/kb/3073930
It is called 'wushowhide.diagcab'
Now that you have the file, go ahead and run it.
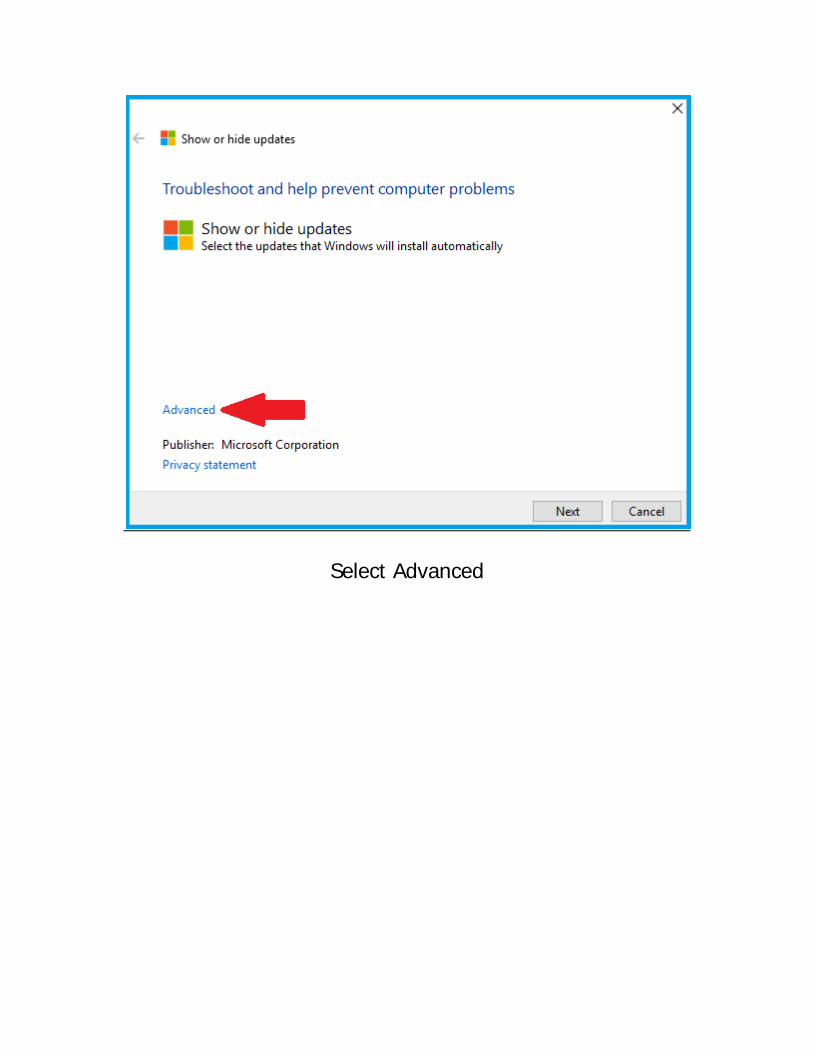
Select Advanced
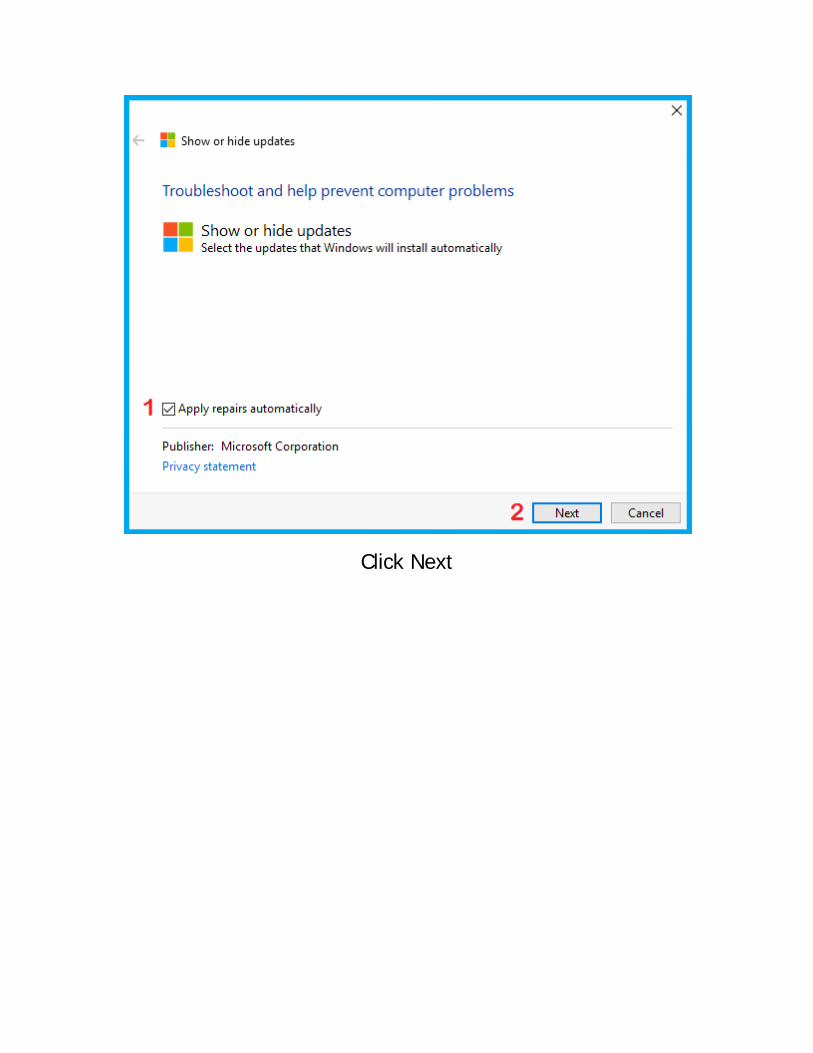
Click Next
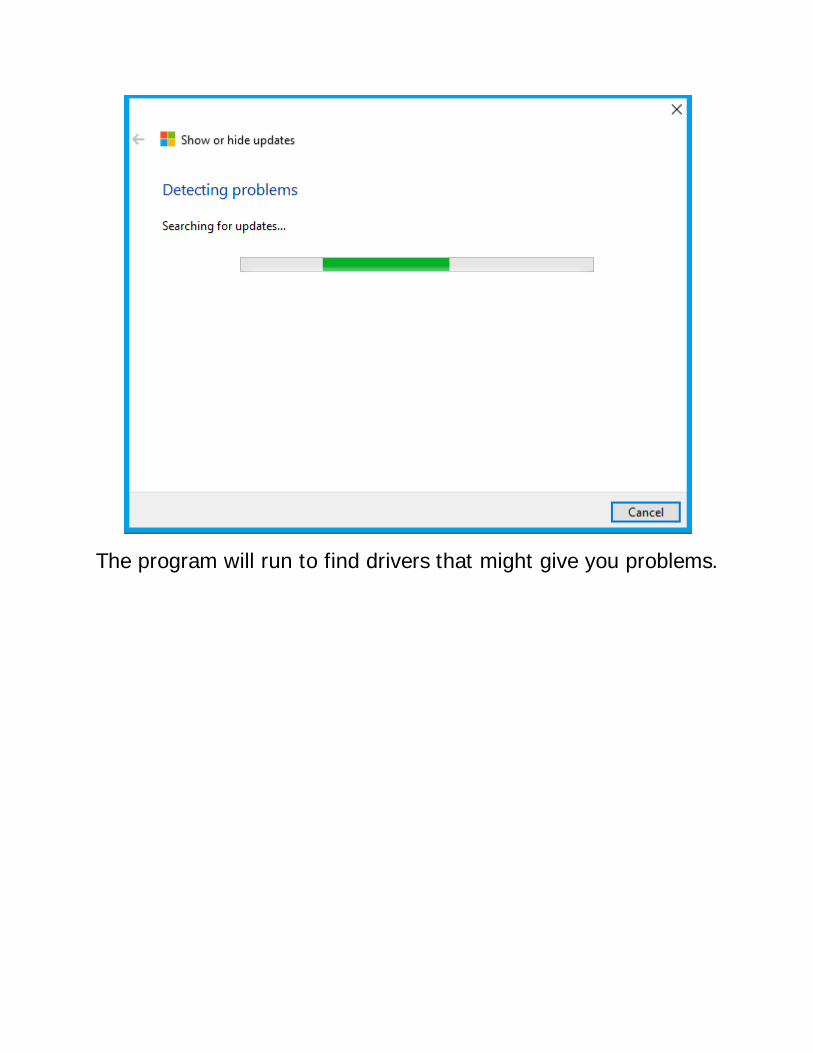
The program will run to find drivers that might give you problems.
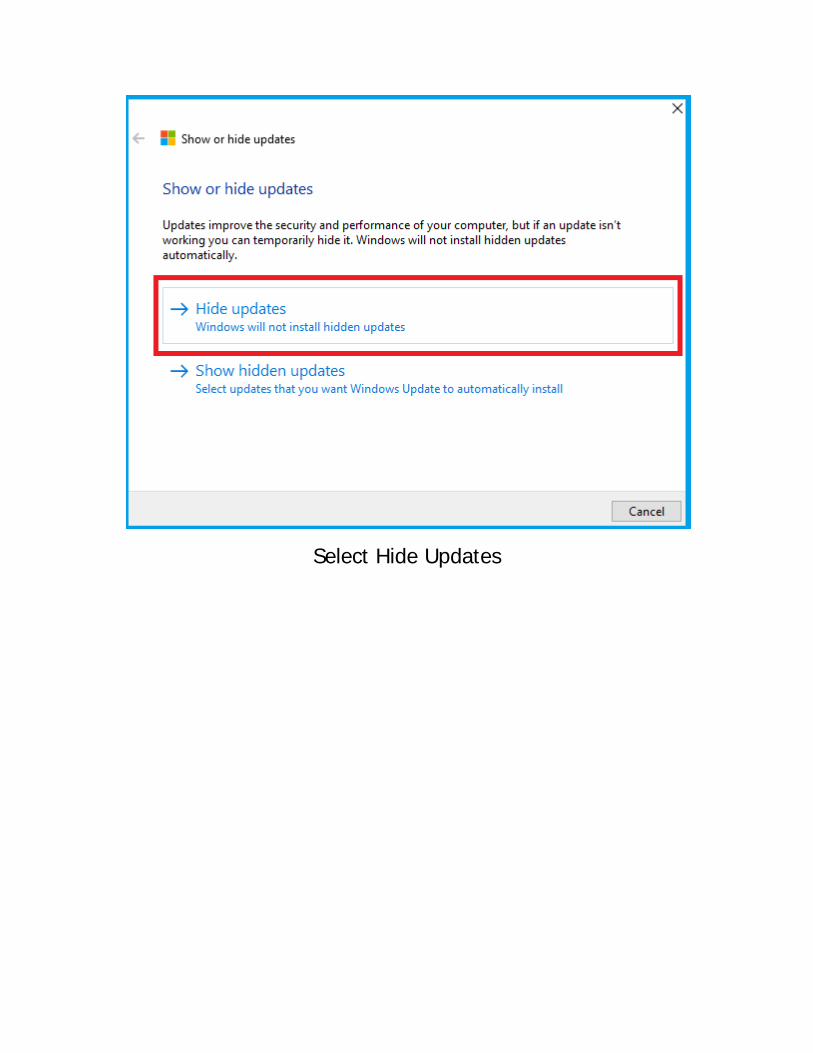
Select Hide Updates
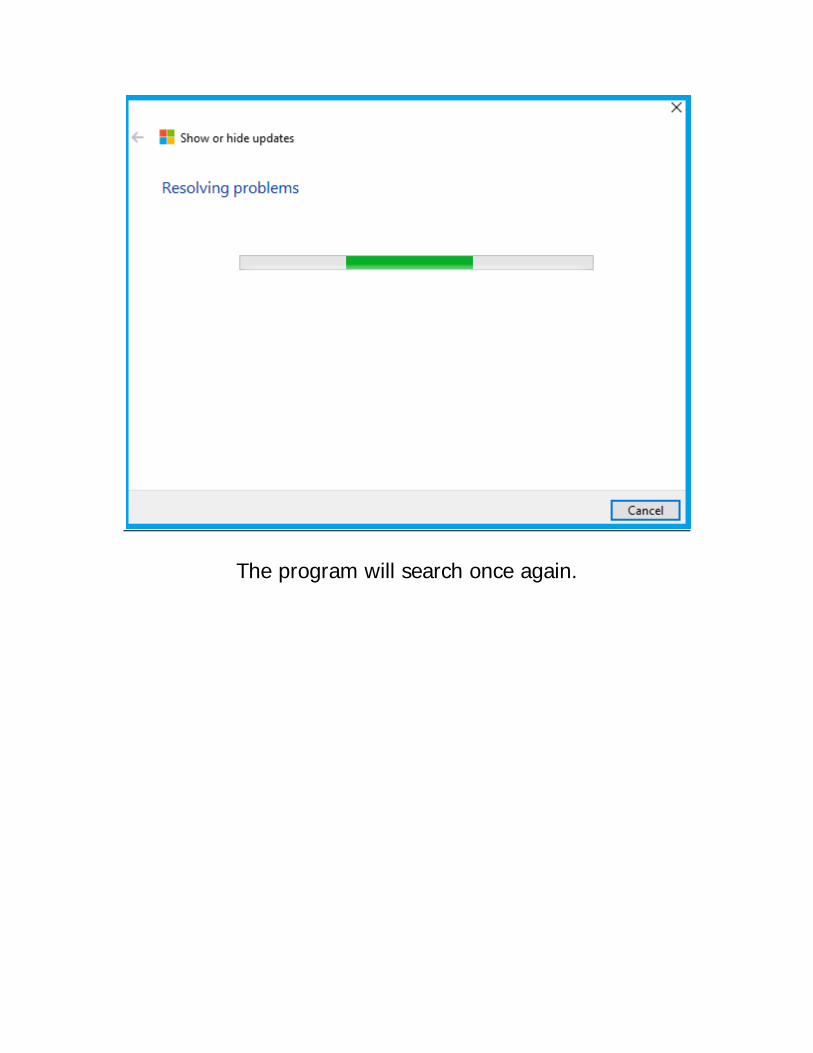
The program will search once again.
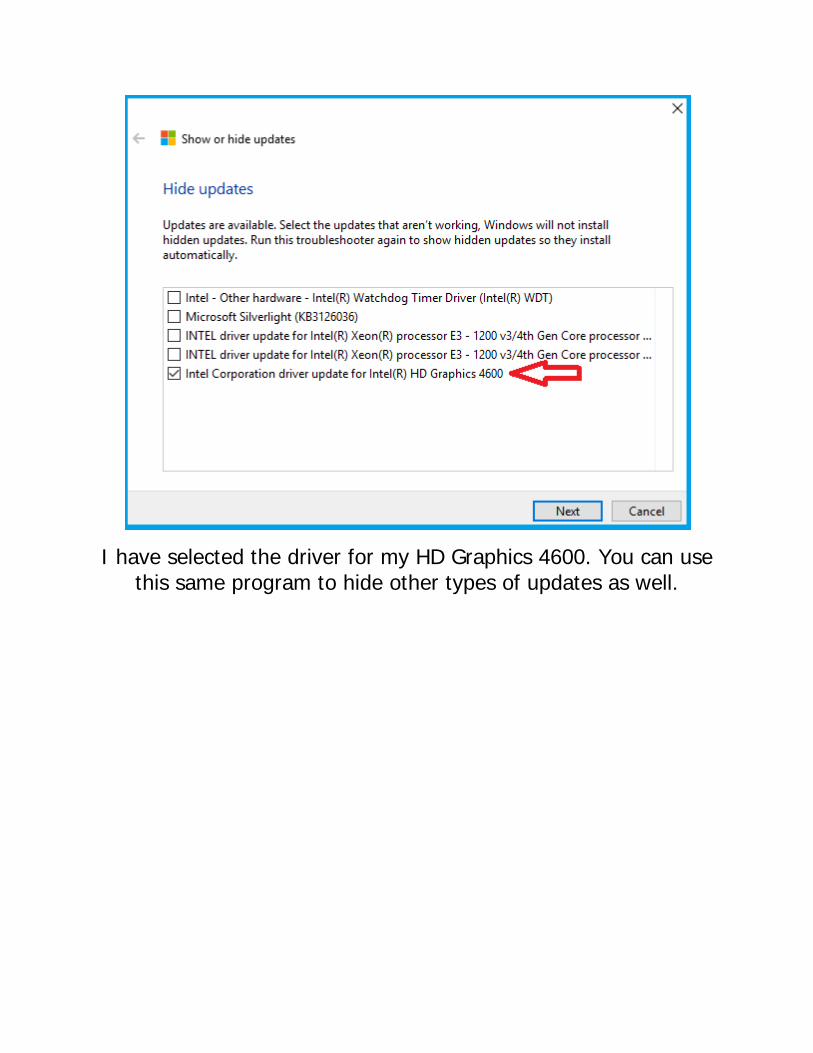
I have selected the driver for my HD Graphics 4600. You can use this same program to hide other types of updates as well.
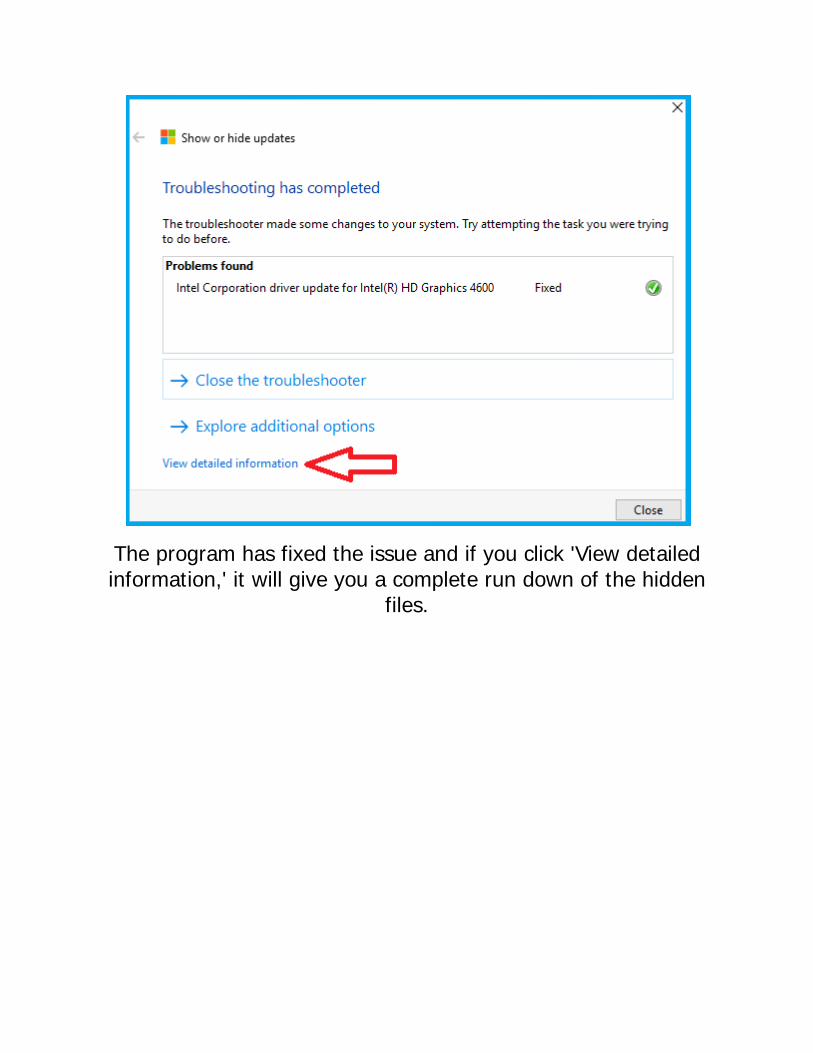
The program has fixed the issue and if you click 'View detailed information,' it will give you a complete run down of the hidden
files.
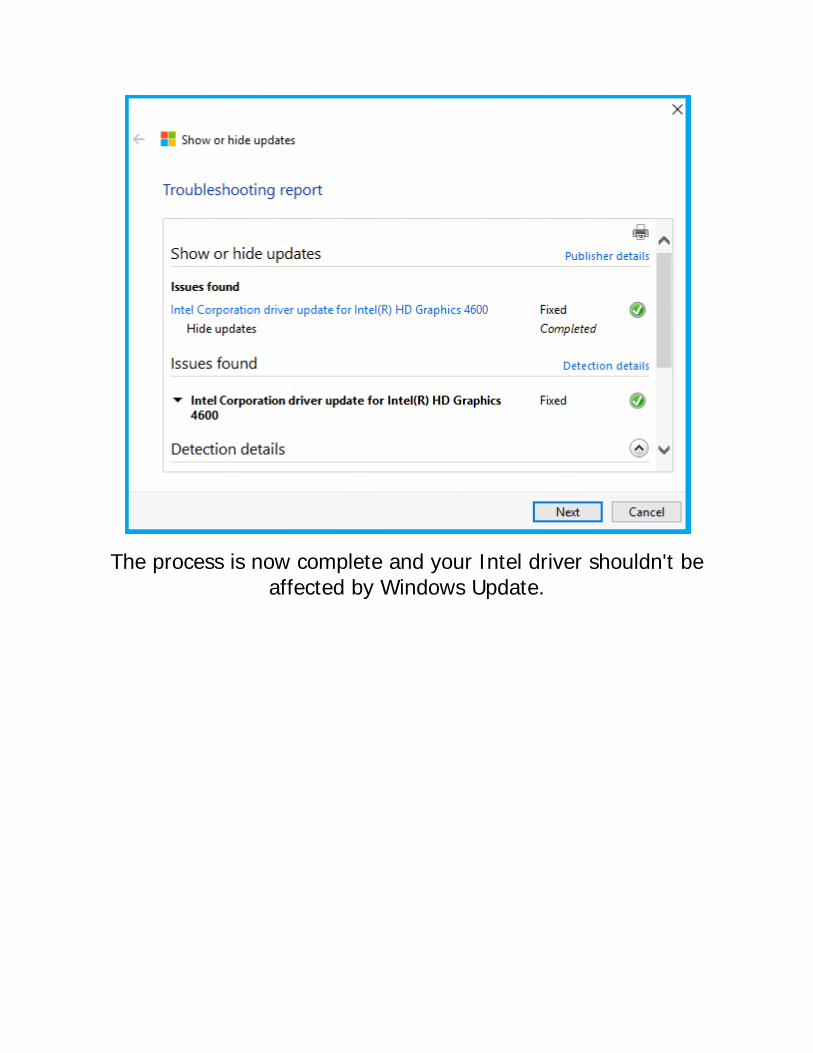
The process is now complete and your Intel driver shouldn't be affected by Windows Update.
FOLDER OPTIONS
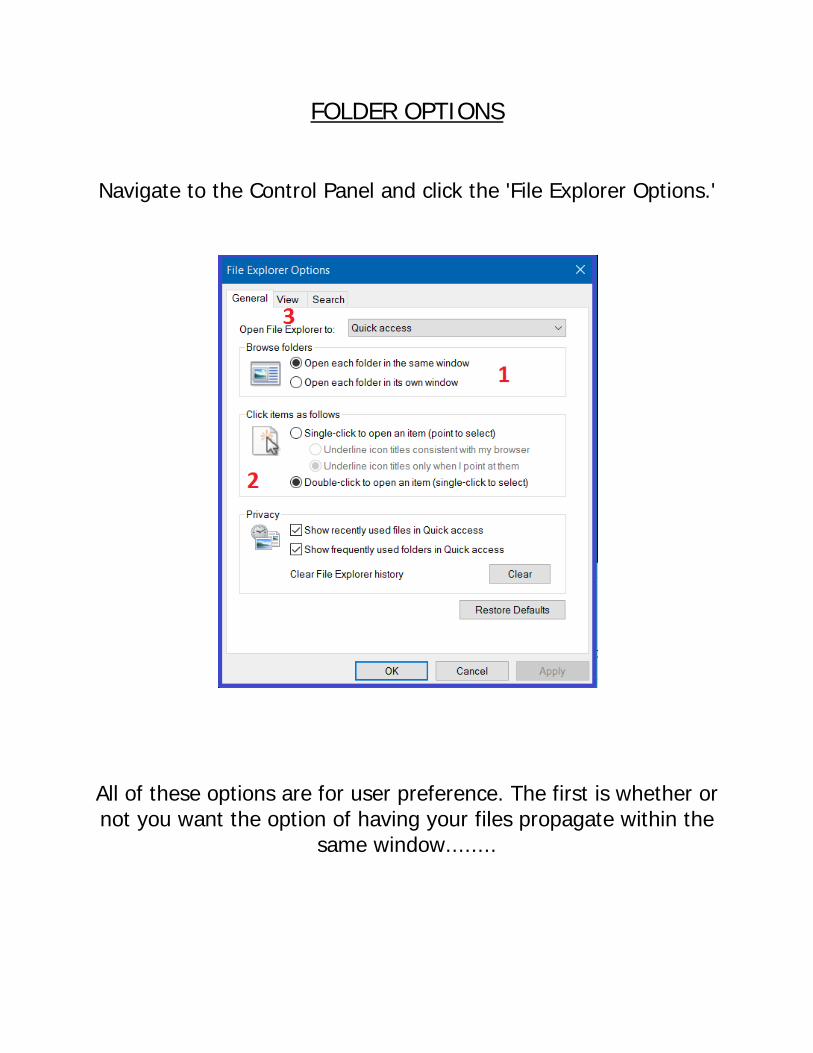
Navigate to the Control Panel and click the 'File Explorer Options.'
All of these options are for user preference. The first is whether or not you want the option of having your files propagate within the
same window........
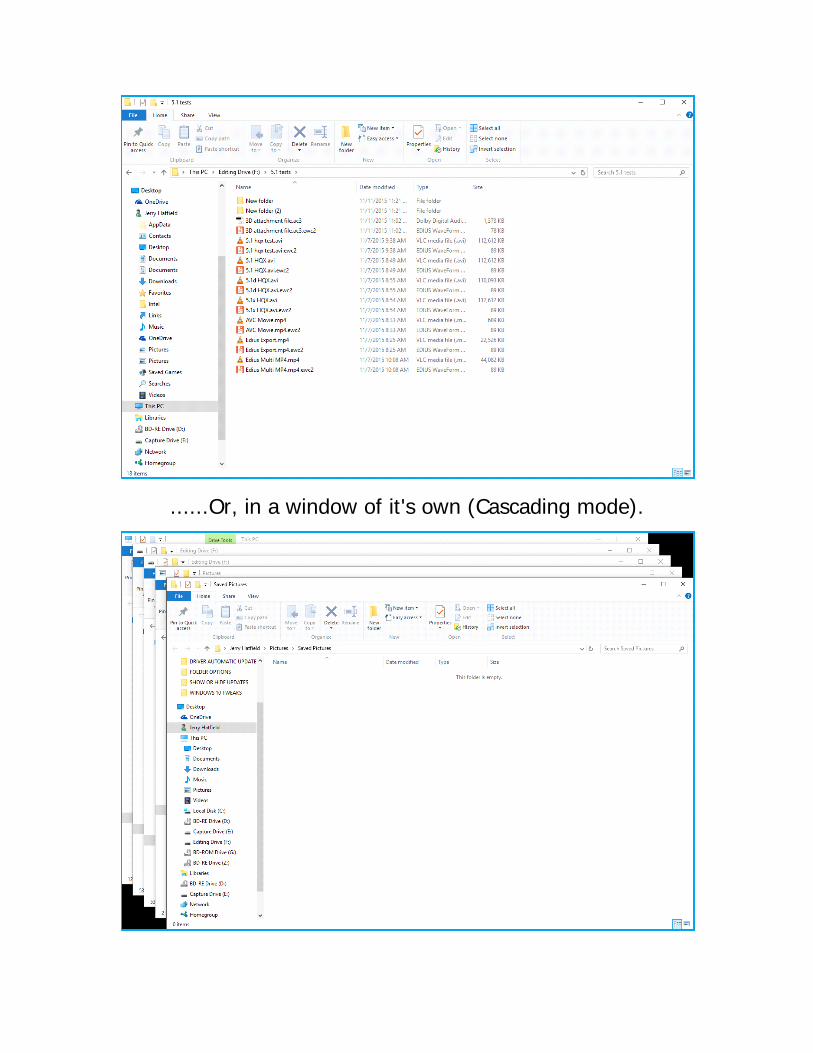
......Or, in a window of it's own (Cascading mode).
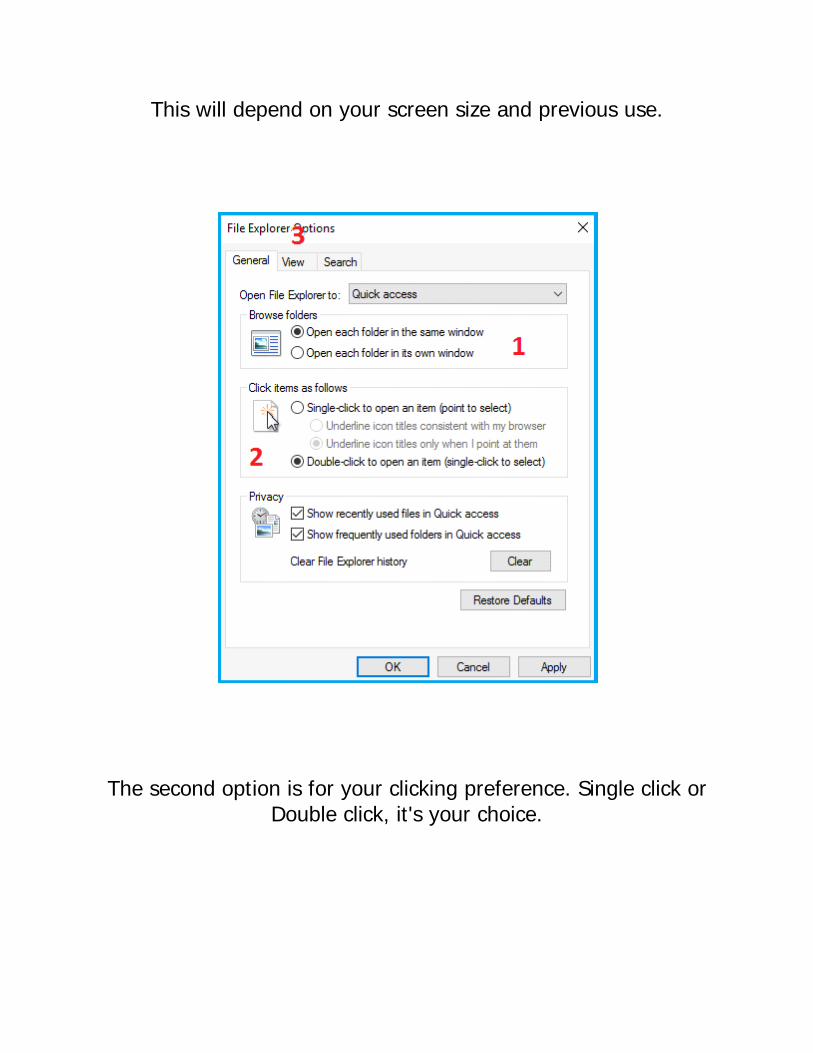
This will depend on your screen size and previous use.
The second option is for your clicking preference. Single click or Double click, it's your choice.
Clicking the 3rd option, View, brings up the folder options panel.
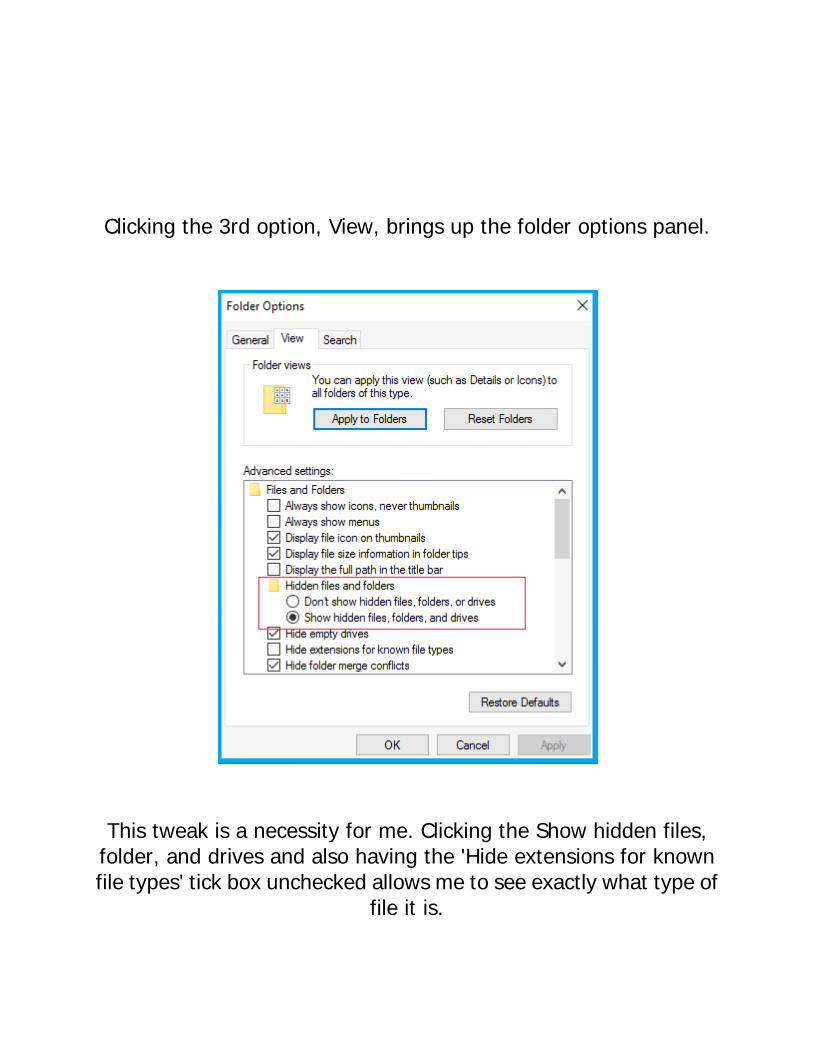
This tweak is a necessity for me. Clicking the Show hidden files, folder, and drives and also having the 'Hide extensions for known file types' tick box unchecked allows me to see exactly what type of
file it is.
HOW TO SET UP SYSTEM RESTORE
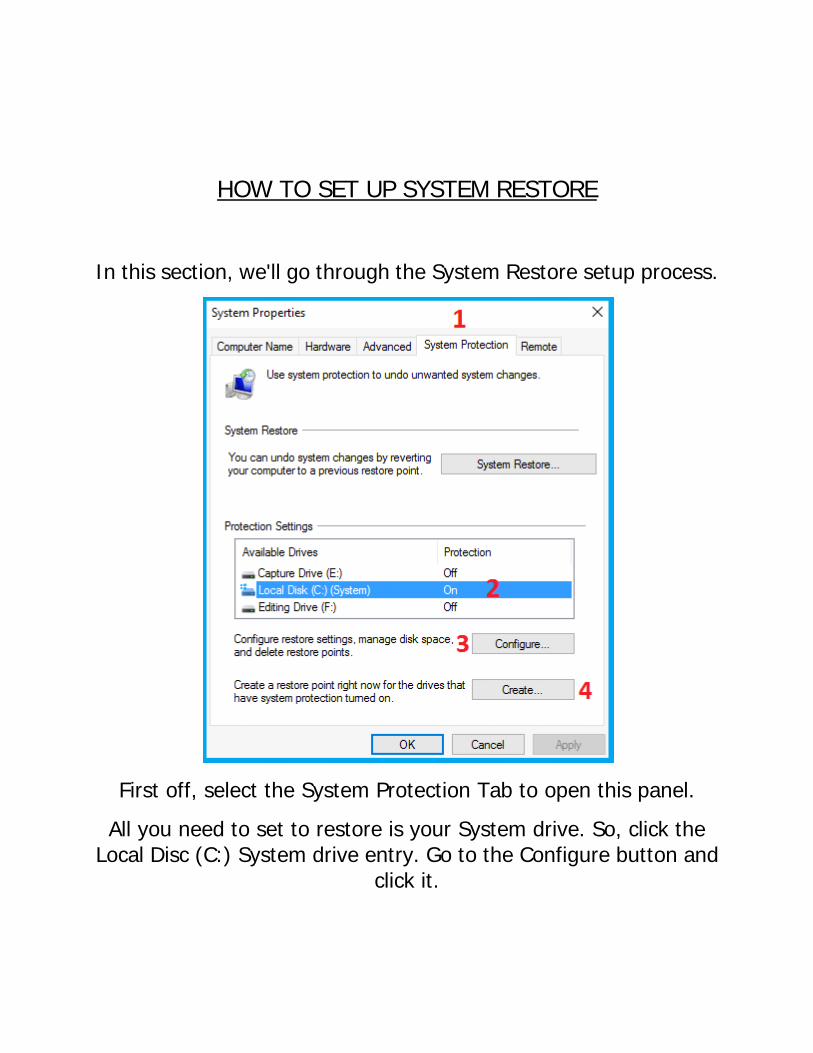
In this section, we'll go through the System Restore setup process.
First off, select the System Protection Tab to open this panel.
All you need to set to restore is your System drive. So, click the Local Disc (C:) System drive entry. Go to the Configure button and
click it.
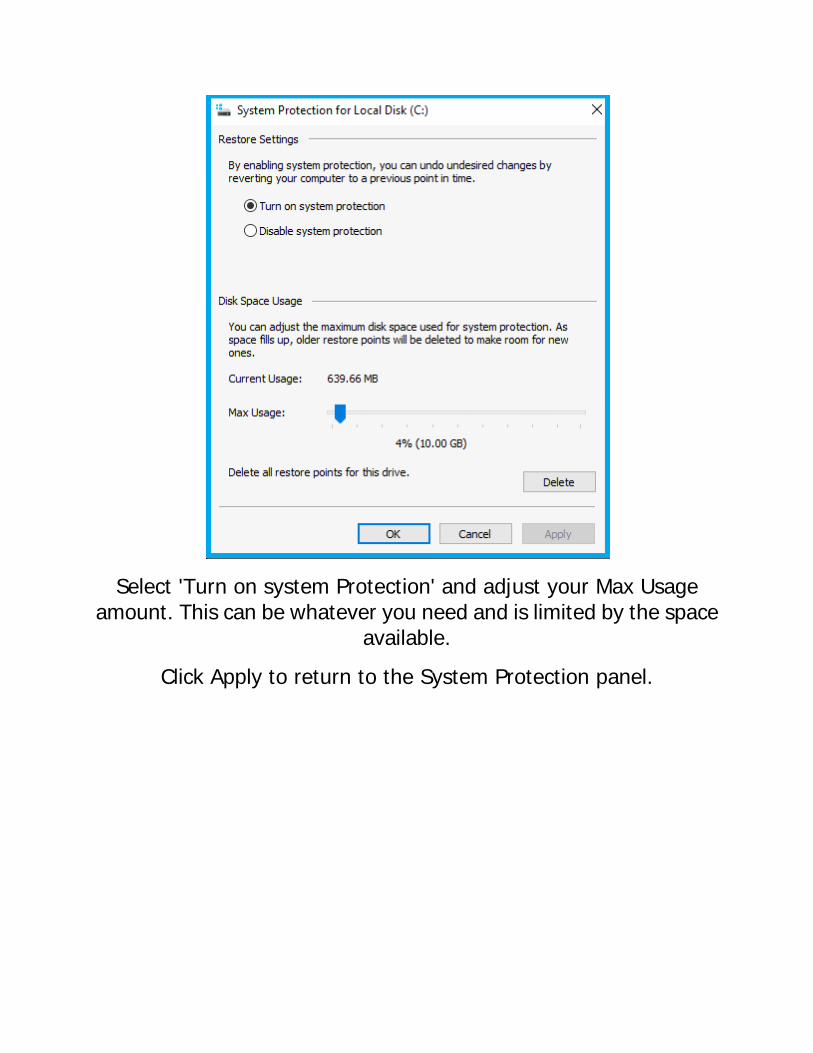
Select 'Turn on system Protection' and adjust your Max Usage amount. This can be whatever you need and is limited by the space
available.
Click Apply to return to the System Protection panel.
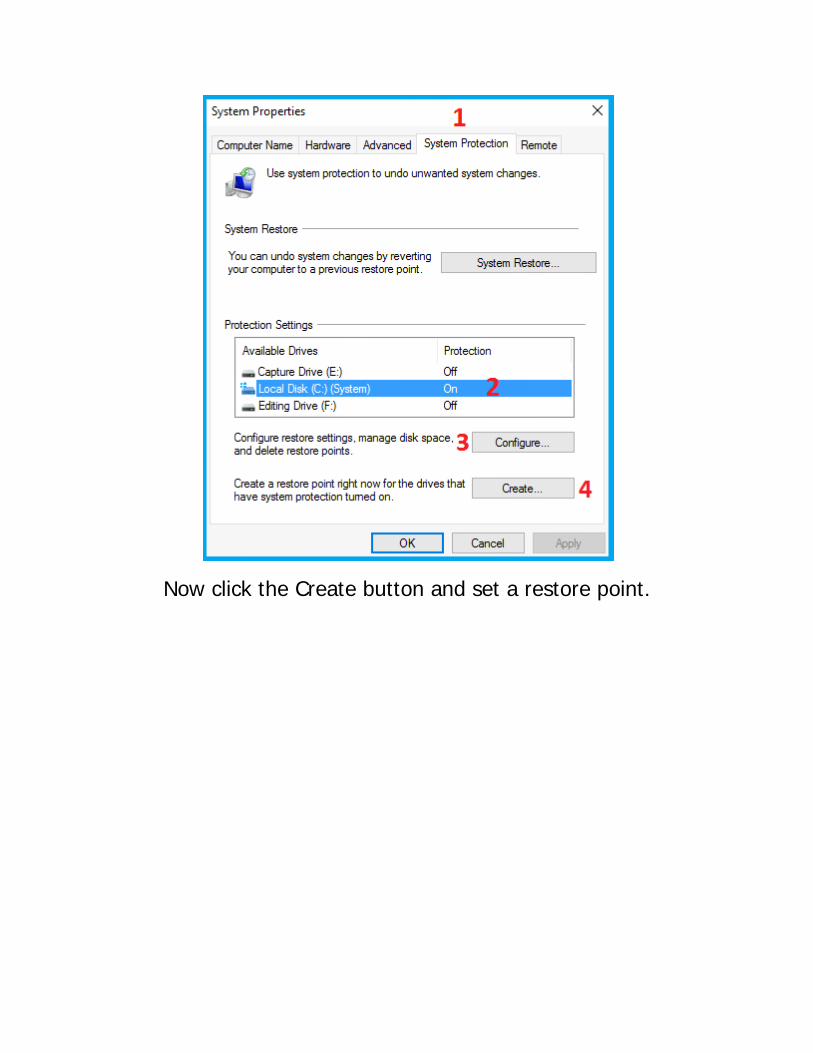
Now click the Create button and set a restore point.
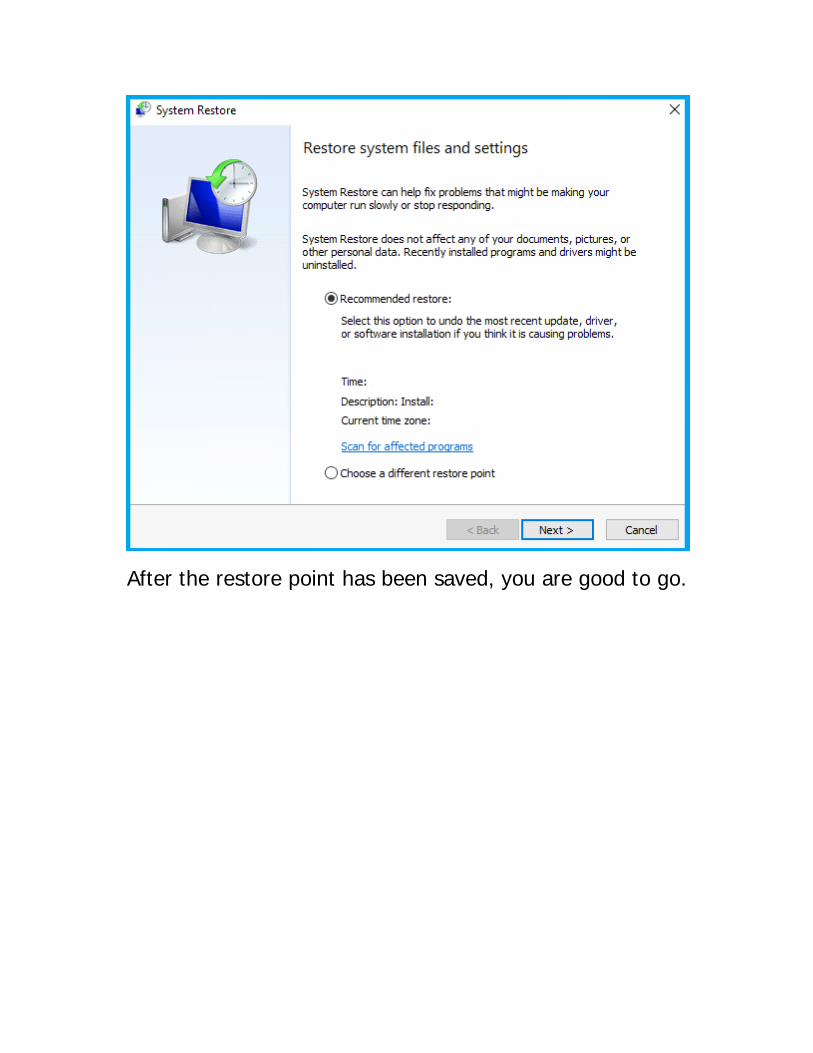
After the restore point has been saved, you are good to go.
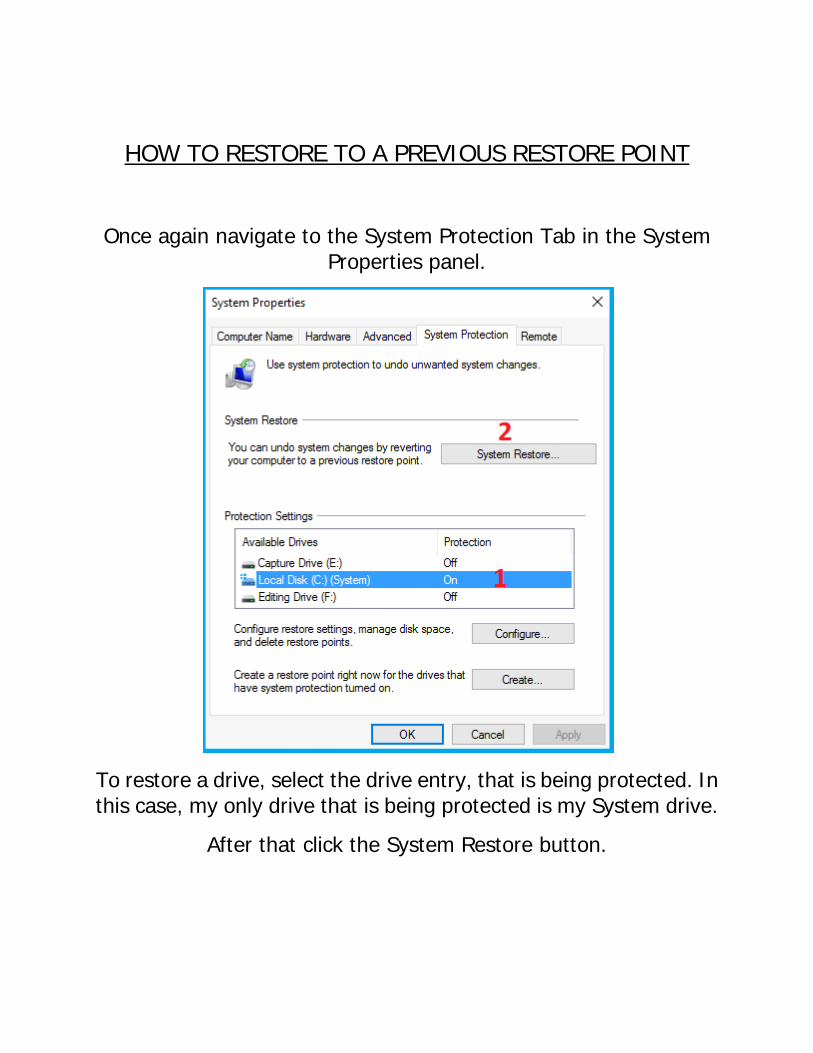
HOW TO RESTORE TO A PREVIOUS RESTORE POINT
Once again navigate to the System Protection Tab in the System Properties panel.
To restore a drive, select the drive entry, that is being protected. In this case, my only drive that is being protected is my System drive.
After that click the System Restore button.
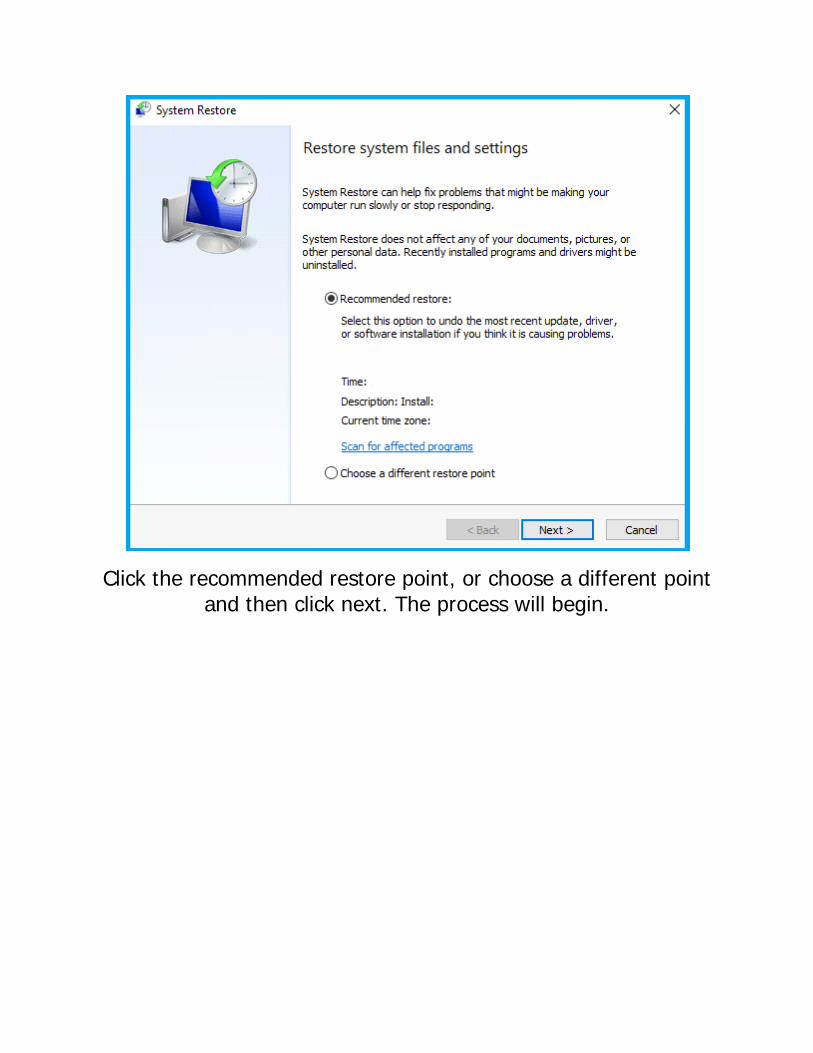
Click the recommended restore point, or choose a different point and then click next. The process will begin.
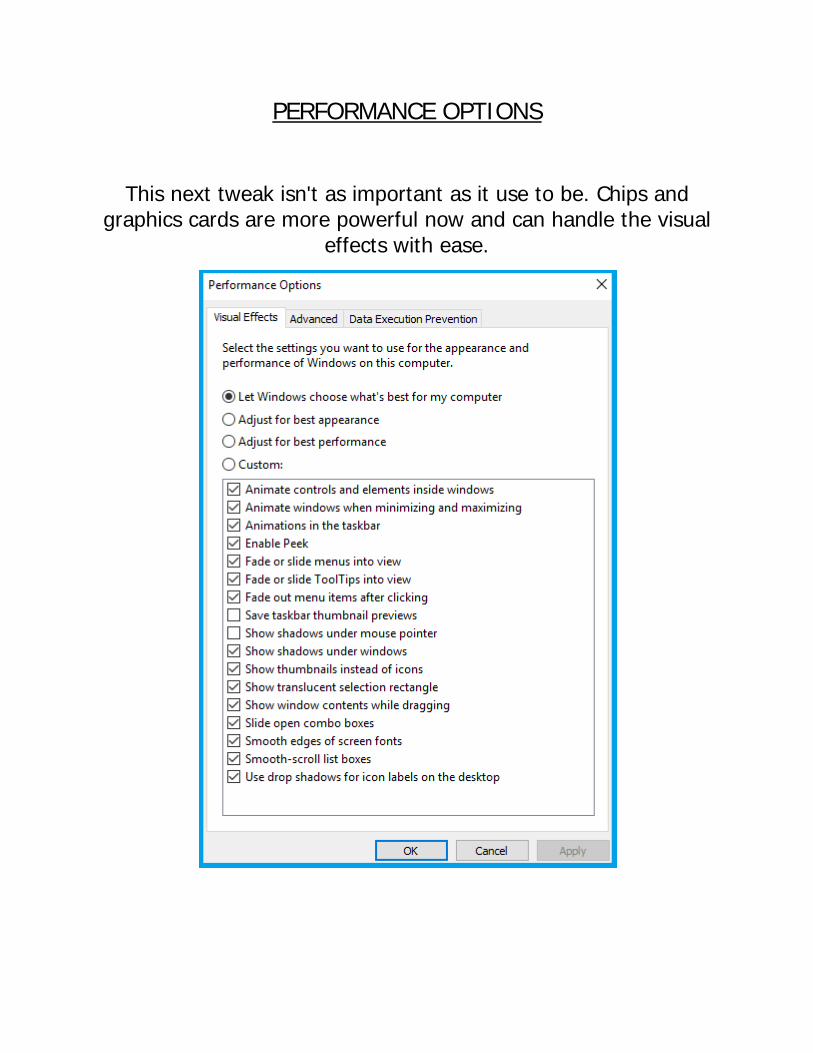
PERFORMANCE OPTIONS
This next tweak isn't as important as it use to be. Chips and graphics cards are more powerful now and can handle the visual
effects with ease.

That said, if you have an older machine and your desktop is sluggish, I would select 'Adjust for best Performance' to help in your functionality. You could also use the Custom setting to reduce some
of the desktop effects.
To gain experience in this function, give each option a try.
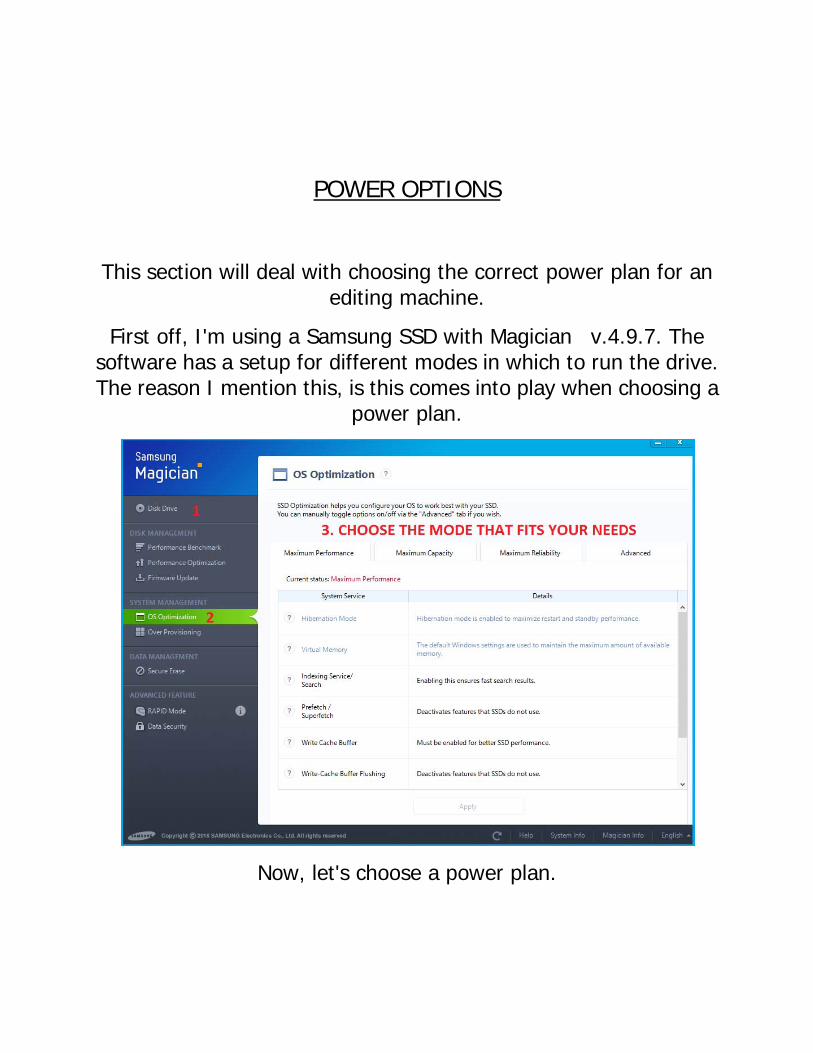
POWER OPTIONS
This section will deal with choosing the correct power plan for an editing machine.
First off, I'm using a Samsung SSD with Magician v.4.9.7. The software has a setup for different modes in which to run the drive. The reason I mention this, is this comes into play when choosing a
power plan.
Now, let's choose a power plan.
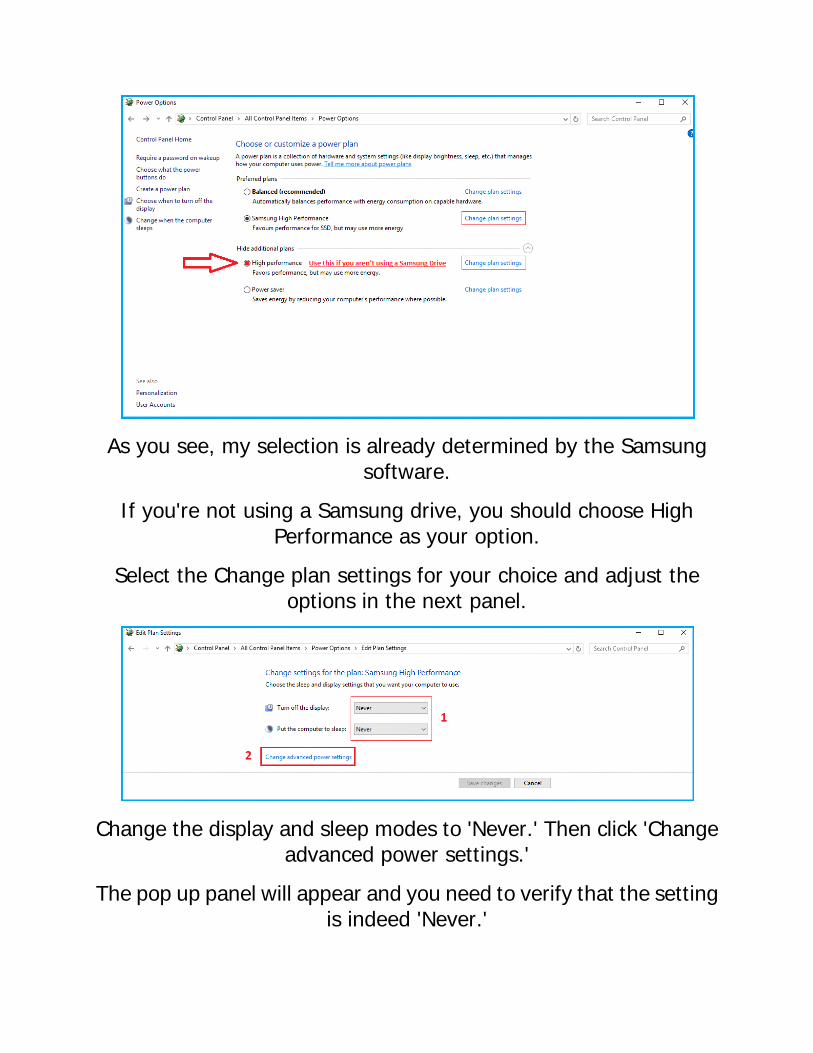
As you see, my selection is already determined by the Samsung software.
If you're not using a Samsung drive, you should choose High Performance as your option.
Select the Change plan settings for your choice and adjust the options in the next panel.
Change the display and sleep modes to 'Never.' Then click 'Change advanced power settings.'
The pop up panel will appear and you need to verify that the setting is indeed 'Never.'
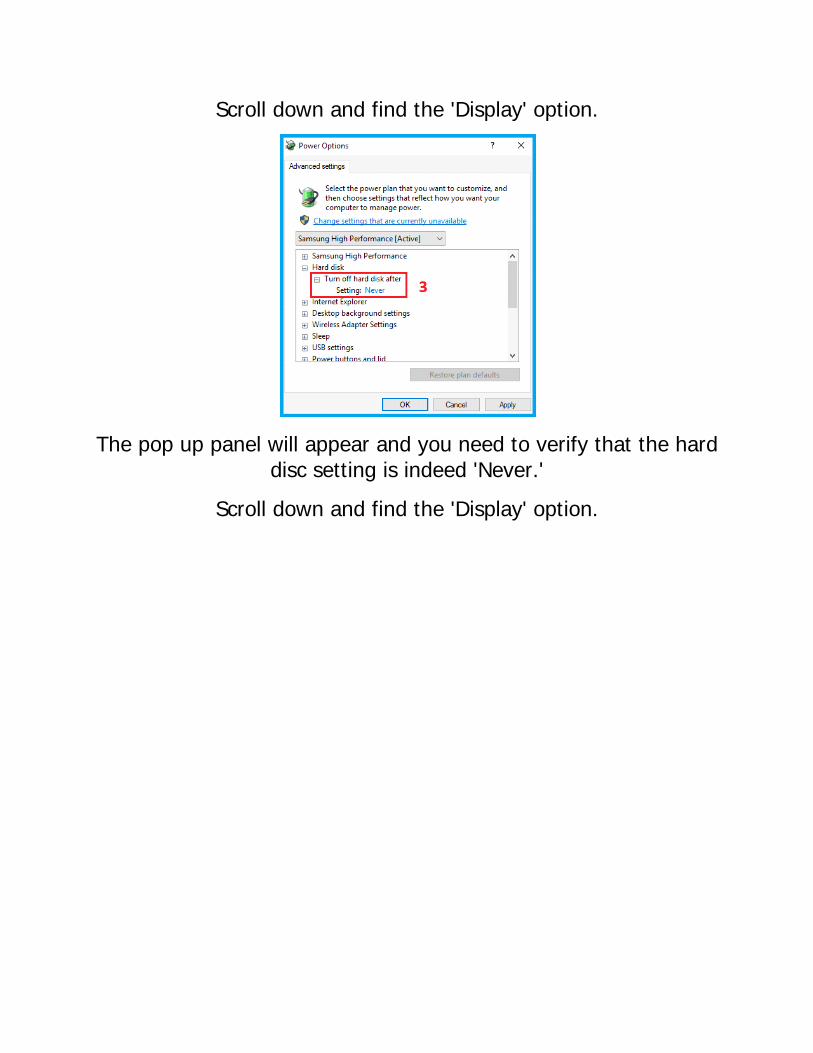
Scroll down and find the 'Display' option.
The pop up panel will appear and you need to verify that the hard disc setting is indeed 'Never.'
Scroll down and find the 'Display' option.
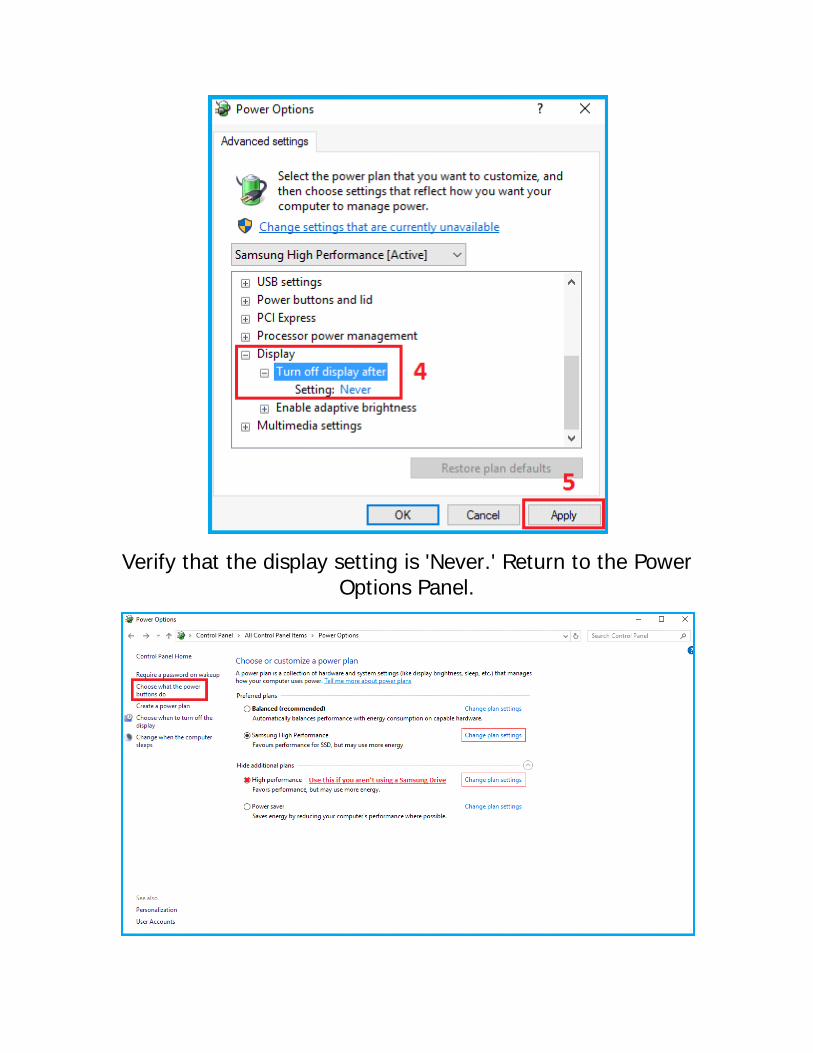
Verify that the display setting is 'Never.' Return to the Power Options Panel.
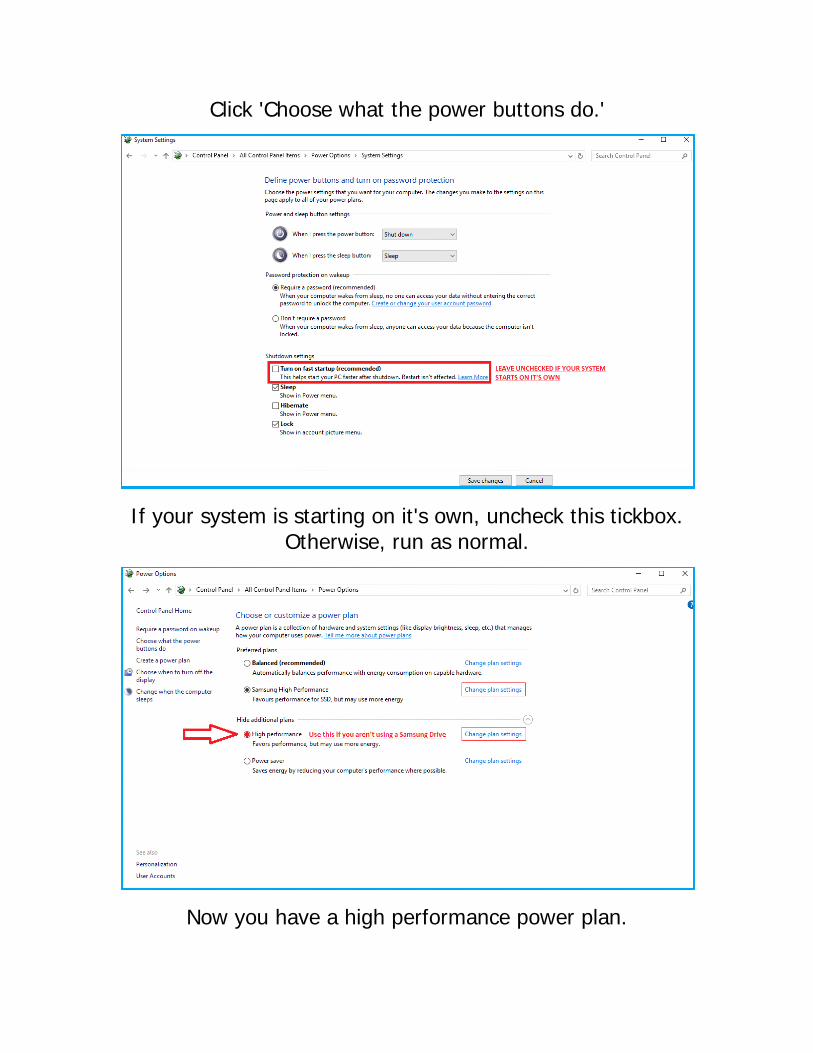
Click 'Choose what the power buttons do.'
If your system is starting on it's own, uncheck this tickbox. Otherwise, run as normal.
Now you have a high performance power plan.
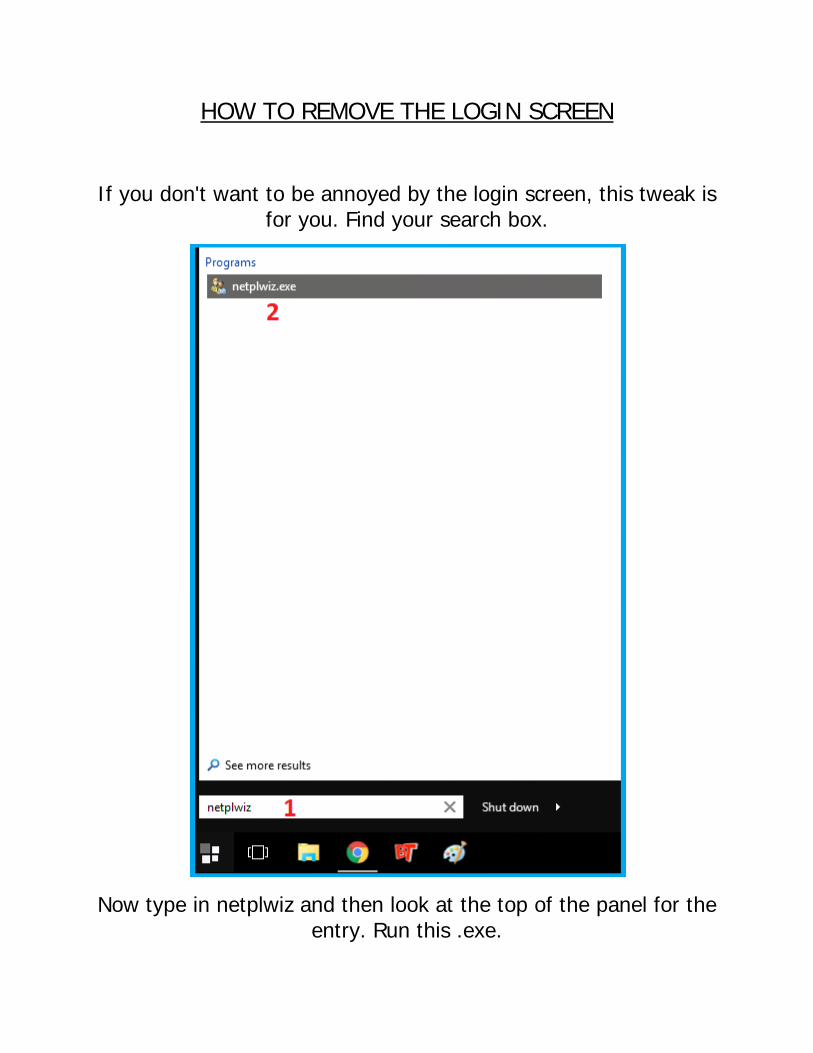
HOW TO REMOVE THE LOGIN SCREEN
If you don't want to be annoyed by the login screen, this tweak is for you. Find your search box.
Now type in netplwiz and then look at the top of the panel for the entry. Run this .exe.
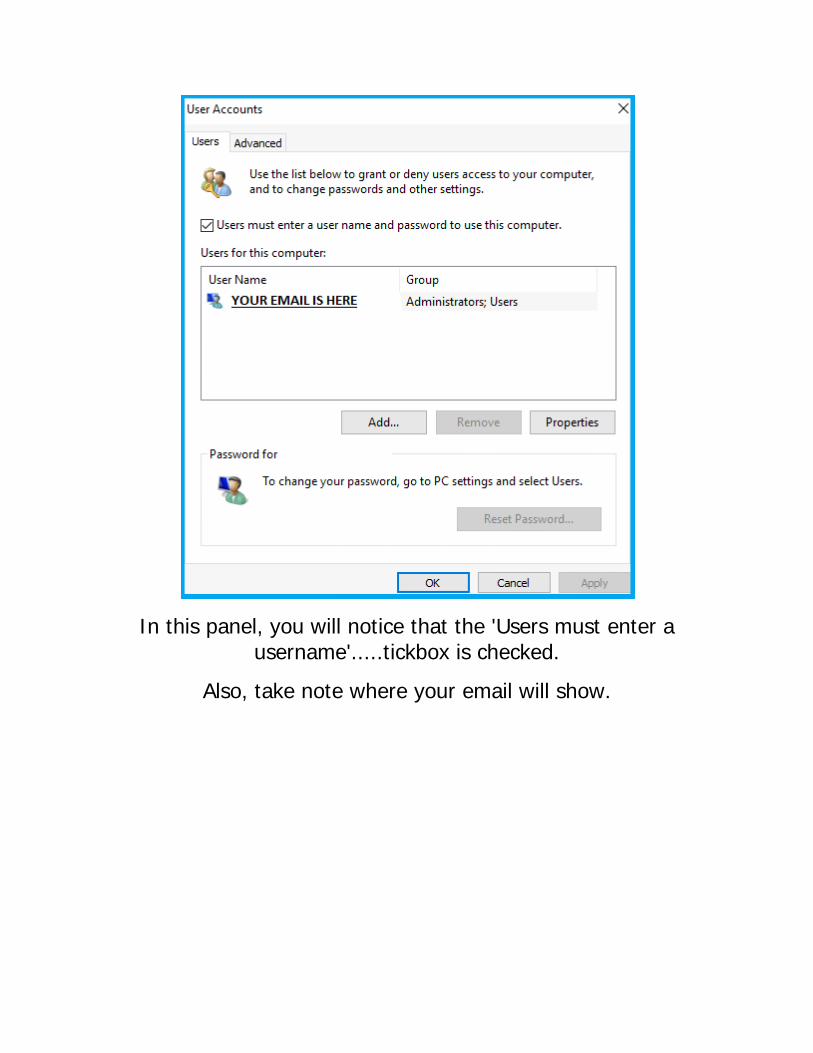
In this panel, you will notice that the 'Users must enter a username'.....tickbox is checked.
Also, take note where your email will show.
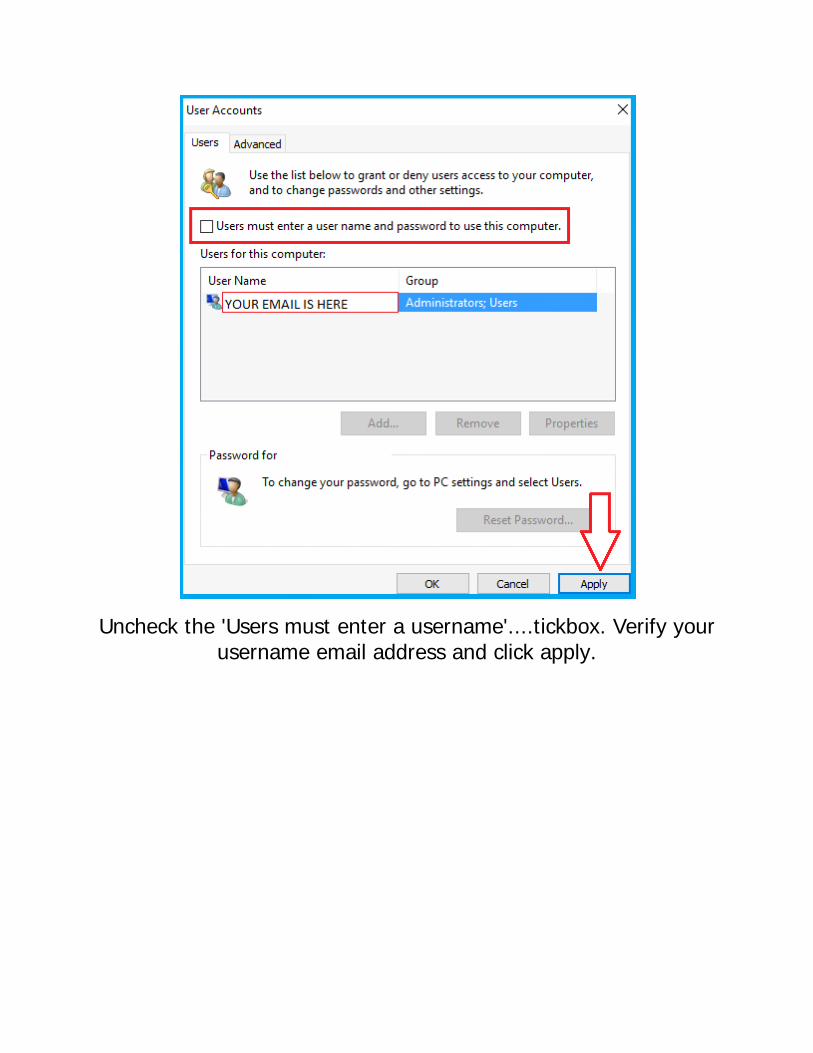
Uncheck the 'Users must enter a username'....tickbox. Verify your username email address and click apply.
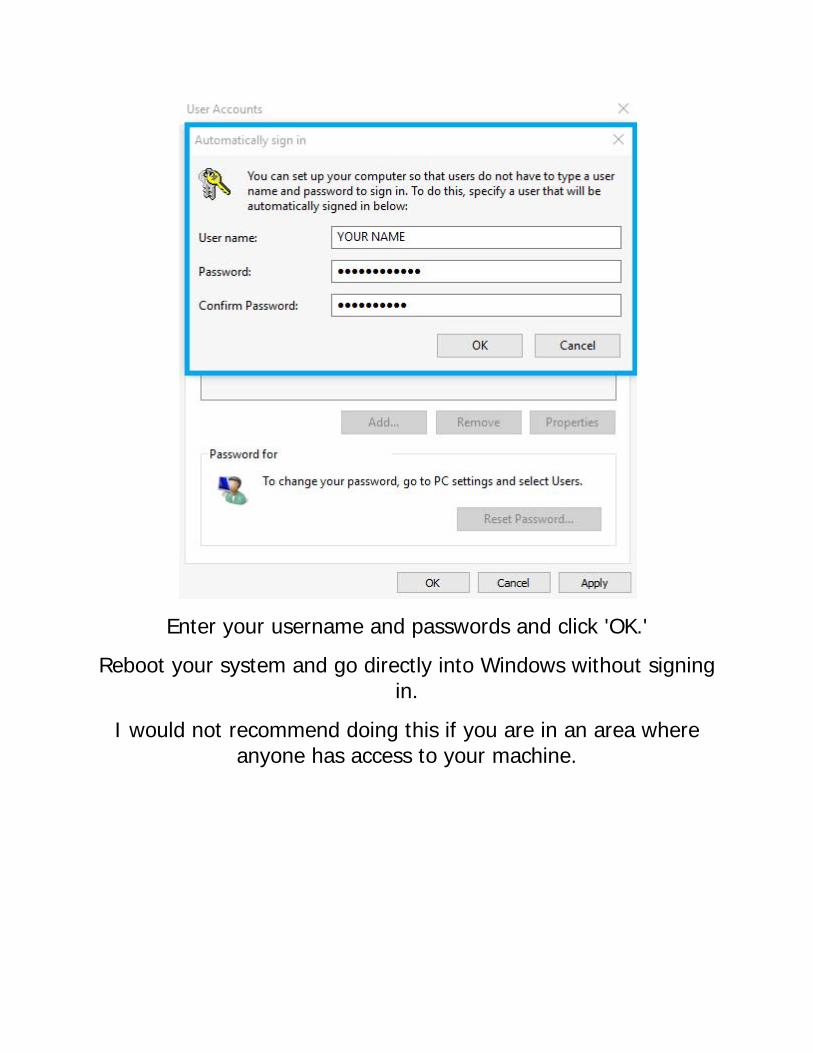
Enter your username and passwords and click 'OK.'
Reboot your system and go directly into Windows without signing in.
I would not recommend doing this if you are in an area where anyone has access to your machine.
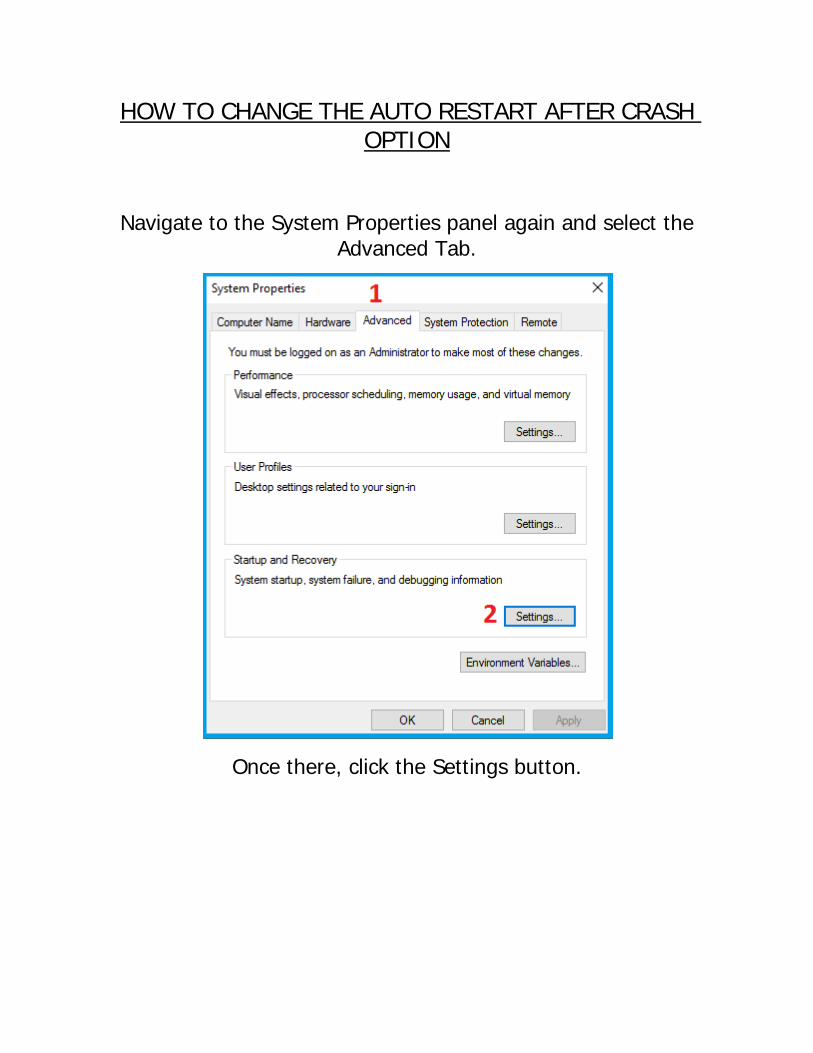
HOW TO CHANGE THE AUTO RESTART AFTER CRASH OPTION
Navigate to the System Properties panel again and select the Advanced Tab.
Once there, click the Settings button.
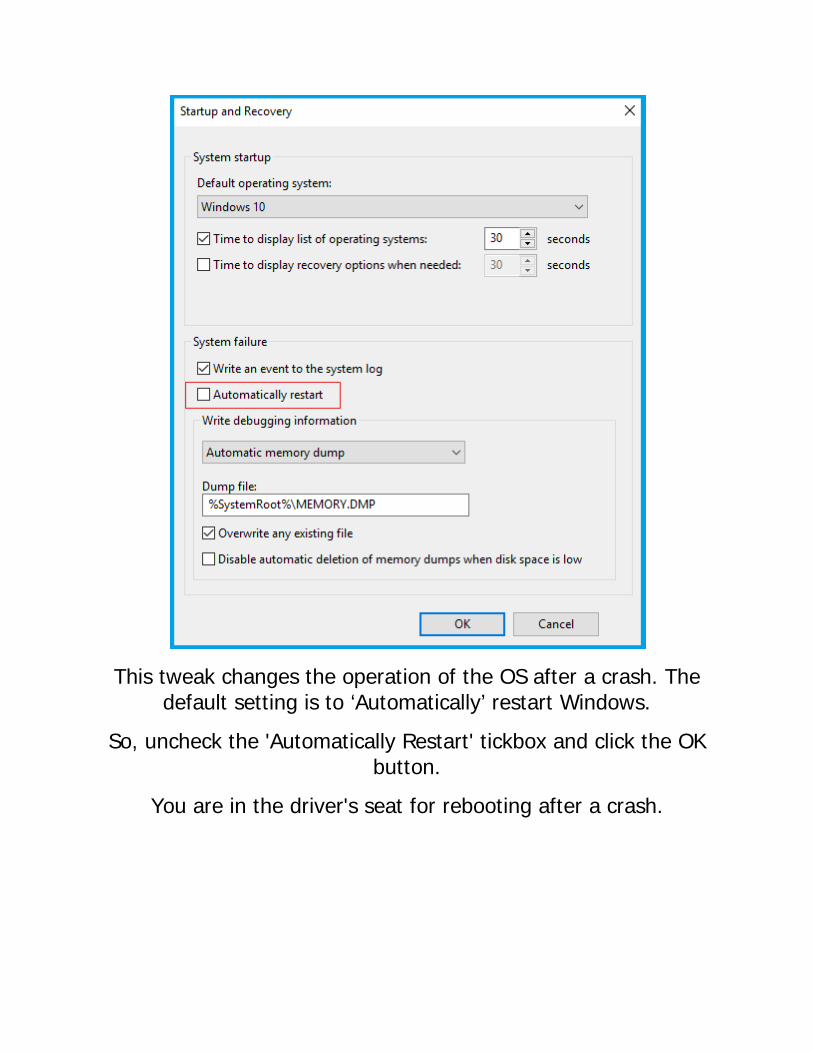
This tweak changes the operation of the OS after a crash. The default setting is to ‘Automatically’ restart Windows.
So, uncheck the 'Automatically Restart' tickbox and click the OK button.
You are in the driver's seat for rebooting after a crash.
GROUPING START MENU ITEMS
How many times have you wanted to group a series of programs together within one folder.
For example, I have my Adobe programs in two folders. The CS 2015.2 folder, contains the newer versions of the
programs I use. The CS6 folder, contains Encore and the support programs needed for it to fully function.
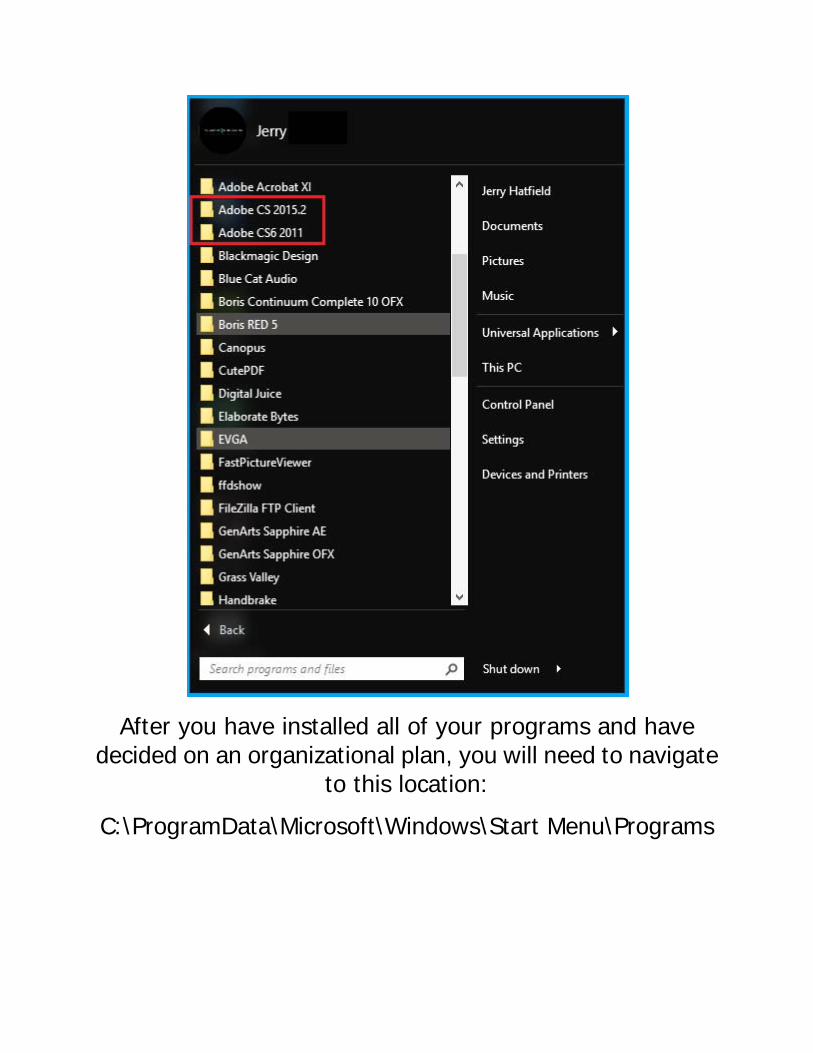
After you have installed all of your programs and have decided on an organizational plan, you will need to navigate
to this location:
C:\ProgramData\Microsoft\Windows\Start Menu\Programs
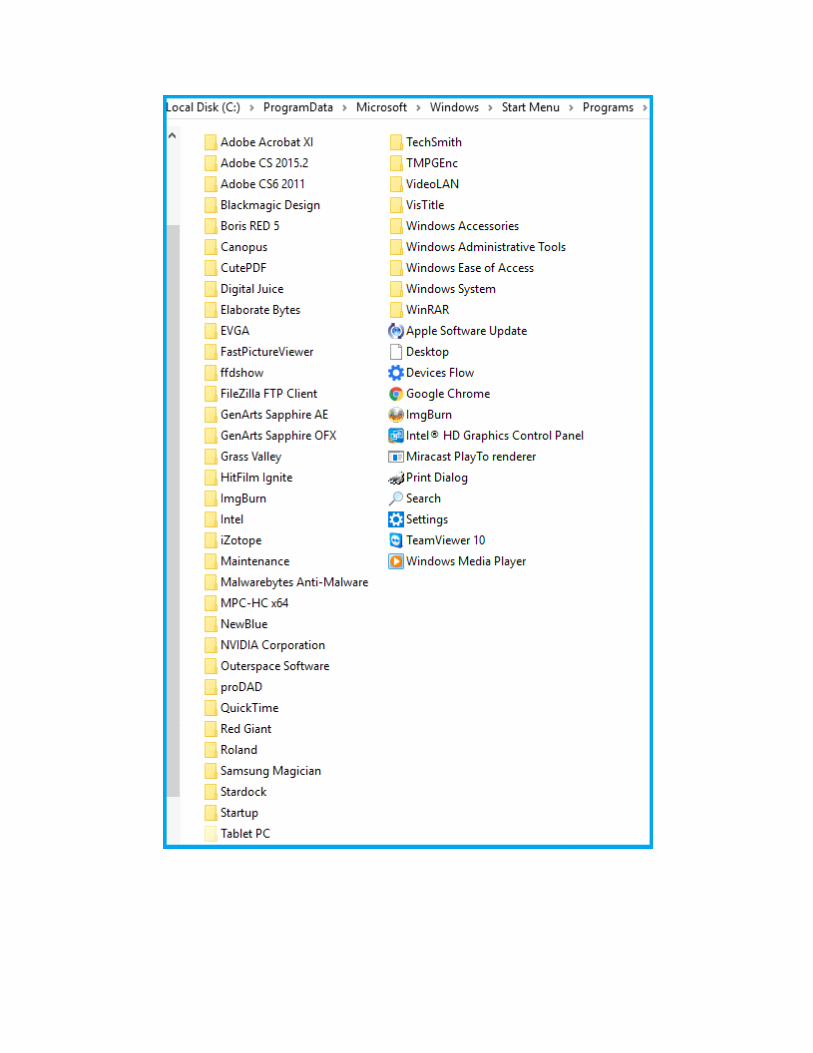

It is here that you create the new folders and drag the 'loose' programs into the desired folder.
This is a very simple procedure to perform.
Once you have created the start menu folders and organized them, they will hold true no matter which start
menu you use.
I use the Start 10 Menu and the folders seen in the menu will also be seen in other start menu variations.
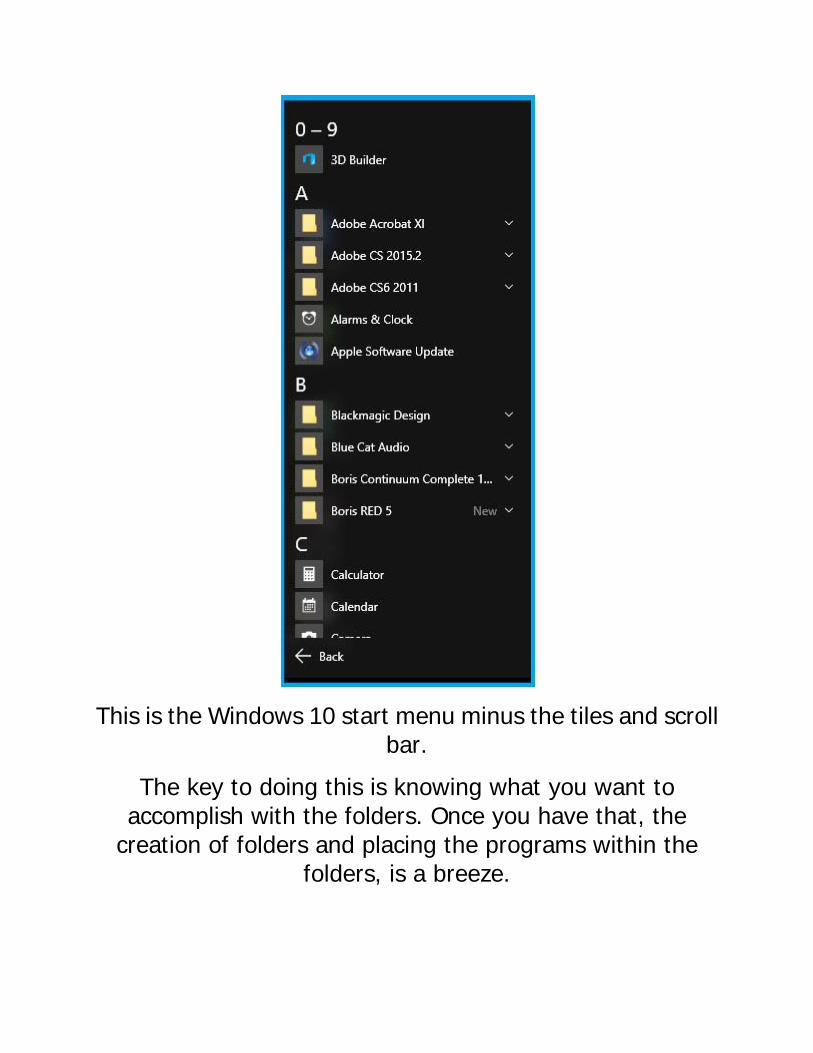
This is the Windows 10 start menu minus the tiles and scroll bar.
The key to doing this is knowing what you want to accomplish with the folders. Once you have that, the
creation of folders and placing the programs within the folders, is a breeze.
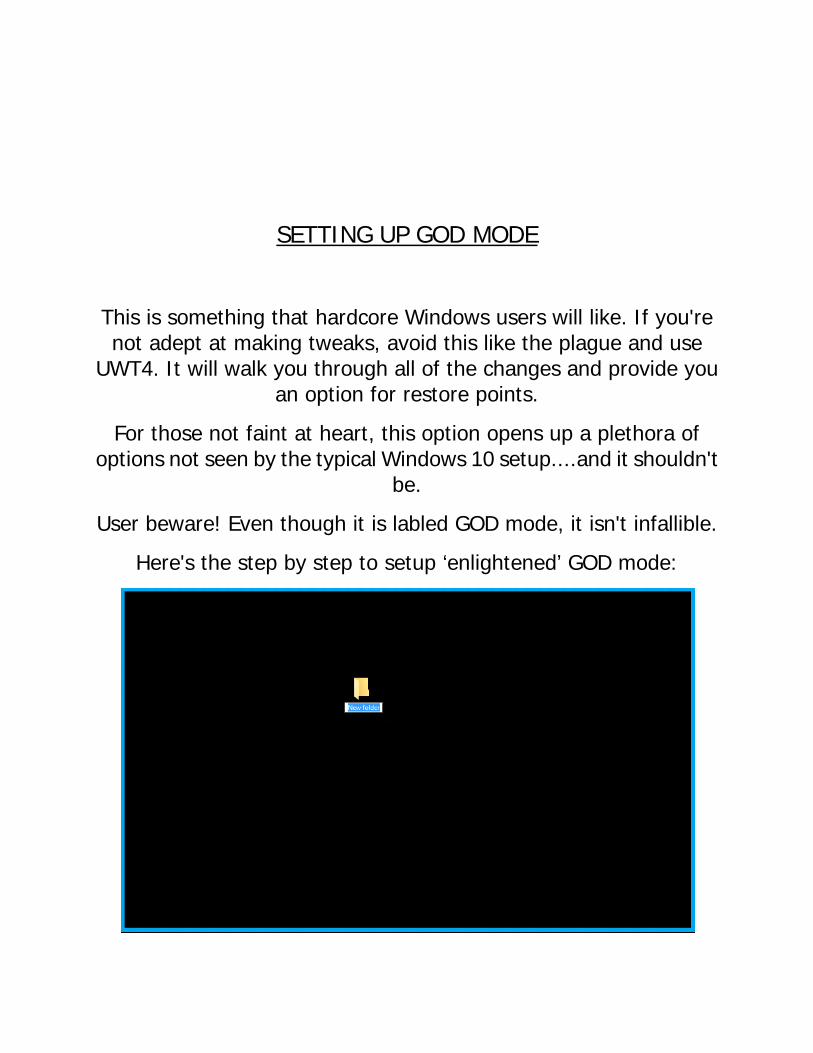
SETTING UP GOD MODE
This is something that hardcore Windows users will like. If you're not adept at making tweaks, avoid this like the plague and use
UWT4. It will walk you through all of the changes and provide you an option for restore points.
For those not faint at heart, this option opens up a plethora of options not seen by the typical Windows 10 setup....and it shouldn't
be.
User beware! Even though it is labled GOD mode, it isn't infallible.
Here's the step by step to setup ‘enlightened’ GOD mode:
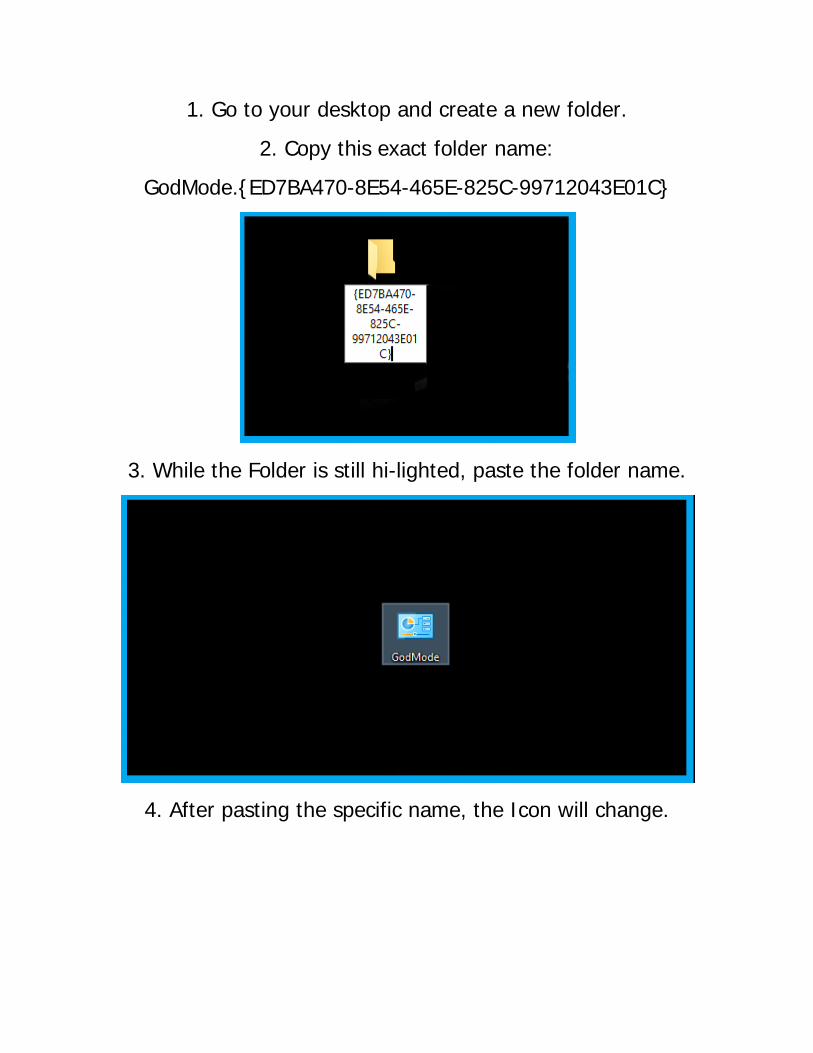
1. Go to your desktop and create a new folder.
2. Copy this exact folder name:
GodMode.{ED7BA470-8E54-465E-825C-99712043E01C}
3. While the Folder is still hi-lighted, paste the folder name.
4. After pasting the specific name, the Icon will change.

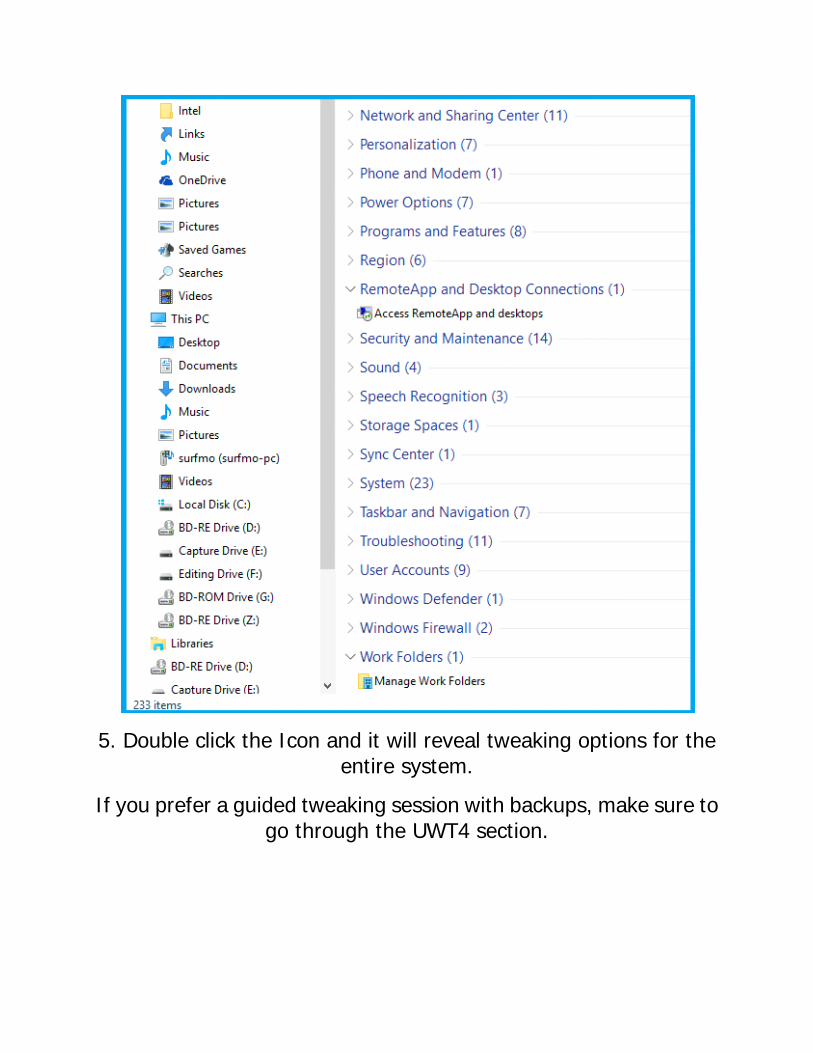
5. Double click the Icon and it will reveal tweaking options for the entire system.
If you prefer a guided tweaking session with backups, make sure to go through the UWT4 section.
HOW TO MOUNT AN .ISO
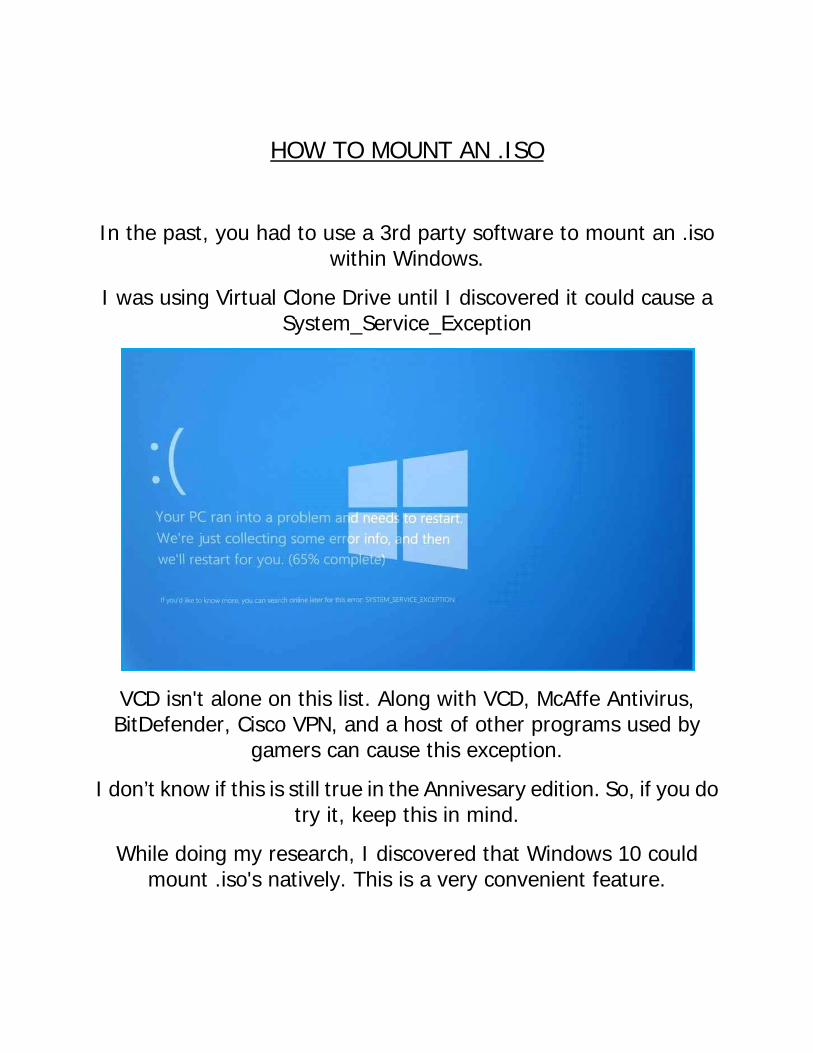
In the past, you had to use a 3rd party software to mount an .iso within Windows.
I was using Virtual Clone Drive until I discovered it could cause a System_Service_Exception
VCD isn't alone on this list. Along with VCD, McAffe Antivirus, BitDefender, Cisco VPN, and a host of other programs used by
gamers can cause this exception.
I don’t know if this is still true in the Annivesary edition. So, if you do try it, keep this in mind.
While doing my research, I discovered that Windows 10 could mount .iso's natively. This is a very convenient feature.
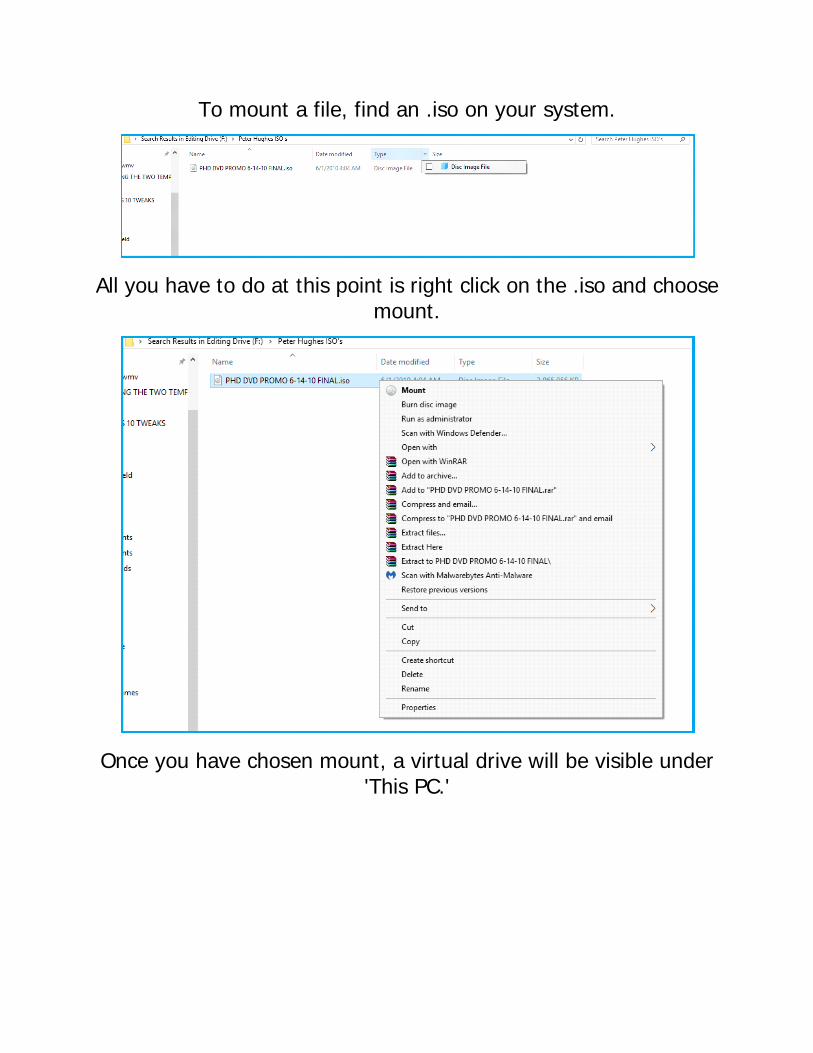
To mount a file, find an .iso on your system.
All you have to do at this point is right click on the .iso and choose mount.
Once you have chosen mount, a virtual drive will be visible under 'This PC.'
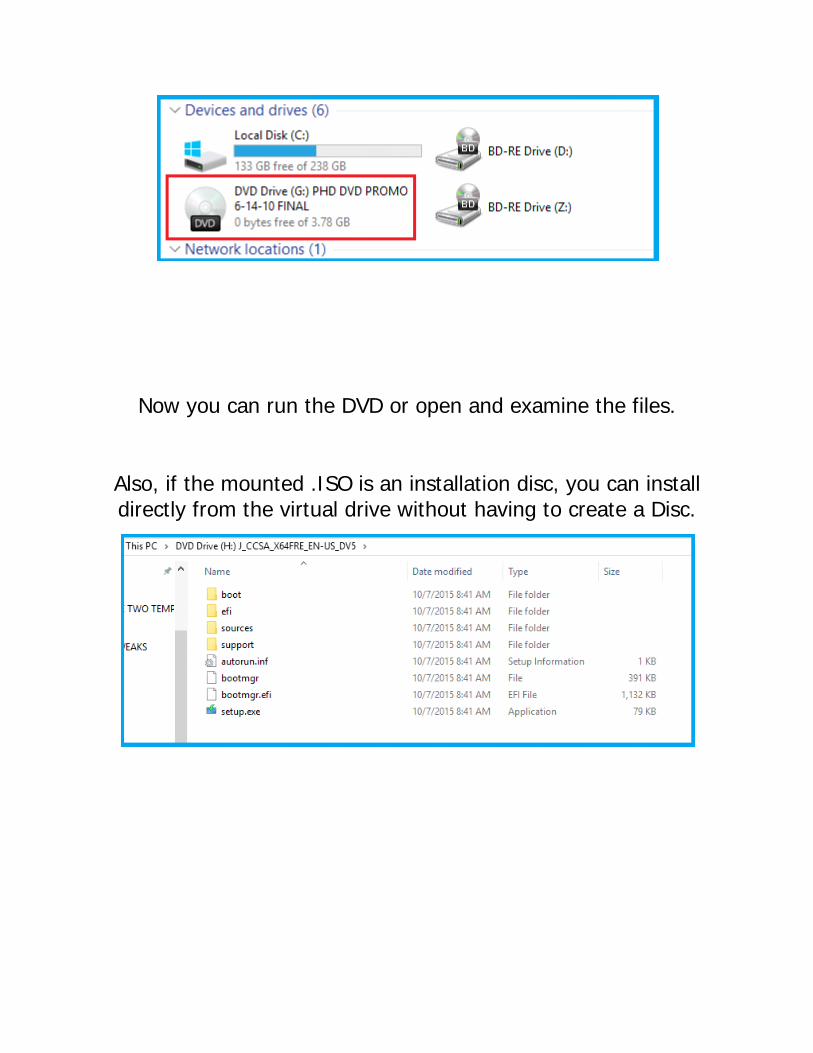
Now you can run the DVD or open and examine the files.
Also, if the mounted .ISO is an installation disc, you can install directly from the virtual drive without having to create a Disc.
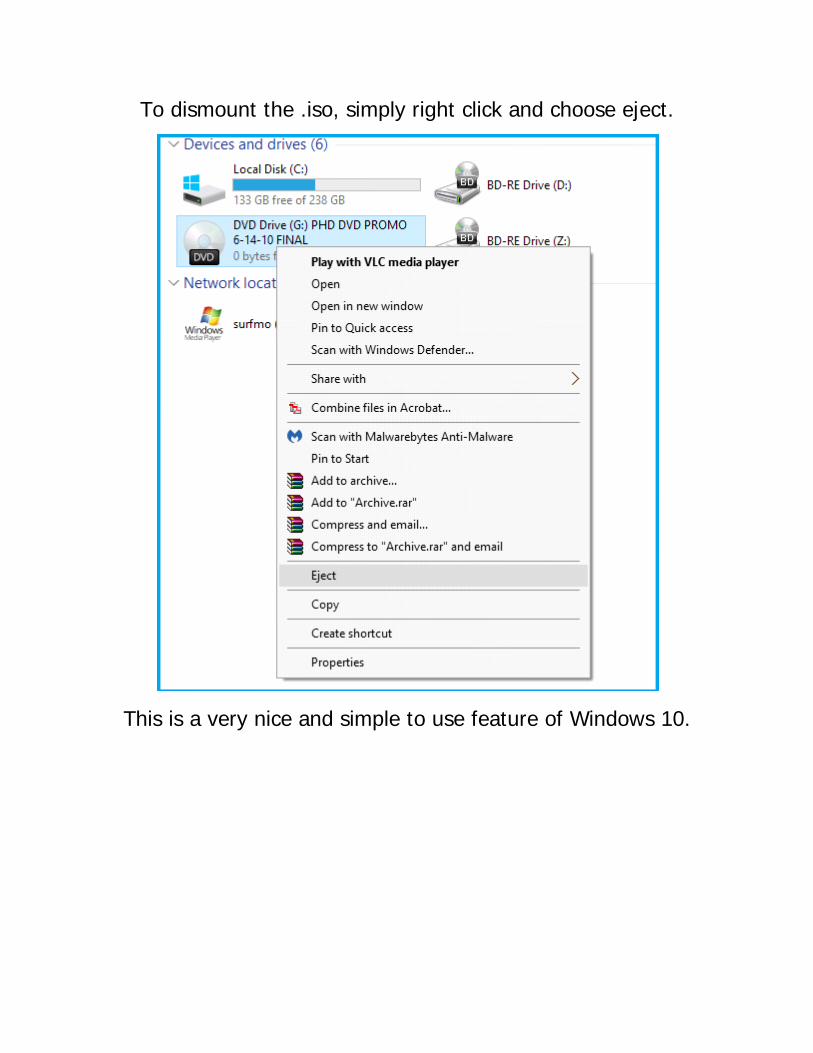
To dismount the .iso, simply right click and choose eject.
This is a very nice and simple to use feature of Windows 10.

USING UWT4: USING ULTIMATE WINDOWS TWEAKER 4 TO TWEAK YOUR WINDOWS 10 OS
This handy little, 911 KB, program can do over 200 tweaks.
Here is the tweak list:
http://www.thewindowsclub.com/list-of-tweaks-available-in-uwt4
Just because it can, doesn't mean you have to.
Here is an entire web page of UWT4 images:
http://www.thewindowsclub.com/image-gallery-for-uwt4
You can download the program here:
http://www.thewindowsclub.com/your-download-of-uwt4-will-start-in-5-seconds
Before doing any tweaks, go to the main page and read about the program before actually setting off on your own to make changes.
http://www.thewindowsclub.com/ultimate-windows-tweaker-4-windows-10
The tweaks I'm showing you are tweaks that I have actually applied to my system, and know that they work. Only the panels on which
I make changes will be shown.
I suggest you look at the panels under the tabs that I don't show. There may be something in those panels that you would use, and I
wouldn't.
So, let's get started.
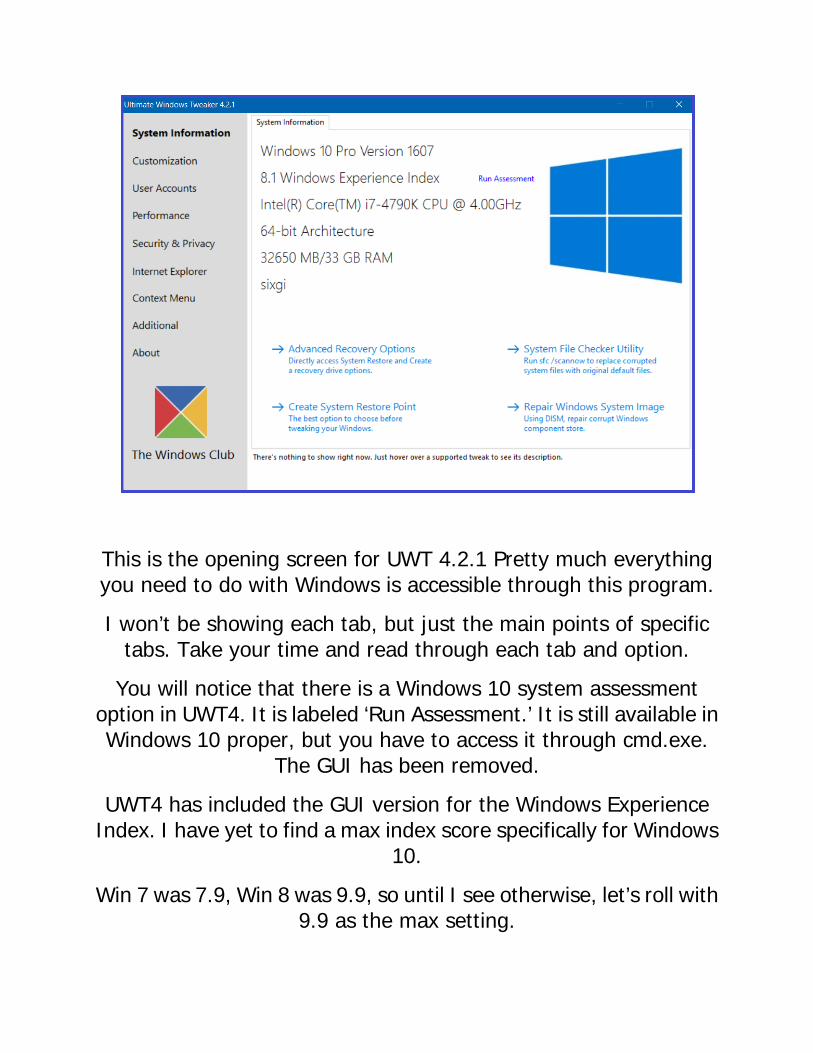
This is the opening screen for UWT 4.2.1 Pretty much everything you need to do with Windows is accessible through this program.
I won’t be showing each tab, but just the main points of specific tabs. Take your time and read through each tab and option.
You will notice that there is a Windows 10 system assessment option in UWT4. It is labeled ‘Run Assessment.’ It is still available in Windows 10 proper, but you have to access it through cmd.exe.
The GUI has been removed.
UWT4 has included the GUI version for the Windows Experience Index. I have yet to find a max index score specifically for Windows
10.
Win 7 was 7.9, Win 8 was 9.9, so until I see otherwise, let’s roll with 9.9 as the max setting.
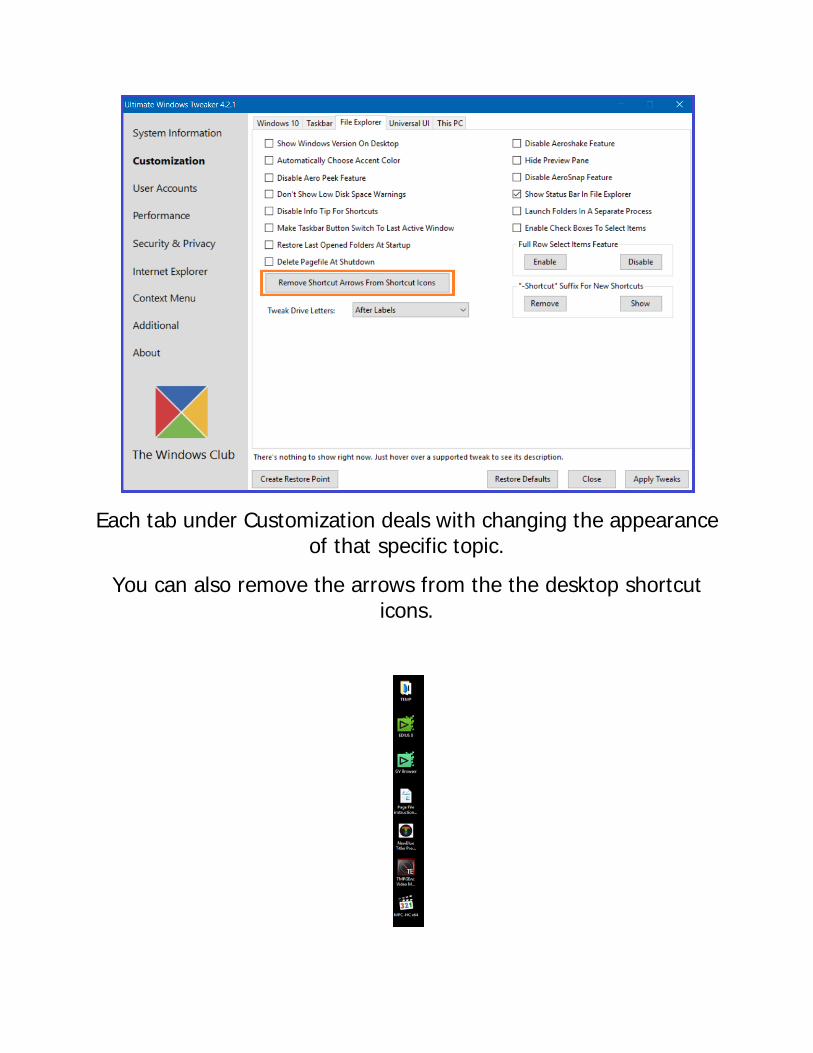
Each tab under Customization deals with changing the appearance of that specific topic.
You can also remove the arrows from the the desktop shortcut icons.
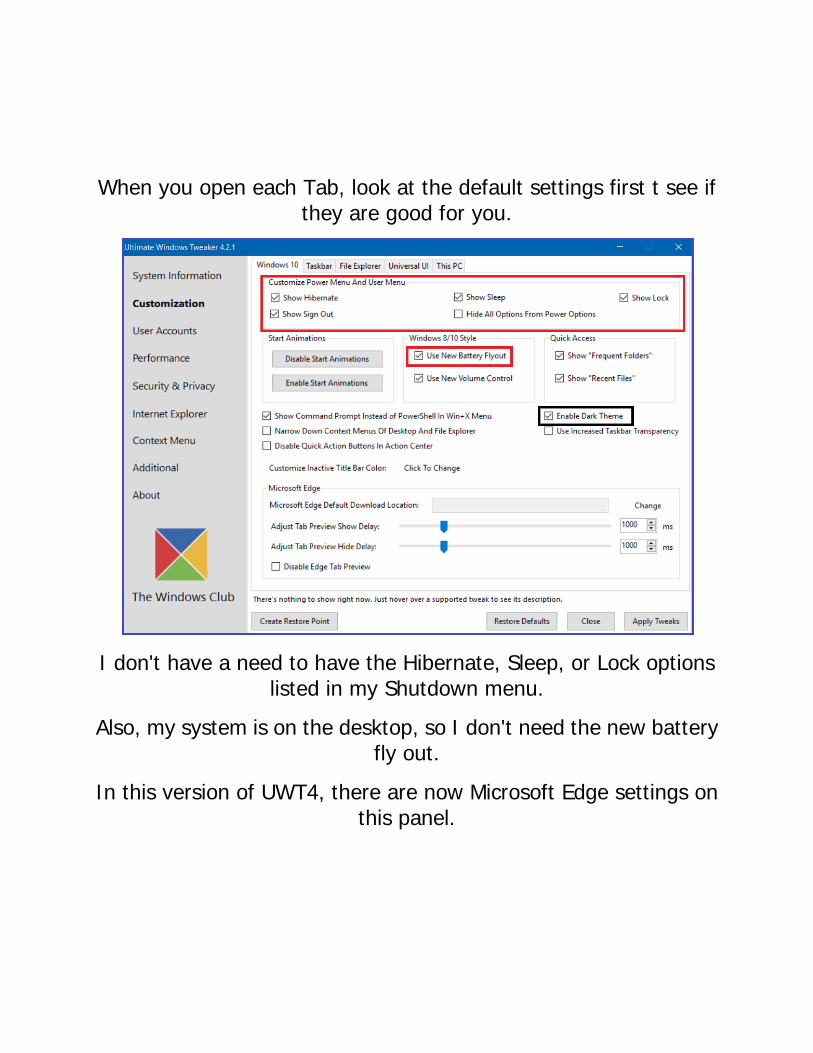
When you open each Tab, look at the default settings first t see if they are good for you.
I don't have a need to have the Hibernate, Sleep, or Lock options listed in my Shutdown menu.
Also, my system is on the desktop, so I don't need the new battery fly out.
In this version of UWT4, there are now Microsoft Edge settings on this panel.
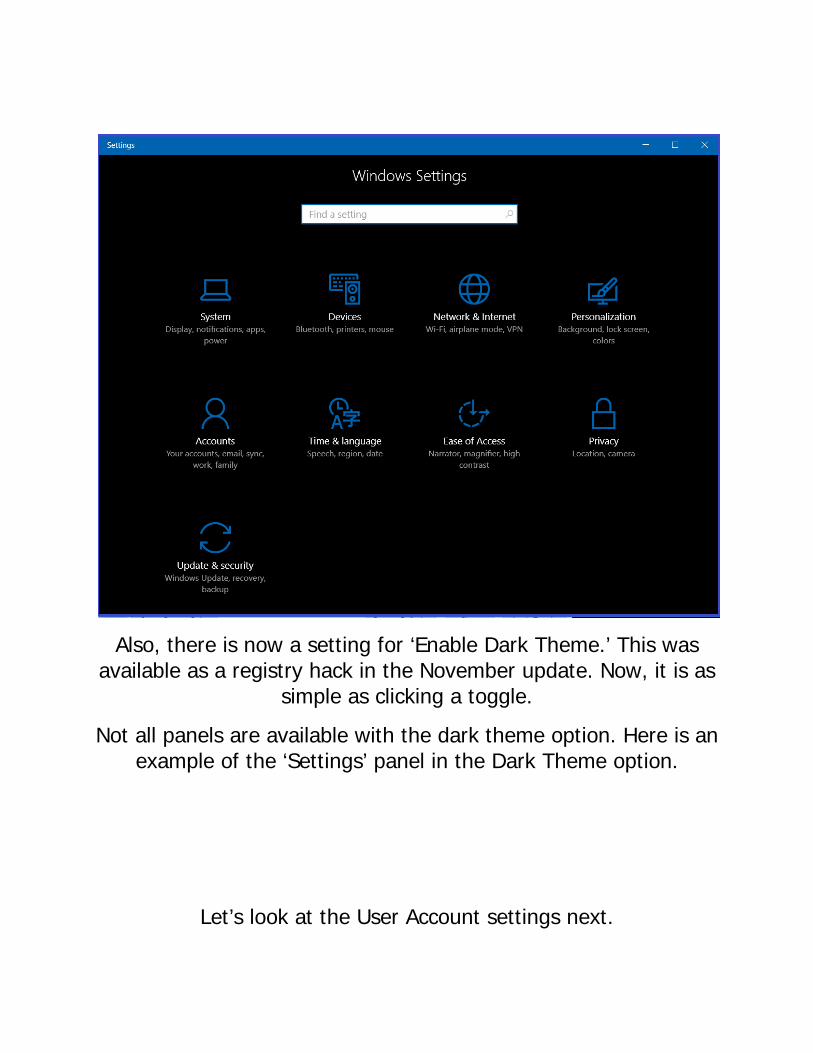
Also, there is now a setting for ‘Enable Dark Theme.’ This was available as a registry hack in the November update. Now, it is as
simple as clicking a toggle.
Not all panels are available with the dark theme option. Here is an example of the ‘Settings’ panel in the Dark Theme option.
Let’s look at the User Account settings next.
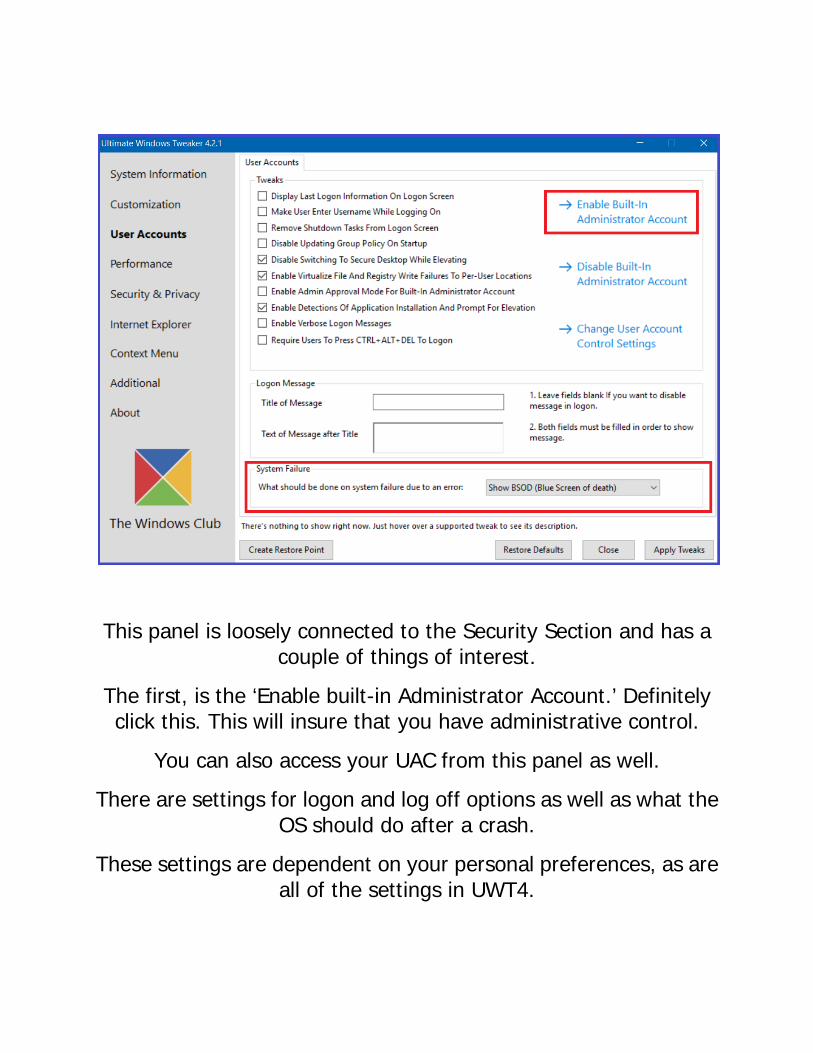
This panel is loosely connected to the Security Section and has a couple of things of interest.
The first, is the ‘Enable built-in Administrator Account.’ Definitely click this. This will insure that you have administrative control.
You can also access your UAC from this panel as well.
There are settings for logon and log off options as well as what the OS should do after a crash.
These settings are dependent on your personal preferences, as are all of the settings in UWT4.
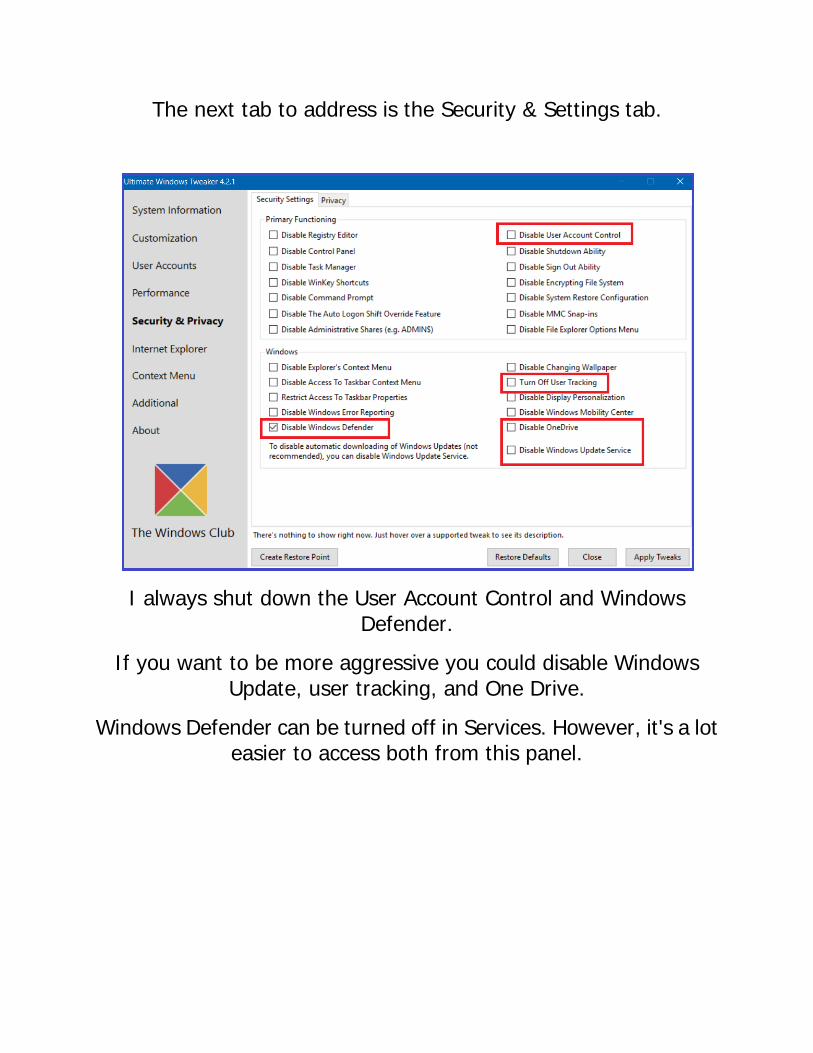
The next tab to address is the Security & Settings tab.
I always shut down the User Account Control and Windows Defender.
If you want to be more aggressive you could disable Windows Update, user tracking, and One Drive.
Windows Defender can be turned off in Services. However, it's a lot easier to access both from this panel.
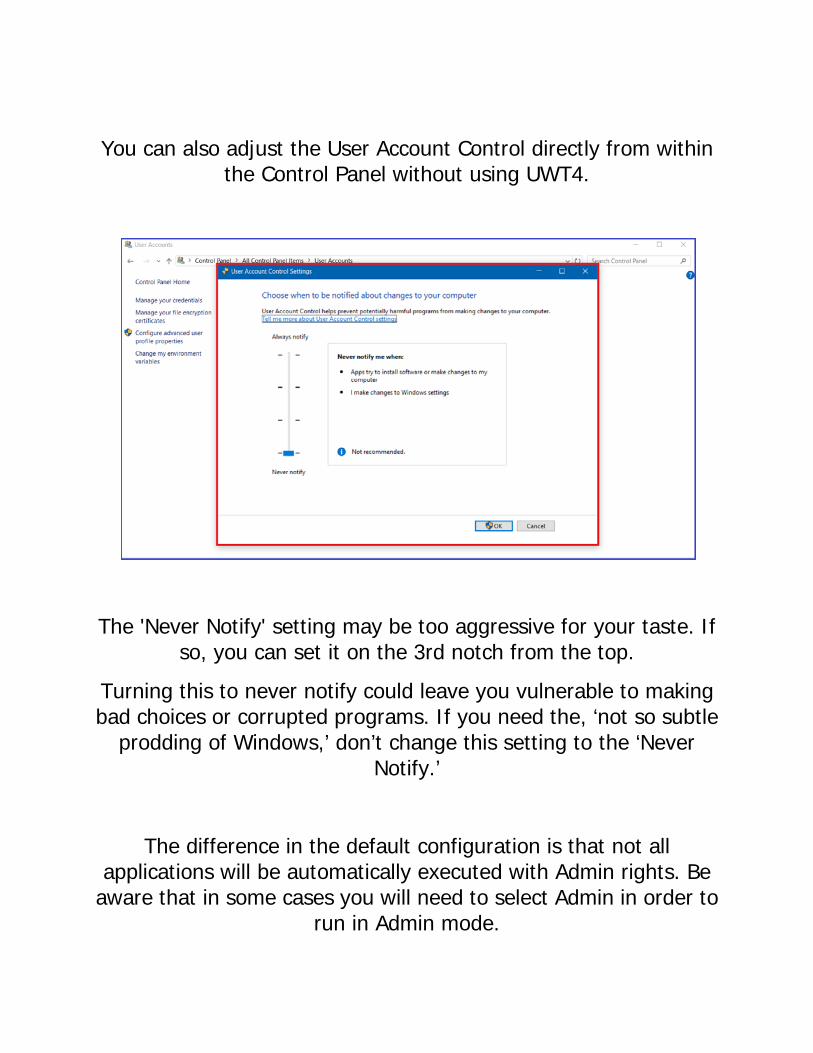
You can also adjust the User Account Control directly from within the Control Panel without using UWT4.
The 'Never Notify' setting may be too aggressive for your taste. If so, you can set it on the 3rd notch from the top.
Turning this to never notify could leave you vulnerable to making bad choices or corrupted programs. If you need the, ‘not so subtle
prodding of Windows,’ don’t change this setting to the ‘Never Notify.’
The difference in the default configuration is that not all applications will be automatically executed with Admin rights. Be
aware that in some cases you will need to select Admin in order to run in Admin mode.
Let me be clear on both of these setting changes. In general, you will not receive any warnings from Windows of harmful programs
wanting to make changes to your system.
If this bothers you in any way, DO NOT make any changes to your User Account.
I will repeat the disclaimer again.
'Making any changes described in these tweaks is at your own risk and you have to accept responsibility of the consequences.'
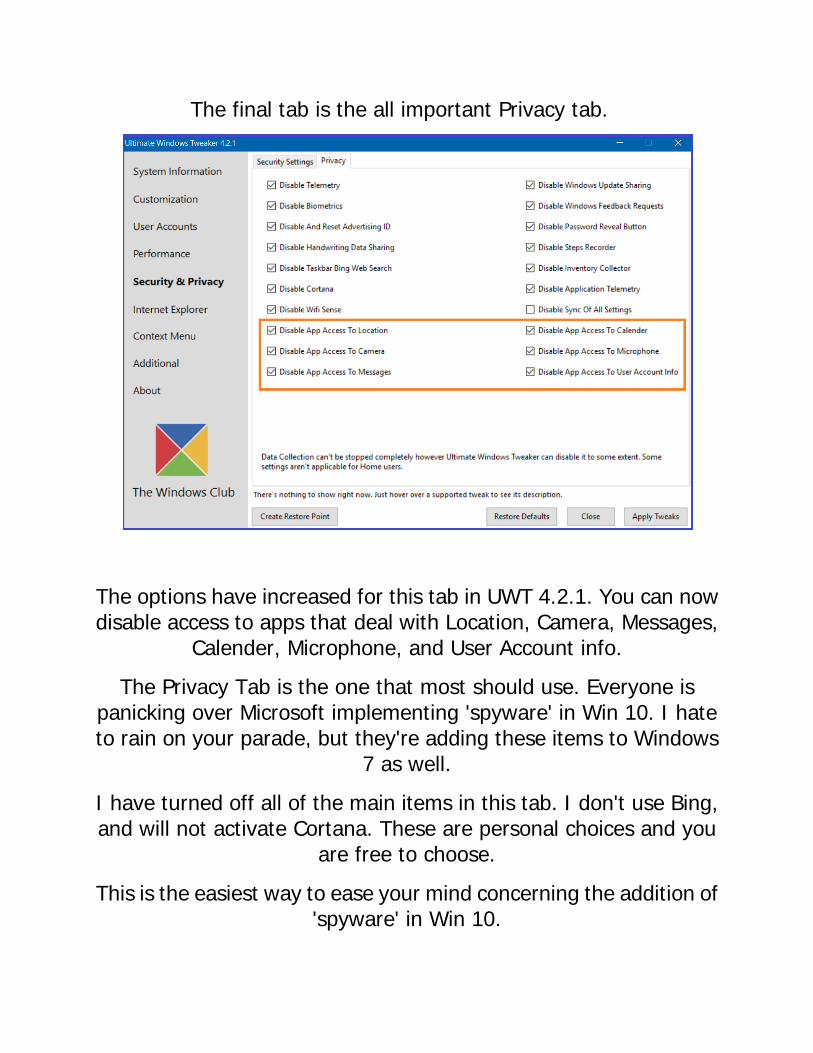
The final tab is the all important Privacy tab.
The options have increased for this tab in UWT 4.2.1. You can now disable access to apps that deal with Location, Camera, Messages,
Calender, Microphone, and User Account info.
The Privacy Tab is the one that most should use. Everyone is panicking over Microsoft implementing 'spyware' in Win 10. I hate to rain on your parade, but they're adding these items to Windows
7 as well.
I have turned off all of the main items in this tab. I don't use Bing, and will not activate Cortana. These are personal choices and you
are free to choose.
This is the easiest way to ease your mind concerning the addition of 'spyware' in Win 10.
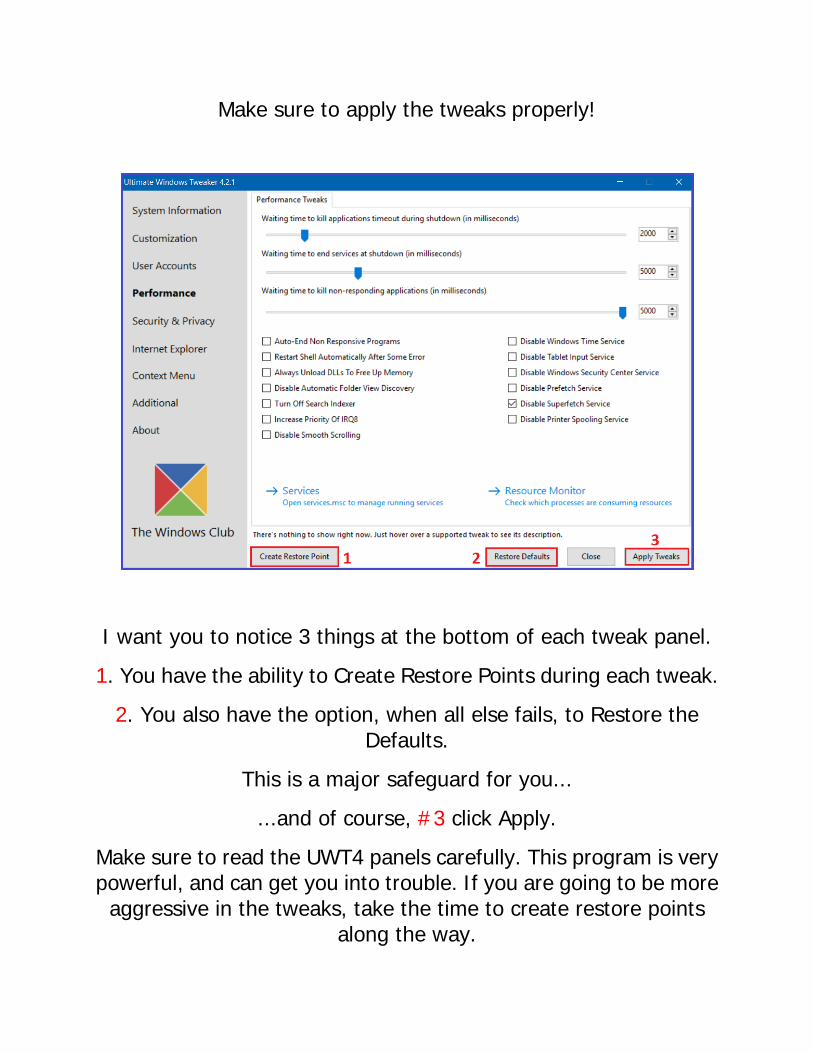
Make sure to apply the tweaks properly!
I want you to notice 3 things at the bottom of each tweak panel.
1. You have the ability to Create Restore Points during each tweak.
2. You also have the option, when all else fails, to Restore the Defaults.
This is a major safeguard for you...
...and of course, #3 click Apply.
Make sure to read the UWT4 panels carefully. This program is very powerful, and can get you into trouble. If you are going to be more
aggressive in the tweaks, take the time to create restore points along the way.
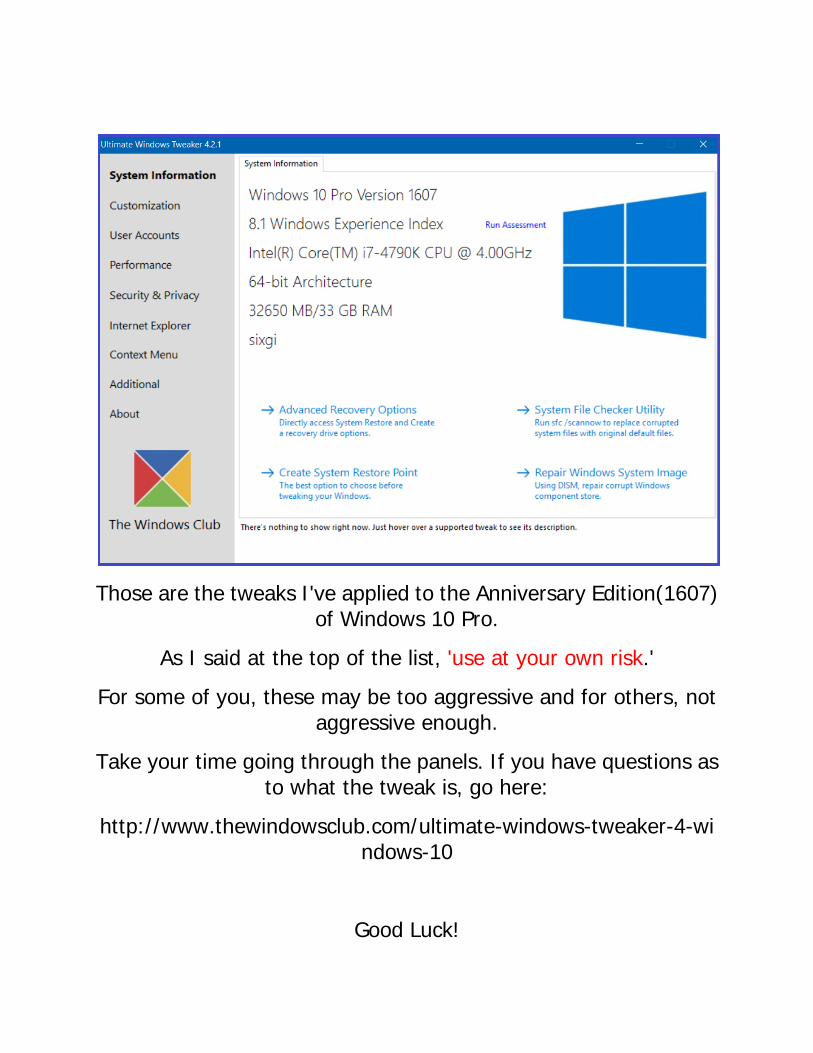
Those are the tweaks I've applied to the Anniversary Edition(1607) of Windows 10 Pro.
As I said at the top of the list, 'use at your own risk.'
For some of you, these may be too aggressive and for others, not aggressive enough.
Take your time going through the panels. If you have questions as to what the tweak is, go here:
http://www.thewindowsclub.com/ultimate-windows-tweaker-4-windows-10
Good Luck!