wincc professional v11 sp1 - siemens · 11 2 wincc readme ... wincc professional v11 sp1 readme,...
TRANSCRIPT
�WinCC Professional V11 SP1�
___________________
___________________
1
General notes
2
WinCC Readme
SIMATIC HMI
WinCC Professional V11 SP1
Readme
Online help printout
07/2011 Online help printout
Legal information Legal information
Warning notice system
This manual contains notices you have to observe in order to ensure your personal safety, as well as to prevent damage to property. The notices referring to your personal safety are highlighted in the manual by a safety alert symbol, notices referring only to property damage have no safety alert symbol. These notices shown below are graded according to the degree of danger.
DANGER indicates that death or severe personal injury will result if proper precautions are not taken.
WARNING indicates that death or severe personal injury may result if proper precautions are not taken.
CAUTION with a safety alert symbol, indicates that minor personal injury can result if proper precautions are not taken.
CAUTION without a safety alert symbol, indicates that property damage can result if proper precautions are not taken.
NOTICE indicates that an unintended result or situation can occur if the relevant information is not taken into account.
If more than one degree of danger is present, the warning notice representing the highest degree of danger will be used. A notice warning of injury to persons with a safety alert symbol may also include a warning relating to property damage.
Qualified Personnel The product/system described in this documentation may be operated only by personnel qualified for the specific task in accordance with the relevant documentation, in particular its warning notices and safety instructions. Qualified personnel are those who, based on their training and experience, are capable of identifying risks and avoiding potential hazards when working with these products/systems.
Proper use of Siemens products Note the following:
WARNING Siemens products may only be used for the applications described in the catalog and in the relevant technical documentation. If products and components from other manufacturers are used, these must be recommended or approved by Siemens. Proper transport, storage, installation, assembly, commissioning, operation and maintenance are required to ensure that the products operate safely and without any problems. The permissible ambient conditions must be complied with. The information in the relevant documentation must be observed.
Trademarks All names identified by ® are registered trademarks of Siemens AG. The remaining trademarks in this publication may be trademarks whose use by third parties for their own purposes could violate the rights of the owner.
Disclaimer of Liability We have reviewed the contents of this publication to ensure consistency with the hardware and software described. Since variance cannot be precluded entirely, we cannot guarantee full consistency. However, the information in this publication is reviewed regularly and any necessary corrections are included in subsequent editions.
Siemens AG Order number: Online help printout Copyright © Siemens AG 2011. Industry Sector Ⓟ 07/2011 Technical data subject to changePostfach 48 48 90026 NÜRNBERG GERMANY
Table of contents
1 General notes ............................................................................................................................................ 5
1.1 General notes.................................................................................................................................5
1.2 Notes on the installation.................................................................................................................9
1.3 Use of communications processors.............................................................................................11
2 WinCC Readme....................................................................................................................................... 13
2.1 Functional Constraints .................................................................................................................13
2.2 Notes on use................................................................................................................................14
2.3 Migration ......................................................................................................................................18
2.4 Special considerations for Windows 7 .........................................................................................20
2.5 Engineering System.....................................................................................................................22 2.5.1 Screens and Screen Objects .......................................................................................................22 2.5.2 Tags .............................................................................................................................................25 2.5.3 Alarm system and alarm displays ................................................................................................25 2.5.4 System functions and scripts .......................................................................................................26 2.5.5 Recipes ........................................................................................................................................27 2.5.6 User administration ......................................................................................................................27 2.5.7 Communication ............................................................................................................................27
2.6 Compiling and loading .................................................................................................................32
2.7 Runtime........................................................................................................................................35 2.7.1 Notes on operation in Runtime ....................................................................................................35 2.7.2 Notes on operation of panels in Runtime.....................................................................................35 2.7.3 Notes on operation of Runtime Advanced ...................................................................................36 2.7.4 Notes on operation of Runtime Professional ...............................................................................36
2.8 HMI devices .................................................................................................................................39 2.8.1 General notes...............................................................................................................................39 2.8.2 Printing via print server ................................................................................................................40
2.9 Add-ons........................................................................................................................................42 2.9.1 DataMonitor..................................................................................................................................42 2.9.2 WebNavigator ..............................................................................................................................42
Index........................................................................................................................................................ 45
WinCC Professional V11 SP1 Readme, 07/2011, Online help printout 3

Table of contents
WinCC Professional V11 SP1 4 Readme, 07/2011, Online help printout

General notes 11.1 General notes
The information in this readme file supersedes statements made in other documents.
Read the following notes carefully because they include important information for installation and use. Read these notes prior to installation.
Security settings In order to operate the software packages in the TIA Portal, port 4410 for TCP must be entered as an exception in the Windows firewall during installation.
Installing new .Net versions or .Net service packs ● Close the TIA portal before installing a new .Net version or a new .Net service pack on
your programming device/PC.
● Restart the TIA portal only after successful installation of the new .Net version or the new .Net service pack.
Notes on handling ● If a project in the list of projects last used is located on a network drive that is not
connected, you may experience delays when opening the "Project" menu.
● When you insert a CPU, you may need to wait for some time if the project editor is open at the same time. This generally takes longer when you insert the first CPU in a newly created project. To be able to continue working more quickly, you should close the project editor before inserting a CPU.
● The message "Application is not responding" may appear in Windows 7 with functions that take a long time to run (loading the CPU for example). If this occurs, wait until the function has correctly finished.
● If you have installed a Microsoft mouse with IntelliPoint, you may find that it superimposes components over the buttons of the title bar. If this is the case, uninstall the IntelliPoint software from Microsoft.
● Enabling the "Virtual Desktop" options with NVIDIA graphics cards can cause problems. In this case, disable the "nView virtual desktop manager" of your NVIDIA graphics driver.
Using the TIA Portal via a remote desktop In principle, it is possible to use the TIA Portal via a remote desktop connection. During configuration, you should, however, avoid disconnecting the connection to the desktop client. In rare cases, this can lead to the software user interface being blocked.
WinCC Professional V11 SP1 Readme, 07/2011, Online help printout 5

General notes 1.1 General notes
WinCC Professional V11 SP1 6 Readme, 07/2011, Online help printout
If you experience this blockage, follow these steps on the desktop client.
1. Open the Windows Task-Manager and close the "rdpclip.exe" process.
2. Type in "rdpclip.exe" in the command prompt to restart the process.
Note that the current content of the clipboard will be lost. You can, however, then continue configuration as usual. To be on the safe side, you should restart the TIA Portal at the next opportunity.
Opening the TIA portal multiple times If you are running several applications of the TIA portal and they continually become active in turn, you can briefly switch to another application or use the key combination <ALT+Tab> to solve the problem.
Note on SD cards The SD cards have been formatted and initialized by Siemens for use with S7-1200 modules. This format must not be overwritten otherwise the card will no longer be accepted by the S7-1200 modules. Formatting with Windows tools is therefore not permitted.
Behavior in case of open force job
Note that active force jobs will be retained even after you have loaded a new project to the SD card. This means you should first delete the active force job before you remove an SD card from the CPU and before you overwrite the card in the PC with a new project. If you use an SD card with unknown content, you should format the SD card before the next download.
Issues when shutting down Windows XP or when activating a screen saver Windows XP uses the ACPI (Advanced Configuration and Power Interface) to shut down the computer or to go to standby mode. It can happen that while the system is processing a newly installed tool that the screen saver is not activated by the ACPI or that after exiting the tool that Windows XP cannot be shut down properly.
If the TIA Portal is running, the Standby function of the computer is deactivated. To put the computer into Standby, you have to first exit the TIA Portal.
The following description shows several optional settings in the "Power Options Properties" you can use to set the Standby mode of the computer with the function "Hibernate":
1. In Windows XP, open the "Power Options Properties" by pointing at "Start > Settings > Control Panel > Power Options" and select the tab "Hibernate". Select the "Enable hibernation" check box.
2. Switch to the "Advanced" tab. In the "Power buttons" dialog, click the drop down list box under "When I close the lid of my portable computer:" and select the option "Hibernate".
3. Then click the drop-down list box under"When I press the power button on my computer:" and select the option "Shut down".
4. Click "Apply" and confirm the settings with "OK".
5. Afterwards, restart the PC.
General notes 1.1 General notes
WinCC Professional V11 SP1 Readme, 07/2011, Online help printout 7
If you experience problems shutting down the computer, make sure that the TIA Portal has closed completely.
1. In the shortcut menu, select the Task Manager from the shortcut menu on the Taskbar.
2. If you see the process "Siemens.Automation.ObjectFrame.FileStorage.Server.exe" in the "Processes" tab, wait until this process has closed.
3. Then you can shut down the computer.
Subnet addressing for CP 1613 and CP 1623 CP 1613 and CP 1623 are communication modules with microprocessor. To ensure secure management of communication links, these are processed on the module. The protocol stack in your PC is used for diagnostic purposes (SNMP, DCP). To allow both protocol stacks (i.e. CP 1613/23 Firmware and CP 1613/23 NDIS access) access to the same partners, is recommended to place both stacks of a module in the same subnet.
Editing a device IP address Do not use the address range from 192.168.x.241 to 192.168.x.250 when editing a device IP address. If necessary, this address range is automatically assigned by the system to a programming device. Depending on the subnet mask, this applies also for all network classes.
"TM_MAIL" instruction for TeleService The "TM_MAIL" instruction is not included in the scope of delivery for TIA portal V11.0. The information on the use and functionality of the "TM_MAIL" instruction contained in the information system does not apply.
Migrating projects with the TIA Portal After the migration of hardware configurations and program blocks from earlier automation solutions, first check the functionality of the migrated project before you use it in productive operation.
Screen display After long periods of work, it can happen in the case of certain computer configurations with Windows XP that parts of the TIA Portal interface are no longer updated. Reducing the graphic hardware acceleration can correct this problem. You can find the setting for this by clicking on the desktop and selecting "Properties > Settings > Advanced > Troubleshoot > Slider Hardware acceleration" by means of the right mouse button. In this dialog, move the slider "Hardware acceleration" gradually to the left and apply this setting until the contents of the screen are displayed correctly again.
Tablet PCs For the TIA Portal V11, tablet PCs are only released with the operating system Windows 7, not with Windows XP.

General notes 1.1 General notes
WinCC Professional V11 SP1 8 Readme, 07/2011, Online help printout
SQL Server During the installation of the SQL Server 2005 or the SQL Server 2005 Express, an error can occur if the product SQL Server 2008 is already installed on your system.
In order to be able to use both varieties of the SQL Server in parallel, the SQL Server 2005 must be installed before the SQL Server 2008. To do this, follow these steps:
1. Remove the SQL Server 2008 version, without deleting the databases.
2. Install WinCC. The SQL Server 2005 is hereby installed and set up on your system.
3. Install the SQL Server 2008 again. Now you can continue to use the databases already created in the SQL Server 2008.
Working with automatically synchronized network drives Automatic synchronization after a network interruption can result in current (local) project data being stored as a "backup" on the network drive through user interactions. This could cause outdated project data to be loaded from the network drive when opening the project. For this reason, we do not recommend that you store TIA Portal projects on synchronized network drives.
If, however, you do work on synchronized drives, you can continue working locally in the event of a network interruption. In this case, you must always ensure that the TIA Portal application is closed while data is synchronized. The synchronization itself must be implemented in such a way that the current (local) project data replaces the project data on the network drive.
Entry of decimal places With certain Windows language settings, it may occur that the entry of values with a comma is not recognised (entering "1,23" leads to an error). Instead, use the international format ("1.23").
FAQs on the TIA Portal FAQs on the TIA Portal are available at http://support.automation.siemens.com (http://support.automation.siemens.com/WW/view/en/28919804/133000).

General notes 1.2 Notes on the installation
WinCC Professional V11 SP1 Readme, 07/2011, Online help printout 9
1.2 Notes on the installation
Contents Information that could not be included in the online help.
Target directory of the installation Do not use any UNICODE characters (for example, Chinese characters) in the installation path.
Installation of STEP 7 Basic V11 and STEP 7 Professional V11 under Windows XP with Turkish Regional and Language Options
Installation of STEP 7 Basic V11 and STEP 7 Professional V11 under Windows XP may be cancelled, if the regional and language options are set to Turkish. In this case change the regional and language options from Turkish to English or German.
1. Open the Control Panel under Windows with one of the following commands:
– "Start > Control Panel" (Start menu under Windows XP)
– "Start > Settings > Control Panel" (classic start menu)
2. Open the "Regional and Language Options".
3. Select the "Regional Options" tab.
4. Under "Standards and formats" select "German" or "English" in the drop-down list.
5. Click "Apply" and confirm with OK.
6. Restart your PC for the setting to become active. Now you can continue with the installation of STEP 7 Basic V11 and STEP 7 Professional V11.
7. After installation, you can revert the regional and language settings (as described in steps 1 to 4) to Turkish.
Removing In rare cases removal of the program can cause the computer to freeze, even when a full version of SQL Server 2005 is installed. In this occurs, disconnect the computer from the network to continue the removal process.
General notes 1.2 Notes on the installation
WinCC Professional V11 SP1 10 Readme, 07/2011, Online help printout
Installation of the SIMATIC USB driver under Windows server 2003 R2 StdE SP2 An operating system message relating to the SIMATIC USB driver is issued on the operating system Windows Server 2003 R2 StdE SP2. This message must be acknowledged with "Yes" as soon as possible after the message has been issued. The message may be in the background and therefore may not be immediately visible. After a certain period of time, the setup continues with the next component. The SIMATIC USB drivers are then not installed and cannot be used.
Display of the desktop icon If you do not select the standard installation path during the installation of the TIA portal, the desktop icon may not be displayed correctly. This does not affect the functionality of the product.
General notes 1.3 Use of communications processors
WinCC Professional V11 SP1 Readme, 07/2011, Online help printout 11
1.3 Use of communications processors
Contents Information that could not be included in the online help.
Necessary hotfixes for the use of certain communications processors For the following communication processors, hotfixes are required for the use of certain products:
● CP 1613
● CP 1613 A2
● CP 1623
● CP 5613
● CP 5614
● CP 5613 A2
● CP 5614 A2
● CP 5623
● CP 5624
Install the following hotfixes and service packs:
● SIMATIC NET CD V8.0 SP1 for Windows 7: Hotfix 1 for SIMATIC NET CD V8.0 SP1
● SIMATIC NET CD 2008 SP3 for Windows XP, Windows Server 2003 or Windows Server 2008
You can find the hotfixes in the Service & Support area (http://support.automation.siemens.com/WW/view/en/12660737) of the Siemens website under the entry ID 12660737
Operation of communications processors If both STEP7 V5.5 and STEP7 V11 are installed on a computer and STEP7 V5.5 is removed, the setup repair function of STEP7 V11 must be executed before the following communications processors can be used:
● CP 561x
● CP 5613 A2
● CP 5614 A2
● CP 5623
● CP 5624
● CP 5711

General notes 1.3 Use of communications processors
WinCC Professional V11 SP1 12 Readme, 07/2011, Online help printout
WinCC Readme 22.1 Functional Constraints
Functional Constraints The following functions are already described in the information system, but are not available in WinCC V11.0 Professional:
1. Mobile Panel 277 IWLAN V2; Mobile Panel 277F IWLAN V2; Mobile Panel 277F IWLAN (RFID tag) These devices cannot be configured with WinCC V11.
WinCC Professional V11 SP1 Readme, 07/2011, Online help printout 13
WinCC Readme 2.2 Notes on use
WinCC Professional V11 SP1 14 Readme, 07/2011, Online help printout
2.2 Notes on use
Contents Information that could not be included in the online help.
Parallel installation in the TIA portal You will be prevented from starting the TIA portal if you set up a non-permitted parallel installation of STEP 7 and WinCC.
The following parallel installations are not permitted in the TIA portal:
● STEP 7 V11 and WinCC V11 SP1
● STEP 7 V11 SP1 and WinCC V11
Both Engineering Systems must always have the same version after an installation.
A dialog opens during installation to inform you of any inconsistencies in your parallel installation.
The following parallel installations are also not permitted:
● WinCC V11 and RT Advanced V11 SP1
● WinCC V11 and RT Professional V11 SP1
● WinCC V11 SP1 and RT Advanced V11
● WinCC V11 SP1 and RT Professional V11
The Engineering System and Runtime must always be of the same version after an installation.
Parallel installation of WinCC V11 and WinCC V7 Parallel installation of WinCC V11 Professional or Runtime Professional with WinCC up to V7.0 (including ServicePacks) is not released.
Parallel use If the term "Combo" appears in the name or license key of the software after installation, the use of the following products/versions is permitted in accordance with paragraph 1.6 of the General Terms and Conditions (see also setup text):
● WinCC flexible 2008 Standard
Installation on a computer with regional setting "Turkish" If the computer is operated with the regional setting "Turkish" at the time of the installation, WinCC Runtime Professional cannot be started.

WinCC Readme 2.2 Notes on use
WinCC Professional V11 SP1 Readme, 07/2011, Online help printout 15
Copying HMI devices with HMI connections If you copy an HMI device with HMI connections to a PLC, the HMI connection in the new HMI device will not automatically be connected to an existing PLC with the same name. This statement applies to copying within a project as well as copying across projects.
To access the PLC tag via HMI tag in the new HMI device, you will have to complete the HMI configuration immediately after the copying step. Proceed as follows:
1. Open the "Devices & Networks" editor.
2. Connect the new HMI device with the desired network.
3. Open the connection table.
4. Select the HMI connection of the new HMI device.
5. Select the desired PLC under "Partner".
If you compile the new HMI device or connect additional PLC tags in between copying the HMI device and completing the connection, there may be some instances in which you create an additional HMI connection to the same PLC. This is especially true if you connect HMI tags with DB array elements.
Device replacement After an HMI device has been replaced, you should check the appearance of the configured screens. Changing the size of the display may result in changes to the position and appearance of screen objects, e.g. recipe view and alarm view.
Device replacement - character sets If you have configured different character sets on screen objects for multilingual texts in the various project languages, you should check the screens after an HMI device replacement from a panel to a PC-based Runtime. The configured character sets may be changed by the device replacement.
Device replacement - communication If an HMI device is replaced, error messages of the type "... will not be supported in the new configuration. It will be removed" will be issued. These alarms refer to configured connections of the device and are triggered, for example, if the HMI devices have a different number of interfaces. These connections are marked red after a device replacement. If you would like to continue to use these connections, you have change the configuration of the connection. Proceed as follows:
1. Open the "Devices and Networks" editor.
2. Click "Network" in the toolbar of the network view.
3. Network the interface of the HMI device with the interface of the CPU.
4. Click in the tabular area of the network view on the "Connections" table.
5. Select the connection marked red.
6. Enter the new interface under "Properties > Properties > General > Interface" in the Inspector window.

WinCC Readme 2.2 Notes on use
WinCC Professional V11 SP1 16 Readme, 07/2011, Online help printout
Specifying the time of modification in the overview window The times of modification displayed in the overview window only refer to changes to the object itself. Changes to subordinate objects, e.g. screen objects in a screen, do not cause the time of the last change to the screen to change in the overview window.
HMI device wizard When you create a device with a color display using the HMI device wizard, the graphics of the navigation buttons may be displayed in black and white. This error only occurs, however, if the new device is created with the same name as a device with a monochrome display which has been deleted in the meantime.
You can avoid this error by always deleting the associated graphics in the Graphics collection whenever you delete a device from the project.
Objects with object references in the project library Two copying methods can be used in WinCC flexible.
● With "simple copy" a WinCC flexible screen including an IO field, for example is copied. Only the object name of a tag configured on the IO field is copied, as this is a reference.
● With "copy", a screen, an IO field contained there and a tag configured on the IO field together with its properties are copied.
These two methods can also be used for storing an object in a library. Project libraries and the objects contained there are migrated during migration and can be used in WinCC.
In WinCC, however, only one copying method is available. With regard to tags, it functions like "simple copy" in WinCC flexible. With regard to graphics, graphics lists and text lists, it functions like "copy" in WinCC flexible.
If you stored objects with references to tags in a library in WinCC flexible, you must reconfigure the referenced objects when using them in WinCC.
Reports with Asian character sets on Windows CE devices If Asian characters sets are displayed in an illegible manner in a report on a Windows CE device, you must change the character sets for the objects in the report. it is sufficient to change to a different character set and then reset the original character set.
Saving the WinCC project If you save a project in WinCC using the "Save As…" command, this has no effect on the names of the Runtime projects generated for Runtime Professional. If you do not adapt the target path of the devices in the "Extended download to device" dialog, the Runtime projects on the target devices will be overwritten. Configuration changes from the original project and configuration changes from the newly saved project may influence each other.
Therefore, change the target path of the devices in the "Extended download to device" dialog.

WinCC Readme 2.2 Notes on use
WinCC Professional V11 SP1 Readme, 07/2011, Online help printout 17
Texts in the simulation If a Runtime language which does not correspond to an installed product langauge is used in the simulation, system texts are shown in an installed product language. Depending on the operating system and the installed product languages, this will be either English or Chinese.
If you wish to see all texts in Japanese, Korean or Taiwanese in the relevant language in the simulation, you should first install WinCC without simulation. Then install WinCC Runtime Professional with the required languages.
SQL Server During the installation of the SQL Server 2005 or the SQL Server 2005 Express, an error can occur if the product SQL Server 2008 is already installed on your system.
In order to be able to use both varieties of the SQL Server in parallel. the SQL Server 2005 must be installed before the SQL Server 2008. To do this, follow these steps:
1. Remove the SQL Server 2008 version, without deleting the databases.
2. Install WinCC. The SQL Server 2005 is hereby installed and set up on your system.
3. Install the SQL Server 2008 again. Now you can continue to use the existing databases in the SQL Server 2008.
WinCC RT Professional and S7-1200 The use of WinCC RT Professional in conjunction with an S7-1200 CPU is not permitted.
Windows 7 and Windows 7 SP1 WinCC V11 SP1 is released for:
● Windows 7
● Windows 7 SP1
WinCC DataMonitor If Windows Excel reports an error, make sure that the regional settings of the operating system and the installed Office language match.
Invalid Runtime language You may only select the Runtime languages for WinCC Professional that are compatible with the current settings on your PC. The setting is available in the Control Panel, "Regional and Language Options > Advanced > Languages for non-Unicode programs" dialog.
The default font is marked as invalid if you select an incompatible Runtime language in the "Runtime settings > Languages & font" editor.
WinCC Readme 2.3 Migration
WinCC Professional V11 SP1 18 Readme, 07/2011, Online help printout
2.3 Migration
Contents Information that could not be included in the online help.
Changing the names of alarm classes In contrast to WinCC flexible, the names of the predefined alarm classes are not dependent on the user interface language currently in use. During migration, the names of the alarm classes are assigned as follows:
WinCC flexible WinCC Error Errors System System Warnings Warnings
The display names of the alarm classes can be changed as necessary after migration.
Project languages in WinCC WinCC V11 does not support all project languages that were available in WinCC flexible, such as Arabic. If you receive an empty project as the result of your migration, you may want to check the set editing language. Do not set the project languages that are not supported as editing language in the source project. Proceed as follows:
1. Open the project with WinCC flexible.
2. Change the editing language to English, for example.
3. Save the project.
4. Restart the migration.
Objects with object references in the project library Two copying methods can be used in WinCC flexible.
● With "simple copy", a WinCC flexible screen including an IO field, for example, is copied. Only the object name of a tag configured on the IO field is copied, as this is a reference.
● With "copy", a screen, an IO field contained there and a tag configured on the IO field together with its properties are copied.
These two methods can also be used for storing an object in a library. Project libraries and the objects contained there are migrated during migration and can be used in WinCC.
In WinCC, however, only one copying method is available. It functions like "simple copy" in WinCC flexible.
If you have stored objects with references to other objects in a library in WinCC flexible, you must reconfigure the referenced objects when using them in WinCC.
WinCC Readme 2.3 Migration
WinCC Professional V11 SP1 Readme, 07/2011, Online help printout 19
Structures with data type "Stringchar" In WinCC V11, the data type "StringChar" is not supported in HMI user data types.
If you have used this data type in a structure in a WinCC flexible project, an invalid element is created by the migration in the HMI user data type.
You have to rework this user data type in WinCC. You can only remove the invalid element if you assign a valid data type and release the user data type. You can then delete the element. However, doing this causes any interconnections present between a faceplate and the elements of the user data type to be lost.
Also check the offsets of the subsequent elements and change them, if required.
Tag logging archives from WinCC V7 It is not possible to use the tag logging archives from WinCC V7 after migration to WinCC V11.
See also Object support during migration
WinCC Readme 2.4 Special considerations for Windows 7
WinCC Professional V11 SP1 20 Readme, 07/2011, Online help printout
2.4 Special considerations for Windows 7
Contents Information that could not be included in the online help.
Permission for the starting Runtime To start WinCC Runtime Professional or WinCC Runtime Advanced, a user must be a member of the automatically created group, "Siemens TIA Engineer".
Working with standard user rights If you are working with standard user rights in Windows 7, "User Account Control (UAC)" cannot be disabled.
The "User Account Control" is enabled in Windows 7 by default.
For more information on the "User Account Control, refer to the online help for Windows 7.
Slow response from the screen keyboard and SmartServer The following programs may start and respond very slowly under Windows 7 and Windows 2008 servers:
● Microsoft OSK screen keyboard and HMI TouchInputPC
● SmartServer: <Ctrl+Alt+Del> shortcut in the logon dialog
The delay is caused by the callback for the Internet certificate validation.
Remedy:
Locate the following files on the product DVD under: Support\Windows7\CRL_Check or CD_RT\ Support\Windows7\CRL_Check\ :
● DisableCRLCheck_LocalSystem.cmd
● DisableCRLCheck_CurrentUser.cmd
1. Run the "DisableCRLCheck_LocalSystem.cmd" file with administrator rights. Select the command "Run as administrator" from the shortcut menu of the file.
2. Reboot the PC.
WinCC Readme 2.4 Special considerations for Windows 7
WinCC Professional V11 SP1 Readme, 07/2011, Online help printout 21
If the problem persists, follow these steps:
1. Double-click the file and run the "DisableCRLCheck_CurrentUser.cmd" file with user rights.
2. Reboot the PC.
NOTICE
The callback for the certificate validation is disabled for all users or PCs. To restore the original state, perform the following files: RestoreDefaults_LocalSystem.cmd RestoreDefaults_CurrentUser.cmd
You can find the files in the following directory of product DVD: Support\Windows7\CRL_Check bzw. CD_RT\Support\Windows7\CRL_Check\

WinCC Readme 2.5 Engineering System
WinCC Professional V11 SP1 22 Readme, 07/2011, Online help printout
2.5 Engineering System
2.5.1 Screens and Screen Objects
Contents Information that could not be included in the online help.
Text format of output fields in alarm text It is not possible to underline tags and text list entries.
Copying display objects between two projects or two devices In Project_1 configure an alarm window in the Global Screen, for example. You copy the alarm window and paste it in the Global Screen in Project_2.
The enabled alarm classes are partly not enabled in the alarm window after pasting.
This behavior applies to the following display objects:
● Alarm window
● Alarm indicator
● Alarm view
Representation of the cross-references in the Inspector window The Inspector window displays objects used by a screen object in the "About > Cross-reference" tab.
A screen is open and an object selected. You are using an HMI tag at the object as process tag.
The object and the linked HMI tag are displayed in the cross-references. All locations of use of the object and the HMI tags are listed.
If the HMI tag is interconnected with a PLC tag or a DB tag, then the locations of use of the interconnected PLC tag or DB tag will be displayed.

WinCC Readme 2.5 Engineering System
WinCC Professional V11 SP1 Readme, 07/2011, Online help printout 23
Event names in case of alarms in the "Info" tab of the Inspector window In some alarms of the Inspector window the event names in the "Info" tab will deviate from the names in the "Properties" tab.
Name in the "Properties" tab of the Inspector window
Name in the "Info" tab of the Inspector window
Cleared ClearScreen Loaded GenerateScreen Enable Activate Change Change When a dialog is opened ONMODALBEGIN When a dialog is closed ONMODALEND User change PASSWORD Screen change SCREEN Disable Deactivate Press Press Outgoing Going Incoming Coming Limit "high limit error" violated AboveUpperLimit Limit "low limit error" violated BelowLowerLimit Click Click Loop-In-Alarm LoopInAlarm Release Release Alarm buffer overflow OVERFLOW Acknowledge Acknowledgement Runtime stop Shutdown Press key KeyDown Release key KeyUp Switch ON SwitchOn Switch OFF SwitchOff Value change Change value
Dynamization of object properties in a group The dynamization of properties for all objects of the group which have these properties is not possible in a group. In WinCC V11, the properties of the objects beloning to a group can only be dynamized for each object itself.
WinCC Readme 2.5 Engineering System
WinCC Professional V11 SP1 24 Readme, 07/2011, Online help printout
Illegible characters in Runtime Professional With Runtime Professional, only characters belonging to the language area which is defined with the operating system setting "Language for non-Unicode programs" can be displayed on the target system. Texts with characters from other language areas can, however, also be configured in the project.
Illegible characters may occur in the Engineering System with the objects text field, symbolic I/O field, gauge and slider if the settings in the operating system relating to "Language for non-Unicode programs" do not match the selected editing language and the objects are displayed in a different design than "WinCC Classic". The characters are displayed correctly in the Inspector window and the "Project texts" editor.
Therefore, first check in the Control Panel under "Regional and Language Options > Advanced" whether the setting for "Language for non-Unicode programs" is the same as the editing language. Otherwise, you can check or change the correct texts in the Inspector window or the "Project texts" editor.
Faceplates Faceplates cannot be rotated or mirrored.
Persistence with display objects in WinCC Runtime Professional The objects f(t)-trend view, f(x)-trend view, alarm view, recipe view, table view and value table have settings for the persistence of online configurations. If you have configured "Persistence" for "Online configuration" and "Keep changes" for "Reaction to screen change", you can make changes to the configuration dialogs in runtime which will be retained after a screen change and after runtime is exited.
However, online configurations for the settings mentioned cause changes to the configuration of the objects in the Engineering System to only be applied in Runtime if you recompile the device with the command "Compile > Software (rebuild all)".
Basic Panels, OP73, OP77A and TP177A: Displaying texts in runtime The default font selected in the "Runtime settings > Languages & font" editor has an effect on the display of texts in runtime.
Text entries may be truncated if you selected an unfavorable font size or style.
This setting possibly has an effect on the following text entries:
● Tooltips
● long alarm text
● text in the dialogs
WinCC Readme 2.5 Engineering System
WinCC Professional V11 SP1 Readme, 07/2011, Online help printout 25
2.5.2 Tags
Contents Information that could not be included in the online help.
Tag names HMI tag names may not start with the character @.
Display of deleted array elements at location of use of HMI tags The locations of use of HMI tags, such as the process value of IO fields, are usually indicated by the tag name. If the element of an array tag is used, then the tag name will be extended by the index of the array element indicated in brackets.
If a used tag is no longer included in the project, then the tag name will still be displayed at the location of use. The field will be displayed with a red background to indicate the missing tag. If a used array element or the array tag is no longer present, then only the index of the array element will be displayed in brackets. The tag name will not be displayed. The field is highlighted in red. You can no longer identify the name of the associated array tag based on the location of use in this instance.
If you do not know which array tag was linked to this location of use, then it may be necessary to link the array element once again.
If a tag or array tag was created based on a reference, then the selected reference will be closed automatically.
If an HMI tag is connected with an array element of a PLC tag and the PLC tag does no longer exist in the project, then the same behavior will take place in the "HMI tags" editor.
Array tags as list entry of multiplex tags You can use the array tags of the Char data type just like the tags of the String data type.
The use of an array tag of the Char data type as list entry of a multiplex tag in the "HMI tags" editor is not supported.
2.5.3 Alarm system and alarm displays
Contents Information that could not be included in the online help.

WinCC Readme 2.5 Engineering System
WinCC Professional V11 SP1 26 Readme, 07/2011, Online help printout
Displaying special characters in alarm texts When configuring alarm texts, a fixed character set is used in the Engineering System. This character set allows you to use numerous special characters in alarm texts.
Language-dependent fonts are used in runtime to display the texts, for example MS PGothic, SimSun. The fonts used in runtime do not support all special characters. As a result, some special characters are not displayed in runtime.
Use of multiplex tags in output boxes with alarm texts In the engineering system, it is also possible to use multiplex tags in the output boxes of alarm texts. During runtime, this leads to an incorrect display of the alarm, because the use of multiplex tags is not supported by the basic panels.
2.5.4 System functions and scripts
Contents Information that could not be included in the online help.
Debugging using the Microsoft Script Debugger If you want to use the Microsoft Script Debugger for debugging, the English version "scd10en.exe" must be used. The German version "scd10de.exe" cannot be installed.
Runtime error on startup on TP 277 and OP 277 At the start of the runtime on a TP 277 or OP 277, the error "Global unknown error with VBScript: 'Expected statement' in script ..". can be reported.
This error is triggered on devices with the Windows CE 3.0 operating system by user functions of the following type:
Sub VBFunction_1() With HmiRuntime.Screens("Screen_1").ScreenItems("Button_1") .backcolor = vbred .visible = not .visible End With End Sub
WinCC Readme 2.5 Engineering System
WinCC Professional V11 SP1 Readme, 07/2011, Online help printout 27
If the error occurs, you need to re-program the user function as follows:
Sub VBFunction_1() HmiRuntime.Screens("Screen_1").ScreenItems("Button_1").backcolor = vbred HmiRuntime.Screens("Screen_1").ScreenItems("Button_1").visible = not .visible End Sub
2.5.5 Recipes
Contents Information that could not be included in the online help.
2.5.6 User administration
Contents Information that could not be included in the online help.
2.5.7 Communication
Contents Information that could not be included in the online help.
Connection interruptions with Mitsubishi PLCs After multiple connection interruptions, a situation may arise where all the connection resources of the Mitsubishi PLC are in use and the connection can no longer be established. It is recommended to check these connection resources in the PLC program of the PLC and also enable them again.

WinCC Readme 2.5 Engineering System
WinCC Professional V11 SP1 28 Readme, 07/2011, Online help printout
Using "DTL" data type for area pointers Use the "DTL" data type for configuration of area pointers "Date/time" and "Date/time PLC". The "DTL" data type supports time information down to the nanosecond range. Because Basic Panels support time information only down to the millisecond range, you will encounter the following restrictions in the case of use on the area pointers:
● Area pointer "Date/time" For transmission of time information from a Basic Panel to the PLC, the smallest unit of time is 1 millisecond. The value range from microseconds to nanoseconds of the "DTL" data type will be filled with zeros.
● Area pointer "Date/time PLC" For transmission of time information from a PLC to a Basic Panel, the area from microseconds to nanoseconds will be ignored. The time information will be processed on the panel down to milliseconds.
Limited number of possible HMI connections An error message is displayed during compilation of a device indicating that the configuration of the HMI connection in the "Devices & Networks" editor is invalid. The reason may be that the maximum number of possible connections of the HMI device or PLC has been exceeded.
Check the maximum number of available connections. Consult the device manuals of the devices you are using.
Routed communication with S7 300/400 The communication of connection partners in various subnets can be routed via the following links: PROFINET, PROFIBUS, MPI.
WinCC Readme 2.5 Engineering System
WinCC Professional V11 SP1 Readme, 07/2011, Online help printout 29
Using PROFINET IO with panel HMI devices When using PROFINET IO to connect the direct keys and LEDs of HMI devices to the PLC, you can define an offset for the address area of the inputs and outputs during configuration in HW Config.
The following restriction applies when you use a PROFINET IO-capable CPU of the 400 series with one of the HMI devices listed below:
The offset for the start of the address area of the inputs must not be bigger than the offset for the start of the address area of the outputs.
The restriction applies to the following HMI devices:
● OP 177B
● OP 277
● Mobile Panel 177
For the configuration of the address parameters, open the PLC with the CPU of the 400 series in HW Config. Select the HMI device connected via PROFINET IO in the station window of HW Config. A table with the properties of the HMI device is displayed at the bottom of the station window in the detail view. Select the line containing the addresses of the HMI device in the table and open the object properties using the shortcut menu.
Select the "Addresses" tab in the "Object properties" dialog. Configure the offset for the inputs under "Inputs > Start". Configure the offset for the outputs under "Outputs > Start".
Exceeding value ranges with Mitsubishi MC and Mitsubishi FX With some data types, the communication drivers Mitsubishi MC and Mitsubishi FX do not check whether the value of a recipe tag exceeds the value range of the PLC tags. The data types affected are:
● 4-bit block
● 12-bit block
● 20-bit block
● 24-bit block
● 28-bit block
Area pointer Coordination in an OPC connection In principle, the area pointer Coordination can be used eight times in an OPC connection. If you have configured an OPC connection and automatically create another OPC connection using "Add", the area pointer Coordination is only displayed once in the newly created connection. In this case, you should change the communication driver of the connection. If you then set OPC again as the communication driver, the area pointer Coordination can again be used eight times.
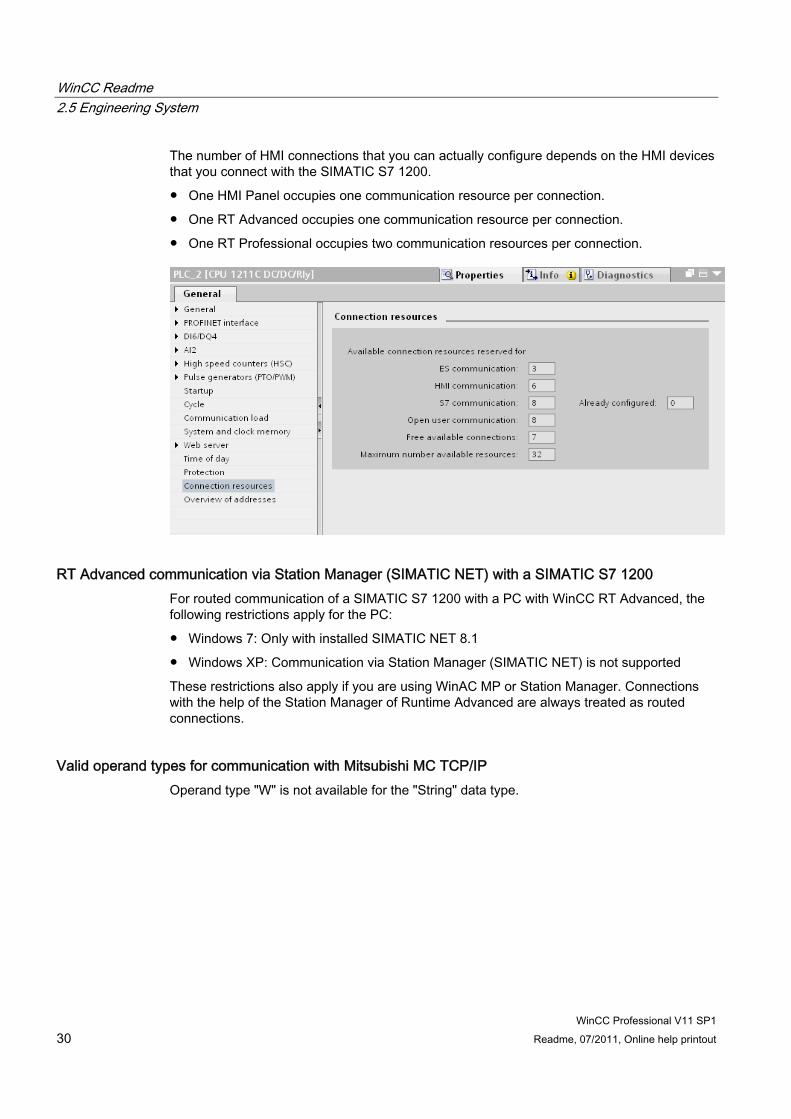
Communication resources: SIMATIC S7 1200 The SIMATIC S7 1200 controller provides six communication resources for HMI communication.
WinCC Readme 2.5 Engineering System
WinCC Professional V11 SP1 30 Readme, 07/2011, Online help printout
The number of HMI connections that you can actually configure depends on the HMI devices that you connect with the SIMATIC S7 1200.
● One HMI Panel occupies one communication resource per connection.
● One RT Advanced occupies one communication resource per connection.
● One RT Professional occupies two communication resources per connection.
RT Advanced communication via Station Manager (SIMATIC NET) with a SIMATIC S7 1200 For routed communication of a SIMATIC S7 1200 with a PC with WinCC RT Advanced, the following restrictions apply for the PC:
● Windows 7: Only with installed SIMATIC NET 8.1
● Windows XP: Communication via Station Manager (SIMATIC NET) is not supported
These restrictions also apply if you are using WinAC MP or Station Manager. Connections with the help of the Station Manager of Runtime Advanced are always treated as routed connections.
Valid operand types for communication with Mitsubishi MC TCP/IP Operand type "W" is not available for the "String" data type.

WinCC Readme 2.5 Engineering System
WinCC Professional V11 SP1 Readme, 07/2011, Online help printout 31
Communication between S7-1200 and a multi panel Communication between an S7-1200 and a multi panel with the "WinAC MP" option installed via ProSave is not possible. The data types affected are:
● SIMATIC MP 177 6" Touch
● SIMATIC MP 277 8" Touch
● SIMATIC MP 277 8" Key
● SIMATIC MP 277 10" Touch
● SIMATIC MP 277 10" Key
● SIMATIC MP 377 12" Touch
● SIMATIC MP 377 12" Key
● SIMATIC MP 377 15" Touch
● SIMATIC MP 377 19" Touch
WinCC Readme 2.6 Compiling and loading
WinCC Professional V11 SP1 32 Readme, 07/2011, Online help printout
2.6 Compiling and loading
Contents Information that could not be included in the online help.
Compiling and loading If internal errors or warnings occur during compiling, compile the complete project using the command "Compile > Software (rebuild all)" in the shortcut menu of the HMI device.
Before you start productive operation with your project, compile the entire project using the "Compile > Software (rebuild all)" command from the shortcut menu of the HMI device.
If you are using HMI tags that are connected to the control tags in your project, compile all modified blocks with the command "Compile > Software" in the shortcut menu before you compile the HMI device.
Saving the WinCC project If you save a project in WinCC using the "Save As…" command, this has no effect on the name of the Runtime projects generated for the devices. If you do not adapt the target path of the devices in the "Extended download to device" dialog, the Runtime projects on the target devices will be overwritten.
Settings for update of operating system If you select the command "Online > HMI device maintenance > Update operating system" from WinCC, you cannot change the settings such as the type of PG/PC interface or baud rate. The settings used during the last download are always used.
To make changes to the settings, open the "Extended download" dialog using the "Online > Extended download to device" command and change the settings. When you click the "Load" button the changed settings are saved.
Alternatively, you can perform an update of the operating system with changed settings with ProSave. You start ProSave via the Windows Start menu "Siemens Automation > Options and Tools > HMI Tools > SIMATIC ProSave".
Incorrect installation of ProSave If you receive an error message during installation of ProSave when loading data to a target device or maintenance of an HMI device, then you cannot remedy this error using the repair function of setup. Remove ProSave via the Control Panel. Then start setup and install the "ProSave" component again.

WinCC Readme 2.6 Compiling and loading
WinCC Professional V11 SP1 Readme, 07/2011, Online help printout 33
Checking the address parameters During compilation of an HMI device in the project tree with the command "Compile > Software" in the shortcut menu, the address parameters of the HMI device, such as the IP address, will not be checked. If you want to ensure that the address parameters are checked as well, you will have to compile the HMI device in the "Devices & Networks" editor of the toolbar.
Error message when downloading data to the PLC A panel and a PLC are connected and communicating with other.
If a tag is accessed while downloading data from the panel to the PLC, an error message is displayed on the panel.
Delayed reaction in the "Extended download to device" dialog If the settings in the "Extended download to device" dialog for "Type of the PG/PC interface" and "PG/PC interface" do not match the settings on the HMI device, this can result in the application not responding for up to a minute.
Extended download with an S7-1200 and a Comfort Panel An S7-1200 PLC and a Comfort Panel are located in the same physical network as the PG/PC. You open the "Extended download to device" dialog for the Comfort Panel.
If you activate the option "Show all accessible devices", it may occur that the application stops responding.
OP77A, OP73, TP177A: Loading projects When loading a project to an HMI device, it can happen that Runtime is not automatically ended, even though "Remote Transfers" is activated in the Panel.
If this happens, stop Runtime and manually set the transfer mode on the HMI device.

WinCC Readme 2.6 Compiling and loading
WinCC Professional V11 SP1 34 Readme, 07/2011, Online help printout
Loading a SIMATIC HMI application to a PC station The following circumstances can lead to an error message during the first load of a SIMATIC PC station:
● A SIMATIC HMI application is configured in a PC station in the project
– WinCC Runtime Advanced
– WinCC Runtime Professional
– WinCC Standby
– or WinCC Client
● The property "S7RTM is installed" is activated.
Before you load a SIMATIC PC station for the first time, select the configured device HMI_RT (WinCC...) in the project navigation. Open the "Extended download to device" dialog and select the appropriate interface and parameter settings. Click "Load".
You then load the PC station as normal.
Unpacking a distributed "Pack&Go" file To unpack a "Pack&Go" file which is distributed over several files, you need an unpack program. The unpack program integrated in the operating system is not adequate to unpack distributed files.

WinCC Readme 2.7 Runtime
WinCC Professional V11 SP1 Readme, 07/2011, Online help printout 35
2.7 Runtime
2.7.1 Notes on operation in Runtime
Contents Information that could not be included in the online help.
CAUTION Ethernet communication
In Ethernet-based communication, the end user is responsible for the security of his data network. The proper functioning of the device cannot be guaranteed in all circumstances; targeted attacks, for example, can lead to overload of the device.
Special characters in the user view Special characters, such as / " § $ % & ' ?, are not permitted when entering a name or the password in the user view.
Language behavior - Layout of screen keyboard The layout of the screen keyboard is not switched when the runtime language changes.
Tag values overwrite the maximum length You enter a character string in a string tag via an I/O field. If the character string exceeds the number of configured tags, the character string will be shortened to the configured length.
2.7.2 Notes on operation of panels in Runtime
Contents Information that could not be included in the online help.
Using the mouse wheel in Runtime The use of the mouse wheel in Runtime is not supported on all panels.

WinCC Readme 2.7 Runtime
WinCC Professional V11 SP1 36 Readme, 07/2011, Online help printout
2.7.3 Notes on operation of Runtime Advanced
Contents Information that could not be included in the online help.
.Net-Controls in Runtime If you have incorporated a .Net Control in your project as "Specific .Net-Control", you have to copy the files belonging to these controls to the installation directory of WinCC Runtime, e.g. "C:\ProgramFiles\Siemens\Automation\WinCC RT Advanced". Otherwise, the control cannot be loaded in Runtime.
2.7.4 Notes on operation of Runtime Professional
Contents Information that could not be included in the online help.
User authorizations within the operating system 1. All user must be added to the "SIMATIC HMI" user group. This also applies to users who
want to open WinCC projects remotely.
2. The storage folders of the projects must have the NTFS authorizations "SIMATIC HMI" with full access and "SIMATIC HMI Viewer" with read access. The authorizations must be inherited for all subordinate objects.
3. Members of the Windows user group "SIMATIC HMI" should not simultaneously be members of the Windows user group "SQLServer2005MSSQLUser$<Computername>$WINCC". The members of this group have administrator rights to the SQL server. Therefore remove all Windows users from this group for whom restricted access to the WinCC database is sufficient.
Windows 7 / Windows Server 2008: Locking key combinations If you want to lock key combinations under Windows 7 or Windows Server 2008, you must change the group policies in the administrative tools of the operating system
A detailed description of this can be found in the FAQ with the entry ID "44027453" in the SIMATIC Customer Online Support:
Internet: WinCC FAQ 44027453 (http://support.automation.siemens.com/WW/view/en/44027453)
WinCC Readme 2.7 Runtime
WinCC Professional V11 SP1 Readme, 07/2011, Online help printout 37
Fault in the connection between the server and the client If the connection between the server and client is faulty, check the settings of the PG/PC interface. TCP/IP(Auto) should not be used for the "Interface Parameter Assignment Used". Used fixed IP addresses instead.
Fault in the connection between the server and the client If the computer is simultaneously used as a server with the Engineering System and a client cannot establish the connection to the server, you should check the releases set on the server.
1. Exit Runtime on the server.
2. Select the command "Find computer..." in the shortcut menu of the network environment on the desktop of the server.
3. Enter the name of the server as the computer to be found.
4. Open the computer found to recognise the released directories.
5. Remove all the releases that begin with "WinCC_Project_HMI". Information on this is available in the documentation for the operating system.
This malfunction is caused by the use of the command "Save as..." in conjunction with the startup of the Runtime of this new project. You can make copies of the projects for backup purposes using the "Save as..." command. You should, however, continue to work with the original project.
Language setting for Runtime Professional With Runtime Professional, illegible texts may occur during runtime if the settings in the operating system for "Language for non-Unicode programs" do not match the selected Runtime language. This setting must also be the same on the client and the server for client/server applications.
Therefore, first check in the Control Panel under "Regional and Language Options > Advanced" whether the setting for "Language for non-Unicode programs" is the same as the Runtime language.
Starting WinCC Runtime Professional If Engineering System and Runtime are operated on a computer, Runtime or simulation for a project opened in the engineering system should only be started and ended via the TIA portal. Other options, for example, the symbol in the taskbar information area, should not be used.
WinCC Readme 2.7 Runtime
WinCC Professional V11 SP1 38 Readme, 07/2011, Online help printout
Setting the services for the SQL server In order to ensure the full functionality of the SQL server for WinCC and WinCC Runtime, you have to check the SQL server settings.
1. Start "Programme > Microsoft SQL Server 2005 > Configuration Tools > SQL Server Configuration Manager" in the start menu.
2. Click "SQL Server 2005 Services" in the tree.
3. Check the services "SQL Server (WinCC)","SQL Server (WINCCPLUSMIG)" and "SQL Server Browser". "Automatic" must be entered for "Start Mode". "LocalSystem" must be entered for "Log On As". Change the settings, if necessary.
4. Click "SQL Server Network Configuration" in the tree.
5. Click "Protocols for WinCC".
6. Check the "TCP/IP" protocol. "Enabled" must be entered for "Status". Change the settings, if necessary.
WinCC RT Professional and S7-1200 The use of WinCC RT Professional in conjunction with an S7-1200 CPU is not permitted in productive operation.
"Report system error" in WinCC Runtime Professional The "Report system error" functionality is limited in WinCC Runtime Professional in conjunction with an S7-300 or S7-400. In an alarm view, only one alarm is ever displayed for each diagnostics type. Alarms on other errors of the same diagnostics type are not displayed.
WinCC Readme 2.8 HMI devices
WinCC Professional V11 SP1 Readme, 07/2011, Online help printout 39
2.8 HMI devices
2.8.1 General notes
Contents Information that could not be included in the online help.
If the PC goes into standby or hibernate mode while the transfer is in progress, the panel status after interruption of the transfer is not defined.
TS Adapter with Ethernet interface If an HMI device is connected via Ethernet and a TS adapter, it can not be reset to factory settings.
Simulation of the Basic Panels Use an output field in an alarm text to output an external tag. The content of the output field will always be displayed with "0" during simulation.
Simulation with real PLC connection The access point used by the simulation is independent from the settings of the Engineering System and can only be altered in the Control Panel with the "Setting PG/PC Interface" tool. If the PLC connection is terminated right after the start of the simulation with alarm 140001, you should check the access point used by the simulation with "Setting PG/PC Interface".
1. Double-click "Setting PG/PC Interface" in the Control Panel. A dialog opens.
2. Select" "S7ONLINE" in the "Access point of application" field as standard for HMI.
3. Select the interface in the "Interface Parameter Assignment Used" area.
4. Exit the dialog "Setting PG/PC Interface" with OK
Loading of projects without recipe data records You are using recipes in a project. You transfer the project to a Basic Panel without recipe data records.
You may encounter inconsistencies if you have altered the structure of the recipe in the Engineering System and the device already held recipe data records.
Check the consistency of the data records in this case. The device will not issue a note for all structural changes.
WinCC Readme 2.8 HMI devices
WinCC Professional V11 SP1 40 Readme, 07/2011, Online help printout
Floating point numbers on MP 277, MP 377, TP 177B 4'' and CP4 Only floating point numbers in the range from 10-293 ... 10+307 are displayed correctly on the HMI devices MP 277, MP 377, TP 177B 4'' and CP4. If the tag value is outside this range, it is displayed as 0.
USB device driver under Windows XP If a configuration PC with Windows XP and a Comfort Panel are connected via USB, the S7-USB driver may be reinstalled when the HMI device is restarted. The device settings may in this case not be restored.
2.8.2 Printing via print server
Introduction Print servers enable access to network printers. Print jobs are routed to a corresponding printer via the print server.
Note
Printing takes place via the print server for the following HMI devices: xP 177, Mobile Panel 177 xP 277, Mobile Panel 277, Mobile Panel 277 IWLAN, Mobile Panel 277F IWLAN Mobile Panel 277 IWLAN V2, Mobile Panel 277F IWLAN V2, Mobile Panel 277F IWLAN
(RFID Tag) MP 377 PC with WinCC Runtime Advanced
Requirements ● The print server deploys the "RAW" mode.
Note
For additional information on settings, refer to the relevant print server documentation.
● The device is interconnected via Ethernet with the print server or with a printer featuring an integrated print server.
● External print servers are interconnected with a printer via USB port.
● The IP address and port used are identical in the "Printer Properties" of the HMI device and on the print server.
WinCC Readme 2.8 HMI devices
WinCC Professional V11 SP1 Readme, 07/2011, Online help printout 41
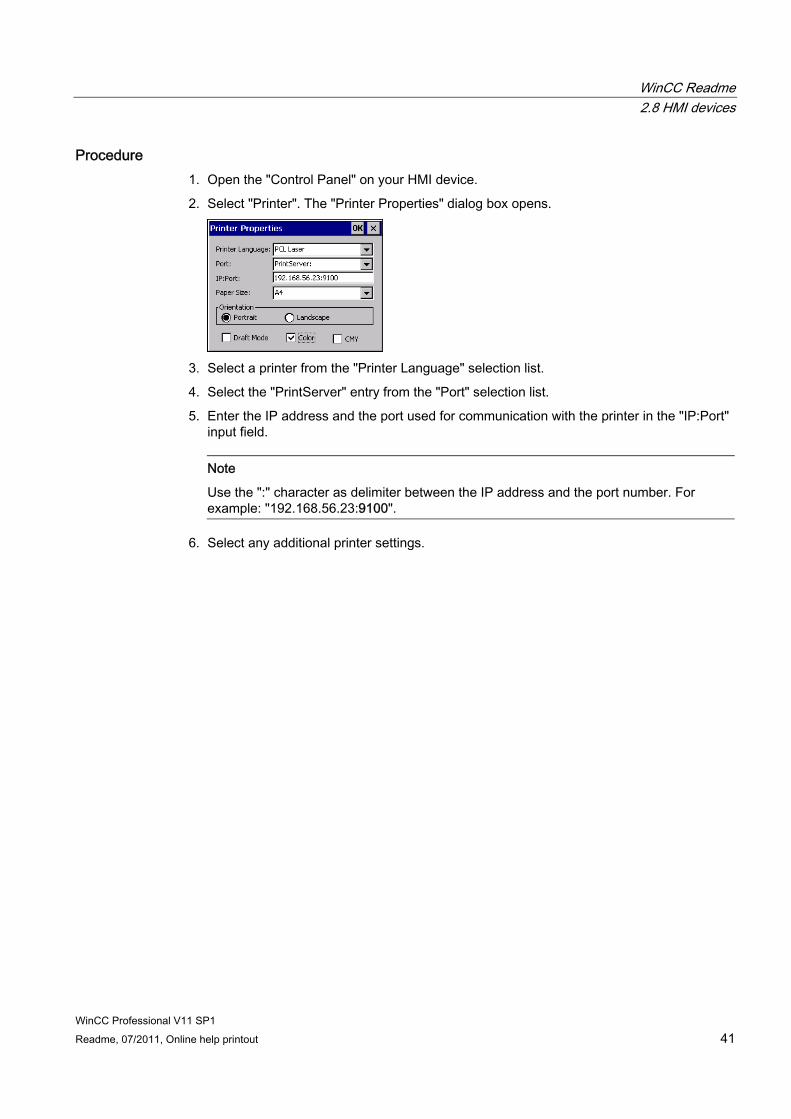
Procedure 1. Open the "Control Panel" on your HMI device.
2. Select "Printer". The "Printer Properties" dialog box opens.
3. Select a printer from the "Printer Language" selection list.
4. Select the "PrintServer" entry from the "Port" selection list.
5. Enter the IP address and the port used for communication with the printer in the "IP:Port" input field.
Note
Use the ":" character as delimiter between the IP address and the port number. For example: "192.168.56.23:9100".
6. Select any additional printer settings.

WinCC Readme 2.9 Add-ons
WinCC Professional V11 SP1 42 Readme, 07/2011, Online help printout
2.9 Add-ons
2.9.1 DataMonitor
Contents Information that could not be included in the online help.
Special considerations for Windows 7 Time- or event-triggered Excel Workbooks are not released under the Windows 7 operating system.
Opening Excel workbooks If you open an Excel workbook from the DataMonitor client, Excel may issue the error message "File not found". If this happens, proceed as follows:
1. Confirm the error message with "OK".
2. Leave Excel open.
3. Open the Excel workbook again in Internet Explorer.
Opening Excel workbooks with Excel 2010 Due to safety settings, the automatic connection of an Excel workbook with the server does not work in Excel 2010.
If you wish to enable automatic connection, deactivate the setting "Enable Protected View for files located in potential unsafe locations" in Excel 2010 under "Files > Options > Trust Center > ProtectedView".
2.9.2 WebNavigator
Contents Information that could not be included in the online help.
Installation instructions The installation instructions for the Web Navigator are part of the installation instructions of WinCC Runtime Professional. They can be found on the DVD of WinCC Runtime Professional.
WinCC Readme 2.9 Add-ons
WinCC Professional V11 SP1 Readme, 07/2011, Online help printout 43
Access via Web client A user can only get access via a Web client if a screen released for Web access has been assigned to him as the start screen in the user administration.
To release a screen for Web access:
1. Select the "Properties" command in the shortcut menu of a screen.
2. Activate the "Web access" option under "Properties > Web access".
To assign a start screen to a user:
1. In the user administration, select the user to whom you would like to assign a start screen.
2. Click "Properties > General" > Web options > Settings in the Inspector window to specify a start screen. You can only select screens which have been released for Web access.

WinCC Readme 2.9 Add-ons
WinCC Professional V11 SP1 44 Readme, 07/2011, Online help printout
Index
" "TM_MAIL" instruction,
A Alarm
Inspector window, 23 Alarm indicator, 22 Alarm text
Output fields, 26 Special characters, 26
Alarm view, 22 Alarm window, 22 Area pointer
Date/time, 28 Date/time PLC, 28
Array, 25 Array element
Location of use of HMI tag, 25 Name, 25
Array tag Char, 25
C Char
Array tag, 25 Comfort Panel
S7-1200, 33 Communications processor
Hotfixes, 11 Operation, 11
Compile Address parameters, 33
Connection resource SIMATIC S7 1200, 29
Copying Alarm indicator, 22 Alarm view, 22 Alarm window, 22 HMI device, 15
Cross-reference Inspector window, 22
D Decimal places, 8 Device
Copying, 15 Download
Extended download to device, 33 Downloading data to the PLC
Error message, 33 DTL data type
Restriction, 28
E Error message
Downloading data to the PLC, 33 Event
Inspector window, 23 Extended download to device, 33
F Force job
On SD card, 6
H Hibernate, 6 HMI device replacement, 15 Hotfix for communications processor, 11
I Inspector window
Cross-reference, 22 Event, 23
Installation ProSave, 32 Target directory, 9
IP address, 7
L Language behavior
WinCC Professional V11 SP1 Readme, 07/2011, Online help printout 45

Index
WinCC Professional V11 SP1 46 Readme, 07/2011, Online help printout
Screen keyboard, 35 Load
SIMATIC PC station, 34
M Maximum length
Tag, 35 Mitsubishi
Connection interruption, 27
N Name
Array element, 25 Network drive, 8
O OP73
Loading a project, 33 OP77A
Loading a project, 33 Output fields
Multiplex tag, 26 Overview window, 16
P Permitted characters
User view, 35 Print server, 40 Printing
Print server, 40 Project library, 16 ProSave
Installation, 32
R Recipe data record
Transferring the project, 39 Resource
SIMATIC S7 1200, 29 Runtime
Mouse wheel, 35
S Screen keyboard
Language behavior, 35 Screen saver, 6 SD card
Open force job, 6 Shutting down Windows XP, 6 SIMATIC PC station
Load, 34 SIMATIC S7 1200
Connection resource, 29 Resource, 29
Simulation, 39 PLC connection, 39
Special characters Alarm text, 26
Standby Mode, 6
T Tag
Maximum length, 35 TM_MAIL, 7 TP177A
Loading a project, 33 Transferring the project
HMI device, 39 Recipe data record, 39
TS adapter, 39
U User view
Permitted characters, 35