whitewater cloud storage gateway - riverbed · deployment guide whitewater cloud storage gateway...
TRANSCRIPT

DEPLOYMENT GUIDE
Whitewater Cloud Storage Gateway Deployment Guide for Commvault Simpana 9 Riverbed Technical Marketing October 2011

RIVERBED WHITEWATER DEPLOYMENT GUIDE
© 2011 Riverbed Technology. All rights reserved. 1
TABLE OF CONTENTS
Executive Summary .................................................................................................................................................................................................... 3
Cloud Storage Overview ............................................................................................................................................................................................. 3 Introduction ........................................................................................................................................................................................................... 3 Cloud Backup ........................................................................................................................................................................................................ 3
Commvault Simpana Architecture Overview .............................................................................................................................................................. 3
Riverbed Whitewater Cloud Storage Gateway Overview ........................................................................................................................................... 4
Whitewater Features ................................................................................................................................................................................................... 5
Whitewater Benefits .................................................................................................................................................................................................... 5
Deploying Whitewater Gateways with Commvault Simpana ...................................................................................................................................... 5
Commvault Simpana, Riverbed Whitewater Gateway, and Cloud Storage Configuration Example .......................................................................... 6
Pre-deployment Checklist ........................................................................................................................................................................................... 6
Cloud Storage Provider Required Tasks .................................................................................................................................................................... 7 Amazon S3 ............................................................................................................................................................................................................ 7 AT&T Synaptic Storage as a Service .................................................................................................................................................................. 7 Nirvanix Cloud Storage Network ......................................................................................................................................................................... 7 EMC Atmos ............................................................................................................................................................................................................ 8 Microsoft Windows Azure .................................................................................................................................................................................... 8 Rackspace Cloud Files ......................................................................................................................................................................................... 8 OpenStack Object Storage (Swift) ...................................................................................................................................................................... 8
Configuring the Whitewater Gateway ......................................................................................................................................................................... 9 Configuring the Whitewater Management Interface.......................................................................................................................................... 9 Connecting to the Management Console GUI ................................................................................................................................................. 10 Configuring Whitewater Licenses ..................................................................................................................................................................... 11 Configuring Whitewater Data Interfaces .......................................................................................................................................................... 11 Configuring Cloud Settings ............................................................................................................................................................................... 12 Configuring a CIFS Share .................................................................................................................................................................................. 13
Configuring Commvault Simpana ............................................................................................................................................................................. 15 Commvault Simpana CommCell Console Overview ....................................................................................................................................... 15 Adding a Whitewater Gateway to Commvault Simpana Task ........................................................................................................................ 15 1. Add a Disk Library to the MediaAgent .......................................................................................................................................................... 15 2. Create or Associate a Storage Policy to the New Disk Library .................................................................................................................. 20
Create a New Storage Policy .......................................................................................................................................................................... 20 Associate an Existing Storage Policy .............................................................................................................................................................. 24
Testing Commvault Simpana with Whitewater ......................................................................................................................................................... 26 Backup to Whitewater Using Commvault Simpana ....................................................................................................................................... 26 Monitoring a Job ................................................................................................................................................................................................. 29 Restore from Commvault Simpana using Whitewater .................................................................................................................................... 29
Whitewater Solution Reporting ................................................................................................................................................................................. 31

RIVERBED WHITEWATER DEPLOYMENT GUIDE
© 2011 Riverbed Technology. All rights reserved. 2
About Report Graphs ......................................................................................................................................................................................... 31 Whitewater Throughput Report ......................................................................................................................................................................... 31 Whitewater Front End Throughout In ............................................................................................................................................................... 32 Whitewater Frontend Throughout Out ............................................................................................................................................................. 33 Whitewater Back End Throughput Out ............................................................................................................................................................. 34 Whitewater Storage Optimization Report ......................................................................................................................................................... 35 Whitewater Optimization Replication Bytes Pending Report ........................................................................................................................ 36 Whitewater Diagnostics “View System Logs” Report .................................................................................................................................... 37
Conclusion ................................................................................................................................................................................................................ 38
About Riverbed ......................................................................................................................................................................................................... 38

RIVERBED WHITEWATER DEPLOYMENT GUIDE
© 2011 Riverbed Technology. All rights reserved. 3
Executive Summary This paper outlines the ease of use and deployment of Riverbed® Whitewater® cloud storage gateway with Commvault Simpana. Whitewater provides a simple, efficient way to offsite data to cloud storage providers powered by Amazon S3, AT&T Synaptic Storage as a Service, Microsoft Windows Azure cloud storage, Nirvanix Cloud Storage Network, Rackspace Cloud Files, and general instances of EMC Atmos and OpenStack (Swift) Object Storage. Whitewater simply acts as a storage unit within a backup infrastructure managed by Commvault Simpana, enabling organizations to eliminate their reliance on tape infrastructure and all of its associated capital and operational costs, while improving backup windows and disaster recovery capabilities. Simple steps are taken to set up the Whitewater gateway and start moving data to the cloud in a few hours, compared to setting up tape or other disk replication infrastructures which can take days. Leveraging Riverbed’s industry leading deduplication, compression and WAN optimization technologies, Whitewater gateways shrink data set sizes by 10 to 30x substantially reducing cloud storage costs, accelerating data transfers and storing more data within the local cache, speeding recovery. This massive reduction in data sets offered by Whitewater allows a single gateway to store up to 1 petabyte of data previously stored on tape. Security is provided by encrypting data on-site, in-flight, as well as in the cloud using 256-bit AES encryption and SSL v3. Whitewater gateway provides a dual layer of encryption that ensures that any data moved into the cloud is not compromised, and it creates a complete end-to-end security solution for cloud storage. Since Whitewater is an asymmetric, stateless gateway, no hardware is needed in the cloud and you can recover the last known good state of a broken or destroyed Whitewater gateway to a new Whitewater gateway. Whitewater provides flexibility to scale cloud storage as the business requirements change. All capital expenditure planning required with tape and disk replication based solutions is avoided, saving organizations 30-50%.
Cloud Storage Overview
Introduction
Public cloud storage can provide easy access to secure, inexpensive storage from anywhere. Data is stored on multiple virtual or physical servers, generally hosted by third parties, rather than being hosted on customer-owned dedicated servers. Hosting companies operate large data centers, allowing customers to buy or lease storage capacity from them. Users can easily expand capacity almost without limit to support backup, archive and disaster recovery. The cloud provider administrators allocate storage resources according to the requirements of the customer. Amazon S3, AT&T Synaptic Storage as a Service, Microsoft Windows Azure cloud storage, Nirvanix Cloud Storage Network, and Rackspace Cloud Files are among the industry’s leading cloud storage providers. Each allows customers to store and retrieve any amount of data, at any time, from anywhere on the web. It gives users access to highly scalable, reliable, secure, fast and inexpensive storage that many industries have struggled to justify within their own IT ecosystems. The public cloud storage service aims to maximize benefits of scale and to pass those benefits on to customers.
Cloud Backup
On a day-to-day basis data sharing and data protection are the two most likely uses for cloud storage. Cloud backup consists of specialized backup technology and processes for protecting data by transmitting a copy of the data over a private or public wide area network to a private or public backup cloud storage provider. In a public cloud implementation, the storage is usually managed by a third-party service provider such as Amazon S3, AT&T Synaptic Storage as a Service, Microsoft Windows Azure cloud storage, Nirvanix Cloud Storage Network, and Rackspace Cloud Files. In conjunction with industry-leading storage hardware and services delivered through partners, Riverbed Whitewater gateway delivers powerful cloud backup capabilities that allow organizations to leverage cloud storage simply and easily for greater efficiency, control and data availability with enhanced security.
Commvault Simpana Architecture Overview
Commvault Simpana, with its revolutionary single-platform architecture, liberates companies from the expense and chaos of legacy data protection software not designed to handle today's IT realities. Modern data management is a tightly integrated blend

RIVERBED WHITEWATER DEPLOYMENT GUIDE
© 2011 Riverbed Technology. All rights reserved. 4
of snapshot, replication and persistent copies that are securely managed and accessible through a single, unified platform. Commvault Simpana is application, operating system, and disk aware. It quickly creates copies that are highly available, by integrating and leveraging hardware array-based snapshot technologies. Then, data is efficiently moved to appropriate tiers of storage—whether it be disk, tape, or cloud. This data can be seamlessly retrieved for multiple possible uses, including Disaster Recovery, Data Mining, eDiscovery , Compliance, or regulatory requirements. This end-to-end activity is what truly modern data management is all about. Commvault Simpana utilizes software modules that share a common set of back-end services to talk through the common platform. Backups can be directed to disk based libraries which can include windows shares such as CIFS based targets. See Diagram 1 Typical Commvault Simpana Network View for an image of a typical Simpana deployment.
Diagram 1 Typical Commvault Simpana Network View
Riverbed Whitewater Cloud Storage Gateway Overview
Figure 1 Whitewater Gateway
The Riverbed Whitewater gateway is a disk-to-disk backup and archive storage gateway with unique cloud storage capabilities. Whitewater gateways easily integrate into your existing backup infrastructure and cloud storage. All of the standard backup applications allow you to add a Whitewater gateway as a common target within its existing infrastructure. The backup server connects to the Whitewater gateway using standard CIFS or NFS protocols. When you backup to a Whitewater device, it performs byte-level inline deduplication of the backup data to minimize storage consumption and transmission times. Whitewater gateways also use their local disk cache for local storage and recovery of recent backups, providing LAN performance for the most likely restores. The Whitewater gateway then writes the deduplicated backup data to cloud storage, such as Amazon S3, AT&T Synaptic Storage as a Service, Nirvanix Cloud Storage Network, Microsoft Windows Azure, Rackspace Cloud Files, EMC Atmos, and OpenStack Object Storage. Whitewater devices also accelerate restores from the cloud by moving only deduplicated data over the WAN. The gateway management console enables you to manage all of this through a web browser interface.

RIVERBED WHITEWATER DEPLOYMENT GUIDE
© 2011 Riverbed Technology. All rights reserved. 5
Whitewater Features The Riverbed Whitewater gateway provides several features that help provide state-of-the-art, out-of-the-box data protection to the cloud. Ease of Use: Management of the gateway is achieved with a simple GUI interface accessed directly from your web browser. Compatibility: The gateway is designed to drop into the customer’s existing backup environment seamlessly, as a standard network-attached storage target. No need for rip-and-replace or a forklift upgrade. WAN Optimization: Using the WAN optimization, compression and deduplication technologies that are the cornerstone of current Riverbed solutions, Whitewater gateways dramatically improve performance when replicating data to, and restoring from, the cloud. Security: Using strong dual-layer encryption, data transferred to and from Whitewater is protected both in transit and at rest in the cloud. Fast Restore/recovery: The gateway can rebuild recent backups from its local disk cache, or if the full data set is not resident within the cache, the required data will quickly be retrieved from the cloud. In addition, if a site with a Whitewater gateway goes down, a Whitewater gateway in another location, like a disaster recovery (DR) site, can retrieve backups from the cloud to restore operations quickly. Near-infinite Scalability: With Whitewater gateways ability to access capacity from cloud storage providers, even the largest organizations can achieve offsite data protection in the cloud for all of their data. Flexibility: Available as a virtual machine or hardware gateway.
Whitewater Benefits
Enables you to outsource your backup storage infrastructure to the cloud using a ―pay-as-you-go‖ model to reduce costs.
Eliminates the need for tape and local backup disk storage, which have lower reliability than cloud storage and up to 30-50% higher capital and operational costs.
Uses inline deduplication techniques on data ingested from backup servers, further reducing the total cost of backup storage and bandwidth consumption.
It provides robust data security, encrypting backup data in transit from the backup server using SSLv3 encryption and AES 256-bit encryption for data at rest in the cloud.
Easily integrates into your existing backup infrastructure. It acts as CIFS or NFS share at the front end and as a cloud gateway that can write directly to cloud storage at the backend. You do not need to change your existing backup products or processes to deploy Whitewater gateways.
Improves DR availability by enabling a Whitewater gateway at the DR site to access backups that originated from a Whitewater gateway at the downed data center. To further accelerate recovery, a virtual Whitewater gateway can be used at the recovery site.
Deploying Whitewater Gateways with Commvault Simpana
Commvault Simpana with Riverbed Whitewater disk-to-disk backup and archive gateway provide users with a flexible, easy-to-configure and use solution that can be deployed with major cloud storage providers. The sections below provide example configurations and setup steps needed to begin using Whitewater gateways. For further information about performance tuning Simpana with Whitewater, please refer to the Whitewater Best Practices Guide for Backup Applications.

RIVERBED WHITEWATER DEPLOYMENT GUIDE
© 2011 Riverbed Technology. All rights reserved. 6
Commvault Simpana, Riverbed Whitewater Gateway, and Cloud Storage Configuration Example
Diagram 2 Logical Architecture View
Pre-deployment Checklist 1. Users will need a least one server that can act as the Simpana CommServe and MediaAgent server. This server needs a minimum of a dual core processor and 4GB RAM and 6GB of free hard disk space. Please check Commvault’s support site and related compatibility lists where applicable. http://documentation.commvault.com/commvault/release_9_0_0/books_online_1/english_us/system_requirements/commserve.htm 2. Obtain server systems and related software media supported by Windows 2008, Commvault Simpana and Riverbed Whitewater gateway. 3. A Whitewater physical gateway or virtual Whitewater needs to be online and connected to the physical network infrastructure. 4. All necessary software licenses from each vendor, including Riverbed, will need to be procured and set using vendor-specific guidelines. 5. Physical stacking and racking of equipment at each site. This includes all cabling and power need to be operational. Verify that all LAN and WAN connections are functioning to and from Internet and cloud storage provider(s) 6. Set up the Windows server(s) within an existing or newly created naming service such as Active Directory.

RIVERBED WHITEWATER DEPLOYMENT GUIDE
© 2011 Riverbed Technology. All rights reserved. 7
Cloud Storage Provider Required Tasks
Amazon S3
To sign up for Amazon S3:
1. Go to http://aws.amazon.com/s3 and click 2. Follow the on-screen instructions. 3. AWS will notify you by e-mail when your account is active and available for you to use. 4. Create a bucket: http://docs.amazonwebservices.com/AmazonS3/latest/gsg/CreatingABucket.html 5. Follow the link to continue with the process: http://docs.amazonwebservices.com/AmazonS3/latest/gsg 6. Make sure that you record the following information:
Access Key - Specify the access key (similar to the user name) for your Amazon S3 (AWS) account.
Secret Key - Specify the secret key (password) for your Amazon S3 provider account.
Bucket Name – Specify the bucket name created in step 4 above.
AT&T Synaptic Storage as a Service
To sign up for AT&T Synaptic Storage as a Service: 1. Go to the following website and click Sign Up Now: http://www.business.att.com/enterprise/Family/application-hosting-enterprise/storage-as-a-service-enterprise/ 2. Follow the on-screen instructions. 3. Receive the confirmation email and login to the AT&T Synaptic Storage as a Service website. 4. Record the following information:
Tenant ID - Specify the tenant ID that AT&T Synaptic Storage as a Service uses to authenticate each request.
UID - Specify the application ID (also known as UID) used to authenticate each request.
Shared Secret - Specify the shared secret that AT&T Synaptic Storage as a Service uses to authenticate each request.
Nirvanix Cloud Storage Network
To sign up for Nirvanix Cloud Storage Network:
1. Go to http://www.nirvanix.com/how-to-buy/index.aspx and click 2. Follow the on-screen instructions. 3. Receive the confirmation email and login to the Nirvanix Cloud Storage Network: https://nmp.nirvanix.com/default.aspx 4. Create an application name, and record the following information related to that application:
Application Key - Specify the application key established during account registration.
Application Name - Specify the application key established during account registration.
UserName - Specify the user account name established during account registration.
Password - Specify the password established during account registration. Note: Users can get the Application Name/Key by going to https://nmp.nirvanix.com/applications.aspx

RIVERBED WHITEWATER DEPLOYMENT GUIDE
© 2011 Riverbed Technology. All rights reserved. 8
EMC Atmos
Please refer to EMC Atmos documentation for information about preparing an EMC Atmos system for use with Whitewater. When ready, EMC Atmos will provide the following information for you to enter to Whitewater:
Host Name – Hostname or IP address of the EMC Atmos system.
Sub Tenant ID – Specify the tenant ID that is used to authenticate each request.
UID – Specify the user ID that is used to authenticate each request.
Shared Secret - Specify the shared secret used to authenticate each request.
Microsoft Windows Azure
To sign up for Microsoft Windows Azure:
1. Go to http://www.microsoft.com/windowsazure/free-trial/ and click 2. Follow the on-screen instructions. 3. Perform account confirmation via phone or text message. 4. Login to the Azure portal https://windows.azure.com/Default.aspx and create a new Storage Account under Hosted Services, Storage Accounts & CDN. 5. Record the following information from the created storage account to enter into Whitewater:
Storage Account – Provide the name of the storage account created in Azure.
Primary/Secondary Key – Provide either the primary or secondary access key from the storage account created.
Rackspace Cloud Files
To sign up for Rackspace Cloud Files:
1. Go to https://signup.rackspacecloud.com/signup and sign up for 2. Once account registration is complete, login to the Rackspace portal: US: https://manage.rackspacecloud.com/pages/Login.jsp UK: https://lon.manage.rackspacecloud.com/pages/Login.jsp 3. Access Your Account > API Access, and record the following information to configure Whitewater:
Access Key – Provide the API key used to access the cloud account.
Username – Provide the user name associated with the account.
OpenStack Object Storage (Swift)
Please refer to OpenStack documentation (http://docs.openstack.org/) for information about deploying an OpenStack Object Storage cluster for use with Whitewater. You should have the following information ready to enter to Whitewater:
Host Name – Hostname or IP address of the OpenStack Object Storage Proxy server
Port – Port on which the OpenStack Object Storage Proxy server listens to
Username – Specify the username that is used to authenticate each request.
Password – Specify the password that is used to authenticate each request.

RIVERBED WHITEWATER DEPLOYMENT GUIDE
© 2011 Riverbed Technology. All rights reserved. 9
Configuring the Whitewater Gateway The Whitewater Installation Guide and Whitewater User’s Guide provide full details for requirements and installation of the Whitewater gateway. The configuration is broken down into the following activities:
Configuring the Whitewater Management Interface
Connecting to the Whitewater Management Console
Configuring Whitewater Licenses
Configuring Whitewater Data Interfaces
Configuring Cloud Settings
Configuring a CIFS Share
Configuring the Whitewater Management Interface
Once the gateway is installed and started connect to the Whitewater CLI to configure the management interface of Whitewater: 1. If using a virtual Whitewater gateway, connect directly to the console session using the VMware vSphere client and skip to step 3. If using a physical Whitewater gateway, plug the serial cable into the Console port and a terminal. 2. Start your terminal emulation program, such as Tera Term Pro. The terminal device must have the following settings: Baud rate: 9600 bps Data bits: 8 Parity: none Stop bits: 1 vt100 emulation No flow control Note: If you are using Whitewater with a terminal server, the terminal server must use hardware flow control for the port connected to Whitewater. 3. Log in as an administrator user (admin) and enter the default password (password): login as: admin password: password 4. The configuration wizard automatically starts after you have entered the login and default password. Enter yes at the system prompt to begin the configuration wizard. For example: Do you want to use the configuration wizard for initial configuration? yes 5. Complete the configuration wizard steps on the client side and server side:
Wizard Prompt Description Example
Step 1: Host name? Enter the host name for Whitewater. Step 1: Hostname? Amnesiac
Step 2: Use DHCP on the primary interface?
You are given the option to enable the DHCP to automatically assign an IP address to the primary interface for Whitewater. Riverbed recommends that you do not set DHCP. The default value is no.
Step 2: Use DHCP? no
Step 3: Primary IP address? Enter the IP address for Whitewater. Step 3: Primary IP address? 10.10.10.6
Step 4: Netmask? Enter the netmask address. Step 4: Netmask? 255.255.0.0
Step 5: Default gateway? Enter the default gateway for Whitewater. Step 5: Default gateway? 10.0.0.1
Step 6: Primary DNS server? Enter the primary DNS server IP address. You must specify the primary DNS server for cloud provider name resolution. If you do not specify a valid DNS server, the system will not start.
Step 6: Primary DNS server? 10.0.0.2
Step 7: Domain name? Enter the domain name for the network where Whitewater is to reside. If you set a domain name, you can enter host names in the system without the domain name.
Step 7: Domain name? example.com
Step 8: Admin password? Riverbed strongly recommends that you change the default administrator password (password) at this time. The new password must be a minimum of 6 characters.
Step 8: Admin password? xxxyyy
6. To log out of the system, enter the following command at the system prompt: amnesiac> exit

RIVERBED WHITEWATER DEPLOYMENT GUIDE
© 2011 Riverbed Technology. All rights reserved. 10
Connecting to the Management Console GUI
After you configure Whitewater, you can verify and modify your configuration settings and view performance reports and system logs in the Management Console. You can connect to the Management Console through any supported Web browser. To connect to the Management Console you must know the host, domain, and administrator password that you assigned in the configuration wizard. Note: Cookies and JavaScript must be enabled in your Web browser. To connect to the Management Console 1. Enter the URL for the Management Console in the location box of your Web browser: protocol://host.domain – protocol is http or https. HTTPS uses the SSL protocol to ensure a secure environment. If you use HTTPS to connect you are prompted to inspect and verify the SSL key. – host is the host name you assigned to Whitewater during initial configuration. If your DNS server maps that IP address to a name, you can specify the DNS name. – domain is the full domain name for Whitewater. Note: Alternatively, you can specify the IP address instead of the host and domain. 2. The Management Console appears, displaying the login page as shown in Figure 2.
Figure 2 Riverbed Whitewater Management Console
-In the Username text box, type the user login: admin or monitor. The default login is admin. Users with administrator (admin) privileges can configure and administer Whitewater. Users with monitor (monitor) privileges can view connected Whitewaters, reports, and system logs. -In the Password text box, type the password that you assigned in the configuration wizard. By default the password is password. -Click Log In to display the Home page. The Home page summarizes the current status of your system.

RIVERBED WHITEWATER DEPLOYMENT GUIDE
© 2011 Riverbed Technology. All rights reserved. 11
Configuring Whitewater Licenses
You can add or remove a license in the Configure > Maintenance > Licenses page. You install a license on a Whitewater gateway after receiving it from Riverbed Technical Support or Sales. To add or remove a license: 1. Choose Configure > Maintenance > Licenses to display the Licenses page, as shown in Figure 3.
Figure 3 Whitewater Gateway Licenses Page
2. Complete the configuration as described in the following table.
Control Description
Add a New License Displays the controls (licenses text box) to add a new license.
Remove Selected Displays the controls to remove a license. Select the license you wish to delete and click Remove Selected to delete it.
Licenses Text Box Copy and paste the license key provided by Riverbed Technical Support or Sales into the text box. Tip: Separate multiple license keys with a space, Tab, or Enter.
Add Adds the license.
3. Click Save to save your settings permanently.
Configuring Whitewater Data Interfaces
You can view and modify settings for the data interfaces in the Configure > Networking > Data Interfaces page. To display and modify the configuration for data interfaces: 1. Choose Configure > Networking > Data Interfaces to display the Data Interfaces page, as shown in Figure 4.
Figure 4 Whitewater Data Interface Page

RIVERBED WHITEWATER DEPLOYMENT GUIDE
© 2011 Riverbed Technology. All rights reserved. 12
2. Under Data Network Interfaces, complete the configuration as described in the following table.
Control Description
Network Interface Displays the controls to add a network interface. Click the magnifying glass icon next to an interface to display the controls to configure the interface. Riverbed recommends that you use the network interfaces for backup and LAN traffic.
IP Configuration Displays the IP address of the network interface.
Enable Data Interface
Check this check box to enable the data interface and specify the following settings: • IPv4 Address - Specify an IP address. • IPv4 Subnet Mask - Specify a subnet mask. • Data Gateway IP - Specify the data gateway IP address. The data gateway must be in the same network as the data interface. • Speed - Select a speed from the drop-down list. The default value is Auto. • Duplex - Select Auto, Full, or Half from the drop-down list. The default value is Auto. If your network routers or switches do not automatically negotiate the speed and duplex, be sure to set them manually. The speed and duplex must match in an interface configuration. If they do not match, you might have a large number of errors on the interface when it is in bypass mode, because the switch and the router are not set with the same duplex settings. • MTU - Specify the MTU value. The MTU is the largest physical packet size, measured in bytes, that a network can send. The default value is 1500.
3. Under Routing Table for <network interface> (for example, Routing Table for eth0_0), configure a static routing in the routing table if your device management network requires static routes. You can add or remove routes from the table as described in following table. Click Apply to apply your changes to the running configuration, and click Save to save your changes permanently.
Control Description
Add a New Route Displays the controls for adding a new route.
Destination Specify the destination IP address for the gateway.
Subnet Mask Specify the subnet mask.
Gateway Specify the IP address for the gateway. The gateway must be in the same network as the network interface you are configuring.
Add Adds the route to the table list.
Remove Selected Check the check box next to the name and click Remove Selected.
Configuring Cloud Settings
You can specify cloud settings, replication scheduling, and bandwidth limit settings in the Configure > Storage > Cloud Settings page. Replication is the process that transfers deduplicated data from Whitewater to the cloud asynchronously. A storage replication service provides an extra measure of redundancy that can be invaluable if the main storage backup system fails. Immediate access to the replicated data minimizes downtime and its associated costs. Replication streamlines disaster recovery processes by generating duplicate copies of all backed-up files on a continuous basis. It can also simplify recovery from all types of disasters including fire, flood, hurricane, virus, or worm. Note: Before you configure cloud settings, configure DNS settings to access the cloud service provider host machine. To configure cloud settings: 1. Choose Configure > Storage > Cloud Settings to display the Cloud Settings page, as shown in Figure 5.
Figure 5 Cloud Settings Page

RIVERBED WHITEWATER DEPLOYMENT GUIDE
© 2011 Riverbed Technology. All rights reserved. 13
2. Under Cloud Settings, complete the configuration as described in the following table.
Control Description
Protocol Typex
Select the cloud service provider from the drop-down menu. If you select Amazon S3, you must also specify the following: • Access Key - Specify the access key (similar to the user name) for your Amazon S3 (AWS) account. • Secret Key - Specify the secret key (password) for your cloud service provider account. If you select AT&T Synaptic Storage, you must specify the following: • Sub Tenant ID - Specify the sub tenant ID that AT&T Synaptic Storage uses to authenticate each request. • UID - Specify the user ID that AT&T Synaptic Storage uses to authenticate each request. • Shared Secret - Specify the shared secret that AT&T Synaptic Storage uses to authenticate each request. When the client application builds a Web service request, AT&T Synaptic Storage uses the shared secret to create a signature entry as a part of the request. The shared secret must be associated with the tenant ID and application ID created by AT&T Synaptic Storage. If you select Nirvanix Storage, you must specify the following: • Application Key - Specify the application (access) key for your Nirvanix Storage account. • Application Name - Specify the application name of your Nirvanix Storage account. • Username - Specify the user name that Nirvanix Storage uses to authenticate each request. • Password - Specify the password that Nirvanix Storage uses to authenticate each request. If you select EMC Atmos, you must specify the following: • Sub Tenant ID - Specify the subtenant ID that EMC Atmos uses to authenticate each request. • UID - Specify the user ID that EMC Atmos uses to authenticate each request. • Shared Secret - Specify the shared secret that EMC Atmos uses to authenticate each request. When the client application builds a Web service request, EMC Atmos uses the shared secret to create a signature entry as a part of the request. The shared secret must be associated with the subtenant ID and application ID created by the EMC Atmos-based storage provider. If you select Microsoft Windows Azure, you must specify the following: • Storage Account – Provide the name of the storage account created in Azure. • Primary/Secondary Key – Provide either the primary or secondary access key from the storage account created. If you select Rackspace Cloud Files, you must specify the following: • Access Key - Specify the access key for the Rackspace account. • Username - Specify the user name associated with the Rackspace account. If you select OpenStack Object Storage, you must specify the following: • Password - Specify the password that OpenStack uses to authenticate each request. • Username - Specify the user name that OpenStack uses to authenticate each request.
Hostname Specify the hostname of the cloud provider on which Whitewater stores the replicated data. For example, s3.amazonaws.com or storage.synaptic.att.com.
Port Specify the port through which replication occurs. Amazon uses port 80, which is an unsecured port, or port 443, which is a secure port. AT&T Synaptic Storage, Nirvanix Storage, and EMC Atmos use port 443. The default value is 443, which works for all cloud providers.
Bucket Name Specify the bucket name associated with your cloud service provider account. Buckets are containers (similar to folders) that store deduplicated data sent from Whitewater.
Configuring a CIFS Share
You can configure Common Internet File System (CIFS) access to Whitewater in the Configure > Storage > CIFS page. CIFS is a protocol that allows programs to make requests for files and services on remote computers on the Internet. The share you configured appears in the list of shares on the page. When you add a CIFS share to Whitewater, you can enable authentication or leave it disabled (allowing all users to access the CIFS share). If you enable authentication, you must add CIFS users who can access the share.To configure CIFS: 1. Choose Configure > Storage > CIFS to display the CIFS page, as shown in Figure 6.
Figure 6 Adding a CIFS Share

RIVERBED WHITEWATER DEPLOYMENT GUIDE
© 2011 Riverbed Technology. All rights reserved. 14
2. To add a CIFS share, complete the configuration as described in the following table.
Control Description
Add CIFS Share Displays the controls to add a new CIFS share.
Share Name Specify the name of the share to be added.
Path Specify the pathname to the share to be added. It starts with a forward slash (/).
Comment Specify a comment about the share.
Read Only Check this check box if you want the share to be a read-only share.
Authentication Required Check this check box to allow only the users in the CIFS users list to access the CIFS share. If you enable authentication, you must add CIFS users who can access the share. For details, see step 3.
Allow All Clients Enables all clients connected to the Whitewater system to access the CIFS share.
Allow Specified Clients Enables only the clients that you specify to connect to the Whitewater system to access the CIFS share. If you select this option, you must specify the client’s IP address and subnet mask in the text field below it.
Remove Selected Deletes the selected CIFS share.
Add Adds the CIFS share to the Whitewater.
3. To add a CIFS user, complete the configuration as described in the following table.
Control Description
Add CIFS User Displays the controls to add a user to the Whitewater CIFS server.
User Name Specify the user name of a user to access the CIFS shares.
Password Specify the password to authenticate the user.
Password Confirm Specify the password again to confirm authentication.
Remove Selected Deletes the selected user name from the CIFS server.
Add Adds the user name and password to the Whitewater CIFS server.
4. Under SMB Signing Settings, select one of the following values for SMB (Server Message Block) signing: Disabled - The CIFS server does not offer SMB signing. This is the default value. Auto - Enables SMB signing automatically. The CIFS server offers SMB signing, but does not enforce it. You can choose to enable or disable it. Mandatory - The CIFS server enforces SMB signing. You must use SMB signing if you select this option. Note: Windows provides the ability to sign CIFS messages to prevent man-in-the-middle attacks when sharing files. Each CIFS message has a unique signature, which prevents the message from being tampered with. Note: Enabling SMB signing degrades Whitewater performance.

RIVERBED WHITEWATER DEPLOYMENT GUIDE
© 2011 Riverbed Technology. All rights reserved. 15
Configuring Commvault Simpana The following sections describe how to configure and use Simpana with the Whitewater gateway - please refer to the Commvault Simpana Documentation for complete details:
Commvault Simpana CommCell Console Overview
Adding the Whitewater gateway to Commvault Simpana Tasks o Add a disk library to the MediaAgent o Create or associate a storage policy to the new disk library
Testing Simpana with the Whitewater Gateway
Monitoring a Job
Restore from Commvault Simpana using Whitewater
Commvault Simpana CommCell Console Overview
The Simpana CommCell Console is the interface that is used to configure all settings in a Simpana environment. In order for the Simpana CommCell console to make changes in a Simpana environment the CommCell console must point to the desired CommServe server. This is performed at setup time as shown in Figure 7.
Figure 7 CommCell Console Connection Panel
Adding a Whitewater Gateway to Commvault Simpana Task
When adding a Whitewater gateway to a Commvault Simpana environment there are two primary tasks that are required. The first is to add a disk libarary to the MediaAgent that points to Whitewater. The second is to modify the backup policy so client backups are directed to use the new disk library target. 1. Add a Disk Library to the MediaAgent (required) 2. Associate a Storage Policy to the New Disk Library (required)
1. Add a Disk Library to the MediaAgent
A library is used by a MediaAgent to communicate and store backup data on a specific device. For the purposes of this configuration, the library created will be configured to point to a Whitewater CIFS share, rather than a local disk volume.

RIVERBED WHITEWATER DEPLOYMENT GUIDE
© 2011 Riverbed Technology. All rights reserved. 16
Step 1. Expand the Storage Resources item from the left tree as shown in Figure 8. Select Libraries, and then right click and select Library & Drive Configuration.
Figure 8 Library & Drive Configuration Step 2. Identify the MediaAgent to use, and click the Add button to select it (Figure 9). Click OK to continue.
Figure 9 Select MediaAgent
Step 3. When the Library and Drive Configuration panel appears, select the Libraries icon, right click it and select Add > Disk Library (Figure 10).
Figure 10 Add a Disk Library

RIVERBED WHITEWATER DEPLOYMENT GUIDE
© 2011 Riverbed Technology. All rights reserved. 17
Step 4 Identify the Library name you wish to use, then click OK (Figure 11).
Figure 11 Library Name Selection
Step 5 Provide a base folder name to store the data in, and provide the fully qualified CIFS share name to the Whitewater target, as shown in Figure 12. Click OK to complete the library creation.
Figure 12 Shared Mount Path Identification

RIVERBED WHITEWATER DEPLOYMENT GUIDE
© 2011 Riverbed Technology. All rights reserved. 18
Step 6 Select the library in the list of libraries available, right click it and select Properties (Figure 13). When the Properties window appears select the Mount Paths tab and set the Allocate Number of Writers value (Figure 14).
Figure 13 Library Properties
Figure 14 Mount Path Allocate Number of Writers
Allocate Number of Writers
Establishes how many writes are allowed by data protection clients. It is recommended to set an initial value of 5.

RIVERBED WHITEWATER DEPLOYMENT GUIDE
© 2011 Riverbed Technology. All rights reserved. 19
Step 7 Now select the mount path for the library selected in step 6, right click it and select Properties (Figure 15). In the Device Paths tab, set the Allocate Number of Writers value (Figure 16).
Figure 15 Mount Path Properties
Figure 16 Device Paths Allocate Number of Writers
Allocate Number of Writers
Establishes how many writes are allowed by data protection clients. It is recommended to set an initial value of 5.

RIVERBED WHITEWATER DEPLOYMENT GUIDE
© 2011 Riverbed Technology. All rights reserved. 20
2. Create or Associate a Storage Policy to the New Disk Library
Storage policies act as the primary channels through which data is included in data protection and data recovery operations. A storage policy forms the primary logical entity through which a subclient or instance is backed up. Its chief function is to map data from its original location to a physical media. Create a New Storage Policy
Step 1. If creating a policy, use the Policies section of the CommCell console and select Storage Policies. Right click and select New Policy (Figure 17)Figure 25.
Figure 17 Create New Storage Policy
Step 2. When the new policy wizard window appears (Figure 18), select Data Protection And Archiving and click Next.
Figure 18 Copy Data Path Selection

RIVERBED WHITEWATER DEPLOYMENT GUIDE
© 2011 Riverbed Technology. All rights reserved. 21
Step 3. Provide a unique storage policy name, and click Next (Figure 19).
Figure 19 Policy Name
Step 4. Select the previously created library to use for this storage policy and click Next (Figure 20).
Figure 20 Library Selection

RIVERBED WHITEWATER DEPLOYMENT GUIDE
© 2011 Riverbed Technology. All rights reserved. 22
Step 5. Select the MediaAgent from the drop down list and click Next (Figure 21).
Figure 21 MediaAgent Selection
Step 6. Enter the number of device streams and provide retention settings, then click Next ().
Figure 22 Streams and Retention Settings
Number of Device Streams
Establishes how many writes are allowed by data protection clients. It is recommended to set an initial value of 5. iDataAgent Backup Data
Define the number of days and versions to hold backup data copies. Data Archive/Compliance Archiver
Define the number of days to hold archive data copies.

RIVERBED WHITEWATER DEPLOYMENT GUIDE
© 2011 Riverbed Technology. All rights reserved. 23
Step 7. Disable deduplication, and click Next (Figure 23).
Figure 23 Deduplication Selection
Step 8. Verify the selections from the wizard and click Finish to create the storage policy (Figure 24).
Figure 24 Finalize New Storage Policy Settings
RIVERBED WHITEWATER DEPLOYMENT GUIDE
© 2011 Riverbed Technology. All rights reserved. 24
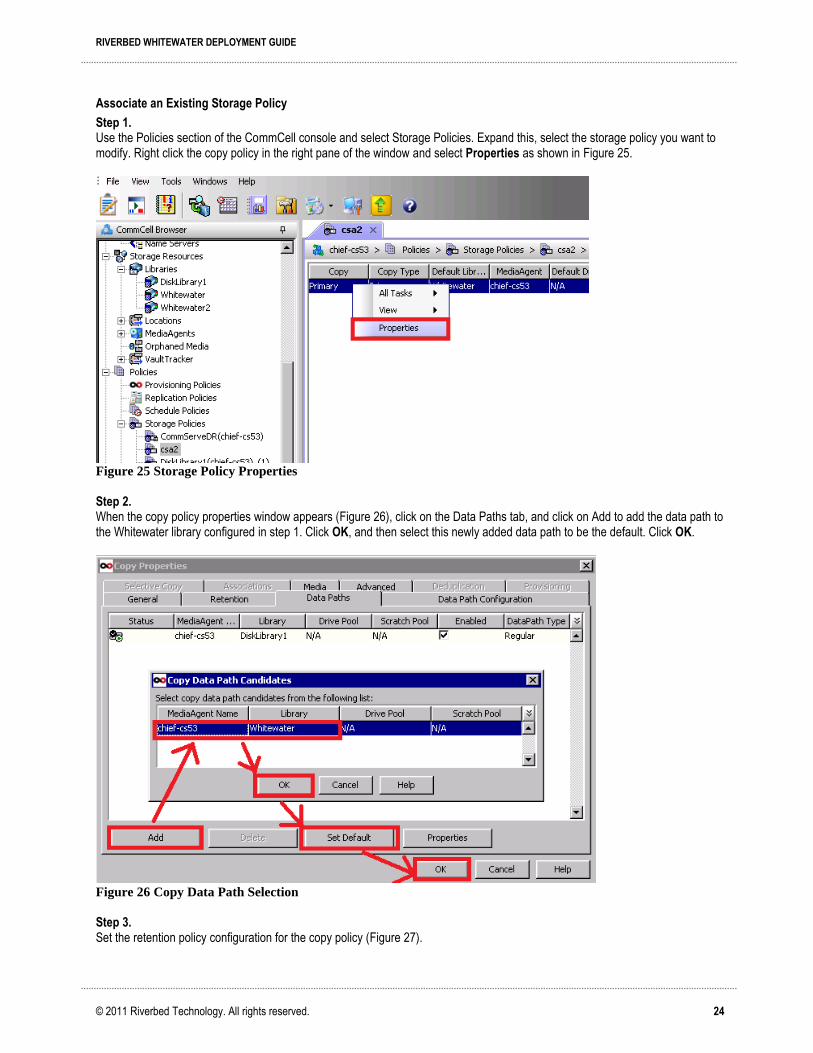
Associate an Existing Storage Policy
Step 1. Use the Policies section of the CommCell console and select Storage Policies. Expand this, select the storage policy you want to modify. Right click the copy policy in the right pane of the window and select Properties as shown in Figure 25.
Figure 25 Storage Policy Properties
Step 2. When the copy policy properties window appears (Figure 26), click on the Data Paths tab, and click on Add to add the data path to the Whitewater library configured in step 1. Click OK, and then select this newly added data path to be the default. Click OK.
Figure 26 Copy Data Path Selection
Step 3. Set the retention policy configuration for the copy policy (Figure 27).

RIVERBED WHITEWATER DEPLOYMENT GUIDE
© 2011 Riverbed Technology. All rights reserved. 25
Figure 27 Retention Settings
Enable Managed Disk Space for Disk Data
Controls whether the free space is used to hold out of retention versions of backup data. Disabled by default or when the backup retention is set to Infinite. Configure according to business requirements.
Basic Retention Rules for All Backups
Specify the retention days and versions to hold backup and archive data. Default is to hold backups and archives Infinitely. Configure according to business requirements.

RIVERBED WHITEWATER DEPLOYMENT GUIDE
© 2011 Riverbed Technology. All rights reserved. 26
Testing Commvault Simpana with Whitewater
Backup to Whitewater Using Commvault Simpana
To test Simpana with the Whitewater gateway you can run a manual backup of a client computer that uses a storage policy configured in the previous step. Step1. Select the client computer to backup from the Client Computers section of the CommCell console, and select the type of backup to modify. In the right pane, right click the subclient name and select Properties (Figure 28).
Figure 28 Initiating a Manual Backup
Step 2. In the properties panel that appears, select the Storage Device tab, and under the Data Storage Policy tab make sure that the storage policy that has been previously modified is selected (Figure 29).
Figure 29 Storage Policy Selection

RIVERBED WHITEWATER DEPLOYMENT GUIDE
© 2011 Riverbed Technology. All rights reserved. 27
Step 3. Moving to the Data Transfer Option tab, make sure that software compression is disabled (Figure 30).
Figure 30 Data Transfer Option for Compression
Step 4. Finally in the Deduplication tab (Figure 31), disable the checkbox Enable Deduplication if selected. Click OK.
Figure 31 Disable Deduplication

RIVERBED WHITEWATER DEPLOYMENT GUIDE
© 2011 Riverbed Technology. All rights reserved. 28
Step 5. Finally, right click on the subclient name, and select Backup (Figure 32). In the window that appears select the backup type, whether to schedule or run the backup immediately, and select OK (Figure 33).
Figure 32 Backup Action
Figure 33 Backup Options

RIVERBED WHITEWATER DEPLOYMENT GUIDE
© 2011 Riverbed Technology. All rights reserved. 29
Monitoring a Job
Use the Job Controller view within the left tree of the CommCell Console to monitor and control backup jobs. The current running backup jobs are reported under the right panel of the window (Figure 34), and a detailed view can be accessed by right clicking on the job name and selecting Details.
Figure 34 Job Sessions and Results
Restore from Commvault Simpana using Whitewater
The Commvault CommCell Console can also be used to perform restores of backup data for clients. Jobs are not required to perform recovery, but instead Commvault provides a recovery tool. Step 1. Click on the Browse & Recover button from the Commvault menu as shown in Figure 35 to launch the recovery tool.
Figure 35 Recovery Initialization

RIVERBED WHITEWATER DEPLOYMENT GUIDE
© 2011 Riverbed Technology. All rights reserved. 30
Step 2. Select the client computer which needs object recovery, and the MediaAgent that was used to store the backup data on Whitewater (Figure 36).
Figure 36 Client and MediaAgent Selection
Step 3. Expand the tree and select the objects to recover and click on the Recover All Selected button to initiate the restore (Figure 37).
Figure 37 Item Recovery Selection

RIVERBED WHITEWATER DEPLOYMENT GUIDE
© 2011 Riverbed Technology. All rights reserved. 31
Whitewater Solution Reporting Whitewater gateways provide detailed reporting about activity that has occurred on the system. You can review throughput of backup activity into the Whitewater gateway from Commvault Simpana, throughput from the gateway out to the cloud, pending data that is outbound to the cloud, and storage optimization rates of Whitewater deduplication activity.
About Report Graphs
In bar-graph and line-graph reports, the x-axis (or tick mark) plots time, according to the interval you select. The y-axis plots the metric of interest such as gigabytes of bandwidth and throughput. Three triangles near the top margin of the graph point to the value on the x-axis (the time) at which the peak occurred. The right margin of the graph points to the value on the y-axis (for example, the percent) that is the average value for the time period selected. Note: The reporting engine is a round-robin system that overwrites the old data periodically with new data to keep the size of the statistics database fixed. Samples over time are aggregated into more coarse data points. As of version 1.3 of the Whitewater solution, the reporting system keeps the following:
an hour’s worth of 5-second samples
a day’s worth of 5-minute samples
a week's worth of hour samples
a month's worth of 2-hour samples
Whitewater Throughput Report
To view the Throughput Optimization report Choose Reports > Optimization > Throughput to display the Throughput Optimization page. The Throughput Optimization report provides the following information:
Average front-end (CIFS/NFS) data that the backup server writes to the Whitewater gateway.
Total amount of data transferred from the backup server to the gateway.
Average front-end (CIFS/NFS) data read by the backup server.
Total amount of data transferred from the front-end CIFS or NFS system to the backup server.
Average back-end data read from the cloud by the gateway.
Total amount of back-end data transferred from the cloud to the gateway.
Average back-end data that Whitewater writes to the cloud.
Total amount of back-end data that Whitewater writes to the cloud.
Peak amount of data transmitted.
Current, expanded and deduplication factor of data stored on the gateway.

RIVERBED WHITEWATER DEPLOYMENT GUIDE
© 2011 Riverbed Technology. All rights reserved. 32
Whitewater Front End Throughout In
As shown in Figure 38, the Front End Thoughput In chart represents the collective sum of incoming backup data activity from Simpana to the Whitewater gateway. The value here would be the sum of the KB/s values from Commvault Simpana for all the active backup jobs to the Whitewater gateway at the time viewed in the chart.
Figure 38 Front End Throughput In

RIVERBED WHITEWATER DEPLOYMENT GUIDE
© 2011 Riverbed Technology. All rights reserved. 33
Whitewater Frontend Throughout Out
The graph shown in Figure 39 represents Front End Throughput Out statistics. These are the CIFS /NFS statistics read by the Simpana server such as for backup verification or restore activity.
Figure 39 Front End Throughput Out

RIVERBED WHITEWATER DEPLOYMENT GUIDE
© 2011 Riverbed Technology. All rights reserved. 34
Whitewater Back End Throughput Out
The graph shown in Figure 40 represents Back End Throughput out statistics. This is the amount of data written out to the cloud backup storage location from the Whitewater gateway.
Figure 40 Back End Throughput Out

RIVERBED WHITEWATER DEPLOYMENT GUIDE
© 2011 Riverbed Technology. All rights reserved. 35
Whitewater Storage Optimization Report
The Storage Optimization report summarizes the percentage of the data storage optimized within the time period specified. It includes statistics that describe the storage optimization activity for the time period you specify. Figure 41 shows the Expanded, Deduplicated and Deduplicated Factor (or ratio) statistics.
Figure 41 Storage Optimization and Deduplication Information

RIVERBED WHITEWATER DEPLOYMENT GUIDE
© 2011 Riverbed Technology. All rights reserved. 36
Whitewater Optimization Replication Bytes Pending Report
This Replication Bytes Pending report (Figure 42) shows the total number of bytes still pending to be replicated to the cloud from the Whitewater gateway. The amount of pending data to be replicated to the cloud will depend on the Front End Throughput In performance, and the speed of the WAN link to the cloud service provider.
Figure 42 Optimization Pending Bytes Report Example

RIVERBED WHITEWATER DEPLOYMENT GUIDE
© 2011 Riverbed Technology. All rights reserved. 37
Whitewater Diagnostics “View System Logs” Report
The Diagnostics Systems Logs report offers the user the ability to view vital and current system-related messages and events that are occurring on the Whitewater gateway. Messages help administrators troubleshoot and validate that the gateway is running properly (Figure 43).
Figure 43 Diagnostics View System Logs Report

RIVERBED WHITEWATER DEPLOYMENT GUIDE
© 2011 Riverbed Technology. All rights reserved. 38
Conclusion Riverbed is extending its industry-proven deduplication to cloud storage. Riverbed deduplication make replication more efficient than in the past by reducing the amount of data that is transferred. Now, the Whitewater gateway will extend those industry-leading deduplication capabilities to cloud storage, cutting the cost of data backup and disaster recovery by significantly reducing the capital and operational costs of storage consumed as well as the bandwidth requirements for moving backup data into and out of the cloud. Backup policies can easily be reconfigured to take advantage of Riverbeds core technology strengths, resulting in improved backup and recovery benefits and increasing availability of data to users.
About Riverbed Riverbed delivers performance for the globally connected enterprise. With Riverbed, enterprises can successfully and intelligently implement strategic initiatives such as virtualization, consolidation, cloud computing, and disaster recovery without fear of compromising performance. By giving enterprises the platform they need to understand, optimize and consolidate their IT, Riverbed helps enterprises to build a fast, fluid and dynamic IT architecture that aligns with the business needs of the organization. Additional information about Riverbed (NASDAQ: RVBD) is available at www.riverbed.com.
Riverbed Technology, Inc. 199 Fremont Street San Francisco, CA 94105 Tel: (415) 247-8800 www.riverbed.com
Riverbed Technology Ltd. Farley Hall, London Road, Level 2 Binfield, Bracknell Berks RG42 4EU Tel: +44 1344 401900
Riverbed Technology Pte. Ltd. 391A Orchard Road #22-06/10 Ngee Ann City Tower A Singapore 238873 Tel: +65 6508-7400
Riverbed Technology K.K. Shiba-Koen Plaza Building 9F 3-6-9, Shiba, Minato-ku Tokyo, Japan 105-0014 Tel: +81 3 5419 1990