welcome to dhl proview user guide
TRANSCRIPT
welcome to dhl PRoVIewUSeR GUIde
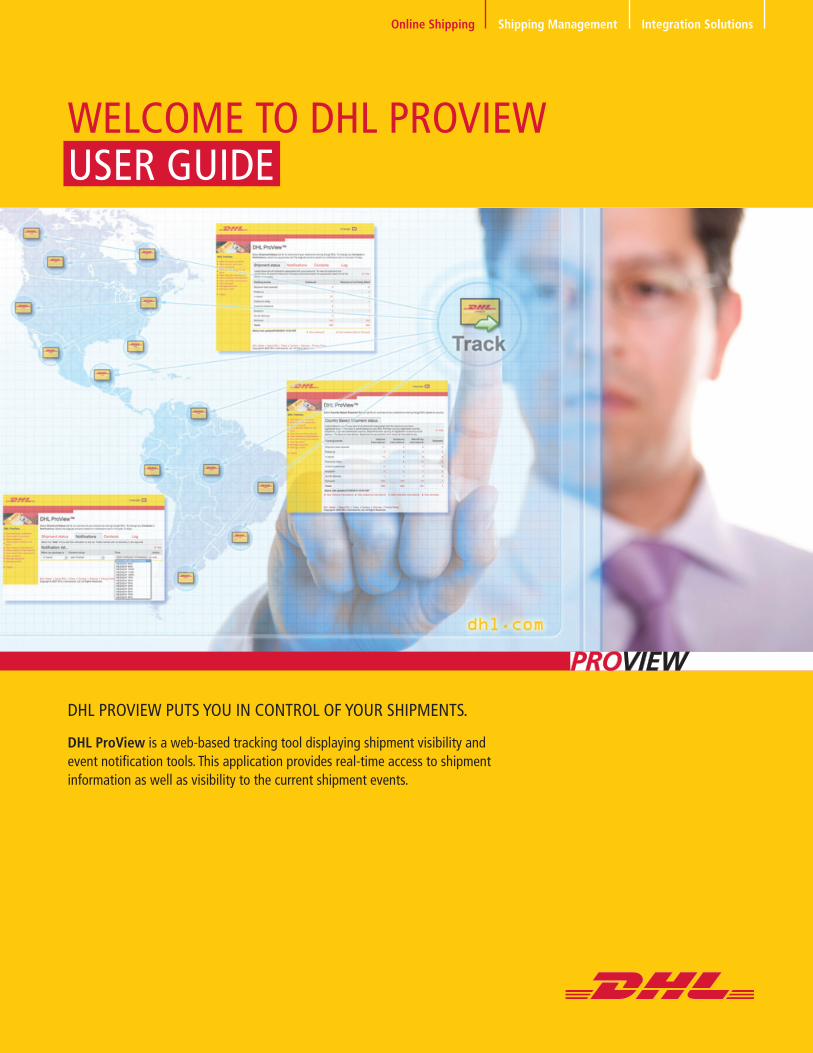
DHL ProView is a web-based tracking tool displaying shipment visibility and event notification tools. this application provides real-time access to shipment information as well as visibility to the current shipment events.
dhl PRoVIew PUtS YoU IN coNtRol oF YoUR ShIPmeNtS.
PROVIEW
Integration SolutionsShipping ManagementOnline Shipping
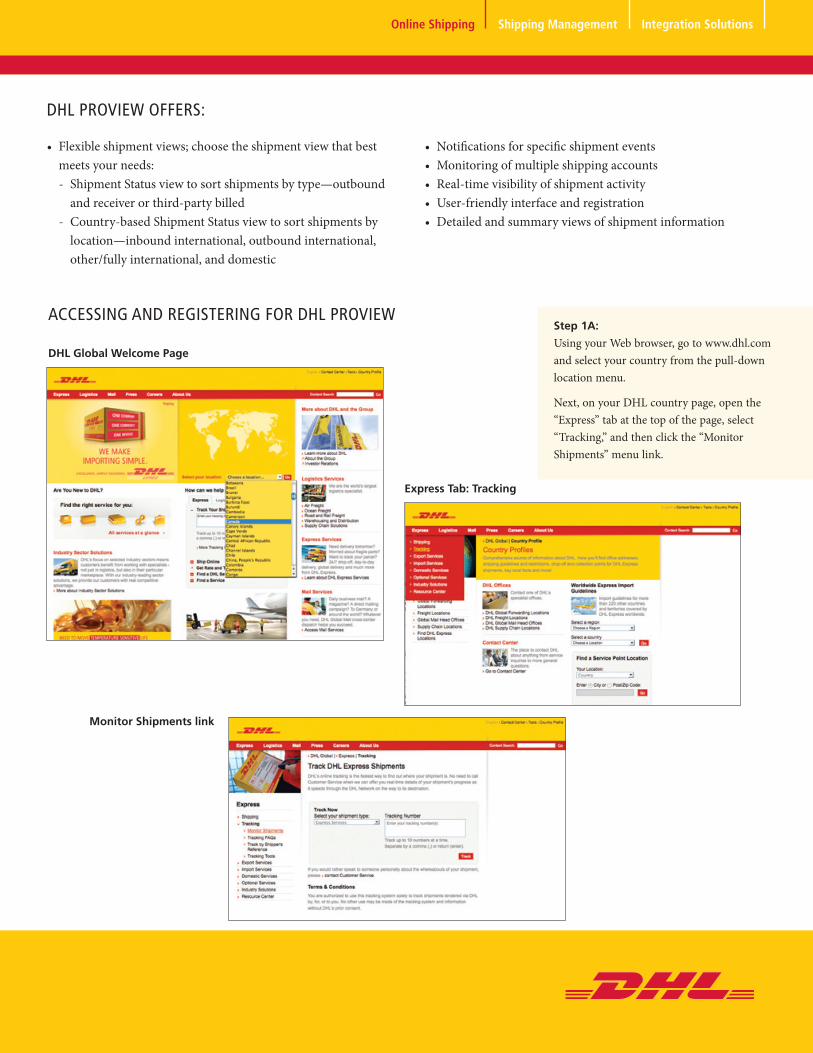
DHL Global Welcome Page
Step 1A:
Using your Web browser, go to www.dhl.com and select your country from the pull-down location menu.
Next, on your DHL country page, open the “Express” tab at the top of the page, select “Tracking,” and then click the “Monitor Shipments” menu link.
AcceSSING ANd ReGISteRING FoR dhl PRoVIew
• Notifications for specific shipment events• Monitoring of multiple shipping accounts• Real-time visibility of shipment activity• User-friendly interface and registration• Detailed and summary views of shipment information
• Flexible shipment views; choose the shipment view that bestmeets your needs:- Shipment Status view to sort shipments by type—outbound
and receiver or third-party billed- Country-based Shipment Status view to sort shipments by
location—inbound international, outbound international, other/fully international, and domestic
dhl PRoVIew oFFeRS:
Express Tab: Tracking
Monitor Shipments link
Integration SolutionsShipping ManagementOnline Shipping
Tip
even though you can register for DHL ProView
without having requested a dhl-generated PIN,
you may want go ahead and request one at this
time since it may take up to 24 hours to validate
your information and receive a confirmation
e-mail. Until you receive a corresponding PIN,
you will not have shipment visibility for your dhl
shipping accounts.
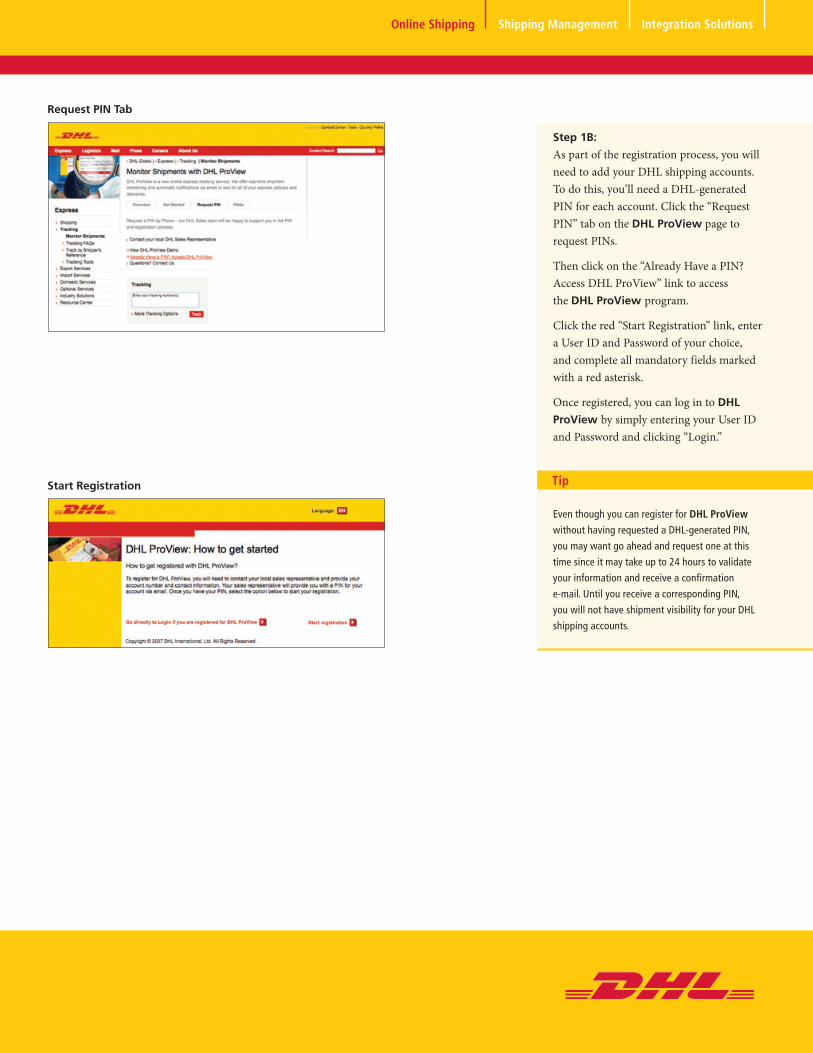
Request PIN Tab
Start Registration
Step 1B:
As part of the registration process, you will need to add your DHL shipping accounts. To do this, you’ll need a DHL-generated PIN for each account. Click the “Request PIN” tab on the DHL ProView page to request PINs.
Then click on the “Already Have a PIN? Access DHL ProView” link to access the DHL ProView program.
Click the red “Start Registration” link, enter a User ID and Password of your choice, and complete all mandatory fields marked with a red asterisk.
Once registered, you can log in to DHL
ProView by simply entering your User ID and Password and clicking “Login.”
Integration SolutionsShipping ManagementOnline Shipping
Note
the maximum number of accounts you may import
per file is 1999. while importing, if any invalid
account numbers and PIN combinations are found,
these individual entries will be rejected. the
system will not allow for duplicate entries.
when you add accounts, it can take up to 24 hours
for the data to appear in DHL ProView. After that,
all data will be real time. Shipment activity that
occurred prior to adding the account will not
appear in DHL ProView.
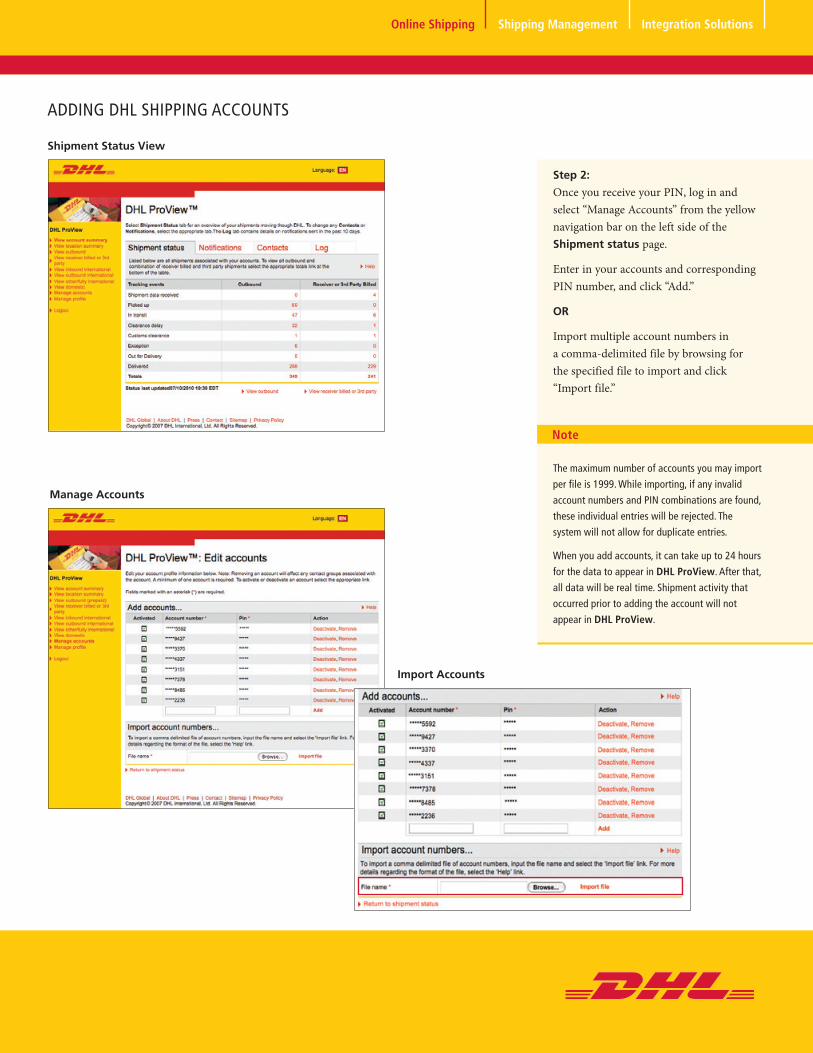
Shipment Status View
Manage Accounts
Step 2:
Once you receive your PIN, log in and select “Manage Accounts” from the yellow navigation bar on the left side of the Shipment status page.
Enter in your accounts and corresponding PIN number, and click “Add.”
OR
Import multiple account numbers in a comma-delimited file by browsing for the specified file to import and click “Import file.”
AddING dhl ShIPPING AccoUNtS
Import Accounts
Integration SolutionsShipping ManagementOnline Shipping
Tip
once a contact has been added, the e-mail
addresses and mobile numbers entered can be
tested. click on “test” in the Action column.
A separate dialog window will open to send the
test message. You will receive confirmation that
the message has been sent via e-mail or SmS,
respectively. If the test message is received at
the designated e-mail address or mobile number
then the test operation has been successful.
You can return to the Contacts tab at any time
to add or edit contacts. You can add an unlimited
number of customers and colleagues to this list.
Contacts Tab
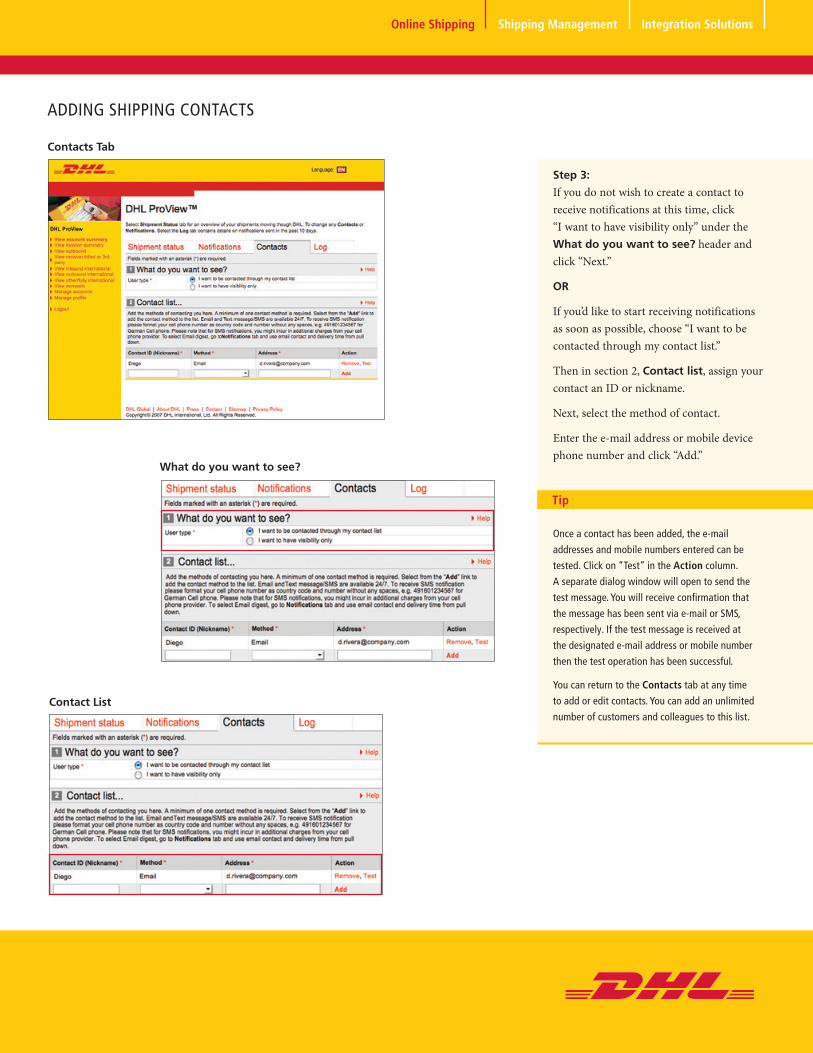
Step 3:
If you do not wish to create a contact to receive notifications at this time, click “I want to have visibility only” under the What do you want to see? header and click “Next.”
OR
If you’d like to start receiving notifications as soon as possible, choose “I want to be contacted through my contact list.”
Then in section 2, Contact list, assign your contact an ID or nickname.
Next, select the method of contact.
Enter the e-mail address or mobile device phone number and click “Add.”
AddING ShIPPING coNtActS
What do you want to see?
Contact List
Integration SolutionsShipping ManagementOnline Shipping
Tips
to receive the update as soon as it occurs, choose
the “Send notification immediately” option under
the Time column.
If an e-mail digest is Not preferred at this time,
choose “do not contact” from the Contact me by
menu.
Notifications Tab
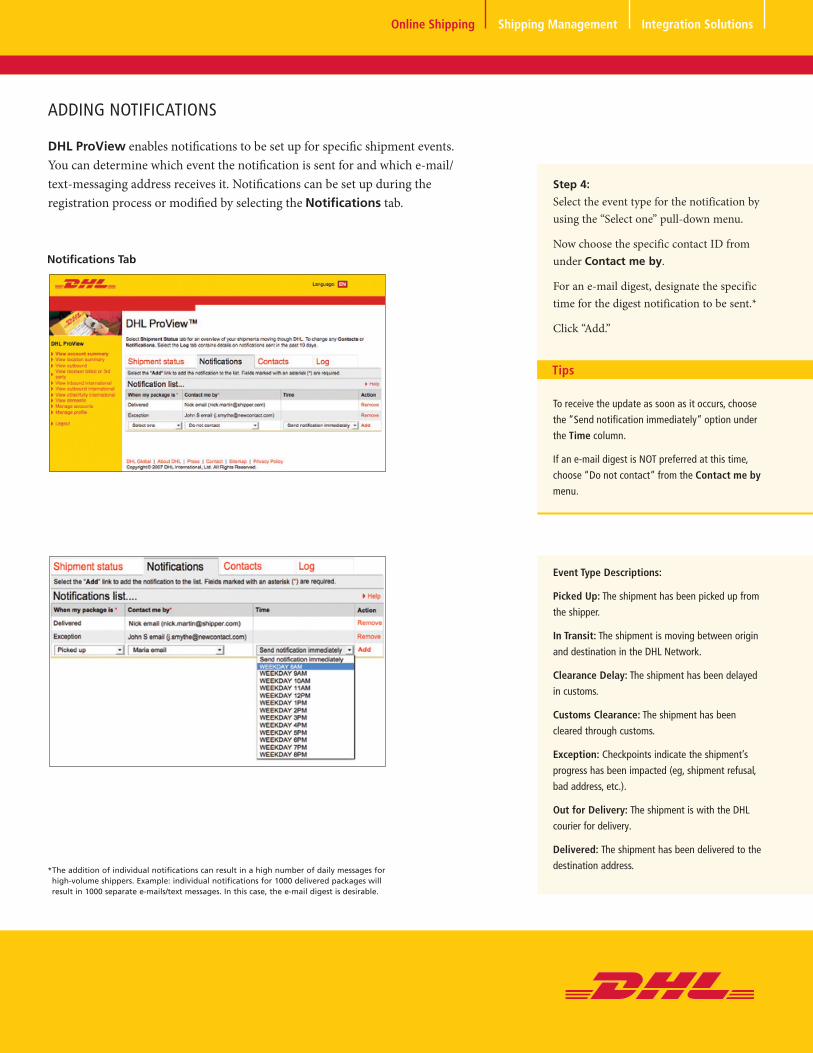
Step 4:
Select the event type for the notification by using the “Select one” pull-down menu.
Now choose the specific contact ID from under Contact me by.
For an e-mail digest, designate the specific time for the digest notification to be sent.*
Click “Add.”
* The addition of individual notifications can result in a high number of daily messages for high-volume shippers. Example: individual notifications for 1000 delivered packages will result in 1000 separate e-mails/text messages. In this case, the e-mail digest is desirable.
Event Type Descriptions:
Picked Up: the shipment has been picked up from
the shipper.
In Transit: the shipment is moving between origin
and destination in the dhl Network.
Clearance Delay: the shipment has been delayed
in customs.
Customs Clearance: the shipment has been
cleared through customs.
Exception: checkpoints indicate the shipment’s
progress has been impacted (eg, shipment refusal,
bad address, etc.).
Out for Delivery: the shipment is with the dhl
courier for delivery.
Delivered: the shipment has been delivered to the
destination address.
DHL ProView enables notifications to be set up for specific shipment events. You can determine which event the notification is sent for and which e-mail/text-messaging address receives it. Notifications can be set up during the registration process or modified by selecting the Notifications tab.
AddING NotIFIcAtIoNS
Integration SolutionsShipping ManagementOnline Shipping
Tip
Because the billing categories contain information
in real time, this view can be used to know at a
glance which shipments require your attention.
when you are not in the Shipment status view,
use the links in the yellow navigation bar to take
you to the view you need.
Shipment Status Tab
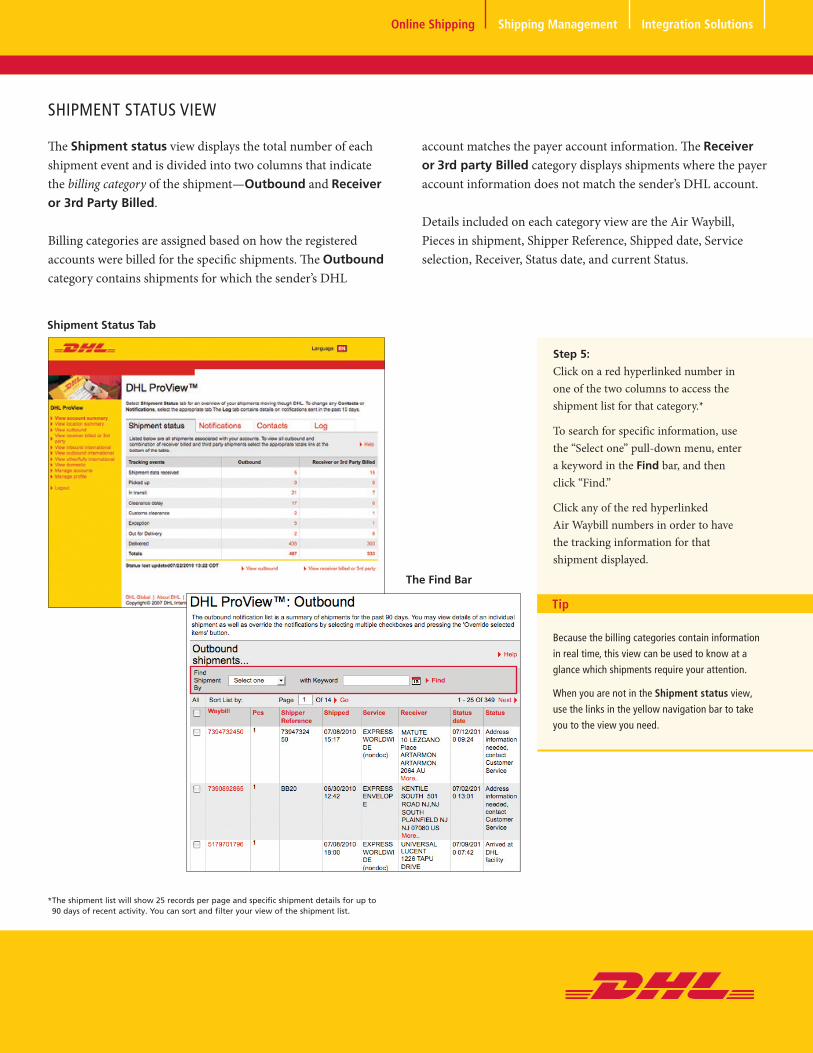
Step 5:
Click on a red hyperlinked number in one of the two columns to access the shipment list for that category.*
To search for specific information, use the “Select one” pull-down menu, enter a keyword in the Find bar, and then click “Find.”
Click any of the red hyperlinked Air Waybill numbers in order to have the tracking information for that shipment displayed.
* The shipment list will show 25 records per page and specific shipment details for up to 90 days of recent activity. You can sort and filter your view of the shipment list.
The Shipment status view displays the total number of each shipment event and is divided into two columns that indicate the billing category of the shipment—Outbound and Receiver
or 3rd Party Billed.
Billing categories are assigned based on how the registered accounts were billed for the specific shipments. The Outbound category contains shipments for which the sender’s DHL
account matches the payer account information. The Receiver or 3rd party Billed category displays shipments where the payer account information does not match the sender’s DHL account.
Details included on each category view are the Air Waybill, Pieces in shipment, Shipper Reference, Shipped date, Service selection, Receiver, Status date, and current Status.
ShIPmeNt StAtUS VIew
The Find Bar
Integration SolutionsShipping ManagementOnline Shipping
Tip
Because the four country-based status categories
contain information in real time, use this view
to access comprehensive information for the
specified destination status.
download any list in DHL ProView to save
information by clicking “download list” at the
bottom a table.
when you are not in the Country Based
Shipment status view, use the links in the yellow
navigation bar to take you to the view you need.
Country Based Shipment Tab
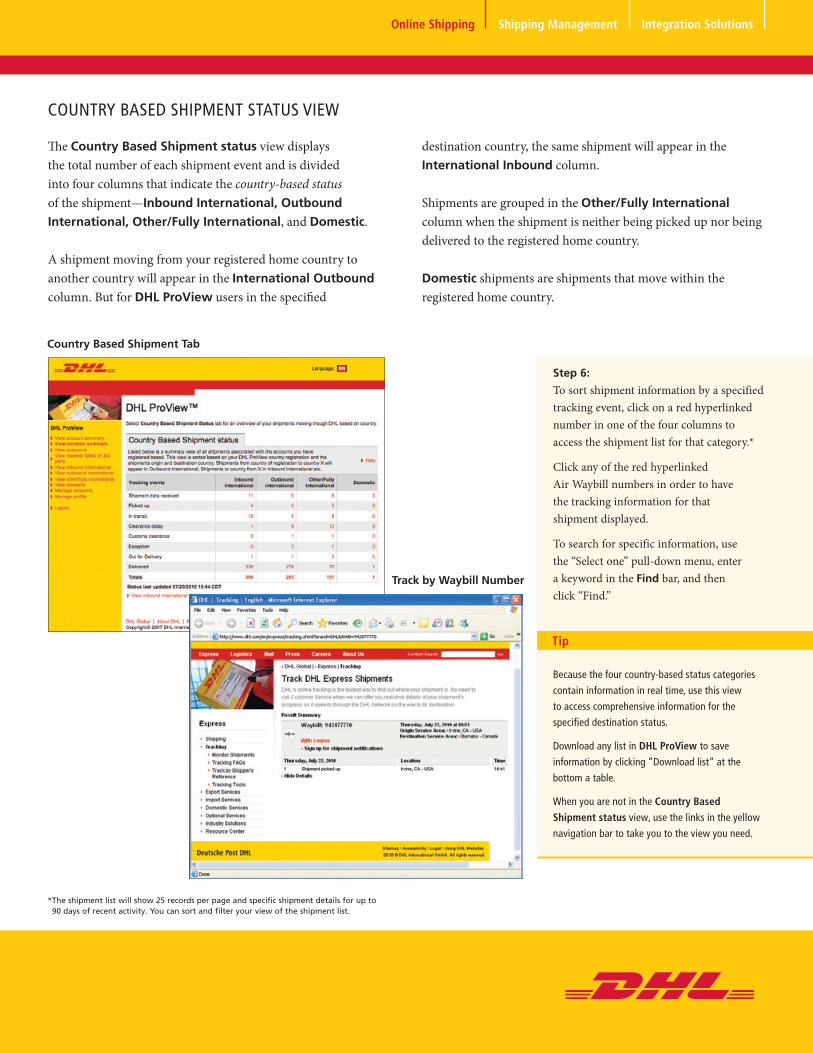
Step 6:
To sort shipment information by a specified tracking event, click on a red hyperlinked number in one of the four columns to access the shipment list for that category.*
Click any of the red hyperlinked Air Waybill numbers in order to have the tracking information for that shipment displayed.
To search for specific information, use the “Select one” pull-down menu, enter a keyword in the Find bar, and then click “Find.”
* The shipment list will show 25 records per page and specific shipment details for up to 90 days of recent activity. You can sort and filter your view of the shipment list.
The Country Based Shipment status view displays the total number of each shipment event and is divided into four columns that indicate the country-based status of the shipment—Inbound International, Outbound
International, Other/Fully International, and Domestic.
A shipment moving from your registered home country to another country will appear in the International Outbound column. But for DHL ProView users in the specified
destination country, the same shipment will appear in the International Inbound column.
Shipments are grouped in the Other/Fully International
column when the shipment is neither being picked up nor being delivered to the registered home country.
Domestic shipments are shipments that move within the registered home country.
coUNtRY BASed ShIPmeNt StAtUS VIew
Track by Waybill Number
Integration SolutionsShipping ManagementOnline Shipping
Override Selected Items
Step 7:
Select the shipment to override by checking the box beside the Air Waybill number.
Click “Override selected items” at the bottom right-hand corner, and a new window will open.
Edit or deleted notifications using the pull-down menus and click “Add.”
Click “Save override.”
From any of the shipment list views on either the Shipment status view or Country Based Shipment status view, use the override function to create updates that apply to some shipments but not others, so you can customize your updates for individuals shipments.
oVeRRIdING NotIFIcAtIoNS
Override Preferences
Integration SolutionsShipping ManagementOnline Shipping

Log Tab
Step 8:
Access the log by clicking on the Log tab from the Shipment status view.
To search for specific information, use the “Select one” pull-down menu, enter a keyword in the Find bar, and then click “Find.”
The Log tab will display details regarding notifications that have been sent in the past 7 days.
Details included are Date and Time, Air Waybill, Shipment Event Code, Contact Method, and the contact information where the notification Message was sent.
AcceSSING the loG
Tip
Use the information in the Log tab to easily look
up shipment events, important notifications and
customer communications.
Integration SolutionsShipping ManagementOnline Shipping
9/10
dhl express
www.dhl.com