weighing scales - seagull scientific€¦ · to add support for weighing scales to a print-time...
TRANSCRIPT

Weighing Scales Installing and Using Weighing Scales with BarTender's Data Entry Forms
The World's Leading Software for Label, Barcode, RFID & Card Printing
White Paper
Page 2
Contents
Overview ............................................................................................ 4 User-Initiated Print Jobs Using BarTender’s Print-Time Data Entry Forms ....................................................................................................... 4 Automatic, Scale-Initiated Print Jobs ........................................................ 4
Reading Scale Data into BarTender’s Data Entry Forms .............. 4 Adding a Scale Display to a Data Entry Form ............................................ 5 Customizing the Scale Display Control ...................................................... 5
Selecting the Scale to Read From ............................................................ 5 Viewing or Changing the Properties of the Connected Scale ................... 6 Performing other Scale Configuration Changes ....................................... 7 Customizing the Appearance of the Scale Display Control ...................... 7 Weight Units ............................................................................................. 9 Testing the Scale Display Control ............................................................ 9
Printing the Weight ....................................................................................... 9 Net Weight and Gross Weight Both Available .......................................... 9
Weight Capture Options ............................................................................. 10 On Print .................................................................................................. 10 Using a Manual Capture Button ............................................................. 10 Capture Stable Weight Automatically ..................................................... 11
Tare Options ................................................................................................ 12 Taring the Scale Using its Front Panel ................................................... 12 Using the Tare Button and/or Clear Tare Button on the Scale Display’s Toolbar .................................................................................... 12 Data Sourcing the Tare Weight .............................................................. 13
Setting Up BarTender to use your Weighing Scale ..................... 13 Adding Scales ............................................................................................. 14
Choosing a Predefined Scale ................................................................. 15 Installing an Unlisted Model of Scale ...................................................... 15 Specifying the Connection to use for your Scale .................................... 16
Configuring Selected Scale Properties ..................................................... 17 General Tab ........................................................................................... 18 Connection Tab ...................................................................................... 18 Advanced Tab ........................................................................................ 18
Renaming Scales ........................................................................................ 18 Copying Scales ........................................................................................... 18 Deleting Scales ........................................................................................... 19
When Using Security Center .......................................................... 19
Configuring Your Scale for Proper Comunications ..................... 19

Page 3
Communication Settings ............................................................................ 20 Serial Port Settings ................................................................................. 20 TCP/IP Socket Settings .......................................................................... 20
Protocol ....................................................................................................... 20 Manufacturer-Specific Setup Guidance .................................................... 21
Fairbanks ................................................................................................ 21 Mettler Toledo (IND560 and similar models) .......................................... 21 Mettler Toledo (PS60 and similar models) .............................................. 21 Ohaus (Adventurer Pro and similar models) ........................................... 21 Ohaus (3000 Series and similar models)................................................ 21 Ohaus (all supported models) ................................................................ 21 Rice Lake (520 and similar models) ....................................................... 22 Rice Lake (TP Series and similar models) .............................................. 22
White Paper: Weighing Scales
Page 4
Overview
With version 9.3, the BarTender Application Suite introduced by far the most powerful and versatile support for weighing scales available in any label software package. (Scale support is offered by the Automation and Enterprise Automation editions of BarTender.) Scale support capabilities include:
• Preconfigured support for a large list of industry standard scales. • Easy setup of unlisted scales. • Incredibly versatile on-screen scale controls for print-time data entry forms. • Powerful support for automated connectivity with other software.
The BarTender Application Suite supports two basic methods of printing labels that include scale data:
1. User-Initiated Print Jobs 2. Automatic, Scale-Initiated Print Jobs
User-Initiated Print Jobs Using BarTender’s Print-Time Data Entry Forms This document is dedicated to the first method: Print jobs that include scale data, but are initiated by users from within BarTender’s print-time data entry forms.
To add support for weighing scales to a print-time data entry form in BarTender, you use the Prompt Design View, drag a Scale Display control from the Toolbox into the design area, and specify the model of scale that you will be using. At print time, the on-screen scale provides a live display of the measured weight on your data entry forms, which in turn sources data to the text and/or barcode objects to be printed.
Automatic, Scale-Initiated Print Jobs If you instead need to create a system that automatically prints when a stable weight is received from a scale, you should use Commander to automate the process. Depending on how your scale is connected, you can use a serial port or TCP/IP socket trigger to initiate print jobs without user intervention. Please see the Commander whitepaper for using scales with more information on this type of print job.
Reading Scale Data into BarTender’s Data Entry Forms
In addition to its normal label design view, BarTender has a prompt design view dedicated to designing print-time data entry forms. Among the many types of controls you can add to these forms, BarTender version 9.3 now supports a scale control that can display live data from an installed weighing scale and link that data with text and barcode objects that print on your labels.

White Paper: Weighing Scales
Page 5
Simply click on the Prompt Design tab in the lower left corner of the design area to start designing a data entry form.
Adding a Scale Display to a Data Entry Form The Controls pane of the Toolbox on the left side of the prompt design area includes a control called Scale Display. To add a scale display to your data entry form, simply “drag” it from the Controls pane and drop it into your data entry form. You will immediately be able to resize the scale display control and customize its appearance.
“Drag and drop” scale objects to create them on forms just as you would any other data entry object.
Customizing the Scale Display Control Once you have added a Scale Display to a data entry form, there are a large variety of customizable settings, including the model of scale that you will be reading data from and how it will display data on screen.
Selecting the Scale to Read From To define the scale model you will be reading data from, double-click on the scale display control in your data entry from to display the Modify Selected Scale Display Control dialog.
White Paper: Weighing Scales
Page 6
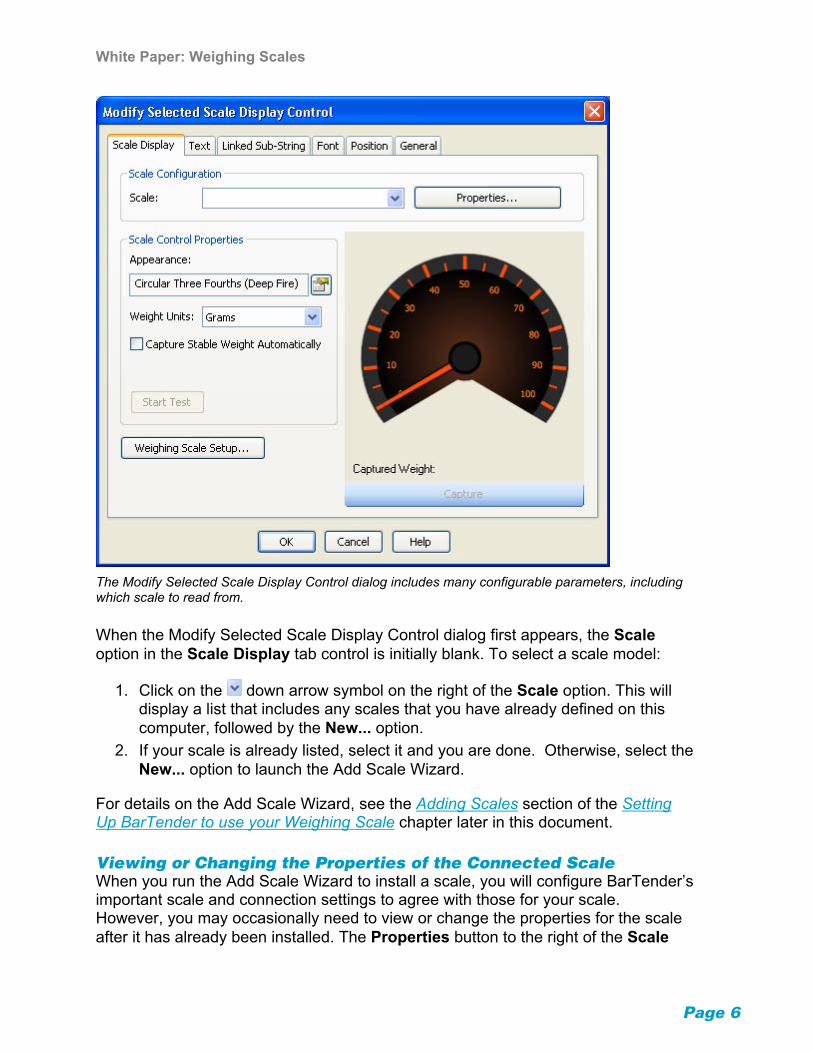
The Modify Selected Scale Display Control dialog includes many configurable parameters, including which scale to read from.
When the Modify Selected Scale Display Control dialog first appears, the Scale option in the Scale Display tab control is initially blank. To select a scale model:
1. Click on the down arrow symbol on the right of the Scale option. This will display a list that includes any scales that you have already defined on this computer, followed by the New... option.
2. If your scale is already listed, select it and you are done. Otherwise, select the New... option to launch the Add Scale Wizard.
For details on the Add Scale Wizard, see the Adding Scales section of the Setting Up BarTender to use your Weighing Scale chapter later in this document.
Viewing or Changing the Properties of the Connected Scale When you run the Add Scale Wizard to install a scale, you will configure BarTender’s important scale and connection settings to agree with those for your scale. However, you may occasionally need to view or change the properties for the scale after it has already been installed. The Properties button to the right of the Scale

White Paper: Weighing Scales
Page 7
control on the Scale Display tab gives you quick access to the Scale Properties dialog. For more details, please see the Configuring Selected Scale Properties section of the Setting Up BarTender to use your Weighing Scale chapter later in this document.
Performing other Scale Configuration Changes If you want to view or modify the settings for other scales, or copy or delete installed scales, press the Weighing Scale Setup button on the Scale Display tab to open the Weighing Scale Setup dialog. For more details, please see the Setting Up BarTender to use your Weighing Scale chapter later in this document.
Customizing the Appearance of the Scale Display Control The previous two sub-sections cover the configuration of properties that affect how BarTender communicates with your scale. In addition, there are many settings that control how the scale display looks and behaves on screen and how it will source data to sub-string(s) linked to the text and barcode objects on your labels.
If you have not already done so, double-click on the scale display control in your data entry form design area and select the Scale Display tab. Next, press the properties button to the right of the Appearance control in the Scale Control Properties group. The Scale Appearance dialog will open.
White Paper: Weighing Scales
Page 8
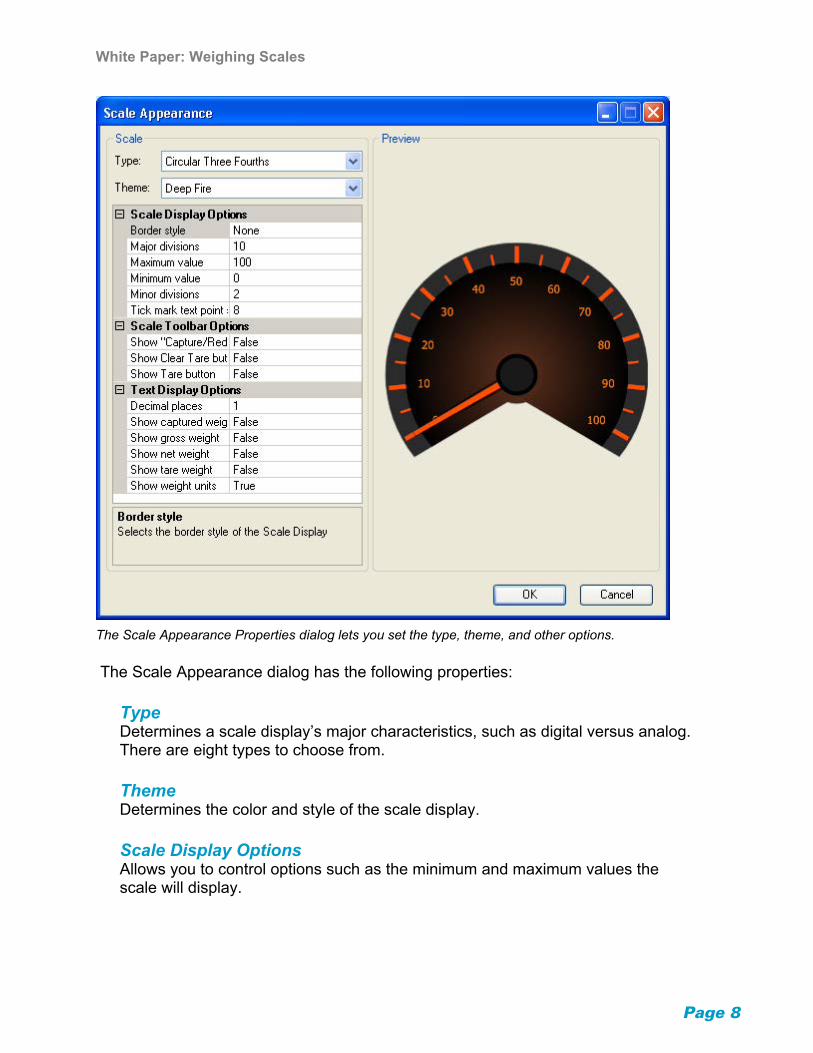
The Scale Appearance Properties dialog lets you set the type, theme, and other options.
The Scale Appearance dialog has the following properties:
Type Determines a scale display’s major characteristics, such as digital versus analog. There are eight types to choose from.
Theme Determines the color and style of the scale display.
Scale Display Options Allows you to control options such as the minimum and maximum values the scale will display.
White Paper: Weighing Scales
Page 9
Scale Toolbar Options Three options control whether or not a toolbar will be included as part of the Scale Display control on screen and, if so, which buttons it will contain. The three possible buttons are: Tare, Clear Tare, and Capture/Redo. See Weight Capture Options and Tare Options sections below for details.
Text Display Options Allows you to optionally display any combination of the captured, net, gross, or tare weight as lines of text within the scale control. When any of these values are displayed as text, they use the font specified in the scale display control’s Font tab.
Weight Units Although your scale will have its own native units, you can use whatever units you like in your data entry forms. BarTender will automatically convert your scale’s data to the units desired for your scale display and subsequent linking to your data sub-strings.
Testing the Scale Display Control To test the scale display control in a data entry form, press the Start Test button in the Scale Control Properties group box. If BarTender is successfully able to contact the scale, it displays the received weight value in the scale preview area on the Scale Display tab. Otherwise, the scale preview area will display a text message notifying you of the failed attempt to communicate with the scale.
Printing the Weight It helps to remember that the purpose of all controls on data entry forms is to collect data to be printed. With most other types of controls, a person types (or scans) in the data. In contrast, with scale controls, the scale enters in the data for you on the form. In both cases, you see the data on the screen and you can decide whether you want to accept it before you print a label. Also, just as with other data entry controls, you have to link the scale display control on the form to a sub-string defined in the label design area in order to print scale data on a label.
Net Weight and Gross Weight Both Available The Linked Sub-String tab for the Scale Display control is somewhat different than most controls because it supports more than one property that you can link to sub-strings. By default, when create a drag-and-drop link from the Sub-Strings pane of the Toolbox in the prompt design view to a scale display control, it will link to the scale’s net weight. However, using the Linked Sub-String tab, you can link to the gross weight instead (or as well).

White Paper: Weighing Scales
Page 10
The Linked Sub-String tab has three properties that you can link to for Scale Display controls.
Weight Capture Options There are three main ways in which the weight reading from the scale is “captured” and used to set the value of any sub-strings the scale display control is linked to.
On Print For most users, it is easiest to first complete all other data entry required on the form. Then, place the item to be weighed on the scale and, when happy with the reading on the scale display, simply press the Print button on the print-time data entry form.
Using a Manual Capture Button If you enable the Capture/Redo button in the Scale Appearance dialog, then your scale display will include a Capture button underneath it. You then press the Capture button when you want to accept the weight. The weight will then be copied to the linked sub-string and the Capture button will change into a Redo button.
If you ever want to recapture the weight once you have already pressed the Capture button, simply press the Redo button. The Redo button will change back into a

White Paper: Weighing Scales
Page 11
Capture button, allowing you to capture the weight again. If you don’t explicitly capture the weight before you press the Print button, it will automatically be captured at that time.
Even though pressing the Capture button places a static weight value into a linked sub-string, the scale display will continue to show a live reading from the scale. This means that the displayed weight value and the value placed into the linked sub-string may not be identical. You can eliminate this potential confusion by enabling the Show Captured Weight option in the Text Display Options of the Scale Appearance dialog. This causes a string of text to appear under the Scale Display which shows the same captured weight value as is placed into the linked sub-string when you push the Capture button.
A scale display control before and after pressing the Capture button.
Capture Stable Weight Automatically If you enable the Capture Stable Weight Automatically checkbox in the Scale Control Properties group box of the Modify Selected Scale Display Control dialog, then the weight will be automatically captured once a stable weight is detected on the scale. If you also enable the Capture/Redo button, you can retake the measurement if necessary. As always, if the weight has not yet been captured when you press the Print button, it will automatically be captured at that time.
The factors that determine whether or not a weight is “stable” depend on the capabilities of you scale and the setting of the Stable Weight Control Method option on the Advanced tab of the Scale Properties dialog. This option has three settings:

White Paper: Weighing Scales
Page 12
Auto If the scale has built-in support for stable weight capture, the Auto setting behaves like the “Use Scale” setting below. Otherwise, the Auto setting behaves like the “Use PC” setting below.
Use Scale This setting uses the scale’s built-in stable weight capture function. To configure options such as minimum weight and stable weight period, consult your scale’s manual.
Use PC This setting uses the PC to capture a stable weight. To configure the Minimum Weight, the Stable Weight Period, and the Maximum Percentage Variance, use the Stable Weight Options on the Advanced tab of the Scale Properties dialog.
Tare Options The “tare” weight is the weight that you subtract from the gross weight to account for containers and packaging in order to calculate the net weight. “Tare” is also used as a verb used to describe the process of setting the zero point of the scale. There are three ways to control tare functions and they can be used in combination.
Taring the Scale Using its Front Panel If you need to tare the scale, you can use the scale’s built-in tare controls. This is often done by placing an empty shipping container on the scale and pushing a button on the scale’s front panel. In the event that an object will be weighed without packing, you would tare the scale without anything on it.
Using the Tare Button and/or Clear Tare Button on the Scale Display’s Toolbar If you enable the Tare and/or Clear Tare buttons in the Scale Appearance dialog, then those buttons will be available underneath the scale display on your data entry form. What happens when you press these buttons depends on the capabilities of your scale and the setting of the Tare Control Method option on the Advanced tab of the Scale Properties dialog. It has three settings:
Auto If the scale has built-in support to receive a tare command, the Auto option behaves like the Use Scale setting below. Otherwise, the Auto option behaves like the Use PC setting below.

White Paper: Weighing Scales
Page 13
Use Scale This uses the scale’s built-in stable tare command for setting and clearing the tare weight. When the Tare or Clear Tare buttons in the toolbar of the scale display control in BarTender’s data entry form are pressed, commands are sent to the scale instructing it to perform the appropriate tare function.
Use PC This uses the PC to implement tare and clear tare. When the Tare or Clear Tare buttons in the scale display control in BarTender’s data entry form are pressed, no commands are sent to the scale. Instead, the PC simulates the tare functions.
Data Sourcing the Tare Weight Sometimes you may use your scale to weigh many different types of items, each with its own tare weight. If the various tare weights are known in advance, you can use the Linked Sub-Strings tab of the Modify Selected Scale Display Control dialog to link a tare weight stored in a database with the scale display’s “Input Tare Weight” property on the Linked Sub-String tab.
Setting Up BarTender to use your Weighing Scale
You do not need to read this chapter in order to simply add Scale Display controls to your BarTender data entry forms and configure how they look. However, before you can read data from a scale into your forms or print scale data on your labels, you will need to complete the appropriate setup procedure, as described in this chapter.
The Weighing Scale Setup option in BarTender’s Administer menu allows you to select and configure as many scales as you want BarTender to be able to read from on a PC. The Weighing Scale Setup dialog includes an Installed Scales list. It will be populated with the names of any scales that you have previously installed and configured, but it will be empty if you are using it for the first time. Until your scale has been properly installed and appears in this list, it cannot source data to a data entry form in BarTender.
White Paper: Weighing Scales
Page 14
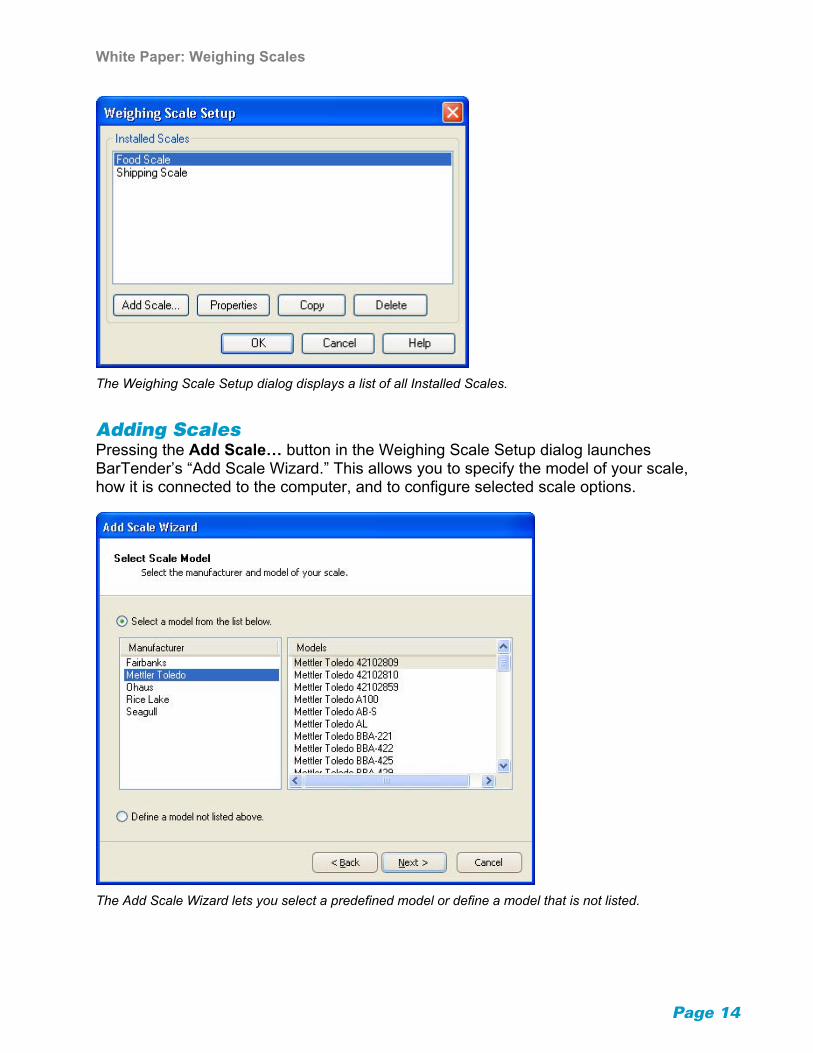
The Weighing Scale Setup dialog displays a list of all Installed Scales.
Adding Scales Pressing the Add Scale… button in the Weighing Scale Setup dialog launches BarTender’s “Add Scale Wizard.” This allows you to specify the model of your scale, how it is connected to the computer, and to configure selected scale options.
The Add Scale Wizard lets you select a predefined model or define a model that is not listed.

White Paper: Weighing Scales
Page 15
Choosing a Predefined Scale The first dialog of the Add Scale Wizard provides a sizable predefined list of scales. If your manufacturer and model of scale are listed, simply select them and press the Next button.
Installing an Unlisted Model of Scale Often, multiple different scale models from the same manufacturer use compatible communication protocols. Therefore, if you have a scale model that is not listed in the Add Scale Wizard, but for which BarTender supports other models from the same manufacturer, there is a good chance that BarTender already supports your scale’s protocol. Ideally, you would be able to check your scale’s manual or speak to a representative of the scale manufacturer to determine if the scales are compatible. Once you have determined which already-supported scale listed in BarTender works like your scale, simply choose it and try it out.
On the other hand, if you determine that your scale model does not work like any scale already support by BarTender, then you need to select the Define a model not listed above radio button in the Add Scale Wizard and press Next to display the “Define a Scale Model” page of the wizard.
The “Define a Scale Model” page of the Add Scale Wizard lets you configure BarTender to use a scale that was not predefined in the Add Scale Wizard
White Paper: Weighing Scales
Page 16
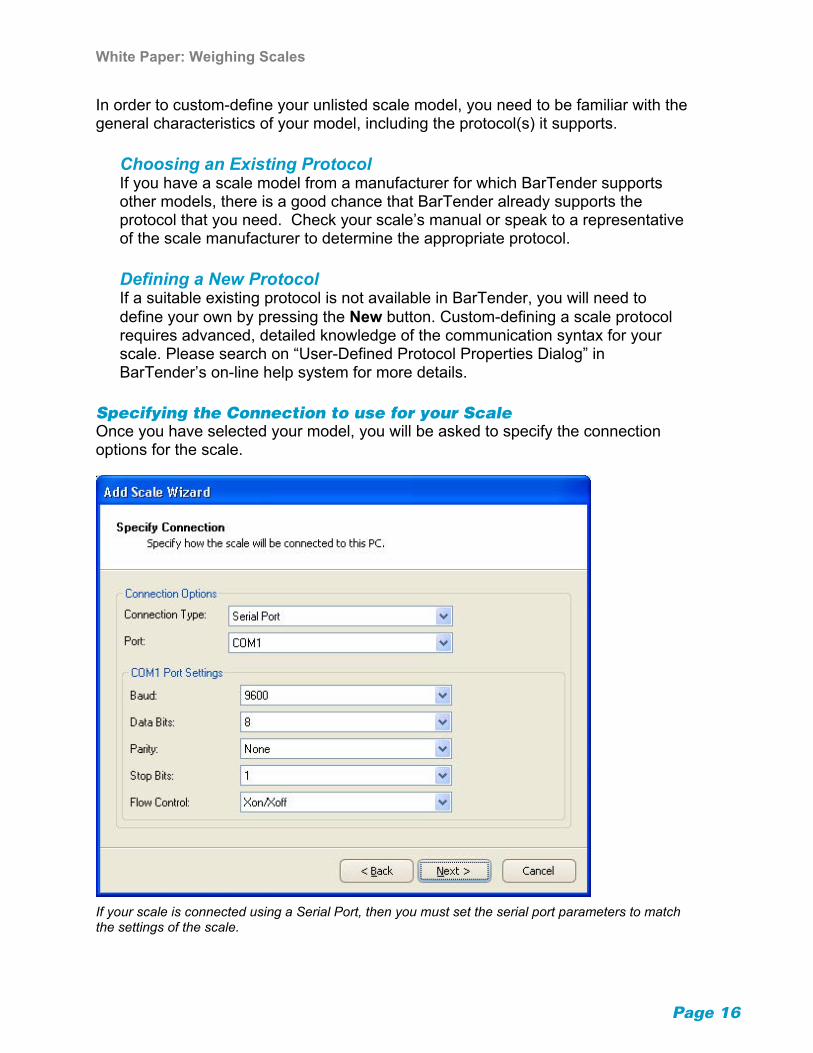
In order to custom-define your unlisted scale model, you need to be familiar with the general characteristics of your model, including the protocol(s) it supports.
Choosing an Existing Protocol If you have a scale model from a manufacturer for which BarTender supports other models, there is a good chance that BarTender already supports the protocol that you need. Check your scale’s manual or speak to a representative of the scale manufacturer to determine the appropriate protocol.
Defining a New Protocol If a suitable existing protocol is not available in BarTender, you will need to define your own by pressing the New button. Custom-defining a scale protocol requires advanced, detailed knowledge of the communication syntax for your scale. Please search on “User-Defined Protocol Properties Dialog” in BarTender’s on-line help system for more details.
Specifying the Connection to use for your Scale Once you have selected your model, you will be asked to specify the connection options for the scale.
If your scale is connected using a Serial Port, then you must set the serial port parameters to match the settings of the scale.

White Paper: Weighing Scales
Page 17
If your scale is connected using a TCP/IP Network Port, you must specify its address and port number.
Configuring Selected Scale Properties Once you have installed a scale using the Add Scale Wizard, there are a variety of scale properties available for customization. To access these properties, select the desired scale in the Installed Scales list and press the Properties button. The Scale Properties dialog will open.
The Scale Properties dialog has three tabs: General, Connection, and Advanced.
White Paper: Weighing Scales
Page 18
General Tab You can change the Name of the scale and its associated Comment property here.
Connection Tab Two types of scale connections are supported on the Connection tab:
• TCP/IP Network Port: When this connection type is selected, the Connection tab lets you specify the IP Address and the Port Number.
• Serial Port: When this connection type is selected, the Connection tab lets you specify the serial port number and the serial port parameters.
Advanced Tab Some advanced, not commonly needed options found in the Advanced tab are particularly useful when using the Automatic Stable Weight Capture option of the Scale Display Control in a BarTender data entry form. See the Capture Stable Weight Automatically section above for more information.
Renaming Scales Unless you overwrote the default name while using the Add Scale Wizard, the name displayed in the Weighing Scale Setup dialog’s Installed Scales list for any newly-installed scale will simply be the model name. At your preference, you can optionally rename your scales as you see fit:
1. Press the Properties button to open the Scale Properties dialog. The existing name for the scale will be displayed on the General tab.
2. Change the contents of the Name option as desired. 3. Press OK to finish renaming the scale.
Copying Scales If you will be installing a second instance of the same scale on your computer, it may be easier to copy the existing scale configuration from the first one that you installed, rather than installing the second scale from scratch. This is especially true if your scale model is not predefined in BarTender’s Add Scale Wizard. To copy an existing scale configuration:
1. 1. In the Weighing Scale Setup dialog of the Administer menu, select the desired scale in the Installed Scales list.
2. Press the Copy button. 3. The selected scale will be copied and the Scale Properties dialog for the
newly-added scale will automatically open with the Connection tab selected. Because two scales cannot share the same connection, you must now specify a different connection for the second instance of the scale.
4. You can optionally select the General tab to view or change the default name that was given to this scale.
5. Press OK to finish creating the second instance of your scale.
White Paper: Weighing Scales
Page 19
Deleting Scales If you will no longer be using a given scale, you may wish to delete the previously-installed support for that scale from BarTender.
1. In the Weighing Scale Setup dialog of the Administer menu, select the scale in the Installed Scales list of the Weighing Scale Setup dialog that you want to delete.
2. Press the Delete button. 3. You will be prompted to confirm the deletion of the scale. Press the Yes button
to finish deleting the scale.
When Using Security Center
If you are using Security Center, you will need BarTender’s “Administer” permission to add, delete, or modify a scale’s properties. These functions are all accessible two places:
If you are using Security Center, you will need to set the Administer permission in the BarTender permissions group of Security Center to Allow in order to add, delete, or modify a scale’s properties. These scale administration functions are can be accessed from either of two BarTender dialogs:
• Weighing Scale Setup Described earlier in this document, this dialog is accessible from BarTender’s Administer menu. It allows you to add, delete, and modify scales. If Security Center’s Administer permission in the BarTender permissions group is not set to Allow, you will not even be able to open this dialog.
• Scale Display Control’s Modify Dialog Although you do not need the Administer permission to open and use most of this dialog, there are three functions in this dialog that do require Administer permission: Adding scales, modifying scale properties, and launching the Weighing Scale Setup dialog.
Configuring Your Scale for Proper Comunications
In general, there are two issues you need to address to ensure proper communication between BarTender and your scale: the communications settings (for either the Serial Port or the TCP/IP Network Port) and the protocol.

White Paper: Weighing Scales
Page 20
Communication Settings The scale will be connected either by a Serial Port or a TCP/IP Network Port.
Serial Port Settings You must specify in BarTender the Baud, Data Bits, Parity, Stop Bits and Flow Control settings that your scale is using. Some scales control this using dip switches. Others have the ability to change these parameters using the front panel. Other have fixed settings that you cannot change. Refer to your scale’s manual for details, and configure your scale and BarTender accordingly.
TCP/IP Socket Settings You must specify in BarTender the network address and the port number that your scale is configured to use. Refer to your scale’s manual for details, and configure your scale and BarTender accordingly.
Protocol BarTender only supports the "Command/Response" methodology to communicate with the scale. BarTender polls the scale at a regular interval to request for weight data. The scale is expected to respond with the requested weight data within a reasonable amount of time.
Many scales can be configured to continuously send data to the PC. BarTender does not support this unsolicited data-streaming mode. When multiple data modes are supported, the scale must be configured at the front panel to the "Command/Response" mode prior to use with BarTender. Some scales can be configured to suppress the weight units in the returned weight data. For BarTender to work correctly, the weight units must NOT be suppressed.
The five basic commands BarTender uses are "Request Immediate Weight", "Request Stable Weight", "Tare", "Get Tare Weight", and "Clear Tare Weight". At a minimum, BarTender requires the scale to support either the "Request Immediate Weight" or the "Request Stable Weight" command. The other commands are optional. BarTender can emulate stable weight and tare features in software if configured properly.
In order for BarTender to support the scale's built-in tare feature, the scale must support the "Tare" and "Get Tare Weight" commands. In addition, the scale must have a response format so that BarTender can distinguish the tare weight from the net weight. We have found some scales inadequate in the response format so the built-in tare cannot be supported.

White Paper: Weighing Scales
Page 21
Manufacturer-Specific Setup Guidance Fairbanks BarTender uses the "Fairbanks UPS Output" protocol to communicate with the Fairbanks scales. With this protocol, the scale returns the data in the predefined format upon receiving the <CR> command. To configure the scale to use this protocol, the "Pr.F" (Print Function) menu item should be set to "Poll."
The serial port settings should be configured to match the serial port settings on the PC. Some models, the 2455 Series for example, have fixed serial settings (9600 Baud, 7 Bits, Odd Parity, 2 Stop Bits). The serial port settings on the PC should be configured accordingly.
Mettler Toledo (IND560 and similar models) BarTender uses the "MT-SICS (Level 1)" protocol to communicate with the Metter Toledo scales. To configure the scale to use this protocol the "Setup | Communications | Connections | COM" option must be set to “SICS.”
Mettler Toledo (PS60 and similar models) Some older Toledo scales do not support the "MT-SICS (Level 1)" protocol. The PS60 falls into this category. BarTender uses the “Toledo Scale Protocol” for these models, which simply uses the "L" command to retrieve the weight value from the scale.
Ohaus (Adventurer Pro and similar models) BarTender uses the “Ohaus Adventruer Pro” protocol for these models, which uses the "IP" and/or "SP" commands to retrieve the weight data. For this protocol to work, the scale should be configured in the "Command/Response" mode.
Ohaus (3000 Series and similar models) BarTender uses the “Ohaus 3000 Series” protocol on these models. In order to configure the scale to use this protocol, the "PRINT | A.PRINT" menu item should be set to "OFF". The menu structure for different Ohaus scales may differ. The key is that the scale should be configured so that it does not continuously send unsolicited data to BarTender.
Ohaus (all supported models) The data output format on Ohaus scales is highly configurable. On most models, the format is configured in the "CONTENT" menu. The returned weight format should be just the numeric weight value followed by the units (e.g., 54.6 lb). The header information, if available on the model, should be disabled.
BarTender does not support the built-in Tare feature on the Ohaus scales due to uncertainty in the response format. BarTender emulated tare feature should be used instead. The scale should be configured to return the gross weight in the CONTENT menu.

White Paper: Weighing Scales
Page 22
Rice Lake (520 and similar models) BarTender uses the "EDP Commands" to communicate with most of the Rice Lake scales. For this protocol to work, the "STREAM CONTINUOUS PORT" should be set to OFF. On the Rice Lake 520 and similar models, this setting can be found in the "CONFIGURATION | SERIAL COMMUNICATIONS | EDP COMM PORT" menu.
Rice Lake (TP Series and similar models) The Rice Lake TP series and similar balances support a different protocol. BarTender requests weight data using the "C1 C2 <CR> <LF>" command format as specified in the balance's manual. There are no special setup requirements on these balances other than making sure the serial port settings match those on the PC.
Version: 2012-09-12 16:30 Copyright © 2012 Seagull Scientific, Inc.
Available Seagull White Papers
General White Papers • The Advantage of Drivers by Seagull
Companion Applications • Printer Maestro: True Enterprise Print Management for Windows • Librarian • BarTender Security Center • BarTender Web Print Server
Recent Upgrades • What’s New in the Latest BarTender
Integration White Papers • Integration Overview • Commander • Commander Examples • BarTender's .NET SDKs • BarTender's ActiveX Automation Interface • Exporting Printer Code Templates • Using BarTender with Remote Desktop Services and Citrix XenApp • Integration with Oracle's WMS and MSCA • Integration with IBM WebSphere Sensor Events • Integration with SAP
Miscellaneous White Papers • Weighing Scales • Dynamically Changing Objects at Print Time using VB Script • GHS Compliance Labeling • Licensing for BarTender's Automation Editions • Printing International Characters Using BarTender • BarTender Software Activation • Using BarTender's Application Identifier Wizard • Optimizing Output Performance • Status Monitor Overview • Silent Install
For downloadable versions, visit: www.seagullscientific.com/aspx/white-papers.aspx