€¦ · web viewdrivers fail to search and identify a safe path of travel when approaching an...
TRANSCRIPT
Module 5: Topic 1Intersections
1. Why do you think more crashes occur at intersections?
2. One in every 3 fatal crashes occur at intersections:a. Drivers fail to search and identify a safe path of travel when approaching an intersection. b. Drivers don’t identify or understand the risks.c. Drivers fail to develop good driving habits to effectively manage the risks.
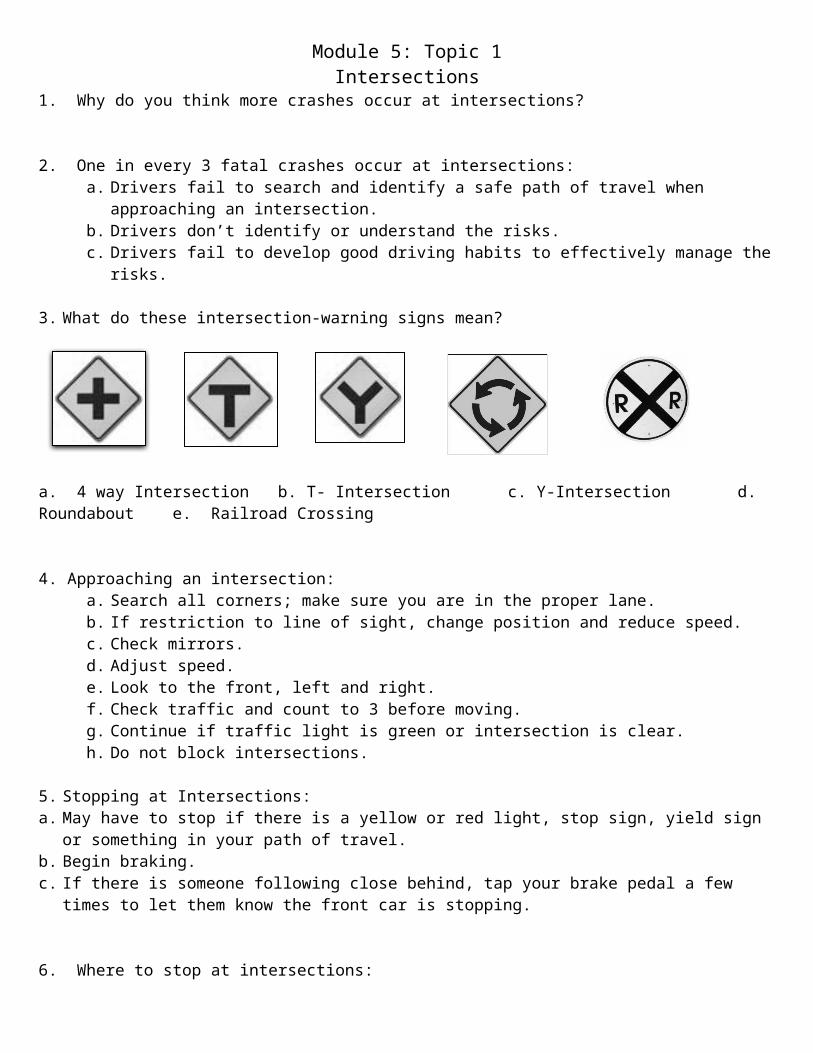
3. What do these intersection-warning signs mean?
a. 4 way Intersection b. T- Intersection c. Y-Intersection d. Roundabout e. Railroad Crossing
4. Approaching an intersection:a. Search all corners; make sure you are in the proper lane.b. If restriction to line of sight, change position and reduce speed.c. Check mirrors.d. Adjust speed.e. Look to the front, left and right.f. Check traffic and count to 3 before moving.g. Continue if traffic light is green or intersection is clear.h. Do not block intersections.
5. Stopping at Intersections:a. May have to stop if there is a yellow or red light, stop sign, yield sign or something in your path of travel.b. Begin braking.c. If there is someone following close behind, tap your brake pedal a few times to let them know the front car is
stopping.
6. Where to stop at intersections:
a. Crosswalk
b. Stop Line
If there is a crosswalk, the vehicle with a bumper or vehicle with wheels must stop with the front bumper or front wheels behind the nearest crosswalk line. Drivers must yield to pedestrians entering or in a crosswalk.
White line found at most intersections. Sometimes there is a crosswalk and a stop line. Should there be a stop line and a crosswalk line, the stop line must be obeyed first.

c. Sidewalk
d. Curb Line
7. Controlled Intersections:a. Intersection flow is regulated by STOP signs, YIELD signs or traffic SIGNALS
8. Right of Way Laws:a. Right-of-Way is not a right or privilege – it must be given!b. Right-of-Way is determined by a set of rulesc. Drivers must understand right-of-way rules governing:
• Intersections• Merges• Special conditions
9. Uncontrolled Intersections: There are No Signs or Traffic Lights Traffic Light is Malfunctioning:a. The first vehicle that arrives at the intersection may proceed first if the other yields right of wayb. If two vehicles arrive at the same time, the driver on the left must yield to the driver on the right
On streets that have sidewalks, but no painted crosswalks, remember that the crosswalks are still considered to be there even though there are no pavement markings. Handle these situations the same way as a painted crosswalk. If a driver is leaving a driveway, alley, or building area such as a gas station or parking lot, the driver must stop even if there is not a stop sign before entering the public roadway.
If there are no identifying pavement markings and the sign or traffic control device says stop, then the stop must be made with the front bumper or front wheel behind an imaginary curb line, which stretches from curb to curb closest to the driver.
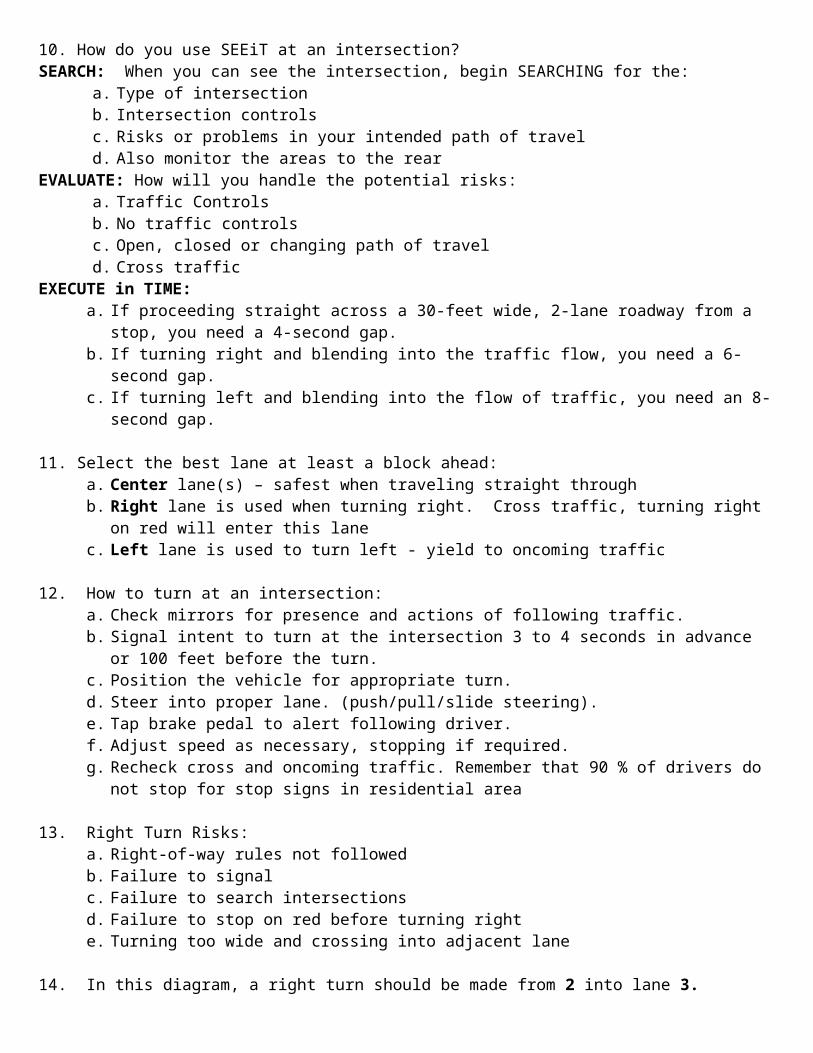
10. How do you use SEEiT at an intersection?SEARCH: When you can see the intersection, begin SEARCHING for the:
a. Type of intersectionb. Intersection controlsc. Risks or problems in your intended path of traveld. Also monitor the areas to the rear
EVALUATE: How will you handle the potential risks:a. Traffic Controlsb. No traffic controlsc. Open, closed or changing path of traveld. Cross traffic
EXECUTE in TIME:a. If proceeding straight across a 30-feet wide, 2-lane roadway from a stop, you need a 4-second gap.b. If turning right and blending into the traffic flow, you need a 6-second gap.c. If turning left and blending into the flow of traffic, you need an 8- second gap.
11. Select the best lane at least a block ahead:a. Center lane(s) – safest when traveling straight throughb. Right lane is used when turning right. Cross traffic, turning right on red will enter this lanec. Left lane is used to turn left - yield to oncoming traffic
12. How to turn at an intersection:a. Check mirrors for presence and actions of following traffic.b. Signal intent to turn at the intersection 3 to 4 seconds in advance or 100 feet before the turn.c. Position the vehicle for appropriate turn. d. Steer into proper lane. (push/pull/slide steering).e. Tap brake pedal to alert following driver.f. Adjust speed as necessary, stopping if required.g. Recheck cross and oncoming traffic. Remember that 90 % of drivers do not stop for stop signs in
residential area
13. Right Turn Risks:a. Right-of-way rules not followedb. Failure to signalc. Failure to search intersectionsd. Failure to stop on red before turning righte. Turning too wide and crossing into adjacent lane
14. In this diagram, a right turn should be made from 2 into lane 3.
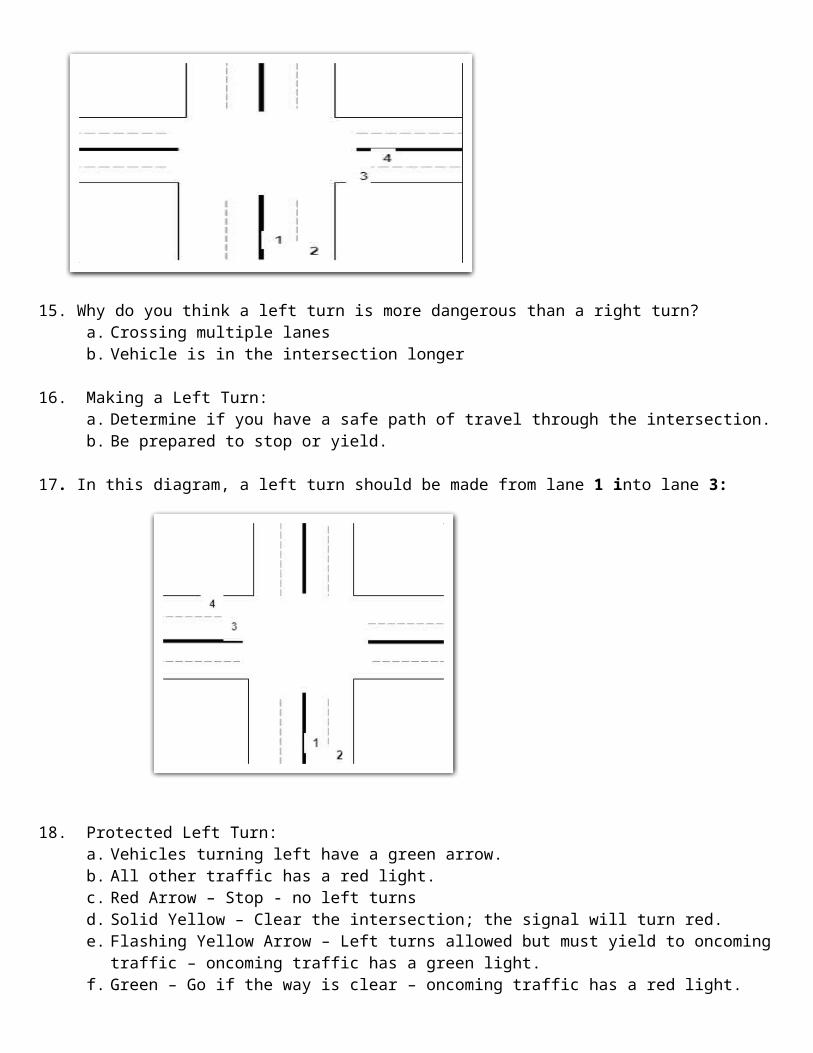
15. Why do you think a left turn is more dangerous than a right turn?a. Crossing multiple lanes b. Vehicle is in the intersection longer
16. Making a Left Turn:a. Determine if you have a safe path of travel through the intersection.b. Be prepared to stop or yield.
17. In this diagram, a left turn should be made from lane 1 into lane 3:
18. Protected Left Turn:a. Vehicles turning left have a green arrow.b. All other traffic has a red light.c. Red Arrow – Stop - no left turnsd. Solid Yellow – Clear the intersection; the signal will turn red.e. Flashing Yellow Arrow – Left turns allowed but must yield to oncoming traffic – oncoming traffic has a
green light.f. Green – Go if the way is clear – oncoming traffic has a red light.
19. Shared Turn lanes:a. Shared lanes help keep traffic moving by giving drivers turning left a
designated shared lane in the center of the roadway.b. Use shared lanes to start and complete left turns.c. You cannot travel more than 150 feet.d. Crossing traffic entering a shared lane from a driveway
Move all the way into the lane to avoid blocking through traffic lane. Stop in the shared lane and wait to merge safely with traffic.
20. Roundabouts:a. A circular intersection controlled by yield signsb. Entries and exits into and out of the circle can be at multiple locationsc. By yielding at the entry, rather than stopping and waiting for a green light or stopping at a stop sign,
significantly reduces delays
21. Advantages of Roundabouts:a. Fewer points of conflictb. The data shows a 90% reduction in fatal crashesc. 75% reduction in injury crashesd. Reduces delays and keeps traffic movinge. Reduction in pollution and fuel use

Module 5: Topic 2Curves
1. Curves:a. Curvy roads present a high risk.b. There are many line-of-sight and/or path-of-travel restrictions (trees, hills, etc.).
2. Blind Curve:a. Only a portion of the corner is visible; the rest is hidden.
3. S- Curve:a. A curve in one direction with a second curve in the opposite direction.
4. Crowned Roadways:a. Most roadways are higher in the middle and slope to the outside for better drainage.
5. Banked Curve:a. The outside of the curve is higher than the inside.
6. Why do vehicles “slow down” going uphill and “speed up” coming downhill?a. Uphill: acceleration is needed to maintain speed.b. Downhill: vehicles will naturally pick up speed.
7. Warning signs for curves:Sharp Curve
Curve to right followed by curve to left
Winding Road
Road curves right – vehicle’s weight shifts left
Maximum SAFE speed is 25 mph
8. Parts of the Curve:Entrance Always reduce speed prior to entering the curve and slow prior to the apexApex Accelerate out of the apexExit Gradually accelerate – lane position 1

9. How do you overcome inertia in a curve?a. Need traction to overcome inertiab. If a vehicle loses traction in a curve, the vehicle will continue traveling in a straight line and the
driver will have no control.
10. How do these statistics below apply to you as a driver?
NHTSA data suggests that over 90% of the vehicles in fatal, single-vehicle rollover crashes were involved in routine driving maneuvers (going straight or negotiating a curve) at the time of the crash. This further suggests that driver behavior (distraction, inattentiveness, speeding, and impaired driving) plays a significant role in rollover crashes.
11. How can you prevent a roll over?
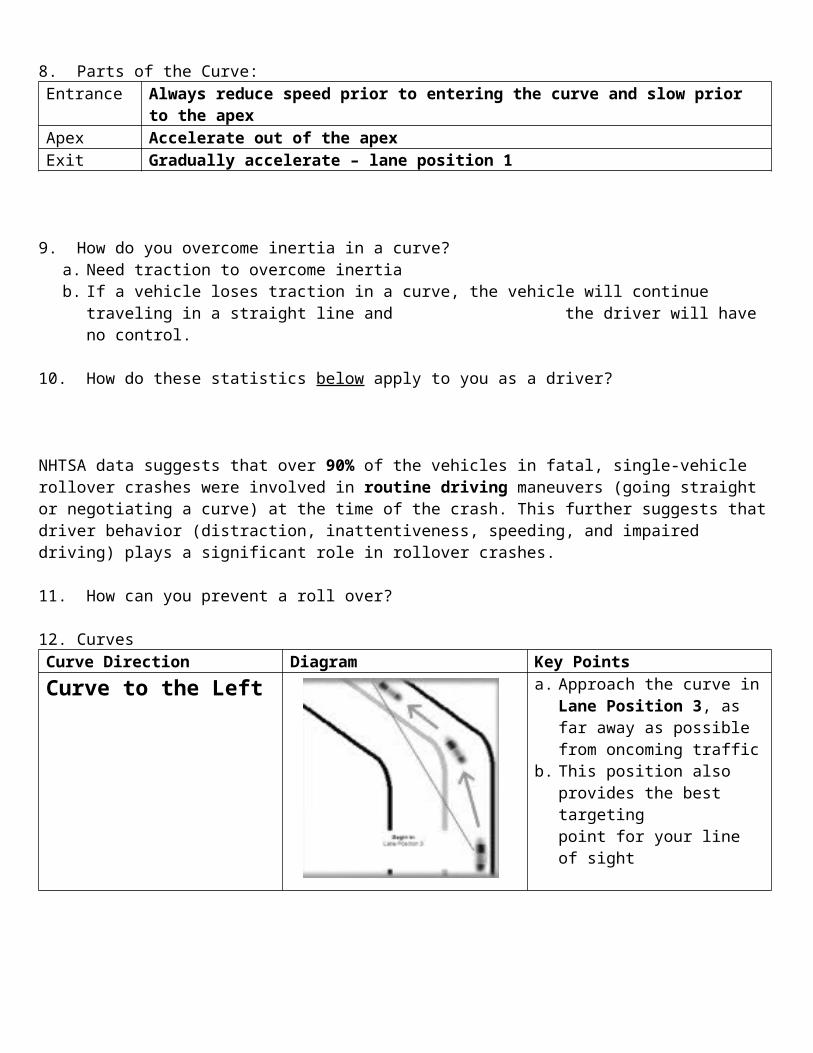
12. CurvesCurve Direction Diagram Key PointsCurve to the Left a. Approach the curve in Lane
Position 3, as far away as possible from oncoming traffic
b. This position also provides the best targeting point for your line of sight
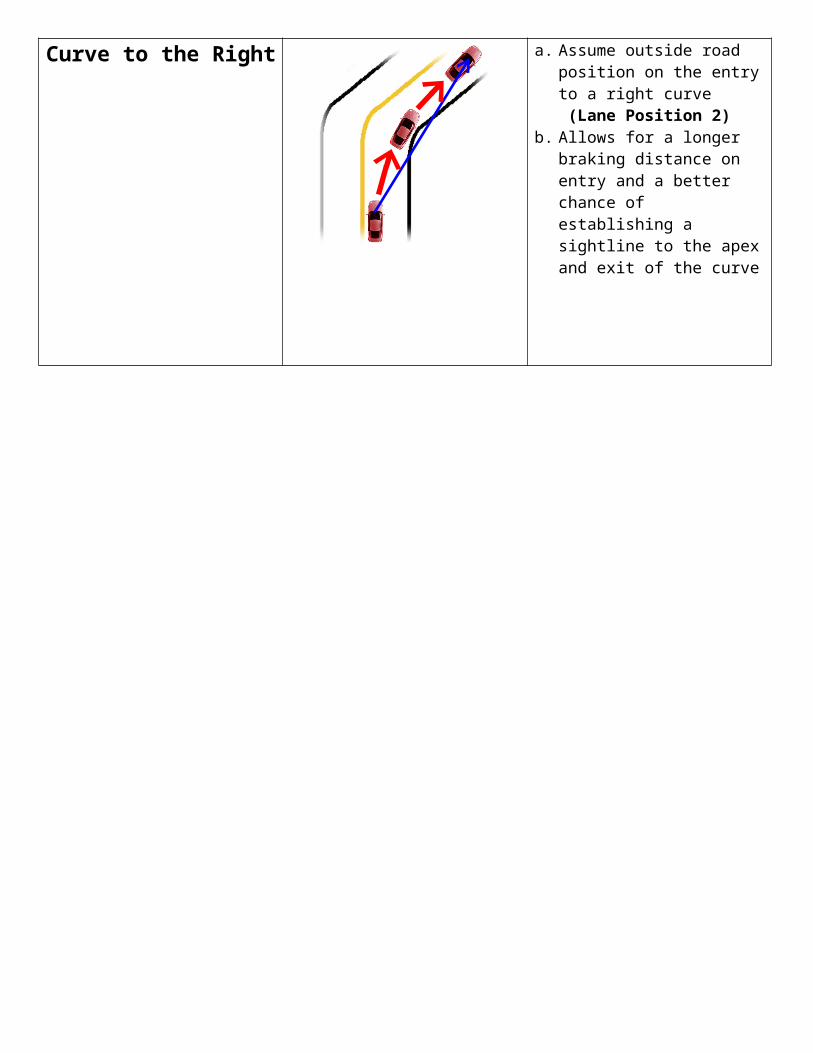
Curve to the Right a. Assume outside road position on the entry to a right curve (Lane Position 2)
b. Allows for a longer braking distance on entry and a better chance of establishing a sightline to the apex and exit of the curve
Module 5: Topic 3Hills and Mountains
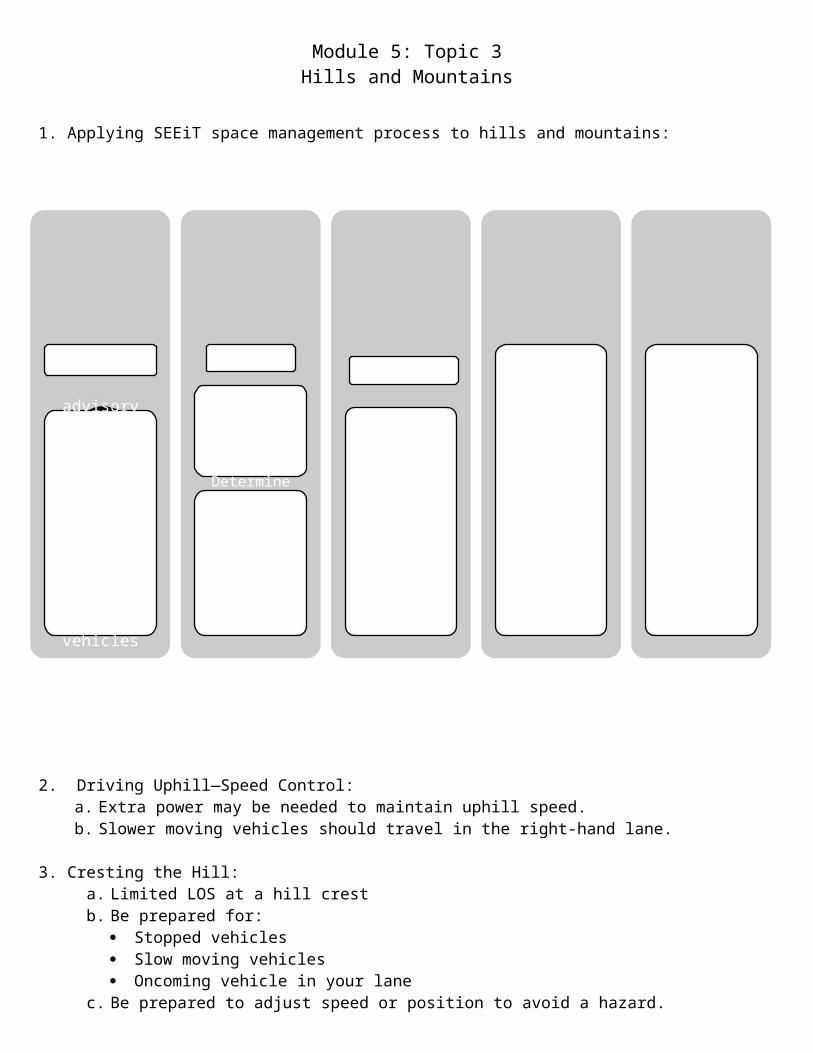
1. Applying SEEiT space management process to hills and mountains:
2. Driving Uphill—Speed Control:a. Extra power may be needed to maintain uphill speed.b. Slower moving vehicles should travel in the right-hand lane.
3. Cresting the Hill:a. Limited LOS at a hill crest b. Be prepared for:
Stopped vehicles Slow moving vehicles Oncoming vehicle in your lane
c. Be prepared to adjust speed or position to avoid a hazard.
4. List potential hazards that may exist on the other side of the hill crest.
SSearch for
advisory speed signs,
oncoming traffic, road
condition/surface traction control and slow moving
vehicles
EEvaluate
Does the hill have curves?
Determine type of curve, and
make decision about safe
speed and lane positions
EExecute
Adjust speed and/or
position as needed
iin
TTime
5. Descending Hills & Mountains:a. Gravity will make the vehicle go faster.b. Heavier vehicles going downhill will pick up more speed . c. Check the rear zone for vehicles that may be having trouble controlling speed.d. Turn off cruise control.
6. Runaway Ramps:a. Runaway ramps are designed for large trucks that lose braking control on steep hills.b. They have deep gravel, sand barrels and other materials to help slow down the runaway vehicle.c. Pull off the road if you see a runaway truck behind you.
Module 5: Topic 4Passing
1. Did you know that?a. At 55 mph, you traveled 968 feet; you need TWICE as much distance to pass a vehicle ahead.b. If the oncoming car seems to be getting closer, it’s already too close.c. When curves or hills keep you from seeing far enough ahead: Assume there’s a car just out of sight
or just about to appear.d. Don’t start to pass unless there’s room ahead to return.
2. Estimating Passing Gap Needs:a. Count the seconds it takes for an oncoming vehicle to pass in the opposite lane.b. Do this until you can accurately estimate the time.c. If you can see a vehicle approaching it is not safe to pass.
3. Passing Procedures: Prepare to pass
a. Position the vehicle 2 to 3 seconds behind the vehicle to be passedb. Check mirrors and oncoming trafficc. Check ahead for safe passing distanced. Signal left
Overtake the ongoing cara. Accelerate and move into passing laneb. Accelerate quickly to the legal speedc. Concentrate on the path aheadd. Check mirror for following vehicles
Return to lanea. Check inside rear-view mirror for the front of the vehicle being passedb. Signal rightc. Change lanes, steer to center of lane and maintain speedd. Cancel turn signal
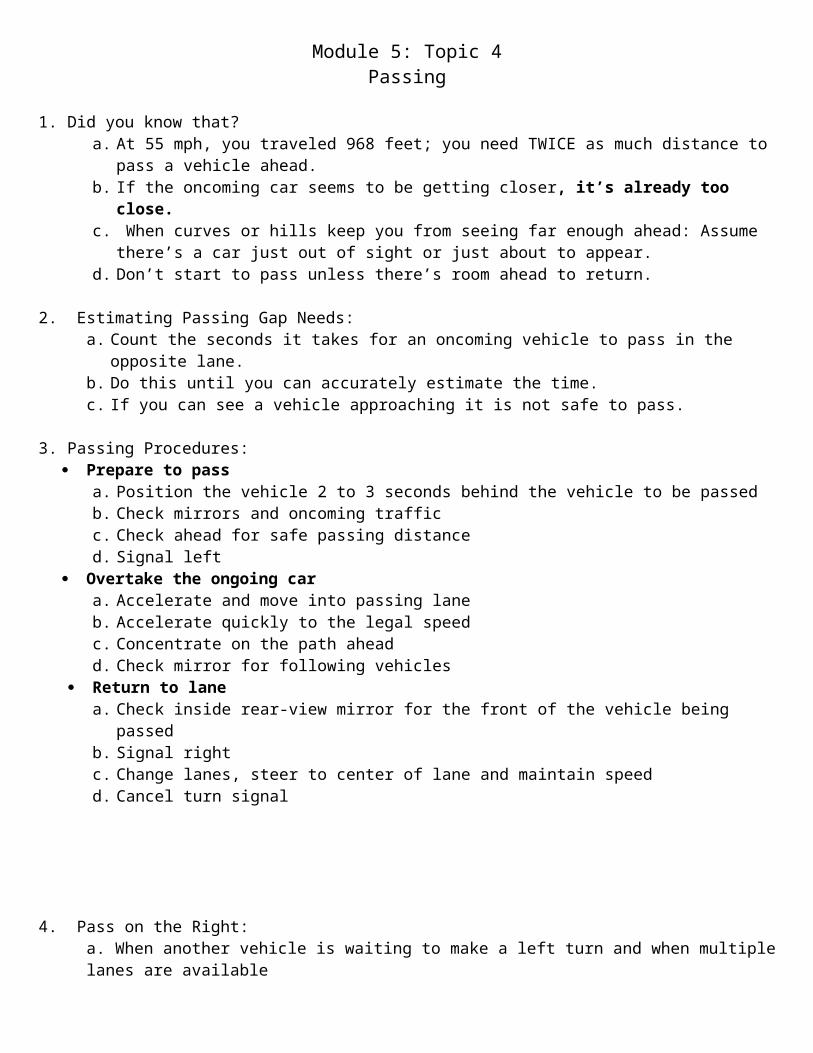
4. Pass on the Right:a. When another vehicle is waiting to make a left turn and when multiple lanes are available
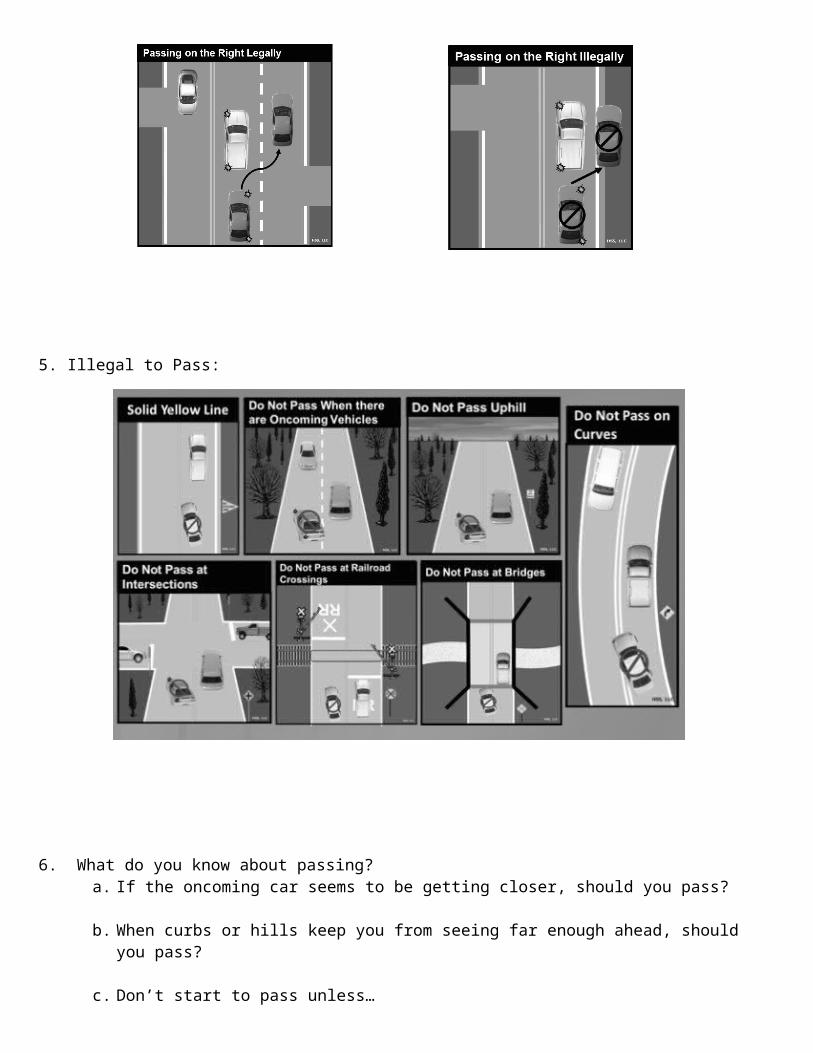
5. Illegal to Pass:
6. What do you know about passing?a. If the oncoming car seems to be getting closer, should you pass?
b. When curbs or hills keep you from seeing far enough ahead, should you pass?
c. Don’t start to pass unless…
7. Passing on Multi-Lane Roads:a. One of the most dangerous maneuvers a driver can attemptb. Higher the speed the greater the riskc. High volume of traffic increases the chance of collisionsd. Passing may occur on the left or right
8. When Being Passed:a. Check passing vehicle’s positionb. Move away slightly if too closec. Maintain speedd. Once passed, create space ahead and behind
Module 5: Topic 5Characteristics of Urban and Rural Roadways
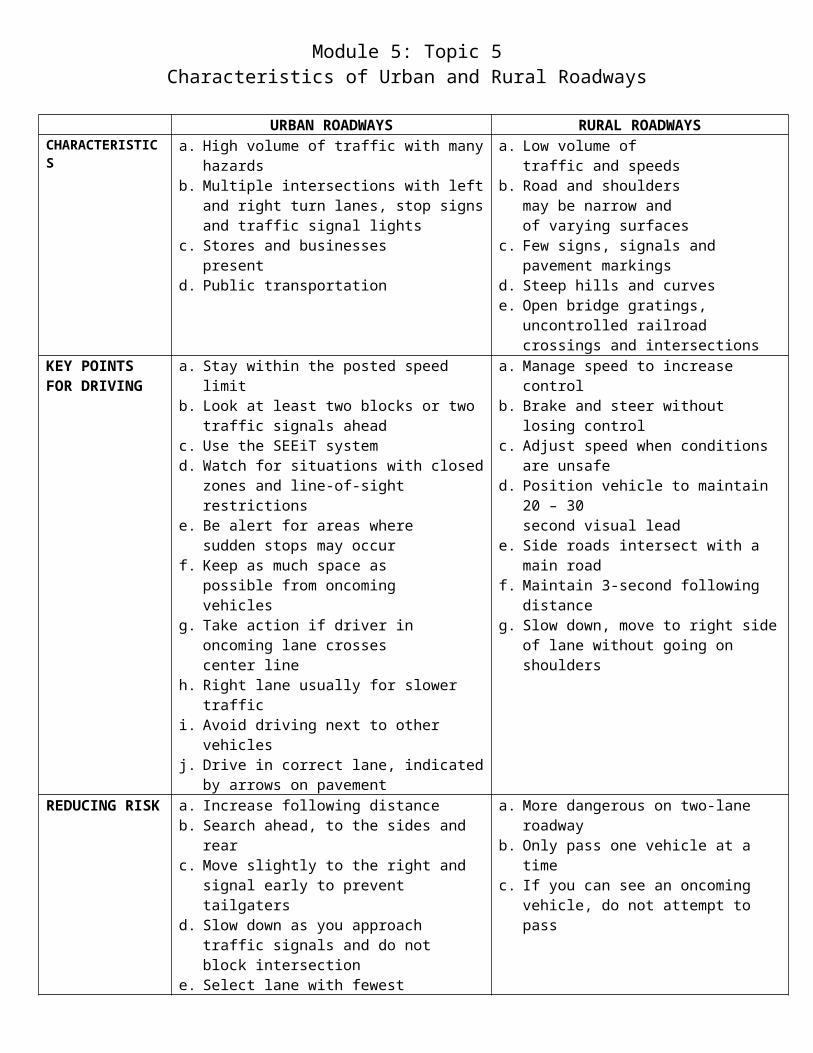
URBAN ROADWAYS RURAL ROADWAYSCHARACTERISTICS a. High volume of traffic with many hazards
b. Multiple intersections with left and right turn lanes, stop signs and traffic signal lights
c. Stores and businesses present
d. Public transportation
a. Low volume of traffic and speeds
b. Road and shoulders may be narrow and of varying surfaces
c. Few signs, signals and pavement markingsd. Steep hills and curvese. Open bridge gratings, uncontrolled railroad
crossings and intersectionsKEY POINTS FOR DRIVING
a. Stay within the posted speed limitb. Look at least two blocks or two traffic signals
aheadc. Use the SEEiT systemd. Watch for situations with closed zones and
line-of-sight restrictionse. Be alert for areas where
sudden stops may occurf. Keep as much space as
possible from oncomingvehicles
g. Take action if driver in oncoming lane crosses center line
h. Right lane usually for slower traffici. Avoid driving next to other vehiclesj. Drive in correct lane, indicated by arrows on
pavement
a. Manage speed to increase controlb. Brake and steer without losing controlc. Adjust speed when conditions are unsafed. Position vehicle to maintain 20 – 30
second visual leade. Side roads intersect with a main roadf. Maintain 3-second following distanceg. Slow down, move to right side of lane
without going on shoulders
REDUCING RISK a. Increase following distanceb. Search ahead, to the sides and rearc. Move slightly to the right and signal early to
prevent tailgatersd. Slow down as you approach traffic signals and
do not block intersection
e. Select lane with fewestnumber of hazards
a. More dangerous on two-lane roadwayb. Only pass one vehicle at a timec. If you can see an oncoming vehicle, do not
attempt to pass
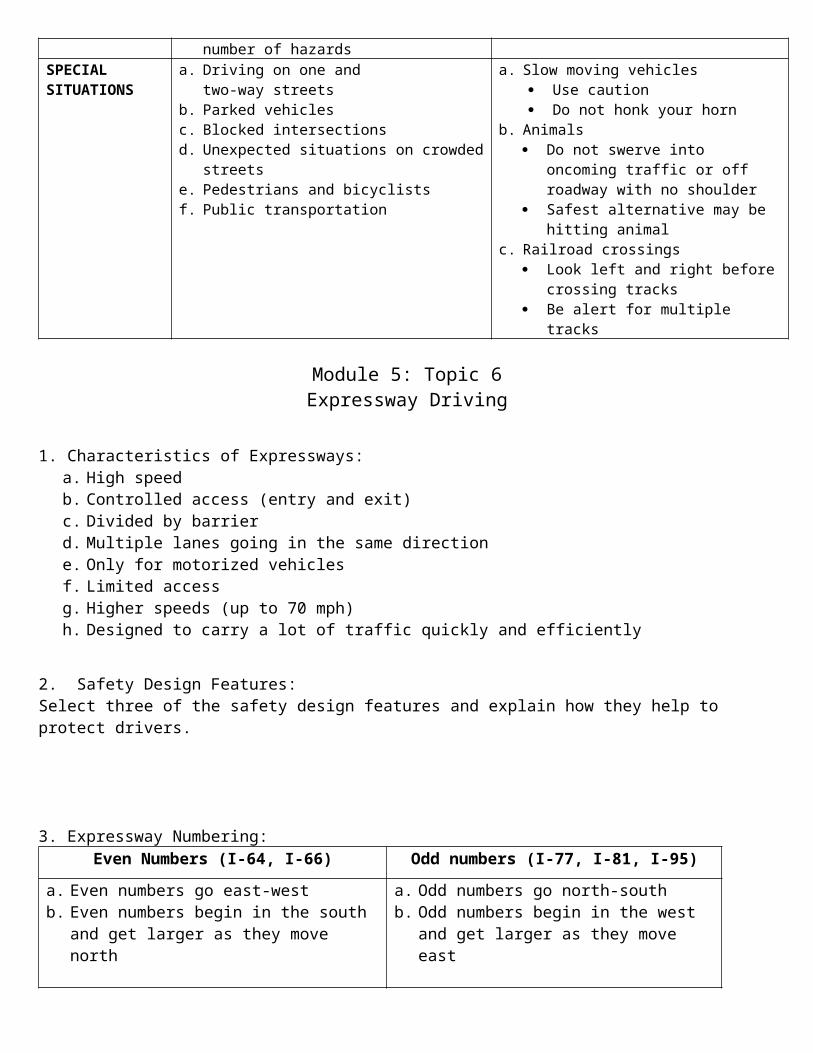
SPECIAL SITUATIONS
a. Driving on one and two-way streets
b. Parked vehiclesc. Blocked intersectionsd. Unexpected situations on crowded streetse. Pedestrians and bicyclistsf. Public transportation
a. Slow moving vehicles Use caution Do not honk your horn
b. Animals Do not swerve into oncoming traffic or
off roadway with no shoulder Safest alternative may be hitting
animalc. Railroad crossings
Look left and right before crossing tracks
Be alert for multiple tracks
Module 5: Topic 6Expressway Driving
1. Characteristics of Expressways:a. High speed b. Controlled access (entry and exit)c. Divided by barrierd. Multiple lanes going in the same directione. Only for motorized vehiclesf. Limited accessg. Higher speeds (up to 70 mph)h. Designed to carry a lot of traffic quickly and efficiently
2. Safety Design Features:Select three of the safety design features and explain how they help to protect drivers.
3. Expressway Numbering:Even Numbers (I-64, I-66) Odd numbers (I-77, I-81, I-95)
a. Even numbers go east-westb. Even numbers begin in the south and get larger
as they move north
a. Odd numbers go north-southb. Odd numbers begin in the west and get
larger as they move east
3-digit numbers designate an alternate route:
1st digit is even (I-664) 1st digit is odd (I-164)
If the first digit is even, the alternate route goes around the city
If it is odd, it leads into the city.What route near us goes AROUND the CITY?
4. Expressway Entrance Components
Parts of Ramp Key Points Good Habits Mistakes/ConcernsEntrance
RampAs you enter the ramp, immediately begin searching for a gap/open space.
Some entrance ramps have ramp meters: Entrance ramp
traffic lights are designed to distribute traffic onto the expressway when traffic is heavy
Permits one car at a time to enter the expressway
a. Make sure the entrance ramp is the correct one
b. Search for “Do Not Enter” or “Wrong Way” signs
c. Check front and rear zones
d. Observe traffic conditions on the limited access roadway
e. Signal, check mirrors and blind zones
f. Prepare to adjust speed for heavy traffic on the ramp
g. Avoid stopping or backing up on a ramp
Oh no! You have entered the EXIT ramp and traffic is coming at you!a. If you see the ramp area marked
with “DO NOT ENTER” and/or “WRONG WAY” signs, immediately pull over to the edge of the road
b. The possibility of a head on collision is very high
c. When the way is clear, turn around and get off the ramp
d. Avoid backing or stopping on ramp
Acceleration Lane
Accelerate to speed of traffic
Monitor gap, and blend with the speed of traffic on the expressway
a. Maintain speed and safe following distance
b. Signalc. Accelerate to the
speed of vehicles on the expressway
d. Continuously check front and rear zones, mirrors and blind spot
e. Decide when and where to merge
a. Search ahead and to the side for a gap on the expressway
b. Prepare to adjust speed with traffic
c. Prepare to use the shoulder if no gap is available
Merge Area Area used to move onto the expressway and is usually marked with a broken white line
Help drivers enter expressway by adjusting speed or changing lanes if it is safe to do so
a. Check Front, Rear and Left Rear Zones
b. Select Gapc. Move into the open
space on expressway
a. Heavy trafficb. No gap to move onto expresswayc. Traffic slowing or stopping ahead
5. Steps for entering an expressway: a. Identify entrance ¼ mile in advanceb. Check trafficc. Signal the proper laned. Enter ramp and adjust speede. Identity gap for merging, signal into the travel lanef. Adjust to travel speed
6. Weave Lane:a. A “weave” lane serves as both an entrance and an exit laneb. Traffic entering and exiting must use the same lanec. Conflicts can occurd. The driver entering from the entrance ramp should yield to the driver leaving the expressway
7. Types of Entrance/Exit Ramps:
a. Clover leaf b. Diamond c. Trumpet d. Frontage
8. List 10 signs or markings you would see on an expressway:
9. Wolf Pack:a. Wolf packs” are groups of drivers traveling together at higher speeds.b. Driving in a “wolf pack” allows you little or no margin of safety.c. Avoid “wolf packs” d. If you see a “wolf pack” approaching from the rear, move over and let them by.
10. It is important to mange space on a highway. How can you manage your time and space on a highway to reduce your risks?
11. Exiting an Expressway:Parts of Exit
RampKey Points Potential Exiting Problems
DecelerationLane
a. Deceleration lanes allow drivers to reduce their speed without blocking traffic on the expressway
b. Look for the advisory speed sign for the deceleration lane
b. Wait until reaching the deceleration lane before reducing speed
a. Short deceleration laneb. Sharp curve on ramp c. Traffic stopped on the exit rampd. Very slow ramp speed - there may be a STOP sign or
a traffic light at the end of the exit ramp. The driver must adjust from a fast speed to a STOP in a short distance.
e. Weave lane conflicts
Exit Ramp a. The exit ramp allows traffic to enter adjoining roadwaysb. Brake to warning sign speed c. Check behindd. Search for traffic control signs or signals