introductiondownload.microsoft.com/.../eventing-guide.docx · web viewthe tutorial defines some...
TRANSCRIPT

Programmers Guide to EventingNovember 16, 2010
Abstract
Windows® eventing surfaces key information about the state of your program and the system. This information is valuable to many audiences:
Information technology (IT) administrators and support professionals can use events to more easily diagnose and manage applications and services.
Performance analysts can use events to more easily identify system bottlenecks and hotspots.
Developers can use events to debug code.
This paper provides information about Windows eventing for the Windows family of operating systems. It contains a step-by-step tutorial that shows driver and application developers how to author and raise events to the Windows Event Log and also describes architectural information and terminology.
This information applies to the following operating systems:Windows Server® 2008 R2Windows 7Windows Server 2008Windows Vista®
References and resources discussed here are listed at the end of this paper.
The current version of this paper is maintained on the web at: http://www.microsoft.com/whdc/system/sysperf/eventing-guide.mspx.
Disclaimer: This document is provided “as-is”. Information and views expressed in this document, including URL and other Internet Web site references, may change without notice. You bear the risk of using it.
This document does not provide you with any legal rights to any intellectual property in any Microsoft product. You may copy and use this document for your internal, reference purposes.
© 2010 Microsoft Corporation. All rights reserved.

Programmers Guide to Eventing - 2
Document HistoryDate ChangeNovember 10, 2010 First publication
ContentsIntroduction...................................................................................................................3Eventing Tutorial............................................................................................................3
Tools..........................................................................................................................3Overview...................................................................................................................6Example Program......................................................................................................6Defining Event Metadata.........................................................................................10Defining a Provider..................................................................................................10Defining a Channel..................................................................................................11Defining an Event and Template.............................................................................13Specifying the Channel and Level for an Event........................................................16Code and Resource File Generation........................................................................17
Code Generation.................................................................................................18Resource File Generation....................................................................................19
Raising an Event......................................................................................................21Installing the Event Manifest...................................................................................25Viewing Events in Event Viewer..............................................................................25Uninstalling the Event Manifest..............................................................................26Defining a Task........................................................................................................26Specifying an Opcode..............................................................................................27
Resources....................................................................................................................28Appendix......................................................................................................................30
Common Uses of Eventing.......................................................................................30Architecture............................................................................................................31Event Layout............................................................................................................32
ID.........................................................................................................................33Version................................................................................................................33Channel...............................................................................................................33Level....................................................................................................................34Task.....................................................................................................................35Opcode................................................................................................................35Keyword..............................................................................................................35Template.............................................................................................................36
November 10, 2010© 2010 Microsoft Corporation. All rights reserved.

Programmers Guide to Eventing - 3
IntroductionWindows® eventing provides a way for developers to surface key information about the state of their programs. This information can provide insight into what is occurring inside the system and in the programs themselves. The following are some common uses of eventing:
IT administration Troubleshooting
Performance analysis Debugging
Events can be used by IT administrators and support professionals to more easily diagnose and manage their applications and services, by performance analysts to identify bottlenecks and hotspots in their systems, and by developers to debug their own code. For more information, see “Common Uses of Eventing” in the appendix.
One of the main advantages of the Windows eventing infrastructure is its flexibility. This paper demonstrates key concepts and best practices for providing events to let you take advantage of this flexibility. It contains two main sections: A tutorial that describes the process of raising your own events for a sample
program to the Windows Event Log. An appendix that describes the architecture and terminology that is associated
with eventing.
Eventing TutorialThis section contains a tutorial that shows you how to raise your own events to the Windows Event Log. The tutorial defines some events for a sample program and defines their provider, which is a software entity that represents the source from which all events are raised in the system.
As with other events delivered to the Event Log, your events are visible with standard event viewing tools, such as the Event Viewer (eventvwr.exe) and the Get-WinEvent PowerShell cmdlet.
For terminology definitions and architectural information, refer to the Appendix.
ToolsTable 1 lists the tools that are required for this tutorial and states where to find them.
Table 1. Required toolsTool Executable Availability DescriptionManifest generator ECMangen.
Windows Software Development Kit (SDK) v7.0 or higherWindows Driver Kit (WDK) v7.0 or higher
GUI tool for defining metadata in the form of an event manifest
November 10, 2010© 2010 Microsoft Corporation. All rights reserved.

Designevents
Define event
metadata
Generate event-specific code &
resources
Modify source code
to raise events
Verify correct logging of
events
Programmers Guide to Eventing - 4
Tool Executable Availability DescriptionMessage compiler
Windows SDK v7.0 or higherWDK v7.0 or higher
Console tool for generating code and resource files from an event manifest
Resource compiler
Windows SDK v6.0 or higherWDK v6.0 or higher
Console tool that compiles resource scripts (.rc files) into Win32® compiled resources (.res files)
Windows events command line utility
Wevtutil.exWindows Vista® or higherWindows Server® 2008 or higher
Console tool that can be used to install and uninstall event manifests and to query events
Event ViewerEventvwr.e
Windows Vista or higherWindows Server 2008 or higher
GUI tool for viewing Event Log events
Some of these tools are available in earlier versions of the kits or the operating system, but this tutorial supports only the versions specified in the preceding table.
Although Microsoft® Visual Studio® is not required, this tutorial provides additional instructions for setting up the Visual Studio 2008 environment for event development.
OverviewFigure 1 shows the process of instrumenting an application to use Windows eventing.
Figure 1. Event workflow
The first step is to determine the types of events to raise. In this step, it is important to consider the purpose and target audience of your events. For example, events that are intended to alert administrators to critical situations are very different from events that are used to build a detailed trace of activities for performance analysis.
After you determine which events to raise, you must define the metadata for these events. Metadata is used to register your provider and events with the system.
The metadata that you define is also used to generate event-specific code and string resources that you can use to easily log your events. Because of the iterative nature of event development, event metadata is often modified periodically, which requires
November 10, 2010© 2010 Microsoft Corporation. All rights reserved.

Programmers Guide to Eventing - 5
generating new code and resources. Consequently, you should integrate this code and resource generation step into the same build process that is used to compile the source code.
With the generated event code, you can then modify your source code to raise the defined events. You must link the generated string resources into your binary file at build time.
As with any software development process, you should test after any modification to the source code. In eventing, your testing should verify that events are logged correctly.
The event workflow tends to be iterative in nature. In fact, we recommend that you add and modify events incrementally because we designed the eventing infrastructure to support reuse and iterative development. After you get started, you can easily add or modify events.
Example ProgramThis tutorial uses the AllCaps example program to describe the event workflow in . AllCaps reads the text from one file, converts all the characters to uppercase, and writes the resulting text to another file.
In this scenario, we will add events to notify users of the following situations:
AllCaps failed to open, create, or close a file. AllCaps successfully converted a file.
We use the Event Log infrastructure to make these events available to all users. For more information, see “Event Log” later in this paper.
The listed events represent high-level conditions that are important to AllCaps users . Although AllCaps is a simple console program, such events play a significant role in applications that run in the background or that are run by users who are not interested in such information. For example, administrators in an enterprise workstation or server deployment can use these events to notify themselves of situations that require their involvement.
The following source code is the AllCaps program without instrumentation. In the sections that follow, we will define event metadata and demonstrate how this program can be instrumented to raise those events.
C/C++#include <stdio.h>#include <Windows.h>
#define BUFSIZE 64
int __cdecl wmain(int argc, WCHAR *argv[]){ ULONG ReturnCode; HANDLE SourceFileHandle; HANDLE DestFileHandle; DWORD BytesRead; DWORD BytesWritten; char Buffer[BUFSIZE];
November 10, 2010© 2010 Microsoft Corporation. All rights reserved.

Programmers Guide to Eventing - 6
BOOL Success; WCHAR* SourceFileName; WCHAR* DestFileName;
if(argc != 3) { wprintf(L"Usage: %s <source_file> <dest_file>\n", argv[0]); return -1; }
SourceFileName = argv[1]; DestFileName = argv[2];
// Open the existing file SourceFileHandle = CreateFile(SourceFileName, // file name GENERIC_READ, // open for reading 0, // do not share NULL, // default security OPEN_EXISTING, // existing file only FILE_ATTRIBUTE_NORMAL, // normal file NULL); // no template if (SourceFileHandle == INVALID_HANDLE_VALUE) { ReturnCode = GetLastError(); goto Exit; }
// Create the new file to write the uppercase version to DestFileHandle = CreateFile(DestFileName, // file name GENERIC_WRITE, // open for writing 0, // do not share NULL, // default security CREATE_NEW, // overwrite existing FILE_ATTRIBUTE_NORMAL, // normal file NULL); // no template if (DestFileHandle == INVALID_HANDLE_VALUE) { ReturnCode = GetLastError(); goto Exit; }
// Read BUFSIZE blocks to the Buffer. Change all characters in // the Buffer to upper case. Write the Buffer to the temporary // file. do { if (ReadFile(SourceFileHandle, Buffer, BUFSIZE, &BytesRead, NULL)) { CharUpperBuffA(Buffer, BytesRead); Success = WriteFile(DestFileHandle, Buffer, BytesRead, &BytesWritten, NULL); if (!Success) { ReturnCode = GetLastError(); goto Exit; } } else { ReturnCode = GetLastError(); goto Exit; } } while (BytesRead == BUFSIZE);
November 10, 2010© 2010 Microsoft Corporation. All rights reserved.

Programmers Guide to Eventing - 7
// Close the handles to the files Success = CloseHandle(SourceFileHandle); if (!Success) { ReturnCode = GetLastError(); goto Exit; } Success = CloseHandle(DestFileHandle); if (!Success) { ReturnCode = GetLastError(); goto Exit; }
Exit: return ReturnCode;}
C#Note: The following sample code is meant to demonstrate raising events rather than best practices in exception handling. For .NET exception best practices, see Best Practices for Handling Exceptions in the “Resources” section.
using System;using System.IO;using System.Text;
namespace Company.Product{ class AllCaps { // Reads one buffer at a time from source, converts the // characters in the buffer to uppercase, and writes the // resulting buffer to destination private static void CopyFileUppercase(FileStream source, FileStream destination) { const int BUFFER_SIZE = 64; byte[] buffer = new byte[BUFFER_SIZE]; UTF8Encoding utf8 = new UTF8Encoding(); string uppercaseString;
while (source.Read(buffer, 0, buffer.Length) > 0) { uppercaseString = utf8.GetString(buffer).ToUpper(); buffer = utf8.GetBytes(uppercaseString); destination.Write(buffer, 0, buffer.Length); } }
public static void Main(string[] args) { if (args.Length != 2) { Console.WriteLine( "Usage: AllCaps <source_file> <dest_file>"); return; }
string sourceFilename = args[0]; string destinationFilename = args[1];
FileStream sourceFileStream; FileStream destinationFileStream;
November 10, 2010© 2010 Microsoft Corporation. All rights reserved.

Programmers Guide to Eventing - 8
try { sourceFileStream = File.OpenRead(sourceFilename); } catch (Exception ex) { return; }
try { destinationFileStream = File.Create( destinationFilename); } catch (Exception ex) { return; }
CopyFileUppercase( sourceFileStream, destinationFileStream);
try { sourceFileStream.Close(); } catch (Exception ex) { return; }
try { destinationFileStream.Close(); } catch (Exception ex) { return; } } }}
Defining Event MetadataTo use the Windows eventing infrastructure, you must define event metadata in the form of an XML-based manifest. During development, this metadata is used to generate code and resource files. After you instrument and compile your program, you can use this metadata to install a provider, to raise events at runtime, and to make the provider and events discoverable to users. To create and edit these manifests, we recommend the ECMangen tool, which is available in the Windows SDK and the WDK.
For this tutorial, the event metadata is defined in a manifest that is named “AllCaps.man”.
Defining a ProviderThe first event metadata element that you must define is the provider. The provider represents the logical entity from which all events are raised. It can be an application, driver, system component, or other software entity.
You should name the event providers by using the following convention:<company_name>-<product_name>-<component_name>
Note that the hyphens (-) are significant because the Event Viewer (eventvwr.exe) uses them to generate its navigation tree. For this tutorial, the provider name is “Company-Product-AllCaps”.
November 10, 2010© 2010 Microsoft Corporation. All rights reserved.

Programmers Guide to Eventing - 9
To define a provider in ECMangen
1. In the right panel, click the New Provider link:
2. In the Name field, type Company-Product-AllCaps.3. Define the symbol for your provider in the Symbol field. The Symbol field accepts
a string that is used to name the macros (native code) or methods (managed code) that you will use later. You can explicitly define this symbol, or you can allow ECMangen to automatically generate it from the provider Name by leaving the Symbol field blank. Note that after a symbol is generated, it is not automatically updated if you change the provider name.
4. Type the provider’s globally unique identifier (GUID) in the GUID field. If you do not have a specific GUID, click the New button to generate one. To maintain application compatibility, you should not change your provider’s GUID after you specify it.
5. Define the file location for decoding information in the Decoding file locations section. The Windows Event Log infrastructure uses these decoding file locations to find decoding information at both event logging and event consumption time. When an event is published through the Event Log, the resource decoding information is used to decode the event descriptors. (For more information, see “Event Layout” later in this paper.) When the event is consumed, the message decoding information is used to construct the message string.
You must specify each decoding file location as a fully qualified path to the binary file that contains the respective decoding file. This binary file must be present at the decoding file location when the event metadata is installed. For this tutorial, type %SystemDrive%\Temp\AllCaps.exe as the decoding file location in both the Resources and the Messages fields. This location is where you will deploy your AllCaps executable file.
November 10, 2010© 2010 Microsoft Corporation. All rights reserved.

Programmers Guide to Eventing - 10
Although your GUID will differ, you should see the following in ECMangen after you save your provider metadata.
Defining a ChannelA channel is used to make related events easily viewable by a particular audience. Each Event Log provider logs its events to one or more channels. Although the Event Log provides a set of predefined channels, we recommend that you deliver events to a custom channel whenever possible.
When you define a custom channel, you create a logical grouping for your events, which allows users to easily discover them. Grouping events into a custom channel also enables more detailed control over policies for those events, which is not possible with predefined channels. For a detailed explanation of channels and the types of channels that you can create, see “Channel” later in this paper.
To create a channel in ECMangen
1. In the right panel, click the New Channel link.
2. In the Name field, type Admin. In this tutorial, our target audience is IT administrators. Note that this name must be unique across all channels that are defined for a particular provider. Other event providers that have different provider GUIDs can use the same channel name with no conflict.
3. Leave the Symbol field blank. As with providers, the symbol is automatically generated by using the Name field when you leave the Symbol field blank.
November 10, 2010© 2010 Microsoft Corporation. All rights reserved.

Programmers Guide to Eventing - 11
4. Set the Type field to Admin, and then select the Enable check box for this tutorial. In this tutorial, we assume that AllCaps is an important application and that administrators want to know when AllCaps encounters an error and when it successfully completes.
After you save your channel, you should see the following in ECMangen.
Defining an Event and TemplateEach event consists of a standard header and an optional payload that contains event-specific data. (For more details, see “Event Layout” later in this paper.) If your event contains a payload, you must also define a template for your event-specific data. As with all other event metadata, this definition occurs in the event manifest. The eventing infrastructure uses the template to statically determine the payload format of each event.
Often, multiple events contain the same payload layout. In this situation, the template allows multiple events to share a common payload. Event messages can reference the fields that are stored in the payload by using %n notation, where n is the field number (for example, “The quick brown %1 jumped over the %2”). Note that the payload can contain more fields than those that are referenced in the message. For more information on templates, see “Template” later in this paper.
For this tutorial, we define the events in Table 2.
Table 2. Events to be raisedEvent symbol Event message Template Event purposeFileOperationException Operation on file FileExceptionTemplate To alert administrators
November 10, 2010© 2010 Microsoft Corporation. All rights reserved.

Programmers Guide to Eventing - 12
Event symbol Event message Template Event purpose(for .NET exceptions) %1 resulted in
the following exception: %2.
to an inability to perform a file operation (managed code)
FileOperationError(for Win32 errors)
Operation on file %1 resulted in the following error: %2.
FileErrorTemplate To alert administrators to an inability to perform a file operation (native code)
Complete Text in file %1 was successfully converted to all caps and copied to file %2.
CompleteTemplate To alert administrators to successful completion of an AllCaps conversion
For efficiency, the statically defined portion of the message is not logged with the payload of each event. That is, only the variable fields (the %1 and %2 values in the preceding event messages) are logged with the payload. When the eventing infrastructure decodes events, it retrieves the static portions of the message from the binary file whose location is specified by the decoding file location of the provider. (For more information, see “Defining a Provider” earlier in this paper.)
In the rare situation where your events do not reference any fields, they should just point to the default (empty payload) template.
All of our event messages contain field references, so we must define templates to specify the format of the payload of each event. Each field of the payload is defined by an InType and an OutType. The InType specifies the internal representation of the field, and the OutType specifies the way in which the field should appear to a person who reads the event message. For a list of all the supported input types and corresponding output types, refer to the Remarks section of the “InputType Complex Type” reference page on the MSDN® website.
In our example, the templates in Table 3 must be defined.
Table 3. Template metadataTemplate Field InType OutTypeFileExceptionTemplate(for .NET exceptions)
FileName UnicodeString stringExceptionMessage UnicodeString string
FileErrorTemplate( for Win32 errors)
FileName UnicodeString stringErrorType UInt32 Win32Error
CompleteTemplate SourceFileName UnicodeString stringDestinationFileName UnicodeString string
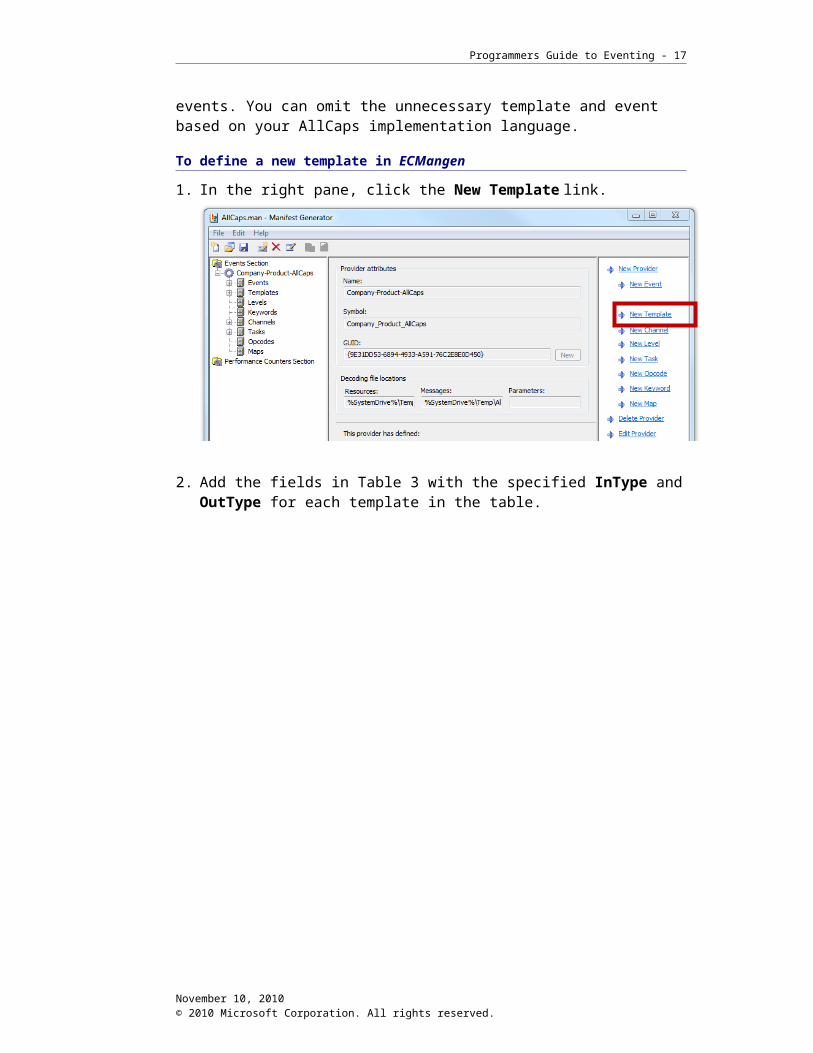
Because of differences between Win32 errors and .NET exceptions, we defined separate FileErrorTemplate and FileExceptionTemplate templates to represent these conditions, respectively. Correspondingly, we also defined separate FileOperationError and FileOperationException events. You can omit the unnecessary template and event based on your AllCaps implementation language.
To define a new template in ECMangen
1. In the right pane, click the New Template link.
November 10, 2010© 2010 Microsoft Corporation. All rights reserved.

Programmers Guide to Eventing - 13
2. Add the fields in Table 3 with the specified InType and OutType for each template in the table.
November 10, 2010© 2010 Microsoft Corporation. All rights reserved.

Programmers Guide to Eventing - 14
As an example, after you add the fields for the CompleteTemplate, you should see the following.
To define a new event in ECMangen
1. In the right pane, click the New Event link.
2. Add the events that are specified in Table 2:
In the Event ID field, choose a unique integer. The scope of this uniqueness is per-provider; that is, other event providers that have different provider GUIDs can use the same event ID with no conflict.
For now, leave Channel, Level, Task, and Opcode set to <default>.
November 10, 2010© 2010 Microsoft Corporation. All rights reserved.

Programmers Guide to Eventing - 15
For Template, choose the template that corresponds to the event that is being defined.
As an example, after you enter the Complete event, you should see the following.
Specifying the Channel and Level for an EventAn event appears in the Event Log only if it has a channel that is associated with it. Consequently, as currently defined, the AllCaps events will not be delivered through the Event Log because we have not yet specified a channel.
Many providers use the predefined legacy channels, such as the Application channel. Events that are delivered to these legacy channels are difficult to discover because of the large number of providers that use them. Instead, we should deliver the AllCaps events to the custom Admin channel that we previously defined in “Defining a Channel” earlier in this paper.
Because this channel is an administrator-type channel, the level of each event must be specified to inform administrators of the severity and verbosity of the event. The level must be one of the permitted predefined values that are described in “Level” later in this paper.
For events that are delivered to other types of channels, levels are still useful to categorize the severity of the event. For more information, see “Level” later in this paper.
November 10, 2010© 2010 Microsoft Corporation. All rights reserved.

Programmers Guide to Eventing - 16
The levels for the AllCaps events should be set as shown in Table 4.
Table 4. Levels for AllCaps eventsEvent Level CommentFileOperationException Error This event represents a loss of functionality that
is serious to the program, but that does not compromise the overall system.
FileOperationError Error This event represents a loss of functionality that is serious to the program, but that does not compromise the overall system.
Complete Informational This event alerts the administrator to the successful completion of AllCaps. Because this is not a problematic or erroneous condition, “Informational” is the appropriate level.
In ECMangen, change the channel of each event from <default> to Admin. Change the level of each event from <default> to the level in Table 4.
As an example, after you specify the channel and level for the Complete event, you should see the following.
Code and Resource File GenerationYou must now generate one of the following to use in your source code to raise events:
For native code, generate the necessary event header file and macros. For managed code, generate the necessary event namespace and methods.
You must also generate string resources to include in your AllCaps.exe binary file.
November 10, 2010© 2010 Microsoft Corporation. All rights reserved.
Programmers Guide to Eventing - 17
Code GenerationTo generate event macros (native) and methods (managed), run the MC tool in the SDK and the WDK. You can run this tool from the command line as follows.
C/C++MC AllCaps.man -um -z AllCapsEvents
This creates AllCapsEvents.h, which contains macros for raising events and for registering and unregistering your event provider.
C#MC AllCaps.man -cs Company.Product.Eventing -z AllCapsEvents
This creates AllCapsEvents.cs, which contains methods for raising events and for registering and unregistering your event provider.
If you are using Visual Studio, you can add the preceding MC command as a custom build step (native) or prebuild event (managed) as follows:
C/C++
1. Add AllCaps.man as a source file in your project.
2. In Solution Explorer, right-click AllCaps.man and then select Properties.3. For Configuration, select All Configurations.
4. Click Configuration Properties, and then click Custom Build Step.5. For Command Line, Description, and Outputs, add the following.
November 10, 2010© 2010 Microsoft Corporation. All rights reserved.

Programmers Guide to Eventing - 18
C#
1. In Solution Explorer, right-click the project.
2. Click Properties, click Build Events, and then click Edit Pre-build.3. Add the following.
When you run the MC command by using C#, the AllCapsEvents.cs file is generated. This file contains the class definition of your provider and methods for raising all your events. Because AllCapsEvents.cs contains unsafe code, be sure to add the /unsafe switch when you invoke the C# compiler from the command line or to select the Allow unsafe code check box in the Build tab of your project Properties in Visual Studio.
Resource File GenerationAs discussed earlier, the eventing infrastructure uses resources that are linked to executable images for decoding information and event messages. Running the MC command as described in the preceding “Code Generation” section also generates a resource-definition script (.rc file). You must run the Windows Resource Compiler (RC) on this .rc file to generate a compiled resource (.res file). You must then link the .res file into the program binary file. This section describes how to do this.
If your project has its own .rc file, you must create a master .rc file that includes both your .rc file and the .rc file that MC generates. For more information on resource-definition scripts, compiled resources, and the Windows Resource Compiler, see the “Resource Compiler” documentation on MSDN.
If you are using C/C++ as your implementation language and Visual Studio as your editor, we recommend that you create a project .rc file in Visual Studio and include the MC-generated .rc file from the project .rc file. Alternatively, you can include just the event .rc file in your project after it is generated for the first time. These approaches cause the .rc file for your events to automatically be compiled and linked into your binary file. If you follow either approach, you can skip to “Raising an Event” because the rest of this section does not apply to you.
November 10, 2010© 2010 Microsoft Corporation. All rights reserved.

Programmers Guide to Eventing - 19
You can run the RC tool from the command line as follows.RC /r AllCapsEvents.rc
This command generates AllCapsEvents.res. When you compile the source code for AllCaps, you must link this .res file into AllCaps.exe.
If you are using C# as your implementation language and Visual Studio as your editor, you must perform the following steps. Otherwise, skip to “Raising an Event.”
Add the RC command as a pre-build event:1. In Solution Explorer, right-click the project.
2. Click Properties, click Build Events, and then click Edit Pre-build.3. Add the following command.
November 10, 2010© 2010 Microsoft Corporation. All rights reserved.

Programmers Guide to Eventing - 20
Specify AllCapsEvents.res as your resource file:1. In Solution Explorer, right-click the project.
2. Click Properties, and then click Application.3. Under Resource File, specify the path to the .res file.
Raising an EventBy using the automatically generated macros (native code) or methods (managed code), you can now raise the events that are defined in AllCaps.man. In the following source code, see the bold text for an example of how to do this.
C/C++#include <stdio.h>#include <Windows.h>#include "AllCapsEvents.h"
#define BUFSIZE 64
int __cdecl wmain(int argc, WCHAR *argv[]){ ULONG ReturnCode; HANDLE SourceFileHandle; HANDLE DestFileHandle; DWORD BytesRead; DWORD BytesWritten; char Buffer[BUFSIZE]; BOOL Success; WCHAR* SourceFileName; WCHAR* DestFileName;
if(argc != 3) { wprintf(L"Usage: %s <source_file> <dest_file>\n", argv[0]); return -1; }
// Register the event provider EventRegisterCompany_Product_AllCaps();
November 10, 2010© 2010 Microsoft Corporation. All rights reserved.

Programmers Guide to Eventing - 21
SourceFileName = argv[1]; DestFileName = argv[2];
// Open the existing file SourceFileHandle = CreateFile(SourceFileName,// file name GENERIC_READ, // open for reading 0, // do not share NULL, // default security OPEN_EXISTING, // existing file only FILE_ATTRIBUTE_NORMAL, // normal file NULL); // no template if (SourceFileHandle == INVALID_HANDLE_VALUE) { ReturnCode = GetLastError();
// Raise a FileOperationError event if unable to open // the source file
EventWriteFileOperationError(SourceFileName, ReturnCode);
goto Exit; }
// Create the new file to write the uppercase version to it DestFileHandle = CreateFile(DestFileName, // file name GENERIC_WRITE, // open for writing 0, // do not share NULL, // default security CREATE_NEW, // overwrite existing FILE_ATTRIBUTE_NORMAL, // normal file NULL); // no template if (DestFileHandle == INVALID_HANDLE_VALUE) { ReturnCode = GetLastError();
// Raise a FileOperationError event if unable to create the // destination file EventWriteFileOperationError(DestFileName, ReturnCode);
goto Exit; }
// Read BUFSIZE blocks to the Buffer. Change all characters in // the Buffer to upper case. Write the Buffer to the temporary // file do { if (ReadFile(SourceFileHandle, Buffer, BUFSIZE, &BytesRead, NULL)) { CharUpperBuffA(Buffer, BytesRead); Success = WriteFile(DestFileHandle, Buffer, BytesRead, &BytesWritten, NULL); if (!Success) { ReturnCode = GetLastError(); goto Exit; } } else { ReturnCode = GetLastError(); goto Exit; }
November 10, 2010© 2010 Microsoft Corporation. All rights reserved.

Programmers Guide to Eventing - 22
} while (BytesRead == BUFSIZE);
// Close the handles to the files Success = CloseHandle(SourceFileHandle); if (!Success) { ReturnCode = GetLastError();
// Raise a FileOperationError event if unable to close the // source file handle EventWriteFileOperationError(SourceFileName, ReturnCode);
goto Exit; } Success = CloseHandle(DestFileHandle); if (!Success) { ReturnCode = GetLastError();
// Raise a FileOperationError event if unable to close the // destination file handle EventWriteFileOperationError(DestFileName, ReturnCode);
goto Exit; }
// Raise a Complete event after successful AllCaps conversion EventWriteComplete(SourceFileName, DestFileName);
// Unregister the event provider EventUnregisterCompany_Product_AllCaps();
Exit: return ReturnCode;}
C#using System;using System.IO;using System.Text;
using Company.Product.Eventing;
namespace Company.Product{ class AllCaps { // Reads one buffer at a time from source, converts the // characters in the buffer to uppercase, and writes the // resulting buffer to destination private static void CopyFileUppercase(FileStream source, FileStream destination) { const int BUFFER_SIZE = 64; byte[] buffer = new byte[BUFFER_SIZE]; UTF8Encoding utf8 = new UTF8Encoding(); string uppercaseString; while (source.Read(buffer, 0, buffer.Length) > 0) { uppercaseString = utf8.GetString(buffer).ToUpper(); buffer = utf8.GetBytes(uppercaseString); destination.Write(buffer, 0, buffer.Length); } }
November 10, 2010© 2010 Microsoft Corporation. All rights reserved.

Programmers Guide to Eventing - 23
public static void Main(string[] args) { if (args.Length != 2) { Console.WriteLine( "Usage: AllCaps <source_file> <dest_file>"); return; }
// Create an instance of the class representing the // event provider Company-Product-AllCaps Company_Product_AllCaps provider = new Company_Product_AllCaps();
string sourceFilename = args[0]; string destinationFilename = args[1];
FileStream sourceFileStream; FileStream destinationFileStream;
try { sourceFileStream = File.OpenRead(sourceFilename); } catch (Exception ex) { // Raise a FileOperationException event if unable to // open the source file provider.EventWriteFileOperationException( sourceFilename, ex.Message); return; }
try { destinationFileStream = File.Create(destinationFilename); } catch (Exception ex) { // Raise a FileOperationException event if unable to // create the destination file provider.EventWriteFileOperationException( destinationFilename, ex.Message); return; }
CopyFileUppercase(sourceFileStream, destinationFileStream);
try { sourceFileStream.Close(); } catch (Exception ex) { // Raise a FileOperationException event if unable to // close the source file stream provider.EventWriteFileOperationException( sourceFilename, ex.Message); return; }
try { destinationFileStream.Close(); } catch (Exception ex) { // Raise a FileOperationException event if unable to // close the destination file stream provider.EventWriteFileOperationException( destinationFilename, ex.Message); return; }
November 10, 2010© 2010 Microsoft Corporation. All rights reserved.

Programmers Guide to Eventing - 24
// Raise a Complete event after successful // AllCaps conversion provider.EventWriteComplete( sourceFilename, destinationFilename); } }}
Installing the Event ManifestTo associate the binary file that is deployed with the provider that it uses to raise events, you must install the event manifest. After you compile your project, you can install your event manifest by issuing the following command from an elevated command prompt.wevtutil im AllCaps.man
In practice, you must perform this installation step on every machine on which the instrumented software is deployed. Additionally, if the manifest ever changes, you must reinstall it on every machine.
For the eventing infrastructure to find your string resources, AllCaps.exe must be present in the decoding file location that is specified in your manifest (%SystemDrive%\Temp\AllCaps.exe in this tutorial). Beginning with Windows 7, you can override the decoding file paths that are specified in the manifest by running wevtutil im with the corresponding /resourceFilePath or /messageFilePath switches.
Viewing Events in Event ViewerYou can now cause events to be raised. In this section, you will run AllCaps.exe on the following two files: A non-empty text file that is named “input_file.txt”.
A non-existent text file that is named “nonexistent_file.txt”.
Issue the following commands on these two files.AllCaps input_file.txt output_file.txtAllCaps nonexistent_file.txt output_file.txtThe first command—performed on an existing text file—causes the Complete event to be written to our custom channel in the Event Log. The second command—performed on a nonexistent text file—causes the FileOperationError or FileOperationException event to be written.
To view the events, launch Event Viewer (eventvwr.exe). In the left pane, navigate to the following location to see the two events that were raised:
Applications and Services Logs\Company\Product\AllCaps\Admin
November 10, 2010© 2010 Microsoft Corporation. All rights reserved.

Programmers Guide to Eventing - 25
You should see the two events that were raised in response to the two AllCaps commands that were issued.
Uninstalling the Event ManifestIf you define additional metadata, you must uninstall the event manifest. After you complete your metadata changes and rebuild your project, you must reinstall the event manifest. This event manifest uninstallation and reinstallation is required to reflect any manifest modifications in the system.
In addition to situations in which a manifest has changed, you should also uninstall the event manifest whenever its corresponding application is uninstalled, to avoid leaving unnecessary state behind in the system.
To uninstall the event manifest, issue the following command from an elevated command prompt.wevtutil um AllCaps.man
Defining a TaskAlthough the current AllCaps event definitions are enough to deliver notifications to our custom channel in the Event Log, additional metadata might increase their usefulness. For example, you should specify the task for each AllCaps event to provide additional information on the activity that is being performed when the event is raised. A task represents a high-level action or unit of functionality that is being accomplished at the time an event is raised.
For example, defining a task to represent the servicing of an HTTP request might be useful for tracking all events that occur during the operation. If you define groupings of events based on individual activities, consumers of the events can gain a better understanding of the context of each event. Filtering on tasks of interest is a technique that is commonly used when working with large quantities of events. For more information, see “Task” later in this paper.
November 10, 2010© 2010 Microsoft Corporation. All rights reserved.

Programmers Guide to Eventing - 26
Table 5 suggests the tasks that can be defined and associated with each AllCaps event.
Table 5. Tasks for AllCaps eventsEvent TaskFileOperationException FileOperationTaskFileOperationError FileOperationTaskComplete AllCapsConversionTask
Note that tasks do not need to be mutually exclusive. For example, in Table 5, AllCapsConversionTask represents the entire end-to-end workflow for the AllCaps program, whereas FileOperationTask represents a series of actions that are performed within this end-to-end workflow.
To define a task in ECMangen, click the New Task link.
Create the two tasks (FileOperationTask and AllCapsConversionTask) by using a unique integer for the Value of each task. Each event should be modified to reference the tasks in Table 5.
Specifying an OpcodeNow that we have associated a task with each event, we should also specify a corresponding opcode. Opcodes are logical complements to tasks and, as such, are often specified on events that contain tasks. To complete this pairing, we will add an opcode to each AllCaps event. For details on the purpose and usage of opcodes, see “Opcode” later in this paper.
The AllCaps events should all use the predefined Info opcode. Note that if the Complete event had a corresponding start event to represent the beginning of AllCapsConversionTask, then the opcode of the Complete event should be set to “Stop”. Because of the significance that certain tools place on the pairing of the Start and Stop opcodes, these opcodes should be used only if a proper pair of start and end events is defined.
November 10, 2010© 2010 Microsoft Corporation. All rights reserved.

Programmers Guide to Eventing - 27
In ECMangen, modify each event to use the Info opcode. As an example, the Complete event should appear as follows at the end of this step.
To use the new tasks and opcodes, be sure to generate new code and resource files and to reinstall the event manifest. For more information, see “Code and Resource File Generation” and “Installing the Event Manifest”, respectively, earlier in this paper. These steps are necessary each time that you modify the event metadata. In the case of actual production code, you should integrate these steps into the build, test, and deployment processes.
Resources
Kits:Windows Driver Kit (WDK)
http://www.microsoft.com/whdc/DevTools/default.mspx
Windows Software Development Kit (SDK)http://msdn.microsoft.com/en-us/windows/bb980924.aspx
Microsoft Developer Network (MSDN):http://msdn.microsoft.com/en-us/default.aspx
Best Practices for Handling Exceptionshttp://msdn.microsoft.com/en-us/library/seyhszts.aspx
channel Elementhttp://msdn.microsoft.com/en-us/library/aa382742(VS.85).aspx
Event Tracinghttp://msdn.microsoft.com/en-us/library/bb968803(VS.85).aspx
November 10, 2010© 2010 Microsoft Corporation. All rights reserved.

Programmers Guide to Eventing - 28
Event Viewerhttp://technet.microsoft.com/en-us/library/cc766042.aspx
EVENT_RECORD Structurehttp://msdn.microsoft.com/en-us/library/aa363769(VS.85).aspx
Get-WinEventhttp://technet.microsoft.com/en-us/library/dd367894.aspx
InputType Complex Typehttp://msdn.microsoft.com/en-us/library/aa382774(VS.85).aspx
keyword Elementhttp://msdn.microsoft.com/en-us/library/aa382787(VS.85).aspx
level Elementhttp://msdn.microsoft.com/en-us/library/aa382795(VS.85).aspx
LevelType Complex Typehttp://msdn.microsoft.com/en-us/library/aa382793(VS.85).aspx
opcode Elementhttp://msdn.microsoft.com/en-us/library/aa383964(VS.85).aspx
OpcodeType Complex Typehttp://msdn.microsoft.com/en-us/library/aa383956(VS.85).aspx
Resource Compilerhttp://msdn.microsoft.com/en-us/library/aa381042(VS.85).aspx
task ELEMENThttp://msdn.microsoft.com/en-us/library/aa384177(VS.85).aspx
template Elementhttp://msdn.microsoft.com/en-us/library/aa384200(VS.85).aspx
Windows Event Loghttp://msdn.microsoft.com/en-us/library/aa385780(VS.85).aspx
Windows Event Forumhttp://social.msdn.microsoft.com/Forums/en/etw/
Windows Performance Analyzer (WPA)http://msdn.microsoft.com/en-us/library/ff191077.aspx
November 10, 2010© 2010 Microsoft Corporation. All rights reserved.

Programmers Guide to Eventing - 29
AppendixThis section of the programmer’s guide contains the terms and theory of eventing. Specifically, it describes the following:
Common uses of eventing Eventing architecture
Event layout
Common Uses of EventingWindows eventing lets you expose key information about the state of your program and the system. Some common uses of eventing include the following: IT administration
IT administrators and management software can use events that are raised in response to errors and other conditions of interest. These events provide a consistent way to monitor the health of important services that the IT administrator manages. Events can also play a pivotal role in auditing the security and availability of a workstation or server deployment.
Troubleshooting
Support professionals can use events when troubleshooting problems because these events can provide insight into software and hardware errors, as well as misconfigurations. This is especially important when the problem cannot be easily reproduced or if the end user cannot remember the exact system or application activities that led up to the manifestation of the problem.
Performance analysis
Event traces can allow performance analysts to precisely identify the cause of performance degradation or potential bottlenecks in their systems. Capacity planning is also aided by such traces. The Windows eventing infrastructure provides a great deal of control and flexibility over these traces, including the ability to disable tracing by default, which avoids an unnecessary overhead on production systems.
DebuggingDevelopers can use eventing to assist in debugging their own code. As with performance analysis, developers who use events for debugging benefit greatly from the degree of control that the Windows eventing infrastructure offers.
November 10, 2010© 2010 Microsoft Corporation. All rights reserved.

Programmers Guide to Eventing - 30
ArchitectureIn its simplest form, the Windows eventing architecture can be viewed as a system that consists of a series of event providers, the Event Tracing for Windows (ETW) infrastructure, the Event Log, and a series of consumers as follows.
Figure A-1. Basic eventing architecture
An event can be any noteworthy activity that results from program execution. It is represented by a piece of data that is written through the eventing infrastructure at the time of logging. Events are published for consumption by the infrastructure in a discoverable and standardized way.
The definitions for these eventing architecture components follow:
ProviderThe provider is responsible for raising events. It can be an application, driver, system component, or other software entity. Each provider has a name and a GUID that can be used to uniquely identify it.
Event Tracing for Windows The ETW infrastructure provides an efficient transport mechanism for delivering the events that providers raise to the appropriate log. This infrastructure also manages event providers. Providers must register themselves and the events that they raise with ETW.Because providers do not log static data as part of the events that they raise, they must provide ETW with the necessary metadata in the form of an event manifest. In addition to allowing events to be decoded, the metadata that is provided as part of the registration process also allows events to be discovered and localized. For example, information on providers and events can be easily queried through the Get-WinEvent PowerShell cmdlet or through the Windows Events command-line utility (wevtutil.exe).
You can control the delivery of events through ETW by using APIs and tools or manage them automatically by using the Event Log service. For more information on Event Tracing, see “Resources” earlier in this paper.
Event Log
The Windows Event Log is commonly used in conjunction with ETW. It can be considered an abstraction that simplifies common usages of Windows eventing. Both event providers and event consumers use the Event Log. It is a convenient way to expose events to users. IT administrators use the Event Log to manage their systems and to troubleshoot problems. Events delivered to the Event Log can be viewed in the Windows Event Viewer (eventvwr.exe) either locally or remotely. For more information on Windows Event Log, see “Resources” earlier in this paper.
November 10, 2010© 2010 Microsoft Corporation. All rights reserved.

Programmers Guide to Eventing - 31
Consumer
The consumer reads events that are delivered through ETW. These events can be located in log files (offline consumption) or in memory buffers (real-time consumption). A consumer must register with ETW or the Event Log for a callback for each event that is delivered. The infrastructure ensures that the consumer is notified of events with relatively low latency and in the correct order.In addition to consumption tools such as Event Viewer, Tracerpt, the Get-WinEvent cmdlet, and Windows Performance Analyzer (WPA), there is a rich API set that allows applications and drivers to consume events.
Event LayoutEvery event consists of a fixed-size header and an optional payload that contains user data as shown in the following figure.
Figure A-2. Event layout
The header consists of a user-defined event descriptor and a series of non-customizable fields. The format of the payload is statically defined by the author of the event in the form of a template. The tutorial section of this guide demonstrates the process of defining the event descriptors and the templates for a series of events.
The remaining subsections discuss the fields of the Event Descriptor in the header. For more information about an event’s layout and the EVENT_Record structure, see “Resources” earlier in this paper.
November 10, 2010© 2010 Microsoft Corporation. All rights reserved.

Programmers Guide to Eventing - 32
IDThe event ID is a unique integer. The scope of this uniqueness is per-provider; that is, other event providers with different provider GUIDs can use the same event ID with no conflict.
VersionThis member indicates a revision to the event definition. You can use Version and ID to uniquely identify the event in the scope of a provider.
ChannelChannels are logical groupings of events, based on target audience. When you define channels and assign events to a particular channel, it is important to remember the expected consumers. Otherwise, a channel becomes difficult to use when it contains events that are not relevant for the target audience. For example, IT administrators would probably find debug events confusing and not actionable.
The following four types of channels can be defined:
Admin typeAdmin channels are targeted at IT administrators. Events that are delivered through admin channels should have clear, actionable messages. Additionally, to avoid overwhelming administrators who depend on channels of this type for day-to-day operations, events that are targeted at admin channels should be raised infrequently. Admin channels should always be enabled.
Operational typeOperational channels should be used for events that are not directly actionable, but might still be interesting for administrators and support professionals who are trying to troubleshoot an issue. Events that are raised to this type of channel should be low in volume. Operational channels should always be enabled.
Analytic type
Analytic channels should be used for performance analysis or other situations that require a high volume of events. In general, analytic channels should be disabled by default and enabled only when they are required.
Debug type
Debug channels are targeted at developers. Developers might ask users to collect events from a debug channel to diagnose a possible bug in their component. This type of channel should be used solely for debug events. In general, debug channels should be disabled by default and enabled only when they are required.
Performance ConsiderationsIt is important to consider the performance implications of the events that are raised to a particular type of channel. The admin and operational channels are designed to handle only a low volume of events, whereas analytic and debug channels are designed to handle a high volume of events. If you raise events to admin or operational channels at a high rate, many of those events are likely dropped. Generally, if you expect your event to be raised at a rate of 104 events per second or higher, the event should not be delivered to an admin or operational channel.
November 10, 2010© 2010 Microsoft Corporation. All rights reserved.

Programmers Guide to Eventing - 33
Identifying the Correct Channel Type for an EventFigure A-3 can be used to determine which channel type to use for a particular event. Though not all possible use cases are covered, the questions in the flowchart represent the majority of eventing scenarios.
Figure A-3. Channel type flowchart
For more information about channels and the channel element, see “Resources” earlier in this paper.
LevelLevels are used to specify the severity of an issue. For example, the Critical level should be used to signal a condition where loss of data or functionality is imminent or has already occurred. Alternatively, the Informational level should be used for events that are not serious in nature and are not actionable.
Levels can also be considered a way to control verbosity. They can be used to increase or reduce the volume of events that are viewed to allow the consumer to focus on specific issues. Although user-defined levels are supported, whenever possible you should use the predefined levels for LevelType Complex Type. For more information about LevelType Complex Type, see “Resources” earlier in this paper.
November 10, 2010© 2010 Microsoft Corporation. All rights reserved.

Programmers Guide to Eventing - 34
To maintain consistency for administrators to view and act upon events of interest, events delivered to admin-type channels have special level requirements: A level must be explicitly specified.
The specified level must be one of the following: Critical, to identify a severe error event that may compromise the system or
result in data loss. Error, to identify an error event that may result in loss of program
functionality. Warning, to identify a warning event such as an allocation failure.
Informational, to identify a non-error event such as an entry or exit event.
For more information about levels and the level element, see “Resources” earlier in this paper.
TaskTasks are top-level actions that a particular provider performs. If a provider has a clear workflow or clear groupings of operations, the stages of the workflow or the groupings of operations naturally correspond to individual tasks. If a provider is a set of APIs that do not logically map to top-level actions, each task can correspond to an API that the provider exposes.
For more information about tasks and the task element, see “Resources” earlier in this paper.
OpcodeOpcodes are used to track progress within a task. For example, opcodes are commonly used to indicate the beginning and end of a task. Whenever possible, you should use the predefined opcodes defined in OpcodeType Complex Type.
For more information about opcodes, the opcode Element, and OpcodeType Complex Type, see “Resources” earlier in this paper.
KeywordKeywords are used to group related events. When you use keywords, you should associate them with the subcomponent that is responsible for the condition or state that is being communicated with the event. Zero or more keywords can be assigned to a single event.
Keywords can be used to enable logical groupings of events. They can also be used for provider-side filtering. Although predefined keywords exist, providers that are not part of the Windows operating system should not use them.
For more information about keywords and the keyword element, see “Resources” earlier in this paper.
November 10, 2010© 2010 Microsoft Corporation. All rights reserved.

Programmers Guide to Eventing - 35
TemplateTemplates are used to define the data types of the fields that are stored in an event’s payload. In a template, you must specify both the internal representation of the field (InType) and the way in which the field should be displayed (OutType).
For events that are targeted at IT administrators and support professionals, the fields in the payload are used to display event messages that reference those fields. For events that are intended for performance analysis and automated consumption tools, the fields in the payload are often accessed programmatically through event consumption APIs.
For more information about templates and the template element, see “Resources” earlier in this paper.
November 10, 2010© 2010 Microsoft Corporation. All rights reserved.