vplex operations - cisco operations thischaptercontainsthefollowingsections: •...
TRANSCRIPT
VPLEX Operations
This chapter contains the following sections:
• System Requirements, page 1
• Assigning a Pod to a Cluster, page 2
• Viewing VPLEX Engines, page 3
• Rediscovering a Storage Array, page 4
• Storage Volume Claiming, page 4
• Extents, page 5
• VPLEX Storage Devices, page 7
• Consistency Groups, page 9
• Distributed Devices and RuleSets, page 13
• Initiators, page 15
• Virtual Volumes, page 17
• Viewing Target Ports, page 20
• Storage Views, page 20
• Logging Volumes, page 25
• Managing VPLEX System Tasks, page 27
System RequirementsRequirementComponent
Two Cisco Nexus 5000/5500 or 7000 Series switches
Two Cisco UCS 6100 or 6200 Series FabricInterconnects
Cisco Nexus 1000V switch
Networking
Cisco UCS Director EMC VPLEX Management Guide, Release 5.4 1
RequirementComponent
One or multiple Cisco UCS chassis with modulesthat have two Fabric Extenders per chassis
Computing
EMC VNX, VMAX, Vblock, or VSPEX storagesystems
Storage
See the Compatibility Matrix for all supportedversions.
Cisco UCS Director
See the Compatibility Matrix for all supportedversions.
Cisco UCS Director Baremetal Agent
2 GB memory and minimum 3000-GHz CPUCisco UCS Director—resource reservation
2 GB memory and minimum 2000-GHz CPUCisco UCS Director Baremetal Agent—resourcereservation
See the Compatibility Matrix for all supportedversions.
VMware (vCenter Server/ESXI/ESXi/vSphere, orMicrosoft Hyper-V Manager) server
Assigning a Pod to a ClusterYou must also create a pod with each VPLEX cluster (1 and 2).
Step 1 On the menu bar, choose Physical > Storage.Step 2 On the Storage pane, click theMulti-Domain Managers icon to expand the list of connected multi-domain managers.Step 3 Choose EMC VPLEX to expand the connected VPLEX device(s) and click the VPLEX device that you want.Step 4 Click the Clusters tab and click the cluster that you want to assign to the pod.Step 5 Click Assign to Pod.Step 6 In the Assign Pod to Cluster dialog box, complete the following field:
DescriptionName
Choose a pod type. This can be one of the following:
• Default Pod
• VSPEX
• Generic
• Vblock
Select Pod drop-down list
Cisco UCS Director EMC VPLEX Management Guide, Release 5.42
VPLEX OperationsAssigning a Pod to a Cluster
Step 7 Click Submit.Step 8 Repeat the previous steps to assign a pod to the other cluster.
Unassigning a Pod from a Cluster
Step 1 On the menu bar, choose Physical > Storage.Step 2 On the Storage pane, click theMulti-Domain Managers icon to expand the list of connected multi-domain managers.Step 3 Choose EMC VPLEX to expand the connected VPLEX device(s) and click the VPLEX device you want.Step 4 Click the Clusters tab and click the cluster you want.Step 5 Click Unassign Pod.Step 6 In the Unassign Pod from Cluster dialog box, click Submit to unassign the pod from the cluster.
Viewing VPLEX EnginesThe duel VPLEX engines provide cache and processing power with redundant directors that each include twoinput and output (I/O) modules per director and one optional WAN COM I/O module for use in a VPLEXMetro configuration.
Step 1 On the menu bar, choose Physical > Storage.Step 2 On the Storage pane, click theMulti-Domain Managers icon to expand the list of connected multi-domain managers.Step 3 Choose EMC VPLEX to expand the connected VPLEX device(s) and click the VPLEX device you want.Step 4 Click the Engines tab.
Information displays for the VPLEX engines, such as the serial numbers, engine IDs, and operational status.Step 5 To view specific information about a specific engine, click on the engine and click View Details.
Information about the director, director ID, port, hostname, cluster, and so on, is displayed.
Cisco UCS Director EMC VPLEX Management Guide, Release 5.4 3
VPLEX OperationsUnassigning a Pod from a Cluster
Rediscovering a Storage ArrayRediscover a storage array to view recently zoned and masked storage that has been presented to VPLEX.
Step 1 On the menu bar, choose Physical > Storage.Step 2 On the Storage pane, click theMulti-Domain Managers icon to expand the list of connected multi-domain managers.Step 3 Choose EMC VPLEX to expand the connected VPLEX device(s) and click the VPLEX device you want.Step 4 Click the Clusters tab and double-click the cluster you want to expand.Step 5 Click the Storage Arrays tab.Step 6 Click on a storage array.Step 7 Click Rediscover.Step 8 In the Rediscover Storage Array dialog box, click Submit.
Storage Volume ClaimingStorage volumes are logical unit numbers (LUNs) that are exported from an array. The claim process ensuresthat only relevant storage volumes can be processed when presented to the VPLEX cluster.
Claiming a Storage Volume
Step 1 On the menu bar, choose Physical > Storage.Step 2 On the Storage pane, click theMulti-Domain Managers icon to expand the list of connected multi-domain managers.Step 3 Choose EMC VPLEX to expand the connected VPLEX device(s) and click the VPLEX device you want.Step 4 Click the Clusters tab and double-click the cluster you want to expand.Step 5 Click the Storage Volumes tab.Step 6 Click Claim.Step 7 In the Claim Storage Volume dialog box, complete the following fields:
DescriptionName
The user-defined name to be applied to the storage volume.New name field
Check the check box to set the LUN to thin provisioning upon rebuilding. Thinprovisioning allocates what is needed while taking advantage of the dynamicthin allocation capabilities of the back-end storage volume.
The actual storage allocated on a back-end storage volume is a functionof the written portions of the storage volume, rather than the advertisedcapacity of the storage volume.
Note
Thin Rebuild check box
Cisco UCS Director EMC VPLEX Management Guide, Release 5.44
VPLEX OperationsRediscovering a Storage Array
DescriptionName
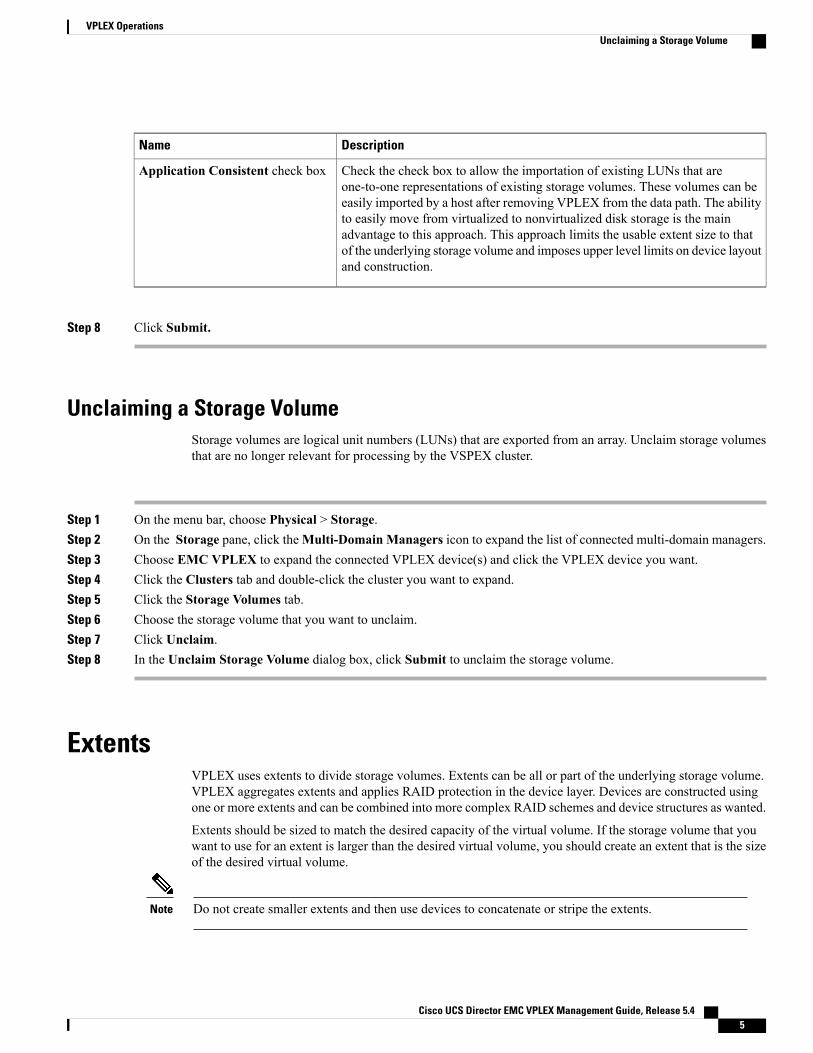
Check the check box to allow the importation of existing LUNs that areone-to-one representations of existing storage volumes. These volumes can beeasily imported by a host after removing VPLEX from the data path. The abilityto easily move from virtualized to nonvirtualized disk storage is the mainadvantage to this approach. This approach limits the usable extent size to thatof the underlying storage volume and imposes upper level limits on device layoutand construction.
Application Consistent check box
Step 8 Click Submit.
Unclaiming a Storage VolumeStorage volumes are logical unit numbers (LUNs) that are exported from an array. Unclaim storage volumesthat are no longer relevant for processing by the VSPEX cluster.
Step 1 On the menu bar, choose Physical > Storage.Step 2 On the Storage pane, click theMulti-Domain Managers icon to expand the list of connected multi-domain managers.Step 3 Choose EMC VPLEX to expand the connected VPLEX device(s) and click the VPLEX device you want.Step 4 Click the Clusters tab and double-click the cluster you want to expand.Step 5 Click the Storage Volumes tab.Step 6 Choose the storage volume that you want to unclaim.Step 7 Click Unclaim.Step 8 In the Unclaim Storage Volume dialog box, click Submit to unclaim the storage volume.
ExtentsVPLEX uses extents to divide storage volumes. Extents can be all or part of the underlying storage volume.VPLEX aggregates extents and applies RAID protection in the device layer. Devices are constructed usingone or more extents and can be combined into more complex RAID schemes and device structures as wanted.
Extents should be sized to match the desired capacity of the virtual volume. If the storage volume that youwant to use for an extent is larger than the desired virtual volume, you should create an extent that is the sizeof the desired virtual volume.
Do not create smaller extents and then use devices to concatenate or stripe the extents.Note
Cisco UCS Director EMC VPLEX Management Guide, Release 5.4 5
VPLEX OperationsUnclaiming a Storage Volume
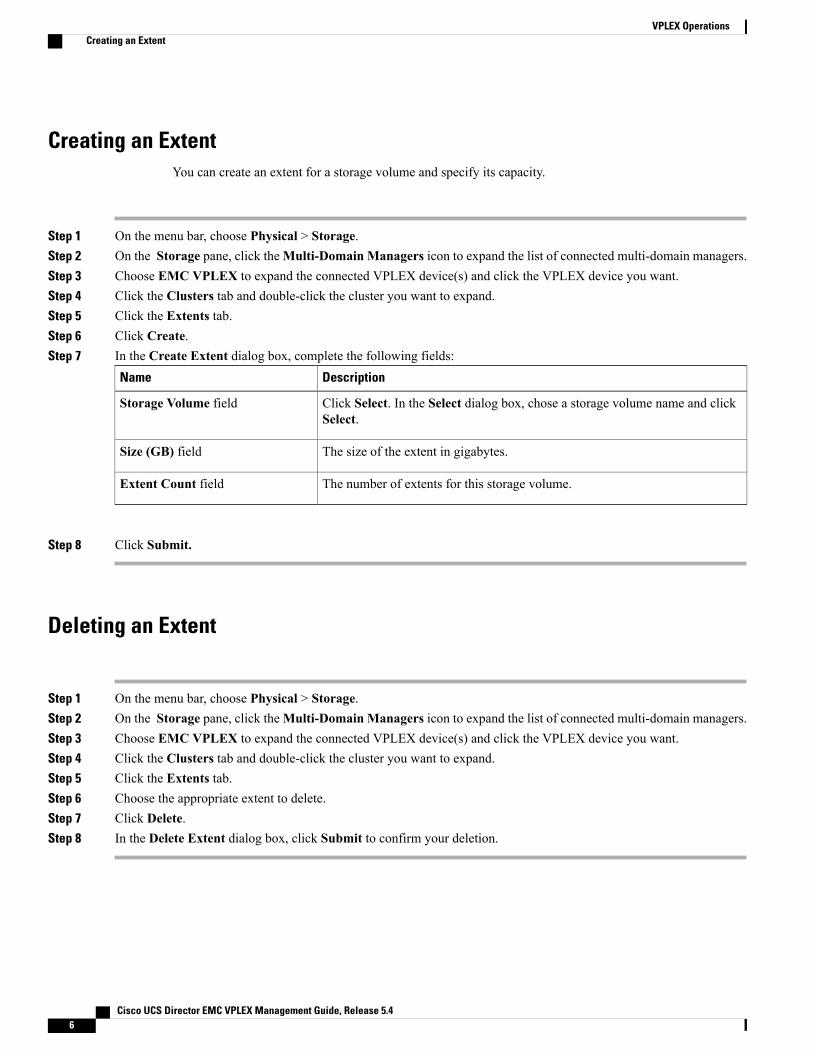
Creating an ExtentYou can create an extent for a storage volume and specify its capacity.
Step 1 On the menu bar, choose Physical > Storage.Step 2 On the Storage pane, click theMulti-Domain Managers icon to expand the list of connected multi-domain managers.Step 3 Choose EMC VPLEX to expand the connected VPLEX device(s) and click the VPLEX device you want.Step 4 Click the Clusters tab and double-click the cluster you want to expand.Step 5 Click the Extents tab.Step 6 Click Create.Step 7 In the Create Extent dialog box, complete the following fields:
DescriptionName
Click Select. In the Select dialog box, chose a storage volume name and clickSelect.
Storage Volume field
The size of the extent in gigabytes.Size (GB) field
The number of extents for this storage volume.Extent Count field
Step 8 Click Submit.
Deleting an Extent
Step 1 On the menu bar, choose Physical > Storage.Step 2 On the Storage pane, click theMulti-Domain Managers icon to expand the list of connected multi-domain managers.Step 3 Choose EMC VPLEX to expand the connected VPLEX device(s) and click the VPLEX device you want.Step 4 Click the Clusters tab and double-click the cluster you want to expand.Step 5 Click the Extents tab.Step 6 Choose the appropriate extent to delete.Step 7 Click Delete.Step 8 In the Delete Extent dialog box, click Submit to confirm your deletion.
Cisco UCS Director EMC VPLEX Management Guide, Release 5.46
VPLEX OperationsCreating an Extent
VPLEX Storage DevicesA VPLEX storage device is made up of a single block storage device that uses storage from the VPLEXcluster. The following types of VPLEX devices are available:
• RAID-0—Provides a performance-oriented striped or dispersed data mapping technique.
• RAID-1—Provides a mirroring data mapping technique to keep two (or more) devices in an identicalstate at all times. If one device fails, the operating system (OS) can continue, using the remaining disk(s).
• Concatenated RAID—Shows that data is concatenated across a linear collection of disks.
Creating a VPLEX Storage Device
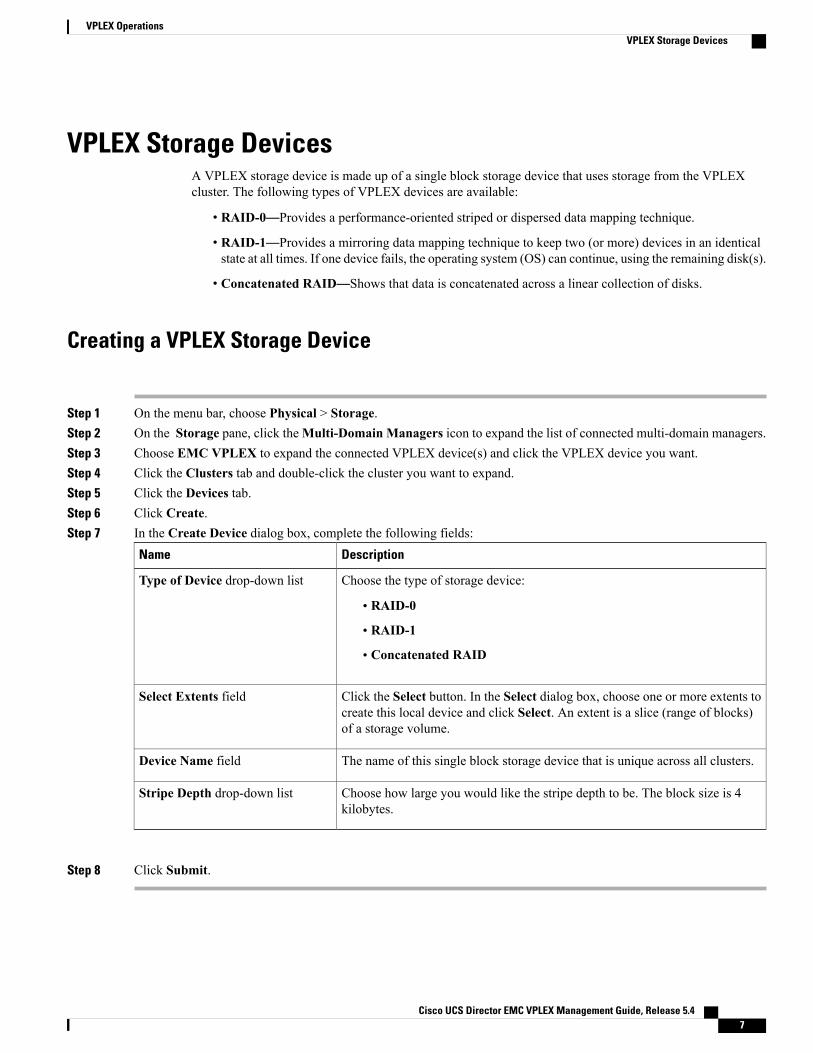
Step 1 On the menu bar, choose Physical > Storage.Step 2 On the Storage pane, click theMulti-Domain Managers icon to expand the list of connected multi-domain managers.Step 3 Choose EMC VPLEX to expand the connected VPLEX device(s) and click the VPLEX device you want.Step 4 Click the Clusters tab and double-click the cluster you want to expand.Step 5 Click the Devices tab.Step 6 Click Create.Step 7 In the Create Device dialog box, complete the following fields:
DescriptionName
Choose the type of storage device:
• RAID-0
• RAID-1
• Concatenated RAID
Type of Device drop-down list
Click the Select button. In the Select dialog box, choose one or more extents tocreate this local device and click Select. An extent is a slice (range of blocks)of a storage volume.
Select Extents field
The name of this single block storage device that is unique across all clusters.Device Name field
Choose how large you would like the stripe depth to be. The block size is 4kilobytes.
Stripe Depth drop-down list
Step 8 Click Submit.
Cisco UCS Director EMC VPLEX Management Guide, Release 5.4 7
VPLEX OperationsVPLEX Storage Devices

Mirroring a VPLEX Storage DeviceWhen a VPLEX storage device is mirrored, it creates a single view of storage data and makes this dataaccessible immediately to the host. This process eliminates the need for host-based mirroring, which savesthe host CPU processing resources and increases high availability for critical applications.
Step 1 On the menu bar, choose Physical > Storage.Step 2 On the Storage pane, click theMulti-Domain Managers icon to expand the list of connected multi-domain managers.Step 3 Choose EMC VPLEX to expand the connected VPLEX device(s) and click the VPLEX device you want.Step 4 Click the Clusters tab and double-click the cluster you want to expand.Step 5 Click the Devices tab.Step 6 Click Attach Mirror.Step 7 In the Attach Local/Remote Mirror dialog box, complete the following fields:
DescriptionName
Choose the type of storage device:
• Local—Local storage device.
• Remote—Remote storage device.
Mirror Type drop-down list
Click the Select. In the Select dialog box, choose the device that is to be attachedto the VPLEX storage device as a mirror and click Select.
Mirror Device button
Step 8 Click Submit.
Viewing a VPLEX Storage DeviceYou can view VPLEX storage device information such as its total capacity in gigabytes, whether it is localor global (remote), if a rebuild is allowed, and whether it is RAID 1, RAID 0, or RAID C (concatenated).
Step 1 On the menu bar, choose Physical > Storage.Step 2 On the Storage pane, click theMulti-Domain Managers icon to expand the list of connected multi-domain managers.Step 3 Choose EMC VPLEX to expand the connected VPLEX device(s) and click the VPLEX device you want.Step 4 Click the Clusters tab and double-click the cluster you want to expand.Step 5 Click the Devices tab.Step 6 Click View Details.Step 7 Click Submit.
Cisco UCS Director EMC VPLEX Management Guide, Release 5.48
VPLEX OperationsMirroring a VPLEX Storage Device
Detaching a Mirror from a VPLEX Storage Device
Step 1 On the menu bar, choose Physical > Storage.Step 2 On the Storage pane, click theMulti-Domain Managers icon to expand the list of connected multi-domain managers.Step 3 Choose EMC VPLEX to expand the connected VPLEX device(s) and click the VPLEX device you want.Step 4 Click the Clusters tab and double-click the cluster you want to expand.Step 5 Click the Devices tab.Step 6 Click Detach Mirror icon.Step 7 In theDetach Local/RemoteMirror dialog box, click Select. In the Select dialog box, choose the name of the mirrored
device and click Submit to remove it from the VPLEX storage device.
Deleting a VPLEX Storage DeviceYou can delete a single block storage device that uses storage from the cluster.
Step 1 On the menu bar, choose Physical > Storage.Step 2 On the Storage pane, click theMulti-Domain Managers icon to expand the list of connected multi-domain managers.Step 3 Choose EMC VPLEX to expand the connected VPLEX device(s) and click the VPLEX device you want.Step 4 Click the Clusters tab and double-click the cluster you want to expand.Step 5 Click the Devices tab.Step 6 Choose the appropriate device to delete.Step 7 Click Delete.Step 8 In the Delete Device dialog box, click Submit to confirm your deletion.
Consistency GroupsVolumes are protected by consistency groups. If two data sets are dependent on one another (such as a databaseand a database log), they should be part of the same consistency group.
Virtual volumes are added to a consistency group when a consistency group is created. A consistency groupensures that there is application-dependent write consistency of application data on distributed virtual volumeswithin the system if a disaster occurs. The properties of the consistency group are then immediately appliedto the added volumes.
Cisco UCS Director EMC VPLEX Management Guide, Release 5.4 9
VPLEX OperationsDetaching a Mirror from a VPLEX Storage Device
Use the following guidelines for consistency groups:
• Only volumes with visibility and storage-at-cluster properties that match those properties of theconsistency group can be added to the consistency group.
• The maximum number of volumes in a consistency group is 1000.
• You should group together volumes used by the same application or host in a consistency group.
• Only volumes with storage at both clusters (distributed volumes) are allowed in remote consistencygroups.
• If any of the specified volumes are already in the consistency group, these volumes are skipped.
•When you initiate a detach rule for a consistency group, it takes 5 seconds to suspend the nonpreferredcluster and maintain input and output functions on the preferred cluster.
Creating a Consistency GroupConsistency groups allow you to group volumes together and apply a set of properties to the entire group.
Step 1 On the menu bar, choose Physical > Storage.Step 2 On the Storage pane, click theMulti-Domain Managers icon to expand the list of connected multi-domain managers.Step 3 Choose EMC VPLEX to expand the connected VPLEX device(s) and click the VPLEX device you want.Step 4 Click the Clusters tab and double-click the cluster you want to expand.Step 5 Click the Consistency Groups tab.Step 6 Click Create.Step 7 In the Create Consistency Group dialog box, complete the following fields:
DescriptionName
The group name, which is unique among all clusters.Group Name field
Choose the type of virtual volumes that need to be added to the consistencygroup. This can be one of the following:
• Local:cluster-1
• Global: All clusters
Type drop-down list
Check the check box to synchronize and make all global consistency groupsvisible to clusters.
Global Visibility check box
Cisco UCS Director EMC VPLEX Management Guide, Release 5.410
VPLEX OperationsCreating a Consistency Group
DescriptionName
Choose from the following detach (win) rules for each volume (cluster):
• cluster 1 detaches—In any failure scenario, the preferred cluster for thatvolume is declared as cluster 1.
• cluster 2 detaches—In any failure scenario, the preferred cluster for thatvolume is declared as cluster 2.
• no automatic winner—The input/output (I/O) operation suspends at bothVPLEX clusters if either the link partitions or an entire VPLEX clusterfails.
Detach Rule drop-down list
The number of seconds after an inter-cluster link fails before the winning clusterdetaches.
Delay field
Click Select. In the Select dialog box, choose the virtual volume(s) to add to theconsistency group and click Select.
Virtual volume(s) field
Step 8 Click Submit.
Adding a Virtual Volume to an Existing Consistency GroupYou can add one or more virtual volumes to an existing consistency group.
You can also add virtual volumes when you create a consistency group.Note
Step 1 On the menu bar, choose Physical > Storage.Step 2 On the Storage pane, click theMulti-Domain Managers icon to expand the list of connected multi-domain managers.Step 3 Choose EMC VPLEX to expand the connected VPLEX device(s) and click the VPLEX device you want.Step 4 Click the Clusters tab and double-click the cluster you want to expand.Step 5 Click the Consistency Groups tab.Step 6 Click Add Virtual Volumes.Step 7 In the Add Virtual Volume(s) to Consistency Groups dialog box, click Select.Step 8 In the Select dialog box, choose the virtual volume(s) to add to the consistency group and click Select.Step 9 Click Submit.
Cisco UCS Director EMC VPLEX Management Guide, Release 5.4 11
VPLEX OperationsAdding a Virtual Volume to an Existing Consistency Group
Removing a Virtual Volume from a Consistency GroupYou can remove one or more virtual volumes from an existing consistency group.
Step 1 On the menu bar, choose Physical > Storage.Step 2 On the Storage pane, click theMulti-Domain Managers icon to expand the list of connected multi-domain managers.Step 3 Choose EMC VPLEX to expand the connected VPLEX device(s) and click the VPLEX device you want.Step 4 Click the Clusters tab and double-click the cluster you want to expand.Step 5 Click the Consistency Groups tab.Step 6 Click Remove Virtual Volumes.Step 7 In the Remove Virtual Volume(s) from Consistency Groups dialog box, click Select.Step 8 In the Select dialog box, choose the virtual volume(s) to add to the consistency group and click Select.Step 9 Click Submit.
Enabling or Disabling a RecoverPoint for a Consistency GroupA RecoverPoint can be enabled for a consistency group to provide any-point-in-time recovery for diversifiedstorage environments both within and across pods to provide continuous data protection for operational anddisaster recovery on VPLEX distributed virtual volumes within the VPLEX system. RecoverPoint can alsobe disabled for a consistency group.
Step 1 On the menu bar, choose Physical > Storage.Step 2 On the Storage pane, click theMulti-Domain Managers icon to expand the list of connected multi-domain managers.Step 3 Choose EMC VPLEX to expand the connected VPLEX device(s) and click the VPLEX device you want.Step 4 Click the Clusters tab and double-click the cluster you want to expand.Step 5 Click the Consistency Groups tab.Step 6 Click Enable/Disable Recoverpoint.Step 7 In the Enable/Disable Recoverpoint on Consistency Group dialog box, choose either Enable or Disable from the
Select Option drop-down list.Step 8 Click Submit.
Cisco UCS Director EMC VPLEX Management Guide, Release 5.412
VPLEX OperationsRemoving a Virtual Volume from a Consistency Group
Viewing a Consistency GroupYou can view the virtual volumes that belong to a consistency group.
Step 1 On the menu bar, choose Physical > Storage.Step 2 On the Storage pane, click theMulti-Domain Managers icon to expand the list of connected multi-domain managers.Step 3 Choose EMC VPLEX to expand the connected VPLEX device(s) and click the VPLEX device you want.Step 4 Click the Clusters tab and double-click the cluster you want to expand.Step 5 Click the Consistency Groups tab.Step 6 Choose the consistency group that you want to view.
In theVirtual Volumes tab you can see a list of the virtual volumes that belong to the consistency group.Note
Deleting an Existing Consistency Group
Step 1 On the menu bar, choose Physical > Storage.Step 2 On the Storage pane, click theMulti-Domain Managers icon to expand the list of connected multi-domain managers.Step 3 Choose EMC VPLEX to expand the connected VPLEX device(s) and click the VPLEX device you want.Step 4 Click the Clusters tab and double-click the cluster you want to expand.Step 5 Click the Consistency Groups tab.Step 6 Choose the consistency group that you want to delete.Step 7 Click Delete.Step 8 In the Delete Consistency Groups confirmation dialog box, click Submit.
Distributed Devices and RuleSetsCreating a distributed device allows you to use storage from both clusters in a single VPLEX cluster (plex).
Each distributed device that spans two VPLEX clusters must have a RuleSet assigned to it. The RuleSetdefines which cluster is declared a preferred cluster that maintains access to the volume and which clustershould be declared the nonpreferred cluster in a failure event. Once these roles are declared, the clusters'distributed devices detach so that they can resume normal input and output operations (I/O).
Cisco UCS Director EMC VPLEX Management Guide, Release 5.4 13
VPLEX OperationsViewing a Consistency Group
Viewing a RuleSet for a Distributed Device
Step 1 On the menu bar, choose Physical > Storage.Step 2 On the Storage pane, click theMulti-Domain Managers icon to expand the list of connected multi-domain managers.Step 3 Choose EMC VPLEX to expand the connected VPLEX device(s) and click the VPLEX device you want.Step 4 Click the RuleSets tab.
Creating a Distributed Device
Step 1 On the menu bar, choose Physical > Storage.Step 2 On the Storage pane, click theMulti-Domain Managers icon to expand the list of connected multi-domain managers.Step 3 Choose EMC VPLEX to expand the connected VPLEX device(s) and click the VPLEX device you want.Step 4 Click the Distributed Devices tab.Step 5 Click Create.Step 6 In the Create Distributed Device dialog box, complete the following fields:
DescriptionName
Click Select. In the Select dialog box, choose the source cluster to display sourcedevices and click Select.
Souce Cluster
Click Select. In the Select dialog box, choose a local device as a source to createa distributed device and click Select.
Souce Device
Click Select. In the Select dialog box, choose a local device that you want toadd as target to create as a distributed device and click Select.
Target Device field
Click Select. In the Select dialog box, choose one or more logging volumes thatyou want to add to this distributed device and click Select.
Logging Volume(s) field
The new device name that is unique across VPLEX.Device Name field
Click Select. In the Select dialog box, choose the RuleSet name that youpreviously configured and want to add to this distributed device and click Select.
RuleSet field
Step 7 Click Submit.
Cisco UCS Director EMC VPLEX Management Guide, Release 5.414
VPLEX OperationsViewing a RuleSet for a Distributed Device
Deleting a Distributed Device
Step 1 On the menu bar, choose Physical > Storage.Step 2 On the Storage pane, click theMulti-Domain Managers icon to expand the list of connected multi-domain managers.Step 3 Choose EMC VPLEX to expand the connected VPLEX device(s) and click the VPLEX device you want.Step 4 Click the Distributed Devices tab.Step 5 Choose the distributed device that you want to delete.Step 6 Click Delete.Step 7 In the Delete Distributed Device dialog box, click Submit to confirm your deletion.
InitiatorsAn initiator is a host that is registered with a port so that it can access the VPLEX storage network.
Creating an Initiator
Step 1 On the menu bar, choose Physical > Storage.Step 2 On the Storage pane, click theMulti-Domain Managers icon to expand the list of connected multi-domain managers.Step 3 Choose EMC VPLEX to expand the connected VPLEX device(s) and click the VPLEX device you want.Step 4 Click the Clusters tab and double-click the cluster you want to expand.Step 5 Click the Initiators tab.Step 6 Click Register.Step 7 In the Register Host Initiator dialog box, complete the following fields:
DescriptionName
Choose the type of intiator:
• default—Other software initiator.
• hpux— HP (Hewlett Packard)-UX iSCSI software initiator
• sun-vcs—SunMicrosystems, Inc andVeritas Cluster Server (VCS) softwareinitiator
• aix—IBM AIX software initiator
• recoverpoint—EMC RecoverPoint initiator
Type drop-down list
Cisco UCS Director EMC VPLEX Management Guide, Release 5.4 15
VPLEX OperationsDeleting a Distributed Device
DescriptionName
The initiator hostname that is assigned to the registered port.Initiator Name field
The worldwide name (WWN) in a Fibre Channel fabric that is a unique portidentifier in the storage network.
Port WWN
TheWWN in a Fibre Channel fabric that is a unique node identifier in the storagenetwork.
Node WWN field
Step 8 Click Submit.
Viewing an InitiatorYou can view an initiator host that has access to VPLEX storage:
Step 1 On the menu bar, choose Physical > Storage.Step 2 On the Storage pane, click theMulti-Domain Managers icon to expand the list of connected multi-domain managers.Step 3 Choose EMC VPLEX to expand the connected VPLEX device(s) and click the VPLEX device you want.Step 4 Click the Clusters tab and double-click the cluster you want to expand.Step 5 Click the Initiators tab.Step 6 Click the initiator you want and click View Details.
Deleting an InitiatorYou can delete an initiator that currently has VPLEX storage access.
Step 1 On the menu bar, choose Physical > Storage.Step 2 On the Storage pane, click theMulti-Domain Managers icon to expand the list of connected multi-domain managers.Step 3 Choose EMC VPLEX to expand the connected VPLEX device(s) and click the VPLEX device you want.Step 4 Click the Clusters tab and double-click the cluster you want to expand.Step 5 Click the Initiators tab.Step 6 Choose the name of the initiator host and click Delete.Step 7 In the Deregister Initiator Port confirmation dialog box, click Submit.
Optionally, check the Force check box to delete the initiator port if the initiator host attached to theport.
Note
Cisco UCS Director EMC VPLEX Management Guide, Release 5.416
VPLEX OperationsViewing an Initiator
Virtual VolumesVPLEX uses extents to divide storage volumes. Extents can be all or part of the underlying storage volume.VPLEX aggregates extents and applies RAID protection in the device layer. Devices are constructed usingone or more extents.
At the top layer of the VPLEX storage structures are virtual volumes, which are created by underlying devicesand inherit their size. A virtual volume can be a single contiguous volume that is distributed over two or morestorage volumes.
VPLEX exposes virtual volumes to hosts that need to use them with its front-end (FE) ports, which are visibleto hosts. Access to virtual volumes is controlled through storage views. Storage views act as logical containersthat determine host initiator access to VPLEX FE ports and virtual volumes.
Creating a Virtual Volume
Step 1 On the menu bar, choose Physical > Storage.Step 2 On the Storage pane, click theMulti-Domain Managers icon to expand the list of connected multi-domain managers.Step 3 Choose EMC VPLEX to expand the connected VPLEX device(s) and click the VPLEX device you want.Step 4 Click the Clusters tab and double-click the cluster you want to expand.Step 5 Click the Virtual Volumes tab.Step 6 Click Create.Step 7 In the Create Virtual Volume dialog box, complete the following fields:
DescriptionName
Click Select. In the Select dialog box, choose a local storage device and clickSelect.
Select Local Device Name field
The storage tier number that is used to manage the local storage volume as asingle unit. Storage tiers are used to manage arrays based on price, performance,capacity and other attributes.
Storage Tier ID field
Step 8 Click Submit.
Cisco UCS Director EMC VPLEX Management Guide, Release 5.4 17
VPLEX OperationsVirtual Volumes
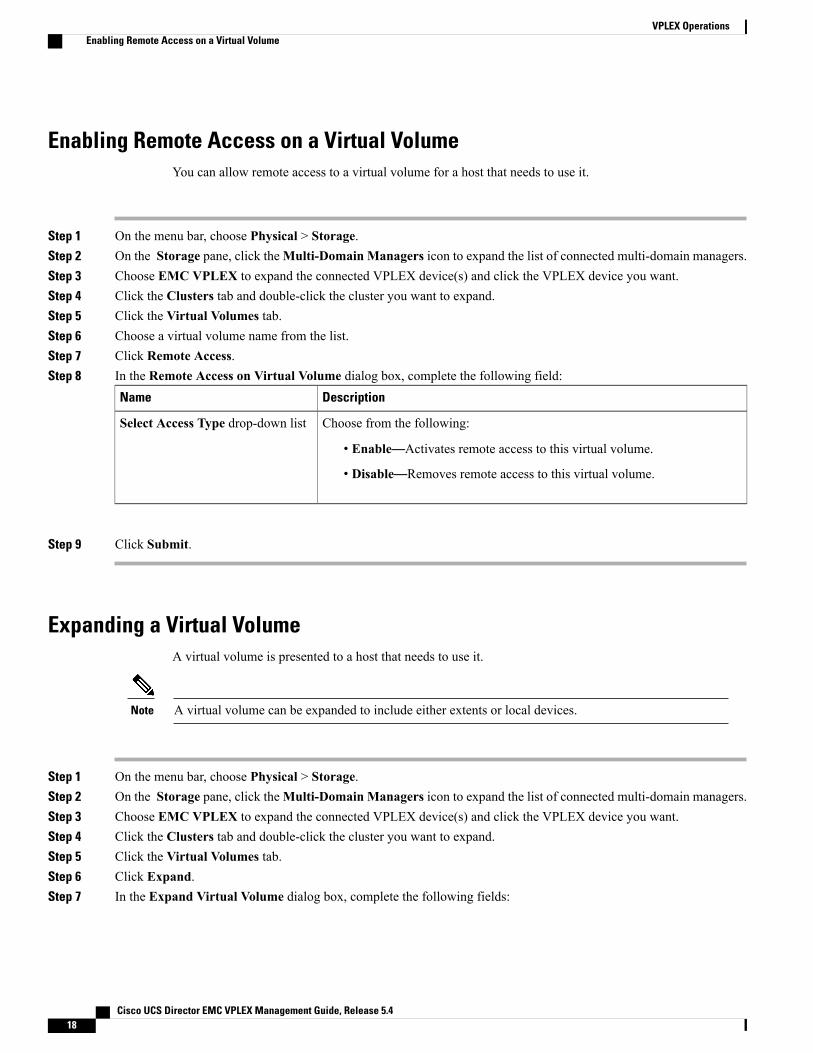
Enabling Remote Access on a Virtual VolumeYou can allow remote access to a virtual volume for a host that needs to use it.
Step 1 On the menu bar, choose Physical > Storage.Step 2 On the Storage pane, click theMulti-Domain Managers icon to expand the list of connected multi-domain managers.Step 3 Choose EMC VPLEX to expand the connected VPLEX device(s) and click the VPLEX device you want.Step 4 Click the Clusters tab and double-click the cluster you want to expand.Step 5 Click the Virtual Volumes tab.Step 6 Choose a virtual volume name from the list.Step 7 Click Remote Access.Step 8 In the Remote Access on Virtual Volume dialog box, complete the following field:
DescriptionName
Choose from the following:
• Enable—Activates remote access to this virtual volume.
• Disable—Removes remote access to this virtual volume.
Select Access Type drop-down list
Step 9 Click Submit.
Expanding a Virtual VolumeA virtual volume is presented to a host that needs to use it.
A virtual volume can be expanded to include either extents or local devices.Note
Step 1 On the menu bar, choose Physical > Storage.Step 2 On the Storage pane, click theMulti-Domain Managers icon to expand the list of connected multi-domain managers.Step 3 Choose EMC VPLEX to expand the connected VPLEX device(s) and click the VPLEX device you want.Step 4 Click the Clusters tab and double-click the cluster you want to expand.Step 5 Click the Virtual Volumes tab.Step 6 Click Expand.Step 7 In the Expand Virtual Volume dialog box, complete the following fields:
Cisco UCS Director EMC VPLEX Management Guide, Release 5.418
VPLEX OperationsEnabling Remote Access on a Virtual Volume
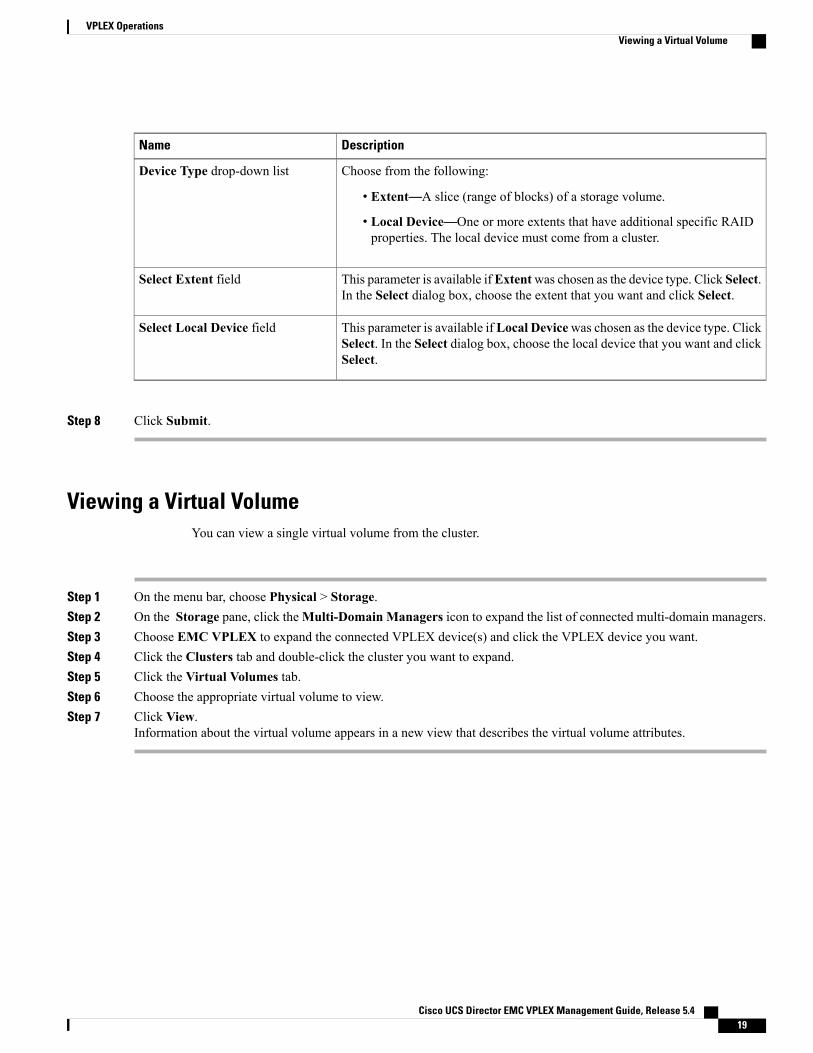
DescriptionName
Choose from the following:
• Extent—A slice (range of blocks) of a storage volume.
• Local Device—One or more extents that have additional specific RAIDproperties. The local device must come from a cluster.
Device Type drop-down list
This parameter is available ifExtentwas chosen as the device type. Click Select.In the Select dialog box, choose the extent that you want and click Select.
Select Extent field
This parameter is available ifLocal Devicewas chosen as the device type. ClickSelect. In the Select dialog box, choose the local device that you want and clickSelect.
Select Local Device field
Step 8 Click Submit.
Viewing a Virtual VolumeYou can view a single virtual volume from the cluster.
Step 1 On the menu bar, choose Physical > Storage.Step 2 On the Storage pane, click theMulti-Domain Managers icon to expand the list of connected multi-domain managers.Step 3 Choose EMC VPLEX to expand the connected VPLEX device(s) and click the VPLEX device you want.Step 4 Click the Clusters tab and double-click the cluster you want to expand.Step 5 Click the Virtual Volumes tab.Step 6 Choose the appropriate virtual volume to view.Step 7 Click View.
Information about the virtual volume appears in a new view that describes the virtual volume attributes.
Cisco UCS Director EMC VPLEX Management Guide, Release 5.4 19
VPLEX OperationsViewing a Virtual Volume
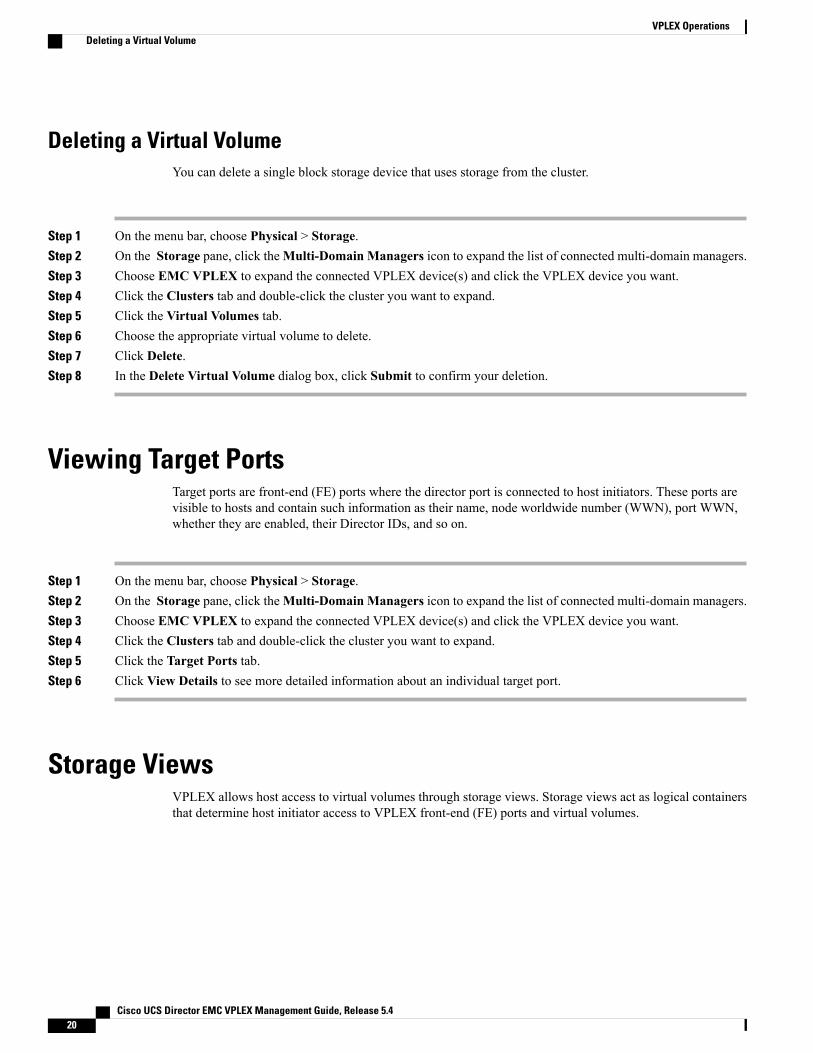
Deleting a Virtual VolumeYou can delete a single block storage device that uses storage from the cluster.
Step 1 On the menu bar, choose Physical > Storage.Step 2 On the Storage pane, click theMulti-Domain Managers icon to expand the list of connected multi-domain managers.Step 3 Choose EMC VPLEX to expand the connected VPLEX device(s) and click the VPLEX device you want.Step 4 Click the Clusters tab and double-click the cluster you want to expand.Step 5 Click the Virtual Volumes tab.Step 6 Choose the appropriate virtual volume to delete.Step 7 Click Delete.Step 8 In the Delete Virtual Volume dialog box, click Submit to confirm your deletion.
Viewing Target PortsTarget ports are front-end (FE) ports where the director port is connected to host initiators. These ports arevisible to hosts and contain such information as their name, node worldwide number (WWN), port WWN,whether they are enabled, their Director IDs, and so on.
Step 1 On the menu bar, choose Physical > Storage.Step 2 On the Storage pane, click theMulti-Domain Managers icon to expand the list of connected multi-domain managers.Step 3 Choose EMC VPLEX to expand the connected VPLEX device(s) and click the VPLEX device you want.Step 4 Click the Clusters tab and double-click the cluster you want to expand.Step 5 Click the Target Ports tab.Step 6 Click View Details to see more detailed information about an individual target port.
Storage ViewsVPLEX allows host access to virtual volumes through storage views. Storage views act as logical containersthat determine host initiator access to VPLEX front-end (FE) ports and virtual volumes.
Cisco UCS Director EMC VPLEX Management Guide, Release 5.420
VPLEX OperationsDeleting a Virtual Volume
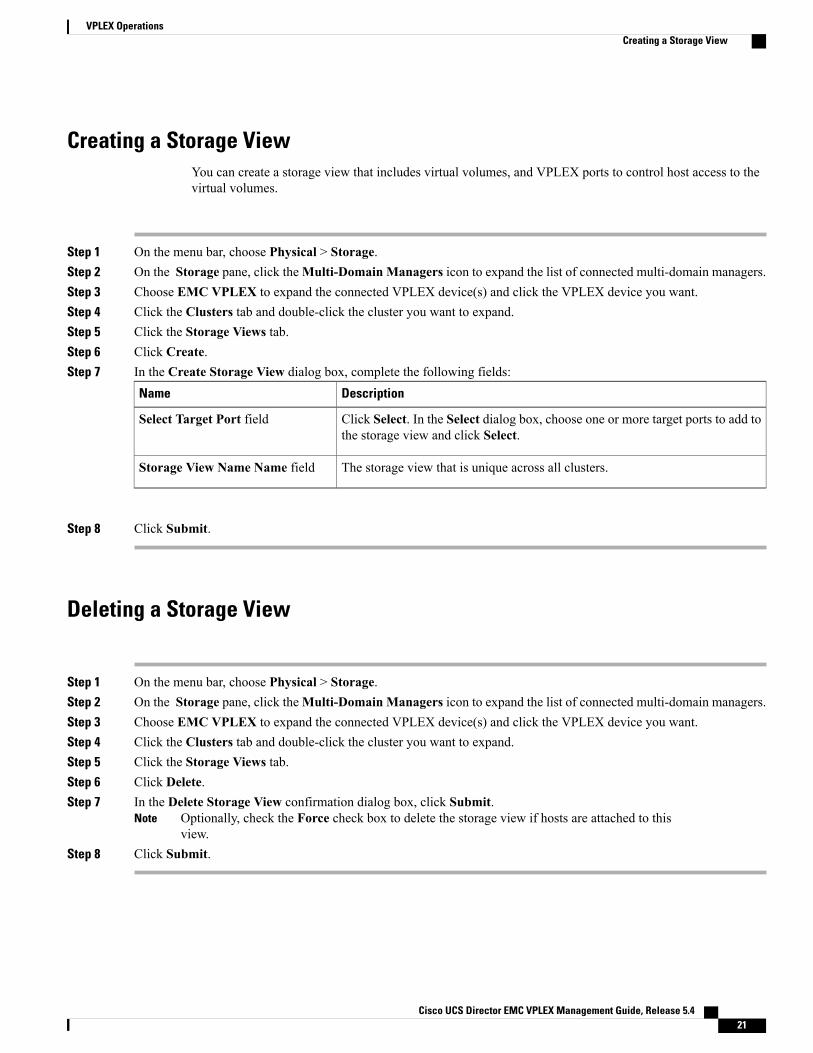
Creating a Storage ViewYou can create a storage view that includes virtual volumes, and VPLEX ports to control host access to thevirtual volumes.
Step 1 On the menu bar, choose Physical > Storage.Step 2 On the Storage pane, click theMulti-Domain Managers icon to expand the list of connected multi-domain managers.Step 3 Choose EMC VPLEX to expand the connected VPLEX device(s) and click the VPLEX device you want.Step 4 Click the Clusters tab and double-click the cluster you want to expand.Step 5 Click the Storage Views tab.Step 6 Click Create.Step 7 In the Create Storage View dialog box, complete the following fields:
DescriptionName
Click Select. In the Select dialog box, choose one or more target ports to add tothe storage view and click Select.
Select Target Port field
The storage view that is unique across all clusters.Storage View Name Name field
Step 8 Click Submit.
Deleting a Storage View
Step 1 On the menu bar, choose Physical > Storage.Step 2 On the Storage pane, click theMulti-Domain Managers icon to expand the list of connected multi-domain managers.Step 3 Choose EMC VPLEX to expand the connected VPLEX device(s) and click the VPLEX device you want.Step 4 Click the Clusters tab and double-click the cluster you want to expand.Step 5 Click the Storage Views tab.Step 6 Click Delete.Step 7 In the Delete Storage View confirmation dialog box, click Submit.
Optionally, check the Force check box to delete the storage view if hosts are attached to thisview.
Note
Step 8 Click Submit.
Cisco UCS Director EMC VPLEX Management Guide, Release 5.4 21
VPLEX OperationsCreating a Storage View
Adding an Initiator to a Storage ViewYou can create a storage view that includes one or more initiator ports.
Step 1 On the menu bar, choose Physical > Storage.Step 2 On the Storage pane, click theMulti-Domain Managers icon to expand the list of connected multi-domain managers.Step 3 Choose EMC VPLEX to expand the connected VPLEX device(s) and click the VPLEX device you want.Step 4 Click the Clusters tab and double-click the cluster you want to expand.Step 5 Click the Storage Views tab.Step 6 Choose the storage view you want from the Storage Views panel.Step 7 Click Add Initiator.Step 8 In the Add Initiators to Storage View dialog box, click Select. In the Select dialog box, choose one or more initiator
host accounts to add to the storage view and click Select.Step 9 Click Submit.
Removing an Initiator from a Storage ViewYou can remove one or more initiator ports from a storage view.
Step 1 On the menu bar, choose Physical > Storage.Step 2 On the Storage pane, click theMulti-Domain Managers icon to expand the list of connected multi-domain managers.Step 3 Choose EMC VPLEX to expand the connected VPLEX device(s) and click the VPLEX device you want.Step 4 Click the Clusters tab and double-click the cluster you want to expand.Step 5 Click the Storage Views tab.Step 6 Choose the storage view you want from the Storage Views panel.Step 7 Click Remove Initiator.Step 8 In the Remove Initiators from Storage View dialog box, click Select. In the Select dialog box, choose one or more
initiator host accounts to remove from the storage view and click Select.Step 9 Click Submit.
Cisco UCS Director EMC VPLEX Management Guide, Release 5.422
VPLEX OperationsAdding an Initiator to a Storage View
Adding a Virtual Volume to a Storage ViewYou can create a storage view that includes virtual volumes.
Step 1 On the menu bar, choose Physical > Storage.Step 2 On the Storage pane, click theMulti-Domain Managers icon to expand the list of connected multi-domain managers.Step 3 Choose EMC VPLEX to expand the connected VPLEX device(s) and click the VPLEX device you want.Step 4 Click the Clusters tab and double-click the cluster you want to expand.Step 5 Click the Storage Views tab.Step 6 Choose the storage view you want from the Storage Views panel.Step 7 Click Add Virtual Volume.Step 8 In the Add Virtual Volume to Storage View dialog box, complete the following fields:
DescriptionName
Click Select. In the Select dialog box, choose a virtual volume (see the Namecolumn) and click Select.
Virtual Volume field
(Optional) enter the logical unit number (LUN) identifier.LUN ID field
Step 9 Click Submit.
Removing a Virtual Volume from a Storage View
Step 1 On the menu bar, choose Physical > Storage.Step 2 On the Storage pane, click theMulti-Domain Managers icon to expand the list of connected multi-domain managers.Step 3 Choose EMC VPLEX to expand the connected VPLEX device(s) and click the VPLEX device you want.Step 4 Click the Clusters tab and double-click the cluster you want to expand.Step 5 Click the Storage Views tab.Step 6 Choose the storage view you want from the Storage Views panel.Step 7 Click Remove Virtual Volume.Step 8 In the Remove Virtual Volume from Storage View dialog box, click Select from the Virtual volume field.Step 9 In the Select dialog box, choose a virtual volume and click Select.Step 10 Click Submit.
Cisco UCS Director EMC VPLEX Management Guide, Release 5.4 23
VPLEX OperationsAdding a Virtual Volume to a Storage View
Adding a Port to a Storage ViewYou can create a storage view that includes target ports. Target ports are front-end (FE) ports where the directorport is connected to host initiators. These ports are visible to hosts and contain such information as their name,node worldwide number (WWN), port WWN, whether they are enabled, their Director IDs, and so on.
Step 1 On the menu bar, choose Physical > Storage.Step 2 On the Storage pane, click theMulti-Domain Managers icon to expand the list of connected multi-domain managers.Step 3 Choose EMC VPLEX to expand the connected VPLEX device(s) and click the VPLEX device you want.Step 4 Click the Clusters tab and double-click the cluster you want to expand.Step 5 Click the Storage Views tab.Step 6 Choose the storage view you want from the Storage Views panel.Step 7 Click Add Port.Step 8 n the Add Target Ports to Storage View dialog box, click Select.Step 9 In the Select dialog box, choose one or more target ports to add to the storage view and click Select.Step 10 Click Submit.
Removing a Port from a Storage ViewYou can remove target port(s) from a storage view.
Step 1 On the menu bar, choose Physical > Storage.Step 2 On the Storage pane, click theMulti-Domain Managers icon to expand the list of connected multi-domain managers.Step 3 Choose EMC VPLEX to expand the connected VPLEX device(s) and click the VPLEX device you want.Step 4 Click the Clusters tab and double-click the cluster you want to expand.Step 5 Click the Storage Views tab.Step 6 Choose the storage view you want from the Storage Views panel.Step 7 Click Remove Port.Step 8 n the Remove Target Ports from Storage View dialog box, click Select.Step 9 In the Select dialog box, choose one or more target ports to remove from the storage view and click Select.Step 10 Click Submit.
Cisco UCS Director EMC VPLEX Management Guide, Release 5.424
VPLEX OperationsAdding a Port to a Storage View
Logging VolumesVPLEX uses logging volumes to track changes during a loss of connectivity or loss of a volume (mirror in adistributed device). You should create a logging volume on each cluster. Each logging volume must be largeenough to contain one bit for every page of distributed storage space (approximately 10 gigabytes of loggingvolume space for every 320 terrabytes of distributed devices). The logging volumes can experience a lot ofinput and output during and after-link outages, so each logging volume should be striped across many disksfor speed, and have a mirror on another fast disk to secure this information.
Creating a Logging Volume
Step 1 On the menu bar, choose Physical > Storage.Step 2 On the Storage pane, click theMulti-Domain Managers icon to expand the list of connected multi-domain managers.Step 3 Choose EMC VPLEX to expand the connected VPLEX device(s) and click the VPLEX device you want.Step 4 Click the Clusters tab and double-click the cluster you want to expand.Step 5 Click the Logging Volumes tab.Step 6 Click Create.Step 7 In the Create Logging Volume dialog box, complete the following fields:
DescriptionName
Choose the type of storage device:
• RAID-0—Performance-oriented striped or dispersed data mappingtechnique.
• RAID-1—Mirroring data mapping technique that keeps two (or more)devices in an identical state at all times.
Type of Device drop-down list
Click the Select button. In the Select dialog box, choose one or more extents forthis device and click Select. An extent is a slice (range of blocks) of a storagevolume.
Select Extents field
The volume name that is unique across all clusters.Volume Name field
The stripe depth for a RAID-0 device.Stripe Depth field
Step 8 Click Submit.
Cisco UCS Director EMC VPLEX Management Guide, Release 5.4 25
VPLEX OperationsLogging Volumes
Adding a Mirror to a Logging Volume
Step 1 On the menu bar, choose Physical > Storage.Step 2 On the Storage pane, click theMulti-Domain Managers icon to expand the list of connected multi-domain managers.Step 3 Choose EMC VPLEX to expand the connected VPLEX device(s) and click the VPLEX device you want.Step 4 Click the Clusters tab and double-click the cluster you want to expand.Step 5 Click theLogging Volumes tab.Step 6 Choose a logging volume from the list.Step 7 Click Add Mirror.Step 8 In the Select dialog box, choose a storage volume and click Select.Step 9 Click Submit.
The mirror is added to the logging storage volume.
Deleting a Logging Volume
Step 1 On the menu bar, choose Physical > Storage.Step 2 On the Storage pane, click theMulti-Domain Managers icon to expand the list of connected multi-domain managers.Step 3 Choose EMC VPLEX to expand the connected VPLEX device(s) and click the VPLEX device you want.Step 4 Click the Clusters tab and double-click the cluster you want to expand.Step 5 Click the Logging Volumes tab.Step 6 Choose the appropriate logging volume to delete.Step 7 Click Delete.Step 8 In the Delete Logging Volume dialog box, click Submit to confirm your deletion.
Cisco UCS Director EMC VPLEX Management Guide, Release 5.426
VPLEX OperationsAdding a Mirror to a Logging Volume
Managing VPLEX System Tasks
Step 1 On the menu bar, choose Physical > Storage.Step 2 On the Storage pane, click theMulti-Domain Managers icon to expand the list of connected multi-domain managers.Step 3 Choose EMC VPLEX to expand the connected VPLEX device(s) and click the VPLEX device you want.Step 4 Click the System Tasks tab.Step 5 Double-click the EMC VPLEX Tasks folder icon.Step 6 Choose a VPLEX task and clickManage Task.Step 7 In theManage Task dialog box, complete the following fields:
DescriptionName
Choose Enable or Disable to enable or disable this VPLEX task.Task Execution drop-down list
Choose either the default-system-task-policy or the local-run-policy assignedto this VPLEX task.
System Task Policy drop-down list
Choose the frequency in minutes for how often the VPLEX task is executed.Minutes drop-down list
Step 8 Click Submit.Step 9 If you want to run this VPLEX task, click Run Now.Step 10 If you want to view this VPLEX task, click View Details.
Cisco UCS Director EMC VPLEX Management Guide, Release 5.4 27
VPLEX OperationsManaging VPLEX System Tasks
Cisco UCS Director EMC VPLEX Management Guide, Release 5.428
VPLEX OperationsManaging VPLEX System Tasks