vodafone machinelink 3g pptp configuration...
TRANSCRIPT

Vodafone MachineLink
SMS Tools Configuration Guide

SMS Tools Configuration Guide – Vodafone MachineLink 2 of 23
September 2016 v. 2.0 vodafone.netcommwireless.com
Document history
This guide covers the following products:
Vodafone MachineLink 3G (NWL-10)
Vodafone MachineLink 3G Plus (NWL-12)
Vodafone MachineLink 4G (NWL-22)
Ver. Document description Date
v. 1.0 Initial document release. March 2013
V 1.1 Updated introduction with more information about GDSP platform June 2013
v. 2.0 Revised content based on current firmware. September 2016
Table i - Document revision history
Note – Before performing the instructions in this guide, please ensure that you have the latest firmware version installed on your router.
Visit http://vodafone.netcommwireless.com to download the latest firmware.
Copyright
Copyright© 2016 NetComm Wireless Limited. All rights reserved.
Copyright© 2016 Vodafone Group Plc. All rights reserved.
The information contained herein is proprietary to NetComm Wireless and Vodafone. No part of this document may be
translated, transcribed, reproduced, in any form, or by any means without prior written consent of NetComm Wireless
and Vodafone.
Trademarks and registered trademarks are the property of NetComm Wireless Limited or Vodafone Group or their
respective owners. Specifications are subject to change without notice. Images shown may vary slightly from the actual
product.
Note – This document is subject to change without notice.

SMS Tools Configuration Guide – Vodafone MachineLink 3 of 23
September 2016 v. 2.0 vodafone.netcommwireless.com
Contents
Introduction 4
Notation
The following symbols are used in this user guide:
The following note requires attention.
The following note provides a warning.
The following note provides useful information.

SMS Tools Configuration Guide – Vodafone MachineLink 4 of 23
September 2016 v. 2.0 vodafone.netcommwireless.com
Introduction
The SMS tools application has been developed to include basic SMS functionality such as sending a message, receiving a message and redirecting
an incoming message to another destination. You can also utilise this functionality to read and change run-time variables on the router.
The SMS diagnostics feature is enabled by default. When using a Vodafone GDSP SIM card with your router, you must use the GDSP web interface
to send and receive the SMS messages as the router is pre-configured with security settings to accept SMS messages from the GDSP platform. If
using a generic SIM card with your router, the messages must be formatted according to the API.
Basic functionality supported:
Ability to send a text message via a 3G network and store in permanent storage
Ability to receive a text message via a 3G network and store in permanent storage
Ability to forward incoming text messages via a 3G network to another remote destination which may be a TCP/UDP server or other
mobile devices.
Ability to read run-time variables from the device (e.g. uptime) and send result to a remote destination which may be a TCP/UDP
server or other mobile devices.
Ability to change live configuration on the device (e.g. connection APN)
Ability to execute supported commands (e.g. reboot)
The Setup page provides the options to enable or disable the SMS messaging functionality and SMS forwarding functionalities of the router. SMS
messaging is enabled by default.
Figure 1 - General SMS Configuration

SMS Tools Configuration Guide – Vodafone MachineLink 5 of 23
September 2016 v. 2.0 vodafone.netcommwireless.com
OPTION DEFINITION
General SMS configuration
SMS messaging Toggles the SMS functionality of the router on and off.
Messages per page (10-50) The number of SMS messages to display per page. Must be a value between
10 and 50.
Encoding scheme The encoding method used for outbound SMS messages. GSM 7-bit mode
permits up to 160 characters per message but drops to 50 characters if the
message includes special characters. UCS-2 mode allows the sending of
Unicode characters and permits a message to be up to 50 characters in length.
SMS forwarding configuration
Forwarding Toggles the SMS forwarding function of the router on and off.
Redirect to mobile Enter a mobile number as the destination for forwarded SMS messages.
TCP server address Enter an IP address or domain name as the destination for forwarded SMS
messages using TCP.
TCP port The TCP port on which to connect to the remote destination.
UDP server address Enter an IP address or domain name as the destination for forwarded SMS
messages using UDP.
UDP port The UDP port on which to connect to the remote destination.
Table 1 - SMS Setup Settings
SMS forwarding configuration Incoming text messages can be redirected to another mobile device and/or a TCP/UDP message server.
Redirect to mobile You can forward incoming text messages to a different destination number. This destination number can be another mobile phone or a router
phone number.
For Example:
If someone sends a text message and Redirect to mobile is set to “+61412345678”, the text message is stored on the router and forwarded to
“+61412345678” at the same time.
To disable redirection to a mobile, clear the Redirect to mobile field and click the Save button.
Redirect to TCP / UDP server address You can also forward incoming text messages to a TCP/UDP based destination. The TCP or UDP server can be any kind of public or private server if
the server accepts incoming text-based messages.
The TCP/UDP address can be an IP address or domain name. The port number range is from 1 to 65535. Please refer to your TCP/UDP based SMS
server configuration for which port to use.
For Example:
If someone sends a text message and TCP server address is set to “192.168.20.3” and TCP port is set to “2002”, this text message is stored in the
router and forwarded to “192.168.20.3” on port “2002” at the same time.
To disable redirection to a TCP or UDP address, clear the TCP server address and UDP server address fields and click the Save button.

SMS Tools Configuration Guide – Vodafone MachineLink 6 of 23
September 2016 v. 2.0 vodafone.netcommwireless.com
New message The New message page can be used to send SMS text messages to a single or multiple recipients. To access the New message page, click on the
Services menu item from the top menu bar, select the SMS messaging menu on the left then select the New message menu item.
A new SMS message can be sent to a maximum of 9 recipients at the same time. After sending the message, the result is displayed next to the
destination number as “Success” or “Failure” if the message failed to send. By default, only one destination number field is displayed. Additional
destination numbers may be added one at a time after entering a valid number for the current destination number field. To add a destination
number, click the button and to remove the last destination in the list, click the button.
Figure 2 - SMS - New Message
Destination numbers should begin with the “+” symbol followed by the country calling code. To send a message to a destination number, enter
the “+” symbol followed by the country calling code and then the destination number.
For example:
To send a message to the mobile destination number 0412345678 in Australia (country calling code 61), enter “+61412345678”.
After entering the required recipient numbers, type your SMS message in the New message field. As you type your message, a counter shows how
many characters you have entered out of the total number available for your chosen encoding scheme. When you have finished typing your
message and you are ready to send it, click the Send button.

SMS Tools Configuration Guide – Vodafone MachineLink 7 of 23
September 2016 v. 2.0 vodafone.netcommwireless.com
Inbox / Sent Items The Inbox displays all received messages that are stored on the router while Sent Items displays all sent messages. To access the Inbox page, click
on the Services menu item from the top menu bar, select the SMS messaging menu on the left then select the Inbox menu item.
Figure 3 - SMS Inbox
To access the Sent items page, click on the Services menu item from the top menu bar, select the SMS messaging menu on the left then select
the Sent items menu item.
Figure 4 - SMS Outbox
Icon Description
Forward button. Click this button to open a new message window where you can forward the
corresponding message to another recipient.
Reply button. Click this button to open a new message window where you can reply to the
sender.
Add to White list. Click this button to add the sender’s mobile number to the white list on the
router.
Delete button. Click this button to delete the corresponding message.
Refresh button. Click this button to refresh the inbox or outbox to see new messages.
Table 2 - Inbox/Outbox icons

SMS Tools Configuration Guide – Vodafone MachineLink 8 of 23
September 2016 v. 2.0 vodafone.netcommwireless.com
Diagnostics The Diagnostics page is used to configure the SMS diagnostics and command execution configuration. This allows you to change the
configuration, perform functions remotely and check on the status of the router via SMS commands.
To access the Diagnostics page, click on the Services menu item then select the SMS menu on the left and finally select Diagnostics beneath it.
Figure 5 - SMS diagnostics and command execution configuration

SMS Tools Configuration Guide – Vodafone MachineLink 9 of 23
September 2016 v. 2.0 vodafone.netcommwireless.com
SMS diagnostics and command execution configuration The options on this page are described below.
Enable remote diagnostics and command execution
Enables or disables the remote diagnostics feature. If this setting is enabled all incoming text messages are parsed and tested for remote
diagnostics commands.
If remote diagnostics commands are found, the router executes those commands. This feature is enabled by default. All remote diagnostic
commands that are received are stored in the Inbox.
Note: It is possible to adjust settings and prevent your router from functioning correctly using remote diagnostics. If this occurs, you will
need to perform a factory reset in order to restore normal operation.
We highly recommended that you use the white list and a password when utilising this feature to prevent unauthorised access. See the
White list description for more information.
Only accept authenticated SMS messages
Enables or disables checking the sender’s phone number against the allowed sender white list for incoming diagnostics and command execution
SMS messages.
If authentication is enabled, the router will check if the sender’s number exists in the white list. If it exists, the router then checks the password (if
configured) in the incoming message against the password in the white list for the corresponding sending number. If they match, the diagnostic or
command is executed.
If the number does not exist in the white list or the password does not match, the router does not execute the incoming diagnostic or command in
the SMS message.
This is enabled by default and it is strongly advised that you leave this feature enabled to maintain security.
Send Set command acknowledgement replies
The Vodafone MachineLink 4G router will automatically reply to certain types of commands received, such as get commands, or execute
commands. However acknowledgement replies from the Vodafone MachineLink 4G router are optional with set commands and the Wakeup
command. This option Enables or disables sending an acknowledgment message after execution of a set command or SMS Wakeup command. If
disabled, the router does not send any acknowledgement after execution of a set command or SMS Wakeup command. All acknowledgment
replies are stored in the Outbox after they have been sent. This can be useful to determine if a command was received and executed by the router.
This option is disabled by default.
Access advanced RDB variables
By default, this option is turned on and allows access to the full list of RDB variables via SMS. When it is turned off, you are only allowed access to
the basic RDB variables listed later in this guide.
Allow execution of advanced commands
By default, this option is turned on and allows execution of advanced commands such as those which are common to the Linux command line. For
example: “execute ls /usr/bin/sms*” to list the contents of the /etc folder on the router.
When it is turned off you are only allowed to execute the basic commands listed later in this guide.
Send acknowledgement replies to
This option allows you to specify where to send acknowledgment messages after the execution of a set, get, or exec command.

SMS Tools Configuration Guide – Vodafone MachineLink 10 of 23
September 2016 v. 2.0 vodafone.netcommwireless.com
If a fixed number is selected, the acknowledgement message will be sent to the number defined in the Fixed number to send replies to field. If
the sender’s number is selected, the acknowledgement message will be sent to the number that the SMS diagnostic or command message
originated from. The default setting is to use the sender’s number.
Fixed number to send replies to
This field defines the destination number to which error messages are sent after the execution of a get, set, or exec command. This field is only
displayed when Send Error SMS to is set to Fixed Number.
Send command error replies
Enables or disables the sending of an error message resulting from the execution of a get, set, or exec command. All error replies are stored in the
Outbox after they have been sent.
Send error replies to
When Send command error replies is set to ON, this option is used to specify where the error SMS is sent. Use the radio buttons to select either a
fixed number or the sender’s number. When set to the sender’s number the router will reply to the originating number of the SMS diagnostic
or command. When set to a fixed number the router will send the error messages to the number specified in the following field.
Send a maximum number of
You can set the maximum number of acknowledgement and error messages sent when an SMS diagnostic or command is executed. The
maximum limit can be set per hour, day, week or month. The router will send a maximum of 100 replies per day by default.
The number of messages sent is shown below the options. The total transmitted message count resets after a reboot or at the beginning of the
time frame specified.
White List for diagnostic or execution SMS The white list is a list of mobile numbers that you can create which are considered “friendly” to the router. If Only accept authenticated SMS
messages is enabled in the diagnostics section, the router will compare the mobile number of all incoming diagnostic and command messages
against this white list to determine whether the diagnostic or command should be executed. You may optionally configure a password for each
number to give an additional level of security. When a password is specified for a number, the SMS diagnostic or command message is parsed for
the password and will only be executed if the number and password match.
Figure 6 - White list for diagnostic or execution SMS

SMS Tools Configuration Guide – Vodafone MachineLink 11 of 23
September 2016 v. 2.0 vodafone.netcommwireless.com
Up to 20 numbers may be stored in the white list, however, when using a Vodafone GDSP SIM, 4 entries are reserved for system numbers and may
not be removed. To add a number to the white list, click the “+Add” button.
Figure 7 – Adding a number to the SMS white list
The White List numbers and passwords can be cleared by pressing the button to the right of each entry. To add a number to the white list,
enter it in the Destination number field and optionally define a password in the Password field. When you have finished adding numbers click
the Save button to save the entries.
Sending an SMS Diagnostic Command Follow the steps below to configure the router to optionally accept SMS diagnostic commands only from authenticated senders and learn how to
send SMS diagnostic commands to the router.
1. Navigate to the Services > SMS messaging > Diagnostics page
1. Confirm that the Enable remote diagnostics and command execution toggle key is set to the ON position. If it is set to OFF click the
toggle key to switch it to the ON position.
2. If you wish to have the router only accept commands from authenticated senders, ensure that Only accept authenticated SMS
messages is set to the ON position. In the White list for diagnostic or execution SMS messages section, click the +Add button and
enter the sender’s number in international format into the Destination number field that appears. If you wish to also configure a
password, enter the password in the Password field corresponding to the destination number.
3. If you would prefer to accept SMS diagnostic commands from any sender, set the Only accept authenticated SMS messages toggle
key to the OFF position.
Note: An alternative method of adding a number to the white list is to send an SMS message to the router, navigate to Services > SMS
messaging > Inbox and then click the button next to the message which corresponds to the sender’s number.
4. Click the Save button.
Types of SMS diagnostic commands There are three types of commands that can be sent; execute, get and set. The basic syntax is as follows:
execute COMMAND
get VARIABLE
set VARIABLE=VALUE

SMS Tools Configuration Guide – Vodafone MachineLink 12 of 23
September 2016 v. 2.0 vodafone.netcommwireless.com
If authentication is enabled, each command must be preceded by the password:
PASSWORD execute COMMAND
PASSWORD get VARIABLE
PASSWORD set VARIABLE=VALUE
The following are some examples of SMS diagnostic commands:
password6657 execute reboot
get rssi
set apn1=testAPNvalue
SMS acknowledgment replies The router automatically replies to get commands with a value and execute commands with either a success or error response. Set commands
will only be responded to if the Send Set command acknowledgement replies toggle key is set to ON. If the Send command error replies
toggle key is set to ON, the router will send a reply if the command is correct but a variable or value is incorrect, for example, due to misspelling.
SMS command format Generic Format for reading variables:
get VARIABLE
PASSWORD get VARIABLE
Generic Format for writing to variables:
set VARIABLE=VALUE
PASSWORD set VARIABLE=VALUE
Generic Format for executing a command:
Execute COMMAND
PASSWORD execute COMMAND
Replies
Upon receipt of a successfully formatted, authenticated (if required) command, the gateway will reply to the SMS in the following format:
Type SMS Contents Notes
get command “VARIABLE=VALUE”
set command “Successfully set VARIABLE to
VALUE”
Only sent if the acknowledgment
message function is enabled
execute command “Successfully executed command
COMMAND”
Table 3 - SMS Diagnostic Command Syntax
Where “VARIABLE” is the name of the value to be read
Where “VARIABLE (x)” is the name of another value to be read
Where “VALUE” is the content to be written to the “VARIABLE”

SMS Tools Configuration Guide – Vodafone MachineLink 13 of 23
September 2016 v. 2.0 vodafone.netcommwireless.com
Where “COMMAND” is a supported command to be executed by the device (e.g. reboot)
Where “PASSWORD” is the password (if configured) for the corresponding sender number specified in the White List
Multiple commands can be sent in the same message, if separated by a semicolon.
For Example:
get VARIABLE1; get VARIABLE2; get VARIABLE3
PASSWORD get VARIABLE1; get VARIABLE2
set VARIABLE=VALUE1 ; set VARIABLE2=VALUE2
PASSWORD set VARIABLE1=VALUE1; set VARIABLE2=VALUE2; set VARIABLE3=VALUE3
If required, values can also be bound by an apostrophe, double apostrophe or back tick.
For Example:
“set VARIABLE=’VALUE’”
“set VARIABLE=”VALUE””
“set VARIABLE=`VALUE`”
“get VARIABLE”
A password (if required), only needs to be specified once per SMS, but can be prefixed to each command if desired.
“PASSWORD get Variable1”; “get VARIABLE2”
“PASSWORD set VARIABLE1=VALUE1”; “set VARIABLE2=VALUE2”
If the command sent includes the “reboot” command and has already passed the white list password check, the device keeps this password and
executes the remaining command line after the reboot with this same password.
For Example:
“PASSWORD execute reboot; getVariable1”; “get VARABLE2”
“PASSWORD execute reboot; PASSWORD get Variable1”; “get VARABLE2”
Note: Commands, variables and values are case sensitive.
SMS Tools Configuration Guide – Vodafone MachineLink 14 of 23
September 2016 v. 2.0 vodafone.netcommwireless.com
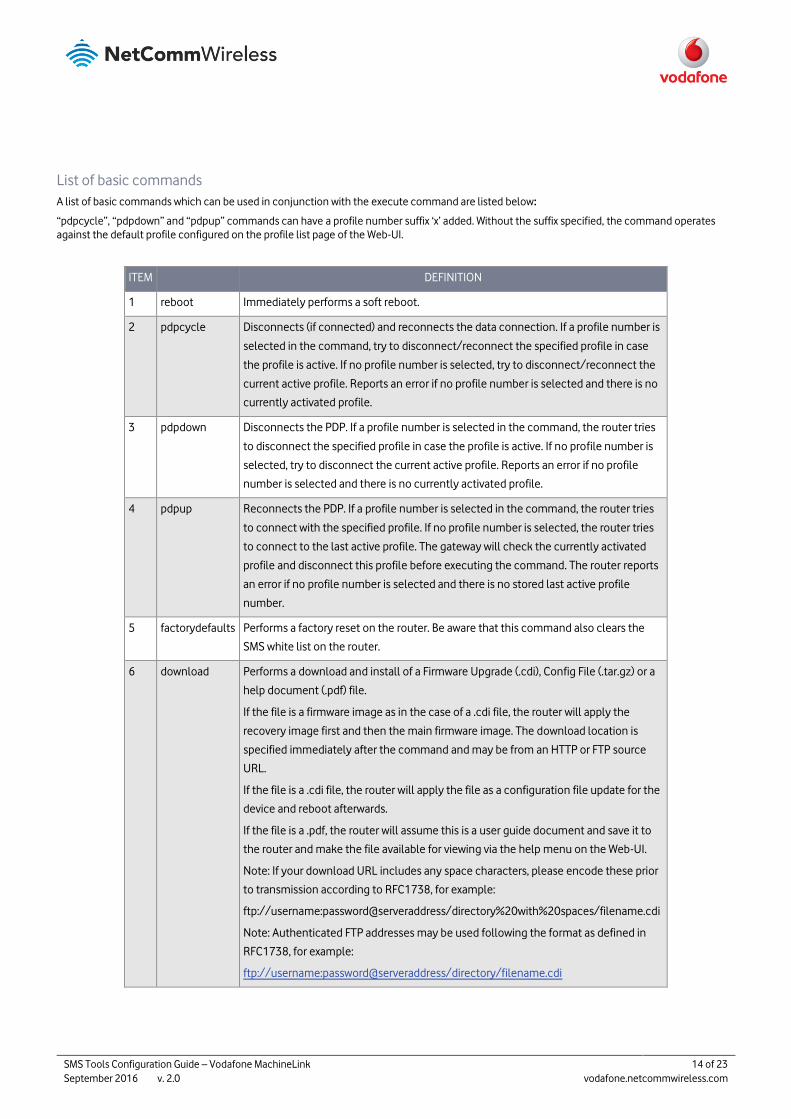
List of basic commands
A list of basic commands which can be used in conjunction with the execute command are listed below:
“pdpcycle”, “pdpdown” and “pdpup” commands can have a profile number suffix ‘x’ added. Without the suffix specified, the command operates
against the default profile configured on the profile list page of the Web-UI.
ITEM DEFINITION
1 reboot Immediately performs a soft reboot.
2 pdpcycle Disconnects (if connected) and reconnects the data connection. If a profile number is
selected in the command, try to disconnect/reconnect the specified profile in case
the profile is active. If no profile number is selected, try to disconnect/reconnect the
current active profile. Reports an error if no profile number is selected and there is no
currently activated profile.
3 pdpdown Disconnects the PDP. If a profile number is selected in the command, the router tries
to disconnect the specified profile in case the profile is active. If no profile number is
selected, try to disconnect the current active profile. Reports an error if no profile
number is selected and there is no currently activated profile.
4 pdpup Reconnects the PDP. If a profile number is selected in the command, the router tries
to connect with the specified profile. If no profile number is selected, the router tries
to connect to the last active profile. The gateway will check the currently activated
profile and disconnect this profile before executing the command. The router reports
an error if no profile number is selected and there is no stored last active profile
number.
5 factorydefaults Performs a factory reset on the router. Be aware that this command also clears the
SMS white list on the router.
6 download Performs a download and install of a Firmware Upgrade (.cdi), Config File (.tar.gz) or a
help document (.pdf) file.
If the file is a firmware image as in the case of a .cdi file, the router will apply the
recovery image first and then the main firmware image. The download location is
specified immediately after the command and may be from an HTTP or FTP source
URL.
If the file is a .cdi file, the router will apply the file as a configuration file update for the
device and reboot afterwards.
If the file is a .pdf, the router will assume this is a user guide document and save it to
the router and make the file available for viewing via the help menu on the Web-UI.
Note: If your download URL includes any space characters, please encode these prior
to transmission according to RFC1738, for example:
ftp://username:password@serveraddress/directory%20with%20spaces/filename.cdi
Note: Authenticated FTP addresses may be used following the format as defined in
RFC1738, for example:
ftp://username:password@serveraddress/directory/filename.cdi

SMS Tools Configuration Guide – Vodafone MachineLink 15 of 23
September 2016 v. 2.0 vodafone.netcommwireless.com
ITEM DEFINITION
7 codconnect Causes the router to activate the PDP context when the Connect on demand feature
is enabled.
8 coddisconnect Causes the router to de-activate the PDP context when the Connect on demand
feature is enabled.
10 ssh.genkeys Instructs the router to generate new public SSH keys.
11 ssh.clearkeys Instructs the router to clear the client public SSH key files.
Table 4 - List of basic SMS diagnostic commands
List of get/set commands The following table is a partial list of get and set commands which may be performed via SMS.
Command name Example Description
get status get status Returns the Module firmware version, LAN IP Address,
Network State, Network operator and Signal strength.
get sessionhistory get sessionhistory Returns the time and date of recent sessions along
with the total amount of data sent and received for
each session.
set syslogserver set
syslogserver=123.45.67.89:514
Sets a remote syslog server IP or hostname and port.
set cod set cod=1 Enables or disables Connect on demand.
get cod get cod Returns the enable/disable status of the Connect on
demand feature.
get codstatus get codstatus Returns the connection status of the Connect on
demand feature.
set coddialport set coddialport=on,53 Sets the Connect on demand feature to connect only
when traffic is received on the specified port.
get coddialport get coddialport Returns the Connect on demand port filter status and
list or filtered ports.
set codonline set codonline=20 Sets the router to stay online for at least X minutes
when data activity is detected.
get codonline get codonline Returns the number of minutes the router is
configured to stay online when data activity is
detected.
set codminonline set codminonline=10 Sets the router to stay online for a minimum of X
minutes after connecting.
get codminonline get codminonline Returns the minimum number of minutes the router
should stay online after connecting.

SMS Tools Configuration Guide – Vodafone MachineLink 16 of 23
September 2016 v. 2.0 vodafone.netcommwireless.com
Command name Example Description
set codredial set codredial=5 Sets the number of minutes that the router should not
attempt to redial after hanging up.
get codredial get codredial Returns the number of minutes that the router is
configured to not attempt to redial after hanging up.
set coddisconnect set coddisconnect=0 Sets the number of minutes after which the router
should disconnect regardless of traffic.
get coddisconnect get coddisconnect Returns the number of minutes the router is
configured to disconnect regardless of traffic.
set codconnectreg set codconnectreg=30 Sets the number of minutes that the router should
regularly attempt to connect.
get codconnectreg get codconnectreg Returns the number of minutes that the router is
configured to regularly attempt to connect.
set
codrandomtime
set codrandomtime=3 Sets the number of minutes that the router should
randomise the dial time by.
get
codrandomtime
get codrandomtime Returns the number of minutes that the router is
configured to randomise the dial time by.
set codverbose set codverbose=1 Sets verbose logging on or off.
get codverbose get codverbose Returns the status of verbose logging.
set codignore.icmp set codignore.icmp=1 Sets the router to ignore ICMP packets triggering data
activity detection.
get
codignore.icmp
get codignore.icmp Returns the status of the Ignore ICMP option.
set codignore.tcp set codignore.tcp=1 Sets the router to ignore TCP packets triggering data
activity detection.
get codignore.tcp get codignore.tcp Returns the status of the Ignore TCP option.
set codignore.udp set codignore.udp=1 Sets the router to ignore UDP packets triggering data
activity detection.
get codignore.udp get codignore.udp Returns the status of the Ignore UDP option.
set codignore.dns set codignore.dns=1 Sets the router to ignore DNS traffic triggering data
activity detection.
get codignore.dns get codignore.dns Returns the status of the Ignore DNS option.
set codignore.ntp set codignore.ntp=1 Sets the router to ignore NTP traffic triggering data
activity detection.
get codignore.ntp get codignore.ntp Returns the status of the Ignore NTP option.
set codignore.ncsi set codignore.ncsi=1 Sets the router to ignore NCSI traffic triggering data
activity detection.

SMS Tools Configuration Guide – Vodafone MachineLink 17 of 23
September 2016 v. 2.0 vodafone.netcommwireless.com
Command name Example Description
get codignore.ncsi get codignore.ncsi Returns the status of the Ignore NCSI option.
get plmnscan get plmnscan Instructs the router to perform a network scan and
returns the results by SMS.
set forceplmn set forceplmn=505,3 Sets the operator to a manual selection made by the
user where “505” is the Mobile Country Code for
Australia and “3” is the Mobile Network Code for
Vodafone. As no network type (e.g.. LTE/3G/2G) is
specified, it is selected automatically.
get forceplmn get forceplmn Returns the operator and network type selection mode
(Automatic/Manual), in addition to the MCC and MNC
values
get pppoe get pppoe Returns the PPPoE status, currently configured dial
string and service name
set pppoe set pppoe=1, telstra.internet,
test
Sets the PPPoE status on, APN to telstra.internet, and
service name to test.
get ledmode get ledmode Returns the status of the LED operation mode.
set ledmode set ledmode=10 Sets the LED operation mode to be always on or to
turn off after the specified number of minutes.
get ssh.proto get ssh.proto Returns the SSH protocol in use.
set ssh.proto set ssh.proto=1,2 Sets the SSH Protocol to protocol 1, 2 or both (1,2).
get ssh.passauth get ssh.passauth Returns the status of the SSH Enable password
authentication option.
set ssh.passauth set ssh.passauth=1 Sets the SSH Enable password authentication option
on or off.
get ssh.keyauth get ssh.keyauth Returns the status of the SSH Enable key
authentication option.
set ssh.keyauth Set ssh.keyauth=1 Sets the SSH Enable key authentication option on or
off.
get
download.timeout
get download.timeout Returns the time in minutes that the router waits
before a download times out.
set
download.timeout
set download.timeout=20 Sets the time in minutes that the router waits before a
download times out. This is set to 10 minutes by
default. Supported range is 10 – 1440 minutes.
get install.timeout get install.timeout Returns the time in minutes that the router waits
before a file that is being installed times out.

SMS Tools Configuration Guide – Vodafone MachineLink 18 of 23
September 2016 v. 2.0 vodafone.netcommwireless.com
Command name Example Description
set install.timeout set install.timeout=5 Sets the time in minutes that the router waits before a
file that is being installed times out. This is set to 3
minutes by default. Supported range is 3 – 300
minutes.
get sw.version get sw.version Returns the software version of the router.
Table 5 - List of get/set commands
List of basic RDB variables The following table lists valid variables where “x” is a profile number (1-6). If no profile is specified, variables are read from or written to for the
current active profile. If a profile is specified, variables are read from or written to for the specified profile number (‘x’).
# RDB variable name SMS variable
name Read/Write Description Example VALUE
0 link.profile.1.enable
link.profile.1.apn
link.profile.1.user
link.profile.1.pass
link.profile.1.auth_type
link.profile.1.iplocal
link.profile.1.status
profile RW Profile Read:
(profile
no,apn,user,pass,auth,iplocal,status)
1,apn,username,password,
chap,202.44.185.111,up
Write:
(apn, user, pass,auth)
apn,username,password
2 link.profile.1.user username RW Cellular
broadband
username
Guest, could also return “null”
3 link.profile.1.pass password RW Cellular
broadband
password
Guest, could also return “null”
4 link.profile.1.auth_type authtype RW Cellular
broadband
Authentication
type
”pap” or”chap”
5 link.profile.1.iplocal wanip R WAN IP address 202.44.185.111
6 wwan.0.radio.information.signal_strength rssi R Cellular signal
strength
-65 dBm
7 wwan.0.imei imei R IMEI number 357347050000177
8 statistics.usage_current usage R Cellular
broadband data
usage of
current session
“Rx 500 bytes, Tx 1024 bytes, Total
1524 bytes” or “Rx 0 byte, Tx 0 byte,
Total 0 byte” when wwan down

SMS Tools Configuration Guide – Vodafone MachineLink 19 of 23
September 2016 v. 2.0 vodafone.netcommwireless.com
# RDB variable name SMS variable
name Read/Write Description Example VALUE
9 statistics.usage_current wanuptime R Up time of
current cellular
broadband
session
1 days 02:30:12 or 0 days 00:00:00
when wwan down
10 /proc/uptime deviceuptime R Device up time 1 days 02:30:12
11 wwan.0.system_network_status.current_band band R Current band WCDMA850
Table 6 - List of basic SMS diagnostics RDB variables
Network scan and manual network selection by SMS
Performing a network scan
The get plmnscan SMS command enables you to perform a scan of the cellular networks available at the time of the scan.
It returns the following semi-colon separated information for each network in range:
MCC
MNC
Network Type (LTE, 3G, 2G)
Provider's Name
Operator Status (available, forbidden, current)
The following is an example of a response from the get plmnscan SMS command:
plmnscan=505,03,7,vodafone AU,1;505,03,1,vodafone AU,1;505,03,9,vodafone AU,4;505,01,7,Telstra Mobile,1;505,01,1,Telstra
Mobile,1;505,02,9,YES OPTUS,1;505,02,1,YES OPTUS,1;505,01,9,Telstra
Network
type Description
9 Indicates an LTE network.
7 Indicates a 3G network
1 Indicates a 2G network
Table 7 - Network types returned by get plmnscan SMS command
Operator status Description
1 Indicates an available operator which may be selected.
2 Indicates a forbidden operator which may not be selected (applies only to generic SIM
cards).
4 Indicates the currently selected operator.
Table 8 - Operator status codes returned by get plmnscan SMS command

SMS Tools Configuration Guide – Vodafone MachineLink 20 of 23
September 2016 v. 2.0 vodafone.netcommwireless.com
Notes about the network connection status when using the get plmnscan command:
If the connection status is Up and connection mode is Always on, the get plmnscan SMS will cause the connection to disconnect,
perform the scan, send the result through SMS and then bring the connection back up again. If the connection status is Down, the
router will perform the PLMN scan, send the result and keep the connection status down.
If the connection status is Waiting and connection mode is Connect on demand, the get plmnscan SMS will change the connection
status to Down, perform the scan, send the result through SMS and then restore the connection status to the Waiting state.
If the connection status is Up and connection mode is Connect on demand, the get plmnscan SMS will cause the connection to
disconnect, perform the scan, send the result through SMS, and then restore the connection status to the Waiting state unless there is a
traffic which triggers a connection in which case the connection status will be set to Up.
Setting the router to connect to a network
The router can be instructed by SMS to connect to one of the networks returned by the get plmnscan command. The set forceplmn command
forces the router to connect to a specified operator network (if available) while the get forceplmn command retrieves the currently configured
network on the router.
Command format:
set forceplmn=0|MCC,MNC| MCC,MNC,Network Type
For example:
set forceplmn=0
Sets the selection of operator and network type to automatic mode.
set forceplmn=505,3
Sets the operator to a manual selection made by the user where “505” is the Mobile Country Code for Australia and “3” is the Mobile
Network Code for Vodafone. As no network type (e.g. LTE/3G/2G) is specified, it is selected automatically.
set forceplmn=505,3,7
Sets the operator and network type to a manual selection made by the user where “505” is the Mobile Country Code for Australia, “3” is
the Mobile Network Code for Vodafone and “7” is the 3G network type.
Notes about the set forceplmn command:
1. If the manual selection fails, the device will fall back to the previous ‘good’ network.
2. When enabled, the SMS acknowledgement reply reflects the success or failure of the manual selection with respect to the set
command and includes the final MNC/MCC that was configured.
Confirming the currently configured operator and network type
You can retrieve the currently configured operator and network type using the get forceplmn command.
The get forceplmn command returns the operator and network type selection mode (Automatic/Manual), in addition to the MCC and MNC
values, for example:
Automatic,505,3
This response indicates that the operator/network selection mode is Automatic, and the network used is Vodafone AU.

SMS Tools Configuration Guide – Vodafone MachineLink 21 of 23
September 2016 v. 2.0 vodafone.netcommwireless.com
SMS diagnostics examples The examples below demonstrate various combinations of supported commands. This is not an exhaustive list and serves as an example of
possibilities only.
Description Authentication Input Example
Send SMS to change APN Not required set apn1=internet
set apn2=”access”
Required PASSWORD set apn1=internet
PASSWORD set apn2=access
Send SMS to change the 3G username Not required set username=’NetComm’
Required PASSWORD set username= ”NetComm”
Send SMS to change the 3G password Not required set password= `NetComm`
Required PASSWORD set password= `NetComm`
Send SMS to change the 3G
authentication
Not required set authtype= ‘pap’
Required PASSWORD set authtype = pap
Send SMS to reboot Not required execute reboot
Required PASSWORD execute reboot
Send SMS to check the WAN IP address Not required get wanip
Required PASSWORD get wanip
Send SMS to check the 3G signal
strength
Not required get rssi
Required PASSWORD get rssi
Send SMS to check the IMEI number Not required get imei
Required PASSWORD get imei
Send SMS to check the current band Not required get band
Required PASSWORD get band
Send SMS to Disconnect (if connected)
and reconnect the 3G connection
Not required execute pdpcycle
Required PASSWORD execute “pdpcycle1”
Send SMS to disconnect the 3G
connection
Not required execute pdpdown1
Required PASSWORD execute “pdpdown1”
Send SMS to connect the 3G connection Not required execute pdpup
Required PASSWORD execute pdpup1
Send multiple get command Not required get wanip; get rssi
Required PASSWORD get wanip; get rssi
Send multiple set command Not required set apn1=”3netaccecss”; set password1=’NetComm’
Required PASSWORD set APN=”3netaccecss”; set password=NetComm

SMS Tools Configuration Guide – Vodafone MachineLink 22 of 23
September 2016 v. 2.0 vodafone.netcommwireless.com
Description Authentication Input Example
Send SMS to reset to factory default
settings
Not required execute factorydefaults
Required PASSWORD execute factorydefaults
Send SMS to retrieve status of router Not required get status
Required PASSWORD get status
Send SMS to retrieve the history of the
session, including start time, end time
and total data usage
Not required get sessionhistory
Required PASSWORD get sessionhistory
Send SMS to configure the router to
send syslog to a remote syslog server
Not required set syslogserver
Required PASSWORD set syslogserver
Send SMS to wake up the router, turn on
the default gateway and trigger the
‘connect on demand’ profile if in waiting
state.
Not required (zero SMS)
Required PASSWORD (zero SMS)
Send SMS to retrieve MCC, MNC, network
type, provider’s name and operator
status
Not required get plmnscan
Required PASSWORD get plmnscan
Send SMS to retrieve current network
type selection mode, MNC and MCC
values.
Not required get forceplmn
Required PASSWORD get forceplmn
Send SMS to force connection to a
specific operator and network type
Not required set forceplmn=505,1,7
Required PASSWORD set forceplmn=505,1,7
Send SMS to perform firmware upgrade
when firmware is located on HTTP server
Not required execute download http://download.com:8080/firmware_image.cdi
execute download http://download.com:8080/firmware_image_r.cdi
Required PASSWORD execute download http://download.com:8080/firmware_image.cdi
PASSWORD execute download http://download.com:8080/firmware_image_r.cdi
Send SMS to perform firmware upgrade
when firmware is located on FTP server
Not required execute download
ftp://username:[email protected]:8080/firmware_image.cdi
execute download ftp://username:password@
download.com:8080/firmware_image_r.cdi
Required PASSWORD execute download ftp://username:password@
download.com:8080/firmware_image.cdi
PASSWORD execute download ftp://username:password@
download.com:8080/firmware_image_r.cdi
Send SMS to download and install IPK
package located on HTTP server
Not required execute download http://download.com:8080/package.ipk
Required PASSWORD execute download http://download.com:8080/package.ipk

SMS Tools Configuration Guide – Vodafone MachineLink 23 of 23
September 2016 v. 2.0 vodafone.netcommwireless.com
Description Authentication Input Example
Send SMS to download and install IPK
package located on FTP server
Not required execute download ftp://username:password@
download.com:8080/package.ipk
Required PASSWORD execute download ftp://username:password@
download.com:8080/package.ipk
Send SMS to turn off PPPoE Not required set pppoe=0
Required PASSWORD set pppoe=0
Send SMS to turn on PPPoE and set APN
and service name
Not required set pppoe=1,internet, Vodafone
Required PASSWORD set pppoe=1,internet, Vodafone
Send SMS to retrieve the PPPoE status,
currently configured APN and service
name
Not required get pppoe
Required PASSWORD get pppoe
Send SMS to set the default data
connection profile
Not required set defaultprofile=1
Required PASSWORD set defaultprofile=1
Send SMS to retrieve the currently
configured default data connection
profile
Not required get defaultprofile
Required PASSWORD get defaultprofile
Send SMS to set the LED mode timeout
to 10 minutes
Not required set ledmode=10
Required PASSWORD set ledmode=10
Send SMS to retrieve the current LED
mode
Not required get ledmode
Required PASSWORD get ledmode
Table 9 - SMS diagnostics example commands