vmware tunnel and vmware nsx micro ... white paper – september 2017 vmware tunnel and vmware nsx...
TRANSCRIPT

TECHNICAL WHITE PAPER – SEPTEMBER 2017
VMWARE TUNNEL AND VMWARE NSX MICRO-SEGMENTATION INTEGRATION GUIDE VMware AirWatch Enterprise Mobility Management 9.1

T E C H N I C A L W H I T E PA P E R | 2
VMWARE TUNNEL AND VMWARE NSX MICRO-SEGMENTATION INTEGRATION GUIDE
Table of Contents
Introduction . . . . . . . . . . . . . . . . . . . . . . . . . . . . . . . . . . . . . . . . . . . . . . . . . . . . . . . . . . . . . . . . . . . . . . . . . . . . . . 4
Purpose . . . . . . . . . . . . . . . . . . . . . . . . . . . . . . . . . . . . . . . . . . . . . . . . . . . . . . . . . . . . . . . . . . . . . . . . . . . . . . . . . 4
Audience . . . . . . . . . . . . . . . . . . . . . . . . . . . . . . . . . . . . . . . . . . . . . . . . . . . . . . . . . . . . . . . . . . . . . . . . . . . . . . . 4
NSX Network Virtualization and Micro-Segmentation . . . . . . . . . . . . . . . . . . . . . . . . . . . . . . . . . . . . . . 5
AirWatch Enterprise Mobility Management . . . . . . . . . . . . . . . . . . . . . . . . . . . . . . . . . . . . . . . . . . . . . . . . 5
VMware Tunnel . . . . . . . . . . . . . . . . . . . . . . . . . . . . . . . . . . . . . . . . . . . . . . . . . . . . . . . . . . . . . . . . . . . . . . . . . . 5
Per-App Tunnel with Micro-Segmentation Use Cases . . . . . . . . . . . . . . . . . . . . . . . . . . . . . . . . . . . . . . . 6
Before You Begin . . . . . . . . . . . . . . . . . . . . . . . . . . . . . . . . . . . . . . . . . . . . . . . . . . . . . . . . . . . . . . . . . . . . . . . . 7
Section A: Configure NSX for Integration . . . . . . . . . . . . . . . . . . . . . . . . . . . . . . . . . . . . . . . . . . . . . . . . . . . . 8
Exercise A1: Verify Minimum Requirements . . . . . . . . . . . . . . . . . . . . . . . . . . . . . . . . . . . . . . . . . . . . . . . . 8
Exercise A2: Plan NSX Micro-Segmentation Integration. . . . . . . . . . . . . . . . . . . . . . . . . . . . . . . . . . . . . 8
Exercise A3: Integrate NSX Manager with vCenter Server . . . . . . . . . . . . . . . . . . . . . . . . . . . . . . . . . . . 11
Exercise A4: Configure the NSX Controllers . . . . . . . . . . . . . . . . . . . . . . . . . . . . . . . . . . . . . . . . . . . . . . .12
Exercise A5: Configure vSphere Installation Bundles . . . . . . . . . . . . . . . . . . . . . . . . . . . . . . . . . . . . . . 14
Exercise A6: Configure VXLAN Transport . . . . . . . . . . . . . . . . . . . . . . . . . . . . . . . . . . . . . . . . . . . . . . . . 15
Exercise A7: Add NSX Logical Switches . . . . . . . . . . . . . . . . . . . . . . . . . . . . . . . . . . . . . . . . . . . . . . . . . . 19
Exercise A8: Define IP Sets . . . . . . . . . . . . . . . . . . . . . . . . . . . . . . . . . . . . . . . . . . . . . . . . . . . . . . . . . . . . . . .21
Exercise A9: Define Security Groups . . . . . . . . . . . . . . . . . . . . . . . . . . . . . . . . . . . . . . . . . . . . . . . . . . . . . 23
Exercise A10: Configure NSX Edge Services Gateway Interfaces . . . . . . . . . . . . . . . . . . . . . . . . . . . 25
Exercise A11: Configure NSX Firewall Rules . . . . . . . . . . . . . . . . . . . . . . . . . . . . . . . . . . . . . . . . . . . . . . . 32
Section B: Integrate NSX for vSphere with VMware Tunnel . . . . . . . . . . . . . . . . . . . . . . . . . . . . . . . . . . . 33
Exercise B1: Verify Linux VMware Tunnel Requirements . . . . . . . . . . . . . . . . . . . . . . . . . . . . . . . . . . . . 33
Exercise B2: Configure Initial Service Settings . . . . . . . . . . . . . . . . . . . . . . . . . . . . . . . . . . . . . . . . . . . . 36
Exercise B3: Sync NSX Security Groups . . . . . . . . . . . . . . . . . . . . . . . . . . . . . . . . . . . . . . . . . . . . . . . . . . 36
Exercise B4: Configure the Linux VMware Tunnel Installer . . . . . . . . . . . . . . . . . . . . . . . . . . . . . . . . . 38
Exercise B5: Install the NSX-Enabled VMware Tunnel Server . . . . . . . . . . . . . . . . . . . . . . . . . . . . . . . 39
Exercise B6: Create a VMware Tunnel Profile . . . . . . . . . . . . . . . . . . . . . . . . . . . . . . . . . . . . . . . . . . . . . 39
Exercise B7: Configure the VMware Tunnel Application . . . . . . . . . . . . . . . . . . . . . . . . . . . . . . . . . . . .40
Exercise B8: Configure Public Applications for Micro-Segmentation . . . . . . . . . . . . . . . . . . . . . . . . 41
Summary . . . . . . . . . . . . . . . . . . . . . . . . . . . . . . . . . . . . . . . . . . . . . . . . . . . . . . . . . . . . . . . . . . . . . . . . . . . . . . . . 43

T E C H N I C A L W H I T E PA P E R | 3
VMWARE TUNNEL AND VMWARE NSX MICRO-SEGMENTATION INTEGRATION GUIDE
Appendix A: General Requirements for Per-App Tunnel with Micro-Segmentation . . . . . . . . . . . . . 44
Appendix B: NSX Firewall Default Rules . . . . . . . . . . . . . . . . . . . . . . . . . . . . . . . . . . . . . . . . . . . . . . . . . . . . 44
Configuring Exclusions for NSX Firewall Default Rules . . . . . . . . . . . . . . . . . . . . . . . . . . . . . . . . . . . . .44
Ordering NSX Firewall Default Rules . . . . . . . . . . . . . . . . . . . . . . . . . . . . . . . . . . . . . . . . . . . . . . . . . . . . . 45
Appendix C: Manage VMware Tunnel . . . . . . . . . . . . . . . . . . . . . . . . . . . . . . . . . . . . . . . . . . . . . . . . . . . . . . 45
VMware Tunnel Commands . . . . . . . . . . . . . . . . . . . . . . . . . . . . . . . . . . . . . . . . . . . . . . . . . . . . . . . . . . . . . 45
Edit IP Aliases . . . . . . . . . . . . . . . . . . . . . . . . . . . . . . . . . . . . . . . . . . . . . . . . . . . . . . . . . . . . . . . . . . . . . . . . . .46
Review Routing Tables . . . . . . . . . . . . . . . . . . . . . . . . . . . . . . . . . . . . . . . . . . . . . . . . . . . . . . . . . . . . . . . . . .46
Additional Post-Installation Configurations for NSX . . . . . . . . . . . . . . . . . . . . . . . . . . . . . . . . . . . . . . . 47
Additional Resources . . . . . . . . . . . . . . . . . . . . . . . . . . . . . . . . . . . . . . . . . . . . . . . . . . . . . . . . . . . . . . . . . . . . . 48
About the Author and Contributors . . . . . . . . . . . . . . . . . . . . . . . . . . . . . . . . . . . . . . . . . . . . . . . . . . . . . . . . 48

T E C H N I C A L W H I T E PA P E R | 4
VMWARE TUNNEL AND VMWARE NSX MICRO-SEGMENTATION INTEGRATION GUIDE
IntroductionExtend the VMware NSX® network virtualization and security platform from the data center to mobile application endpoints by integrating VMware AirWatch® Enterprise Mobility Management™ security policies. The integration enables micro-segmentation capabilities by creating policies that dynamically follow mobile applications. This approach eliminates time-consuming network provisioning, bringing speed and simplicity to networking.
PurposeThis white paper provides configuration guidelines and exercises for integrating NSX micro-segmentation with per-app VMware Tunnel™.
Use the exercises to:
• Complete the configurations required to integrate a non-production, proof-of-concept instance of per-app VMware Tunnel with NSX to enable micro-segmentation functionality for a group of test users
• Facilitate collaboration and planning between AirWatch Enterprise Mobility Management and the NSX system administrators
VMwareTunnel
VMwareNSX
Figure 1: VMware Tunnel Works with NSX to Extend Network Virtualization Security Policies Beyond the Data Center and to Mobile Endpoints
AudienceThis document is for AirWatch Enterprise Mobility Management and NSX system administrators who want to integrate a VMware Tunnel per-app connection with NSX micro-segmentation. Because AirWatch Enterprise Mobility Management and NSX are distinct product offerings, they are typically managed by different administrators. We recommend that each dedicated administrator use this document to facilitate planning and collaboration.

T E C H N I C A L W H I T E PA P E R | 5
VMWARE TUNNEL AND VMWARE NSX MICRO-SEGMENTATION INTEGRATION GUIDE
NSX Network Virtualization and Micro-SegmentationThe NSX platform establishes a virtual network independent from the underlying IP network hardware. Administrators can programmatically create, provision, snapshot, delete, and restore complex networks all in software.
NSX micro-segmentation is a logical, bidirectional firewall that monitors inbound and outbound access controls for individual endpoints. It uses the NSX virtualization tool, making it a streamlined, cost-effective alternative to a physical firewall.
AirWatch Enterprise Mobility ManagementAirWatch Enterprise Mobility Management secures the workspace for today’s mobile operating systems. Over-the-air security configurations enable
• Device restrictions
• Platform-specific features
• Application management
• Device encryption
• Access control
• Data loss prevention
The AirWatch Console unifies endpoint management into a single space by aggregating mobile endpoints of every
• Platform
• Operating system
• Device type
VMware TunnelVMware Tunnel provides a secure connection for individual applications to access corporate resources. It authenticates and encrypts traffic from individual applications on compliant devices to the back-end system that they are trying to reach.
Internal NetworkInternet DMZ
VMwareTunnel
InternetFirewall
PerimeterFirewall
YourData Center Apps
DeviceApplication
Figure 2: Per-App VMware Tunnel – Single App Access to the Entire Subnet

T E C H N I C A L W H I T E PA P E R | 6
VMWARE TUNNEL AND VMWARE NSX MICRO-SEGMENTATION INTEGRATION GUIDE
While VMware Tunnel per-app functionality addresses some device-level VPN security concerns, it still exposes the domain’s endpoints and services to an application. Micro-segmentation takes security to the next level by restricting application-level access to a specified endpoint on the data center.
Internal NetworkInternet DMZ
VMwareTunnel
InternetFirewall
PerimeterFirewall
YourData Center Apps
DeviceApplication
Figure 3: Per-App Tunnel with NSX Micro-Segmentation – Single App Access to Specific Hosts
Per-App Tunnel with Micro-Segmentation Use CasesWhen you integrate NSX with VMware Tunnel, you can configure endpoint access based on the device type and the security level of the endpoint. You can leverage these capabilities to provide tiered access to internal resources for employee-owned devices.
Here are some use cases that would benefit from per-app tunnel integration with micro-segmentation.
• Enhanced network security and granular controls for mobile workflows
• Accelerated digital workspace and bring-your-own-device (BYOD) deployments
• Policy-defined network access for mobile apps and users
• Reduced mobile access footprint to the data center, minimizing the attack surface
• Accelerated mobile app delivery, testing, and automation

T E C H N I C A L W H I T E PA P E R | 7
VMWARE TUNNEL AND VMWARE NSX MICRO-SEGMENTATION INTEGRATION GUIDE
Before You BeginThis document explains how to enable per-app tunnel micro-segmentation for a fleet of iOS devices under AirWatch Enterprise Mobility Management. Before performing the exercises in this guide, review the requirements.
Deploy an instance of NSX that meets the following specifications.
• NSX as a VMware vSphere® 6.1.x or 6.2.x appliance Important: You can use VMware NSX Edge™ service gateways, logical switches, distributed logical routers, and distributed firewall service insertion capabilities depending on the data center and micro-segmentation design. For more information, see the VMware NSX for vSphere (NSX) Network Virtualization Design Guide.
• Complete the initial configuration that appears when you first start the NSX appliance
• Install VMware Tools™ on the virtual machines
• Use VMware ESXi™ 6 or later
• Set default firewall rules to Block or Reject
Deploy an instance of AirWatch Enterprise Mobility Management that meets the following specifications.
• Software-as-a-system (SaaS) deployment model
• AirWatch Console version 9.1 or later
• On-premises Active Directory instance for the existing enterprise infrastructure
• VMware Enterprise Systems Connector™ set to auto-update For more information, see the VMware Enterprise Systems Connector Installation and Configuration Guide.
• Necessary third-party integrations with AirWatch Enterprise Mobility Management
• VMware Workspace™ ONE™ catalog set up to deliver SaaS apps with preconfigured authentication policies
• iOS devices managed with the latest version of the AirWatch Agent
• Device ownership types include BYOD and corporate dedicated.

T E C H N I C A L W H I T E PA P E R | 8
VMWARE TUNNEL AND VMWARE NSX MICRO-SEGMENTATION INTEGRATION GUIDE
Section A: Configure NSX for IntegrationTogether, AirWatch Enterprise Mobility Management and NSX extend network virtualization security policies beyond the data center to mobile endpoints. These exercises walk you through the configurations involved to prepare NSX for successful integration with AirWatch Enterprise Mobility Management using a typical enterprise example.
The exercises are sequential and build on one another, so complete each exercise before going to the next.
1. Verify minimum requirements
2. Plan integration for NSX micro-segmentation integration
3. Integrate NSX Manager with VMware vCenter Server®
4. Configure the NSX controllers
5. Configure vSphere installation bundles
6. Configure VXLAN transport
7. Add NSX logical switches
8. Define IP sets
9. Define security groups
10. Configure NSX Edge service gateway interfaces
11. Configure NSX firewall rules for micro-segmentation
Exercise A1: Verify Minimum RequirementsIntegrate VMware Tunnel with NSX micro-segmentation to establish a secure connection to internal resources for a fleet of managed iOS devices.
• Before beginning integration, verify that NSX for vSphere meets the minimum requirements detailed in Before You Begin.
Exercise A2: Plan NSX Micro-Segmentation IntegrationBecause NSX establishes a virtual network independent from the underlying IP network hardware, you can programmatically create, provision, snapshot, delete, and restore complex networks—all in software.
After verifying that NSX for vSphere meets the minimum requirements, plan NSX micro-segmentation for successful integration.
1. Identify the types of devices accessing the internal resources and the services accessed from those devices.
• Device Types
– Corporate-dedicated
– BYOD
• Internal Resources
– Expense app
– Corporate accounting
– CRM
– Skype
– Business intelligence
T E C H N I C A L W H I T E PA P E R | 9
VMWARE TUNNEL AND VMWARE NSX MICRO-SEGMENTATION INTEGRATION GUIDE
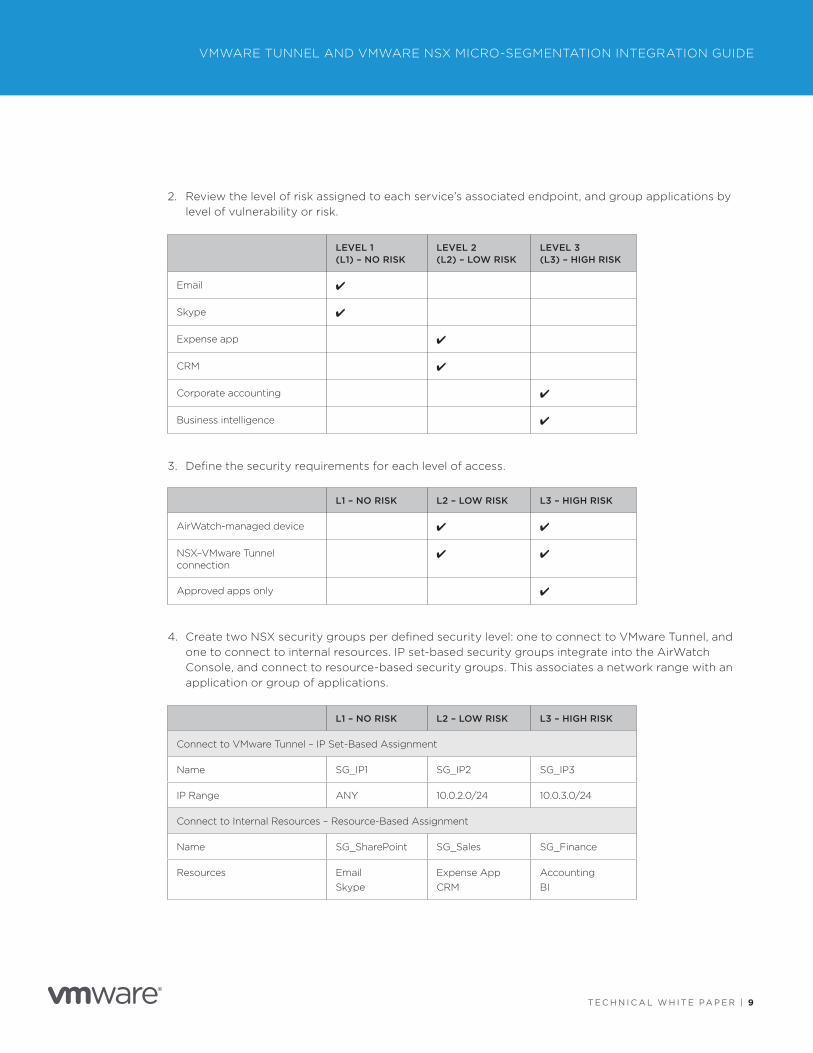
2. Review the level of risk assigned to each service’s associated endpoint, and group applications by level of vulnerability or risk.
LEVEL 1 (L1) – NO RISK
LEVEL 2 (L2) – LOW RISK
LEVEL 3 (L3) – HIGH RISK
Email 4
Skype 4
Expense app 4
CRM 4
Corporate accounting 4
Business intelligence 4
3. Define the security requirements for each level of access.
L1 – NO RISK L2 – LOW RISK L3 – HIGH RISK
AirWatch-managed device 4 4
NSX–VMware Tunnel connection
4 4
Approved apps only 4
4. Create two NSX security groups per defined security level: one to connect to VMware Tunnel, and one to connect to internal resources. IP set-based security groups integrate into the AirWatch Console, and connect to resource-based security groups. This associates a network range with an application or group of applications.
L1 – NO RISK L2 – LOW RISK L3 – HIGH RISK
Connect to VMware Tunnel – IP Set-Based Assignment
Name SG_IP1 SG_IP2 SG_IP3
IP Range ANY 10.0.2.0/24 10.0.3.0/24
Connect to Internal Resources – Resource-Based Assignment
Name SG_SharePoint SG_Sales SG_Finance
Resources EmailSkype
Expense AppCRM
AccountingBI

T E C H N I C A L W H I T E PA P E R | 1 0
VMWARE TUNNEL AND VMWARE NSX MICRO-SEGMENTATION INTEGRATION GUIDE
Keep the following recommendations in mind when planning IP set-based security groups.
• Use network ranges outside the scope of the deployed network.
– Deployed Network Range – 192.168.0.x/24
– Security Group Network Range – 10.0.0.x/24
• Consider future as well as current deployment requirements when selecting network ranges. Since NSX IP ranges can support up to 254 security groups, start by assigning IP ranges to support the current use case. Then, save the remaining ranges to support future requirements. For example, consider the range 10.0.0.x/24.
L1 – NO RISK L2 – LOW RISK L3 – HIGH RISK LX
Requirement Current Current Current Future
Security Group SG_1 SG_2 SG_3 SG_X
IP Range ANY 10.0.2.x/24 10.0.3.x/24 10.0.4.x/24-10.0.254.x/24
5. Identify the application endpoint addresses.
L1 – NO RISK L2 – LOW RISK L3 – HIGH RISK
Security Group SG_1 SG_2 SG_3
Application Endpoint SkypeEmail
CRMExpense
AccountingBusiness intelligence
Addresses 192.168.20.x/24 192.168.20.x/24 192.168.30.x/24
6. Define routing from VMware Tunnel. The network topology uses the connection’s inbound network address to permit or deny access.

T E C H N I C A L W H I T E PA P E R | 1 1
VMWARE TUNNEL AND VMWARE NSX MICRO-SEGMENTATION INTEGRATION GUIDE
Exercise A3: Integrate NSX Manager with vCenter Server
Integrate the NSX Manager appliance with vCenter Server by synchronizing the clocks between the machines and defining key URLs for the vCenter Server.
1. Open a browser, and enter the NSX manager IP address or fully qualified domain name (FQDN) to open the login screen.
2. Log in using your NSX Manager credentials.
3. On the NSX Manager Virtual Appliance Management page, click View Summary.
4. Scroll to NSX Management Components, locate the NSX Management Service, and check that its status is Running.
5. Click the Manage tab.
a. Scroll to the Time Settings section, and click Edit to configure the options.
• NTP Server – Enter the appropriate NTP host for your infrastructure. For example, if you are using services with an internal NTP host, such as Microsoft Active Directory, use the format 0.uk.pool.ntp.org.
If using a public host, select one from the list of public NTP resources.
• The rest of the settings auto-populate.

T E C H N I C A L W H I T E PA P E R | 1 2
VMWARE TUNNEL AND VMWARE NSX MICRO-SEGMENTATION INTEGRATION GUIDE
b. On the left, select NSX Management Service.
c. Scroll to the Lookup Service URL section, and click Edit to configure the options.
• Lookup Service URL – Enter the vCenter Server host name, and the system appends the rest. For example, vcenter.vmeuc.com becomes https://vcenter.vmeuc.com:443/lookupservice/sdk.
• SSO Administrator User Name – Provide the credentials used to configure the lookup service.
d. Scroll to the vCenter Server section, and click Edit to configure the options.
• vCenter Server – Enter the same vCenter Server host name as you used for the lookup service For example, enter vcenter.vmeuc.com.
• vCenter User Name – Provide the user name used to configure vCenter Server.
After integrating the NSX Manager with vCenter Server, proceed to the next section to configure the NSX controllers.
Exercise A4: Configure the NSX ControllersThe NSX controllers establish communication between the components and automate the initial configuration between some components.
1. Open vCenter Server, and navigate to Networking & Security > Installation.

T E C H N I C A L W H I T E PA P E R | 1 3
VMWARE TUNNEL AND VMWARE NSX MICRO-SEGMENTATION INTEGRATION GUIDE
2. In the NSX Controller nodes section, click the Add icon and configure the controller.
• Name – Give the NSX controller a friendly name for identification purposes.
• NSX Manager – Select your NSX Manager’s IP address.
• Datacenter – Select the vSphere data center.
• Cluster – Select the vSphere cluster or resource pool.
• Datastore – Select your controller’s ESXi datastore.
• Host – Select your controller’s host.
• Folder – Select a storage location for the controller’s virtual machine.
• Connected To – Click Select and choose which distributed port group or network to connect with.
• IP Pool – Click Select, and choose an IP pool. If the IP pool isn’t listed, click New IP Pool and add the pool.

T E C H N I C A L W H I T E PA P E R | 1 4
VMWARE TUNNEL AND VMWARE NSX MICRO-SEGMENTATION INTEGRATION GUIDE
3. On the Add Controller page, click OK to deploy the NSX controller to the specified host.
The deployment can take several minutes depending on your host’s speed and availability.
4. Repeat the steps to configure two more controllers, for a total of three.
5. On the Management tab, confirm that each controller’s status is Connected.
When the NSX controllers can control communication between components, configure Layer 2 communication via the vSphere installation bundles.
Exercise A5: Configure vSphere Installation BundlesThe vSphere installation bundles enable Layer 2 communication, routing, and firewalling between all hosts in the vSphere cluster.
1. Open vCenter Server, and navigate to Networking & Security > Installation > Host Preparation.
2. Locate the cluster, and in the Installation Status column, click Install.
While the installation completes, make sure that the virtual machine (VM) hosts are running. Do not install bundles on hosts in maintenance mode. The install can take several minutes to complete.
3. When the installation status is Complete, close the window.
After completing the installation, configure the VXLAN transport.

T E C H N I C A L W H I T E PA P E R | 1 5
VMWARE TUNNEL AND VMWARE NSX MICRO-SEGMENTATION INTEGRATION GUIDE
Exercise A6: Configure VXLAN TransportVXLAN transport operates on Layer 2 of the OSI model. You must configure VXLAN transport to establish the logical networks for the VMs and enable communication between them. Each VXLAN can assign up to 16 billion segment IDs to separate communication. The VXLAN contains a VMkernel interface that encapsulates traffic. Encapsulated traffic allows VMs on separate network segments to communicate and traverse onto the physical LAN.
1. Open vCenter Server, and navigate to Networking & Security > Installation > Host Preparation > Actions > Configure VXLAN.
a. On the Configure VXLAN networking page, provide the following information to install a VMkernel port per host and click OK.
• Switch – Review the distributed virtual switch that auto-populates from the ESXi server.
• VLAN – Leave the value at 0 to opt out of virtual LAN tagging. To use VLAN tagging, provide the VLAN ID.
• MTU –Leave the maximum transmission unit at 1600, the default. Alternatively, enter a value according to your network best practices.
• VMKNic IP Addressing – Base your selections on your network best practices for IP addressing.
– Use DHCP – Select if using a DHCP server.
– Use IP Pool – Select if you require a static IP address pool.
– IP Pool – If using a static IP address pool, select New IP Pool from the drop-down menu, and define the static address list.
• VMKNic Teaming Policy – Leave at Fail Over, the default.

T E C H N I C A L W H I T E PA P E R | 1 6
VMWARE TUNNEL AND VMWARE NSX MICRO-SEGMENTATION INTEGRATION GUIDE
• VTEP – Provide the virtual tunnel endpoint for the VMkernel port.
b. When the configuration completes, review the cluster and hosts.

T E C H N I C A L W H I T E PA P E R | 1 7
VMWARE TUNNEL AND VMWARE NSX MICRO-SEGMENTATION INTEGRATION GUIDE
2. Navigate to Networking & Security > Installation, and click the Logical Network Preparation tab.
a. On the VXLAN Transport tab, click Change.
b. In the Edit Segment IDs and Multicast Address Allocation dialog box, provide the following information, and click OK.
• Segment ID pool – Define the range of segment IDs for the VXLAN IP pool. Start at 5000 to ensure that the segment ID pool starts at a value greater than the largest allowable VLAN ID.
• Enable Multicast addressing – Leave deselected.
3. On the Logical Network Preparation tab, click Transport Zones.
a. Click Add.
T E C H N I C A L W H I T E PA P E R | 1 8
VMWARE TUNNEL AND VMWARE NSX MICRO-SEGMENTATION INTEGRATION GUIDE
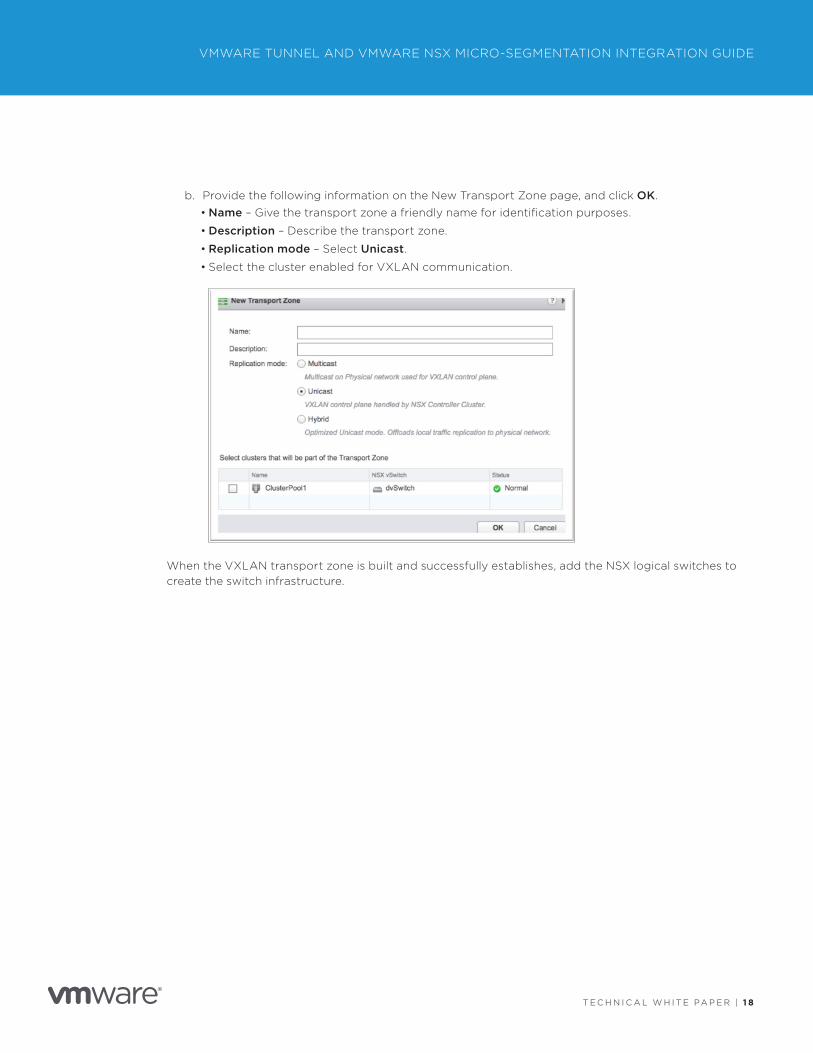
b. Provide the following information on the New Transport Zone page, and click OK.
• Name – Give the transport zone a friendly name for identification purposes.
• Description – Describe the transport zone.
• Replication mode – Select Unicast.• Select the cluster enabled for VXLAN communication.
When the VXLAN transport zone is built and successfully establishes, add the NSX logical switches to create the switch infrastructure.

T E C H N I C A L W H I T E PA P E R | 1 9
VMWARE TUNNEL AND VMWARE NSX MICRO-SEGMENTATION INTEGRATION GUIDE
Exercise A7: Add NSX Logical SwitchesAdd and assign NSX logical switches to VMs to create the first part of the communication path that connects internal endpoints to VMware Tunnel. Configure one logical switch per defined security level to create a complete switch infrastructure. Then use the associated security level of the VM’s application endpoint to determine switch assignment.
This exercise adds an NSX logical switch for the L2 security level defined for this document’s example use case. It does not provide instructions for creating a complete switch infrastructure, which is necessary for a successful proof-of-concept. To create the entire infrastructure, replicate this exercise for each level defined in the use case.
1. Open vCenter Server, and navigate to Networking & Security > Logical Switches.
2. Click the Add icon.
3. On the New Logical Switch page, provide the following information, and click OK.
• Name – Name the L2 switch NSX Low Risk.
• Description – Describe the purpose of the switch.
• Transport Zone – The transport zone is auto-populated with the transport zone that you previously configured.
• Enable IP Discovery – Select to display the IP addresses that connect to a switch to assist when configuring Layer 3 routing and the NSX firewall.
• Enable MAC Learning – Select to allow the switch to learn which MAC addresses it is connected to.

T E C H N I C A L W H I T E PA P E R | 2 0
VMWARE TUNNEL AND VMWARE NSX MICRO-SEGMENTATION INTEGRATION GUIDE
4. On the Logical Switches page, review the segment IDs that automatically apply to the switch.
5. Select NSX Low Risk.
6. Click the Add Virtual Machine icon and assign the appropriate VMs to NSX Low Risk, the L2 security-level logical switch.
For example, the following VMs host these L2 application endpoints:
L2 ENDPOINT VIRTUAL MACHINE
Expense App Win10ISNSX-1
CRM App Win10ISNSX-2
7. Move VMs from Available Objects to Selected Objects based on the selected logical switch’s security level, and click Next.
8. Select the VM’s vNIC to establish the machine’s connection to the logical switch, and click Next.
9. Review the configurations, and click Finish to move the selected VMs’ vNICs to the NSX Low Risk logical switch.

T E C H N I C A L W H I T E PA P E R | 2 1
VMWARE TUNNEL AND VMWARE NSX MICRO-SEGMENTATION INTEGRATION GUIDE
10. Complete these steps for each security level defined.
For example, in this document’s use case, repeat the steps to create the L3 logical switch. Name the switch NSX Secure, and select the VMs that host the L3 application endpoints.
L3 ENDPOINT VIRTUAL MACHINE
Corporate Accounting Win10ISNSX-3
Business Intelligence Win10ISNSX-4
You can now define the IP sets for NSX.
Exercise A8: Define IP SetsVMware Tunnel uses the IP sets defined in NSX to establish the link between the two services. Define an NSX IP set for each security level, and assign each security level a distinct network range for communication.
This exercise defines the L2 security-level IP set for this document’s example use case. For a proof of concept, replicate this procedure to define the IP sets for all security levels.
1. Open vCenter Server, and navigate to Networking & Security > NSX Managers > [your NSX Manager IP address] > Manage > Grouping Objects > IP Sets.
2. Click the Add icon.
T E C H N I C A L W H I T E PA P E R | 2 2
VMWARE TUNNEL AND VMWARE NSX MICRO-SEGMENTATION INTEGRATION GUIDE
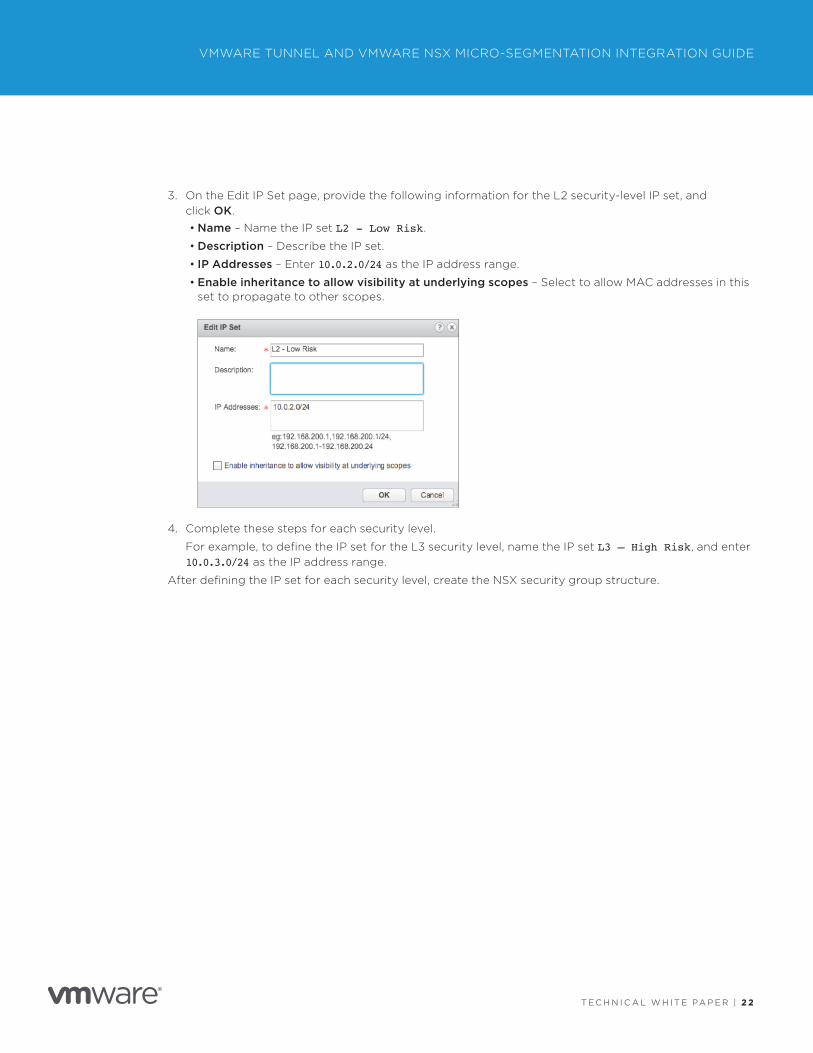
3. On the Edit IP Set page, provide the following information for the L2 security-level IP set, and click OK.
• Name – Name the IP set L2 - Low Risk.
• Description – Describe the IP set.
• IP Addresses – Enter 10.0.2.0/24 as the IP address range.
• Enable inheritance to allow visibility at underlying scopes – Select to allow MAC addresses in this set to propagate to other scopes.
4. Complete these steps for each security level.
For example, to define the IP set for the L3 security level, name the IP set L3 – High Risk, and enter 10.0.3.0/24 as the IP address range.
After defining the IP set for each security level, create the NSX security group structure.

T E C H N I C A L W H I T E PA P E R | 2 3
VMWARE TUNNEL AND VMWARE NSX MICRO-SEGMENTATION INTEGRATION GUIDE
Exercise A9: Define Security GroupsTo establish a complete chain of communication between VMware Tunnel and internal resources, you must configure an IP set–based security group and an internal resource-based security group for each defined security level.
The IP set–based security group connects to VMware Tunnel and applies to an app or an approved set of apps. The resource-based security group connects to internal resources via virtual machines. Each security group requires its own dedicated IP range.
This exercise defines the required security groups for the L2 security level. It does not provide instructions for defining security groups for all security levels, but you can replicate the steps to create security groups for each defined level.
To define the L2 IP set–based security group:
1. Open vCenter Server, and navigate to Networking & Security > NSX Managers > [your NSX Manager IP address] > Manage > Grouping Objects > Security Group.
2. Click the Add icon to configure the security group.
3. For the name and description, enter the following information and click Next.• Name – Name the security group SG_IP2.
• Description – Apply the tags listed below to enable integration with the AirWatch Console.
– @airwatch – Use this tag to map a security group that contains an IP set to AirWatch.
– @dns – Use this tag to meet iOS application requirements for DNS lookup. Use this tag for only one security group.

T E C H N I C A L W H I T E PA P E R | 2 4
VMWARE TUNNEL AND VMWARE NSX MICRO-SEGMENTATION INTEGRATION GUIDE
4. Select the objects to include, and click Finish to link the IP set to the security group.
• Object Type – Select IP Sets.
• IP Set – Select 10.0.2.0/24, the L2 – Low Risk IP set.
5. Repeat the steps for each security level.
For example, to create the IP set–based security group for the L3 security level, name the security group SG_IP3. Assign it 10.0.3.0/24, the L3-High Risk IP set.
To define the L2 internal resource-based security group:
1. Open vCenter Server, and navigate to Networking & Security > NSX Managers > [your NSX Manager IP address] > Manage > Grouping Objects > Security Group.
2. Click the Add icon to configure the security group.
3. For the name and description, enter the following information and click Next.• Name – Name the security group SG_Sales.
• Description – Tag the security group with @airwatch to enable integration with the AirWatch Console.
4. Select the Objects to Include, and click Finish to link the selected web server to the security group.
• Object Type – Select Virtual Machine.
• Web Server – Select the virtual machine that the SG_Sales security group can access.

T E C H N I C A L W H I T E PA P E R | 2 5
VMWARE TUNNEL AND VMWARE NSX MICRO-SEGMENTATION INTEGRATION GUIDE
5. Repeat the steps for each security level.
For example, to create the internal resources-based security group for the L3 security level, name the security group SG_Finance. Assign the VMs that the finance security group can access.
Use the following table to set up security groups for this use case.
L1 – No Risk L2 – Low Risk L3 – High Risk
IP SET-BASED ASSIGNMENT
Name SG_IP1 SG_IP2 SG_IP3
IP Range ANY 10.0.2.0/24 10.0.3.0/24
RESOURCES-BASED ASSIGNMENT
Name SG_SharePoint SG_Sales SG_Finance
Resources EmailSkype
Expense AppCRM
AccountingBI
After configuring the security groups for each security level, configure the NSX Edge Gateway to glue the communication pathway together.
Exercise A10: Configure NSX Edge Services Gateway InterfacesThe VMware NSX Edge services gateway routes traffic from VMware Tunnel to the designated endpoint, as shown in Figure 4. For each security level, create interfaces to establish a distinct connection from VMware Tunnel to the Edge Service interface and from the Edge Service interface to an endpoint.
NSX Edge Services Gateway Virtual MachinesInternal Network
L3 - High Risk
10.0.3.1/24
NSX Firewall
CRM Endpoint
192.168.20/24
CRM Endpoint
192.168.30/24
L2 - Tunnel
10.0.2.254/24L2 - VMs
192.168.20.254/24
L2 - Low Risk
10.0.2.1/24
L3 - Tunnel
10.0.3.254/24L3 - VMs
192.168.30.254/24
VMwareTunnel
EndpointServer
Figure 4: NSX Edge Services Gateway Creates the Communication Path Connecting NSX and VMware Tunnel Services

T E C H N I C A L W H I T E PA P E R | 2 6
VMWARE TUNNEL AND VMWARE NSX MICRO-SEGMENTATION INTEGRATION GUIDE
1. Open vCenter Server, and navigate to Network & Security > NSX Edges.
2. Click the Add icon to add a new Edge gateway.
a. Enter the name and description information, and click Next. • Install Type – Select Edge Services Gateway. This setting provides common gateway services,
such as DHCP, firewall, VPN, NAT, routing, and load balancing.
• Name – Give the NSX Edge services gateway a friendly name for identification purposes.
• Hostname – Enter the host name.
• Deploy NSX Edge – Select this option to generate the gateway.
• Enable High Availability – Leave deselected, unless you require high availability.

T E C H N I C A L W H I T E PA P E R | 2 7
VMWARE TUNNEL AND VMWARE NSX MICRO-SEGMENTATION INTEGRATION GUIDE
b. Under Settings, enter the CLI credentials, and click Next.
• User Name – Create an administrator user name who can access the edge gateway from the CLI.
• Password – Create a password for the administrator user consisting of a mix of at least 12 lowercase, uppercase, and numerical characters.
• Enable SSH access – Select to communicate via the CLI using SSH.
• Enable auto rule generation – Select to generate service rules to allow flow-of-control traffic.
• Edge Control Level Logging – Select the appropriate log level.
c. For Configure deployment, enter the following information, and click Next. • Datacenter – Select the appropriate vSphere data center for the NSX Edge gateway.
• Appliance Size – Select Compact.• NSX Edge Appliances – Click Add and specify the NSX Edge gateway’s ESXi resource pool and
datastore.

T E C H N I C A L W H I T E PA P E R | 2 8
VMWARE TUNNEL AND VMWARE NSX MICRO-SEGMENTATION INTEGRATION GUIDE
d. For Configure interfaces, click Add to configure interface 3, and click OK.
• Name – Name the interface L3 – VMs.
• Type – Select Uplink.
• Connected To – Select the previously defined logical switch, NSX Secure.
• Connectivity Status – Select Connected.
• Primary IP Address – Select 192.168.30.254, the IP address associated with the L3 security level and the NSX Secure logical switch.
• MAC Addresses – Leave blank to use an auto-generated address. Alternatively, enter a specific MAC address based on your network best practices.
• MTU – Leave the default value of 1500, or enter the required MTU.
• Options – Select both options, and for Reverse Path Filter select Enabled.
• Fence Parameters – Leave blank. Alternatively, if using IP and MAC addresses across fenced environments, such as cloud management platforms, enter the parameters.

T E C H N I C A L W H I T E PA P E R | 2 9
VMWARE TUNNEL AND VMWARE NSX MICRO-SEGMENTATION INTEGRATION GUIDE
e. For each interface required for the use case, repeat the previous steps. After configuring the appropriate number of interfaces, click Next.
For example, configure interfaces 0-4, for a total of 5 interfaces. Interfaces 0-3 route traffic between VMware Tunnel and the virtual machine network. Interface 4 routes traffic for physical components on the physical network 192.168.0.x/24.
f. For Default gateway settings, configure the gateway to enable communication between the Edge Gateway, the remainder of the network, and the internet (0.0.0.0), and click Next. • Configure Default Gateway – Select this option.
• Gateway IP – Provide the IP address for the gateway.
• vNIC – Select Physical Network as the default gateway address.
• MTU – Enter the required MTU, or leave the default 1500.
• Admin Distance – Supply a value for use by the routing protocol.

T E C H N I C A L W H I T E PA P E R | 3 0
VMWARE TUNNEL AND VMWARE NSX MICRO-SEGMENTATION INTEGRATION GUIDE
g. For Firewall and HA, configure the settings, and click Next. • Configure Firewall default policy – Leave unselected.
• Default Traffic Policy – The system automatically selects Deny.
• Logging – The system automatically selects Disable.
• Configure HA parameters – Skip these settings unless the use case requires high availability.

T E C H N I C A L W H I T E PA P E R | 3 1
VMWARE TUNNEL AND VMWARE NSX MICRO-SEGMENTATION INTEGRATION GUIDE
h. For Ready to complete, review the configuration, and click Finish to deploy the Edge Gateway.
3. On the NSX Edges page, check that the new Edge Gateway displays with a Deployed status in the list view.
After establishing the NSX Edge services gateway, configure the firewall policies.

T E C H N I C A L W H I T E PA P E R | 3 2
VMWARE TUNNEL AND VMWARE NSX MICRO-SEGMENTATION INTEGRATION GUIDE
Exercise A11: Configure NSX Firewall RulesUse firewall policies to permit or deny access from the IP aliases to the resource-based security groups. The firewall rules use the originating IP sets to control VMware Tunnel access to L2 and L3 application endpoints.
This exercise defines the firewall rules for the L2 security level. It does not provide instructions for defining firewall rules for all security levels, but you can replicate the steps to create firewall rules for each defined level.
1. Navigate to Home > Networking & Security > Firewall.
2. Click the Add icon, and configure the settings to create the firewall rule.
• Name – Name the rule L2 Applications.
• Source – Select SG_IP2, the L2 IP set–based security group tied to the IP range 10.0.2.0/24.
• Destination – Select SG_Sales to set L2 resources as a destination. Additionally, select SG_SharePoint to set L1 resources as a destination.
• Action – Set to Allow to permit access to the specified resources.
3. Repeat these steps for all security levels.

T E C H N I C A L W H I T E PA P E R | 3 3
VMWARE TUNNEL AND VMWARE NSX MICRO-SEGMENTATION INTEGRATION GUIDE
Section B: Integrate NSX for vSphere with VMware TunnelNow that the NSX system is configured to support micro-segmentation, you can configure AirWatch Enterprise Mobility Management to establish the client-side behavior. This section highlights the most important configurations for integrating AirWatch Enterprise Mobility Management with NSX. The exercises in this section are sequential and build on one another, so complete each exercise in the order presented.
1. Verify Linux VMware Tunnel Requirements
2. Configure Initial Service Settings
3. Sync NSX Security Groups
4. Configure the Linux VMware Tunnel Installer
5. Install the NSX Enabled VMware Tunnel Server
6. Create a VMware Tunnel Profile
7. Configure the VMware Tunnel App
8. Configure Public Apps for Micro-Segmentation
Exercise B1: Verify Linux VMware Tunnel RequirementsBefore you begin, make sure that your system meets the minimum requirements.
1. Enable NSX in an AirWatch Console organization group.
This action causes the VMware Tunnel installer to request an Ethernet adapter (NIC) to create virtual adapters during installation. Contact the NSX network administrator to get the correct information.
2. Determine which VMware Tunnel features to install in addition to the required per-app VPN.
These components are optional and not covered in these exercises:
• Access log integration
• SSL offloading
• Certificate Authority integration
3. Meet the installation requirements for the tunnel features you decide to implement. Per-app VMware Tunnel software requires at least one Linux server with the following hardware and operating system requirements.
Devices UP TO 5,000 5,000–10,000 10,000–40,000 40,000–100,000
Servers 1 2 2 4
Load-balanced No Yes Yes Yes
CPU 2* 2 per server 2 per server 4 per server
RAM 4 4 per server 8 per server 16 per server
Hard-disk space 10 GB for distribution 400 MB for installer About 10 GB for log file space**
*For a small deployment, you can use a single VMware Tunnel server. However, for uptime and performance purposes, we recommend deploying at least two load-balanced servers with two CPU cores each, regardless of the number of devices.**Reserve 10 GB for a typical deployment. Scale the log file size based on your log usage and requirements for storing logs.
Table 1: Hardware and Sizing Requirements for a VM or 64-Bit Physical Server

T E C H N I C A L W H I T E PA P E R | 3 4
VMWARE TUNNEL AND VMWARE NSX MICRO-SEGMENTATION INTEGRATION GUIDE
REQUIREMENT DESCRIPTION
CentOS 6.5/6.6/6.7/7.0/7.1/7.2 (64-bit) RHEL 6.5/6.6/6.7/7.0/7.1/7.2 (64-bit)
Recommended UI-less.
Internally registered DNS record Register the internal DNS entry for the endpoint server.
Externally registered DNS record Register the public DNS record for the relay server.
SSL certificate from a trusted third party Use an SSL certificate to establish the trust required between AirWatch Console and the NSX Manager. Prior to integrating the services, bind a certificate to the NSX Manager, and add the root certificate authority for this SSL certificate in the Microsoft Management Console (on the AirWatch API server and the VMware Enterprise Systems Connector).
Table 2: VMware Tunnel Software Requirements
REQUIREMENT DESCRIPTION
SSH access and administrator rights to Linux servers available to AirWatch Enterprise Mobility Management
Administrator account with the following permissions:• Root privileges to the server
• Full write permission for files
• Write and run permissions for the /opt/*, /tmp/*, and /etc/* directories
After installation completes, you can apply restrictions for these account types. If using an account other than root, it must have sudo access with the same privileges as root. Ensure that the root user is not removed from the sudoers file on the tunnel server.
Outbound Internet access for VMware Tunnel
The VMware Tunnel installer requires an Internet connection to download the required packages.
Public host name for VMware Tunnel For example, tunnel.yourdomain.com. The host name, bound with a public SSL certificate, points to an external IP address.
IPv6 enabled locally on the tunnel server hosting per-app tunnel
Table 3: VMware Tunnel General Requirements

T E C H N I C A L W H I T E PA P E R | 3 5
VMWARE TUNNEL AND VMWARE NSX MICRO-SEGMENTATION INTEGRATION GUIDE
SOURCE COMPONENT
DESTINATION COMPONENT
PROTOCOL PORT VERIFICATION NOTE
Devices (from Internet and Wi-Fi)
VMware Tunnel per-app Tunnel
TCP 8443 1
VMware Tunnel Relay
VMware Enterprise Systems Connector
HTTP or HTTPS
443 Use wget to https://:/awcm/status and verify that you receive an HTTP 200 response
2
VMware Tunnel Relay
VMware Tunnel endpoint HTTPS 2010 Telnet from VMware Tunnel relay to the VMware Tunnel endpoint server on port
3
VMware Tunnel Endpoint
Internal websites and web apps
HTTP or HTTPS
80 or 443 4
VMware Tunnel Endpoint
Internal resources HTTP, HTTPS, or TCP
80, 443, or TCP
4
VMware Tunnel Endpoint and Relay
AirWatch REST API endpoint https://asXXX.awmdm.com or https://asXXX. airwatchportals.com
HTTP or HTTPS
80 or 443 Use wget to https://APIServerUrl/API/help and verify that you receive a “401 – not authorized” response
5
1. For devices attempting to access internal resources. Traffic routes through port 8443 by default. Alternatively, you can select a different port based on your environment’s restrictions when configuring VMware Tunnel.2. For VMware Tunnel to query the AirWatch Console for compliance and tracking purposes. If whitelisting outbound communication, see the knowledge base article What are the AirWatch IP ranges for SaaS data centers for an up-to-date list of the IP ranges that AirWatch Enterprise Mobility Management owns.3. For VMware Tunnel Relay topologies to forward device requests only to the internal VMware Tunnel endpoint. Traffic between the relay and endpoint server routes through port 2010 by default. Alternatively, you can select a different port based on your environment’s restrictions when configuring VMware Tunnel.4. For applications using VMware Tunnel to access internal resources. 5. VMware Tunnel must communicate with the API for initialization. Ensure that connectivity between the REST API and the VMware Tunnel server exists.
Table 4: VMware Tunnel Network Requirements for Outbound Traffic
4. Deploy your Linux servers and ensure that each server has the appropriate networking in place.
You are ready to configure initial service settings.

T E C H N I C A L W H I T E PA P E R | 3 6
VMWARE TUNNEL AND VMWARE NSX MICRO-SEGMENTATION INTEGRATION GUIDE
Exercise B2: Configure Initial Service Settings Before attempting to configure or install the per-app VMware Tunnel, ensure that the AirWatch Enterprise Mobility Management servers are installed correctly, running, and communicating with the AirWatch Console without errors.
1. From the AirWatch Console, navigate to Groups & Settings > All Settings > System > Advanced > Site URLs.
2. Under Site URLs, validate the following URLs.
• REST API URL – Use the format https://api.AWCM.Server.
• External URL – Use the format server.acme.com. Do not include a protocol, such as http or https.
• AWCM Service Internal URL – Use the format https://server.acme.com and port 443.
After validating the health of the system, synchronize the NSX security groups with AirWatch Enterprise Mobility Management.
Exercise B3: Sync NSX Security GroupsSynchronize the NSX security groups that represent data center endpoints and services to share the data center logic with the AirWatch Enterprise Mobility Management system.
1. In the AirWatch Console, select the appropriate Organization Group level.
2. Navigate to Groups & Settings > All Settings > System > Enterprise Integration > VMware Tunnel > Network Accessibility.
3. Select Enable AirWatch Tunnel.
4. For NSX Communication, select Enabled and enter the NSX settings.
5. Click Sync NSX Security Groups to sync the security groups and test the integration.

T E C H N I C A L W H I T E PA P E R | 3 7
VMWARE TUNNEL AND VMWARE NSX MICRO-SEGMENTATION INTEGRATION GUIDE
If successful, all NSX security groups that contain @airwatch in their description are listed in the AirWatch Console.
Note: Every time a security group is added or updated in NSX, sync the security groups to update AirWatch Enterprise Mobility Management with the latest information.
6. Set Block All Non Compliant Devices to Disabled.
7. In the Security Group – Non Compliant Devices column, assign each application a security group to restrict noncompliant devices to a limited set of endpoints without completely blocking network access.
8. Save the configuration.
After the security groups are synchronized, configure the Linux installer for VMware Tunnel.
T E C H N I C A L W H I T E PA P E R | 3 8
VMWARE TUNNEL AND VMWARE NSX MICRO-SEGMENTATION INTEGRATION GUIDE
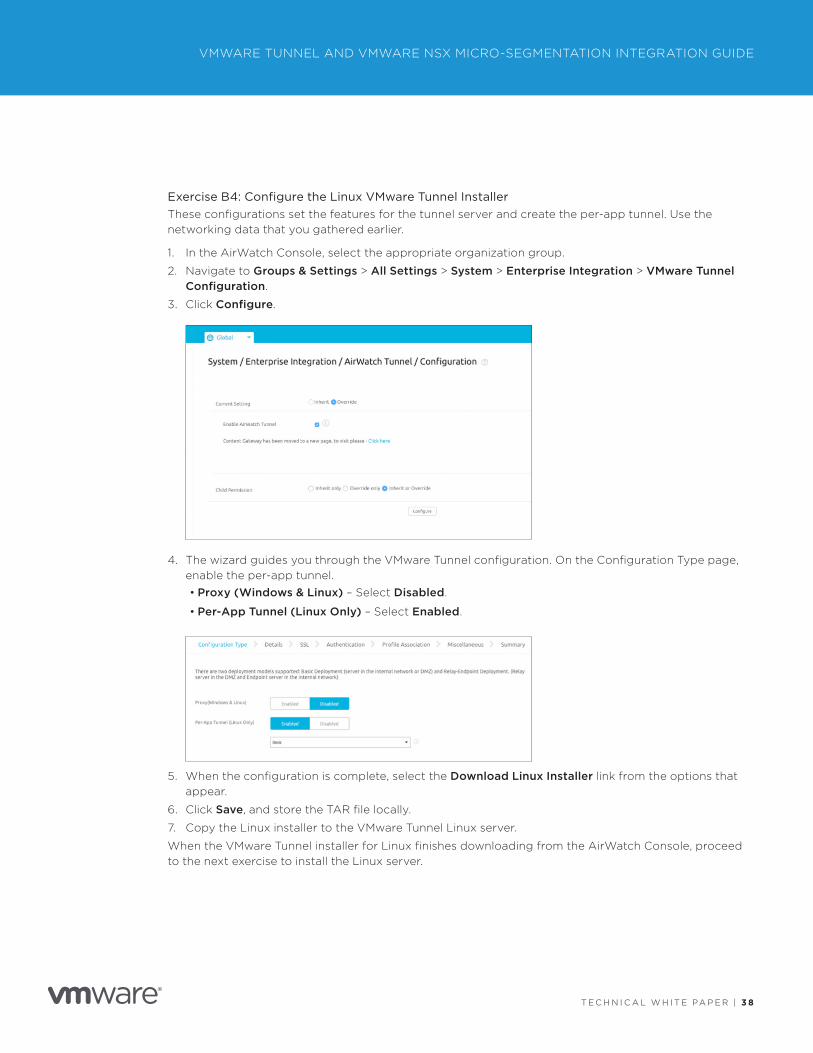
Exercise B4: Configure the Linux VMware Tunnel InstallerThese configurations set the features for the tunnel server and create the per-app tunnel. Use the networking data that you gathered earlier.
1. In the AirWatch Console, select the appropriate organization group.
2. Navigate to Groups & Settings > All Settings > System > Enterprise Integration > VMware Tunnel Configuration.
3. Click Configure.
4. The wizard guides you through the VMware Tunnel configuration. On the Configuration Type page, enable the per-app tunnel.
• Proxy (Windows & Linux) – Select Disabled.
• Per-App Tunnel (Linux Only) – Select Enabled.
5. When the configuration is complete, select the Download Linux Installer link from the options that appear.
6. Click Save, and store the TAR file locally.
7. Copy the Linux installer to the VMware Tunnel Linux server.
When the VMware Tunnel installer for Linux finishes downloading from the AirWatch Console, proceed to the next exercise to install the Linux server.

T E C H N I C A L W H I T E PA P E R | 3 9
VMWARE TUNNEL AND VMWARE NSX MICRO-SEGMENTATION INTEGRATION GUIDE
Exercise B5: Install the NSX-Enabled VMware Tunnel ServerRun the installer, and enable the service. Install the relay server first.
1. Navigate to the directory that contains the VMware Tunnel installer, and issue the following command to unarchive the installer.
tar -xvf AirWatchTunnel.tar
2. Check that the unarchive process unzipped the following files.
• AirWatchTunnel.bin
• vpn_config.xml
• Uninstall_Tunnel
3. Issue the following command to start the VMware Tunnel installation.
./AirWatchTunnel.bin
4. Respond to the installation prompts. Typically, you will accept the defaults for each question.
5. When finished, press Enter to exit the installer.
After completing installation, create a VPN profile to enable device-side per-app capabilities.
Exercise B6: Create a VMware Tunnel Profile After installing the VMware Tunnel server, configure a per-app tunnel profile for iOS. This profile enables specified applications to route traffic through VMware Tunnel and connect to defined internal sites.
1. In the AirWatch Console, select the appropriate organization group.
2. Navigate to Devices > Profiles > List View > Add, and select iOS.
3. Configure the profile’s General settings.
• Complete the required fields to specify how the profile deploys and who receives it.
• Set the Deployment Type to Auto so that end users receive the profile automatically.

T E C H N I C A L W H I T E PA P E R | 4 0
VMWARE TUNNEL AND VMWARE NSX MICRO-SEGMENTATION INTEGRATION GUIDE
4. On the left, select VPN and provide the following information.
• Connection Name – Enter the name that displays on the user’s device in the VMware Tunnel application.
• Connection Type – Select AirWatch Tunnel.• Server – Confirm that the correct server URL populates in the text box.
• Provider Type – This setting auto-populates based on previously configured settings.
• Per-App VPN Rules – Select this option.
5. Click Save.
The VPN profile can establish a per-app tunnel connection only on devices with the VMware Tunnel application installed. Therefore, after creating the profile, configure the VMware Tunnel application.
Exercise B7: Configure the VMware Tunnel ApplicationConfigure the VMware Tunnel application that installs on devices. The VMware Tunnel application enables device-side access to internal resources through managed applications. Always install the VMware Tunnel app prior to installing applications that access resources using a per-app tunnel connection.
Configure the VMware Tunnel app for iOS as a public application.
You are now ready to configure applications to use the per-app tunnel connection.

T E C H N I C A L W H I T E PA P E R | 4 1
VMWARE TUNNEL AND VMWARE NSX MICRO-SEGMENTATION INTEGRATION GUIDE
Exercise B8: Configure Public Applications for Micro-SegmentationAfter establishing the infrastructure for per-app tunneling, configure public applications to use the connection. Associate the appropriate NSX security groups to the application to designate the network endpoint that the apps can access.
This workflow deploys the Dolphin browser, a public iOS app, to the Workspace ONE app catalog with per-app VPN enabled. After the configured app is installed on a device, it uses VMware Tunnel to access internal resources.
1. In the AirWatch Console, select the appropriate organization group.
2. Navigate to Apps and Books > List View.
3. Select the Public tab to configure a public application.
4. Select Add Application, enter the criteria to search for the application, and click Next. • Managed By – By default, the application uploads to devices in the parent organization group.
• Platform – Select Apple iOS.
• Source – Click Search App Store to search for the application in the App Store.
• Name – Enter dolphin or another descriptive keyword to search for the application in the public store.
5. Choose the application from the results.
6. Review the information on the Info tab.

T E C H N I C A L W H I T E PA P E R | 4 2
VMWARE TUNNEL AND VMWARE NSX MICRO-SEGMENTATION INTEGRATION GUIDE
7. On the Assignment tab, for Assigned Groups, select who can use the app.
8. On the Deployment tab, configure how end users receive the app.
• Push Mode – Select Auto, which installs the application on the device.
• Device must be MDM managed to install this application (Workspace ONE only) – Select to prompt end users on unmanaged devices to enroll into AirWatch Enterprise Mobility Management when they access the app from the catalog.
• Remove On Unenroll – Select to remove the app when a device unenrolls from AirWatch Enterprise Mobility Management.
• Prevent Application Backup (iOS only) – Select to disable iCloud backup.
• Make App MDM Managed if User Installed (iOS only) – Leave unselected to force end users to download the latest version from the app catalog even if they already downloaded the app Selecting this option assumes management of the previously installed application version on users’ devices.
• Use VPN – Enable application-level VPN.
• Per-App VPN Profile – Select the VMware Tunnel profile you configured.
• Select NSX Security Group – Apply the NSX security group with an IP range that coordinates with the security level of the app.

T E C H N I C A L W H I T E PA P E R | 4 3
VMWARE TUNNEL AND VMWARE NSX MICRO-SEGMENTATION INTEGRATION GUIDE
• Send Application Configuration – Leave unselected.
• Application uses AirWatch SDK – Select No.
• Add Exception – Skip this option. Alternatively, click to deploy applications to special use cases that can develop within an organization.
9. (Optional) Assign terms of use.
10. Click Save and Publish.
Repeat these steps for each app and security level. On the client side, each app communicates with internal resources over a per-app tunnel connection.
SummaryVMware Tunnel integrates with NSX security groups to establish a secure communication route from mobile endpoints to internal resources. To set up the integration, you sync and assign NSX security groups and configure applications to use a per-app VMware Tunnel connection, thereby establishing a link between each app and a specific NSX security group. Each security group in NSX represents one or more data center applications. The link between NSX and AirWatch Enterprise Mobility Management enables dynamic mapping between mobile apps and data center apps, controlling access to internal resources based on specific user, device, or app criteria.

T E C H N I C A L W H I T E PA P E R | 4 4
VMWARE TUNNEL AND VMWARE NSX MICRO-SEGMENTATION INTEGRATION GUIDE
Appendix A: General Requirements for Per-App Tunnel with Micro-SegmentationThese requirements apply to a wider range of use cases than the requirements listed in the main body of this document.
• AirWatch Console 8.3 or later
• On-premises or SaaS deployment model
• VMware Tunnel server using the Linux Installer (NSX integration does not support the virtual appliance deployment method)
• VMware Enterprise Systems Connector (if you are using SaaS)
• Managed Android or iOS devices
Appendix B: NSX Firewall Default RulesThe default rules for the NSX firewall are block and reject. When configuring firewall policies order the default rules carefully, and configure exclusions for VMs that require access.
While the NSX firewall denies traffic by default, there are slight differences between blocking traffic and rejecting traffic.
• Block – Prevents a connection to the machine, causing the connection to time out.
• Reject – Instantly responds with a connection rejection.
Configuring Exclusions for NSX Firewall Default RulesPrior to implementing the block or reject rule, exclude VMs that require access, such as the vCenter Server or NSX Manager, from the rule.
Use one of the following options to create firewall exclusions:
• Use the Exclusion List – Navigate to Network & Security > NSX Managers > [NSX Manager IP address] > Exclusion List and add the required VMs.
• Create Firewall Rules – Create required firewall rules. The rules allow access from your IP sets contained in your security groups defined earlier to your security groups containing your VMs.

T E C H N I C A L W H I T E PA P E R | 4 5
VMWARE TUNNEL AND VMWARE NSX MICRO-SEGMENTATION INTEGRATION GUIDE
Ordering NSX Firewall Default RulesRequests to the NSX firewall use the first-matching rule. This means that if the first rule blocks or rejects access to a VM, subsequent rules do not get triggered.
To prevent interference, place the default rules after the micro-segmentation policies, as seen in Figure 5.
Figure 5: Default Rules for NSX Firewall Ordered to Occur after Micro-Segmentation Policies
Appendix C: Manage VMware TunnelPost-installation, you can manually configure and manage VMware Tunnel.
VMware Tunnel CommandsThe /opt/airwatch/tunnel directory contains all the binaries and configuration for the server to run.
Use the following commands to start, restart, and stop the VMware Tunnel.
ACTION COMMAND
Start systemctl start vpnd
Restart systemctl restart vpnd
Stop systemctl stop vpnd

T E C H N I C A L W H I T E PA P E R | 4 6
VMWARE TUNNEL AND VMWARE NSX MICRO-SEGMENTATION INTEGRATION GUIDE
Edit IP AliasesWhen VMware Tunnel starts, it creates virtual Ethernet aliases based on the IP sets associated with the assigned NSX security group. If necessary, you can assign the virtual aliases a different IP address.
1. Navigate to the /opt/airwatch/tunnel/vpnd directory.
This is the default configuration.
• 10.0.2.1/24
• 10.0.3.1/24
2. To use a different IP address, change the last octet of each virtual alias.
a. Open the server.conf file located in the vpnd directory.
b. Locate the nsx_host_id setting in the last section of the server.conf file.
c. Edit the nsx_host_id to meet your networking requirements.
3. Restart VMware Tunnel after changing the settings.
Review Routing TablesEnsure that the correct routing table is in place for the next hop on each virtual alias interface. Your routing configuration must use the correct Ethernet alias on your tunnel server when connecting to your virtual machines.
Add and delete routes using the standard Linux commands for changing a routing table.
DESTINATION GATEWAY GENMASK
192.168.20.0 10.0.2.254 24
192.168.30.0 10.0.3.254 24

T E C H N I C A L W H I T E PA P E R | 47
VMWARE TUNNEL AND VMWARE NSX MICRO-SEGMENTATION INTEGRATION GUIDE
Additional Post-Installation Configurations for NSXThe server.conf file located in /opt/airwatch/tunnel/vpnd contains additional post-installation configurations for NSX. The possible values and definition are:
## Enable/disable NSX Integration
## 0 - Disabled
## 1 - Enabled static IP mode where a static IP address from a security group’s subnet will be used as the request source IP address
nsx_enabled 1
## NSX static IP host ID. Use this to control the static IP address
## e.g. if the subnet is 1.1.1.0 and nsx_host_id is 2, the static IP address will be 1.1.1.2
nsx_host_id 2
## Specify the ethernet interface where traffic to NSX will be routed to
nsx_ethernet_interface eno16777736
## If NSX is enabled, specify whether non compliant devices should be allowed to connect
## 0 - Devices will be allowed to connect but can only access security
groups for non compliant devices
## 1 - Devices will not be allowed to connect
nsx_block_non_compliant_device 0

T E C H N I C A L W H I T E PA P E R | 4 8
VMWARE TUNNEL AND VMWARE NSX MICRO-SEGMENTATION INTEGRATION GUIDE
Additional ResourcesVMware AirWatch Cloud Messaging (AWCM) Guide
VMware Enterprise Systems Connector Installation and Configuration
VMware NSX for vSphere (NSX) Network Virtualization Design Guide
VMware Tunnel Guide AirWatch v9.1, Chapter 7: Tunnel Server Installer Method
About the Author and ContributorsOliver Forder, Lead EUC Specialist, EMEA, at VMware, wrote this paper.
The following people contributed to the review of this paper:
• Shardul Navare, Sr. Solution Architect, EUC Technical Marketing, VMware
• Wade Holmes, Sr. Technical Product Manager, NSBU Tech Marketing, VMware
• Sulay Shah, Sr. Technical Product Manager, EUC, VMware
To comment on this paper, contact VMware End-User-Computing Technical Marketing at [email protected].

VMware, Inc. 3401 Hillview Avenue Palo Alto CA 94304 USA Tel 877-486-9273 Fax 650-427-5001 www.vmware.comCopyright © 2017 VMware, Inc. All rights reserved. This product is protected by U.S. and international copyright and intellectual property laws. VMware products are covered by one or more patents listed at http://www.vmware.com/go/patents. VMware is a registered trademark or trademark of VMware, Inc. in the United States and/or other jurisdictions. All other marks and names mentioned herein may be trademarks of their respective companies. Item No: VMW-TWP-TUNNNSXMICRSEGMENT-USLTR-20170915-WEB 9/17