video editing with finalcut pro
TRANSCRIPT
1/5/08 2:51 PMVideo Editing with FinalCut Pro
Page 1 of 41http://multimedia.journalism.berkeley.edu/tutorials/video/finalcut/printfriendly/
Knight Digital Media Center MultimediaTraining
Video Editing with FinalCut ProBy Ellen Seidler, Paul Grabowicz, Tim Gnatek
About this Tutorial
This tutorial is based on lectures Ellen Seidler gave in multimedia skills classes at the UC BerkeleyGraduate School of Journalism. It was written by Paul Grabowicz and edited and illustrated by TimGnatek.
Introduction
Final Cut Pro is a very sophisticated video editing program made by Apple.
It is the editing software of choice for multimedia journalists using Apple computers, and iscomparable to Adobe's Premiere video editing program for the Windows platform (Final Cut Pro doesnot make a version for Windows, and Premiere has discontinued making a version for the Appleplatform).
Final Cut Pro is particularly popular with video journalists working in the field who want to edit theirvideo on a laptop computer.
It's very important to do some initial settings in Final Cut Pro to make sure you're storing your videoproperly (this is especially true if you are sharing a computer with others who also are using Final CutPro for their video projects).
Scratch Disk Settings
You need to configure Final Cut Pro so it will find the drive and the project folder where you will becapturing your video clips and creating your Final Cut Pro movie.
This is a crucial step in the importing process. Without directing the computer to your file location,you will not be able to edit your video.
The drive and project folder are called your "scratch disk," which could be a portable firewire drive onwhich you are storing all your video files.
Note: when using a firewire drive, the drive must be turned on and mounted before opening Final CutPro.
Start Final Cut Pro.
In the menu at the top click on Final Cut Pro...System Settings

1/5/08 2:51 PMVideo Editing with FinalCut Pro
Page 2 of 41http://multimedia.journalism.berkeley.edu/tutorials/video/finalcut/printfriendly/
Then select the tab for:
Scratch Disk Settings
Near the top of the screen that appears you'll see a series of checked boxes for Video Capture, AudioCapture, Video Render and Audio Render.
These should be checked so you can set all of them to the scratch disk drive and folder for your project(so when you capture your video and audio it will be stored in the right folder, and when you dorendering of your movie it also will be stored in the right folder).
To the right of those click on the button labeled:
Set
Then use the Choose a Folder box to navigate through the computer's directory to your scratch diskdrive.
If you already have a folder for your project, just click on it.
If you don't have a folder, then click on the New Folder button to create one and give a name to it.
When you've created your folder, again just click on it.
With the project folder selected, click on:
Choose
For example, if you're using a portable firewire drive, click on Set and Choose a Folder to find theicon for the firewire drive on the desktop and open it. If you have already created a folder on the

1/5/08 2:51 PMVideo Editing with FinalCut Pro
Page 3 of 41http://multimedia.journalism.berkeley.edu/tutorials/video/finalcut/printfriendly/
firewire drive for your project then just click on it. If you don't have a project folder on your firewiredrive, then click on the New Folder button to create and name one and again click on it. Then afterselecting the folder click on Choose.
Now click on OK.
You should now be back at the Scratch Disk Settings screen.
This time look further down on the screen for the other three buttons labeled Set:
Waveform Cache Set
Thumbnail Cache Set
Autosave Vault Set
These are three other Final Cut Pro settings, each of which also needs to be set to the same scratchdisk as the first one.
It is especially important that you set the Autosave Set button to the same scratch disk, as this iswhere Final Cut Pro will periodically save copies of whatever you're working on so you don't lose yourwork if the computer crashes. You want to be sure that these automatically saved files are being savedto your scratch disk drive and folder.
So click on each of the three Set buttons in turn, and follow the same directions as above to useChoose a Folder to set each of these to the same scratch disk (such as a firewire drive and theproject folder within it). Click on Choose and OK in each case.
When you're done and back at the Scratch Disk Settings Screen, leave the default settings for theother options, such as Minimum Allowable Free

1/5/08 2:51 PMVideo Editing with FinalCut Pro
Page 4 of 41http://multimedia.journalism.berkeley.edu/tutorials/video/finalcut/printfriendly/
Space on Scratch Disks, Limit Capture...Size and Limit Capture Now.
And click on the button at the bottom labeled:
OK
Now start a new project in Final Cut Pro by clicking on:
File...New
Click on:
Save Project As...
Give your project file a name and then navigate through the directory tree to the same scratch diskdrive and project folder you used in the Scratch Disk Settings instructions above.
Save the Final Cut Pro project file in that folder.
Once you've completed these settings, they are now stored in the copy of Final Cut Pro on thecomputer you're using.
The next time you launch Final Cut Pro, it will look for that scratch disk. If someone else has used thatcomputer in the interim for a different Final Cut Pro project, they probably set it to use a differentscratch disk. In that case at the prompt you'll need to reset the scratch preferences to your disk, asdescribed above.
Connecting the Video Camera to the Computer
To capture video off your digital camera you need to connect it to the computer with a cable - usuallyFirewire.
Firewire is the standard for Apple computers and a firewire port is built into each one. It also is usedby Windows PC computers to do video capture, although in some cases you'll have to purchase afirewire card to insert into an expansion slot in your PC to create a firewire port.
You connect one end of the cable to the firewire port in the back of your computer. Then connect theother end to the firewire jack in your digital video camera.
On the Sony TRV900, the firewire jack is on the right front side of the camera under the gray flap. It's

1/5/08 2:51 PMVideo Editing with FinalCut Pro
Page 5 of 41http://multimedia.journalism.berkeley.edu/tutorials/video/finalcut/printfriendly/
the jack for DV in/out and has an icon of an I next to it.
Then turn on the camera, setting it to VTR or playback mode, and put the mini-DV tape you want tocapture video from into the camera.
When you launch Final Cut Pro it now will detect the camera and allow you to control playing of yourmini-DV tape using your computer monitor, including selecting clips to capture.
Browser and Viewer
Launch Final Cut Pro by clicking on its icon.
Then in the Final Cut Pro menu at the top click on:
File...Open
And open the project file you created in the Scratch Disk Settings section of the tutorial.
The Final Cut Pro screen is divided into four main areas - Browser, Viewer, Canvas and Timeline.

1/5/08 2:51 PMVideo Editing with FinalCut Pro
Page 6 of 41http://multimedia.journalism.berkeley.edu/tutorials/video/finalcut/printfriendly/
There's also a floating Tool Pallette with various tools you'll select to use in editing.
Note: to make sure you're displaying all the main sections of the Final Cut Pro screen, click in themenu at the top on:
Window...Arrange...Standard
Browser

1/5/08 2:51 PMVideo Editing with FinalCut Pro
Page 7 of 41http://multimedia.journalism.berkeley.edu/tutorials/video/finalcut/printfriendly/
The upper left of the screen is your Browser, which is like a file cabinet for your project within whichyou put your media files - audio, video, still pictures, etc.
You can create folders - which are called bins - within each project in the Browser to organize yourmedia files.
To see what's in a folder, just click on the tiny triangle to the left of its name.
The files can be individual files, such as individual clips, or sequences, which are the sequences of clipsyou will create in the Final Cut Pro Timeline.
You can get more details on the files in your Browser by dragging the lower right corner of theBrowser window further to the right. The new columns will tell you which files are video, which areaudio, which are both video and audio, how many tracks of audio there are, the duration of each clip,etc.
Viewer
1/5/08 2:51 PMVideo Editing with FinalCut Pro
Page 8 of 41http://multimedia.journalism.berkeley.edu/tutorials/video/finalcut/printfriendly/
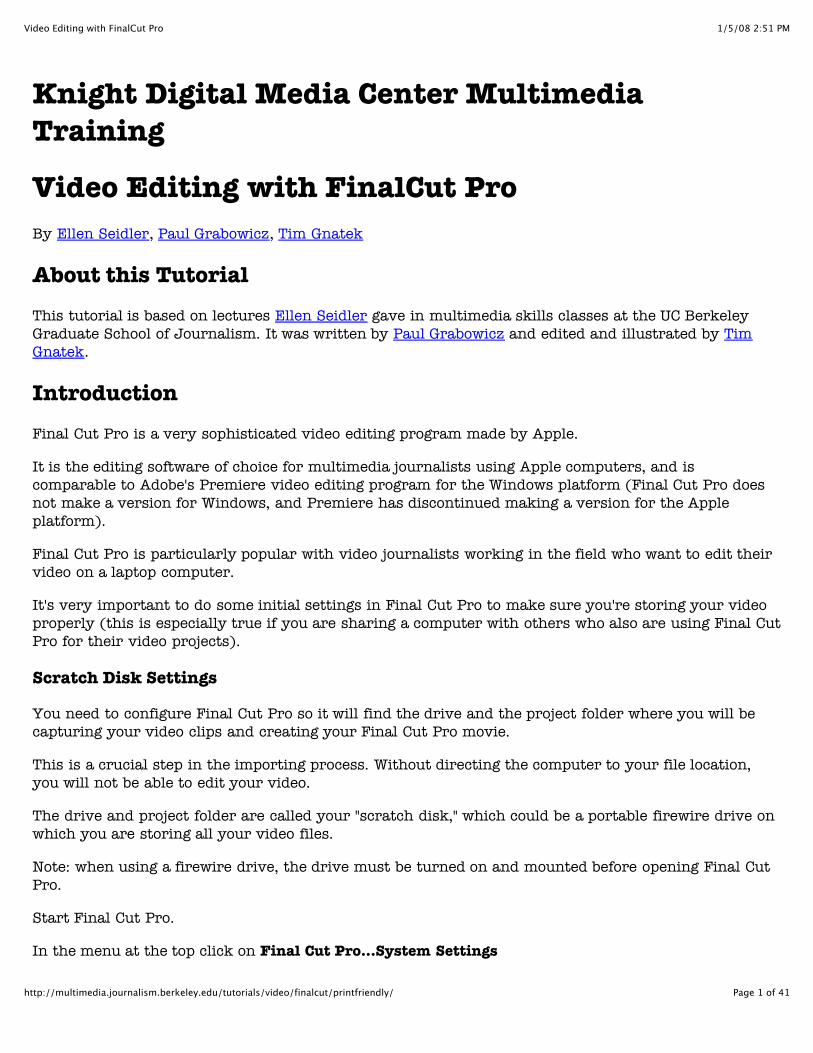
Just to the right of the Browser is the Viewer, where you can display and play individual video clipsyou select in the Browser.
So if you double click on a video clip in the Browser directory, it will be displayed in the Viewer.
Just below the clip in the Viewer is the playhead, a small yellow triangle in the white horizontal boxthat you can click on and drag to the left or right to move or scrub through the clip.
Beneath the playhead is a Play/Stop button you can use to play or move through a clip.
You also can play a clip in the Viewer by pressing the spacebar on your computer. To stop playing theclip, just press the spacebar again.
To the right of the Play/Stop button is a jog control you can use to move very slowly or very quicklythrough a clip.
Click on the control and drag your mouse slowly to the right to move through a clip frame by frame.Click on the control and drag your mouse quickly to the right to move rapidly through a clip. If youclick and drag to the left, it similarly will allow you to move backward through a clip either slowly orrapidly.
To the left of the Play/Stop button is a shuttle control you can use to vary the playback speed of yourclip.
Click on and drag the control to the points just to the right of center to make a clip play very slowly.Click on and drag the control to points further to the right to play the clip at faster than normal speed.If you click on and drag the control to the left of center, it similarly will allow you to vary the speed ofa clip playing in reverse.

1/5/08 2:51 PMVideo Editing with FinalCut Pro
Page 9 of 41http://multimedia.journalism.berkeley.edu/tutorials/video/finalcut/printfriendly/
Above the clip are time duration and time code boxes. The box on the left shows the duration of theclip currently displayed in the Viewer. The box on the right displays the time code - the time stampshowing where the current frame of the displayed clip exists on the mini-DV tape from which it wascaptured.
There also are tabs at the top of the Viewer that will change depending on the type of media you'veselected in the Browser. Thus if you select an audio clip, or a video clip that has audio in it, you'll seean audio tab at the top of the Viewer.
You click on a clip in the Viewer, hold down your mouse and drag and drop the clip into the Timelinebelow to begin putting together a movie.
Later, when you're doing more editing ofyour clips on the Timeline, you can double-click on a clip thereand it again will be displayed in the Viewer.
Timeline and Canvas
Below the Browser and Viewer is the Timeline, where you assemble your video and audio clips into asequence to create a movie.
On the upper far right is the Canvas, which will play whatever sequence of clips is in your Timeline.
Timeline
You can click on and drag video and audio clips from the Viewer (or the Browser) into the Timeline.
The Timeline displays video tracks in blue and audio tracks in green. You can have up to 99 tracks ofeach stacked on top of one another.
Thus if you drag a video clip that also has two audio tracks from the Viewer into the Timeline, it willbe displayed in the Timeline as a single blue horizontal video track, with two separate green horizontalaudio tracks underneath.
If you then drag another clip down from the viewer you could drop it onto the timeline to the right ofthe first clip, so it would play after that first clip in your sequence.

1/5/08 2:51 PMVideo Editing with FinalCut Pro
Page 10 of 41http://multimedia.journalism.berkeley.edu/tutorials/video/finalcut/printfriendly/
You can continue this process to create a sequence of clips along your Timeline.
Just above the top video track in the Timeline is the playhead, a tiny yellow triangle you can click onand drag to the left or right to move or "scrub" through your sequence of clips.
To see the entire sequence of clips, on your keyboard press shift Z. Final Cut then will try to squash allthe clips in your sequence together into a single screen view on the Timeline.
To the far left of each track are buttons that can be selected to turn off each individual track. Thus ifyou had a video track with audio, but wanted to substitute different audio to accompany the video, youcould use the button to turn off the existing audio track. Then you could drag a new audio clip to adifferent green audio track in the Timeline to play instead of the original audio.
Also to the left of each track are buttons with tiny lock icons that can be selected to lock a track. Thismeans you will not be able to edit or change it accidentally. Cliick on the icon again to unlock thetrack.
Linking and Snapping Clips
To the far right of the Timeline and above the top video track is a small light green button you can useto link or unlink video and audio tracks from each other (if you pass your mouse cursor over thebutton the words Linked Selection will appear).
If you want to unlink the tracks, in the Timeline select the tracks you want unlinked, and then click onthe unlink button (which then will turn gray in color). This will allow you to separate the audio fromthe video, and then move them to different places in the timeline or delete one or the other.
Also the far right next to the link button is another small light green button that sets your playheadand clips to snap into place on the Timeline (if pass your mouse cursor over the button the wordSnapping will appear).
With snapping on, your playhead will snap to the nearest marker point on the Timeline when yourelease the playhead. Thus if you release your playhead near the beginning of a clip on the Timeline, itwill snap back to the beginning of the clip. If your playhead is near the end of the clip and you releaseit, it will snap to the end of the clip.
With snapping on, your clips also will snap together when you place them next to each other on theTimeline, so there's no empty space between them.
When snapping is similarly activated on an audio track, the playhead will snap to the nearest beat andthe audio tracks will snap together.
You also can set markers within a clip so the playhead snaps to those points within a clip.
To turn snapping off, select a clip and click on the snaping button on the right (which then will turngray in color). You then can place clips near to each other on your Timeline, but keep empty spacebetween them.
Canvas

1/5/08 2:51 PMVideo Editing with FinalCut Pro
Page 11 of 41http://multimedia.journalism.berkeley.edu/tutorials/video/finalcut/printfriendly/
The screen in the upper right is the Canvas, which will display whatever clip or frame is selected inthe Timeline below. It also will play a clip in the Timeline, or an entire sequence of clips in theTimeline.
Just below the clip in the Canvas is the playhead, a small yellow triangle in the white horizontal boxthat you can click on and drag to the left or right to move or scrub through a clip in the Timeline.
Beneath the playhead is the Play/Stop button that you can use to play or move through a clip orthrough a sequence of clips.
You also can play a clip or sequence of clips in the Canvas by selecting them in the Timeline andpressing the spacebar on your computer. To stop playing the clip, just press the spacebar again.
To the left of the Play/Stop button in the Canvas is a jog control that you can use to move very slowlyor very quickly through a clip.
Click on the control and drag your mouse slowly to the right to move through a clip frame by frame.Click on the control and drag your mouse quickly to the right to move rapidly through a clip. If youclick and drag to the left, it similarly will allow you to move backward through a clip either slowly orrapidly.
To the right of the Play/Stop button in the Canvas is a shuttle control that you can use to vary theplayback speed of your clip.
Click on and drag the control to the points just to the right of center to make a clip play very slowly.Click on and drag the control to points further to the right to play the clip at faster than normal speed.If you click on and drag the control to the left of center, it similarly will allow you to vary the speed ofa clip playing in reverse.
Above the clip in the Canvas are time duration and time code boxes. The one on the left shows the

1/5/08 2:51 PMVideo Editing with FinalCut Pro
Page 12 of 41http://multimedia.journalism.berkeley.edu/tutorials/video/finalcut/printfriendly/
duration of the sequence of clips in your Timeline. The one on the right displays the time code for thesequence at the point where your playhead is placed - in other words how many minutes, seconds andframes you are into your sequence at the point of the playhead.
If you would like to rearrange the Canvas or Timeline windows, click in the menu at the top on:
Window...Arrange
Or to make sure you're displaying all the main sections of the Final Cut Pro screen, click in the menuat the top on:
Window...Arrange...Standard
Logging and Capturing Video
To capture video using Final Cut Pro - that is to take the video on a mini-DV tape and download it intoyour computer as a digital file - you first need to connect your camera to the computer before youlaunch Final Cut Pro.
Then start Final Cut Pro. You should get a screen stating Final Cut Pro has found the camera. If not,check your connections between the camera and the computer, and make sure the camera is turned toVCR/VTR/playback.
Now in Final Cut Pro click on:
File...Log and Capture
(the hotkey combination is apple key | 8)
A new window will appear, and you should see the words VTR OK near the bottom of the screen.
To the right are some tabs you can use to change the settings for the video you want to capture. Thesettings include:
Capture Settings
Be sure the Device Control is set to Firewire NTSC.
Leave the Capture Input at the default (DV NTSC 48MHz).
Scratch Disks
These are the same settings you initially selected to make sure your media isbeing stored in the proper scratch disk - the drive and folder for your Final CutPro project. So just check with the top Set button to make sure your scratchdisk is selected. If it's not, then go through the instructions for setting theScratch Disk Settings.
Clip Settings
You can set this to capture Audio Only, Video Only or Audio and Video. In

1/5/08 2:51 PMVideo Editing with FinalCut Pro
Page 13 of 41http://multimedia.journalism.berkeley.edu/tutorials/video/finalcut/printfriendly/
most cases you'd select Audio and Video (you might select Video Only if theaudio for that clip is unusable, or you might select Audio Only if you used yourcamera to record a voice-over for use with other video clips).
Leave the audio setting at Channels 1 & 2, to capture all the audio.
Logging
Log Bin
This should be the name of the folder where you want to capture your video.
Reel
Give a name to the reel of tape you're about to log and capture. It's probablybest to use the same name that you used for your mini-DV tape.
Playing Your Tape
Your tape will be displayed in the Viewer window during the log and capture process.
To begin playing your tape, you can use the Play, Stop, Pause, Fast Forward and Rewind buttonsbelow the Viewer window.
You also can play a clip in the Viewer by pressing the spacebar on your computer. To stop playing theclip, just press the spacebar again.
Just below the clip in the Viewer is the playhead, a short vertical line in the white horizontal box thatyou can click on and drag to the left or right to move or scrub through the clip.
To the right of the Play/Stop buttons is a shuttle control that you can click on and drag horizontally toplay the clip more quickly.
To the left of the Play/Stop buttons is a jog control that you click on and drag horizontally to movethrough a clip frame by frame.
Above the clip are time duration and time code boxes. The one on the left shows the duration of theclip currently displayed in the Viewer. The one on the right displays the time code - the time stampshowing where the current frame of the displayed clip exists on the mini-DV tape from which it will becaptured.
Final Cut Pro has two basic ways to capture the video you're playing - immediate capture and log andcapture.
Capture Now
You can immediately begin capturing a video clip by starting to play the clip at the point where youwant to start capturing it, and then clicking on the button labeled:
Capture...Now
That will begin capturing the clip from that point.

1/5/08 2:51 PMVideo Editing with FinalCut Pro
Page 14 of 41http://multimedia.journalism.berkeley.edu/tutorials/video/finalcut/printfriendly/
To stop capturing, on the upper left of your keyboard press the:
escape key
You'll notice the clip will then appear as a file in your Browser area to the left.
You can continue this process to capture other clips, by just moving through the tape to the next pointthat you want to capture, playing the tape and then again clicking on Caputure...Now and then theescape key.
Note: It's not good practice to just capture all the video you have on a tape. Instead go through yourtape and capture only the segments you think you might use in your video project.
Capturing everything will make it more difficult to edit later, because you'll have far more materialthan you need and you'll have to play through all of it to find the segments you might want to use.
Also remember that even a small segment of video can take up a huge amount of space on your harddrive or on a portable firewire drive. As a rule of thumb, every 5 minutes of video you capture willtake up about 1 GB of space on your hard drive.
Log and Capture
The other way to capture video clips is to first go through your tape and log the clips you want tocapture by creating in and out points.
Then when you're done selecting all the clips you want, you can do a Batch capture to capture them allat once.
Start by moving through your clips to the beginning of a segment you want to log and starting to playthe clip.
Then on your keyboard click on the
i key
Which will create an in point to begin logging the clip.
When the clip has reached the point where you want to stop capturing it, on your keyboard click onthe:
o key
Which will create an out point to stop logging the clip.
Then click on the button for:
Log Clip
Give a name to the clip (you also can type in some notes describing the clip if you want).
Then click OK.
Then play the video until you reach the point where you want to log another clip, again click on the i

1/5/08 2:51 PMVideo Editing with FinalCut Pro
Page 15 of 41http://multimedia.journalism.berkeley.edu/tutorials/video/finalcut/printfriendly/
key, and then the o key. Click on Log Clip, give this clip another name, and click on OK.
You'll notice that as you do this, your clips will show up as files in the Browser to the left. But the fileswill have red slashes through them, indicating they have been logged, but they have not yet beencaptured to the computer).
When you're done logging all the clips you want to capture, click on the button on the right for:
Batch
You'll be given some options:
Capture All Items, Capture Selected Items, or Capture Offline Items - Select CaptureOffline Items.
Make sure the use logged clip settings box is checked.
Make sure the add handles box is checked and the time is changed to 00:00:01:00 toslightly increase the length of each captured clip (adding a handle means adding a little bitof video - 1 second in this case - at the beginning of each clip you've logged and at the endof each clip you've logged. This gives you a little added wiggle room when you're doing yourfinal editing, such as allowing you to include a tiny bit more of a clip than you originallyselected when you logged its in or out points)
Then click on:
Ready
When you get a box stating X clips ready, click on:
Continue
Final Cut Pro now will go through your mini-DV tape, finding the clips you've logged and capturingeach of them to the computer.
When capturing is completed, you'll get a screen stating the process is done, at which you point shouldclick on:
Finished
You'll notice the clips that were displayed as files in the Browser to the left no longer have the redslashes through them, as they have now been captured to the computer.
Undoing Changes
Before we start describing how to edit clips, you should know how to undo any editing changes youmake that aren't what you intended or that you change your mind about.
To undo any change either click on Edit...Undo in the Final Cut Pro menu or press the Apple and Zkeys on the keyboard simultaneously.

1/5/08 2:51 PMVideo Editing with FinalCut Pro
Page 16 of 41http://multimedia.journalism.berkeley.edu/tutorials/video/finalcut/printfriendly/
Spliting Clips at Scene Changes
You can quickly break a long clip into segments by activating auto-detect clip scenes. By using thisfeature, Final Cut Pro will automatically determine when a divide occurs in your video, (such as whenyou stopped and started the camera for a scene change), and create a new clip for each differentscene.
To use this feature, double click on a clip in the Browser so it appears in the Viewer.
Then in to the Final Cut Pro Menu at the top click on:
Mark...DV Start/Stop Detect
Final Cut will then place markers on the clip wherever a scene change occurs. And you will see subclips appear beneath the file for the main clip in the Browser, with each sub clip representing adifferent scene or segment in the master clip.
At this point you might want to create another bin and drag and drop the clip segments into that bin.That will make copies of the segments that you then can drag into your timeline, while also leaving themain clip and the original copies of the segments in the original bin.
Editing Clips in the Viewer with In and Out Points
You can edit clips in the Viewer so you don't have to load your entire clip into the Timeline when youwant to create your movie.
You can choose a smaller selection to add by double clicking on the clip in the Browser so it displays inthe Viewer. Then start playing the clip.

1/5/08 2:51 PMVideo Editing with FinalCut Pro
Page 17 of 41http://multimedia.journalism.berkeley.edu/tutorials/video/finalcut/printfriendly/
Press the I Key (for IN) at the desired point where you want your clip to start playing. Then hit the OKey (for OUT) at the point you want your clip to end. You will see arrows appear in the window at thepoints you pressed the I and O keys.
These points can be moved later by clicking and dragging on the arrows.
When you have the clip set with in and out points you want, you can click on the clip in the Viewerand drag the clip into the Timeline. Only the portion of the clip where you set your in and out pointswill be placed in the Timeline.
Moving Clips to the Timeline
You can move a clip into the Timeline by double clicking on it in the Browser, which then will displaythe clip in the Viewer window to the right.
Then click on the clip in the Viewer and drag it down into the Timeline below. If it's an audio-only clip,you need to click on the tiny hand in the upper right of the Viewer above the waveform, and then holddown your mouse button and drag the audio clip down into the Timeline.
If the clip is just video, it will be displayed in the Timeline as just a green segment in the upper videotrack area.
If the clip is video with one or more audio tracks, it will be displayed in the Timeline as a greensegment for the video, with the audio tracks displayed underneath as blue segments.
If the clip is just audio, it will be displayed in the Timeline as just a blue segment in the lower audiotrack area.
If you want to add a second clip at the end of the first one on the same track, double click on thesecond clip in the Browser, which will display the clip in the Viewer window to the right. Click on theclip in the Viewer and drag it down into the track on the Timeline to an area to the right of theexisting clip.
Destination Tracks
If you want to add clips to different tracks in the Timeline, a good way to ensure you place them onthe correct track (and don't accidentally overwrite an existing clip in the Timeline) is to select adestination track in the Timeline.
1/5/08 2:51 PMVideo Editing with FinalCut Pro
Page 18 of 41http://multimedia.journalism.berkeley.edu/tutorials/video/finalcut/printfriendly/
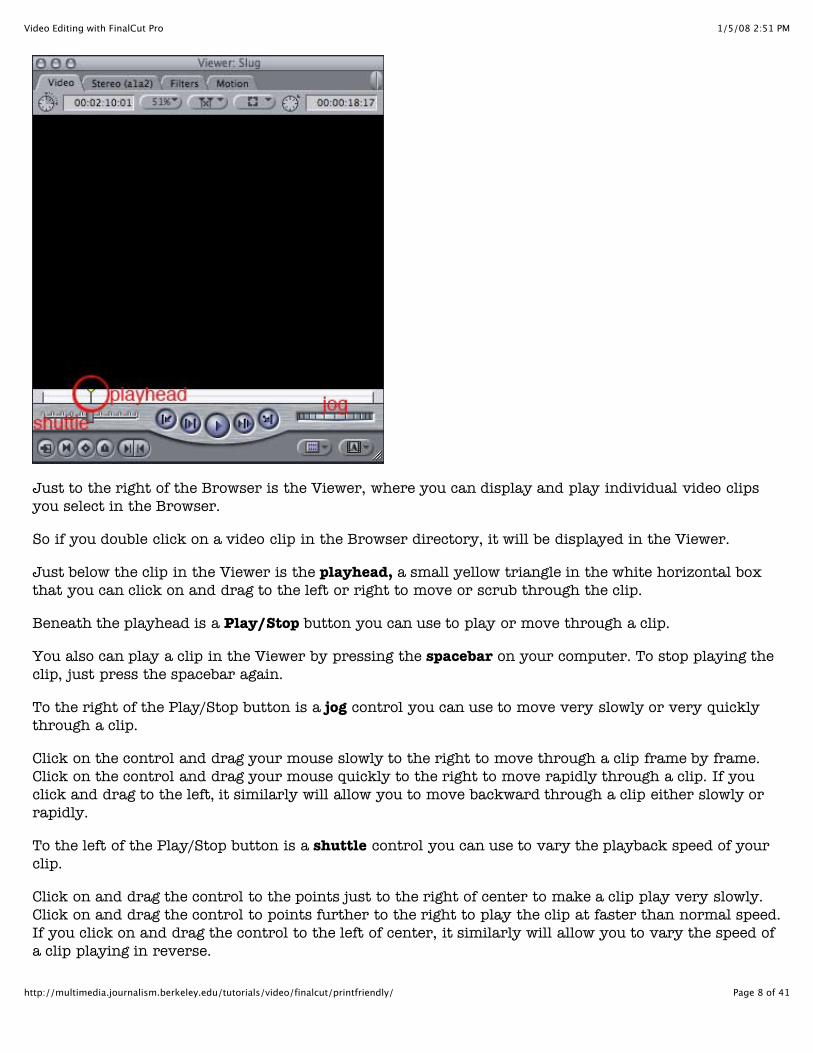
To do that, first double click in the Browser on the video clip you want to place on a new track, so theclip is displayed in the Viewer to the right.
Now look on the far left of the Timeline below at the second column in from the left. There you'll seegray buttons labeled V1 (for the video clip you've selected) and possibly A1 and A2 (the A1 and A2buttons will appear if the video clip you've selected has audio attached to it).
Drag the V1 button to the new Timeline track where you want to insert the video clip (and drag theA1 and A2 buttons to new audio tracks if there's audio with our video clip).
Now drag the playhead in the Timeline to the point where you want the new clip to begin.
Then click on the clip in the Viewer and drag it to the right to the Canvas and release it (see also thesection on Insert vs. Overwrite Edits). The clip (and any attendant audio tracks) will be inserted ontothe new track in the Timeline and at the point you specified with the playhead.
Adding Additional Video or Audio Tracks
If you need more tracks to move additional audio or video clips in the Timeline, in the Final Cut ProMenu click on:
Sequence...Insert Tracks
The type into the boxes the number of additional audio or video tracks you want.
Working with Multiple Tracks of Video and Audio
If you have multiple tracks of video and audio:
Whatever video is on the top track will play, and any other video clips underneath will not bedisplayed.All audio tracks will play simultaneously no matter which ones are above or below the others onthe Timeline.
If you want to stop the video from playing on the top track you can:

1/5/08 2:51 PMVideo Editing with FinalCut Pro
Page 19 of 41http://multimedia.journalism.berkeley.edu/tutorials/video/finalcut/printfriendly/
Turn off the video for a particular track in the Timeline by selecting the hide button to the farleft to hide the track.
If you want to stop the audio from playing on a particular audio track you can either:
Turn off the audio for a particular track in the Timeline by selecting the hide button to the farleft to hide the track.
Double click on the audio track in the Timeline, which will open up an audio editing box in theBrowser above. Then you can click on the horizontal black audio level line in the middle of youraudio track and drag it to the bottom to lower the audio level to zero.
Insert and Overwrite Edits
Once you have some clips in your Timeline and you want to add more video clips or additional audiotracks to the tracks for your existing clips, there are two basic ways to do this.
You can do an insert edit, in which the new clip will be inserted into an existing clip in theTimeline. This will preserve the entirety of the existing clip, and move segments of it to the leftand right to make room for the new clip.
You can do an overwrite edit, in which the new clip will overwrite or replace portions of yourexisting clip or clips. The portions replaced will be equal to the duration of the new clip you'removing to the Timeline.
In both cases you begin by clicking on the Playhead in the Timeline and positioning it at the pointwhere you want to place the new clip.
Then there are several ways you can do an insert or overwrite edit of a new clip.
The easiest way is to click on the clip in the Viewer that you want to add to the Timeline, and holddown your mouse button. You'll see a small version of the clip appear where you've selected it.
Now drag the clip down to the track on the Timeline where you want to place the clip, and position itat the point where you positioned the Playhead.

1/5/08 2:51 PMVideo Editing with FinalCut Pro
Page 20 of 41http://multimedia.journalism.berkeley.edu/tutorials/video/finalcut/printfriendly/
If you see a downward pointing arrow appear, that means the clip will overwrite or replace theexisting clip (that is, a portion of the existing clip will be overwritten by the new clip). Release yourmouse button to do the overwrite.
If you see an arrow pointing to the right, that means the clip will be inserted into the track and thenpush the segments of the existing clip to the right and left (thus preserving all of the existing clip).Release your mouse button to do the insert.
The same principles apply if you're adding an audio track from the Viewer to the Timeline.
Note: Even if you're adding the new clip to an empty track above some existing video in the Timeline,you still have the option of doing an insert or overwrite edit.
If you see a downward pointing arrow, then the new clip will appear on a new track on top of theexisting clip below, which means that when you play the video, the clip on top will be displayed, whilethe clip underneath will not play.
If you see an arrow pointing to the right, then the new clip will appear on a new track on top of theexisting clip below, and the existing clip will be split in two and its segments moved to the right andleft to make room for the new clip above.
Other Ways to do Insert and Overwrite Edits
Another way to do insert or overwrite edits is to first position the playhead at the point in theTimeline where you want to place a clip, and then select in the Viewer the new clip you want to placein the Timeline and drag it over to the Canvas area to the right. When you do this, you'll see severalcolored editing option boxes pop up on the Canvase screen, including Insert Edit and Overwrite Edit.Dropping the clip in one of these highlighted areas will then place the clip into the Timeline at thepoint where you've set the playhead, either inserting it between or within existing clips (if you dropthe clip on the Insert Edit box) or overwriting a portion of the existing clips (if you drop the clip onthe Overwrite Edit box).
As an alternative, you can again position the playhead at the point in the Timeline where you want toplace a clip, then select in the Browser or Viewer the new clip you want to move into the Timeline andclick on one of the small yellow or red colored icons that look like envelopes on the lower left of theCanvas screen. Click on the yellow icon to do an Insert Edit, or click on the red icon to do anOverwrite Edit.

1/5/08 2:51 PMVideo Editing with FinalCut Pro
Page 21 of 41http://multimedia.journalism.berkeley.edu/tutorials/video/finalcut/printfriendly/
As a third alternative, you can again position the playhead at the point in the Timeline where you wantto place a clip, then select in the Browser or Viewer the new clip you want to move into the Timelineand press the F9 key on your keyboard to do an Insert Edit or press the F10 key to do an OverwriteEdit.
Note: If you choose one of these latter three alternate ways of doing an insert or overwrite edit, thenyou should be sure first to identify the destination tracks in the Timeline where you want the new clipto be placed.
Editing Clips in the Timeline with In and Out Points
You can edit clips in the Timeline to create a precise segment into which you can insert another clip -a process called three-point editing.
To do so, click on the clip in the Timeline so it also displays in the Canvas, then start scrubbingthrough the clip.

1/5/08 2:51 PMVideo Editing with FinalCut Pro
Page 22 of 41http://multimedia.journalism.berkeley.edu/tutorials/video/finalcut/printfriendly/
Press the I Key (for IN) at the desired point where you want an inserted clip to begin. Then press theO Key (for OUT) at the point you want the inserted clip to end. You will see arrows appear in thewindow at the points you pressed the I and O keys.
These points can be moved by clicking and dragging on the arrows, either in the Canvas or in theTimeline.
When you then drag a new clip from the Viewer into the Timeline and do an Overwrite Edit on theexisting clip that has the set in and out points, the beginning of the new clip will be inserted at the inpoint of the existing clip, and the new clip will be cropped so it ends at the out point of the existing clipin the Timeline.
Deleting Portions of a Clip with the Razor Blade Tool
If you want to split a video or audio clip in two or remove a segment of a clip (such as eliminating asound gap in your audio), you can use the Razor Blade Tool to slice out the segment of the track.
It's called a razor blade because in the traditional film editing process a tape was literally sliced with arazor blade to remove unwanted pieces of the film or rearrange segments of a film.
To do these cuts in Final Cut Pro, in the Tool Pallette click on the Razor Blade tool, which is an iconthat looks like a little razor blade (or press the B Key for "blade" on your keyhboard). Your cursor willchange to a small razor icon.

1/5/08 2:51 PMVideo Editing with FinalCut Pro
Page 23 of 41http://multimedia.journalism.berkeley.edu/tutorials/video/finalcut/printfriendly/
If you hold down your mouse button when you click on the razor blade icon you'll be able to choosebetween cutting a single track or multiple tracks.
If you select single track you can just slice a single track of video at a particular point in yourTimeline, while leaving accompanying tracts such as audio untouched. If you select multiple tracks thecut will apply to all the tracks in your sequence at that point in the Timeline.
With the razor blade tool selected you apply the cut by clicking on a clip at the point in the Timelinewhere you want to make the cut. That will split the clip in two.
If you click at another point in the clip and make a second cut, you create a segment of a clip betweenthe two cuts that you then can remove.
You now need to decide whether you want to create a gap where you're about to remove the cutsegment, or if you want the remaining segments of the clip on either side of the cut piece to slidetogether, with no gap between them.
If you want to leave a gap, just click on the section of the clip between your two razor cuts and pressthe delete key. A gray area will appear on the Timeline in place of the deleted piece of the clip.
If you don't want to leave a gap and instead want the clips on either side of the cut portion to snaptogether, click on the section of the clip between your two razor cuts and press the shift/delete keys.The remaining segments of the clip to the left and right of the deleted piece should now slide together.Your clips should butt up against each other in the Timeline.
If you change your mind about wanting a gap between the clip segments, you can move clips separatedby a gap together using the Toolbar Pallette.
In the Toolbar click on the icon that looks like an arrow. Hold down your mouse button and you'll seedifferent options for moving clips.
For example, if you select track tool...all tracks forward, you then can click on the clip just to theright of the gap and drag it to the left until the gap is closed.
This will also drag with it clips in the rest of your tracks, such as audio tracks associated with thevideo clip you're dragging to the left. This way the audio and video in accompanying tracks won't windup out of sequence.

1/5/08 2:51 PMVideo Editing with FinalCut Pro
Page 24 of 41http://multimedia.journalism.berkeley.edu/tutorials/video/finalcut/printfriendly/
And the track tool...all tracks forward option also will drag any clip segments further to the right onyour Timeline to the left as well. Thus no gaps will be created elsewhere in the Timeline when you dragyour clips to the left.
Note: Instead of deleting a segment of a clip that you created with the razor blade tool, you can insteadsave the segment for possible use elsewhere in the Timeline for your project.
To do this, select the unwanted segment of the clip, but instead of pressing the delete key, click on thesegment with your mouse and drag it to the Browser in the upper right. It will be stored there with therest of your clips for future use (you should rename it, so you can distinguish it from the original, fullclip that's also listed in the Browser).
Inserting Markers for Precise Editing
You can set a marker on the Timeline or in an individual clip in the Timeline to help you do moreprecise video and audio editing.
The marker creates a snap-point on the Timeline or on a clip that the playhead will lock onto.
This can be helpful when you're editing audio and you want a video track to begin exactly at thedownbeat of a song. You can set a marker during audio editing at the downbeat so you then can add thevideo clip to begin at precisely that point.
You create a marker in a clip in the Viewer by moving the playhead to a point on the clip and pressingthe M Key. The marker will appear as a tiny red triangular icon just below the playhead (it also willbe displayed in the clip in the Timeline as a tiny red triangular icon).

1/5/08 2:51 PMVideo Editing with FinalCut Pro
Page 25 of 41http://multimedia.journalism.berkeley.edu/tutorials/video/finalcut/printfriendly/
In the Timeline you similarly create a marker by clicking anywhere in the gray area in the Timeline(in other words, click somewhere outside of any individual clip so the clip isn't selected) and thenmoving the playhead to a point on the Timeline and pressing the M Key. The marker will appear as atiny green triangular icon at the top of the Timeline.
To delete a marker, move the playhead until it snaps into place on a marker. Then click in the menu atthe top on Mark...Markers...Delete.
Note: If you created a marker in a clip, you'll need to select the clip in order to delete the marker that'son the clip. Similarly, if you created a marker on the Timeline, you'll need to click in the gray area ofthe Timeline in order to delete the marker that's on the Timeline.
Adjusting the Audio Level of a Clip
Audio tracks, either those associated with your video or tracks that are just audio, are displayed asblue areas at the bottom of your Timeline.
If you want to stop the audio from playing on a particular audio track you can:
Turn off the audio for a particular track in the Timeline by selecting the hide button to the farleft. The audio then will not play as part of your sequence of clips.
If you want to adjust the overall audio level for a track, making it louder or softer, you can:
Double click on the audio track in the Timeline, which will open up an audio editing box in the

1/5/08 2:51 PMVideo Editing with FinalCut Pro
Page 26 of 41http://multimedia.journalism.berkeley.edu/tutorials/video/finalcut/printfriendly/
Viewer above. Then you can click on the horizontal purple audio level line in the middle of onyour audio track and drag it down to lower the overall audio level or up to increase the audiolevel.
Creating Multiple Audio Levels
For precise audio editing, like creating fades and crecendos in your tracks, you should createkeyframes in your audio clip using the Pen Tool.
Open an audio track by double-clicking on it in the Timeline, which will open up an audio editing box inthe Viewer above.
Then click on the small icon that looks like a mountain on the lower left of the Timeline.
Then activate the Pen Tool by clicking on the icon looks like the tip of a pen on the Tool Pallette (orpress the P key on your keyboard). Your cursor will change to a pen-like icon when you move it overthe horizontal purple audio level line in the Viewer.
With the Pen Tool, you create keyframes by clicking the red horizontal audio level line in the Viewer atthe points where you want the audio to change.

1/5/08 2:51 PMVideo Editing with FinalCut Pro
Page 27 of 41http://multimedia.journalism.berkeley.edu/tutorials/video/finalcut/printfriendly/
Then move the Pen Tool over a keyframe and it will change to a cross. Click, hold down your mousebutton and drag the keyframe point higher to increase the audio, or drag it lower to decrease the audioat that point. Notice that the red line will slope up or down to the other keyframes you've created withyour Pen Tool, so the audio will fade in or out between the keyframes.
You also can drag a keyframe to the left or right using the Pen Tool.
To delete a keyframe, click on it and press the Control Key. In the pop-up box that appears, selectclear.
Using the Pen Tool to Fade Video In or Out
You also can use the Pen tool to create similar fades in a video clip. Thus if you have two video clipsstacked on top of each other in the Timeline, you can have the top clip fade out to reveal the video clipunderneath.
To do this double click on a video clip in the Timeline so it appears in the Viewer.
Then click on the small icon that looks like a mountain on the lower left of the Timeline.
You'll see a black horizontal line appear at the top of the video clip in the Timeline.
Select the Pen tool as described above, click on the black overlay line to create keyframes in the videoclip, and then drag a keyframe down to make the clip less opaque - fading out to display any clipunderneath.

1/5/08 2:51 PMVideo Editing with FinalCut Pro
Page 28 of 41http://multimedia.journalism.berkeley.edu/tutorials/video/finalcut/printfriendly/
Exporting to Soundtrack Pro for Detailed Audio Editing
For more advanced editing of audio tracks, you can export your Final Cut Pro movie into theSoundtrack Pro audio editing program that comes bundled with Final Cut Pro. Soundtrack Pro has amore sophisticated set of audio editing tools.
For instructions on doing this, see the section of the Soundtrack Pro tutorial on Editing Final Cut ProAudio files.
Exporting to Pro Tools for Detailed Audio Editing
For more advanced editing of audio tracks, you can export your Final Cut Pro movie and then import itinto the ProTools audio editing program, which has a more sophisticated set of audio editing tools.
You even can export you entire Fincal Cut Pro project, including both audio and video, as a QuickTimemovie, which then will display the video portion of your movie in Pro Tools along with the audio.
This way you can see how the audio matches up with the video when you edit the audio. And it willhelp ensure that when you edit the audio it doesn't wind up out of synch with the video.
Then you can export the audio (or audio with video) out of Pro Tools and import it back into Final CutPro.
To export just an audio track from Final Cut Pro for editing in Pro Tools, first select the audio trackyou want to export. Turn off other tracks. Export one stero pair at a time. Or you can export the entiresequence by selecting all of it.
Then in the menu at the top select:
File...Export...Audio to AIFF
Name each track and just use the other default settings, which are Settings Rate: 48 kHz; Depth: 16-but; Config: Channel Group.
Pick a folder on your hard drive or firewire drive to which you want to save the exported audio. Youmight create a folder named "Exported FCP Audio" for this purpose, so you can keep track of theexported files.
Click on Save.
If you want to export multiple tracks of audio for editing in Pro Tools, repeat the above steps, givingdifferent names to your different exported audio tracks.
If you also want to export the video that goes with your audio as a QuickTime movie (so you can seethe video when you edit the audio in Pro Tools), first select the video that accompanies the audio trackor the entire sequence and in the menu at the top select:
File...Export...Export QuickTime movie
In the options, select video only and don't change the other default settings.

1/5/08 2:51 PMVideo Editing with FinalCut Pro
Page 29 of 41http://multimedia.journalism.berkeley.edu/tutorials/video/finalcut/printfriendly/
Pick a folder on your hard drive or firewire drive to which you want to save the exported video (suchas the same folder where you stored your exported audio).
Click on Save.
Opening the Audio and Video Files in Pro Tools
Now open ProTools, create a new session, import the audio tracks you exported from Final Cut Pro intothe Pro Tools audio bin and then move the audio to the ProTools timeline for editing. Use the "shuffle"mode to snap files to 0:00 in the time line.
To import the video segment to accompany the audio, in the menu at the top select:
Movie...Import Movie
Find the movie you exported from Final Cut Pro in the folder where you placed it on your hard driveor firewire drive, and click on:
Open
This will create a new track in the Pro Tools timeline for the video.
If you then play the audio in Pro Tools, the video will play along with it so you can see the video as youfine-tune your audio.
When you're editing the audio, if you decide to delete a portion of it, make sure you're in slip, notshuffle mode, so the edited audio will remain in place and still in synch with your video.
Exporting Audio back to Final Cut Pro
When you're done editing your audio, follow the bounce to disc process for exporting the audio. Makesure the File Type is AIFF, and the the Sample Rate at 4800
Select a folder on your hard drive or firewire drive for the file, and give it a name, such as "FCP EditedVideo."
Now in Final Cut Pro, in the menu at the top select:
File...Import File
Find the file with the edited audio on your hard drive or firewire drive and import it into the Final CutPro browser.
Then you can drag the edited audio onto your timeline to replace the old audio in your Final Cut Prosequence. Make sure you have snapping on in Final Cut Pro, so your edited audio track keeps in synchwith the existing video in the timeline.
Adding Handles to Allow Transitions

1/5/08 2:51 PMVideo Editing with FinalCut Pro
Page 30 of 41http://multimedia.journalism.berkeley.edu/tutorials/video/finalcut/printfriendly/
Before you add a transition between clips, such as a dissolve to make your first clip gradually dissolveinto the second, you need to make sure you have enough extra material or "handles" on your clips soFinal Cut Pro has excess video to work with when it applies the transition.
For example, let's say you selected two clips in the Browser and then, without editing them (such ascreating In or Out points), dragged them to the Timeline and put them next to each other on the sametrack.
If you then tried to apply a transition between the two clips, Final Cut Pro would reject it. That'sbecause there's no extra video to use for the transition, in which a portion of one clip overlaps withpart of the other clip.
The only way Final Cut Pro could apply the transition to these two unedited clips would be to try tosomehow move them on the Timeline so they overlapped. But that would shorten the movie anddisrupt the timing of audio on any adjacent track.
There's just no room for a transition to be applied to unedited clips.
This means you need to make sure before you add a transition that the first clip has enough extra,unused material at its end, and the second clip has enough extra, unused material at its beginning soFinal Cut Pro can apply the transition.
Thus if you want a one-second transition between two clips, you should have half a second or more ofunused material at the end of the first clip, and another half second or more of unused material at thebeginning of the second clip.
Adding the Handles for Transitions
If you know you want to apply a transition between two clips, you should add In and Out points to theclips in the Viewer before dragging the clips to the Timeline. Use the In and Out points to createenough extra, unused video for the duration of the transition you want to apply.
If your clips are already in Timeline and Final Cut Pro is rejecting a transition between them, you'llneed to double click on the first clip in the Timeline to display it in the Viewer. Then check to see ifthere's an Out point near the end of the clip and enough excess material after the Out point toaccommodate half the transition. If not, then you'll need to drag the Out point to the left until theunused portion of the clip is long enough to accommodate half of the transition you're going to apply.
Repeat this procedure with the second clip in the Timeline. Double click on it to display it in theViewer. Then check to see if there's an In point near the beginning of the clip and enough excessmaterial before the In point to accommodate half the transition. If not, then you'll need to drag the Inpoint to the right until the unused portion of the clip is long enough to accommodate half of thetransition you're going to apply.
After you've edited the clips, you'll need to drag the now shortened clips back next to each other in theTimeline (editing the clips with the In and Out points in the Viewer, shortens them and creates a gapbetween the two clips in the Timeline).
Now you'll be able to apply your transition to the clips, because you've marked out enough excessvideo in your clips to be used in the transition.
Note: if you're editing clips that are in the Timeline, be sure to have linking and snapping turned on,

1/5/08 2:51 PMVideo Editing with FinalCut Pro
Page 31 of 41http://multimedia.journalism.berkeley.edu/tutorials/video/finalcut/printfriendly/
so any audio associated with the clips remains in synch with the video and so the clips will snaptogether when you move them.
Addng Transitions Between Clips
To add a transition, such as a dissolve so the first clip gradually dissolves into the second, first click onthe vertical line between two clips in the Timeline.
You should see a brown area, like a thick I appear between the clips.
Now select a transition in the Final Cut Pro menu at the top by clicking on:
Effects...Video Transitions
Then click on a subfolder such as Dissolves. Finally click on the file for the transition you want toapply.
Or you can select a transition by going to the Browser window in the upper left of your screen andclicking on the Effects tab. Then click on the Video Transitions folder, and within that select asubfolder, such as Dissolves. Finally click on the file for the transition you want to apply.

1/5/08 2:51 PMVideo Editing with FinalCut Pro
Page 32 of 41http://multimedia.journalism.berkeley.edu/tutorials/video/finalcut/printfriendly/
For example, you might select the file for the Cross Dissolve, which is a common type of transitionbetween clips, where the first clip will start to dissolve as the second clip begins to appear in thetransition.
When you've clicked on the desired transition file, just hold down your mouse button and drag the filedown from the Browser to the point between your clips in the Timeline and release your mouse button.
You should see the transition appear as a grayish area between the two clips in your Timeline.
You should see a green line appear just above the transition on the Timeline, which means thetransition has been applied and you can view it by playing the clip.
(If there's a red line above the transition instead of a green line, that means you'll need to render thetransition before you can play and view it.)

1/5/08 2:51 PMVideo Editing with FinalCut Pro
Page 33 of 41http://multimedia.journalism.berkeley.edu/tutorials/video/finalcut/printfriendly/
If you then move your playhead to a point on the Timeline prior to the transition and play the clip(you can press the Space key on your keyboard to play the sequence of clips, and press the space keyagain to stop playing the sequence of clips), you should see the transition between the two clipsdisplayed in the Canvas above and to the right.
You also can make changes in your transition by double clicking on the transition in the Timeline.
For example, you can change the duration of the dissolve - that is how long the dissolve will last.
To do that double click on the transition. In the box that appears in the Viewer area at the top of yourscreen, just type a new number into the time box, which usually is set at a 1 second duration bydefault.
You can set a transition either in number of seconds or in number of frames or a combination of both.
If you don't like the transition you've created, you can click on it and press the delete key to removeit.
Or you can replace it with a different transition by clicking in the Browser window on the Effects tab.Then click on the Video Transitions folder and select a subfolder and file for another transition.
Now just hold down your mouse button and drag the transition file from the Browser down over theunwanted transition between your clips and release your mouse button. The new transition willreplace the old transition.
Rendering Transitions
When you add a transition between clips, it still needs to be "rendered," or processed by the computerto permanently add it to your sequence of clips.
Sometimes when you add a transition, you'll see a green line above the transition, which means youcan view the transition, but it still needs to be rendered.

1/5/08 2:51 PMVideo Editing with FinalCut Pro
Page 34 of 41http://multimedia.journalism.berkeley.edu/tutorials/video/finalcut/printfriendly/
Other times when you add a transition, you'll see a red line above the transition, which means youcan't view the transition until it is rendered.
To render a transition, in the Final Cut Pro menu at the top click on:
Sequence...Render Sequence
(which will render all the transitions you've added to your sequence)
Final Cut then will process your transition and permanently apply it to your sequence. The time ittakes to render depends on how sophisticated your transition is. More advanced transitions could takeup to a minute to render.
When the rendering is completed, the red or green line should be gone from above your transition.
Adding Titles and Text to Clips
You can add a title or some text to a clip, such as the name of a person who appears in the clip.
To do this, double click on a clip in the Timeline to display it in the Viewer at the top. Then at thebottom of the Viewer click on the button with a large A on it, which is the text button.

1/5/08 2:51 PMVideo Editing with FinalCut Pro
Page 35 of 41http://multimedia.journalism.berkeley.edu/tutorials/video/finalcut/printfriendly/
Hold down your mouse button and in the drop-down menu select:
Text...Text
Then release your mouse button.
In the Viewer area will appear a screen with sample text in it.
To change the sample text, click on the tab entry at the top labeled:
Controls

1/5/08 2:51 PMVideo Editing with FinalCut Pro
Page 36 of 41http://multimedia.journalism.berkeley.edu/tutorials/video/finalcut/printfriendly/
A box will appear on your screen in the Viewer area.
You change the text of the title by just typing new words into the box.
Below the box are selections for:
Changing the font face of the textChanging the font size of the textChanging the Font Color by clicking on the white box to the right and selecting a new color forthe text (yellow is a color that usually works well on most clips).Aligning the title on the screen, such as centering it, making it flush to the left or making itflush to the right.
You also can add a drop shadow to the title by selecting the Motion tab and checking the box for DropShadow.
Finally, you can change the duration of the text (how long it will appear on your clip) by selecting theVideo tab and then changing the time in the box at the top left.

1/5/08 2:51 PMVideo Editing with FinalCut Pro
Page 37 of 41http://multimedia.journalism.berkeley.edu/tutorials/video/finalcut/printfriendly/
Now to place the text on your Timeline, click on the Video tab.
Then move your playhead on the Timeline to the point in a clip where you want your text to begin.
Now click in the Viewer on the text you created, hold down your mouse button, drag it down onto theTimeline just above the clip and at the point of the playhead, and release it. The text will be placed ona new track above your clip.
You should see a green line appear just above the clip on the Timeline, which means the text has beenapplied and you can view it by playing the clip.
Move the playhead on the Timeline to a point prior to the clip and play the clip to see the textdisplayed.
(If there's a red line above the text instead of a green line, that means you'll need to render the textbefore you can play and view it.)
To make adjustments to your text, double click on it in the Timeline to display it in the Viewer, andthen follow the steps above to make changes.
Positioning the Text
You also can change the position of the text - moving it anywhere you want on the screen - by creatinga wireframe to drag the title to different points on the screen.
To do that, double click on the text you've created in the Timeline, to display it in the Viewer and inthe Canvas.
in the Canvas area to the right, click on the the tiny box toward the top right that has a hole in it.
In the drop-down menu that appears, select:
Image+Wireframe

1/5/08 2:51 PMVideo Editing with FinalCut Pro
Page 38 of 41http://multimedia.journalism.berkeley.edu/tutorials/video/finalcut/printfriendly/
A wireframe will appear over your title, with an image of the clip underneath. Click on the point in themiddle where the lines intersect, and you can drag the title anywhere on the screen.
When you're done positioning the text, to place the new text on your Timeline, in the Viewer to the leftmake sure the Video tab is selected.
Then move your playhead on the Timeline to the point where you placed the beginning of your existingtitle.
Now in the Viewer above click on the new text you created, hold down your mouse button, and drag itdown onto the Timeline to the point of the playhead and on the tack where your existing title is.Release your mouse button, and the new text will replace the old text on the Timeline.
Lower 3rd Title
Some common text to use on a video clip is a "Lower Third" title, which appears toward the bottom of aclip and has two lines on it - one for a title and a second just below for a subtitle (such as a listing of aperson's name, with their occupation or affiliation listed in slightly smaller type underneath).

1/5/08 2:51 PMVideo Editing with FinalCut Pro
Page 39 of 41http://multimedia.journalism.berkeley.edu/tutorials/video/finalcut/printfriendly/
If you want to add a Lower Third title to a clip, double click on a clip in the Timeline to display it in theViewer at the top. Then at the bottom of the Viewer click on the button with a large A on it, which isthe title button.
Hold down your mouse button and in the drop-down menu select:
Title...Lower 3rd
You can change the properties of the text in this title - the size, color, position, etc. - using the samesteps described above for changing the attributes of text.
But this time there will be two sets of controls - one for the main title, and one just underneath for thesubtitle.
You also can add a rectangular color bar behind a lower third title to better display it on the screen.
You would do this, for example, if there's a lot of variety in the color of the video to which you'reapplying the title and the title thus doesn't display well against that varied background. The title willdisplay much better if its on top of a color bar.
To add a color bar, select the Controls tab, scroll down the line for Background and select Solid. Youthen can change the color of the bar, by clicking below on the white box to the right of the word Color.
Now to place the title on your Timeline, click on the Video tab.
Then move your playhead on the Timeline to the point in a clip where you want your title to begin.
Now click in the Viewer on the title you created, hold down your mouse button, drag it down onto theTimeline just above the clip and at the point of the playhead, and release it. The title will be placed ona new track above your clip.
You should see a green line appear just above the clip on the Timeline, which means the title has beenapplied and you can view it by playing the clip.

1/5/08 2:51 PMVideo Editing with FinalCut Pro
Page 40 of 41http://multimedia.journalism.berkeley.edu/tutorials/video/finalcut/printfriendly/
Move the playhead on the Timeline to a point prior to the clip and play the clip to see the titledisplayed.
(If there's a red line above the title instead of a green line, that means you'll need to render the titlebefore you can play and view it.)
To make adjustments to your title, double click on it in the Timeline to display it in the Viewer, andthen follow the steps above to make changes.
Rendering Titles
When you add a title to a clip, it still needs to be "rendered," or processed by the computer topermanently add it to the clip.
Sometimes when you add a title, you'll see a green line above the clip, which means you can view thetitle, but it still needs to be rendered.
Other times when you add a title, you'll see a red line above the clip, which means you can't view thetitle until it is rendered.
To render a title, in the Final Cut Pro menu at the top click on:
Sequence...Render Sequence
(which will render all the titles you've added to your sequence)
Final Cut then will process your title and permanently apply it to your clip. The time it takes to renderdepends on how sophisticated your title is. More advanced titles could take up to a minute to render.
When the rendering is completed, the red or green line should be gone from above the clip with yourtitle.
Exporting Still Frames as Pictures
You can export a single frame from a clip in Final Cut Pro, to use as a picture on a Web site.
To do this, select a clip in the Browser or the Timeline to display it in the Viewer, and then move theplayhead to the single frame you want to export.
In the menu at the top select:
File...Export...Using QuickTime Conversion
In box that appears, change the Format setting to Still Image.
Click on the Options button and select a format for the picture, such as JPEG, and click on OK.
Now pick a destination folder where you want to store the picture, rename the picture, and click onSave.
The photo will be saved into the folder you selected.
1/5/08 2:51 PMVideo Editing with FinalCut Pro
Page 41 of 41http://multimedia.journalism.berkeley.edu/tutorials/video/finalcut/printfriendly/
Create a single frame to put in your Timeline
You similarly can create a "freeze frame" for the Timeline that will display as a still image that lastsfor several seconds in your movie.
To do this, select a clip in the Browser or the Timeline to display it in the Viewer, and then move theplayhead to the single frame you want for your movie.
In the menu at the top, select:
Modify...Make Freeze Frame
Click on the frame in the Viewer and drag it to the point you want it to appear in the Timeline.
You then can grab the edge of the single-frame image to shorten or lengthen the duration of the imagein your movie.
Exporting Your Movie Sequence
When your movie is complete, you'll want to export it as a compressed QuickTime movie for use on theWeb. See the tutorial Exporting Video for the Web.
Related Links
© 2007 The Regents of the University of California