vi tips - essential vi/vim editor skills
TRANSCRIPT
vi!1" TipsEssential vi/vim Editor Skills
by
Jacek Artymiak
First Edition
Lublin 2008

!i"1# Tips, 1st ed. by Jacek Artymiak
Editor: Suzanne Trellis
Published by devGuide.net
www: http://www.devguide.net/books/vitips1
email: [email protected]
Copyright © 2008 Jacek Artymiak
All rights reserved. No part of this publication may be reproduced, stored in a retrieval system, or transmitted, in any form or by any means, electronic, mechanical, photocopying, recording, or otherwise, without the prior consent of the publisher.
First edition 2008
Printed in Poland and the United States of America.
08! 10 9 8 7 6 5 4 3 2 1
ISBN: 978"83"60869"00"0
The author and the publisher disclaim any and all liability for the use of information and programs contained in this book.
All trademarks mentioned in this book are the sole property of their owners.
Table of Contents
Introduction ## # # # # 1
Chapter 1: Essentials## # # # 3
! PANIC!!! ! ! ! ! 5
! Canceling Commands! ! ! ! 5
! Switching Between Command Mode and
! ! Insert Mode! ! ! ! 6
! Escaping from the ex Editor Mode! ! 6
! Unscrambling the Screen! ! ! ! 6
Chapter 2: Basic File Operations# # # 7
! Starting vi#1$! ! ! ! ! 9
! Starting vi#1$ and Opening a File for Editing! 10
! Starting vi#1$ and Opening Multiple Files for
! ! Editing! ! ! ! ! 11
! Switching Between Files! ! ! ! 13
! Opening a File after Starting vi#1$! ! ! 14
! Saving the Current File! ! ! ! 15
! Forcing vi#1$ to Save the Current File! ! 16
! Saving the Current File Under a Di%erent Name! 17
! Saving a Part of the Current File! ! ! 18
! Saving a Part of the Current File Under a
! ! Di%erent Name! ! ! ! 19
! Appending the Current File to Another! ! 20
! Appending a Part of the Current File to Another! 21
! Saving the Current file and Quitting vi#1$! ! 22
! Forcing vi#1$ to Save the Current File and Quit! 23
! Quitting vi#1$ without Saving the Current File! 24
! Forcing vi#1$ to Quit without Saving the
! ! Current File! ! ! ! 25
! Recovering the Current File! ! ! 26
Chapter 3: Cursor Movement## # # 27
! Moving the Cursor One Character/Line
! ! at a Time! ! ! ! 29
! Moving the Cursor x Characters or
! ! Lines at a Time! ! ! ! 30
! Moving the Cursor to Column x! ! ! 32
! Moving the Cursor to the Start or End of Line! 33
! Moving the Cursor Between Lines! ! 34
! Which Line Am I On?! ! ! ! 36
! Moving the Cursor Relative to the vi#1$ Screen! 38
! Moving the Cursor to Character x$! ! 40
! Moving the Cursor Between Words! ! 41
! Moving the Cursor Between Sentences! ! 44
! Moving the Cursor Between Paragraphs! ! 45
! Moving the Cursor Between Matching
! ! #$, &', (), or <>! ! ! ! 47
! Moving the Cursor Between Markers! ! 48
! Moving Around with Simple Search! ! 50
! Repositioning Text Relatively to the Screen! 51
Chapter 4: Editing# # # # # 53
! Entering Text! ! ! ! ! 55
! Inserting Lines! ! ! ! ! 57
! Inserting Files! ! ! ! ! 59
! Table of Contents "
! Inserting Output of a Command! ! ! 60
! Processing Text Using External Commands! 61
! Changing Text! ! ! ! ! 63
! Replacing Text! ! ! ! ! 67
! Replacing One or More Characters with
! ! Any Number of Characters! ! 69
! Replacing the Current Line! ! ! 70
! Deleting Text! ! ! ! ! 71
! Search and Replace! ! ! ! 77
! Cut, Copy, and Paste! ! ! ! 80
! Copying Text! ! ! ! ! 80
! Pasting Text! ! ! ! ! 84
! Joining Lines! ! ! ! ! 85
! Changing Case! ! ! ! ! 86
! Incrementing and Decrementing Numbers! 87
! Repeating Actions! ! ! ! 87
! Undo / Redo! ! ! ! ! 87
Chapter 5: Tricks# # # # # 89
! Running Commands! ! ! ! 91
! Sending vi#1$ to the Background! ! ! 92
! Shell Access! ! ! ! ! 92
Index ## # # # # # 95
! Table of Contents "


List of Tables
Table 1: UNIX filename wildcards.! ! ! 12
Table 2: Motion commands.! ! ! ! 66
Table 3: Regular expressions.! ! ! ! 76

Introduction
No Unix"class system administrator or user will get far without learning the basics of vi#1$, the widespread visual text"mode editor.
Contrary to some misinformed opinions spread among users who are new to Unix"class systems, vi#1$ is not di*cult to learn. Granted, it is over thirty years old and not very friendly to beginners, but once you grasp the basic concepts, you will never have to learn another text editor again, because vi#1$ is available for all standard operating systems, including Microsoft Windows, Mac OS X, Linux, BSD, and many others.
My own experience teaching vi#1$ and Unix"class system and network administration suggests that most of the problems reported by new users stem from the fact that vi#1$ is completely di%erent from any other text editor.
Vi#1$ is a modal editor, which means that you need to tell it to switch between di%erent modes and commands, even when all you want to do is change a few characters. This minor inconvenience is o%set by the enormous flexibility of the editor and its seamless integration with the rest of the Unix environment.
Another problem is the obscure terminology used to describe its functionality. It makes learning vi#1$ unnecessarily di*cult for no good reason.
Bearing those two issues in mind, I have written a book which does not bombard you with the old terminology, but rather uses concepts that are familiar to users who are used to working with Microsoft Windows or Mac OS X and who do not know much about the ‘joys’ of working on dial"up text mode terminals.
I hope this fresh new look at vi#1$ will help you learn it and become more productive.
Jacek Artymiak
Page 1

Chapter 1
Essentials

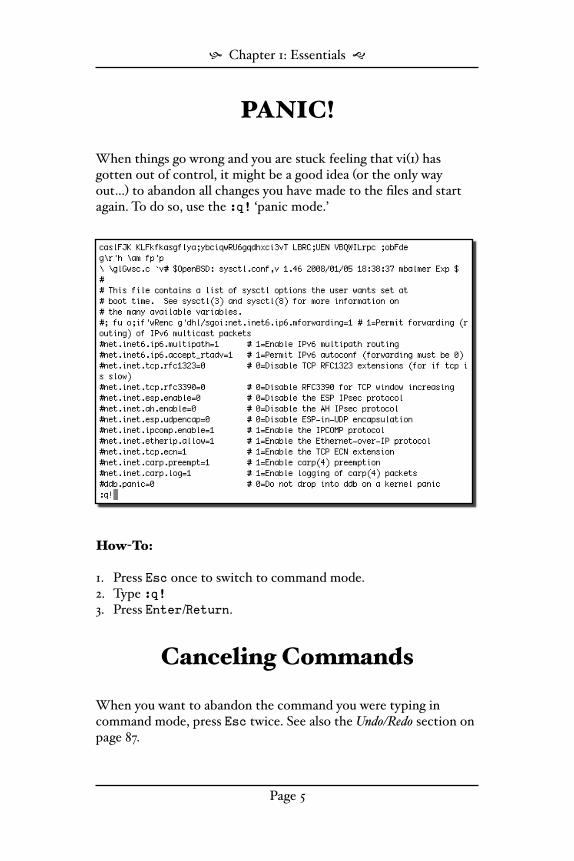
PANIC!
When things go wrong and you are stuck feeling that vi#1$ has gotten out of control, it might be a good idea #or the only way out…$ to abandon all changes you have made to the files and start again. To do so, use the :q! ‘panic mode.’
How$To:
1. Press Esc once to switch to command mode.2. Type :q!3. Press Enter/Return.
Canceling Commands
When you want to abandon the command you were typing in command mode, press Esc twice. See also the Undo/Redo section on page 87.
! Chapter 1: Essentials "
Page 5
Switching Between Command Mode and Insert Mode
Unlike the majority of text editors and word processors, vi#1$ has two modes of operation: command and insert.
How you enter insert mode depends on the kind of action you want to perform. #You can learn about the di%erent actions in Chapter 4, Editing on page 53.$ The most important trick to master is switching back to command mode. This is actually very simple+just press Esc.
Escaping from the ex Editor Mode
For those who like to do things the old, hard way, vi#1$ o%ers the ex#1$ editor mode #a primitive text editor with no visual editing functionality$. Most of us don’t need it, however, and when we end up there, it’s mostly by accident.
If you notice that the text you were working with has suddenly disappeared and all you can see is the : command prompt, type vi and press Enter/Return. This will get you back to vi#1$.
If you want to switch to the ex#1$ editor mode, type Q in command mode.
Unscrambling the Screen
Long lines and messages sent to you by other users or the system itself may temporarily mess up the vi#1$ screen. You can always clean it up with Ctrl+l #lowercase letter L$ or Ctrl+r #lowercase letter R$.
! Chapter 1: Essentials "
Page 6
Chapter 2
Basic File Operations

Starting vi!1"
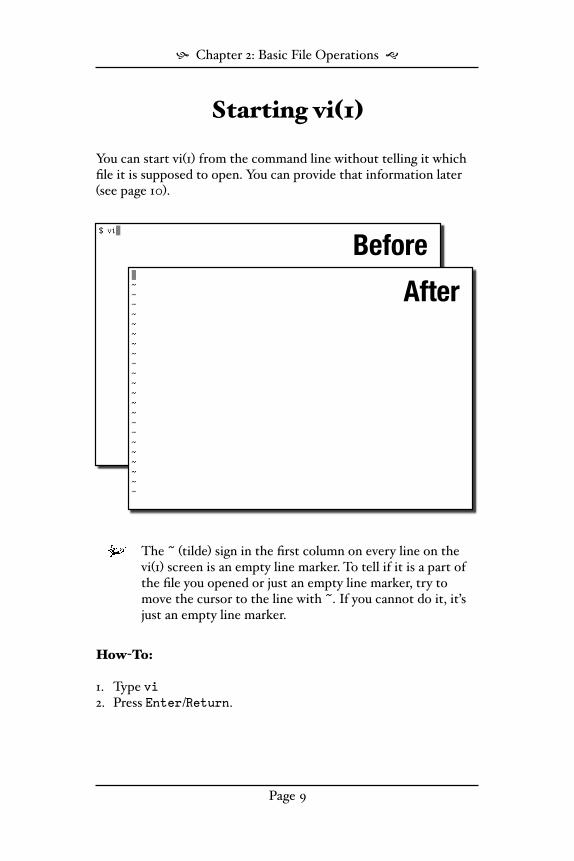
You can start vi#1$ from the command line without telling it which file it is supposed to open. You can provide that information later #see page 10$.
After
Before
The ~ #tilde$ sign in the first column on every line on the vi#1$ screen is an empty line marker. To tell if it is a part of the file you opened or just an empty line marker, try to move the cursor to the line with ~. If you cannot do it, it’s just an empty line marker.
How$To:
1. Type vi2. Press Enter/Return.
! Chapter 2: Basic File Operations "
Page 9
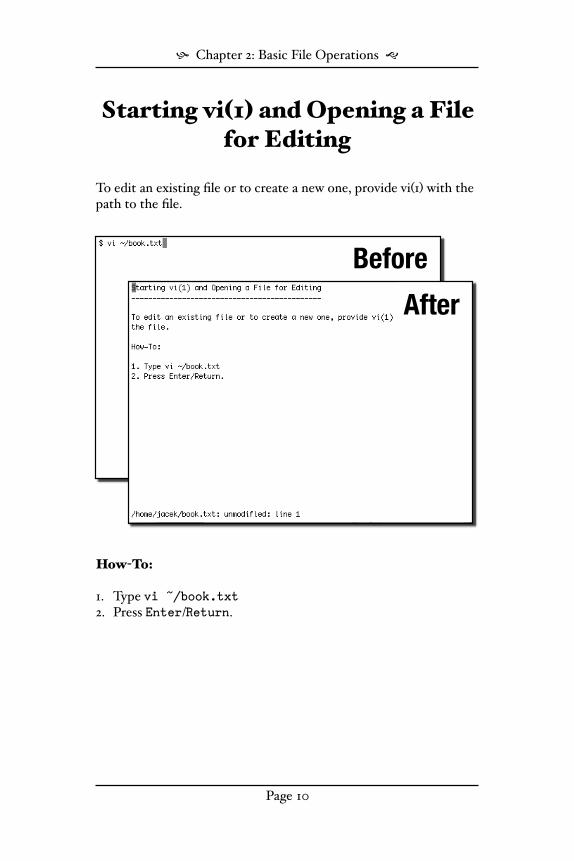
Starting vi!1" and Opening a File for Editing
To edit an existing file or to create a new one, provide vi#1$ with the path to the file.
Before
After
How$To:
1. Type vi ~/book.txt2. Press Enter/Return.
! Chapter 2: Basic File Operations "
Page 10
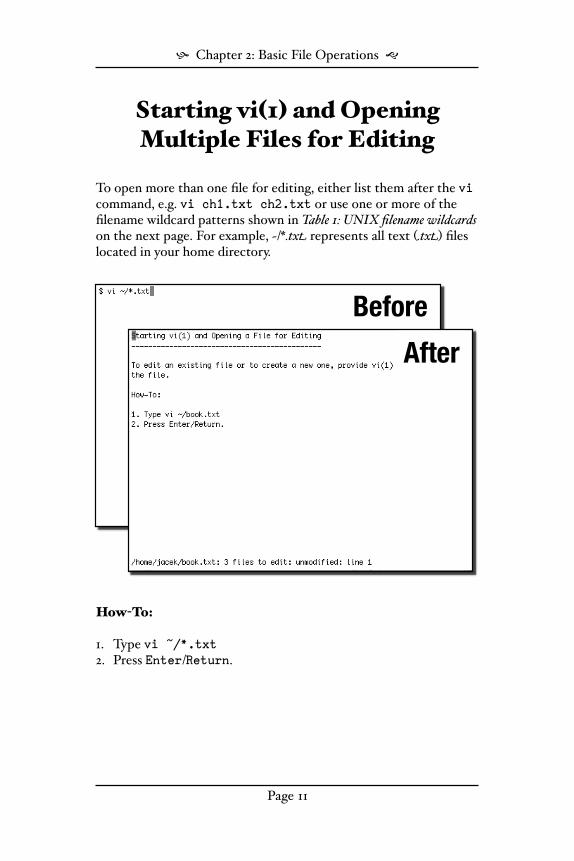
Starting vi!1" and Opening Multiple Files for Editing
To open more than one file for editing, either list them after the vi command, e.g. vi ch1.txt ch2.txt or use one or more of the filename wildcard patterns shown in Table 1: UNIX filename wildcards on the next page. For example, ~/*.tx% represents all text #.tx%$ files located in your home directory.
Before
After
How$To:
1. Type vi ~/*.txt2. Press Enter/Return.
! Chapter 2: Basic File Operations "
Page 11
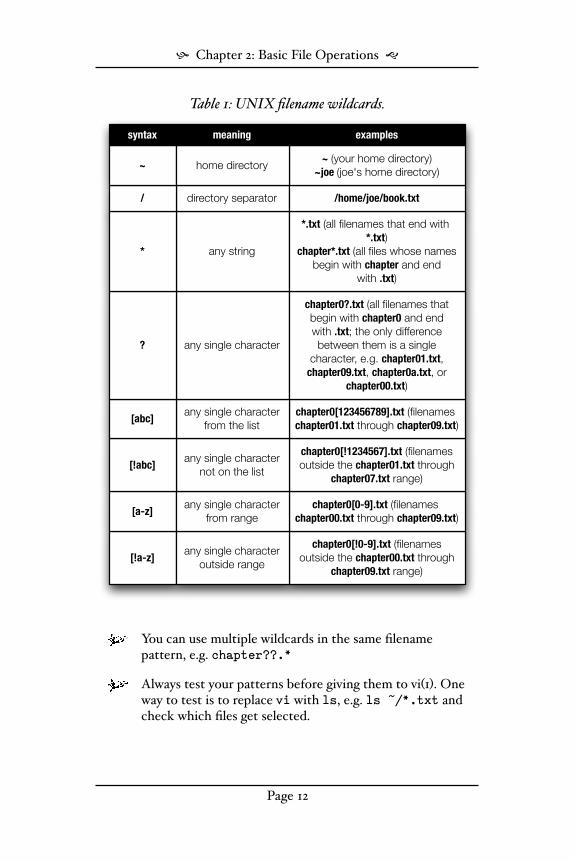
Table 1: UNIX filename wildcards.
chapter0[!0-9].txt (filenames
outside the chapter00.txt through
chapter09.txt range)
[!a-z]any single character
outside range
chapter0[0-9].txt (filenames
chapter00.txt through chapter09.txt)[a-z]
any single character
from range
chapter0[!1234567].txt (filenames
outside the chapter01.txt through
chapter07.txt range)
any single character
not on the list[!abc]
chapter0[123456789].txt (filenames
chapter01.txt through chapter09.txt)
any single character
from the list[abc]
any single character ?
chapter0?.txt (all filenames that
begin with chapter0 and end
with .txt; the only difference
between them is a single
character, e.g. chapter01.txt,
chapter09.txt, chapter0a.txt, or
chapter00.txt)
any string
*.txt (all filenames that end with
*.txt)
chapter*.txt (all files whose names
begin with chapter and end
with .txt)
*
directory separator /home/joe/book.txt/
~ (your home directory)
~joe (joe's home directory)~ home directory
examplesmeaningsyntax
You can use multiple wildcards in the same filename pattern, e.g. chapter??.*
Always test your patterns before giving them to vi#1$. One way to test is to replace vi with ls, e.g. ls ~/*.txt and check which files get selected.
! Chapter 2: Basic File Operations "
Page 12
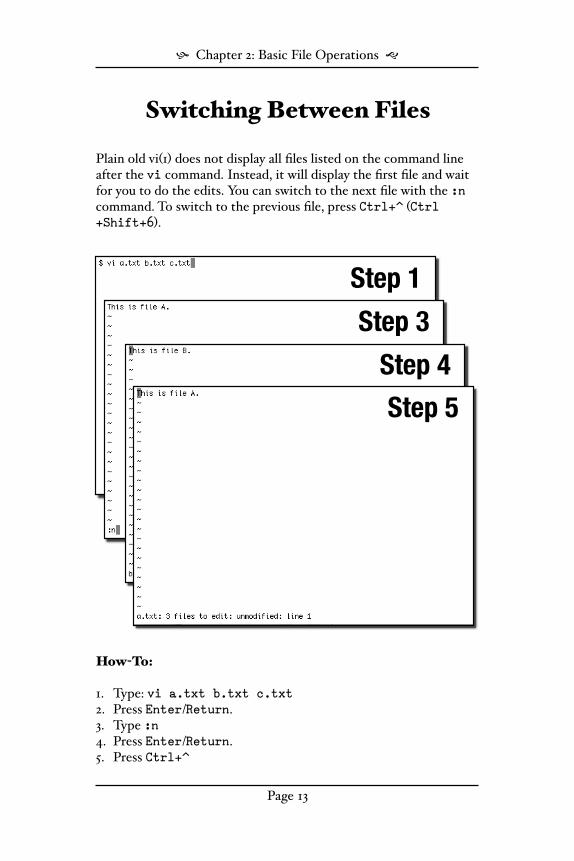
Switching Between Files
Plain old vi#1$ does not display all files listed on the command line after the vi command. Instead, it will display the first file and wait for you to do the edits. You can switch to the next file with the :n command. To switch to the previous file, press Ctrl+^ #Ctrl+Shift+6$.
Step 1
Step 3
Step 4
Step 5
How$To:
1. Type: vi a.txt b.txt c.txt2. Press Enter/Return.3. Type :n4. Press Enter/Return.5. Press Ctrl+^
! Chapter 2: Basic File Operations "
Page 13
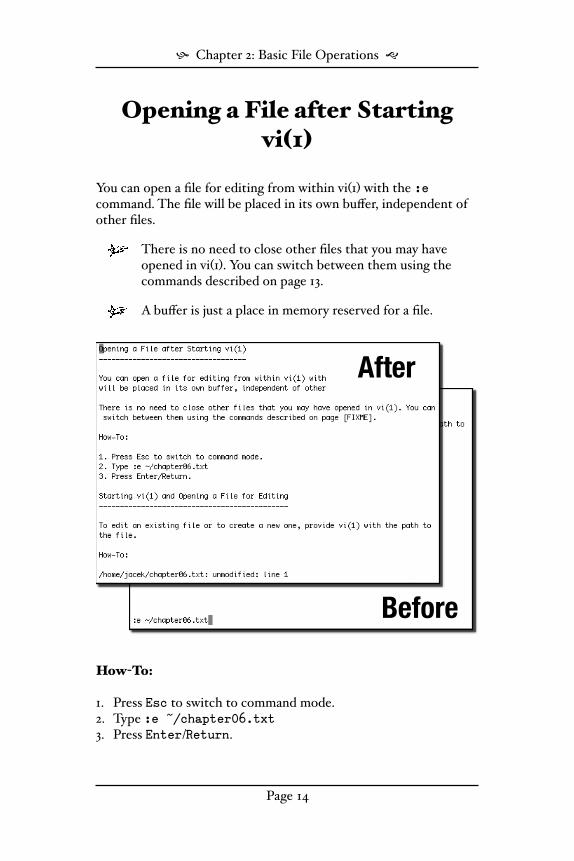
Opening a File after Starting vi!1"
You can open a file for editing from within vi#1$ with the :e command. The file will be placed in its own bu%er, independent of other files.
There is no need to close other files that you may have opened in vi#1$. You can switch between them using the commands described on page 13.
A bu%er is just a place in memory reserved for a file.
Before
After
How$To:
1. Press Esc to switch to command mode.2. Type :e ~/chapter06.txt3. Press Enter/Return.
! Chapter 2: Basic File Operations "
Page 14
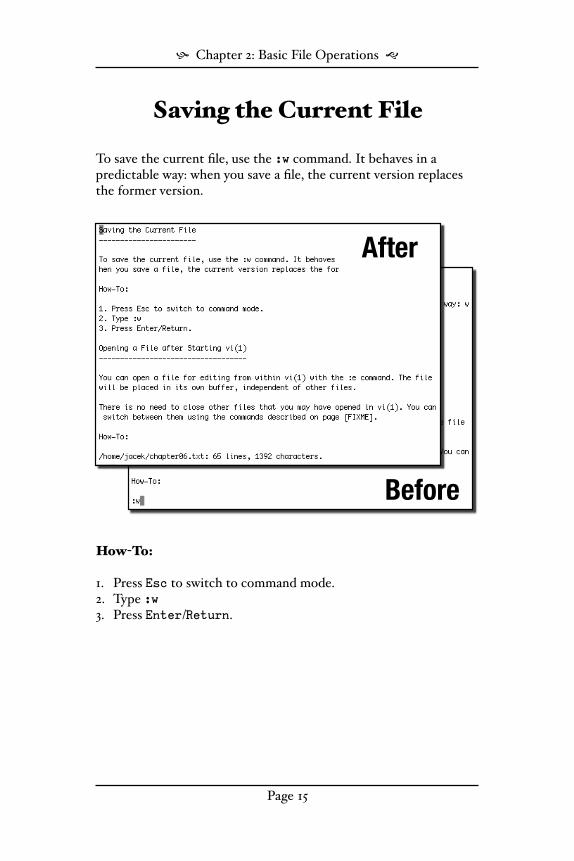
Saving the Current File
To save the current file, use the :w command. It behaves in a predictable way: when you save a file, the current version replaces the former version.
After
Before
How$To:
1. Press Esc to switch to command mode.2. Type :w3. Press Enter/Return.
! Chapter 2: Basic File Operations "
Page 15
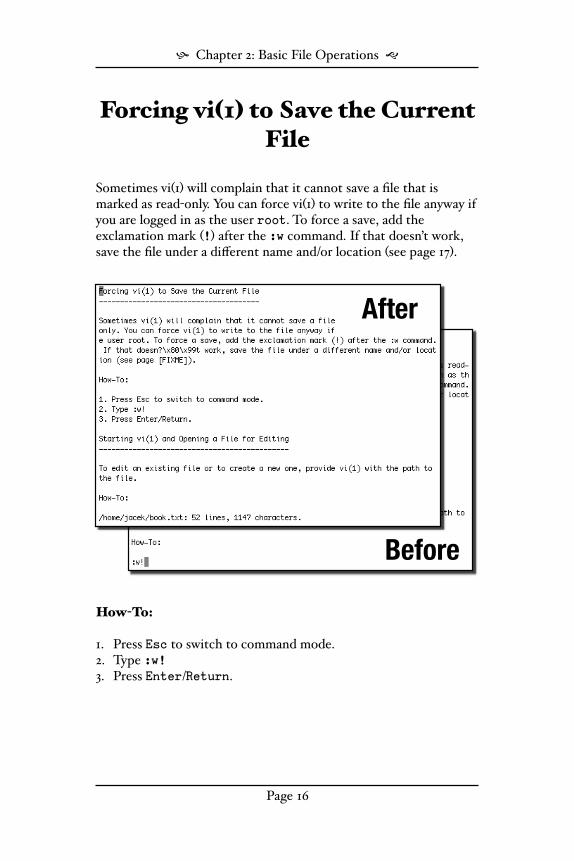
Forcing vi!1" to Save the Current File
Sometimes vi#1$ will complain that it cannot save a file that is marked as read"only. You can force vi#1$ to write to the file anyway if you are logged in as the user root. To force a save, add the exclamation mark #!$ after the :w command. If that doesn’t work, save the file under a di%erent name and/or location #see page 17$.
Before
After
How$To:
1. Press Esc to switch to command mode.2. Type :w!3. Press Enter/Return.
! Chapter 2: Basic File Operations "
Page 16
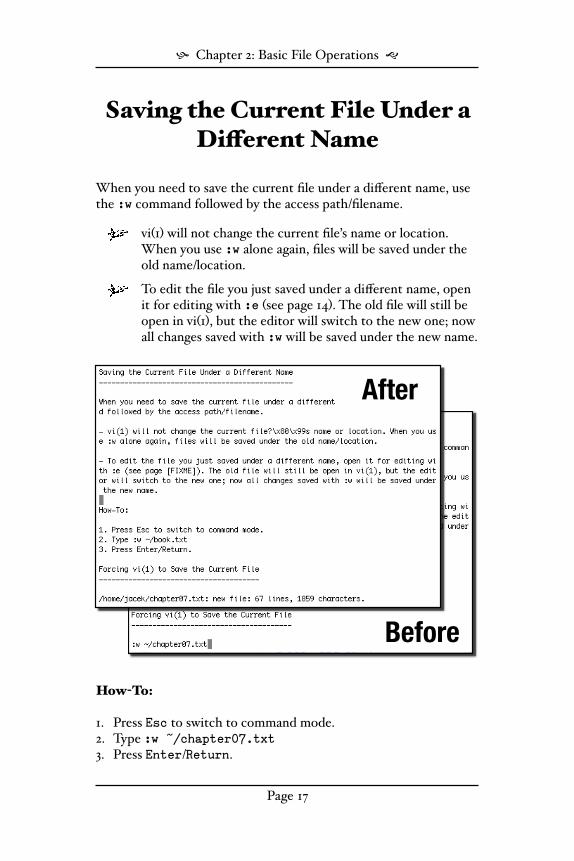
Saving the Current File Under a Di%erent Name
When you need to save the current file under a di%erent name, use the :w command followed by the access path/filename.
vi#1$ will not change the current file’s name or location. When you use :w alone again, files will be saved under the old name/location.
To edit the file you just saved under a di%erent name, open it for editing with :e #see page 14$. The old file will still be open in vi#1$, but the editor will switch to the new one; now all changes saved with :w will be saved under the new name.
Before
After
How$To:
1. Press Esc to switch to command mode.2. Type :w ~/chapter07.txt3. Press Enter/Return.
! Chapter 2: Basic File Operations "
Page 17
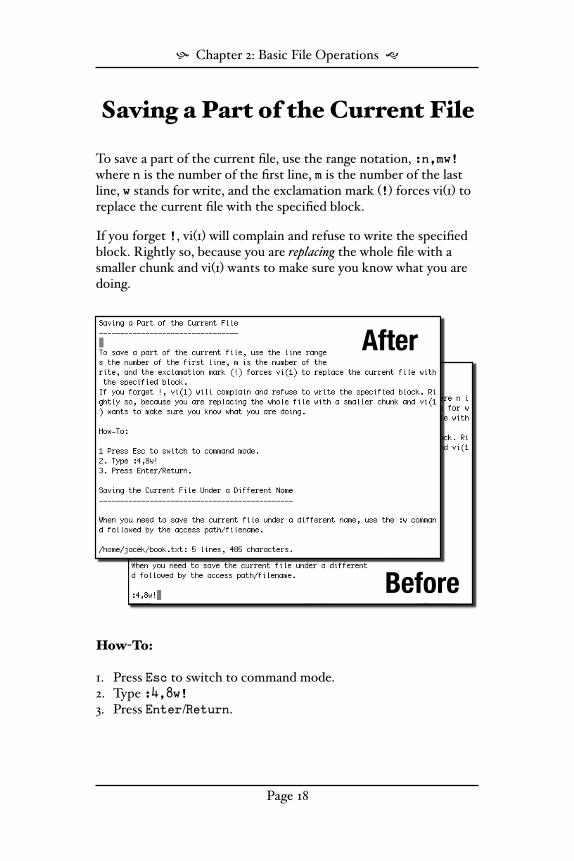
Saving a Part of the Current File
To save a part of the current file, use the range notation, :n,mw! where n is the number of the first line, m is the number of the last line, w stands for write, and the exclamation mark #!$ forces vi#1$ to replace the current file with the specified block.
If you forget !, vi#1$ will complain and refuse to write the specified block. Rightly so, because you are replacing the whole file with a smaller chunk and vi#1$ wants to make sure you know what you are doing.
Before
After
How$To:
1. Press Esc to switch to command mode.2. Type :4,8w!3. Press Enter/Return.
! Chapter 2: Basic File Operations "
Page 18
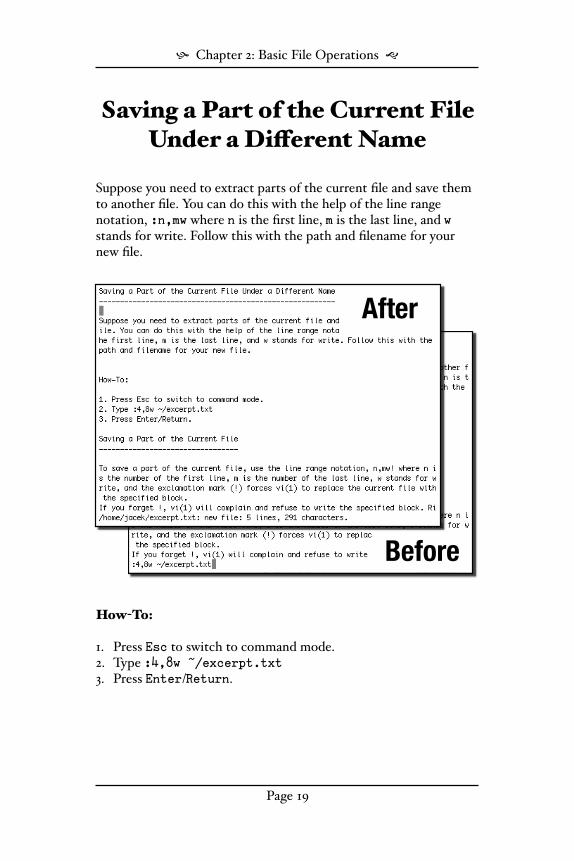
Saving a Part of the Current File Under a Di%erent Name
Suppose you need to extract parts of the current file and save them to another file. You can do this with the help of the line range notation, :n,mw where n is the first line, m is the last line, and w stands for write. Follow this with the path and filename for your new file.
Before
After
How$To:
1. Press Esc to switch to command mode.2. Type :4,8w ~/excerpt.txt3. Press Enter/Return.
! Chapter 2: Basic File Operations "
Page 19
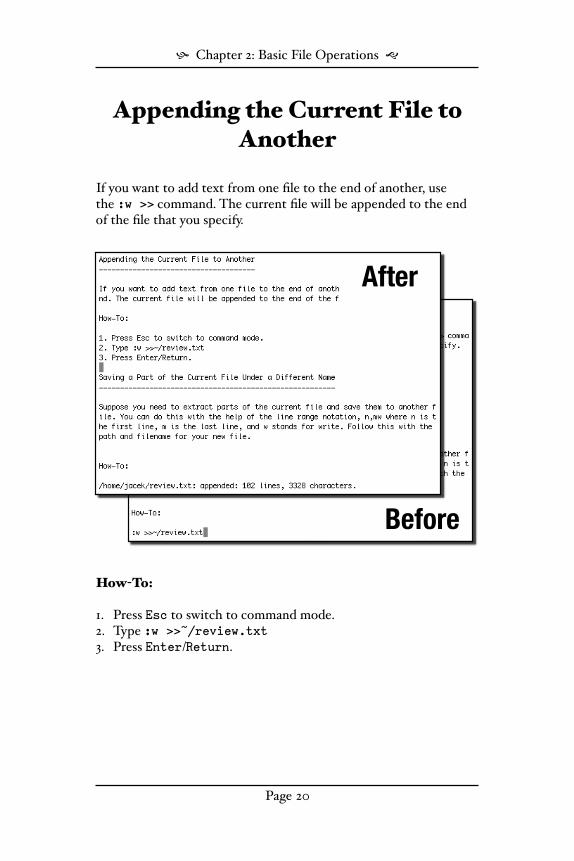
Appending the Current File to Another
If you want to add text from one file to the end of another, use the :w >> command. The current file will be appended to the end of the file that you specify.
Before
After
How$To:
1. Press Esc to switch to command mode.2. Type :w >>~/review.txt3. Press Enter/Return.
! Chapter 2: Basic File Operations "
Page 20
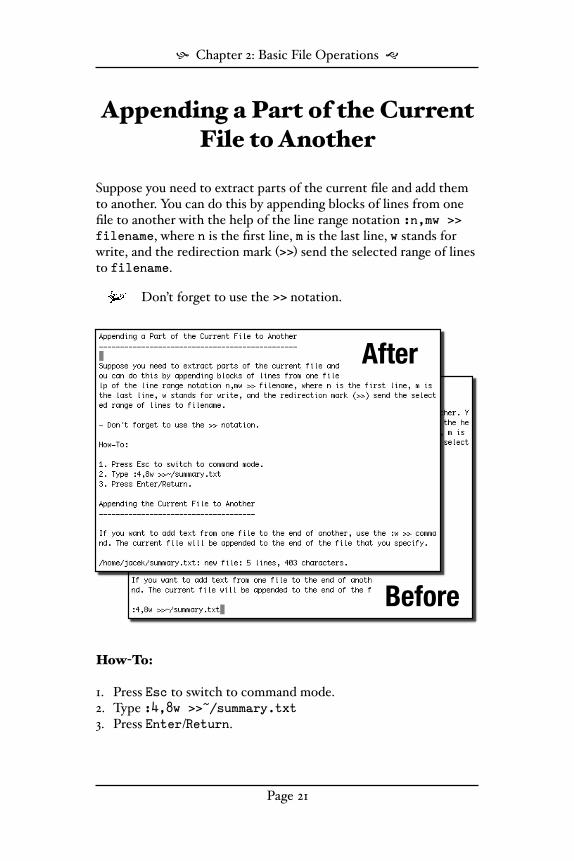
Appending a Part of the Current File to Another
Suppose you need to extract parts of the current file and add them to another. You can do this by appending blocks of lines from one file to another with the help of the line range notation :n,mw >> filename, where n is the first line, m is the last line, w stands for write, and the redirection mark #>>$ send the selected range of lines to filename.
Don’t forget to use the >> notation.
Before
After
How$To:
1. Press Esc to switch to command mode.2. Type :4,8w >>~/summary.txt3. Press Enter/Return.
! Chapter 2: Basic File Operations "
Page 21

Saving the Current File and Quitting vi!1"
When you are done editing, save the current file and quit vi#1$. There are three ways to do this, all equally e%ective: :x, :wq, and :ZZ.
Before
After
How$To:
1. Press Esc to switch to command mode.2. Type :x3. Press Enter/Return.
! Chapter 2: Basic File Operations "
Page 22
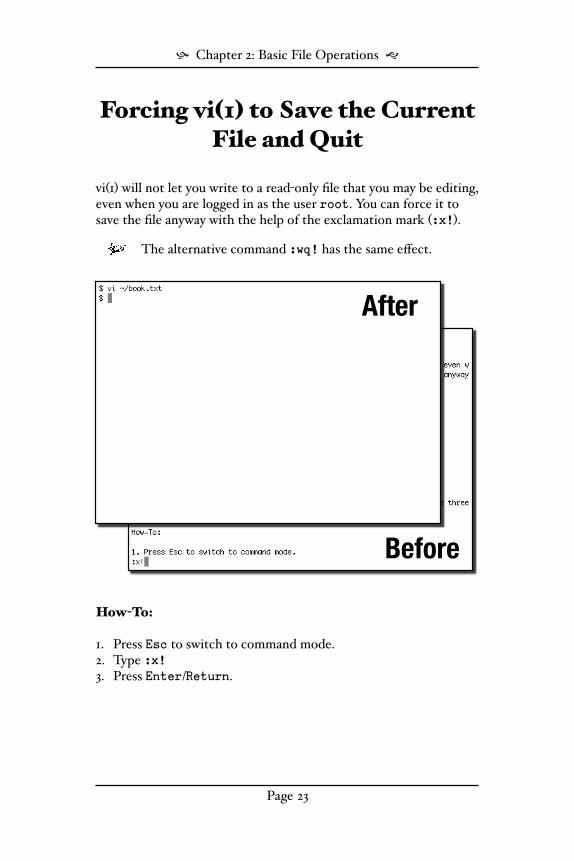
Forcing vi!1" to Save the Current File and Quit
vi#1$ will not let you write to a read"only file that you may be editing, even when you are logged in as the user root. You can force it to save the file anyway with the help of the exclamation mark #:x!$.
The alternative command :wq! has the same e%ect.
Before
After
How$To:
1. Press Esc to switch to command mode.2. Type :x!3. Press Enter/Return.
! Chapter 2: Basic File Operations "
Page 23

Quitting vi!1" without Saving the Current File
Use the :q command to quit vi#1$ without saving the current file. If you haven’t made any changes to the file, vi#1$ will exit as soon as you press Enter/Return. If you did edit it, you will have to either save it #see pages 15, 17, 22$, or force vi#1$ to abandon all changes since the last save #see page 25$.
Before
After
How$To:
1. Press Esc to switch to command mode.2. Type :q3. Press Enter/Return.
! Chapter 2: Basic File Operations "
Page 24
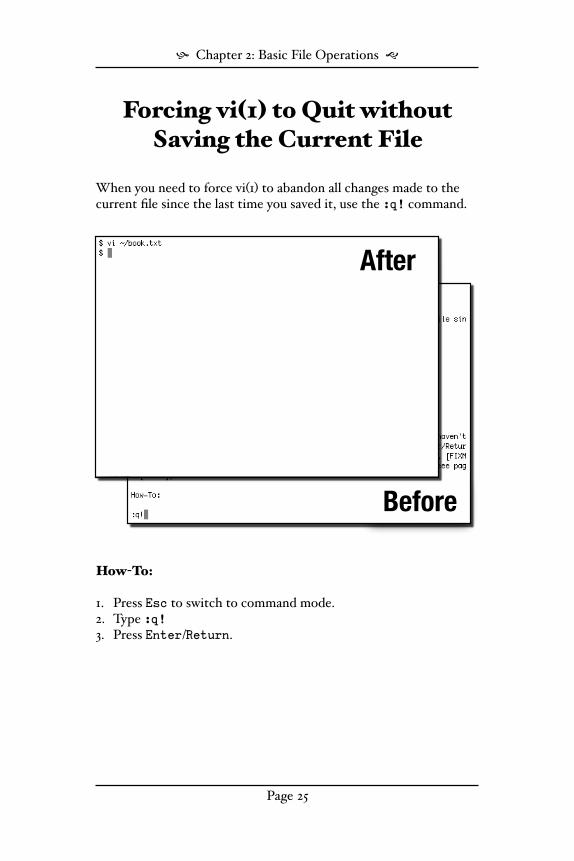
Forcing vi!1" to Quit without Saving the Current File
When you need to force vi#1$ to abandon all changes made to the current file since the last time you saved it, use the :q! command.
Before
After
How$To:
1. Press Esc to switch to command mode.2. Type :q!3. Press Enter/Return.
! Chapter 2: Basic File Operations "
Page 25
Recovering the Current File
If you decide that the changes you have made to the current file are too extensive to revert manually, use the :e! command. It will restore the last saved version of the current file.
You must switch vi#1$ to command mode to use these commands.
! Chapter 2: Basic File Operations "
Page 26
Chapter 3
CursorMovement


Moving the Cursor One Character/Line at a Time
There are two sets of keys used to move the cursor one character to the left or right, or one line up or down:
Move the cursor one character to the left: h or !
Move the cursor one character to the right: l, space, or "
Step 1
Step 2
Step 3
Step 4
Step 5
Step 6
Move the cursor one line down: j or #
Move the cursor one line up: k or $
Switch to the command mode to use the h, l, j, k keys when you want to move the cursor. The arrow keys can be used in either command or insert mode.
! Chapter 3: Cursor Movement "
Page 29
When the source line is shorter than the destination line, the cursor will be placed at the end of the target line.
When the cursor in located at the end of the source line, the cursor will be placed at the end of the target line.
How$To:
1. Open exercise file: vi hjkl.txt2. Press j nine times to move the cursor to 1.3. Press l once to move the cursor to 2.4. Press j once to move the cursor to 4.5. Press h once to move the cursor to 3.6. Press k once to move the cursor to 1.
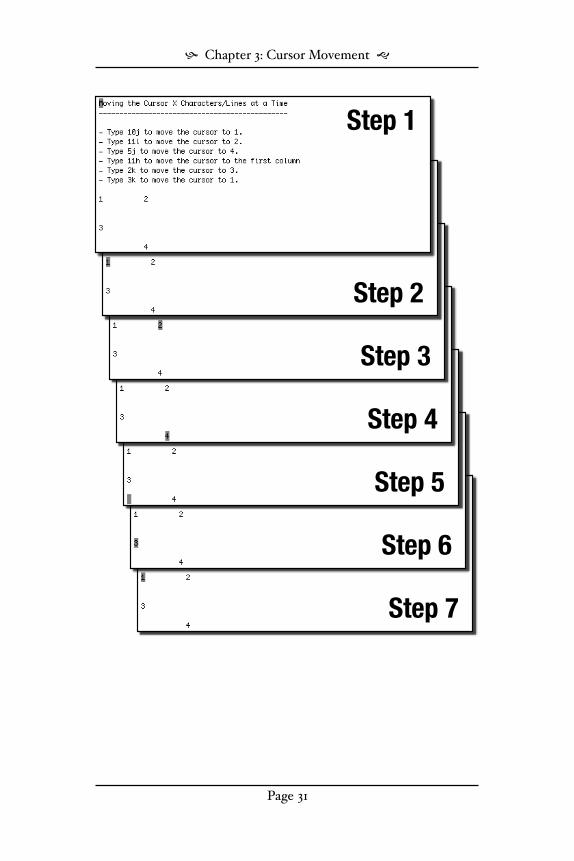
Moving the Cursor x Characters or Lines at a Time
When moving one character or line at a time is too cumbersome, use the numeric prefix to move the cursor x characters or lines at a time.
You need to switch vi#1$ to command mode and then type the number of characters or lines you want the cursor to move, followed by h, j, k, or l.
This technique cannot be used with the arrow keys: !"#$
How$To:
1. Open exercise file: vi n-hjkl.txt2. Type 10j to move the cursor to 1.3. Type 11l to move the cursor to 2.4. Type 5j to move the cursor to 4.5. Type 11h to move the cursor to the first column.6. Type 2k to move the cursor to 3.7. Type 3k to move the cursor to 1.
! Chapter 3: Cursor Movement "
Page 30
Step 1
Step 2
Step 3
Step 4
Step 5
Step 6
Step 7
! Chapter 3: Cursor Movement "
Page 31
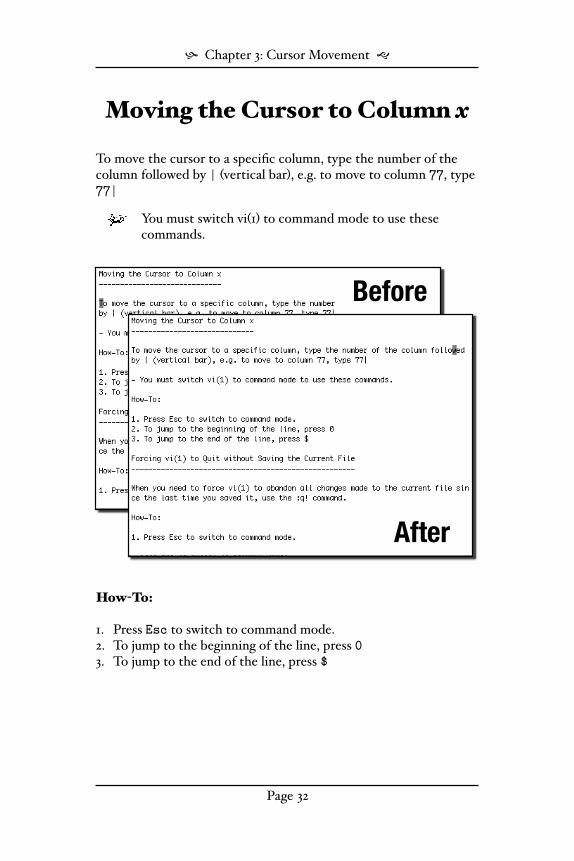
Moving the Cursor to Column x
To move the cursor to a specific column, type the number of the column followed by | #vertical bar$, e.g. to move to column 77, type 77|
You must switch vi#1$ to command mode to use these commands.
Before
After
How$To:
1. Press Esc to switch to command mode.2. To jump to the beginning of the line, press 03. To jump to the end of the line, press $
! Chapter 3: Cursor Movement "
Page 32
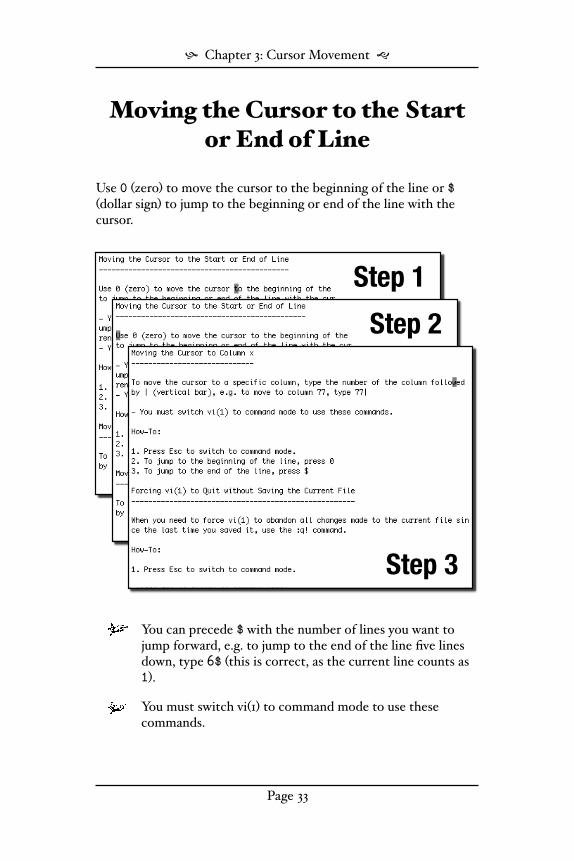
Moving the Cursor to the Start or End of Line
Use 0 #zero$ to move the cursor to the beginning of the line or $ #dollar sign$ to jump to the beginning or end of the line with the cursor.
Step 1
Step 2
Step 3
You can precede $ with the number of lines you want to jump forward, e.g. to jump to the end of the line five lines down, type 6$ #this is correct, as the current line counts as 1$.
You must switch vi#1$ to command mode to use these commands.
! Chapter 3: Cursor Movement "
Page 33

How$To:
1. Press Esc to switch to command mode.2. To jump to the beginning of the line, press 03. To jump to the end of the line, press $
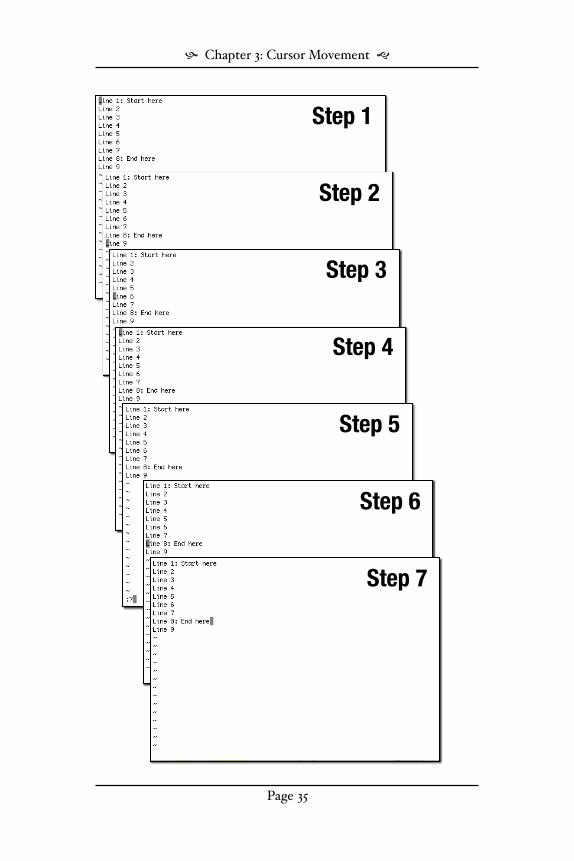
Moving the Cursor Between Lines
Moving the cursor between lines is accomplished with the G command:
Move the cursor to line x: type the line number followed by G, e.g. to move to line 12, type 12G
Alternatively, type :x, e.g. :12 moves the cursor to line 12. Note that the : precedes the line number.
Move the cursor to the first line: type 1G or [[
Move the cursor to the last line: type G or ]]
Move the cursor to the next line: press +
Move the cursor x lines down: type x+, e.g. to move two lines down, type 2+
Move the cursor to the previous line: press -
Move the cursor x lines up: type x-, e.g. to move two lines up, type 2-
You must switch vi#1$ to command mode to use the commands described in this section.
! Chapter 3: Cursor Movement "
Page 34
Step 1
Step 2
Step 3
Step 4
Step 5
Step 6
Step 7
! Chapter 3: Cursor Movement "
Page 35
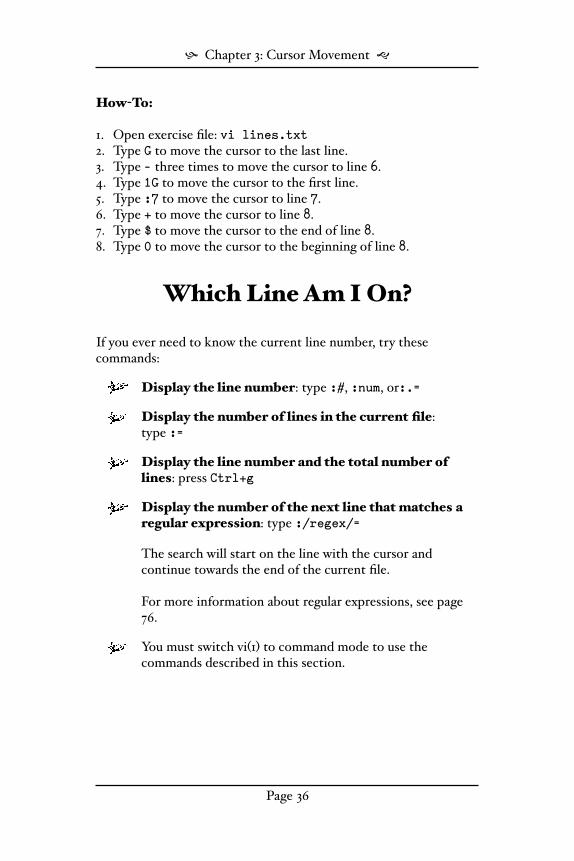
How$To:
1. Open exercise file: vi lines.txt2. Type G to move the cursor to the last line.3. Type - three times to move the cursor to line 6.4. Type 1G to move the cursor to the first line.5. Type :7 to move the cursor to line 7.6. Type + to move the cursor to line 8.7. Type $ to move the cursor to the end of line 8.8. Type 0 to move the cursor to the beginning of line 8.
Which Line Am I On?
If you ever need to know the current line number, try these commands:
Display the line number: type :#, :num, or:.=
Display the number of lines in the current file: type :=
Display the line number and the total number of lines: press Ctrl+g
Display the number of the next line that matches a regular expression: type :/regex/=
The search will start on the line with the cursor and continue towards the end of the current file.
For more information about regular expressions, see page 76.
You must switch vi#1$ to command mode to use the commands described in this section.
! Chapter 3: Cursor Movement "
Page 36
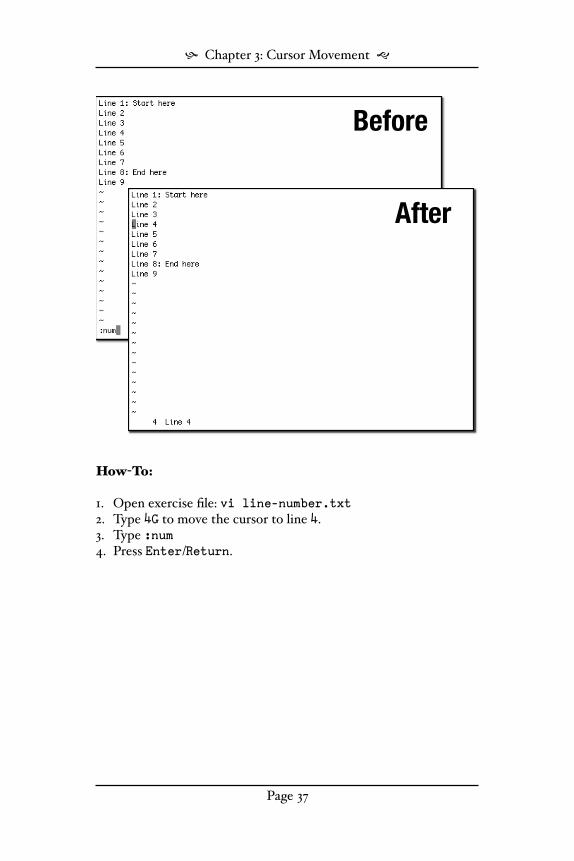
Before
After
How$To:
1. Open exercise file: vi line-number.txt2. Type 4G to move the cursor to line 4.3. Type :num4. Press Enter/Return.
! Chapter 3: Cursor Movement "
Page 37
Moving the Cursor Relative to the vi!1" Screen
Moving the cursor between lines in half" and full"screen chunks is accomplished with the following commands:
Move the cursor to the top of the screen: type H
Move the cursor down x lines relatively to the top of the screen: type xH. For example, to place the cursor on the third line of the screen type 3H.
Move the cursor to the middle of the screen: type M
Move the cursor to the bottom of the screen: type L
Move the cursor up x lines relatively to the bottom of the screen: type xL. For example, to place the cursor on the third line from the bottom of the screen type 3L.
Move the cursor one screen forward: press Ctrl+f
Move the cursor one screen backward: press Ctrl+b
Move the cursor half a screen down: press Ctrl+d
Move the cursor half a screen up: press Ctrl+u
You must switch vi#1$ to command mode to use these commands.
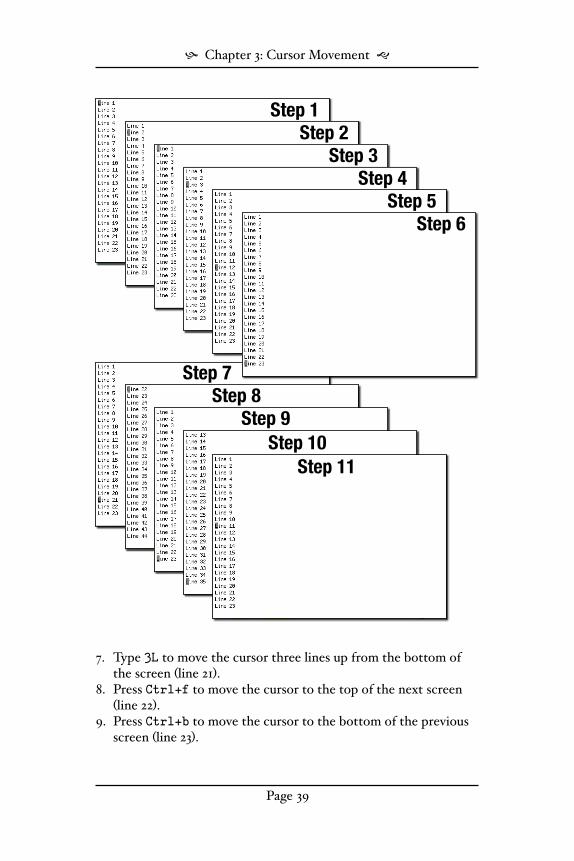
How$To:
1. Open exercise file: vi screen.txt2. Type + to move the cursor from line 1 to line 2.3. Type H to move the cursor to the top of the screen.4. Type 3H to move the cursor three lines down from the top of the
screen.5. Type M to move the cursor to the middle of the screen #line 12$.6. Type L to move the cursor to the bottom of the screen #line 23$.
! Chapter 3: Cursor Movement "
Page 38
Step 1
Step 2
Step 3
Step 5
Step 4
Step 6
Step 7
Step 8
Step 9
Step 10
Step 11
7. Type 3L to move the cursor three lines up from the bottom of the screen #line 21$.
8. Press Ctrl+f to move the cursor to the top of the next screen #line 22$.
9. Press Ctrl+b to move the cursor to the bottom of the previous screen #line 23$.
! Chapter 3: Cursor Movement "
Page 39
10.Press Ctrl+d to move the cursor to the middle of the next screen #line 35$.
11. Press Ctrl+u twice to move the cursor to the middle of the previous screen #line 11$.
Moving the Cursor toCharacter x
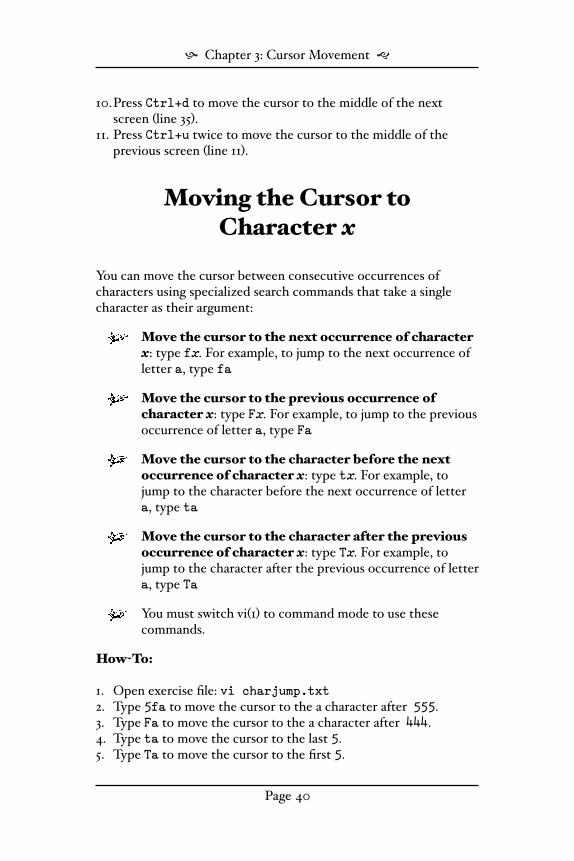
You can move the cursor between consecutive occurrences of characters using specialized search commands that take a single character as their argument:
Move the cursor to the next occurrence of character x: type fx. For example, to jump to the next occurrence of letter a, type fa
Move the cursor to the previous occurrence of character x: type Fx. For example, to jump to the previous occurrence of letter a, type Fa
Move the cursor to the character before the next occurrence of character x: type tx. For example, to jump to the character before the next occurrence of letter a, type ta
Move the cursor to the character after the previous occurrence of character x: type Tx. For example, to jump to the character after the previous occurrence of letter a, type Ta
You must switch vi#1$ to command mode to use these commands.
How$To:
1. Open exercise file: vi charjump.txt2. Type 5fa to move the cursor to the a character after 555.3. Type Fa to move the cursor to the a character after 444.4. Type ta to move the cursor to the last 5.5. Type Ta to move the cursor to the first 5.
! Chapter 3: Cursor Movement "
Page 40
Step 1
Step 2
Step 4
Step 3
Step 5
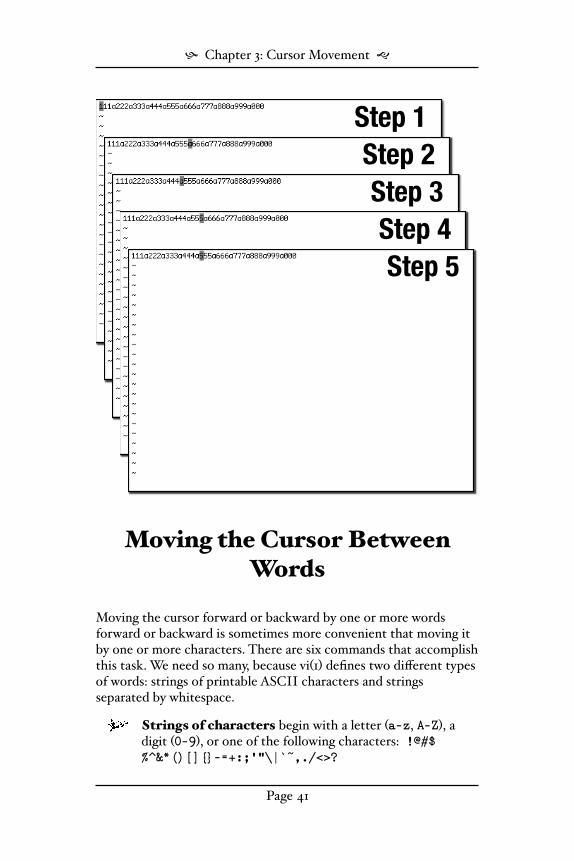
Moving the Cursor Between Words
Moving the cursor forward or backward by one or more words forward or backward is sometimes more convenient that moving it by one or more characters. There are six commands that accomplish this task. We need so many, because vi#1$ defines two di%erent types of words: strings of printable ASCII characters and strings separated by whitespace.
Strings of characters begin with a letter #a-z, A-Z$, a digit #0-9$, or one of the following characters: !@#$%^&*()[]{}-=+:;’”\|`~,./<>?
! Chapter 3: Cursor Movement "
Page 41
Step 1
Step 2
Step 3
Step 4
Step 5
Step 6
Step 7
! Chapter 3: Cursor Movement "
Page 42
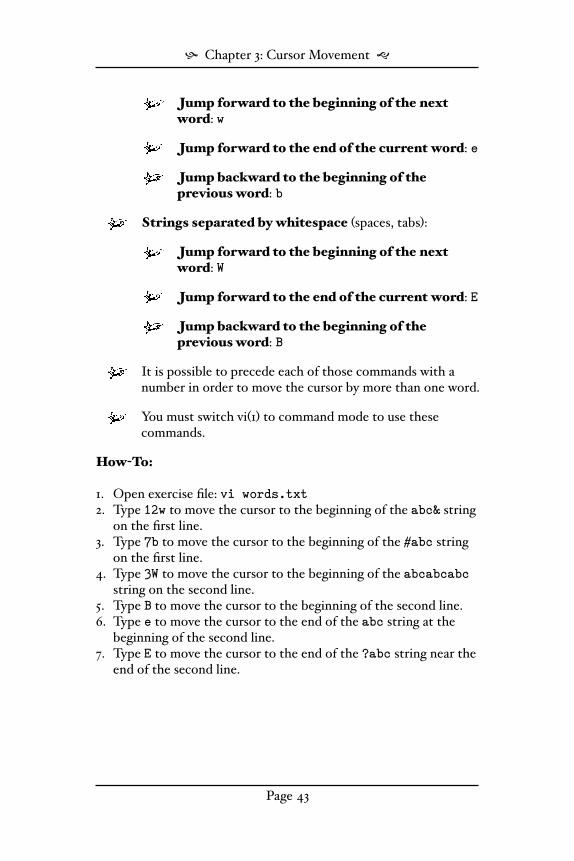
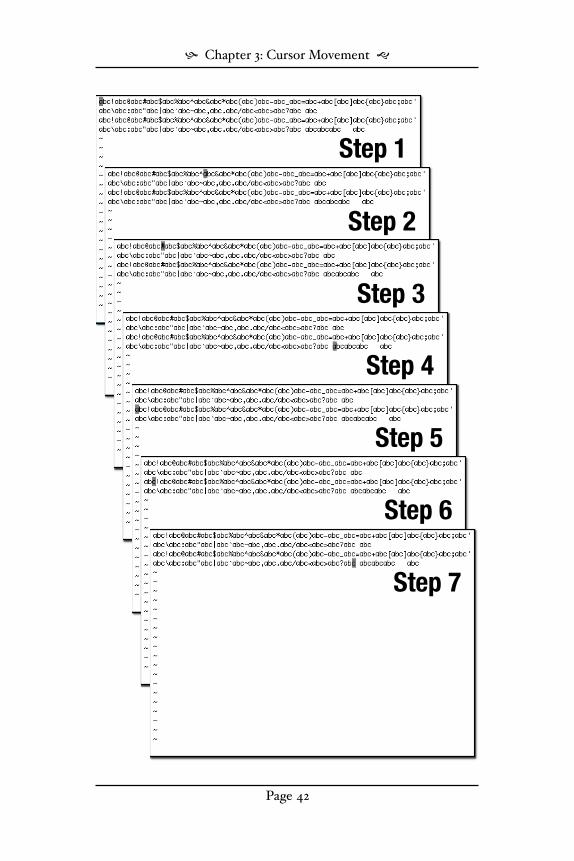
Jump forward to the beginning of the next word: w
Jump forward to the end of the current word: e
Jump backward to the beginning of the previous word: b
Strings separated by whitespace #spaces, tabs$:
Jump forward to the beginning of the next word: W
Jump forward to the end of the current word: E
Jump backward to the beginning of the previous word: B
It is possible to precede each of those commands with a number in order to move the cursor by more than one word.
You must switch vi#1$ to command mode to use these commands.
How$To:
1. Open exercise file: vi words.txt2. Type 12w to move the cursor to the beginning of the abc& string
on the first line.3. Type 7b to move the cursor to the beginning of the #abc string
on the first line.4. Type 3W to move the cursor to the beginning of the abcabcabc
string on the second line.5. Type B to move the cursor to the beginning of the second line.6. Type e to move the cursor to the end of the abc string at the
beginning of the second line.7. Type E to move the cursor to the end of the ?abc string near the
end of the second line.
! Chapter 3: Cursor Movement "
Page 43
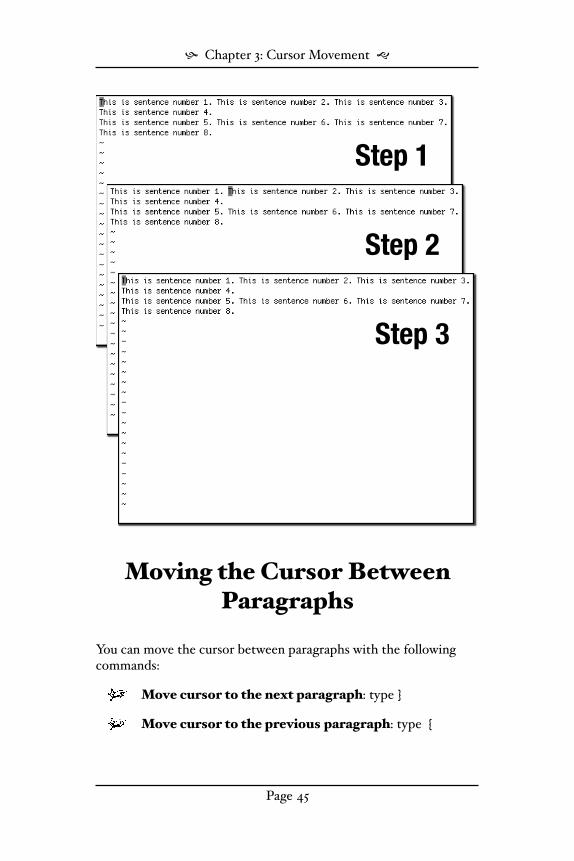
Moving the Cursor Between Sentences
Moving the cursor between sentences is accomplished with the following commands:
Move the cursor to the next sentence: type )
This does not work in all implementations of vi#1$, the cursor may jump to the next line instead.
Move the cursor to the previous sentence: type (
When vi#1$ is asked to jump from one sentence to another, it will look for full stop #.$ signs as markers.
It is possible to precede these two commands with a number in order to move the cursor by more than one sentence. For example, type 14# to move fourteen sentences backward.
You must switch vi#1$ to the command mode to use these commands.
How$To:
1. Press Esc to switch to command mode.2. To jump to the next sentence, press )3. To jump to the previous sentence, press (
! Chapter 3: Cursor Movement "
Page 44
Step 1
Step 2
Step 3
Moving the Cursor Between Paragraphs
You can move the cursor between paragraphs with the following commands:
Move cursor to the next paragraph: type }
Move cursor to the previous paragraph: type {
! Chapter 3: Cursor Movement "
Page 45
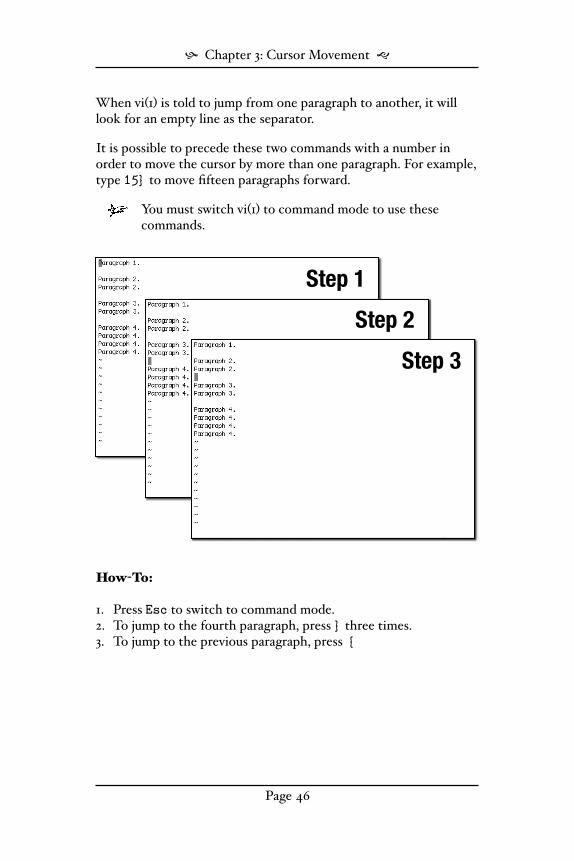
When vi#1$ is told to jump from one paragraph to another, it will look for an empty line as the separator.
It is possible to precede these two commands with a number in order to move the cursor by more than one paragraph. For example, type 15} to move fifteen paragraphs forward.
You must switch vi#1$ to command mode to use these commands.
Step 1
Step 2
Step 3
How$To:
1. Press Esc to switch to command mode.2. To jump to the fourth paragraph, press } three times.3. To jump to the previous paragraph, press {
! Chapter 3: Cursor Movement "
Page 46
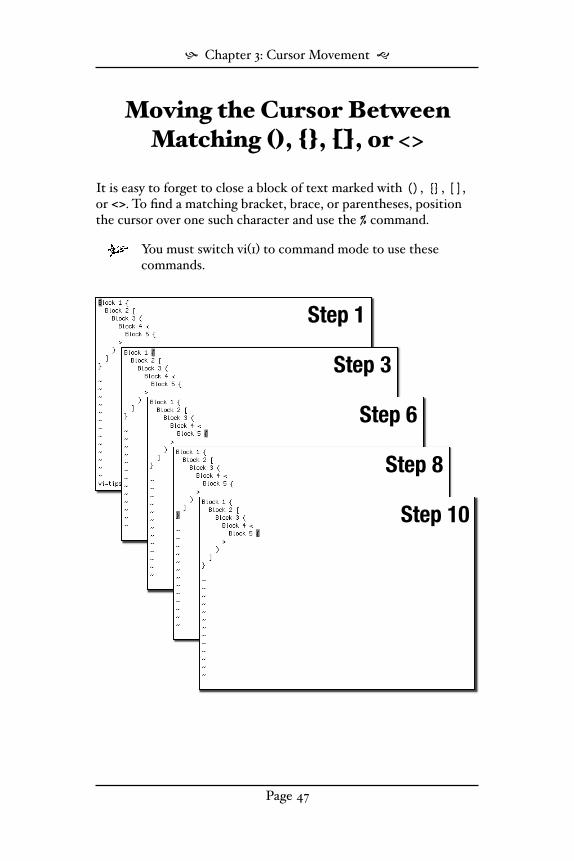
Moving the Cursor Between Matching !", &', (), or <>
It is easy to forget to close a block of text marked with (), {}, [], or <>. To find a matching bracket, brace, or parentheses, position the cursor over one such character and use the % command.
You must switch vi#1$ to command mode to use these commands.
Step 1
Step 3
Step 6
Step 8
Step 10
! Chapter 3: Cursor Movement "
Page 47
How$To:
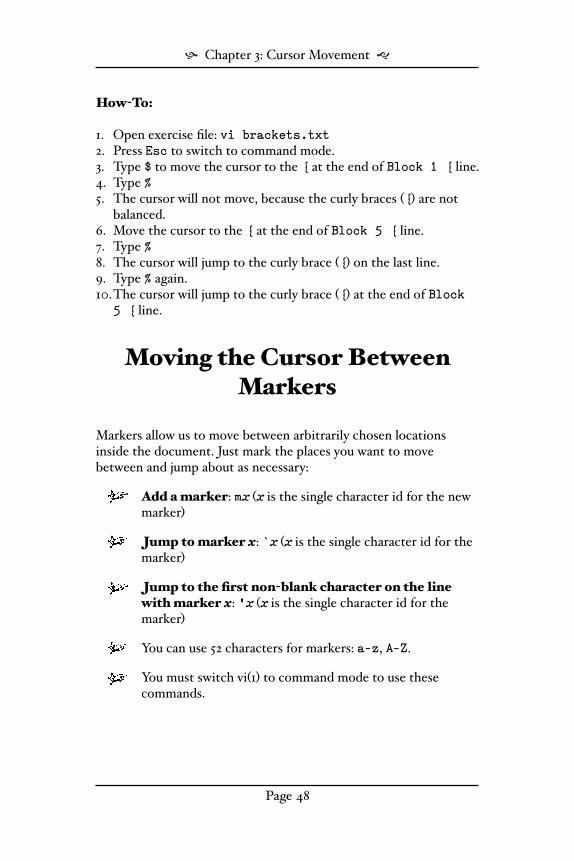
1. Open exercise file: vi brackets.txt2. Press Esc to switch to command mode.3. Type $ to move the cursor to the { at the end of Block 1 { line.4. Type %5. The cursor will not move, because the curly braces #{$ are not
balanced. 6. Move the cursor to the { at the end of Block 5 { line.7. Type %8. The cursor will jump to the curly brace #{$ on the last line.9. Type % again.10.The cursor will jump to the curly brace #{$ at the end of Block
5 { line.
Moving the Cursor Between Markers
Markers allow us to move between arbitrarily chosen locations inside the document. Just mark the places you want to move between and jump about as necessary:
Add a marker: mx #x is the single character id for the new marker$
Jump to marker x: `x #x is the single character id for the marker$
Jump to the first non$blank character on the line with marker x: ‘x #x is the single character id for the marker$
You can use 52 characters for markers: a-z, A-Z.
You must switch vi#1$ to command mode to use these commands.
! Chapter 3: Cursor Movement "
Page 48
Step 1
Step 2
Step 4
Step 5
Step 6
How$To:
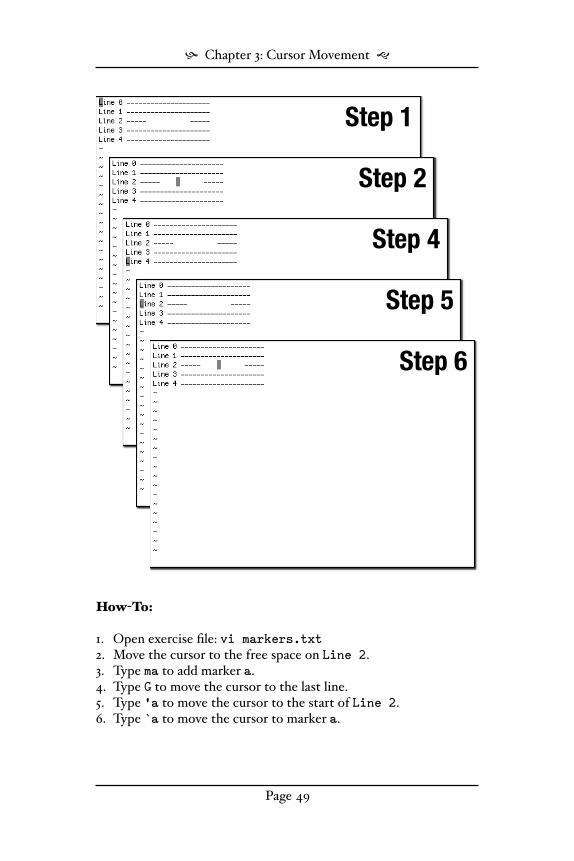
1. Open exercise file: vi markers.txt2. Move the cursor to the free space on Line 2.3. Type ma to add marker a.4. Type G to move the cursor to the last line.5. Type ‘a to move the cursor to the start of Line 2.6. Type `a to move the cursor to marker a.
! Chapter 3: Cursor Movement "
Page 49
Moving Around with Simple Search
When moving the cursor using other means is not convenient, there is always the ‘search for it’ option:
Search forward: type /string
Search backward: type ?string
Search for the next occurrence of string in the same direction: type n
Search for the next occurrence of string in the opposite direction: type N
Strings that you are looking for ought to be literal strings, not regular expressions. If you want to use regular expressions in your searches, visit page 76.
You must switch vi#1$ to command mode to use these commands.
How$To:
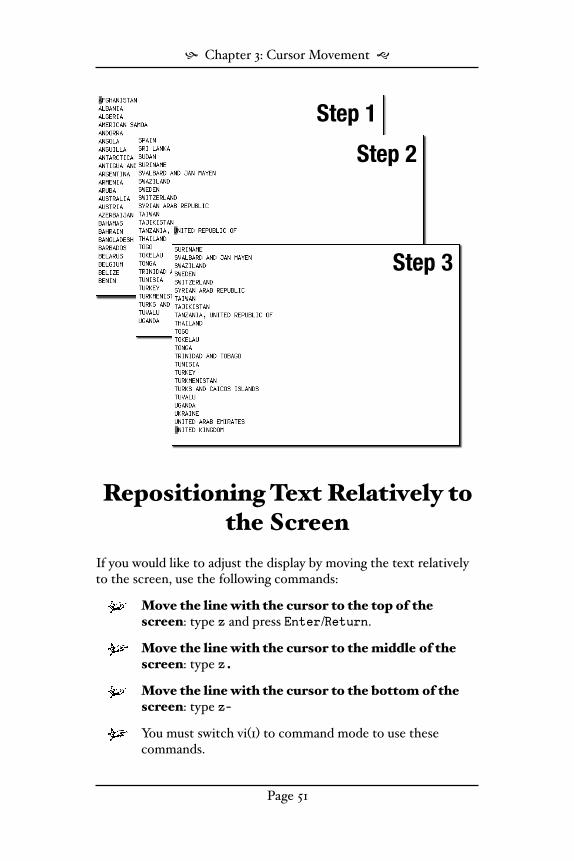
1. Open exercise file: vi countries.txt2. Type /UNITED3. Hit Enter/Return4. Press n twice.
! Chapter 3: Cursor Movement "
Page 50
Step 1
Step 2
Step 3
Repositioning Text Relatively to the Screen
If you would like to adjust the display by moving the text relatively to the screen, use the following commands:
Move the line with the cursor to the top of the screen: type z and press Enter/Return.
Move the line with the cursor to the middle of the screen: type z.
Move the line with the cursor to the bottom of the screen: type z-
You must switch vi#1$ to command mode to use these commands.
! Chapter 3: Cursor Movement "
Page 51

Chapter 4
Editing


Entering Text
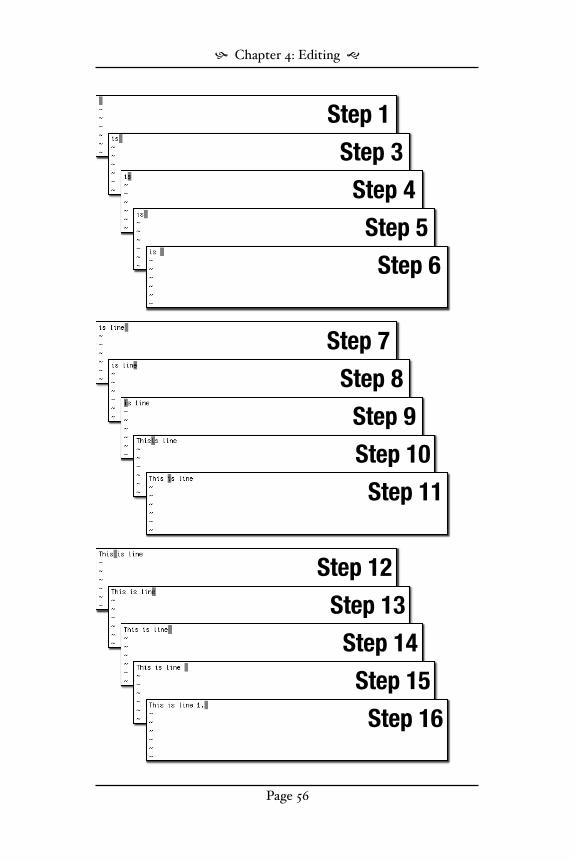
Typing text into the current bu%er is done using insert mode. To switch to insert mode, press i and type away. Whatever you type will appear before the cursor. If you want to add text after the cursor, press a.
Both i and a have their uppercase equivalents: I tells vi#1$ to add what you type to the beginning of the line and A does the same at the end of the line.
Each of the a, A, i, I commands automatically switches vi#1$ to insert mode.
If you precede any of the commands with a number, whatever you type will be inserted that many times into the text you are editing.
How$To:
1. Start vi#1$: vi2. Type i3. Type is4. Press Esc5. Type a6. Press Space7. Type line8. Press Esc9. Type I10.Type This11. Press Space.12. Press Esc13. Type $14. Press a15. Press Space16. Type 1.17. The end result should be This is line 1.
! Chapter 4: Editing "
Page 55
Step 1
Step 3
Step 4
Step 5
Step 6
Step 7
Step 8
Step 9
Step 10
Step 11
Step 12
Step 13
Step 14
Step 15
Step 16
! Chapter 4: Editing "
Page 56
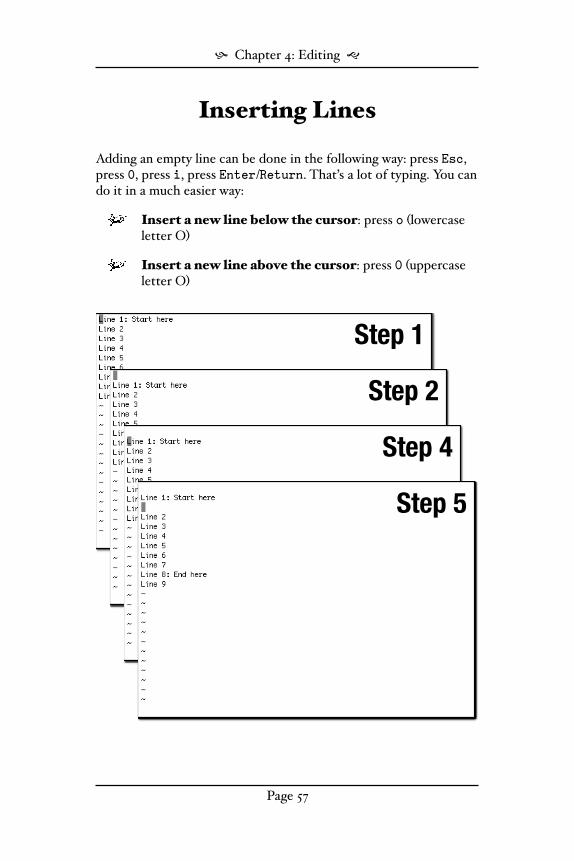
Inserting Lines
Adding an empty line can be done in the following way: press Esc, press 0, press i, press Enter/Return. That’s a lot of typing. You can do it in a much easier way:
Insert a new line below the cursor: press o #lowercase letter O$
Insert a new line above the cursor: press O #uppercase letter O$
Step 1
Step 2
Step 4
Step 5
! Chapter 4: Editing "
Page 57
Both commands switch vi#1$ to insert mode.
It is possible to insert more than one empty line by preceding either o or O with a number.
You must switch vi#1$ to command mode to use these commands.
How$To:
1. Open exercise file: vi lines.txt2. Press O #uppercase letter O$3. Press Esc4. Press j5. Press o #lowercase letter O$
! Chapter 4: Editing "
Page 58
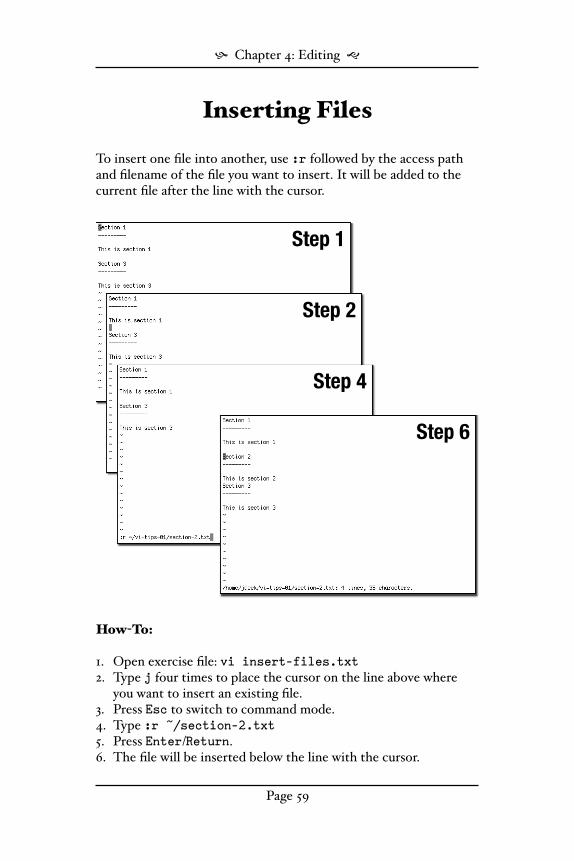
Inserting Files
To insert one file into another, use :r followed by the access path and filename of the file you want to insert. It will be added to the current file after the line with the cursor.
Step 1
Step 2
Step 4
Step 6
How$To:
1. Open exercise file: vi insert-files.txt2. Type j four times to place the cursor on the line above where
you want to insert an existing file.3. Press Esc to switch to command mode.4. Type :r ~/section-2.txt5. Press Enter/Return.6. The file will be inserted below the line with the cursor.
! Chapter 4: Editing "
Page 59
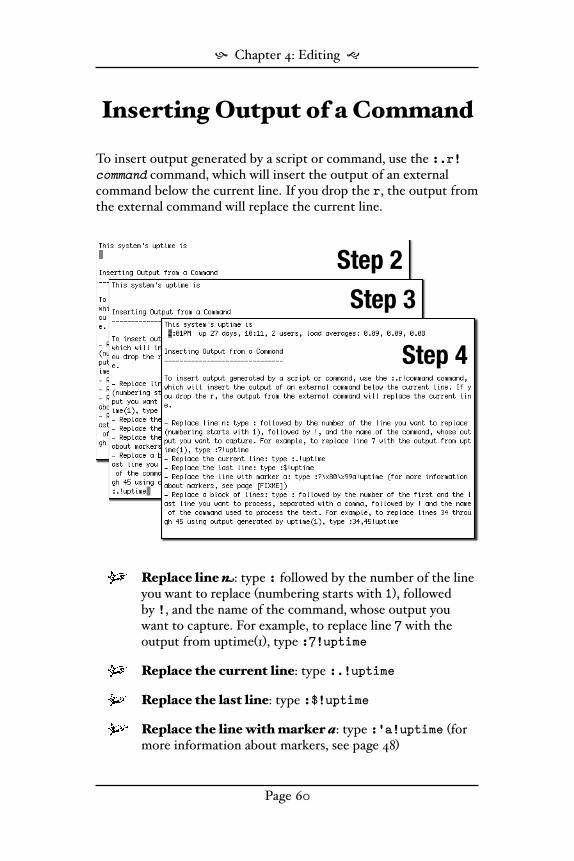
Inserting Output of a Command
To insert output generated by a script or command, use the :.r!command command, which will insert the output of an external command below the current line. If you drop the r, the output from the external command will replace the current line.
Step 2
Step 3
Step 4
Replace line !: type : followed by the number of the line you want to replace #numbering starts with 1$, followed by !, and the name of the command, whose output you want to capture. For example, to replace line 7 with the output from uptime#1$, type :7!uptime
Replace the current line: type :.!uptime
Replace the last line: type :$!uptime
Replace the line with marker a: type :’a!uptime #for more information about markers, see page 48$
! Chapter 4: Editing "
Page 60
Replace a block of lines: type : followed by the number of the first and the last line you want to process, separated with a comma, followed by ! and the name of the command used to process the text. For example, to replace lines 34 through 45 using output generated by uptime#1$, type :34,45!uptime
Replace all lines: type :%!uptime
How$To:
1. Press Esc to switch to command mode.2. Place the cursor on the line above where you want to insert
output from a command, e.g. uptime#1$.3. Type :.!uptime4. Press Enter/Return.
Processing Text Using External Commands
You can send part or all of the current file for processing by an external command and capture the results with the :!command command.
Process line !: type : followed by the number of the line you want to process #numbering starts with 1$, followed by !, and the name of the command. For example, to process line 7 using fmt#1$ to wrap lines on the 65th column, type :7!fmt 65
Process the current line: type :.!fmt 65
Process the last line: type :$!fmt 65
Process the line with marker a: type :’a!fmt 65 #for more information about markers, see page 48$
Process a block of lines: type : followed by the numbers of the first and the last line you want to process, separated with a comma, followed by ! and the name of the command
! Chapter 4: Editing "
Page 61
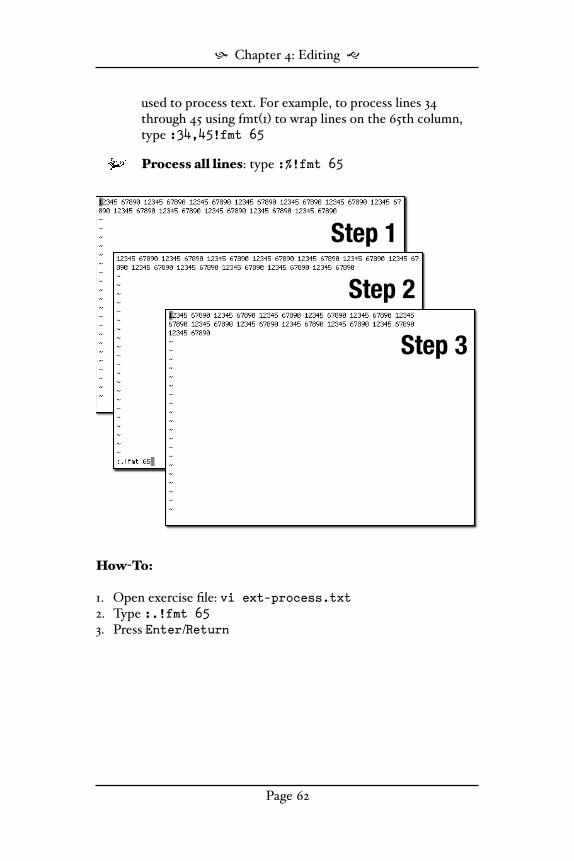
used to process text. For example, to process lines 34 through 45 using fmt#1$ to wrap lines on the 65th column, type :34,45!fmt 65
Process all lines: type :%!fmt 65
Step 1
Step 2
Step 3
How$To:
1. Open exercise file: vi ext-process.txt2. Type :.!fmt 653. Press Enter/Return
! Chapter 4: Editing "
Page 62
Changing Text
The way vi#1$ implements text editing functionality may catch you by surprise with its clear distinction between text entry and editing.
When you enter text, you work in insert mode, which o%ers very limited editing functionality. You can use the arrow keys to move back and forth, and Backspace or Del to make small changes to any text you typed since the last switch to insert mode, but that’s about all you can do.
To make any serious changes you need to switch to command mode and use c, C, cc , r, or R.
The c command has to be followed by one of the motion commands listed in Table 2: Motion commands on page 66. These commands are used to tell vi#1$ how much of the existing text ought to be replaced with what you are going to type. For example, to change two words from the cursor onwards, type c2w. The automatically inserted $ character marks the end of the region of text about to be a%ected by your typing.
There is no need to type exactly the same number of characters to replace the previous text, vi#1$ will replace the marked string with as many characters, words, or lines as you choose to type and make the necessary adjustments to the rest of the text. Should the screen become garbled in the process, Ctrl+l #lowercase letter L$ will clean it up.
The other two c commands are handy shortcuts. To change text up to the end of line, use C. If c or C are not convenient enough, you can change the whole line with cc.
Whenever you change something using the commands discussed in this section, the old text gets placed into the default text storage register. To avoid overwriting it with the next change or cut you make, you can tell vi#1$ to place the old text in one of its many named registers. To do so, precede the commands with “x, where x is the one"character register name. For example, if you want to replace two words with something else and keep the originals in register t, type: “tc2w
! Chapter 4: Editing "
Page 63

Step 1
Step 3
Step 4
Step 5
Step 6
Step 7
Step 8
Step 9
Step 10
Step 11
Step 12
Step 13
! Chapter 4: Editing "
Page 64
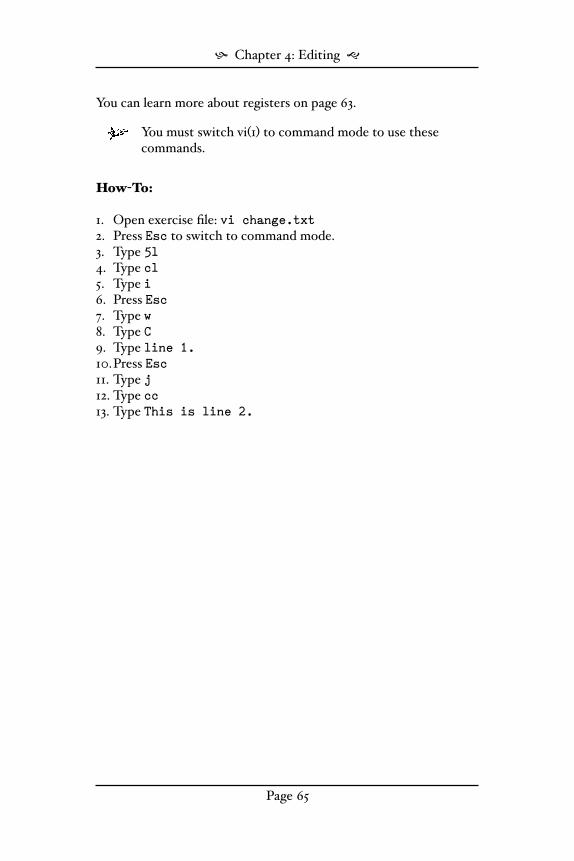
You can learn more about registers on page 63.
You must switch vi#1$ to command mode to use these commands.
How$To:
1. Open exercise file: vi change.txt2. Press Esc to switch to command mode.3. Type 5l4. Type cl5. Type i6. Press Esc7. Type w8. Type C9. Type line 1.10.Press Esc11. Type j12. Type cc13. Type This is line 2.
! Chapter 4: Editing "
Page 65
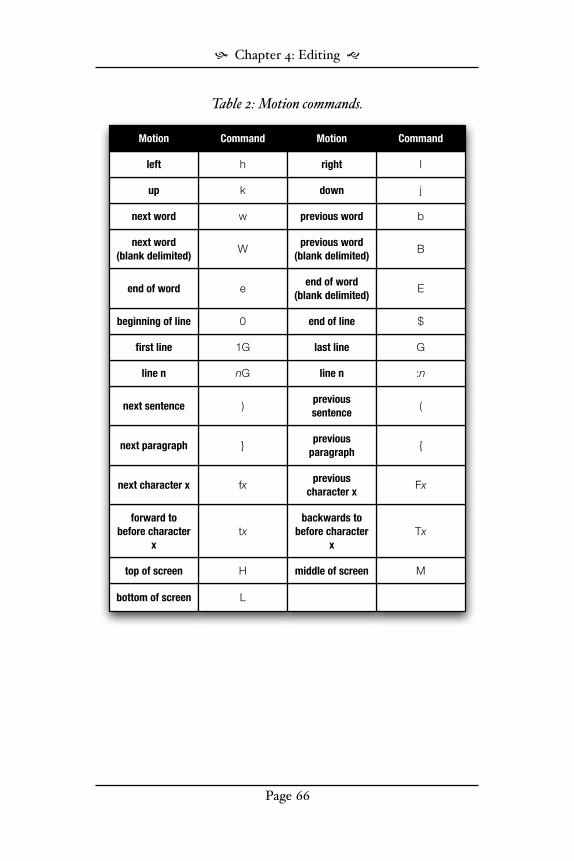
Table 2: Motion commands.
bottom of screen L
H middle of screentop of screen M
Txtxbackwards to
before character
x
forward to
before character
x
fxprevious
character xFxnext character x
} {previous
paragraphnext paragraph
previous
sentence()next sentence
line n line n :nnG
first line last line G1G
end of line0 $beginning of line
end of word
(blank delimited)Eeend of word
Bprevious word
(blank delimited)
next word
(blank delimited)W
w bnext word previous word
downk jup
lhleft right
CommandMotionCommandMotion
! Chapter 4: Editing "
Page 66
Replacing Text
When you are changing text with the ‘c’ commands, the only part of the text that gets deleted and overwritten is the part that you described using the motion commands listed in Table 2: Motio& commands on page 66. That’s a lot of typing that not everyone wants to do. Sometimes it is more convenient to switch to ‘overtype’ mode and replace characters as you type along.
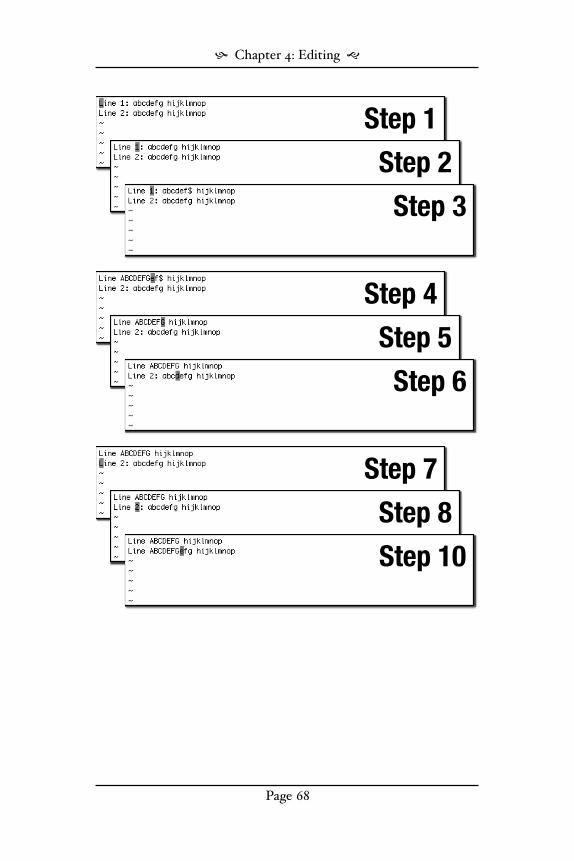
There are two text editing commands, r and R, which come in handy when you want to replace one #r$ or more #R$ characters. Unlike c or C, which replace the specified amount of text with any number of characters, r replaces the character under the cursor and then automatically switches back to command mode, while R overwrites all characters under cursor until you press Esc.
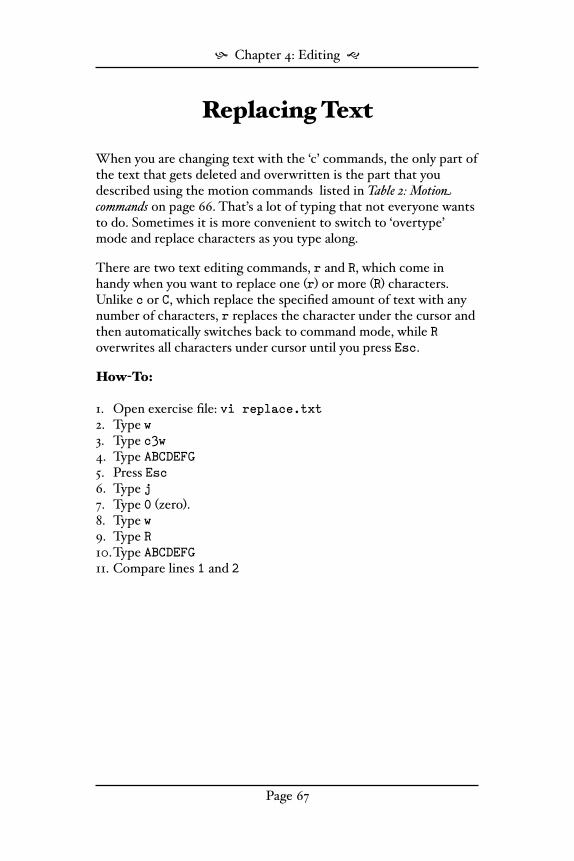
How$To:
1. Open exercise file: vi replace.txt2. Type w3. Type c3w4. Type ABCDEFG5. Press Esc6. Type j7. Type 0 #zero$.8. Type w9. Type R10.Type ABCDEFG11. Compare lines 1 and 2
! Chapter 4: Editing "
Page 67
Step 1
Step 2
Step 3
Step 4
Step 5
Step 6
Step 7
Step 8
Step 10
! Chapter 4: Editing "
Page 68
Replacing One or More Characters with Any Number of
Characters
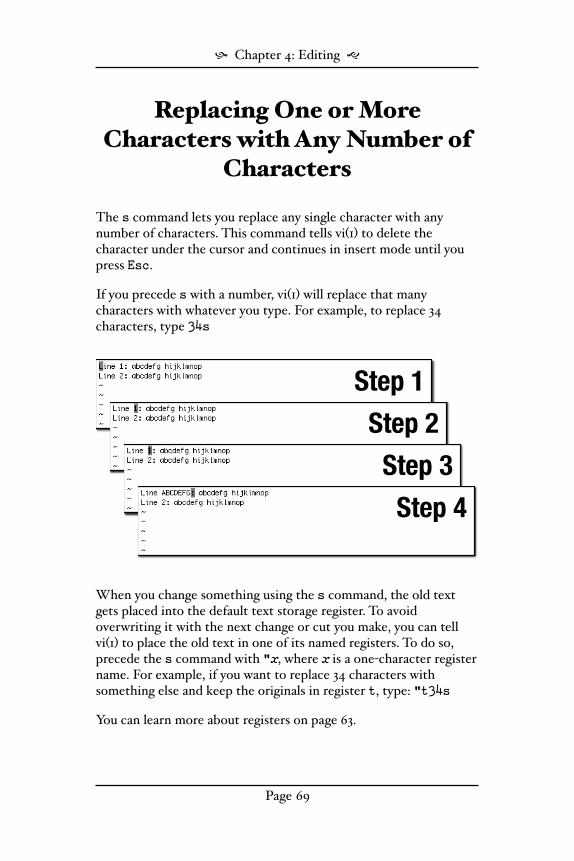
The s command lets you replace any single character with any number of characters. This command tells vi#1$ to delete the character under the cursor and continues in insert mode until you press Esc.
If you precede s with a number, vi#1$ will replace that many characters with whatever you type. For example, to replace 34 characters, type 34s
Step 1
Step 2
Step 3
Step 4
When you change something using the s command, the old text gets placed into the default text storage register. To avoid overwriting it with the next change or cut you make, you can tell vi#1$ to place the old text in one of its named registers. To do so, precede the s command with “x, where x is a one"character register name. For example, if you want to replace 34 characters with something else and keep the originals in register t, type: “t34s
You can learn more about registers on page 63.
! Chapter 4: Editing "
Page 69

You must switch vi#1$ to command mode to use this command.
How$To:
1. Open exercise file: vi s-replace.txt2. Type w3. Type s4. Type ABCDEFG
Replacing the Current Line
If you would like to replace the current line with a new one in a single action, use the S command. The line will be deleted and vi#1$ will continue in insert mode until you press Esc.
You can precede S with the number of line you want to replace. For example, to replace 72 lines, type 72S
Step 1
Step 3
Step 4
Whenever you change something using S, the old text gets placed into the default text storage register. To avoid overwriting it with the next change or cut you make, you can tell vi#1$ to place the old text in one of its many named registers. To do so, precede the S command with “x, where x is the one"character register name. For example, if you want to replace two words with something else and keep the originals in register t, type: “t72S
! Chapter 4: Editing "
Page 70
You can learn more about registers on page 63.
You must switch vi#1$ to command mode to use this command.
How$To:
1. Place the cursor on the line you want to replace.2. Press Esc once to switch to the command mode.3. Type S4. Type anything you like to replace the old line.
Deleting Text
There is a multitude of commands designed to help you delete characters, words, lines, and whole blocks of text.
Deleting Characters:
Delete a character under the cursor: type x
Delete ! characters, starting with the one under the cursor: type the number of characters to be deleted and then type x
Delete a character to the left of the cursor: press X
Delete ! characters to the left: type the number of characters to be deleted and then press X
Delete all characters, from the one under the cursor to the end of the line: press D. An alternative to D is d$
Delete all characters, from the beginning of the line to the cursor: type d0
! Chapter 4: Editing "
Page 71

Step 1
Step 2
Step 3
Step 4
Step 5
Step 6
Step 7
Step 8
Step 9
Step 10
Step 11
Step 12
Step 13
Step 14
Step 15
! Chapter 4: Editing "
Page 72
How$To:
1. Open exercise file: vi d-char.txt2. Type 10l3. Type x4. Type j5. Type 5x6. Type j7. Type X8. Type j9. Type 4X10.Type j11. Type D12. Type j13. Type d$14. Type j15. Type d0
Deleting Words:
Delete a word: type dw
Delete ! words: type d followed by the number of words to be deleted followed by w
Delete the word to the left of the cursor: type db
Deleting Text Using Motion Commands:
Use motion commands to delete bigger chunks of text in a more convenient way. For example, to delete three characters to the left, type d3h; to remove four paragraphs, type d4}; etc. To see more examples of motion commands, consult Table 2 on page 63.
Deleting Lines:
Delete the current line: type dd or :.d
Delete ! lines: type the number of lines to be deleted and then type dd
! Chapter 4: Editing "
Page 73
Deleting Lines Using Ranges:
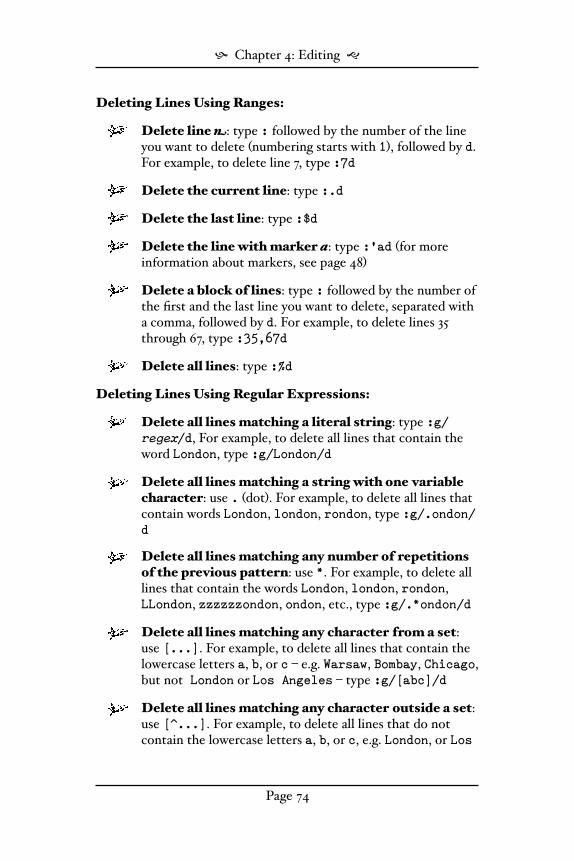
Delete line !: type : followed by the number of the line you want to delete #numbering starts with 1$, followed by d. For example, to delete line 7, type :7d
Delete the current line: type :.d
Delete the last line: type :$d
Delete the line with marker a: type :’ad #for more information about markers, see page 48$
Delete a block of lines: type : followed by the number of the first and the last line you want to delete, separated with a comma, followed by d. For example, to delete lines 35 through 67, type :35,67d
Delete all lines: type :%d
Deleting Lines Using Regular Expressions:
Delete all lines matching a literal string: type :g/regex/d, For example, to delete all lines that contain the word London, type :g/London/d
Delete all lines matching a string with one variable character: use . #dot$. For example, to delete all lines that contain words London, london, rondon, type :g/.ondon/d
Delete all lines matching any number of repetitions of the previous pattern: use *. For example, to delete all lines that contain the words London, london, rondon, LLondon, zzzzzzondon, ondon, etc., type :g/.*ondon/d
Delete all lines matching any character from a set: use [...]. For example, to delete all lines that contain the lowercase letters a, b, or c , e.g. Warsaw, Bombay, Chicago, but not London or Los Angeles , type :g/[abc]/d
Delete all lines matching any character outside a set: use [^...]. For example, to delete all lines that do not contain the lowercase letters a, b, or c, e.g. London, or Los
! Chapter 4: Editing "
Page 74
Angeles, but not Warsaw, Bombay, Chicago , type :g/[^abc]/d
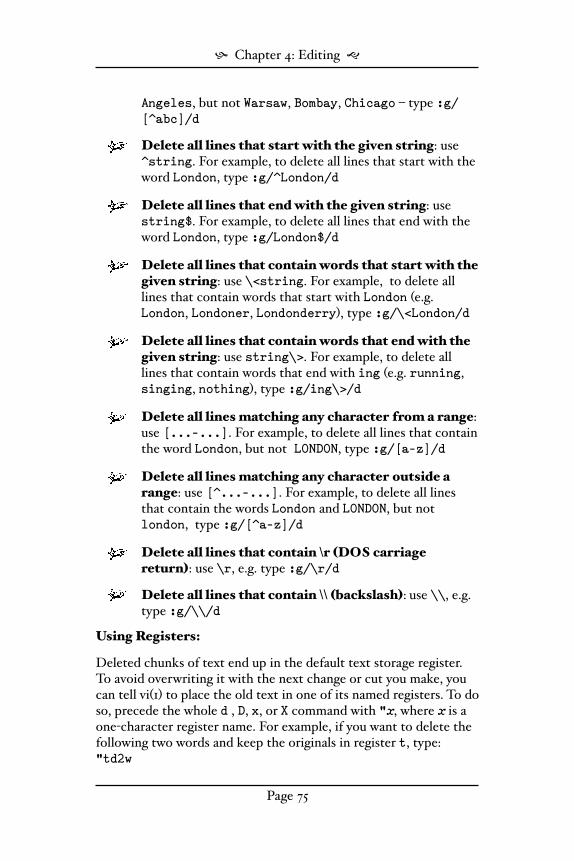
Delete all lines that start with the given string: use ^string. For example, to delete all lines that start with the word London, type :g/^London/d
Delete all lines that end with the given string: use string$. For example, to delete all lines that end with the word London, type :g/London$/d
Delete all lines that contain words that start with the given string: use \<string. For example, to delete all lines that contain words that start with London #e.g. London, Londoner, Londonderry$, type :g/\<London/d
Delete all lines that contain words that end with the given string: use string\>. For example, to delete all lines that contain words that end with ing #e.g. running, singing, nothing$, type :g/ing\>/d
Delete all lines matching any character from a range: use [...-...]. For example, to delete all lines that contain the word London, but not LONDON, type :g/[a-z]/d
Delete all lines matching any character outside a range: use [^...-...]. For example, to delete all lines that contain the words London and LONDON, but not london, type :g/[^a-z]/d
Delete all lines that contain \r !DOS carriage return": use \r, e.g. type :g/\r/d
Delete all lines that contain \\ !backslash": use \\, e.g. type :g/\\/d
Using Registers:
Deleted chunks of text end up in the default text storage register. To avoid overwriting it with the next change or cut you make, you can tell vi#1$ to place the old text in one of its named registers. To do so, precede the whole d , D, x, or X command with “x, where x is a one"character register name. For example, if you want to delete the following two words and keep the originals in register t, type: “td2w
! Chapter 4: Editing "
Page 75
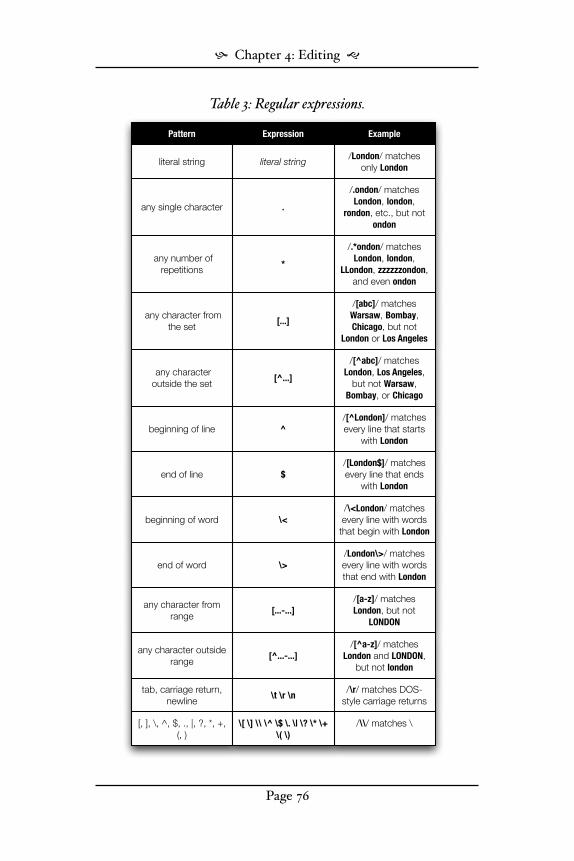
Table 3: Regular expressions.
[, ], \, ^, $, ., |, ?, *, +, (, )
/\\/ matches \\[ \] \\ \^ \$ \. \| \? \* \+
\( \)
tab, carriage return, newline
\t \r \n/\r/ matches DOS-
style carriage returns
[^...-...]any character outside
range
/[^a-z]/ matches London and LONDON,
but not london
[...-...]any character from
range
/[a-z]/ matches London, but not
LONDON
/London\>/ matches every line with words that end with London
\>end of word
/\<London/ matches every line with words
that begin with London
\<beginning of word
end of line $
/[London$]/ matches every line that ends
with London
beginning of line ^
/[^London]/ matches every line that starts
with London
[^...]
/[^abc]/ matches London, Los Angeles,
but not Warsaw, Bombay, or Chicago
any character outside the set
any character from the set
/[abc]/ matches Warsaw, Bombay, Chicago, but not
London or Los Angeles
[...]
* any number of
repetitions
/.*ondon/ matches London, london,
LLondon, zzzzzzondon, and even ondon
/.ondon/ matches London, london,
rondon, etc., but not ondon
any single character .
/London/ matches only London
literal string literal string
ExampleExpressionPattern
! Chapter 4: Editing "
Page 76
Search and Replace
Finer or global changes to text are best done with the help of regular expressions. The command used to search and replace strings is
! :s/regex/replacement/flags
The regex pattern is one of those listed in Table 3: Regular expressions on page 76. The replacement string is the literal string you want to put in place of the regular expression you are searching for.
You can control the behavior of :s with two flags: g #replace all occurrences of regex on the same line without asking to confirm$ and c #ask for permission for every match$. You can use either or both flags in the same command.
If you ever need to repeat the last :s command, type &
You must switch vi#1$ to command mode to use these commands.
Restricting Replacements Using Ranges:
Restrict replacements to line !: type : followed by the number of the line you want to run :s on, followed by s/regex/replacement/flags. For example, to limit replacements to line 7, type: :7s/london/London/g
Restrict replacements to the current line: type :. followed by s/regex/replacement/flags. For example, type: :.s/london/London/g
Restrict replacements to the last line: type :$ followed by s/regex/replacement/flags. For example, type: :$s/london/London/g
Restrict replacements to the line with marker a: type :’a followed by s/regex/replacement/flags: For example, type: :’as/london/London/g
! Chapter 4: Editing "
Page 77
Restrict replacements to a block of lines: type : followed by the numbers of the first and the last line of the block you want to replace strings on, separated with a comma followed by s/regex/replacement/flags. For example, to replace strings on lines 35 through 67, type::35,67s/london/London/g
Run search and replace on all lines, type :% followed by s/regex/replacement/flags, e.g. :%s/london/London/g
Replacing Text Using Regular Expressions:
Replace all literal string matches, type:s/regex/string/g. For example, to replace all occurrences of London with Manchester, type :s/London/Manchester/g
Remove all pattern matches, type :s/regex//g. For example, to remove all occurrences of London, type :s/London//g
(This trick works with all regex patterns.$
Replace all . !dot" pattern matches: for example, to replace all occurrences of the words London, london, rondon, etc. with LONDON, type :s/.ondon/LONDON/g
Replace all matches of any number of repetitions of the previous pattern: use *. For example, to replace all occurrences of the words London, london, rondon, LLondon, zzzzzzondon, ondon, etc. with LONDON, type:s/.*ondon/LONDON/g
Replace all matches of any character from a set: use [...]. For example, to replace letters a, b, and c with -, e.g. to change the words Warsaw, Bombay, Chicago, to W-rs-w, Bom--y, Chi--go, type :s/[abc]/-/g
Replace all matches of any character outside a set: use [^...]. For example, to replace all letters other than a, b, c with -, e.g. to change words Warsaw, Bombay,
! Chapter 4: Editing "
Page 78
Chicago, to -a--a-, ---ba-, ---ca--, type:s/[^abc]/-/g
Replace all matches of the string at the beginning of a line: use ^string. For example, to replace london with London on every line that starts with london, type:s/^london/London/g
Replace all matches of the string at the end of a line: use string$. For example, to replace london with London on every line that ends with london, type :s/london$/London/g
Replace all matches of words that start with the given string: use \<string. For example, to replace all occurrences of London with Manchester at the start of similar words #e.g. London, Londoner, Londonderry$, type :s/\<London/Manchester/g
Replace all matches of words that end with the given string: use string\>. For example, to replace all occurrences of ing with ING at the end of similar words #e.g. running, singing, nothing$, type :s/ing\>/ING/g
Replace all matches of any character from a range: use [...-...]. For example, to replace all occurrences of London with L-----, type :s/[a-z]/-/g
Replace all matches of any character outside a range, use [^...-...]. For example, to replace all occurrences of London with -ondon, type :s/[^a-z]/-/g
Remove all occurrences of \r !DOS carriage return", type :s/\r*//g
Replace all occurrences of \\ !backslash" with the word backslash, type: :s/\\/backslash/g
Replace all lines matching a regular expression from the set that matches another regular expression, type :g/regex1/s/regex2/string/g. For example, to replace all occurrences of York with Orleans on every line
! Chapter 4: Editing "
Page 79
that matches New York, type :g/New York/s/York/Orleans/g
Cut, Copy, and Paste
Just like anything else in vi#1$, the cut, copy and paste commands are implemented in a way that may surprise you. First of all, there is no single cut/copy clipboard. Second, there is no clipboard at all! What you get instead is over sixty registers. Whatever their names, they work like sixty"plus clipboards, holding any text that you change, delete, or yank #aka. copy$.
vi#1$ does not o%er multi"level registers, but with sixty of them, that’s not too much of a problem.
The following list is a short summary of pointers to the pages that contain more information:
To cut text, use the delete commands #see page 71$ or change commands #see page 63$.
To copy text, use the yank commands #see page 80$.
To paste text, use the put commands #see page 84$.
Copying Text
Copying text in vi#1$ is called yanking. Whatever the terminology the principle of operation is the same.
There is a multitude of commands designed to help you delete characters, words, lines, and whole blocks of text. You will find them listed below.
Copying Characters:
Copy a character under the cursor: type yl and then press either Esc or Enter/Return
! Chapter 4: Editing "
Page 80
Copy ! characters, starting with the one under the cursor: type y followed by the number of characters to be copied followed by l. Then press either Esc or Enter/Return
Copy a character to the left of the cursor: type y1h and press either Esc or Enter/Return
Copy ! characters to the left: type y followed by the number of characters to be copied followed by h. Then press either Esc or Enter/Return
Copy all characters, from the one under the cursor to the end of the line: type y$ and then press either Esc or Enter/Return
Copy all characters, from the beginning of the line to the character before the cursor: type y0 and then press either Esc or Enter/Return
Copying Words:
Copy a word: type yw and then press either Esc or Enter/Return
Copy ! words: type y followed by number of words to be copied, type w. Then press either Esc or Enter/Return
Copy the word to the left of the cursor: type yb and then press either Esc or Enter/Return
Copy ! words to the left of the cursor: type y followed by the number of words to be copied followed by b. Then press either Esc or Enter/Return
Copying Text Using Motion Commands:
Use motion commands to copy bigger chunks of text in a more convenient way. For example, to copy three characters to the left, type y3h; to copy four paragraphs, type y4}; etc.
To see more examples of motion commands, consult Table 2 on page 66.
! Chapter 4: Editing "
Page 81
Copying Lines:
Copy the current line: type yy, :.y, or Y
Copy ! lines: type the number of lines to be copied followed by yy or Y
Copying Lines Using Ranges:
Copy line !: type : followed by the number of the line you want to copy #numbering starts with 1$, followed by y. For example, to copy line 7, type :7y
Copy the current line: type :.y
Copy the last line: type :$y
Copy the line with marker a: type :’ay #for more information about markers, see page 48$
Copy a block of lines: type : followed by the numbers of the first and last line you want to yank, separated with a comma, followed by y. For example, to copy lines 35 through 67, type :35,67y
Copy all lines: type :%y
Copying Lines Using Regular Expressions:
Copy all lines matching a literal string: type :g/regex/y. For example, to copy all lines that contain the word London, type :g/London/y
Copy all lines matching a string with one variable character: use . #dot$. For example, to copy all lines that contain the words London, london, rondon, type :g/.ondon/y
Copy all lines matching any number of repetitions of the previous pattern: use *. For example to copy all lines that contain the words London, london, rondon, LLondon, zzzzzzondon, ondon, etc., type :g/.*ondon/y
! Chapter 4: Editing "
Page 82
Copy all lines matching any character from a set: use [...]. For example, to copy all lines that contain the words Warsaw, Bombay, Chicago, but not London or Los Angeles, type :g/[abc]/y
Copy all lines matching any character outside a set: use [^...]. For example, to copy all lines that contain the words London, or Los Angeles, but not Warsaw, Bombay, Chicago, type :g/[^abc]/y
Copy all lines that start with the given string: use ^string. For example, to copy all lines that start with the word London, type :g/^London/y
Copy all lines that end with the given string: use string$. For example, to copy all lines that end with the word London, type :g/London$/y
Copy all lines that contain words that start with the given string: use \<string. For example, to copy all lines that contain words that start with London #e.g. London, Londoner, Londonderry$, type :g/\<London/y
Copy all lines that contain words that end with the given string: use string\>. For example, to copy all lines that contain words that end with ing #e.g. running, singing, nothing$, type :g/ing\>/y
Copy all lines matching any character from a range: use [...-...]. For example, to copy all lines that contain words London, but not LONDON, type :g/[a-z]/y
Copy all lines matching any character outside a range: use [^...-...]. For example, to copy all lines that contain the words London, and LONDON but not london, type :g/[^a-z]/y
Copy all lines that contain \r !DOS carriage return": use \r, e.g. type :g/\r/y
Copy all lines that contain \\ !backslash": use \\, e.g. type :g/\\/y
! Chapter 4: Editing "
Page 83
Using Registers:
Copied blocks of text end up in the default text storage register. To avoid overwriting them with the next change or cut you make, you can tell vi#1$ to place the old text in one of its named registers. To do so, precede the whole y or Y command with “x, where x is a one"character register name. For example, if you want to copy the following two words and keep the originals in register t, type: “ty2w
Pasting Text
Cut, deleted, changed, or copied text will be stored in the default register, unless you instruct vi#1$ otherwise. Pasting stored text is called putting, but the principles of operation are the same.
To paste text, use the p and P commands:
Paste text after the cursor or after line: type p
Paste text before cursor or before the line: type P
You must switch vi#1$ to command mode to use this command.
Using Registers:
When you copy or delete chunks of text, they end up in the default text storage register. You can change that behavior by putting them in named registers using the “x notation, where x is a one"character register name. For example, if you want to delete the two words following the cursor and keep the originals in register t, type: “td2w
Pasting text stored in a named register is done with either “xp or “xP. If we were to continue the example, whatever was stored in register t could be pasted with “tp or “tP
! Chapter 4: Editing "
Page 84
Joining Lines
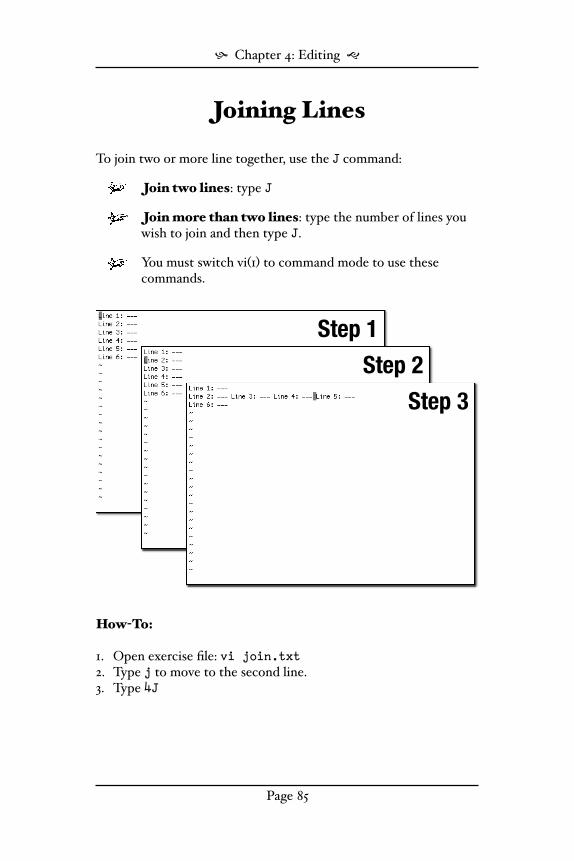
To join two or more line together, use the J command:
Join two lines: type J
Join more than two lines: type the number of lines you wish to join and then type J.
You must switch vi#1$ to command mode to use these commands.
Step 1
Step 2
Step 3
How$To:
1. Open exercise file: vi join.txt2. Type j to move to the second line.3. Type 4J
! Chapter 4: Editing "
Page 85
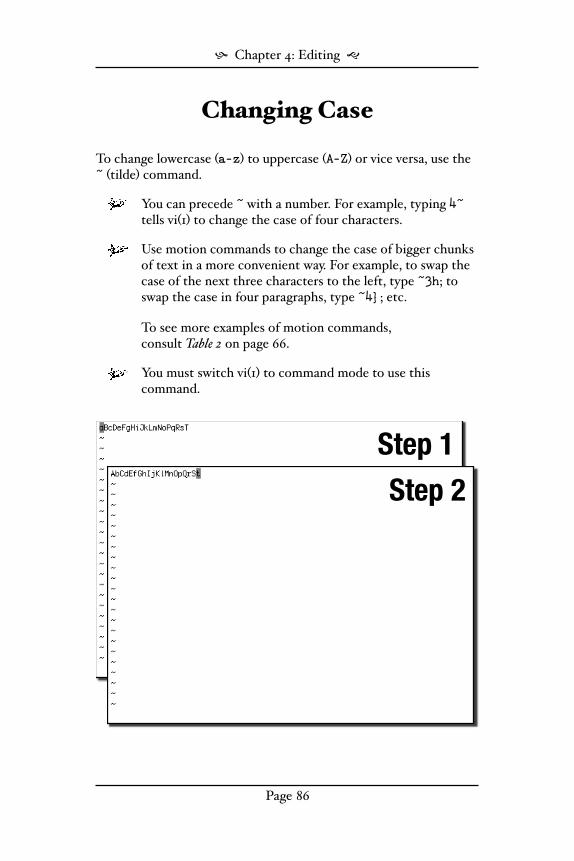
Changing Case
To change lowercase #a-z$ to uppercase #A-Z$ or vice versa, use the ~ #tilde$ command.
You can precede ~ with a number. For example, typing 4~ tells vi#1$ to change the case of four characters.
Use motion commands to change the case of bigger chunks of text in a more convenient way. For example, to swap the case of the next three characters to the left, type ~3h; to swap the case in four paragraphs, type ~4}; etc.
To see more examples of motion commands,consult Table 2 on page 66.
You must switch vi#1$ to command mode to use this command.
Step 1
Step 2
! Chapter 4: Editing "
Page 86
How$To:
1. Open exercise file: vi tilde.txt2. Type 20~ and you should see all letters change case.
Incrementing and Decrementing Numbers
There is a quick way to increment or decrement numbers in vi#1$: Position the cursor on the first digit of the numeric value you want to change:
Increment a number: press Ctrl+a
Decrement a number: press Ctrl+x
You must switch vi#1$ to command mode to use this command.
Repeating Actions
To repeat the last action, type . #dot$. To repeat the last action any number of times, type the number of repetitions followed by . #dot$.
You must switch vi#1$ to command mode to use this command.
Undo / Redo
To undo the last action, switch to the command mode and type u. There is no multi"step undo/redo history in vi#1$, but you can revert all changes made on the current line with U. There’s a gotcha, you can only use U, if the cursor is still on the line for which you want to undo changes. To redo #revert the e%ects of undo$, type u or U again.
You must switch vi#1$ to command mode to use this command.
! Chapter 4: Editing "
Page 87

Chapter 5
Tricks

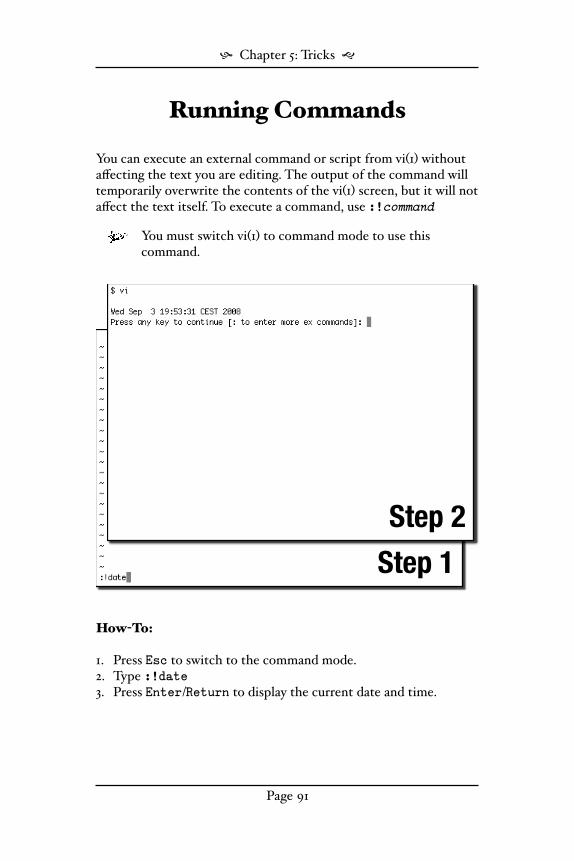
Running Commands
You can execute an external command or script from vi#1$ without a%ecting the text you are editing. The output of the command will temporarily overwrite the contents of the vi#1$ screen, but it will not a%ect the text itself. To execute a command, use :!command
You must switch vi#1$ to command mode to use this command.
Step 1
Step 2
How$To:
1. Press Esc to switch to the command mode.2. Type :!date3. Press Enter/Return to display the current date and time.
! Chapter 5: Tricks "
Page 91
Sending vi!1" to the Background
Another way to get out of vi#1$ to do some work on the command line is to use process suspension. To send vi#1$ to the background, press Ctrl+z, to bring it back, type fg on the command line.
Shell Access
If you need to do some work on the system command line but do not want to leave vi#1$ use the :sh command.
To go back to vi#1$, type exit and press Enter/Return.
You must switch vi#1$ to command mode to use this command.
How$To:
1. Press Esc to switch to command mode.2. Type :sh3. Press Enter/Return.4. Type ls /bin5. Press Enter/Return.6. Type exit7. Press Enter/Return.
! Chapter 5: Tricks "
Page 92
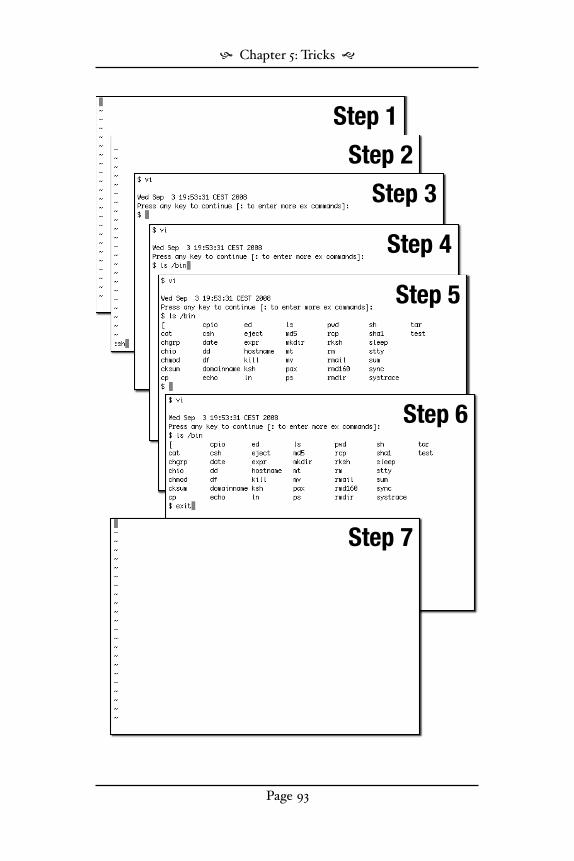
Step 1
Step 2
Step 3
Step 4
Step 5
Step 6
Step 7
! Chapter 5: Tricks "
Page 93


Index

A
arrow keys, 29'30, 63
ASCII, 41
B
background processes, 92
bu%ers, 14, 55current, 55switching between, 14
C
canceling vi#1$ commands, 5
changes, abandon all, 5
changing #swapping$, case, 86'87
changing, 41, 48, 63, 67, 69'70, 75, 77'78, 84, 87characters, 41, 48lines, 63words, 63
clipboard, 80
command line, 9, 13, 92
command mode, 5'6, 14'26, 29'30, 32'34, 36, 38, 40, 43'44, 46'48, 50'51, 58'59, 61, 63, 65, 67 70'71, 77, 84'87, 91'92
command prompt, 6
commands, external, 60'61, 91output of,
inserting, 60'61reading, 91
running, 91
copying, 80'84characters, 80'81
lines, 82'83words, 81
cursor, 9, 27, 29'30, 32'34, 36'41, 43'51, 57, 55, 59, 61, 63, 67, 69, 71, 73, 80'81, 84, 87
cursor movement, 9, 27, 29'30, 32'34, 36'41, 43'51, 57, 55, 59, 61, 63, 67, 69, 71, 73, 80'81, 84, 87between
braces, 47'48brackets, 47'48markers, 48paragraphs, 45parentheses, 47'48sentences, 44words, 41
& charactersleft, 30right, 30& lines down, 30, 34
from the top of the screen, 38& lines up, 30, 34
from the bottom of the screen, 38
one character,left, 29right, 29
one line,down, 29up, 29
one screenbackward, 38forward, 38
relative to the screen, 38to
character x,after previous, 40before next, 40next, 40previous, 40
column &, 32line,
end of, 33'34
! Index "
Page 97
first, 34last, 34next, 34previous, 34start of the line, 33'34
paragraph,next, 45'46previous, 45'46
screen,bottom of, 38, 51middle of, 38, 51top of, 38, 51
sentence, next, 44previous, 44
word,end of, 43next, 43previous, 43
screen, half adown, 38, 40up, 38, 40
search match,next, 50previous, 50
cutting text, see deleting
D
deleting, 67, 69'71, 73'75, 80, 84characters, 71lines, 70'71, 73'75words, 71, 73
display, adjusting, 51
E
editing, text, 10'11, 13'14, 17, 22'24, 53, 55, 63, 67, 91
entering, text, 55, 63
ex mode, 6
F
file operations, 6
filename, 11'12 , 17, 59changing, 17wildcard, 11'12
testing, 11
file, 10'11, 13'24, 26, 59access path, 10, 19, 59appending to, 20
a part of, to another, 21current, 20'22, 24'26, 59
forcing to save and quit, 23editing, 10'11forced saving the current, 16inserting, 59location, 17opening, 10, 14
opening multiple, 11read"only, 23recovery, 26saving, 22
a part of, 18under a di%erent name, 19
current, 15quitting, 22under a di%erent name, 17
switching between, 13
I
insert mode, 6, 29, 55, 58, 63, 69'70
inserting, 55, 57empty lines, 57
above the current line, 57below the current line, 57
text, 55
J
joining, lines, 85
! Index "
Page 98
L
lines, 6, 21, 61blocks of, 21, 61long, 6
line, 9, 30, 36, 70current, 60empty, 9number, 36, 70source, 30target, 30
lowercase, 86
M
markers, 9, 48, 60'61,63, 77, 82~, 9end of region, 63
motion commands, 63, 66'67, 73, 81, 86character x,
backward to before, 66forward to before, 66next, 66previous, 66
down, 66left, 66line,
beginning of, 66end of, 66first, 66last, 66&th, 66
paragraph,next, 66previous, 66
right, 66screen,
bottom of, 66 middle of, 66top of, 66
sentence,next, 66previous, 66
up, 66word,
end of, 66next, 66previous, 66
N
numbers, 87decrementing, 87incrementing, 87
O
out of control, 5
overtype mode, 67
P
panic, 5
pasting, 80, 84text,
aftercurrent line, 84cursor, 84
beforecurrent line, 84cursor, 84
process suspension, 92
processing text with external commands, 61'62
putting, see pasting
R
ranges, 18'19, 21, 61, 74, 77, 82lines in,
first, 18'19last, 18'19
redo, 87
! Index "
Page 99

register, 65, 69'71, 75, 80, 84default, 63, 69'70, 75, 84
regular expressions, 36, 50, 74'79,82'83
^, 76^string, 75'76, 79, 83?, 76., 74, 76, 78, 82#, 76$, 76(^..."...), 75, 76, 79, 83(^...), 74'76, 78'79, 83(, 76(..."...), 75'76, 79, 83(...), 74, 76, 78, 83), 76*, 74, 76, 78, 82\, 76\\, 75, 79, 83\<string, 75'76, 79, 83\n, 76\r, 75'76, 79, 83\t, 76+, 76|, 76-, 76any character from the given set,
74, 78, 83any character from the set, 76any character outside range, 76any character outside the given
set, 74'75, 78'79, 83any character outside the set, 76any characters from range, 76any number of repetitions of the
previous pattern, 74, 78, 82any number of repetitions, 76any single character #.$, 74, 76, 78,
82backslash #\$, 75, 79, 83beginning of line #^$, 75'76, 79, 83beginning of word, 75'76, 79, 83carriage return #\r$, 76
characters in range, 75, 79, 83characters outside range, 75, 79, 83DOS carriage return, 75, 79, 83end of line #-$, 75'76, 79, 83end of word, 75'76, 79, 83newline #\n$, 76literal string, 74, 76, 82string\>, 75'76, 79, 83string-, 75'76, 79, 83tab #\t$, 76
repeating actions, 77, 87
replacing, 60'61, 63, 67, 69'71, 77'80characters, 69lines,
a block of, 61all, 61current, 60, 70last, 60&th, 60old, 71with marker, 60
text, 67old with new, 63on all lines, 78on line &, 77on the current line, 77on the last line, 77on the line with marker, 77using regular expressions, 78on lines matching regular expressions, 79'80within a block of lines, 78
words, 63
root, 16, 23
Q
quitting, see !i, quitting
S
screen, 6, 38, 51, 63, 91unscrambling, 6
! Index "
Page 100

scripts, 91
searching, 50, 77backward, 50forward, 50
shell access, 92
strings of characters, see characters, strings of
strings, 50, 63, 77literal, 50, 77with markers, 63
T
text editor, 6
tricks, 89
U
undo, 87history, 87
uppercase, 86
V
vi, 9'11, 22, 24'25, 92forcing to quit without saving, 25quitting without saving, 24quitting, 22, 92starting, 9'11
W
way out, 5
whitespace, 43
wrapping lines, 62
Y
yank, see yankingyanking, 80
! Index "
Page 101