version r95 - kaseya
TRANSCRIPT

February 4, 2021
DDiissccoovveerryy
Quick Start Guide
Version R95
English
Copyright Agreement
The purchase and use of all Software and Services is subject to the Agreement as defined in Kaseya’s “Click-Accept” EULATOS as updated from time to time by Kaseya at http://www.kaseya.com/legal.aspx. If Customer does not agree with the Agreement, please do not install, use or purchase any Software and Services from Kaseya as continued use of the Software or Services indicates Customer’s acceptance of the Agreement.”
©2019 Kaseya. All rights reserved. | www.kaseya.com

i
Contents

Discovery Overview
1
Contents
Discovery Overview ..................................................................................................................................... i
Discovery Module Minimum Requirements ...................................................................................... ii
Getting Started with Network Discovery ................................................................................................... ii
Domains....................................................................................................................................................... iii
Getting Started with Domain Watch ................................................................................................. iv
Managing a Synchronized Security Model ................................................................................ v
Managing Multiple Domains ....................................................................................................... v
Managing Remote Portal Access ............................................................................................... v
Configuration ...................................................................................................................................... vi
Configuration Prerequisites ...................................................................................................... vi
Configuring Probe Deployment ................................................................................................ vii
Configuring Agent Deployment ............................................................................................... viii
Configuring OU/Container Policies ......................................................................................... viii
Configuring Contact Policies .................................................................................................... ix
Configuring Computer Policies .................................................................................................. x
Configuring Group Policies ........................................................................................................ x
Configuring User Policies .......................................................................................................... xi
Configuring Alerting Profiles .................................................................................................... xii
Applying Changes ..................................................................................................................... xii
Reviewing Domain Watch Results .......................................................................................... xiii
Configuring Activation ............................................................................................................. xiii
Configuring Full Synchronization ........................................................................................... xiv
Index ........................................................................................................................................................... 15


i
Discovery Overview Discovery discovers computers and devices on individual networks or entire domains.
Network Discovery
Discovers computers and devices on individual networks.
Deploys agents to discovered machines.
Identifies SNMP-enabled devices that can be monitored using the Monitor > Assign SNMP page.
Identifies vPro-enabled machines that can be managed using the vPro module.
Integrates with Network Monitor. Agent-less devices can be monitored by Network Monitor.
Enables a device to be "promoted" to a managed asset. An Audit > View Assets page provides a consolidated view of all computers and devices managed by the VSA, regardless of the method of discovery.
Generates alerts for first-time discovery of new device names and new IP addresses.
Domain Discovery
Automatically discovers AD domains that can be synced with the VSA.
Deploys agents to discovered domain machines.
Automatically creates a VSA security hierarchy modeled after an existing domain hierarchy. Automatically keeps the VSA synchronized with all domain changes.
Automatically creates VSA users and staff member records in the VSA based on the creation of users and contacts in the domains.
Auto-populates domain user and contact information in Service Desk tickets.
Resets a domain password or enable/disables a domain user from the VSA.
Uses the industry standard LDAP protocol to safely and securely communicate with Active Directory domains.
Note: See Discovery Module Requirements (page ii).
Functions Description
Overview Displays the workflow of discovering computers and devices by network and by domain.
By Agent Discovers devices on the same network as a selected "probe" machine.
By Network Discovers computers and devices by network.
Discovered Devices Displays discovered computers and devices in table format.
Discovered Devices - Tile View
Displays discovered computers and devices in tile format.
Domain Watch Configures the integration of Discovery with Active Directory domains.
Computers Manages machine ID accounts created, based on applied Discovery computer policies, for all domains monitored by Discovery probes.
Contacts Manages staff records created, based on applied Discovery contact policies, for all domains monitored by Discovery probes.
Users & Portal Users Manages VSA users and Portal Access candidates created, based on applied Discovery group policies, for all domains

ii Contents
ii
monitored by Discovery probes.
Settings Sets options and default values that apply to the entire Discovery module.
Audit Log Displays a log of Discovery module activities.
Discovery Module Minimum Requirements Kaseya Server
The Discovery R95 module requires VSA R95.
Directory Services
Directory Services 1.2 is a feature set that can be licensed and enabled separately. The feature set provides advanced functionality in the Discovery module.
Network Probe
Microsoft Windows Server 2012, 2012 R2, 2016, 2019 (64-bit versions only)
Microsoft Windows 8, 8.1, 10 (64-bit versions only)
Domain Probe
Microsoft Windows Server 2012, 2012 R2, 2016, 2019
Microsoft Windows 8, 8.1, 10
Note: See general System Requirements
(http://help.kaseya.com/WebHelp/EN/VSA/9050000/reqs/index.asp#home.htm).
Getting Started with Network Discovery The By Network and By Agent pages discovers all computers and devices on networks that have an IP address. Any agent machine can be selected as the "probe" machine for its own network. Discovered devices can be workstations and servers without agents, SNMP devices and vPro-enabled machines. Discovered devices display on the following pages:
Discovered Devices
Discovered Devices - Tile View
Scanning Networks by Agent
This is the fastest way to scan a new network.
1. On the By Agent page, select a machine ID. Both Windows and Apple agent machines can serve as a probe agent.
2. Click the Scan Now button to scan a network immediately.
Optionally click the Schedule Scan to schedule a scan and enter additional options. For Schedule Scan, leave the network scan range blank. It will be populated automatically, based on the subnet defined for the probe agent machine.
3. Enter a network name if the selected agent hasn't scanned a network before.
4. Click the Scan button to start the scan.
View discovered devices on the Discovered Devices page.
Visit the By Network page to edit networks before you scan again.

iii
Scanning Networks by Network
1. On the By Network page select New or Edit. Enter a new network or change the name of an existing network.
2. If an agent has not already been selected for the network, select an agent. Both Windows and Apple agent machines can serve as a probe agent.
3. Leave the network scan range blank. It will be populated automatically, based on the subnet defined for the probe agent machine.
4. Optionally search for SNMP devices and vPro enabled machines by configuring these tabs.
5. Select Save —instead of Save & Scan—so you can configure additional settings.
Optionally deploy agents to discovered computers by policy, using the Agent Deployment Policy tab in the lower panel.
Optionally create alerts for newly discovered types of computers and devices, using the Alert Profiles tab in the lower panel.
Optionally set asset policies for discovered computers and devices, using the Asset Promotion page.
6. Run a scan immediately using the Scan Now button or schedule a scan on a recurring basis using the Schedule Scan button.
View discovered devices on the Discovered Devices page.
Deploy Agents
The Discovered Devices page shows computers and devices discovered using By Agent and By Network. Use this page to install agents on discovered computers and mobile devices. You can also make discovered devices a managed asset, even if they cannot be installed with an agent. The scan results shown on this page is cumulative from all probe machines. A record is not removed unless you delete it.
Domains Discovery Overview ..................................................................................................................................... i
Discovery Module Minimum Requirements ...................................................................................... ii
Getting Started with Network Discovery ................................................................................................... ii
Domains....................................................................................................................................................... iii
Getting Started with Domain Watch ................................................................................................. iv
Managing a Synchronized Security Model ................................................................................ v
Managing Multiple Domains ....................................................................................................... v
Managing Remote Portal Access ............................................................................................... v
Configuration ...................................................................................................................................... vi
Configuration Prerequisites ...................................................................................................... vi
Configuring Probe Deployment ................................................................................................ vii
Configuring Agent Deployment ............................................................................................... viii
Configuring OU/Container Policies ......................................................................................... viii
Configuring Contact Policies .................................................................................................... ix
Configuring Computer Policies .................................................................................................. x
Configuring Group Policies ........................................................................................................ x
Configuring User Policies .......................................................................................................... xi
Configuring Alerting Profiles .................................................................................................... xii
iv Contents
iv
Applying Changes ..................................................................................................................... xii
Reviewing Domain Watch Results .......................................................................................... xiii
Configuring Activation ............................................................................................................. xiii
Configuring Full Synchronization ........................................................................................... xiv
Index ........................................................................................................................................................... 15
In This Section
Getting Started with Domain Watch iv Configuration vi
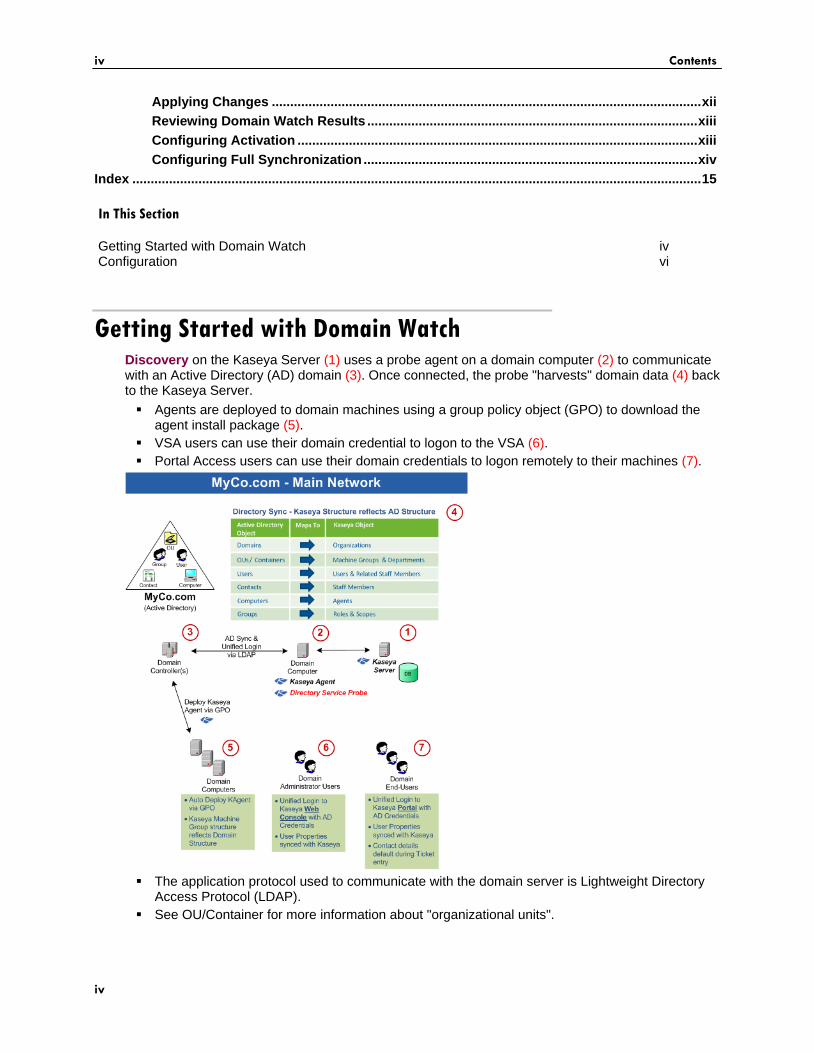
Getting Started with Domain Watch Discovery on the Kaseya Server (1) uses a probe agent on a domain computer (2) to communicate with an Active Directory (AD) domain (3). Once connected, the probe "harvests" domain data (4) back to the Kaseya Server.
Agents are deployed to domain machines using a group policy object (GPO) to download the agent install package (5).
VSA users can use their domain credential to logon to the VSA (6).
Portal Access users can use their domain credentials to logon remotely to their machines (7).
The application protocol used to communicate with the domain server is Lightweight Directory Access Protocol (LDAP).
See OU/Container for more information about "organizational units".

v
Managing a Synchronized Security Model One of the benefits of synchronizing the VSA with the domain is that the domain hierarchy of folders and items—domains, organizational units/containers, computers, groups, users, and contacts—is automatically "harvested" to create and maintain a similar security model in the VSA—organizations, machine groups, machines, users, scopes, roles, and staff. Service providers are freed from having to enter the same data a second time in the VSA. For example, user data, such as email, phone and other contact information need only be updated in the domain to update corresponding fields in the VSA.
The security model created in the VSA by Discovery integration with the Active Directory domain results in the following mapping of objects.
Managing Multiple Domains Discovery provides consolidated access throughout the VSA to Discovery managed domain computers, users and contacts, regardless of whether these domains have a "trust" relationship between them. For example, Discovery can provide a consolidated view of the domains of both a primary company and a subsidiary company.
Each Discovery managed domain is associated with a unique organization within the VSA.
A scope matching the name of the organization is created. If you like, you can add multiple organizations to the same scope. This enables a VSA user to use a single scope to have visibility of all machine groups in multiple organizations.
The machine ID / group ID filter enables you to filter the display of machines—by machine property, machine group or organization.
Managing Remote Portal Access Discovery sets policies that enable users to use their domain credentials to logon remotely to their machines using Portal Access. Remote access using Portal Access can be inside or outside of the company's firewall. For example, a Portal Access user might want to access their office computer from home.

vi Contents
vi
Note: Portal Access in R95 only works using Live Connect (Classic). Even if the Use new Live Connect when
clicking the Live Connect button in Quickview option is set to Yes in System > Default Settings, Live Connect
(Classic) will still be used when logging into the VSA using Portal Access credentials.
Configuration The following topics provide a step-by-step procedure for configuring the Discovery > Domain Watch page.
In This Section
Configuration Prerequisites vi Configuring Probe Deployment vii Configuring Agent Deployment viii Configuring OU/Container Policies viii Configuring Contact Policies ix Configuring Computer Policies x Configuring Group Policies x Configuring User Policies xi Configuring Alerting Profiles xii Applying Changes xii Reviewing Domain Watch Results xiii Configuring Activation xiii Configuring Full Synchronization xiv
Configuration Prerequisites 1. Identify the domain administrator credentials for the Active Directory domain you intend to
integrate with the VSA. Discovery requires a domain credential authorized to perform the following types of updates:
Create a GPO for the purpose of storing Kaseya install packages
Reset a password
Enable or disable a user account
Must have administrator level permissions to the assigned probe machine (either locally through the built-in Administrators group OR as a Domain Admin)

vii
Note: A domain administrator credential provides the necessary authorization.
2. Create a new organization for your domain using the System > Orgs/Groups/Depts/Staff > Manage page.
3. Install a VSA agent on a machine that is a member of the Active Directory domain you intend to integrate with the VSA.
4. Verify you can see your domain in the upper panel of the Domain Watch page.
At least one domain machine with an agent on it displays in the lower panel.
Notice that the Org Id and Org Name for the domain network is currently blank.
Configuring Probe Deployment
Note: No tabs display unless a domain row in the upper panel is selected. At least one agent must be
installed on a domain computer to see its domain row displayed in the upper panel.
1. Click the Discovery > Domains > Domain Watch > Probe Deployment tab.
2. Select the row of the Domain Name in the upper panel you want to configure.
The Probe Status displays Un-installed.
Domain machines with Kaseya agents installed on them display in the lower panel.
Initially you may only see a single domain computer with a Kaseya agent installed on it displayed in the lower pane. As agents are automatically installed on other domain computers using Discovery policies, these domain computers will all be displayed in the lower pane.
3. Select one of the machines in the lower panel.
Click the enabled Install button in the lower panel.
4. The first thing the Install dialog asks you to enter is a credential. Discovery requires a domain credential authorized to perform the following types of updates:
Create a GPO for the purpose of storing Kaseya install packages
Reset a password
Enable or disable a user account
Must have administrator level permissions to the assigned probe machine (either locally through the built-in Administrators group OR as a Domain Admin)
Note: A domain administrator credential provides the necessary authorization.
5. Click the Verify and Set Credentials button.
If the credential is valid, the dialog displays a second Install button.
6. Optionally filter the scan performed by the probe machine using the Filter String. Useful for large domains. Use distinguished name notation. For example, CN=Users,DC=myDomain,DC=com
Note: Semicolon can be used to separate multiple OUs, for example:
CN=OU1,DC=myDomain,DC=com;CN=OU2,DC=myDomain,DC=com.
7. The Install dialog asks you to specify a unique VSA organization for each domain integrated with Discovery.
When agents are installed on machines for this domain, the machine ID accounts created in the VSA become members of this organization.
When user records or staff records are created in the VSA for this domain, they are associated with the organization you select.

viii Contents
viii
After the install, the association with the organization cannot be changed without Uninstalling the Probe and Detaching the Org. This prevents creating duplicate users, staff and computer records in multiple organizations.
8. Click the Install button in the dialog. The dialog closes.
Discovery probe components are installed on the agent machine.
After the install, the probe agent automatically begins "harvesting" a preview of all folders and items in the domain concerning the OU/container hierarchy, computers, contacts, groups and users. No detailed information is requested. The preview populates the Policies tabs with this summary data.
The Probe Status displays Previewing while harvesting the data. This can take several
minutes. Use the Refresh button to update the page. Refreshing of the page is not done automatically.
When the preview is complete, the Probe Status icon displays Installed.
Notice that the Org Id and Org Name for the domain network is now shows the organization you selected.
Configuring Agent Deployment 1. Click the Discovery > Domains > Domain Watch > Agent Deployment tab.
2. Click the Edit button. Set the following:
Automatically install Agents when computer is discovered - Leave this checkbox blank if you have just activated the probe for the first time. Wait until policies are applied, then return to this tab and check this checkbox. When policies are applied, agents are automatically installed on computers that are members of those policies. The computers may need to be rebooted to complete the installation of Kaseya agents.
Allow Agents to be installed on Directory Server - Leave this checkbox blank. If checked, agents will also be installed on the system hosting the Active Directory domain.
Default Package - Select a Windows-based agent install package to use with the selected domain.
Note: Domain Watch does not support installing agents on Linux or Apple machines. Agents must
be installed on domain Linux machines and domain Apple machines outside of Domain Watch. See
How Agents are Installed Using Discovery.
3. Click the Save button to close this dialog.
Configuring OU/Container Policies 1. Click the Discovery > Domains > Domain Watch > Policies > OU/Containers.
Use this tab to specify which domain machines you want to install a Kaseya agent on.
Each OU/container in this tab is identified by its canonical name. A canonical name provides the complete hierarchy of OUs/containers used to locate folders and items—such as computers, contacts or groups—in a domain, similar in format to the full path name of a file in a disk directory.
Additional columns show counts for the computers and contacts selected and available in each OU/container.
2. Select an OU/container that shows a count for one or more computers.
Note: Sort this tab by clicking the Sort Descending option in the Total Computers column heading. This
ensures any OU/containers with computer counts greater than zero are listed first.
3. Select the Computers Policy button.

ix
The dialog box lists all the available computers of the OU/container you can include in selected policies.
Entering a checkbox next to a computer in this dialog means you want to install an agent on that domain computer.
Optionally checking the Include new Computers checkbox means you want to include new computers added to this OU/container. They will be assigned the same Discovery policy you have previously configured for selected computers in this OU/container.
Optionally checking the Automatically assign portal access to portal candidates means you also want to designate these computers as portal candidate machines.
Select the Machine Group to assign machine ID accounts created by this policy.
Select a fixed account, or
Use Directory Default - Administrators can automatically map the VSA machine
groups used to organize domain computers inside the VSA using the OU hierarchy that already exists in Active Directory. This occurs when a OU policy or a computer policy selects the Use Directory Default value. When this occurs, the domain
machine is assigned to the machine group that matches its current OU location. If an Active Directory administrator renames the OU or moves the computer to a different OU location, the machine group is changed in the VSA to match it. Tracking moves fully requires policies be set in both the source and target OUs. Parent machine groups are created as necessary, to match the OU hierarchy. Alternatively, a computer can be assigned a policy that assigns it to a fixed machine group.
4. Check one or more computers in the list and click Save.
The dialog closes and the count in the Selected Computers column is updated with the number of machines included in the computer policy you just set.
The Computers/Contacts Status displays Modified.
Do not Apply Changes yet.
Configuring Contact Policies 1. Click the Discovery > Domains > Domain Watch > OU/Containers.
Use this tab to specify which domain contacts you want to create a staff record for in the VSA. A domain contact contains contact information similar to information defined for a user, but a contact has no domain logon privileges.
2. Select a OU/container that shows a count for one or more contacts.
Note: Sort this tab by clicking the Sort Descending option in the Total Contacts column heading. This
ensures any OU/containers with contact counts greater than zero are listed first.
3. Select the Contacts Policy button.
The dialog box lists all the available contacts of the OU/container you can include in selected policies.
Entering a checkbox next to a contact in this dialog means you want to create a VSA staff record for that domain contact.
Optionally checking the Include new Contacts checkbox means you want to include new contacts added to this OU/container. VSA staff records will be created for these new contacts as they are discovered.
4. Check one or more contacts in the list and click Save.
The dialog closes and the count in the Selected Contacts column is updated with the number of contacts included in the contact policy you just set.
The Computers/Contacts Status displays Modified.
Do not Apply Changes yet.

x Contents
x
Configuring Computer Policies 1. Click the Discovery > Domains > Domain Watch > Policies > Computers.
Sets the machine group assignment policy for each domain computer individually.
This tab has precedence over policies set on the OU/Containers tab.
2. Select the Computers Policy button.
Set the computer policy for the selected machine to Include or Do Not Include.
Select the Machine Group to assign machine ID accounts created by this policy.
Select a fixed account, or
Use Default
3. Click Save.
The Policy Status displays Modified.
Do not Apply Changes yet.
Configuring Group Policies
Note: In Active Directory, users included in policies must have a first name, last name,
username,.password and email address.
1. Click the Discovery > Domains > Domain Watch > Policies > Groups tab.
Discovery user policies enables domain logons to be used by the VSA in two ways:
VSA user logons - These logons are used by VSA administrators.
Portal Access logons - These logons are used by machine users who want to access their own machines remotely.
User groups are called "security groups" or simply "groups" in an Active Directory domain. Each group in this tab is identified by its canonical name.
An additional column shows a count for the number of users in each group.
2. Select a group that shows a count for one or more users.
The same member can be a member of multiple groups in an Active Directory domain.
Note: Sort this tab by clicking the Sort Descending option in the Total Users column heading. This
ensures any groups with user counts greater than zero that don't yet have policies assigned
are listed near the top of the tab.
3. Select the Configure Group Policy button.
The Group Policy dialog displays, listing the Member Users in this group.
4. Select a Member Group Policy.
Each user group in Discovery can be assigned one of three different VSA logon policies. These policies are applied to all users belonging to the group.
Do Not Include Users - Do nothing with the domain users listed in this user group.
Create Staff Members - Creates a staff member record. These users can be
assigned Portal Access to a machine manually.
Create Staff and make Auto Portal Candidates - Designates domain users in this
user group for Auto Portal Access assignment. See Making Portal Access Candidates for details.
Create VSA Users - Creates VSA user logons for domain users listed in this user
group.
xi
Since each domain user can belong to multiple domain user groups, a domain user is assigned the highest ranking VSA logon policy assigned to any user group the domain user is a member of. Logon policies are ranked from highest to lowest in this order:
Create VSA Users
Create Staff and make Auto Portal Candidates
Create Staff Members
Do Not Include Users
5. If Create VSA Users is selected:
Role Lookup - Select the role these users will use.
Scope Lookup - Select the scope these users will use.
If a scope with the same name as the organization does not already exist, a displays to the right of the Scope Lookup drop-down list of the User Policy dialog. Clicking the icon enables you to create a new scope that has the same name as the organization associated with the domain. Once the scope is created the no longer displays to the right of the Scope Lookup drop-down list and text at the top of the dialog indicates the default scope already exists.
If the same user is assigned to multiple groups, and different roles and scopes are assigned to each group, then when the user logs on to the VSA, these roles and scopes will be available in the roles/scope selector in the upper-right corner of the VSA window.
Roles/scope assignments using the Groups tab and Users tab can be modified and reapplied multiple times. Successive changes will cause roles and scopes to accumulate, rather than be replaced. Discovery never removes records in the VSA.
You can assign a VSA user to a scope outside of the organization associated with the domain network. This enables a VSA user to use a single scope to have visibility of all machine groups in multiple organizations. You must ensure the scope selected provides access to each domain organization.
6. Select a Department to assign staff records created by this policy.
Select a fixed department, or
Use Directory Default - Administrators can automatically map the departments used to
organize staff records inside the VSA using the OU hierarchy that already exists in Active Directory. This occurs when a Group or User policy selects the Use Directory Default value. When this occurs, a staff record created by policy is assigned to the department that matches its current OU location. If an Active Directory administrator renames the OU or moves the user to a different OU location, the staff record is changed in the VSA to match it. Tracking moves fully requires policies be set in both the source and target OUs. Parent departments are created as necessary, to match the OU hierarchy. Alternatively, a staff record can be assigned a policy that assigns it to a fixed department.
7. Click Save to close this dialog.
The dialog closes and the policy you selected displays in the Users Policy column.
The Policy Status displays Modified.
Do not Apply Changes yet.
Configuring User Policies 1. Click the Discovery > Domains > Domain Watch > Policies > Users tab.
Sets user policy for each user individually.
This tab has precedence over policies set on the Group tab.
2. Select a user.
3. Select the Configure Users Policy button.
xii Contents
xii
The Users Policy dialog displays.
4. Select a Member User Policy.
5. If Create VSA Users is selected:
Role Lookup - Select the role these users will use.
Scope Lookup - Select the scope these users will use.
6. Select a Department to assign staff records created by this policy.
Select a fixed department, or
Use Directory Default
7. Click Save to close this dialog.
The dialog closes and the policy you selected displays in the Users Policy column.
The Policy Status displays Modified.
Do not Apply Changes yet.
Configuring Alerting Profiles 1. Click the Discovery > Domains > Domain Watch > Alerting Profiles tab.
2. Enable all probe alerts.
This notifies you of any interruptions in the connection between the probe agent and Active Directory.
3. Enable selected domain alerts.
If agents are deployed automatically using the Automatically install Agents when computer is discovered checkbox in Agent Deployment, you do not need to be notified about the discovery of new computers. If agents are not installed automatically, you do need to be notified about newly discovered computers.
Enable alarms and email notification for the creation, change or deletion of various domain objects in Active Directory. Each domain object belonging to an alert category--computer, contact, container, domain, group, organization unit, user—must be assigned to a Discovery policy, otherwise alerts for this object will not be triggered. Alerts are only triggered after being detected by the next full or incremental sync.
Note: For more information about alerts see: Probe Alerts and Domain Alerts
Applying Changes You can apply changes to policies at any time. Typically you wait to apply changes until you have completed your configuration changes on all policy tabs.
Note: You should not enable Activation (page xiii) or Full Synchronization (page xiv) until you are satisfied
with your initial policy configuration.
1. Navigate to any of the following policy tabs. It doesn't matter which tab you use. Changes are applied to all policy tabs that have been modified.
OU/Containers
Computers
Groups
Users.
2. Click Apply Changes.
An "on demand" incremental synchronization is started. This is the same incremental synchronization performed by Activation, which recurs on a fixed time period.

xiii
Domain Watch harvests detailed data for the Active Directory objects you set to "included" in the policies you configured.
Harvesting is complete when the Policy Status for all policies says Applied.
Reviewing Domain Watch Results 1. Review Domain Watch data on these three pages. These pages display all Active Directory
objects discovered by "included" policies in Domain Watch.
Computers - Machine account templates are listed on this page.
New machine groups may have been created for these new machine accounts, depending on the policy.
Any machine account template can be installed with an agent.
Some machines may be designated "auto portal candidate" machines.
Contacts - Active Directory contacts are listed on this page. These are for reference purposes only.
Users & Portal Access - There are three types of domain users listed on this page, depending on the policy specified.
VSA Users - These domain users can logon to the VSA using their domain credentials. You can see them listed in the System > User Security > Users page. A new domain-specific scope may have been generated for one or more VSA users, depending on the policy. Check the System > User Security > Scopes page.
Auto Portal - These domain users are designated "auto portal" users. Whenever a "auto portal" user is the last one to log out of an "auto portal candidate" domain machine, Portal Access for that machine is automatically assigned to the user. Portal Access allows a user to remote desktop into the machine. Any domain user can be manually assigned Portal Access to a domain machine using this page, provided the domain user was the last one logged out of the domain machine. Portal Access assignments display on both this page and the Computers page. You can also see Portal Access assignments on the Agent > Portal Access page.
Note: Portal Access in R95 only works using Live Connect (Classic). Even if the Use new Live
Connect when clicking the Live Connect button in Quickview option is set to Yes in System >
Default Settings, Live Connect (Classic) will still be used when logging into the VSA using
Portal Access credentials.
Staff - Displays domain user information, for reference purposes only. New staff records, and in most cases new departments, are generated for all domain users and contacts discovered by Domain Watch. These are located on the System > Orgs/Groups/Depts/Staff > Manage page.
2. Review Domain Watch records in these additional VSA locations.
Alarms based on domain alerts are listed on the Monitor > Alarm Summary page and Agent > Agent Logs > Alarm Log tab.
Tickets based on domain alerts display in either the Ticketing module or Service Desk module.
Create and run reports based on Discovery > Active Directory report parts in Info Center.
Configuring Activation After the probe is installed and the initial preview has completed, you should set as many as policies as you can without activating your network domain. Instead click Apply Changes to perform an "on demand" incremental synchronization. This is the same event performed by activation on a recurring fixed time period basis. Continue performing "on demand" incremental synchronization until you are satisfied with

xiv Contents
xiv
the results of your initial configuration. Then click Activation to perform incremental synchronization automatically. The default recurring time period is 60 minutes.
1. Select the Agent Deployment tab for your selected domain network on the Domain Watch page.
2. Select the agent probe row in the lower panel.
3. Click the Activate button in the lower panel. The Activate Probe dialog opens.
You can enter a different credential for the probe than the one entered for the install. Typically the same credential is used.
Set a incremental synchronization interval for synchronization of data between the domain and Discovery The default is 60 minutes.
Click the Activate button to close this dialog and activate the probe. This should only take a minute or two. Use the Refresh button to update the page. Refreshing of the page is not done automatically.
The Probe Status displays Activated.
Configuring Full Synchronization The Discovery probe accumulates domain changes in real time. If the connection between the Discovery probe and a domain is lost for a period of time, the probe has no way to recover those changes. To ensure domain changes are not lost forever, set probe alerts and schedule a recurring full synchronization, for example, once a week. If a probe alert is triggered, consider running a full synchronization immediately. You should also run a full synchronization if the probe was temporarily deactivated and reactivated.
1. Click the Discovery > Domains > Domain Watch > Schedule and Status tab.
2. Enable full synchronization on a weekly basis.

Index
15
Index A
Applying Changes • xii
C
Configuration • vi Configuration Prerequisites • vi Configuring Activation • xiii Configuring Agent Deployment • viii Configuring Alerting Profiles • xii Configuring Computer Policies • x Configuring Contact Policies • ix Configuring Full Synchronization • xiv Configuring Group Policies • x Configuring OU/Container Policies • viii Configuring Probe Deployment • vii Configuring User Policies • xi
D
Discovery Module Minimum Requirements • ii Discovery Overview • i Domains • iii
G
Getting Started with Domain Watch • iv Getting Started with Network Discovery • ii
M
Managing a Synchronized Security Model • v Managing Multiple Domains • v Managing Remote Portal Access • v
R
Reviewing Domain Watch Results • xiii