version 9 web user guide - progeny software€¦ · version 9 web user guide. 2 ... questions and...
TRANSCRIPT
1
Version 9
Web User Guide
2
Copyright © 2015. Progeny Genetics, LLC, All rights reserved.
The information contained herein is proprietary and confidential and is the exclusive
property of Progeny Genetics, LLC. It may not be copied, disclosed, used, distributed,
modified, or reproduced, in whole or in part, without the express written permission of
Progeny Genetics, LLC.
Limit of
Liability
Progeny Genetics, LLC has used their best effort in preparing this guide. Progeny Genetics, LLC makes no representations or warranties with respect to the accuracy or completeness of the contents of this guide and specifically disclaims any implied warranties of merchantability or fitness for a particular purpose. Information in this document is subject to change without notice and does not represent a commitment on the part of Progeny Genetics, LLC or any of its affiliates. The accuracy and completeness of the information contained herein and the opinions stated herein are not guaranteed or warranted to
produce any particular results, and the advice and strategies contained herein may not be suitable for every user.
The software described herein is furnished under a license agreement or a non-disclosure
agreement. The software may be copied or used only in accordance with the terms of the
agreement. It is against the law to copy the software on any medium except as specifically
allowed in the license or the non-disclosure agreement.
Trademarks The name “Progeny Genetics,” the Progeny Genetics logo, Progeny Clinical,
Progeny Lab, and Progeny LIMS are trademarks or registered trademarks of Progeny
Genetics, LLC. All other products and company names mentioned herein might be
trademarks or registered trademarks of their respective owners.
Customer
Support
Support is available for Support Plan members who purchase Progeny
Clinical, Progeny Lab, or Progeny LIMS and that have an annual support agreement and for
trial users. Contact Progeny Genetics, LLC at:
800 Palm Trail Suite 200, Delray Beach, FL 33483
574-968-0822 International 800-776-4369 (US/CAN)
http://www.progenygenetics.com
3
Preface .................................................................................................................................................................... 10
Using the manual .............................................................................................................................................................. 10
Special information about the manual ............................................................................................................................. 10
Conventions used in the manual ...................................................................................................................................... 11
Assumptions for the manual ............................................................................................................................................. 11
Section 1 – Progeny Web Core Database Functionality .............................................................................................. 12
Chapter 1 – Connecting and Navigating Progeny Web ............................................................................................... 13
Connecting to Progeny Web ............................................................................................................................................. 14
Navigating Progeny ........................................................................................................................................................... 14
Panes ............................................................................................................................................................................. 15
Title bar ......................................................................................................................................................................... 18
Navigation bar ............................................................................................................................................................... 18
Toolbar .......................................................................................................................................................................... 20
Tab bar .......................................................................................................................................................................... 20
View/Edit User Profile ....................................................................................................................................................... 20
Signing Out of Progeny Web ............................................................................................................................................. 21
Progeny Organization........................................................................................................................................................ 22
Smart Lists ..................................................................................................................................................................... 22
Smart List types ............................................................................................................................................................. 22
To create a smart list ..................................................................................................................................................... 23
Tasks .............................................................................................................................................................................. 24
To create a database task ............................................................................................................................................. 25
To create a task from the task window......................................................................................................................... 26
To manually associate an item with a task ................................................................................................................... 28
To search for a task ....................................................................................................................................................... 29
To work with tasks in the reminders dialogue box ....................................................................................................... 29
To edit a task ................................................................................................................................................................. 31
To delete a task ............................................................................................................................................................. 33
Database Queries and Searches........................................................................................................................................ 34
Database Query Format ................................................................................................................................................ 34
Query Operators ........................................................................................................................................................... 35
4
AND/OR operators ........................................................................................................................................................ 38
Order of operations for a query .................................................................................................................................... 39
Contextual Search ............................................................................................................................................................. 40
To carry out a contextual search ................................................................................................................................... 40
Chapter 2 – Progeny Database Design ....................................................................................................................... 41
Progeny Record-Level Database Fields ............................................................................................................................. 42
Database Field Types ........................................................................................................................................................ 44
Text field........................................................................................................................................................................ 46
Date field ....................................................................................................................................................................... 46
Numeric field ................................................................................................................................................................. 46
Yes/No field ................................................................................................................................................................... 47
Dropdown field ............................................................................................................................................................. 47
Image field..................................................................................................................................................................... 48
Table .............................................................................................................................................................................. 48
Lookup Table ................................................................................................................................................................. 48
Computed field ............................................................................................................................................................. 49
Summary field ............................................................................................................................................................... 49
Table Summary field ..................................................................................................................................................... 50
Hyperlink field ............................................................................................................................................................... 50
System Fields ..................................................................................................................................................................... 51
Individual System Fields ................................................................................................................................................ 51
Pedigree System Fields ................................................................................................................................................. 52
Sample System Fields .................................................................................................................................................... 53
Marker System Fields .................................................................................................................................................... 55
Data Folders Overview ...................................................................................................................................................... 56
Chapter 3 – Datasheet Basics .................................................................................................................................... 57
Datasheet Types ................................................................................................................................................................ 58
Loading Datasheet Formats .............................................................................................................................................. 60
To load a Datasheet format .......................................................................................................................................... 60
Working with Tables in a Datasheet ................................................................................................................................. 60
To enter data directly into a table in a datasheet......................................................................................................... 60
5
Printing a Datasheet.......................................................................................................................................................... 62
To print a datasheet ...................................................................................................................................................... 62
Chapter 4 Spreadsheet Basics ................................................................................................................................... 64
Spreadsheet Types ............................................................................................................................................................ 65
Generating a Spreadsheet ................................................................................................................................................ 67
To generate a spreadsheet ........................................................................................................................................... 68
Tables in spreadsheets .................................................................................................................................................. 72
Lookup tables in spreadsheets ...................................................................................................................................... 72
Entering Data into a Spreadsheet ..................................................................................................................................... 73
To manually enter data into a spreadsheet cell ........................................................................................................... 73
To add more rows to a table in a spreadsheet ............................................................................................................. 74
To copy and paste data ................................................................................................................................................. 74
Exporting Spreadsheet Data ............................................................................................................................................. 75
To export spreadsheet data .......................................................................................................................................... 75
Saving and Loading a Spreadsheet Format ....................................................................................................................... 76
To save a spreadsheet format ....................................................................................................................................... 77
To load a spreadsheet format ....................................................................................................................................... 77
Running Spreadsheet Queries........................................................................................................................................... 78
To run a spreadsheet query .......................................................................................................................................... 79
Sorting and Filtering Spreadsheet Data ............................................................................................................................ 80
To filter spreadsheet data ............................................................................................................................................. 80
Counting Spreadsheet Data .............................................................................................................................................. 81
Section 2 – Progeny Clinical ...................................................................................................................................... 83
Chapter 5 – Clinical Terms and Conventions .............................................................................................................. 84
Chapter 6 – Pedigrees .............................................................................................................................................. 88
Overview of Pedigree Icons .............................................................................................................................................. 89
Overview of a Pedigree ..................................................................................................................................................... 90
Pedigree Viewer ................................................................................................................................................................ 90
Split Screen Buttons ...................................................................................................................................................... 92
Pedigree Viewer Display Settings .................................................................................................................................. 93
Drawing Lines ................................................................................................................................................................ 99
6
Loading Formats ............................................................................................................................................................ 99
To load a symbols format ............................................................................................................................................ 101
Adding a New Pedigree ................................................................................................................................................... 102
Manually Drawing a Pedigree ......................................................................................................................................... 103
To manually draw a pedigree using the palette ......................................................................................................... 103
To manually draw a pedigree using one-click Add ..................................................................................................... 104
To manually draw a pedigree using the palette and Add Relation menu .................................................................. 105
To manually draw a pedigree by collecting “singlets” ................................................................................................ 105
Working with Individuals in a Pedigree .......................................................................................................................... 106
To change the gender and/or vital status of an individual in a pedigree ................................................................... 107
To move an individual in a pedigree ........................................................................................................................... 108
To delete an individual from the database within a pedigree .................................................................................... 109
To select individuals in a pedigree based on familial relationships ............................................................................ 110
To select an individual based on relationship ............................................................................................................. 110
To select an individual based on a reverse relationship ............................................................................................. 111
Pedigree Viewer Query ................................................................................................................................................... 113
Chapter 7 Managing Pedigrees ............................................................................................................................... 115
Modifying a Pedigree ...................................................................................................................................................... 116
To Modify a Pedigree .................................................................................................................................................. 116
Copying and Moving Pedigrees between Data Folders .................................................................................................. 117
To copy or move a pedigree between data folders .................................................................................................... 118
To copy a pedigree to another data folder ................................................................................................................. 118
To move a pedigree between Pedigree folders .......................................................................................................... 118
Saving Pedigree Images .................................................................................................................................................. 119
To Save a Pedigree as an Image file ............................................................................................................................ 119
Deleting a Pedigree ......................................................................................................................................................... 122
To delete a pedigree ................................................................................................................................................... 122
Generating a Spreadsheet for Individuals in a Pedigree ................................................................................................. 123
To generate a spreadsheet for the individuals in a pedigree ..................................................................................... 123
Printing a Pedigree .......................................................................................................................................................... 123
To print a pedigree ...................................................................................................................................................... 123
7
Chapter 8 Managing Individuals ............................................................................................................................. 126
Adding a New Individual ................................................................................................................................................. 127
To add a new individual .............................................................................................................................................. 127
Modifying an Individual .................................................................................................................................................. 128
To modify an individual ............................................................................................................................................... 128
Copying and Moving Individuals ..................................................................................................................................... 130
To copy or move an individual .................................................................................................................................... 130
To copy an individual between data folders ............................................................................................................... 130
To move an individual between data folders ............................................................................................................. 131
Deleting an Individual ..................................................................................................................................................... 131
To delete an individual ................................................................................................................................................ 131
Moving an Individual to a Pedigree ................................................................................................................................ 131
To move an individual to an existing pedigree ........................................................................................................... 132
To move an individual to a new pedigree ................................................................................................................... 133
Chapter 9 – Samples (Clinical) ................................................................................................................................. 135
Manually Adding a New Sample ..................................................................................................................................... 136
To add a new sample .................................................................................................................................................. 136
To add a new control .................................................................................................................................................. 137
Modifying a Sample ........................................................................................................................................................ 138
To modify a sample ..................................................................................................................................................... 138
Section 3 – Progeny LIMS ....................................................................................................................................... 140
Chapter 10 – LIMS Terms and Conventions ............................................................................................................. 141
LIMS Components ........................................................................................................................................................... 144
Chapter 11- Managing Containers........................................................................................................................... 145
Adding a New Container ................................................................................................................................................. 146
To add a new container .............................................................................................................................................. 146
To add a child container .............................................................................................................................................. 149
Modifying and Deleting a Container ............................................................................................................................... 150
To modify a container ................................................................................................................................................. 150
To delete a container .................................................................................................................................................. 151
Search for Samples in Containers ................................................................................................................................... 152

8
Manually Updating Sample Well Positions in a Plate or a Box ....................................................................................... 153
To drag samples to their well positions in a plate or a box ........................................................................................ 154
To manually enter positions for a sample in a plate or a box ..................................................................................... 156
Chapter 12 Managing Reactions ............................................................................................................................. 157
Adding a Reaction ........................................................................................................................................................... 158
To add a new reaction................................................................................................................................................. 158
Print Reaction Types ....................................................................................................................................................... 161
To specify Print Reaction barcode settings ................................................................................................................. 162
Editing a Reaction ........................................................................................................................................................... 164
To edit a reaction ........................................................................................................................................................ 164
Deleting a Reaction ......................................................................................................................................................... 166
To delete a reaction .................................................................................................................................................... 166
Chapter 13 Managing Actions ................................................................................................................................. 167
Adding an Action ............................................................................................................................................................. 168
To add a new action .................................................................................................................................................... 168
Setting an Action as a Default Action.............................................................................................................................. 172
To set an action as a default action ............................................................................................................................ 173
Specifying Action Barcode Settings ................................................................................................................................. 174
Editing an Action ............................................................................................................................................................. 174
To edit an action ......................................................................................................................................................... 175
Deleting an Action ........................................................................................................................................................... 176
To delete an action ..................................................................................................................................................... 176
Chapter 14 - Managing Samples ............................................................................................................................. 178
Adding a Create Sample Reaction ................................................................................................................................... 179
To add a create sample reaction ................................................................................................................................. 179
Adding a Create Aliquot Reaction ................................................................................................................................... 182
To add a create aliquot reaction ................................................................................................................................. 182
Carrying out Actions on a Sample in the Scan Window .................................................................................................. 185
Sample Datasheet ........................................................................................................................................................... 187
Chain of Custody Audit Report ....................................................................................................................................... 188
Chapter 15 Managing Workflows ........................................................................................................................... 189
9
Workflows Window ........................................................................................................................................................ 190
Creating a New Workflow ............................................................................................................................................... 191
To name a workflow ................................................................................................................................................... 191
To add stages to a workflow ....................................................................................................................................... 191
Modifying and Deleting a Workflow Stage ..................................................................................................................... 194
To modify a workflow stage ........................................................................................................................................ 194
To remove a stage ....................................................................................................................................................... 195
Deleting a Workflow ....................................................................................................................................................... 196
To delete a workflow .................................................................................................................................................. 197
Assigning a Sample to a Workflow .................................................................................................................................. 197
To assign a sample to a workflow ............................................................................................................................... 197
Moving Samples through a Workflow ............................................................................................................................ 200
10
Preface
Welcome to the Progeny Web User’s Manual. The purpose of the Progeny Web User’s Manual is to answer your questions and guide you through the procedures necessary to use the Progeny Clinical Web application and the Progeny LIMS Web application efficiently and effectively.
Using the manual You will find the Progeny Web User’s Manual easy to use. You can simply look up the topic that you need in the table of contents or the index. In this Preface, you will find a brief discussion of each chapter to further assist you in locating the information that you need.
Special information about the manual The Progeny Web User’s Manual has a dual purpose design. It can be distributed electronically and then printed on an as-needed basis, or it can be viewed online in its fully interactive capacity. If you print the document, for best results, it is recommended that you print it on a duplex printer; however, single-sided printing will also work. If you view the document online, a standard set of bookmarks appears in a frame on the left side of the document window for navigation through the document. For better viewing, decrease the size of the bookmark frame and use the magnification box to increase the magnification of the document to your viewing preference.
If you do print the document using a single-sided printer, you might see a single blank page at the end of some chapters. This blank page has been added solely to ensure that the next chapter begins on an odd-numbered page. This blank page in no way indicates that your manual is missing information.
11
Conventions used in the manual The Progeny Web User’s Manual uses the following conventions:
Information that can vary in a command—variable information—is indicated by alphanumeric characters enclosed in angle brackets; for example, <Sample ID>. Do not type the angle brackets when you specify the variable information.
Page numbering is “online friendly.” Pages are numbered from 1 to x, starting with the cover and ending on the last page of the index.
The Progeny application provides multiple ways of accessing the same Progeny functions. If an option is available from the toolbar as well as other areas (for example, the main menu or a context menu), then this manual references the toolbar. Although this manual does not address all the multiple ways of accessing the same function, you can use whatever method best suits your working needs.
This manual is intended for both print and online viewing.
If information appears in blue, it is a hyperlink. Table of Contents and Index entries are also hyperlinks. Click the hyperlink to advance to the referenced information.
Assumptions for the manual The Progeny Web User’s Manual assumes that you are familiar with web-based applications and basic web and
Windows functions, navigational elements, and icons.
12
Section 1 – Progeny Web Core Database Functionality
This section contains the following chapters:
Chapter 1 Connecting and Navigating Progeny Web
Chapter 2 Progeny Database
Chapter 3 Datasheet Basics
Chapter 4 Spreadsheet Basics

13
Chapter 1 – Connecting and Navigating Progeny Web
Progeny Genetics is a suite of three individual products—Progeny Clinical, Progeny LIMS, and Progeny Lab– with each product designed for data management in a specific area. Progeny Clinical is designed for the management of clinical data, Progeny LIMS is designed for the management of sample data and inventories and Progeny Lab is designed for the management of genotype data. Progeny Clinical, Progeny LIMS, or Progeny Lab can be combined in any fashion (including all three products) into a single application that is ideal for complete family history data management. At this time Progeny Lab is not available through Progeny Web. This chapter provides an overview of Progeny Web and its major navigational elements.
This chapter covers the following topics:
Connecting to Progeny Web
Navigating Progeny
View/ Edit User profile
Signing out of Progeny Web
Progeny Organization
Smart Lists
Tasks
Database Queries and Searches
14
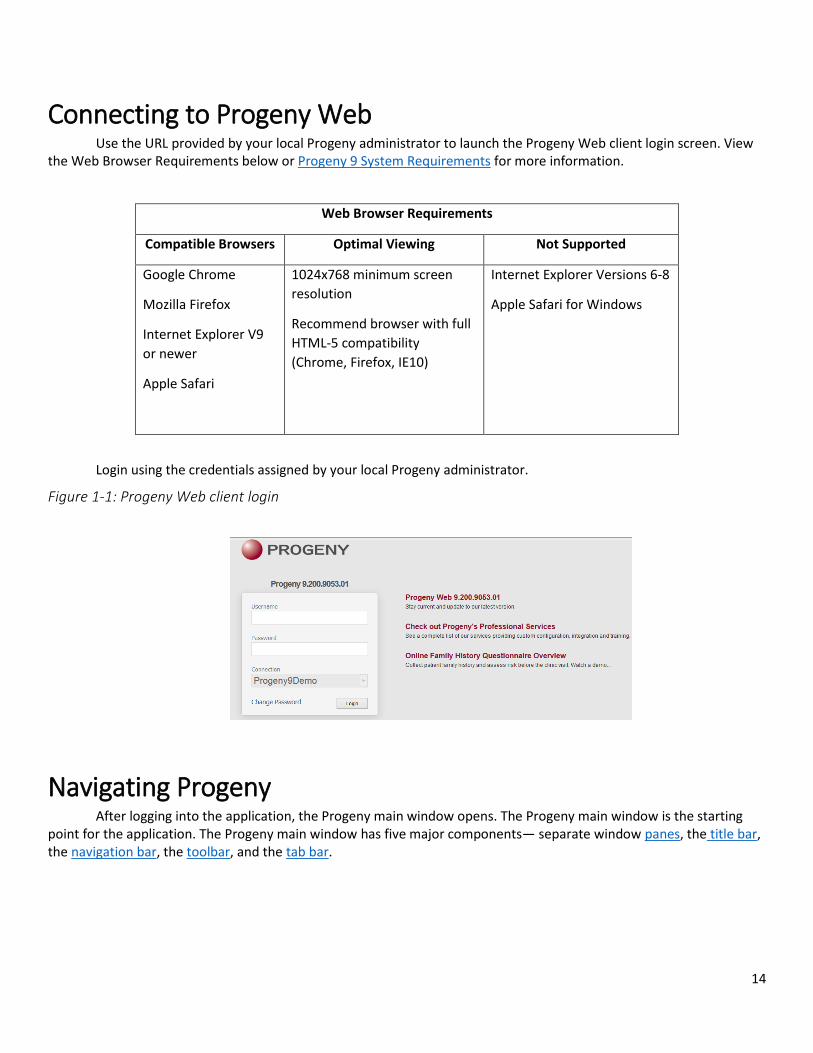
Connecting to Progeny Web Use the URL provided by your local Progeny administrator to launch the Progeny Web client login screen. View
the Web Browser Requirements below or Progeny 9 System Requirements for more information.
Web Browser Requirements
Compatible Browsers Optimal Viewing Not Supported
Google Chrome
Mozilla Firefox
Internet Explorer V9
or newer
Apple Safari
1024x768 minimum screen
resolution
Recommend browser with full
HTML-5 compatibility
(Chrome, Firefox, IE10)
Internet Explorer Versions 6-8
Apple Safari for Windows
Login using the credentials assigned by your local Progeny administrator.
Figure 1-1: Progeny Web client login
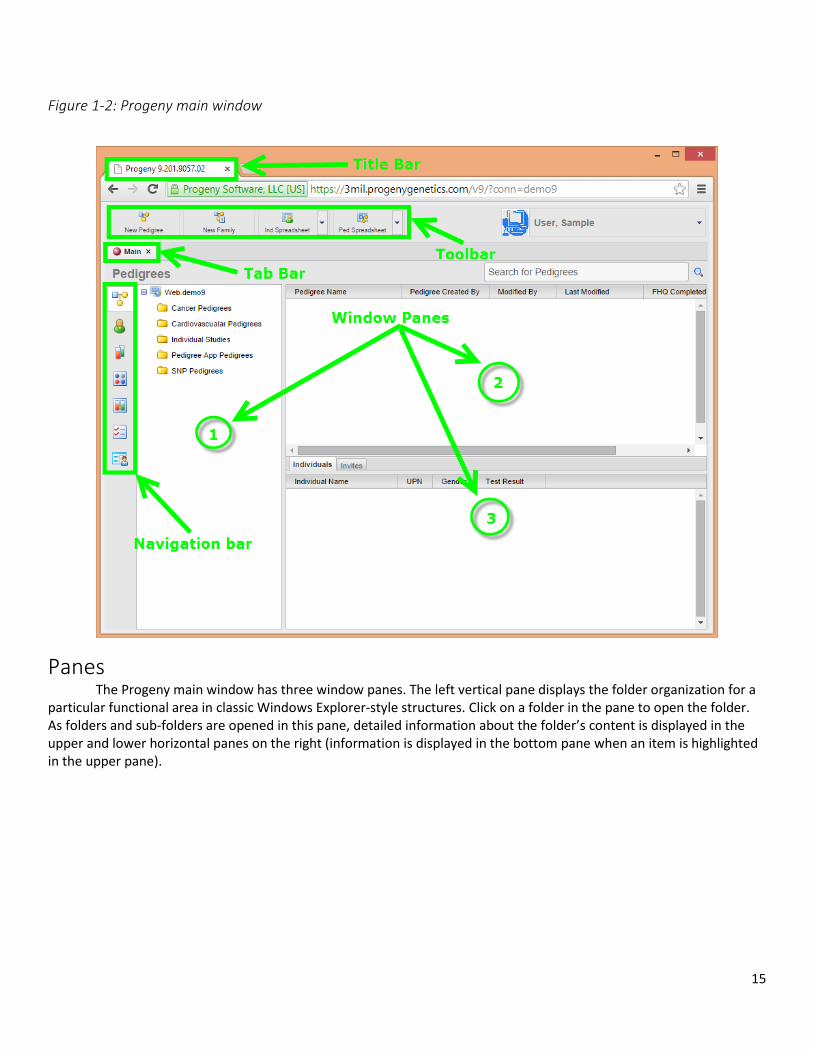
Navigating Progeny After logging into the application, the Progeny main window opens. The Progeny main window is the starting point for the application. The Progeny main window has five major components— separate window panes, the title bar, the navigation bar, the toolbar, and the tab bar.
15
Figure 1-2: Progeny main window
Panes The Progeny main window has three window panes. The left vertical pane displays the folder organization for a particular functional area in classic Windows Explorer-style structures. Click on a folder in the pane to open the folder. As folders and sub-folders are opened in this pane, detailed information about the folder’s content is displayed in the upper and lower horizontal panes on the right (information is displayed in the bottom pane when an item is highlighted in the upper pane).
16
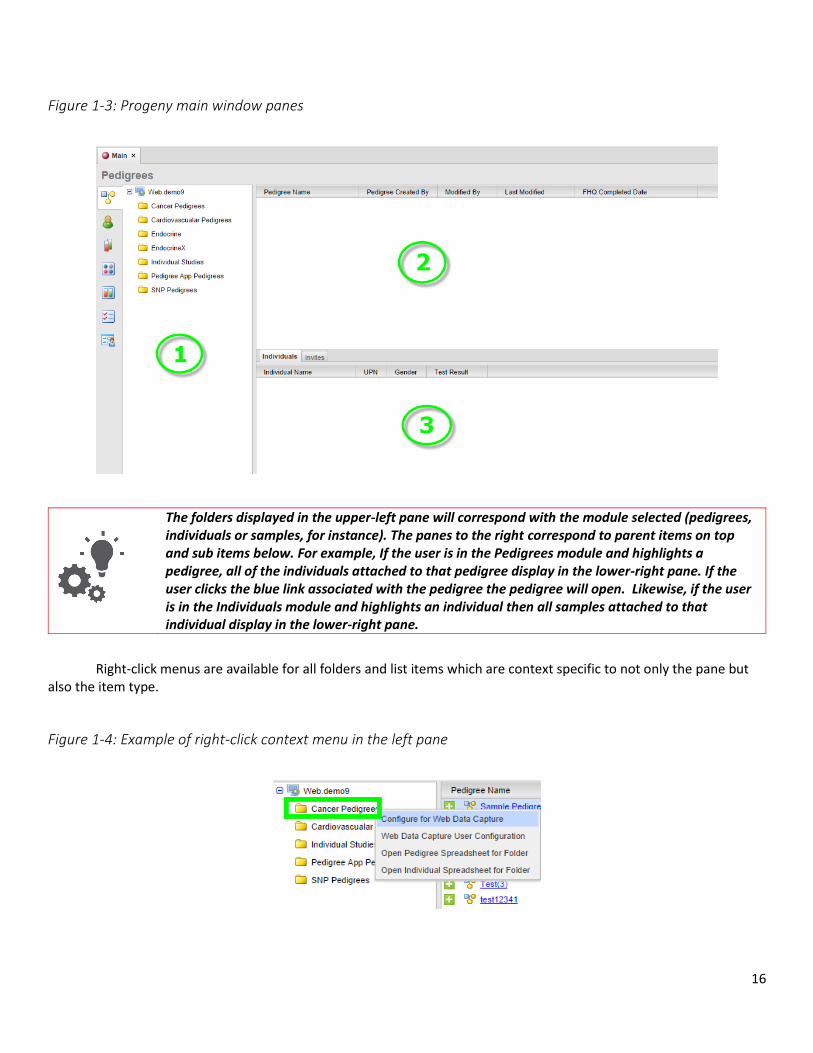
Figure 1-3: Progeny main window panes
The folders displayed in the upper-left pane will correspond with the module selected (pedigrees, individuals or samples, for instance). The panes to the right correspond to parent items on top and sub items below. For example, If the user is in the Pedigrees module and highlights a pedigree, all of the individuals attached to that pedigree display in the lower-right pane. If the user clicks the blue link associated with the pedigree the pedigree will open. Likewise, if the user is in the Individuals module and highlights an individual then all samples attached to that individual display in the lower-right pane.
Right-click menus are available for all folders and list items which are context specific to not only the pane but also the item type.
Figure 1-4: Example of right-click context menu in the left pane
17
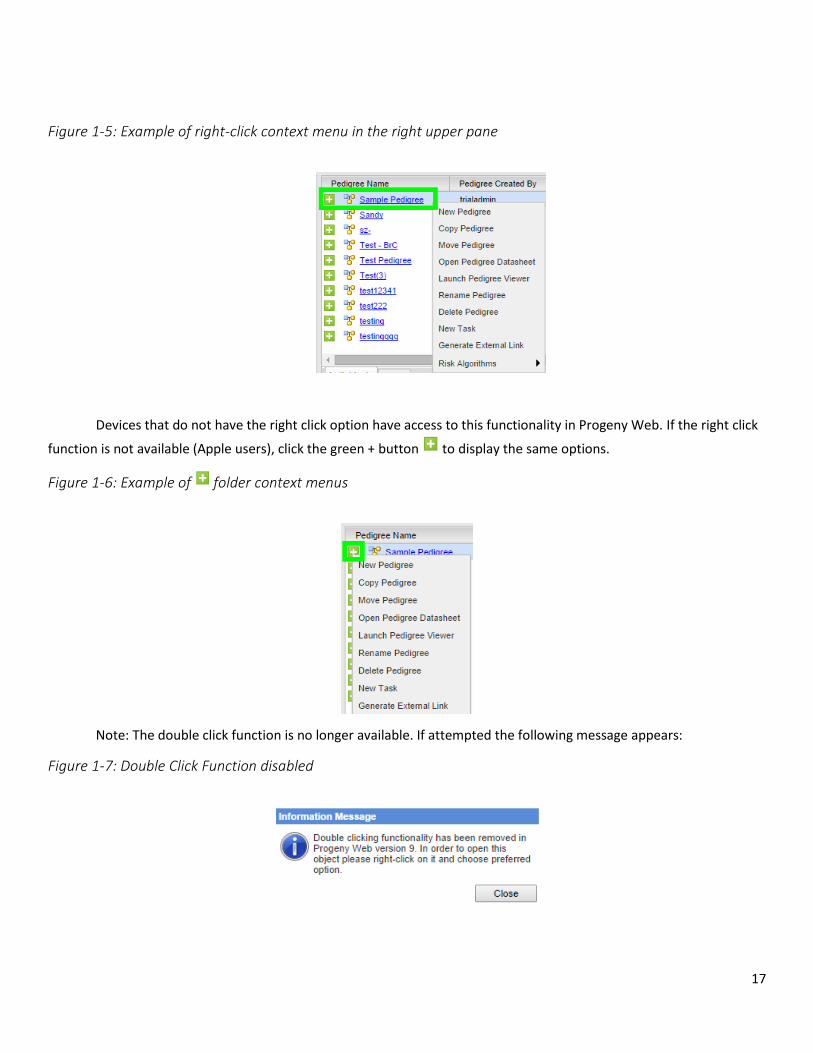
Figure 1-5: Example of right-click context menu in the right upper pane
Devices that do not have the right click option have access to this functionality in Progeny Web. If the right click
function is not available (Apple users), click the green + button to display the same options.
Figure 1-6: Example of folder context menus
Note: The double click function is no longer available. If attempted the following message appears:
Figure 1-7: Double Click Function disabled
18
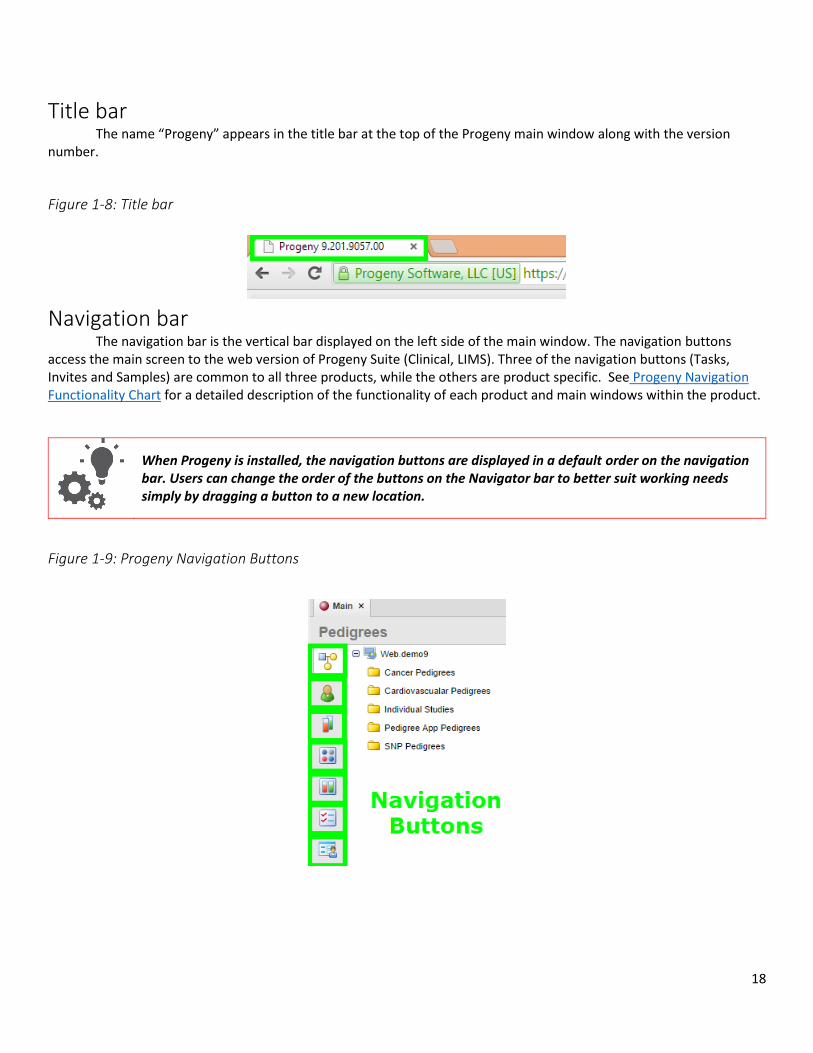
Title bar The name “Progeny” appears in the title bar at the top of the Progeny main window along with the version number.
Figure 1-8: Title bar
Navigation bar The navigation bar is the vertical bar displayed on the left side of the main window. The navigation buttons access the main screen to the web version of Progeny Suite (Clinical, LIMS). Three of the navigation buttons (Tasks, Invites and Samples) are common to all three products, while the others are product specific. See Progeny Navigation Functionality Chart for a detailed description of the functionality of each product and main windows within the product.
When Progeny is installed, the navigation buttons are displayed in a default order on the navigation bar. Users can change the order of the buttons on the Navigator bar to better suit working needs simply by dragging a button to a new location.
Figure 1-9: Progeny Navigation Buttons
19
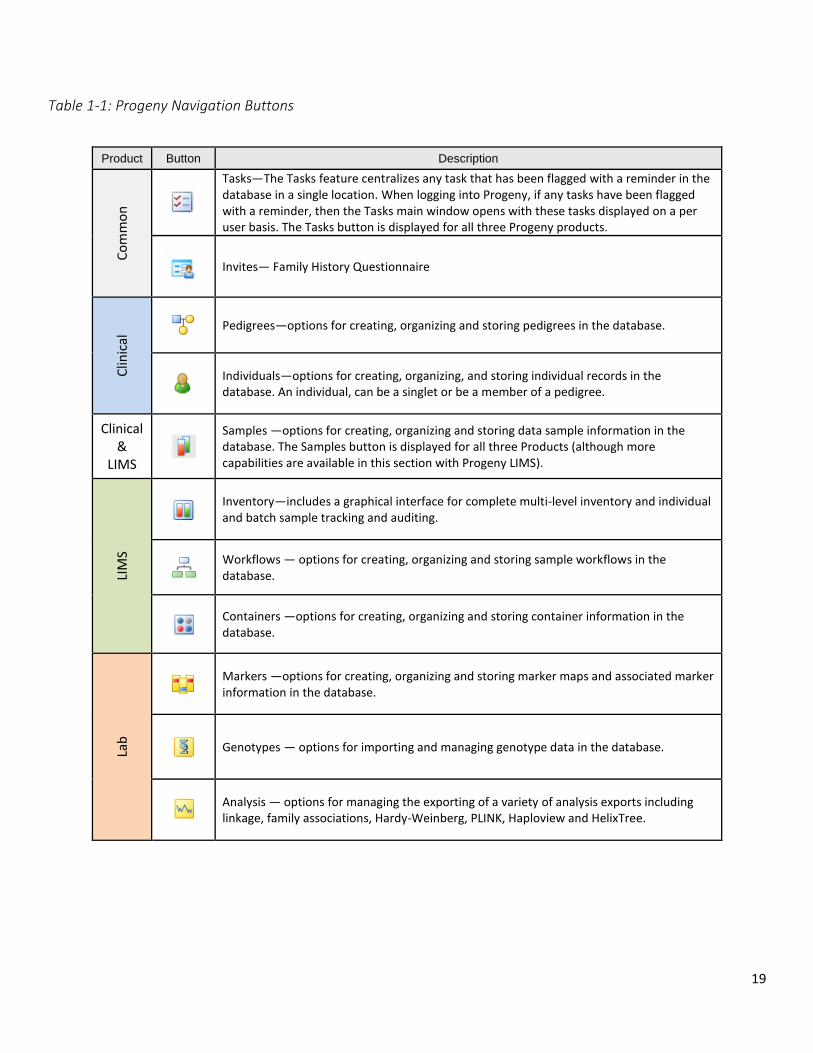
Table 1-1: Progeny Navigation Buttons
Product Button Description
Co
mm
on
Tasks—The Tasks feature centralizes any task that has been flagged with a reminder in the database in a single location. When logging into Progeny, if any tasks have been flagged with a reminder, then the Tasks main window opens with these tasks displayed on a per user basis. The Tasks button is displayed for all three Progeny products.
Invites— Family History Questionnaire
Clin
ical
Pedigrees—options for creating, organizing and storing pedigrees in the database.
Individuals—options for creating, organizing, and storing individual records in the database. An individual, can be a singlet or be a member of a pedigree.
Clinical &
LIMS
Samples —options for creating, organizing and storing data sample information in the database. The Samples button is displayed for all three Products (although more capabilities are available in this section with Progeny LIMS).
LIM
S
Inventory—includes a graphical interface for complete multi-level inventory and individual and batch sample tracking and auditing.
Workflows — options for creating, organizing and storing sample workflows in the database.
Containers —options for creating, organizing and storing container information in the database.
Lab
Markers —options for creating, organizing and storing marker maps and associated marker information in the database.
Genotypes — options for importing and managing genotype data in the database.
Analysis — options for managing the exporting of a variety of analysis exports including linkage, family associations, Hardy-Weinberg, PLINK, Haploview and HelixTree.

20
Toolbar The toolbar is located below the title bar as icons, some with drop down options. The toolbar provides quick
access to all the available functions for a selected product feature. The toolbar is dynamically updated based on the window that is open.
Figure 1-10: Example of the toolbar when Pedigrees is selected
Tab bar Datasheets, spreadsheets, lookup tables, tables, and pedigrees open as separate tabs just below the toolbar in
the main window. To open a datasheet, spreadsheet, table, or pedigree, simply click the tab for it. Return to the main window at any time by clicking the Main tab. To close a tab, right-click on the tab and select Close Tab or click the red “X” at the far right of the tab.
Figure 1-11: Tab bar
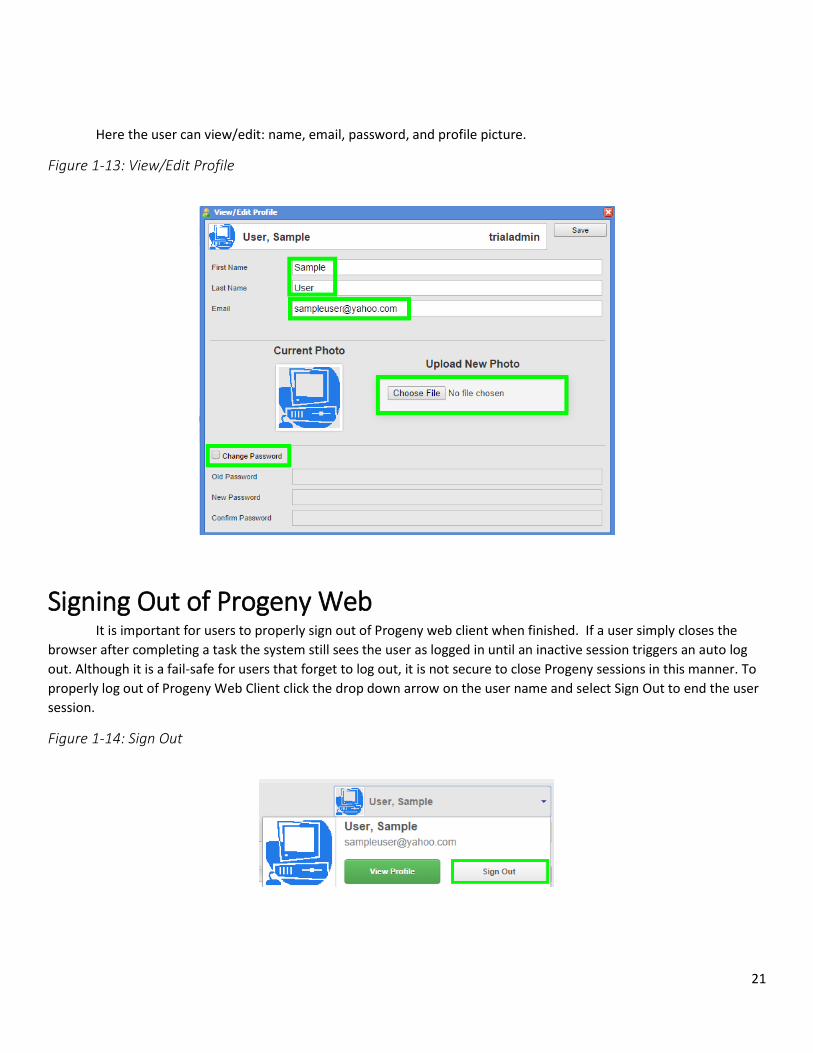
View/Edit User Profile Users in Progeny Web Client can manage their basic user profile. On the upper right side of the toolbar click the
drop down arrow next to the name and select View Profile.
Figure 1-12: User Options
21
Here the user can view/edit: name, email, password, and profile picture.
Figure 1-13: View/Edit Profile
Signing Out of Progeny Web It is important for users to properly sign out of Progeny web client when finished. If a user simply closes the
browser after completing a task the system still sees the user as logged in until an inactive session triggers an auto log
out. Although it is a fail-safe for users that forget to log out, it is not secure to close Progeny sessions in this manner. To
properly log out of Progeny Web Client click the drop down arrow on the user name and select Sign Out to end the user
session.
Figure 1-14: Sign Out
22
Progeny Organization Progeny provides several functions—Smart Lists, Tasks, Queries and Searches—to assist in organizing the data
for easy review and retrieval.
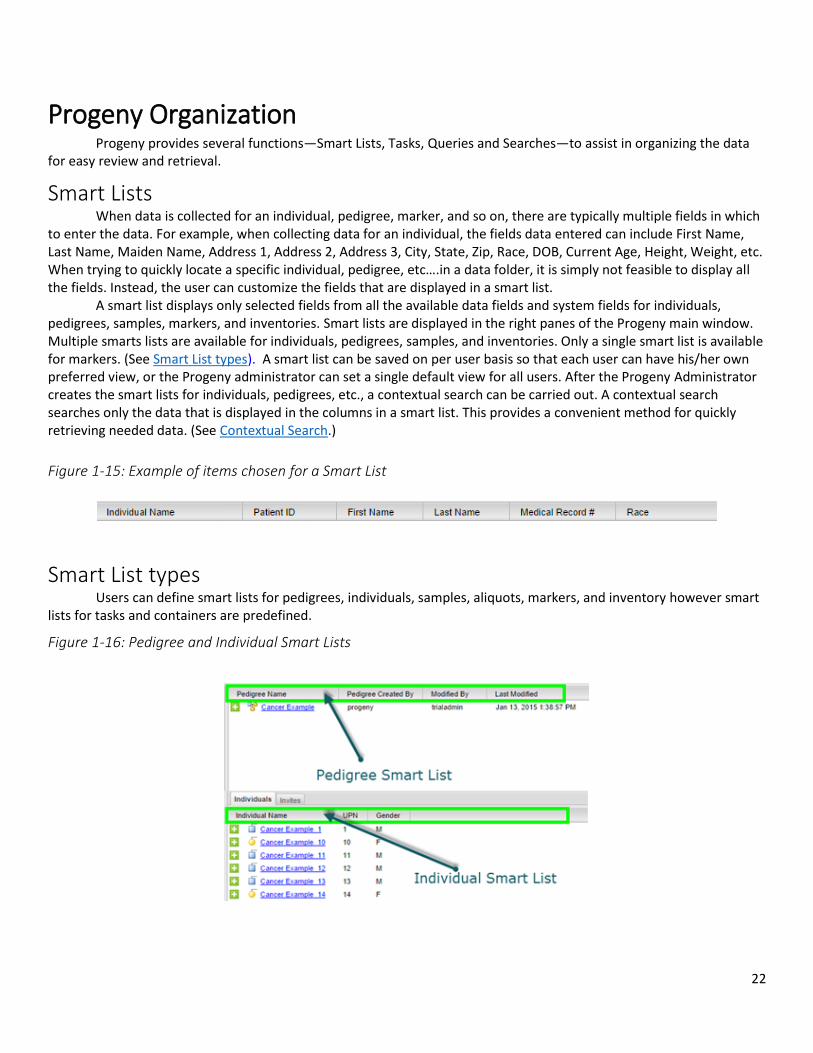
Smart Lists When data is collected for an individual, pedigree, marker, and so on, there are typically multiple fields in which to enter the data. For example, when collecting data for an individual, the fields data entered can include First Name, Last Name, Maiden Name, Address 1, Address 2, Address 3, City, State, Zip, Race, DOB, Current Age, Height, Weight, etc. When trying to quickly locate a specific individual, pedigree, etc….in a data folder, it is simply not feasible to display all the fields. Instead, the user can customize the fields that are displayed in a smart list.
A smart list displays only selected fields from all the available data fields and system fields for individuals, pedigrees, samples, markers, and inventories. Smart lists are displayed in the right panes of the Progeny main window. Multiple smarts lists are available for individuals, pedigrees, samples, and inventories. Only a single smart list is available for markers. (See Smart List types). A smart list can be saved on per user basis so that each user can have his/her own preferred view, or the Progeny administrator can set a single default view for all users. After the Progeny Administrator creates the smart lists for individuals, pedigrees, etc., a contextual search can be carried out. A contextual search searches only the data that is displayed in the columns in a smart list. This provides a convenient method for quickly retrieving needed data. (See Contextual Search.)
Figure 1-15: Example of items chosen for a Smart List
Smart List types Users can define smart lists for pedigrees, individuals, samples, aliquots, markers, and inventory however smart lists for tasks and containers are predefined.
Figure 1-16: Pedigree and Individual Smart Lists
23
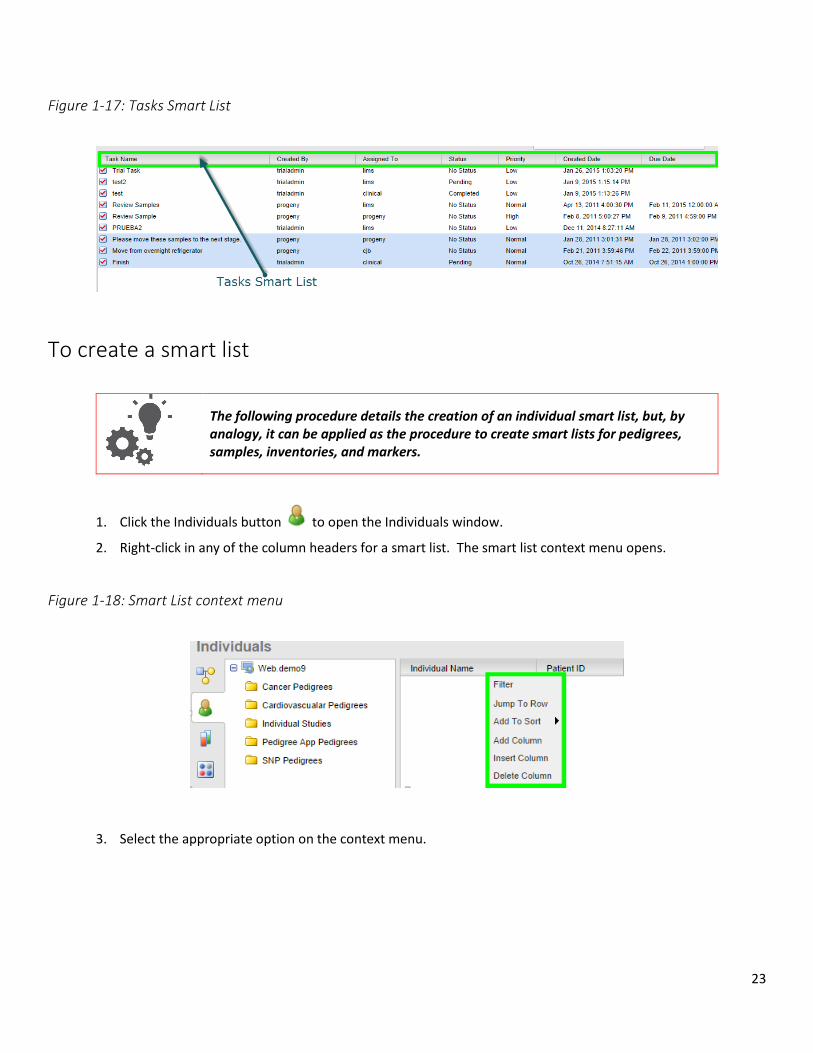
Figure 1-17: Tasks Smart List
To create a smart list
The following procedure details the creation of an individual smart list, but, by analogy, it can be applied as the procedure to create smart lists for pedigrees, samples, inventories, and markers.
1. Click the Individuals button to open the Individuals window.
2. Right-click in any of the column headers for a smart list. The smart list context menu opens.
Figure 1-18: Smart List context menu
3. Select the appropriate option on the context menu.
24
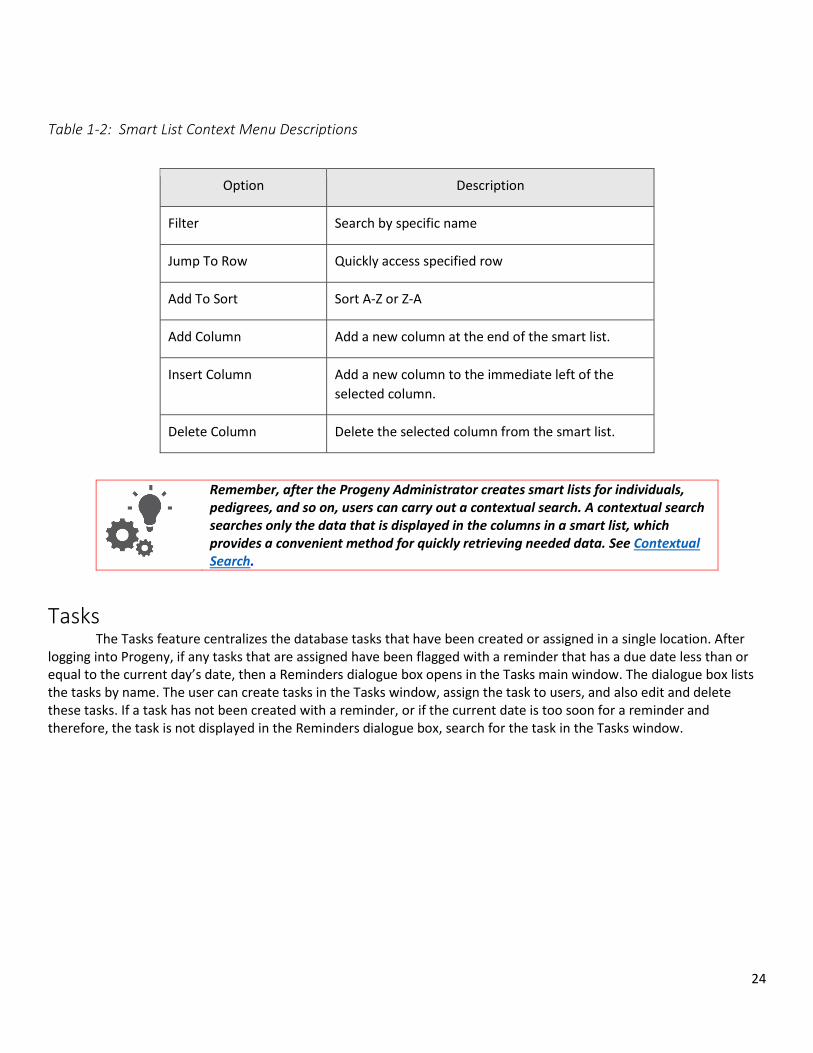
Table 1-2: Smart List Context Menu Descriptions
Option Description
Filter Search by specific name
Jump To Row Quickly access specified row
Add To Sort Sort A-Z or Z-A
Add Column Add a new column at the end of the smart list.
Insert Column Add a new column to the immediate left of the
selected column.
Delete Column Delete the selected column from the smart list.
Remember, after the Progeny Administrator creates smart lists for individuals, pedigrees, and so on, users can carry out a contextual search. A contextual search searches only the data that is displayed in the columns in a smart list, which provides a convenient method for quickly retrieving needed data. See Contextual Search.
Tasks The Tasks feature centralizes the database tasks that have been created or assigned in a single location. After logging into Progeny, if any tasks that are assigned have been flagged with a reminder that has a due date less than or equal to the current day’s date, then a Reminders dialogue box opens in the Tasks main window. The dialogue box lists the tasks by name. The user can create tasks in the Tasks window, assign the task to users, and also edit and delete these tasks. If a task has not been created with a reminder, or if the current date is too soon for a reminder and therefore, the task is not displayed in the Reminders dialogue box, search for the task in the Tasks window.
25
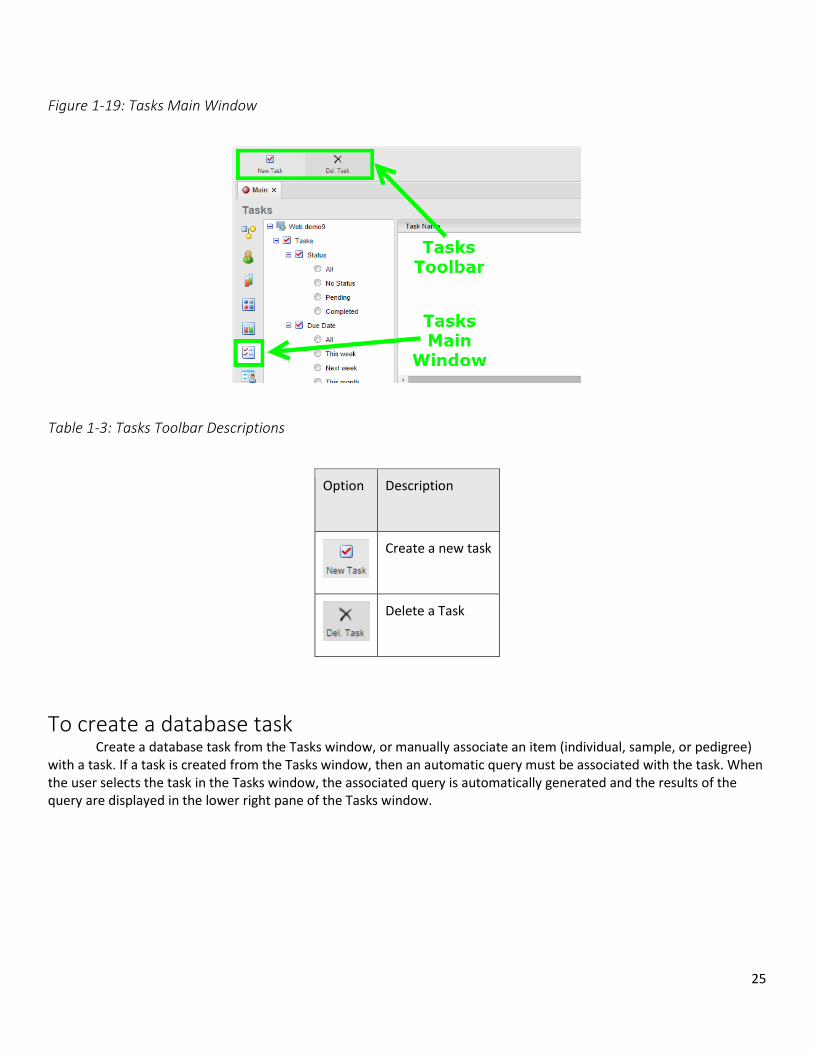
Figure 1-19: Tasks Main Window
Table 1-3: Tasks Toolbar Descriptions
Option Description
Create a new task
Delete a Task
To create a database task Create a database task from the Tasks window, or manually associate an item (individual, sample, or pedigree) with a task. If a task is created from the Tasks window, then an automatic query must be associated with the task. When the user selects the task in the Tasks window, the associated query is automatically generated and the results of the query are displayed in the lower right pane of the Tasks window.
26
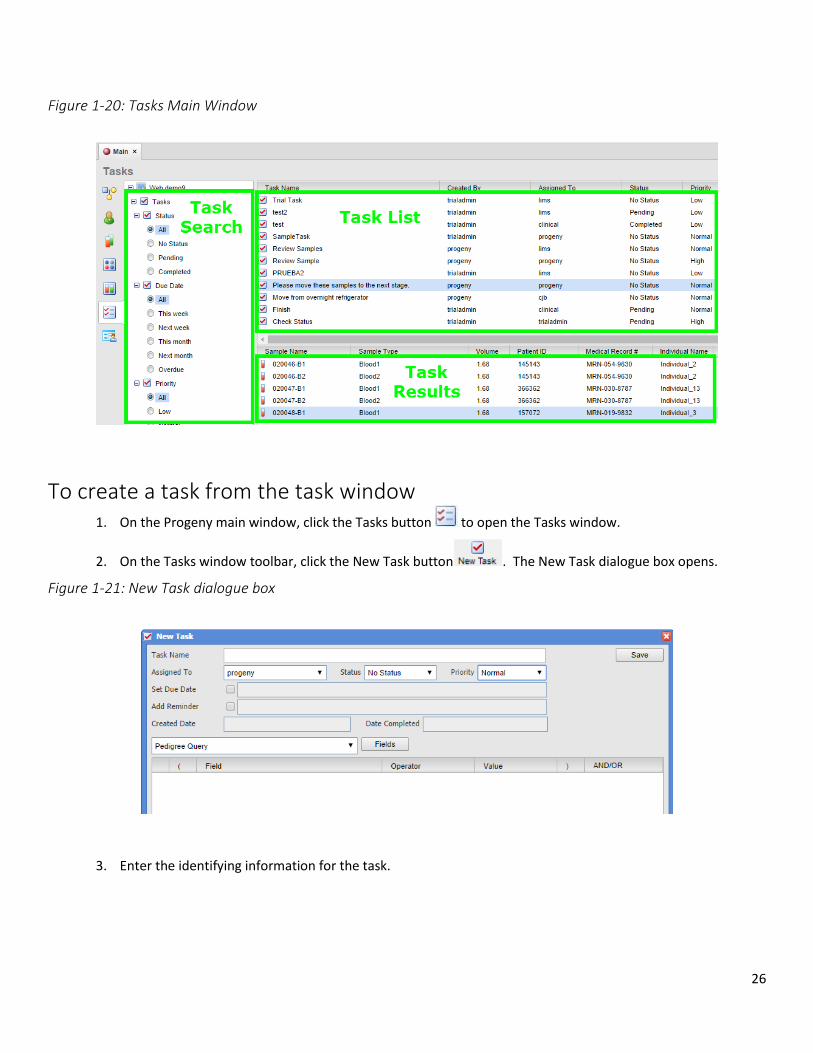
Figure 1-20: Tasks Main Window
To create a task from the task window 1. On the Progeny main window, click the Tasks button to open the Tasks window.
2. On the Tasks window toolbar, click the New Task button . The New Task dialogue box opens.
Figure 1-21: New Task dialogue box
3. Enter the identifying information for the task.
27
Table 1-4: New Tasks Descriptions
Item Description
Task Name A descriptive or identifying name for the task.
Assigned To Dropdown list of all the users in the database.
Status Dropdown list. Available values are No Status, In Progress, and
Completed.
Priority Dropdown list. Available values are Normal, Low, and High.
Set Due Date
Add Reminder
Default values are the current day’s date and current time. To
modify these values, select the appropriate checkbox to enable the
Date and Time fields.
Note: If a reminder has not be set for a task, then to view the task,
users must search for the Task in the Tasks window.
Task Type
Dropdown
Manually Associate Items with Individuals, Pedigrees or Samples
Pedigree Query with selected Fields
Individual Query with selected Fields
Sample Query with selected Fields
4. To associate an automatic query with the task, select the Query Type (Pedigree Query, Individual Query, or Sample Query), then click the Fields button and the Fields dialogue box opens.

28
Figure 1-22: Field selection for New Task query
See Database Query Format for detailed information about formatting a database query.
5. Drag and drop the field(s) to query into the New Task field window and input any additional parameters.
Close the fields dialogue box and click Save.
6. The Add New Task dialogue box closes. Select the All radio button under the Tasks menu on the left pane to
refresh the task list in the right upper pane.
To manually associate an item with a task 1. Right-click on the item (individual, pedigree, or sample) that you are associating with a task, and on the
context menu that opens, click New Task.
Figure 1-23: Creating a task for an individual
29
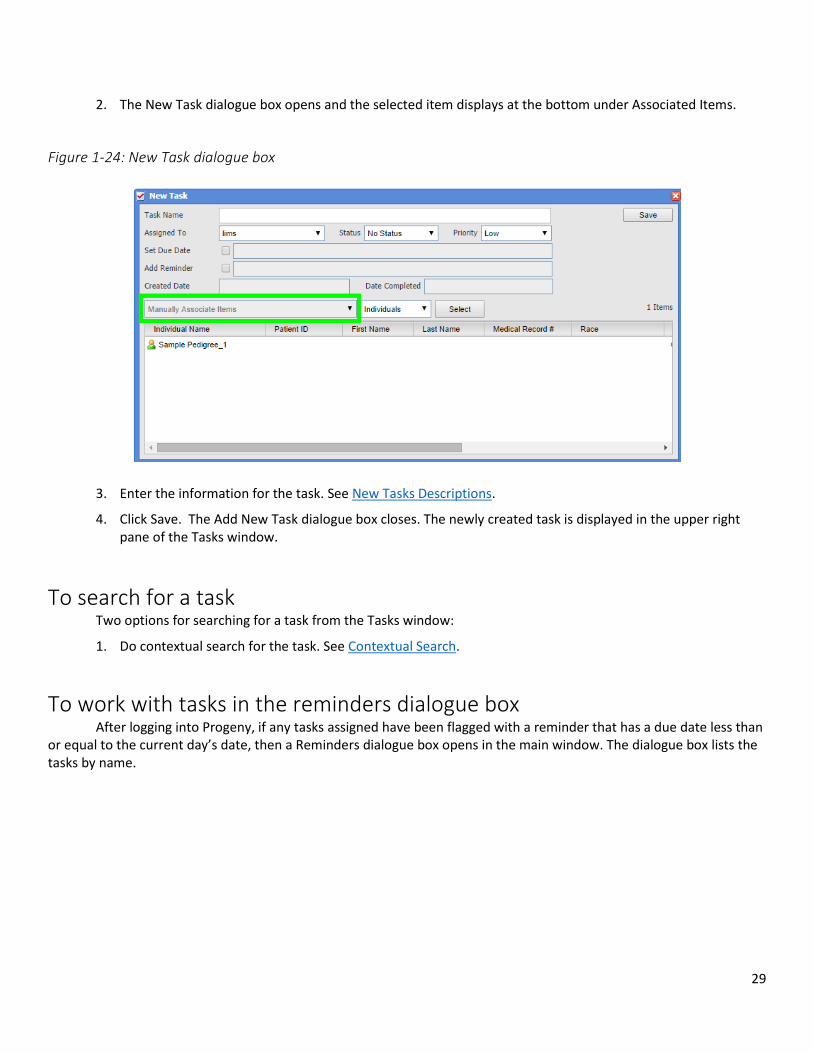
2. The New Task dialogue box opens and the selected item displays at the bottom under Associated Items.
Figure 1-24: New Task dialogue box
3. Enter the information for the task. See New Tasks Descriptions.
4. Click Save. The Add New Task dialogue box closes. The newly created task is displayed in the upper right pane of the Tasks window.
To search for a task Two options for searching for a task from the Tasks window:
1. Do contextual search for the task. See Contextual Search.
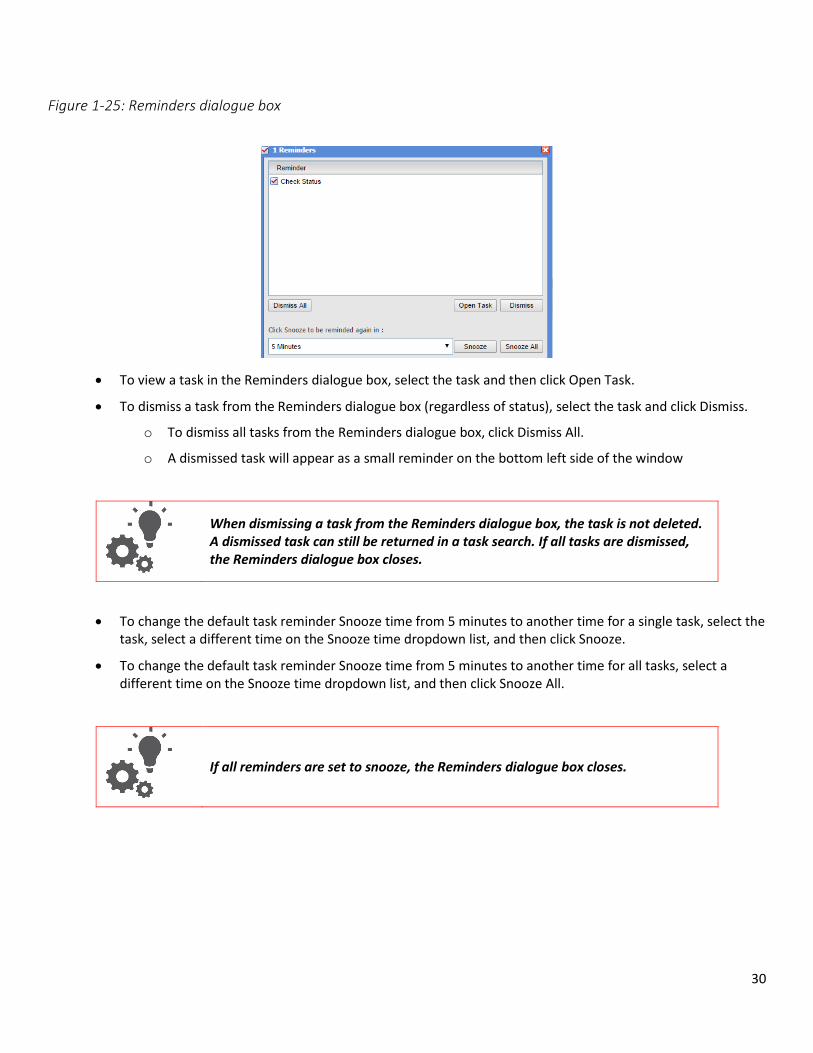
To work with tasks in the reminders dialogue box After logging into Progeny, if any tasks assigned have been flagged with a reminder that has a due date less than or equal to the current day’s date, then a Reminders dialogue box opens in the main window. The dialogue box lists the tasks by name.
30
Figure 1-25: Reminders dialogue box
To view a task in the Reminders dialogue box, select the task and then click Open Task.
To dismiss a task from the Reminders dialogue box (regardless of status), select the task and click Dismiss.
o To dismiss all tasks from the Reminders dialogue box, click Dismiss All.
o A dismissed task will appear as a small reminder on the bottom left side of the window
When dismissing a task from the Reminders dialogue box, the task is not deleted. A dismissed task can still be returned in a task search. If all tasks are dismissed, the Reminders dialogue box closes.
To change the default task reminder Snooze time from 5 minutes to another time for a single task, select the task, select a different time on the Snooze time dropdown list, and then click Snooze.
To change the default task reminder Snooze time from 5 minutes to another time for all tasks, select a different time on the Snooze time dropdown list, and then click Snooze All.
If all reminders are set to snooze, the Reminders dialogue box closes.
31
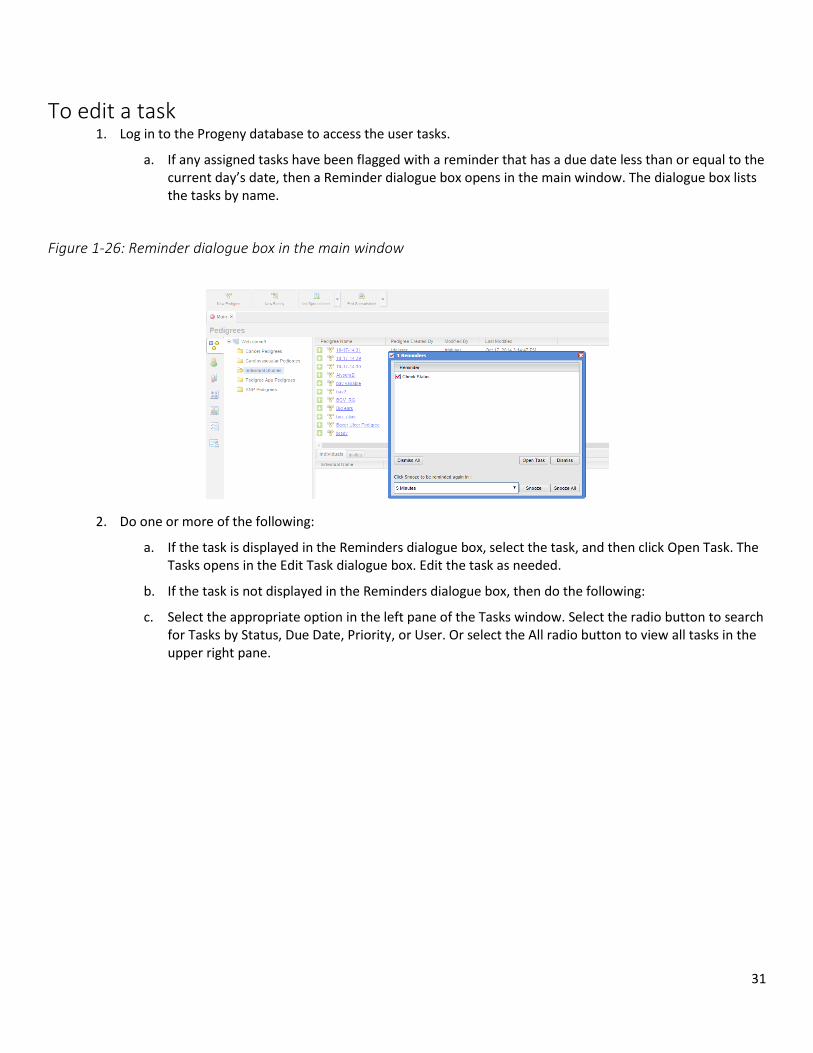
To edit a task 1. Log in to the Progeny database to access the user tasks.
a. If any assigned tasks have been flagged with a reminder that has a due date less than or equal to the current day’s date, then a Reminder dialogue box opens in the main window. The dialogue box lists the tasks by name.
Figure 1-26: Reminder dialogue box in the main window
2. Do one or more of the following:
a. If the task is displayed in the Reminders dialogue box, select the task, and then click Open Task. The Tasks opens in the Edit Task dialogue box. Edit the task as needed.
b. If the task is not displayed in the Reminders dialogue box, then do the following:
c. Select the appropriate option in the left pane of the Tasks window. Select the radio button to search for Tasks by Status, Due Date, Priority, or User. Or select the All radio button to view all tasks in the upper right pane.
32
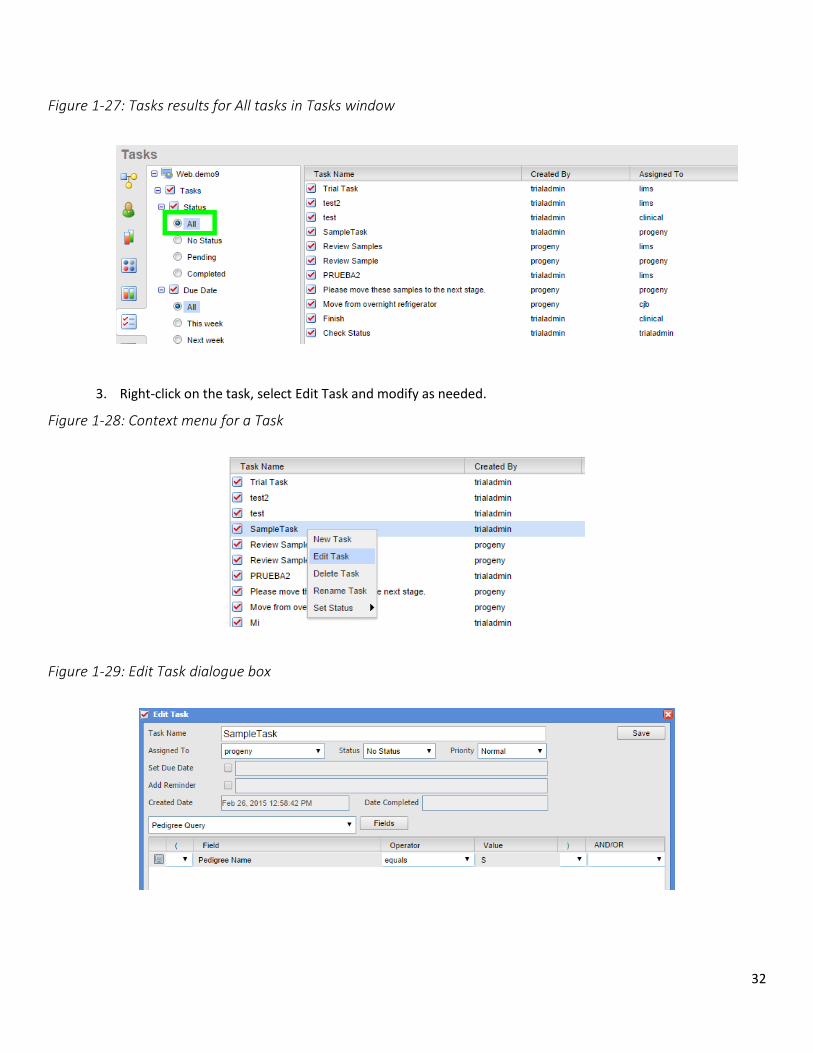
Figure 1-27: Tasks results for All tasks in Tasks window
3. Right-click on the task, select Edit Task and modify as needed.
Figure 1-28: Context menu for a Task
Figure 1-29: Edit Task dialogue box
33
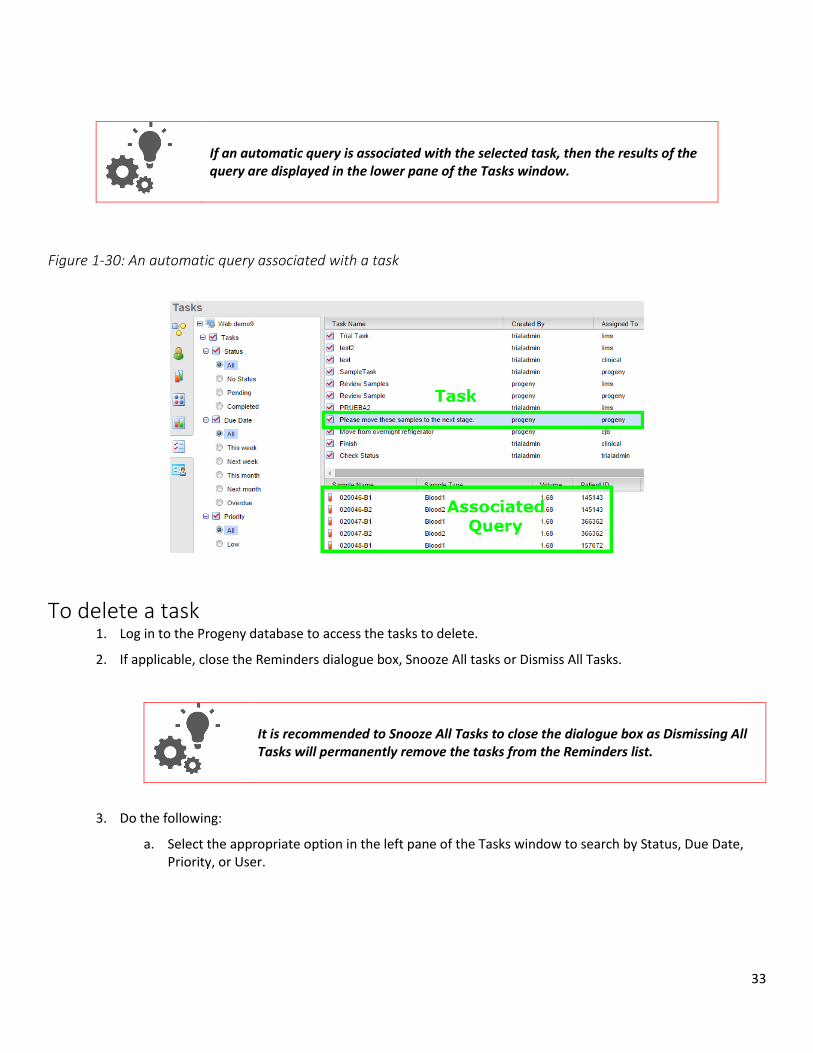
If an automatic query is associated with the selected task, then the results of the query are displayed in the lower pane of the Tasks window.
Figure 1-30: An automatic query associated with a task
To delete a task 1. Log in to the Progeny database to access the tasks to delete.
2. If applicable, close the Reminders dialogue box, Snooze All tasks or Dismiss All Tasks.
It is recommended to Snooze All Tasks to close the dialogue box as Dismissing All Tasks will permanently remove the tasks from the Reminders list.
3. Do the following:
a. Select the appropriate option in the left pane of the Tasks window to search by Status, Due Date, Priority, or User.
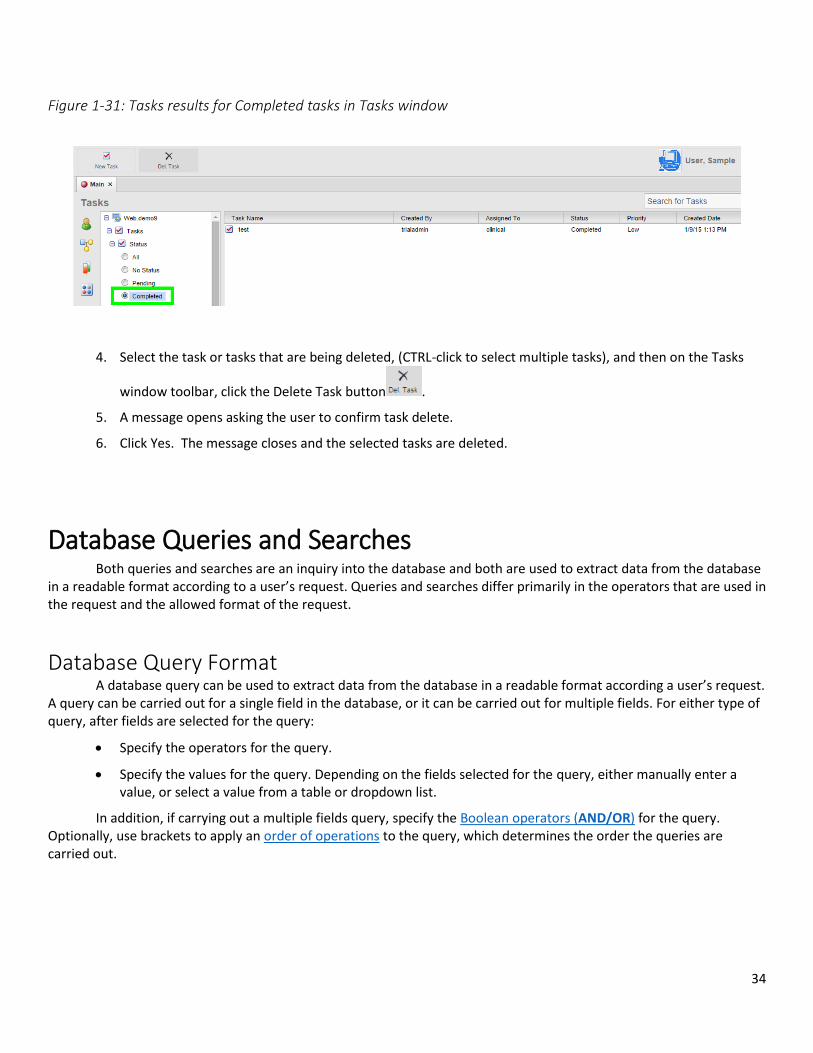
34
Figure 1-31: Tasks results for Completed tasks in Tasks window
4. Select the task or tasks that are being deleted, (CTRL-click to select multiple tasks), and then on the Tasks
window toolbar, click the Delete Task button .
5. A message opens asking the user to confirm task delete.
6. Click Yes. The message closes and the selected tasks are deleted.
Database Queries and Searches Both queries and searches are an inquiry into the database and both are used to extract data from the database
in a readable format according to a user’s request. Queries and searches differ primarily in the operators that are used in the request and the allowed format of the request.
Database Query Format A database query can be used to extract data from the database in a readable format according a user’s request. A query can be carried out for a single field in the database, or it can be carried out for multiple fields. For either type of query, after fields are selected for the query:
Specify the operators for the query.
Specify the values for the query. Depending on the fields selected for the query, either manually enter a value, or select a value from a table or dropdown list.
In addition, if carrying out a multiple fields query, specify the Boolean operators (AND/OR) for the query. Optionally, use brackets to apply an order of operations to the query, which determines the order the queries are carried out.
35
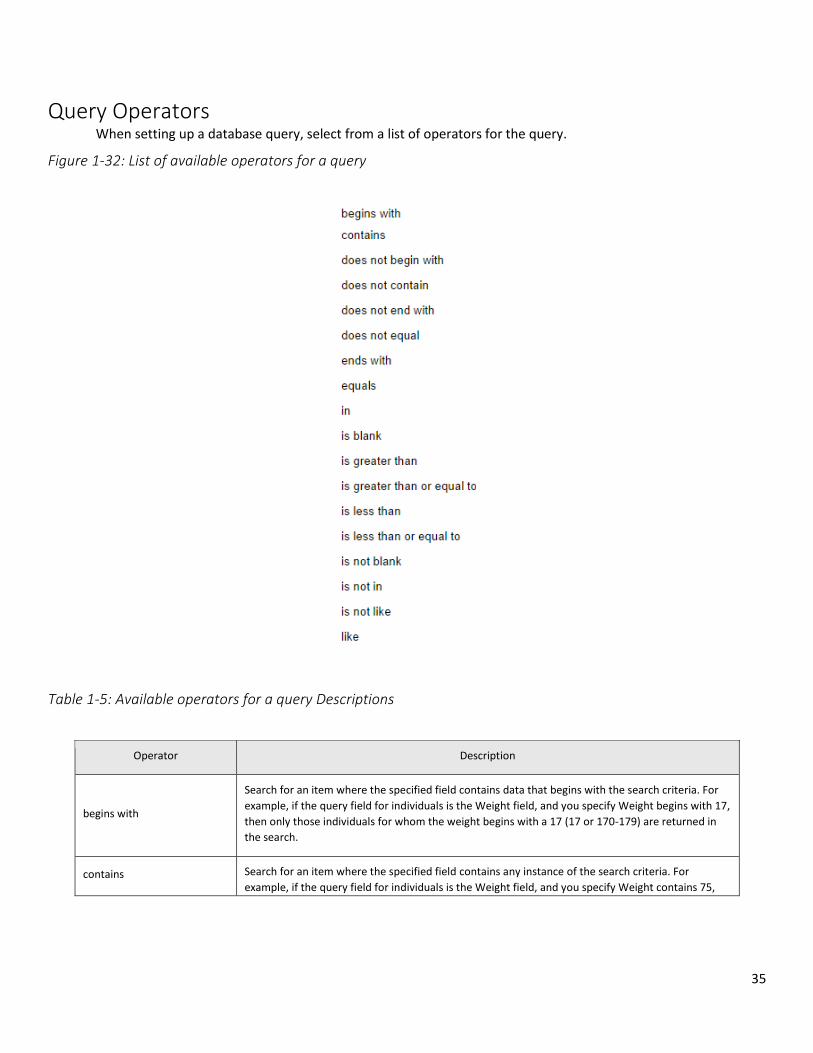
Query Operators When setting up a database query, select from a list of operators for the query.
Figure 1-32: List of available operators for a query
Table 1-5: Available operators for a query Descriptions
Operator Description
begins with
Search for an item where the specified field contains data that begins with the search criteria. For
example, if the query field for individuals is the Weight field, and you specify Weight begins with 17,
then only those individuals for whom the weight begins with a 17 (17 or 170-179) are returned in
the search.
contains Search for an item where the specified field contains any instance of the search criteria. For
example, if the query field for individuals is the Weight field, and you specify Weight contains 75,

36
then all individuals who have a weight in which 75 appears anywhere (75, 175, 275, and so on) are
returned in the search.
does not begin with
Search for an item where the specified field contains data that does not begin with the search
criteria. For example, if the query field for individuals is the Weight field, and you specify Weight
does not begin with 17, then only those individuals for whom the weight does not begin with a 17
(0-16, 18 -169, and so on) are returned in the search.
does not contain
Search for an item where the specified field does not contain any instance of the search criteria.
For example, if the query field for individuals is the Weight field, and you specify Weight does not
contain 75, then all individuals who have a weight in which 75 does not appear (0-74, 76-174, 176-
274, and so on) are returned in the search.
does not end with
Search for an item where the specified field contains data that does not end with the search
criteria. For example, if the query field for individuals is the Weight field, and you specify Weight
does not end with 75, then only those individuals for whom the weight does not end with a 75 (0-
74, 76-174, 176-274, and so on) are returned in the search.
does not equal Search for an item that meets any criteria other than the specified value For example, if the query
field for individuals is the Weight field, and you specify Weight ≠ 175, then only those individuals
whose weight does not equal 175
ends with
Search for an item where the specified field contains data that ends with the search criteria. For
example, if the query field for individuals is the Weight field, and you specify Weight ends with 75,
then only those individuals for whom the weight ends with a 75 (75, 175, 275, and so on) are
returned in the search.
equals
Search for an exact match. For example, if the query field for individuals is the Weight field, and you
specify the search criteria as Weight = 175, then only those individuals whose weight is exactly 175
are returned in the search.
in
Allows for comma separated values to be entered into a field so that multiple items can be
searched and returned in the search results. For example, if the query field for individuals is the
Weight field, and you specify Weight in 75, 80, 85, 90, then all individuals whose weight is exactly
75, 80, 85, or 90 are returned in the search.
Note: You can copy and paste a list of values from .csv file into a query of this type.
is blank
Search for an item where the specified field contains absolutely no data. For example, if the query
field for individuals is the Weight field, and you specify Weight is blank, only those individuals for
whom data has not been entered into the Weight field are returned in the search.
Note: A zero (0) is an actual data value. This means that if a zero (0) has been entered into the
Weight field for an individual, then the individual is not returned in the search.
is greater than Search for an item that is greater than the specified value. For example, if the query field for
individuals is the Weight field, and you specify Weight > 175, then only those individuals whose
weight is greater than 175 are returned in the search.
37
is greater than or equal to Search for an item that is greater than the specified value or is an exact match for the specified
value. For example, if the query field for individuals is the Weight field, and you specify Weight >
175, then those individuals whose weight is exactly 175 or greater are returned in the search.
is less than Search for an item that is less than the specified value. For example, if the query field for individuals
is the Weight field, and you specify Weight < 175, then only those individuals whose weight are less
than 175 are returned in the search.
is less than or equal to Search for an item that is less than the specified value or is an exact match for the specified value.
For example, if the query field for individuals is the Weight field, and you specify Weight < 175,
then those individuals whose weight is exactly 175 or less are returned in the search.
is not blank
Search for an item where the specified field contains any valid data. For example, if the query field
for individuals is the Weight field, and you specify Weight is not blank, all individuals for whom
data has been entered into the Weight field are returned in the search.
Note: A zero (0) is an actual data value. This means that if a zero (0) has been entered into the
Weight field for an individual, then the individual is returned in the search.
is not in
Allows for comma separated values to be entered into a field so that multiple items can be
searched and excluded from the search results. For example, if the query field for individuals is the
Weight field, and you specify Weight is not in 75, 80, 85, 90, then all individuals whose weight is not
exactly 75, 80, 85, or 90 are returned in the search.
Note: You can copy and paste a list of values from .csv file into a query of this type.
is not like A pattern matching search based on the keyword “like.” An underscore (_) is used to match exactly
one character, and the percent sign (%) is used to indicate any number of characters. For example,
if the query field for individuals is the Weight field, then to search for all individuals whose weight is
not like 75, select “is not like” as the operator and enter %75 in the Value field. The % indicates that
any number of characters can come before 75, for example, 0 -74, 176 - 184, 186 - 274, and so on.
Note: You can use the % anywhere in the search criteria, for example, 75% or 7%5.
like
A pattern matching search based on the keyword “like.” An underscore (_) is used to match exactly
one character, and the percent sign (%) is used to indicate any number of characters. For example,
if the query field for individuals is the Weight field, then to search for all individuals whose weight is
like 75, select “like” as the operator and enter %75 in the Value field. The % indicates that any
number of characters can come before 75, for example, 75, 175, 275, and so on.
Note: You can use the % anywhere in the search criteria, for example, 75% or 7%5.
38
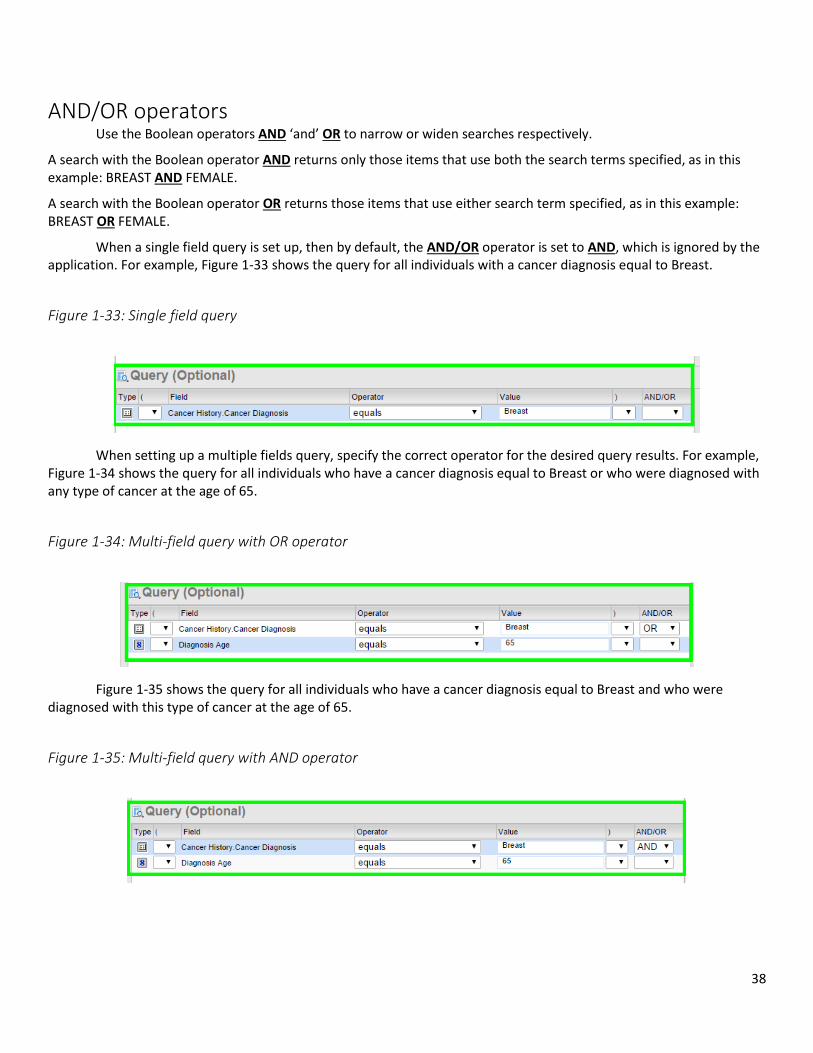
AND/OR operators Use the Boolean operators AND ‘and’ OR to narrow or widen searches respectively.
A search with the Boolean operator AND returns only those items that use both the search terms specified, as in this example: BREAST AND FEMALE.
A search with the Boolean operator OR returns those items that use either search term specified, as in this example: BREAST OR FEMALE.
When a single field query is set up, then by default, the AND/OR operator is set to AND, which is ignored by the application. For example, Figure 1-33 shows the query for all individuals with a cancer diagnosis equal to Breast.
Figure 1-33: Single field query
When setting up a multiple fields query, specify the correct operator for the desired query results. For example, Figure 1-34 shows the query for all individuals who have a cancer diagnosis equal to Breast or who were diagnosed with any type of cancer at the age of 65.
Figure 1-34: Multi-field query with OR operator
Figure 1-35 shows the query for all individuals who have a cancer diagnosis equal to Breast and who were diagnosed with this type of cancer at the age of 65.
Figure 1-35: Multi-field query with AND operator
39
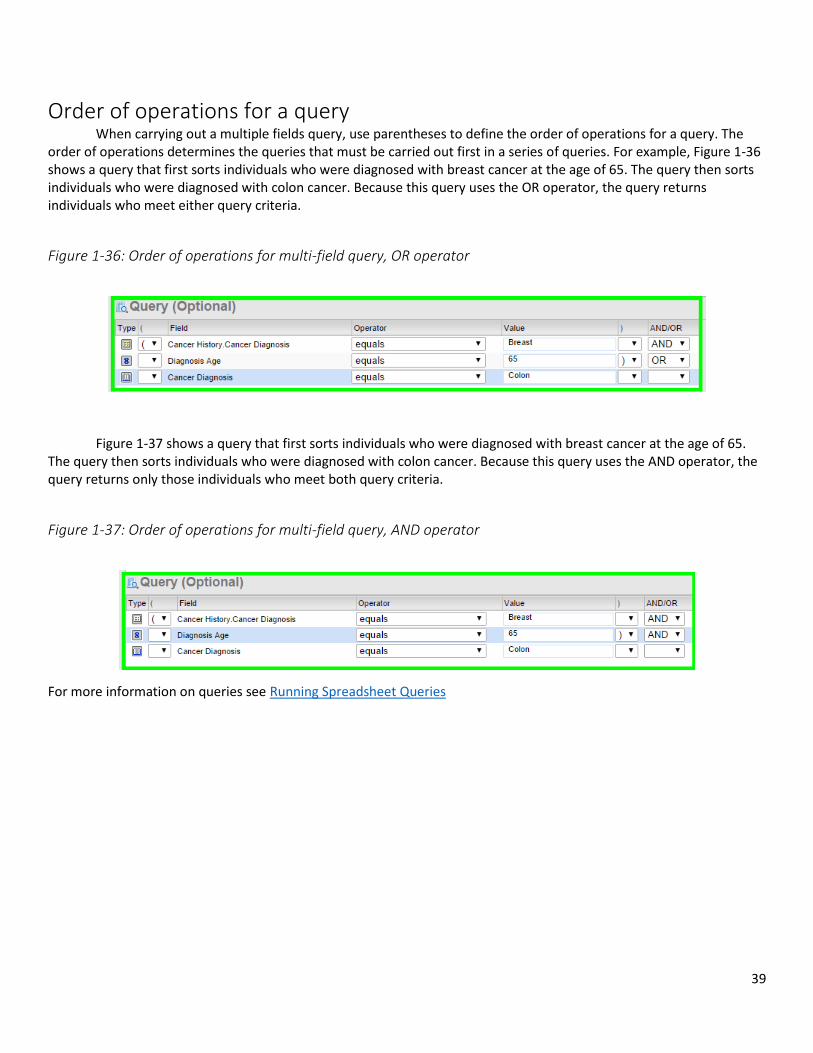
Order of operations for a query When carrying out a multiple fields query, use parentheses to define the order of operations for a query. The order of operations determines the queries that must be carried out first in a series of queries. For example, Figure 1-36 shows a query that first sorts individuals who were diagnosed with breast cancer at the age of 65. The query then sorts individuals who were diagnosed with colon cancer. Because this query uses the OR operator, the query returns individuals who meet either query criteria.
Figure 1-36: Order of operations for multi-field query, OR operator
Figure 1-37 shows a query that first sorts individuals who were diagnosed with breast cancer at the age of 65. The query then sorts individuals who were diagnosed with colon cancer. Because this query uses the AND operator, the query returns only those individuals who meet both query criteria.
Figure 1-37: Order of operations for multi-field query, AND operator
For more information on queries see Running Spreadsheet Queries
40
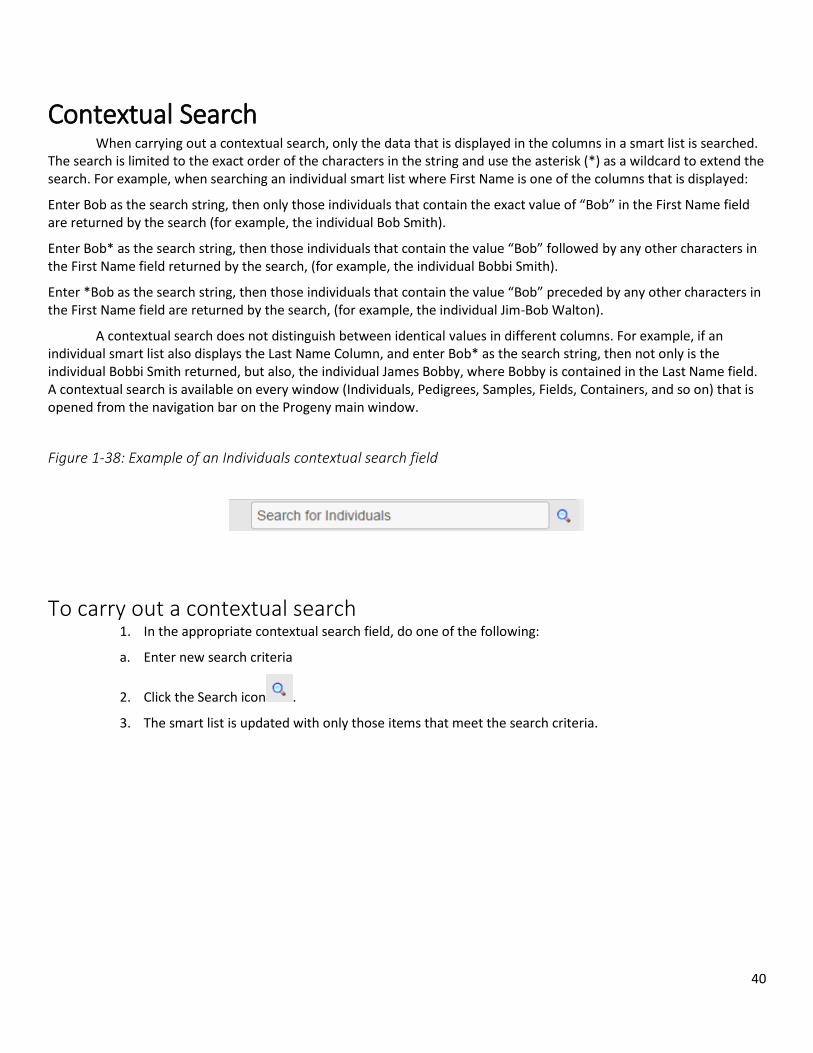
Contextual Search When carrying out a contextual search, only the data that is displayed in the columns in a smart list is searched. The search is limited to the exact order of the characters in the string and use the asterisk (*) as a wildcard to extend the search. For example, when searching an individual smart list where First Name is one of the columns that is displayed:
Enter Bob as the search string, then only those individuals that contain the exact value of “Bob” in the First Name field are returned by the search (for example, the individual Bob Smith).
Enter Bob* as the search string, then those individuals that contain the value “Bob” followed by any other characters in the First Name field returned by the search, (for example, the individual Bobbi Smith).
Enter *Bob as the search string, then those individuals that contain the value “Bob” preceded by any other characters in the First Name field are returned by the search, (for example, the individual Jim-Bob Walton).
A contextual search does not distinguish between identical values in different columns. For example, if an individual smart list also displays the Last Name Column, and enter Bob* as the search string, then not only is the individual Bobbi Smith returned, but also, the individual James Bobby, where Bobby is contained in the Last Name field. A contextual search is available on every window (Individuals, Pedigrees, Samples, Fields, Containers, and so on) that is opened from the navigation bar on the Progeny main window.
Figure 1-38: Example of an Individuals contextual search field
To carry out a contextual search 1. In the appropriate contextual search field, do one of the following:
a. Enter new search criteria
2. Click the Search icon .
3. The smart list is updated with only those items that meet the search criteria.
41
Chapter 2 – Progeny Database Design
At a high level overview, database design is the logical design of the base data structures that are used to store the data in the database. Complete and accurate database design is critical for data storage, data retrieval, and ensuring the integrity of the data the database. This chapter details the Progeny database design so that the user can understand how the database is built.
Note: Progeny Database Administrative Functions: The configuration of the Progeny database is done in the
Progeny Desktop Client and is managed by the designated administrator. The Progeny Web Client does not allow users
to create, modify or delete database fields. The following section will cover database fields and functions but keep in
mind configuring fields is an administrator function and must be managed in the Progeny Desktop Client by the Progeny
administrator.
This chapter covers the following topics:
Progeny Record- Level Database Fields
Database Field Types
System Fields
Data Folders Overview

42
Progeny Record-Level Database Fields A database field is a single piece of information from a record. A database record is a set of fields. A file is a collection of records. The Fields window in the desktop client displays the record-level fields that are contained in a Progeny database. In Progeny Web users will not be able to view this but for the purpose of understanding fields the following screenshots will be from Progeny Desktop Client.
Figure 2-1: Example of the components of a database
There are four different record-level fields in Progeny: Individual, Pedigree, Sample and Marker.
Individual database fields – Individual database fields are stored at the individual record level. The demo database that is shipped with Progeny contains individual data fields grouped into Cardiac, Clinical and PHI Data folders with additional subfolders under Cardiac and Clinical. Individual database fields are displayed on the Fields window only if Progeny Clinical has been purchased and installed.
Figure 2-2: Individual database fields in Progeny demo database
43
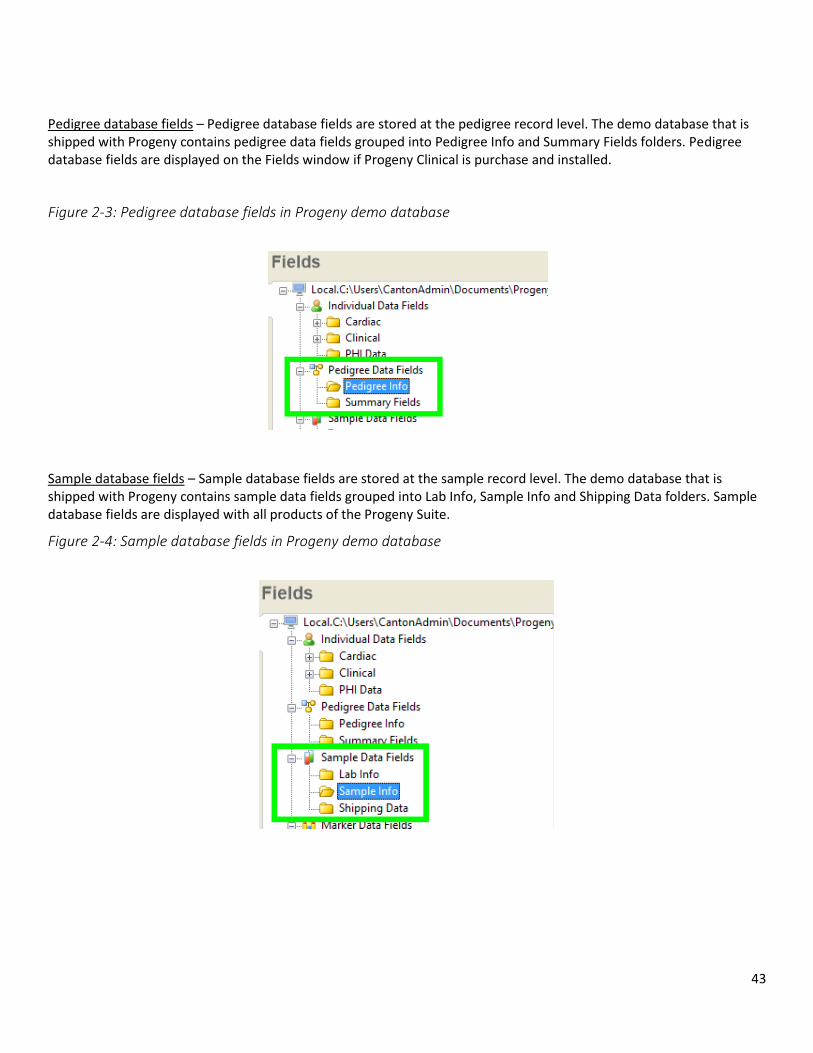
Pedigree database fields – Pedigree database fields are stored at the pedigree record level. The demo database that is shipped with Progeny contains pedigree data fields grouped into Pedigree Info and Summary Fields folders. Pedigree database fields are displayed on the Fields window if Progeny Clinical is purchase and installed.
Figure 2-3: Pedigree database fields in Progeny demo database
Sample database fields – Sample database fields are stored at the sample record level. The demo database that is shipped with Progeny contains sample data fields grouped into Lab Info, Sample Info and Shipping Data folders. Sample database fields are displayed with all products of the Progeny Suite.
Figure 2-4: Sample database fields in Progeny demo database

44
Marker database fields – Marker database fields are stored at the marker record level. The demo database that is
shipped with Progeny contains a progeny folder but does not include any fields. Marker database fields are displayed on
the Fields window only Progeny Lab has been purchased and installed.
Figure 2-5: Marker database fields in Progeny demo database
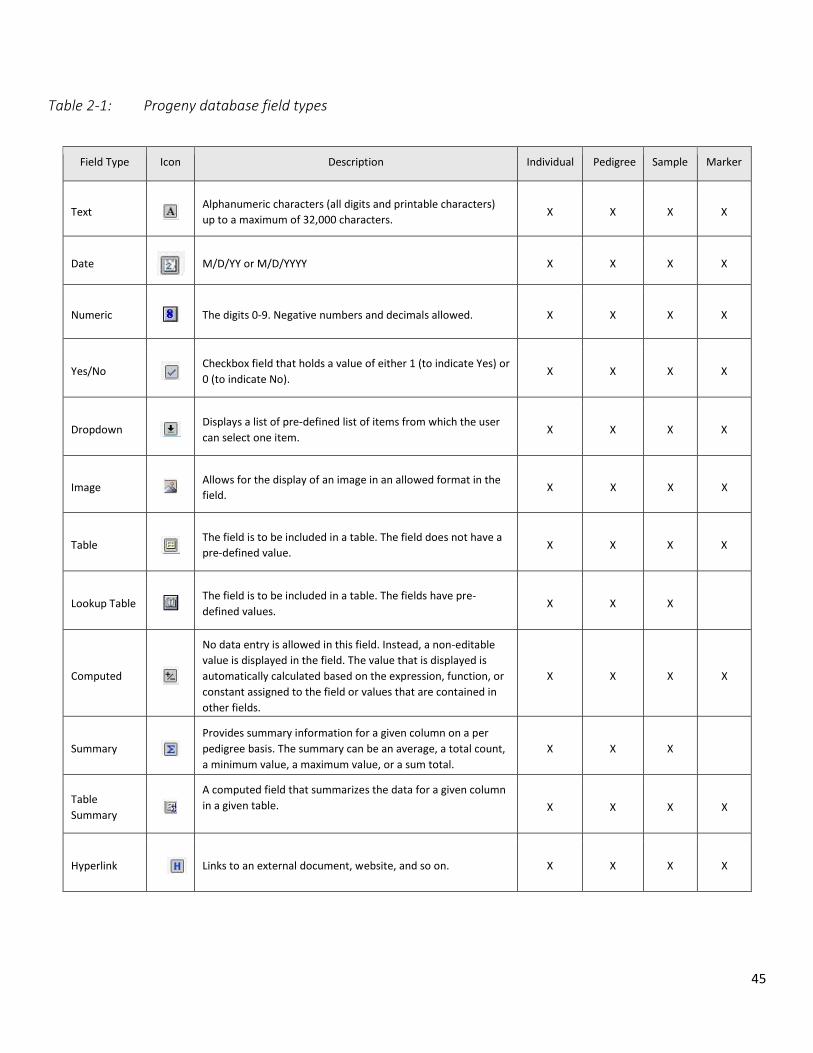
Database Field Types When an administrator creates a database field in the Progeny Desktop Client a field type is specified. The field
type determines the type of data that a user can enter into the field (alphanumeric, numeric, date, and so on) or
determines how the field functions in the database, for example, an image displays in the field when a user selects an
image file for an image field, dropdown fields provide a custom pick list and date fields provide a date and time picker
for data entry into those field types. By default, each field type is marked with a unique icon in application. Not all field
types are available for all record levels. Table 2-1 below lists the field types that are available for each record level field
in a Progeny database. It also provides a description of each field and the records for which the field type is applicable.
45
Table 2-1: Progeny database field types
Field Type Icon Description Individual Pedigree Sample Marker
Text Alphanumeric characters (all digits and printable characters)
up to a maximum of 32,000 characters. X X X X
Date
M/D/YY or M/D/YYYY X X X X
Numeric The digits 0-9. Negative numbers and decimals allowed. X X X X
Yes/No Checkbox field that holds a value of either 1 (to indicate Yes) or
0 (to indicate No). X X X X
Dropdown Displays a list of pre-defined list of items from which the user
can select one item. X X X X
Image Allows for the display of an image in an allowed format in the
field. X X X X
Table The field is to be included in a table. The field does not have a
pre-defined value. X X X X
Lookup Table The field is to be included in a table. The fields have pre-
defined values. X X X
Computed
No data entry is allowed in this field. Instead, a non-editable
value is displayed in the field. The value that is displayed is
automatically calculated based on the expression, function, or
constant assigned to the field or values that are contained in
other fields.
X X X X
Summary
Provides summary information for a given column on a per
pedigree basis. The summary can be an average, a total count,
a minimum value, a maximum value, or a sum total.
X X X
Table
Summary
A computed field that summarizes the data for a given column
in a given table. X X X X
Hyperlink Links to an external document, website, and so on. X X X X
46
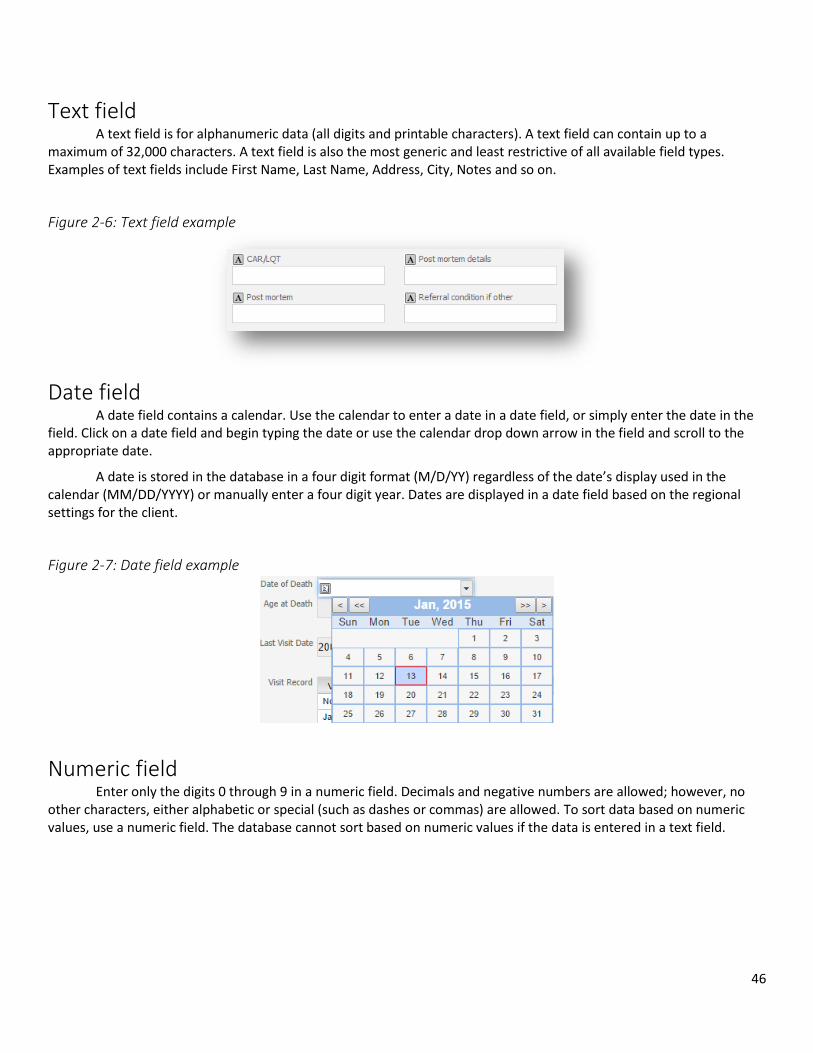
Text field A text field is for alphanumeric data (all digits and printable characters). A text field can contain up to a maximum of 32,000 characters. A text field is also the most generic and least restrictive of all available field types. Examples of text fields include First Name, Last Name, Address, City, Notes and so on.
Figure 2-6: Text field example
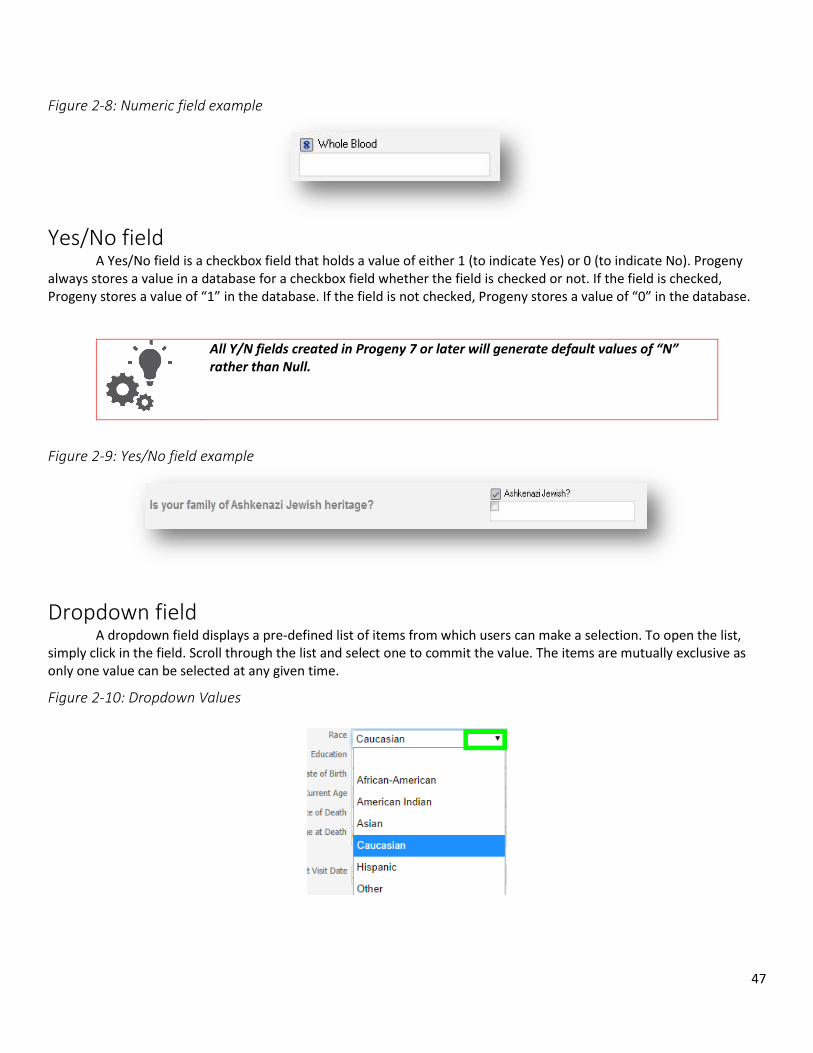
Date field A date field contains a calendar. Use the calendar to enter a date in a date field, or simply enter the date in the field. Click on a date field and begin typing the date or use the calendar drop down arrow in the field and scroll to the appropriate date.
A date is stored in the database in a four digit format (M/D/YY) regardless of the date’s display used in the calendar (MM/DD/YYYY) or manually enter a four digit year. Dates are displayed in a date field based on the regional settings for the client.
Figure 2-7: Date field example
Numeric field Enter only the digits 0 through 9 in a numeric field. Decimals and negative numbers are allowed; however, no other characters, either alphabetic or special (such as dashes or commas) are allowed. To sort data based on numeric values, use a numeric field. The database cannot sort based on numeric values if the data is entered in a text field.
47
Figure 2-8: Numeric field example
Yes/No field A Yes/No field is a checkbox field that holds a value of either 1 (to indicate Yes) or 0 (to indicate No). Progeny always stores a value in a database for a checkbox field whether the field is checked or not. If the field is checked, Progeny stores a value of “1” in the database. If the field is not checked, Progeny stores a value of “0” in the database.
All Y/N fields created in Progeny 7 or later will generate default values of “N” rather than Null.
Figure 2-9: Yes/No field example
Dropdown field A dropdown field displays a pre-defined list of items from which users can make a selection. To open the list, simply click in the field. Scroll through the list and select one to commit the value. The items are mutually exclusive as only one value can be selected at any given time.
Figure 2-10: Dropdown Values
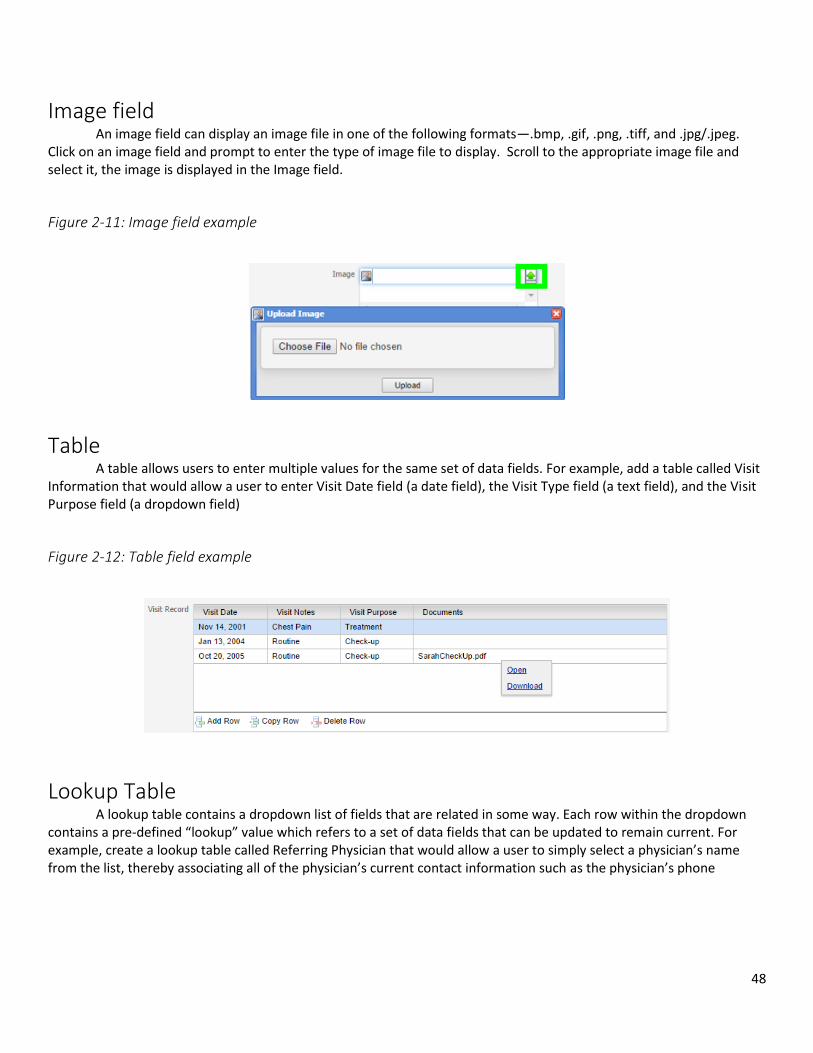
48
Image field An image field can display an image file in one of the following formats—.bmp, .gif, .png, .tiff, and .jpg/.jpeg. Click on an image field and prompt to enter the type of image file to display. Scroll to the appropriate image file and select it, the image is displayed in the Image field.
Figure 2-11: Image field example
Table A table allows users to enter multiple values for the same set of data fields. For example, add a table called Visit Information that would allow a user to enter Visit Date field (a date field), the Visit Type field (a text field), and the Visit Purpose field (a dropdown field)
Figure 2-12: Table field example
Lookup Table A lookup table contains a dropdown list of fields that are related in some way. Each row within the dropdown contains a pre-defined “lookup” value which refers to a set of data fields that can be updated to remain current. For example, create a lookup table called Referring Physician that would allow a user to simply select a physician’s name from the list, thereby associating all of the physician’s current contact information such as the physician’s phone
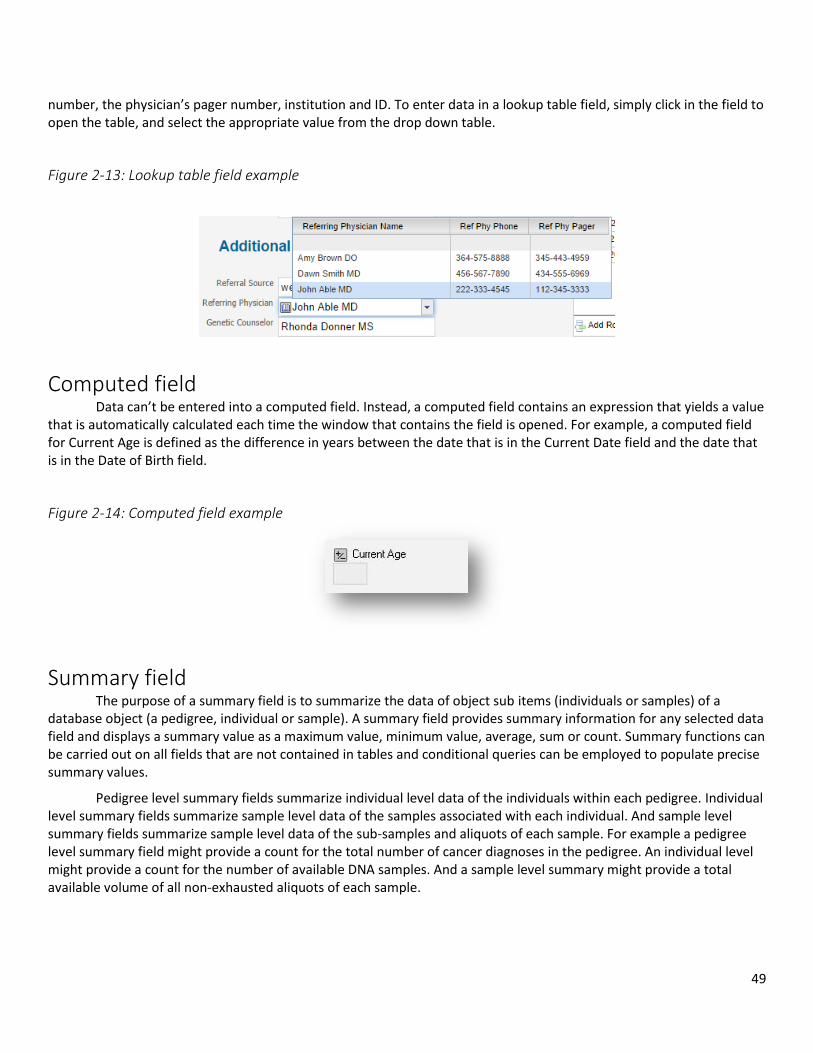
49
number, the physician’s pager number, institution and ID. To enter data in a lookup table field, simply click in the field to open the table, and select the appropriate value from the drop down table.
Figure 2-13: Lookup table field example
Computed field Data can’t be entered into a computed field. Instead, a computed field contains an expression that yields a value that is automatically calculated each time the window that contains the field is opened. For example, a computed field for Current Age is defined as the difference in years between the date that is in the Current Date field and the date that is in the Date of Birth field.
Figure 2-14: Computed field example
Summary field The purpose of a summary field is to summarize the data of object sub items (individuals or samples) of a database object (a pedigree, individual or sample). A summary field provides summary information for any selected data field and displays a summary value as a maximum value, minimum value, average, sum or count. Summary functions can be carried out on all fields that are not contained in tables and conditional queries can be employed to populate precise summary values.
Pedigree level summary fields summarize individual level data of the individuals within each pedigree. Individual level summary fields summarize sample level data of the samples associated with each individual. And sample level summary fields summarize sample level data of the sub-samples and aliquots of each sample. For example a pedigree level summary field might provide a count for the total number of cancer diagnoses in the pedigree. An individual level might provide a count for the number of available DNA samples. And a sample level summary might provide a total available volume of all non-exhausted aliquots of each sample.
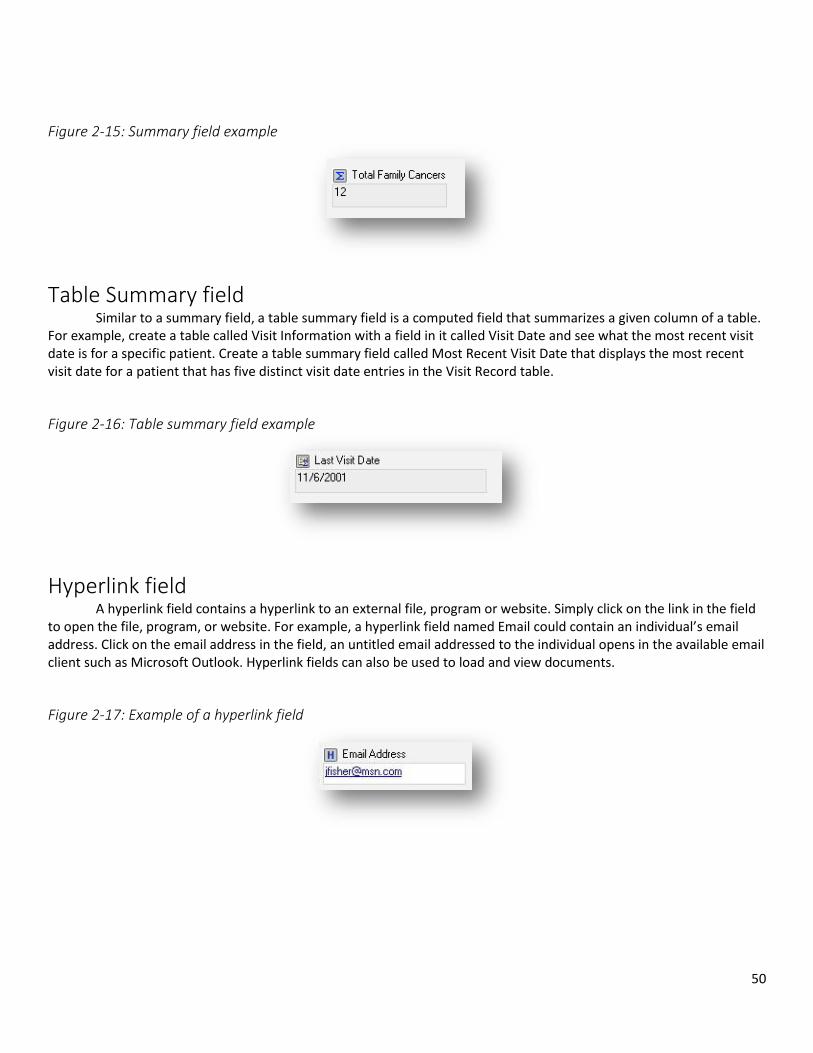
50
Figure 2-15: Summary field example
Table Summary field Similar to a summary field, a table summary field is a computed field that summarizes a given column of a table. For example, create a table called Visit Information with a field in it called Visit Date and see what the most recent visit date is for a specific patient. Create a table summary field called Most Recent Visit Date that displays the most recent visit date for a patient that has five distinct visit date entries in the Visit Record table.
Figure 2-16: Table summary field example
Hyperlink field A hyperlink field contains a hyperlink to an external file, program or website. Simply click on the link in the field to open the file, program, or website. For example, a hyperlink field named Email could contain an individual’s email address. Click on the email address in the field, an untitled email addressed to the individual opens in the available email client such as Microsoft Outlook. Hyperlink fields can also be used to load and view documents.
Figure 2-17: Example of a hyperlink field
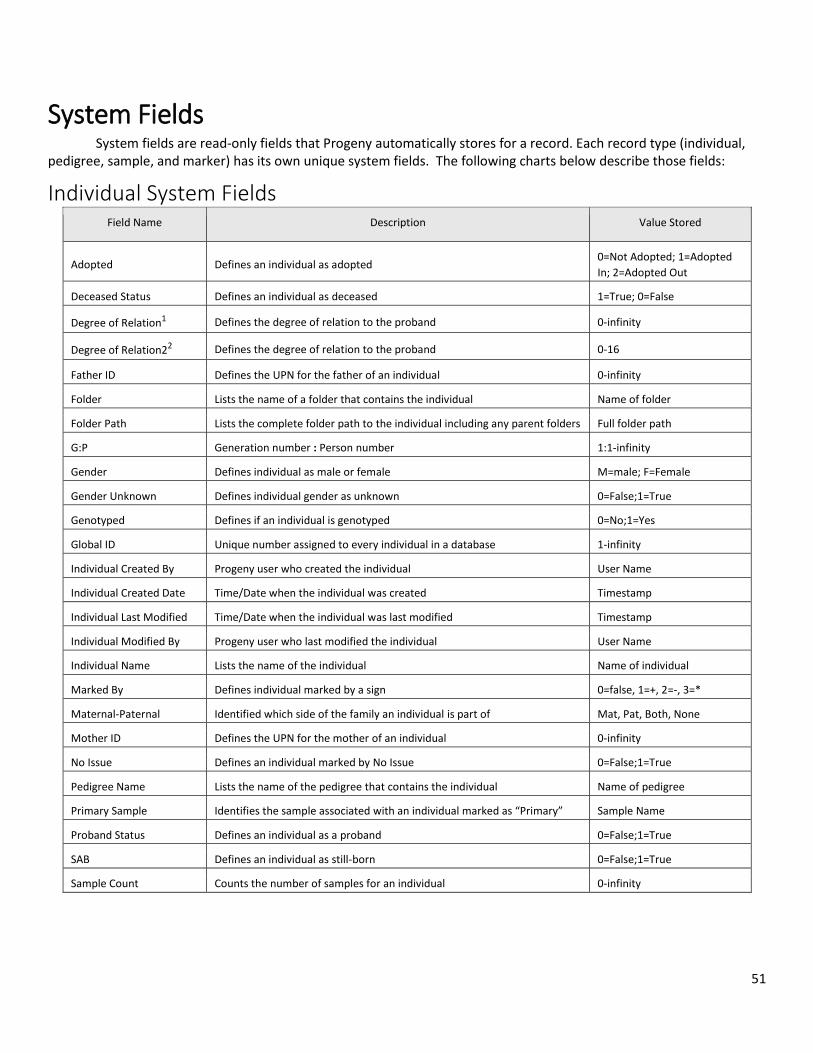
51
System Fields System fields are read-only fields that Progeny automatically stores for a record. Each record type (individual,
pedigree, sample, and marker) has its own unique system fields. The following charts below describe those fields:
Individual System Fields Field Name Description Value Stored
Adopted Defines an individual as adopted 0=Not Adopted; 1=Adopted
In; 2=Adopted Out
Deceased Status Defines an individual as deceased 1=True; 0=False
Degree of Relation1 Defines the degree of relation to the proband 0-infinity
Degree of Relation22 Defines the degree of relation to the proband 0-16
Father ID Defines the UPN for the father of an individual 0-infinity
Folder Lists the name of a folder that contains the individual Name of folder
Folder Path Lists the complete folder path to the individual including any parent folders Full folder path
G:P Generation number : Person number 1:1-infinity
Gender Defines individual as male or female M=male; F=Female
Gender Unknown Defines individual gender as unknown 0=False;1=True
Genotyped Defines if an individual is genotyped 0=No;1=Yes
Global ID Unique number assigned to every individual in a database 1-infinity
Individual Created By Progeny user who created the individual User Name
Individual Created Date Time/Date when the individual was created Timestamp
Individual Last Modified Time/Date when the individual was last modified Timestamp
Individual Modified By Progeny user who last modified the individual User Name
Individual Name Lists the name of the individual Name of individual
Marked By Defines individual marked by a sign 0=false, 1=+, 2=-, 3=*
Maternal-Paternal Identified which side of the family an individual is part of Mat, Pat, Both, None
Mother ID Defines the UPN for the mother of an individual 0-infinity
No Issue Defines an individual marked by No Issue 0=False;1=True
Pedigree Name Lists the name of the pedigree that contains the individual Name of pedigree
Primary Sample Identifies the sample associated with an individual marked as “Primary” Sample Name
Proband Status Defines an individual as a proband 0=False;1=True
SAB Defines an individual as still-born 0=False;1=True
Sample Count Counts the number of samples for an individual 0-infinity
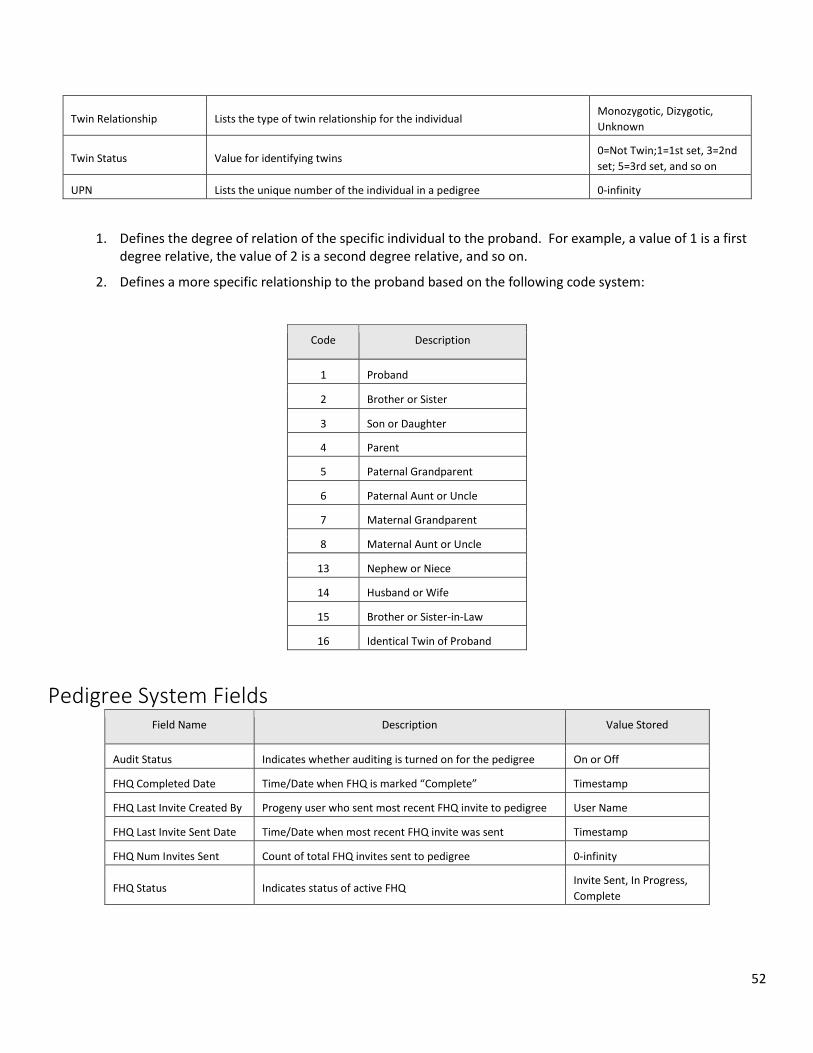
52
Twin Relationship Lists the type of twin relationship for the individual Monozygotic, Dizygotic,
Unknown
Twin Status Value for identifying twins 0=Not Twin;1=1st set, 3=2nd
set; 5=3rd set, and so on
UPN Lists the unique number of the individual in a pedigree 0-infinity
1. Defines the degree of relation of the specific individual to the proband. For example, a value of 1 is a first degree relative, the value of 2 is a second degree relative, and so on.
2. Defines a more specific relationship to the proband based on the following code system:
Code Description
1 Proband
2 Brother or Sister
3 Son or Daughter
4 Parent
5 Paternal Grandparent
6 Paternal Aunt or Uncle
7 Maternal Grandparent
8 Maternal Aunt or Uncle
13 Nephew or Niece
14 Husband or Wife
15 Brother or Sister-in-Law
16 Identical Twin of Proband
Pedigree System Fields Field Name Description Value Stored
Audit Status Indicates whether auditing is turned on for the pedigree On or Off
FHQ Completed Date Time/Date when FHQ is marked “Complete” Timestamp
FHQ Last Invite Created By Progeny user who sent most recent FHQ invite to pedigree User Name
FHQ Last Invite Sent Date Time/Date when most recent FHQ invite was sent Timestamp
FHQ Num Invites Sent Count of total FHQ invites sent to pedigree 0-infinity
FHQ Status Indicates status of active FHQ Invite Sent, In Progress,
Complete
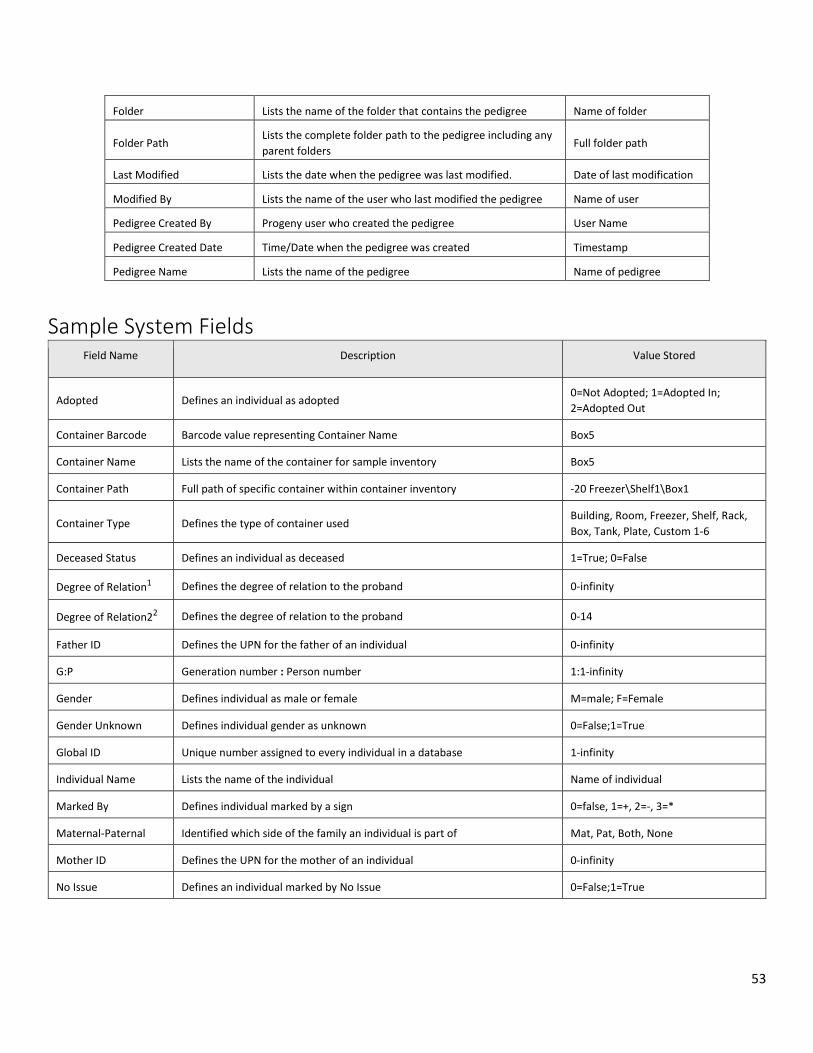
53
Folder Lists the name of the folder that contains the pedigree Name of folder
Folder Path Lists the complete folder path to the pedigree including any
parent folders Full folder path
Last Modified Lists the date when the pedigree was last modified. Date of last modification
Modified By Lists the name of the user who last modified the pedigree Name of user
Pedigree Created By Progeny user who created the pedigree User Name
Pedigree Created Date Time/Date when the pedigree was created Timestamp
Pedigree Name Lists the name of the pedigree Name of pedigree
Sample System Fields Field Name Description Value Stored
Adopted Defines an individual as adopted 0=Not Adopted; 1=Adopted In;
2=Adopted Out
Container Barcode Barcode value representing Container Name Box5
Container Name Lists the name of the container for sample inventory Box5
Container Path Full path of specific container within container inventory -20 Freezer\Shelf1\Box1
Container Type Defines the type of container used Building, Room, Freezer, Shelf, Rack,
Box, Tank, Plate, Custom 1-6
Deceased Status Defines an individual as deceased 1=True; 0=False
Degree of Relation1 Defines the degree of relation to the proband 0-infinity
Degree of Relation22 Defines the degree of relation to the proband 0-14
Father ID Defines the UPN for the father of an individual 0-infinity
G:P Generation number : Person number 1:1-infinity
Gender Defines individual as male or female M=male; F=Female
Gender Unknown Defines individual gender as unknown 0=False;1=True
Global ID Unique number assigned to every individual in a database 1-infinity
Individual Name Lists the name of the individual Name of individual
Marked By Defines individual marked by a sign 0=false, 1=+, 2=-, 3=*
Maternal-Paternal Identified which side of the family an individual is part of Mat, Pat, Both, None
Mother ID Defines the UPN for the mother of an individual 0-infinity
No Issue Defines an individual marked by No Issue 0=False;1=True

54
Order Number Unique identifier for orders (requires optional Orders Module) 0-infinity
Parent Sample Name Lists the name of the parent sample for an aliquot Name of parent sample
Pedigree Name Lists the name of the pedigree that contains the individual Name of pedigree
Position Lists the location of the sample within a container 0-infinity
Proband Status Defines an individual as a proband 0=False;1=True
SAB Defines an individual as still-born 0=False;1=True
Sample Audit Status Indicates whether auditing is turned on or off for the sample On or Off
Sample Created By Progeny user who created the sample User Name
Sample Created Date Time/Date when the sample was created Timestamp
Sample Folder Lists the name of the folder that contains the sample Name of sample folder
Sample Last Modified Time/Date when the sample was last modified Timestamp
Sample Modified By Progeny user who last modified the sample User Name
Sample Name Lists the name of the sample Name of sample
Twin Relationship Lists the type of twin relationship for the individual Monozygotic, Dizygotic, Unknown
Twin Status Value for identifying twins 0=Not Twin;1=1st set, 3=2nd set;
5=3rd set, and so on
UPN Lists the unique number of the individual in a pedigree 0-infinity
Volume Lists the current sample volume 0-infinity
Workflow Lists the name of the workflow with which the sample is associated Name of workflow
Workflow stage Lists the name of the workflow stage that was last completed for the sample Name of workflow stage
1. Defines the degree of relation of the specific individual to the proband. For example, a value of 1 is a first degree relative, the value of 2 is a second degree relative, and so on.
2. Defines a more specific relationship to the proband based on the following code system:
Code Description
1 Proband
2 Brother or Sister
3 Son or Daughter
4 Parent
5 Paternal Grandparent
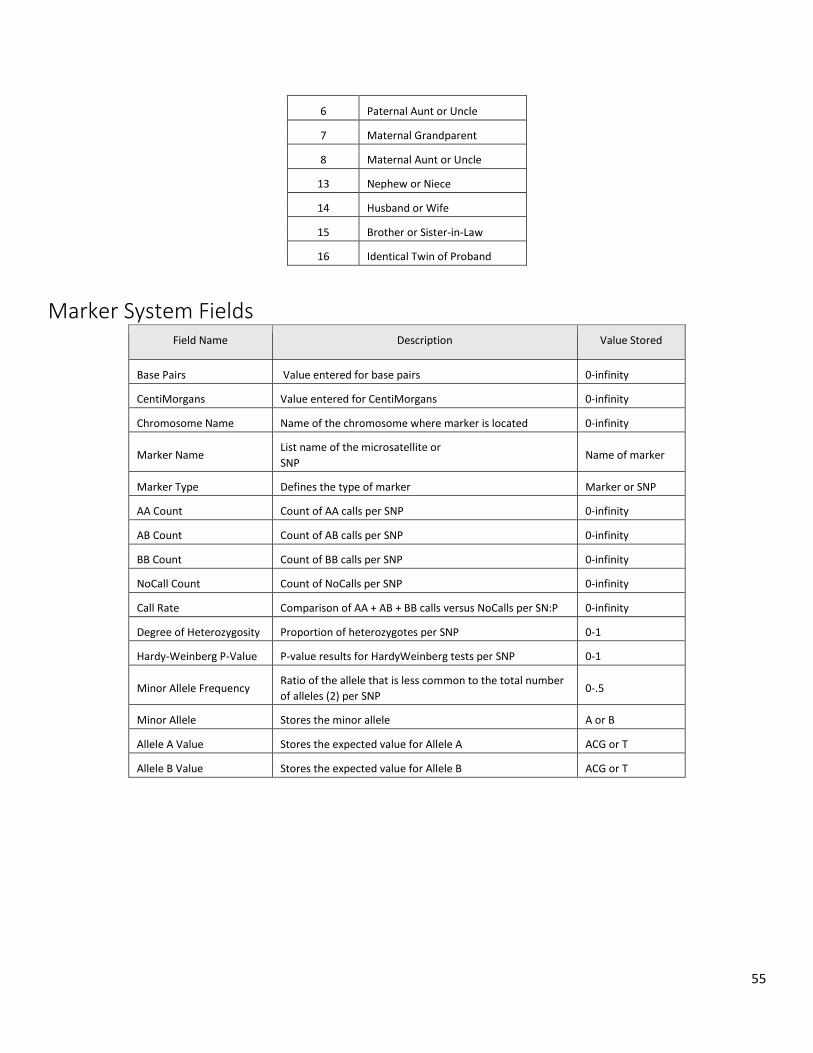
55
6 Paternal Aunt or Uncle
7 Maternal Grandparent
8 Maternal Aunt or Uncle
13 Nephew or Niece
14 Husband or Wife
15 Brother or Sister-in-Law
16 Identical Twin of Proband
Marker System Fields Field Name Description Value Stored
Base Pairs Value entered for base pairs 0-infinity
CentiMorgans Value entered for CentiMorgans 0-infinity
Chromosome Name Name of the chromosome where marker is located 0-infinity
Marker Name List name of the microsatellite or SNP
Name of marker
Marker Type Defines the type of marker Marker or SNP
AA Count Count of AA calls per SNP 0-infinity
AB Count Count of AB calls per SNP 0-infinity
BB Count Count of BB calls per SNP 0-infinity
NoCall Count Count of NoCalls per SNP 0-infinity
Call Rate Comparison of AA + AB + BB calls versus NoCalls per SN:P 0-infinity
Degree of Heterozygosity Proportion of heterozygotes per SNP 0-1
Hardy-Weinberg P-Value P-value results for HardyWeinberg tests per SNP 0-1
Minor Allele Frequency Ratio of the allele that is less common to the total number
of alleles (2) per SNP 0-.5
Minor Allele Stores the minor allele A or B
Allele A Value Stores the expected value for Allele A ACG or T
Allele B Value Stores the expected value for Allele B ACG or T
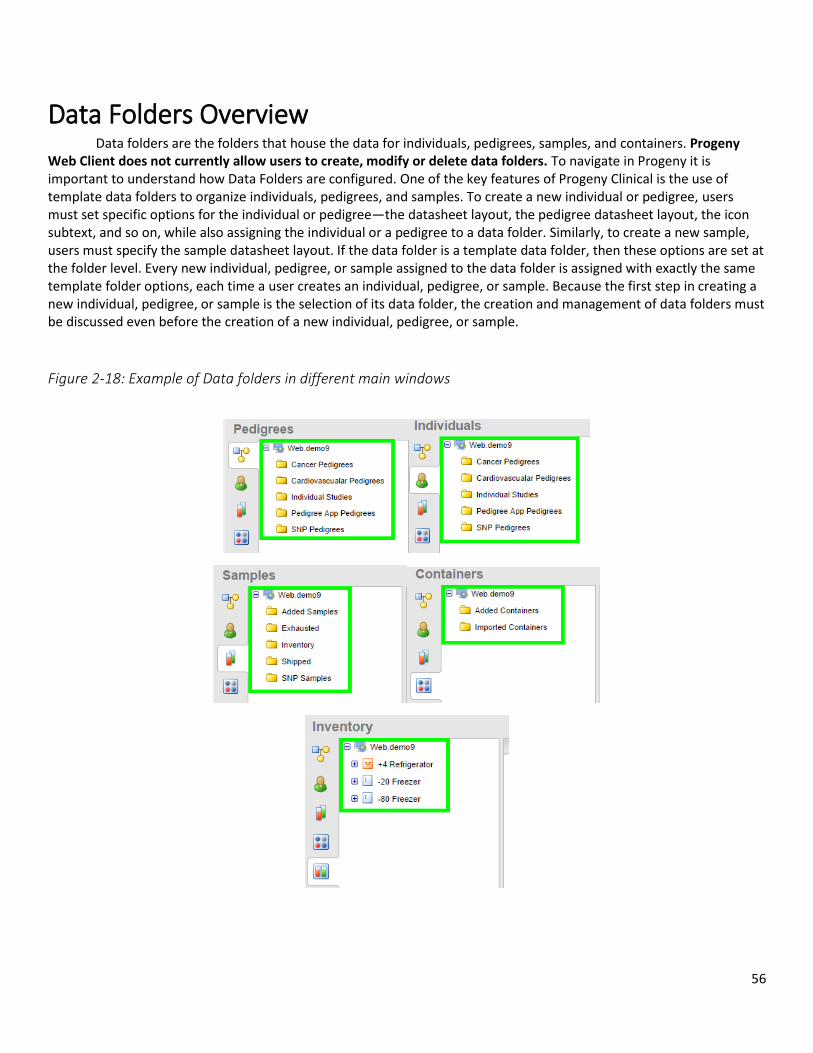
56
Data Folders Overview Data folders are the folders that house the data for individuals, pedigrees, samples, and containers. Progeny
Web Client does not currently allow users to create, modify or delete data folders. To navigate in Progeny it is important to understand how Data Folders are configured. One of the key features of Progeny Clinical is the use of template data folders to organize individuals, pedigrees, and samples. To create a new individual or pedigree, users must set specific options for the individual or pedigree—the datasheet layout, the pedigree datasheet layout, the icon subtext, and so on, while also assigning the individual or a pedigree to a data folder. Similarly, to create a new sample, users must specify the sample datasheet layout. If the data folder is a template data folder, then these options are set at the folder level. Every new individual, pedigree, or sample assigned to the data folder is assigned with exactly the same template folder options, each time a user creates an individual, pedigree, or sample. Because the first step in creating a new individual, pedigree, or sample is the selection of its data folder, the creation and management of data folders must be discussed even before the creation of a new individual, pedigree, or sample.
Figure 2-18: Example of Data folders in different main windows
57
Chapter 3 – Datasheet Basics
The datasheet is a paper form or document that details the properties of a particular product or component. The form contains fields for collecting specific data about the product or component. By analogy, datasheets in Progeny are used to enter and store data for individuals, pedigrees, markers, and samples. Each datasheet contains database fields that store specific data for an individual, a pedigree, a marker set, and or a sample.
This chapter covers the following topics:
Datasheet Types
Loading Datasheet Formats
Working with Tables in a Datasheet
Printing a Datasheet
This chapter addresses only the basics for all datasheet types. Detailed information about adding the necessary components for creating a specific type of datasheet (for example, creating folders and adding individuals to the folder to create an individual datasheet) are discussed in detail in the appropriate chapter of the Progeny 9 Desktop Client User Guide (Progeny Clinical, Progeny Lab, or Progeny LIMS).
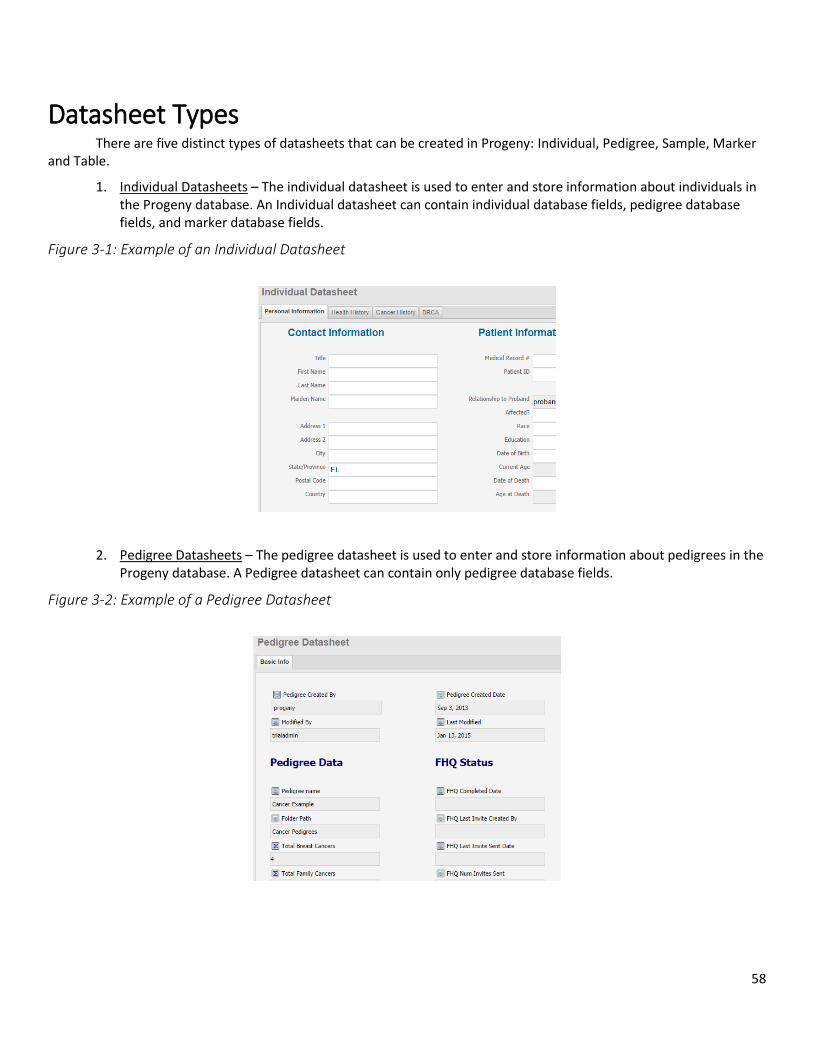
58
Datasheet Types There are five distinct types of datasheets that can be created in Progeny: Individual, Pedigree, Sample, Marker
and Table.
1. Individual Datasheets – The individual datasheet is used to enter and store information about individuals in the Progeny database. An Individual datasheet can contain individual database fields, pedigree database fields, and marker database fields.
Figure 3-1: Example of an Individual Datasheet
2. Pedigree Datasheets – The pedigree datasheet is used to enter and store information about pedigrees in the Progeny database. A Pedigree datasheet can contain only pedigree database fields.
Figure 3-2: Example of a Pedigree Datasheet
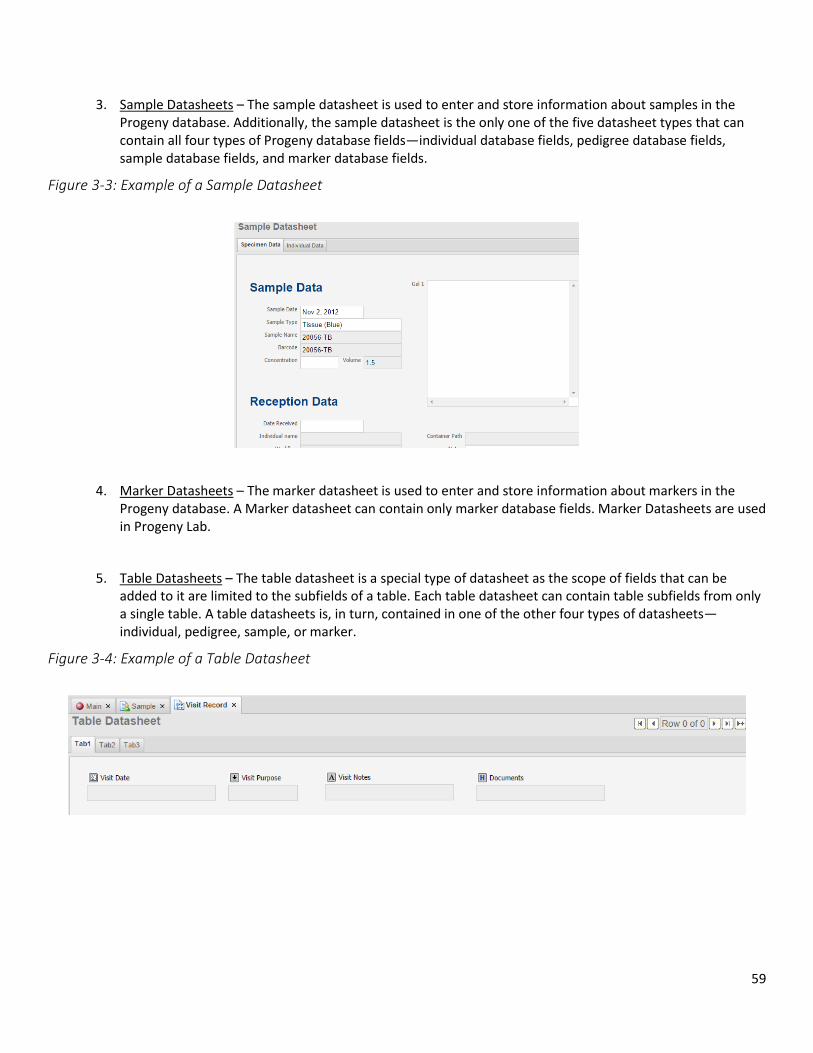
59
3. Sample Datasheets – The sample datasheet is used to enter and store information about samples in the Progeny database. Additionally, the sample datasheet is the only one of the five datasheet types that can contain all four types of Progeny database fields—individual database fields, pedigree database fields, sample database fields, and marker database fields.
Figure 3-3: Example of a Sample Datasheet
4. Marker Datasheets – The marker datasheet is used to enter and store information about markers in the Progeny database. A Marker datasheet can contain only marker database fields. Marker Datasheets are used in Progeny Lab.
5. Table Datasheets – The table datasheet is a special type of datasheet as the scope of fields that can be added to it are limited to the subfields of a table. Each table datasheet can contain table subfields from only a single table. A table datasheets is, in turn, contained in one of the other four types of datasheets—individual, pedigree, sample, or marker.
Figure 3-4: Example of a Table Datasheet
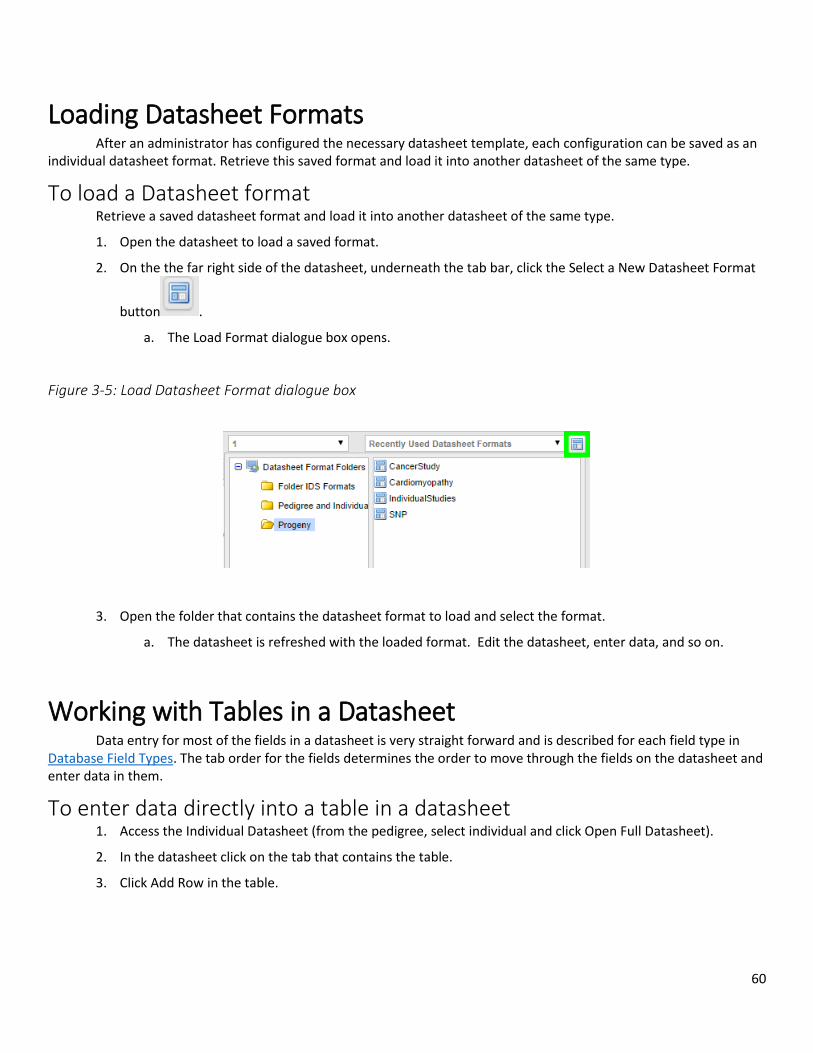
60
Loading Datasheet Formats After an administrator has configured the necessary datasheet template, each configuration can be saved as an
individual datasheet format. Retrieve this saved format and load it into another datasheet of the same type.
To load a Datasheet format Retrieve a saved datasheet format and load it into another datasheet of the same type.
1. Open the datasheet to load a saved format.
2. On the the far right side of the datasheet, underneath the tab bar, click the Select a New Datasheet Format
button .
a. The Load Format dialogue box opens.
Figure 3-5: Load Datasheet Format dialogue box
3. Open the folder that contains the datasheet format to load and select the format.
a. The datasheet is refreshed with the loaded format. Edit the datasheet, enter data, and so on.
Working with Tables in a Datasheet Data entry for most of the fields in a datasheet is very straight forward and is described for each field type in
Database Field Types. The tab order for the fields determines the order to move through the fields on the datasheet and enter data in them.
To enter data directly into a table in a datasheet 1. Access the Individual Datasheet (from the pedigree, select individual and click Open Full Datasheet).
2. In the datasheet click on the tab that contains the table.
3. Click Add Row in the table.
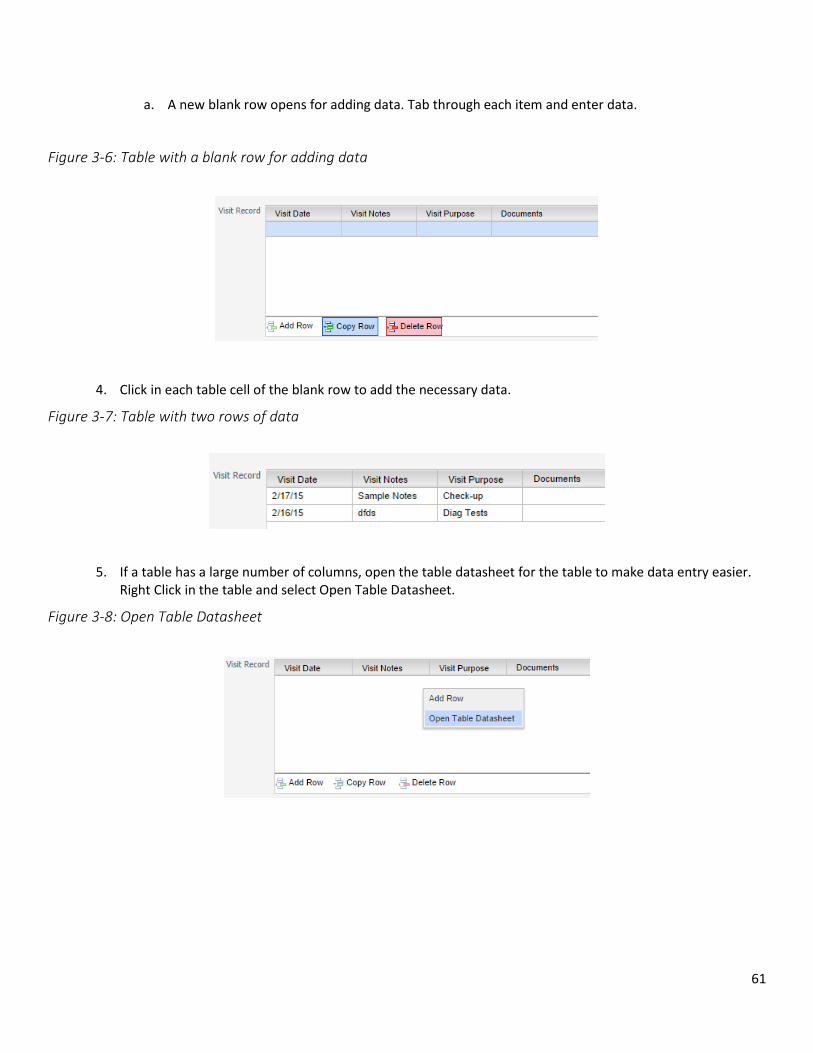
61
a. A new blank row opens for adding data. Tab through each item and enter data.
Figure 3-6: Table with a blank row for adding data
4. Click in each table cell of the blank row to add the necessary data.
Figure 3-7: Table with two rows of data
5. If a table has a large number of columns, open the table datasheet for the table to make data entry easier. Right Click in the table and select Open Table Datasheet.
Figure 3-8: Open Table Datasheet
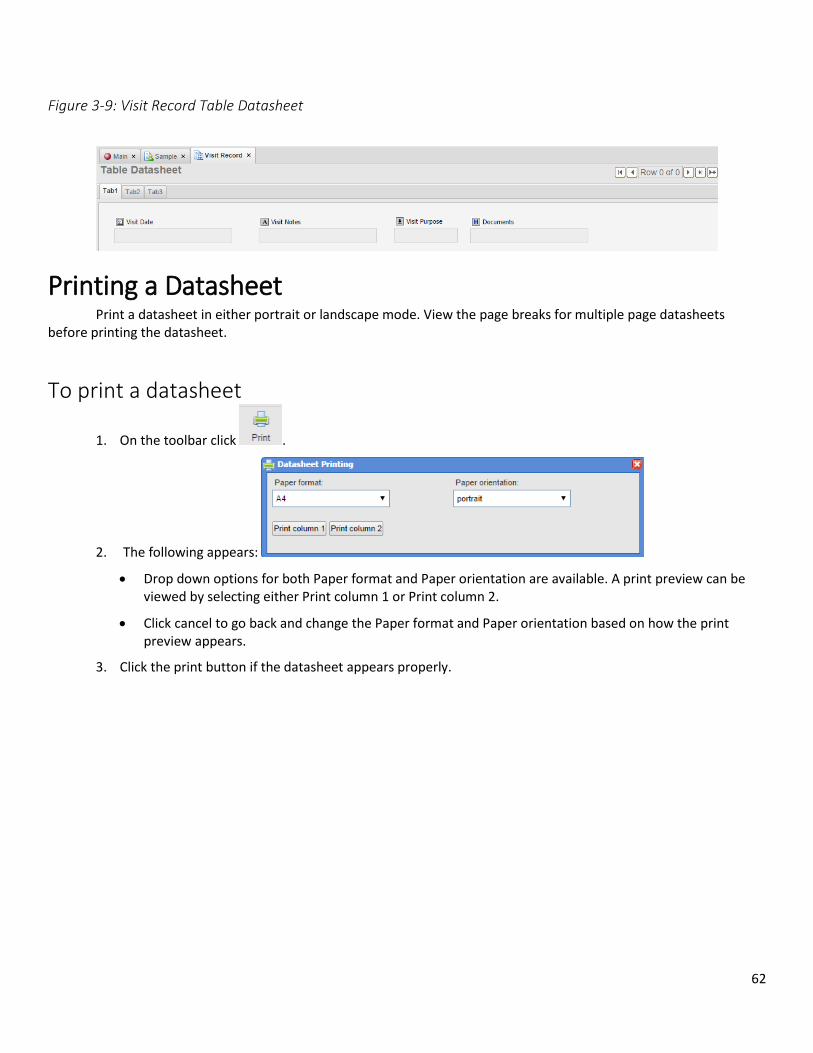
62
Figure 3-9: Visit Record Table Datasheet
Printing a Datasheet Print a datasheet in either portrait or landscape mode. View the page breaks for multiple page datasheets
before printing the datasheet.
To print a datasheet
1. On the toolbar click .
2. The following appears:
Drop down options for both Paper format and Paper orientation are available. A print preview can be viewed by selecting either Print column 1 or Print column 2.
Click cancel to go back and change the Paper format and Paper orientation based on how the print preview appears.
3. Click the print button if the datasheet appears properly.
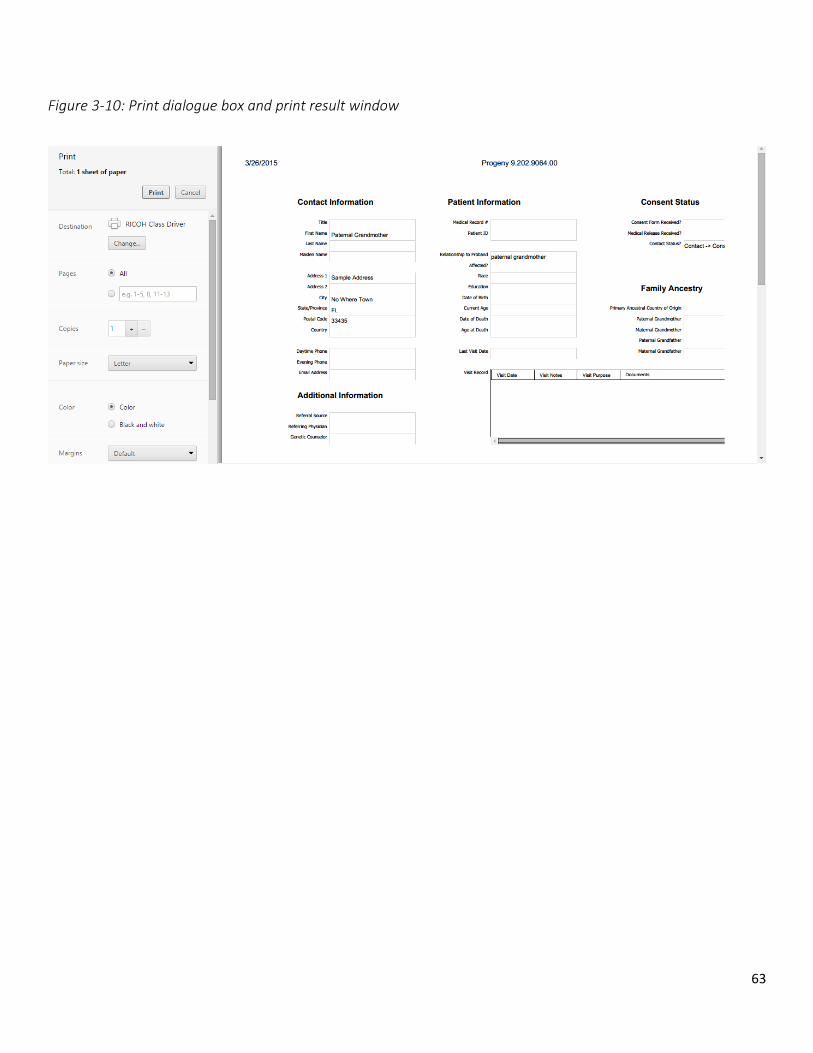
63
Figure 3-10: Print dialogue box and print result window
64
Chapter 4 Spreadsheet Basics
A spreadsheet is a table of values that are arranged in rows and columns. In Progeny, spreadsheets are used to organize multiple individuals, pedigrees, samples, or markers by rows and the database fields for entering the corresponding data by columns.
This chapter covers the following topics:
Spreadsheet Types
Generating a Spreadsheet
Entering Data into a Spreadsheet
Exporting Spreadsheet Data
Saving and Loading a Spreadsheet Format
Running Spreadsheet Queries
Sorting and Filtering Spreadsheet Data
Counting Spreadsheet Data
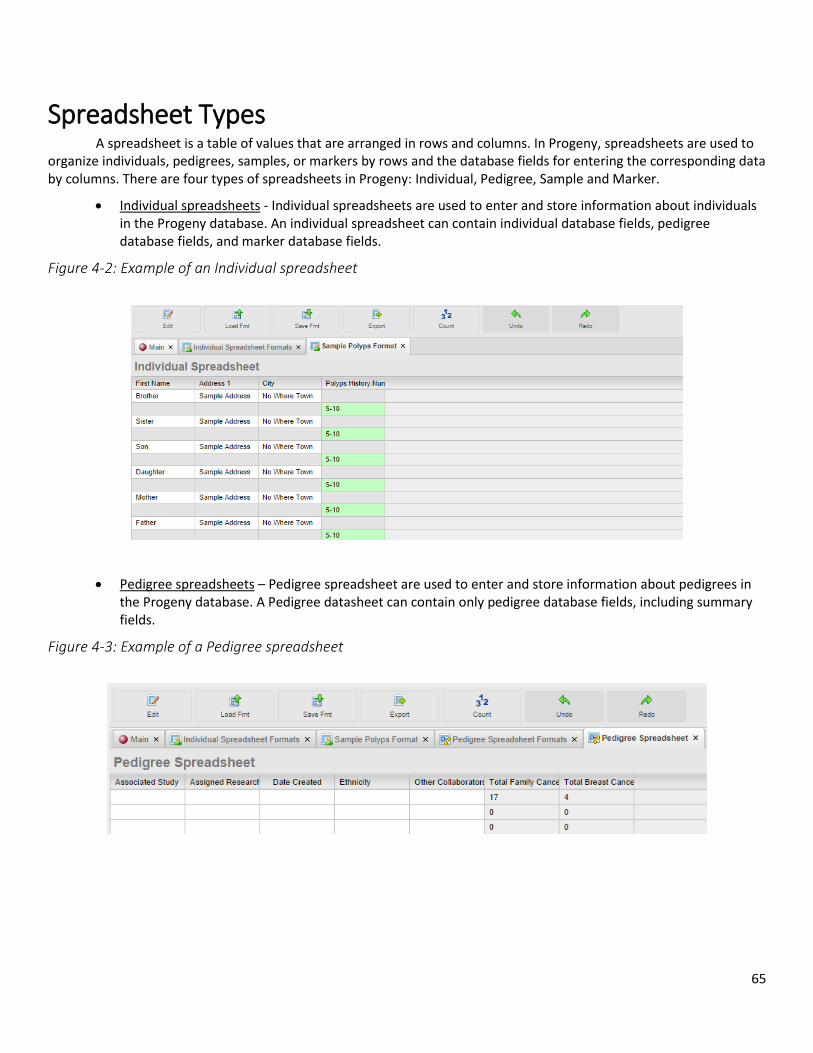
65
Spreadsheet Types A spreadsheet is a table of values that are arranged in rows and columns. In Progeny, spreadsheets are used to organize individuals, pedigrees, samples, or markers by rows and the database fields for entering the corresponding data by columns. There are four types of spreadsheets in Progeny: Individual, Pedigree, Sample and Marker.
Individual spreadsheets - Individual spreadsheets are used to enter and store information about individuals in the Progeny database. An individual spreadsheet can contain individual database fields, pedigree database fields, and marker database fields.
Figure 4-2: Example of an Individual spreadsheet
Pedigree spreadsheets – Pedigree spreadsheet are used to enter and store information about pedigrees in the Progeny database. A Pedigree datasheet can contain only pedigree database fields, including summary fields.
Figure 4-3: Example of a Pedigree spreadsheet
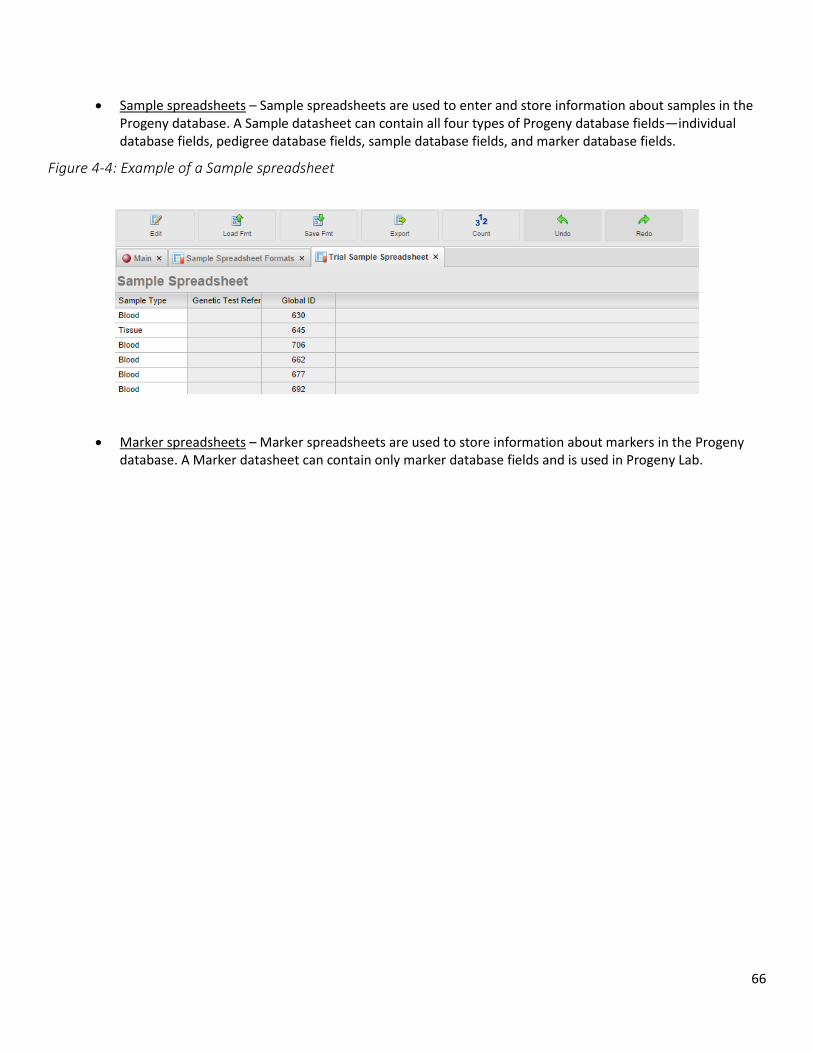
66
Sample spreadsheets – Sample spreadsheets are used to enter and store information about samples in the Progeny database. A Sample datasheet can contain all four types of Progeny database fields—individual database fields, pedigree database fields, sample database fields, and marker database fields.
Figure 4-4: Example of a Sample spreadsheet
Marker spreadsheets – Marker spreadsheets are used to store information about markers in the Progeny database. A Marker datasheet can contain only marker database fields and is used in Progeny Lab.
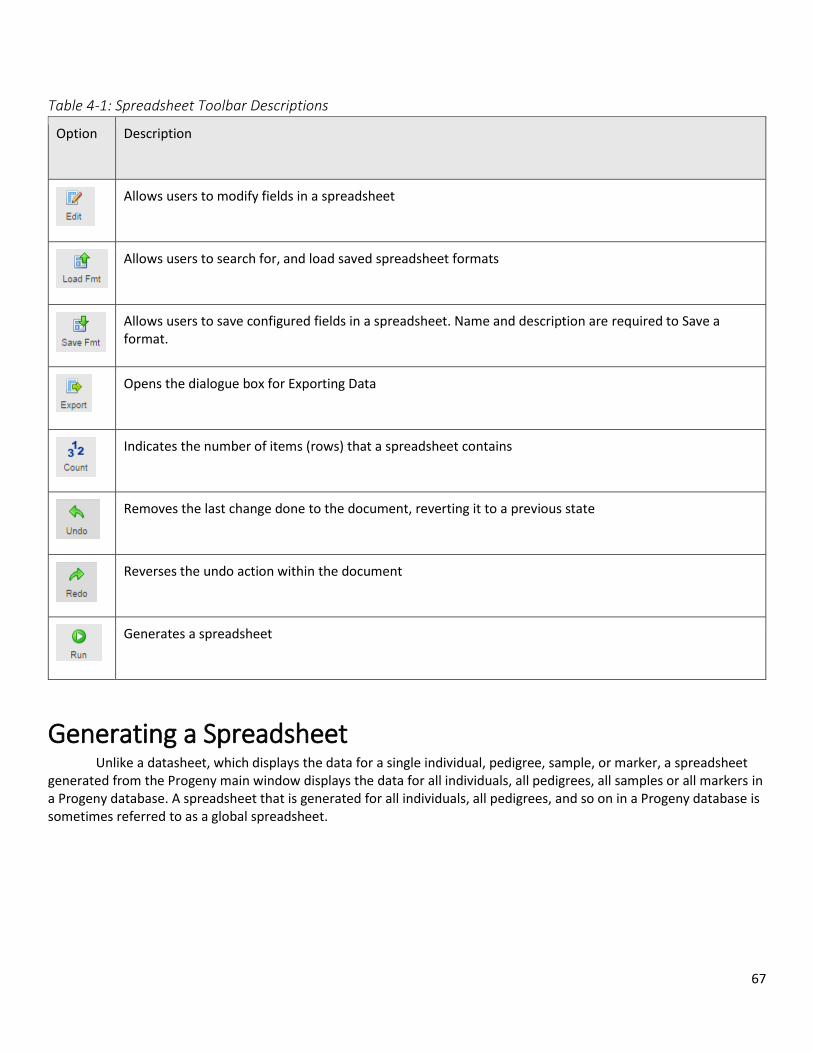
67
Table 4-1: Spreadsheet Toolbar Descriptions
Option Description
Allows users to modify fields in a spreadsheet
Allows users to search for, and load saved spreadsheet formats
Allows users to save configured fields in a spreadsheet. Name and description are required to Save a format.
Opens the dialogue box for Exporting Data
Indicates the number of items (rows) that a spreadsheet contains
Removes the last change done to the document, reverting it to a previous state
Reverses the undo action within the document
Generates a spreadsheet
Generating a Spreadsheet Unlike a datasheet, which displays the data for a single individual, pedigree, sample, or marker, a spreadsheet generated from the Progeny main window displays the data for all individuals, all pedigrees, all samples or all markers in a Progeny database. A spreadsheet that is generated for all individuals, all pedigrees, and so on in a Progeny database is sometimes referred to as a global spreadsheet.
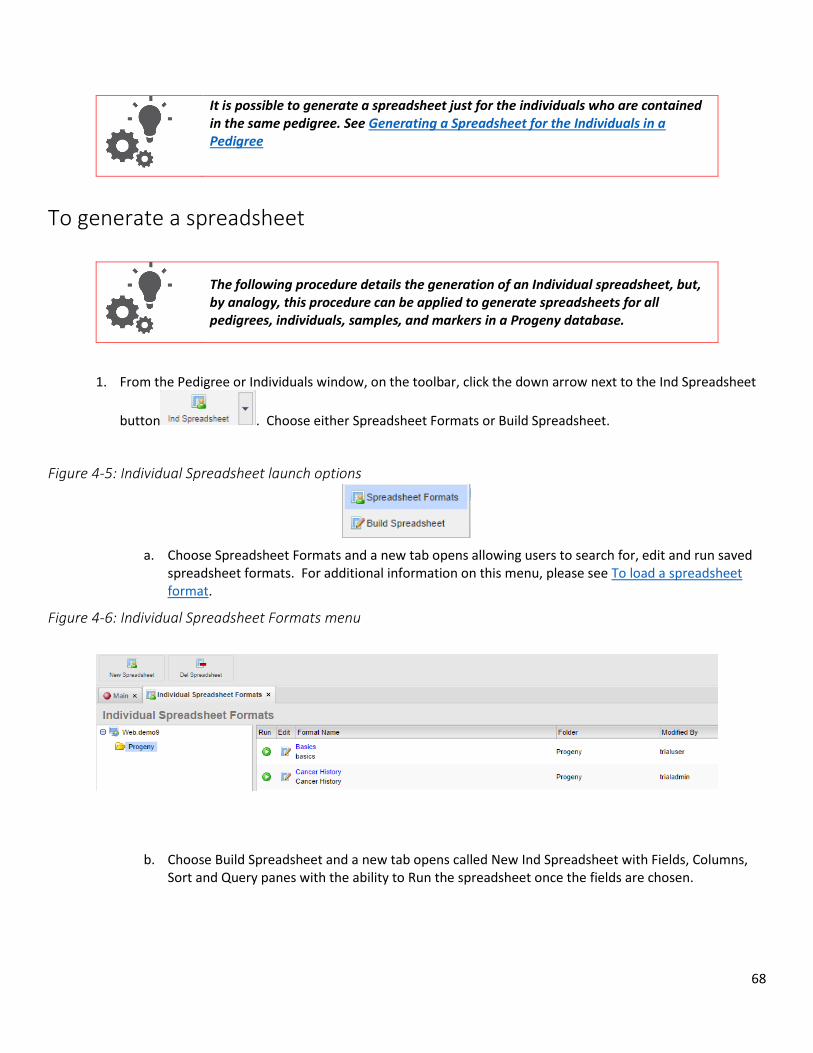
68
It is possible to generate a spreadsheet just for the individuals who are contained in the same pedigree. See Generating a Spreadsheet for the Individuals in a Pedigree
To generate a spreadsheet
The following procedure details the generation of an Individual spreadsheet, but, by analogy, this procedure can be applied to generate spreadsheets for all pedigrees, individuals, samples, and markers in a Progeny database.
1. From the Pedigree or Individuals window, on the toolbar, click the down arrow next to the Ind Spreadsheet
button . Choose either Spreadsheet Formats or Build Spreadsheet.
Figure 4-5: Individual Spreadsheet launch options
a. Choose Spreadsheet Formats and a new tab opens allowing users to search for, edit and run saved spreadsheet formats. For additional information on this menu, please see To load a spreadsheet format.
Figure 4-6: Individual Spreadsheet Formats menu
b. Choose Build Spreadsheet and a new tab opens called New Ind Spreadsheet with Fields, Columns, Sort and Query panes with the ability to Run the spreadsheet once the fields are chosen.
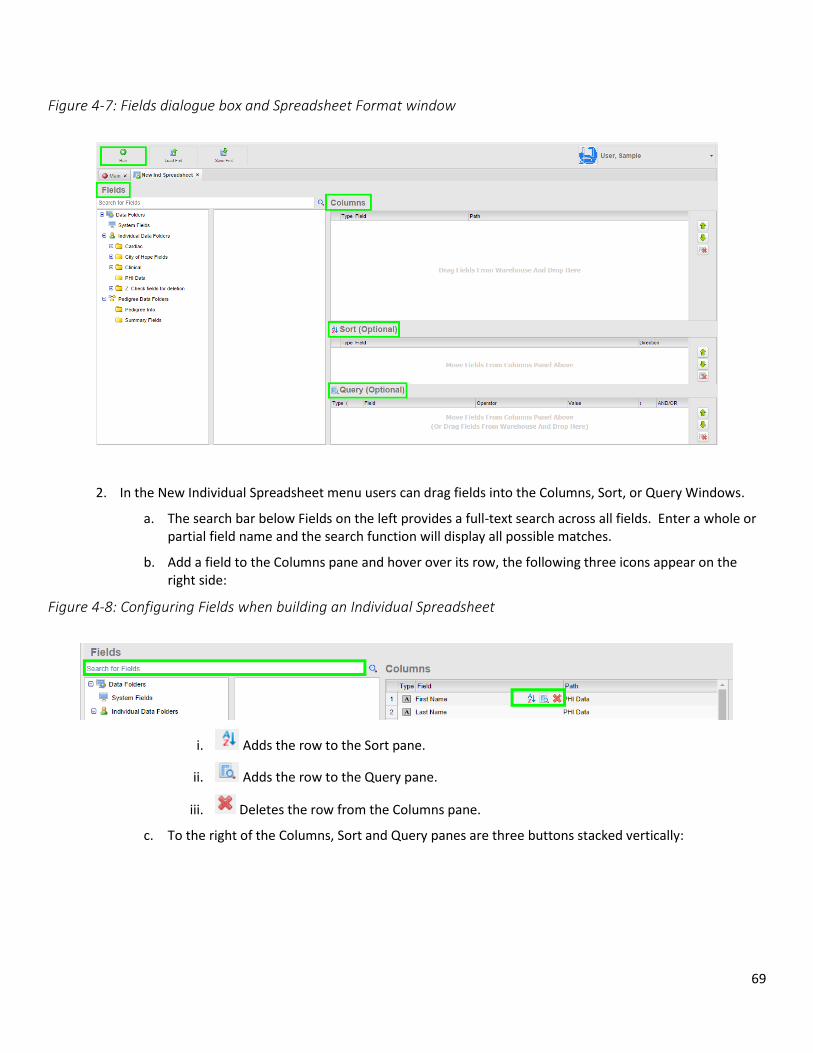
69
Figure 4-7: Fields dialogue box and Spreadsheet Format window
2. In the New Individual Spreadsheet menu users can drag fields into the Columns, Sort, or Query Windows.
a. The search bar below Fields on the left provides a full-text search across all fields. Enter a whole or partial field name and the search function will display all possible matches.
b. Add a field to the Columns pane and hover over its row, the following three icons appear on the right side:
Figure 4-8: Configuring Fields when building an Individual Spreadsheet
i. Adds the row to the Sort pane.
ii. Adds the row to the Query pane.
iii. Deletes the row from the Columns pane.
c. To the right of the Columns, Sort and Query panes are three buttons stacked vertically:

70
Figure 4-9: Configuring the Columns pane when building an Individual Spreadsheet
i. Moves the selected field/row up one position in the order
ii. Moves the selected field/row down one position in the order
iii. A so-called “Nuclear Option,” this button will delete all fields/rows within the selected pane.
System fields are read-only fields that Progeny automatically stores in its database for a record. Each record type (individual, pedigree, sample, and marker) has its own unique system fields. System fields can be included on a spreadsheet if there is information that needs to be visible at all times, but not edit, for an individual, a pedigree, a sample, or a marker. For a complete list of system fields and the read-only value that is displayed in each field, see System Fields
For all fields other than table fields, the order in which the fields are dragged is the order in which they appear in columns (from left to right) in the spreadsheet. To include table fields in the spreadsheet please see the Tables in spreadsheets section below. To include a lookup table field in the spreadsheet please see the Lookup tables in spreadsheets section below.
Figure 4-10: Dragging non-table fields to a spreadsheet
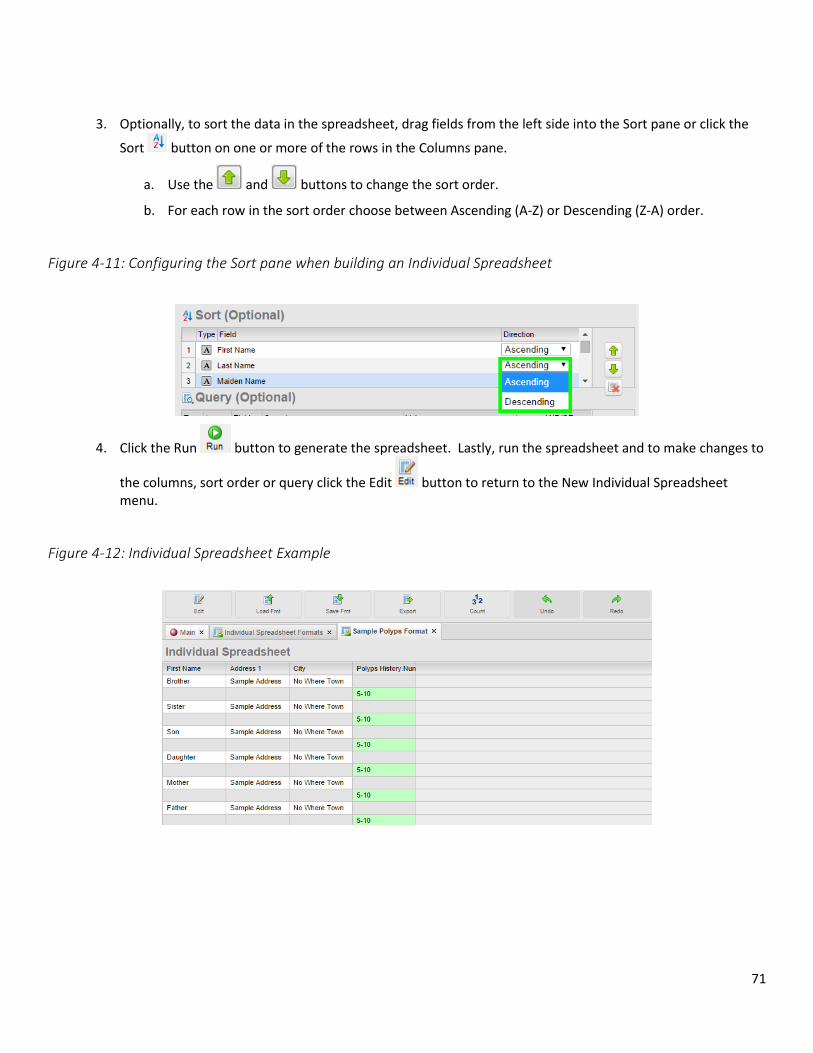
71
3. Optionally, to sort the data in the spreadsheet, drag fields from the left side into the Sort pane or click the
Sort button on one or more of the rows in the Columns pane.
a. Use the and buttons to change the sort order.
b. For each row in the sort order choose between Ascending (A-Z) or Descending (Z-A) order.
Figure 4-11: Configuring the Sort pane when building an Individual Spreadsheet
4. Click the Run button to generate the spreadsheet. Lastly, run the spreadsheet and to make changes to
the columns, sort order or query click the Edit button to return to the New Individual Spreadsheet menu.
Figure 4-12: Individual Spreadsheet Example

72
To adjust the width of a spreadsheet column, place the mouse cursor on the black line inside the column heading separating the column to adjust and the column immediately to its right. The cursor will change to a double-headed arrow indicating the drag function which will allow the column to move to the left or right.
5. To view the pedigree of an individual within the spreadsheet or see an individual’s datasheet, right click on the first column displayed for that person’s row and select Open Individual Datasheet.
Tables in spreadsheets Progeny 9 changes how tables are handled within the spreadsheet modules. When building a spreadsheet, tables are no longer displayed as an individual entity but are broken apart with each of their table subfields being displayed as a distinct entity.
Figure 4-13: A table displayed as a group of subfields within the Create New Individual Spreadsheet menu.
In Progeny 9 drag the individual table subfield into the Columns pane to add it to the spreadsheet format.
Figure 4-14: The Columns pane of an individual spreadsheet showing table subfields added to it
Lookup tables in spreadsheets In Progeny 9 Lookup Table fields are handled the same way as Table fields (see previous section). Each subfield of the lookup table is displayed in the fields list as a separate entity, to use the specific subfield in the spreadsheet, drag it into the Columns pane.

73
Figure 4-15: Lookup table subfields added to the Columns pane of a new individual spreadsheet.
Entering Data into a Spreadsheet There are a variety of options for entering data into a spreadsheet, including manually entering data, copying and pasting data. Regardless of the method used, after completing data entry in a spreadsheet, the information is saved.
To manually enter data into a spreadsheet cell Data entry for the fields in a spreadsheet is straight forward. Click in the cell and enter the needed data, or select the data from a dropdown list. It is possible to enter data into a spreadsheet cell that has no highlighting or one that is highlighted in green (a table field). Fields that are highlighted in gray are read-only fields, such as system fields or lookup table subfields, will not allow for data entry directly into these fields. To add more rows to a table, or populate the table subfields for a lookup table, see To add more rows to a table in a spreadsheet below or To add data to a lookup table field in a spreadsheet.
Figure 4-16: Data entry fields and read-only fields in a spreadsheet
To move from one field to the next within the same row, press the Tab key on the keyboard. To move back a field within the same row, press and hold the Shift key and then press the Tab key. To move from one row to the next, press the Enter key. (Pressing the Enter key does not delete the data in a spreadsheet cell.)
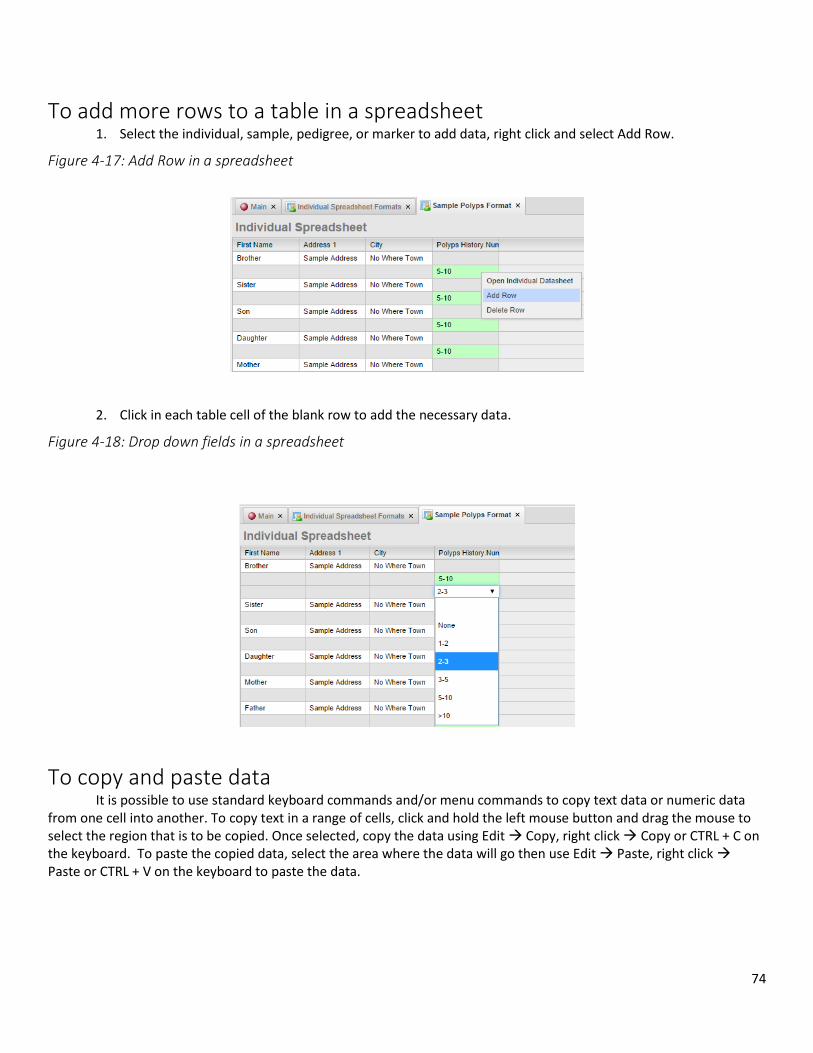
74
To add more rows to a table in a spreadsheet 1. Select the individual, sample, pedigree, or marker to add data, right click and select Add Row.
Figure 4-17: Add Row in a spreadsheet
2. Click in each table cell of the blank row to add the necessary data.
Figure 4-18: Drop down fields in a spreadsheet
To copy and paste data It is possible to use standard keyboard commands and/or menu commands to copy text data or numeric data from one cell into another. To copy text in a range of cells, click and hold the left mouse button and drag the mouse to select the region that is to be copied. Once selected, copy the data using Edit Copy, right click Copy or CTRL + C on the keyboard. To paste the copied data, select the area where the data will go then use Edit Paste, right click Paste or CTRL + V on the keyboard to paste the data.
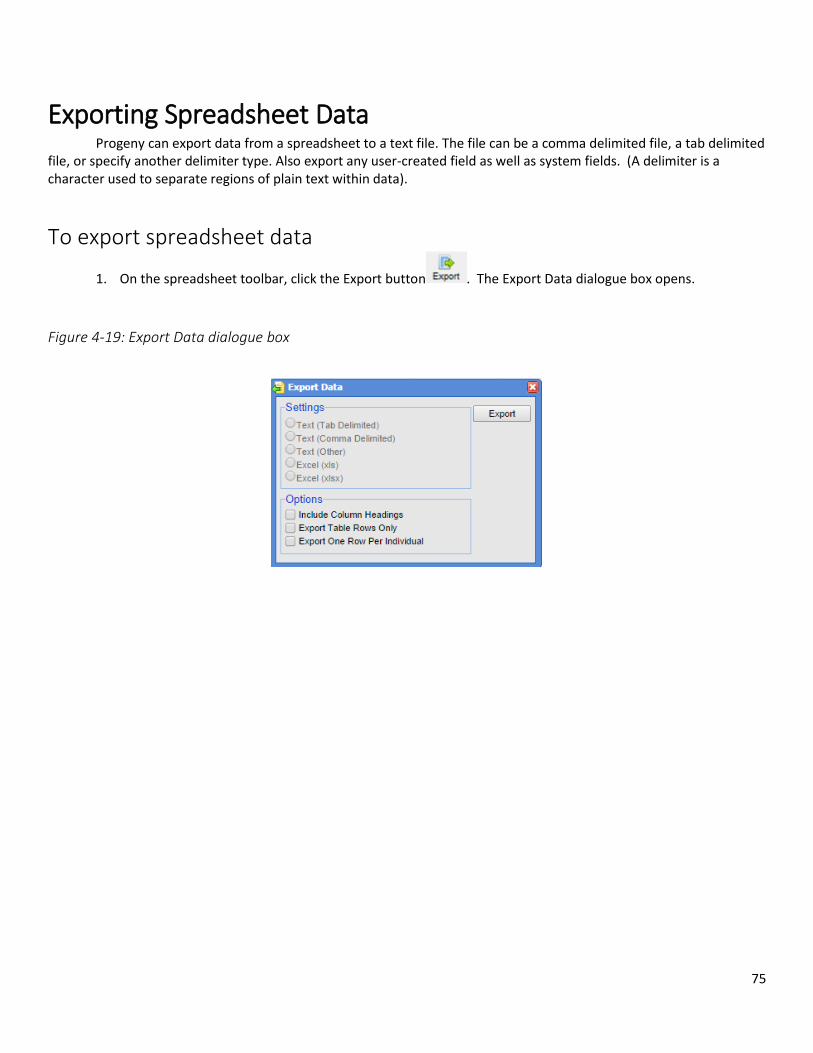
75
Exporting Spreadsheet Data Progeny can export data from a spreadsheet to a text file. The file can be a comma delimited file, a tab delimited file, or specify another delimiter type. Also export any user-created field as well as system fields. (A delimiter is a character used to separate regions of plain text within data).
To export spreadsheet data
1. On the spreadsheet toolbar, click the Export button . The Export Data dialogue box opens.
Figure 4-19: Export Data dialogue box
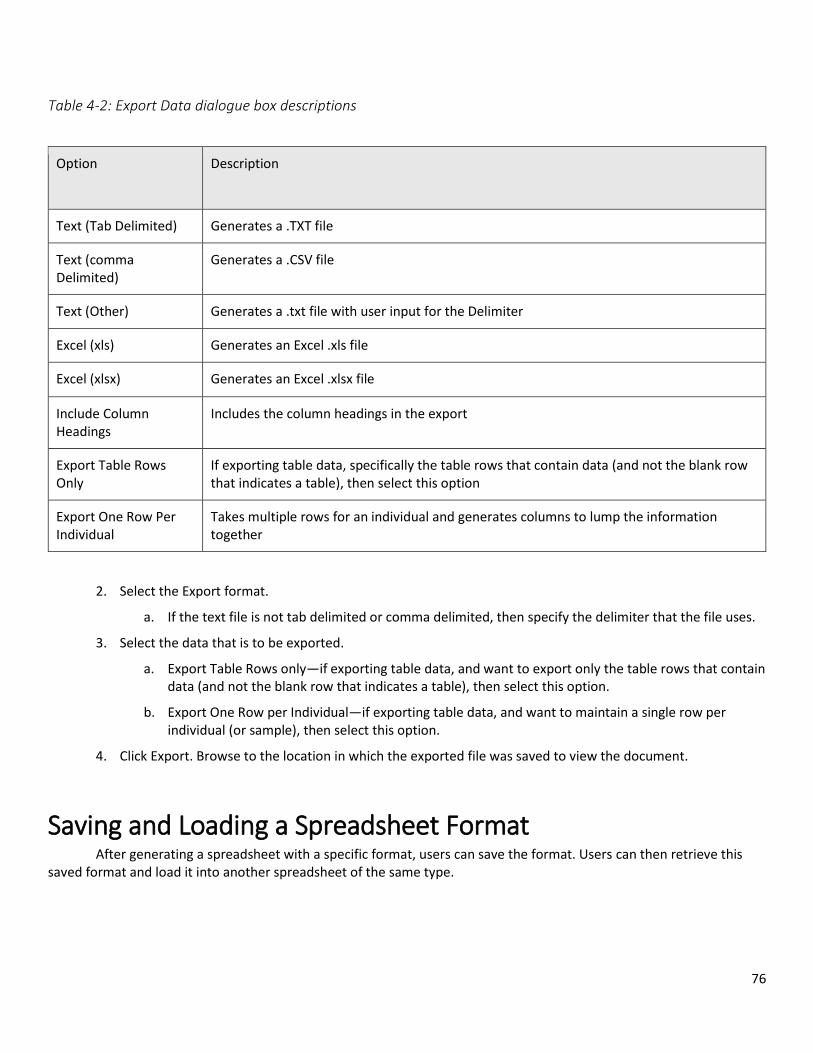
76
Table 4-2: Export Data dialogue box descriptions
Option Description
Text (Tab Delimited) Generates a .TXT file
Text (comma Delimited)
Generates a .CSV file
Text (Other) Generates a .txt file with user input for the Delimiter
Excel (xls) Generates an Excel .xls file
Excel (xlsx) Generates an Excel .xlsx file
Include Column Headings
Includes the column headings in the export
Export Table Rows Only
If exporting table data, specifically the table rows that contain data (and not the blank row that indicates a table), then select this option
Export One Row Per Individual
Takes multiple rows for an individual and generates columns to lump the information together
2. Select the Export format.
a. If the text file is not tab delimited or comma delimited, then specify the delimiter that the file uses.
3. Select the data that is to be exported.
a. Export Table Rows only—if exporting table data, and want to export only the table rows that contain data (and not the blank row that indicates a table), then select this option.
b. Export One Row per Individual—if exporting table data, and want to maintain a single row per individual (or sample), then select this option.
4. Click Export. Browse to the location in which the exported file was saved to view the document.
Saving and Loading a Spreadsheet Format After generating a spreadsheet with a specific format, users can save the format. Users can then retrieve this saved format and load it into another spreadsheet of the same type.
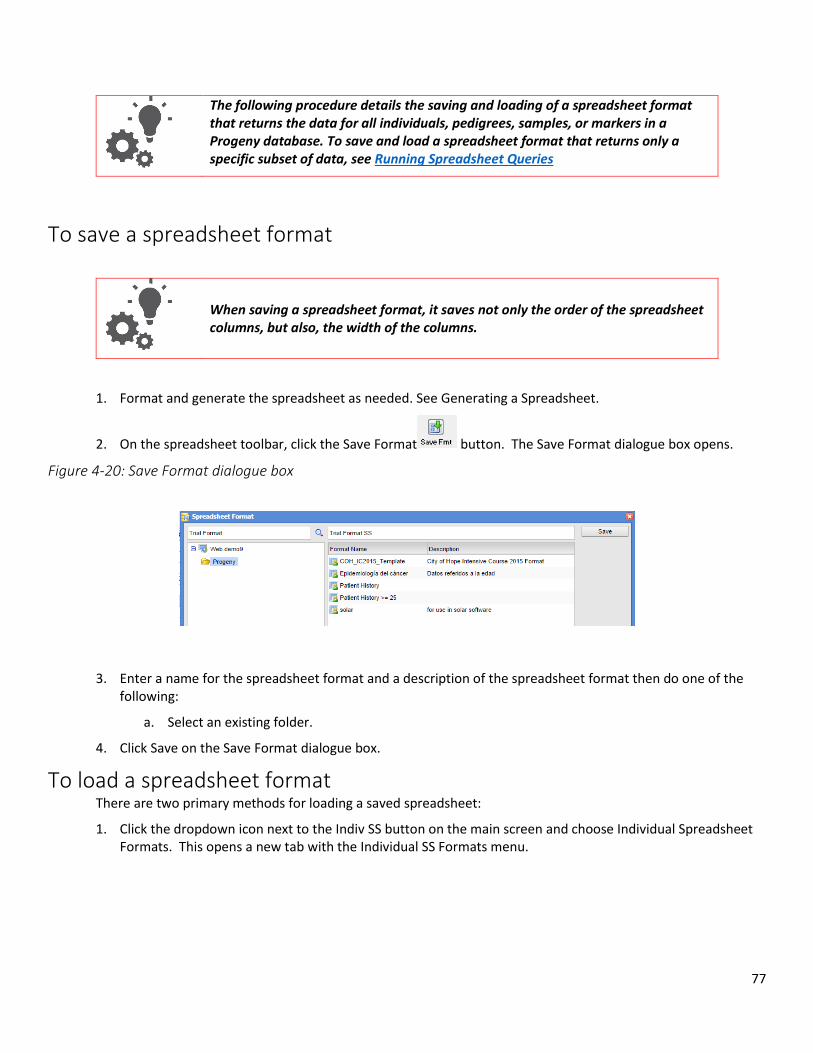
77
The following procedure details the saving and loading of a spreadsheet format that returns the data for all individuals, pedigrees, samples, or markers in a Progeny database. To save and load a spreadsheet format that returns only a specific subset of data, see Running Spreadsheet Queries
To save a spreadsheet format
When saving a spreadsheet format, it saves not only the order of the spreadsheet columns, but also, the width of the columns.
1. Format and generate the spreadsheet as needed. See Generating a Spreadsheet.
2. On the spreadsheet toolbar, click the Save Format button. The Save Format dialogue box opens.
Figure 4-20: Save Format dialogue box
3. Enter a name for the spreadsheet format and a description of the spreadsheet format then do one of the following:
a. Select an existing folder.
4. Click Save on the Save Format dialogue box.
To load a spreadsheet format There are two primary methods for loading a saved spreadsheet:
1. Click the dropdown icon next to the Indiv SS button on the main screen and choose Individual Spreadsheet Formats. This opens a new tab with the Individual SS Formats menu.
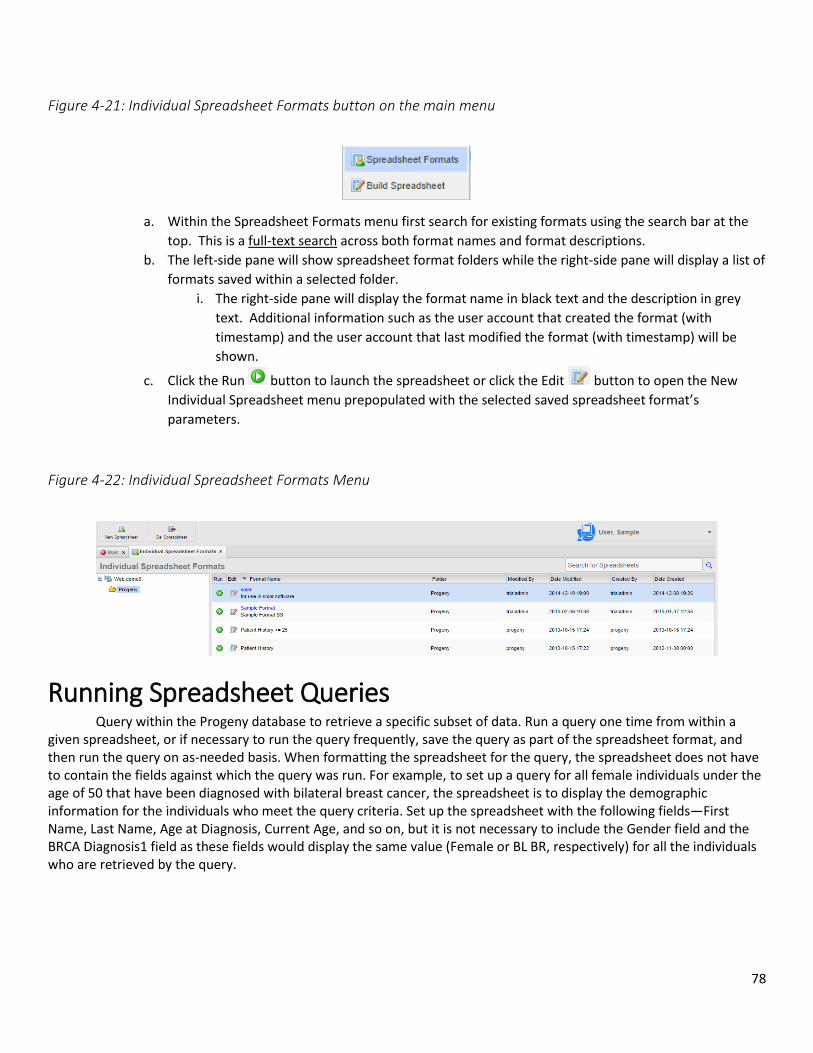
78
Figure 4-21: Individual Spreadsheet Formats button on the main menu
a. Within the Spreadsheet Formats menu first search for existing formats using the search bar at the
top. This is a full-text search across both format names and format descriptions.
b. The left-side pane will show spreadsheet format folders while the right-side pane will display a list of
formats saved within a selected folder.
i. The right-side pane will display the format name in black text and the description in grey
text. Additional information such as the user account that created the format (with
timestamp) and the user account that last modified the format (with timestamp) will be
shown.
c. Click the Run button to launch the spreadsheet or click the Edit button to open the New
Individual Spreadsheet menu prepopulated with the selected saved spreadsheet format’s
parameters.
Figure 4-22: Individual Spreadsheet Formats Menu
Running Spreadsheet Queries Query within the Progeny database to retrieve a specific subset of data. Run a query one time from within a given spreadsheet, or if necessary to run the query frequently, save the query as part of the spreadsheet format, and then run the query on as-needed basis. When formatting the spreadsheet for the query, the spreadsheet does not have to contain the fields against which the query was run. For example, to set up a query for all female individuals under the age of 50 that have been diagnosed with bilateral breast cancer, the spreadsheet is to display the demographic information for the individuals who meet the query criteria. Set up the spreadsheet with the following fields—First Name, Last Name, Age at Diagnosis, Current Age, and so on, but it is not necessary to include the Gender field and the BRCA Diagnosis1 field as these fields would display the same value (Female or BL BR, respectively) for all the individuals who are retrieved by the query.

79
To run a spreadsheet query 1. Build spreadsheet or go into Spreadsheet Formats and choose the Edit button for the desired spreadsheet
format.
a. If creating a new spreadsheet add fields into the Columns pane to generate the query output formatting
2. Either drag and drop fields from the Fields pane into the Query pane or click the Query button for a field within the Columns pane.
Figure 4-23: Adding fields into the Query pane of an individual spreadsheet
a. To remove a row from the Query pane, either right-click the field and choose Delete Row or click the
button on the right side of the query row.
3. Click the Run button to run the query. The results of the query are displayed onscreen in the spreadsheet.
a. If needed, save this query as a spreadsheet format to use again in the future (See To Save A Spreadsheet Format)
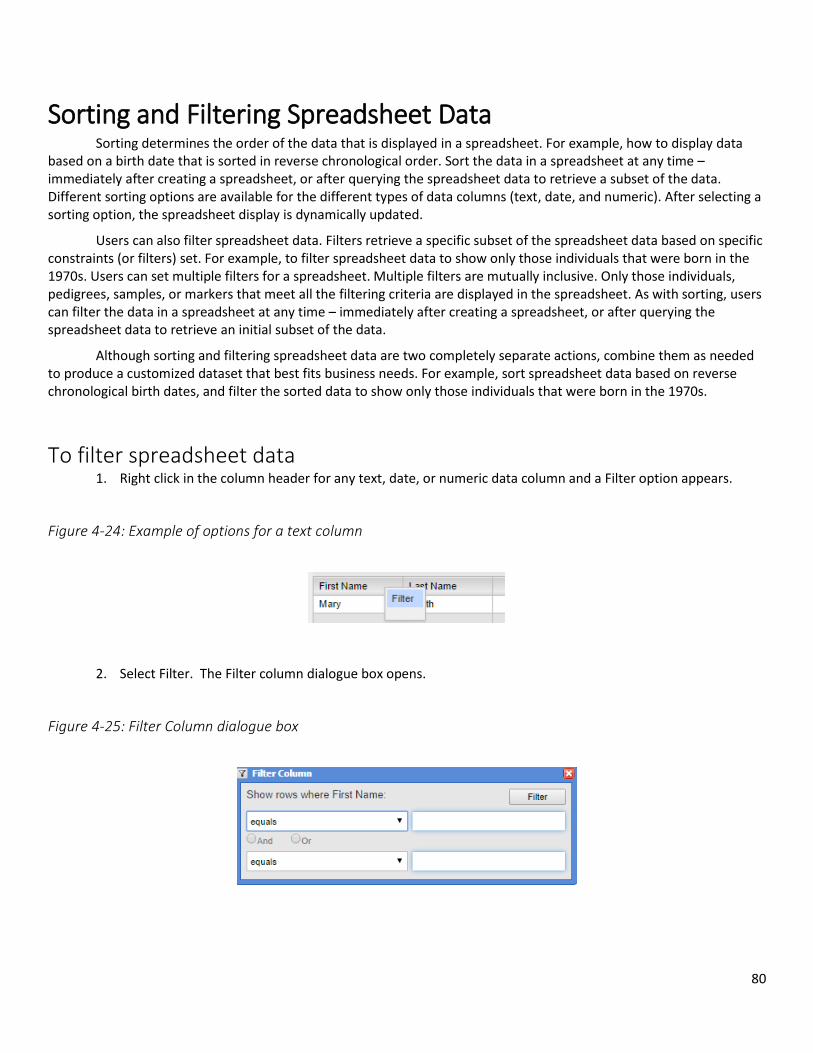
80
Sorting and Filtering Spreadsheet Data Sorting determines the order of the data that is displayed in a spreadsheet. For example, how to display data based on a birth date that is sorted in reverse chronological order. Sort the data in a spreadsheet at any time – immediately after creating a spreadsheet, or after querying the spreadsheet data to retrieve a subset of the data. Different sorting options are available for the different types of data columns (text, date, and numeric). After selecting a sorting option, the spreadsheet display is dynamically updated.
Users can also filter spreadsheet data. Filters retrieve a specific subset of the spreadsheet data based on specific constraints (or filters) set. For example, to filter spreadsheet data to show only those individuals that were born in the 1970s. Users can set multiple filters for a spreadsheet. Multiple filters are mutually inclusive. Only those individuals, pedigrees, samples, or markers that meet all the filtering criteria are displayed in the spreadsheet. As with sorting, users can filter the data in a spreadsheet at any time – immediately after creating a spreadsheet, or after querying the spreadsheet data to retrieve an initial subset of the data.
Although sorting and filtering spreadsheet data are two completely separate actions, combine them as needed to produce a customized dataset that best fits business needs. For example, sort spreadsheet data based on reverse chronological birth dates, and filter the sorted data to show only those individuals that were born in the 1970s.
To filter spreadsheet data 1. Right click in the column header for any text, date, or numeric data column and a Filter option appears.
Figure 4-24: Example of options for a text column
2. Select Filter. The Filter column dialogue box opens.
Figure 4-25: Filter Column dialogue box
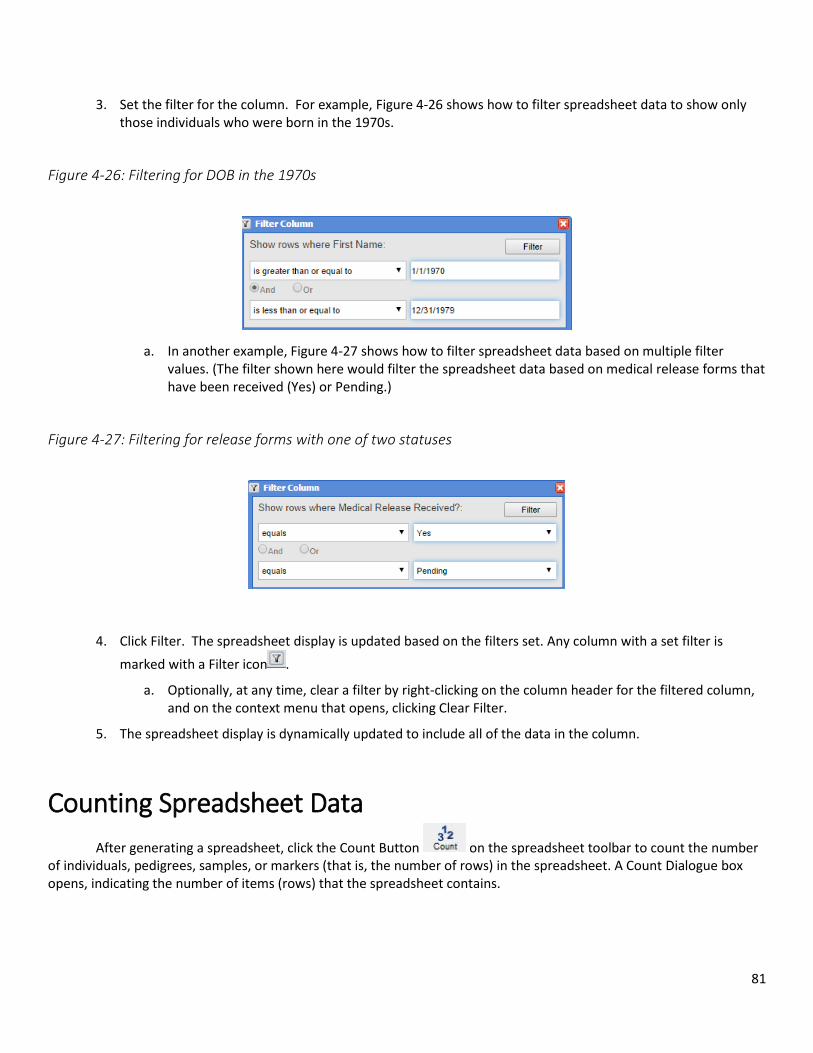
81
3. Set the filter for the column. For example, Figure 4-26 shows how to filter spreadsheet data to show only those individuals who were born in the 1970s.
Figure 4-26: Filtering for DOB in the 1970s
a. In another example, Figure 4-27 shows how to filter spreadsheet data based on multiple filter values. (The filter shown here would filter the spreadsheet data based on medical release forms that have been received (Yes) or Pending.)
Figure 4-27: Filtering for release forms with one of two statuses
4. Click Filter. The spreadsheet display is updated based on the filters set. Any column with a set filter is
marked with a Filter icon .
a. Optionally, at any time, clear a filter by right-clicking on the column header for the filtered column, and on the context menu that opens, clicking Clear Filter.
5. The spreadsheet display is dynamically updated to include all of the data in the column.
Counting Spreadsheet Data
After generating a spreadsheet, click the Count Button on the spreadsheet toolbar to count the number of individuals, pedigrees, samples, or markers (that is, the number of rows) in the spreadsheet. A Count Dialogue box opens, indicating the number of items (rows) that the spreadsheet contains.
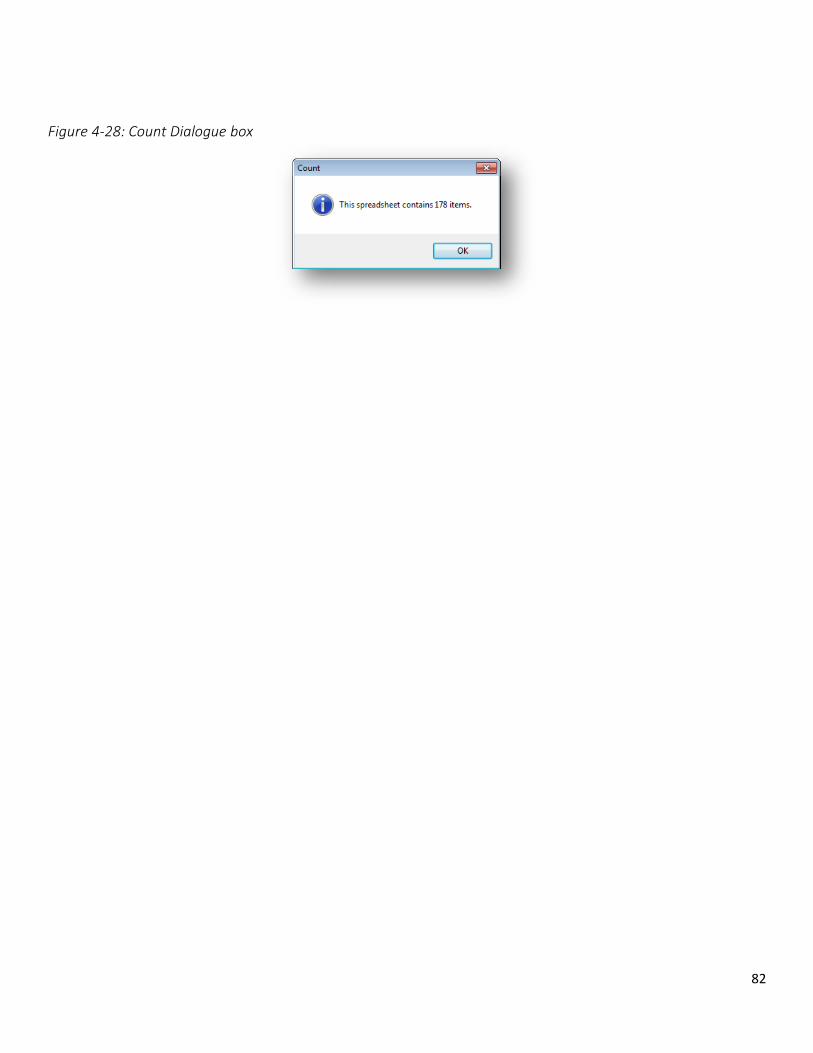
82
Figure 4-28: Count Dialogue box
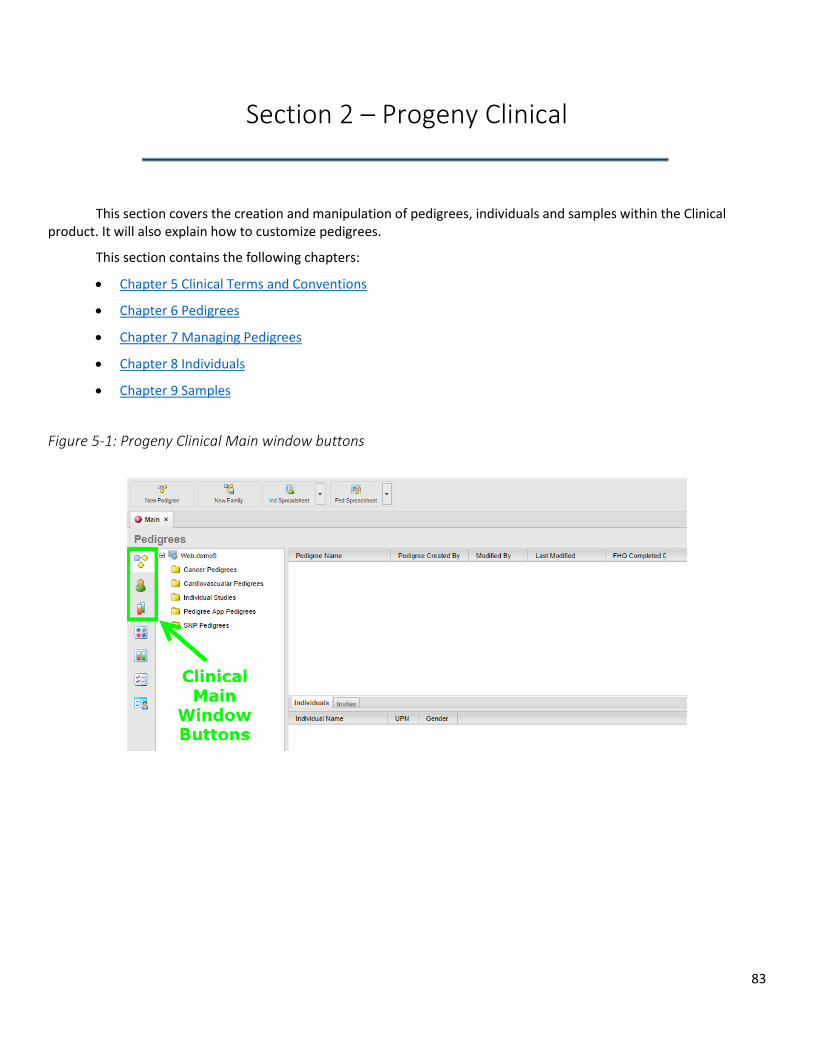
83
Section 2 – Progeny Clinical
This section covers the creation and manipulation of pedigrees, individuals and samples within the Clinical product. It will also explain how to customize pedigrees.
This section contains the following chapters:
Chapter 5 Clinical Terms and Conventions
Chapter 6 Pedigrees
Chapter 7 Managing Pedigrees
Chapter 8 Individuals
Chapter 9 Samples
Figure 5-1: Progeny Clinical Main window buttons
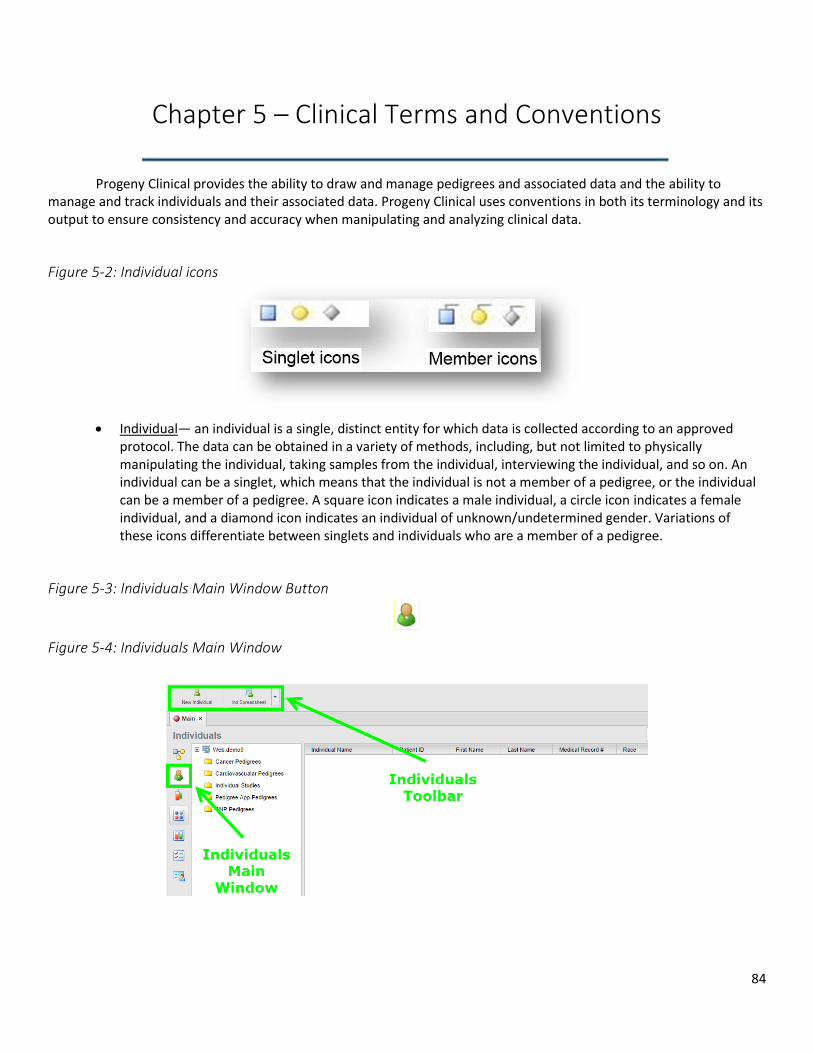
84
Chapter 5 – Clinical Terms and Conventions
Progeny Clinical provides the ability to draw and manage pedigrees and associated data and the ability to manage and track individuals and their associated data. Progeny Clinical uses conventions in both its terminology and its output to ensure consistency and accuracy when manipulating and analyzing clinical data.
Figure 5-2: Individual icons
Individual— an individual is a single, distinct entity for which data is collected according to an approved protocol. The data can be obtained in a variety of methods, including, but not limited to physically manipulating the individual, taking samples from the individual, interviewing the individual, and so on. An individual can be a singlet, which means that the individual is not a member of a pedigree, or the individual can be a member of a pedigree. A square icon indicates a male individual, a circle icon indicates a female individual, and a diamond icon indicates an individual of unknown/undetermined gender. Variations of these icons differentiate between singlets and individuals who are a member of a pedigree.
Figure 5-3: Individuals Main Window Button
Figure 5-4: Individuals Main Window
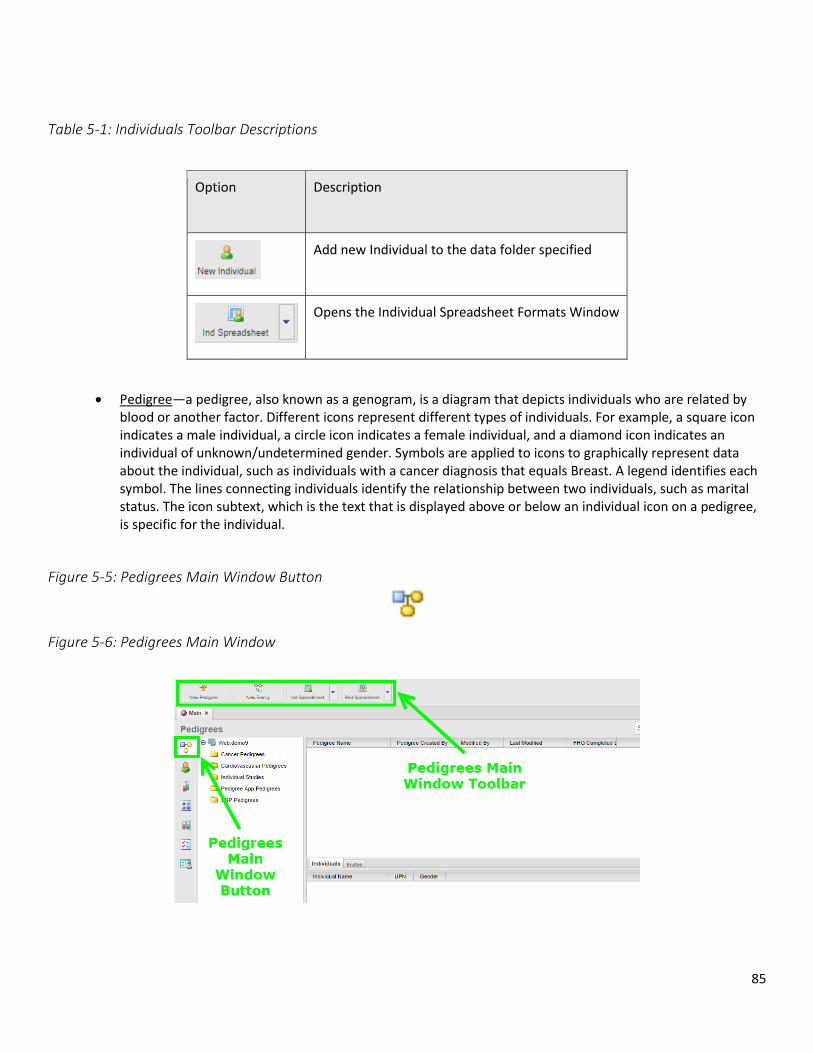
85
Table 5-1: Individuals Toolbar Descriptions
Option Description
Add new Individual to the data folder specified
Opens the Individual Spreadsheet Formats Window
Pedigree—a pedigree, also known as a genogram, is a diagram that depicts individuals who are related by blood or another factor. Different icons represent different types of individuals. For example, a square icon indicates a male individual, a circle icon indicates a female individual, and a diamond icon indicates an individual of unknown/undetermined gender. Symbols are applied to icons to graphically represent data about the individual, such as individuals with a cancer diagnosis that equals Breast. A legend identifies each symbol. The lines connecting individuals identify the relationship between two individuals, such as marital status. The icon subtext, which is the text that is displayed above or below an individual icon on a pedigree, is specific for the individual.
Figure 5-5: Pedigrees Main Window Button
Figure 5-6: Pedigrees Main Window
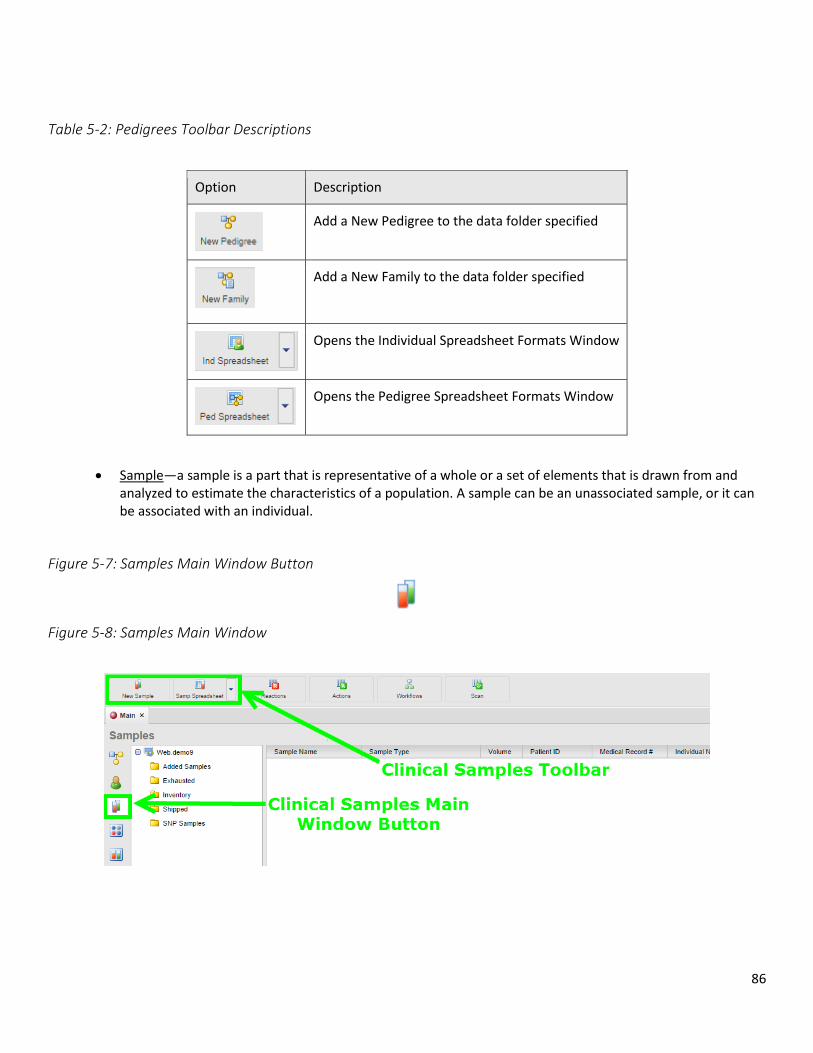
86
Table 5-2: Pedigrees Toolbar Descriptions
Option Description
Add a New Pedigree to the data folder specified
Add a New Family to the data folder specified
Opens the Individual Spreadsheet Formats Window
Opens the Pedigree Spreadsheet Formats Window
Sample—a sample is a part that is representative of a whole or a set of elements that is drawn from and analyzed to estimate the characteristics of a population. A sample can be an unassociated sample, or it can be associated with an individual.
Figure 5-7: Samples Main Window Button
Figure 5-8: Samples Main Window
87
Table 5-3: Sample Toolbar Descriptions
Option Description
Opens the New Sample configuration window
Opens the Sample Spreadsheet Formats window
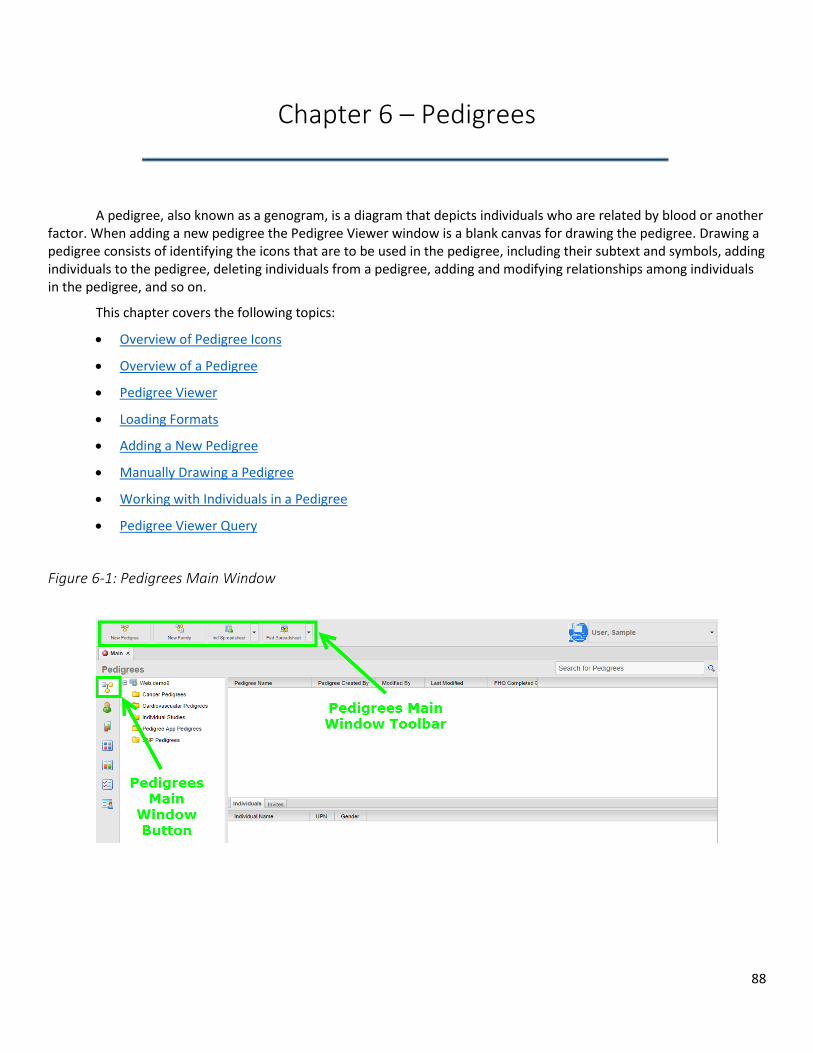
88
Chapter 6 – Pedigrees
A pedigree, also known as a genogram, is a diagram that depicts individuals who are related by blood or another factor. When adding a new pedigree the Pedigree Viewer window is a blank canvas for drawing the pedigree. Drawing a pedigree consists of identifying the icons that are to be used in the pedigree, including their subtext and symbols, adding individuals to the pedigree, deleting individuals from a pedigree, adding and modifying relationships among individuals in the pedigree, and so on.
This chapter covers the following topics:
Overview of Pedigree Icons
Overview of a Pedigree
Pedigree Viewer
Loading Formats
Adding a New Pedigree
Manually Drawing a Pedigree
Working with Individuals in a Pedigree
Pedigree Viewer Query
Figure 6-1: Pedigrees Main Window

89
Overview of Pedigree Icons Although there are no definitive standards when drawing pedigrees, there are published guidelines for the human genetics market. Progeny uses pedigree icons based on the guidelines published in the American Journal of Human Genetics (1995) Bennet, et al.
Figure 6-2: Icons used in pedigrees drawn in Progeny
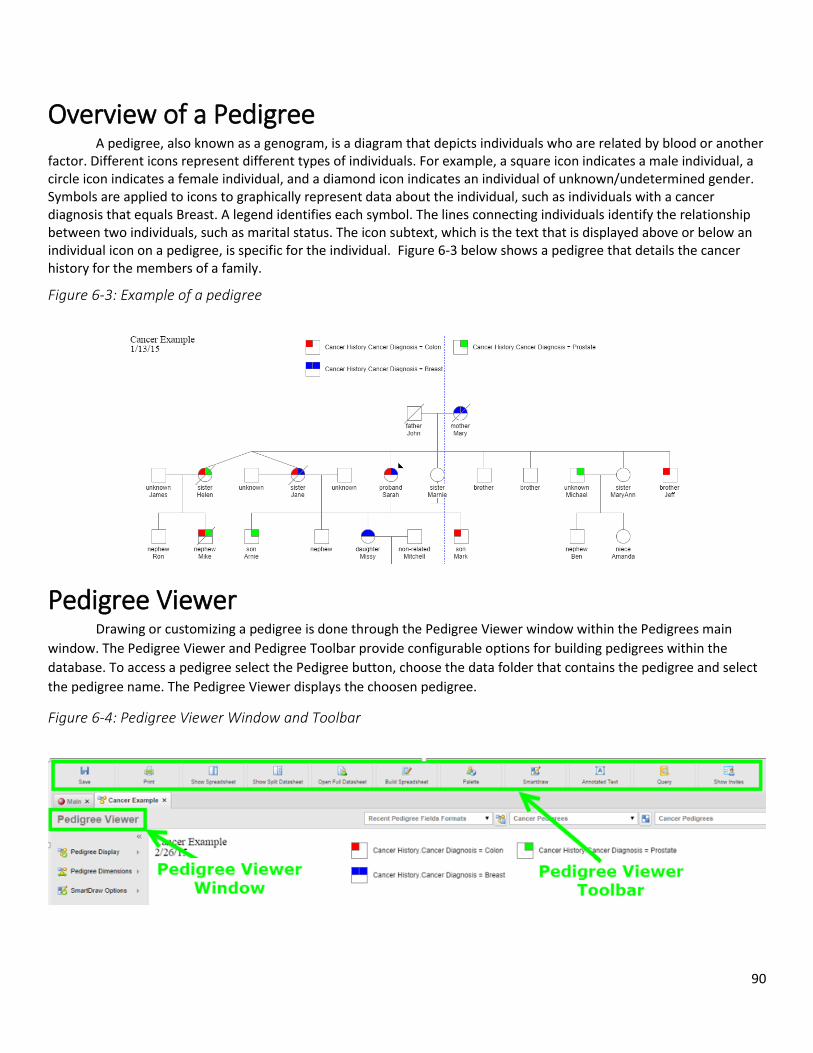
90
Overview of a Pedigree A pedigree, also known as a genogram, is a diagram that depicts individuals who are related by blood or another factor. Different icons represent different types of individuals. For example, a square icon indicates a male individual, a circle icon indicates a female individual, and a diamond icon indicates an individual of unknown/undetermined gender. Symbols are applied to icons to graphically represent data about the individual, such as individuals with a cancer diagnosis that equals Breast. A legend identifies each symbol. The lines connecting individuals identify the relationship between two individuals, such as marital status. The icon subtext, which is the text that is displayed above or below an individual icon on a pedigree, is specific for the individual. Figure 6-3 below shows a pedigree that details the cancer history for the members of a family.
Figure 6-3: Example of a pedigree
Pedigree Viewer Drawing or customizing a pedigree is done through the Pedigree Viewer window within the Pedigrees main
window. The Pedigree Viewer and Pedigree Toolbar provide configurable options for building pedigrees within the
database. To access a pedigree select the Pedigree button, choose the data folder that contains the pedigree and select
the pedigree name. The Pedigree Viewer displays the choosen pedigree.
Figure 6-4: Pedigree Viewer Window and Toolbar
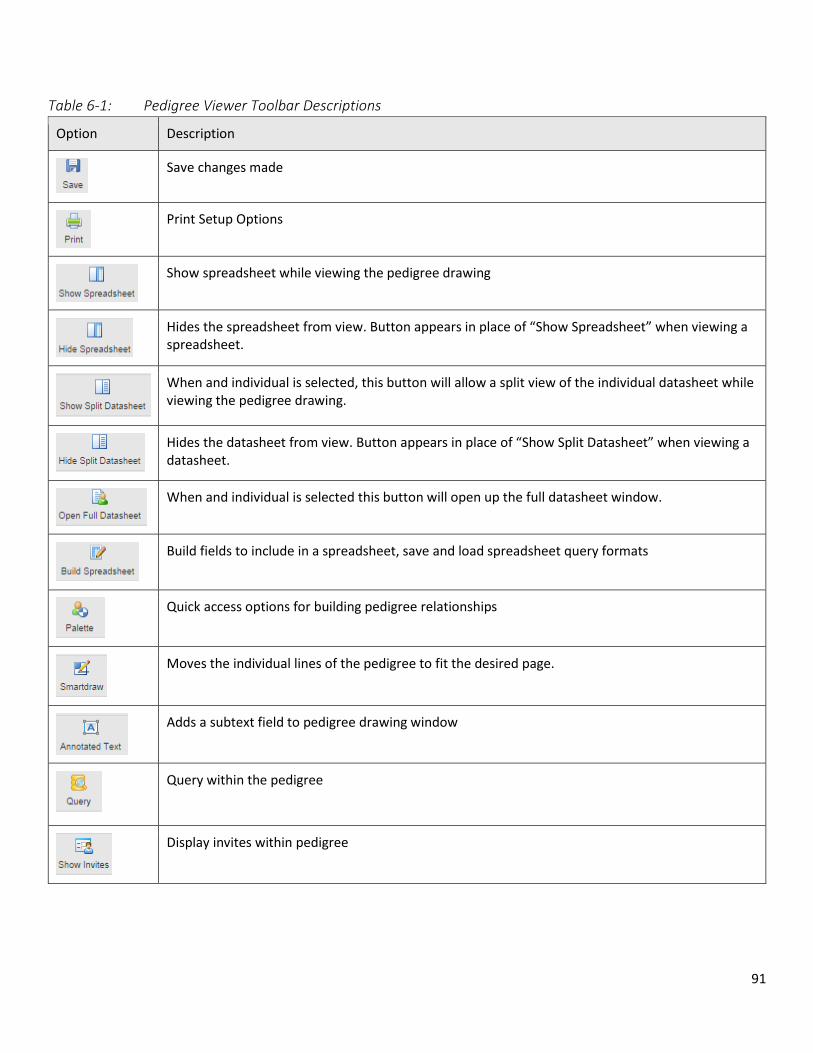
91
Table 6-1: Pedigree Viewer Toolbar Descriptions
Option Description
Save changes made
Print Setup Options
Show spreadsheet while viewing the pedigree drawing
Hides the spreadsheet from view. Button appears in place of “Show Spreadsheet” when viewing a spreadsheet.
When and individual is selected, this button will allow a split view of the individual datasheet while viewing the pedigree drawing.
Hides the datasheet from view. Button appears in place of “Show Split Datasheet” when viewing a datasheet.
When and individual is selected this button will open up the full datasheet window.
Build fields to include in a spreadsheet, save and load spreadsheet query formats
Quick access options for building pedigree relationships
Moves the individual lines of the pedigree to fit the desired page.
Adds a subtext field to pedigree drawing window
Query within the pedigree
Display invites within pedigree
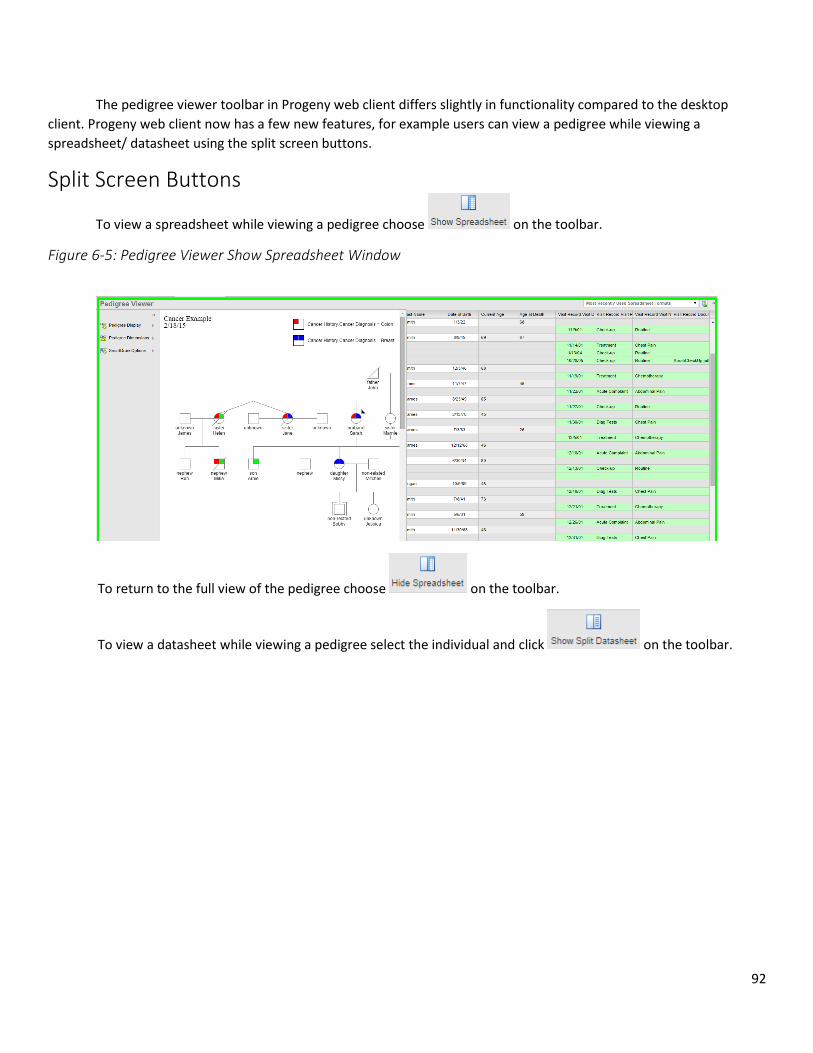
92
The pedigree viewer toolbar in Progeny web client differs slightly in functionality compared to the desktop
client. Progeny web client now has a few new features, for example users can view a pedigree while viewing a
spreadsheet/ datasheet using the split screen buttons.
Split Screen Buttons
To view a spreadsheet while viewing a pedigree choose on the toolbar.
Figure 6-5: Pedigree Viewer Show Spreadsheet Window
To return to the full view of the pedigree choose on the toolbar.
To view a datasheet while viewing a pedigree select the individual and click on the toolbar.
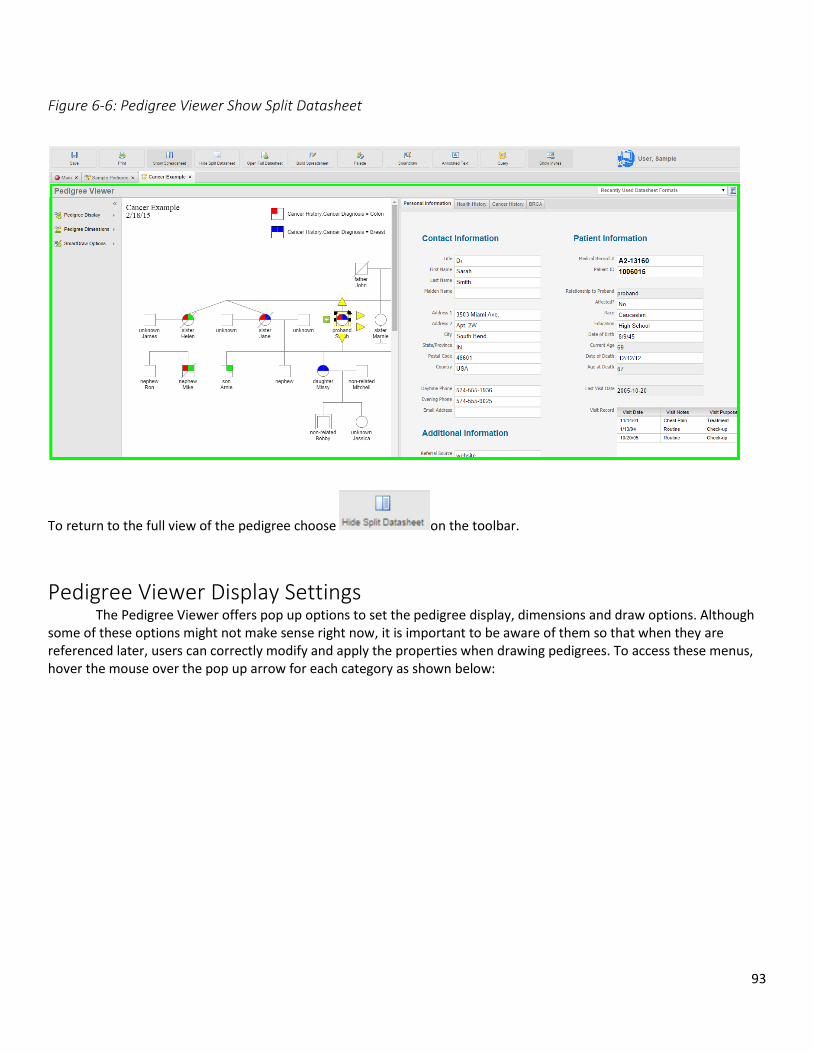
93
Figure 6-6: Pedigree Viewer Show Split Datasheet
To return to the full view of the pedigree choose on the toolbar.
Pedigree Viewer Display Settings The Pedigree Viewer offers pop up options to set the pedigree display, dimensions and draw options. Although some of these options might not make sense right now, it is important to be aware of them so that when they are referenced later, users can correctly modify and apply the properties when drawing pedigrees. To access these menus, hover the mouse over the pop up arrow for each category as shown below:

94
Figure 6-7: Pedigree Viewer Display Options
Table 6-2: Pedigree Display Descriptions
Option Description
Show Grid Displays a grid on the pedigree canvas.
Snap to Grid When moving an icon in the pedigree, aligns (or “snaps”) the icon to the nearest intersection of lines in the grid, even if the grid is not visible.
Show Page Breaks Displays print boundaries on the pedigree as blue dashed lines.
Show Header/Show Footer Displays a header or footer on each page of the pedigree.
Live Dragging Relationship lines move with the icon when repositioned.
Show Symbols Legend Displays a legend for the symbols shown on the pedigree.
Show Subtext Legend Displays a legend for the icon subtext displayed in the pedigree.
One-click Add
Allows user to click on specific handles on an individual icon to automatically add a relationship to the individual. (No longer manually add relationships from the palette or drag lines between icons to create relationships).
95
AutoDraw
Automatically runs SmartDraw every time users add an individual to a pedigree. Users can then define SmartDraw options. See Smart Draw Options.
Show Haplotypes Display a colored-coded legend for markers that are displayed on a pedigree.
Show Invite Status Displays invite status
Show Linkage Settings Displays sample status (Sample/Plate/Gentoyped) on the pedigree and indicates whether individual has been “Included in Analysis.”
Use Hooks
Distinguishes between lines that cross over one another.
Note: See Overview of Pedigree Icons for a graphical depiction of hooks.
Show Blue ID #
Display a blue number next to an icon in a pedigree to indicate the ordering of individuals from left to right in a generation.
Note: See Overview of Pedigree Icons for a graphical depiction of blue numbers. Users can change the position of blue numbers on the Dimensions tab.
Show Date Display the current date in the upper left hand corner of the pedigree.
Proband Arrow Position Change the position of the solid black arrowhead that identifies the proband on a pedigree. Values are UL (for upper left), UR (for upper right), LL (for lower left), and LR (for lower right).
Icon Subtext Font The font type and font size used for the icon subtext.
Header and Footer
Information
Optional text-entry fields for header and footer information.
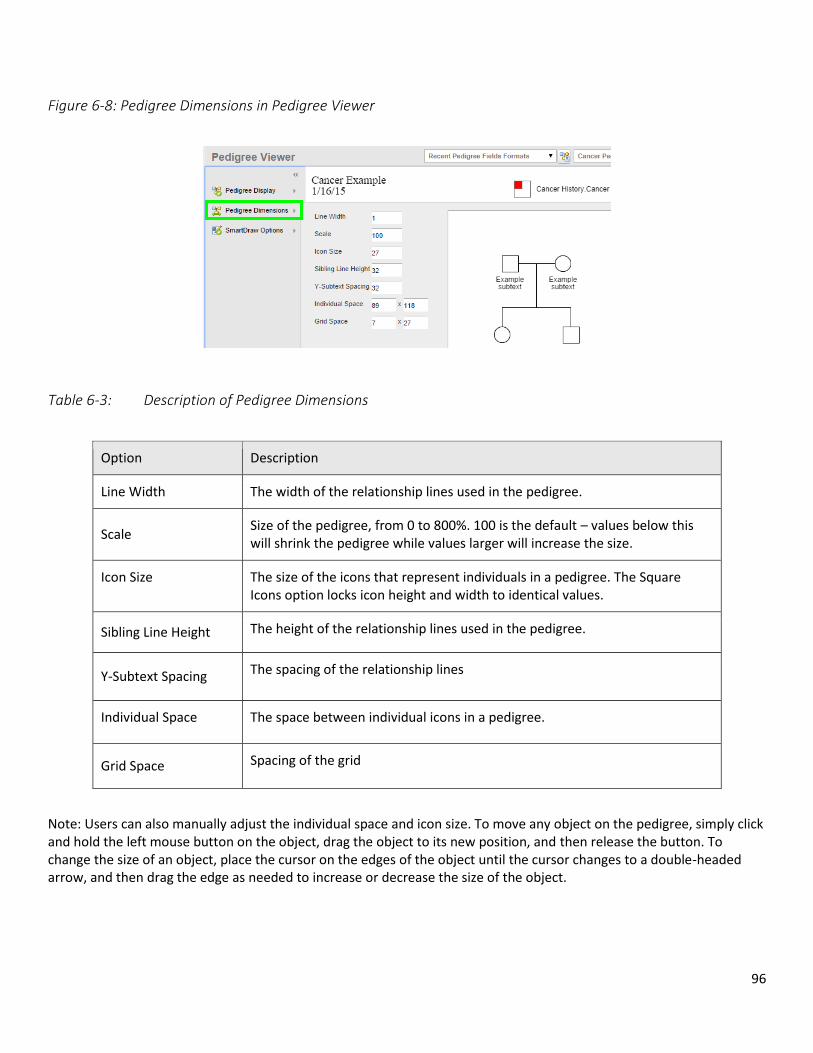
96
Figure 6-8: Pedigree Dimensions in Pedigree Viewer
Table 6-3: Description of Pedigree Dimensions
Option Description
Line Width The width of the relationship lines used in the pedigree.
Scale Size of the pedigree, from 0 to 800%. 100 is the default – values below this will shrink the pedigree while values larger will increase the size.
Icon Size The size of the icons that represent individuals in a pedigree. The Square Icons option locks icon height and width to identical values.
Sibling Line Height The height of the relationship lines used in the pedigree.
Y-Subtext Spacing The spacing of the relationship lines
Individual Space The space between individual icons in a pedigree.
Grid Space Spacing of the grid
Note: Users can also manually adjust the individual space and icon size. To move any object on the pedigree, simply click and hold the left mouse button on the object, drag the object to its new position, and then release the button. To change the size of an object, place the cursor on the edges of the object until the cursor changes to a double-headed arrow, and then drag the edge as needed to increase or decrease the size of the object.
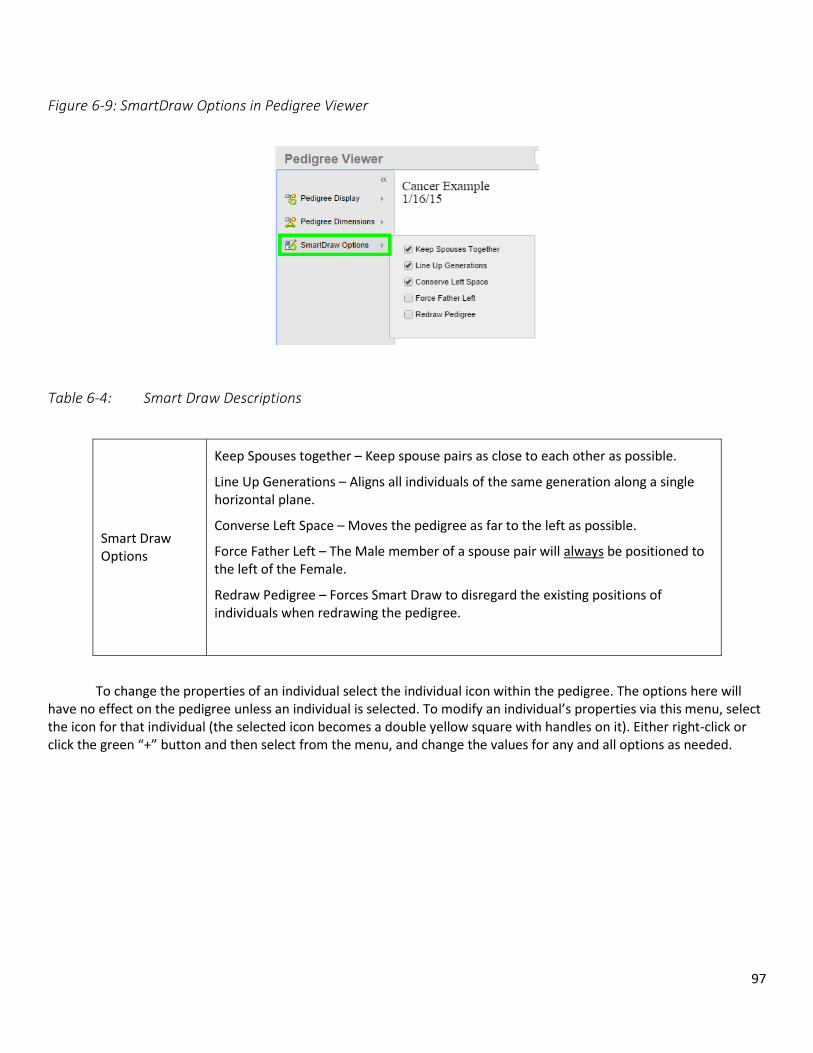
97
Figure 6-9: SmartDraw Options in Pedigree Viewer
Table 6-4: Smart Draw Descriptions
Smart Draw Options
Keep Spouses together – Keep spouse pairs as close to each other as possible.
Line Up Generations – Aligns all individuals of the same generation along a single horizontal plane.
Converse Left Space – Moves the pedigree as far to the left as possible.
Force Father Left – The Male member of a spouse pair will always be positioned to the left of the Female.
Redraw Pedigree – Forces Smart Draw to disregard the existing positions of individuals when redrawing the pedigree.
To change the properties of an individual select the individual icon within the pedigree. The options here will have no effect on the pedigree unless an individual is selected. To modify an individual’s properties via this menu, select the icon for that individual (the selected icon becomes a double yellow square with handles on it). Either right-click or click the green “+” button and then select from the menu, and change the values for any and all options as needed.
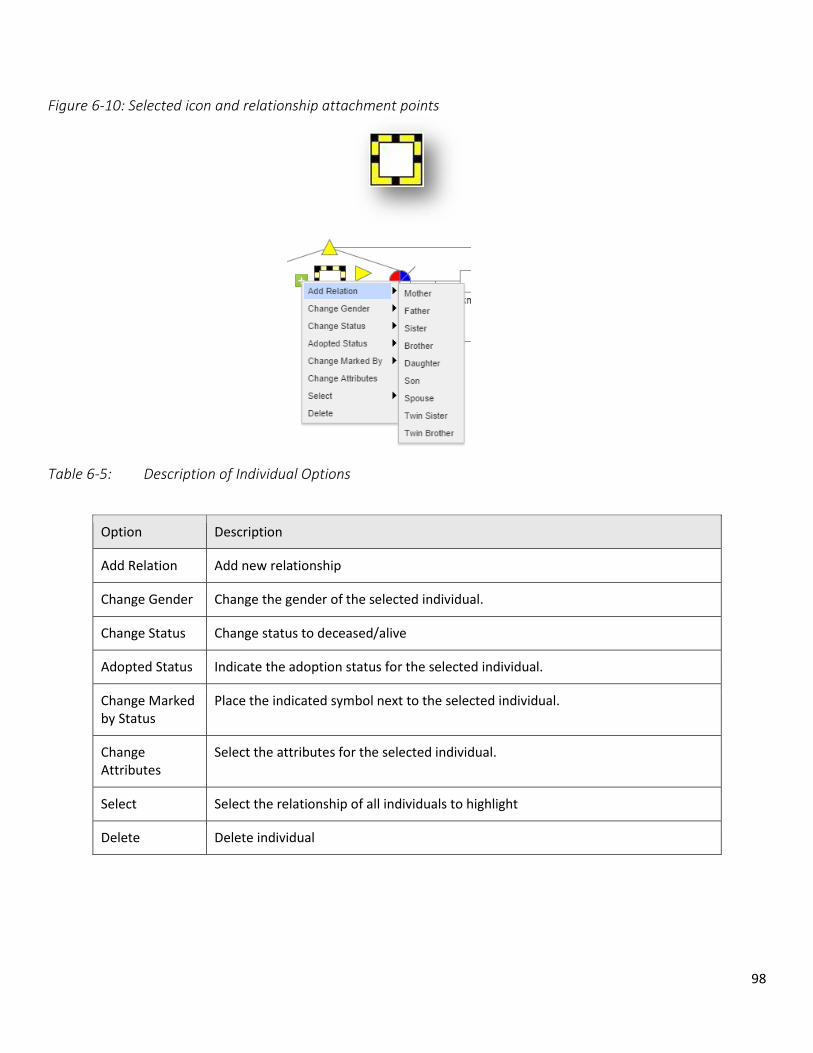
98
Figure 6-10: Selected icon and relationship attachment points
Table 6-5: Description of Individual Options
Option Description
Add Relation Add new relationship
Change Gender Change the gender of the selected individual.
Change Status Change status to deceased/alive
Adopted Status Indicate the adoption status for the selected individual.
Change Marked by Status
Place the indicated symbol next to the selected individual.
Change Attributes
Select the attributes for the selected individual.
Select Select the relationship of all individuals to highlight
Delete Delete individual
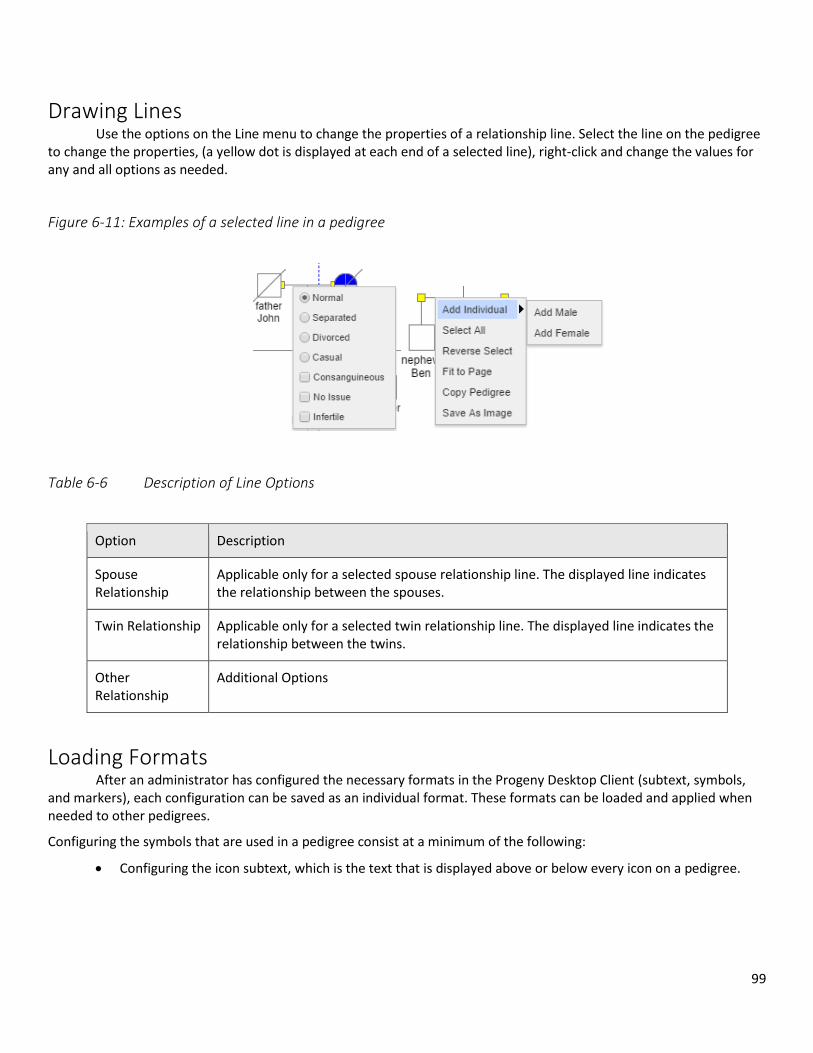
99
Drawing Lines Use the options on the Line menu to change the properties of a relationship line. Select the line on the pedigree to change the properties, (a yellow dot is displayed at each end of a selected line), right-click and change the values for any and all options as needed.
Figure 6-11: Examples of a selected line in a pedigree
Table 6-6 Description of Line Options
Option Description
Spouse Relationship
Applicable only for a selected spouse relationship line. The displayed line indicates the relationship between the spouses.
Twin Relationship Applicable only for a selected twin relationship line. The displayed line indicates the relationship between the twins.
Other Relationship
Additional Options
Loading Formats After an administrator has configured the necessary formats in the Progeny Desktop Client (subtext, symbols, and markers), each configuration can be saved as an individual format. These formats can be loaded and applied when needed to other pedigrees.
Configuring the symbols that are used in a pedigree consist at a minimum of the following:
Configuring the icon subtext, which is the text that is displayed above or below every icon on a pedigree.
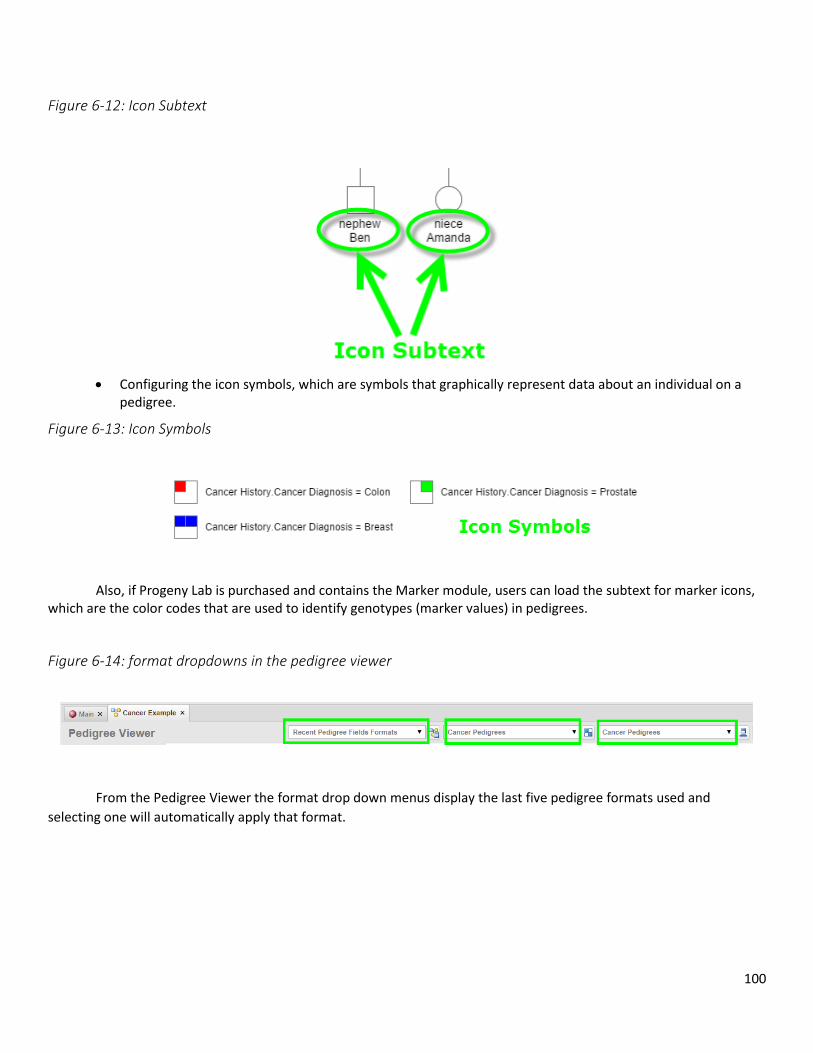
100
Figure 6-12: Icon Subtext
Configuring the icon symbols, which are symbols that graphically represent data about an individual on a pedigree.
Figure 6-13: Icon Symbols
Also, if Progeny Lab is purchased and contains the Marker module, users can load the subtext for marker icons, which are the color codes that are used to identify genotypes (marker values) in pedigrees.
Figure 6-14: format dropdowns in the pedigree viewer
From the Pedigree Viewer the format drop down menus display the last five pedigree formats used and
selecting one will automatically apply that format.
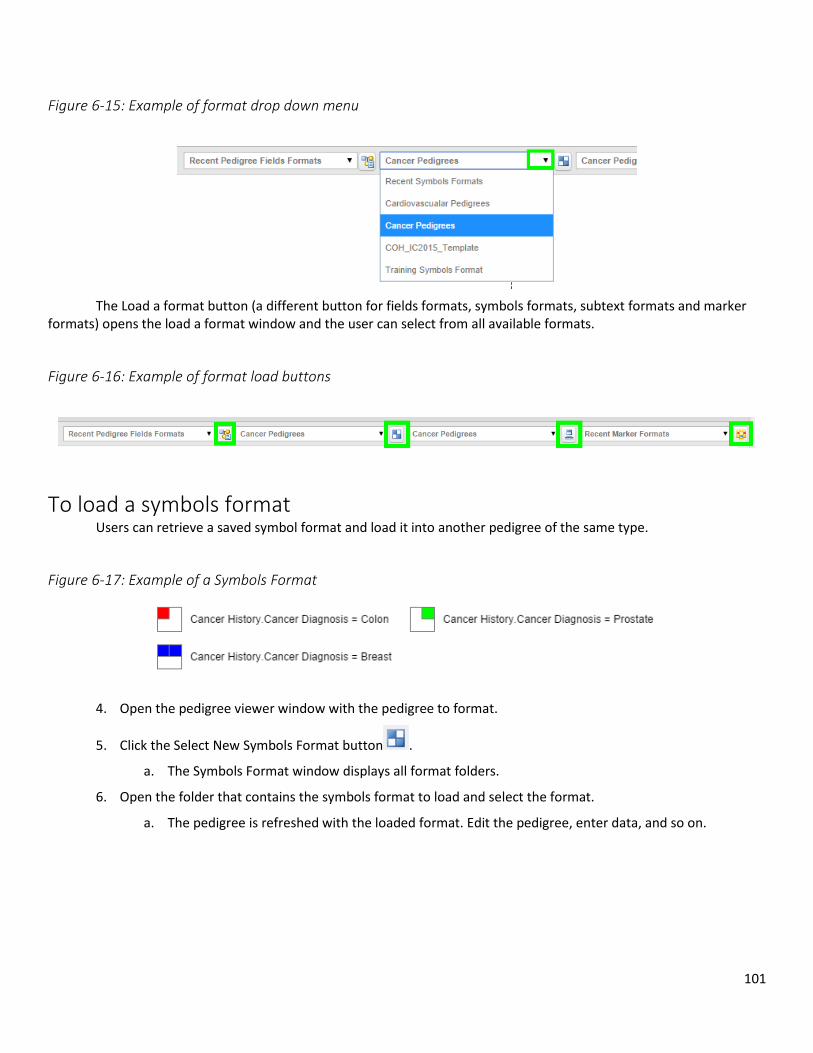
101
Figure 6-15: Example of format drop down menu
The Load a format button (a different button for fields formats, symbols formats, subtext formats and marker formats) opens the load a format window and the user can select from all available formats.
Figure 6-16: Example of format load buttons
To load a symbols format Users can retrieve a saved symbol format and load it into another pedigree of the same type.
Figure 6-17: Example of a Symbols Format
4. Open the pedigree viewer window with the pedigree to format.
5. Click the Select New Symbols Format button .
a. The Symbols Format window displays all format folders.
6. Open the folder that contains the symbols format to load and select the format.
a. The pedigree is refreshed with the loaded format. Edit the pedigree, enter data, and so on.
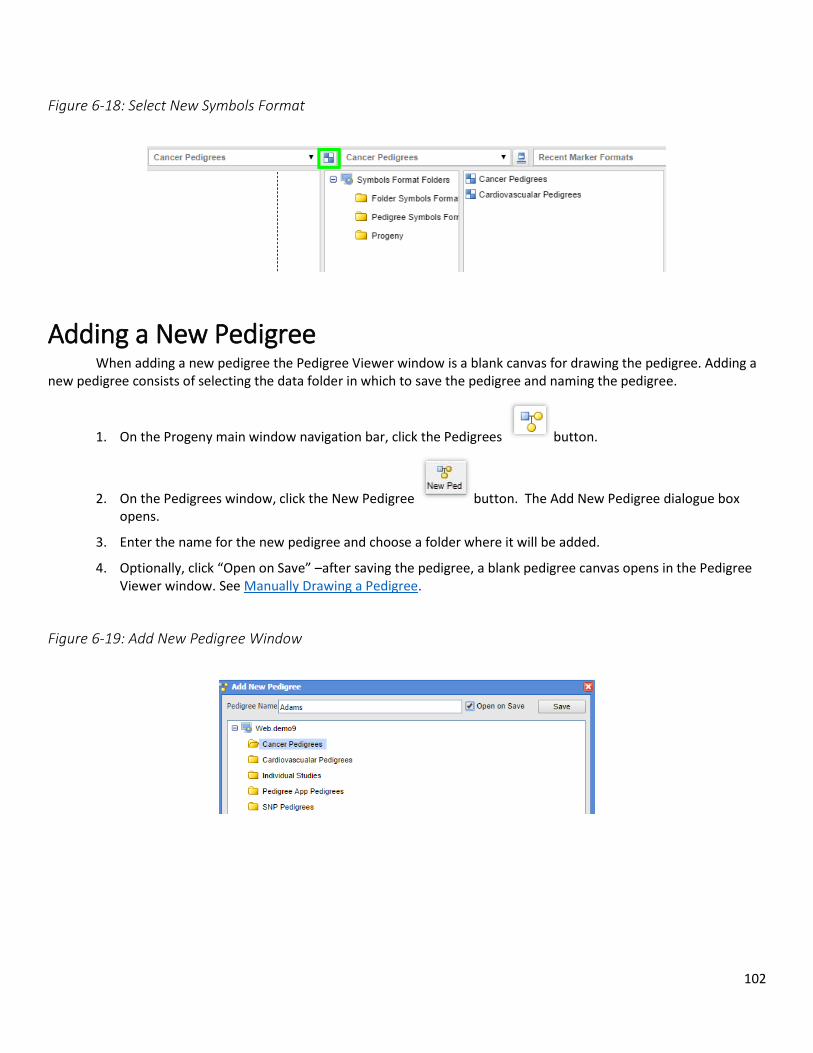
102
Figure 6-18: Select New Symbols Format
Adding a New Pedigree When adding a new pedigree the Pedigree Viewer window is a blank canvas for drawing the pedigree. Adding a
new pedigree consists of selecting the data folder in which to save the pedigree and naming the pedigree.
1. On the Progeny main window navigation bar, click the Pedigrees button.
2. On the Pedigrees window, click the New Pedigree button. The Add New Pedigree dialogue box opens.
3. Enter the name for the new pedigree and choose a folder where it will be added.
4. Optionally, click “Open on Save” –after saving the pedigree, a blank pedigree canvas opens in the Pedigree Viewer window. See Manually Drawing a Pedigree.
Figure 6-19: Add New Pedigree Window
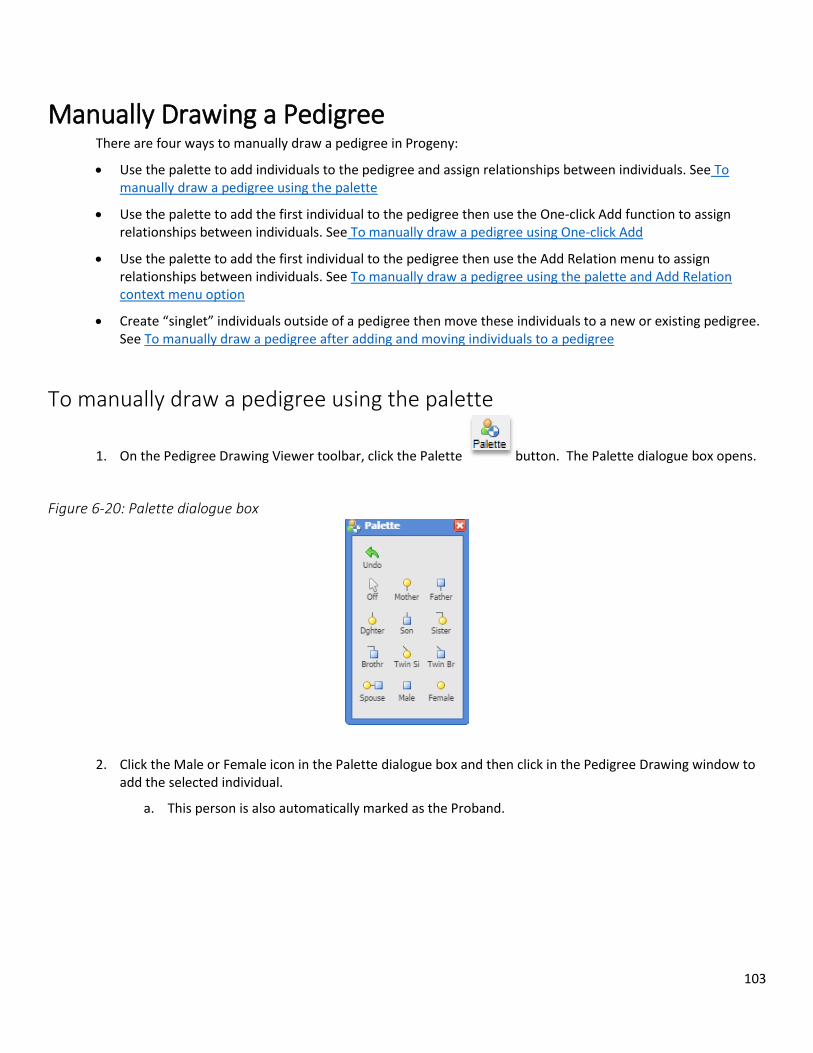
103
Manually Drawing a Pedigree There are four ways to manually draw a pedigree in Progeny:
Use the palette to add individuals to the pedigree and assign relationships between individuals. See To manually draw a pedigree using the palette
Use the palette to add the first individual to the pedigree then use the One-click Add function to assign relationships between individuals. See To manually draw a pedigree using One-click Add
Use the palette to add the first individual to the pedigree then use the Add Relation menu to assign relationships between individuals. See To manually draw a pedigree using the palette and Add Relation context menu option
Create “singlet” individuals outside of a pedigree then move these individuals to a new or existing pedigree. See To manually draw a pedigree after adding and moving individuals to a pedigree
To manually draw a pedigree using the palette
1. On the Pedigree Drawing Viewer toolbar, click the Palette button. The Palette dialogue box opens.
Figure 6-20: Palette dialogue box
2. Click the Male or Female icon in the Palette dialogue box and then click in the Pedigree Drawing window to add the selected individual.
a. This person is also automatically marked as the Proband.
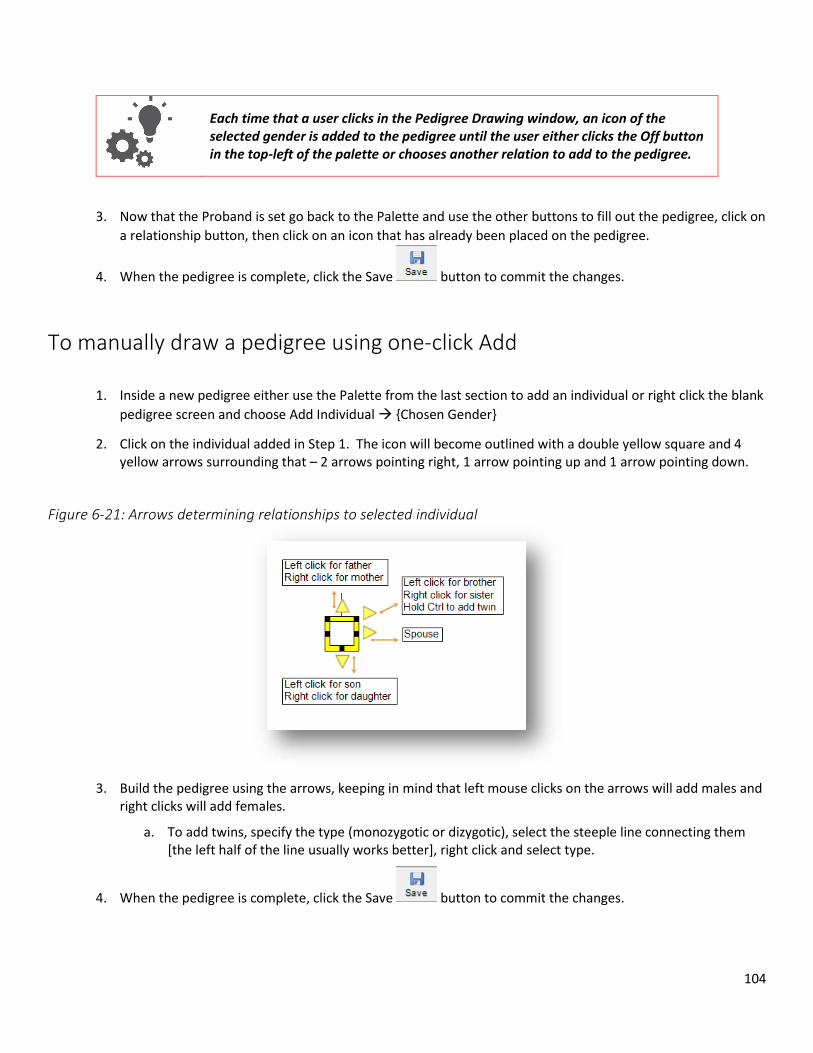
104
Each time that a user clicks in the Pedigree Drawing window, an icon of the selected gender is added to the pedigree until the user either clicks the Off button in the top-left of the palette or chooses another relation to add to the pedigree.
3. Now that the Proband is set go back to the Palette and use the other buttons to fill out the pedigree, click on
a relationship button, then click on an icon that has already been placed on the pedigree.
4. When the pedigree is complete, click the Save button to commit the changes.
To manually draw a pedigree using one-click Add
1. Inside a new pedigree either use the Palette from the last section to add an individual or right click the blank
pedigree screen and choose Add Individual {Chosen Gender}
2. Click on the individual added in Step 1. The icon will become outlined with a double yellow square and 4 yellow arrows surrounding that – 2 arrows pointing right, 1 arrow pointing up and 1 arrow pointing down.
Figure 6-21: Arrows determining relationships to selected individual
3. Build the pedigree using the arrows, keeping in mind that left mouse clicks on the arrows will add males and right clicks will add females.
a. To add twins, specify the type (monozygotic or dizygotic), select the steeple line connecting them [the left half of the line usually works better], right click and select type.
4. When the pedigree is complete, click the Save button to commit the changes.
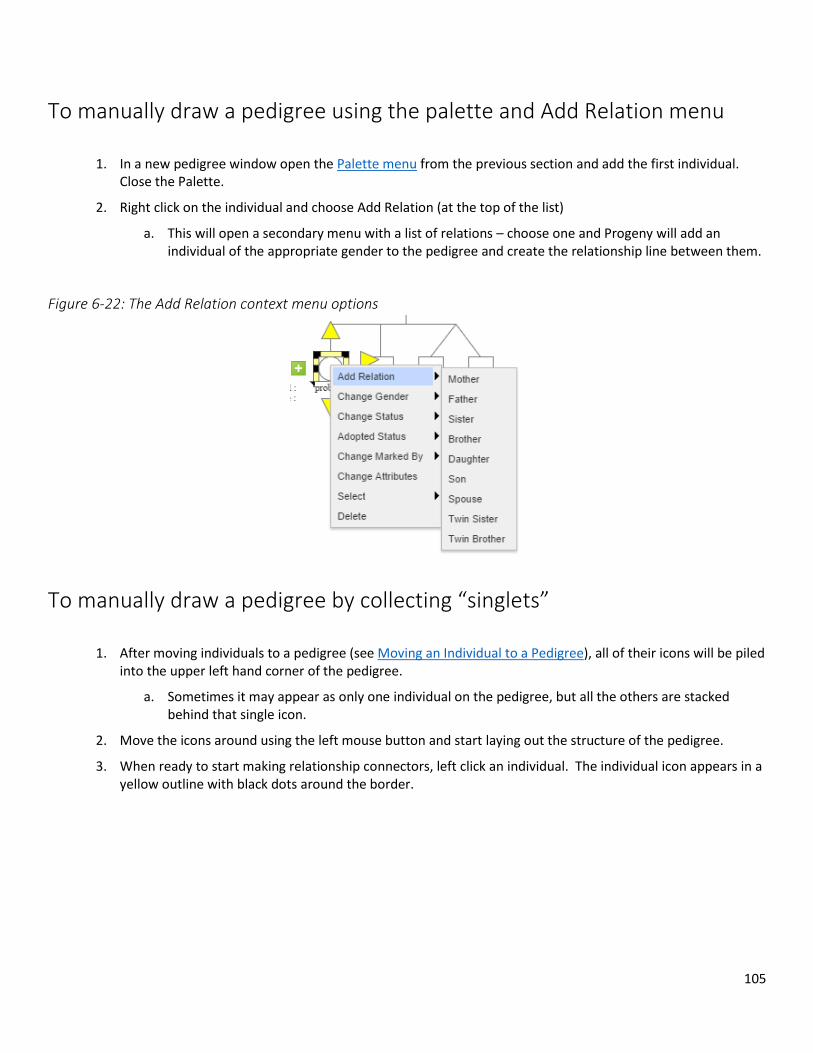
105
To manually draw a pedigree using the palette and Add Relation menu
1. In a new pedigree window open the Palette menu from the previous section and add the first individual. Close the Palette.
2. Right click on the individual and choose Add Relation (at the top of the list)
a. This will open a secondary menu with a list of relations – choose one and Progeny will add an individual of the appropriate gender to the pedigree and create the relationship line between them.
Figure 6-22: The Add Relation context menu options
To manually draw a pedigree by collecting “singlets”
1. After moving individuals to a pedigree (see Moving an Individual to a Pedigree), all of their icons will be piled into the upper left hand corner of the pedigree.
a. Sometimes it may appear as only one individual on the pedigree, but all the others are stacked behind that single icon.
2. Move the icons around using the left mouse button and start laying out the structure of the pedigree.
3. When ready to start making relationship connectors, left click an individual. The individual icon appears in a yellow outline with black dots around the border.
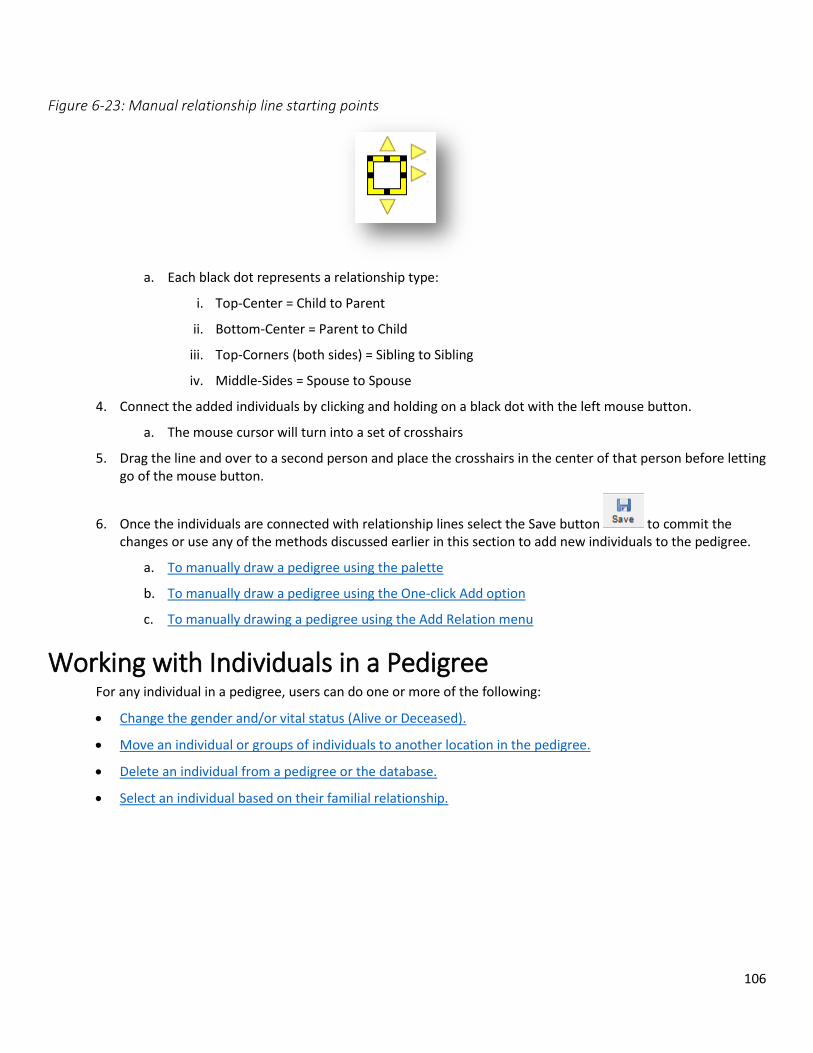
106
Figure 6-23: Manual relationship line starting points
a. Each black dot represents a relationship type:
i. Top-Center = Child to Parent
ii. Bottom-Center = Parent to Child
iii. Top-Corners (both sides) = Sibling to Sibling
iv. Middle-Sides = Spouse to Spouse
4. Connect the added individuals by clicking and holding on a black dot with the left mouse button.
a. The mouse cursor will turn into a set of crosshairs
5. Drag the line and over to a second person and place the crosshairs in the center of that person before letting go of the mouse button.
6. Once the individuals are connected with relationship lines select the Save button to commit the changes or use any of the methods discussed earlier in this section to add new individuals to the pedigree.
a. To manually draw a pedigree using the palette
b. To manually draw a pedigree using the One-click Add option
c. To manually drawing a pedigree using the Add Relation menu
Working with Individuals in a Pedigree For any individual in a pedigree, users can do one or more of the following:
Change the gender and/or vital status (Alive or Deceased).
Move an individual or groups of individuals to another location in the pedigree.
Delete an individual from a pedigree or the database.
Select an individual based on their familial relationship.
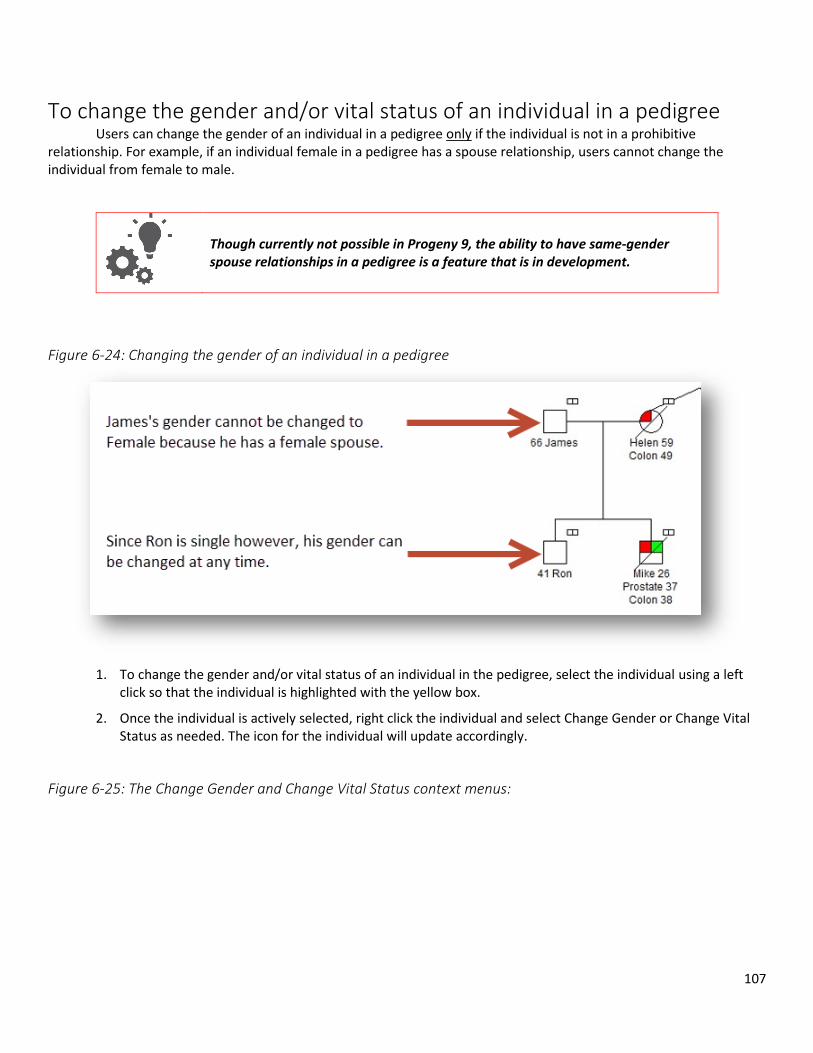
107
To change the gender and/or vital status of an individual in a pedigree Users can change the gender of an individual in a pedigree only if the individual is not in a prohibitive relationship. For example, if an individual female in a pedigree has a spouse relationship, users cannot change the individual from female to male.
Though currently not possible in Progeny 9, the ability to have same-gender spouse relationships in a pedigree is a feature that is in development.
Figure 6-24: Changing the gender of an individual in a pedigree
1. To change the gender and/or vital status of an individual in the pedigree, select the individual using a left click so that the individual is highlighted with the yellow box.
2. Once the individual is actively selected, right click the individual and select Change Gender or Change Vital Status as needed. The icon for the individual will update accordingly.
Figure 6-25: The Change Gender and Change Vital Status context menus:
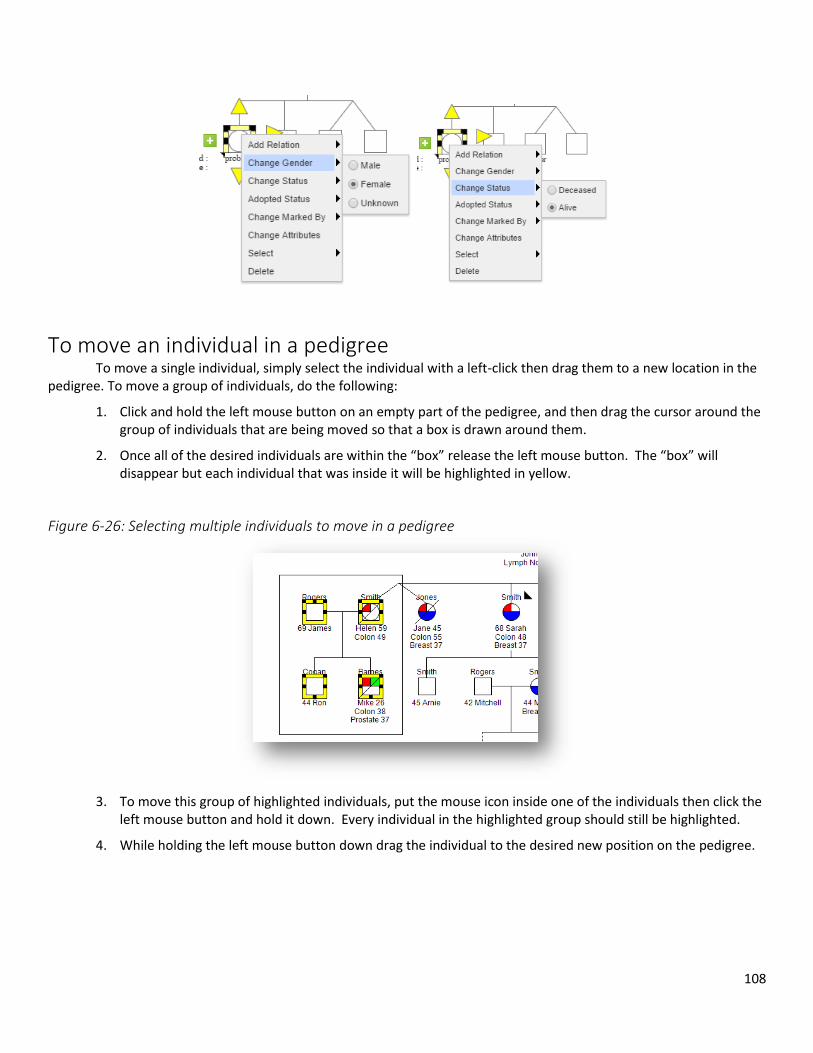
108
To move an individual in a pedigree To move a single individual, simply select the individual with a left-click then drag them to a new location in the pedigree. To move a group of individuals, do the following:
1. Click and hold the left mouse button on an empty part of the pedigree, and then drag the cursor around the group of individuals that are being moved so that a box is drawn around them.
2. Once all of the desired individuals are within the “box” release the left mouse button. The “box” will disappear but each individual that was inside it will be highlighted in yellow.
Figure 6-26: Selecting multiple individuals to move in a pedigree
3. To move this group of highlighted individuals, put the mouse icon inside one of the individuals then click the left mouse button and hold it down. Every individual in the highlighted group should still be highlighted.
4. While holding the left mouse button down drag the individual to the desired new position on the pedigree.
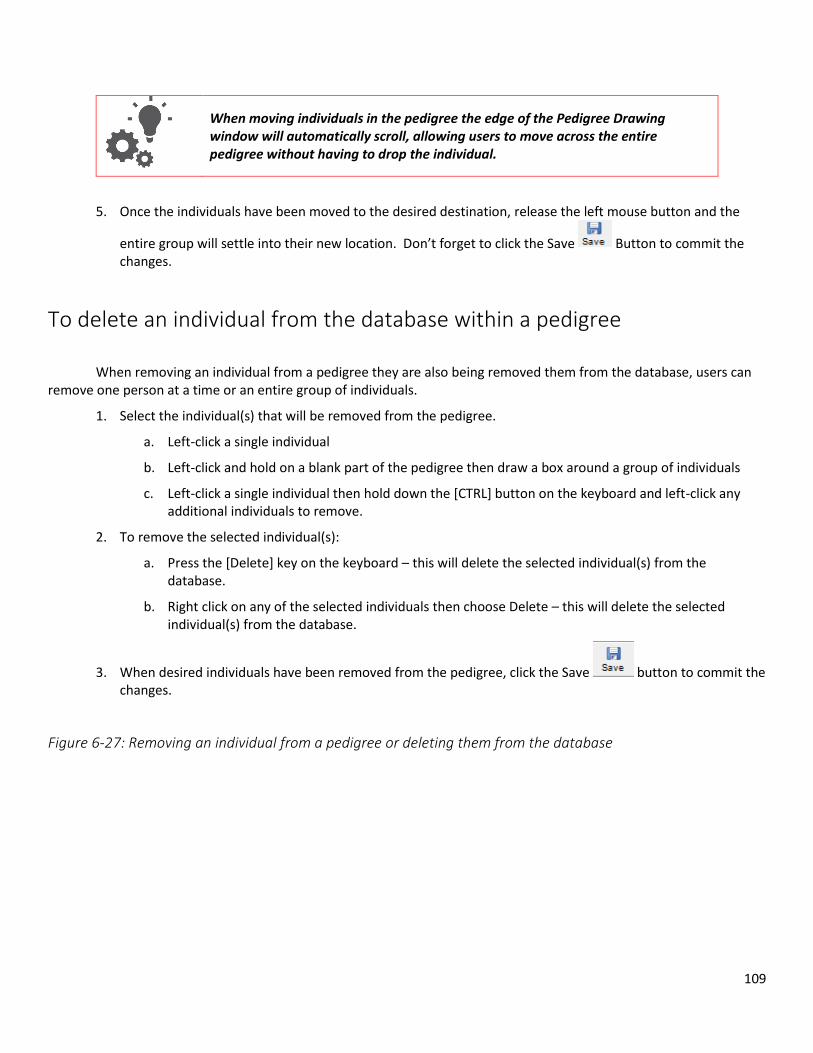
109
When moving individuals in the pedigree the edge of the Pedigree Drawing window will automatically scroll, allowing users to move across the entire pedigree without having to drop the individual.
5. Once the individuals have been moved to the desired destination, release the left mouse button and the
entire group will settle into their new location. Don’t forget to click the Save Button to commit the changes.
To delete an individual from the database within a pedigree
When removing an individual from a pedigree they are also being removed them from the database, users can remove one person at a time or an entire group of individuals.
1. Select the individual(s) that will be removed from the pedigree.
a. Left-click a single individual
b. Left-click and hold on a blank part of the pedigree then draw a box around a group of individuals
c. Left-click a single individual then hold down the [CTRL] button on the keyboard and left-click any additional individuals to remove.
2. To remove the selected individual(s):
a. Press the [Delete] key on the keyboard – this will delete the selected individual(s) from the database.
b. Right click on any of the selected individuals then choose Delete – this will delete the selected individual(s) from the database.
3. When desired individuals have been removed from the pedigree, click the Save button to commit the changes.
Figure 6-27: Removing an individual from a pedigree or deleting them from the database
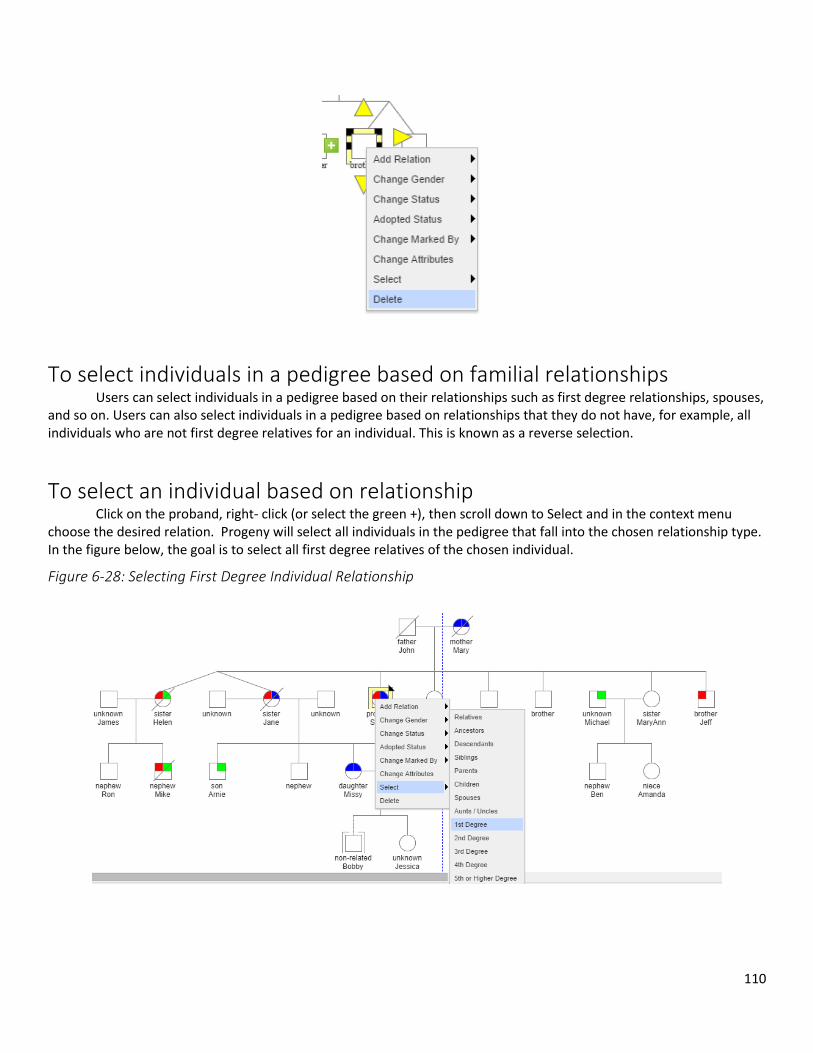
110
To select individuals in a pedigree based on familial relationships Users can select individuals in a pedigree based on their relationships such as first degree relationships, spouses, and so on. Users can also select individuals in a pedigree based on relationships that they do not have, for example, all individuals who are not first degree relatives for an individual. This is known as a reverse selection.
To select an individual based on relationship Click on the proband, right- click (or select the green +), then scroll down to Select and in the context menu
choose the desired relation. Progeny will select all individuals in the pedigree that fall into the chosen relationship type. In the figure below, the goal is to select all first degree relatives of the chosen individual.
Figure 6-28: Selecting First Degree Individual Relationship
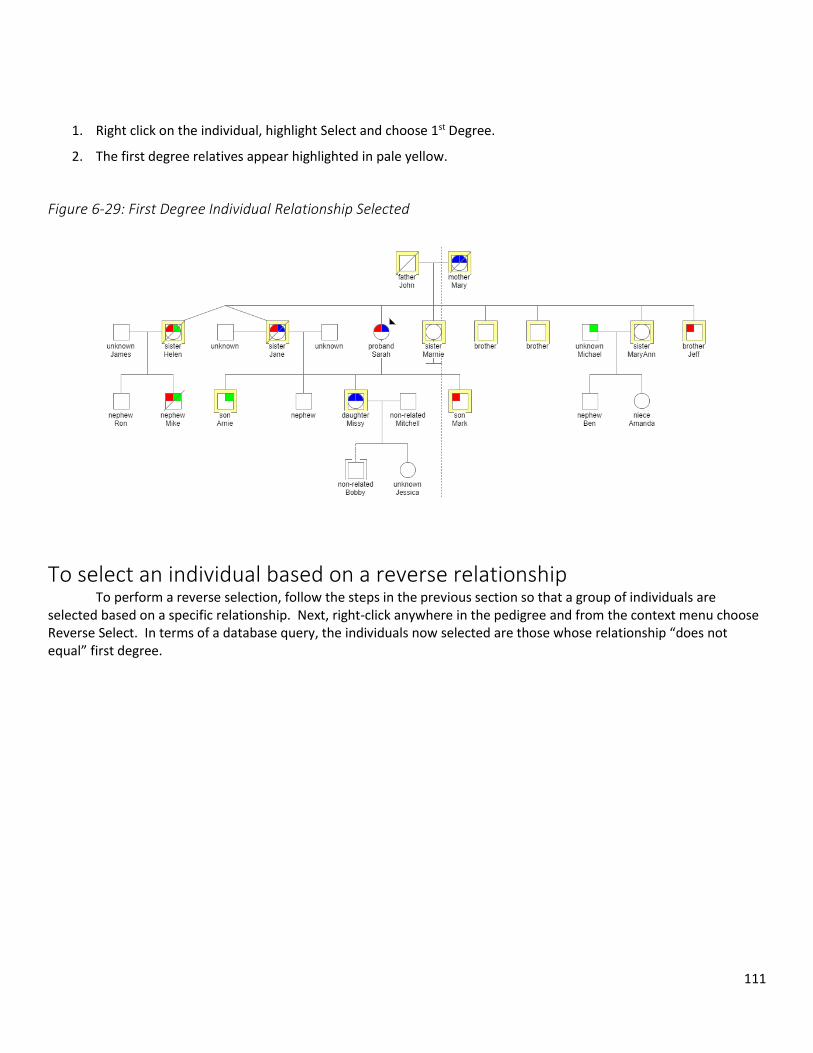
111
1. Right click on the individual, highlight Select and choose 1st Degree.
2. The first degree relatives appear highlighted in pale yellow.
Figure 6-29: First Degree Individual Relationship Selected
To select an individual based on a reverse relationship To perform a reverse selection, follow the steps in the previous section so that a group of individuals are selected based on a specific relationship. Next, right-click anywhere in the pedigree and from the context menu choose Reverse Select. In terms of a database query, the individuals now selected are those whose relationship “does not equal” first degree.
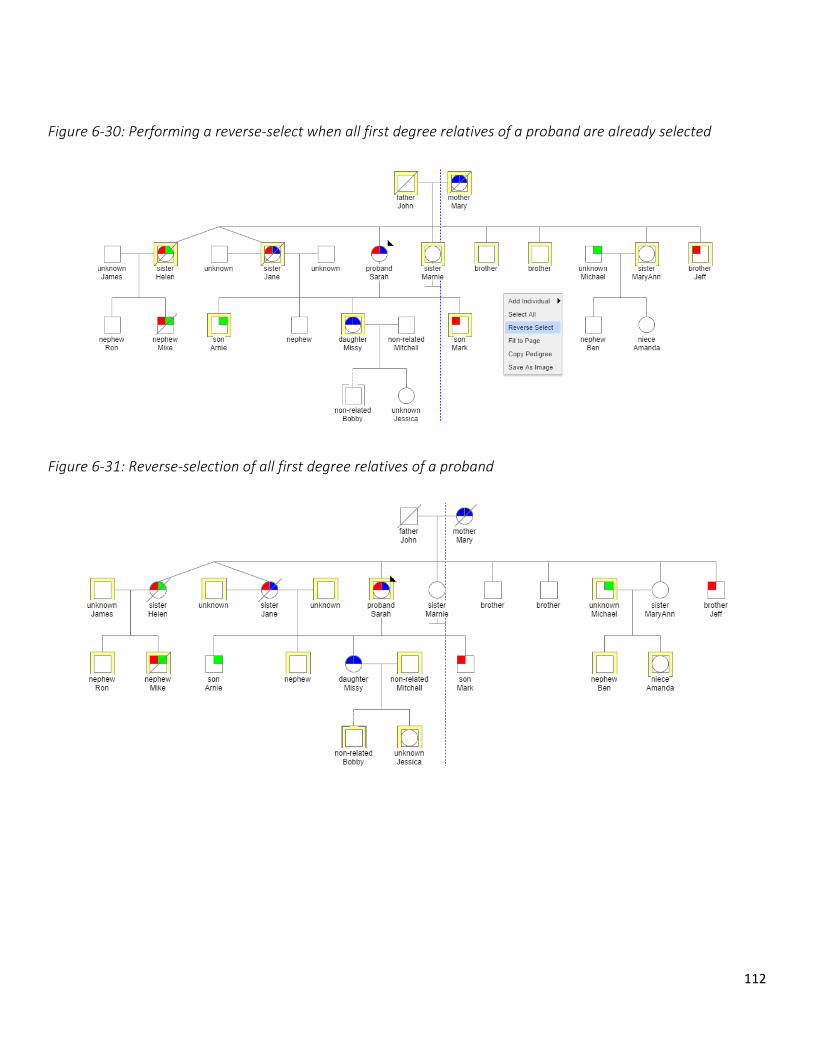
112
Figure 6-30: Performing a reverse-select when all first degree relatives of a proband are already selected
Figure 6-31: Reverse-selection of all first degree relatives of a proband
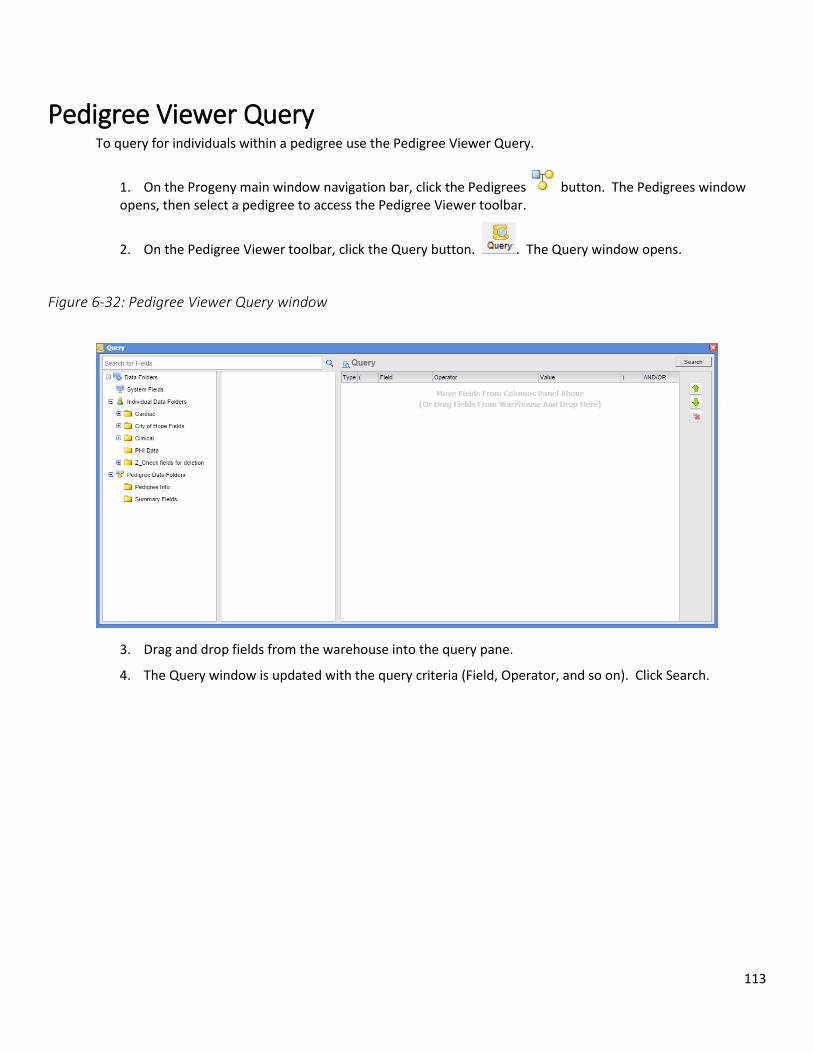
113
Pedigree Viewer Query To query for individuals within a pedigree use the Pedigree Viewer Query.
1. On the Progeny main window navigation bar, click the Pedigrees button. The Pedigrees window opens, then select a pedigree to access the Pedigree Viewer toolbar.
2. On the Pedigree Viewer toolbar, click the Query button. . The Query window opens.
Figure 6-32: Pedigree Viewer Query window
3. Drag and drop fields from the warehouse into the query pane.
4. The Query window is updated with the query criteria (Field, Operator, and so on). Click Search.
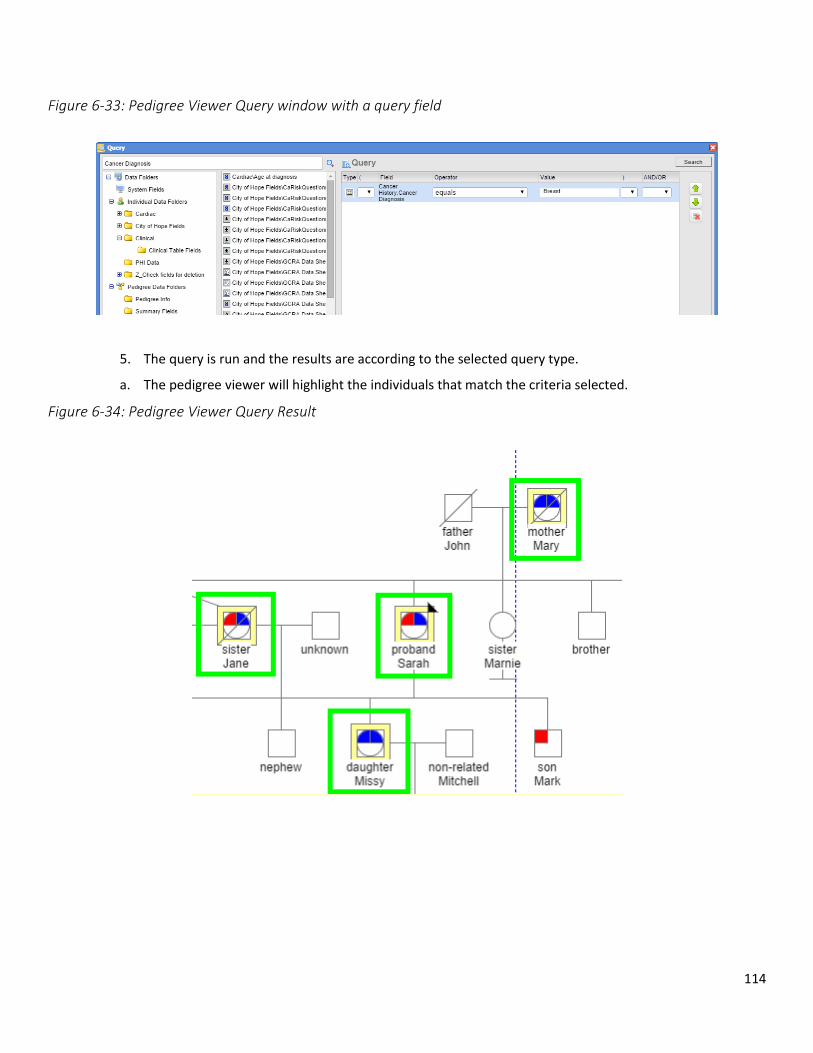
114
Figure 6-33: Pedigree Viewer Query window with a query field
5. The query is run and the results are according to the selected query type.
a. The pedigree viewer will highlight the individuals that match the criteria selected.
Figure 6-34: Pedigree Viewer Query Result
115
Chapter 7 Managing Pedigrees
A pedigree, also known as a genogram, is a diagram that depicts individuals who are related by blood or another factor. Managing pedigrees in Progeny Clinical consists of creating new pedigrees, creating pedigrees shortcuts, creating datasheets for pedigrees, modifying a pedigree, creating pedigree shortcuts, copying, moving, or deleting pedigrees, merging pedigrees, generating sub-pedigrees, printing pedigrees, and importing pedigree data.
This chapter covers the following topics:
Modifying a Pedigree
Copying and Moving Pedigrees between Data Folders
Saving Pedigree Images
Deleting a Pedigree
Generating a Spreadsheet for the Individuals in a Pedigree
Printing a Pedigree
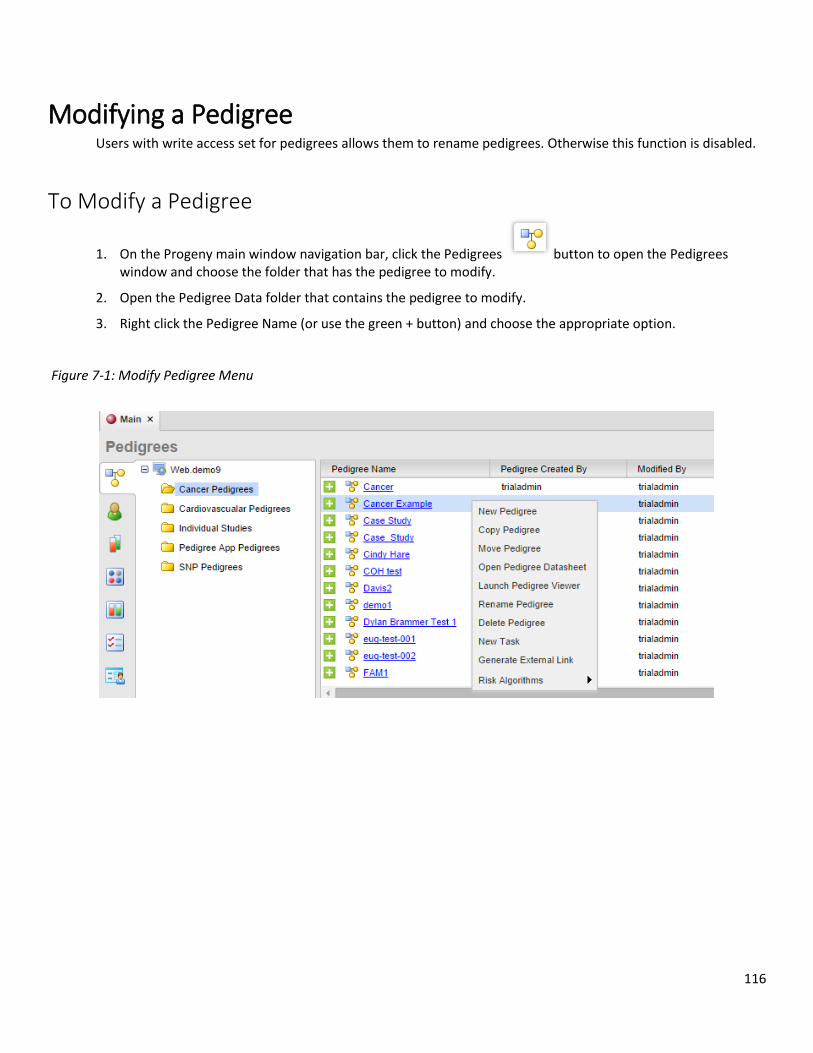
116
Modifying a Pedigree Users with write access set for pedigrees allows them to rename pedigrees. Otherwise this function is disabled.
To Modify a Pedigree
1. On the Progeny main window navigation bar, click the Pedigrees button to open the Pedigrees window and choose the folder that has the pedigree to modify.
2. Open the Pedigree Data folder that contains the pedigree to modify.
3. Right click the Pedigree Name (or use the green + button) and choose the appropriate option.
Figure 7-1: Modify Pedigree Menu
117
Table 7-1: Modify Pedigree Options
Option Description
New Pedigree Opens dialogue box to Add New Pedigree
Copy Pedigree Opens dialogue box to Copy Pedigree, saving a New Pedigree Name
Move Pedigree Opens dialogue box to move Pedigree into another Data Folder
Open Pedigree
Datasheet
Opens basic info on the Pedigree datasheet
Launch Pedigree
Viewer
Opens the Pedigree Viewer
Rename pedigree Automatically selects the pedigree name for modification.
Delete Pedigree Deletes pedigree from database
New Task Opens New Task window
Generate External
Link
Generates a URL to view the pedigree in a separate window on the web. The
external link does not provide further function other than viewing the pedigree.
Risk Algorithms Use CaGene, Boadicea or BRCAPro
Copying and Moving Pedigrees between Data Folders Pedigrees can be copied between Pedigree folders, and can be moved between Pedigree folders. For any of these actions, the following are important points to note:
Copying a pedigree leaves the original pedigree in its original data folder while putting a copy (or duplicate) of the pedigree in the new destination folder. Any edits made to the copied pedigree are not reflected in the original pedigree.
Moving a pedigree removes the pedigree from its original data folder and places the pedigree in a new destination folder. A copy of the original pedigree is not made.
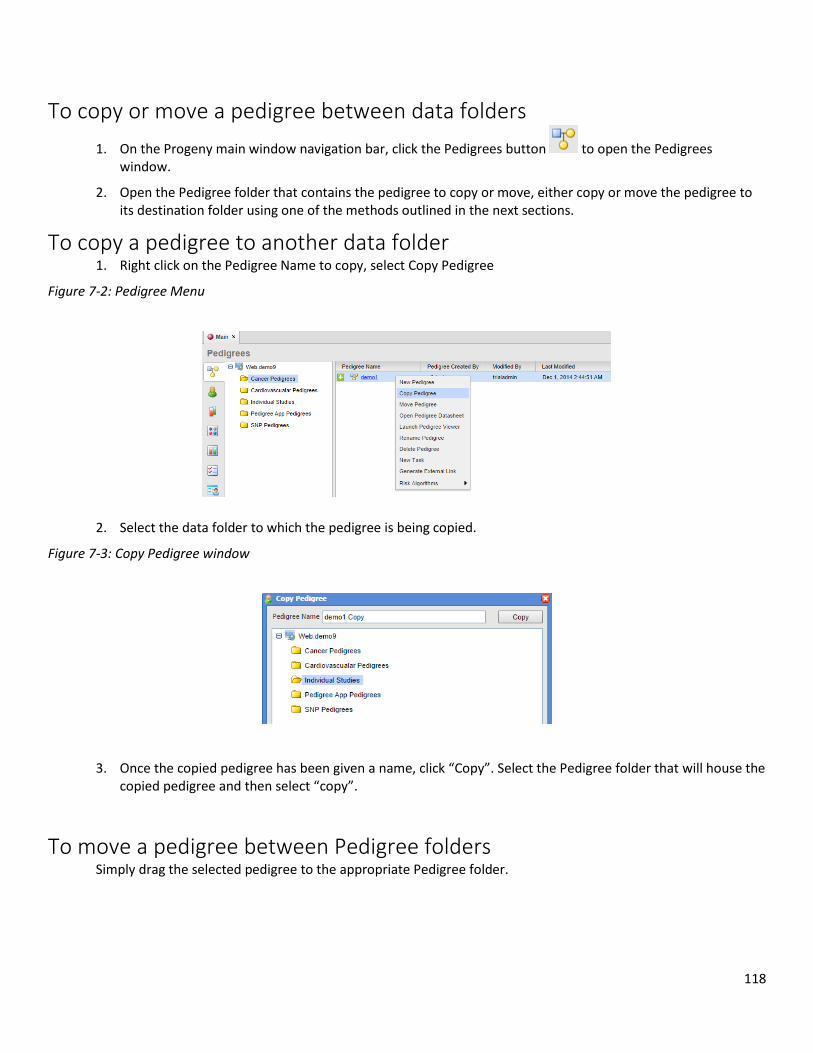
118
To copy or move a pedigree between data folders
1. On the Progeny main window navigation bar, click the Pedigrees button to open the Pedigrees window.
2. Open the Pedigree folder that contains the pedigree to copy or move, either copy or move the pedigree to its destination folder using one of the methods outlined in the next sections.
To copy a pedigree to another data folder 1. Right click on the Pedigree Name to copy, select Copy Pedigree
Figure 7-2: Pedigree Menu
2. Select the data folder to which the pedigree is being copied.
Figure 7-3: Copy Pedigree window
3. Once the copied pedigree has been given a name, click “Copy”. Select the Pedigree folder that will house the copied pedigree and then select “copy”.
To move a pedigree between Pedigree folders Simply drag the selected pedigree to the appropriate Pedigree folder.
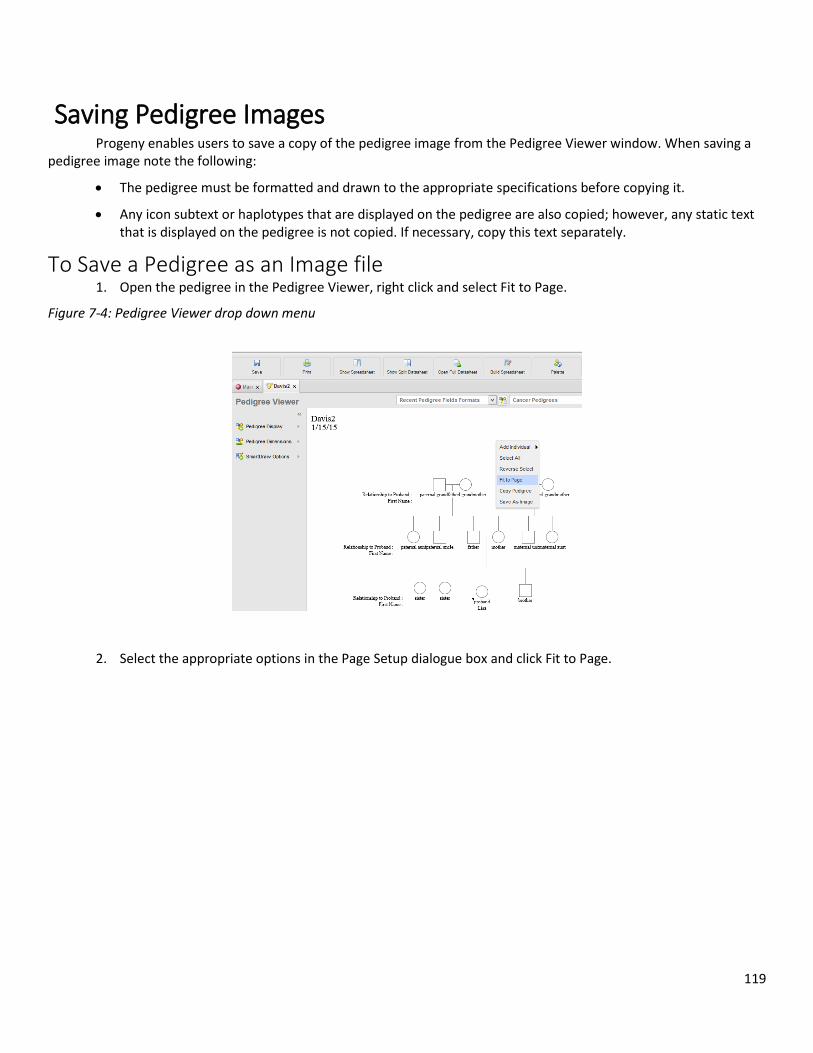
119
Saving Pedigree Images Progeny enables users to save a copy of the pedigree image from the Pedigree Viewer window. When saving a
pedigree image note the following:
The pedigree must be formatted and drawn to the appropriate specifications before copying it.
Any icon subtext or haplotypes that are displayed on the pedigree are also copied; however, any static text that is displayed on the pedigree is not copied. If necessary, copy this text separately.
To Save a Pedigree as an Image file 1. Open the pedigree in the Pedigree Viewer, right click and select Fit to Page.
Figure 7-4: Pedigree Viewer drop down menu
2. Select the appropriate options in the Page Setup dialogue box and click Fit to Page.

120
Figure 7-5: Page Setup Dialogue box
3. The pedigree viewer will now display the pedigree within the page breaks. Right click on the pedigree drawing a second time and select Save as Image.
Figure 7-6: Save as Image
4. A pop up window will display the pedigree as the image to be saved. Follow the instructions as listed: Right-click Image below and choose “Save Image” option.
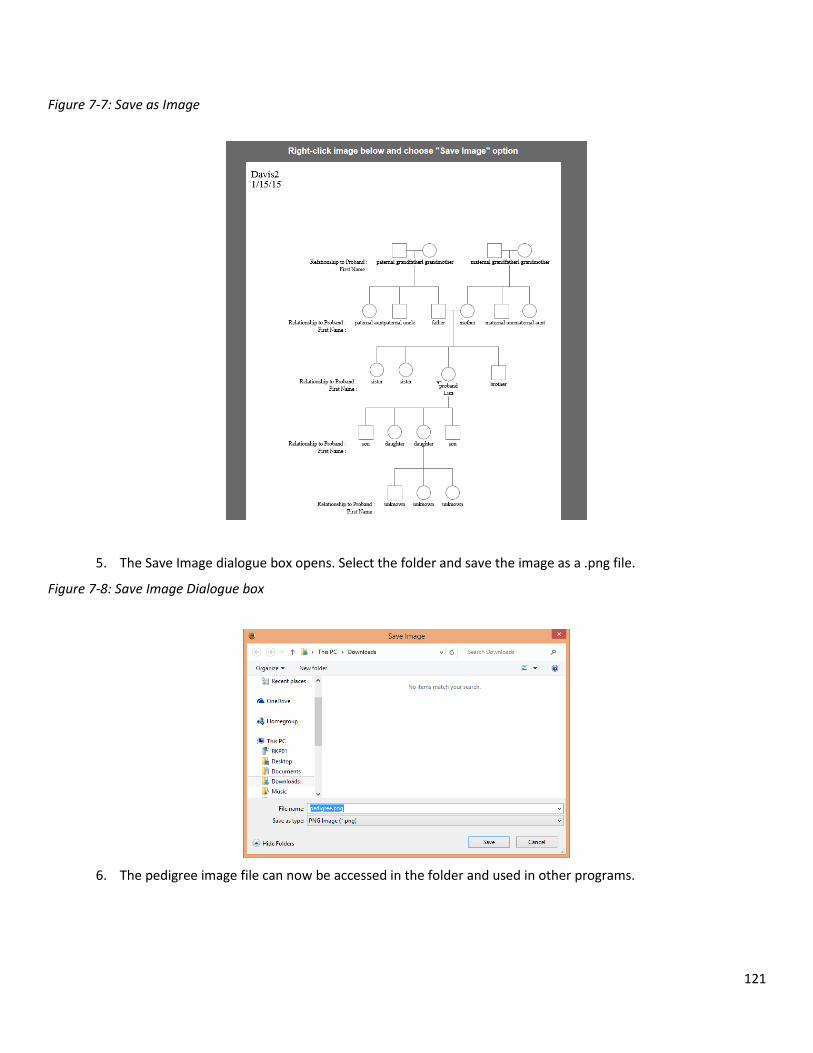
121
Figure 7-7: Save as Image
5. The Save Image dialogue box opens. Select the folder and save the image as a .png file.
Figure 7-8: Save Image Dialogue box
6. The pedigree image file can now be accessed in the folder and used in other programs.
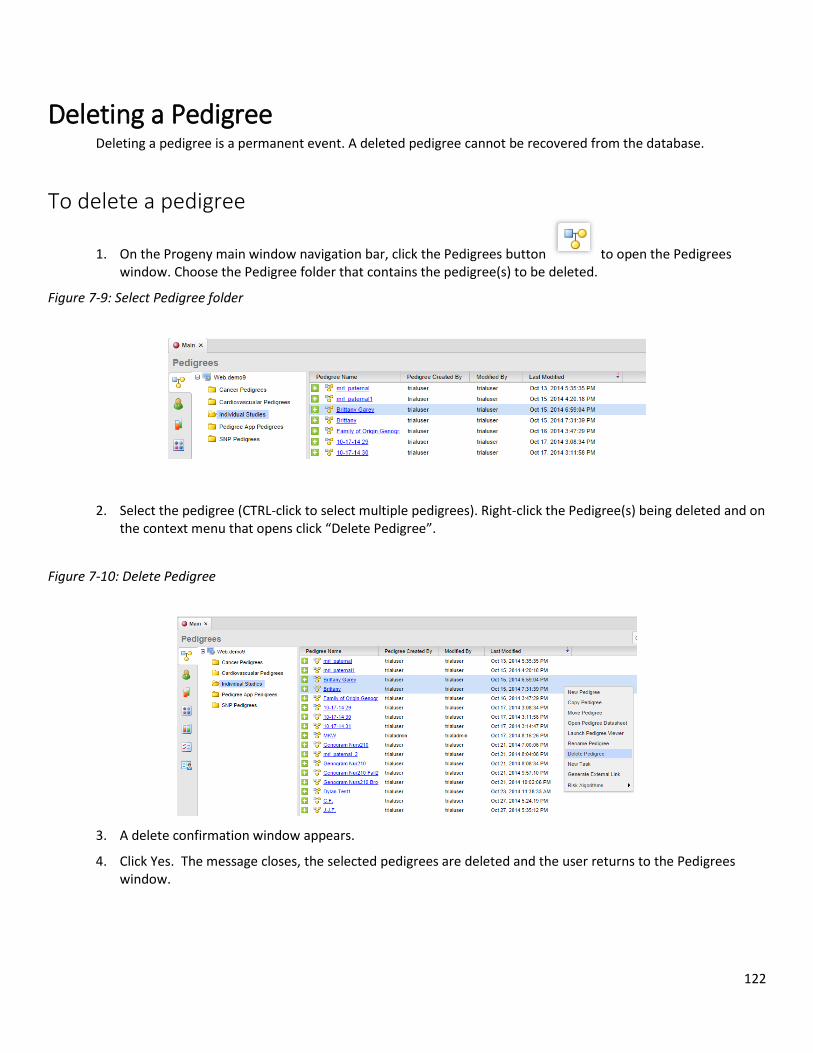
122
Deleting a Pedigree Deleting a pedigree is a permanent event. A deleted pedigree cannot be recovered from the database.
To delete a pedigree
1. On the Progeny main window navigation bar, click the Pedigrees button to open the Pedigrees window. Choose the Pedigree folder that contains the pedigree(s) to be deleted.
Figure 7-9: Select Pedigree folder
2. Select the pedigree (CTRL-click to select multiple pedigrees). Right-click the Pedigree(s) being deleted and on the context menu that opens click “Delete Pedigree”.
Figure 7-10: Delete Pedigree
3. A delete confirmation window appears.
4. Click Yes. The message closes, the selected pedigrees are deleted and the user returns to the Pedigrees window.
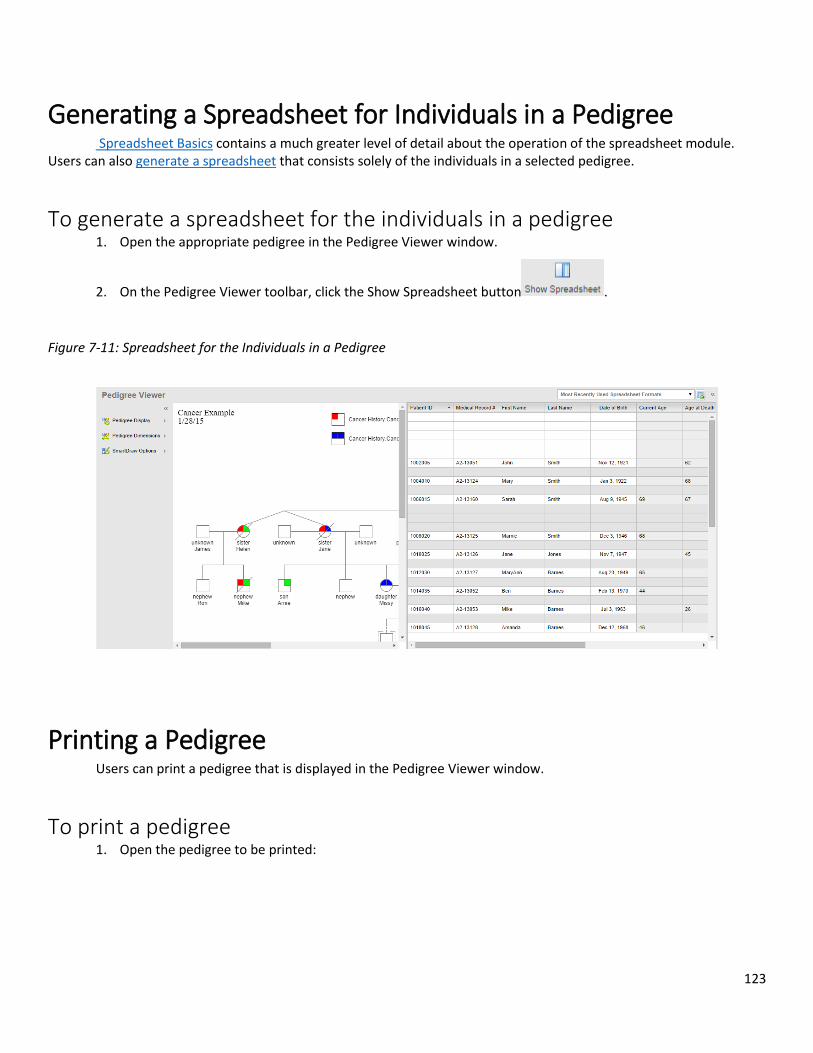
123
Generating a Spreadsheet for Individuals in a Pedigree Spreadsheet Basics contains a much greater level of detail about the operation of the spreadsheet module.
Users can also generate a spreadsheet that consists solely of the individuals in a selected pedigree.
To generate a spreadsheet for the individuals in a pedigree 1. Open the appropriate pedigree in the Pedigree Viewer window.
2. On the Pedigree Viewer toolbar, click the Show Spreadsheet button .
Figure 7-11: Spreadsheet for the Individuals in a Pedigree
Printing a Pedigree Users can print a pedigree that is displayed in the Pedigree Viewer window.
To print a pedigree 1. Open the pedigree to be printed:
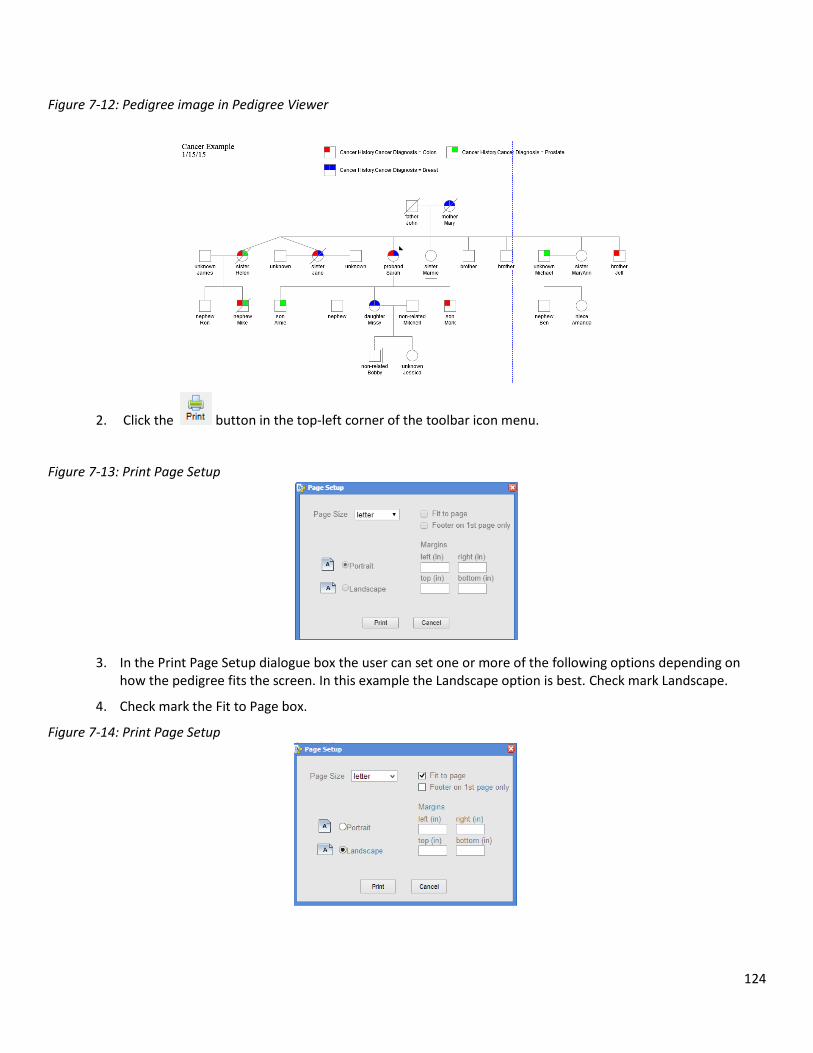
124
Figure 7-12: Pedigree image in Pedigree Viewer
2. Click the button in the top-left corner of the toolbar icon menu.
Figure 7-13: Print Page Setup
3. In the Print Page Setup dialogue box the user can set one or more of the following options depending on how the pedigree fits the screen. In this example the Landscape option is best. Check mark Landscape.
4. Check mark the Fit to Page box.
Figure 7-14: Print Page Setup
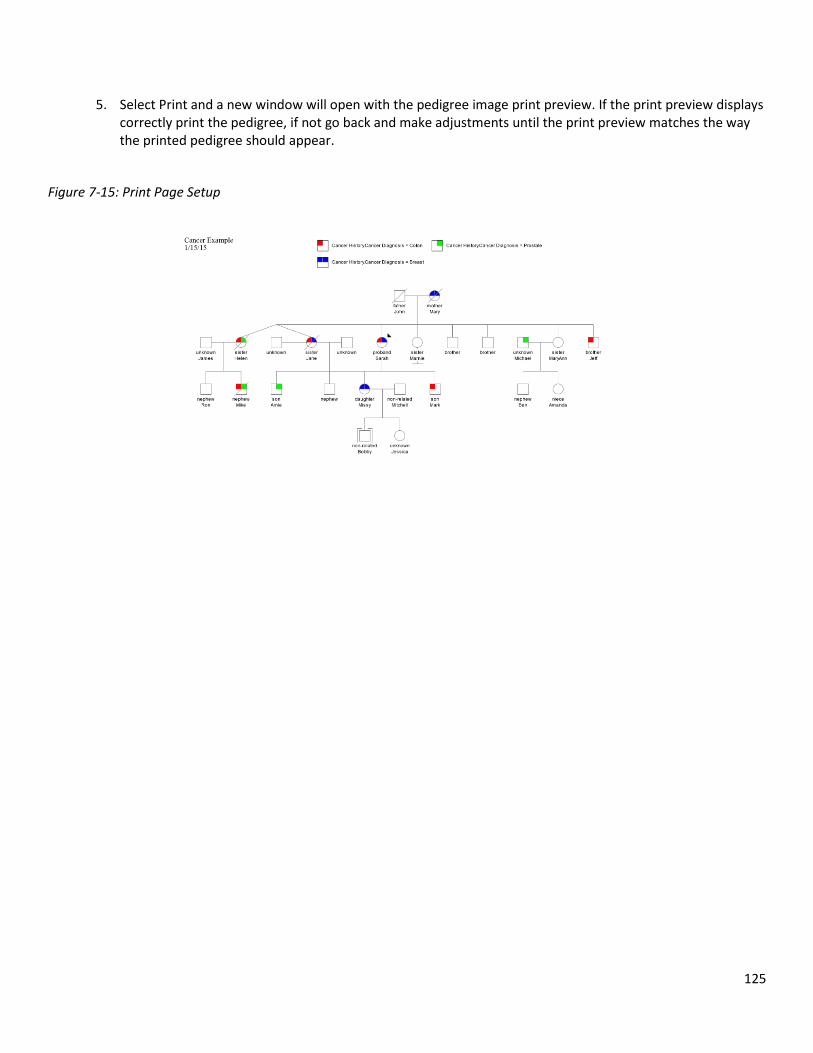
125
5. Select Print and a new window will open with the pedigree image print preview. If the print preview displays correctly print the pedigree, if not go back and make adjustments until the print preview matches the way the printed pedigree should appear.
Figure 7-15: Print Page Setup

126
Chapter 8 Managing Individuals
An individual is a single, distinct entity for which data is collected according to an approved protocol. Managing individuals in Progeny Clinical consists of creating new individuals, creating individual shortcuts, creating datasheets for individuals, modifying an individual, creating individual shortcuts, copying, moving, and deleting individuals, moving individuals to a pedigree, and importing individual data.
This chapter covers the following topics:
Adding a New Individual
Modifying an Individual
Copying and Moving Individuals
Deleting an Individual
Moving an Individual to a Pedigree
Figure 8-1: Individuals Main Window
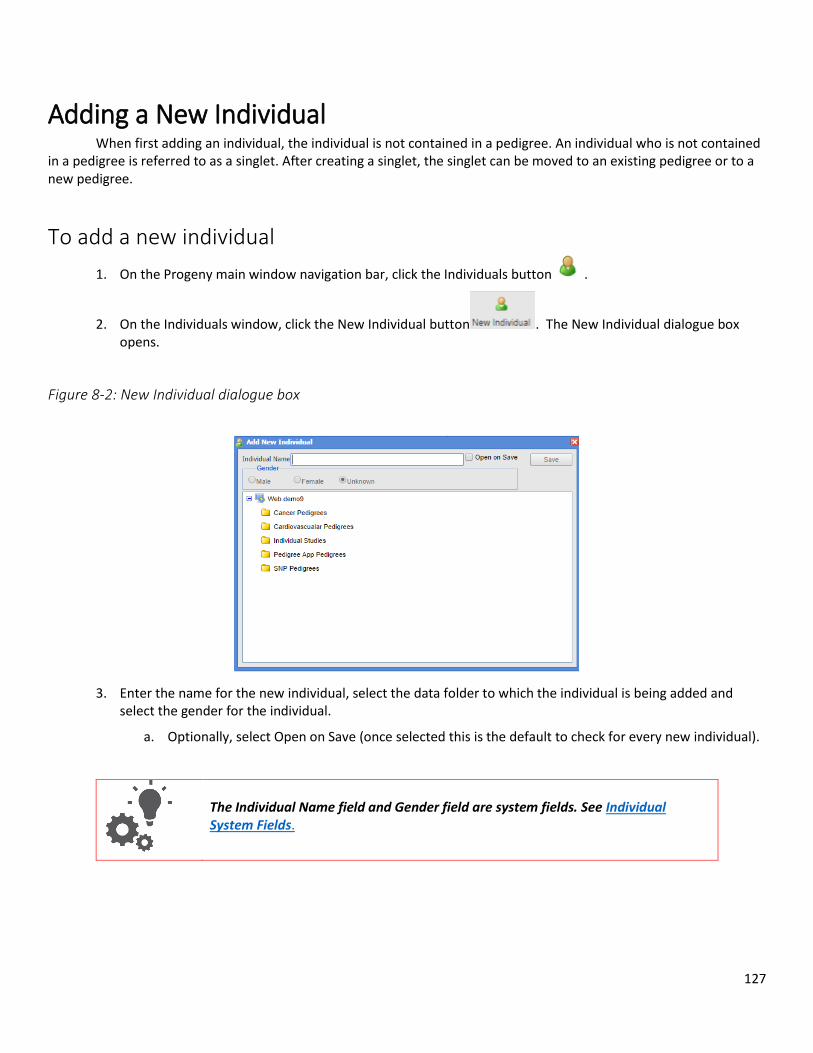
127
Adding a New Individual When first adding an individual, the individual is not contained in a pedigree. An individual who is not contained in a pedigree is referred to as a singlet. After creating a singlet, the singlet can be moved to an existing pedigree or to a new pedigree.
To add a new individual
1. On the Progeny main window navigation bar, click the Individuals button .
2. On the Individuals window, click the New Individual button . The New Individual dialogue box opens.
Figure 8-2: New Individual dialogue box
3. Enter the name for the new individual, select the data folder to which the individual is being added and select the gender for the individual.
a. Optionally, select Open on Save (once selected this is the default to check for every new individual).
The Individual Name field and Gender field are system fields. See Individual System Fields.

128
b. If the selected folder to which the individual has been assigned has an Individual Datasheet template assigned, the formatted datasheet opens to immediately begin entering data for the individual after saving. If no datasheet format has been assigned to the folder then a blank datasheet opens.
Modifying an Individual After an individual is created, users can modify the gender for the individual. If the Progeny administrator has set Write access for the individual or user account, the user can rename the individual. In addition Progeny administrators can modify the security levels for the individual.
To modify an individual
1. On the Progeny main window navigation bar, click the Individuals button to open the Individuals window.
2. Open the data folder that contains the individual that is being modified.
3. Select the individual that is being modified, and on the main menu bar in upper left corner (to the right of ‘Files” and “Folders”), click “Individuals”, and then click the appropriate option.
a. The options that are available from the Individuals menu depends on whether the individual is a single or a member of a pedigree.
Figure 8-3: Individuals right-click menu for a singlet
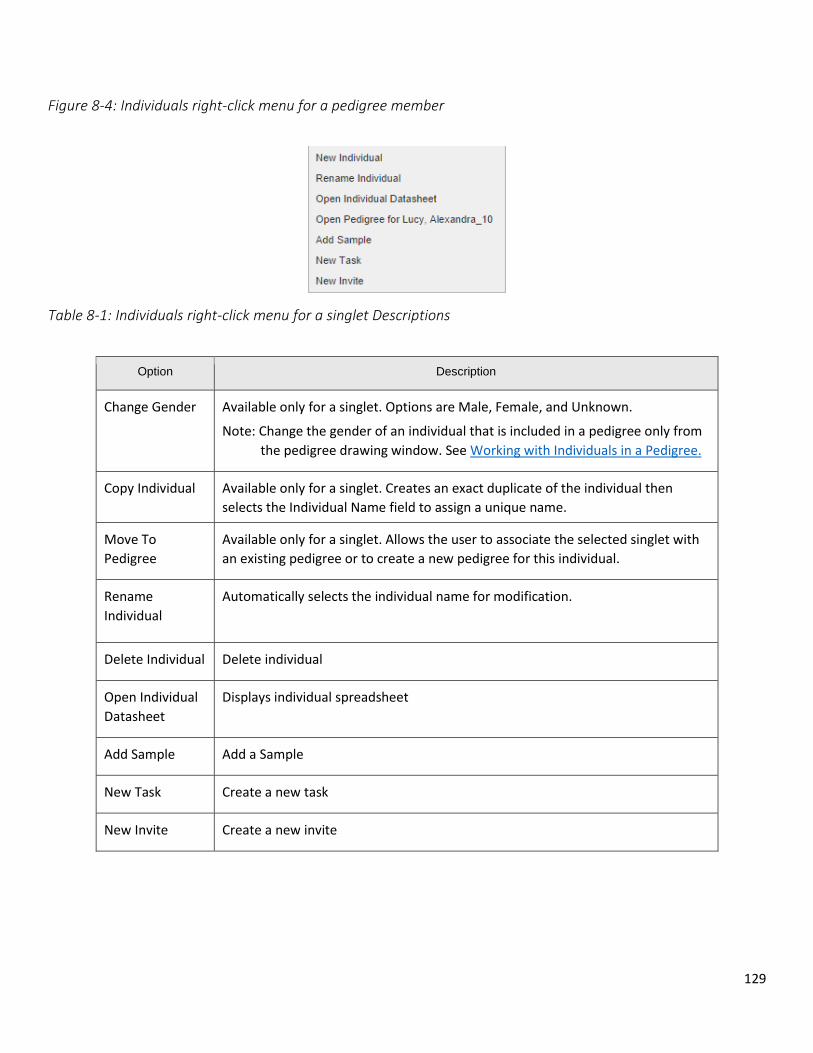
129
Figure 8-4: Individuals right-click menu for a pedigree member
Table 8-1: Individuals right-click menu for a singlet Descriptions
Option Description
Change Gender Available only for a singlet. Options are Male, Female, and Unknown.
Note: Change the gender of an individual that is included in a pedigree only from
the pedigree drawing window. See Working with Individuals in a Pedigree.
Copy Individual Available only for a singlet. Creates an exact duplicate of the individual then
selects the Individual Name field to assign a unique name.
Move To
Pedigree
Available only for a singlet. Allows the user to associate the selected singlet with
an existing pedigree or to create a new pedigree for this individual.
Rename
Individual
Automatically selects the individual name for modification.
Delete Individual Delete individual
Open Individual
Datasheet
Displays individual spreadsheet
Add Sample Add a Sample
New Task Create a new task
New Invite Create a new invite

130
Copying and Moving Individuals 1. Users can copy an individual between data folders, and can move an individual between data folders. For
any of these actions, the following are important points to note:
a. Copying an individual leaves the original individual in its original data folder while putting a copy (or duplicate) of the individual in the new destination folder. Any edits made to the copied individual are not reflected in the original individual.
b. Moving an individual removes the individual from its original data folder and places the individual in a new destination folder. A copy of the original individual is not made.
To copy or move an individual
1. On the Progeny main window navigation bar, click the Individuals button .
2. Open the data folder that contains the individual to copy or move, and then continue to one of the following:
a. To copy an individual between data folders
b. To move an individual between data folders
To copy an individual between data folders 1. On the main menu, click Individuals > Copy Individual. The “Copy Individual” dialogue box opens.
Figure 8-5: Copy Individual
2. Select the data folder to which the individual is being copied. Enter the name for the individual.
3. Click Copy. A message opens indicating that the individual was successfully copied.
4. Click OK to close the message and return to the Individuals window.
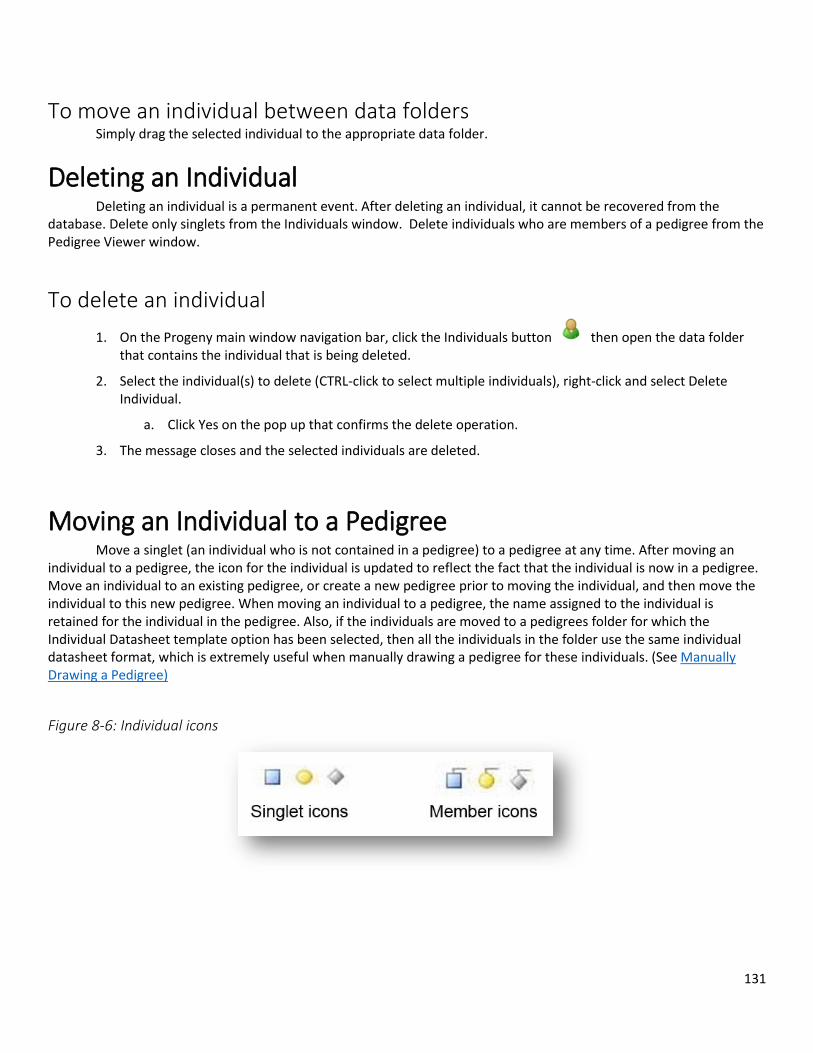
131
To move an individual between data folders Simply drag the selected individual to the appropriate data folder.
Deleting an Individual Deleting an individual is a permanent event. After deleting an individual, it cannot be recovered from the database. Delete only singlets from the Individuals window. Delete individuals who are members of a pedigree from the Pedigree Viewer window.
To delete an individual
1. On the Progeny main window navigation bar, click the Individuals button then open the data folder that contains the individual that is being deleted.
2. Select the individual(s) to delete (CTRL-click to select multiple individuals), right-click and select Delete Individual.
a. Click Yes on the pop up that confirms the delete operation.
3. The message closes and the selected individuals are deleted.
Moving an Individual to a Pedigree Move a singlet (an individual who is not contained in a pedigree) to a pedigree at any time. After moving an individual to a pedigree, the icon for the individual is updated to reflect the fact that the individual is now in a pedigree. Move an individual to an existing pedigree, or create a new pedigree prior to moving the individual, and then move the individual to this new pedigree. When moving an individual to a pedigree, the name assigned to the individual is retained for the individual in the pedigree. Also, if the individuals are moved to a pedigrees folder for which the Individual Datasheet template option has been selected, then all the individuals in the folder use the same individual datasheet format, which is extremely useful when manually drawing a pedigree for these individuals. (See Manually Drawing a Pedigree)
Figure 8-6: Individual icons
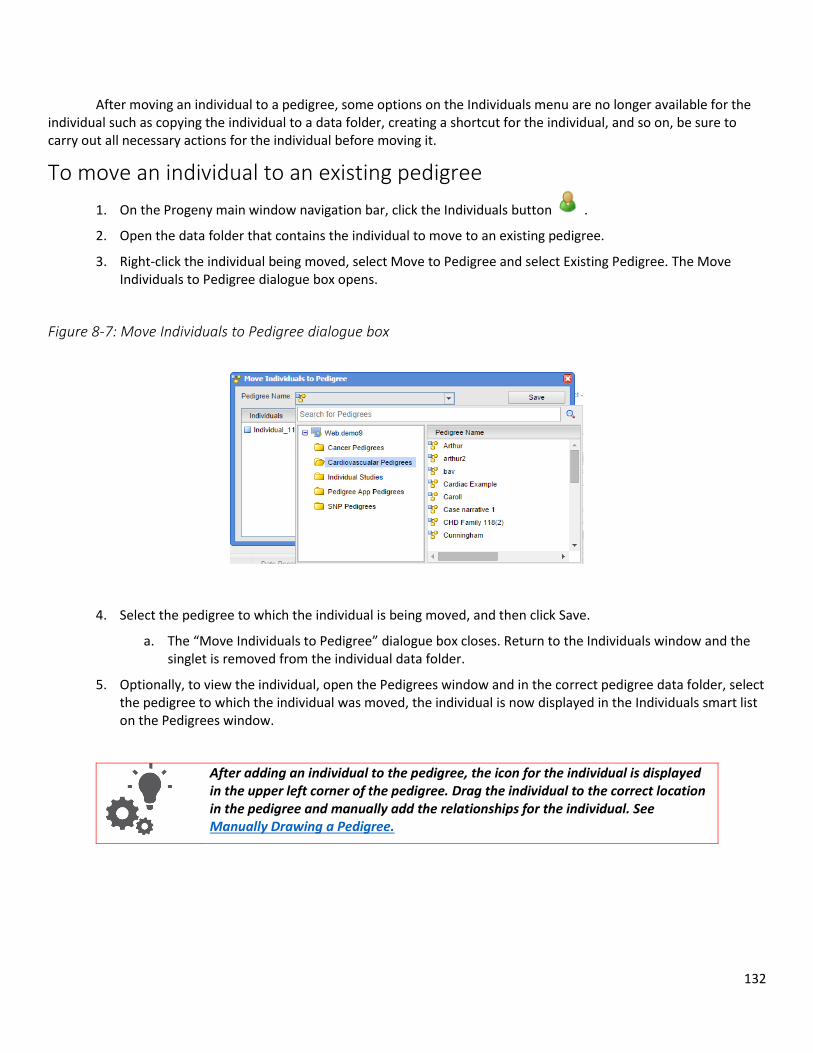
132
After moving an individual to a pedigree, some options on the Individuals menu are no longer available for the individual such as copying the individual to a data folder, creating a shortcut for the individual, and so on, be sure to carry out all necessary actions for the individual before moving it.
To move an individual to an existing pedigree
1. On the Progeny main window navigation bar, click the Individuals button .
2. Open the data folder that contains the individual to move to an existing pedigree.
3. Right-click the individual being moved, select Move to Pedigree and select Existing Pedigree. The Move Individuals to Pedigree dialogue box opens.
Figure 8-7: Move Individuals to Pedigree dialogue box
4. Select the pedigree to which the individual is being moved, and then click Save.
a. The “Move Individuals to Pedigree” dialogue box closes. Return to the Individuals window and the singlet is removed from the individual data folder.
5. Optionally, to view the individual, open the Pedigrees window and in the correct pedigree data folder, select the pedigree to which the individual was moved, the individual is now displayed in the Individuals smart list on the Pedigrees window.
After adding an individual to the pedigree, the icon for the individual is displayed in the upper left corner of the pedigree. Drag the individual to the correct location in the pedigree and manually add the relationships for the individual. See Manually Drawing a Pedigree.
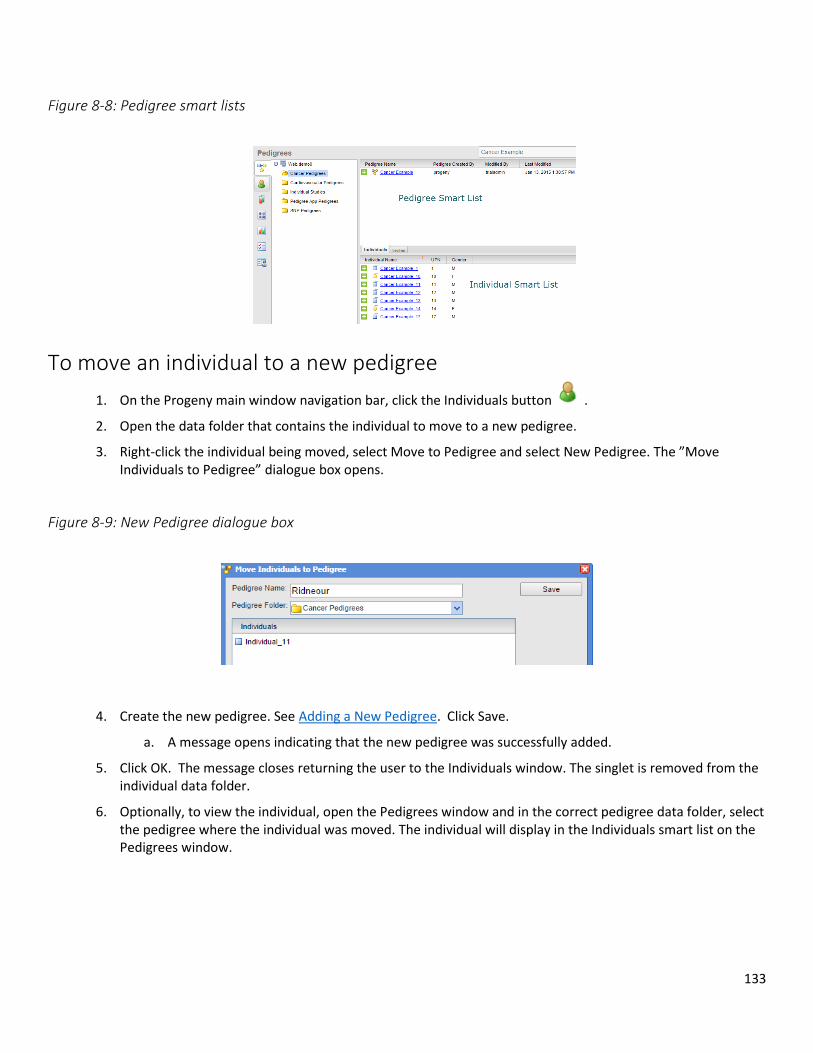
133
Figure 8-8: Pedigree smart lists
To move an individual to a new pedigree
1. On the Progeny main window navigation bar, click the Individuals button .
2. Open the data folder that contains the individual to move to a new pedigree.
3. Right-click the individual being moved, select Move to Pedigree and select New Pedigree. The ”Move Individuals to Pedigree” dialogue box opens.
Figure 8-9: New Pedigree dialogue box
4. Create the new pedigree. See Adding a New Pedigree. Click Save.
a. A message opens indicating that the new pedigree was successfully added.
5. Click OK. The message closes returning the user to the Individuals window. The singlet is removed from the individual data folder.
6. Optionally, to view the individual, open the Pedigrees window and in the correct pedigree data folder, select the pedigree where the individual was moved. The individual will display in the Individuals smart list on the Pedigrees window.
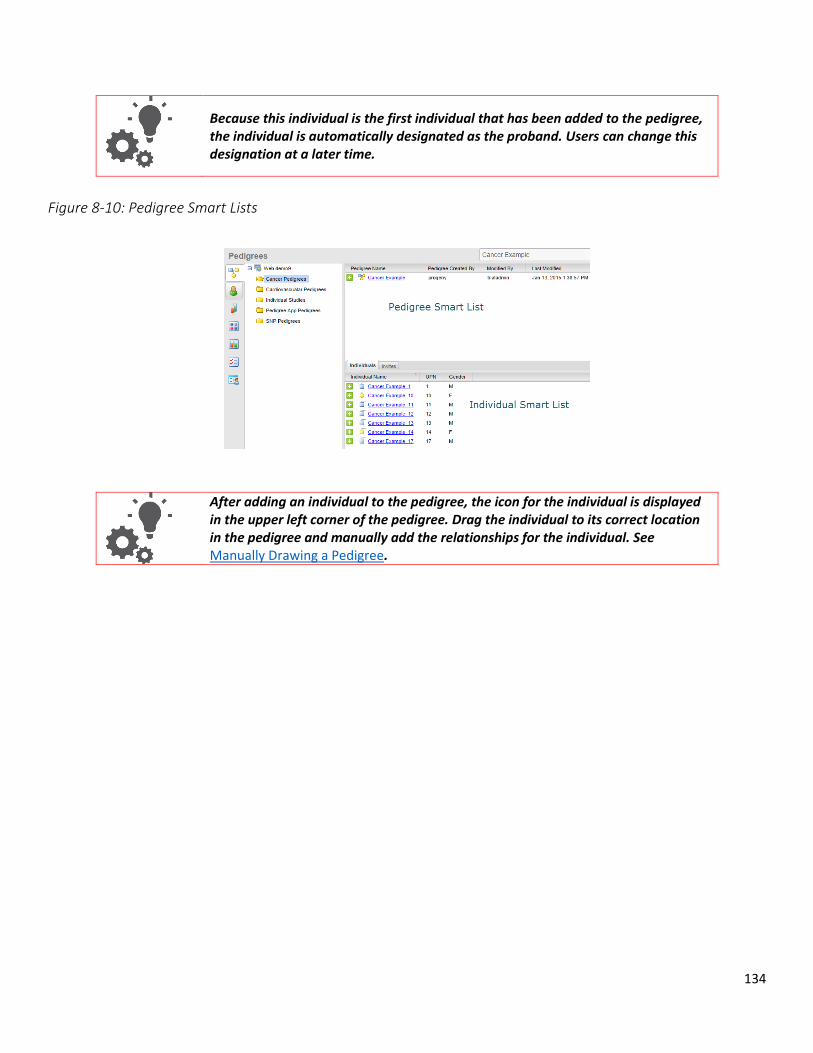
134
Because this individual is the first individual that has been added to the pedigree, the individual is automatically designated as the proband. Users can change this designation at a later time.
Figure 8-10: Pedigree Smart Lists
After adding an individual to the pedigree, the icon for the individual is displayed in the upper left corner of the pedigree. Drag the individual to its correct location in the pedigree and manually add the relationships for the individual. See Manually Drawing a Pedigree.
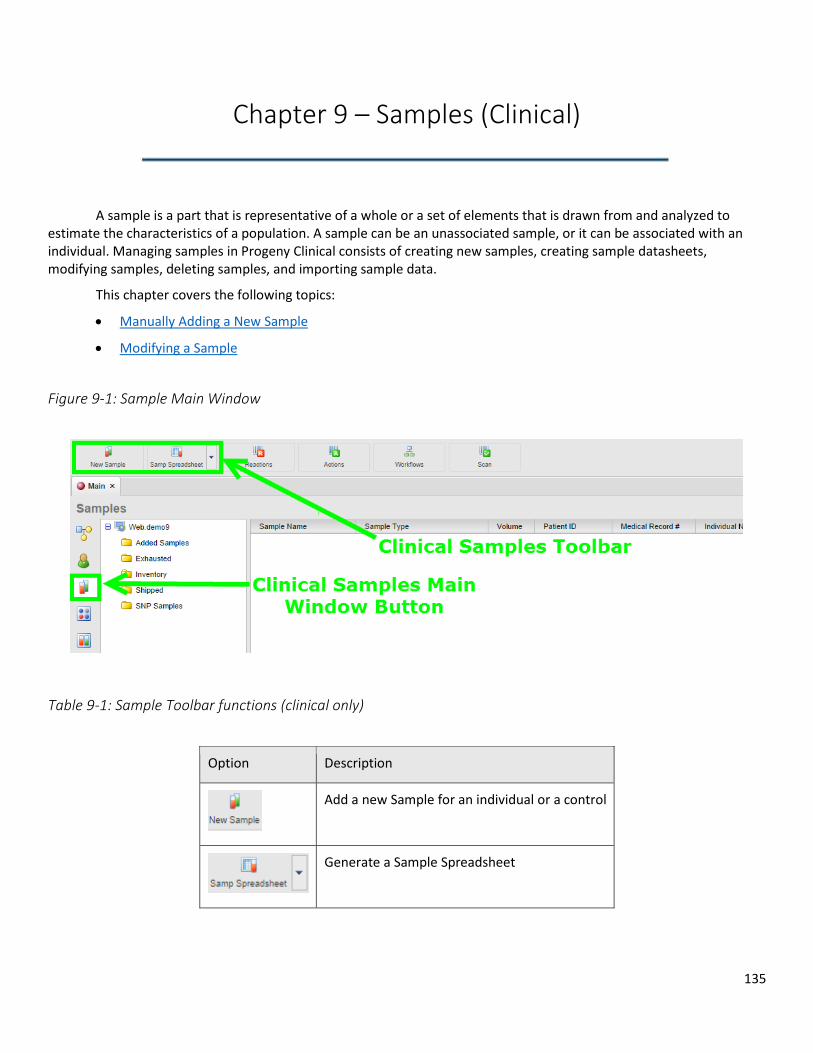
135
Chapter 9 – Samples (Clinical)
A sample is a part that is representative of a whole or a set of elements that is drawn from and analyzed to estimate the characteristics of a population. A sample can be an unassociated sample, or it can be associated with an individual. Managing samples in Progeny Clinical consists of creating new samples, creating sample datasheets, modifying samples, deleting samples, and importing sample data.
This chapter covers the following topics:
Manually Adding a New Sample
Modifying a Sample
Figure 9-1: Sample Main Window
Table 9-1: Sample Toolbar functions (clinical only)
Option Description
Add a new Sample for an individual or a control
Generate a Sample Spreadsheet
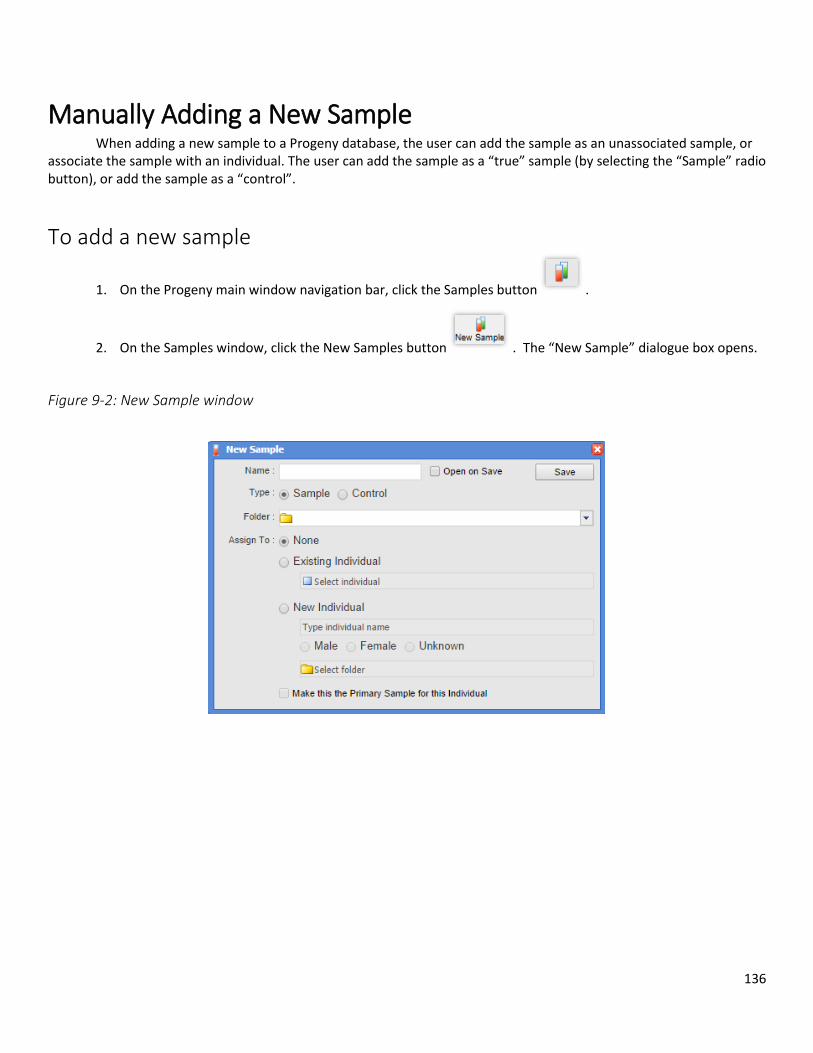
136
Manually Adding a New Sample When adding a new sample to a Progeny database, the user can add the sample as an unassociated sample, or associate the sample with an individual. The user can add the sample as a “true” sample (by selecting the “Sample” radio button), or add the sample as a “control”.
To add a new sample
1. On the Progeny main window navigation bar, click the Samples button .
2. On the Samples window, click the New Samples button . The “New Sample” dialogue box opens.
Figure 9-2: New Sample window
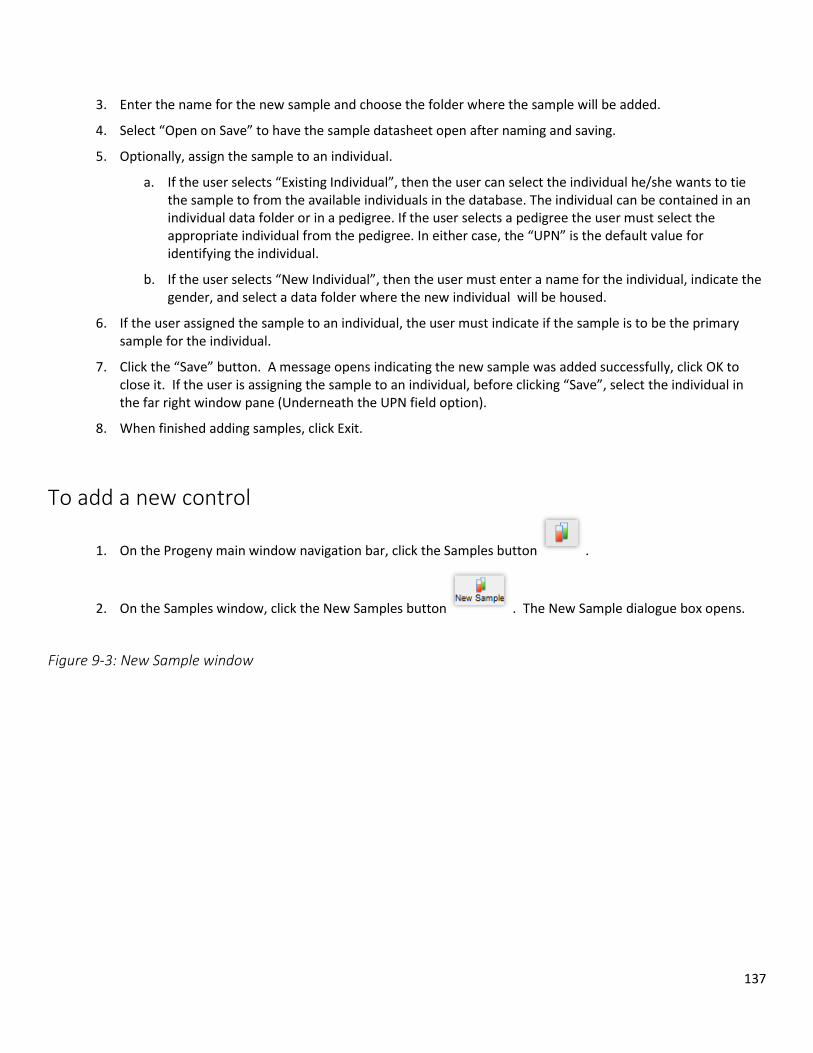
137
3. Enter the name for the new sample and choose the folder where the sample will be added.
4. Select “Open on Save” to have the sample datasheet open after naming and saving.
5. Optionally, assign the sample to an individual.
a. If the user selects “Existing Individual”, then the user can select the individual he/she wants to tie the sample to from the available individuals in the database. The individual can be contained in an individual data folder or in a pedigree. If the user selects a pedigree the user must select the appropriate individual from the pedigree. In either case, the “UPN” is the default value for identifying the individual.
b. If the user selects “New Individual”, then the user must enter a name for the individual, indicate the gender, and select a data folder where the new individual will be housed.
6. If the user assigned the sample to an individual, the user must indicate if the sample is to be the primary sample for the individual.
7. Click the “Save” button. A message opens indicating the new sample was added successfully, click OK to close it. If the user is assigning the sample to an individual, before clicking “Save”, select the individual in the far right window pane (Underneath the UPN field option).
8. When finished adding samples, click Exit.
To add a new control
1. On the Progeny main window navigation bar, click the Samples button .
2. On the Samples window, click the New Samples button . The New Sample dialogue box opens.
Figure 9-3: New Sample window
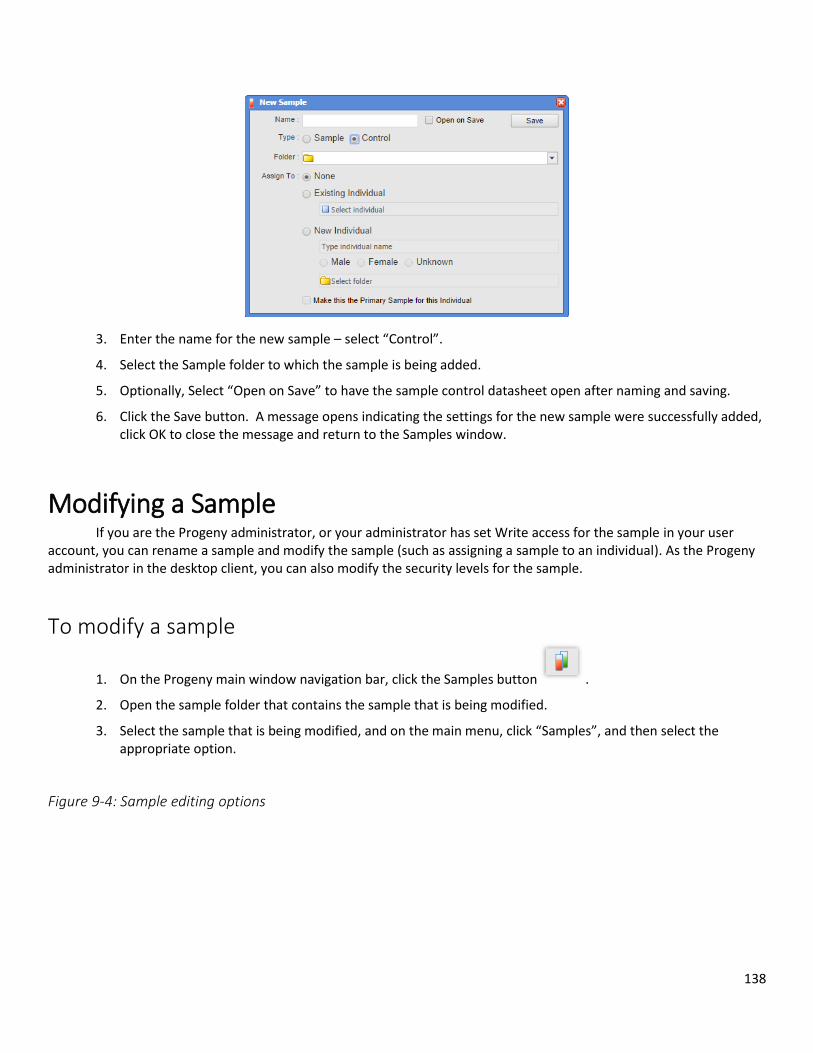
138
3. Enter the name for the new sample – select “Control”.
4. Select the Sample folder to which the sample is being added.
5. Optionally, Select “Open on Save” to have the sample control datasheet open after naming and saving.
6. Click the Save button. A message opens indicating the settings for the new sample were successfully added, click OK to close the message and return to the Samples window.
Modifying a Sample If you are the Progeny administrator, or your administrator has set Write access for the sample in your user
account, you can rename a sample and modify the sample (such as assigning a sample to an individual). As the Progeny administrator in the desktop client, you can also modify the security levels for the sample.
To modify a sample
1. On the Progeny main window navigation bar, click the Samples button .
2. Open the sample folder that contains the sample that is being modified.
3. Select the sample that is being modified, and on the main menu, click “Samples”, and then select the appropriate option.
Figure 9-4: Sample editing options
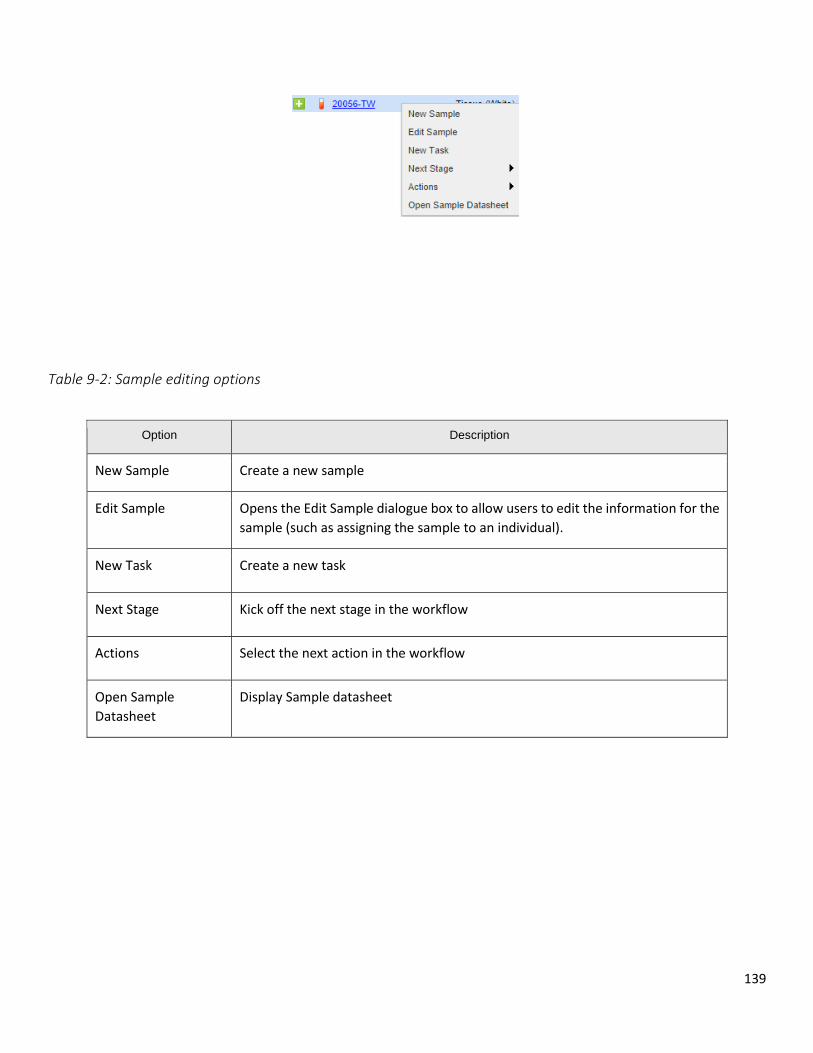
139
Table 9-2: Sample editing options
Option Description
New Sample Create a new sample
Edit Sample Opens the Edit Sample dialogue box to allow users to edit the information for the
sample (such as assigning the sample to an individual).
New Task Create a new task
Next Stage Kick off the next stage in the workflow
Actions Select the next action in the workflow
Open Sample
Datasheet
Display Sample datasheet
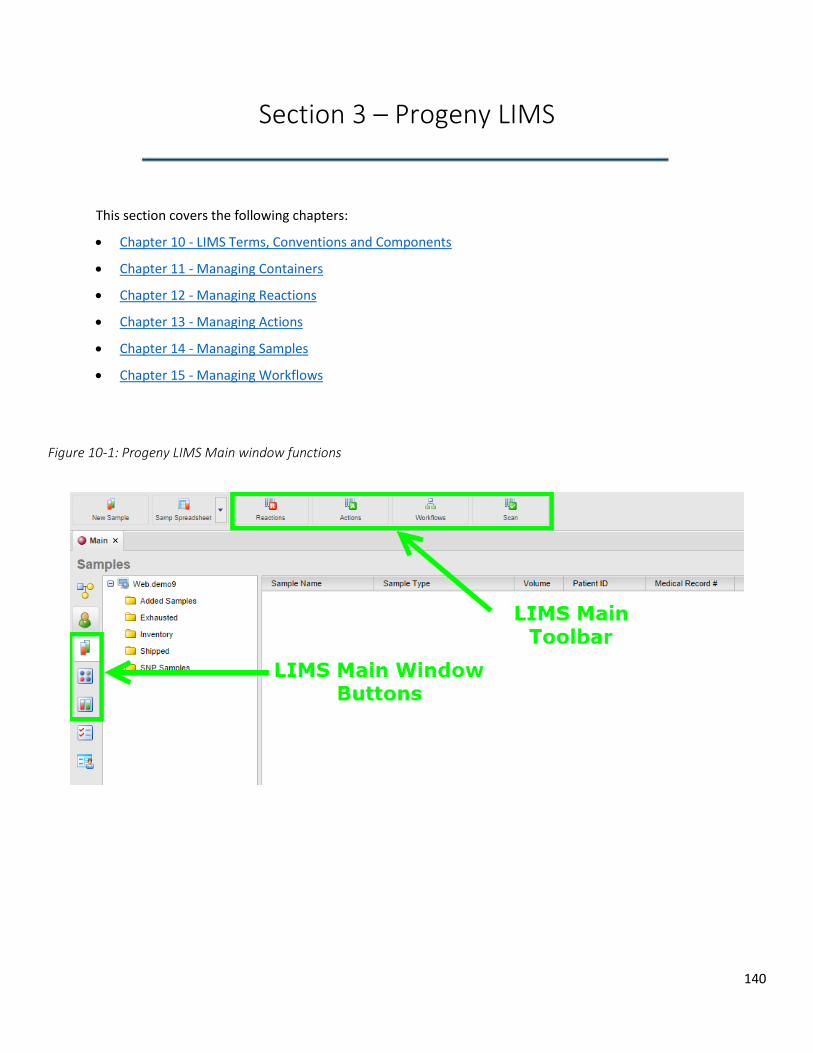
140
Section 3 – Progeny LIMS
This section covers the following chapters:
Chapter 10 - LIMS Terms, Conventions and Components
Chapter 11 - Managing Containers
Chapter 12 - Managing Reactions
Chapter 13 - Managing Actions
Chapter 14 - Managing Samples
Chapter 15 - Managing Workflows
Figure 10-1: Progeny LIMS Main window functions

141
Chapter 10 – LIMS Terms and Conventions
Progeny LIMS is software that is designed for managing any type of sample and associated data in a fully customizable multi-level inventory system with the freedom to create any laboratory workflow. Progeny LIMS uses conventions in both its terminology and its output to ensure consistency and accuracy when manipulating and analyzing sample data.
Sample—a sample is a part that is representative of a whole or a set of elements that is drawn from and analyzed to estimate the characteristics of a population. A sample can be an unassociated sample, or it can be associated with an individual.
Figure 10-2: Samples Main Window Button
Figure 10-3: Samples Main Window
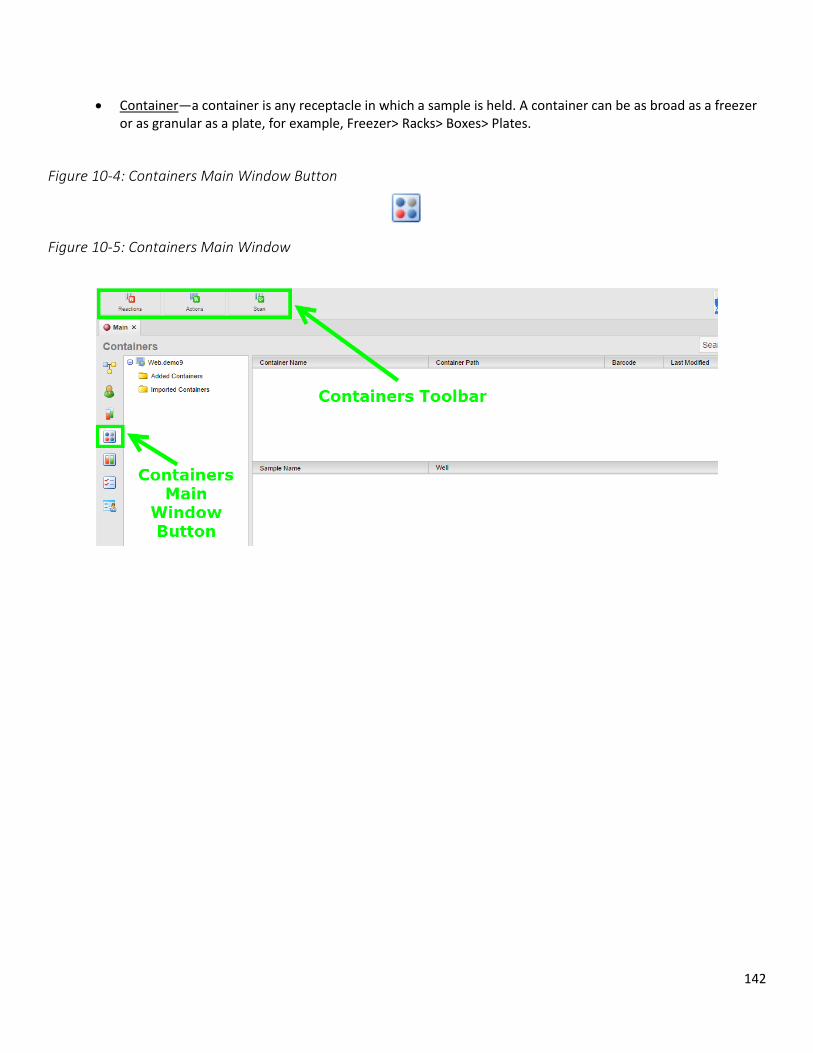
142
Container—a container is any receptacle in which a sample is held. A container can be as broad as a freezer or as granular as a plate, for example, Freezer> Racks> Boxes> Plates.
Figure 10-4: Containers Main Window Button
Figure 10-5: Containers Main Window
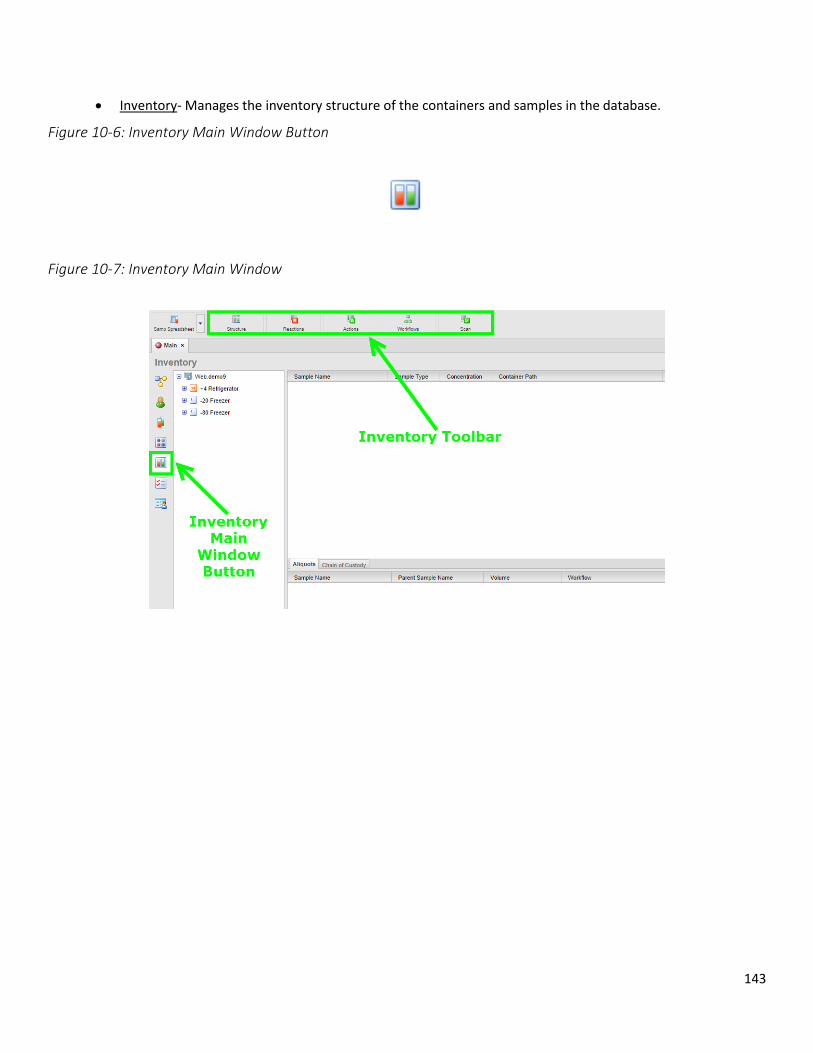
143
Inventory- Manages the inventory structure of the containers and samples in the database.
Figure 10-6: Inventory Main Window Button
Figure 10-7: Inventory Main Window
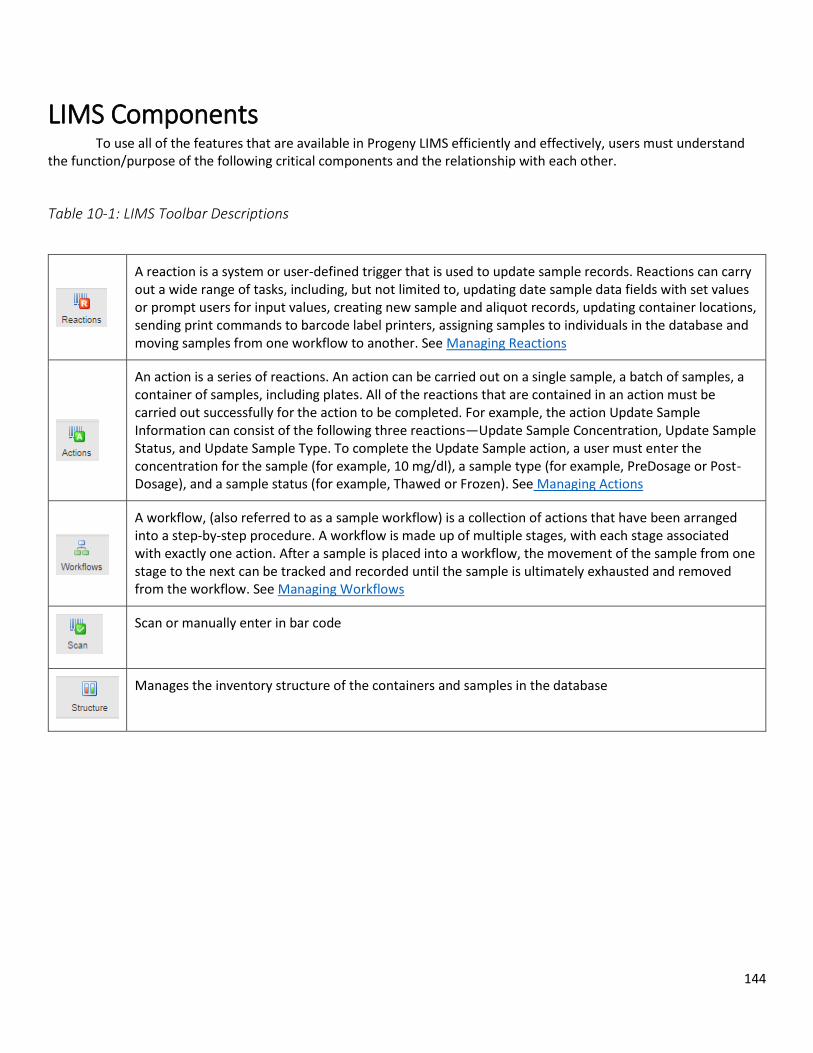
144
LIMS Components To use all of the features that are available in Progeny LIMS efficiently and effectively, users must understand the function/purpose of the following critical components and the relationship with each other.
Table 10-1: LIMS Toolbar Descriptions
A reaction is a system or user-defined trigger that is used to update sample records. Reactions can carry out a wide range of tasks, including, but not limited to, updating date sample data fields with set values or prompt users for input values, creating new sample and aliquot records, updating container locations, sending print commands to barcode label printers, assigning samples to individuals in the database and moving samples from one workflow to another. See Managing Reactions
An action is a series of reactions. An action can be carried out on a single sample, a batch of samples, a container of samples, including plates. All of the reactions that are contained in an action must be carried out successfully for the action to be completed. For example, the action Update Sample Information can consist of the following three reactions—Update Sample Concentration, Update Sample Status, and Update Sample Type. To complete the Update Sample action, a user must enter the concentration for the sample (for example, 10 mg/dl), a sample type (for example, PreDosage or Post-Dosage), and a sample status (for example, Thawed or Frozen). See Managing Actions
A workflow, (also referred to as a sample workflow) is a collection of actions that have been arranged into a step-by-step procedure. A workflow is made up of multiple stages, with each stage associated with exactly one action. After a sample is placed into a workflow, the movement of the sample from one stage to the next can be tracked and recorded until the sample is ultimately exhausted and removed from the workflow. See Managing Workflows
Scan or manually enter in bar code
Manages the inventory structure of the containers and samples in the database
145
Chapter 11- Managing Containers
A container is any receptacle in which a sample is held. A container can be as broad as a freezer or as granular as a plate, for example, Freezer > Racks > Boxes > Plates. Managing containers consists of adding new containers, modifying and deleting containers, updating sample positions in containers, and importing and exporting container information.
This chapter covers the following topics:
Adding a New Container
Modifying and Deleting a Container
Search for Samples in Containers
Manually Updating Sample Well Positions in a Plate or a Box
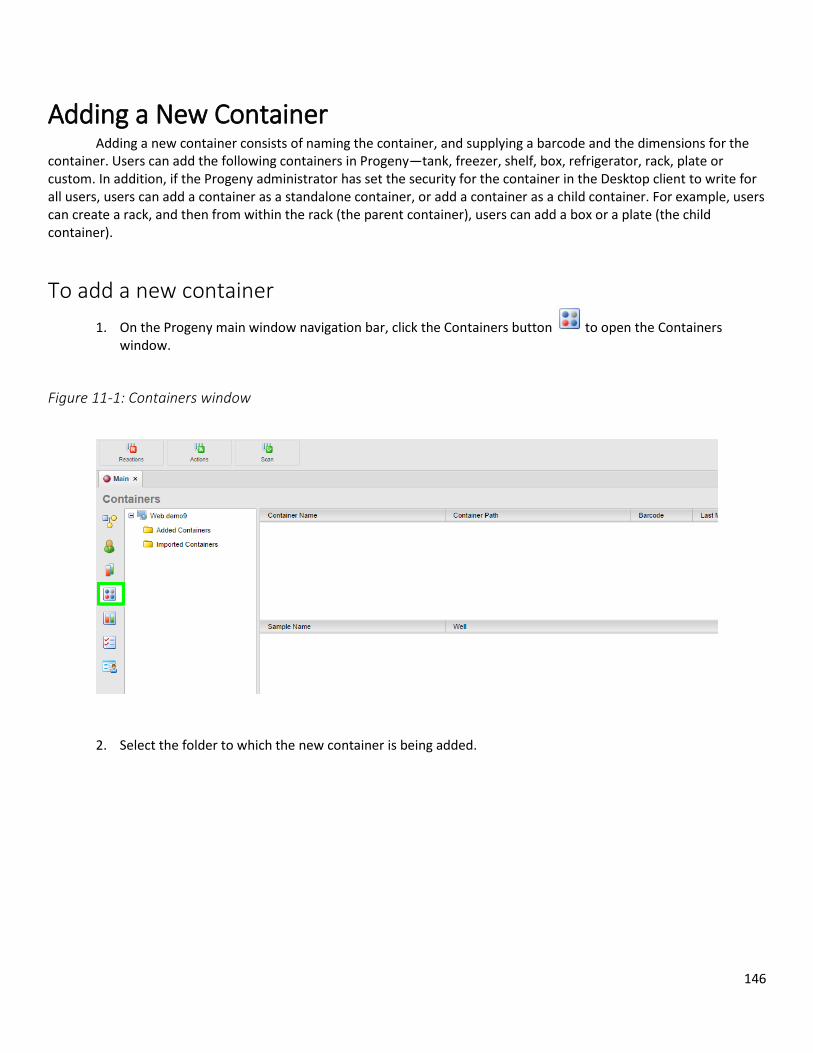
146
Adding a New Container Adding a new container consists of naming the container, and supplying a barcode and the dimensions for the container. Users can add the following containers in Progeny—tank, freezer, shelf, box, refrigerator, rack, plate or custom. In addition, if the Progeny administrator has set the security for the container in the Desktop client to write for all users, users can add a container as a standalone container, or add a container as a child container. For example, users can create a rack, and then from within the rack (the parent container), users can add a box or a plate (the child container).
To add a new container
1. On the Progeny main window navigation bar, click the Containers button to open the Containers window.
Figure 11-1: Containers window
2. Select the folder to which the new container is being added.
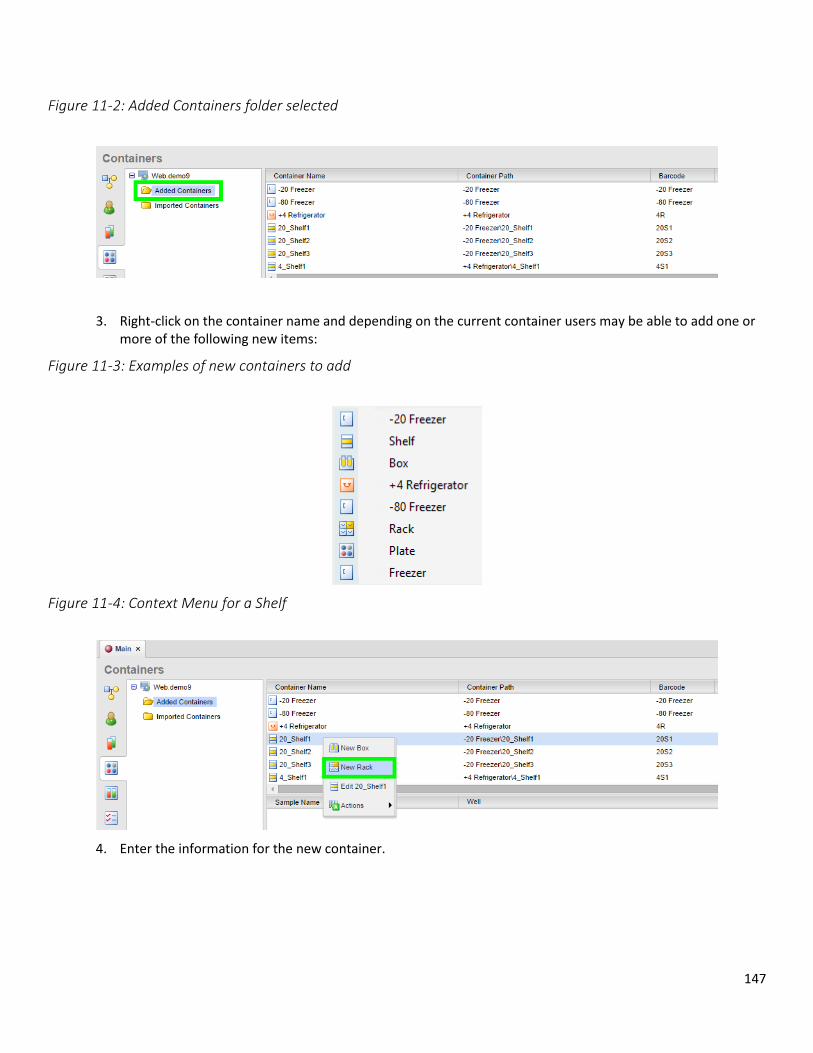
147
Figure 11-2: Added Containers folder selected
3. Right-click on the container name and depending on the current container users may be able to add one or more of the following new items:
Figure 11-3: Examples of new containers to add
Figure 11-4: Context Menu for a Shelf
4. Enter the information for the new container.
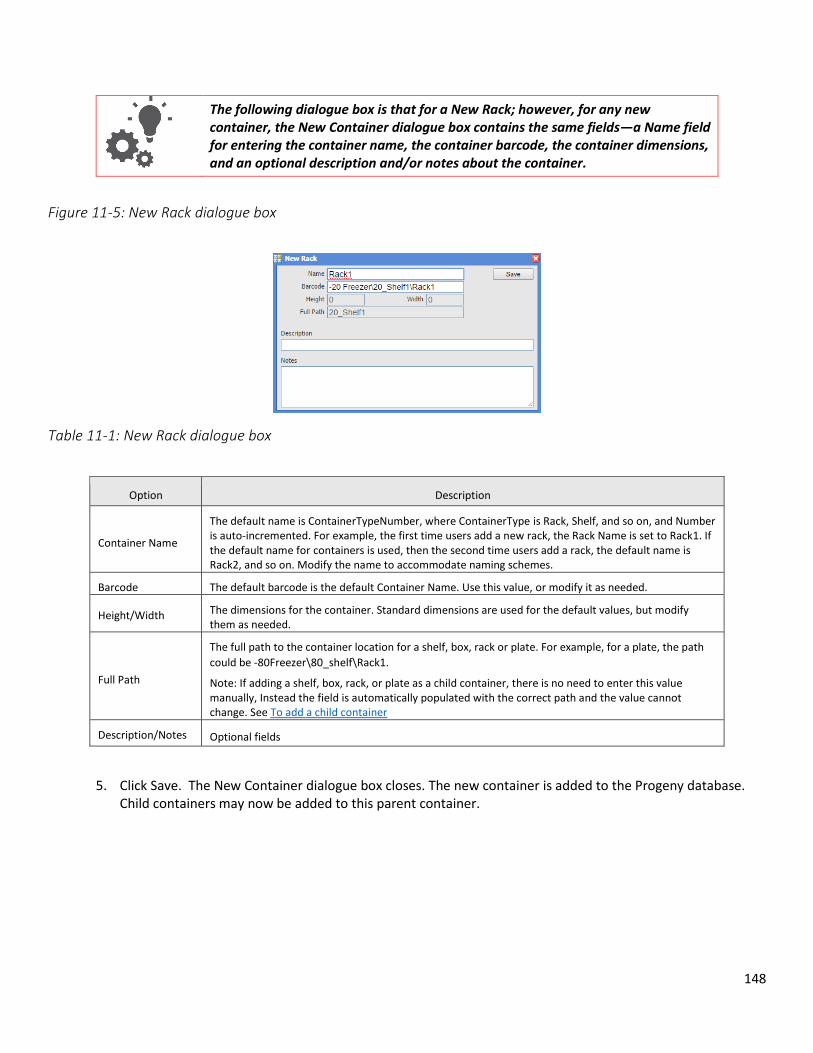
148
The following dialogue box is that for a New Rack; however, for any new container, the New Container dialogue box contains the same fields—a Name field for entering the container name, the container barcode, the container dimensions, and an optional description and/or notes about the container.
Figure 11-5: New Rack dialogue box
Table 11-1: New Rack dialogue box
Option Description
Container Name
The default name is ContainerTypeNumber, where ContainerType is Rack, Shelf, and so on, and Number is auto-incremented. For example, the first time users add a new rack, the Rack Name is set to Rack1. If the default name for containers is used, then the second time users add a rack, the default name is Rack2, and so on. Modify the name to accommodate naming schemes.
Barcode The default barcode is the default Container Name. Use this value, or modify it as needed.
Height/Width The dimensions for the container. Standard dimensions are used for the default values, but modify them as needed.
Full Path
The full path to the container location for a shelf, box, rack or plate. For example, for a plate, the path
could be -80Freezer\80_shelf\Rack1.
Note: If adding a shelf, box, rack, or plate as a child container, there is no need to enter this value manually, Instead the field is automatically populated with the correct path and the value cannot change. See To add a child container
Description/Notes Optional fields
5. Click Save. The New Container dialogue box closes. The new container is added to the Progeny database. Child containers may now be added to this parent container.
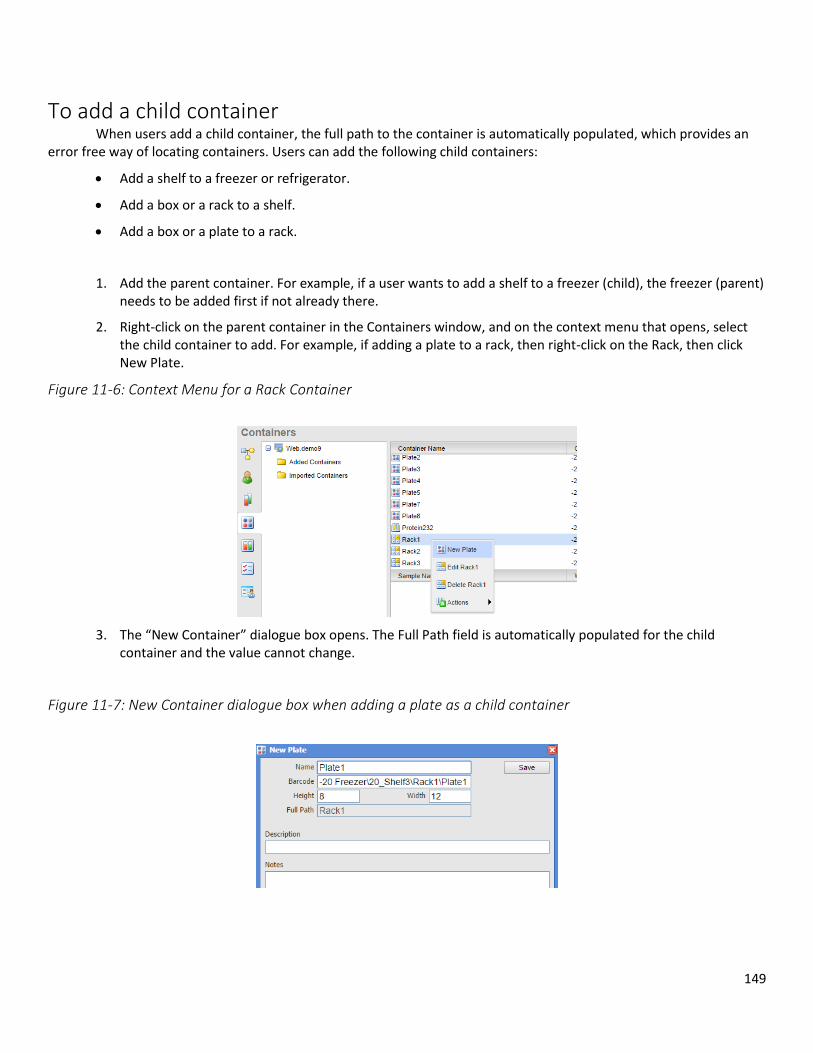
149
To add a child container When users add a child container, the full path to the container is automatically populated, which provides an error free way of locating containers. Users can add the following child containers:
Add a shelf to a freezer or refrigerator.
Add a box or a rack to a shelf.
Add a box or a plate to a rack.
1. Add the parent container. For example, if a user wants to add a shelf to a freezer (child), the freezer (parent) needs to be added first if not already there.
2. Right-click on the parent container in the Containers window, and on the context menu that opens, select the child container to add. For example, if adding a plate to a rack, then right-click on the Rack, then click New Plate.
Figure 11-6: Context Menu for a Rack Container
3. The “New Container” dialogue box opens. The Full Path field is automatically populated for the child container and the value cannot change.
Figure 11-7: New Container dialogue box when adding a plate as a child container
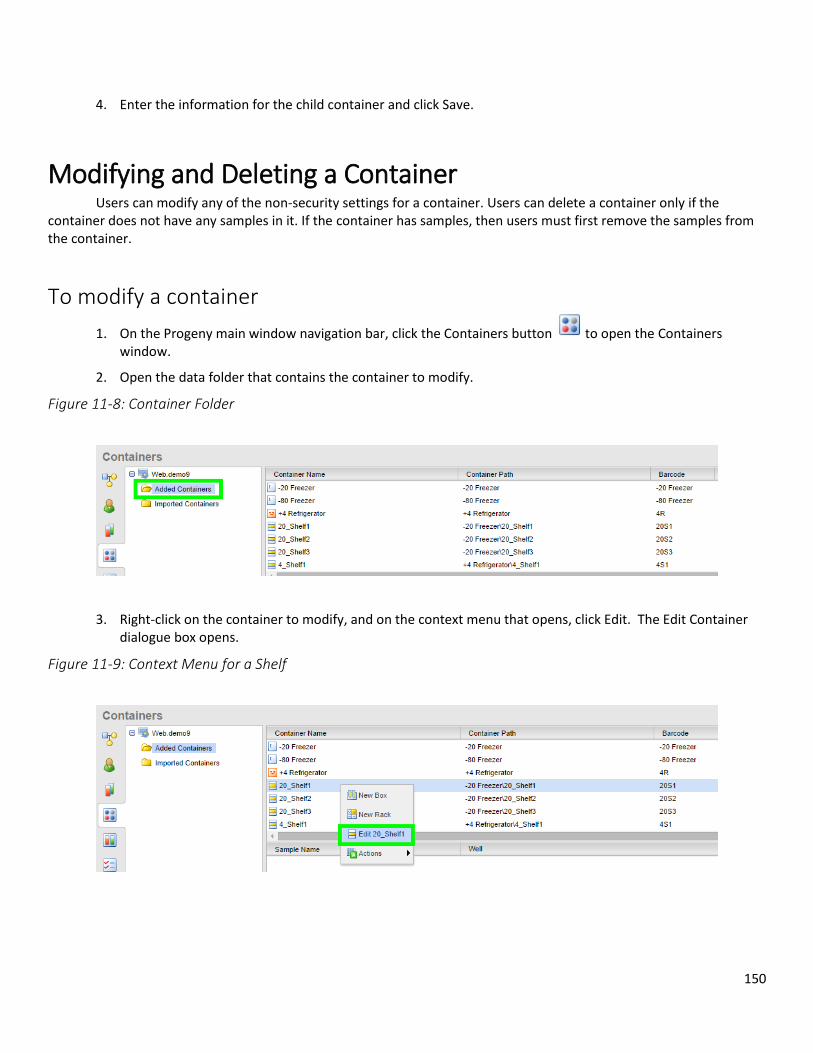
150
4. Enter the information for the child container and click Save.
Modifying and Deleting a Container Users can modify any of the non-security settings for a container. Users can delete a container only if the container does not have any samples in it. If the container has samples, then users must first remove the samples from the container.
To modify a container
1. On the Progeny main window navigation bar, click the Containers button to open the Containers window.
2. Open the data folder that contains the container to modify.
Figure 11-8: Container Folder
3. Right-click on the container to modify, and on the context menu that opens, click Edit. The Edit Container dialogue box opens.
Figure 11-9: Context Menu for a Shelf
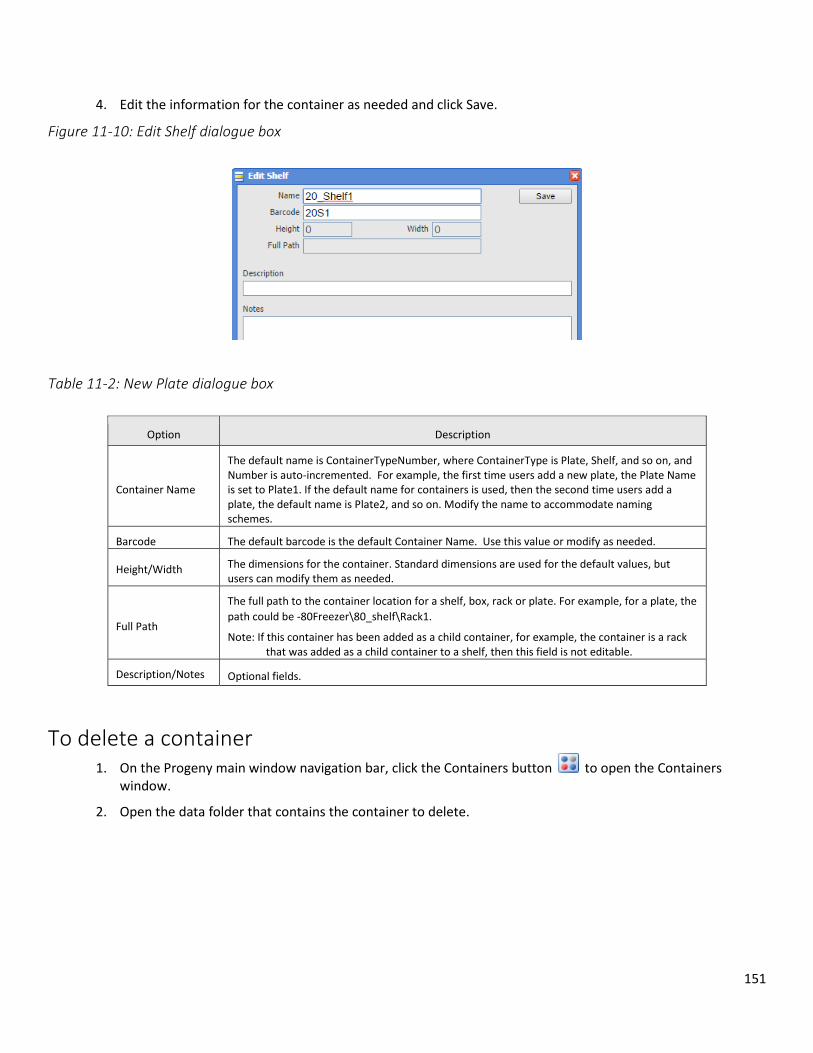
151
4. Edit the information for the container as needed and click Save.
Figure 11-10: Edit Shelf dialogue box
Table 11-2: New Plate dialogue box
Option Description
Container Name
The default name is ContainerTypeNumber, where ContainerType is Plate, Shelf, and so on, and Number is auto-incremented. For example, the first time users add a new plate, the Plate Name is set to Plate1. If the default name for containers is used, then the second time users add a plate, the default name is Plate2, and so on. Modify the name to accommodate naming schemes.
Barcode The default barcode is the default Container Name. Use this value or modify as needed.
Height/Width The dimensions for the container. Standard dimensions are used for the default values, but users can modify them as needed.
Full Path
The full path to the container location for a shelf, box, rack or plate. For example, for a plate, the
path could be -80Freezer\80_shelf\Rack1.
Note: If this container has been added as a child container, for example, the container is a rack that was added as a child container to a shelf, then this field is not editable.
Description/Notes Optional fields.
To delete a container
1. On the Progeny main window navigation bar, click the Containers button to open the Containers window.
2. Open the data folder that contains the container to delete.
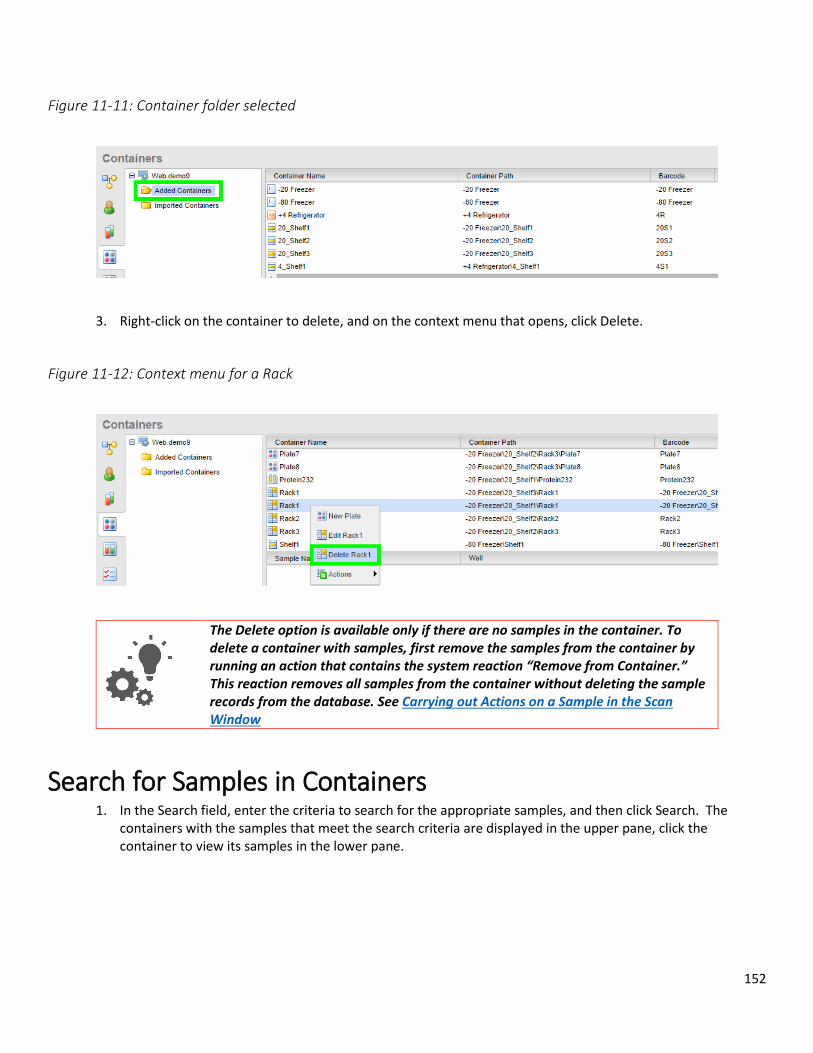
152
Figure 11-11: Container folder selected
3. Right-click on the container to delete, and on the context menu that opens, click Delete.
Figure 11-12: Context menu for a Rack
The Delete option is available only if there are no samples in the container. To delete a container with samples, first remove the samples from the container by running an action that contains the system reaction “Remove from Container.” This reaction removes all samples from the container without deleting the sample records from the database. See Carrying out Actions on a Sample in the Scan Window
Search for Samples in Containers 1. In the Search field, enter the criteria to search for the appropriate samples, and then click Search. The
containers with the samples that meet the search criteria are displayed in the upper pane, click the container to view its samples in the lower pane.
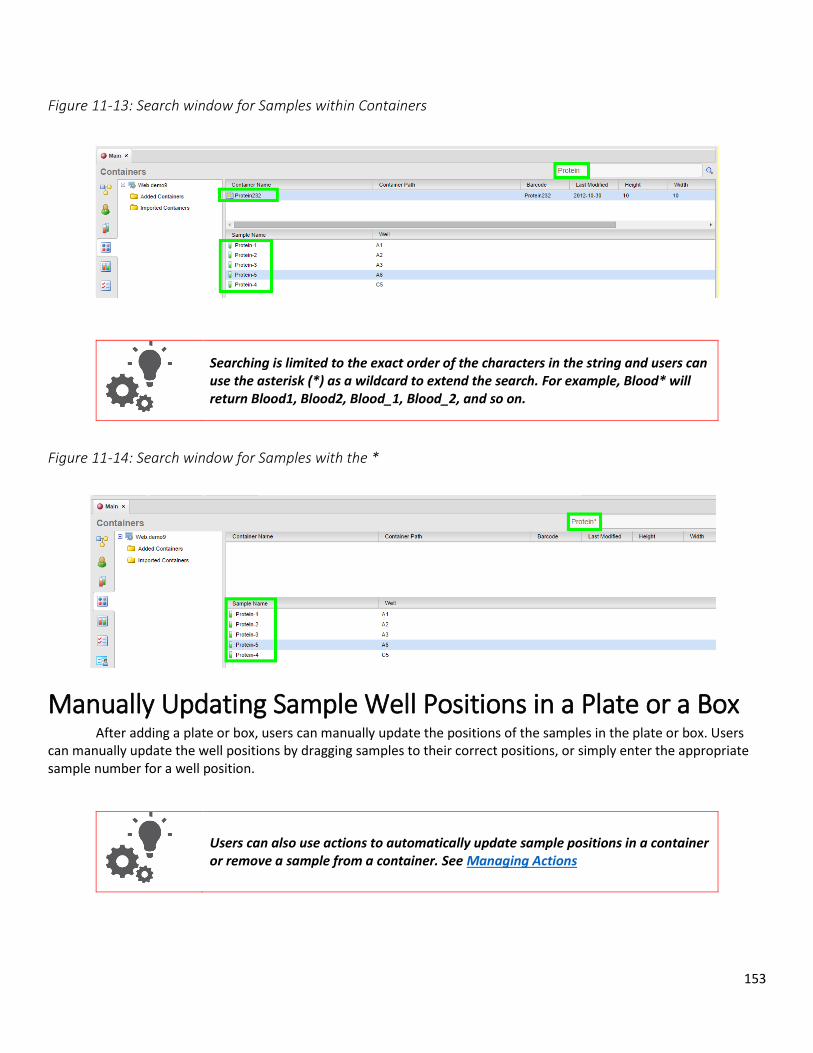
153
Figure 11-13: Search window for Samples within Containers
Searching is limited to the exact order of the characters in the string and users can use the asterisk (*) as a wildcard to extend the search. For example, Blood* will return Blood1, Blood2, Blood_1, Blood_2, and so on.
Figure 11-14: Search window for Samples with the *
Manually Updating Sample Well Positions in a Plate or a Box After adding a plate or box, users can manually update the positions of the samples in the plate or box. Users can manually update the well positions by dragging samples to their correct positions, or simply enter the appropriate sample number for a well position.
Users can also use actions to automatically update sample positions in a container or remove a sample from a container. See Managing Actions
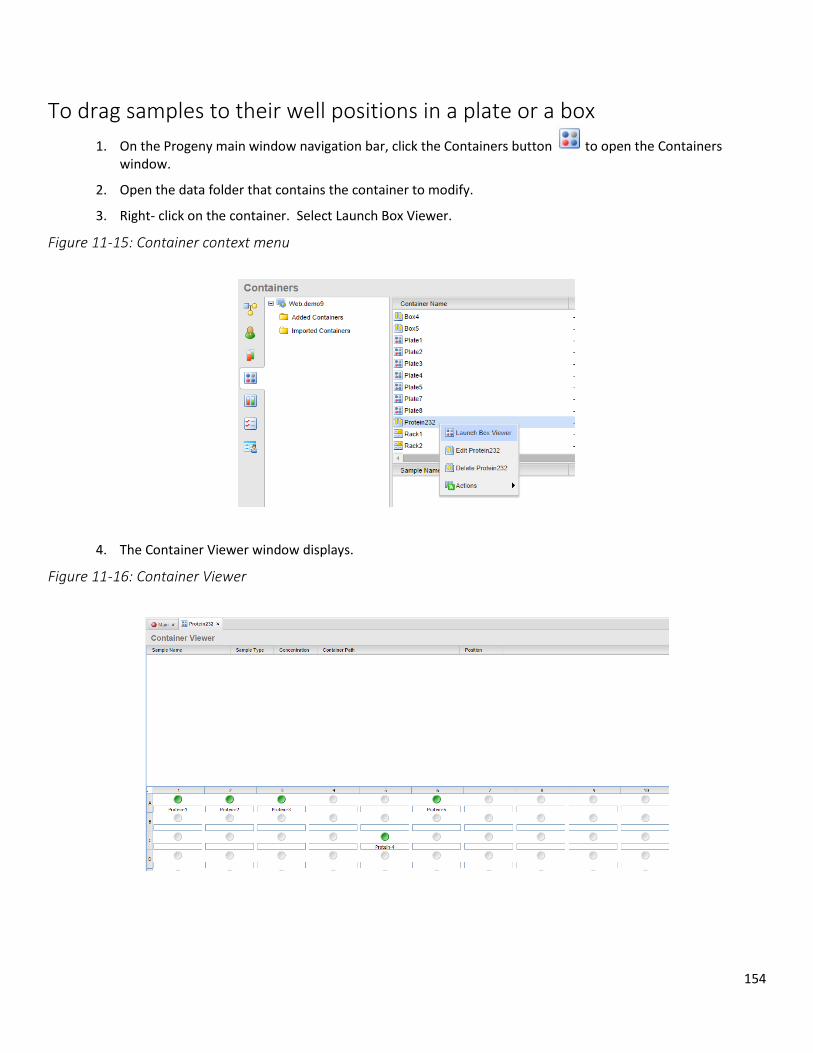
154
To drag samples to their well positions in a plate or a box
1. On the Progeny main window navigation bar, click the Containers button to open the Containers window.
2. Open the data folder that contains the container to modify.
3. Right- click on the container. Select Launch Box Viewer.
Figure 11-15: Container context menu
4. The Container Viewer window displays.
Figure 11-16: Container Viewer
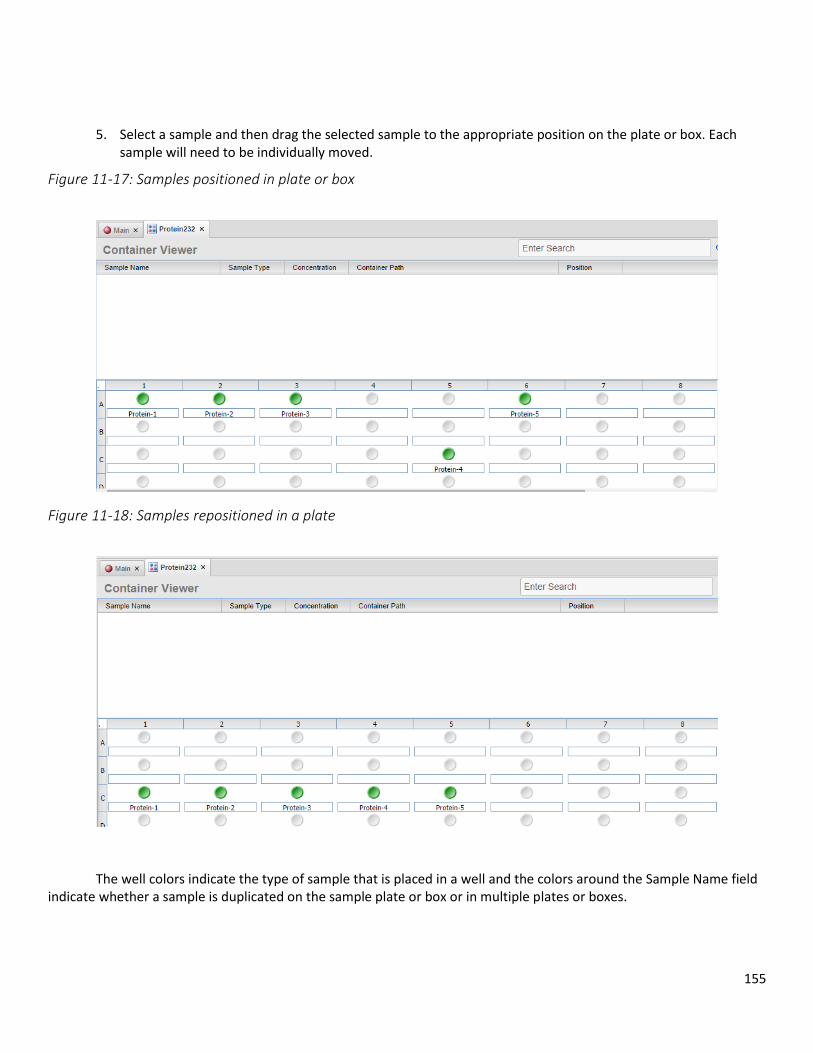
155
5. Select a sample and then drag the selected sample to the appropriate position on the plate or box. Each sample will need to be individually moved.
Figure 11-17: Samples positioned in plate or box
Figure 11-18: Samples repositioned in a plate
The well colors indicate the type of sample that is placed in a well and the colors around the Sample Name field indicate whether a sample is duplicated on the sample plate or box or in multiple plates or boxes.

156
Figure 11-19: Color coding for samples in wells
To manually enter positions for a sample in a plate or a box
1. On the Progeny main window navigation bar, click the Containers button to open the Containers window.
2. Open the data folder that contains the container to modify.
3. Double-click on the container to modify. The Container Viewer opens.
4. Select the text field below a well position and enter the sample number for the position.
Figure 11-20: Manually entering Sample
5. Select Save. The Sample has been saved to the container and the color updated.
Figure 11-21: Sample manually entered into well
157
Chapter 12 Managing Reactions
A reaction is a system or user-defined trigger that is used to update sample records. Managing reactions consists of adding, modifying, and deleting reactions. Reactions that are marked with a blue Reaction icon are system reactions that are always available in every Progeny database and are not editable. Reactions that are marked with a red Reaction icon are user-defined reactions and are editable.
This chapter covers the following topics:
Adding a Reaction
Print as a Reaction Type
Editing a Reaction
Deleting a Reaction
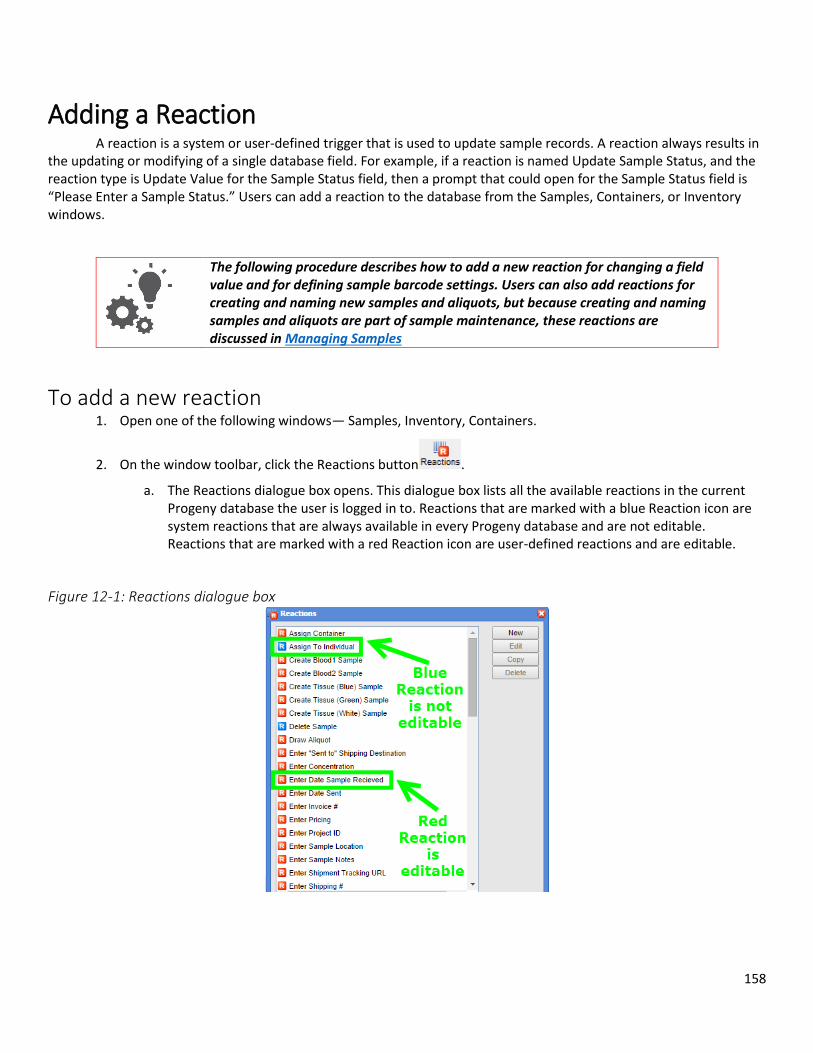
158
Adding a Reaction A reaction is a system or user-defined trigger that is used to update sample records. A reaction always results in the updating or modifying of a single database field. For example, if a reaction is named Update Sample Status, and the reaction type is Update Value for the Sample Status field, then a prompt that could open for the Sample Status field is “Please Enter a Sample Status.” Users can add a reaction to the database from the Samples, Containers, or Inventory windows.
The following procedure describes how to add a new reaction for changing a field value and for defining sample barcode settings. Users can also add reactions for creating and naming new samples and aliquots, but because creating and naming samples and aliquots are part of sample maintenance, these reactions are discussed in Managing Samples
To add a new reaction 1. Open one of the following windows— Samples, Inventory, Containers.
2. On the window toolbar, click the Reactions button .
a. The Reactions dialogue box opens. This dialogue box lists all the available reactions in the current Progeny database the user is logged in to. Reactions that are marked with a blue Reaction icon are system reactions that are always available in every Progeny database and are not editable. Reactions that are marked with a red Reaction icon are user-defined reactions and are editable.
Figure 12-1: Reactions dialogue box
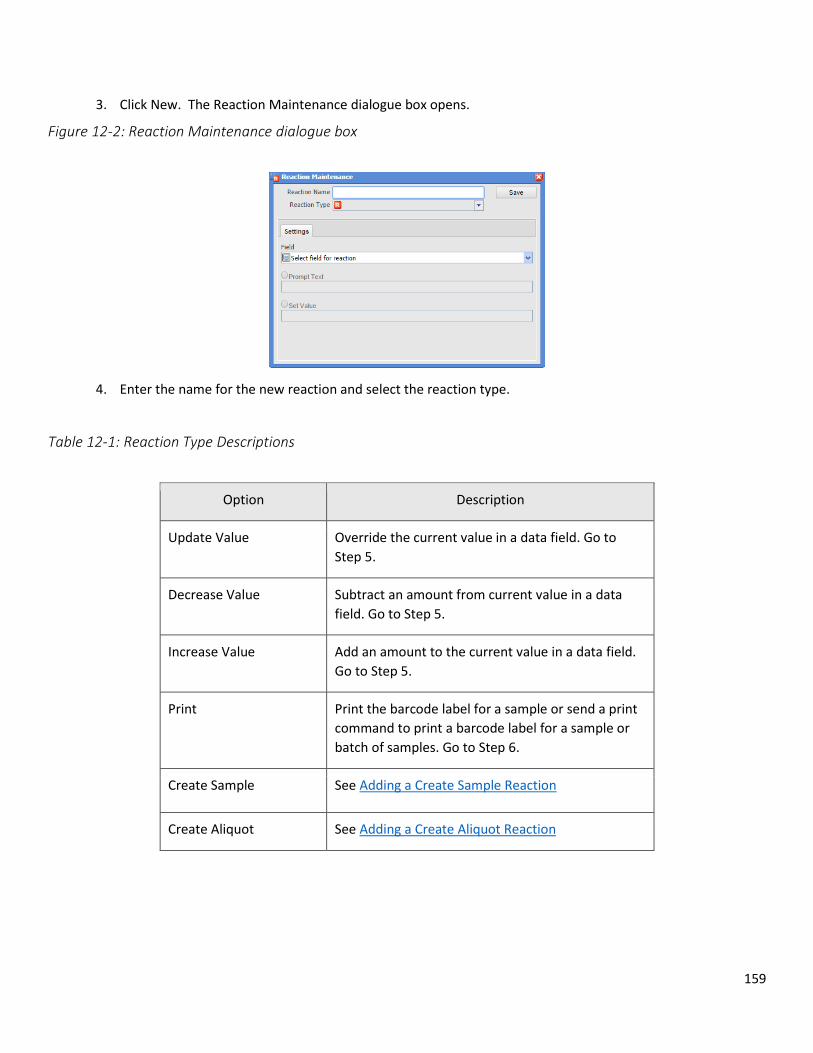
159
3. Click New. The Reaction Maintenance dialogue box opens.
Figure 12-2: Reaction Maintenance dialogue box
4. Enter the name for the new reaction and select the reaction type.
Table 12-1: Reaction Type Descriptions
Option Description
Update Value Override the current value in a data field. Go to
Step 5.
Decrease Value Subtract an amount from current value in a data
field. Go to Step 5.
Increase Value Add an amount to the current value in a data field.
Go to Step 5.
Print Print the barcode label for a sample or send a print
command to print a barcode label for a sample or
batch of samples. Go to Step 6.
Create Sample See Adding a Create Sample Reaction
Create Aliquot See Adding a Create Aliquot Reaction
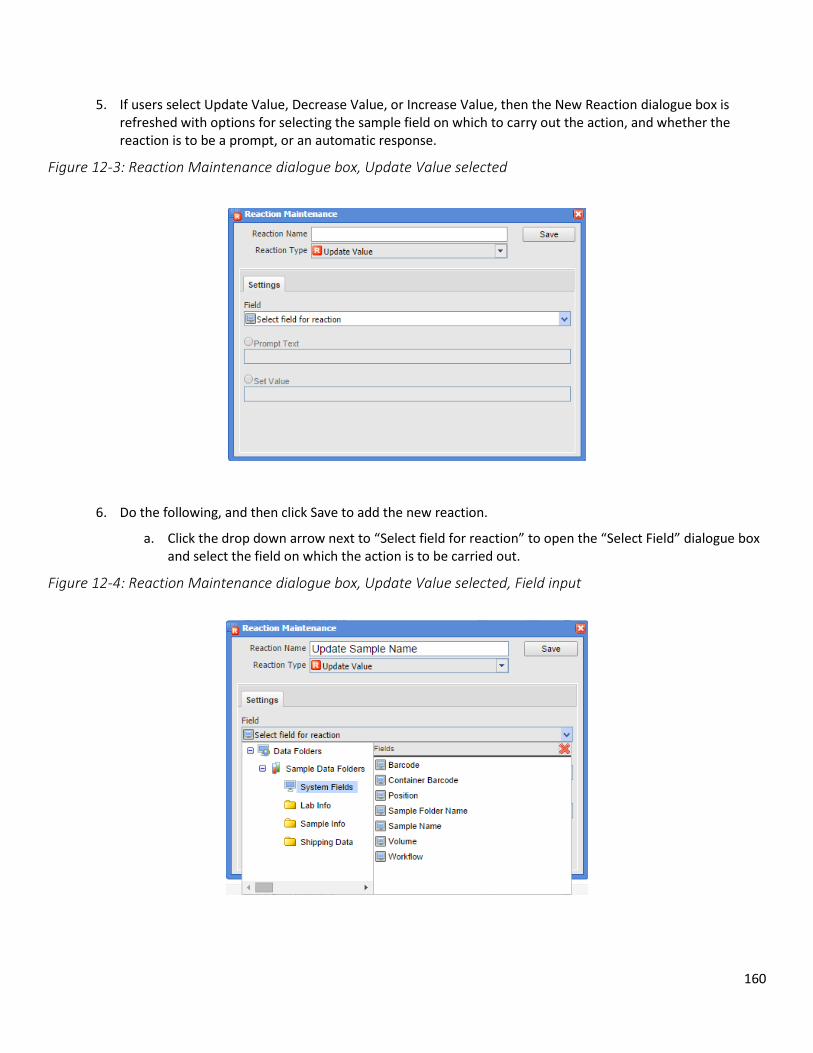
160
5. If users select Update Value, Decrease Value, or Increase Value, then the New Reaction dialogue box is refreshed with options for selecting the sample field on which to carry out the action, and whether the reaction is to be a prompt, or an automatic response.
Figure 12-3: Reaction Maintenance dialogue box, Update Value selected
6. Do the following, and then click Save to add the new reaction.
a. Click the drop down arrow next to “Select field for reaction” to open the “Select Field” dialogue box and select the field on which the action is to be carried out.
Figure 12-4: Reaction Maintenance dialogue box, Update Value selected, Field input

161
b. Select the radio button for the reaction type – Prompt text or Set Value. Enter information for the text or value.
A Prompt is typically used for variables, such as “Please enter a Sample ID or Name.” A Set Value is typically used for static values that require no manual intervention. Instead of a prompt appearing, the software automatically enters the value in the background, for example, “Mark Sample as Exhausted.”
The figure below is an example of a reaction in which “Update Value” was selected for the Reaction Type. In this reaction, the value of the Sample Name field is to be updated, and the prompt that is given for the reaction is “Please Enter Sample Name or ID”.
Figure 12-5: Example of an Update Value reaction
Print Reaction Types If users select Print as a Reaction Type, then the “Reaction Maintenance” dialogue box is refreshed with new
options.
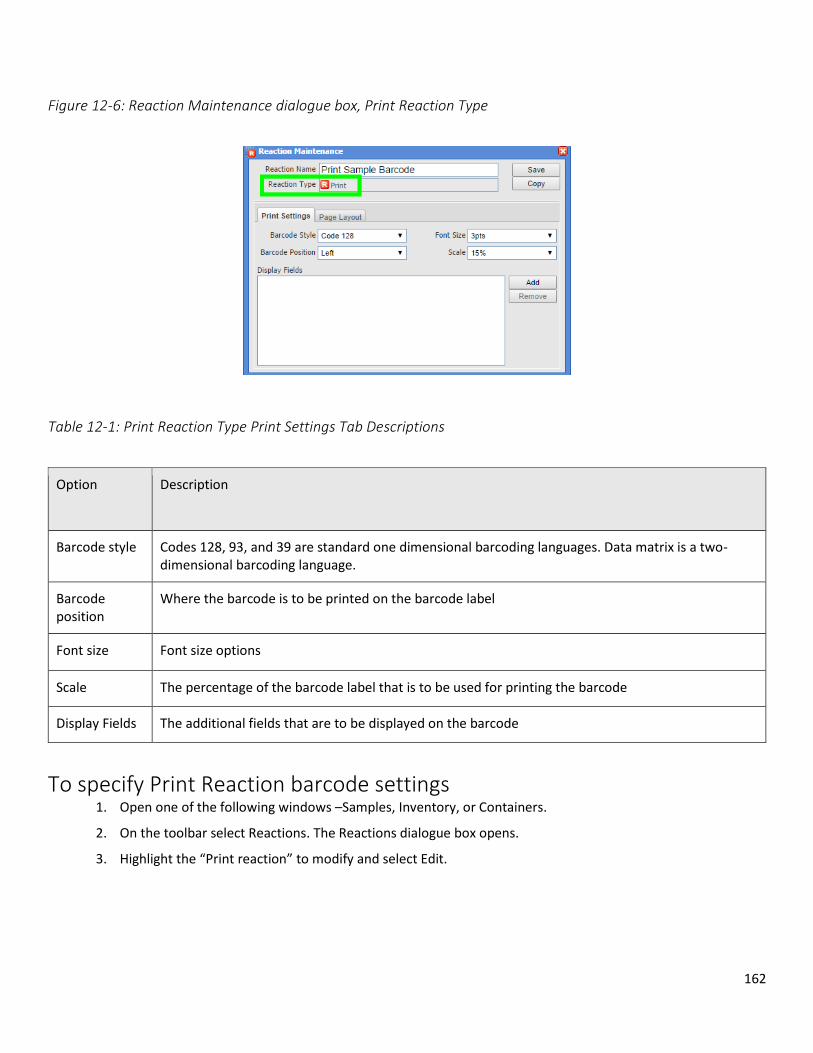
162
Figure 12-6: Reaction Maintenance dialogue box, Print Reaction Type
Table 12-1: Print Reaction Type Print Settings Tab Descriptions
Option Description
Barcode style Codes 128, 93, and 39 are standard one dimensional barcoding languages. Data matrix is a two-dimensional barcoding language.
Barcode position
Where the barcode is to be printed on the barcode label
Font size Font size options
Scale The percentage of the barcode label that is to be used for printing the barcode
Display Fields The additional fields that are to be displayed on the barcode
To specify Print Reaction barcode settings 1. Open one of the following windows –Samples, Inventory, or Containers.
2. On the toolbar select Reactions. The Reactions dialogue box opens.
3. Highlight the “Print reaction” to modify and select Edit.
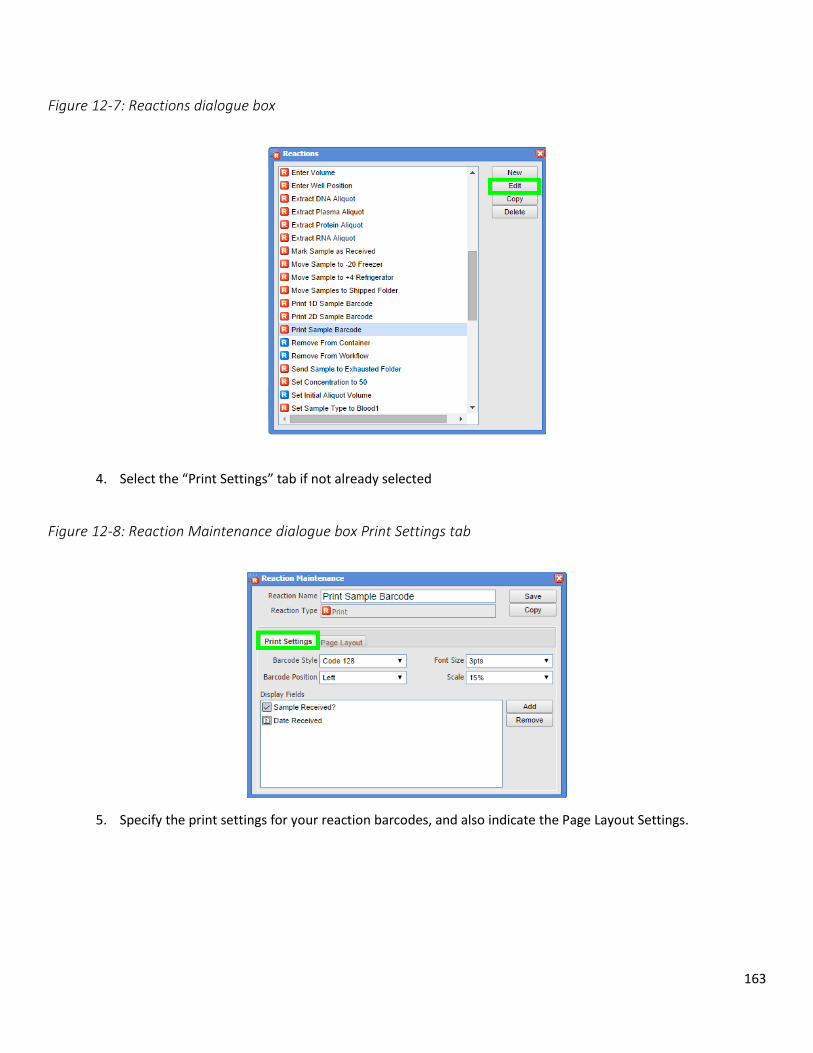
163
Figure 12-7: Reactions dialogue box
4. Select the “Print Settings” tab if not already selected
Figure 12-8: Reaction Maintenance dialogue box Print Settings tab
5. Specify the print settings for your reaction barcodes, and also indicate the Page Layout Settings.
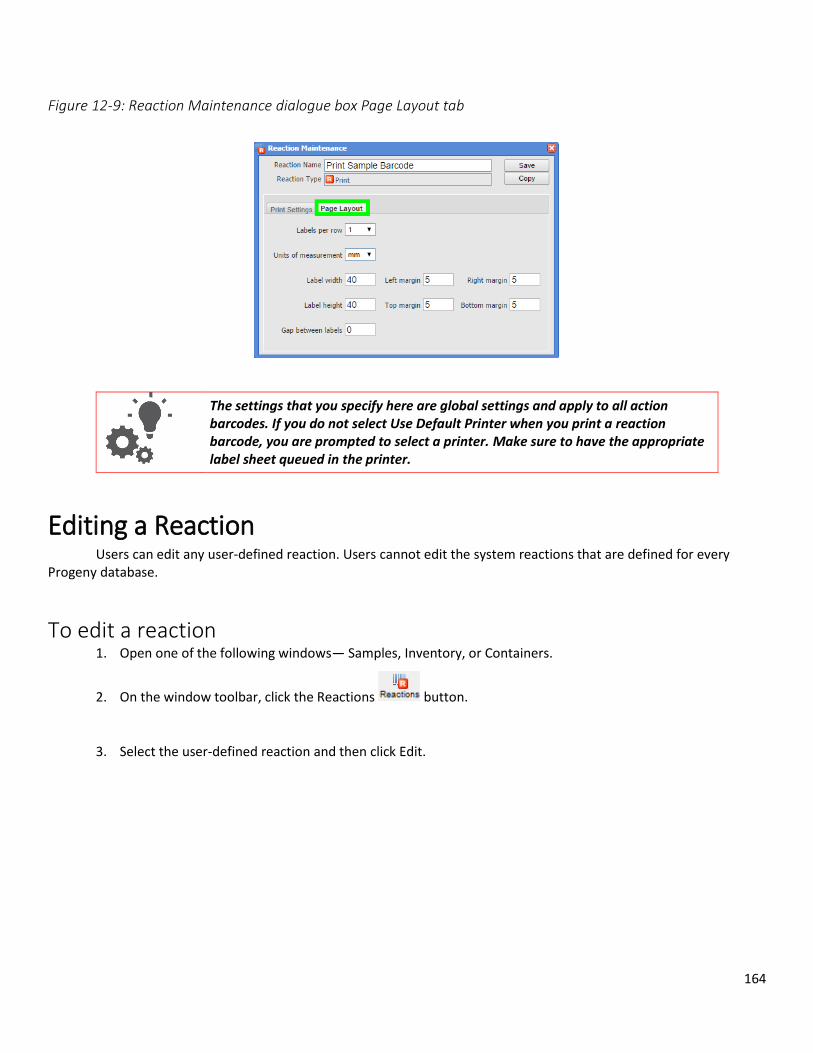
164
Figure 12-9: Reaction Maintenance dialogue box Page Layout tab
The settings that you specify here are global settings and apply to all action barcodes. If you do not select Use Default Printer when you print a reaction barcode, you are prompted to select a printer. Make sure to have the appropriate label sheet queued in the printer.
Editing a Reaction Users can edit any user-defined reaction. Users cannot edit the system reactions that are defined for every Progeny database.
To edit a reaction 1. Open one of the following windows— Samples, Inventory, or Containers.
2. On the window toolbar, click the Reactions button.
3. Select the user-defined reaction and then click Edit.

165
Figure 12-10: Reactions dialogue box
4. The Reaction maintenance dialogue box opens. The dialogue box displays the reaction as currently defined.
Figure 12-11: Reaction Maintenance dialogue box
5. Edit the reaction as needed, and then click Save to save the edited reaction.
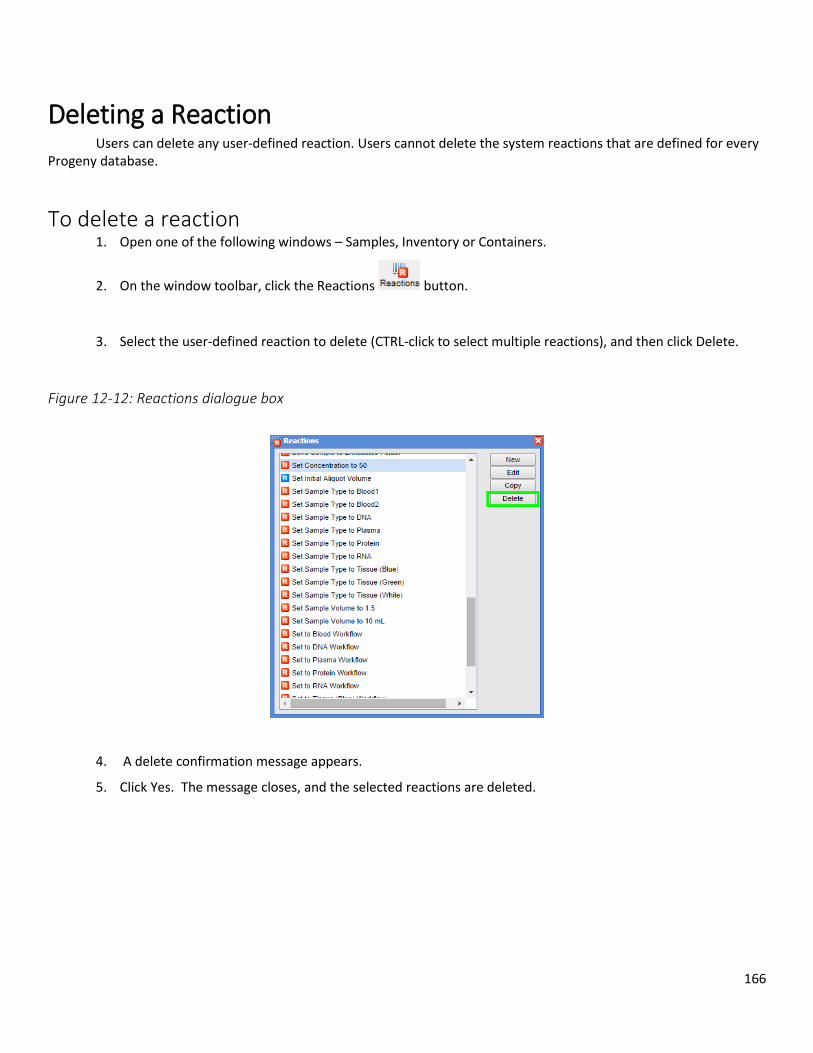
166
Deleting a Reaction Users can delete any user-defined reaction. Users cannot delete the system reactions that are defined for every Progeny database.
To delete a reaction 1. Open one of the following windows – Samples, Inventory or Containers.
2. On the window toolbar, click the Reactions button.
3. Select the user-defined reaction to delete (CTRL-click to select multiple reactions), and then click Delete.
Figure 12-12: Reactions dialogue box
4. A delete confirmation message appears.
5. Click Yes. The message closes, and the selected reactions are deleted.
167
Chapter 13 Managing Actions
An action is a series of reactions. An action can be carried out on a single sample, a batch of samples, a container of samples, or a plate. (Managing reactions consists of adding, modifying, and deleting actions).
This chapter covers the following topics:
Adding an Action
Setting an Action as a Default Action
Specifying Action Barcode Settings
Editing an Action
Deleting an Action
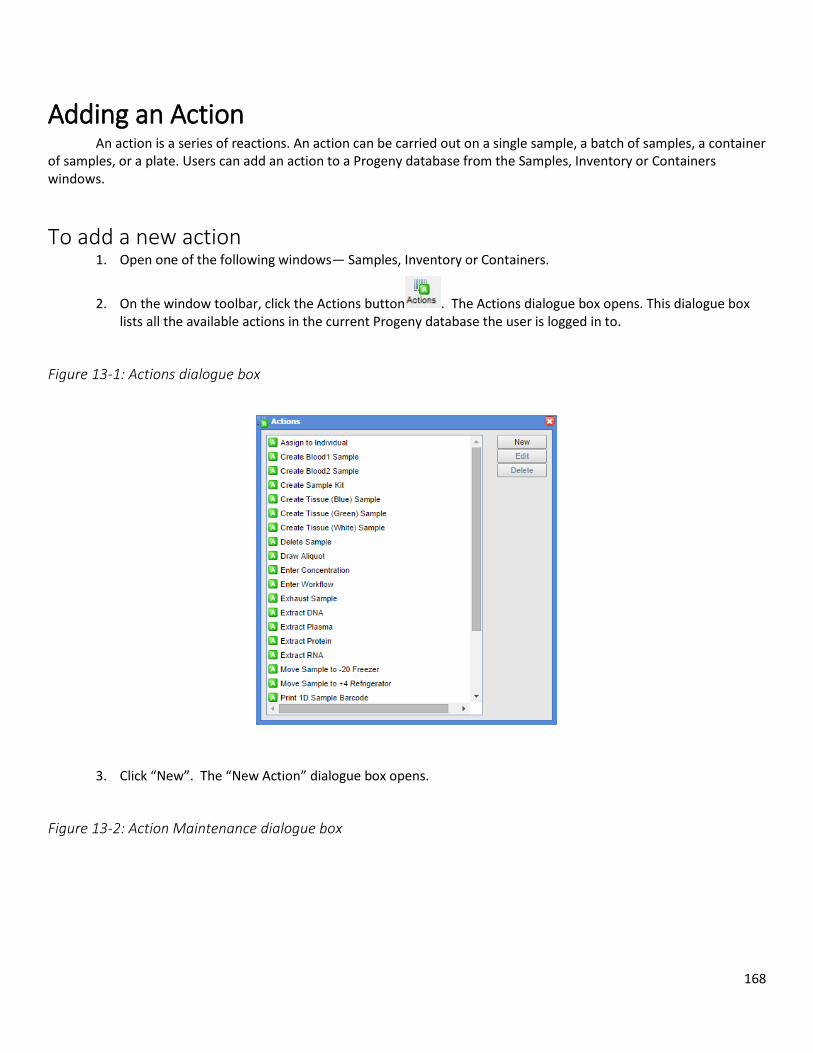
168
Adding an Action An action is a series of reactions. An action can be carried out on a single sample, a batch of samples, a container of samples, or a plate. Users can add an action to a Progeny database from the Samples, Inventory or Containers windows.
To add a new action 1. Open one of the following windows— Samples, Inventory or Containers.
2. On the window toolbar, click the Actions button . The Actions dialogue box opens. This dialogue box lists all the available actions in the current Progeny database the user is logged in to.
Figure 13-1: Actions dialogue box
3. Click “New”. The “New Action” dialogue box opens.
Figure 13-2: Action Maintenance dialogue box
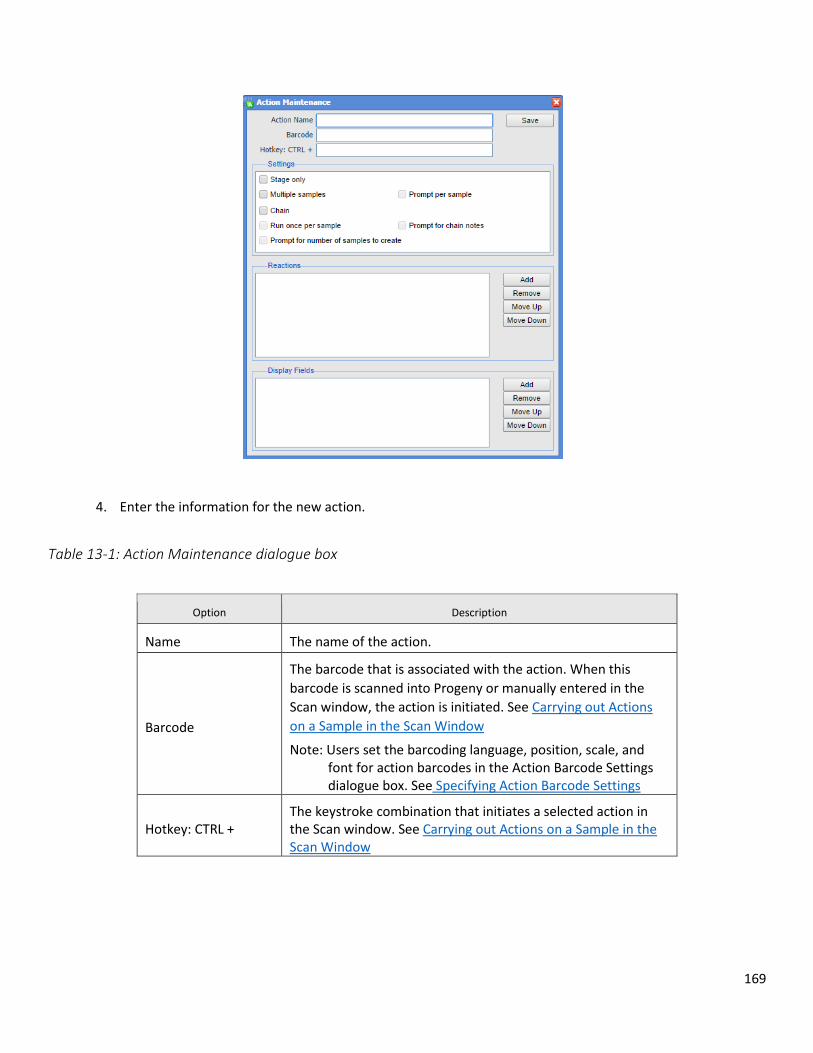
169
4. Enter the information for the new action.
Table 13-1: Action Maintenance dialogue box
Option Description
Name The name of the action.
Barcode
The barcode that is associated with the action. When this
barcode is scanned into Progeny or manually entered in the
Scan window, the action is initiated. See Carrying out Actions
on a Sample in the Scan Window
Note: Users set the barcoding language, position, scale, and font for action barcodes in the Action Barcode Settings dialogue box. See Specifying Action Barcode Settings
Hotkey: CTRL + The keystroke combination that initiates a selected action in the Scan window. See Carrying out Actions on a Sample in the Scan Window
170
Stage Only
Select this option if the action is to be carried out only from
within a workflow (a stage action).
Note: If the action is carried out outside of a workflow, then it is referred to as an open action.
Multiple Samples Select this option if the action can be carried out on multiple samples at the same time. This is known as batch operation of samples.
Prompt Per Sample Applicable only for Multiple Samples. A prompt opens for each selected sample when the action is initiated for the sample.
Chain
Select this option to log the action carried out on the sample into the Chain of Custody for the sample. The action is logged with the name of the user who carried out the action on the sample along with a date and timestamp.
Run only once per sample
Applicable only for Chain. Select this option to allow the indicated action to be carried out only once for any given sample if the action has already been logged into the Chain of Custody for the sample.
Prompt for chain notes
Applicable only for Chain. Select this option to allow the user to enter notes/comments about the action that is being logged into the Chain of Custody for the sample.
Prompt for number of samples to create
Displayed only if the first reaction in a series of reactions is of the type “Create Sample” and the reaction is set to “Accept Default” as the sample name. Select this option to open a prompt in which a user can specify the number of samples to create.
Prompt for number of aliquots to create
Displayed only if the first reaction in a series of reactions is of the type “Create Aliquot” and the reaction is set to “Accept Default” as the aliquot name. Select this option to open a prompt in which a user can specify the number of aliquots to create.
5. In the Reactions pane, click “Add” to open the Reactions dialogue box and select the reactions (CTRL-click to select multiple reactions) that are to be contained in the action.
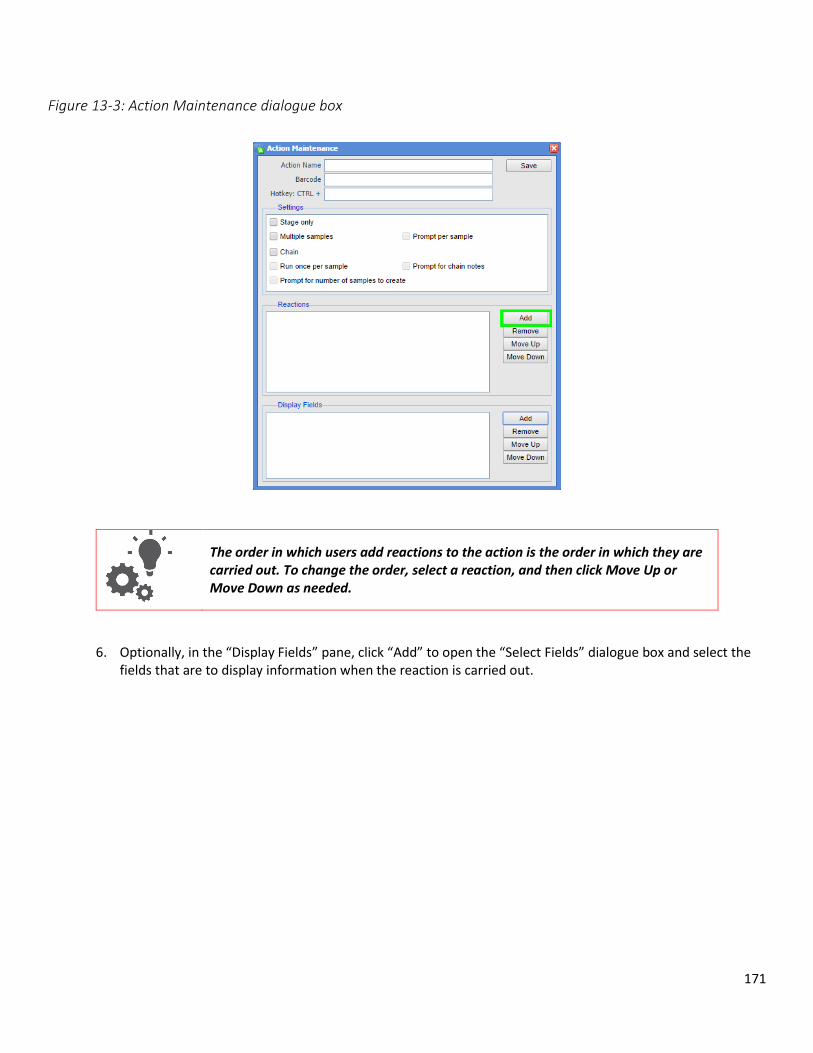
171
Figure 13-3: Action Maintenance dialogue box
The order in which users add reactions to the action is the order in which they are carried out. To change the order, select a reaction, and then click Move Up or Move Down as needed.
6. Optionally, in the “Display Fields” pane, click “Add” to open the “Select Fields” dialogue box and select the fields that are to display information when the reaction is carried out.
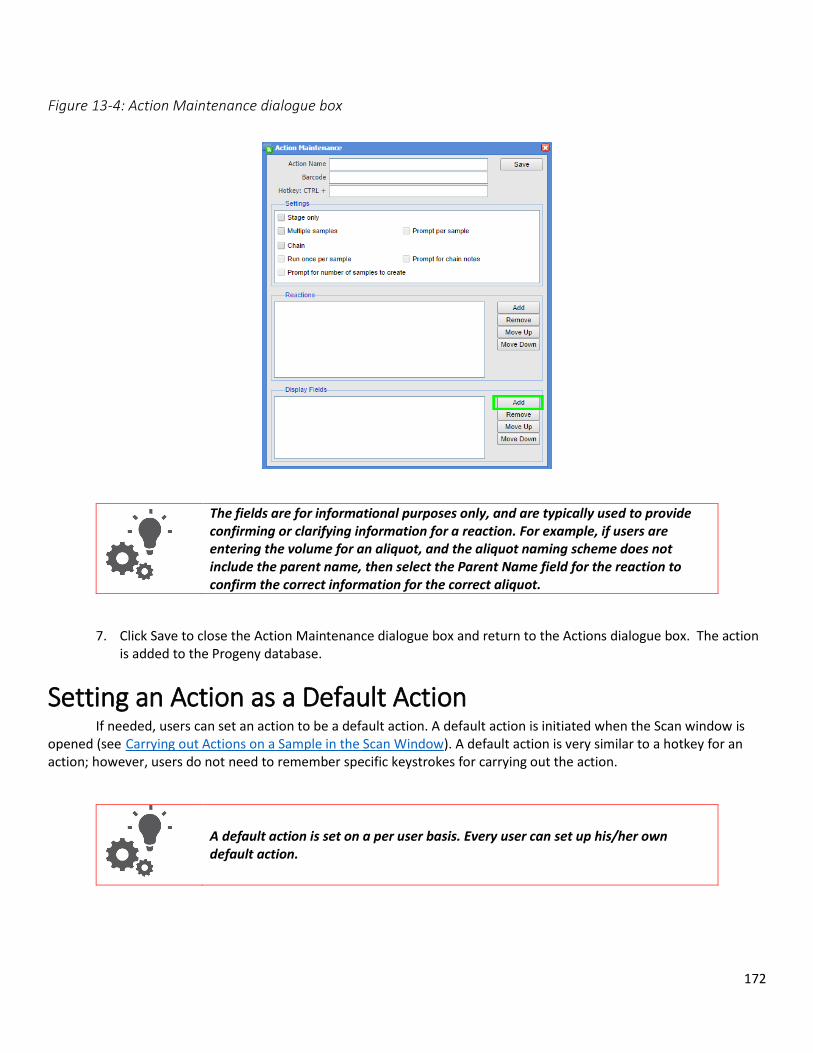
172
Figure 13-4: Action Maintenance dialogue box
The fields are for informational purposes only, and are typically used to provide confirming or clarifying information for a reaction. For example, if users are entering the volume for an aliquot, and the aliquot naming scheme does not include the parent name, then select the Parent Name field for the reaction to confirm the correct information for the correct aliquot.
7. Click Save to close the Action Maintenance dialogue box and return to the Actions dialogue box. The action is added to the Progeny database.
Setting an Action as a Default Action If needed, users can set an action to be a default action. A default action is initiated when the Scan window is
opened (see Carrying out Actions on a Sample in the Scan Window). A default action is very similar to a hotkey for an action; however, users do not need to remember specific keystrokes for carrying out the action.
A default action is set on a per user basis. Every user can set up his/her own default action.
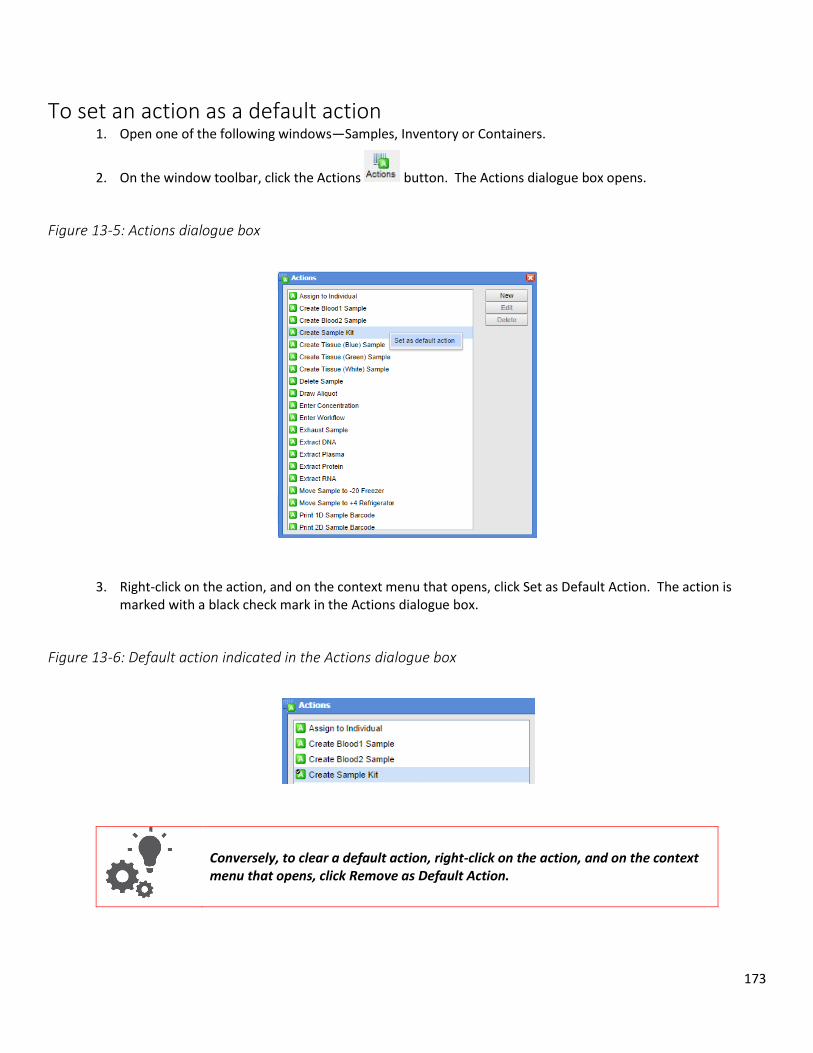
173
To set an action as a default action 1. Open one of the following windows—Samples, Inventory or Containers.
2. On the window toolbar, click the Actions button. The Actions dialogue box opens.
Figure 13-5: Actions dialogue box
3. Right-click on the action, and on the context menu that opens, click Set as Default Action. The action is marked with a black check mark in the Actions dialogue box.
Figure 13-6: Default action indicated in the Actions dialogue box
Conversely, to clear a default action, right-click on the action, and on the context menu that opens, click Remove as Default Action.
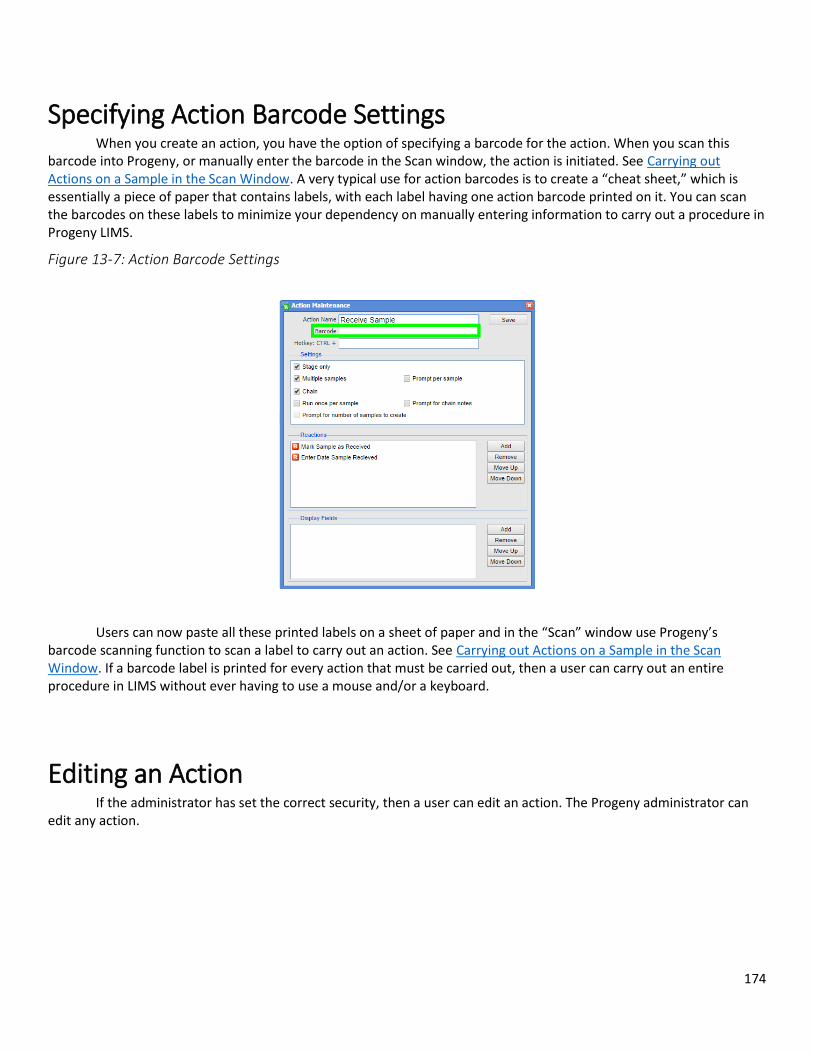
174
Specifying Action Barcode Settings When you create an action, you have the option of specifying a barcode for the action. When you scan this barcode into Progeny, or manually enter the barcode in the Scan window, the action is initiated. See Carrying out Actions on a Sample in the Scan Window. A very typical use for action barcodes is to create a “cheat sheet,” which is essentially a piece of paper that contains labels, with each label having one action barcode printed on it. You can scan the barcodes on these labels to minimize your dependency on manually entering information to carry out a procedure in Progeny LIMS.
Figure 13-7: Action Barcode Settings
Users can now paste all these printed labels on a sheet of paper and in the “Scan” window use Progeny’s barcode scanning function to scan a label to carry out an action. See Carrying out Actions on a Sample in the Scan Window. If a barcode label is printed for every action that must be carried out, then a user can carry out an entire procedure in LIMS without ever having to use a mouse and/or a keyboard.
Editing an Action If the administrator has set the correct security, then a user can edit an action. The Progeny administrator can edit any action.
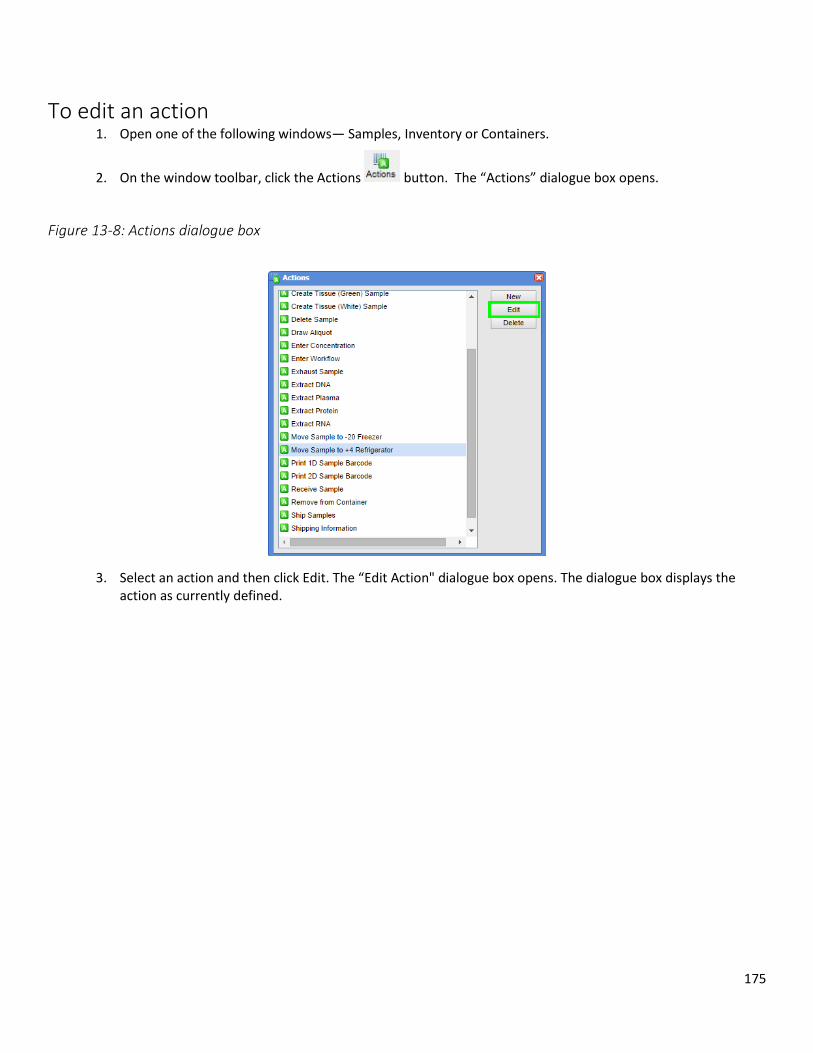
175
To edit an action 1. Open one of the following windows— Samples, Inventory or Containers.
2. On the window toolbar, click the Actions button. The “Actions” dialogue box opens.
Figure 13-8: Actions dialogue box
3. Select an action and then click Edit. The “Edit Action" dialogue box opens. The dialogue box displays the action as currently defined.
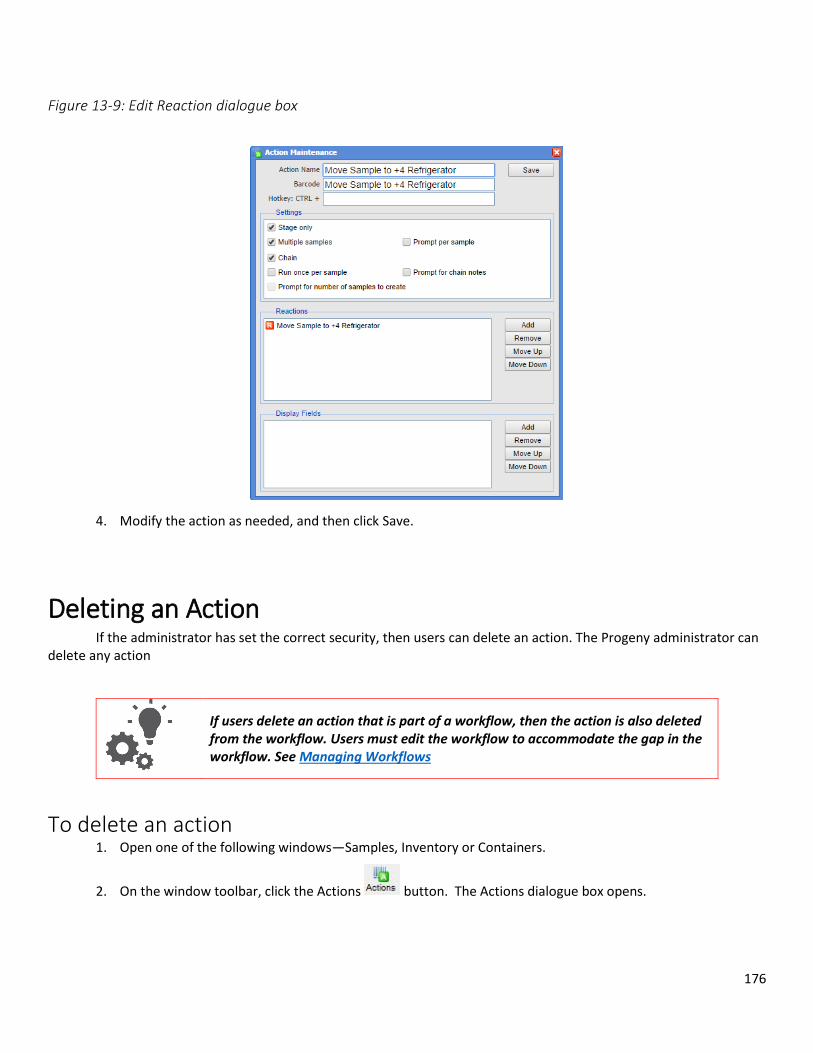
176
Figure 13-9: Edit Reaction dialogue box
4. Modify the action as needed, and then click Save.
Deleting an Action If the administrator has set the correct security, then users can delete an action. The Progeny administrator can delete any action
If users delete an action that is part of a workflow, then the action is also deleted from the workflow. Users must edit the workflow to accommodate the gap in the workflow. See Managing Workflows
To delete an action 1. Open one of the following windows—Samples, Inventory or Containers.
2. On the window toolbar, click the Actions button. The Actions dialogue box opens.
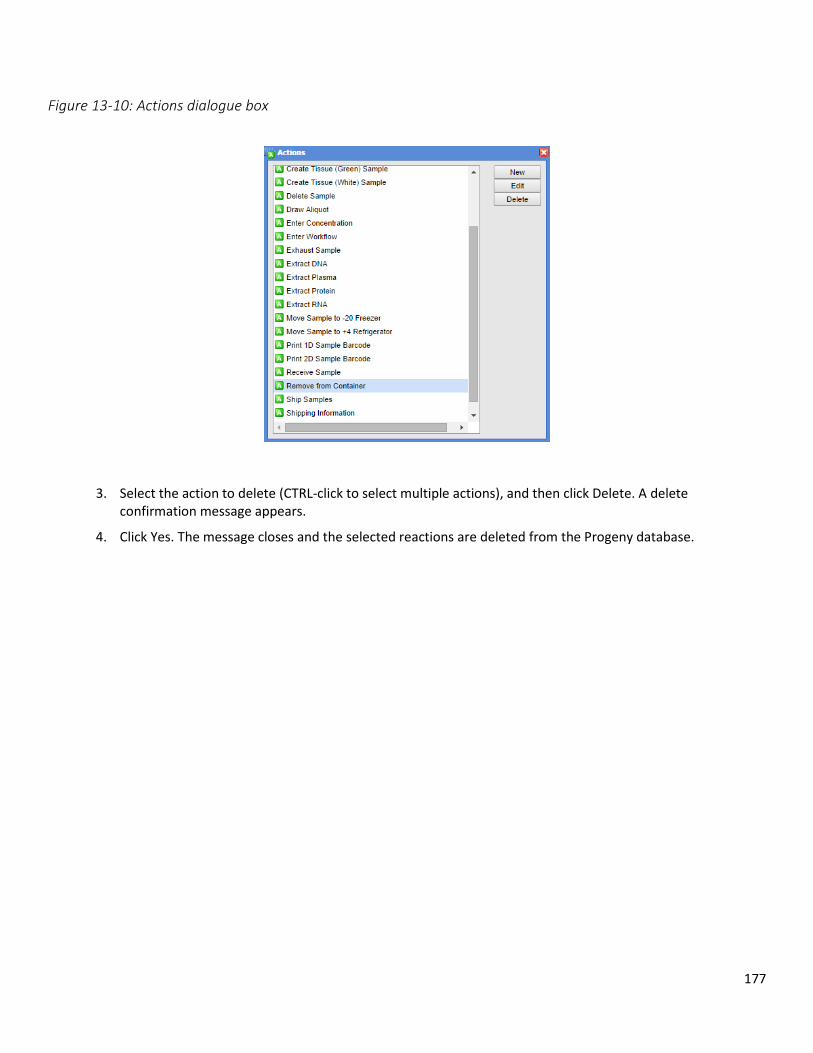
177
Figure 13-10: Actions dialogue box
3. Select the action to delete (CTRL-click to select multiple actions), and then click Delete. A delete confirmation message appears.
4. Click Yes. The message closes and the selected reactions are deleted from the Progeny database.

178
Chapter 14 - Managing Samples
A sample is a part that is representative of a whole or a set of elements that is drawn from and analyzed to estimate the characteristics of a population. A sample can be an unassociated sample, or it can be associated with an individual. Managing samples in Progeny LIMS consists of creating new samples, carrying out actions on samples, generating sample reports, assigning samples to workflows and moving a sample through a workflow, modifying samples, deleting samples, importing sample data. In Progeny LIMS, users accomplish all of these tasks through use of actions.
This chapter covers the following topics:
Adding a Create Sample Reaction
Adding a Create Aliquot Reaction
Carrying out Actions on a Sample in the Scan Window
Sample Datasheet
Chain of Custody Audit Report
For detailed information about assigning a sample to a workflow and moving a sample through a workflow, see Moving Samples through a Workflow
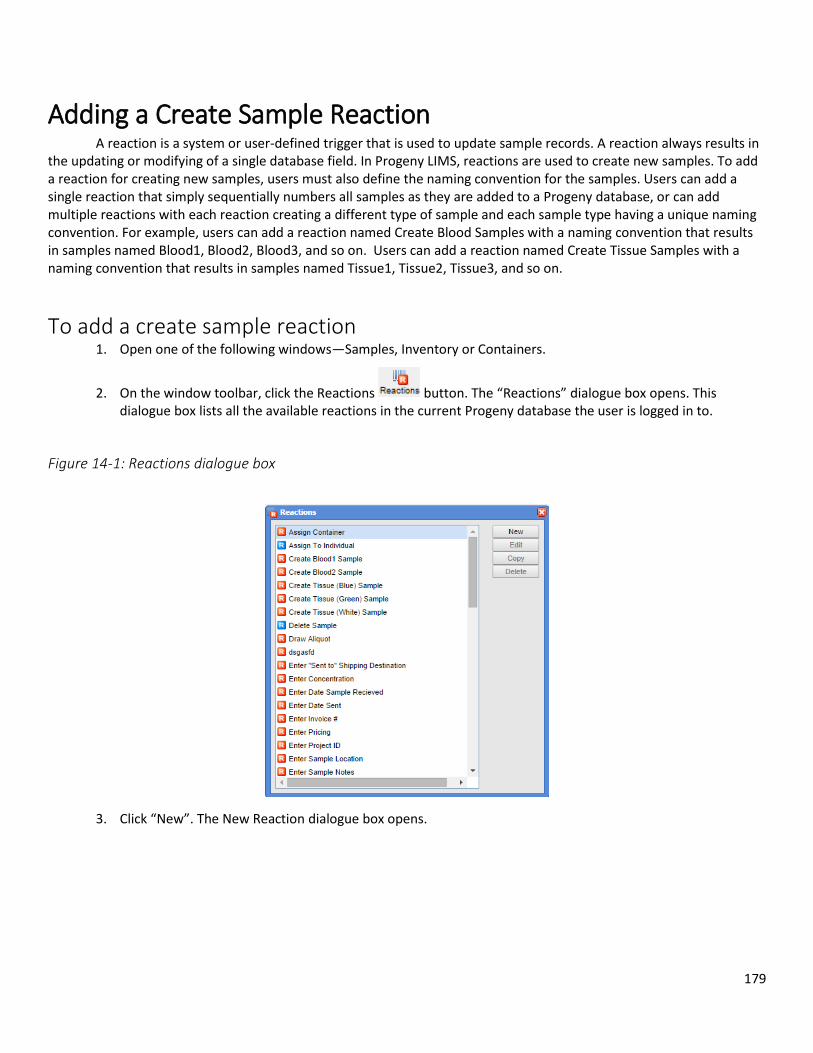
179
Adding a Create Sample Reaction A reaction is a system or user-defined trigger that is used to update sample records. A reaction always results in the updating or modifying of a single database field. In Progeny LIMS, reactions are used to create new samples. To add a reaction for creating new samples, users must also define the naming convention for the samples. Users can add a single reaction that simply sequentially numbers all samples as they are added to a Progeny database, or can add multiple reactions with each reaction creating a different type of sample and each sample type having a unique naming convention. For example, users can add a reaction named Create Blood Samples with a naming convention that results in samples named Blood1, Blood2, Blood3, and so on. Users can add a reaction named Create Tissue Samples with a naming convention that results in samples named Tissue1, Tissue2, Tissue3, and so on.
To add a create sample reaction 1. Open one of the following windows—Samples, Inventory or Containers.
2. On the window toolbar, click the Reactions button. The “Reactions” dialogue box opens. This dialogue box lists all the available reactions in the current Progeny database the user is logged in to.
Figure 14-1: Reactions dialogue box
3. Click “New”. The New Reaction dialogue box opens.
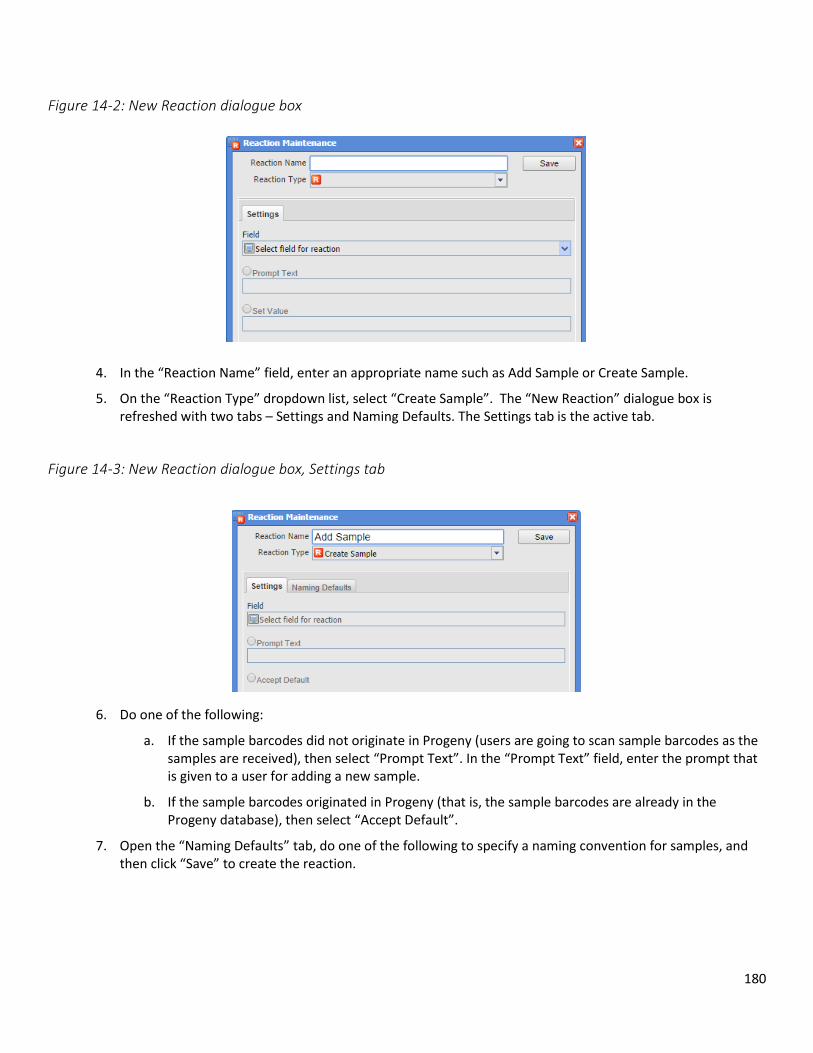
180
Figure 14-2: New Reaction dialogue box
4. In the “Reaction Name” field, enter an appropriate name such as Add Sample or Create Sample.
5. On the “Reaction Type” dropdown list, select “Create Sample”. The “New Reaction” dialogue box is refreshed with two tabs – Settings and Naming Defaults. The Settings tab is the active tab.
Figure 14-3: New Reaction dialogue box, Settings tab
6. Do one of the following:
a. If the sample barcodes did not originate in Progeny (users are going to scan sample barcodes as the samples are received), then select “Prompt Text”. In the “Prompt Text” field, enter the prompt that is given to a user for adding a new sample.
b. If the sample barcodes originated in Progeny (that is, the sample barcodes are already in the Progeny database), then select “Accept Default”.
7. Open the “Naming Defaults” tab, do one of the following to specify a naming convention for samples, and then click “Save” to create the reaction.

181
a. Leave the “Name Default” set to “SampleID” and “Barcode Default” to “Auto-increment” to increment every sample that is added to the database. The sample names are simply sequential numbers – 1, 2, 3, and so on as shown in the Preview field.
Figure 14-4: New Reaction dialogue box, Naming Defaults tab
b. Select Prefix, Auto-Increment, Suffix for the Name Default, and select Sample Name for Barcode Default to create a unique barcode naming convention that autoincrements every sample that is added to the database. The sample names are sequentially numbered and are uniquely identified through the use of a prefix and/or suffix, for example, Blood1Pre, Blood2Pre, Blood3Pre, and so on as shown in the Preview field.
Figure 14-5: New Reaction dialogue box, Naming Defaults tab
With this approach, users can create multiple reactions with each reaction creating a different type of sample and each sample type having a unique naming convention. For example, users can create a reaction named Create Blood Samples with a naming convention that results in samples named Blood1, Blood2, and so on. Users can also create a reaction named Create Tissue Samples with a naming convention that results in samples named Tissue1, Tissue2, and so on.
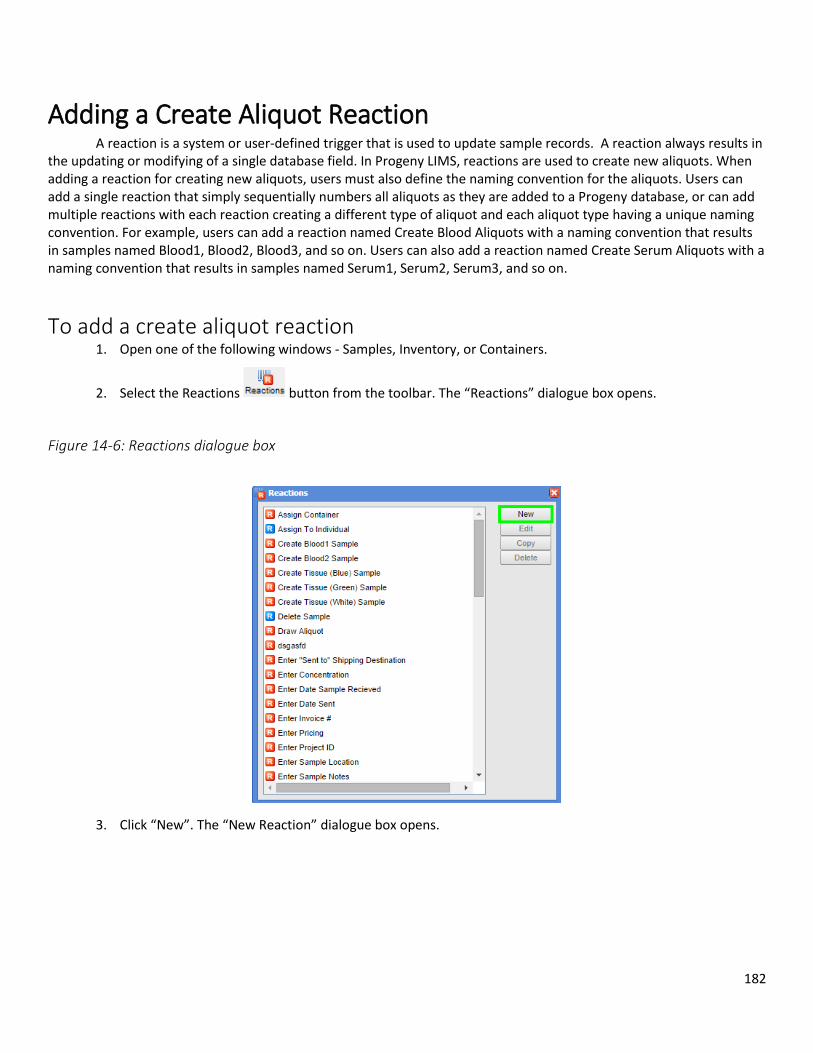
182
Adding a Create Aliquot Reaction A reaction is a system or user-defined trigger that is used to update sample records. A reaction always results in the updating or modifying of a single database field. In Progeny LIMS, reactions are used to create new aliquots. When adding a reaction for creating new aliquots, users must also define the naming convention for the aliquots. Users can add a single reaction that simply sequentially numbers all aliquots as they are added to a Progeny database, or can add multiple reactions with each reaction creating a different type of aliquot and each aliquot type having a unique naming convention. For example, users can add a reaction named Create Blood Aliquots with a naming convention that results in samples named Blood1, Blood2, Blood3, and so on. Users can also add a reaction named Create Serum Aliquots with a naming convention that results in samples named Serum1, Serum2, Serum3, and so on.
To add a create aliquot reaction 1. Open one of the following windows - Samples, Inventory, or Containers.
2. Select the Reactions button from the toolbar. The “Reactions” dialogue box opens.
Figure 14-6: Reactions dialogue box
3. Click “New”. The “New Reaction” dialogue box opens.
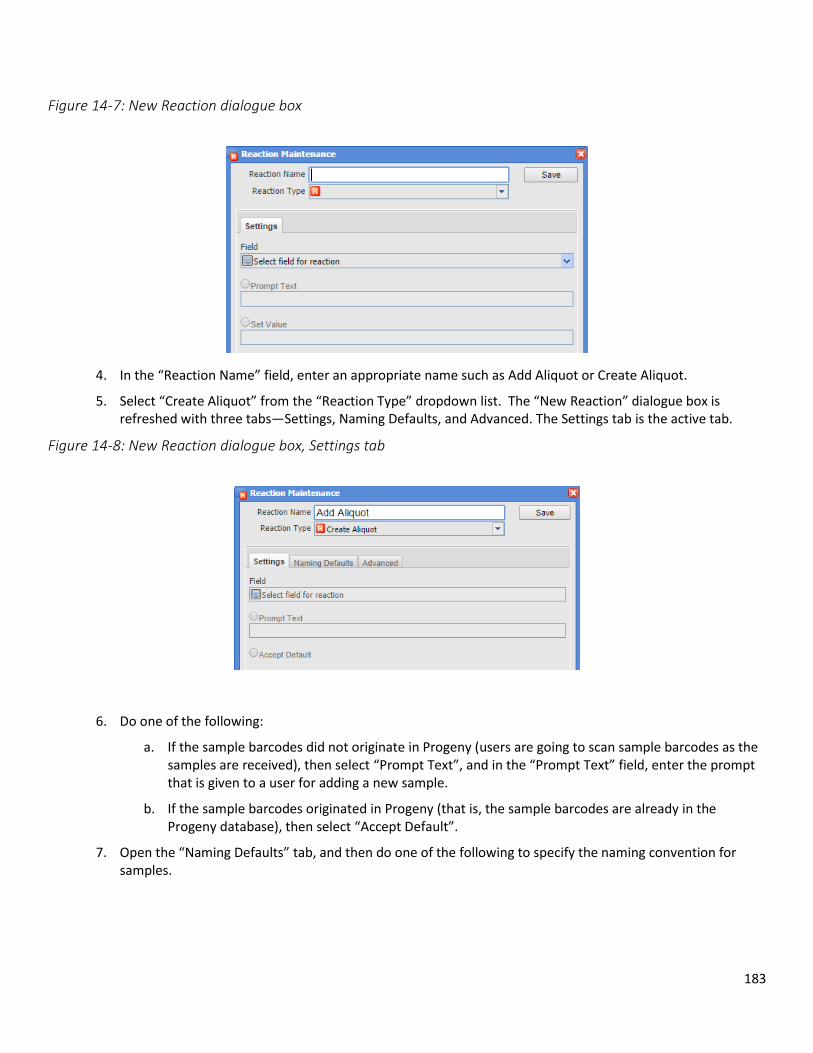
183
Figure 14-7: New Reaction dialogue box
4. In the “Reaction Name” field, enter an appropriate name such as Add Aliquot or Create Aliquot.
5. Select “Create Aliquot” from the “Reaction Type” dropdown list. The “New Reaction” dialogue box is refreshed with three tabs—Settings, Naming Defaults, and Advanced. The Settings tab is the active tab.
Figure 14-8: New Reaction dialogue box, Settings tab
6. Do one of the following:
a. If the sample barcodes did not originate in Progeny (users are going to scan sample barcodes as the samples are received), then select “Prompt Text”, and in the “Prompt Text” field, enter the prompt that is given to a user for adding a new sample.
b. If the sample barcodes originated in Progeny (that is, the sample barcodes are already in the Progeny database), then select “Accept Default”.
7. Open the “Naming Defaults” tab, and then do one of the following to specify the naming convention for samples.
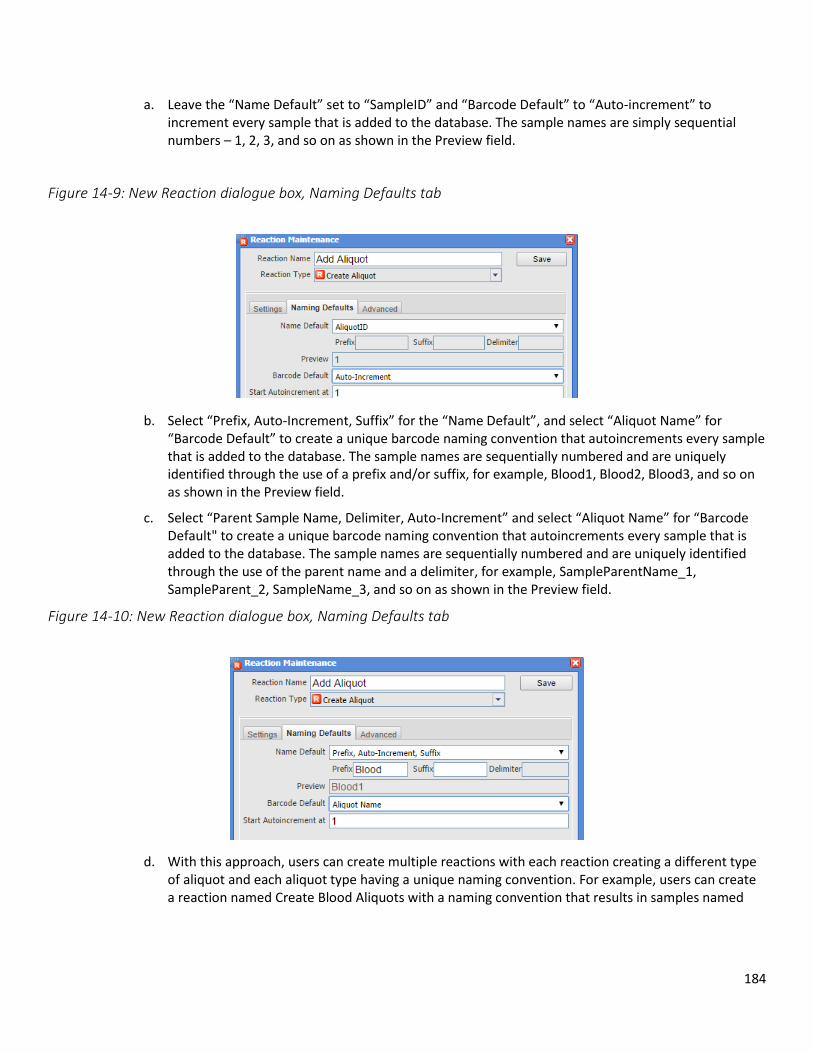
184
a. Leave the “Name Default” set to “SampleID” and “Barcode Default” to “Auto-increment” to increment every sample that is added to the database. The sample names are simply sequential numbers – 1, 2, 3, and so on as shown in the Preview field.
Figure 14-9: New Reaction dialogue box, Naming Defaults tab
b. Select “Prefix, Auto-Increment, Suffix” for the “Name Default”, and select “Aliquot Name” for “Barcode Default” to create a unique barcode naming convention that autoincrements every sample that is added to the database. The sample names are sequentially numbered and are uniquely identified through the use of a prefix and/or suffix, for example, Blood1, Blood2, Blood3, and so on as shown in the Preview field.
c. Select “Parent Sample Name, Delimiter, Auto-Increment” and select “Aliquot Name” for “Barcode Default" to create a unique barcode naming convention that autoincrements every sample that is added to the database. The sample names are sequentially numbered and are uniquely identified through the use of the parent name and a delimiter, for example, SampleParentName_1, SampleParent_2, SampleName_3, and so on as shown in the Preview field.
Figure 14-10: New Reaction dialogue box, Naming Defaults tab
d. With this approach, users can create multiple reactions with each reaction creating a different type of aliquot and each aliquot type having a unique naming convention. For example, users can create a reaction named Create Blood Aliquots with a naming convention that results in samples named
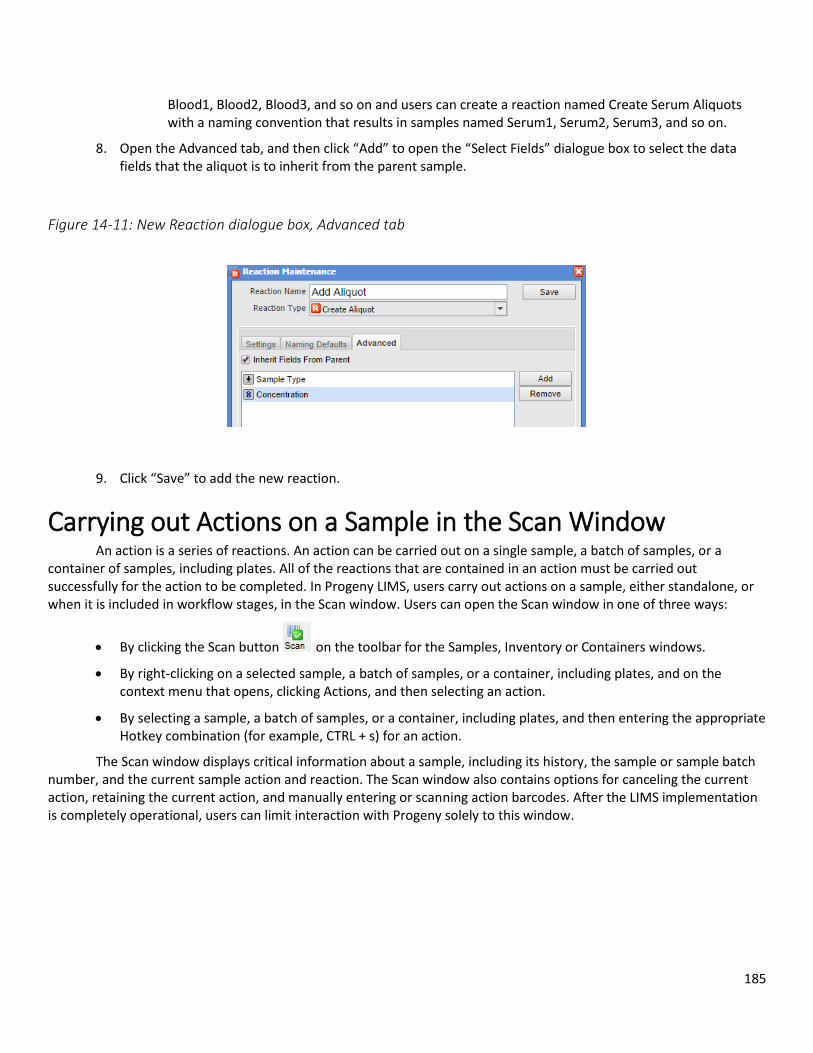
185
Blood1, Blood2, Blood3, and so on and users can create a reaction named Create Serum Aliquots with a naming convention that results in samples named Serum1, Serum2, Serum3, and so on.
8. Open the Advanced tab, and then click “Add” to open the “Select Fields” dialogue box to select the data fields that the aliquot is to inherit from the parent sample.
Figure 14-11: New Reaction dialogue box, Advanced tab
9. Click “Save” to add the new reaction.
Carrying out Actions on a Sample in the Scan Window An action is a series of reactions. An action can be carried out on a single sample, a batch of samples, or a container of samples, including plates. All of the reactions that are contained in an action must be carried out successfully for the action to be completed. In Progeny LIMS, users carry out actions on a sample, either standalone, or when it is included in workflow stages, in the Scan window. Users can open the Scan window in one of three ways:
By clicking the Scan button on the toolbar for the Samples, Inventory or Containers windows.
By right-clicking on a selected sample, a batch of samples, or a container, including plates, and on the context menu that opens, clicking Actions, and then selecting an action.
By selecting a sample, a batch of samples, or a container, including plates, and then entering the appropriate Hotkey combination (for example, CTRL + s) for an action.
The Scan window displays critical information about a sample, including its history, the sample or sample batch number, and the current sample action and reaction. The Scan window also contains options for canceling the current action, retaining the current action, and manually entering or scanning action barcodes. After the LIMS implementation is completely operational, users can limit interaction with Progeny solely to this window.
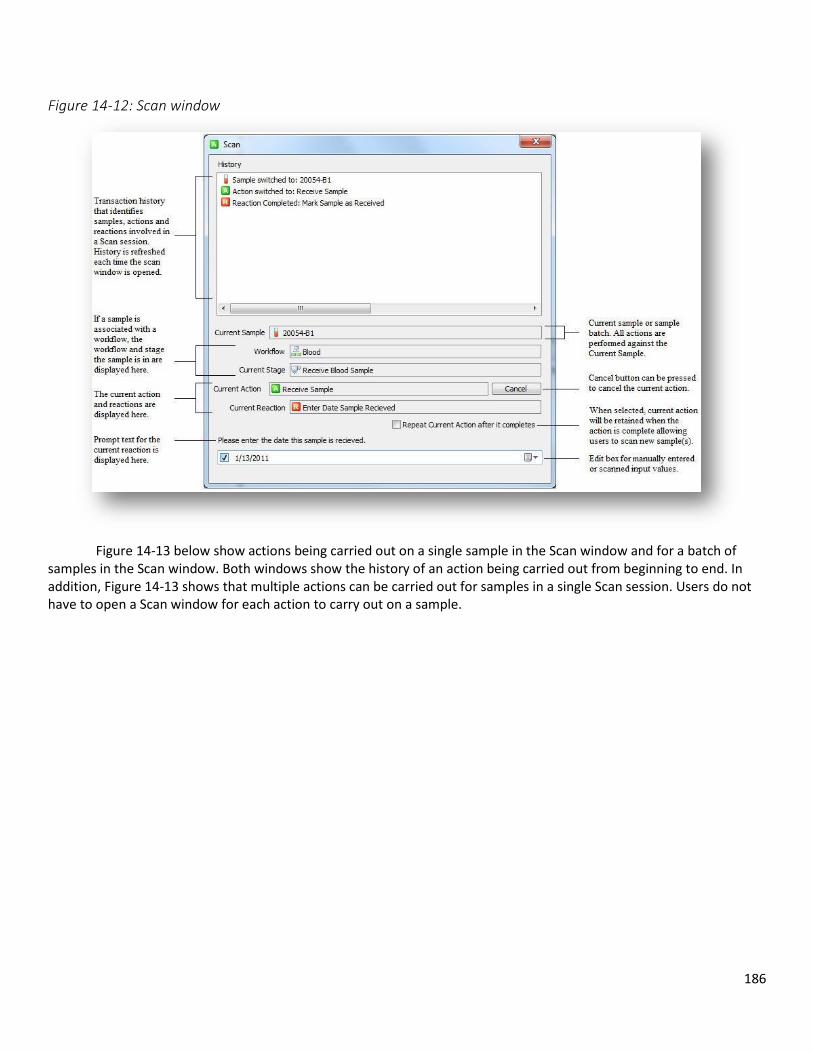
186
Figure 14-12: Scan window
Figure 14-13 below show actions being carried out on a single sample in the Scan window and for a batch of samples in the Scan window. Both windows show the history of an action being carried out from beginning to end. In addition, Figure 14-13 shows that multiple actions can be carried out for samples in a single Scan session. Users do not have to open a Scan window for each action to carry out on a sample.
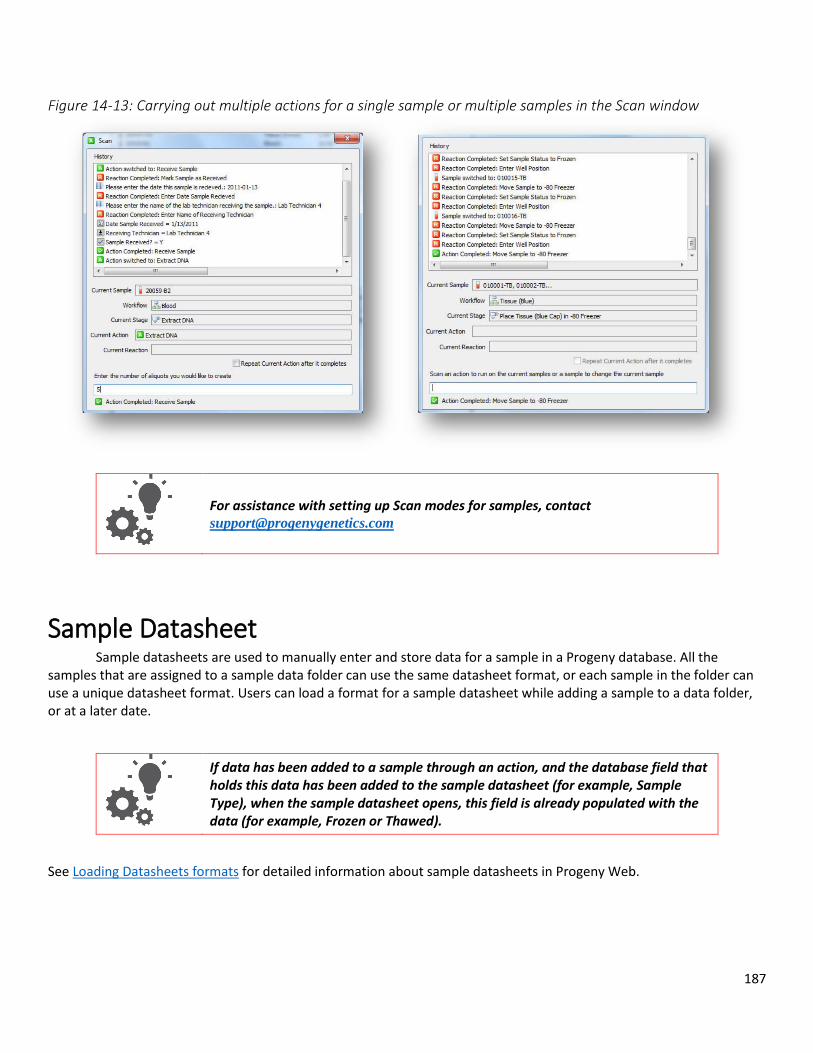
187
Figure 14-13: Carrying out multiple actions for a single sample or multiple samples in the Scan window
For assistance with setting up Scan modes for samples, contact [email protected]
Sample Datasheet Sample datasheets are used to manually enter and store data for a sample in a Progeny database. All the samples that are assigned to a sample data folder can use the same datasheet format, or each sample in the folder can use a unique datasheet format. Users can load a format for a sample datasheet while adding a sample to a data folder, or at a later date.
If data has been added to a sample through an action, and the database field that holds this data has been added to the sample datasheet (for example, Sample Type), when the sample datasheet opens, this field is already populated with the data (for example, Frozen or Thawed).
See Loading Datasheets formats for detailed information about sample datasheets in Progeny Web.
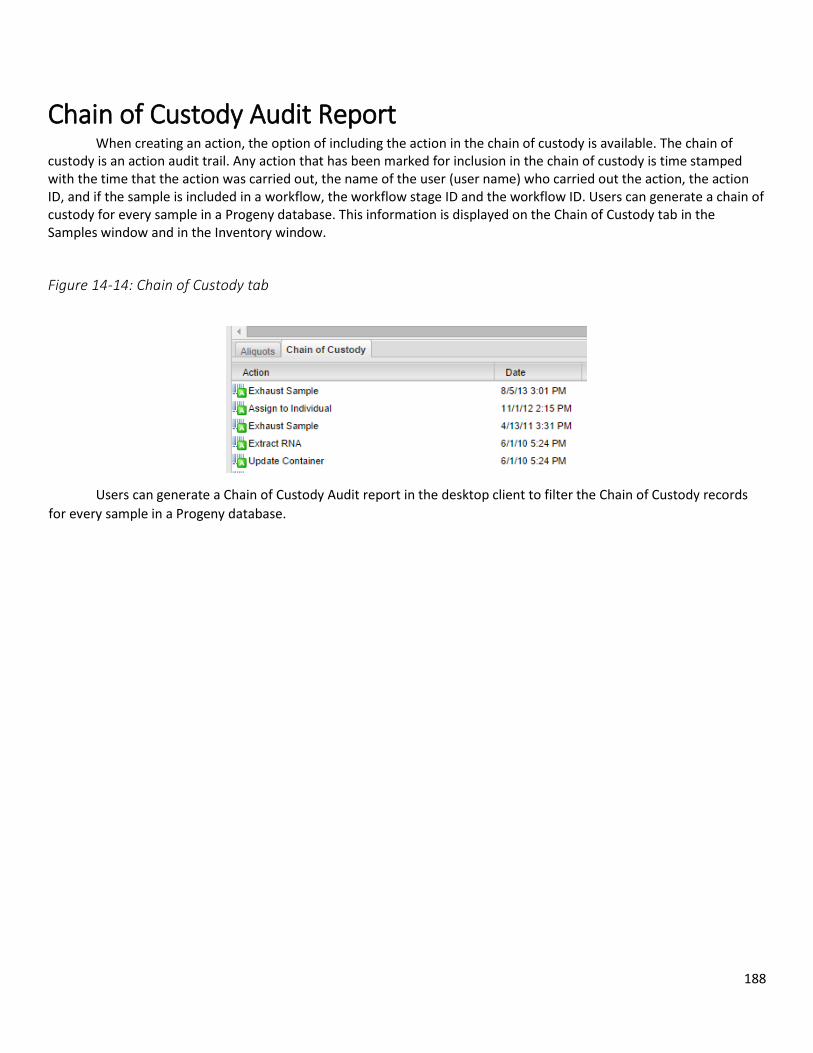
188
Chain of Custody Audit Report When creating an action, the option of including the action in the chain of custody is available. The chain of custody is an action audit trail. Any action that has been marked for inclusion in the chain of custody is time stamped with the time that the action was carried out, the name of the user (user name) who carried out the action, the action ID, and if the sample is included in a workflow, the workflow stage ID and the workflow ID. Users can generate a chain of custody for every sample in a Progeny database. This information is displayed on the Chain of Custody tab in the Samples window and in the Inventory window.
Figure 14-14: Chain of Custody tab
Users can generate a Chain of Custody Audit report in the desktop client to filter the Chain of Custody records
for every sample in a Progeny database.
189
Chapter 15 Managing Workflows
A workflow, (also referred to as a sample workflow) is a collection of actions that have been arranged into a step-by-step procedure. A workflow is made up of multiple stages, with each stage associated with exactly one action. After a sample is placed into a workflow, the movement of the sample from one stage to the next can be tracked and recorded until the sample is ultimately exhausted and removed from the workflow. Managing a workflow includes creating, modifying, and deleting workflows, assigning a sample to a workflow, and moving a sample through a workflow.
This chapter covers the following topics:
Workflows Window
Creating a New Workflow
Modifying and Deleting a Workflow Stage
Deleting a Workflow
Assigning a Sample to a Workflow
Moving Samples through a Workflow
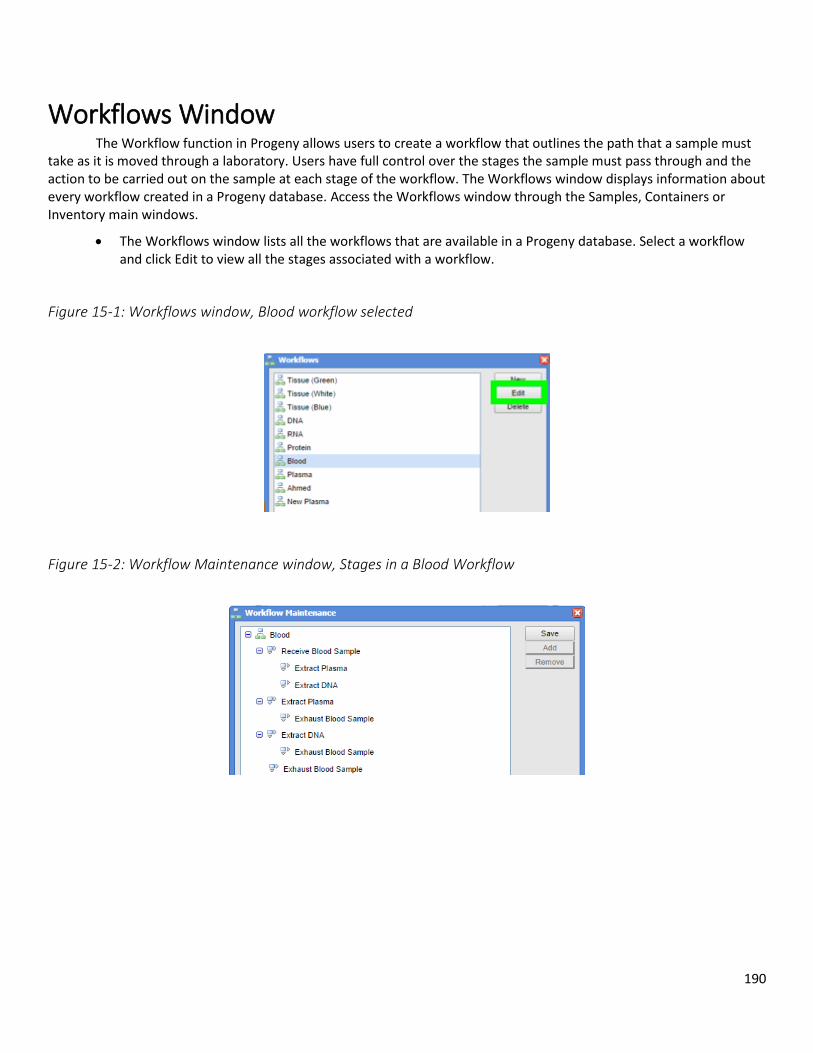
190
Workflows Window The Workflow function in Progeny allows users to create a workflow that outlines the path that a sample must take as it is moved through a laboratory. Users have full control over the stages the sample must pass through and the action to be carried out on the sample at each stage of the workflow. The Workflows window displays information about every workflow created in a Progeny database. Access the Workflows window through the Samples, Containers or Inventory main windows.
The Workflows window lists all the workflows that are available in a Progeny database. Select a workflow and click Edit to view all the stages associated with a workflow.
Figure 15-1: Workflows window, Blood workflow selected
Figure 15-2: Workflow Maintenance window, Stages in a Blood Workflow
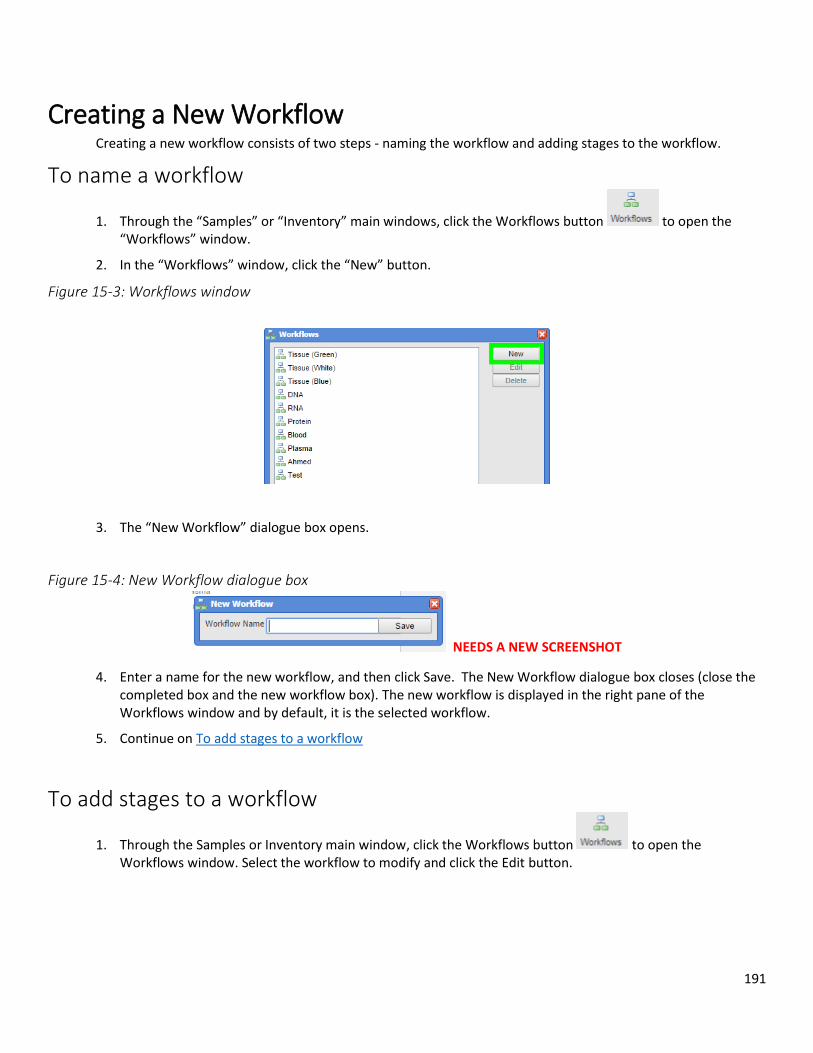
191
Creating a New Workflow Creating a new workflow consists of two steps - naming the workflow and adding stages to the workflow.
To name a workflow
1. Through the “Samples” or “Inventory” main windows, click the Workflows button to open the “Workflows” window.
2. In the “Workflows” window, click the “New” button.
Figure 15-3: Workflows window
3. The “New Workflow” dialogue box opens.
Figure 15-4: New Workflow dialogue box
NEEDS A NEW SCREENSHOT
4. Enter a name for the new workflow, and then click Save. The New Workflow dialogue box closes (close the completed box and the new workflow box). The new workflow is displayed in the right pane of the Workflows window and by default, it is the selected workflow.
5. Continue on To add stages to a workflow
To add stages to a workflow
1. Through the Samples or Inventory main window, click the Workflows button to open the Workflows window. Select the workflow to modify and click the Edit button.
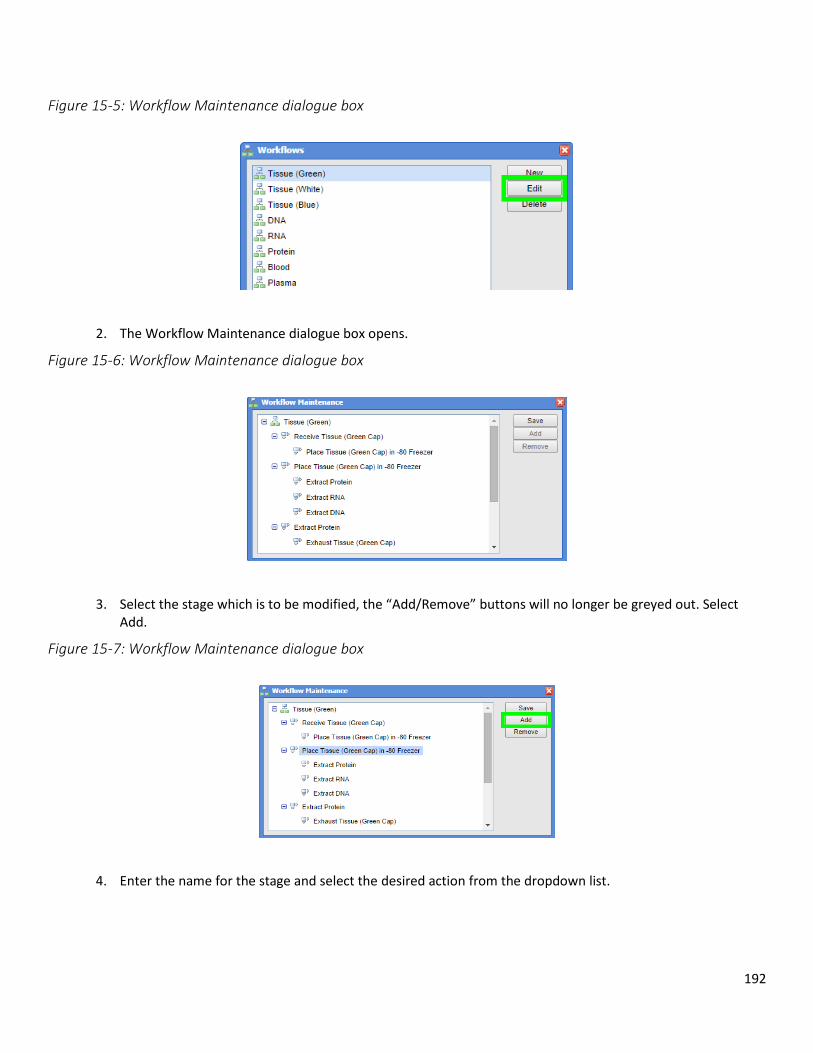
192
Figure 15-5: Workflow Maintenance dialogue box
2. The Workflow Maintenance dialogue box opens.
Figure 15-6: Workflow Maintenance dialogue box
3. Select the stage which is to be modified, the “Add/Remove” buttons will no longer be greyed out. Select Add.
Figure 15-7: Workflow Maintenance dialogue box
4. Enter the name for the stage and select the desired action from the dropdown list.

193
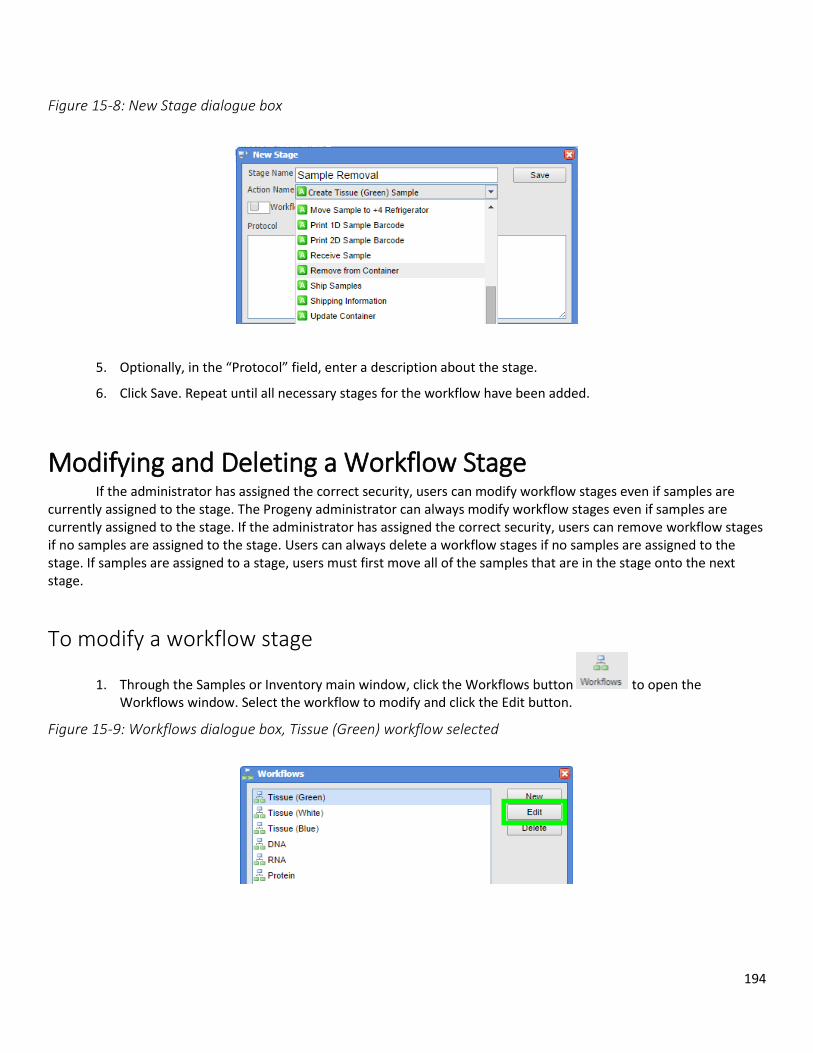
194
Figure 15-8: New Stage dialogue box
5. Optionally, in the “Protocol” field, enter a description about the stage.
6. Click Save. Repeat until all necessary stages for the workflow have been added.
Modifying and Deleting a Workflow Stage If the administrator has assigned the correct security, users can modify workflow stages even if samples are currently assigned to the stage. The Progeny administrator can always modify workflow stages even if samples are currently assigned to the stage. If the administrator has assigned the correct security, users can remove workflow stages if no samples are assigned to the stage. Users can always delete a workflow stages if no samples are assigned to the stage. If samples are assigned to a stage, users must first move all of the samples that are in the stage onto the next stage.
To modify a workflow stage
1. Through the Samples or Inventory main window, click the Workflows button to open the Workflows window. Select the workflow to modify and click the Edit button.
Figure 15-9: Workflows dialogue box, Tissue (Green) workflow selected
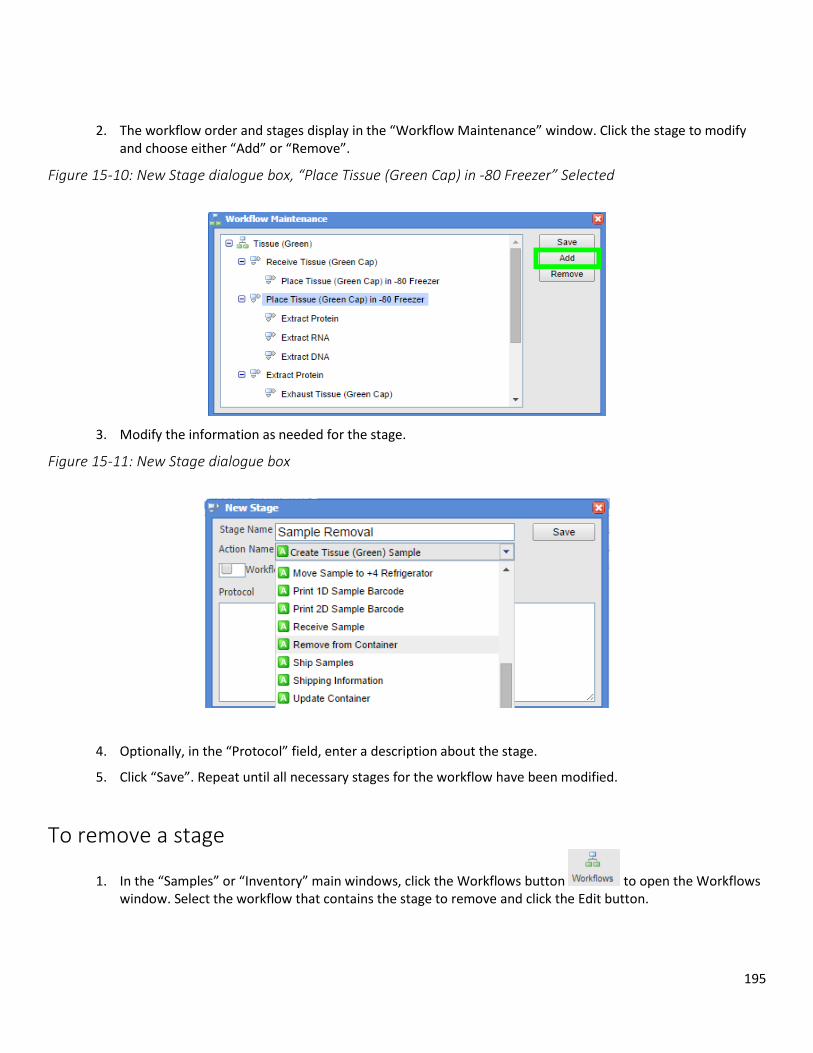
195
2. The workflow order and stages display in the “Workflow Maintenance” window. Click the stage to modify and choose either “Add” or “Remove”.
Figure 15-10: New Stage dialogue box, “Place Tissue (Green Cap) in -80 Freezer” Selected
3. Modify the information as needed for the stage.
Figure 15-11: New Stage dialogue box
4. Optionally, in the “Protocol” field, enter a description about the stage.
5. Click “Save”. Repeat until all necessary stages for the workflow have been modified.
To remove a stage
1. In the “Samples” or “Inventory” main windows, click the Workflows button to open the Workflows window. Select the workflow that contains the stage to remove and click the Edit button.
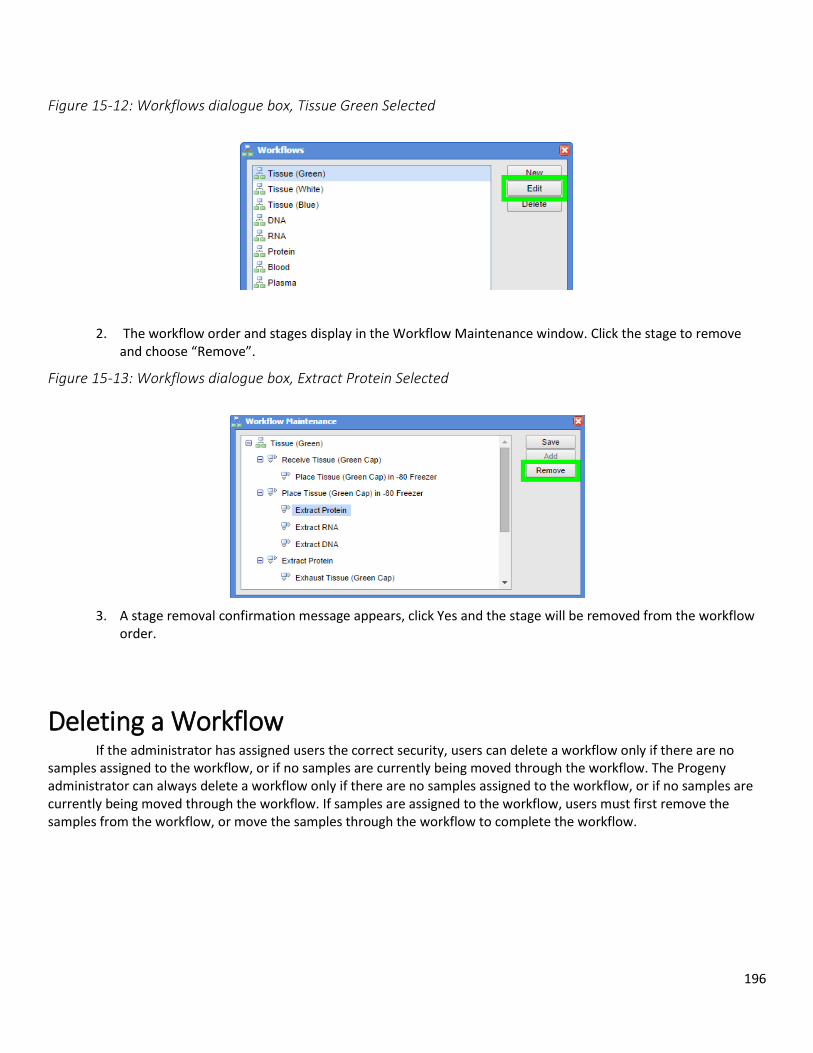
196
Figure 15-12: Workflows dialogue box, Tissue Green Selected
2. The workflow order and stages display in the Workflow Maintenance window. Click the stage to remove and choose “Remove”.
Figure 15-13: Workflows dialogue box, Extract Protein Selected
3. A stage removal confirmation message appears, click Yes and the stage will be removed from the workflow order.
Deleting a Workflow If the administrator has assigned users the correct security, users can delete a workflow only if there are no samples assigned to the workflow, or if no samples are currently being moved through the workflow. The Progeny administrator can always delete a workflow only if there are no samples assigned to the workflow, or if no samples are currently being moved through the workflow. If samples are assigned to the workflow, users must first remove the samples from the workflow, or move the samples through the workflow to complete the workflow.
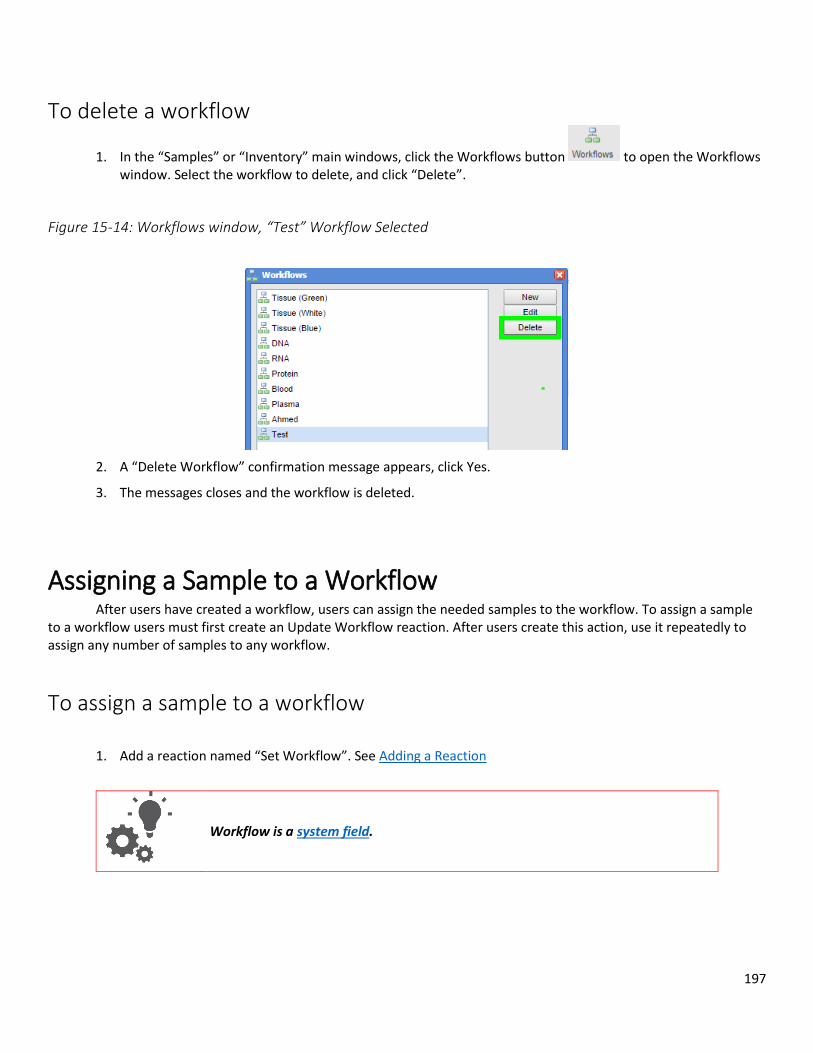
197
To delete a workflow
1. In the “Samples” or “Inventory” main windows, click the Workflows button to open the Workflows window. Select the workflow to delete, and click “Delete”.
Figure 15-14: Workflows window, “Test” Workflow Selected
2. A “Delete Workflow” confirmation message appears, click Yes.
3. The messages closes and the workflow is deleted.
Assigning a Sample to a Workflow After users have created a workflow, users can assign the needed samples to the workflow. To assign a sample to a workflow users must first create an Update Workflow reaction. After users create this action, use it repeatedly to assign any number of samples to any workflow.
To assign a sample to a workflow
1. Add a reaction named “Set Workflow”. See Adding a Reaction
Workflow is a system field.
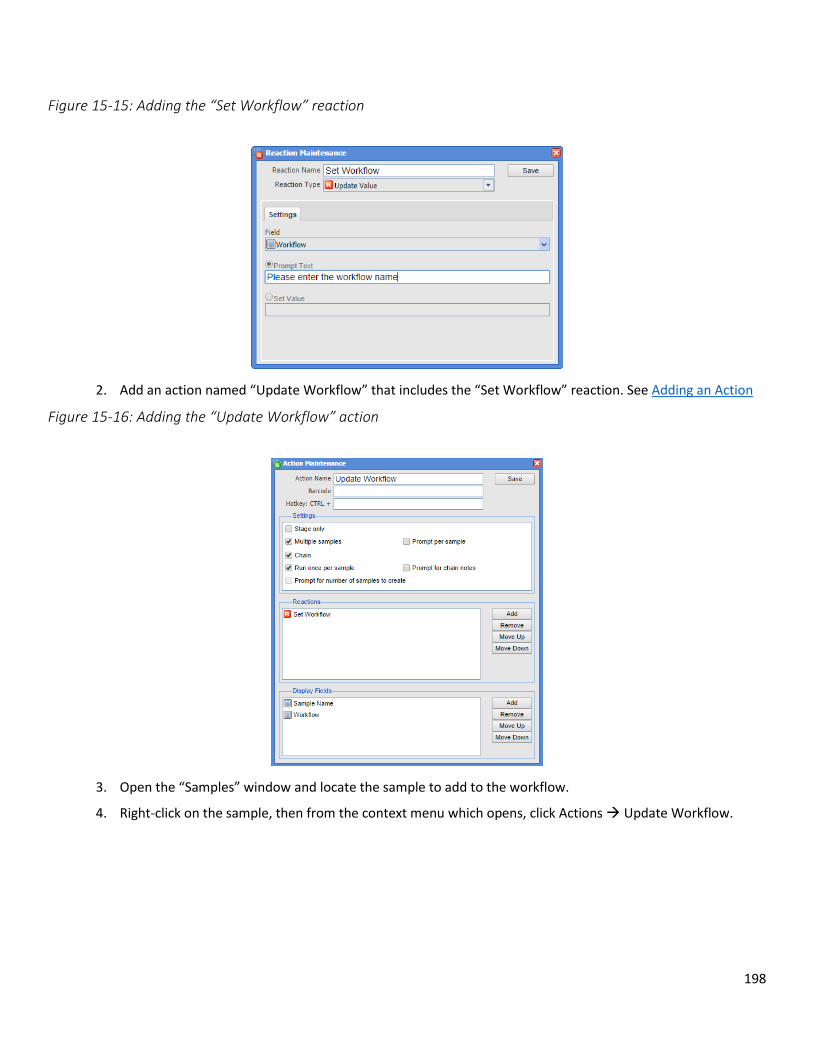
198
Figure 15-15: Adding the “Set Workflow” reaction
2. Add an action named “Update Workflow” that includes the “Set Workflow” reaction. See Adding an Action
Figure 15-16: Adding the “Update Workflow” action
3. Open the “Samples” window and locate the sample to add to the workflow.
4. Right-click on the sample, then from the context menu which opens, click Actions Update Workflow.
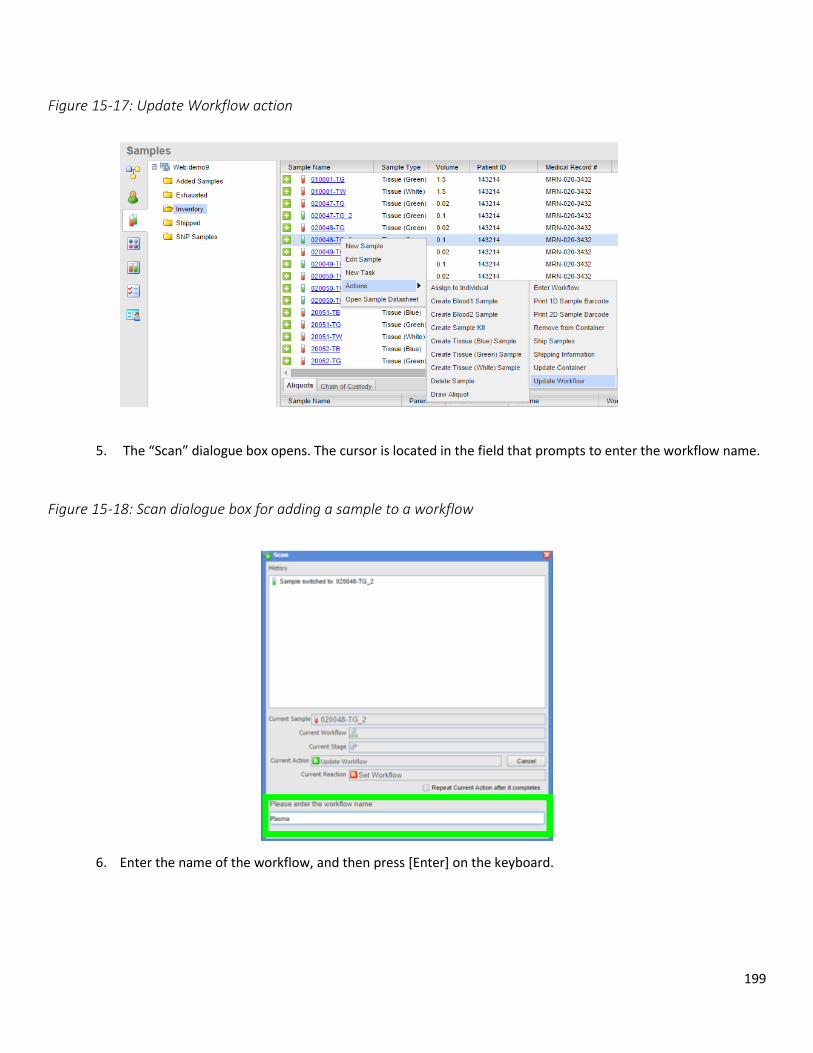
199
Figure 15-17: Update Workflow action
5. The “Scan” dialogue box opens. The cursor is located in the field that prompts to enter the workflow name.
Figure 15-18: Scan dialogue box for adding a sample to a workflow
6. Enter the name of the workflow, and then press [Enter] on the keyboard.
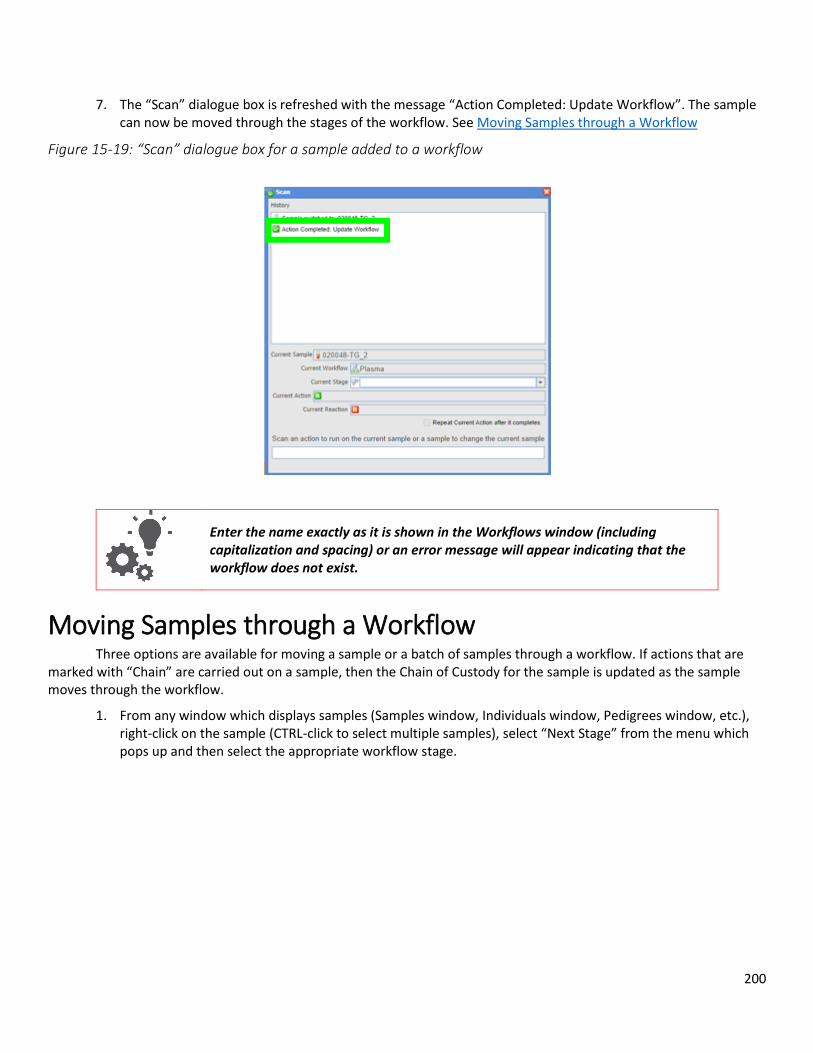
200
7. The “Scan” dialogue box is refreshed with the message “Action Completed: Update Workflow”. The sample can now be moved through the stages of the workflow. See Moving Samples through a Workflow
Figure 15-19: “Scan” dialogue box for a sample added to a workflow
Enter the name exactly as it is shown in the Workflows window (including capitalization and spacing) or an error message will appear indicating that the workflow does not exist.
Moving Samples through a Workflow Three options are available for moving a sample or a batch of samples through a workflow. If actions that are marked with “Chain” are carried out on a sample, then the Chain of Custody for the sample is updated as the sample moves through the workflow.
1. From any window which displays samples (Samples window, Individuals window, Pedigrees window, etc.), right-click on the sample (CTRL-click to select multiple samples), select “Next Stage” from the menu which pops up and then select the appropriate workflow stage.
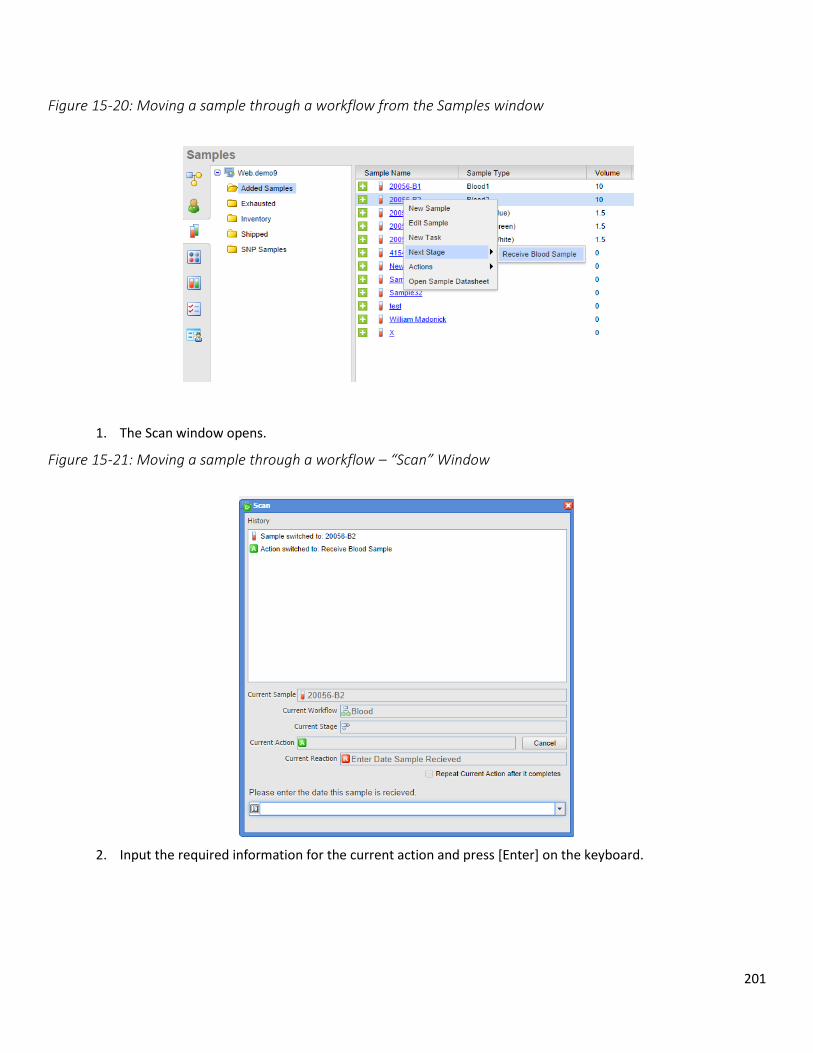
201
Figure 15-20: Moving a sample through a workflow from the Samples window
1. The Scan window opens.
Figure 15-21: Moving a sample through a workflow – “Scan” Window
2. Input the required information for the current action and press [Enter] on the keyboard.
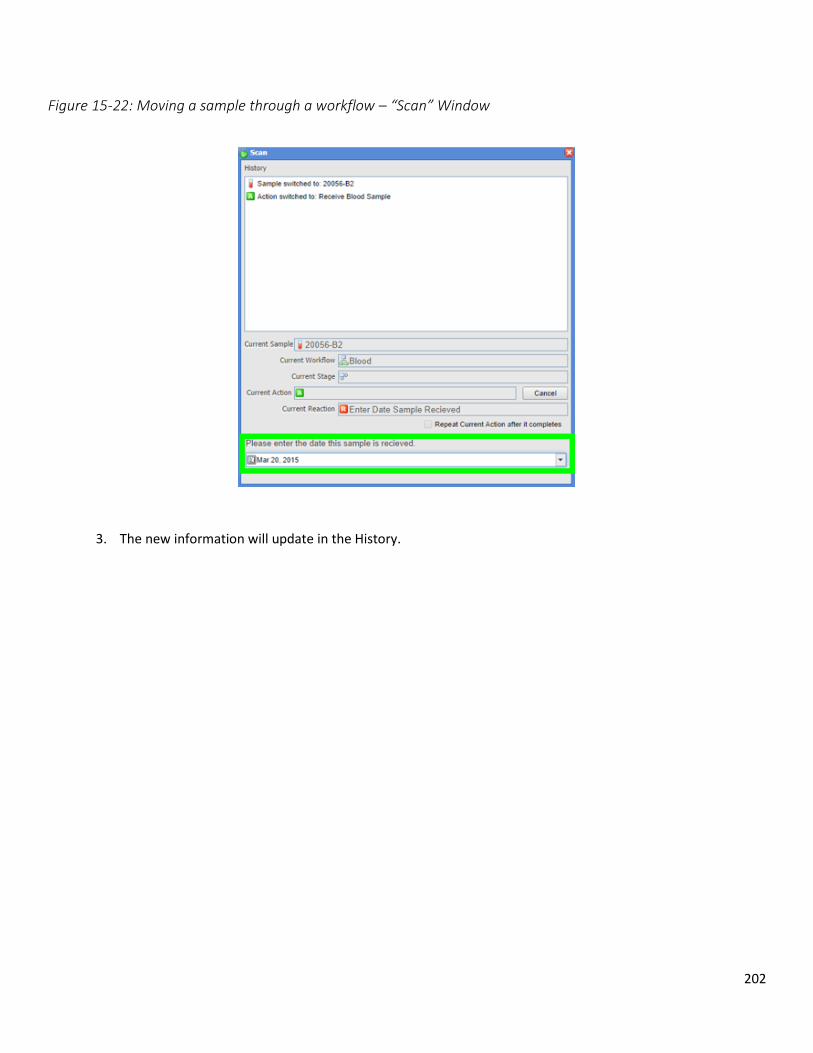
202
Figure 15-22: Moving a sample through a workflow – “Scan” Window
3. The new information will update in the History.
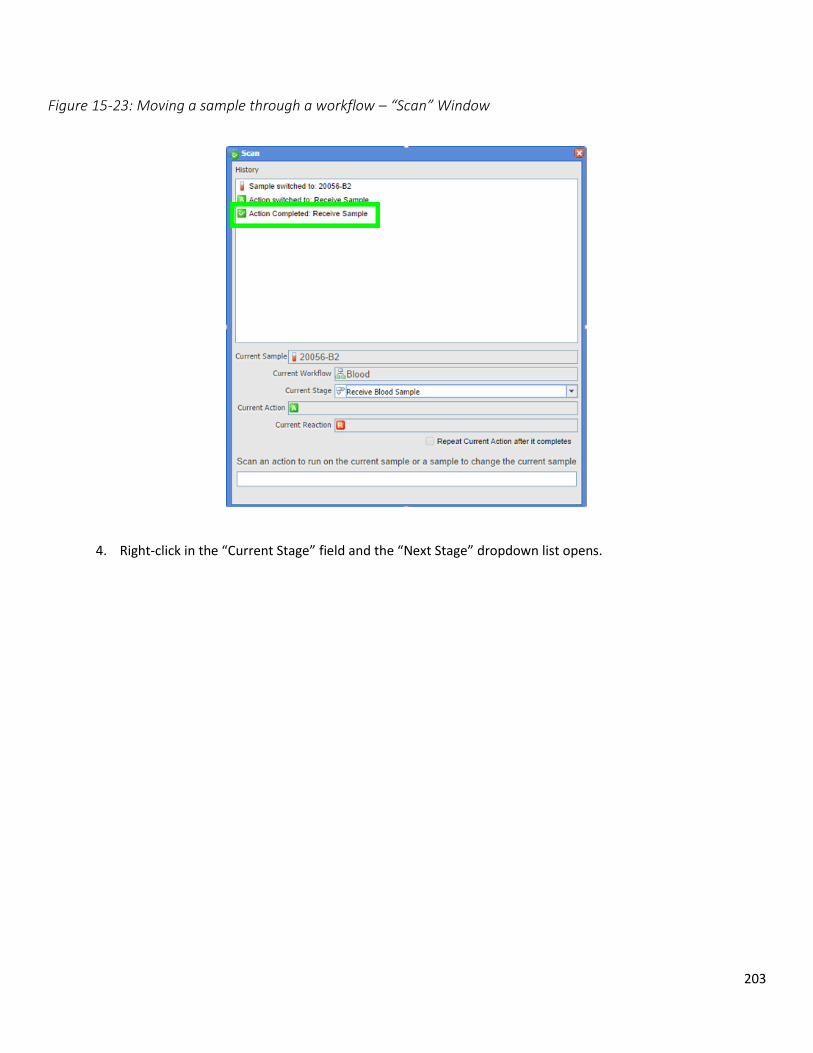
203
Figure 15-23: Moving a sample through a workflow – “Scan” Window
4. Right-click in the “Current Stage” field and the “Next Stage” dropdown list opens.
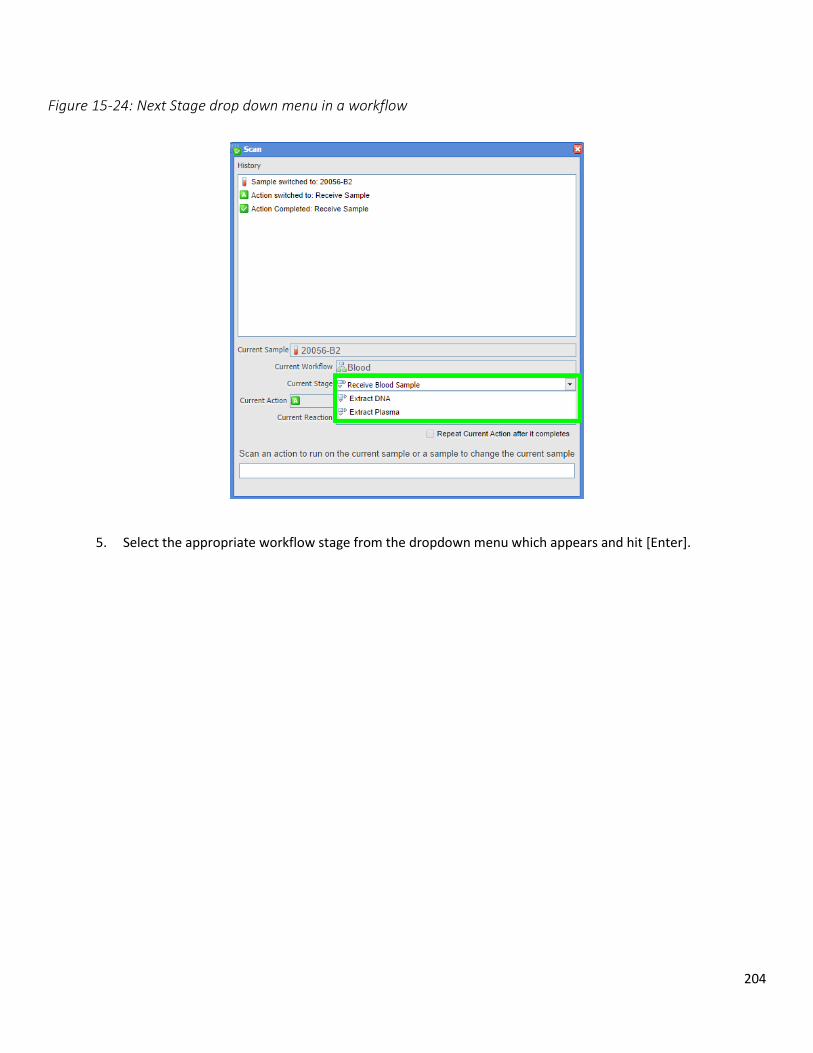
204
Figure 15-24: Next Stage drop down menu in a workflow
5. Select the appropriate workflow stage from the dropdown menu which appears and hit [Enter].

205
Figure 15-25: Next Stage drop down menu in a workflow
6. The new information will update in the History.
Figure 15-26: Next Stage Listed in History
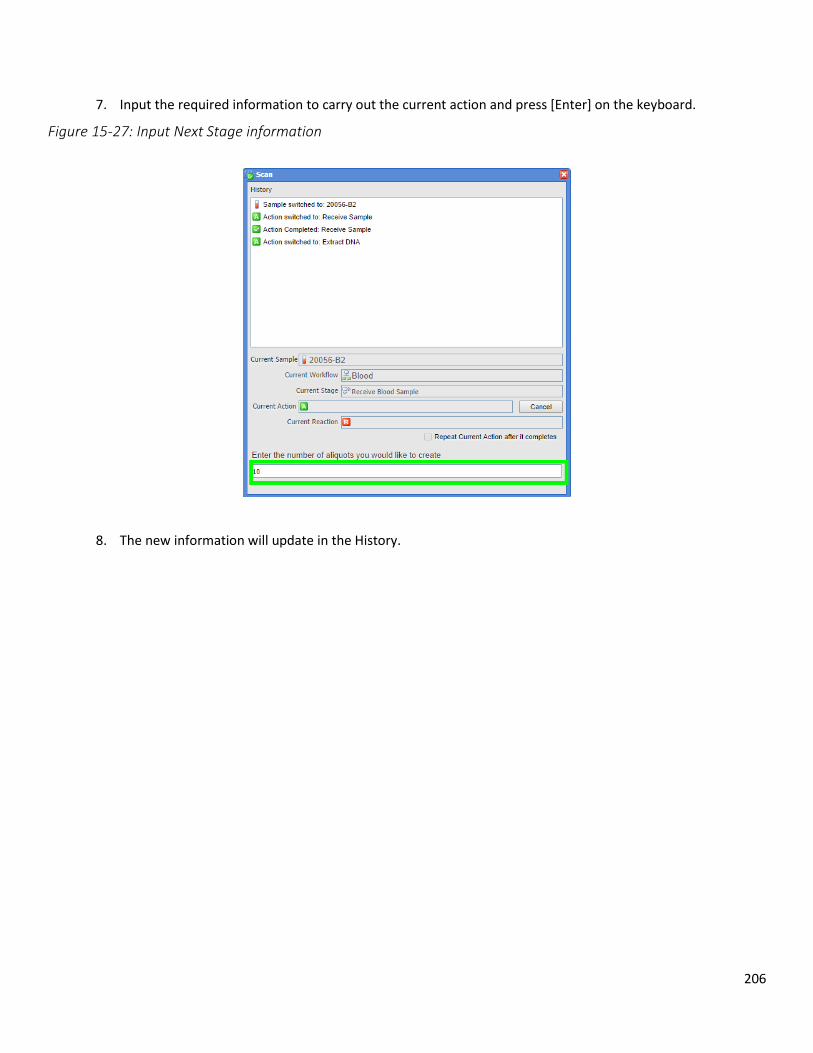
206
7. Input the required information to carry out the current action and press [Enter] on the keyboard.
Figure 15-27: Input Next Stage information
8. The new information will update in the History.
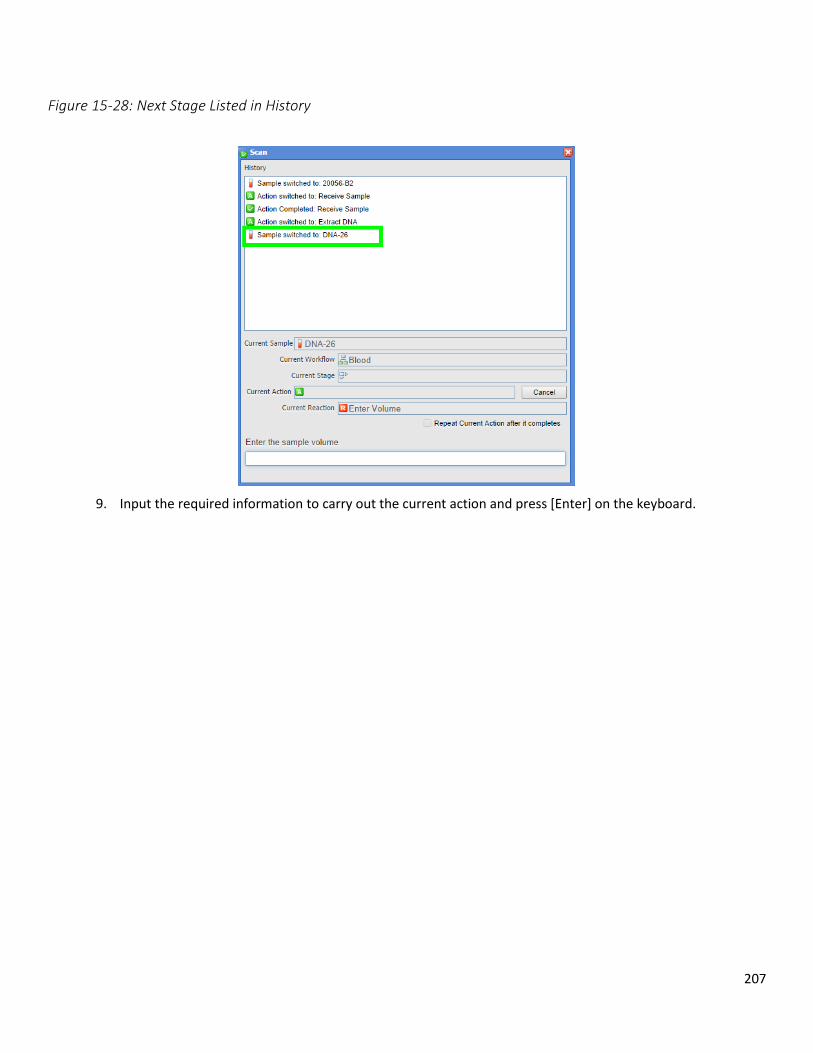
207
Figure 15-28: Next Stage Listed in History
9. Input the required information to carry out the current action and press [Enter] on the keyboard.

208
Figure 15-29: Input Next Stage information
10. The new information will update in the History.
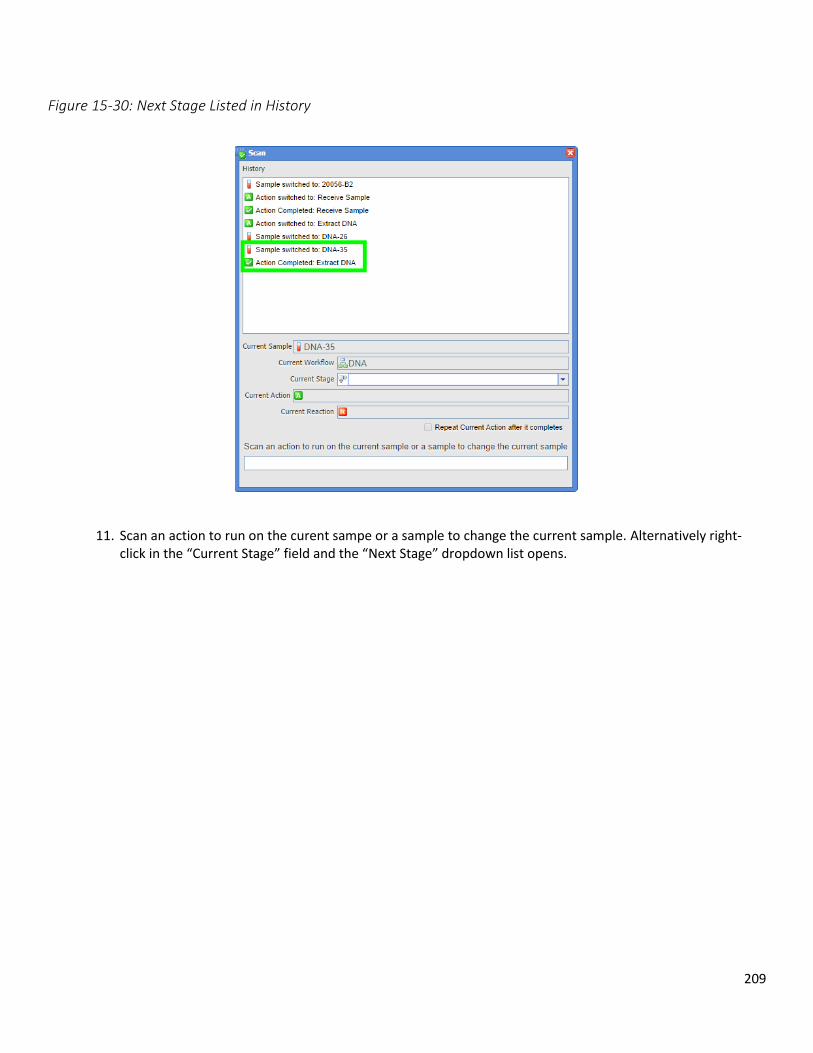
209
Figure 15-30: Next Stage Listed in History
11. Scan an action to run on the curent sampe or a sample to change the current sample. Alternatively right-click in the “Current Stage” field and the “Next Stage” dropdown list opens.
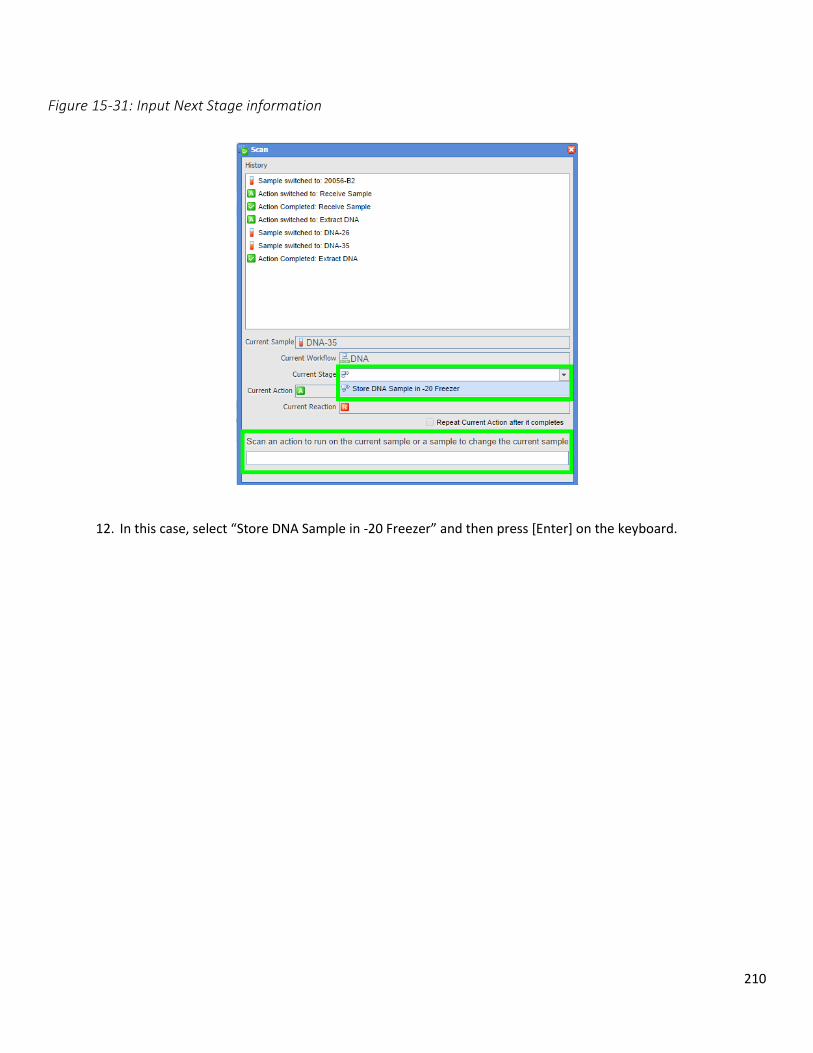
210
Figure 15-31: Input Next Stage information
12. In this case, select “Store DNA Sample in -20 Freezer” and then press [Enter] on the keyboard.
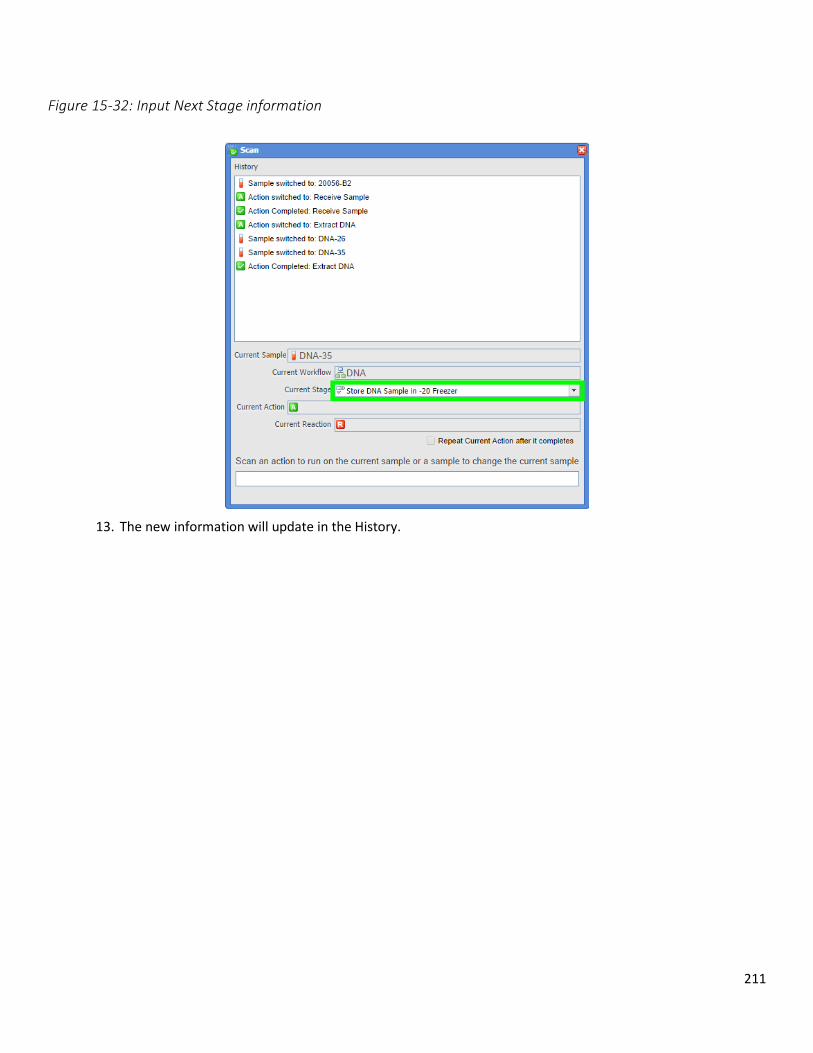
211
Figure 15-32: Input Next Stage information
13. The new information will update in the History.
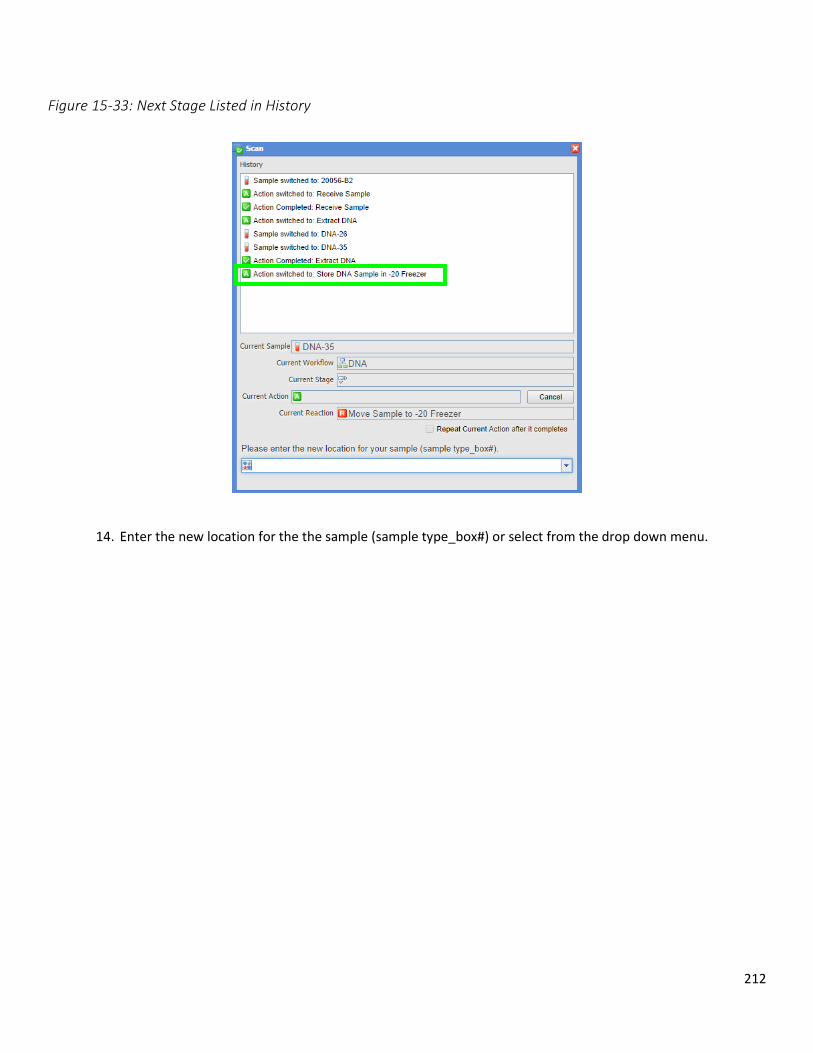
212
Figure 15-33: Next Stage Listed in History
14. Enter the new location for the the sample (sample type_box#) or select from the drop down menu.
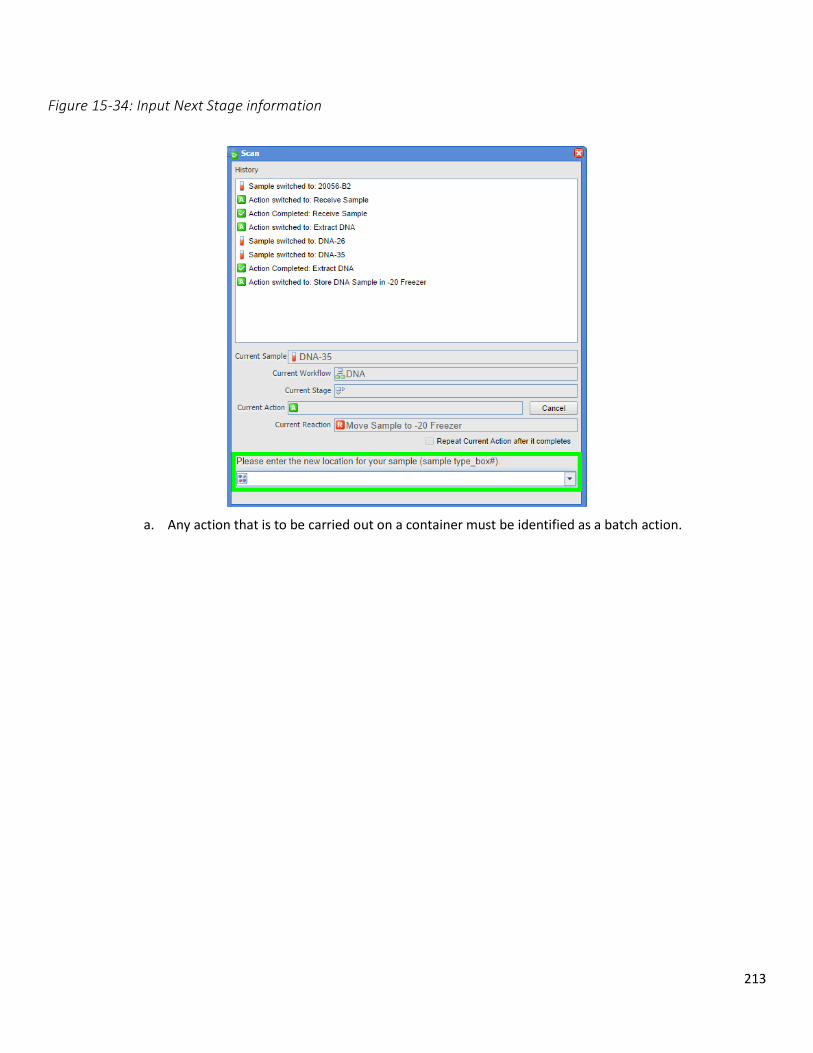
213
Figure 15-34: Input Next Stage information
a. Any action that is to be carried out on a container must be identified as a batch action.
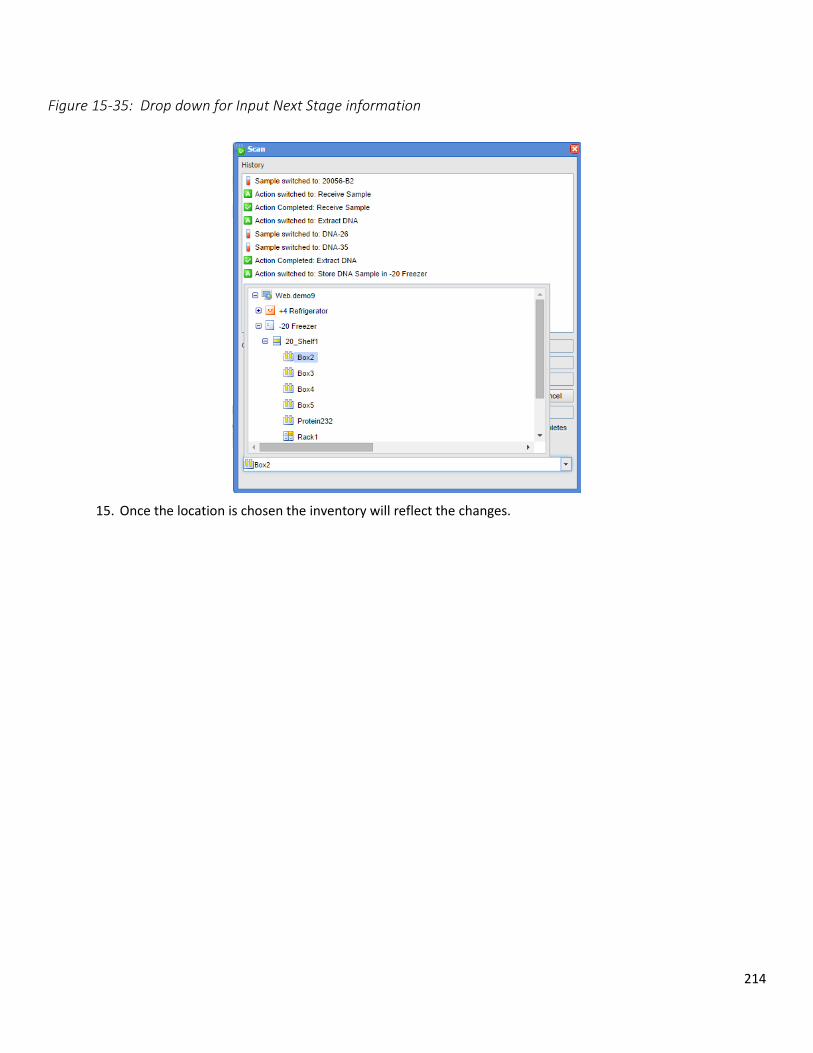
214
Figure 15-35: Drop down for Input Next Stage information
15. Once the location is chosen the inventory will reflect the changes.