veritas netbackup 9.1 cloud marketplace deployment
TRANSCRIPT
Veritas NetBackup 9.1 Cloud
Marketplace Deployment Microsoft Azure

Copyright © 2021 Veritas Technologies LLC. All rights reserved. Veritas, the Veritas Logo, and NetBackup are trademarks or registered
trademarks of Veritas Technologies LLC or its affiliates in the U.S. and other countries. Other names may be trademarks of their respective owners.
1 Veritas NetBackup 9.1 Cloud Marketplace Deployment: Azure
Disclaimer
The information contained in this publication is subject to change without notice. Veritas Technologies
LLC makes no warranty of any kind with regard to this manual, including, but not limited to, the implied
warranties of merchantability and fitness for a particular purpose. Veritas Technologies LLC shall not be
liable for errors contained herein or for incidental or consequential damages in connection with the
furnishing, performance, or use of this manual.
The software described in this book is furnished under a license agreement and may be used only in
accordance with the terms of the agreement.
Legal Notice Copyright © 2021
Veritas Technologies LLC. All rights reserved.
Veritas and the Veritas Logo are trademarks or registered trademarks of Veritas Technologies LLC or its
affiliates in the U.S. and other countries. Other names may be trademarks of their respective owners.
The product described in this document is distributed under licenses restricting its use, copying,
distribution, and decompilation/reverse engineering. No part of this document may be reproduced in any
form by any means without prior written authorization of Veritas Technologies LLC and its licensors, if
any.
THE DOCUMENTATION IS PROVIDED "AS IS" AND ALL EXPRESS OR IMPLIED CONDITIONS,
REPRESENTATIONS AND WARRANTIES, INCLUDING ANY IMPLIED WARRANTY OF
MERCHANTABILITY, FITNESS FOR A PARTICULAR PURPOSE OR NON-INFRINGEMENT, ARE
DISCLAIMED, EXCEPT TO THE EXTENT THAT SUCH DISCLAIMERS ARE HELD TO BE
LEGALLY INVALID. VERITAS TECHNOLOGIES LLC SHALL NOT BE LIABLE FOR
INCIDENTAL OR CONSEQUENTIAL DAMAGES IN CONNECTION WITH THE FURNISHING,
PERFORMANCE, OR USE OF THIS DOCUMENTATION. THE INFORMATION CONTAINED IN
THIS DOCUMENTATION IS SUBJECT TO CHANGE WITHOUT NOTICE.
Veritas Technologies LLC
2625 Augustine Drive
Santa Clara, CA 95054
http://www.veritas.com
Third-Party Legal Notices
This Veritas product may contain third party software for which Veritas is required to provide attribution
(“Third Party Programs”). Some of the Third Party Programs are available under open source or free
software licenses. The License Agreement accompanying the Licensed Software does not alter any rights or
obligations you may have under those open source or free software licenses. This document or appendix
contains proprietary notices for the Third Party Programs and the licenses for the Third Party Programs,
where applicable.

Copyright © 2021 Veritas Technologies LLC. All rights reserved. Veritas, the Veritas Logo, and NetBackup are trademarks or registered
trademarks of Veritas Technologies LLC or its affiliates in the U.S. and other countries. Other names may be trademarks of their respective owners.
2 Veritas NetBackup 9.1 Cloud Marketplace Deployment: Azure
The following copyright statements and licenses apply to various open source software components (or
portions thereof) that are distributed with the Licensed Software.
The Licensed Software that includes this file does not necessarily use all the open source software components
referred to below and may also only use portions of a given component.
Copyright © 2021 Veritas Technologies LLC. All rights reserved. Veritas, the Veritas Logo, and NetBackup are trademarks or registered
trademarks of Veritas Technologies LLC or its affiliates in the U.S. and other countries. Other names may be trademarks of their respective owners.
3 Veritas NetBackup 9.1 Cloud Marketplace Deployment: Azure
Table of Contents
Disclaimer.................................................................................................................................................. 1
Legal Notice ............................................................................................................................................... 1
Third-Party Legal Notices .......................................................................................................................... 1
About Veritas NetBackup Cloud Marketplace Deployment on Microsoft Azure ......................................... 4
Before you begin the deployment ............................................................................................................ 4
Deploying NetBackup on Azure Cloud using the marketplace offer ............................................................ 5
Installation types for NetBackup on Azure Cloud ..................................................................................... 5
Installation type 1 (full deployment): Primary, Media, and CloudPoiunt servers ................................ 5
Installation type 2: Primary and media servers .................................................................................... 5
Installation type 3: Primary server only ................................................................................................ 6
Installation type 4: media server only .................................................................................................. 6
Installation type 5: CloudPoint server only ........................................................................................... 6
NetBackup configuration parameters....................................................................................................... 6
Basics tab .............................................................................................................................................. 7
Primary Sever Details tab ...................................................................................................................... 8
CloudPoint Sever Details tab ................................................................................................................. 8
Media Sever Details tab ...................................................................................................................... 10
Accessing the NetBackup Web UI ............................................................................................................... 11
Upgrading CloudPoint ................................................................................................................................. 11
Migrating CloudPoint from RHEL 7.x to RHEL 8.x ................................................................................... 12
Recovering CloudPoint VM ..................................................................................................................... 12
Troubleshooting .......................................................................................................................................... 12
Copyright © 2021 Veritas Technologies LLC. All rights reserved. Veritas, the Veritas Logo, and NetBackup are trademarks or registered
trademarks of Veritas Technologies LLC or its affiliates in the U.S. and other countries. Other names may be trademarks of their respective owners.
4 Veritas NetBackup 9.1 Cloud Marketplace Deployment: Azure
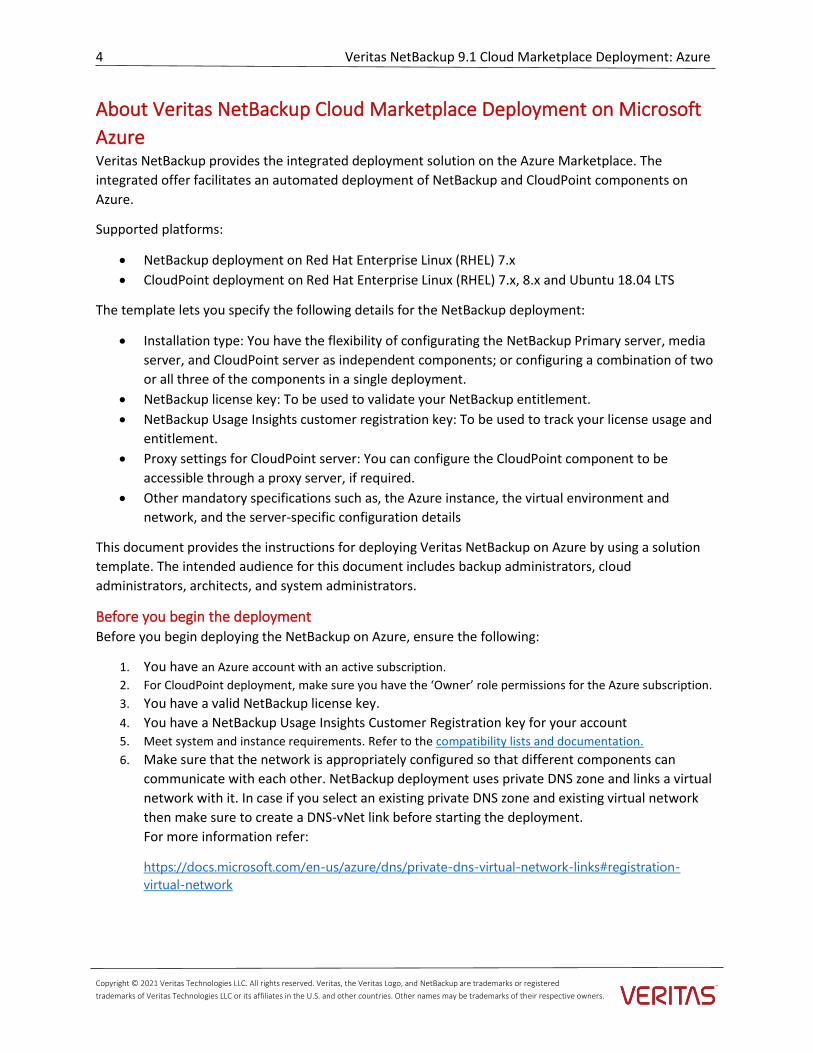
About Veritas NetBackup Cloud Marketplace Deployment on Microsoft
Azure Veritas NetBackup provides the integrated deployment solution on the Azure Marketplace. The
integrated offer facilitates an automated deployment of NetBackup and CloudPoint components on
Azure.
Supported platforms:
• NetBackup deployment on Red Hat Enterprise Linux (RHEL) 7.x
• CloudPoint deployment on Red Hat Enterprise Linux (RHEL) 7.x, 8.x and Ubuntu 18.04 LTS
The template lets you specify the following details for the NetBackup deployment:
• Installation type: You have the flexibility of configurating the NetBackup Primary server, media
server, and CloudPoint server as independent components; or configuring a combination of two
or all three of the components in a single deployment.
• NetBackup license key: To be used to validate your NetBackup entitlement.
• NetBackup Usage Insights customer registration key: To be used to track your license usage and
entitlement.
• Proxy settings for CloudPoint server: You can configure the CloudPoint component to be
accessible through a proxy server, if required.
• Other mandatory specifications such as, the Azure instance, the virtual environment and
network, and the server-specific configuration details
This document provides the instructions for deploying Veritas NetBackup on Azure by using a solution
template. The intended audience for this document includes backup administrators, cloud
administrators, architects, and system administrators.
Before you begin the deployment Before you begin deploying the NetBackup on Azure, ensure the following:
1. You have an Azure account with an active subscription.
2. For CloudPoint deployment, make sure you have the ‘Owner’ role permissions for the Azure subscription.
3. You have a valid NetBackup license key.
4. You have a NetBackup Usage Insights Customer Registration key for your account
5. Meet system and instance requirements. Refer to the compatibility lists and documentation.
6. Make sure that the network is appropriately configured so that different components can
communicate with each other. NetBackup deployment uses private DNS zone and links a virtual
network with it. In case if you select an existing private DNS zone and existing virtual network
then make sure to create a DNS-vNet link before starting the deployment.
For more information refer:
https://docs.microsoft.com/en-us/azure/dns/private-dns-virtual-network-links#registration-
virtual-network

Copyright © 2021 Veritas Technologies LLC. All rights reserved. Veritas, the Veritas Logo, and NetBackup are trademarks or registered
trademarks of Veritas Technologies LLC or its affiliates in the U.S. and other countries. Other names may be trademarks of their respective owners.
5 Veritas NetBackup 9.1 Cloud Marketplace Deployment: Azure
Deploying NetBackup on Azure Cloud using the marketplace offer To deploy NetBackup on Azure
1. Visit the Azure Marketplace at: https://azuremarketplace.microsoft.com/en-
us/marketplace/apps/
2. Locate and access the Veritas NetBackup offer.
3. On the offer page, select version 9.1 and click Create. This opens the deployment template that
has various tabs for providing the basic and server-specific configuration details.
4. Then refer to the individual configuration sections that correspond to the installation type you
will select in the Basics tab.
Refer to Basics tab section.
Note: The configuration parameters you are asked to provide under each tab, change based on the
selections you make. For example, if you select any installation type other than the ‘CloudPoint server
only’ option, the NetBackup license key and DNS zone fields are enabled for input. There are more such
fields that change dynamically depending on your selection.
Installation types for NetBackup on Azure Cloud
Installation type 1 (full deployment): Primary, Media, and CloudPoiunt servers Refer to this section if you are performing the full deployment that includes configuring the NetBackup
Primary, Media, and CloudPoint servers, in a single deployment.
In case of full deployment, the servers are deployed in the following order-
1. Primary server
2. Media server
3. CloudPoint server is deployed.
The deployment can take approximately 25 minutes.
Steps to configure:
1. Make sure that the appropriate details are provided in the Basics tab. Refer to Basics tab
section.
2. Provide the Primary Sever Details. Refer to Primary Sever Details tab section.
3. Provide the CloudPoint Sever Details. Refer to CloudPoint Sever Details tab section.
4. Provide the Media Sever Details. Refer to Media Sever Details tab section.
5. Click Review + Create to review all the details and initiate the deployment.
Installation type 2: Primary and media servers Refer to this section if you intend to configure the NetBackup Primary and media servers both, in a
single deployment.
Steps to configure:
1. Make sure that the appropriate details are provided in the Basics tab. Refer to Basics tab
section.

Copyright © 2021 Veritas Technologies LLC. All rights reserved. Veritas, the Veritas Logo, and NetBackup are trademarks or registered
trademarks of Veritas Technologies LLC or its affiliates in the U.S. and other countries. Other names may be trademarks of their respective owners.
6 Veritas NetBackup 9.1 Cloud Marketplace Deployment: Azure
2. Provide the Primary Sever Details. Refer to Primary Sever Details tab section.
3. Provide the Media Sever Details. Refer to Media Sever Details tab section.
4. Click Review + Create to review all the details and initiate the deployment.
Installation type 3: Primary server only Refer to this section if you intend to configure the NetBackup Primary server only in a single
deployment.
Steps to configure:
1. Make sure that the appropriate details are provided in the Basics tab. Refer to Basics tab
section.
2. Provide the Primary Sever Details. Refer to Primary Sever Details tab section.
3. Provide only the Media Sever hostname. Refer to Media Sever Details tab section.
4. Click Review + Create to review all the details and initiate the deployment.
Installation type 4: media server only Refer to this section if you intend to configure the NetBackup Media server only in a single deployment.
Steps to configure:
1. Make sure that the appropriate details are provided in the Basics tab. Refer to Basics tab
section.
2. Provide only the Primary Sever hostname. Refer to Primary Sever Details tab section.
3. Provide the Media Sever Details. Refer to Media Sever Details tab section.
4. Click Review + Create to review all the details and initiate the deployment.
Installation type 5: CloudPoint server only Refer to this section if you intend to:
• Configure the NetBackup CloudPoint server only in a single deployment
• Upgrade your existing CloudPoint server to 9.1.
Steps to configure:
1. Make sure that the appropriate details are provided in the Basics tab. Refer to Basics tab
section.
2. Provide the CloudPoint Sever Details. Refer to CloudPoint Sever Details tab section.
3. Click Review + Create to review all the details and initiate the deployment.
NetBackup configuration parameters Refer to the following tables and provide the configuration details depending on the type of installation
you want to perform. Refer to the Installation types for NetBackup CloudPoint on Azure.
Copyright © 2021 Veritas Technologies LLC. All rights reserved. Veritas, the Veritas Logo, and NetBackup are trademarks or registered
trademarks of Veritas Technologies LLC or its affiliates in the U.S. and other countries. Other names may be trademarks of their respective owners.
7 Veritas NetBackup 9.1 Cloud Marketplace Deployment: Azure
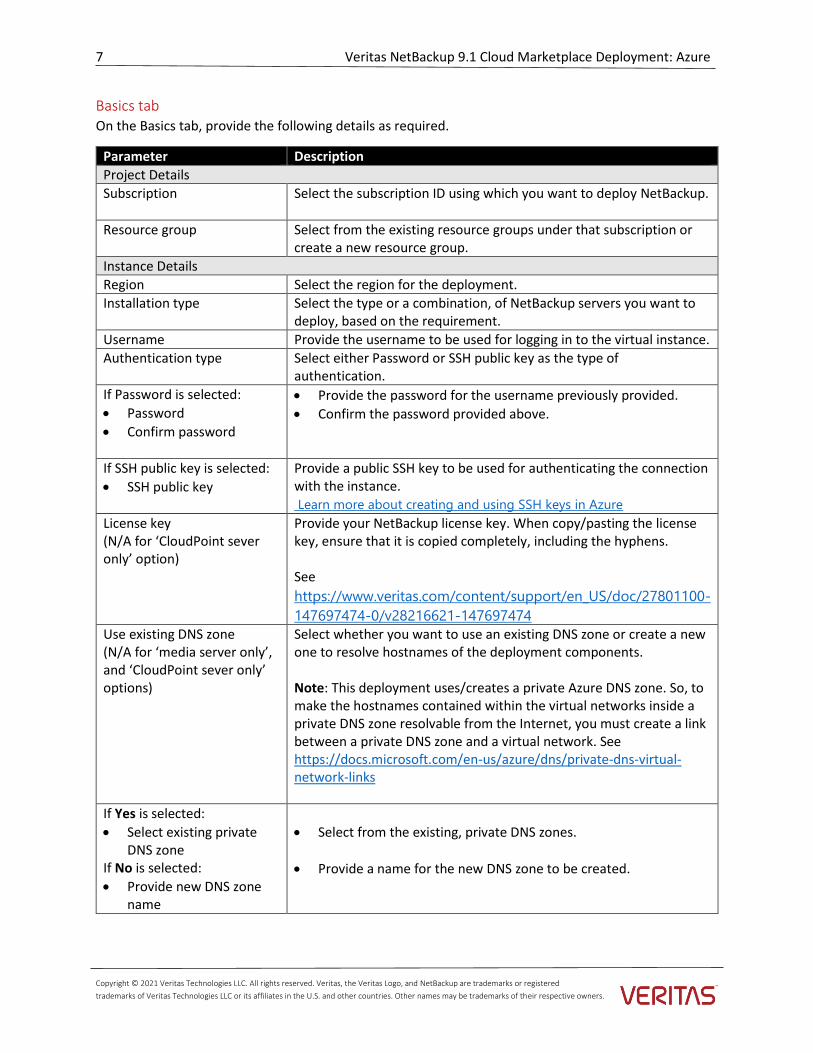
Basics tab On the Basics tab, provide the following details as required.
Parameter Description
Project Details
Subscription Select the subscription ID using which you want to deploy NetBackup.
Resource group Select from the existing resource groups under that subscription or create a new resource group.
Instance Details
Region Select the region for the deployment.
Installation type Select the type or a combination, of NetBackup servers you want to deploy, based on the requirement.
Username Provide the username to be used for logging in to the virtual instance.
Authentication type Select either Password or SSH public key as the type of authentication.
If Password is selected:
• Password
• Confirm password
• Provide the password for the username previously provided.
• Confirm the password provided above.
If SSH public key is selected:
• SSH public key
Provide a public SSH key to be used for authenticating the connection with the instance. Learn more about creating and using SSH keys in Azure
License key (N/A for ‘CloudPoint sever only’ option)
Provide your NetBackup license key. When copy/pasting the license key, ensure that it is copied completely, including the hyphens. See
https://www.veritas.com/content/support/en_US/doc/27801100-
147697474-0/v28216621-147697474
Use existing DNS zone (N/A for ‘media server only’, and ‘CloudPoint sever only’ options)
Select whether you want to use an existing DNS zone or create a new one to resolve hostnames of the deployment components. Note: This deployment uses/creates a private Azure DNS zone. So, to make the hostnames contained within the virtual networks inside a private DNS zone resolvable from the Internet, you must create a link between a private DNS zone and a virtual network. See https://docs.microsoft.com/en-us/azure/dns/private-dns-virtual-network-links
If Yes is selected:
• Select existing private DNS zone
If No is selected:
• Provide new DNS zone name
• Select from the existing, private DNS zones.
• Provide a name for the new DNS zone to be created.

Copyright © 2021 Veritas Technologies LLC. All rights reserved. Veritas, the Veritas Logo, and NetBackup are trademarks or registered
trademarks of Veritas Technologies LLC or its affiliates in the U.S. and other countries. Other names may be trademarks of their respective owners.
8 Veritas NetBackup 9.1 Cloud Marketplace Deployment: Azure
Primary Sever Details tab If you have chosen the installation type that includes the NetBackup Primary server deployment, provide
the following details as appropriate.
Parameter Description
Primary server configuration details
Hostname Provide the hostname for the primary server.
Server size Select size to be allocated for the primary server. The default size is 1x Standard DS4 v2, which you can change if required.
Usage Insights registration key
Upload a JSON file containing the NetBackup Usage Insights customer registration key.
File name example: veritas_customer_registration_key.json See Enable Veritas Usage Insights documentation.
Service username Provide a 'service user' name. Most services on the server will run as this user. If a non-root username is provided, then the user will be created, and associated with the ‘nbwebgrp’ user group as the secondary group. Refer to “Running NetBackup services with non-privileged user
(service user) account” in the “Veritas NetBackup™ Security and Encryption Guide”
Configure virtual networks
Virtual network Select an existing virtual network or create a new one.
Subnet Select an existing subnet or create a new one, in which to deploy the primary server.
Public IP (optional) Select an existing public IP or create a new one, if you want to access the primary server from outside the private network.
Domain name label Provide a globally unique domain name label to resolve with the public IP provided above.
CloudPoint Sever Details tab If you have chosen the installation type that includes the NetBackup CloudPoint server deployment,
provide the following details as appropriate.
Parameter Description
System settings
Virtual machine name Provide the name for the Azure VM that is being provisioned, on which the CloudPoint server will be deployed. The VM name will be used as a short hostname of the instance.
Virtual machine OS type Select the OS that should be configured on the VM.
Virtual machine size Select the size of the VM to be provisioned. The default size is 1x Standard B2ms, which you can change if required
Upgrade from an existing CloudPoint instance?
Select from Yes only in case of an upgrade.
Copyright © 2021 Veritas Technologies LLC. All rights reserved. Veritas, the Veritas Logo, and NetBackup are trademarks or registered
trademarks of Veritas Technologies LLC or its affiliates in the U.S. and other countries. Other names may be trademarks of their respective owners.
9 Veritas NetBackup 9.1 Cloud Marketplace Deployment: Azure
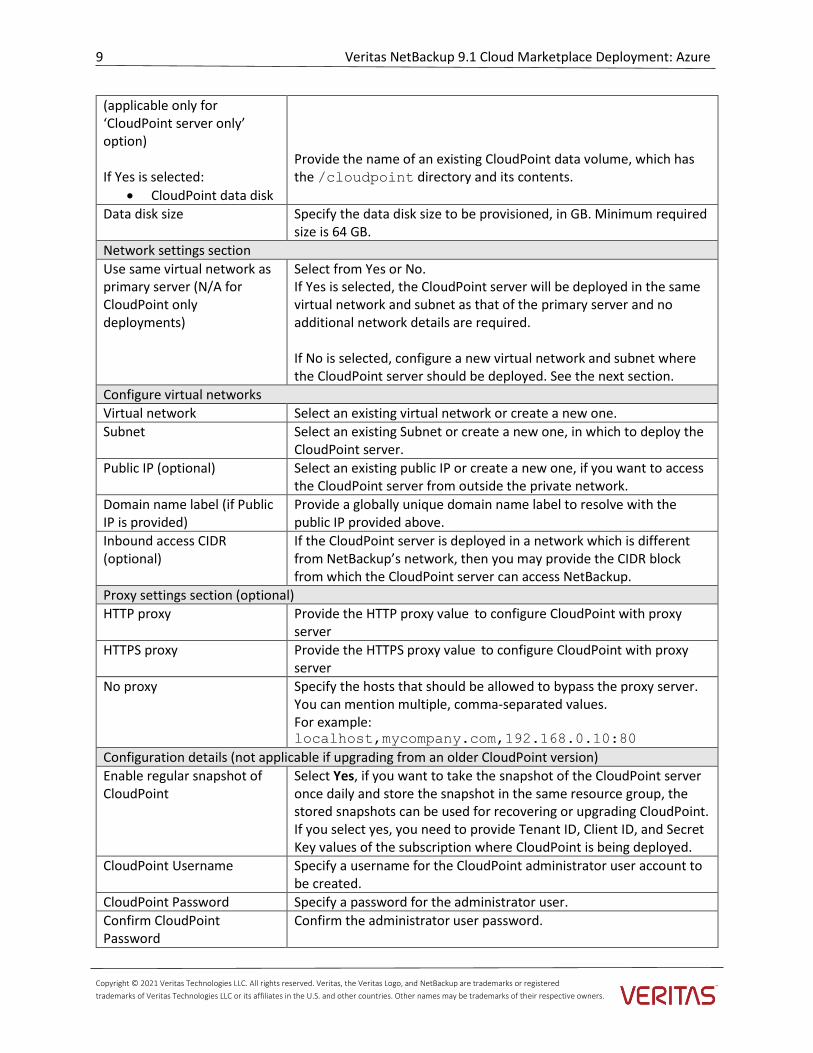
(applicable only for ‘CloudPoint server only’ option) If Yes is selected:
• CloudPoint data disk
Provide the name of an existing CloudPoint data volume, which has the /cloudpoint directory and its contents.
Data disk size Specify the data disk size to be provisioned, in GB. Minimum required size is 64 GB.
Network settings section
Use same virtual network as primary server (N/A for CloudPoint only deployments)
Select from Yes or No. If Yes is selected, the CloudPoint server will be deployed in the same virtual network and subnet as that of the primary server and no additional network details are required. If No is selected, configure a new virtual network and subnet where the CloudPoint server should be deployed. See the next section.
Configure virtual networks
Virtual network Select an existing virtual network or create a new one.
Subnet Select an existing Subnet or create a new one, in which to deploy the CloudPoint server.
Public IP (optional) Select an existing public IP or create a new one, if you want to access the CloudPoint server from outside the private network.
Domain name label (if Public IP is provided)
Provide a globally unique domain name label to resolve with the public IP provided above.
Inbound access CIDR (optional)
If the CloudPoint server is deployed in a network which is different from NetBackup’s network, then you may provide the CIDR block from which the CloudPoint server can access NetBackup.
Proxy settings section (optional)
HTTP proxy Provide the HTTP proxy value to configure CloudPoint with proxy server
HTTPS proxy Provide the HTTPS proxy value to configure CloudPoint with proxy server
No proxy Specify the hosts that should be allowed to bypass the proxy server. You can mention multiple, comma-separated values. For example: localhost,mycompany.com,192.168.0.10:80
Configuration details (not applicable if upgrading from an older CloudPoint version)
Enable regular snapshot of CloudPoint
Select Yes, if you want to take the snapshot of the CloudPoint server once daily and store the snapshot in the same resource group, the stored snapshots can be used for recovering or upgrading CloudPoint. If you select yes, you need to provide Tenant ID, Client ID, and Secret Key values of the subscription where CloudPoint is being deployed.
CloudPoint Username Specify a username for the CloudPoint administrator user account to be created.
CloudPoint Password Specify a password for the administrator user.
Confirm CloudPoint Password
Confirm the administrator user password.
Copyright © 2021 Veritas Technologies LLC. All rights reserved. Veritas, the Veritas Logo, and NetBackup are trademarks or registered
trademarks of Veritas Technologies LLC or its affiliates in the U.S. and other countries. Other names may be trademarks of their respective owners.
10 Veritas NetBackup 9.1 Cloud Marketplace Deployment: Azure
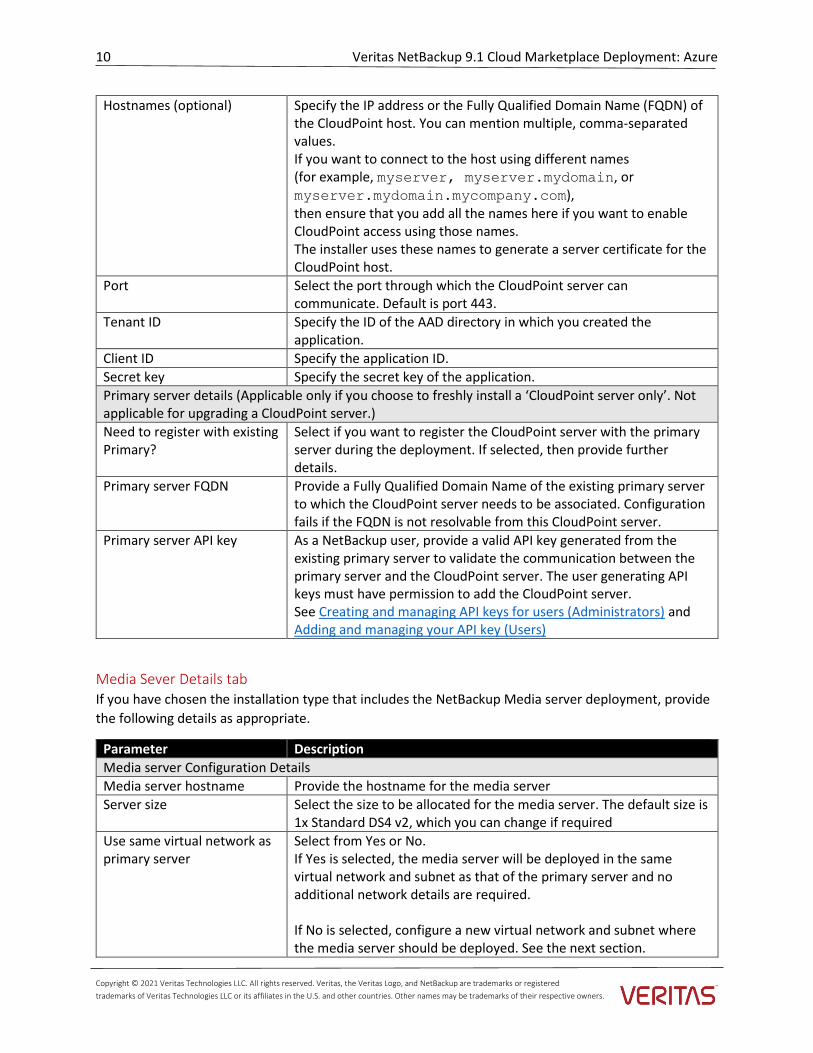
Hostnames (optional) Specify the IP address or the Fully Qualified Domain Name (FQDN) of the CloudPoint host. You can mention multiple, comma-separated values. If you want to connect to the host using different names (for example, myserver, myserver.mydomain, or myserver.mydomain.mycompany.com), then ensure that you add all the names here if you want to enable CloudPoint access using those names. The installer uses these names to generate a server certificate for the CloudPoint host.
Port Select the port through which the CloudPoint server can communicate. Default is port 443.
Tenant ID Specify the ID of the AAD directory in which you created the application.
Client ID Specify the application ID.
Secret key Specify the secret key of the application.
Primary server details (Applicable only if you choose to freshly install a ‘CloudPoint server only’. Not applicable for upgrading a CloudPoint server.)
Need to register with existing Primary?
Select if you want to register the CloudPoint server with the primary server during the deployment. If selected, then provide further details.
Primary server FQDN Provide a Fully Qualified Domain Name of the existing primary server to which the CloudPoint server needs to be associated. Configuration fails if the FQDN is not resolvable from this CloudPoint server.
Primary server API key As a NetBackup user, provide a valid API key generated from the existing primary server to validate the communication between the primary server and the CloudPoint server. The user generating API keys must have permission to add the CloudPoint server. See Creating and managing API keys for users (Administrators) and Adding and managing your API key (Users)
Media Sever Details tab If you have chosen the installation type that includes the NetBackup Media server deployment, provide
the following details as appropriate.
Parameter Description
Media server Configuration Details
Media server hostname Provide the hostname for the media server
Server size Select the size to be allocated for the media server. The default size is 1x Standard DS4 v2, which you can change if required
Use same virtual network as primary server
Select from Yes or No. If Yes is selected, the media server will be deployed in the same virtual network and subnet as that of the primary server and no additional network details are required. If No is selected, configure a new virtual network and subnet where the media server should be deployed. See the next section.
Copyright © 2021 Veritas Technologies LLC. All rights reserved. Veritas, the Veritas Logo, and NetBackup are trademarks or registered
trademarks of Veritas Technologies LLC or its affiliates in the U.S. and other countries. Other names may be trademarks of their respective owners.
11 Veritas NetBackup 9.1 Cloud Marketplace Deployment: Azure
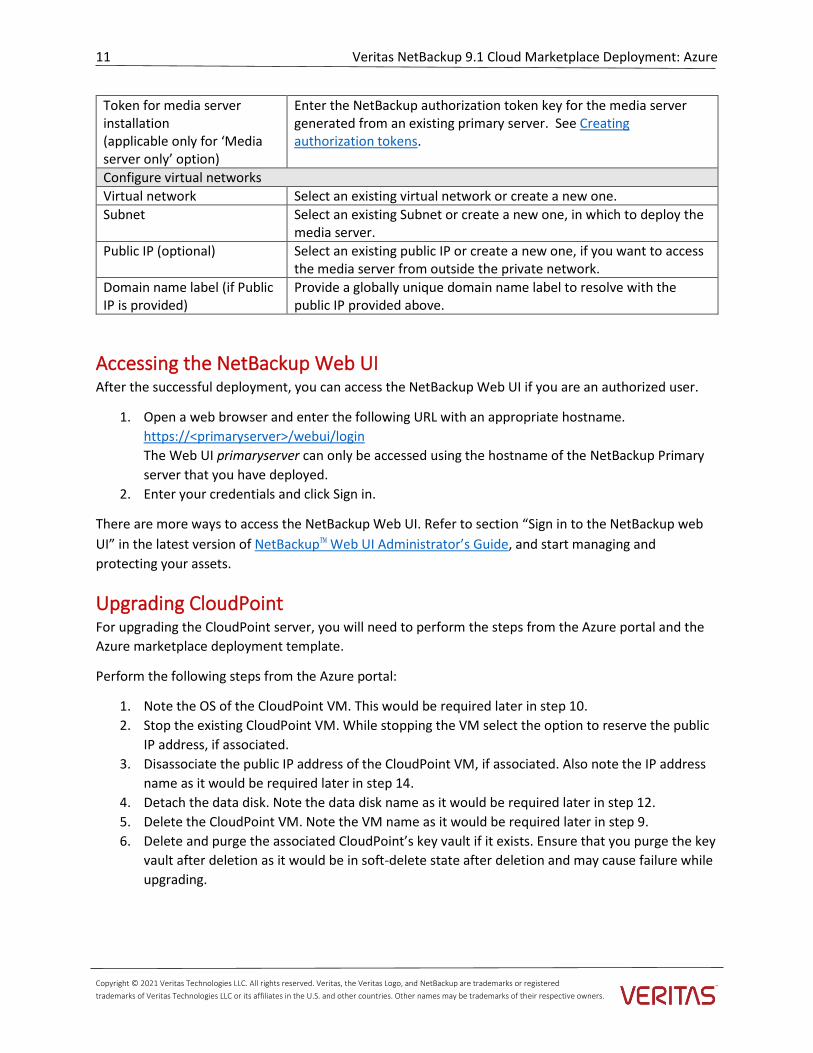
Token for media server installation (applicable only for ‘Media server only’ option)
Enter the NetBackup authorization token key for the media server generated from an existing primary server. See Creating authorization tokens.
Configure virtual networks
Virtual network Select an existing virtual network or create a new one.
Subnet Select an existing Subnet or create a new one, in which to deploy the media server.
Public IP (optional) Select an existing public IP or create a new one, if you want to access the media server from outside the private network.
Domain name label (if Public IP is provided)
Provide a globally unique domain name label to resolve with the public IP provided above.
Accessing the NetBackup Web UI After the successful deployment, you can access the NetBackup Web UI if you are an authorized user.
1. Open a web browser and enter the following URL with an appropriate hostname.
https://<primaryserver>/webui/login
The Web UI primaryserver can only be accessed using the hostname of the NetBackup Primary
server that you have deployed.
2. Enter your credentials and click Sign in.
There are more ways to access the NetBackup Web UI. Refer to section “Sign in to the NetBackup web
UI” in the latest version of NetBackup™ Web UI Administrator’s Guide, and start managing and
protecting your assets.
Upgrading CloudPoint For upgrading the CloudPoint server, you will need to perform the steps from the Azure portal and the
Azure marketplace deployment template.
Perform the following steps from the Azure portal:
1. Note the OS of the CloudPoint VM. This would be required later in step 10.
2. Stop the existing CloudPoint VM. While stopping the VM select the option to reserve the public
IP address, if associated.
3. Disassociate the public IP address of the CloudPoint VM, if associated. Also note the IP address
name as it would be required later in step 14.
4. Detach the data disk. Note the data disk name as it would be required later in step 12.
5. Delete the CloudPoint VM. Note the VM name as it would be required later in step 9.
6. Delete and purge the associated CloudPoint’s key vault if it exists. Ensure that you purge the key
vault after deletion as it would be in soft-delete state after deletion and may cause failure while
upgrading.
Copyright © 2021 Veritas Technologies LLC. All rights reserved. Veritas, the Veritas Logo, and NetBackup are trademarks or registered
trademarks of Veritas Technologies LLC or its affiliates in the U.S. and other countries. Other names may be trademarks of their respective owners.
12 Veritas NetBackup 9.1 Cloud Marketplace Deployment: Azure
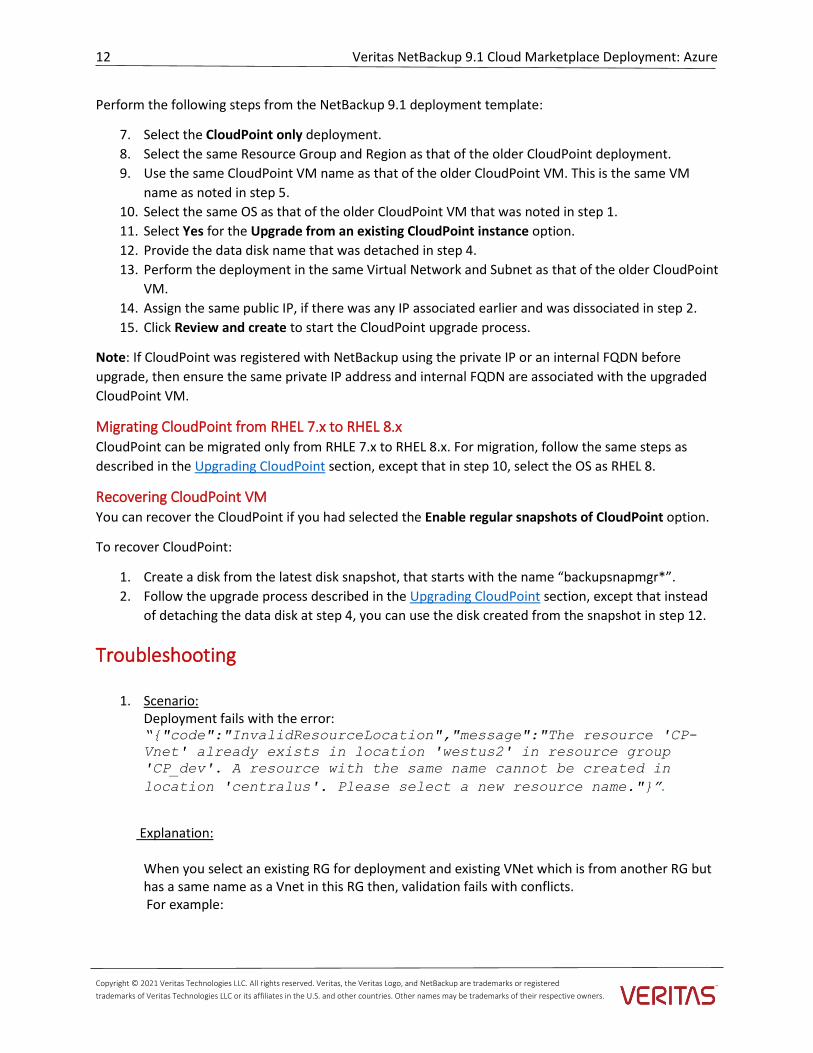
Perform the following steps from the NetBackup 9.1 deployment template:
7. Select the CloudPoint only deployment.
8. Select the same Resource Group and Region as that of the older CloudPoint deployment.
9. Use the same CloudPoint VM name as that of the older CloudPoint VM. This is the same VM
name as noted in step 5.
10. Select the same OS as that of the older CloudPoint VM that was noted in step 1.
11. Select Yes for the Upgrade from an existing CloudPoint instance option.
12. Provide the data disk name that was detached in step 4.
13. Perform the deployment in the same Virtual Network and Subnet as that of the older CloudPoint
VM.
14. Assign the same public IP, if there was any IP associated earlier and was dissociated in step 2.
15. Click Review and create to start the CloudPoint upgrade process.
Note: If CloudPoint was registered with NetBackup using the private IP or an internal FQDN before
upgrade, then ensure the same private IP address and internal FQDN are associated with the upgraded
CloudPoint VM.
Migrating CloudPoint from RHEL 7.x to RHEL 8.x CloudPoint can be migrated only from RHLE 7.x to RHEL 8.x. For migration, follow the same steps as
described in the Upgrading CloudPoint section, except that in step 10, select the OS as RHEL 8.
Recovering CloudPoint VM You can recover the CloudPoint if you had selected the Enable regular snapshots of CloudPoint option.
To recover CloudPoint:
1. Create a disk from the latest disk snapshot, that starts with the name “backupsnapmgr*”.
2. Follow the upgrade process described in the Upgrading CloudPoint section, except that instead
of detaching the data disk at step 4, you can use the disk created from the snapshot in step 12.
Troubleshooting
1. Scenario: Deployment fails with the error: “{"code":"InvalidResourceLocation","message":"The resource 'CP-
Vnet' already exists in location 'westus2' in resource group
'CP_dev'. A resource with the same name cannot be created in
location 'centralus'. Please select a new resource name."}”.
Explanation:
When you select an existing RG for deployment and existing VNet which is from another RG but has a same name as a Vnet in this RG then, validation fails with conflicts.
For example:
Copyright © 2021 Veritas Technologies LLC. All rights reserved. Veritas, the Veritas Logo, and NetBackup are trademarks or registered
trademarks of Veritas Technologies LLC or its affiliates in the U.S. and other countries. Other names may be trademarks of their respective owners.
13 Veritas NetBackup 9.1 Cloud Marketplace Deployment: Azure
a) You choose to deploy in CP_dev which is an existing RG which has CP_VNet as a virtual network in West US 2
b) Then in the region parameter you choose region as Central US, so all your resources are deployed in central US and are linked to RG: CP_dev
c) In the networking section you choose an existing VNet, i.e. CP_VNet from another RG: demoRG, which is in Central US (as this the location he selected in step 2 so all VNets in central US region are listed).
In the above scenario the validation fails with conflicts saying it cannot create a VNet with same
name as existing VNet CP_VNet in another region. “{"code":"InvalidResourceLocation","message":"The resource 'CP-
Vnet' already exists in location 'westus2' in resource group
'CP_dev'. A resource with the same name cannot be created in
location 'centralus'. Please select a new resource name."}”.
Solution: Try to deploy in an RG which does not have a VNet with the same name as the existing VNet
that you want to select.
2. Scenario: Deployment fails with the error: “{"code":"InvalidResourceLocation","message":"The resource
'PublicIp' already exists in location 'centralindia' in resource
group 'CP_dev'. A resource with the same name cannot be created
in location 'centralus'. Please select a new resource name."}”.
Explanation: When you select an existing RG for deployment which has a public IP address as ‘publicIP’ (i.e. default public IP address of arm template) and you select to deploy without any public IP address then validation fails with conflicts. For example:
a) You select to deploy in CP_dev which is an existing RG which has publicIP as a public IP
address in centralindia b) Then in the region parameter you select region as Central US, so all your resources are
deployed in central US and are linked to RG: CP_dev c) In the networking section you select ‘none’ for public IP, so that deployment would not
have any public Ip address.
In the above scenario the validation fails with conflicts saying it cannot create a public IP address with same name as existing public IP “publicIP” in another region.
“{"code":"InvalidResourceLocation","message":"The resource
'PublicIp' already exists in location 'centralindia' in
resource group 'CP_dev'. A resource with the same name cannot

Copyright © 2021 Veritas Technologies LLC. All rights reserved. Veritas, the Veritas Logo, and NetBackup are trademarks or registered
trademarks of Veritas Technologies LLC or its affiliates in the U.S. and other countries. Other names may be trademarks of their respective owners.
14 Veritas NetBackup 9.1 Cloud Marketplace Deployment: Azure
be created in location 'centralus'. Please select a new
resource name."}”.
Solution: Try to deploy in an RG which does not have an IP address whose name is PublicIP.
3. Scenario:
Deployment fails with the error: “{"code":"InvalidResourceLocation","message":"The resource 'CP-
IP' already exists in location 'centralindia' in resource group
'CP_dev'. A resource with the same name cannot be created in
location 'centralus'. Please select a new resource name."}”.
Explanation: When you select an existing RG for deployment and existing public IP address which is from another RG, but has a same name as a public IP address in this RG then, validation fails with conflicts.
For example:
a) You select to deploy in CP_dev which is an existing RG which has CP_IP as a public IPaddress.
b) Then in the region parameter you select region as Central US, so all your resources are deployed in central US and are linked to RG: CP_dev
c) In the networking section you select an existing public IP, i.e. CP_IP from another RG: demoRG, which is in Central US (as this the location you selected in step 2 so all IPs in central US region are listed).
In the above scenario the validation fails with conflicts saying it cannot create an IP address with
same name as existing IP address CP_IP in another region. “{"code":"InvalidResourceLocation","message":"The resource 'CP-
IP' already exists in location 'centralindia' in resource
group 'CP_dev'. A resource with the same name cannot be
created in location 'centralus'. Please select a new resource
name."}”.
Solution: Try to deploy in an RG which does not have an IP address with same name as the existing IP
address that you want to select.
4. Scenario: Deployment fails with the error: { "status": "Failed", "error": { "code":
"DeploymentFailed", "message": "At least one resource
deployment operation failed. Please list deployment operations
for details. Please see https://aka.ms/DeployOperations for usage
details.", "details": [ {
"code": "Conflict", "message": "{
Copyright © 2021 Veritas Technologies LLC. All rights reserved. Veritas, the Veritas Logo, and NetBackup are trademarks or registered
trademarks of Veritas Technologies LLC or its affiliates in the U.S. and other countries. Other names may be trademarks of their respective owners.
15 Veritas NetBackup 9.1 Cloud Marketplace Deployment: Azure
\r\n \"status\": \"Failed\",\r\n \"error\": {\r\n \"code\":
\"ResourceDeploymentFailure\",\r\n \"message\": \"The resource
operation completed with terminal provisioning state
'Failed'.\",\r\n \"details\": [\r\n {
\r\n \"code\":
\"VMExtensionProvisioningTimeout\",\r\n \"message\":
\"Provisioning of VM extension ExtensionForConfiguringCP has
timed out. Extension provisioning has taken too long to complete.
The extension last reported \\\"Plugin
enabled\\\".\\r\\n\\r\\nMore information on troubleshooting is
available
at https://aka.ms/VMExtensionCSELinuxTroubleshoot\"\r\n }
\r\n ]\r\n }\r\n}" }, {
"code": "NotFound", "message": "{
\r\n \"error\": {\r\n \"code\":
\"ParentResourceNotFound\",\r\n \"message\": \"Can not perform
requested operation on nested resource. Parent resource 'cp-
zbxyjundfpwc2-kv' not found.\"\r\n }\r\n}" }
, { "code":
"Conflict", "message": "{\r\n \"error\": {
\r\n \"code\": \"ConflictError\",\r\n \"message\": \"Exist
soft deleted vault with the same name. \"\r\n }\r\n}
" } ] }}
Explanation: If you delete an old CloudPoint deployment and its resources and immediately start a new deployment with the same VM name for CloudPoint as earlier, you face this issue as the Key-vault created in the earlier deployment is in soft-delete state, and the new deployment tries to create a key-vault with same name. Solution: Purge the Key-vault and attempt again. Or try the deployment with a new VM name for CloudPoint.
5. Scenario: Unable to add Azure provider, when CloudPoint is deployed behind a Proxy
Explanation:
CloudPoint is unable to access azure.com, microsoftonline.com
Solution:
Set azure.com, microsoftonline.com values for noproxy during CloudPoint deployment
6. Scenario:
Copyright © 2021 Veritas Technologies LLC. All rights reserved. Veritas, the Veritas Logo, and NetBackup are trademarks or registered
trademarks of Veritas Technologies LLC or its affiliates in the U.S. and other countries. Other names may be trademarks of their respective owners.
16 Veritas NetBackup 9.1 Cloud Marketplace Deployment: Azure
Provisioning of VM extension NB-Primary-Installation has timed out. Extension provisioning has taken too
long to complete.
Explanation: Installation of primary or media server failed because of some issue. To check the issue, you need to login to the instance and switch to the root user using command ‘sudo su’. You can check logs at location /root/NBSetup/userdata.log.
7. Scenario: NetBackup component upgrade failure
Explanation:
If you are trying to upgrade a NetBackup component till version 9, which was deployed through
Azure marketplace then, you may get a following error:
Unable to configure target host.
ERROR: bpnbaz failed with status [68].
The authentication broker could not be configured.
Review the NetBackup Security and Encryption Guide for more
information.
Solution:
Add an entry in the /etc/hosts file for ‘private_ip’ ‘short_hostname’ mapping. This happens
when the server cannot resolve a short hostname while upgrade. After adding an entry restart
the upgrade.
8. Scenario: Deployment fails with the error: {
"status": "Failed",
"error": {
"code": "PrincipalNotFound",
"message": "Principal
55535faac7f748a2b8a1b080518b3df3 does not exist in the directory
fc8e13c0-422c-4c55-b3ea-ca318e6cac32."
}
}
Explanation:
This error may happen when Azure is speedily processing the template and tries to assign
authorization to the VM to access key vault when the VM is not yet completely formed.
Copyright © 2021 Veritas Technologies LLC. All rights reserved. Veritas, the Veritas Logo, and NetBackup are trademarks or registered
trademarks of Veritas Technologies LLC or its affiliates in the U.S. and other countries. Other names may be trademarks of their respective owners.
17 Veritas NetBackup 9.1 Cloud Marketplace Deployment: Azure
Solution:
Delete the resources formed in the deployment, purge the key vault if formed, and retry the
deployment.
9. Scenario: Backup from Snapshot job fails with errors:
Jun 10, 2021 2:17:48 PM - Error mqclient (pid=1054) SSL
Connection failed with string, broker:<hostname>
Jun 10, 2021 2:17:48 PM - Error mqclient (pid=1054) Failed SSL
handshake, broker:<hostname>
Jun 10, 2021 2:19:16 PM - Error nbcs (pid=29079) Invalid
operation for asset: <asset_id>
Jun 10, 2021 2:19:16 PM - Error nbcs (pid=29079) Acknowledgement
not received for datamover <datamover_id>
AND/OR
Jun 10, 2021 3:06:13 PM - Critical bpbrm (pid=32373) from client
<asset_id>: FTL - Cannot retrieve the exported snapshot details
for the disk with UUID:<disk_asset_id>
Jun 10, 2021 3:06:13 PM - Info bptm (pid=32582) waited for full
buffer 1 times, delayed 220 times
Jun 10, 2021 3:06:13 PM - Critical bpbrm (pid=32373) from client
<asset_id>: FTL - cleanup() failed, status 6
Explanation:
This can happen when the inbound access to CloudPoint on port 5671 and 443 port gets blocked
at the OS firewall level (firewalld). Hence, from the datamover container (used for the Backup
from Snapshot jobs), communication to CloudPoint gets blocked. This results in the datamover
container not being able to start the backup.
Solution:
Modify the rules in OS firewall to allow the inbound connection from 5671 and 443 port.