venus - this is block 5 of the block of · round the year - block of the month quilt block 5- venus...
TRANSCRIPT
Round the Year - Block of the Month Quilt Block 5- Venus
www.betukbandi.wordpress.com A Pattern by Madhu Mathur
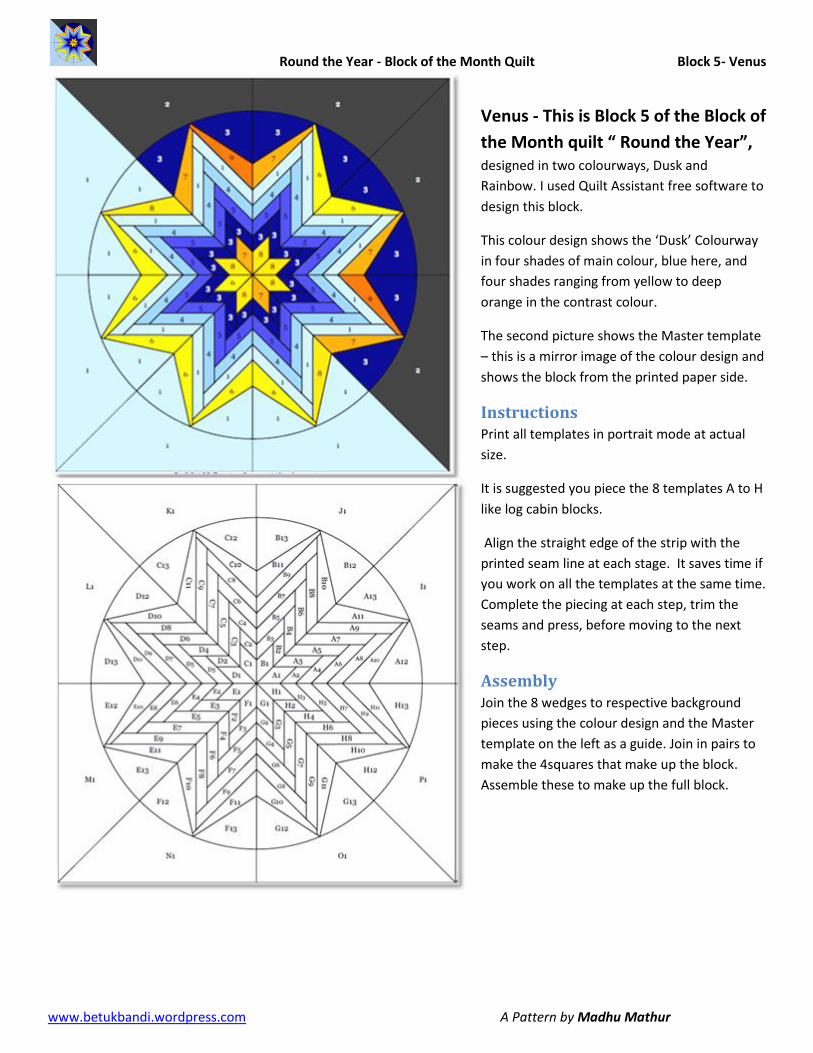
Venus - This is Block 5 of the Block of
the Month quilt “ Round the Year”, designed in two colourways, Dusk and
Rainbow. I used Quilt Assistant free software to
design this block.
This colour design shows the ‘Dusk’ Colourway
in four shades of main colour, blue here, and
four shades ranging from yellow to deep
orange in the contrast colour.
The second picture shows the Master template
– this is a mirror image of the colour design and
shows the block from the printed paper side.
Instructions Print all templates in portrait mode at actual
size.
It is suggested you piece the 8 templates A to H
like log cabin blocks.
Align the straight edge of the strip with the
printed seam line at each stage. It saves time if
you work on all the templates at the same time.
Complete the piecing at each step, trim the
seams and press, before moving to the next
step.
Assembly Join the 8 wedges to respective background
pieces using the colour design and the Master
template on the left as a guide. Join in pairs to
make the 4squares that make up the block.
Assemble these to make up the full block.
Round the Year - Block of the Month Quilt Block 5- Venus
www.betukbandi.wordpress.com A Pattern by Madhu Mathur
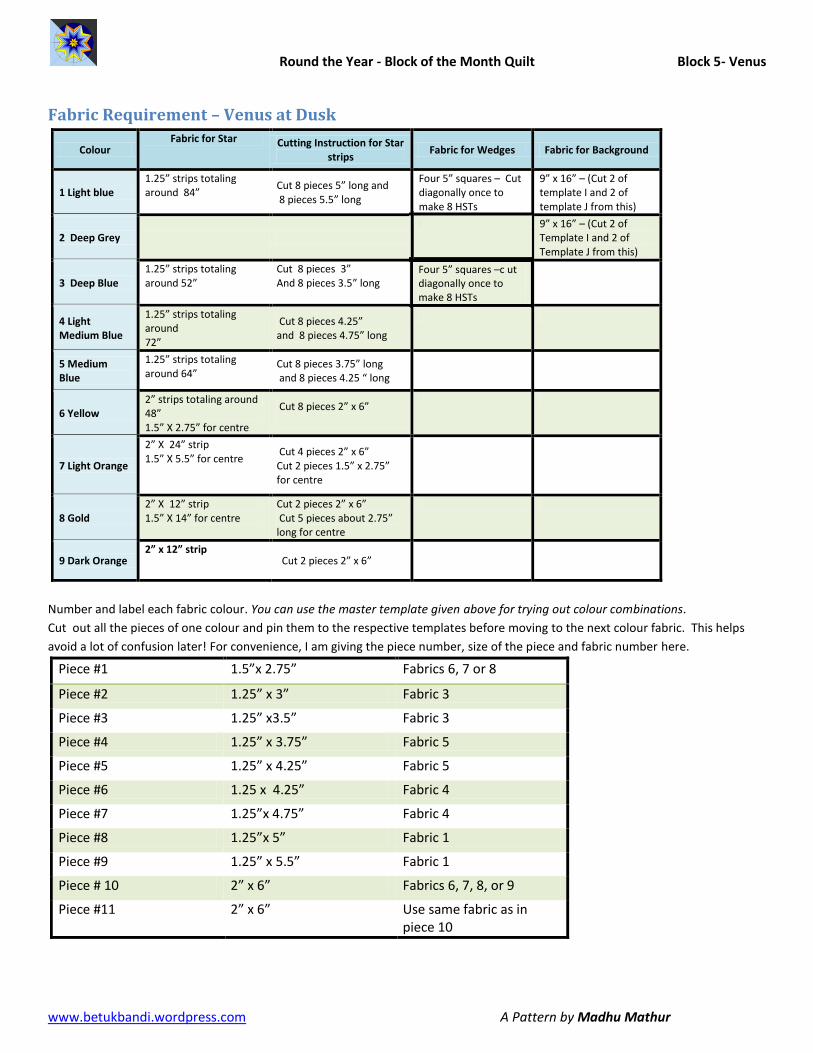
Fabric Requirement – Venus at Dusk
Number and label each fabric colour. You can use the master template given above for trying out colour combinations.
Cut out all the pieces of one colour and pin them to the respective templates before moving to the next colour fabric. This helps
avoid a lot of confusion later! For convenience, I am giving the piece number, size of the piece and fabric number here.
Colour Fabric for Star Cutting Instruction for Star
strips Fabric for Wedges Fabric for Background
1 Light blue 1.25” strips totaling around 84”
Cut 8 pieces 5” long and 8 pieces 5.5” long
Four 5” squares – Cut diagonally once to make 8 HSTs
9” x 16” – (Cut 2 of template I and 2 of template J from this)
2 Deep Grey
Four 5” squares –c ut diagonally once to make 8 HSTs
9” x 16” – (Cut 2 of Template I and 2 of Template J from this)
3 Deep Blue 1.25” strips totaling around 52”
Cut 8 pieces 3” And 8 pieces 3.5” long
4 Light Medium Blue
1.25” strips totaling around 72”
Cut 8 pieces 4.25” and 8 pieces 4.75” long
5 Medium Blue
1.25” strips totaling around 64”
Cut 8 pieces 3.75” long and 8 pieces 4.25 “ long
6 Yellow 2” strips totaling around 48” 1.5” X 2.75” for centre
Cut 8 pieces 2” x 6”
7 Light Orange
2” X 24” strip 1.5” X 5.5” for centre
Cut 4 pieces 2” x 6” Cut 2 pieces 1.5” x 2.75” for centre
8 Gold 2” X 12” strip 1.5” X 14” for centre
Cut 2 pieces 2” x 6” Cut 5 pieces about 2.75” long for centre
9 Dark Orange 2” x 12” strip
Cut 2 pieces 2” x 6”
Piece #1 1.5”x 2.75” Fabrics 6, 7 or 8
Piece #2 1.25” x 3” Fabric 3
Piece #3 1.25” x3.5” Fabric 3
Piece #4 1.25” x 3.75” Fabric 5
Piece #5 1.25” x 4.25” Fabric 5
Piece #6 1.25 x 4.25” Fabric 4
Piece #7 1.25”x 4.75” Fabric 4
Piece #8 1.25”x 5” Fabric 1
Piece #9 1.25” x 5.5” Fabric 1
Piece # 10 2” x 6” Fabrics 6, 7, 8, or 9
Piece #11 2” x 6” Use same fabric as in piece 10
Round the Year - Block of the Month Quilt Block 5- Venus
www.betukbandi.wordpress.com A Pattern by Madhu Mathur
Step by Step Piecing and Assembly Instructions 1.It is recommended you sort out all the pieces template-wise and pin them to the far end of your template ( near the piece # 10-11)
in the order of stitching – the longest piece at the bottom of the pile and the shortest on top.
2. As mentioned earlier, the block templates A to H are pieced like a log cabin, beginning from the centre (yellow to oranges here).
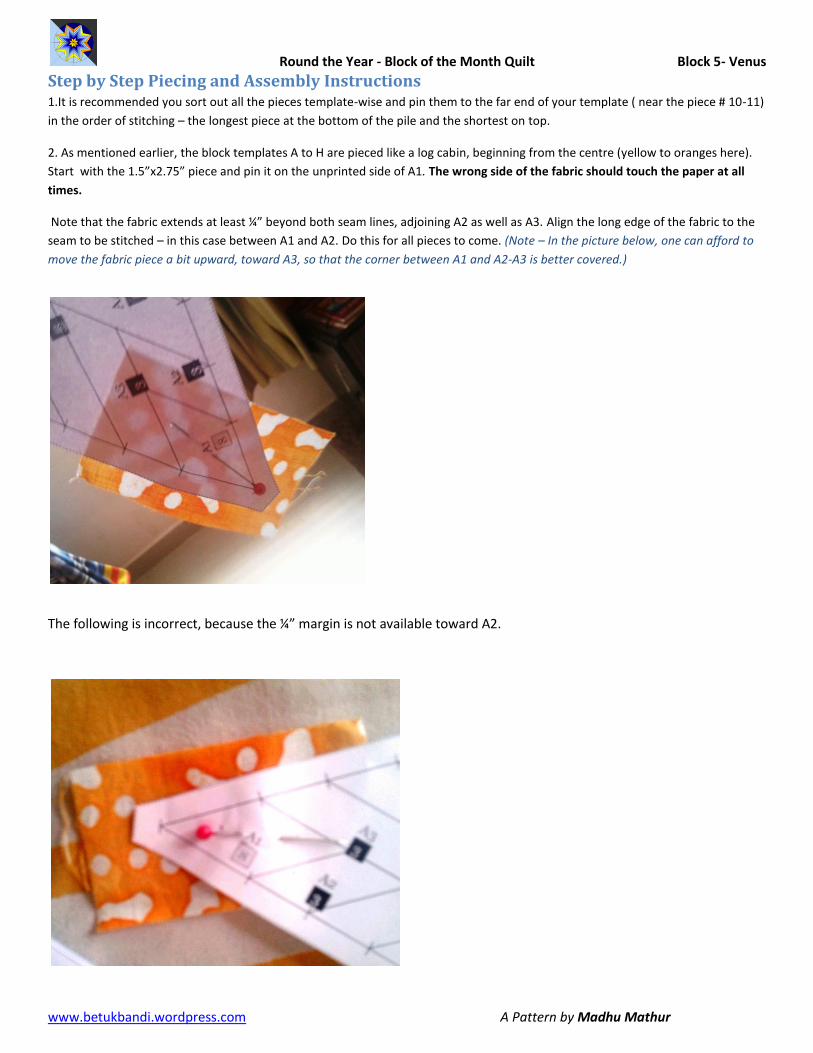
Start with the 1.5”x2.75” piece and pin it on the unprinted side of A1. The wrong side of the fabric should touch the paper at all
times.
Note that the fabric extends at least ¼” beyond both seam lines, adjoining A2 as well as A3. Align the long edge of the fabric to the
seam to be stitched – in this case between A1 and A2. Do this for all pieces to come. (Note – In the picture below, one can afford to
move the fabric piece a bit upward, toward A3, so that the corner between A1 and A2-A3 is better covered.)
The following is incorrect, because the ¼” margin is not available toward A2.
Round the Year - Block of the Month Quilt Block 5- Venus
www.betukbandi.wordpress.com A Pattern by Madhu Mathur
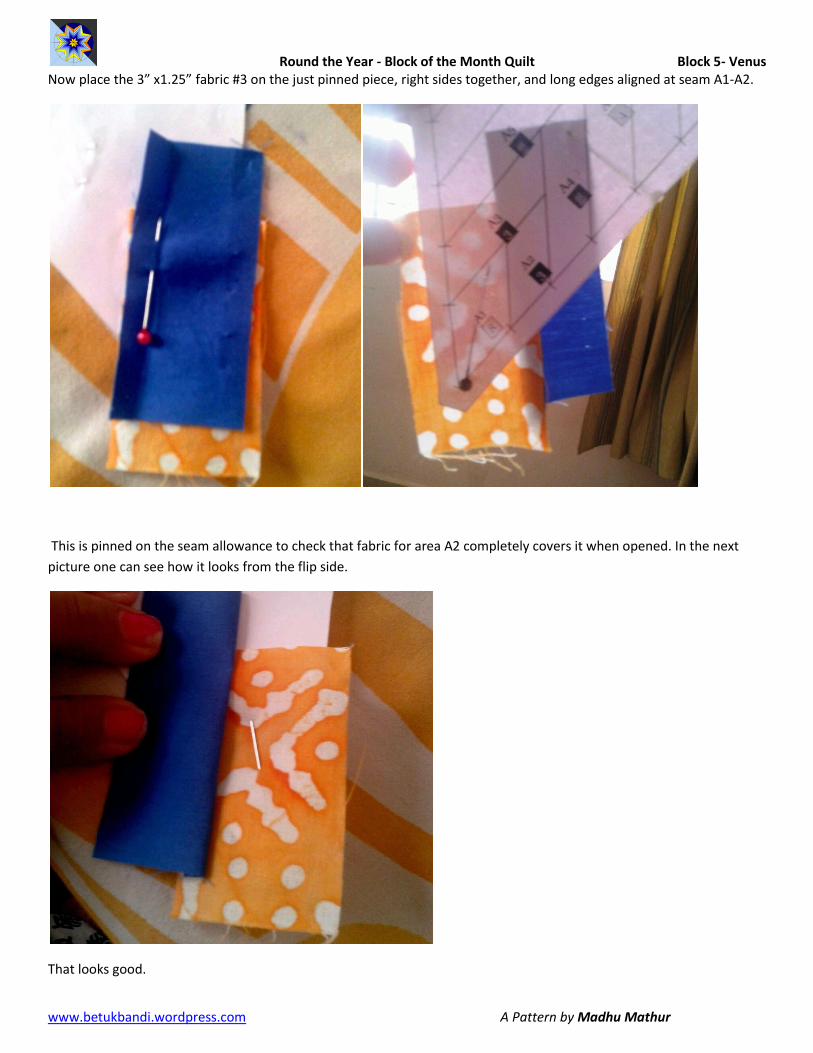
Now place the 3” x1.25” fabric #3 on the just pinned piece, right sides together, and long edges aligned at seam A1-A2.
This is pinned on the seam allowance to check that fabric for area A2 completely covers it when opened. In the next
picture one can see how it looks from the flip side.
That looks good.
Round the Year - Block of the Month Quilt Block 5- Venus
www.betukbandi.wordpress.com A Pattern by Madhu Mathur
Set the sewing machine to a stitch length between 1 and 1.5 so that it is easy to tear away the paper. Sew on the seam
line A1-A2, extending the stitching line about ¼” on to A3.
3. Similarly stitch the first two pieces on all the templates, before heading to your ironing table and pressing the seams
to set them. Then trim the seams to ¼” and press open the piece #2 on all templates.
4. Pin piece#3, which is fabric#3 and 3.5” long, right side down, aligning the long edge to ¼” beyond the printed seam
line between A1 –A2 and A3, the way you would in a log cabin. Do this for all the templates and then do the stitching of
piece #3 to pieces #1 and #2.
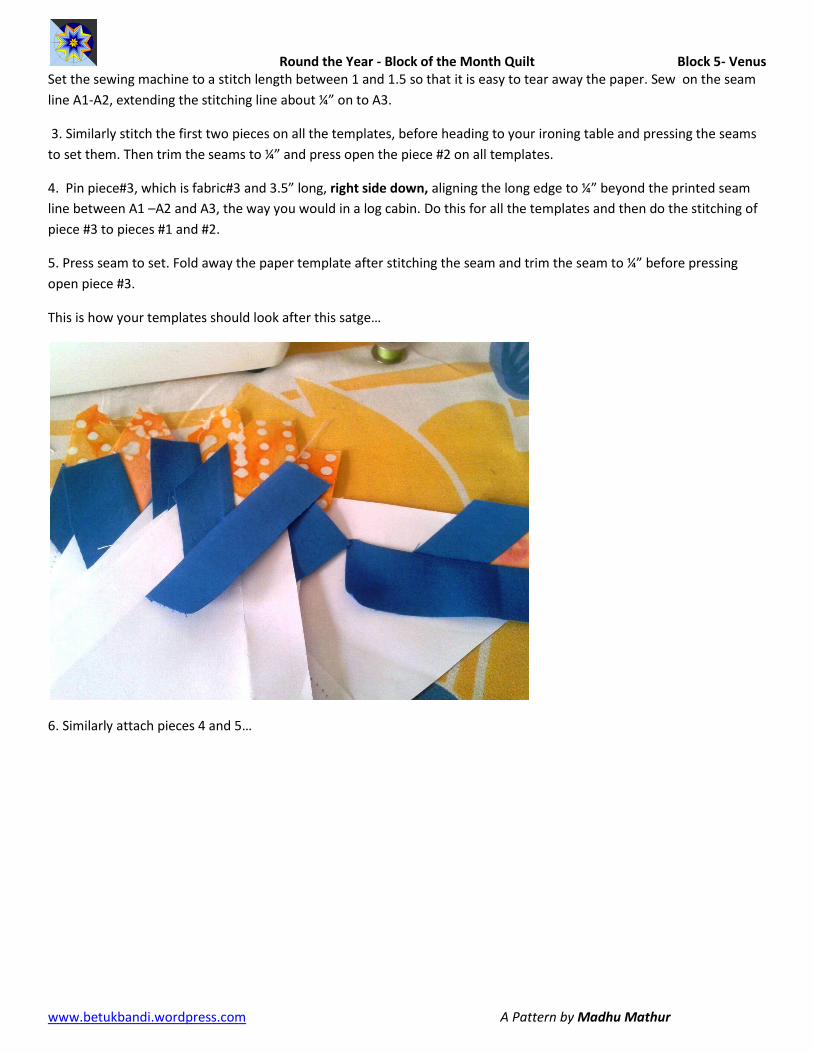
5. Press seam to set. Fold away the paper template after stitching the seam and trim the seam to ¼” before pressing
open piece #3.
This is how your templates should look after this satge…
6. Similarly attach pieces 4 and 5…
Round the Year - Block of the Month Quilt Block 5- Venus
www.betukbandi.wordpress.com A Pattern by Madhu Mathur
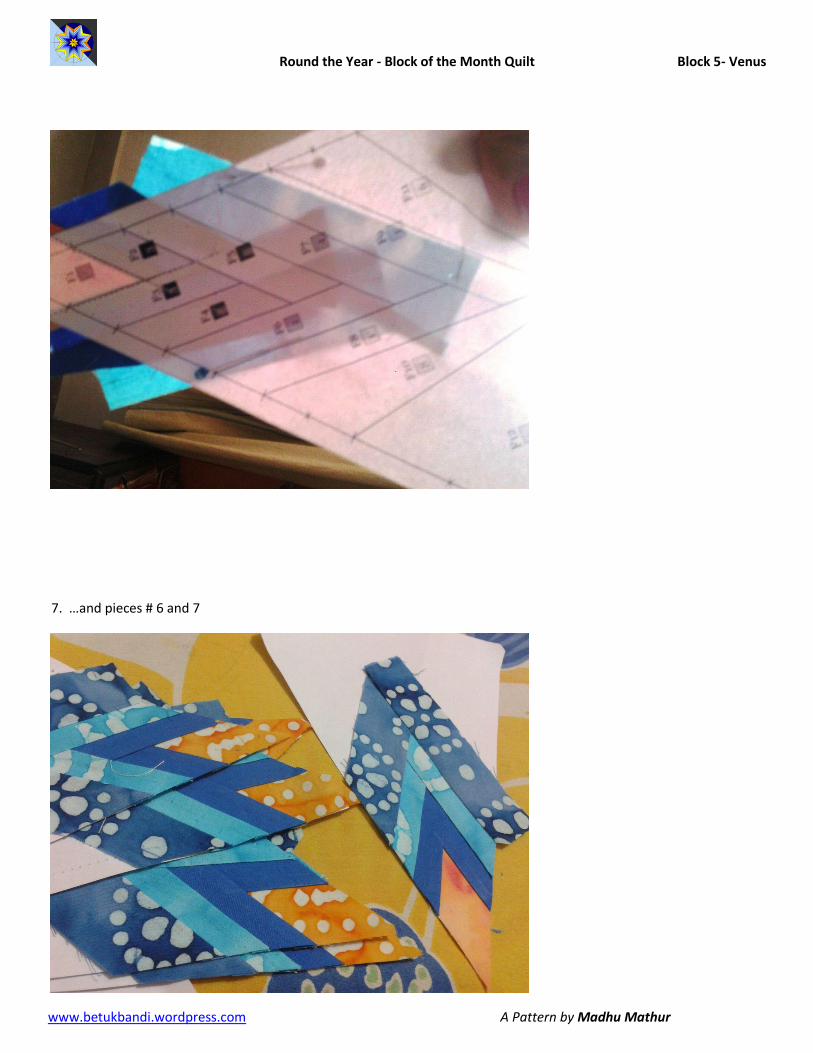
7. …and pieces # 6 and 7

Round the Year - Block of the Month Quilt Block 5- Venus
www.betukbandi.wordpress.com A Pattern by Madhu Mathur
8. Sew on Piece#8.
9. …the final blue pieces# 8 and 9 attached!
Round the Year - Block of the Month Quilt Block 5- Venus
www.betukbandi.wordpress.com A Pattern by Madhu Mathur
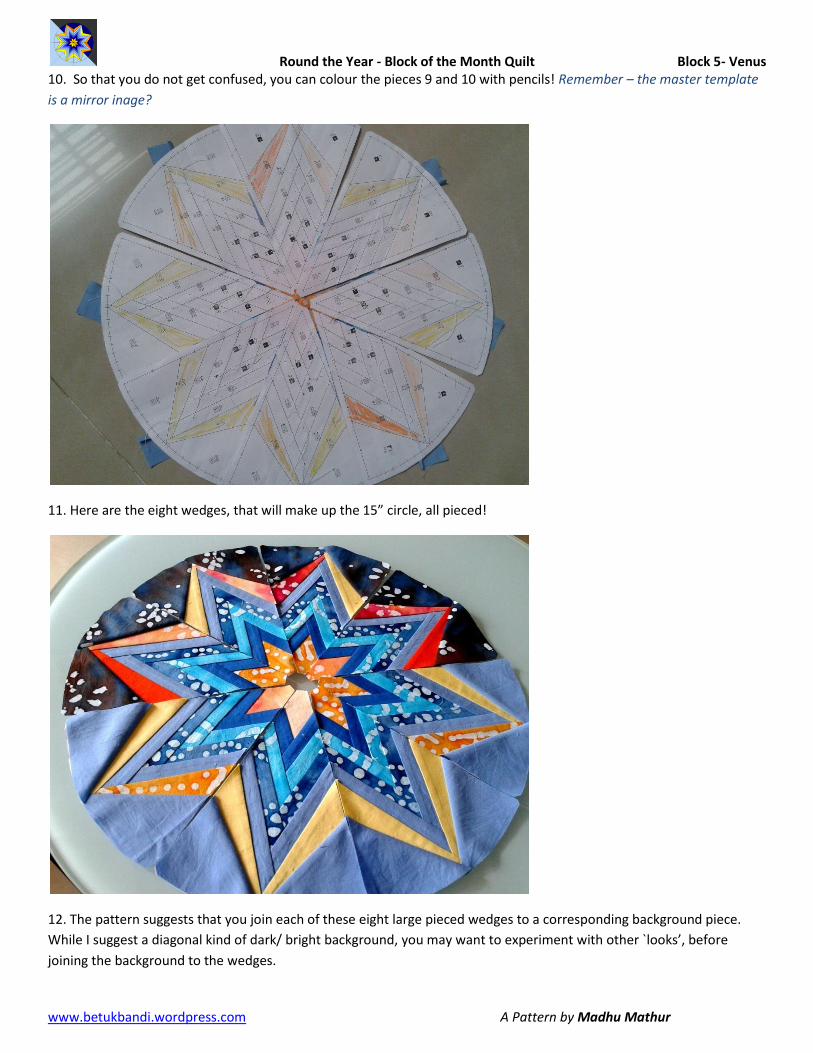
10. So that you do not get confused, you can colour the pieces 9 and 10 with pencils! Remember – the master template
is a mirror inage?
11. Here are the eight wedges, that will make up the 15” circle, all pieced!
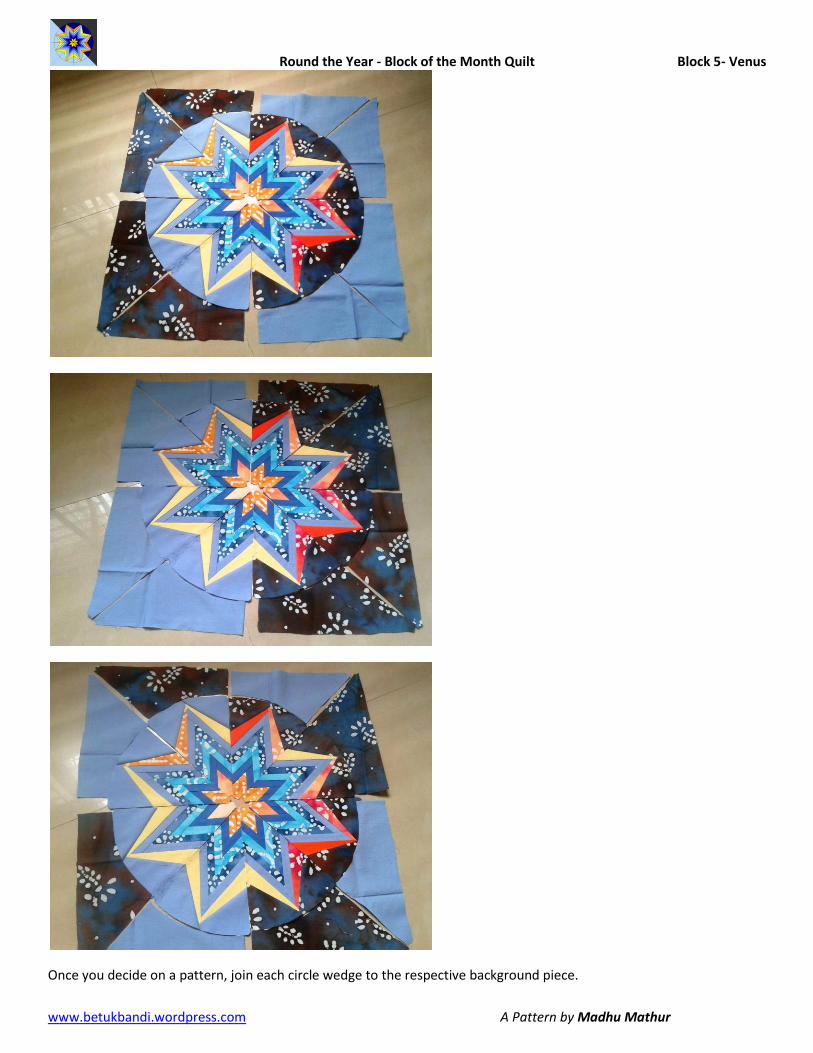
12. The pattern suggests that you join each of these eight large pieced wedges to a corresponding background piece.
While I suggest a diagonal kind of dark/ bright background, you may want to experiment with other `looks’, before
joining the background to the wedges.
Round the Year - Block of the Month Quilt Block 5- Venus
www.betukbandi.wordpress.com A Pattern by Madhu Mathur
Once you decide on a pattern, join each circle wedge to the respective background piece.

Round the Year - Block of the Month Quilt Block 5- Venus
www.betukbandi.wordpress.com A Pattern by Madhu Mathur
13. Join the pieces in pairs.
AI to BJ to get a square AIBJ
CK to DL to get the square CKDL
EM to FN to get the square EMFN
GO to HP to get the square GOHP
14. Join these squares in pairs to get the top half and bottom halves of the block. Join the halves to get the final block –
Venus!