vdrive ql user manual v0.18 - … · 'rfxphqw +lvwru\ yhuvlrq lqlwldo gudiw yhuvlrq xsgdwhg...
TRANSCRIPT
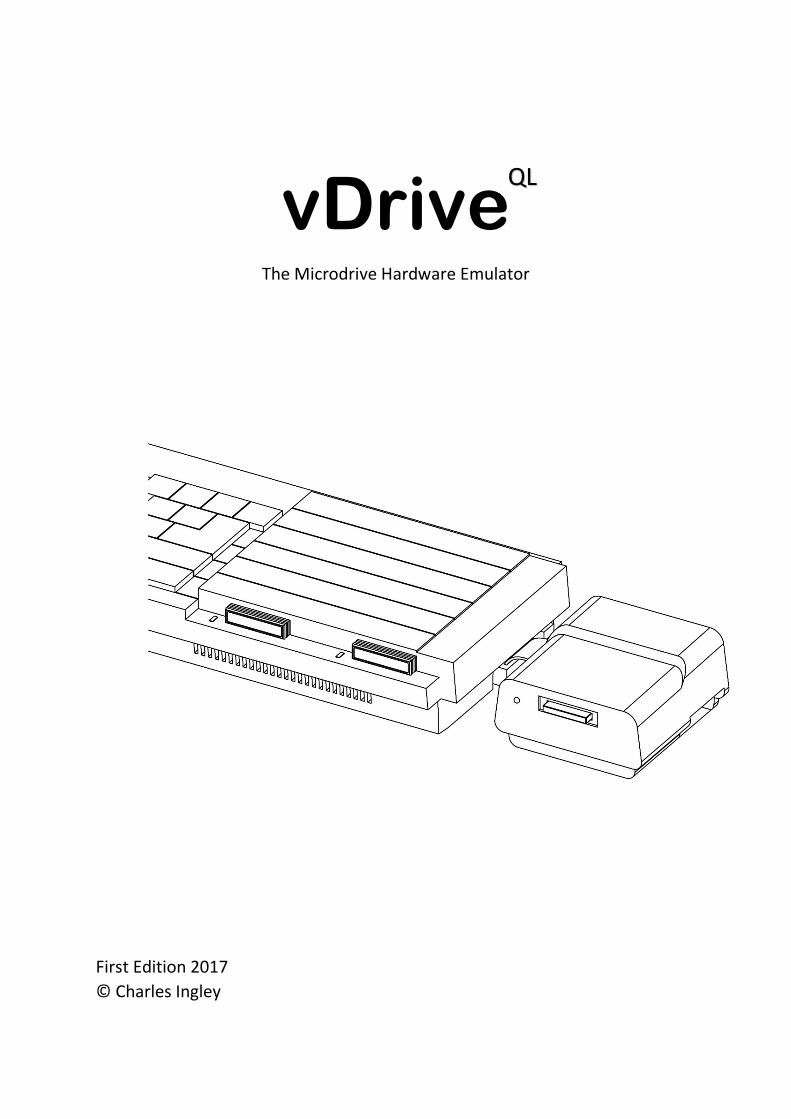
vDrive
The Microdrive Hardware Emulator
First Edition 2017 © Charles Ingley
QL
Document History 29/05/17 version 1.00 initial draft 18/07/17 version 1.05 updated layout 23/08/17 version 1.08 updated tutorial 25/08/17 version 1.09 added index 31/08/17 version 1.11 added vMapQL commands 06/09/17 version 1.15 first release 25/10/17 version 1.16 updated for firmware release 001
Disclaimer: This user manual is provided as is with no guarantees that the information contained herein is complete or correct. All (registered) trademarks are the property of their respective owners and are used for informational purposes only.
The vDriveQL …
Delivers hardware emulation for up to eight Microdrives and includes a comprehensive toolkit for managing your Microdrive cartridge images. The vDriveQL simply connects to your QL’s external Microdrive bus and is accessed with the usual Microdrive commands.
This Manual…
Provides you with everything you need to make full use of the vDriveQL. After following the initial setup covered in Chapter 1, you can continue with the concepts covered in Chapter 2, or jump straight into using the new toolkit commands by following the tutorial in Chapter 3.
If you have yet to install the vDriveQL in a case then please follow the instructions that came separately.
The manual is organised in the following chapters: Chapter 1 How to set up the vDriveQL
Chapter 2 Concepts including virtual drives, images and banks
Chapter 3 Installing and using the Toolkit commands
Appendix 1 The complete Toolkit reference
Appendix 2 Technical Information
Appendix 3 Updating the Firmware
Appendix 4 A list of supported systems
Appendix 5 A list of all system messages
Appendix 6 Troubleshooting
Please read this manual in conjunction with the original documentation that came with your QL computer system, as topics that have been previously introduced, such as file management and Microdrive commands, will not be covered in detail here.
1
Contents Chapter 1 Setting up your vDriveQL 2
Connection to the QL
Adding Microdrives
Chapter 2 Concepts 4
Virtual Drives and Cartridge Images
Files and Directories
Banks
Chapter 3 The Toolkit 7
Installing the Toolkit
Using the commands
SD Card Initialisation Managing Directories Managing Images Assigning a vDrive Image Managing Banks Updating the Firmware
More Toolkit Commands
Appendix 1 The Toolkit Reference 12
Appendix 2 Technical Information 17
Appendix 3 Updating the Firmware 22
Appendix 4 Supported Systems 23
Appendix 5 System Messages 24
Appendix 6 Troubleshooting Guide 26
Index 27
Chapter 1
2
Setting up your vDriveQL What you will need
First you will need to install the vDriveQL in a Microdrive case. Please follow the instructions that came with your vDriveQL hardware package.
You will also require a standard Microdrive cable and an SD Card.
Connection to the QL
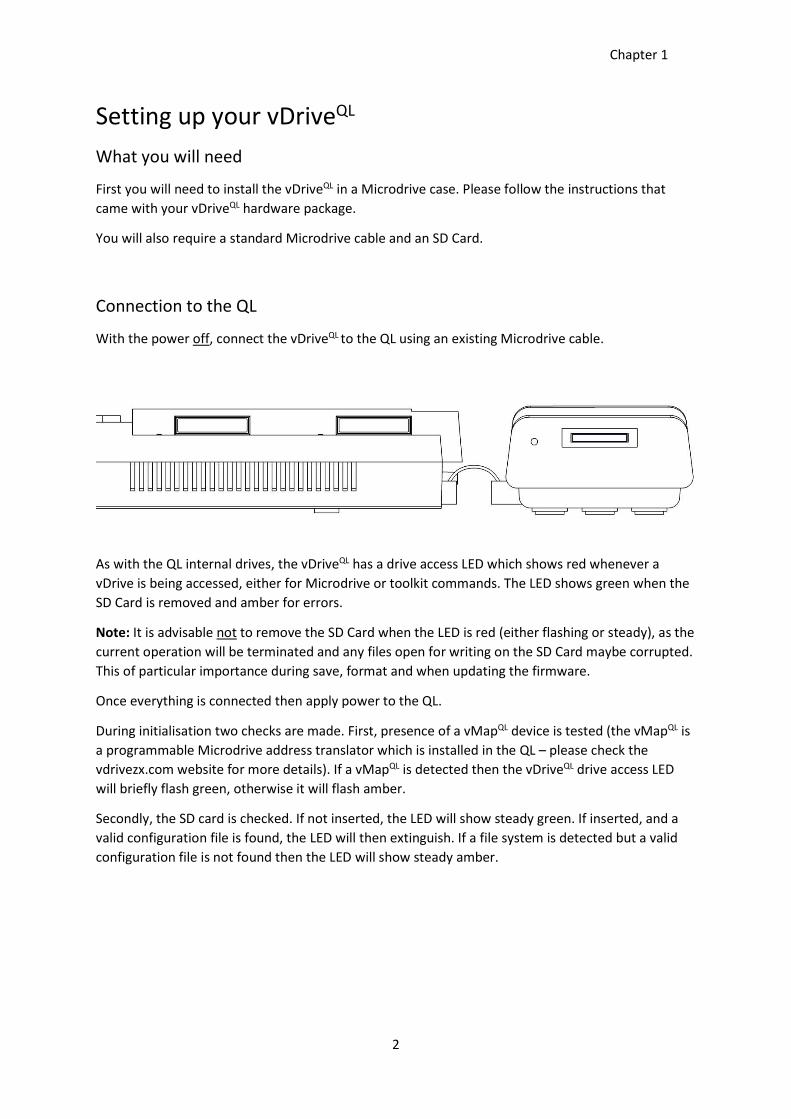
With the power off, connect the vDriveQL to the QL using an existing Microdrive cable.
As with the QL internal drives, the vDriveQL has a drive access LED which shows red whenever a vDrive is being accessed, either for Microdrive or toolkit commands. The LED shows green when the SD Card is removed and amber for errors.
Note: It is advisable not to remove the SD Card when the LED is red (either flashing or steady), as the current operation will be terminated and any files open for writing on the SD Card maybe corrupted. This of particular importance during save, format and when updating the firmware.
Once everything is connected then apply power to the QL.
During initialisation two checks are made. First, presence of a vMapQL device is tested (the vMapQL is a programmable Microdrive address translator which is installed in the QL – please check the vdrivezx.com website for more details). If a vMapQL is detected then the vDriveQL drive access LED will briefly flash green, otherwise it will flash amber.
Secondly, the SD card is checked. If not inserted, the LED will show steady green. If inserted, and a valid configuration file is found, the LED will then extinguish. If a file system is detected but a valid configuration file is not found then the LED will show steady amber.
Chapter 1
3
Adding Microdrives
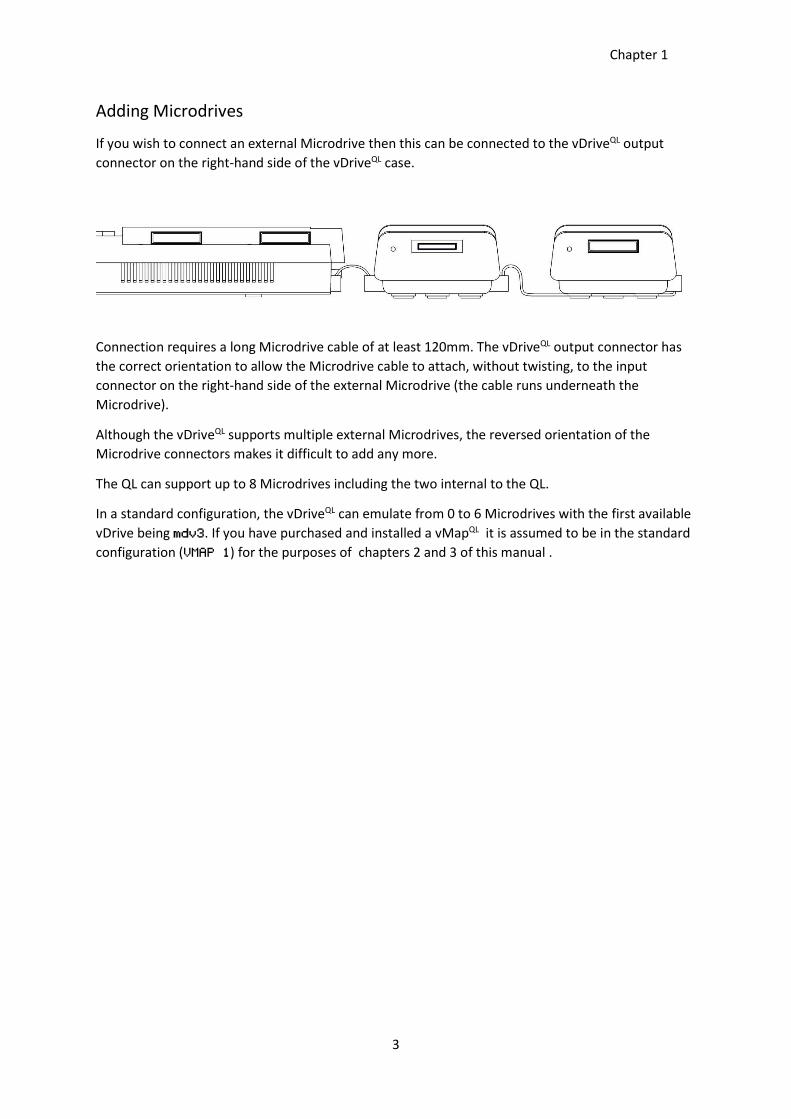
If you wish to connect an external Microdrive then this can be connected to the vDriveQL output connector on the right-hand side of the vDriveQL case.
Connection requires a long Microdrive cable of at least 120mm. The vDriveQL output connector has the correct orientation to allow the Microdrive cable to attach, without twisting, to the input connector on the right-hand side of the external Microdrive (the cable runs underneath the Microdrive).
Although the vDriveQL supports multiple external Microdrives, the reversed orientation of the Microdrive connectors makes it difficult to add any more.
The QL can support up to 8 Microdrives including the two internal to the QL.
In a standard configuration, the vDriveQL can emulate from 0 to 6 Microdrives with the first available vDrive being mdv3. If you have purchased and installed a vMapQL it is assumed to be in the standard configuration (VMAP 1) for the purposes of chapters 2 and 3 of this manual .
Chapter 2
4
Concepts Virtual Drives and Cartridge Images
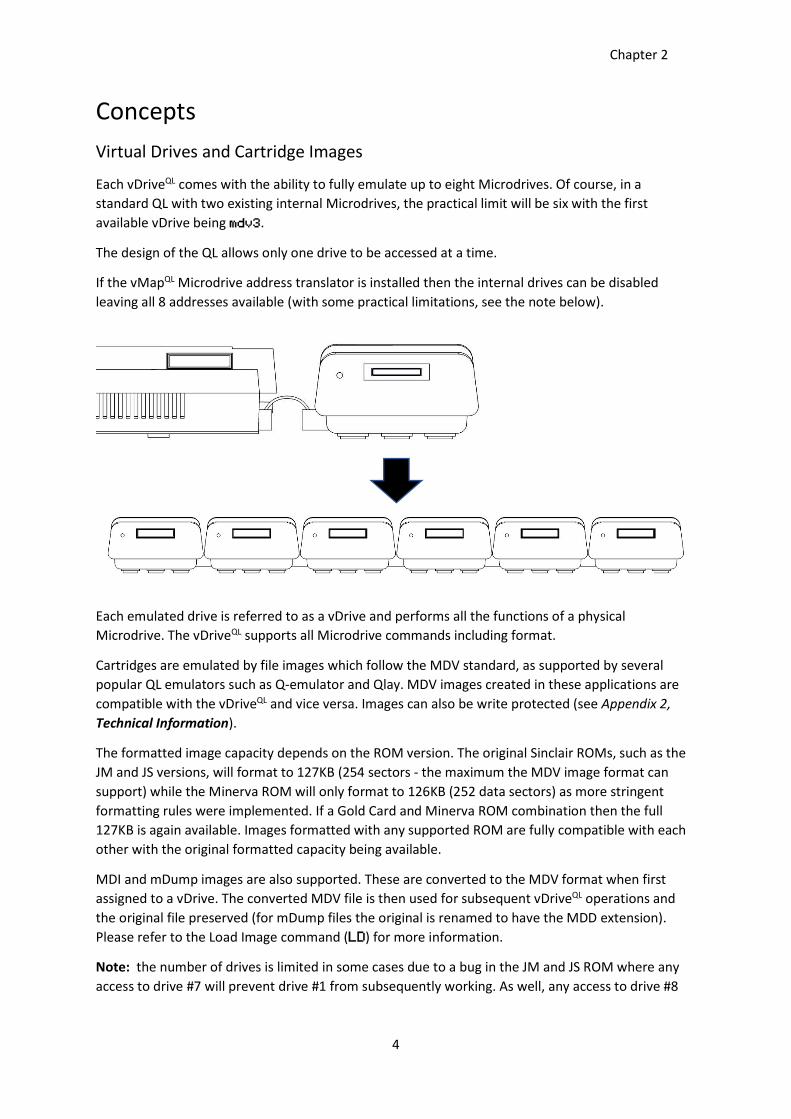
Each vDriveQL comes with the ability to fully emulate up to eight Microdrives. Of course, in a standard QL with two existing internal Microdrives, the practical limit will be six with the first available vDrive being mdv3.
The design of the QL allows only one drive to be accessed at a time.
If the vMapQL Microdrive address translator is installed then the internal drives can be disabled leaving all 8 addresses available (with some practical limitations, see the note below).
Each emulated drive is referred to as a vDrive and performs all the functions of a physical Microdrive. The vDriveQL supports all Microdrive commands including format.
Cartridges are emulated by file images which follow the MDV standard, as supported by several popular QL emulators such as Q-emulator and Qlay. MDV images created in these applications are compatible with the vDriveQL and vice versa. Images can also be write protected (see Appendix 2, Technical Information).
The formatted image capacity depends on the ROM version. The original Sinclair ROMs, such as the JM and JS versions, will format to 127KB (254 sectors - the maximum the MDV image format can support) while the Minerva ROM will only format to 126KB (252 data sectors) as more stringent formatting rules were implemented. If a Gold Card and Minerva ROM combination then the full 127KB is again available. Images formatted with any supported ROM are fully compatible with each other with the original formatted capacity being available.
MDI and mDump images are also supported. These are converted to the MDV format when first assigned to a vDrive. The converted MDV file is then used for subsequent vDriveQL operations and the original file preserved (for mDump files the original is renamed to have the MDD extension). Please refer to the Load Image command (LD) for more information.
Note: the number of drives is limited in some cases due to a bug in the JM and JS ROM where any access to drive #7 will prevent drive #1 from subsequently working. As well, any access to drive #8

Chapter 2
5
will stop drive #2 from working correctly. The Minerva ROM corrects this bug. Using the JM or JS ROM with a Gold Card has no effect.
Chapter 2
6
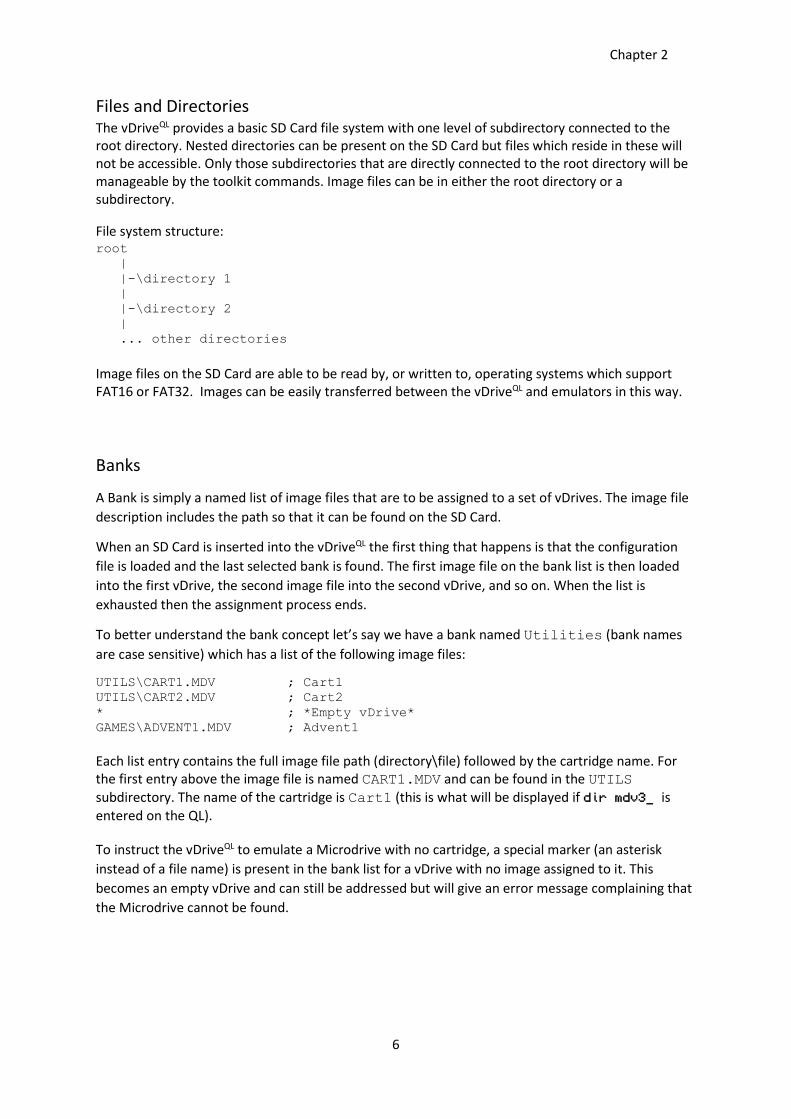
Files and Directories The vDriveQL provides a basic SD Card file system with one level of subdirectory connected to the root directory. Nested directories can be present on the SD Card but files which reside in these will not be accessible. Only those subdirectories that are directly connected to the root directory will be manageable by the toolkit commands. Image files can be in either the root directory or a subdirectory.
File system structure: root | |-\directory 1 | |-\directory 2 | ... other directories Image files on the SD Card are able to be read by, or written to, operating systems which support FAT16 or FAT32. Images can be easily transferred between the vDriveQL and emulators in this way.
Banks
A Bank is simply a named list of image files that are to be assigned to a set of vDrives. The image file description includes the path so that it can be found on the SD Card.
When an SD Card is inserted into the vDriveQL the first thing that happens is that the configuration file is loaded and the last selected bank is found. The first image file on the bank list is then loaded into the first vDrive, the second image file into the second vDrive, and so on. When the list is exhausted then the assignment process ends.
To better understand the bank concept let’s say we have a bank named Utilities (bank names are case sensitive) which has a list of the following image files:
UTILS\CART1.MDV ; Cart1 UTILS\CART2.MDV ; Cart2 * ; *Empty vDrive* GAMES\ADVENT1.MDV ; Advent1 Each list entry contains the full image file path (directory\file) followed by the cartridge name. For the first entry above the image file is named CART1.MDV and can be found in the UTILS subdirectory. The name of the cartridge is Cart1 (this is what will be displayed if dir mdv3_ is entered on the QL). To instruct the vDriveQL to emulate a Microdrive with no cartridge, a special marker (an asterisk instead of a file name) is present in the bank list for a vDrive with no image assigned to it. This becomes an empty vDrive and can still be addressed but will give an error message complaining that the Microdrive cannot be found.
Chapter 2
7
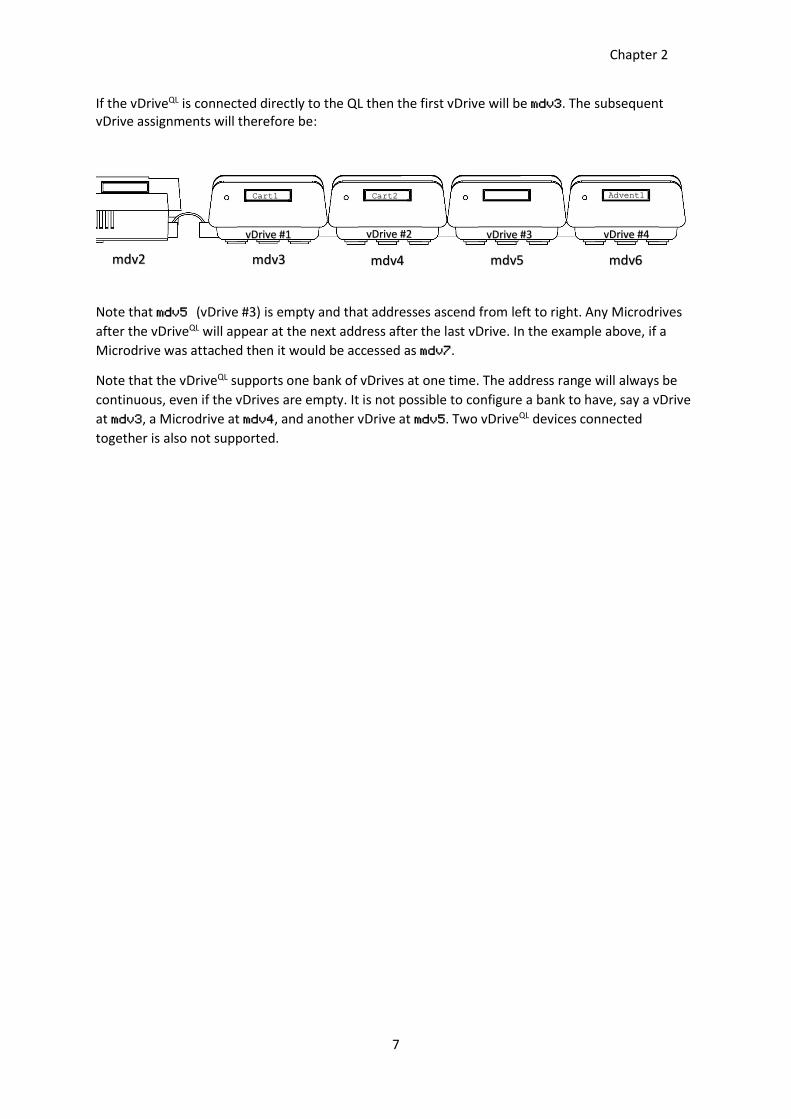
If the vDriveQL is connected directly to the QL then the first vDrive will be mdv3. The subsequent vDrive assignments will therefore be:
Note that mdv5 (vDrive #3) is empty and that addresses ascend from left to right. Any Microdrives after the vDriveQL will appear at the next address after the last vDrive. In the example above, if a Microdrive was attached then it would be accessed as mdv7.
Note that the vDriveQL supports one bank of vDrives at one time. The address range will always be continuous, even if the vDrives are empty. It is not possible to configure a bank to have, say a vDrive at mdv3, a Microdrive at mdv4, and another vDrive at mdv5. Two vDriveQL devices connected together is also not supported.
Advent1 Cart2 Cart1
mdv3 mdv4 mdv5 mdv6
vDrive #1 vDrive #2 vDrive #3 vDrive #4
mdv2
Chapter 3
8
The Toolkit
Installing the Toolkit
The vDriveQL comes with an extensive suite of commands to take full advantage of the vDriveQL functionality. These commands can be used interactively or included in QL SuperBASIC programs to further automate functions. Although it is not essential to have the toolkit loaded to use the vDriveQL with an existing configuration, any vDriveQL management tasks require the toolkit commands to be available.
The easiest way to install the toolkit is to access the cartridge that comes built-in to every vDriveQL.
Note: If you have purchased and installed a vMapQL it is assumed to be in the standard configuration (i.e. VMAP 1 and with the internal drives not swapped) for the purposes of the tutorial found later in this chapter.
To make the toolkit cartridge available, first remove any SD Card that may be in the vDriveQL. The drive access LED will show steady green indicating that the SD Card has been removed. The built-in cartridge will now appear as mdv3. If you wish, you can make a backup of the toolkit by copying all the files on mdv3 to another storage device.
Enter LRUN mdv3_boot. The drive access LED will light red briefly while the toolkit loads. The built-in cartridge has only a few sectors so loading only takes a moment.
Once installed successfully, the vDriveQL will beep once and the toolkit commands will be available (to display a list of available commands, enter HELP).
Problems with installation, such as unsupported or faulty hardware, will result in a message indicating a likely reason. Please see Appendix 5, System Messages and Appendix 6, Troubleshooting Guide for more information.
After the toolkit is installed, the toolkit commands will stay resident until a system reset. The commands are designed to will coexist with Toolkit 2.
The built-in cartridge may be disabled by using the TKOFF command (see the System Commands section in Appendix 1, Toolkit reference). If this is done, then you will need to install the toolkit from the supplied SD Card. To restore the built-in cartridge capability, enter the TKON command (see Appendix 1).
Using the Commands
The rest of the chapter provides a short guide to using the Toolkit commands to initialise the SD Card, to create and manage directories and images, and to create and configure banks of vDrives.
Note that key steps are highlighted by boxed text
Please refer to Appendix 1, The Toolkit Reference, for more detailed information on each command.
SD Card Initialisation
Before an SD Card can be used with the vDriveQL it will need to be initialised. Initialisation formats the card (erasing any data that may be present) and then saves a default configuration file with a single bank called vDrive and one empty vDrive.
Chapter 3
9
Although the SD Card format is FAT16/32, for best compatibility always initialise the SD Card using the vDriveQL toolkit commands.
To initialise an SD Card first install the Toolkit, insert the SD Card and enter SDINIT
The drive access LED will flash red during the initialisation process. As a rule of thumb, allow for about 1 second per GB of capacity to complete. Once initialisation is complete, the LED will extinguish and the SD Card will be ready for use.
If the process fails for any reason then an error message will be displayed (see Appendix 4, System Messages).
Managing Directories
Once the SD Card has been initialised it is time to add a directory, or two, to store your images. The creation of directories can also be done on a computer but for this exercise we are going to be using the Toolkit commands.
The commands for managing directories are MKDIR (make a directory), RMDIR (remove a directory), and CD (change to a directory).
A freshly initialised SD Card has only the root directory. To list directories and images in the current directory (which will be root by default) enter the LI (list images) command. Because this is a freshly initialised SD Card there will be no images listed.
Enter MKDIR ‘TESTDIR1’ to create a directory called TESTDIR1 on the SD Card.
Entering LI will now show the newly created directory. Directory names are case insensitive and can be from 1 to 8 characters in length.
To change directories, the CD (change directory) command is used.
Enter CD ‘TESTDIR1’ to change to the TESTDIR1 directory.
To create more directories, just enter the MKDIR command along with a unique directory name enclosed in quotes. All directories are created attached to the root directory so there is no need to change to the root directory before executing the MKDIR command.
To delete a directory the RMDIR (remove directory) command is used. Again, there is no need to change to the root directory before using this command.
Note: a directory must be empty of files before the RMDIR command will succeed.
Managing Images
Now that there is a directory or two on the SD Card, it’s time to create some images.
The command to create an image is MKIMG (make image). This image will be unformatted and will not be assigned to a vDrive (yet). First ensure that you are still in the TESTDIR1 directory by using the LI command. If not then enter CD ‘TESTDIR1’
Make an image called TESTIMG1 by entering MKIMG ‘TESTIMG1’
Chapter 3
10
The drive access LED will light red while the image is created and extinguish when complete. It can take a few seconds. Note that, with all image related commands, the .MDV extension to the file is implied and can be omitted. Image names are case insensitive and can be from 1 to 8 characters in length.
Using the LI command will confirm that the image has been created and you will notice that it has also been detected as being BLANK (unformatted). To create more images, just change to the directory you wish the image to be created in and enter further MKIMG commands along with a unique image name (this only needs to be unique in the same directory. Having a few more images will come in handy when you configure banks later on).
To delete an image the RM (remove file) command is used. This command only removes files in the current directory. If a file name without the .MDV extension is specified then it will be assumed to be an image file. Wildcards are not supported.
The RM command can be used to remove files other than image files. The full file name and extension is then needed. To view all files in a directory, use the LS (List files) command.
The toolkit also provides commands to copy, move and rename files. These won’t be required for now so please refer to Appendix 1, The Toolkit Reference, for more detailed information.
Assigning a vDrive Image
The LD (load image) command assigns an image to a vDrive.
To assign the TESTIMG1 image we created earlier to mdv3 then enter LD 3,’TESTIMG1’
Note that the number after the LD command selects the drive that the image is assigned to.
To check the vDrive assignments in the current bank the LV (list vDrives) command is used. Enter LV and mdv3 will now have the unformatted (labelled BLANK in the cartridge name field) image TESTIMG1 assigned to it.
Now that we finally have an image assigned to a vDrive we can use the standard Microdrive commands to access it. As the image is unformatted, the first thing to do is perform a format.
Format the image by entering format mdv3_Cart1
Enter LV and notice that the cartridge name field has changed to Cart1 where before it was BLANK. The image can now be used as a normal cartridge.
Managing vDrives
To add further vDrives to the current bank the MKDRV (make vDrive) command is used.
Enter MKDRV 3 to add three more vDrives to the one that is already available.
When first created, each vDrive has no image assigned and is ‘empty’.
Enter LV to confirm that three more empty vDrives have been added.
Chapter 3
11
If any Microdrives are connected after the vDriveQL then they will start at an address that is one more than the last vDrive address. In the current example, with a total of four vDrives, the next Microdrive address will be mdv7.
The MKDRV command will fail when an attempt is made to add more vDrives than can be supported. In all cases the last vDrive address cannot be higher than the limit of eight.
To remove vDrives from the current bank the RMDRV (remove vDrive) command is used.
Enter RMDRV 1 to remove one vDrive from those configured.
Note that any image assignment is lost when a vDrive is removed. Enter LV to confirm that one vDrive has been removed. There will now be three vDrives available.
Managing Banks
So far, we have been working with the default bank, called vDrive. This bank is always created when an SD Card is initialised. To see what banks are currently available on the SD Card, the LB (list banks) is used.
Enter LB to confirm that the only bank available is vDrive.
To create a new bank, we need the MKBANK (make bank) command. This will create a bank with the name of your choice with one empty vDrive.
Enter MKBANK ‘NewBank’ to make a new bank called NewBank.
Enter LB to confirm that the new bank has been created. Bank names are case insensitive and can be from 1 to 10 characters in length.
Selecting a different bank requires the SB (select bank) command. When selected, the new bank configuration simply replaces the previous bank configuration, including the number of vDrives and the images assigned to them. This will also change the drive numbering for any attached Microdrives if the number of vDrives changes.
Enter SB ‘NewBank’ to select the bank called NewBank.
Enter LV to confirm that the bank has just one empty vDrive. You can now add vDrives or assign images to create any configuration you wish. Use the images you may have created earlier on. If not then just make some more.
To remove a bank the RMBANK (remove bank) is used. The currently selected bank cannot be removed. You will need to select another bank first.
Note: when assigning images, you will find that you cannot assign the same image to more than one vDrive at a time. Images of the same name, but residing in different directories, are not considered the same image and therefore can be assigned to different vDrives.
Chapter 3
12
More Toolkit Commands
Also available are commands to:
Set write protect on images RO, RW Turn the system sounds on or off SNDON, SNDOFF Enable or disable the in-built toolkit TKON,TKOFF Display current settings VINFO Make a new default configuration file MKCFG Update the system firmware UPDATE Configure the vMapQL VMAP, VSWAP,VSTD
Please refer to Appendix 1, The Toolkit Reference, for more detailed information on each of these commands.
Appendix 1
13
The Toolkit Reference Introduction
The following terminology is used to refer to the different drive types.
vDrive an emulated drive provided by the vDriveQL
Microdrive a physical Microdrive
drive an address at which either a vDrive, or a Microdrive, can be accessed
Toolkit commands are not case sensitive.
Valid characters for SD Card files/directories include A-Z, a-z, 0-9, ! # $ % & ( ) - @ ^ _ { } ~
SD Card file names follow the DOS short file naming convention of 1 to 8 characters for the name, an optional full-stop separator, with an optional 0 to 3 characters for the extension (commonly referred to as 8.3). File names are not case sensitive.
SD Card directory names can be from 1 to 8 characters and are not case sensitive.
“file” refers to a valid DOS file name. Any file name without an extension is treated as having the .MDV extension. If files without an extension need to be processed, then the full-stop separator needs to be entered.
“image” refers to an MDV image file. The .MDV extension is optional in all file commands.
“dir” refers to a valid DOS directory name. Directory names can be from 1 to 8 characters in length and are not case sensitive.
The root directory is denoted by an empty string (i.e. ‘’).
“bank” refers to a bank name. Bank names are case sensitive and can be from 1 to 10 characters in length.
“name” refers to a Microdrive file name. Microdrive file names are case sensitive and can be from 1 to 10 characters in length.
‘n’ refers to a valid drive number. Drive numbers range from 1 to 8.
For the CP (copy file), RM (remove file), MV (move file) and REN (rename file) commands, the TO separator can be replaced with a comma.
The following are both the same:
.CP “file” TO “dir”
.CP “file”,“dir”
Appendix 1
14
Image management commands
LD n,’image’ Assign an image file to drive number n. The image can be either a valid MDV (either standard MDV or mDump format), or an MDI image file. Images can only be assigned to one vDrive at a time and the vDrive needs to exist.
The LD command converts mDump and MDI images to the standard MDV format before assigning them to a vDrive. The converted file has the .MDV extension. In all conversions, the original file is left intact (mDump files are renamed with the .MDD extension, while an MDI file is left unchanged).
Note that to assign an MDI file, the full filename is used:
i.e. LD n,’image.MDI’
For further details of format conversion, see Appendix 2, Technical Information.
LD n,’’ Remove the image assignment from drive number n. After the command has executed, the vDrive will become empty.
LI List Images. All valid MDV, MDI, and mDump images in the current directory will be displayed along with the cartridge name.
Read only images MDV images are indicated by |R being appended to the cartridge name.
Note that MDI images are identified by |M after the cartridge name while mDump images are identified with |D (whether unconverted .MDV or those renamed to .MDD after conversion. See the LD command).
MKIMG ‘image’ Create an unformatted MDV image in the current directory. Before use the image will need to be assigned to a vDrive and formatted. For unformatted images, the cartridge name is shown as BLANK.
If unformatted images are accessed, then the QL will give the not found error.
RO ‘image’ Set access to the image as read-only. The image needs to be a valid MDV image file and exist in the current directory. The file can be currently assigned to a vDrive. Read only images are indicated by |R being appended to the cartridge name when the LI or LV commands are used.
RW ‘image’ Set access to the image as read and write. The image needs to be a valid image file and exist in the current directory. The file can be currently assigned to a vDrive.

Appendix 1
15
vDrive management commands
LV List vDrives. All configured vDrives in the current Bank will be displayed along with the assigned MDV image name, cartridge name and read-only status.
MKDRV n Add number n of empty vDrives to the current configuration. Existing image assignments will not be affected. Trying to add more drives than are available will result in an error.
RMDRV n Remove number n vDrives from the current configuration starting from the highest current vDrive number. Image assignments for those vDrives removed will be lost. Trying to delete more drives than are available will result in an error.
Bank management commands
LB List Banks. All available banks in the current configuration will be displayed.
MKBANK ‘bank’ Make Bank. The named bank will be created with one empty vDrive as the default. The bank name must be unique.
RMBANK ‘bank’ Remove Bank. The named bank will be deleted along with all associated image assignments.
SB ‘bank’ Select Bank. vDrives are assigned to images as defined in the named bank. The previous bank configuration is saved.
File management commands
CD ‘dir’ Change Directory. Two levels of directory are supported with all named directories attached to the root directory. Directories are addressed directly, for example if currently in the TOOLS directory then CD ‘ADVENT’ will switch to the ADVENT directory.
CD ‘’ Change to the root directory.
CP ‘file’ TO ‘dir’ Copy a file to a directory. The file will be copied to the destination directory as long as long as a file of the same name does not already exist at this location.
LS List files. All files in the current directory will be displayed.
MKDIR ‘dir’ Create a directory. The directory will be created if it doesn’t already exist.
RMDIR ‘dir’ Remove a directory. The directory will be removed as long as the directory is empty.
MV ‘file’ TO ‘dir’ Move a file to a directory. The file will be copied to the directory and the original file deleted as long as a file of the same name does not

Appendix 1
16
already exist at this location and the file is not currently assigned to a vDrive. The destination directory can be the root directory:
i.e. MV ‘file’ TO ‘’
REN ‘oldfile’ TO ‘newfile’ Rename a file in the current directory. The file will be renamed as long as the new file name does not already exist and the file is not currently assigned to a vDrive.
RM ‘file’ Remove a file. The file will be deleted as long as it is not currently assigned to a vDrive.
SD Card configuration commands
MKCFG Create a new configuration file. The VDRIVEQL.CFG configuration file will be deleted and a new VDRIVEQL.CFG created (with a default bank called vDrive which will contain one empty vDrive). If the current configuration needs to be saved prior to this command then the VDRIVEQL.CFG can be renamed using the REN command.
SDINIT Initialise the SD Card. The SD Card is formatted and the MKCFG command executed to create a default configuration file.
System commands
HELP A helpful list of all available commands is displayed.
SNDON Enable sound. System sounds are turned on. System sounds include vDrive access and error reporting.
SNDOFF Disable sound. All system sounds are turned off.
TKON Enable the built-in toolkit image. With the SD Card removed, the built-in toolkit image will be assigned to the first vDrive (normally mdv3). Entering LRUN mdv3_boot will load the toolkit making all toolkit commands available (see Chapter 3, The Toolkit).
TKOFF Disable the built-in toolkit image. With the SD Card removed, no vDrives will be active and the vDriveQL will be in pass-through mode. All Microdrive commands will address any physical Microdrives connected to the vDriveQL.
UPDATE Update the system firmware. The required update file (VDRIVEQL.BIN) is copied to the root directory of the SD Card and the UPDATE command executed (see Appendix 3, Updating the Firmware).
VINFO Display the firmware version and sound, toolkit image, and vMapQL (if attached) configuration.
Appendix 1
17
vMapQL commands
VMAP n Sets address remapping to configuration n where n is a number from 0 to 9.
VSWAP Redirects all accesses for internal drive #1 to internal drive #2 and vice versa.
VSTD Restores the internal drive addressing to normal.
See the vMapQL User Manual for more detailed information.
Appendix 2
18
Technical Information The SD Card File System The SD Card file system implementation is DOS based and is therefore compatible with systems which can read or write to FAT16 or FAT32 media. The vDriveQL has been tested with SD Cards having a capacity of up to 32GB.
Short DOS names are supported and although nested directories can be present, the vDriveQL can only process files in either the root or the next directory level (a two-level directory structure).
The decision to limit the number of levels to two was due in part to hardware constraints but largely to manage software complexity. The result is, I hope, a good compromise between flexibility and compatibility given the rest of the functionality available.
Most SD Cards that can be initialised by the vDriveQL will be suitable for use (see the SDINT command). The vDriveQL is designed to overcome most variable timing issues caused by SD Cards in real time environments, particularly during write operations, by buffering images in static ram. There may be some cards which will cause problems so if repeated errors occur, especially during saving, then try another card.
Drive Addressing
The vDriveQL supports up to eight virtual Microdrives at a time, of which six will generally available due to the two existing QL Microdrives. Each drive can either have an image assigned to it or can be empty. The number of drives emulated along within the image assignments are stored in a configuration file known as a bank. Any number of banks can be stored in the configuration file and these can be selected by using the toolkit SB (select bank) command.
As supported by the QL, up to eight drives (mdv1 to mdv8) can be configured made up of a combination of vDrives and Microdrives. The vDriveQL has been designed to be connected closest to the QL with any additional (likely just one) Microdrives connected after it. The number of vDrives configured will correspondingly reduce the number of physical Microdrives that can be addressed.
vDrives are configured in a contiguous address range (without gaps). For example, if four virtual drives are configured and the vDriveQL is the first drive attached to the QL, then these drives will become mdv3, mdv4, mdv5 and mdv6. Conversely, it is not possible to have a vDrive as mdv3, a physical Microdrive as mdv4, and another vDrive as mdv5. vDrives can be empty (no image assigned) and will appear to the QL as having no cartridge.
vDrives are added to, or deleted from, the last vDrive in the current bank. They cannot be added or deleted by individual address. For example, if the current bank has two vDrives, mdv3 and mdv4, then the MKDRV,2 command will add two new empty vDrives as mdv5 and mdv6. Similarly, the RMDRV,2 command will remove two vDrives from the current bank leaving vDrives mdv3 and mdv4, and the configuration for the vDrives associated with mdv5 and mdv6 will be lost.
Appendix 2
19
Image Format
The vDriveQL adopts the MDV image format. This format is supported by emulators such as Q-emulator, and QLAY, and in general, images created with these emulators will be compatible with the vDriveQL and vice versa. MDV images can be formatted, saved to, read from and erased by standard QL commands on real QL hardware.
Write protect is fully supported by a benign extension to the MDV format (byte 0, bit 0 of an MDV image is true for write protect enabled and false for full access). This capability is not currently supported by emulators. Write protected images on the vDriveQL will not be write protected when used with an emulator but otherwise can be accessed normally.
When a vDrive is addressed, the vDriveQL first checks to see if the image is already cached. If so, then play starts immediately. If not, then the vDriveQL loads the image assigned to the addressed vDrive from the SD Card into memory. After a short delay, play then starts. On insertion of an SD Card the first assigned image is always cached.
When saving, a tally of sectors changed is recorded. Once the vDrive is stopped, or another drive is addressed, only those sectors which have changed are saved to the SD Card.
Unformatted images are treated in a special way. When created on the vDriveQL they are identified by a unique signature which is overwritten during the format process. An unformatted image must be assigned to a vDrive prior to formatting. If a vDrive with an unformatted image is accessed, then the image won’t play giving a not found error.
One of the quirks of the QL is that if a physical cartridge with unreadable data (such as those formatted with an Interface 1 on the Spectrum) is played on a Microdrive, then the dir command will take a lengthy period to exit. To stop this from happening, the vDriveQL does not start playing data when an unformatted image is accessed. This immediately results in a not found message.
Files of the correct MDV length, but containing data not conforming to the MDV format, will cause the lengthy timeout problem if assigned to a vDrive and then accessed (this won’t normally happen of course but is to keep the emulation faithful to the original hardware – don’t ask why…).
Format Conversion
In addition to the MDV format, both MDI (an alternative to MDV) and mDump (developed for archival preservation) formats are supported.
In the process of being assigned to a vDrive (see the LD command), these formats are detected and automatically converted to a standard MDV image. The original file is left intact with the mDump file (as its extension is .MDV) being renamed with the.MDD extension. A new MDV image is created in all cases (unless a file of the same name already exists).
For example, if we want to assign an mDump file named ARCHIVE1.MDV to mdv3 then we would use the command LD 3,’ARCHIVE1.MDV’. The ARCHIVE1.MDV file would first be checked to determine whether it was a valid MDV or an mDump file. The vDriveQL uses the unique mDump file header to differentiate between the two.
In this case, it is an mDump file so conversion to a standard MDV file would take place. The original mDump file would be renamed to ARCHIVE1.MDD and the new ARCHIVE1.MDV file would be assigned to mdv3.
Appendix 2
20
Toolkit Implementation The toolkit is a simple client for the vDriveQL system. It is written entirely in relocatable assembler code and is loaded by a short QL SuperBASIC program.
The toolkit is comprised of a parser for the toolkit commands along with supporting functions to establish a two-way communications channel across the existing QL Microdrive interface and to display information on the QL screen.
The built-in toolkit is a cartridge image stored on the vDriveQL with only enough sectors (about 9) to hold the toolkit files. With the SD Card removed, the toolkit image will be assigned to the first vDrive (usually mdv3). Try dir mdv3_ with the SD Card removed and see what happens.
The toolkit can, of course, be loaded from another storage device of from an SD Card image assigned to a vDrive (the loader program is called boot). This has the advantage that the toolkit BASIC loader can be changed to load from another location.
About Banks
A Bank is a named configuration of vDrive image assignments. Each bank defines both how many vDrives are available and the images that may be assigned to them. The banks are stored in the vDriveQL configuration file, VDRIVEQL.CFG, which resides in the root directory of the SD Card (see The Configuration File section below for more details).
Each bank has a unique name which can be made up of any printable characters (upper case, lower case, symbols). Therefore vDrive, VDRIVE, and vdrive are all different bank names. Bank names can be up to 10 characters in length.
When the SD Card is inserted, the vDriveQL searches for the currently selected bank in the configuration file and then assigns the images listed to vDrive addresses in ascending order.
The best way to manage banks is with the toolkit as this ensures that the configuration file syntax is followed and such things as duplicate banks cannot exist. Banks are created with the MKBANK command, removed with the RMBANK command, and selected (made current) by the SB command.
The Configuration File
The VDRIVEQL.CFG configuration file resides in the root directory and without it the vDriveQL will not work. Is the configuration file is missing, or unreadable, then the vDriveQL will signal this by a steady amber LED. The file is a simple text file with a format similar to INI files found in many other systems.
The file can be edited manually but it is best left to the vDriveQL to handle any changes in configuration. With the toolkit commands, the configuration file can be copied, renamed, or moved to another directory.
Appendix 2
21
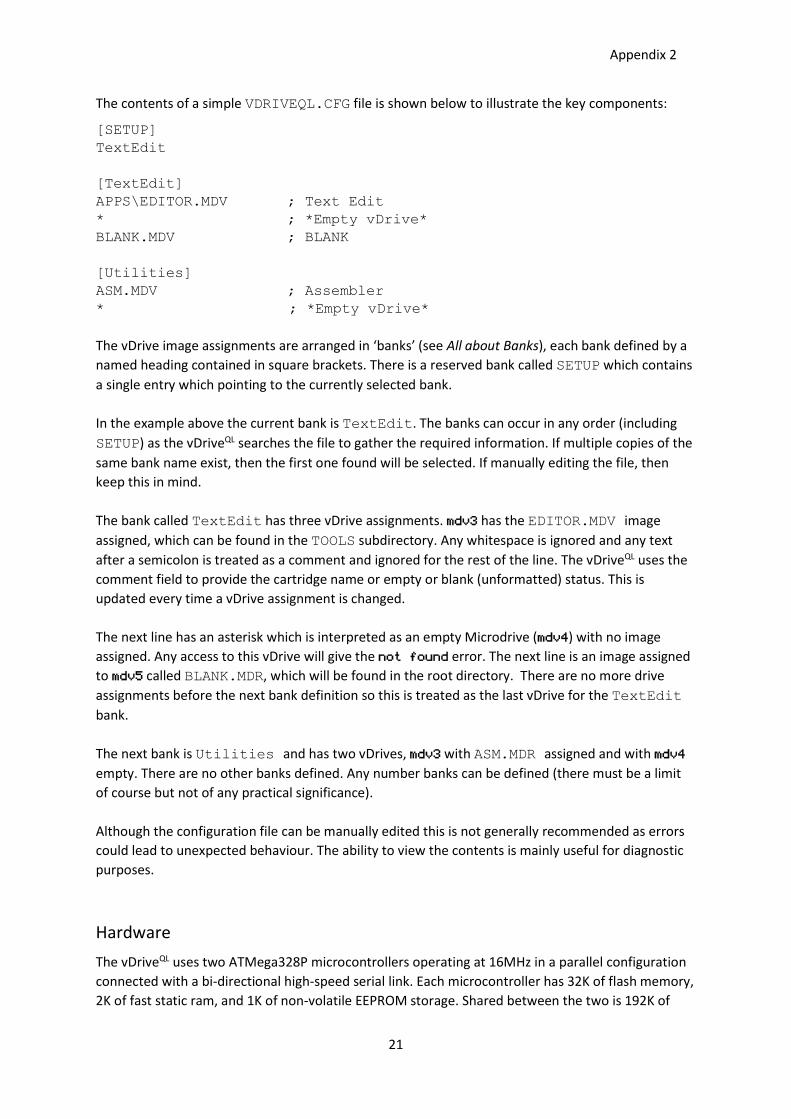
The contents of a simple VDRIVEQL.CFG file is shown below to illustrate the key components:
[SETUP] TextEdit [TextEdit] APPS\EDITOR.MDV ; Text Edit * ; *Empty vDrive* BLANK.MDV ; BLANK [Utilities] ASM.MDV ; Assembler * ; *Empty vDrive* The vDrive image assignments are arranged in ‘banks’ (see All about Banks), each bank defined by a named heading contained in square brackets. There is a reserved bank called SETUP which contains a single entry which pointing to the currently selected bank. In the example above the current bank is TextEdit. The banks can occur in any order (including SETUP) as the vDriveQL searches the file to gather the required information. If multiple copies of the same bank name exist, then the first one found will be selected. If manually editing the file, then keep this in mind. The bank called TextEdit has three vDrive assignments. mdv3 has the EDITOR.MDV image assigned, which can be found in the TOOLS subdirectory. Any whitespace is ignored and any text after a semicolon is treated as a comment and ignored for the rest of the line. The vDriveQL uses the comment field to provide the cartridge name or empty or blank (unformatted) status. This is updated every time a vDrive assignment is changed. The next line has an asterisk which is interpreted as an empty Microdrive (mdv4) with no image assigned. Any access to this vDrive will give the not found error. The next line is an image assigned to mdv5 called BLANK.MDR, which will be found in the root directory. There are no more drive assignments before the next bank definition so this is treated as the last vDrive for the TextEdit bank. The next bank is Utilities and has two vDrives, mdv3 with ASM.MDR assigned and with mdv4 empty. There are no other banks defined. Any number banks can be defined (there must be a limit of course but not of any practical significance). Although the configuration file can be manually edited this is not generally recommended as errors could lead to unexpected behaviour. The ability to view the contents is mainly useful for diagnostic purposes.
Hardware The vDriveQL uses two ATMega328P microcontrollers operating at 16MHz in a parallel configuration connected with a bi-directional high-speed serial link. Each microcontroller has 32K of flash memory, 2K of fast static ram, and 1K of non-volatile EEPROM storage. Shared between the two is 192K of
Appendix 2
22
serial static memory connected via a shared SPI bus (enough to hold one image plus some more for housekeeping tasks).
The first processor (called VDRV) has the job of communicating with the Microdrive control and data lines and driving the LED. The second processor (called FSYS) has the responsibility of handling the SD Card and file system as well as the sound. To check the version of processor firmware versions, use the toolkit VINFO command.
Due to the real-time nature of Microdrive emulation it is important that Microdrive addressing and data communication can occur without interruption. Using two independent processors is just one way of managing the complexity, and cost, without resorting to the intricacies of a real-time operating system or a much more capable processor.
The analogue interface to the QL is similar to that used in the original Microdrive hardware as the design was already minimal and it worked great. The vDriveQL uses series resistors to protect the data signals as the ZX8302 ULA, (internal to the QL and providing Microdrive control) is intolerant of driving loads that it wasn’t designed for (such as shorts or data lines being held high with low impedance). The Microdrives themselves do not have this protection built-in but I thought it prudent for any third-party device.
Development
Initial development was on the Arduino platform but this was quickly outgrown as the need for more extensive C code management became a necessity (C code size alone is now around 130,000 lines).
The vDriveQL has been developed with the following tools:
AVR C Compiler CodeVisionAVR by HP InfoTech
AVR IDE AVR Studio 7 by Atmel
68000 Assembler QL-Macro Assembler by GST Computer Systems
QL Emulator Q-emulator by Daniele Terdina
Schematic and PCB DesignSpark PCB by RS Components Ltd.
3D Modelling DesignSpark Mechanical by the SpaceClaim Corporation
3D processing pronterface/Slic3r
3D Printer Mendel90 by nophead
Appendix 3
23
Updating the Firmware
Updating the firmware is a simple process.
Copy the latest update file (always called VDRIVEQL.BIN) to the root directory of a formatted SD card (this doesn’t have to have a configuration file – just ignore the amber LED if this is the case).
Enter the UPDATE command and you will be asked ‘OK to update firmware Y/N ?’ Entering anything other than Y or y will terminate the update process.
The update file integrity is checked and, if OK, the update process will start and the access LED will light RED several times. The LED will flash amber if the update cannot proceed (see What to do if an update fails below). Any update file with corrupt data will be rejected to prevent ‘bricking’ the vDriveZX
Once started, the SD Card must not be removed and the power must not be interrupted. The access LED will flash green when the update is done. To take advantage of any changes that may have been made to the toolkit then the QL first needs to be rebooted and the toolkit reinstalled.
What to do if the update fails
If any problems are detected during the update process the update will stop and the access LED will flash amber. If the update file is not corrupt then this is indicative of a hardware problem and may need further investigation to rectify. First recycle the power and check if the vDriveZX works normally. If it does then check the SD Card and update file and try the update process again. Failure a second time will mean a repair is required. Please contact support on [email protected]
Reverting to a previous firmware version
If you experience problems after installing the new firmware then it is a simple matter to revert to a previous version. Just copy the old firmware file (VDRIVEQL.BIN from a previous zipped release) and update as usual.

Appendix 4
24
Supported Systems
As well as the standard 128K QL hardware with either the Sinclair JM, JS, JS(USA version), Minerva 1.89, 1.97 or1.98 ROM, the vDrive QL has also been tested on the following:
Miracle Systems Gold Card
Miracle Systems Super Gold Card
512K memory expansion cards
QL Trump Card (including clones)
vMapQL Microdrive Address Translator
Any combination of system firmware and peripheral listed above are supported. It is likely that many other peripheral cards will also be compatible but these haven’t been tested.
The toolkit is compatible with Toolkit II and both extensions can be resident at the same time.
Appendix 5
25
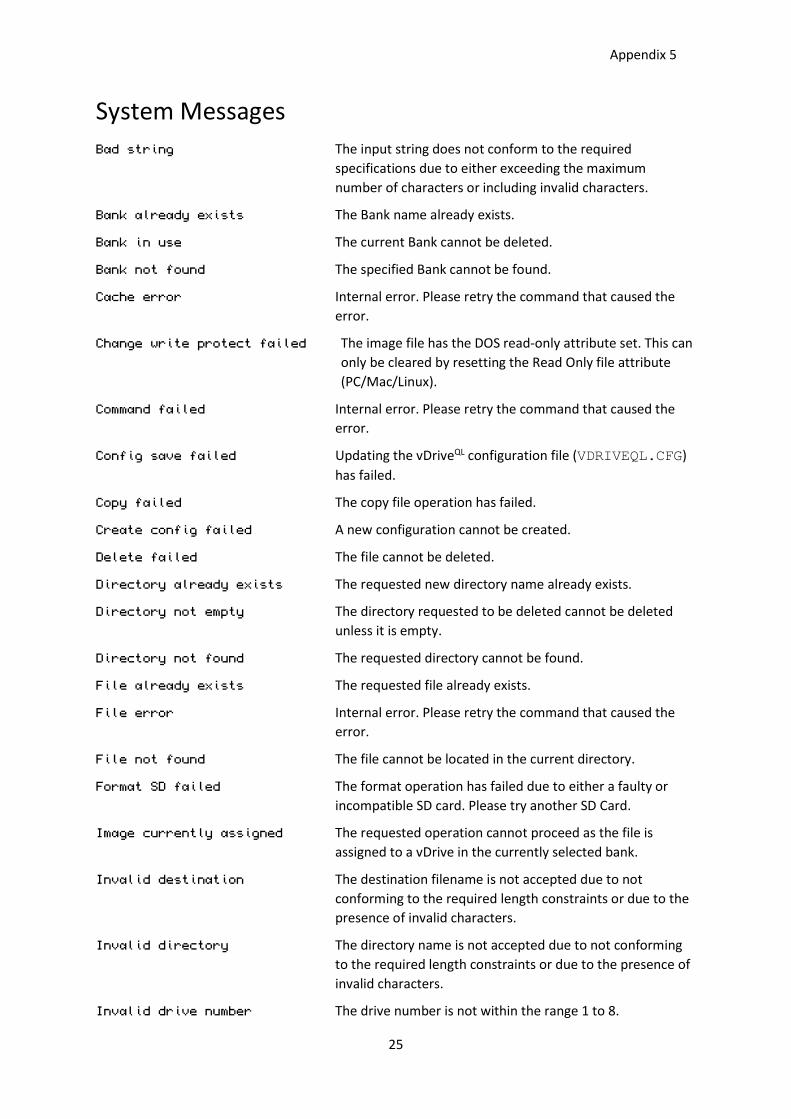
System Messages Bad string The input string does not conform to the required
specifications due to either exceeding the maximum number of characters or including invalid characters.
Bank already exists The Bank name already exists.
Bank in use The current Bank cannot be deleted.
Bank not found The specified Bank cannot be found.
Cache error Internal error. Please retry the command that caused the error.
Change write protect failed The image file has the DOS read-only attribute set. This can only be cleared by resetting the Read Only file attribute (PC/Mac/Linux).
Command failed Internal error. Please retry the command that caused the error.
Config save failed Updating the vDriveQL configuration file (VDRIVEQL.CFG) has failed.
Copy failed The copy file operation has failed.
Create config failed A new configuration cannot be created.
Delete failed The file cannot be deleted.
Directory already exists The requested new directory name already exists.
Directory not empty The directory requested to be deleted cannot be deleted unless it is empty.
Directory not found The requested directory cannot be found.
File already exists The requested file already exists.
File error Internal error. Please retry the command that caused the error.
File not found The file cannot be located in the current directory.
Format SD failed The format operation has failed due to either a faulty or incompatible SD card. Please try another SD Card.
Image currently assigned The requested operation cannot proceed as the file is assigned to a vDrive in the currently selected bank.
Invalid destination The destination filename is not accepted due to not conforming to the required length constraints or due to the presence of invalid characters.
Invalid directory The directory name is not accepted due to not conforming to the required length constraints or due to the presence of invalid characters.
Invalid drive number The drive number is not within the range 1 to 8.
Appendix 5
26
Invalid image The MDV image does not conform to the required specification.
Invalid name The name is not accepted due to not conforming to the required length constraints or due to the presence of invalid characters.
Invalid source name The source filename is not accepted due to not conforming to the required length constraints or due to the presence of invalid characters.
Load config error The vDriveQL configuration file (VDRIVEQL.CFG) cannot be read.
Mount SD failed The SD Card mount operation has failed.
Move failed The move file operation has failed.
No vDrive config The vDriveQL configuration file (VDRIVEQL.CFG) cannot be found.
Not a vDrive The requested drive is not a vDrive. For example, if the current bank has 4 vDrives (mdv3 to mdv6) then trying to assign an image to mdv7 will cause this error.
SD not present The SD card is not inserted. This error will only occur for toolkit operations that require the presence of the SD Card.
SPI error Internal error. Please retry the command that caused the error.
Unknown command Internal error. Please retry the command that caused the error.
Update bank failed Internal error. Please retry the command that caused the error.
Update config failed Internal error. Please retry the command that caused the error.
Update failed Firmware update failed. Please check that the VDRIVEQL.BIN is not corrupt.
Appendix 6
27
Troubleshooting Guide
Troubleshooting Guide SD Card Problems Due to the vast range of SD Card manufacturers and card types there will be times when compatibility problems will arise.
Many different cards of varying size and manufacturer have been tested with only a few that did not pass. Failing to save files to the SD Card is the most likely symptom.
Although I’ve found the SanDisk® microSDHC™ card range to work reliably it is worth trying your existing SD Cards before purchasing any new. Capacities up to 32GB are supported.
Note that some lower capacity, and older SD cards, can take quite a while to format (up to a minute in some instances). Newer, and faster, SD cards typically take less than 15 seconds.
File system corruption can also occur, leading to results that appear similar to a faulty SD Card. This is usually as the result of removing the SD Card while it is still in use. If this happens then it is worth checking the SD Card on a PC and using the tools available to scan and correct any errors that may be present.
Connectors and Cables As the Microdrive connector on the QL has likely not been used a great deal there is the possibility of corrosion or dust making for a poor contact. The Microdrive cable also can cause problems as the insertion displacement contacts can become loose.
Symptoms include not be able to address drives, the vDrive QL not responding to toolkit commands, or other general unreliable behaviour.
These problems can be simply fixed by replacing or repairing the Microdrive cable, and by cleaning the PCB contacts on the QL. A good remedy for cleaning contacts is to first use a pencil eraser to remove any light corrosion and then follow up with isopropyl alcohol. Ensure the power is off before attempting these repairs.
Hardware The vDrive QL has been tested with some of the most popular QL interfaces (see appendix 3, Supported Systems) but there are many that have not been tested due to availability.
The vDrive QL depends on known timing values for address detection and write synchronisation. Although there is a healthy margin built in, any firmware or hardware that changes these values from the standard QL in an appreciable way can cause problems with vDrive QL operation. Faster systems such as the Miracle Systems Gold Card, and Super Gold Card, are catered for but others may not.
Index
28
Index
3D, 22 Adding Microdrives, 3 address detection, 27 address range, 7 Arduino, 22 Assigning a vDrive Image, 10 ATMega328P, 21 Bank management, 15 Banks, 20 buffering, 18 built-in cartridge, 8 cached, 19 Cartridge Images, 4 CD, 15 comment field, 21 configuration file, 18, 21 Configuration File, 20 Connection to the QL, 2 Connectors and Cables, 27 contiguous address, 18 CP, 15 Development, 22 Disclaimer, 2 DOS, 13 drive, 2, 13 drive access LED, 2 Drive Addressing, 18 drive number, 13 EEPROM, 21 emulated drive, 4 emulator, 19 FAT16, 18 FAT32, 18 file names, 13 File system corruption, 27 Files and Directories, 6 first assigned image, 19 flash memory, 21 format, 4 Format Conversion, 19 formatted image capacity, 4 Gold Card, 24 Hardware, 21, 27 HELP, 16, 17 Image Format, 19 Image management, 14 interfaces, 27 JM, 4 JS, 4
LB, 15 LD, 14 LED, 23 LI, 14 LS, 15 LV, 15 Managing Banks, 11 Managing Directories, 9 Managing Images, 9 Managing vDrives, 10 manually editing, 21 MDD extension, 4 MDI, 19 mDump, 19 MDV, 19 memory expansion, 24 microcontroller, 21 Microdrive, 13 Microdrive cable, 3 Minerva, 4 MKBANK, 15 MKCFG, 16 MKDIR, 15 MKDRV, 15 MKIMG, 14 MV, 15 peripheral, 24 Q-emulator, 19 QLAY, 19 real-time, 22 REN, 16 resident, 24 RM, 16 RMBANK, 15 RMDIR, 15 RMDRV, 15 RO, 14 root directory, 6 RW, 14 SB, 15 SD Card, 2, 6, 8, 27 SD Card Initialisation, 8 SD Card Problems, 27 SDINIT, 16 Sinclair ROM, 4 SNDOFF, 16 SNDON, 16 sound, 16 static ram, 21
Index
29
subdirectory, 6 Super Gold Card, 24 SuperBASIC, 8 Supported Systems, 24 System Messages, 25 Technical Information, 18 The SD Card File System, 18 TKOFF, 16 TKON, 16 toolkit, 20 Toolkit II, 24 Toolkit Implementation, 20 Toolkit Reference, 13 Troubleshooting Guide, 27 Trump Card, 24 ULA, 22
unformatted, 10, 14, 19, 21 UPDATE, 16 Updating the Firmware, 23 Valid characters, 13 vDrive, 13 vDrive management, 15 VDRIVEQL.BIN, 23 VDRIVEQL.CFG, 21 VINFO, 16 virtual, 18 Virtual Drives, 4 whitespace, 21 Write protect, 19 write synchronisation, 27